3.5.0 auto eng -...
TRANSCRIPT

Navigation software
Navitel Navigator
User manual
© 2007 The Join-Stock Company “CNT” . All rights reserved.The contents of this Guide, as well as any attached demo materials, are the sole proprietor-ship of the Join Stock Company "CNT". Any commercial usage of this Guide maybe carried out only with written permission from the Join-Stock Company "CNT". Theinformation in this document shall not be changed without prior notice given to the JoinStock Company "CNT".

Contents
1. Introduction ..............................................................................................52. General Information ....................................................................................53. Program interface.......................................................................................8
3.1. The program interface when routing...........................................................................83.2. “Map” interface. .......................................................................................................10
4. Pages ......................................................................................................124.1. “Map” page..............................................................................................................12
4.1.1. Map scrolling ..................................................................................................124.1.2. Zooming.........................................................................................................124.1.3. GPS-cursor ....................................................................................................124.1.4. Compass........................................................................................................13
4.1.4.1. Map rotation..........................................................................................134.1.4.2. Day/Night skins .....................................................................................13
4.1.5. Information panels ..........................................................................................144.2. “Dashboard” page ....................................................................................................14
4.2.1 Gauges list ......................................................................................................154.3. “Satellites” Page.......................................................................................................204.4. “Weather” page........................................................................................................21
5. Main menu ................................................................................................225.1. Find.........................................................................................................................225.2. Route ......................................................................................................................22
5.2.1. STOP .............................................................................................................225.2.2. Route editing ..................................................................................................225.2.3. Route plan......................................................................................................225.2.4. Show the route................................................................................................235.2.5. Detour............................................................................................................235.2.6. Route simulation .............................................................................................235.2.7. Export ............................................................................................................235.2.8. Import ............................................................................................................23
5.3. My Navitel ................................................................................................................245.3.1. All products ....................................................................................................245.3.2. My products ...................................................................................................255.3.3. Update ...........................................................................................................255.3.4. Help ..............................................................................................................25
5.4. Settings ...................................................................................................................265.4.1. Map ...............................................................................................................26
5.4.1.1. Top of the map ......................................................................................265.4.1.2. Automatic zoom.....................................................................................265.4.1.3. Visual effects.........................................................................................265.4.1.4.Detail level .............................................................................................265.4.1.5. Draw models from..................................................................................275.4.1.6. Map tilt .................................................................................................275.4.1.7. Reset position .......................................................................................27
5.4.2. Other maps ....................................................................................................275.4.3. Navigation ......................................................................................................27
5.4.3.1. Vehicle..................................................................................................27
2

5.4.3.2. Avoid ....................................................................................................285.4.3.3. Guidance prompt...................................................................................285.4.3.4. Off-route...............................................................................................285.4.3.5. Lock on Road ........................................................................................28
5.4.4. Interface.........................................................................................................285.4.4.1. Map buttons..........................................................................................285.4.4.2. Skin ......................................................................................................295.4.4.3. Hide buttons..........................................................................................295.4.4.4. Hide menu ............................................................................................295.4.4.5.Show scroll bar.......................................................................................29
5.4.5. POI filter .........................................................................................................305.4.6. Online services ...............................................................................................31
5.4.6.1. Traffic jams............................................................................................315.4.6.2. Weather ................................................................................................315.4.6.3. Communication .....................................................................................31
5.4.7. Alerts .............................................................................................................325.4.7.1. Speed limits ..........................................................................................325.4.7.2. Speed cams ..........................................................................................325.4.7.3. Traffic lanes...........................................................................................32
5.4.8.Regional settings .............................................................................................325.4.8.1 Interface language..................................................................................325.4.8.2. Map language ......................................................................................325.4.8.3 Voice .....................................................................................................335.4.8.4 Keyboard ..............................................................................................335.4.8.5 Measurement units .................................................................................33
5.4.9. System...........................................................................................................345.4.9.1. Satellites ...............................................................................................345.4.9.2. Time .....................................................................................................355.4.9.3. Power ...................................................................................................355.4.9.4. Sound...................................................................................................355.4.9.5. Quit prompt (function is unavailable for devices based on iOS)..................365.4.9.6. Folder settings.......................................................................................36
5.4.10. Dashboard....................................................................................................365.4.11. Profiles .........................................................................................................365.4.12. Tracks ..........................................................................................................36
5.4.12.1. Track record ........................................................................................375.4.12.2. Track format ........................................................................................375.4.12.4. Track’s folder.......................................................................................37
6. Functional options ......................................................................................376.1. Routes.....................................................................................................................37
6.1.1. Autorouting.....................................................................................................376.1.2. Route creation after searching results...............................................................376.1.3. Manual route creation......................................................................................386.1.4. Edit route........................................................................................................386.1.5. Route properties .............................................................................................38
6.2. Tracks......................................................................................................................396.3. Waypoints................................................................................................................39
3

6.4. Traffic jams ..............................................................................................................406.5. Find.........................................................................................................................41
6.5.1. Search «By address» .......................................................................................416.5.2.Search «Nearest places» ..................................................................................426.5.3. Search “Friends”.............................................................................................436.5.3. Search «Waypoints» ........................................................................................436.5.4. History ...........................................................................................................436.5.5. Favorite ..........................................................................................................436.5.6. Search «By coordinates»..................................................................................446.5.7. Search «On the map» ......................................................................................44
6.6. Navitel talks .............................................................................................................456.7 Navitel.Events ...........................................................................................................466.8. Navitel.Friends .........................................................................................................47
6.8.1. «Navitel.Friends» account. ...............................................................................476.8.2. Using «Navitel.Friends»....................................................................................48
7. Running the program after a crash..................................................................53
4

1. IntroductionNavitel Navigator is a multifunctional navigation software intended for efficient search forthe shortest route on the map. Voice prompts allows you to follow the route, not payingattention to the display and being not distracted from driving. Function «Navitel.TrafficJams» will help you to overcome traffic jams.
This is the manual on how to use the navigation program “Navitel Navigator”. It describesthe elements of the user interface, basic functions of the navigation application, and alsothe order of user’s actions when performing standard operations.
2. General Information GPS (Global Positioning System) is a satellite system, which allows to determine theobject’s location and speed. For the most successful use of GPS devices the basics of thistechnology should be known.The GPS system, also known as NAVSTAR (NAVigation System using Timing AndRanging), is based on satellites, moving around the earth on orbital trajectories. 24 satel-lites provide 100% of the system operability at any point of the globe, but may not alwaysensure the stable signal recept and good calculation of the position . Therefore, to increasethe accuracy of the position and reserve in case of failures, the total number of satellites inorbit is supported in greater quantity. The maximum number of simultaneously workingsatellites in the system NAVSTAR is limited to 32.
GPS is a passive system of navigation, which allows you to receive satellite signals, butexcludes the possibility of a signal transfer. Signal of the GPS satellites has a frequency1.227 and 1.575 GHz. This means that for the electromagnetic wave with such frequencyas an interference will be metal and wooden surfaces, some types of plastics, concrete.Because of this, it is impossible to catch the satellites in the reinforced concrete building,you need to change the location of the device for better signal reception.
Attention! The most accurate readings can be expected, when signals are received in anopen area not less than with 4 satellites, evenly placed across the sky, and the deviceshould be fixed relative to the earth.
The quality of the positioning depends on the set of satellites, which the device operateswith. If the receiver has the opportunity to choose the best from a large number of receivedsignals , this will positively influence on a quality of the coordinates determination. If thereis no choice, then the precision of the work will be hard to predict.
After turning on the GPS device, navigation system doesn;t activate immediately.Navigation messages transmitted from satellites contain two types of data: ephemeris andalmanac of satellites.
5

The almanac is stored in the memory of the receiver and is constantly updated, since eachsatellite transfers the data of the almanac for the entire group of satellites. The «life» of thealmanac is 2-3 months. Further, the value of the accumulated error in the calculations willbe unacceptable.
Ephemeris data contains options that enable you to calculate the current location of thesatellite more precisely. In contrast to the almanac, each of satellite transmits only its ownephemeris. The «life» of the ephemeris is 4-6 hours.
Ephemeris and almanac data , transmitted from the satellites, is constantly corrected. Thisoccures one time per day (if necessary more). Stations network receives data from satel-lites, analyzes measurments, compares them with reference data, calculates the correctiveamendments and sends them to the main station, where data is transmitted to the satel-lites.
Starting process, that is necessary for the device to define the position after switching ondepends on the available memory of the initial information. There are the following modes:
• ”Cold start” — time, position, almanac and ephemeris are unknown. This may be due tothe location of the device off for a long time (more than 70 hours) or moving it being off toa great distance. In this case the device must download the new data on the almanac andbounds. This process can take more than 20 minutes.
• ”Warm start” — position and ephemeris are unknown, time and the almanac areknown. The device starts collecting data ephemeris, then it will be able to make positionfinding. Usually it takes few minutes.
• ”Hot start — the almanac, ephemeris are known, time and a position are knownwith some mistakes. This is the fastest kind of system start and it is possible ifthe device was switched off for less than 4 hours. Last data is actual except forsmall inaccuracies which the system specify in less than 1 minute.
Navitel Navigator is a navigation software developed for a variety of devices equipped withbuilt-in or external GPS-receivers.
The program allows you to download detailed maps of cities and regions with the housenumbers, street names, metro stations and other useful information. Also the satellite nav-igation program provides voice-guided navigation. The program is optimized for the stan-dart screen resolution, it has fast map zooming and scrolling, as well as automatic switch-ing between maps with various scales.
6

The advantages of the «Navitel Navigator» in comparison with other similar software:
1. Implemented quick map zooming and scrolling;2. Autoswitching between maps;3. Different map orientations;4. Full-screen mode;5. Fully supported map display modes such as 2D, and the pseudo-3D;6. Tooltips;7. The ability to download the traffic jams information from the Navitel.
Main tasks carried out by the program are: to identify and display the current position on the map, automatic and manual routing, different kinds of objects searching, calculation and display a lot of travel information, display and recording the trajectory of motion in the form of the track and much more.
7

3. Program interface3.1. The program interface when routing.
The illustration shows the main elements of the inter-face and the management of the program. The deviceshown in the figure, is not a standard, recommended oradvertised. The model of your device and the orienta-tion of the screen may differ from that shown in the fig-ure, but the functionality of the interface elements willbe the same.
Fig. 1
8
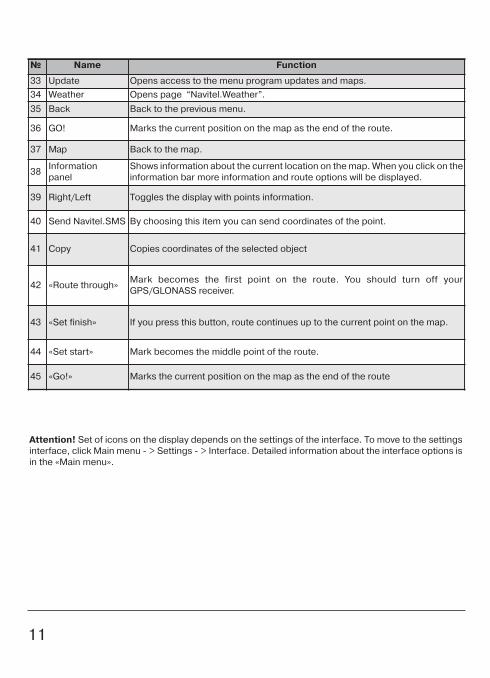
№ Name Function
1 GPS
GPS connection indicator. If the indicator is gray color - GPS/GLONASS receiv-er is off; red - receiver is turned on, but there is no connection with satellites;yellow - bad connection; green - connection is established. There is a numberof found satellites in the circle. When you click on it appears the menu whereyou can turn on/turn off GPS/GLONASS receiver. Also you can move to thepage “Satellites”.
2 Compass
Context menu opens by pressing this button. In this menu switches the orienta-tion of the map («North up» - lock icon is next to the compass, «Rotate in accor-dance with the movement» - route is next to the compass), the type of card (Flatview «2D» and the Panoramic view of the «3D») and the skins («Night», «Day»,«Auto»). When driving the compass always points to the North.
3Information panel
A sign of the upcoming manoeuvre. There are various turns, distance to the nextmaneuver in meters or kilometers, etc. on a gray background. Clicking on thesign stops the route guidance and more route options.
4Information panel
Following street.

9
№ Name Function
5Back toposition
Button is active if the map is shifted relative to your location. A short click on itreturns a map to your location.
6 Speed Current speed.
7 Route Active route.
8 GPS-cursor Your location indicator.
9 Traffic lane Displays the traffic lanes with a valid maneuvers at the next intersection.
10 Progress-bar The line is filled in as you come closer to the maneuvre
11 Menu Main menu opens by pressing this button.
12Information panel
The estimated total time in a way, the total length of the route, time of arrival atthe final point of the route.
13Information panel
Name of the street that you drive on. Is active only when connection with sat-telites is established.
14 Scale button Zoom out.
15 2D/3D Switches 2D/3D format.
16 Scale button Zoom in.
17 Navitel. Events Event management button.
18Navitel.Friendsicon
Shows your friends on map. If the icon is grey, your friend is offline. If it is green, your friend is online.
19 Traffic Jams Shows the current traffic jams on a 10-point scale.
20 Time Current time.
21 Battery Icon shows the level of battery charge. Click on it to see the remaining memory.
22 Navitel.FriendsIcon to open Navitel. Friends menu. Service allows you to add friends, see theirlocation on the map and chat with them.

3.2. “Map” interface.
10
Fig.2 Fig.3
№ Name Function
23 Route panel Allows you to see the entire route, your location and traffic jams* on the routedirectly on the Map page.
24 Sound Sound menu opens by pressing this button.
25 Navitel.TalksThis button is intended to read/send messages. Near the icon you can see thenumber of unread messages.
26 EventRoad event, applied on the map by users. For more details, see“Navitel.Events”.
27 Mark on the mapYou can set the mark by taping on the map. You can save this mark as a way-point, add it to the route or see object’s characteristics the mark was set on.
Fig.21
28 “Save” Saves current mark on the map as a way point.
29 «Cursor» Shows the point menu.
30 WaypointWaypoints are indicated by red flags, created by the user. Tapping the pointat the bottom of the page opens a panel to work with waypoints.
31 ObjectDifferent objects placed on the map (traffic lights, metro stations, gas stations, etc.).
32 Track recordTrack record. Red dot means that the track is recording, grey dot means thatthe record stoped.
11
Attention! Set of icons on the display depends on the settings of the interface. To move to the settingsinterface, click Main menu - > Settings - > Interface. Detailed information about the interface options isin the «Main menu».
№ Name Function
33 Update Opens access to the menu program updates and maps.
34 Weather Opens page “Navitel.Weather”.
35 Back Back to the previous menu.
36 GO! Marks the current position on the map as the end of the route.
37 Map Back to the map.
38Information panel
Shows information about the current location on the map. When you click on theinformation bar more information and route options will be displayed.
39 Right/Left Toggles the display with points information.
40 Send Navitel.SMS By choosing this item you can send coordinates of the point.
41 Copy Copies coordinates of the selected object
42 «Route through»Mark becomes the first point on the route. You should turn off yourGPS/GLONASS receiver.
43 «Set finish» If you press this button, route continues up to the current point on the map.
44 «Set start» Mark becomes the middle point of the route.
45 «Go!» Marks the current position on the map as the end of the route

4. Pages4.1. “Map” page
“Map” page (Fig. 4)is intended to display downloaded e-map and your current location. It contains a lot of trafficinformation. Here you can work with routes, waypoints,objects search and more.
4.1.1. Map scrolling
Press on any point on a map and drag the map in any direc-tion. After this a new zone of the map will be opened.
4.1.2. Zooming
You can zoom in with the “+“ key and zoom out with the “-“ key. The scale is set to 5 meters with maxi-mum zoom and is set to 2000 km, with minimum zoom. It is possible to set the scale to 5 m, 8 m, 12 m,20 m, 30 m, 50 m, 80 m, 120 m, 200 m, 300m, 500 m, 800 m, 1,2 km, 2 km, 3 km, 5 km, 8 km, 12 km, 20 km, 30 km, 50 km, 80km, 120 km, 200 km, 300 km, 500 km, 800 km, 1200 kmand 2000 km. Press the“+“/”-“ key ones to change the scale to the next/previous value. You can alsopress this keys to change the scale quickly.
4.1.3. GPS-cursor
GPS-cursor shows current device location and displays on the map if the GPS-connection is estab-lished. The cursor can take one of two states, depending on the status of the device:
«Moving»;
«Stop».
Green arrow points at the current direction. If speed is less than 2,5 km/h cursor changes to green cir-cle. And if GPS-connection is missing or switched off, the GPS-cursor will not display.
Fig. 4
12

4.1.4. Compass
Press the button to open the map settings menu (Fig. 5).
4.1.4.1. Map rotation
• Track up;
• North up (Static mode).
4.1.4.2. Day/Night skins
This option allows you to switch between day and night skins.Use night skinmode when it is dark. It will protect your eyes from tiredness and make the device morecomfortable to maintain. You can set this option as one of three positions
•Day view mode(Fig. 6);
•Night skin (Fig. 7);
•Auto (allows to switch between day and night view modes automatically).
Fig. 5
Fig. 6 Fig. 7
13

4.1.5. Information panels
There are several information panels on the “Map” page.The bottom panel displays a current street name or a drivingdirection (Fig. 8). The top panel shows a following streetname (Fig. 9).
Note: information panel or the control panel can be dis-played in the bottom of the screen. To hide a panel with but-tons click on any place at the map.
While you navigate a route you can see an information panelin the left side of the screen displaying a next maneuvericon, speed, calculated travel time, route overall length anddestination achievement time. Press the next maneuvericon to display a route settings menu.
Note: The set of buttons in this menu depends on ademo mode: is it on or off? If you press the maneuver iconwith demo-mode turned off, you will see a Fig. 10.Otherwise you will see a Fig. 11.
More information about routes can be found in“Functionality” section of this manual.
4.2. “Dashboard” page
Page “Dashboard” (Fig. 12) is intended to display variousnavigation information. To see page “Dashboard” open“Menu” - “Settings” - “Dashboard”.
The location of the sensors on the page depends on orienta-tion and type of the screen. The management mode of thesensors is carried out in the control menu, as well as bymoving the joystick “Up”/”Down”. The “Previous page” but-ton is located in the lower left side of the screen and the“Map” page button is in the lower right corner.
Fig. 9
Fig. 8
14
Fig. 11
Fig. 10

Choose an item and tap on it. The “Dashboard” page set-tings menu will appear on the screen (Fig.13):• Select gauge — select a gauge from the list. New gaugewill replace the one you selected to an open settings menu.Gauges are separated into groups to ease the search.Detailed info on the each gauge can be found in the “Gaugelist” table;• Reset gauge — resets the current gauge. System willrequest the confirmation;• Reset all gauges — reset all the gauges. System willrequest the confirmation;• Default gauges — apply a default set of gauges. Systemwill request the confirmation;• Big/Small dashboard — Each gauge increases/decreasesin size at the cost of an overall number of the gauges on thescreen. System automatically chooses the most commongauges to display, but you can create a set manually.
4.2.1 Gauges list
Name Function
1. Trip computer 1
1.1. Stopping time Overall number of stops made since last trip computer reset.
1.2. Moving time Overall moving time since last trip computer reset.
1.3. Measurement time Overall measurement time since last trip computer reset.
1.4. Trip Odometer Distance passed since last trip computer reset.
1.5. Overall Av SpdAverage speed including all the measurement time periodsince last trip computer reset.
1.6. Moving Av SpdAverage speed including only movement time since last tripcomputer reset.
2. Trip computer 2
2.1.Stopping time. (2) Overall number of stops made since last trip computer reset.
2.2. Moving time (2) Overall moving time since last trip computer reset.
2.3. Measurement time (2) Overall measurement time since last trip computer reset.
2.4. Trip Odometer (2) Distance passed since last trip computer reset.
2.5. Overall Av Spd (2)Average speed including all the measurement time periodsince last trip computer reset.
2.6. Moving Av Spd (2)Avarage speed including only movement time since last tripcomputer reset.
15
Fig. 12
Fig. 13

16
Name Function
3. Max values
3.1. Max Descent Maximal descent speed measured since last gauge reset.
3.2. Max Ascent Maximal ascent speed measured since last gauge reset.
3.3. Max speed Maximal speed measured since last gauge reset.
3.4. Min Altitude Minimal altitude measured since last gauge reset.
3.5. Max Altitude Maximal altitude measured since last gauge reset.
3.6. Odometer Overall distance travelled (unresetable gauge).
4. Navigation
4.1. 5 s Ave.Speed Average speed in last 5 seconds.
4.2. 5 m Ave.Speed Average speed in last 5 minutes.
4.3. Bearing The direction from current location to destination.
4.4. Waypoint Final Name of the final waypoint.
4.5. Waypoint Next Name of the next waypoint.
4.6. To final point The remaining distance to final waypoint.
4.7. To the next point The ramaining distance to next waypoint.
4.8. ETA Current Next waypoint arrival time estimation.
4.9. ETE Final Final waypoint moving time estimation.
4.10. ETE Current Next waypoint moving time estimation.
4.11. ETA Final Final waypoint arrival time estimation.
4.12. Next Turn Next maneuver on active route and distance left.
4.13. Pointer Nearest waypoint pointer and distance to it.
4.14. Final point Name of the final route point.
4.15. Time zone Current location time zone.
4.16. VMG Next waypoint approaching speed.
4.17. Sunrise Sunrise time for current location
4.18. Sunset Sunset time for current location
5. GPS data
5.1.Date GMT Greenwich GPS data.
5.2. Time GMT Greenwich GPS time.
5.3. Date Formed date according to GPS and recalculated to local time.
5.4. Time of day Formed time according to GPS and recalculated to local time.
5.5. Speed Comparative moving speed.
5.6. Longitude WGS-84 longitude (or any other datum GPS-receiver works with)
5.7. Latitude WGS-84 latitude (or any other datum GPS-receiver works with)

17
Name Function
5.8. HeadingComparative moving direction azimuth. Magnetic azimuth if usingmagnetic compass and NMEA-0183 protocol.
6. Altitude
6.1. Vertical Speed Current vertical speed.
6.2. Climb angle Angle between current driving direction and horizontal level.
6.3. Glide RatioHorizontal speed comparative to vertical speed. Availableonly if using Garmin and SiRF protocols.
6.4. Height of Geoid Geoid’s height (average sea level) above WGS84 ellipsoid.
6.5. Altitude Altitude above geoid (above sea level).
7. GPS data precision
7.1. Vertical EPEVertical coordinate precision with 95% probability. Availableonly if using Garmin protocol
7.2. VDOPVertical coordinates precision deterioration factor reflectinggeometric satellites configuration. Value exceeding 10 meanslow precision. Available only if using NMEA-0183
7.3. Magnetic VariationMagnetic Variation — difference between true meridian(north direction) and magnetic. Available only if using NMEA-0183 protocol.
7.4. Used Satellites Number of satellites used during last position determination.
7.5. EPEHorizontal coordinates precision, 95% probability. Availableonly on Garmin devices.
7.6. HDOPHorizontal coordinates precision deterioration factor reflecting geomet-ric satellites configuration. Value exceeding 10means low precision. Available only if using NMEA-0183
7.7. GPS Fix QualityCoordinates determination method – 3D (all coordinates areknown), 2D (only horizontal coordinates are known), differential, etc.
8. DGPS Data
8.1. DGPS station Number of station used to make differential correction data.
8.2. DGPS age Time passed from last received differential correction data.
8.3. DGPS station Name of the closest DGPS station.
9. Area
9.1.AreaFigure area consisting of motion path and a section, connecting startand end points.
10. Sonar data
10.1. TemperatureWater temperature. Available only if NMEA-0183 protocolcompatible temperature sensor is connected.
10.2. DepthDepth. Available only if NMEA-0183 protocol compatiblesonar is connected.

18
Name Function
11. Map
11.1. Rendering 3D TIme spent for rendering 3D models.
11.2. Indexation Atlas last loaded indexation time.
11.8. Map infotipTime spent to find nearest object on a map to displaypop-up help window after pressing it using stylus.
11.9. Maps in CacheCurrent number of maps loaded in cache. This valueaffects on consumable memory.
11.10. Map Zoom Level Map detalization level (0—maximum detalization).
11.11. File nameMap file displaying at the moment. If several map files arein use, only one of them will be displayed in this gauge.
11.12. Map Rendering Number of maps rendering on the screen.
11.13. Blocks Number of rendered blocks.
11.14. Labels in objects Number of labels on the map after rendering.
11.15. Points in objects Number of points in objects rendered on a map.
11.16. ObjectsNumber of points/polylines/polygons appeared on a screen afterlast rendering.
11.17. Text redraw Text redraw time.
11.18.Label redraw Label redraw time calculation.
11.19. Routes Rendering Time spent on last route rendering.
11.20. Wpts Rendering Time spent on last waypoints rendering.
11.21. Trk Rendering Time spent on last track rendering.
11.22. Jams Draw. Time spent on last traffic jams rendering.
11.23. Map RenderingTime spent on last map rendering. If the value exceeds 1second, the special map optimization is required.
11.24. Map Opening Map opening time
11.25. Map Covering Current map and region match time
11.3. Check atlas time Time spent to check atlas integrity.
11.4. First element search Time spent to find first object from “Nearest places”.
11.5. First element search(city)
Time spent to find first object “City”.
11.6. First element search(street)
Time spent to find first object “Street”.
11.7. First element search(building)
Time spent to find first object “Building”.

19
Name Function
12. System
12.1. Routing Time spent on autorouting.
12.2. Redraw Image redraw time.
12.3. Data FailuresNumber of failures during GPS-data receiving. If this valueis increasing, poor electrical contact may have occurred.
12.4. Battery Main battery charge (value determined by operationalsystem).
12.5. . Free Memory Amount of RAM available to run application.
12.6. Lock on Road Time spent on finding an anchor point to lock on road.
12.7. Initialization Program loading time.
12.8. CPU Usage Amout of CPU resourses involved in running process.
12.9. Clock Fix-ups System time adjustment counter with GPS time.
12.10. Clock Drift Current system time deviation
12.11. KalmanKalman filter working time (used to boost position findingprecision)
12.12. Current Phone CellCode of current GSM cell. It is used for netmonitoring andconsists of MCC (Mobile Country Code), MNC (MobileNetwork Code), LAC (Local Area Code) and CELL ID.
13.3. Wind Wind speed and direction.
13.4. Cloudiness Current precipitation.
13. Weather
13.1. Temperature Current temperature.
13.2. Pressure Current pressure.
13.5. Weather forecast+1 day Weather forecast for tomorrow.
13.6. Weather forecast+2 day Weather forecast for the day after tomorrow.
13.7. Weather forecast+3 day Weather forecast for the day after tomorrow.
13.8. Weather forecast+4 day Weather forecast for 4-rd day.
13. Internet traffic
13.1. Total.All Overall internet traffic from the first program initialization.
13.2. Outgoing. All Outgoing internet traffic from the first program initialization.
13.3. Incoming. Total Incoming internet traffic from the first program initialization.
13.4. Total. Current Overall internet traffic from the current program initialization
13.5. Outcoming. Current Outgoing internet traffic from the current program initialization
13.6. Incoming. Current Incoming internet traffic from the current program initialization

4.3. “Satellites” Page
“Satellites” page (Fig. 14) is intended to displayGPS/GLONASS signal status, number of satellites and theirposition. Schematic sky map with directions is in the upper leftcorner of the screen.
To move on page “Satellites” click on the icon of the satellite atthe top of the screen on the page “Map” and select“Satellites”.
Note: the opportunity of reception the GLONASS signals is pos-sible only if the device supports this system.
The hemisphere center corresponds to the zenith circle of it indicates the line of the horizon. If the satel-lites function is activated in the hemisphere are displayed satellites conventional signs of yellow andgreen colours. The green colors indicates a higher quality signal reception, yellow - lower quality. Underthe image of the hemisphere indicates the current data transfer protocol and port connections to thereceiver of GPS/GLONASS.
There is a field for the display of satellite information in a graphical diagram in the bottom of the page.The levels of the signals of the satellite are shown in the form of columns of yellow and green colors,under which the number of satellites located. Height of the column is directly proportional to the quali-ty of the received signal - higher the level, better the quality.
In the upper right part of the page displays the following information:
• The current latitude and longitude;• The number of satellites. This number determines GPS/GLONASS receiver. The maximum number ofsatellites is 12;• The determination of the coordinates.
Note: on devices based on iOS sattellites do not display.
20
Fig. 14

4.4. “Weather” page
The “Weather” page (Fig. 15) shows the weather forecast for a few days and shows current weather.
To move to the page “Satellites” click on the weather in the upper part of the “Map” page.
In the upper part of the page displays the current temperature, pressure, wind speed and direction. Inthe right part of the screen displays forecast for four days, on the button “Back” will launch the defaultweb browser on your device and displays the home page of GISmeteo.ru.
The weather is displayed for the city by default which is close to the current GPS position. In case GPSsignal is off, the weather will be displayed for the city, which is close to the center of the map.
In the lower part of the screen there is a button:
- “Update” (update the information about the weather).
Besides manual information updating, it is possible to update the forecasts automatically.
21
Fig. 15

5. Main menuIn the lower left corner of the “Map” page is a main “Menu”button. When you click on it the main menu of the programopens (Fig. 16). Using this menu you can get different infor-mation.
5.1. Find
This menu implements the search function on variousrepresentation of the objects on the map. See details in thesection “Search.
5.2. RouteThis menu item is intended for management functions of themiddle points of the route. When you click on this buttonwindow management features of the route open, where setof buttons depends on the availability of the active route.
If you press the “Route” in the case it’s not on the map, amenu will appear, in which will be available only two func-tions: “Create a route” and “Import” (Fig. 17). If you selectfirst item, the search window will be opened. For more infor-mation about using this menu see “Search”.
5.2.1. STOPIf route is set this item allows you to finish the navigation onit (Fig. 18). After clicking on this button, the route will nolonger appear on the map, and the middle point of the finishline will be deleted.
If the route simulation is on, this button disables it. “Start”,“Finish” and all “Middle” points will be saved.
5.2.2. Route editingPressing this button allows you to add the middle point orchange the finish point. Every added point will be first toroute throught. This item is available only when the route isactive.
5.2.3. Route plan
This menu provides information about all of the maneuvers,which are present on the route. In the upper part of the pagedisplays detailed information about the next maneuver,below there is a list of upcoming maneuvers with streetnames and distance to maneuver. Here are also 3 sensors:“Time left”, “Distance” and “Arrival time” (Fig. 19).
22
Fig. 16
Fig.18
Fig.17
Fig.19

5.2.4. Show the route
With this menu item it is possible to see the entire route on asmall scale, where all intermediate points will be visible, aswell as the start and finish.
5.2.5. Detour
When routing this menu item specifies the program thatfrom the current location on the route is no possibility tomove further. The program analyzes the situation and look-ing for alternative route. When the routing is off, this item isnot available.
5.2.6. Route simulation
With the help of this menu item you can see the approximate movement on the route turns on the route and some roughinformation on the route. Such demonstration can help toreveal dangerous or adverse parts of the route and tochange the route if needed.
5.2.7. Export
To work with created route in the future or to transfer it toanother device, it is recommended to use the export func-tion of the route (Fig. 21).
5.2.8. Import
Previously exported routes may be imported for further workwith them (Fig.22). Note: more information about importing a track and workwith the route you can get after reviewing the paragraph“Functionality”.
23
Fig.20
Fig.21
Fig.22

5.3. My Navitel
5.3.1. All products
In this menu item all currently available Navitel maps are col-lected together, as well as the program description. Themenu item “Navitel Navigator” (Fig. 23) is made for viewinginformation about the application: version, the license key,serial number, copyright, etc.
Next on the list are maps that you can purchase or activate.To buy a map, press the button “Buy” and pay for the pur-chase (this option is available only for devices with Android or iOS). If you already have a license key,select the menu item “Activate” and enter the key in the appropriate field.
If you have the license on the map of required countries,you can download them not only on your personal web-sitepage on www.navitel.ru, but in this menu item. Just selectthe country from the list, confirm your choice and wait untilit downloads (Fig. 24). Then select “Install” (Fig. 25).Program will create the atlas.
If necessary unused maps can be deleted (Fig. 28). Selectan item from the list. You can always re-download deleted
24
Fig. 23
Fig. 25
Fig. 24
Fig. 26 Fig. 27
Fig. 28

map.
5.3.2. My products
This menu is similar to the item “All products” except that itcontains only your purchased products. With this menu itemyou can similarly download or delete a map, and view infor-mation about the program.
5.3.3. Update
If you selected this menu item, the program will connect tothe update server (requires an active Internet connection)and determine if installed on your device maps are updated.If any of maps are outdated, you will be offered to updatethem automatically. Updating process is completely analo-gous to the process of installing new maps.
Note: when you update your navigation program it will bedisabled until the end of the installation process. On somedevices you may need to run the Navitel Navigator softwaremanually.
5.3.4. Help
With this menu opens a Quick Start Guide for Navitel.
25
Fig. 29
Fig. 30
Fig. 31

5.4. Settings
“Settings” menu (Fig. 32) contains some functions and pro-gram main settings. Color and type of some icons maydepend on function status and current Skin-file. Also icon’scolor on the “Map” page depends on the interface settings.
5.4.1. MapThis menu (Fig. 33) contains various map view settings.Most of these settings manage the quality of objects on themap.
5.4.1.1. Top of the map
«Map’s north is on top» -the top of the map always will befocused on North;
«Rotate map with movement» - top of the map will point ontraffic direction.
5.4.1.2. Automatic zoom
Parameters of scale are set depending on the environmentand the speed (Fig. 34).
«Used scales» - select the scale interval. It will be used inautomatic scaling.
«Preferred zoom» - select the operating mode of automatic scaling: higher or lower detalization.
Function “Automatic zoom” can be turned off, and if it’s not active the scale can be changed only man-ually.
5.4.1.3. Visual effects
Visual effects (Fig. 35) improve the map display, but time ofits rendering may increase. Following visual effects are available:
• Object border smoothing;• Smooth motion;• Smooth zoom.
You can change this settings by switching “On / Off” button.
“3D models” - specify zoom level for the three-dimensional models.
5.4.1.4.Detail level
Here you can set the detailizaiton of the map by chossing from:1.Custom2. Very low
26
Fig. 32
Fig. 33
Fig. 34

3. Low4.Medium5. High6. Max
5.4.1.5. Draw models fromHere you can set the value of the scale on which 3D modelswill be visible.
5.4.1.6. Map tilt
This menu item is used to set the degree of inclination of themaps while viewing it in panoramic (3D) mode. To changethe setting, move the switch to the left (minimum slope) orright (maximum slope).
5.4.1.7. Reset positionIf the map is moved while navigating, this function returnsyou to the current location after specified amount of time(Fig. 36). Following values are available: 5 seconds, 10 sec-onds, 15 seconds, 20 seconds and “Never” (Off).
5.4.2. Other maps
Atlas is a set of maps, which is one of the major componentsof the system. Selecting this menu item opens a window(Fig. 37), where you can create atlas or manage existingone. If you have the atlas, its name will be displayed in thiswindow.
Click on the map to open it. Note: all other atlases in thiscase will be closed (Fig. 38).
To remove the Atlas press “Edit”, then delete it. When you fin-ish press “Done”.
5.4.3. Navigation
The navigation system and a route settings (Fig.39).
5.4.3.1. Vehicle
The function allows you to optimize a system according tovehicle being used for the navigation. Press the green arrowin the right side of the screen to choose an option (Fig. 40):Pedestrian; Bicycle; Car/Motorcycle; Taxi; Bus; Emergency;Delivery; Truck.
«Route» - choose routing method: “Route on roads” or “Route on direct line”
«Choose a road» - system prefers a quick or a short way.
27
Fig. 35
Fig. 36
Fig. 37
Fig. 38

5.4.3.2. Avoid
Choose items you want to avoid when routing: «U-turns»,«Toll roads», «Unpaved roads», «Ferry connections».
5.4.3.3. Guidance prompt
Set the time when system should inform you about theupcoming manoeuvre (Fig. 41).The button can be set in therange from «More distance» (the maximum time) to «Less dis-tance» (minimum time).
5.4.3.4. Off-routeYou can set the sensitivity of the withdrawal from the route.
5.4.3.5. Lock on Road
This function allows you to draw your location to the route, ifthe quality of the GPS signal has decreased or you decidedto go around an obstacle.
Variants of sets: «Don’t lock»; closer 20 m; closer 50 m;closer 100 m; closer 200 m; closer 500m; Auto.
5.4.4. Interface
Interface settings menu (Fig. 40) will allow you to use the«Map» page and all of its elements effectively.
5.4.4.1. Map buttons
You can set the display of each button (Fig. 41).
Near each icon placed a symbol, that can be different col-ors depending on the setting of the button. Green colormeans that the button will be always displayed. Grey colormeans that the button will not be displayed. Half painted ingreen color means, that under certain conditions button willnot be displayed on the map page. By clicking on the sym-bol you may disable or enable the display buttons on themap page.
In the left part of each field is a setting button (“+” sign). Ifyou click on it the advanced settings menu will be opened,the item is displayed depending on the current function sta-tus (Fig. 60). Click on the icon to turn on/off the display ofthe buttons.
28
Fig. 39
Fig. 40
Fig. 41
Fig. 42

5.4.4.2. Skin
In the «Navitel Navigator» you can change the configurationof the program by installing additional theme (skin files):Day and Night.
5.4.4.3. Hide buttons
The “Hide button” (Fig. 43) - determines how long after thelast user activity will be lost of the button “Cursor” and“Save”, as well as button “Menu” and “Compass”, “GPS”,etc.
5.4.4.4. Hide menu
«Hide menu» - determines how long after last activity Navitel Navigator switches to the Map page.
5.4.4.5.Show scroll bar
In this menu item you can turn on/off the display of scroll bars on the right side of the screen.
29
Fig. 43

5.4.5. POI filter
Setting up the display of infrastructure objects on the map(Fig. 44).
Infrastructure objects icons are classified into differentgroups: “Auto”, “Food”, “Shopping”, “Entertainments”,“Transport”, “Banks/Financial” and etc. By choosing “+” inthe left part of the group, you can open a list of subgroups(Fig. 45).
In the left part of each group and subgroup is the symbol thatindicates whether the group displays or not. If the symbol is
painted in green color - this means that the group isenabled, half-painted in green- some of its subgroups areincluded, and some not. In case, if the group is turned offcompletely, the symbol will be grey. By clicking on this sym-bol, you can enable/disable the display on the map all of theicons of the corresponding group.
In the right part of each group is a setup button. By clickingon it displays page with additional settings (46):
• “Turn off all” - turn off the display of all components of thegiven group/subgroup.
• “Seen on scales” - lower and upper limits of the scale. Youcan set icons displaying of this group on the map;
• “Labels seen on scales” (Fig. 47) - noting the subitem“Show title POI” you can select the maximum zoom, whichwill be displaying not only the icons of the group, but alsothe name of each icon;
• “Restore defaults” - back to the standard (default) values.
With the help of first group “All types” settings you can set allthe icons of the POI. This filter works as the limiter. Forexample, using it you can turn off the display of icon names.But to display all names it is necessary to install the appro-priate mark in the settings of each group.
Fig. 44
Fig. 45
Fig. 46
Fig. 47
30

5.4.6. Online services5.4.6.1. Traffic jams
«Use jams for automatic routing» - if this function is activated, traffic situation will be taken into accountduring the route setup;
«Show jams on map» - when this function is enabled, traffic jams are shown on the map as different colored lines ;
«Connection with Internet» - to update the information about traffic jams Internet connection must beestablished. This function manages the system access to the Internet.
5.4.6.2. Weather
This page (Fig. 48) allows you to setup the «Weather» service.
- Automatically (weather information is updated by system);- Manually (manual downloading weather information).
“Show weather on the map” - if you select this menu item,on a small scale on the map will display the weather in set-tlements.
5.4.6.3. Communication
“Allow Navitel.SMS receipt” — mark this item to receiveSMS-messages from other users;“Show Navitel.SMS pop-up window automatically” — ifthe function is activated there is a window on the display, notifying about received SMS messages. Todisplay this window it’s necessary to click on the symbol in the upper part of the map screen.Enable events displayingIn this menu, you can switch on the display of events on the roads. For more details, see item“Navitel.Events”.Enable downloading up to date POI information via theInternetSome points of the POI are dynamically loadable informa-tion: for the gas station it is the price of gasoline, for cinemas- showtimes, etc. Turn on this feature when viewing detailedinformation about the point you can see this data. A full list ofpartners can be found in the section “Partners” at www.navi-tel.ru.UpdatesUpdate settings.Friends settings.Turn on/turn off Navitel.FriendsSee chapter 8.9
Fig. 48
Fig. 49
31

5.4.7. Alerts
The voice and visual warnings settings (Fig. 49).
5.4.7.1. Speed limitsSpeed limits alert when overspeed on specific road section.
«Enable sound allert» - this function turns off the soundwhen you are close to the speedcams, railways and man-made unevenness of the road.
You can also select the type of alert tone: «Voice alert» or«Signal alert».
It is also possible to set the type of audible and visual warn-ing: «Do not notify», «Always notify», «Overspeed to 0 km/h10 km/h and 20 km/h,..., 100 km/h».
5.4.7.2. Speed cams
The camera will warn you about the radar, dangerous intersections, speed bumps and pedestrian cross-ings (Fig. 50).
«Enable sound alerts» - this function turns off the soundwhen you are close to the speedcams, radars and roadhumps.
You can also select the type of alert tone: «Notify voice» or«Alert signal.»
It is also possible to set the type of audible and visual warn-ing: «Do not allert», «Always alert», «Overspeed is 0 km/h 10km/h and 20 km/h,..., 100 km/h» (Fig. 51).
5.4.7.3. Traffic lanes
«Show traffic lanes» - sets up the display of traffic lanes,with information about maneuvers at the next intersection.
5.4.8.Regional settings
On page «Regional settings» user can select the languageof the program interface, the voice sound (audio), keyboardlayout, as well as the units of measurement (Fig. 52).
5.4.8.1 Interface language
Select the program interface language.
5.4.8.2. Map language
Select the language of the map (Fig. 52). The program interface language is set by default. If the map
Fig.50
Fig. 51
32
Fig. 52

does not support some of languages the program will use language of the country, which map is activeat the moment.
5.4.8.3 Voice
Voice settings, using which the program informs you about different events. You can change the voicepackage, clicking on the green arrow in the right part of the field and choosing a different package fromthe list that appears.
Additional voice packages you can download on page http://www.navitel.ru/downloads/voice_packets.Extract the contents of the archive into the folder with the program in the directory \wav\ or in\NavitelContent\Voices\ on the memory card. The foldername must begin with “0409 AC” for English and “0419 AC”for the Russian.Also you can download additional voice packets from Navitelby choosing
5.4.8.4 Keyboard
This menu is for setting the keyboard layout and selection ofsupported languages when typing text.
«Keyboard layout» - type of keyboard layout, that appearson the display when you click on the text input window .
Available keyboard languages:
• QWERTY v1 - classic keyboard layout used on home PC(Fig. 53). The first letters in the top row, if you read from leftto right, are «qwerty» in the English version, additional but-tons are located on the right part of the screen;• QWERTY v2 - letters are similar to the first option, the lay-out is changed only in vertical orientation of the screen (Fig.54);• QWERTY v3 - letters are similar to the first option, butadditional keys are in the lower part of the display;• ABCD - the letters are arranged in alphabetical order, from left to right (Fig. 55).
• Use cellular layout for search - similar to the layout of amobile phone, where each number corresponds to a few let-ters.
5.4.8.5 Measurement units
On this page you can select the units of measurement ofcoordinates, azimuth length/speed, height/depth, size, andformat of the address. Click on the arrow next to the field toopen a list of possible options.
«Keyboard languages» - there is a button switchingbetween languages when you click on that will switch the languages available on the keyboard. Check
33
Fig. 53
FIg. 54
Fig. 55

the settings of those languages, which will be included in this sequence (Fig. 56).
5.4.9. System
Setting up General program functions (Fig. 56).
5.4.9.1. Satellites
«Autodetect settings» - automatically detect the settingsof the program.
“GPS on/off” - switches on/off the GPS-receiver.
«In background mode» (for devices based on Androidand iOS)
GPS keep on - when the program switches to the back-ground mode, the GPS receiver will be turned on: the programwill continue route guidance, the jams, even without displaying a map on the screen.
GPS turn off - when the program switches to the background mode, the GPS receiver will be turned offto save energy. Route guidance resumes when you open the program.GPS keep on with route - when the program switches tothe background mode, the GPS receiver will stay turned on.The program will continue route guidance, even without dis-playing a map on the screen, but only in case, if there is anactive route.
«Data sources»
«Operating system (GPS API)» - if you select this menuitem, data for the correct working of GPS receiver will be putout by the operating system.
«Demo track» - when selecting the «Demo track», informa-tion about its options will be displayed: playback speed, themoment of the start of playback and «Repeat» if the relevantfunction is active.
«Track file» - select the demonstration of the track. Clickthe field to open a selection menu file. In the upper-left cor-ner is the folder selection window, in the upper right - fileformat selection window, where you can set a filter of dis-played files: “All sizes” (the filter is disabled), *.gpx file *.plt,*.gdb, *.mps. Then specify the path to the file, by clickingon the folder.
«Play rate» - playback speed demo track: 1x (withoutincreasing the speed), 2x, 4x, 8x.
«Start at» - the moment of beginning of the track. Measured as a percentage (100% - all the length ofthe track). You can select one of the following values: 0%, 10%, 20%, ..., 100%
«Loop» - if this function is activated, the demonstration of the tracks will begin again after the end of theprevious cycle.
34
Fig. 56
Fig. 57
Fig. 58

Record low-level data sent to or received from the GPSreceiver to \gps_log.txt - turn on/off the record.
5.4.9.2. TimeMenu allows you to setup the time in the program «NavitelNavigator».
“Update time zone automatically” - if this function isswitched on, the time zone will update automatically (Fig60).
5.4.9.3. Power
This menu allows managing the power settings (Fig. 60).
“Keep power on while the application is active” -despite the system settings, with the active “NavitelNavigator” device will not switch to the sleep mode;
“Keep screen backlight on while the application isactive” - similar to the previous paragraph, but in this casethe backlight will not turn off (for devices baced on Android, Windows Mobile and Windows Phone).
“Turn off GPS in sleep mode” - when device is switchedto a sleep mode, GPS will be turned off.
5.4.9.4. Sound
This menu allows to set the sound in Navitel Navigator (Fig60).
«Turn off sound» - this function is intended for switching offthe sound of the program;
«Keep volume» - when this function is switched on the vol-ume level in the program will comply with the system set-tings. Otherwise, the speaker volume can be set independ-ently.
«Sound stream» (for devices with Android)- chose asound stream : Music stream, System stream, Alarm stream, Notification stream, Ring stream (Fig. 61).
Sound mode (only for devices based on iOS):
«Pause sound» - if there is playing an audio on you device and the route is active this setup will allowyou to stop the sound while the Navitel voice prompts.
«Muffle sound» - similar to the previous paragraph when you turn on the voice prompts, sound will bemuffled.
Fig. 59
Fig. 60
35
Fig. 61
5.4.9.5. Quit prompt (function is unavailable fordevices based on iOS)
Setting the function “Quit prompt”. If you selected item“Don’t ask”, then if you press the “Quit” button program willswitch off immediately. Otherwise, if you press the “Quit”button you will see the clarifying question.
5.4.9.6. Folder settings
“Download folder”- use this menu item (Fig. 61) to set thefolder where the temporary files are stored. By default it is\NavitelContent\Download\ at the storage card.
“Maps folder”- use this menu item (Fig. 61) to set the folderwhere the official maps are stored. By default it is\NavitelContent\Maps\ in the storage card.
5.4.10. Dashboard
See the “Dashboard” page.
5.4.11. Profiles
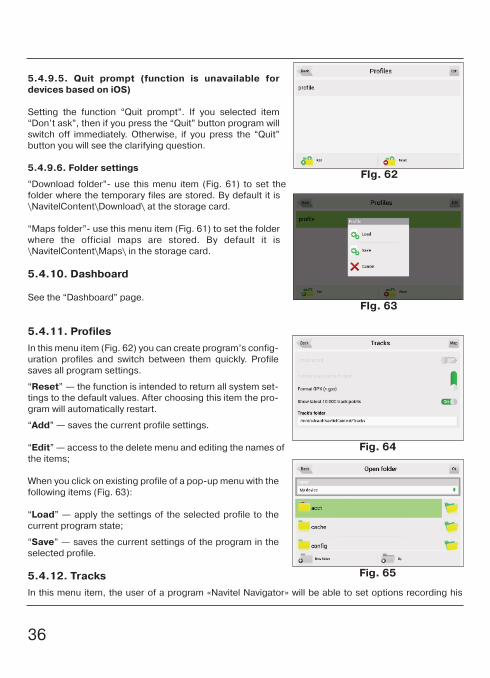
In this menu item (Fig. 62) you can create program’s config-uration profiles and switch between them quickly. Profilesaves all program settings.
“Reset” — the function is intended to return all system set-tings to the default values. After choosing this item the pro-gram will automatically restart.
“Add” — saves the current profile settings.
“Edit” — access to the delete menu and editing the names ofthe items;
When you click on existing profile of a pop-up menu with thefollowing items (Fig. 63):
“Load” — apply the settings of the selected profile to thecurrent program state;
“Save” — saves the current settings of the program in theselected profile.
5.4.12. Tracks
In this menu item, the user of a program «Navitel Navigator» will be able to set options recording his
Fig. 64
Fig. 65
FIg. 62
FIg. 63
36

route (Fig. 64)5.4.12.1. Track recordIf necessary, activate a track recording.5.4.12.2. Track formatTo select the recording format of tracks, select the appropri-ate item in the menu.5.4.12.3. Show latests 10 000 track points - shows last10 000 track points of the recorded track.5.4.12.4. Track’s folderTo select a directory, where the tracks will record, select it inthe directory field and press the OK button (Fig. 64).
6. Functional options6.1. RoutesThe route can be created from your location to any otherpoint, which can be set in menu “Find”, chosen in “History”and in list “Favorite” and also shown on map.«Go!» — in route guidance mode this button routes fromfirst point of the existing route to the selected point (allpoints between them will be deleted).«Properties» — properties of the selected point. When youpress the button additional information appears.«Set start» - the point is becoming the start of the current route, the GPS-receiver when it is necessaryto disable.«Route through» — add point to existing route. The lastadded point(when you add few of them) will become the sec-ond (after the first point or current position) priority point onthis route.«Set finish» — point is added in the end of the route as it’scontinuation.«Copy» - copies the coordinates of the selected point.«SMS-button» - using this button you can send coordinatesof the point.
6.1.1. AutoroutingTo set the route automatically from your current position, tapon map and in appeared menu choose “Cursor”, and then “Go!” (Fig. 68). Pay attention: on maps, thatdo not contain information to set routes, the route will look like a direct line of green color, connectingyour location and the point of destination, ignoring all the buildings, roads, etc.
6.1.2. Route creation after searching resultsGo to the «Search» menu, find the required object, that you want to route through, click on it and inappeared menu select «Go». When you click on the “Information about the object” will appear button«Route through» - add a point between two points of an existing route, it will become the second routepoint, and «Set finish» - the point is added to the end of the route, continuing it. Both of these buttonsare only available in case, when there is an established route on the map.
37
Fig. 66
Fig. 67
Fig. 68

6.1.3. Manual route creation
To create a route, click on the map to create the first route point. At the bottom of the screen select“Cursor”, in “Properties” - the “Set start”. Then find the finalpoint of the route and press button «Cursor» - «Go!». If mapcontains information for automatic routing, the route will becreated on the basis of this data, and will be the shortest bythe time or the distance. Otherwise, the route will connectthe points of a route using straight lines.
6.1.4. Edit routeClick on the maneuver sign to edit the route. The contextmenu that appears when you click, contains the basic com-mands for route editing (Fig. 69).
«Stop route guidance» — delete the route from the mapand stop routing.
«Avoid» — when moving along the active route this menuitem specifies the program that from the current location onthe route there is no possibility to move further. The programanalyzes the situation and looking for alternative, less timeroute. When the system is off, this item is not available.
«Go next via point» — press this button to get to the nextpoint of the route, if you suddenly passed the current point.
«Demo route» — this menu item is only available when youturn off the GPS. Using this menu item you can see the route, turns on the route and some rough infor-mation on the route. Full demonstration allows you to pre-identify hazardous or adverse parts of theroute and re-route if it is necessary.
«Show route» - displays the route fit in the screen of thedevice.Also editing the route can be made using the intermediatepoints. When the route is active, tap anywhere on the map tocreate a point. Then tap «Cursor», and select the arrow inthe right bottom part of the screen, after you will see a but-ton «Go», «Stop», «Continue», «Start», and also get theopportunity to copy the coordinates of the object.
6.1.5. Route propertiesThe program allows to work with the route. Go to the «Route»(Fig. 71).
On top of the page the total length of the route is indicated. In the bottom of the page are buttons, whichallow you to import and export the route. The settings of «Edit route», «Route plan», «Show route»,«Avoid», «Demo route» and «Export»are available only when the route is active.In menu “Route plan” points of the route are displayed.
Fig. 69
Fig. 70
Fig. 71
38

6.2. Tracks
There is a recording track option in Navitel (Fig. 72). Thisfunction is called «Record track» and it can be turned on/offin «Menu»->«Settings»->«Tracks», or by pressing button onthe toolbar. This function is available only with satellitesswitched on.
6.3. WaypointsWaypoints allow you to mark places with chosen coordi-nates. They help to orientate better and mark interesting foryou places. The point can be created manually. They areautomatically named with sequence numbers in 3D format.
To create a waypoint, click on the required location on the map. A green cursor will appear. Then in thebottom of the screen press «Save».
Waypoint tipes are divided into groups (for example: services, buildings, transport, etc.) to simplify thesearch for the required type of point. To choose the correct type of waypoint, click on the icon with thecurrent type.
A list of all the waypoints can be seen in the «Search» menu, item «Waypoints». On this page you can work with points:add a point, delete all points, export and import points usingthe button (context menu) at the bottom of the screen.
To delete waypoint choose “Edit” in the upper-right corner.To export waypoints go to «Waypoints» menu and select theitem «Export». Window with the list of files will open. All of thewaypoints are exported to the selected folder.To import waypoints take the same steps. After the waypointsimport appears a window, informing about the number ofimported points.
If you click on the waypoint’s name, window “My route” willopen and you will see you location on map.
If you select “Go!”, then program will route to this point. Also you can click on the grey arrow on the right side of thescreen to open the “Properties” window, where you canmake the waypoint start, middle or finish point.
Fig. 72
39
Fig. 73
Fig. 74

6.4. Traffic jams
Attention! This function is available only when the GPRS isturned on. Information about it is available on your device,you can get it from the manufacturer.
With the service “Navitel.Traffic jams” from the companyNavitel, the device allows you to download the informationabout traffic jams on the whole territory of Russia, as well ason the roads of Ukraine and other countries, which officialmaps are maps from Navitel.
Traffic jams from Navitel are in the «Settings»->«Online serv-ices»->«Traffic Jams», and for further use of the service noadditional data is required (Fig. 75).
Traffic information is available 24 hours a day. The programsupports the traffic jams service through GPRS for free.
The service corresponds to the sign, which is displayed inthe upper part of the display. It can be three colors: green(there are traffic jams, updated), yellow (there are trafficjams, but they are outdated) and red (no connection.). If thefields «Use for routing» and «Show on map» are not selected, a sign of traffic jams will be grey.
Traffic jams are displayed on the screen of the device by different colors depending on the difficulty oftraffic. On the main highways of the city depending on the speed different colors are displayed:
• Red - traffic jam;• Orange - traffic is bad;• Yellow - traffic is a bit difficult;• Green - normal traffic.
In addition, the status depends on the total road congestion of the nearby highways, on the work of traf-fic lights, on repair work, on the presence of emergency areas, traffic accidents and other factors affect-ing the intensity of the movement. Also, when the function «Use autorouting»is turned on, informationabout the road situation will be taken into account in the autorouting. Route set with the account of traf-fic jams may be a bit longer, but you will be moving by less loaded routes (according to the informationof the system Navitel). An optimal route takes into account the maximum possible speed on the varioussections of the road, and your choice in the route settings - the lowest on time or shortest route.
Fig. 75
Fig. 76
40

6.5. FindThis program implements the search of all sorts of theobjects on the map according to different conditions (Fig.77).Found object can be looked through and also can beadded to the route different ways. Specifying search condi-tions is made by using the keyboard pre-selected in the set-tings. The keyboard can be hidden or displayed by clickingthe button in the upper-right corner of the screen.
In some types of search when typing the name of the search-ing information by using the keyboard, number of matchingthe search conditions objects will be displayed next to thecurrent typed name. The keyboard will be automatically hid-den when the number of entire objects fits the page. Clickon the required object when you choose it from the list. Ifyou made a mistake in typing press the “Backspace” buttonto return.
6.5.1. Search «By address»
• Select country
There are four buttons at the top of the search page (Fig.78): “[Select a Country]”, “[Select a City]”, “[Select aStreet]” and “[Select a Building]”. Selecting a city, street andbuilding or crossroad is not available until you select a country, city or street, respectively.
Select required country from the list using the keyboard. Ifyou don’t need the keyboard it can be hidden by using thebutton located in the upper-corner of the screen. The key-board will be automatically hidden when the number ofselected countries covers up the whole page. For selectingthe country from the list click on it. The item “[Select a City]”will become active.
• Select city
City selection is similar to country selection. Start typing thename of the city and choose it from the list (Fig. 79).
• Select street
Using keyboard type the street name where the requiredobject is located. As you type on the list will be left only thosestreet names that are suitable for the search terms. Alsopossible following letters of the street name will be highlight-ed on the keyboard. When there will be left as many as it ispossible street names fitting the page, the keyboard will behidden automatically and you will be able to select requiredstreet from the list (Fig. 80).
Fig. 77
Fig. 78
Fig. 79
41
Fig. 80

• Select building
Similar to typing the street name, type the building number.For going one step back click on the button placed in thelower left corner. In case you want to find an intersectioninstead of building you can skip this step and move on to thenext menu item.
• Select intersection
After selecting the street that is a part of a required intersec-tion you can begin search of the intersection. Intersectionsearching menu (Fig. 82) is similar to the street searchingmenu except that the number of source data is less. So ifyou don’t know the correct name of the crossing road youcan hide the keyboard by clicking on its icon at the upper-right screen corner and manually scroll through the list.
• Result
After the object is found you can see its location on the mapand you can continue the route to the object (Fig. 82). Alsoif you enabled the route guidance while searching (that isthe route on the map has been created), found object canbe included in the route as one of the middle points. For thispurpose click on the object name and select one of the fol-lowing: “Rought through” - the object will be insertedbetween two route points becoming the second route point,or “Finish” - and the object will be added to the end of theroute.
6.5.2.Search «Nearest places»
Search nearest to the specified point objects is also can be made in a several steps. In addition to objecttypes here is also a history of the nearest objects search.
• Select reference point
When searching the nearest points the reference point is the most important search term. Referencepoint is the point in relation to which the closest objects of the selected objects types will be searched.On the page (Fig. 83) you will see the following referencepoints: “Current location” – search the nearest to your cur-rent location (active when sattelites are switched on),“Cursor” – current position on the map is taken as the start-ing point of the distance, “Postal address” – search thenearest to the specified address, “By route” – search for thepoints those are near to the route, “Finish” – search for thenearest to the end of the route point objects, “History” – oneof the objects from the general searching history can bechosen as a reference point,
Fig. 81
Fig. 82
Fig. 83
42

• Search for a specific object
After selecting the object category the page with all requiredand sorted by the distance increasing to the reference pointobjects will open.
• Result
After the object is found, you can see its location on the mapand the route up to it. Also, as in other types of search, addthe object to the route and drop the object, if route guidanceis enabled (Fig. 84).
6.5.3. Search “Friends”
Using this menu item you can find your friend’s location androute to meet them. You need to select your friend from helist and tap on it’s name (Fig.87). Page with friend’s locationwill open. You can choose “GO” button to see the route toyour friend (Fig. 87).
6.5.3. Search «Waypoints»
This search contains a list of all the waypoints using whichyou can search objects (Fig. 85). The waypoints search isimplemented using the title. Except the name of the way-point in the search results list displays the distance to it. Youcan set route through the waypoint or find it on the map. Youcan also edit the waypoint from this menu, delete the select-ed point or all the waypoints,send its coordinates inNavitel.SMS, export and import.
6.5.4. History
All objects ever found using any types of search (Fig. 89). Inthis type of search objects are sorted by date of search,later found objects are at the top. You can remove itemsfrom this list, if you are sure, that you will no longer usethem.
6.5.5. Favorite
Find the most frequently used in search objects. As opposed to search «History», objects in this search aresorted by the number of uses, and not by the date of last use.
Fig. 84
Fig. 85
43
Fig. 86
Fig. 87

6.5.6. Search «By coordinates»
Search for a specific object coordinates. Coordinates canbe entered manually, or insert the ready-made, using thebutton «Paste» on the right, after saving them in the proper-ties of the object on the page «Map».
«Result» — show the point with the coordinates on the map(Fig. 91);«Go» — autorouting to this point of the route;To view additional options, click on the arrow in the right bot-tom part of the screen (Fig. 91):
«Set start» — check the selected point as the starting pointof the route;
«Route through» — if there is a route, it re-routes taking intoaccount passing the point with the coordinates;
«Set finish» — mark on the map becomes the end of theroute. And previous end of the route becomes the middlepoint.
«Back» — return to the menu;
«Map» - return to the map.
6.5.7. Search «On the map»
When you choose this menu item, current place on the mapwill be displayed.
You can route to this location by choosing “Go!” button.
Fig. 90
Fig. 91
44
Fig. 89
Fig. 88

6.6. Navitel talks Function Navitel talks makes possible coordinatesexchange between users to identify the current locations ofeach other, as well as send coordinates of any object (Fig.92).
There are two types of SMS-messages: sending your coor-dinates - “I'm here”; and the requesting other user’s coordi-nates “Where are you?”. To send the message, press thebutton at the bottom of the screen. Clicking on this menuitem opens a window with fields (Fig. 93). Here you can enterinformation such as the number of the recipient, name,description and coordinates. Dialing by using the keyboard.
Fig. 92
Fig. 93
45

6.7 Navitel.EventsAttention! This function is only available when device isconnected with GPRS. You can get more information fromdevice manufacturer.
Function Navitel.Event is a supplement to the Navitel.Trafficjams, using which you will be able to determine the cause ofthe traffic jam, as well as choose the most convenient strat-egy to overcome it.
The events are shown on the map as small signs and can beseveral types: “Road accident”, “Camera”, “Road work” and“Other warnings”.
For any road events you can see the properties and description, and also to confirm or deny his exis-tence. To do this, select the cursor the event and click “Events”, which appears in the right part of thescreen.
In the information about the point you can see when it wasset, as well as a description.
To mark the event on the map, select a point on the map andclick on the button marked with an exclamation mark. Incase, if you don't select a point on the map, the event will beestablished in the area of current position of the card nearthe scale.
Select the required type of event, and, in the case of a roadaccident you can specify in what part of the road that theevent occurred. In addition, a click on the input field, you can enter your own text description of theevent.
Note: each user may create no more than 3 events in 10 minutes. Also, you cann’t set the event at a dis-tance of less than 100m from the similar events. If you will try to increase the limit, you will receive noti-fication of the error.
Fig. 94
Fig. 95
46

6.8. Navitel.FriendsNew interactive service «Navitel.Friends» allows you to findyour friend’s location on the map in real time, to share yourgeographic location with friends, exchange messages ormake a route to meet them.
6.8.1. «Navitel.Friends» account.
To use functions of « Navitel.Friends » you have to registeron the Web-site www.navitel.ru. Also you should have atleast one device with the installed Navitel Navigator programwith an activated license key. This device should be added inthe section "My devices" in your "Private area" on the Web-site.If you do not have an account on the website www.navitel.ru or your device is not added in "Private area",when you switch on your device, service «Navitel.Friends» will offer you a quick registration (Fig.96).When you choose the registration option, you have an opportunity to choose one of the two variants:register a new account or register a new device (using an existing account).
6.8.1.1. Register new account1.In "Register" window choose " Register new account"(Fig.97).2.Enter Login.3.Enter Password and repeat it in "Verify" field.4.Enter the name of your device.5.After you fill in all the fields on the "Register" page, click inthe upper right corner "OK" (or click "Register" at the bot-tom of the page) (Fig. 98).
6.If registration was successful, you will see the message " CONGRATULATION! Congratulations!Registration succeeded".After the registration succeed, user can work with "Navitel.Friends" service.To delete your device and change (restore) your login password you have to login on the web-site andin "Profile" – "E-mail change" enter your E-mail.You will receive the confirmation on specified E-mail.
6.8.1.2. Register new device
To register a new device on the existing account in the loginwindow select "Register new device".Enter login and password in appropriate fields, then enterthe name of the device that you want to register.If registration was successful, you will see the message "CONGRATULATION! Registration succeeded"
Fig. 96
Fig. 97
47
Fig. 98

6.8.2. Using «Navitel.Friends»
6.8.2.1. Login «Navitel.Friends»
Login can be done in two ways:
1.Menu – Settings – Online services – EnableNavitel.Friends service (Fig. 117).Switch on the service and enter your login and password.Before clicking OK, you can enable the option "Rememberpassword" in order to not enter it when you turn on the serv-ice.
2.Click on the icon at "Map" page on the toolbar на and choose the item "Turn on" (Fig. 99).If the authorization fails, the program will report the error and again will open the same window. To for-get the stored password, you can use the button "Forgotpassword" in the settings of the service.
6.8.2.2. Menu "Navitel.Friends"
You can use "Navitel.Friends" clicking the button on the tool-bar of the "Map" page (Fig.100). When you click the icon youwill see a pop-up menu with the following buttons:1.Turn on/Turn off.2.Friends.3.Find friends.4.Friendship request.5.Settings.6.Cancel.Buttons "Friends ", "Find friends" and "Friendship request" are available only when you are authorized.
6.8.2.3. Friendship request
To find a friend in pop-up menu you should select the button"Find friends" and enter your friend's login (keyboard caseis not taken into account) and click OK.You will see the information about user with chosen login.To add a friend click the button at the button "Sendrequest"(Fig.101).
After sending the request you can cancel it by pressing thebutton "Cancel the request". In this case the request disap-pear on both sides.
You can see sent and received requests in menu "Friendship request" (Fig. 102).After you sent a request your friend will receive a notification and will be able to accept the request.When your friend has accepted the request, you'll see message "Accepted requests" in menu"Friendship request"( Fig. 103).
Fig. 99
Fig. 100
48
Fig. 101

Creating requests is limited to the following criteria: you maynot offer friendship to more than 10 users for the last 10hours, can not re-offer the friendship to a man, who hasalready rejected your request. However, if this person willoffer you friendship, then you will be able to offer him friend-ship again.
Sent request will be relevant until it is closed: either personwill agree, or refuse, or you cancel the request. Until then therequest will be opened.
6.8.2.4.Friends list
When your friend has accepted the request you can seeinformation about him/her at "Friends" menu (Fig 104).
There is brief information about your friends in the list:user's name, avatar, current location and time of the update,your friend's status.There is an opportunity of the fast search by first letters ofthe name.
6.8.2.5.Friend's profile
When you click on your friend's login opens Friend's profile,which contains full information and a set of actions in rela-tion to this friend:1. General information about friend: avatar and status(avatar's color: green - if user is active, grey - if inactive).When you click on the line of general information opens acomplete list of attributes of your friend's account, includingcontacts: phone number, address, etc. Also it is possible tochange the name of a friend (this name will only appear inyour list) when you press the “Edit” next to the name (Fig.105).2. Location: when you click on this item you move on themap to the specified location. When this mode is switchedon the tracking becomes active, i.e. if your friend moves thescreen will move after him/her. As soon as you will reformsome action (clicking on the map screen, including approx-imation/delete), following mode is canceled.3. Message: the last message from the conversation with afriend. When you click on a Message opens conversations(chat) with a friend.4. Device( Fig. 106): the list of your friend's devices. Whenyou open this item you will see dialogs with the locations of alldevices and their locations on the map.5. The current setting of your privacy. When you click the "Privacy" you can set new privacy mode.6. The opportunity to break the friendship.
Fig. 102
Fig. 103
49
Fig. 104
Fig. 105

6.8.2.6. Privacy
In "Navitel.Friends" service you can set privacy. This is amode for sharing your location with a friend.
You can set the same privacy for all of your friends or individ-ually. To set the same privacy for all your friends you need toclick the "Navitel.Friends" icon on the toolbar, choose"Settings" – "Privacy settings" (Fig.107).For individual privacy settings you need in "Privacy settings"click on your friend's name and choose the option, or in"Friend's profile" select "Privacy" and choose the required.
You can set privacy only for the current device.
There are three types of privacy:
1. Share my exact location. Friends can see an exact pointwhere the device is, as well as its status (online/offline).2. Share rough location. Friends see a city where the deviceis, as well as the status of your friend. In this case the exactposition of the device is attracted to the nearest big city andis displayed in the center of it.3. Do not share my location. Friends don't see your deviceon the map, and do not see its status.
6.8.2.7. Settings
"Navitel.Friends" has some additional settings, available from the "Navitel.Friends" menu and from themain menu (Menu – Settings – Online services – Friends settings).
1.Enable "Navitel.Friends" service: turn on/off.2.Profile (Fig.108): your profile, where you can edit informa-tion about yourself. All the data will be visible to users in thesearch, as well as after adding you as a friend (in profile).3.Forget password: it's active if you previously saved yourpassword. When you select this item, the program will showthe message that you will have to enter the password at thenext login.4.Privacy settings: please refer to the paragraph "Privacy".5.Don't show users in offline mode: when the setting isenabled, offline friends are not displayed on the map.6.The frequency of the location data exchange (Fig.109). The higher the frequency, the faster will beupdated friends' location and the user's location. At the same time, with increasing frequency increasesnetwork traffic (traffic payment is carried out according to the tariffs of your provider). The default fre-quency is set as 10 seconds.
Fig. 106
50
Fig. 107
Fig. 108

7. A privacy mode for new friends: privacy in relation to newfriends, by default. In the case of setting any privacy (exceptthe “Define individually”) privacy in relation to new friend isautomatically set to selected mode. If you have set in thismenu "Define individually" on the button Friends (as well ason the dialogue between the requests for friendship) will bethe numerical indicator (1), which means that you need todefine privacy in relation to the new friend (information willbe duplicated in the dialog requests for friendship). Thelocation of the device will be hidden from your friend until theuser defines the mode of privacy.
8. Your location in the service "Navitel.Friends": defines thesource of the positions in the service of friends: either GPSsensor, or position selected manually (Fig. 110).
6.8.2.8. "Navitel.Chat"
Having access to the service "Navitel.Friends", the user hasthe opportunity to exchange personal messages withfriends. For this you need to open a chat (opens the icon"Navitel.SMS") and create a new chat, clicking on the but-ton "Create new talk" in the bottom of the screen, then"Create Navitel.Friends talk" and selecting friend.Messages are sorted in order of decreasing the time of the last message. Thus, the recent talks will bein the beginning of the list. Unread messages are determined by the green indicator in the upper-rightcorner of the avatars.
6.8.2.9. Talks
In the talk with friend displays all incoming and outgoing messages, sorted by date from the top down inascending order. On the left on a white background is displayed your friend's messages, on the right ona gray background – you messages.
Messages on one side are grouped according to the time between sending messages no more than 10minutes. When you scroll the history, the program requests the server old messages, which are auto-matically added to the talk list.
To send new message you have to open the keyboard, enter your message and click the button "Send".The message which is in the process of sending displayed in orange color. The message that has failedto send and will be displayed in red. By clicking on the message that is not sent successfully, the user issending the message again.
In talks there is a possibility to send the different locations types. To attach the location to message, clickon the button “Attach” and select the desired position. When you click on a message with the locationmap shows you the specified point.
Fig. 109
Fig. 110
51

6.8.2.10. News displaying
Buttons on the map ("Navitel.SMS", "Navitel.Friends") support the option of displaying the number ofnews. In "Navitel.SMS" service it's new messages, in "Navitel. Friends" service it's friends requests andnew friends without unset privacy. In pop-up menu "Navitel.Friends" you can see all the new but sortedby items(Fig. 111).
6.8.2.11. Friends on the map
On the map displays all your friends' devices (except for those that are offline, if the appropriate settingis turned on). If a friend is currently online, its icon on the map will be highlighted in green, if offline -white. When you click on the icon of your friend opens theprofile.
If friends are too close to each other (the center of one ofthe icons hides the other), they are united in one commonicon with the indicator of the number of united devices in theupper right corner. When you click on this icon opens the listof the friends that are at this point.
Fig. 111
52

7. Running the program after a crash
If the program was closed incorrectly (for example, a battery of your device was low), during the next runyou will see an after-crash information (Fig. 112).
In this mode, you can choose one of the following options:
“Start application” – if the software starts in an after-crash mode for the first time, selectthis option. In this case, Navitel Navigator will save all your setting, but there is a probability that duringthe incorrect stop a mistake appeared, so the Navitel Navigator will work incorrectly. If the softwaredoesn’t start correctly when you select this option, try one from the options below.
“Restore settings from last successful start” – Navitel Navigator automatically saves allthe user data and settings when it works with no exceptions. You can use them to startthe software after crash. Note, that the last changes, like settings, last places andfavorite lists that were changed during the last work session could be missed.
“Reset all settings – if no of the options above didn’t make Navitel Navigator start correctly, use thismenu item. Note, that History, Favorites lists, all the settings will be missed, but waypoints andNavitel.SMS will be saved.
If the program doesn’t start after all, please, contact our technical support: [email protected].
53
Fig. 112

© 2007 The Join-Stock Company “CNT” . All rights reserved.The contents of this Guide, as well as any attached demo materials, are the sole proprietor-ship of the Join Stock Company "CNT". Any commercial usage of this Guide maybe carried out only with written permission from the Join Stock Company "CNT". Theinformation in this document shall not be changed without prior notice given to the JoinStock Company "CNT".