32 charcoal grill -...
TRANSCRIPT

Kingsford and the Kingsford logo are registered trademarks of the Kingsford Products Company, LLC and are used under license by Chant Kitchen Equipment(H.K.)Ltd. All rights reserved.
Vendor Stock No.: BC251
INSTRUCTION MANUAL
32” CHARCOAL GRILL
FOR OUTDOOR USE ONLY.
PLEASE READ INSTRUCTIONS CAREFULLY BEFORE ASSEMBLY
RETAIN THIS MANUAL FOR FUTURE REFERENCE.
If you have any questions or problems, you can call our customer service department at 1-855-CHANT-US (1-855-242-6887) from 8:00am to 5:00pm Eastern time, Monday through Friday for assistance.
DO NOT RETURN TO THE PLACE OF PURCHASE.

1
SAFETY WARNINGS – READ CAREFULLY
Before assembling or using your new KINGSFORD® CHARCOAL GRILL -- carefully read the
instruction manual and all safety warnings!
This symbol “!” indicates a safety warning – pay special attention to the information following
this warning when assembling or using your grill.
Use caution and common sense when operating grill to protect persons and property.
Failure to follow safety warnings could result in bodily injury or property damage.
“!” WARNING “!”
ASSEMBLY
Use caution during assembly or operation of grill. Use caution when reaching into or under grill.
Properly dispose of packaging materials.
When moving or lifting grill, use caution to avoid back strains or injuries.
PLACEMENT
Outdoor use only. Do not use grill indoors or in an enclosed or non-ventilated area.
Household use only. Do not operate this grill for other than its intended use.
Never use grill on a wooden surface or other flammable surfaces. Use grill only on a hard,
stable surface that can support the grill’s weight.
Keep 10 feet of clearance between grill and any combustible materials when grill is in use
(including, but not limited to bushes, shrubs, trees, leaves, grass, wooden decks or fences,
buildings, etc.).
Keep grill away from gasoline and/or other flammable liquids, flammable gases, flammable
vapors, or areas where these may be present. Do not store or use grill in these areas.
In windy conditions, place in an outdoor area that is sheltered from wind.
Keep out of reach of children and pets.
When moving or lifting grill, use caution to avoid back strains or injuries.
Do not try to move or reposition grill while it is in use.
Store out of reach of children when not in use.
Don’t place goods over 10kgs/22lbs on side shelf.
LIGHTING A FIRE
Do not use gasoline, kerosene, or alcohol to light charcoal. Using any of these products (or
similar products) could cause a flare up, flash fire, or explosion. Severe bodily injury could be
result.
If using lighter fluid to start fire, leave the hood open until briquettes are ashed over and lighter
fluid has burned off. Closing hood too soon could cause fumes from the lighter fluid to
accumulate inside the grill. This could cause a flare up or explosion when the hood is opened.
Do not open the hood whist the charcoal door is opened. This could cause a flare up or explosion.
Do not add lighter fluid to warm or hot coals. A flash fire may result in bodily injury or property
damage.
Do not add instant light charcoal briquettes to an existing fire. A flash fire may result in bodily
injury or property damage.
Do not light grill without the slide out ash pan in place.

2
GRILL USAGE AND OPERATION
It is always recommended to pre burn your grill prior to your first use. By lighting a small
charcoal fire to simulate the cooking process, you will burn off any residues or oils created during
the manufacturing process.
Grill is hot when in use – do not touch grill surfaces.
Always wear insulated mitts when grill is in use.
Do not wear loose clothing when using grill or allow hair to come in contact with grill.
When in use, never leave grill unattended
Do not operate grill without the slide out ash pan in place.
Use caution when opening the charcoal pan access door. Charcoal pan access door handle may
be hot – use insulated mitts. Follow additional instructions in the “ADDING ADDITIONAL
CHARCOAL” section.
Use caution when adjusting the charcoal pan -- do not allow adjustable charcoal pan to fall
uncontrolled to its lowest position. Adjustable charcoal pan handle may be hot – use insulated
mitts.
Use caution when opening the hood – push back to its fully opened position. If the hood is left
partially open, it may drop suddenly, causing bodily injury. Hood’s handle may be hot – use
insulated mitts.
Use caution when adjusting the butterfly dampers. The butterfly damper handle may be hot –
use insulated mitts.
Do not lean on or place more than 10kgs/22lbs on the side shelf.
Keep a fire extinguisher on hand – in the event the fire gets out of control.
When fresh air comes in contact with flame, a flare up can result. Use caution when opening hood
or charcoal pan access door. Maintain a safe distance from hot steam and flame.
Close hood and butterfly dampers to extinguish flames.
To prolong grill finish and metal life, do not exceed a grill temperature of 400F and do not let
burning charcoal or wood come in contact with the walls of the grill.
After normal operation, if the crank handle does not rotate smoothly, add some lubricating oils into
the crank handle.
Clean the cooking grid and slightly coated with vegetable oil after use.
If there is naked flame or temperature is over 325F, please do not close the hood.
ASH DISPOSAL AND CLEAN UP
Do not leave hot grill or hot coals and ashes unattended.
Do not remove or empty slide out ash pan until coals and ashes have completely cooled.
Using insulated mitts – after coals and ashes have completely cooled – remove slide out ash pan
and empty ashes into a metal container. Douse with water before disposal. Keep container a
safe distance from combustible materials.
Wet the surfaces beneath and around the grill to extinguish any ashes or coals that may have
fallen out of grill.
To prevent excessive rust: clean grill after each use, cover and store in a dry place.
3
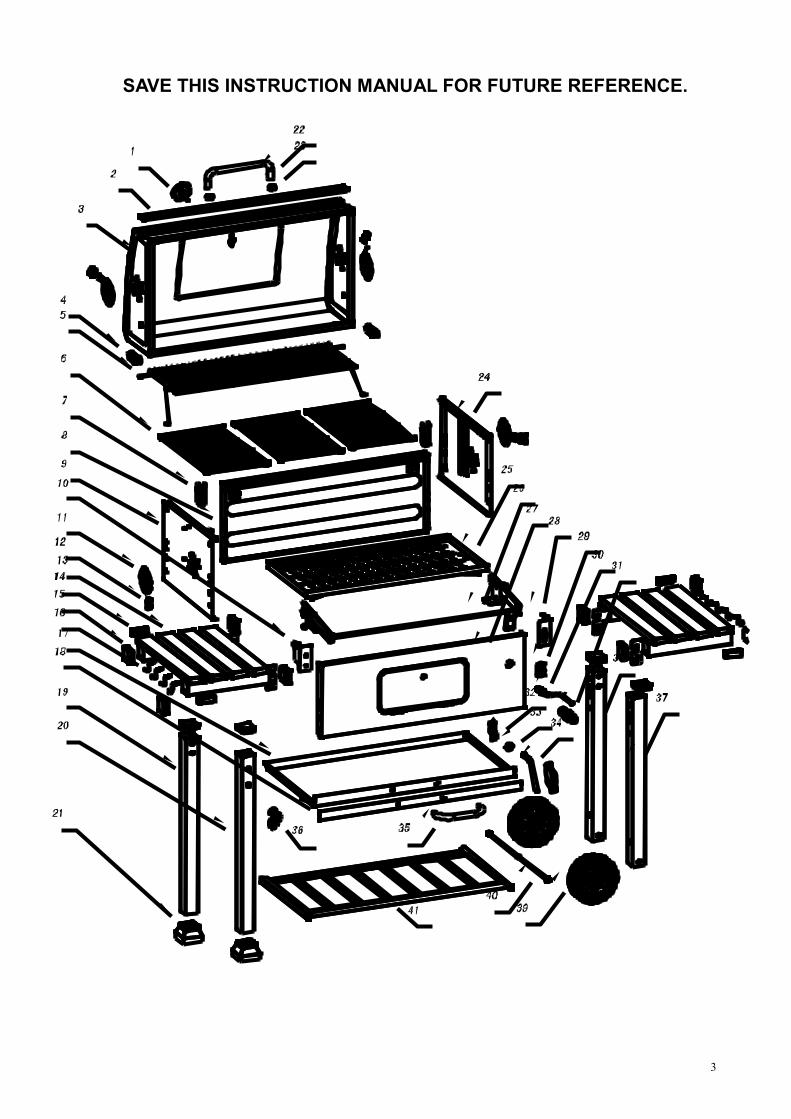
SAVE THIS INSTRUCTION MANUAL FOR FUTURE REFERENCE.

4
Parts List
Part Part Name Photo
Qty
Part No.
1 ※Temperature
Gauge
1pc 2406912
2 ※Lid Decorative
Plate
1pc 5204464
3 Hood Assembly
1pc 5204463
4 Upper Hood Hinge
2pcs 5013985
5 Warming Rack
1pc 2406917
6 Cooking Grid
3pcs 2409634
7 Lower Hood Hinge
2pcs 5014001
8 Fire Box Back
Panel 1pc 5207575
9 Fire Box Left Panel
1pc 5109378
10 Left Shaft Support
Bracket
1 pc 5204471

5
Part Part Name Photo Qty Part No.
11 Butterfly Damper
4pcs 5201618
12 ※Butterfly
Damper Handle
4pcs 2100065
13
Side Shelf with
hooks
(pre-assembled)
2pcs 5204476
14 ※Small Pipe Plug
4pcs 2100486
15 ※Large Pipe Plug
12pcs 2100478
16 ※Tool Hook
8pcs 2409448
17 Ash Pan
1pc 5204469
18 ※Ash Pan
Decorative Plate 1pc 5204468
19 Left Back Leg
1pc 5204474
20 Left Front Leg
1pc 5204473

6
Part
Number Part Name Photo Qty Part No.
21 Leg End Cap
2pcs 2404950
22 Hood Handle
1pc 5201617
23 Spacers
2pcs 5201175
24 Fire Box Right
Panel
1pc 5109379
25 Charcoal Tray
1pc 5204467
26 Shaft Assembly
1pc 5204470
27
Fire Box Front
Panel with
charcoal door
(pre-assembled)
1pc 5204465
28 Right Shaft
Support Bracket
1pc 5204472
29 Handle Locking
Bracket
1pc 2307014
30 Crank Handle
1pc 2404949

7
Part
Number Part Name Photo Qty Part No.
31 ※Handle Grip
2pcs 5201622
32 Door Locking
Lever
1pc 5207049
33 Trim
1pc 5207050
34 Charcoal Door
Handle
1pc 2409446
35 Ash Pan Handle
1pc 5201620
36 Bottle Opener
1pc 5014838
37 Right Front Leg
1pc 5201802
38 Right Back Leg
1pc 5201798
39 Wheel
2pcs 2100530

8
Part
Number Part Name Photo Qty Part No.
40 Axle
1pc 2307601
41 Bottom Shelf 1pc 5204475
※ :NO ASSEMBLY REQUIRED

9
HARDWARE
Note: Tools required for assembly (not included):
Phillips #2 screwdriver
Pliers and Adjustable Wrench
Part
Number Part Name Photo Qty
A M6x12 Bolt
26pcs
B M6x35 Bolt 8pcs
C M6 Half Screw Thread Bolt
8pcs
D M6 Nut
8pcs
E M10 Nut
1pc
F Hinge Pin
2pcs
G Cotter Pin
2pcs

10
ASSEMBLY INSTRUCTIONS
! Read all safety warnings and assembly instructions carefully before assembling or
operating your grill.
FOR ASSEMBLY ASSISTANCE, MISSING OR DAMAGED PARTS, Contact Customer
Service, Call:1-855-242-6887 Monday thru Friday 08:00 A.M. to 05:00 P.M., Eastern
Standard Time.
(proof of purchase required) Inspect contents of box to make sure all parts are included and not damaged.
STEP 1
24
9
8
27
STEP 2
Put Leg End Cap (21) into Left Back Leg (19) and Left Front Leg (20),Make
sure the bumping on Leg End Cap is locked into the square hole on the legs.
Loosen pre-assembled Screws and leave the screw heads protruding
approximately 5mm. Hang the side panels onto the screws and tighten them.
19
20
21

11
STEP3
STEP4
A
41
38
A
19
20
37

12
STEP5
STEP6
E
4039
2928
A

13
STEP7
STEP8
A10
30
Self-Tapping Bolt
Loosen the pre-assembled Self-Tapping Bolt from the end of Crank Handle (30),
then rotate the Crank Handle (30) into the hole of the front panel.

14
Self-Tapping Bolt
Fasten the Self-Tapping Bolt to the end of the Crank Handle ( 30),after rotating
the Crank Handle(30) into the hole of the front panel.
Note: Make sure to rotate the crank handle counterclockwise completely to the
end.

15
STEP9
Put the Bolts of the Shaft Assembly (26) into the slot of the Left & Right Fire
box side panel.
Fit the shaft onto the slot of the bracket of the fire box front panel.
26

16
STEP10
STEP11
A25
A11
D
Make sure the holes of the charcoal pan(25) are matched with the holes on
Shaft Assembly brackets. Screw the M6x12 Bolts(A) as shown, then tighten
them one by one.

17
STEP12
3433Door
32
M8 Nut
Φ8 Spring Washer
STEP13
7
B
Loosen the pre-assembled M8 Nut and spring washer from the handle (34),
and then assemble the handle to Charcoal Door according to the diagram as
shown.

18
STEP14
STEP15
A
36
6

19
STEP 16
STEP 17
B
4
D
3
B 4
D
A11
D
D
11A
20
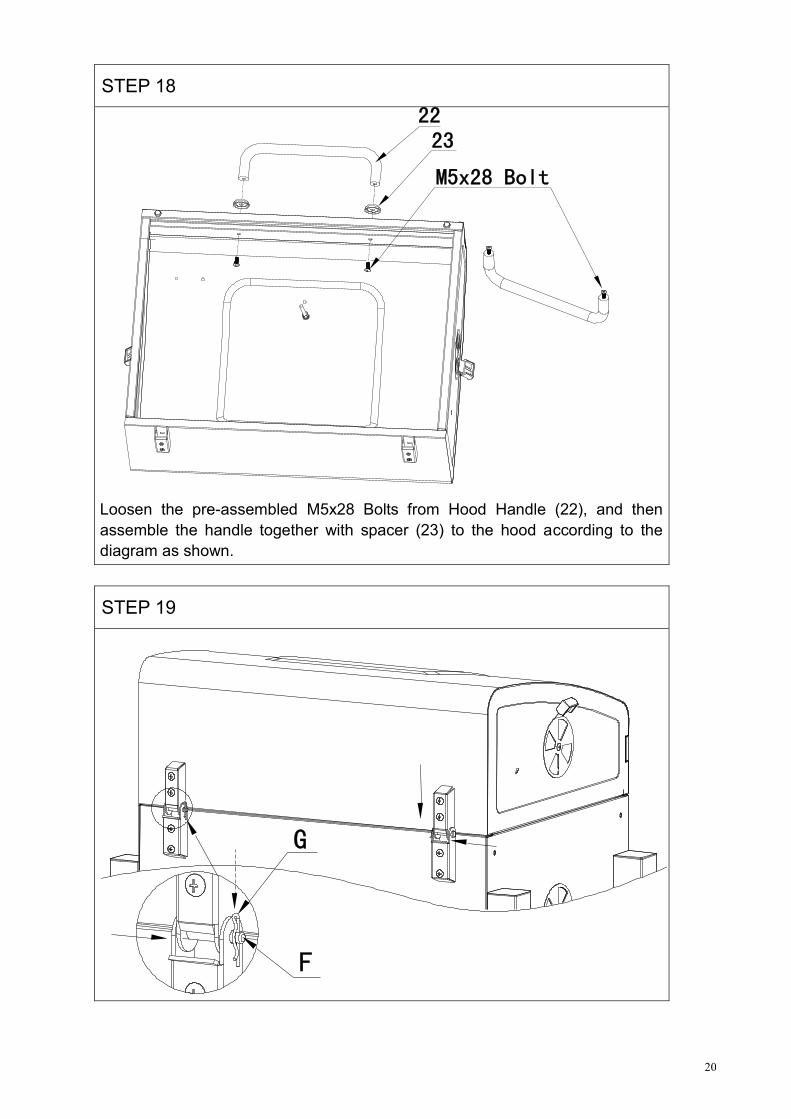
STEP 18
STEP 19
2223
M5x28 Bolt
Loosen the pre-assembled M5x28 Bolts from Hood Handle (22), and then
assemble the handle together with spacer (23) to the hood according to the
diagram as shown.
F
G
21
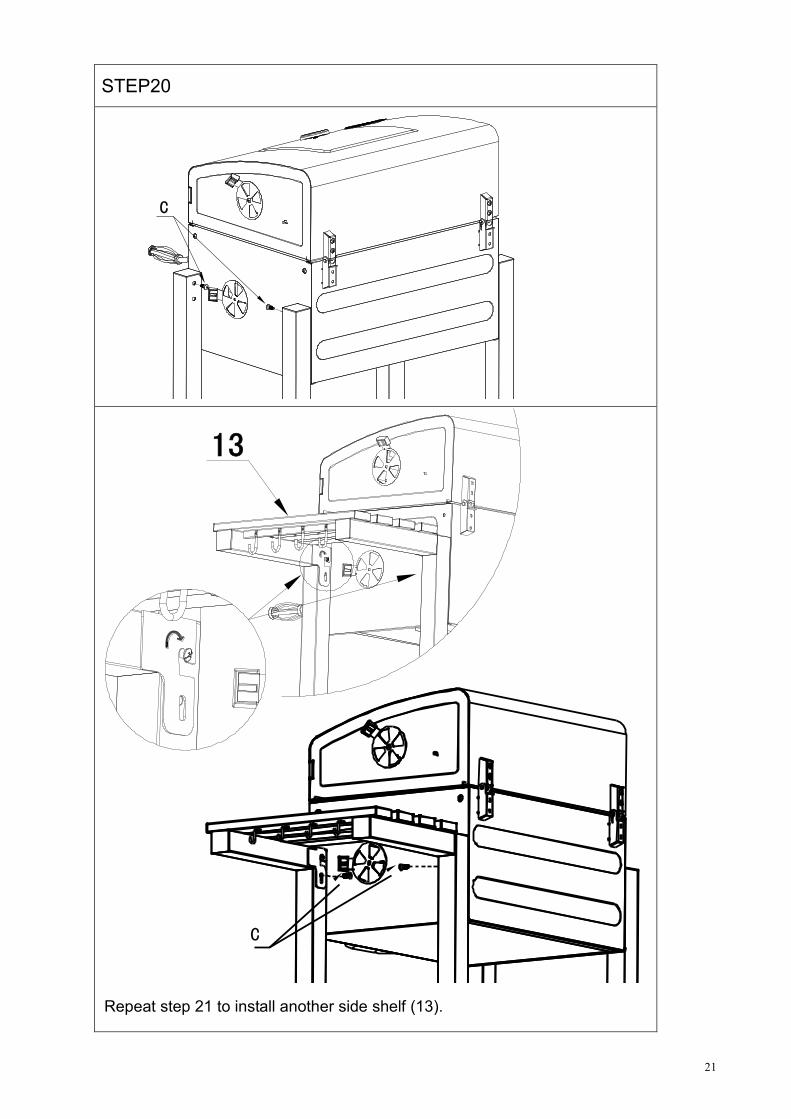
STEP20
Repeat step 21 to install another side shelf (13).
13
C
C

22
STEP21
17
35 M5x12 Bolt
Loosen the pre-assembled M5x12 Bolts from Ash Pan Handle (35), and then
assemble the handle to Ash Pan (17) according to the diagram as shown.

23
STEP22
Finish
5

24
USING AND CARING FOR YOUR KINGSFORD®
CHARCOAL GRILL
ASH CLEANOUT
It is imperative that you clean out the ashes from your GRILL after both grill and ashes have
completely cooled – and before moisture can combine with the ash. Ash and moisture can create
lye, which is very acidic, and can cause rusting. FYI -- lye soap was made from the lye leached out
of ashes by pouring water through them.
USE OF COOKING GRATE
First Time Use
Before using a cast iron grate, wash it thoroughly with a mild dishwashing liquid to remove the
protective wax coating applied for shipping. Rinse with hot water and dry completely with a soft cloth
or paper towel. NEVER ALLOW TO DRAIN DRY OR WASH IN A DISHWASHER. Now season the
grates to prevent rust and sticking.
Seasoning
A solid vegetable shortening is recommended for the initial seasoning. Spread a thin coating of solid
vegetable shortening over the entire surface, including all corners, with a paper towel. Do not use
salted fats such as butter or margarine. Preheat grill for 15 minutes; carefully place grates in the grill.
Allow the grill to heat grates for 1 to 1 ½ hours. Allow the fire to burn out on its own, and leave cooking
grates in grill until they are cool. Your cast iron cooking grates are now ready to use.
To Prevent Rusting:
Re-season your grates frequently, particularly when new. If rust occurs, it is an indication that the
grates have not been seasoned enough or the seasoning has been burned off. Clean with a heavy
brush, re-apply vegetable shortening and heat as indicated above to re-season the grates.
Maintenance
It is much easier to keep the cast iron cooking grates clean if they are brushed just after cooking,
while the coals are still hot – instead of allowing excess residue to harden after it cools. After brushing,
allow the grates (as well as the grill itself) to cool. For more thorough cleaning, use a wet, soapy,
fine steel wool pad with only slight pressure. Rinse thoroughly and dry.
GRILL TOUCH-UP
After time, surface rust can be removed with a wire brush and touched up with high temperature black
paint. Never apply paint to the interior surface. Rust spots on the interior surface can be buffed,
cleaned, and then lightly coated with vegetable oil or vegetable oil spray to minimize rusting.

25
LIGHTING AND CONTROLLING THE FIRE
LIGHTING THE FIRE
Always light the fire with the grill lid open. Before lighting the fire, open the hood of your
KINGSFORD® CHARCOAL GRILL, as well as all of the butterfly dampers and remove the cooking
grates.
Do not build too large of a fire. We recommend starting a fire with no more than 2 pounds of
charcoal (approximately 30 briquettes) and adding more as needed during cooking. After allowing the
fire to burn down, place the cooking grate on the unit. Lower the adjustable charcoal pan to its lowest
setting.
If using charcoal lighter fluid to start the fire, saturate the charcoal briquettes with lighter fluid and let it
soak in for approximately 5 minutes. After allowing the lighter fluid to properly soak in, light the pile of
briquettes in several locations to ensure an even burn. Chimney starters, electric starters, or other
types of fire starters may be used instead of lighter fluid to light the fire – but only according to those
manufacturers’ instructions. Never use instant light charcoal or charcoal lighter fluid with any of
these other starting methods.
Allow the charcoal enough time to completely ash over before beginning to cook, so that the lighter
fluid has enough time to burn off. Starting to cook too soon can leave your food tasting like lighter
fluid. After ashover is complete, use long-handled tongs to spread the charcoal into a single layer on
the pan.
Failure to read and follow instructions for lighting charcoal may result in serious personal injury and/or
property damage.
CONTROLLING THE FIRE
Allow enough time for properly building the fire and getting the grill up to desired temperature before
attempting to cook. You simply cannot cook properly in a cold grill, nor can you nurse a fire to life
while busy with the food. Both deserve your best! Once a fire is burning happily, it is easy to keep
it going with just a little attention. You will be pleased at how long your KINGSFORD® CHARCOAL
GRILL will burn on a little charcoal.
Rising heat will move up and out of the grill, pulling in cooler air behind it, which provides oxygen for
the fire. Your KINGSFORD® CHARCOAL GRILL has four butterfly dampers that control airflow,
which lets you fine tune the temperature. NOTE: Dampers will become very hot after lighting the
charcoal - be sure to wear insulated grill mitt during adjustment.
After the fire is established and the grill reaches the desired cooking temperature, the butterfly
dampers can be left completely open, providing maximum airflow for a higher temperature or closed
as needed to decrease airflow for a lower temperature. Use the temperature gauge to monitor the grill
temperature.
Fully opening the upper damper on one side and fully opening the opposite lower damper (closing the
remaining dampers) will create a convection effect inside the grill when the hood is closed. This will
allow for extended cooking times when barbecuing.
The adjustable charcoal grate can also be used to control the temperature. Raise it to its highest
setting for quick searing and lower it to its lowest setting for slow cooking.

26
ADDING ADDITIONAL CHARCOAL
To achieve the extended cooking times needed for barbecuing or slow smoking (or if you’re using
your KINGSFORD® CHARCOAL GRILL to make enough hot dogs and hamburgers to feed an army),
additional charcoal can be added through the charcoal pan access door. Lower the adjustable
charcoal pan to its lowest setting. Open the charcoal pan access door using an insulated grill mitt –
as the handle can be hot. Using long-handled tongs, stoke the coals enough to allow excess ash to
fall through the charcoal pan into the slide out ash pan below. Again using insulated mitts and
long-handled tongs, add charcoal to the pan as needed and close the access door. Raise the
adjustable charcoal pan to the desired level.
Do not use lighter fluid or instant light charcoal when adding additional charcoal to an existing fire.
This can be dangerous, and will leave a lighter fluid aftertaste on your food.
Do not attempt to empty the ash pan of burning charcoal pieces or hot ash. Wait until the ashes and
grill have completely cooled before emptying the grill.
See the “Cooking Methods” section for more information on barbecuing and slow smoking.
COOKING METHODS
You can use your GRILL to cook three different ways – depending on the type of food, and how you
want to prepare it.
GRILLING
Grilling is cooking directly over the fire, using direct heat. This method is the quickest and works well
for foods that are tender before you cook them – including steaks, beef or pork tenderloin, burgers,
hot dogs, sausages, chicken, seafood, etc. Vegetables are also wonderful when grilled.
Grilling uses very high temperatures that are over 325F. When cooking at these temperatures, it is
important to carefully watch your food to keep it from burning. Also, close the lid to put out any
grease flare-up that may occur when flipping burgers or steaks.
BARBECUING
Barbecuing is cooking using indirect heat and smoke. This method takes a little longer, but can be
used for nearly any kind of food you want to cook (including those above). As barbecuing uses
lower temperatures and longer cooking times – this method works best for cuts of meat that need
time to tenderize – such as ribs, brisket, pork shoulder, wild game, etc.
Barbecuing uses temperatures from 225F to 325F. Try to maintain 275F for optimal results. Use
your imagination when barbecuing, as the possibilities are endless!
SLOW SMOKING
Slow smoking uses much lower temperatures and much longer cooking times. Slow smoking is
actually a way to cure meats rather than cook them. Slow smoking is ideal for turkeys, chickens,
beef briskets, cheese and sausage.
Slow smoking uses temperatures that range from 140F to 225F. Most slow smoking recipes call
for the use of saline brine that helps preserve the meat and avoid bacterial contamination during the
cooking process.

27
USING CHARCOAL AND WOOD
CHARCOAL
Your KINGSFORD® CHARCOAL GRILL is made to burn either charcoal briquettes or natural wood
lump charcoal – both of which have different cooking attributes. Briquettes typically provide longer
burn times than lump charcoal – but lump charcoal burns hotter than briquettes. Using the charcoal
pan access door to add more charcoal makes both briquettes and lump easy and convenient for
extended cooking times.
SMOKING WOODS
Adding smoking woods to your KINGSFORD® CHARCOAL GRILL is an easy and effective way to
create wonderful flavor combinations for all types of grilled, barbecued, or slow smoked foods. Wood
chips are typically used for shorter cooking times, where chunks are better for longer cooking times.
When choosing smoking woods, the rule of thumb is to use a fruited hardwood – from a tree that
bears a nut, fruit, or berry. The most popular and widely available smoking woods are hickory and
mesquite. Hickory imparts a milder flavor, where mesquite is more intense. Other common wood
varieties are oak, apple, pecan, cherry, etc.
It is important to never use pine, cedar, or kiln dried wood – and any smoking woods should be well
cured. Green wood still contains all the sap and moisture needed to keep the tree alive, and will
impart a super strong-tasting smoke that will turn your foods black. Also, when you try burning green
wood, it is hard to reach a good temperature, because all the moisture inside the wood almost puts
the fire out while it’s burning. Well-cured wood lights easily, maintains cooking temperature, and
produces a great tasting smoke flavor that isn’t too strong.
The amount of smoke flavor imparted to your food can be controlled by not just the type of wood you
use (whether a mild wood or more intense), but also by the length of time the meat is smoked.
Barbecuing typically adds more smoke flavor to food than grilling, due to the longer cooking times.
You can also control the amount of smoke flavor by wrapping meats in aluminum foil for part of the
cooking process. Cook meat for ½ to 2/3 of the total cooking time, or until it looks to be the perfect
color. Then wrap the meat in foil and finish cooking the meat until done.

28
2 YEAR LIMITED WARRANTY
This warranty is non-transferable and does not cover failures due to misuse of improper
installation or maintenance.
This warranty is for replacement of defective parts only. We are not responsible for
incidental or consequential damages or labor costs.
This warranty does not cover corrosion or discoloration after the grill is used, or lack of
maintenance, hostile environment, accidents, alterations, abuse or neglect.
This warranty does not cover damage caused by heat, abrasive and chemical cleaners,
or any damage to other components used in the installation or operation of the charcoal
grill. And paint is not warranted and may require touch-up.
Some states do not allow the limitation or exclusion of incidental or consequential
damages, so the above limitations or exclusions may not apply to you. This warranty
gives you specific legal rights, and you may also have other rights that vary from state to
state.
For service regarding this warranty, call our Customer Service Department at
1-855-CHANT-US (1-855-242-6887). Proof of purchase in the form of an original receipt
with date of purchase is required. DO NOT ship parts or units without a return
authorization number. Upon receipt of an authorization number, the product must be
shipped prepaid.
DO NOT RETURN TO THE PLACE OF PURCHASE
For replacement parts, call our customer service department at 1-855-CHANT-US
(1-855-242-6887) from 8:00am to 5:00pm Eastern time, Monday through Friday for
assistance.