3035 4035 5035standardbusinessmachines.com/files/3035-4035-5035enogr6.pdf · please read the...
TRANSCRIPT

Please read the Operation Guide before using the copierKeep it close to the copier for easy reference
303540355035
* The above illustration includes the optional original cover.

<IMPORTANT>The instructions contained herein are based on the 30 cpm (copies-per-minute) 3035 copier, the 40 cpm 4035 copierand the 50 cpm 5035 copier.
NOTE:This Operation Guide contains information that corresponds to using both the inch and metric versions of this copier.Within the text we have generally indicated messages by listing that for the inch version followed, in brackets, by thecorresponding information for the metric version. However, when a message is essentially the same, or when thedifference is only one of upper- and lower-case spelling, we have listed the information specifically as it is displayed inthe inch version of this machine.
All rights reserved. No part of this material may be reproduced or transmitted in any form or by any means, electronicor mechanical, including photocopying, recording or by any information storage and retrieval system, withoutpermission in writing from the Publisher.
Legal Restriction On Copying• It may be prohibited to copy copyrighted material without permission of the copyright owner.• It is prohibited under any circumstances to copy domestic or foreign currencies.• Copying other items may be prohibited.

i
Introduction to this Operation Guide
The explanations contained in this Operation Guide have beenseparated into different sections in order to allow even those using acopier for the first time to use this machine efficiently, properly andwith relative ease.A basic introduction to each section can be found below for reference.Refer to the related section when using this copier.
Section 1 IMPORTANT! PLEASE READ FIRST.This section contains explanations on information that is necessaryfor you to know prior to using this copier for the first time afterpurchase.For example, it contains notes and cautions on installation andoperation that should be strictly obeyed in order to ensure its safe andproper operation.
Section 2 NAMES OF PARTSThis section contains explanations on the names and functions of theparts of the copier and its operation panel.
Section 3 PREPARATIONSThis section contains explanations on procedures for loading copypaper.
Section 4 BASIC OPERATIONThis section contains explanations on the basic procedures requiredto make simple copies.
Section 5 OTHER CONVENIENT FUNCTIONSThis section contains explanations on using the various convenientfunctions of this copier.
Section 6 DOCUMENT AND OUTPUT MANAGEMENTFUNCTIONSThis section contains explanations on the procedures for registeringfrequently used business forms and documents on the optional HardDisk, printing them out when desired, and managing printingconditions.
Section 7 COPIER MANAGEMENTThis section contains explanations on the procedures for changing thevarious default settings available for adjusting the copier to fit yourcopy needs and on the procedures for managing copy us.
Section 8 OPTIONAL EQUIPMENTThis section contains explanations on the optional equipment that areavailable for use with this copier.
Section 9 TROUBLESHOOTINGThis section contains explanations on handling problems that mayoccur during operation of this copier, such as when an error indicationappears or if a paper jam occurs.
Section 10 MAINTENANCE AND OPERATION INFORMATIONThis section contains explanations on maintaining the copier in propercondition and on replacing the toner container, as well as informationon the specifications for this copier.

ii
CONTENTS
Section 1IMPORTANT! PLEASE READ FIRST. .. 1-1
CAUTION LABELS ................................................................... 1-1
INSTALLATION PRECAUTIONS ............................................. 1-2
PRECAUTIONS FOR USE ...................................................... 1-3
Section 2NAMES OF PARTS ............................... 2-1
1. Main body ................................................................................ 2-1
2. Operation panel ....................................................................... 2-3
3. Touch panel ............................................................................. 2-5
Section 3PREPARATIONS ................................... 3-1
1. Loading paper ......................................................................... 3-1
(1) Note when adding paper .................................................. 3-1
(2) Loading paper into the drawer[cassette] .......................... 3-2
(3) Loading paper into the multi-bypass tray ......................... 3-3
Section 4BASIC OPERATION .............................. 4-1
1. Basic copying procedure ......................................................... 4-1
2. Enlarging/reducing the copy image ......................................... 4-5
(1) Auto magnification selection mode .................................. 4-5
(2) Zoom mode ..................................................................... 4-6
(3) Preset zoom mode ........................................................... 4-7
(4) XY zoom mode ................................................................ 4-8
3. Interrupt copying ...................................................................... 4-9
4. Job reservation ...................................................................... 4-10
5. Energy-saving modes ............................................................ 4-11
Section 5OTHER CONVENIENT FUNCTIONS .... 5-1
1. Making 2-sided copies from various types of originals [2-sided
copy modes] ............................................................................ 5-1
(1) Making 2-sided copies from a 2-sided original ................ 5-1
(2) Making 2-sided copies from an
open-faced (books, etc.) original ..................................... 5-1
(3) Making 2-sided copies from one-sided originals .............. 5-2
2. Copying two-page originals onto separate sheets
[Page separation/Split copy modes] ........................................ 5-4
(1) Page separation/Split copy from book originals ............... 5-4
(2) Page separation/Split copy from 2-sided originals ........... 5-4
3. Making a margin space on the copies [Margin mode] ............. 5-6
(1) Standard margin .............................................................. 5-6
(2) Separate front and back margin settings ......................... 5-6
4. Centering the copy image [Centering/Image shift mode] ........ 5-8
5. Adding a space next to the copy images for making notes
[Memo mode] .......................................................................... 5-9
6. Making copies with clean edges [Border erase modes] ........ 5-11
(1) Erasing blemishes from edges of copies
(Sheet erase mode) ....................................................... 5-11
(2) Erasing blemishes from the edges and middle of copies
made from books (Book erase mode) ........................... 5-11
(3) Erasing blemishes from the edges of copies using individual
border settings (Individual border erase mode) ............. 5-12
7. Fitting the image of either two or four originals onto a single copy
page [Combine/Merge Copy modes] ..................................... 5-13
(1) 2 in 1 .............................................................................. 5-13
(2) 4 in 1 .............................................................................. 5-13
8. Printing page numbers on copies
[Print page numbers mode] ................................................... 5-16
9. Overlaying one image over another [Form overlay mode] ..... 5-20
10. Making booklets from sheet originals
[Booklet/Stitching mode] ........................................................ 5-22
11. Making booklets from book originals
[Book to Booklet mode] ......................................................... 5-26
12. Automatic sorting of copy sets without the Document Finisher
[Sort/Finished mode] ............................................................. 5-29
13. Auto rotation function ............................................................. 5-30
14. Adding a front and/or back cover to your copy sets
[Cover mode] ......................................................................... 5-31
15. Original size selection mode ................................................. 5-34
16. Feeding paper as a backing sheet for OHP transparencies
[Transparency + backing sheet mode] ................................... 5-36
17. Inverting black and white [Invert mode] ................................. 5-38
18. Making mirror image copies [Mirror image mode] ................. 5-39
19. Making a test copy prior to large volume copying
[Proof mode] .......................................................................... 5-40
20. Making more of the same copies after a copy job is finished
[Repeat copy mode] .............................................................. 5-42
(1) Registering a copy job for repeat copying ...................... 5-42
(2) Printing out with the repeat copy mode ......................... 5-43
21. Copying a large volume of originals in one operation
[Batch scanning mode] .......................................................... 5-47
22. Saving on toner use [Eco print mode] ................................... 5-48
23. Original set direction .............................................................. 5-49
24. Memorizing frequently used settings [Program function] ...... 5-50
(1) Registering a program ................................................... 5-50
(2) Using programmed settings to make copies .................. 5-51
(3) Changing a registered program name ........................... 5-51
(4) Deleting a registered program ....................................... 5-52
25. Registration keys ................................................................... 5-53
(1) Registering a function or mode under a function key .... 5-53
(2) Deleting a registration key ............................................. 5-55
26. Easily add covers and insert sheets between various sets of
originals in one operation [Job build mode] ........................... 5-57
(1) Using the job build mode ............................................... 5-57
(2) Selecting the settings and functions ................................ 5-62

iii
CONTENTS
Section 6DOCUMENT AND OUTPUTMANAGEMENT FUNCTIONS ............... 6-1
1. Document management functions .......................................... 6-1
(1) What are the “document management” functions? .......... 6-1
(2) Form registration .............................................................. 6-1
(3) Shared data box .............................................................. 6-4
(4) Synergy print boxes ......................................................... 6-9
2. Output management functions .............................................. 6-20
(1) What are the “output management” functions? .............. 6-20
(2) Display of the output management functions ................. 6-21
(3) The “Print status” screen ................................................ 6-22
Section 7COPIER MANAGEMENT FUNCTIONS 7-1
1. Copy management mode ........................................................ 7-1
(1) Copy management procedures ....................................... 7-2
(2) Accessing the copy management menu screen .............. 7-3
(3) Editing copy management information ............................ 7-4
(4) Checking the copy management counts ........................ 7-21
(5) Turning the copy management function ON/OFF .......... 7-25
(6) Changing the copy management default settings .......... 7-25
(7) Making copies when copy management is turned ON .. 7-37
2. Default settings ...................................................................... 7-38
(1) Machine default settings ................................................ 7-38
(2) Accessing the machine default settings ......................... 7-41
(3) Making machine default settings ................................... 7-42
(4) Copy default settings ..................................................... 7-59
(5) Accessing the copy default settings ............................... 7-62
(6) Making copy default settings ......................................... 7-63
3. Multi-bypass tray paper settings ............................................ 7-87
(1) Paper size and type ....................................................... 7-87
(2) Selecting other standard sizes ....................................... 7-88
4. Original size registration ........................................................ 7-90
5. Drum refresh ......................................................................... 7-91
6. Checking the total counter and printing out the counter
report ..................................................................................... 7-93
7. Box management default settings ......................................... 7-94
(1) Box settings ................................................................... 7-94
(2) Accessing the box management default settings .......... 7-94
(3) Making box management default settings ..................... 7-95
8. Hard disk management ......................................................... 7-99
9. Report print out .................................................................... 7-101
10. Changing the language used for messages ........................ 7-103
11. Entering characters ............................................................. 7-104
(1) Character input screens ............................................... 7-104
(2) Character input procedure ........................................... 7-106
Section 8OPTIONAL EQUIPMENT ...................... 8-1
(1) Document Processor ....................................................... 8-1
(2) Paper Feeder ................................................................... 8-5
(3) Paper Feeder ................................................................... 8-5
(4) Document Finisher ........................................................... 8-5
(5) Document Finisher ........................................................... 8-9
(6) Document Finisher ........................................................... 8-9
(7) Built-in Finisher ................................................................ 8-9
(8) Job Separator ................................................................ 8-11
(9) Hard Disk ....................................................................... 8-11
(10) Key Counter ................................................................... 8-12
(11) Document Tray ............................................................... 8-12
(12) Printer Kit ....................................................................... 8-12
(13) Printer/Scanner Kit ........................................................ 8-12
(14) Fax Kit ............................................................................ 8-12
Section 9TROUBLESHOOTING........................... 9-1
1. If one of the following messages is displayed .......................... 9-1
2. If one of these indicators lights or flashes ............................... 9-3
3. When paper misfeeds .............................................................. 9-4
(1) Cautions ........................................................................... 9-4
(2) Removal procedures ........................................................ 9-4
4. If other trouble occurs ............................................................ 9-13
Section 10MAINTENANCE AND OPERATIONINFORMATION .................................... 10-1
1. Cleaning the copier ............................................................... 10-1
2. Replacing the toner container and waste toner box .............. 10-3
3. Specifications ........................................................................ 10-7
4. Environmental Specifications ................................................ 10-9
5. Installing the optional equipment ......................................... 10-10
Appendix: Functions and settings combination chart .................. 10-12

iv
● MAKING FULL USE OF THE COPIER'S ADVANCED FUNCTIONS
1 Having the copier automatically selectcopy paper of the same size as theoriginal<Auto paper selection mode>(Page 4-2)
2 Making clear reproductions ofphotographs<Image quality selection>
(Page 4-3)
3 Various functions for making enlargedand reduced copies
■ Enlarging/reducing the copy image to fit thesize of paper in a specified drawer[cassette]<Auto magnification selection mode>(Page 4-5)
■ Enlarging/reducing the copy image to adesired size between 25% and 400%<Zoom mode> (Page 4-6)
■ One-touch selection of the copymagnification ratio<Preset zoom mode>(Page 4-7)
■ Enlarging/reducing the length and width ofthe image to separate magnification ratios<XY zoom mode>(Page 4-8)
4 Making 2-sided copies from various typesof originals<2-sided copy modes>(Page 5-1)
5 Copying each image of open-faced(books, etc.) or 2-sided originals ontoseparate sheets<Page separation/Split copy modes>(Page 5-4)
6 Creating a margin on the copies<Margin mode>(Page 5-6)
8 Adding a space next to the copy imagesfor making notes<Memo mode>(Page 5-9)
7 Centering the copy image<Centering/Image shift mode>(Page 5-8)
9 Making copies with clean edges<Border erase modes>(Page 5-11)
abcdefghijkabcdefghijk
abcdefghijkabcdefghijk
abcdefghijkabcdefghijk
abcdefghijkabcdefghijk
abcdefghijk
abcdefghi
jkmn
64% (70%)5 1/2"✕8 1/2" (A5)
8 1/2"✕11" (A4)
11"✕17" (A3)
129% (141%)
25%
400%
50%
70% 141%400%
M M Y %
X %
54
32
1 1234
5 1 21212 1 2
10 Fitting the image of either two or fouroriginals onto a single copy page<Combine/Merge Copy modes>(Page 5-13)
11 Printing page numbers on the copies<Print page numbers mode>(Page 5-16)
12 Overlaying one image over another<Form overlay mode>(Page 5-20)
DC
BA
DC
BA
-4-
-3-
-2-
-1-
ABC
BC
A
iv

v
13 Making booklets from sheet originals<Booklet/Stitching mode>(Page 5-22)
14 Making booklets from books<Book to Booklet mode>(Page 5-26)
15 Automatic sorting of copy sets without theDocument Finisher<Sort/Finished mode>(Page 5-29)
16 Automatic rotation of the copy image<Auto rotation function>(Page 5-30)
17 Adding a front and/or back cover to yourcopy sets<Cover mode>(Page 5-31)
18 Feeding paper as a backing sheet forOHP transparencies<Transparency + backing sheet mode>(Page 5-36)
19 Inverting black and white<Invert mode>(Page 5-38)
20 Making mirror image copies<Mirror image mode>(Page 5-39)
21 Making a test copy prior to large volumecopying<Proof mode>(Page 5-40)
22 Making more of the same copies after acopy job is finished<Repeat copy mode>(Page 5-42)
23 Copying a large volume of originals inone operation<Batch scanning mode>(Page 5-47)
bb
a
a BA BA
32
1
32
1
321
32
1
11
1
33
3
222
32
1
6
1
534
6
12
54
32
1 BA
A B C CBA
1
23 4 5
67
8
v
24 Saving on toner use<Eco print mode>(Page 5-48)
25 Memorizing frequently used settings<Program function>(Page 5-50)
26 Easily add covers and insert sheetsbetween various sets of originals in oneoperation<Job build mode>(Page 5-57)
27 Registering images to be used for formoverlay<Form registration>(Page 6-1)

vi
28 Managing shared forms<Shared data box>(Page 6-4)
29 Printing out different stored originals inone operation
<Synergy print boxes>(Page 6-9)
English Español
vi
30 Using department ID-codes to managethe number of copies made by eachdepartment<Copy management mode>(Page 7-1)
31 Changing the language used in the touchpanel<Language selection function>(Page 7-103)
32 A full range of optional equipment isavailable
■ Document Processor (Page 8-1)
■ Paper Feeder (Page 8-5)
■ Hard Disk (Page 8-11) ■ Key Counter (Page 8-12)
■ Document Finisher (Page 8-5) ■ Document Finisher (Page 8-9)■ Paper Feeder (Page 8-5)
■ Document Finisher (Page 8-9) ■ Built-in Finisher (Page 8-9) ■ Job Separator (Page 8-11)
■ Document Tray (Page 8-12)

vii
■ Printer Kit (Page 8-12) ■ Printer/scanner Kit (Page 8-12) ■ Fax Kit (Page 8-12)


ix
Please read this Operation Guide before using the copier. Keep it close to the copier
for easy reference.
The sections of this guide and parts of the copier marked with symbols are safety warnings meantto protect the user, other individuals and surrounding objects, and ensure correct and safe usageof the copier. The symbols and their meanings are indicated below.
DANGER: Indicates that serious injury or even death will very possibly result frominsufficient attention to or incorrect compliance with the related points.
WARNING: Indicates that serious injury or even death may result from insufficient attentionto or incorrect compliance with the related points.
CAUTION: Indicates that personal injury or mechanical damage may result from insufficientattention to or incorrect compliance with the related points.
SymbolsThe m symbol indicates that the related section includes safety warnings. Specific points of attentionare indicated inside the symbol.
................. [General warning]
................. [Warning of danger of electrical shock]
................. [Warning of high temperature]
The symbol indicates that the related section includes information on prohibited actions. Specificsof the prohibited action are indicated inside the symbol.
.................. [Warning of prohibited action]
................... [Disassembly prohibited]
The ● symbol indicates that the related section includes information on actions which must beperformed. Specifics of the required action are indicated inside the symbol.
.................. [Alert of required action]
.................. [Remove the power plug from the outlet]
.................. [Always connect the copier to an outlet with a ground connection]
Please contact your service representative to order a replacement if the safety warnings in thisOperation Guide are illegible or if the guide itself is missing. (fee required)

x

1-1
Caution labels have been attached to the copier at the following locations for safety purposes.BE SUFFICIENTLY CAREFUL to avoid fire or electric shock when removing a paper jam or when replacing toner.
CAUTION LABELS
NOTE: DO NOT remove these labels.
Section 1 IMPORTANT! PLEASE READ FIRST.
Label 3Moving parts inside. May causepersonal injury. Do not touchmoving parts. .................................
Label 2Do not incinerate toner andtoner container. Dangeroussparks may cause burn. ......
Label 4High temperature inside.Do not touch parts in thisarea, because there is adanger of getting burned.
Label 1High temperature inside. Do nottouch parts in this area, becausethere is a danger of getting burned.

1-2
• During copying, some ozone is released, but the amountdoes not cause any ill effect to one's health. If, however,the copier is used over a long period of time in a poorlyventilated room or when making an extremely largenumber of copies, the smell may become unpleasant. Tomaintain the appropriate environment for copy work, it issuggested that the room be properly ventilated.
■ Power supply/Grounding the copier
WARNING• DO NOT use a power supply with a voltage other
than that specified. Avoid multiple connections inthe same outlet. These types of situationspresent a danger of fire or electrical shock. .........
• Plug the power cord securely into the outlet. Ifmetallic objects come in contact with the prongson the plug, it may cause a fire or electric shock.
• Always connect the copier to an outlet with aground connection to avoid the danger of fire orelectrical shock in case of an electric short. If anearth connection is not possible, contact yourservice representative. .........................................
Other precautions• Connect the power plug to the closest outlet possible to
the copier.
• The power supply cord is used as the main disconnectdevice. Ensure that the socket/outlet is located/installednear the equipment and is easily accessible.
■ Handling of plastic bags
WARNING• Keep the plastic bags that are used with the
copier away from children. The plastic may clingto their nose and mouth causing suffocation. .......
INSTALLATION PRECAUTIONS■ Environment
CAUTION• Avoid placing the copier on or in locations which
are unstable or not level. Such locations maycause the copier to fall down or fall over. Thistype of situation presents a danger of personalinjury or damage to the copier. .............................
• Avoid locations with humidity or dust and dirt. Ifdust or dirt become attached to the power plug,clean the plug to avoid the danger of fire orelectrical shock. ....................................................
• Avoid locations near radiators, heaters, or otherheat sources, or locations near flammable items,to avoid the danger of fire. ...................................
• To keep the copier cool and facilitate changing ofparts and maintenance, allow access space asshown below. Leave adequate space, especiallyaround the vents, to allow air to be properlyventilated out of the copier. ..................................
Rear: 11 13/16"/30cm
>=
Right: 11 13/16"/30cmFront: 39 3/8"/
100cm
>=
>=
Left: 11 13/16"/30cm
>=
Other precautions• Adverse environmental conditions may affect the safe
operation and performance of the copier. Install in an air-conditioned room (recommended room temperature:around 73.4°F (23°C), humidity: around 50%) and avoidthe following locations when selecting a site for thecopier.
. Avoid locations near a window or with exposure todirect sunlight.
. Avoid locations with vibrations.
. Avoid locations with drastic temperature fluctuations.
. Avoid locations with direct exposure to hot or cold air.
. Avoid poorly ventilated locations.
• Delicate floor material may be damaged if this product ismoved after installation.

1-3
CAUTION• DO NOT pull the power cord when removing it
from the outlet. If the power cord is pulled, thewires may become broken and there is a dangerof fire or electrical shock. (ALWAYS grasp thepower plug when removing the power cord fromthe outlet.) ............................................................
• ALWAYS remove the power plug from the outletwhen moving the copier. If the power cord isdamaged, there is a danger of fire or electricalshock. ...................................................................
• If the copier will not be used for a short period oftime (overnight, etc.), turn the main power switchOFF (O).If it will not be used for an extended period oftime (vacations, etc.), remove the power plugfrom the outlet for safety purposes during thetime the copier is not in use. ................................
• ALWAYS hold the designated parts only whenlifting or moving the copier. ..................................
• For safety purposes, ALWAYS remove the powerplug from the outlet when performing cleaningoperations. ...........................................................
• If dust accumulates within the copier, there is adanger of fire or other trouble. It is thereforerecommended that you consult with your servicerepresentative in regard to cleaning of internalparts. This is particularly effective if accomplishedprior to seasons of high humidity. Consult withyour service representative in regard to the costof cleaning the internal parts of the copier. ..........
■ Cautions when using the copier
WARNING• DO NOT place metallic objects or containers with
water (flower vases, flower pots, cups, etc.) on ornear the copier. This of situation presents adanger of fire or electrical shock should they fallinside. ...................................................................
• DO NOT remove any of the covers from thecopier as there is a danger of electrical shockfrom high voltage parts inside the copier. ............
• DO NOT damage, break or attempt to repair thepower cord. DO NOT place heavy objects on thecord, pull it, bend it unnecessarily or cause anyother type of damage.These types of situations present a danger of fireor electrical shock. ...............................................
• NEVER attempt to repair or disassemble thecopier or its parts as there is a danger of fire,electrical shock or damage to the laser. If thelaser beam escapes, there is a danger of itcausing blindness. ................................................
• If the copier becomes excessively hot, smokeappears from the copier, there is an odd smell, orany other abnormal situation occurs, there is adanger of fire or electrical shock. Turn the mainpower switch OFF (O) immediately, BEABSOLUTELY CERTAIN to remove the powerplug from the outlet and then contact your servicerepresentative. .....................................................
• If anything harmful (paper clips, water, otherfluids, etc.) falls into the copier, turn the mainpower switch OFF (O) immediately. Next, BEABSOLUTELY CERTAIN to remove the powerplug from the outlet to avoid the danger of fire orelectrical shock. Then contact your servicerepresentative. .....................................................
• DO NOT remove or connect the power plug withwet hands, as there is a danger of electricalshock. ...................................................................
• ALWAYS contact your service representative formaintenance or repair of internal parts. ...............
PRECAUTIONS FOR USE

1-4
■ Cautions when handlingconsumables
CAUTION• DO NOT attempt to incinerate the toner container
or the waste toner box. Dangerous sparks maycause burns. .........................................................
• Keep the toner container and the waste toner boxout of the reach of children...................................
• If toner happens to spill from the toner containeror the waste toner box, avoid inhalation andingestion, as well as contact with your eyes andskin. ......................................................................
. If you do happen to inhale toner, move to a place withfresh air and gargle thoroughly with a large amount ofwater. If coughing develops, contact a physician.
. If you do happen to ingest toner, rinse your mouth outwith water and drink 1 or 2 cups of water to dilute thecontents of your stomach. If necessary, contact aphysician.
. If you do happen to get toner in your eyes, flush themthoroughly with water. If there is any remainingtenderness, contact a physician.
. If toner does happen to get on your skin, wash withsoap and water.
• DO NOT attempt to force open or destroy thetoner container or the waste toner box. ................
Other precautions• After use, ALWAYS dispose of the toner container and
the waste toner box in accordance with Federal, Stateand Local rules and regulations.
• Store all consumables in a cool, dark location.
• If you will not be using the copier for a prolonged periodof time, remove all paper from the drawer(s)[cassette(s)]and the multi-bypass tray and seal in its originalpackaging.
PRECAUTIONS FOR USE
Other precautions• DO NOT place heavy objects on the copier or cause
other damage to the copier.
• DO NOT open the front cover, turn off the main powerswitch, or pull out the power plug during copying.
• When lifting or moving the copier, contact your servicerepresentative.
• Do not touch electrical parts, such as connectors orprinted circuit boards. They could be damaged by staticelectricity.
• DO NOT attempt to perform any operations notexplained in this handbook.
• CAUTION : Use of controls or adjustments orperformance of procedures other than those specifiedherein may result in hazardous radiation exposure.
• Do not look directly at the light from the scanning lampas it may cause your eyes to feel tired or painful.


1-6
CAUTION!
The power plug is the main isolation device! Other switches on the equipment are onlyfunctional switches and are not suitable for isolating the equipment from the power source.
ATTENTION!
Le débranchement de la fiche secteur est le seul moyen de mettre l’appareil hors tension.Les interrupteurs sur l’appareil ne sont que des interrupteurs de fonctionnement : ils nemettent pas l’appareil hors tension.

1-7
NEW 3035/4035/5035 COPIER LIMITED WARRANTY
Kyocera Mita America, Inc. and Kyocera Mita Canada, Ltd. (both referred to as “Kyocera”) warrant the Customer’s new copier, and the new accessories installed with the initial installation of the copier, against any defects in material and workmanship for a period of one year, or 400,000 copies/prints from date of installation by an Authorized Kyocera Dealer for the 3035, or 500,000 copies/prints from date of installation by an Authorized Kyocera Dealer for the 4035 and the 5035, whichever first occurs. In the event the copier or an accessory is found to be defective within the warranty period, Kyocera’s only obligation and the Customer’s exclusive remedy shall be replacement of any defective parts. It is understood that Kyocera shall have no obligation to furnish labor.
This warranty is valid only as to the original retail purchaser (referred to as the “Customer”) of a new Kyocera copier in the United States of America, or Canada based upon the country of purchase.
In order to obtain performance of this warranty, the Customer must immediately notify the Authorized Kyocera Dealer from whom the product was purchased. If the Kyocera Dealer is not able to provide service, write to Kyocera at the address below for the name and address of the Authorized Kyocera Dealer in your area.
This warranty does not cover copiers or accessories: (a) which have become damaged due to operator negligence, misuse, accidents, improper storage or unusual physical or electrical stress, (b) which have used parts or supplies which are not genuine Kyocera brand parts or supplies, (c) which have been serviced by a technician not employed by Kyocera or an Authorized Kyocera Dealer, or (d) which have had the serial number modified, altered, or removed.
This warranty does not cover Maintenance Kits or the components of Maintenance Kits, which consist of the drum unit, the fixing unit, and the developing unit. Kyocera shall give the Customer a separate warranty for these items.
This warranty gives the Customer specific legal rights. The Customer may also have other rights, which vary from state to state, or province to province. Neither the seller, nor any other person is authorized to extend the time period, or expand this warranty on behalf of Kyocera.
THIS WARRANTY IS MADE IN LIEU OF ALL OTHER WARRANTIES AND (CONDITIONS), EXPRESS OR IMPLIED, AND KYOCERA SPECIFICALLY DISCLAIMS ANY IMPLIED WARRANTY (OR CONDITION) OF MERCHANTABILITY OR FITNESS FOR A PARTICULAR PURPOSE. THIS WARRANTY SHALL NOT EXTEND TO, AND KYOCERA SHALL NOT BE LIABLE FOR, ANY INCIDENTAL OR CONSEQUENTAL DAMAGES WHICH MAY ARISE OUT OF THE USE, OR INABILITY TO USE, THE COPIER.
1.
2.
3.
4.
5.
6.
7.

1-8
WARNING
This equipment has been tested and found to comply with the limits for a Class Bdigital device, pursuant to Part 15 of the FCC Rules. These limits are designed toprovide reasonable protection against harmful interference in a residentialinstallation. This equipment generates, uses and can radiate radio frequencyenergy and, if not installed and used in accordance with the instructions, maycause harmful interference to radio communications. However, there is noguarantee that interference will not occur in a particular installation. If thisequipment does cause harmful interference to radio or television reception, whichcan be determined by turning the equipment off and on, the user is encouraged totry to correct the interference by one or more of the following measures:
– Reorient or relocate the receiving antenna.
– Increase the separation between the equipment and receiver.
– Connect the equipment into an outlet on a circuit different from that to which thereceiver is connected.
– Consult the dealer or an experienced radio/TV technician for help.
CAUTION – The changes or modifications not expressly approved by the partyresponsible for compliance could void the user’s authority to operate theequipment.
* The above warning is valid only in the United States of America.
THE LAMP(S) INSIDE THIS PRODUCT CONTAIN MERCURY AND MUST BERECYCLED OR DISPOSED OF ACCORDING TO LOCAL, STATE OR FEDERALLAWS.
MERCURY WARNING

2-1
Section 2 NAMES OF PARTS
1. Main body
5
1
2
7
8
9
3
4
6
1 Original cover (Option)(Open/close to set the original on the platen.)
2 Operation panel(Contains the keys and indicators for operating the copier.)
3 Left cover 1 handle(Pull up to open the left cover 1.)
4 Left cover 1(Open when a paper misfeed occurs.)
5 Platen(Set originals here for copying. Place originals face-down with the edges aligned with the size scales on the left and rear sides of the platen.)
6 Original size scales(Be sure to align the original with these when setting the original on the platen.)
7 Drawer[Cassette] 1(Holds up to 500 sheets of standard paper [standard paper specified by our company].)
8 Drawer[Cassette] 2(Holds up to 500 sheets of standard paper [standard paper specified by our company].)
9 Left cover 2(Open when a paper misfeed occurs inside the left cover 2.)

Section 2 NAMES OF PARTS
2-2
87 CB
A
0
I
G HLJK
F
09 ED
0 Multi-bypass tray(Load paper here when copying onto small-size or special paper.)
! Insert guides(Be sure to set the paper width when loading paper on the multi-bypass tray.)
@ Toner container
# Toner container release lever(Operate to replace the toner container.)
$ Waste toner box
% Cleaning shaft(Pull and push back in after toner container replacement or when copy images become soiled with toner.)
^ Front cover(Open to replace the toner container or waste toner box.)
& Main power switch(Turn ON ( | ) before starting to make copies.)
* Main power switch cover (only on metric specification copiers)(Open this cover in order to access the main power switch.)
( Copy store section(Copied paper is stored here.)
) Length adjustment plate(Adjust to the length of the paper to be set in the drawer[cassette].)
⁄ Width adjustment lever(Hold the lever and adjust the width guide to the width of the paper to be set in the drawer[cassette].)
¤ Handles for transport(Become handles when pulled out.)

Section 2 NAMES OF PARTS
2-3
2. Operation panel
7 6 5 4%^&*(0@!
9 1
)
⁄
8 32# $
1 [Start] key & indicator lamp(Press this key when the lamp in that key is lit green and you wantto start copying.)
2 [Stop/Clear] key(Press this key when you want to stop copying or change thenumber of copies to be made.)
3 [Reset] key(Press this key to reset all functions to their initial mode settings.See “Initial mode” on page 2-4.)
4 [Energy Saver] key & indicator lamp(Press this key when you want to turn the energy-saving mode ON.Press the same key again to turn the energy-saving mode OFF. Inmetric specification copiers, this key corresponds to the Low powermode. See page 4-11.)
5 [Interrupt] key & indicator lamp(Press this key to light the lamp in that key when you want toperform interrupt copying. See page 4-9.)
6 [Management] key(When copy management is turned ON, press this key aftercopying in order to return to the department ID-code entry display.See page 7-1.)
7 [Default Setting/Counter] key(Press this key when you want to perform default settings as wellas those related to copy management, etc.)
8 Keypad(Use these keys when you want to set the number of copies to bemade or enter other values.)
9 Touch panel(This panel displays such information as operation procedures,machine status, and the various function keys.)
0 Brightness adjustment control dial(Turn this dial when you want to adjust the brightness of the touchpanel.)
! [Copier] key, lamp & indicator(Press this key to light the indicator to the right of the key when youwant to use the copier functions of this machine.)
@ [Printer] key, lamp & indicator(Press this key when you want to use the optional printer functionsof this machine. The indicator to the right of the key will light whenthe machine is in the printer operation mode. The lamp to the leftof the key will either light green or orange, or will flash one of thosecolors, depending upon the status of the machine. See page 9-3.)
# [Scanner] key, lamp & indicator(Press this key when you want to use the optional scannerfunctions of this machine. The indicator to the right of the key willlight when the machine is in the scanner operation mode. Thelamp to the left of the key will either light green or orange, or willflash one of those colors, depending upon the status of themachine. See page 9-3.)
$ [Fax] key, lamp & indicator(Press this key when you want to use the optional fax functions ofthis machine. The indicator to the right of the key will light whenthe machine is in the fax operation mode. The lamp to the left ofthe key will either light or flash green, depending upon the statusof the machine. )
% [Auto Selection] key & indicator lamp(Press this key to light the lamp in that key when you want to usethe auto selection mode. The optional Document Processor mustbe installed in your copier in order to use this mode.See page 8-3.)
^ [Job Build] key & indicator lamp(Press this key to light the lamp in that key when you want to usethe job build mode. See page 5-57.)
& [Repeat Copy] key & indicator lamp(Press this key to light the lamp in that key when you want to usethe repeat copy mode. The optional Hard Disk must be installed onthis copier in order to use this mode. See page 5-42.)
* [Job Queue] key & indicator lamp(Press this key to light the lamp in that key when you want to usethe output management functions of the copier. See page 6-20.)
( [Document Management] key & indicator lamp(Press this key to light the lamp in that key when you want to usethe document management functions of the copier. The optionalHard Disk must be installed on this copier in order to use thisfunction.See page 6-1.)

Section 2 NAMES OF PARTS
2-4
) [Power] key & indicator lamp (only on metric specificationcopiers)(Press this key when you want to turn the Sleep mode ON. Pressthe same key again to turn the Sleep mode OFF. See page 4-12.)
⁄ Main power indicator lamp (only on metric specification copiers)(This lamp will light when the main power switch is turned ON ( | ).)
● Initial mode (at the end of warm-up or when the [Reset] key ispressed)
In the default settings prepared at the factory, paper of the same sizeas the original is selected automatically and the copy magnificationratio is set to “100%” [1:1] (under the auto paper selection mode), thenumber of copies to be made is set to “1” and the image quality is setto the text+photo mode.
NOTES
• The default settings for the initial mode can be changed using thecorresponding “copy default settings” procedure.
• It is possible for you to change the default setting for the copyexposure in the initial mode from the “manual exposure mode” to the“auto exposure mode”. (See “Exposure mode” on page 7-63.)
● Auto clear function
Once a designated amount of time has passed after copying stops(between 10 and 270 seconds), the auto clear function willautomatically engage and the copier will return to the same settingsas those after warm up (initial mode settings). (However, the copyexposure mode and the image quality mode will not change.) Copiescan continually be made using the same settings (copy mode,number of copies and exposure mode) if the next batch of copying isstarted before the auto clear function engages.
● Automatic drawer[cassette] switching function
If two drawers[cassettes] contain the same size of paper and thepaper in one drawer[cassette] runs out during copying, the automaticdrawer[cassette] switching function will switch to paper feed from theother drawer[cassette] that still contains paper.
NOTES
• The automatic drawer[cassette] switching function can be turnedOFF. (See “Auto drawer[cassette] switching ON/OFF” on page7-42.)
• Paper must be loaded in the same orientation in bothdrawers[cassettes].
• Only drawers[cassettes] that are loaded with the same type of papercan be used with the automatic drawer[cassette] switching function.

Section 2 NAMES OF PARTS
2-5
3. Touch panel
Combine
AMS
Reduce/Enlarge
APS
Orig.imagequality
Reduce/Enlarge
Exposuremode
AutoExposure
Ready to copy. SetPaper Size
Bypass
Color
Plain Plain
Plain
Sort/Finished
Sort:Off
Sort:On
Basic User choice ProgramFunction
11x81/2"
81/2x11"
11x81/2"
11x81/2"
11x81/2"
Recycled
3
6*& 5 #@0! )( $
21
^
%8 97
4
Merge copy
AMS
Reduce/Enlarge
APS
Imagequality
Reduce/Enlarge
Exposuremode
AutoExposure
Ready to copy. SetPaper Size
Bypass
Colour
Recycled
Plain Plain
Plain
Sort/Finished
Sort:Off
Sort:On
Basic User choice ProgramFunction
3
6*& 5 #@0! )( $
21
^
%8 97
4
Inch specifications
Metric specifications

Section 2 NAMES OF PARTS
2-6
1 This area displays messages on the machine's status and onoperational procedures.
2 This area displays information on the size of paper in thedrawer[cassette] and the current copy magnification ratio.
3 This area displays the current number of copies to be made.4 Paper size keys (Remaining paper volume icons)
(Touch these keys when you want to change the currently selecteddrawer[cassette] in order to change the size of paper that will beused. The drawer[cassette] that holds the currently selected papersize and type of paper will be highlighted. Drawer[Cassette] No.3and drawer[cassette] No.4 will be displayed when the optionalPaper Feeder is installed on your copier.)
5 “APS” key(Touch this key until it is highlighted when you want to have thepaper size selected automatically. See page 4-2.)
6 “Bypass” key(Touch this key when you want to copy onto paper that is set onthe multi-bypass tray. The type of paper registered for use on themulti-bypass tray will be indicated in the key.)
7 Copy exposure adjustment keys / Copy exposure scale(Touch the appropriate key when you want to manually adjust thecopy exposure. The copy exposure scale will indicate the currentlyselected setting. See page 4-2.)
8 “Exposure mode” key(Touch this key when you want to access the “Exposure Mode”screen.)
9 “Auto Exposure” key(Touch this key until it is highlighted when you want to select theauto exposure mode. In the auto exposure mode, the contrast ofthe original will be detected and the most suitable exposure levelselected automatically. See page 4-2.)
0 “AMS” key(Touch this key until it is highlighted when you want to have thecopy magnification ratio selected automatically. See page 4-5.)
! “Reduce/Enlarge” key(Touch this key when you want to manually change the copymagnification ratio. See page 4-6.)
@ “100%” (same size) key(Touch this key when you want to copy the original image at itsactual size “100%”.)
# “Sort:OFF” key(Touch this key when you want to make copies without sortingthem.)
$ “Sort:ON” key(Touch this key when you want to make copies in the sort mode.)
% “Sort/Finish” key(Touch this key when you want to access the “Sort/Finish” screen.See page 5-29.)
^ Registration keys(Touch the appropriate key when you want to access thecorresponding function or mode. Any function or mode in the“Function” tab can be registered to be displayed as one of theregistration key. See page 5-53.)
& “Basic” tab(Touch this tab when you want to return the display to the contentsof the “Basic” tab.)
* “User choice” tab(Touch this tab when you want to display the contents of the “Userchoice” tab.)
Inch specifications
User choice Function ProgramBasic
BorderErase
Combine
Margin/Centering
2 sided/Separation
Selectorig.size
Orig.imagequality
Metric specifications
User choice Function ProgramBasic
Selectsize orig.
Imagequality
Merge copy
2-sided/Split
Erase Mode
Margin/Imag. shift
( “Function” tab(Touch this tab when you want to display the contents of the“Function” tab.)
Inch specifications
2 sided/Separation
Selectpaper Combine
Reduce/Enlarge
Margin/Centering
FormsOverlayPage #
FunctionBasic User choice Program
CoverMode
BookletSort/Finished
BorderErase
Exposuremode
Orig.imagequality
Ready to copy.
Selectorig. size
AutoSelection
Batchscanning Up
Down
SetPaper size11x81/2"
Invert Mirror
ModifyCopy
Proof CopyMemopages
Orig. setdirection
Ready to copy.
Up
Down
SetPaper size
Eco Print
AutoRotation
FunctionBasic User choice Program
OHP backing
11x81/2"
Metric specifications
Select paper
2-sided/Split
Merge copy
Reduce/Enlarge
Margin/Imag. shift
Pagenumbering
FunctionBasic User choice Program
Cover Mode
BookletErase Mode
Exposuremode
Image quality
Sort/Finished
Ready to copy.
Select size orig.
Autoselection
Large # oforiginals
Form overlay
Up
Down
SetPaper size
Invert Mirror
Modify copy
Test copy Memopages
Orig. setdirection
Ready to copy.
Up
Down
SetPaper size
Eco Print
Auto Rotation
FunctionBasic User choice Program
OHP back

Section 2 NAMES OF PARTS
2-7
) “Program” tab(Touch this tab when you want to register the currently selectedsettings as a program, or to delete a previously registeredprogram. See page 5-50.)
NOTE
If you press any key that has an arrow (PPPPP) in its bottom right corner,the corresponding setting screen will be displayed.
Inch specifications
2 sided/Separation
Selectpaper Combine
Reduce/Enlarge
Margin/Centering
FormsOverlayPage #
FunctionBasic User choice Program
CoverMode
BookletSort/Finished
BorderErase
Exposuremode
Orig.imagequality
Ready to copy.
Selectorig. size
AutoSelection
Batchscanning Up
Down
SetPaper size11x81/2"
Metric specifications
Select paper
2-sided/Split
Merge copy
Reduce/Enlarge
Margin/Imag. shift
Pagenumbering
FunctionBasic User choice Program
Cover Mode
BookletErase Mode
Exposuremode
Image quality
Sort/Finished
Ready to copy.
Select size orig.
Autoselection
Large # oforiginals
Form overlay
Up
Down
SetPaper size
“Register” key(Touch this key when you want to register the currently selectedfunction or mode under a registration key. See page 5-53.)
“Back” key(Touch this key when you want to return the settings for the currentlyselected mode back to their previous values.)
“Close” key(Touch this key when you want to return to the previous screen.)
Inch specifications
Reduce/Enlarge
StandardZoom
Ready to copy.
BackRegister
XY Zoom
Close
# keys
AMS
SetPaper size
100%
(25~400)
100 %
100%
400%
200%
154%
129%
121%
78%
77%
64%
50%
25%51/2x81/2"➔11x17"
81/2x11"➔11x17"
51/2x81/2"➔81/2x14"
11x81/2"
81/2x14"➔11x17"
11x17"➔81/2x11"
11x17"➔81/2x14"
11x17"➔51/2x81/2"
81/2x14"➔81/2x11"
Metric specifications
Reduce/Enlarge
StandardZoom
Ready to copy.
BackRegister
XY Zoom
Close
#-Keys
AMS
SetPaper size
100%
(25~400)
100 %
100%
400%
200%
141%
127%
106%
90%
75%
70%
50%
25%A 5➔A 3
Folio➔A 3
A 5➔A 4A 4➔A 3
11x15"➔A 3
Folio➔A 4
11x15"➔A 4
A 3➔A 4A 4➔A 5
Metric specifications (Asia Pacific)
Reduce/Enlarge
StandardZoom
Ready to copy.
BackRegister
XY Zoom
Close
#-Keys
AMS
SetPaper size
100%
(25~400)
100 %
100%
400%
200%
141%
122%
115%
86%
81%
70%
50%
25%A 5➔A 3
A 5➔B 5
B 5➔B 4A 4➔A 3
B 5➔A 4
A 4➔B 5
B 4➔A 3
A 3➔B 4
B 5➔A 5
A 4➔B 4
B 4➔A 4
A 3➔A 4B 4➔B 5
NOTE
You can change or add new keys to those displayed in the “Basic” andthe “User choice” tabs by following the “Customize screen layout(Main functions)” procedure on page 7-85 or the “Customize screenlayout (Add functions)” procedure on page 7-86, as appropriate.

Section 2 NAMES OF PARTS
2-8

3-1
Section 3 PREPARATIONS
1. Loading paper
Paper can be loaded into the two drawers[cassettes] and the multi-bypass tray.
(1) Note when adding paper
After taking new paper out of its packaging, be sure to fan throughthem a few times to separate the sheets and use a flat surface to alignthe leading edges of the paper before loading that paper into adrawer[cassette] or setting it on the multi-bypass tray.
Set the paper in the drawer[cassette] with the side that was facingupward when you opened the package facing upward.
IMPORTANT!
• When copying onto used paper (paper which has already beencopied onto at least one side), DO NOT use paper that is stapled orclipped together as this can be the cause of damage to the copierand/or create problems in the copy image.
• If you use paper that is curled at all, straighten the paper out beforeloading it into a drawer[cassette] or setting it on the multi-bypasstray, or it can cause a paper jam.
IMPORTANT!
Using special paperIn this copier, the type of paper loaded in each drawer[cassette] andon the multi-bypass tray can be specified under “Paper type(drawer[cassette] No.1 - No.4)” on page 7-44 and “(1) Paper size andtype” on page 7-87, respectively.Among the special paper that can be use with this copier, there is awide range in paper quality and construction, especially in those typesof paper noted below. For that reason, there is a greater possibility ofproblems occurring during copying with these type of paper.Whenever you do use such special paper as noted here, it isrecommended that you first make a test copy and verify the results.
<Special paper for which extra caution is recommended>• Preprinted• Labels *1
• Prepunched• Envelopes *2
*1 When using label sheets, be absolutely certain that there is nopossibility that the backing glue will come into contact with any partof the copier, and that none of the labels will come off the sheetduring copying.If glue does happen to come into contact with the drum or rollers,or one of the labels comes off inside the copier, it can be the causeof major damage.
*2 The following types of envelopes should never be used:• Those on which the glue is exposed.• Those whereby glue will be exposed if the protective paper is
removed. (If the paper protecting the glue comes off inside thecopier it can be the cause of major damage.)
• Those of special construction.• Those which have a round tab on the back and are closed with
string.• Those which have an open window.• Those which have a transparent film window.
NOTE
When using prepunched, preprinted or letterhead paper, refer to“Special paper action setting” on page 7-46-1.

Section 3 PREPARATIONS
3-2
(2) Loading paper into the drawer[cassette]
Up to 500 sheets of standard paper (75 or 80 g/m2/standard paper asspecified by our company) or colored paper can be loaded into theeach drawer[cassette].
The each drawer[cassette] can be set to hold paper of any desiredsize from 5 1/2" x 8 1/2", 8 1/2" x 11", 11" x 8 1/2", 8 1/2" x 13", 8 1/2" x14", 11" x 17", A5R, B5R, B5, A4R, A4, B4, A3, Folio, 8K and 16K.
IMPORTANT!
Set the type of paper (standard paper, recycled paper, etc.) to beloaded in the drawer[cassette] in “Paper type (drawer[cassette] No.1 -No. 4)” on page 7-44.
1 Pull the drawer[cassette] out toward you as far as it will go.* Do not pull more than one drawer[cassette] out at a time.
2 Hold the width adjustment lever and move it to align the widthguide with the required paper width.Paper sizes are marked inside the drawer[cassette].
3 Hold the length adjustment plate and move it to align with therequired paper length.
4 Set the paper flush against the left-hand wall of thedrawer[cassette].
IMPORTANT!
• Make sure that there are no folds, etc., in the paper when it is set ina drawer[cassette]. Such paper may be the cause of paper jams.
• There is a sticker (1 in the illustration) indicating paper capacityattached to the inside of the drawer[cassette]. Do not load paperabove this limit.
• When you are loading paper into a drawer[cassette], make sure thatthe side facing upward when the package is opened is the side thatis facing upward in the drawer[cassette].
• Adjust the length adjustment plate and the width guide BEFOREloading paper into a drawer[cassette]. Failure to do so may result inskewed paper feed or a paper jam.
• Make sure that the paper is set securely against the lengthadjustment plate and the width guide. If there is a gap between thepaper and the adjustment plate or the width guide, readjust the plateand the guide to fit the paper snugly.
1

Section 3 PREPARATIONS
3-3
5 Set the supplied paper size sheet so that the size of thepaper loaded can be checked by looking at the front of thedrawer[cassette].
6 Gently push the drawer[cassette] back in.
NOTE
Before leaving the copier in disuse for a prolonged period of time,remove the paper from the drawer(s)[cassette(s)] and seal it in itsoriginal packaging to protect from moisture. Also, when storing paperin a high temperature and high humidity environment, seal it in amoisture-proof bag.
(3) Loading paper into the multi-bypass tray
Up to 200 sheets of standard copy paper (75 g/m2 – 80 g/m2), of asize between 11" x 17" [A3] and 5 1/2" x 8 1/2" [A6R] can be set on themulti-bypass tray at one time. When copying onto special paper, besure to use the multi-bypass tray.
NOTE
The types of special paper and the number of sheets that can beloaded in the multi-bypass tray are:• Transparencies: 25 sheets• Standard paper (120 g/m2): 130 sheets• Standard paper (160 g/m2): 100 sheets
IMPORTANT!
• When copying onto OHP transparencies, be sure to fan throughthem a few times to separate the sheets before setting them on themulti-bypass tray.
• When copying onto non-standard size paper, perform the procedurein “(1) Paper size and type” on page 7-87 and select the paper size.
• When setting special paper such as OHP transparencies and thickpaper on the multi-bypass tray, the type of paper must be specifiedunder “(1) Paper size and type” on page 7-87.
• You can select to have the “Bypass setting” screen (see page 7-86)displayed whenever the “Bypass” key is touched. (See “Multi-bypasstray setting display ON/OFF” on page 7-45.)
1 Open the multi-bypass tray.
2 Adjust the insert guides to the size of the paper to be loaded.
3 Insert the paper along the guides as far as it will go.
IMPORTANT!
• When you are setting paper onto the multi-bypass tray, make surethat the side facing upward when the package is opened is the sidethat is facing upward on the multi-bypass tray as well. In addition, ifthe leading edge of the paper is curled at all, straighten it out beforesetting it on the multi-bypass tray.
• ALWAYS straighten out curled paper before setting it on the multi-bypass tray.

Section 3 PREPARATIONS
3-4
● Setting envelopes
Up to 20 envelopes can be set on the multi-bypass tray at a time.Refer to the following table for the types and sizes of envelopes thatcan be used in this machine.
1 Open the multi-bypass tray.
2 Align the insert guides with the envelope size.
Size
3 1/8" x 7 1/2"
3 3/8" x 9 1/2"
110 x 220 (mm)
162 x 229 (mm)
7 1/4" x 10 1/2"
3 7/8" x 8 7/8"
3 5/8" x 6 1/2"
176 x 250 (mm)
229 x 324 (mm)
200 x 148 (mm)
162 x 114 (mm)
234 x 105 (mm)
Acceptable envelope types
Monarch
Comm. #10
Envelope DL
Envelope C5
Executive
Comm. #9
Comm. #6-3/4
ISO B5
Envelope C4
Oufuku Hagaki
YOUKEI 2
YOUKEI 4
3 When using envelopes that are wider than they are tall, leavethe flap closed and set the envelopes with the copy sidefacing upward and the flap facing towards the rear of thecopier. Then slide the envelopes into the slot along the insertguides as far as they will go.When using envelopes that are taller than they are wide,open the flap and set the envelopes with the copy side facingupward and the flap facing away from the direction ofinsertion. Then slide the envelopes into the slot along theinsert guides as far as they will go.
NOTES
• If the optional Printer Kit or Printer/scanner Kit is installed on yourcopier and you attempt to print from a computer onto envelopes thatare wider than they are tall, be sure to leave the flap closed and setthe envelopes with the side to be printed onto facing upward. Orientthe edge with the flap towards the front of the copier and then slidethe envelopes into the slot along the insert guides as far as they willgo.
• The proper orientation will actually depend upon the type ofenvelope being used.
• Incorrectly loading envelopes can result in printing in the wrongorientation or on the wrong side.
• When setting envelopes on the multi-bypass tray, BE SURE tospecify the type of envelopes that will be used under “3. Multi-bypass tray paper settings” on page 7-87.
Copier
Copier
Copier

4-1
Section 4 BASIC OPERATION
1. Basic copying procedure
1. Warm-up
Turn the main power switch ON ( | ). At the end of warm-up, “Ready tocopy.” will be displayed.
NOTES
• With metric specification copiers you will first need to open the mainpower switch cover.
• If you set the originals that you want to copy and press the [Start]key while the copier is still warming up, copying will begin as soonas warm-up is finished.
2. Setting the originals
Open the original cover and set the original that you want to copyface-down on the platen. Be sure to align originals with the upper leftcorner of the platen (towards the left-rear portion of the copier).
NOTE
See “4 How to set originals in the Document Processor” on page 8-2for instructions on how to set originals in your Document Processor(option).
Inch specifications
Metric specifications
3. Selecting the desired functions
Select from among the copier’s various modes and functions.
• Enlarging/reducing the copy image (Page 4-5.)• Interrupt copying (Page 4-9.)• Making 2-sided copies from various types of originals (Page 5-1.)• Copying each image of open-faced (books, magazines, etc.) or
2-sided originals onto separate sheets (Page 5-4.)• Creating a margin on the copies (Page 5-6.)• Centering the copy image (Page 5-8.)• Adding a space next to the copy images for making notes
(Page 5-9.)• Making copies with clean edges (Page 5-11.)• Fitting the image of either two or four originals onto a single copy
page (Page 5-13.)• Printing page numbers on the copies (Page 5-16.)• Overlaying one image over another (Page 5-20.)• Making booklets from sheet originals (Page 5-22.)• Making booklets from book originals (Page 5-26.)• Automatic sorting of copy sets without the Document Finisher
(Page 5-29.)• Automatic rotation of the copy image (Page 5-30.)• Adding a front and/or back cover to your copy sets (Page 5-31.)• Feeding paper as a backing sheet for OHP transparencies
(Page 5-36.)• Inverting black and white (Page 5-38.)• Making mirror image copies (Page 5-39.)• Making a test copy prior to large volume copying (Page 5-40.)• Making more of the same copies after a copy job is finished
(Page 5-42.)• Copying a large volume of originals in one operation (Page 5-47.)• Easily add covers and insert sheets between various sets of
originals in one operation (Page 5-57.)
Com
AMS
Reduce/Enlarge
APS
Oriqua
Re/En
Exposuremode
AutoExposure
Ready to copy. SetPaper Size
Bypass
Color
Plain Plain
Plain
Sort/Finished
Sort:Off
Sort:On
Basic User choice ProgramFunction
11x81/2"
81/2x11"
11x81/2"
11x81/2"
11x81/2"
Recycled
3
Mer
AMS
Reduce/Enlarge
APS
Imaqua
ReEn
Exposuremode
AutoExposure
Ready to copy. SetPaper Size
Bypass
Colour
Recycled
Plain Plain
Plain
Sort/Finished
Sort:Off
Sort:On
Basic User choice ProgramFunction
3
1
2

Section 4 BASIC OPERATION
4-2
4. Selecting the paper size
When the “APS” key is highlighted on the touch panel, copy paper ofthe same size as the original will be automatically selected. In order tocopy the original onto a different size of paper without changing thesize of the image, touch the paper size key that corresponds to thepaper size that you want to use.
NOTES
• You can stop the copier from automatically selecting the paper size.(See “Paper selection” on page 7-68.)
• It is also possible for you to specify one drawer[cassette] that will beselected automatically regardless of the size of paper loaded in thatdrawer[cassette].(See “Default drawer[cassette]” on page 7-70.)
Inch specifications
Metric specifications
Inch specifications
Metric specifications
5. Adjusting the copy exposure
Adjustment of the copy exposure is generally accomplished manually.If you want to make the exposure darker, touch the right exposureadjustment key to move the arrow under the exposure scale to theright; If you want to make the exposure lighter, touch the left exposureadjustment key to move the arrow under the exposure scale to theleft.If you want the copy exposure to be adjusted automatically, touch the“Auto Exposure” key until it is highlighted. The contrast of the originalwill be detected and the most suitable exposure level selectedautomatically.* It is also possible for you to adjust the copy exposure by touching
the “Exposure Mode” key to access the “Exposure Mode” screen.Copy exposure adjustment can then be performed in this screenusing the same methods as above.
Inch specifications
Ready to copy. SetPaper Size
Back CloseExposure ModeExposure Mode
DarkerLighterManual
Auto
Register
11x81/2"
1 2 3 4 5 6 7
Metric specifications
Ready to copy.
Back CloseExposure modeExposure mode
DarkerLighterManual
Auto
Register
SetPaper size
NOTES
• It is possible for you to make adjustments to the auto exposuremode if the overall copies come out too dark or too light.(See “Auto exposure adjustment” on page 7-73.)
• It is also possible for you to change the default setting for the copyexposure to the auto exposure mode.(See “Exposure mode” on page 7-63.)
AMS
Reduce/Enlarge
APS
Exposuremode
AutoExposure
Bypass
Color
Plain Plain
Plain11x81/2"
81/2x11"
11x81/2"
11x81/2"Recycled
5
AMS
Reduce/Enlarge
APS
Exposuremode
AutoExposure
Bypass
Colour
Recycled
Plain Plain
Plain5
Com
AMS
Reduce/Enlarge
APS
Oriqua
Re/En
Exposuremode
AutoExposure
Ready to copy. SetPaper Size
Bypass
Color
Plain Plain
Plain
Sort/Finished
Sort:Off
Sort:On
Basic User choice ProgramFunction
11x81/2"
81/2x11"
11x81/2"
11x81/2"
11x81/2"
Recycled
4
Me
AMS
Reduce/Enlarge
APS
Imaqua
ReEn
Exposuremode
AutoExposure
Ready to copy. SetPaper Size
Bypass
Colour
Recycled
Plain Plain
Plain
Sort/Finished
Sort:Off
Sort:On
Basic User choice ProgramFunction
4

Section 4 BASIC OPERATION
4-3
6. Selecting the image quality
The image quality is selected according to the type of original.Touch the “Function” tab and then the resulting “Orig. image quality”[“Image quality”] key that is displayed within that tab in order to accessthe “Orig.image quality” [“Image quality orig.”] screen.
Inch specifications
Text Photo
Photo
Text
Text Photo:Set th is mode to copy or ig.wi th mixed text and photo
Photo:Add a dimensional ef fect of photoText :Copy a penci l or f ine l ine.
Orig.image quality
SetPaper Size11x81/2"
Back CloseRegister
Ready to copy.
Metric specifications
Register Back Close
SetPaper size
Text+Photo
Photo
Text
Text+Photo:Set th is mode to copy or ig inal mixed ( text & photo).Photo:Add a dimensional ef fect of photo.Text :Copy penci l & f ine l ine c lear ly.
Image quality orig.
Ready to copy.
Text+photo mode: Touch the “Text+Photo” key until it is highlighted.Select this mode when the original contains amixture of both text and photographs.
Photo mode: Touch the “Photo” key until it is highlighted. Selectthis mode to bring out the depth in photographs.
Text mode: Touch the “Text” key until it is highlighted. Selectthis mode especially to reproduce originals writtenin pencil of which contain thin lines.
NOTES
• It is possible for you to change the image quality mode that will bethe default setting in the initial mode. (See “Original quality” onpage7-65.)
• It is also possible for you to adjust the copy exposure in each ofthe image quality modes. (See “Manual exposure adjustment(text+photo mode)” on page 7-75, “Manual exposure adjustment(text mode)” on page 7-76 and “Manual exposure adjustment(photo mode)” on page 7-77.)
Inch specifications
Metric specifications
7. Setting the number of copies to be made
Use the keypad to change the number of copies to be made that isdisplayed on the touch panel to the actual number that you want tomake. Up to 999 copies can be made at one time.
NOTE
It is possible for you to limit the number of copies (or copy sets) thatcan be made at a time. (See “Copy limit” on page 7-82.)
Merge copy
AMS
Imagequality
Reduce/EnlargeAuto
SetPaper Size
Sort:Off
S t O
7Inch specifications
Metric specifications
8. Start copying
Press the [Start] key. Once the lamp in the [Start] key is lit green and“Ready to copy.” is displayed, copying is possible.
Inch specifications
Pause
Or ig. page Count/Set
1 sidedPlain
Now copying.
Output
Inner tray
11x81/2"11x81/2"
Rear
Job 1
1 sided APSSort
Metric specifications
Original Count/set
1-sided
Now copying.
1-sided Stop/ Change
Sort
Output
Inner trayR top / rear
Plain
Job 1
APS
Combine
AMS
Orig.imagequality
Reduce/Enlargeuto
SetPaper Size
Sort:Off
S t O
11x81/2"7
8
2 sided/Separation
Selectpaper Combine
Reduce/Enlarge
Margin/Centering
FormsOverlayPage #
FunctionBasic User choice Program
CoverMode
BookletSort/Finished
BorderErase
Exposuremode
Orig.imagequality
Ready to copy.
Selectorig. size
AutoSelection
Batchscanning Up
Down
SPaper size11x81/2"6
Select paper
2-sided/Split
Merge copy
Reduce/Enlarge
Margin/Imag. shift
Pagenumbering
FunctionBasic User choice Program
Cover Mode
BookletErase Mode
Exposuremode
Image quality
Sort/Finished
Ready to copy.
Select size orig.
Autoselection
Large # oforiginals
Form overlay
Up
Down
SPaper size
6

Section 4 BASIC OPERATION
4-4
9. At the end of copying
Finished copies will be ejected onto the copy store section.
IMPORTANT!
• Up to 250 copies can be stored on the copy store section.• If “The output tray exceeds capacity. Remove the paper.” [“Too much
paper in output tray. Remove paper.”] is displayed, there are toomany copies on the top tray. Remove the copies from the copy storesection and then press the [Start] key to resume copying.
• If ejected copies come out curled, or are otherwise not storedcleanly, remove the paper from the drawer[cassette] or the multi-bypass tray (whichever is currently being used), turn the paper over,set it again in that location and try to copy again.
CAUTIONIf the copier will not be used for a short period of time(overnight, etc.), turn the main power switch OFF (O).If it will not be used for an extended period of time(vacations, etc.), remove the power plug from theoutlet for safety purposes during the time the copieris not in use.
9
IMPORTANT!
(For metric specification copiers)If you turn the main power switch OFF (O) or remove the power plugfrom its outlet when the optional Printer Kit, Printer/Scanner Kit or FaxKit is installed on your copier, the corresponding print out and faxcommunication operations will not be possible. To keep thosefunctions enabled, press the [Power] key to put the copier into theSleep mode rather than turning the main power switch OFF.
NOTE
Metric specification copiers have a main power switch cover.

Section 4 BASIC OPERATION
4-5
2 Select the size of paper that you want to copy onto bytouching the appropriate paper size key.Touch the “AMS” key. The corresponding magnification ratiowill be displayed.
Inch specifications
Combine
AMS
Reduce/Enlarge
APS
Orig.imagequality
Reduce/Enlarge
Exposuremode
AutoExposure
Ready to copy. SetPaper Size
Bypass
Color
Plain Plain
Plain
Sort/Finished
Sort:Off
Sort:On
Basic User choice ProgramFunction
11x81/2"
81/2x11"
11x81/2"
11x81/2"
11x81/2"
Recycled
Metric specifications
AMS
Merge copy
Reduce/Enlarge
Imagequality
Reduce/Enlarge
Exposuremode
AutoExposure
Ready to copy. SetPaper Size
Sort/Finished
Sort:Off
Sort:On
Basic User choice ProgramFunction
APS
Bypass
Colour
Recycled
Plain Plain
Plain
3 Press the [Start] key to begin the copying procedure.
(1) Auto magnification selection mode
With this mode, the original image is enlarged/reduced automaticallyaccording to the selected paper size.
IMPORTANT!
If you use this mode most often, select “AMS” under “Defaultmagnification ratio” on page 7-72.
1 Set the original to be copied.The copier will automatically detect the size of the originalsand select copy paper of that same size.
Inch specifications
Combine
AMS
Reduce/Enlarge
APS
Orig.imagequality
Reduce/Enlarge
Exposuremode
AutoExposure
Ready to copy. SetPaper Size
Bypass
Color
Plain Plain
Plain
Sort/Finished
Sort:Off
Sort:On
Basic User choice ProgramFunction
11x81/2"
81/2x11"
11x81/2"
11x81/2"
11x81/2"
Recycled
Metric specifications
Merge copy
AMS
Reduce/Enlarge
APS
Imagequality
Reduce/Enlarge
Exposuremode
AutoExposure
Ready to copy. SetPaper Size
Bypass
Colour
Recycled
Plain Plain
Plain
Sort/Finished
Sort:Off
Sort:On
Basic User choice ProgramFunction
2. Enlarging/reducing the copy image

Section 4 BASIC OPERATION
4-6
(2) Zoom mode
With this mode, the magnification ratio can be set to any 1%increment between 25% and 400%.
1 Set the original to be copied.
2 Touch the “Reduce/Enlarge” key. The “Reduce/Enlarge”screen will be displayed.
Inch specifications
Combine
AMS
Reduce/Enlarge
APS
Orig.imagequality
Reduce/Enlarge
Exposuremode
AutoExposure
Ready to copy. SetPaper Size
Bypass
Color
Plain Plain
Plain
Sort/Finished
Sort:Off
Sort:On
Basic User choice ProgramFunction
11x81/2"
81/2x11"
11x81/2"
11x81/2"
11x81/2"
Recycled
Metric specifications
Merge copy
AMS
Reduce/Enlarge
APS
Imagequality
Reduce/Enlarge
Exposuremode
AutoExposure
Ready to copy. SetPaper Size
Bypass
Colour
Recycled
Plain Plain
Plain
Sort/Finished
Sort:Off
Sort:On
Basic User choice ProgramFunction
3 Touch the “+” key or the “-” key to change the displayedmagnification ratio to the desired setting.* The desired magnification ratio can also be entered directly
by touching the “# keys” [“#-Keys”] key and then using thekeypad.
Inch specifications
Reduce/Enlarge
StandardZoom
Ready to copy.
BackRegister
XY Zoom
Close
# keys
AMS
SetPaper size
100%
(25~400)
100 %
100%
400%
200%
154%
129%
121%
78%
77%
64%
50%
25%51/2x81/2"➔11x17"
81/2x11"➔11x17"
51/2x81/2"➔81/2x14"
11x81/2"
81/2x14"➔11x17"
11x17"➔81/2x11"
11x17"➔81/2x14"
11x17"➔51/2x81/2"
81/2x14"➔81/2x11"
Metric specifications
Reduce/Enlarge
StandardZoom
Ready to copy.
BackRegister
XY Zoom
Close
#-Keys
AMS
SetPaper size
100%
(25~400)
100 %
100%
400%
200%
141%
127%
106%
90%
75%
70%
50%
25%A 5➔A 3
Folio➔A 3
A 5➔A 4A 4➔A 3
11x15"➔A 3
Folio➔A 4
11x15"➔A 4
A 3➔A 4A 4➔A 5
Metric specifications (Asia Pacific)
Reduce/Enlarge
StandardZoom
Ready to copy.
BackRegister
XY Zoom
Close
#-Keys
AMS
SetPaper size
100%
(25~400)
100 %
100%
400%
200%
141%
122%
115%
86%
81%
70%
50%
25%A 5➔A 3
A 5➔B 5
B 5➔B 4A 4➔A 3
B 5➔A 4
A 4➔B 5
B 4➔A 3
A 3➔B 4
B 5➔A 5
A 4➔B 4
B 4➔A 4
A 3➔A 4B 4➔B 5
4 Press the [Start] key to begin the copying procedure.
25%
400%

Section 4 BASIC OPERATION
4-7
(3) Preset zoom mode
With this mode, the magnification ratio can be set to one of the pre-set ratios:
[Available magnification ratios]
Inch specificationReduction 25%
50% (11" x 17" R 5 1/2" x 8 1/2")64% (11" x 17" R 8 1/2" x 11")77% (11" x 17" R 8 1/2" x 14")78% (8 1/2" x 14" R 8 1/2" x 11")
Enlargement 121% (8 1/2" x 14" R 11" x 17")129% (8 1/2" x 11" R 11" x 17")154% (5 1/2" x 8 1/2" R 8 1/2" x 14")200% (5 1/2" x 8 1/2" R 11" x 17")400%
Metric specificationReduction 25%
50%70% (A3 R A4, A4 R A5)75% (11" x 15" R A4)90% (Folio R A4)
Enlargement 106% (11" x 15" R A3)127% (Folio R A3)141% (A4 R A3, A5 R A4)200% (A5 R A3)400%
Metric specification (Asia Pacific)Reduction 25%
50%70% (A3 R A4, B4 R B5)81% (B4 R A4, B5 R A5)86% (A3 R B4, A4 R B5)
Enlargement 115% (B4 R A3, B5 R A4)122% (A4 R B4, A5 R B5)141% (A4 R A3, B5 R B4)200% (A5 R A3)400%
1 Set the original to be copied.
2 Touch the “Reduce/Enlarge” key.The “Reduce/Enlarge” screen will be displayed.
Inch specifications
Combine
AMS
Reduce/Enlarge
APS
Orig.imagequality
Reduce/Enlarge
Exposuremode
AutoExposure
Ready to copy. SetPaper Size
Bypass
Color
Plain Plain
Plain
Sort/Finished
Sort:Off
Sort:On
Basic User choice ProgramFunction
11x81/2"
81/2x11"
11x81/2"
11x81/2"
11x81/2"
Recycled
Metric specifications
Merge copy
AMS
Reduce/Enlarge
APS
Imagequality
Reduce/Enlarge
Exposuremode
AutoExposure
Ready to copy. SetPaper Size
Bypass
Colour
Recycled
Plain Plain
Plain
Sort/Finished
Sort:Off
Sort:On
Basic User choice ProgramFunction
3 Touch the preset zoom key that corresponds to themagnification ratio that you want to use.
Inch specifications
Reduce/Enlarge
StandardZoom
Ready to copy.
BackRegister
XY Zoom
Close
# keys
AMS
SetPaper size
100%
(25~400)
100 %
100%
400%
200%
154%
129%
121%
78%
77%
64%
50%
25%51/2x81/2"➔11x17"
81/2x11"➔11x17"
51/2x81/2"➔81/2x14"
11x81/2"
81/2x14"➔11x17"
11x17"➔81/2x11"
11x17"➔81/2x14"
11x17"➔51/2x81/2"
81/2x14"➔81/2x11"
Metric specifications
Reduce/Enlarge
StandardZoom
Ready to copy.
BackRegister
XY Zoom
Close
#-Keys
AMS
SetPaper size
100%
(25~400)
100 %
100%
400%
200%
141%
127%
106%
90%
75%
70%
50%
25%A 5➔A 3
Folio➔A 3
A 5➔A 4A 4➔A 3
11x15"➔A 3
Folio➔A 4
11x15"➔A 4
A 3➔A 4A 4➔A 5
Metric specifications (Asia Pacific)
Reduce/Enlarge
StandardZoom
Ready to copy.
BackRegister
XY Zoom
Close
#-Keys
AMS
SetPaper size
100%
(25~400)
100 %
100%
400%
200%
141%
122%
115%
86%
81%
70%
50%
25%A 5➔A 3
A 5➔B 5
B 5➔B 4A 4➔A 3
B 5➔A 4
A 4➔B 5
B 4➔A 3
A 3➔B 4
B 5➔A 5
A 4➔B 4
B 4➔A 4
A 3➔A 4B 4➔B 5
NOTE
You can also change the magnification ratio in 1% increments bytouching the “+” key or the “-” key, as appropriate.
4 Press the [Start] key to begin the copying procedure.
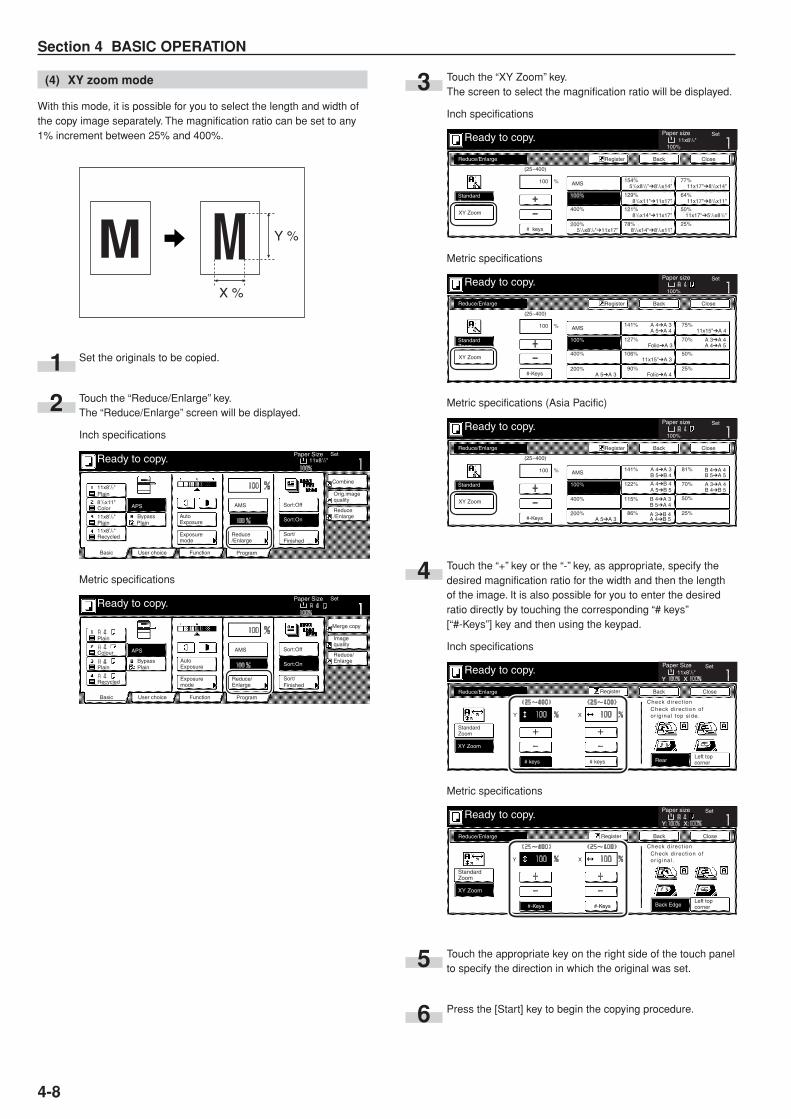
Section 4 BASIC OPERATION
4-8
(4) XY zoom mode
With this mode, it is possible for you to select the length and width ofthe copy image separately. The magnification ratio can be set to any1% increment between 25% and 400%.
1 Set the originals to be copied.
2 Touch the “Reduce/Enlarge” key.The “Reduce/Enlarge” screen will be displayed.
Inch specifications
Combine
AMS
Reduce/Enlarge
APS
Orig.imagequality
Reduce/Enlarge
Exposuremode
AutoExposure
Ready to copy. SetPaper Size
Bypass
Color
Plain Plain
Plain
Sort/Finished
Sort:Off
Sort:On
Basic User choice ProgramFunction
11x81/2"
81/2x11"
11x81/2"
11x81/2"
11x81/2"
Recycled
Metric specifications
Merge copy
AMS
Reduce/Enlarge
APS
Imagequality
Reduce/Enlarge
Exposuremode
AutoExposure
Ready to copy. SetPaper Size
Bypass
Colour
Recycled
Plain Plain
Plain
Sort/Finished
Sort:Off
Sort:On
Basic User choice ProgramFunction
3 Touch the “XY Zoom” key.The screen to select the magnification ratio will be displayed.
Inch specifications
Reduce/Enlarge
StandardZoom
Ready to copy.
BackRegister
XY Zoom
Close
# keys
AMS
SetPaper size
100%
(25~400)
100 %
100%
400%
200%
154%
129%
121%
78%
77%
64%
50%
25%51/2x81/2"➔11x17"
81/2x11"➔11x17"
51/2x81/2"➔81/2x14"
11x81/2"
81/2x14"➔11x17"
11x17"➔81/2x11"
11x17"➔81/2x14"
11x17"➔51/2x81/2"
81/2x14"➔81/2x11"
Metric specifications
Reduce/Enlarge
StandardZoom
Ready to copy.
BackRegister
XY Zoom
Close
#-Keys
AMS
SetPaper size
100%
(25~400)
100 %
100%
400%
200%
141%
127%
106%
90%
75%
70%
50%
25%A 5➔A 3
Folio➔A 3
A 5➔A 4A 4➔A 3
11x15"➔A 3
Folio➔A 4
11x15"➔A 4
A 3➔A 4A 4➔A 5
Metric specifications (Asia Pacific)
Reduce/Enlarge
StandardZoom
Ready to copy.
BackRegister
XY Zoom
Close
#-Keys
AMS
SetPaper size
100%
(25~400)
100 %
100%
400%
200%
141%
122%
115%
86%
81%
70%
50%
25%A 5➔A 3
A 5➔B 5
B 5➔B 4A 4➔A 3
B 5➔A 4
A 4➔B 5
B 4➔A 3
A 3➔B 4
B 5➔A 5
A 4➔B 4
B 4➔A 4
A 3➔A 4B 4➔B 5
4 Touch the “+” key or the “-” key, as appropriate, specify thedesired magnification ratio for the width and then the lengthof the image. It is also possible for you to enter the desiredratio directly by touching the corresponding “# keys”[“#-Keys”] key and then using the keypad.
Inch specifications
StandardZoom
Y
# keys# keys
X
XY Zoom
Reduce/Enlarge
Ready to copy.
RearLeft topcorner
Check direct ionCheck direct ion ofor ig inal top s ide.
Y X11x81/2"
SetPaper Size
Back CloseRegister
+ +
Metric specifications
StandardZoom
Y
#-Keys#-Keys
X
XY Zoom
Back CloseReduce/Enlarge
Ready to copy.
Back EdgeLeft topcorner
Check direct ionCheck direct ion ofor ig inal .
Set
Y: X:
Paper size
Register
5 Touch the appropriate key on the right side of the touch panelto specify the direction in which the original was set.
6 Press the [Start] key to begin the copying procedure.
M M Y %
X %

Section 4 BASIC OPERATION
4-9
4 When copying is completed, press the [Interrupt] key onceagain. The lamp in the [Interrupt] key will go out. Replace thenewly copied originals with the ones removed before. Then,press the [Start] key. The interrupted copy job will beresumed.
Interrupt copying is useful if, during one copy job, you want to copyother originals at different settings. Once the rush job is completed,the interrupted copy job can be resumed at the same settings asbefore.
1 Press the [Interrupt] key to light the lamp in the [Interrupt]key. “Interrupt mode OK” will be displayed.
2 Remove the originals that were currently being copied andput them aside.
3 Set the new originals and perform the desired copyprocedure.
3. Interrupt copying
A321
A 321

Section 4 BASIC OPERATION
4-10
1 Touch the “Reserve next copy” key.The “Ready to copy. (Job reservation)” screen will bedisplayed.
Inch specifications
Memory usage 30%
1 sided APS 1 sided Rear Sort
100%
Now copying.
Orig. page Count/Set
11x81/2" 11x81/2"
Reservenext copy1/99912Pause
Output
Inner tray
Metric specifications
Now copying.
1-sided APSSort
Reservenext copy
100%
Original Count/set
1-sided
1/99912Stop/Change
Output
R top / rear Inner tray
NOTE
Job reservation is not available if the “Reserve next copy” key isn’tdisplayed.
2 Set the originals to be copied.
3 Select the settings and functions that you want to use for thatcopy job.
Inch specifications
Combine
AMS
Reduce/Enlarge
APS
Orig.imagequality
Reduce/Enlarge
Exposuremode
AutoExposure
Bypass
Color
Plain Plain
Plain
Sort/Finished
Sort:Off
Sort:On
Basic User choice ProgramFunction
11x81/2"
81/2x11"
11x81/2"
11x81/2"
11x81/2"
Recycled
Ready to copy. (Job reservation)SetPaper Size
Finish Jobres.
Metric specifications
Merge copy
AMS
Reduce/Enlarge
APS
Imagequality
Reduce/Enlarge
Exposuremode
AutoExposure
Bypass
Color
Recycled
Plain Plain
Plain
Sort/Finished
Sort:Off
Sort:On
Basic User choice ProgramFunction
Ready to copy. (Jobreservation)SetPaper Size
Job resrv.finished
4 Press the [Start] key. Scanning of the originals will start.Once all of the originals have been completely scanned,the touch panel will return to the screen in step 1.
Copy jobs can be scheduled even while another copy job is inprogress any time the “Reserve next copy” key is displayed.
Inch specifications
Memory usage 30%
1 sided APS 1 sided Rear Sort
100%
Now copying.
Orig. page Count/Set
11x81/2" 11x81/2"
Reservenext copy1/99912Pause
Output
Inner tray
Metric specifications
Now copying.
1-sided APSSort
Reservenext copy
100%
Original Count/set
1-sided
1/99912Stop/Change
Output
R top / rear Inner tray
You can enter the corresponding copy settings and scan in theoriginals in preparation for your copy job even before the other job iscompleted.Once that job is finished and print out is possible, the operation for thereserved job will begin automatically.
NOTES
• The optional Hard Disk must be installed on your copier in order touse this function.
• If the optional Fax Kit, Printer Kit or Printer/Scanner Kit are installedin your copier, job reservation will be possible during print out ofboth received fax jobs and print jobs.
4. Job reservation

Section 4 BASIC OPERATION
4-11
Inch specification
If you press the [Energy Saver] key, even while the main power switchis still turned ON, the copier will enter one of the following two energy-saving modes (a state of rest).
● Low power mode
The lamp in the [Energy Saver] key will be the only lit indication on theoperation panel. To resume copying, press the [Energy Saver] keyonce again. It will take the copier less than 12 seconds to return to acopy-ready state.
● Sleep mode
Just like with the Low power mode, the lamp in the [Energy Saver] keywill be the only lit indication on the operation panel, but even lesspower will be consumed in this mode. To resume copying, press the[Energy Saver] key once again. It will take the copier less than 25seconds to return to a copy-ready state.
NOTES
• If the optional Printer Kit or Printer/Scanner Kit is installed in yourcopier, you can switch between the energy-saving modes (Lowpower mode and Sleep mode) that will be entered into when the[Energy Saver] key is pressed. To change the energy-saving mode,see “Changing the energy-saving mode” on page 7-58.
• If you are using a standard copier, or if the optional Fax Kit isinstalled in your copier, you can press the [Energy Saver] key toengage the Low power mode.
• If the optional Fax Kit, Printer Kit or Printer/Scanner Kit are installedin your copier and a received fax job or a print job is detected whilethe copier is in one of the energy-saving modes, it will automaticallyreturn to a copy-ready state and print out the corresponding job.
The following two functions will also automatically cause the copier toenter the corresponding energy-saving mode if no operation isperformed for a designated period of time.
● Auto low power function
If no operation is performed on the copier for a designated period oftime (adjustable between 1 and 240 minutes), the auto low powerfunction will engage and cause the copier to automatically enter theLow power mode.The factory default setting is for 15 minutes.
● Auto sleep function
If no operation is performed on the copier for a designated period oftime (adjustable between 1 and 240 minutes), the auto sleep functionwill engage and automatically turn the main power switch OFF (O).When you want to make copies again, simply turn the main powerswitch back ON ( | ).The factory default setting is for 60 minutes.
Copiers are generally in a standby mode more than they are in actualoperation, so power consumption in the standby mode occupies alarge part of overall consumption. Having the copier enter a rest stateafter a certain amount of time, or turning the power completely OFF(O), reduces unnecessary power consumption in the standby modeand as a result can save on electricity bills.
NOTES
• The auto low power function will not engage when the copier is inthe sleep mode.
• In order to change the amount of time that will elapse before theauto low power function engages, see “Auto low power time” onpage 7-48.
• In order to change the amount of time that will elapse before theauto sleep function engages, see “Auto sleep time” on page 7-47. Inorder to disable the auto sleep function, see “Auto sleep ON/OFF”on page 7-57.
• If the optional Printer Kit or Printer/Scanner Kit is installed in yourcopier, the copier will enter the Sleep mode whenever the auto sleepfunction engages. In this state, when the copier detects data for aprint job, it will automatically recover to a print-ready state and printout of the corresponding information will begin.
• If the optional Fax Kit is installed in your copier, the copier will beautomatically turned OFF (O) whenever the auto sleep functionengages. In this state, when the copier receives an incoming fax, itwill automatically recover to a print-ready state and print out of thecorresponding information will begin.
5. Energy-saving modes
2
45
6
98
7
*0
#
3
1
Management
Default Setting /
Counter
Interrupt
Start
Stop/
Clear
Energy Saver
Reset
Energy Saver

Section 4 BASIC OPERATION
4-12
Metric specification
It is possible to put the copier into either one of two energy savingmodes (a state of sleep) even when the main power switch is turnedON ( | ).
● Low power mode
Press the [Energy Saver] key in order to put the copier into the Lowpower mode. Only the [Energy Saver], [Power], and main powerindicator lamps will light on the operation panel and the rest of theindications will go out. To resume copying, press the [Energy Saver]key once again. It will take the copier less than 12 seconds to returnto a copy-ready state.
● Sleep mode
Press the [Power] key in order to put the copier into the Sleep mode.Only the main power indicator lamp will light on the operation paneland the rest of the indications will go out. In the Sleep mode, powerconsumption is reduced even further than it is in the Low power mode.To resume copying, press the [Power] key once again. It will take thecopier less than 25 seconds to return to a copy-ready state.
NOTES
• If the optional Printer Kit or Printer/Scanner Kit is installed in yourcopier, you can switch between the energy-saving modes (Lowpower mode and Sleep mode) that will be entered into when the[Energy Saver] key is pressed. To change the energy-saving mode,see “Changing the energy-saving mode” on page 7-58.
• If you are using a standard copier, or if the optional Fax Kit isinstalled in your copier, you can press the [Energy Saver] key toengage the Low power mode.
• If the optional Fax Kit, Printer Kit or Printer/Scanner Kit are installedin your copier and a received fax job or a print job is detected whilethe copier is in one of the energy-saving modes, it will automaticallyreturn to a copy-ready state and print out the corresponding job.
The following two functions will also automatically cause the copier toenter the corresponding energy-saving mode if no operation isperformed for a designated period of time.
● Auto low power function
If no operation is performed on the copier for a designated period oftime (adjustable between 1 and 240 minutes), the auto low powerfunction will engage and cause the copier to automatically enter theLow power mode.The factory default setting is for 15 minutes.
● Auto sleep function
If no operation is performed on the copier for a designated period oftime (adjustable between 1 and 240 minutes), the auto sleep functionwill engage and cause the copier to automatically enter the Sleepmode.The factory default setting is for 60 minutes.
Copiers are generally in a standby mode more than they are in actualoperation, so power consumption in the standby mode occupies alarge part of overall consumption. Having the copier enter a rest stateafter a certain amount of time, reduces unnecessary powerconsumption in the standby mode and as a result can save onelectricity bills.
NOTES
• The auto low power function will not engage when the copier is inthe sleep mode.
• In order to change the amount of time that will elapse before theauto low power function engages, see “Auto low power time” onpage 7-48.
• In order to change the amount of time that will elapse before theauto sleep function engages, see “Auto sleep time” on page 7-47. Inorder to disable the auto sleep function, see “Auto sleep ON/OFF”on page 7-57.
Power
2
45
6
98
7
*0
#
3
1
Management
Default Setting /
Counter
Interrupt
Start
Stop/
Clear
Energy Saver
Reset
Energy Saver
2
45
6
98
7
*0
#
3
1
Management
Default Setting /
Counter
Interrupt
Start
Stop/
Clear
Energy Saver
Reset
Power

5-1
(2) Making 2-sided copies from an
open-faced (books, etc.) original
With this mode, the two facing pages of a book or magazine arecopied separately onto the front and back sides of the copy paper bysimply pressing the [Start] key.
NOTE
Only 8 1/2" x 11", 11" x 17", A5R, B5R, A4R, B4 and A3 size originalscan be used in this mode.
Section 5 OTHER CONVENIENT FUNCTIONS
1. Making 2-sided copies from various types of originals [2-sided copy modes]
With these modes, 2-sided copies can be made from a variety oforiginals including open-faced (books, etc.) or 2-sided originals.
(1) Making 2-sided copies from a 2-sided original
With this mode, a 2-sided original is copied and the front and backsides of the copy paper are used so that the copy looks just like theoriginal.
NOTES
• Only paper sizes between 5 1/2" x 8 1/2", 8 1/2" x 11", 11" x 8 1/2",8 1/2" x 13", 8 1/2" x 14", 11" x 17", A5R, B5R, B5, A4R, A4, B4, A3and Folio can be used in this mode.
• The Document Processor (option) must be installed on your copierin order to use this mode.
1 2 1 2
1 2 1
2
1
2
1
2
1
2
1 2
<Finished copy>“Left/Right”
“Top”
“Left/Right”
“Top”
<Original>“Left/Right”
“Left/Right”
“Top”
“Top”
<Finished copy>
“Book / Duplex”
“Book / Book”
“Book / Duplex”
“Book / Book”
1 2
1 2
0 3
3 0
1 2
1 21 2
2 1
2 1
2 1
<Original>
“Left”
“Left”
“Right”
“Right”

Section 5 OTHER CONVENIENT FUNCTIONS
5-2
(3) Making 2-sided copies from one-sided originals
With this mode, multiple one-sided originals are copied onto the frontand back sides of the copy paper. If you are copying an odd numberof originals, the back side of the last copy page will be blank.
NOTE
The image that is copied onto the back side of the copies can also berotated 180 degrees.1 If you chose the “Left/Right” [“Left/Right binding”] setting for
finished copies:The back side of the copies will be created with the sameorientation as the originals.
2 If you chose the “Top” [“Top binding”] setting for finished copies:The image that is copied onto the back side of the copies will berotated 180 degrees. If you then bind the copy set at the top, theimages will be oriented in the same direction when flipped up likea calendar, etc.
54
32
1 1234
5
1 Set the originals to be copied.
2 Touch the “Function” tab. The content of the “Function” tabwill be displayed.Touch the “2 sided/Separation” [“2-sided/Split”] key.The “2 sided/Separation” [“2-sided/Split”] screen will bedisplayed.
Inch specifications
2 sided/Separation
Selectpaper Combine
Reduce/Enlarge
Margin/Centering
FormsOverlayPage #
FunctionBasic User choice Program
CoverMode
BookletSort/Finished
BorderErase
Exposuremode
Orig.imagequality
Ready to copy.
Selectorig. size
AutoSelection
Batchscanning Up
Down
SetPaper size11x81/2"
Metric specifications
Select paper
2-sided/Split
Merge copy
Reduce/Enlarge
Margin/Imag. shift
Pagenumbering
FunctionBasic User choice Program
Cover Mode
BookletErase Mode
Exposuremode
Image quality
Sort/Finished
Ready to copy.
Select size orig.
Autoselection
Large # oforiginals
Form overlay
Up
Down
SetPaper size
3 If you are copying from 2-sided originals, touch the“2 sided / 2 sided” [“2-sided / 2-sided”] key. If you arecopying from open-faced originals, touch the “Book / 2sided” [“Book / 2-sided”] key. If you are copying from 1-sided originals, touch the “1 sided / 2 sided” [“1-sided / 2-sided”] key.If you selected “2 sided / 2 sided” [“2-sided / 2-sided”] or“Book / 2 sided” [“Book / 2-sided”], go to the next step.If you selected “1 sided / 2 sided” [“1-sided / 2-sided”], godirectly to step 5.
Inch specifications
Register
1 sided➔1 sided
1 sided➔2 sided
2 sided➔1 sided
2 sided➔2 sided
Book➔1 sided
Book➔2 sided
Back Close2 sided/Separation
Able to copy 1 sided (separate) or2 sided copy using 1 sided original,Book original or 2 sided original.
11x81/2"Ready to copy. SetPaper size
Metric specifications
Register
1-sidedR1-sided
1-sidedR2-sided
2-sidedR1-sided
2-sidedR2-sided
BookR1-sided
BookR2-sided
Back Close2-sided / Split
Ready to copy.
Able to copy 1-sided (separate) or2-sided copy using 1-sided or ig inal ,book or ig inal or 2-s ided or ig inal .
SetPaper size
defghi
abc
ghi
ghiabc
def
def
abc

Section 5 OTHER CONVENIENT FUNCTIONS
5-3
4 Specify the binding direction of the originals.
Inch specifications
<for 2-sided originals> <for open-faced originals>
Metric specifications
<for 2-sided originals> <for open-faced originals>
5 Select the binding direction you want for the finished copies.
Inch specifications
<for 1-sided or 2-sided originals> <for open-faced originals>
Metric specifications
<for 1-sided or 2-sided originals> <for open-faced originals>
6 Follow the instructions on the right side of the touch paneland verify the direction in which the originals were set.
IMPORTANT!
If the designation for the direction that the originals are set is notcorrect, copying may be accomplished incorrectly.
Inch specifications
<for 1-sided or 2-sided originals> <for open-faced originals>
Metric specifications
<for 1-sided or 2-sided originals> <for open-faced originals>
7 Press the [Start] key.Scanning of the originals will start.
If you set the originals in the optional Document Processor,copying will start automatically.If you set an original on the platen, a message will appeartelling you to set the next original. In this case, go to the nextstep.
8 Replace the first original with the next one and press the[Start] key. Scanning of that next original will start.
9 Once you have finished scanning all of the originals, touchthe “Scanning finished” key. Copying will start.
Finished
Back Edge
Check direc Check dire or ig inal .
Register
Or iginal
Left/RightbindingTopbinding
Left/RightbindingTopbinding
Back
Paper s
Register
Or iginal Finished
Leftbinding
Rightbinding
d
dBookR Book
BookR Duplex
ed
Ba
CheSesid
copy.
Open fromleft/rightOpen from top
Rear
Check direction
Register Back Close
11x81/2"SetPaper size
Left topcorner
Finished
Check direction of original top side.
Register
Finished
BookR Book
BookR Duplex
Back Close
Check direct ionSet book or ig inal top s ide direct ion to back.
SetPaper size
Finished
Back EdgeLeft topCorner
Check direct ion Check direct ion of or ig inal .
Register
Left/RightbindingTopbinding
Back Close
SetPaper size
Register
Finished
BookR Book
BookR Duplex
Back Close
Check direct ionSet book or ig inal top s ide direct ion to back.
SetPaper size
Finished
to copy.
Register
Or iginal
Left/RightbindingTopbinding
Left/RightbindingTopbinding
1-sidedR2-sided
2-sidedR2-sided
BookR2-sided
Register
Or iginal Finished
Leftbinding
Rightbinding
1-sidedR2-sided
2-sidedR2-sided
BookR Book
BookR Duplex
BookR2-sided
to copy.
Open fromleft/right
Open fromleft/right
Open from top
Open from top
Rear
Check direction
Register Back
11xPaper siz
Original Finished
Check directionoriginal top side
Book➔ Book
Book➔ Duplex
Open from leftOpen from right
Check
opy.
Register
d
d
d
Bac
Original Finished
Set ttop s
Open fromleft/right
Open fromleft/right
Open from top
Open from top
ion
to copy.
Register
1 sided➔2 sided
2 sided➔2 sided
Book➔2 sided
Original Finished
Book➔ Book
Book➔ Duplex
Open from leftOpen from right
ion
to copy.
Register
1 sided➔2 sided
2 sided➔2 sided
Book➔2 sided
Original Finished

Section 5 OTHER CONVENIENT FUNCTIONS
5-4
2. Copying two-page originals onto separate sheets
[Page separation/Split copy modes]
(1) Page separation/Split copy from book originals
With this mode, the two facing pages of an open-faced original suchas a book, a magazine, and the like are each copied onto a separatesheet of paper.
NOTES
Inch specifications• Only 8 1/2" x 11", 11" x 17", A5R, B5R, A4R, B4 and A3 size
originals and 11" x 8 1/2" size copy paper can be used in this mode.Depending upon the size of the originals, the image will be enlargedor reduced to fit the size of the copy paper.
Metric specifications• Only A5R, B5R, A4R, B4, A3, 8 1/2" x 11" and 11" x 17" size
originals and A4 size copy paper can be used in this mode.Depending upon the size of the originals, the image will be enlargedor reduced to fit the size of the copy paper.
Metric specifications (Asia Pacific)• Only A5R, B5R, A4R, B4, A3, 8 1/2" x 11" and 11" x 17" size
originals and B5 or A4 size copy paper can be used in this mode.Depending upon the size of the originals, the image will be enlargedor reduced to fit the size of the copy paper.
(2) Page separation/Split copy from 2-sided originals
With this mode, the two sides of a 2-sided original are each copiedonto a separate sheet of paper.
NOTE
The Document Processor (option) must be installed on your copier inorder to use this mode.
1 Set the originals to be copied.
2 Touch the “Function” tab. The content of the “Function” tabwill be displayed.
3 Touch the “2 sided/Separation” [“2-sided/Split”] key.The “2 sided/Separation” [“2-sided/Split”] screen will bedisplayed.
Inch specifications
2 sided/Separation
Selectpaper Combine
Reduce/Enlarge
Margin/Centering
FormsOverlayPage #
FunctionBasic User choice Program
CoverMode
BookletSort/Finished
BorderErase
Exposuremode
Orig.imagequality
Ready to copy.
Selectorig. size
AutoSelection
Batchscanning Up
Down
SetPaper size11x81/2"
Metric specifications
Select paper
2-sided/Split
Merge copy
Reduce/Enlarge
Margin/Imag. shift
Pagenumbering
FunctionBasic User choice Program
Cover Mode
BookletErase Mode
Exposuremode
Image quality
Sort/Finished
Ready to copy.
Select size orig.
Autoselection
Large # oforiginals
Form overlay
Up
Down
SetPaper size
1 2121221
12 1 2
12 1 2

Section 5 OTHER CONVENIENT FUNCTIONS
5-5
4 Touch the “2 sided / 1 sided” [“2-sided / 1-sided”] key orthe “Book / 1 sided” [“Book / 1-sided”] key, as appropriateto the type of originals being copied and the type of finishedcopies to be made.
Inch specifications
Register
1 sided➔1 sided
1 sided➔2 sided
2 sided➔1 sided
2 sided➔2 sided
Book➔1 sided
Book➔2 sided
Back Close2 sided/Separation
Able to copy 1 sided (separate) or2 sided copy using 1 sided original,Book original or 2 sided original.
11x81/2"Ready to copy. SetPaper size
Metric specifications
Register
1-sidedR1-sided
1-sidedR2-sided
2-sidedR1-sided
2-sidedR2-sided
BookR1-sided
BookR2-sided
Back Close2-sided / Split
Ready to copy.
Able to copy 1-sided (separate) or2-sided copy using 1-sided or ig inal ,book or ig inal or 2-s ided or ig inal .
SetPaper size
5 Specify the binding direction of the originals.
Inch specifications
<for 2-sided originals> <for open-faced originals>
Metric specifications
<for 2-sided originals> <for open-faced originals>
6 Follow the instructions on the right side of the touch paneland verify the direction in which the originals were set.
IMPORTANT!
If the designation for the direction that the originals are set is notcorrect, copying may be accomplished incorrectly.
Inch specifications
<for 1-sided or 2-sided originals> <for open-faced originals>
Metric specifications
<for 1-sided or 2-sided originals> <for open-faced originals>
7 Press the [Start] key. Scanning of the originals will start.
If you set the originals in the optional Document Processor,copying will start automatically.If you set an original on the platen, a message will appeartelling you to set the next original. In this case, go to the nextstep.
8 Replace the first original with the next one and press the[Start] key. Scanning of that next original will start.
9 Once you have finished scanning all of the originals, touchthe “Scanning finished” key. Copying will start.
Rear
Check direction
Register Back Close
11x81/2"SetPaper size
Left topcorner
Check direction of original top side.
Check direction
Register Back Close
11x81/2"SetPaper size
Set the book originaltop side direct to back.
Open fromleft/right
Open fromtop
Separation
ady to copy.
Registe
1 sided➔2 sided
d2 sided➔2 sided
dBook➔2 sided
d
Original
Open fromleft
Open fromright
on
to copy.
Register
1 sided➔2 sided
2 sided➔2 sided
Book➔2 sided
Original
R
Or iginal
Left/Right bindingTopbinding
edsided
1-sidedR2-sided
edsided
2-sidedR2-sided
ksided
BookR2-sided
ided / Split
Ready to copy.
Register
Or iginal
Left binding
Rightbinding
-sidedR2-sided
-sidedR2-sided
BookR2-sided
to copy.
Back EdgeLeft topcorner
Check direct ion Check direct ion of or ig inal .
Register Back Close
SetPaper size
Register Back Close
Check direct ionSet book or ig inal top s ide direct ion to back.
SetPaper size

Section 5 OTHER CONVENIENT FUNCTIONS
5-6
3. Making a margin space on the copies [Margin mode]
(1) Standard margin
Inch specificationsThe image of the original can be shifted to the left or right and up ordown to make a margin (blank) space on the copy. The width of eachmargin can be set to any 1/8" increment between 1/8" and 3/4".A setting of “0” will leave no margin space.Metric specificationsThe image of the original can be shifted to the left or right and up ordown to make a margin (blank) space on the copy. The width of eachmargin can be set to any 1 mm increment between 1 mm and 18 mm.A setting of “0” will leave no margin space.
NOTES
• It is also possible for you to select the default setting for the locationand width of the margins. (See “Margin width” on page 7-80.)
• If you select to have a left margin created during 2-sided copyingand the location for the back side margin is set to “Auto”, a rightmargin that is the same width as the margin on the front side will beautomatically created on the back side of the copies.
(2) Separate front and back margin settings
Inch specificationsWhen you are making 2-sided copies, the margin positions and widthscan be selected separately for the front and back sides. The width ofeach margin can be set to any 1/8" increment between 1/8" and 3/4".A setting of “0” will leave no margin space.Metric specificationsWhen you are making 2-sided copies, the margin positions and widthscan be selected separately for the front and back sides. The width ofeach margin can be set to any 1 mm increment between 1 mm and 18mm. A setting of “0” will leave no margin space.
1 Set the originals to be copied.
IMPORTANT!
Set originals so that the top edge is facing either the back or the left ofthe copier. Setting them in the wrong direction may cause the marginto be created in the incorrect position.
2 Touch the “Function” tab. The content of the “Function” tabwill be displayed.
3 Touch the “Margin/Centering” [“Margin/Imag.shift”] key.The “Margin/Centering” [“Margin/Image shift”] screen will bedisplayed.
Inch specifications
2 sided/Separation
Selectpaper Combine
Reduce/Enlarge
Margin/Centering
FormsOverlayPage #
FunctionBasic User choice Program
CoverMode
BookletSort/Finished
BorderErase
Exposuremode
Orig.imagequality
Ready to copy.
Selectorig. size
AutoSelection
Batchscanning Up
Down
SetPaper size11x81/2"
Metric specifications
Select paper
2-sided/Split
Merge copy
Reduce/Enlarge
Margin/Imag. shift
Pagenumbering
FunctionBasic User choice Program
Cover Mode
BookletErase Mode
Exposuremode
Image quality
Sort/Finished
Ready to copy.
Select size orig.
Autoselection
Large # oforiginals
Form overlay
Up
Down
SetPaper size
AA B
B

Section 5 OTHER CONVENIENT FUNCTIONS
5-7
4 Touch the “Margin” key. The screen to set the front sidemargin will be displayed.
Inch specifications
Margin/Centering
Reposition image to left/right ortop/bottom, and also center imageon paper.
None
Margin
Centering
Ready to copy.
Register Back Close
11x81/2"SetPaper size
Metric specifications
None
Back Close
Ready to copy.
Register
SetPaper size
Margin/Image shift
Reposi t ion image to lef t / r ight ortop/bottom and center image on paper.
Margin
Image shift
5 Use the up/down and left/right cursor keys to select thedesired location and width of each margin.
Inch specifications
Centering
Front page
Back pagemargin
Auto
None
Margin
Margin/Centering
Ready to copy.
Register Back Close
11x81/2"SetPaper size
Rear
Check direction
Left topcorner
Check direction of original top side.
Left 1/4 "
0 "
(0~3/4)
(0~3/4)
Metric specifications
Back Close
Ready to copy.
Register
SetPaper size
Back Edge Left topcorner
None
Margin
Image shift
Margin/Image shift
Check direct ionCheck direct ion ofor ig inal .
Front page
Left Back pagemargin
Auto
6 If you are making 2-sided copies, touch the “Back pagemargin” key. The “Back page margin” screen will bedisplayed.
Inch specifications
Top
Centering
Front page
Back pagemargin
Auto
None
Margin
Margin/Centering
Ready to copy.
Register Back Close
11x81/2"SetPaper size
Rear
Check direction
Left topcorner
Check direction of original top side.
Left 1/2 "
1/4 "
(0~3/4)
(0~3/4)
Metric specifications
Back Close
Ready to copy.
Register
SetPaper size
Back Edge Left topcorner
Margin/Image shift
None
Margin
Image shift
Front page
Left
Top
Back pagemargin
Check direct ionCheck direct ion ofor ig inal .
Auto
7 If you want to create a margin on the back side of the copiesthat lines up with that on the front side, touch the “Auto” key.If you want to set the margins for the front and back sidesseparately, touch the “Front/Back margin” key. The screen toset the back side margin will be displayed.
Inch specifications
Back page margin
Auto
Front/Backmargin
If "AUTO" is selected for duplexcopying, rear will have same marginsetting as that for the front page.
Ready to copy.
Back Close
11x81/2"SetPaper size
Rear
Check direction
Left topcorner
Check direction of original top side.
Metric specifications
Back page margin
Auto
Front/Backmargin
I f "AUTO" is selected at the duplexcopying, back s ide wi l l have same marginsett ing as that for the f ront page.
Back Close
Ready to copy. SetPaper size
Back Edge Left topcorner
Check direct ionCheck direct ion ofor ig inal .
8 Use the up/down and left/right cursor keys to select thedesired location and width of each margin.
Inch specifications
Back page margin
Auto
Front/Backmargin
Back page
Ready to copy.
Back Close
11x81/2"SetPaper size
Rear
Check direction
Left topcorner
Check direction of original top side.
(0~3/4)
"
"
(0~3/4)
0
0
Metric specifications
Back page margin
Auto
Front/Backmargin
Back page
Back Close
Ready to copy. SetPaper size
Back Edge Left topcorner
Check direct ionCheck direct ion ofor ig inal .
9 Follow the instructions on the right side of the touch paneland verify the direction in which the originals were set.
IMPORTANT!
If the designation for the direction that the originals are set is notcorrect, copying may be accomplished incorrectly.
10 Press the [Start] key.Copying will start.

Section 5 OTHER CONVENIENT FUNCTIONS
5-8
4. Centering the copy image [Centering/Image shift mode]
With this mode you can center the image on the copy paper when youcopy onto a paper size that is larger than that of the original.
1 Set the originals to be copied.
IMPORTANT!
Set originals so that the top edge is facing either the back or the left ofthe copier. Setting them in the wrong direction may cause the imageto be copied in the incorrect position.
2 Touch the “Function” tab. The content of the “Function” tabwill be displayed.
3 Touch the “Margin/Centering” [“Margin/Imag.shift”] key. The“Margin/Centering” [“Margin/Image shift”] screen will bedisplayed.
Inch specifications
2 sided/Separation
Selectpaper Combine
Reduce/Enlarge
Margin/Centering
FormsOverlayPage #
FunctionBasic User choice Program
CoverMode
BookletSort/Finished
BorderErase
Exposuremode
Orig.imagequality
Ready to copy.
Selectorig. size
AutoSelection
Batchscanning Up
Down
SetPaper size11x81/2"
Metric specifications
Select paper
2-sided/Split
Merge copy
Reduce/Enlarge
Margin/Imag. shift
Pagenumbering
FunctionBasic User choice Program
Cover Mode
BookletErase Mode
Exposuremode
Image quality
Sort/Finished
Ready to copy.
Select size orig.
Autoselection
Large # oforiginals
Form overlay
Up
Down
SetPaper size
4 Touch the “Centering” [“Imag.shift”] key.
Inch specifications
Margin/Centering
Reposition image to left/right ortop/bottom, and also center imageon paper.
None
Margin
Centering
Ready to copy.
Register Back Close
11x81/2"SetPaper size
Metric specifications
None
Back Close
Ready to copy.
Register
SetPaper size
Margin/Image shift
Reposi t ion image to lef t / r ight ortop/bottom and center image on paper.
Margin
Image shift
5 Follow the instructions on the right side of the touch paneland verify the direction in which the originals were set.
Inch specifications
Able to center scanned image on paper.
Centering
None
Margin
Margin/Centering
Ready to copy.
Register Back Close
11x81/2"SetPaper size
Rear
Check direction
Left topcorner
Check direction of original top side.
Metric specifications
Margin/Image shift
None
Margin
Image shift
Check direct ionCheck direct ion ofor ig inal .
Able to center scanned image on paper.
Back Close
Ready to copy.
Register
SetPaper size
Back Edge Left topcorner
IMPORTANT!
If the designation for the direction that the originals are set is notcorrect, copying may be accomplished incorrectly.
6 Press the [Start] key.Copying will start.

Section 5 OTHER CONVENIENT FUNCTIONS
5-9
5. Adding a space next to the copy images for making notes [Memo mode]
With this mode you can leave a space for adding notes next to thecopied image. It is also possible to fit the images of 2 originals ontothe same copy page along with a blank space for each.
● Copying one original onto one copy page (layout A)
● Copying two originals onto one copy page (layout B)
NOTE
Only 8 1/2" x 11", 11" x 8 1/2", 11" x 17", B5R, B5, A4R, A4, B4 and A3size copy paper can be used in this mode.
1 Set the originals to be copied.
2 Touch the “Function” tab and then the “N Down” key.The content of the next portion of the “Function” tab will bedisplayed.
3 Touch the “Memo pages” key. The “Memo pages” screen willbe displayed.
Inch specifications
Invert Mirror
ModifyCopy
Proof CopyMemopages
Orig. setdirection
Ready to copy.
Up
Down
SetPaper size
Eco Print
AutoRotation
FunctionBasic User choice Program
OHP backing
11x81/2"
Metric specifications
Invert Mirror
Modify copy
Test copy Memopages
Orig. setdirection
Ready to copy.
Up
Down
SetPaper size
Eco Print
Auto Rotation
FunctionBasic User choice Program
OHP back
4 Touch the “Layout A” key or the “Layout B” key, asappropriate. The screen to make the layout settings will bedisplayed.
Inch specifications
Memo pages
None
Layout A
Layout
None
Border line
Solid
Dotted
BordersLayout B
SetPaper sizeReady to copy.
Register Back Close
11x81/2"
Rear
Check direction
Left topcorner
Check direction of original top side.
50%
Metric specifications
Check direct ion ofor ig inal .
BackRegister CloseMemo pages
Ready to copy.
None
Layout A
Layout
None
Border line
Solid
Dotted
CropmarkLayout B Back EdgeLeft topcorner
Check direct ion
SetPaper size

Section 5 OTHER CONVENIENT FUNCTIONS
5-10
5 Select the desired direction of the layout.
Inch specifications
<Layout A> <Layout B>
Metric specifications
<Layout A> <Layout B>
6 Select the type of the borderline that you want to use toseparate the different areas.
7 Press the [Start] key.Scanning of the originals will start.
If you set the originals in the optional Document Processor,copying will start automatically.If you set an original on the platen, a message will appeartelling you to set the next original. In this case, go to the nextstep.
8 Replace the first original with the next one and press the[Start] key. Scanning of that next original will start.
9 Once you have finished scanning all of the originals, touchthe “Scanning finished” key. Copying will start.
Layout
None
Border line
Solid
Dotted
Borders
to copy.
Register
Layout
None
Border line
Solid
Dotted
Borders
to copy.
Register
Register
to copy.
Layout
None
Border line
Solid
Dotted
Cropmark
Register
to copy.
Layout
None
Border line
Solid
Dotted
Cropmark

Section 5 OTHER CONVENIENT FUNCTIONS
5-11
6. Making copies with clean edges [Border erase modes]
(1) Erasing blemishes from edges of copies
(Sheet erase mode)
Inch specificationsWith this mode, shadows, lines, etc., that occur around the edges ofcopies made from sheet originals can be erased. A border of equalwidth will be erased around all sides of the copied image. The width ofthe border to be erased can be set to any 1/8" increment between1/8" and 3/4". A setting of “0” will result in no border being erased.(The areas that will be erased are shown as a in the illustration.)Metric specificationsWith this mode, shadows, lines, etc., that occur around the edges ofcopies made from sheet originals can be erased. A border of equalwidth will be erased around all sides of the copied image. The width ofthe border to be erased can be set to any 1 mm increment between1 mm and 18 mm. A setting of “0” will result in no border being erased.(The areas that will be erased are shown as a in the illustration.)
NOTE
It is possible for you to change the default setting for the width of theerased border. (See “Erased border width” on page 7-81.)
(2) Erasing blemishes from the edges and middle of
copies made from books (Book erase mode)
Inch specificationsWith this mode, you can make clean copies, even from thick books.The width of the outside border to be erased can be set to any 1/8"increment between 1/8" and 3/4". The width of the center area to beerased can be set to any 1/8" increment between 1/8" and 1 1/2".A setting of “0” will result in no border being erased.(The area that will be erased as the outside border is shown as a inthe illustration, while that of the center area is shown as b.)Metric specificationsWith this mode, you can make clean copies, even from thick books.The width of the outside border to be erased can be set to any 1 mmincrement between 1 mm and 18 mm. The width of the center area tobe erased can be set to any 1 mm increment between 1 mm and36 mm. A setting of “0” will result in no border being erased.(The area that will be erased as the outside border is shown as a inthe illustration, while that of the center area is shown as b.)
NOTE
It is possible for you to change the default setting for the width of theerased borders. (See “Erased border width” on page 7-81.)
abcdefghijkabcdefghijk
abcdefghijkabcdefghijk
abcdefghijkabcdefghijk
abcdefghijkabcdefghijk
abcdefghijk
abcdefghijkabcdefghijk
abcdefghijkabcdefghijkabcdefghijk
abcdefghijkabcdefghijk
abcdefghijk
a
baa
a

Section 5 OTHER CONVENIENT FUNCTIONS
5-12
1 Set the original to be copied.
2 Touch the “Function” tab. The content of the “Function” tabwill be displayed.
3 Touch the “Border Erase” [“Erase Mode”] key. The “BorderErase” [“Erase Mode”] screen will be displayed.
Inch specifications
2 sided/Separation
Selectpaper Combine
Reduce/Enlarge
Margin/Centering
FormsOverlayPage #
FunctionBasic User choice Program
CoverMode
BookletSort/Finished
BorderErase
Exposuremode
Orig.imagequality
Ready to copy.
Selectorig. size
AutoSelection
Batchscanning Up
Down
SetPaper size11x81/2"
Metric specifications
Select paper
2-sided/Split
Merge copy
Reduce/Enlarge
Margin/Imag. shift
Pagenumbering
FunctionBasic User choice Program
Cover Mode
BookletErase Mode
Exposuremode
Image quality
Sort/Finished
Ready to copy.
Select size orig.
Autoselection
Large # oforiginals
Form overlay
Up
Down
SetPaper size
If you want to select the sheet erase mode or the book erasemode, go to the next step.If you want to select the individual border erase mode, godirectly to step 6.
(3) Erasing blemishes from the edges of copies using
individual border settings (Individual border erase
mode)
Inch specificationsWith this mode, shadows, lines, etc., that occur around the edges ofcopies made from sheet originals can be erased, but in this case youcan designate separate widths for each of the top, bottom, left andright borders. The width of each border to be erased can be set to any1/8" increment between 0 and 2".(The area that will be erased as the top border is shown as a, thebottom border is shown as b, the left border as c, and the rightborder as d, in the illustration.)Metric specificationsWith this mode, shadows, lines, etc., that occur around the edges ofcopies made from sheet originals can be erased, but in this case youcan designate separate widths for each of the top, bottom, left andright borders. The width of each border to be erased can be set to any1 mm increment between 0 and 50 mm.(The area that will be erased as the top border is shown as a, thebottom border is shown as b, the left border as c, and the rightborder as d, in the illustration.)
NOTE
The default settings for the border widths are the same values as thatset for the sheet erase mode.

Section 5 OTHER CONVENIENT FUNCTIONS
4 Touch the “Sheet Erase” [“Border erase”] key or the “BookErase” key, as appropriate. The screen to set the outsideborder and the center area will be displayed.
Inch specifications
Border Erase
Erase the border shadow of originalor shadow from centor of book.
None
SheetErase
BookErase
SetPaper sizeReady to copy.
Register Back Close
11x81/2"
IndividualBordrErase
Metric specifications
Erase Mode
Bordererase
Bookerase
Erase edge of original or center of bookand copy.
None
Back Close
Ready to copy.
Register
SetPaper size
IndividualErase Mode
5 Touch the “+” key or the “–” key to change the displayedborder width to that desired.* In metric specification copiers, the desired border width can
also be entered directly by touching the “#-Keys” key andthen using the keypad.
Inch specifications
None
Border Center
SheetErase
IndividualBordrErase
BookErase
Border Erase
Ready to copy.
1/4 " 1/2 "
(0~3/4) (0~11/2)
Register Back Close
11x81/2"SetPaper size
Metric specifications
Back Close
Ready to copy.
Register
SetPaper size
None
Bordererase
IndividualErase Mode
Bookerase
Erase Mode
Border
(0~18) (0~36)
#-Keys
Center6 12
#-Keys
Go directly to step 10.
5-12-1
6 Touch the “Individual BordrErase” [“Individual Erase Mode”]key. The screen to set the top, bottom, left or right border willbe displayed.
Inch specifications
Border Erase
Erase the border shadow of originalor shadow from centor of book.
None
SheetErase
BookErase
SetPaper sizeReady to copy.
Register Back Close
11x81/2"
IndividualBordrErase
Metric specifications
Erase Mode
Bordererase
Bookerase
Erase edge of original or center of bookand copy.
None
Back Close
Ready to copy.
Register
SetPaper size
IndividualErase Mode
7 Touch the key that corresponds to the border whose widthyou want to change. The screen to set that border width willbe displayed.
Inch specifications
None
Top Bottom
Left Right
SheetErase
IndividualBordrErase
BookErase
Border Erase
Ready to copy.
2 " 2 "
2 " 2 "
Register Back Close
11x81/2"SetPaper size
Rear
Check direction
Left topcorner
Check direction of original top side.
Metric specifications
None
Top Bottom
Left Right
Bordererase
IndividualErase Mode
Bookerase
Erase Mode
Ready to copy.
6 mm 6 mm
6 mm 6 mm
Register Back Close
SetPaper size
Back EdgeLeft topCorner
Check direct ion Check direct ion of or ig inal .

Section 5 OTHER CONVENIENT FUNCTIONS
5-12-2
8 Touch the “+” key or the “–” key to change the displayedborder width to that desired.* In metric specification copiers, the desired border width can
also be entered directly by touching the “#-Keys” key andthen using the keypad.
Inch specifications
Top
Individual Border Erase
Ready to copy.
Back Close
11x81/2"SetPaper size
(0~2)
1/4 "
Rear
Check direction
Left topcorner
Check direction of original top side.
Metric specifications
Top
Individual Erase Mode
Ready to copy.
Back Close
SetPaper size
Back EdgeLeft topCorner
Check direct ion Check direct ion of or ig inal .
(0~50)
6
#-Keys
9 Touch the “Close” key. The touch panel will return to thescreen in step 7.If you want to change the width of any of the other borders,repeat steps 7 through 9.
10 Press the [Start] key.Copying will start.

Section 5 OTHER CONVENIENT FUNCTIONS
5-13
7. Fitting the image of either two or four originals onto a single copy page
[Combine/Merge Copy modes]
With this mode, the images from either 2 or 4 originals can bereduced and then combined onto a single copy. The borderline ofeach original can also be marked with either a solid line or a dottedline.
NOTE
Only 8 1/2" x 11", 11" x 8 1/2", 11" x 17", B5R, B5, A4R, A4, B4 and A3size copy paper can be used in this mode.
(1) 2 in 1
Use this mode when you want to copy two originals onto one sheet.This mode can also be used in conjunction with the 2-sided copymodes in order to copy four originals onto one sheet.(When setting the originals on the platen, be sure to set the originalsin the correct order: 1 and then 2.)
(2) 4 in 1
Use this mode when you want to copy four originals onto one sheet.This mode can also be used in conjunction with the 2-sided copymodes in order to copy eight originals onto one sheet.(When setting the originals on the platen, be sure to set the originalsin the correct order: 1, 2, 3 and then 4.)
43
21
1
3
2
4
2
4
1
3
1
2
3
4
3
4
1
2
21
1 2
2 1
1
2
2
1

Section 5 OTHER CONVENIENT FUNCTIONS
5-14
1 Set the originals to be copied.
2 Touch the “Function” tab. The content of the “Function” tabwill be displayed.
Inch specifications
Combine
AMS
Reduce/Enlarge
APS
Orig.imagequality
Reduce/Enlarge
Exposuremode
AutoExposure
Ready to copy. SetPaper Size
Bypass
Color
Plain Plain
Plain
Sort/Finished
Sort:Off
Sort:On
Basic User choice ProgramFunction
11x81/2"
81/2x11"
11x81/2"
11x81/2"
11x81/2"
Recycled
Metric specifications
Merge copy
AMS
Reduce/Enlarge
APS
Imagequality
Reduce/Enlarge
Exposuremode
AutoExposure
Ready to copy. SetPaper Size
Bypass
Colour
Recycled
Plain Plain
Plain
Sort/Finished
Sort:Off
Sort:On
Basic User choice ProgramFunction
3 Touch the “Combine” [“Merge copy”] key. The “Combine”[“Merge copy”] screen will be displayed.
Inch specifications
2 sided/Separation
Selectpaper Combine
Reduce/Enlarge
Margin/Centering
FormsOverlayPage #
FunctionBasic User choice Program
CoverMode
BookletSort/Finished
BorderErase
Exposuremode
Orig.imagequality
Ready to copy.
Selectorig. size
AutoSelection
Batchscanning Up
Down
SetPaper size11x81/2"
Metric specifications
Select paper
2-sided/Split
Merge copy
Reduce/Enlarge
Margin/Imag. shift
Pagenumbering
FunctionBasic User choice Program
Cover Mode
BookletErase Mode
Exposuremode
Image quality
Sort/Finished
Ready to copy.
Select size orig.
Autoselection
Large # oforiginals
Form overlay
Up
Down
SetPaper size
4 Touch the “2 in 1” [“2-in-1”] key or the “4 in 1” [“4-in-1”] key, asappropriate.The screen to make the layout settings will be displayed.
Inch specifications
None
Combine
2 or 4 original pages can combine onone page.
Ready to copy.
Register Back Close
11x81/2"SetPaper size
Metric specifications
None
2-in-1
4-in-1
Back CloseMerge copy
Ready to copy.
2 or 4 or ig inals can be pr intedon one page.
Register
SetPaper size
5 Select the desired direction of the layout.
Inch specifications
Metric specifications
6 Select the type of the borderline that you want to use toseparate the images.
Layout
None
Border line
Solid
Dotted
Borders
to copy.
Register
None
Solid
Dotted
Borders
Layout Border line
to copy.
Register
None
Layout
Solid
Dotted
Cropmark
Border l ine
to copy.
Register
Layout
None
Solid
Dotted
Cropmark
Border l ine
to copy.
Register

Section 5 OTHER CONVENIENT FUNCTIONS
5-15
7 Press the [Start] key.Scanning of the originals will start.
If you set the originals in the optional Document Processor,copying will start automatically.If you set an original on the platen, a message will appeartelling you to set the next original. In this case, go to the nextstep.
8 Replace the first original with the next one and press the[Start] key. Scanning of that next original will start.
9 Once you have finished scanning all of the originals, touchthe “Scanning finished” key. Copying will start.

Section 5 OTHER CONVENIENT FUNCTIONS
5-16
8. Printing page numbers on copies [Print page numbers mode]
3 Touch the “Page #” [“Page numbering”] key. The “Page #”[“Page numbering”] screen will be displayed.
Inch specifications
2 sided/Separation
Selectpaper Combine
Reduce/Enlarge
Margin/Centering
FormsOverlayPage #
FunctionBasic User choice Program
CoverMode
BookletSort/Finished
BorderErase
Exposuremode
Orig.imagequality
Ready to copy.
Selectorig. size
AutoSelection
Batchscanning Up
Down
SetPaper size11x81/2"
Metric specifications
Select paper
2-sided/Split
Merge copy
Reduce/Enlarge
Margin/Imag. shift
Pagenumbering
FunctionBasic User choice Program
Cover Mode
BookletErase Mode
Exposuremode
Image quality
Sort/Finished
Ready to copy.
Select size orig.
Autoselection
Large # oforiginals
Form overlay
Up
Down
SetPaper size
4 Touch the key that corresponds to the style of page numbersthat you want to use. The screen to make settings for thatstyle will be displayed.
Inch specifications
None
Page # Register
Page # can be added on bottom of copy.
Ready to copy. SetPaper size
Back Close
11x81/2"
Metric specifications
None
-1-
P.1
1/n
Page numbering
Page # can be added on bottom of copy.
Back Close
Ready to copy.
Register
SetPaper size
E
-5-
D
-4-
C
-3-
B
-2-
A
-1-
E
-2-
D
-1-
CB
A
ED
C
-3-
B
-2-
A
-1-
E
P.5
D
P.4
C
P.3
B
P.2
A
P.1
E
5/5
D
4/5
C
3/5
B
2/5
A
1/5
ED
CB
A
When you make copies from multiple originals, you can have pagenumbers printed on the corresponding copies in numerical order fromthe first original. There are three styles of page numbers to choosefrom: “-1-”, “P.1” and “1/n”.* If you select “1/n” as the style of page numbers, the denominator will
indicate the total number of pages.
NOTE
Page numbers will be printed relative to the middle of the bottom ofthe page. (The arrow in the illustration indicates the direction in whichthe originals are set.)
1 Set the originals to be copied.
2 Touch the “Function” tab. The content of the “Function” tabwill be displayed.
Abcde
-1-
Abcde
-1-
Abc
de
-1-
Abc
de
-1-

Section 5 OTHER CONVENIENT FUNCTIONS
5-17
5 If you want printing of the page numbers to be started from apage other than the first page, touch the “Setting 1st page”key.The “Setting 1st page” screen will be displayed.
Inch specifications
None
Start page #
Finish Page #
Auto
Start #
Setting1st page
Settingstart #
Setting last page
Set denom-inator #
Denominator #
Page # Register
Ready to copy. SetPaper size
Back Close
11x81/2"
Rear
Check direction
Left topcorner
Check direction of original top side.
Last page
Metric specifications
Star t page #
Last page #
Star t #
Setting1st page
SettingStart page
Settinglast page
SetDenomin. #
Page numbering
Check direct ionCheck direct ion ofor ig inal .
Denominator #
Back Close
Ready to copy.
Register
SetPaper size
Back Edge Left topcorner
None
-1-
P.1
1/n Last page Auto
1 1
6 Touch the “+” key or the “-” key to select from which pageprinting of the page numbers will start.
Inch specifications
Page
Setting 1st page
Ready to copy. SetPaper size
Back Close
11x81/2"
Rear
Check direction
Left topcorner
Check direction of original top side.
+
Metric specifications
Page
Setting 1st page
Check direct ionCheck direct ion ofor ig inal .
Back Close
Ready to copy. SetPaper size
Back Edge Left topcorner
7 Touch the “Close” key. The touch panel will return to thescreen in step 5.
8 If you want the first page number that is printed to besomething other than “1”, touch the “Setting start #” [“SettingStart page”] key. The “Setting start #” screen will bedisplayed.
Inch specifications
None
Start page #
Finish Page #
Auto
Start #
Setting1st page
Settingstart #
Setting last page
Set denom-inator #
Denominator #
Page # Register
Ready to copy. SetPaper size
Back Close
11x81/2"
Rear
Check direction
Left topcorner
Check direction of original top side.
Last page
Metric specifications
Star t page #
Last page #
Star t #
Setting1st page
SettingStart page
Settinglast page
SetDenomin. #
Page numbering
Check direct ionCheck direct ion ofor ig inal .
Denominator #
Back Close
Ready to copy.
Register
SetPaper size
Back Edge Left topcorner
None
-1-
P.1
1/n Last page Auto
1 1
9 Touch the “+” key or the “-” key to select the first pagenumber that will be printed.* The desired page number can also be entered directly by
touching the “# keys” [“#-Keys”] key and then using thekeypad.
Inch specifications
# keys
Setting start #
Ready to copy. SetPaper size
Back Close
81/2x11"
Rear
Check direction
Left topcorner
Check direction of original top side.
+
Metric specifications
#-Keys
Setting start #
Check direct ionCheck direct ion ofor ig inal .
Back Close
Ready to copy. SetPaper size
Back Edge Left topcorner
10 Touch the “Close” key. The touch panel will return to thescreen in step 8.

Section 5 OTHER CONVENIENT FUNCTIONS
5-18
11 If you want the last page number that is printed to be on acopy other than that for the last original, touch the “Settinglast page” key. The “Setting last page” screen will bedisplayed.
Inch specifications
None
Start page #
Finish Page #
Auto
Start #
Setting1st page
Settingstart #
Setting last page
Set denom-inator #
Denominator #
Page # Register
Ready to copy. SetPaper size
Back Close
11x81/2"
Rear
Check direction
Left topcorner
Check direction of original top side.
Last page
Metric specifications
Star t page #
Last page #
Star t #
Setting1st page
SettingStart page
Settinglast page
SetDenomin. #
Page numbering
Check direct ionCheck direct ion ofor ig inal .
Denominator #
Back Close
Ready to copy.
Register
SetPaper size
Back Edge Left topcorner
None
-1-
P.1
1/n Last page Auto
1 1
12 Touch the “Manual” key.The screen to designate the last page will be displayed.
Inch specifications
Last page
Manual
Setting last page
Ready to copy. SetPaper size
Back Close
11x81/2"
Rear
Check direction
Left topcorner
Check direction of original top side.
Metric specifications
Check direct ionCheck direct ion ofor ig inal .
Last page
Manual
Setting last page Back Close
Ready to copy. SetPaper size
Back Edge Left topcorner
13 Touch the “+” key or the “-” key to select, counting from thefinal copy, how many pages you do NOT want to have pagenumbers printed on.
Inch specifications
Last page
Manual
Page
Setting last page
Ready to copy. SetPaper size
Back Close
11x81/2"
Rear
Check direction
Left topcorner
Check direction of original top side.
+
Metric specifications
Last page
Manual
Setting last page
Check direct ionCheck direct ion ofor ig inal .Page
Back Close
Ready to copy. SetPaper size
Back Edge Left topcorner
14 Touch the “Close” key. The touch panel will return to thescreen in step 11.If you selected the “1/n” style, the “Set denominator #”[“Set Denomin. #”] key will be displayed.
15 If you want to manually select the denominator for the pagenumbers, touch the “Set denominator #” [“Set Denomin. #”]key. The “Setting denominator #” screen will be displayed.
Inch specifications
None
Start page #
Finish Page #
Auto
Start #
Setting1st page
Settingstart #
Setting last page
Set denom-inator #
Denominator #
Page # Register
Ready to copy. SetPaper size
Back Close
11x81/2"
Rear
Check direction
Left topcorner
Check direction of original top side.
Last page
Metric specifications
Star t page #
Last page #
Star t #
Setting1st page
SettingStart page
Settinglast page
SetDenomin. #
Page numbering
Check direct ionCheck direct ion ofor ig inal .
Denominator #
Back Close
Ready to copy.
Register
SetPaper size
Back Edge Left topcorner
None
-1-
P.1
1/n Last page Auto
1 1

Section 5 OTHER CONVENIENT FUNCTIONS
5-19
16 Touch the “Manual” key.The screen to designate the denominator will be displayed.
Inch specifications
Auto
Manual
Setting denominator #
Ready to copy. SetPaper size
Back Close
11x81/2"
Rear
Check direction
Left topcorner
Check direction of original top side.
Metric specifications
Check direct ionCheck direct ion ofor ig inal .
Auto
Manual
Setting denominator # Back Close
Ready to copy. SetPaper size
Back Edge Left topcorner
17 Touch the “+” key or the “-” key to select the desireddenominator for the page numbers.* The desired denominator can also be entered directly by
touching the “# keys” [“#-Keys”] key and then using thekeypad.
Inch specifications
Auto
Manual
Setting denominator #
Ready to copy. SetPaper size
Back Close
81/2x11"
Rear
Check direction
Left topcorner
Check direction of original top side.
# keys
+
Metric specifications
Auto
Manual
Setting denominator #
Check direct ionCheck direct ion ofor ig inal .
Back Close
Ready to copy. SetPaper size
Back Edge Left topcorner#-Keys
18 Follow the instructions on the right side of the touch paneland verify the direction in which the originals were set.
Inch specifications
Metric specifications
19 Press the [Start] key.Copying will start.
Open fromleft/rightOpen from top
Rear
Check direction
Register Back Close
11x81/2"SetPaper size
Left topcorner
Finished
Check direction of original top side.
Book➔ Book
Book➔ Duplex
Check direction
Register Back Close
11x81/2"SetPaper size
Finished
Set the book originaltop side direct to back.
Finished
Back EdgeLeft topCorner
Check direct ion Check direct ion of or ig inal .
Register
Left/RightbindingTopbinding
Back Close
SetPaper size
Register
Finished
BookR Book
BookR Duplex
Back Close
Check direct ionSet book or ig inal top s ide direct ion to back.
SetPaper size

Section 5 OTHER CONVENIENT FUNCTIONS
5-20
9. Overlaying one image over another [Form overlay mode]
This mode can be used to scan the first original (the “form”) intomemory and have its image overlaid onto copies made fromsubsequent originals. If the optional Hard Disk is installed on yourcopier, it is also possible to register and store in memory, in advance,the images that you want to use as original forms.
NOTE
Refer to “(2) Form registration” on page 6-1 for the procedure toregister images as forms.
1 Touch the “Function” tab. The content of the “Function” tabwill be displayed.
2 Touch the “Forms Overlay” [“Form overlay”] key. The “FormsOverlay” [“Form overlay”] screen will be displayed.
Inch specifications
2 sided/Separation
Selectpaper Combine
Reduce/Enlarge
Margin/Centering
FormsOverlayPage #
FunctionBasic User choice Program
CoverMode
BookletSort/Finished
BorderErase
Exposuremode
Orig.imagequality
Ready to copy.
Selectorig. size
AutoSelection
Batchscanning Up
Down
SetPaper size11x81/2"
Metric specifications
Select paper
2-sided/Split
Merge copy
Reduce/Enlarge
Margin/Imag. shift
Pagenumbering
FunctionBasic User choice Program
Cover Mode
BookletErase Mode
Exposuremode
Image quality
Sort/Finished
Ready to copy.
Select size orig.
Autoselection
Large # oforiginals
Form overlay
Up
Down
SetPaper size
3 Touch the “On” key.The screen to set the shading level of the form image will bedisplayed.
Inch specifications
On
Off
Forms Overlay Register
Overlay first scanned image ontothe scanned image or on registered from.
Ready to copy. SetPaper size
Back Close
11x81/2"
Metric specifications
On
Form overlay
Overlay 1st image on the scannedimage or on registered form.
Of
Back Close
Ready to copy.
Register
SetPaper size
4 Touch the “+” key or the “-” key to select the level of shadingthat you want to use for the original form.The desired shading level can be set to any 10% incrementbetween 10% and 100%.* A sample of the effect that the selected shading level will
produce will be displayed to the right of the entry field.
Inch specifications
Place from first then press start.
Forms Overlay
%
(10~100)
Scan form onceOn
Off
Register Back Close
Exposure 50
FormSelected
Metric specifications
Set form.Press Start Key.
Form overlay
Off
50 %
On
Register Back Close
Scan form once
Formselection
Exposure
(10 100)
5 If the optional Hard Disk is installed on your copier, it is alsopossible to register and store in memory, in advance, theimages that you want to use as original forms. If you want touse a previously registered image as the form, touch the“Form Selected” [“Form selection”] key and go to the nextstep.If you want to scan in a new image, go directly to step 9.
ABC
BC
A

Section 5 OTHER CONVENIENT FUNCTIONS
5-21
6 Touch the “Loading Form” key.A list of registered forms will be displayed.
Inch specifications
Overlay first scanned image ontothe scanned image or on registered from.
Scan formonceLoadingForm
Select Form Back Close
Metric specifications
Back CloseForm selection
Set form.Press Start key.
Scan formonceLoadingForm
SetPaper size
Overlay 1st image on the scannedimage or on registered form.
Back CloseForm selection
y
7 Select from that list the image that you want to use and thentouch the “Close” key. The touch panel will return to thescreen in step 4.
Inch specifications
The arrow means direction of registered form.Set original and form directions.
Form 600dpi
Select Form
Scan formonce
LoadingForm
Form 005
Form 004
Form 003
Form 002
Form 001
Back Close
Up
Down
11x81/2"
11x81/2"
81/2x11"
11x81/2"
11x81/2"
Metric specifications
Back CloseForm selection
Form
Scan formonce
The arrow means direction of registered form.Set original and form directions.
LoadingForm
Down
UpForm006
Form005
Form004
Form003
Form002
600dpi
8 Set the originals that you want to copy and go directly to step10.
9 If you are using the optional Document Processor, make surethat the original that you want to use as the form is on top ofthe originals that you want to copy.
If you are using the platen, set the original that you want touse as the form.
10 Press the [Start] key.Copying will start.
If a message appears telling you to set the next original, goto the next step.
11 Replace the first original with the next one and press the[Start] key. Scanning of that next original will start.
12 Once you have finished scanning all of the originals, touchthe “Scanning finished” key. Copying will start.

Section 5 OTHER CONVENIENT FUNCTIONS
5-22
10. Making booklets from sheet originals [Booklet/Stitching mode]
With this mode, you can use 1-sided or 2-sided originals to makeopen-faced, two-sided copies in such a way that the finished copiescan be stacked and folded into a booklet format. You can also selectto have color paper or relatively thick paper fed as front and/or backcovers to the copy sets.
NOTES
• Only 8 1/2" x 11", 11" x 8 1/2", 11" x 17", B5R, B5, A4R, A4, B4 andA3 size copy paper can be used in this mode.
• It is possible for you to change the drawer[cassette] that will be usedto feed the cover sheets. (See “Cover drawer[cassette]” onpage 7-71.)
Inch specifications• If the optional Document Finisher with Center Bind & Fold Unit is
installed on your copier, you will be able to select center binding(stapling) and folding. Only 8 1/2" x 11" and 11" x 17" size copy papercan be center folded and stapled.
Metric specifications• If the optional Document Finisher with Center Bind & Fold Unit is
installed on your copier, you will be able to select center binding(stapling) and folding. Only A4R, B4 and A3 size copy paper can becenter folded and stapled.
1 If “Left” is selected as the binding direction...
Copying will be performed so that the stacked and folded pages of thefinished copies read from left to right.
2 If “Right” is selected as the binding direction...
Copying will be performed so that the stacked and folded pages of thefinished copies read from right to left.
3 If “Top” is selected as the binding direction...
Copying will be performed so that the stacked and folded pages of thefinished copies read from top to bottom.
4 It is possible for you to select whether or not to copy onto thefront and/or back cover sheets.
Front cover Back cover
Do NOT copy
Copy on outside
Copy on inside
Copy on both sides
NOTES
• The asterisk “ ” indicates the side of the cover on which copyingwill be accomplished.
• The illustrations above are an example of when “Left” is selected asthe binding direction.
87
65
43
21
7
86
5
231
4
2
13
4
768
5
2
1
21
34
7
685
87
65
43
21
bb
a
a

Section 5 OTHER CONVENIENT FUNCTIONS
5-23
1 Set the first original to be copied.
2 Touch the “Function” tab. The content of the “Function” tabwill be displayed.
3 Touch the “Booklet” key. The “Booklet” screen will bedisplayed.
Inch specifications
2 sided/Separation
Selectpaper Combine
Reduce/Enlarge
Margin/Centering
FormsOverlayPage #
FunctionBasic User choice Program
CoverMode
BookletSort/Finished
BorderErase
Exposuremode
Orig.imagequality
Ready to copy.
Selectorig. size
AutoSelection
Batchscanning Up
Down
SetPaper size11x81/2"
Metric specifications
Select paper
2-sided/Split
Merge copy
Reduce/Enlarge
Margin/Imag. shift
Pagenumbering
FunctionBasic User choice Program
Cover Mode
BookletErase Mode
Exposuremode
Image quality
Sort/Finished
Ready to copy.
Select size orig.
Autoselection
Large # oforiginals
Form overlay
Up
Down
SetPaper size
4 Touch the “Booklet” key. The screen to specify the bindingdirection of the originals and the finished copies will bedisplayed.
Inch specifications
None
Booklet
Book➔Booklet
Register
Edi t one or two sided or ig inal pagesand out put a book.Use Book-booklet for book or ig inal .
Booklet
Ready to copy. SetPaper size
Back Close
11x81/2"
Metric specifications
Booklet
BookRBooklet
Booklet
Edi t 1- and 2-sided or ig inalsand output as book.Use BookRbooklet for book or ig inal .
None
Back Close
Ready to copy.
Register
SetPaper size
5 Specify the binding direction of both the originals and thefinished copies.
Inch specifications
Booklet
2 sided mode.
Book➔Booklet
Stitching
Off
None
Stitching Front cvr
Saddle Stitch
None
Booklet
1 sided
2-sidedLeft/Right
2-sidedTop/Bottom
Open fromleft
Open fromright
Open fromtop
Register
SetPaper size
Back Close
11x81/2"
Original Finishing
Rear
Check direction
Left topcorner
Check direction of original top side.
Metric specifications
Duplex Mode.
Sti tching
Off
None
StitchingFront cov.
CenterStaple Back Edge Left top
corner
Check direct ionCheck direct ion ofor ig inal .
1-sided
2-sidedLeft/Right
2-sidedTop/Bottom
Topbinding
SetPaper size
Booklet
BookRBooklet
None
Back CloseRegisterBooklet
LeftbindingRightbinding
Or iginal Finished
6 If “It is impossible to copy in present setting mode. Changesetting of original and finishing mode.” appears, check (onthe right side of the touch panel) whether both the orientationof the originals and the finish mode setting are correct or not.
Inch specifications
Booklet
It is impossible to copy in present setting mode.Change setting of original and finishing mode.
Book➔Booklet
Stitching
Off
None
Stitching Front cvr
Saddle Stitch
None
Booklet
1 sided
2-sidedLeft/Right
2-sidedTop/Bottom
Open fromleft
Open fromright
Open fromtop
Register
SetPaper size
Back Close
11x81/2"
Original Finishing
Rear
Check direction
Left topcorner
Check direction of original top side.
Metric specifications
Sti tching
Off
StitchingFront cov.
CenterStaple Back Edge Left top
corner
Check direct ionCheck direct ion ofor ig inal .
1-sided
2-sidedLeft/Right
2-sidedTop/Bottom
Topbinding
SetPaper size
Booklet
BookRBooklet
None
Back CloseRegisterBooklet
It is impossible to copy in present setting mode.Change setting of original and finishing mode.
None
LeftbindingRightbinding
Or iginal Finished

Section 5 OTHER CONVENIENT FUNCTIONS
5-24
7 If the optional Document Finisher with Center Bind & FoldUnit is installed on your copier, the “Saddle Stitch” [“CenterStaple”] key will be displayed and you will be able to selectcenter binding (stapling) and folding of the copy sets. In thiscase, if you DO want the center stapling and foldingoperation to be performed, touch the “Saddle Stitch” [“CenterStaple”] key and go to the next step.
If you do NOT want the stapling and folding operation to beperformed, go directly to step 9.
Inch specifications
Booklet
2 sided mode.
Book➔Booklet
Stitching
Off
None
Stitching Front cvr
Saddle Stitch
None
Booklet
1 sided
2-sidedLeft/Right
2-sidedTop/Bottom
Open fromleft
Open fromright
Open fromtop
Register
SetPaper size
Back Close
11x81/2"
Original Finishing
Rear
Check direction
Left topcorner
Check direction of original top side.
Metric specifications
Duplex Mode.
Sti tching
Off
None
StitchingFront cov.
CenterStaple Back Edge Left top
corner
Check direct ionCheck direct ion ofor ig inal .
1-sided
2-sidedLeft/Right
2-sidedTop/Bottom
Topbinding
SetPaper size
Booklet
BookRBooklet
None
Back CloseRegisterBooklet
LeftbindingRightbinding
Or iginal Finished
8 Touch the “Bind & Fold” key.* It is possible for you to center staple and fold, up to 10 copy
sheets (40 layout pages) at one time.
Inch specifications
Pape Set
100%
Saddle Stitch Back Close
Off
Bind &Fold
81/2x11"2 sided mode.
Metric specifications
Duplex Mode.
Saddle Stitch
Bind& Fold
Back Close
SetPaper size
Off
9 If you want to add covers, touch the “Stitching Front cvr”[“Stitching Front cov.”] key and go to the next step.If you do NOT want to add covers, go directly to step 11.
Inch specifications
Booklet
2 sided mode.
Book➔Booklet
Stitching
Off
None
Stitching Front cvr
Saddle Stitch
None
Booklet
1 sided
2-sidedLeft/Right
2-sidedTop/Bottom
Open fromleft
Open fromright
Open fromtop
Register
SetPaper size
Back Close
11x81/2"
Original Finishing
Rear
Check direction
Left topcorner
Check direction of original top side.
Metric specifications
Duplex Mode.
Sti tching
Off
None
StitchingFront cov.
CenterStaple Back Edge Left top
corner
Check direct ionCheck direct ion ofor ig inal .
1-sided
2-sidedLeft/Right
2-sidedTop/Bottom
Topbinding
SetPaper size
Booklet
BookRBooklet
None
Back CloseRegisterBooklet
LeftbindingRightbinding
Or iginal Finished
10 Touch the “Cover” key and select whether or not (and where)to copy on each of the front and back covers.
Inch specifications
Front cover Rear cover
2 sided mode.
No cover
Cover
Blank
Front copy2 sidedcopy
Back copy Blank
Front copy2 sidedcopy
Back copy
Front cover
SetPaper size
Back Close
11x81/2"
Metric specifications
Back
Front cover Back cover
CloseStitch. front cover.
Duplex Mode.
No cover
Cover
Blank
Front copy 2-sidedcopy
Back copy
Front copy 2-sidedcopy
Back copyBlank
SetPaper size

Section 5 OTHER CONVENIENT FUNCTIONS
5-25
11 Press the [Start] key.Scanning of the originals will start.
If you set the originals in the optional Document Processor,copying will start automatically.If you set an original on the platen, a message will appeartelling you to set the next original. In this case, go to the nextstep.
12 Replace the first original with the next one and press the[Start] key. Scanning of that next original will start.
13 Once you have finished scanning all of the originals, touchthe “Scanning finished” key. Copying will start.

Section 5 OTHER CONVENIENT FUNCTIONS
5-26
11. Making booklets from book originals [Book to Booklet mode]
With this mode, you can add covers, and either copy onto them or not,so that the finished copy sets will appear like a magazine, etc.
NOTES
• Only 8 1/2" x 11", 11" x 8 1/2", 11" x 17", A5R, B5R, A4R, B4 and A3size originals and 8 1/2" x 11", 11" x 8 1/2", 11" x 17", B5R, B5, A4R,A4, B4 and A3 size copy paper can be used in this mode.
• It is possible for you to change the drawer[cassette] that will be usedto feed the cover sheets. (See “Cover drawer[cassette]” on page7-71.)
Inch specifications• If the optional Document Finisher with Center Bind & Fold Unit is
installed on your copier, you will be able to select center binding(stapling) and folding. Only 8 1/2" x 11" and 11" x 17" size copy papercan be center folded and stapled.
Metric specifications• If the optional Document Finisher with Center Bind & Fold Unit is
installed on your copier, you will be able to select center binding(stapling) and folding. Only A4R, B4 and A3 size copy paper can becenter folded and stapled.
● With a cover
The original that will be used as the cover will be scanned first so that,when the finished copies are folded, that page will act as the front andback cover to the copy set.
● Without a cover
When the finished copies are folded, the front and back of the copyset will be blank.
1 Set the open-faced (book, etc.) original to be copied.
2 Touch the “Function” tab. The content of the “Function” tabwill be displayed.
BA BA
BA2
B A3
1 5
46 612
3
5
4
2
3
1 5
4
612
3
5
4
AB6

Section 5 OTHER CONVENIENT FUNCTIONS
5-27
3 Touch the “Booklet” key. The “Booklet” screen will bedisplayed.
Inch specifications
2 sided/Separation
Selectpaper Combine
Reduce/Enlarge
Margin/Centering
FormsOverlayPage #
FunctionBasic User choice Program
CoverMode
BookletSort/Finished
BorderErase
Exposuremode
Orig.imagequality
Ready to copy.
Selectorig. size
AutoSelection
Batchscanning Up
Down
SetPaper size11x81/2"
Metric specifications
Select paper
2-sided/Split
Merge copy
Reduce/Enlarge
Margin/Imag. shift
Pagenumbering
FunctionBasic User choice Program
Cover Mode
BookletErase Mode
Exposuremode
Image quality
Sort/Finished
Ready to copy.
Select size orig.
Autoselection
Large # oforiginals
Form overlay
Up
Down
SetPaper size
4 Touch the “Book / Booklet” key. The screen to specify thebinding direction of the originals and the finished copies willbe displayed.
Inch specifications
None
Booklet
Book➔Booklet
Register
Edi t one or two sided or ig inal pagesand out put a book.Use Book-booklet for book or ig inal .
Booklet
Ready to copy. SetPaper size
Back Close
11x81/2"
Metric specifications
Booklet
BookRBooklet
Booklet
Edi t 1- and 2-sided or ig inalsand output as book.Use BookRbooklet for book or ig inal .
None
Back Close
Ready to copy.
Register
SetPaper size
5 Specify the binding direction of both the originals and thefinished copies.
Inch specifications
Copy onfront cvr
None
Booklet
Booklet
Book➔Booklet
Set first page.Press "Start" key.
Register
SetPaper size
Back Close
11x81/2"
Copy front
Off
None
SaddleStitch
BookRight
BookLeft
Open fromright
Open fromleft
Original Finishing Check directionSet the book originaltop side direct to back.
Metric specifications
Back Close
SetPaper size
Register
Booklet
BookRBooklet
Booklet
NoneLeft bindingRightbinding
BookLeftBookRight
Copy onfront cov.
CenterStaple
Check direct ionSet book or ig inal topside direct ion to back.
Or iginal Finished Copy front
Off
Set first page.Press "START" button.
None
6 If the optional Document Finisher with Center Bind & FoldUnit is installed on your copier, the “Saddle Stitch” [“CenterStaple”] key will be displayed and you will be able to selectcenter binding (stapling) and folding of the copy sets. In thiscase, if you DO want the center stapling and foldingoperation to be performed, touch the “Saddle Stitch” [“CenterStaple”] key and go to the next step.
If you do NOT want the stapling and folding operation to beperformed, go directly to step 8.
Inch specifications
Copy onfront cvr
None
Booklet
Booklet
Book➔Booklet
Set first page.Press "Start" key.
Register
SetPaper size
Back Close
11x81/2"
Copy front
Off
None
SaddleStitch
BookRight
BookLeft
Open fromright
Open fromleft
Original Finishing Check directionSet the book originaltop side direct to back.
Metric specifications
Back Close
SetPaper size
Register
Booklet
BookRBooklet
Booklet
NoneLeft bindingRightbinding
BookLeftBookRight
Copy onfront cov.
CenterStaple
Check direct ionSet book or ig inal topside direct ion to back.
Or iginal Finished Copy front
Off
Set first page.Press "START" button.
None

Section 5 OTHER CONVENIENT FUNCTIONS
5-28
9 Touch the “On” key.
Inch specifications
Off
On
Set first page.Press "Start" key.
When selecting "ON" for copying on thefront cover, follow the instruction.1. Scan front cover book original2. Start scan book originals
Copy on front cover
SetPaper size
Back Close
11x81/2"
Check directionSet the book originaltop side direct to back.
Metric specifications
Off
SetPaper size
Back Close
On
Copy on front cover
Set first page.Press "START" button.
When select ing "ON" for copying on thefront cover, fo l low the instruct ion.1. Scan front cover book or ig inal .2. Star t scan book or ig inals.
Check direct ionSet book or ig inal topside direct ion to back.
IMPORTANT!
If you DO want to copy onto the covers, be absolutely certain to setthe original that you want to have copied onto the cover first.
10 Press the [Start] key.Scanning of the original will start.
When a message appears telling you to set the next original,go to the next step.
11 Replace the first original with the next one and press the[Start] key. Scanning of that next original will start.
12 Once you have finished scanning all of the originals, touchthe “Scanning finished” key. Copying will start.
7 Touch the “Bind & Fold” key.* It is possible for you to center staple and fold, up to 10 copy
sheets (40 layout pages) at one time.
Inch specifications
Pape Set
100%
Saddle Stitch Back Close
Off
Bind &Fold
81/2x11"Set first page.Press "Start" key.
Metric specifications
Saddle Stitch
Bind& Fold
Back Close
SetPaper size
Off
Set first page.Press "START" button.
8 If you want to add covers, touch the “Copy on front cvr”[“Copy on front cov.”] key. The “Copy on front cover” screenwill be displayed.At this point, if you do NOT want to copy onto the covers, godirectly to step 10.
Inch specifications
Copy onfront cvr
None
Booklet
Booklet
Book➔Booklet
Set first page.Press "Start" key.
Register
SetPaper size
Back Close
11x81/2"
Copy front
Off
None
SaddleStitch
BookRight
BookLeft
Open fromright
Open fromleft
Original Finishing Check directionSet the book originaltop side direct to back.
Metric specifications
Back Close
SetPaper size
Register
Booklet
BookRBooklet
Booklet
NoneLeft bindingRightbinding
BookLeftBookRight
Copy onfront cov.
CenterStaple
Check direct ionSet book or ig inal topside direct ion to back.
Or iginal Finished Copy front
Off
Set first page.Press "START" button.
None

Section 5 OTHER CONVENIENT FUNCTIONS
5-29
12. Automatic sorting of copy sets without the Document Finisher
[Sort/Finished mode]
Since copying in this mode is performed after multiple originals arescanned and memorized, copies can be sorted into the requirednumber of sets even without the optional Document Finisher.
NOTES
• If you do not have paper of the same size but different orientationsavailable for paper feed, copies will be ejected without being“sorted” in this way.
• You can also select whether or not the Sort and/or the Finishedmodes will be the default setting in the initial mode. (See “Sort/Finished mode ON/OFF” on page 7-78.)
1 Set the originals to be copied.
2 Touch the “Function” tab. The content of the “Function” tabwill be displayed.
32
1
32
1
321
32
1
11
1
33
3
222
32
1
3 Touch the “Sort/Finished” key. The “Sort/Finished” screen willbe displayed.
Inch specifications
2 sided/Separation
Selectpaper Combine
Reduce/Enlarge
Margin/Centering
FormsOverlayPage #
FunctionBasic User choice Program
CoverMode
BookletSort/Finished
BorderErase
Exposuremode
Orig.imagequality
Ready to copy.
Selectorig. size
AutoSelection
Batchscanning Up
Down
SetPaper size11x81/2"
Metric specifications
Select paper
2-sided/Split
Merge copy
Reduce/Enlarge
Margin/Imag. shift
Pagenumbering
FunctionBasic User choice Program
Cover Mode
BookletErase Mode
Exposuremode
Image quality
Sort/Finished
Ready to copy.
Select size orig.
Autoselection
Large # oforiginals
Form overlay
Up
Down
SetPaper size
4 Touch the “Sort:ON” key.
Inch specifications
OffsetSort
Sort/Finished
Off
On
Register
Ready to copy. SetPaper size
Back Close
11x81/2"
Sort:Off
Sort:On
Rear
Metric specifications
Sort:Off
Sort:On
GroupSor t
Sort/Finished
Off
1 set
Back Close
Ready to copy.
Register
SetPaper size
5 Touch the “On” [“1 set”] key.
6 Use the keypad to set the number of copies to be made.
7 Press the [Start] key.Copying will start.
(when there is paper loaded of the samesize but different orientation)
When “Sort:ON” and “On” [“1 set”] areselected
When “Sort:OFF” and “On” [“Output eachpage”] are selected

Section 5 OTHER CONVENIENT FUNCTIONS
5-30
13. Auto rotation function
If the orientation of the original is different from that of the paperloaded in the drawers[cassettes], the image will be automaticallyturned 90 degrees counter-clockwise for copying. No special setting isrequired in order to use this function.
NOTES
• This function will only work with 5 1/2" x 8 1/2", 8 1/2" x 11",11" x 8 1/2", A6R, B6R, A5R, B5R, B5, A4R and A4 size copy paper.
• You can also select whether or not the Auto Rotation mode will bethe default setting in the initial mode. (See “Auto Rotation mode ON/OFF” on page 7-79.)
If you want to disengage the auto rotation function, perform thefollowing procedure.
1 Touch the “Function” tab and then the “▼ Down” key.The content of the next portion of the “Function” tab will bedisplayed.
2 Touch the “Auto Rotation” key. The “Auto Rotation” screenwill be displayed.
Inch specifications
Invert Mirror
ModifyCopy
Proof CopyMemopages
Orig. setdirection
Ready to copy.
Up
Down
SetPaper size
Eco Print
AutoRotation
FunctionBasic User choice Program
OHP backing
11x81/2"
Metric specifications
Invert Mirror
Modify copy
Test copy Memopages
Orig. setdirection
Ready to copy.
Up
Down
SetPaper size
Eco Print
Auto Rotation
FunctionBasic User choice Program
OHP back
3 Touch the “No Rotate” key.
Inch specifications
When original and paper have differentdirection, image will be rotated.
No Rotate
Rotate
Auto Rotation Register
Ready to copy.SetPaper size
Back Close
11x81/2"
Metric specifications
Auto Rotation
When or ig inal and paper have di f ferentdirect ion, or ig inal wi l l be rotatedautomat ical ly.
No rotate
Rotate
Back Close
Ready to copy.
Register
SetPaper size

Section 5 OTHER CONVENIENT FUNCTIONS
5-31
14. Adding a front and/or back cover to your copy sets [Cover mode]
With this mode, you can select to have color paper or relatively thick paper fed as front and/or back covers to your copy sets.
NOTE
It is possible for you to change the drawer[cassette] that will be used to feed the cover sheets. (See “Cover drawer[cassette]” on page 7-71.)
You can select separately whether you want both sides or only one side of both the front and back covers to be copied onto, or to have either orboth of them left completely blank. Select also whether or not you even want to include a back cover at all.
* The illustrations above show the result when sets of 2-sided copies are being made.If you are making sets of 1-sided copies, copying will not be performed on the rear side of the covers even if the 2-sided copy [Duplex Copy] orBack copy settings are selected.
Back coverFront cover
2 sided copy[Duplex Copy]*
Front copy
Back copy*
Blank
No back cover

Section 5 OTHER CONVENIENT FUNCTIONS
5-32
1 Set the originals to be copied.
2 Touch the “Function” tab. The content of the “Function” tabwill be displayed.
3 Touch the “Cover Mode” key. The “Cover Mode” screen will bedisplayed.
Inch specifications
2 sided/Separation
Selectpaper Combine
Reduce/Enlarge
Margin/Centering
FormsOverlayPage #
FunctionBasic User choice Program
CoverMode
BookletSort/Finished
BorderErase
Exposuremode
Orig.imagequality
Ready to copy.
Selectorig. size
AutoSelection
Batchscanning Up
Down
SetPaper size11x81/2"
Metric specifications
Select paper
2-sided/Split
Merge copy
Reduce/Enlarge
Margin/Imag. shift
Pagenumbering
FunctionBasic User choice Program
Cover Mode
BookletErase Mode
Exposuremode
Image quality
Sort/Finished
Ready to copy.
Select size orig.
Autoselection
Large # oforiginals
Form overlay
Up
Down
SetPaper size
4 Touch the “Cover” key. The screen to make the front coversettings will be displayed.
Inch specifications
Ready to copy.
No cover
Cover
Front cover
Insert Color or Thick, etc paper as a front/back cover.Able to copy on same paper. Set the cover paper for specify
drawer.
Cover Mode Register
SetPaper size
Back Close
11x81/2"
Metric specifications
Cover
Front cover
Cover Mode
Inser t f ront & back cover paper (Colour/Thick etc. . . ) to head & end of copy.
Set cover paper in dedignatedpaper cassette.
No cover
Back Close
Ready to copy.
Register
SetPaper size
5 Select the desired settings for the front cover.
Inch specifications
Rear cover
No cover
Cover
Blank
Front copy2 sidedcopy
Back copy
Ready to copy.
No cover
Cover
Front cover
Cover Mode Register
SetPaper size
Back Close
11x81/2"
Metric specifications
Cover Mode
No cover
Cover
Front cover Back cover
No cover
Cover
Blank
Front copyDuplex Copy
Back copy
Back Close
Ready to copy.
Register
SetPaper size
6 Touch the “Cover” key or the “No cover” key, as appropriate,to select whether or not you want to include a back cover.If you selected “Cover”, the screen to make the back coversettings will be displayed.
Inch specifications
Rear cover
No cover
Cover
Blank
Front copy2 sidedcopy
Back copy
Ready to copy.
No cover
Cover
Front cover
Cover Mode Register
SetPaper size
Back Close
11x81/2"
Metric specifications
Cover Mode
No cover
Cover
Front cover Back cover
No cover
Cover
Blank
Front copyDuplex Copy
Back copy
Back Close
Ready to copy.
Register
SetPaper size
7 Select the desired settings for the back cover.
Inch specifications
Rear cover
No cover
Cover
Blank
Front copy2 sidedcopy
Back copy
Ready to copy.
No cover Blank
Front copy2 sidedcopy
Back copy
Cover
Front cover
Cover Mode Register
SetPaper size
Back Close
11x81/2"
Metric specifications
Cover Mode
No cover
Cover
Front cover Back cover
No cover
Cover
Blank
Front copyDuplex Copy
Back copy Blank
Front copyDuplex Copy
Back copy
Back Close
Ready to copy.
Register
SetPaper size

Section 5 OTHER CONVENIENT FUNCTIONS
5-33
8 Press the [Start] key.Scanning of the originals will start.
If you set the originals in the optional Document Processor,copying will start automatically.If you set an original on the platen, a message will appeartelling you to set the next original. In this case, go to the nextstep.
9 Replace the first original with the next one and press the[Start] key. Scanning of that next original will start.
10 Once you have finished scanning all of the originals, touchthe “Scanning finished” key. Copying will start.

Section 5 OTHER CONVENIENT FUNCTIONS
5-34
15. Original size selection mode
With this mode, if you manually select a size for the original, only thatsize image will be scanned for copying. Use this mode as well whencopying from originals of non-standard sizes.
NOTES
• You can register the size of non-standard originals that you oftenuse as a custom original size. (See “4. Original size registration” onpage 7-90.)
• ALWAYS set non-standard sized originals on the platen.• Once you select the original size under this mode, you can copy with
originals set on the platen even with the optional DocumentProcessor open.
• If this mode is used in combination with the Centering/Image shiftmode, you can, for example, have the image of non-standard sizedoriginals centered on standard sized copy paper. (See “4. Centering/Image shift mode” on page 5-8.)
1 Set the originals to be copied.
2 Touch the “Function” tab. The content of the “Function” tabwill be displayed.
3 Touch the “Select orig. size” [“Select size orig.”] key. The“Select original size” [“Select size original”] screen will bedisplayed.
Inch specifications
2 sided/Separation
Selectpaper Combine
Reduce/Enlarge
Margin/Centering
FormsOverlayPage #
FunctionBasic User choice Program
CoverMode
BookletSort/Finished
BorderErase
Exposuremode
Orig.imagequality
Ready to copy.
Selectorig. size
AutoSelection
Batchscanning Up
Down
SetPaper size11x81/2"
Metric specifications
Select paper
2-sided/Split
Merge copy
Reduce/Enlarge
Margin/Imag. shift
Pagenumbering
FunctionBasic User choice Program
Cover Mode
BookletErase Mode
Exposuremode
Image quality
Sort/Finished
Ready to copy.
Select size orig.
Autoselection
Large # oforiginals
Form overlay
Up
Down
SetPaper size
4 Select the size of the originals.If you want to select a standard scanning size, touch the keythat corresponds to the desired size and then go directly tostep 9.If you want to select a standard size other than thosedisplayed, go to the next step.If you want to select the dimensions of the scan areamanually, go directly to step 7.
Inch specifications
User regist.
Selectsize
Input size
Otherstand. Size
Cardstock
Auto 51/2 x 51/2"
81/2 x 81/2"
11 x 11"
9 x 9"
Ready to copy.
Select original size Register
SetPaper size
Back Close
11x81/2"
11 x 17"
81/2 x 11"
11 x 81/2"
81/2 x 14"
51/2 x 81/2"
81/2 x 51/2"
11 x 15"
A4
A4
Metric specifications
BackRegister Close
Use regist
Select size original
Ready to copy.
Select size
Input size
Auto
SetPaper size
100X100mm
150X150mm
200X200mm
120X120mmFolioOthersstand. Size
NOTE
If you have registered a custom original size, you will be able to selectthat size for use in this mode. (See “4. Original size registration” onpage 7-90.)
8 1/2" x 11"
A4B CA

Section 5 OTHER CONVENIENT FUNCTIONS
5-35
5 Touch the “Other stand. Size” [“Others stand.Size”] key.
6 Select the size of the originals and then proceed to step 9.
Inch specifications
Selectsize
Input size
Otherstand. Size
Ready to copy.
Select original size Register
SetPaper size
Back Close
11x81/2"
A3
A5
A6
A5
B4 8K
B5
B6
B5
B5
16K
81/2 x 13"
Folio
P. Card
Metric specifications
SetPaper size
Selectsize
Input size
Othersstand. Size
Ready to copy.
Select size original Register Back Close
8K
16K
11 x 17" 81/2 x 13"
81/2 x 14"
51/2 x 81/2"
81/2 x 51/2"
Pstcard
7 Touch the “Input size” key. The screen to set the dimensionsof the scan area will be displayed.
8 Based on the left rear corner of the platen being a setting of“0”, touch the “+” key or the “-” key to change the dimensionsof the scan area to the desired setting.* In metric specification copiers, the dimensions can also be
entered directly by touching the “#-Keys” key and thenusing the keypad.
Inch specifications
Back CloseSelect original size
Ready to copy.
Selectsize
2 115/8
2 2" "
Input size
Set or ig inal on platen and inputscanning range. (Y s ide, X s ide)
SetPaper Size
2 17
11x81/2"
Register
Otherstand. Size
Metric specifications
Back CloseSelect size original
Ready to copy.
Select size
Input size
#-Keys #-Keys
Register
Scanning range can be set wi thX-Y direct ion when or ig inal isplaced at lef t rear corner.
SetPaper size
Othersstand. Size
9 Press the [Start] key.Copying will start.

Section 5 OTHER CONVENIENT FUNCTIONS
5-36
16. Feeding paper as a backing sheet for OHP transparencies
[Transparency + backing sheet mode]
When 2 or 3 transparencies are piled on top of one another, staticelectricity can cause problems. This mode automatically places abacking sheet between the transparencies during copying for easyhandling. You can also select whether or not to have the image of theoriginal copied onto the backing sheet, or even make multiple copiesfrom the same original.
IMPORTANT!
When copying onto transparencies, ALWAYS use the multi-bypasstray.
● Copying onto the backing sheetWith this setting, after the original is copied onto the transparency, thesame image will be copied onto the backing sheet as well. (Theasterisk “*” in the illustration indicates the transparencies.)
● Leaving the backing sheet blankWith this setting, the original will be copied onto the transparency butthe backing sheet will be left blank. (The asterisk “*” in the illustrationindicates the transparencies.)
1 Set the originals to be copied.
2 Set the transparency film on the multi-bypass tray.
IMPORTANT!
• Fan through the transparencies before setting them.• Up to 25 transparencies can be set on the multi-bypass tray at one
time.• Make sure that paper of the same size and orientation as the
transparencies has been loaded into a drawer[cassette].
3 Touch the “Function” tab and then the “▼ Down” key.The content of the next portion of the “Function” tab will bedisplayed.
4 Touch the “OHP backing” [“OHP back”] key. The “OHPbacking” [“OHP back”] screen will be displayed.
Inch specifications
Invert Mirror
ModifyCopy
Proof CopyMemopages
Orig. setdirection
Ready to copy.
Up
Down
SetPaper size
Eco Print
AutoRotation
FunctionBasic User choice Program
OHP backing
11x81/2"
Metric specifications
Invert Mirror
Modify copy
Test copy Memopages
Orig. setdirection
Ready to copy.
Up
Down
SetPaper size
Eco Print
Auto Rotation
FunctionBasic User choice Program
OHP back
BA

Section 5 OTHER CONVENIENT FUNCTIONS
5-37
5 Touch the “Copy” key or the “Blank” key, as appropriate.
Inch specifications
None
Copy
Back Close
Ready to copy. SetPaper Size
Blank
OHP bacOHP backingking
Inser t a blank paper between piece of OHP f i lm, or copy to a OHP back paper.
Place the OHP f i lm in the bypass.
11x81/2"
Register
Metric specifications
None
Copy
BackRegister Close
Ready to copy. SetPaper size
Blank
OHP bacOHP back
Inser t blank paper between OHP f i lms orcopy to OHP back paper.
Place OHP f i lm on bypass.
6 Press the [Start] key.Copying will start.

Section 5 OTHER CONVENIENT FUNCTIONS
5-38
17. Inverting black and white [Invert mode]
With this mode, you can make copies where the black and whiteareas of the image are inverted (or reversed).* If multiple inverted copies are being made, “Please wait Now
cleaning” may be displayed.
1 Set the originals to be copied.
2 Touch the “Function” tab. The content of the “Function” tabwill be displayed.
3 Touch the “▼ Down” key. The content of the next portion ofthe “Function” tab will be displayed.
4 Touch the “Invert” key. The “Invert” screen will be displayed.
Inch specifications
Invert Mirror
ModifyCopy
Proof CopyMemopages
Orig. setdirection
Ready to copy.
Up
Down
SetPaper size
Eco Print
AutoRotation
FunctionBasic User choice Program
OHP backing
11x81/2"
Metric specifications
Invert Mirror
Modify copy
Test copy Memopages
Orig. setdirection
Ready to copy.
Up
Down
SetPaper size
Eco Print
Auto Rotation
FunctionBasic User choice Program
OHP back
5 Touch the “On” key.
Inch specifications
Off
On
Back CloseInvert
Ready to copy. SetPaper Size
Copy the scanned image with reversingblack and white par ts.
11x81/2"
Register
Metric specifications
Off
On
Back CloseInvert Register
Ready to copy. SetPaper size
Copy scanned image withblack and white par ts reversed.
6 Press the [Start] key.Copying will start.

Section 5 OTHER CONVENIENT FUNCTIONS
5-39
18. Making mirror image copies [Mirror image mode]
With this mode, you can make mirror image copies.
1 Set the originals to be copied.
2 Touch the “Function” tab. The content of the “Function” tabwill be displayed.
3 Touch the “▼ Down” key. The content of the next portion ofthe “Function” tab will be displayed.
4 Touch the “Mirror” key. The “Mirror” screen will be displayed.
Inch specifications
Invert Mirror
ModifyCopy
Proof CopyMemopages
Orig. setdirection
Ready to copy.
Up
Down
SetPaper size
Eco Print
AutoRotation
FunctionBasic User choice Program
OHP backing
11x81/2"
Metric specifications
Invert Mirror
Modify copy
Test copy Memopages
Orig. setdirection
Ready to copy.
Up
Down
SetPaper size
Eco Print
Auto Rotation
FunctionBasic User choice Program
OHP back
5 Touch the “On” key.
Inch specifications
Back CloseMirror
Ready to copy. SetPaper Size
Reverse scanned image lef t to r ight ,mirror image.
11x81/2"
Register
Off
On
Metric specifications
Back CloseMirror Register
Ready to copy. SetPaper size
Reversed scanned image lef t to r ightas a ref lect ion in the mirror.
Off
On
6 Press the [Start] key.Copying will start.

Section 5 OTHER CONVENIENT FUNCTIONS
5-40
With this mode, you can use the same settings to create a single setof test copies in order to verify the results prior to actually starting tomake a large number of copies or copy sets. This way, if there is aproblem with the copies, you can cancel print out in order to changethe settings and eliminate a great majority of miss-copying.
1 Set the originals to be copied.
2 Touch the “Function” tab. The content of the “Function” tabwill be displayed.
3 Touch the “▼ Down” key. The content of the next portion ofthe “Function” tab will be displayed.
4 Touch the “Proof Copy” [“Test copy”] key. The “Proof Copy”[“Test copy”] screen will be displayed.
Inch specifications
Invert Mirror
ModifyCopy
Proof CopyMemopages
Orig. setdirection
Ready to copy.
Up
Down
SetPaper size
Eco Print
AutoRotation
FunctionBasic User choice Program
OHP backing
11x81/2"
Metric specifications
Invert Mirror
Modify copy
Test copy Memopages
Orig. setdirection
Ready to copy.
Up
Down
SetPaper size
Eco Print
Auto Rotation
FunctionBasic User choice Program
OHP back
19. Making a test copy prior to large volume copying [Proof mode]
5 Touch the “On” key.
Inch specifications
BackRegister CloseProof Copy
Ready to copy.
When "On" is selected, copying stopsafter one set is e jected.This is useful for checking f in ishing.
SetPaper81/2x11
Off
On
Metric specifications
BackRegister CloseTest copy
Ready to copy.
On
Off I f "On" is selected, copying stops af terone set is e jected.Finishing resul t can then be checked.
SetPaper size
6 Press the [Start] key.Copying will start.
If a message appears telling you to set the next original, goto the next step.
7 Replace the first original with the next one and press the[Start] key. Scanning of that next original will start.
8 Once you have finished scanning all of the originals, touchthe “Scanning finished” key. Copying of the test copy set willstart.

Section 5 OTHER CONVENIENT FUNCTIONS
5-41
9 Once the test copy set is complete, a screen will bedisplayed in order to verify whether or not you want to makethe initially designated number of copy sets at the presentsettings, and the copier will enter a waiting-to-copy state.Check the test copies.
Inch specifications
ChangePreset
Cancel
Or ig. page Count/Set
Check proof copy.To stop and retr y, press "Cancel" key.To cont inue to pr int , press "Star t" key.
2 sidedSort Inner tray
100%APS
Output
Rear1 sided
Job130
11x81/2" 11x81/2"
Metric specifications
ChangePreset
Cancel
Or iginal Count / set
Check test copy.To stop and retr y , press "Cancel" key.To cont inue to pr int , press "Star t" key.
2-sidedSort
100%APS
Output
Rtop/Rear1-sided
JOB130
A4 A4
Inner tray
● If there is no problem with the copies…Press the [Start] key and copying of the initially designatednumber of copy sets will start.If you want to change the number of copies to be made,touch the “Change Preset” key and enter the actual numberof copies you do want to make.
● If there is some problem with the copies…Touch the “Cancel” key to cancel the copy job and start theprocedure from the beginning.

Section 5 OTHER CONVENIENT FUNCTIONS
5-42
20. Making more of the same copies after a copy job is finished
[Repeat copy mode]
With this mode, if you think you might want to make another set of thesame copies even after the initial copy job is finished, simply turn therepeat copy mode ON and you can make the necessary number ofadditional copies later. In order to maintain privacy, you can make itnecessary to enter a security code in order to use the repeat copymode so that, if the entered code doesn’t match the registeredsecurity code, it will not be possible to use the repeat copy mode.
NOTES
• The optional Hard Disk must be installed on this copier in order touse this mode.
• All data for repeat copying will be deleted when the main powerswitch is turned OFF.
• Repeat copying registration is not available for print out underdocument management or with the form overlay mode.
• You can prohibit repeat copying as well as make repeat copying thedefault setting in the initial mode. (See “Repeat copying ON/OFF” onpage 7-83.)
(1) Registering a copy job for repeat copying
1 Set the originals to be copied.
2 Touch the “Function” tab. The content of the “Function” tabwill be displayed.
3 Touch the “▼ Down” key. The content of the next portion ofthe “Function” tab will be displayed.
4 Touch the “Modify Copy” key. The “Modify Copy” screen willbe displayed.
Inch specifications
Invert Mirror
ModifyCopy
Proof CopyMemopages
Orig. setdirection
Ready to copy.
Up
Down
SetPaper size
Eco Print
AutoRotation
FunctionBasic User choice Program
OHP backing
11x81/2"
Metric specifications
Invert Mirror
Modify copy
Test copy Memopages
Orig. setdirection
Ready to copy.
Up
Down
SetPaper size
Eco Print
Auto Rotation
FunctionBasic User choice Program
OHP back
5 Touch the “On” key.
Inch specifications
Back CloseModify Copy
Ready to copy.
On
# keys
Security
Off When select [On], data can be saved.You can recal l and re-pr int at anyt ime.You can set the password to securesaved document.
SetPaper Size11x81/2"
Register
Metric specifications
BackRegister CloseModify copy
Ready to copy.
On
#-Keys
Security
OffWhen select [On], job can be saved.You can recal l and re-pr int at anyt ime.You can set a password to secure saveddocument.
SetPaper size
If you want to register a security code, go to the next step.
If you do NOT want to register a security code, go directly tostep 7.

Section 5 OTHER CONVENIENT FUNCTIONS
5-43
6 Touch the “# keys” [“#-Keys”] key to highlight that key andthen enter the security code that will enable repeat copyingfor these originals.
Inch specifications
Back CloseModify Copy
Ready to copy.
On
# keys
Security
Off When select [On], data can be saved.You can recal l and re-pr int at anyt ime.You can set the password to securesaved document.
SetPaper Size11x81/2"
Register
Metric specifications
BackRegister CloseModify copy
Ready to copy.
On
#-Keys
Security
Off
SetPaper size
When select [On], job can be saved.You can recal l and re-pr int at anyt ime.You can set a password to secure saveddocument.
NOTES
• The security code can be between 1 and 8 digits long.• If you forget the security code that you enter here, repeat copying
will not be possible for these originals. Be sure to keep some sort ofrecord of the security code.
7 Press the [Start] key.Copying will start.
If a message appears telling you to set the next original, goto the next step.
8 Replace the first original with the next one and press the[Start] key. Scanning of that next original will start.
9 Once you have finished scanning all of the originals, touchthe “Scanning finished” key. Copying will start.
(2) Printing out with the repeat copy mode
Once you press the [Repeat Copy] key, the “Modify copy” list will bedisplayed so that you can verify the copy jobs that are registered forrepeat copying. It is possible to reprint, check the contents of, anddelete the copy jobs that are registered in this list.
1Reprinting a registered copy job
1 Press the [Repeat Copy] key. The “Modify copy” list will bedisplayed.
2 Select the copy job that you want to reprint and touch the“Reprint” key.
Inch specifications
Job Input source Original
Reprint DeleteCheck details
Modify Copy
Set Registration Type
Norm. copy10/10 22:371
5
2
6
119
120
121
122
7
3
10
1
10/10 22:40
10/10 22:45
10/10 22:50
10/10 22:50
Norm. copy
Norm. copy
Norm. copy
Copy
Copy
Copy
Copy
EndModify copy
Metric specifications
Job Original
Reprint DeleteCheck details
Modify copy
Set Registration Type
10/10 22:371
5
2
6
119
120
121
122
7
3
10
1
10/10 22:40
10/10 22:45
10/10 22:50
10/10 22:50
Norm. copy
Norm. copy
Norm. copy
Norm. copy
EndModify copy
Input source
Copy
Copy
Copy
Copy
If you designated a security code when you registered thecopy job for repeat copying, the code input screen will bedisplayed. In this case, go to the next step.
If you did NOT designate a security code when youregistered the copy job for repeat copying, the screen toselect the number of copies or copy sets to be made will bedisplayed. In this case, go directly to step 4.

Section 5 OTHER CONVENIENT FUNCTIONS
5-44
2Checking the contents of registered copy jobs
1 Press the [Repeat Copy] key. The “Modify copy” list will bedisplayed.
2 Select the copy job that you want to check the content of andtouch the “Check detail” key.
Inch specifications
Job Input source Original
Reprint DeleteCheck details
Modify Copy
Set Registration Type
Norm. copy10/10 22:371
5
2
6
119
120
121
122
7
3
10
1
10/10 22:40
10/10 22:45
10/10 22:50
10/10 22:50
Norm. copy
Norm. copy
Norm. copy
Copy
Copy
Copy
Copy
EndModify copy
Metric specifications
Job Original
Reprint DeleteCheck details
Modify copy
Set Registration Type
10/10 22:371
5
2
6
119
120
121
122
7
3
10
1
10/10 22:40
10/10 22:45
10/10 22:50
10/10 22:50
Norm. copy
Norm. copy
Norm. copy
Norm. copy
EndModify copy
Input source
Copy
Copy
Copy
Copy
If you designated a security code when you registered thecopy job for repeat copying, the code input screen will bedisplayed. In this case, go to the next step.
If you did NOT designate a security code when youregistered the copy job for repeat copying, the “Checkdetails / Reprint” screen will be displayed. In this case,go directly to step 4.
3 Use the keypad to enter the appropriate security code andthe touch the “Enter” key. If the entered code matches theregistered one, the screen to select the number of copies orcopy sets to be made will be displayed.
Inch specifications
Enter
(Enter by #key)
Clear
Enter the re-print code.
Stop
Metric specifications
Enter
(Enter #-key)
Clear
Enter the re-print code.
Stop
NOTES
• To reenter a mistaken security code, touch the “Clear” key.• If you touch the “Stop” key, the touch panel will return to the screen
in step 2.
4 Touch the “+” key or the “-” key to set the number of copies orcopy sets to be made.
Inch specifications
Printing
Set
StopReprint
Metric specifications
Printing
Set
StopReprint
5 Touch the “Printing” key.Print out will start.

Section 5 OTHER CONVENIENT FUNCTIONS
5-45
3 Use the keypad to enter the appropriate security code andthe touch the “Enter” key. If the entered code matches theregistered one, the “Check details / Reprint” screen will bedisplayed.
Inch specifications
Enter
(Enter by #key)
Clear
Enter the re-print code.
Stop
Metric specifications
Enter
(Enter #-key)
Clear
Enter the re-print code.
Stop
4 Check the contents of the selected job. You can also checkthe content of the first page of the copy job by touching the“Print from 1st” [“Head print”] key.
Inch specifications
Printfrom 1st
DetailsItem
Orig. page 3511 x 8 1/2"copy
SetPrint sizeInput sourceRegistration date
Job120
CloseCheck details / Reprint
10/10 22:40
Metric specifications
Headprint
DetailsItem
Original 35A4Copy
SetPrint sizeInput sourceRegistration date
Job120
CloseCheck details / Reprint
10/10 22:40
5 Once you have finished checking the content of the copy job,touch the “Close” key. The touch panel will return to thescreen in step 2.
6 If you want to check the contents of another registered copyjob, repeat steps 2 through 5.
7 Touch the “Close” key. The touch panel will return to thecontents of the “Basic” tab.
3Deleting a registered copy jobs
1 Press the [Repeat Copy] key. The “Modify copy” list will bedisplayed.
2 Select the copy job that you want to delete and touch the“Delete” key. A verification screen will be displayed.
Inch specifications
Job Input source Original
Reprint DeleteCheck details
Modify Copy
Set Registration Type
Norm. copy10/10 22:371
5
2
6
119
120
121
122
7
3
10
1
10/10 22:40
10/10 22:45
10/10 22:50
10/10 22:50
Norm. copy
Norm. copy
Norm. copy
Copy
Copy
Copy
Copy
EndModify copy
Metric specifications
Job Original
Reprint DeleteCheck details
Modify copy
Set Registration Type
10/10 22:371
5
2
6
119
120
121
122
7
3
10
1
10/10 22:40
10/10 22:45
10/10 22:50
10/10 22:50
Norm. copy
Norm. copy
Norm. copy
Norm. copy
EndModify copy
Input source
Copy
Copy
Copy
Copy

Section 5 OTHER CONVENIENT FUNCTIONS
5-46
3 Touch the “Yes” key or the “No” key, as appropriate.
Inch specifications
Job # :
Delete this job. Do you really want to delete?
Yes No
Stop
117
Metric specifications
Job # :
Delete this job. Do you really want to delete?
Yes No
Stop
117
If you selected “Yes”, the selected copy job will be canceledand the touch panel will return to the screen in step 2.
If you selected “No”, the touch panel will return to the screenin step 2 without canceling the selected job.
4 If you want to cancel another registered copy job, repeatsteps 2 through 3.
5 Touch the “Close” key. The touch panel will return to thecontents of the “Basic” tab.

Section 5 OTHER CONVENIENT FUNCTIONS
5-47
With this mode, you can scan multiple sets of originals and then havethem all copied at the same time. Scan one set of originals of thesame type and then register that as a single step in the copy job, andyou can copy an extremely large volume of originals in one batch.
1 Set the originals to be copied.
2 Touch the “Function” tab. The content of the “Function” tabwill be displayed.
3 Touch the “Batch scanning” [“Large # of originals”] key.The “Continuous scanning” [“Multiple scanning”] screen willbe displayed.
Inch specifications
2 sided/Separation
Selectpaper Combine
Reduce/Enlarge
Margin/Centering
FormsOverlayPage #
FunctionBasic User choice Program
CoverMode
BookletSort/Finished
BorderErase
Exposuremode
Orig.imagequality
Ready to copy.
Selectorig. size
AutoSelection
Batchscanning Up
Down
SetPaper size11x81/2"
Metric specifications
Select paper
2-sided/Split
Merge copy
Reduce/Enlarge
Margin/Imag. shift
Pagenumbering
FunctionBasic User choice Program
Cover Mode
BookletErase Mode
Exposuremode
Image quality
Sort/Finished
Ready to copy.
Select size orig.
Autoselection
Large # oforiginals
Form overlay
Up
Down
SetPaper size
21. Copying a large volume of originals in one operation
[Batch scanning mode]
4 Touch the “On” key.
Inch specifications
Off
On
Back CloseContinuous scanning
Place originals then press Start key. SetPaper Size
Copy scanned images of f.Platen as one job or scanned or ig inalsusing document processor.
11x81/2"
Register
Metric specifications
Off
On
Back CloseMultiple scanning
Set original. Press Start key.
Register
SetPaper size
Or iginals scanned through the platen and Document Processor can be processed as one copy job.
5 Press the [Start] key.Scanning of the originals will start.
6 Replace the first originals with the next set and press the[Start] key. Scanning of those next originals (the next step inthe copy job) will start.
7 Once you have finished scanning all of the originals, touchthe “Scanning finished” key. Copying will start.
A B C CBA

Section 5 OTHER CONVENIENT FUNCTIONS
5-48
With this mode, you can reduce the amount of toner that is used tomake the copies.Use this mode with, for example making test copies, when you do notespecially need to print out high quality copies. You can also makethe eco print mode the default setting in the initial mode. (See “Ecoprint mode ON/OFF” on page 7-66.)* Images will be printed out relatively lighter than normal.
1 Set the originals to be copied.
2 Touch the “Function” tab. The content of the “Function” tabwill be displayed.
3 Touch the “▼ Down” key. The content of the next portion ofthe “Function” tab will be displayed.
22. Saving on toner use [Eco print mode]
With the eco printmode turned ON
With the eco printmode turned OFF
4 Touch the “Eco Print” key. The “Eco Print” screen will bedisplayed.
Inch specifications
Invert Mirror
ModifyCopy
Proof CopyMemopages
Orig. setdirection
Ready to copy.
Up
Down
SetPaper size
Eco Print
AutoRotation
FunctionBasic User choice Program
OHP backing
11x81/2"
Metric specifications
Invert Mirror
Modify copy
Test copy Memopages
Orig. setdirection
Ready to copy.
Up
Down
SetPaper size
Eco Print
Auto Rotation
FunctionBasic User choice Program
OHP back
5 Touch the “Off” key or the “On” key, as appropriate.
Inch specifications
Back Close
It is possible to reducetoner consumption. Image is light.
Eco PrEco Printint
Ready to copy.
Register
Eco print is saving toner consumption,and it is economically.
Set11 x 81/2"
Paper Size
Eco Print
OnOff
Metric specifications
Back Close
Toner consumptioncan be reduced.
Eco Print
Ready to copy.
Register
Eco Pr int enables toner consumption reduct ion.
SetPaper size
Eco Pr int
OnOff
Image resolut ion reduced.
6 Press the [Start] key.Copying will start.

Section 5 OTHER CONVENIENT FUNCTIONS
5-49
23. Original set direction
During the procedures to use the 2-sided copy modes, the pageseparation/split copy modes, the margin mode, the centering/imageshift mode, the memo mode, the border erase modes, the combine/merge copy modes, the print page numbers mode, the booklet/stitching mode, the auto selection/filing mode (optional), the staplemode (optional) and the punch mode (optional), it is necessary tospecify the direction in which the originals were set. You can also usethe following procedure to perform that setting as well.
NOTE
You can also specify the direction of the original that will be used asthe default setting in the initial mode. (See “Original set direction” onpage 7-46-2.)
1 Touch the “Function” tab. The content of the “Function” tabwill be displayed.
2 Touch the “▼ Down” key. The content of the next portion ofthe “Function” tab will be displayed.
3 Touch the “Orig.set direction” key. The “Orig.set direction”screen will be displayed.
Inch specifications
Invert Mirror
ModifyCopy
Proof CopyMemopages
Orig. setdirection
Ready to copy.
Up
Down
SetPaper size
Eco Print
AutoRotation
FunctionBasic User choice Program
OHP backing
11x81/2"
Metric specifications
Invert Mirror
Modify copy
Test copy Memopages
Orig. setdirection
Ready to copy.
Up
Down
SetPaper size
Eco Print
Auto Rotation
FunctionBasic User choice Program
OHP back
4 Touch the “Rear” [“Back Edge”] key or the “Left top corner”key, as appropriate.
Inch specifications
Orig. set direction
Ready to copy.
"Check direction original" can be shownat right side of display.Follow the steps. If setting mode iswrong, incorrect copy will result.
Check directionCheck direction oforiginal top side.
RearLeft topcorner
Back CloseRegister
Set11 x 81/2"
Paper Size
Metric specifications
Orig. set direction
"Check direct ion or ig inal" can be shownat r ight s ide of d isplay.Fol low the steps. I f set t ing mode iswrong, incorrect copy wi l l resul t .
Back Close
Ready to copy.
Register
SetPaper size
Back Edge Left topcorner
Check direct ionCheck direct ion ofor ig inal .

Section 5 OTHER CONVENIENT FUNCTIONS
5-50
24. Memorizing frequently used settings [Program function]
Up to eight combinations of copy modes and other functions displayedon the operation panel can be registered as a single program usingthis function. You can also register a name for each registeredprogram.
(1) Registering a program
1 Set the desired copy modes, etc., to be registered.
2 Touch the “Program” tab. The content of the “Program” tabwill be displayed.
3 Touch the “Register” key.
Inch specifications
Recall
Ready to copy.
ProgramFunction
Reg./delete
Register
Changename
Delete
User choiceBasic
Set11 x 81/2"
Paper Size
Metric specifications
Reg./delete
Register
Recal l
Delete
Changename
Basic User choice Function Program
Ready to copy. SetPaper size
4 Touch any key that is marked “No registration” and thatcorresponds to the program key (1 – 8) under which youwant to register the settings. The screen to register a namefor that program will be displayed.
Inch specifications
Select program number.
No registration
No registration
No registration
No registration
No registration
No registration
No registration
Register present setting End
No registration
Metric specifications
Select program number.
No registration
No registration
No registration
No registration
No registration
No registration
No registration
Register present setting End
No registration
5 Use the displayed keyboard to enter the desired name andthen touch the “End” key.
Inch specifications
EndStopName to display
Catalog A Limit:16 letters including #
AllDel. Del. prev
1 2 3 4 5 6 7 8 9 0 - = `
q w e r t y u i o p [ ] \
a s d f g h j k l ;
z x c v b n m , . /
'
Capital Num./Sym. SpaceLetter
Metric specifications
EndStopName to display
Catalog A Limit: 16 letters inc. # key
Del. prev
1 2 3 4 5 6 7 8 9 0 - = `
q w e r t y u i o p [ ] \
a s d f g h j k l ;
z x c v b n m , . /
'
Capital Symbol 1 Symbol 2 SpaceLetter
`
AllDel.
NOTE
Refer to “11. Entering characters” on page 7-104 for information onentering characters.
6 Touch the “Yes” key or the “No” key, as appropriate.If you selected “Yes”, the selected program will be registeredand the touch panel will return to the screen in step 3.Copying is now possible using the settings that wereregistered under that program.
Inch specifications
Program # : 1
The set program is registered. Is it correct?
Yes No
Program name :Catalog A
Register program. Stop
Metric specifications
Program # : 1
The set program is registered. Is it correct?
Yes No
Program name : Catalog A
Register program. Stop

Section 5 OTHER CONVENIENT FUNCTIONS
5-51
(2) Using programmed settings to make copies
1 Touch the “Program” tab. The content of the “Program” tabwill be displayed.
2 Touch the program key under which the settings that youwant to use are registered.
Inch specifications
Reg./delete
Register
Recall
Ready to copy.
Delete
Changename
Basic User choice Function Program
Set11 x 81/2"
Paper Size
File A
File B
List A
Catalog B
Catalog C
Catalog D
Catalog A
Metric specifications
Reg./delete
Register
Recal l
Delete
Changename
File A
File B
List A
Catalog B
Catalog C
Catalog D
Basic User choice Function Program
Catalog A
Ready to copy. SetPaper size
3 Set the originals to be copied and press the [Start] key.Copying will start using the settings that were registeredunder that program.
(3) Changing a registered program name
1 Touch the “Program” tab. The content of the “Program” tabwill be displayed.
2 Touch the “Change name” key.
Inch specifications
Reg./delete
Register
Recall
Ready to copy.
Delete
Changename
Basic User choice Function Program
Set11 x 81/2"
Paper Size
File A
File B
List A
Catalog B
Catalog C
Catalog D
Catalog A
Metric specifications
Reg./delete
Register
Recal l
Delete
Changename
File A
File B
List A
Catalog B
Catalog C
Catalog D
Basic User choice Function Program
Catalog A
Ready to copy. SetPaper size
3 Touch the program key (1 – 8) for which you want to changethe registered name.The screen to register a name for that program will bedisplayed.
Inch specifications
End
No registration
File A
File B
List A
Catalog B
Catalog C
Catalog D
Catalog A
Select the number for changing name.
Registration name change
Metric specifications
Select the number for changing name.
Registration name change End
File A
File B
List A
Catalog B
Catalog C
Catalog D
Catalog A
No registration
4 Once you have deleted the old name and entered the newone, press the “End” key.
Inch specifications
EndStopName to display
Catalog A Limit:16 letters including #
AllDel. Del. prev
1 2 3 4 5 6 7 8 9 0 - = `
q w e r t y u i o p [ ] \
a s d f g h j k l ;
z x c v b n m , . /
'
Capital Num./Sym. SpaceLetter
Metric specifications
EndStopName to display
Catalog A Limit: 16 letters inc. # key
Del. prev
1 2 3 4 5 6 7 8 9 0 - = `
q w e r t y u i o p [ ] \
a s d f g h j k l ;
z x c v b n m , . /
'
Capital Symbol 1 Symbol 2 SpaceLetter
`
AllDel.
NOTE
Refer to “11. Entering characters” on page 7-104 for information onentering characters.
5 Once “The set program is registered. Is it correct?” isdisplayed, check the entered name and, if it is correct, touchthe “Yes” key.The touch panel will return to the screen in step 2.

Section 5 OTHER CONVENIENT FUNCTIONS
5-52
(4) Deleting a registered program
1 Touch the “Program” tab. The content of the “Program” tabwill be displayed.
2 Touch the “Delete” key.
Inch specifications
Reg./delete
Register
Recall
Ready to copy.
Delete
Changename
Basic User choice Function Program
Set11 x 81/2"
Paper Size
File A
File B
List A
Catalog B
Catalog C
Catalog D
Catalog A
Metric specifications
Reg./delete
Register
Recal l
Delete
Changename
File A
File B
List A
Catalog B
Catalog C
Catalog D
Basic User choice Function Program
Catalog A
Ready to copy. SetPaper size
3 Touch the program key (1 – 8) that corresponds to theprogram that you want to delete.
lnch specifications
Select the number of program to delete.
No registration
Delete registration End
File A
File B
List A
Catalog B
Catalog C
Catalog D
Catalog A
Metric specifications
Select the number of program to delete.
No registration
Delete registration End
File A
File B
List A
Catalog B
Catalog C
Catalog D
Catalog A
4 Touch the “Yes” key or the “No” key, as appropriate.
Inch specifications
Program #
This program wi l l be deleted. Are you sure?
Yes No
Delete program. Stop
Program name Catalog A
Metric specifications
Program #
This program wi l l be deleted. Are you sure?
Delete program.
Program name Catalog A
YES NO
Stop
If you selected “Yes”, the selected program will be deleted and thetouch panel will return to the screen in step 2.If you selected “No”, the touch panel will return to the screen in step 3without deleting the selected program.

Section 5 OTHER CONVENIENT FUNCTIONS
5-53
You can register up to 3 functions and/or modes, from among thosedisplayed in the “Function” tab, under the registration keys. Thefunctions and modes in the “Basic” tab and the “User choice” tab canbe registered under registration keys as well.
(1) Registering a function or mode under a function
key
Perform the following procedure when you want to register a functionor mode under a registration key.To register a function or mode under a registration key, refer to thefollowing sample procedure (which shows how to register the “4 in 1”combine/merge copy mode under a registration key).
IMPORTANT!
In order to register functions and/or modes under registration keys,you must first turn the setting ON under “Registration keys ON/OFF”on page 7-84.
1 Touch the “Function” tab. The content of the “Function” tabwill be displayed.
2 Touch the “Combine” [“Merge copy”] key. The “Combine”[“Merge copy”] screen will be displayed.
lnch specifications
2 sided/Separation
Selectpaper Combine
Reduce/Enlarge
Margin/Centering
FormsOverlayPage #
FunctionBasic User choice Program
CoverMode
BookletSort/Finished
BorderErase
Exposuremode
Orig.imagequality
Ready to copy.
Selectorig. size
AutoSelection
Batchscanning Up
Down
SetPaper size11x81/2"
Metric specifications
Select paper
2-sided/Split
Merge copy
Reduce/Enlarge
Margin/Imag. shift
Pagenumbering
FunctionBasic User choice Program
Cover Mode
BookletErase Mode
Exposuremode
Image quality
Sort/Finished
Ready to copy.
Select size orig.
Autoselection
Large # oforiginals
Form overlay
Up
Down
SetPaper size
25. Registration keys
3 Touch the “4 in 1” key and then the “Register” key.
Inch specifications
None
Solid
Dotted
Borders
Combine
None
Layout Border line
SetPaper sizeReady to copy.
Register Back Close
11x81/2"
Rear
Check direction
Left topcorner
Check direction of original top side.
50%
Metric specifications
Layout Check direct ionCheck direct ion ofor ig inal .
None
4-in-1
2-in-1
None
Merge copy
Solid
Dotted
Cropmark
Border l ine
Back Close
Ready to copy.
Register
SetPaper size
Back Edge Left topcorner
4 In the “Register” screen, touch the “Register” key once again.The screen to register functions and/or modes underregistration keys will be displayed.
Inch specifications
Register
Register
Delete
End
Select item.
Metric specifications
Register
Register
Delete
End
Select item.

Section 5 OTHER CONVENIENT FUNCTIONS
5-54
5 Touch the registration key under which you want to registerthe function. “Register this selecting mode. OK?” will bedisplayed.
Inch specifications
No registrat.
No registrat.
No registrat.
Select the number of program to registered.
Register present setting End
Metric specifications
No registrat.
No registrat.
Select the number of program to registered.
Register present setting
No registrat.
End
6 Touch the “Yes” key. The “Combine” [“Merge copy”] screenwill be displayed again.
Inch specifications
Register No. 1
Register th is select ing mode. OK?
Yes No
Register this function. Stop
Metric specifications
Register No. 1
Register th is select ing mode. OK?
YES NO
Register this function. Stop
NOTE
If, in the screen to register functions and/or modes under registrationkeys, you select a previously registered key, the following screen willbe displayed.
Inch specifications
Register No. 1
This number is already registered.
Yes No
Register this function. Stop
Register th is select ing mode. OK?
Metric specifications
This number is already registered
Register this function. Stop
Register No. 1
Register th is select ing mode. OK?
YES NO
If you selected “Yes”, the selected function will be registered under theregistration key.If you selected “No”, the touch panel will return to the screen in step 5without registering the selected function.
7 Touch the “Close” key. The “Combine” [“Merge copy”] key willnow appear on the right side of the touch panel as aregistration key.
Inch specifications
FunctionBasic User choice Program
Ready to copy.
Up
Down
SetPaper size
Combine
81/2x11"
2 sided/Separation Combine
Page #
Cover Mode
Orig.imagequality
Selectorig. size
AutoSelection
Batchscanning
Selectpaper
Reduce/Enlarge
Margin/Centering
FormsOverlay
BookletSort/Finished
BorderErase
Exposuremode
Metric specifications
SetPaper size
Merge copy
Select paper
2-sided/Split
Merge copy
Reduce/Enlarge
Margin/Imag. shift
Pagenumbering
FunctionBasic User choice Program
Cover Mode Booklet
Erase Mode
Exposuremode
Image quality orig.
Sort/Finished
Ready to copy.
Select size original
Autoselection
Large # oforiginals
Form overlay
Up
Down
NOTE
The functions and modes in the “Basic” tab and the “User choice” tabcan be registered under registration keys as well. A “Register” key willbe displayed in the screen for those function and modes which can beregistered under the registration keys.

Section 5 OTHER CONVENIENT FUNCTIONS
5-55
(2) Deleting a registration key
Perform the following procedure when you want to delete aregistration key.
1 Touch the registration (to the right of the “Basic” tab) that youwant to delete. (Example: “Combine” [“Merge copy”])
lnch specifications
Combine
AMS
Reduce/Enlarge
APS
Orig.imagequality
Reduce/Enlarge
Exposuremode
AutoExposure
Ready to copy. SetPaper Size
Bypass
Color
Plain Plain
Plain
Sort/Finished
Sort:Off
Sort:On
Basic User choice ProgramFunction
11x81/2"
81/2x11"
11x81/2"
11x81/2"
11x81/2"
Recycled
Metric specifications
Merge copy
AMS
Reduce/Enlarge
APS
Imagequality
Reduce/Enlarge
Exposuremode
AutoExposure
Ready to copy. SetPaper Size
Bypass
Colour
Recycled
Plain Plain
Plain
Sort/Finished
Sort:Off
Sort:On
Basic User choice ProgramFunction
2 In the resulting screen for that function or mode (example:the “Combine” [“Merge copy”] screen), touch the “Register”key. The “Register” screen will be displayed.
lnch specifications
None
Solid
Dotted
Borders
Combine
None
Layout Border line
SetPaper sizeReady to copy.
Register Back Close
11x81/2"
Rear
Check direction
Left topcorner
Check direction of original top side.
50%
Metric specifications
Layout Check direct ionCheck direct ion ofor ig inal .
None
4-in-1
2-in-1
None
Merge copy
Solid
Dotted
Cropmark
Border l ine
Back Close
Ready to copy.
Register
SetPaper size
Back Edge Left topcorner
3 In the “Register” screen, touch the “Delete” key once again.The screen to delete registration keys will be displayed.
Inch specifications
Register
Register
Delete
End
Select item.
Metric specifications
Register
Register
Delete
End
Select item.
4 Touch the registration key (1 – 3) that corresponds to theprogram that you want to delete. “Are you sure you want todelete?” will be displayed.
Inch specifications
Combine
Orig. Imagequality
Select the number of program to delete.
Delete registration
Reduce/Enlarge
End
Metric specifications
Merge copy
Imagequality
Select the number of program to delete.
Delete registration
Reduce/Enlarge
End

Section 5 OTHER CONVENIENT FUNCTIONS
5-56
5 Touch the “Yes” key. The “Combine” [“Merge copy”] screenwill be displayed again.
Inch specifications
Register No. 1
Are you sure you want to delete?
Yes No
Delete registration. Stop
Metric specifications
Are you sure you want to delete?
Delete registration.
Register No. 1
YES NO
Stop
6 Touch the “Close” key. The “Combine” [“Merge copy”] key willbe deleted from on the right side of the touch panel.
Inch specifications
AMS
Reduce/Enlarge
APS
Orig.imagequality
Reduce/Enlarge
Exposuremode
AutoExposure
Ready to copy. SetPaper Size
Bypass
Color
Plain Plain
Plain
Sort/Finished
Sort:Off
Sort:On
Basic User choice ProgramFunction
11x81/2"
81/2x11"
11x81/2"
11x81/2"
11x81/2"
Recycled
Metric specifications
AMS
Reduce/Enlarge
APS
Imagequality
Reduce/Enlarge
Exposuremode
AutoExposure
Ready to copy. SetPaper Size
Bypass
Colour
Recycled
Plain Plain
Plain
Sort/Finished
Sort:Off
Sort:On
Basic User choice ProgramFunction

Section 5 OTHER CONVENIENT FUNCTIONS
5-57
26. Easily add covers and insert sheets between various sets of originals in
one operation [Job build mode]
The job build function enables you to scan different sets of originalsinto memory in separate steps and then copy them all at one time.Each set of scanned originals is then seen as one step in the copyprocess and you can select different copy modes for each step(enlarge/reduce, border erase, original type [2-sided originals, 1-sidedoriginals or open-faced book originals]). You can choose to have ablank sheet of paper fed in between each set of originals, as well ashave front and rear covers included for the full set, AND do this allduring 2-sided copying!
(1) Using the job build mode
The following procedure shows one way of using the job build modeand explains how to perform that operation under the situationindicated in the examples below.
[Example]<Finished copies>(The asterisk “*” in the illustration indicates the blank sheets.)
<Originals>
A-1
B-1 C-1
B-313 C-2
B-12
A-32 A-1
A-1
2-12-2
2
1-2
1-1
1
2-2
1 2 2-11-2
1-1
BA C D
NOTE
This procedure will assume that the color paper to be used as thefront cover and the middle insert (originals “A” and “C”), as well as forthe back cover, will be set on the multi-bypass, and that there is plaincopy paper loaded in drawer[cassette] No.1.
● Step 1: Accessing the “Job build” screen
1 Press the [Job build] key.The “Job build” screen will be displayed.
● Making the settings that apply to all stepsFirst, the settings for the 2-sided copy modes and the repeat copymode must be made.
NOTES
• The repeat copy mode is used to enable you to make an additionalnumber of copy sets later.
• It is also possible to select other settings and functions, as desired,besides those given in the example procedure. (See “(2) Selectingthe settings and functions” on page 5-62.)
2 Touch the “1 sided/2 sided” key.The “1 sided/2 sided” screen will be displayed.
Inch specifications
Ready to Job build.Place originals then press Start key.
1 sided 1 sided copy
Back Edge
1 sided/2 sided
1 sided copy-LeftFinished page #:0
Orig. set direction
Original type
AMS
Reduce/Enlarge
Finished
Basic Quality Edit
Offset
Job Build - Step1 End
Insert page
Set
Select paper
11x81/2”
Metric specifications
Ready to Job build.Set original. Press Start key.
1-sided 1-sided Copy
Back Edge
1-sided/2-sided
1-sided Copy-LeftFinished page #: 0
Orig. setdirection
Originaltype
AMS
Reduce/EnlargeFinished
Basic Quality Edit
Group
Job Build-Step 1 End
Set
Select paper
Insertblank page

Section 5 OTHER CONVENIENT FUNCTIONS
5-58
3 Touch the “2 sided copy” key and then touch the “Open fromleft” [“Left binding”] key. Finally, touch the “Close” key. Thetouch panel will return to the screen in step 2.
Inch specifications
1 sided/ 2 sided copy
1 sidedcopy2 sidedcopy
Open fromleftOpen fromright
Finished
Open fromtop
Check directionCheck direction oforiginal top side.
Ready to Job build.Place originals then press Start key.
CloseBack
Set
RearLeft topcorner
Metric specifications
1-sided / 2-sided Copy
1-sided Copy2-sided Copy
Left bindingRight binding
Finished
Top binding
Ready to Job build.Set original. Press Start key.
CloseBack
Set
Back EdgeLeft topcorner
Check directionCheck direction oforiginal.
4 Touch the “Edit” key. Then, in the resulting screen, touch the“Modify Copy” key. The “Modify Copy” screen will bedisplayed.
Inch specifications
BorderErase
Auto
ModifyCopy
Selectorig.size
None
Page #Margin/Centering
None
Off Off
2 sided copy-LeftFinished page # : 0
Basic Quality Edit
Job Build - Step1 End
Insert page
Ready to Job build.Place originals then press Start key.
Set
Print fromRear page
Metric specifications
EraseMode
Auto NoneOff
Modifycopy
Selectsize orig.
NoneNone
Pagenumbering
Margin/Imag.shift
2-sided Copy-LeftFinished page #: 0
Basic Quality Edit
Job Build - Step1 End
Ready to Job build.Set original. Press Start key.
Set
Insertblank page
Print fromrear page
5 Touch the “On” key.Touch the “Close” key. The touch panel will return to thescreen in step 4.
Inch specifications
Ready to Job build.Place originals then press Start key.
Modify Copy
Off
On
Set
CloseBack
When select [On], data can be saved.You can recal l and re-pr int at anyt ime.You can set the password to securesaved document.
Metric specifications
Modify copy
Off
OnWhen the mode is set [On], it cansave a job data and reprint it anytime.And you can set that other user are notable to reprint.
Ready to Job build.Set original. Press Start key.
CloseBack
Set
When select [On], job can be saved.You can recall and re-print at anytime.You can set a password to secure saveddocument.
● Making the settings for the first original (“A” in the illustration onpage 5-57.)
The multi-bypass is to be selected for color paper feed under the“Select paper” screen.
6 Touch the “Select paper” key. The “Select paper” screen willbe displayed.
Inch specifications
Ready to Job build.Place originals then press Start key.
1-sided 2 sided copy
Back Edge
1 sided/2 sided
2 sided copy-LeftFinished page #:0
Orig. set direction
Original type
AMS
Reduce/Enlarge
Finished
Basic Quality Edit
Offset
Job Build - Step1 End
Insert page
Set
Select paper
11x81/2”
Print fromRear page
Metric specifications
Ready to Job build.Set original. Press Start key.
1-sided 2-sided Copy
Back Edge
1-sided/2-sided
2-sided Copy-LeftFinished page #: 0
Orig. setdirection
Originaltype
AMS
Reduce/EnlargeFinished
Basic Quality Edit
Group
Job Build-Step 1 End
Set
Select paper
Insertblank page
Print fromrear page

Section 5 OTHER CONVENIENT FUNCTIONS
5-59
● Step 3: Making the settings for the second originals (“B” in theillustration on page 5-57.)
Drawer[Cassette] No.1 is to be selected for plain paper feed under the“Select paper” screen.
10 Touch the “Select paper” key. The “Select paper” screen willbe displayed.
Inch specifications
Select paper
1 sided 2 sided copy
Back Edge
1 sided/2 sided
2 sided copy-LeftFinished page #:2Next copy page: FrontOrig. set
direction
Original type
AMS
Reduce/EnlargeFinished
Basic Quality Edit
Offset
Job Build - Step3 Cancel
Insert page
Print from Rear page
Scanningfinished
SetScan next original(s).Place the originals and press start key.Press "Scanning finished" key when starting copy.
11x81/2”
Metric specifications
Select paper
1-sided 2-sided Copy
Back Edge
1-sided/2-sided
2-sided Copy-LeftFinished page #: 2Next copy page: FrontOrig. set
direction
Original type
AMSGroup
Reduce/EnlargeFinished
Basic Quality Edit
Job Build - Step3 Cancel
SetScan next original(s).Place the originals and press start key.Press "Scanning finished" key when starting copy.
Insertblank page
Print fromrear page
Scanningfinished
11 Touch the key that corresponds to drawer[cassette] No. 1.Touch the “Close” key. The touch panel will return to thescreen in step 10.
Inch specifications
Select paper CloseBack
Set
Plain11x81/2”
11x81/2”Plain
Plain11x81/2”Color
81/2x14”Plain
Bypass
Scan next original(s).Place the originals and press start key.Press "Scanning finished" key when starting copy.
Metric specifications
Select paper CloseBack
Set
Bypass
Plain
Colour Plain
Plain
Plain
Scan next original(s).Place the originals and press start key.Press "Scanning finished" key when starting copy.
12 Set the second originals (“B”) to be copied. Press the [Start]key.Scanning of the originals will start.
7 Touch the “Bypass” key.Touch the “Close” key. The touch panel will return to thescreen in step 6.
Inch specifications
Select paper CloseBack
Set
Place originals then press Start key.Ready to Job build.
Plain11x81/2”
11x81/2”Plain
Plain11x81/2”Color
81/2x14”Plain
Bypass
Metric specifications
Select paper CloseBack
SetReady to Job build.Set original. Press Start key.
Bypass
Plain
Colour Plain
Plain
Plain
8 Set the first original (“A”) to be copied. Press the [Start] key.Scanning of the originals will start.
● Step 2: Leaving the back side of the first original (“A”) blank
9 Touch the “Print from Front page” key.Leaving the back side of the original blank will allow the nextcopy to start on the front side of the next page.
Inch specifications
Select paper
1 sided 2 sided copy
Back Edge
1 sided/2 sided
2 sided copy-LeftFinished page #:1Next copy page: RearOrig. set
direction
Original type
AMS
Reduce/EnlargeFinished
Basic Quality Edit
Offset
Job Build - Step2 Cancel
Scanning finished
Set
Insert page
Scan next original(s).Place the originals and press start key.Press "Scanning finished" key when starting copy.
Print from Front page
11x81/2”
Metric specifications
Select paper
1-sided 2-sided Copy
Back Edge
1-sided/2-sided
2-sided Copy-LeftFinished page #: 1Next copy page: RearOrig. set
direction
Original type
AMSGroup
Reduce/EnlargeFinished
Basic Quality Edit
Job Build- Step2 Cancel
SetScan next original(s).Place the originals and press start key.Press "Scanning finished" key when starting copy.
Insertblank page
Print fromfront page
Scanningfinished

Section 5 OTHER CONVENIENT FUNCTIONS
5-60
● Step 4: Making the settings for the third original (“C” in theillustration on page 5-57.)
The multi-bypass is to be selected for color paper feed under the“Select paper” screen.
13 Touch the “Select paper” key. The “Select paper” screen willbe displayed.
Inch specifications
Scan next original(s).Place the originals and press start key.Press "Scanning finished" key when starting copy.
Select paper
1 sided 2 sided copy
Back Edge
1 sided/2 sided
2 sided copy-LeftFinished page #:4Next copy page: FrontOrig. set
direction
Original type
AMS
Reduce/EnlargeFinished
Basic Quality Edit
Offset
Job Build - Step4 Cancel
Insert page
Scanning finished
Set
Print from Rear page
11x81/2”
Metric specifications
Select paper
1-sided 2-sided Copy
Back Edge
1-sided/2-sided
2-sided Copy-LeftFinished page #: 4Next copy page: FrontOrig. set
direction
Original type
AMSGroup
Reduce/EnlargeFinished
Basic Quality Edit
Job Build- Step4 Cancel
SetScan next original(s).Place the originals and press start key.Press "Scanning finished" key when starting copy.
Insertblank page
Print fromrear page
Scanningfinished
14 Touch the “Bypass” key.Touch the “Close” key. The touch panel will return to thescreen in step 13.
Inch specifications
Select paper CloseBack
Set
Plain11x81/2”
11x81/2”Plain
Plain11x81/2”Color
81/2x14”Plain
Bypass
Scan next original(s).Place the originals and press start key.Press "Scanning finished" key when starting copy.
Metric specifications
Select paper CloseBack
Set
Bypass
Plain
Colour Plain
Plain
Plain
Scan next original(s).Place the originals and press start key.Press "Scanning finished" key when starting copy.
15 Set the third original (“C”) to be copied. Press the [Start] key.Scanning of the original will start.
● Step 5: Leaving the back side of the third original (“C”) blank
16 Touch the “Print from Front page” key.Leaving the back side of the original blank will allow the nextcopy to start on the front side of the next page.
Inch specifications
Select paper
1 sided 2 sided copy
Back Edge
1 sided/2 sided
2 sided copy-LeftFinished page #:5Next copy page: RearOrig. set
direction
Original type
AMS
Reduce/EnlargeFinished
Basic Quality Edit
Offset
Job Build - Step5 Cancel
Scanning finished
Set
Insert page
Scan next original(s).Place the originals and press start key.Press "Scanning finished" key when starting copy.
Print from Front page
11x81/2”
Metric specifications
Select paper
1-sided 2-sided Copy
Back Edge
1-sided/2-sided
2-sided Copy-LeftFinished page #: 5Next copy page: RearOrig. set
direction
Original type
AMSGroup
Reduce/EnlargeFinished
Basic Quality Edit
Job Build - Step5 Cancel
SetScan next original(s).Place the originals and press start key.Press "Scanning finished" key when starting copy.
Insertblank page
Print fromfront page
Scanningfinished
● Step 6: Making the settings for the fourth originals (“D” in theillustration on page 5-57.)
Drawer[Cassette] No.1 is to be selected for plain paper feed underthe “Select paper” screen.
17 Touch the “Select paper” key. The “Select paper” screen willbe displayed.
Inch specifications
Select paper
1 sided 2 sided copy
Back Edge
1 sided/2 sided
2 sided copy-LeftFinished page #:6Next copy page: FrontOrig. set
direction
Original type
AMS
Reduce/EnlargeFinished
Basic Quality Edit
Offset
Job Build - Step6 Cancel
Scanning finished
Set
Insert page
Scan next original(s).Place the originals and press start key.Press "Scanning finished" key when starting copy.
Print from Rear page
11x81/2”
Metric specifications
Select paper
1-sided 2-sided Copy
Back Edge
1-sided/2-sided
2-sided Copy-LeftFinished page #: 6Next copy page: FrontOrig. set
direction
Original type
AMSGroup
Reduce/EnlargeFinished
Basic Quality Edit
Job Build - Step6 Cancel
SetScan next original(s).Place the originals and press start key.Press "Scanning finished" key when starting copy.
Insertblank page
Print fromrear page
Scanningfinished

Section 5 OTHER CONVENIENT FUNCTIONS
5-61
21 Touch the “Bypass” key.Touch the “Close” key. The touch panel will return to thescreen in step 20.
Inch specifications
Select paper CloseBack
Set
Plain11x81/2”
11x81/2”Plain
Plain11x81/2”Color
81/2x14”Plain
Bypass
Scan next original(s).Place the originals and press start key.Press "Scanning finished" key when starting copy.
Metric specifications
Select paper CloseBack
Set
Bypass
Plain
Colour Plain
Plain
Plain
Scan next original(s).Place the originals and press start key.Press "Scanning finished" key when starting copy.
22 Touch the “Insert page” [“Insert blank page”] key.
Inch specifications
Select paper
1 sided 2 sided copy
Back Edge
1 sided/2 sided
2 sided copy-LeftFinished page #:8Next copy page: FrontOrig. set
direction
Original type
AMS
Reduce/EnlargeFinished
Basic Quality Edit
Offset
Job Build - Step7 Cancel
Scanning finished
Set
Insert page
Scan next original(s).Place the originals and press start key.Press "Scanning finished" key when starting copy.
Print from Rear page
11x81/2”
Metric specifications
Select paper
1-sided 2-sided Copy
Back Edge
1-sided/2-sided
2-sided Copy-LeftFinished page #: 8Next copy page: FrontOrig. set
direction
Original type
AMSGroup
Reduce/EnlargeFinished
Basic Quality Edit
Job Build - Step7 Cancel
SetScan next original(s).Place the originals and press start key.Press "Scanning finished" key when starting copy.
Insertblank page
Print fromrear page
Scanningfinished
23 The job build set-up procedure is complete. Touch the“Scanning finished” key. Copying will start.
Inch specifications
Select paper
1 sided 2 sided copy
Back Edge
1 sided/2 sided
2 sided copy-LeftFinished page #:10Next copy page: FrontOrig. set
direction
Original type
AMS
Reduce/EnlargeFinished
Basic Quality Edit
Offset
Job Build - Step8 Cancel
Scanning finished
Set
Insert page
Scan next original(s).Place the originals and press start key.Press "Scanning finished" key when starting copy.
Print from Rear page
11x81/2”
Metric specifications
Scan next original(s).Place the originals and press start key.Press "Scanning finished" key when starting copy.
Select paper
1-sided 2-sided Copy
Back Edge
1-sided/2-sided
2-sided Copy-LeftFinished page #: 10Next copy page: FrontOrig. set
direction
Original type
AMSGroup
Reduce/EnlargeFinished
Basic Quality Edit
Job Build - Step8 Cancel
Insertblank page
Print fromrear page
Scanningfinished
Set
18 Touch the key that corresponds to drawer[cassette] No. 1.Touch the “Close” key. The touch panel will return to thescreen in step 17.
Inch specifications
Select paper CloseBack
Set
Plain11x81/2”
11x81/2”Plain
Plain11x81/2”Color
81/2x14”Plain
Bypass
Scan next original(s).Place the originals and press start key.Press "Scanning finished" key when starting copy.
Metric specifications
Select paper CloseBack
Set
Bypass
Plain
Colour Plain
Plain
Plain
Scan next original(s).Place the originals and press start key.Press "Scanning finished" key when starting copy.
19 Set the fourth originals (“D”) to be copied. Press the [Start]key.Scanning of the originals will start.
● Step 7: Making the settings for a blank rear coverThe multi-bypass is to be selected for color paper feed under the“Select paper” screen.
20 Touch the “Select paper” key. The “Select paper” screen willbe displayed.
Inch specifications
Select paper
1 sided 2 sided copy
Back Edge
1 sided/2 sided
2 sided copy-LeftFinished page #:8Next copy page: FrontOrig. set
direction
Original type
AMS
Reduce/EnlargeFinished
Basic Quality Edit
Offset
Job Build - Step7 Cancel
Scanning finished
Set
Insert page
Scan next original(s).Place the originals and press start key.Press "Scanning finished" key when starting copy.
Print from Rear page
11x81/2”
Metric specifications
Select paper
1-sided 2-sided Copy
Back Edge
1-sided/2-sided
2-sided Copy-LeftFinished page #: 8Next copy page: FrontOrig. set
direction
Original type
AMSGroup
Reduce/EnlargeFinished
Basic Quality Edit
Job Build - Step7 Cancel
SetScan next original(s).Place the originals and press start key.Press "Scanning finished" key when starting copy.
Insertblank page
Print fromrear page
Scanningfinished

Section 5 OTHER CONVENIENT FUNCTIONS
5-62
24 If there are no problems with the copy set you made, thenyou can use the repeat copy mode to make any additionalnumber of copy sets as desired (see “(2) Printing out with therepeat copy mode” on page 5-43).
(2) Selecting the settings and functions
1 Selecting the paperThis procedure selects the size of the copy paper.
1 With the content of the “Basic” tab displayed, touch the“Select paper” key. The “Select paper” screen will bedisplayed.
Inch specifications
Ready to Job build.Place originals then press Start key.
1 sided 1 sided copy
Back Edge
1 sided/2 sided
1 sided copy-LeftFinished page #:0
Orig. set direction
Original type
AMS
Reduce/Enlarge
Finished
Basic Quality Edit
Offset
Job Build - Step1 End
Insert page
Set
Select paper
11x81/2”
Metric specifications
Ready to Job build.Set original. Press Start key.
1-sided 1-sided Copy
Back Edge
1-sided/2-sided
1-sided Copy-LeftFinished page #: 0
Orig. setdirection
Originaltype
AMS
Reduce/EnlargeFinished
Basic Quality Edit
Group
Job Build-Step 1 End
Set
Select paper
Insertblank page
2 Touch the key that corresponds to the drawer[cassette] whichcontains the desired size of copy paper, and then touch the“Close” key. The touch panel will return to the screen in step1.
Inch specifications
Select paper CloseBack
Set
Place originals then press Start key.Ready to Job build.
Plain11x81/2”
11x81/2”Plain
Plain11x81/2”Color
81/2x14”Plain
Bypass
Metric specifications
Select paper CloseBack
SetReady to Job build.Set original. Press Start key.
Bypass
Plain
Colour Plain
Plain
Plain
2 Specifying the type of originalsThis procedure specifies the type of originals being copied between1-sided, 2-sided and open-faced.
1 With the content of the “Basic” tab displayed, touch the“Original type” key. The “Original type” screen will bedisplayed.
Inch specifications
Ready to Job build.Place originals then press Start key.
1 sided 1 sided copy
Back Edge
1 sided/2 sided
1 sided copy-LeftFinished page #:0
Orig. set direction
Original type
AMS
Reduce/Enlarge
Finished
Basic Quality Edit
Offset
Job Build - Step1 End
Insert page
Set
Select paper
11x81/2”
Metric specifications
Ready to Job build.Set original. Press Start key.
1-sided 1-sided Copy
Back Edge
1-sided/2-sided
1-sided Copy-LeftFinished page #: 0
Orig. setdirection
Originaltype
AMS
Reduce/EnlargeFinished
Basic Quality Edit
Group
Job Build-Step 1 End
Set
Select paper
Insertblank page
2 Select between “1 sided”, “2 sided” and “Book”, inaccordance with the originals being copied.
Inch specifications
Ready to Job build.Place originals then press Start key.
Original type
2 sided
Book
CloseBack
Set
RearLeft topcorner
Check directionCheck direction oforiginal top side.
1 sided
Metric specifications
Ready to Job build.Set original. Press Start key.
Original type
2-sided
Book
CloseBack
Set
Back EdgeLeft topcorner
Check directionCheck direction of original.
1 sided
NOTES
• If you selected “1 sided”, verify the direction in which the originalswere set.
• If you selected “2 sided”, specify the binding direction of the originalsand then verify the direction in which the originals were set.
• If you selected “Book”, specify the binding direction of the originals.
3 Touch the “Close” key. The touch panel will return to thescreen in step 1.

Section 5 OTHER CONVENIENT FUNCTIONS
5-63
3 Selecting between 1-sided or 2-sided copiesThis procedure selects the type of finished copies to be madebetween 1-sided and 2-sided.
1 With the content of the “Basic” tab displayed, touch the “1sided/2 sided” key. The “1 sided/2 sided” screen will bedisplayed.
Inch specifications
Ready to Job build.Place originals then press Start key.
1 sided 1 sided copy
Back Edge
1 sided/2 sided
1 sided copy-LeftFinished page #:0
Orig. set direction
Original type
AMS
Reduce/Enlarge
Finished
Basic Quality Edit
Offset
Job Build - Step1 End
Insert page
Set
Select paper
11x81/2”
Metric specifications
Ready to Job build.Set original. Press Start key.
1-sided 1-sided Copy
Back Edge
1-sided/2-sided
1-sided Copy-LeftFinished page #: 0
Orig. setdirection
Originaltype
AMS
Reduce/EnlargeFinished
Basic Quality Edit
Group
Job Build-Step 1 End
Set
Select paper
Insertblank page
NOTE
The setting in regard to making either 1-sided or 2-sided copies canonly be made in the first step of the job build mode and will apply to allsteps in the copy job.
2 Touch the “1 sided” key or the “2 sided” key, as appropriate,and then select the binding direction you want for thefinished copies.Follow the instructions on the right side of the touch paneland verify the direction in which the originals were set.
Inch specifications
1 sided/ 2 sided copy
1 sidedcopy2 sidedcopy
Open fromleftOpen fromright
Finished
Open fromtop
Check directionCheck direction oforiginal top side.
Ready to Job build.Place originals then press Start key.
CloseBack
Set
RearLeft topcorner
Metric specifications
1-sided / 2-sided Copy
1-sided Copy2-sided Copy
Left bindingRight binding
Finished
Top binding
Ready to Job build.Set original. Press Start key.
CloseBack
Set
Back EdgeLeft topcorner
Check directionCheck direction oforiginal.
IMPORTANT!
If the designation for the direction that the originals are set is notcorrect, copying may be accomplished incorrectly.
3 Touch the “Close” key. The touch panel will return to thescreen in step 1.
4 Selecting how to finished up the copy setsIf the optional Document Finisher is installed on your copier, thisprocedure lets you select whether to staple or hole punch the finishedcopy sets.
1 With the content of the “Basic” tab displayed, touch the“Finished” key. The “Finished” screen will be displayed.
Inch specifications
Ready to Job build.Place originals then press Start key.
1 sided 1 sided copy
Back Edge
1 sided/2 sided
1 sided copy-LeftFinished page #:0
Orig. set direction
Original type
AMS
Reduce/Enlarge
Finished
Basic Quality Edit
Offset
Job Build - Step1 End
Insert page
Set
Select paper
11x81/2”
Metric specifications
Ready to Job build.Set original. Press Start key.
1-sided 1-sided Copy
Back Edge
1-sided/2-sided
1-sided Copy-LeftFinished page #: 0
Orig. setdirection
Originaltype
AMS
Reduce/EnlargeFinished
Basic Quality Edit
Group
Job Build-Step 1 End
Set
Select paper
Insertblank page
NOTE
The setting in regard to how the copy sets will be finished can only bemade in the first step of the job build mode and will apply to all stepsin the copy job.
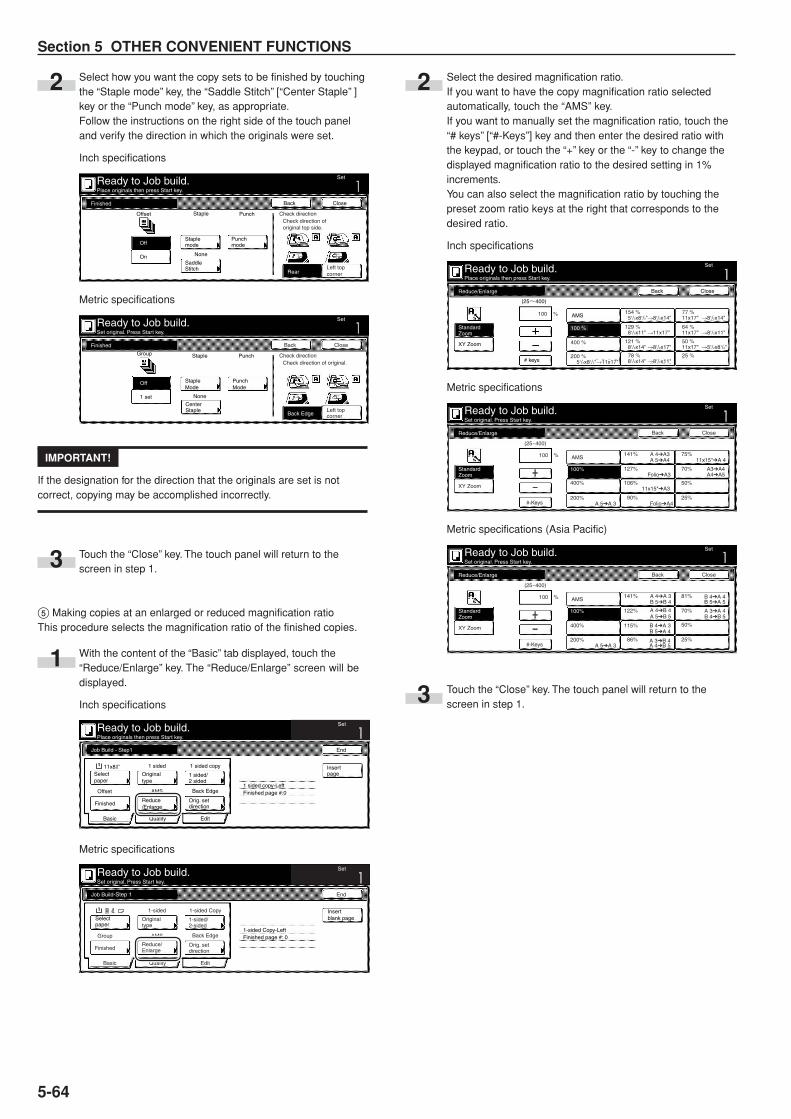
Section 5 OTHER CONVENIENT FUNCTIONS
5-64
2 Select the desired magnification ratio.If you want to have the copy magnification ratio selectedautomatically, touch the “AMS” key.If you want to manually set the magnification ratio, touch the“# keys” [“#-Keys”] key and then enter the desired ratio withthe keypad, or touch the “+” key or the “-” key to change thedisplayed magnification ratio to the desired setting in 1%increments.You can also select the magnification ratio by touching thepreset zoom ratio keys at the right that corresponds to thedesired ratio.
Inch specifications
Reduce/Enlarge
StandardZoom
XY Zoom
# keys
AMS
Ready to Job build.Place originals then press Start key.
CloseBack
Set
(25 400)
100 %
100 %
400 %
200 %51/2x81/2"R11x17"
154 %51/2x81/2"R81/2x14"
129 %81/2x11" R11x17"
121 %81/2x14" R81/2x17"
78 %
77 %11x17" R81/2x14"
64 %11x17" R81/2x11"
50 %11x17" R51/2x81/2"
25 %81/2x14" R81/2x11"
Metric specifications
Ready to Job build.Set original. Press Start key.
CloseBack
Set
Reduce/Enlarge
StandardZoom
XY Zoom
(25~400)
#-Keys
AMS100 %
100%
400%
200%
141%
127%
106%
90%
75%
70%
50%
25%A 5➔A 3
Folio➔A3
A 5➔A4A 4➔A3
11x15"➔A3
Folio➔A4
11x15"➔A 4
A3➔A4A4➔A5
Metric specifications (Asia Pacific)
Ready to Job build.Set original. Press Start key.
CloseBack
Set
Reduce/Enlarge
StandardZoom
XY Zoom
(25~400)
#-Keys
100 % AMS
100%
400%
200%
141%
122%
115%
86%
81%
70%
50%
25%A 5➔A 3
A 5➔B 5
B 5➔B 4A 4➔A 3
B 5➔A 4
A 4➔B 5
B 4➔A 3
A 3➔B 4
B 5➔A 5
A 4➔B 4
B 4➔A 4
A 3➔A 4B 4➔B 5
3 Touch the “Close” key. The touch panel will return to thescreen in step 1.
2 Select how you want the copy sets to be finished by touchingthe “Staple mode” key, the “Saddle Stitch” [“Center Staple” ]key or the “Punch mode” key, as appropriate.Follow the instructions on the right side of the touch paneland verify the direction in which the originals were set.
Inch specifications
Finished
Staple
No cover
Staplemode
Punch
No cover
Punchmode
Ready to Job build.Place originals then press Start key.
CloseBack
Set
RearLeft topcorner
Check directionCheck direction oforiginal top side.
Offset
SaddleStitch
Off
On None
Metric specifications
Finished
None
1 set
Group
StapleMode
Staple Punch
None
PunchMode
Ready to Job build.Set original. Press Start key.
CloseBack
Set
Back EdgeLeft topcorner
Check directionCheck direction of original.
Group
CenterStaple
Off
1 set
IMPORTANT!
If the designation for the direction that the originals are set is notcorrect, copying may be accomplished incorrectly.
3 Touch the “Close” key. The touch panel will return to thescreen in step 1.
5 Making copies at an enlarged or reduced magnification ratioThis procedure selects the magnification ratio of the finished copies.
1 With the content of the “Basic” tab displayed, touch the“Reduce/Enlarge” key. The “Reduce/Enlarge” screen will bedisplayed.
Inch specifications
Ready to Job build.Place originals then press Start key.
1 sided 1 sided copy
Back Edge
1 sided/2 sided
1 sided copy-LeftFinished page #:0
Orig. set direction
Original type
AMS
Reduce/Enlarge
Finished
Basic Quality Edit
Offset
Job Build - Step1 End
Insert page
Set
Select paper
11x81/2”
Metric specifications
Ready to Job build.Set original. Press Start key.
1-sided 1-sided Copy
Back Edge
1-sided/2-sided
1-sided Copy-LeftFinished page #: 0
Orig. setdirection
Originaltype
AMS
Reduce/EnlargeFinished
Basic Quality Edit
Group
Job Build-Step 1 End
Set
Select paper
Insertblank page

Section 5 OTHER CONVENIENT FUNCTIONS
5-65
6 Specifying the direction that the originals were setThis procedure specifies the direction of the set originals.
1 With the content of the “Basic” tab displayed, touch the“Orig.set direction” key. The “Orig.set direction” screen will bedisplayed.
Inch specifications
Ready to Job build.Place originals then press Start key.
1 sided 1 sided copy
Back Edge
1 sided/2 sided
1 sided copy-LeftFinished page #:0
Orig. set direction
Original type
AMS
Reduce/Enlarge
Finished
Basic Quality Edit
Offset
Job Build - Step1 End
Insert page
Set
Select paper
11x81/2”
Metric specifications
Ready to Job build.Set original. Press Start key.
1-sided 1-sided Copy
Back Edge
1-sided/2-sided
1-sided Copy-LeftFinished page #: 0
Orig. setdirection
Originaltype
AMS
Reduce/EnlargeFinished
Basic Quality Edit
Group
Job Build-Step 1 End
Set
Select paper
Insertblank page
2 Touch the “Rear” [“Back Edge”] key or the “Left top corner”key, as appropriate, according to the direction of theoriginals.
Inch specifications
Org. set direction
"Check direct ion or ig inal" can be shownat r ight s ide of d isplay.Fol low the steps. I f set t ing mode iswrong, incorrect copy wi l l resul t .
Ready to Job build.Place originals then press Start key.
CloseBack
Set
RearLeft topcorner
Check directionCheck direction oforiginal top side.
Metric specifications
Orig. set direction
"Check direct ion or ig inal" can be shownat r ight s ide of d isplay.Fol low the steps. I f set t ing mode iswrong, incorrect copy wi l l resul t .
Ready to Job build.Set original. Press Start key.
CloseBack
Set
Back EdgeLeft topcorner
Check directionCheck direction of original.
IMPORTANT!
If the designation for the direction that the originals are set is notcorrect, copying may be accomplished incorrectly.
3 Touch the “Close” key. The touch panel will return to thescreen in step 1.
7 Setting the scanning densityThis procedure sets the copy exposure for the finished copies.
1 Touch the “Quality” key. Then, in the resulting screen, touchthe “Exposure mode” key. The “Exposure mode” screen willbe displayed.
Inch specifications
Exposuremode
Text+PhotoDensity 4 Off
Eco Print1 sided copy-LeftFinished page # : 0
Orig. imagequality
Basic Quality Edit
Job Build - Step1 End
Insert page
Ready to Job build.Place originals then press Start key.
Set
Metric specifications
Exposuremode
Text + PhotoManual 4 Off
Eco Print
1-sided Copy-LeftFinished page #: 0
Imagequality
Basic Quality Edit
Job Build - Step1 End
Ready to Job build.Set original. Press Start key.
Set
Insertblank page
2 If you want to have the copy exposure selectedautomatically, touch the “Auto” key.If you want to manually set the exposure, touch the “Manual”key and then touch the “Lighter” key or the “Darker” key tomove the cursor on the exposure scale and adjust theexposure as desired.
Inch specifications
Exposure mode
Auto
Manual Lighter Darker
Ready to Job build.Place originals then press Start key.
CloseBack
Set
Metric specifications
Exposure mode
Auto
Manual Lighter Darker
Ready to Job build.Set original. Press Start key.
CloseBack
Set
3 Touch the “Close” key. The touch panel will return to thescreen in step 1.

Section 5 OTHER CONVENIENT FUNCTIONS
5-66
8 Setting the image qualityThis procedure sets the image quality according to the type oforiginals being copied.
1 Touch the “Quality” key. Then, in the resulting screen, touchthe “Orig. image quality” key. The “Orig. image quality”screen will be displayed.
Inch specifications
Exposuremode
Text+PhotoDensity 4 Off
Eco Print1 sided copy-LeftFinished page # : 0
Orig. imagequality
Basic Quality Edit
Job Build - Step1 End
Insert page
Ready to Job build.Place originals then press Start key.
Set
Metric specifications
Exposuremode
Text + PhotoManual 4 Off
Eco Print
1-sided Copy-LeftFinished page #: 0
Imagequality
Basic Quality Edit
Job Build - Step1 End
Ready to Job build.Set original. Press Start key.
Set
Insertblank page
2 Select the image quality mode by touching the “Manual” keyand then touching the “Text+Photo” key, the “Photo” key orthe “Text” key, as appropriate.
Inch specifications
Ready to Job build.Place originals then press Start key.
Orig.image quality
Text+Photo
Photo
Text
Set
Text+Photo : Set this mode to copy orig.wi th mixed text and photo
Photo : Add a dimensional effect of photoText : Copy a pencil or fine line.
CloseBack
Metric specifications
Image quality orig.
Text+Photo
Photo
Text
Text+Photo: Set this mode to copy original mixed (text & photo).
Photo: Add a dimensional effect of photo.Text : Copy pencil & fine line clearly.
Ready to Job build.Set original. Press Start key.
CloseBack
Set
3 Touch the “Close” key. The touch panel will return to thescreen in step 1.
9 Turning the eco print mode ONThis procedure allows you to turn the eco print mode ON in order tosave on toner use.
1 Touch the “Quality” key. Then, in the resulting screen, touchthe “Eco Print” key. The “Eco Print” screen will be displayed.
Inch specifications
Exposuremode
Text+PhotoDensity 4 Off
Eco Print1 sided copy-LeftFinished page # : 0
Orig. imagequality
Basic Quality Edit
Job Build - Step1 End
Insert page
Ready to Job build.Place originals then press Start key.
Set
Metric specifications
Exposuremode
Text + PhotoManual 4 Off
Eco Print
1-sided Copy-LeftFinished page #: 0
Imagequality
Basic Quality Edit
Job Build - Step1 End
Ready to Job build.Set original. Press Start key.
Set
Insertblank page
NOTE
The setting in regard to whether or not to use the eco print mode canonly be made in the first step of the job build mode and will apply to allsteps in the copy job.
2 Touch the “On” key to turn the eco print mode ON.
Inch specifications
Eco Print
Off On
Eco Print
I t is possible to reducetoner consumption. Image is a l i t t le l ight .
Eco Print is saving toner consumption, and i t is economical ly.
Ready to Job build.Place originals then press Start key.
CloseBack
Set
Metric specifications
Eco Print
Off On
Eco Pr intToner consumptioncan be reduced.Image resolut ion reduced.
Eco Pr int enables toner consumption reduct ion.
Ready to Job build.Set original. Press Start key.
CloseBack
Set
3 Touch the “Close” key. The touch panel will return to thescreen in step 1.

Section 5 OTHER CONVENIENT FUNCTIONS
5-67
0 Selecting the sheet erase modeThis procedure selects the sheet erase mode in order to erase theshadows, lines, etc., that can occur around the edges of copies.
1 Touch the “Edit” key. Then, in the resulting screen, touch the“Border Erase” [“Erase Mode”] key. The “Border Erase”[“Erase Mode”] screen will be displayed.
Inch specifications
BorderErase
Auto
ModifyCopy
Selectorig.size
None
Page #Margin/Centering
None
Off Off
2 sided copy-LeftFinished page # : 0
Basic Quality Edit
Job Build - Step1 End
Insert page
Ready to Job build.Place originals then press Start key.
Set
Metric specifications
EraseMode
Auto NoneOff
Modifycopy
Selectsize orig.
NoneNone
Pagenumbering
Margin/Imag.shift
2-sided Copy-LeftFinished page #: 0
Basic Quality Edit
Job Build - Step1 End
Ready to Job build.Set original. Press Start key.
Set
Insertblank page
2 Touch the “Sheet Erase” [“Border erase”] key or “IndividualBordrErase” [“Individual Erase Mode”] key and then set thedesired border width.
Inch specifications
Ready to Job build.Place originals then press Start key.
Border Erase
None
SheetErase
IndividualBordrErase
Set
CloseBack
Erase the border shadow of original.
Metric specifications
Erase Mode
None
Bordererase
IndividualErase Mode
Erase edge of original copy.
Ready to Job build.Set original. Press Start key.
CloseBack
Set
3 Touch the “Close” key. The touch panel will return to thescreen in step 1.
! Manually selecting the size of the originalsThis procedure allow you to select the size of the originals manuallyusing the touch panel.
1 Touch the “Edit” key. Then, in the resulting screen, touch the“Select orig. size” [“Select size orig.”] key. The “Select originalsize” [“Select size original”] screen will be displayed.
Inch specifications
BorderErase
Auto
ModifyCopy
Selectorig.size
None
Page #Margin/Centering
None
Off Off
2 sided copy-LeftFinished page # : 0
Basic Quality Edit
Job Build - Step1 End
Insert page
Ready to Job build.Place originals then press Start key.
Set
Metric specifications
EraseMode
Auto NoneOff
Modifycopy
Selectsize orig.
NoneNone
Pagenumbering
Margin/Imag.shift
2-sided Copy-LeftFinished page #: 0
Basic Quality Edit
Job Build - Step1 End
Ready to Job build.Set original. Press Start key.
Set
Insertblank page
2 If you want the size of the originals to be detectedautomatically, touch the “Auto” key. If you want to select astandard original size, touch the key that corresponds to thedesired size.If you want to select another standard original size, touch the“Other stand. Size” [“Others stand. Size”] key and select thedesired size.If you want to select the dimensions of the originals manually,touch the “Input size” key and then set the correspondingdimensions.
Inch specifications
Select original size
Selectsize
Auto
Input size
User regist.
10 x 10"
9 x 9"
8 x 8"
12 x 12"
Ready to Job build.Place originals then press Start key.
CloseBack
Set
81/2 x 14"
51/2 x 81/2"
81/2 x 51/2"
11 x 15"
A 4
A 4
11 x 17"
81/2 x 11"
11 x 81/2"Otherstand. Size
Metric specifications
Select size original
Selectsize
Auto
Input size
Use regist.
215x400mm
215x400mm
215x400mm
215x400mm
Ready to Job build.Set original. Press Start key.
CloseBack
Set
FolioOthersstand. Size
3 Touch the “Close” key. The touch panel will return to thescreen in step 1.

Section 5 OTHER CONVENIENT FUNCTIONS
5-68
@ Selecting the repeat copy modeThis procedure allow you to select the repeat copy mode so that youcan make any necessary number of additional copies later.
1 Touch the “Edit” key. Then, in the resulting screen, touch the“Modify Copy” key. The “Modify Copy” screen will bedisplayed.
Inch specifications
BorderErase
Auto
ModifyCopy
Selectorig.size
None
Page #Margin/Centering
None
Off Off
2 sided copy-LeftFinished page # : 0
Basic Quality Edit
Job Build - Step1 End
Insert page
Ready to Job build.Place originals then press Start key.
Set
Metric specifications
EraseMode
Auto NoneOff
Modifycopy
Selectsize orig.
NoneNone
Pagenumbering
Margin/Imag.shift
2-sided Copy-LeftFinished page #: 0
Basic Quality Edit
Job Build - Step1 End
Ready to Job build.Set original. Press Start key.
Set
Insertblank page
NOTES
• To make additional copies with the repeat copy mode, refer to“(2) Printing out with the repeat copy mode” on page 5-43.
• The setting in regard to whether or not to use the repeat copy modecan only be made in the first step of the job build mode and willapply to all steps in the copy job.
2 Touch the “On” key to select the repeat copy mode.
Inch specifications
Ready to Job build.Place originals then press Start key.
Modify Copy
Off
On
Set
CloseBack
When select [On], data can be saved.You can recal l and re-pr int at anyt ime.You can set the password to securesaved document.
Metric specifications
Modify copy
Off
OnWhen the mode is set [On], it cansave a job data and reprint it anytime.And you can set that other user are notable to reprint.
Ready to Job build.Set original. Press Start key.
CloseBack
Set
When select [On], job can be saved.You can recall and re-print at anytime.You can set a password to secure saveddocument.
3 Touch the “Close” key. The touch panel will return to thescreen in step 1.
# Selecting the margin mode or the centering/image shift modeThis procedure selects the margin mode or the centering/image shiftmode in order to create a margin space or center the copy image.
1 Touch the “Edit” key. Then, in the resulting screen, touch the“Margin/Centering” [“Margin/Imag. shift”] key. The “Margin/Centering” [“Margin/Imag. shift”] screen will be displayed.
Inch specifications
BorderErase
Auto
ModifyCopy
Selectorig.size
None
Page #Margin/Centering
None
Off Off
2 sided copy-LeftFinished page # : 0
Basic Quality Edit
Job Build - Step1 End
Insert page
Ready to Job build.Place originals then press Start key.
Set
Metric specifications
EraseMode
Auto NoneOff
Modifycopy
Selectsize orig.
NoneNone
Pagenumbering
Margin/Imag.shift
2-sided Copy-LeftFinished page #: 0
Basic Quality Edit
Job Build - Step1 End
Ready to Job build.Set original. Press Start key.
Set
Insertblank page
NOTE
The setting in regard to the margin mode or the centering/image shiftmode can only be made in the first step of the job build mode and willapply to all steps in the copy job.
2 Touch the “Margin” key or the “Centering” [“Imag.shift”] key,as appropriate.For more detailed information on these two settings, refer tothe explanation for the margin mode on page 5-6 or thecentering/image shift mode on page 5-8, as appropriate.
Inch specifications
Ready to Job build.Place originals then press Start key.
Margin/Centering
Reposition image to left/right ortop/bottom, and also center imageon paper.
None
Margin
Centering
Back Close
Set
Metric specifications
Margin/Image shift
None
Margin
Image shift
Reposition image to left/right ortop/bottom and center image on paper.
Ready to Job build.Set original. Press Start key.
CloseBack
Set
3 Touch the “Close” key. The touch panel will return to thescreen in step 1.

Section 5 OTHER CONVENIENT FUNCTIONS
5-69
$ Selecting the print page numbers modeThis procedure selects the print page numbers mode in order to havepage numbers printed on the corresponding copies.
1 Touch the “Edit” key. Then, in the resulting screen, touch the“Page #” [“Page numbering”] key. The “Page #” [“Pagenumbering”] screen will be displayed.
Inch specifications
BorderErase
Auto
ModifyCopy
Selectorig.size
None
Page #Margin/Centering
None
Off Off
2 sided copy-LeftFinished page # : 0
Basic Quality Edit
Job Build - Step1 End
Insert page
Ready to Job build.Place originals then press Start key.
Set
Metric specifications
EraseMode
Auto NoneOff
Modifycopy
Selectsize orig.
NoneNone
Pagenumbering
Margin/Imag.shift
2-sided Copy-LeftFinished page #: 0
Basic Quality Edit
Job Build - Step1 End
Ready to Job build.Set original. Press Start key.
Set
Insertblank page
NOTE
The setting in regard to the print page numbers mode can only bemade in the first step of the job build mode and will apply to all stepsin the copy job.
2 For more detailed information on this setting, refer to theexplanation for the print page numbers mode on page 5-16.
Inch specifications
Ready to Job build.Place originals then press Start key.
Page #
None
-1-
P.1
1/n
CloseBack
Set
Page # can be added on bottom of copy.
Metric specifications
Page numbering
None
-1-
P.1
1/nPage # can be added on bottom of copy.
Ready to Job build.Set original. Press Start key.
CloseBack
Set
3 Touch the “Close” key. The touch panel will return to thescreen in step 1.

Section 5 OTHER CONVENIENT FUNCTIONS
5-70

6-1
Section 6 DOCUMENT AND OUTPUT MANAGEMENT
FUNCTIONS
1. Document management functions
NOTE
The optional Hard Disk must be installed on this copier in order to usethis function.
(1) What are the “document management” functions?
“Document management” functions refer to those functions thatenable you to scan and save documents onto the copier’s hard disk,and then use that data for copying purposes.Each function has it’s own separate “box” (the area where documentdata is saved) on the hard disk and all data for that particular functionis saved into that specific box.
The following “document management” functions are available withthis copier:
● Form registration (pages 6-1 through 6-4)
You can store in a box on the copier’s hard disk, and you can thenmanage the use of, those images that will be used as the “form” in theform overlay mode.
● Shared data box (pages 6-4 through 6-8)
If you register data that will be shared by all users in the shared databox, it will be possible for each user to print out that data at their ownconvenience. This is useful, for example, for registering businessforms and the like that are frequently used my many people. The datathat you register here will be stored permanently until the procedure todelete it is performed.
● Synergy print boxes (pages 6-9 through 6-19)
If you store multiple sets of documents in a synergy print box, you canprint out up to 10 of these sets at one time.
(2) Form registration
1Registering a form
Perform the following procedure when you want to register an imagesas a “form” for use in the form overlay mode.
1 Set the document that you want to register as a form.
2 Press the [Document Management] key. The “DocumentManagement” screen will be displayed.
3 Touch the “Form reg.” [“Form registr.”] key. The “Formregistration” screen will be displayed.
Inch specifications
Select function.
Document Management End
Shared Data Box Synergy Print Box Form box
Document reg.
Document printing
Document reg.
Document printing
Form reg.
Box Editing
Box Editing
Box Editing
25/10/'01 19:20
Metric specifications
Select function.
Document Management
25/10/'01 19:20
End
Shared Data Box Synergy Print Box Form box
Documentregistr.
Documentprinting
Documentprinting
Documentregistr.
Formregistr.
Box Editing
BoxEditing
BoxEditing

Section 6 DOCUMENT AND OUTPUT MANAGEMENT FUNCTIONS
6-2
4 Touch the “Change name” key and then enter a name for theform data.If you do not want to register a name for the form data,go directly to the next step.
Inch specifications
Cancel
Documents
100%
Basic Quality Edit
Back EdgeReduce/Enlarge
Orig. setdirection
Original Register
Auto
Auto size
Select orig. size
Select regi. size
Changename
Ready to register form(s).
Form registration
Form box
Place originals then press Start key.
Form006
25/10/'01 19:2011x81/2" 81/2x11"
Metric specifications
Job cancel
Documents
100%
Basic Quality Edit
Back EdgeReduce/Enlarge
Orig. setdirection
Original
A4 A4
Register
25/10/'01 19:20
Auto
Auto size
Select size orig.
Select regi. size
Changename
Ready to register form(s).
Form registration
Form box
Set original. Press Start key.
FORM006
NOTE
Refer to “11. Entering characters” on page 7-104 for information onentering characters.
5 Touch the “Select orig. size” [“Select size orig.”], “Select regi.size”, “Reduce/Enlarge” and/or “Orig. set direction” keys ifyou want to perform the corresponding settings for theoriginals being used.If you want to access the “Scanning density” key and/or the“Orig. image quality” [“Image quality”] key to make thosesettings, touch the “Quality” key.If you want to set access the “Border Erase” [“Erase Mode”]key to make those settings, touch the “Edit” key.
6 Press the [Start] key. Scanning of the document will start.Once the document has been completely scanned, the touchpanel will return to the screen in step 3.If you want to register another form, repeat steps 3through 6.
7 Touch the “End” key. The touch panel will return to thecontents of the “Basic” tab.
2Checking registered forms and changing form names
Perform the following procedure when you want to verify the name ofa registered form, the size of the original document or the date andtime it was stored in memory, or when you want to print out thedocument in order to check it. You can also use this procedure tochange the registered form name.
1 Press the [Document Management] key. The “DocumentManagement” screen will be displayed.
2 Touch the “Box Editing” key under “Form box”.The “Box editing” screen will be displayed.
Inch specifications
Select function.
Document Management End
Shared Data Box Synergy Print Box Form box
Document reg.
Document printing
Document reg.
Document printing
Form reg.
Box Editing
Box Editing
Box Editing
25/10/'01 19:20
Metric specifications
Select function.
Document Management
25/10/'01 19:20
End
Shared Data Box Synergy Print Box Form box
Documentregistr.
Documentprinting
Documentprinting
Documentregistr.
Formregistr.
Box Editing
BoxEditing
BoxEditing
3 Select the form that you want to check and then touch the“Conf/Crrt. details” [“Check/Rev. details”] key. The “Check/Correct details” [“Check/revise details”] screen will bedisplayed.
Inch specifications
Box editing
Form 005
Form 004
Form 003
Form 002
Form 001
Form Up
Delete
Close
Document Management - Form box
Down
Order of indication
Conf/Crrt. details
01/04/19
01/04/19
01/04/19
01/04/19
01/04/19
001/005
11x81/2"
11x81/2"
81/2x11"
11x81/2"
11x81/2"
Metric specifications
Box editing
Form 007
Form 006
Form 005
Form 004
Form 003
Form Up
Delete
Close
Document Management - Form box
Down
Order ofindication
Check/Rev.details
A4
A4
A4
A4
A4
25/10/01
25/10/01
25/10/01
25/10/01
25/10/01
001/007

Section 6 DOCUMENT AND OUTPUT MANAGEMENT FUNCTIONS
6-3
NOTE
It is possible to change the order of display for the registered forms.To do so, touch the “Order of indication” key, and then touch the “Sortby date” key (and select either “New R Old” or “Old R New”) or the“Sort by name” key (and select either “A R Z” or “Z R A”), asappropriate.
4 Check the displayed information.If you want to print out the selected form, touch the “PrintForm” key.If you want to change the name of the selected form, touchthe “Change form name” key and then enter the new name.
Inch specifications
Check/Correct details
User nameDocument nameSizeOrig. set directionInput sourceResolutionRegistration date
Item
Changeform name
Print Form
Close
Document Management - Form box - Box editing
- - - - - - - - - - - Form 00111x17"Back EdgeCopy600dpi25/10/'01 14:06
Details
Metric specifications
Check/revice details
Changeform name
PrintForm
Close
Document Management - Form box - Box editing
Item Details
User nameDocument nameSizeOrig. set directionInput sourceResolutionRegistration date
- - - - - - - - - - - FORM007A4Back EdgeCopy600dpi25/10/'01 14:06
NOTE
Refer to “11. Entering characters” on page 7-104 for information onentering characters.
5 Once you have finished checking the information for thatform, touch the “Close” key. The touch panel will return to thescreen in step 3.If you want to check the information for another registeredform, repeat steps 3 through 5.
6 Touch the “Close” key once again. The touch panel will returnto the screen in step 2.Touch the “End” key. The touch panel will return to thecontents of the “Basic” tab.
3Deleting a registered form
Perform the following procedure when you want to delete a registeredform.
1 Press the [Document Management] key. The “DocumentManagement” screen will be displayed.
2 Touch the “Box Editing” key under “Form Box”.The “Box editing” screen will be displayed.
Inch specifications
Select function.
Document Management End
Shared Data Box Synergy Print Box Form box
Document reg.
Document printing
Document reg.
Document printing
Form reg.
Box Editing
Box Editing
Box Editing
25/10/'01 19:20
Metric specifications
Select function.
Document Management
25/10/'01 19:20
End
Shared Data Box Synergy Print Box Form box
Documentregistr.
Documentprinting
Documentprinting
Documentregistr.
Formregistr.
Box Editing
BoxEditing
BoxEditing
3 Select the form that you want to delete and then touch the“Delete” key. A verification screen will be displayed.
Inch specifications
Box editing
Form 005
Form 004
Form 003
Form 002
Form 001
Form Up
Delete
Close
Document Management - Form box
Down
Order of indication
Conf/Crrt. details
01/04/19
01/04/19
01/04/19
01/04/19
01/04/19
001/005
11x81/2"
11x81/2"
81/2x11"
11x81/2"
11x81/2"
Metric specifications
Box editing
Form 007
Form 006
Form 005
Form 004
Form 003
Form Up
Delete
Close
Document Management - Form box
Down
Order ofindication
Check/Rev.details
A4
A4
A4
A4
A4
25/10/01
25/10/01
25/10/01
25/10/01
25/10/01
001/007

Section 6 DOCUMENT AND OUTPUT MANAGEMENT FUNCTIONS
6-4
NOTE
It is possible to change the order of display for the stored documents.To do so, touch the “Order of indication” key, and then touch the “Sortby date” key (and select either “New R Old” or “Old R New”) or the“Sort by name” key (and select either “A R Z” or “Z R A”), asappropriate.
4 Touch the “Yes” key or the “No” key, as appropriate.
Inch specifications
Form name : Form 001
This form will be deleted. Do you really want to delete it?
Yes No
Stop
Metric specifications
Form name : FORM007
This form will be deleted. Are you sure?
Yes No
Stop
If you selected “Yes”, the selected form will be deleted andthe touch panel will return to the screen in step 3.If you selected “No”, the touch panel will return to the screenin step 3 without deleting the selected form.
5 If you want to delete another registered form, repeat steps 3and 4.
6 Touch the “Close” key. The touch panel will return to thescreen in step 2.Touch the “End” key. The touch panel will return to thecontents of the “Basic” tab.
(3) Shared data box
1Storing documents in the box
Perform the following procedure when you want to register a set ofdocuments in the shared data box.* Up to 100 sets of documents can be saved in the shared data box.
1 Set the documents to be stored.
2 Press the [Document Management] key. The “DocumentManagement” screen will be displayed.
3 Touch the “Document reg.” [“Document registr.”] key under“Shared Data Box”. The “Document registration” screen willbe displayed.
Inch specifications
Select function.
Document Management End
Shared Data Box Synergy Print Box Form box
Document reg.
Document printing
Document reg.
Document printing
Form reg.
Box Editing
Box Editing
Box Editing
25/10/'01 19:20
Metric specifications
Select function.
Document Management
25/10/'01 19:20
End
Shared Data Box Synergy Print Box Form box
Documentregistr.
Documentprinting
Documentprinting
Documentregistr.
Formregistr.
Box Editing
BoxEditing
BoxEditing

Section 6 DOCUMENT AND OUTPUT MANAGEMENT FUNCTIONS
6-5
4 Touch the “Change name” key and then enter a name for thedocuments.If you do not want to register a name for the documents, godirectly to the next step.
Inch specifications
Ready to register document(s).
Document registration Cancel
DocumentsAuto 1 sided
Auto size 100%
Shared Data Box
Job006
BasicChangename Quality Edit
Back Edge
Reduce/Enlarge
Originaltype
Select orig. size
Select regi. size
Orig. set direction
Place originals then press Start key. 25/10/'01 19:20
Original Register11x81/2" 81/2x11"
Metric specifications
Ready to register document(s).
Job cancel
Documents1-sided
100%
Shared Data Box
Job001
Basic Quality Edit
Back EdgeReduce/Enlarge
Original type
Orig. setdirection
Set original. Press Start key.
Original
A4 A4
Register
Document registration
25/10/'01 19:20
Auto
Auto size
Select size orig.
Select regi. size
Changename
NOTE
Refer to “11. Entering characters” on page 7-104 for information onentering characters.
5 Touch the “Select orig. size” [“Select size orig.”] key, the“Select regi. size” key, the “Original type” key, the “Reduce/Enlarge” key and/or the “Orig.set direction” key, if you want toperform the corresponding settings.If you want to access the “Scanning density” key and/or the“Orig.image quality” [“Image quality”] key to make thosesettings, touch the “Quality” key.If you want to set access the “Border Erase” [“Erase Mode”]key and/or the “Continuous scanning” [“Multiple scanning”]key to make those settings, touch the “Edit” key.
6 Press the [Start] key. Scanning of the documents will start.Once all of the documents have been completely scanned,the touch panel will return to the screen in step 3.If you want to register another document, repeat steps 3through 6.
7 Touch the “End” key. The touch panel will return to thecontents of the “Basic” tab.
2Printing out stored documents
Perform the following procedure when you want to print outdocuments that are stored in a shared data box.
1 Press the [Document Management] key. The “DocumentManagement” screen will be displayed.
2 Touch the “Document printing” key under “Shared Data Box”.The “Document printing” screen will be displayed.
Inch specifications
Select function.
Document Management End
Shared Data Box Synergy Print Box Form box
Document reg.
Document printing
Document reg.
Document printing
Form reg.
Box Editing
Box Editing
Box Editing
25/10/'01 19:20
Metric specifications
Select function.
Document Management
25/10/'01 19:20
End
Shared Data Box Synergy Print Box Form box
Documentregistr.
Documentprinting
Documentprinting
Documentregistr.
Formregistr.
Box Editing
BoxEditing
BoxEditing
3 Select the documents to be printed out and then touch the“Finish selecting” key.
Inch specifications
Document printing
Up
Finish selecting
Cancel
Document Management - Shared Data Box
Down
Order of indication
Conf/Crrt.details
001/010
Job 005
Job 004
Job 003
Job 002
Job 001
1
1
1
1
1
25/10/01
25/10/01
25/10/01
25/10/01
25/10/01
Document data box
Metric specifications
Document printing
Up
Finish Selecting
Job cancel
Document Management - Shared Data Box
Down
Order ofindication
1
1
1
001/003
Document data box
JOB003
JOB002
JOB001
Check/Rev.details25/10/01
25/10/01
25/10/01

Section 6 DOCUMENT AND OUTPUT MANAGEMENT FUNCTIONS
6-6
NOTE
It is possible to change the order of display for the stored documents.To do so, touch the “Order of indication” key, and then touch the “Sortby date” key (and select either “New R Old” or “Old R New”) or the“Sort by name” key (and select either “A R Z” or “Z R A”), asappropriate.
4 Touch the “Select paper” key, the “Sort/Finished” key and/orthe “1 sided/ 2 sided” key, to perform the correspondingsettings.If you want to access the “Form Overlay” key, the “Margin”key, the “Cover Mode” key, the “Page #” [“Page numbering”]key, the “Booklet” key and/or the “Select of Output” key tomake those settings, touch the “Edit” key.
5 Press the [Start] key.Print out will start.
3Checking stored documents and changing their names
Perform the following procedure when you want to verify the name ofstored documents, the size of the original documents or the date andtime they were stored in the shared data box, or when you want toprint out the first page of those document in order to check them. Youcan also use this procedure to change the registered name for thedocuments.
1 Press the [Document Management] key. The “DocumentManagement” screen will be displayed.
2 Touch the “Document printing” key or the “Box Editing” keyunder “Shared Data Box”. The “Document printing” screen orthe “Box editing” screen, as appropriate, will be displayed.
Inch specifications
Select function.
Document Management End
Shared Data Box Synergy Print Box Form box
Document reg.
Document printing
Document reg.
Document printing
Form reg.
Box Editing
Box Editing
Box Editing
25/10/'01 19:20
Metric specifications
Select function.
Document Management
25/10/'01 19:20
End
Shared Data Box Synergy Print Box Form box
Documentregistr.
Documentprinting
Documentprinting
Documentregistr.
Formregistr.
Box Editing
BoxEditing
BoxEditing

Section 6 DOCUMENT AND OUTPUT MANAGEMENT FUNCTIONS
6-7
3 Select the documents that you want to check and then touchthe “Cont/Crrt. details” [“Check/Rev. details”] key.The “Check/Correct details” [“Check/revice details”] screenwill be displayed.
Inch specifications
Box editing
Up
Delete
Close
Document Management - Shared Data Box
Down
Order of indication
Cont/Crrt.details
001/010
Job 005
Job 004
Job 003
Job 002
Job 001
1
1
1
1
1
25/10/01
25/10/01
25/10/01
25/10/01
25/10/01
Document data box
Metric specifications
Up
Delete
Close
Down
Box editing
Document Management - Shared Data Box
Order ofindication
1
1
1
001/003
Document data box
JOB003
JOB002
JOB001
Check/Rev.details
25/10/01
25/10/01
25/10/01
NOTE
It is possible to change the order of display for the stored documents.To do so, touch the “Order of indication” key, and then touch the “Sortby date” key (and select either “New R Old” or “Old R New”) or the“Sort by name” key (and select either “A R Z” or “Z R A”), asappropriate.
4 Check the displayed information.If you want to print out the first page of the selecteddocuments, touch the “Print from 1st” [“Head Print”] key.If you want to change the name of the selected documents,touch the “Change doc.name” key and then enter the newname.
Inch specifications
Check/Correct details
Item Details
Change doc. name
Printfrom 1st
Close
Document Management - Shared Data Box - Box editing
User name --------------------Document name Job005Registration size 11x15"Orig. set direction Back Edgepage # 1Input source CopyResolution 600dpiRegistration date '25/10/01 14:39
Metric specifications
Check/revise details
User name --------------------Document name Job006Registration size A4Orig. set direction Back Edgepage # 1Input source CopyResolution 600dpiRegistration date '25/10/01 14:39
Changedoc. name
Head print
Close
Document Management - Shared Data Box - Box editing
Item Details
NOTE
Refer to “11. Entering characters” on page 7-104 for information onentering characters.
5 Once you have finished checking the information for thosedocuments, touch the “Close” key. The touch panel will returnto the screen in step 3.If you want to check the information for other storeddocuments, repeat steps 3 through 5.
6 Touch the “Close” key once again. The touch panel will returnto the screen in step 2.Touch the “End” key. The touch panel will return to thecontents of the “Basic” tab.

Section 6 DOCUMENT AND OUTPUT MANAGEMENT FUNCTIONS
6-8
4Deleting stored documents
Perform the following procedure when you want to delete storeddocuments.
1 Press the [Document Management] key. The “DocumentManagement” screen will be displayed.
2 Touch the “Box Editing” key under “Shared Data Box”.The “Box editing” screen will be displayed.
Inch specifications
Select function.
Document Management End
Shared Data Box Synergy Print Box Form box
Document reg.
Document printing
Document reg.
Document printing
Form reg.
Box Editing
Box Editing
Box Editing
25/10/'01 19:20
Metric specifications
Select function.
Document Management
25/10/'01 19:20
End
Shared Data Box Synergy Print Box Form box
Documentregistr.
Documentprinting
Documentprinting
Documentregistr.
Formregistr.
Box Editing
BoxEditing
BoxEditing
3 Select the documents that you want to delete and then touchthe “Delete” key. A verification screen will be displayed.
Inch specifications
Box editing
Up
Delete
Close
Document Management - Shared Data Box
Down
Order of indication
Cont/Crrt.details
001/010
Job 005
Job 004
Job 003
Job 002
Job 001
1
1
1
1
1
25/10/01
25/10/01
25/10/01
25/10/01
25/10/01
Document data box
Metric specifications
Up
Delete
Close
Down
Box editing
Document Management - Shared Data Box
Order ofindication
1
1
1
001/003
Document data box
JOB003
JOB002
JOB001
Check/Rev.details
25/10/01
25/10/01
25/10/01
NOTE
It is possible to change the order of display for the stored documents.To do so, touch the “Order of indication” key, and then touch the “Sortby date” key (and select either “New R Old” or “Old R New”) or the“Sort by name” key (and select either “A R Z” or “Z R A”), asappropriate.
4 Touch the “Yes” key or the “No” key, as appropriate.
Inch specifications
Document name : JOB 005
This document(s) will be deleted. Do you want to delete it?
Yes No
Stop
Metric specifications
Document name :JOB002
This document will be deleted. Are you sure?
Yes No
Stop
If you selected “Yes”, the selected documents will be deletedand the touch panel will return to the screen in step 3.If you selected “No”, the touch panel will return to the screenin step 3 without deleting the selected documents.
5 If you want to delete other stored documents, repeat steps 3and 4.
6 Touch the “Close” key. The touch panel will return to thescreen in step 2.Touch the “End” key. The touch panel will return to thecontents of the “Basic” tab.

Section 6 DOCUMENT AND OUTPUT MANAGEMENT FUNCTIONS
6-9
(4) Synergy print boxes
1Storing documents in a box
Perform the following procedure when you want to register a set ofdocuments in a synergy print box.
1 Set the documents to be stored.
2 Press the [Document Management] key. The “DocumentManagement” screen will be displayed.
3 Touch the “Document reg.” [“Document registr.”] key under“Synergy Print Box”. The screen to select the synergy printbox will be displayed.
Inch specifications
Select function.
Document Management End
Shared Data Box Synergy Print Box Form box
Document reg.
Document printing
Document reg.
Document printing
Form reg.
Box Editing
Box Editing
Box Editing
25/10/'01 19:20
Metric specifications
Select function.
Document Management
25/10/'01 19:20
End
Shared Data Box Synergy Print Box Form box
Documentregistr.
Documentprinting
Documentprinting
Documentregistr.
Formregistr.
Box Editing
BoxEditing
BoxEditing
4 Either touch the synergy print box in which you want toregister the documents, or enter its number using thekeypad. Then touch the “Enter” key. The “Documentregistration” screen will be displayed.
Inch specifications
Document registration
Select box No.
Cancel
Box No.(with #key)
Enter1/5
Document Management - Synergy Print Box
0 0 7001 ABCD_0000001 006 UVWX_0000006 011 QRST_0000105 016 MNOP_0200104
002 EFGH_0000002 007 ABCD_0000101 012 UVWX_0000106 017 QRST_0200105
003 IJKL_0200003 008 EFGH_0000102 013 ABCD_0200101 018 UVWX_0200106
004 MNOP_0000004 009 IJKL_0000103 014 EFGH_0200102 019 ABCD_050010
005 QRST_0000005 010 MNOP_0000104 015 IJKL_0200103 020 EFGH_0500102
Metric specifications
Document registration
Select box No.
Job cancel
Box No.(with # key)
Enter1/ 5
Document Management - Synergy Print Box
0 0 7001 ABCD_0000001 006 UVWX_0000006 011 QRST_0000105 016 MNOP_0200104
002 EFGH_0000002 007 ABCD_0000101 012 UVWX_0000106 017 QRST_0200105
003 IJKL_0200003 008 EFGH_0000102 013 ABCD_0200101 018 UVWX_0200106
004 MNOP_0000004 009 IJKL_0000103 014 EFGH_0200102 019 ABCD_050010
005 QRST_0000005 010 MNOP_0000104 015 IJKL_0200103 020 EFGH_0500102
5 Touch the “Change name” key and then enter a name for thedocuments.If you do not want to register a name for the documents, godirectly to the next step.
Inch specifications
Ready to register document(s).
Document registration Cancel
Documents
Auto size 100%
007
Job001
Basic Quality Edit
Back Eage
Reduce/Enlarge
Orig. set direction
Select regi. size
Place originals then press Start key.
Auto 1 sided
Changename
Originaltype
Select orig. size
25/10/'01 19:20
Original Register11x81/2" 81/2x11"
Metric specifications
100%
Basic Quality
Back Edge
Document registration Job cancel
Documents
007
Job001
Changename
RegisterA4 A4Ready to register document(s).
1-sided
Reduce/Enlarge
Original type
Orig. setdirection
Set original. Press Start key.
Original
Edit
25/10/'01 19:20
Auto
Auto size
Select size orig.
Select regi. size
NOTE
Refer to “11. Entering characters” on page 7-104 for information onentering characters.

Section 6 DOCUMENT AND OUTPUT MANAGEMENT FUNCTIONS
6-10
2Combining and printing out stored documents
Perform the following procedure when you want to combine and printout documents that are stored in a synergy print box.
1 Press the [Document Management] key. The “DocumentManagement” screen will be displayed.
2 Touch the “Document printing” key under “Synergy PrintBox”. The screen to select the synergy print box will bedisplayed.
Inch specifications
Select function.
Document Management End
Shared Data Box Synergy Print Box Form box
Document reg.
Document printing
Document reg.
Document printing
Form reg.
Box Editing
Box Editing
Box Editing
25/10/'01 19:20
Metric specifications
Select function.
Document Management
25/10/'01 19:20
End
Shared Data Box Synergy Print Box Form box
Documentregistr.
Documentprinting
Documentprinting
Documentregistr.
Formregistr.
Box Editing
BoxEditing
BoxEditing
6 Touch the “Select orig. size” [“Select size orig.”] key, the“Select regi. size” key, the “Original type” key, the “Reduce/Enlarge” key and/or the “Orig.set direction” key, if you want toperform the corresponding settings.If you want to access the “Scanning density” key and/or the“Orig.image quality” [“Image quality”] key to make thosesettings, touch the “Quality” key.If you want to set access the “Border Erase” [“Erase Mode”]key and/or the “Continuous scanning” [“Multiple scanning”]key to make those settings, touch the “Edit” key.
7 Press the [Start] key. Scanning of the documents will start.Once all of the documents have been completely scanned,the touch panel will return to the screen in step 3.If you want to register another document, repeat steps 3through 7.
8 Touch the “End” key. The touch panel will return to thecontents of the “Basic” tab.

Section 6 DOCUMENT AND OUTPUT MANAGEMENT FUNCTIONS
6-11
3 Either touch the synergy print box that contains thedocuments to be printed out, or enter its number using thekeypad. Then touch the “Enter” key. The “Document printing”screen will be displayed.
Inch specifications
001 ABCD_0000001 006 UVWX_0000006 011 QRST_0000105 016 MNOP_0200104
002 EFGH_0000002 007 ABCD_0000101 012 UVWX_0000106 017 QRST_0200105
003 IJKL_0200003 008 EFGH_0000102 013 ABCD_0200101 018 UVWX_0200106
004 MNOP_0000004 009 IJKL_0000103 014 EFGH_0200102 019 ABCD_0500101
005 QRST_0000005 010 MNOP_0000104 015 IJKL_0200103 020 EFGH_0500102
Document printing
Select box No.
Cancel
Box No.(with #key)
Enter1/ 5
Document Management - Synergy Print Box
0 0 7
Metric specifications
001 ABCD_0000001 006 UVWX_0000006 011 QRST_0000105 016 MNOP_0200104
002 EFGH_0000002 007 ABCD_0000101 012 UVWX_0000106 017 QRST_0200105
003 IJKL_0200003 008 EFGH_0000102 013 ABCD_0200101 018 UVWX_0200106
004 MNOP_0000004 009 IJKL_0000103 014 EFGH_0200102 019 ABCD_0500101
005 QRST_0000005 010 MNOP_0000104 015 IJKL_0200103 020 EFGH_0500102
Document Printineg
Select box No.
Job cancel
Box No.(with # key)
Enter1/ 5
Document Management - Synergy Print Box
0 0 7
NOTES
• If that box was registered with a password, the password entryscreen will be displayed.Enter the registered password with the keypad and then touch the“Enter” key.
Inch specifications
Stop
Enter
Clear
(Enter by #key)
007
Password
Enter password.
********
Metric specifications
Stop
Enter
Clear
(Enter #-key)
007 Box Name ABCDEFG
Password ********
Enter password.
• Refer to “7 Registering a password for a box” on page 6-18 forinformation on registering the password.
4 Select the document sets in order of how you want themprinted. Up to 10 sets of documents can be selected.
Inch specifications
Document printing
JOB005
JOB004
JOB003
JOB002
JOB001
Up
Select/Cancel
Cancel
Document Management - Synergy Print Box
Down
Order of indication
Print onceall data
Finish selecting
Conf/Crrt.details
1
1
1
1
1
WED 15:32
WED 15:33
WED 15:34
WED 15:35
WED 15:37
001/005
007 Select: 2
1
2
Metric specifications
Document printing
JOB005
JOB004
JOB003
JOB002
JOB001
Up
Select/Cancel
Job cancel
Document Management - Synergy Print Box
Down
Order ofindication
Print once all data
Finish selecting
Check/ Rev.details
1
1
1
1
1
WED 15:32
WED 15:33
WED 15:34
WED 15:35
WED 15:37
001/005
007 Box ABCDEFGHIJK Select : 2
2
1
NOTES
• It is possible to change the order of display for the storeddocuments. To do so, touch the “Order of indication” key, and thentouch the “Sort by date” key (and select either “New R Old” or “OldR New”) or the “Sort by name” key (and select either “A R Z” or “ZR A”), as appropriate.
• If you want to print out more than one set of documents, they mustall be of the same size.
5 Touch the “Select paper” key, the “Sort/Finished” key and/orthe “1 sided/ 2 sided” key, to perform the correspondingsettings.If you want to access the “Form Overlay” key, the “Margin”key, the “Cover Mode” key, the “Page #” key, the “Booklet”key and/or the “Select of Output” key to make those settings,touch the “Edit” key.
6 Press the [Start] key.Print out will start.

Section 6 DOCUMENT AND OUTPUT MANAGEMENT FUNCTIONS
6-12
3Printing out the full contents of a box
Perform the following procedure when you want to print out all of thedocuments that are stored in a synergy print box at one time.
1 Press the [Document Management] key. The “DocumentManagement” screen will be displayed.
2 Touch the “Document printing” key under “Synergy PrintBox”. The screen to select the synergy print box will bedisplayed.
Inch specifications
Select function.
Document Management End
Shared Data Box Synergy Print Box Form box
Document reg.
Document printing
Document reg.
Document printing
Form reg.
Box Editing
Box Editing
Box Editing
25/10/'01 19:20
Metric specifications
Select function.
Document Management
25/10/'01 19:20
End
Shared Data Box Synergy Print Box Form box
Documentregistr.
Documentprinting
Documentprinting
Documentregistr.
Formregistr.
Box Editing
BoxEditing
BoxEditing
3 Either touch the synergy print box that contains thedocuments to be printed out, or enter its number using thekeypad. Then touch the “Enter” key. The “Document printing”screen will be displayed.
Inch specifications
001 ABCD_0000001 006 UVWX_0000006 011 QRST_0000105 016 MNOP_0200104
002 EFGH_0000002 007 ABCD_0000101 012 UVWX_0000106 017 QRST_0200105
003 IJKL_0200003 008 EFGH_0000102 013 ABCD_0200101 018 UVWX_0200106
004 MNOP_0000004 009 IJKL_0000103 014 EFGH_0200102 019 ABCD_0500101
005 QRST_0000005 010 MNOP_0000104 015 IJKL_0200103 020 EFGH_0500102
Document printing
Select box No.
Cancel
Box No.(with #key)
Enter1/ 5
Document Management - Synergy Print Box
0 0 7
Metric specifications
001 ABCD_0000001 006 UVWX_0000006 011 QRST_0000105 016 MNOP_0200104
002 EFGH_0000002 007 ABCD_0000101 012 UVWX_0000106 017 QRST_0200105
003 IJKL_0200003 008 EFGH_0000102 013 ABCD_0200101 018 UVWX_0200106
004 MNOP_0000004 009 IJKL_0000103 014 EFGH_0200102 019 ABCD_0500101
005 QRST_0000005 010 MNOP_0000104 015 IJKL_0200103 020 EFGH_0500102
Document Printineg
Select box No.
Job cancel
Box No.(with # key)
Enter1/ 5
Document Management - Synergy Print Box
0 0 7
NOTES
• If that box was registered with a password, the password entryscreen will be displayed.Enter the registered password with the keypad and then touch the“Enter” key.
Inch specifications
Stop
Enter
Clear
(Enter by #key)
007
Password
Enter password.
********
Metric specifications
Stop
Enter
Clear
(Enter #-key)
007 Box Name ABCDEFG
Password ********
Enter password.
• Refer to “7 Registering a password for a box” on page 6-18 forinformation on registering the password.
4 Touch the “Print once all data” key. Print out will start.Once printing is completed, the touch panel will return to thescreen in step 2.
Inch specifications
Document printing
Job 005
Job 004
Job 003
Job 002
Job 001
Up
Cancel
Document Management - Synergy Print Box
Down
1
1
1
1
1
WED 15:32
WED 15:33
WED 15:34
WED 15:35
WED 15:37
001/005
007 Select : 0
Select/Cancel
Order of indication
Print onceall data
Finish selecting
Conf/Crrt.details
Metric specifications
Document printingDocument printing
JOB005
JOB004
JOB003
JOB002
JOB001
Up
Select/Cancel
Job cancel
Document Management - Synergy Print Box
Down
Order ofindication
Print once all data
Finish selecting
Check/ Rev.details
1
1
1
1
1
WED 15:32
WED 15:33
WED 15:34
WED 15:35
WED 15:37
001/005
007 Box ABCDEFGHIJK Select : 0
5 Touch the “End” key. The touch panel will return to thecontents of the “Basic” tab.

Section 6 DOCUMENT AND OUTPUT MANAGEMENT FUNCTIONS
6-13
4Checking stored documents and changing their names
Perform the following procedure when you want to verify the name ofstored documents, the size of the original documents or the date andtime they were stored in the synergy print box, or when you want toprint out the first page of those document in order to check them. Youcan also use this procedure to change the registered name for thedocuments.
1 Press the [Document Management] key. The “DocumentManagement” screen will be displayed.
2 Touch the “Document printing” key or the “Box Editing” keyunder “Synergy Print Box”. The screen to select the synergyprint box will be displayed.
Inch specifications
Select function.
Document Management End
Shared Data Box Synergy Print Box Form box
Document reg.
Document printing
Document reg.
Document printing
Form reg.
Box Editing
Box Editing
Box Editing
25/10/'01 19:20
Metric specifications
Select function.
Document Management
25/10/'01 19:20
End
Shared Data Box Synergy Print Box Form box
Documentregistr.
Documentprinting
Documentprinting
Documentregistr.
Formregistr.
Box Editing
BoxEditing
BoxEditing
3 Either touch the synergy print box that contains thedocuments to be printed out, or enter its number using thekeypad. Then touch the “Enter” key. The “Document printing”screen or the “Box editing” screen, as appropriate, will bedisplayed.
Inch specifications
001 ABCD_0000001 006 UVWX_0000006 011 QRST_0000105 016 MNOP_0200104
002 EFGH_0000002 007 ABCD_0000101 012 UVWX_0000106 017 QRST_0200105
003 IJKL_0200003 008 EFGH_0000102 013 ABCD_0200101 018 UVWX_0200106
004 MNOP_0000004 009 IJKL_0000103 014 EFGH_0200102 019 ABCD_0500101
005 QRST_0000005 010 MNOP_0000104 015 IJKL_0200103 020 EFGH_0500102
Box editing
Select box No.
Cancel
Box No.(with #key)
Enter1/ 5
Document Management - Synergy Print Box
Metric specifications
001 ABCD_0000001 006 UVWX_0000006 011 QRST_0000105 016 MNOP_0200104
002 EFGH_0000002 007 ABCD_0000101 012 UVWX_0000106 017 QRST_0200105
003 IJKL_0200003 008 EFGH_0000102 013 ABCD_0200101 018 UVWX_0200106
004 MNOP_0000004 009 IJKL_0000103 014 EFGH_0200102 019 ABCD_0500101
005 QRST_0000005 010 MNOP_0000104 015 IJKL_0200103 020 EFGH_0500102
Box editing
Select box No.
Job cancel
Box No.(with # key)
Enter1/ 5
Document Management - Synergy Print Box
NOTES
• If that box was registered with a password, the password entryscreen will be displayed.Enter the registered password with the keypad and then touch the“Enter” key.
Inch specifications
Stop
Enter
Clear
(Enter by #key)
007
Password
Enter password.
********
Metric specifications
Stop
Enter
Clear
(Enter #-key)
007 Box Name ABCDEFG
Password ********
Enter password.
• Refer to “7 Registering a password for a box” on page 6-18 forinformation on registering the password.

Section 6 DOCUMENT AND OUTPUT MANAGEMENT FUNCTIONS
6-14
4 Select the documents that you want to check and then touchthe “Conf/Correct details” [“Check/Rev. details”] key. The“Check/Correct details” [“Check/revise details”] screen will bedisplayed.
Inch specifications
Box editing
JOB005
JOB004
JOB003
JOB002
JOB001
Up
Delete
End
Document Management - Synergy Print Box
Down
Order of indication
Delete alldata / box
Conf/Crrtdetails
Box Password
1
1
1
1
1
WED 15:32
WED 15:33
WED 15:34
WED 15:35
WED 15:37
001/005
007
Metric specifications
Box editing End
Delete allbox data
BoxPassword
JOB005
JOB004
JOB003
JOB002
JOB001
Up
Delete
Document Management - Synergy Print Box
Down
Order ofindication
Check/ Rev.details
1
1
1
1
1
WED 15:32
WED 15:33
WED 15:34
WED 15:35
WED 15:37
001/005
007 Box ABCDEFGHIJK
NOTE
It is possible to change the order of display for the stored documents.To do so, touch the “Order of indication” key, and then touch the “Sortby date” key (and select either “New R Old” or “Old R New”) or the“Sort by name” key (and select either “A R Z” or “Z R A”), asappropriate.
5 Check the displayed information.If you want to print out the first page of the selecteddocuments, touch the “Print from 1st” [“Head print”] key.If you want to change the name of the selected documents,touch the “Change doc.name” key and then enter the newname.
Inch specifications
Check/Correct details
Change doc. name
Printfrom 1st
Close
Document Management - Synergy Print Box - Box editing
User name --------------------Document name Job006Registration size 11x81/2"Orig. set direction Back Edgepage # 1Input source CopyResolution 600dpiRegistration date '25/10/01 14:39
Item Details
Metric specifications
Document Management - Synergy Print Box - Box editing
Check/revise details
User name --------------------Document name Job006Registration size A4Orig. set direction Back Edgepage # 1Input source CopyResolution 600dpiRegistration date '25/10/01 14:39
Changedoc. name
Head print
Close
Item Details
NOTE
Refer to “11. Entering characters” on page 7-104 for information onentering characters.
6 Once you have finished checking the information for thosedocuments, touch the “Close” key. The touch panel will returnto the screen in step 4.If you want to check the information for other storeddocuments, repeat steps 4 through 6.
7 Touch the “End” key. The touch panel will return to thescreen in step 2.Touch the “End” key. The touch panel will return to thecontents of the “Basic” tab.

Section 6 DOCUMENT AND OUTPUT MANAGEMENT FUNCTIONS
6-15
5Deleting stored documents from a box
Perform the following procedure when you want to delete storeddocuments.
1 Press the [Document Management] key. The “DocumentManagement” screen will be displayed.
2 Touch the “Box Editing” key under “Synergy Print Box”. Thescreen to select the synergy print box will be displayed.
Inch specifications
Select function.
Document Management End
Shared Data Box Synergy Print Box Form box
Document reg.
Document printing
Document reg.
Document printing
Form reg.
Box Editing
Box Editing
Box Editing
25/10/'01 19:20
Metric specifications
Select function.
Document Management
25/10/'01 19:20
End
Shared Data Box Synergy Print Box Form box
Documentregistr.
Documentprinting
Documentprinting
Documentregistr.
Formregistr.
Box Editing
BoxEditing
BoxEditing
3 Either touch the synergy print box that contains thedocuments to be deleted, or enter its number using thekeypad. Then touch the “Enter” key. The “Box editing” screenwill be displayed.
Inch specifications
001 ABCD_0000001 006 UVWX_0000006 011 QRST_0000105 016 MNOP_0200104
002 EFGH_0000002 007 ABCD_0000101 012 UVWX_0000106 017 QRST_0200105
003 IJKL_0200003 008 EFGH_0000102 013 ABCD_0200101 018 UVWX_0200106
004 MNOP_0000004 009 IJKL_0000103 014 EFGH_0200102 019 ABCD_0500101
005 QRST_0000005 010 MNOP_0000104 015 IJKL_0200103 020 EFGH_0500102
Box editing
Select box No.
Cancel
Box No.(with #key)
Enter1/ 5
Document Management - Synergy Print Box
Metric specifications
001 ABCD_0000001 006 UVWX_0000006 011 QRST_0000105 016 MNOP_0200104
002 EFGH_0000002 007 ABCD_0000101 012 UVWX_0000106 017 QRST_0200105
003 IJKL_0200003 008 EFGH_0000102 013 ABCD_0200101 018 UVWX_0200106
004 MNOP_0000004 009 IJKL_0000103 014 EFGH_0200102 019 ABCD_0500101
005 QRST_0000005 010 MNOP_0000104 015 IJKL_0200103 020 EFGH_0500102
Box editing
Select box No.
Job cancel
Box No.(with # key)
Enter1/ 5
Document Management - Synergy Print Box
NOTES
• If that box was registered with a password, the password entryscreen will be displayed.Enter the registered password with the keypad and then touch the“Enter” key.
Inch specifications
Stop
Enter
Clear
(Enter by #key)
007
Password
Enter password.
********
Metric specifications
Stop
Enter
Clear
(Enter #-key)
007 Box Name ABCDEFG
Password ********
Enter password.
• Refer to “7 Registering a password for a box” on page 6-18 forinformation on registering the password.
4 Select the documents that you want to delete and then touchthe “Delete” key. A verification screen will be displayed.
Inch specifications
Box editing
JOB005
JOB004
JOB003
JOB002
JOB001
Up
Delete
End
Document Management - Synergy Print Box
Down
Order of indication
Delete alldata / box
Conf/Crrtdetails
Box Password
1
1
1
1
1
WED 15:32
WED 15:33
WED 15:34
WED 15:35
WED 15:37
001/005
007
Metric specifications
Box editing End
Delete allbox data
BoxPassword
JOB005
JOB004
JOB003
JOB002
JOB001
Up
Delete
Document Management - Synergy Print Box
Down
Order ofindication
Check/ Rev.details
1
1
1
1
1
WED 15:32
WED 15:33
WED 15:34
WED 15:35
WED 15:37
001/005
007 Box ABCDEFGHIJK
NOTE
It is possible to change the order of display for the stored documents.To do so, touch the “Order of indication” key, and then touch the “Sortby date” key (and select either “New R Old” or “Old R New”) or the“Sort by name” key (and select either “A R Z” or “Z R A”), asappropriate.

Section 6 DOCUMENT AND OUTPUT MANAGEMENT FUNCTIONS
6-16
6Deleting the full contents of a box
Perform the following procedure when you want to delete the fullcontents of a synergy print box in one step.
1 Press the [Document Management] key. The “DocumentManagement” screen will be displayed.
2 Touch the “Box editing” key under “Synergy Print Box”. Thescreen to select the synergy print box will be displayed.
Inch specifications
Select function.
Document Management End
Shared Data Box Synergy Print Box Form box
Document reg.
Document printing
Document reg.
Document printing
Form reg.
Box Editing
Box Editing
Box Editing
25/10/'01 19:20
Metric specifications
Select function.
Document Management
25/10/'01 19:20
End
Shared Data Box Synergy Print Box Form box
Documentregistr.
Documentprinting
Documentprinting
Documentregistr.
Formregistr.
Box Editing
BoxEditing
BoxEditing
3 Either touch the synergy print box that contains thedocuments to be deleted, or enter its number using thekeypad. Then touch the “Enter” key. The “Box editing” screenwill be displayed.
Inch specifications
001 ABCD_0000001 006 UVWX_0000006 011 QRST_0000105 016 MNOP_0200104
002 EFGH_0000002 007 ABCD_0000101 012 UVWX_0000106 017 QRST_0200105
003 IJKL_0200003 008 EFGH_0000102 013 ABCD_0200101 018 UVWX_0200106
004 MNOP_0000004 009 IJKL_0000103 014 EFGH_0200102 019 ABCD_0500101
005 QRST_0000005 010 MNOP_0000104 015 IJKL_0200103 020 EFGH_0500102
Box editing
Select box No.
Cancel
Box No.(with #key)
Enter1/ 5
Document Management - Synergy Print Box
Metric specifications
001 ABCD_0000001 006 UVWX_0000006 011 QRST_0000105 016 MNOP_0200104
002 EFGH_0000002 007 ABCD_0000101 012 UVWX_0000106 017 QRST_0200105
003 IJKL_0200003 008 EFGH_0000102 013 ABCD_0200101 018 UVWX_0200106
004 MNOP_0000004 009 IJKL_0000103 014 EFGH_0200102 019 ABCD_0500101
005 QRST_0000005 010 MNOP_0000104 015 IJKL_0200103 020 EFGH_0500102
Box editing
Select box No.
Job cancel
Box No.(with # key)
Enter1/ 5
Document Management - Synergy Print Box
5 Touch the “Yes” key or the “No” key, as appropriate.
Inch specifications
Document name : Job 005
This document(s) will be deleted. Do you want to delete it?
Yes No
Stop
Metric specifications
Document name : JOB005
This document will be deleted. Are you sure?
Yes No
Stop
If you selected “Yes”, the selected documents will be deletedand the touch panel will return to the screen in step 4.If you selected “No”, the touch panel will return to the screenin step 4 without deleting the selected documents.
6 If you want to delete other stored documents, repeat steps 4and 5.
7 Touch the “End” key. The touch panel will return to thescreen in step 2.Touch the “End” key once again. The touch panel will returnto the contents of the “Basic” tab.

Section 6 DOCUMENT AND OUTPUT MANAGEMENT FUNCTIONS
6-17
5 Touch the “Yes” key or the “No” key, as appropriate.
Inch specifications
Document Number: 10
All data in box will be deleted. Do you want to delete?
Yes No
Stop
Metric specifications
Document Number : 5
All data in box will be deleted. Are you sure?Are you sure?
Yes No
Stop
If you selected “Yes”, the entire contents of the selected boxwill be deleted and the touch panel will return to the screen instep 4.If you selected “No”, the touch panel will return to the screenin step 4 without deleting any documents.
6 Touch the “End” key. The touch panel will return to thescreen in step 2.Touch the “End” key once again. The touch panel will returnto the contents of the “Basic” tab.
NOTES
• If that box was registered with a password, the password entryscreen will be displayed.Enter the registered password with the keypad and then touch the“Enter” key.
Inch specifications
Stop
Enter
Clear
(Enter by #key)
007
Password
Enter password.
********
Metric specifications
Stop
Enter
Clear
(Enter #-key)
007 Box Name ABCDEFG
Password ********
Enter password.
• Refer to “7 Registering a password for a box” on page 6-18 forinformation on registering the password.
4 Touch the “Delete all data / box” [“Delete all box data”] key. Averification screen will be displayed.
Inch specifications
Box editing
JOB005
JOB004
JOB003
JOB002
JOB001
Up
Delete
End
Document Management - Synergy Print Box
Down
Order of indication
Delete alldata / box
Conf/Crrtdetails
Box Password
1
1
1
1
1
WED 15:32
WED 15:33
WED 15:34
WED 15:35
WED 15:37
001/005
007
Metric specifications
Box editing End
Delete allbox data
BoxPassword
JOB005
JOB004
JOB003
JOB002
JOB001
Up
Delete
Document Management - Synergy Print Box
Down
Order ofindication
Check/ Rev.details
1
1
1
1
1
WED 15:32
WED 15:33
WED 15:34
WED 15:35
WED 15:37
001/005
007 Box ABCDEFGHIJK

Section 6 DOCUMENT AND OUTPUT MANAGEMENT FUNCTIONS
6-18
7Registering a password for a box
For security and privacy purposes, you can register a password foreach synergy print box. In this case, it will be necessary to enter theregistered password in order to print out, check or delete anydocuments stored in that box. Perform the following procedure whenyou want to change the password settings for any box.
1 Press the [Document Management] key. The “DocumentManagement” screen will be displayed.
2 Touch the “Box Editing” key under “Synergy Print Box”. Thescreen to select the synergy print box will be displayed.
Inch specifications
Select function.
Document Management End
Shared Data Box Synergy Print Box Form box
Document reg.
Document printing
Document reg.
Document printing
Form reg.
Box Editing
Box Editing
Box Editing
25/10/'01 19:20
Metric specifications
Select function.
Document Management
25/10/'01 19:20
End
Shared Data Box Synergy Print Box Form box
Documentregistr.
Documentprinting
Documentprinting
Documentregistr.
Formregistr.
Box Editing
BoxEditing
BoxEditing
3 Either touch the synergy print box that you want to set thepassword for, or enter its number using the keypad. Thentouch the “Enter” key. The “Box editing” screen will bedisplayed.
Inch specifications
001 ABCD_0000001 006 UVWX_0000006 011 QRST_0000105 016 MNOP_0200104
002 EFGH_0000002 007 ABCD_0000101 012 UVWX_0000106 017 QRST_0200105
003 IJKL_0200003 008 EFGH_0000102 013 ABCD_0200101 018 UVWX_0200106
004 MNOP_0000004 009 IJKL_0000103 014 EFGH_0200102 019 ABCD_0500101
005 QRST_0000005 010 MNOP_0000104 015 IJKL_0200103 020 EFGH_0500102
Box editing
Select box No.
Cancel
Box No.(with #key)
Enter1/ 5
Document Management - Synergy Print Box
Metric specifications
001 ABCD_0000001 006 UVWX_0000006 011 QRST_0000105 016 MNOP_0200104
002 EFGH_0000002 007 ABCD_0000101 012 UVWX_0000106 017 QRST_0200105
003 IJKL_0200003 008 EFGH_0000102 013 ABCD_0200101 018 UVWX_0200106
004 MNOP_0000004 009 IJKL_0000103 014 EFGH_0200102 019 ABCD_0500101
005 QRST_0000005 010 MNOP_0000104 015 IJKL_0200103 020 EFGH_0500102
Box editing
Select box No.
Job cancel
Box No.(with # key)
Enter1/ 5
Document Management - Synergy Print Box
NOTE
If that box was registered with a password, the password entry screenwill be displayed.Enter the registered password with the keypad and then touch the“Enter” key.
Inch specifications
Stop
Enter
Clear
(Enter by #key)
007
Password
Enter password.
********
Metric specifications
Stop
Enter
Clear
(Enter #-key)
007 Box Name ABCDEFG
Password ********
Enter password.

Section 6 DOCUMENT AND OUTPUT MANAGEMENT FUNCTIONS
6-19
4 Touch the “Box Password” key. A verification screen will bedisplayed.
Inch specifications
Box editing
JOB005
JOB004
JOB003
JOB002
JOB001
Up
Delete
End
Document Management - Synergy Print Box
Down
Order of indication
Delete alldata / box
Conf/Crrtdetails
Box Password
1
1
1
1
1
WED 15:32
WED 15:33
WED 15:34
WED 15:35
WED 15:37
001/005
007
Metric specifications
Box editing End
Delete allbox data
BoxPassword
JOB005
JOB004
JOB003
JOB002
JOB001
Up
Delete
Document Management - Synergy Print Box
Down
Order ofindication
Check/ Rev.details
1
1
1
1
1
WED 15:32
WED 15:33
WED 15:34
WED 15:35
WED 15:37
001/005
007 Box ABCDEFGHIJK
5 Use the keypad to enter the new password for that box andthen touch the “Enter” key. The new password will beregistered and the touch panel will return to the screen instep 4.
Inch specifications
Enter
Clear
(Enter by #key)
007
New password
Enter password.
Box Password Stop
Metric specifications
Stop
Enter
Clear
(Enter #-key)
007 Box Name ABCDEFG
New password
Enter password
********
Box Password
NOTES
• The password can be between 1 and 8 digits long.• If you decide not to register a password for that box, touch the
“Clear” key and then, with nothing entered in the password field,touch the “Enter” key.
6 Touch the “End” key. The touch panel will return to thescreen in step 2.Touch the “End” key. The touch panel will return to thecontents of the “Basic” tab.

Section 6 DOCUMENT AND OUTPUT MANAGEMENT FUNCTIONS
6-20
2. Output management functions
(1) What are the “output management” functions?
The “Output management” functions use the “Print status” screen to manage printing conditions.
Objective
When you want to know how many jobs arescheduled to be printed before yours.
When you want to know whether or not yourjob (scheduled using the job reservationfunction) was printed.
When you are using the printer functions ofthis copier to print out data from a computer,or using the fax functions of this copier toreceive fax data, and you want know thestatus of your print job.
When you want to check the contents of acopy job that is waiting to be printed.
When you want to force-print a copy job thatis waiting to be printed immediately.
When you want to cancel a copy job that iswaiting to be printed.
You can verify the documents that are waiting to be printed by checking the “Print status” screen.The jobs in the list are printed in order from the top down, so you can easily see in which orderyour documents will be printed.* The optional Hard Disk must be installed on this copier in order to perform this operation.
Check the “Print status” screen. If your job IS in the “Print status” screen, that job has not yetbeen printed.* The optional Hard Disk must be installed on this copier in order to perform this operation.
With the “output management functions”, jobs using the printer functions of this copier to print outdata from a computer or using the fax functions of this copier to receive fax data are displayedjust like any other copy job. These print jobs can be verified just like copy jobs by checking the“Print status” screen. (A “ ” icon under the “Job” heading indicates a copy job, a “ ” iconindicates a print job, and a “ ” icon indicates a fax job.)
The number of originals, number of copies to be made, the date the job was scheduled, and thestatus of printing can all be verified in the “Print status” screen. In addition, if you need even moredetailed information on any particular job, just select that job and touch the “Conf/Crrt. details”[“Check/ Correct details”] key to display the e size of the paper the job will be output to and, if ithas been designated, the location of ejection of the finished copies.* The optional Hard Disk must be installed on this copier in order to perform this operation.
Select the job that you want to print immediately in the “Print status” screen and touch the “Moveahead” [“Move up”] key to move that job upwards to the top of the list.* It is only possible to change the printing order for copy jobs. It is not possible to move copy jobs
ahead of print and fax jobs.* The optional Hard Disk must be installed on this copier in order to perform this operation.
OR, select the job that you want to print immediately in the “Print status” screen and touch the“Interrupt print” key to stop the job that is currently being printed and start print out for theselected job.* The optional Hard Disk must be installed on this copier in order to force-print a copy job.
Select the job that you want to cancel in the “Print status” screen and touch the “Cancel/Delete”key. The selected job will be canceled.* The optional Hard Disk must be installed on this copier in order to perform this operation.
Procedure

Section 6 DOCUMENT AND OUTPUT MANAGEMENT FUNCTIONS
6-21
Inch specifications
Print management End
Job
Prt status
123 Copy 100 100 10/10 23:00 Printing
124 Printer _ _ _ _ _ _ _ _ _ Waiting
128 Copy 1 5 10/10 23:00 Waiting
127 Fax _ _ _ _ _ _ _ _ _ Waiting
Input source Original Set Registration State
10/10 23:50
Move ahead
Move behind
Cancel/Delete
interrupt print
Conf/Crrt.details
Metric specifications
Print management
123 100 100 10/10 23:00 Printing
124 _ _ _ _ _ _ _ _ _ Waiting
128 1 5 10/10 23:00 Waiting
127 _ _ _ _ _ _ _ _ _ Waiting
Job Original Set State
10/10 23:50
End
Move up
Prnt status
Move down
Cancel /Delete
interruptprint
Check/ Rev.details
Registration
Copy
Printer
Copy
Fax
Input source
(2) Display of the output management functions
Press the [Job Queue] key. The “Print status” screen will be displayed.
The following operations can be managed.
● When the optional Hard Disk is NOT installed
Copy job
Print or Fax job
Check printstatus
✕
Change theprint order
✕
✕
Interruptprinting
(force-print)
✕
Cancel / Delete
✕
✕
Check jobcontents
✕
✕
● When the optional Hard Disk IS installed
Copy job
Print or Fax job
Check printstatus
Change theprint order
*1
✕
Interruptprinting
(force-print)
Cancel / Delete
✕
Check jobcontents
✕
*1 Print or fax jobs will automatically be moved to a position immediately after the job currently being printed. It is not possible to move copy jobsahead of print and fax jobs.

Section 6 DOCUMENT AND OUTPUT MANAGEMENT FUNCTIONS
6-22
1 Job queueDisplays information about each job in the queue.The job at the top of the list is that job that is currently beingprinted. The rest of the jobs will be printed in order from the topdown.A “ ” icon under the “Job” heading indicates a copy job, a “ ”icon indicates a print job, and a “ ” icon indicates a fax job.
2 “Move ahead” keyTouching this key moves the currently selected (highlighted) jobupward in the job queue. A job can be moved as far as the secondhighest position in the list. In this case, print out for that job willbegin as soon as the current job is completed. (This is onlyavailable when the optional Hard Disk is installed on this copier.)
3 “Move behind” [“Move down”] keyTouching this key moves the currently selected (highlighted) jobdownward in the job queue. (This is only available when theoptional Hard Disk is installed on this copier.)
4 “Interrupt print” keyTouching this key interrupts the job that is currently being printedand start print out for the currently selected (highlighted) job. (Theselected job will be moved to the top of the list.)
5 “Cancel/Delete” keyTouching this key cancels the currently selected (highlighted) joband deletes it from the job queue. (This is only available when theoptional Hard Disk is installed on this copier.)
6 “Conf/Crrt.details” [“Check/Rev. details”] keyTouching this key displays the “Check/Correct details” [“Check/revise details”] screen, enabling you, for example, to check thecontents of, or change the number of copies to be made for, thecurrently selected (highlighted) job. (This is only available whenthe optional Hard Disk is installed on this copier.)
Inch specifications
Check/Correct details
Orig. pageSetPrint sizeInput sourceRegistration date
Item Details
Close
Job 5
1111x81/2"Copy11/01 15:31
ChangePreset
Metric specifications
Check/revise details
OriginalSetPrint sizeInput sourceRegistration date
Item Details
Close
Job 5
11A4Copy11/01 15:31
ChangePreset
7 “M” and “N” cursor keysUse these keys to select a job from the job queue.
8 “End” keyTouching this key quits the output management function. In thiscase, the touch panel will return to the contents of the “Basic” tab.
Print management End
Job
Prt status
123 Copy 100 100 10/10 23:00 Printing
124 Printer _ _ _ _ _ _ _ _ _ Waiting
128 Copy 1 5 10/10 23:00 Waiting
127 Fax _ _ _ _ _ _ _ _ _ Waiting
Input source Original Set Registration State
10/10 23:50
Move ahead
Move behind
Cancel/Delete
interrupt print
Conf/Crrt.details
2 3 4 5 6
781
Print management
123 100 100 10/10 23:00 Printing
124 _ _ _ _ _ _ _ _ _ Waiting
128 1 5 10/10 23:00 Waiting
127 _ _ _ _ _ _ _ _ _ Waiting
Job Original Set State
10/10 23:50
End
Move up
Prnt status
Move down
Cancel /Delete
interruptprint
Check/ Rev.details
Registration
Copy
Printer
Copy
Fax
Input source
2 3 4 5 6
781
Inch specifications Metric specifications
(3) The “Print status” screen
This screen displays the currently set printing conditions and the job queue of documents waiting to be printed.

7-1
Section 7 COPIER MANAGEMENT FUNCTIONS
1. Copy management mode
By registering a different department ID-code for each individual department that uses the copier, the copy management function will help youmanage the overall number of copies made by each department.The copy management function in this copier offers the following features.• Manage use of all optional functions (printer, scanner and fax) utilized by the same department ID-code.• Manage up to 100 individual departments. (Up to 1000 when the optional Hard Disk is installed on this copier.)• Register department ID-codes of up to 8 digits (between 0 and 99999999).• Check the total number of copies made under all department ID-codes as a whole or by each individual department.• Set copy limits to any 1-page increment up to 999,999.• Clear the copy counts for all department ID-codes at one time or for each individual department.• Check copy counts for your own department without the need to enter the management code. Just enter the corresponding department ID-code.
IMPORTANT!
In order to access the “Change restrictions for use” procedure under “Editing copy management information”, it is necessary to select “On” under“Copier function management ON/OFF”. When the optional Printer Kit, Printer/Scanner Kit or Fax Kit are installed in your copier, it is necessary toselect “On” under the corresponding “Printer function management ON/OFF”, “Scanner function management ON/OFF” or “Fax functionmanagement ON/OFF” procedure. (See “(6) Changing the copy management default settings” on page 7-25.)

Section 7 COPIER MANAGEMENT FUNCTIONS
7-2
Procedure
Editing copy managementinformation
Checking the copy managementcounts
Turning the copy managementfunction ON/OFF
Changing the copy managementdefault settings
Description
• Register new department ID-codesPerform this procedure when you want to register a new department ID-code and set therestrictions for using the copier under that ID-code. Up to 100 department ID-codes canbe registered. (When the optional Hard Disk is installed on this copier, up to 1000department ID-codes can be registered.)
• Delete department ID-codesPerform this procedure when you want to delete registered department ID-codes.
• Change registered informationPerform this procedure when you want to change a department name or thecorresponding ID-code.
• Change restrictions for usePerform this procedure when you want to change the restrictions for using the copierunder each department ID-code.
• Check all departmentsPerform this procedure when you want to check the total number of copies made underall department ID-codes as a whole, print out a copy management report and clear thecopy counts for all of the registered department ID-codes.
• Check individual departmentsPerform this procedure when you want to check the total number of copies made undereach individual department ID-code and/or clear the copy counts for individualdepartments as well.
Perform this procedure and touch the “On” key when you want to turn the copymanagement function ON, or touch the “Off” key to turn the copy management functionOFF.
Perform this procedure when you want to change the default settings for the copymanagement function.
Referencepage
7-4
7-16
7-17
7-20
7-21
7-23
7-25
7-25
(1) Copy management procedures

Section 7 COPIER MANAGEMENT FUNCTIONS
7-3
(2) Accessing the copy management menu screen
Perform the following procedure in order to access the copymanagement menu screen.
1 With the content of the “Basic” tab displayed, press the[Default Setting/Counter] key.The “Default setting”screen will be displayed.
2 Touch the “Management” key on the right side of the touchpanel.
Inch specifications
Default setting
Copydefault
Machinedefault
Language Management
End
BOXManagement
Bypasssetting
Document Management
Registerorig. size
Printreport
Countercheck
UserAdjustment
Default setting / Counter
Metric specifications
Default setting
Copydefault
Machinedefault
Language Management
End
Hard DiskManagement
Bypasssetting
Document Management
Registerorig. size
Printreport
Countercheck
UserAdjustment
Default setting / Counter
3 Use the numeric keys on the keypad to enter the 4-digitmanagement code.The factory default management code for 30 cpm copiers is“3000”, for 40 cpm copiers is “4000” and for 50 cpm copiersis “5000”.If the entered management code matches the currentlyregistered one, the copy management menu screen will bedisplayed.
Inch specifications
Enter the administrator number Close
Metric specifications
Enter the administrator number Close
4 Touch the key that corresponds to the desired procedure.The setting screen for that procedure will be displayed.
Inch specifications
Close
Each Mgt. Total
Management total
Managem. Total
Default setting
Register/Sett.
ManagementDef. Set.
Managementedit Off
On
Management
Management
Metric specifications
Close
Each Mgt. Total
Management total
Managem. Total
Default setting
Register/Sett.
ManagementDef. Set.
Managementedit Off
On
Management
Management
NOTES
• It is possible for you to change the 4-digit management code. (See“Changing the management code” on page 7-56.)
• Perform the following procedure that corresponds to the desiredsetting.

Section 7 COPIER MANAGEMENT FUNCTIONS
7-4
(3) Editing copy management information
● Register new department ID-codes
Perform the following procedure when you want to registerdepartment ID-codes (up to 8-digits per ID-code) and thecorresponding department name, and set certain restrictions for usingthe copier under that ID-code.
1 Access the copy management menu screen.(See “Accessing the copy management menu screen”.)
Inch specifications
Default setting
Copydefault
Machinedefault
Language Management
End
BOXManagement
Bypasssetting
Document Management
Registerorig. size
Printreport
Countercheck
UserAdjustment
Default setting / Counter
Metric specifications
Default setting
Copydefault
Machinedefault
Language Management
End
Hard DiskManagement
Bypasssetting
Document Management
Registerorig. size
Printreport
Countercheck
UserAdjustment
Default setting / Counter
2 Touch the “Management edit” key.The “Management edit” screen will be displayed.
Inch specifications
Close
Each Mgt. Total
Management total
Managem. Total
Default setting
Register/Sett.
ManagementDef. Set.
Managementedit Off
On
Management
Management
Metric specifications
Close
Each Mgt. Total
Management total
Managem. Total
Default setting
Register/Sett.
ManagementDef. Set.
Managementedit Off
On
Management
Management
3 Touch the “Register” key.The “New register” screen will be displayed.
Inch specifications
Up
Down
Order ofindication
Mgt. Inf.correction
Delete
Register
Limitin use
010200010014000000150000001600000017
001/010
1st Sales Dept.2nd Sales Dept.3rd Sales Dept.4th Sales Dept.5th Sales Dept.6th Sales Dept.7th Sales Dept.
Close
Department
Default setting - Management
Management edit
Metric specifications
Up
Down
Order ofindication
Mgt. Inf.correction
Delete
Register
Limitin use
010200010014000000150000001600000017
001/010
1st Sales Dept.2nd Sales Dept.3rd Sales Dept.4th Sales Dept.5th Sales Dept.6th Sales Dept.7th Sales Dept.
Close
Department
Default setting - Management
Management edit
4 Select “ID-code” under the “Setting item” column on the leftside of the touch panel and then touch the “Change #” key.The “ID-code” screen will be displayed.
Inch specifications
Cancel
Change #
Next
ValueSetting item
Default setting - Management - Management edit
New register
ID-codeName to display
(No register)(No register)
Metric specifications
Job cancel
ValueSetting item
Default setting - Management - Management edit
New register
ID-codeName to display
(No register)(No register)
Change #
Next

Section 7 COPIER MANAGEMENT FUNCTIONS
7-5
5 Use the numeric keys on the keypad to enter the departmentID-code that you want to register (up to 8 digits).You can enter any number between “0” and “99999999”.
Inch specifications
CloseBackID-code
ID-code
(0~99999999)
0007
Clear
Management - Management edit - New register
Metric specifications
CloseBackID-code
ID-code
(0~99999999)
0007
Clear
Management - Management edit - New register
6 Touch the “Close” key.The touch panel will return to the screen in step 4.
7 Select “Name to display” under the “Setting item” column onthe left side of the touch panel and then touch the “Change #”key.The “Name to display” screen will be displayed.
Inch specifications
Cancel
Change #
Next
ValueSetting item
Default setting - Management - Management edit
New register
ID-codeName to display
0007(No register)
Metric specifications
Job cancel
Change #
Next
ValueSetting item
Default setting - Management - Management edit
New register
ID-codeName to display
0007(No register)
8 Enter the name for that department, and then touch the“End” key.The touch panel will return to the screen in step 4.
Inch specifications
EndStopName to display
1st Sales Dept. Limit:32 letters including #
AllDel. Del. prev
1 2 3 4 5 6 7 8 9 0 - = `
q w e r t y u i o p [ ] \
a s d f g h j k l ;
z x c v b n m , . /
'
Capital Num./Sym. SpaceLetter
Metric specifications
EndStopName to display
1st Sales Dept. Limit: 32 letters inc. # key
Del. prev
1 2 3 4 5 6 7 8 9 0 - = `
q w e r t y u i o p [ ] \
a s d f g h j k l ;
z x c v b n m , . /
'
Capital Symbol 1 Symbol 2 SpaceLetter
`
AllDel.
NOTE
For information on how to enter the department name, refer to“11. Entering characters” on page 7-104.
9 Once you are finished registering that department's ID-codeand name, touch the “Next” key.
Inch specifications
Cancel
Change #
Next
ValueSetting item
Default setting - Management - Management edit
New register
ID-code 0007Name to display 1st Sales Dept.
Metric specifications
Job cancel
Change #
Next
ValueSetting item
Default setting - Management - Management edit
New register
ID-code 0007Name to display 1st Sales Dept.
NOTES
• Be sure to register both of the setting items above, If you do not, anerror will occur and you will be unable to continue to the next step.
• If you attempt to register a department ID-code or a departmentname that is already registered, an error will occur and you will beunable to continue to the next step. In this case, select a different ID-code and/or name, as appropriate.

Section 7 COPIER MANAGEMENT FUNCTIONS
7-6
10 Set the restrictions for using the copier under thatdepartment ID-code.
Inch specifications
Cancel
0007 1st Sales Dept.
Default setting - Management - Management edit
New register
Change #
Registr.
ValueSetting item
Copy limitationPrinter limitation
OnNo limit
Output limitation No limitScanner limitation No limitFax Transm. Limitation No limit
Metric specifications
Job cancel
0007 1st Sales Dept.
Default setting - Management - Management edit
New register
Change #
Registr.
ValueSetting item
Copy limitationPrinter limitation
OnNo limit
Output limitation No limitScanner limitation No limitFax Transm. Limitation No limit
NOTE
For information on how to set restrictions, refer to “Setting therestrictions for use” on page 7-7.
11 Once you are finished setting the restrictions for thatdepartment ID-code, touch the “Registr.” key.The touch panel will return to the screen in step 3.
Inch specifications
Cancel
0007 1st Sales Dept.
Default setting - Management - Management edit
New register
Change #
Registr.
ValueSetting item
Copy limitationPrinter limitation
OnNo limit
Output limitation No limitScanner limitation No limitFax Transm. Limitation No limit
Metric specifications
Job cancel
0007 1st Sales Dept.
Default setting - Management - Management edit
New register
Change #
Registr.
ValueSetting item
Copy limitationPrinter limitation
OnNo limit
Output limitation No limitScanner limitation No limitFax Transm. Limitation No limit
12 Touch the “Close” key.The touch panel will return to the screen in step 2.
Inch specifications
Up
Down
Order ofindication
Mgt. Inf.correction
Delete
Register
Limitin use
01020001000700140000001500000016
001/011
1st Sales Dept.2nd Sales Dept.3rd Sales Dept.1st Sales Dept.4th Sales Dept.5th Sales Dept.6th Sales Dept.
Close
Department
Default setting - Management
Management edit
Metric specifications
Up
Down
Order ofindication
Mgt. Inf.correction
Delete
Register
Limitin use
01020001000700140000001500000016
001/011
1st Sales Dept.2nd Sales Dept.3rd Sales Dept.1st Sales Dept.4th Sales Dept.5th Sales Dept.6th Sales Dept.
Close
Department
Default setting - Management
Management edit
NOTE
If you want to register an ID-code for a new department, touch the“Register” key and repeat steps 4 through 12.
13 Touch the “Close” key.

Section 7 COPIER MANAGEMENT FUNCTIONS
7-7
: The available settings are “No limit”, “Counter limit” and “Is not permitted”m: The available settings are “No limit” and “Counter limit”●: The available settings are “Can use” and “Is not permitted”
● Setting the restrictions for use
Perform the following procedure when you want to set certain restrictions for using the copier under each department ID-code.The setting items available for restriction will differ depending upon whether you have selected “All” or “Each” as the “Copy/Printer outputmanagement” setting. (See “Copy/Printer output management” on page 7-30.)The following settings are available.
If “All” is selected as the “Copy/Printer output management” setting (“All” is the factory default setting)
Copier
●
m
Copying privileges ON/OFF
Printing privileges ON/OFF
Output limitation
Scanning restrictions
Fax transmission restrictions
Printer
●
m
Scanning Faxtransmission
Referencepage
7-8
7-9
7-10
7-11
7-12
If “Each” is selected as the “Copy/Printer output management” setting
Copier
Copying restrictions
Printing restrictions
Scanning restrictions
Fax transmission restrictions
Printer Scanning Faxtransmission
Referencepage
7-13
7-14
7-11
7-12
: The available settings are “No limit”, “Counter limit” and “Is not permitted”

Section 7 COPIER MANAGEMENT FUNCTIONS
7-8
Copying privileges ON/OFF
Perform the following procedure when you want to turn copyingprivileges ON or OFF for the corresponding department ID-code.
NOTE
This setting will only be available when “On” is selected as the “Copierfunction management ON/OFF” setting.
1 Access the screen that contains the copy restriction settingitems. (See “Register new department ID-codes” on page 7-4or “Change restrictions for use” on page 7-20.)
Inch specifications
Up
Down
Order ofindication
Mgt. Inf.correction
Delete
Register
Limitin use
010200010014000000150000001600000017
001/010
1st Sales Dept.2nd Sales Dept.3rd Sales Dept.4th Sales Dept.5th Sales Dept.6th Sales Dept.7th Sales Dept.
Close
Department
Default setting - Management
Management edit
Metric specifications
Up
Down
Order ofindication
Mgt. Inf.correction
Delete
Register
Limitin use
010200010014000000150000001600000017
001/010
1st Sales Dept.2nd Sales Dept.3rd Sales Dept.4th Sales Dept.5th Sales Dept.6th Sales Dept.7th Sales Dept.
Close
Department
Default setting - Management
Management edit
2 Select “Copy limitation” under the “Setting item” column onthe left side of the touch panel and then touch the “Change #”key.The “Copy limitation” screen will be displayed.
Inch specifications
Close
0007 1st Sales Dept.
Default setting - Management - Management edit
Limit in use
Change #
ValueSetting item
Copy limitationPrinter limitation
OnOn
Output limitation No limitScanner limitation No limitFax Transm. Limitation No limit
Metric specifications
Close
0007 1st Sales Dept.
Default setting - Management - Management edit
Limit in use
Change #
ValueSetting item
Copy limitationPrinter limitation
OnOn
Output limitation No limitScanner limitation No limitFax Transm. Limitation No limit
3 To allow copying privileges for this ID-code, touch the “Canuse” key. To cancel copying privileges completely, touch the“Is not permitted” key.
Inch specifications
CloseBack
Management - Management edit - New register
Copy limitation
Can use
Is notpermitted
Metric specifications
CloseBack
Management - Management edit - New register
Copy limitation
Can use
Is notpermited
NOTE
If you want to quit the displayed setting without changing it, touch the“Back” key. The touch panel will return to the screen in step 2.
4 Touch the “Close” key.The touch panel will return to the screen in step 2.

Section 7 COPIER MANAGEMENT FUNCTIONS
7-9
Printing privileges ON/OFF
Perform the following procedure when the optional Printer Kit orPrinter/Scanner Kit is installed in your copier and you want to turnprinting privileges ON or OFF for the corresponding department ID-code.
NOTE
This setting will only be available when “On” is selected as the “Printerfunction management ON/OFF” setting.
1 Access the screen that contains the copy restriction settingitems.(See “Register new department ID-codes” on page 7-4 or“Change restrictions for use” on page 7-20.)
Inch specifications
Up
Down
Order ofindication
Mgt. Inf.correction
Delete
Register
Limitin use
010200010014000000150000001600000017
001/010
1st Sales Dept.2nd Sales Dept.3rd Sales Dept.4th Sales Dept.5th Sales Dept.6th Sales Dept.7th Sales Dept.
Close
Department
Default setting - Management
Management edit
Metric specifications
Up
Down
Order ofindication
Mgt. Inf.correction
Delete
Register
Limitin use
010200010014000000150000001600000017
001/010
1st Sales Dept.2nd Sales Dept.3rd Sales Dept.4th Sales Dept.5th Sales Dept.6th Sales Dept.7th Sales Dept.
Close
Department
Default setting - Management
Management edit
2 Select “Printer limitation” under the “Setting item” column onthe left side of the touch panel and then touch the “Change #”key.The “Printer limitation” screen will be displayed.
Inch specifications
Close
0007 1st Sales Dept.
Default setting - Management - Management edit
Limit in use
Change #
ValueSetting item
Copy limitationPrinter limitation
OnOn
Output limitation No limitScanner limitation No limitFax Transm. Limitation No limit
Metric specifications
Close
0007 1st Sales Dept.
Default setting - Management - Management edit
Limit in use
Change #
ValueSetting item
Copy limitationPrinter limitation
OnOn
Output limitation No limitScanner limitation No limitFax Transm. Limitation No limit
3 To allow printing privileges for this ID-code, touch the “Canuse” key. To cancel printing privileges completely, touch the“Is not permitted” key.
Inch specifications
CloseBack
Management - Management edit - New register
Printer limitation
Can use
Is notpermitted
Metric specifications
CloseBack
Management - Management edit - New register
Printer limitation
Can use
Is notpermited
NOTE
If you want to quit the displayed setting without changing it, touch the“Back” key. The touch panel will return to the screen in step 2.
4 Touch the “Close” key.The touch panel will return to the screen in step 2.

Section 7 COPIER MANAGEMENT FUNCTIONS
7-10
Output limitation
Perform the following procedure when you want to set the maximumnumber of copies and printouts that can be made under thecorresponding department ID-code. If the optional Printer Kit orPrinter/Scanner Kit is installed in your copier, this limit will apply to thenumber of copies AND printouts that can be made in total.
NOTE
This setting will not be available when “Is not permitted” is selected forboth the “Copying privileges ON/OFF” and the “Printing privileges ON/OFF” settings, or when “Is not permitted” is selected as the “Copyingprivileges ON/OFF” setting and the optional Printer Kit or Printer/Scanner Kit is NOT installed in your copier.
1 Access the screen that contains the copy restriction settingitems.(See “Register new department ID-codes” on page 7-4 or“Change restrictions for use” on page 7-20.)
Inch specifications
Up
Down
Order ofindication
Mgt. Inf.correction
Delete
Register
Limitin use
010200010014000000150000001600000017
001/010
1st Sales Dept.2nd Sales Dept.3rd Sales Dept.4th Sales Dept.5th Sales Dept.6th Sales Dept.7th Sales Dept.
Close
Department
Default setting - Management
Management edit
Metric specifications
Up
Down
Order ofindication
Mgt. Inf.correction
Delete
Register
Limitin use
010200010014000000150000001600000017
001/010
1st Sales Dept.2nd Sales Dept.3rd Sales Dept.4th Sales Dept.5th Sales Dept.6th Sales Dept.7th Sales Dept.
Close
Department
Default setting - Management
Management edit
2 Select “Output limitation” under the “Setting item” column onthe left side of the touch panel and then touch the “Change #”key.The “Output limitation” screen will be displayed.
Inch specifications
Close
0007 1st Sales Dept.
Default setting - Management - Management edit
Limit in use
Change #
ValueSetting item
Copy limitationPrinter limitation
OnOn
Output limitation No limitScanner limitation No limitFax Transm. Limitation No limit
Metric specifications
Close
0007 1st Sales Dept.
Default setting - Management - Management edit
Limit in use
Change #
ValueSetting item
Copy limitationPrinter limitation
OnOn
Output limitation No limitScanner limitation No limitFax Transm. Limitation No limit
3 To set the maximum limit for copying and printing under thisID-code, touch the “Counter limit” key and proceed to thenext step.To allow unlimited copying and printing, touch the “No limit”key and then proceed to step 5.
Inch specifications
CloseBack
Management - Management edit - New register
Output limitation
No limit
Counterlimit
Metric specifications
CloseBack
Management - Management edit - New register
Output limitation
No limit
Counterlimit
NOTE
If you want to quit the displayed setting without changing it, touch the“Back” key. The touch panel will return to the screen in step 2.

Section 7 COPIER MANAGEMENT FUNCTIONS
7-11
4 Use the numeric keys on the keypad to enter the maximumnumber of copies and printouts that can be made in totalunder this ID-code. The limit can be set to any 1-pageincrement up to 999,999.
Inch specifications
Clear
999,999
(1~999,999)
Limited value
CloseBack
Management - Management edit - New register
Output limitation
No limit
Counterlimit
Metric specifications
Clear
999,999
(1~999,999)
Limited value
CloseBack
Management - Management edit - New register
Output limitation
No limit
Counterlimit
5 Touch the “Close” key.The touch panel will return to the screen in step 2.
Scanning restrictions
Perform the following procedure when you want to set the maximumnumber of originals that can be scanned under the correspondingdepartment ID-code when the optional Printer/Scanner Kit is installedin your copier.
NOTE
This setting will only be available when “On” is selected as the“Scanner function management ON/OFF” setting.
1 Access the screen that contains the copy restriction settingitems.(See “Register new department ID-codes” on page 7-4 or“Change restrictions for use” on page 7-20.)
Inch specifications
Up
Down
Order ofindication
Mgt. Inf.correction
Delete
Register
Limitin use
010200010014000000150000001600000017
001/010
1st Sales Dept.2nd Sales Dept.3rd Sales Dept.4th Sales Dept.5th Sales Dept.6th Sales Dept.7th Sales Dept.
Close
Department
Default setting - Management
Management edit
Metric specifications
Up
Down
Order ofindication
Mgt. Inf.correction
Delete
Register
Limitin use
010200010014000000150000001600000017
001/010
1st Sales Dept.2nd Sales Dept.3rd Sales Dept.4th Sales Dept.5th Sales Dept.6th Sales Dept.7th Sales Dept.
Close
Department
Default setting - Management
Management edit
2 Select “Scanner limitation” under the “Setting item” columnon the left side of the touch panel and then touch the“Change #” key.The “Scanner limitation” screen will be displayed.
Inch specifications
Close
0007 1st Sales Dept.
Default setting - Management - Management edit
Limit in use
Change #
ValueSetting item
Copy limitationPrinter limitation
OnOn
Output limitation No limitScanner limitation No limitFax Transm. Limitation No limit
Metric specifications
Close
0007 1st Sales Dept.
Default setting - Management - Management edit
Limit in use
Change #
ValueSetting item
Copy limitationPrinter limitation
OnOn
Output limitation No limitScanner limitation No limitFax Transm. Limitation No limit

Section 7 COPIER MANAGEMENT FUNCTIONS
7-12
3 To set the maximum number of originals that can be scannedunder this ID-code, touch the “Counter limit” key and proceedto the next step.To allow unlimited scanning, touch the “No limit” key, and tocancel scanning privileges completely, touch the “Is notpermitted” key and proceed to step 5.
Inch specifications
CloseBack
Management - Management edit - New register
Scanner limitation
No limit
Counterlimit
Is notpermitted
Metric specifications
CloseBack
Management - Management edit - New register
Scanner limitation
No limit
Counterlimit
Is notpermited
NOTE
If you want to quit the displayed setting without changing it, touch the“Back” key. The touch panel will return to the screen in step 2.
4 Use the numeric keys on the keypad to enter the maximumnumber of originals that can be scanned under this ID-code.The scanning limit can be set to any 1-page increment up to999,999.
Inch specifications
CloseBack
Management - Management edit - New register
Scanner limitation
No limit
Counterlimit
Is notpermitted
Clear
999,999
(1~999,999)
Limited value
Metric specifications
CloseBack
Management - Management edit - New register
Scanner limitation
No limit
Counterlimit
Is notpermited
Clear
999,999
(1~999,999)
Limited value
5 Touch the “Close” key.The touch panel will return to the screen in step 2.
Fax transmission restrictions
Perform the following procedure when you want to set the maximumnumber of documents that can be transmitted under thecorresponding department ID-code when the optional Fax Kit isinstalled in your copier.
NOTE
This setting will only be available when “On” is selected as the “Faxfunction management ON/OFF” setting.
1 Access the screen that contains the copy restriction settingitems.(See “Register new department ID-codes” on page 7-4 or“Change restrictions for use” on page 7-20.)
Inch specifications
Up
Down
Order ofindication
Mgt. Inf.correction
Delete
Register
Limitin use
010200010014000000150000001600000017
001/010
1st Sales Dept.2nd Sales Dept.3rd Sales Dept.4th Sales Dept.5th Sales Dept.6th Sales Dept.7th Sales Dept.
Close
Department
Default setting - Management
Management edit
Metric specifications
Up
Down
Order ofindication
Mgt. Inf.correction
Delete
Register
Limitin use
010200010014000000150000001600000017
001/010
1st Sales Dept.2nd Sales Dept.3rd Sales Dept.4th Sales Dept.5th Sales Dept.6th Sales Dept.7th Sales Dept.
Close
Department
Default setting - Management
Management edit
2 Select “Fax transm. Limitation” under the “Setting item”column on the left side of the touch panel and then touch the“Change #” key.The “Fax transm. Limitation” screen will be displayed.
Inch specifications
Close
0007 1st Sales Dept.
Default setting - Management - Management edit
Limit in use
Change #
ValueSetting item
Copy limitationPrinter limitation
OnOn
Output limitation No limitScanner limitation No limitFax Transm. Limitation No limit
Metric specifications
Close
0007 1st Sales Dept.
Default setting - Management - Management edit
Limit in use
Change #
ValueSetting item
Copy limitationPrinter limitation
OnOn
Output limitation No limitScanner limitation No limitFax Transm. Limitation No limit

Section 7 COPIER MANAGEMENT FUNCTIONS
7-13
3 To set the maximum number of documents that can betransmitted under this ID-code, touch the “Counter limit” keyand proceed to the next step.To allow unlimited fax transmission, touch the “No limit” key,and to cancel fax transmission privileges completely, touchthe “Is not permitted” key and proceed to step 5.
Inch specifications
CloseBack
Management - Management edit - New register
Fax Transm. Limitation
No limit
Counterlimit
Is notpermitted
Metric specifications
CloseBack
Management - Management edit - New register
Fax Transm. Limitation
No limit
Counterlimit
Is notpermited
NOTE
If you want to quit the displayed setting without changing it, touch the“Back” key. The touch panel will return to the screen in step 2.
4 Use the numeric keys on the keypad to enter the maximumnumber of documents that can be transmitted under this ID-code. The document limit can be set to any 1-page incrementup to 999,999.
Inch specifications
CloseBack
Management - Management edit - New register
Fax Transm. Limitation
No limit
Counterlimit
Is notpermitted
Clear
999,999
(1~999,999)
Limited value
Metric specifications
CloseBack
Management - Management edit - New register
Fax Transm. Limitation
No limit
Counterlimit
Is notpermited
Clear
999,999
(1~999,999)
Limited value
5 Touch the “Close” key.The touch panel will return to the screen in step 2.
Copying restrictions
Perform the following procedure when you want to set the maximumnumber of copies that can be made under the correspondingdepartment ID-code.
NOTES
• This setting will only be available when “On” is selected as the“Copier function management ON/OFF” setting.
1 Access the screen that contains the copy restriction settingitems.(See “Register new department ID-codes” on page 7-4 or“Change restrictions for use” on page 7-20.)
Inch specifications
Up
Down
Order ofindication
Mgt. Inf.correction
Delete
Register
Limitin use
010200010014000000150000001600000017
001/010
1st Sales Dept.2nd Sales Dept.3rd Sales Dept.4th Sales Dept.5th Sales Dept.6th Sales Dept.7th Sales Dept.
Close
Department
Default setting - Management
Management edit
Metric specifications
Up
Down
Order ofindication
Mgt. Inf.correction
Delete
Register
Limitin use
010200010014000000150000001600000017
001/010
1st Sales Dept.2nd Sales Dept.3rd Sales Dept.4th Sales Dept.5th Sales Dept.6th Sales Dept.7th Sales Dept.
Close
Department
Default setting - Management
Management edit
2 Select “Copy limitation” under the “Setting item” column onthe left side of the touch panel and then touch the “Change#” key.The “Copy limitation” screen will be displayed.
Inch specifications
Close
0007 1st Sales Dept.
Default setting - Management - Management edit
Limit in use
Change #
ValueSetting item
Copy limitationPrinter limitation
No limitNo limit
Scanner limitation No limitFax Transm. Limitation No limit
Metric specifications
Close
0007 1st Sales Dept.
Default setting - Management - Management edit
Limit in use
Change #
ValueSetting item
Copy limitationPrinter limitation
No limitNo limit
Scanner limitation No limitFax Transm. Limitation No limit

Section 7 COPIER MANAGEMENT FUNCTIONS
7-14
3 To set the maximum number of copies that can be madeunder this ID-code, touch the “Counter limit” key and proceedto the next step.To allow unlimited copies, touch the “No limit” key, and tocancel copying privileges completely, touch the “Is notpermitted” key and proceed to step 5.
Inch specifications
CloseBack
Management - Management edit - New register
Copy limitation
No limit
Counterlimit
Is notpermitted
Metric specifications
CloseBack
Management - Management edit - New register
Copy limitation
No limit
Counterlimit
Is notpermited
NOTE
If you want to quit the displayed setting without changing it, touch the“Back” key. The touch panel will return to the screen in step 2.
4 Use the numeric keys on the keypad to enter the maximumnumber of copies that can be made under this ID-code. Thecopy limit can be set to any 1-page increment up to 999,999.
Inch specifications
CloseBack
Management - Management edit - New register
Copy limitation
No limit
Counterlimit
Is notpermitted
Clear
999,999
(1~999,999)
Limited value
Metric specifications
CloseBack
Management - Management edit - New register
Copy limitation
No limit
Counterlimit
Is notpermited
Clear
999,999
(1~999,999)
Limited value
5 Touch the “Close” key.The touch panel will return to the screen in step 2.
Printing restrictions
Perform the following procedure when the optional Printer Kit orPrinter/Scanner Kit is installed in your copier and you want to set themaximum number of printouts that can be made under thecorresponding department ID-code.
NOTE
This setting will only be available when “On” is selected as the “Printerfunction management ON/OFF” setting.
1 Access the screen that contains the copy restriction settingitems.(See “Register new department ID-codes” on page 7-4 or“Change restrictions for use” on page 7-20.)
Inch specifications
Up
Down
Order ofindication
Mgt. Inf.correction
Delete
Register
Limitin use
010200010014000000150000001600000017
001/010
1st Sales Dept.2nd Sales Dept.3rd Sales Dept.4th Sales Dept.5th Sales Dept.6th Sales Dept.7th Sales Dept.
Close
Department
Default setting - Management
Management edit
Metric specifications
Up
Down
Order ofindication
Mgt. Inf.correction
Delete
Register
Limitin use
010200010014000000150000001600000017
001/010
1st Sales Dept.2nd Sales Dept.3rd Sales Dept.4th Sales Dept.5th Sales Dept.6th Sales Dept.7th Sales Dept.
Close
Department
Default setting - Management
Management edit

Section 7 COPIER MANAGEMENT FUNCTIONS
7-15
2 Select “Printer limitation” under the “Setting item” column onthe left side of the touch panel and then touch the “Change#” key.The “Printer limitation” screen will be displayed.
Inch specifications
Close
0007 1st Sales Dept.
Default setting - Management - Management edit
Limit in use
Change #
ValueSetting item
Copy limitationPrinter limitation
No limitNo limit
Scanner limitation No limitFax Transm. Limitation No limit
Metric specifications
Close
0007 1st Sales Dept.
Default setting - Management - Management edit
Limit in use
Change #
ValueSetting item
Copy limitationPrinter limitation
No limitNo limit
Scanner limitation No limitFax Transm. Limitation No limit
3 To set the maximum number of printouts that can be madeunder this ID-code, touch the “Counter limit” key and proceedto the next step.To allow unlimited printing, touch the “No limit” key, and tocancel printing privileges completely, touch the “Is notpermitted” key and proceed to step 5.
Inch specifications
CloseBack
Management - Management edit - New register
Printer limitation
No limit
Counterlimit
Is notpermitted
Metric specifications
CloseBack
Management - Management edit - New register
Printer limitation
No limit
Counterlimit
Is notpermited
NOTE
If you want to quit the displayed setting without changing it, touch the“Back” key. The touch panel will return to the screen in step 2.
4 Use the numeric keys on the keypad to enter the maximumnumber of printouts that can be made under this ID-code.The printing limit can be set to any 1-page increment up to999,999.
Inch specifications
CloseBack
Management - Management edit - New register
Printer limitation
No limit
Counterlimit
Is notpermitted
Clear
999,999
(1~999,999)
Limited value
Metric specifications
CloseBack
Management - Management edit - New register
Printer limitation
No limit
Counterlimit
Is notpermited
Clear
999,999
(1~999,999)
Limited value
5 Touch the “Close” key.The touch panel will return to the screen in step 2.

Section 7 COPIER MANAGEMENT FUNCTIONS
7-16
● Delete department ID-codes
Perform the following procedure when you want to delete registereddepartment ID-codes.
1 Access the copy management menu screen.(See “(2) Accessing the copy management menu screen” onpage 7-3.)
Inch specifications
Default setting
Copydefault
Machinedefault
Language Management
End
BOXManagement
Bypasssetting
Document Management
Registerorig. size
Printreport
Countercheck
UserAdjustment
Default setting / Counter
Metric specifications
Default setting
Copydefault
Machinedefault
Language Management
End
Hard DiskManagement
Bypasssetting
Document Management
Registerorig. size
Printreport
Countercheck
UserAdjustment
Default setting / Counter
2 Touch the “Management edit” key.The “Management edit” screen will be displayed.
Inch specifications
Close
Each Mgt. Total
Management total
Managem. Total
Default setting
Register/Sett.
ManagementDef. Set.
Managementedit Off
On
Management
Management
Metric specifications
Close
Each Mgt. Total
Management total
Managem. Total
Default setting
Register/Sett.
ManagementDef. Set.
Managementedit Off
On
Management
Management
3 Select the department ID-code that you want to delete, andthen touch the “Delete” key.
Inch specifications
Up
Down
Order ofindication
Mgt. Inf.correction
Delete
Register
Limitin use
010200010014000000150000001600000017
001/010
1st Sales Dept.2nd Sales Dept.3rd Sales Dept.4th Sales Dept.5th Sales Dept.6th Sales Dept.7th Sales Dept.
Close
Department
Default setting - Management
Management edit
Metric specifications
Up
Down
Order ofindication
Mgt. Inf.correction
Delete
Register
Limitin use
010200010014000000150000001600000017
001/010
1st Sales Dept.2nd Sales Dept.3rd Sales Dept.4th Sales Dept.5th Sales Dept.6th Sales Dept.7th Sales Dept.
Close
Department
Default setting - Management
Management edit
NOTE
It is possible for you to change the order of how the list of ID-codes isdisplayed.To so, touch the “Order of indication” key and then touch the “Sort bycode” key (and select either “1 / 9” or “9 / 1”) or the “Sort by Name”key (and select either “A / Z” or “Z / A”), as appropriate.

Section 7 COPIER MANAGEMENT FUNCTIONS
7-17
4 Verify that this is the ID-code that you want to delete, andtouch the “Yes” key.The touch panel will return to the screen in step 3.
Inch specifications
ID-code:
Name to display:
0007
1st Sales Dept.
Are you sure you want to delete this ID-code?
Yes No
Stop
Metric specifications
ID-code:
Name to display:
0007
1st Sales Dept.
Are you sure you want to delete this ID-code?
Yes No
Stop
NOTE
If you want to delete another ID-code, repeat steps 3 and 4.
5 Touch the “Close” key.The touch panel will return to the screen in step 2.
● Change registered information
Perform the following procedure when you want to change apreviously registered department name or the corresponding ID-code.
1 Access the copy management menu screen.(See “(2) Accessing the copy management menu screen” onpage 7-3.)
Inch specifications
Default setting
Copydefault
Machinedefault
Language Management
End
BOXManagement
Bypasssetting
Document Management
Registerorig. size
Printreport
Countercheck
UserAdjustment
Default setting / Counter
Metric specifications
Default setting
Copydefault
Machinedefault
Language Management
End
Hard DiskManagement
Bypasssetting
Document Management
Registerorig. size
Printreport
Countercheck
UserAdjustment
Default setting / Counter
2 Touch the “Management edit” key.The “Management edit” screen will be displayed.
Inch specifications
Close
Each Mgt. Total
Management total
Managem. Total
Default setting
Register/Sett.
ManagementDef. Set.
Managementedit Off
On
Management
Management
Metric specifications
Close
Each Mgt. Total
Management total
Managem. Total
Default setting
Register/Sett.
ManagementDef. Set.
Managementedit Off
On
Management
Management

Section 7 COPIER MANAGEMENT FUNCTIONS
7-18
3 Select the department ID-code for which you want to changethe registered information, and then touch the “Mgt. Inf.Correction” key.The “Department inform. edit” [“Department info. Editing”]screen will be displayed.
Inch specifications
Up
Down
Order ofindication
Mgt. Inf.correction
Delete
Register
Limitin use
010200010014000000150000001600000017
001/010
1st Sales Dept.2nd Sales Dept.3rd Sales Dept.4th Sales Dept.5th Sales Dept.6th Sales Dept.7th Sales Dept.
Close
Department
Default setting - Management
Management edit
Metric specifications
Up
Down
Order ofindication
Mgt. Inf.correction
Delete
Register
Limitin use
010200010014000000150000001600000017
001/010
1st Sales Dept.2nd Sales Dept.3rd Sales Dept.4th Sales Dept.5th Sales Dept.6th Sales Dept.7th Sales Dept.
Close
Department
Default setting - Management
Management edit
To change the registered ID-code, proceed to the next step.To change the registered department name, proceed to step7.
NOTE
It is possible for you to change the order of how the list of ID-codes isdisplayed.To so, touch the “Order of indication” key and then touch the “Sort bycode” key (and select either “1 / 9” or “9 / 1”) or the “Sort by Name”key (and select either “A / Z” or “Z / A”), as appropriate.
4 Select “ID-code” under the “Setting item” column on the leftside of the touch panel and then touch the “Change #” key.The “ID-code” screen will be displayed.
Inch specifications
Close
Change #
ValueSetting item
Default setting - Management - Management edit
Department inform. edit
ID-codeName to display
00071st Sales Dept.
Back
Metric specifications
Close
Change #
ValueSetting item
Default setting - Management - Management edit
Department info. Editing
ID-codeName to display
00071st Sales Dept.
Back
5 Touch the “Clear” key to delete the old ID-code. Use thenumeric keys on the keypad to enter the new ID-code (up to8 digits).
Inch specifications
CloseBack
Management - Management edit
ID-code
(0~99999999)
ID-code 0007
Clear
Metric specifications
CloseBack
Management - Management edit
ID-code
(0~99999999)
ID-code 0007
Clear
6 Touch the “Close” key.The touch panel will return to the screen in step 4. Proceedto step 10.
Inch specifications
CloseBack
Management - Management edit
ID-code
(0~99999999)
ID-code 0007
Clear
Metric specifications
CloseBack
Management - Management edit
ID-code
(0~99999999)
ID-code 0007
Clear

Section 7 COPIER MANAGEMENT FUNCTIONS
7-19
7 Select “Name to display” under the “Setting item” column onthe left side of the touch panel and then touch the “Change #”key.The “Name to display” screen will be displayed.
Inch specifications
Close
Change #
ValueSetting item
Default setting - Management - Management edit
Department inform. edit
ID-codeName to display
00071st Sales Dept.
Back
Metric specifications
Close
Change #
ValueSetting item
Default setting - Management - Management edit
Department info. Editing
ID-codeName to display
00071st Sales Dept.
Back
8 Touch the “AllDel.” key to delete the old department name,then enter the new name.
Inch specifications
EndStopName to display
1st Sales Dept. Limit:32 letters including #
AllDel. Del. prev
1 2 3 4 5 6 7 8 9 0 - = `
q w e r t y u i o p [ ] \
a s d f g h j k l ;
z x c v b n m , . /
'
Capital Num./Sym. SpaceLetter
Metric specifications
EndStopName to display
1st Sales Dept. Limit: 32 letters inc. # key
Del. prev
1 2 3 4 5 6 7 8 9 0 - = `
q w e r t y u i o p [ ] \
a s d f g h j k l ;
z x c v b n m , . /
'
Capital Symbol 1 Symbol 2 SpaceLetter
`
AllDel.
NOTE
For information on how to enter the department name, refer to“11. Entering characters” on page 7-104.
9 Touch the “End” key.The touch panel will return to the screen in step 7.
10 Touch the “Close” key.The touch panel will return to the screen in step 3.
11 Touch the “Close” key.The touch panel will return to the screen in step 2.
12 Touch the “Close” key.

Section 7 COPIER MANAGEMENT FUNCTIONS
7-20
● Change restrictions for use
Perform the following procedure when you want to change therestrictions for using the copier under each department ID-code.
IMPORTANT!
In order to access the “Change restrictions for use” procedure under“Editing copy management information”, it is necessary to select “On”under “Copier function management ON/OFF”. When the optionalPrinter Kit, Printer/Scanner Kit or Fax Kit are installed in your copier, itis necessary to select “On” under the corresponding “Printer functionmanagement ON/OFF”, “Scanner function management ON/OFF” or“Fax function management ON/OFF” procedure. (See “(6) Changingthe copy management default settings” on page 7-25.)
1 Access the copy management menu screen.(See “(2) Accessing the copy management menu screen” onpage 7-3.)
Inch specifications
Default setting
Copydefault
Machinedefault
Language Management
End
BOXManagement
Bypasssetting
Document Management
Registerorig. size
Printreport
Countercheck
UserAdjustment
Default setting / Counter
Metric specifications
Default setting
Copydefault
Machinedefault
Language Management
End
Hard DiskManagement
Bypasssetting
Document Management
Registerorig. size
Printreport
Countercheck
UserAdjustment
Default setting / Counter
2 Touch the “Management edit” key.The “Management edit” screen will be displayed.
Inch specifications
Close
Each Mgt. Total
Management total
Managem. Total
Default setting
Register/Sett.
ManagementDef. Set.
Managementedit Off
On
Management
Management
Metric specifications
Close
Each Mgt. Total
Management total
Managem. Total
Default setting
Register/Sett.
ManagementDef. Set.
Managementedit Off
On
Management
Management
3 Select the department ID-code for which you want to changethe restrictions, and then touch the “Limit in use” key.The “Limit in use” screen will be displayed.
Inch specifications
Up
Down
Order ofindication
Mgt. Inf.correction
Delete
Register
Limitin use
010200010014000000150000001600000017
001/010
1st Sales Dept.2nd Sales Dept.3rd Sales Dept.4th Sales Dept.5th Sales Dept.6th Sales Dept.7th Sales Dept.
Close
Department
Default setting - Management
Management edit
Metric specifications
Up
Down
Order ofindication
Mgt. Inf.correction
Delete
Register
Limitin use
010200010014000000150000001600000017
001/010
1st Sales Dept.2nd Sales Dept.3rd Sales Dept.4th Sales Dept.5th Sales Dept.6th Sales Dept.7th Sales Dept.
Close
Department
Default setting - Management
Management edit
NOTE
It is possible for you to change the order of how the list of ID-codes isdisplayed.To so, touch the “Order of indication” key and then touch the “Sort bycode” key (and select either “1 / 9” or “9 / 1”) or the “Sort by Name”key (and select either “A / Z” or “Z / A”), as appropriate.
4 Change the restrictions for using the copier under thatdepartment ID-code as desired.
Inch specifications
Close
0007 1st Sales Dept.
Default setting - Management - Management edit
Limit in use
Change #
ValueSetting item
Copy limitationPrinter limitation
OnOn
Output limitation No limitScanner limitation No limitFax Transm. Limitation No limit
Metric specifications
Close
0007 1st Sales Dept.
Default setting - Management - Management edit
Limit in use
Change #
ValueSetting item
Copy limitationPrinter limitation
OnOn
Output limitation No limitScanner limitation No limitFax Transm. Limitation No limit
NOTE
For information on how to change restrictions, refer to “Setting therestrictions for use” on page 7-7.

Section 7 COPIER MANAGEMENT FUNCTIONS
7-21
5 Touch the “Close” key.The touch panel will return to the screen in step 3.
Inch specifications
Close
0007 1st Sales Dept.
Default setting - Management - Management edit
Limit in use
Change #
ValueSetting item
Copy limitationPrinter limitation
OnOn
Output limitation No limitScanner limitation No limitFax Transm. Limitation No limit
Metric specifications
Close
0007 1st Sales Dept.
Default setting - Management - Management edit
Limit in use
Change #
ValueSetting item
Copy limitationPrinter limitation
OnOn
Output limitation No limitScanner limitation No limitFax Transm. Limitation No limit
6 Touch the “Close” key.The touch panel will return to the screen in step 2.
7 Touch the “Close” key.
(4) Checking the copy management counts
● Check all departments
Perform the following procedure when you want to check the totalnumber of copies made under all department ID-codes as a whole,print out a copy management report and clear the copy counts for allof the registered department ID-codes.
1 Access the copy management menu screen.(See “(2) Accessing the copy management menu screen” onpage 7-3.)
Inch specifications
Default setting
Copydefault
Machinedefault
Language Management
End
BOXManagement
Bypasssetting
Document Management
Registerorig. size
Printreport
Countercheck
UserAdjustment
Default setting / Counter
Metric specifications
Default setting
Copydefault
Machinedefault
Language Management
End
Hard DiskManagement
Bypasssetting
Document Management
Registerorig. size
Printreport
Countercheck
UserAdjustment
Default setting / Counter
2 Touch the “Management total” key.The “Management total” screen will be displayed.
Inch specifications
Close
Each Mgt. Total
Management total
Managem. Total
Default setting
Register/Sett.
ManagementDef. Set.
Managementedit Off
On
Management
Management
Metric specifications
Close
Each Mgt. Total
Management total
Managem. Total
Default setting
Register/Sett.
ManagementDef. Set.
Managementedit Off
On
Management
Management

Section 7 COPIER MANAGEMENT FUNCTIONS
7-22
3 The total number of copies made under all department ID-codes as a whole will be displayed. If you want to print out acopy management report, touch the “Print report” key.
Inch specifications
CloseManagement Total
Default setting - Management
Counterclear
Printreport
Copy Printer Fax TotalNumber print.
Black & White: 300 100 50 450
100 100
1Hrs 10Mins
Scanner FaxScan.Transm. Fax Transm.
Scan # pages: Trsm. # pages:
Commun.Time:
Metric specifications
CloseManagement Total
Default setting - Management
Counterclear
Printreport
Copy Printer Fax TotalNumber print.
Black & White: 300 100 50 450
100 100
Scanner FaxScan.Transm. Fax transm.
Scan # pages: Trsm. # pages:
Commun.Time: 1Hrs 10Mins
NOTES
• The type of report printed out will vary according the setting selectedfor “Copy/Printer output management” under the copy managementdefault settings.
• If any of the “Total size 1” through “Total size 5” settings is selectedunder the copy management default settings, the total size reportwill also be printed out.
4 To clear all of the copy counts, touch the “Counter clear” key.
Inch specifications
CloseManagement Total
Default setting - Management
Counterclear
Printreport
Copy Printer Fax TotalNumber print.
Black & White: 300 100 50 450
100 100
1Hrs 10Mins
Scanner FaxScan.Transm. Fax Transm.
Scan # pages: Trsm. # pages:
Commun.Time:
Metric specifications
CloseManagement Total
Default setting - Management
Counterclear
Printreport
Copy Printer Fax TotalNumber print.
Black & White: 300 100 50 450
100 100
Scanner FaxScan.Transm. Fax transm.
Scan # pages: Trsm. # pages:
Commun.Time: 1Hrs 10Mins
5 When the confirmation message appears, touch the “Yes”key.
Inch specifications
Yes No
The counted number for this ID-code will be deleted Are you sure?
Stop
Metric specifications
Yes No
The counted number for this ID-code will be deleted Are you sure?
Stop
6 Touch the “Close” key.The touch panel will return to the screen in step 2.
7 Touch the “Close” key.

Section 7 COPIER MANAGEMENT FUNCTIONS
7-23
● Check individual departments
Perform the following procedure when you want to check the totalnumber of copies made under each individual department ID-codeand/or clear the copy counts for individual departments as well.
1 Access the copy management menu screen.(See “(2) Accessing the copy management menu screen” onpage 7-3.)
Inch specifications
Default setting
Copydefault
Machinedefault
Language Management
End
BOXManagement
Bypasssetting
Document Management
Registerorig. size
Printreport
Countercheck
UserAdjustment
Default setting / Counter
Metric specifications
Default setting
Copydefault
Machinedefault
Language Management
End
Hard DiskManagement
Bypasssetting
Document Management
Registerorig. size
Printreport
Countercheck
UserAdjustment
Default setting / Counter
2 Touch the “Each Mgt. Total” key.The “Each Management Total” screen will be displayed.
Inch specifications
Close
Each Mgt. Total
Management total
Managem. Total
Default setting
Register/Sett.
ManagementDef. Set.
Managementedit Off
On
Management
Management
Metric specifications
Close
Each Mgt. Total
Management total
Managem. Total
Default setting
Register/Sett.
ManagementDef. Set.
Managementedit Off
On
Management
Management
3 Select the department ID-code for which you want to checkthe copy counts, and then touch the “Total” key.
Inch specifications
Up
Down
Order ofindication
001/010
Close
Department
Default setting - Management
Each Management Total
Total010200010014000000150000001600000017
1st Sales Dept.2nd Sales Dept.3rd Sales Dept.4th Sales Dept.5th Sales Dept.6th Sales Dept.7th Sales Dept.
!
!
Metric specifications
Up
Down
Order ofindication
001/010
Close
Department
Default setting - Management
Each Management Total
Total010200010014000000150000001600000017
1st Sales Dept.2nd Sales Dept.3rd Sales Dept.4th Sales Dept.5th Sales Dept.6th Sales Dept.7th Sales Dept.
!
!
NOTES
• The “---ETC” displayed in the list indicates the number of printoutsthat were made without entering an ID-code.
· The printouts included under “---ETC” are as follows:· Report print out· Printer error report print out· Print out from a computer for which an ID-code is not set (When
the “Non-standard printer driver printout (Printer)” is set to “ON”under the copy management default settings.)
· Fax reception print out· Fax report print out
• It is possible for you to change the order of how the list of ID-codesis displayed. To so, touch the “Order of indication” key and thentouch the “Sort by code” key (and select either “1 / 9” or “9 / 1”)or the “Sort by Name” key (and select either “A / Z” or “Z / A”), asappropriate.

Section 7 COPIER MANAGEMENT FUNCTIONS
7-24
4 The total number of copies made under that department ID-code will be displayed.
Inch specifications
CloseEach Management Total
Default setting - Management 0007 1st Sales Dept.
Counterclear
Number print.Number in( )is limit value50 30 80
100 100
Copy Printer
Scanner Fax
Total
Scan.Transm. Fax Transm.
Black & White:
Scan # pages: Trsm. # pages:
Commun.Time: 1Hrs 10Mins
Metric specifications
CloseEach Management Total
Default setting - Management 0007 1st Sales Dept.
Counterclear
Number print.Number in( )is limit value50 30 80
100 100
Copy Printer
Scanner Fax
Total
Scan.Transm. Fax transm.
Black & White:
Scan # pages: Trsm. # pages:
Commun.Time: 1Hrs 10Mins
NOTE
On the “Each Management Total” screen, the number in the bracketsfollowing the number of copies made indicates the maximum numberof copies that can be made.
5 To clear all of the copy counts for that ID-code, touch the“Counter clear” key.
Inch specifications
CloseEach Management Total
Default setting - Management 0007 1st Sales Dept.
Counterclear
Number print.Number in( )is limit value50 30 80
100 100
Copy Printer
Scanner Fax
Total
Scan.Transm. Fax Transm.
Black & White:
Scan # pages: Trsm. # pages:
Commun.Time: 1Hrs 10Mins
Metric specifications
CloseEach Management Total
Default setting - Management 0007 1st Sales Dept.
Counterclear
Number print.Number in( )is limit value50 30 80
100 100
Copy Printer
Scanner Fax
Total
Scan.Transm. Fax transm.
Black & White:
Scan # pages: Trsm. # pages:
Commun.Time: 1Hrs 10Mins
6 When the confirmation message appears, touch the “Yes”key.
Inch specifications
Yes No
Stop
The count value of this ID-code will be deletedAre you sure?
Metric specifications
Yes No
Stop
The count value of this ID-code will be deletedAre you sure?
7 Touch the “Close” key.The touch panel will return to the screen in step 3.
8 Touch the “Close” key.The touch panel will return to the screen in step 2.
9 Touch the “Close” key.

Section 7 COPIER MANAGEMENT FUNCTIONS
7-25
(5) Turning the copy management function ON/OFF
Perform the following procedure when you want to turn copymanagement ON or OFF.
1 Access the copy management menu screen.(See “(2) Accessing the copy management menu screen” onpage 7-3.)
Inch specifications
Default setting
Copydefault
Machinedefault
Language Management
End
BOXManagement
Bypasssetting
Document Management
Registerorig. size
Printreport
Countercheck
UserAdjustment
Default setting / Counter
Metric specifications
Default setting
Copydefault
Machinedefault
Language Management
End
Hard DiskManagement
Bypasssetting
Document Management
Registerorig. size
Printreport
Countercheck
UserAdjustment
Default setting / Counter
2 To turn copy management ON, touch the “On” key. To turncopy management OFF, touch the “Off” key.
Inch specifications
Close
Each Mgt. Total
Management total
Managem. Total
Default setting
Register/Sett.
ManagementDef. Set.
Managementedit Off
On
Management
Management
Metric specifications
Close
Each Mgt. Total
Management total
Managem. Total
Default setting
Register/Sett.
ManagementDef. Set.
Managementedit Off
On
Management
Management
3 Touch the “Close” key.
(6) Changing the copy management default settings
Perform the following procedure when you want to change the defaultsettings for the copy management function.The following default settings are available.• Copier function management ON/OFF (Page 7-26.)• Printer function management ON/OFF (Page 7-27.)• Printer error report (Page 7-28.)• Non-standard printer driver printout (Printer) (Page 7-29.)• Copy/Printer output management (Page 7-30.)• Scanner function management ON/OFF (Page 7-31.)• Fax function management ON/OFF (Page 7-32.)• Response to exceeded restriction (Page 7-33.)• Default copy limit (Page 7-34.)• Total count for specified paper size (1 to 5) (Page 7-35)
● Accessing the copy management default settings
1 Access the copy management menu screen.(See “(2) Accessing the copy management menu screen” onpage 7-3.)
Inch specifications
Default setting
Copydefault
Machinedefault
Language Management
End
BOXManagement
Bypasssetting
Document Management
Registerorig. size
Printreport
Countercheck
UserAdjustment
Default setting / Counter
Metric specifications
Default setting
Copydefault
Machinedefault
Language Management
End
Hard DiskManagement
Bypasssetting
Document Management
Registerorig. size
Printreport
Countercheck
UserAdjustment
Default setting / Counter

Section 7 COPIER MANAGEMENT FUNCTIONS
7-26
2 Touch the “Management Def. Set.” key.The “Managem. Def. Set.” screen will be displayed.
Inch specifications
Close
Each Mgt. Total
Management total
Managem. Total
Default setting
Register/Sett.
ManagementDef. Set.
Managementedit Off
On
Management
Management
Metric specifications
Close
Each Mgt. Total
Management total
Managem. Total
Default setting
Register/Sett.
ManagementDef. Set.
Managementedit Off
On
Management
Management
3 Select the default setting that you want to change and thentouch the “Change #” key.
Inch specifications
Close
Change #
ValueSetting item
Default setting - Management - Managem. Def set.
Managem. Def. Set.
Copy managementPrint. Managem.
OnOn
Printer error report OnOthers Mgt. Reg. (print) OnCopy/Printer output mgt. AllScanner Managem. OnFax Management On
Metric specifications
Close
Change #
ValueSetting item
Default setting - Management - Managem. Def set.
Managem. Def. Set.
Copy managementPrint. managem.
OnOn
Printer error report OnOthers mgt. Reg. (print) OnCopy/Printer output mgt. AllScanner Managem. OnFax Management On
NOTE
Perform the following procedure that corresponds to the desiredsetting.
● Copier function management ON/OFF
Perform the following procedure when you want to turn copymanagement ON or OFF for the copier functions of this machine.
1 Select “Copy management” under the “Setting item” columnon the left side of the touch panel and then touch the“Change #” key.The “Copy management” screen will be displayed.
Inch specifications
Close
Change #
ValueSetting item
Default setting - Management - Managem. Def set.
Managem. Def. Set.
Copy managementPrint. Managem.
OnOn
Printer error report OnOthers Mgt. Reg. (print) OnCopy/Printer output mgt. AllScanner Managem. OnFax Management On
Metric specifications
Close
Change #
ValueSetting item
Default setting - Management - Managem. Def set.
Managem. Def. Set.
Copy managementPrint. managem.
OnOn
Printer error report OnOthers mgt. Reg. (print) OnCopy/Printer output mgt. AllScanner Managem. OnFax Management On
2 To turn copy management ON for the copier functions of thismachine, touch the “On” key.
Inch specifications
CloseBackCopy management
Default setting - Management - Managem. Def set.
Copy management can be set up.
Off
On
Metric specifications
CloseBackCopy management
Default setting - Management - Managem. Def set.
Copy management can be set up.
Off
On
NOTE
If you want to quit the displayed setting without changing it, touch the“Back” key. The touch panel will return to the screen in step 1.
3 Touch the “Close” key.The touch panel will return to the screen in step 1.

Section 7 COPIER MANAGEMENT FUNCTIONS
7-27
● Printer function management ON/OFF
Perform the following procedure when you want to turn copymanagement ON or OFF for the printer functions of this machine.
NOTE
This setting is only available when the optional Printer Kit or Printer/Scanner Kit is installed in your copier.
1 Select “Print. Managem.” under the “Setting item” column onthe left side of the touch panel and then touch the “Change #”key.The “Print. Managem.” screen will be displayed.
Inch specifications
Close
Change #
ValueSetting item
Default setting - Management - Managem. Def set.
Managem. Def. Set.
Copy managementPrint. Managem.
OnOn
Printer error report OnOthers Mgt. Reg. (print) OnCopy/Printer output mgt. AllScanner Managem. OnFax Management On
Metric specifications
Close
Change #
ValueSetting item
Default setting - Management - Managem. Def set.
Managem. Def. Set.
Copy managementPrint. managem.
OnOn
Printer error report OnOthers mgt. Reg. (print) OnCopy/Printer output mgt. AllScanner Managem. OnFax Management On
2 To turn copy management ON for the printer functions of thismachine, touch the “On” key.
Inch specifications
CloseBackPrint. Managem.
Default setting - Management - Managem. Def set.
Printer management can be set up.
Off
On
Metric specifications
CloseBackPrint. managem.
Default setting - Management - Managem. Def set.
Printer management can be set up.
Off
On
NOTE
If you want to quit the displayed setting without changing it, touch the“Back” key. The touch panel will return to the screen in step 1.
3 Touch the “Close” key.The touch panel will return to the screen in step 1.

Section 7 COPIER MANAGEMENT FUNCTIONS
7-28
● Printer error report
Perform the following procedure if you want an error report printedanytime “On” is selected as the “Printer function management ON/OFF” setting and printing is attempted with an invalid department ID-code.
NOTE
This setting will only be available when “On” is selected as the “Printerfunction management ON/OFF” setting.
1 Select “Printer error report” under the “Setting item” columnon the left side of the touch panel and then touch the“Change #” key.The “Printer error report” screen will be displayed.
Inch specifications
Close
Change #
ValueSetting item
Default setting - Management - Managem. Def set.
Managem. Def. Set.
Copy managementPrint. Managem.
OnOn
Printer error report OnOthers Mgt. Reg. (print) OnCopy/Printer output mgt. AllScanner Managem. OnFax Management On
Metric specifications
Close
Change #
ValueSetting item
Default setting - Management - Managem. Def set.
Managem. Def. Set.
Copy managementPrint. managem.
OnOn
Printer error report OnOthers mgt. Reg. (print) OnCopy/Printer output mgt. AllScanner Managem. OnFax Management On
2 To have a printer error report printed out, touch the “On” key.If you do not want the printer error report printed out, touchthe “Off” key.
Inch specifications
CloseBackPrinter error report
Default setting - Management - Managem. Def set.
Error report is output. at the time of Mgt. code mismatch.
Off
On
Metric specifications
CloseBackPrinter error report
Default setting - Management - Managem. Def set.
Error report is output. at the time of Mgt. code mismatch.
Off
On
NOTE
If you want to quit the displayed setting without changing it, touch the“Back” key. The touch panel will return to the screen in step 1.
3 Touch the “Close” key.The touch panel will return to the screen in step 1.
NOTE
If anyone attempts to print using an invalid department ID-code, anerror will occur under the printing functions and printout will not bepossible. When the [Printer] key is touched, “Department ID-codemismatch.” will be displayed. Touch the “GO” key to print out an errorreport.
Inch specifications
Department code mismatch.Off line
Cancel GO
Metric specifications
Department code mismatch.Off line
Cancel GO

Section 7 COPIER MANAGEMENT FUNCTIONS
7-29
● Non-standard printer driver printout (Printer)
Perform the following procedure when “On” is selected as the “Printerfunction management ON/OFF” setting and you want to want to allowthe use of printer drivers other than those available under copymanagement.
NOTE
This setting will only be available when “On” is selected as the “Printerfunction management ON/OFF” setting.
1 Select “Others Mgt. Reg. (print)” under the “Setting item”column on the left side of the touch panel and then touch the“Change #” key.The “Others Mgt. Reg. (print)” screen will be displayed.
Inch specifications
Close
Change #
ValueSetting item
Default setting - Management - Managem. Def set.
Managem. Def. Set.
Copy managementPrint. Managem.
OnOn
Printer error report OnOthers Mgt. Reg. (print) OnCopy/Printer output mgt. AllScanner Managem. OnFax Management On
Metric specifications
Close
Change #
ValueSetting item
Default setting - Management - Managem. Def set.
Managem. Def. Set.
Copy managementPrint. managem.
OnOn
Printer error report OnOthers mgt. Reg. (print) OnCopy/Printer output mgt. AllScanner Managem. OnFax Management On
2 To allow the use of printer drivers other than those availableunder copy management, touch the “On” key.
Inch specifications
CloseBackOthers Mgt. Reg. (print)
Default setting - Management - Managem. Def set.
Output. of print. is possible for unspecif. ID-code
Off
On
Metric specifications
CloseBackOthers mgt. Reg. (print)
Default setting - Management - Managem. Def set.
Output. of print. is possible for unspecif. ID-code
Off
On
NOTE
If you want to quit the displayed setting without changing it, touch the“Back” key. The touch panel will return to the screen in step 1.
3 Touch the “Close” key.The touch panel will return to the screen in step 1.

Section 7 COPIER MANAGEMENT FUNCTIONS
7-30
● Copy/Printer output management
Perform the following procedure to determine whether management ofcopier and printer functions will be handled together or separately.
NOTE
If this setting is changed, it will affect which setting items are availablefor restriction under the copy management function. (See “Setting therestrictions for use” on page 7-7.)
1 Select “Copy/Printer output mgt.” under the “Setting item”column on the left side of the touch panel and then touch the“Change #” key.The “Copy/Printer output mgt.” screen will be displayed.
Inch specifications
Close
Change #
ValueSetting item
Default setting - Management - Managem. Def set.
Managem. Def. Set.
Copy managementPrint. Managem.
OnOn
Printer error report OnOthers Mgt. Reg. (print) OnCopy/Printer output mgt. AllScanner Managem. OnFax Management On
Metric specifications
Close
Change #
ValueSetting item
Default setting - Management - Managem. Def set.
Managem. Def. Set.
Copy managementPrint. managem.
OnOn
Printer error report OnOthers mgt. Reg. (print) OnCopy/Printer output mgt. AllScanner Managem. OnFax Management On
2 To have copier and printer functions both handled together,touch the “All” key. To have copier and printer functions eachhandled separately, touch the “Each” key.
Inch specifications
CloseBackCopy/Printer output mgt.
Default setting - Management - Managem. Def set.
Copy/Printer output management method setting.
All
Each
Metric specifications
CloseBackCopy/Printer output mgt.
Default setting - Management - Managem. Def set.
Copy/Printer output management method setting.
All
Each
NOTE
If you want to quit the displayed setting without changing it, touch the“Back” key. The touch panel will return to the screen in step 1.
3 Touch the “Close” key.The touch panel will return to the screen in step 1.

Section 7 COPIER MANAGEMENT FUNCTIONS
7-31
● Scanner function management ON/OFF
Perform the following procedure when you want to turn copymanagement ON or OFF for the scanner functions of this machine.
NOTE
This setting is only available when the optional Printer/Scanner Kit isinstalled in your copier.
1 Select “Scanner Managem.” under the “Setting item” columnon the left side of the touch panel and then touch the“Change #” key.The “Scanner Managem.” screen will be displayed.
Inch specifications
Close
Change #
ValueSetting item
Default setting - Management - Managem. Def set.
Managem. Def. Set.
Copy managementPrint. Managem.
OnOn
Printer error report OnOthers Mgt. Reg. (print) OnCopy/Printer output mgt. AllScanner Managem. OnFax Management On
Metric specifications
Close
Change #
ValueSetting item
Default setting - Management - Managem. Def set.
Managem. Def. Set.
Copy managementPrint. managem.
OnOn
Printer error report OnOthers mgt. Reg. (print) OnCopy/Printer output mgt. AllScanner Managem. OnFax Management On
2 To turn copy management ON for the scanner functions ofthis machine, touch the “On” key.
Inch specifications
CloseBackScanner Managem.
Default setting - Management - Managem. Def set.
Scanner management can be set up.
Off
On
Metric specifications
CloseBackScanner Managem.
Default setting - Management - Managem. Def set.
Scanner management can be set up.
Off
On
NOTE
If you want to quit the displayed setting without changing it, touch the“Back” key. The touch panel will return to the screen in step 1.
3 Touch the “Close” key.The touch panel will return to the screen in step 1.

Section 7 COPIER MANAGEMENT FUNCTIONS
7-32
● Fax function management ON/OFF
Perform the following procedure when you want to turn copymanagement ON or OFF for the fax functions of this machine.
NOTE
This setting is only available when the optional Fax Kit is installed inyour copier.
1 Select “Fax Management” under the “Setting item” column onthe left side of the touch panel and then touch the “Change #”key.The “Fax Management” screen will be displayed.
Inch specifications
Close
Change #
ValueSetting item
Default setting - Management - Managem. Def set.
Managem. Def. Set.
Scanner Managem.Fax Management
OnOn
Excess of limit Setting Unable to use Def. Val. of coun. limit 999999Total size 1 81/2x11" No specif.Total size 2 81/2x11" No specif.Total size 3 81/2x11" No specif.
Metric specifications
Close
Change #
ValueSetting item
Default setting - Management - Managem. Def set.
Managem. Def. Set.
Scanner Managem.Fax Management
OnOn
Excess of limit Setting You cannot useDef. Val. of coun. limit 999999Total size 1 A3 No specif.Total size 2 B4 No specif.Total size 3 A4 No specif.
2 To turn copy management ON for the fax functions of thismachine, touch the “On” key.
Inch specifications
CloseBackFax Management
Default setting - Management - Managem. Def set.
Fax management can be set up.
Off
On
Metric specifications
CloseBackFax Management
Default setting - Management - Managem. Def set.
Fax management can be set up.
Off
On
NOTE
If you want to quit the displayed setting without changing it, touch the“Back” key. The touch panel will return to the screen in step 1.
3 Touch the “Close” key.The touch panel will return to the screen in step 1.

Section 7 COPIER MANAGEMENT FUNCTIONS
7-33
● Response to exceeded restriction
Perform the following procedure to determine whether further use ofthe machine by the corresponding department will be discontinuedimmediately (starting with the current job) or with the next job, or ifonly an error message will be generated when a department ID-codehas exceeded its set limit.
NOTE
If the optional Printer/Scanner Kit or Fax Kit is installed on your copier,even if you select here to have further use of the machinediscontinued immediately (starting with the current job), if adepartment ID-code exceeds its set limit during scanning or during faxtransmission, the actual restriction will start from the next job.
1 Select “Excess of limit Setting” under the “Setting item”column on the left side of the touch panel and then touch the“Change #” key.The “Excess of limit Setting” screen will be displayed.
Inch specifications
Close
Change #
ValueSetting item
Default setting - Management - Managem. Def set.
Managem. Def. Set.
Scanner Managem.Fax Management
OnOn
Excess of limit Setting Unable to use Def. Val. of coun. limit 999999Total size 1 81/2x11" No specif.Total size 2 81/2x11" No specif.Total size 3 81/2x11" No specif.
Metric specifications
Close
Change #
ValueSetting item
Default setting - Management - Managem. Def set.
Managem. Def. Set.
Scanner Managem.Fax Management
OnOn
Excess of limit Setting You cannot useDef. Val. of coun. limit 999999Total size 1 A3 No specif.Total size 2 B4 No specif.Total size 3 A4 No specif.
2 To discontinue further use of the machine immediately(starting with the current job) when a department ID-codehas exceeded its set limit, touch the “Stop job immediatly”key. To cancel further use of the machine starting from thenext job, touch the “Stop after job done” key. To have an errormessage generated, touch the “Only warning” key.
Inch specifications
CloseBackExcess of limit Setting
Default setting - Management - Managem. Def set.
Select proper setting when limit exceeded.
Stop jobimmediatlyStop afterjob done
Only warning
Metric specifications
CloseBackExcess of limit Setting
Default setting - Management - Managem. Def set.
Select proper setting when limit exceeded.
Stop jobimmediatlyStop afterjob done
Only warning
NOTE
If you want to quit the displayed setting without changing it, touch the“Back” key. The touch panel will return to the screen in step 1.
3 Touch the “Close” key.The touch panel will return to the screen in step 1.

Section 7 COPIER MANAGEMENT FUNCTIONS
7-34
● Default copy limit
Perform the following procedure when you want to change the defaultcopy limit for new department ID-codes.
1 Select “Def. Val. of coun. limit” under the “Setting item”column on the left side of the touch panel and then touch the“Change #” key.The “Def. Val. of coun. limit” screen will be displayed.
Inch specifications
Close
Change #
ValueSetting item
Default setting - Management - Managem. Def set.
Managem. Def. Set.
Scanner Managem.Fax Management
OnOn
Excess of limit Setting Unable to use Def. Val. of coun. limit 999999Total size 1 81/2x11" No specif.Total size 2 81/2x11" No specif.Total size 3 81/2x11" No specif.
Metric specifications
Close
Change #
ValueSetting item
Default setting - Management - Managem. Def set.
Managem. Def. Set.
Scanner Managem.Fax Management
OnOn
Excess of limit Setting You cannot useDef. Val. of coun. limit 999999Total size 1 A3 No specif.Total size 2 B4 No specif.Total size 3 A4 No specif.
2 Use the numeric keys on the keypad to enter the default copylimit. The limit can be set to any 1-page increment up to999,999.
Inch specifications
CloseBackDef. Val. of coun. limit
Default setting - Management - Managem. Def set.
Default value of counter limit can be set.
Clear
999,999
(1~999,999)
Limited value
Metric specifications
CloseBackDef. Val. of coun. Limit
Default setting - Management - Managem. Def set.
Default value of counter limit can be set.
Clear
999,999
(1~999,999)
Limited value
NOTE
If you want to quit the displayed setting without changing it, touch the“Back” key. The touch panel will return to the screen in step 1.
3 Touch the “Close” key.The touch panel will return to the screen in step 1.

Section 7 COPIER MANAGEMENT FUNCTIONS
7-35
● Total count for specified paper size (1 to 5)
Perform the following procedure when you want to register a specificpaper size in order to calculate and check the copy counts for thatparticular size of paper. It is also possible to register a paper size ANDtype.
NOTES
• You can register up to 5 different paper sizes for this function.• If the type of paper is not registered in any of the settings, the
corresponding copy counts for that size of paper will be calculatedregardless of the type of paper that is used. However, if the samesize of paper is registered in another setting along with a paper type,the counts for the first setting will NOT include copies made with thetype of paper that is registered in the second setting.
1 Select one of the “Total size 1” through “Total size 5” settingsunder the “Setting item” column on the left side of the touchpanel and then touch the “Change #” key.The corresponding setting screen will be displayed.
Inch specifications
Close
Change #
ValueSetting item
Default setting - Management - Managem. Def set.
Managem. Def. Set.
Scanner Managem.Fax Management
OnOn
Excess of limit Setting Unable to use Def. Val. of coun. limit 999999Total size 1 81/2x11" No specif.Total size 2 81/2x11" No specif.Total size 3 81/2x11" No specif.
Metric specifications
Close
Change #
ValueSetting item
Default setting - Management - Managem. Def set.
Managem. Def. Set.
Scanner Managem.Fax Management
OnOn
Excess of limit Setting You cannot useDef. Val. of coun. limit 999999Total size 1 A3 No specif.Total size 2 B4 No specif.Total size 3 A4 No specif.
2 Touch the “On” key.
Inch specifications
CloseBack
Default setting - Management - Managem. Def set.
Total size 1
Off
On
Can set totals of paper size and type.
Metric specifications
CloseBack
Default setting - Management - Managem. Def set.
Total size 1
Off
On
Can set totals of paper size and type.
3 Touch the “Select size” key.
Inch specifications
CloseBackTotal size 1
Default setting - Management - Managem. Def set.
Can set totals of paper size and type.
Off
On
Selectsize
Select paper type
Paper size Paper type
With nospecif.
81/2x11"
Metric specifications
CloseBackTotal size 1
Default setting - Management - Managem. Def set.
Can set totals of paper size and type.
Off
On
Selectsize
Select paper type
Paper size Paper type
With nospecif.
A4
NOTE
If you want to quit the displayed setting without changing it, touch the“Back” key. The touch panel will return to the screen in step 1.

Section 7 COPIER MANAGEMENT FUNCTIONS
7-36
4 Touch the key that corresponds to the desired paper size,and then touch the “Close” key.
Inch specifications
CloseBackSelect size
Management - Managem. Def set. - Total size 1
81/2x11"
A4
A5
B4
B5
Folio
11x17"
81/2x14"
A3
51/2x81/2"
Metric specifications
CloseBackSelect size
Management - Managem. Def set. - Total size 1
81/2x11"
A4
A5
B4
B5
Folio
11x17"
81/2x14"
A3
51/2x81/2"
5 To specify a paper type as well, touch the “Select paper type”key and proceed to the next step. If you do not want tospecify a paper type, proceed to step 7.
Inch specifications
CloseBackTotal size 1
Default setting - Management - Managem. Def set.
Can set totals of paper size and type.
Off
On
Selectsize
Select paper type
Paper size Paper type
With nospecif.
81/2x11"
Metric specifications
CloseBackTotal size 1
Default setting - Management - Managem. Def set.
Can set totals of paper size and type.
Off
On
Selectsize
Select paper type
Paper size Paper type
With nospecif.
A4
6 Touch the key that corresponds to the desired paper type,and then touch the “Close” key.
Inch specifications
Thickpaper
CloseBackSelect paper type
Management - Managem. Def set. - Total size 1
Transp-arency
Vellum
Rough
Plain Labels
Recycled
Bond
Preprinted
Cardstock
Color
Letterhead
Prepunched
High quality
Envelope
Custom 1
Custom 2
Custom 3
Custom 4
Custom 5
Custom 6
Custom 7
Custom 8
With nospecif.
Metric specifications
Thickpaper
CloseBackSelect paper type
Management - Managem. Def set. - Total size 1
Transp-arency
Vellum
Rough
Plain Labels
Recycled
Bond
Preprinted
Cardstock
Colour
Letterhead
Prepunched
High quality
Envelope
Custom 1
Custom 2
Custom 3
Custom 4
Custom 5
Custom 6
Custom 7
Custom 8
With nospecif.
7 Touch the “Close” key.The touch panel will return to the screen in step 1.
NOTE
You can check the copy counts for the paper sizes registered underthe “Total size 1” through “Total size 5” settings on the total size reportthat is printed together with the copy management report. Forinformation on how to print out a copy management report, refer to“Check all departments” on page 7-21.

Section 7 COPIER MANAGEMENT FUNCTIONS
7-37
(7) Making copies when copy management is turned
ON
When copy management is turned ON, copying will only be possiblewhen a valid department ID-code is entered.
IMPORTANT!
Once you are finished copying, BE SURE to press the [Management]key so that the “Enter ID-code” screen is displayed again.
1 Use the numeric keys on the keypad to enter yourdepartment ID-code, and then touch the “Enter” key.The “Basic” screen will be displayed.
Inch specifications
Clear
Enter
Each Mgt. Total
Enter ID-code.
****
Metric specifications
Clear
Enter
Each Mgt. Total
Enter ID-code.
****
NOTES
• If you enter the wrong ID-code, touch the “clear” key and reenter thecorrect ID-code.
• If an invalid (unregistered) department ID-code is entered, an erroralarm will sound. Enter the correct ID-code.
• If you enter your department ID-code and touch the “Each Mgt.Total” key, you can check the copy counts for your own department.
Inch specifications
CloseEach Management Total
Default setting - Management 1st Sales Dept.
Number print.Number in( )is limit value50 30 80
100 100
Copy Printer
Scanner Fax
Total
Scan.Transm. Fax Transm.
Black & White:
Scan # pages: Trsm. # pages:
Commun.Time: 1Hrs 10Mins
Metric specifications
CloseEach Management Total
Default setting - Management 1st Sales Dept.
Number print.Number in( )is limit value50 30 80
100 100
Copy Printer
Scanner Fax
Total
Scan.Transm. Fax transm.
Black & White:
Scan # pages: Trsm. # pages:
Commun.Time: 1Hrs 10Mins
2 Perform the desired copy operation as usual.
3 Once you are finished copying, press the [Management] key.

Section 7 COPIER MANAGEMENT FUNCTIONS
7-38
2. Default settings
The state that the copier enters at the end of warm-up or when the [Reset] key is pressed is called the “initial mode”. The modes, functions and othersettings that are automatically pre-set for the initial mode are called “default settings”. These default settings are separated into two categories:“Copy defaults” and “Machine defaults” and can be changed as desired to suit your copying needs.
(1) Machine default settings
The following table indicates the machine default settings available in this copier. Change any or all of the settings as desired in order to make themost effective use of your copier.
Default setting
Auto drawer[cassette]switching ON/OFF
Paper size(drawer[cassette] No.1 –No.4)
Description
If the paper in one drawer[cassette] runs out duringcopying, the automatic drawer[cassette] switchingfunction will switch paper feed from the emptydrawer[cassette] to another drawer[cassette] thatcontains the same size of paper in the same orientationfor uninterrupted copying. To enable this function, it isnecessary to turn the related setting “On”.
In order to prevent a drawer[cassette] that holds a differenttype of paper from being switched to when the automaticdrawer[cassette] switching function is turned ON, it isnecessary to select “Feed same paper type” as well.
Sets the size of paper that is loaded indrawers[cassettes] No.1 through No.4.If you want the size to be detected automatically, select“Auto Detection” (Automatic size detection). If you wantto manually set the size of paper, select “Standardsizes”.
<If you select “Auto Detection”>You can also select the desired unit of measurement:“Inch” or “Centimeter”.
<If you select “Standard sizes”>You can then select the paper size.
* The setting for drawer[cassette] No.3 and No.4 will onlybe available when the optional Paper Feeder isinstalled on your copier.
Availablesettings
On / Off
All types of paper /Feed same papertype
Auto Detection /Standard sizes
InchCentimeter
A3A4A4RA5RB4B5B5RFolio11 x 178 1/2 x 1411 x 8 1/2
8 1/2 x 115 1/2 x 8 1/2
8 1/2 x 138K16K
Factorysetting
On
All types ofpaper
Auto Detection
Inchspecification:InchMetricspecification:Centimeter
– – –
Referencepage
7-42
7-43

Section 7 COPIER MANAGEMENT FUNCTIONS
7-39
Default setting
Paper type(drawer[cassette] No.1 -No. 4)
Multi-bypass traysettings display ON/OFF
Custom paper type for2-sided copying
Special paper actionsetting
Description
Sets and then displays the type of paper that is loaded indrawers[cassettes] No.1 through No.4.* The setting for drawer[cassette] No.3 and No.4 will only
be available when the optional Paper Feeder isinstalled on your copier.
Turn this setting ON if you want the “Bypass setting”screen to be displayed whenever the “Bypass” key istouched in the “Basic” tab.
Sets whether or not each custom paper type (custom 1 –custom 8) will be available for use in2-sided copying.
-When copying onto prepunched, preprinted or letterheadpaper, and performing both 1-sided copying and 2-sidedcopying from the same drawer[cassette], the positioningof the holes in relation to the copied image may bedifferent for each copy or the front and rear images of 2-sided copies may be copied onto the opposites sides ofthe paper. If you select “Adj. print Direction”, both 1-sidedand 2-sided copies will be created with the sameorientation.Example: Set the paper as shown in the illustration
* When “Adj. print Direction” is selected, the speed of 1-sided copying will be somewhat slower than normal.
* When making copies with “Adj. print Direction”selected, set the paper as shown in illustration A andwith the first image being copied set face-down. (If theoptional Built-in Finisher is installed on your copier, setthe paper as shown in illustration B and with the firstimage being copied set face-down.)
* If the optional Document Finisher or Built-in Finisher isinstalled on your copier and you have selected eitherthe Staple mode or the Hole Punch mode, the directionthat the copy image is created in may not conform tothe desired position of the staples or holes.
Availablesettings
PlainPreprintedRecycledLetterheadColor [Colour]PrepunchedRoughBondHigh qualityVellumCustom 1 –Custom 8
On / Off
On / Off
Adj. print Direction /Speed Priority
Factorysetting
Plain
Off
On
Speed Priority
Referencepage
7-44
7-45
7-46
7-46-1
Setting 1-sided copying 2-sided copying
Adj. print Direction
Speed Priority
Drawer[Cassette]

Section 7 COPIER MANAGEMENT FUNCTIONS
7-40
Default setting
Original set direction
Auto sleep time
Auto low power time
Copy eject location
Fax eject location
Default operation mode
Description
Designates the default setting for the original setdirection.
Sets the amount of time that will elapse before the autosleep function engages.* It is recommended that you try to set a longer time
interval before the auto sleep function engages if youuse the copier frequently, and to a shorter time if thereare long intervals between use.
* For more detailed information on the auto sleepfunction, see page 4-11.
Sets the amount of time that will elapse before the LowPower mode is automatically activated if no operation isperformed on the copier during that time.* For more detailed information on the Low power mode,
see page 4-11.
Sets the location for the ejection of finished copies.* This setting will only be displayed when the optional
Document Finisher, Built-in Finisher or Job Separatoris installed on your copier.
* The available location for ejection will differ dependingupon the optional equipment that is installed on yourcopier.
Sets the location for the ejection of received faxes.* This setting will only be displayed when the optional
Fax Kit and Document Finisher (or the Built-in Finisheror Job Separator) are installed on your copier.
* The available location for ejection will differ dependingupon the optional equipment that is installed on yourcopier.
Sets which operation mode, the copy operation mode orthe fax operation mode, will be selected when the poweris turned on to the copier.
Availablesettings
Rear [Back Edge] /Left top corner
1, 5, 15, 30, 45, 60,90, 120, 180, 240(minutes)
1, 5, 15, 30, 45, 60,90, 120, 180, 240(minutes)
Inner trayJob separatorFinisher trayFinisher main trayFinisher sub tray
Inner trayJob separatorFinisher trayFinisher main trayFinisher sub trayMailbox 1
Copy modeFAX mode
Factorysetting
Rear [BackEdge]
60 (minutes)
15 (minutes)
Inner tray
Inner tray
Copy mode
Referencepage
7-46-2
7-47
7-48
7-49
7-50
7-51
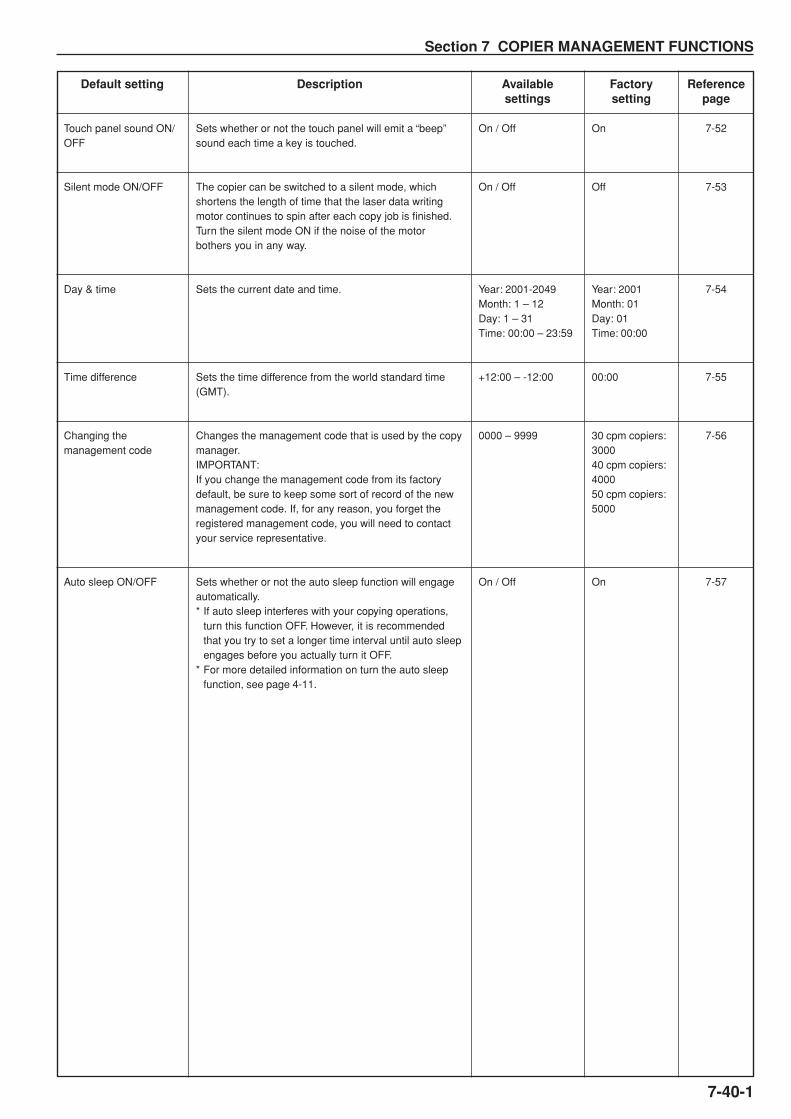
Section 7 COPIER MANAGEMENT FUNCTIONS
Default setting
Touch panel sound ON/OFF
Silent mode ON/OFF
Day & time
Time difference
Changing themanagement code
Auto sleep ON/OFF
Description
Sets whether or not the touch panel will emit a “beep”sound each time a key is touched.
The copier can be switched to a silent mode, whichshortens the length of time that the laser data writingmotor continues to spin after each copy job is finished.Turn the silent mode ON if the noise of the motorbothers you in any way.
Sets the current date and time.
Sets the time difference from the world standard time(GMT).
Changes the management code that is used by the copymanager.IMPORTANT:If you change the management code from its factorydefault, be sure to keep some sort of record of the newmanagement code. If, for any reason, you forget theregistered management code, you will need to contactyour service representative.
Sets whether or not the auto sleep function will engageautomatically.* If auto sleep interferes with your copying operations,
turn this function OFF. However, it is recommendedthat you try to set a longer time interval until auto sleepengages before you actually turn it OFF.
* For more detailed information on turn the auto sleepfunction, see page 4-11.
Availablesettings
On / Off
On / Off
Year: 2001-2049Month: 1 – 12Day: 1 – 31Time: 00:00 – 23:59
+12:00 – -12:00
0000 – 9999
On / Off
Factorysetting
On
Off
Year: 2001Month: 01Day: 01Time: 00:00
00:00
30 cpm copiers:300040 cpm copiers:400050 cpm copiers:5000
On
Referencepage
7-52
7-53
7-54
7-55
7-56
7-57
7-40-1

Section 7 COPIER MANAGEMENT FUNCTIONS
7-40-2
Default setting
Changing the energy-saving mode
Description
Changes the energy-saving mode that will be enteredinto when the [Energy Saver] key is pressed.(See “5. Energy-saving modes” on page 4-11 for moreinformation.)* This setting is displayed when the optional Printer Kit
or Printer/Scanner Kit is installed.If you are using a standard copier, or if the optional FaxKit is installed in your copier, you can press the[Energy Saver] key to engage the Low power mode.
Availablesettings
Low power modeSleep mode
Factorysetting
Low powermode
Referencepage
7-58

Section 7 COPIER MANAGEMENT FUNCTIONS
(2) Accessing the machine default settings
Perform the following procedure when you want to access thescreens for each of the various machine default settings.
1 With the content of the “Basic” tab displayed, press the[Default Setting/Counter] key.The “Default setting”screen will be displayed.
2 Touch the “Machine default” key on the left side of the touchpanel.
Inch specifications
Default setting
Copydefault
Machinedefault
Language Management
End
BOXManagement
Bypasssetting
Document Management
Registerorig. size
Printreport
Countercheck
UserAdjustment
Default setting / Counter
Metric specifications
Default setting
Copydefault
Machinedefault
Language Management
End
Hard DiskManagement
Bypasssetting
Document Management
Registerorig. size
Printreport
Countercheck
UserAdjustment
Default setting / Counter
3 Use the keypad to enter the 4-digit management code.The factory default setting for 30 cpm copiers is “3000”, for40 cpm copiers is “4000” and for 50 cpm copiers is “5000”.
Inch specifications
Enter the administrator number Close
Metric specifications
Enter the administrator number Close
4 If the entered code matched the registered one, the“Machine default” screen will be displayed.
Inch specifications
Machine default
Auto drawer switchingPaper size (1st drawer)Paper size (2nd drawer)Paper size (3rd drawer)Paper size (4th drawer)
On / All types of paper Auto / Inch Auto / Inch Auto / Inch Auto / Inch
Default menu
Down
Change #
Close
Setting mode Up
Default setting
Default setting / Counter
Metric specifications
Machine default
Auto cassette switchingPaper size (1st cassette)Paper size (2nd cassette)Paper size (3rd cassette)Paper size (4th cassette)
On / All types of paperAuto / CentimeterAuto / CentimeterAuto / CentimeterAuto / Centimeter
Up
Down
Change #
Close
Default setting
Default menu Setting mode
Default setting / Counter
NOTES
• It is possible for you to change the 4-digit management code.(See “Changing the management code” on page 7-56.)
• Refer to the desired procedure(s) explained under “(3) Makingmachine default settings” and perform the corresponding setting(s).
7-41

Section 7 COPIER MANAGEMENT FUNCTIONS
(3) Making machine default settings
Perform the following procedure that corresponds to the desiredsetting.
● Auto drawer[cassette] switching ON/OFF
Perform the following procedure to turn automatic drawer[cassette]switching ON or OFF, as desired.
1 Display the “Machine default” screen.(See “(2) Accessing the machine default settings” onpage 7-41.)
Inch specifications
Default setting
Copydefault
Machinedefault
Language Management
End
BOXManagement
Bypasssetting
Document Management
Registerorig. size
Printreport
Countercheck
UserAdjustment
Default setting / Counter
Metric specifications
Default setting
Copydefault
Machinedefault
Language Management
End
Hard DiskManagement
Bypasssetting
Document Management
Registerorig. size
Printreport
Countercheck
UserAdjustment
Default setting / Counter
2 Select “Auto drawer switching” [“Auto cassette switching”] inthe settings list on the left side of the touch panel and thentouch the “Change #” key.The “Auto drawer switching” [“Autocassette switching”] screen will be displayed.
Inch specifications
Machine default
Auto drawer switchingPaper size (1st drawer)Paper size (2nd drawer)Paper size (3rd drawer)Paper size (4th drawer)
On / All types of paper Auto / Inch Auto / Inch Auto / Inch Auto / Inch
Default menu
Down
Change #
Close
Setting mode Up
Default setting
Default setting / Counter
Metric specifications
Machine default
Auto cassette switchingPaper size (1st cassette)Paper size (2nd cassette)Paper size (3rd cassette)Paper size (4th cassette)
On / All types of paperAuto / CentimeterAuto / CentimeterAuto / CentimeterAuto / Centimeter
Up
Down
Change #
Close
Default setting
Default menu Setting mode
Default setting / Counter
3 Touch the “On” key to automatic drawer[cassette] switchingON.
Inch specifications
Auto drawer switching Back Close
When paper drawer is empty, switch to another one,set same size/direction paper, and continue copying.
All typesof paper
Feed samepaper type
Default setting - Machine default
Function Paper type
Off
On
Metric specifications
Auto cassette switching
When paper cassette is empty, switch to another one,set same size/direction paper, and continue copying.
Default setting - Machine default
Back Close
Function Paper type
All typesof PaperFeed samepaper typeOff
On
4 In order to prevent a drawer[cassette] that holds a differenttype of paper from being switched to when the automaticdrawer[cassette] switching function is turned ON, touch the“Feed same paper type” key under “Paper type”.
NOTE
If you want to quit the displayed setting without changing it, touch the“Back” key. The touch panel will return to the screen in step 2.
5 Touch the “Close” key. The touch panel will return to thescreen in step 2.
6 Touch the “Close” key once again. The touch panel will returnto the “Default setting”screen.
7 Touch the “End” key. The touch panel will return to thecontents of the “Basic” tab.
7-42

Section 7 COPIER MANAGEMENT FUNCTIONS
● Paper size (drawer[cassette] No.1 – No.4)
Perform the following procedure to set the size of paper that is loadedin drawer[cassette] No.1 through No.4.
1 Display the “Machine default” screen.(See “(2) Accessing the machine default settings” onpage 7-41.)
Inch specifications
Default setting
Copydefault
Machinedefault
Language Management
End
BOXManagement
Bypasssetting
Document Management
Registerorig. size
Printreport
Countercheck
UserAdjustment
Default setting / Counter
Metric specifications
Default setting
Copydefault
Machinedefault
Language Management
End
Hard DiskManagement
Bypasssetting
Document Management
Registerorig. size
Printreport
Countercheck
UserAdjustment
Default setting / Counter
2 Select one of the “Paper size” settings(“1st drawer[cassette]” through “4th drawer[cassette]”) in thesettings list on the left side of the touch panel and then touchthe “Change #” key.The screen to set the paper size for that drawer[cassette] willbe displayed.
Inch specifications
Machine default
Auto drawer switchingPaper size (1st drawer)Paper size (2nd drawer)Paper size (3rd drawer)Paper size (4th drawer)
On / All types of paper Auto / Inch Auto / Inch Auto / Inch Auto / Inch
Default menu
Down
Change #
Close
Setting mode Up
Default setting
Default setting / Counter
Metric specifications
Machine default
Auto cassette switchingPaper size (1st cassette)Paper size (2nd cassette)Paper size (3rd cassette)Paper size (4th cassette)
On / All types of paperAuto / CentimeterAuto / CentimeterAuto / CentimeterAuto / Centimeter
Up
Down
Change #
Close
Default setting
Default menu Setting mode
Default setting / Counter
3 If you select “Auto Detection” (automatic size detection) here,select the desired unit of measure (“Centimeter” or “Inch”) aswell.If you select “Standard sizes” (standard paper size) here,simply touch the key that corresponds to the size of paperthat is loaded in that drawer[cassette].
Inch specifications
Paper type(1st drawer)
Select paper size.
Default setting - Machine default
A3 B4
B5
B5
11x17"
81/2x14"
51/2x81/2"
81/2x13"
11x81/2"
81/2x11"
8K
16K
A4
A5 Folio
A4AutoDetection
Standardsizes
Back Close
Metric specifications
Paper size (1st cassette)
Select paper size.
Default setting - Machine default
A3 B4
B5
B5
11x17"
81/2x14"
51/2x81/2"
81/2x13"
11x81/2"
81/2x11"
A4
A5 Folio
A4
Back Close
AutoDetection
Standardsizes
8K
16K
NOTES
• If you want to quit the displayed setting without changing it, touchthe “Back” key. The touch panel will return to the screen in step 2.
• The setting for drawer[cassette] No.3 and No.4 will only be availablewhen the optional Paper Feeder is installed on your copier.
4 Touch the “Close” key. The touch panel will return to thescreen in step 2.
5 Touch the “Close” key once again. The touch panel will returnto the “Default setting”screen.
6 Touch the “End” key. The touch panel will return to thecontents of the “Basic” tab.
7-43

Section 7 COPIER MANAGEMENT FUNCTIONS
● Paper type (drawer[cassette] No.1 - No. 4)
Perform the following procedure to set the type of paper that is loadedin drawers[cassettes] No.1 through No.4.
1 Display the “Machine default” screen.(See “(2) Accessing the machine default settings” onpage 7-41.)
Inch specifications
Default setting
Copydefault
Machinedefault
Language Management
End
BOXManagement
Bypasssetting
Document Management
Registerorig. size
Printreport
Countercheck
UserAdjustment
Default setting / Counter
Metric specifications
Default setting
Copydefault
Machinedefault
Language Management
End
Hard DiskManagement
Bypasssetting
Document Management
Registerorig. size
Printreport
Countercheck
UserAdjustment
Default setting / Counter
2 Select one of the “Paper type” settings(“1st drawer[cassette]” through “4th drawer[cassette]”) in thesettings list on the left side of the touch panel and then touchthe “Change #” key.The screen to set the paper type for that drawer[cassette] willbe displayed.
Inch specifications
Machine default
Paper type (1st drawer)Paper type (2nd drawer)Paper type (3rd drawer)Paper type (4th drawer)Check bypass sizing
Default menu
PlainPlainPlainPlainOff
Setting mode Up
Down
Change #
Close
Default setting
Default setting / Counter
Metric specifications
Machine default
Paper type (1st cassette)Paper type (2nd cassette)Paper type (3rd cassette)Paper type (4th cassette)Check bypass sizing
PlainPlainPlainPlainOff
Up
Down
Change #
Close
Default setting
Default menu Setting mode
Default setting / Counter
3 Touch the key that corresponds to the type of paper that isloaded in that drawer[cassette].
Inch specifications
Select and display paper type.
Preprinted
Plain
Recycled
Letterhead
Prepunched
ColorHighquality
Rough
Bond
Custom 2
Custom 1
Custom 3
Custom 4
Custom 6
Custom 5
Custom 7
Custom 8
Paper type(1st drawer)
Default setting - Machine default
Back Close
Vellum
Metric specifications
Paper type (1st cassette)
Select and display paper type.
Default setting - Machine default
Back Close
Preprinted
Plain
Recycled
Letterhead
Prepunched
Colour
Rough
Bond
Custom 2
Custom 1
Custom 3
Custom 4
Custom 6
Custom 5
Custom 7
Custom 8
Highquality
Vellum
NOTES
• If you want to quit the displayed setting without changing it, touchthe “Back” key. The touch panel will return to the screen in step 2.
• The setting for drawer[cassette] No.3 and No.4 will only be availablewhen the optional Paper Feeder is installed on your copier.
4 Touch the “Close” key. The touch panel will return to thescreen in step 2.
5 Touch the “Close” key once again. The touch panel will returnto the “Default setting”screen.
6 Touch the “End” key. The touch panel will return to thecontents of the “Basic” tab.
7-44

Section 7 COPIER MANAGEMENT FUNCTIONS
7-45
● Multi-bypass tray settings display ON/OFF
Perform the following procedure to have the “Bypass setting” screenappear whenever the “Bypass” key is pressed in the “Basic” tab.
1 Display the “Machine default” screen.(See “(2) Accessing the machine default settings” onpage 7-41.)
Inch specifications
Default setting
Copydefault
Machinedefault
Language Management
End
BOXManagement
Bypasssetting
Document Management
Registerorig. size
Printreport
Countercheck
UserAdjustment
Default setting / Counter
Metric specifications
Default setting
Copydefault
Machinedefault
Language Management
End
Hard DiskManagement
Bypasssetting
Document Management
Registerorig. size
Printreport
Countercheck
UserAdjustment
Default setting / Counter
2 Select “Check bypass sizing” in the settings list on the leftside of the touch panel and then touch the “Change #” key.The “Check bypass sizing” screen will be displayed.
Inch specifications
Machine default
Paper type (1st drawer)Paper type (2nd drawer)Paper type (3rd drawer)Paper type (4th drawer)Check bypass sizing
Default menu
PlainPlainPlainPlainOff
Setting mode Up
Down
Change #
Close
Default setting
Default setting / Counter
Metric specifications
Machine default
Paper type (1st cassette)Paper type (2nd cassette)Paper type (3rd cassette)Paper type (4th cassette)Check bypass sizing
PlainPlainPlainPlainOff
Up
Down
Change #
Close
Default setting
Default menu Setting mode
Default setting / Counter
3 Touch the “On” key if you want to have the “Bypass setting”screen appear.
Inch specifications
Check bypass sizing
Display and check bypass setting mode when selecting.Select "On" when using custom size or changing paper type.
On
Off
Back Close
Default setting - Machine default
Metric specifications
Check bypass sizing
Display and check bypass setting mode when selecting.Select "On" when using custom size or changing paper type.
Default setting - Machine default
On
Off
Back Close
NOTE
If you want to quit the displayed setting without changing it, touch the“Back” key. The touch panel will return to the screen in step 2.
4 Touch the “Close” key. The touch panel will return to thescreen in step 2.
5 Touch the “Close” key once again. The touch panel will returnto the “Default setting” screen.
6 Touch the “End” key. The touch panel will return to thecontents of the “Basic” tab.

Section 7 COPIER MANAGEMENT FUNCTIONS
● Custom paper type for 2-sided copying
Perform the following procedure to set whether or not each customtype of paper (custom 1 - custom 8) will be available for use in 2-sidedcopying.
1 Display the “Machine default” screen.(See “(2) Accessing the machine default settings” onpage 7-41.)
Inch specifications
Default setting
Copydefault
Machinedefault
Language Management
End
BOXManagement
Bypasssetting
Document Management
Registerorig. size
Printreport
Countercheck
UserAdjustment
Default setting / Counter
Metric specifications
Default setting
Copydefault
Machinedefault
Language Management
End
Hard DiskManagement
Bypasssetting
Document Management
Registerorig. size
Printreport
Countercheck
UserAdjustment
Default setting / Counter
2 Select “Select paper type (2sided)” in the settings list on theleft side of the touch panel and then touch the “Change #”key.The “Select paper type (2sided)” screen will be displayed.
Inch specifications
Machine default
Paper type (2nd drawer)Paper type (3rd drawer)Paper type (4th drawer)Check bypass sizingSelect paper type (2sided)
Default menu
PlainPlainPlainOff
Setting mode Up
Down
Change #
Close
Default setting
Default setting / Counter
Metric specifications
Machine default
Paper type (2nd cassette)Paper type (3rd cassette)Paper type (4th cassette)Check bypass sizingSelect paper type (2sided)
PlainPlainPlainOff
Up
Down
Change #
Close
Default setting
Default menu Setting mode
Default setting / Counter
3 Select one of the “custom” paper type settings (“Custom 1”through “Custom 8”) under the “Default menu” column on theleft side of the touch panel and then touch the “Change #”key.
Inch specifications
Custom 1Custom 2Custom 3Custom 4Custom 5Custom 6Custom 7
OnOnOnOnOnOnOn
Default menu Setting mode
Change #
Select paper type(2sided) Close
Default setting - Machine default
Select paper type(s) for duplex copy.
Up
Down
Metric specifications
Custom 1Custom 2Custom 3Custom 4Custom 5Custom 6Custom 7
OnOnOnOnOnOnOn
Default menu Setting mode
Change #
Select paper type(2sided) Close
Default setting - Machine default
Select paper type(s) for duplex copy.
Up
Down
4 Touch the “Off” key if you do NOT want that custom papertype to be available for use in 2-sided copying.
Inch specifications
Custom 1 Back Close
Default setting - Machine default - Select paper type (2sided)
Off
On
Metric specifications
Custom 1 Back Close
Default setting - Machine default - Select paper type (2sided)
Off
On
NOTE
If you want to quit the displayed setting without changing it, touch the“Back” key. The touch panel will return to the screen in step 3.
5 Touch the “Close” key. The touch panel will return to thescreen in step 3.
6 Touch the “Close” key. The touch panel will return to thescreen in step 2.
7 Touch the “Close” key. The touch panel will return to the“Default setting”screen.
8 Touch the “End” key. The touch panel will return to thecontents of the “Basic” tab.
7-46

Section 7 COPIER MANAGEMENT FUNCTIONS
7-46-1
● Special paper action setting
When copying onto prepunched, preprinted or letterhead paper, andperforming both 1-sided copying and 2-sided copying from the samedrawer[cassette], the positioning of the holes in relation to the copiedimage may be different for each copy or the front and rear images of2-sided copies may be copied onto the opposites sides of the paper. Ifyou select “Adj. print Direction”, both 1-sided and 2-sided copies willbe created with the same orientation.
1 Display the “Machine default” screen.(See “(2) Accessing the machine default settings” onpage 7-41.)
Inch specifications
Default setting
Copydefault
Machinedefault
Language Management
End
BOXManagement
Bypasssetting
Document Management
Registerorig. size
Printreport
Countercheck
UserAdjustment
Default setting / Counter
Metric specifications
Default setting
Copydefault
Machinedefault
Language Management
End
Hard DiskManagement
Bypasssetting
Document Management
Registerorig. size
Printreport
Countercheck
UserAdjustment
Default setting / Counter
2 Select “Special paper action mode” [“Specif. paper actionmode”] in the settings list on the left side of the touch paneland then touch the “Change #” key.The “Special paper action mode” [“Specif. paper actionmode”] screen will be displayed.
Inch specifications
Machine default
Paper type (3rd drawer)Paper type (4th drawer)Check bypass sizingSelect paper type (2sided)Special paper action mode
Default menu
PlainPlainOff
Speed priority
Setting mode Up
Down
Change #
Close
Default setting
Default setting / Counter
Metric specifications
Machine default
Paper type (3rd cassette)Paper type (4th cassette)Check bypass sizingSelect paper type (2sided)Specif. paper action mode
PlainPlainOff
Speed priority
Up
Down
Change #
Close
Default setting
Default menu Setting mode
Default setting / Counter
3 Select “Adj. print Direction”.
Inch specifications
Special paper action mode
Possible to set action of the paper (Prepunched, Preprinted, Letterhead)
SpeedPriority
Back Close
Default setting - Machine default
Adj. printDirection
Metric specifications
Specif. paper action mode
Possible to set action of the paper (Prepunched, Preprinted, Letterhead)
SpeedPriority
Back Close
Default setting - Machine default
Adj. printDirection
NOTES
• When “Adj. print Direction” is selected, the speed of 1-sided copyingwill be somewhat slower than normal.
• If you want to quit the displayed setting without changing it, touchthe “Back” key. The touch panel will return to the screen in step 2.
4 Touch the “Close” key. The touch panel will return to thescreen in step 2.
5 Touch the “Close” key once again. The touch panel will returnto the “Default setting” screen.
6 Touch the “End” key. The touch panel will return to thecontents of the “Basic” tab.

Section 7 COPIER MANAGEMENT FUNCTIONS
● Original set direction
Perform the following procedure to designate the default setting forthe original set direction.
1 Display the “Machine default” screen.(See “(2) Accessing the machine default settings” onpage 7-41.)
Inch specifications
Default setting
Copydefault
Machinedefault
Language Management
End
BOXManagement
Bypasssetting
Document Management
Registerorig. size
Printreport
Countercheck
UserAdjustment
Default setting / Counter
Metric specifications
Default setting
Copydefault
Machinedefault
Language Management
End
Hard DiskManagement
Bypasssetting
Document Management
Registerorig. size
Printreport
Countercheck
UserAdjustment
Default setting / Counter
2 Select “Orig. set direction” in the settings list on the left sideof the touch panel and then touch the “Change #” key.The “Orig. set direction” screen will be displayed.
Inch specifications
Machine default
Paper type (4th drawer)Check bypass sizingSelect paper type (2sided)Special paper action modeOrig. set direction
Default menu
PlainOff
Speed priorityRear
Setting mode Up
Down
Change #
Close
Default setting
Default setting / Counter
Metric specifications
Machine default
Paper type (4th cassette)Check bypass sizingSelect paper type (2sided)Specif. paper action modeOrig. set direction
PlainOff
Speed priorityBack Edge
Up
Down
Change #
Close
Default setting
Default menu Setting mode
Default setting / Counter
3 Select either “Rear” [“Back Edge”] or “Left top corner”.
Inch specifications
Orig. set direction Back Close
Default setting - Machine default
Select default mode for Original set direction.Rear or Left top corner.
Left topcorner
Rear
Metric specifications
Orig. set direction Back Close
Default setting - Machine default
Select default mode for Original set direction.Back Edge or Left top corner.
Left topcorner
Back Edge
NOTE
If you want to quit the displayed setting without changing it, touch the“Back” key. The touch panel will return to the screen in step 2.
4 Touch the “Close” key. The touch panel will return to thescreen in step 2.
5 Touch the “Close” key once again. The touch panel will returnto the “Default setting” screen.
6 Touch the “End” key. The touch panel will return to thecontents of the “Basic” tab.
7-46-2

Section 7 COPIER MANAGEMENT FUNCTIONS
● Auto sleep time
Perform the following procedure to set the amount of time that willelapse before the auto sleep function engages.
1 Display the “Machine default” screen.(See “(2) Accessing the machine default settings” onpage 7-41.)
Inch specifications
Default setting
Copydefault
Machinedefault
Language Management
End
BOXManagement
Bypasssetting
Document Management
Registerorig. size
Printreport
Countercheck
UserAdjustment
Default setting / Counter
Metric specifications
Default setting
Copydefault
Machinedefault
Language Management
End
Hard DiskManagement
Bypasssetting
Document Management
Registerorig. size
Printreport
Countercheck
UserAdjustment
Default setting / Counter
2 Select “Sleep mode changing time” in the settings list on theleft side of the touch panel and then touch the “Change #”key.The “Sleep mode changing time” screen will be displayed.
Inch specifications
Machine default Close
Default setting
Sleep mode changing timeLow power mode chng. timeSelect Copy output modeSelect FAX output modeSelect the main mode
60 Minute15 MinuteInner trayInner trayCopy mode
Default menu
Down
Change #
Setting mode Up
Default setting / Counter
Metric specifications
Machine default
Sleep mode changing timeLow power mode chng. timeSelect COPY output modeSelect FAX output modeSelect main mode
60 Minute15 MinuteInner trayInner trayCOPY Mode
Up
Down
Change #
Close
Default setting
Default menu Setting mode
Default setting / Counter
3 Touch the “+” key or the “–” key to change the displayed timeto the desired setting (between 1 minutes and 240 minutes).
Inch specifications
Set Changing time to turn automatically into sleep modeafter last setting,or when copying is done.
Sleep mode changing time
Default setting - Machine default
Minute
+–
Back Close
Metric specifications
Set Changing time to turn automatically into sleep modeafter last setting,or when copying is done.
BackSleep mode changing time
Default setting - Machine default
Minute
Close
NOTES
• The setting can be made to 1 minute, 5 minutes, 15 minutes, 30minutes, 45 minutes, 60 minutes, 90 minutes, 120 minutes, 180minutes or 240 minutes.
• It is recommended that you try to set a longer time interval beforethe auto sleep function engages if you use the copier frequently, andto a shorter time if there are long intervals between use.
• If you want to quit the displayed setting without changing it, touchthe “Back” key. The touch panel will return to the screen in step 2.
4 Touch the “Close” key. The touch panel will return to thescreen in step 2.
5 Touch the “Close” key once again. The touch panel will returnto the “Default setting”screen.
6 Touch the “End” key. The touch panel will return to thecontents of the “Basic” tab.
7-47

Section 7 COPIER MANAGEMENT FUNCTIONS
7-48
● Auto low power time
Perform the following procedure to set the amount of time that willelapse before the auto low power function automatically engages andputs the copier in the Low power mode if no operation has beenperformed on the copier during that time.
1 Display the “Machine default” screen.(See “(2) Accessing the machine default settings” onpage 7-41.)
Inch specifications
Default setting
Copydefault
Machinedefault
Language Management
End
BOXManagement
Bypasssetting
Document Management
Registerorig. size
Printreport
Countercheck
UserAdjustment
Default setting / Counter
Metric specifications
Default setting
Copydefault
Machinedefault
Language Management
End
Hard DiskManagement
Bypasssetting
Document Management
Registerorig. size
Printreport
Countercheck
UserAdjustment
Default setting / Counter
2 Select “Low power mode chng. time” in the settings list on theleft side of the touch panel and then touch the “Change #”key.The “Auto preheat time” screen will be displayed.
Inch specifications
Machine default Close
Default setting
Sleep mode changing timeLow power mode chng. timeSelect Copy output modeSelect FAX output modeSelect the main mode
60 Minute15 MinuteInner trayInner trayCopy mode
Default menu
Down
Change #
Setting mode Up
Default setting / Counter
Metric specifications
Machine default
Sleep mode changing timeLow power mode chng. timeSelect COPY output modeSelect FAX output modeSelect main mode
60 Minute15 MinuteInner trayInner trayCOPY Mode
Up
Down
Change #
Close
Default setting
Default menu Setting mode
Default setting / Counter
3 Touch the “+” key or the “–” key to change the displayed timeto that desired (any available setting between 1 minute and240 minutes).
Inch specifications
Low power mode chng. time
Set Changing time to turn autom. into low power modeafter last setting,or when copying is done.
Default setting - Machine default
Minute
Back Close
+–
Metric specifications
Set Changing time to turn autom. into low power modeafter last setting,or when copying is done.
Back CloseLow power mode chng. time
Default setting - Machine default
Minute
NOTES
• The setting can be made to 1 minute, 5 minutes, 15 minutes, 30minutes, 45 minutes, 60 minutes, 90 minutes, 120 minutes, 180minutes or 240 minutes.
• If you want to quit the displayed setting without changing it, touchthe “Back” key. The touch panel will return to the screen in step 2.
4 Touch the “Close” key. The touch panel will return to thescreen in step 2.
5 Touch the “Close” key once again. The touch panel will returnto the “Default setting”screen.
6 Touch the “End” key. The touch panel will return to thecontents of the “Basic” tab.

Section 7 COPIER MANAGEMENT FUNCTIONS
7-49
● Copy eject location
Perform the following procedure to set where finished copies will beejected.
NOTE
This setting will only be displayed when the optional DocumentFinisher, Built-in Finisher or Job Separator is installed on your copier.
1 Display the “Machine default” screen.(See “(2) Accessing the machine default settings” onpage 7-41.)
Inch specifications
Default setting
Copydefault
Machinedefault
Language Management
End
BOXManagement
Bypasssetting
Document Management
Registerorig. size
Printreport
Countercheck
UserAdjustment
Default setting / Counter
Metric specifications
Default setting
Copydefault
Machinedefault
Language Management
End
Hard DiskManagement
Bypasssetting
Document Management
Registerorig. size
Printreport
Countercheck
UserAdjustment
Default setting / Counter
2 Select “Select Copy output mode” in the settings list on theleft side of the touch panel and then touch the “Change #”key.The “Select Copy output mode” screen will be displayed.
Inch specifications
Machine default Close
Default setting
Sleep mode changing timeLow power mode chng. timeSelect Copy output modeSelect FAX output modeSelect the main mode
60 Minute15 MinuteInner trayInner trayCopy mode
Default menu
Down
Change #
Setting mode Up
Default setting / Counter
Metric specifications
Machine default
Sleep mode changing timeLow power mode chng. timeSelect COPY output modeSelect FAX output modeSelect main mode
60 Minute15 MinuteInner trayInner trayCOPY Mode
Up
Down
Change #
Close
Default setting
Default menu Setting mode
Default setting / Counter
3 Touch the key that corresponds to the desired location.
Inch specifications
Select Copy output mode Back Close
Default setting - Machine default
Set the default copy output destination
Finishermain tray
Jobseparator
Inner tray
Finishersub tray
Metric specifications
Select COPY output mode
Set the default copy output destination.
Default setting - Machine default
Back Close
Finishermain tray
Jobseparator
Inner tray
Finishersub tray
NOTES
• The available location for ejection will differ depending upon theoptional equipment that is installed on your copier.
• If you want to quit the displayed setting without changing it, touchthe “Back” key. The touch panel will return to the screen in step 2.
4 Touch the “Close” key. The touch panel will return to thescreen in step 2.
5 Touch the “Close” key once again. The touch panel will returnto the “Default setting”screen.
6 Touch the “End” key. The touch panel will return to thecontents of the “Basic” tab.

Section 7 COPIER MANAGEMENT FUNCTIONS
7-50
● Fax eject location
Perform the following procedure to set where incoming faxes will beejected.
NOTE
This setting will only be displayed when the optional Fax Kit andDocument Finisher (or the Built-in Finisher or Job Separator) areinstalled on your copier.
1 Display the “Machine default” screen.(See “(2) Accessing the machine default settings” onpage 7-41.)
Inch specifications
Default setting
Copydefault
Machinedefault
Language Management
End
BOXManagement
Bypasssetting
Document Management
Registerorig. size
Printreport
Countercheck
UserAdjustment
Default setting / Counter
Metric specifications
Default setting
Copydefault
Machinedefault
Language Management
End
Hard DiskManagement
Bypasssetting
Document Management
Registerorig. size
Printreport
Countercheck
UserAdjustment
Default setting / Counter
2 Select “Select FAX output mode” in the settings list on the leftside of the touch panel and then touch the “Change #” key.The “Select FAX output mode” screen will be displayed.
Inch specifications
Machine default Close
Default setting
Sleep mode changing timeLow power mode chng. timeSelect Copy output modeSelect FAX output modeSelect the main mode
60 Minute15 MinuteInner trayInner trayCopy mode
Default menu
Down
Change #
Setting mode Up
Default setting / Counter
Metric specifications
Machine default
Sleep mode changing timeLow power mode chng. timeSelect COPY output modeSelect FAX output modeSelect main mode
60 Minute15 MinuteInner trayInner trayCOPY Mode
Up
Down
Change #
Close
Default setting
Default menu Setting mode
Default setting / Counter
3 Touch the key that corresponds to the desired location.
Inch specifications
Select FAX output mode Back Close
Default setting - Machine default
Set the default fax output destination
Finishersub tray
Jobseparator
Inner tray
MailBox 1
Metric specifications
Select FAX output mode
Set the default fax output destination.
Default setting - Machine default
Back Close
Finishersub tray
Jobseparator
Inner tray
Mailbox 1
NOTES
• The available location for ejection will differ depending upon theoptional equipment that is installed on your copier.
• If you want to quit the displayed setting without changing it, touchthe “Back” key. The touch panel will return to the screen in step 2.
4 Touch the “Close” key. The touch panel will return to thescreen in step 2.
5 Touch the “Close” key once again. The touch panel will returnto the “Default setting”screen.
6 Touch the “End” key. The touch panel will return to thecontents of the “Basic” tab.

Section 7 COPIER MANAGEMENT FUNCTIONS
7-51
● Default operation mode
Perform the following procedure to set whether the display thatappears after power is turned on to the copier will be the one for thecopy operation mode or for the fax operation mode.
NOTE
This setting is only available when the optional Fax Kit is installed inyour copier.
1 Display the “Machine default” screen.(See “(2) Accessing the machine default settings” onpage 7-41.)
Inch specifications
Default setting
Copydefault
Machinedefault
Language Management
End
BOXManagement
Bypasssetting
Document Management
Registerorig. size
Printreport
Countercheck
UserAdjustment
Default setting / Counter
Metric specifications
Default setting
Copydefault
Machinedefault
Language Management
End
Hard DiskManagement
Bypasssetting
Document Management
Registerorig. size
Printreport
Countercheck
UserAdjustment
Default setting / Counter
2 Select “Select the main mode” [“Select main mode”] in thesettings list on the left side of the touch panel and then touchthe “Change #” key.The “Select the main mode” [“Select main mode”] screen willbe displayed.
Inch specifications
Machine default Close
Default setting
Sleep mode changing timeLow power mode chng. timeSelect Copy output modeSelect FAX output modeSelect the main mode
60 Minute15 MinuteInner trayInner trayCopy mode
Default menu
Down
Change #
Setting mode Up
Default setting / Counter
Metric specifications
Machine default
Sleep mode changing timeLow power mode chng. timeSelect COPY output modeSelect FAX output modeSelect main mode
60 Minute15 MinuteInner trayInner trayCOPY Mode
Up
Down
Change #
Close
Default setting
Default menu Setting mode
Default setting / Counter
3 Select the "Copy mode" key or the "FAX mode" key, asappropriate.
Inch specifications
Select the main mode Back Close
Default setting - Machine default
Select the default display panel modewhen the power is on.
FAX mode
Copy mode
Metric specifications
Select main mode Back Close
Default setting - Machine default
Select the default display panel modewhen the power is on.
FAX mode
COPY Mode
NOTE
If you want to quit the displayed setting without changing it, touch the“Back” key. The touch panel will return to the screen in step 2.
4 Touch the “Close” key. The touch panel will return to thescreen in step 2.
5 Touch the “Close” key once again. The touch panel will returnto the “Default setting”screen.
6 Touch the “End” key. The touch panel will return to thecontents of the “Basic” tab.

Section 7 COPIER MANAGEMENT FUNCTIONS
7-52
● Touch panel sound ON/OFF
Perform the following procedure to set whether or not the touch panelwill emit a “beep” sound each time a key is touched. Select “Off” if youwant to turn the sound OFF.
1 Display the “Machine default” screen.(See “(2) Accessing the machine default settings” onpage 7-41.)
Inch specifications
Default setting
Copydefault
Machinedefault
Language Management
End
BOXManagement
Bypasssetting
Document Management
Registerorig. size
Printreport
Countercheck
UserAdjustment
Default setting / Counter
Metric specifications
Default setting
Copydefault
Machinedefault
Language Management
End
Hard DiskManagement
Bypasssetting
Document Management
Registerorig. size
Printreport
Countercheck
UserAdjustment
Default setting / Counter
2 Select “Key sound ON/OFF” in the settings list on the leftside of the touch panel and then touch the “Change #” key.The “Key sound ON/OFF” screen will be displayed.
Inch specifications
Key sound ON/OFFSilent modeDate/TimeTime differenceManagement code change
Default setting / Counter
OnOn2001/10/30 14:02GMT+08:005000
Default menu
Down
Change #
Setting mode Up
Machine default Close
Metric specifications
Machine default
Key sound ON/OFFSilent modeDate/TimeTime differenceChange MGMT code with #
OnOff30/10/'01 14:02GMT+08:005000
Up
Down
Change #
Close
Default setting
Default menu Setting mode
Default setting / Counter
3 Touch the “On” key or the “Off” key to turn the sound on thetouch panel ON or OFF, as desired.
Inch specifications
Key sound ON/OFF
Select panel key sound mode off/on.
On
Off
Back Close
Default setting - Machine default
Metric specifications
Key sound ON/OFF
Select panel key sound mode off/on.
Default setting - Machine default
On
Off
Back Close
NOTE
If you want to quit the displayed setting without changing it, touch the“Back” key. The touch panel will return to the screen in step 2.
4 Touch the “Close” key. The touch panel will return to thescreen in step 2.
5 Touch the “Close” key once again. The touch panel will returnto the “Default setting” screen.
6 Touch the “End” key. The touch panel will return to thecontents of the “Basic” tab.

Section 7 COPIER MANAGEMENT FUNCTIONS
7-53
● Silent mode ON/OFF
Perform the following procedure to set whether or not to use the silentmode which shortens the length of time that the laser data writingmotor continues to spin after each copy job is finished. Turn the silentmode ON if the noise of the motor bothers you in any way.
1 Display the “Machine default” screen.(See “(2) Accessing the machine default settings” onpage 7-41.)
Inch specifications
Default setting
Copydefault
Machinedefault
Language Management
End
BOXManagement
Bypasssetting
Document Management
Registerorig. size
Printreport
Countercheck
UserAdjustment
Default setting / Counter
Metric specifications
Default setting
Copydefault
Machinedefault
Language Management
End
Hard DiskManagement
Bypasssetting
Document Management
Registerorig. size
Printreport
Countercheck
UserAdjustment
Default setting / Counter
2 Select “Silent mode” in the settings list on the left side of thetouch panel and then touch the “Change #” key.The “Silent mode” screen will be displayed.
Inch specifications
Key sound ON/OFFSilent modeDate/TimeTime differenceManagement code change
Default setting / Counter
OnOn2001/10/30 14:02GMT+08:005000
Default menu
Down
Change #
Setting mode Up
Machine default Close
Metric specifications
Machine default
Key sound ON/OFFSilent modeDate/TimeTime differenceChange MGMT code with #
OnOff30/10/'01 14:02GMT+08:005000
Up
Down
Change #
Close
Default setting
Default menu Setting mode
Default setting / Counter
3 Touch the “On” key if you want to use the silent mode.
Inch specifications
Use this mode i f you are distracted by moter sounds.
Default setting - Machine default
Silent mode
Off
On
Back Close
Metric specifications
Silent mode
Shorten laser motor rotating time for before/after copyingUse this mode if you are distracted by motor sound.
Default setting - Machine default
Back Close
Off
On
NOTE
If you want to quit the displayed setting without changing it, touch the“Back” key. The touch panel will return to the screen in step 2.
4 Touch the “Close” key. The touch panel will return to thescreen in step 2.
5 Touch the “Close” key once again. The touch panel will returnto the “Default setting”screen.
6 Touch the “End” key. The touch panel will return to thecontents of the “Basic” tab.

Section 7 COPIER MANAGEMENT FUNCTIONS
7-54
● Day & time
Perform the following procedure to set the current date and time.
NOTE
BE SURE to perform the “Time difference” setting prior to setting theday and time.
1 Display the “Machine default” screen.(See “(2) Accessing the machine default settings” onpage 7-41.)
Inch specifications
Default setting
Copydefault
Machinedefault
Language Management
End
BOXManagement
Bypasssetting
Document Management
Registerorig. size
Printreport
Countercheck
UserAdjustment
Default setting / Counter
Metric specifications
Default setting
Copydefault
Machinedefault
Language Management
End
Hard DiskManagement
Bypasssetting
Document Management
Registerorig. size
Printreport
Countercheck
UserAdjustment
Default setting / Counter
2 Select “Date/Time” in the settings list on the left side of thetouch panel and then touch the “Change #” key.The “Date/Time” screen will be displayed.
Inch specifications
Key sound ON/OFFSilent modeDate/TimeTime differenceManagement code change
Default setting / Counter
OnOn2001/10/30 14:02GMT+08:005000
Default menu
Down
Change #
Setting mode Up
Machine default Close
Metric specifications
Machine default
Key sound ON/OFFSilent modeDate/TimeTime differenceChange MGMT code with #
OnOff30/10/'01 14:02GMT+08:005000
Up
Down
Change #
Close
Default setting
Default menu Setting mode
Default setting / Counter
3 Touch the “+” key or the “–” key to change the displayedinformation for each field (“Year”, “Month”, “Day” and “Time”)to the current time and date.If you want the time to be automatically calculated fordaylight savings time, touch the “On” key under“Summertime”.
Inch specifications
Date/Time
2001
10
16
18:27
Summertime
Off
On
Default setting - Machine default
Back Close
Year
Month
Day
Time
Metric specifications
Date/Time Back Close
Year
Month
Day
Time
2001
10
16
18:27
Summertime
Off
On
Default setting - Machine default
NOTE
If you want to quit the displayed setting without changing it, touch the“Back” key. The touch panel will return to the screen in step 2.
4 Touch the “Close” key. The touch panel will return to thescreen in step 2.
5 Touch the “Close” key once again. The touch panel will returnto the “Default setting”screen.
6 Touch the “End” key. The touch panel will return to thecontents of the “Basic” tab.

Section 7 COPIER MANAGEMENT FUNCTIONS
7-55
● Time difference
Perform the following procedure to set a designated time differencefrom the world standard time (GMT).
1 Display the “Machine default” screen.(See “(2) Accessing the machine default settings” onpage 7-41.)
Inch specifications
Default setting
Copydefault
Machinedefault
Language Management
End
BOXManagement
Bypasssetting
Document Management
Registerorig. size
Printreport
Countercheck
UserAdjustment
Default setting / Counter
Metric specifications
Default setting
Copydefault
Machinedefault
Language Management
End
Hard DiskManagement
Bypasssetting
Document Management
Registerorig. size
Printreport
Countercheck
UserAdjustment
Default setting / Counter
2 Select “Time difference” in the settings list on the left side ofthe touch panel and then touch the “Change #” key.The “Time difference” screen will be displayed.
Inch specifications
Key sound ON/OFFSilent modeDate/TimeTime differenceManagement code change
Default setting / Counter
OnOn2001/10/30 14:02GMT+08:005000
Default menu
Down
Change #
Setting mode Up
Machine default Close
Metric specifications
Machine default
Key sound ON/OFFSilent modeDate/TimeTime differenceChange MGMT code with #
OnOff30/10/'01 14:02GMT+08:005000
Up
Down
Change #
Close
Default setting
Default menu Setting mode
Default setting / Counter
3 Touch the “+” key or the “–” key to change the displayed timedifference to the desired setting.
Inch specifications
GMT+ 00 : 00
Default setting - Machine default
Back CloseTime difference
Metric specifications
Time difference Back Close
GMT+ 00 : 00
Default setting - Machine default
NOTE
If you want to quit the displayed setting without changing it, touch the“Back” key. The touch panel will return to the screen in step 2.
4 Touch the “Close” key. The touch panel will return to thescreen in step 2.
5 Touch the “Close” key once again. The touch panel will returnto the “Default setting”screen.
6 Touch the “End” key. The touch panel will return to thecontents of the “Basic” tab.

Section 7 COPIER MANAGEMENT FUNCTIONS
7-56
● Changing the management code
Perform the following procedure to change the management codeused by the copy manager.
IMPORTANT!
If you change the management code from its factory default, be sureto keep some sort of record of the new management code. If, for anyreason, you forget the registered management code, you will need tocontact your service representative.
1 Display the “Machine default” screen.(See “(2) Accessing the machine default settings” onpage 7-41.)
Inch specifications
Default setting
Copydefault
Machinedefault
Language Management
End
BOXManagement
Bypasssetting
Document Management
Registerorig. size
Printreport
Countercheck
UserAdjustment
Default setting / Counter
Metric specifications
Default setting
Copydefault
Machinedefault
Language Management
End
Hard DiskManagement
Bypasssetting
Document Management
Registerorig. size
Printreport
Countercheck
UserAdjustment
Default setting / Counter
2 Select “Management code change” [“Change MGMT codewith #”] in the settings list on the left side of the touch paneland then touch the “Change #” key.The “Management code change” [“Change MGMT code with#”] screen will be displayed.
Inch specifications
Key sound ON/OFFSilent modeDate/TimeTime differenceManagement code change
Default setting / Counter
OnOn2001/10/30 14:02GMT+08:005000
Default menu
Down
Change #
Setting mode Up
Machine default Close
Metric specifications
Key sound ON/OFFSilent modeDate/TimeTime differenceManagement code change
Default setting / Counter
OnOn2001/10/30 14:02GMT+08:005000
Default menu
Down
Change #
Setting mode Up
Machine default Close
3 Use the keypad to enter a new 4-digit management code.
Inch specifications
Management code change
Default setting - Machine default
Back Close
Able to change management code.(# key)
Metric specifications
Change MGMT code with #
Able to change management code.(# key)
Default setting - Machine default
Back Close
NOTE
If you want to quit the displayed setting without changing it, touch the“Back” key. The touch panel will return to the screen in step 2.
4 Touch the “Close” key. The touch panel will return to thescreen in step 2.
5 Touch the “Close” key once again. The touch panel will returnto the “Default setting”screen.
6 Touch the “End” key. The touch panel will return to thecontents of the “Basic” tab.

Section 7 COPIER MANAGEMENT FUNCTIONS
7-57
● Auto sleep ON/OFF
Perform the following procedure to set whether or not the auto sleepfunction will engage automatically.
1 Display the “Machine default” screen.(See “(2) Accessing the machine default settings” onpage 7-41.)
Inch specifications
Default setting
Copydefault
Machinedefault
Language Management
End
BOXManagement
Bypasssetting
Document Management
Registerorig. size
Printreport
Countercheck
UserAdjustment
Default setting / Counter
Metric specifications
Default setting
Copydefault
Machinedefault
Language Management
End
Hard DiskManagement
Bypasssetting
Document Management
Registerorig. size
Printreport
Countercheck
UserAdjustment
Default setting / Counter
2 Select “Auto sleep” in the settings list on the left side of thetouch panel and then touch the “Change #” key.The “Auto sleep” screen will be displayed.
Inch specifications
Date/TimeTime differenceManagement code changeAuto sleepEnergy Saver key setting
Default setting / Counter
2001/10/30 14:02GMT+08:005000OnLow power mode
Default menu
Down
Change #
Setting mode Up
Machine default Close
Metric specifications
Machine default
Date/TimeTime differenceChange MGMT code with #Auto sleepEnergy Saver key setting
30/10/'01 14:02GMT+08:005000OnLow power mode
Up
Down
Change #
Close
Default setting
Default menu Setting mode
Default setting / Counter
3 Touch the “On” key if you want to use the auto sleep function.
Inch specifications
On
Off
Auto sleep
Default setting - Machine default
CloseBack
Autom. turns into sleep mode if no oper. within a set timeafter last setting,or when copying is done.
Metric specifications
Autom. turns into sleep mode if no oper. within a set timeafter last setting,or when copying is done.
Back Close
On
Off
Auto sleep
Default setting - Machine default
NOTES
• If auto sleep interferes with your copying operations, turn thisfunction OFF. However, it is recommended that you try to set alonger time interval until auto sleep engages before you actually turnit OFF.
• If you want to quit the displayed setting without changing it, touchthe “Back” key. The touch panel will return to the screen in step 2.
4 Touch the “Close” key. The touch panel will return to thescreen in step 2.
5 Touch the “Close” key once again. The touch panel will returnto the “Default setting”screen.
6 Touch the “End” key. The touch panel will return to thecontents of the “Basic” tab.

Section 7 COPIER MANAGEMENT FUNCTIONS
7-58
● Changing the energy-saving mode
Perform the following procedure to change the energy-saving mode(the Low power mode or the Sleep mode) that will be entered intowhen the [Energy Saver] key is pressed.
1 Display the “Machine default” screen.(See “(2) Accessing the machine default settings” onpage 7-41.)
Inch specifications
Default setting
Copydefault
Machinedefault
Language Management
End
BOXManagement
Bypasssetting
Document Management
Registerorig. size
Printreport
Countercheck
UserAdjustment
Default setting / Counter
Metric specifications
Default setting
Copydefault
Machinedefault
Language Management
End
Hard DiskManagement
Bypasssetting
Document Management
Registerorig. size
Printreport
Countercheck
UserAdjustment
Default setting / Counter
2 Select “Energy Saver key setting” in the settings list on theleft side of the touch panel and then touch the “Change #”key.The “Energy Saver key setting” screen will be displayed.
Inch specifications
Date/TimeTime differenceManagement code changeAuto sleepEnergy Saver key setting
Default setting / Counter
2001/10/30 14:02GMT+08:005000OnLow power mode
Default menu
Down
Change #
Setting mode Up
Machine default Close
Metric specifications
Machine default
Date/TimeTime differenceChange MGMT code with #Auto sleepEnergy Saver key setting
30/10/'01 14:02GMT+08:005000OnLow power mode
Up
Down
Change #
Close
Default setting
Default menu Setting mode
Default setting / Counter
3 Touch the “Low power mode” key or the “Sleep mode” key, asdesired.
Inch specifications
Low power modeSleep mode
Energy Saver key setting
Default setting - Machine default
CloseBack
When pressing Energy Saver key, state can be set.
Metric specifications
Default setting - Machine default
CloseBack
Low power modeSleep mode
Energy Saver key setting
When pressing Energy Saver key, state can be set.
NOTE
If you want to quit the displayed setting without changing it, touch the“Back” key. The touch panel will return to the screen in step 2.
4 Touch the “Close” key. The touch panel will return to thescreen in step 2.
5 Touch the “Close” key once again. The touch panel will returnto the “Default setting”screen.
6 Touch the “End” key. The touch panel will return to thecontents of the “Basic” tab.

Section 7 COPIER MANAGEMENT FUNCTIONS
7-59
Default setting
Exposure mode
Exposure adjustmentstep
Original quality
Eco print mode ON/OFF
Background exposureadjustment
Paper selection
Paper type (auto paperselection mode)
Default drawer[cassette]
Description
Selects between auto exposure and manualexposure as the default copy exposure mode in theinitial mode.
Changes the incremental step to be used duringadjustment of the copy exposure.
Determines the default setting that will be used forthe image quality in the initial mode.
Determines whether the Eco print mode will be thedefault setting in the initial mode. In this case, theamount of toner that is used to make the copies willbe reduced, and images will be printed out relativelylighter than normal.
Adjusts the ground color of the copied paper.
Sets whether the copier will automatically select thesame size of copy paper as the original once anoriginal is set (APS: auto paper selection mode), orwhether the drawer[cassette] selected “Defaultdrawer” [“Default cassette”] setting will beautomatically selected.
Sets which types of paper can be selected under theauto paper selection mode.* It is possible to select the type of paper that has
been designated for the drawer[cassette] currentlyin use.
Sets one drawer[cassette] that will be selectedautomatically regardless of the size of paper loadedin that drawer[cassette].* It is NOT possible to select the multi-bypass tray
as the default drawer[cassette].* The setting for drawer[cassette] No.3 and No.4 will
only be available when the optional Paper Feederis installed on your copier.
Available settings
Manual / Auto
1 step / 0.5 step
Text+Photo / Text /Photo
On / Off
-2 – +2
APS / Defaultdrawer[cassette]
Off / On
PlainPreprintedRecycledLetterheadColor [Colour]PrepunchedRoughBondHigh qualityVellumCustom 1 –Custom 8
1st paper2nd paper3rd paper4th paper
Factorysetting
Manual
1 step
Text+Photo
Off
Standard setting(0)
APS
On
Plain
1st paper
Referencepage
7-63
7-64
7-65
7-66
7-67
7-68
7-69
7-70
(4) Copy default settings
The following table indicates the copy default settings available in this copier. Change any or all of the settings as desired in order to make the mosteffective use of your copier.

Section 7 COPIER MANAGEMENT FUNCTIONS
7-60
Default setting
Cover drawer[cassette]
Default magnificationratio
Auto exposureadjustment
Auto exposureadjustment (OCR)
Manual exposureadjustment (text+photomode)
Manual exposureadjustment (text mode)
Manual exposureadjustment (photomode)
Sort/Finished mode ON/OFF
Auto Rotation mode
Margin width
Description
Sets which drawer[cassette] will be used to feed thecover sheets in the cover mode, the booklet/stitchingmode and the book to booklet mode.* The setting for drawer[cassette] No.3 and No.4 will
only be available when the optional Paper Feederis installed on your copier.
Sets whether or not the auto magnification selectionmode will be used to automatically calculate theappropriate magnification ratio when you select thesize of copy paper.
Adjusts the overall exposure level for the autoexposure mode.
Adjusts the overall exposure level for scanning withOCR (Optical Character Recognition) software whenusing the optional scanner functions of this copier.
Adjusts the median exposure value when thetext+photo mode is selected for the image quality.
Adjusts the median exposure value when the textmode is selected for the image quality.
Adjusts the median exposure value when the photomode is selected for the image quality.
Determines whether or not the Sort and/or theFinished modes will be the default setting in theinitial mode.
Determines whether or not the Auto Rotation modewill be the default setting in the initial mode. If AutoRotation is turned ON, the image will beautomatically rotated even if the orientation of theoriginal is different from that of the paper loaded inthe drawers[cassettes].
Determines the default value of the location andwidth of the margins in the margin mode.
Available settings
1st paper2nd paper3rd paper4th paperBypass
Manual / AMS
-3 – +3
-3 – +3
-3 – +3
-3 – +3
-3 – +3
Sort mode :On / OffFinished mode :Off / On [1 set (Outputeach page) ]
Rotate / No Rotate
Inch specification0 – 3/4 (inches)Metric specification0 – 18 (mm)
Factorysetting
Bypass
Manual
Standard setting(0)
Standard setting(0)
Standard setting(0)
Standard setting(0)
Standard setting(0)
Sort mode :OnFinished mode :Off
Rotate
InchspecificationLeft: 1/4 (inches)Top: 0 (inches)MetricspecificationLeft: 6 (mm)Top: 0 (mm)
Referencepage
7-71
7-72
7-73
7-74
7-75
7-76
7-77
7-78
7-79
7-80

Section 7 COPIER MANAGEMENT FUNCTIONS
7-61
Default setting
Erased border width
Copy limit
Repeat copying ON/OFF
Registration keys ON/OFF
Customize screen layout(Main functions)
Customize screen layout(Add functions)
Description
Determines the default value for the width of theborder to be erased in the two border erase modes.
Sets the limit for the number of copies (or copy sets)that can be made at a time.
Sets whether or not to prohibit repeat copying, aswell as whether or not to make repeat copying thedefault setting in the initial mode. Sets whether toturn the repeat copy mode ON or OFF.
Sets whether or not to make repeat copying thedefault setting in the initial mode.
* This setting is displayed when the optional HardDisk is installed.
Sets whether or not to allow a “Register” key to bedisplayed in the screen for those function and modeswhich can be registered under the registration keys.Functions and/or modes can only be registeredunder registration keys through the “Register” key.
Changes the order of the main functions and modesthat are displayed in the “Basic” and the “Userchoice” tabs in order to make the display moreappropriate to the way you use the copier.* Up to 6 functions and modes can be listed and
displayed.
Adds often-used functions and/or modes, andchanges the order of their layout, in order to makethe display more appropriate to the way you use thecopier.
Available settings
Inch specificationOutside border:0 – 3/4 (inches)Center area:0 – 1 1/2 (inches)
Metric specificationOutside border:0 – 18 (mm)Center area:0 – 36 (mm)
1 – 999
Off / On
Off / On
Off / On
Exposure Mode /Reduce/Enlarge /Sort/Finished /1/2 sided /Original size /Orig. quality [Quality orig.]
All functions and modesother than those in the“Basic” tab and the“main functions” in the“User choice” tab.
Factorysetting
InchspecificationOutside border:1/4 (inches)Center area:1/2 (inches)
MetricspecificationOutside border:6 (mm)Center area:12 (mm)
999
On
Off
On
1 ExposureMode
2 Reduce/Enlarge
3 Sort/Finished4 1/2 sided5 Original size6 Orig. quality [Quality orig.]
7 Margin8 Border Erase
[Erase Mode]9 Combine
[Merge]10 (None)11 (None)12 (None)13 (None)
Referencepage
7-81
7-82
7-83
7-84
7-85
7-86

Section 7 COPIER MANAGEMENT FUNCTIONS
7-62
(5) Accessing the copy default settings
Perform the following procedure when you want to access thescreens for each of the various copy default settings.
1 With the content of the “Basic” tab displayed, press the[Default Setting/Counter] key.The “Default setting”screen will be displayed.
2 Touch the “Copy default” key on the left side of the touchpanel.
Inch specifications
Default setting
Copydefault
Machinedefault
Language Management
End
BOXManagement
Bypasssetting
Document Management
Registerorig. size
Printreport
Countercheck
UserAdjustment
Default setting / Counter
Metric specifications
Default setting
Copydefault
Machinedefault
Language Management
End
Hard DiskManagement
Bypasssetting
Document Management
Registerorig. size
Printreport
Countercheck
UserAdjustment
Default setting / Counter
3 Use the keypad to enter the 4-digit management code.The factory default setting for 30 cpm copiers is “3000”, for40 cpm copiers is “4000” and for 50 cpm copiers is “5000”.
Inch specifications
Enter the administrator number Close
Metric specifications
Enter the administrator number Close
4 If the entered code matched the registered one, the “Copydefault” screen will be displayed.
Inch specifications
Copy default
Default setting
Exposure modeExposure stepsOriginal image qualityEco PrintBackground exp. adj.
Manual1 stepText + PhotoOffStandard
Default menu
Down
Change #
Setting mode Up
Close
Default setting / Counter
Metric specifications
Copy default
Exposure modeExposure stepsImage quality originalEco PrintBackground exp. adj.
Manual1 stepText + PhotoOffStandard
Default menu Setting mode Up
Down
Change #
Close
Default setting
Default setting / Counter
NOTES
• It is possible for you to change the 4-digit management code.(See “Changing the management code” on page 7-56.)
• Refer to the desired procedure(s) explained under “(6) Making copydefault settings” and perform the corresponding setting(s).

Section 7 COPIER MANAGEMENT FUNCTIONS
7-63
(6) Making copy default settings
Perform the following procedure that corresponds to the desiredsetting.
● Exposure mode
Perform the following procedure to select between auto exposure andmanual exposure as the default copy exposure mode in the initialmode.
1 Display the “Copy default” screen.(See “(5) Accessing the copy default settings” on page 7-62.)
Inch specifications
Default setting
Copydefault
Machinedefault
Language Management
End
BOXManagement
Bypasssetting
Document Management
Registerorig. size
Printreport
Countercheck
UserAdjustment
Default setting / Counter
Metric specifications
Default setting
Copydefault
Machinedefault
Language Management
End
Hard DiskManagement
Bypasssetting
Document Management
Registerorig. size
Printreport
Countercheck
UserAdjustment
Default setting / Counter
2 Select “Exposure mode” in the settings list on the left side ofthe touch panel and then touch the “Change #” key.The “Exposure mode” screen will be displayed.
Inch specifications
Copy default
Default setting
Exposure modeExposure stepsOriginal image qualityEco PrintBackground exp. adj.
Manual1 stepText + PhotoOffStandard
Default menu
Down
Change #
Setting mode Up
Close
Default setting / Counter
Metric specifications
Copy default
Exposure modeExposure stepsImage quality originalEco PrintBackground exp. adj.
Manual1 stepText + PhotoOffStandard
Default menu Setting mode Up
Down
Change #
Close
Default setting
Default setting / Counter
3 Touch the “Manual” key or the “Auto” key, as appropriate.
Inch specifications
Exposure mode
Select default mode of copy exposure, auto or manual.
Manual
Auto
Defaul t set t ing - Copy defaul t
CloseBack
Metric specifications
Exposure mode
Select default mode of copy exposure, auto or manual.
Manual
Auto
Default setting - Copy default
Back Close
NOTE
If you want to quit the displayed setting without changing it, touch the“Back” key. The touch panel will return to the screen in step 2.
4 Touch the “Close” key. The touch panel will return to thescreen in step 2.
5 Touch the “Close” key once again. The touch panel will returnto the “Default setting”screen.
6 Touch the “End” key. The touch panel will return to thecontents of the “Basic” tab.

Section 7 COPIER MANAGEMENT FUNCTIONS
7-64
● Exposure adjustment step
Perform the following procedure to change the incremental step to beused during adjustment of the copy exposure.
1 Display the “Copy default” screen.(See “(5) Accessing the copy default settings” on page 7-62.)
Inch specifications
Default setting
Copydefault
Machinedefault
Language Management
End
BOXManagement
Bypasssetting
Document Management
Registerorig. size
Printreport
Countercheck
UserAdjustment
Default setting / Counter
Metric specifications
Default setting
Copydefault
Machinedefault
Language Management
End
Hard DiskManagement
Bypasssetting
Document Management
Registerorig. size
Printreport
Countercheck
UserAdjustment
Default setting / Counter
2 Select “Exposure steps” in the settings list on the left side ofthe touch panel and then touch the “Change #” key.The “Exposure steps” screen will be displayed.
Inch specifications
Copy default
Default setting
Exposure modeExposure stepsOriginal image qualityEco PrintBackground exp. adj.
Manual1 stepText + PhotoOffStandard
Default menu
Down
Change #
Setting mode Up
Close
Default setting / Counter
Metric specifications
Copy default
Exposure modeExposure stepsImage quality originalEco PrintBackground exp. adj.
Manual1 stepText + PhotoOffStandard
Default menu Setting mode Up
Down
Change #
Close
Default setting
Default setting / Counter
3 Touch the “1 step” key or the “0.5 step” key, as appropriate.
Inch specifications
Select step of copy exposure.
Exposure steps
Defaul t set t ing - Copy defaul t
CloseBack
1 step
step
Metric specifications
Select adjustment step of copy exposure.
Back Close
1 step
0.5 step
Exposure steps
Default setting - Copy default
NOTE
If you want to quit the displayed setting without changing it, touch the“Back” key. The touch panel will return to the screen in step 2.
4 Touch the “Close” key. The touch panel will return to thescreen in step 2.
5 Touch the “Close” key once again. The touch panel will returnto the “Default setting”screen.
6 Touch the “End” key. The touch panel will return to thecontents of the “Basic” tab.

Section 7 COPIER MANAGEMENT FUNCTIONS
7-65
● Original quality
Perform the following procedure to determine the default setting thatwill be used for the image quality in the initial mode.
1 Display the “Copy default” screen.(See “(5) Accessing the copy default settings” on page 7-62.)
Inch specifications
Default setting
Copydefault
Machinedefault
Language Management
End
BOXManagement
Bypasssetting
Document Management
Registerorig. size
Printreport
Countercheck
UserAdjustment
Default setting / Counter
Metric specifications
Default setting
Copydefault
Machinedefault
Language Management
End
Hard DiskManagement
Bypasssetting
Document Management
Registerorig. size
Printreport
Countercheck
UserAdjustment
Default setting / Counter
2 Select “Original image quality” [“Image quality Original”] inthe settings list on the left side of the touch panel and thentouch the “Change #” key.The “Original image quality” [“Image quality Original”] screenwill be displayed.
Inch specifications
Copy default
Default setting
Exposure modeExposure stepsOriginal image qualityEco PrintBackground exp. adj.
Manual1 stepText + PhotoOffStandard
Default menu
Down
Change #
Setting mode Up
Close
Default setting / Counter
Metric specifications
Copy default
Exposure modeExposure stepsImage quality originalEco PrintBackground exp. adj.
Manual1 stepText + PhotoOffStandard
Default menu Setting mode Up
Down
Change #
Close
Default setting
Default setting / Counter
3 Touch the “Text+Photo” key, the “Photo” key or the “Text” key,as appropriate.
Inch specifications
Select defaul t mode of or ig inal image qual i ty.
Text
Photo
Defaul t set t ing - Copy defaul t
Original image quality CloseBack
Text + Photo
Metric specifications
Select defaul t mode of or ig inal qual i ty.
Back Close
Text+Photo
Photo
Text
Image quality original.
Default setting - Copy default
NOTE
If you want to quit the displayed setting without changing it, touch the“Back” key. The touch panel will return to the screen in step 2.
4 Touch the “Close” key. The touch panel will return to thescreen in step 2.
5 Touch the “Close” key once again. The touch panel will returnto the “Default setting”screen.
6 Touch the “End” key. The touch panel will return to thecontents of the “Basic” tab.

Section 7 COPIER MANAGEMENT FUNCTIONS
7-66
● Eco print mode ON/OFF
Perform the following procedure to determine whether or not the ecoprint mode will be the default setting in the initial mode.
1 Display the “Copy default” screen.(See “(5) Accessing the copy default settings” on page 7-62.)
Inch specifications
Default setting
Copydefault
Machinedefault
Language Management
End
BOXManagement
Bypasssetting
Document Management
Registerorig. size
Printreport
Countercheck
UserAdjustment
Default setting / Counter
Metric specifications
Default setting
Copydefault
Machinedefault
Language Management
End
Hard DiskManagement
Bypasssetting
Document Management
Registerorig. size
Printreport
Countercheck
UserAdjustment
Default setting / Counter
2 Select “Eco Print” in the settings list on the left side of thetouch panel and then touch the “Change #” key.The “Eco Print” screen will be displayed.
Inch specifications
Copy default
Default setting
Exposure modeExposure stepsOriginal image qualityEco PrintBackground exp. adj.
Manual1 stepText + PhotoOffStandard
Default menu
Down
Change #
Setting mode Up
Close
Default setting / Counter
Metric specifications
Copy default
Exposure modeExposure stepsImage quality originalEco PrintBackground exp. adj.
Manual1 stepText + PhotoOffStandard
Default menu Setting mode Up
Down
Change #
Close
Default setting
Default setting / Counter
3 Touch the “On” key if you want to make the eco print modethe default setting in the initial mode.
Inch specifications
Off
On
Select defaul t Eco Pr int .
Eco Print
Defaul t set t ing - Copy defaul t
CloseBack
Metric specifications
Back Close
Off
On
Select default EcoPrint.
Eco Print
Default setting - Copy default
NOTE
If you want to quit the displayed setting without changing it, touch the“Back” key. The touch panel will return to the screen in step 2.
4 Touch the “Close” key. The touch panel will return to thescreen in step 2.
5 Touch the “Close” key once again. The touch panel willreturn to the “Default setting”screen.
6 Touch the “End” key. The touch panel will return to thecontents of the “Basic” tab.

Section 7 COPIER MANAGEMENT FUNCTIONS
7-67
● Background exposure adjustment
Perform the following procedure to adjust the ground color of thecopied paper.
1 Display the “Copy default” screen.(See “(5) Accessing the copy default settings” on page 7-62.)
Inch specifications
Default setting
Copydefault
Machinedefault
Language Management
End
BOXManagement
Bypasssetting
Document Management
Registerorig. size
Printreport
Countercheck
UserAdjustment
Default setting / Counter
Metric specifications
Default setting
Copydefault
Machinedefault
Language Management
End
Hard DiskManagement
Bypasssetting
Document Management
Registerorig. size
Printreport
Countercheck
UserAdjustment
Default setting / Counter
2 Select “Background exp. adj.” in the settings list on the leftside of the touch panel and then touch the “Change #” key.The “Background exp. adj.” screen will be displayed.
Inch specifications
Copy default
Default setting
Exposure modeExposure stepsOriginal image qualityEco PrintBackground exp. adj.
Manual1 stepText + PhotoOffStandard
Default menu
Down
Change #
Setting mode Up
Close
Default setting / Counter
Metric specifications
Copy default
Exposure modeExposure stepsImage quality originalEco PrintBackground exp. adj.
Manual1 stepText + PhotoOffStandard
Default menu Setting mode Up
Down
Change #
Close
Default setting
Default setting / Counter
3 Touch the “Lighter” key or “Darker” key to adjust density.
Inch specifications
Able to adjust exposure of paper background.
Default setting - Copy default
Background exp. adj. CloseBack
Lighter Darker
Metric specifications
Able to adjust exposure of paper background.
Default setting - Copy default
Background exp. adj. CloseBack
Lighter Darker
NOTE
If you want to quit the displayed setting without changing it, touch the“Back” key. The touch panel will return to the screen in step 2.
4 Touch the “Close” key. The touch panel will return to thescreen in step 2.
5 Touch the “Close” key once again. The touch panel willreturn to the “Default setting”screen.
6 Touch the “End” key. The touch panel will return to thecontents of the “Basic” tab.

Section 7 COPIER MANAGEMENT FUNCTIONS
7-68
● Paper selection
Perform the following procedure to set whether the copier willautomatically select the same size of copy paper as the original oncean original is set, or whether the designated default drawer[cassette]will be automatically selected.
1 Display the “Copy default” screen.(See “(5) Accessing the copy default settings” on page 7-62.)
Inch specifications
Default setting
Copydefault
Machinedefault
Language Management
End
BOXManagement
Bypasssetting
Document Management
Registerorig. size
Printreport
Countercheck
UserAdjustment
Default setting / Counter
Metric specifications
Default setting
Copydefault
Machinedefault
Language Management
End
Hard DiskManagement
Bypasssetting
Document Management
Registerorig. size
Printreport
Countercheck
UserAdjustment
Default setting / Counter
2 Select “Select paper” in the settings list on the left side of thetouch panel and then touch the “Change #” key.The “Select paper” screen will be displayed.
Inch specifications
Copy default
Select paperSelect paper type(APS)Default drawerDrawer for cover paperDefault magnification
APSPlain1st paperBypassManual
Up
Change #
Close
Default setting
Default menu Setting mode
Down
Default setting / Counter
Metric specifications
Copy default
Select paperSelect paper type(APS)Default cassetteCassette for cover paperDefault mode
APSPlain1st paperBypassManual
Up
Change #
Close
Default setting
Default menu Setting mode
Down
Default setting / Counter
3 Touch the “APS” key to have the same size of copy paper asthe original selected automatically, and the “Defaultdrawer[cassette]” key to have paper fed from the designateddefault drawer[cassette].
Inch specifications
Set auto paper select ion mode.
APS
Defaultdrawer
Select paper
Defaul t set t ing - Copy defaul t
CloseBack
Metric specifications
Sett ing paper select mode.
Back Close
APS
Defaultcassette
Select paper
Default setting - Copy default
NOTE
If you want to quit the displayed setting without changing it, touch the“Back” key. The touch panel will return to the screen in step 2.
4 Touch the “Close” key. The touch panel will return to thescreen in step 2.
5 Touch the “Close” key once again. The touch panel will returnto the “Default setting”screen.
6 Touch the “End” key. The touch panel will return to thecontents of the “Basic” tab.

Section 7 COPIER MANAGEMENT FUNCTIONS
7-69
● Paper type (auto paper selection mode)
Perform the following procedure to set which types of paper can beselected under the auto paper selection mode.
1 Display the “Copy default” screen.(See “(5) Accessing the copy default settings” on page 7-62.)
Inch specifications
Default setting
Copydefault
Machinedefault
Language Management
End
BOXManagement
Bypasssetting
Document Management
Registerorig. size
Printreport
Countercheck
UserAdjustment
Default setting / Counter
Metric specifications
Default setting
Copydefault
Machinedefault
Language Management
End
Hard DiskManagement
Bypasssetting
Document Management
Registerorig. size
Printreport
Countercheck
UserAdjustment
Default setting / Counter
2 Select “Select paper type(APS)” in the settings list on the leftside of the touch panel and then touch the “Change #” key.The “Select paper type(APS)” screen will be displayed.
Inch specifications
Copy default
Select paperSelect paper type(APS)Default drawerDrawer for cover paperDefault magnification
APSPlain1st paperBypassManual
Up
Change #
Close
Default setting
Default menu Setting mode
Down
Default setting / Counter
Metric specifications
Copy default
Select paperSelect paper type(APS)Default cassetteCassette for cover paperDefault mode
APSPlain1st paperBypassManual
Up
Change #
Close
Default setting
Default menu Setting mode
Down
Default setting / Counter
3 Touch the “On” key and then touch the key that correspondsto the types of paper you want to allow to be used under theauto paper selection mode. If you do NOT want to limit thetypes of paper that will be available for use in that mode,touch the “Off” key.
Inch specifications
Select paper type(APS)
Select paper type(s) for Auto Paper Selection.
Default setting - Copy default
Plain
Off
On
Preprinted
Recycled
Letterhead
Prepunched
ColorHighquality
Rough
Bond
Custom 1
Custom 2
Custom 3
Custom 4
Custom 6
Custom 5
Custom 7
Custom 8
Back Close
Vellum
Metric specifications
Vellum
Select paper type(APS)
Select paper type(s) for Auto Paper Selection.
Default setting - Copy default
Preprinted
Plain
Recycled
Letterhead
Prepunched
ColourHighquality
Rough
Bond
Off
On
Back Close
Custom 1
Custom 2
Custom 3
Custom 4
Custom 6
Custom 5
Custom 7
Custom 8
NOTES
• It is possible to select the type of paper that has been designated forthe drawer[cassette] currently in use.
• If you want to quit the displayed setting without changing it, touchthe “Back” key. The touch panel will return to the screen in step 2.
4 Touch the “Close” key. The touch panel will return to thescreen in step 2.
5 Touch the “Close” key once again. The touch panel will returnto the “Default setting”screen.
6 Touch the “End” key. The touch panel will return to thecontents of the “Basic” tab.

Section 7 COPIER MANAGEMENT FUNCTIONS
7-70
● Default drawer[cassette]
Perform the following procedure to set one drawer[cassette] that willbe selected automatically regardless of the size of paper loaded inthat drawer[cassette].* It is NOT possible to select the multi-bypass tray as the default
drawer[cassette].
1 Display the “Copy default” screen.(See “(5) Accessing the copy default settings” on page 7-62.)
Inch specifications
Default setting
Copydefault
Machinedefault
Language Management
End
BOXManagement
Bypasssetting
Document Management
Registerorig. size
Printreport
Countercheck
UserAdjustment
Default setting / Counter
Metric specifications
Default setting
Copydefault
Machinedefault
Language Management
End
Hard DiskManagement
Bypasssetting
Document Management
Registerorig. size
Printreport
Countercheck
UserAdjustment
Default setting / Counter
2 Select “Default drawer[cassette]” in the settings list on the leftside of the touch panel and then touch the “Change #” key.The “Default drawer[cassette]” screen will be displayed.
Inch specifications
Copy default
Select paperSelect paper type(APS)Default drawerDrawer for cover paperDefault magnification
APSPlain1st paperBypassManual
Up
Change #
Close
Default setting
Default menu Setting mode
Down
Default setting / Counter
Metric specifications
Copy default
Select paperSelect paper type(APS)Default cassetteCassette for cover paperDefault mode
APSPlain1st paperBypassManual
Up
Change #
Close
Default setting
Default menu Setting mode
Down
Default setting / Counter
3 Touch the key that corresponds to the desireddrawer[cassette].
Inch specifications
Default drawer
Select priority drawer.
Default setting - Copy default
1st paper
2nd paper
3rd paper
4th paper
CloseBack
Metric specifications
Default cassette Back Close
Select paper cassette for default setting.
1st paper
2nd paper
3rd paper
Default setting - Copy default
4th paper
NOTES
• If you want to quit the displayed setting without changing it, touchthe “Back” key. The touch panel will return to the screen in step 2.
• The setting for drawer[cassette] No.3 and No.4 will only be availablewhen the optional Paper Feeder is installed on your copier.
4 Touch the “Close” key. The touch panel will return to thescreen in step 2.
5 Touch the “Close” key once again. The touch panel will returnto the “Default setting”screen.
6 Touch the “End” key. The touch panel will return to thecontents of the “Basic” tab.

Section 7 COPIER MANAGEMENT FUNCTIONS
7-71
● Cover drawer[cassette]
Perform the following procedure to set which drawer[cassette] will beused to feed the cover sheets in the cover mode, the booklet/stitchingmode and the book to booklet mode.
1 Display the “Copy default” screen.(See “(5) Accessing the copy default settings” on page 7-62.)
Inch specifications
Default setting
Copydefault
Machinedefault
Language Management
End
BOXManagement
Bypasssetting
Document Management
Registerorig. size
Printreport
Countercheck
UserAdjustment
Default setting / Counter
Metric specifications
Default setting
Copydefault
Machinedefault
Language Management
End
Hard DiskManagement
Bypasssetting
Document Management
Registerorig. size
Printreport
Countercheck
UserAdjustment
Default setting / Counter
2 Select “Drawer for cover paper” [“Cassette for cover paper”]in the settings list on the left side of the touch panel and thentouch the “Change #” key.The “Drawer for cover paper” [“Cassette for cover paper”]screen will be displayed.
Inch specifications
Copy default
Select paperSelect paper type(APS)Default drawerDrawer for cover paperDefault magnification
APSPlain1st paperBypassManual
Up
Change #
Close
Default setting
Default menu Setting mode
Down
Default setting / Counter
Metric specifications
Copy default
Select paperSelect paper type(APS)Default cassetteCassette for cover paperDefault mode
APSPlain1st paperBypassManual
Up
Change #
Close
Default setting
Default menu Setting mode
Down
Default setting / Counter
3 Touch the key that corresponds to the desireddrawer[cassette].
Inch specifications
Drawer for cover paper
Select drawer for cover paper.
1st paper
2nd paper
3rd paper
Default setting - Copy default
4th paper
Bypass
CloseBack
Metric specifications
Cassette for cover paper Back Close
Select cassette for cover paper.
Default setting - Copy default
1st paper
2nd paper
3rd paper
4th paper
Bypass
NOTES
• If you want to quit the displayed setting without changing it, touchthe “Back” key. The touch panel will return to the screen in step 2.
• The setting for drawer[cassette] No.3 and No.4 will only be availablewhen the optional Paper Feeder is installed on your copier.
4 Touch the “Close” key. The touch panel will return to thescreen in step 2.
5 Touch the “Close” key once again. The touch panel will returnto the “Default setting”screen.
6 Touch the “End” key. The touch panel will return to thecontents of the “Basic” tab.

Section 7 COPIER MANAGEMENT FUNCTIONS
7-72
● Default magnification ratio
Perform the following procedure to set whether or not the appropriatemagnification ratio to be calculated automatically when you select thesize of copy paper.
1 Display the “Copy default” screen.(See “(5) Accessing the copy default settings” on page 7-62.)
Inch specifications
Default setting
Copydefault
Machinedefault
Language Management
End
BOXManagement
Bypasssetting
Document Management
Registerorig. size
Printreport
Countercheck
UserAdjustment
Default setting / Counter
Metric specifications
Default setting
Copydefault
Machinedefault
Language Management
End
Hard DiskManagement
Bypasssetting
Document Management
Registerorig. size
Printreport
Countercheck
UserAdjustment
Default setting / Counter
2 Select “Default magnification” [“Default mode”] in the settingslist on the left side of the touch panel and then touch the“Change #” key.The “Default magnification” [“Default mode”] screen will bedisplayed.
Inch specifications
Copy default
Select paperSelect paper type(APS)Default drawerDrawer for cover paperDefault magnification
APSPlain1st paperBypassManual
Up
Change #
Close
Default setting
Default menu Setting mode
Down
Default setting / Counter
Metric specifications
Copy default
Select paperSelect paper type(APS)Default cassetteCassette for cover paperDefault mode
APSPlain1st paperBypassManual
Up
Change #
Close
Default setting
Default menu Setting mode
Down
Default setting / Counter
3 Touch the “Manual” key or the “AMS” key, as appropriate.
Inch specifications
Select defaul t magnif icat ion mode.
Manual
AMS
Default magnification
Defaul t set t ing - Copy defaul t
CloseBack
Metric specifications
Select defaul t zoom mode.
Back Close
Manual
AMS
Default mode
Default setting - Copy default
NOTE
If you want to quit the displayed setting without changing it, touch the“Back” key. The touch panel will return to the screen in step 2.
4 Touch the “Close” key. The touch panel will return to thescreen in step 2.
5 Touch the “Close” key once again. The touch panel will returnto the “Default setting”screen.
6 Touch the “End” key. The touch panel will return to thecontents of the “Basic” tab.

Section 7 COPIER MANAGEMENT FUNCTIONS
7-73
● Auto exposure adjustment
Perform the following procedure to adjust the overall exposure levelfor the auto exposure mode.
1 Display the “Copy default” screen.(See “(5) Accessing the copy default settings” on page 7-62.)
Inch specifications
Default setting
Copydefault
Machinedefault
Language Management
End
BOXManagement
Bypasssetting
Document Management
Registerorig. size
Printreport
Countercheck
UserAdjustment
Default setting / Counter
Metric specifications
Default setting
Copydefault
Machinedefault
Language Management
End
Hard DiskManagement
Bypasssetting
Document Management
Registerorig. size
Printreport
Countercheck
UserAdjustment
Default setting / Counter
2 Select “Adjust auto exposure.” in the settings list on the leftside of the touch panel and then touch the “Change #” key.The “Adjust auto exposure.” screen will be displayed.
Inch specifications
Copy default
Change #
Default setting
Adjust auto exposure.Adjust auto exposure. (OCR)Adj. manual expo.(Mixed)Adj. manual expo.(Text)Adj. manual expo.(Photo)
StandardStandardStandardStandardStandard
Default menu
Down
Setting modeUp
Close
Default setting / Counter
Metric specifications
Default setting / Counter
Copy default
Up
Down
Change #
Close
Default setting
Default menu Setting mode
Adjust auto exposure.Adjust auto exposure. (OCR)Adj. manual expo.(Mixed)Adj. manual expo.(Text)Adj. manual expo.(Photo)
StandardStandardStandardStandardStandard
3 Touch the “Lighter” key or the “Darker” key, as appropriate, tomove the cursor on the exposure scale and adjust theexposure as desired.
Inch specifications
Adjust copy exposure defaul t set t ing. (Auto)
Adjust auto exposure.
Defaul t set t ing - Copy defaul t
Lighter Darker
CloseBack
Metric specifications
Adjust defaul t set t ing of copy exposure. (Auto)
Back CloseAdjust auto exposure.
Default setting - Copy default
Lighter Darker
NOTE
If you want to quit the displayed setting without changing it, touch the“Back” key. The touch panel will return to the screen in step 2.
4 Touch the “Close” key. The touch panel will return to thescreen in step 2.
5 Touch the “Close” key once again. The touch panel willreturn to the “Default setting”screen.
6 Touch the “End” key. The touch panel will return to thecontents of the “Basic” tab.

Section 7 COPIER MANAGEMENT FUNCTIONS
7-74
● Auto exposure adjustment (OCR)
Perform the following procedure to adjust the overall exposure levelfor scanning with OCR (Optical Character Recognition) softwarewhen using the optional scanner functions of this copier.
1 Display the “Copy default” screen.(See “(5) Accessing the copy default settings” on page 7-62.)
Inch specifications
Default setting
Copydefault
Machinedefault
Language Management
End
BOXManagement
Bypasssetting
Document Management
Registerorig. size
Printreport
Countercheck
UserAdjustment
Default setting / Counter
Metric specifications
Default setting
Copydefault
Machinedefault
Language Management
End
Hard DiskManagement
Bypasssetting
Document Management
Registerorig. size
Printreport
Countercheck
UserAdjustment
Default setting / Counter
2 Select “Adjust auto exposure (OCR)” in the settings list onthe left side of the touch panel and then touch the “Change#” key.The “Adjust auto exposure (OCR)” screen will be displayed.
Inch specifications
Copy default
Change #
Default setting
Adjust auto exposure.Adjust auto exposure. (OCR)Adj. manual expo.(Mixed)Adj. manual expo.(Text)Adj. manual expo.(Photo)
StandardStandardStandardStandardStandard
Default menu
Down
Setting modeUp
Close
Default setting / Counter
Metric specifications
Default setting / Counter
Copy default
Up
Down
Change #
Close
Default setting
Default menu Setting mode
Adjust auto exposure.Adjust auto exposure. (OCR)Adj. manual expo.(Mixed)Adj. manual expo.(Text)Adj. manual expo.(Photo)
StandardStandardStandardStandardStandard
3 Touch the “Lighter” key or the “Darker” key, as appropriate, tomove the cursor on the exposure scale and adjust theexposure as desired.
Inch specifications
Adjust auto exposure (OCR)
Defaul t set t ing - Copy defaul t
Lighter Darker
CloseBack
Metric specifications
Back CloseAdjust auto exposure (OCR)
Default setting - Copy default
Lighter Darker
NOTE
If you want to quit the displayed setting without changing it, touch the“Back” key. The touch panel will return to the screen in step 2.
4 Touch the “Close” key. The touch panel will return to thescreen in step 2.
5 Touch the “Close” key once again. The touch panel willreturn to the “Default setting”screen.
6 Touch the “End” key. The touch panel will return to thecontents of the “Basic” tab.

Section 7 COPIER MANAGEMENT FUNCTIONS
7-75
● Manual exposure adjustment (text+photo mode)
Perform the following procedure to adjust the median exposure valuewhen the text+photo mode is selected for the image quality.
1 Display the “Copy default” screen.(See “(5) Accessing the copy default settings” on page 7-62.)
Inch specifications
Default setting
Copydefault
Machinedefault
Language Management
End
BOXManagement
Bypasssetting
Document Management
Registerorig. size
Printreport
Countercheck
UserAdjustment
Default setting / Counter
Metric specifications
Default setting
Copydefault
Machinedefault
Language Management
End
Hard DiskManagement
Bypasssetting
Document Management
Registerorig. size
Printreport
Countercheck
UserAdjustment
Default setting / Counter
2 Select “Adj. Manual expo. (Mixed)” in the settings list on theleft side of the touch panel and then touch the “Change #”key.The “Adj. Manual expo. (Mixed)” screen will be displayed.
Inch specifications
Copy default
Change #
Default setting
Adjust auto exposure.Adjust auto exposure. (OCR)Adj. manual expo.(Mixed)Adj. manual expo.(Text)Adj. manual expo.(Photo)
StandardStandardStandardStandardStandard
Default menu
Down
Setting modeUp
Close
Default setting / Counter
Metric specifications
Default setting / Counter
Copy default
Up
Down
Change #
Close
Default setting
Default menu Setting mode
Adjust auto exposure.Adjust auto exposure. (OCR)Adj. manual expo.(Mixed)Adj. manual expo.(Text)Adj. manual expo.(Photo)
StandardStandardStandardStandardStandard
3 Touch the “Lighter” key or the “Darker” key, as appropriate, tomove the cursor on the exposure scale and adjust theexposure as desired.
Inch specifications
Adjust copy exposure defaul t set t ing.(Manual, Text+Photo)
Defaul t set t ing - Copy defaul t
Lighter Darker
Adj. manual expo.(Mixed) CloseBack
Metric specifications
Adjust defaul t set t ing of copy exposure.(Manual,Text+Photo)
Back CloseAdj. manual expo.(Mixed)
Default setting - Copy default
Lighter Darker
NOTE
If you want to quit the displayed setting without changing it, touch the“Back” key. The touch panel will return to the screen in step 2.
4 Touch the “Close” key. The touch panel will return to thescreen in step 2.
5 Touch the “Close” key once again. The touch panel will returnto the “Default setting”screen.
6 Touch the “End” key. The touch panel will return to thecontents of the “Basic” tab.

Section 7 COPIER MANAGEMENT FUNCTIONS
7-76
● Manual exposure adjustment (text mode)
Perform the following procedure to adjust the median exposure valuewhen the text mode is selected for the image quality.
1 Display the “Copy default” screen.(See “(5) Accessing the copy default settings” on page 7-62.)
Inch specifications
Default setting
Copydefault
Machinedefault
Language Management
End
BOXManagement
Bypasssetting
Document Management
Registerorig. size
Printreport
Countercheck
UserAdjustment
Default setting / Counter
Metric specifications
Default setting
Copydefault
Machinedefault
Language Management
End
Hard DiskManagement
Bypasssetting
Document Management
Registerorig. size
Printreport
Countercheck
UserAdjustment
Default setting / Counter
2 Select “Adj. manual expo. (Text)” in the settings list on theleft side of the touch panel and then touch the “Change #”key.The “Adj. manual expo. (Text)” screen will be displayed.
Inch specifications
Copy default
Change #
Default setting
Adjust auto exposure.Adjust auto exposure. (OCR)Adj. manual expo.(Mixed)Adj. manual expo.(Text)Adj. manual expo.(Photo)
StandardStandardStandardStandardStandard
Default menu
Down
Setting modeUp
Close
Default setting / Counter
Metric specifications
Default setting / Counter
Copy default
Up
Down
Change #
Close
Default setting
Default menu Setting mode
Adjust auto exposure.Adjust auto exposure. (OCR)Adj. manual expo.(Mixed)Adj. manual expo.(Text)Adj. manual expo.(Photo)
StandardStandardStandardStandardStandard
3 Touch the “Lighter” key or the “Darker” key, as appropriate, tomove the cursor on the exposure scale and adjust theexposure as desired.
Inch specifications
Adjust copy exposure defaul t set t ing. (Manual, Text)
Defaul t set t ing - Copy defaul t
Lighter Darker
Adj. manual expo. (Text) CloseBack
Metric specifications
Adjust defaul t set t ing of copy exposure. (Manual, Text)
Back CloseAdj. manual expo. (Text)
Default setting - Copy default
Lighter Darker
NOTE
If you want to quit the displayed setting without changing it, touch the“Back” key. The touch panel will return to the screen in step 2.
4 Touch the “Close” key. The touch panel will return to thescreen in step 2.
5 Touch the “Close” key once again. The touch panel will returnto the “Default setting”screen.
6 Touch the “End” key. The touch panel will return to thecontents of the “Basic” tab.

Section 7 COPIER MANAGEMENT FUNCTIONS
7-77
● Manual exposure adjustment (photo mode)
Perform the following procedure to adjust the median exposure valuewhen the photo mode is selected for the image quality.
1 Display the “Copy default” screen.(See “(5) Accessing the copy default settings” on page 7-62.)
Inch specifications
Default setting
Copydefault
Machinedefault
Language Management
End
BOXManagement
Bypasssetting
Document Management
Registerorig. size
Printreport
Countercheck
UserAdjustment
Default setting / Counter
Metric specifications
Default setting
Copydefault
Machinedefault
Language Management
End
Hard DiskManagement
Bypasssetting
Document Management
Registerorig. size
Printreport
Countercheck
UserAdjustment
Default setting / Counter
2 Select “Adj. manual expo. (Photo)” in the settings list on theleft side of the touch panel and then touch the “Change #”key.The “Adj. manual expo. (Photo)” screen will be displayed.
Inch specifications
Copy default
Change #
Default setting
Adjust auto exposure.Adjust auto exposure. (OCR)Adj. manual expo.(Mixed)Adj. manual expo.(Text)Adj. manual expo.(Photo)
StandardStandardStandardStandardStandard
Default menu
Down
Setting modeUp
Close
Default setting / Counter
Metric specifications
Default setting / Counter
Copy default
Up
Down
Change #
Close
Default setting
Default menu Setting mode
Adjust auto exposure.Adjust auto exposure. (OCR)Adj. manual expo.(Mixed)Adj. manual expo.(Text)Adj. manual expo.(Photo)
StandardStandardStandardStandardStandard
3 Touch the “Lighter” key or the “Darker” key, as appropriate, tomove the cursor on the exposure scale and adjust theexposure as desired.
Inch specifications
Adjust copy exposure defaul t set t ing. (Manual, Photo)
Adj. manual expo. (Photo)
Defaul t set t ing - Copy defaul t
Lighter Darker
CloseBack
Metric specifications
Adjust defaul t set t ing of copy exposure. (Manual, Photo)
Back CloseAdj. manual expo. (Photo)
Default setting - Copy default
Lighter Darker
NOTE
If you want to quit the displayed setting without changing it, touch the“Back” key. The touch panel will return to the screen in step 2.
4 Touch the “Close” key. The touch panel will return to thescreen in step 2.
5 Touch the “Close” key once again. The touch panel will returnto the “Default setting”screen.
6 Touch the “End” key. The touch panel will return to thecontents of the “Basic” tab.

Section 7 COPIER MANAGEMENT FUNCTIONS
7-78
● Sort/Finished mode ON/OFF
Perform the following procedure to determine whether or not the Sortand/or the Finished modes will be the default setting in the initialmode.
1 Display the “Copy default” screen.(See “(5) Accessing the copy default settings” on page 7-62.)
Inch specifications
Default setting
Copydefault
Machinedefault
Language Management
End
BOXManagement
Bypasssetting
Document Management
Registerorig. size
Printreport
Countercheck
UserAdjustment
Default setting / Counter
Metric specifications
Default setting
Copydefault
Machinedefault
Language Management
End
Hard DiskManagement
Bypasssetting
Document Management
Registerorig. size
Printreport
Countercheck
UserAdjustment
Default setting / Counter
2 Select “Sort” in the settings list on the left side of the touchpanel and then touch the “Change #” key.The “Sort” screen will be displayed.
Inch specifications
Default setting / Counter
Copy default
Change #
Default setting
SortAuto RotationDefault margin widthDefault erase widthPreset limit
Sort : On / Offset : OffRotateLeft 1/4" 0"Border 1/4" Center 1/2"999 Set
Default menu
Down
Setting modeUp
Close
Metric specifications
Default setting / Counter
Copy default
SortAuto RotationDefault margin widthDefault erase widthPreset limit
Sort : On / Group : OffRotateLeft 6mm 0mmBorder 6mm Center 12mm999 Set
Up
Down
Change #
Close
Default setting
Default menu Setting mode
3 Touch the “Sort:On” key under “Sort” if you want to make theSort mode the default setting in the initial mode.
Inch specifications
OffsetSort
Off
On
Select default mode for sort, ON or OFF.
Sort
Defaul t set t ing - Copy defaul t
CloseBack
Sort : Off
Sort : On
Metric specifications
Off
Sort Group
1 set
Back Close
Select default mode of sort, ON or OFF.
Sort
Default setting - Copy default
Sort : Off
Sort : On
4 Touch the “On” [“1 set”] key under “Offset” [“Group”] if youwant to make the Finished mode the default setting in theinitial mode.• In metric specification copiers, if you select “Sort:Off” under
“Sort”, the “1 set” key that appears under “Group” willchange to the “Output each page” key.
NOTE
If you want to quit the displayed setting without changing it, touch the“Back” key. The touch panel will return to the screen in step 2.
5 Touch the “Close” key. The touch panel will return to thescreen in step 2.
6 Touch the “Close” key once again. The touch panel will returnto the “Default setting”screen.
7 Touch the “End” key. The touch panel will return to thecontents of the “Basic” tab.

Section 7 COPIER MANAGEMENT FUNCTIONS
7-79
● Auto Rotation mode ON/OFF
Perform the following procedure to determine whether or not the AutoRotation mode will be the default setting in the initial mode.
1 Display the “Copy default” screen.(See “(5) Accessing the copy default settings” on page 7-62.)
Inch specifications
Default setting
Copydefault
Machinedefault
Language Management
End
BOXManagement
Bypasssetting
Document Management
Registerorig. size
Printreport
Countercheck
UserAdjustment
Default setting / Counter
Metric specifications
Default setting
Copydefault
Machinedefault
Language Management
End
Hard DiskManagement
Bypasssetting
Document Management
Registerorig. size
Printreport
Countercheck
UserAdjustment
Default setting / Counter
2 Select “Auto Rotation” in the settings list on the left side ofthe touch panel and then touch the “Change #” key.The “Auto Rotation” screen will be displayed.
Inch specifications
Default setting / Counter
Copy default
Change #
Default setting
SortAuto RotationDefault margin widthDefault erase widthPreset limit
Sort : On / Offset : OffRotateLeft 1/4" 0"Border 1/4" Center 1/2"999 Set
Default menu
Down
Setting modeUp
Close
Metric specifications
Default setting / Counter
Copy default
SortAuto RotationDefault margin widthDefault erase widthPreset limit
Sort : On / Group : OffRotateLeft 6mm 0mmBorder 6mm Center 12mm999 Set
Up
Down
Change #
Close
Default setting
Default menu Setting mode
3 Touch the “Rotate” key if you want to make the Auto Rotationmode the default setting in the initial mode.
Inch specifications
Select default mode for Auto Rotation, ON or OFF.
Auto Rotation
Defaul t set t ing - Copy defaul t
CloseBack
No Rotate
Rotate
Metric specifications
Back Close
Select default mode of Auto Rotation, ON or OFF.
Auto Rotation
Default setting - Copy default
No rotate
Rotate
NOTE
If you want to quit the displayed setting without changing it, touch the“Back” key. The touch panel will return to the screen in step 2.
4 Touch the “Close” key. The touch panel will return to thescreen in step 2.
5 Touch the “Close” key once again. The touch panel will returnto the “Default setting”screen.
6 Touch the “End” key. The touch panel will return to thecontents of the “Basic” tab.

Section 7 COPIER MANAGEMENT FUNCTIONS
7-80
● Margin width
Perform the following procedure to determine the default value of thelocation and width of the margins in the margin mode.
1 Display the “Copy default” screen.(See “(5) Accessing the copy default settings” on page 7-62.)
Inch specifications
Default setting
Copydefault
Machinedefault
Language Management
End
BOXManagement
Bypasssetting
Document Management
Registerorig. size
Printreport
Countercheck
UserAdjustment
Default setting / Counter
Metric specifications
Default setting
Copydefault
Machinedefault
Language Management
End
Hard DiskManagement
Bypasssetting
Document Management
Registerorig. size
Printreport
Countercheck
UserAdjustment
Default setting / Counter
2 Select “Default margin width” in the settings list on the leftside of the touch panel and then touch the “Change #” key.The “Default margin width” screen will be displayed.
Inch specifications
Default setting / Counter
Copy default
Change #
Default setting
SortAuto RotationDefault margin widthDefault erase widthPreset limit
Sort : On / Offset : OffRotateLeft 1/4" 0"Border 1/4" Center 1/2"999 Set
Default menu
Down
Setting modeUp
Close
Metric specifications
Default setting / Counter
Copy default
SortAuto RotationDefault margin widthDefault erase widthPreset limit
Sort : On / Group : OffRotateLeft 6mm 0mmBorder 6mm Center 12mm999 Set
Up
Down
Change #
Close
Default setting
Default menu Setting mode
3 Touch the “O” key or the “P” key, and the “M” key or the “N”key, as desired, to change the default margins and marginwidths to the desired setting.
Inch specifications
Left
"
"
(0~3/4)
(0~3/4)
Adjust defaul t set t ing of margin width.
Defaul t set t ing - Copy defaul t
Front page
1/4
0
Default margin width CloseBack
Metric specifications
Default margin width Back Close
mm
mm
(0~18)
(0~18)
Adjust default setting of margin width.
Default setting - Copy default
Front page
6
0
Left
NOTE
If you want to quit the displayed setting without changing it, touch the“Back” key. The touch panel will return to the screen in step 2.
4 Touch the “Close” key. The touch panel will return to thescreen in step 2.
5 Touch the “Close” key once again. The touch panel will returnto the “Default setting”screen.
6 Touch the “End” key. The touch panel will return to thecontents of the “Basic” tab.

Section 7 COPIER MANAGEMENT FUNCTIONS
7-81
● Erased border width
Perform the following procedure to determine the default value for thewidth of the border to be erased in the two border erase modes.
1 Display the “Copy default” screen.(See “(5) Accessing the copy default settings” on page 7-62.)
Inch specifications
Default setting
Copydefault
Machinedefault
Language Management
End
BOXManagement
Bypasssetting
Document Management
Registerorig. size
Printreport
Countercheck
UserAdjustment
Default setting / Counter
Metric specifications
Default setting
Copydefault
Machinedefault
Language Management
End
Hard DiskManagement
Bypasssetting
Document Management
Registerorig. size
Printreport
Countercheck
UserAdjustment
Default setting / Counter
2 Select “Default erase width” in the settings list on the left sideof the touch panel and then touch the “Change #” key.The “Default erase width” screen will be displayed.
Inch specifications
Default setting / Counter
Copy default
Change #
Default setting
SortAuto RotationDefault margin widthDefault erase widthPreset limit
Sort : On / Offset : OffRotateLeft 1/4" 0"Border 1/4" Center 1/2"999 Set
Default menu
Down
Setting modeUp
Close
Metric specifications
Default setting / Counter
Copy default
SortAuto RotationDefault margin widthDefault erase widthPreset limit
Sort : On / Group : OffRotateLeft 6mm 0mmBorder 6mm Center 12mm999 Set
Up
Down
Change #
Close
Default setting
Default menu Setting mode
3 Touch the “+” key or the “-” key under the “Border” and“Center” fields to change the displayed widths to thosedesired.
Inch specifications
Border Center" "
Adjust defaul t set t ing of erase width.
Defaul t set t ing - Copy defaul t
1/41/2
++– –
(0~3/4) (0~11/2)
Default erase width CloseBack
Metric specifications
Default erase width Back Close
Border Centermm mm
(0~18) (0~36)
Adjust default setting of erase width.
Default setting - Copy default
6 12
++– –
NOTE
If you want to quit the displayed setting without changing it, touch the“Back” key. The touch panel will return to the screen in step 2.
4 Touch the “Close” key. The touch panel will return to thescreen in step 2.
5 Touch the “Close” key once again. The touch panel will returnto the “Default setting”screen.
6 Touch the “End” key. The touch panel will return to thecontents of the “Basic” tab.

Section 7 COPIER MANAGEMENT FUNCTIONS
7-82
● Copy limit
Perform the following procedure to set the limit for the number ofcopies (or copy sets) that can be made at a time.
1 Display the “Copy default” screen.(See “(5) Accessing the copy default settings” on page 7-62.)
Inch specifications
Default setting
Copydefault
Machinedefault
Language Management
End
BOXManagement
Bypasssetting
Document Management
Registerorig. size
Printreport
Countercheck
UserAdjustment
Default setting / Counter
Metric specifications
Default setting
Copydefault
Machinedefault
Language Management
End
Hard DiskManagement
Bypasssetting
Document Management
Registerorig. size
Printreport
Countercheck
UserAdjustment
Default setting / Counter
2 Select “Preset limit” in the settings list on the left side of thetouch panel and then touch the “Change #” key.The “Preset limit” screen will be displayed.
Inch specifications
Default setting / Counter
Copy default
Change #
Default setting
SortAuto RotationDefault margin widthDefault erase widthPreset limit
Sort : On / Offset : OffRotateLeft 1/4" 0"Border 1/4" Center 1/2"999 Set
Default menu
Down
Setting modeUp
Close
Metric specifications
Default setting / Counter
Copy default
SortAuto RotationDefault margin widthDefault erase widthPreset limit
Sort : On / Group : OffRotateLeft 6mm 0mmBorder 6mm Center 12mm999 Set
Up
Down
Change #
Close
Default setting
Default menu Setting mode
3 Touch the “+” key or the “-” key to change the copy limit tothe desired setting.
Inch specifications
Set output quant i ty.
Preset limit
Defaul t set t ing - Copy defaul t
Set
~
CloseBack
+
Metric specifications
Select copy preset in one job (# key).
Back ClosePreset limit
Default setting - Copy default
Set
~
NOTE
If you want to quit the displayed setting without changing it, touch the“Back” key. The touch panel will return to the screen in step 2.
4 Touch the “Close” key. The touch panel will return to thescreen in step 2.
5 Touch the “Close” key once again. The touch panel will returnto the “Default setting”screen.
6 Touch the “End” key. The touch panel will return to thecontents of the “Basic” tab.

Section 7 COPIER MANAGEMENT FUNCTIONS
7-83
● Repeat copying ON/OFF
Perform the following procedure to set whether or not to prohibitrepeat copying, as well as whether or not to make repeat copying thedefault setting in the initial mode.
NOTE
This setting is displayed when the optional Hard Disk is installed.
1 Display the “Copy default” screen.(See “(5) Accessing the copy default settings” on page 7-62.)
Inch specifications
Default setting
Copydefault
Machinedefault
Language Management
End
BOXManagement
Bypasssetting
Document Management
Registerorig. size
Printreport
Countercheck
UserAdjustment
Default setting / Counter
Metric specifications
Default setting
Copydefault
Machinedefault
Language Management
End
Hard DiskManagement
Bypasssetting
Document Management
Registerorig. size
Printreport
Countercheck
UserAdjustment
Default setting / Counter
2 Select “Modify Copy” in the settings list on the left side of thetouch panel and then touch the “Change #” key.The “Modify Copy” screen will be displayed.
Inch specifications
Default setting / Counter
Copy default
Change #
Default setting
Preset limitModify Copy Display register keyCustomize(Main function)Customize(Add function)
999 SetOn / Default OffOn
Default menu
Down
Setting modeUp
Close
Metric specifications
Default setting / Counter
Copy default
Preset limitModify copy Display"Register"keyCustomize(Main function)Customize(Add function)
999 SetOn / Default OffOn
Up
Down
Change #
Close
Default setting
Default menu Setting mode
3 If you want to prohibit repeat copying, touch the “Off” key. Ifyou want to make repeat copying the default setting in theinitial mode, touch the “On” key.
Inch specifications
Modify Copy
Select ON to act ivate Modify Copy or OFFto inact ivate i t .
Defaul t set t ing - Copy defaul t
CloseBack
Defaul tFunct ion
Off
On
Off
On
Metric specifications
Modify copy Back Close
Select ON to activate Modify Copy or OFF to inactivate it.
Off Off
Default setting - Copy default
Function Default
On On
NOTE
If you want to quit the displayed setting without changing it, touch the“Back” key. The touch panel will return to the screen in step 2.
4 Touch the “Close” key. The touch panel will return to thescreen in step 2.
5 Touch the “Close” key once again. The touch panel will returnto the “Default setting”screen.
6 Touch the “End” key. The touch panel will return to thecontents of the “Basic” tab.

Section 7 COPIER MANAGEMENT FUNCTIONS
7-84
● Registration keys ON/OFF
Perform the following procedure to set whether or not to allow a“Register” key to be displayed in the screen for those function andmodes which can be registered under the registration keys. Functionsand/or modes can only be registered under registration keys throughthe “Register” key.
1 Display the “Copy default” screen.(See “(5) Accessing the copy default settings” on page 7-62.)
Inch specifications
Default setting
Copydefault
Machinedefault
Language Management
End
BOXManagement
Bypasssetting
Document Management
Registerorig. size
Printreport
Countercheck
UserAdjustment
Default setting / Counter
Metric specifications
Default setting
Copydefault
Machinedefault
Language Management
End
Hard DiskManagement
Bypasssetting
Document Management
Registerorig. size
Printreport
Countercheck
UserAdjustment
Default setting / Counter
2 Select “Display register key” [“Display "Register" key”] in thesettings list on the left side of the touch panel and then touchthe “Change #” key.The “Display register key” [“Display "Register" key”] screenwill be displayed.
Inch specifications
Default setting / Counter
Copy default
Change #
Default setting
Preset limitModify Copy Display register keyCustomize(Main function)Customize(Add function)
999 SetOn / Default OffOn
Default menu
Down
Setting modeUp
Close
Metric specifications
Default setting / Counter
Copy default
Preset limitModify copy Display"Register"keyCustomize(Main function)Customize(Add function)
999 SetOn / Default OffOn
Up
Down
Change #
Close
Default setting
Default menu Setting mode
3 If you want the “Register” key to be displayed, touch the “On”key. If you do NOT want it to be displayed, touch the “Off”key.
Inch specifications
Select One touch key On/Off.Able to use Register key on each screen.
Display register key
On
Off
Defaul t set t ing - Copy defaul t
CloseBack
Metric specifications
Select to show Register key On/Off.Able to use Register key to register/delete at each page.
Back CloseDisplay"Register"key
On
Off
Default setting - Copy default
NOTE
If you want to quit the displayed setting without changing it, touch the“Back” key. The touch panel will return to the screen in step 2.
4 Touch the “Close” key. The touch panel will return to thescreen in step 2.
5 Touch the “Close” key once again. The touch panel will returnto the “Default setting”screen.
6 Touch the “End” key. The touch panel will return to thecontents of the “Basic” tab.

Section 7 COPIER MANAGEMENT FUNCTIONS
7-85
● Customize screen layout (Main functions)
Perform the following procedure to change the order of the mainfunctions and modes that are displayed in the “Basic” and the “Userchoice” tabs in order to make the display more appropriate to the wayyou use the copier.
1 Display the “Copy default” screen.(See “(5) Accessing the copy default settings” on page 7-62.)
Inch specifications
Default setting
Copydefault
Machinedefault
Language Management
End
BOXManagement
Bypasssetting
Document Management
Registerorig. size
Printreport
Countercheck
UserAdjustment
Default setting / Counter
Metric specifications
Default setting
Copydefault
Machinedefault
Language Management
End
Hard DiskManagement
Bypasssetting
Document Management
Registerorig. size
Printreport
Countercheck
UserAdjustment
Default setting / Counter
2 Select “Customize(Main function)” in the settings list on theleft side of the touch panel and then touch the “Change #”key.The “Customize(Main function)” screen will be displayed.
Inch specifications
Default setting / Counter
Copy default
Change #
Default setting
Preset limitModify Copy Display register keyCustomize(Main function)Customize(Add function)
999 SetOn / Default OffOn
Default menu
Down
Setting modeUp
Close
Metric specifications
Default setting / Counter
Copy default
Preset limitModify copy Display"Register"keyCustomize(Main function)Customize(Add function)
999 SetOn / Default OffOn
Up
Down
Change #
Close
Default setting
Default menu Setting mode
3 If you want to change the order of the basic functions andmodes, touch the “▲” or the “▼” cursor key to select the itemyou want to move. Then touch the “Move ahead” key or the“Move behind” [“Move backward”] key to move that item andchange the order of display. The final display of the basicfunctions and modes will be in accordance with the numbersin the list and those shown in the tabs to the left of that list.
Inch specifications
Customize(Main function)
Default setting - Copy default
Basic
MoveAhead
User choice
Exposure Mode
Register mode
Reduce/EnlargeSort/Finished1/2 sided
Orig. qualityOriginal size
CloseBack
MoveBehind
Metric specifications
Back CloseCustomize(Main function)
Default setting - Copy default
Basic Register mode
User choice
Move ahead
Move backward
Exposure ModeReduce/EnlargeSort/Finished1/2 sided
Quality origOriginal size
NOTE
If you want to quit the displayed setting without changing it, touch the“Back” key. The touch panel will return to the screen in step 2.
4 Touch the “Close” key. The touch panel will return to thescreen in step 2.
5 Touch the “Close” key once again. The touch panel will returnto the “Default setting”screen.
6 Touch the “End” key. The touch panel will return to thecontents of the “Basic” tab.

Section 7 COPIER MANAGEMENT FUNCTIONS
7-86
● Customize screen layout (Add functions)
Perform the following procedure to add often-used functions and/ormodes, or to change the order of their layout, in order to make thedisplay more appropriate to the way you use the copier.
1 Display the “Copy default” screen.(See “(5) Accessing the copy default settings” on page 7-62.)
Inch specifications
Default setting
Copydefault
Machinedefault
Language Management
End
BOXManagement
Bypasssetting
Document Management
Registerorig. size
Printreport
Countercheck
UserAdjustment
Default setting / Counter
Metric specifications
Default setting
Copydefault
Machinedefault
Language Management
End
Hard DiskManagement
Bypasssetting
Document Management
Registerorig. size
Printreport
Countercheck
UserAdjustment
Default setting / Counter
2 Select “Customize(Add function)” in the settings list on theleft side of the touch panel and then touch the “Change #”key.The “Customize(Add function)” screen will be displayed.
Inch specifications
Default setting / Counter
Copy default
Change #
Default setting
Preset limitModify Copy Display register keyCustomize(Main function)Customize(Add function)
999 SetOn / Default OffOn
Default menu
Down
Setting modeUp
Close
Metric specifications
Default setting / Counter
Copy default
Preset limitModify copy Display"Register"keyCustomize(Main function)Customize(Add function)
999 SetOn / Default OffOn
Up
Down
Change #
Close
Default setting
Default menu Setting mode
3 If you want to add functions and/or modes to the “Userchoice” tab, touch the “▲” or the “▼” cursor key under the liston the right to select the item you want to add. Then touchthe “▲” or the “▼” cursor key under the list on the left toselect in what order you want it to be added in that tab.Finally, touch the “b” key to add the selected item to the“User choice” tab.
Inch specifications
Customize(Add function)
Defaul t set t ing - Copy defaul t
Basic
MarginBorder EraseCombineNoneNoneNone
Select paperCombineAuto SelectionBatch scanning
Addition mode
None
Margin
User choice
Register mode
CloseBack
Metric specifications
Back CloseCustomize(Add function)
Default setting - Copy default
Basic
MarginEraceMergeNoneNoneNone
Select paperMergeAuto selectionBatch scanning
Addition Mode
None
Margin
User choice
Register mode
NOTE
If you want to quit the displayed setting without changing it, touch the“Back” key. The touch panel will return to the screen in step 2.
4 Touch the “Close” key. The touch panel will return to thescreen in step 2.
5 Touch the “Close” key once again. The touch panel will returnto the “Default setting”screen.
6 Touch the “End” key. The touch panel will return to thecontents of the “Basic” tab.

Section 7 COPIER MANAGEMENT FUNCTIONS
7-87
3. Multi-bypass tray paper settings
(1) Paper size and type
Perform the following procedure in order to use the multi-bypass trayto feed copy paper.
1 With the content of the “Basic” tab displayed, press the[Default Setting/Counter] key.The “Default setting” screen will be displayed.
2 Touch the “Bypass setting” key.The “Bypass setting” screen will be displayed.
Inch specifications
Default setting
Copydefault
Machinedefault
Language Management
End
BOXManagement
Bypasssetting
Document Management
Registerorig. size
Printreport
Countercheck
UserAdjustment
Default setting / Counter
Metric specifications
Default setting
Copydefault
Machinedefault
Language Management
End
Hard DiskManagement
Bypasssetting
Document Management
Registerorig. size
Printreport
Countercheck
UserAdjustment
Default setting / Counter
3 Specify the desired method of selecting the paper size.If you select “Auto Detection” here, select the desired unit ofmeasure (“Centimeter” or “Inch”) as well, and then go directlyto step 5. If you want to select a custom paper size, touch the“Input size” and then go to the next step.
Inch specifications
Bypass setting
Paper size Unit Paper type
Auto
Select paper type
AutoDetection
Input size
Centimeter
Inch
OthersStandard
Default setting / Counter A4
Back Close
Auto
Metric specifications
Bypass setting
Paper size Unit Paper type
Selectpaper type
Auto Detection
Input size
Centimeter
Inch
OthersStandard
Default setting / Counter
Back Close
Auto
Auto
4 Touch the “+” key or the “-” key to change each of thedisplayed sizes (length and width) to the desired settings.* In metric specification copiers, the desired sizes can also
be entered directly by touching the corresponding “#-Keys”key and then using the keypad.
Inch specifications
Paper size (37/8~115/8) (57/8~17)
Input size
AutoDetection
OthersStandard
297x432mm
# keys # keys
1111/16 169/16Y X" "
+ +––
Bypass setting
Paper type
Select paper type
Default setting / Counter
Back Close
Auto
Auto
Metric specifications
Bypass setting
Paper size (98~297) (148~432)Paper type
Selectpaper type
Input size
Auto Detection
OthersStandard
Default setting / Counter
#-Keys #-Keys
297 420mm mm
+ +––
Back Close
Y X
Auto
Auto
5 Designate the paper type by pressing the “Select paper type”key or the “Auto” key, as desired.If you pressed the “Select paper type” key, proceed to thenext step.If you pressed the “Auto” key, proceed directly to step 7.
Inch specifications
Bypass setting
Paper size Unit Paper type
Auto
Select paper type
AutoDetection
Input size
Centimeter
Inch
OthersStandard
Default setting / Counter A4
Back Close
Auto
Metric specifications
Bypass setting
Paper size Unit Paper type
Selectpaper type
Auto Detection
Input size
Centimeter
Inch
OthersStandard
Default setting / Counter
Back Close
Auto
Auto

Section 7 COPIER MANAGEMENT FUNCTIONS
7-88
(2) Selecting other standard sizes
Perform the following procedure when you want to print out onto otherstandard sizes of special paper.
1 With the content of the “Basic” tab displayed, press the[Default setting/Counter] key.The “Default setting” screen will be displayed.
2 Touch the “Bypass setting” key.The “Bypass setting” screen will be displayed.
Inch specifications
Default setting
Copydefault
Machinedefault
Language Management
End
BOXManagement
Bypasssetting
Document Management
Registerorig. size
Printreport
Countercheck
UserAdjustment
Default setting / Counter
Metric specifications
Default setting
Copydefault
Machinedefault
Language Management
End
Hard DiskManagement
Bypasssetting
Document Management
Registerorig. size
Printreport
Countercheck
UserAdjustment
Default setting / Counter
3 Touch the “Others Standard” key.
Inch specifications
Bypass setting
Paper size Unit Paper type
Auto
Select paper type
AutoDetection
Input size
Centimeter
Inch
OthersStandard
Default setting / Counter A4
Back Close
Auto
Metric specifications
Bypass setting
Paper size Unit Paper type
Selectpaper type
Auto Detection
Input size
Centimeter
Inch
OthersStandard
Default setting / Counter
Back Close
Auto
Auto
NOTE
If you selected “Auto”, the designated paper type will be automaticallychanged in accordance with the selected paper size.
6 Touch the key that corresponds to the type of paper to beused, and then touch the “Close” key.
Inch specifications
Plain
Transp-arency
Rough
Vellum
Labels
Recycled
Preprinted
Bond
Cardstock
Color
Prepunched
Letterhead
Thickpaper
Default setting / Counter
Select paper type Back Close
Custom 2
Custom 1
Custom 3
Custom 4
Custom 6
Custom 5
Custom 7
Custom 8
Envelope
Highquality
Metric specifications
Plain
Transp-arency
Rough
Vellum
Labels
Recycled
Preprinted
Bond
Cardstock
Colour
Prepunched
Letterhead
Thickpaper
Default setting / Counter
Select paper type Back Close
Custom 2
Custom 1
Custom 3
Custom 4
Custom 6
Custom 5
Custom 7
Custom 8
Envelope
Highquality
IMPORTANT!
BE ABSOLUTELY certain to select the paper type that corresponds tothe paper that is to be used. If the paper being used and the selectpaper type differ, problems may occur in regard to the quality of thecopies.
7 Touch the “Close” key once again. The touch panel will returnto the screen in step 2. Touch the “End” key. The touch panelwill return to the contents of the “Basic” tab.
Paper type
Cardstock
Envelope
Plain
Paper size
OUFUKU HAGAKI
Envelope size (ISO B5, Envelope DL,Envelope C5, Envelope C4, Comm.#10,Comm.#9, Comm.#6-3/4, MO, YOUKEI 2,YOUKEI 4)
Other sizes

Section 7 COPIER MANAGEMENT FUNCTIONS
7-89
4 Touch the “Select size” key. The “Select size” screen will bedisplayed.
Inch specifications
EXSelect size
ISO B5
Bypass setting
Paper size Paper type
Select paper type
AutoDetection
Input size
OthersStandard
Default setting / CounterPaper Size
Back Close
Auto
Auto
Metric specifications
Bypass setting
Paper size
EX
Paper type
Selectpaper type
Auto Detection
Input size
Select size
OthersStandard
Default setting / Counter
Back Close
Auto
Auto
5 Touch the key that corresponds to the size of paper you wantto use, and then touch the “Close” key. The touch panel willreturn to the screen in step 4.
Inch specifications
EnvelopeDL
EnvelopeC5
Comm.#6-3/4
EnvelopeC4
81/2x13"
Default setting / Counter
Select size Back Close
ISO B5
Comm.#9
MO
Comm.#10
OUFUKUHAGAKI
YOUKEI 2
8 K
16 K
YOUKEI 4
EX
Metric specifications
EnvelopeDL
EnvelopeC5
Comm.#6-3/4
EnvelopeC4
81/2x13"
Default setting / Counter
Select size Back Close
ISO B5
Comm.#9
MO
Comm.#10
OUFUKUHAGAKI
YOUKEI 2
8 K
16 K
YOUKEI 4
EX
6 Designate the paper type by pressing the “Select paper type”key or the “Auto” key, as desired.If you pressed the “Select paper type” key, proceed to thenext step.If you pressed the “Auto” key, proceed directly to step 8.
Inch specifications
EXSelect size
ISO B5
Bypass setting
Paper size Paper type
Select paper type
AutoDetection
Input size
OthersStandard
Default setting / CounterPaper Size
Back Close
Auto
Auto
Metric specifications
Bypass setting
Paper size
EX
Paper type
Selectpaper type
Auto Detection
Input size
Select size
OthersStandard
Default setting / Counter
Back Close
Auto
Auto
NOTE
If you selected “Auto”, the designated paper type will be automaticallychanged in accordance with the selected paper size.
7 Touch the key that corresponds to the type of paper to beused, and then touch the “Close” key.
Inch specifications
Plain
Transp-arency
Rough
Vellum
Labels
Recycled
Preprinted
Bond
Cardstock
Color
Prepunched
Letterhead
Thickpaper
Default setting / Counter
Select paper type Back Close
Custom 2
Custom 1
Custom 3
Custom 4
Custom 6
Custom 5
Custom 7
Custom 8
Envelope
Highquality
Metric specifications
Plain
Transp-arency
Rough
Vellum
Labels
Recycled
Preprinted
Bond
Cardstock
Colour
Prepunched
Letterhead
Thickpaper
Default setting / Counter
Select paper type Back Close
Custom 2
Custom 1
Custom 3
Custom 4
Custom 6
Custom 5
Custom 7
Custom 8
Envelope
Highquality
IMPORTANT!
BE ABSOLUTELY certain to select the paper type that corresponds tothe paper that is to be used. If the paper being used and the selectpaper type differ, problems may occur in regard to the quality of thecopies.
8 Touch the “Close” key. The touch panel will return to thescreen in step 2. Touch the “End” key. The touch panel willreturn to the contents of the “Basic” tab.
Paper type
Cardstock
Envelope
Plain
Paper size
OUFUKU HAGAKI
Envelope size (ISO B5, Envelope DL,Envelope C5, Envelope C4, Comm.#10,Comm.#9, Comm.#6-3/4, MO, YOUKEI 2,YOUKEI 4)
Other sizes

Section 7 COPIER MANAGEMENT FUNCTIONS
7-90
4. Original size registration
Perform the following procedure in order to register a custom originalsize that can be used under the “Original size selection” procedure.
1 With the content of the “Basic” tab displayed, press the[Default Setting/Counter] key.The “Default setting”screen will be displayed.
2 Touch the “Register orig. size” key.The “Register orig. size” screen will be displayed.
Inch specifications
Default setting
Copydefault
Machinedefault
Language Management
End
BOXManagement
Bypasssetting
Document Management
Registerorig. size
Printreport
Countercheck
UserAdjustment
Default setting / Counter
Metric specifications
Default setting
Copydefault
Machinedefault
Language Management
End
Hard DiskManagement
Bypasssetting
Document Management
Registerorig. size
Printreport
Countercheck
UserAdjustment
Default setting / Counter
3 Select of the “Original size (custom 1)” to “Original size(custom 4)” settings under the “Default menu” column on theleft side of the touch panel and then touch the “Change #”key.The corresponding setting screen will be displayed.
Inch specifications
Register orig. size
Original size (custom 1)Original size (custom 2)Original size (custom 3)Original size (custom 4)
2x2"2x2"2x2"2x2"
Default menu
Down
Change #
Close
Setting mode Up
Default setting
Default setting / Counter
Metric specifications
Register orig. size
Original size (custom 1)Original size (custom 2)Original size (custom 3)Original size (custom 4)
50x50mm50x50mm50x50mm50x50mm
Default menu
Down
Change #
Close
Setting mode Up
Default setting
Default setting / Counter
4 Touch the “+” key or the “-” key to change each of thedisplayed sizes (Y = width and X = length) to the desiredsettings.If you do not want to register a custom original size, touchthe “Off” key.
Inch specifications
CloseBackOriginal size (custom 1)
Register custom size original.
Off
On
Default setting - Register orig. size
22(2~115/8) (2~17)
""
Metric specifications
CloseBackOriginal size (custom 1)
Register custom size original.
Off
On
Default setting - Register orig. size
5050
(50~297) (50~432)
mmmm
5 Touch the “Close” key. The touch panel will return to thescreen in step 3.
6 Touch the “Close” key. The touch panel will return to thescreen in step 2. Touch the “End” key. The touch panel willreturn to the contents of the “Basic” tab.

Section 7 COPIER MANAGEMENT FUNCTIONS
7-91
5. Drum refresh
Perform the following procedure if the copy image becomes blurred orif white spots which are not on the originals appear on the copies. Thedrum refreshing operation will take approximately 5 minutes.
1 Set 11" x 8 1/2", 11" x 17", A4 or A3 size paper on the multi-bypass tray.
2 With the content of the “Basic” tab displayed, press the[Default Setting/Counter] key.The “Default setting” screen will be displayed.
3 Touch the “User adjustment” key.
Inch specifications
Default setting
Copydefault
Machinedefault
Language Management
End
BOXManagement
Bypasssetting
Document Management
Registerorig. size
Printreport
Countercheck
UserAdjustment
Default setting / Counter
Metric specifications
Default setting
Copydefault
Machinedefault
Language Management
End
Hard DiskManagement
Bypasssetting
Document Management
Registerorig. size
Printreport
Countercheck
UserAdjustment
Default setting / Counter
4 Touch the “Drum refresh” key. The “Drum refresh” screen willbe displayed.
Inch specifications
Default setting / Counter
CloseUser adjustment
Default setting
Drumrefresh
Metric specifications
Default setting / Counter
CloseUser adjustment
Default setting
Drumrefresh

Section 7 COPIER MANAGEMENT FUNCTIONS
7-92
5 Touch the “On” key. The drum refreshing process will begin.
Inch specifications
Close
Default setting - User adjustment
Refresh the drum when image blur or white dots appearon the image.
Drum refresh
On
Metric specifications
Close
Default setting - User adjustment
Refresh the drum when image blur or white dots appearon the image.
Drum refresh
On
The “Now drum refreshing.” message will appear and thepaper is fed from the multi-bypass tray to execute drumrefreshing.
Inch specifications
Orig. page Count/Set
1 sidedSort
Now drum refreshing.
Output
Inner tray
11x81/2"1 sidedRear
----------
Metric specifications
Original Count/Set
1-sidedSort
Now drum refreshing.
Output
Inner tray
A41-sidedRtop / rear
----------
NOTE
To cancel drum refreshing, press the [Stop/Clear] key.
When drum refreshing completes after ejecting the paper,the touch panel will return to the “Drum refresh” screen.
6 Touch the “Close” key.The touch panel will return to the screen in step 4.
7 Touch the “Close” key.The touch panel will return to the screen in step 3.
8 Touch the “End” key.The touch panel will return to the contents of the “Basic” tab.

Section 7 COPIER MANAGEMENT FUNCTIONS
7-93
6. Checking the total counter and printing out the counter report
Perform this procedure when you want to check, on the touch panel,the total count of copies, etc., made on this machine as a whole. Youcan also print out the information as a counter report.
NOTES
• You can also check the total number of printouts made under eachof the optional printer, scanner a fax functions.
• You can additionally check the number of originals scanned on thismachine.
1 With the content of the “Basic” tab displayed, press the[Default Setting/Counter] key.The “Default setting”screen will be displayed.
2 Touch the “Counter check” key.The “Counter check” screen will be displayed.
Inch specifications
Default setting
Copydefault
Machinedefault
Language Management
End
BOXManagement
Bypasssetting
Document Management
Registerorig. size
Printreport
Countercheck
UserAdjustment
Default setting / Counter
Metric specifications
Default setting
Copydefault
Machinedefault
Language Management
End
Hard DiskManagement
Bypasssetting
Document Management
Registerorig. size
Printreport
Countercheck
UserAdjustment
Default setting / Counter
3 The total number of copies and printouts made will bedisplayed.If you want to print out a counter report, touch the “Printreport” key.
Inch specifications
Close
Default setting
Number print.
Num. of pages
Black & White:
Original:
Counter check
Printreport
1,073 - - - - - - - - - - - - - - 1,073
3 - - - - - - - 3- - - - - - -
Copy Printer Fax
Copy scanner Fax Total
Total
Metric specifications
Close
Default setting
Number print.
Num. of pages
Black & White:
Original:
Counter check
Printreport
1,073 - - - - - - - - - - - - - - 1,073
3 - - - - - - - 3- - - - - - -
Copy Printer Fax
Copy scanner Fax Total
Total
NOTE
Make sure there is 11" x 8 1/2" [A4] size paper loaded in one of thedrawers[cassettes] when you print out the counter report.
4 Once you are finished checking the counts, touch the “Close”key.The touch panel will return to the screen in step 2.
Inch specifications
Close
Default setting
Number print.
Num. of pages
Black & White:
Original:
Counter check
Printreport
1,073 - - - - - - - - - - - - - - 1,073
3 - - - - - - - 3- - - - - - -
Copy Printer Fax
Copy scanner Fax Total
Total
Metric specifications
Close
Default setting
Number print.
Num. of pages
Black & White:
Original:
Counter check
Printreport
1,073 - - - - - - - - - - - - - - 1,073
3 - - - - - - - 3- - - - - - -
Copy Printer Fax
Copy scanner Fax Total
Total
5 Touch the “End” key.The touch panel will return to the contents of the “Basic” tab.

Section 7 COPIER MANAGEMENT FUNCTIONS
7-94
7. Box management default settings
Perform the following settings in order to manage the “boxes” that are used under the document management functions.
NOTE
This setting is displayed when the optional Hard Disk is installed.
(1) Box settings
Setting
● Document list print out
● Reset box
● Box name & password /Clear data in box
● Document save time
Description
This procedure will allow you to print out a list of all of the images stored in the box for the formoverlay mode, of the documents stored in the shared data box or of the documents stored in thesynergy print boxes.
This procedure will delete all of the image data that is stored in the “Form” box, as well as thedocuments stored in the shared data box and the synergy print boxes. Make absolutely certainthat you do not need the corresponding data before you attempt to delete it.
This procedure will allow you to change the name and password for any one of the synergy printboxes as well as delete at one time all of the data registered in any one box. If you register apassword for any of these boxes, you will need to enter the registered password in order to printout or delete any documents that are stored win that box.
This procedure will allow you to select the length of time that will elapse before each job in asynergy print box is automatically deleted. Set this time to any number of days between 1 and 7.* This setting cannot be made independently for each box.
Referencepage
7-95
7-96
7-97
7-98
(2) Accessing the box management default settings
Perform the following procedure when you want to access the“Document Management” screen for each of the various boxmanagement default settings.
1 With the content of the “Basic” tab displayed, press the[Default Setting/Counter] key.The “Default setting/Counter” screen will be displayed.
2 Touch the “Document Management” key.
Inch specifications
Default setting
Copydefault
Machinedefault
Language Management
End
BOXManagement
Bypasssetting
Document Management
Registerorig. size
Printreport
Countercheck
UserAdjustment
Default setting / Counter
Metric specifications
Default setting
Copydefault
Machinedefault
Language Management
End
Hard DiskManagement
Bypasssetting
Document Management
Registerorig. size
Printreport
Countercheck
UserAdjustment
Default setting / Counter

Section 7 COPIER MANAGEMENT FUNCTIONS
7-95
(3) Making box management default settings
Perform the following procedure that corresponds to the desiredsetting.
● Document list print out
1 Touch the “Print the list” key under the box (“Form Box”,“Shared Data Box” or “Synergy Print Box”) for which youwant to print out the document list.
Inch specifications
Document Management
Document Management Close
Shared Data Box Synergy Print Box Form box
Print the list
Documentsave term
Reset Box
Print the list
Box editing
Reset Box
Print the list
Reset Box
Default setting
Metric specifications
Document management
Document management
Shared Data Box Synergy Print Box Form box
Close
Printthe list
Printthe list
Printthe list
Box editing
Document saving
Reset Box
Reset Box
Reset Box
Default setting
2 A document list will be printed out for that box. once print outis completed, the touch panel will return to the screen in step1.
3 Touch the “Close” key. The touch panel will return to the“Default setting”screen. Touch the “End” key. The touch panelwill return to the contents of the “Basic” tab.
3 Use the keypad to enter the 4-digit management code.The factory default setting for 30 cpm copiers is “3000”, for40 cpm copiers is “4000” and for 50 cpm copiers is “5000”.If the entered code matched the registered one, the“Document Management” screen will be displayed.
Inch specifications
Enter the administrator number Close
Metric specifications
Enter the administrator number Close
4 Touch the key that corresponds to the desired boxmanagement default setting.
Inch specifications
Document Management
Document Management Close
Shared Data Box Synergy Print Box Form box
Print the list
Documentsave term
Reset Box
Print the list
Box editing
Reset Box
Print the list
Reset Box
Default setting
Metric specifications
Document management
Document management
Shared Data Box Synergy Print Box Form box
Close
Printthe list
Printthe list
Printthe list
Box editing
Document saving
Reset Box
Reset Box
Reset Box
Default setting
NOTES
• It is possible for you to change the 4-digit management code.(See “Changing the management code” on page 7-56.)
• Refer to the desired procedure(s) explained under “(3) Making boxmanagement default settings” and perform the correspondingsetting(s).

Section 7 COPIER MANAGEMENT FUNCTIONS
7-96
● Reset box
1 Touch the “Reset Box” key under the box (“Form Box”,“Shared Data Box” or “Synergy Print Box”) that you want todelete all data for.A verification screen will be displayed.
Inch specifications
Document Management
Document Management Close
Shared Data Box Synergy Print Box Form box
Print the list
Documentsave term
Reset Box
Print the list
Box editing
Reset Box
Print the list
Reset Box
Default setting
Metric specifications
Document management
Document management
Shared Data Box Synergy Print Box Form box
Close
Printthe list
Printthe list
Printthe list
Box editing
Document saving
Reset Box
Reset Box
Reset Box
Default setting
2 Touch the “Yes” key or the “No” key, as appropriate.
Inch specifications
Shared Data Box
Reset this Box. Do you really want to reset?
Yes No
Stop
Metric specifications
Shared Data Box
Reset this box. Do you really want to reset?
Yes No
Stop
If you selected “Yes”, all the data in the selected box will bedeleted and the touch panel will return to the screen in step1. If you selected “No”, the touch panel will return to thescreen in step 1 without deleting any data.
3 Touch the “Close” key. The touch panel will return to the“Default setting” screen.Touch the “End” key. The touchpanel will return to the contents of the “Basic” tab.
● Box name & password / Clear data in box
1 Touch the “Box editing” key under “Synergy Print Box”. The“Box editing” screen will be displayed.
Inch specifications
Document Management
Document Management Close
Shared Data Box Synergy Print Box Form box
Print the list
Documentsave term
Reset Box
Print the list
Box editing
Reset Box
Print the list
Reset Box
Default setting
Metric specifications
Document management
Document management
Shared Data Box Synergy Print Box Form box
Close
Printthe list
Printthe list
Printthe list
Box editing
Document saving
Reset Box
Reset Box
Reset Box
Default setting
2 Either touch the synergy print box that contains theinformation to be modified, or enter its number using thekeypad. Then touch the “Enter” key.
Inch specifications
Box editing
Select box No.
Cancel
Box No.(with #key)
Enter1/ 5
Default setting - Document management
001 ABCD_0000001
002 EFGH_0000002
003
004 MNOP_0000004
005 QRST_0000005
006 UVWX_0000006
007 ABCD_0000101
008 EFGH_0000102
009 IJKL_0000103
010 MNOP_0000104
011 QRST_0000105
012
013 ABCD_0200101
014 EFGH_0200102
015 IJKL_0200103
016 MNOP_0200104
017 QRST_0200105
018 UVWX_0200106
019 ABCD_0500101
020 EFGH_0500102
Metric specifications
001 ABCD_0000001 006 UVWX_0000006 011 QRST_0000105 016 MNOP_0200104
002 EFGH_0000002 007 ABCD_0000101 012 017 QRST_0200105
003 008 EFGH_0000102 013 ABCD_0200101 018 UVWX_0200106
004 MNOP_0000004 009 IJKL_0000103 014 EFGH_0200102 019 ABCD_0500101
005 QRST_0000005 010 MNOP_0000104 015 IJKL_0200103 020 EFGH_0500102
Box editing
Select box No.
Job cancel
Box No.(With # key)
Enter1/5
Default setting - Document management
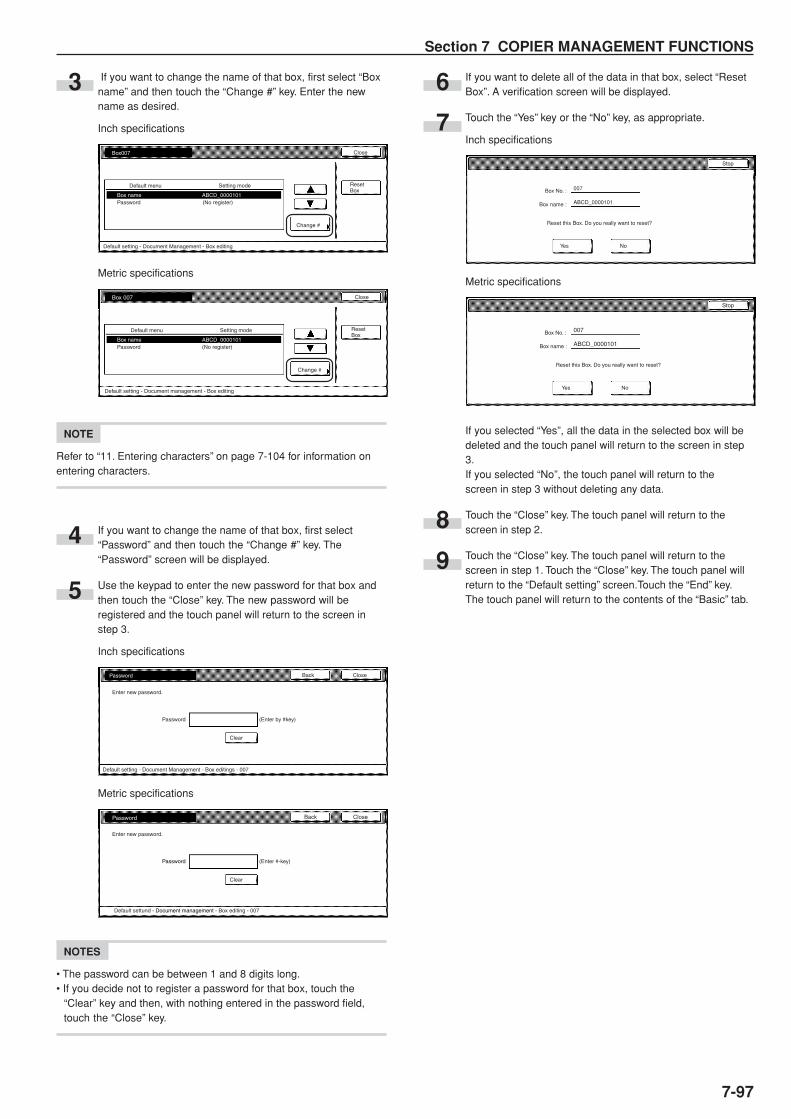
Section 7 COPIER MANAGEMENT FUNCTIONS
7-97
3 If you want to change the name of that box, first select “Boxname” and then touch the “Change #” key. Enter the newname as desired.
Inch specifications
Box007
Box name ABCD_0000101Password (No register)
Default menu Reset Box
Change #
Close
Default setting - Document Management - Box editing
Setting mode
Metric specifications
Box 007
Box name ABCD_0000101Password (No register)
Close
Default menu Reset Box
Change #
Default setting - Document management - Box editing
Setting mode
NOTE
Refer to “11. Entering characters” on page 7-104 for information onentering characters.
4 If you want to change the name of that box, first select“Password” and then touch the “Change #” key. The“Password” screen will be displayed.
5 Use the keypad to enter the new password for that box andthen touch the “Close” key. The new password will beregistered and the touch panel will return to the screen instep 3.
Inch specifications
Password (Enter by #key)
Password Back Close
Default setting - Document Management - Box editings - 007
Enter new password.
Clear
Metric specifications
Password (Enter #-key)
Password Back Close
Default settund - Document management - Box editing - 007
Enter new password.
Clear
NOTES
• The password can be between 1 and 8 digits long.• If you decide not to register a password for that box, touch the
“Clear” key and then, with nothing entered in the password field,touch the “Close” key.
6 If you want to delete all of the data in that box, select “ResetBox”. A verification screen will be displayed.
7 Touch the “Yes” key or the “No” key, as appropriate.
Inch specifications
Box No. :
Box name :
Reset this Box. Do you really want to reset?
Yes No
Stop
007
ABCD_0000101
Metric specifications
Box No. :
Box name :
Stop
007
ABCD_0000101
Reset this Box. Do you really want to reset?
Yes No
If you selected “Yes”, all the data in the selected box will bedeleted and the touch panel will return to the screen in step3.If you selected “No”, the touch panel will return to thescreen in step 3 without deleting any data.
8 Touch the “Close” key. The touch panel will return to thescreen in step 2.
9 Touch the “Close” key. The touch panel will return to thescreen in step 1. Touch the “Close” key. The touch panel willreturn to the “Default setting” screen.Touch the “End” key.The touch panel will return to the contents of the “Basic” tab.

Section 7 COPIER MANAGEMENT FUNCTIONS
7-98
● Document save time
1 Touch the “Document save term” [“Document saving”] keyunder “Synergy Print Box”. The “Document data saving term”[“Document data save period”] screen will be displayed.
Inch specifications
Document Management
Document Management Close
Shared Data Box Synergy Print Box Form box
Print the list
Documentsave term
Reset Box
Print the list
Box editing
Reset Box
Print the list
Reset Box
Default setting
Metric specifications
Document management
Document management
Shared Data Box Synergy Print Box Form box
Close
Printthe list
Printthe list
Printthe list
Box editing
Document saving
Reset Box
Reset Box
Reset Box
Default setting
2 Touch the “Set save term” [“Set save period”] key and thentouch “+” key or the “-” key to change the displayed save timeto the desired setting.
Inch specifications
Document data saving term Back Close
Set saving term for documents in synergy print box.
(1~7)
Days
No timelimit
Set save term 7
+–
Default setting - Document Management
Metric specifications
Document data save period
Set save period for documents in synergy print box.
(1~7)
Days
No time limit
Set saveperiod
7
+–
Default Setting - Document management
Back Close
NOTES
• The save time can be set to any number of days between 1 and 7.The factory default setting is for “7 Days”.
• If you want the data to be saved indefinitely, touch the “No time limit”key to highlight it.
3 Touch the “Close” key. The touch panel will return to thescreen in step 1.
4 Touch the “Close” key once again. The touch panel will returnto the “Default setting” screen.Touch the “End” key. Thetouch panel will return to the contents of the “Basic” tab.

Section 7 COPIER MANAGEMENT FUNCTIONS
7-99
8. Hard disk management
Perform the following procedure to access the “HDD managementmode” screen and check available space and/or delete any invaliddata on the optional Hard Disk.
1 With the content of the “Basic” tab displayed, press the[Default setting/Counter] key.The “Default setting” screen will be displayed.
2 Touch the “BOX Management” [“Hard Disk Management”]key.
Inch specifications
Default setting
Copydefault
Machinedefault
Language Management
End
BOXManagement
Bypasssetting
Document Management
Registerorig. size
Printreport
Countercheck
UserAdjustment
Default setting / Counter
Metric specifications
Default setting
Copydefault
Machinedefault
Language Management
End
Hard DiskManagement
Bypasssetting
Document Management
Registerorig. size
Printreport
Countercheck
UserAdjustment
Default setting / Counter
3 Use the keypad to enter the 4-digit management code.The factory default setting for 30 cpm copiers is “3000”, for40 cpm copiers is “4000” and for 50 cpm copiers is “5000”.If the entered code matched the registered one, the “HDDManagement mode” [“HDD Management”] screen will bedisplayed.
Inch specifications
Enter the administrator number Close
Metric specifications
Enter the administrator number Close
4 Touch the “On” key under “Check HDD capacity” (left side ofthe touch panel). The overall size of the hard disk, as wellas the currently available space, will be displayed. If youwant to delete any invalid data, go to the next step. If youare finished with this procedure, go directly to step 6.
Inch specifications
HDD management mode
OnOn
CloseHDD management mode
Default setting
Delete invalid data
Delete invalid deta from the HDD.
Check HDD capacity
Able to check the free space and capacityof HDD.
Metric specifications
HDD management mode
OnOn
CloseHDD management
Default setting
Delete invalid data
Delete invalid deta from the HDD.
Check HDD capacity
Able to check the free space and capacityof HDD.

Section 7 COPIER MANAGEMENT FUNCTIONS
7-100
5 Touch the “On” key under “Delete invalid data” (right side ofthe touch panel). The operation to delete invalid data willstart.
Inch specifications
HDD management mode
On
CloseHDD management mode
Default setting
Delete invalid data.
Delete invalid deta from the HDD.Item
Free SpaceCapacity
18, 569 MB19, 092 MB
Setting mode
Metric specifications
HDD management mode
On
CloseHDD management
Default setting
Delete invalid data.
Delete invalid deta from the HDD.Item
Free spaceCapacity
18, 569 MB19, 092 MB
Setting mode
6 Touch the “Close” key. The touch panel will return to thescreen in step 2.Touch the “End” key. The touch panel willreturn to the contents of the “Basic” tab.

Section 7 COPIER MANAGEMENT FUNCTIONS
7-101
9. Report print out
Perform the following procedure to print out one of the followingreports.< Copy report >Lists all of the values for the copy default settings.< Machine report >Lists all of the values for the machine default settings.< Toner coverage report>Lists the average toner density (black ratio) for each size of copypaper used under each of the copy, printer and fax functions of thismachine.
NOTE
Make sure that 11" x 8 1/2" [A4] size paper is loaded in one of thedrawers[cassettes].
1 With the content of the “Basic” tab displayed, press the[Default Setting/Counter] key.The “Default setting” screen will be displayed.
2 Touch the “Print report” key.
Inch specifications
Default setting
Copydefault
Machinedefault
Language Management
End
BOXManagement
Bypasssetting
Document Management
Registerorig. size
Printreport
Countercheck
UserAdjustment
Default setting / Counter
Metric specifications
Default setting
Copydefault
Machinedefault
Language Management
End
Hard DiskManagement
Bypasssetting
Document Management
Registerorig. size
Printreport
Countercheck
UserAdjustment
Default setting / Counter
3 Use the keypad to enter the 4-digit management code.The factory default setting for 30 cpm copiers is “3000”, for40 cpm copiers is “4000” and for 50 cpm copiers is “5000”.
Inch specifications
Enter the administrator number Close
Metric specifications
Enter the administrator number Close
NOTE
It is possible for you to change the 4-digit management code.(See “Changing the management code” on page 7-56.)
4 Once the “Print report menu” screen is displayed, touch the“Copy report” key, the “Machine report” key or the “Tonercoverage” key, as appropriate.
Inch specifications
Print report
Print report menu
Copy report
Tonercoverage
Machinereport
Default setting
Close
Metric specifications
Print report
Print report menu
Copyreport
Machinereport
Tonercoverage
Default setting
Close

Section 7 COPIER MANAGEMENT FUNCTIONS
7-102
5 The “Printing report” screen will be displayed and printing ofthe corresponding report will start.
Inch specifications
Cancel
Or ig. page Count/Set
1 sidedSort
11x81/2"
Inner tray
Printing report.
Output
Cancel
Metric specifications
Original Count/set
1-sidedSort
Printing report.
Output
Cancel
Plain
Inner tray
NOTE
If you want to cancel print out of the corresponding report, touch the“Cancel” key.
When the report is complete, the touch panel will return tothe screen in step 4.
6 Touch the “Close” key. The touch panel will return to thescreen in step 2.
7 Touch the “End” key. The touch panel will return to thecontents of the “Basic” tab.

Section 7 COPIER MANAGEMENT FUNCTIONS
7-103
10. Changing the language used for messages
You can select the language that will be used on the touch panel.
The available languages are as follows:Inch specification copiers:English, French (“Français”), Spanish (“Español”) and Japanese(“ ”)Metric specification copiers:English, German (“DEUTSCH”), French (“FRANÇAIS”), Italian(“ITALIANO”) and Spanish (“ESPAÑOL”)
1 With the content of the “Basic” tab displayed, press the[Default Setting/Counter] key.The “Default setting/Counter” screen will be displayed.
2 Touch the “Language” key. The “Language” screen will bedisplayed.
Inch specifications
Default setting
Copydefault
Machinedefault
Language Management
End
BOXManagement
Bypasssetting
Document Management
Registerorig. size
Printreport
Countercheck
UserAdjustment
Default setting / Counter
Metric specifications
Default setting
Copydefault
Machinedefault
Language Management
End
Hard DiskManagement
Bypasssetting
Document Management
Registerorig. size
Printreport
Countercheck
UserAdjustment
Default setting / Counter
3 Touch the key that corresponds to the language that youwant to use.The language used on the touch panel will change to thatselected.
Inch specifications
Language Stop
Default setting
English Français Español
Metric specifications
Language Stop
Default setting
English Deutsch Français
Español Italiano
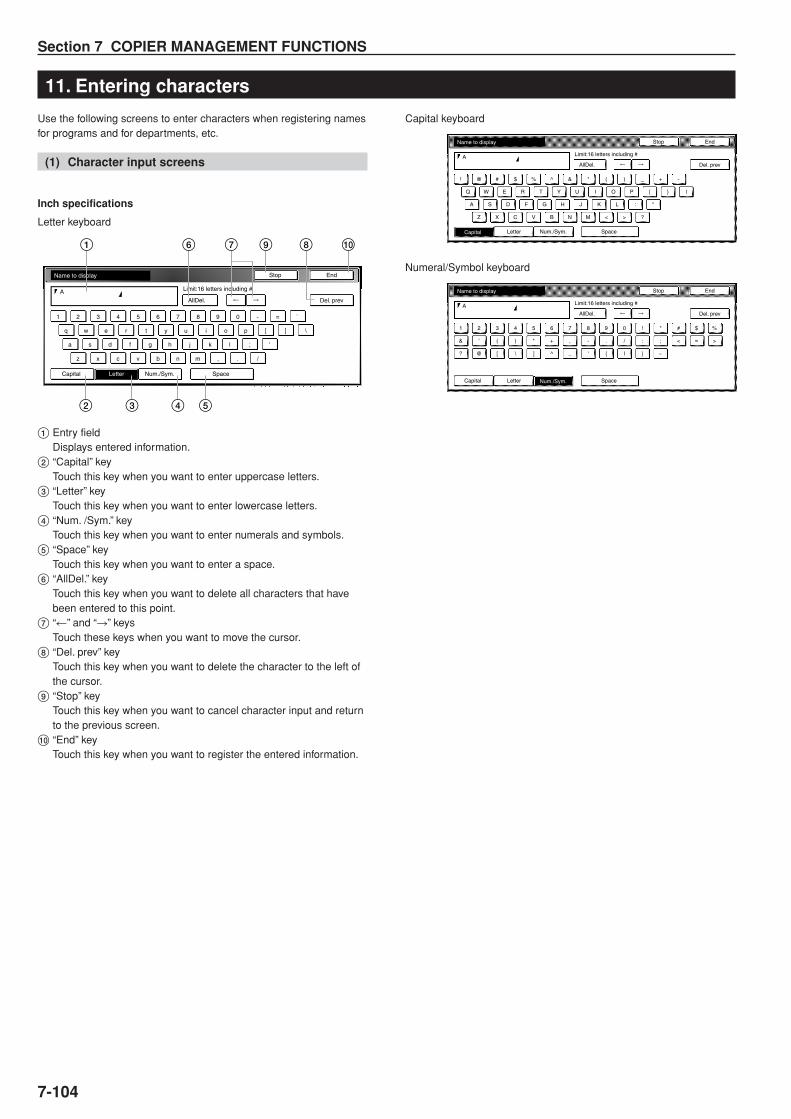
Section 7 COPIER MANAGEMENT FUNCTIONS
7-104
11. Entering characters
Use the following screens to enter characters when registering namesfor programs and for departments, etc.
(1) Character input screens
Inch specifications
Letter keyboard
1 Entry fieldDisplays entered information.
2 “Capital” keyTouch this key when you want to enter uppercase letters.
3 “Letter” keyTouch this key when you want to enter lowercase letters.
4 “Num. /Sym.” keyTouch this key when you want to enter numerals and symbols.
5 “Space” keyTouch this key when you want to enter a space.
6 “AllDel.” keyTouch this key when you want to delete all characters that havebeen entered to this point.
7 “r” and “R” keysTouch these keys when you want to move the cursor.
8 “Del. prev” keyTouch this key when you want to delete the character to the left ofthe cursor.
9 “Stop” keyTouch this key when you want to cancel character input and returnto the previous screen.
0 “End” keyTouch this key when you want to register the entered information.
EndStopName to display
A Limit:16 letters including #
AllDel. Del. prev
1 2 3 4 5 6 7 8 9 0 - = `
q w e r t y u i o p [ ] \
a s d f g h j k l ;
z x c v b n m , . /
'
Capital Num./Sym. SpaceLetter
1
2 3 4 5
6 7 9 8 0
Capital keyboard
EndStopName to display
A Limit:16 letters including #
AllDel. Del. prev
! @ # $ % ^ & * ( ) _ + -
Q W E R T Y U I O P { } l
A S D F G H J K L :
Z X C V B N M < > ?
"
Capital Num./Sym. SpaceLetter
Numeral/Symbol keyboard
EndStopName to display
A Limit:16 letters including #
AllDel. Del. prev
1 2 3 4 5 6 7 8 9 0 ! " #
& ' ( ) * + , - . / : ; <
$
=
%
>
? @ [ \ ] ^ _ ' { l } ~
Capital Num./Sym. SpaceLetter

Section 7 COPIER MANAGEMENT FUNCTIONS
7-105
Metric specifications
Letter keyboard
1 Entry fieldDisplays entered information.
2 “Capital” keyTouch this key when you want to enter uppercase letters.
3 “Letter” keyTouch this key when you want to enter lowercase letters.
4 “Symbol 1” keyTouch this key when you want to enter certain symbols.
5 “Symbol 2” keyTouch this key when you want to enter certain symbols.
6 “Space” keyTouch this key when you want to enter a space.
7 “AllDel.” keyTouch this key when you want to delete all characters that havebeen entered to this point.
8 “r” and “R” keysTouch these keys when you want to move the cursor.
9 “Del. prev” keyTouch this key when you want to delete the character to the left ofthe cursor.
0 “Stop” keyTouch this key when you want to cancel character input and returnto the previous screen.
! “End” keyTouch this key when you want to register the entered information.
EndStopName to display
A Limit: 16 letters inc. # key
Del. prev
1 2 3 4 5 6 7 8 9 0 - = `
q w e r t y u i o p [ ] \
a s d f g h j k l ;
z x c v b n m , . /
'
Capital Symbol 1 Symbol 2 SpaceLetter
`
AllDel.
1
2 3 4 5 6
7 8 0 9 !
Capital keyboard
EndStopName to display
A Limit:16 letters including #
AllDel. Del. prev
! @ # $ % ^ & * ( ) _ + ~
Q W E R T Y U I O P { } l
A S D F G H J K L :
Z X C V B N M < > ?
"
Capital Symbol 1 Symbol 2 SpaceLetter
`
Symbol 1 keyboard
EndStopName to display
A Limit:16 letters including #
AllDel. Del. prev
Capital Symbol 1 Symbol 2 SpaceLetter
Symbol 2 keyboard
EndStopName to display
A Limit:16 letters including #
AllDel. Del. prev
Capital Symbol 1 Symbol 2 SpaceLetter

Section 7 COPIER MANAGEMENT FUNCTIONS
7-106
(2) Character input procedure
[Example] “Abcde”
1 Touch the “Capital” key. The “Capital” will be displayed. Touchthe “A” key on the keyboard.
Inch specifications
EndStopName to display
Limit:16 letters including #
AllDel. Del. prev
! @ # $ % ^ & * ( ) _ + -
Q W E R T Y U I O P { } l
A S D F G H J K L :
Z X C V B N M < > ?
"
Capital Num./Sym. SpaceLetter
Metric specifications
`
EndStopName to display
Limit:16 letters including #
AllDel. Del. prev
! @ # $ % ^ & * ( ) _ + -
Q W E R T Y U I O P { } l
A S D F G H J K L :
Z X C V B N M < > ?
"
Capital Symbol 2Symbol 1 SpaceLetter
2 Touch the “Letter” key.
Inch specifications
EndStopName to display
A Limit:16 letters including #
AllDel. Del. prev
! @ # $ % ^ & * ( ) _ + -
Q W E R T Y U I O P { } l
A S D F G H J K L :
Z X C V B N M < > ?
"
Capital Num./Sym. SpaceLetter
Metric specifications
EndStopName to display
A Limit:16 letters including #
AllDel. Del. prev
! @ # $ % ^ & * ( ) _ + ~
Q W E R T Y U I O P { } l
A S D F G H J K L :
Z X C V B N M < > ?
"
Capital Symbol 1 Symbol 2 SpaceLetter
`
3 Touch the “b”, “c”, “d” and “e” keys, in that order, on thekeyboard.
Inch specifications
EndStopName to display
Abcde Limit:16 letters including #
AllDel. Del. prev
1 2 3 4 5 6 7 8 9 0 - = `
q w e r t y u i o p [ ] \
a s d f g h j k l ;
z x c v b n m , . /
'
Capital Num./Sym. SpaceLetter
Metric specifications
EndStopName to display
Abcde Limit: 16 letters inc. # key
Del. prev
1 2 3 4 5 6 7 8 9 0 - = `
q w e r t y u i o p [ ] \
a s d f g h j k l ;
z x c v b n m , . /
'
Capital Symbol 1 Symbol 2 SpaceLetter
`
AllDel.
4 Once you have finished entering the information, touch the“End” key.
Inch specifications
EndStopName to display
Abcde Limit:16 letters including #
AllDel. Del. prev
1 2 3 4 5 6 7 8 9 0 - = `
q w e r t y u i o p [ ] \
a s d f g h j k l ;
z x c v b n m , . /
'
Capital Num./Sym. SpaceLetter
Metric specifications
EndStopName to display
Abcde Limit: 16 letters inc. # key
Del. prev
1 2 3 4 5 6 7 8 9 0 - = `
q w e r t y u i o p [ ] \
a s d f g h j k l ;
z x c v b n m , . /
'
Capital Symbol 1 Symbol 2 SpaceLetter
`
AllDel.

8-1
Section 8 OPTIONAL EQUIPMENT
(1) Document ProcessorThe Document Processor automatically feeds one-sided originals oneby one for scanning. It also reverses two-sided originals automaticallyfor duplex copying and page separation copying.
11111Originals that can be used with the Document Processor
• Sheet originals only• Original weights: Single-sided original of 35 g/m2 to 160 g/m2 two-
sided original of 50 g/m2 to 120g g/m2
• Original sizes: 11" x 17"/A3 (maximum) to 5 1/2" x 8 1/2"/A5R(minimum)
• Capacity:100 sheets (8 1/2" x 11"/A4 and smaller, 75 g/m2 or 80 g/m2)70 sheets (8 1/2" x 14"/Folio and larger, 75 g/m2 or 80 g/m2)30 sheets in auto selection mode
22222Precautions for the use of Document Processor
Do not use any of the originals given below with the DocumentProcessor. Also do not set originals with punch holes or tear-off stripspositioned at the leading edge.• Transparency films• Carbon paper and extremely creased or folded originals, originals of
sort material such as vinyl• Non-square originals, wet originals, originals with adhesive tape or
glue• Originals bundled with a paper clip or staple (if inevitable, remove
the paper clip or staple and straighten out the creases and foldsbefore setting the originals)
• Clipped out originals, originals with slippery surface• Originals with still-wet whiteout• Originals with creases (if inevitable, straighten out the creases
before setting the originals)
33333Document Processor part names
1 Original table(Place the originals here.)
2 Original insertion guides(Adjust the guides to the width of the originals.)
3 Document Processor open/close handle(Hold this handle when opening and closing the DocumentProcessor.)
4 Original eject cover(Copied originals are stored here.)
5 Document Processor original cover(Open this cover to remove an original misfed in the DocumentProcessor.)
6 Original set indicator(Lights green when the originals are set.)
125
6
3
4

Section 8 OPTIONAL EQUIPMENT
8-2
44444How to set originals in the Document Processor
1 Adjust the original insertion guides to the original size.
NOTE
Before setting the originals in the Document Processor, check that nooriginal from the previous operation is remaining on the original ejectcover. Originals remaining on the original eject cover may causeoriginal misfeed.
2 Set the originals on the original table in correct sequencewith the side to be copied facing upward. Securely insert theleading edge of the originals into the Document Processor asfar as they will go.
* When setting large size paper such as 8 1/2" x 11", A4R orlarger, pull out the support extension.
IMPORTANT!
Do not set originals exceeding the limit indicated on the stickerattached on the rear original insertion guide. Setting more originalsthan specified may cause original misfeed.
55555How to set originals on the platen
When using an original that cannot be set in the Document Processor,such as a book or magazine, open the Document Processor andplace it on the platen.
1 Hold the Document Processor open/close handle and openthe Document Processor.* Before opening the Document Processor, check that no
original is present on the original table or original ejectcover. If present, the original may fall off when theDocument Processor is opened.
2 Set the original with the side to be copied facing downward.Be sure to align the original with the original size scales.

Section 8 OPTIONAL EQUIPMENT
8-3
3 Hold the Document Processor open/close handle and closethe Document Processor.
IMPORTANT!
Do not press the Document Processor against the platen with force.Doing so many cause damage to the glass material.
CAUTIONDO NOT leave the Document Processor open asthere is a danger of personal injury.
66666Auto selection/Filing mode
With this mode, when you are using the Document Processor withoutpressing one of the paper size keys, and thereby, specifying a desiredpaper size, originals will be checked one by one for their size, and youcan select to either have paper of the same size as each originalselected automatically (auto selection) or to have the originals allcopied onto one single size of copy paper (filing).
IMPORTANT!
• You can set up to 30 originals in the Document Processor in thismode.
Inch specifications• Only 11" x 8 1/2" and 11" x 17", or 8 1/2" x 14" and 8 1/2" x 11", size
originals can be used together in this mode, and the originals mustbe arranged together so that their widths coincide.
Metric specifications• Only A4 and A3, B5 and B4, or A4R and Folio, size originals can be
used together in this mode, and the originals must be arrangedtogether so that their widths coincide.
Metric specifications (Asia Pacific)• Only A4 and A3, B5 and B4, size originals can be used together in
this mode, and the originals must be arranged together so that theirwidths coincide.
● Differing finished sizes (Auto selection)
Each original will copied onto the same size copy paper as thatoriginal.
B4 B5
(A3)
(Folio)
(A4)11"✕17"
8 1/2"✕14"
11"✕8 1/2"
(A4R)8 1/2"✕11"

Section 8 OPTIONAL EQUIPMENT
8-4
● Matching finished sizes (Filing)
All originals will copied onto the same size copy paper.
1 Set the originals to be copied in the Document Processor.
2 Press the [Auto Selection] key.The lamp in the [Auto Selection] key will light and the autoselection/filing mode screen will be displayed.
3 Touch the “Auto selection” key or the “Electronic Filing” key,as appropriate.
If you selected “Auto selection”, go directly to step 6.
If you selected “Electronic Filing”, go to the next step.
Inch specifications
Able to copy mix size originals atone time using Document processor.
Ready to copy.
Off
Autoselection
Electronic Filing
Auto Selection Register
SetPaper size
Back Close
11x81/2"
Metric specifications
BackRegister CloseAuto selection
Ready to copy.
Off
Autoselection
Electronic Filing
SetPaper size
Able to copy mixed size originals atone time using Document processor.
4 Specify the size of the very first original to be copied andthen touch the “Close” key.The touch panel will return to the contents of the “Basic” tab.
Inch specifications
Auto Selection
Place originals in Document processor.
Off
1st pg. orig.
Able to scan mix size originals atone time using Document processor,and copy them in unified paper size.
Autoselection
ElectronicFiling
Register
SetPaper size
Back Close
11x81/2"
81/2x11"/11x81/2"
81/2x14"/11x17"
Metric specifications
BackRegister CloseAuto selection
Place originals in Document processor.
Off
Autoselection
1st original
Able to scan different size originals atone time using Document processor,and copy them to unified paper size.
ElectronicFiling
SetPaper size
A4 /B5 /A4
A3 /B4 /Folio
NOTE
In order to have the binding direction set properly for stapling or holepunching, etc., finished copies, be sure to specify the size of the veryfirst original being copied.
5 Select the desired drawer[cassette].
Inch specifications
Combine
AMS
Reduce/Enlarge
APS
Orig.imagequality
Reduce/Enlarge
Exposuremode
AutoExposure
Ready to copy. SetPaper Size
Bypass
Color
Plain Plain
Plain
Sort/Finished
Sort:Off
Sort:On
Basic User choice ProgramFunction
11x81/2"
81/2x11"
11x81/2"
11x81/2"
11x81/2"
Recycled
Metric specifications
AMS
Merge copy
Reduce/Enlarge
Imagequality
Reduce/Enlarge
Exposuremode
AutoExposure
Ready to copy. SetPaper Size
Sort/Finished
Sort:Off
Sort:On
Basic User choice ProgramFunction
APS
Bypass
Colour
Recycled
Plain Plain
Plain
6 Press the [Start] key.Copying will start.

Section 8 OPTIONAL EQUIPMENT
8-5
(2) Paper Feeder
Two Paper Feeders of the same type as drawer[cassette] in the mainbody can be added.Capacity and the paper loading method is the same as those for thestandard drawer[cassette] in the main unit.* Paper misfed in the optional Paper Feeder can be removed by
opening its left cover.
(3) Paper Feeder
The Paper Feeder holds up to 3,000 sheets of 11" x 8 1/2" [A4 or B5(B5 is for Asia-Pacific specification copiers only)] size standard paper.Pull the Paper Feeder out towards you as far as it will go, and thenload up to 1,500 sheets of paper in each rows.* The cover on the left side of the Paper Feeder is prepared to remove
misfed paper.
(4) Document Finisher
This unit lets you store a large volume of copies and shifts theposition of each copy set for ease of sorting. It can staple finishedcopy sets and bind them. It is also possible to use the DocumentFinisher to punch holes in them for filling purposes (optional). Formore detailed information, refer to the Operation Guide for theDocument Finisher.
IMPORTANT!
• If copies come out curled or are tacked unevenly, turn the paper inthe drawer[cassette] over.
• When copying onto special paper such as OHP film and othertransparencies, use Non-sort mode.
11111Copying in the Sort:ON mode
This mode automatically sorts copies made from multiple originalsinto sets identical to the originals.
1 Touch the “Sort/Finished” key.The “Sort/Finished” screen will appear.
Inch specifications
2 sided/Separation
Selectpaper Combine
Reduce/Enlarge
Margin/Centering
FormsOverlayPage #
FunctionBasic User choice Program
CoverMode
BookletSort/Finished
BorderErase
Exposuremode
Orig.imagequality
Ready to copy.
Selectorig. size
AutoSelection
Batchscanning Up
Down
SetPaper size11x81/2"
Metric specifications
Select paper
2-sided/Split
Merge copy
Reduce/Enlarge
Margin/Imag. shift
Pagenumbering
FunctionBasic User choice Program
Cover Mode
BookletErase Mode
Exposuremode
Image quality
Sort/Finished
Ready to copy.
Select size orig.
Autoselection
Large # oforiginals
Form overlay
Up
Down
SetPaper size

Section 8 OPTIONAL EQUIPMENT
8-6
2 Touch the “Sort:On” key.(Only for metric specification copiers produced)The “Output each page” key will be changed to the “1 set”key.
Inch specifications
Sort:Off Off
OnSort:On
OffsetSor t Staple
Staple mode
Punch
Punch mode
BackRegister CloseSort/Finished
Ready to copy.
RearLeft top corner
Check direction
Check direction of original top side.
SetPaper size11x81/2"
Metric specifications
Sort:Off Off
Outputeach pageSort:On
GroupSor t Staple
Staple Mode
Punch
Punch Mode
BackRegister CloseSort/Finished
Ready to copy.
Back EdgeLeft top corner
Check directionCheck direction oforiginal.
SetPaper size
3 Touch the “On” [“1 set”] key.
4 Touch the “Close” key. The message display returns to theFunction screen.
5 Set the originals to be copied.
6 Press the [Start] key. Scanning of the originals will start. Thenumber of scanned originals will be displayed.
NOTE
Repeat this operation for all originals when using the platen. After allthe originals have been scanned, touch the “Scanning finished” key.
7 Copying will begin and finished copies will be ejected facedown onto the tray with each full set shifted slightly from theprevious one.
8 Remove all of the finished copies from the tray.
22222Copying in the Sort:OFF mode
This mode automatically groups copies made from multiple originals,with all the copies produced from an individual original stackedtogether in one set.
1 Touch the “Sort/Finished” key.The “Sort/Finished” screen will appear.
Inch specifications
2 sided/Separation
Selectpaper Combine
Reduce/Enlarge
Margin/Centering
FormsOverlayPage #
FunctionBasic User choice Program
CoverMode
BookletSort/Finished
BorderErase
Exposuremode
Orig.imagequality
Ready to copy.
Selectorig. size
AutoSelection
Batchscanning Up
Down
SetPaper size11x81/2"
Metric specifications
Select paper
2-sided/Split
Merge copy
Reduce/Enlarge
Margin/Imag. shift
Pagenumbering
FunctionBasic User choice Program
Cover Mode
BookletErase Mode
Exposuremode
Image quality
Sort/Finished
Ready to copy.
Select size orig.
Autoselection
Large # oforiginals
Form overlay
Up
Down
SetPaper size
2 Touch the “Sort:Off” key.
Inch specifications
Sort:Off Off
OnSort:On
OffsetSor t Staple
Staple mode
Punch
Punch mode
BackRegister CloseSort/Finished
Ready to copy.
RearLeft top corner
Check direction
Check direction of original top side.
SetPaper size11x81/2"
Metric specifications
Sort:Off Off
Outputeach pageSort:On
GroupSor t Staple
Staple Mode
Punch
Punch Mode
BackRegister CloseSort/Finished
Ready to copy.
Back EdgeLeft top corner
Check directionCheck direction oforiginal.
SetPaper size
3 Touch the “On” [“Output each page”] key.
4 Touch the “Close” key. The message display returns to theFunction screen.
5 Set the originals to be copied.
6 Press the [Start] key. Scanning of the originals will start. Thenumber of scanned originals will be displayed.

Section 8 OPTIONAL EQUIPMENT
8-7
NOTE
Repeat this operation for all originals when using the platen. After allthe originals have been scanned, press the “Scanning finished” key.
7 Copying will begin and finished copies will be ejected facedown onto the tray with each full set shifted slightly from theprevious one.
8 Remove all of the finished copies from the tray.
33333Copying in the Staple mode
This mode automatically staples each copy set.
1 Touch the “Sort/Finished” key.The “Sort/Finished” screen will appear.
Inch specifications
2 sided/Separation
Selectpaper Combine
Reduce/Enlarge
Margin/Centering
FormsOverlayPage #
FunctionBasic User choice Program
CoverMode
BookletSort/Finished
BorderErase
Exposuremode
Orig.imagequality
Ready to copy.
Selectorig. size
AutoSelection
Batchscanning Up
Down
SetPaper size11x81/2"
Metric specifications
Select paper
2-sided/Split
Merge copy
Reduce/Enlarge
Margin/Imag. shift
Pagenumbering
FunctionBasic User choice Program
Cover Mode
BookletErase Mode
Exposuremode
Image quality
Sort/Finished
Ready to copy.
Select size orig.
Autoselection
Large # oforiginals
Form overlay
Up
Down
SetPaper size
2 Touch the “Staple mode” key.The staple mode set-up screen will appear.
Inch specifications
Sort:Off Off
OnSort:On
OffsetSor t Staple
Staple mode
Punch
Punch mode
BackRegister CloseSort/Finished
Ready to copy.
RearLeft top corner
Check direction
Check direction of original top side.
SetPaper size11x81/2"
Metric specifications
Sort:Off Off
Outputeach pageSort:On
GroupSor t Staple
Staple Mode
Punch
Punch Mode
BackRegister CloseSort/Finished
Ready to copy.
Back EdgeLeft top corner
Check directionCheck direction oforiginal.
SetPaper size
3 Touch the key that corresponds to the desired stapling style.
Inch specifications
Back CloseStaple mode
Ready to copy.
None
1 staple
RearLeft top corner
Check directionStaple
SetPaper size
2 staples
Check direction of original top side.
11x81/2"
Limited number of staple pages.The limit is set in setting mode.
When selecting staple functionthe offset can not be combined.
Metric specifications
Back CloseStaple Mode
Ready to copy.
None
1 staple
Back EdgeLeft top corner
Check directionStaple
Check direction oforiginal.
SetPaper size
2 staples
Limited number of pages to be stapled.The limitation depends on setting mode.
Cannot combine sort function andstaple.
* Stapling will be accomplished as shown in the illustration(as viewed from the front of the copies).
4 Set the originals to be copied. Check the direction of theoriginal top side.
5 Press the [Start] key. Scanning of the originals will start. Thenumber of scanned originals will be displayed.
NOTE
Repeat this operation for all originals when using the platen. After allthe originals have been scanned, touch the “Scanning finished” key.
6 Copying will begin and the copies will be automaticallystapled and ejected face down onto the tray.
7 Remove all of the finished copies from the tray.
A
AA
AA A A
A
A
A
A
A
A
A

Section 8 OPTIONAL EQUIPMENT
8-8
44444Copying in the Hole Punch mode (optional)
Copies can be automatically hole punched.
1 Touch the “Sort/Finished” key.The “Sort/Finished” screen will appear.
Inch specifications
2 sided/Separation
Selectpaper Combine
Reduce/Enlarge
Margin/Centering
FormsOverlayPage #
FunctionBasic User choice Program
CoverMode
BookletSort/Finished
BorderErase
Exposuremode
Orig.imagequality
Ready to copy.
Selectorig. size
AutoSelection
Batchscanning Up
Down
SetPaper size11x81/2"
Metric specifications
Select paper
2-sided/Split
Merge copy
Reduce/Enlarge
Margin/Imag. shift
Pagenumbering
FunctionBasic User choice Program
Cover Mode
BookletErase Mode
Exposuremode
Image quality
Sort/Finished
Ready to copy.
Select size orig.
Autoselection
Large # oforiginals
Form overlay
Up
Down
SetPaper size
2 Touch the “Punch mode” key.The hole “Punch” screen will appear.
Inch specifications
Sort:Off Off
OnSort:On
OffsetSor t Staple
Staple mode
Punch
Punch mode
BackRegister CloseSort/Finished
Ready to copy.
RearLeft top corner
Check direction
Check direction of original top side.
SetPaper size11x81/2"
Metric specifications
Sort:Off Off
Outputeach pageSort:On
GroupSor t Staple
Staple Mode
Punch
Punch Mode
BackRegister CloseSort/Finished
Ready to copy.
Back EdgeLeft top corner
Check directionCheck direction oforiginal.
SetPaper size
IMPORTANT!
When the optional punch unit is not installed, the “Punch mode” keywill not appear.
3 <Inch specification copiers>Touch the “2 holes” key or the “3 holes” key, as appropriate.The screen to select the hole positioning will appear.<Metric specification copiers>Touch the “4 holes” key. The screen to select the holepositioning will appear.* If your copier has been set for 2-hole punching, you can
have the “4 holes” key changed in order to display it as a “2holes” key.
Inch specifications
Back ClosePunch mode
Ready to copy.
None
2 holes
3 holes
Punch
RearLeft top corner
SetPaper size11x81/2"
Preview Check direction
Check direction of original top side.
Metric specifications
Back ClosePunch Mode
Ready to copy.
None
4 holes
Punch
SetPaper size
Preview
Back EdgeLeft top corner
Check directionCheck direction oforiginal.
4 Touch the key that corresponds to the desired position of holes.
Inch specifications
Ready to copy.
Punch mode
Punch Position
None
2 holes
Left side
Right side
Preview
SetPaper size11x81/2"
Back Close
Check direction
Check direction of original top side.
RearLeft top corner3 holes Top side
Metric specifications
Ready to copy. SetPaper size11x81/2"
Back ClosePunch Mode
Punch Position
None
4 holes
Left side
Right side
Preview
Top side Back EdgeLeft top corner
Check directionCheck direction oforiginal.
* Hole punching will be accomplished as shown in theillustration (as viewed from the front of the copies).
Inch specifications Metric specifications
A
A
A
A
AA
A
A
A
A
A
A
A
A
A
A
AA
A
A
A
A
AA

Section 8 OPTIONAL EQUIPMENT
8-9
IMPORTANT!
The position of the holes on each page may differ very slightly due tothe fact that holes are punched in one sheet at a time.
5 Set the originals to be copied.
6 Press the [Start] key. Scanning of the originals will start. Thenumber of scanned originals will be displayed.
NOTE
Repeat this operation for all originals when using the platen. After allthe originals have been scanned, touch the “Scanning finished” key.
7 Copying will begin and the copies will be automaticallypunched and ejected face down onto the tray.
8 Remove all of the finished copies from the tray.
(5) Document Finisher
The Document Finisher stores a large quantity copies, and sortsmultiple sets by shifting the position that each one is ejected. It is alsopossible to use the Document Finisher to staple the copy sets orpunch holes in them for filling purposes.For detailed information on the sort mode, refer to the OperationGuide for the Document Finisher. For more information on thecorresponding procedures, refer to “(4) Document Finisher” on page8-5 of this guide.
* Stacking mode
If the number of copies to be made in the Non-sort mode is set to anumber greater than the acceptable limit (250 sheets), the finishedcopies will be ejected onto the Sort tray.
(6) Document Finisher
The Document Finisher stores a large quantity copies, and sortsmultiple sets (Sort: ON) or groups copies made from multipleoriginals, with all the copies produced from an individual originalgrouped together in one set (Sort: OFF). It is also possible to use theDocument Finisher to staple sorted copy sets.For detailed information on the sort mode, refer to the OperationGuide for the Document Finisher. For more information on thecorresponding procedures, refer to “(4) Document Finisher” on page8-5 of this guide.
* Stapling will be accomplished as shown in the illustration(at the top and from the front of the copies).
(7) Built-in Finisher
The finisher stores a large quantity of copies. It can also sorts multiplecopies into sets by shifting the eject position. Paginated copies can bestapled, too.
1 Sort tray2 Finisher tray
1
2
A A

Section 8 OPTIONAL EQUIPMENT
8-10
* Sorted copies are ejected to the Sort tray.
* When setting large size paper such as 8 1/2" x 11", A4R or larger,pull out the support extension.
11111Refilling the Stapling Unit
1 Open the stapler front cover towards you.
2 Pull out the staple holder.
3 Remove the empty staple cartridge from the staple holder.
4 Hold the staple holder in one hand and the new staplecartridge in the other and insert the new staple cartridgemaking sure the direction of insertion is correct.* The arrow on the staple cartridge indicates the correct
direction of insertion.
5 Make sure the new staple cartridge is completely inserted allthe way into the staple holder and then remove the papertape covering the staple cartridge.
6 Replace the staple holder back in its original position in theStapling Unit. Once it has been fully inserted, it will click intoplace.

Section 8 OPTIONAL EQUIPMENT
8-11
22222Clearing a staple jam
1 Remove the staple cartridge referring to the “1 Refilling theStapling Unit”.Push up on the tab “A” on the protective faceplate in order toraise the faceplate.
2 Remove the jammed staple from the tip of the staplecartridge (the end where staples are set).
3 Lower the protective faceplate back into its original position.
4 Replace the staple holder back in its original position in theStapling Unit. Once it has been fully inserted, it will click intoplace.
5 Lift up the Stapling Unit slightly and than lower it into itsoriginal position.
6 Close the stapler front cover securely.
(8) Job Separator
When using the optional printer function, the paper eject point can bechanged according to the used function, making it easier to sortpaper.Copied paper can be ejected to the Job Separator (upper section).See “Copy eject location” in Machine default setting on page 7-49.* The Job Separator can store up to 100 copies. When making 101 or
more copies, copying will stop when 100 copies are made. Copyingwill resume automatically when the copied sheets are removed.
(9) Hard Disk
The Hard Disk is required in order to use the following modes andfunctions of your copier.• Job reservation during copying• Form overlay of registered forms• Repeat copying• Document management functions• Using the output management functions to change the job printing
order, cancel and delete print jobs, and verify contentIt is also possible to register up to 1000 department ID-codes underdocument management.
A

Section 8 OPTIONAL EQUIPMENT
8-12
(10) Key Counter
The Key Counter determines the number of copies that have beenmade. It is useful for copier centralized management on a departmentor even company level.* The Key Counter may count up when either data from a computer is
printed out or fax pages are printed out.
• Setting the Key Counter
Insert the Key Counter securely into the Key Counter opening.
NOTE
When the Key Counter function is used, copies cannot be madeunless the Key Counter is inserted into the copier. If the Key Counteris not inserted securely, “Insert key counter.” appears on the messagedisplay.
(11) Document Tray
The Document Tray lets you place originals and other documents nextto the machine before using them, etc. It also contains space forstoring paper clips, etc.
(12) Printer Kit
If the Printer Kit is installed, this copier can be used as a printer.For more detailed information, see the printer’s Operation Guide.Since the network board is equipped, this copier can also be used asa network printer, allowing access from multiple computers. Theoptional printer network kit and hard disk are also available.
(13) Printer/Scanner Kit
If the Printer/Scanner Kit is installed, this copier can be used as aprinter or a network scanner. For more detailed information, see theOperation Guide for the Printer/Scanner Kit. Since the network boardis equipped, this copier can also be used as a network printer,allowing access from multiple computers. The optional printer networkkit and hard disk are also available.
(14) Fax KitIf the Fax Kit is installed, this copier can be used as a fax. Also if theFax Kit is used together with the optional Printer/Scanner Kit, thiscopier can be used as a network fax, allowing transmission andreception by a computer. For details, see the Operation Guide for thefax.* In some cases, this function may not be used.

9-1
Section 9 TROUBLESHOOTING
1. If one of the following messages is displayed
When any of the following messages appears on the message display, take the indicated action.
Message
“Close xxx cover x.”
“Add paper in drawer.”[“Add paper in cassette.”]
“Set drawer. ”[“Close paper cassette.”]
“Paper drawer is out of order. Selectanother paper drawer.”[“Paper cassette is out of order. Selectother paper cassette. ”]
“Check paper size.”
“Reposition original.”
“Exceeds pre registered copyingquantity.”[“Copy limit for this ID-code has beenreached. No copying possible.”]
“Ready to copy. Add toner.”
“Add toner to resume copying.”
“System error. Main switch off/on.”
“System error. Disconnect power plugfrom the socket.”
Procedure
The cover indicated is open. Close the cover securely.
There is no paper in the drawer[cassette] indicated. Load paper.
One of the drawers[cassettes] is not closed properly. Pull it out and push it back in allthe way.
The drawer[cassette] currently in use is out of order and cannot be used. Contactyour service representative immediately. Continue copying using anotherdrawer[cassette].
No paper that can be used in the selected mode is loaded. Check the paper.
The orientation of the original and the selected paper are different. Change theorientation of the original. If the [Start] key is pressed, same-size copying will beperformed.
The number of copies reached the limit set in the copy management mode and nomore copies can be made. Clear the copy count from the management mode.
There is not enough toner in the copier. Replace the toner container immediately asonly one copy can be made at a time.
There is not enough toner in the copier to make copies. Replace the toner containerimmediately.
A system error has occurred. Turn the main power switch OFF and then ON.
A system error has occurred. Disconnect the power plug from the outlet and connectit again.
Referencepage
——
3-1
——
——
——
——
7-1
10-3
10-3
——
——
* If the optional Fax Kit is installed in your copier, when the power cord is unplugged from the outlet, original data or reserved communicationinformation stored in the memory may be lost.

Section 9 TROUBLESHOOTING
9-2
Message
“Call service.”
“Time for maintenance.”
“Close Document processor cover.”
“Memory full.”
“Paper misfeed.”“Paper misfeed. Careful for Drum.”
“Duplex tray inoperable, call service.”[“Duplex unit is out of order. Callservice.”]
“Clean the slit glass for original fed fromDP.” [“Clean the slit glass for originalfed.”]
“Attach Finisher.”
“Finisher is out of order. DetachFinisher.”
“Paper capacity exceeded. Removepaper from Finisher.”
“Remove paper form inner tray ofFinisher.”
Procedure
Open and close the front cover. If the same message appears again, make a note ofthe “C” and the number appearing with it, turn the main power switch OFF (O),unplug the power cord from the outlet, and contact your service representative orauthorized service center.
Periodic maintenance is necessary to keep your copier in good condition.Contact your service representative or an authorized service center as soon aspossible.
The Document Processor original cover of the optional document processor is open.Close the cover securely.
The copier memory is full. Either print out or clear all scanned data. It is not possibleto copy or scan another original until one of these two operations is performed.The copier memory size and the capacity for scanning originals are shown below.
Number of originals that can be scanned*Standard memory (64MB): approximately 322 pagesWhen the optional Hard Disk is installed (20GB): approximately 70,000 pages*** When using our standard original (A4 original, 6% text)** The maximum number of originals that can be scanned at one time is 999
(11" x 8 1/2" [A4]).
If paper is misfed, the copier will stop and the location of the misfeed will appear onthe message display. Remove the misfed paper with the main power switch turnedON ( | ) by following the appropriate procedure. If “Careful for Drum.” is displayed, besure not to touch the drum area that is located inside the machine when removingthe jammed paper.
The duplex unit is out of order and duplex copying is not possible.Contact your service representative immediately.
The slit glass is dirty. This may result in black lines or other blemishes appearing oncopies when you use the optional Document Processor, so you should perform thecleaning operation on the slit glass.
Connect the optional Document Finisher securely to the copier.
The optional Document Finisher is out of order and cannot be used for the moment.Contact your service representative or an authorized service center as soon aspossible.
The maximum number of sheets that can be stored on the optional DocumentFinisher has been exceeded. Remove the copies from the Document Finisher.
Paper has been misfed inside the optional Document Finisher. See the DocumentFinisher’s Operation Guide and remove the paper.
Referencepage
——
——
——
——
9-4
——
10-1
——
——
——

Section 9 TROUBLESHOOTING
9-3
Message
“Out of staples. Add staples.”[“Stapler empty. Add staples.”]
“Cannot staple this size.”[“Cannot staple this paper size.”]
“Empty waste punch box.”
“Check the waste punch box.”[“Check Punch Hole box.”]
“Replace the waste toner box.”
Procedure
There are no staples in the optional Document Finisher. See the DocumentFinisher’s Operation Guide and replace the staple cartridge.
Stapling is not possible with small size paper. For details, see the optional DocumentFinisher’s Operation Guide.
The hole punch chad container in the optional Document Finisher is full. Refer to theOperation Guide for your Document Finisher and dispose of the waste hole punchchads.
The hole punch chad container in the optional Document Finisher is not set properly.Refer to the Operation Guide for your Document Finisher and set the hole punchchad container properly.
The waste toner box is filled with waste toner. Replace the waste toner box with anew one.
Referencepage
——
——
——
——
10-3
2. If one of these indicators lights or flashes
If one of the indicators to the left of the [Copier] key, the [Printer] key, or the [Scanner] key either lights orange or flashes orange, carry out theappropriate procedure indicated below.
Indication
Lights orange or flashesorange
Procedure
Check the appropriate response to themessage, and perform thecorresponding procedure.
Referencepage
–

Section 9 TROUBLESHOOTING
9-4
(1) Cautions
• Do not reuse misfed paper.• If paper is torn during removal, be sure to remove all loose scraps
from inside the copier, or they could cause misfeed later.• After misfed paper has been removed, warm-up will begin. The
Misfeed indicator will turn off and the copier will return to the samesettings prior to the misfeed.
3. When paper misfeedsIf a paper misfeed occurs, a message will be displayed in the touch panel about the misfeed and copying will stop. Leave the main power switch ON( | ) and refer to “(2) Removal procedures” to remove the jammed paper.
Paper misfeed. Careful for Drum.
1. Open left cover1.2. Remove paper.3. Close cover.
JAM 30
1. Open left cover1.2. Remove paper.3. Close cover.
JAM 30
Paper misfeed. Careful for Drum.
Inch specification Metric specification
WARNINGHigh voltage is present in the charger section. Takesufficient care when working in this area, as there isa danger of electrical shock.
CAUTIONThe copier’s fixing unit is extremely hot. Takesufficient care when working in this area, as there isa danger of getting burned.
(2) Removal procedures
11111Misfeed in paper feed section
• Misfeed in drawer[cassette] (JAM 10 to 13, 15 to 17)
If the message below appears, a misfeed has occurred in thedrawer[cassette] (or optional Paper Feeder). Remove the misfedpaper using the procedure given below.
Inch specifications
Paper misfeed.
1. Open cassette1.2. Remove paper.3. Set cassette.
JAM 10
Metric specifications
Paper misfeed.
1. Open cassette1.2. Remove paper.3. Set cassette.
JAM 10
1 Open the drawer[cassette].

Section 9 TROUBLESHOOTING
9-5
2 Remove the misfed paper while taking care not to tear it.* If the paper should be torn, remove all the scraps from the
inside the copier.
3 Close the drawer[cassette] slowly.
• Misfeed in left cover 1 (JAM 30, 40 to 44, 46, 47, 50 to 53, 60,61)
If the message below appears, a misfeed has occurred in the leftcover 1. Remove the misfed paper using the procedure given below.
Inch specifications
Paper misfeed. Careful for Drum.
1. Open left cover1.2. Remove paper.3. Close cover.
JAM 30
Metric specifications
1. Open left cover1.2. Remove paper.3. Close cover.
JAM 30
Paper misfeed. Careful for Drum.
NOTE
The drum area inside the copier is extremely sensitive to dirt anddamage. When removing the jammed paper, be sure not to touch thedrum area that is located inside the machine with your hands, or withjewelry such as watches and rings, etc.
1 Pull up the left cover 1 handle to open the left cover 1.
2 Remove the misfed paper.
3 Raise the duplex unit to remove the misfed paper.
4 Remove the misfed paper in the output section.
5 Close the left cover 1.
CAUTIONThe copier’s fixing unit is extremely hot. Takesufficient care when working in this area, as there isa danger of getting burned.

Section 9 TROUBLESHOOTING
9-6
• Misfeed in left cover 1 (JAM 05)
If the message below appears, a misfeed has occurred in the leftcover 1. Remove the misfed paper using the procedure given below.
Inch specifications
1. Open left cover1.2. Remove paper.3. Close cover.
JAM 05
Paper misfeed. Careful for Drum.
Metric specifications
1. Open left cover1.2. Remove paper.3. Close cover.
JAM 05
Paper misfeed. Careful for Drum.
NOTE
The drum area inside the copier is extremely sensitive to dirt anddamage. When removing the jammed paper, be sure not to touch thedrum area that is located inside the machine with your hands, or withjewelry such as watches and rings, etc.
1 Pull up the left cover 1 handle to open the left cover 1.
2 Remove the misfed paper.
3 Raise the duplex unit to remove the misfed paper.
4 Remove the misfed paper in the output section.
5 Close the left cover 1.
CAUTIONThe copier’s fixing unit is extremely hot. Takesufficient care when working in this area, as there isa danger of getting burned.

Section 9 TROUBLESHOOTING
9-7
6 Press the [Start] key after the “Press Start Key. Re-starting.”message appears.If the message below appears, proceed to the next step.
Inch specifications
1. Open left cover1.2. Remove paper.3. Close cover.
JAM 05
Paper misfeed. Careful for Drum.
Metric specifications
1. Open left cover1.2. Remove paper.3. Close cover.
JAM 05
Paper misfeed. Careful for Drum.
7 Repeat the steps 1 to 5.
8 The message below appears. Perform the appropriate actionby following the message.
Inch specifications
APS
Bypass
Color
Plain Plain
Plain11x81/2"
11x81/2"81/2x11"
11x81/2"
11x81/2"Recycled
System error.Main switch off / on.
1-SidedSort
Metric specifications
System error.Main switch off / on.
APS
Bypass
Colour
Recycled
Plain Plain
Plain
1-SidedSort
9 When the optional Fax Kit is installed, the message belowappears. Perform the appropriate action by following themessage.
Inch specifications
APS
Bypass
Color
Plain Plain
Plain11x81/2"
11x81/2"81/2x11"
11x81/2"
11x81/2"Recycled
System error.Disconnect power plug from the socket.
1-SidedSort
Metric specifications
System error.Disconnect power plug from the socket.
APS
Bypass
Colour
Recycled
Plain Plain
Plain
1-SidedSort
• Misfeed in left cover 2 (JAM 18, 22)
If the message below appears, a misfeed has occurred in the leftcover 2. Remove the misfed paper using the procedure given below.
Inch specifications
Paper misfeed.
1. Open left cover2.2. Remove paper.3. Close cover.
JAM 18
Metric specifications
Paper misfeed.
1. Open left cover 2.2. Remove paper.3. Close cover.
JAM 18
1 Open the left cover 2.

Section 9 TROUBLESHOOTING
9-8
2 Remove the misfed paper.
3 Close the left cover 2.
• Misfeed in multi-bypass tray (JAM14, 20, 21, 23)
If the message below appears, a misfeed has occurred in the multi-bypass tray.Remove the misfed paper using the procedure given below.
Inch specifications
Paper misfeed.
1. Remove paper in bypass.2. Open left cover1.3. Remove paper.4. Open front cover if you can not remove paper.5. Turn right the green knob.6. Remove paper.7. Close the cover.
Metric specifications
Paper misfeed.
1. Remove paper in bypass.2. Open left cover 1.3. Remove paper.4. Open front cover if you can not remove paper.5. Turn green knob clockwise.6. Remove paper.7. Close cover.
1 Remove all the paper remaining in the multi-bypass tray.
2 Pull up the lever to remove the misfed paper.If the misfed paper cannot be removed, go to the next step.
3 Pull up the left cover 1 handle to open the left cover 1.
4 Remove the misfed paper.
5 Raise the duplex unit to remove the misfed paper.If the misfed paper cannot be removed, go to the next step.

Section 9 TROUBLESHOOTING
9-9
6 Open the front cover.
7 Turn the knob clockwise to release the misfed paper from theinternal tray section.
8 Remove the misfed paper.If the misfed paper cannot be removed, go to the next step.
9 Pull out the internal tray.
10 Open the internal tray cover to remove the misfed paper.
11 If the paper has been torn, remove the internal tray.
12 Remove the misfed paper.
13 Replace the internal tray in its original position.Close the front cover.

Section 9 TROUBLESHOOTING
9-10
22222Misfeed in Document Processor (optional) (JAM 70 to 76)
If the message below appears, a misfeed has occurred in theDocument Processor. Remove the misfed original using the proceduregiven below.
Inch specifications
Paper misfeed.
1. Open the document processor.2. Raise the reverse unit up.3. Turn the left dial.4. Remove original(s).5. Close Document processor.
JAM 73
Metric specifications
Paper misfeed.
1. Open document processor.2. Raise reverse unit up.3. Turn dial left.4. Remove original (s).5. Close Document processor.
JAM 73
1 If the original is on the original table, remove it.
2 Open the Document Processor original cover.
3 If the misfed original is found, remove it.* If paper is torn during removal, be sure to remove all loose
scraps from inside the copier, or they could cause misfeedlater.
4 Raise the reversing unit.
5 If the misfed original is found, remove it.* If paper is torn during removal, be sure to remove all loose
scraps from inside the copier, or they could cause misfeedlater.
6 Turn the left knob to eject and remove the misfed original.
7 Close the Document Processor original cover.

Section 9 TROUBLESHOOTING
9-11
33333Misfeed in Built-in Finisher (optional) (JAM 80 to 84)
If the message below appears, a misfeed has occurred in the Built-inFinisher. Remove the misfed paper using the procedure below.
Inch specifications
Paper misfeed.
1. Remove any paper in output part of Finisher2. Pull the tray of finisher down.3. Remove the paper if there is a paper.4. Set the tray
JAM 84
1. Lower inner tray of finisher.2. Remove the paper.3. Remove the eject tray, open left cover of machine.4. Remove the paper.5. Close cover and set the tray.
JAM 83
Paper misfeed. Careful for Drum.
Metric specifications
Paper misfeed.
1. Remove any paper in output part of Finisher.2. Put Finisher tray down.3. Remove any paper.4. Set tray back.
JAM 84
1. Put inner tray of Finisher down.2. Remove any paper.3. Remove output tray, open left cover of machine.4. Remove paper.5. Close cover and set tray.
JAM 83
Paper misfeed. Careful for Drum.
NOTE
The drum area inside the copier is extremely sensitive to dirt anddamage. When removing the jammed paper, be sure not to touch thedrum area that is located inside the machine with your hands, or withjewelry such as watches and rings, etc.
1 Remove the misfed paper in the Built-in Finisher outputsection.
2 Lower the Built-in Finisher tray.
3 Remove the misfed paper.
4 Raise the Built-in Finisher tray back into its original position.
5 Remove the tray.
6 Pull up the left cover 1 handle to open the left cover 1.
1
2
3

Section 9 TROUBLESHOOTING
9-12
7 Remove the misfed paper.
8 Install the tray.
9 Close the left cover 1.
44444Misfed in Document Finisher (optional) (JAM 80 to 89)
If a misfeed has occurred in the Document Finisher, remove themisfed paper referring to the Operation Guide for the DocumentFinisher.

Section 9 TROUBLESHOOTING
9-13
4. If other trouble occurs
Trouble
Nothing lights on theoperation panel when themain power switch is turnedON.
No copies come out whenthe [Start] key is pressed.
Copies come out blank.
Copies come out too light.
If trouble occurs with your copier, carry out the applicable checkpoints and procedures indicated on the following pages.If the trouble persists, contact your service representative or authorized service center.
Checkpoint
Is the power plug connected to an ACoutlet?
Is there any message appearing on themessage display?
Are the originals set correctly?
Is the copier in the auto exposuremode?
Is the copier in the manual exposure mode?
Is the add toner message displayed?
Is paper wet?
Procedure
Connect the plug to an AC outlet.
Perform the corrective action correspondingto the message.
When setting originals on the platen, placethem face-down.
When setting originals in the optionalDocument Processor, place them face-up.
To change the overall exposure, perform theauto exposure adjustment.
Adjust the exposure to the correct degreeusing the copy exposure adjustment keys.
To change the overall exposure, perform theexposure adjustment for the each copyquality mode.
Replace the toner container.
Replace the paper with new paper.
Referencepage
——
9-1
-4-1
8-2
7-73
4-2
7-757-767-77
10-3
3-1

Section 9 TROUBLESHOOTING
9-14
Trouble
Copies come out too dark.
Copies are dirty.
Copy image is askew.
Misfeed occurs frequently.
Copies are wrinkled.
Black or white lines appearon the copy.
Checkpoint
Is the copier in the auto exposure mode?
Is the copier in the manual exposure mode?
Is the platen or the original cover dirty?
Is the transfer roller contaminated?
Are the originals set correctly?
Is the paper set correctly in thedrawer[cassette]?
Is paper curled, folded or wrinkled?
Is there any misfed paper or loose scraps ofpaper remaining inside the copier?
Is the separation in the paper feed sectiondirty?
Is the electrostatic section dirty?
Procedure
To change the overall exposure, perform theauto exposure adjustment.
Adjust the exposure to the correct degreeusing the copy exposure adjustment keys.
To change the overall exposure, perform theexposure adjustment for the each copyquality mode.
Clean the platen and/or the original cover.
Open the front cover and pull and push backin the cleaning shaft.
Clean the transfer roller with the cleaningbrush.
When setting originals on the platen, aligntheir edges with the correct original sizescale for their size.
When setting originals in the optionalDocument Processor, adjust the originalinsertion guides to the size of the originalscorrectly.
Set paper properly.
Replace the paper with new paper.
Carry out the appropriate procedure toremove the paper.
Clean the separator.
Open the front cover and pull and push backin the cleaning shaft.
Referencepage
7-73
4-2
7-757-767-77
10-1
10-5
10-2
4-1
8-2
3-1
3-1
9-4
10-1
10-5

10-1
Section 10 MAINTENANCE AND OPERATION
INFORMATION
1. Cleaning the copier
CAUTIONFor safety purposes, ALWAYS remove the powerplug from the outlet when performing cleaningoperations.
● Cleaning the original cover
Lift open the original cover. Wipe the back side of the original coverwith a soft cloth dampened with alcohol or a mild detergent.* Never use thinner or other organic solvents for this purpose.
● Cleaning the platen
Lift open the original cover. Wipe the platen with a soft clothdampened with alcohol or a mild detergent.* Never use thinner or other organic solvents for this purpose.
* If soiling, such as black lines appear on the copy while using theoptional Document Processor, the slit glass a is soiled.Wipe the slit glass with a soft dry cloth.
* Never use water, thinner, organic solvents or alcohol.
NOTE
When the slit glass becomes dirty, “Clean the slit glass for original fedfrom DP.” [“Clean the slit glass for original fed.”] may appear. In thiscase, perform the cleaning operation on the slit glass and then touchthe “End” key.
Inch specifications
Clean the slit glass for original fed from DP.
Open the document processor.Clean the surface of narrower glasslocated at left with a dry cloth.Please close the document processor.Press END key
If the slit glass is dirty, black line will appear on the copy.
End
Metric specifications
Clean the slit glass for original fed.
Open the document processor.Clean the surface of narrower glasslocated at left with a dry cloth.Please close the document processor.Press END key
If the slit glass is dirty, black line will appear on the copy.
End
● Cleaning the separator
NOTE
To keep the best copying quality, perform cleaning periodically(approximately once a month) using the following procedure.
1 Open the front cover.
a

Section 10 MAINTENANCE AND OPERATION INFORMATION
10-2
2 Remove the blue cleaning brush.
3 Pull up the left cover 1 handle to open the left cover 1.
4 Clean the separator by moving the cleaning brush from leftand right several times along the separator as shown in theillustration.
5 Once the cleaning operation is completed, return thecleaning brush to the copier and close both the left cover 1and the front cover.
● Cleaning the transfer roller
1 Open the front cover.
2 Remove the blue cleaning brush.
3 Pull up the left cover 1 handle to open the left cover 1.
4 While rotating the gear as shown, clean the transfer roller bymoving the cleaning brush from left to right along with thetransfer roller.
5 Once the cleaning operation is completed, return thecleaning brush to the copier and close both the left cover 1and the front cover.

Section 10 MAINTENANCE AND OPERATION INFORMATION
10-3
2. Replacing the toner container and waste toner box
If “Add toner to resume copying.” appears on the message display,replenish the toner. Although several copies can be made after themessage appears, it is recommended that you replace the tonercontainer immediately. After replacing the toner container, be sure toalso replace the waste toner box.Also be sure to clean the related parts when you replace a tonercontainer. Dirty parts can cause lower performance by your copier.
IMPORTANT!
• Replenish toner only when the message is displayed.• When replacing a toner container, do not leave any items such as
floppy disks, etc., nearby.
Inch specifications
Combine
AMS
Reduce/Enlarge
APS
Orig.imagequality
Reduce/Enlarge
Exposuremode
AutoExposure
Ready to copy. SetPaper Size
Bypass
Color
Plain Plain
Plain
Sort/Finished
Sort:Off
Sort:On
Basic User choice ProgramFunction
11x81/2"
81/2x11"
11x81/2"
11x81/2"
11x81/2"
Recycled
Add toner to resume copying.
Addingtoner
Metric specifications
Merge copy
AMS
Reduce/Enlarge
APS
Imagequality
Reduce/Enlarge
Exposuremode
AutoExposure
Ready to copy. SetPaper Size
Bypass
Colour
Recycled
Plain Plain
Plain
Sort/Finished
Sort:Off
Sort:On
Basic User choice ProgramFunction
Add toner to resume copying.
Addingtoner
1 Open the front cover.
2 Push up the toner container release lever and slowly pull theold toner container out until the handle can be seen.
3 Grasp the handle on the toner container, push the left cover1 handle up again and gently lift the toner container.
CAUTIONDO NOT attempt to incinerate the toner container orthe waste toner box. Dangerous sparks may causeburns.
CAUTIONDO NOT attempt to force open or destroy the tonercontainer or the waste toner box.
WARNINGHigh voltage is present in the charger section. Takesufficient care when working in this area, as there isa danger of electrical shock.
CAUTIONDo not pull the toner container all the way as it canfall off.

Section 10 MAINTENANCE AND OPERATION INFORMATION
10-4
4 Take out the new toner container from the bag, and then tapit on the top 5 to 6 times.
5 Thoroughly shake the toner container (in the direction of thearrow) ten times or more to loosen and mix the toner inside.
6 Grasp the handle on the toner container and insert the tonercontainer along the rail of the copier.
7 Hold the toner container by hands and fully insert it into thecopier.
8 Remove the waste toner box.
9 Close the opening of the waste toner box with its seal.
CAUTIONDO NOT attempt to incinerate the toner container orthe waste toner box. Dangerous sparks may causeburns.
CAUTIONDO NOT attempt to force open or destroy the tonercontainer or the waste toner box.

Section 10 MAINTENANCE AND OPERATION INFORMATION
10-5
13 Pull the electrostatic section out as far as it will go and thenpush it back into the copier to a point just BEFORE the rollerA touches the white pad of the grid cleaner.Repeat this step a few times.
IMPORTANT!
DO NOT push the electrostatic section all the way back into the copierin this step as that may result in problems appearing in the printedimages.
14 With the electrostatic section pulled out about 2 inches(5 cm), remove the grid cleaner and then push theelectrostatic section all the way back into the copier.
15 Fit the new waste toner box into the copier.
<Cleaning the related parts>
10 Push the electrostatic section (with the blue handle) to theright and then pull it out about 2 inches (5 cm).
11 Remove the cap from the grid cleaner.
12 Attach the grid cleaner to the machine body aligning with thenotches.

Section 10 MAINTENANCE AND OPERATION INFORMATION
10-6
19 Clean the separator by moving the cleaning brush from leftand right several times along the separator as shown in theillustration.
20 Once the cleaning operation is completed, return thecleaning brush to the copier and close both the left cover 1and the front cover.
IMPORTANT!
Wait about 5 minutes after the cleaning operation is completed for theelectrostatic section to dry before attempting to start copying again.
NOTE
To keep the best copying quality, perform cleaning of steps 15 and 18described above periodically (approximately once a month) in additionto the time of toner container replacement.
16 Gently pull out the cleaning shaft (with the green handle) asfar as it will go and then push it back into the copier.Repeat this step a few times.
IMPORTANT!
Do not pull the cleaning shaft with force or pull it out completely.
17 Remove the blue cleaning brush.
18 Pull up the left cover 1 handle to open the left cover 1.
● After use, ALWAYS dispose of the toner containerand the waste toner box in accordance withFederal, State and Local rules and regulations.
1
2

Section 10 MAINTENANCE AND OPERATION INFORMATION
10-7
3. Specifications
Type ............................................................................... Desk-topOriginal table .................................................................. Fixed typeCopying system .............................................................. Indirect electrostaticOriginals ......................................................................... Sheets, books and 3-dimensional objects (Maximum original size: 11" x 17"/A3)Copy sizes ...................................................................... Drawers[Cassettes]: 11" x 17" / A3, 8 1/2" x 14" / B4 (257 mm x 364 mm), 11" x 8 1/2" / A4,
8 1/2" x 11" / A4R, 5 1/2" x 8 1/2" / A5R, 8 1/2" x 13", Folio, 8K and 16K,B5, and B5R (Asia Pacific specification copiers)Multi-bypass tray: 11" x 17" / A3, 8 1/2" x 14" / B4 (257 mm x 364 mm), 11" x 8 1/2" / A4,8 1/2" x 11" / A4R, 5 1/2" x 8 1/2" / A5R, A6R, 8 1/2" x 13", Folio, 8K and 16K,B5, and B5R (Asia Pacific specification copiers)For 2-sided copying: 11" x 17" / A3 – 5 1/2" x 8 1/2" / A5RPrint margin loss: 0.5 mm – 5.5 mm
Copying speed ............................................................... 30 cpm copiers: Same-size copying/memory copying;11" x 17"/A3: 20 copies/min., 8 1/2" x 14"/B4: 20 copies/min., 11" x 8 1/2"/A4: 30 copies/min.,8 1/2" x 11"/A4R: 22 copies/min., B5: 30 copies/min., B5R: 18 copies/min.40 cpm copiers: Same-size copying/memory copying;11” x 17”/A3: 23 copies/min., 8 1/2" x 14"/B4: 23 copies/min., 11" x 8 1/2"/A4: 40 copies/min.,8 1/2" x 11"/A4R: 27 copies/min., B5: 40 copies/min., B5R: 22 copies/min.50 cpm copiers: Same-size copying/memory copying;11” x 17”/A3: 26 copies/min., 8 1/2" x 14"/B4: 26 copies/min., 11" x 8 1/2"/A4: 50 copies/min.,8 1/2" x 11"/A4R: 31 copies/min., B5: 50 copies/min., B5R: 24 copies/min.
Warm-up time................................................................. Within 25 seconds (at room temperature of 73.4°F (23°C), humidity 50%RH)From Low power mode: Within 12 seconds
First copy time ................................................................ 30 cpm copiers: From 3.9 seconds (11" x 8 1/2"/A4)40 cpm copiers, 50 cpm copiers: From 3.5 seconds (11" x 8 1/2"/A4)
Zoom ratio ...................................................................... Any ratio between 25 and 400% (in increments of 1%). Alternatively, standard ratios.Standard amount of memory ......................................... 64 MBResolution ...................................................................... Reading: 600 x 600 dpi
Writing: 600 x 600 dpiPaper feed system ......................................................... Automatic feeding from drawers[cassettes] (2 drawers[cassettes], capacity 500 sheets each
[80 g/m2/standard paper specified by our company]), automatic feeding from multi-bypass(capacity 200 sheets [80g/m2])
Copy paper ..................................................................... <Paper weights>Drawers[Cassettes]: 60 g/m2 – 105 g/m2
Duplex Unit: 64 g/m2 – 80 g/m2
Multi-bypass tray: 45 g/m2 – 200 g/m2; 110 lbs.<Paper types>Drawers[Cassettes]: Standard copy paper and color paperDuplex Unit: Standard copy paper and color paperMulti-bypass tray: Standard copy paper, letterhead, color paper, tracing paper,OHP transparencies, envelopes, etc.
Continuous copying ........................................................ 1 – 999 sheetsLight source ................................................................... Rare gas lampDeveloping system ......................................................... Dry processFixing system ................................................................. Heat rollerCleaning system ............................................................ Blade and cleaning rollerPhotoconductor .............................................................. a-SiStandard functions and modes ...................................... Auto paper selection mode, Image quality selection, Auto magnification selection mode,
Zoom mode, Preset zoom mode, XY zoom mode, 2-sided copy modes, Page separation/Split copy modes, Margin mode, Centering/Image shift mode, Memo mode, Border erasemodes, Combine/Merge Copy modes, Print page numbers mode, Form overlay mode,Booklet/Stitching mode, Book to Booklet mode, Sort/Finished mode, Auto rotation function,Cover mode, Transparency + backing sheet mode, Invert mode, Mirror image mode, Proofmode, Repeat copy mode*, Batch scanning mode, Eco print mode, Program function, Jobbuild mode, Form registration*, Shared data box*, Synergy print boxes*, Copy managementmode, Language selection function* Requires the optional Hard Disk

Section 10 MAINTENANCE AND OPERATION INFORMATION
10-8
Power source ................................................................. Inch specifications: 120 V AC, 60 Hz, 12 A Max.Metric specifications: 220-240 V AC, 50 or 60 Hz, 6.5 A Max.
Dimensions .................................................................... 23"(W) x 25 2/5"(D) x 29 1/3"(H)585 mm (W) x 646 mm (D) x 745 mm (H)
Weight ............................................................................ Approx. 165 lbs.Approx. 82 kg
Noise emission ............................................................... =< 70dB (A)Required space .............................................................. 23"(W) x 25 2/5"(D)
585 mm (W) x 646 mm (D)Optional equipment ........................................................ Document Processor, Paper Feeder, Document Finisher, Bult-in Finisher, Job Separator,
Hard Disk, Key Counter, Document Tray, Printer Kit, Printer/Scanner Kit, Fax Kit
(Specifications are subject to change without notice.)

Section 10 MAINTENANCE AND OPERATION INFORMATION
10-9
4. Environmental Specifications
* Power consumption in the Plugged-In mode can only be terminated by removing the power plug from the outlet.
● Duplex (2-sided) copying
• Comes as standard equipment
● Paper feed
• Recycled paper made from 100% recycled pulp may be used with this product.* Contact your sales or service representative for information on recommended paper types, etc.
• During copying
• During standby
• During the Low Power mode
• Recovery time from the Low Powermode
• During the Off and Sleep mode
• Transition time to the Low Powermode (at time of purchase)
• Transition time to the Off and Sleepmodes (at time of purchase)
• During the Plugged-In mode
● Power consumption
Inchspecifications
670 wh or less
175 wh or less
75 wh or less
12 seconds orless
0.1 wh or less
15 minutes
60 minutes
0.1 wh or less
Metricspecifications
670 wh or less
200 wh or less
75 wh or less
12 seconds orless
0.1 wh or less
15 minutes
60 minutes
0.1 wh or less
Inchspecifications
685 wh or less
175 wh or less
75 wh or less
12 seconds orless
0.1 wh or less
15 minutes
60 minutes
0.1 wh or less
Metricspecifications
685 wh or less
200 wh or less
75 wh or less
12 seconds orless
0.1 wh or less
15 minutes
60 minutes
0.1 wh or less
Inchspecifications
720 wh or less
175 wh or less
75 wh or less
12 seconds orless
0.1 wh or less
15 minutes
60 minutes
0.1 wh or less
Metricspecifications
760 wh or less
200 wh or less
75 wh or less
12 seconds orless
0.1 wh or less
15 minutes
60 minutes
0.1 wh or less
30 cpm copiers 40 cpm copiers 50 cpm copiers

Section 10 MAINTENANCE AND OPERATION INFORMATION
10-10
5. Installing the optional equipment
This section shows where to install the optional units for this copier. For more details, refer to the Operation Guide for the corresponding optionalunit.
● Available optional unitsThe following optional units can be installed on your copier.
DocumentProcessor
Original Cover Document TrayKey Counter Printer/Scanner Kit
Fax Kit
Hard Disk
Paper Feeder
Paper Feeder
Job SeparatorBuilt-in Finisher
DocumentFinisher
DocumentFinisher
DocumentFinisher
Printer Kit

Section 10 MAINTENANCE AND OPERATION INFORMATION
10-11
Document ProcessorThe Duplex Document Processor automatically feeds one-sided originals one by one for scanning. It also reverses two-sided originals automaticallyfor duplex copying and page separation copying.
Paper FeederTwo Paper Feeders of the same type as drawer[cassette] in the main body can be added.Capacity and the paper loading method is the same as those for the standard drawer[cassette] in the main unit.
Paper FeederThe Paper Feeder holds up to 3,000 sheets of 11" x 8 1/2" [A4 or B5 (B5 is for Asia-Pacific specification copiers only)] size standard paper.Pull the Paper Feeder out towards you as far as it will go, and then load up to 1,500 sheets of paper in each rows.
Document FinisherThis unit lets you store a large volume of copies and shifts the position of each copy set for ease of sorting. It can staple finished copy sets and bindthem. It is also possible to use the Document Finisher to punch holes in them for filling purposes (optional).
Document FinisherThe Document Finisher stores a large quantity copies, and sorts multiple sets by shifting the position that each one is ejected. It is also possible touse the Document Finisher to staple the copy sets or punch holes in them for filling purposes.
Document FinisherThe Document Finisher stores a large quantity copies, and sorts multiple sets (Sort: ON) or groups copies made from multiple originals, with all thecopies produced from an individual original grouped together in one set (Sort: OFF). It is also possible to use the Document Finisher to staple sortedcopy sets.
Built-in FinisherThe finisher stores a large quantity of copies. It can also sorts multiple copies into sets by shifting the eject position. Paginated copies can bestapled, too.
Job SeparatorWhen using the optional printer function, the paper eject point can be changed according to the used function, making it easier to sort paper. Copied-paper can be ejected to the Job Separator (upper section). See “Copy eject location” in Machine default setting on page 7-49.
Hard DiskThe Hard Disk is required in order to use the following modes and functions of your copier.• Job reservation• Form overlay of registered forms• Repeat copying• Document management functions• Using the output management functions to change the job printing order, cancel and delete print jobs, and verify contentIt is also possible to register up to 1000 department ID-codes under document management.
Key CounterThe Key Counter determines the number of copies that have been made. It is useful for copier centralized management on a department or evencompany level.
Document TrayThe Document Tray lets you place originals and other documents next to the machine before using them, etc. It also contains space for storingpaper clips, etc.
Printer KitIf the Printer Kit is installed, this copier can be used as a printer.Since the network board is equipped, this copier can also be used as a network printer, allowing access from multiple computers.
Printer/Scanner KitIf the Printer/Scanner Kit is installed, this copier can be used as a printer or a network scanner.Since the network board is equipped, this copier can also be used as a network printer, allowing access from multiple computers.
Fax KitIf the Fax Kit is installed, this copier can be used as a fax. Also if the Fax Kit is used together with the optional Printer/Scanner Kit, this copier can beused as a network fax, allowing transmission and reception by a computer.

10-12
This copier contains many different functions and settings, and many of them can be used in combination for more efficient copying.Refer to the following chart for details on combining specific functions and settings.
:Combination is possible---: Combination is NOT possible01:Auto exposure adjustment is not available for the photo
mode. The text&photo mode, the text mode, or manualexposure adjustment will be selected.
02:Only the auto magnification selection mode is available.That mode will be selected.
03:Only same size (100% [1:1]) copying in the auto paperselection mode is available. That mode will be selected.
04:The margin mode cannot be used in combination withthe booklet/stitching mode or the book to booklet mode.
05:The margin mode cannot be used in combination withthe combine/merge copy modes or the memo mode.
06:The border erase modes cannot be used incombination with original size selection (input size).
07:The border erase modes and the auto selection/filingmode cannot be used in combination with each other.
08:The book erase mode and the booklet/stitching modecannot be used in combination with each other.
09:Not available because open-faced originals must be setwith the top edge towards the rear of the platen.
10:The booklet/stitching mode and book to booklet modewill be given second priority when the 2-sided copymodes or the page separation/split copy modes areselected.
30
1212
14
14
1212
14
142020
0606063232
2429
1212
14
142020
0606063232
2429
0302
02
0302
0202
0202
03 0302
02
12
09
09
09
09
33
1212
120303030331
12
12
12
121212
070707121212121212
1212
120202
02
27
12
121212
070707121212121212
35
01
01
Image quality mode (text&photo)Image quality mode (photo)Image quality mode (text)Copy exposure mode (auto exposure)Copy exposure mode (manual exposure)Eco print modeOriginal size selection (standard size)Original size selection (input size)Original size selection (auto selection)Original size selection (custom original size)Same size (100% [1:1]) copyingXY zoom modeAuto magnification selection modeZoom modePaper selectionOriginal set directionBatch scanning modeAuto rotation functionAuto selection/filing mode (auto selection)Auto selection/filing mode (filing)Proof modeRepeat copy mode (settings)Sort modeFinished modeStaple modePunch mode2-sided copy modes (1 sidedR1 sided)2-sided copy modes (1 sidedR2 sided)2-sided copy modes (2 sidedR2 sided)2-sided copy modes (BookR2 sided)Page separation/Split copy modes (2 sidedR1 sided)Page separation/Split copy modes (BookR1 sided)Booklet/Stitching modeBook to Booklet modeMargin modeCentering/Image shift modeBorder erase modes (Sheet erase)Border erase modes (Individual border erase)Border erase modes (Book erase)Combine/Merge Copy modesMemo modeForm overlay modeCover modeTransparency + backing sheet modePrint page numbers modeInvert modeMirror image modeInterrupt copyingDocument management functions (form registration)Document management functions (shared data box [storing documents])Document management functions (synergy print boxes [storing documents])Document management functions (shared data box [printing out documents])Document management functions (synergy print boxes [printing out documents])Output management functions (interrupt print)Repeat copy mode (print out)Job build mode (Step 1)Job build mode (from step 2)Scanner functions (Scan to PC)Scanner functions (Send E-mail)Scanner functions (TWAIN)Scanner functions (Database connection)
Function selected secondFunction selected first1
2
3
4
5
6
7
8
9
0
!
@
#
$
%
^
&
*
(
)
⁄
¤
‹
›
fi
fl
‡
—
·
‚
Œ
„
´
‰
ˇ
Á
¨
ˆ
Ø
∏
Å
Í
Î
Ï
˝
Ó
Ô
Ò
Ú
¸
˛
Ç
◊
ı
˜
Â
¯
˘
¿
¡
11:The transparency + backing sheet mode and the 2-sided copy modes cannot be used in combination witheach other.
12:Cannot be used in combination with the auto selection/filing mode.
13:The 2-sided copy modes and the invert mode cannotbe used in combination with each other.
14:Open-faced originals cannot be used in combinationwith original size selection.
15:The book g page separation/split copy mode cannot beused in combination with the combine/merge copymodes or the memo mode.
Appendix: Functions and settings combination chart

10-13
16:The book g page separation/split copy mode and thetransparency + backing sheet mode cannot be used incombination with each other.
17:The print page numbers mode is only available in theauto magnification selection mode.
18:Because a cover can be selected within the booklet/stitching and book to booklet modes, they cannot beused in combination with the cover mode.
19:The transparency + backing sheet mode and the covermode cannot be used in combination with each other.
20:The booklet/stitching and book to booklet modescannot be used in combination with original sizeselection (input size).
21:The function selected second will be given priority andoriginal size selection (auto selection) will engage.
22:Cannot be used in combination with the punch mode.
23:The booklet/stitching and book to booklet modescannot be used in combination with the combine/mergecopy modes or the memo mode.
24:The cover mode cannot be used in combination withoriginal size selection (input size).
25:The cover mode cannot be used in combination withthe combine/merge copy modes or the memo mode.
26:The cover mode and the invert mode cannot be used incombination with each other.
27:The function selected second will be given priority andthe function selected first will be canceled.
28:The transparency + backing sheet mode and the invertmode cannot be used in combination with each other.
29:The transparency + backing sheet mode cannot beused in combination with original size selection (inputsize).
30:The transparency + backing sheet mode cannot beused in combination with the sort/finished mode, thestaple mode or the punch mode.
31:The selected paper setting will be canceled in order toswitch to the auto paper selection mode.
32:The combine/merge copy modes and the memo modecannot be used in combination with original sizeselection (input size).
33:Cannot be used in combination with the batch scanningmode.
34:Cannot be used in combination with interrupt copying.35:Not available in combination with the form overlay
mode.
™: Image quality (OCR)
Appendix: Functions and settings combination chart
2222
30
1010
11
13
12
1010
11
13
1414
14
09
1212
1010
151535
11
13
1010
1414
14
09
1212
1010
151535
16
21
21
02
1212
22
1010101010
04
082323351811
13
21
210202
02
09
1212
22
1010101010
04
2323351811
13
0404
0505
06
06
0707
06
06
0707
06
06
09
0707
08
32
32
02
1212
15
15232305
3525
32
32
02
1212
15
15232305
3525
1212
35
35
353535
3535
24
24
1212
1818
2525
19
27
29
29
1212
272727
111111
161111
19
27
12
131313
1313
2628
34
34
12
30
Image quality mode (text&photo)Image quality mode (photo)Image quality mode (text)Copy exposure mode (auto exposure)Copy exposure mode (manual exposure)Eco print modeOriginal size selection (standard size)Original size selection (input size)Original size selection (auto selection)Original size selection (custom original size)Same size (100% [1:1]) copyingXY zoom modeAuto magnification selection modeZoom modePaper selectionOriginal set directionBatch scanning modeAuto rotation functionAuto selection/filing mode (auto selection)Auto selection/filing mode (filing)Proof modeRepeat copy mode (settings)Sort modeFinished modeStaple modePunch mode2-sided copy modes (1 sidedR1 sided)2-sided copy modes (1 sidedR2 sided)2-sided copy modes (2 sidedR2 sided)2-sided copy modes (BookR2 sided)Page separation/Split copy modes (2 sidedR1 sided)Page separation/Split copy modes (BookR1 sided)Booklet/Stitching modeBook to Booklet modeMargin modeCentering/Image shift modeBorder erase modes (Sheet erase)Border erase modes (Individual border erase)Border erase modes (Book erase)Combine/Merge Copy modesMemo modeForm overlay modeCover modeTransparency + backing sheet modePrint page numbers modeInvert modeMirror image modeInterrupt copyingDocument management functions (form registration)Document management functions (shared data box [storing documents])Document management functions (synergy print boxes [storing documents])Document management functions (shared data box [printing out documents])Document management functions (synergy print boxes [printing out documents])Output management functions (interrupt print)Repeat copy mode (print out)Job build mode (Step 1)Job build mode (from step 2)Scanner functions (Scan to PC)Scanner functions (Send E-mail)Scanner functions (TWAIN)Scanner functions (Database connection)
Function selected secondFunction selected first
1
2
3
4
5
6
7
8
9
0
!
@
#
$
%
^
&
*
(
)
⁄
¤
‹
›
fi
fl
‡
—
·
‚
Œ
„
´
‰
ˇ
Á
¨
ˆ
Ø
∏
Å
Í
Î
Ï
˝
Ó
Ô
Ò
Ú
¸
˛
Ç
◊
ı
˜
Â
¯
˘
¿
¡

10-14

Index
Numerics2 in 1 ............................................................................................. 5-13
2-sided copy modes ........................................................................ 5-1
4 in 1 ............................................................................................. 5-13
AAccessing the copy default settings .............................................. 7-62
Accessing the copy management menu screen ............................. 7-3
Accessing the machine default settings ........................................ 7-41
Adjusting the copy exposure ........................................................... 4-2
At the end of copying ...................................................................... 4-4
Auto clear function .......................................................................... 2-4
Auto drawer[cassette] switching ON/OFF(machine default setting) ............................................................... 7-42
Auto exposure adjustment (copy default setting) .......................... 7-73
Auto exposure adjustment (OCR) (copy default setting) .............. 7-74
Auto low power function ................................................................. 4-11
Auto low power time (machine default setting) ............................. 7-48
Auto magnification selection mode ................................................. 4-5
Auto rotation function .................................................................... 5-30
Auto Rotation mode ON/OFF (copy default setting) ..................... 7-79
Auto selection mode ....................................................................... 8-3
Auto selection/Filing mode .............................................................. 8-3
Auto sleep function ........................................................................ 4-11
Auto sleep ON/OFF (machine default setting) .............................. 7-57
Auto sleep time (machine default setting) ..................................... 7-47
Automatic drawer[cassette] switching function ............................... 2-4
BBackground exposure adjustment (copy default setting) .............. 7-67
BASIC OPERATION ....................................................................... 4-1
Batch scanning mode ................................................................... 5-47
Book erase mode ........................................................................... 5-11
Book to Booklet mode ................................................................... 5-26
Booklet/Stitching mode ................................................................. 5-22
Border erase modes ...................................................................... 5-11
Box management default settings ................................................. 7-94
Built-in Finisher ............................................................................... 8-9
CCAUTION LABELS ......................................................................... 1-1
Centering/Image shift mode ............................................................ 5-8
Changing a registered program name .......................................... 5-51
Changing the copy management default settings ......................... 7-25
Changing the energy-saving mode (machine default setting) ....... 7-58
Changing the management code (machine default setting) ......... 7-56
Checking the copy management counts ....................................... 7-21
Checking the total counter and printing out the counter report ..... 7-93
Cleaning the copier ....................................................................... 10-1
Cleaning the original cover ........................................................... 10-1
Cleaning the platen ....................................................................... 10-1
Cleaning the separator .................................................................. 10-1
Cleaning the transfer roller ............................................................ 10-2
Combine/Merge Copy modes ....................................................... 5-13
COPIER MANAGEMENT ................................................................ 7-1
Copy default settings ..................................................................... 7-59
Copy eject location (machine default setting) ............................... 7-49
Copy limit (copy default setting) .................................................... 7-82
Copy management mode ................................................................ 7-1
Copying in the Hole Punch mode .................................................... 8-8
Copying in the Sort:OFF mode ....................................................... 8-6
Copying in the Sort:ON mode ......................................................... 8-5
Copying in the Staple mode ............................................................ 8-7
Cover drawer[cassette] (copy default setting) ............................... 7-71
Cover mode ................................................................................... 5-31
Custom paper type for 2-sided copying(machine default setting) ............................................................... 7-46
Customize screen layout (Add functions) (copy default setting) ... 7-86
Customize screen layout (Main functions) (copy default setting) .. 7-85
DDay & time (machine default setting) ............................................ 7-54
Default drawer[cassette] (copy default setting) ............................. 7-70
Default magnification ratio (copy default setting) .......................... 7-72
Default operation mode (machine default setting) ........................ 7-51
Default settings ............................................................................. 7-38
Delete department ID-codes ......................................................... 7-16
Deleting a registered program ...................................................... 5-52
Deleting a registration key ............................................................ 5-55
Document Finisher .................................................................. 8-5, 8-9
Document management functions .................................................. 6-1
Document Processor ...................................................................... 8-1
Document Tray .............................................................................. 8-12
Drawer[Cassette] ............................................................................ 3-2
Drum refresh ................................................................................. 7-91
EEco print mode .............................................................................. 5-48
Eco print mode ON/OFF (copy default setting) ............................. 7-66
Editing copy management information ............................................ 7-4
Enlarging/reducing the copy image ................................................. 4-5
Entering characters ..................................................................... 7-104
Environmental specifications ........................................................ 10-9
Erased border width (copy default setting) ................................... 7-81
Exposure adjustment step (copy default setting) .......................... 7-64
Exposure mode (copy default setting) .......................................... 7-63
FFax eject location (machine default setting) .................................. 7-50
Fax Kit ........................................................................................... 8-12
Filing mode ..................................................................................... 8-4
Form overlay mode ....................................................................... 5-20
Form registration ............................................................................. 6-1
HHard Disk ...................................................................................... 8-11
Hard disk management ................................................................. 7-99
How to set originals in the Document Processor ............................ 8-2

IIf one of the following messages is displayed ................................. 9-1
If one of these indicators lights or flashes ....................................... 9-3
If other trouble occurs ................................................................... 9-13
Individual border erase mode ....................................................... 5-12
Initial mode ...................................................................................... 2-4
INSTALLATION PRECAUTIONS .................................................... 1-2
Installing the optional equipment ................................................ 10-10
Interrupt copying ............................................................................. 4-9
Invert mode ................................................................................... 5-38
JJob build mode .............................................................................. 5-57
Job reservation ............................................................................. 4-10
Job Separator ............................................................................... 8-11
KKey Counter .................................................................................. 8-12
LLanguage selection function ....................................................... 7-103
Loading paper ................................................................................. 3-1
Low power mode ............................................................................ 4-11
MMachine default settings ............................................................... 7-38
MAINTENANCE AND OPERATION INFORMATION .................... 10-1
Making copies when copy management is turned ON .................. 7-37
Making copy default settings ......................................................... 7-63
Making machine default settings ................................................... 7-42
Manual exposure adjustment (photo mode)(copy default setting) ..................................................................... 7-77
Manual exposure adjustment (text mode) (copy default setting) .. 7-76
Manual exposure adjustment (text+photo mode)(copy default setting) ..................................................................... 7-75
Margin mode ................................................................................... 5-6
Margin width (copy default setting) ............................................... 7-80
Memo mode .................................................................................... 5-9
Mirror image mode ........................................................................ 5-39
Misfed in Document Finisher ........................................................ 9-12
Misfeed in Built-in Finisher ............................................................. 9-11
Misfeed in Document Processor ................................................... 9-10
Misfeed in drawer[cassette] ............................................................ 9-4
Misfeed in left cover 1 ............................................................. 9-5, 9-6
Misfeed in left cover 2 ..................................................................... 9-7
Misfeed in multi-bypass tray ........................................................... 9-8
Misfeed in paper feed section ......................................................... 9-4
Multi-bypass tray ............................................................................. 3-3
Multi-bypass tray paper settings ................................................... 7-87
Multi-bypass tray settings display ON/OFF(machine default setting) ............................................................... 7-45
NNAMES OF PARTS ......................................................................... 2-1
OOPTIONAL EQUIPMENT ............................................................... 8-1
Original quality (copy default setting) ............................................ 7-65
Original set direction ..................................................................... 5-49
Original set direction (machine default setting) .......................... 7-46-2
Original size registration ............................................................... 7-90
Original size selection ................................................................... 5-34
Originals that can be used with the Document Processor .............. 8-1
Output management functions ...................................................... 6-20
PPage separation/Split copy modes .................................................. 5-4
Paper Feeder .................................................................................. 8-5
Paper selection (copy default setting) ........................................... 7-68
Paper size (drawer[cassette] No.1 - No.4)(machine default setting) ............................................................... 7-43
Paper type (auto paper selection mode) (copy default setting) ..... 7-69
Paper type (drawer[cassette] No.1 - No.4)(machine default setting) ............................................................... 7-44
Photo mode ..................................................................................... 4-3
Precautions for the use of Document Processor ............................. 8-1
PRECAUTIONS FOR USE ............................................................. 1-3
Preset zoom mode .......................................................................... 4-7
Print page numbers mode ............................................................. 5-16
“Print status” screen ...................................................................... 6-22
Printer Kit ...................................................................................... 8-12
Printer/Scanner Kit ........................................................................ 8-12
Printing out with the repeat copy mode ......................................... 5-43
Program function ........................................................................... 5-50
Proof mode ................................................................................... 5-40
RRegister new department ID-codes ................................................ 7-4
Registering a copy job for repeat copying ..................................... 5-42
Registering a function or mode under a function key .................... 5-53
Registering a program .................................................................. 5-50
Registration keys ........................................................................... 5-53
Registration keys ON/OFF (copy default setting) ......................... 7-84
Repeat copy mode ........................................................................ 5-42
Repeat copying ON/OFF (copy default setting) ............................ 7-83
Report print out ........................................................................... 7-101
SSaving on toner use ...................................................................... 5-48
Selecting functions .......................................................................... 4-1
Selecting the image quality ............................................................. 4-3
Selecting the paper size .................................................................. 4-2
Separate front and back margin settings ........................................ 5-6
Setting an original ........................................................................... 4-1
Setting the Key Counter ................................................................ 8-12
Setting the number of copies to be made ....................................... 4-3
Shared data box .............................................................................. 6-4
Sheet erase mode ......................................................................... 5-11
Silent mode ON/OFF (machine default setting) ............................ 7-53
Sleep mode ................................................................................... 4-11
Sort/Finished mode ....................................................................... 5-29
Sort/Finished mode ON/OFF (copy default setting) ...................... 7-78
Special paper action setting (machine default setting) ............... 7-46-1
Specifications ................................................................................ 10-7
Start copying ................................................................................... 4-3
Synergy print boxes ........................................................................ 6-9

TText mode ........................................................................................ 4-3
Text+photo mode ............................................................................ 4-3
Time difference (machine default setting) ..................................... 7-55
Toner Container ............................................................................ 10-3
Touch panel sound ON/OFF (machine default setting) ................. 7-52
Transparency + backing sheet mode ............................................ 5-36
Turning the copy management function ON/OFF ......................... 7-25
UUsing programmed settings to make copies ................................. 5-51
WWarm-up ......................................................................................... 4-1
Waste Toner Box ........................................................................... 10-3
When paper misfeeds ..................................................................... 9-4
XXY zoom mode ................................................................................ 4-8
ZZoom mode ..................................................................................... 4-6

MEMO

MEMO

A1

* For best copy results and machine performance, we
recommend that you use only KYOCERA MITA original
supplies for your KYOCERA MITA copier.

©2003 http://www.kyoceramita.com
is a trademark of Kyocera Corporation2006. 3
302FD80025 Rev.6.0