3 input data to vector layers
TRANSCRIPT

1
3 Input data to Vector Layers
3.1 Preparation for Data Editing
3.2 Editing Data
3.3 Editing Geometry
Premise:PostgreSQL
username=‘yokoi’, password=‘yokoi’(This can create new database)
databasename=‘valley’ owned by user ‘yokoi’(This is connected to PostGIS)
tablesname=buildings, type=POINTname=roads, type=LINESTRINGname=open_spaces, type=POLYGON

2
3.1 Preparation for Data Editing
Double click on ‘Quantum GIS’ icon.
Logo of Quantum GIS appears.
Then, Quantum GIS 0.9.1 starts.

3
Double click on ‘Add a PosGIS Layer’.
‘Add PostGIS Tables’ dialog opens.Click on ‘New’.
‘Create a New PostGIS connection’ dialog opens.Type in:
Name (of connection): ‘connect to valley’ (arbitrary),Host : ‘localhost’ (fixed),DataBase : ‘valley’ (target database),Port : ‘5432’ (fixed),Username : ‘yokoi’ (User of PostgreSQL)Password : ‘yokoi’ (Password of above user).
Then, click on ‘Test Connect’.

4
Click ‘OK’ if successfully connected.
Then, click on ‘OK’.
Click ‘Connect’.
Then, three tables appear here.

5
Select all these three tables and click on ‘Add’.
Three tables are connected to QGIS as vector layers.

6
Manipulating PostgreSQL Database & Tables with pgAdmin III & QGIS 5
On MicroSoft Windows
Account=Administrator
Account=user
PostgreSQL DataBase Client
User Account=postgres
PostgreSQL DataBase Server 8.1Internal DataBase
Superuser=postgres
DataBase=“TEST”
Table=“buildings”
Table2
Table?
QGISPostGIS Layer
(“buildings”)
Table = PostGIS Layer
Connect to the raster layer (Satellite Image) that is used as BaseMap.

7
‘Tai_wide_G.tif’ is a GeoTiff file that was exported from GRASS after georeferencing and rectfying and also Pylamidized. Its georeferencing information is stored in ‘Tai_wide_G.tfw’. These two files compose a GeoTiff file.
Select ‘Tai_wide_G’ layer in the left panel and ‘Zoom to Layer’ button.
Then, the selected ‘Tai_wide_G’ layer is displayed.

8
Drug down ‘Tai_wide_G’ layer in the left panel.
Take tick off from other layers.
Click the left button on the ‘Tai_wide_G’ layer and put check ‘Shown in overview’ box on.Then, the overview if this layer is displayed in the Map overview area.
Map overview area
Panning Zoom in Zoom out Zoom full
Zoom to Selection Zoom to Layer Zoom last Refresh

9
Zoom in a target. Set the scale 1:2500
Type in the scaleOverview Area
3.2 Editing Data

10
From ‘Setting’ in Menu bar select ‘Project Properties’. Then, ‘Project Properties’dialog appears.
Confirm that the ‘Snapping Toplerance’ is set ‘0’.
Click on ‘Toggle Editing’ button to start data input.
Editing POINT data

11
Select ‘building’ layer and put check box on.
Click on ‘Toggle Editing’ button to allow editing this layer. (By default QGIS loads layers read-only.‘Capture Point’ button is put on simultaneously. If not click on ‘Capture Point’ button also.
Confirm that the cursor changes its shape to an aim mark.
Click on a building. For example a white color big roof.‘Enter Attribute Value’ dialog appears.

12
Type in the corresponding attribute values and clock on ‘OK’.
Note that a mark appears on the targeted building.
After typing in the data for all targeted buildings, click the ‘Toggle editing’ button again.Then, ‘Stop editing’ dialog appears. Click on ‘Save’ if everything goes well. The edited data are saved in PostgreSQL table ‘buildings’.
Click on ‘Identify Feature’ button.

13
Click on a mark on ‘buildings’ layer. Then, ‘Identify Result…’ appears and shows the data saved in the PostgreSQLtable ’buildings’.Close it.
If you find a necessity to revise the data, click on ‘Toggle editing’ button.
Then, edit the necessary part.

14
Editing LINESTRING data
Select ‘roads’ layer and put check box on.
Click on ‘Toggle Editing’ button to allow editing this layer. (By default QGIS loads layers read-only.‘Capture Line’ button is put on simultaneously. If not click on ‘Capture Line’ button also.
Confirm that the cursor changes its shape to an aim mark.

15
Click on points along the target road and finally click the left button. ‘Enter Attribute Values’ dialog appears.Type in the data and finally click ‘OK’.
The targeted road and points (verteces) appear.
After typing in the data for all targeted roads, click the ‘Toggle editing’ button again.Then, ‘Stop editing’ dialog appears. Click on ‘Save’ if everything goes well. The edited data are saved in PostgreSQL table ‘roads’.
Click on ‘Identify Feature’ button.

16
Click on a mark on ‘roads’ layer. Then, ‘Identify Result…’ appears and shows the data saved in the PostgreSQL table ’roads’.Close it.
If you find a necessity to revise the data, click on ‘Toggle editing’ button.
Then, edit the necessary part.

17
Editing POLYGON data
Click on ‘Toggle Editing’ button to allow editing this layer. (By default QGIS loads layers read-only.‘Capture Polygon’ button is put on simultaneously. If not click on ‘Capture Polygon’ button also.
Confirm that the cursor changes its shape to an aim mark.
Select ‘open_spaces’ layer and put check box on.
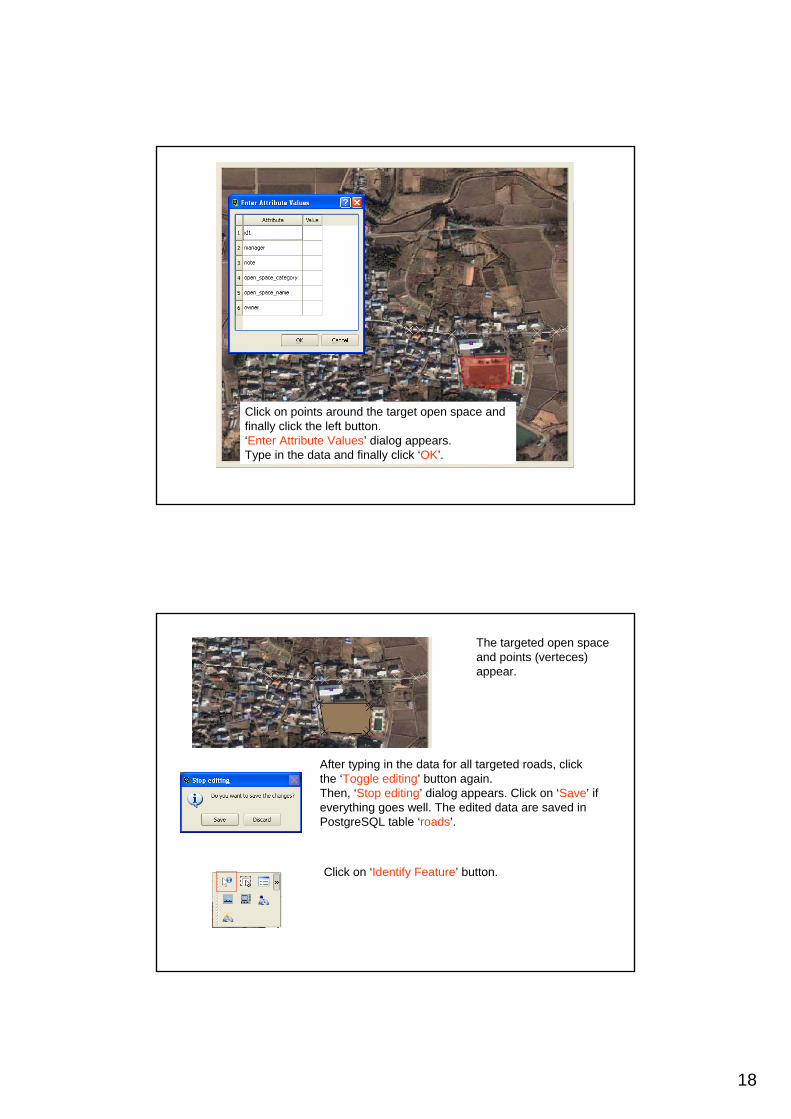
18
Click on points around the target open space and finally click the left button. ‘Enter Attribute Values’ dialog appears.Type in the data and finally click ‘OK’.
The targeted open space and points (verteces) appear.
After typing in the data for all targeted roads, click the ‘Toggle editing’ button again.Then, ‘Stop editing’ dialog appears. Click on ‘Save’ if everything goes well. The edited data are saved in PostgreSQL table ‘roads’.
Click on ‘Identify Feature’ button.

19
Click on a mark on ‘open spaces’ layer. Then, ‘Identify Result…’ appears and shows the data saved in the PostgreSQLtable ’open_spaces’.Close it.
If you find a necessity to revise the data, click on ‘Toggle editing’ button.
Then, edit the necessary part.

20
After completing the tasks for editing, ‘File’ and ‘Save Project As’.
Save the project as ‘Tai.qgs’ in ‘C:¥cygwin¥home¥yokoi’for this example.
The saved project can be used in the next session. Connection to
PostgreSQL tables are saved also.

21
3.3 Editing Geometry
It is necessary to edit geometry of newly digitized vector layers except POINT type one.
PostGIS does have the functionality for editing geometry but command base.QGIS does not have the functionality for editing geometry.GRASS does have the functionality for editing geometry in GUI base.andIt is possible to edit geometry of vector data from QGIS through its GRASS Edit Dialog.
First, PostgreSQL tables are imported to GRASS through PostGIS. Then, the imported layer is edited and exported from GRASS to PostgreSQLthrough PostGIS again.This topic will be explained later.