2d puzzle platform game phototype -...
TRANSCRIPT

Studio 1, Sem 01 2018 MAGI – Master of Animation, Games, and Interactivity, RMIT Univer-
Jiayi ShaoMasters of Animation, Games and Interactivity (MAGI),School of Design,RMIT University,Melbourne, [email protected]
Abstract
In this Folio, I am going to focus more on making a game in Unity. First, I simplify the character that based on the concept I did in Folio 1, and redesign the game level. The game is a 2D side-scrolling game with a couple of puzzles. The character is a small droplet, and its goal is to pass through the stage. The stage might be the beginning of a game, so it doesn’t have a specific goal or end. With this game, the player can interact with boxes, moving platforms and water.
To make this game in Unity, I mainly use Playmaker (a Unity asset). Playmaker lets me develop game logic without coding. Besides, most of the puzzles in this game are based on physics and water. So, I also use Water 2D Tool to help me simulate water. Moreover, ProCamera 2D helps me tackle with the camera move-ment in my Game.
KeywordsGame concept design, Game level design, Unity 2D game, Playmaker, Liquid simulation, Camera move-ment in Unity, Playmaker U GUI.
Unity Playmaker Study -- Making Game without Coding
2D PUZZLE PLATFORM GAME PHOTOTYPE

Studio 1, Sem 01 2018 MAGI – Master of Animation, Games, and Interactivity, RMIT Univer-
2
Chapter 1 Inspiration
1.1 Introduction
1.2 Moodboard
1.3 Plan
Chapter 2 Design
2.1 Character Design
2.2 Level Design
2.3 Sprite Sheet
Chapter 3 Unity
3.1 Layer and Sorting Layer
3.2 Player Movement
3.3 Water Simulation
3.4 Rigidbody, Collider and Physic Metreial
3.5 Trigger and Animation
3.6 Load Level and Check Point
3.7 Camera Movement
3.8 Menu and U GUI
Contents1.1 Introduction
I am interested in the side-scrolling puzzle-platform games. The key aspect of puzzle platform games involves solving riddles and puzzles, rather than com-bat. In the last decade or so, physical simulation has been an important gameplay mechanics. It has mostly taken the form of rigid body physics and the use of the off-the-shelf physical engines (Kellomaki 2015). Kellomaki also believes that water could provide a new gameplay possibility in physical simulation. So, I try to build a puzzle platform game that uses water-based gameplay.
Different from Folio 1 that I did character and envi-ronment concepts, in this Folio, I am going to focus more on making a game in Unity. So, the first thing I need to do is simplifying my character and game level. The character is a small droplet, and its goal is to pass through the stage. The stage might be the beginning of a game, so it doesn’t have a specific goal or end. With this game, the player can interact with boxes, moving platforms and water.
To make this game in Unity, due to the reason that I haven’t use it before and lack of coding experience, I choose to use Playmaker, which is an asset that helps me to develop the game without coding. Besides, most of the puzzles in this game are based on physics and water. So, I also use Water 2D Tool (another Unity as-sert) to simulate water. Moreover, ProCamera 2D helps me tackle with the camera movement in my Game. Thus, there are a huge amount of things need to learn.

Studio 1, Sem 01 2018 MAGI – Master of Animation, Games, and Interactivity, RMIT Univer-
3
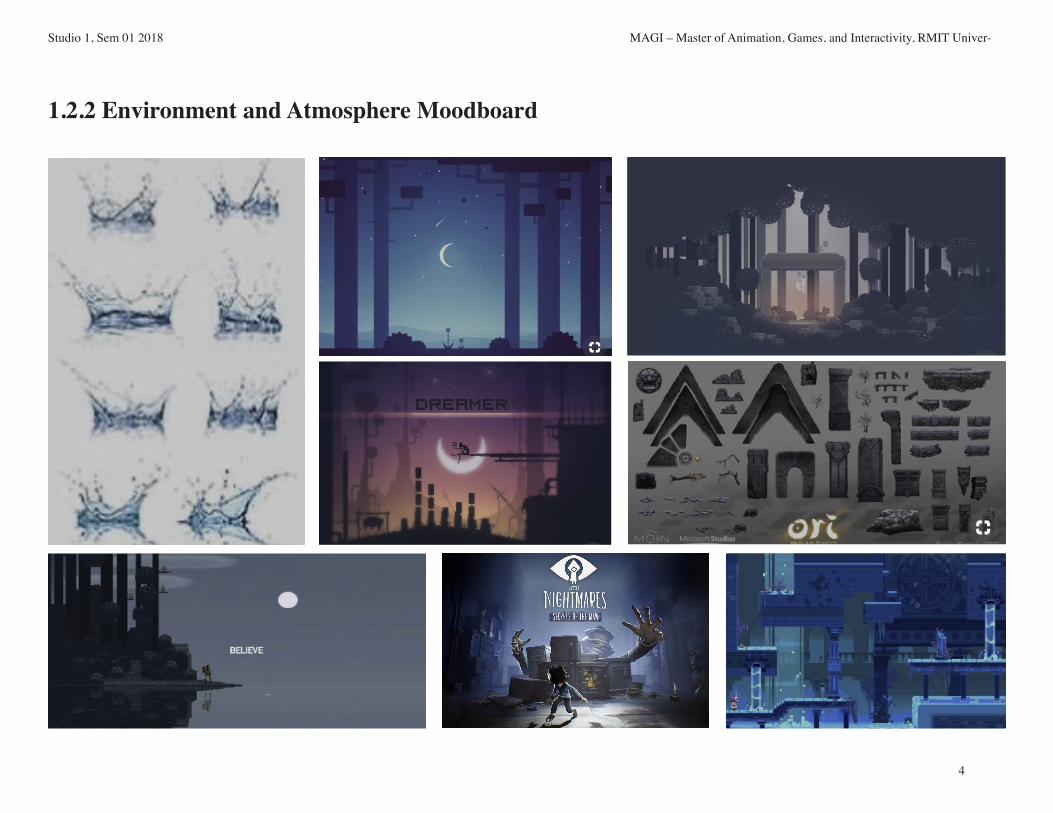
Limbo (2010) is a 2D puzzle-platform game made by Playdead. The art form of this game is compelling. By present-ing in black and white tones, using light-ing from the back to set off the character who is a boy in black. Similarly to Inside, the developers build the game’s puzzles without any literate tutorial. The game focuses on logical and conceptual chal-lenges that base on rigid physics system. There are minimal ambient sounds as clues to suggest the players. In terms of its story, the players may find some detail during the progress that reveals the end-ing. The open-ended work also has some deep meanings.
Inside (2016) is a 2.5D puzzle-plat-form side-scrolling game also made by Playdead. The player controls a boy to adventure an unrealistic world, and solves the puzzles that based on physics system or the rigid gameplay mechanics. The developers build the game’s puzzles without any literate tutor, players need to try or fail again and again in order to find the correct solution. The color in the game is pale and depressed. In most cases, the game is silent, the sounds only from the environment that could be clues to solve the puzzle.
1.2.1 Moodboard and Related Works
Studio 1, Sem 01 2018 MAGI – Master of Animation, Games, and Interactivity, RMIT Univer-
4
1.2.2 Environment and Atmosphere Moodboard
Studio 1, Sem 01 2018 MAGI – Master of Animation, Games, and Interactivity, RMIT Univer-
5
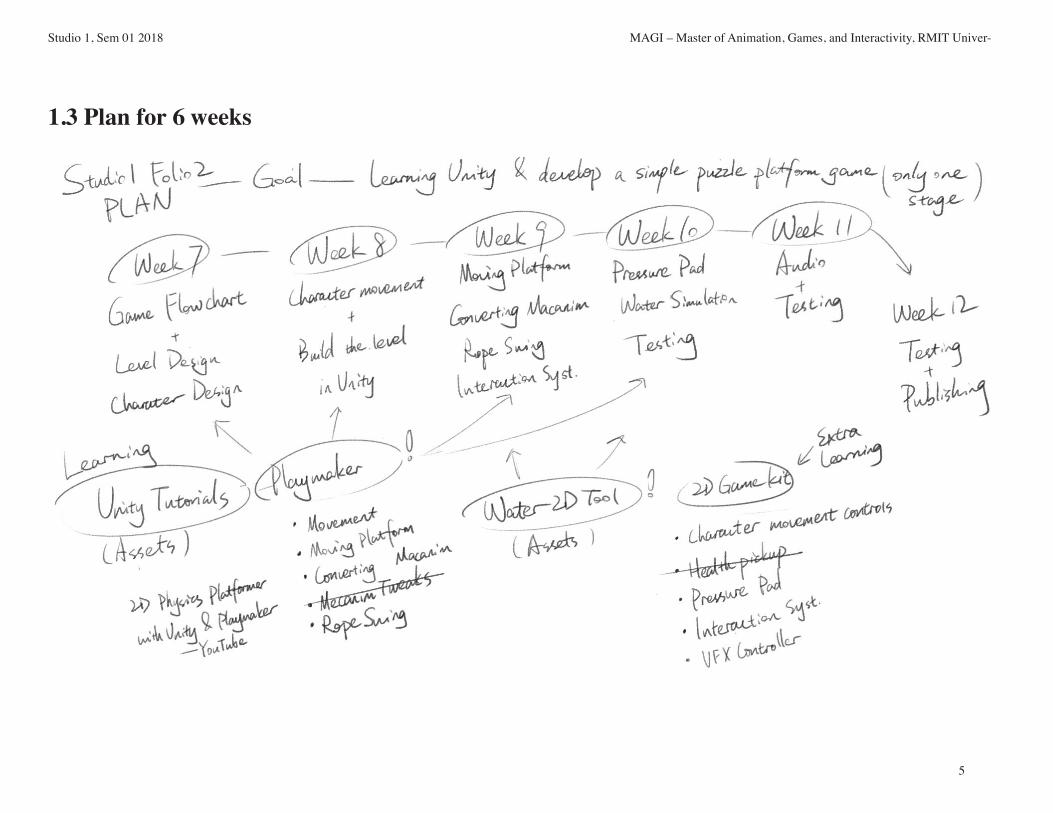
1.3 Plan for 6 weeks

Studio 1, Sem 01 2018 MAGI – Master of Animation, Games, and Interactivity, RMIT Univer-
6
2.1 Character and Character Movement Design
My character is transformed into a droplet, al-though I keep some of its features — eyes, and hair. I like to draw some poses to help me figure out its movement. When I design the animation of a droplet, I need to consider its feature. How does the water
move? How does it jump? And how does it die? Gilland (2009 & 2011) presents excellent real-istic animations about water in his books, like dripping water, ripple, water splash… which are fantastic references?

Studio 1, Sem 01 2018 MAGI – Master of Animation, Games, and Interactivity, RMIT Univer-
7
2.2.1 Level Design
I am keeping changing the level design during the whole 2nd-term semester. For the first puzzle, I first designed that the droplet has a time limit if it wants to move on the ground, namely somewhere without water. So, the first level is designed to have two pipes that are dripping water. The player can get the supply under those pipes to extend the liv-ing time. However, I failed to achieve this in Unity. First, I have no idea to reduce the size of droplet while it is walking. Second, I also don’t know how does the droplet combine with another droplet. So, I have to delete this idea. In the final design, the first level becomes the two water pools with dif-ferent water levels. With the lower water level, the player needs to move the box aline the wall, so that he can jump up on a box to get on next level. Next, I add three “cliffs” and the last one will fall down if the player hit it.
The second puzzle I first designed as a slope with a suspended ball. The player needs to hit the ball when the droplet is falling along with the slope. In the consultation with Max, he thinks the ball may hard to be found or be recognized as an intractable object by the player. I agreed with him, so I change the puzzle to a seesaw. The player needs to hit down the ball. The ball is quite heavy so it can flip the seesaw up. And then, the player can go to the other side.
Studio 1, Sem 01 2018 MAGI – Master of Animation, Games, and Interactivity, RMIT Univer-
8
2.2.2 Final Level Design
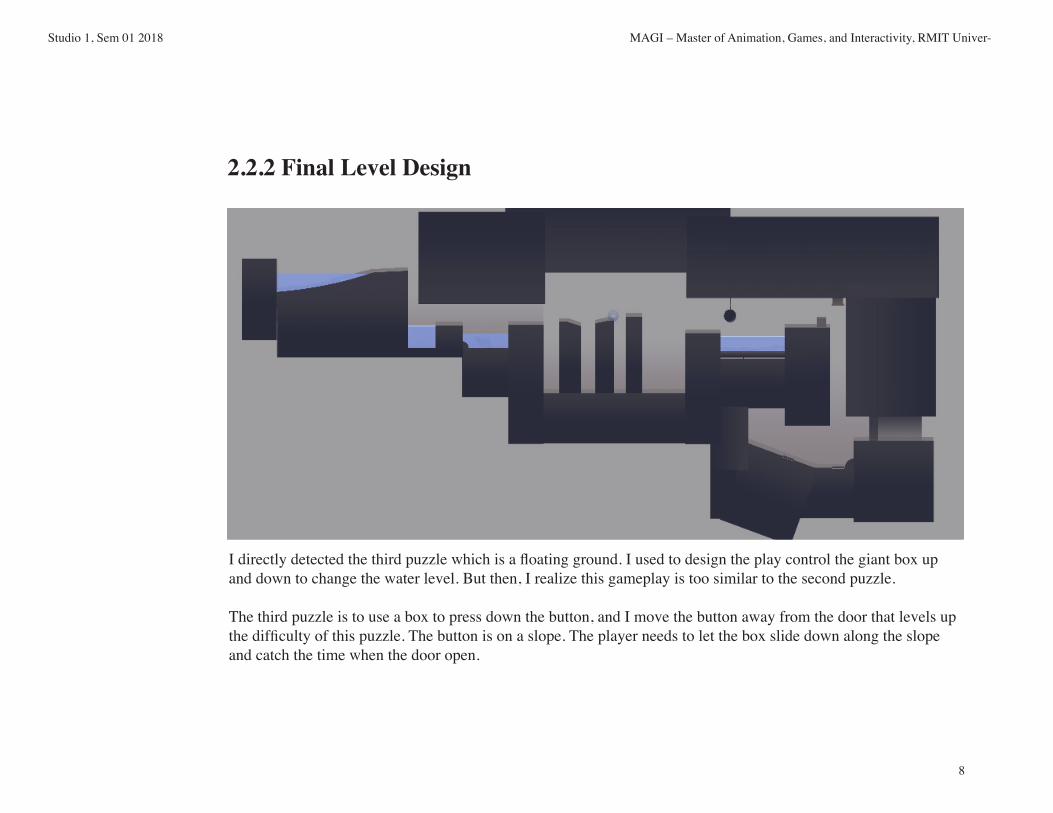
I directly detected the third puzzle which is a floating ground. I used to design the play control the giant box up and down to change the water level. But then, I realize this gameplay is too similar to the second puzzle.
The third puzzle is to use a box to press down the button, and I move the button away from the door that levels up the difficulty of this puzzle. The button is on a slope. The player needs to let the box slide down along the slope and catch the time when the door open.
Studio 1, Sem 01 2018 MAGI – Master of Animation, Games, and Interactivity, RMIT Univer-
9
2.2.3 Environment Color Test and Concept
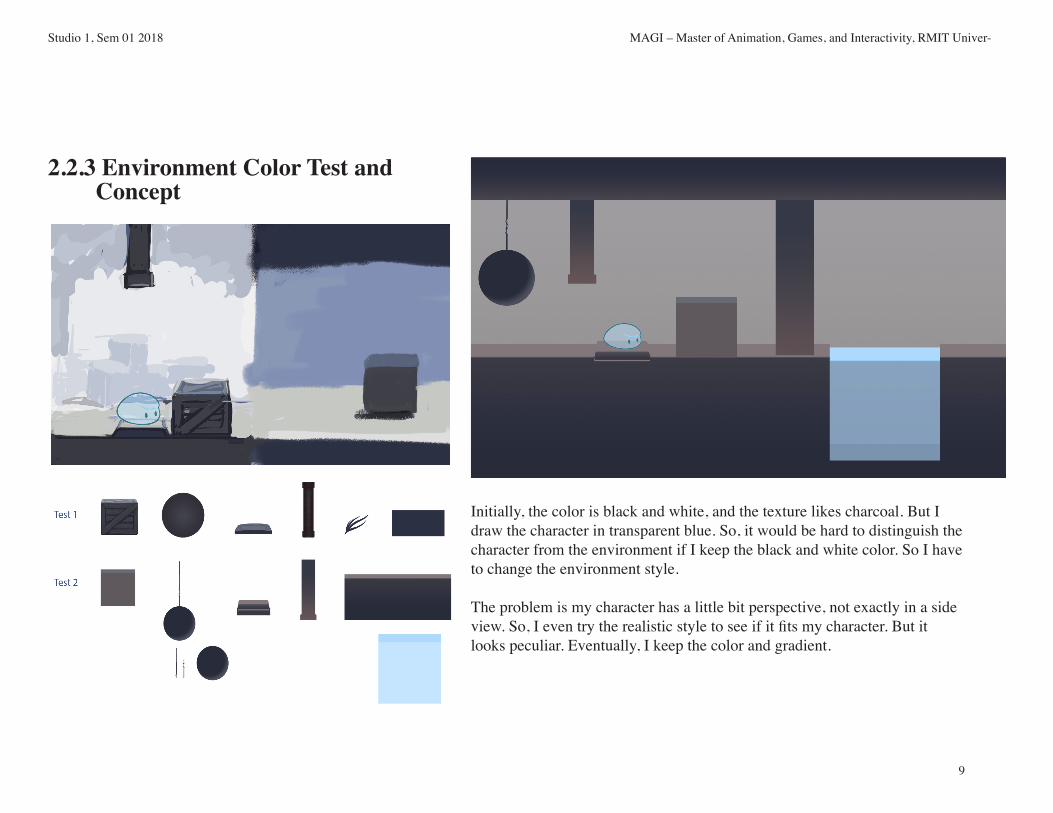
Initially, the color is black and white, and the texture likes charcoal. But I draw the character in transparent blue. So, it would be hard to distinguish the character from the environment if I keep the black and white color. So I have to change the environment style.
The problem is my character has a little bit perspective, not exactly in a side view. So, I even try the realistic style to see if it fits my character. But it looks peculiar. Eventually, I keep the color and gradient.
Studio 1, Sem 01 2018 MAGI – Master of Animation, Games, and Interactivity, RMIT Univer-
10
2.3 Character and Environment Sprite Sheet
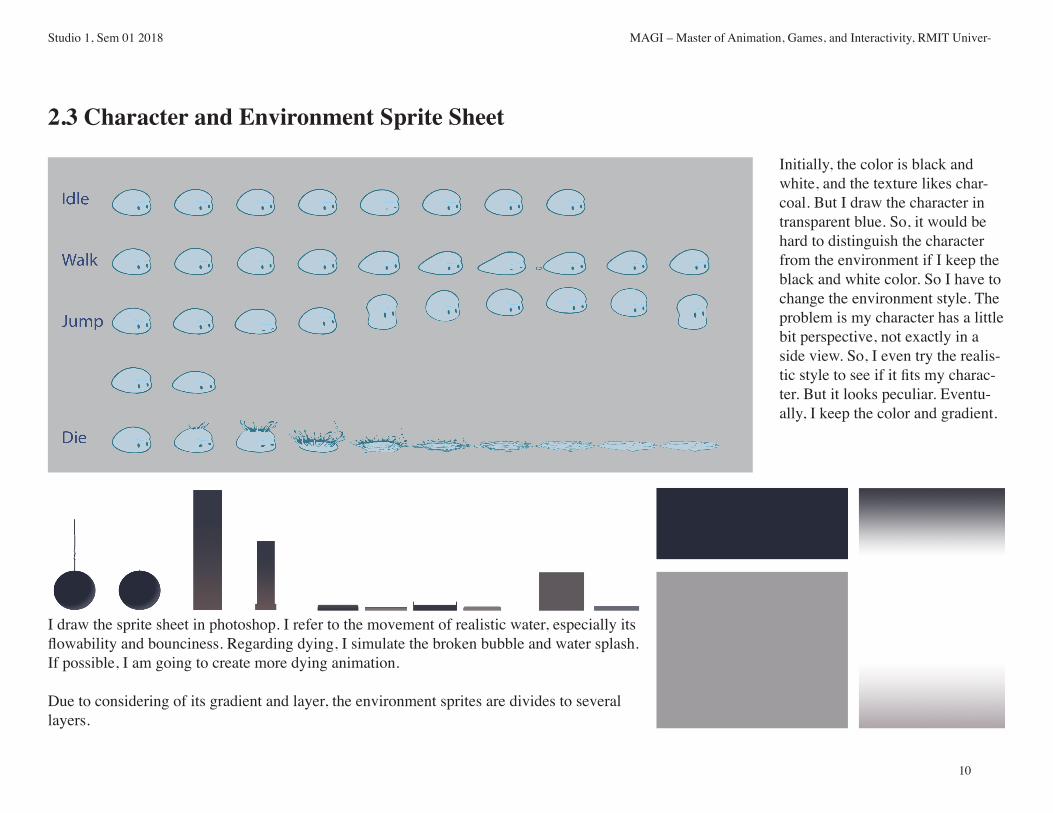
Initially, the color is black and white, and the texture likes char-coal. But I draw the character in transparent blue. So, it would be hard to distinguish the character from the environment if I keep the black and white color. So I have to change the environment style. The problem is my character has a little bit perspective, not exactly in a side view. So, I even try the realis-tic style to see if it fits my charac-ter. But it looks peculiar. Eventu-ally, I keep the color and gradient.
I draw the sprite sheet in photoshop. I refer to the movement of realistic water, especially its flowability and bounciness. Regarding dying, I simulate the broken bubble and water splash. If possible, I am going to create more dying animation.
Due to considering of its gradient and layer, the environment sprites are divides to several layers.
Studio 1, Sem 01 2018 MAGI – Master of Animation, Games, and Interactivity, RMIT Univer-
11
3.1 Unity Layer and Sorting Layer
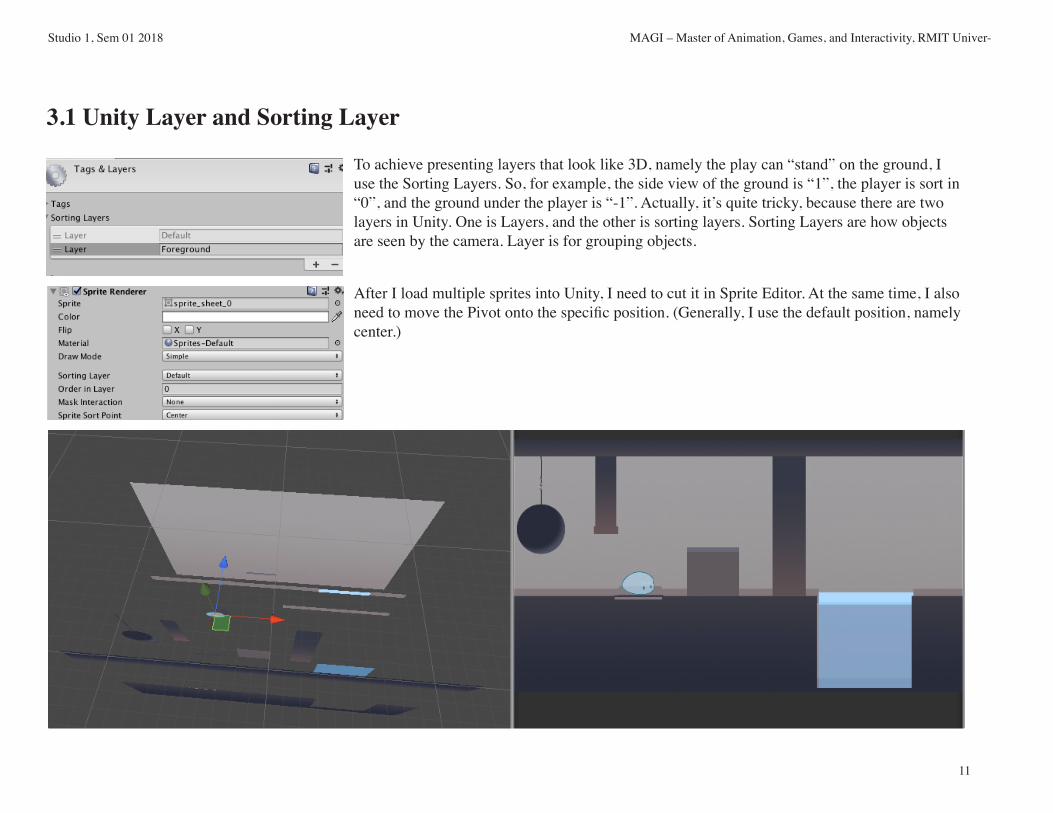
To achieve presenting layers that look like 3D, namely the play can “stand” on the ground, I use the Sorting Layers. So, for example, the side view of the ground is “1”, the player is sort in “0”, and the ground under the player is “-1”. Actually, it’s quite tricky, because there are two layers in Unity. One is Layers, and the other is sorting layers. Sorting Layers are how objects are seen by the camera. Layer is for grouping objects.
After I load multiple sprites into Unity, I need to cut it in Sprite Editor. At the same time, I also need to move the Pivot onto the specific position. (Generally, I use the default position, namely center.)
Studio 1, Sem 01 2018 MAGI – Master of Animation, Games, and Interactivity, RMIT Univer-
12
3.2.1 Character Movement Animation in Unity
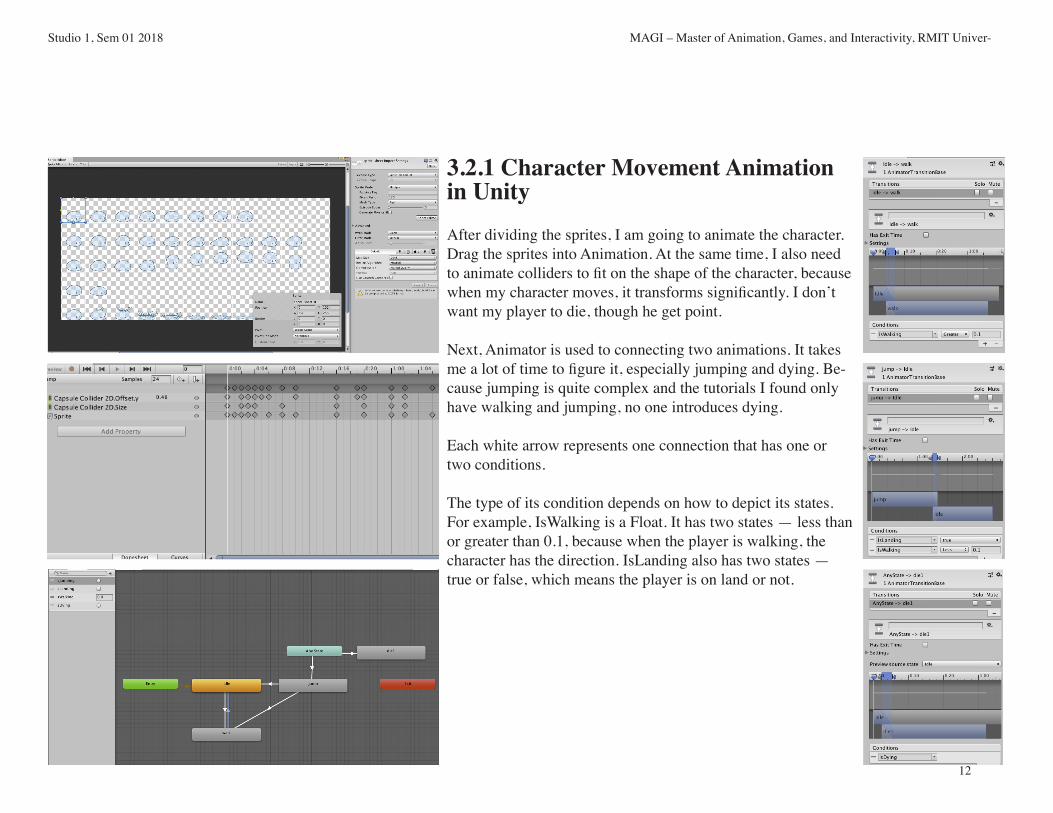
After dividing the sprites, I am going to animate the character. Drag the sprites into Animation. At the same time, I also need to animate colliders to fit on the shape of the character, because when my character moves, it transforms significantly. I don’t want my player to die, though he get point.
Next, Animator is used to connecting two animations. It takes me a lot of time to figure it, especially jumping and dying. Be-cause jumping is quite complex and the tutorials I found only have walking and jumping, no one introduces dying.
Each white arrow represents one connection that has one or two conditions.
The type of its condition depends on how to depict its states. For example, IsWalking is a Float. It has two states — less than or greater than 0.1, because when the player is walking, the character has the direction. IsLanding also has two states — true or false, which means the player is on land or not.

Studio 1, Sem 01 2018 MAGI – Master of Animation, Games, and Interactivity, RMIT Univer-
13
3.2.2 Player Movement in Unity (Playmaker)
In playmaker, FSM is the controller of action. It relies on the logic in a series of actions. In short, I want to do this action, and then when I achieve this condition, transit to the next action. To make a character move, need an axis first, Horizontal or Vertical. I call this state “Move Player.” Next, set the velocity. Ok, the droplet move. But if I press left arrow key, it doesn’t face left. So, I need to create another two states “Flip Left” and “Flip Right” to set scale, when the player press right arrow key, X-axis scales 1, and when he press left one, x-axis scales -1. So, the droplet can move and flip.
To make a character jump, I need an “Init” state to set a Float Value first. I want the player press up arrow key to jump. Next, I create a “Jumping” state and Add a Force to Y axis, which is the Value I set before. Then send back to the get Jump Input stage. Now, the droplet can jump. But, there is a problem, it can jump infinitely. I’ll fix this in next page.
To add animation while the droplet is moving, typically use the Global Events. For example, in the Jump FSM, I use Send Event action to Animation FSM, named the Event “ANI_JUMP”. Then, in Animation FSM, Add a Global Transition “ANI-JUMP” to the Jump state. Set Animator condition. I’ve set it on the last page. Here I use Trigger “IsJumping” and Bool “IsLanding”. Ok, the animation works.

Studio 1, Sem 01 2018 MAGI – Master of Animation, Games, and Interactivity, RMIT Univer-
14
3.2.3 Prevent double Jumping -- Ray Cast
I have to say here is the most frustrating problem in the whole process. The majority of the bugs I have is due to this Ray Cast, even now I am not quite sure about how to use this action. So, as I said before, to prevent the player can jumping infinitely, I need two states “Pre-Jump Check” and “In Air Check”. Then, I need to create an Empty Child GameObject under Player, name it Ground Check Object, drag it under my Player. The Ground Check Object is to check the player whether the land on ground or not.
In the FSM, I need to create a GameObject Variables, name it Ground Object. In Pre-Jump Check state, add Set Game Object action, choose the Ground Object. Next, add Ray Cast 2d, From the “Ground Check Object” I set before. It is going to check the Layer Mask I want it can jump on. So, In my game, I want it to jump onto the Ground Layer and Default Layer. Then, add Game Object Tag Switch. Compare with the Ground Tag. If it is, send to JUMP Event.
The Tag Switch and Layer confused me so much, because I always meet the situation that the char-acter is on the ground, but it can’t jump. Sometimes, the jump work for me, but if I find the other person test, it doesn’t work again. Cheerfully, I finally solve this problem, really achievable.

Studio 1, Sem 01 2018 MAGI – Master of Animation, Games, and Interactivity, RMIT Univer-
15
3.3.1 Water Simulation 1 (Water 2D Tool)Water simulation plays a vital role in my game. Almost every puzzle relies on water. At first, I also meet the problem that the droplet can’t dive into the water. It only floats above the water. After tests, I found two solutions. One is dragging down the Col-lider Top Offset, but when the droplet goes into the water, it doesn’t have any ripple. Then, I try to adjust the Water Density; it works better. Besides, I also try to make more realistic water by changing other parameters.
Studio 1, Sem 01 2018 MAGI – Master of Animation, Games, and Interactivity, RMIT Univer-
16
3.3.2 Water Simulation 2 (Particle System)
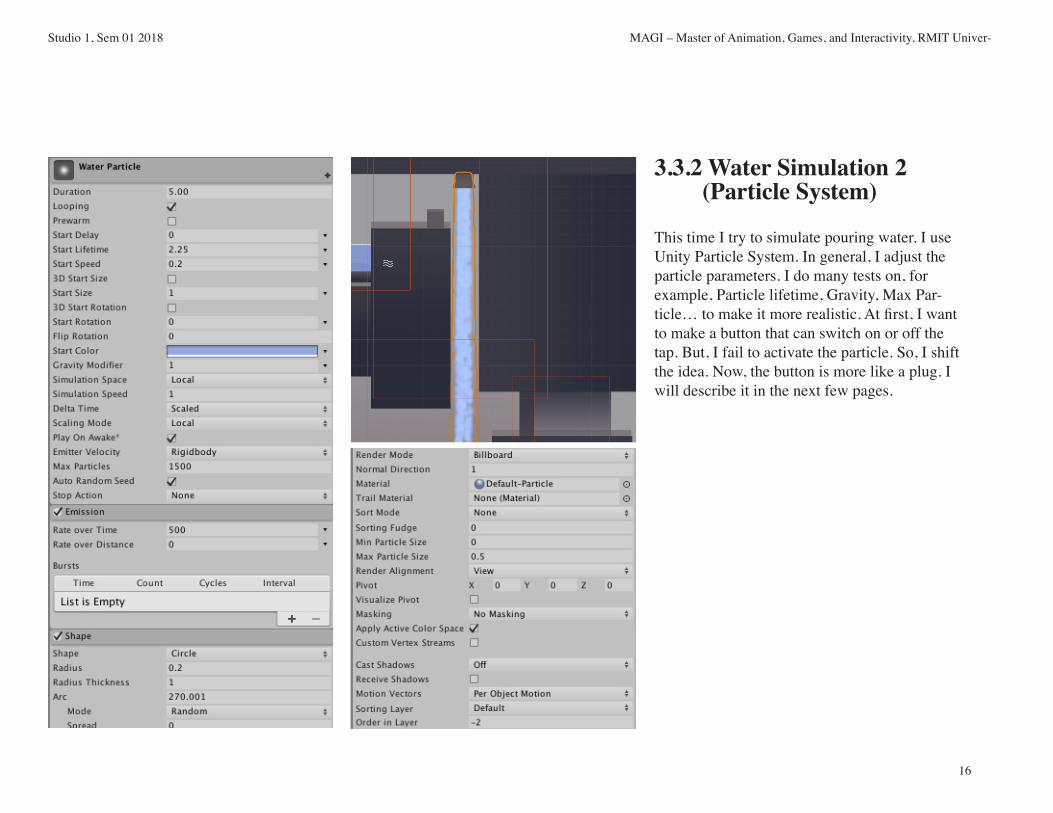
This time I try to simulate pouring water. I use Unity Particle System. In general, I adjust the particle parameters. I do many tests on, for example, Particle lifetime, Gravity, Max Par-ticle… to make it more realistic. At first, I want to make a button that can switch on or off the tap. But, I fail to activate the particle. So, I shift the idea. Now, the button is more like a plug. I will describe it in the next few pages.
Studio 1, Sem 01 2018 MAGI – Master of Animation, Games, and Interactivity, RMIT Univer-
17
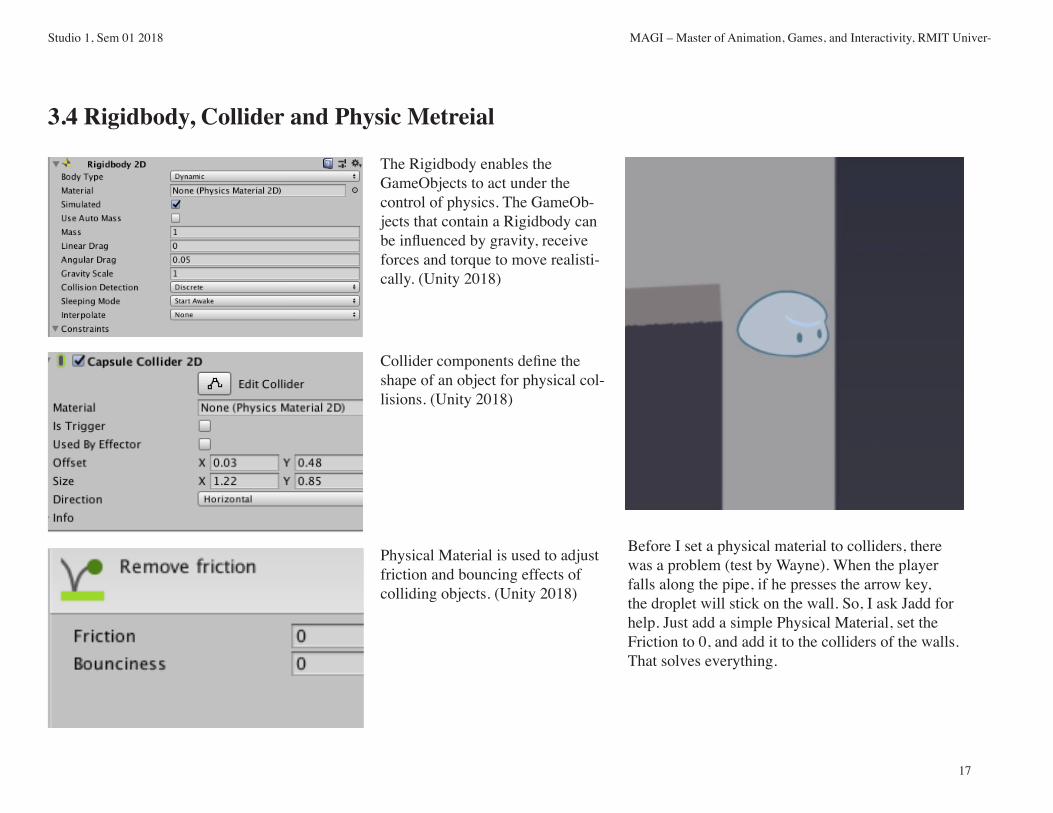
The Rigidbody enables the GameObjects to act under the control of physics. The GameOb-jects that contain a Rigidbody can be influenced by gravity, receive forces and torque to move realisti-cally. (Unity 2018)
Collider components define the shape of an object for physical col-lisions. (Unity 2018)
Physical Material is used to adjust friction and bouncing effects of colliding objects. (Unity 2018)
3.4 Rigidbody, Collider and Physic Metreial
Before I set a physical material to colliders, there was a problem (test by Wayne). When the player falls along the pipe, if he presses the arrow key, the droplet will stick on the wall. So, I ask Jadd for help. Just add a simple Physical Material, set the Friction to 0, and add it to the colliders of the walls. That solves everything.
Studio 1, Sem 01 2018 MAGI – Master of Animation, Games, and Interactivity, RMIT Univer-
18
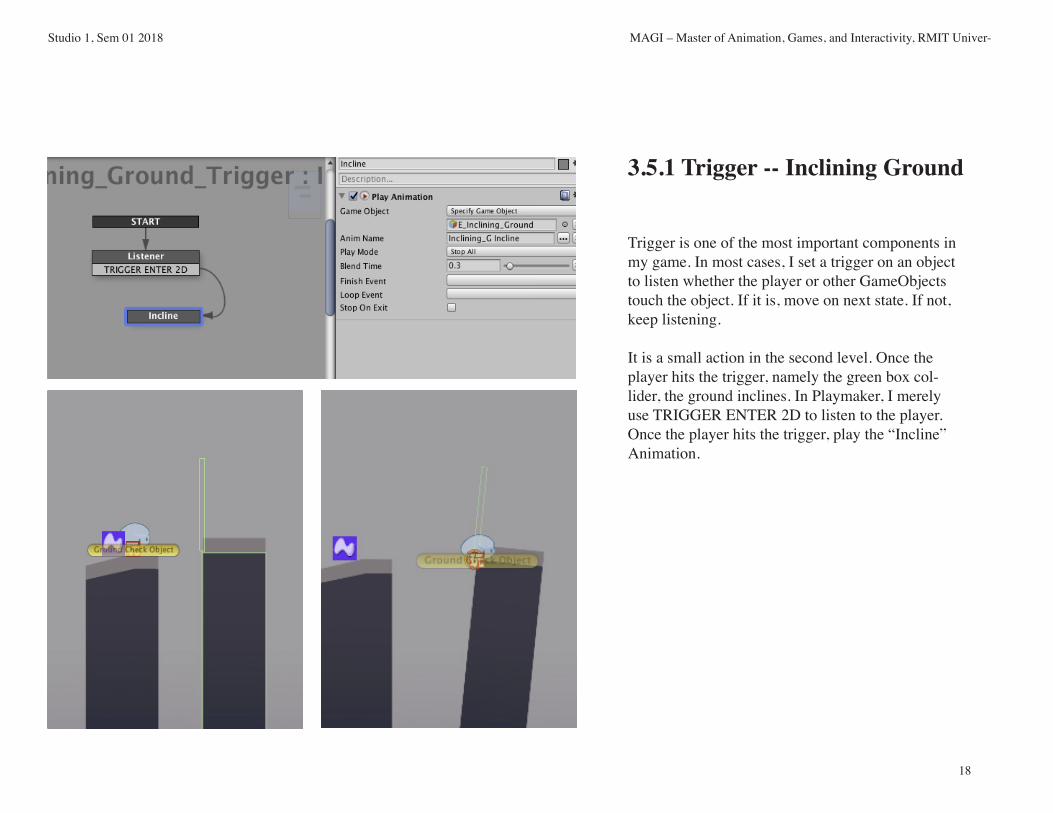
3.5.1 Trigger -- Inclining Ground
Trigger is one of the most important components in my game. In most cases, I set a trigger on an object to listen whether the player or other GameObjects touch the object. If it is, move on next state. If not, keep listening.
It is a small action in the second level. Once the player hits the trigger, namely the green box col-lider, the ground inclines. In Playmaker, I merely use TRIGGER ENTER 2D to listen to the player. Once the player hits the trigger, play the “Incline” Animation.
Studio 1, Sem 01 2018 MAGI – Master of Animation, Games, and Interactivity, RMIT Univer-
19
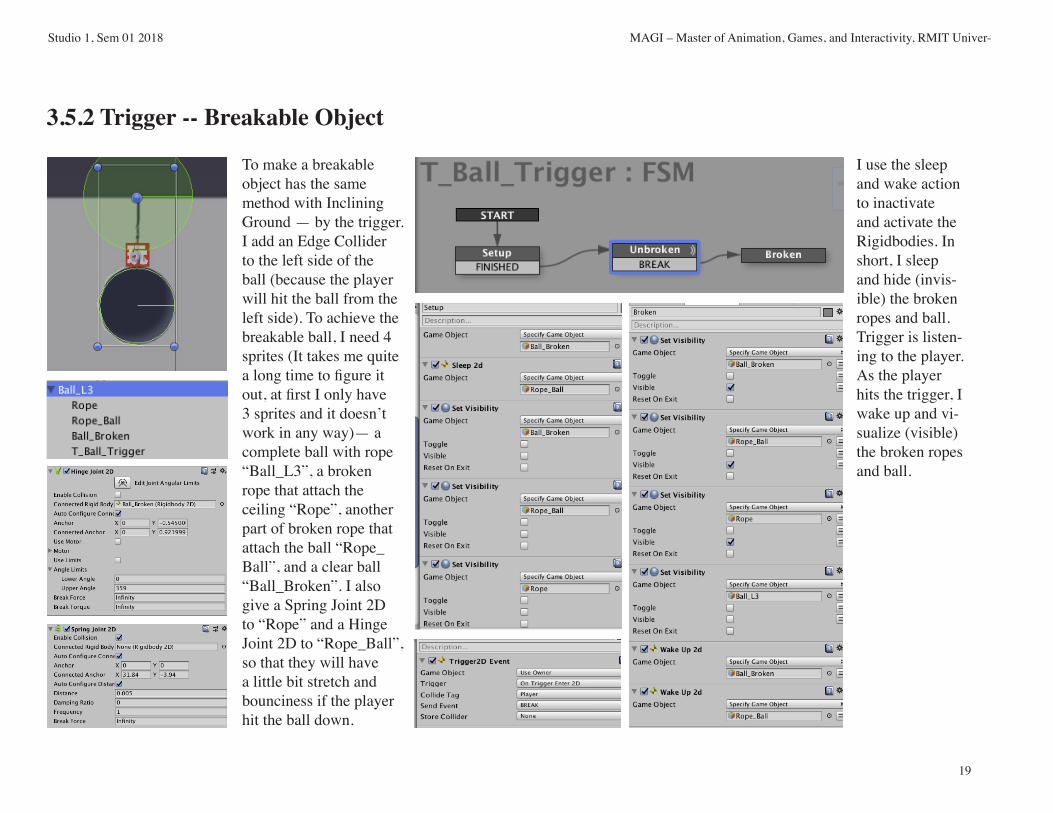
3.5.2 Trigger -- Breakable Object
To make a breakable object has the same method with Inclining Ground — by the trigger. I add an Edge Collider to the left side of the ball (because the player will hit the ball from the left side). To achieve the breakable ball, I need 4 sprites (It takes me quite a long time to figure it out, at first I only have 3 sprites and it doesn’t work in any way)— a complete ball with rope “Ball_L3”, a broken rope that attach the ceiling “Rope”, another part of broken rope that attach the ball “Rope_ Ball”, and a clear ball “Ball_Broken”. I also give a Spring Joint 2D to “Rope” and a Hinge Joint 2D to “Rope_Ball”, so that they will have a little bit stretch and bounciness if the player hit the ball down.
I use the sleep and wake action to inactivate and activate the Rigidbodies. In short, I sleep and hide (invis-ible) the broken ropes and ball. Trigger is listen-ing to the player. As the player hits the trigger, I wake up and vi-sualize (visible) the broken ropes and ball.

Studio 1, Sem 01 2018 MAGI – Master of Animation, Games, and Interactivity, RMIT Univer-
20
3.5.3 Trigger -- Seesaw
The seesaw needs two triggers to realize it. (At first, I only have one trigger. Well, it doesn’t work. Thank Max assistant). The player hits down the ball and moves it to the right, so that he will get a higher water level and an up-flipped seesaw surface. While if the player moves the ball to the right, the seesaw flips down and the water level is lower, namely small buoyant force.
In terms of Buoyant Force in this game. The player might find it in level 1. I design two water pools with different levels. The higher water level has a greater buoyant force, which means the player can jump higher.

Studio 1, Sem 01 2018 MAGI – Master of Animation, Games, and Interactivity, RMIT Univer-
21
3.5.4 Trigger Buttons, Door and Water Level
In the final puzzle, I have two buttons. One control the water level, like a sink plug. The water level rises if the droplet presses (plugs in) the button. The other one controls the door. If the player presses the door, the door opens. So, the puzzle is how to makes the door open and a high water level at the same time? Keep it in secret.

Studio 1, Sem 01 2018 MAGI – Master of Animation, Games, and Interactivity, RMIT Univer-
22
3.5.5 Trigger -- Die and Global Event
I’ve explained this in Die Animation. In short, I create a trigger at the position where I want the player dies. In my game, the player will die, if he falls from the high place, and there isn’t any wa-ter at the bottom. So, I create the trigger at the bottom of cliffs. If the player hit the trigger, send a Global Event to Animation FSM in the Player. Then, play Die Animation.
I did the same one under the door so that the player might be crushed over by the door.
Studio 1, Sem 01 2018 MAGI – Master of Animation, Games, and Interactivity, RMIT Univer-
23
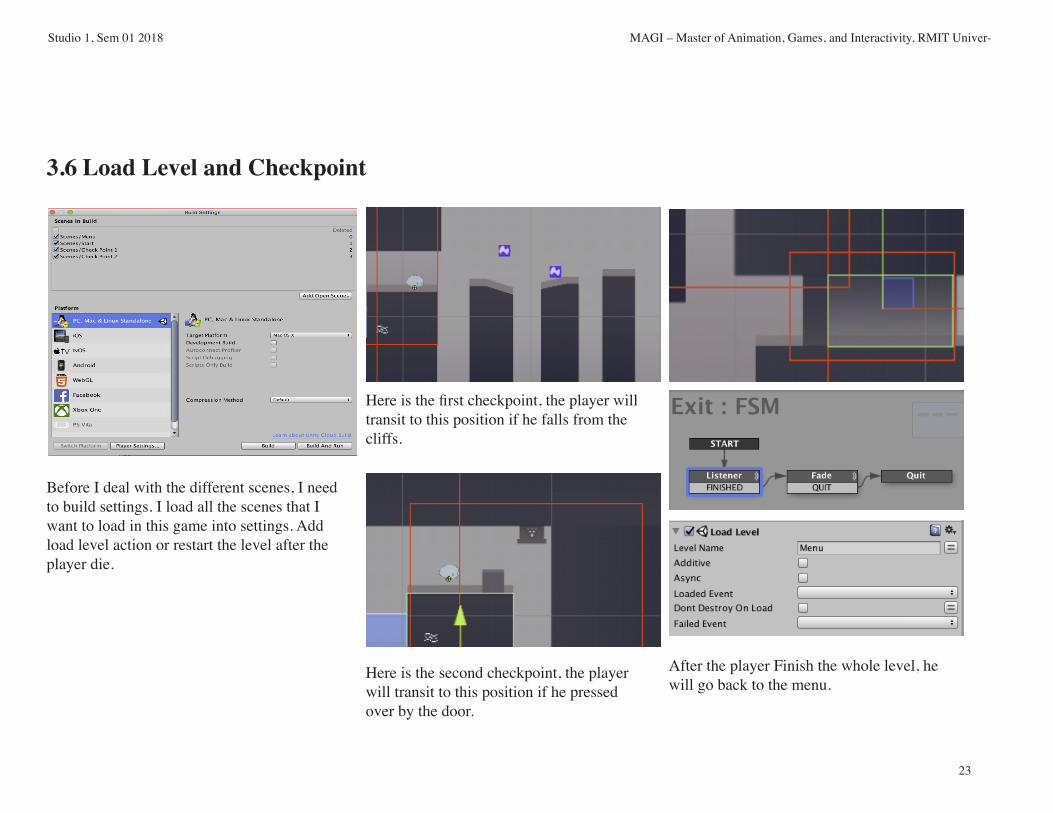
3.6 Load Level and Checkpoint
Here is the first checkpoint, the player will transit to this position if he falls from the cliffs.
Here is the second checkpoint, the player will transit to this position if he pressed over by the door.
Before I deal with the different scenes, I need to build settings. I load all the scenes that I want to load in this game into settings. Add load level action or restart the level after the player die.
After the player Finish the whole level, he will go back to the menu.
Studio 1, Sem 01 2018 MAGI – Master of Animation, Games, and Interactivity, RMIT Univer-
24
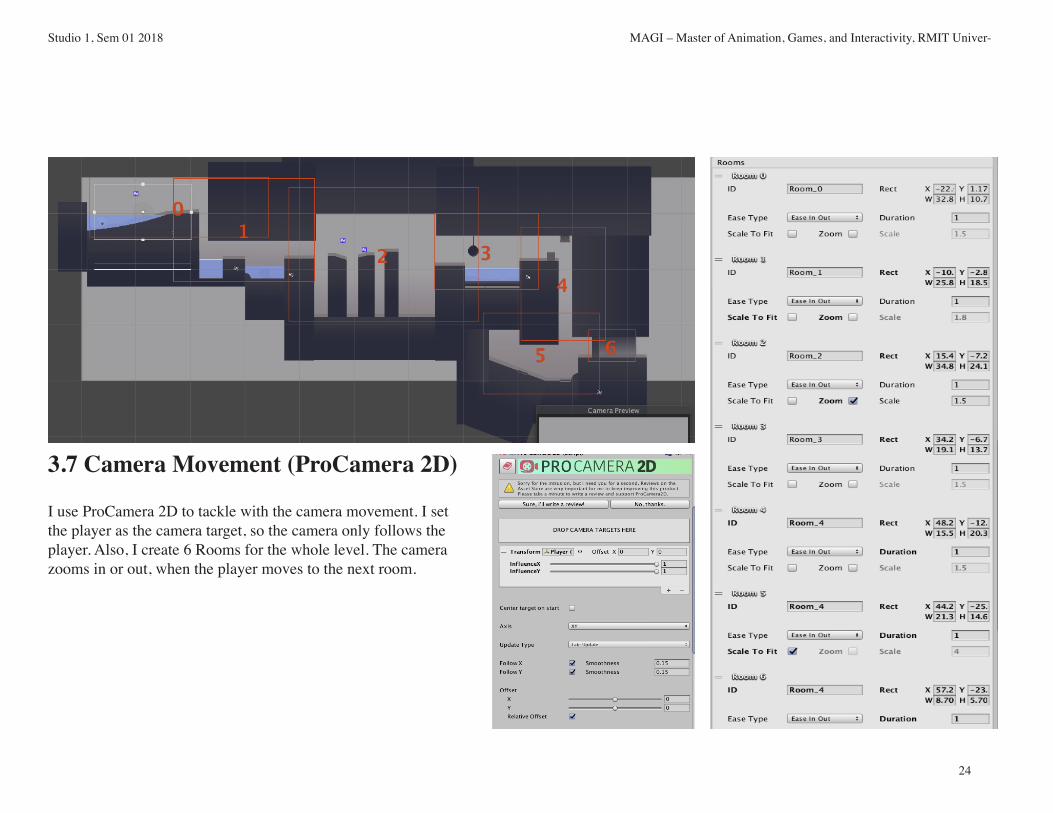
3.7 Camera Movement (ProCamera 2D)
I use ProCamera 2D to tackle with the camera movement. I set the player as the camera target, so the camera only follows the player. Also, I create 6 Rooms for the whole level. The camera zooms in or out, when the player moves to the next room.
Studio 1, Sem 01 2018 MAGI – Master of Animation, Games, and Interactivity, RMIT Univer-
25
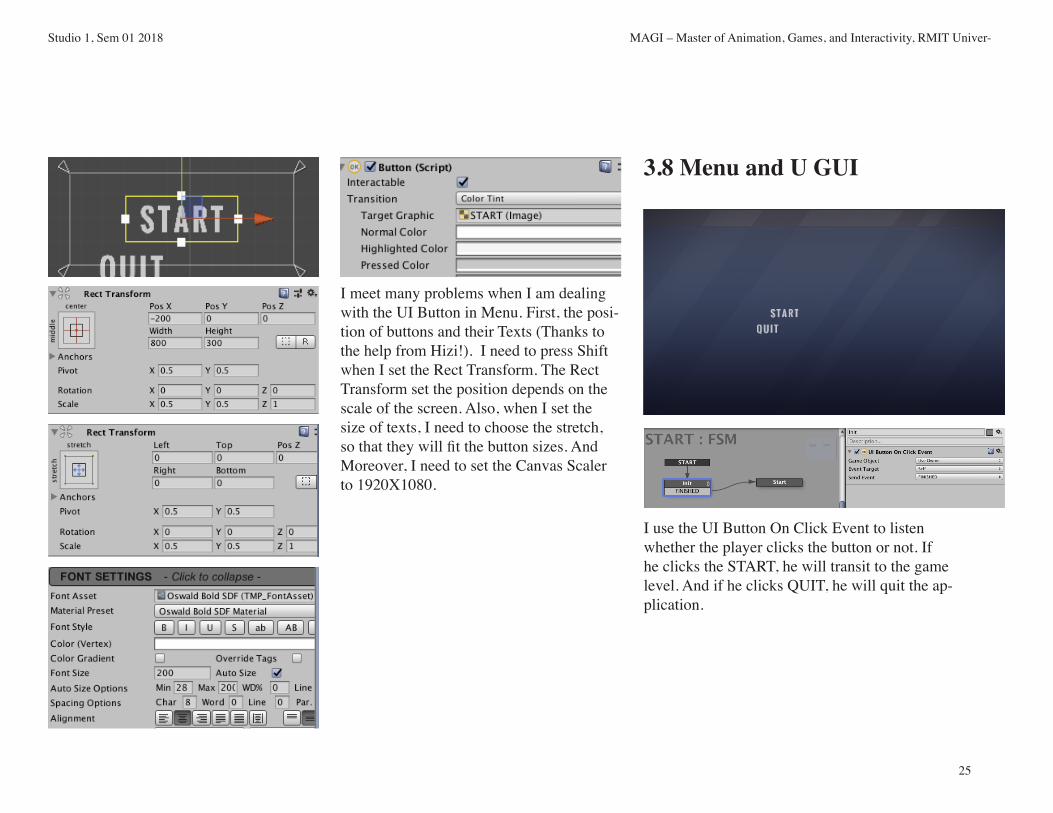
3.8 Menu and U GUI
I meet many problems when I am dealing with the UI Button in Menu. First, the posi-tion of buttons and their Texts (Thanks to the help from Hizi!). I need to press Shift when I set the Rect Transform. The Rect Transform set the position depends on the scale of the screen. Also, when I set the size of texts, I need to choose the stretch, so that they will fit the button sizes. And Moreover, I need to set the Canvas Scaler to 1920X1080.
I use the UI Button On Click Event to listen whether the player clicks the button or not. If he clicks the START, he will transit to the game level. And if he clicks QUIT, he will quit the ap-plication.

Studio 1, Sem 01 2018 MAGI – Master of Animation, Games, and Interactivity, RMIT Univer-
26
1. Bill Whetsel 2016, Playmaker Menu UI, 14 Novenmber, Viewed 7 October 2018, < https://www.youtube.com/watch?v=VofUsXeEFh0&list=PLYvaQ6le3cEDbJ69ntUzJntSGr9FB-HiB&t=371s&index=39 >.
2. Bpwebmedia 2016, Unity 5 / Playmaker Tutorial - Trigger Animation - Sliding Doors, 17 October, viewed 24 September 2018, < https://www.youtube.com/watch?v=P7Gaf85MXBY&list=PLYvaQ6le3cEDbJ69ntUzJntSGr9FB-HiB&t=0s&index=31 >.
3. Byrne, E 2005, Game level design, Hingham, Charles River Media, US.
4. GamesWithFrank 2017, How to make Flappy Bird - Unity Playmaker Tutorial, 8 Jane, viewed 21 September 2018, < https://www.youtube.com/watch?v=8nGCbsobQAo&list=PLYvaQ6le3cEDbJ69ntUzJntSGr9FB-HiB&t=0s&index=32 >.
5. Gilland, J 2009, Elemental Magic: The Art of Special Effects Anima-tion, Focal Press, Boston, USA.
6. Gilland, J 2011, Elemental Magic, volume 2: The Technique of Special Effects Animation, Focal Press, Boston, USA.
7. Hutong Games 2012, 05 - Breakable Objects, 19 April, viewed 29 Sep-tember 2018, <https://www.youtube.com/watch?v=mgzF-nF3TCE&list=PLYvaQ6le3cEDbJ69ntUzJntSGr9FB-HiB&t=1037s&index=34 >.
8. Ion Sula 2015, Water 2D Tool - Tutorial 1: The Basics, YouTuBe, 5 May, viewed 21 September 2018, < https://www.youtube.com/watch?v=DBqtvQisJKs&list=PLYvaQ6le3cEDbJ69ntUzJntSGr9FB-HiB&t=25s&index=10 >.
9. Jayanam 2017, Unity Playmaker Tutorial for Beginners,YouTuBe, 5 July, viewed 11 September 2018, < https://www.youtube.com/watch?v=NpMn10cvh3M&list=PLYvaQ6le3cEDbJ69ntUzJntSGr9FB-HiB&t=174s&index=12 >.
10. Kellomäki, T 2015, Large-Scale Water Simulation in Games, Tampere University of Technology Publication, Vol. 1354.
11. Luis Fonseca 2016, Pro Camera 2D - Example Setup, 22 November,
viewed 25 September 2018, < https://www.youtube.com/watch?v=jxCIHgjP3dU&list=PLYvaQ6le3cEDbJ69ntUzJntSGr9FB-HiB&t=0s&index=15 >.
12. Playdead Studio 2010, video game, Limbo, Playdead, Microsoft Game Studios, directed by Arnt Jensen.
13. Playdead Studio 2016, video game, Inside, Playdead, directed by Arnt Jensen.
14. Playmaker 2013, Playmaker Manual, Hutong Games, 3 April, viewed 19 September, < https://hutonggames.fogbugz.com/default.asp?W1 >.
15. Romi Fauzi 2014, 2D Sprite Based Platformer - Part 1 Basic Move-ment and Tweaks, 28 August, viewed 11 September 2018, < https://www.youtube.com/watch?v=llaonCy3yG4&list=PLYvaQ6le3cEDbJ69ntUzJntSGr9FB-HiB&t=0s&index=22 >.
16. Sykoo 2018, Asset Review: Water 2D Tool - Unity 2018, YouTuBe, 17 Jane, viewed 24 September 2018, < https://www.youtube.com/watch?v=LKMavvi4BYw&list=PLYvaQ6le3cEDbJ69ntUzJntSGr9FB-HiB&t=172s&index=9 >.
17. Tarsier Studios 2017, Little Nightmares, Tarisier Studio.18. Unity 2014, Sorting Layers - Official Unity Tutorial, Unity, 22 April,
viewed 18 September 2018, < https://www.youtube.com/watch?v=ZzcyREamMUo&list=PLYvaQ6le3cEDbJ69ntUzJntSGr9FB-HiB&t=0s&index=28 >.
19. Unity 2018, Getting Started with Sprite Shape in Unity 2018! - Sprite Shape Demo (Part 1/3), 20 September, viewed 30 September 2018, < https://www.youtube.com/watch?v=wumwrMori1Y&list=PLYvaQ6le3cEDbJ69ntUzJntSGr9FB-HiB&t=0s&index=29 >.
20. Unity 2018, Unity User Manual (2018.2), Unity, February, viewed 19 September 2018, < https://docs.unity3d.com/Manual/index.html >.
References