2.998 command shaping – fall 2010 lab 1 objectives: part 1
TRANSCRIPT

1
2.998 Command Shaping – Fall 2010 Lab 1
Objectives: Develop a basic understanding of the laboratory equipment. Record the time response of the system by measuring oscillation.
Part 1: Cherrypicker Operation Register for a 30 minute time slot on the Google calendar. Go to https://www.google.com/calendar Email: [email protected] Password: GTMIT2010 Sign up for 30 minutes. Reserve a day and time so other students know when you are registered. Pre-lab You will move the cherrypicker using 3 different maximum velocities. The control system uses a trapezoidal velocity profile to move each axis, as seen in Figure 1. Speed is specified in terms of the percentage of a maximum limit, with 100% being 43.5 deg/s for the elbow joint. The acceleration up to maximum velocity is approximately 363 deg/s2. For the 3 trials, use velocity limits of: 70%, 85%, and 100%.
Figure 1: Drive System Velocity Profile.
For each trial, move the cherrypicker elbow angle 30 degrees from an initial location of [shoulder =0 deg, elbow=0 deg]. Given that each trial uses a different maximum velocity, the move time in each case will be different.
1. Calculate the move time, tm, for each of the three speeds. Figure 1 shows the move time, tm, in relation to the velocity profile
2. Execute the velocity profiles and record the response. Cherrypicker operation
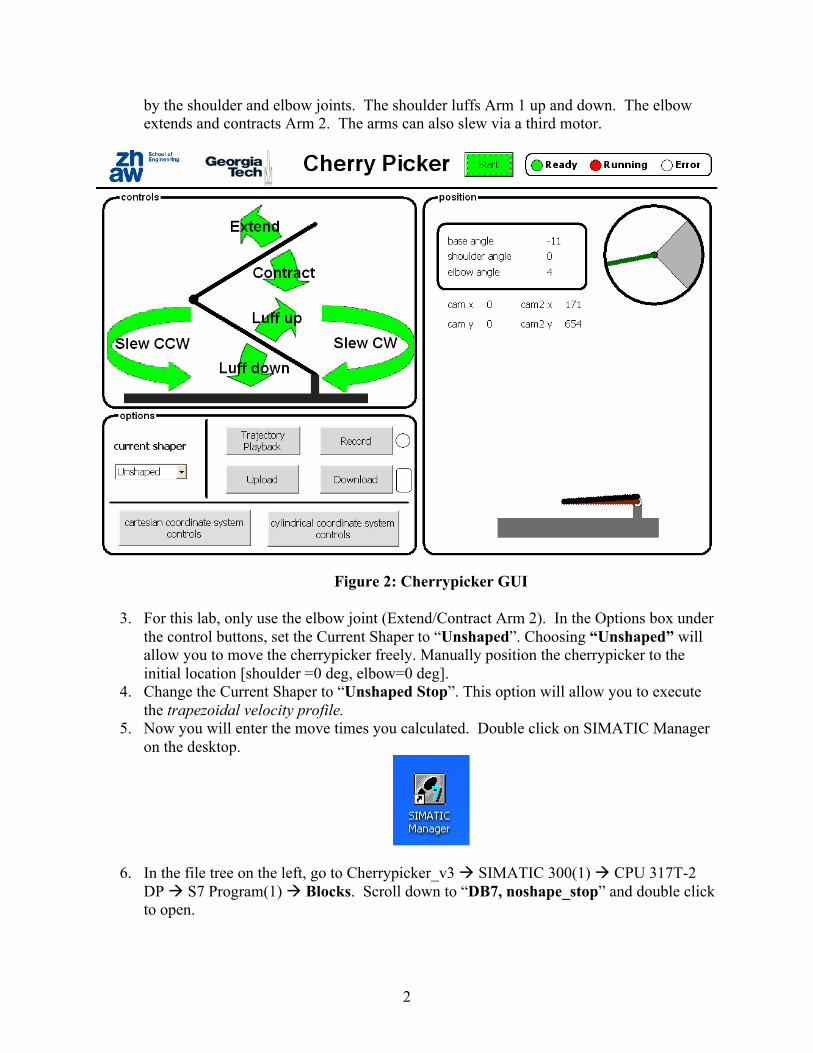
1. Open “Cherrypicker GUI” on the desktop of the control laptop. 2. To operate the cherrypicker, use the GUI in Figure 2. To begin moving the cherrypicker,
press the Start button at the top of the screen. The cherrypicker has two arms, operated
43.5
Vel
ocity
(deg
/s)
Time (s)
363 deg/s2
tm
2
by the shoulder and elbow joints. The shoulder luffs Arm 1 up and down. The elbow extends and contracts Arm 2. The arms can also slew via a third motor.
Figure 2: Cherrypicker GUI
3. For this lab, only use the elbow joint (Extend/Contract Arm 2). In the Options box under
the control buttons, set the Current Shaper to “Unshaped”. Choosing “Unshaped” will allow you to move the cherrypicker freely. Manually position the cherrypicker to the initial location [shoulder =0 deg, elbow=0 deg].
4. Change the Current Shaper to “Unshaped Stop”. This option will allow you to execute the trapezoidal velocity profile.
5. Now you will enter the move times you calculated. Double click on SIMATIC Manager on the desktop.
6. In the file tree on the left, go to Cherrypicker_v3 SIMATIC 300(1) CPU 317T-2 DP S7 Program(1) Blocks. Scroll down to “DB7, noshape_stop” and double click to open.

3
7. In the new window, select View Data View. Address 0.0 should always hold the value 2, and Address 2.0 should always be zero. Address 4.0 should be the calculated move time, tm. The values in Addresses 6.0 and 8.0 should be the maximum velocity corresponding to the calculated move time. Address 6.0 should always be positive while address 8.0 should always be negative. Refer to the figure below for an example of a 100% velocity trial with a move time of 1.5 seconds.
8. In the top menu, go to PLC and click Download. If prompted, overwrite existing data. Return to the control GUI.
9. To record your response, click the Record button. The PLC can record 80 seconds of data. Each time new data is recorded, all previous data is lost.
10. Click Record. Press and HOLD the Contract button to move the endpoint until it stops by itself.
11. Once the endpoint has moved and come to rest, release the button. The endpoint will return to its original position.
12. Click Record to stop recording. Download the data from the PLC to the computer by pressing the Download button.
Analyzing Downloaded Data 13. The data has been saved in the directory
C:\Documents and Settings\Student\Desktop\Cherrypicker\Download

4
14. For this lab, the .xls files correspond to the following data:
Input 1 Desired Shoulder Velocity As a percent of maximum velocity Input 2 Actual Shoulder Velocity As a percent of maximum velocity Input 3 Desired Elbow Velocity As a percent of maximum velocity Input 4 Actual Elbow Velocity As a percent of maximum velocity Input 5 Endpoint Position in horizontal direction Measured in mm Input 6 Endpoint Position in vertical direction Measured in mm
15. Data has been recorded at a 40 ms sampling rate. 16. Repeat the above steps for 70% and 85% maximum velocities.

5
Part 2: Tower Crane Tele-Operation Register for a 30 minute time slot on the Google calendar. Go to https://www.google.com/calendar Email: [email protected] Password: singhose6404 Sign up for 30 minutes under the “Portable tower crane session” calendar. Reserve a day and time so other students know when you are registered. View the webcam: http://singhose.marc.gatech.edu/cranewebpage/minitower_stream.htm Log into GUI: http://130.207.34.181:5800/ Password: GTMIT10
1. If the control GUI above is not visible, then start it by clicking on “Tower Crane GUI
(Default)”. Push START. Choose “Remote User” and push “Activate Mode”.
6
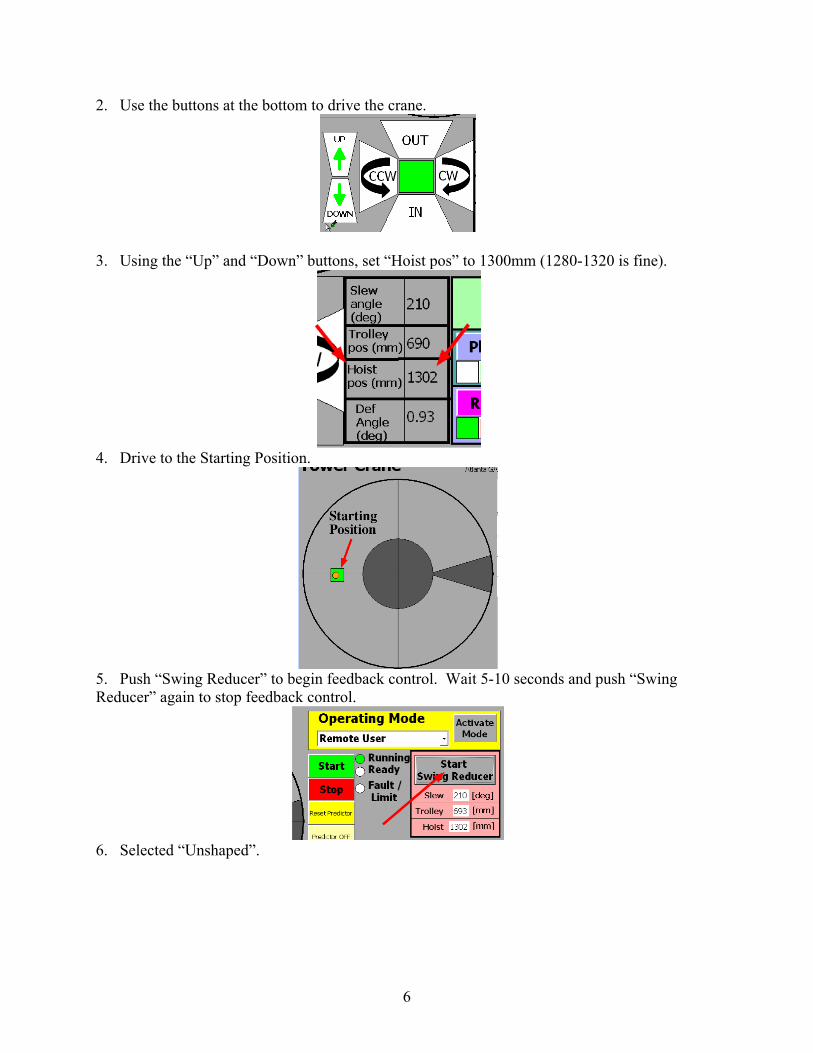
2. Use the buttons at the bottom to drive the crane.
3. Using the “Up” and “Down” buttons, set “Hoist pos” to 1300mm (1280-1320 is fine).
4. Drive to the Starting Position.
5. Push “Swing Reducer” to begin feedback control. Wait 5-10 seconds and push “Swing Reducer” again to stop feedback control.
6. Selected “Unshaped”.

7
7. Push “Record” to record data.
8. Move the crane approximately 20 degrees.
9. Wait 20 seconds. Press “Record” again to stop data recording. Press “Download” to receive the data. Write your name and email address in the pop-up menu.
10. Repeat the above steps for 40 and 60 degree motions.

8
Lab Report: Discuss your work in less than 1 page of text. However, include as many plots as you feel necessary to illustrate your conclusions.
The text must cover: • What you did. • A summary analysis of the results.
Following the text should be a set of plots. The plots must include: • The encoder time history for each of the 3 tests on the cherrypicker. • The endpoint vibration for each of the 3 tests on the cherrypicker. • The payload swing for each of the 3 tests on the tower crane.
You should think carefully about the plots that you include in your report – these must be neat, clear, non-redundant, and convey the desired message in an efficient manner. Furthermore, in the text, you should comment appropriately on the plots and say what is significant about them. The Report is due at the Beginning of Lecture Next Wednesday (Sept. 15).