2802.sites.sheenomo.com · web viewa word of caution: as you have already worked through the...
TRANSCRIPT

Step 1: A NEW ME A copy of this handout is also on my webpage.
This lesson will cover some new uses for many of the Photoshop tools we have been working with as well as introduce you to some new, very useful tools. We will be working with the headshot photos we took in class to build a new you. You will use the faces of four other students (or one of the extra pictures in the folder) to build a new face for yourself. When finished, you should have an interesting image that looks somewhat natural, but mostly freaky. Smile, this is fun.
A word of caution: as you have already worked through the learning Photoshop tutorials, these instructions will not cover every single step and tell you how to do every single thing, though it will discuss the new techniques in more detail. Remember that if the instructions refer to something that you should have already learned but you do not remember how to do it, you can simply refer to the Photoshop videos on my website, tutorial videos online, or ask a classmate. If all else fails, ask your instructor...but she is your last resort (take some pride in your work and attempt to solve your own problems - you will enjoy this process much more if you are doing the work yourself).
Ok, let’s get started…
1. Go to your network folder and find your head shot. 2. Find your head and open it up in Photoshop; you should now have something similar to the graphic
below… (Except we are now using a newer version of Photoshop).
1

3. We need the image to be a Photoshop file, so click File then Save As...And save the image as ANewMe Lastname Firstname.psd in your network folder. DO NOT SKIP THIS STEP!!!!!!!!!!!!!!
You should notice that the image is rather large – this is good because we can zoom in and work in great detail.
4. You will need to select four images (four of your classmates or the extra images from the files placed in your network folder). You should consider skin tone when selecting your four other images. It will make your work easier if the skin tones are similar.
I have chosen four other faces at random, and assigned facial parts to transfer to my original face. Who you decide to
use is up to you, but you must replace the following four facial features: eyes, hair, nose, and mouth. You may also replace the ear for bonus points. Keep the following in mind as you choose replacements for each part…
Eyes – this MUST be more than just the iris (the colored part), as it is easy to change a person’s iris without it even looking like a change was made; you must include the sclera (the white part) and some of the surrounding skin area up towards the eyebrow and down towards the check bone as well – this should result in a reshaping of the eyes (which is what we want) and not just a replacement of the eyeball
Hair – if you have lots of it, it will be a little more difficult to remove it all and replace it with someone else’s, but there are many techniques that you can use.
Mouth – choose one of approximate size to your own, or one that can be easily scaled without looking silly; in other words, if you have a huge head don’t choose a student with a tiny mouth
Nose – make sure your choice can be easily blended into the surrounding skin Ears – be sure the ones you choose are not coved by hair; notice that in three of the six photos above the
ears are unusable; if your picture has hair covering your ears you will simply need to add in someone else’s ears and place them over your hair – Remember Ears are bonus only.
When finished, we will end up with an entirely different face...like the image on the right-hand side above.
Using this method, we have all types of image possibilities!
2

Let's get started by working with the eyes, which will give us experience with several different tools and techniques at once that we can apply to the other areas of our face.
Step 2: The EYES Put each new body part on a new layer!
Let's get to work by getting you some new eyes. Follow the steps below…
1. Be sure your head is open in Photoshop and that it is a PSD file (which you should have saved in Step 1)
2. Open the head of the student you wish to pull the eyes from in Photoshop and position the images so you can see them both at the same time
3. Use the Lasso Tool and draw a selection area around one of the student’s eyes
the Lasso tool allows you to draw a selection area of any shape and size, so be sure you get enough of the eye to actually change the shape of your eye instead of just replace the eyeball...IF YOU JUST REPLACE THE EYEBALL AND DO NOT INCLUDE SKIN UP TO THE EYEBROW AND SKIN BELOW THE LOWER LASHES (as shown in the image above), YOU WILL RECEIVE NO CREDIT FOR THIS PART OF THE ASSIGNMENT (it will be an automatic 25 point deduction).
4. Use the Move Tool to drag the eye selection onto your face (you must change to the Move Tool or you will simply be dragging your selection around)
Notice that Photoshop has created a new layer and placed the eye on it.
5. Rename the new layer containing the eye to L_Eye (or R_Eye depending on which one you used)
6. Position the new eye over your current eye
3

Let's get the new eye to be the same size as your eye...
7. Click Edit then click Free Transform
8. The eye should now have resize handles around it (the 8 little empty boxes in the image below are the resize handles)...
9. If the new eye is simply wider or skinnier or taller or shorter than what you need, use the top/bottom or right/left resize handles to adjust the eye until it is the correct size
10. Alternately, you can use one of the corner resize handles to adjust the eyes height and width at the same time until it is the correct size (you don't have to use the same corner handle as I did...use whichever one you want)
4

Keep in mind that if you hold down the Shift key while you resize that Photoshop will resize both the width and height at the same time
11. Use the Move Tool to place the eye in the proper position
ROTATING THE EYE
It never fails: someone in class has their head tilted, or turned, or is looking up or down, or something along these lines (it may even have been YOU!). If you want to use features from one of these students, it will be necessary for you to rotate the new eye so that it more preciously matches your current eye. Let's take a quick look at how to do this...
12. Make sure the new eye is selected and is in the correct position 13. Click Edit then point at Transform then click Rotate 14. You should now have the selection box with resize handles
15. Point at the image just off the box...
notice that your cursor has changed to a curved, double-headed arrow - this is what we want
5

16. Click and drag to Rotate the eye until it sits at the correct angle
17. Press Enter to apply the transformation
SHARP EDGES
With the eye in the proper position and approximately the correct size, we can now begin to smooth it out and get it looking like it belongs on your face. This will likely be a problem on just about all of the pieces you pull over – hard, sharp, unnatural looking edges. Look at the graphic below...
Notice the hard edge between the new eye and the original face? Once again, we have an easy fix in these situations…
18. Use the Eraser Tool with a soft, round edge - brush Soft Round 27 pixels seems to work well here 19. Click around the edge of the eye (DO NOT click and drag, just click, move your mouse to a different
spot around the eye, click again, move your mouse, etc.); notice that when you click the edge will appear smooth and will seem to blend into the background
20. Gradually work around the outside of the eye to slowly remove the hard edge to create a smooth transition…
again, don't click and drag - it will not look natural
This is a good time to point out that not every facial feature will look perfect (or even good) when placed on your face. All of our faces are a different shape, and you will be morphing the pieces to fit your face. It is OK that it is does not look perfect (in fact, it is not supposed to look perfect...where is the fun in that...).
6

ADJUSTING SKIN COLOR
One final issue we need to deal with here is that we all have different skin color, but we want our final product to appear as natural as possible. The skin around your new eye is likely lighter or darker than your actual skin color...
This is a good time to point out that if you do not have any skin around your eye YOU DID IT WRONG. As stated back in direction 3, you need to include the area around their eye and not just the eyeball so that you actually reshape your eyes and not just give yourself different colored pupils. If this applies to you, delete your eye layer and go back right now and do it correctly, otherwise you will lose many, many points on this major grade project.
Correcting the skin tone problem involves using Photoshop's Adjustments tool...
21. With the new eye selected, click Image then point at Adjustments or use the Adjustment panel
which Adjustment you use is up to you, so you will need to experiment with several of them until you
7

find one that does the job - this tutorial will NOT go into detail of how all of the Adjustments work, you have worked with the various Adjustment tools enough up to this point to know how they work and what you need to do (use the sliders to adjust the color of the the eye and be sure the Preview box is checked so you can immediately see the changes you make - all of the adjustments have a different effect, but you likely want to give Levels, Hue/Saturation, Desaturate, Brightness/Contrast, or Color Balance a try first; keep in mind that it may be necessary to use more than one Adjustment to get the desired result); just experiment until the new eye's skin color matches yours
I cannot tell you exactly how to do this. You must use trial and error to figure it out. There are far too many skin color variations and combination possibilities for us to discuss how all of them work, so you are on your own this time. Don't worry; I am confident in your ability to figure this out.
REPAIRING SHADOW
If the problem is not skin color but shadow, we must resort to different solution. This process is really only necessary if your face has significant shadows, which it should not if the original picture was taken correctly. If the eyes you pulled off another student have shadows, you can use the color variation tips above to correct this. If your face is the one with the shadow, you need to add shadows to the new eyes so they match your face, here is how to do it...
22. Make sure the eyes are in the correct position 23. Use the Brush Tool with the airbrush enabled, black foreground color and the Opacity set to 20%
and the transparency locked (this is located on our layers palette just above the name of our first layer..
24. Gradually draw over the eyes until the shading approximates the shading on your face
We have done a great deal of detailed work, but at this point we only have one new eye. So.....
25. Repeat directions 3-24 to create the other eye
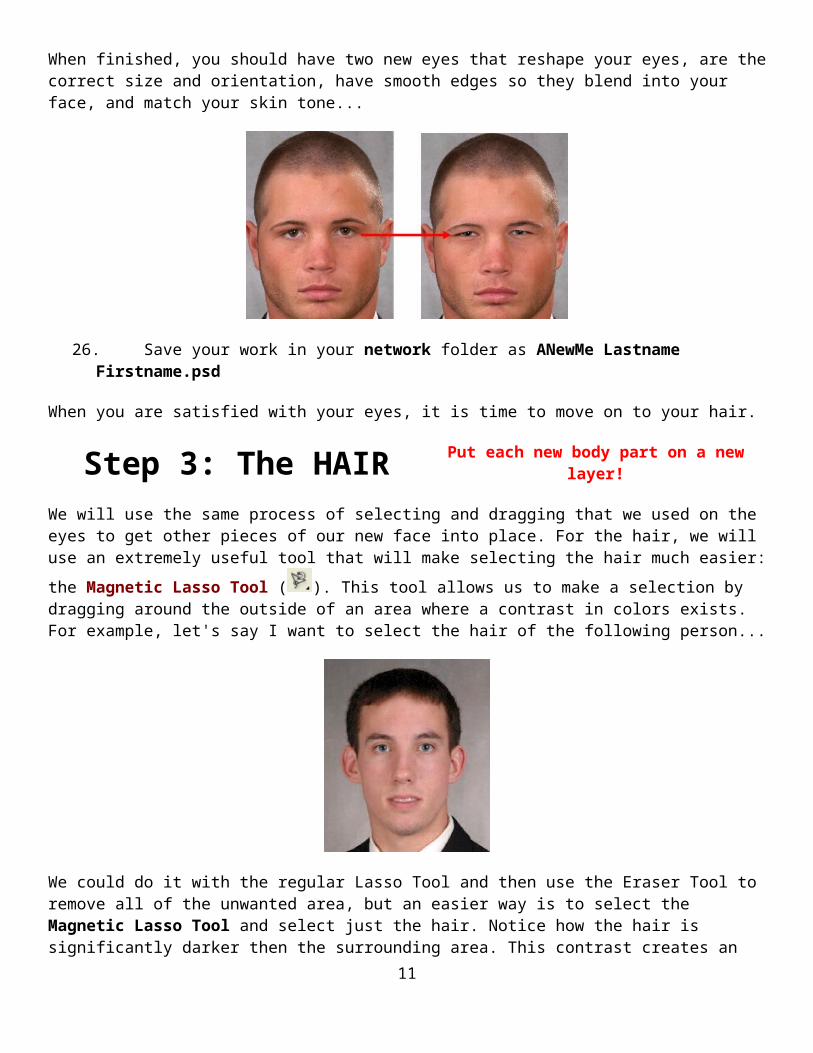
When finished, you should have two new eyes that reshape your eyes, are the correct size and orientation, have smooth edges so they blend into your face, and match your skin tone...
26. Save your work in your network folder as ANewMe Lastname Firstname.psd
When you are satisfied with your eyes, it is time to move on to your hair.8

Step 3: The HAIR Put each new body part on a new layer!
We will use the same process of selecting and dragging that we used on the eyes to get other pieces of our new face into place. For the hair, we will use an extremely useful tool that will make selecting the hair much easier:
the Magnetic Lasso Tool ( ). This tool allows us to make a selection by dragging around the outside of an area where a contrast in colors exists. For example, let's say I want to select the hair of the following person...
We could do it with the regular Lasso Tool and then use the Eraser Tool to remove all of the unwanted area, but an easier way is to select the Magnetic Lasso Tool and select just the hair. Notice how the hair is significantly darker then the surrounding area. This contrast creates an excellent line that the Magnetic Lasso Tool can use to create a selection area. Let's get you some new hair by following the instructions below...
1. Open your picture in Photoshop 2. Make sure you hair is able to be replaced; take a look at Niel's hair below...
notice he has hair a significant distance off of his head - it will be difficult to replace your hair with someone else's hair if you have this situation; to correct this you can do one of two things...
i. Use the Clone Stamp Tool (how the clone stamp works is covered in direction 9 of the Ear step) to remove the top of your hair, as we did with Niel below...
it is now far easier to get new hair on top of him 9

ii. Use the Magic Lasso Tool described in this Step to select your hair, invert the selection so that you have everything but your hair selected, and copy and paste your face on a new layer, then simply hide the original background layer thus making your current hair 'invisible' (yeah, it is kinda complicated...just do the Clone Stamp thing...)
how you choose to do it is up to you, but remember that part of your grade depends on your new hair looking natural
3. Locate a student with hair you wish to use and determine which parts of the hair you wish to use - no, you don't have to use all of the hair from the new students, you can use parts of it, but keep in mind that there must be a definite contrast between the area you want to select and the area surrounding it (no, it doesn't matter which area, the hair or the background, is darker, there just has to be a contrast of color) so that you can select it
4. Determine the best place to click to begin your selection (in our hair example above - the first picture in this Step, not Niel - a good place is the point of hair by the ear on the left)
5. Click where you want to begin your selection 6. Slowly (yes, slowly!) move your cursor around the area you want to select - as in the graphic below
where we are moving the Magnetic Lasso Tool around the hair - and Photoshop will automatically drop selection handles around our area for us...I know, cool huh?
7. Enclose the selection area by either clicking back on the first selection box, or by double-clicking somewhere on the screen
8. Once complete we will have a selection similar to the one below...
Not bad, but there are few problems. The selections we get with this tool are generally rounded and not exceptionally precise. Notice by the ears that the pointed areas of hair did not get selected, and that there are
10
perhaps segments across the forehead that we might want to add or delete. We can add to or delete from our current selection by holding down specific keys on the keyboard while we use the Lasso Tool. Here is how...
9. Change to the Lasso Tool, this will make it much easier to work with our selection 10. Hold down the Shift key - notice that the cursor now includes a tiny plus sign with the lasso - and draw
a selection area around whatever you want to add to the selection; when you release the mouse button and the Shift key that area should now have the highlight around it
11. Hold down the Alt key - notice that the cursor now includes a tiny minus sign with the lasso - and draw a selection area around whatever you want to remove from the selection; when you release the mouse button and the Alt key that area should no longer have the highlight around it
12. Continue to make adjustments in your hair selection until you have a selection that you are more happy with, such as the one below...
notice that the accuracy of the outline has been improved, but is still not perfect as it is nearly impossible to get EVERY hair in this scenario
We now have to get the new hair onto our image...
13. Use Move Tool to drag the hair selection onto your face - notice that Photoshop has created a new layer and placed the hair on it
14. Rename the new layer containing the hair to Hair 15. Resize the hair so that it matches the scale of your head 16. Position the new hair on top of your head 17. Use the Eraser Tool to smooth out the edges of the new hair 18. Save your work in your network folder as ANewMe Lastname Firstname.psd
That should do it for creating our new hair. You do not need to worry about using the Adjustments tools this time around, as you will not have any skin tones to match. Up next: the mouth.
Step 4: The MOUTH Put each new body part on a new layer!
At this point you should have new eyes, hair, and ears (you should have two new ears). For the mouth, choose one of approximate size to your own, or one that can be easily scaled without looking silly; in other words, if you have a huge head don’t choose a student with a tiny mouth. We will follow the same steps we followed with the other features...
11

1. Open your picture in Photoshop 2. Locate a student whose mouth you wish to use 3. Use the Lasso Tool to draw a selection area around the mouth – YOU MUST SELECT THE ENTIRE
MOUTH – THAT MEANS THE LIPS AND SOME OF THE SKIN AROUND THE LIPS. No credit will be awarded if you only select the lips.
4. Use Move Tool to drag the mouth selection onto your face - notice that Photoshop has created a new layer and placed the mouth on it
5. Rename the new layer containing the mouth to Mouth 6. Resize the mouth so that it matches the scale of your head 7. Position the new mouth on top of your old one 8. Use the Eraser Tool with a solid edge - brush Hard Round 19 pixels seems to work well here - to trim
any background or remaining face parts from your new mouth 9. Use Photoshop's Adjustment Tools to make the new mouth's skin tone match yours
Once your new mouth is in place you may notice that it does not look very realistic. Take a look at the graphics below..
It is obvious that the mouth in the image on the left is not the real mouth because the cheeks are flat instead of creased, as they would be if he were actually smiling. Compare the image on the left to the one on the right...
Notice the cheek creases and that the mouth now looks more natural. To achieve the more realistic smile, I simply grabbed the cheeks of the girl whose smile I used and incorporated them into my original character using a great deal of smudging and color adjusting. You can do the same...
10. Determine if your cheeks need to be adjusted - if your new mouth would make your cheeks move you need to FIX IT OR YOU WILL LOSE POINTS
11. Fix your cheeks, either by adding in the cheeks of the student you took the mouth from (be sure to change the tint so it looks natural), using the cheeks from another student, or by actually drawing in lines to make your face look natural - remember that it MUST look natural!
12. Save your work in your network folder as ANewMe Lastname Firstname.psd
12

Our next item: the nose.
Step 5: The NOSE Put each new body part on a new layer!
Once again we will use the same technique to give ourselves a new nose...
1. Open your picture in Photoshop 2. Locate a student whose nose you wish to use 3. Use the Lasso Tool to draw a selection area around the nose 4. Use Move Tool to drag the nose selection onto your face - notice that Photoshop has created a new layer
and placed the nose on it 5. Rename the new layer containing the nose to Nose 6. Resize the nose so that it matches the scale of your head 7. Position the new nose on top of your old one 8. Use the Eraser Tool with a solid edge - brush Hard Round 19 pixels seems to work well here - to trim
any background or remaining face parts from your new nose 9. You should now have something similar to the image below...
10. Use Photoshop's Adjustment Tools to make the new nose's skin tone match yours 11. You should now have something similar to the image below...
Once the color is corrected, notice that your new nose has a hard edge, particularly at the top of the nose...
13

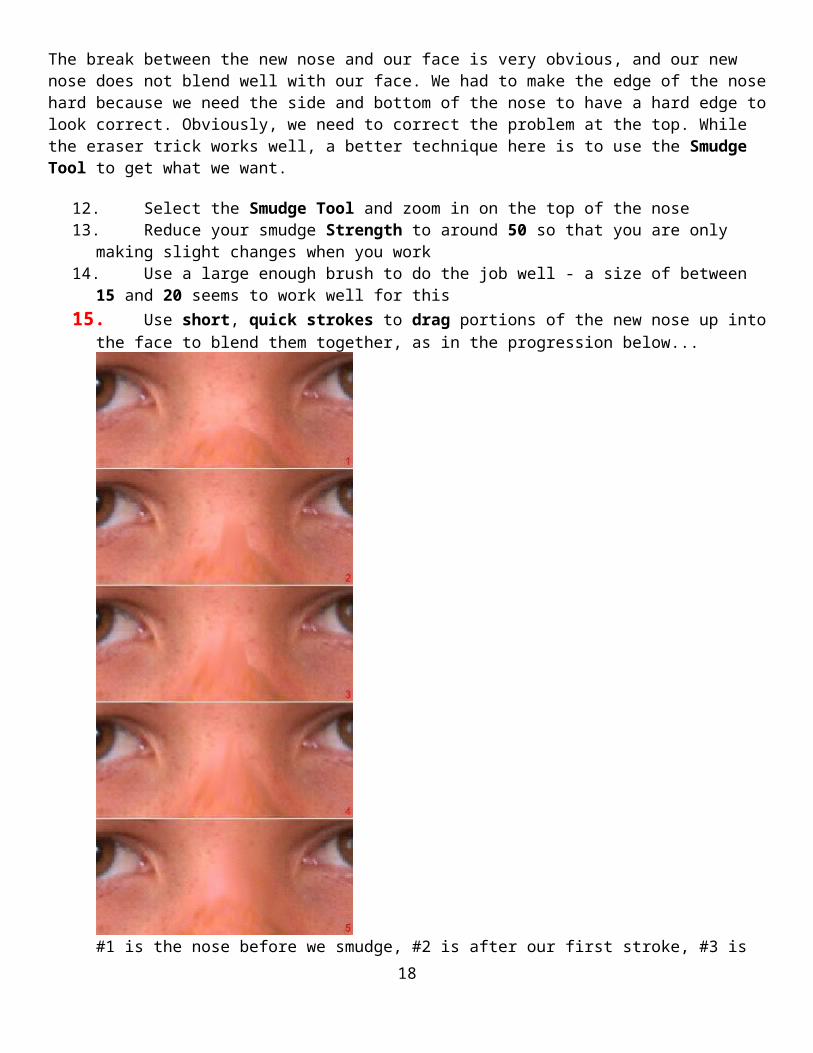
The break between the new nose and our face is very obvious, and our new nose does not blend well with our face. We had to make the edge of the nose hard because we need the side and bottom of the nose to have a hard edge to look correct. Obviously, we need to correct the problem at the top. While the eraser trick works well, a better technique here is to use the Smudge Tool to get what we want.
12. Select the Smudge Tool and zoom in on the top of the nose 13. Reduce your smudge Strength to around 50 so that you are only making slight changes when you work 14. Use a large enough brush to do the job well - a size of between 15 and 20 seems to work well for this 15.Use short, quick strokes to drag portions of the new nose up into the face to blend them together, as in
the progression below...
14

#1 is the nose before we smudge, #2 is after our first stroke, #3 is after 2 strokes, #4 is after 3 strokes, and #5 is after we have completed multiple strokes and have finished the blending and are happy with the results. You can also use the Adjustment Panel tools and masking to help the nose blend.
You should now have built an entirely new you similar to the image below- Minus the ears which is next..
16. Save your work in your network folder as ANewMe Lastname Firstname.psd 17. If you do not have time to attempt the bonus (the ears), submit your final file to Edmodo and print your
image to the color printer (make sure to check your image size first – the image must fit on an 8 ½ X 11 sheet of paper).
18. Otherwise, go to the next step and earn some bonus points (you can’t lose point – only earn points on the bonus).
Step 6: The EARS Bonus Portion of assignment
You will use the same techniques you used on the eyes and hair to give yourself new ears. Because of their shape and their position on the outside of your head, the ears will present a unique challenge.
Let's get to work...
15

1. Open your picture in Photoshop 2. Locate a student whose ears you wish to use 3. Use the Lasso Tool to draw a selection area around one of the ears 4. Use the Move Tool to drag the ear selection onto your face - notice that Photoshop has created a new
layer and placed the ear on it 5. Rename the new layer containing the ear to L_Ear (or R_Eye depending on which one you used) 6. Resize the ear so that it matches the scale of your head 7. Position the new ear on top of your old one 8. Use the Eraser Tool with a solid edge - brush Hard Round 19 pixels seems to work well here - to trim
any background or remaining face parts from your new ear
If you can no longer see your ears thanks to your new hair, it is no big deal. Simply place the new ear on top of the new hair, as in the graphic below...
It is unlikely that your new ear is the same size as your old ear. We will need to do a little covering up to make our ear look natural. Take a look at the graphic below...
16

Notice that inside the circles on the left you can see pieces of the old ear, but no longer in the image on the right. This was easily accomplished using the Clone Stamp Tool, which allows you to select a portion of the image you would like to copy as you draw on your image. In other words, we can actually extend a portion of the new ear so that it is larger and covers more area. Keep reading to get a better understanding of what this powerful tool does...
9. Click on the Clone Stamp Tool 10. Determine what portion of the image you would like to copy, in the ear example above we are going to
fix the problem at the top of the ear by using other parts of the ear; notice that the Clone Stamp Tool's normal shape is a circle
We want to make a section of the ear just above the problem area and copy it down over the original ear. To do this, we need to let Photoshop know the area we want to copy (or clone) and then we can begin drawing...
11. Be certain you are using a large enough brush: 5-10 seems to work well for what we are doing 12. Position the cursor over the area you wish to clone (the part of the image you wish to replace another
part with)
17
13. Press and hold the Alt key - the cursor should turn into a target
14. Click the spot where you want to begin cloning and release the Alt key- it will look as though nothing happened, but Photoshop has placed a marker at that spot
15. Move to the area you wish to draw over and begin drawing by clicking and holding the left mouse button and dragging the mouse around to draw over the area we no longer want - Photoshop replaces what is currently there with whatever is located at the target you placed in the above direction
16. Draw in small strokes to keep the work manageable - it will be necessary to reset your target often - as you draw a plus will appear at the target area to let you know where you pulling color from while a circle appears at the spot you are dropping color to
17. Continue clone-stamping until the ear looks natural
Using the Clone Stamp Tool takes some getting used to - take your time and practice with it until you get what you want. Don't freak out if it does not work immediately - nothing works perfectly the first time you use it.
18. If the new ear is a different skin tone, use Photoshop's Adjustments Tools to make the skin color match yours
When finished, you should have a nice looking ear...
18

19. Repeat directions 3-18 to create the other ear 20. Save your work in your network folder as ANewMe Lastname Firstname.psd 21. Submit your completed work to Edmodo and print your completed image using the color laser printer
(Make sure you check the image size first – the image must fit on an 8 ½ X 11 sheet of paper).
19