28 terminals
TRANSCRIPT

Terminals
EPLAN Training 1
Terminals

Terminals
EPLAN Training 2
1 Inserting Terminals and Terminal Strip Definitions ...................................3
1.1 Insert terminals .........................................................................................3
1.2 Insert terminal strip definition ....................................................................4
2 Creating and Editing Terminal Strips..........................................................6
2.1 Create terminal strips................................................................................6
2.2 Generate terminal strips with default properties........................................8
2.3 Edit terminal strips ..................................................................................12
2.4 Edit terminal strip properties ...................................................................14
3 Generating and Editing Terminals.............................................................17
3.1 Create terminals......................................................................................17
3.2 Create terminals with default properties..................................................19
3.3 Edit terminals ..........................................................................................22
4 Defining Terminal Strip Structure..............................................................24
4.1 Generate function templates...................................................................24
4.2 Delete function templates .......................................................................25
5 Adding or Deleting Strip Accessories.......................................................27
5.1 Display strip accessories ........................................................................27
5.2 Add strip accessory.................................................................................27
5.3 Delete strip accessories..........................................................................30
6 Sorting Terminals .......................................................................................32
7 Numbering Terminals .................................................................................34
8 Moving Terminals / Pins.............................................................................36
9 Editing Terminal Targets............................................................................37
10 Generating Jumpers ...................................................................................39
10.1 Generate saddle jumpers on a terminal ..................................................39
11 Defining Multi-level Terminals ...................................................................41
This functionality is only available for certain module packages. Info

Terminals
EPLAN Training 3
1 Inserting Terminals and Terminal Strip Definitions
Terminals and terminal strip definitions can be created upon inserting the appropriate symbol. You can also predefine terminals or terminal strip definitions in the terminal strip navigator or the device navigator and then place them from there (using the Popup menu). Terminal strip definitions must be placed if you want to copy them later on.
1.1 Insert terminals
Insert > Symbol
1. Scroll through the tree structure in the Symbol selection dialog, select the desired terminal, and click [OK].
2. Place the terminal on the page.

Terminals
EPLAN Training 4
3. In the Properties <...> dialog specify the device data for the terminal in the Terminal tab.
4. In the Displayed DT field, enter a new or existing DT. Click [...] to open the DT selection dialog and register an existing function or create a new DT using [Next] .
5. Click [OK].
If you specified an existing DT, the terminal will be assigned to the corresponding terminal strip.
If you specified a new DT that does not already exist, then EPLAN will generate a new terminal strip. However, this strip will have no terminal strip definition.
1.2 Insert terminal strip definition
Insert > Terminal strip definition

Terminals
EPLAN Training 5
1. Place the terminal strip definition on the page.
2. In the Properties <...> dialog, specify the device data for the terminal strip in the Terminal Strip Definition tab.
3. Click [OK].
EPLAN generates a terminal strip definition with the specified properties.
This functionality is only available for certain module packages. Info

Terminals
EPLAN Training 6
2 Creating and Editing Terminal Strips
Terminal strips are managed via the terminal strip definition. If you would like to create a default terminal strip (with an established terminal strip construction), you must first generate a terminal strip definition.
If you would like to just create a new terminal strip (without other properties), simply enter the DT for the terminal strip in the Properties <...> dialog when you insert the terminal. A non-default terminal strip will be generated that has no terminal strip definition. A non-default terminal strip of this sort is visible in reports but you cannot assign properties to it (this is only possible via the terminal strip definition).
Initially, you can create non-default terminal strips and then edit their properties later on. However, you can also specify settings for the terminal strips upon creation. You can use the function definition to generate a terminal strip with default properties.
In the Terminal strip definition tab of the Properties dialog you can edit the properties of a terminal strip.
2.1 Create terminal strips
Project data > Terminal strips > Navigator

Terminals
EPLAN Training 7
1. Select Popup menu > Generate terminal strip.
Terminals
EPLAN Training 8
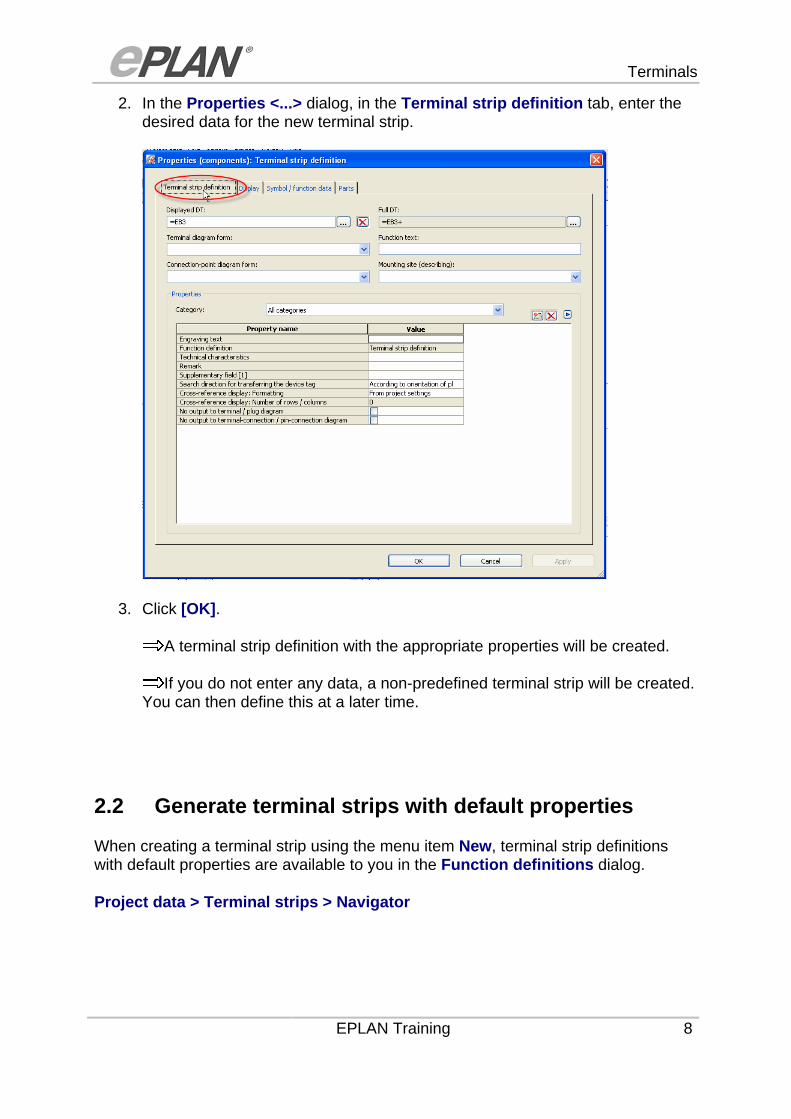
2. In the Properties <...> dialog, in the Terminal strip definition tab, enter the desired data for the new terminal strip.
3. Click [OK].
A terminal strip definition with the appropriate properties will be created.
If you do not enter any data, a non-predefined terminal strip will be created. You can then define this at a later time.
2.2 Generate terminal strips with default properties
When creating a terminal strip using the menu item New, terminal strip definitions with default properties are available to you in the Function definitions dialog.
Project data > Terminal strips > Navigator

Terminals
EPLAN Training 9
1. Select a DT and select Popup menu > New.
Terminals
EPLAN Training 10
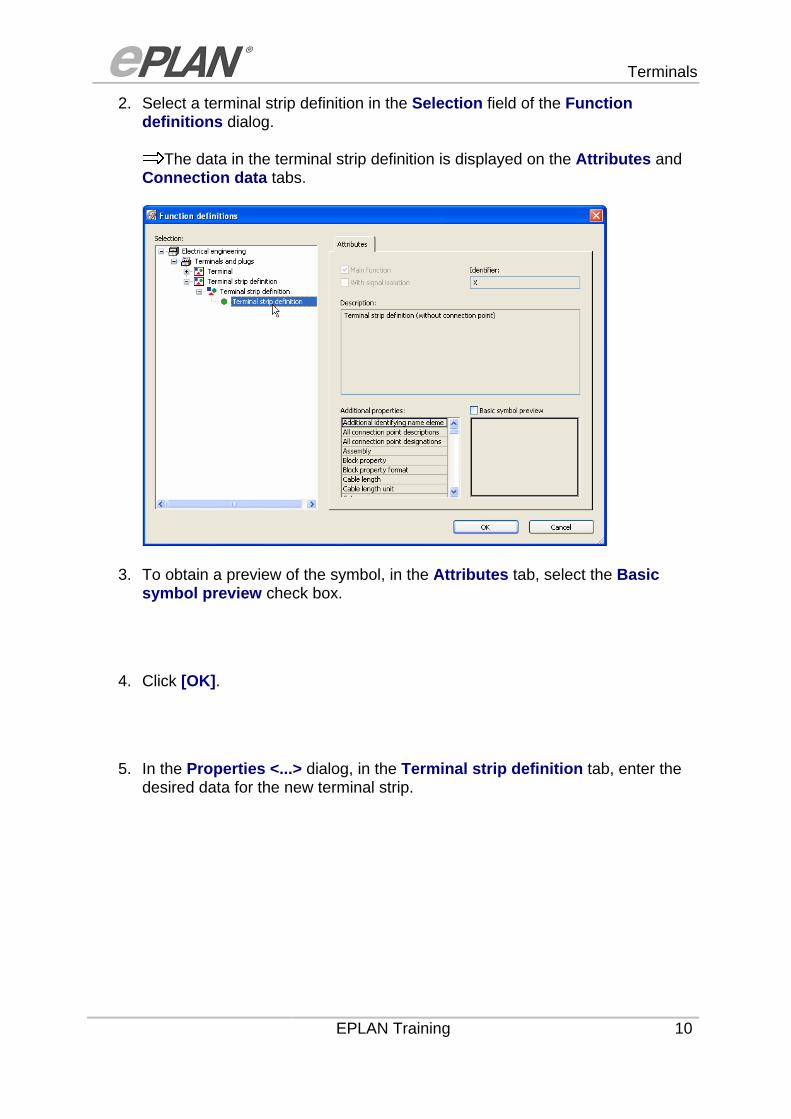
2. Select a terminal strip definition in the Selection field of the Function definitions dialog.
The data in the terminal strip definition is displayed on the Attributes and Connection data tabs.
3. To obtain a preview of the symbol, in the Attributes tab, select the Basic symbol preview check box.
4. Click [OK].
5. In the Properties <...> dialog, in the Terminal strip definition tab, enter the desired data for the new terminal strip.

Terminals
EPLAN Training 11
6. Click [OK].
Below the selected DT, a terminal strip definition with the appropriate properties will be created.
If you do not enter any data, a non-predefined terminal strip will be created. You can then define this at a later time.

Terminals
EPLAN Training 12
2.3 Edit terminal strips
1. Select a terminal strip definition or a terminal in the graphical editor or the terminal strip navigator:
Terminals
EPLAN Training 13
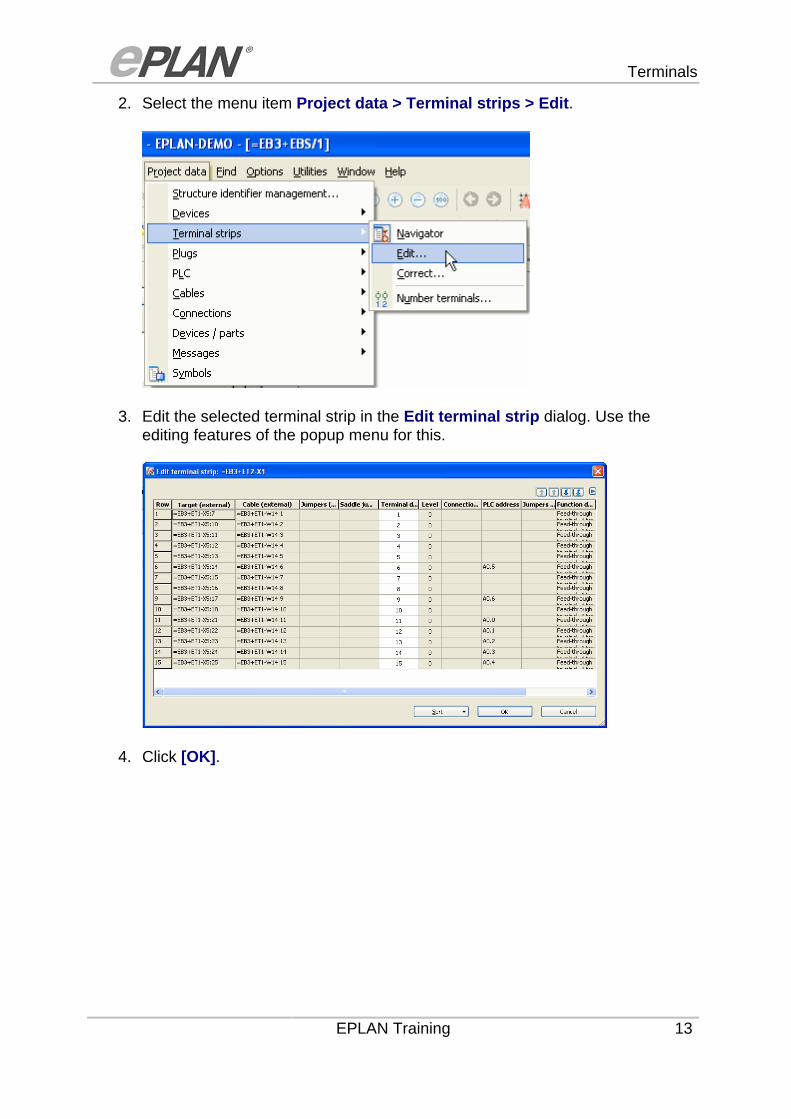
2. Select the menu item Project data > Terminal strips > Edit.
3. Edit the selected terminal strip in the Edit terminal strip dialog. Use the editing features of the popup menu for this.
4. Click [OK].

Terminals
EPLAN Training 14
2.4 Edit terminal strip properties
1. Select a terminal strip definition in the graphical editor or the terminal strip navigator.
2. Select Popup menu > Properties or double-click on the selected terminal strip definition.

Terminals
EPLAN Training 15
3. In the Properties <...> dialog, in the Terminal strip definition tab, edit the data for the selected terminal strip.
4. Click [OK].
Tip:
You can copy and place terminal strips using Drag & Drop, by dragging selected terminal strips from the navigator and dropping them into an open page in the graphical editor within your project.
Terminals
EPLAN Training 16
This functionality is only available for certain module packages. Info

Terminals
EPLAN Training 17
3 Generating and Editing Terminals
You can create terminals in the graphical editor by placing a terminal and specifying its properties in the Properties dialog. Also, in the terminal strip navigator or the device navigator, you have the option of predefining terminals with certain properties that you can place at a later time.
Initially, you can create non-default terminals and then edit their properties later. However, you can also specify settings for the terminal upon creation. You can use the function definition to generate terminals with default properties.
3.1 Create terminals
Project data > Terminal strips > Navigator
1. Select a terminal strip definition or a terminal below a terminal strip.
2. Select Popup menu > Generate terminal.

Terminals
EPLAN Training 18
3. In the Properties <...> dialog, in the Terminal tab, enter the desired data for the new terminal.
4. Click [OK].
A terminal with the appropriate properties will be created.
Tip:
You can also create terminals in the same manner in the Edit terminal strip dialog.

Terminals
EPLAN Training 19
Using Popup menu > New functions you can create several terminals at the same time.
3.2 Create terminals with default properties
When creating a terminal using the menu item New, terminals with default properties are available to you in the Function definitions dialog.
Project data > Terminal strips > Navigator
1. Select a DT or a terminal strip definition and select Popup menu > New.

Terminals
EPLAN Training 20
2. In the Function definitions dialog in the Selection field scroll through the tree structure and select the desired terminal.
The terminal data is displayed on the Attributes and Connection point data tabs.
3. To obtain a preview of the symbol, in the Attributes tab, select the Basic symbol preview check box.
4. Click [OK].

Terminals
EPLAN Training 21
5. In the Properties <...> dialog, in the Terminal tab, enter the desired data for the new terminal.
6. Click [OK].
Below the selected DT a terminal with the appropriate properties will be created.

Terminals
EPLAN Training 22
3.3 Edit terminals
1. Select the desired terminal in the graphical editor, the terminal strip navigator, or in the device navigator.
2. Select Popup menu > Properties or double-click on the selected terminal.

Terminals
EPLAN Training 23
3. In the Properties <...> dialog, in the Terminal tab, edit the data for the selected terminal.
4. Click [OK].
Tip:
You can copy and place terminals using Drag & Drop, by dragging selected terminals from the navigator and dropping them into an open page in the graphical editor within your project.
This functionality is only available for certain module packages. Info
Terminals
EPLAN Training 24
4 Defining Terminal Strip Structure
Terminal strips exist in a variety of combinations of terminal types, quantities, and accessories. Using a device definition you can specify a custom terminal strip construction that cannot be subsequently changed in any way (e.g., by deletion of terminals). The function template is saved in the terminal strip definition. The terminal strip construction can then only be deleted by deleting the individual function templates or the terminal strip definition. Unlike other devices, you do not create the device definition for terminal strips in the parts management but rather in the Edit terminal strip dialog.
The individual terminals are identified in the function template by the terminal designation, the function definition, and the level. If there is no terminal designation in the function template, the template works for any terminal designation in the project. If any terminal is deleted in the schematic, it will remain in the terminal strip and can be used or placed again.
The function template (i.e., the terminal strip construction) can be transferred using the copy function or macros.
4.1 Generate function templates
Precondition:
You have selected one or more terminals in the terminal strip navigator, the device navigator or the graphical editor.
Project data > Terminal strips > Edit

Terminals
EPLAN Training 25
1. In the Edit terminal strip dialog select all terminals that belong to the function template (as a rule, all terminals in the strip). To mark individual terminals, press and hold down the [Ctrl] key and click the first field of each desired terminal.
2. Select Popup menu > Generate function templates.
Function templates are created for the selected terminals and the line number is moved to the foremost field.
4.2 Delete function templates
Precondition:
You have selected one or more terminals in the terminal strip navigator, the device navigator or the graphical editor.

Terminals
EPLAN Training 26
Project data > Terminal strips > Edit
1. In the Edit terminal strip dialog, select all or just individual terminals. To mark individual terminals, press and hold the [Ctrl] key and click the first field of each desired terminal.
2. Select Popup menu > Delete function templates.
The function template for the selected terminal is deleted and the row number will be removed from the foremost field.
This functionality is only available for certain module packages. Info
Terminals
EPLAN Training 27
5 Adding or Deleting Strip Accessories
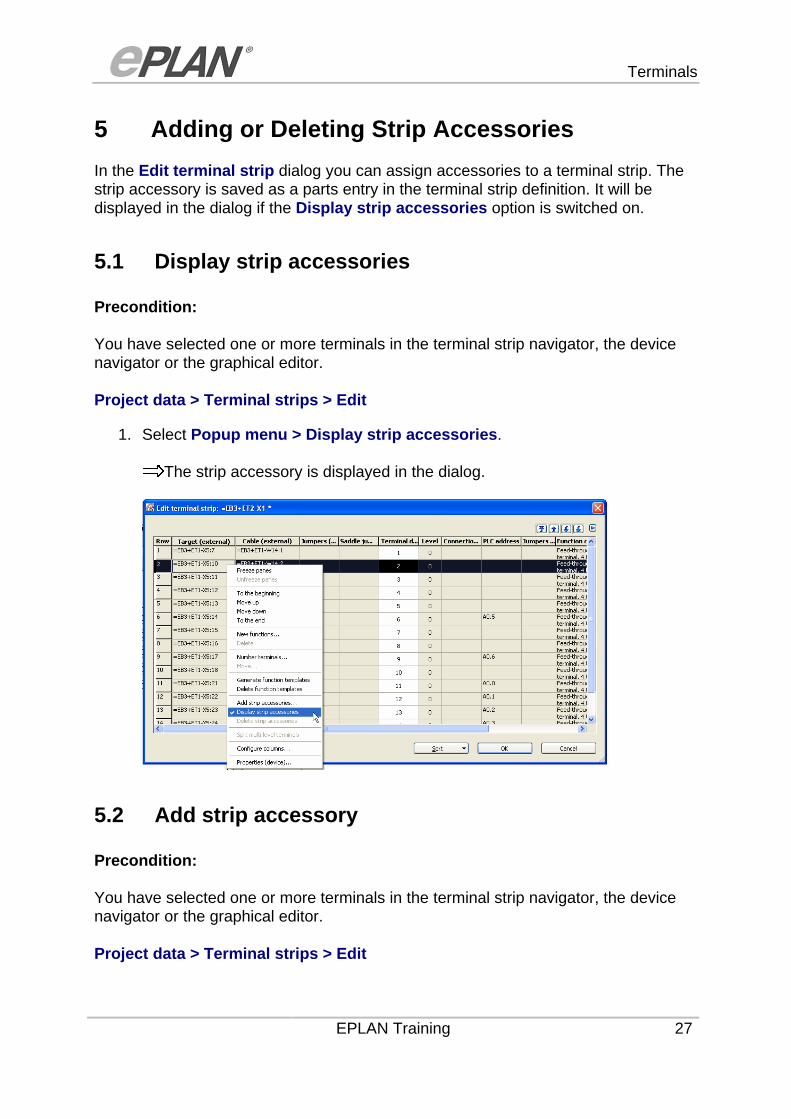
In the Edit terminal strip dialog you can assign accessories to a terminal strip. The strip accessory is saved as a parts entry in the terminal strip definition. It will be displayed in the dialog if the Display strip accessories option is switched on.
5.1 Display strip accessories
Precondition:
You have selected one or more terminals in the terminal strip navigator, the device navigator or the graphical editor.
Project data > Terminal strips > Edit
1. Select Popup menu > Display strip accessories.
The strip accessory is displayed in the dialog.
5.2 Add strip accessory
Precondition:
You have selected one or more terminals in the terminal strip navigator, the device navigator or the graphical editor.
Project data > Terminal strips > Edit
Terminals
EPLAN Training 28
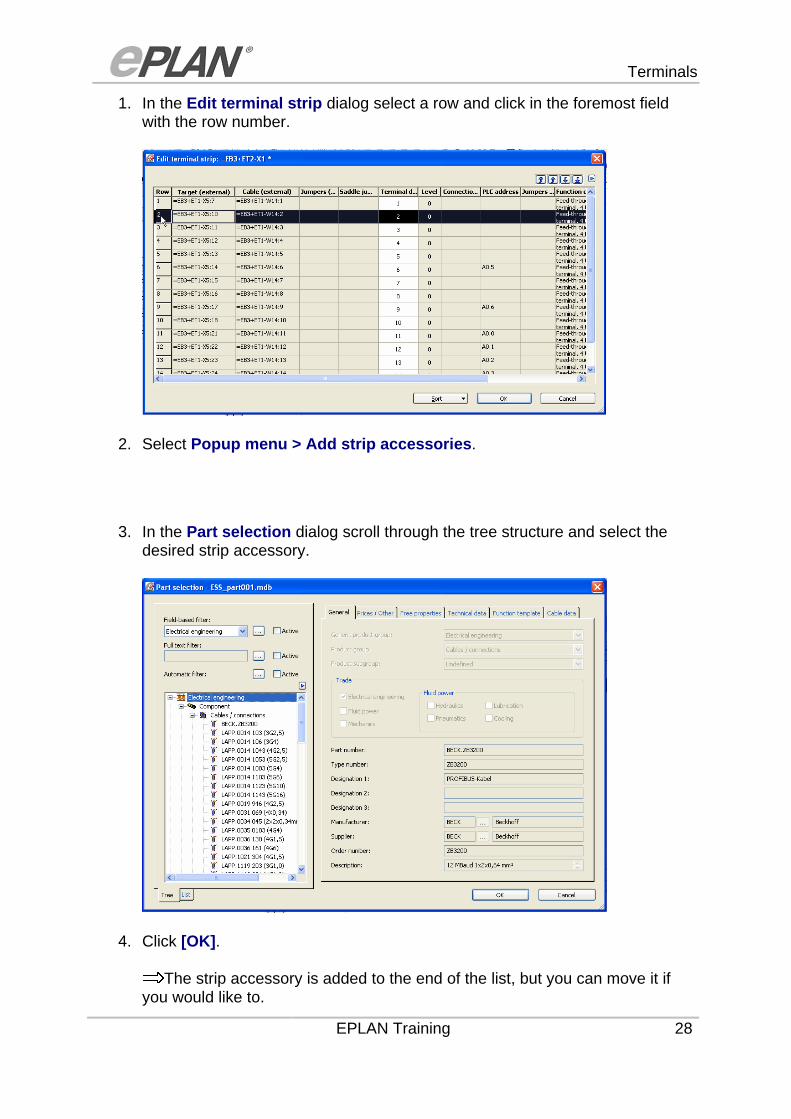
1. In the Edit terminal strip dialog select a row and click in the foremost field with the row number.
2. Select Popup menu > Add strip accessories.
3. In the Part selection dialog scroll through the tree structure and select the desired strip accessory.
4. Click [OK].
The strip accessory is added to the end of the list, but you can move it if you would like to.

Terminals
EPLAN Training 29
The part is displayed as a separate line if it belongs to one of the following
product subgroups:
o End plate (partition plate)
o End angle (end bracket)
o Strip label
o Rail
o Plug housing
o Plug accessory
o Test accessory
o Mounting rail
o Partition plate

Terminals
EPLAN Training 30
o Jumper (Potential rail)
o Other labels
o Tools.
5.3 Delete strip accessories
Precondition:
You have selected one or more terminals in the terminal strip navigator, the device navigator or the graphical editor.
Project data > Terminal strips > Edit
1. In the Edit terminal strip dialog click in the foremost field with the position specification in order to select the strip accessory.
2. Select Popup menu > Delete strip accessories.
The selected strip accessory is deleted, i.e., the parts entry is deleted from the terminal strip definition.
Terminals
EPLAN Training 31
This functionality is only available for certain module packages. Info
Terminals
EPLAN Training 32
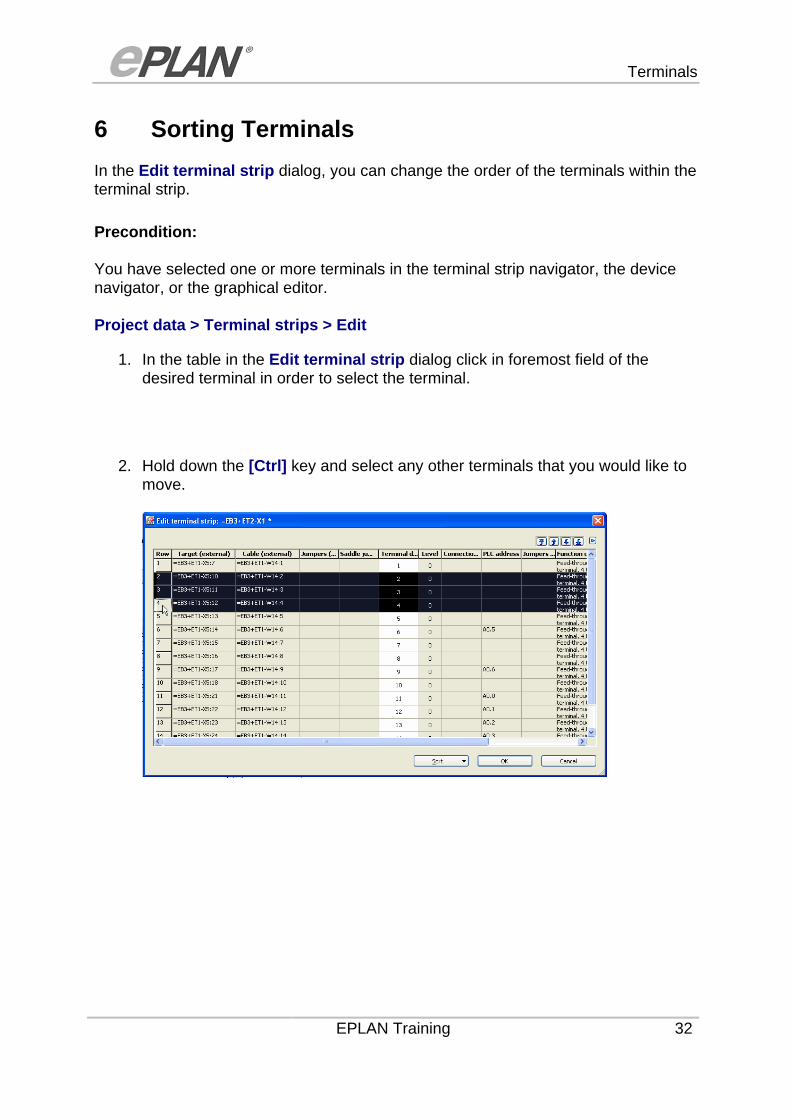
6 Sorting Terminals
In the Edit terminal strip dialog, you can change the order of the terminals within the terminal strip.
Precondition:
You have selected one or more terminals in the terminal strip navigator, the device navigator, or the graphical editor.
Project data > Terminal strips > Edit
1. In the table in the Edit terminal strip dialog click in foremost field of the desired terminal in order to select the terminal.
2. Hold down the [Ctrl] key and select any other terminals that you would like to move.

Terminals
EPLAN Training 33
3. Move the selected terminals with the arrow keys to the desired position on the terminal strip.
A sort code is assigned to the terminals, which is entered in the "Sorting" property.
The terminals are sorted according to the order of the sort code on the terminal strips. If multiple terminals have the same sort code or if the sort code is empty, these terminals are sorted according to the order of the terminal designation.
Tip:
The [Sort] button allows you to automatically sort all terminals in a terminal strip.
This functionality is only available for certain module packages. Info
Terminals
EPLAN Training 34
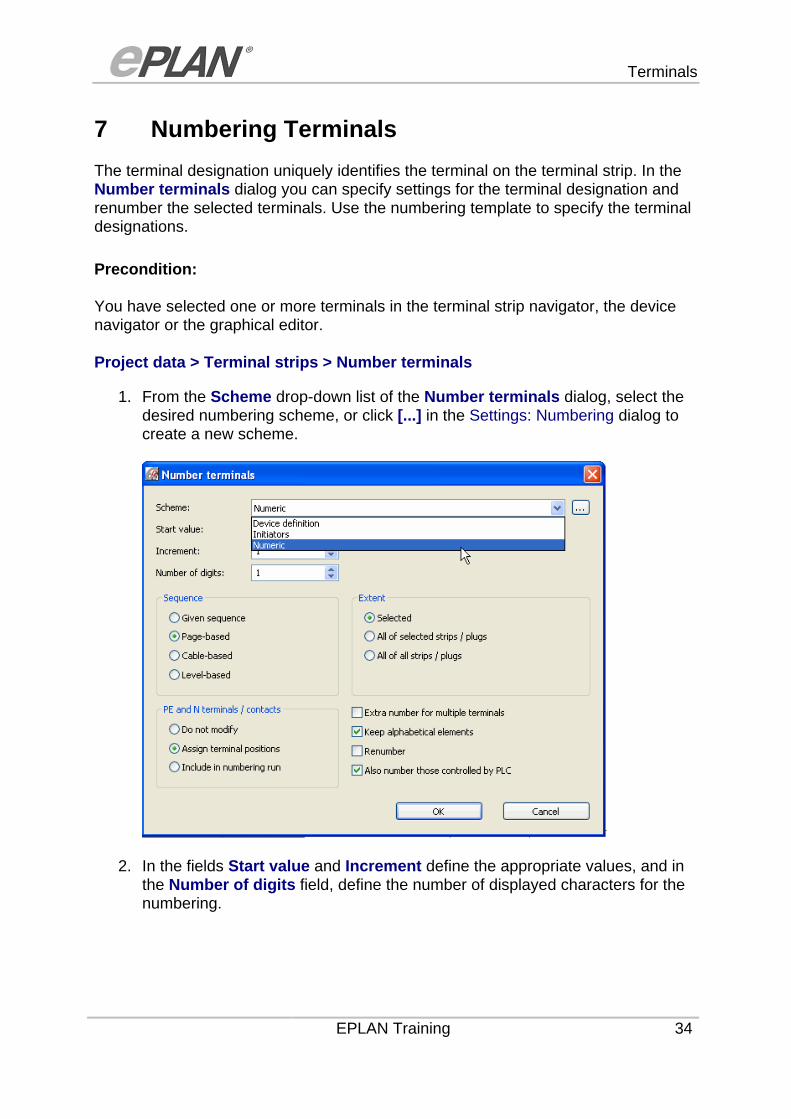
7 Numbering Terminals
The terminal designation uniquely identifies the terminal on the terminal strip. In the Number terminals dialog you can specify settings for the terminal designation and renumber the selected terminals. Use the numbering template to specify the terminal designations.
Precondition:
You have selected one or more terminals in the terminal strip navigator, the device navigator or the graphical editor.
Project data > Terminal strips > Number terminals
1. From the Scheme drop-down list of the Number terminals dialog, select the desired numbering scheme, or click [...] in the Settings: Numbering dialog to create a new scheme.
2. In the fields Start value and Increment define the appropriate values, and in the Number of digits field, define the number of displayed characters for the numbering.

Terminals
EPLAN Training 35
3. Select the desired options for the sequence and extent of the numbering.
4. Specify how PE and N terminals and contacts should be handled when numbered.
5. Select the corresponding check boxes in order to specify additional options for numbering.
6. Click [OK].
Numbering is carried out according to the settings and the new terminal designations are assigned to the appropriate terminals.
This functionality is only available for certain module packages. Info

Terminals
EPLAN Training 36
8 Moving Terminals / Pins
You can move terminals or pins in order to change their position, reassign the terminals / pins, or to resort them. This is sometimes necessary in order to create a gap between terminals and to create space in the terminal strip for new terminals to be added.
The following describes the process of moving terminals in the terminal strip navigator. Move pins in the same way using the plug navigator.
Project data > Terminal strips > Navigator
1. Select one or more terminals.
2. Select Popup menu > Move.
3. In the By how many field of the Move dialog, select the desired value or specify a value directly in the field.
4. Click [OK].
The terminals will be moved by the specified distance.
This functionality is only available for certain module packages. Info

Terminals
EPLAN Training 37
9 Editing Terminal Targets
The terminals in EPLAN contain properties as well as target information. In the Connections tab of the Properties dialog you can edit this information for every terminal connection point.
Precondition:
You have selected one or more terminals in the terminal strip navigator, the device navigator or the graphical editor.
Edit > Properties
1. In the Properties <...> dialog, select the Connections tab.
There is an entry here for every terminal target.
2. In the 1st connection or the 2nd connection field click an entry.

Terminals
EPLAN Training 38
3. Specify the desired settings.
4. Click [OK].
This functionality is only available for certain module packages. Info

Terminals
EPLAN Training 39
10 Generating Jumpers
You can generate saddle jumpers automatically or specify manually whether a saddle jumper should be used on a terminal.
Wire jumpers are automatically generated if the terminal has no saddle jumper.
Manually generate a jumper on a connection definition point by specifying the jumper type for the connection there. You can also define an insertable jumper, for example.
10.1 Generate saddle jumpers on a terminal
Precondition:
You have selected one terminal in the terminal strip navigator, the device navigator or the graphical editor.
Edit > Properties
1. In the Properties <...> dialog, select the Terminal tab.

Terminals
EPLAN Training 40
2. Select the desired setting from the Saddle jumper drop-down list.
3. Click [OK].
A saddle jumper is generated for the selected terminal.
This functionality is only available for certain module packages. Info

Terminals
EPLAN Training 41
11 Defining Multi-level Terminals
The levels in the terminal housing are designated with level numbers. The level with the number "1" is the lowest of the levels.
Within the terminal strip there are terminals with the same designation but with different values for the levels of a multi-level terminal.
Precondition:
You have selected one terminal in the terminal strip navigator, the device navigator, or the graphical editor.
Edit > Properties
1. In the Properties <...> dialog, select the Terminal tab.
2. Enter the desired value in the Level field.
A value > 0 defines the terminal as a multi-level terminal; the value "0" defines the terminal as a "simple" terminal.
3. Click [OK].
The specified value is used for the terminal.

Terminals
EPLAN Training 42
�