270318-fx500e user's manual - dtm printdtm-print.eu/manuals/fx500e-manual-en.pdf · edition...
TRANSCRIPT

Use
r's M
anua
l
270318-FX500E
User's Manual
© 2018 All rights reservedFor the most recent version of this manual please visithttp://primeralabel.eu/europe/manuals.html
ii
Notices: The information in this document is subject to change without notice. NO WARRANTY OF ANY KIND IS MADE WITH REGARD TO THIS MATERIAL, INCLUDING, BUT NOT LIMITED TO, THE IMPLIED WARRANTIES OF MERCHANTABILITY AND FITNESS FOR A PARTICULAR PURPOSE. No liability is assumed for errors contained herein or for incidental or consequential damages in connection with the furnishing, performance, or use of this material. This document contains proprietary information that is protected by copyright. All rights are reserved. No part of this document may be photocopied, reproduced, or translated into another language without prior written consent.
Trademark Acknowledgments: Windows is a registered trademark of Microsoft Corporation. All other trademarks are the property of their respective owners.
Printing HistoryEdition 1.2, #270318, Copyright 2018 All rights reserved. FCC Compliance Statement: This device complies with part 15 of the FCC rules. Operation is subject to the following two conditions: (1) this device may not cause harmful interference, and (2) this device must accept any interference received, including interference that may cause undesired operation.
CAUTION!TO PREVENT FIRE OR SHOCK HAZARD, DO NOT EXPOSE THE UNIT TO RAIN ORMOISTURE. TO REDUCE THE RISK OF ELECTRIC SHOCK, DO NOT REMOVE EXTERIOR PANELS. NO USER-SERVICEABLE PARTS INSIDE. REFER SERVICING TO QUALIFIED SERVICE PERSONNEL. OPERATE THE UNIT WITH ONLY THE PROPER ELECTRICAL SPECIFICATIONS AS LABELED ON THE PRINTER AND AC ADAPTER.
CAUTION!THIS PRODUCT CONTAINS A LASER DIODE OF A HIGHER CLASS THAN 1. TO ENSURECONTINUED SAFETY, DO NOT REMOVE ANY COVERS OR ATTEMPT TO GAIN ACCESS TO THE INSIDE OF THIS PRODUCT. REFER ALL SERVICING TO QUALIFIED PERSONNEL. THEFOLLOWING LABEL APPEARS INSIDE YOUR UNIT:CLASS 1 LASER PRODUCT LASER KLASSE 1
CAUTION!USE OF CONTROLS OR ADJUSTMENTS OR PERFORMANCE OF PROCEDURES OTHER THAN THOSE SPECIFIED HEREIN MAY RESULT IN HAZARDOUS RADIATION.
iii
Table of Contents
Section 1: Getting Started ...............................................................................1A. Choosing a Good Location ................................................................1B. Unpacking and Inspection ................................................................2C. Identifying the Parts ...........................................................................3
Section 2: Hardware and Software Setup ...................................................5A. Installing BarTender ...........................................................................5B. Installing the Printer ..........................................................................5C. Loading Label Stock ...........................................................................8D. Adjusting the Label Stock Sensor .....................................................9E. Loading the Ribbon ..........................................................................10
Section 3: Printing ..........................................................................................12A. Adding Highlights to a Label with BarTender .............................15B. Printing from BarTender ..................................................................19C. Sealing Labels with Clear Film .......................................................20D. Printer Driver Settings .....................................................................20E. Printing from other Programs ........................................................22
Section 4: Troubleshooting ...........................................................................23A. Creating a Full Bleed Print (Clear Film Sealing) ..........................23B. Cleaning the Printer .........................................................................23C. Factory Defaults ................................................................................24D. Printer Controls and Indicators ......................................................24E. Troubleshooting by LED Indicators Diagnosis ............................25F. Miscellaneous ....................................................................................27G. Technical Support .............................................................................28
Section 5: Maintenance .................................................................................29A. Caring for Your Printer ....................................................................29
Section 6: Label Specifications ....................................................................30
Section 7: Technical Specifications .............................................................32
Index .................................................................................................................33

iv

Getting Started 1
Section 1: Getting Started
THANK YOU…
… for choosing an FX500e Foil Imprinting System. The FX500e Foil Imprinter adds brilliant, shiny highlights to your pre-printed or blank labels.
This User's Manual is your complete step-by-step guide to quickly and easily setting up and printing with your new Foil Imprinting System.
A. CHOOSING A GOOD LOCATION
• Place the printer on a flat surface in a location withadequate air circulation to prevent internal heat build up.
• Do not place the printer near heat sources such as radiators orair ducts, or in a place subject to direct sunlight,excessive dust, mechanical vibration or shock.
• Allow for adequate clearance in front of the printer to accommo-date the printed label stock as it is leaving the printer to avoidthe possibility of binding or jamming of the label stock.
• Allow for adequate overhead clearance for opening thetop cover to allow easy access to the label stock and ribbons.

2 Getting Started
B. UNPACKING AND INSPECTION
While unpacking your printer, inspect the carton to ensure that no damage has occurred during shipping. Make sure that all supplied accessories are included with your unit. The follow-ing items should be included:
• Foil Imprinter• Power Adapter• Separate Power Cord• USB Cable• Four sample rolls• One Ribbon Rewind Paper Core• Two Ribbon Core Spindle• One Internal Label Supply Spindle with a Core Adapter• One External Label Supply Spindle incl. External Mount
(without figure)
Save the carton and packing materials. They will come in handy when transporting the printer.

C. IDENTIFYING THE PARTS
This illustration shows the front of the printer with its control but-tons and LED indicator lights:
This illustration shows the input ports and power switch found on the rear panel of the printer. "Parallel Port" and "RS-232 Serial" not necessary, it is there because the printer was originally designed for extended professional use.
Getting Started 3
Top Cover
Power Switch
Parallel Port USB Port Power Jack RS-232 Serial
Power LEDReady LED
Feed Button
4 Getting Started
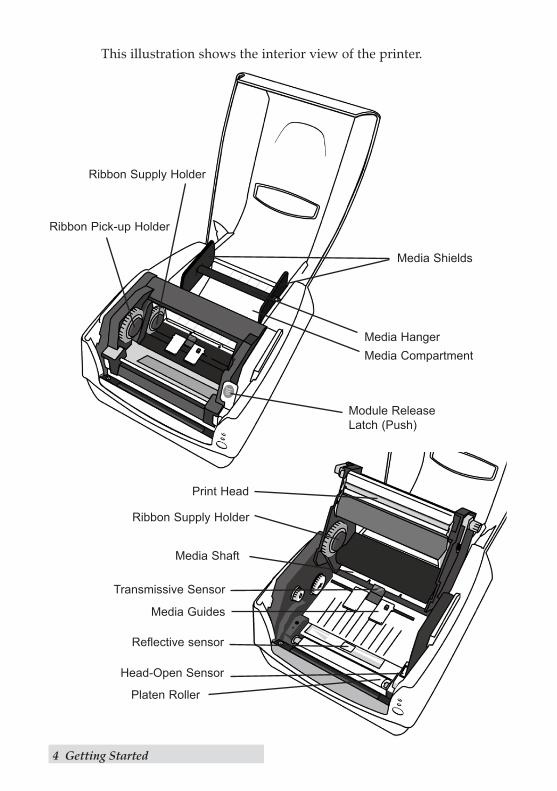
This illustration shows the interior view of the printer.
Media HangerMedia Compartment
Module Release Latch (Push)
Ribbon Pick-up Holder
Media Shields
Ribbon Supply Holder
Ribbon Supply Holder
Media Shaft
Transmissive Sensor
Print Head
Media Guides
Reflective sensor
Head-Open Sensor
Platen Roller

Hardware and Software Setup 5
Section 2: Hardware and Software Setup
A. INSTALLING BARTENDER
1. Download the installer athttp://primeralabel.eu/en/driv-er/software-label.html
2. Double-click on the Auto-Executable file (.exe) you've justdownloaded.
3. The on screen instructions willguide you step-by-step through theinstallation process.
B. INSTALLING THE PRINTER
1. Place this printer on a flat stable surface and make sure thepower switch is turned off.
2. Connect the printer to the host computer with the USB cable.
3. Plug the power cord into the power jack connector at the rear ofthe printer, then plug the power cord into a properly groundedoutlet. Once the power cord is connected, the printer can beswitched on and off using the power switch.
4. Turn on the printer. After a few moments, Windows will tell youit has found new hardware and displays a dialog that allows youto install a driver. Click Cancel and do not install the driverusing this wizard.
5. Download the driver at:http://primeralabel.eu/en/driver/fx500e.html.On the prompt, WindowsPrinter Driver, select “Iaccept…”and click "Next".

6 Hardware and Software Setup
6. Assign the directory to keep FX500e driver, (for example: C:\Primera) and click "Next".
7. Click "Finish".
8. Select "Install printer drivers" and Click "Next".
9. On the Seagull Driver Wizard promt, select the first radio buttonto attach the printer via "USB"
10. Connect the FX500e to the PC and turn it on. If the AddHardware Wizard appears, please cancel it.The Wizard automatically advances as soon as the printer isdetected.

Hardware and Software Setup 7
11. Enter Printer name (i.e. FX500e) and select "do not share thisprinter”, and click "Next".
12. Check all the data on the showing screen, if it is correct, click"Finish".
13. After the related files have been copied to your system, click"Finish".
14. After driver installation is complete, click "Close".The driver should now be installed.

8 Hardware and Software Setup
C. LOADING LABEL STOCK
The inside wound or outside wound media rolls can be loaded into the printer in the same way. In case media roll may become dirty or dusty during shipment, handling, or storage, firstly remove the out-side length of media, which helps to avoid dragging adhesive or dirty media between the print head and platen roller. When loading media, it must be placed onto the media hangers.
1. Open the Top Cover.
2. Put the Media Hanger through media supply roll, and then cen-trally align with the two Media Shields to closely lean againstthe media supply roll
3. Locate the media supply roll into the Media Compartment ofprinter.
4. Push the Release Latch to open the printer module.
Media HangerMedia Shields
PUSH
Module Release Latch (Push)
Hardware and Software Setup 9
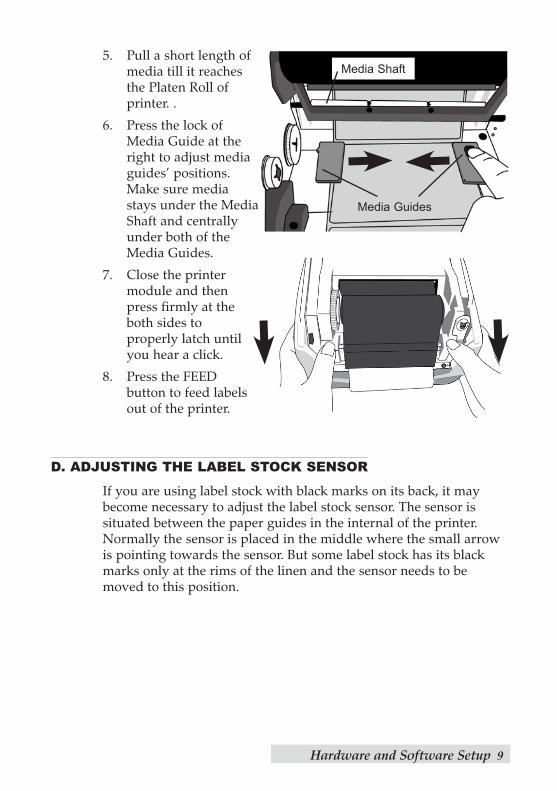
5. Pull a short length ofmedia till it reachesthe Platen Roll ofprinter. .
6. Press the lock ofMedia Guide at theright to adjust mediaguides’ positions.Make sure mediastays under the MediaShaft and centrallyunder both of theMedia Guides.
7. Close the printermodule and thenpress firmly at theboth sides toproperly latch untilyou hear a click.
8. Press the FEEDbutton to feed labelsout of the printer.
D. ADJUSTING THE LABEL STOCK SENSOR
If you are using label stock with black marks on its back, it may become necessary to adjust the label stock sensor. The sensor is situated between the paper guides in the internal of the printer. Normally the sensor is placed in the middle where the small arrow is pointing towards the sensor. But some label stock has its black marks only at the rims of the linen and the sensor needs to be moved to this position.
Media Shaft
Media Guides
10 Hardware and Software Setup
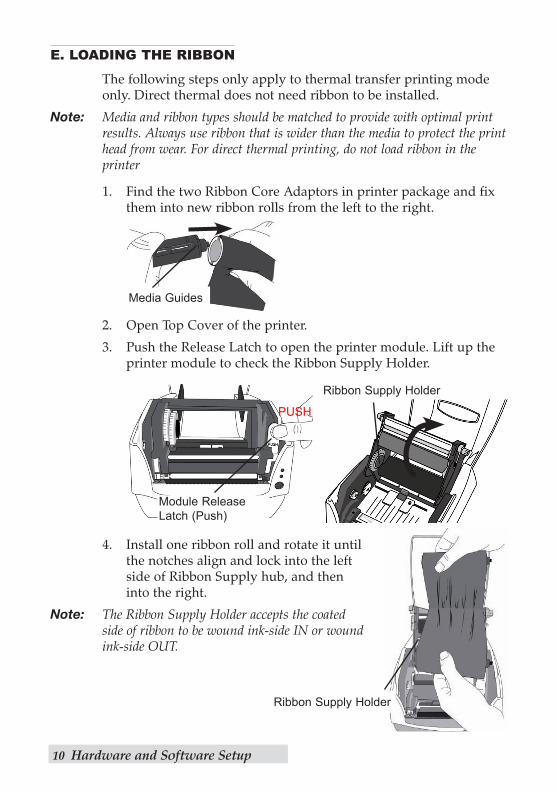
E. LOADING THE RIBBON
The following steps only apply to thermal transfer printing mode only. Direct thermal does not need ribbon to be installed.
Note: Media and ribbon types should be matched to provide with optimal print results. Always use ribbon that is wider than the media to protect the print head from wear. For direct thermal printing, do not load ribbon in the printer
1. Find the two Ribbon Core Adaptors in printer package and fixthem into new ribbon rolls from the left to the right.
2. Open Top Cover of the printer.
3. Push the Release Latch to open the printer module. Lift up theprinter module to check the Ribbon Supply Holder.
4. Install one ribbon roll and rotate it untilthe notches align and lock into the leftside of Ribbon Supply hub, and theninto the right.
Note: The Ribbon Supply Holder accepts the coated side of ribbon to be wound ink-side IN or wound ink-side OUT.
Media Guides
PUSH
Module Release Latch (Push)
Ribbon Supply Holder
Ribbon Supply Holder

Hardware and Software Setup 11
5. Install the other ribbon roll and rotate it until the notches alignand lock into the left side of Ribbon Pick-up hub, and then theright
Note: The Ribbon Pick-up Holder accepts the coated side of ribbon to be wound ink-side IN or wound ink-side OUT.
6. Close the printer module and then press firmly at the both sidesto properly latch it until you hear a click.
7. Rotate Thumb Wheel of Ribbon Pick-up Holder to remove slackand ribbon wrinkle, and to align the ribbon on the spindles.
Ribbon Pick-up Holder
Thumb Wheel

12 Printing
Section 3: Printing
Your printer ships with a version NiceLabel Free 2017 Primera Edition and BarTender UltraLite Primera Edition. These easy-to-use softwares are designed to allow you to create label designs with text, shapes or barcodes quickly and simply. The following is a BarTender Ultralite tutorial to guide you through creating and printing a sam-ple label.
Note: You are not required to print from the BarTender or NiceLabel software. You can print from any application that prints to a Windows Printer. In some cases it be even easier to print with a software that supports multiple layers.
A. ADDING HIGHLIGHTS TO A LABEL WITH BARTENDER
1. Load a colour or metallic ribbon. For instructions see Section 2E.
2. Select "Blank Template". Click "Next".

Printing 13
3. Select "FX500e". Click "Next".
4. Select "Specify Custom Settings". Click "Next".
14 Printing
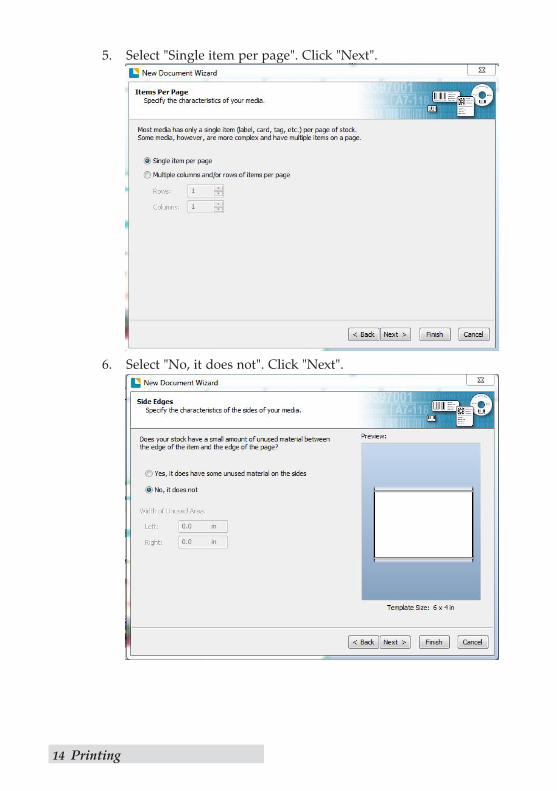
5. Select "Single item per page". Click "Next".
6. Select "No, it does not". Click "Next".

Printing 15
7. Select "Rectangle". Click "Next".
8. Set the page size, width and height to match labels installed inthe printer. Click "Next".

16 Printing
9. Check the "Picture" box to add a background photo or graphicto your label. Click "Next". If you click "Finish", the remainingdefault wizard options will be set and no picture will be added.
10. Select "Embedded Picture". Click the "File" Button to browse tothe location of your photo/graphic file. Set the Size Method to"Stretch". Note the preview to the right. Click "Next" if you aresatisfied with the layout of the photo or graphic.

Printing 17
11. Review the label setup summary. If it is correct, click "Finish".Your blank label will be displayed.
After you click Finish, you can always go back and change any of these settings, by going to the File Menu and selecting "Page Setup". Basic and advanced settings are available on the various tabs.
Once you have created your label size you can start to design your label using Tools from the Tool Box/button bar. You will need to add text, rectangles, lines and/or graphics. This can be done using one of the buttons on the button bar at the top of the screen.
Tip! Double-click any object to open settings for that object.
Tip! Go to the Help menu to access the BarTender Manual and Tutorials.
Add Graphic. Click the Image button. Now click any-where on your label. An Image icon will appear. Double-click it to open up image settings and browse to the image/graphic that you would like to insert.
Lines. Click the Line button to add a horizontal or vertical line.
Page Setup. Click the Page Setup button to change your label size, adjust corner radius or change the shape.
Add Text. Click the Text button. Now click anywhere on your label. "Sample Text" will appear. Edit the text on screen or double click it to open up text settings to change font, size and other settings.

18 Printing
If you are adding metallic or colour highlights to a label you can open the label file that you have used to print the labels. Afterward you can add the picture for the highlights for easier positioning of the highlights. While dragging the box with the highlights, it becomes transparent and you can easily position it at the desired position.
By using the label file you can make sure, that the highlights will be printed at the desired position. This helps you saving time and money.
While dragging:
At desired position:

Printing 19
When the highlights box is covering the whole label, you can leave the label underneath the highlights box:
If the original label is still visible you should delete it after position-ing the details box.
You are now ready to print your label.
B. PRINTING FROM BARTENDER
1. To print, click the Print button or go to the File Menu and select "Print". The Print Dialog window will appear.
2. Select the FX500e.
3. Set the number of copies.
4. Click "Document Properties" to adjust darkness, speed, etc.These settings are explained in Section 3D.
5. Click "Print".
Congratulations! You have successfully created and printed your first label. The rest of this section will explain how to seal labels with clear film and the printer settings. Also, you can find more tips and hints by simply clicking Help then Contents in the main menu
NOTE: Objects will be layered in the order they are added to your document. To change the layering order right click on the object, choose "Arrange" and "Order".

20 Printing
C. SEALING LABELS WITH CLEAR FILM
Clear film is also available for FX500e. It lets you produce labels with a high degree of resistance to water, chemicals, cleaning solu-tions, UV and other harsh environmental factors
1. Load a clear film ribbon. For instructions see Section 2E.
2. Create a "Blank Template" in the Label Setup Wizard. Follow thesteps in Section 3A 2-11.
3. Click the Rectangle Button, then click on a corner of the labeland pull the rectangle to the other corner of the label. Then dou-ble click on the rectangle and select black color under "FillProperties". Make sure the whole label is completely covered.
4. You are now ready to print your label. Click File - Print -Document Properties to adjust darkness, speed etc. See Section3D for more information. Click File then Print from the mainmenu. Choose your number of copies and click OK.
D. PRINTER DRIVER SETTINGS
Once the printer driver has been successfully installed, you will need to setup the driver with the appropriate print options. Refer to the following steps to change or verify your default printer driver preferences. These settings will apply to all new designs created in BarTender, NiceLabel or other programs after the preferences were changed. Existing labels saved in BarTender or NiceLabel will not be affected since the preferences are saved with the label. To change these preferences you will have to change printer preferences through BarTender or NiceLabel. (File Menu - Printer Settings).
To find Driver Settings:Click the Start button, choose Printers and Faxes. Right-click on the FX500e Icon and select Printing Preferences from the drop-down menu.
The preferences screen will appear.
NOTE: Most applications allow you to change these same printer driver options from their "Print" and/or "Printer Setup" screens. Some applications such as BarTender and NiceLabel save your settings with the label, others use settings only for the current print job just sent to the printer.

Printing 21
The Printing Preferences menu includes plenty of options, but not all of them are really necessary to change or they even don’t have any effects. This is because the driver was originally designed for extended professional use. So only the involved options will be explained
Page Setup Tab
In the first area you can pre-define settings for specific label stock. The pre-defined settings are available in the Stock - Name drop-down menu. Create new customised pre-defined label stock, edit or delete them.
There are two settings for orientation, Portrait and Landscape. If your text and graphics print left to right or as shown on the screen, select portrait. If you wish your printing to rotate 90 degrees from what you see on the screen so it is printing horizontally, select landscape as your orientation. Remember, this does not change the width and height in the Paper Size setting. It is only a tool for viewing a label upright on screen that will be printed sideways on the printer.
Once you've done all settings in the following tabs, you want to come back to this tab for saving the present. Therefore choose "Manage…" in the bottom area of this Page Setup Tab.
Graphics Tab
Adjust the Dithering type to your needs.
Stock Tab
In this tab you can set your media settings. Choose Direct Transfer or Thermal Transfer as Print Method, set the right Media Type for Labels with Gaps (die-cut), Labels with Notches, Multi-Column Labels, Labels with Marks (black mark) or Continuous Label Stock. Adjust the Gap Height or Top of the Media.
Two present-modes (tear off or cut) are available in the Post-Print Action as well as a Feed Adjustment.

22 Printing
Options Tab
Either use the Current Printer Setting or choose your own Darkness and Speed Settings. Adjust these values to your needs.
Recommended settings on Primera certified foils:
Foil Darkness SpeedGold/Silver Metallic 8 4 inch/s
Blue/Red Metallic 8 4 inch/s
Clear Transparent 9-10 3 inch/s
This is only a recommendation. If the printout doesn't meet your requirements, try to reduce or increase the darkness/speed setting.
E. PRINTING FROM OTHER PROGRAMS
Since this printer uses a standard Windows printer driver you can print from any application you would like. There are just a few things to remember that will make it much easier.
1. Set the Page/Label Size in the Driver. BarTender automaticallyprompts you for the size of the label that you are using. Whenprinting from any other program you must do this manually.
2. Check the image or document size. The image size or documentsize should correspond to the Page/Label Size set in the driver.
3. Choose the right printing program. There are manydifferent applications that are capable of printing to the LX500e.However there are only a few that are idealprinting applications. For example, Adobe Illustrator isan excellent design program but is not always the best printingprogram. It can be difficult to find the printing preferences or toknow the exact size of the art board. It is best to save as a PDFfile and print from Adobe Reader or export as a 300 dpi JPG andprint from BarTender.

Troubleshooting 23
Section 4: Troubleshooting
A. CREATING A FULL BLEED PRINT (CLEAR FILM SEALING)
1. If you are having trouble making the image cover the entirelabel, first make sure the image is printing at least as big as thelabel size you have selected. To accomplish this using NiceLabelor BarTender, make the image a few millimeters larger than thelabel by dragging the image over the edge of the label on allsides. The bounding box around the image will turn red when itis over the edge of the label. Try printing again to see if it coversthe entire label. If not, move on to step two.
2. Adjust these settings in the printer driver preferences:
Size. Increase the height and/or width of the size in the Optionstab a little bit. If you are using NiceLabel/BarTender, simplychange the size under the File Menu - Label Setup. Increase thesize of the image to fit the new larger page size. If you are usingother graphics programs you will need to change the page sizein the application and in the printer driver preferences.
Top Adjustment. Decrease the Top Adjustment by approximate-ly 2mm (0.08"). This will cause the printer to start printing beforethe label and ensure a fully printed label.
Note: Over bleeding too much will cause the printer to skip labels. This is because the printer stops printing too late to sense the next label.
B. CLEANING THE PRINTER
Use a clean, white rag with a small amount of water or isopropyl alcohol to clean the printer's outside case. Stronger cleaning solu-tions are NOT recommended because they may damage the paint and plastic materials from which the parts are manufactured.
Always disconnect the power cord before cleaning. Resume opera-tion only after the surfaces are completely dry.

24 Troubleshooting
C. FACTORY DEFAULTS
If the printer prints only one label at a time and doesn’t accept any new jobs, you have to restore the printer drivers Factory Defaults. To restore the Factory Defaults, follow the steps below:
1. Turn on the printer and wait till both "Ready" indicator and"Power" indicator stay solid green.
2. Press the "FEED" button for 4 seconds, and the "Ready" indicatorand "Power" indicator will go off in order.(at this step, if the “FEED” button is pressed for 8 seconds, print-er will reset first >> feed blank labels as media calibration >>and then print configuration/self-test labels.)
3. Once "Power" indicator becomes lit again, release the FEED but-ton.
4. "Ready" indicator will then become lit, too. At this moment, theprinter has resumed its factory default settings.
Printer will delete those print tasks received but not yet printed.
Note: The printer factory default settings are stored in printer’s flash; these set-tings remain stored, without being erased even the printer power is discon-nected
D. PRINTER CONTROLS AND INDICATORS
Power LEDReady LED
Feed Button
Power Switch

Troubleshooting 25
The following table explains printer controls and indicators’ func-tions to help understanding LED indications and printer status:
Control / Indicator
Function
Power Switch • On: turns on normal operation (at “I” position)
• Off: turns off power ( at “O” position)
Note: Turn power off before connecting or disconnecting cables
Power LED • It will start blinking while “Media Out”, “Media Gap NotFound” or “Ribbon Out” has been detected.
• Once printer cutter mode has been enabled, when Cutter isjammed with paper or Cutter is not installed, POWERindicator will blink.
Ready LED • When printer is started, the READY indicator will blink.
• When printer receives data from host PC, READY indica-tor will start blinking.
• READY indicator will blink when printing is paused.
• It will start blinking while “Media Out”, “Media Gap NotFound” or “Ribbon Out” has been detected.
• It will blink as soon as the printer module is opened.
Note: When the print head is over-heated, printers thermal protection function will be activated and make READY LED blink to indicate printer is in PAUSE status to wait till print head has been cooled down. The printing tasks sent previously will be resumed automatically later.
Feed Button • Press to advance the label media to the first printing posi-tion.
• Press during printing to make printer "pause".
• Press and hold while switching on the power to conductmedia calibration and print out a configuration profile.
• To resume printing after “Media Out “or “Ribbon Out “errors have been resolved
E. TROUBLESHOOTING BY LED INDICATORS DIAGNOSIS
Normally, when the printer is in not working properly, the "Power" LED blinks continuously, and printing and communication between the host and printer stops. Refer to LED indications listed below to understand possible solutions to resolve the problems printer run into.

26 Troubleshooting
LED Indicators: Power and Ready LEDs blink at the same tempo
Power LED Ready LEDON ONOFF OFF
Possible Problems Solutions RemarksMedia sensor cannot index label gaps
Check the label path
Check the label sensor
If a continuous label roll is in use, set “continuous media” printing in driver settings or commands
Media out Install a new label roll
Paper jam Recover the jam
LED Indicators: Power and Ready LEDs blink alternately
Power LED Ready LEDON OFFOFF ON
Possible Problems Solutions RemarksRibbon out Install a new ribbon roll Set “Direct Thermal”
printing by driver or com-mands if no ribbon is required.
LED Indicators: Only the Power LED blinks
Power LED Ready LEDON ONOFF ON
Possible Problems Solutions RemarksSerial IO error Check serial baud rate at
both of your system and the printer.
For serial interface only
Cutter has failed, or there is paper jam inside the cut-ter.
Check the cutter or recover paper jam.
Only applicable when cutter mode to cutter mode.
Other possible hardware errors.
Contact the reseller for further service.

Troubleshooting 27
LED Indicators: Only the Power LED blinks
Power LED Ready LEDON ONON OFF
Possible Problems SolutionsPrint head needs to Printing will stop until the print head cools to normal
printing temperature.
cool down Once it completes, the printer will automatically resume the printing tasks sent previously.
Printer head module unlatched
Close the printer module and then press firmly at both the left and the right of printer module to prop-erly latch.
Printer is in PAUSE status Press FEED button to resume printing.
Printer is receiving data As soon as all the data has been received, Ready LED will stay solid green and automatically resume nor-mal operation.
F. MISCELLANEOUS
Vertical streaks in the printout usu-ally indicate a dirty or faulty. print head. (Refer to the following exam-ples.)
Clean the print head. If the problem persists, replace the print head.
Poor printout quality:
- The ribbon may not be qualified.- The media may not be qualified.- Adjust the Darkness (heat temperature).- Slow down the print speed.- Refer to the next chapter and clean the related spare parts

28 Troubleshooting
G. TECHNICAL SUPPORT
If you have difficulties in operating your Printer, the procedures in this manual and the software User's Guide should, in most cases, solve the problem.
If you have difficulties operating your Printer, contact technical support using one of the methods listed below.
Source Location
Primera Knowledge Base http://kb.primera.com
BarTender Software Help files Open the software. Click on the Help Menu - BarTender Help
NiceLabel Software Help files Open the software. Click on the Help Menu - NiceLabel Help
Email Support [email protected]
Phone Support +49 (0) 611 92 777- 0 (Mon - Thu 9a.m. - 5 p.m., Fri 9 a.m. - 3 p.m. CET)
Live Chat http://primeralabel.eu (Mon - Thu 9 a.m. - 5 p.m., Fri 9 a.m. - 3 p.m. CET)

Maintenance 29
Section 5: Maintenance
A. CARING FOR YOUR PRINTER
To keep the Print Head remain in the best conditions and efficiency and to extend duration for use, regular cleaning action is needed:
Note: Always switch off printer power before cleaning. In case of long-time print-ing, surface of print head may be very hot. Please wait till print head cools down properly before maintenance, to prevent burns. During maintenance, do not directly touch print head surface, to avoid its damage and any possi-ble injury to you. Use cleaning material instead
Cleaning Interval
It’s strongly recommended to regularly clean print heads at least when changing every one label roll (in direct thermal printing mode) or every one ribbon roll (in thermal transfer printing mode). In addition, if printers are operated under critical applications and environments, or if it’s found that print quality is degraded, please clean print heads more frequently
Cleaning Material
Surface of print head’s heating element is very fragile. To prevent from any possible damage, please use soft cloth/ cotton buds with “Ethanol” or “IPA” to clean print head surface. It’s strongly recommended to wear hand gloves during cleaning progress. Do not touch print head surface by bare hands or with any hard equipment. Water or spit should be kept away in case of corrosion on heating elements.
Cleaning Direction
When cleaning the print head, always wipe in One-Way Direction - from Left to Right only, or, from Right to Left only, to clean “Heating Line” of print head gently without excessive stress.
Do not wipe back and forth, to avoid dust or dirt on cleaning cotton would be attached onto print head again.
Special Caution: Warranty of print heads will be void if print head serial number is removed, altered, defected, or made illegible, under every circumstance.

30 Label Specifications
Section 6: Label Specifications
Important! Test all custom made label stock with the intended printer before order-ing large quantities! Primera will only assume responsibility for custom label stock ordered from Primera.

Label Specifications 31
Max Min
Label/Print width 104 mm (4.10") N/A
Liner width 110 mm (4.33") 25.4 mm (1")Label height/length 1270 mm (50") 5 mm (0.2")Gap between labels 19 mm (0.75") 2.5 mm (0.10")Distance from edge of media to edge of thru-hole
48.3 mm (1.90") 5.1 mm (0.20")
Reflective/Black Mark Width* Equal to distance between labels
25.4mm (1")
Max Outer Diameter (OD) 127 mm (5,0") N/A
Inner Core Diameter (ID) 76 mm (3") 25.4 mm (1.0")Stock Thickness** 10 mil (0.254) 2.5 mil
(0.0635 mm)Distance from edge of media to edge of label
Printer driver assumes 2 mm gap. However, this is adjustable via the left margin offset
* The Reflective/Black Mark should be opaque to infrared light. Themark should be between the labels. The end of the mark should cor-respond with the beginning of the next label.
**This is the recommended maximum. There are two factors that determine whether the printer will accept any particular stock thick-ness.
1. The ability for the printer to pull the paper through the printarea.
2. The ability for the sensor to read through the backing if the sen-sor is set to die-cut.
If you are printing in continuous or reflective label sensing mode number 2 does not apply. The fact that the printer must read through the backing in die-cut mode will limit the thickness much more than the printer's ability to pull the paper through the print area. However, if you adjust opacity level of the liner enough to allow the label to be seen by the stock sensor, the thickness will only be limited by the printer's ability to pull it through the printer area. For these reasons the weight or thickness of the liner is a variable that can not easily be defined. Primera recommends and uses 40# liner with all label stock.

32 Technical Specifications
Section 7: Technical Specifications
Print Method: Print Resolutions: Print Speed: Imprint Width: Media Types: Media Sensing:
Indicator Lights: Controls: Operating Systems: Minimum System Requirements: Data Interface: Label Design
Software:
Electrical Rating:
Thermal Transfer / Direct Thermal300 dpi (12 dots/mm)25.4 - 101.6 mm/s (1-4 ips)Max. 104 mm (4.1")Roll-fed pressure-sensitive labels, roll-fed tags Moveable see-through sensor for die-cut media and reflective for media with black mark sensing & fixed transmissive sensor Power, ReadyFeed ButtonWindows 7/10Pentium® IV computer or better, 512 MB RAM, 5 GB free hard drive space, USB 2.0 port USB 2.0NiceLabel Free 2017 Primera Edition, BarTender Ultralite Primera EditionCan also be used with most other popular Windows label design software programs24 VDC, 2.91 A
Power Requirements: 100-240 VAC, 1.5 A, 50/60 HzCertifications: Weight: Dimensions:
Warranty:
Note:
CE, FCC, cTUVus, CCC, RoHS2.1 kg (4.6 lbs)225 mmW x 273 mmD x 186 mmH (8.85"W x 10.74"D x 7.32"H)Two years on parts and labor after product registration on primeraregister.comLX-Series printers are not included in the price of the FX500e Foil Imprinting System.

Index 33
Index
Adjusting Label Stock Sensor ........................................................9Factory Defaults ..............................................................................24Feed Button ........................................................................................3Full Bleed Print................................................................................23Installing Label Stock .......................................................................8Installing the Printer ........................................................................5Installing the Printer Driver ............................................................5Label Specifications ........................................................................30LED Indicator ..................................................................................25Loading Ribbon ..............................................................................10Location ..............................................................................................1Parts ....................................................................................................2Power LED .........................................................................................3Power Switch .....................................................................................3Printer Driver Settings ...................................................................20Printing .............................................................................................12Technical Specifications .................................................................28Technical Support ...........................................................................28Troubleshooting ..............................................................................23USB Port .............................................................................................3Using BarTender .............................................................................12


P/N FX500E
