27005 00 - p1 600g - stoves · thank you for choosing this british built appliance from stoves. we...
TRANSCRIPT
660000GG
600mm built-in gas oven / grillFor Natural Gas models
User & Installation Handbook

Thank you for choosing this British built appliance from Stoves. We hope you enjoy many years of trouble free cooking with this oven. Should
you need to contact us however, please call the number below and our CustomerCare Centre staff will be pleased to help in any way they can.
0871 22 22 502
When you dial this number you will hear a recorded message and be given anumber of options. This indicates that your call has been accepted and is being
held in a queue. Calls are answered in strict rotation as our Customer CareRepresentatives become available.
When calling please have to hand you appliances model an serial numbers.These numbers help us to quickly identify your product and enable out Customer
Care team to provide you with the most up to date advice and support.
Alternatively spares and service call outs can be requested via our website:www.stoves.co.uk
Outside the UK and Northern Ireland, refer to your local supplier.
Stoves Customer Care
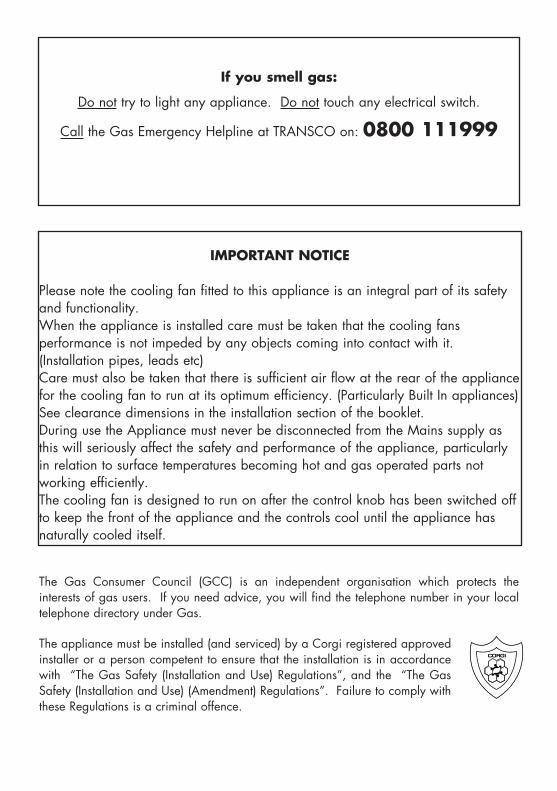
If you smell gas:
Do not try to light any appliance. Do not touch any electrical switch.
Call the Gas Emergency Helpline at TRANSCO on: 0800 111999
The Gas Consumer Council (GCC) is an independent organisation which protects theinterests of gas users. If you need advice, you will find the telephone number in your localtelephone directory under Gas.
The appliance must be installed (and serviced) by a Corgi registered approvedinstaller or a person competent to ensure that the installation is in accordancewith “The Gas Safety (Installation and Use) Regulations”, and the “The GasSafety (Installation and Use) (Amendment) Regulations”. Failure to comply withthese Regulations is a criminal offence.
IMPORTANT NOTICE
Please note the cooling fan fitted to this appliance is an integral part of its safetyand functionality.When the appliance is installed care must be taken that the cooling fansperformance is not impeded by any objects coming into contact with it.(Installation pipes, leads etc)Care must also be taken that there is sufficient air flow at the rear of the appliancefor the cooling fan to run at its optimum efficiency. (Particularly Built In appliances)See clearance dimensions in the installation section of the booklet.During use the Appliance must never be disconnected from the Mains supply asthis will seriously affect the safety and performance of the appliance, particularlyin relation to surface temperatures becoming hot and gas operated parts notworking efficiently.The cooling fan is designed to run on after the control knob has been switched offto keep the front of the appliance and the controls cool until the appliance hasnaturally cooled itself.

User Section . . . . . . . . . . . . . . . . . . . . . . . . . . . . . . . . . . . . . . . 3 -23 Introduction . . . . . . . . . . . . . . . . . . . . . . . . . . . . . . . . . . . . . . . . . . . . . . . . . 3Be Safe - Not Sorry. . . . . . . . . . . . . . . . . . . . . . . . . . . . . . . . . . . . . . . . . . . . 6Using the Grill . . . . . . . . . . . . . . . . . . . . . . . . . . . . . . . . . . . . . . . . . . . . . . . 7Using the Oven . . . . . . . . . . . . . . . . . . . . . . . . . . . . . . . . . . . . . . . . . . . . . . 9Main oven ignition . . . . . . . . . . . . . . . . . . . . . . . . . . . . . . . . . . . . . . . . . . . 10Oven baking guide. . . . . . . . . . . . . . . . . . . . . . . . . . . . . . . . . . . . . . . . . . . 11Roasting guide . . . . . . . . . . . . . . . . . . . . . . . . . . . . . . . . . . . . . . . . . . . . . . 12Slow cooking, Frozen & Chilled food . . . . . . . . . . . . . . . . . . . . . . . . . . . . . . 13Roasting Turkey . . . . . . . . . . . . . . . . . . . . . . . . . . . . . . . . . . . . . . . . . . . . . 14Traditional Fruit cakes . . . . . . . . . . . . . . . . . . . . . . . . . . . . . . . . . . . . . . . . . 14Automatic cooking . . . . . . . . . . . . . . . . . . . . . . . . . . . . . . . . . . . . . . . . . . . 15Programmer / clock . . . . . . . . . . . . . . . . . . . . . . . . . . . . . . . . . . . . . . . . . . 16Cleaning . . . . . . . . . . . . . . . . . . . . . . . . . . . . . . . . . . . . . . . . . . . . . . . . . . 23
Installation Instructions . . . . . . . . . . . . . . . . . . . . . . . . . . . . . 26 - 32Regulations & Standards, Ventilation requirements . . . . . . . . . . . . . . . . . . . . . 26Step 1: Prepare installation . . . . . . . . . . . . . . . . . . . . . . . . . . . . . . . . . . . . . 27Step 2: Connect to gas supply . . . . . . . . . . . . . . . . . . . . . . . . . . . . . . . . . . . 29Step 3: Connect to electricity supply . . . . . . . . . . . . . . . . . . . . . . . . . . . . . . . 30Step 4: Check edging strip . . . . . . . . . . . . . . . . . . . . . . . . . . . . . . . . . . . . . 31Step 5: Secure appliance into housing unit . . . . . . . . . . . . . . . . . . . . . . . . . . 31Step 6: Commissioning . . . . . . . . . . . . . . . . . . . . . . . . . . . . . . . . . . . . . . . . 32
Technical Data . . . . . . . . . . . . . . . . . . . . . . . . . . . . . . . . . . . . . . . 33
Stoves Customer Care . . . . . . . . . . . . . . . . . . . . . . . . . . . . . . . . . . 34
Please keep this handbook for future reference, or for anyone elsewho may use this appliance.
1
Contents
We hope that the followinginformation will help you to familiariseyourself with the features of theappliance, and to use it successfullyand safely.Our policy is one of constantdevelopment and improvement. Strictaccuracy of illustrations and specificationsis not guaranteed. Modification todesign and materials may benecessary subsequent to publication.
This appliance must be installed inaccordance with the regulations inforce and only in a well ventilatedspace. Read the instructions beforeusing or installing this appliance.
Your 1st Year GuaranteeTo fulfil the conditions of your guarantee,this appliance must be correctlyinstalled and operated, in accordancewith these instructions, and only beused for normal domestic purposes. Please note that the guarantee, andService availability, only apply to theUK and Republic of Ireland.
Gas & Electrical connectionPlease refer to installation instructionsfor the Gas & Electrical Safety Regulationsand the Ventilation Requirements.In your own interest, and that of safety,it is the law that all gas appliances beinstalled by a competent person whowill ensure that the installation is inaccordance with “The Gas Safety(Installation & Use) Regulations”, & the“The Gas Safety (Installation & Use)(Amendment) Regulations. Failure tocomply with these Regulations is acriminal offence.Corgi registered installers undertake towork to satisfactory standards.Disconnection of gas and electricappliances should always be carriedout by competent persons.Warning: This appliance must beearthed.
In the event of a power cut1. Switch off the electricity to the
appliance at the socket.2. When the power returns, see the
‘Programmer / Clock’ section to‘Set the time of day’.
The Gas Consumer Council (GCC) isan independent organisation whichprotects the interests of gas users. Ifyou need advice, you will find thetelephone number in your localtelephone directory under Gas.
3
Introduction

The cooling fanThe cooling fan helps to keep theexterior cool during normal use.When a burner is operated, youshould hear the cooling fan switch onautomatically and be able to feel airevacuating from the appliance ventsjust below the fascia. The cooling fanwill continue to operate forapproximately 10 minutes afterturning off the burners. This is normal.If there is no such indication that thefan is operating, the appliance willrequire servicing. DO NOT USE THEAPPLIANCE UNTIL IT HAS BEENSERVICED. Switch the appliance offat the mains and contact CustomerCare.
For your safetyThis appliance has a built in safetydevice to isolate the gas and electricsupplies to various components in theevent of fan failure. If the programmer/clock and lights donot function, and the ignition systemstops working, the safety device hasoperated. Within an hour, the safetydevice will reset itself and the programmer/clock display will flash.To reset the programmer/clock, simplypress and hold in the cook time andready time buttons, and set the time ofday within 5 seconds by pressing the“+” plus and “-” minus buttons.
If when a burner control is turned on,the fan does not operate in the normalway, then the appliance will requireservicing. DO NOT USE THE APPLIANCEUNTIL IT HAS BEEN SERVICED.Switch the appliance off at the mainsand contact Customer Care. Continued use of the appliancewithout it being serviced could result inexcessive temperatures beinggenerated, which in turn could reducethe life of certain components.
VentilationThe use of a gas cooking applianceresults in the production of heat andmoisture in the room in which it isinstalled. Ensure that the kitchen is wellventilated; keep natural ventilation holesopen or install a mechanical ventilationdevice (mechanical ventilator).Prolonged intensive use of the appliancemay call for additional ventilation, forexample opening a window, or moreeffective ventilation, for exampleincreasing the level of mechanicalventilation where present.This appliance is not connected to acombustion products evacuationdevice. It must be installed andconnected in accordance with currentinstallation regulations. Particularattention must be given to the relevantregulations regarding ventilation.
4
Introduction

Glass door panelsTo meet the relevant Standards ofDomestic cooking appliances, all theglass panels on this appliance aretoughened to meet the fragmentationrequirements of BS3193. This ensuresthat, in the unlikely event that a panelbreaks, it does so into small fragmentsto minimise the risk of injury. Please take care when handling, usingor cleaning all glass panels as anydamage to the surfaces or edges mayresult in the glass breaking withoutwarning or apparent cause at a laterdate. Should any glass panel bedamaged, we strongly recommendthat it is replaced immediately.
Before using the appliance forthe first time, remove any protectivepolythene film and wash the ovenshelves in hot soapy water to removetheir protective covering of oil. Evenso, when you first switch on the ovenor grill you may notice a smell andsome smoke.
CondensationWhen hot and cold air meet,condensation forms. The outer door is aircooled and the inner door gets hot, so somecondensation might form; this is normaland will disappear within 10 - 15 minutes.
To replace a light bulbCaution: Switch off the electricitysupply to the cooker at the socket, toavoid the risk of electric shock.Wait until the oven is cool, thenremove the oven shelves. Grasp the lens cover on the light fittingand pull it away from the side of theoven. Unscrew the bulb.Please note that the oven light bulb isnot covered by the guarantee.Replacement bulbs can be orderedfrom your local supplier, or boughtfrom a hardware store.
Environmental ProtectionWe are committed to protecting theenvironment and operate anEnvironmental Management Systemwhich complies with BS EN ISO14001.Disposal of packaging� All our packaging materials are
recyclable and environmentallyfriendly.
� Please help us to protect ourenvironment by disposing of allpackaging in an environmentallyfriendly manner.
� Please contact your local authorityfor the nearest recycling centre.
Caution: Packaging materials canpose a risk of suffocation - keep awayfrom children.
5
Introduction
When you are cooking, keepchildren away from the vicinityof the appliance.This product is designed as a domesticcooking appliance for the preparationand cooking of domestic foodproducts, and should not be used forany other purpose.� Remove all packaging from the
appliance before using for thefirst time.
� Make sure you read andunderstand the instructions beforeusing the appliance.
� Keep electrical leads short so theydo not drape over the applianceor the edge of the worktop.
� Keep all flammable materials (suchas curtains, furnishings & clothing)away from the appliance.
� Parts of the appliance may be hotduring or immediately after use. Allowsufficient time for the appliance tocool after switching off.
� Do not drape tea towels over theflue vents or doors, as this createsa fire hazard.
� Do not use aluminium foil to coverthe grill pan, or put items wrappedin foil under the grill, as thiscreates a fire hazard.
� Never use the appliance forheating a room.
� Do not use the oven with the doorinner glass panel removed (glassoven doors only).
� Always use oven gloves whenremoving hot food / dishes fromthe oven or grill. The oven / grilland utensils will be very hot whenin use.
� When opening the appliancedoor, take care to avoid skincontact with any steam which mayescape from the cooking.
� Do not use foil on oven shelves orallow it to block the oven flue, asthis creates a fire hazard, andprevents heat circulation.
� When cooking heavy items - eg;turkeys - do not pull the oven shelfout with the item still on the shelf.
� Switch off the electricity supplybefore replacing the oven light bulbto avoid the risk of an electric shock.
All installation, servicing andmaintenance work must be carried outby a competent person who willcomply with current Regulations,Standards and Requirements.Warning: This appliance must beearthed.When you have finishedcooking check that all controlsare in the off position.As with all gas appliances, it isrecommended that your appliance isserviced regularly.
6
Be Safe - Not Sorry
Caution: Accessible parts maybe hot when the grill is used,young children should be keptaway.
Grill ignitionImportant: The door must be fullyopen when the grill is used. Open the door.Push in and turn the grill control knobclockwise to the “on” position. Ensurethat the grill burner is alight beforeleaving it unattended.Do not operate the grill between the“on” setting and the “off” position -use the “on” setting only.To switch off, turn the control knobanti-clockwise to return it to the “�” offposition.
If for any reason the burner does notlight within 15 seconds turn the controloff and wait for one minute beforebeginning a further ignition attempt.
Aluminium foilNever cover the grill pan or grill trivetwith cooking foil, or allow fat to buildup in the grill pan, as this creates afire hazard.
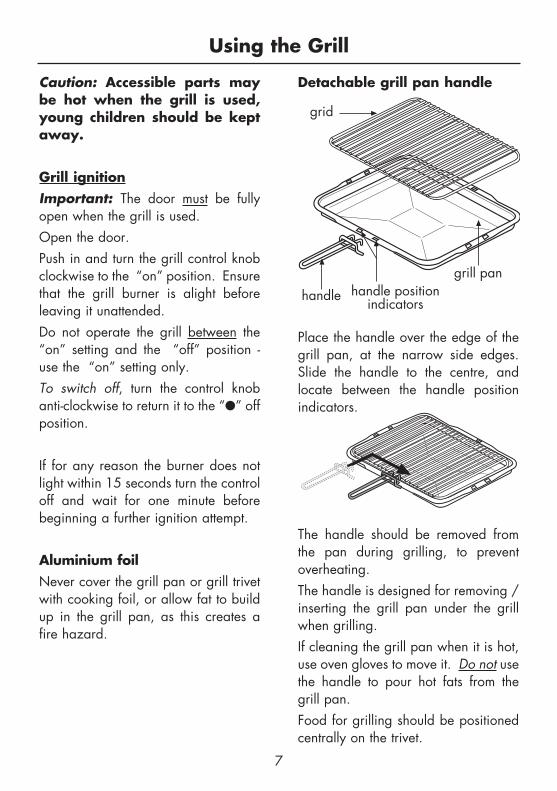
Detachable grill pan handle
Place the handle over the edge of thegrill pan, at the narrow side edges.Slide the handle to the centre, andlocate between the handle positionindicators.
The handle should be removed fromthe pan during grilling, to preventoverheating.The handle is designed for removing /inserting the grill pan under the grillwhen grilling. If cleaning the grill pan when it is hot,use oven gloves to move it. Do not usethe handle to pour hot fats from thegrill pan.Food for grilling should be positionedcentrally on the trivet.
7
Using the Grill
handle
grill pan
grid
handle positionindicators
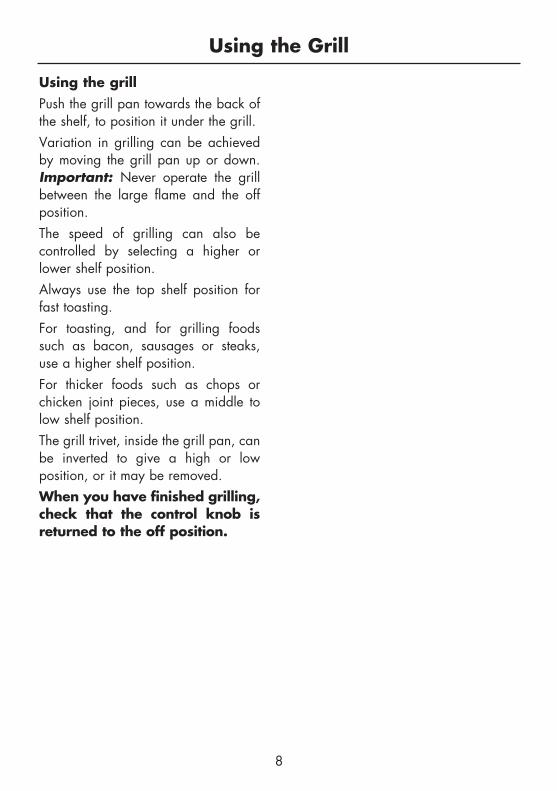
Using the grillPush the grill pan towards the back ofthe shelf, to position it under the grill.Variation in grilling can be achievedby moving the grill pan up or down.Important: Never operate the grillbetween the large flame and the offposition.The speed of grilling can also becontrolled by selecting a higher orlower shelf position.Always use the top shelf position forfast toasting.For toasting, and for grilling foodssuch as bacon, sausages or steaks,use a higher shelf position.For thicker foods such as chops orchicken joint pieces, use a middle tolow shelf position.The grill trivet, inside the grill pan, canbe inverted to give a high or lowposition, or it may be removed.When you have finished grilling,check that the control knob isreturned to the off position.
8
Using the Grill
9
Using the Oven
When you are cooking, keepchildren away from the vicinityof the oven.
NotesIn the event of the flame beingaccidentally extinguished, the flamewill automatically re-light, owing tothe automatic re-ignition system.If it is found over a period of time thatthe oven becomes hotter when used ata particular gas mark, the thermostatmay need to be replaced.As part of the cooking process, hot airis expelled through a vent at the top ofthe oven(s). When opening the ovendoor, care should be taken to avoidany possible contact with potentiallyhot air, since this may causediscomfort to people with sensitiveskin. We recommend that you hold theunderneath of the oven door handle.
Oven furniture
Oven shelvesThe oven shelf must be positionedtowards the rear of the oven, with theupstand facing upwards.Position baking trays and roasting tinson the middle of the shelves, and leaveone clear shelf position betweenshelves, to allow for circulation of heat.
Baking tray and roasting tinsFor best cooked results and evenbrowning, the maximum size baking
trays and roasting tins that should beused are as follows;Baking tray 350mm x 280mmThis size of baking tray will hold up to16 small cakes.Roasting tin 370mm x 320mmWe recommend that you use goodquality cookware. Poor quality traysand tins may warp when heated,leading to uneven baking results.
PreheatingThe oven must be preheated for 15minutes when reheating frozen orchilled food, and we recommendpreheating for yeast mixtures, batters,soufflés and whisked sponges. If you are not preheating the oven, thecooking times in the Baking Guidemay need to be extended, as they arebased on a preheated oven.
Oven lights & replacing bulbsThere are 2 lights in the oven/grillcavity.Caution: Switch off the electricitysupply to the cooker at the socket, toavoid the risk of electric shock.Wait until the oven is cool, thenremove the oven shelves. Grasp the lens cover on the light fittingand pull it away from the side of theoven. Unscrew the bulb and replacewith a new bulb.
Oven ignitionPush in and turn the oven control knobanticlockwise to gas mark 9.When the oven is switched on theoven light will come on automatically.It can take up to 60 seconds for theoven burner to come on to full rate,and the oven burner may not come onto full rate unless the oven door is closed.The automatic ignition will continue tospark for a short time after the burnerhas lit until the flame is established.Adjust to the required setting.To switch off, return the control knob tothe “�” off position.
Zones of heatThe temperature at the centre of theoven corresponds with the selectedGas Mark and is slightly highertowards the top of the oven andslightly lower towards the oven base.These zones of heat can be useful asdifferent dishes requiring differenttemperatures may be cooked at thesame time - eg; the temperature at theoven base is suitable for cooking bakedvegetables, baked fruit, milk pudding,etc, and for warming bread rolls, soup,coffee, or ovenproof plates and dishes.
Baking guide - hintsTo protect a very rich fruit cake duringcooking, tie 2 layers of brown paperaround the tin.Cooking times for pastry dishesdepend on the size and type ofcooking dish and also the filling.When cooking 2 trays of items,remove the top item when it is cookedand raise the lower item to the highershelf to finish cooking, or whereadditional browning of the base isrequired - eg; pies and pastries -interchange part way through cooking.
10
Using the Oven
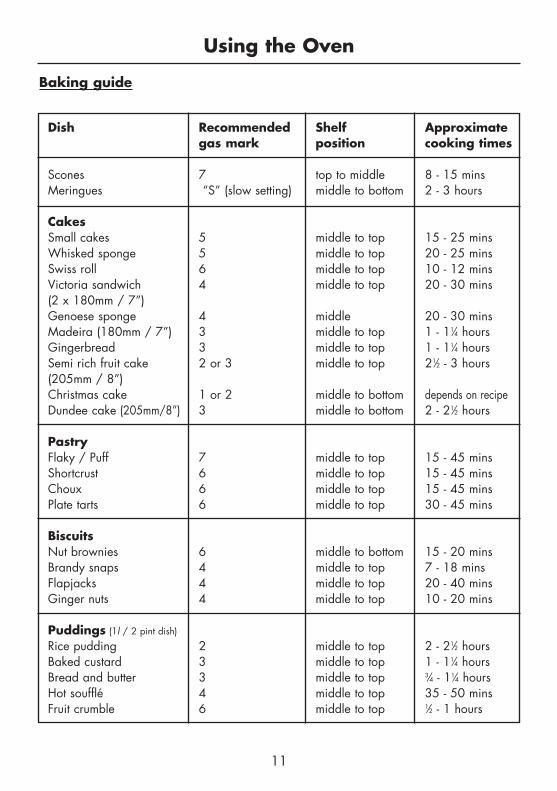
Dish Recommended Shelf Approximategas mark position cooking times
Scones 7 top to middle 8 - 15 minsMeringues “S” (slow setting) middle to bottom 2 - 3 hours
CakesSmall cakes 5 middle to top 15 - 25 minsWhisked sponge 5 middle to top 20 - 25 minsSwiss roll 6 middle to top 10 - 12 minsVictoria sandwich 4 middle to top 20 - 30 mins(2 x 180mm / 7”)Genoese sponge 4 middle 20 - 30 minsMadeira (180mm / 7”) 3 middle to top 1 - 11⁄4 hoursGingerbread 3 middle to top 1 - 11⁄4 hoursSemi rich fruit cake 2 or 3 middle to top 21⁄2 - 3 hours(205mm / 8”)Christmas cake 1 or 2 middle to bottom depends on recipeDundee cake (205mm/8”) 3 middle to bottom 2 - 21⁄2 hours
PastryFlaky / Puff 7 middle to top 15 - 45 minsShortcrust 6 middle to top 15 - 45 minsChoux 6 middle to top 15 - 45 minsPlate tarts 6 middle to top 30 - 45 mins
BiscuitsNut brownies 6 middle to bottom 15 - 20 minsBrandy snaps 4 middle to top 7 - 18 minsFlapjacks 4 middle to top 20 - 40 minsGinger nuts 4 middle to top 10 - 20 mins
Puddings (1l / 2 pint dish)
Rice pudding 2 middle to top 2 - 21⁄2 hoursBaked custard 3 middle to top 1 - 11⁄4 hoursBread and butter 3 middle to top 3⁄4 - 11⁄4 hoursHot soufflé 4 middle to top 35 - 50 minsFruit crumble 6 middle to top 1⁄2 - 1 hours
11
Using the Oven
Baking guide
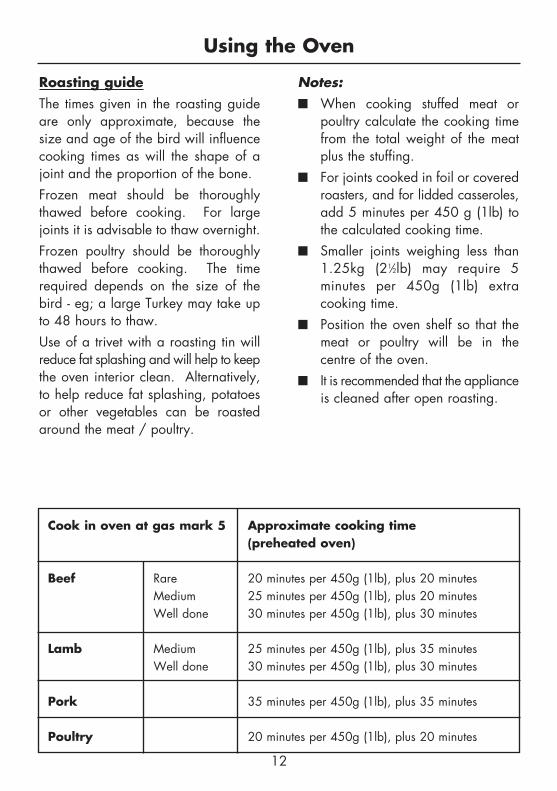
Roasting guideThe times given in the roasting guideare only approximate, because thesize and age of the bird will influencecooking times as will the shape of ajoint and the proportion of the bone.Frozen meat should be thoroughlythawed before cooking. For largejoints it is advisable to thaw overnight.Frozen poultry should be thoroughlythawed before cooking. The timerequired depends on the size of thebird - eg; a large Turkey may take upto 48 hours to thaw.Use of a trivet with a roasting tin willreduce fat splashing and will help to keepthe oven interior clean. Alternatively,to help reduce fat splashing, potatoesor other vegetables can be roastedaround the meat / poultry.
Notes:� When cooking stuffed meat or
poultry calculate the cooking timefrom the total weight of the meatplus the stuffing.
� For joints cooked in foil or coveredroasters, and for lidded casseroles,add 5 minutes per 450 g (1lb) tothe calculated cooking time.
� Smaller joints weighing less than1.25kg (21⁄2lb) may require 5minutes per 450g (1lb) extracooking time.
� Position the oven shelf so that themeat or poultry will be in thecentre of the oven.
� It is recommended that the applianceis cleaned after open roasting.
12
Cook in oven at gas mark 5 Approximate cooking time(preheated oven)
Beef Rare 20 minutes per 450g (1lb), plus 20 minutesMedium 25 minutes per 450g (1lb), plus 20 minutesWell done 30 minutes per 450g (1lb), plus 30 minutes
Lamb Medium 25 minutes per 450g (1lb), plus 35 minutesWell done 30 minutes per 450g (1lb), plus 30 minutes
Pork 35 minutes per 450g (1lb), plus 35 minutes
Poultry 20 minutes per 450g (1lb), plus 20 minutes
Using the Oven

Cooking frozen & chilled foods� Preheat the oven.� When cooking frozen or chilled foods,
please follow the manufacturer’sinstructions. If cooking more thanone tray or item, cooking timesmay need to be increased.
� Please ensure that foods arepiping hot before consumption.
� Always use the temperaturesetting stated on food packagingwhen cooking convenience food.
� Never overload the tray - eg; ovenchips should be placed onto thebaking tray in one even layer forsatisfactory cooking.
� Follow the cooking times given onpackaging but remember they areonly intended as a guide and donot take individual preferencesinto account.
� Always cook frozen conveniencefoods straight from the freezerunless packaging advises otherwise.
Slow cooking� Make sure that frozen foods are
thoroughly THAWED before cooking.� Do not slow cook joints of meat
or poultry weighing more than21⁄4 kg / 41⁄2lb.
� For roasting joints of meat orpoultry and for pot roasts preheatthe oven to Gas Mark 6 and cookfor 30 minutes, then adjust theoven control to ‘S’ slow cooksetting for the remainder of thecooking time.
� Always use the top half of the ovenwhen slow cooking.
� Slow cooking times will be aboutthree times as long as conventionalcooking times.
13
Using the Oven

Traditional fruit cakesIt should be remembered that ovenscan vary over time, therefore cookingtimes can vary, making it difficult to beprecise when baking fruit cakes. It is necessary, therefore, to test thecake before removal from the oven.Use a fine warmed skewer insertedinto the centre of the cake. If theskewer comes out clean, then the cakeis cooked.� Do not attempt to make Christmas
cakes larger than the oven cancope with; you should allow atleast 25mm (1 inch) spacebetween the oven walls and the tin.
� Always follow the temperaturesrecommended in the recipe.
� To protect a very rich fruit cakeduring cooking, tin, or tie 2 layersof brown paper around the tin.
� We recommend that the cake tin isnot stood on layers of brownpaper, as this can hinder effectivecirculation of air.
� Do not use soft tub margarine forrich fruit cakes unless specified inthe recipe.
� Always use the correct size andshape of tin for the recipe quantities.
Roast TurkeyRoasting Turkey perfectly involvescooking two different types of meat -the delicate light breast meat, whichmust not be allowed to dry out, andthe darker leg meat, which takeslonger to cook.The Turkey must be roasted longenough for the legs to cook, sofrequent basting is necessary. Thebreast meat can be covered oncebrowned.� Turkey should be roasted at
gas mark 4 for 20 minutes per1lb, plus 20 minutes unlesspackaging advises otherwise.
� The Turkey can be open roasted,breast side down, for half of thecook time, and then turned over forthe remainder of the cooking time.
� If the Turkey is stuffed, add 5minutes per lb to the cooking time.
� If roasting Turkey covered withfoil, add 5 minutes per 1lb to thecooking time.
To test if the Turkey is cooked, push afine skewer into the thickest part of thethigh. If the juices run clear, theTurkey is cooked. If the juices are stillpink, the Turkey will need longercooking.
14
Using the Oven
Using the Oven
15
Automatic cookingThe automatic cooking facility iscontrolled by the programmer (see‘Programmer/ Clock’ section) andallows complete meals, or individualdishes to be cooked while you are outof the house, to be ready for when youreturn. The ‘Ready Time’ should be setas close as possible to, or just afteryour anticipated return so food is notleft standing in a warm oven.
Do:� Select foods which are as fresh as
possible, and as cold as possible -i.e.; preferably straight from therefrigerator.
� Choose foods which are suitable forcooking from a cold start, as somedishes will be affected by beingleft uncooked, at room temperature,perhaps for several hours - eg; awet filling on a pastry base.
� Make sure that meat an d poultryare thoroughly thawed (but still coldfrom the refrigerator), before placingthem in the oven, and avoid usingrolled joints of meat which can bemore susceptible to the growth offood poisoning organisms.
� Cover dishes with lids or foil tokeep the food moist, prevent thetransfer of odours, and protect frompossible contamination; the foodcan be uncovered towards the endof cooking to crisp and brown.
Do not:� Warm food should never be
placed in the oven if there is adelay period. Stews prepared byfrying the meat and vegetablesfirst should be cooked as soon aspossible, or refrigerated prior toplacing in the oven.
� Some dishes are not suitable forcooking on automatic - eg; dishescontaining left over cooked meator poultry, eggs, cooked rice orseafood.
� Do not put food items (intended forautomatic cooking) into a warmoven. Allow the oven to cool beforesetting for automatic cooking.
� Do not over-fill dishes containingliquids as they might boil over.
� Never leave food in the oven tocool slowly after cooking; serveimmediately or refrigerated.
� Never use the automatic facility toreheat ‘cook chill’ foods as theyshould go straight from therefrigerator into a preheated oven.
Using the Oven
Important: Food is more susceptibleto the growth of food poisoningorganisms in warm conditions. If theweather is hot, either take care toensure that food is not left standing ina warm oven, or avoid using theautomatic cooking facility.
Hints for automatic cooking� Food is placed in a cold oven so
you will need to add about 10 -15 minutes onto the cooking timeto allow for the oven to reach theselected temperature.
� Wine or beer may ferment, andcream may curdle during the delayperiod, so it is best to add theseingredients just before serving.
� Potatoes should be parboiled orbrushed with oil to preventdiscolouration during the delayperiod.
� Meat can be brushed with oil toprevent it drying.
� Lemon juice can be added tocertain fruits and vegetables suchas apples, pears, turnips andparsnips to prevent discolourationduring the delay period.
16
Programmer / Clock
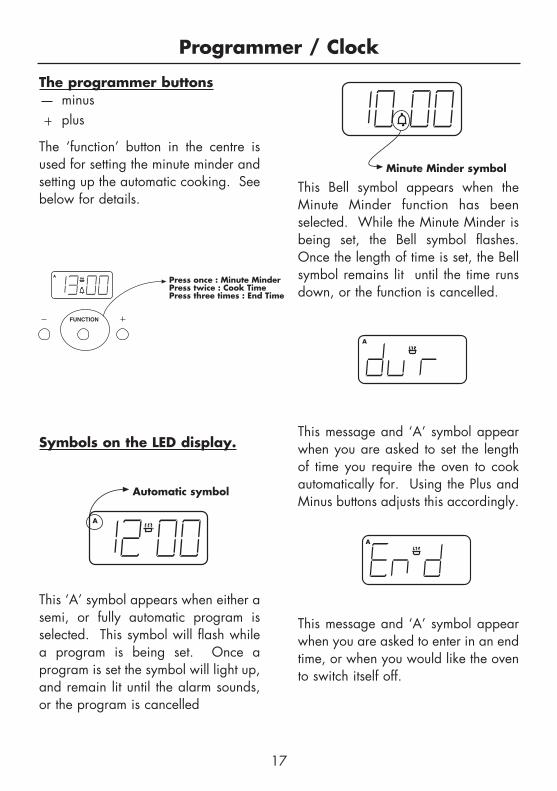
The programmer buttonsminusplus
The ‘function’ button in the centre isused for setting the minute minder andsetting up the automatic cooking. Seebelow for details.
Symbols on the LED display.
This ‘A’ symbol appears when either asemi, or fully automatic program isselected. This symbol will flash whilea program is being set. Once aprogram is set the symbol will light up,and remain lit until the alarm sounds,or the program is cancelled
This Bell symbol appears when theMinute Minder function has beenselected. While the Minute Minder isbeing set, the Bell symbol flashes.Once the length of time is set, the Bellsymbol remains lit until the time runsdown, or the function is cancelled.
This message and ‘A’ symbol appearwhen you are asked to set the lengthof time you require the oven to cookautomatically for. Using the Plus andMinus buttons adjusts this accordingly.
This message and ‘A’ symbol appearwhen you are asked to enter in an endtime, or when you would like the ovento switch itself off.
17
APress once : Minute MinderPress twice : Cook TimePress three times : End Time
A
Automatic symbol
Minute Minder symbol
A
A
Programmer / Clock
18
A
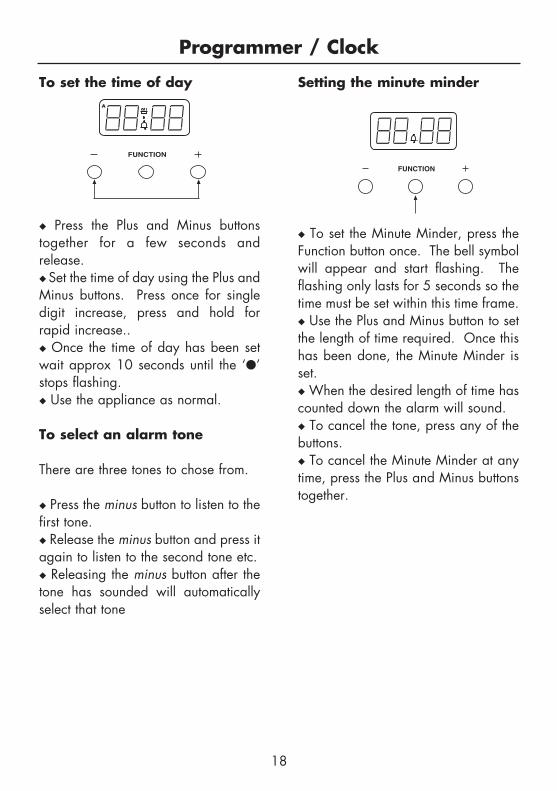
To set the time of day
� Press the Plus and Minus buttonstogether for a few seconds andrelease.� Set the time of day using the Plus andMinus buttons. Press once for singledigit increase, press and hold forrapid increase..� Once the time of day has been setwait approx 10 seconds until the ‘�’stops flashing.� Use the appliance as normal.
To select an alarm tone
There are three tones to chose from.
� Press the minus button to listen to thefirst tone.� Release the minus button and press itagain to listen to the second tone etc.� Releasing the minus button after thetone has sounded will automaticallyselect that tone
Setting the minute minder
� To set the Minute Minder, press theFunction button once. The bell symbolwill appear and start flashing. Theflashing only lasts for 5 seconds so thetime must be set within this time frame.� Use the Plus and Minus button to setthe length of time required. Once thishas been done, the Minute Minder isset. � When the desired length of time hascounted down the alarm will sound. � To cancel the tone, press any of thebuttons. � To cancel the Minute Minder at anytime, press the Plus and Minus buttonstogether.

Programmer / Clock
Semi-automatic cooking
There are two types of semi automaticcooking available on this appliance.
The oven must be switched on, and inuse to use either of these functionssuccessfully.
The Duration method allows you to setthe oven for a specific length of time.If a dish needs 2 hours to cook, then itis possible for you to set the oven toturn off 2 hours later. This allows youto be sure that your food will becooked for a set length of time and nolonger.
The End Time method allows you toenter a specific time when you wouldlike the oven to switch off. If you wishto leave the oven unattended, then itoffers peace of mind that the oven willhave turned itself off at the set time.
However, once the program is set thenit cannot be adjusted. Extra timecannot be added, nor can the endtime be extended.
To cancel the semi automaticprograms, press both the Plus andMinus buttons together. This can bedone at any time during the cookingprocess. Then if necessary, reprogram.
For the instructions on how to use bothof these functions, please see thefollowing pages.
Fully automatic cookingThis function incorporates both aduration and an end time and is meantto be used when you wish to delay thestart time.
We recommend that the first few timesthis function is used you are in thehouse, this will familiarise you with youroven and prevents food from being overcooked or under cooked.
Care must be taken when selectingfoods for this function, it is notrecommended for certain food itemswhich may spoil, or are sensitive tobeing left.
It is also advisable to set the end time tobe as close to your return as possible toprevent food being left standing.
19

Programmer / Clock1. The Duration method
2.
3.
4. The End Time method
5.
6.
20
Semi-automatic cooking
The Duration method
� Press the Function button twice,(1)which will skip past the MinuteMinder.
� The LED display will flash the word‘dur’, (2) and the ‘A’ will flash on theleft hand side of the display.
� Use the Plus and Minus buttons to setthe length of time you want to cookfor.(3) This must be done within 5seconds or the time of day will showagain.
Once this is done the oven willautomatically switch off once the timehas elapsed, and the alarm willsound. To switch off the alarm, press anybutton. To view any remaining timepress the function button twice
The End Time method
� Press the Function button three times,which will skip past the Minute Minderand the Duration programmer. (4)
� The LED display will flash the word‘End’ and the ‘A’ will flash on the lefthand side of the display. (5)� Use the Plus and Minus buttons toselect the time the oven is required toturn off. (6)
Once this is done the oven will turnitself off at the time you have selected. To switch off the alarm, press anybutton.
A
A
A
A
A
A
Programmer / Clock
7
8
9
10
11
12
21
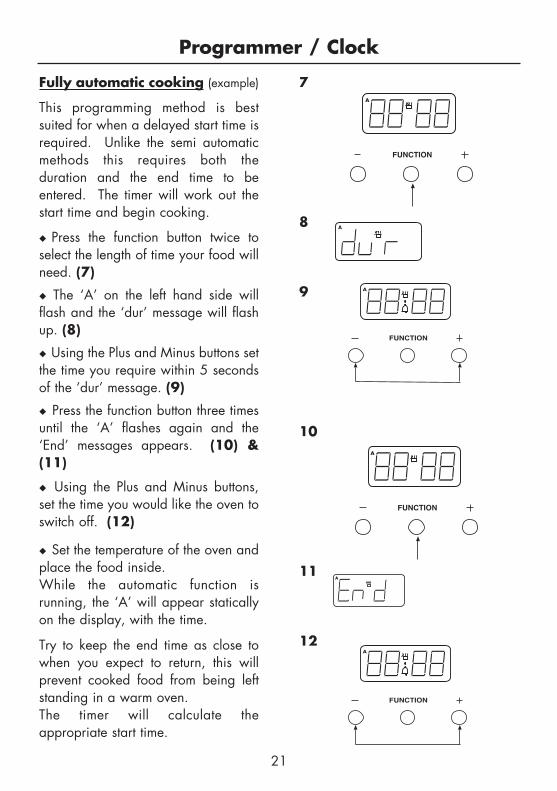
Fully automatic cooking (example)
This programming method is bestsuited for when a delayed start time isrequired. Unlike the semi automaticmethods this requires both theduration and the end time to beentered. The timer will work out thestart time and begin cooking.
� Press the function button twice toselect the length of time your food willneed. (7)
� The ‘A’ on the left hand side willflash and the ‘dur’ message will flashup. (8)
� Using the Plus and Minus buttons setthe time you require within 5 secondsof the ‘dur’ message. (9)
� Press the function button three timesuntil the ‘A’ flashes again and the‘End’ messages appears. (10) &(11)
� Using the Plus and Minus buttons,set the time you would like the oven toswitch off. (12)
� Set the temperature of the oven andplace the food inside.While the automatic function isrunning, the ‘A’ will appear staticallyon the display, with the time.
Try to keep the end time as close towhen you expect to return, this willprevent cooked food from being leftstanding in a warm oven.The timer will calculate theappropriate start time.
A
A
A
A
A
A
Automatic cookingThese notes below are to help you withusing the automatic cooking facility.Please make sure that you read themcarefully before you start using theautomatic functions.
Do • Familiarise yourself with the use of
the programmer.• Select foods which are as fresh as
possible, and as cold as possible -if; preferably straight from therefrigerator.
• Choose foods which are suitablefor cooking from a cold start, assome dishes will be affected bybeing left uncooked, at roomtemperature, perhaps forseveral hours, especially when theweather is hot.
• Make sure that meat, poultry anduncooked food are thoroughlythawed before placing them in theoven.
• Cover dishes with lids or foil, asthey may be left standing in theoven for some time beforecooking.
Do not• Never place warm food in the
oven for delayed cooking - eg;stews prepared by frying meat firstmust be thoroughly cooled beforeplacing in the oven.
• Do not cook dishes containing leftover cooked meat or poultry, orpastry dishes with wet fillings,as they are not suitable forautomatic cooking.
• Do not put food items intended fordelayed cooking into a warm oven- allow the oven to cool beforesetting for delayed cooking.
• Do not over-fill dishes containingliquids, as they might boil over.
• Never leave food in the oven tocool slowly after cooking, serveimmediately or refrigerate.
Automatic cooking - hints
22
Caution: Any cleaning agentused incorrectly may damagethe appliance. Always let the appliance coolbefore cleaning.Some cooking operations generate aconsiderable amount of grease. This,combined with spillage, can become ahazard if allowed to accumulate onthe appliance through lack of cleaning.In extreme cases this may amount tomisuse of the appliance and couldinvalidate your guarantee.It is recommended that the applianceis cleaned after open roasting.Do not use caustic, corrosive orabrasive cleaning products, productscontaining bleach, coarse wire woolor any hard implements, as they willdamage the surfaces.All parts of the appliance can be safelycleaned with a cloth wrung out in hotsoapy water.
Painted, plastic and metal finishparts (if fitted)DOOR HANDLES, METAL FASCIA PANEL,CONTROL KNOBS
Only use a clean cloth wrung out inhot soapy water.
Enamel surfacesOVEN CAVITY, GRILL PAN & ROASTING TIN
If you do a lot of open roasting, orroast at temperatures above 200˚C,we recommend regular cleaning. Useof a trivet in a roasting tin whenroasting will help reduce fat splashing.Caution: Most types of cleaningagent will damage these surfaces.Only use a few drops of washing upliquid in hot water. Wipe the surfaceswith a clean cloth wrung out in hot soapywater - if larger splashes of fat do notreadily disappear, scrub the area witha nylon brush or nylon pan scourerand hot soapy water. Rinse well andheat the oven to dry the surfaces.
23
Cleaning
Glass partsFACIA PANEL & DOOR PANELS
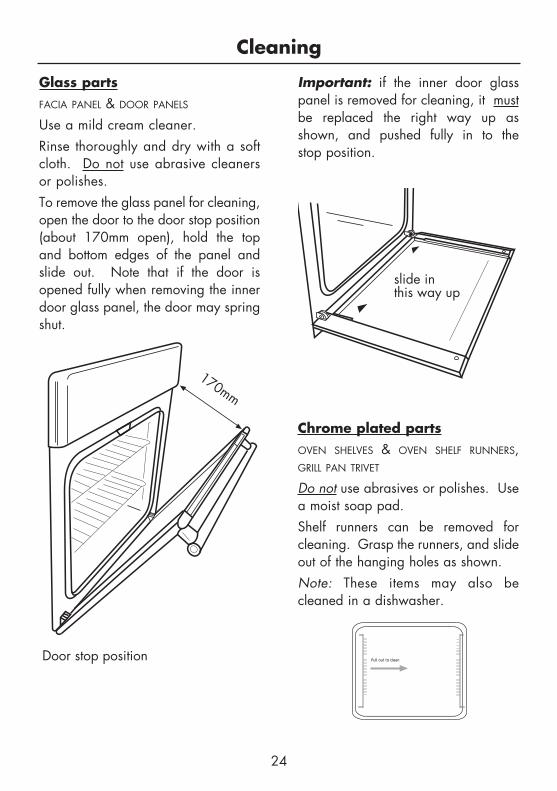
Use a mild cream cleaner. Rinse thoroughly and dry with a softcloth. Do not use abrasive cleanersor polishes.To remove the glass panel for cleaning,open the door to the door stop position(about 170mm open), hold the topand bottom edges of the panel andslide out. Note that if the door isopened fully when removing the innerdoor glass panel, the door may springshut.
Important: if the inner door glasspanel is removed for cleaning, it mustbe replaced the right way up asshown, and pushed fully in to thestop position.
Chrome plated partsOVEN SHELVES & OVEN SHELF RUNNERS,GRILL PAN TRIVET
Do not use abrasives or polishes. Usea moist soap pad.Shelf runners can be removed forcleaning. Grasp the runners, and slideout of the hanging holes as shown.Note: These items may also becleaned in a dishwasher.
24
Cleaning
Door stop position
170mm
slide inthis way up
Pull out to clean
Stainless Steel surfaces (stainlesssteel finish models only)FACIA PANEL, HANDLES, DOOR CLADDING
Only use a clean cloth wrung out in hotsoapy water, and dry with a soft cloth.Stubborn marks can be removed usingstainless steel cleaner. Werecommend that you clean the wholeof the stainless steel area to maintain auniform finish. Supplies can bepurchased from the Customer CareCentre.Do not use undiluted bleach or anyproducts containing chlorides as theycan permanently damage the steel.Extra care should be taken whencooking food in salted water. Somefoods are corrosive - eg; vinegar, fruitjuices and especially salt - they canmark or damage stainless steel if theyare left on the surface. Turn off andwipe any spillage immediately, takingcare to avoid skin contact with any hotsurface or spillage.Sharp objects can mark the surface ofstainless steel, but marks will becomeless noticeable with time.To maintain the finish of the stainlesssteel, or to remove any greasy marks,wipe the stainless steel surfacesparingly with a minimum amount ofBaby Oil and kitchen paper.Do not use cooking oils, as these maycontain salt, which can damage thestainless steel surface.
25
Cleaning
26
Installation Instructions
Before you start: Please read theinstructions. Planning your installation willsave you time and effort.Prior to installation, ensure that the localdistribution conditions (nature of the gas andgas pressure) and the adjustment of theappliance are compatible. The adjustmentconditions are stated on the data badge.This appliance is not connected to a combustionevacuation device. It shall be installed andconnected in accordance with currentinstallation regulation. Particular attentionshall be given to the relevant requirementsregarding ventilation.In your own interest and that of safety, it isthe law that all gas appliances be installedand serviced by competent persons.CORGI registered installers undertake towork to satisfactory standards.Where regulations or standards have beenrevised since this handbook was printed,always use the latest edition.
In the UK the regulations andstandards are as follows:1. Gas Safety Regulations (Installation
and Use).2. Building Regulations - Issued by the
Department of the Environment.3. Building Standards (Scotland)
(Consolidated) - Issued by the ScottishDevelopment Department.
4. The current I.E.E. Wiring Regulations.5. Electricity at Work Regulations.6. BS 6172 Installation of Domestic Gas
cooking Appliances7. Installation & Servicing Instructions for
this appliance.For installation in countries other than theUK, the appliance must be connected in
accordance with all local gas and electricalregulations. In the Republic of Ireland,Installers should refer to IS813 DomesticGas Appliances.
Ventilation Requirements The room containing the appliance shouldhave an air supply in accordance withBS 5440: Part 2.• All rooms require an openable window,
or equivalent, and some rooms willrequire a permanent vent as well.
• For room volumes up to 5m3 an airvent of 100cm2 is required.
• If the room has a door that opens directlyto the outside, or the room exceeds10m3, NO AIR VENT is required.
• For room volumes between 5m3 and10m3 an air vent of 50cm2 is required.
• If there are other fuel burning appliancesin the same room, BS 5440: Part 2should be consulted to determine theair vent requirements.
• This appliance must not be installed ina bed sitting room of less than 20m3 orin a bathroom or shower room.
Windows and permanent vents shouldtherefore not be blocked or removed withoutfirst consulting a CORGI gas installer.In the Republic of Ireland, refer to relevant IrishStandards for correct ventilation requirements.Failure to install appliances correctly isdangerous and could lead toprosecution.This appliance is notconnected to a combustion productsevacuation device. It shall be installed andconnected in accordance with currentinstallation regulations. Particular attentionshall be given to the relevant requirementsregarding ventilation.
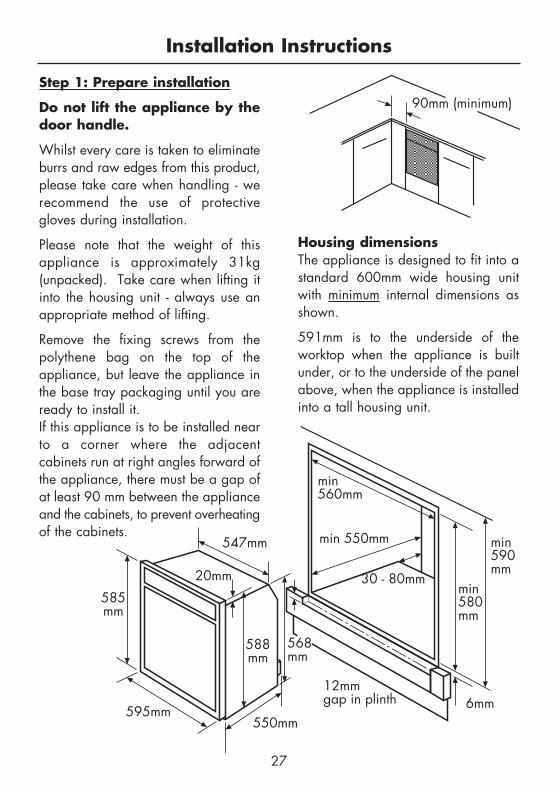
Step 1: Prepare installation
Do not lift the appliance by thedoor handle.
Whilst every care is taken to eliminateburrs and raw edges from this product,please take care when handling - werecommend the use of protectivegloves during installation.
Please note that the weight of thisappliance is approximately 31kg(unpacked). Take care when lifting itinto the housing unit - always use anappropriate method of lifting.
Remove the fixing screws from thepolythene bag on the top of theappliance, but leave the appliance inthe base tray packaging until you areready to install it.If this appliance is to be installed nearto a corner where the adjacentcabinets run at right angles forward ofthe appliance, there must be a gap ofat least 90 mm between the applianceand the cabinets, to prevent overheatingof the cabinets.
Housing dimensionsThe appliance is designed to fit into astandard 600mm wide housing unitwith minimum internal dimensions asshown.
591mm is to the underside of theworktop when the appliance is builtunder, or to the underside of the panelabove, when the appliance is installedinto a tall housing unit.
27
585mm
min560mm
595mm550mm
568mm
547mm
20mm
min 550mm
30 - 80mmmin580mm
min590mm
12mmgap in plinth 6mm
588mm
90mm (minimum)
Installation Instructions
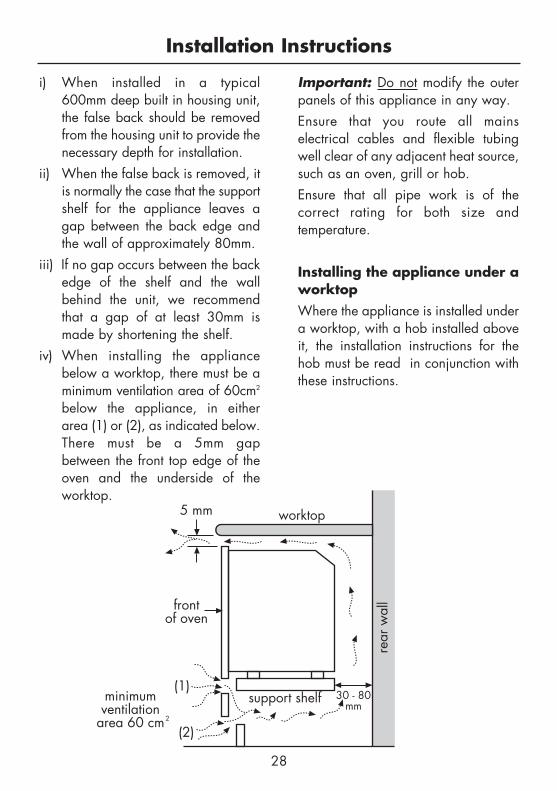
i) When installed in a typical600mm deep built in housing unit,the false back should be removedfrom the housing unit to provide thenecessary depth for installation.
ii) When the false back is removed, itis normally the case that the supportshelf for the appliance leaves agap between the back edge andthe wall of approximately 80mm.
iii) If no gap occurs between the backedge of the shelf and the wallbehind the unit, we recommendthat a gap of at least 30mm ismade by shortening the shelf.
iv) When installing the appliancebelow a worktop, there must be aminimum ventilation area of 60cm2
below the appliance, in eitherarea (1) or (2), as indicated below.There must be a 5mm gapbetween the front top edge of theoven and the underside of theworktop.
Important: Do not modify the outerpanels of this appliance in any way.Ensure that you route all mainselectrical cables and flexible tubingwell clear of any adjacent heat source,such as an oven, grill or hob.Ensure that all pipe work is of thecorrect rating for both size andtemperature.
Installing the appliance under aworktopWhere the appliance is installed undera worktop, with a hob installed aboveit, the installation instructions for thehob must be read in conjunction withthese instructions.
28
worktop
support shelf
rear
wal
lfrontof oven
5 mm
30 - 80mm
minimumventilation
area 60 cm2
(1)
(2)
Installation Instructions
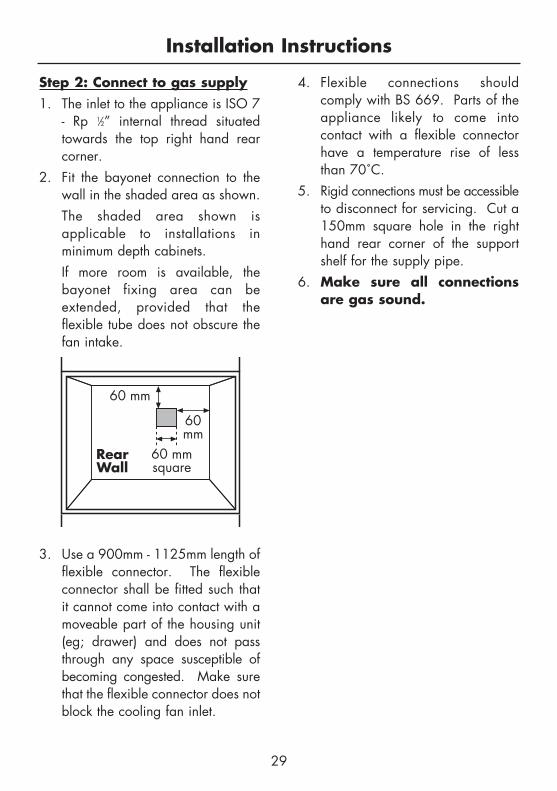
Step 2: Connect to gas supply1. The inlet to the appliance is ISO 7
- Rp 1⁄2” internal thread situatedtowards the top right hand rearcorner.
2. Fit the bayonet connection to thewall in the shaded area as shown. The shaded area shown isapplicable to installations inminimum depth cabinets.If more room is available, thebayonet fixing area can beextended, provided that theflexible tube does not obscure thefan intake.
3. Use a 900mm - 1125mm length offlexible connector. The flexibleconnector shall be fitted such thatit cannot come into contact with amoveable part of the housing unit(eg; drawer) and does not passthrough any space susceptible ofbecoming congested. Make surethat the flexible connector does notblock the cooling fan inlet.
4. Flexible connections shouldcomply with BS 669. Parts of theappliance likely to come intocontact with a flexible connectorhave a temperature rise of lessthan 70˚C.
5. Rigid connections must be accessibleto disconnect for servicing. Cut a150mm square hole in the righthand rear corner of the supportshelf for the supply pipe.
6. Make sure all connectionsare gas sound.
29
RearWall
60 mm
60mm
60 mmsquare
Installation Instructions

30
Step 3: Connect to the electricitysupplyThis appliance must be connected bya competent person, using fixedwiring via a double pole switchedfused spur outlet, with a contactseparation of 3mm at all poles.Use a 3 amp fuse.We recommend that the appliance isconnected by a qualified electrician,who will comply with the I.E.E. andlocal regulations.Warning: This appliance must beearthed.
The wires in the mains lead arecoloured in accordance with thefollowing code: Green & Yellow =earth, Blue = neutral, Brown = live.
As the colours of the wires in the mainslead for the appliance may notcorrespond with the coloured markingsidentifying the terminals in your spurbox, proceed as follows:1. The wire which is coloured green
and yellow must be connected tothe terminal marked E (Earth) orcoloured green.
2. The wire which is coloured bluemust be connected to the terminalmarked N (Neutral) LOAD orcoloured Black.
3. The wire which is coloured brownmust be connected to the terminalmarked L (Live) LOAD or colouredRed.
If the supply cord is damaged, obtaina special cord from the CustomerSupport Helpline, which must be fittedby a qualified person.
ON
FUSE
Use a 3 amp fuse
Typical example of a doublepole fused spur outlet
N LSUPPLY LOAD L
~NLOAD13250
Neutral
Live Earth
Cable
Installation Instructions
31
Installation Instructions
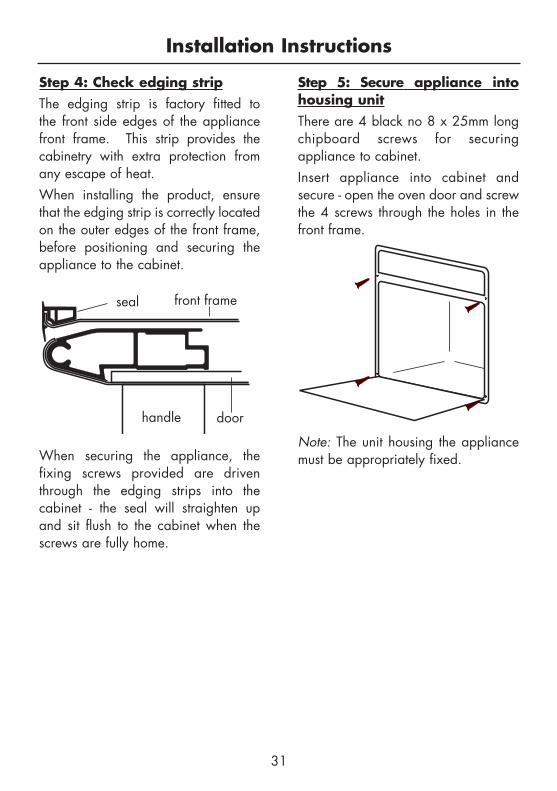
Step 4: Check edging stripThe edging strip is factory fitted tothe front side edges of the appliancefront frame. This strip provides thecabinetry with extra protection fromany escape of heat.When installing the product, ensurethat the edging strip is correctly locatedon the outer edges of the front frame,before positioning and securing theappliance to the cabinet.
When securing the appliance, thefixing screws provided are driventhrough the edging strips into thecabinet - the seal will straighten upand sit flush to the cabinet when thescrews are fully home.
Step 5: Secure appliance intohousing unitThere are 4 black no 8 x 25mm longchipboard screws for securingappliance to cabinet.Insert appliance into cabinet andsecure - open the oven door and screwthe 4 screws through the holes in thefront frame.
Note: The unit housing the appliancemust be appropriately fixed.
seal front frame
doorhandle
Step 6: Commissioning
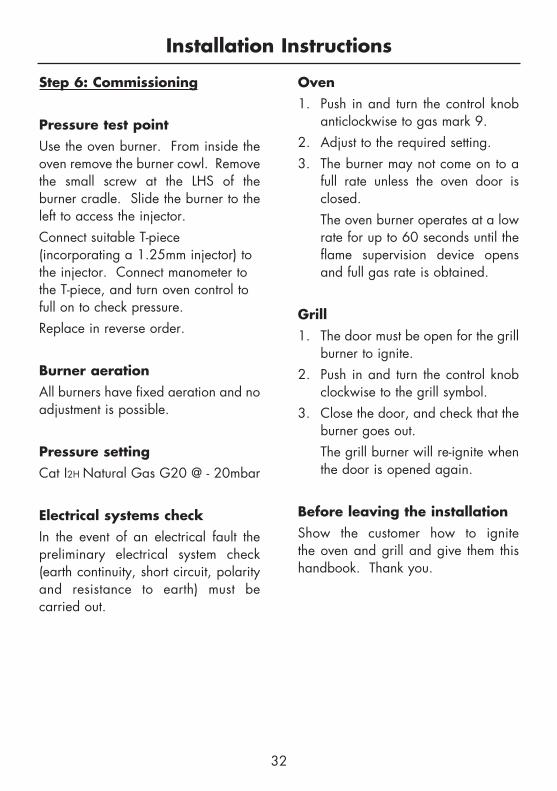
Pressure test pointUse the oven burner. From inside theoven remove the burner cowl. Removethe small screw at the LHS of theburner cradle. Slide the burner to theleft to access the injector. Connect suitable T-piece(incorporating a 1.25mm injector) tothe injector. Connect manometer tothe T-piece, and turn oven control tofull on to check pressure.Replace in reverse order.
Burner aerationAll burners have fixed aeration and noadjustment is possible.
Pressure setting Cat I2H Natural Gas G20 @ - 20mbar
Electrical systems checkIn the event of an electrical fault thepreliminary electrical system check(earth continuity, short circuit, polarityand resistance to earth) must becarried out.
Oven1. Push in and turn the control knob
anticlockwise to gas mark 9.2. Adjust to the required setting.3. The burner may not come on to a
full rate unless the oven door isclosed.The oven burner operates at a lowrate for up to 60 seconds until theflame supervision device opensand full gas rate is obtained.
Grill1. The door must be open for the grill
burner to ignite.2. Push in and turn the control knob
clockwise to the grill symbol.3. Close the door, and check that the
burner goes out. The grill burner will re-ignite whenthe door is opened again.
Before leaving the installationShow the customer how to ignitethe oven and grill and give them thishandbook. Thank you.
32
Installation Instructions
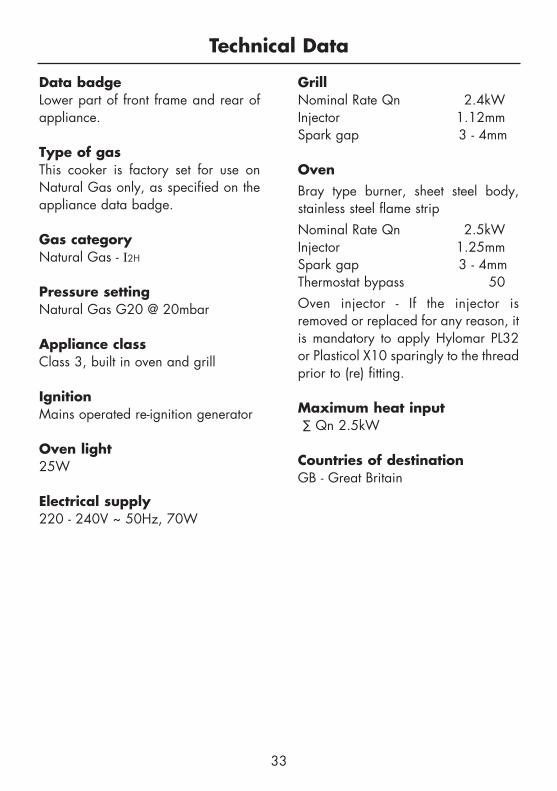
Data badgeLower part of front frame and rear ofappliance.
Type of gasThis cooker is factory set for use onNatural Gas only, as specified on theappliance data badge.
Gas categoryNatural Gas - I2H
Pressure settingNatural Gas G20 @ 20mbar
Appliance classClass 3, built in oven and grill
IgnitionMains operated re-ignition generator
Oven light25W
Electrical supply220 - 240V ~ 50Hz, 70W
Grill Nominal Rate Qn 2.4kWInjector 1.12mmSpark gap 3 - 4mm
OvenBray type burner, sheet steel body,stainless steel flame stripNominal Rate Qn 2.5kWInjector 1.25mmSpark gap 3 - 4mmThermostat bypass 50Oven injector - If the injector isremoved or replaced for any reason, itis mandatory to apply Hylomar PL32or Plasticol X10 sparingly to the threadprior to (re) fitting.
Maximum heat input∑ Qn 2.5kW
Countries of destinationGB - Great Britain
33
Technical Data
08 27369 00 © 03.2008
Stoves Stoney Lane, Prescot, Merseyside, L35 2XW
Please keep this handbook in a safe place as the information inside may be ofuse should you sell, or pass on the appliance. Please fill in the model number
and serial number in the spaces provided below as they will assist us should youneed to call.
0871 22 22 502
When you dial this number you will hear a recorded message and be given anumber of options. This indicates that your call has been accepted and is being
held in a queue. Calls are answered in strict rotation as our Customer CareRepresentatives become available.
Enter appliance numbers here for future reference:
4 4 4
These numbers can be found on your appliances data badge.Outside the UK and Northern Ireland, refer to your local supplier.
Model No
Serial No
Stoves Customer Care