265027305 exchange server study guide exscc 10 v2 0 interactive study guide
DESCRIPTION
The reliance on email over the last few years has led to an increasing number of people sending and receiving email in one form or another. To manage emails on private networks and across the Internet, one can use a messaging server.TRANSCRIPT
Exchange Server
EXSCC-10

Exchange Server
EXSCC-10
Compiled by: Brendon Gouws and Jean Henrico
Updated by: Tiyane Maluleke
Edited by: Kim Randleff-Rasmussen and Norman Baines
Version 2.0
© April 2014 CTI Education Group

Table of contents
Introduction 1 Required reading material 2 Supplementary material 2 How to approach this module 2 Icons used in this study guide 4
Unit 1 – Messaging Basics 5 1.1 Email communication process 5 1.2 Domain Name System (DNS) 7 1.3 Exchange Server features and roles 8 1.4 Setup requirements 9 1.5 Computer setup instructions 10 1.6 Textbook review questions 11
Unit 2 – Active Directory for Exchange Server 13 2.1 Active Directory 13 2.2 Installing Active Directory 14 2.3 Raising the domain and forest functional level 15 2.4 Sites and replication 16 2.5 Global catalog servers 16 2.6 FSMO roles 17 2.7 Creating and managing Active Directory objects 18 2.8 Textbook review questions 19
Unit 3 – Exchange Server Installation 21 3.1 First Exchange Server setup 21 3.2 Second Exchange Server setup 25 3.3 Third Exchange Server setup 26 3.4 Textbook review questions 30
Unit 4 – Exchange Server Configuration 32 4.1 Administrative roles 32 4.2 DNS resource records 33 4.3 Hub Transport server role 37 4.4 Edge Transport server role 38 4.5 Mailbox server role 40 4.6 CAS role 42 4.7 Email flow connectors 43 4.8 Client configuration 44 4.9 Lab challenge 48 4.10 Textbook review questions 48
Unit 5 – Recipient Objects 50 5.1 Recipients 50 5.2 Mailbox users 50 5.3 Mailbox user permissions 51 5.4 Mail users 52 5.5 Mail contacts 52 5.6 Mail-enabled groups 53 5.7 Resource mailboxes 54 5.8 Moving mailboxes 56 5.9 Disabling mailboxes and users 57 5.10 Linked mailboxes 57 5.11 Lab challenge 58

5.12 Textbook review questions 58
Unit 6 – Address Lists and Policies 60 6.1 Address lists and books 60 6.2 Email address policies 61 6.3 Message records management 62 6.4 Message journaling 63 6.5 Working with multiple recipient objects 63 6.6 Lab challenge 65 6.7 Textbook review questions 65
Unit 7 – Public Folders 67 7.1 Public folders 67 7.2 Creating public folders 68 7.3 Public folder home page 70 7.4 Public folder replicas 71 7.5 Lab challenge 71 7.6 Textbook review questions 71
Unit 8 – Protocols and Transport Rules 73 8.1 Supporting POP3 and IMAP4 clients 73 8.2 HTTP and OWA 74 8.3 MAPI/RPC and Outlook Anywhere 76 8.4 SMTP 78 8.5 Transport rules 80 8.6 Lab challenge 81 8.7 Textbook review questions 81
Unit 9 – Security 83 9.1 Securing email information 83 9.2 Attack surfaces 84 9.3 Viruses and spam 85 9.4 Encryption and authentication 87 9.5 User certificates 90 9.6 Textbook review questions 91
Unit 10 – Backup and Recovery 92 10.1 Database backups 92 10.2 Restoring a mailbox database 94 10.3 Restoring mailbox and email items 94 10.4 Recovery storage groups 95 10.5 Managing and repairing Exchange databases 96 10.6 Lab challenge 98 10.7 Textbook review questions 98
Unit 11 – Monitoring and Reporting 100 11.1 System performance 100 11.2 Monitoring mail flow and routing 103 11.3 Message tracking 104 11.4 Client connectivity 105 11.5 Server and usage reports 107 11.6 Textbook review questions 108
Unit 12 – Mobile Access and Unified Messaging 109 12.1 ActiveSync 109 12.2 Unified messaging 110 12.3 Textbook review questions 111

Unit 13 – High Availability 112 13.1 High availability for Mailbox servers 112 13.2 Textbook review questions 114
Addenda 115 Page 124 (Lesson 4) 115 Page 196 (Lesson 5) 115 Page 207 (Lesson 5) 116 Page 247 (Lesson 6) 116 Page 252 (Lesson 6) 116
Unit 14 – Theory and Practical Examination 117 14.1 Theory examination 117 14.2 Practical examination 117
Bibliography 118 Websites 118 Books 118
Exchange Server – Exercise Checklist 119
Exchange Server – Evaluation Form 120

Exchange Server | V2.0 | April 2014 Page 1 of 125
Introduction
The reliance on email over the last few years has led to an increasing number of people sending and receiving email in one form or another. To manage
emails on private networks and across the Internet, one can use a messaging server. A messaging server is an application run on a server operating system
which manages messages for distribution among multiple client applications. Microsoft’s messaging server application is called Exchange Server. The first
version of Exchange Server, version 4.0, was released to the public in 1996 and Exchange Server has gone through a number of design phases and
versions since then. This course focuses on configuring Exchange Server 2007 with Service Pack 1.
This course is based on Microsoft’s 70-236 Microsoft Certified Technology Specialist (MCTS) examination. The objectives for CTI’s and Microsoft’s 70-236
examination are listed in Table 1. For more information on this and other Microsoft certifications, you can go to www.microsoft.com/learning.
Table 1 – Examination objectives
Installing and configuring Exchange Servers
Prepare the infrastructure of Exchange installation
Prepare the servers for Exchange installation
Install Exchange
Configure Exchange Server roles
Configuring recipients and public folders
Configure recipients
Configure mail-enabled groups
Configure resource mailboxes
Configure public folders
Move mailboxes
Implement bulk management of mail-enabled objects
Configuring the Exchange infrastructure
Configure connectors
Configure the antivirus and anti-spam system
Configure transport rules and message compliance
Configure policies
Configure public folders
Configure client connectivity

Exchange Server | V2.0 | April 2014 Page 2 of 125
Monitoring and reporting
Monitor mail queues
Monitor system performance
Perform message tracking
Monitor client connectivity
Create server reports
Create usage reports
Configuring disaster recovery
Configure backups
Recover messaging data
Recover server roles
Configure high availability
Required reading material
You will need the following books to complete the Exchange Server course: Eckert, J. W. Microsoft Official Academic Course Microsoft Exchange Server
2007 Configuration (Exam 70-236). John Wiley & Sons Inc.
Eckert, J. W. Microsoft Official Academic Course Microsoft Exchange Server 2007 Configuration (Exam 70-236) lab manual. John Wiley & Sons Inc.
Supplementary material
www.msexchange.org
How to approach this module
This study guide will prepare you for the CTI Exchange Server theory and practical examination. This study guide is to be used in conjunction with the
self-paced Microsoft MCTS training kit. You are advised to spend as much time
as possible working with the Microsoft Exchange Server 2007 SP1 application, as practical experience will not only improve the skills required to pass the
practical examination, but will also provide the learner with good knowledge of the material for the theory examination. You are required to study this guide and the Microsoft Exchange Server 2007 Configuration textbook in its entirety
before you book for the theory examination.
NOTE The practical examination will be based on the labs/exercises found in the Microsoft Official Academic Course Microsoft Exchange Server 2007 Configuration (Exam 70-236) lab manual.

Exchange Server | V2.0 | April 2014 Page 3 of 125
Table 2 provides a 20-day suggested study schedule for this course.
Table 2 – Study schedule
Day Unit
1 1+ 2
2 2
3 3
4 4
5 5
6 5
7 6
8 7
9 8
10 9
11 9
12 10
13 11
14 12 + 13
15 Lab Exercises
16 Lab Exercises
17 Lab Exercises
18 Revision
19 Theory Examination
20 Practical Examination

Exchange Server | V2.0 | April 2014 Page 4 of 125
Icons used in this study guide
This icon indicates the beginning of a unit.
Outcomes at the start of the each section or unit, i.e. the
knowledge and skills you should have acquired after each unit.
This icon indicates the required reading in the prescribed
textbook.
Self-assessment: A knowledge assessment to test the learner’s understanding of the material.
Labs/work to be done on computer: Hands-on exercises to be done on one or more computers in order to improve your
practical skills.
Labs/exercises refer to those labs/exercises found in prescribed lab manual.
Exchange Server | V2.0 | April 2014 Page 5 of 125
Unit 1 – Messaging Basics
At the end of this unit you will be able to:
Identify the purpose and use of Exchange Server.
Describe standard email terminology. Understand email relay and DNS MX record usage.
Identify common email formats and protocols. Identify previous versions of Exchange Server and their
features. List the new features introduced into Exchange Server 2007.
Describe the function and use of Exchange Server 2007 server roles.
Set up the lab computers.
Microsoft Exchange Server 2007 Configuration textbook:
Lesson 1, pages 1–22.
1.1 Email communication process
Email or electronic mail is the process of sending text messages in electronic form between one or more computers. Today, emails can include images and video clips and a variety of other attachments. Email relaying is the act of a
mail transfer agent (MTA, discussed next) accepting a message from a
person’s email client software and forwarding that message on to its final
destination or, at least, as close as possible to its final destination – sometimes a message has to be relayed in two or more hops (servers). The following
three agents (programs) are involved in the email relaying process:
1.1.1 Mail user agent
Also referred to as the email client program, the mail user agent (MUA) is
the program that allows a user to compose, send and receive email messages. The MUA provides the interface between the user and the mail transfer
agent (MTA). Modern MUAs are capable of retrieving messages via several
protocols, setting up mailboxes to store messages and sending outbound
messages to an MTA. Outgoing mail is handed over to an MTA for delivery
while the incoming messages are picked up from where the MTA left them. An MUA may send a message directly to an MTA that handles mail for the
intended recipient or to the local MTA that will forward the message to another MTA. Microsoft Outlook 2007 (shown in Error! Reference source not found.)
is an example of an MUA.

Exchange Server | V2.0 | April 2014 Page 6 of 125
1.1.2 Mail transfer agent
The mail transfer agent (MTA) is responsible for transferring messages
between machines. MTAs do not deliver the message to the recipient, but rather prepare the message for the next step on its journey. A message may
involve several MTAs as it moves to its intended destination. Upon receiving a message from an MUA or another MTA, the MTA stores it locally, analyses the
recipient, and either sends it to the mail delivery agent (MDA) if addressed locally or forwards it to another MTA.
1.1.3 Mail delivery agent
A mail delivery agent (MDA) is a small program that is responsible for
accepting incoming mail from an MTA and placing that mail in a particular user’s mailbox.
NOTE A mailbox is a file or a container that is stored on a mail server that
holds both incoming messages until they are ready to be processed by
a particular user’s MUA and outgoing messages. It is the equivalent of a post box for electronic mail. A public folder is a repository for
information, and can be used to store messages, files (as message attachments), calendars or contacts. The idea behind a public folder is
that if your organisation has information that everyone needs to access, it is sometimes easier to place that information in a public
folder so that it is available through client applications than to put it in a normal file share.
Figure 1 – A mail transfer agent

Exchange Server | V2.0 | April 2014 Page 7 of 125
An example of the overall flow for message creation, mail transport and
delivery is illustrated in Figure 2.
Figure 2 – Email relay
1.2 Domain Name System (DNS)
If you spend any time on the Internet sending email, then you have probably used one or more DNS servers without even realising it. For Exchange Server
2007 to function correctly, DNS must be used in your organisation. DNS
functions as a distributed database using a client/server relationship between clients that need name resolution (the process of translating host names into
IP addresses) and servers that maintain the DNS data. The whole database is pictured as a hierarchical tree, similar to the Windows file system, and the
database is indexed by domain names. At the top of the tree lies a hidden domain called the root domain, which is represented by a dot (.). Beneath the
root domain lie several top-level domain names such as .co.za and beneath the top-level domain names lie several second-level domain names that are used
by organisations, such as CTI.

Exchange Server | V2.0 | April 2014 Page 8 of 125
When you send an email message, you use a domain name to do it. For
example, the email address [email protected] contains the domain name cti.co.za. Each domain name is a path in the tree, called the domain
namespace. The absolute path of a domain name is called a fully qualified domain name (FQDN). A domain is a subtree of the domain namespace and
contains the actual host computers. The DNS database is made up of resource records, which will be discussed in more detail later on in this study guide
(Section 4.2).
1.3 Exchange Server features and roles
Exchange Server provides a role-based installation model, which increases
functionality, performance and security. This allows an administrator to split the functions of an Exchange server and place each role, or a combination of
roles, on different servers in the organisation. The five exchange server roles are briefly discussed in Table 3.
Table 3 – Exchange Server roles
Role Function
Mailbox Server (MB)
This is a mandatory role that holds the user mailbox and public folder databases. Mailbox
servers must be members of an Active Directory domain.
Hub Transport Server (HT)
This is a mandatory role that routes all messages between mailboxes on the same Mailbox server and on different Mailbox servers. This role also
transports rules and allows you to apply policies to messages. This role must be a member of an Active
Directory domain.
Client Access Server (CAS)
This is the server role that users connect to with their email clients, mobile devices and web
browsers. The CAS role handles all connections to the mailboxes and processes client requests
directly. This role must also be a member of an Active Directory domain.

Exchange Server | V2.0 | April 2014 Page 9 of 125
Role Function
Edge Transport Server (ET)
This is an optional role that is designed to be installed on a stand-alone server on the edge of a
network or demilitarised zone (DMZ) and provide a secure SMTP gateway for all incoming and
outgoing messages. The Edge Transport role performs a number of other functions including
anti-spam and antivirus protection. Because this
role is not intended to be a member of an Active Directory domain, a service called Active
Directory Application Mode (ADAM) or Active Directory Lightweight Directory Services (AD
LDS) for Windows Server 2008 computers and a component called EdgeSync are required to
perform a scheduled one-way synchronisation of the configuration and recipient information from
Active Directory to the Edge Transport server.
Unified Messaging Server (UM)
This is an optional role that is responsible for merging your Voice over Internet Protocol/Public
Branch Exchange (VoIP/PBX) infrastructure with your Exchange mailboxes. It allows you to:
Combine voice messaging, fax and email into one inbox, which can be accessed from a
telephone and a computer. Access voice, fax and mail via multiple
interfaces.
1.4 Setup requirements
The practical examination will be based on the labs in the Microsoft Official Academic Course, Microsoft Exchange Server
2007 Configuration lab manual. We will be using the Windows
Server 2003 operating system with Service Pack 2. The labs for
this course will be done on three physical PCs, not virtual machines as suggested in the prescribed lab manual. You will be
given directions throughout this study guide on which exercises to complete.
The minimum hardware requirements for each one of the three PCs are as
follows:
Processor: 1 GHz 64-bit Intel (EM64T) or AMD processor RAM: 2 GB
Disk space: 80 GB hard drive DVD-ROM drive
Keyboard and mouse
10/100 Ethernet network card SVGA monitor
1 × switch (required to connect all PCs)

Exchange Server | V2.0 | April 2014 Page 10 of 125
The software requirements for the PCs are as follows:
Drivers for the above-mentioned hardware
Operating system: Windows Server 2003 64-bit with Service Pack 2 (Standard or Enterprise edition)
Exchange Server 2007 Standard or Enterprise Edition with Service Pack 1 Microsoft Office 2007 (Outlook 2007 and Excel 2007)
PowerShell 1.0 Microsoft .NET Framework 2.0 with service pack 1
Windows Media Encoder 9 Series (x64 version) Microsoft Core XML Services 6.0 (MSXML6_x64)
The appropriate updates/hotfixes Storage: a memory stick/flash drive or blank CD/DVD
Your lecturer will provide you with the above software products. Do not install any software just yet. You will be given instructions on when and how to install
the above software in the subsequent units.
1.5 Computer setup instructions
Complete the Installing Windows Server 2003 exercise on
page 583 of the prescribed Microsoft Exchange Server 2007
Configuration textbook to install the Windows Server 2003
operating system on all three of the computers. Install and
configure the operating system using the configuration information below along with the information on page 583 of the prescribed textbook and the information found in Exercise 1.1
(LAB 1) of the prescribed lab manual.
PC1:
Time zone: (GMT+02:00) Harare, Pretoria
Correct date and time IP address: 192.168.1.1
Subnet mask: 255.255.255.0 Preferred DNS server: 127.0.0.1
Default gateway: 192.168.1.1
Computer name: Student01-A (referred to as StudentXX-A in the lab
manual) Password: secret
PC2: Time zone: (GMT+02:00) Harare, Pretoria
Correct date and time IP address: 192.168.1.2 Subnet mask: 255.255.255.0
Default gateway: 192.168.1.1 Preferred DNS server: 192.168.1.1
Computer name: Student01-B (referred to as StudentXX-B in the lab
manual) Password: secret

Exchange Server | V2.0 | April 2014 Page 11 of 125
PC3:
Time zone: (GMT+02:00) Harare, Pretoria
Correct date and time IP address: 192.168.1.3
Subnet mask: 255.255.255.0 Default gateway: 192.168.1.1
Preferred DNS server: 192.168.1.1 Computer name: Student01-C (referred to as StudentXX-C in the lab
manual) Password: secret
Make sure Windows Server 2003 Service Pack 2 is installed on all three
computers.
Ensure that all three PCs are set up correctly and each PC has network access.
The three PCs will be referred to by the above computer names for the rest of the exercises in this study guide and the lab manual. The same administrator
account and password (i.e. ‘secret’) will be used to log on to all three PCs and complete the exercises in the lab manual.
NOTE Do not complete exercises 1.2–1.4 in LAB 1 of the prescribed lab
manual.
1.6 Textbook review questions
Complete the Knowledge Assessment section for Lesson 1 on
pages 20–22 of the prescribed textbook. Complete the review questions on page 21 and the case scenarios on page 22 in the
spaces provided below.
Question 1:
Question 2:

Exchange Server | V2.0 | April 2014 Page 12 of 125
Scenario 1-1: Creating a Proposal
Scenario 1-2: Designing Server Roles
Signed by lecturer: ________________

Exchange Server | V2.0 | April 2014 Page 13 of 125
Unit 2 – Active Directory for Exchange
Server
At the end of this unit you will be able to:
Explain what Active Directory is and its function.
Understand, configure and manage the following Active Directory components:
o Objects including users, groups and computers o Domains
o Organisational units o Forests
o Trusts o Functional levels
o Sites and replication o Global catalog
o FSMOs
o GPOs
Microsoft Exchange Server 2007 Configuration textbook:
Lesson 2, pages 23–78.
2.1 Active Directory
A directory service is a system that stores, organises and provides access to
information in a directory. The directory service in Windows Server 2003 is called Active Directory (AD). Active Directory is a database that stores
information about resources on a Windows Server network and makes it easy
for administrators and users to find and use these resources.
The advantages of using Active Directory as well as the services provided with Active Directory are as follows:
AD is based on the Lightweight Directory Access Protocol (LDAP). LDAP is a
directory service protocol that runs over TCP/IP and is used by network clients to look up information about resources in Active Directory.
Authentication is based on Kerberos, a network authentication protocol that enables hosts on a non-secure network to prove their identity to one
another in a secure way. Active Directory relies on DNS-based naming and other network
information.
AD provides a central location from which to manage the network. Active Directory allows single sign on for user access to networked-based
resources. AD provides the ability to scale up or down easily.
Table 4 provides a brief description of the function of domains, domain trees,
forests, domain controllers and the schema.

Exchange Server | V2.0 | April 2014 Page 14 of 125
Table 4 – Domains, domain trees, forests, DCs and schema
Domain
A domain is a group of computers and other resources that are part of the network and share a
common directory database. All objects and OUs exist within a domain.
Domain Tree
A domain tree is a hierarchical grouping of one or more domains that share a common namespace.
DNS domain names are represented as a tree
structure.
Forest
At the top of the Active Directory structure is the
forest. A forest consists of one or more domain trees that do not necessarily form a contiguous
namespace but may share a common schema and global catalog.
Domain Controller
A domain controller (DC) is a computer running Windows Server that validates user network access
and manages Active Directory. A DC stores and manages all Active Directory information for a
particular domain as well as replicating those
changes to other domain controllers in the same domain. Schema and infrastructure configuration
information are replicated between all domain controllers in a forest.
Schema
The schema is created when Active Directory is installed on the first domain controller on the
network; it contains a set of rules that define all the objects and attributes that Active Directory
uses to store data. An administrator can add new definitions to the schema to support new types of
objects in the directory.
2.2 Installing Active Directory
Complete Exercise 2.1 and Exercise 2.2 in LAB 2 of the
prescribed lab manual using the configuration information below. Take note of any addenda/changes listed and which steps you
must and must not complete.

Exchange Server | V2.0 | April 2014 Page 15 of 125
Exercise 2.1
Complete Steps 1–24. In Step 10, name the new domain StudentAA.com. Remember that
wherever StudentXX.com is referenced in the prescribed lab manual, you must replace this with StudentAA.com.
Do not complete Steps 25–27.
Exercise 2.2
Complete all steps. In Step 6, enter StudentAA.com as the domain instead of StudentXX.com.
Remember to use this domain name whenever StudentXX.com is referred to in the prescribed lab manual.
2.3 Raising the domain and forest functional level
In Active Directory, domain controllers can run different versions of Windows
Server operating systems. The functional level of a domain or forest depends on which versions of Windows Server operating systems are running on the
domain controllers that reside in the domain or forest. The functional level of a
domain or forest controls which advanced features are available in the domain or forest.
Active Directory supports a phased implementation of new versions of the
Windows Server operating system and advanced features on domain controllers by providing multiple functional levels, each of which is specific to
the version of Windows Server that is running on the domain controllers in the environment. These functional levels provide configuration support for Active
Directory features and ensure compatibility with domain controllers running earlier versions of Windows Server.
Complete Exercise 2.3 of the prescribed lab manual using the
configuration information below. Take note of any addenda/changes listed and which steps you must and must not
complete.
Exercise 2.3
Complete all steps.

Exchange Server | V2.0 | April 2014 Page 16 of 125
2.4 Sites and replication
A site comprises one or more Internet Protocol (IP) subnets that are tied
together by high-speed, reliable connections. Administrators establish sites to group subnets together into a logical collection to effectively control the
replication (copying) of Active Directory information among domain controllers
across the network and to ensure that updates and policies are applied to all users and computers. Domain controllers that are located in the same site will
replicate their Active Directory database information more often than those located at different sites.
Complete Exercise 2.4 in LAB 2 of the prescribed lab manual
using the configuration information below. Take note of any
addenda/changes listed and which steps you must and must not complete.
Exercise 2.4
Complete all steps.
Step 4 should read: Expand StudentXX-B and then highlight NTDS Settings.
2.5 Global catalog servers
A global catalog (GC) is a catalogue of all objects in a forest (it contains a
subset of attributes for each object). This catalogue enables users and
applications to perform forest-wide searches and quickly find objects or resources in a multiple-domain environment.
Universal Group Membership Caching (UGMC) is used to locally cache a
user’s membership in universal groups on the domain controller authenticating the user. Unlike global group memberships, which are stored in each domain,
universal group memberships are only stored in the global catalog. For example, when a user who belongs to a universal group logs on to a domain
that is set to the Windows 2000 native domain functional level or higher, the global catalog provides universal group membership information for that user’s
account at the time the user logs on to the domain to the authenticating domain controller.
UGMC can be particularly useful in branch office scenarios where you do not
want to deploy a global catalog server because of the extra WAN traffic that
the GC needs to replicate with other domain controllers in the domain. UGMC is generally a good idea for multiple domain forests when:
Universal group membership does not change frequently. There is low WAN bandwidth between domain controllers at different sites.
It is recommended that you disable UGMC if all domain controllers in a forest are global catalog servers.

Exchange Server | V2.0 | April 2014 Page 17 of 125
Complete Exercise 2.5 in LAB 2 of the prescribed lab manual
using the configuration information below. Take note of any addenda/changes listed and which steps you must and must not
complete.
Exercise 2.5
Complete all steps.
2.6 FSMO roles
Active Directory, in general, uses a multimaster replication scheme for
replicating the directory database between domain controllers, so all domain controllers in a domain are essentially equal. Some tasks are impractical to
perform using the multimaster replication scheme; one domain controller called the operations master accepts requests for such tasks. Active
Directory has five operations master roles, and initially all five exist on the first
domain controller installed in a new forest. You can and should move roles around as additional domain controllers are joined to the forest and as
subsequent domains are created within the forest. The operations master roles are sometimes called flexible single master operations (FSMO) roles.
Every domain in an Active Directory forest contains one of each of the
following FSMO roles:
PDC emulator Relative identifiers (RID) master
Infrastructure master Every Active Directory forest contains one instance of the following FSMO
roles:
Schema master Domain naming master
Read page 37 of the prescribed textbook for a description of the function of the
above FSMO roles.
Complete Exercise 2.6 in LAB 2 of the prescribed lab manual
using the configuration information below. Take note of any addenda/changes listed and which steps you must and must not
complete.
Exercise 2.6
Complete all steps.

Exchange Server | V2.0 | April 2014 Page 18 of 125
2.7 Creating and managing Active Directory objects
An object is any user, printer, system, resource, or group tracked within
Active Directory. Each object is identified by its name and represented by a set of properties called attributes. For example, in Exchange, a user’s attributes
would include the first name, last name and email address of the user. Attributes are defined by the schema, which determines the kinds of objects
that can be stored in Active Directory.
Groups are objects that can contain users, computers and other groups.
Groups may be assigned permissions and be part of an email distribution list. An organisational unit (OU) is a container in which you can place objects
and other OUs that belong to the same domain. An OU is the smallest unit to
which you can assign and delegate administrative authority.
Complete Exercise 2.7 and Lab Challenge 2.1: Seizing an FSMO role in LAB 2 of the prescribed lab manual using the
configuration information below. Take note of any addenda/changes listed and which steps you must and must not
complete.
Exercise 2.7
Complete all steps. Step 14 should read:
Use the procedure detailed in the previous two steps to create the Executives and Supervisors groups under your domain.
Step 15 should read: In the left pane, highlight the Sales OU. Next, right-click the Sophia Boren
user account in the right pane and select Properties. Highlight the Member Of tab of the group’s properties.
After completing Step 19, enable the Lois Lipshitz user account by right-clicking the account and selecting Enable Account.
Lab Challenge 2.1
Complete lab challenge. Ensure that Student01-A holds all five of the FSMO
roles. See pages 60–61 of Lesson 2 in the prescribed textbook for how to seize FSMO roles.
Lab Challenge 2.2
Do not complete this lab challenge.

Exchange Server | V2.0 | April 2014 Page 19 of 125
2.8 Textbook review questions
Complete the Knowledge Assessment section for Lesson 2 on
pages 76–78 of the prescribed textbook. Complete the review questions on page 78 and the case scenarios on page 78 in the
spaces provided.
Question 1:
Question 2:
Question 3:
Question 4:
Scenario 2-1: Designing a forest

Exchange Server | V2.0 | April 2014 Page 20 of 125
Scenario 2-2: Planning for Sites, GC and FSMO Roles
Signed by lecturer: ________________

Exchange Server | V2.0 | April 2014 Page 21 of 125
Unit 3 – Exchange Server Installation
At the end of this unit you will be able to:
Determine the Active Directory requirements for Exchange
Server. Determine the hardware and software requirements needed
for the different Exchange Server roles. Install Exchange Server using the graphical user interface.
Microsoft Exchange Server 2007 Configuration textbook:
Lesson 3, pages 79–111.
3.1 First Exchange Server setup
There are three main software installation prerequisites that need to be
installed prior to installing any of the server roles. You will also need to prepare Active Directory for Exchange Server.
The main software requirements are as follows:
Microsoft .NET Framework 2.0 with SP1 or later
Microsoft Management Console (MMC 3.0) Windows PowerShell 1.0
All of the required software packages for each of the three Exchange servers will be provided to you by your lecturer.
The following roles will be installed on Student01-A:
Mailbox server
Hub Transport server Client Access server
Unified Messaging server
Complete Exercise 3.1 in LAB 3 of the prescribed lab manual
using the configuration information below. Take note of any
addenda/changes listed and which steps you must and must not complete. Please note that the installation will take about an hour
to complete.

Exchange Server | V2.0 | April 2014 Page 22 of 125
Exercise 3.1
Complete Steps 1–31. Step 2
o Install the Microsoft .NET Framework 2.0 SP1 package before you install PowerShell 1.0.
o You do not need to install MMC version 3.0 because it is included in Windows Server 2003 with Service Pack 2.
o Install the appropriate updates/hotfixes along with the software packages listed in this step.
Complete Step 4 to install the default Application Server services such as
IIS; you will not be able to place a check mark next to ASP.NET. This will not affect the installation because Windows Server 2003 with Service Pack 2
installs ASP.NET 2.0 and the Microsoft .NET Framework package registers it. If in Steps 7–11 you are not able to run the setup commands from the
media (CD or DVD), you will have to copy all of the Exchange Server 2007 files from the media to the C: drive of the computer. When you open the
command prompt, ensure that you change the default directory to C:\Exchange Server or whichever directory you copied the files to (the
name of the directory) and then run the setup commands from within that directory.
Step 10 should read: Type the following at the command prompt and press <Enter>:
setup /PrepareAD /OrganizationName:StudentAAOrg
Leave spaces between the commands and name the organisation
StudentAAOrg.
If in Step 13 you are not able to run setup.exe from the media (CD or
DVD), you will have to copy all of the Exchange Server 2007 files from the media to the C: drive of the computer and then run the Exchange Server
installation program from there. In Step 21 you may receive the error message ‘Setup cannot detect an
SMTP Connector or Send Connector with an address space of (*). Mail flow to the Internet may not work properly’. For the Hub Transport role
prerequisite, ignore this warning and continue with the installation. In Step 29, run the following command:
get-SetupLog C:\ExchangeSetupLogs\ExchangeSetup.log
–error –tree
In Step 30, run the following command:
get-SetupLog C:\ExchangeSetupLogs\ExchangeSetup.msilog
–error –tree
Do not complete Steps 32–34.

Exchange Server | V2.0 | April 2014 Page 23 of 125
3.1.1 Services
More often than not, when a key service fails, the problem will surface quickly. One of the first places to troubleshoot a specific problem is to visit the Services console. There are several key services that run the Exchange Server
and its infrastructure. Some of the most important ones to check are as
follows:
Microsoft Exchange EdgeSync Microsoft Exchange Transport Microsoft Exchange Information
Store
Microsoft Exchange Transport Log
Search
Microsoft Exchange Mail Submission
Microsoft Exchange System Attendant
Microsoft Exchange Mailbox Assistants
Microsoft Exchange Service Host
Microsoft Exchange Monitoring Microsoft Exchange Replication Service
Microsoft Exchange Search Indexer
It is important that you check that all of these services have been started
whenever an Exchange Server has been switched on or rebooted. Set these services to start automatically by navigating to Start > All Programs >
Administrative Tools > Services. Even when setting a service to start
automatically, you should always double check the status of these services
every time the server boots or reboots.
3.1.2 Exchange folder structure
To examine the Exchange folder structure, navigate to C:\Program Files\Microsoft\Exchange Server. Read page 102 of the prescribed
textbook for information on the function and contents of each folder.
3.1.3 Exchange Management Console
The Exchange Management Console (EMC) is an MMC snap-in that allows an administrator to manage the configuration of the Exchange organisation.
Familiarise yourself with the four main panes of the console as shown in Figure 3.

Exchange Server | V2.0 | April 2014 Page 24 of 125
Figure 3 – Exchange Management Console
To refresh the Exchange Management Console, press <F5>.
3.1.4 Exchange Management Shell
The Exchange Management Shell (EMS) is a snap-in that is built on the Windows PowerShell scripting language. It provides a command-line
environment in which administrators can perform administrative tasks on both local and remote Exchange servers. Figure 4 illustrates the welcome screen
that is displayed when the EMS is first opened.
Figure 4 – Exchange Management Shell
Commands are created though a verb-noun pairing called cmdlets
(pronounced ‘command-lets’). The format of the cmdlet is as follows:
Verb-Noun
Actions pane
Result/Detail pane
Console Tree
pane
Work pane
Exchange Server | V2.0 | April 2014 Page 25 of 125
By combining the verb and noun in the name of the cmdlet, each cmdlet
describes the type of operation it performs as well as the object it manipulates.
Consider using simple ones such as get-mailbox, move-mailbox, get-
storagegroup and so forth. Table 5 lists 26 different verbs that can be used at
the EMS prompt to perform a particular task.
Table 5 – cmdlet verbs
Add Copy Export Mount Restore Start Uninstall
Clean Disable Get Move Resume Stop Update
Clear Dismount Import New Retry Suspend
Connect Enable Install Remove Set Test
To get a full list of commands, you can type get-command at the EMS prompt.
To see only the Exchange commands, you can type get-excommand. For help
with any of these, you can type help and the cmdlet name. Many of the
commands that you will be performing are long strings of characters and many tasks can only be performed using cmdlets at the EMS, so it is suggested that
you practise over and over again.
The following tips will help you perform tasks through Windows PowerShell:
Use the up arrow key to view the commands that have previously been used and the down arrow key to scroll back through the list.
Use the <Tab> key while typing a command: PowerShell will attempt to complete the command for you.
Press <Ctrl + C> to cancel a command.
Like Linux, PowerShell can use a pipeline to compose complex commands, allowing the output of one command to be passed as input to another, using
the | operator. To change the properties of PowerShell, right-click the PowerShell icon
displayed in the upper left corner of the title bar and select Properties.
3.2 Second Exchange Server setup
The following roles will be installed on Student01-B:
Mailbox server
Hub Transport server Client Access server
Complete Exercise 3.2 in LAB 3 of the prescribed lab manual using the configuration information below. Take note of any
addenda/changes listed and which steps you must and must not complete.

Exchange Server | V2.0 | April 2014 Page 26 of 125
Exercise 3.2
Complete Steps 1–25.
Step 2: o Install the Microsoft .NET Framework 2.0 SP1 package before you install
PowerShell 1.0. o You do not need to install MMC version 3.0 because it is included in
Windows Server 2003 with Service Pack 2. o Install the appropriate updates/hotfixes along with the software
packages listed in this step.
Complete Step 4 as it stands to install the default Application Server services such as IIS; you will not be able to place a check mark next to
ASP.NET. This will not affect the installation because Windows Server 2003 with Service Pack 2 installs ASP.NET 2.0 and the Microsoft .NET Framework
package registers it.
If in Step 7 you are not able to run setup.exe from the media (CD or DVD),
you will have to copy all of the Exchange Server 2007 files from the media to the C: drive of the computer and then run the Exchange Server
installation program from there.
If in Step 15 you receive the error message ‘Setup cannot detect an SMTP Connector or Send Connector with an address space of (*). Mail flow to the
Internet may not work properly’ for the Hub Transport role prerequisite, ignore this warning and continue with the installation.
In Step 23, run the following command:
get-SetupLog C:\ExchangeSetupLogs\ExchangeSetup.log
–error –tree
In Step 24, run the following command:
get-SetupLog C:\ExchangeSetupLogs\ExchangeSetup.msilog
–error –tree
Do not complete Steps 26–28.
3.3 Third Exchange Server setup
Student01-C must be configured with a DNS suffix and must be able to perform name resolution before the Edge Transport role
can be installed on it:
1. Click Start > Control Panel > System. 2. Navigate to the Computer Name tab and click Change. 3. From the Computer Name Changes dialog box, click More.
4. In the Primary DNS suffix of this computer textbox, type StudentAA.com.
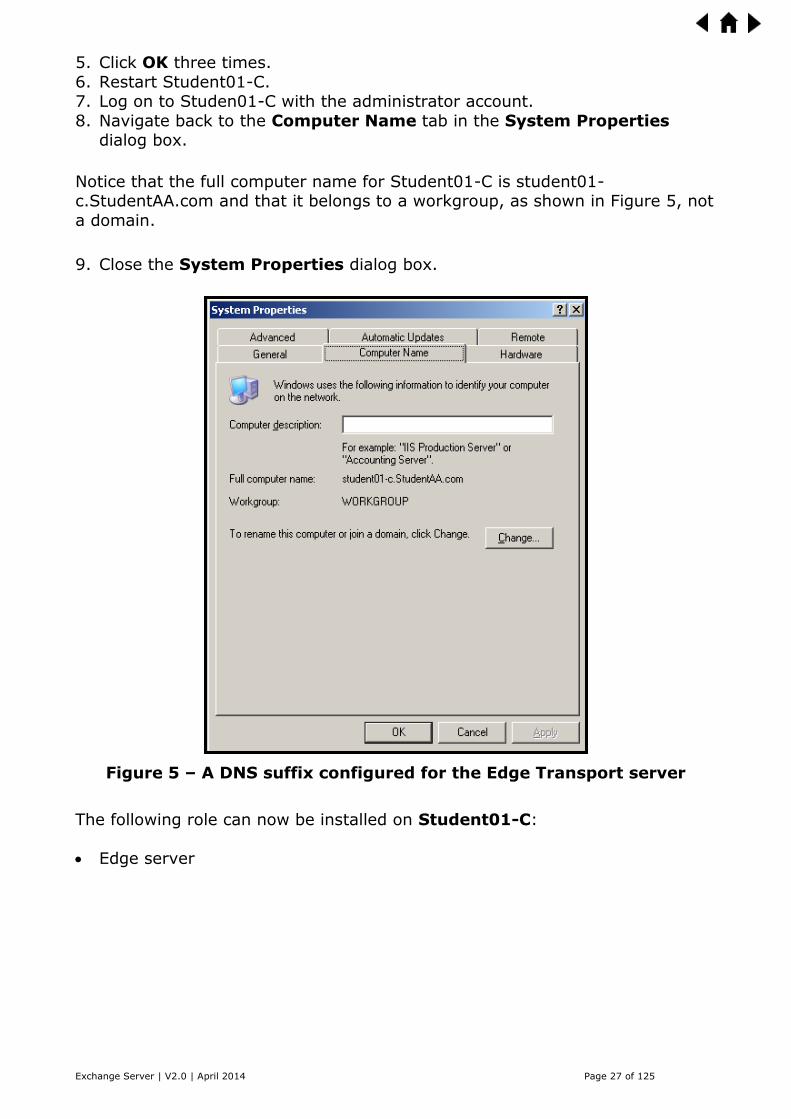
Exchange Server | V2.0 | April 2014 Page 27 of 125
5. Click OK three times.
6. Restart Student01-C. 7. Log on to Studen01-C with the administrator account.
8. Navigate back to the Computer Name tab in the System Properties dialog box.
Notice that the full computer name for Student01-C is student01-c.StudentAA.com and that it belongs to a workgroup, as shown in Figure 5, not
a domain.
9. Close the System Properties dialog box.
Figure 5 – A DNS suffix configured for the Edge Transport server
The following role can now be installed on Student01-C:
Edge server

Exchange Server | V2.0 | April 2014 Page 28 of 125
Complete Exercise 3.3 in LAB 3 of the prescribed lab manual using the configuration information below. Take note of any
addenda/changes listed and which steps you must and must not complete.
Exercise 3.3
Complete Steps 1–20. Step 2:
o Install the Microsoft .NET Framework 2.0 SP1 package before you install
PowerShell 1.0. o You do not need to install MMC version 3.0 because it is included in
Windows Server 2003 with Service Pack 2. o Install the appropriate updates/hotfixes along with the software
packages listed in this Step. Skip Step 3.
If in Step 7 you are not able to run setup.exe from the media (CD or DVD), you will have to copy all of the Exchange Server 2007 files from the media
to the C: drive of the computer and then run the Exchange Server installation program from there.
In Step 18, run the following command:
get-SetupLog C:\ExchangeSetupLogs\ExchangeSetup.log
–error –tree
In Step 19, run the following command:
get-SetupLog C:\ExchangeSetupLogs\ExchangeSetup.msilog
–error –tree
Do not complete Steps 3 and 21–23.
After successfully installing the Edge Transport server, you can navigate to and open the EMC console as shown in Figure 6.
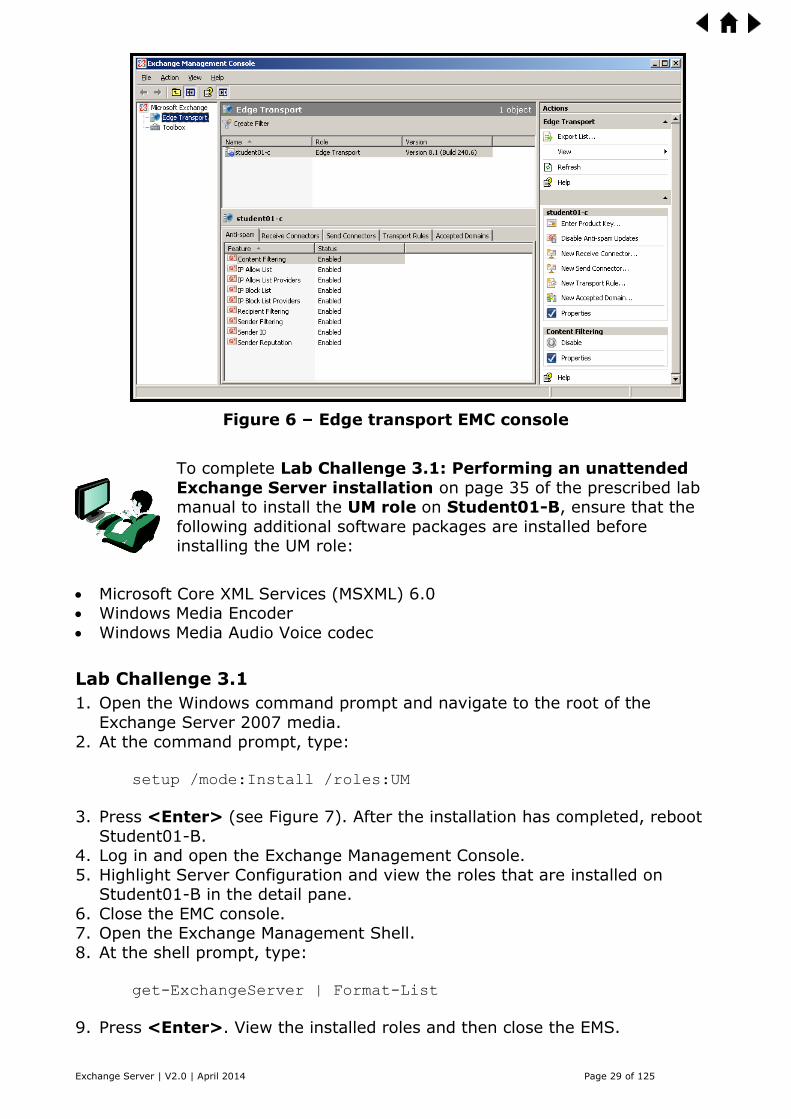
Exchange Server | V2.0 | April 2014 Page 29 of 125
Figure 6 – Edge transport EMC console
To complete Lab Challenge 3.1: Performing an unattended
Exchange Server installation on page 35 of the prescribed lab manual to install the UM role on Student01-B, ensure that the
following additional software packages are installed before installing the UM role:
Microsoft Core XML Services (MSXML) 6.0 Windows Media Encoder
Windows Media Audio Voice codec
Lab Challenge 3.1
1. Open the Windows command prompt and navigate to the root of the
Exchange Server 2007 media.
2. At the command prompt, type:
setup /mode:Install /roles:UM
3. Press <Enter> (see Figure 7). After the installation has completed, reboot
Student01-B. 4. Log in and open the Exchange Management Console.
5. Highlight Server Configuration and view the roles that are installed on Student01-B in the detail pane.
6. Close the EMC console. 7. Open the Exchange Management Shell.
8. At the shell prompt, type:
get-ExchangeServer | Format-List
9. Press <Enter>. View the installed roles and then close the EMS.

Exchange Server | V2.0 | April 2014 Page 30 of 125
Figure 7 – Performing an unattended installation of the UM role
3.4 Textbook review questions
Complete the Knowledge Assessment section for Lesson 3 on
pages 108–111 of the prescribed textbook. Complete the review
questions on page 110 and the case scenarios on pages 110–111 in the spaces provided.
Question 1:
Question 2:

Exchange Server | V2.0 | April 2014 Page 31 of 125
Scenario 3-1: Planning Exchange Server Roles
Scenario 3-2: Planning Exchange Hardware and Software
Signed by lecturer: _______________

Exchange Server | V2.0 | April 2014 Page 32 of 125
Unit 4 – Exchange Server Configuration
At the end of this unit you will be able to:
Understand and configure Exchange administrative roles.
Understand and configure DNS A and MX resource records. Configure the Hub role and the postmaster account.
Configure the Edge role and an Edge subscription file. Configure the Mailbox role.
Explain, move and create storage groups, mailbox databases and public folder databases.
Set storage limits on a new mailbox database. Configure the CAS role and Outlook Anywhere.
Explain connectors and configure send and receive connectors.
Understand and configure a Microsoft Outlook 2007 and
Windows Mail client account.
Microsoft Exchange Server 2007 Configuration textbook: Lesson 4, pages 112–172.
4.1 Administrative roles
In smaller Exchange environments, you might find one person handling all the
Exchange roles and responsibilities. In larger environments, however, an
administrator might need more help managing the Exchange environment. This involves assigning administrative roles to users or other administrators, giving
them the appropriate permission to do only the job they are assigned to do. See Table 6 for a list of Exchange administrator roles.
Table 6 – Administrative roles
Exchange administrative role Permissions
Exchange Organisation Administrator
This is the highest role you can assign; it
gives an individual the ability to perform all organisation-wide Exchange-related tasks.
Exchange Recipient
Administrator
This role gives an individual the ability to
create and manage recipient objects such as users, groups and public folders.
Exchange Public Folder Administrator
This role gives a person the ability to create and manage the properties of public
folders as long as they are not related to specific recipient objects.
Exchange View-Only
Administrator
This role gives an individual read-only
access to the Exchange organisation and all recipients.

Exchange Server | V2.0 | April 2014 Page 33 of 125
Exchange Server Administrator
This role gives a user the permission to
administer a specific Exchange Server only. This user must also be a member of the
local administrators group on the specific Exchange Server that will be administered.
You can configure administrative roles from either the Exchange Management
Shell or the Exchange Management Console.
Complete Exercise 4.1 in LAB 4 of the prescribed lab manual using the configuration information below. Take note of any
addenda/changes listed and which steps you must and must not complete.
Exercise 4.1
Complete Steps 1–11.
4.2 DNS resource records
As previously discussed, DNS is a name resolution service. The database on a DNS server is made up of a collection of resource records. Each resource
record specifies information about a particular host. The DNS server uses these
records to answer queries for hosts in its domain. Because an email address is never directly addressed to an email server, such as Student01-A.ctimail.com,
but rather to the target domain, such as ctimail.com, the following resource records must be configured on a DNS server to locate the email server for the
ctimail.com domain:
The mail exchanger record (MX record) specifies the mail server responsible for accepting email messages on behalf of a recipient’s domain
or organisation. When multiple mail servers are available for a particular domain, a priority number is used to prioritise the mail. Other computers
will contact the MX server with the lowest priority number in the list that is returned by DNS. If all MX records have the same priority number, DNS will
reorder the list with a process called round robin and the computer will contact the MX record at the top of the list returned by DNS. A mail
exchanger server must have a corresponding host address (A) record in a
valid domain.
The host (A) resource record is what gives you the IP address for a domain or host computer (it maps an FQDN to an IP address).
A pointer (PTR) record is what gives you the FQDN for a domain or host
computer (it maps an IP address to an FQDN).

Exchange Server | V2.0 | April 2014 Page 34 of 125
4.2.1 Configuring DNS records
Before creating a Host (A) and MX record for the Edge Transport (Student01-C) server, you need to verify that DNS is in good
working order. You will also need to create a reverse lookup zone on the DNS server and create pointer (PTR) records for Student01-
A, Student01-B and Student01-C.
On Student01-A:
1. Click Start > Administrative Tools > DNS.
2. Expand the Forward Lookup Zones folder and highlight StudentAA.com. A host (A) record for Student01-C should already exist
along with host (A) records for Student01-A and Student01-B. 3. Right-click the StudentAA.com domain and select Properties.
4. On the Name Servers tab, ensure that the FQDN and IP address of Student01-A are correct. This is one of the most important records to
check on a DNS server (see Figure 8). If the FQDN or IP address is
incorrect, click the Edit button and enter the correct settings.
5. Click OK.
6. In the left pane of the DNS console, right-click the Reverse Lookup Zones folder and select New zone.
7. Click Next. Ensure that the Primary zone radio button is selected and click Next.
Figure 8 – Verifying DNS server settings

Exchange Server | V2.0 | April 2014 Page 35 of 125
8. Select the To all DNS servers in the Active Directory forest
StudentAA.com radio button and click Next. 9. Enter 192.168.1 in the Network ID textbox.
10. Click Next. 11. Select both the Nonsecure and Secure dynamic updates radio buttons
and click Next. 12. Review your configurations and click Finish.
13. The reverse lookup zone (1.168.192.x) appears under the Reverse Lookup Zones folder.
14. Right-click the 1.168.192.x subnet and select New Pointer (PTR) from the context menu.
15. At the New Resource Record window, ensure that the host IP address is 192.168.1.1.
16. Click the Browse button; double-click Student01-A > Forwards Lookup
Zones > StudentAA.com. 17. Scroll down and select the student01-a host (A) record and click OK
twice. Notice that the pointer (PTR) record for Student01-A has been created in the right-hand pane of the DNS console.
18. Using the same procedure outlined in Steps 14 to 17, create two pointer (PTR) records for Student01-B and Student01-C.
4.2.2 Verify DNS resolution
To perform basic name resolution testing, on Student01-A:
1. Right-click Student01-A and select Launch nslookup. 2. At the nslookup prompt, type:
studentaa.com
3. Press <Enter>.
The nslookup prompt should display the FQDN and IP address of the DNS
server itself as well as the domain name and IP addresses of both Student01-B and Student01-A (see Figure 9).
Figure 9 – Verifying name resolution using nslookup

Exchange Server | V2.0 | April 2014 Page 36 of 125
If the nslookup prompt does not display the correct domain name or if it shows
Unknown, then restart the DNS server or restart the net logon service and then try nslookup again.
4. Type exit to exit the nslookup utility.
5. Close the command prompt.
On Student01-C:
6. Open the Windows command prompt. 7. At the prompt, type:
nslookup
8. Press <Enter>.
9. At the nslookup prompt, type: studentaa.com
10. Press <Enter>. The same output should be displayed as shown in Figure
9.
11. Type exit. Close the command prompt.
Complete Exercise 4.2 in LAB 4 of the prescribed lab manual
using the configuration information below. Take note of any addenda/changes listed and which steps you must and must not
complete.
Exercise 4.2
Complete Steps 1–8.
To verify that the MX record exists for Student01-C and that it does not point to the FQDN of either of the Exchange servers on the internal network, on
Student01-C:
1. Open the Windows command prompt.
2. At the command prompt, type:
nslookup
3. Press <Enter>. 4. At the nslookup prompt, type:
set q=mx
5. Press <Enter>. 6. At the nslookup prompt, type:
studentaa.com

Exchange Server | V2.0 | April 2014 Page 37 of 125
7. Press <Enter>. Verify that only one MX record exists for
mail.studentaa.com with the IP address of 192.168.1.3 (Student01-C). There should be no other MX records listed.
If the only result returned is the correct A record, name resolution and email
relay should succeed. If there are no records, or if an MX record is returned and points to the wrong FQDN or IP address, other servers may be unable to
send mail to this Exchange server.
8. Type exit. Close the command prompt.
NOTE Another method of configuring name resolution would be to add the IP address and FQDN of the Edge Transport server to the local Hosts
file on each Hub Transport server as well as add the IP address and FQDN of each HT server to the local hosts file on the ET server. This
solution should only be used on small networks where DNS is not used.
4.3 Hub Transport server role
The Hub Transport role is responsible for all message routing and each Exchange organisation must have at least one Hub Transport server up and
running.
Accepted domains are used to specify the domain(s) for which the Exchange organisation will accept and route messages. An accepted domain may or may
not be within your Exchange organisation or Active Directory forest, but it is a domain with which you have an administrative relationship with, such as a
partner domain or a domain within another Active Directory forest in your organisation.
A postmaster is a special email address that is required in every messaging infrastructure and the address that receives non-delivery reports and delivery
status notifications. We have all occasionally run into situations in which we have tried to email someone and received an unexpected non-delivery report.
To an administrator, these reports and notifications are useful as he or she troubleshoots and responds to reports of message delivery problems within the
Exchange organisation.
Complete Exercise 4.3 in LAB 4 of the prescribed lab manual using the configuration information below. Take note of any addenda/changes listed and which steps you must and must not
complete.
Exercise 4.3
Complete Steps 1–14.

Exchange Server | V2.0 | April 2014 Page 38 of 125
4.4 Edge Transport server role
An organisation’s demilitarised zone (DMZ) or perimeter network is situated
between a firewall on an internal network and another firewall (if implemented) that extends out to the Internet. The Edge Transport (ET) server role is
designed to be deployed in the DMZ so that it can relay incoming and outgoing
mail to a Hub Transport server on the internal network as well as provide anti-spam and antivirus support. See Figure 10 for an illustration on the location
and setup of the Edge Transport server as well as the other Exchange role servers.
Figure 10 – An ET server situated in a perimeter network
Source: www.msexchange.org
The process of linking the HT server and ET server together is known as
EdgeSync. This process consists of exporting an XML subscription file from the
ET server and taking that file and importing it on the HT server. This establishes a one-way replication of recipient and configuration information
from Active Directory to ADAM (which is installed on the Edge Transport server).
Complete Exercise 4.4 in LAB 4 of the prescribed lab manual using the configuration information below. Take note of any
addenda/changes listed and which steps you must and must not complete.

Exchange Server | V2.0 | April 2014 Page 39 of 125
Exercise 4.4
Complete Steps 1–17.
Before running the Start-EdgeSynchronization cmdlet, test whether there
is a problem between the Hub Transport server and Edge Transport server by running the following cmdlet:
Test-EdgeSynchronization
Press <Enter>. You should receive an output similar to that shown in
Figure 11. Complete Steps 18 and 19. After completing Step 18, you should receive a
successful synchronisation status as shown in Figure 12.
If you receive an error, you can try restarting the Microsoft Exchange
EdgeSync service in the Services console.
Figure 11 – Testing EdgeSynchronization

Exchange Server | V2.0 | April 2014 Page 40 of 125
Figure 12 – Successful EdgeSynchronization
4.5 Mailbox server role
The database engine used by Exchange Server 2007 is called the extensible storage engine (ESE). This engine stores all of the databases that contain all
the messages and other email-related items for an organisation. Mailbox
servers can either contain mailbox or public folder databases or both. A storage group is a storage container that contains a group of mailbox or
public folder databases that share a single set of transaction log files and a checkpoint file. When an email message enters a Mailbox server, it goes
through memory and is then written to two locations: the data is firstly written to the transaction logs and then read and written to the actual database file
at a later time, depending on the current load being placed on the server. The reason for this is that it is quicker for the responsible service to write data to
the transaction log first because the write operation is done sequentially (that is, one right after the other) whereas database access is almost always
random.

Exchange Server | V2.0 | April 2014 Page 41 of 125
NOTE To improve the speed, performance and recoverability of a storage
group on a Mailbox server, it is recommended that you have one database per storage group. The transaction logs and databases for
each storage group should also be placed on a separate hard drive or volume. These transaction log files can be used to replay transactions
from the log when rebuilding the Exchange database, thus providing redundancy. It is recommended that storage limits are configured on
mailboxes to prevent users from using up all the available space on
the server and warnings should be issued to users when their limit has been reached.
Each database created contains a single rich-text file with a .edb extension.
The first database file created on Exchange Server 2007 is called Mailbox Database.edb and is stored in the C:\Program Files\Microsoft\Exchange
Server\Mailbox\First Storage Group directory. If a public folder database was created during the installation of Exchange, it would be created by default
in the second storage group under the C:\Program
Files\Microsoft\Exchange Server\Mailbox\Second Storage Group directory and named Public Folder Database.edb. Each log file in the first
storage group has a prefix of E00 (i.e. E00.log) and each log file in the second storage group has a prefix of E01 (i.e. E01.log). When the current log file has
reached a capacity of 1 MB, it is renamed and no longer written to the database and a new file is created and used.
Checkpoint files are used to keep track of transactions that are committed
(written) to the database from a transaction log. This ensures that transactions cannot be committed to the database more than once. If you need to perform
a recovery, this file contains the point at which the replaying of transaction logs must start. Checkpoint files have an E00.chk extension.
Complete Exercise 4.5 in LAB 4 of the prescribed lab manual
using the configuration information below. Take note of any
addenda/changes listed and which steps you must and must not complete.
Exercise 4.5
Complete Steps 1–29 on Student01-A.
Complete Step 30 on Student01-B. Complete Steps 31–41 on Student01-A.
Step 38 should read: At the New Mailbox Database window, type ‘Second Mailbox Database’ in
the Mailbox database name field. Beside the Database file path dialog box, click Browse, select C:\SG3, and click Save.
Do not complete Step 41.
Complete Step 42 on Student01-B. Complete Steps 43–50 on Student01-A.
After Step 48, click OK and continue with Step 49. Remember that you can press <F5> to refresh the console.
After completing Exercise 4.4, the work pane for Student01-B should display the additional storage groups, mailbox database and public folder database
that you created along with the file paths as shown in Figure 13.

Exchange Server | V2.0 | April 2014 Page 42 of 125
Figure 13 – Creating storage groups and databases
4.6 CAS role The Client Access server (CAS) role and the Mailbox server role work hand in
hand with one another. Some of the main features of the CAS role are listed in
Table 7.
Table 7 – CAS features
Feature Description
Outlook Web Access (OWA)
This feature provides users with a
connection to their mailboxes from a web browser.
Exchange ActiveSync (EAS) This feature provides users with mobile devices with access their mailboxes.
Outlook Anywhere
This feature has replaced a feature called
RPC over HTTP (Remote Procedure Call over Hypertext Transfer Protocol) found in
Windows Server 2003. Outlook Anywhere enables mailbox users to use their
Microsoft Outlook 2003 or 2007 client applications to work outside their network
and establish a connection to the Exchange Server on the internal network
over the Internet with the same level of security as that configured on the internal
network.
POP3 and IMAP4 These are the most basic email retrieval
protocols in use.

Exchange Server | V2.0 | April 2014 Page 43 of 125
Many of the features of OWA are enabled by default. This is unsecure. You can
provide a customised secure solution for OWA clients and their access to remote file and sharepoint servers that may exist on a company’s network.
OWA options can be configured via the EMC or EMS console as well as the IIS manager. Read pages 135–140 of the prescribed textbook for a better
understanding of the various options that can be configured.
Complete Exercise 4.6 in LAB 4 of the prescribed lab manual using the configuration information below. Take note of any addenda/changes listed and which steps you must and must not
complete.
Exercise 4.6
Complete Steps 1–17.
In Step 9, use Student01-A.StudentAA.com and Student01-B.StudentAA.com respectively.
In Step 12, specify StudentAA.com.
After Step 14, click Apply and then OK.
4.7 Email flow connectors
After Exchange is installed, you need to configure how mail will be sent and
received. This is done through send and receive connectors, which allow end-to-end message routing in and out of the Exchange organisation to occur:
Send connectors – These connectors are needed to send messages
between Exchange servers within an organisation or between Exchange servers on the Internet. Send connectors are stored in Active Directory.
Receive connectors – These connectors are needed to receive messages
from email clients and other email servers from within the organisation or from the Internet and are stored on the Hub or Edge role server.
Complete Exercise 4.7 in LAB 4 of the prescribed lab manual using the configuration information below. Take note of any
addenda/changes listed and which steps you must and must not complete.
Exercise 4.7
Complete Steps 1–24.
In Step 6, specify Student01-A.StudentAA.com.

Exchange Server | V2.0 | April 2014 Page 44 of 125
4.8 Client configuration
4.8.1 Configuring Outlook 2007
Complete Exercise 4.8 in LAB 4 of the prescribed lab manual using the configuration information below. Take note of any
addenda/changes listed and which steps you must and must not complete.
Exercise 4.8
Complete Steps 1–11. In Step 2, install Office 2007 with Outlook 2007 and Excel 2007 at a
minimum. Step 4 should read:
Click Start > Control Panel > View x86 Control Panel Icons, and
double-click Mail.
In Step 8, specify Student01-A.StudentAA.com.
Figure 14 displays the mailbox for the administrator as well as an indication that Microsoft Outlook 2007 is online with Microsoft Exchange.
Figure 14 – Connecting Outlook to Exchange

Exchange Server | V2.0 | April 2014 Page 45 of 125
4.8.2 Configuring Outlook Express
By default, you cannot connect to the administrator mailbox on an Exchange Server using POP3 or IMAP4 because Exchange Server 2007 is designed this
way to improve security.
This means that you will have to create a separate user mailbox-enabled account and create an Outlook Express account using that account. You will
also assign AD administrative privileges as well as assign the Exchange organisation administrator role to this user.
To do this, on Student01-A:
1. Open the Exchange Management Console. 2. Expand Recipient Configuration in the Console Tree pane and highlight
Mailbox. 3. From the Actions pane, click the New Mailbox link to open the New
Mailbox wizard. 4. At the Introduction screen, you are presented with several different mailbox
types; select User Mailbox and click Next. 5. You are asked if you want to create a mailbox for a new user or existing
user. Select New User and click Next. 6. At the New Mailbox screen, enter the following information as shown in
Figure 15:
Organisational Unit: StudentAA.com/Users
First Name: Lucas Last Name: Radebe
User logon name (User Principal Name): lucas.radebe Password and Confirm Password: Secret123

Exchange Server | V2.0 | April 2014 Page 46 of 125
Figure 15 – Creating a mailbox-enabled user
7. Click Next. Ensure that lucas.radebe is listed in the Alias dialog box.
8. Click Browse next to the Mailbox Database textbox, and select the Mailbox
Database in the first storage group on Student01-A and click OK. 9. Click Next, review a summary of your configuration, and then click New.
10. After the mailbox is created, a Completed screen displays; click Finish. 11. Close the Exchange Management Console.
12. Open the Active Directory Users and Computers console. 13. Expand StudentAA.com and highlight the Users folder.
14. Right-click the Lucas Radebe user account and select Properties. 15. Highlight the Member Of tab; click Add.
16. Add Lucas Radebe to the following administrative groups:
Domain Admins Enterprise Admins
17. Close the Active Directory Users and Computers console.
18. Open the Exchange Management Console.
19. Expand Recipient Configuration and highlight Mailbox. 20. In the Detail pane, highlight Lucas Radebe and select Properties from the
Actions pane. You can also access an object’s properties by right-clicking the object and selecting Properties from the context menu.
21. The General tab contains all the basic identifying information about the mailbox.
22. The Mailbox Features tab allows you to enable and disable specific Exchange features. On the Mailbox Features tab, ensure that POP3 and IMAP4 are
enabled. 23. Click OK to close the mailbox user’s properties dialog box.

Exchange Server | V2.0 | April 2014 Page 47 of 125
24. Highlight Organisation Configuration.
25. Assign Lucas Radebe the Exchange Organisation Administrator role. Refer back to Section 4.1 and Exercise 4.1 in the prescribed lab manual for
how to add administrative roles.
Complete Exercise 4.9 in LAB 4 of the prescribed lab manual using the configuration information below. Take note of any addenda/changes listed and which steps you must and must not
complete.
Exercise 4.9
Complete Steps 1–13. In Step 2, click Cancel twice after opening Outlook Express and continue
with the step. In Step 5, type Lucas Radebe in the Display Name dialog box.
In Step 6, type [email protected] in the E-mail address dialog box.
In Step 7, type Student01-A.StudentAA.com in both Incoming and Outgoing mail server dialog boxes.
In Step 8, ensure that lucas.radebe is specified in the Account name dialog box and that his password is Secret123. SPA must be selected.
After completing Exercise 4.9, you should have a successfully connected IMAP4
client as shown in Figure 16. Take note of the various folders that exist under Student01-A.StudentAA.com. These folders reside on the IMAP server.
Figure 16 – Configuring Outlook Express to obtain email using IMAP4

Exchange Server | V2.0 | April 2014 Page 48 of 125
4.9 Lab challenge
Complete Lab Challenge 4.1: Performing Exchange Server
configuration using the Exchange Management Shell in LAB 4 of the prescribed lab manual. See pages 112–168 of Lesson 4
of the prescribed textbook for instructions on how to complete the lab challenge. If you experience problems, ask your lecturer for
help.
Lab Challenge 4.1
Complete the lab challenge.
4.10 Textbook review questions
Complete the Knowledge Assessment section for Lesson 4 on
pages 169–172 of the prescribed textbook. Complete the review questions on page 171 and the case scenarios on pages 171–
172 in the spaces provided.
Question 1:
Question 2:
Scenario 4-1: Configuring an Alternate SMTP Port

Exchange Server | V2.0 | April 2014 Page 49 of 125
Scenario 4-2: Configuring Email Clients
Signed by lecturer: _______________

Exchange Server | V2.0 | April 2014 Page 50 of 125
Unit 5 – Recipient Objects
At the end of this unit you will be able to:
Define the major types of recipient objects.
Create, configure and manage a mailbox user. Create, configure and manage mail users and contacts.
Create, configure and manage mail-enabled universal groups.
Create, configure and manage dynamic distribution groups. Create and configure resource mailboxes.
Understand and configure automatic booking. Understand and configure resource booking policies.
Move mailboxes. Create an Exchange resource forest and linked mailbox
users.
Microsoft Exchange Server 2007 Configuration textbook:
Lesson 5, pages 173–235.
5.1 Recipients
A recipient is an object that has an email address and can receive a message. This object references a resource such as a mailbox, a user or a public folder
that is shared by multiple users that can receive the message. The major types
of recipient objects will be discussed in more detail throughout this unit. You must be a member of the Exchange recipient administrator or Exchange
organisation administrator role to be able to manage all recipient objects. Public folders can be managed by users who are assigned the Exchange public
folder administrator role.
5.2 Mailbox users
A mailbox user is a user account within Active Directory that has an email
address and an associated mailbox in the mailbox database on an Exchange server. This user is able to send, receive and store messages on an Exchange
server. The mailbox is just an extension of the properties and attributes of the user account object.

Exchange Server | V2.0 | April 2014 Page 51 of 125
Complete Exercise 5.1 and Exercise 5.2 in LAB 5 of the prescribed lab manual using the configuration information below.
Take note of any addenda/changes listed and which steps you must and must not complete.
Exercise 5.1
Complete Steps 1–18.
After Step 6, click Next and continue with Step 7.
Exercise 5.2
Complete Steps 1–14.
For Step 5, type [email protected].
5.3 Mailbox user permissions
On some occasions you may need to assign a user the permission necessary to
access another user’s mailbox. In Exchange Server 2007, there are two main types of permissions:
Send As permission – This permission can be assigned to a user or group
that needs to be able to only send a message on behalf of another user. The identity of the original sender is hidden.
Full Access permission – This permission allows you to give a user or
group full access to another user’s mailbox. This permission will grant that user or group the ability to open and view any messages or folders in a
particular user’s mailbox as well as receive and respond to emails sent to the other user’s mailbox as the owner of that mailbox (the original sender’s
identity is hidden).
NOTE A third permission called Send On Behalf is similar to the Send As permission with the only difference being that the user cannot hide their identity when sending a message on behalf of another user.

Exchange Server | V2.0 | April 2014 Page 52 of 125
Complete Exercise 5.3 in LAB 5 of the prescribed lab manual using the configuration information below. Take note of any addenda/changes listed and which steps you must and must not
complete.
Exercise 5.3
Complete Steps 1–25.
Step 16 should read: Highlight Microsoft Exchange under the E-mail tab and click Change.
If in Step 20 you are asked to import Lucas Radebe settings, click No and continue with the step.
Step 21 should read:
Click New to compose a new email. At the new message window, click the Options tab and click Show From button from the Fields section.
Step 22 should read: Click the From button and select Tiger Smith. Click OK. Next, click the To
button and select Administrator. Click the To button and click OK.
5.4 Mail users
A mail user is an Active Directory user who has an email address enabled on
the internal Exchange Server but does not have a mailbox configured.
The mail user’s email address points to an external email server that holds the
mailbox for this user. Messages sent to a mail user are forwarded to the relevant external email server for retrieval by that user.
Complete Exercise 5.4 in LAB 5 of the prescribed lab manual using the configuration information below. Take note of any
addenda/changes listed and which steps you must and must not
complete.
Exercise 5.4
Complete Steps 1–15.
5.5 Mail contacts
A mail contact is an AD contact object that contains information about people
or organisations that exist outside of the Exchange organisation and cannot access internal network resources. Mail contacts have an external email
address and any emails sent to them are forwarded to the external organisation’s email server.

Exchange Server | V2.0 | April 2014 Page 53 of 125
Both mail contacts and mail users can be shown in the global address list
(GAL) and both recipient types usually involve a user who does not work for the company itself. The GAL is the database of all the recipients in the
Exchange organisation, such as mailboxes, distribution lists and public folders.
Complete Exercise 5.5 in LAB 5 of the prescribed lab manual using the configuration information below. Take note of any
addenda/changes listed and which steps you must and must not complete.
Exercise 5.5
Complete Steps 1–16.
Step12 should read: In the Use MAPI rich text window on the General tab, select Never from
the drop-down box.
5.6 Mail-enabled groups
A group is an AD object that can hold users and other groups. Exchange supports the universal group scope because a universal group allows Exchange
users who are located in any AD domain in the forest to be able to determine the group membership of any group in the forest, regardless of the domain in
which it has been created.
There are two types of groups in Exchange:
Mail-enabled universal security groups – These groups are created for
configuring and assigning security settings such as permissions as well as to send email to those user and group objects placed within the group.
Mail-enabled universal distribution groups – These groups are formed
so that an email message can be sent to the group and then sent automatically to all members of that group. Distribution groups do not
provide security.
Unlike regular distribution groups that contain a defined set of members, the membership list for dynamic distribution groups is calculated based on the
filters and conditions that you define. When an email message is sent to a dynamic distribution group, it is delivered to all recipients in the organisation
that match the criteria defined for that dynamic distribution group. Dynamic
distribution groups are created through Active Directory queries rather than through the creation of a list of recipients. For example, if you wanted to
create a dynamic distribution group consisting of all recipients who live in Nelspruit, you would create a query on the City attribute. If a user object’s City
attribute contains the word ‘Nelspruit’, then that user is automatically included in the Exchange dynamic distribution group.

Exchange Server | V2.0 | April 2014 Page 54 of 125
Complete Exercise 5.6 in LAB 5 of the prescribed lab manual using the configuration information below. Take note of any
addenda/changes listed and which steps you must and must not complete.
Exercise 5.6
Complete Steps 1–26. Figure 17 displays the groups that were created in
this exercise as well as their email information such as the alias and the
primary SMTP address for the group. When composing an email to the various groups, remember to specify
StudentAA.com instead of StudentXX.com.
Figure 17 – Distribution groups
5.7 Resource mailboxes
The calendaring and scheduling features in Exchange are often used to keep track of more than just people; they also track resources such as rooms and
equipment.
Exchange Server | V2.0 | April 2014 Page 55 of 125
A resource mailbox is a recipient object that is used for scheduling purposes.
By creating a resource mailbox, you can allow users to schedule resources when they set up meetings.
You can create two different kinds of resource mailboxes: a room mailbox and
an equipment mailbox.
You can assign a room mailbox to a conference or training room, auditorium or any other room that people ordinarily share.
You can assign an equipment mailbox to items that are usually shared among workers such as a projector, laptop, company car or other
equipment. The equipment mailbox is loosely associated with the room mailbox because equipment such as a projector is usually located in a
specific room such as a conference or training room.
When a resource mailbox is created, an account is also created for that
resource in Active Directory. However, the account is disabled by default to prevent a person from logging in to the network with that account.
Read pages 217–220 of the prescribed textbook to gain an understanding of
resource mailboxes, automatic booking and the various resource booking policies and how to manage and configure them.
Complete Exercise 5.7 in LAB 5 of the prescribed lab manual
using the configuration information below. Take note of any addenda/changes listed and which steps you must and must not
complete.
Exercise 5.7
Complete Steps 1– 43. In Step 29, do not create another conference room called conference room
1; start from row two and create conference rooms 2–5.
In Steps 32–34, see Figure 18 for an illustration on how to enable automatic booking and how to specify a book-in policy for conference rooms 1–5.
In Step 37, highlight Mailbox-Administrator in the left pane of Outlook; select the Calendar option at the bottom of the left pane to switch to the
calendar view and then select New to create a new calendar appointment.

Exchange Server | V2.0 | April 2014 Page 56 of 125
Figure 18 – Enabling automatic booking and specifying a book-in policy
5.8 Moving mailboxes
Some of the main reasons why an administrator will move a mailbox between Exchange servers, databases and storage groups are as follows:
The addition of new servers and users. The relocation of users between departments or geographical locations.
To provide fault tolerance. To load balance access to mailboxes.
You must be a member of the Exchange Recipient Administrator and Exchange
Server Administrator roles as well as the Local Administrator account on both the server you are moving the mailboxes from and the server where the
mailboxes will be moved to.
Complete Exercise 5.8 in LAB 5 of the prescribed lab manual using the configuration information below. Take note of any addenda/changes listed and which steps you must and must not
complete.
Exercise 5.8
Complete Steps 1–27. Step 23 should read:
Select Database and Equals from the two drop-down boxes. Click Browse, select the Mailbox Database in the first storage group on
StudentXX-A, and click OK.

Exchange Server | V2.0 | April 2014 Page 57 of 125
5.9 Disabling mailboxes and users
An administrator can disable, remove and reconnect mailbox users. Take note
of the following main points when removing, disabling and reconnecting a mailbox user:
When you delete or disable a mailbox user, by default the mailbox itself is not deleted immediately but disconnected for a default period of 30 days.
After the 30-day period, the mailbox user is permanently deleted. The default 30-day time interval can be changed on the Limits tab of the
mailbox database’s properties textbox. Removing a mailbox user deletes its associated AD user account.
Disabling a mailbox user does not remove its associated AD user account.
A mail user and mail contact can be disabled and removed in much the same way that mailbox users are disabled and removed.
Complete Exercise 5.9 in LAB 5 of the prescribed lab manual using the configuration information below. Take note of any
addenda/changes listed and which steps you must and must not complete.
Exercise 5.9
Complete Steps 1–12.
5.10 Linked mailboxes
An Exchange resource forest is an Exchange-based Active Directory forest
that is separate from the Active Directory forest where user and computer
accounts and application servers are installed. The Exchange resource forest is dedicated to running Exchange and hosting mailboxes and other Exchange-
related resources.
A one-way trust between the Active Directory forest(s) and the Exchange resource forest is created and allows the Exchange forest to trust the Active
Directory forest so that users in the AD forest are granted access to their mailboxes in the Exchange resource forest.
Because an Exchange organisation cannot cross an Active Directory forest
boundary, each mailbox that is created in the Exchange resource forest must have a corresponding user object in the Exchange resource forest. The user
objects in the Exchange resource forest are never logged into by a user and are disabled by default to prevent them from being a point of exploitation.
These linked mailboxes are called linked mailbox users.

Exchange Server | V2.0 | April 2014 Page 58 of 125
5.11 Lab challenge
Complete Lab Challenge 5.1: Configuring Recipients using
the Exchange Management Shell in LAB 5 of the prescribed lab manual. See pages 173–232 of Lesson 5 of the prescribed
textbook for instructions on how to complete the lab challenge. If you experience problems, ask your lecturer for help.
Lab Challenge 5.1
Complete the lab challenge.
Lab Challenge 5.2
Do not complete this lab challenge.
5.12 Textbook review questions
Complete the Knowledge Assessment section for Lesson 5 on
pages 233–235 of the prescribed textbook. Complete the review
questions and case scenarios on page 235 in the spaces provided.
Question 1:
Question 2:
Scenario 5-1: Configuring an Exchange Resource Forest

Exchange Server | V2.0 | April 2014 Page 59 of 125
Scenario 5-2: Managing Recipient Objects
Signed by lecturer: ______________

Exchange Server | V2.0 | April 2014 Page 60 of 125
Unit 6 – Address Lists and Policies
At the end of this unit you will be able to:
Create and manage address lists.
Create and manage offline address books. Define and configure email address policies.
Define and configure message compliance policies. Define and configure messaging records management.
Explain and configure message journaling. Manage multiple recipient objects.
Move multiple mailboxes. Create multiple recipient objects.
Understand how to create a PowerShell script.
Microsoft Exchange Server 2007 Configuration textbook:
Lesson 6, pages 236–279.
6.1 Address lists and books
With each new recipient, it becomes more difficult to locate users and other AD objects. An address list is a collection of recipients and other AD objects such
as contacts, groups, users and rooms that are organised into manageable lists. Users can use these lists to find the recipients and resources they need to send
emails to. The default address list for an organisation is called the global
address list (GAL). The GAL contains all of the organisation’s email-related objects.
An offline address book (OAB) is a copy of one or more address lists that
have been downloaded so that a client can access the information it contains while disconnected from the server/network. Administrators can choose which
address lists are made available to users who work offline, and they can also configure the method by which the address lists are distributed (web-based
distribution or public folder distribution).
Complete Exercise 6.1 in LAB 6 of the prescribed lab manual
using the configuration information below. Take note of any addenda/changes listed and which steps you must and must not
complete.
Exercise 6.1 Complete Steps 1–19.
While performing Steps 17 and 18, you should see a list of users associated with each department/address list that you have selected from the Address
Book drop-down list. Figure 19 displays the list of users associated with the production department.

Exchange Server | V2.0 | April 2014 Page 61 of 125
Figure 19 – Viewing address lists
6.2 Email address policies
For a mail-enabled object or recipient (user, group, contact, or resource) to
send or receive email messages, the object must have an email address. That email address is generated because of an email address policy. By default,
when Exchange is installed, a policy is created and automatically applies a
primary email address to all of the objects you have mail enabled. This default policy takes the recipient’s alias (an alternative name for an object such as a
user’s full name) and places it before the ‘@’ sign and then appends the default accepted domain name at the end (e.g. [email protected]).
You cannot delete the default policy but you can modify it or create additional
policies that override it. For example, you can create email policies to assign specific email addresses using criteria such as
[email protected] or departments instead of aliases.
Complete Exercise 6.2 in LAB 6 of the prescribed lab manual
using the configuration information below. Take note of any addenda/changes listed and which steps you must and must not
complete.
Exercise 6.2 Complete Steps 1–22.

Exchange Server | V2.0 | April 2014 Page 62 of 125
Step 4 should read:
Select the E-mail Address Policies tab in the detail pane, highlight Default Policy, and click Edit in the action pane.
Remember to use StudentAA.com.
6.3 Message records management
Exchange Server 2007 is the first version of Microsoft’s email server software
that makes it more practical for organisations to conform to regulatory requirements, governing information retention and privacy. It can also reduce
litigation risks (legal action) caused by undeleted emails and attachments. A message compliance policy, in general, defines who can access what
information (regarding emails and attachments), for how long (retention) and what they can do with it. Message compliance in Exchange Server 2007 is
facilitated by messaging records management (MRM) and message journaling.
Messaging records management allows you to create and control the contents
of managed folders. Managed folders are mailbox folders that appear in a user’s mailbox and are controlled by the administrator. There are two types of
managed folders:
Managed Default Folders – These are retention folders that Exchange
automatically creates in a user’s mailbox, for example Inbox, Sent Items and Deleted Items. These cannot be moved, renamed, or deleted.
Managed Custom Folders – These are folders administrators can create in a user’s mailbox. A user cannot delete, rename, or remove these folders.
Once the managed folder is created and configured, an administrator can define a group of content settings called managed content settings. With
these settings, the Exchange administrator will define the type of message to which these settings will apply and also specify the time period that items
within the folder will be retained.
Complete Exercise 6.3 in LAB 6 of the prescribed lab manual
using the configuration information below. Take note of any addenda/changes listed and which steps you must and must not
complete.
Exercise 6.3 Complete Steps 1–39.
In Step 33, after running the command, press <Y> and <Enter> when prompted.
In Step 33, see Figure 20 on how to run the command. If in Step 34 the prompt displays an error after running the command, try
starting the Managed Folder Assistant for each server separately as follows:
Start-ManagedFolderAssistant –Identity Student01-A
Start-ManagedFolderAssistant –Identity Student01-B

Exchange Server | V2.0 | April 2014 Page 63 of 125
Figure 20 – Applying a managed mailbox folder policy to multiple users at the EMS
6.4 Message journaling
Journaling allows you to record a copy of a message going to and from a
mailbox database. That message can be sent to a secondary location to be
stored for retention or regularity compliance purposes. This secondary location is typically called an archive. Once in the archive, messages cannot be deleted
by users.
Complete Exercise 6.4 in LAB 6 of the prescribed lab manual using the configuration information below. Take note of any
addenda/changes listed and which steps you must and must not
complete.
Exercise 6.4 Complete Steps 1–20.
In Step 3, Alias is the User Principal Name dialog box. Also, to set the user’s password to never expire, open the Active Directory Users and
Computers console, highlight Users in the console tree pane and in the right pane right-click journalarchive and select Properties. On the
Account tab, select the Password never expires checkbox under Account options, click Apply, and continue with the exercise.
After completing Step 18, the original email message should be displayed as an attachment to the journaled message.
6.5 Working with multiple recipient objects
In Exchange, for tasks that involve single recipients, it is usually simpler to use the Exchange Management Console. However, when you are trying to
configure multiple recipients at a time, you would typically use cmdlets at the Exchange Management Shell along with comma-separated values (CSV) files to
automatically perform bulk operations, for example to obtain information about objects or to create and modify existing objects. A CSV file is a plain text file
with a .csv extension that can be created with most text editors. This file contains a list of object information and is organised by fields which are placed
on the first line of the CSV file.

Exchange Server | V2.0 | April 2014 Page 64 of 125
Read pages 266–275 of the prescribed textbook and make sure that you
understand how to perform bulk management tasks using the Exchange Management Shell (PowerShell), cmdlets and CSV files.
Complete Exercise 6.5 in LAB 6 of the prescribed lab manual using the configuration information below. Take note of any
addenda/changes listed and which steps you must and must not complete.
Exercise 6.5 Complete Steps 1–21.
In Step 8, see Figure 21 for how to run the command and the output that should be displayed.
In Step 16, see Figure 22 for how to run the command and the output that should be displayed.
After completing Step 19, Press <Y> and then <Enter> when prompted.
Figure 21 – Verifying the location for each user’s custom attribute
Figure 22 – Creating multiple mailbox users at the EMS
Exchange Server | V2.0 | April 2014 Page 65 of 125
6.6 Lab challenge
Complete Lab Challenge 6.1: Configuring Address Lists using the Exchange Management Shell in LAB 6 of the prescribed lab
manual. See pages 236–276 of Lesson 6 of the prescribed textbook for instructions on how to complete the lab challenge. If
you experience problems, ask your lecturer for help.
Lab Challenge 6.1
Complete the lab challenge.
Lab Challenge 6.2
Do not complete this lab challenge.
6.7 Textbook review questions
Complete the Knowledge Assessment section for Lesson 6 on
pages 277–279 of the prescribed textbook. Complete the review questions and case scenarios on page 279 in the spaces
provided.
Question 1:
Question 2:
Scenario 6-1: Configuring a Messaging Compliance Policy

Exchange Server | V2.0 | April 2014 Page 66 of 125
Scenario 6-2: Performing Bulk Management
Signed by lecturer: ______________

Exchange Server | V2.0 | April 2014 Page 67 of 125
Unit 7 – Public Folders
At the end of this unit you will be able to:
Define and configure public folders.
Understand and configure mail-enabled public folders. Understand and work with multiple public folders.
Microsoft Exchange Server 2007 Configuration textbook:
Lesson 7, pages 280–316.
7.1 Public folders A public folder is a folder created in a public store on an Exchange server and
is accessible to multiple users. Public folders can be used by users who want to share information such as messages, file attachments, calendars, journals, etc.
with other users. A public folder database must be created on the Mailbox role server to store these public folders.
Just as you access files on your computer using a drive letter and a file path,
you access public folders using a structured naming system or top level hierarchy (TLH) tree structure. The TLH structure is MAPI-based and is divided
into two subtrees:
Default public folder subtree (also known as the Interpersonal
Message IPM_Subtree) – This contains all the user-created content and can be created by the administrator. Users can access these folders directly
by using client applications such as Microsoft Outlook 2007, Entourage and OWA.
System public folder subtree (also known as the Non_IPM_Subtree) – Legacy versions of Outlook use these folders to store information such as
free and busy data, OABs and organisational forms. Other system folders that contain configuration information used by Exchange are created
automatically. Users cannot access these folders.
This tree or hierarchy is a list of public folders and their subfolders that are stored in the public folder database on a single Exchange server. When
multiple Exchange servers exist, each server that has a public folder database holds a copy of the public folder hierarchy. Each Exchange server is then
automatically kept up to date with any changes to this hierarchy through a
process called public folder hierarchy replication.
All copies of a public folder are called content replicas. When a user accesses a public folder by using a MAPI client application, the public folder database
determines which public folder replica the client should access. This process is called a public folder referral. If a replica of the requested content exists on
the Exchange server that serves the client’s request, the client accesses the local replica.
Exchange Server | V2.0 | April 2014 Page 68 of 125
When a user connects to a public folder database that does not contain a copy
of the public folder content that the user wants, the user is redirected to another public folder database that has a copy of the content.
7.1.1 Working with mail-enabled support public folders
A mail-enabled public folder is a public folder that has an email address. Mail-enabling a public folder provides an extra level of functionality to recipient
users. In addition to being able to post messages to the folder, users can send email messages to and sometimes receive email messages from the public
folder. Each mail-enabled folder has an object in the Active Directory database
that stores its email address, address book name and other mail-related attributes.
Complete Exercise 7.1 in LAB 7 of the prescribed lab manual using the configuration information below. Take note of any
addenda/changes listed and which steps you must and must not complete.
Exercise 7.1 Complete Steps 1–29. Step 4 should read:
Highlight Default Public Folders in the console tree pane. In Step 3, in the console tree pane, highlight Toolbox and double-click
Public Folder Management Console in the detail pane. In Step 18, you might need to click the Folder List icon located at the
bottom of the left pane of Outlook to view the Public Folders folder. Step 21 should read:
At the Moderated Folder window, select Set folder up as a moderated folder. Next, click To, select Administrator, click Add, and then click OK.
Step 24 should read:
Next to the Moderators dialog box, click Add, select Administrator, click Add, and then click OK.
Step 27 should read: Highlight Inbox under Mailbox-Tiger Smith in the left pane. Compose a
new email from Tiger Smith to [email protected]. Click Send. Observe the moderated folder auto reply that Tiger Smith receives.
7.2 Creating public folders
When new public folders are created, the public folder inherits the parent folder’s administrative and client access permissions, but when you
change the parent folder’s permissions, those newly assigned permissions are
not automatically inherited by the child public folders. You can use Outlook 2007 and the Exchange Management Shell to manage permissions for client
users (recipients) who use and manage the content within public folders. Client permissions to public folders can only be assigned to mailbox users and mail-
enabled groups, not AD users or groups. You can only use the Exchange

Exchange Server | V2.0 | April 2014 Page 69 of 125
Management Shell to delegate administrative permissions to Exchange users
who need to perform administrative tasks on public folders.
Complete Exercise 7.2 in LAB 7 of the prescribed lab manual using the configuration information below. Take note of any addenda/changes listed and which steps you must and must not
complete.
Exercise 7.2 Complete Steps 1–32.
In Steps 18 and 19, see Figure 23 on how to run these two commands. In Step 31, run the following command at the Exchange Management Shell:
Import-CSV 'C:\Project45Folders.csv' | ForEach-Object –
Process { Get-PublicFolderAdministrativePermission –Identity
$_.Folder –Server ‘Student01-A’ | Format-List }
You can also use Outlook to view and grant permissions to public folders. To do this, open Outlook, right-click the public folder or subfolder that you want to
assign permissions to, and either select Change Sharing Permissions or Properties (navigate to the Permissions tab) from the context menu. From
here, you can add users and configure permissions. You must be the owner of the public folder or have the correct access rights to change permissions.
Figure 23 – Assigning permission to public folders at the EMS

Exchange Server | V2.0 | April 2014 Page 70 of 125
7.3 Public folder home page
In the following exercise, you will attach a web page to the
Project45 folder that describes the usage of the folders within it. You must also make sure that the public folder user will be able
to see the web page when they highlight the Project45 public
folder. For testing and verification purposes, you will configure the Project45 folder to use Internet Explorer’s default home page
and verify that the web page appears when you access the public folder using Microsoft Outlook 2007.
NOTE In a production environment, one can configure the public folder to use
any default web page, such as www.google.com or www.cti.co.za; however, an Internet connection is required.
On Student01-A:
1. Open Microsoft Outlook 2007. 2. In the lower left pane, click on the Folder List icon to open the Folder List
window. Expand Public Folders > All Public Folders > Project45. 3. Right-click the Project45 public folder and select Properties.
4. On the Home Page tab, click Browse, and navigate to C:\Inetpub\wwwroot and the select the iisstart HTML document. Click
Open. 5. Next, select the Show home page by default for this folder checkbox
and click OK.
6. Highlight the Project45 public folder in the left pane and verify that the correct web page is displayed (the default IIS web page) as shown in Figure
24.
Figure 24 – Configuring a public folder home page

Exchange Server | V2.0 | April 2014 Page 71 of 125
7. Close Microsoft Outlook 2007.
7.4 Public folder replicas
Complete Exercise 7.4 in LAB 7 of the prescribed lab manual
using the configuration information below. Take note of any addenda/changes listed and which steps you must and must not
complete.
Exercise 7.4 Complete Steps 1–11.
Step 3 should read:
In the console tree pane, highlight Toolbox and double-click Public Folder Management Console in the detail pane.
Step 4 should read: Expand and highlight Default Public Folders in the console tree pane,
highlight the Project45 public folder in the detail pane, and click Properties in the actions pane.
In Step 10, expand the Default Public Folders folder and highlight Project45. From there, you can select in the detail pane and access
Properties in the actions pane for the Comments, Journals and Meeting Notes public folders.
7.5 Lab challenge
Complete Lab Challenge 7.1: Configuring a form for Public Folder Posts in the prescribed lab manual. See pages 295–298 of
Lesson 7 in the prescribed textbook for instructions on how to complete the lab challenge. If you experience problems, ask your
lecturer for help.
Lab Challenge 7.1
You will not be tested on this in the practical examination. This is a fun lab
challenge for you to try on your own.
7.6 Textbook review questions
Complete the Knowledge Assessment section for Lesson 7 on
pages 314–316 of the prescribed textbook. Complete the review questions and case scenarios on pages 316 in the spaces
provided.
Question 1:

Exchange Server | V2.0 | April 2014 Page 72 of 125
Question 2:
Scenario 7-1: Designing a Public Folder proposal
Scenario 7-2: Implementing a Public Folder Structure
Signed by lecturer: ______________

Exchange Server | V2.0 | April 2014 Page 73 of 125
Unit 8 – Protocols and Transport Rules
At the end of this unit you will be able to:
Understand and configure the various protocols used in the
email communication process, including: o POP3
o IMAP4 o HTTP
o MAPI RPC o SMTP
o ESMTP Define, create and manage transport rules.
Microsoft Exchange Server 2007 Configuration textbook:
Lesson 8, pages 317–355.
8.1 Supporting POP3 and IMAP4 clients
Mail servers use SMTP (Simple Mail Transfer Protocol) or Extended SMTP
(ESMTP) to both send and receive mail between them. But as the message completes the route from the initial outgoing mail server to the destination
server, it is retrieved by the recipient’s email client via one of the standard mail retrieval protocols, Post Office Protocol (POP) or Internet Message
Access Protocol (IMAP), that are complementary to SMTP. The version of
POP that is most commonly used today is POP3.
IMAP performs the same function as POP but supports additional features. The major difference between POP and IMAP is that with IMAP, all the mail stays on
the server in one or more folders whereas POP removes the mail from the server and stores it locally. IMAP enables you to connect from any computer
and see all your mail and mail folders on the mail server. Also, you have the option to create as many folders as you wish using IMAP. The version of IMAP
that is currently in use is IMAP4.
Both POP3 and IMAP4 are disabled by default in Exchange Server 2007. The configuration settings for POP and IMAP are almost identical, except for a few
minor distinctions such as port settings.

Exchange Server | V2.0 | April 2014 Page 74 of 125
Complete Exercise 8.1 in LAB 8 of the prescribed lab manual
using the configuration information below. Take note of any addenda/changes listed and which steps you must and must not
complete.
Exercise 8.1
Complete Steps 1–22. Step 14 should read:
Highlight the Connection tab and enter 500 in the Maximum connections and Maximum connections from a single IP address
dialog boxes. Click OK.
8.2 HTTP and OWA
The Hypertext Transfer Protocol (HTTP) defines how information such as a
message is transferred between web browsers and web servers. By default,
when you install the CAS role on a computer that is running Microsoft Exchange Server 2007, you enable Outlook Web Access (OWA). OWA is a
program that works alongside Exchange server and IIS (the default website) and thus HTTP and allows users to connect to the Exchange server and access
their mailbox and public folders using a web browser.
You can manage OWA via the EMC or EMS and via the Internet Information Services (IIS) Manager console. The web interface of OWA resembles the
interface of Microsoft Outlook 2007. Figure 25 provides an example of the OWA interface, accessed through Internet Explorer.
Figure 25 – Outlook Web Access
Source: exchangepedia.com/blog/2007/05/happy-birthday-owa-outlook-web-
access.html

Exchange Server | V2.0 | April 2014 Page 75 of 125
Complete Exercise 8.2 in LAB 8 of the prescribed lab manual using the configuration information below. Take note of any
addenda/changes listed and which steps you must and must not complete.
Exercise 8.2
Complete Steps 1–19.
In Step 6, ensure that both the internal URL and external URL for Student01-A are set to https://Student01-A.StudentAA.com/owa.
In Step 9, ensure that both the internal URL and external URL for Student01-B are set to https://Student01-B.StudentAA.com/owa.
Complete Step 16. A Stop/Start/Restart message will appear. Click OK to restart Internet services on Student01-A.
Complete Step 19 and, when prompted, click OK to restart Internet services on Student01-B.
To access and view the Outlook Web Access logon screen, perform the following steps on Student01-A:
1. Open Internet Explorer. (Click Start > All Programs > Internet Explorer)
2. Enter the following URL in the address bar of Internet Explorer:
https://Student01-A.StudentAA.com/owa. 3. Click Yes when the Security Alert message appears.
4. When the Internet Explorer box appears, click Add. 5. Click Add again when the Trusted sites dialog box appears and click
Close. 6. Click OK.
The Microsoft Office Outlook Web Access logon screen should appear as shown in Figure 26. Close Internet Explorer when finished.

Exchange Server | V2.0 | April 2014 Page 76 of 125
Figure 26 – OWA logon screen
8.3 MAPI/RPC and Outlook Anywhere
RPC, MAPI, Outlook Anywhere and the Autodiscover and Availability services are discussed in Table 8.
Table 8 – Client access features and services
Remote Procedure Calls (RPC)
RPC is a set of protocols that issue instructions that can be sent over a network for execution at the
receiving end. Messaging Application Programming Interface (MAPI) is a mature
mechanism that is used to access information in
Exchange. Client applications such as Microsoft Outlook 2007 use MAPI to access user mailboxes
and public folders stored in Exchange, as well as user directory information stored in Active
Directory. There is also a server-side MAPI mechanism that Exchange applications use to
communicate with mailbox databases and the Exchange Management Console.

Exchange Server | V2.0 | April 2014 Page 77 of 125
Outlook Anywhere
Previously called Remote Procedure Call (RPC) over HTTP, Outlook Anywhere enables mailbox users to
work outside their network with their MAPI-based Microsoft Outlook 2003 or 2007 clients, but with the
same level of security as the organisation’s internal network. This is done without creating a Virtual
Private Network (VPN) or requiring the use of OWA.
Instead, Outlook Anywhere encapsulates the MAPI/RPC packets inside HTTP/HTTPS packets,
which then travel across the Internet to the destination Exchange server, which strips off the
HTTP/HTTPS packet and then works with the MAPI/RPC packet.
Autodiscover Service
This is a Web Service that enables MAPI clients to discover configuration information for a specific mailbox and automatically connect to the Exchange
server that houses their mailbox. Users launching Microsoft Outlook 2007 for the first time are
prompted for an email address. Microsoft Outlook 2007 then contacts the Autodiscover Web Service
that resides on the CAS for information, such as the user’s home Mailbox server, display name and the
URLs of the offline address book and the Availability
service (discussed next). This service also keeps MAPI clients updated with any changes or
reconfigurations to the above-mentioned information.
Availability Service
The Availability service improves free/busy
information access for information workers by providing secure, consistent and up-to-date
free/busy information to computers that are running a MAPI client application. Free/busy
information is any published information of a user’s availability data based on the user’s schedule.
Exchange uses this information when users are scheduling meetings.

Exchange Server | V2.0 | April 2014 Page 78 of 125
Complete Exercise 8.3 in LAB 8 of the prescribed lab manual using the configuration information below. Take note of any
addenda/changes listed and which steps you must and must not complete.
Exercise 8.3
Complete Steps 1–2 and 5–11.
Do not complete Steps 3 and 4. The external hostname for Student01-A and Student01-B has already been configured (refer back to Exercise 4.6).
To check the external hostname for Outlook Anywhere, you can run the
Get-OutlookAnywhere cmdlet at the Exchange Management Shell;
alternatively, in the Exchange Management Console, expand Server Configuration > Client Access, highlight Student 01-A, and select
Properties from the Actions pane. Review the OutlookAnywhere tab.
Perform the same Steps for Student01-B. In Steps 5–8, refer to Figure 27 for how to run the commands.
After running the Test-OutlookWebServices cmdlets in Steps 9 and 10,
you should receive a list of information and success event types and their
associated IDs and messages stating that the test for the Autodiscover and Availability services was a success.
Figure 27 – Configuring the Autodiscover and Availability services at the EMS
8.4 SMTP
The objective of SMTP (Simple Mail Transfer Protocol) is to transfer
messages reliably and efficiently between email clients and a mail server as well as between mail servers. SMTP defines the rules for exchanging these
messages and is typically implemented by the MTA and MDA running on the mail server. Extended Simple Mail Transfer Protocol (ESMTP) improves on
the original SMTP protocol by adding new extensions to it that support graphics, audio and video files, as well as security and authentication.
A remote domain is an email domain that is located outside an Exchange
organisation and Active Directory forest. An exchange organisation has a default remote domain configuration in place, which allows an administrator to
have a degree of control over all message transfers between their organisation
and all other remote domains. You can alter this default remote domain configuration to gain more control over how mail is sent to and accepted by a
specific domain; for example, you can specify how delivery reports are

Exchange Server | V2.0 | April 2014 Page 79 of 125
handled, whether to allow or disallow automatic replies and whether or not to
use rich-text format and other format types.
Complete Exercise 8.4 in LAB 8 of the prescribed lab manual using the configuration information below. Take note of any
addenda/changes listed and which steps you must and must not complete.
Exercise 8.4
Complete Steps 1–16.
8.4.1 Testing SMTP support
In this exercise, you will use the telnet utility to verify SMTP support on the email server (Student01-A).
On Student01-C:
1. Click Start > All Programs > Accessories > Command Prompt.
2. At the command prompt, type:
telnet 192.168.1.1 25
3. Press <Enter>. You should see a banner that indicates a connection to Student01-A.StudentAA.
4. Type EHLO. An output similar to that shown in Figure 28 should be
displayed.
Figure 28 – Testing SMTP
5. The lines that start with 250 indicate that ESTMP features are supported.

Exchange Server | V2.0 | April 2014 Page 80 of 125
6. Type quit at the prompt and press <Enter>.
8.5 Transport rules
Every message in an Exchange organisation must travel though the Hub
Transport server. This includes a message sent to another mailbox on the
same mail server. The benefit of having all messages go through the Hub Transport server is that an administrator is provided with the capability to
configure rules, which are applied by the Hub Transport server to messages in transit. These rules are called transport rules. Transport rules are composed
of three components:
Conditions – This identifies the messages upon which the rule should act. Conditions examine parts of the message such as the header, recipient(s),
the sender of the message, the size and subject of the message, as well as the type of attachment the message contains.
Exceptions – This specifies messages that should be exempt from a rule based on the same criteria as that used to build conditions. Exceptions
override conditions and prevent actions from being applied to messages, even if the message matches all the configured conditions.
Actions – This determines the action that must be performed on the
message by the rule if the condition is met. This component modifies some aspect of the message itself or the delivery of the message.
There are no default rules to control messaging in the organisation; an
administrator has to configure them. Rules are applied on the Hub Transport server by the transport rules agent. If an Edge Transport server is used in
the organisation, then rules can also be applied to it through the edge rules agent.
Complete Exercise 8.5 in LAB 8 of the prescribed lab manual
using the configuration information below. Take note of any addenda/changes listed and which steps you must and must not
complete.

Exchange Server | V2.0 | April 2014 Page 81 of 125
Exercise 8.5
Complete Steps 1–29. In Step 28, open the Transport Rule Test attachment and view the
disclaimer text (see Figure 29).
Figure 29 – Verifying a transport rule
8.6 Lab challenge
Create a transport rule on your Edge role server that automatically deletes any emails with a spam confidence level (SCL) of eight or greater using the Exchange Management
Console on Student01-C. Read pages 347–351 of the prescribed
textbook (Lesson 8) for how to create a transport rule on the Edge role server. Specify an appropriate name for the rule as well
as a comment. If you experience problems, ask your lecturer for help.
8.7 Textbook review questions
Complete the Knowledge Assessment section for Lesson 8 on
pages 352–355 of the prescribed textbook. Complete the review questions and case scenarios on page 354 in the spaces
provided.
Question 1:

Exchange Server | V2.0 | April 2014 Page 82 of 125
Question 2:
Scenario 8-1: Select Email Protocols
Scenario 8-2: Implementing Transport Rules
Signed by lecturer: ______________

Exchange Server | V2.0 | April 2014 Page 83 of 125
Unit 9 – Security
At the end of this unit you will be able to:
Define security and how to secure email information.
Explain the various attacks on email systems including email bombs, phishing attacks, surface attacks and buffer
overruns. Control viruses and spam.
Understand antivirus software packages and how they work. Explain cryptography.
Explain and configure SSL, TLS and public key certificates. Install and configure a certificate authority.
Configure email encryption. Configure user certificates.
Microsoft Exchange Server 2007 Configuration textbook: Lesson 9, pages 356–415.
9.1 Securing email information
Securing an Exchange organisation and its email information includes
everything from creating a high-level architectural design to configuring settings on both the Exchange server and mail client(s) as well as securing the
Active Directory forest. Some of the technologies and configurations that can
help strengthen an Exchange organisation are listed below:
Grant only the minimum permissions needed by users for access to servers, objects and resources.
Prevent or limit access to mailboxes and public folders from outside the organisation.
Ensure that users run the latest MAPI RPC clients such as Microsoft Outlook 2007 or later. Older email clients contain vulnerabilities that could increase
the spread of viruses. Implement effective antivirus scanning software such as Forefront Security
for Exchange Server (FSE) for your different server roles as well as software for your MAPI RPC clients such as Forefront Client Security.
Configure anti-spam filters. Control the attachments that users receive by running attachment filtering.
Configure password policies to enforce all users throughout your
organisation to use strong passwords and require them to change their passwords on a regular basis.
Implement biometric or smart card authentication technologies. Configure strong encryption for email communication between servers and
clients such as implementing trusted third party certificates and encrypting email protocols that are used.
Configure transport rules to restrict email relay.

Exchange Server | V2.0 | April 2014 Page 84 of 125
Stop unnecessary services from running and restrict the use of open ports
only to those that are needed. Implement and configure both host-based and network-based firewalls.
Keep all software including the messaging servers, clients and the operating systems up to date with the latest updates and patches.
9.2 Attack surfaces
To be vulnerable, an attacker must have at least one applicable tool or technique that they can use to connect to a system’s weakness. In this frame,
vulnerability is also known as the attack surface. The attack surface of your server is the area that an individual or system can use to overcome the
security measures that you have in place.
To reduce the attack surface of a mail server, an administrator can run the Security Configuration Wizard (SCW). The SCW examines the roles a
server plays and then tries to adjust security to match those roles. You can use it to verify that you have the desired level of security and make modifications if
necessary.
Through SCW, you can:
Disable unnecessary services and software.
Close network communication ports and other communication resources that are not in use.
Examine shared files and folders to help manage network access through access protocols.
Configure firewall rules.
Complete Exercise 9.1 in LAB 9 of the prescribed lab manual using the configuration information below. Take note of any
addenda/changes listed and which steps you must and must not complete.
Exercise 9.1
Complete Steps 1–5 and 7–30. In Step 6, run the following command to register Exchange Server services
and features with SCW:
Scwcmd register /kbname:Ex2007EdgeKB
/kbfile:"%programfiles%\Microsoft\Exchange
Server\scripts\Exchange2007Edge.xml"
Ignore Step 24 and continue with Step 25.
Ignore Step 27 and continue with Step 28.
NOTE After completing this exercise, the SCW program will have enabled the firewall on Student01-C. Turn the firewall off.
Exchange Server | V2.0 | April 2014 Page 85 of 125
9.3 Viruses and spam
9.3.1 Spam
Spam is unsolicited commercial email (also known as junk email). Both the Hub Transport and the Edge Transport servers have the capability to protect
your organisation from spam; however, only the Edge Transport server has the anti-spam features turned on by default. In the event that an Edge Transport
server has not been implemented on a network, you can enable the anti-spam features on your Hub Transport server using the EMS.
Exchange Server 2007 provides the following anti-spam features:
Content filtering – This filters junk email based on examining the content
of the message. Once examined, a message is assigned a spam confidence level (SPL), which is a value in the range 0–9 that indicates
the likelihood that a particular message is spam. A message with a value of 0 is almost certainly deemed not to be spam whereas a value of 9 is
deemed to be spam.
IP allow list – You can specify which IP addresses are always allowed to connect to and transmit messages to this server without being treated as
spam. IP allow list providers – If you have subscribed to a trusted provider that
maintains a verified list of ‘safe’ IP addresses that are known not to send spam, you can configure this setting to use that provider.
IP block list – You can specify the IP addresses that are not allowed to connect and transmit messages to this server.
IP block list providers – If you know of providers that cannot be relied upon because they are publishing lists of IP addresses/servers that are
sending spam messages, you can add them to this list. Recipient filtering – Here you can specify a list of email recipients
(individuals or domains) from which the server will not accept any messages. You can also block messages addressed to recipients who do not
exist in the global address list.
Sender filtering – Here you can block a list of email senders (individuals and domains) from sending any type of message that your organisation has
deemed it does not want to receive as well as configure an action to occur when you receive a message from a configured blocked sender.
Sender ID – This feature is intended to combat both email spoofing and phishing by examining the email header information using the sender’s
purported responsible address (PRA). You can determine whether you want to reject, delete, or send the message to the recipient’s mailbox along
with a stamped message of the sender ID results. Sender reputation – This feature dynamically adds and removes IP
addresses to and from the IP address block list based on certain characteristics of a sender that appears to be a source of spam.

Exchange Server | V2.0 | April 2014 Page 86 of 125
NOTE A spoofed message is an email message that has a sending address
which has been modified to appear as if it originates from a sender other than the actual sender of the message. A phishing message is
a message designed to trick the recipient into divulging sensitive information (such as passwords and other personal information) to a
non-trustworthy source.
In Exchange, attachment filtering lets you apply filters to control the
attachments that users receive. Attachment filtering is increasingly important in today’s environment, where many attachments contain harmful viruses or
unsuitable material that may cause significant damage to the user’s computer or to the organisation.
Complete Exercise 9.2 in LAB 9 of the prescribed lab manual
using the configuration information below. Take note of any addenda/changes listed and which steps you must and must not
complete.
Exercise 9.2
Complete Steps 1–35.
Step 17 should read:
Highlight the Action tab. Type 9 in the Delete messages that have an SCL rating greater than or equal to dialog box, type 8 in the Reject
messages that have an SCL rating greater than or equal to dialog box, select and type 7 in the Quarantine messages that have an SCL
rating greater than or equal to dialog box, type [email protected] in the Quarantine mailbox e-mail address dialog box and click OK.
In Step 33, see Figure 30 for an example of the output that should be displayed. This screen indicates that the default action for an email that has
a restricted attachment is to strip the attachment and relay the email.
Figure 30 – Viewing the attachment filtering agent

Exchange Server | V2.0 | April 2014 Page 87 of 125
9.3.2 Viruses
In messaging terms, a virus is a malicious program designed specifically to replicate itself and spread from system to system though emails and
attachments. A virus may damage hardware, software and/or data.
There are multiple third party antivirus and anti-spam software solutions for Exchange Server; however, Forefront Security for Exchange Server (FSE)
is recommended and fully supported by Microsoft.
9.4 Encryption and authentication Cryptography forms a fundamental part of message security. It is basically
the practice of protecting mail information through the use of secret code. Encryption is the cryptography process of converting the email information
into secret code (known as ciphertext), to make it unreadable by anyone except for the person that possesses a key that allows them to change the
information back to its original readable form (known as plaintext).
An encryption algorithm is the mathematical procedure/formula for
performing encryption on data. There are three types of encryption algorithms:
Symmetric encryption – This requires a single key for both encryption and decryption.
Asymmetric encryption – This requires a public key for encryption and a private key for decryption
Hash functions – This uses a mathematical transformation to irreversibly ‘encrypt’ information.
Secure Sockets Layer (SSL) is a security protocol that supports
confidentiality and integrity of messages in client and server applications that communicate over open networks. Transport Layer Security (TLS) encrypts
communications and enables clients to authenticate servers and vice versa.
TLS is a more secure version of SSL. SSL and TLS both use symmetric and asymmetric encryption.
By default, Exchange Server 2007 uses SSL and TLS to secure communications
between email clients and mail servers that use POP3, IMAP4 and HTTP. POP3S, IMAP4S and HTTPS are the secure versions of these protocols. In each
case, the secure version of the service uses a different port from the unsecured service. TLS can be used to authenticate and encrypt SMTP sessions
between the Edge Transport and Hub Transport servers within an organisation as well as relay sessions to outside organisations. Both SSL and TLS require
the Exchange server to use private and public keys and public key certificates.
A certificate authority (CA) is a server that verifies the information or identity of computers, individuals and resources, and issues public key
certificates for authenticity. A public key certificate binds the public key to
the identity of a person, server, or service that holds the corresponding private key. The CA digitally signs the public key certificate with its own digital
signature using its private key. The digital signature can be decrypted by a user or computer that has obtained the CA’s public key.

Exchange Server | V2.0 | April 2014 Page 88 of 125
Table 9 discusses the three primary types of digital certificates: self-signed
certificates, Windows PKI-generated certificates and third party certificates.
Table 9 – Certificate types
Type of certificate Description
Self-signed
When you install Exchange 2007, a self-signed certificate is automatically configured. A self-signed
certificate is signed by the application that created it.
The subject and the name of the certificate match. The issuer and the subject are defined on the
certificate. A self-signed certificate will allow some client protocols to use SSL for their communications.
Windows PKI-generated
Public Key Infrastructure (PKI) is a system of
digital certificates, certification authorities and registration authorities (RAs) that verify and
authenticate the validity of each party that is involved in an electronic transaction by using public key
cryptography. When you implement a CA in an organisation that uses Active Directory, you provide
an infrastructure for certificate life-cycle management, renewal, trust management and
revocation.
Trusted third party
Third party or commercial certificates are certificates that are generated by a third party or commercial CA
server and then purchased for use on network/messaging servers. One problem with self-
signed and PKI-based certificates is that, because the certificate is not automatically trusted by the client
computer or mobile device, you must make sure that
you import the certificate into the trusted root certificate store on client computers and devices.
Third party or commercial certificates do not have this problem. Most commercial CA certificates are
already trusted because the certificate already resides in the trusted root certificate store. Because
the issuer is trusted, the certificate is also trusted.
Complete Exercise 9.4 in LAB 9 of the prescribed lab manual using the configuration information below. Take note of any addenda/changes listed and which steps you must and must not
complete.

Exchange Server | V2.0 | April 2014 Page 89 of 125
Exercise 9.4
Complete Steps 1–50. In Step 6, type StudentAA-CA in the Common name for this CA dialog box.
Step 10 should read: Click Finish to close the Windows Components Wizard window. Close the
Add or Remove Programs window. Step 16 should read:
On the File to Import page, click Browse, navigate to C:\, select Student01-A.StudentAA.com_StudentAA-CA.crt, and click Open.
In Step 33, type Student01-A.StudentAA.com in the Name dialog box
and click Next. In Step 34, type StudentAA in the Organisation dialog box, type
HeadOffice in the Organisational unit dialog box, and click Next. In Step 35, enter Student01-A.StudentAA.com in the Common Name
dialog box and click Next. In Step 36, on the Geographical Information page, select ZA (South
Africa) from the Country/Region drop-down box. Next, supply the appropriate province (i.e. Gauteng) and city (i.e. Johannesburg) that you
currently reside in and click Next when finished. In Step 45, write down the thumbprint of the very first certificate listed in
the list of certificates displayed by the Get-ExchangeCertificate
command. This will be the CA-signed certificate. You can use the Get-
ExchangeCertificate | Format-List command to obtain more
information about all of the certificates and to distinguish between them. View the subject field of the output, which should display the OU, city and
province that you configured for the certificate. In Step 46, after running the command, press <Y> when prompted.
In Step 50, configure the same settings for Student01-B as you did for Student01-A but use Student01-B.StudentAA.com for both the name and
common name when configuring the certificate.
Figure 31 illustrates the commands that were used in Steps 44–47 of Exercise 9.4 at the shell prompt to view and enable the certificate on Student01-B.
Figure 31 – Viewing and configuring certificates at the EMS

Exchange Server | V2.0 | April 2014 Page 90 of 125
Because we are using a CA-signed certificate, you will need to change settings
for Lucas Radebe in Outlook Express to allow him to send and receive email. To do this, perform the following steps:
1. Open Outlook Express on Student01-A.
2. Select Tools > Accounts. 3. On the Mail tab, highlight the Student01-A.StudentAA.com account and
select Properties. 4. On the Servers tab, select the My server requires authentication
checkbox. 5. Click OK and click Close.
6. Compose and send an email to test this. Make sure that there are no errors. 7. Close Outlook Express.
9.5 User certificates
Complete Exercise 9.5 in LAB 9 of the prescribed lab manual using the configuration information below. Take note of any
addenda/changes listed and which steps you must and must not complete.
Exercise 9.5
Complete Steps 1–16 and 18–23.
Step 3 should read: In the right pane of the Certificates Templates window, right-click User and
click Properties. On the Security tab, ensure that Authenticated Users is assigned the Read and Enroll permissions and click OK.
Do not complete Step 17. Step 21 should read:
Click the To button, select Administrator, click To, and then click OK. Type Certificate Test in the Subject field. Type Email body in the body
and click Send.
Lab Challenge 9.1
Do not complete this lab challenge.

Exchange Server | V2.0 | April 2014 Page 91 of 125
9.6 Textbook review questions
Complete the Knowledge Assessment section for Lesson 9 on
pages 413–415 of the prescribed textbook. Complete the review questions and case scenarios on page 415 in the spaces
provided.
Question 1:
Question 2:
Scenario 9-1: Reducing the Classroom Attack Surface
Scenario 9-2: Responding to a New Virus Attack
Signed by lecturer: ______________

Exchange Server | V2.0 | April 2014 Page 92 of 125
Unit 10 – Backup and Recovery
At the end of this unit you will be able to:
Understand how Exchange databases work.
Explain the various media used for backups. Understand the process of selecting a backup program.
Explain the various types of backups. Understand how to back up Exchange databases.
Understand how to restore Exchange databases. Understand the purpose of a recovery storage group.
Explain how to perform a dial tone recovery. Explain the procedure to recover mailbox and deleted items.
Explain how to back up and restore the following server role configurations:
o Mailbox
o Hub o Edge
o CAS Explain the procedure to manage and repair Exchange
databases.
Microsoft Exchange Server 2007 Configuration textbook: Lesson 10, pages 416–455.
10.1 Database backups
Backups are a critical part in the recovery of data. An organisation needs to keep backups for the following reasons:
Data loss
Hardware failures Site loss
Compliance
The most important information to back up is the Exchange database.
10.1.1 Selecting backup media
To avoid data loss, you must design your Exchange Server hardware and hard
disk subsystems to be as redundant as possible. You have different choices and methods for accomplishing a good redundancy plan. You must make sure
that your database and transaction logs are stored on a redundant disk solution such as NAS and SAN.
Network Attached Storage (NAS) – A storage system that contains a
number of hard drives arranged into a RAID (Redundant Array of Independent Disks) array that increases the reliability of a system through
the process of replicating data among all the drives in the array.

Exchange Server | V2.0 | April 2014 Page 93 of 125
Storage Area Network (SAN) – A separate subnet of connected storage
devices such as drive arrays and servers that can be accessed from an organisation’s LAN.
10.1.2 Selecting a backup program
Legacy Streaming Backup – This backup runs while the database is mounted and in use by making a backup copy of the EDB file. It reads every
page of the database and also checks for consistency. This type of backup is supported by the Windows Backup program in Windows Server 2003.
Volume Shadow Copy Service (VSS) – This backup solution pauses any
write operations to the Exchange database and transaction logs for a few seconds and takes a snapshot of the database during that time. Once the
snapshot has been taken, the database resumes normal operation. Then for subsequent backups, VSS looks for changes to data within the database and
only backs up those changes. It cannot be used alongside the Windows Backup utility for backing up Exchange databases. You can use VSS-aware
third party backup programs to perform this type of backup.
10.1.3 Backup types
Table 10 gives a description of the four backup types supported by Exchange
running on a Windows Server 2003 machine.
Table 10 – Backup types
Backup type
Description
Full (Normal)
This performs a complete backup of storage groups and databases as well as all the transaction log files associated
with the databases. It deletes the original log files older than the checkpoint at the time of the backup. During the restore
operation, the log files can be replayed along with any unwritten items. Full backups should be performed on a daily
basis. They provide a faster restore operation because only a
single backup set is required.
Copy The same as a full backup; however, it does not delete the original transaction logs. Used when performing maintenance
on a database.
Incremental
Only backs up transaction log files created since the last full or incremental backup. Log files older than the checkpoint at the
time of the backup are deleted. This backup does not take long to complete but does take a long time to restore.
Differential
Only backs up transaction logs created since the last full
backup. Log files are not deleted after the backup has been completed. This backup takes a little longer to complete but
the restoration period is shorter.

Exchange Server | V2.0 | April 2014 Page 94 of 125
Complete Exercise 10.1 in LAB 10 of the prescribed lab manual using the configuration information below. Take note of
any addenda/changes listed and which steps you must and must not complete.
Exercise 10.1
Complete Steps 1–15.
10.2 Restoring a mailbox database
Complete Exercise 10.2 in LAB 10 of the prescribed lab manual using the configuration information below. Take note of any
addenda/changes listed and which steps you must and must not
complete.
Exercise 10.2
Complete Steps 1–27.
Step 13 should read: Highlight the Restore and Manage Media tab. In the left pane, expand
File > Backup1.bkf and place a check mark next to Student01-
A\Microsoft Information Store\First Storage Group. Highlight Student01-A\Microsoft Information Store\First Storage Group. Note
that both Mailbox Database and Log Files are selected in the right pane.
10.3 Restoring mailbox and email items
When you delete a mailbox, you disconnect it from the user’s Active Directory
user account. If you delete the AD account, the associated mailbox is disconnected automatically from the deleted account. The disconnected
mailbox is placed in the Disconnected Mailbox section under Recipient Configuration. You can reconnect that mailbox as long as you do so within the
default period of 30 days. See Unit 5, section 5.9 for how to disconnect and reconnect a mailbox.
Complete Exercise 10.3 in LAB 10 of the prescribed lab manual using the configuration information below. Take note of any
addenda/changes listed and which steps you must and must not
complete.
Exercise 10.3
Complete Steps 1–17.

Exchange Server | V2.0 | April 2014 Page 95 of 125
10.4 Recovery storage groups
A recovery storage group (RSG) is a special storage group that allows you
to mount a second copy of a mailbox database to the same server that contains the original database or from another Exchange server in the same
organisation for the purpose of recovering deleted mailbox databases and the
items they contain. You can do this while the original database on the production server is still running and servicing clients.
Once a database is mounted to the RSG and a restoration of the original
database is required, the backup utility restores the backup of the database to the RSG instead of restoring it to the original database on the production
server. The administrator can then copy the database, mailbox, or other item to the production database with minimal disruption to end users. This is a good
solution for the recovery of mailboxes and databases, but not public folders because they are not supported by RSGs.
10.4.1 Dial tone recovery
This is a recovery tool that is used in conjunction with an RSG. It allows you to
create a dial tone (empty) database in the RSG to replace a failed production database. The dial tone database allows users to send and receive email while
the failed database is in the process of being recovered. This is done by switching the paths of the failed storage group and the RSG, which redirects
users to the dial tone database. Once the failed database is recovered, it can be merged with the dial tone database.
Complete Exercise 10.4 in LAB 10 of the prescribed lab manual
using the configuration information below. Take note of any addenda/changes listed and which steps you must and must not
complete.
Exercise 10.4
Complete Steps 1–32.
Before completing Step 4, when the Microsoft Exchange
Troubleshooting Assistant window appears, click the Do not check for updates on startup radio button and then select the I don’t want to join
the program at this time radio button. Next, click the Go to Welcome screen link and continue with Step 4.
In Step 31, notice that the RSG path that you recorded in Step 7 is listed next to the mailbox database under the first storage group on Student01-A
as shown in Figure 32.

Exchange Server | V2.0 | April 2014 Page 96 of 125
Figure 32 – Dial tone restore operation
Read pages 443–451 in the textbook for how to back up and restore the
different Exchange Server roles.
10.5 Managing and repairing Exchange databases
Exchange Server 2007 includes four tools that you can use to work with and repair databases. Table 11 discusses these tools.
Table 11 – Exchange recovery tools
Utility Description
Eseutil.exe
The extensible storage engine utility (eseutil.exe) is a Windows command prompt utility that can be used
with the extensible storage engine and transaction log files to modify and repair an Exchange database file.
You can also use this utility to perform offline defragmentation as well as to verify the integrity and
the state (checksum) of a database. You must dismount the database before running this utility.
Isinteg.exe
The information store integrity checker (isinteg.exe) is used to find and repair problems found in a public folder and mailbox database. These errors
can prevent the information store from starting or
prevent users from logging on and from receiving, opening, or deleting emails. You can use the –fix option
along with this command at the Windows command prompt to fix any errors detected.

Exchange Server | V2.0 | April 2014 Page 97 of 125
Utility Description
Database Recovery
Management
This graphical tool can help you resolve database issues and can assist you with configuring and recovering
databases using recovery storage groups and dial tone recoveries.
Microsoft Exchange
Troubleshooter
This is another graphical tool that can help you repair an Exchange database. It examines event logs for you, helps to determine database-related errors, and
provides you with resources or possible solutions to any errors that are found.
Complete Exercise 10.5 in LAB 10 of the prescribed lab manual using the configuration information below. Take note of any
addenda/changes listed and which steps you must and must not
complete.
Exercise 10.5
Complete Steps 1–14.
After running the command in Step 3, type <Y> and press <Enter> when prompted.
In Steps 5, 6 and 7, use double quotes instead of single quotes, for
example:
eseutil.exe /g "C:\SG3\Second Mailbox Database.edb"
In Step 6, see Figure 33 for an example of the output that is displayed
when running the eseutil.exe /d command.
Figure 33 – eseutil.exe /d

Exchange Server | V2.0 | April 2014 Page 98 of 125
10.6 Lab challenge
Complete Lab Challenge 10.1: Backing up server roles in LAB 10 of the prescribed lab manual. See pages 443–448 of
Lesson 10 of the prescribed textbook for instructions on how to complete the challenge. If you experience problems, ask your
lecturer for help.
Lab Challenge 10.1
You will not be tested on this in the practical examination. This lab challenge is
only for demonstration purposes; however, it important for you to complete the lab challenge because Exchange administrators perform these backup
tasks on a regular basis. Only complete the lab challenge on Student 01-A and Student01-C. The procedure for Student01-B is the same as that for
Student01-A. If you experience problems, ask your lecturer for help.
10.7 Textbook review questions
Complete the Knowledge Assessment section for Lesson 10 on pages 452–455 of the prescribed textbook. Complete the review
questions and case scenarios on pages 454–455 in the spaces provided.
Question 1:
Question 2:

Exchange Server | V2.0 | April 2014 Page 99 of 125
Scenario 10-1: Designing a Database Backup plan
Scenario 10-2: Recovering Mailbox Data
Signed by lecturer: ______________

Exchange Server | V2.0 | April 2014 Page 100 of 125
Unit 11 – Monitoring and Reporting
At the end of this unit you will be able to:
Define and monitor performance using the following
utilities: o Task Manager
o Reliability and Performance Monitor o Event Viewer
o Exchange Best Practices Analyzer o Exchange Troubleshooting Assistant
Define the function of an email queue. Monitor and manage email queues using the Queue Viewer
utility and queue management cmdlets. Define message tracking.
Use the Message Tracking tool to track messages.
Understand the tools used to monitor client connectivity including Microsoft Outlook 2007, protocol-related cmdlets
and SMTP protocol logs and use these tools to monitor connectivity.
Microsoft Exchange Server 2007 Configuration textbook:
Lesson 11, pages 456–506.
11.1 System performance
From the moment you create and enable your first mailbox and mail begins
travelling through your organisation, your Exchange environment begins weakening to a degree. Disk space is consumed and network bandwidth
increases and this could result in a traffic jam. The key to staying on top of this is to monitor the environment.
Refer to Table 12 for the different utilities used to monitor performance.

Exchange Server | V2.0 | April 2014 Page 101 of 125
Table 12 – Monitoring tools
Monitoring tool Description
Task Manager
This tool provides information about the programs and processes running on the local server. You can use this
tool to monitor key indicators of the server’s performance including CPU, kernel and memory usage
and commit charge as well as stop programs that are not responding.
Performance Monitor
Performance Monitor is a great stand-alone tool for
configuring objects and counters that capture performance data on system components such as the
CPU, memory, hard disk and network interfaces. The Performance Monitor is included as an option in
Exchange Server 2007 with all Exchange-related objects and counters already set up.
Event Viewer
This is an application that enables administrators to view and manage event logs. Event logs are special files that record significant events on the server.
Because Exchange is considered an application, the information and failure events are located in the
application log. Event Viewer also allows you to attach a task to an event. Tasks include starting a program or
sending an email when a significant event occurs.
Best Practices Analyzer
This is a monitoring and troubleshooting tool that can be used to ensure that best practices are being
followed between the Exchange servers and the AD
environment. With this tool, you can perform:
A readiness check A health/performance check
A permission check
A connectivity check
Performance Troubleshooter
This can either be a troubleshooting or monitoring tool depending on what you are concerned about with
regard to your Exchange server. The main focus of this tool is on RPC-related issues. It can also assist by
providing solutions to problems or performance issues.
Complete Exercise 11.1 in LAB 11 of the prescribed lab manual
using the configuration information below. Take note of any addenda/changes listed and which steps you must and must not
complete.
Exercise 11.1 Complete Steps 1–70.
In Steps 12–14, you can also save the file with a .tsv extension to the C: drive, open the file with a text editor, and examine the output from there.
If in Step 23 a message appears asking you to create the log file, click Yes.

Exchange Server | V2.0 | April 2014 Page 102 of 125
After completing Step 27, maximise the Performance window and continue
with Step 28. Step 28 should read:
Expand Performance Logs and Alerts in the left pane and highlight Counter Logs; right-click Client Connection Monitoring in the right
pane and select Stop. After completing Step 30, click Close to close the Add Counters window.
After completing Step 37, click Close to close the Add Counters window. After completing Step 41, close Performance Monitor.
In Step 45, type the following and press <Enter> (substitute ‘Administrator’ with ‘Lucas Radebe’ – the Outlook Express account):
Set-CASMailbox –Identity 'Lucas Radebe'
–IMAPEnabled $false
In Step 50, the message should indicate that the Lucas Radebe user
attempted to access IMAP4 but is disabled for that protocol as shown in Figure 34.
In Step 53, type the following at the shell prompt and press <Enter>:
Set-CASMailbox –Identity ‘Lucas Radebe’ –IMAPEnabled $true
Step 57 should read: At the Microsoft Exchange Best Practices Analyzer window, click both
the Do not check for updates on startup and I don’t want to join the program at this time radio buttons and then click Go to Welcome
screen.
Figure 34 – Using Event Viewer

Exchange Server | V2.0 | April 2014 Page 103 of 125
11.2 Monitoring mail flow and routing
Messages in transit that are between processing steps are stored in a
temporary location called a queue. Examining message queues will most likely be the first step or at least one of the first steps that you will take to
troubleshoot mail flow issues such as mail not flowing properly or getting stuck
somewhere on its journey to its destination.
There are various queues on the Hub Transport and Edge Transport servers and each one represents a set of messages to be processed in a specific way.
The following tools can help solve mail flow/routing issues:
Queue Viewer is a graphical tool that lets you view and manipulate messages in the message queue that have not completed their journey. The
main page of the Queue Viewer utility displays a wealth of information about the status of each queue on the server. With this tool, you can
determine whether messages are sitting in the queue because DNS is failing, Hub Transport servers are unavailable, or the destination mail
servers are unavailable.
Mail Flow Troubleshooter allows one to track down symptoms such as
users receiving non-delivery reports when sending messages, delays with messages, recipients not receiving expected messages, and messages
backing up in one or more queues on the server.
Routing Log Viewer is a new tool in Exchange Server SP1 that allows you to analyse and determine whether the route that mail flows through is the
best route for the Exchange organisation. This tool enables an administrator to open a routing log file that contains information about how the routing
topology appears to the server. Once this is done, the administrator can then open a second routing log file at a later stage to determine if any
changes to the route have occurred within the routing topology between the two time periods. Any differences between the two routing table logs are
highlighted.
Complete Exercise 11.2 in LAB 11 of the prescribed lab manual using the configuration information below. Take note of any
addenda/changes listed and which steps you must and must not complete.

Exchange Server | V2.0 | April 2014 Page 104 of 125
Exercise 11.2
Complete Steps 1–29. After completing Step 3, press <Y> and then <Enter>.
Step 7 should read: Click New to compose a new email. Click the To button, select Meg
Roombas, click To, and then click OK. The mailbox for Meg Roombas is within the second mailbox database in the third storage group on
Student01-A. After completing Step 27, you can run the following command to obtain
more information about messages in a queue:
Get-Message | Format-List
11.3 Message tracking
Message tracking refers to the tracking of events from the time a message
enters an Edge Transport or Hub Transport server to the time it leaves the Edge Transport or Hub Transport server in a single organisation. Message
tracking logs capture data from all stages of a message’s journey through a server. These logs can be used for message forensics, mail flow analysis,
reporting and troubleshooting.
By default, message tracking is enabled on each Exchange server that has the Hub Transport server role, Mailbox server role, or Edge Transport server role
installed.

Exchange Server | V2.0 | April 2014 Page 105 of 125
Complete Exercise 11.3 in LAB 11 of the prescribed lab manual using the configuration information below. Take note of any
addenda/changes listed and which steps you must and must not complete.
Exercise 11.3
Complete Steps 1–20.
In Step 16, see Figure 35 for how to run the command and an example of the output that should be displayed.
Figure 35 – Message tracking at the EMS
11.4 Client connectivity
These are a few basic Windows command line tools that can help you to
troubleshoot an email client that cannot send or receive email to and from a mail server:
Ping – Use the ping command to ping the IP address or name of the
Exchange server. Ipconfig – Use this tool to display and modify TCP/IP information. Common
uses include flushing the DNS resolver cache with the flushdns parameter
and renewing and releasing DHCP address leases.
Telnet – Use this tool to test POP3, IMAP4 and SMTP connections (i.e.
telnet ServerIPaddress port number).
11.4.1 Protocol logs
Protocol logging lets you see the commands that clients are sending to your
Exchange server. If you detect suspicious SMTP, POP3, or IMAP4 traffic patterns, you can take action before they become a problem. Protocol logs are
also an excellent forensic tool for analysing attacks that occur without warning or detection.

Exchange Server | V2.0 | April 2014 Page 106 of 125
Complete Exercise 11.4 in LAB 11 of the prescribed lab manual using the configuration information below. Take note of any
addenda/changes listed and which steps you must and must not complete.
Exercise 11.4
Complete Steps 1–24.
If in Step 10 you receive an error when connecting to your CAS role server
using the Test-POPConnectivity cmdlet, you will need to create a new
system user account for testing by running the New-TestCASConnectivityUser.ps1 script at the EMS prompt on both
Student01-A and Student01-B and then run the Test-POPConnectivity
cmdlet. If successful and you receive a response similar to the output
shown in Figure 36, continue with the rest of the exercise.
Figure 36 – Testing POP, IMAP and OWA
If unsuccessful and you receive any errors regarding access to the recovery storage group, you might need to remove the recovery storage group by
returning to Exercise 10.4 and use the Disaster Recovery Management tool to remove the recovery storage group. Select the Remove the recovery
storage group option instead of selecting the Create a recovery storage group option. Remember to create a recovery storage group again after
running the test cmdlets (refer back to Exercise 10.4).

Exchange Server | V2.0 | April 2014 Page 107 of 125
11.5 Server and usage reports
In order to get a good handle on what is going on in your messaging
environment, you will need to report the overall usage. You will want to know information such as which users are using up the most space on the mailbox
database, so that you can set the appropriate quota. The information gathered
in a report will give you an idea of how the Exchange environment is changing so that you are ready to implement a response to those changes.
Complete Exercise 11.5 in LAB 11 of the prescribed lab manual using the configuration information below. Take note of any
addenda/changes listed and which steps you must and must not complete.
Exercise 11.5
Complete Steps 1–16.
In Steps 7 and 8, do not run the commands; instead run the following commands at the command prompt to obtain a report for mailboxes larger
than 10 KB in size and sort them by TotalItemSize on Student01-A and export these statistics to a CSV file named StudentAA.com_Large-
Mailbox_Sizes on the C: drive:
Get-MailboxStatistics –Server 'Student01-A' | where {
$_.TotalItemSize –ge 10KB } | Sort-Object TotalItemSize |
Export-CSV 'C:\StudentAA.com_Large_Mailbox_Sizes.csv' –NoType
To ensure that only mailboxes that have more than 10 items are shown in a CSV file called StudentAA.com_Large_Mailbox_Messages on the C: drive of
Student01-A and to sort them by the total number of items, run the following command at the command prompt:
Get-MailboxStatistics –Server 'Student01-A' | where {
$_.ItemCount –ge 10 } | Sort-Object ItemCount | Export-CSV
'C:\StudentAA.com_Large_Mailbox_Messages.csv'
–NoType
In Step 16, do not print your spreadsheet. You can save it to the desktop.
Lab Challenge 11.1
Do not complete this lab challenge.

Exchange Server | V2.0 | April 2014 Page 108 of 125
11.6 Textbook review questions
Complete the Knowledge Assessment section for Lesson 11 on
pages 503–506 of the prescribed textbook. Complete the review questions and case scenarios on page 506 in the spaces
provided.
Question 1:
Question 2:
Scenario 11-1: Troubleshooting Exchange Performance
Scenario 11-2: Preparing Server Documentation
Signed by Lecturer: ______________

Exchange Server | V2.0 | April 2014 Page 109 of 125
Unit 12 – Mobile Access and Unified
Messaging
At the end of this unit you will be able to:
Understand the different mobile access technologies
including: o Exchange ActiveSync
o Blackberry Infrastructure Configure ActiveSync and create ActiveSync policies.
Explain how to configure the ActiveSync virtual directory. Understand the Blackberry Enterprise Server installation and
configuration process. Understand unified messaging.
Configure a UM dial plan and a UM IP gateway. Configure a UM mailbox policy.
Configure a UM auto attendant.
Microsoft Exchange Server 2007 Configuration textbook:
Lesson 12, pages 507–546.
12.1 ActiveSync
Exchange ActiveSync (EAS) is a synchronisation protocol based on HTTP and XML that is designed to work over cellular and wireless Internet
connections. With EAS, you can synchronise email, contacts, calendar
information and tasks between your mobile device and the Exchange server.
Direct Push uses a long-standing HTTPS connection to ensure your device is always kept up-to-date with new messages. As new items arrive in your
Inbox, Exchange ActiveSync notifies your mobile device, which then initiates the synchronisation.
Exchange ActiveSync allows for control over mobile devices using policies that
define security settings such as password requirements and attachment downloads. You create this policy using the either the EMC or EMS and apply it
to specific or a set of mobile users. You can also set a default policy which will be applied to all new mailboxes created. Note that a user can only be assigned
a single policy at a time.
Complete Exercise 12.1 in LAB 12 of the prescribed lab manual using the configuration information below. Take note of any
addenda/changes listed and which steps you must and must not complete.
Exercise 12.1
Complete Steps 1–26.

Exchange Server | V2.0 | April 2014 Page 110 of 125
12.2 Unified messaging
Unified messaging (UM) in Exchange Server integrates voicemail and
incoming faxes with your email services. A UM server provides the following functionality:
Retrieval of voicemail through inboxes. Outlook Voice Access (OVA) – This enables users to access their mailbox
and listen to their email using a voice user interface (VUI) such as a telephone, cellphone, or an Internet solution such as Skype.
Calendar access via a phone connection. Out-of-office messages in voicemail via a phone connection.
Faxes can be accessed via Outlook. Auto Attendant – With this feature, you can set an automatic interactive
voice system to respond to external calls that are dialling into your organisation’s telephone number. You can configure this automated
operator to provide spoken menus (for example, “Press 1 for Accounts”) and global address list directory lookups (for example, “whom would you
like to contact”) to answer any incoming calls.
A UM server must be deployed on the internal network and must have a
reliable, high-speed connection to Mailbox servers, domain controllers and global catalog servers. Additionally, to connect the UM server to the phone
system, an IP-PBX (Public Branch Exchange) or VoIP gateway device is required.
Complete Exercise 12.2 in LAB 12 of the prescribed lab manual using the configuration information below. Take note of any
addenda/changes listed and which steps you must and must not complete.
Exercise 12.2
Complete Steps 1–36.
In Step 32, specify a PIN that is six or more digits in length (e.g. 449123) in the Manually specify PIN dialog box and click Next. This is because the
test UM mailbox policy requires a minimum PIN length of six characters. This can be changed in the properties of the test UM mailbox policy.

Exchange Server | V2.0 | April 2014 Page 111 of 125
12.3 Textbook review questions
Complete the Knowledge Assessment section for Lesson 12 on
pages 544–545 of the prescribed textbook. Complete the review questions and case scenarios on page 546 in the spaces
provided.
Question 1:
Question 2:
Scenario 12-1: Comparing Smartphone Technologies
Scenario 12-2: Configuring a PBX for Unified Messaging
Signed by lecturer: ______________
Exchange Server | V2.0 | April 2014 Page 112 of 125
Unit 13 – High Availability
At the end of this unit you will be able to:
Understand high availability within your Exchange
infrastructure. Define local continuous replication.
Define cluster continuous replication. Provide high availability for Mailbox role servers by
configuring local continuous replication and cluster continuous replication.
Define standby continuous replication. Define single copy clusters.
Explain how to provide high availability for non-Mailbox role servers.
Microsoft Exchange Server 2007 Configuration textbook: Lesson 13, pages 547–579.
13.1 High availability for Mailbox servers
High availability (HA) prevents downtime, the period of time a system is
unavailable, by improving a system’s ability to resist failure or by adding redundancy so that other resources/systems can handle a given request. In
Exchange, high availability ensures that the necessary messaging services and
data remain available and usable.
A cluster is two or more servers that work together as a single unit. A failover cluster provides high availability by making application software and data
available on several servers linked together in a cluster configuration. If one server stops functioning, the failover process automatically shifts the workload
of the failed server to another server or multiple servers in the cluster with the aim of reducing the effect of the failover for end users. To increase the
reliability and availability of its messaging services, Exchange Server includes the following four features:
Local Continuous Replication (LCR) – This solution allows you to keep a
replicated copy of one or more mailbox databases on another hard disk that is installed on or connected to the same server that holds the active mailbox
database. Should a failure occur, the LCR solution gives you the option to
manually switch over to the passive copy of the mailbox database in a matter of minutes. This switchover period is unavailable time for the server.
Cluster Continuous Replication (CCR) – The CCR process is similar to how LCR functions; however, this automatic failover solution requires a
cluster to be set up on the network. CCR works by continuously updating a passive copy of the mailbox database on a passive server. The CCR process
is asynchronous in the sense that the logs are not copied to the passive server until they are closed by the active server but it is continuous in the

Exchange Server | V2.0 | April 2014 Page 113 of 125
sense that the log is immediately copied across to the passive server once it
has been closed by the active server. Standby Continuous Replication (SCR) – This solution complements the
other solutions by providing a means to replicate data from one server, whether or not it is in a cluster, to another server. It can be used, for
example, to replicate a storage group from a CCR or SCC cluster over to a remote location. Also, SCR supports multiple replication targets per storage
group. LCR and CCR support only one target per storage group (the passive copy).
Single Copy Cluster (SCC) – Two to eight cluster servers connect to the same shared storage (disk array or SAN) in an active/passive configuration.
When one server fails, the clustered resources automatically fail over to the other passive server(s) that will continue the operation. The two or more
clustered servers appear to computers as a single system. The disadvantage
of this solution is that it has a single point of failure, the SAN or disk array.
Data redundancy is the storing of the same data in two or more locations. Table 13 provides a summary of the types and features of the four high
availability solutions:
Table 13 – A summary of the high availability solutions
HA solution Replication/cluster Data
redundancy
Automatic
failover
Manual
failover
LCR Hard drive to hard drive replication
Yes No Yes
SCC Failover clustering No Yes No
CCR Failover clustering Yes Yes No
SCR Multiple server replication
Yes No Yes
Complete Exercise 13.1 in LAB 13 of the prescribed lab manual using the configuration information below. Take note of any addenda/changes listed and which steps you must and must not
complete.
Exercise 13.1
Complete Steps 1–34. Step 10 should read:
Ensure that Second Mailbox Database is selected in the Database name dialog box, click Browse next to the Local Continuous Replication
Exchange database file path dialog box, navigate to the C:\LCR directory, and click Save and then Next.
Step 20 should read: Click New to compose a new email. Click the To button, select Meg
Roombas, click To, and then click OK. The mailbox for Meg Roombas is within the second mailbox database in the third storage group on
Student01-A.

Exchange Server | V2.0 | April 2014 Page 114 of 125
Exercise 13.2
Do not complete this exercise.
13.2 Textbook review questions
Complete the Knowledge Assessment section for Lesson 12 on pages 547–579 of the prescribed textbook. Complete the review
questions and case scenarios on pages 578–579 in the spaces provided.
Question 1:
Question 2:
Scenario 12-1: Creating a High Availability Strategy
Scenario 12-2: Researching High Availability Technologies
Signed by lecturer: ______________

Exchange Server | V2.0 | April 2014 Page 115 of 125
Addenda
Page 124 (Lesson 4)
Change
The last sentence in the paragraph under the ‘Modifying the default storage groups and databases’ section at the bottom of the page states:
If you are running the Enterprise edition of Exchange Server
2007, this public folder database will be stored in a separate storage group on the hard disk called Second Storage Group
(%systemroot%\Program Files\Exchange Server\Mailbox\First
Storage Group).
To
If you are running the Enterprise edition of Exchange Server
2007, this public folder database will be stored in a separate storage group on the hard disk called Second Storage Group
(%systemroot%\Program Files\Exchange Server\Mailbox\Second Storage Group).
Page 196 (Lesson 5)
It states in the first paragraph that you can also use the Enable-Mailbox
cmdlet in the Exchange Management Shell to mail enable an existing AD user
and then gives an example that states that you could run the Enable-
MailUser cmdlet. Please note the difference between the Enable-Mailbox and
the Enable-MailUser cmdlets:
Enable-Mailbox – This cmdlet mailbox enables an existing AD user. It creates
additional mailbox attributes on the existing user object in Active Directory. When the user logs on to a mailbox or receives an email message, a mailbox is
created in Exchange for it.
Enable-MailUser – This cmdlet mail enables an existing AD user by adding Exchange attributes to the user account. This cmdlet does not configure a
mailbox for the user. The user is only given an identity, alias and external email address where it will receive and view any messages sent by users
within the organisation.
NOTE The changes in this addendum apply to the MOAC Microsoft Exchange Server 2007 Configuration textbook.

Exchange Server | V2.0 | April 2014 Page 116 of 125
Therefore, the ‘Enable-Mailbox’ mentioned in the first paragraph should be
‘Enable-MailUser’.
The Enable-MailUser –Identity 'octavius.net/East/Kelly Armstrong' –Alias 'kelly.armstrong' –ExternalEmailAddress 'karmstrong@mips-
in.com' command shown on this page is correct.
Page 207 (Lesson 5)
‘Add-DistributionGro-upMember’ should be ‘Add-DistributionGroupMember’.
Page 247 (Lesson 6)
‘Move-OfflineAddress Book’ should be ‘Move-OfflineAddressBook’.
‘Update-OfflineAddress Book’ should be ‘Update-OfflineAddressBook’.
‘Remove-OfflineAddress Book’ should be ‘Remove-OfflineAddressBook’.
Page 252 (Lesson 6)
‘Remove-EmailAddress Policy’ should be ‘Remove-EmailAddressPolicy’.

Exchange Server | V2.0 | April 2014 Page 117 of 125
Unit 14 – Theory and Practical Examination
14.1 Theory examination
The examination will be made up of multiple choice and true or false questions from all the units of the study guide and prescribed textbook. The examination
counts for 70% of the final mark for this course. It is essential to complete the
questions set out at the end of every lesson in the Exchange Server textbook provided. These questions are good preparation for the examination.
14.2 Practical examination
Note the following about the practical examination:
You will not be required to install any operating system, configure networking or install AD, DS or DNS.
You will, however, be required to configure the Mailbox, CAS, Hub Transport roles, and install, configure and synchronise the Edge Transport server role
and enable all these roles to communicate and function correctly. You will be required to configure the Exchange Server infrastructure as well
as perform administration tasks via the Exchange Management Console and the Exchange Management Shell.
Be sure to read the examination specifications very carefully. Ensure that you have a sound comprehension of all the exercises in all the
units throughout this study guide. Practise doing the exercises in this study guide and the prescribed lab
manual over and over again. They are guaranteed to help you attain a pass for the practical.
The practical counts for 30% of the final mark for this course.

Exchange Server | V2.0 | April 2014 Page 118 of 125
Bibliography
Websites
www.computerperformance.co.uk
www.exchangepedia.com www.exclusivelyexchange.com
www.msexchange.org http://blogs.technet.com/b/exchange/
www.petri.co.il
Books
Stidley, J. 2009. MCTS: Microsoft Exchange Server 2007 Configuration
Study Guide: Exam 70-236. Indianapolis: Wiley Publishing, Inc. Microsoft Official Academic Course. 2009. 70-646 Windows Server 2008
Administrator. John Wiley & Sons, Inc.

Exchange Server | V2.0 | April 2014 Page 119 of 125
Exchange Server – Exercise Checklist
EXSCC-10 V2.0
Learner:
_________________________________
Start date:
_____________________
Learner please note that unless ALL the practical exercises have been signed
off by a lecturer, you will NOT be allowed to book for the Exchange Server examination.
Date Signature
Unit 1 Exercises
Unit 2 Exercises
Unit 3 Exercises
Unit 4 Exercises
Unit 5 Exercises
Unit 6 Exercises
Unit 7 Exercises
Unit 8 Exercises
Unit 9 Exercises
Unit 10 Exercises
Unit 11 Exercises
Unit 12 Exercises
Unit 13 Exercise

Exchange Server | V2.0 | April 2014 Page 120 of 125
Exchange Server – Evaluation Form
EXSCC-10 V2.0
How would you evaluate the Exchange Server study guide? Place a or in
one of the five squares that best indicates your choice. Your response will help
us to improve the quality of the study guides and courses, and will be much appreciated.
Very poor Poor Fair Good Excellent
The study guide is clear and understandable.
The text material is clear and understandable.
The exercises help you to grasp the course material.
You know what to expect in the examination.
The practical exercises test your knowledge and
ability.
Your lecturer was able to help you.
What did you most enjoy?
What did you least enjoy?
General comments (what would you add, leave out, etc.).
Please note any errors that you found in the study guide.
Campus: Lecturer: Date:
Thank you for completing the evaluation form. Please remove this evaluation
form and return it to your lecturer.

Exchange Server | V2.0 | April 2014 Page 121 of 125
Bedfordview Campus
1st Floor, 14 Skeen Boulevard
Bedfordview, 2008
P.O. Box 1389, Bedfordview, 2008
Tel: +27 (0)11 450 1963/4, Fax: +27 (0)86 686
4950
Email: [email protected]
Bloemfontein Campus
Tourist Centre, 60 Park Avenue,
Willows, Bloemfontein, 9301
P.O. Box 1015, Bloemfontein, 9300
Tel: +27 (0)51 430 2701, Fax: +27 (0)51 430 2708
Email: [email protected]
Cape Town Campus
The Brookside Building, 11 Imam Haron Street
(old Lansdowne Road), Claremont, 7708
P.O.Box 2325, Clareinch, 7740
Tel: +27 (0)21 674 6567, Fax: +27 (0)21 674
6599
Email: [email protected]
Durban Campus
59 Adelaide Tambo Drive (old Kensington Drive)
Durban North, 4067
P.O. Box 20251, Durban North, 4016
Tel: +27 (0)31 564 0570/5, Fax: +27 (0)31 564
8978
Email: [email protected]
Durbanville Campus
Kaapzicht, 9 Rogers Street, Tyger Valley, 7530
P.O. Box 284, Private Bag X7
Tyger Valley, 7536
Tel: +27 (0)21 914 8000, Fax: +27 (0)21 914
8004
Email: [email protected]
East London Campus
12 Stewart Drive, Berea, East London, 5241
PostNet Suite 373
Private Bag X9063, East London, 5200
Tel: +27 (0)43 721 2564, Fax: +27 (0)43 721 2597
Email: [email protected]
Nelspruit Campus
50 Murray Street
Nelspruit, 1200
P.O. Box 9497, Sonpark, Nelspruit, 1206
Tel: +27 (0)13 755 3918, Fax: +27 (0)13 755
3918
Email: [email protected]
Port Elizabeth Campus
Building 4, Ascot Office Park
Cnr Ascot & Conyngham Roads, Greenacres,
6065
P.O. Box 40049, Walmer, 6065
Tel: +27 (0)41 374 7978, Fax: +27 (0)41 374 3190
Email: [email protected]
Potchefstroom Campus
16 Esselen Street
Cnr Esselen Street & Steve Biko Avenue
Die Bult, Potchefstroom, 2531
P.O. Box 19900, Noordbrug, 2522
Tel: +27 (0)18 297 7760, Fax: +27 (0)18 297
7783
Email: [email protected]
Pretoria Campus
Menlyn Corporate Park, Building A
175 Corobay Avenue (Cnr Garsfontein), Pretoria,
0181
PostNet Suite A147, Private Bag X18
Lynnwood Ridge, 0040
Tel: +27 (0)12 348 3060, Fax: +27 (0)12 348 3063
Email: [email protected]
Randburg Campus
6 Hunter Avenue, Cnr Bram Fischer Drive
Ferndale, Randburg, 2194
P.O. Box 920, Randburg, 2125
Tel: +27 (0)11 789 3178, Fax: +27 (0)11 789
4606
Email: [email protected]
Vanderbijlpark Campus
Building 2, Cnr Rutherford & Frikkie Meyer Blvds
Vanderbijlpark, 1911
P.O. Box 6371, Vanderbijlpark, 1900
Tel: +27 (0)16 931 1180, Fax: +27 (0)16 933 1055
Email: [email protected]
Group Head Office
Fourways Manor Office Park, Building 1
Cnr Roos & Macbeth Streets, Fourways, 2191
P.O. Box 1398, Randburg, 2125
Tel: +27 (0)11 467 8422, Fax: +27 (0)11 467
6528
Website: www.cti.ac.za