2.5 reply workflow occur in the following cases. another research classification or an input sheet...
TRANSCRIPT

SLIMOFFICE
42 All Rights Reserved, Copyright © FUJITSU FIP Corporation 2010
2.5 Reply Workflow "Reply" means an operation where the person in charge in the target
department requested to input data registers an input request file with the system
from the [Prepare Reply] screen. The registered data will be fixed at the end of the
application/approval workflow. This section describes a series of procedures for
"registering a request file," "making a reply application," and "approving a reply."
Reply workflow
Selecting the target research for a reply
2.5.1
Registering a reply file 2.5.2
Registering an attached file 2.5.5
Setting an approval route 2.5.7
Forwarding an application 2.5.8
Prepare Reply
Apply
: Optional process
Fixing reply data 2.5.3
Replying with representative input 2.5.4
Troubleshooting 2.5.6
Reviewing reply data and calling back an
application 2.5.9
Approve
Confirming application data
2.5.10
Rejecting an application and canceling approval
2.5.12
Representative approval 2.5.13
Approving a reply application 2.5.11 : Optional
flow

SLIMOFFICE
43 All Rights Reserved, Copyright © FUJITSU FIP Corporation 2010
2.5.1 Selecting the target research for a reply After data input to the file downloaded from the [Receive Research] screen
is completed, select the registered research classification of the reply data on
the [Prepare Reply] screen to display a file registration screen.
(1) Click [Prepare Reply] from the menu buttons.
- [List of received research] displays a summary of data input requests to the
department to which the login user belongs.i
(2) Click the [Display] button of the target request for a reply.
- A registration screen for request files and attached files appears on the right
side of the screen.
[Register] button: Displays the [Register reply files] dialog box.
Request files/Reply files: Displays the file names of request files.ii
Registration date/Registering user: Displays registration dates
(yyyy/mm/dd) and the names of the people in charge.
Reply from other department: For any request from the department of
reply to another departmentiii, a one-word link shows the reply status for
i Among the research requested of one's own department, all the research that has not completed final approval for a reply or whose reply deadline date has not yet passed is displayed. ii After registration of a reply file, a link to the registered reply file is displayed here too. iii The research requested of one's own department can be requested as secondary to another

SLIMOFFICE
44 All Rights Reserved, Copyright © FUJITSU FIP Corporation 2010
the request destination ([Unfinished]: no reply made; [Finished]: reply
made).
You can confirm the details by opening the [Request to another department
/ Confirm reply data] window from the above link.iv
Add attached files: You can attach documents to reply files.
department on the [Request Research] screen. iv This screen is the same as the screen showing progress by research classification on the [Progress] screen. For details, see "2.6 Progress Check."

SLIMOFFICE
45 All Rights Reserved, Copyright © FUJITSU FIP Corporation 2010
2.5.2 Registering a reply file Upload a request file (reply file) that has input data and was saved on the
PC of the person in charge of the reply.
(1) Click the [Register] button in the row of the same form as the reply file to
be uploaded, which is shown in the [Request files/Reply files] column, on the
right side of the screen.
- The [Register reply files] dialog box appears.
(2) Click the [Browse…] button.
- The [Choose File] dialog box appears.
(3) Click [Desktop] on the left side of the window.
SLIMOFFICE
46 All Rights Reserved, Copyright © FUJITSU FIP Corporation 2010
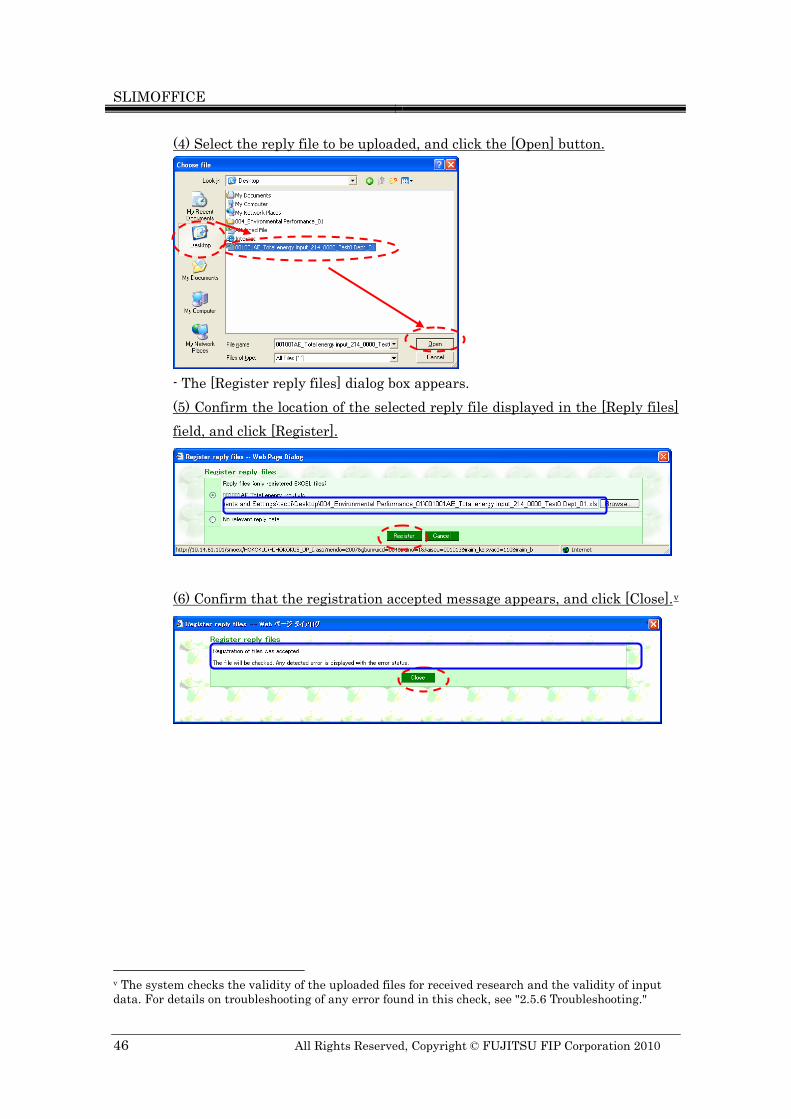
(4) Select the reply file to be uploaded, and click the [Open] button.
- The [Register reply files] dialog box appears.
(5) Confirm the location of the selected reply file displayed in the [Reply files]
field, and click [Register].
(6) Confirm that the registration accepted message appears, and click [Close].v
v The system checks the validity of the uploaded files for received research and the validity of input data. For details on troubleshooting of any error found in this check, see "2.5.6 Troubleshooting."

SLIMOFFICE
47 All Rights Reserved, Copyright © FUJITSU FIP Corporation 2010
- The [Request files/Reply files] column displays the name of the registered
reply file as a link.vi,vii
- The [Registration date/Registering user] column displays the registration
date and the name of the registering user.
<Reference> No data for a reply
For a request file that has no data for a reply from your own
department, you can skip the upload process for the empty file by
selecting [No relevant reply data].
- In step (2) on the previous page, select [No relevant reply data], and click
[Register].
- Confirm that the process completed message appears, and click [Close].
vi To confirm the registered reply file data, click the link of the file name to download the registered file. vii For replies for multiple files, repeat steps (1) to (6).

SLIMOFFICE
48 All Rights Reserved, Copyright © FUJITSU FIP Corporation 2010
- "No relevant reply data" appears in the [Request files/Registering user]
column on the right side of the [Prepare Reply] screen.

SLIMOFFICE
49 All Rights Reserved, Copyright © FUJITSU FIP Corporation 2010
2.5.3 Fixing reply data The reply preparation process is completed with the upload of a reply file
and attached file. Fix the reply data, and continue to the application
process.viii
ant reply data] is
(1) Confirm that the reply file is registered or [No relev
selected for all request files on the [Prepare Reply] screen.
(2) Confirm that the [Registration status] column displays "Finished."
( umn.3) Click [Preparations] in the [Prepare reply] col
- The application screen appears automatically.
viii For the process when the [Preparations] button is unavailable (cannot be clicked), see "2.5.6 Troubleshooting."

SLIMOFFICE
50 All Rights Reserved, Copyright © FUJITSU FIP Corporation 2010
2.5.4 Replying with representative input The person in charge in the request source department registers the reply
file for the target department of representative input on the [Prepare Reply]
screen.
Selecting the target department of representative input
(1) Click [Prepare Reply] from the menu buttons.
- "(representative exists)" is displayed at [Target department].
(2) Select the target department of representative input from the [Target
department] list box.
The research for the target department selected for representative input
.1 Selecting the target research for a
-
appears in the [Target department] list.
- For the subsequent operations, see "2.5
reply" and "2.5.2 Registering a reply file."ix
ix Reply file registration must be completed for all target departments of representative input displayed in the [Target department] list box. If there is no reply for one or more departments, the [Preparations] button is unavailable (cannot be clicked).
SLIMOFFICE
51 All Rights Reserved, Copyright © FUJITSU FIP Corporation 2010
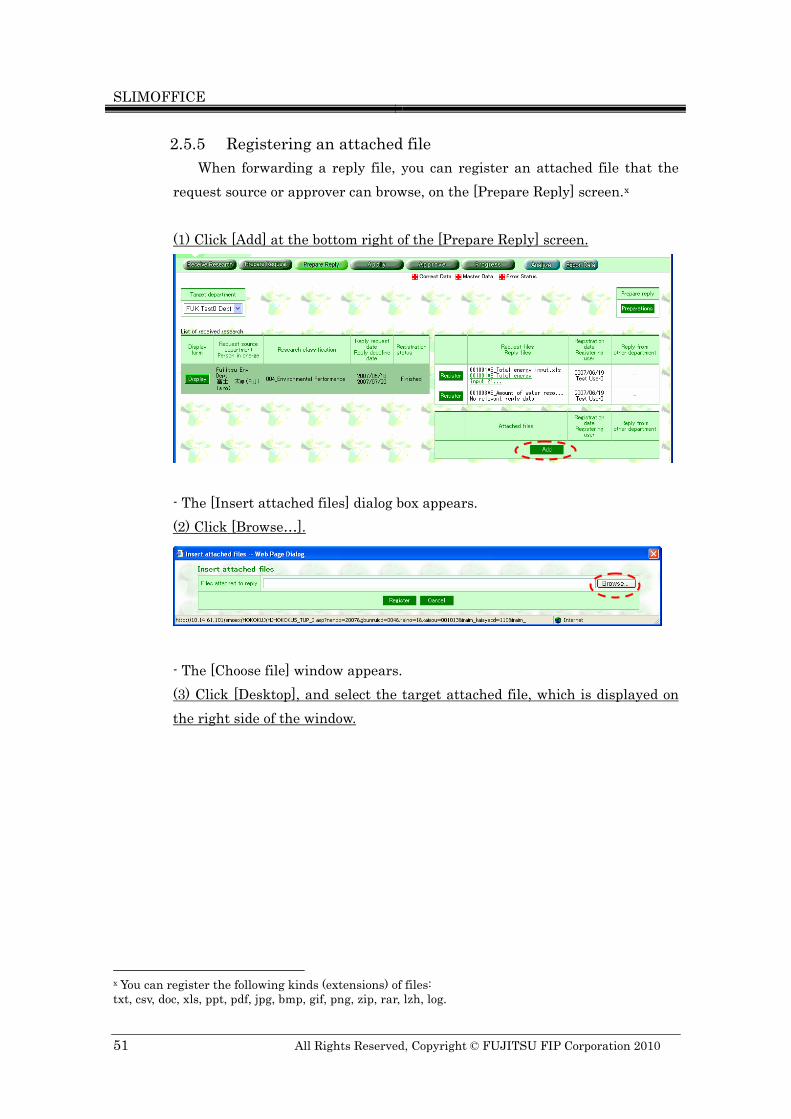
2.5.5 Registering an attached file When forwarding a reply file, you can register an attached file that the
request source or approver can browse, on the [Prepare Reply] screen.x
(1) Click [Add] at the bottom right of the [Prepare Reply] screen.
- The [Insert attached files] dialog box appears.
(2) Click [Browse…].
- The [Choose file] window appears.
(3) Click [Desktop], and select the target attached file, which is displayed on
the right side of the window.
x You can register the following kinds (extensions) of files: txt, csv, doc, xls, ppt, pdf, jpg, bmp, gif, png, zip, rar, lzh, log.

SLIMOFFICE
52 All Rights Reserved, Copyright © FUJITSU FIP Corporation 2010
(4) Click [Open].
- The [Insert attached files] dialog box appears.
(5) Confirm the location of the selected attached file displayed in the [Files
attached to reply] field, and click [Register].
(6) Confirm that the registration accepted message appears, and click [Close].
SLIMOFFICE
53 All Rights Reserved, Copyright © FUJITSU FIP Corporation 2010
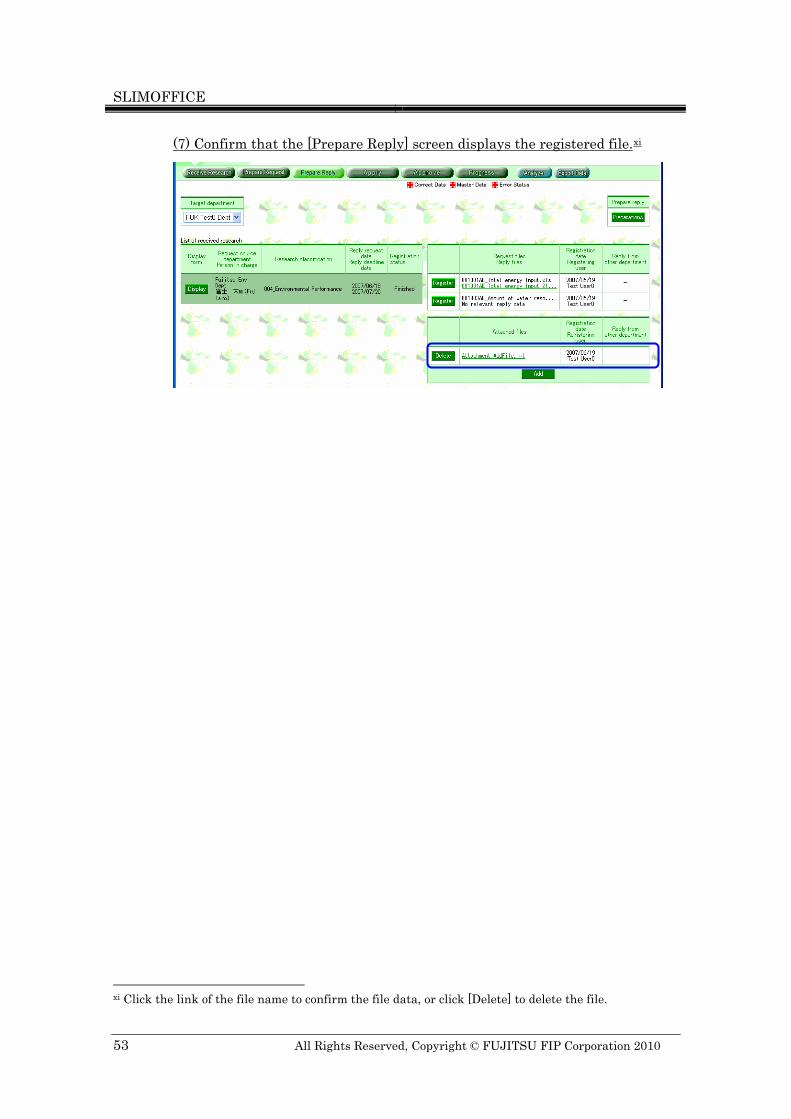
(7) Confirm that the [Prepare Reply] screen displays the registered file.xi
xi Click the link of the file name to confirm the file data, or click [Delete] to delete the file.

SLIMOFFICE
54 All Rights Reserved, Copyright © FUJITSU FIP Corporation 2010
2.5.6 Troubleshooting After the completion of reply settings, the [Preparations] button may be
unavailable (cannot be clicked) in the following cases.
1. File registration has not been completed.
The possible causes of the [Preparations] button being inactive (the button
cannot be clicked) on the [Prepare Reply] screen are as follows.
Cause 1: [No relevant reply data] is not selected for a file that has no reply
data.
Solution: Select [No relevant reply data] in the window opened by clicking the
[Register] button.
Cause 2: A reply file with a representative's data is not registered.
Solution: Select the target department of representative input in the [Target
department] list box, and register the reply data.
[No relevant reply data] is not selected.
[Preparations] is inactive.
[Preparations] is inactive.
"(representative exists)" is
displayed at [Target department].

SLIMOFFICE
55 All Rights Reserved, Copyright © FUJITSU FIP Corporation 2010
2. A reply file check is in progress.
The validity of data in the reply files registered on the [Register reply files]
screen is checked.
If you click the [Prepare Reply] button during this check, the following
message appears.
- A dialog box appears with a message about reply files being checked.
- The message "The reply files are being checked..." appears on the screen.
Solution: The message disappears from the screen when the check is
completed.
Wait a moment. After the message disappears, click [Preparations].
3. There is a reply file registration error.
If a registered reply file is insufficient, a registration error occurs.
- The [Request files/Reply files] column displays the file link in red letters.
A message indicating files are being checked appears.
It disappears automatically after the check is completed.
The reply file with the error is displayed in red letters.
"Error" appears.

SLIMOFFICE
56 All Rights Reserved, Copyright © FUJITSU FIP Corporation 2010
- The [Registration status] column displays "Error" in red letters.
- If you click [Preparations] when there is an error, an alert message appears,
and the process does not complete.
Solution: Follow these steps to correct the error, and click [Preparations]
again.
(1) Click the [Error Status] button.
- The [Error Status] screen appears.
(2) Click the [Display] button.
(1) Check the [Error Status] screen.

SLIMOFFICE
57 All Rights Reserved, Copyright © FUJITSU FIP Corporation 2010
- The [Display error details] window appears.
(3) Confirm the error details, and correct the reply file.
Errors occur in the following cases.
Another research classification or an input sheet for the last period
(previous month) or the previous year was input.
-> "A reply file to be registered is in an invalid format."
A file not downloaded from SLIMOFFICE is registered.
-> "The template file downloaded for receiving a research request was not
used for the reply."
An input number has the wrong number of digits.
-> "No more than 12 digits in the integer part of numeric data can be
saved."
A character string has been input into a numeric cell.
-> "A character string has been entered in a cell that accepts only numeric
values."
Many characters have been input into a remarks column, etc.
-> "No more than 2000 characters of string data can be saved."
(4) Register the corrected file again.xii
xii For details on how to register a reply file, see "2.5.1 Selecting the target research for a reply."
SLIMOFFICE
58 All Rights Reserved, Copyright © FUJITSU FIP Corporation 2010
2.5.7 Setting an approval route * If the application/approval workflow function is OFF, this operation is
not necessary.
Click the [Preparations] button on the [Prepare Reply] screen, and the
[Apply] screen appears. Confirm the reply data, set the approval route, and
forward the application to the approver on this screen to use the workflow
function.
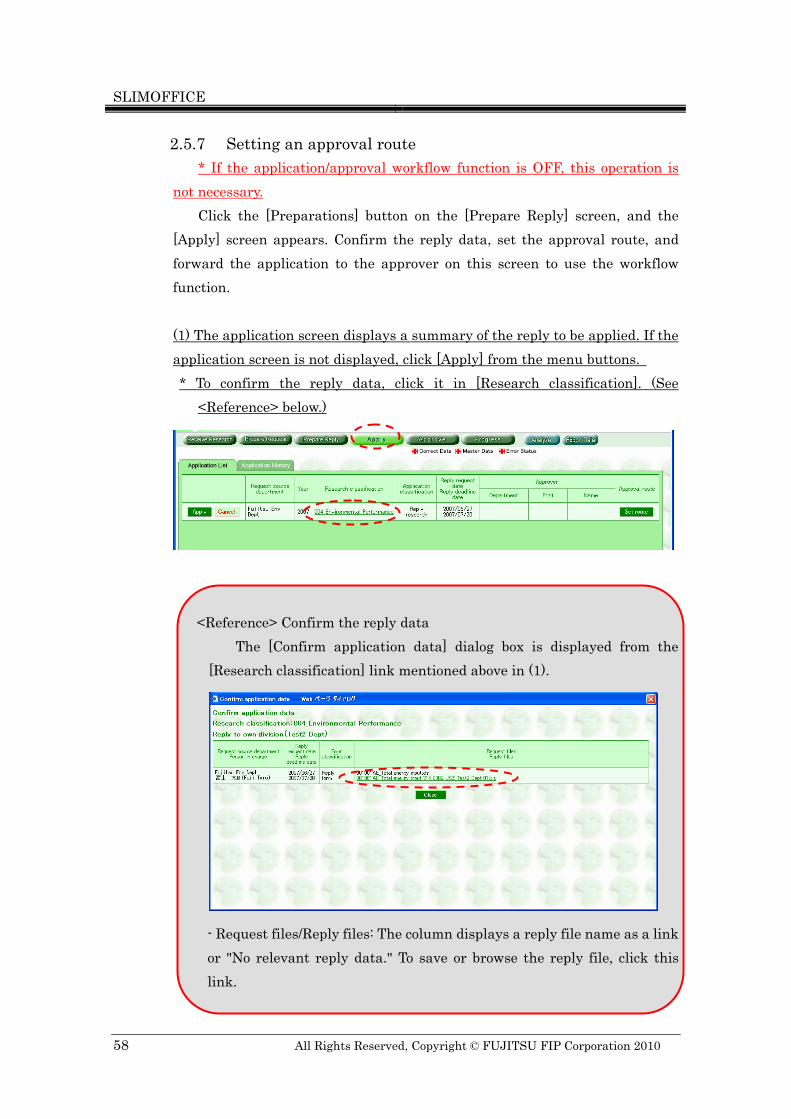
(1) The application screen displays a summary of the reply to be applied. If the
application screen is not displayed, click [Apply] from the menu buttons.
* To confirm the reply data, click it in [Research classification]. (See
<Reference> below.)
<Reference> Confirm the reply data
The [Confirm application data] dialog box is displayed from the
[Research classification] link mentioned above in (1).
- Request files/Reply files: The column displays a reply file name as a link
or "No relevant reply data." To save or browse the reply file, click this
link.

SLIMOFFICE
59 All Rights Reserved, Copyright © FUJITSU FIP Corporation 2010
- Attached files: You can save or browse the files attached by the person
in charge of the reply.
- Reply with data from the request destination department: The person
in charge of the reply can confirm the results of a further request to
another department. (Use the [Confirm reply] button to display the
nested [Confirm application data] dialog box of the request to another
department.)
(2) Click the [Set route] button.
(3) Specify an approver from the [Department] list box and [Name] list
box.xiii,xiv
- For selection of an approver, list boxes appear immediately beneath the
columns, and [-- Select --] appears in the list box of the [Name] column.xv
(4) Click [Set] to finish the setting.xvi
ick
xiii By default, the [Department] list box displays the applicant's affiliated department. xiv If approval by another user is not required, set the applicant as the approver. xv Up to five applicants can be set. xvi At least one approver must be set. After an approver is set, if a second approver is unnecessary, cl[Set] even though the bottom row displays [-- Select --].

SLIMOFFICE
60 All Rights Reserved, Copyright © FUJITSU FIP Corporation 2010
- The application screen appears, and the [Approver] column displays the
approver that was set in step (3).

SLIMOFFICE
61 All Rights Reserved, Copyright © FUJITSU FIP Corporation 2010
2.5.8 Forwarding an application After fixing an approval route, forward the application. If you set yourself
as an approver in the approval route settings, be sure to approve the
forwarded application according to the procedure described in "2.5.11
Approving a reply application."
(1) Click the [Apply] button.
- The [Apply reply] dialog box appears.
(2) Input comments to the approver in the comment field as needed. The
comments will be sent by e-mail.xvii
(3) Click the [Set] button. The application is forwarded to the next approver in
the route settings, and e-mail will be sent.
xvii Approval request mail to the approver is sent to the first approver immediately after an application is made.

SLIMOFFICE
62 All Rights Reserved, Copyright © FUJITSU FIP Corporation 2010
2.5.9 Reviewing reply data and calling back an application Use procedure 1 to review reply data before forwarding an application, and
use procedure 2 after forwarding an application to call back the application.
1. Reviewing reply data
(1) Click the [Cancel] button on the application screen.
- The application is canceled, and the window returns to the [Prepare Reply]
screen where [Preparations] was clicked before.xviii
2. Calling back an application after it was made and before final approval
(1) Click [Application History] to display the [Application History] screen.
(2) Click [Cancel] for the application to be called back.
- The applicant is returned to the previous state of the application made.
Concurrently, e-mail about the calling back of the application is sent to the
approver that the application was forwarded to, at the calling-back time.
xviii Correct the reply data on the [Prepare Reply] screen, and click [Preparations] again.
SLIMOFFICE
63 All Rights Reserved, Copyright © FUJITSU FIP Corporation 2010
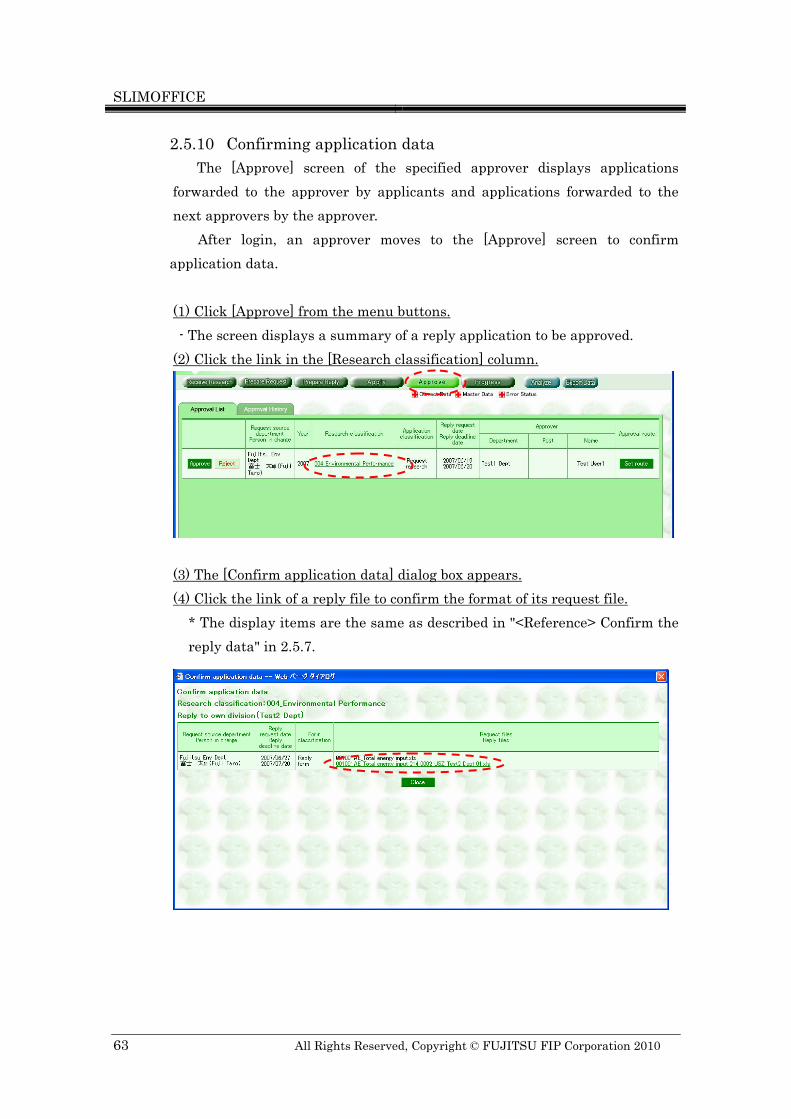
2.5.10 Confirming application data The [Approve] screen of the specified approver displays applications
forwarded to the approver by applicants and applications forwarded to the
next approvers by the approver.
After login, an approver moves to the [Approve] screen to confirm
application data.
(1) Click [Approve] from the menu buttons.
- The screen displays a summary of a reply application to be approved.
(2) Click the link in the [Research classification] column.
(3) The [Confirm application data] dialog box appears.
(4) Click the link of a reply file to confirm the format of its request file.
* The display items are the same as described in "<Reference> Confirm the
reply data" in 2.5.7.

SLIMOFFICE
64 All Rights Reserved, Copyright © FUJITSU FIP Corporation 2010
2.5.11 Approving a reply application An approver approves an application and forwards it to the next approver.
If the approver is the final approver, the reply data is fixed when the approval
is fixed.
(1) Click the [Approve] button.
(2) The [Approve reply data] dialog box appears. Input comments to the
approver in the comment field as needed.xix The comments will be sent by
e-mail.
(3) Click [Set]. (E-mail is sent to the applicant.)
xix If there are multiple approvers, the mail destination is the next approver and the comments are for the approver.
SLIMOFFICE
65 All Rights Reserved, Copyright © FUJITSU FIP Corporation 2010
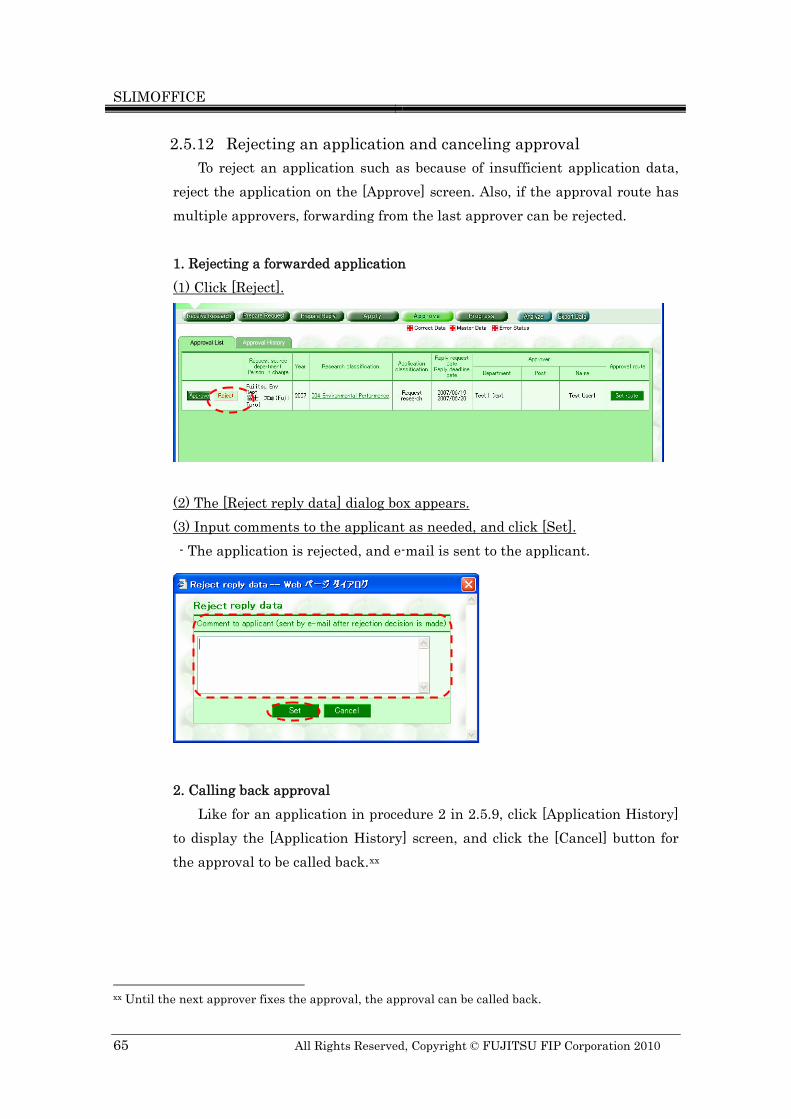
2.5.12 Rejecting an application and canceling approval To reject an application such as because of insufficient application data,
reject the application on the [Approve] screen. Also, if the approval route has
multiple approvers, forwarding from the last approver can be rejected.
1. Rejecting a forwarded application
(1) Click [Reject].
(2) The [Reject reply data] dialog box appears.
(3) Input comments to the applicant as needed, and click [Set].
- The application is rejected, and e-mail is sent to the applicant.
2. Calling back approval
Like for an application in procedure 2 in 2.5.9, click [Application History]
to display the [Application History] screen, and click the [Cancel] button for
the approval to be called back.xx
xx Until the next approver fixes the approval, the approval can be called back.

SLIMOFFICE
66 All Rights Reserved, Copyright © FUJITSU FIP Corporation 2010
2.5.13 Representative approval If multiple approvers are set in the same department, this function is used
with the approval of the person in charge to give approval for business reasons
on behalf of another user belonging to the same department (thus skipping the
approval of the other user). If multiple approvers are not set in the same
department, this function cannot be used.
(1) Click [Set route].
(2) Check [Representative] on the right side of the [Set approval route (Set
route up to final approver)] dialog box.
- The approver in this operation becomes the representative of the approver's
own department, with subsequent approvers in the department no longer
displayed.
(3) Click [Set].xxi (The remaining operations are the same as in ordinary
approval.)
xxi “(Representative)” will appear at the end of the relevant name displayed in the “Name” column under [Approver] on the [Approval History] screen.