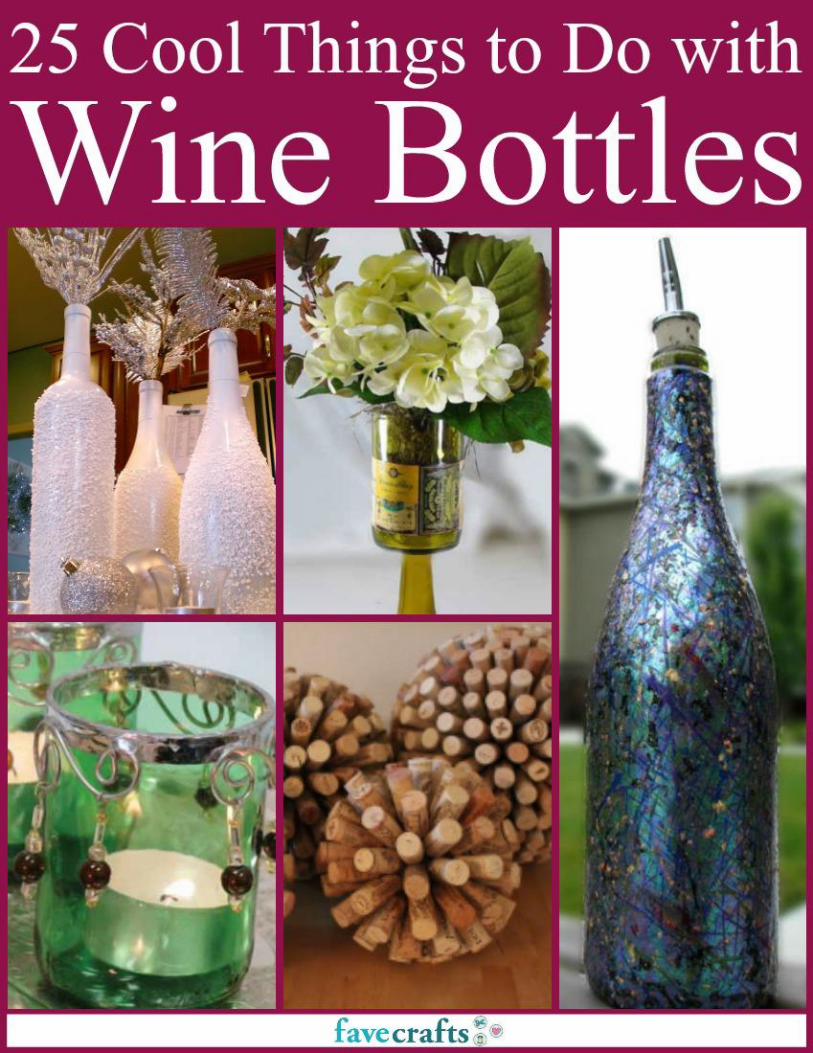
25 cool things to do with wine bottles - favecrafts.com
TRANSCRIPT
25 Cool Things to Do with Wine Bottles
Find great craft projects at www.FaveCrafts.com. 2
25 Cool Things to Do with Wine Bottles
Copyright 2013 by Prime Publishing LLC
All rights reserved. No part of this book may be reproduced or transmitted in any form or by any means,
electronic or mechanical, including photocopying, recording, or by any information storage or retrieval
system, without written permission from the publisher, except in the case of brief quotations embodied
in critical articles and reviews.
Trademarks are property of their respective holders. When used, trademarks are for the benefit of the
trademark owner only.
Published by Prime Publishing LLC, 3400 Dundee Road, Northbrook, IL 60062 – www.primecp.com
Free Craft Projects
Free Crochet Projects Free Knitting Projects Free Holiday Craft Projects
Free Sewing Projects Free Quilt Projects Free Jewelry Projects
Free Christmas Crafts Free Kids’ Craft Projects Free Crochet Afghan Patterns
25 Cool Things to Do with Wine Bottles
Find great craft projects at www.FaveCrafts.com. 3
Letter from the Editors
Hello, Readers!
Looking for some creative ways to use up those old wine bottles? Well, you’re in luck! With your free
copy of 25 Cool Things to Do with Wine Bottles, you’ll find yourself inspired to create all kinds of bottle
and cork crafts. From beautiful indoor and outdoor décor to functional crafts that can help you stay
organized, these wine bottle crafts are a great way to work through that recycle bin and put those wine
bottles to work for you! So pour yourself a glass of vino and dive into creating one of these awesome
recycled projects.
You can find more craft projects, great activities for kids and decorating ideas at www.FaveCrafts.com.
Our eBooks, like all of our craft projects, are absolutely FREE. Please feel free to share with family and
friends and ask them to sign up at our website for free newsletters from FaveCrafts.com.
We hope you enjoy reading and creating!
Sincerely,
The Editors of FaveCrafts www.FaveCrafts.com www.FaveCraftsBlog.com
25 Cool Things to Do with Wine Bottles
Find great craft projects at www.FaveCrafts.com. 4
25 Cool Things to Do with Wine Bottles eBook Table of Contents
Crafting with Wine Bottles ............ 5
Tissue Wine Bottle Vases ............................... 5
Wine Bottle Topiary ....................................... 6
Snowball Wine Bottle Vases .......................... 9
Illuminated Wine Bottle ............................... 11
Faux Dichroic Glass Recycled Bottle ............ 12
Beaded Glass Votive Candle Holder ............. 15
Tuscan Grapes Wine Bottle.......................... 19
Tuscan Lights Candlesticks ........................... 21
Wine Bottle Candle Shelter .......................... 23
Hemp Wrapped Wine Bottle ....................... 26
Crafting with Wine Corks ............ 27
Wine Cork Balls ............................................ 27
Beaded Wine Cork Keychains ...................... 29
Wine Cork Sail Boats .................................... 31
Wine Cork Board .......................................... 32
Wine Cork Keychains ................................... 34
Wine Cork Apple Stamp ............................... 36
Quirky Cork Wedding Favors ....................... 37
Wine Bottle Accessories ................39
Holiday Party Bottle Accessories ................. 39
Better with Age Wine Bottle Cozy ............... 41
Steampunk Style Wine Stopper ................... 43
Christmas Wine Bottle Cover ...................... 45
Personalized Wine Bottle Wrap .................. 46
I Heart Wine Bottle Stopper ........................ 47
Buttoned Bottle Cozy ................................... 51
Wine Tasting Party Invite and Bottle Décor 54
25 Cool Things to Do with Wine Bottles
Find great craft projects at www.FaveCrafts.com. 5
Crafting with Wine Bottles
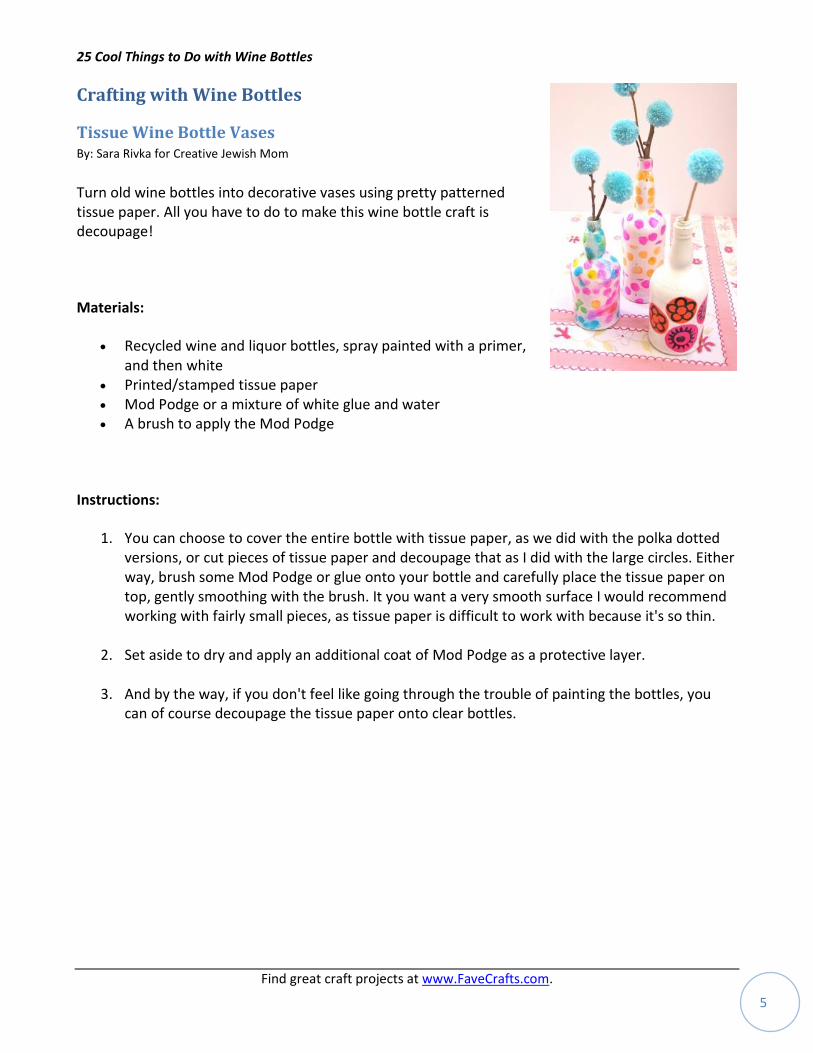
Tissue Wine Bottle Vases By: Sara Rivka for Creative Jewish Mom
Turn old wine bottles into decorative vases using pretty patterned tissue paper. All you have to do to make this wine bottle craft is decoupage!
Materials:
Recycled wine and liquor bottles, spray painted with a primer, and then white
Printed/stamped tissue paper Mod Podge or a mixture of white glue and water A brush to apply the Mod Podge
Instructions:
1. You can choose to cover the entire bottle with tissue paper, as we did with the polka dotted versions, or cut pieces of tissue paper and decoupage that as I did with the large circles. Either way, brush some Mod Podge or glue onto your bottle and carefully place the tissue paper on top, gently smoothing with the brush. It you want a very smooth surface I would recommend working with fairly small pieces, as tissue paper is difficult to work with because it's so thin.
2. Set aside to dry and apply an additional coat of Mod Podge as a protective layer.
3. And by the way, if you don't feel like going through the trouble of painting the bottles, you can of course decoupage the tissue paper onto clear bottles.
25 Cool Things to Do with Wine Bottles
Find great craft projects at www.FaveCrafts.com. 6
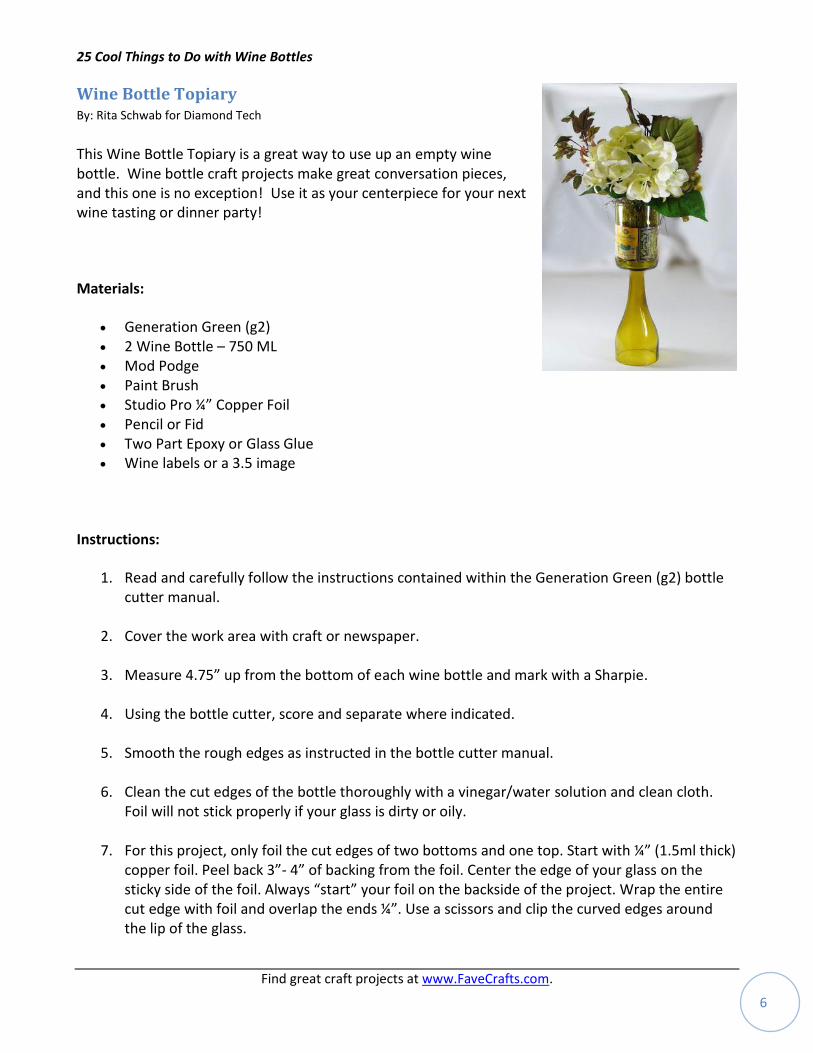
Wine Bottle Topiary By: Rita Schwab for Diamond Tech
This Wine Bottle Topiary is a great way to use up an empty wine bottle. Wine bottle craft projects make great conversation pieces, and this one is no exception! Use it as your centerpiece for your next wine tasting or dinner party!
Materials:
Generation Green (g2) 2 Wine Bottle – 750 ML Mod Podge Paint Brush Studio Pro ¼” Copper Foil Pencil or Fid Two Part Epoxy or Glass Glue Wine labels or a 3.5 image
Instructions:
1. Read and carefully follow the instructions contained within the Generation Green (g2) bottle cutter manual.
2. Cover the work area with craft or newspaper.
3. Measure 4.75” up from the bottom of each wine bottle and mark with a Sharpie.
4. Using the bottle cutter, score and separate where indicated.
5. Smooth the rough edges as instructed in the bottle cutter manual.
6. Clean the cut edges of the bottle thoroughly with a vinegar/water solution and clean cloth. Foil will not stick properly if your glass is dirty or oily.
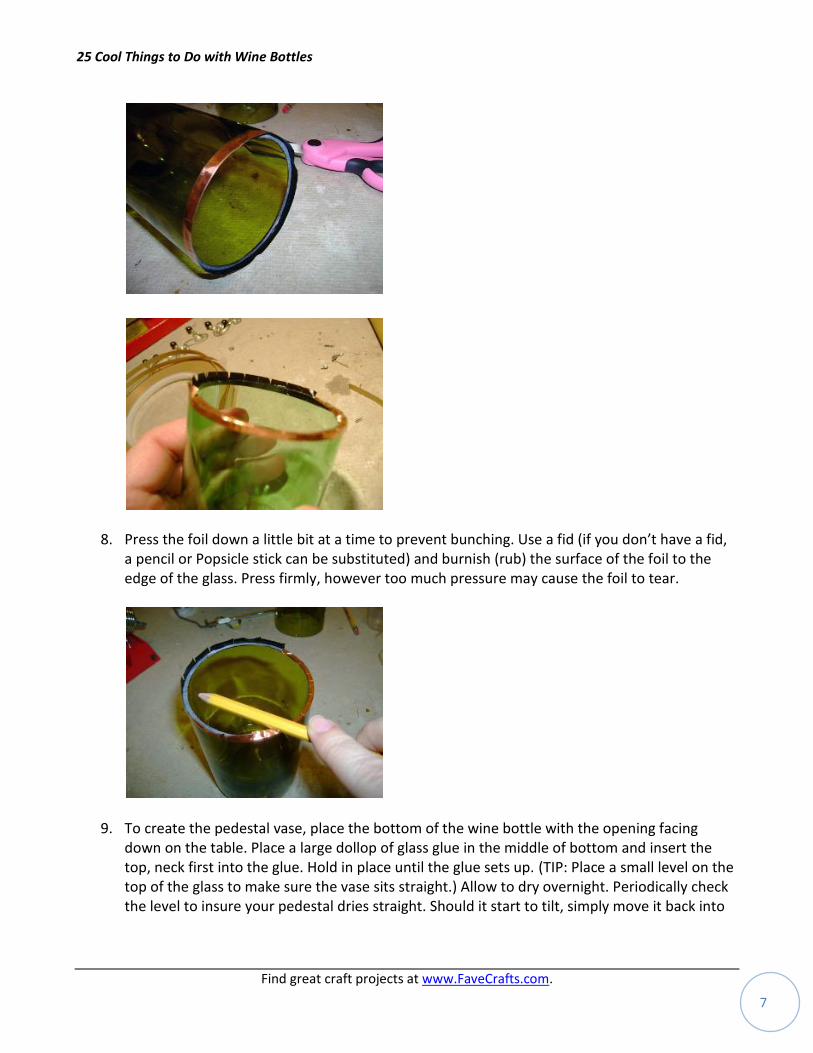
7. For this project, only foil the cut edges of two bottoms and one top. Start with ¼” (1.5ml thick) copper foil. Peel back 3”- 4” of backing from the foil. Center the edge of your glass on the sticky side of the foil. Always “start” your foil on the backside of the project. Wrap the entire cut edge with foil and overlap the ends ¼”. Use a scissors and clip the curved edges around the lip of the glass.
25 Cool Things to Do with Wine Bottles
Find great craft projects at www.FaveCrafts.com. 7
8. Press the foil down a little bit at a time to prevent bunching. Use a fid (if you don’t have a fid, a pencil or Popsicle stick can be substituted) and burnish (rub) the surface of the foil to the edge of the glass. Press firmly, however too much pressure may cause the foil to tear.
9. To create the pedestal vase, place the bottom of the wine bottle with the opening facing down on the table. Place a large dollop of glass glue in the middle of bottom and insert the top, neck first into the glue. Hold in place until the glue sets up. (TIP: Place a small level on the top of the glass to make sure the vase sits straight.) Allow to dry overnight. Periodically check the level to insure your pedestal dries straight. Should it start to tilt, simply move it back into
25 Cool Things to Do with Wine Bottles
Find great craft projects at www.FaveCrafts.com. 8
place and hold for a minute for the glue to set-up.
10. Next, either use your favorite wine label or print one from the Internet. Labels should be at least 3.50” tall.
11. To prevent the bottle from rolling while you decoupage, place it on an old pillow or a Ziploc bag filled with rice.
12. Apply the wine label to the bottom portion of the small vase and the top portion of the pedestal vase, using the decoupage medium. Once dry, apply several coats to the surface of the wine label, allowing each layer to dry before applying the next.
13. Allow to dry thoroughly before using.
14. You are now ready to tuck your favorite bouquet into each or insert a pillar candle to create a couple flickering two beauties.
25 Cool Things to Do with Wine Bottles
Find great craft projects at www.FaveCrafts.com. 9
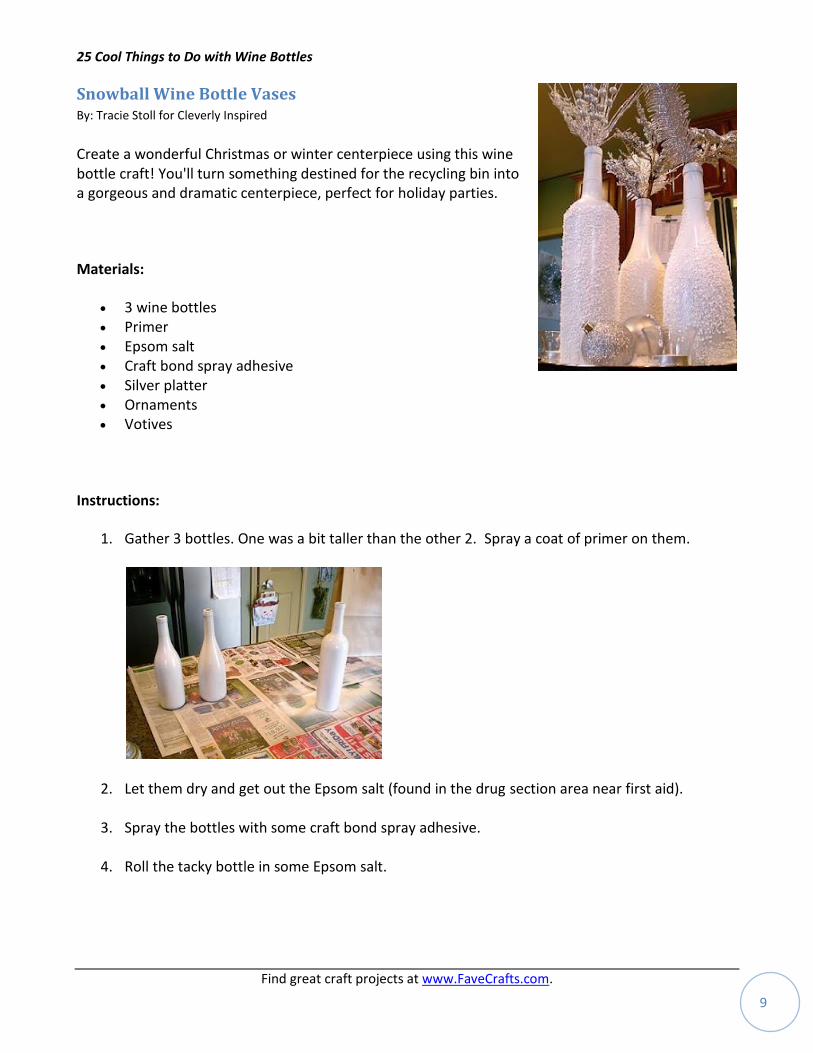
Snowball Wine Bottle Vases By: Tracie Stoll for Cleverly Inspired
Create a wonderful Christmas or winter centerpiece using this wine bottle craft! You'll turn something destined for the recycling bin into a gorgeous and dramatic centerpiece, perfect for holiday parties.
Materials:
3 wine bottles Primer Epsom salt Craft bond spray adhesive Silver platter Ornaments Votives
Instructions:
1. Gather 3 bottles. One was a bit taller than the other 2. Spray a coat of primer on them.
2. Let them dry and get out the Epsom salt (found in the drug section area near first aid).
3. Spray the bottles with some craft bond spray adhesive.
4. Roll the tacky bottle in some Epsom salt.
25 Cool Things to Do with Wine Bottles
Find great craft projects at www.FaveCrafts.com. 10
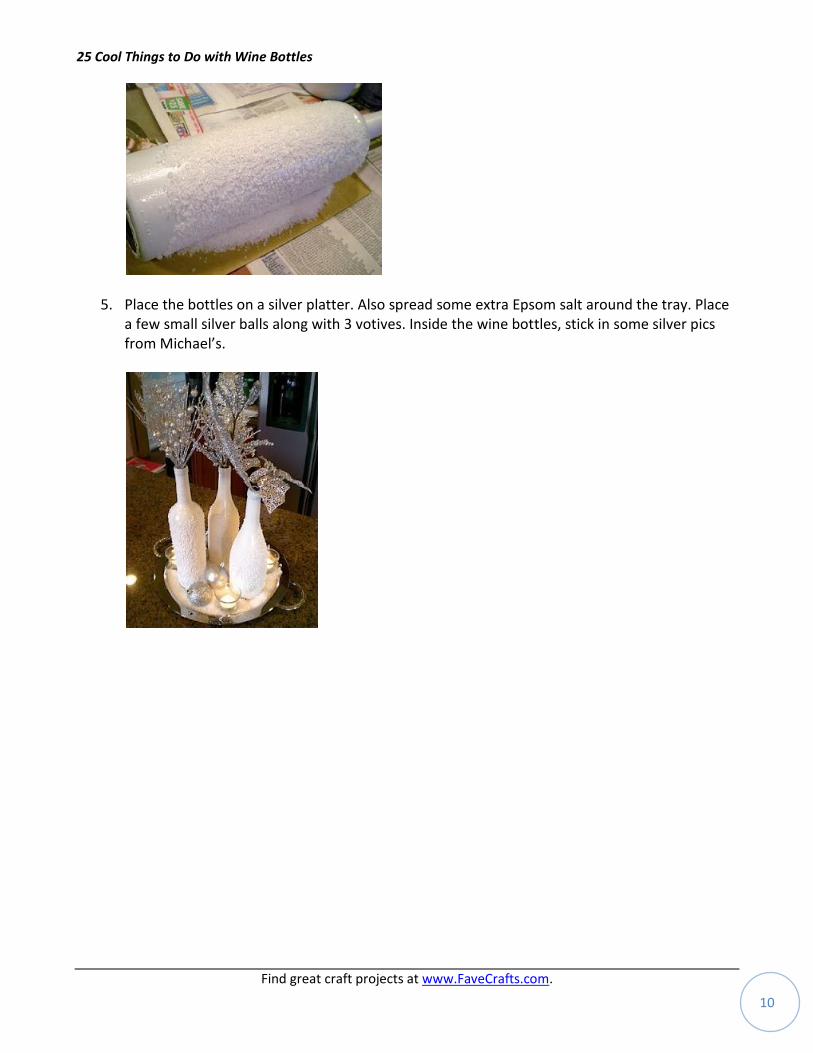
5. Place the bottles on a silver platter. Also spread some extra Epsom salt around the tray. Place a few small silver balls along with 3 votives. Inside the wine bottles, stick in some silver pics from Michael’s.
25 Cool Things to Do with Wine Bottles
Find great craft projects at www.FaveCrafts.com. 11
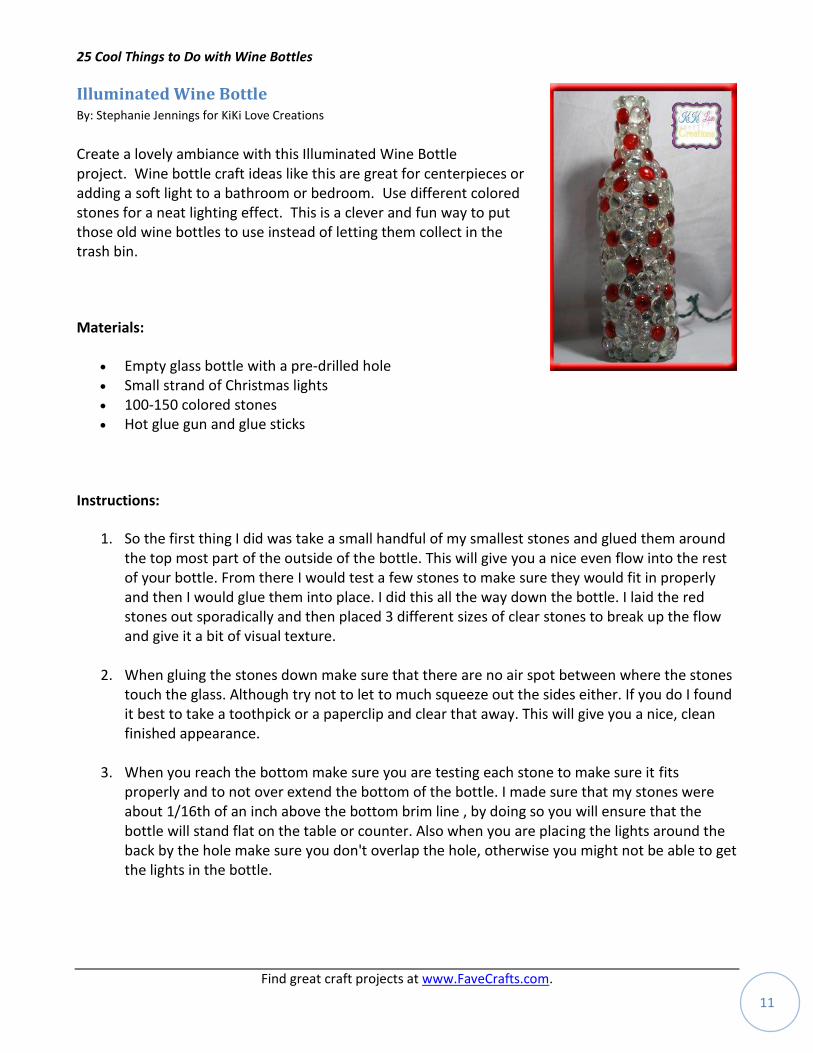
Illuminated Wine Bottle By: Stephanie Jennings for KiKi Love Creations
Create a lovely ambiance with this Illuminated Wine Bottle project. Wine bottle craft ideas like this are great for centerpieces or adding a soft light to a bathroom or bedroom. Use different colored stones for a neat lighting effect. This is a clever and fun way to put those old wine bottles to use instead of letting them collect in the trash bin.
Materials:
Empty glass bottle with a pre-drilled hole Small strand of Christmas lights 100-150 colored stones Hot glue gun and glue sticks
Instructions:
1. So the first thing I did was take a small handful of my smallest stones and glued them around the top most part of the outside of the bottle. This will give you a nice even flow into the rest of your bottle. From there I would test a few stones to make sure they would fit in properly and then I would glue them into place. I did this all the way down the bottle. I laid the red stones out sporadically and then placed 3 different sizes of clear stones to break up the flow and give it a bit of visual texture.
2. When gluing the stones down make sure that there are no air spot between where the stones touch the glass. Although try not to let to much squeeze out the sides either. If you do I found it best to take a toothpick or a paperclip and clear that away. This will give you a nice, clean finished appearance.
3. When you reach the bottom make sure you are testing each stone to make sure it fits properly and to not over extend the bottom of the bottle. I made sure that my stones were about 1/16th of an inch above the bottom brim line , by doing so you will ensure that the bottle will stand flat on the table or counter. Also when you are placing the lights around the back by the hole make sure you don't overlap the hole, otherwise you might not be able to get the lights in the bottle.
25 Cool Things to Do with Wine Bottles
Find great craft projects at www.FaveCrafts.com. 12
4. After all your stones are in place you can then put your lights in through the bottom hole. Set the bottle on your counter plug it in and the lights will bounce through the stones projecting parts of the shapes and colors anywhere near it.
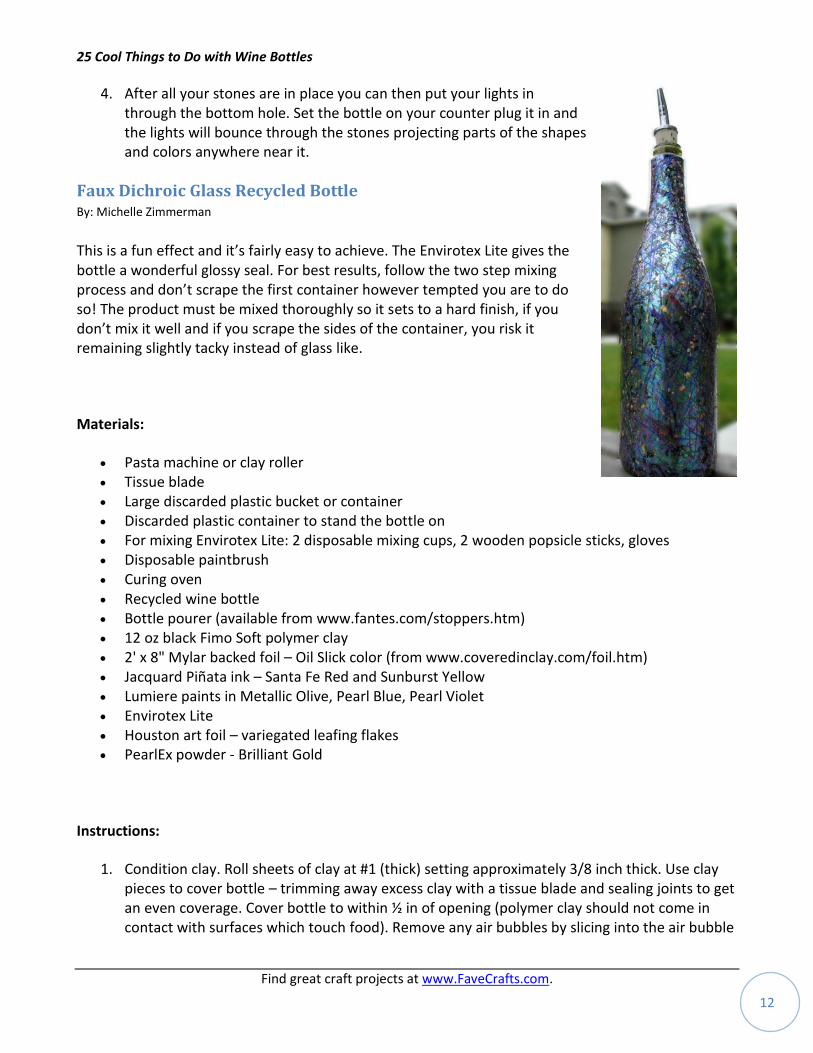
Faux Dichroic Glass Recycled Bottle By: Michelle Zimmerman
This is a fun effect and it’s fairly easy to achieve. The Envirotex Lite gives the bottle a wonderful glossy seal. For best results, follow the two step mixing process and don’t scrape the first container however tempted you are to do so! The product must be mixed thoroughly so it sets to a hard finish, if you don’t mix it well and if you scrape the sides of the container, you risk it remaining slightly tacky instead of glass like.
Materials:
Pasta machine or clay roller Tissue blade Large discarded plastic bucket or container Discarded plastic container to stand the bottle on For mixing Envirotex Lite: 2 disposable mixing cups, 2 wooden popsicle sticks, gloves Disposable paintbrush Curing oven Recycled wine bottle Bottle pourer (available from www.fantes.com/stoppers.htm) 12 oz black Fimo Soft polymer clay 2' x 8" Mylar backed foil – Oil Slick color (from www.coveredinclay.com/foil.htm) Jacquard Piñata ink – Santa Fe Red and Sunburst Yellow Lumiere paints in Metallic Olive, Pearl Blue, Pearl Violet Envirotex Lite Houston art foil – variegated leafing flakes PearlEx powder - Brilliant Gold
Instructions:
1. Condition clay. Roll sheets of clay at #1 (thick) setting approximately 3/8 inch thick. Use clay pieces to cover bottle – trimming away excess clay with a tissue blade and sealing joints to get an even coverage. Cover bottle to within ½ in of opening (polymer clay should not come in contact with surfaces which touch food). Remove any air bubbles by slicing into the air bubble
25 Cool Things to Do with Wine Bottles
Find great craft projects at www.FaveCrafts.com. 13
with a tissue blade or craft knife held at a 45 degree angle, press out the air and reseal the clay. It’s essential you get a good even coverage.
2. Apply the Mylar backed foil to the clay decorative side facing up. Rub the foil lightly but firmly with your hand repeatedly to warm the foil and then lift the plastic leaving the foil behind – foil adheres to clay with heat and friction. Continue and apply foil all over the bottle. Aim for just less than 100% coverage – small areas of black clay are desirable.
3. Using Lumiere paints and a small paintbrush, paint random long brushstrokes across the bottle. Cross the colors over each other – you’re aiming to give the project more dimension and color.
4. Using the Piñata inks, dip a brush into the inks and touch the brush to the surface of the bottle to make small dots. The inks spread on the clay so a little ink goes a long way.
5. Place the bottle into a cold oven preferably standing upright. Heat the oven to the required temperature with the bottle in it and then cure for the amount of time and at the temperature recommended by the manufacturer. Allow the bottle to cool in the oven before removing it.
6. Mix the Envirotex Lite according to manufacturer’s instructions. It works best if you pour both parts into one container and stir to mix. Pour the mix into a second container – do not scrape the excess off the sides of the first container when you do so. Continue to mix in the second container using a fresh stirring stick.
7. Stand the cured bottle on top of an upturned discarded container in the large bucket. It works best if the bottle is standing on a container slightly smaller than the bottom rim of the bottle. As the excess Envirotex Lite won’t be able to be removed from the containers, use containers you don’t mind damaging.
8. Add approximately 2 tablespoons of the variegated foil pieces and 1/8 teaspoon of gold PearlEx powder to the Envirotex Lite and mix in.
9. Place an old cork into the wine bottle to seal it. Working over the bucket, pour the Envirotex Lite over the surface of the bottle and work it in so it covers the surface of the bottle. This is best done with a disposable paint brush or a gloved hand. You must completely cover the bottle with the Envirotex Lite.
10. When the bottle is covered, stand it on the upside-down container in the bucket, remove the cork and leave it until set. Perching it on a container ensures that excess Envirotex Lite runs off the bottom of the bottle and won’t adhere to it.
25 Cool Things to Do with Wine Bottles
Find great craft projects at www.FaveCrafts.com. 14
11. When dry, remove the bottle from the bucket and remove the plastic container from the bottom of the bottle. If you need to smooth the bottom of the bottle, sand the excess set Envirotex Lite with coarse sandpaper. Insert the bottle pourer cork.
25 Cool Things to Do with Wine Bottles
Find great craft projects at www.FaveCrafts.com. 15
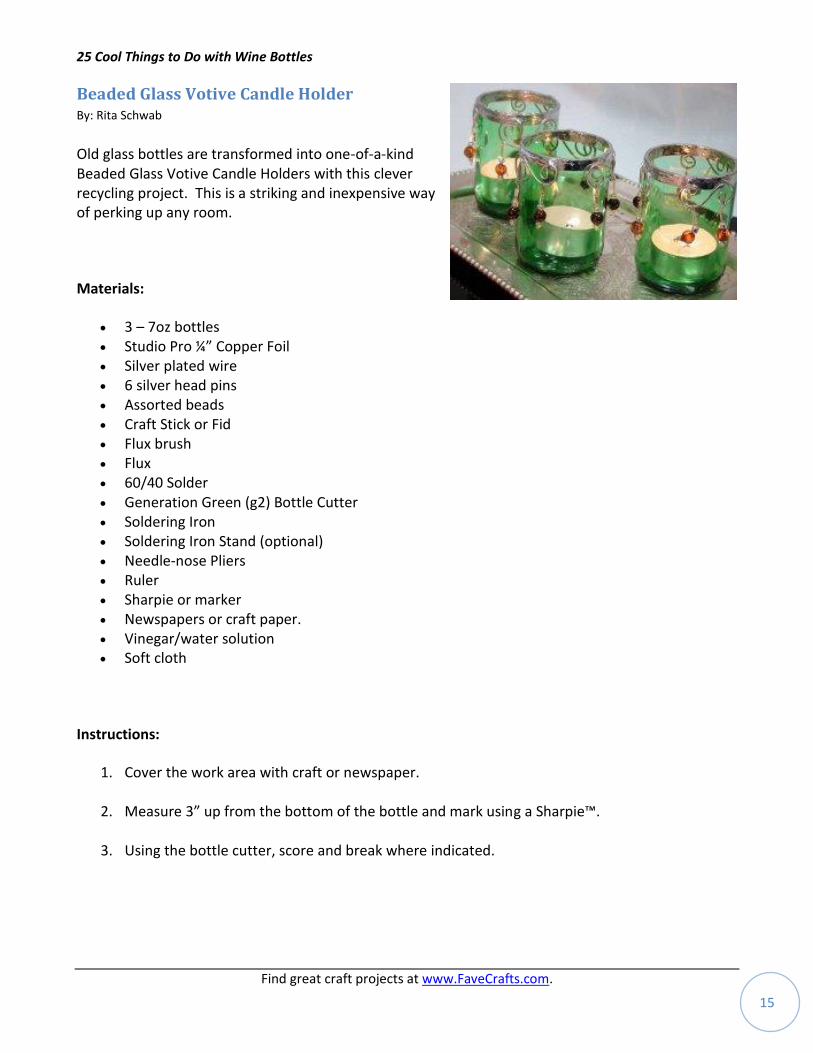
Beaded Glass Votive Candle Holder By: Rita Schwab
Old glass bottles are transformed into one-of-a-kind Beaded Glass Votive Candle Holders with this clever recycling project. This is a striking and inexpensive way of perking up any room.
Materials:
3 – 7oz bottles Studio Pro ¼” Copper Foil Silver plated wire 6 silver head pins Assorted beads Craft Stick or Fid Flux brush Flux 60/40 Solder Generation Green (g2) Bottle Cutter Soldering Iron Soldering Iron Stand (optional) Needle-nose Pliers Ruler Sharpie or marker Newspapers or craft paper. Vinegar/water solution Soft cloth
Instructions:
1. Cover the work area with craft or newspaper.
2. Measure 3” up from the bottom of the bottle and mark using a Sharpie™.
3. Using the bottle cutter, score and break where indicated.
25 Cool Things to Do with Wine Bottles
Find great craft projects at www.FaveCrafts.com. 16
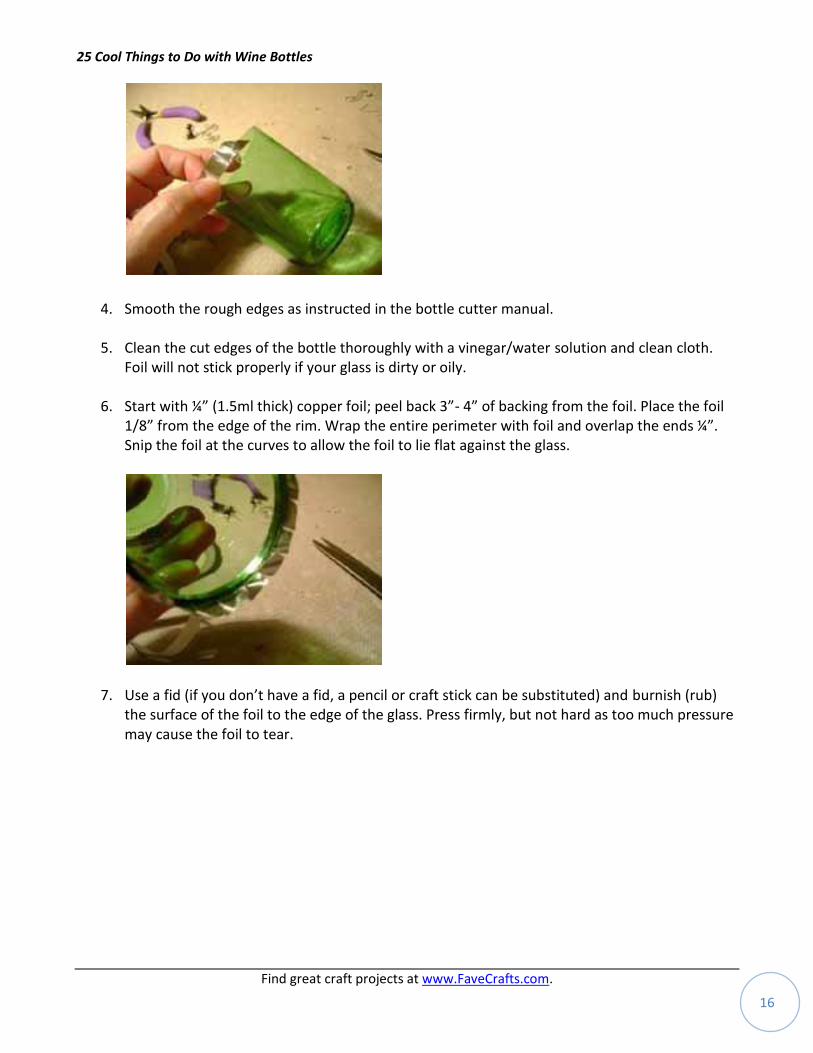
4. Smooth the rough edges as instructed in the bottle cutter manual.
5. Clean the cut edges of the bottle thoroughly with a vinegar/water solution and clean cloth. Foil will not stick properly if your glass is dirty or oily.
6. Start with ¼” (1.5ml thick) copper foil; peel back 3”- 4” of backing from the foil. Place the foil 1/8” from the edge of the rim. Wrap the entire perimeter with foil and overlap the ends ¼”. Snip the foil at the curves to allow the foil to lie flat against the glass.
7. Use a fid (if you don’t have a fid, a pencil or craft stick can be substituted) and burnish (rub) the surface of the foil to the edge of the glass. Press firmly, but not hard as too much pressure may cause the foil to tear.
25 Cool Things to Do with Wine Bottles
Find great craft projects at www.FaveCrafts.com. 17
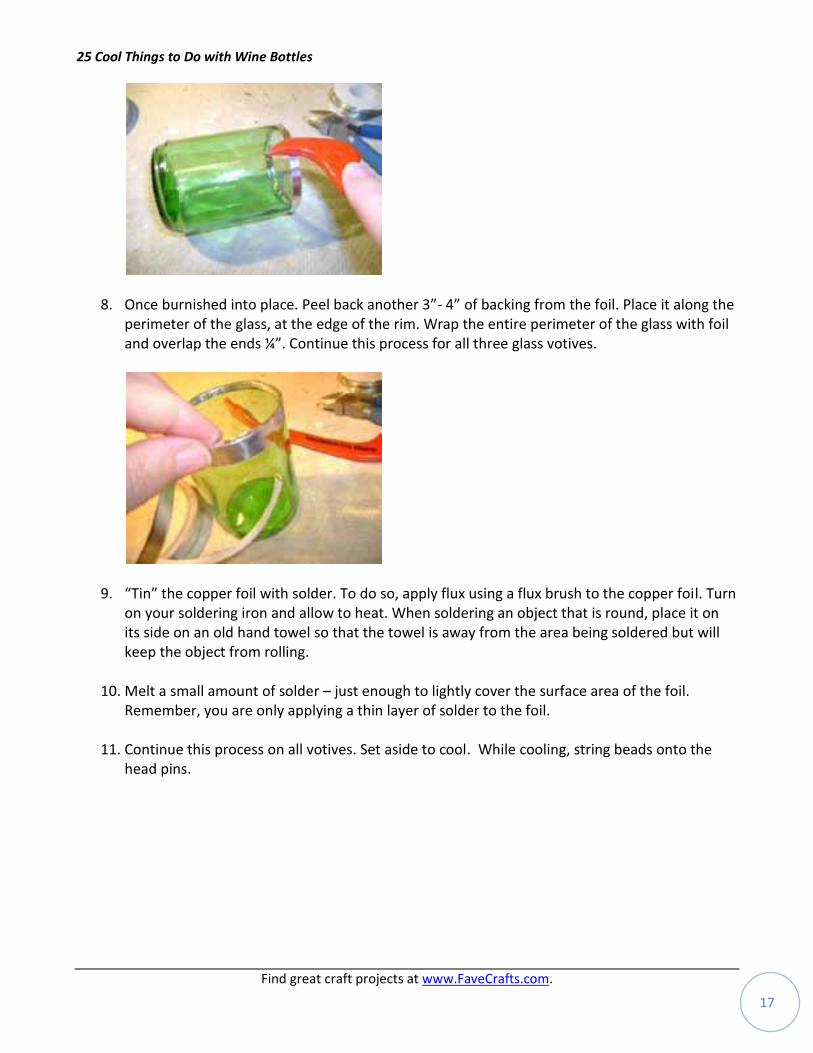
8. Once burnished into place. Peel back another 3”- 4” of backing from the foil. Place it along the perimeter of the glass, at the edge of the rim. Wrap the entire perimeter of the glass with foil and overlap the ends ¼”. Continue this process for all three glass votives.
9. “Tin” the copper foil with solder. To do so, apply flux using a flux brush to the copper foil. Turn on your soldering iron and allow to heat. When soldering an object that is round, place it on its side on an old hand towel so that the towel is away from the area being soldered but will keep the object from rolling.
10. Melt a small amount of solder – just enough to lightly cover the surface area of the foil. Remember, you are only applying a thin layer of solder to the foil.
11. Continue this process on all votives. Set aside to cool. While cooling, string beads onto the head pins.
25 Cool Things to Do with Wine Bottles
Find great craft projects at www.FaveCrafts.com. 18
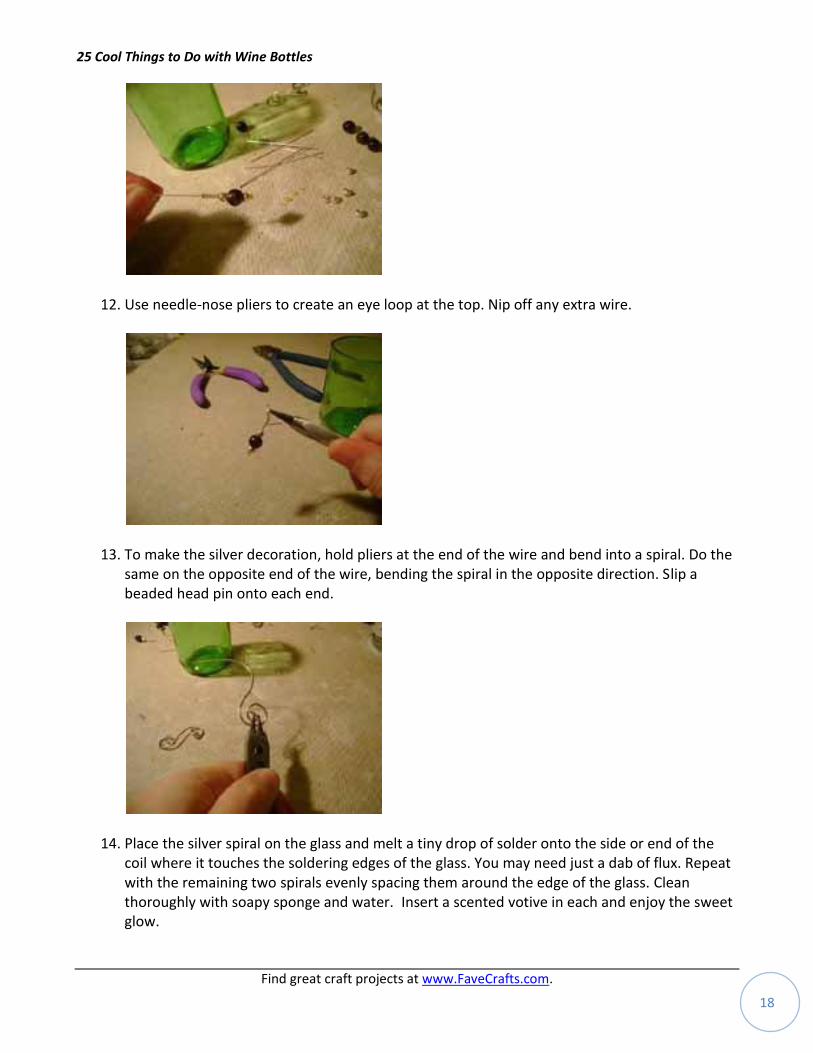
12. Use needle-nose pliers to create an eye loop at the top. Nip off any extra wire.
13. To make the silver decoration, hold pliers at the end of the wire and bend into a spiral. Do the same on the opposite end of the wire, bending the spiral in the opposite direction. Slip a beaded head pin onto each end.
14. Place the silver spiral on the glass and melt a tiny drop of solder onto the side or end of the coil where it touches the soldering edges of the glass. You may need just a dab of flux. Repeat with the remaining two spirals evenly spacing them around the edge of the glass. Clean thoroughly with soapy sponge and water. Insert a scented votive in each and enjoy the sweet glow.
25 Cool Things to Do with Wine Bottles
Find great craft projects at www.FaveCrafts.com. 19
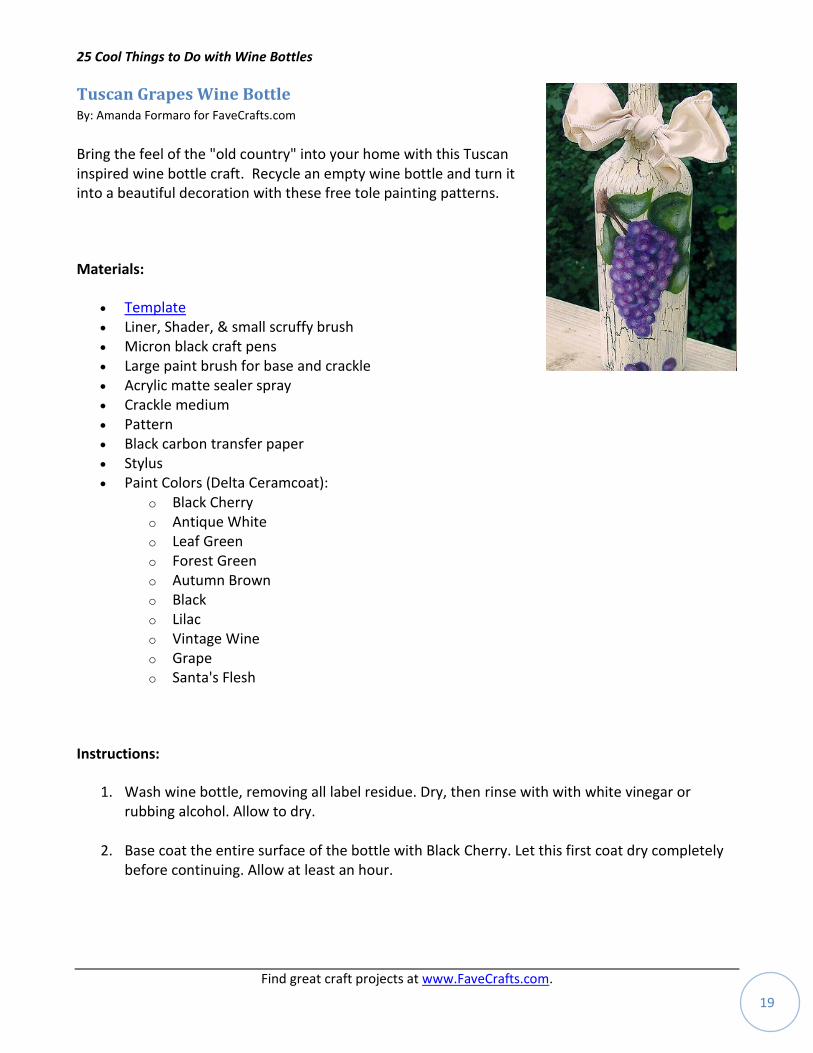
Tuscan Grapes Wine Bottle By: Amanda Formaro for FaveCrafts.com
Bring the feel of the "old country" into your home with this Tuscan inspired wine bottle craft. Recycle an empty wine bottle and turn it into a beautiful decoration with these free tole painting patterns.
Materials:
Template Liner, Shader, & small scruffy brush Micron black craft pens Large paint brush for base and crackle Acrylic matte sealer spray Crackle medium Pattern Black carbon transfer paper Stylus Paint Colors (Delta Ceramcoat):
o Black Cherry o Antique White o Leaf Green o Forest Green o Autumn Brown o Black o Lilac o Vintage Wine o Grape o Santa's Flesh
Instructions:
1. Wash wine bottle, removing all label residue. Dry, then rinse with with white vinegar or rubbing alcohol. Allow to dry.
2. Base coat the entire surface of the bottle with Black Cherry. Let this first coat dry completely before continuing. Allow at least an hour.
25 Cool Things to Do with Wine Bottles
Find great craft projects at www.FaveCrafts.com. 20
3. Apply crackle medium over the Black Cherry according to the directions on the bottle. Follow bottle directions for drying time.
4. Apply a coat of Antique White over the crackle medium and allow to dry overnight.
5. Transfer the pattern onto the surface of the bottle using a stylus and black carbon transfer paper.
6. Paint the grapes with Grape and the leaves with Leaf Green.
7. Paint the branch with Autumn Brown and shade with Black.
8. Shade leaves with Forest Green, highlight leaves with Santa's Flesh on a dry scruffy brush.
9. Shade the grapes with a "c-stroke" motion with Vintage Wine. Highlight grapes with "c-stroke" motion in opposite direction with Lilac.
10. use a scruffy brush to add touches of Santa's Flesh to highlight the grapes and use Vintage Wine mixed with a touch of black (just enough the darken it) to shade in between grapes. You can darken a grape here and there to give the bunch some depth. Highlight and shade wherever needed.
11. Don't forget the grapes on the ground! Shade underneath the grapes with Black and the darkened Vintage Wine.
12. Sign your work with a Micron craft pen! Spray completed project with 2-3 coats of acrylic sealer spray according to directions on can.
25 Cool Things to Do with Wine Bottles
Find great craft projects at www.FaveCrafts.com. 21
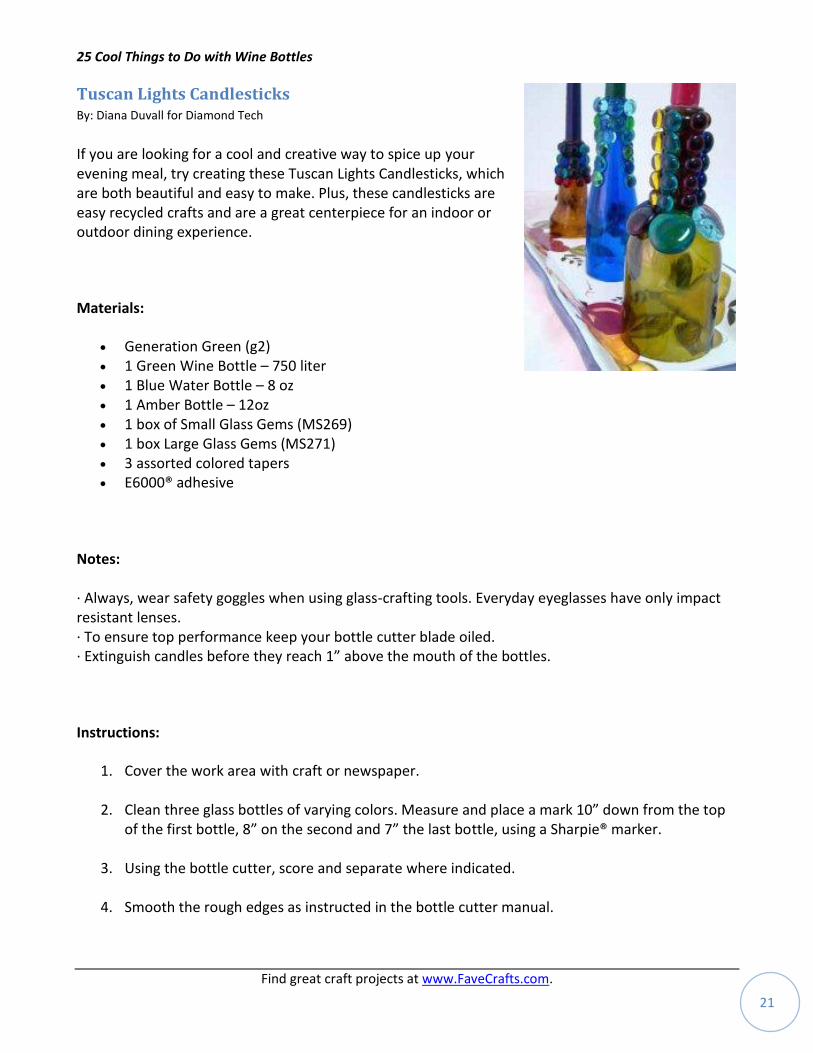
Tuscan Lights Candlesticks By: Diana Duvall for Diamond Tech
If you are looking for a cool and creative way to spice up your evening meal, try creating these Tuscan Lights Candlesticks, which are both beautiful and easy to make. Plus, these candlesticks are easy recycled crafts and are a great centerpiece for an indoor or outdoor dining experience.
Materials:
Generation Green (g2) 1 Green Wine Bottle – 750 liter 1 Blue Water Bottle – 8 oz 1 Amber Bottle – 12oz 1 box of Small Glass Gems (MS269) 1 box Large Glass Gems (MS271) 3 assorted colored tapers E6000® adhesive
Notes: · Always, wear safety goggles when using glass-crafting tools. Everyday eyeglasses have only impact resistant lenses. · To ensure top performance keep your bottle cutter blade oiled. · Extinguish candles before they reach 1” above the mouth of the bottles.
Instructions:
1. Cover the work area with craft or newspaper.
2. Clean three glass bottles of varying colors. Measure and place a mark 10” down from the top of the first bottle, 8” on the second and 7” the last bottle, using a Sharpie® marker.
3. Using the bottle cutter, score and separate where indicated.
4. Smooth the rough edges as instructed in the bottle cutter manual.
25 Cool Things to Do with Wine Bottles
Find great craft projects at www.FaveCrafts.com. 22
5. Clean bottles and place the tallest bottle on an old pillow or a bag of rice. This will prevent the bottle from rolling as you are mosaicking the surface.
6. Use small 3/8” glass gems and glue them to the neck of the bottle. Each row of gems should be a different color. Allow to dry. Once dry add a row of 1 ½” glass gems in assorted colors to the shoulder of the bottle and allow drying.
7. Next, coordinate 3/8” glass gem colors to the remaining two bottle color. For example, we used a blue bottle with blue and green gems. Glue them on the bottle necks. Allow to dry.
8. Once each bottle has been embellished with gems, place them on a decorative Tuscany-style plate/tray cut side down.
9. Slip a tapered candle into the opening in the neck of each bottle, light and enjoy their beauty. Do not leave candles unattended.
25 Cool Things to Do with Wine Bottles
Find great craft projects at www.FaveCrafts.com. 23
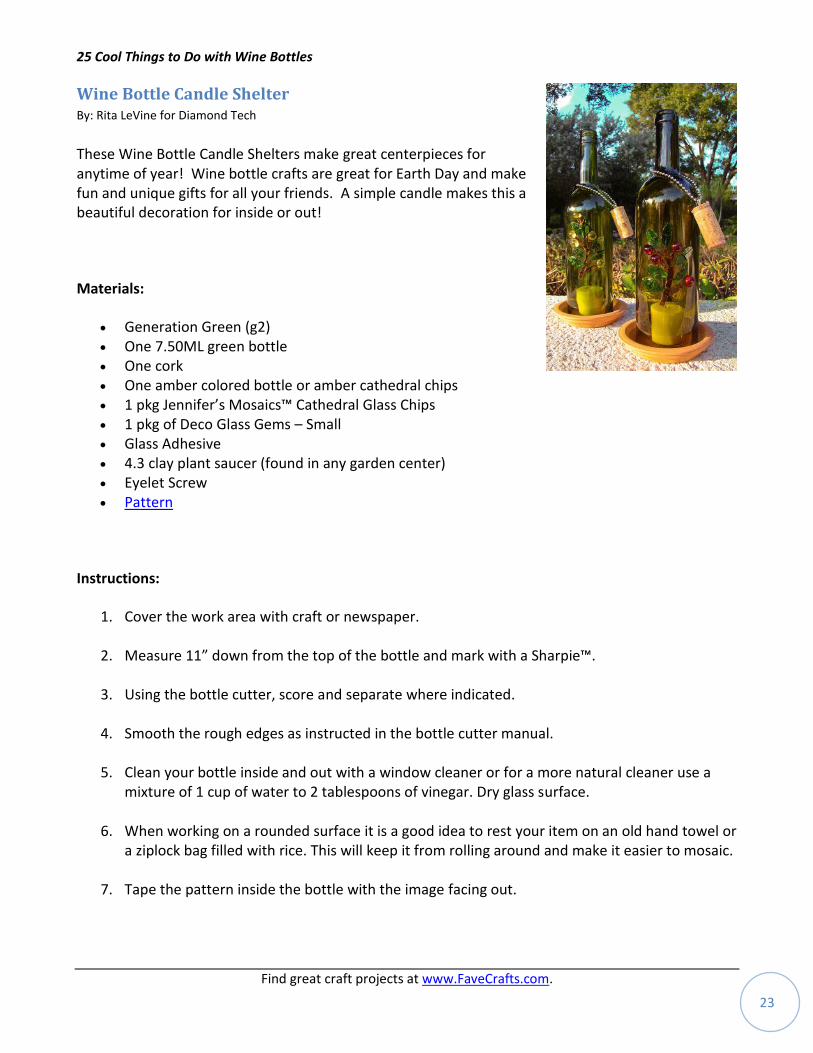
Wine Bottle Candle Shelter By: Rita LeVine for Diamond Tech
These Wine Bottle Candle Shelters make great centerpieces for anytime of year! Wine bottle crafts are great for Earth Day and make fun and unique gifts for all your friends. A simple candle makes this a beautiful decoration for inside or out!
Materials:
Generation Green (g2) One 7.50ML green bottle One cork One amber colored bottle or amber cathedral chips 1 pkg Jennifer’s Mosaics™ Cathedral Glass Chips 1 pkg of Deco Glass Gems – Small Glass Adhesive 4.3 clay plant saucer (found in any garden center) Eyelet Screw Pattern
Instructions:
1. Cover the work area with craft or newspaper.
2. Measure 11” down from the top of the bottle and mark with a Sharpie™.
3. Using the bottle cutter, score and separate where indicated.
4. Smooth the rough edges as instructed in the bottle cutter manual.
5. Clean your bottle inside and out with a window cleaner or for a more natural cleaner use a mixture of 1 cup of water to 2 tablespoons of vinegar. Dry glass surface.
6. When working on a rounded surface it is a good idea to rest your item on an old hand towel or a ziplock bag filled with rice. This will keep it from rolling around and make it easier to mosaic.
7. Tape the pattern inside the bottle with the image facing out.
25 Cool Things to Do with Wine Bottles
Find great craft projects at www.FaveCrafts.com. 24
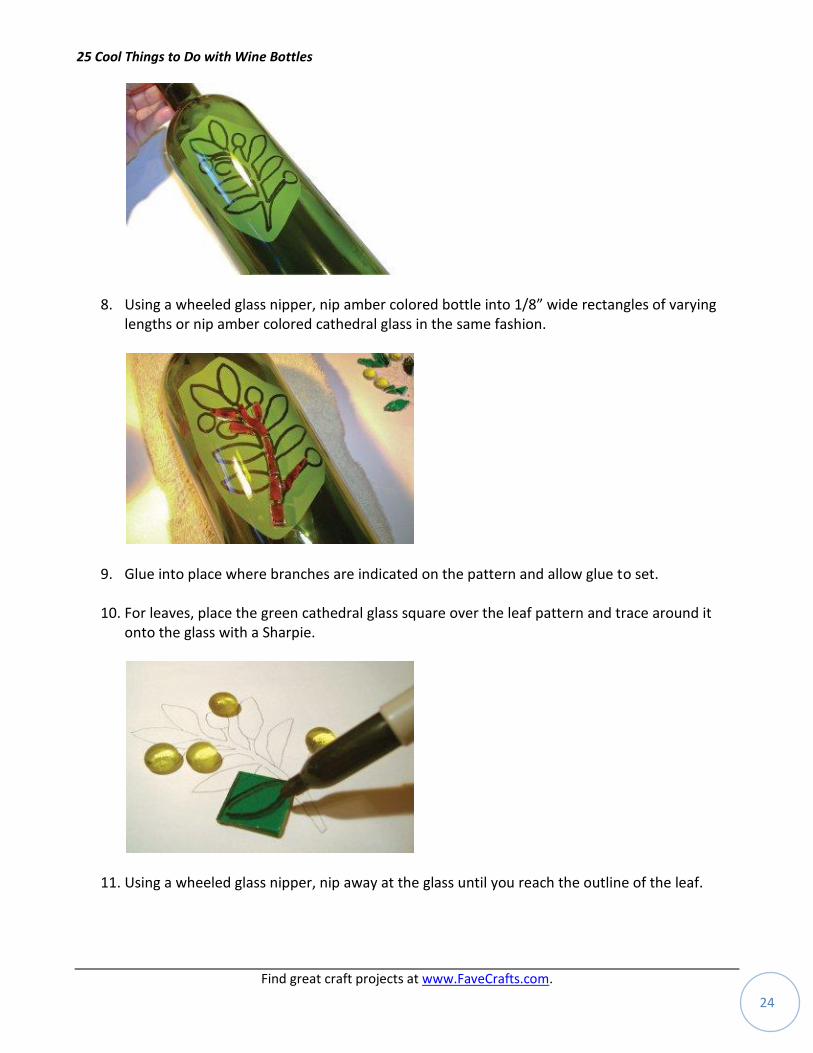
8. Using a wheeled glass nipper, nip amber colored bottle into 1/8” wide rectangles of varying lengths or nip amber colored cathedral glass in the same fashion.
9. Glue into place where branches are indicated on the pattern and allow glue to set.
10. For leaves, place the green cathedral glass square over the leaf pattern and trace around it onto the glass with a Sharpie.
11. Using a wheeled glass nipper, nip away at the glass until you reach the outline of the leaf.
25 Cool Things to Do with Wine Bottles
Find great craft projects at www.FaveCrafts.com. 25
12. You may choose to glue the whole leaf on the surface of your bottle or, further nip them into halves and quarters for a more mosaic-look.
13. Glue leaves into place where indicated on the pattern and allow to dry.
14. Next, glue medium sized glass gems at the tips of each branch.
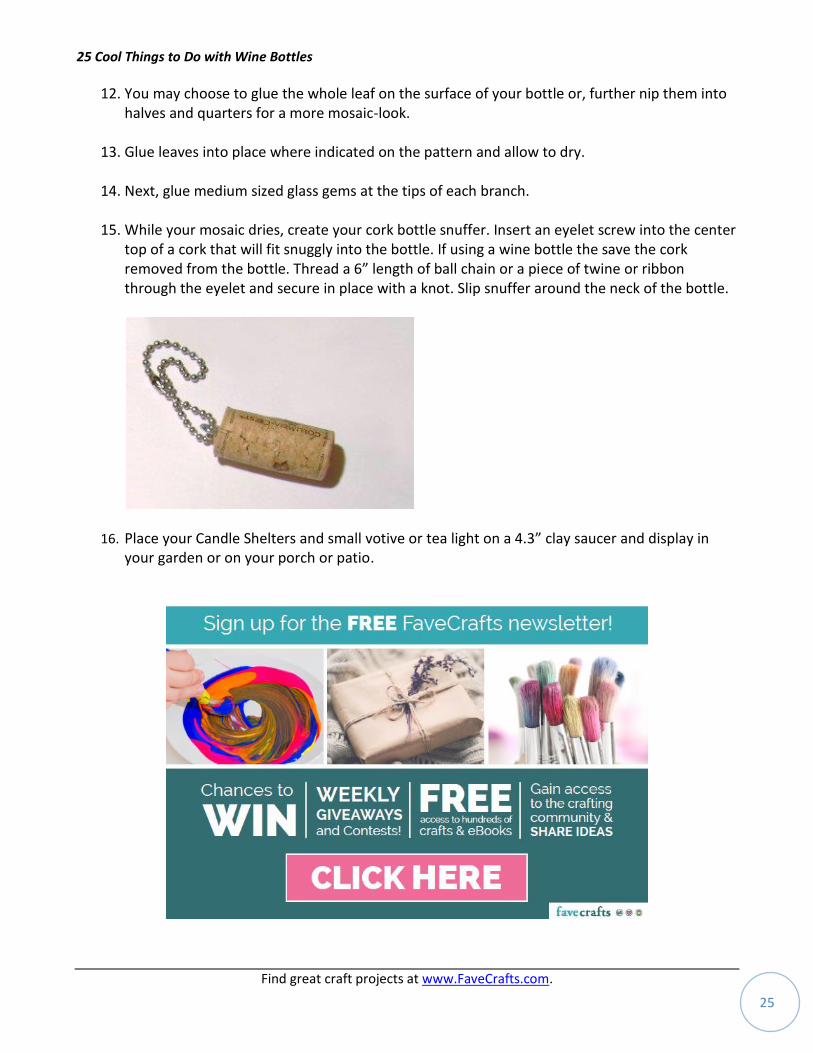
15. While your mosaic dries, create your cork bottle snuffer. Insert an eyelet screw into the center top of a cork that will fit snuggly into the bottle. If using a wine bottle the save the cork removed from the bottle. Thread a 6” length of ball chain or a piece of twine or ribbon through the eyelet and secure in place with a knot. Slip snuffer around the neck of the bottle.
16. Place your Candle Shelters and small votive or tea light on a 4.3” clay saucer and display in your garden or on your porch or patio.
25 Cool Things to Do with Wine Bottles
Find great craft projects at www.FaveCrafts.com. 26
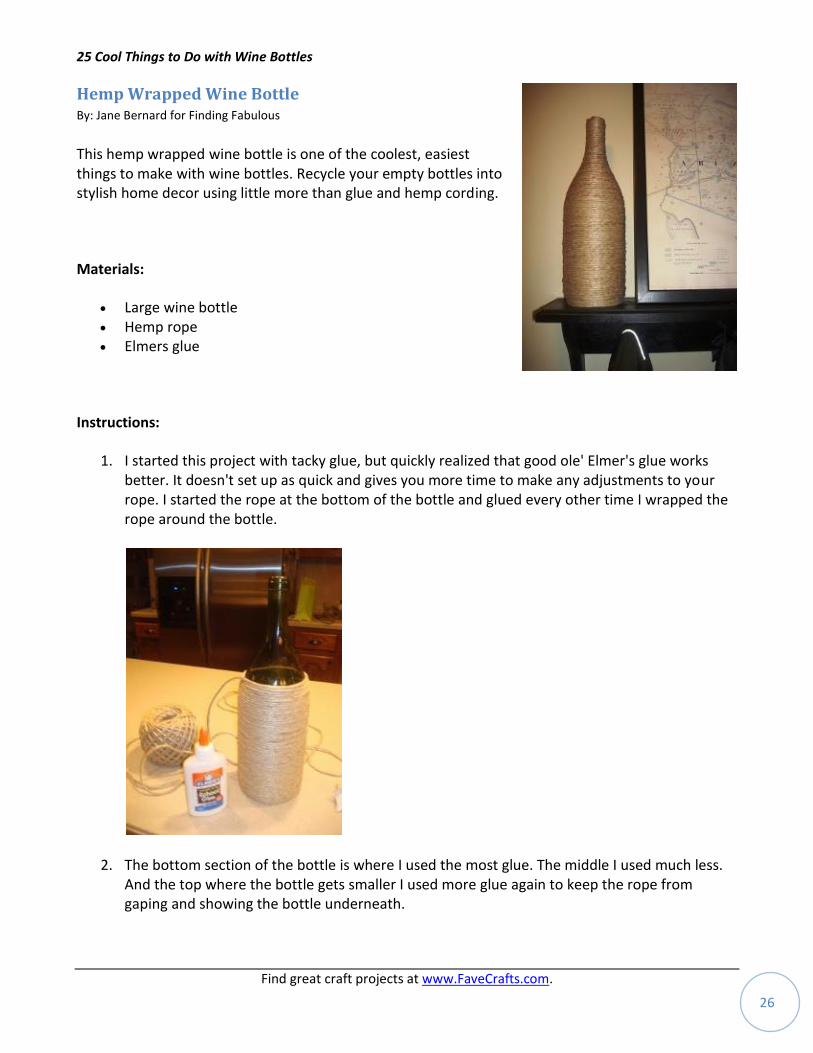
Hemp Wrapped Wine Bottle By: Jane Bernard for Finding Fabulous
This hemp wrapped wine bottle is one of the coolest, easiest things to make with wine bottles. Recycle your empty bottles into stylish home decor using little more than glue and hemp cording.
Materials:
Large wine bottle Hemp rope Elmers glue
Instructions:
1. I started this project with tacky glue, but quickly realized that good ole' Elmer's glue works better. It doesn't set up as quick and gives you more time to make any adjustments to your rope. I started the rope at the bottom of the bottle and glued every other time I wrapped the rope around the bottle.
2. The bottom section of the bottle is where I used the most glue. The middle I used much less. And the top where the bottle gets smaller I used more glue again to keep the rope from gaping and showing the bottle underneath.
25 Cool Things to Do with Wine Bottles
Find great craft projects at www.FaveCrafts.com. 27
Crafting with Wine Corks
Wine Cork Balls By: Heather Skold for Unleashing My Creativity
Who knew you could create an expensive looking decorative accent using old wine corks? If you're looking for things to make with wine bottles and corks, check out these wine cork balls!
Materials:
Styrofoam balls Paint Wine corks Hot glue and glue gun
Instructions:
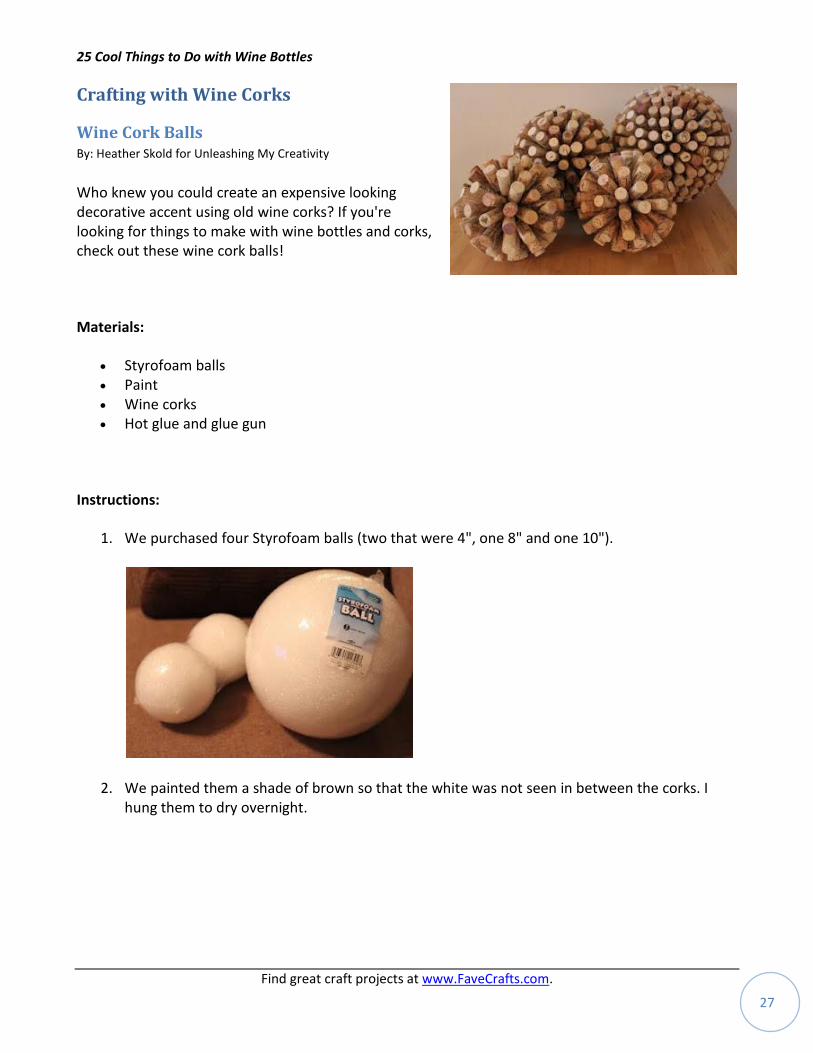
1. We purchased four Styrofoam balls (two that were 4", one 8" and one 10").
2. We painted them a shade of brown so that the white was not seen in between the corks. I hung them to dry overnight.

25 Cool Things to Do with Wine Bottles
Find great craft projects at www.FaveCrafts.com. 28
3. Next, I hot glued the corks on one by one.
4. I glued a line of corks around the center and then filled in one half. Then I flipped it over and filled in the other half row by row. Occasionally the bottom of a cork had to be trimmed down some to fit into a tighter space.
25 Cool Things to Do with Wine Bottles
Find great craft projects at www.FaveCrafts.com. 29
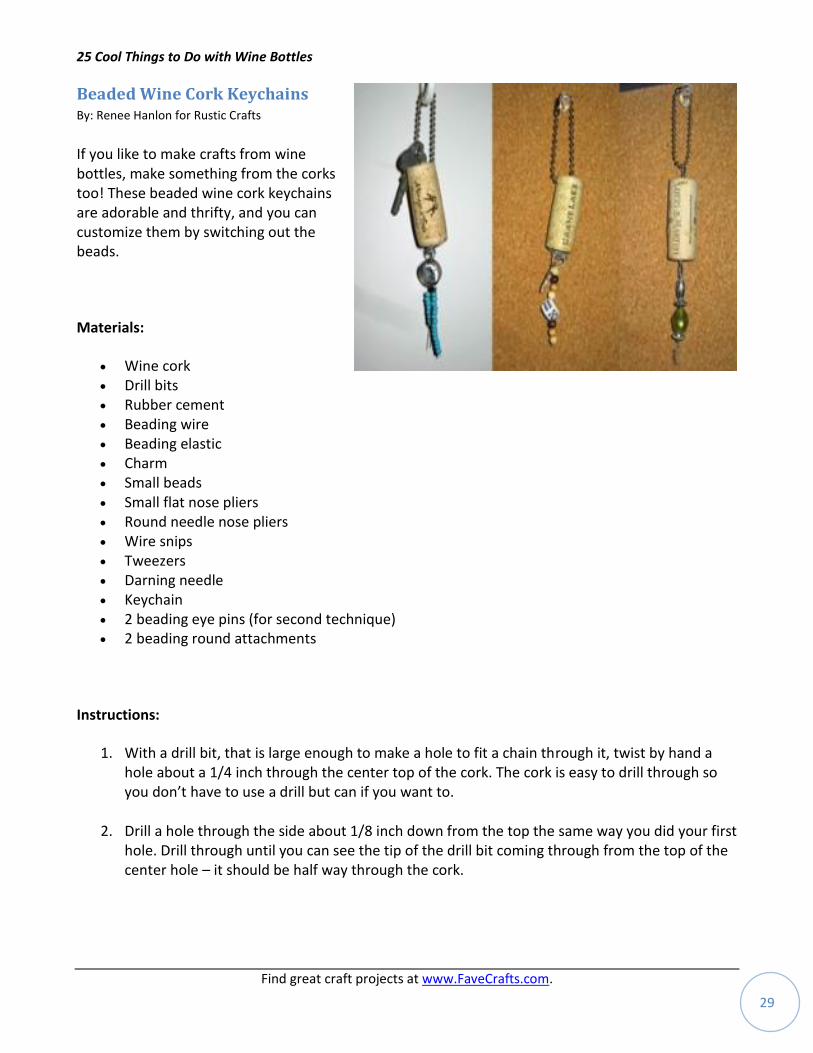
Beaded Wine Cork Keychains By: Renee Hanlon for Rustic Crafts
If you like to make crafts from wine bottles, make something from the corks too! These beaded wine cork keychains are adorable and thrifty, and you can customize them by switching out the beads.
Materials:
Wine cork Drill bits Rubber cement Beading wire Beading elastic Charm Small beads Small flat nose pliers Round needle nose pliers Wire snips Tweezers Darning needle Keychain 2 beading eye pins (for second technique) 2 beading round attachments
Instructions:
1. With a drill bit, that is large enough to make a hole to fit a chain through it, twist by hand a hole about a 1/4 inch through the center top of the cork. The cork is easy to drill through so you don’t have to use a drill but can if you want to.
2. Drill a hole through the side about 1/8 inch down from the top the same way you did your first hole. Drill through until you can see the tip of the drill bit coming through from the top of the center hole – it should be half way through the cork.
25 Cool Things to Do with Wine Bottles
Find great craft projects at www.FaveCrafts.com. 30
3. Now start pushing your chain through the side hole. Use a darning needle and a tweezers to pull the chain through the top hole and continue feeding through. Clasp the chain together.
4. Coat the top and the upper side of the cork, especially at the drilled holes, with rubber cement. This will give it some extra strength where the chain is pulled through and keep the holes from flaking.
5. With a smaller drill bit, drill a hole completely through the bottom of the cork as shown. This is where your beading wire will be inserted.
6. Cut a piece of beading wire about six inches long and insert it through your hole.
7. Criss-cross the wires through your charm and then pull the wires tight so that your charm is against the cork. Now twist the two wires together a couple of times and bring them around and under the side of the charm holder. You will need to use your flat nose pliers to get this nice and tight.
8. Now loop the wires around the opposite side and bring them back to where you started. Crimp them tight with your pliers. Snip the access ends off with your wire snips and bend in place with pliers.
9. Sting your desired beads on to your elastic and time them on to your charm holder. Place a dot of rubber cement over your knots to keep them secure.
10. Second Technique: The second technique requires purchasing just a couple of extra parts but it provides a nice look. Attach a round beading attachment to each eye pin. Cut the eye pin to about a one inch length with your wire snips. Apply glue to the pin and insert one into each end of the cork. You now have a ring on each end to attach your chain and your string of beads. I used one of the key chains, that I made, just to display one of my vintage keys in a fun way.
11. I originally tried inserting my beading wire, wrapping around a charm, and then stringing those ends with beads and twisting the wire at the ends to hold the beads in place. This was a stiffer look – almost like legs on a cork, which I didn’t care for. But, if you wanted to make a person key chain and add wire arms and a head as well, it would be cute.
25 Cool Things to Do with Wine Bottles
Find great craft projects at www.FaveCrafts.com. 31
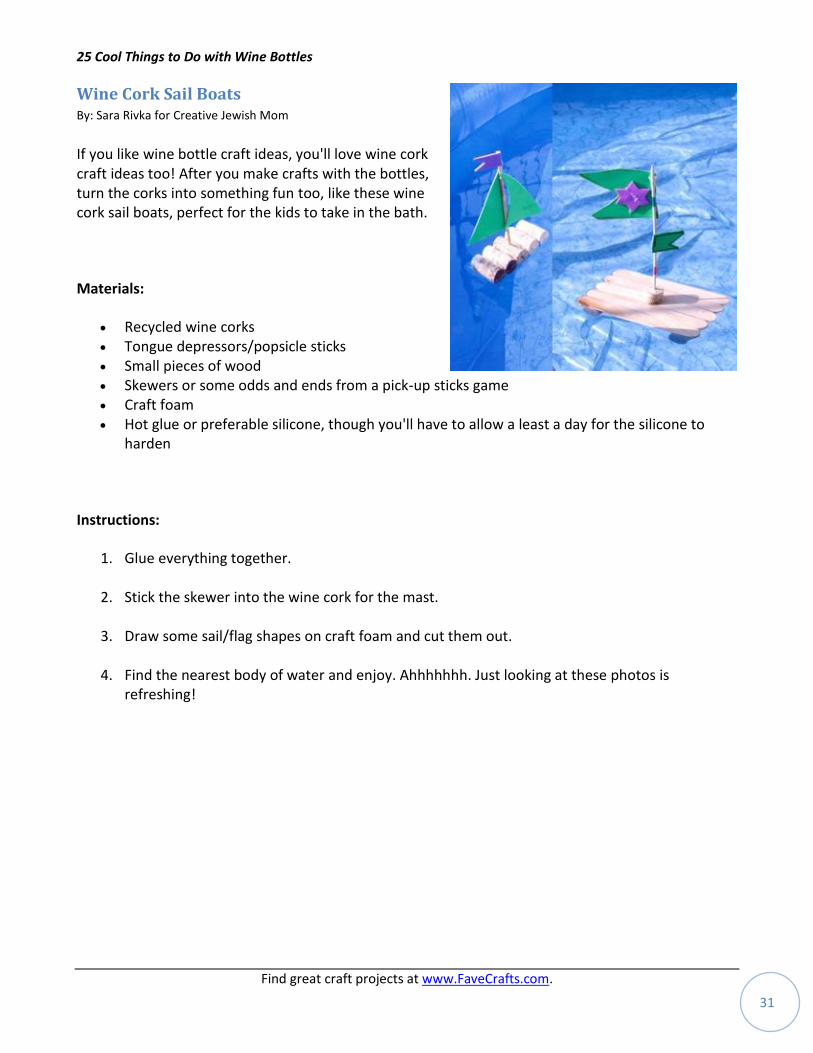
Wine Cork Sail Boats By: Sara Rivka for Creative Jewish Mom
If you like wine bottle craft ideas, you'll love wine cork craft ideas too! After you make crafts with the bottles, turn the corks into something fun too, like these wine cork sail boats, perfect for the kids to take in the bath.
Materials:
Recycled wine corks Tongue depressors/popsicle sticks Small pieces of wood Skewers or some odds and ends from a pick-up sticks game Craft foam Hot glue or preferable silicone, though you'll have to allow a least a day for the silicone to
harden
Instructions:
1. Glue everything together.
2. Stick the skewer into the wine cork for the mast.
3. Draw some sail/flag shapes on craft foam and cut them out.
4. Find the nearest body of water and enjoy. Ahhhhhhh. Just looking at these photos is refreshing!
25 Cool Things to Do with Wine Bottles
Find great craft projects at www.FaveCrafts.com. 32
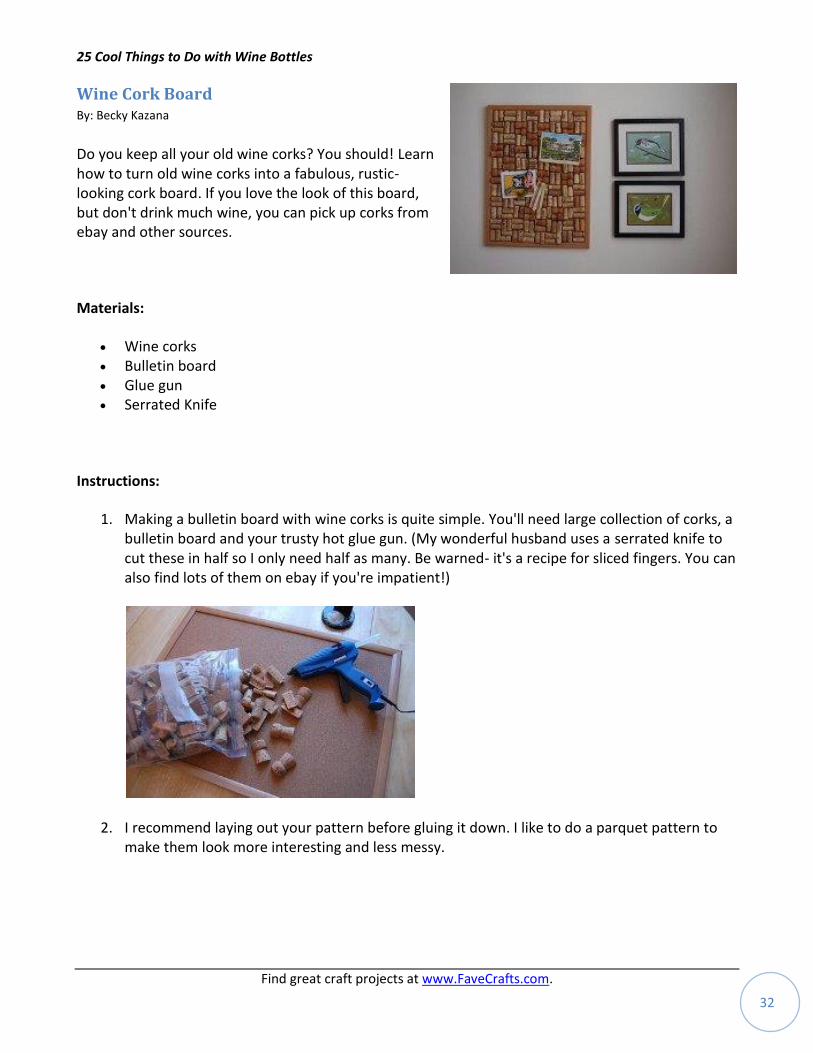
Wine Cork Board By: Becky Kazana
Do you keep all your old wine corks? You should! Learn how to turn old wine corks into a fabulous, rustic-looking cork board. If you love the look of this board, but don't drink much wine, you can pick up corks from ebay and other sources.
Materials:
Wine corks Bulletin board Glue gun Serrated Knife
Instructions:
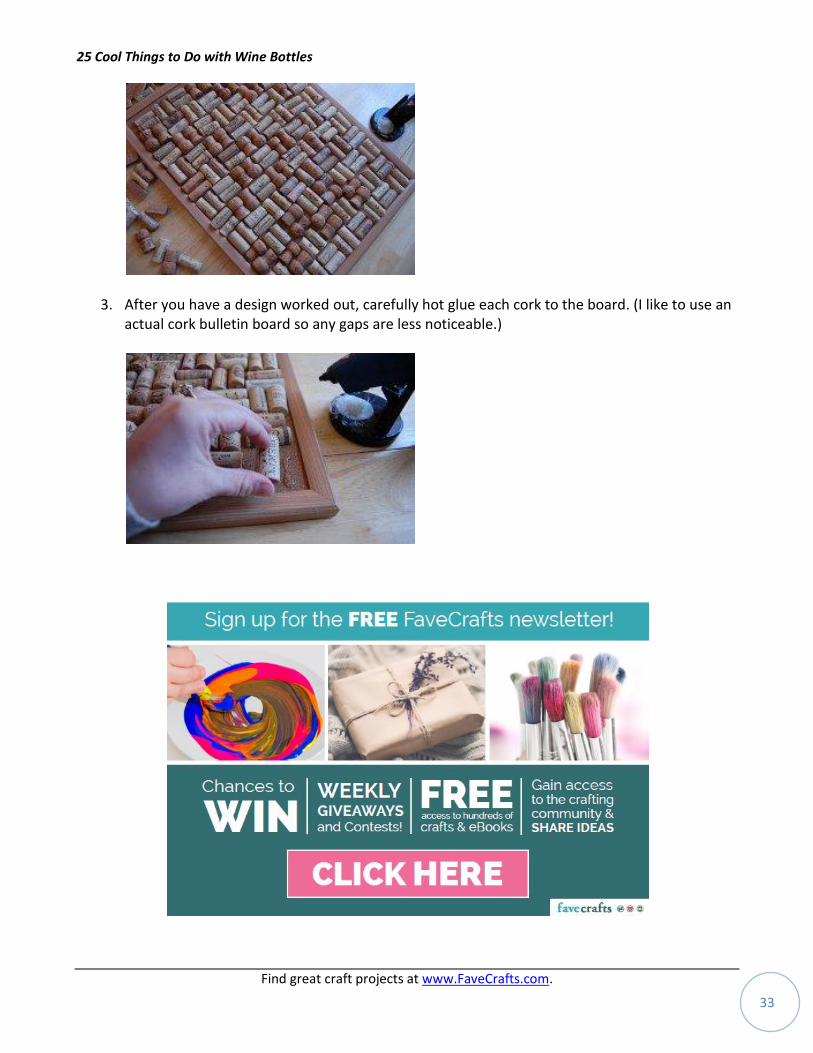
1. Making a bulletin board with wine corks is quite simple. You'll need large collection of corks, a bulletin board and your trusty hot glue gun. (My wonderful husband uses a serrated knife to cut these in half so I only need half as many. Be warned- it's a recipe for sliced fingers. You can also find lots of them on ebay if you're impatient!)
2. I recommend laying out your pattern before gluing it down. I like to do a parquet pattern to make them look more interesting and less messy.
25 Cool Things to Do with Wine Bottles
Find great craft projects at www.FaveCrafts.com. 33
3. After you have a design worked out, carefully hot glue each cork to the board. (I like to use an actual cork bulletin board so any gaps are less noticeable.)
25 Cool Things to Do with Wine Bottles
Find great craft projects at www.FaveCrafts.com. 34
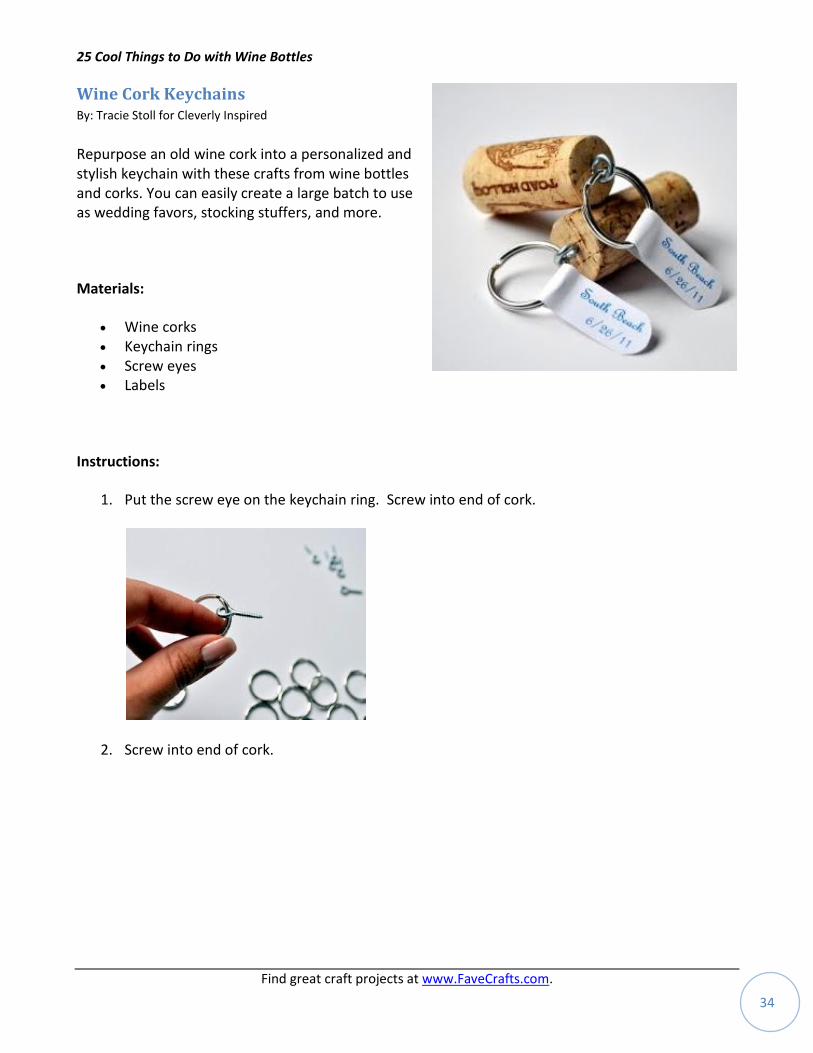
Wine Cork Keychains By: Tracie Stoll for Cleverly Inspired
Repurpose an old wine cork into a personalized and stylish keychain with these crafts from wine bottles and corks. You can easily create a large batch to use as wedding favors, stocking stuffers, and more.
Materials:
Wine corks Keychain rings Screw eyes Labels
Instructions:
1. Put the screw eye on the keychain ring. Screw into end of cork.
2. Screw into end of cork.
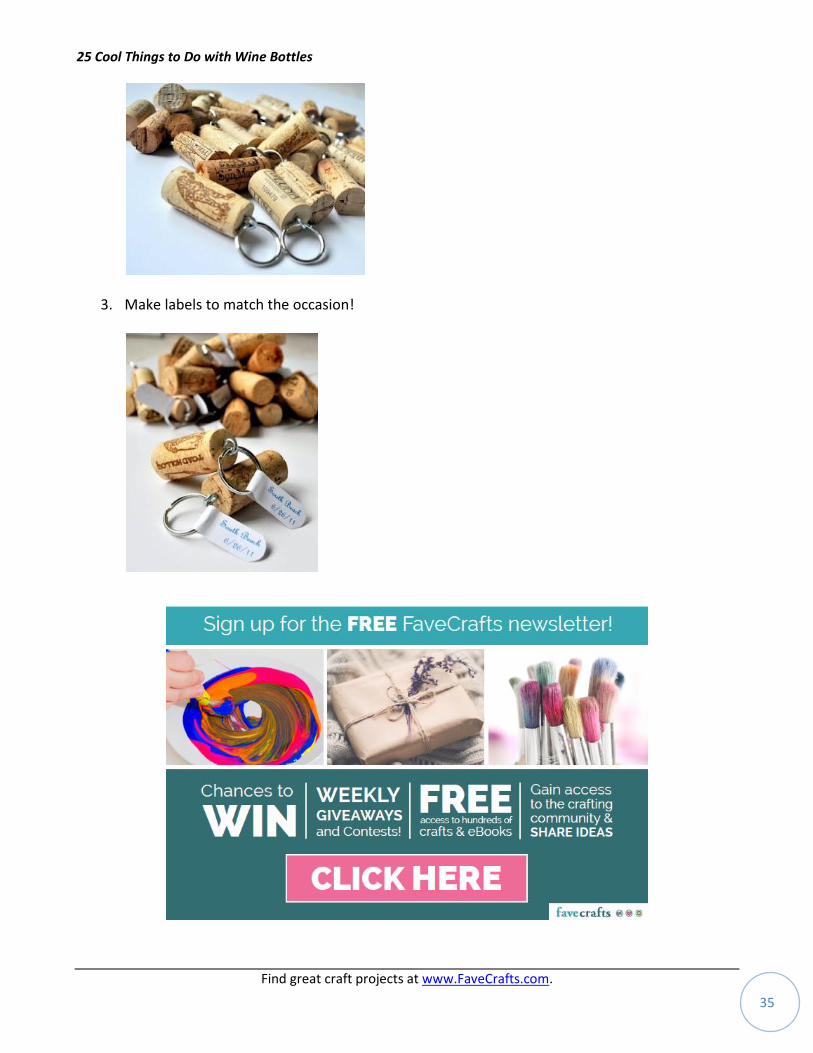
25 Cool Things to Do with Wine Bottles
Find great craft projects at www.FaveCrafts.com. 35
3. Make labels to match the occasion!
25 Cool Things to Do with Wine Bottles
Find great craft projects at www.FaveCrafts.com. 36
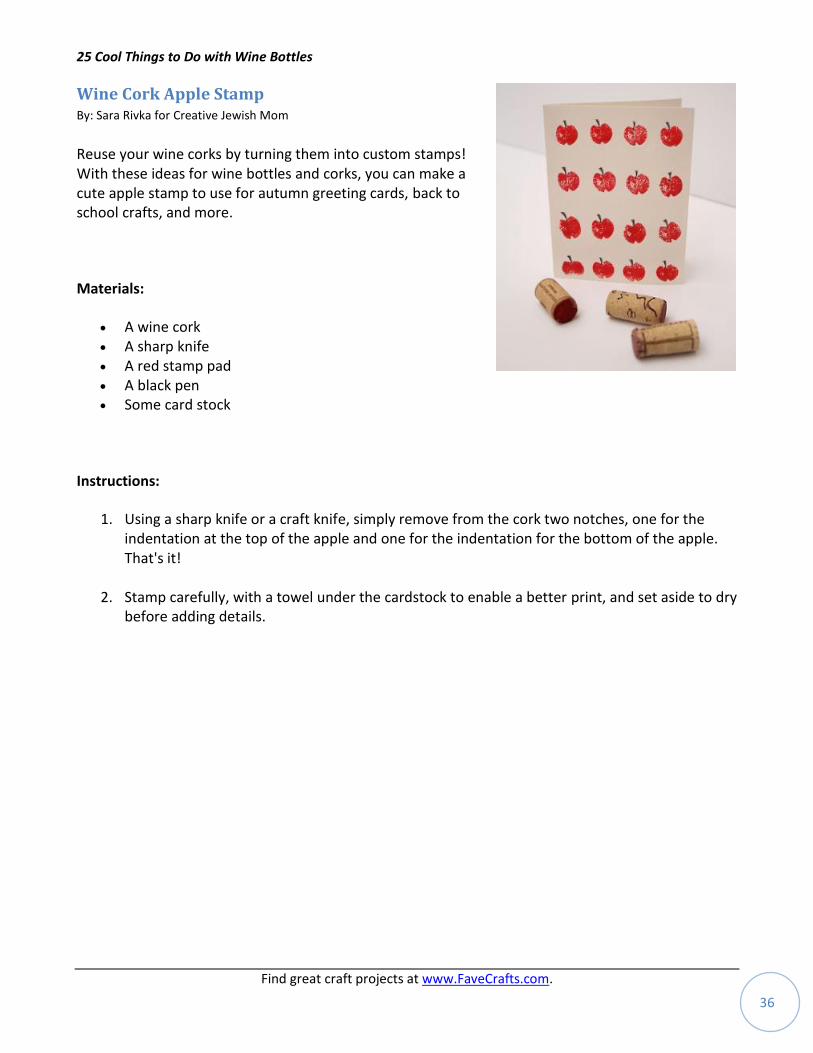
Wine Cork Apple Stamp By: Sara Rivka for Creative Jewish Mom
Reuse your wine corks by turning them into custom stamps! With these ideas for wine bottles and corks, you can make a cute apple stamp to use for autumn greeting cards, back to school crafts, and more.
Materials:
A wine cork A sharp knife A red stamp pad A black pen Some card stock
Instructions:
1. Using a sharp knife or a craft knife, simply remove from the cork two notches, one for the indentation at the top of the apple and one for the indentation for the bottom of the apple. That's it!
2. Stamp carefully, with a towel under the cardstock to enable a better print, and set aside to dry before adding details.
25 Cool Things to Do with Wine Bottles
Find great craft projects at www.FaveCrafts.com. 37
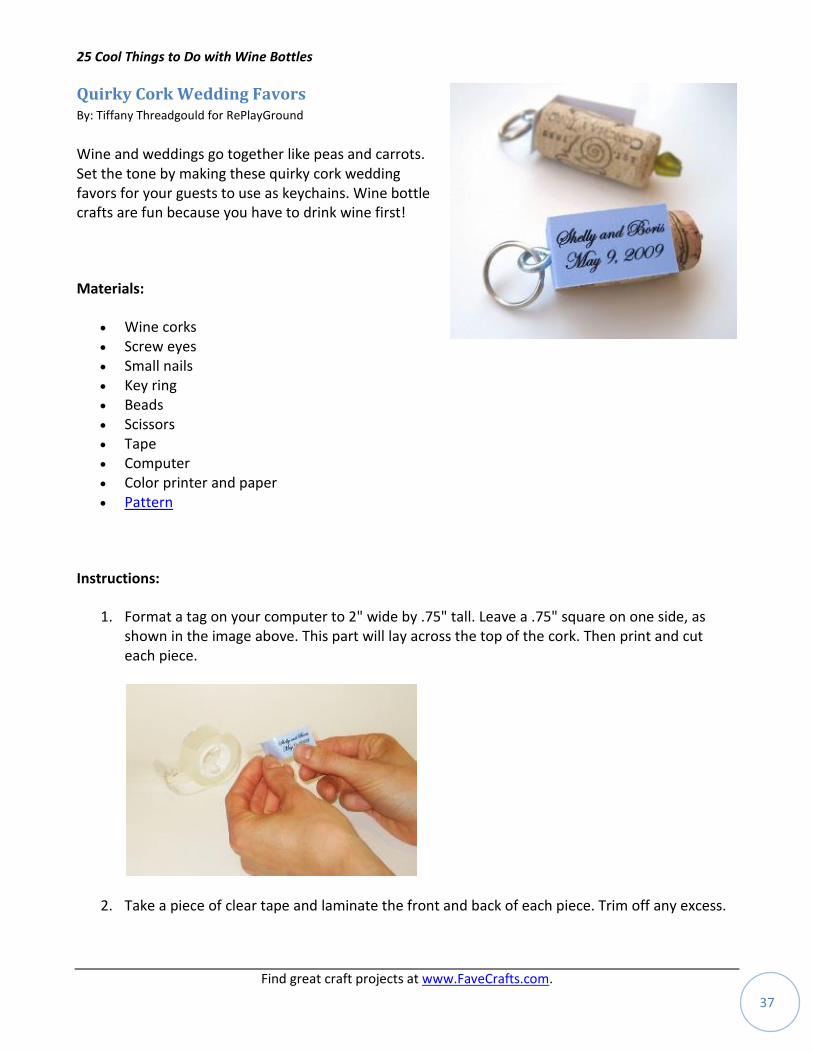
Quirky Cork Wedding Favors By: Tiffany Threadgould for RePlayGround
Wine and weddings go together like peas and carrots. Set the tone by making these quirky cork wedding favors for your guests to use as keychains. Wine bottle crafts are fun because you have to drink wine first!
Materials:
Wine corks Screw eyes Small nails Key ring Beads Scissors Tape Computer Color printer and paper Pattern
Instructions:
1. Format a tag on your computer to 2" wide by .75" tall. Leave a .75" square on one side, as shown in the image above. This part will lay across the top of the cork. Then print and cut each piece.
2. Take a piece of clear tape and laminate the front and back of each piece. Trim off any excess.
25 Cool Things to Do with Wine Bottles
Find great craft projects at www.FaveCrafts.com. 38
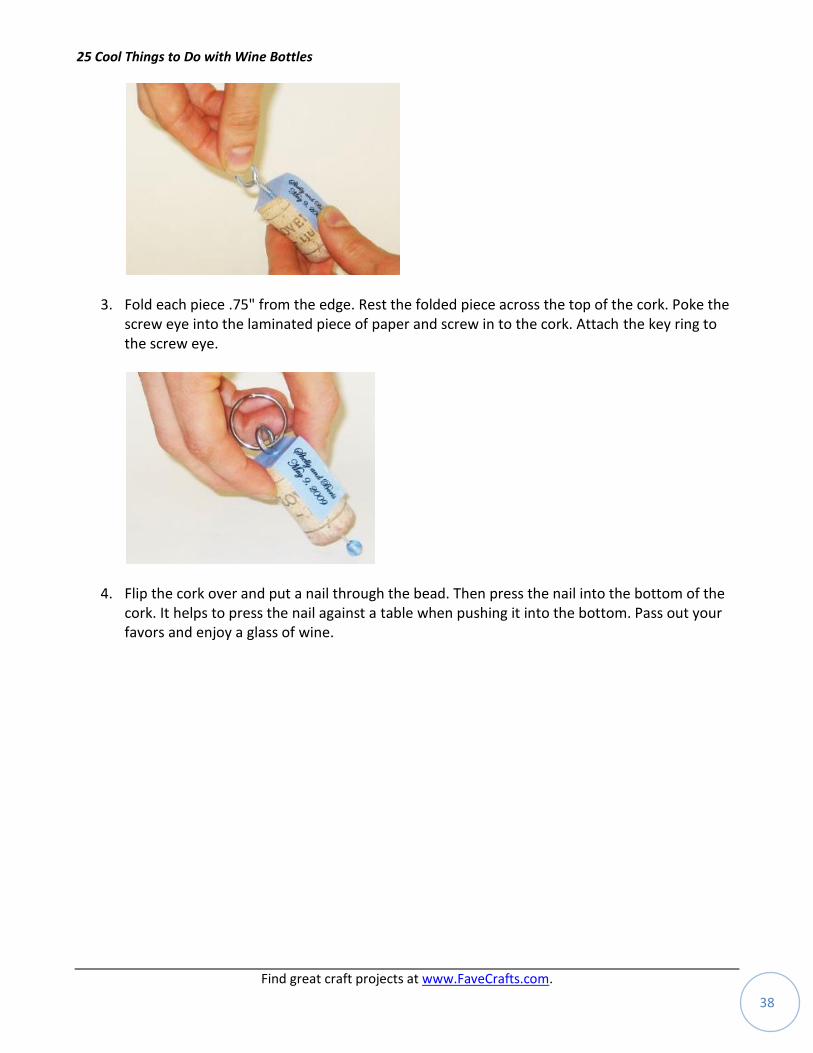
3. Fold each piece .75" from the edge. Rest the folded piece across the top of the cork. Poke the screw eye into the laminated piece of paper and screw in to the cork. Attach the key ring to the screw eye.
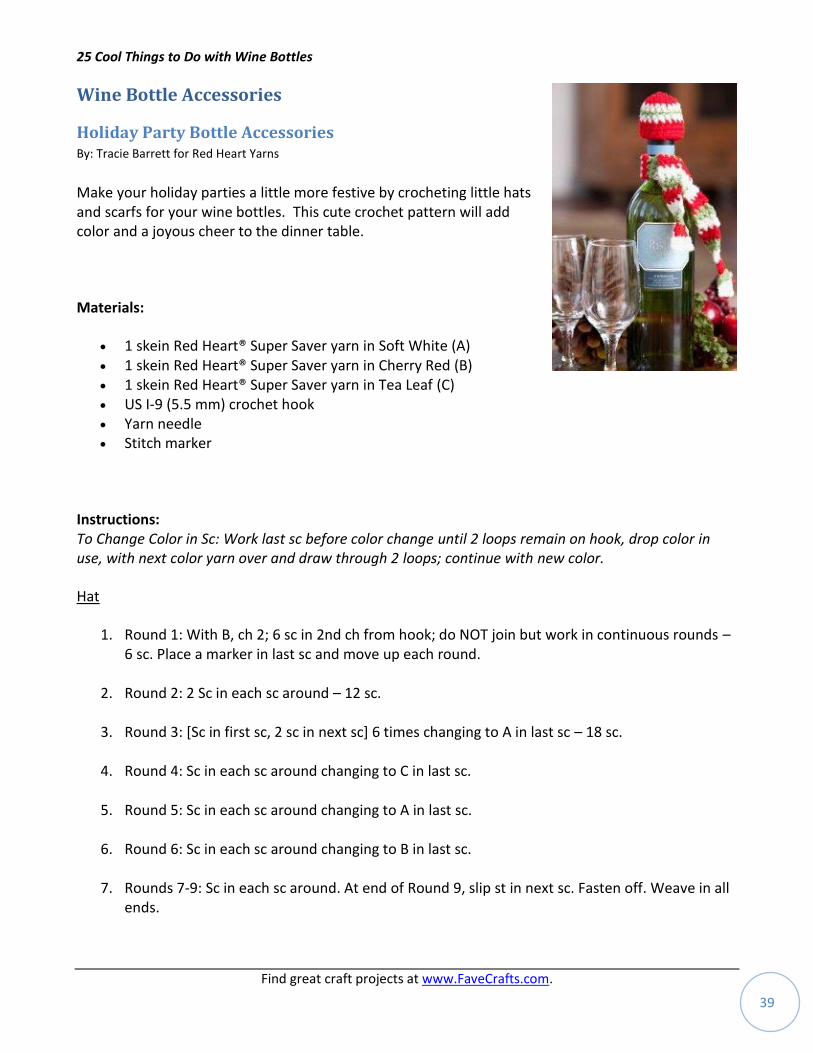
4. Flip the cork over and put a nail through the bead. Then press the nail into the bottom of the cork. It helps to press the nail against a table when pushing it into the bottom. Pass out your favors and enjoy a glass of wine.
25 Cool Things to Do with Wine Bottles
Find great craft projects at www.FaveCrafts.com. 39
Wine Bottle Accessories
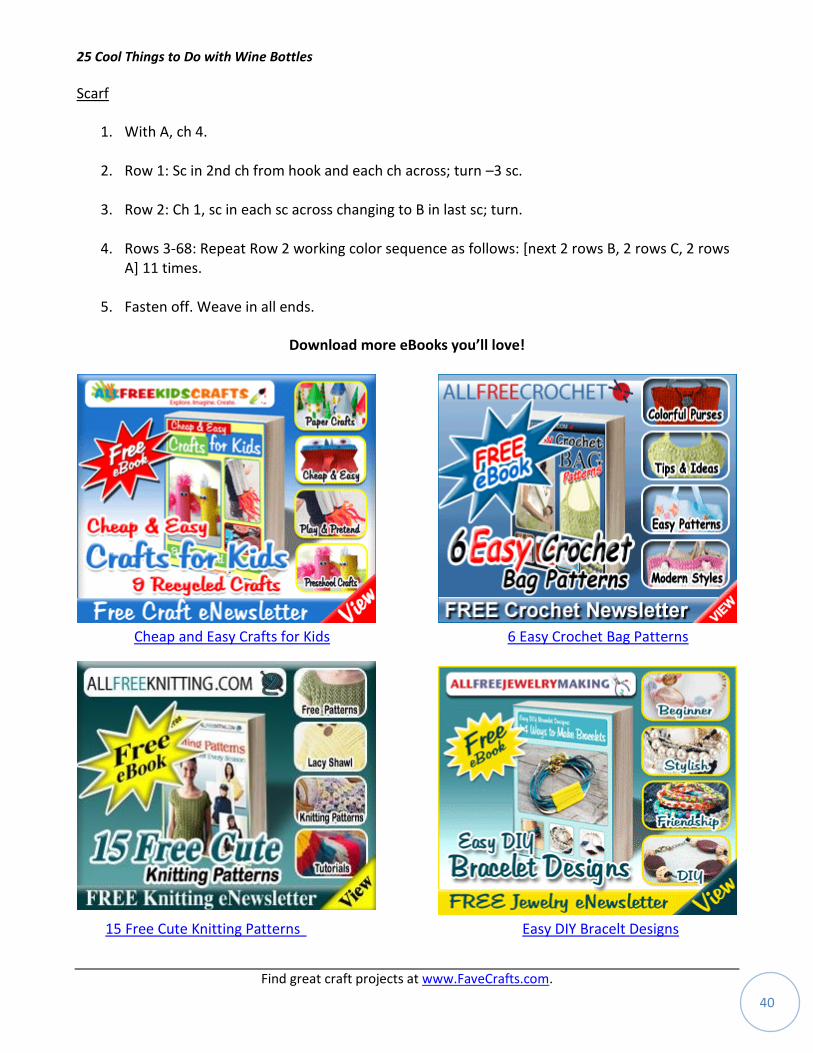
Holiday Party Bottle Accessories By: Tracie Barrett for Red Heart Yarns
Make your holiday parties a little more festive by crocheting little hats and scarfs for your wine bottles. This cute crochet pattern will add color and a joyous cheer to the dinner table.
Materials:
1 skein Red Heart® Super Saver yarn in Soft White (A) 1 skein Red Heart® Super Saver yarn in Cherry Red (B) 1 skein Red Heart® Super Saver yarn in Tea Leaf (C) US I-9 (5.5 mm) crochet hook Yarn needle Stitch marker
Instructions: To Change Color in Sc: Work last sc before color change until 2 loops remain on hook, drop color in use, with next color yarn over and draw through 2 loops; continue with new color.
Hat
1. Round 1: With B, ch 2; 6 sc in 2nd ch from hook; do NOT join but work in continuous rounds – 6 sc. Place a marker in last sc and move up each round.
2. Round 2: 2 Sc in each sc around – 12 sc.
3. Round 3: [Sc in first sc, 2 sc in next sc] 6 times changing to A in last sc – 18 sc.
4. Round 4: Sc in each sc around changing to C in last sc.
5. Round 5: Sc in each sc around changing to A in last sc.
6. Round 6: Sc in each sc around changing to B in last sc.
7. Rounds 7-9: Sc in each sc around. At end of Round 9, slip st in next sc. Fasten off. Weave in all ends.
25 Cool Things to Do with Wine Bottles
Find great craft projects at www.FaveCrafts.com. 40
Scarf
1. With A, ch 4.
2. Row 1: Sc in 2nd ch from hook and each ch across; turn –3 sc.
3. Row 2: Ch 1, sc in each sc across changing to B in last sc; turn.
4. Rows 3-68: Repeat Row 2 working color sequence as follows: [next 2 rows B, 2 rows C, 2 rows A] 11 times.
5. Fasten off. Weave in all ends.
Download more eBooks you’ll love!
Cheap and Easy Crafts for Kids 6 Easy Crochet Bag Patterns
15 Free Cute Knitting Patterns Easy DIY Bracelt Designs
25 Cool Things to Do with Wine Bottles
Find great craft projects at www.FaveCrafts.com. 41
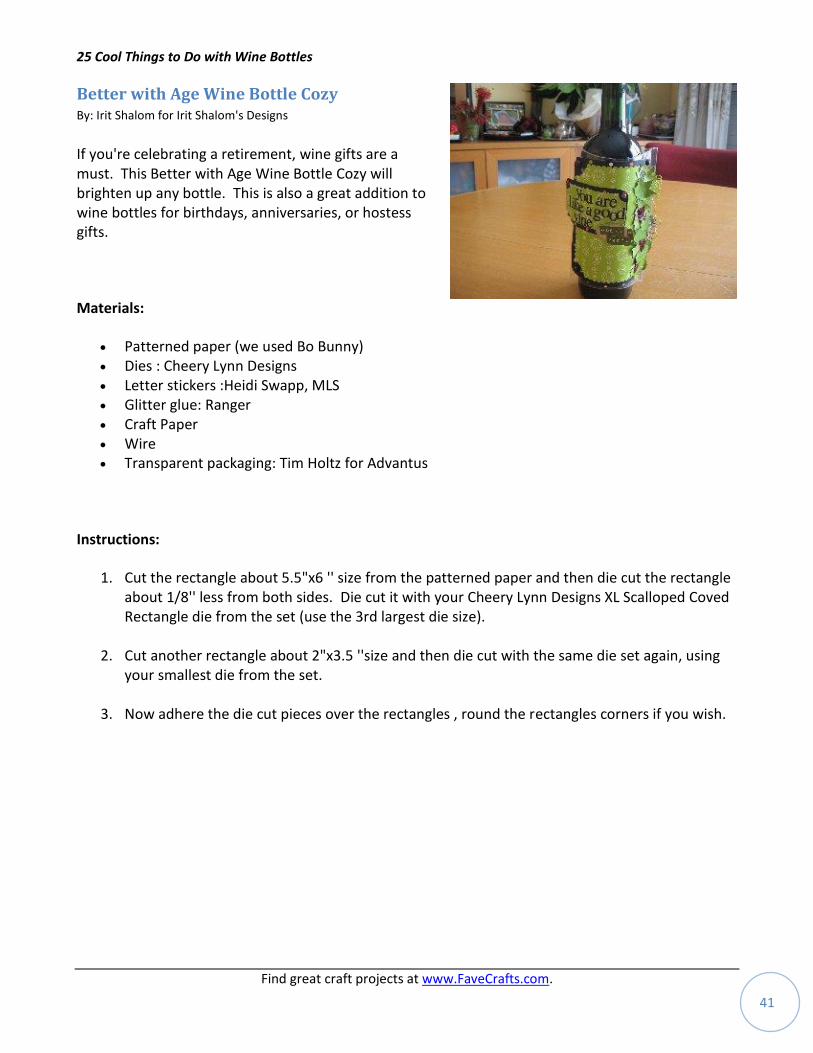
Better with Age Wine Bottle Cozy By: Irit Shalom for Irit Shalom's Designs
If you're celebrating a retirement, wine gifts are a must. This Better with Age Wine Bottle Cozy will brighten up any bottle. This is also a great addition to wine bottles for birthdays, anniversaries, or hostess gifts.
Materials:
Patterned paper (we used Bo Bunny) Dies : Cheery Lynn Designs Letter stickers :Heidi Swapp, MLS Glitter glue: Ranger Craft Paper Wire Transparent packaging: Tim Holtz for Advantus
Instructions:
1. Cut the rectangle about 5.5"x6 '' size from the patterned paper and then die cut the rectangle about 1/8'' less from both sides. Die cut it with your Cheery Lynn Designs XL Scalloped Coved Rectangle die from the set (use the 3rd largest die size).
2. Cut another rectangle about 2"x3.5 ''size and then die cut with the same die set again, using your smallest die from the set.
3. Now adhere the die cut pieces over the rectangles , round the rectangles corners if you wish.
25 Cool Things to Do with Wine Bottles
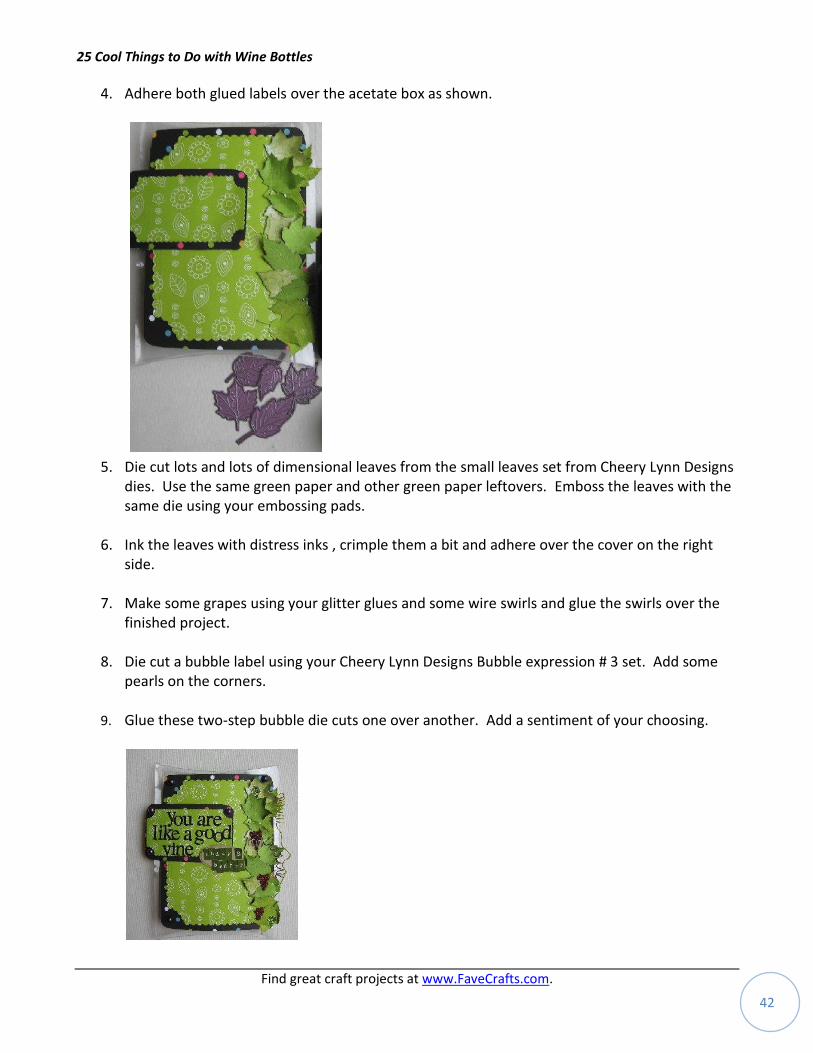
Find great craft projects at www.FaveCrafts.com. 42
4. Adhere both glued labels over the acetate box as shown.
5. Die cut lots and lots of dimensional leaves from the small leaves set from Cheery Lynn Designs
dies. Use the same green paper and other green paper leftovers. Emboss the leaves with the same die using your embossing pads.
6. Ink the leaves with distress inks , crimple them a bit and adhere over the cover on the right side.
7. Make some grapes using your glitter glues and some wire swirls and glue the swirls over the finished project.
8. Die cut a bubble label using your Cheery Lynn Designs Bubble expression # 3 set. Add some pearls on the corners.
9. Glue these two-step bubble die cuts one over another. Add a sentiment of your choosing.
25 Cool Things to Do with Wine Bottles
Find great craft projects at www.FaveCrafts.com. 43
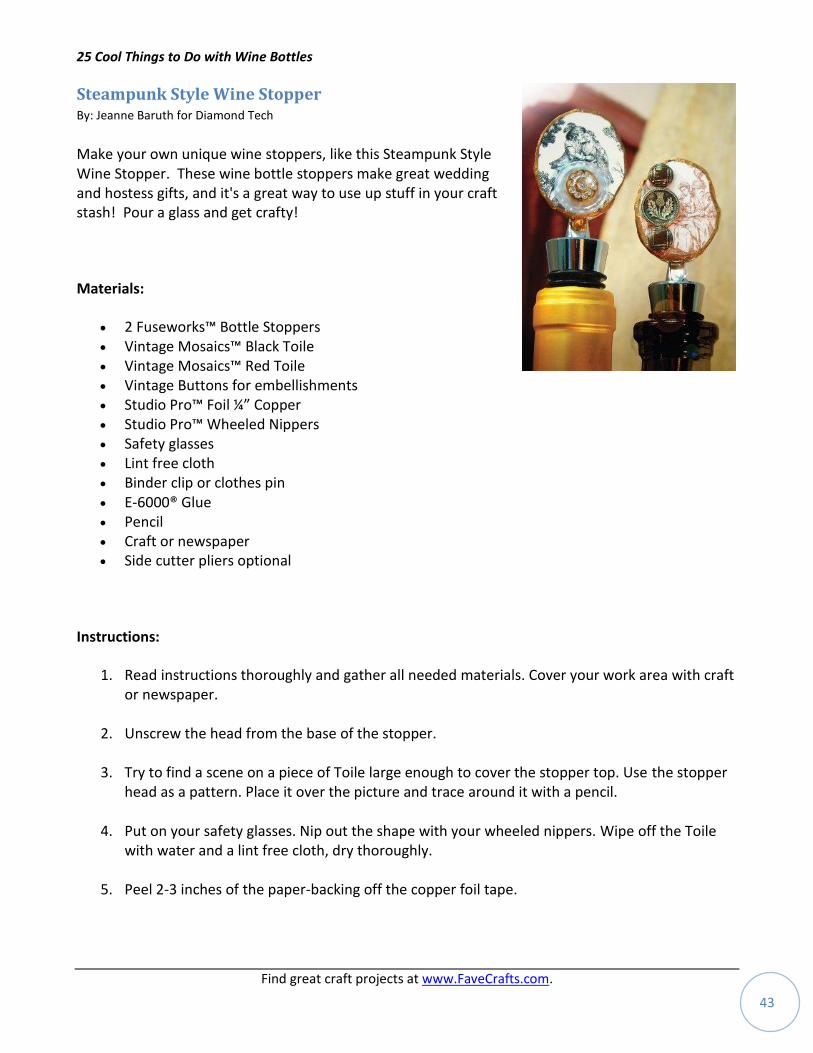
Steampunk Style Wine Stopper By: Jeanne Baruth for Diamond Tech
Make your own unique wine stoppers, like this Steampunk Style Wine Stopper. These wine bottle stoppers make great wedding and hostess gifts, and it's a great way to use up stuff in your craft stash! Pour a glass and get crafty!
Materials:
2 Fuseworks™ Bottle Stoppers Vintage Mosaics™ Black Toile Vintage Mosaics™ Red Toile Vintage Buttons for embellishments Studio Pro™ Foil ¼” Copper Studio Pro™ Wheeled Nippers Safety glasses Lint free cloth Binder clip or clothes pin E-6000® Glue Pencil Craft or newspaper Side cutter pliers optional
Instructions:
1. Read instructions thoroughly and gather all needed materials. Cover your work area with craft or newspaper.
2. Unscrew the head from the base of the stopper.
3. Try to find a scene on a piece of Toile large enough to cover the stopper top. Use the stopper head as a pattern. Place it over the picture and trace around it with a pencil.
4. Put on your safety glasses. Nip out the shape with your wheeled nippers. Wipe off the Toile with water and a lint free cloth, dry thoroughly.
5. Peel 2-3 inches of the paper-backing off the copper foil tape.
25 Cool Things to Do with Wine Bottles
Find great craft projects at www.FaveCrafts.com. 44
6. Hold the foil with the adhesive side up and center the Toile edge on the foil, leaving equal amounts showing on either side of the Toile. Fold edges over the Toile and press firmly, continue this process until you have covered all the edges of the Toile. Burnish the tape to the glass with a fid or the side of a pencil.
7. Squeeze a dollop of E-6000® on the back of the Toile. Press firmly on the bottle stopper top. Hold in place until dry with a binder clip or a clothes pin. Embellish with buttons as show in the photograph. Glue them in place with E-6000®. Once the buttons have dried securely to the Toile, screw the stopper head to the base.
Download more eBooks you’ll love!
Our Favorite Crochet Patterns Jewelry Making for Beginners
Baby Quilt Patterns for Boys and Girls 9 Ways to Transform Old T-Shirts
25 Cool Things to Do with Wine Bottles
Find great craft projects at www.FaveCrafts.com. 45
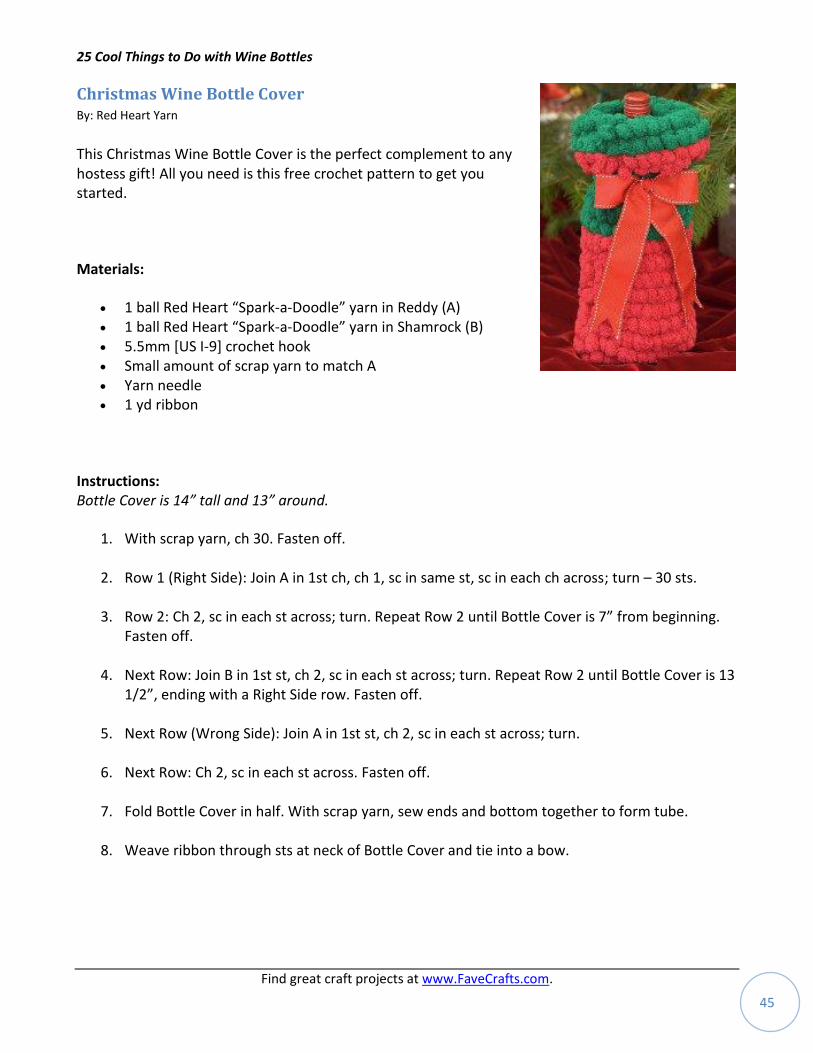
Christmas Wine Bottle Cover By: Red Heart Yarn
This Christmas Wine Bottle Cover is the perfect complement to any hostess gift! All you need is this free crochet pattern to get you started.
Materials:
1 ball Red Heart “Spark-a-Doodle” yarn in Reddy (A) 1 ball Red Heart “Spark-a-Doodle” yarn in Shamrock (B) 5.5mm [US I-9] crochet hook Small amount of scrap yarn to match A Yarn needle 1 yd ribbon
Instructions: Bottle Cover is 14” tall and 13” around.
1. With scrap yarn, ch 30. Fasten off.
2. Row 1 (Right Side): Join A in 1st ch, ch 1, sc in same st, sc in each ch across; turn – 30 sts.
3. Row 2: Ch 2, sc in each st across; turn. Repeat Row 2 until Bottle Cover is 7” from beginning. Fasten off.
4. Next Row: Join B in 1st st, ch 2, sc in each st across; turn. Repeat Row 2 until Bottle Cover is 13 1/2”, ending with a Right Side row. Fasten off.
5. Next Row (Wrong Side): Join A in 1st st, ch 2, sc in each st across; turn.
6. Next Row: Ch 2, sc in each st across. Fasten off.
7. Fold Bottle Cover in half. With scrap yarn, sew ends and bottom together to form tube.
8. Weave ribbon through sts at neck of Bottle Cover and tie into a bow.
25 Cool Things to Do with Wine Bottles
Find great craft projects at www.FaveCrafts.com. 46
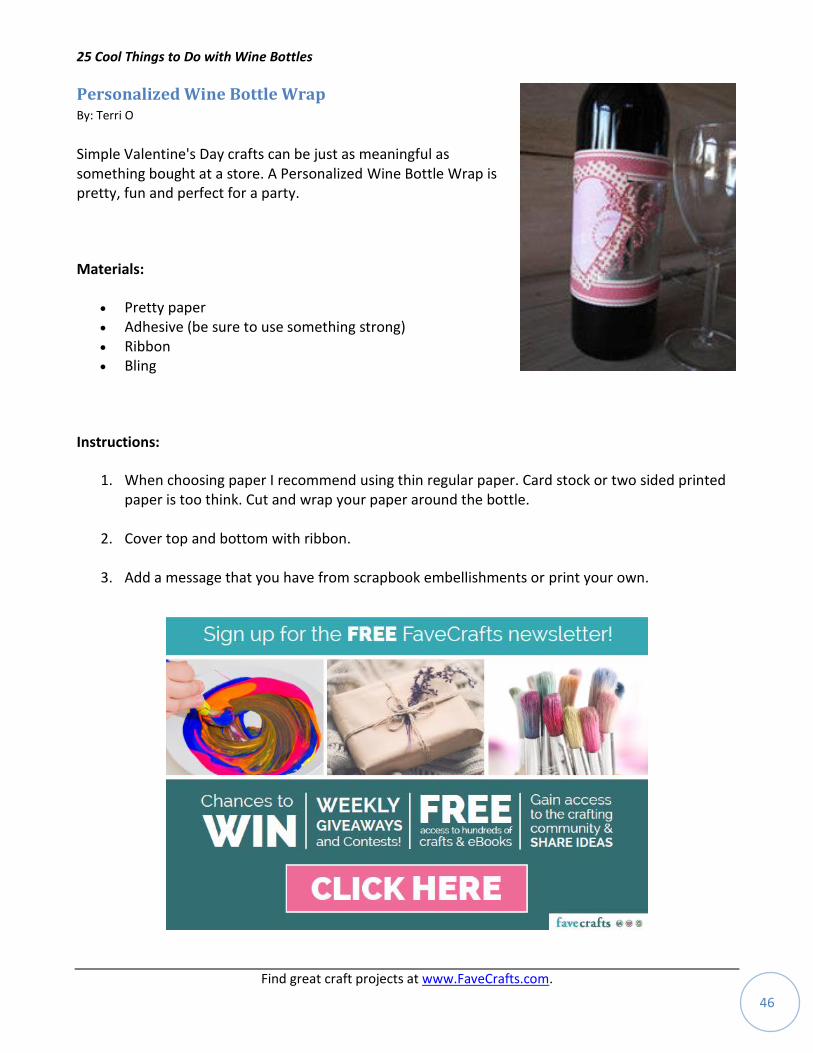
Personalized Wine Bottle Wrap By: Terri O
Simple Valentine's Day crafts can be just as meaningful as something bought at a store. A Personalized Wine Bottle Wrap is pretty, fun and perfect for a party.
Materials:
Pretty paper Adhesive (be sure to use something strong) Ribbon Bling
Instructions:
1. When choosing paper I recommend using thin regular paper. Card stock or two sided printed paper is too think. Cut and wrap your paper around the bottle.
2. Cover top and bottom with ribbon.
3. Add a message that you have from scrapbook embellishments or print your own.
25 Cool Things to Do with Wine Bottles
Find great craft projects at www.FaveCrafts.com. 47
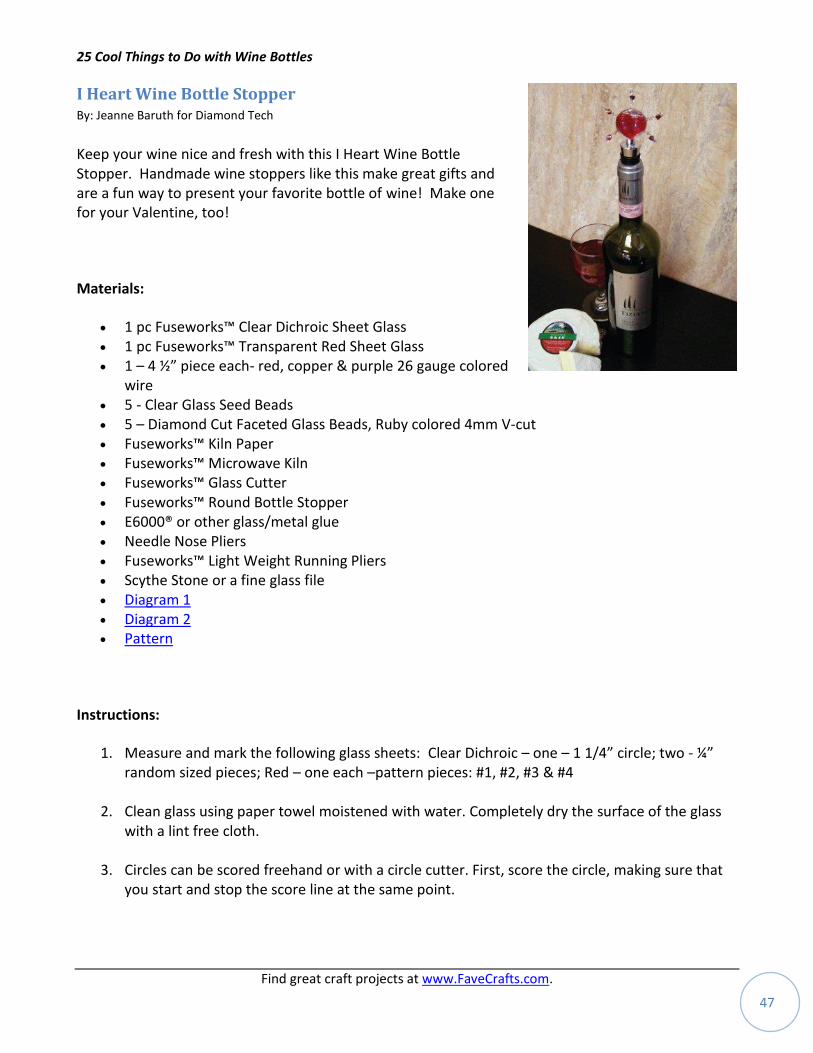
I Heart Wine Bottle Stopper By: Jeanne Baruth for Diamond Tech
Keep your wine nice and fresh with this I Heart Wine Bottle Stopper. Handmade wine stoppers like this make great gifts and are a fun way to present your favorite bottle of wine! Make one for your Valentine, too!
Materials:
1 pc Fuseworks™ Clear Dichroic Sheet Glass 1 pc Fuseworks™ Transparent Red Sheet Glass 1 – 4 ½” piece each- red, copper & purple 26 gauge colored
wire 5 - Clear Glass Seed Beads 5 – Diamond Cut Faceted Glass Beads, Ruby colored 4mm V-cut Fuseworks™ Kiln Paper Fuseworks™ Microwave Kiln Fuseworks™ Glass Cutter Fuseworks™ Round Bottle Stopper E6000® or other glass/metal glue Needle Nose Pliers Fuseworks™ Light Weight Running Pliers Scythe Stone or a fine glass file Diagram 1 Diagram 2 Pattern
Instructions:
1. Measure and mark the following glass sheets: Clear Dichroic – one – 1 1/4” circle; two - ¼” random sized pieces; Red – one each –pattern pieces: #1, #2, #3 & #4
2. Clean glass using paper towel moistened with water. Completely dry the surface of the glass with a lint free cloth.
3. Circles can be scored freehand or with a circle cutter. First, score the circle, making sure that you start and stop the score line at the same point.
25 Cool Things to Do with Wine Bottles
Find great craft projects at www.FaveCrafts.com. 48
4. Turn the glass over onto a piece of corrugated cardboard with the score line face down. With your fingers, press along the score line until you see the score line "runs" completely around the circle.
5. Turn the glass over to the side on which you scored. Score several tangent cuts off the circle, see diagram.
6. Break these tangential scores with your hands or pliers. The circle should break out clean with no rough or jagged edges.
7. Next, cut a 2” X 2” piece of kiln paper. Remove the lid from the Fuseworks™ Kiln. Place the kiln paper on the kiln base.
8. Layer the glass on the kiln paper. Start with the clear dichroic 1 1/4” circle, dichroic side down. Next, configure the heart by centering glass piece #3 & #4 side-by-side (Diagram 1) on top of the circle. Stack glass pieces #1 & #2 on top of #3 & #4 and position randomly shaped dichroic bits one on each side of the heart globs.
9. Carefully set the kiln base inside the microwave. Cover base and glass with kiln lid.
10. Fuse in a 1200 WATT microwave at full (100%) power for 2 minutes PLEASE NOTE: All microwave and kiln combinations will have different firing patterns. Be sure to take careful notes and log all fusing times for future use. For microwaves with less wattage increase the fusing times no more than a minute for the first fuse.
11. After time has expired, open microwave and using Hot Mitts; carefully lift the lid enough to inspect the fusing process. Glass edges should appear nicely rounded. If not, continue fusing by adding 15 second increments to the time until desired results are achieved. Remove kiln from microwave using the Hot Mitts and place on a heat resistant surface. Cool the kiln for 30-45 minutes with the lid on. PLEASE NOTE: Removing the lid or peeking under the lid during the cooling will result in your piece cracking. Glass remains hot for a long time and should be handled with great caution.
12. Cut one 4 ½” lengths of purple, copper and red wire. Working with one section at a time, run one end of the wire through a seed bead. Use needle nose pliers to wrap 1/4 inch of the wire around the bead so the wires meet at the base, twist wires together to secure. Repeat these steps for each length of wire.
25 Cool Things to Do with Wine Bottles
Find great craft projects at www.FaveCrafts.com. 49
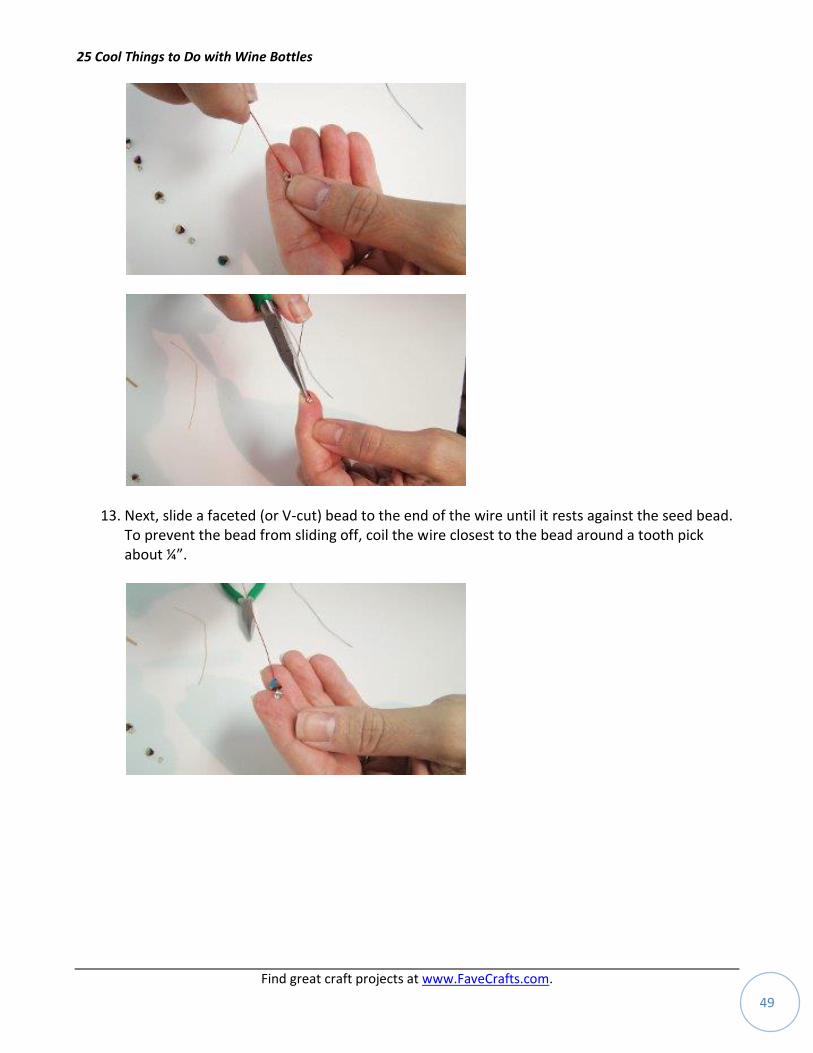
13. Next, slide a faceted (or V-cut) bead to the end of the wire until it rests against the seed bead. To prevent the bead from sliding off, coil the wire closest to the bead around a tooth pick about ¼”.
25 Cool Things to Do with Wine Bottles
Find great craft projects at www.FaveCrafts.com. 50
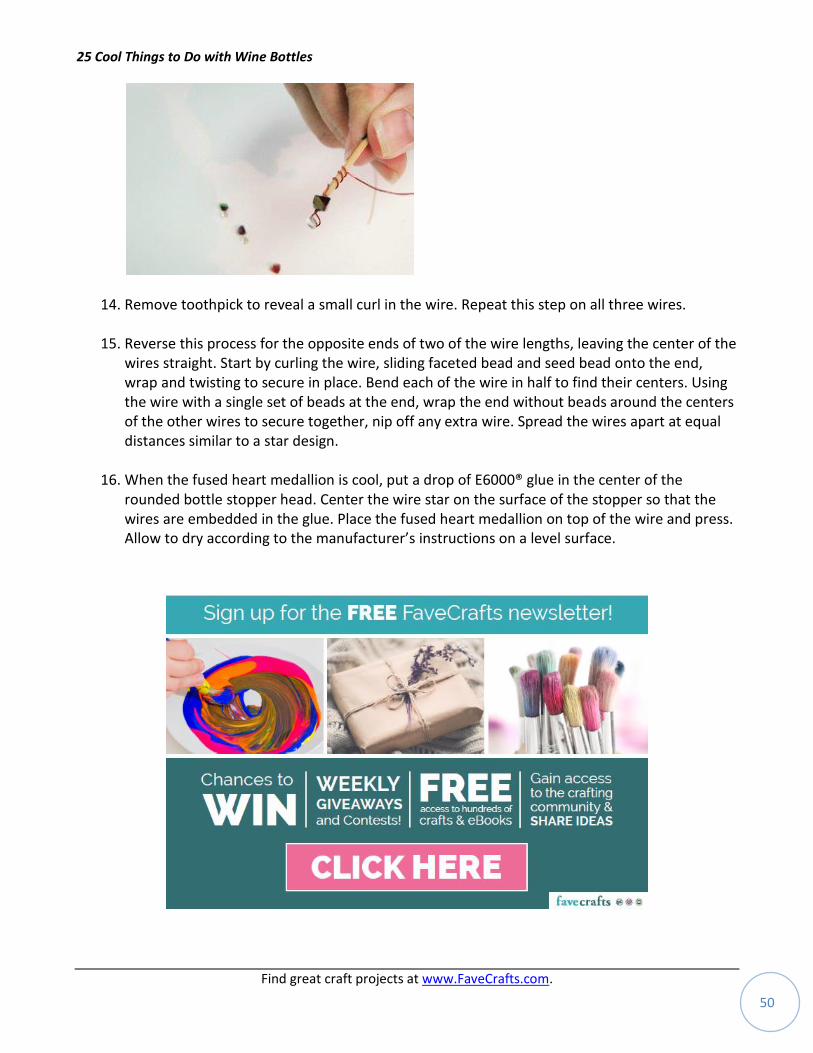
14. Remove toothpick to reveal a small curl in the wire. Repeat this step on all three wires.
15. Reverse this process for the opposite ends of two of the wire lengths, leaving the center of the wires straight. Start by curling the wire, sliding faceted bead and seed bead onto the end, wrap and twisting to secure in place. Bend each of the wire in half to find their centers. Using the wire with a single set of beads at the end, wrap the end without beads around the centers of the other wires to secure together, nip off any extra wire. Spread the wires apart at equal distances similar to a star design.
16. When the fused heart medallion is cool, put a drop of E6000® glue in the center of the rounded bottle stopper head. Center the wire star on the surface of the stopper so that the wires are embedded in the glue. Place the fused heart medallion on top of the wire and press. Allow to dry according to the manufacturer’s instructions on a level surface.
25 Cool Things to Do with Wine Bottles
Find great craft projects at www.FaveCrafts.com. 51
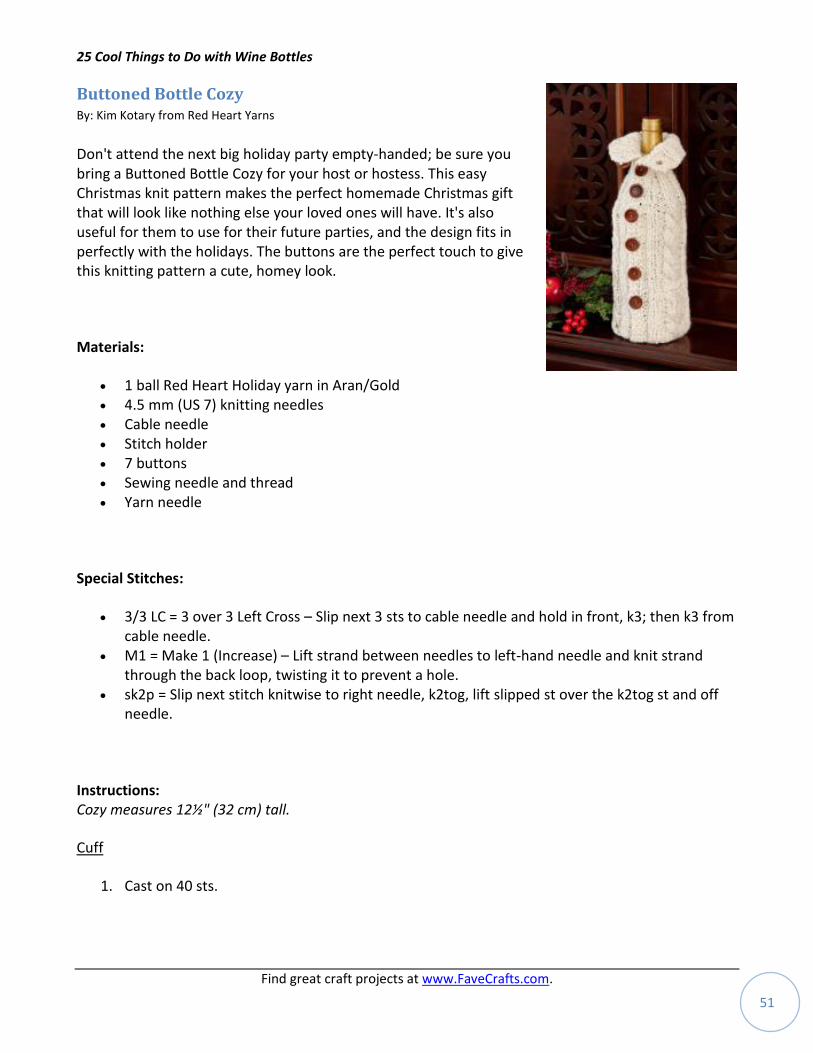
Buttoned Bottle Cozy By: Kim Kotary from Red Heart Yarns
Don't attend the next big holiday party empty-handed; be sure you bring a Buttoned Bottle Cozy for your host or hostess. This easy Christmas knit pattern makes the perfect homemade Christmas gift that will look like nothing else your loved ones will have. It's also useful for them to use for their future parties, and the design fits in perfectly with the holidays. The buttons are the perfect touch to give this knitting pattern a cute, homey look.
Materials:
1 ball Red Heart Holiday yarn in Aran/Gold 4.5 mm (US 7) knitting needles Cable needle Stitch holder 7 buttons Sewing needle and thread Yarn needle
Special Stitches:
3/3 LC = 3 over 3 Left Cross – Slip next 3 sts to cable needle and hold in front, k3; then k3 from cable needle.
M1 = Make 1 (Increase) – Lift strand between needles to left-hand needle and knit strand through the back loop, twisting it to prevent a hole.
sk2p = Slip next stitch knitwise to right needle, k2tog, lift slipped st over the k2tog st and off needle.
Instructions: Cozy measures 12½" (32 cm) tall.
Cuff
1. Cast on 40 sts.
25 Cool Things to Do with Wine Bottles
Find great craft projects at www.FaveCrafts.com. 52
2. Row 1 (Right Side): Slip 1, k4, *p2, k2; repeat from * to last 3 sts, k3.
3. Row 2: Slip 1, *k2, p2; repeat from * to last 3 sts, k3.
4. Row 3 (buttonhole row): Slip 1, k1, yo, k2tog (buttonhole made), k1, *p2, k2; repeat from * to last 3 sts, k3.
5. Row 4: Repeat Row 2.
Body
1. Row 1 (Right Side): Slip 1, *k2, M1; repeat from * to last 3 sts, k3—58 sts.
2. Row 2: Slip 1, k2, [p2, k2, p6, k2] 4 times, p2, k5.
3. Row 3: Slip 1, k2, p2, [k2, p2, 3/3 LC, p2] 4 times, k5.
4. Row 4: Repeat Row 2.
5. Row 5: Slip 1, k2, p2, [k2, p2, k6, p2] 4 times, k5.
6. Rows 6 and 7: Repeat Rows 4 and 5.
7. Row 8: Repeat Row 4.
8. Row 9 (buttonhole row): Slip 1, k1, yo, k2tog, p1, [k2, p2, 3/3 LC, p2] 4 times, k5.
9. Rows 10–14: Repeat Rows 4–8.
10. Row 15: Repeat Row 3.
11. Rows 16–18: Repeat Rows 6–8.
12. Row 19 (buttonhole row): Slip 1, k1, yo, k2tog, p1, [k2, p2, k6, p2] 4 times, k5.
13. Rows 20–26: Repeat Rows 2–8.
14. Row 27: Repeat Row 3.
15. Row 28: Repeat Row 2.
16. Row 29 (buttonhole row): Repeat Row 19.
25 Cool Things to Do with Wine Bottles
Find great craft projects at www.FaveCrafts.com. 53
17. Rows 30 and 31: Repeat Rows 4 and 5.
18. Repeat Rows 2–31 once more (a total of 7 buttonholes made).
19. Repeat Rows 2–7 until piece measures 10" from beginning, end with a Row 4 or 6.
Pocket Opening
1. Row 1 (Right Side): Slip 1, k2, p2, k2, p2, k6, p2, slip last 10 sts worked onto st holder, [k2, p2, k6, p2] 3 times, k5.
2. Row 2: Slip 1, k2, [p2, k2, p6, k2] 3 times, p2, cast on 10 sts, p2, k5. Continue in pattern as established until piece measures 12½" from beginning or to desired height for bottle, end with a Wrong Side row.
3. Bind off 3 sts at the beginning of the next 2 rows—52 sts.
Bottom
1. Row 1 (Right Side): K2, [K1, sk2p, k5, sk2p] 4 times, k2—36 sts.
2. Row 2: Purl.
3. Row 3: K1, sk2p, k3, sk2p, [k5, sk2p] 3 times, k2—26 sts.
4. Row 4: Purl.
5. Row 5: [K3, sk2p] 4 times, k2—18 sts.
6. Row 6: Purl.
7. Row 7: [K1, sk2p] 4 times, k2—10 sts.
8. Cut yarn leaving a long tail. With yarn needle, thread tail through remaining 10 sts and pull to close opening. Overlap first and last 3 sts of side edges, placing buttonholes on outside. Sew from center of bottom to just below last buttonhole.
Pocket: Return pocket sts from holder to needle. Work in established cable pattern for 2" (5 cm). Bind off. Sew inside of pocket to Wrong Side of cozy. Finishing: Weave in ends. Sew buttons opposite buttonholes.
25 Cool Things to Do with Wine Bottles
Find great craft projects at www.FaveCrafts.com. 54
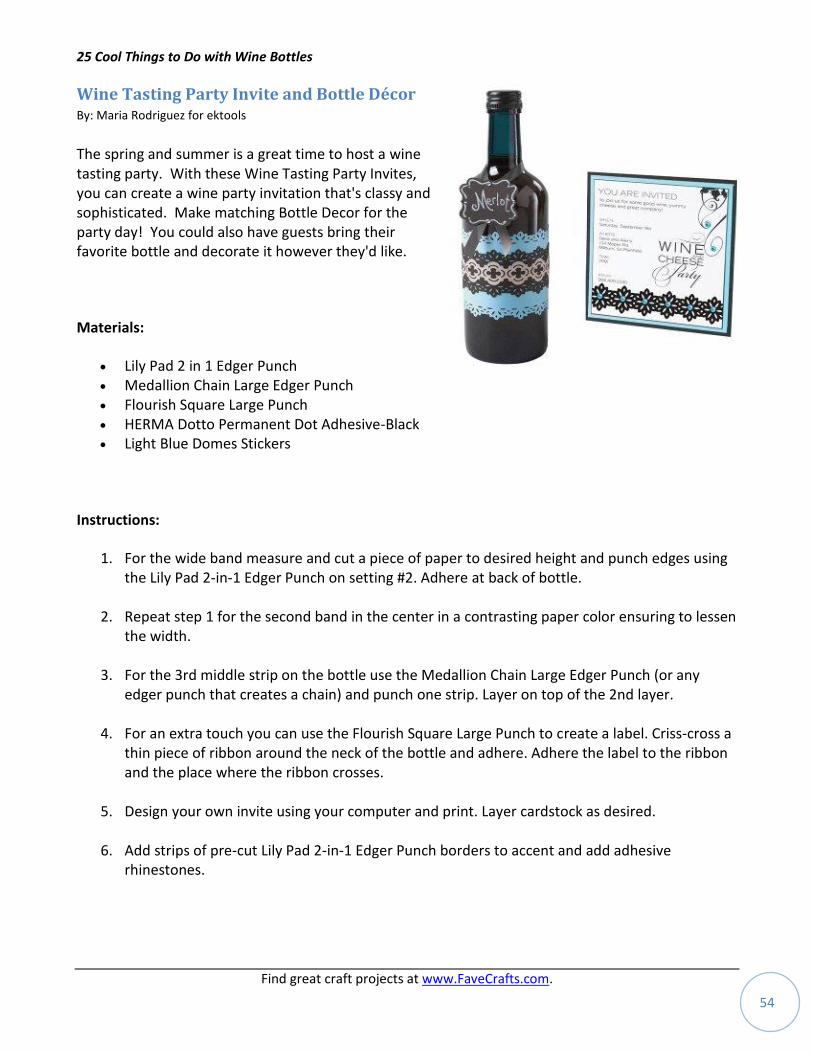
Wine Tasting Party Invite and Bottle Décor By: Maria Rodriguez for ektools
The spring and summer is a great time to host a wine tasting party. With these Wine Tasting Party Invites, you can create a wine party invitation that's classy and sophisticated. Make matching Bottle Decor for the party day! You could also have guests bring their favorite bottle and decorate it however they'd like.
Materials:
Lily Pad 2 in 1 Edger Punch Medallion Chain Large Edger Punch Flourish Square Large Punch HERMA Dotto Permanent Dot Adhesive-Black Light Blue Domes Stickers
Instructions:
1. For the wide band measure and cut a piece of paper to desired height and punch edges using the Lily Pad 2-in-1 Edger Punch on setting #2. Adhere at back of bottle.
2. Repeat step 1 for the second band in the center in a contrasting paper color ensuring to lessen the width.
3. For the 3rd middle strip on the bottle use the Medallion Chain Large Edger Punch (or any edger punch that creates a chain) and punch one strip. Layer on top of the 2nd layer.
4. For an extra touch you can use the Flourish Square Large Punch to create a label. Criss-cross a thin piece of ribbon around the neck of the bottle and adhere. Adhere the label to the ribbon and the place where the ribbon crosses.
5. Design your own invite using your computer and print. Layer cardstock as desired.
6. Add strips of pre-cut Lily Pad 2-in-1 Edger Punch borders to accent and add adhesive rhinestones.
25 Cool Things to Do with Wine Bottles
Find great craft projects at www.FaveCrafts.com. 55
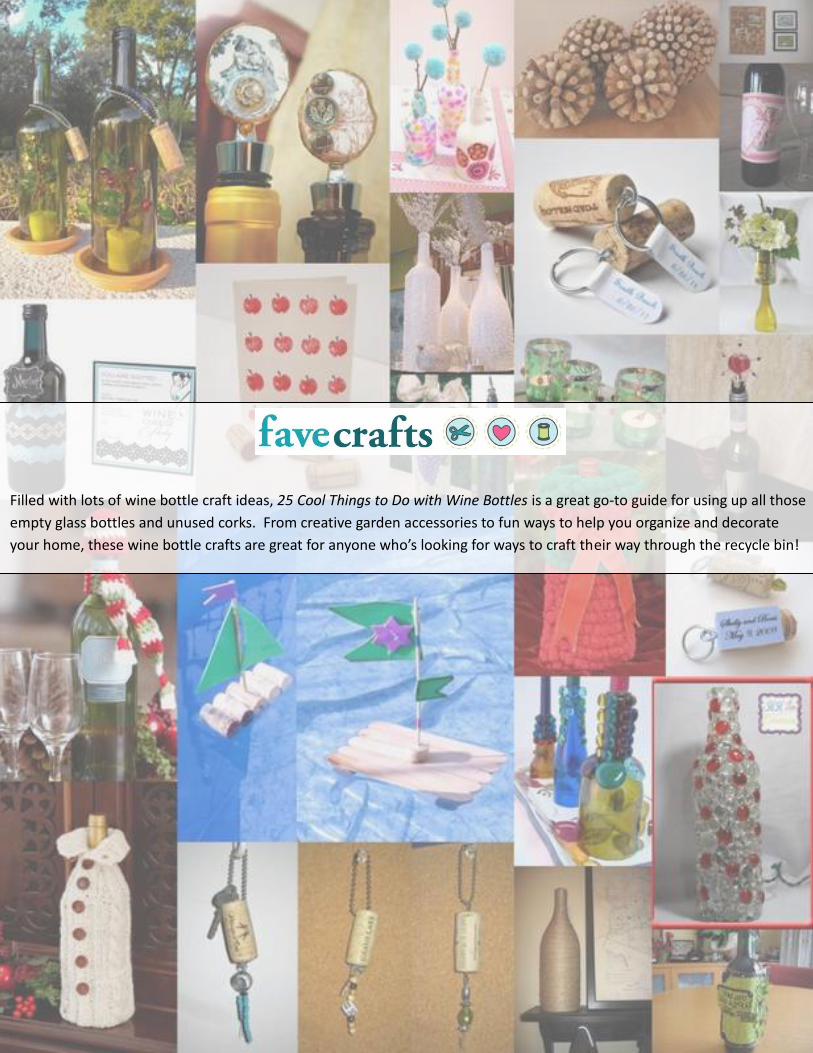
Filled with lots of wine bottle craft ideas, 25 Cool Things to Do with Wine Bottles is a great go-to guide for using up all those
empty glass bottles and unused corks. From creative garden accessories to fun ways to help you organize and decorate
your home, these wine bottle crafts are great for anyone who’s looking for ways to craft their way through the recycle bin!