24 hour technical helpline: 0870 843 0333 fault code … · generation 0 = original x = flexi (low...
TRANSCRIPT

Page 1 of 64 Version 13.1
24 Hour Technical Helpline: 0870 843 0333
Fault Code Text Service: 07624 803 017

Page 2 of 64 Version 13.1
Make Up Of Model Number RAV Products
R A V – 1 6 5 K H _ - P E
RAV = Light Commercial Range E = CE marked RAS = Small Office / Domestic
P = Made in Plymouth Approx Duty (x 1000 = BTU)
Blank = Single Phase Power Supply Generation 8 = Three Phase Power Supply RAV use numbers i.e. 0,1,2,3,4,5 RAS use letters i.e. U,E,S,Y Blank = Cool Only (RAV) / HP (inv)*
H = HP (RAV) / Cool Only (inv)*
N = Chassis Type K = High Wall L = Console Type C = Ceiling suspended
S = Low Wall TU = Two Way Cassette F = Tall Floor U = Four Way Cassette
B = Ducted Type A = Outdoor Unit
Digital/Super Digital Inverter
R A V – SM 5 6 6 K R T - E
RAV = Light Commercial Range E = CE marked
T = Twin rotary compressor SM = Digital Inverter V = Single rotary compressor SP = Super Digital Inverter
R = Infrared option Nominal Duty (kW) i.e. 56 = 5.6kW
Style
Generation 0 = original X = Flexi (low wall or under-slung) 2 = second up date K = Hi Wall C = Ceiling suspended U = Cassette B = Ducted A = outdoor
Modular Multi Outdoor Units
MMY - M AP 120 4 H T 8 MMY = Modular Multi Three phase power supply
M = Single module Capacity variable unit (Inverter) No mark = Combined model
H = Heat pump (two pipe) Refrigerant R410A Blank = Cooling Only (two pipe) F = Heat recovery (three pipe)
Development series
Capacity rank HP x 10
Modular Multi Indoor Units
MM* - AP 056 4 B H Style U = Cassette D = Ducted Style C = Ceiling suspended K = High Wall H = Heat pump WH = 2-way discharge L = Floor standing F = Tall Floor standing SH = 1-way discharge BH = Standard duct Refrigerant R410A Development series Capacity rank 009 = 2.8kW 012 = 3.6kW 015 = 4.5kW 018 = 5.6kW 024 = 7.1kW 027 = 8kW 030 = 9kW 036 = 11.2kW 048 = 14kW 056 = 16kW
* = RAS type with inverter drive

Page 3 of 64 Version 13.1
Index
Model number make up Page 2
Mechanical Specifications R410A Page 4
Electrical Specifications R410A Page 4/5 Twin & Multi Split Electrical Details Page 6
VRF additional refrigerant charge calculations Page 7/8
SMMS/SMMSi/SHRM2/SHRMi system make up chart Page 9/10 RAS Indoor to outdoor Combinations Page 11 Refrigeration Details – RAS auto restart function Page 12
Acoustic Data – RAS, RAV & MMY – Indoor units Page 13/14 Digital / Super Digital inverter twin splits Page 15
Digital / Super Digital inverter triple splits Page 16 Digital / Super Digital inverter Quad splits Page 17
RAV Heat Pump Pipe specifications Page 18/20 Twin, Triple and quad wiring diagram Page 21 SDI 4 & DI Series 3 outdoor units Page 22
Fault Codes – RAS „‟N‟‟ Series, RAV Series /SM/SP Page 23/25 Fault Codes - 2 Pipe Super Multi Page 26
Fault Codes - 3 Pipe Super Multi Page 27 Fault Codes - 3 Pipe SMI Page 28 Fault Codes - 2 Pipe Modular Multi Page 29/30
Fault Codes – SMMS / SHRM Page 31/33 Error Detected by TCC-Link central control device Page 33
Fault Codes – SMMSi / SHRMi Page 34/35 VRF Rotary Dial Display Page 36 Wiping/Re-addressing of VRF Systems Page 37
Super Modular Multi ( SMMS / SHRM ) Switch Positions Page 37 Modular Multi Switch Positions Page 38
TCC-net Controller Guides Page 39 Standard Wired Controller Page 40/41 Remote control data retrieval (SMMS/SMMSI/SHRM/4Series DI) Page 42/43 Central Remote Controller Page 44/53
Central Remote Control Configuration Menu Page 54/55 Central Remote Control Extras Page 56
TCC Net Configuration Page 57 Assorted Wiring Diagrams For Auxillary Devices Page 58
Common Sensor Characteristics Page 59 Air To Air Heat Exchanger configurations Page 60 New Harmonised Electrical Wiring Colours Page 61/62
Technical Support Page 63

Page 4 of 64
Mechanical Specifications – R410A Single Splits
Electrical Specifications-R410A Residential Single Splits
Model
Capacity (kW)
Sensible Capacity
(kW)
Phase
Power To
Soft Start
Max Current
Suggested Fuse Size
Interconnecting Cable C H
Domestic Range
RAS-107SAV-E3 2.92 3.07 2.22
1Ph + N Outdoor Yes
4.0 6
3Core + Earth
RAS-137SAV-E3 3.90 3.75 2.96 5.2 6
RAS-167SAV-E3 4.87 4.65 3.70 7.9 10
RAS-10SAVP-E 3.30 4.62 2.43 2.49 6
RAS-13SAVP-E 4.07 4.91 3.05 3.9 6
RAS-16SAVP-E 4.50 5.80 3.38 5.9 10
RAS-10SAVP2-E 3.30 4.62 2.48 2.35 6
RAS-13SAVP2-E 4.07 4.91 3.05 3.8 6
RAS-16SAVP2-E 4.50 5.80 3.38 6.13 10
RAS-10SAV2-E 3.02 3.60 2.53 3.5 6
RAS-13SAV2-E 3.99 4.05 2.79 4.9 6
RAS-18SAV2-E 5.55 4.73 3.89 7.2 10
Model
Pipe Sizes Min/Max Pipe Sep
(m)
Max Height
Sep
Pre- charge
(m)
Add Charge (g/m)
Base Charge
(kg) Dimensions
(mm) Weight
(kg) L S
Domestic Range
RAS-107SAV-E3
1/4
3/8 1/10 8 10 N/A 0.63 530x660x240 27
RAS-137SAV-E3 1/20
10
15 20
0.80
550x780x290
33
RAS-167SAV-E3 1/2 1.05
40
RAS-10SAVP-E 3/8
2/25
38 RAS-13SAVP-E
RAS-16SAVP-E 1/2
RAS-10SAVP2-E 3/8
1.05 630x800x300 41 RAS-13SAVP2-E
RAS-16SAVP2-E 1/2
RAS-10SAV2-E 3/8
1/20
0.8 550x780x290
33 RAS-13SAV2-E
RAS-18SAV2-E 1/2 1.4 39
Commercial Range
RAV-SM561AT-E
1/4 1/2
5/30
30
20
20 1.0
550x780x290
38 RAV-SM562AT-E
RAV-SM563AT-E
RAV-SM801AT-E
3/8 5/8 40
1.7 42 RAV-SM802AT-E
RAV-SM803AT-E
RAV-SM1101AT-E
5/50
30
2.8
795x900x320
77
RAV-SM1102AT-E
RAV-SM1103AT-E
RAV-SM1401AT-E 795x780x320
RAV-SM1402AT-E 795x900x320
RAV-SM1403AT-E
RAV-SM1603AT-E 3.1 1340x900x320 99
RAV-SM2244AT8-E 1/2 1 1/8 7.5/75 80 5.9 1540x900x320 133
RAV-SM2804AT8-E
RAV-SP404AT-E
1/4
1/2
5/30 20 1.0 550x780x290
RAV-SP562AT-E
5/50
20 1.0 795x900x320 55
RAV-SP564AT-E 550x780x290 44
RAV-SP802AT-E
3/8
5/8
40
1.4 795x900x320 62
RAV-SP804AT-E 890x900x320 63
RAV-SP1102AT-E 5/70
3.1
1340x900x320
95
RAV-SP1104AT-E 5/75 93
RAV-SP1402AT-E 5/70 95
RAV-SP1404AT-E 5/75 93
RAV-SP1104AT8-E
3/75
95 RAV-SP1404AT8-E
RAV-SP1604AT8-E

Page 5 of 64
Electrical Specifications-R410A Commercial Single Splits
*Capacities are quoted at UK conditions
Air-to-Air Heat Exchangers Model (Standard)
Power (W) Air Volume
(m³/hr) Static Pressure
(Pa) Dimensions (H x W x D)
Weight (kg)
Duct (mm)
VN-M150HE 42-78 110-150 47-102 900-900-290 36 100
VN-M250HE 52-138 155-250 28-98 900-900-290 36 150
VN-M350HE 82-182 210-350 65-125 900-900-290 38 150
VN-M500HE 128-238 390-400 62-150 1140-1140-350 53 200
VN-M650HE 178-290 520-650 61-107 1140-1140-350 53 200
VN-M800HE 286-383 700-800 76-158 1189-1189-400 70 250
VN-M1000HE 353-569 755-1000 84-150 1189-1189-400 70 250
Model
(DX Coil)
Capacity Power
(W)
Air Volume
(m³/hr)
Static Press
(Pa)
Dimensions
(H x W x D) Weight
(kg) Duct
(mm) C H
MMD-VN502HEXE 4.10 5.53 235-300 440-500 115-120 430-01140-1690 84 200
MMD-VN802HEXE 6.56 8.61 335-505 640-800 105-120 430-1189-1739 100 250
MMD-VN1002HEXE 8.25 10.9 485-550 820-950 105-135 430-1189-1739 101 250
Model (DX Coil/Humidifer)
Capacity Humidifier
(Kg/hr) Power
(W)
Air Volume (m³/hr)
Static Press (Pa)
Dimensions (H x W x D)
Weight (kg)
Duct (mm) C H
MMD-VNK502HEXE 4.10 5.53 3.0 240-305 440-500 85-95 430 -1140-1690 91 200
MMD-VNK802HEXE 6.56 8.61 5.0 350-530 640-800 85-105 430 -1189-1739 111 250
MMD-VNK1002HEXE 8.25 10.9 6.0 520-575 820-950 90-115 430 -1189-1739 112 250
Model
Capacity (kW)
Sensible Capacity
(kW)
Phase
Power To
Soft Start
Max Current
Suggested Fuse Size
Interconnecting Cable C H
Commercial Range
RAV-SM561AT-E 4.44 4.69 4.26
1Ph + N
Outdoor Yes
7.70
10
3Core + Earth
RAV-SM562AT-E 5.44 4.69 4.26 8.42
RAV-SM563AT-E 5.44 4.69 4.26 7.90
RAV-SM801AT-E 7.76 6.72 5.85 10.3
16 RAV-SM802AT-E 7.76 6.72 5.85 11.32
RAV-SM803AT-E 7.46 6.72 5.25 10.1
RAV-SM1101AT-E 10.87 9.68 6.67 15.0
20 RAV-SM1102AT-E 10.87 9.68 6.67 16.3
RAV-SM1103AT-E 10.87 9.68 6.67 14.4
RAV-SM1401AT-E 12.81 11.92 8.35 17.6
20 RAV-SM1402AT-E 12.81 11.92 8.35 19.2
RAV-SM1403AT-E 12.61 11.92 8.15 17.7
RAV-SM1603AT-E 15.53 13.64 11.0 23.9 25
RAV-SM2244AT8-E 21.70 15.77 16.85 3Ph + N
18.0 25
RAV-SM2804AT8-E 26.21 19.56 19.64 22.0
RAV-SP404AT-E 3.88 4.93 3.20
1Ph + N
5.2 10
RAV-SP562AT-E 5.44 5.29 4.26 7.17 10
RAV-SP564AT-E 5.44 4.69 4.26 6.82
RAV-SP802AT-E 7.76 7.45 5.85 8.95 10
RAV-SP804AT-E 7.46 6.72 5.25 8.72
RAV-SP1102AT-E 10.87 9.31 6.67 11.24 20
RAV-SP1104AT-E 10.87 9.68 6.67 11.24
RAV-SP1402AT-E 13.59 12.29 8.86 16.54 20
RAV-SP1404AT-E 12.61 11.92 8.15 16.21
RAV-SP1104AT8-E 10.87 9.68 6.67
3Ph + N
4.52
16 RAV-SP1404AT8-E 12.61 11.92 8.15 5.97
RAV-SP1604AT8-E 15.53 13.64 11.10 7.26

Page 6 of 64
Twin & Multi Splits Electrical Details
Model (Outdoor) 2 Indoor
Units 3 Indoor
Units 4 Indoor
Units Phase
Power To
Soft Start
Suggested Fuse Size
Inter- Connecting
Cable
Digital Inverter
RAV-SM1101AT-E RAV-SM561*T-E N/A N/A 1Ph-N Outdoor Y 20 3C+E
RAV-SM1102AT-E RAV-SM562*T-E N/A N/A 1Ph-N Outdoor Y 20 3C+E
RAV-SM1103AT-E RAV-SM564*T-E N/A N/A 1Ph-N Outdoor Y 20 3C+E
RAV-SM1401AT-E RAV-SM801*T-E N/A N/A 1Ph-N Outdoor Y 25 3C+E
RAV-SM1402AT-E RAV-SM802*T-E N/A N/A 1Ph-N Outdoor Y 25 3C+E
RAV-SM1403AT-E RAV-SM804*T-E N/A N/A 1Ph-N Outdoor Y 25 3C+E
RAV-SM1603AT-E RAV-SM802*T-E RAV-SM562*T-E N/A 1Ph-N Outdoor Y 32 3C+E
RAV-SM1603AT-E RAV-SM804*T-E RAV-SM564*T-E N/A 1Ph-N Outdoor Y 32 3C+E
RAV-SM2244AT8-E RAV-SM1102*T-E RAV-SM802*T-E RAV-SM562*T-E 3Ph-N Outdoor Y 25 3C+E
RAV-SM2244AT8-E RAV-SM1104*T-E RAV-SM804*T-E RAV-SM564*T-E 3Ph-N Outdoor Y 25 3C+E
RAV-SM2804AT8-E RAV-SM1402*T-E RAV-SM802*T-E RAV-SM802*T-E 3Ph-N Outdoor Y 25 3C+E
RAV-SM2804AT8-E RAV-SM1404*T-E RAV-SM804*T-E RAV-SM804*T-E 3Ph-N Outdoor Y 25 3C+E
Super Digital Inverter
RAV-SP1102AT-E RAV-SM562*T-E N/A N/A 1Ph-N Outdoor Y 20 3C+E
RAV-SP1104AT-E RAV-SM564*T-E N/A N/A 1Ph-N Outdoor Y 20 3C+E
RAV-SP1104AT8-E RAV-SM564*T-E N/A N/A 3Ph N Outdoor Y 16 3C+E
RAV-SP1402AT-E RAV-SM802*T-E N/A N/A 1Ph-N Outdoor Y 20 3C+E
RAV-SP1404AT-E RAV-SM804*T-E N/A N/A 1Ph-N Outdoor Y 20 3C+E
RAV-SP1104AT-E RAV-SM564*T-E N/A N/A 3Ph-N Outdoor Y 16 3C+E
RAV-SP1404AT8-E RAV-SM804*T-E N/A N/A 3Ph-N Outdoor Y 16 3C+E
RAV-SP1604AT8-E RAV-SM804*T-E RAV-SM564*T-E N/A 3Ph-N Outdoor Y 16 3C+E
RAS Multi Systems
RAS-M14GAV-E Min 1-Max 2 1Ph-N Outdoor Y 10 3C+E
RAS-M18GAV-E Min 2-Max 2 1Ph-N Outdoor Y 10 3C+E
RAS-3M26GAV-E Min 2-Max 3 1Ph-N Outdoor Y 16 3C+E
RAS-4M27GAV-E Min 2-Max 4 1Ph-N Outdoor Y 16 3C+E
RAS-5M34UAV-E Min 2-Max 5 1Ph-N Outdoor Y 16 3C+E
Heat Pump VRF (SMMS)
MMY-MAP0501HT8
Max 48 In Modular Format
3Ph-N In + Out Y 10 2C Screened
MMY-MAP0601HT8 3Ph-N In + Out Y 10 2C Screened
MMY-MAP0801HT8 3Ph-N In + Out Y 16 2C Screened
MMY-MAP1001HT8 3Ph-N In + Out Y 16 2C Screened
MMY-MAP1201HT8 3Ph-N In + Out Y 20 2C Screened
Heat Pump VRF (SMMSi)
MMY-MAP804HT8-E
Max 48 In Modular Format
3Ph-N In + Out Y 16 2C Screened
MMY-MAP1004HT8-E 3Ph-N In + Out Y 16 2C Screened
MMY-MAP1204HT8-E 3Ph-N In + Out Y 20 2C Screened
MMY-MAP1404HT8-E 3Ph-N In + Out Y 25 2C Screened
MMY-MAP1604HT8-E 3Ph-N In + Out Y 25 2C Screened
Heat Pump VRF (SHRM)
MMY-MAP0802FT8-E
Max 48 In Modular Format
3Ph-N In + Out Y 16 2C Screened
MMY-MAP1002FT8-E 3Ph-N In + Out Y 20 2C Screened
MMY-MAP1202FT8-E 3Ph-N In + Out Y 25 2C Screened
Mini SMMS
MCY-MAP0401HT Max 6 1Ph-N In + Out Y 16 2C Screened
MCY-MAP0501HT Max 8 1Ph-N In + Out Y 25 2C Screened
MCY-MAP0601HT Max 9 iPh-N In + Out Y 25 2C Screened
Please note that all screened cables should have minimum CSA of 1.5mm²

Page 7 of 64
VRF additional refrigerant charge calculations
Mini SMMS
SMMS
SHRM
SMMSi
Liquid pipe size
Charge rate
(kg/m)
¼” 0.025
3/8” 0.055
Mini SMMS trim charge (kgs)
0401 0501 0601
-0.8 -0.4 0
Trim charge SMMS only
HP Condenser Correction
factor (kg’s)
HP Condenser Correction
factor (kg’s) 1 2 3 1 2 3 4
5 5 0 28 10 10 8 -2.0
6 6 0 30 10 10 10 0
8 8 1.5 32 8 8 8 8 -6.0
10 10 2.5 32 12 10 10 1.0
12 12 3.5 34 10 8 8 8 -6.0
14 8 6 0 34 12 12 10 3.0
16 8 8 0 36 10 10 8 8 -6.0
18 10 8 0 36 12 12 12 4.0
20 10 10 3.0 38 10 10 10 8 -6.0
22 8 8 6 0 40 10 10 10 10 -5.0
22 12 10 5.0 42 12 10 10 10 -4.0
24 8 8 8 -4.0 44 12 12 10 10 -2.0
24 12 12 7.0 46 12 12 12 10 0
26 10 8 8 -4.0 48 12 12 12 12 2.0
Liquid pipe size
SMMS Charge
rate (kg/m)
¼” 0.025 3/8” 0.055
½” 0.105 5/8” 0.160
¾” 0.250 7/8” 0.350
Trim charge SMMSi STANDARD Efficiency
HP Condenser Correction
factor (kg’s)
HP Condenser Correction
factor (kg’s) 1 2 3 1 2 3
8 8 1.5 30 16 14 11.5
10 10 2.5 32 16 16 12.5
12 12 3.5 34 12 12 10 3.0
14 14 8.5 36 12 12 12 4.0
16 16 10.5 38 16 12 10 6.0
18 10 8 0 40 16 12 12 7.0
20 10 10 3.0 42 16 14 12 8.0
22 16 10 5.0 44 16 16 12 10.0
24 12 12 7.5 46 16 16 14 12.0
26 16 10 8.5 48 16 16 16 14.0
28 16 12 9.5
Liquid pipe size
SMMSi Charge
rate (kg/m)
¼” 0.025 3/8” 0.055
½” 0.105 5/8” 0.160
¾” 0.250 7/8” 0.350
Trim charge SMMSi HIGH Efficiency HP Condenser Correction HP Condenser Correction
1 2 3 4 1 2 3 4
16 8 8 0.0 36 10 10 8 8 -6.0
24 8 8 8 -4.0 38 10 10 10 8 -6.0
26 10 8 8 -4.0 40 10 10 10 10 -5.0
28 10 10 8 -2.0 42 12 10 10 10 -4.0
30 10 10 10 0.0 44 12 12 10 10 -2.0
32 8 8 8 8 -6.0 46 12 12 12 10 0
34 10 8 8 8 -6.0 48 12 12 12 12 2.0

Page 8 of 64
SHRM II
SHRMi
Trim charge SHRM (ONLY)
HP 1 2 3 correction
8 8 2.0
10 10 2.5
12 12 3.0
16 8 8 -1.5
18 10 8 0
20 10 10 2.0
24 8 8 8 -4.5
26 10 8 8 -3.0
28 10 10 8 -1.5
30 10 10 10 0
Liquid
pipe size
SHRM
Charge rate
(kg/m)
¼” 0.0325 3/8” 0.0715
½” 0.1365 5/8” 0.208
¾” 0.325 7/8” 0.455
Trim charge SHRMi (ONLY)
HP 1 2 3 correction
8 8 2
10 10 3
12 12 8
14 14 10
16 8 8 0
18 10 8 1.5
20 10 10 3.5
22 12 10 7.5
24 14 10 8.5
26 14 12 11
28 14 14 12
30 10 10 10 2.5
32 12 10 10 5
34 14 10 10 6
36 12 12 12 8
38 14 12 12 9.5
40 14 14 12 11
42 14 14 14 12.5
Liquid
pipe size
SHRM
Charge rate
(kg/m)
¼” 0.0325 3/8” 0.0715
½” 0.1365 5/8” 0.208
¾” 0.325 7/8” 0.455

Page 9 of 64
SMMS/SMMSi system make up chart
Model reference MMY
Duty HP
Cooling Capacity
kW
Heating capacity
kW
Outdoor unit combination Max. Indoor
units 0501 0601 0801/4 1001/4 1201/4 1404 1604
MAP0501HT8 5 14 16 1 8
MAP0601HT8 6 16 18 1 10
MAP0801HT8 8 22.4 25 1 13
MAP1001HT8 10 28 31.5 1 16
MAP1201HT8 12 33.5 37.5 1 20
MAP1401HT8 14 38.4 43 1 1 23
MAP1601HT8 16 45 50 2 27
MAP1801HT8 18 50.4 56.5 1 1 30
MAP2001HT8 20 56 63 2 33
MAP2201HT8 22 61.5 69 1 2 37
MAP2211HT8 22 61.5 69 1 1 37
MAP2401HT8 24 68 76.5 3 40
MAP2411HT8 24 68 76.5 2 40
MAP2601HT8 26 73 81.5 2 1 43
MAP2801HT8 28 78.5 88 1 2 47
MAP3001HT8 30 84 95 3 48
MAP3201HT8 32 90 100 4 48
MAP3211HT8 32 90 100 2 1 48
MAP3401HT8 34 96 108 3 1 48
MAP3411HT8 34 96 108 1 2 48
MAP3601HT8 36 101 113 2 2 48
MAP3611HT8 36 101 113 3 48
MAP3801HT8 38 106.5 119.5 1 3 48
MAP4001HT8 40 112 126.5 4 48
MAP4201HT8 42 118 132 3 1 48
MAP4401HT8 44 123.5 138 2 2 48
MAP4601HT8 46 130 145 1 3 48
MAP4801HT8 48 135 150 4 48
MAP0804HT8-E 8 22.4 25.0 1 13
MAP1004HT8-E 10 28.0 31.5 1 16
MAP1204HT8-E 12 33.5 37.5 1 20
MAP1404HT8-E 14 40.0 45.0 1 23
MAP1604HT8-E 16 45.0 50.0 1 27
MAP1814HT8-E 18 50.4 56.5 1 1 30
MAP2014HT8-E 20 56 63.0 2 33
MAP2214HT8-E 22 61.5 69.0 1 1 37
MAP2414HT8-E 24 68.0 76.5 2 40
MAP2614HT8-E 26 73.0 81.5 1 1 43
MAP2814HT8-E 28 78.5 88.0 1 1 47
MAP3014HT8-E 30 85.0 95.0 1 1 48
MAP3214HT8-E 32 90.0 100.0 2 48
MAP3414HT8-E 34 96.0 108.0 1 2 48
MAP3614HT8-E 36 101.0 113.0 3 48
MAP3814HT8-E 38 106.5 119.5 1 1 1 48
MAP4014HT8-E 40 112.0 127.0 2 1 48
MAP4214HT8-E 42 118.0 132.0 1 1 1 48
MAP4414HT8-E 44 123.5 138.0 1 2 48
MAP4614HT8-E 46 130.0 145.0 1 2 48
MAP4814HT8-E 48 135.0 150.0 3 48

Page 10 of 64
SMMS i System Make Up Chart High Efficiency
SHRM II system make up chart
Note: MMY-MAP1202FT8-E is NOT modular
SHRM i Make up chart
Model reference
MMY
Duty
HP
Cooling
Capacity kW
Heating
capacity kW
Outdoor unit combination Max.
Indoor units
0804 1004 1204
MAP1624HT8-E 16 45.0 50.0 2 27
MAP2424HT8-E 24 68.0 76.5 3 40
MAP2624HT8-E 26 73.0 81.5 2 1 43
MAP2824HT8-E 28 78.5 88.0 1 2 47
MAP3024HT8-E 30 85.0 95.0 3 48
MAP3224HT8-E 32 90.0 100.0 4 48
MAP3424HT8-E 34 96.0 108.0 3 1 48
MAP3624HT8-E 36 101.0 113.0 2 2 48
MAP3824HT8-E 38 106.5 119.5 1 3 48
MAP4024HT8-E 40 112.0 126.5 4 48
MAP4224HT8-E 42 118.0 132.0 3 1 48
MAP4424HT8-E 44 123.5 138.0 2 2 48
MAP4624HT8-E 46 130.0 145.0 1 3 48
MAP4824HT8-E 48 135.0 150.0 4 48
Model reference MMY
Duty HP
Cooling Capacity
kW
Heating capacity
kW
Outdoor unit combination Max. Indoor
units 0802 1002 1202
MAP0802HT8-E 8 22.4 25.0 1 13
MAP1002HT8-E 10 28.0 31.5 1 16
MAP1202HT8-E 12 33.5 35.5 1 16
MAP1602HT8-E 16 45.0 50.0 2 27
MAP1802HT8-E 18 50.4 56.5 1 1 30
MAP2002HT8-E 20 56.0 63.0 2 33
MAP2402HT8-E 24 68.0 76.5 3 40
MAP2602HT8-E 26 73.0 81.5 2 1 43
MAP2802HT8-E 28 78.5 88.0 1 2 47
MAP3002HT8-E 30 84.0 95.0 3 48
804 1004 1204 1404
MAP0804FT8-E 8 22.4 25 1 13
MAP1004FT8-E 10 28 31.5 1 16
MAP1204FT8-E 12 33.5 37.5 1 20
MAP1404FT8-E 14 40 45 1 23
AP1614FT8-E 16 45 50 2 27
AP1814FT8-E 18 50.4 56.5 1 1 30
AP2014FT8-E 20 56 63 2 33
AP2214FT8-E 22 61.5 69 1 1 37
AP2414FT8-E 24 68 76.5 1 1 40
AP2614FT8-E 26 73 81.5 1 1 43
AP2814FT8-E 28 78.5 88 2 47
AP3014FT8-E 30 85 95 3 48
AP3214FT8-E 32 90 100 2 1 48
AP3414FT8-E 34 96 108 2 1 48
AP3614FT8-E 36 101 113 3 48
AP3814FT8-E 38 106.5 119.5 2 1 48
AP4014FT8-E 40 112 127 1 2 48
AP4214FT8-E 42 118 132 3 48
M ax
Indo o rs
H eating
capacity
kW
D uty
H P
Model reference
MMYOutdo o r unit co mbinat io n
C o o ling
capacity
kW

Page 11 of 64
RAS Multi Split Indoors to Outdoor Combinations
Indoor Unit Combinations
RAS-M14GAV-E RAS-M18UAV-E RAS-3M26UAV-E RAS-4M27UAV-E RAS-5M34UAV-E1
A B C D A B C D A B C D A B C D A B C D E
Ind
oo
r Un
its
Inverter High-Wall
RAS-M10SKV-E RAS-M13SKV-E
RAS-M16SKV-E
10 0 0 0 13 0 0 0
10 10 0 0 13 10 0 0
10 0 0 0 13 0 0 0
16 0 0 0 10 10 0 0 13 10 0 0
13 13 0 0 16 10 0 0
10 0 0 0 13 0 0 0
18 0 0 0 10 10 0 0 13 10 0 0
18 10 0 0 13 13 0 0 18 13 0 0
16 16 0 0 10 10 10 0 13 10 10 0
18 10 10 0 13 13 10 0 18 13 10 0
13 13 13 0 18 16 10 0 18 13 13 0 16 16 13 0
10 0 0 0 13 0 0 0
16 0 0 0 18 0 0 0 10 10 0 0
13 10 0 0 16 10 0 0 18 10 0 0
13 13 0 0 16 13 0 0 18 13 0 0
16 16 0 0 10 10 10 0 13 10 10 0
16 10 10 0 18 10 10 0 13 13 10 0 16 13 10 0
18 13 10 0 13 13 13 0 16 16 10 0
18 16 10 0 16 13 13 0 18 13 13 0
16 16 13 0 16 16 16 0 10 10 10 10
13 10 10 10 16 10 10 10 18 10 10 10
13 13 10 10 16 13 10 10 18 13 10 10
13 13 13 10 16 13 13 10 13 13 13 13
16 16 10 10
10 0 0 0 0 13 0 0 0 0
16 0 0 0 0 18 0 0 0 0 10 10 0 0 0
13 10 0 0 0 16 10 0 0 0 18 10 0 0 0
13 13 0 0 0 16 13 0 0 0 18 13 0 0 0
16 16 0 0 0 18 16 0 0 0 18 18 0 0 0
10 10 10 0 0 13 10 10 0 0 16 10 10 0 0 18 10 10 0 0
13 13 10 0 0 16 13 10 0 0 18 13 10 0 0
16 16 10 0 0 18 16 10 0 0 18 18 10 0 0
13 13 13 0 0 16 13 13 0 0 18 13 13 0 0
16 16 13 0 0 18 16 13 0 0 18 18 13 0 0
10 10 10 10 0 13 10 10 10 0 16 10 10 10 0
18 10 10 10 0 13 13 10 10 0 16 13 10 10 0
16 16 10 10 0 18 13 10 10 0 18 16 10 10 0
18 18 10 10 0 13 13 13 10 0 16 16 13 10 0
18 13 13 10 0 18 16 13 10 0 18 18 13 10 0
13 13 13 13 0 16 13 13 13 0 18 13 13 13 0
16 16 13 13 0 18 16 13 13 0 18 18 13 13 0
10 10 10 10 10 13 10 10 10 10 16 10 10 10 10
18 10 10 10 10 13 13 10 10 10 16 13 10 10 10
18 13 10 10 10 16 16 10 10 10 13 13 13 10 10
16 13 13 10 10 18 13 13 10 10 16 16 13 10 10
13 13 13 13 10 16 13 13 13 10 18 13 13 13 10
16 16 13 13 10 13 13 13 13 13 16 13 13 13 13
Super Daisekai
RAS-B10SKVP-E RAS-B13SKVP-E RAS-B16SKVP-E
Bi-Flow
RAS-B10UFV-E RAS-B13UFV-E RAS-B18UFV-E
600 x 600 Cassette
RAS-M10SMUV-E RAS-M13SMUV-E RAS-M16SMUV-E
Ducted Type
RAS-M10GDV-E
RAS-M13GDV-E RAS-M16GDV-E

Page 12 of 64
Refrigeration Details
RAS – Auto Restart Function The indoor unit is equipped with an automatic restart facility that allows the unit to restart, at the last set operating conditions, after a power failure. The operation will resume without warning three minutes after power is restored. This feature is not set up when these systems are shipped from the factory, therefore it will need to be activated by the installing company.
Generally the process is the same for all RAS products since approx 2001 and is as follows:
To initiate auto restart: 1. Turn the power on. Green On/Off light will flash.
2. Set the system to operate using the remote controller. Green On/Off light will be on constantly. 3. Press and hold down the temporary button for three seconds. 4. The indoor unit will bleep three times to acknowledge set up. In most cases the green light changes to orange. 5. The system will continue to operate during this set up.
6. After set up the system may be stopped using the remote controller.
To cancel auto restart: 1. The system is operating. Green On/Off light will be on constantly.
2. Stop the system operating using the remote controller. Green On/Off light will extinguish. 3. Press and hold down the temporary button for three seconds. 4. The indoor unit will bleep three times to acknowledge cancellation. 5. The system will have stopped operating.
This feature cannot be set if the timer is in operation. The louver will not swing, if it was previously set, when the system auto restarts.
Model Refrigerant
Type Branch Pipe Sizes
Max
Total Pipe
Max
per indoor
Max Height
Pre-charge
Additional Charge
Liquid Suction Length Length
2 Room Multi-Split Inches Inches m m m m g/m
RAS-M14GAV-E R410a 1/4 3/8 30 20 10 20 n/a
RAS-M18GAV-E R410a 1/4 3/8 30 20 10 20 n/a
3 Room Multi-Split
RAS-3M26GAV-E R410a 1/4 3/8 50 25 15 50 n/a
4 Room Multi-Split
RAS-4M27GAV-E R410a 1/4 1/2 70 25 15 70 n/a
5 Room Multi-Split
RAS-5M34UAV-E R410a 1/4 3/8 80 25 15 40 n/a

Page 13 of 64
Acoustic Data – RAS, RAV & MMY - Indoor Units
Model High Med Low
RAS-107SKV-E3 40 35 30
RAS-137SKV-E3 40 34 28
RAS-167SKV-E3 45 40 31
RAS-B10SKVP-E 43 - 27
RAS-B13SKVP-E 44 - 27
RAS-B16SKVP-E 45 - 29
RAS-B10UFV-E 39 - 23
RAS-B13UFV-E 40 - 24
RAS-B18UFV-E 46 - 32
RAS-M10SKV-E 40 - 30
RAS-M13SKV-E 40 - 28
RAS-M16SKV-E 45 - 31
RAS-M10SMUV-E 37 - 30
RAS-M13SMUV-E 38 - 30
RAS-M16SMUV-E 40 - 31
RAS-M10GDV-E 31 - 24
RAS-M13GDV-E 32 - 25
RAS-M16GDV-E 33 - 28
Model High Med Low
RAV-SM564UT-E 32 29 28
RAV-SM804UT-E 35 31 28
RAV-SM1104UT-E 58 53 48
RAV-SM1404UT-E 44 38 34
RAV-SM1604UT-E 45 40 36
RAV-SM402MUT-E 55 51 46
RAV-SM562MUT-E 55 51 46
RAV-SM566BT-E 40 37 33
RAV-SM806BT-E 40 39 34
RAV-SM1106BT-E 42 39 36
RAV-SM1406BT-E 44 41 38
RAV-SM564SDT-E 45 40 36
RAV-SM562KRT-E 54 51 48
RAV-SM566KRT-E 42 - -
RAV-SM802KRT-E 60 56 51
RAV-SM806KRT-E 47 - -
RAV-SM564CT-E 36 33 30
RAV-SM804CT-E 38 36 33
RAV-SM1104CT-E 41 38 35
RAV-SM1404CT-E 43 40 37
RAV-SM562XT-E 43 39 36
RAV-SM802XT-E 46 42 37
RAV-SM2242DT-E 54 - -
RAV-SM2802DT0E 55 - -

Page 14 of 64
Model High Med Low
MMD-AP0481HFE 45 43 41
MMD-AP0721HFE 46 45 44
MMD-AP0961HFE 46 45 44
MMU-AP0092H 30 29 27
MMU-AP0122H 30 29 27
MMU-AP0152H 31 29 27
MMU-AP0182H 32 29 27
MMU-AP0242H 35 31 28
MMU-AP0272H 35 31 28
MMU-AP0302H 38 33 30
MMU-AP0362H 48 38 32
MMU-AP0482H 46 38 33
MMU-AP0562H 46 40 33
MMU-AP0074MH 36 32 28
MMU-AP0094MH 37 33 28
MMU-AP0124MH 37 33 29
MMU-AP0154MH 40 35 30
MMU-AP0184MH 44 39 34
MMU-AP0072WH 34 32 30
MMU-AP0092WH 34 32 30
MMU-AP0122WH 34 32 30
MMU-AP0152WH 35 33 30
MMU-AP0182WH 35 33 30
MMU-AP0242WH 38 35 33
MMU-AP0272WH 38 35 33
MMU-AP0302WH 40 37 34
MMU-AP0362WH 42 39 36
MMU-AP0482WH 43 40 37
MMU-AP0562WH 46 42 39
MMU-AP0071YH 55 52 47
MMU-AP0091YH 55 52 47
MMU-AP0121YH 55 52 47
MMU-AP0152SH 55 52 48
MMU-AP0182SH 55 52 48
MMU-AP0242SH 56 54 50
MMU-AP0074YH 42 39 34
MMU-AP0094YH 42 39 34
MMU-AP0124YH 42 39 34
MMU-AP0154YH 37 35 32
MMU-AP0184YH 38 36 34
MMU-AP0244YH 45 41 37
MMD-AP0074SPH 36 33 30
MMD-AP0094SPH 36 33 30
MMD-AP0124SPH 38 35 32
MMD-AP0154SPH 39 36 33
MMD-AP0184SPH 40 38 36
MMD-AP0074BH 30 28 26
MMD-AP0094BH 30 28 26
MMD-AP0124BH 31 29 27
MMD-AP0154BH 31 29 27
MMD-AP0184BH 32 30 28
MMD-AP0244BH 33 31 29
MMD-AP0274BH 33 31 29
MMD-AP0304BH 34 32 29
MMD-AP0364BH 36 34 32
MMD-AP0484BH 38 36 32
MMD-AP0564BH 38 36 32
MMC-AP0154H 35 32 30
MMC-AP0184H 36 33 30
MMC-AP0244H 38 36 33
Model High Med Low
MMC-AP0274H 38 36 33
MMC-AP0364H 41 38 35
MMC-AP0484H 43 40 37
MMD-AP0184H 37 35 33
MMD-AP0244H 40 38 36
MMD-AP0274H 40 38 36
MMD-AP0364H 40 38 36
MMD-AP0484H 40 38 36
MMU-AP0724H 49 47 45
MMU-AP0964H 50 48 46
MMK-AP0073H 35 31 28
MMK-AP0093H 37 32 28
MMK-AP0123H 37 32 28
MMK-AP0153H 41 36 33
MMK-AP0183H 41 36 33
MMK-AP0243H 46 39 34
MMK-AP0072MH 35 32 29
MMK-AP0092MH 36 33 29
MMK-AP0122MH 37 33 29
MML-AP0073H 39 37 35
MML-AP0093H 39 37 35
MML-AP0123H 45 41 38
MML-AP0153H 45 41 38
MML-AP0183H 49 44 39
MML-AP0243H 49 44 39
MML-AP0074BH 36 34 32
MML-AP0094BH 36 34 32
MML-AP0124BH 36 34 32
MML-AP0154BH 36 34 32
MML-AP0184BH 36 34 32
MML-AP0244BH 42 37 33
MMF-AP0151H 46 43 38
MMF-AP0181H 46 43 38
MMF-AP0241H 49 45 40
MMF-AP0274H 49 45 40
MMF-AP0364H 51 48 44
MMF-AP0484H 54 50 46
MMF-AP0564H 54 50 46
MML-AP0074NH 38 32 26
MML-AP0094NH 38 32 26
MML-AP0124NH 40 34 29
MML-AP0154NH 43 37 61
MML-AP0184NH 47 40 34

Page 15 of 64
Digital / Super Digital Inverter Twin Splits
Both indoor units must be of the same style, duty and serve the same room. A common controller will be used, individual controls is not possible. A generic arrangement is shown below:-
Configurations When twinning a pair of digital inverter indoor units to one outdoor the twin kit is no longer required
Digital Inverter / Super Digital Outdoor Unit Indoor Units x 2
RAV-SM1103AT-E/RAV-SP1104AT-E
RAV-SM564UT-E
RAV-SM564MUT-E RAV-SM564CT-E RAV-SM566BT-E
RAV-SM564SDT-E RAV-SM566KRT-E
RAV-SM1403AT-E/RAV-SP1404AT-E
RAV-SM804UT-E RAV-SM804CT-E RAV-SM806BT-E RAV-SM866KRT-E
RAV-SM1603AT-E/RAV-SP1604AT8-E
RAV-SM804UT-E RAV-SM804CT-E RAV-SM806BT-E
RAV-SM806KRT-E
RAV-SM2244AT8-E
RAV-SM1104UT-E
RAV-SM1106BT-E RAV-SM1102CT-E
RAV-SM2804AT8-E RAV-SM1404UT-E RAV-SM1406BT-E
RAV-SM1402BT-E

Page 16 of 64
Digital / Super Digital Inverter Triple Splits
All Indoor units must be of the same style, duty and serve the same room. A common controller will be used, individual controls is not possible.
Digital Inverter / Super Digital Outdoor Unit Indoor Units x 3
RAV-SM1603AT-E/RAV-SP1604AT8-E
RAV-SM564UT-E
RAV-SM564MUT-E RAV-SM564CT-E RAV-SM566BT-E
RAV-SM564SDT-E
RAV-SM566KRT-E
RAV-SM2244AT8-E
RAV-SM804UT-E RAV-SM804BT-E RAV-SM804CT-E
RAV-SM806KRT-E
RAV-SM2804AT8-E
RAV-SM804UT-E RAV-SM806BT-E RAV-SM804CT-E
RAV-SM806KRT-E

Page 17 of 64
Digital / Super Digital Inverter Quads Splits
All indoor units must be of the same style, duty and serve the same room. A common controller will be used, individual controls is not possible. A generic arrangement is shown below:-
Digital Inverter / Super Digital Outdoor Unit Indoor Units x 4
RAV-SM2244AT8-E
RAV-SM564UT-E RAV-SM564MUT-E
RAV-SM564CT-E RAV-SM566BT-E
RAV-SM564SDT-E RAV-SM566KRT-E
RAV-SM2804AT8-E
RAV-SM804UT-E RAV-SM804CT-E
RAV-SM806BT-E RAV-SM806KRT-E

Page 18 of 64
RAV Heat Pump Twin Splits The branch lengths, where feasible, should be equal, however a slight difference is permitted. Units will be of the same style, duty and serve the same room. A common controller will be used. Pipe Specifications
Model (RAV-)
Piping Lengths (one way) & Sizes Height Difference
Number of bent portions
Main Pipe (L+a or L+b)
Sizes
*Branch Pipe (a or b)
Sizes
Branch Pipe differential
length (a-b or b-a)
Outdoor Unit – Indoor Unit (H) Indoor unit height
difference (Δh)
Outdoor Unit
higher
Indoor Unit
higher
SM1103AT-E
Max 50m Max 15m
Max 10m
Max 30m
Max 30m
Max 0.5m Max 10
SM1403AT-E
Max 50m
Max 15m
Max 10m
Max 30m
Max 30m
Max 0.5m
Max 10
SM1603AT-E
Max 50m
Max 15m
Max 10m
Max 30m
Max 30m
Max 0.5m
Max 10
SP1104AT-E
Max 50m
Max 15m
Max 10m
Max 30m
Max 30m
Max 0.5m
Max 10
SP1404AT-E
Max 50m
Max 15m
Max 10m
Max 30m
Max 30m
Max 0.5m
Max 10
SP1604AT-E
Max 50m
Max 15m
Max 10m
Max 30m
Max 30m
Max 0.5m
Max 10
Note: The digital inverter systems will automatically set the internal addresses necessary. Additional Charge Gas calculation - [Main pipe] (L-18) x L + [Branch Pipe] (a+b - 4) x l = additional charge
Model
Main Pipes Branch pipes
Sizes (“)
Gas/Liquid Pre-charge (m)
Add amount
(kg/m) – [ L ]
Sizes (“)
Gas/Liquid Pre-charge (m)
Add amount
(g/m) – [ l ]
SM1103AT-E
5/8 – 3/8 18 0.040 1/2 – 1/4 2 0.020
SM1403AT-E
5/8 – 3/8 18 0.040 5/8 – 3/8 2 0.040
SM1603AT-E
5/8 – 3/8 18 0.040 5/8 – 3/8 2 0.020
SP1104AT-E
5/8 – 3/8 18 0.040 1/2 – 1/4 2 0.020
SP1404AT-E
5/8 – 3/8 18 0.040 5/8 – 3/8 2 0.040
SP1604AT-E
5/8 – 3/8 18 0.040 5/8 – 3/8 2 0.020

Page 19 of 64
RAV Heat Pump Triple Splits The branch lengths, where feasible, should be equal however a slight difference is permitted. Units will be of the same style, duty and serve the same room. A common controller will be used. Pipe Specifications
Model (RAV-)
Piping Lengths (one way) & Sizes Height Difference
Comments Main Pipe
(L+a or L+b) Sizes
*Branch Pipe (a or b) Sizes
Branch Pipe differential
length (a-b or b-a)
Outdoor Unit – Indoor Unit (H) Indoor unit height
difference (Δh)
Outdoor Unit higher
Indoor Unit higher
SM1603AT-E
Max 50m
Max 15m Max 10m Max 30m Max 30m Max 0.5m 10 or less
SP1604AT-E
Max 50m
Max 15m Max 10m Max 30m Max 30m Max 0.5m 10 or less
SM2244AT8-E
Max 70m
Max 20m
Max 10m Max 30m Max 30m Max 0.5m 10 or less
SM2804AT8-E
Max 70m
Max 20m
Max 10m Max 30m Max 30m Max 0.5m 10 or less
Note: The digital inverter systems will automatically set the internal addresses necessary. Additional Charge Gas calculation - [Main pipe] (L-18) x L + [Branch Pipe] (a+b+c - 6) x l = additional charge (RAV-SM1603/1604AT-E) Gas calculation - [Main pipe] (L-28) x L + [Branch Pipe] (a+b+c - 6) x l = additional charge (RAV-SM2244/2804AT8-E)
Model
Main Pipes Branch pipes
Sizes (“) Gas/Liquid
Pre-charge (m) Add amount (kg/m) – [ L ]
Sizes (“) Gas/Liquid
Pre-charge (m) Add amount (g/m) – [ l ]
SM1603AT-E
5/8 - 3/8 18 0.040 5/8 – 3/8 4 0.020
SP1604AT-E
5/8 – 3/8 18 0.040 5/8 – 3/8 4 0.020
SM2244AT8-E
1 1/8 – 1/2 28 0.080 5/8 – 3/8 4 0.040
SM2804AT8-E
1 1/8 – 1/2 28 0.080 5/8 – 3/8 4 0.040

Page 20 of 64
RAV Quad Splits The branch lengths, where feasible, should be equal, however a slight difference is permitted. Units will be of the same style, duty and serve the same room. A common controller will be used. Pipe Specifications
Model (RAV-)
Piping Lengths (one way) & Sizes Branch Piping Height Difference
Comments Main Pipe
(L+a or L+b) Sizes
*Branch
Pipe (a or b)
Sizes
Branch Pipe
differential length (a-b
or b-a)
( c + a ) – ( d + a ) ( c + a ) – ( e + b )
( c + a ) – ( f + b ) ( d + a ) – ( e + b ) ( d + a ) – ( f + b ) ( e + b ) – ( f + b )
Outdoor Unit – Indoor Unit (H)
Indoor unit height
difference (Δh)
Outdoor Unit higher
Indoor Unit higher
SM2244AT8-E Max 70m
Max 15m
Max 20m Max 6m Max 30m Max 30m Max 0.5m 10 or less
SM2804AT8-E
Max 70m
Max 15m Max 20m Max 6m Max 30m Max 30m Max 0.5m 10 or less
Note: The digital inverter systems will automatically set the internal addresses necessary. Additional Charge Gas calcaultaion = [Main pipe] (L-28) x L + [Branch Pipe] (a+b - 4) x l + [Terminal pipes] (c+d+e+f) x j = additional charge
Model
Main Pipes Branch pipes
Sizes (“) Gas/Liquid
Pre-charge (m)
Add amount (kg/m) – [ L ]
Sizes (“) Gas/Liquid
Pre-charge (m)
Add amount (g/m) – [ l ]
Sizes (“) Gas/Liquid
Add amount (g/m) – [ j ]
SM2244AT8-E
1 1/8 – 1/2 28 0.080 5/8 – 3/8 4 0.040 1/2 – 1/4 0.020
SM2804AT8-E
1 1/8 – 1/2 28 0.080 5/8 – 3/8 4 0.040 5/8 – 3/8 0.040

Page 21 of 64
Twin, Triple and Quad Wiring Diagram

Page 22 of 64
SDI 4 & DI Series 3 Outdoor Units
Piping Connection with different diameter is possible under the below restraint conditions. Maximum pipe length is determined by the connection of liquid pipe diameter and gas pipe diameter.
= Normal Piping Size = The Cooling Capacity Is Lower Since The Diameter Of The Gas Pipe Is Smaller Than The Standard One
Liquid Pipe 1/4(STD) 3/8(1-size large)
Gas Pipe 3/8(1-size smaller) 1/2(STD) 5/8(1-size larger) 1/2(STD) 5/8(1-size larger)
Pipe Length
Max Pipe Length
Pre-charged
Max Pipe Length
Pre-charged
Max Pipe Length
Pre-charged
Max Pipe Length
Pre-charged
Max Pipe Length
Pre-charged
SDI ser4
SP404 30m 20m 30m 20m 30m 20m 20m 10m 20m 10m
SP454 30m 20m 30m 20m 30m 20m 20m 10m 20m 10m
SP564 N/A N/A 50m 20m 50m 20m 20m 10m 20m 10m
DI ser 3 SM563 N/A N/A 50m 20m 50m 20m 20m 10m 20m 10m
Liquid Pipe
1/4(1-size smaller) 3/8(STD) 1/2(1-size larger)
Gas Pipe
1/2(1-size smaller) 5/8(STD) 1/2(1-size smaller) 5/8(STD) 3/4(1-size larger) 5/8(STD) 3/4(1-size larger)
Pipe Length
Max
Pipe Length
Pre-charged
Max
Pipe Length
Pre-charged
Max
Pipe Length
Pre-charged
Max
Pipe Length
Pre-charged
Max
Pipe Length
Pre-charged
Max
Pipe Length
Pre-charged
Max
Pipe Length
Pre-charged
SDI ser4
SP804 30m 20m 30m 20m 50m 30m 50m 30m 50m 30m N/A N/A N/A N/A
SP1104 N/A N/A N/A N/A N/A N/A 75m 30m 75m 30m 25m 15m 25m 15m
SP1404 N/A N/A N/A N/A N/A N/A 75m 30m 75m 30m 25m 15m 25m 15m
DI ser 3
SM803 20m 20m 20m 20m 30m 20m 30m 20m 30m 20m N/A N/A N/A N/A
SM1103 N/A N/A N/A N/A N/A N/A 50m 30m 50m 30m 25m 15m 25m 15m
SM1403 N/A N/A N/A N/A N/A N/A 50m 30m 50m 30m 25m 15m 25m 15m
SM1603 N/A N/A N/A N/A N/A N/A 50m 30m 50m 30m 25m 15m 25m 15m
Liquid Pipe 1/2(STD) 5/8(1-size larger)
Gas Pipe 7/8(1-size smaller) 1 1/8(STD) 7/8(1-size smaller) 1 1/8(STD)
Pipe Length Max Pipe
Length Pre-charged
Max Pipe
Length Pre-charged Max Pipe Length Pre-charged Max Pipe Length Pre-charged
DI ser 4 SM2244 70m 30m 70m 30m 50m 20m 50m 20m
SM2804 70m 30m 70m 30m 50m 20m 50m 20m

Page 23 of 64
Fault Codes – RAS “N” Series
Do Not turn off the power supply before reading the fault codes, doing so will clear the diagnostic memory. Caution must be taken when removing the access covers as high voltages are present. Fault codes are displayed through the LEDs flashing at 5 times per second. Note, the green LED will flash once per second when the system is initially powered. More specific codes may be obtained, while in the fault mode through the wireless controller
1. Press CHK to enter service mode 2. Navigate through TIMER buttons until all LEDs flash, accompanied by the internal buzzer – compare the
displayed code with the table below 3. Press CLR button to clear the existing fault code (controller displays 7F) Press ON/OFF button to exit service mode.
Initial code/display
Code Description
01
0C TA sensor open or short circuit
0d TC sensor open or short circuit
11 Indoor fan motor problem
12 Indoor PCB problem
01 04 Indoor to outdoor communication (includes compressor thermostat)
05 Indoor to outdoor communication
02
14 Inverter low voltage or short circuit protection
16 Compressor position circuit
17 Compressor current detected during off-cycle
18 TE or TS sensor open or short circuit
19 Td sensor open or short circuit
1A Outdoor fan motor problem
1b TE sensor fault
1C Compressor drive circuit
03
07 Indoor to outdoor communication (includes compressor thermostat)
08 Indoor heat exchanger changes temperature – but in wrong direction
1d Compressor locked rotor current protection
1E Compressor - high discharge temperature
1F Compressor current remains too high – after current release

Page 24 of 64
Fault Codes – RAV Series
Do Not turn off the power supply before reading the fault codes, doing so may clear the diagnostic memory. Caution must be taken when removing the access covers, as high voltages are present. Fault diagnosis is available by pressing the check button on the remote controller.
Note: The first number displayed is a code for the number of compressor starts the indoor unit has requested. This number is displayed using the hexadecimal format. Numbers displayed after the start number are fault codes.
Code Fault System Status Check
0C TA Sensor open circuit
No cooling operation (Heating operation continuously – heat pumps)
Sensor Resistance 20°C = 12.5k 25°C = 10k
TA Sensor short circuit No heating operation – heat pumps (Cooling
operation continuously) Sensor Resistance
20°C = 12.5k 25°C = 10k
0d TC Sensor open circuit Indoor fan stays off in the heating mode
Sensor Resistance 20°C = 12.5k 25°C = 10k
TC Sensor short circuit Outdoor unit simulates high temperature
release continually
Sensor Resistance 20°C = 12.5k 25°C = 10k
04 No communication
Outdoor to Indoor
Indoor unit operates – outdoor unit does
not
Interconnecting cables / isolator Outdoor transformer (240/12vac)
Printed Circuit Board
08 Reverse change temp. Cooling o/p in Heat mode or
Heating o/p in Cool mode Operation of 4 way valve, energised for
heating / TC sensor
09
No change in temp. of indoor unit
Indoor unit operates Compressor running not pumping / klixon tripped. / For cross wiring.
Frost Condition Indoor fan low speed, no outdoor unit
operation
Gas charge / pipe blockage. Indoor air flow
TC Sensor / For cross wiring
0b Indoor water level Indoor unit operates – outdoor unit does
not
Lift pump operation. Condensate drain for blockage. Float switch operation –
break on rise.
97 LAN com. fault One zone may not be operating X&Y terminations and wiring continuity.
Indoor PCB
98 Duplicated zone address Dupl. Addresses Stop SW02 address set up
99 No communication
Indoor to Rem. Con. System stop.
Interconnecting cables. Indoor is set up as a master. Only one master in a group.
18 TE Sensor open circuit System stop.
Sensor Resistance
20°C = 12.5k 25°C = 10k
TE Sensor short circuit System stop. Sensor Resistance
20°C = 12.5k 25°C = 10k
19
TL or TD Sensor open
circuit System stop.
Sensor Resistance TL 20°C = 12.5k 25°C = 10k
TD 23°C = 53k
TL or TD Sensor short
circuit System stop.
Sensor Resistance TL 20°C = 12.5k 25°C = 10k
TD 23°C = 53k
20 Low Pressure Trip System stop. Change Outdoor PCB (No LP Switch)
21 High Pressure Trip System stop. Gas Charge – quantity & quality
Pipe blockages Air flows
1E High Compressor
Discharge Temperature System stop.
Gas Charge – quantity & quality
TD sensor Indoor unit air flow
b5
External input display fault or Low level
refrigerant leak if RD1 fitted
System stop. Check connectons on indoor pcb and
chech leak detection system if fitted
b6
External interlock display fault or high level
refrigerant leak if RD1 fitted
System stop. Check connectons on indoor pcb and
chech leak detection system if fitted
b7 Slave unit in group has
fault Group stop. Check group controller for faults

Page 25 of 64
Fault Codes RAV-SM / RAV-SP
Fault codes are displayed directly on wired remote controller – to access the service history: Press TEST and SET for 4 seconds Scroll through stored codes using the TEMP set buttons Press TEST to cancel service history Press CLEAR to delete codes Up to 4 Codes can be stored
Code
Description 3 series and earlier
4 series onwards
E01 E01 Controller (local or network) receives no communication from a master indoor unit- could include that master is turned off. Also check that there is a master controller
E02 E02 Local controller failure (unable to transmit)
E03 E03 Master indoor unit receives no data to A-B. Often appears as an E01 fault code
E04 E04 Indoor unit (except twin slave) receives no communication from outdoor unit; can include comprssorer klixon
E08 E08 Duplicated indoor address
E09 E09 2 local controller on a group – both configured as masters
E10 E10 Indoor PCB failure
E18 E18 Communication failure between master indoor unit and slave
F01 F01 Indoor TCJ sensor error
F02 F02 Indoor TC2 sensor error
F04 F04 TD Sensor error
F06 - TE/TS Sensor error
- F06 TE Sensor error
- F07 TL Sensor Error
F08 F08 TO sensor error
F10 F10 Indoor TA sensor error
- F12 TS Sensor Error
- F13 ( number of detected IPDU units is reduced )
- F15 TE,TS Sensor Error IPDU error
- F23 PS sensor error
F29 F29 Indoor PCB failure
- F31 Outdoor P.C EEPROM Error
H01 H01 Inverter compressor over current detected
H02 H02 Master outdoor unit over current detected shortly after start up (compressor lock)
H03 H03 Current detected on master outdoor unit whilst idle
- H04 Case thermostat operation
H06 H06 Low pressure detected by Ps sensor (0.02Mpa)
L03 L03 Duplicated master indoor units in a group
L07 L07 Indoor in a group previously addressed as a single unit – check addressing
L08 L08 Indoor address not set
L09 L09 Indoor unit capacity not set
- L10 Unset jumper of service P.C board
L29 L29 IPDU error ( number of detected IPDU is reduced )
L30 L30 Input on CN80 circuit for 1 minute
L31 L31 Outdoor PCB error
P01 P01 Indoor fan motor error
P03 P03 High discharge temperature (TD1 exceeded 115°C)
P04 P04 High pressure switch activated (Detected by high TE temp on Digital Inverter)
- P05 Open Phase of 3 phase power supply
P07 P07 Heat sink overheat Error
P10 P10 Float switch activated
P12 P12 Indoor fan motor error – detected by feedback circuit
- P15 TD.TS sensor Error
P19 P19 Wrong change in temperature (4 way valve error)
- P20 TL Sensor error
P22 P22 Outdoor fan IPDU error
P26 P26 Short circuit error of compressor driving element
P29 P29 Compressor error detected by feedback circuit
P31 P31 Indoor PCB error

Page 26 of 64
Fault Codes – 2 Pipe Super Multi Do Not turn off the power supply before reading the fault codes, doing so will clear the diagnostic memory. Caution must be taken when removing the access covers, as high voltages are present. Fault diagnosis is available at three locations within the Air Conditioning system. :-
1. Remote Controller - press the check button 2. Multi Controller - rotate the display switch to position 1 3. Outdoor Unit - see following chart
Remote Controller Press check
Multi Controller Switch position 1
Outdoor Unit Switch position 0
04
No Communication Interface to Inverter
04
No Communication Interface to Inverter
LED 5 off LED 6 on
No Communication Interface to Inverter
No Communication Multi C. to Outdoor
No communication Multi C. to Outdoor
No Communication Indoor to Multi C.
0b ID water level
0C TA Sensor Fault
88 M/C doesn‟t recognise outdoor capacity
Display Switch set to 8 (If lit….)
0d TC Sensor Fault 80 Th(A) Sensor Fault LED 1 Th(A) Sensor Fault
08 Reverse change temp 81 Th(B) Sensor Fault LED 2 Th(B) Sensor Fault
09 Frost or no temp change 82 Th(C) Sensor Fault LED 3 Th(C) Sensor Fault
99 No Communication Indoor to
Rem Con
83 Th(D) Sensor Fault
LED 4 Th(D) Sensor Fault
84 Th(X) Sensor Fault LED 5 Th(X) Sensor Fault
15 Refer to Multi Con 0b M/C water level M/C water level
Preheat/Defrost Flash 89 ID codes set too high LED 6 ID codes set too high
ID codes set to zero LED 7 M/C 1 Sensor Fault
LED 8 M/C 2 Sensor Fault
Display Switch set to 3 (If lit….)
1C Refer to Outdoor 1C Refer to Outdoor LED 1 ThD1 Sensor Fault LED 2 ThD2 Sensor Fault
LED 3 ThS Sensor Fault
LED 4 HP Trip, by sensor
LED 5 Pd Sensor Fault
LED 6 Discharge Pipe >130°C
LED 7 Suction Pipe > 40°C
LED 8 Low Pressure Trip
Inv. PCB SW01 set to Off/Off
14 Refer to Outdoor 14 Refer to Outdoor Low Inverter Voltage
1d Refer to Outdoor 1d Refer to Outdoor High Inverter dc Current
1F Refer to Outdoor 1F Refer to Outdoor
High Inverter ac Current
18 Refer to Outdoor 18 Refer to Outdoor ThE Sensor Fault
21 Refer to Outdoor
21 Refer to Outdoor
Inverter HP Trip
Inv. Comp. overheat
=LED Flashing =LED Lit
Phase Rotation / DOL HP Trip
/ Overload Trip / DOL Comp. overheat

Page 27 of 64
Fault Codes – 3 Pipe Super Multi Do Not turn off the power supply before reading the fault codes, doing so will clear the diagnostic memory. Caution must be taken when removing the access covers, as high voltages are present. Fault diagnosis is available at three locations within the Air Conditioning system. :-
1. Remote Controller - press the check button 2. Multi Controller - rotate the display switch to position 1 3. Outdoor Unit - see following chart
Remote Controller Press check
Multi Controller Switch position 1
Outdoor Unit Switch positions 2 & 0
04
No Communication Interface to Inverter
04
No Communication Interface to Inverter
04
No Communication Interface to Inverter
No Communication Multi C. to Outdoor
No communication Multi C. to Outdoor
No Communication Indoor to
Multi C.
0b ID water level
0C TA Sensor Fault 88
M/C doesn‟t recognise outdoor capacity
0d TC Sensor Fault 80 Th(A) Sensor Fault 80 Th(A) Sensor Fault
08 Reverse change temp 81 Th(B) Sensor Fault 81 Th(B) Sensor Fault
09 Frost or no temp change 82 Th(C) Sensor Fault 82 Th(C) Sensor Fault
99 No Communication Indoor to Rem Con
83 Th(D) Sensor Fault
83 Th(D) Sensor Fault
84 Th(X) Sensor Fault 84 Th(X) Sensor Fault
15 Refer to Multi Con 0b M/C water level 0b M/C water level
Preheat/Defrost Flash 89 ID codes set too high 89 ID codes set too high
ID codes set to zero
1C Refer to Outdoor 1C Refer to Outdoor A0 ThD1 Sensor Fault
A1 ThD2 Sensor Fault
A2 ThS Sensor Fault
A4 ThO Sensor Fault
A5 ThE Sensor Fault
A6 Discharge Pipe >130°C
A7 Suction Pipe > 40°C
AA Pressure Sensor Fault
AE Low Pressure Trip
14 Refer to Outdoor 14 Refer to Outdoor 14 Low Inverter Voltage
1d Refer to Outdoor 1d Refer to Outdoor 1d High Inverter dc Current
1F Refer to Outdoor 1F Refer to Outdoor 1F High Inverter ac Current
21 Refer to Outdoor
21 Refer to Outdoor
21 Inverter HP Trip
Inv. Comp. overheat
Ad
Phase Rotation / DOL HP Trip / Overload Trip / DOL Comp. overheat

Page 28 of 64
Fault Codes – 3 Pipe SMI Do Not turn off the power supply before reading the fault codes, doing so will clear the diagnostic memory. Caution must be taken when removing the access covers, as high voltages are present. Fault diagnosis is available at three locations within the Air Conditioning system. :-
1. Remote Controller - press the check button 2. Multi Controller - rotate the display switch to position 1 3. Outdoor Unit - see following chart
Remote Controller Press Check
Multi Controller Switch Position 1
Outdoor Unit Switch Position 2 & 0
04
No Communication Between Interface and
IPDU 04
No Communication between interface PCB and IPDU
No Communication between Interface PCB and IPDU
No Communication between M/C and O/D
No Communication between M/C and O/D
No Communication
between I/D and M/C
0b Drain pump fault I/D
0C TA Sensor fault
0d TC Sensor fault
08 Reverse TC temp. change
09 No TC temp. change
11 I/D Fan Motor short circuit
12 I/D PCB short circuit 8A Multi Controller PCB error
b5
External input display fault 88 Communication error between O/D
and M/C
Low level refrigerant leak if RD1 fitted
80 ThA sensor fault 80 ThA sensor fault
b6
External interlock display fault
81 ThB sensor fault 81 ThB sensor fault
High level refrigerant leak if RD1 fitted
82 ThC sensor fault 82 ThC sensor fault
97 Central management
comms. Short circuit 83 ThD sensor fault 83 ThD sensor fault
98 Central management address set-up fault
84 ThX sensor fault 84 ThX sensor fault
99 No communication I/D to
R/C 0b Drain pump fault M/C 0b Drain pump fault M/C
89 I/D units capacity too high or set at 0 89 Over Capacity
15 Refer to M/C
1C Refer to O/D 1C Refer to O/D 08 Four way valve alarm
A0
Discharge temp. sensor TD1 short circuit
A1 Discharge temp. sensor TD2 short
circuit
A2 Suction temp. sensor TS short
circuit
A4 External air sensor Th0 short circuit
A5 O/D heat exchanger sensor TE
short circuit
A6 Discharge temp TD1 high temp. >
130ºC
A7 Suction temp. TS high temp. >
40ºC
AA Pressure sensor Pd short circuit
Ad DOL compressor fault
AE Low pressure < 3 psig – 0.21 Bar
AF O/D power phase miss-wire
1C Extension IC EPROM short circuit
14 Refer to O/D 14 Refer to O/D 14 G-Tr short circuit protection
17 Refer to O/D 17 Refer to O/D 17 Current detection circuit
21 Refer to O/D 21 Refer to O/D 21 High pressure switch circuit
> 425 psig – 29 Bar
1d Refer to O/D 1d Refer to O/D 1d Compressor error
1F Refer to O/D 1F Refer to O/D 1F Inverter malfunction
d3 Refer to O/D d3 Refer to O/D d3 TH sensor circuit – inverter micro.
IPDU
dA Refer to O/D dA Refer to O/D dA Heat sink overheat protection IPDU

Page 29 of 64
Fault Codes – 2 Pipe Modular Multi Do Not turn off the power supply before reading the fault codes, doing so will clear the diagnostic memory. Caution must be taken when removing the access covers, as high voltages are present. Fault diagnosis is available at three locations within the Air Conditioning system. :-
1. Remote Controller - press the check button (if installed) 2. Central Controller – press the check button (if installed) 3. Outdoor Unit – Inv & Fix switch positions 1 - 1 - 1
Code PCB Area Condition Criteria
04 IFACE IFACE to INV Communication failure
08 IN TC1 and TC2 coil
sensors Indoor heat exchange changes temperature
but in wrong direction
0C IN TA air temperature
sensor OC/SC
0b IN Float switch circuit OC
11 IN Fan motor Short circuit
12 IN PCB EEPROM failure
14 INV DC current sensor INV compressor or transistor SC. Sensor OC
17 INV DC current sensor INV compressor current detected during off
cycle.
18 IFACE TE1 defrost sensor OC/SC
1C IFACE PCB EEPROM failure
1d INV DC current sensor INV compressor overload > 1.5 times full load current
1F INV DC current sensor Excessive current detected after current
release
21 INV INV compressor HP switch or klixon > 363 psig – 25 Bar
22 IFACE Pd sensor Excessive pressure > 406 psig – 28 Bar
87 IFACE Input Phase Missing phase
89 IFACE IN capacity settings Too high > 135% outdoor unit
8d IFACE Outdoor units - number
of Has fallen since last set up
8E IFACE Outdoor units - number
of Is too high > 5
8F IFACE FIX unit address Duplicated When manually set
93 IN TC1 gas sensor OC/SC
94 IN TC2 liquid sensor OC/SC
95 IFACE PQ Communication failure No INV outdoor unit
96 IFACE IN units - number of Too many > 40
97 Central XY Communication failure
98 Central XY Duplicated addresses
99 Remote ABC Communication failure
9A IN TC1 gas sensor Unauthorized temperature change Changed by > 5ºC after 15 minutes
operation
9F IN TC1 gas sensor and TC2 liquid sensor
Insufficient performance Changed by < 5ºC after 60 minutes
operation
A0 IFACE TD1 discharge sensor OC/SC
A1 IFACE TD2 discharge sensor OC/SC
A2 IFACE TS1 suction sensor OC/SC
A6 IFACE TD1 discharge sensor High discharge temperature > 130ºC 3 times
A7 IFACE TS1 suction sensor High suction temperature > 60ºC for 10 minutes, 3 times
AA IFACE Pd pressure sensor OC
Ab IFACE
Pd and Ps pressure sensors
OC or crossed
AE IFACE TD1 discharge sensor High discharge temperature (low load
condition) > 110ºC, 3 times
AF IFACE Phase rotation Incorrect

Page 30 of 64
Code PCB Area Condition Criteria b4 IFACE Ps sensor Suction pressure too high during operation OC or < 138 psig – 9.5 Bar
b5 IN CN17 Indoor unit emergency circuit Resistive connection
b6 IN CN17 Indoor unit emergency circuit SC
b7 Central Fault in connected
group Check local controller
b9 IN Pressure sensor OC
bb IFACE TD2 discharge sensor High discharge temperature > 130ºC 3 times
bd IFACE TD2, Ps, Pd FIX compressor contactor fault Operation detected during off cycle
bE IFACE Ps sensor Low pressure < 3 psig – 0.21 Bar
cF IN Main and relay PCBs Communication failure
d1 IFACE INV outdoor units Duplicated within a system
d2 IFACE FIX unit fault Press SW04 for several seconds Fan of outdoor unit runs
d3 IFACE TH inverter overheat
sensor OC/SC
d4 IFACE
TK1 oil level sensor primary side
OC/SC
d5 IFACE TK2 oil level sensor
secondary side OC/SC
d6 IFACE TK3 oil level sensor OC/SC
d7 IFACE TK1, 2, 3 Oil level low > 2 hours
d8 IFACE TK1 oil level sensor
primary side No oil flow detected
No temp change during oil level management
d9 IFACE TK2 oil level sensor
secondary side No oil flow detected
No temp change during oil level management
dA INV IGBT overheating
db IFACE TK1 and TK2 No oil flow detected No temp change during oil level
management
dC IFACE TK1 High oil temperature > 50ºC
dd IFACE FIX outdoor unit Operation detected during off cycle
dE IFACE IN unit Automatic addressing failure
dF IFACE Outdoor unit Automatic addressing failure
E1 IFACE FIX compressor 1 HP switch, klixon or overload relay Pd is > 363 psig – 25 Bar
E5 IFACE INV compressor HP switch or klixon Pd is < 363 psig– 25 Bar
E6 IFACE FIX compressor 1 HP switch, klixon or overload relay Pd is < 363 psig– 25 Bar
Eb IFACE b6 code received from
IN unit
F0 IFACE FIX compressor 2 HP switch, klixon or overload relay Pd is > 363 psig– 25 Bar
F1 IFACE FIX compressor 2 HP switch, klixon or overload relay Pd is < 363 psig– 25 Bar

Page 31 of 64
Fault Codes SMMS / SHRM Remote controller AMT32 / 41, 51 will automatically display fault codes at the bottom left of the LCD display. On the outdoor unit fault codes are obtained by the three rotary switches being in the 1-1-1 positions.
Check Code Wireless Remote
Check Code Judging Device Main TCC
Remote
Outdoor 7 segment display AI Central
controller
Sensor block display
Sub code O T R F
E01 --- --- --- Communication error between indoor unit
and remote controller (Detected at remote controller)
Remote Controller
E02 --- --- --- Sending error of remote controller Remote
Controller
E03 --- --- 97 Communication error between indoor unit
and remote controller (Detected indoor) Indoor
E04 --- --- 04 Communication circuit error between
indoor and outdoor units (Detected indoor)
Indoor
E06 E06 No. of indoor units in which sensor has been normally received
04 Decrease of No. of indoor units I/F
--- E07 --- --- Communication circuit error of indoor and outdoor units (Detected outdoor)
I/F
E08 E08 Duplicated indoor address 96 Duplicated indoor address Indoor /
I/F
E09 --- --- 99 Duplicated master remote controllers Remote
controller
E10 --- --- CF Communication error in indoor PCB‟s ass‟y Indoor
E12 E12
01: Indoor / Outdoor
communication 02: Communication between outdoor units
42
Automatic address start error I/F
E15 E15 --- 42 No indoor automatic address I/F
E16 E16 00: Over capacity 01: No. of connected units
89 No. of indoor units / Over capacity I/F
E18 --- --- 97 / 99 Communication error between indoor header and follower units
Indoor
E19 E19 00: No. header units 02: Two or more header units
96 Outdoor header units quantity error I/F
E20 E20 01: Outdoor of other line connected 02: Indoor of other line connected
42 Other line connected during automatic
address I/F
E23 E23 --- 15 Sending error in communication between
outdoor units I/F
E25 E25 --- 15 Duplicated follower outdoor unit addresses I/F
E26 E26 No. of outdoor units which received signal normally
15 Decrease of No. of connected outdoor units
I/F
E28 E28 Detected outdoor unit number d2 Outdoor follower error I/F
E31 E31
01: IPDU 1 error 02: IPDU 2 error
03: IPDU 1, 2 error 04: Fan IPDU error
05: IPDU 1 + Fan IPDU error 06: IPDU 2 + Fan IPDU error 07: All IPDU error
CF IPDU communication error I/F
F01 --- --- 0F Alt Indoor TCJ (Coil) sensor error Indoor
F02 --- --- 0d Alt Indoor TC2 (Coil) sensor error Indoor
F03 --- --- 93 Alt Indoor TC1 (Coil) sensor error Indoor
F04 F04 --- 19 Alt Outdoor TD1 (Discharge) sensor error I/F
F05 F05 --- A1 Alt Outdoor TD2 (Discharge) sensor error I/F
F06 F06 --- 18 Alt Outdoor TE1 () sensor error I/F
F07 F07 --- 18 Alt Outdoor TL () sensor error I/F
F08 F08 --- 1b Alt Outdoor T0 (Ambient) sensor error I/F

Page 32 of 64
Check Code Wireless Remote
Check Code Judging Device Main TCC
Remote
Outdoor 7 segment display AI Central
controller
Sensor block display
Sub code O T R F
F10 --- --- 0C Alt Indoor TA (Return Air) sensor error Indoor
F12 F12 --- A2 Alt Outdoor TS1 (Suction) sensor error I/F
F13 F13 01: Compressor 1 side 02: Compressor 2 side
43 Alt Outdoor TH (IPDU) sensor error IPDU
F15 F15 --- 18 Alt Outdoor temp. sensors misconnected (TE, TL)
I/F
F16 F16 --- 43 Alt Outdoor pressure sensors misconnected (Pd, Ps)
I/F
F23 F23 --- 43 Alt Outdoor Ps (pressure) sensor error I/F
F24 F24 --- 43 Alt Outdoor Pd (pressure) sensor error I/F
F29 --- --- 12 Sim
Indoor other error Indoor
F31 F31 --- 1C Sim
Outdoor EPROM error I/F
H01 H01 01: Compressor 1 side 02: Compressor 2 side
IF Compressor breakdown IPDU
H02 H02 01: Compressor 1 side 02: Compressor 2 side
1d
Magnetic switch (contactor) error Over current relay operation Compressor error (Lock)
MG-SW
Over current relay IPDU
H03 H03 01: Compressor 1 side
02: Compressor 2 side 17
Current detection circuit system error IPDU
H04 H04 --- 44 Compressor 1 case thermo operation I/F
H06 H06 --- 20 Low pressure protection operation I/F
H07 H07 --- d7 Low oil level protection detected I/F
H08 H08
01: TK1 sensor error 02: TK2 sensor error 03: TK3 sensor error
04: TK4 sensor error
d4
Oil level detection temperature sensor error
I/F
H14 H14 --- 44 Compressor 2 case thermo operation I/F
H16 H16
01: TK1 oil circuit system error 02: TK2 oil circuit system error 03: TK3 oil circuit system error 04: TK4 oil circuit system error
d7
Oil level detection circuit error Magnetic switch (contactor) error Over current relay operation
I/F MG-SW Over
current relay
L03 L03 --- 96 Sim Duplicated indoor header units Indoor
L04 L04 --- 96 Sim Duplicated outdoor line address I/F
L05 L05 --- 96 Sim Duplicated indoor units with priority
(Displayed on indoor unit with priority) I/F
L06 L06 No. of indoor units with priority 96
Sim Duplicated indoor units with priority (Displayed in unit other than indoor unit with priority)
I/F
L07 --- --- 99 Sim Group line in individual indoor unit Indoor
L08 L08 --- 99 Sim
Indoor group / address unset Indoor
I/F
L09 --- --- 46 Sim
Indoor capacity unset Indoor
L10 L10 --- 88 Sim Outdoor capacity unset I/F
L17 L17 --- 46 Sim Inconsistency error of outdoor units I/F
L18 L18 --- 8A Sim FS unit error FS unit
L20 --- --- 98 Sim
Duplicated central controller addresses AI-NET Indoor
L28 L28 --- 46 Sim No. of connected outdoor units
overcapacity I/F
L29 L29
01: IPDU1 error 02: IPDU2 error 03: IPDU3 error
04: Fan IPDU error 05: IPDU1 + Fan IPDU error 06: IPDU2 + Fan IPDU error 07: All IPDU error
CF
Sim
No. of IPDU error I/F
L30 L30 Detected indoor address b6 Sim Auxiliary interlock in indoor unit Indoor
--- L31 --- --- -- -- -- IC error I/F

Page 33 of 64
Error detected by TCC-Link central control device
Check Code Wireless Remote
Check Code Name Judging Device
Central control device
Outdoor 7 segment display AI Central
controller
Sensor block display
Auxiliary code O T R F
C05 --- --- --- --- Sending error in TCC-Link central control
device TCC-LINK
C06 --- --- --- --- Receiving error in TCC-Link central control device
TCC-LINK
C12 --- --- --- --- Batch alarm of general purpose equipment control interface
HA control interface
I/F
P30 Differs according to error contents of unit with occurrence of alarm Group control follower unit error
TCC-LINK --- --- (L20 is displayed) Duplicated central control addresses
Check Code Wireless Remote
Check Code Judging Device Main TCC
Remote
Outdoor 7 segment display AI Central
controller
Sensor block display
Sub code O T R F
P01 --- --- 11 Alt Indoor fan motor error Indoor
P03 P03 --- 1E Alt Discharge temperature TD1 error I/F
P04 P04 01: Compressor 1 side 02; Compressor 2 side
21 Alt High pressure switch detection error IPDU
P05 P05 01: Phase-missing detection 02: Phase order error
AF Alt Phase-missing detection / Phase order error
I/F
P07 P07 01: Compressor 1 side 02: Compressor 2 side
1C Alt Heat sink overheat error IPDU I/F
P10 P10 Detected indoor address 0b Alt Indoor overflow error Indoor
P12 --- --- 11 Alt Indoor fan motor error Indoor
P13 P13 --- 47 Alt Outdoor liquid back detection error I/F
P15 P15 01: TS condition
02: TD condition AE Alt Gas leak detection I/F
P17 P17 --- Bb Alt Discharge temperature TD2 error I/F
P19 P19 Detected outdoor unit number 08 Alt 4-Way valve inverse error I/F
P20 P20 --- 22 Alt High pressure protection operation I/F
P22 P22
0_:IGBT short 1_: Fan motor position detective circuit error 3_: Fan motor error
C_; TH sensor temp. error (Heat sink overheat) D_: TH sensor error E_: Vdc output error
1A Alt Outdoor fan IPDU error Fan
IPDU
P26 P26 01: Compressor 1 side 02: Compressor 2 side
14 Alt G-TR short circuit protection error IPDU
P29 P29 01: Compressor 1 side 02: Compressor 2 side
16 Alt Compressor position detective circuit system error
IPDU
P31 --- --- 47 Alt Other indoor unit error (Group follower unit error)
Indoor
--- --- --- b7 By alarm device Alt Error in indoor group AI-NET
--- --- --- 97 --- AI-NET communication system error AI-NET
--- --- --- 99 --- Duplicated network adaptors / addresses AI-NET

Page 34 of 64
Fault Codes SMMSi / SHRMi
Check Code Wireless Remote
Check Code Judging
Device Main TCC Remote
Outdoor 7 segment display AI Central
controller
Sensor block display
Sub code O T R F
E31 E31
01: IPDU 1 error 02: IPDU 2 error 03: IPDU 1, 2 error
04: IPDU 3 error 05: IPDU 1, 3 error 06: IPDU 2,3 error 07: IPDU 1,2,3 error
08: Fan IPDU error 09: IPDU 1 error + fan IPDU error 0A: IPDU 2 error + Fan IPDU error 0B: IPDU 1, 2 error + Fan IPDU
error 0C: IPDU 3 error + Fan IPDU error 0E: IPDU 2, 3 error + Fan IPDU error 0F: All IPDU error + Fan IPDU error
CF IPDU communication error
F06 F06 01:TE1 02: TE2
18 Alt
Outdoor heat exchanger
temperature sensors (TE1, TE2) have been open/short-circuited.
F11 F11 --- Alt Discharge temperature sensor (TF) has been open/short-circuited.
F13 F13 01: Compressor 1 02: Compressor 2 03: Compressor 3
43 Alt Temperature sensor built into indoor IGBT (TH) has been open/short-circuited.
F22 F22
--- Alt
Outdoor discharge
temperature sensor (TD3) has been open/short-circuited.
H01 H01 01: Compressor 1
02: Compressor 2 03: Compressor 3
IF Alt
Inverter current (Idc)
detection circuit detects overcurrent.
H02 --- 01: Compressor 1 02: Compressor 2
03: Compressor 3 1d Alt
Compressor lockup is
detected
H03 H03 17 Alt Abnormal current is detected while inverter compressor is turned off.
H05 H05 --- Alt
Wiring/installation error or detachment of outdoor discharge temperature sensor (TD1) has been
detected.
H08 H08
01:TK1 Sensor error 02:TK2 sensor error 03:TK3 sensor error
04:TK4 sensor error 05:TK5 sensor error
d4 Alt Temperature sensor for oil level detection (TK1-5) has
been open/short-circuited.
H15 H15 --- Alt
Wiring/installation error or detachment of outdoor
discharge temperature sensor (TD2) has been detected.
H16 H16
01:TK1 Oil circuit error 02:TK2 Oil circuit error 03:TK3 Oil circuit error 04:TK4 Oil circuit error 05:TK5 Oil circuit error
d7 Alt
No temperature change is detected by temperature sensor for oil level detection (TK1-5) despite compressor having been started.
H25 H25 --- Alt
Wiring/installation error or detachment of outdoor discharge temperature
sensor (TD3) has been
detected.

Page 35 of 64
Check Code Wireless Remote
Check Code Judging Device Main TCC
Remote
Outdoor 7 segment display AI Central
controller
Sensor block display
Sub code O T R F
L29 L29
01: IPDU 1 error 02: IPDU 2 error 03: IPDU 1, 2 error
04: IPDU 3 error 05: IPDU 1, 3 error 06: IPDU 2,3 error 07: All IPDU error 08: Fan IPDU error
09: IPDU 1 error + fan IPDU error 0A: IPDU 2 error + Fan IPDU error 0B: IPDU 1, 2 error + Fan IPDU error. 0C: IPDU 3 error + Fan IPDU error
0D: IPDU 1,3 error+ Fan IPDU error 0E: IPDU 2, 3 error + Fan IPDU error 0F: IPDU 1,2,3 error + Fan IPDU error
CF There are insufficient number of IPDUs ( P.C.
Boards ) inverter box.
P04 P04 01: Compressor 1
02: Compressor 2 03: Compressor 3
21 High-pressure SW is activated
P05 P05
00: Open Phase detected
01: Compressor 1 02: Compressor 2
03: Compressor 3
AF
Open phase is detected when power is turned on
inverted DC voltage is too
high ( Overvoltage ) or too low ( Under voltage ).
P07 P07 01: Compressor 1 02: Compressor 2 03: Compressor 3
1C Alt Temperature sensor built into IGBT (TH) detects overheating.
P18 P18 ---
Outdoor discharge
temperature sensor (TD3) detects abnormally high temperature.
P22 ---
0* IGBT circuit
1* Position detection circuit error 3* Motor lockup 4*Motor current detection C* TH sensor
D* TH sensor error E* Inverter DC voltage error ( outdoor fan ) Note : although letters O to F appear
at locations indicated by „‟*‟‟ please
ignore them.
1A Alt Outdoor fan IPDU detects error.
P26 P26 01: Compressor 1
02: Compressor 2 03: Compressor 3
14
Short-circuit protection for compressor motor driver
circuit components is activated ( momentary overcurrent )
P29 P29 01: Compressor 1
02: Compressor 2
03: Compressor 3 16
Compressor motor position
detection error is detected.

Page 36 of 64
VRF Rotary Dial Data Display SMMS, SHRM, Mini SMMS, SMMSi
SW1 SW2 SW3 SW1 SW2 SW3
1 1 1 Fault codes 1 10 1 SV2 / SV5 valve status (1=on, 0=off)
1 1 2 Discharge pressure (Mpag) 1 10 2 TO sensor
1 1 16 Last error code of header unit 1 11 1 SV3A / 3B / 3C / 3D valve status (1=on, 0=off)
1 2 2 Suction pressure (Mpag) 1 11 2 TK1 sensor data
1 2 3 System capacity 1 12 1 SV41 / SV42 valve status (1=on, 0=off)
1 3 1 Operating mode C=cool, H=heat, J=defrost 1 12 2 TK2 sensor data
1 3 2 Liquid line pressure (Mpag) 1 12 3 Demand operation
1 3 3 Number of outdoor units 1 12 3 Power Peak-Cut
1 4 1 Outdoor unit size (HP) 1 13 1 SV11 / SV12 valve status (1=on,
0=off)
1 4 2 TD1 sensor 1 13 2 TK3 sensor
1 4 3 Number of indoor units (0-48) Plus No. of units in cooling
1 14 2 TK4 Sensor
1 5 1 Compressor speed 1 16 1 Oil level judgment status
1 5 2 TD2 sensor 2 1 2 Clearing system address
1 5 3 Number of indoor units (0-48)
Plus No. of units in heating 2 2 2 Clearing central addresses
1 6 1 Outdoor fan speed 2 3 1 Open/Close PMV‟s ( FF=Open, 00=closed ) Press SW04
1 6 2 TS1 Sensor 2 4 1 Remote control identification function
1 7 2 TS2 Sensor (SHRM) 2 5 1
System test – cooling, when under way, press SW04 to scroll through, Suction pressure and temperature,
discharge pressure and temperature plus sub-cooled liquid temperature
1 7 2 TE Sensor (SMMS) 2 6 1
System test - heating, when under way, press SW04 to scroll through,
Suction pressure and temperature, discharge pressure and temperature plus sub-cooled liquid temperature
1 8 2 TE1 sensor (SHRM) 2 7 1 Start indoor units to remote controller
setting
1 9 1 Reversing valve status (1=on, 0=off) 2 14 2 Adding additional indoor units
1 9 2 TL sensor data 2 16 1 Error clearing function
1 9 3 Oil equalisation request 2 16 3 Solenoid check – all valves
SMMSi/SHRMi Mini SMMS
SW1 SW2 SW3
1 6 2 TD3 Sensor data
1 7 2 TS Sensor data
1 9 2 TE2 Sensor data
1 10 2 TL Sensor data
1 12 2 TK1 Sensor
1 13 2 TK2 Sensor
1 14 2 TK3 Sensor
1 15 2 TK4 Sensor
1 16 2 TK5 Sensor
SW1 SW2 SW3
1 5 2 TS Sensor Data
1 6 2 TE Sensor
1 8 2 TO Sensor

Page 37 of 64
Step By Step Wiping/Re-addressing Of VRF Systems
Dials must be in positions „ 1 – 1 – 1 ‟with a 7 segment displaying „ U1 - - - „
To start the wiping of addresses move rotary dials to „ 2 – 1 – 2 ‟ 7 segment display will read „ ad bus ‟
Press and hold SW04 for 4 seconds, „ ad cl ‟ will appear on the 7 segment display
Once „ ad cl ‟ appears on display release SW04 and return rotary dials to „ 1 – 1 – 1 ‟
Approx 3 minutes later „ U1 L08 ‟ will appear, wiping of BUS address is now complete
To start re-address of indoor units press and hold SW15 – display will scroll from AUTO1 to AUTO9
After approx. 10 minutes display will show „ U1 - - - „
To check the quantity of indoors assigned place rotary dials at „ 1 – 4 – 3 ‟ e.g. display of „ 10 C 0 ‟ the number 10 in this display relates to the number of indoors addressed. Once complete return dials to „ 1 – 1 – 1 ‟
Super Modular Multi (SMMSi) Switch Positions
Priority mode (SMMS Only). Factory setting - Heating priority, this can be modified to Cooling priority via “Dip switch” SW11 bit‟s 1 & 2 In addition to above priority is factory set at “Any one indoor unit” this can be modified to Percentage, i.e. 60% of units requiring a mode, or Set to One SPECIFIC indoor unit.
SW11 Operation Bit 1 Bit 2
OFF OFF Heating priority (Factory setting)
ON OFF Cooling priority
OFF ON Percentage (60%)
ON ON Specific indoor unit
Note; On specific indoor unit setup, it is necessary to High static fan option (SMMS / SHRM)
set up the specific indoor unit, via remote Factory setting - 15Pa, this can be controller (AMT32/41/51) Configuration menu “04” increased to 35Pa via “Dip switch” please refer to configuration settings on page 54. SW10 bit 2 – ON = 35Pa Compressor backup setting In the event of a compressor error it is possible to electronically remove the affected compressor allowing the second compressor to operate normally, this is achieved via “Dip switch” SW06. Turn OFF the power to the system, set up “Dip switch” SW06 “Bits 1 to 4” as per the chart.
SW06
Bit1 Bit 2 Bit 3 Bit 4
Factory setting OFF OFF OFF OFF
No 1 Comp. Defective ON OFF OFF OFF
No 2 Comp. Defective OFF ON OFF OFF
No 3 Comp. Defective OFF OFF ON OFF
CCNN3300 –– FFoorrccee ooppeenn aallll oouuttddoooorr PPMMVV’’ss sshhoorrtt CCNN3300 oouutt aanndd kkiillll ppoowweerr
WWiitthhiinn 22 mmiinnuutteess ttoo eennssuurree vvaallvveess ssttaayy iinn tthhee ffuullllyy ooppeenn ppoossiittiioonn..

Page 38 of 64
Modular Multi Switch Positions
SW3 SW2 SW1 SW3 SW2 SW1
1 1 1 Check Codes 2 1 1 Discharge Pressure (MPag) 1 2 1 Compressor Type 2 2 1 Suction Pressure (MPag) 1 3 1 Operation Mode 2 3 1 TD1 discharge sensor 1 4 1 O/D Capacity 2 4 1 TD2 discharge sensor 1 5 1 Compressor Status 2 5 1 TS suction sensor 1 6 1 O/D Fan Operation 2 6 1 TE O/D coil sensor 1 7 1 Compressor Backup 2 8 1 TK1 sensor 1 9 - 13 1 Control Valve Output 2 9 1 TK2 sensor 1 14-15 1 PMV Position 2 10 1 TK3 sensor 1 16 1 Oil Management
3 1 1 Refrigerant type 2 1 2 Solenoid test SV2 3 2 1 O/D capacity HP 2 2 2 Solenoid test SV41 & 42 3 3 1 No. of connected O/D units 2 3 2 Solenoid test SV3A 3 4 1 No. of connected I/D units 2 4 2 Solenoid test SV3B 3 5 1 No. of I/D units operating 2 5 2 Solenoid test SV3C 3 11 1 Automatic addressing 2 6 2 Solenoid test SV3A, B, C
2 16 2 All valves 3 1 2 Outdoor fan test Press SW04
Press SW04 as SW02 is increased fan will slow down
1 5 2 100% Cooling demand ALL I/D units. Press SW04 to activate and SW05 To deactivate
1 7 2 I/D units ON / OFF Press SW04 Start, Press SW05 Stop
1 4 2 All connected local controllers will display (STANDBY) Press SW04 to start
1 3 2 All indoor PMV‟s will be opened for 2 minutes. Press SW04 to start
1 16 1 Oil Level Test. Press SW04 to start. Results A0 Good – A1 Low oil – A2 TK1 error – A3 Block management circuit – A4 TK2 error
Indoor PMV operation Mode Priority
CN33 CN32 PMV Full Open / Full Close Function
Heat Priority (Factory set)
Cool Priority
Open Open Normal operation 1off - 2off - 3off - 4off 1off - 2on – 3off - 4off
Open Short Fully Open
Short Open Fully Closed Indoor Unit Associated with Network Control
Short Short Medium opening (Half open) Indoor PCB switch 07 bit 1, OFF not Networked, ON Networked
Outdoor PMV operation CN30 CN31 Both PMV‟s Full OPEN /CLOSED
Note: SW08 bit 1 Off
Please pay careful attention to the labelling of the switches on the interface PCB. Switches are labelled 3 – 2 –1 from left to right.

Page 39 of 64
TTCCCC--nneett CCoonnttrroolllleerr GGuuiiddeelliinneess
DDiiggiittaall // SSuuppeerr DDiiggiittaall IInnvveerrtteerr
SSMMMMSSii // SSHHRRMMii VVRRFF
RBC-AMS41-E
RBC-AMS51E-ES
RBC-AMT32-E

Page 40 of 64
TCC-net Control – standard wired controller
Features 2 wire, screened, non-polarised controller connection Infra red control available for cassette models
Remote temperature sensing available Wired controller Infra red controller
Separate room sensor Automatic addressing of groups and twins Optional control of external fan High ceiling compensation
Time for filter warning is configurable Each mode of operation (auto – heat – cool – dry) may have a different temperature set point Auto restart is configurable
Cassette PCB DC fan motor with feedback circuit
Red LEDs indicate communication with local controller and PCB activity when illuminated.
Wired or infra red control (or both) Drain pump and float switch
Wired controller
1. Set data – displayed
when setting timer
2. Operating mode
3. Alarm alert
4. Timer/check code
5. Choice of timer mode
6. Filter alert
7. Not used
8. External fan active
9. Louver position
10. Louver swinging
11. Set temperature
12. Displayed when using
the remote sensor
13. Preheat defrost
14. Not used
15. Fan speed
16. Displayed during test run
1. Fan speed
2. Timer set button
3. Check button
4. Control of external fan
5. Filter reset button
6. Unit button and louver control
7. Operation lamp
8. Operation button
9. Mode select
0. Temperature select button

Page 41 of 64
Group control Indoor units may be supplied from any phase Up to 8 indoor units per group
Automatic addressing Any indoor unit may be designated as the “master”
Pre-heat indication
Filter indication
Automatic addressing This takes place when power is applied and can last up to 5 minutes – the address will be selected automatically. If a replacement indoor PCB is fitted, the missing address will be re-applied. The powered controller screen shows the demarcation lines – and does not indicate that the system is either configuring itself – or is ready to use. If the remote temperature sensor is selected (configuration item 32), the associated symbol
will appear when the system is ready for use. If a 9th indoor unit (which can be a protocol converter) is added to a group, the controller will continue to show the demarcation lines. Adding a system to an existing group (or powering a group up at different times) will require manual configuration (the fault codes will provide guidance).
Identifying an indoor unit Stop operation
Press TEST and (external) FAN for 4 seconds
ALL is displayed Indoor fans of the entire group are now energised
Press UNIT to scroll through group Indoor fan of selected indoor unit runs Press TEST to exit.
Test operation System must be stopped Press TEST for 4 seconds
Controller displays TEST
Press the ON/OFF button to start operation Select MODE of operation
HEAT or COOL
Press the ON/OFF button to stop test System will automatically revert to normal operation after 1 hour
Press the TEST button to leave TEST function
Historical Fault Codes
Press TEST & SET for 4 seconds – use temp buttons to scroll through up to four historical fault codes
Data from a wired controller Press TEST & CL for 4 seconds - use TEMP buttons to scroll through for historical fault codes
3 Series & Earlier - Light Commercial
Item Value item Value
00
01
02
03
04
06
Room Sensor temp Controller Temp
TA TCJ
TC
Not used
60
61
62
63
64
65
TE TO
TD TS
Not Used
THS – Heat sink

Page 42 of 64
4 Series - Light Commercial
SMMS / SMMSi / SHRMI/ SHRM / SMMS
Icon * 1=condenser 1 2=condenser 2 3=condenser 3 4=condenser 4
Ou
tdoor u
nit
data
Item
code
Data name
Unit
60
61
62
63
65
6A
6d
70
72
73
F1
Outdoor heat exchanger (Coil)
temperature (TE)
Outside temperature (TO)
Compressor discharge temperature (TD)
Compressor suction temperature (TS)
Heat sing temperature (THS)
Operation current
Outdoor heat exchanger (Coil) temperature (TL)
Compressor operation frequency
Outdoor fan revolution frequency (Lower)
Outdoor fan revolution frequency (Upper)
Compressor calculated operation time
°C
°C
°C
°C
°C
A
°C
rps
rpm
rpm
×100h
Ind
oor u
nit
data
Item
code
Data name
Unit
01
02
03
04
07
F2
F3
F8
Room temperature (Remote controller)
Indoor suction temperature (TA)
Indoor heat exchanger (Coil) temperature (TCJ)
Indoor heat exchanger (Coil) temperature (TC)
Indoor fan revolution frequency
Indoor fan calculated operation
time
Filter sign time
Indoor discharge temperature*
°C
°C
°C
°C
rpm
×100h
×1h
°C O
utd
oor
un
it i
nd
ivid
ua
l d
ata
(*
see
no
te b
elo
w)`
Item
code
Data name
Unit
*0
*1
*2
*3
*4
*5
*6
*7
*9
*A
*b
*d
*E
*F
Compressor 1 discharge temp ( Td1 )
Compressor 2 Discharge temp ( Td2 )
High Pressure sensor ( pd )
Low Pressure sensor ( ps )
Suction temp ( TS )
Outdoor heat exchanger temp ( TE )
Temp at liquid side ( TL )
Outside ambient temp ( TO )
Compressor 1 current ( l1 )
Compressor 2 current ( l2 )
PMV1 + 2 opening
Compressor 1, 2 ON/OFF
Outdoor fan mode
Outdoor unit HP
°C
°C
MPa
MPa
°C
°C
°C
°C
A
A
Pulse
HP
Ind
oo
r u
nit
da
ta
Item
code
Data name
Unit
00
01
02
03
04
05
06
08
Room Temp ( During control )
Room Temp ( Remote control )
Return Air Temp ( TA )
Indoor coil temp ( TCJ )
Indoor coil temp ( TC2 )
Indoor coil temp ( TC1 )
Indoor discharge temp ( tf )
( Note 1 )
Indoor PMV opening
°C
°C
°C
°C
°C
°C
°C
Pulse
Syst
em
data
0A
0b
0C
0d
No. Of connected indoor units
Total HP of connected indoor
units No. Of connected indoor units
Total HP of outdoor units
Unit
HP
Unit
HP

Page 43 of 64
SMMSi / SHRMi Data Retrieval
Icon * 1=condenser 1 2=condenser 2 3=condenser 3 4=condenser 4
Icon * 5=condenser 1 6=condenser 2 7=condenser 3 8=condenser 4
CODE No. Data Name Unit
U1
Ou
tdo
or
un
it i
nd
ivid
ua
l d
ata
(*
se
e n
ote
belo
w)
*0
*1
*2
*3
*4
*5
*6
*7
*8
*9
*A
*B
*C
*D
*E
*F
High-pressure sensor detention pressure (Pd)
Low-pressure sensor detention pressure (Ps)
Compressor 1 discharge temperature (Td1)
Compressor 2 discharge temperature (Td2)
Compressor 3 discharge temperature (Td3)
Suction temperature (TS)
Outdoor coil temperature 1 (TE1)
Outdoor coil temperature 2 (TE2)
Temperature at liquid side (TL)
Outside ambient temperature (TO)
PMV1 + 2 opening
PMV4 opening
Compressor 1 current (l1)
Compressor 2 current (l2)
Compressor 3 current (l3)
Outdoor fan current (lFan)
MPa
MPa
°C
°C
°C
°C
°C
°C
°C
°C
Pls
Pls
A
A
A
A
CODE No. Data Name Unit
U1
Ou
tdo
or
un
it i
nd
ivid
ua
l d
ata
(*
se
e n
ote
belo
w)
*0
*1
*2
*3
*4
*5
*6
*7
*8
*9
*A
*B
*F
Compressor 1 revolutions
Compressor 2 revolutions
Compressor 3 revolutions
Outdoor fan mode
Compressor IPDU 1 heat sink temperature
Compressor IPDU 2 heat sink temperature
Compressor IPDU 3 heat sink temperature
Outdoor fan IPDU heat sink temperature
Heating/cooling recovery controlled
Pressure release
Discharge temperature release
Follower unit release
Outdoor unit horsepower
Rps
Rps
Rps
Mode
°C
°C
°C
°C
-----------------
-----------------
-----------------
-----------------
HP

Page 44 of 64
TCC-net Control – Central Remote Controller

Page 45 of 64
Central Remote Controller –Dipswitch settings

Page 46 of 64
Central Remote Controller –Connections
1) Basic wiring
L:
Power supply (240volts 50hz). N:
U1/U3: Indoor unit control wiring (Low voltage). U2/U4:
C3: Auxillary. C4: Ground for inter-unit control wiring.
Ground for power wiring.
2) Terminals for remote monitoring.
A1: Input for turning ON air conditioning concurrently.
A2: Input for turning OFF air conditioning concurrently.
A3: Common input for turning air conditioning ON or OFF.
B1: On operation statue indicator output
B2: Alarm indicator output.
B3: Common indicator output.

Page 47 of 64
Zone registration using the central controller (RBC-AMT31E) (RAV models, each individual unit or lead unit of a “Group” must have a TCB-PCNT30TLE interface connected) In this case, after confirming which indoor unit is connected to the remote controller and that the air conditioner is in the OFF state, you set the central addresses one at a time.
If the system has no remote controller, connect a remote controller to the system temporarily, then follow this procedure. NOTE
The indoor unit address must already have been set before performing zone registration. 1) Press the and buttons at the same time for more than 4 seconds 2) Do NOT press button 3) Once in this mode, the UNIT No. CODE No. No. of SET DATA and
indications will flash on the display as shown in Fig. 13
In case of group control “ALL” instead of “UNIT No.” will flash on the display. Select the main indoor unit address by pressing the button once. 4) Set CODE No. to 03 using the and buttons.
The CODE No. 03 must be selected to perform zone registration using the remote controller.
5) Set the Central address, which you want to assign to the indoor unit address using the and buttons according to the zone registration table.
6) Press the button. The CODE No. and the Central address changes from flashing to ON state. If you make a mistake, then press the button and reset the central address.
7) Set CODE No. to 12 using the and buttons. 8) Set the Outdoor unit address which you want to assign to the system using the and buttons. (Each outdoor unit will require a
unique address, between 1 and 30) 9) Press the button.
10) When all address‟s, Zone and System have been set press the remote controller‟s display will CLEAR, with flashing, once has cleared the system has been configured.

Page 48 of 64
Zone registration using the central controller (TCB-SC642TLE) This method is NOT supported by the RAV models
In this case, you set all central addresses by central Controller at once manually.
1) Press the and buttons at the same time for more than 4 seconds. And CODE No.C1 will flash.
2) After confirming that CODE No.C1 is displayed press the button. Once in this mode, a change takes place as fig 15.
3) Select the zone and group No. which you want to set with and (GROUP) buttons. If already set. Press the button.
4) Set the unit No. (Indoor unit address) with and buttons, according to the zone registration table. R.C. No. ………………… button
Indoor unit No. ………….. button
5) Press the button. GROUP No. turns ON and UNIT No. (Indoor unit Address) changes from flashing to ON state. Unit No. is registered to selected ZONE No. and GROUP No. If you make a mistake, then press the button and Reselect the ZONE, GROUP and UNIT No.
6) Register the other Unit No. in the same way by following the steps (3) to (5).
7) Finally, complete the registration by pressing the button. flashes for a few minutes, then OFF.
Automatic zone registration using the central controller (TCB-SC642TLE) 1) Press the and buttons at the same time for more than 4 seconds. and CODE No. C! will flash.
2) Select CODE. No. C” by pressing and ( ) button and press the button. C2 changes from flashing to ON state and automatic zone Registration will start.
3) Registered GROUP No. will be disappeared all.
4) Central address will be assigned from small indoor unit address to large one in numerical order automatically. Finishing automatic zone registration, changes from Flashing to OFF.
5) If an error occurs, the “CHECK” starts flashing and zone registration finishes at this time. Press the button.
6) Finally, complete automatic zone registration mode by pressing the button. Flashes for a few minutes, then OFF.

Page 49 of 64
Central address duplication error check; C3
* This cannot be used with RAV products. For further details refer to the instructions of the TCC-LINK adaptor. 1) Hold down the and buttons together for at least 4 seconds. (CODE No, C1 starts flashing)
2) Press the or ( ) button to select CODE No. C3.
3) When the button is now pressed, CODE No. C3 lights and flashes. The central address duplication error check now starts.
4) The address of all outdoor units is checked in sequence starting with outdoor unit system 1. The check is completed when CODE No. C3 flashes and goes off.
5) If any duplication is discovered among the central addresses, the GROUP No. will flash.
Press the or ( ) button to select CODE No. C1, and press the button. The central address is cleared by selecting the area where the GROUP No. is flashing and by pressing the button. Set the correct central address using the wired remote Controller or the central controller.
6) Press the button to complete the procedure. Flashes for several minutes, the initial setting is automatically Established, and the procedure is completed.
When setting up a central remote controller, which includes more than one outdoor system, each outdoor system needs to have a system address set, factory setting is 1. Additional systems may be addressed up to a system number of 28. This is achieved via “Dip switches” SW13 & 14
System address
SW13 SW14
1 2 3 4 1 2 3 4
1 X X X X X
2 X O X X X
3 X X O X X
4 X O O X X
5 X X X O X
6 X O X O X
7 X X O O X
8 X O O O X
9 X X X X O
10 X O X X O
11 X X O X O
12 X O O X O
13 X X X O O
14 X O X O O
15 X X O O O
16 X O O O O
17 O X X X X
18 O O X X X
19 O X O X X
20 O O O X X
21 O X X O X
22 O O X O X
23 O X O O X
24 O O O O X
25 O X X X O
26 O O X X O
27 O X O X O
28 O O O X O

Page 50 of 64
Central Remote Controller – wiring examples
Basic wiring diagram

Page 51 of 64
]

Page 52 of 64

Page 53 of 64
Configuration menu A number of items are configurable by the wired controller – if an indoor unit without a wired controller requires configuration, it may be temporarily connected for the procedure to be undertaken. In order to access the menu,
Press + SET + CL for 4 seconds Item Description Value Default
01 Filter alarm time Filter sign displayed after selected time has elapsed – or by external pressure switch (CN70)
0000: Inactive 0001: 150 H
0002: 250 H 0003: 500 H
0004: 1000 H
0005: External switch
0004
02 Dirty environment Allows filter alarm time to be halved if used in a dirty environment 0000: Standard
0001: Dirty
0000
03 Network address When under network control. 0099: Unset
0001 to 0064 available
0099
04 Priority Setting for
Remote Controller 0 = Normal 1= Priority (This remote has priority of mode setting
0000 = Standard
0001 = Priority
0000
06 Stratification control Increases effective return air temperature setting in heating mode (0 to 10 K)
0000 to 0010
0002; +2oC
(Floor type 000; 0oC)
0C Preheat Preheat indication on display 0000 = available
0001 = unavailable
0000
0d Auto mode Enable or disable Auto mode 0000 = available
0001 = unavailable
0000 except
SMMS
0E SHRM only Used when multiple indoor units are served via a single FS box 0000 = normal
0001 = multiple units
0000
0F Heat Mode Enable or disable Heat Mode 0000 = available
0001 = unavailable
0000
10 Indoor unit model Must be set when replacing indoor printed circuit board
0000: 1 way cassette (s models)
0001: 4 way cassette
0002: 2 way cassette
0003: 1 way cassette (y models)
0004: duct (standard)
0005: slim duct
0006: duct (high static)
0007: ceiling
0008: hi wall
0010: console
0011: concealed floor
0014: 4 way cassette (600 x 600)
0013: tall cabinet
11 Indoor unit capacity 0000 will generate a (L09) fault
0001 = 0.8hp 0003 = 1hp
0005 = 1.25hp 0007 = 1.7hp
0009 = 2hp (056*)
0011 = 2.5hp
0012 = 3hp (080*)
0013 = 3.2hp
0015 = 4hp (110*)
0017 = 5hp (140*)
0018 = 6hp 0021 = 8hp
0023 = 10hp
12 System number
DI/SDI indoor and outdoor units are automatically addressed – this
value may be set manually but it must be done via the wired controller – on an individual basis. Settings are 0001 to 0030
0001: outdoor unit 1
0002: outdoor unit 2
0099
13 Indoor unit number Indoor units connected to a common outdoor unit (e.g. twinned indoor units) will have the same system number - settings are 0001 to 0064. Automatically allocated – but may be manually overridden.
0001: indoor unit 1
0002: indoor unit 2
0099
14 Group master/slave Allows selection of master indoor unit within group. Automatically allocated – but may be manually overridden.
0000: single indoor unit
0001: group master
0002: group slave
0099
15 Temperature Sensor Compensation for missing temperature sensor (split systems ONLY) –
other settings produce F03 fault code 0022
0022
16 Indoor Fan Indoor fan speed selection. Binary addition. 0015 = all speeds available
1 – auto; 2 = low; 4 = medium; 8 = high
0015
except high static (008)
17 Set point shift Cooling temperature set point shift.
(shifted by 1 to 10 k)
0000 = no shift
0001 = 1 k shift
0010 = 10 k shift
0000
19
Louver functions None, swing only, swing and auto (where applicable)
0000: disabled
0001: swing only
0004: all options

Page 54 of 64
Item Description Value Default
1b Compressor on time Compressor minimum on time 0 = 5 minutes 1 = 4 minutes 0000: 0 – 5 min.
0001: 1 - 4 min.
0000
1C Thermo Shift Thermal shift of Discharge Air in Cooling Mode -005 = 5oC -004 = 4oC
0000 = 0oC 0010 = 10oC
1E Dead band - auto Changeover sensitivity in automatic mode.
1 to 10 k adjustable
0000: 0 K
0010: 10 K
0003
1F Max. Setting Cooling mode maximum temperature setting (18 – 29) 0018 = 18o C 0020 = 20 o C
0029 = 29 o C
29 o C
20 Min. Setting Cooling mode minimum temperature setting (18 – 29) 0018 = 18o C 0020 = 20 o C
0029 = 29 o C
18 o C
21 Max. Setting Heating mode maximum temperature setting (18 – 29) 0018 = 18o C 0020 = 20 o C
0029 = 29 o C
29 o C
22 Min. Setting Heating mode minimum temperature setting (18 – 29) 0018 = 18o C 0020 = 20 o C
0029 = 29 o C
18 o C
23 Max. Setting Dry mode maximum temperature setting (18 – 29) 0018 = 18o C 0020 = 20 o C
0029 = 29 o C
29 o C
24 Min. Setting Dry mode minimum temperature setting (18 – 29) 0018 = 18o C 0020 = 20 o C
0029 = 29 o C
18 o C
25 Max. Setting Auto mode maximum temperature setting (18 – 29) 0018 = 18o C 0020 = 20 o C
0029 = 29 o C
29 o C
26 Min. Setting Auto mode minimum temperature setting (18 – 29) 0018 = 18o C 0020 = 20 o C
0029 = 29 o C
18 o C
28 Auto restart Enable or disable 0000: disabled
0001: enabled
0000
29 Humidifier condition Operating condition of humidifier 0000: Usual
0001: Condition ignored
0000
2A CN70 Selection of optional error input (CN70)
0000: Filter input
0001: Alarm input
0002: None
0002
2d Modes available Binary addition of modes available.
Split systems 0000, will fault the system
0015 = all modes
1 = fan; 2 = cool; 4 = dry;
8 = heat
0015
2E External On / Off
control
Making or breaking terminals 1 and 2 of CN61 (indoor pcb)
External switching option, remove jumper 01 master indoor pcb
allows continuous contact switch- link 01 in place; pulse switch
required
0000 = group starts when made
stops when open
0001 = enable when made,
disable when open
0000
30 Automatic grille Automatic elevating grille control 0000: Unavailable
0001: Available
0000
31 External fan control Through remote controller and CN32 indoor pcb 0000 = disable
0001 = enabled
0000
32 Sensor location Return air/room sensor OR in local controller 0000: return air sensor
0001: remote sensor
0000
33 Unit of temperature Celsius or Fahrenheit 000 = Celsius
0001 = Fahrenheit
0000
40 Drain pump Drain pump control 0000: None 0001: Pump ON
0002: None 0003: Pump OFF
0003
45 Anti smudge 4 way cassette – anti smudge effect via louver position 0000 = enabled
0001 = disabled
0000
5d Airflow correction Used with high ceilings or applications with high sensible loads
0000: standard
0003: high (duct)
0004: low (except duct)
0006:low (duct); ultra high others
0000
60 Timer lock Locks timer in wired local controller – maintaining last setting 0000: unlocked
0001: locked
0000
62 Anti smudge 4 way cassette – ant smudge via fan speed (Coanda effect) 0001
69 Louver Louver restriction when cooling
0000 = restricted to horizontal
positions
0001 = full range of movement
0000
8b Heating Correction Heating output reduction split systems only 0000: None
0001: Correction
0000
8C Forced Defrost Run group in HEAT mode after setting defrost is conducted
automatically. Value is reset automatically back to 0000
0000 = disabled
0001 = enabled
0000
91 Certification settings
(reduced)
0000 = standard
0001 = test
0002 = low capacity
0000
A0 Fan & Pump Fan and pump operation during oil retrieval mode (VRF cassettes
ONLY)
0000 = fan off, pump on
0003 = fan on, pump on
0003

Page 55 of 64
The indoor units to be configured will be chosen by pressing the UNIT button.
The indoor unit being configured runs its fan and swings its louvers (if possible). Use SET TEMPERATURE up/down buttons to scroll through the configurable items Use TIMER up/down buttons to choose the
configuration value Use
SET to confirm configuration value Use CL to undo an incorrect setting (provided that configurable item has not been changed)Use CHECK to return to normal operation
Extras TCCJ Control options
Item Description Model Name Details
1 Wired remote controller RBC-AMT21E Hard wired remote controller (superseded)
2 Wired remote controller RBC-AMT31E Hard wired remote controller with extended timer functions (replaces AMT21E)
3 Wired remote controller RBC-AMS41E Wired remote controller CW 24/7 Day timer
4 Wired remote controller RBC-AMS51E LITE vision controller with 7 day timer
5 Weekly timer RBC-EX21E 7 day timer with day omit, suitable for connection to items 1, 2 & 10
6 External timer interface lead RBC-SMT1 Interface lead to connect an external timer, (supplied separately) with items 1,2 & 10
7 Wired remote controller RBC-AS21E Simplified hard wired remote controller
8 Infra red remote kit TCB-AX22CE Wireless remote unit kit suitable on Ceiling suspended units
9 Infra red remote kit TCB-AX21E Wireless remote unit kit suitable on Ducted Units
10 Infra red remote kit TCB-AX21U(W)E Wireless remote unit kit suitable on 4 way Cassette units
11 Remote Sensor TCB-TC21LE Remote temperature sensor
12 Central remote controller TCB-SC642TLE Central controller suitable for controlling 64 units
13 Fault indicator module RBC-FDP2-PE Fault indication module connects to indoor control circuit
14 Twin kit RBCTWP30E Twin kit to enable twinning on 1100 / 1101 outdoor units
15 Triple
16 External fan control RBC-SMF1 Interface to enable control of an external fan
17 Drain pump kit TCB-DP10CE Drain pump kit designed for the XT unit, (ceiling mount only)
18 Drain pump kit TCB-DP22CE Drain pump kit designed for the ceiling suspended unit
19 Network / Protocol adaptor TCB-PCNT20E Adaptor kit to enable integration with AI network controls
20 1:1 interface TCB-PCNT30LE Adaptor kit to enable 1:1 systems to integrate with VRF systems
21 Remote On / Off TCB-IFCB-4E Enables remote On / Off (SMMS / SHRM)
22 Error output interface TCB-PCIN2E Error output interface (SMMS / SHRM)
23 Peak Power TCB-PCDM2E Power peak control interface (SMMS / SHRM)
24 External On / Off TCB-PCM02E External interface to enable remote On / Off
25 Flow selector box electrical extension RBC-CBK15FE 10 m extension cables for flow selector boxes

Page 56 of 64
PCB plugs
External fan control CN32 12VDC output
IP1 CN60 1 common (12 VDC) 2 defrost 3 compressor on 4 cooling mode 5 heating mode 6 indoor fan on
HA circuit CN70
Filter input CN70 1 filter switch 2 0 VDC
Check function of indoor unit no communication Takes place – just indoor functions
CN71 1 check function 2 0 VDC
Display mode enables indoor unit and controller to communicate when powered
CN72 1 check function 2 0 VDC
EXCT demand forces compressor off CN73 1 check function 2 0VDC
Leak detector etc – L30 code generated CN80 1 common (12 VDC) 2 common (12 VDC) 3 input
Integration with AI network control TCC-net models use a different language to AI – however a TCC-net group can be linked to an AI network, by the use of a protocol converter. This device is not standard and should be fitted on site – a group requires only one protocol converter to communicate with a network.
An LED flashes to indicate communication with the network. The Protocol converter provides terminals X-Y for the network connection – it also has the 7-way DIP switch used to give a network address – the method is identical to that used for AI indoor units. The network address may also be set by a wired controller – from the configuration menu.
The protocol converter is counted as an indoor unit – only 7 indoor units may therefore be group controlled in this way.
Second controller Options available
2 x wired controllers 1 wired + 1 infra red controller
Full group control from either Connection may be anywhere within group Changes updated
The sub-controller must be set – this can be done from either controller. The choice of sub-controller makes little difference unless it is required to act as the temperature sensor
Temperature sensing Both infrared and wired controllers are able to supply a temperature value to the indoor unit. This may be more representative than the standard, return air sensor but is not available from sub controllers of either type. To set the room sensor: Infrared controller – press MAIN SENSOR Wired controller – selected from configuration menu
Should the infrared controller lose contact with the indoor unit, return air temperature control will automatically resume. A further option for remote sensing is available – the remote sensor. This is connected to terminals A-B whether or not a wired controller is used. The indoor unit must, in this case, be set to use the standard, return air sensor – this sensor automatically takes over in this case. This value will be used to provide control to all indoor units within the group.

Page 57 of 64
RBC SMT1 Digital Inverter Timer Interface Compatible with RAV SM (Digital / Super digital inverter) via RBC-AMT21/31E Remote Controller External Switch, Volt Free Contact, i.e. Time switch, passive switch, key switch etc. Refer to fig. 11.
Fig 11
RBC SMF1 Digital Inverter Fan Interface Compatible with RAV SM (Digital / Super digital inverter) The accessory will allow an external ventilation fan To be controlled via the indoor unit Refer to fig. 12. TCB-IFCB-4E Remote location ON/OFF control Compatible with RAV SM (Digital / Super digital inverter) The accessory will allow for external ON/OFF, with Operation and Alarm indication Refer to fig. 13.
Fan Run 14 15
4
3
CN32 Indoor PCB
Red
Red
Connection CN2
Located in Remote Controller
AMT21/31
Volt Free
Remote Switch 15vdc
Live
Switch
Wire
Fig 13
Fig 12
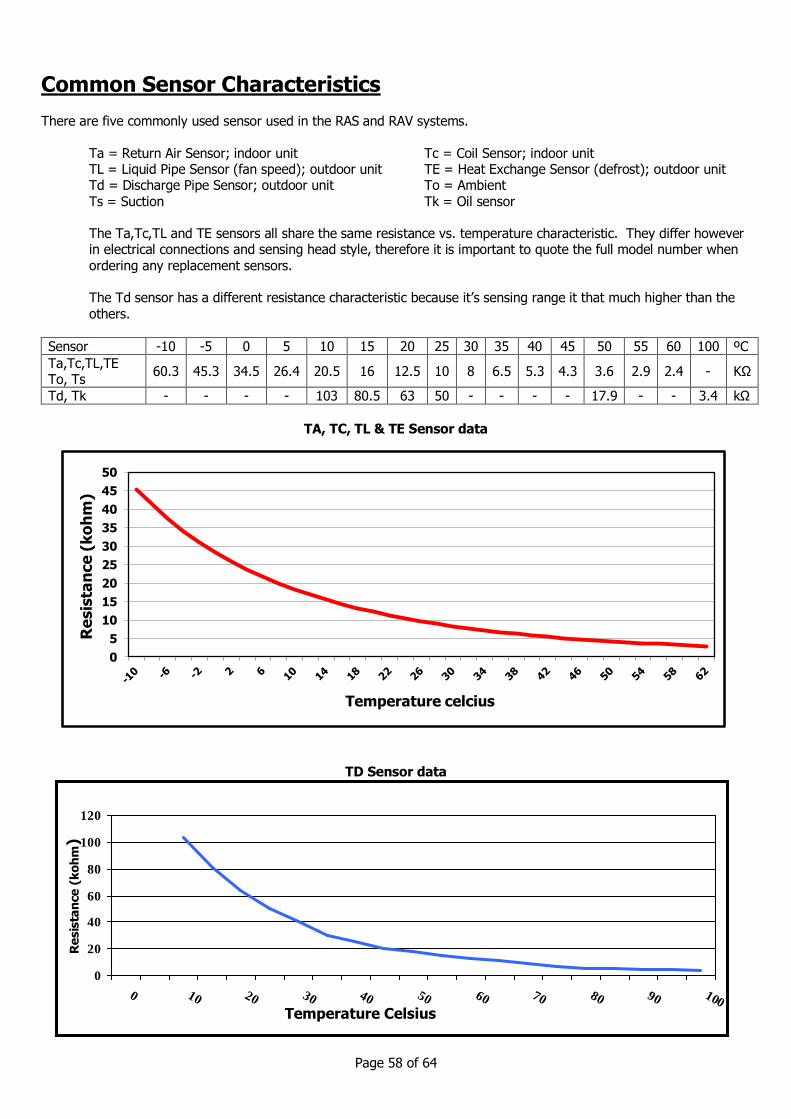
Page 58 of 64
Common Sensor Characteristics There are five commonly used sensor used in the RAS and RAV systems.
Ta = Return Air Sensor; indoor unit Tc = Coil Sensor; indoor unit TL = Liquid Pipe Sensor (fan speed); outdoor unit TE = Heat Exchange Sensor (defrost); outdoor unit Td = Discharge Pipe Sensor; outdoor unit To = Ambient Ts = Suction Tk = Oil sensor The Ta,Tc,TL and TE sensors all share the same resistance vs. temperature characteristic. They differ however in electrical connections and sensing head style, therefore it is important to quote the full model number when ordering any replacement sensors.
The Td sensor has a different resistance characteristic because it‟s sensing range it that much higher than the others.
Sensor -10 -5 0 5 10 15 20 25 30 35 40 45 50 55 60 100 ºC
Ta,Tc,TL,TE To, Ts
60.3 45.3 34.5 26.4 20.5 16 12.5 10 8 6.5 5.3 4.3 3.6 2.9 2.4 - KΩ
Td, Tk - - - - 103 80.5 63 50 - - - - 17.9 - - 3.4 kΩ
TA, TC, TL & TE Sensor data
TD Sensor data
0
20
40
60
80
100
120
0 10 20 30 40 50 60 70 80 90 100Temperature Celsius
Re
sis
tan
ce
(k
oh
m)
0
5
10
15
20
25
30
35
40
45
50
Re
sis
tan
ce
(k
oh
m)
Temperature celcius

Page 59 of 64
CONTROLLER MODEL
ON/OFF CONTROL
TIME CLOCK CONTROL
FULL CONTROL
RBC-AMT31-E NO NO NO
RBC-AMT32-E YES NO NO
RBC-AMS41-E YES YES NO
RBC-AMS51E-ES* YES YES NO
NRC-01HE fig. 1 YES NO YES
fig. 2 & 3 YES NO NO
*RBC-AMS51E-ES Offers time clock control when paired with a compatible A/C Indoor Unit
fig. 1 fig. 2
fig. 3

Page 60 of 64
New Harmonised Electrical Wiring Colours. Amendment No. 2 to BS 7671: 2001 (IEE Wiring Regulations) Affective 31st March 2004, new electrical installations may use the new harmonised cable colours or the pre-existing colours but not both. Works commencing after 31st March 2006 will be required to comply with the harmonised cable colours only, old coloured cables must not be used. Alterations to existing single-phase installations. Alterations or additions to a single-phase installation do not require marking at the interface between old and new cabling. Providing that they are correctly coloured. A warning notice must be attached at the distribution board or consumer unit.
Alterations to existing three-phase installations. Alterations or additions to a three-phase installation, it is recommended that old and new cables are marked at the interface L1, L2, and L3 for the phases and N for the neutral. The marking should be made to both the new and the old cables. A warning notice must be attached at the distribution board.

Page 61 of 64
In addition to the New Harmonised Electrical Wiring Colours. From the 1st January 2005. New rules for Electrical Safety in Homes (Electrical Safety Part P) came into force.
The rules in brief are; From the 1st January 2005. People carrying out electrical work in homes and gardens in England and Wales will have to follow the new rules in the Building Regulations. Persons carrying out electrical works within a domestic environment must be registered with a “competent person scheme”. Full details can be obtained from; www.odpm.gov.uk/explanatory-booklet alternatively call 0870 1226 236
For details of the “Approved Document P” visit www.odpm.gov.uk/approved-documents alternately a copy can be
purchased from the Stationary Office, for £15.00. To order call 0870 600 5522

Page 62 of 64
Technical Support.
In order to obtain an efficient service when contacting technical support, please have the following information on hand:
a. Model number of the system, Indoor and Outdoor. If there has been any recent repairs or changes made these details may give insight to a particular problem.
b. Try to have a good idea what the system in question can and cannot do. It‟s no use saying the system
doesn‟t work when in fact one mode operates and the other doesn‟t.
c. Check time clock controls haven‟t timed out causing the system to, correctly stop. Re-synchronising a time clock may save many a call.
d. Where possible, be with the equipment, this will allow for any test‟s to be carried out and the results
shared with technical support.
e. A record of the fault codes produced by the system.
RAS Fault codes are obtained via the LED lights located on the front of the indoor unit. RAV Fault codes are obtained via the remote controller display, [Press the “CHECK” button for 2 – 4 seconds] On R22 and R407C COOLING ONLY equipment, the first four figures displayed after the time are the compressor start count, (NOT FAULT CODES), fault codes will automatically be displayed after the
compressor start count. The first two digits are the unit number, the third and fourth digits are the FAULT CODE, two fault codes per connected unit can be stored and displayed. On R407C HEAT PUMP systems, the middle section of the display being the unit number, the first and second digits, displayed in the bottom section of the display are the FAULT CODES In the event that NO fault codes are displayed, [Press the “CHECK Button followed by the FILTER Button, keeping the FILTER button depressed until the display changes] the display will read
R **, the last two digits being the LAST fault the system suffered from.
RAV SM / SP [Digital Inverter R410A], fault codes are displayed automatically, in the event that there are no fault codes displayed [Press the “Spanner Button and the SET button”, together for 4 seconds], the LATEST fault codes will be displayed, to scroll through the, “Second, Third and Fourth error codes, [Press “TEMP SET” up or down arrows] On RAV-SM / SP units with infrared remote controllers, record the LED display on the indoor unit.
On MAR F Product (VRF), With the Power supply ON, set the TWO rotary switches on the large interface PCB to [TWO on the first and ZERO on the second], record the error codes from the LED display.
On MAR C/M Products (VRF), with the power supply ON, set the rotary switch to 3 and record which of the LED‟s are illuminated.
ON MM / SMMS / SHRM (Modular Multi / Super Modular Multi and Super Heat Recovery Module VRF), with the power supply switched ON, set the THREE rotary switches to ONE – ONE – ONE, and record the error codes from the LED display.
f. Confirm power supply to equipment is correct, i.e. 230 volts / 400 volt
g. Armed with the above information contact technical support on: -

Page 63 of 64
0870 843 0333 [24 hours / 7 days]
Outdoor
Unit Model No.
Indoor Unit Model No.
Compressor Start Count.
(R22 Heat Pumps or R407C Cooling
Only)
Fault Codes
Outdoor Unit
Fault Codes (VRF)
Input Voltage
L / N L1 / L2 / L3
Any Other Issues

Page 64 of 64
TOSHIBA Carrier UK Limited
Guildford Road Leatherhead
Surrey, KT22 9UT
24 Hour Technical Helpline: 0870 843 0333
Fault Code Text Service: 07624 803 017
Toshiba products are supplied by:
The manufacturer reserves the right to change the product specifications, data and images without notice
Tcuk_TechnicalHB_04.08_V13.1