22. edit web.config for the secure token service application web viewin this in webapplication...
TRANSCRIPT

Steps For farm based authentication:
Link: http://blogs.msdn.com/b/kaevans/archive/2010/07/09/sql-server-provider-for-claims-based-authentication-in-sharepoint-2010.aspx
1.Go to sharepoint central administration
2.Open application management in that open “manage web application” under web applications.
3.In ribbon open new web application is present.Click it.Now one window is open called create new web application
4. Check its in claim based authentication

5.Enable farm based authentication in the same form and give membership provider name and role manager name

6. The last thing I configured was to change the identify of the application pool to Network Service.

7.Move the cursor and Click ok.It will take few sec to complete and atlast it will show one window that is “application created”
8.Again go to application management and open create site collection under site collections.it will show this page

In this in webapplication change the site regarding you created already in web application.Give the title whatever you for example I gave sathya.


Then give username and then click ok.
Do step10 or step11.But step11 is best to do.
10.Open Microsoft SQL server management studio and connect it.Right click the database to create new database


Give database name as aspnetdb and click ok.
11. Open the Visual Studio 2010 Command Prompt from the start menu and type “aspnet_regsql”.


12.Open visual studio2010 and create “ASP.NET Empty Web Site”

Edit the web.config file.
Instead of“<connectionStrings/>” you will put this code:
<connectionStrings> <clear/> <add name="AspNetSqlProvider" connectionString="data source=kirke1; Integrated Security=SSPI;Initial Catalog=aspnetdb;" providerName="System.Data.SqlClient" /> </connectionStrings>
In this code give sourcename=your computer name. and then, paste the below code before </system.web>
<membership defaultProvider="AspNetSqlMembershipProvider">

<providers>
<clear />
<add name="AspNetSqlMembershipProvider"
connectionStringName="AspNetSqlProvider"
applicationName="/"
type="System.Web.Security.SqlMembershipProvider, System.Web,
Version=2.0.0.0, Culture=neutral, PublicKeyToken=b03f5f7f11d50a3a" />
</providers>
</membership>
<roleManager defaultProvider="AspNetSqlRoleProvider">
<providers>
<clear/>

<add name="AspNetSqlRoleProvider"
connectionStringName="AspNetSqlProvider"
applicationName="/"
description="Stores and retrieves roles data from the local Microsoft SQL Server database"
type="System.Web.Security.SqlRoleProvider, System.Web,
Version=2.0.0.0, Culture=neutral, PublicKeyToken=b03f5f7f11d50a3a" />
</providers>
</roleManager>
13.Run the project and in solution explorer click asp.net configuration symbol.
It shows

14.Go to security to create new user and go to role to add roles
15.To add the connection string
Open the Internet Information Services Manager . Expand the “Sites” node to reveal the web application we created called “SharePoint – sathya”
16. Double-click the Connection Strings feature, and under Actions choose Add. Add a new connection string called AspNetSqlProvider (this is case-sensitive) and click OK.

Server name is your system name database name is what you already created.
17. Now, click on the “SharePoint Central Administration v4” node in IIS Manager.
Double-click on Connection Strings and add a new connection string like you did in the previous step, making sure that you are adding the connection string to the Central Administration application this time.

18. expand the “SharePoint Web Services” node in IIS Manager and choose the “SecurityTokenServiceApplication” node. Double-click on the connection strings feature and add a connection string just like before.

19. In the IIS Manager, click on the “SharePoint – sathya” node again to reveal the list of features for the web application. Double-click on the “Providers” feature.
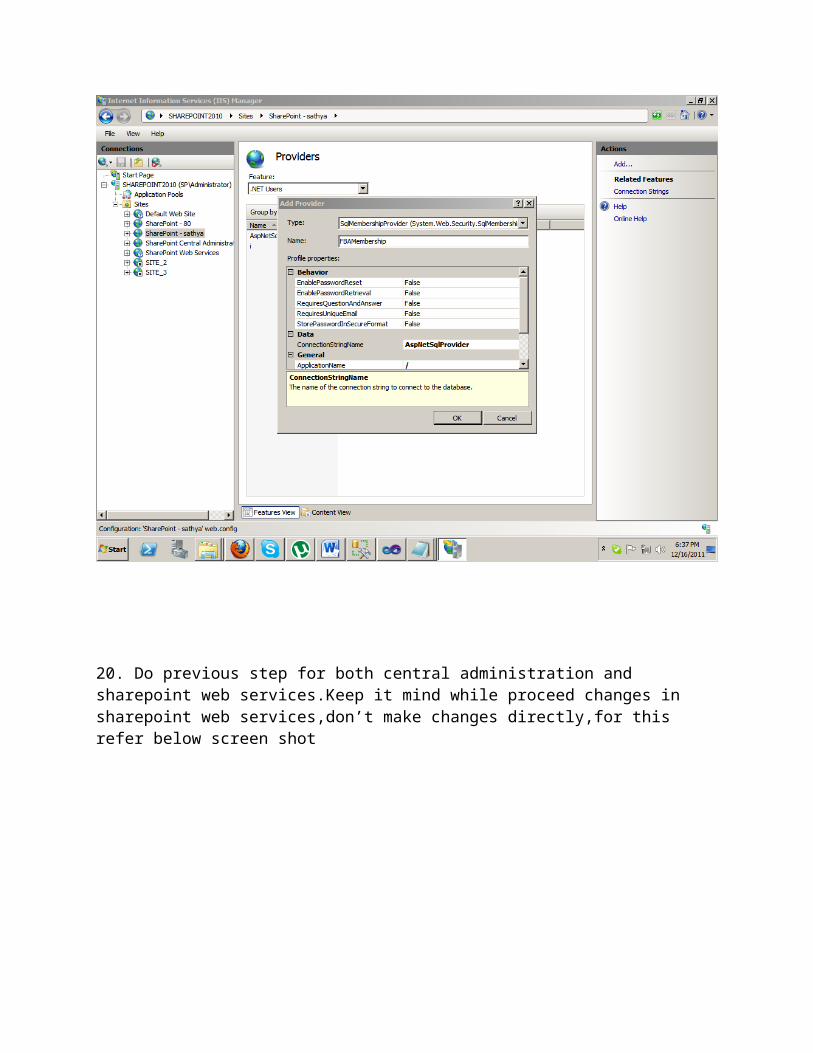
Add a new role provider called “FBARoles”. Specify the type as “SqlRoleProvider”, the ApplicationName as “/”, and the connection string name as “AspNetSqlProvider” (available in a drop-down to reduce the likelihood of fat-fingering this).

Add a new membership provider called “FBAMembership”. The type is SqlMembershipProvider, connection string name is “AspNetSqlProvider”, and the application name is “/”.

20. Do previous step for both central administration and sharepoint web services.Keep it mind while proceed changes in sharepoint web services,don’t make changes directly,for this refer below screen shot

21.Edit Web.Config for Central AdministrationIn the previous section, we added configuration for connection string, membership, and roles to our web application. We also need to add these settings for Central Administration so that we can add our forms-based authentication users as site collection owners (among other settings).
We need to make a few small tweaks to the configuration for Central Administration because there isn’t a way (that I could find, anyway) to do this using the MMC console:
1. The defaultProvider for the role section must be AspNetWindowsTokenRoleProvider. 2. The defaultProvider for the membership section must be our new membership provider,
“FBAMembership”.
For this right click the central admin in iis and click explore
<roleManager defaultProvider="AspNetWindowsTokenRoleProvider" enabled="true"> <providers> <clear /> <add applicationName="/"
name="AspNetWindowsTokenRoleProvider" type="System.Web.Security.WindowsTokenRoleProvider, System.Web, Version=2.0.0.0, Culture=neutral, PublicKeyToken=b03f5f7f11d50a3a" /> <add name="FBARoles" type="System.Web.Security.SqlRoleProvider, System.Web, Version=2.0.0.0, Culture=neutral, PublicKeyToken=b03f5f7f11d50a3a" applicationName="/" connectionStringName="AspNetSqlProvider" /> </providers></roleManager><membership defaultProvider="FBAMembership"> <providers> <clear /> <add name="FBAMembership" type="System.Web.Security.SqlMembershipProvider, System.Web, Version=2.0.0.0, Culture=neutral, PublicKeyToken=b03f5f7f11d50a3a" applicationName="/" connectionStringName="AspNetSqlProvider" enablePasswordReset="false" enablePasswordRetrieval="false" passwordFormat="Clear" requiresQuestionAndAnswer="false" requiresUniqueEmail="false" /> </providers></membership>
While we are editing the web.config for Central Administration, there’s one more thing that we need to be sure to add. We need to enable wildcard searches for our users when using the People Picker control. This section is located under configuration/SharePoint/PeoplePickerWildcards.
<PeoplePickerWildcards> <clear /> <add key="FBAMembership" value="%" /> </PeoplePickerWildcards>
22. Edit Web.Config for the Secure Token Service ApplicationJust like we did with Central Administration, we need to set the default providers for the Secure Token Service Application. Open the web.config file at:
C:\Program Files\Common Files\Microsoft Shared\Web Server Extensions\14\WebServices\SecurityToken\web.config
You will need to add your connectionStrings section and a web.config section. A partial listing showing the configuration that needs to be added:
<membership defaultProvider="FBAMembership"> <providers> <add name="FBAMembership"

connectionStringName="AspNetSqlProvider" applicationName ="/" type="System.Web.Security.SqlMembershipProvider, System.Web, Version=2.0.0.0, Culture=neutral, PublicKeyToken=b03f5f7f11d50a3a" /> </providers></membership><roleManager enabled="true" defaultProvider="FBARoles"> <providers> <add name="FBARoles" connectionStringName="AspNetSqlProvider" applicationName="/" type="System.Web.Security.SqlRoleProvider, System.Web, Version=2.0.0.0, Culture=neutral, PublicKeyToken=b03f5f7f11d50a3a" /> </providers></roleManager>
23.Add user in site that is present in manage web application under application management in central administration.
For this click that site and go to user policy that is present in the ribbon.It shows one window in that click “add users” .It shows Add users window in that select “default” and give “next” and select user from people picker
Select user that you already gave in create users in visual studio.Give permission and click ok.