2022-23 budget call training manual
TRANSCRIPT

2022-23 BUDGET CALL
TRAINING MANUAL
Budgets and Asset Management
October 2021
1 | P a g e
TABLE OF CONTENTS
Introduction .................................................................................................................................................................. 2
Budget Call Communication ...................................................................................................................................... 2
Budget Process Summary ......................................................................................................................................... 3
Step 1 - Entering Your Budgets ................................................................................................................................ 4
eReports And PeopleSoft Log-in ..................................................................................................................... 4
Budget Modules at a Glance ............................................................................................................................ 5
The Budget Entry Spreadsheet Method ......................................................................................................... 6
Budget Mass Upload Template Method ....................................................................................................... 12
Step 2 - Verifying Your Budgets via eReports ...................................................................................................... 17
Budget View Report in eReports ................................................................................................................... 17
Budget Status Report in eReports ................................................................................................................. 19
Step 3 - Finalizing Your Budgets via PeopleSoft ................................................................................................. 21
Step 4 - Approving Your Budgets via PeopleSoft ................................................................................................ 23
Other Budgeting Tools ............................................................................................................................................. 23
Reset and Reopen Budgets ........................................................................................................................... 23
ROLLING BUDGETS ............................................................................................................................................... 24
ROLLING BUDGETS PROCESS SUMMARY ..................................................................................................... 24
SHARP Salary Planning Report .......................................................................................................................... 25
Contact Information .................................................................................................................................................. 26
2 | P a g e
INTRODUCTION
This manual is intended to provide planners and administrators with a detailed Training Manual for the
2022-23 Budget Call process, including screen shots that guide you through the submission of your
budget.
BUDGET CALL COMMUNICATION
Changes and updates to information included in the 2022-23 Budget Call process are communicated
through the following methods:
COMMUNICATIONS MEANS DETAILS
Emails to specific user groups
User groups such as the Finance Department and CPM staff may
receive an email from Budgets and Asset Management Office informing
them of the Budget Call information.
Budgets & Asset Management
Website
The Budget and Asset Management (BAM) Department webpage
includes information concerning the Budget Call.
eReports Application The eReports application contains various up-to-date financial
information and reports which may assist with your submission of
budgets.
Budget Call Systems Training Training on the Budget Call is detailed and interactive. Enrolment is
limited and runs from November 2021 through January 2022 and will be
done via Zoom. If you would like to enroll, please register via York
Employee Learning Calendar (YELC) at http://www.yorku.ca/yelc/.
Introduction to Budgets
Workshop
The Introduction to Budgets workshop is typically delivered during the
budget cycle. This workshop offers planners and administrators an
opportunity to understand the budgeting process at the university level.
To enroll, please register via York Employee Learning Calendar (YELC)
at http://www.yorku.ca/yelc/.
3 | P a g e
BUDGET PROCESS SUMMARY
1. ENTERING YOUR BUDGETS
Planners and administrators have the option of entering their budgets via the Budget Entry Spreadsheet
or through the Mass Upload Template:
(a) Budget Entry Spreadsheet Method allows users to download the Budget Call Template from
eReports and reload the complete budget through the PeopleSoft system individually for each Cost
Centre. The Template is accessible through eReports. This process is recommended if there are
only a few cost centre/ATL budgets to enter. or
(b) Budget Mass Upload Template Method allows users to upload their budgets via a batch file, submitting budgets for one or multiple cost centres at a time. The Template is accessible by downloading it from the Finance webpage. This process is recommended for users who manage many cost centres or cost centre/ATL combinations.
2. VERIFYING YOUR BUDGETS
Once your budgets have been uploaded, the budget data should be verified via the following reports:
(a) Budget View Report (eReports)
• Displays the submitted budget(s) in a formatted report
(b) Budget Status Report (eReports)
• Displays the budget status (Open, Finalized or Approved) for each Cost Centre/ATL
combination.
• Displays an audit trail, such as the last updated user and last updated time.
3. FINALIZING YOUR BUDGETS
Budgets should be finalized through the Budget Administration page in PeopleSoft.
4. APPROVING YOUR BUDGETS
Approval of budgets is also processed through the Budget Administration page on PeopleSoft. All
budget submissions must be approved by the authorized approvers and/or designates of every division,
namely: Chief of Staff (President’s Division) and Senior Executive Officers (all other Divisions).
4 | P a g e
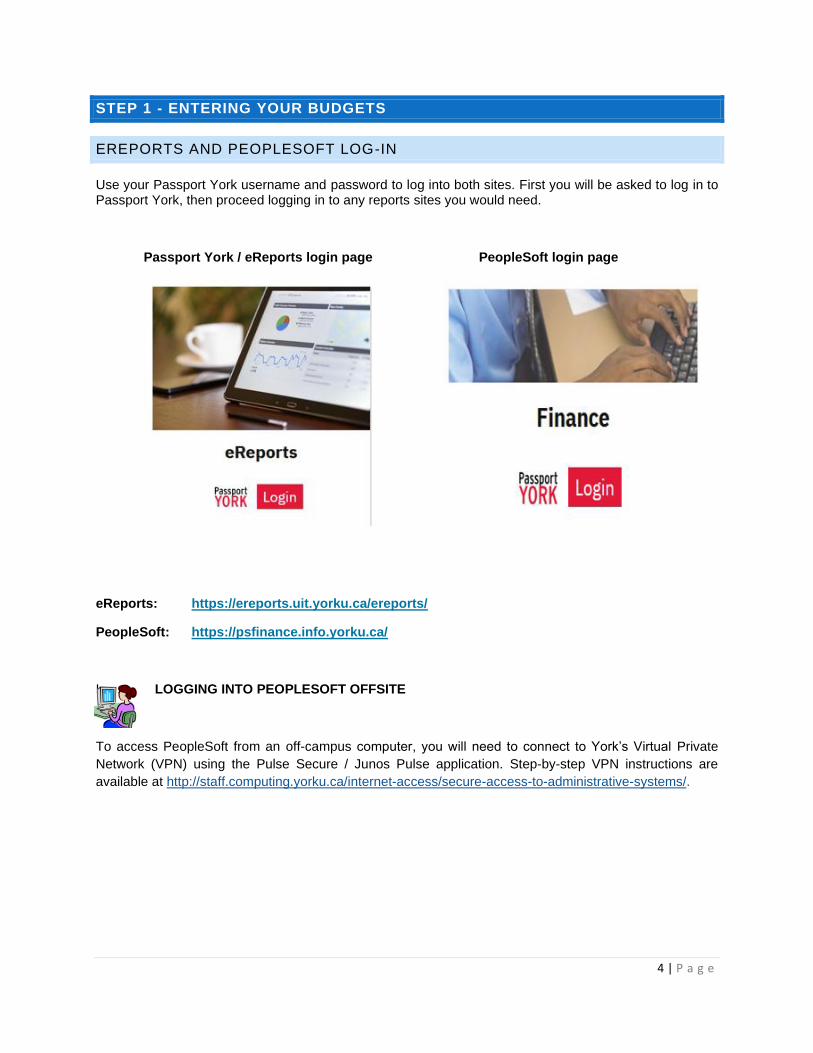
STEP 1 - ENTERING YOUR BUDGETS
EREPORTS AND PEOPLESOFT LOG-IN
Use your Passport York username and password to log into both sites. First you will be asked to log in to Passport York, then proceed logging in to any reports sites you would need.
Passport York / eReports login page PeopleSoft login page
eReports: https://ereports.uit.yorku.ca/ereports/
PeopleSoft: https://psfinance.info.yorku.ca/
L LOGGING INTO PEOPLESOFT OFFSITE
To access PeopleSoft from an off-campus computer, you will need to connect to York’s Virtual Private
Network (VPN) using the Pulse Secure / Junos Pulse application. Step-by-step VPN instructions are
available at http://staff.computing.yorku.ca/internet-access/secure-access-to-administrative-systems/.
5 | P a g e
BUDGET MODULES AT A GLANCE
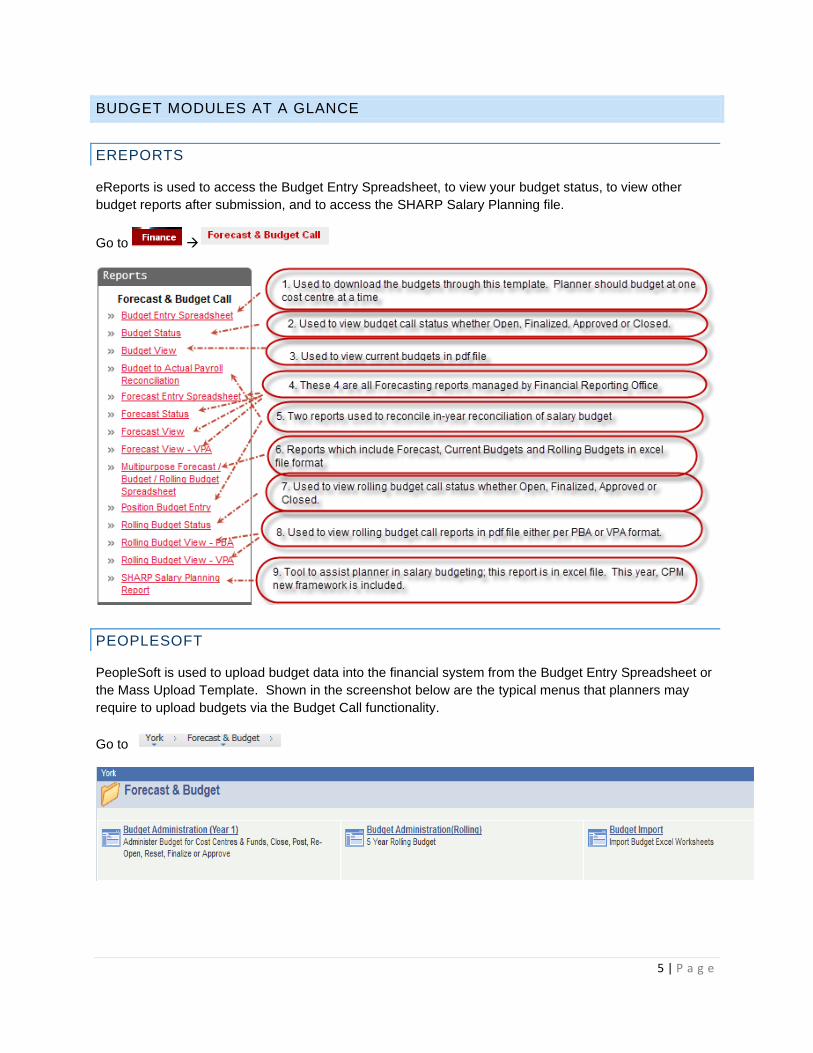
EREPORTS
eReports is used to access the Budget Entry Spreadsheet, to view your budget status, to view other
budget reports after submission, and to access the SHARP Salary Planning file.
Go to →
PEOPLESOFT
PeopleSoft is used to upload budget data into the financial system from the Budget Entry Spreadsheet or
the Mass Upload Template. Shown in the screenshot below are the typical menus that planners may
require to upload budgets via the Budget Call functionality.
Go to
6 | P a g e
THE BUDGET ENTRY SPREADSHEET METHOD
ACCESSING YOUR SPREADSHEET VIA EREPORTS AND ENTERING BUDGET
DATA
The Budget Entry Spreadsheet is recommended when inputting your budget data for each cost centre. The
Budget Entry Spreadsheet is accessible after you have logged in through eReports.
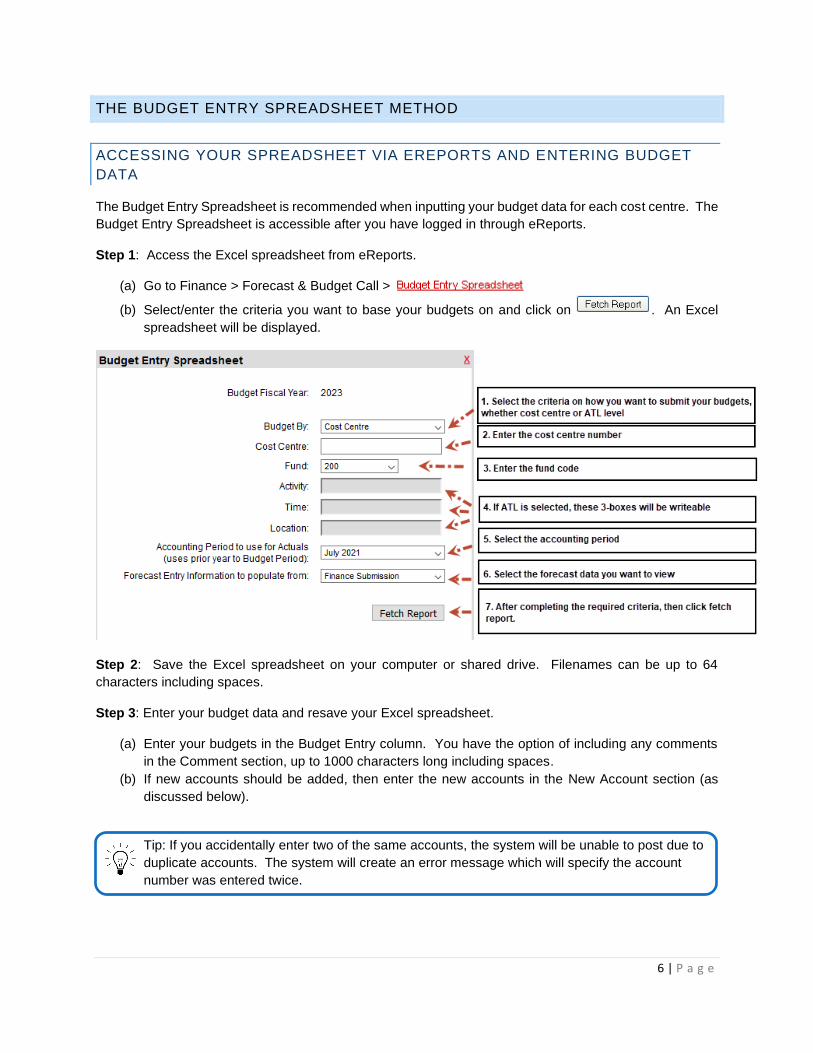
Step 1: Access the Excel spreadsheet from eReports.
(a) Go to Finance > Forecast & Budget Call >
(b) Select/enter the criteria you want to base your budgets on and click on . An Excel
spreadsheet will be displayed.
Step 2: Save the Excel spreadsheet on your computer or shared drive. Filenames can be up to 64
characters including spaces.
Step 3: Enter your budget data and resave your Excel spreadsheet.
(a) Enter your budgets in the Budget Entry column. You have the option of including any comments
in the Comment section, up to 1000 characters long including spaces.
(b) If new accounts should be added, then enter the new accounts in the New Account section (as
discussed below).
Tip: If you accidentally enter two of the same accounts, the system will be unable to post due to
duplicate accounts. The system will create an error message which will specify the account
number was entered twice.
7 | P a g e
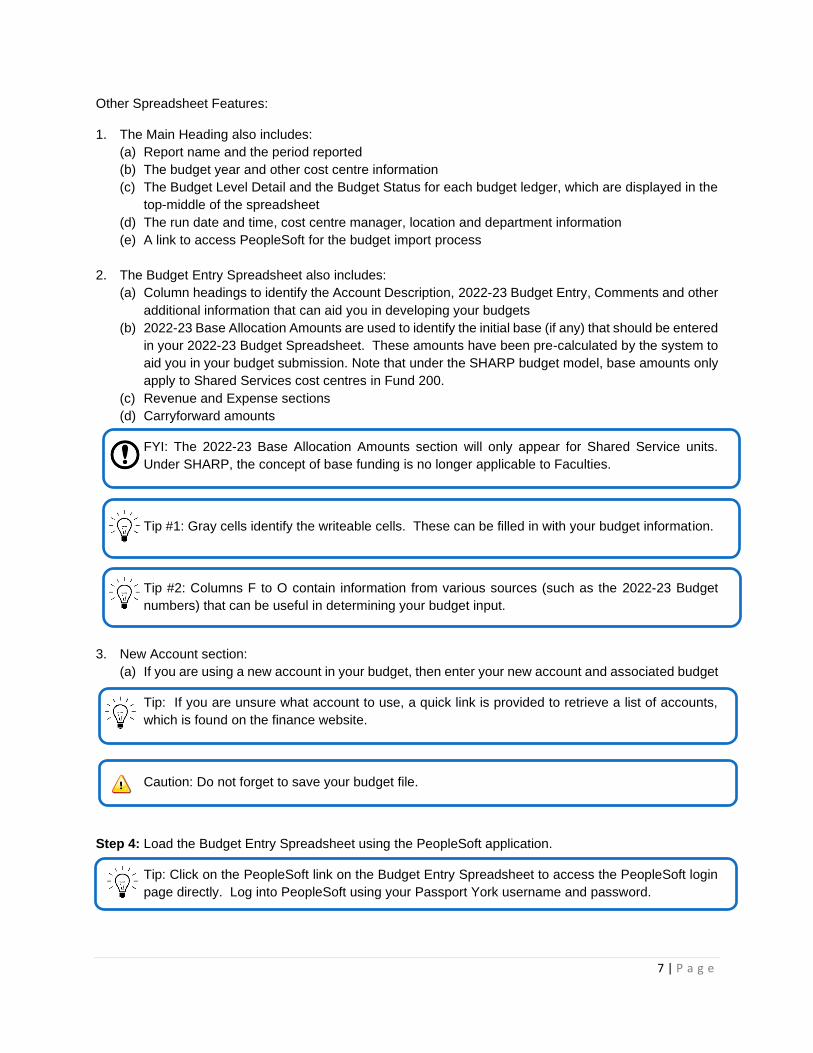
Other Spreadsheet Features:
1. The Main Heading also includes:
(a) Report name and the period reported
(b) The budget year and other cost centre information
(c) The Budget Level Detail and the Budget Status for each budget ledger, which are displayed in the
top-middle of the spreadsheet
(d) The run date and time, cost centre manager, location and department information
(e) A link to access PeopleSoft for the budget import process
2. The Budget Entry Spreadsheet also includes:
(a) Column headings to identify the Account Description, 2022-23 Budget Entry, Comments and other
additional information that can aid you in developing your budgets
(b) 2022-23 Base Allocation Amounts are used to identify the initial base (if any) that should be entered
in your 2022-23 Budget Spreadsheet. These amounts have been pre-calculated by the system to
aid you in your budget submission. Note that under the SHARP budget model, base amounts only
apply to Shared Services cost centres in Fund 200.
(c) Revenue and Expense sections
(d) Carryforward amounts
FYI: The 2022-23 Base Allocation Amounts section will only appear for Shared Service units.
Under SHARP, the concept of base funding is no longer applicable to Faculties.
Tip #1: Gray cells identify the writeable cells. These can be filled in with your budget information.
Tip #2: Columns F to O contain information from various sources (such as the 2022-23 Budget
numbers) that can be useful in determining your budget input.
3. New Account section:
(a) If you are using a new account in your budget, then enter your new account and associated budget
Tip: If you are unsure what account to use, a quick link is provided to retrieve a list of accounts,
which is found on the finance website.
Caution: Do not forget to save your budget file.
Step 4: Load the Budget Entry Spreadsheet using the PeopleSoft application.
Tip: Click on the PeopleSoft link on the Budget Entry Spreadsheet to access the PeopleSoft login
page directly. Log into PeopleSoft using your Passport York username and password.
8 | P a g e
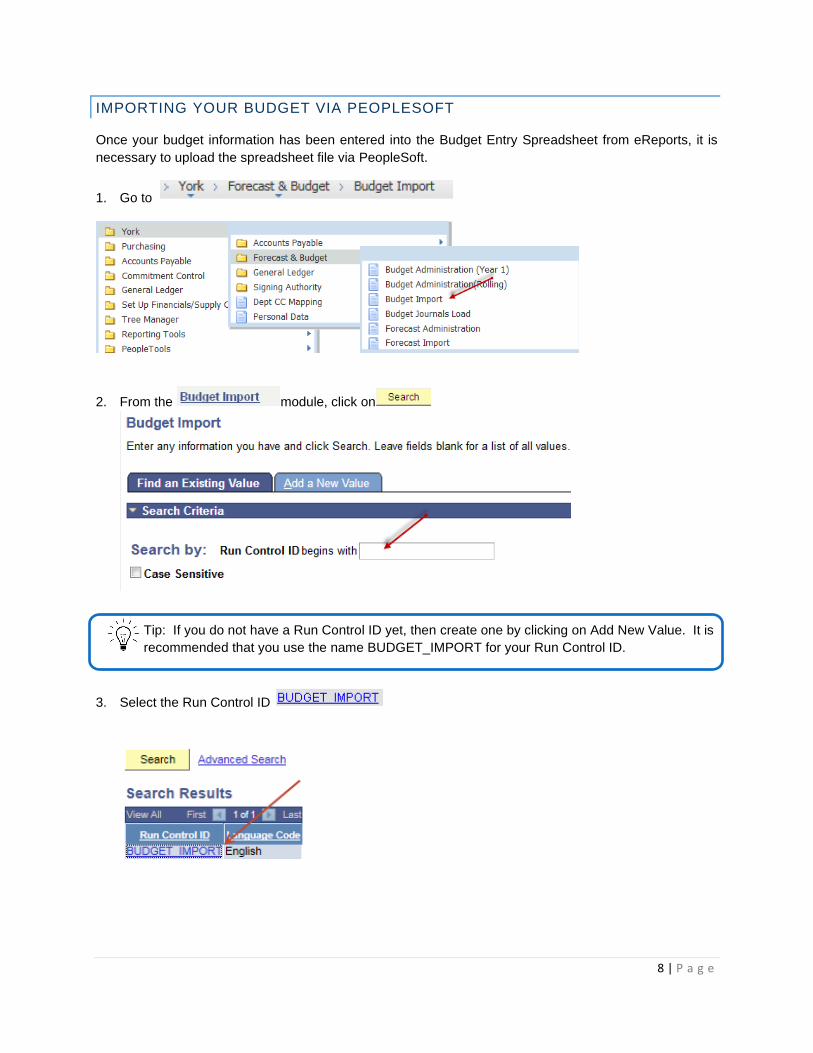
IMPORTING YOUR BUDGET VIA PEOPLESOFT
Once your budget information has been entered into the Budget Entry Spreadsheet from eReports, it is
necessary to upload the spreadsheet file via PeopleSoft.
1. Go to
2. From the module, click on
Tip: If you do not have a Run Control ID yet, then create one by clicking on Add New Value. It is
recommended that you use the name BUDGET_IMPORT for your Run Control ID.
3. Select the Run Control ID
9 | P a g e
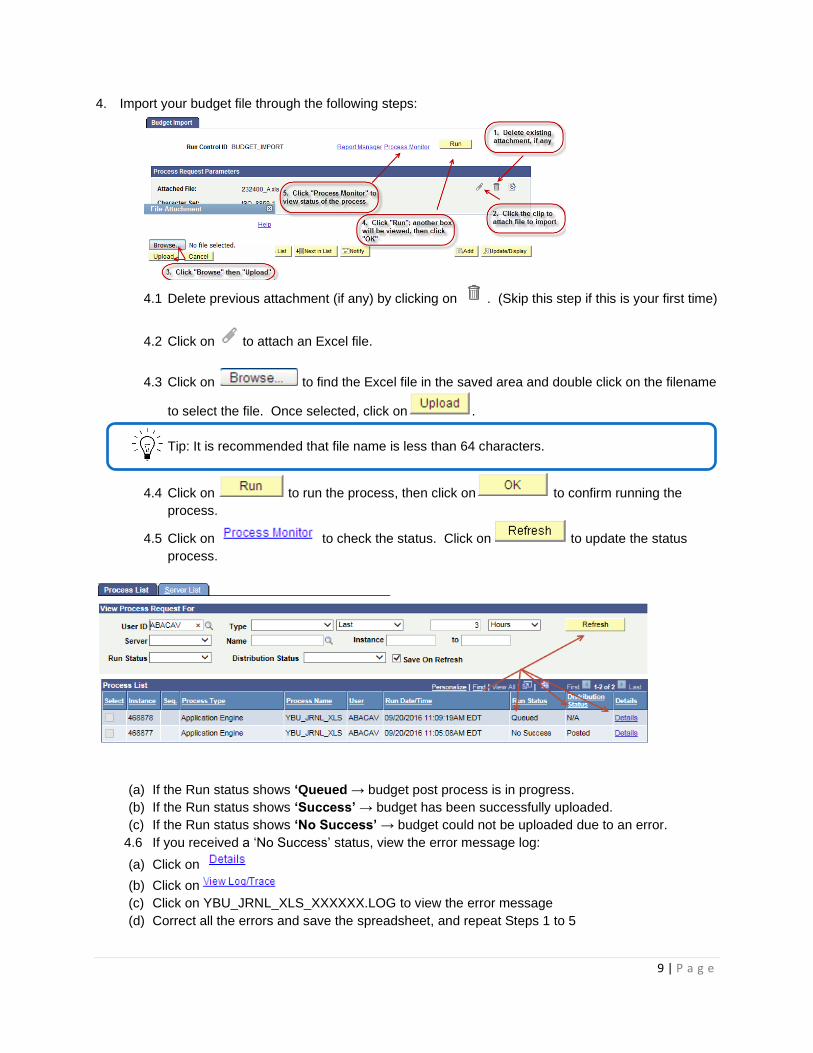
4. Import your budget file through the following steps:
4.1 Delete previous attachment (if any) by clicking on . (Skip this step if this is your first time)
4.2 Click on to attach an Excel file.
4.3 Click on to find the Excel file in the saved area and double click on the filename
to select the file. Once selected, click on .
Tip: It is recommended that file name is less than 64 characters.
4.4 Click on to run the process, then click on to confirm running the
process.
4.5 Click on to check the status. Click on to update the status
process.
(a) If the Run status shows ‘Queued → budget post process is in progress.
(b) If the Run status shows ‘Success’ → budget has been successfully uploaded.
(c) If the Run status shows ‘No Success’ → budget could not be uploaded due to an error.
4.6 If you received a ‘No Success’ status, view the error message log:
(a) Click on
(b) Click on
(c) Click on YBU_JRNL_XLS_XXXXXX.LOG to view the error message
(d) Correct all the errors and save the spreadsheet, and repeat Steps 1 to 5
10 | P a g e
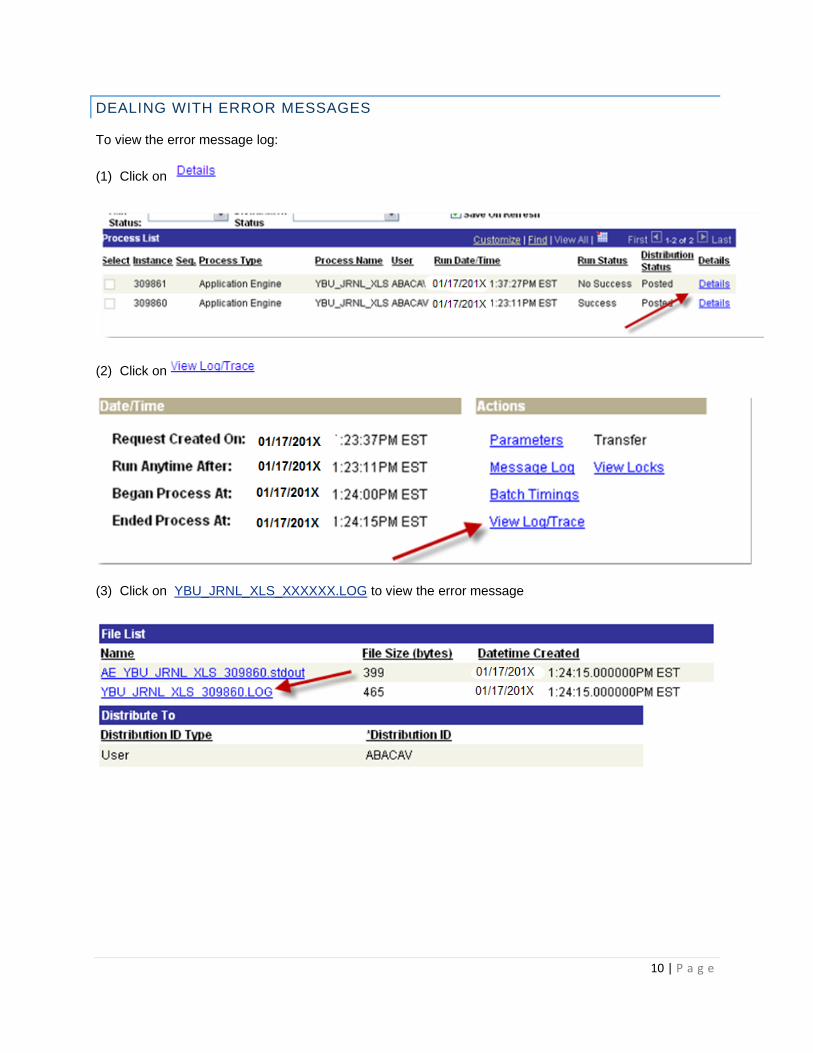
DEALING WITH ERROR MESSAGES
To view the error message log:
(1) Click on
(2) Click on
(3) Click on YBU_JRNL_XLS_XXXXXX.LOG to view the error message
11 | P a g e
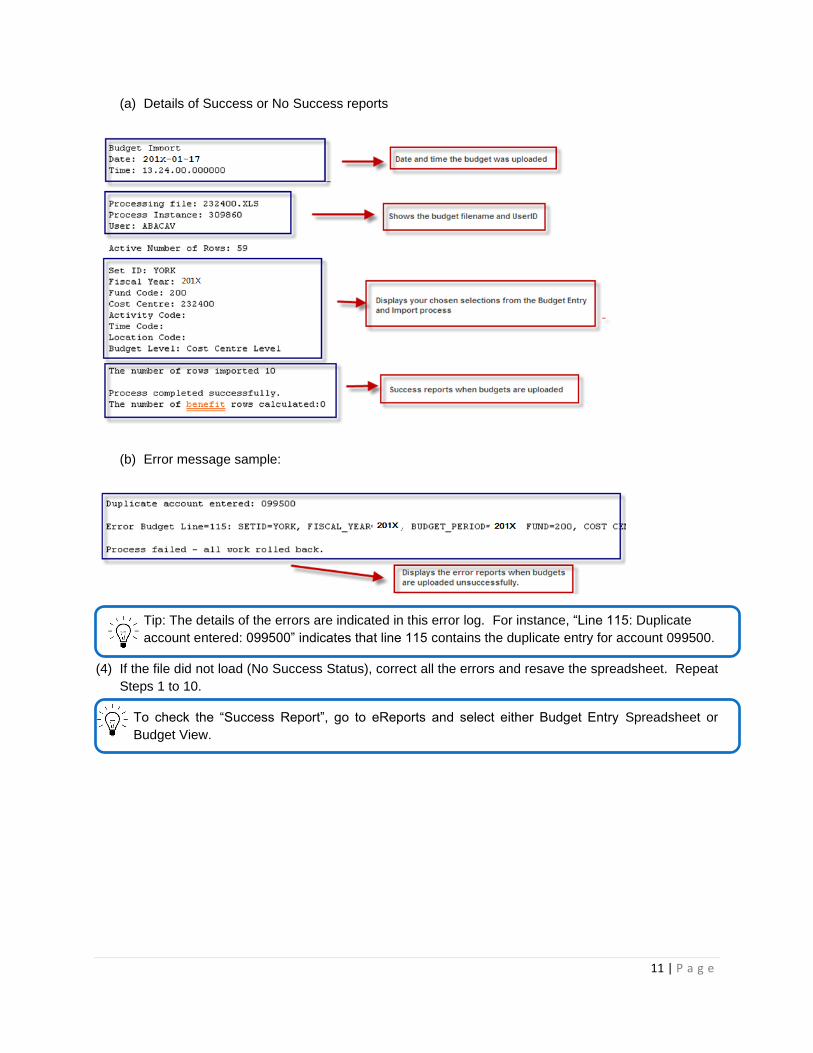
(a) Details of Success or No Success reports
(b) Error message sample:
Tip: The details of the errors are indicated in this error log. For instance, “Line 115: Duplicate
account entered: 099500” indicates that line 115 contains the duplicate entry for account 099500.
(4) If the file did not load (No Success Status), correct all the errors and resave the spreadsheet. Repeat
Steps 1 to 10.
To check the “Success Report”, go to eReports and select either Budget Entry Spreadsheet or
Budget View.
12 | P a g e
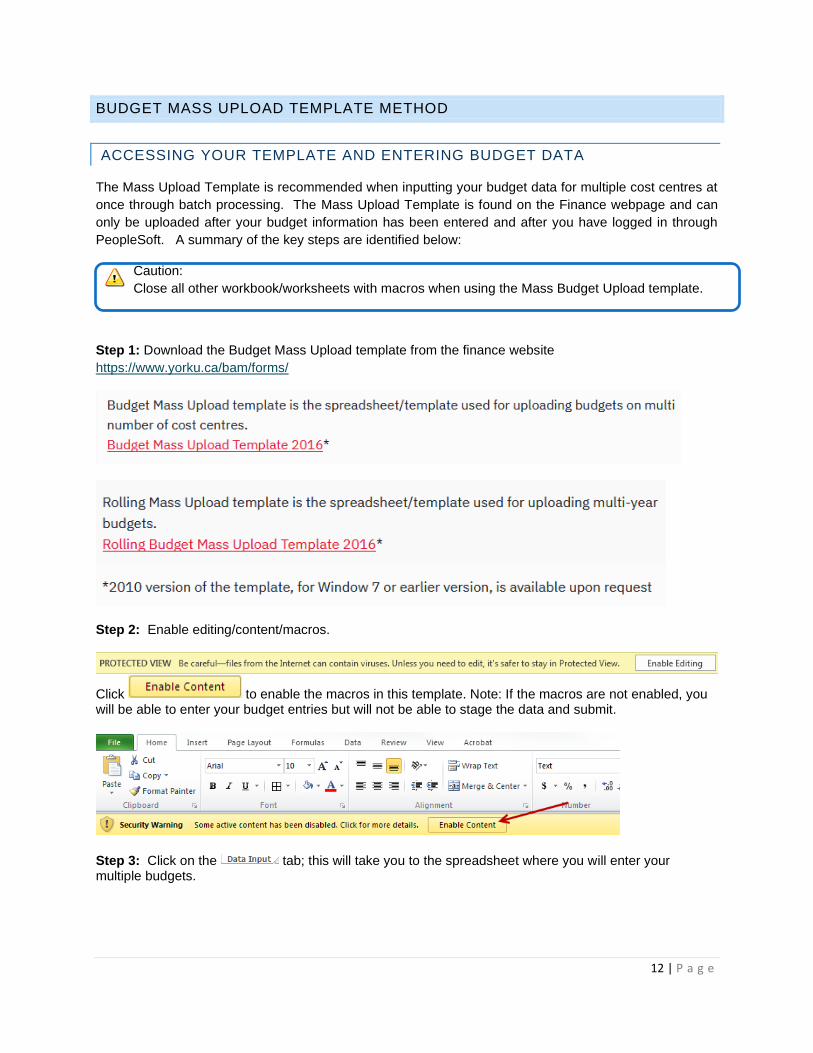
BUDGET MASS UPLOAD TEMPLATE METHOD
ACCESSING YOUR TEMPLATE AND ENTERING BUDGET DATA
The Mass Upload Template is recommended when inputting your budget data for multiple cost centres at
once through batch processing. The Mass Upload Template is found on the Finance webpage and can
only be uploaded after your budget information has been entered and after you have logged in through
PeopleSoft. A summary of the key steps are identified below:
Caution:
Close all other workbook/worksheets with macros when using the Mass Budget Upload template.
Step 1: Download the Budget Mass Upload template from the finance website
https://www.yorku.ca/bam/forms/
Step 2: Enable editing/content/macros.
Click to enable the macros in this template. Note: If the macros are not enabled, you will be able to enter your budget entries but will not be able to stage the data and submit.
Step 3: Click on the tab; this will take you to the spreadsheet where you will enter your multiple budgets.
13 | P a g e
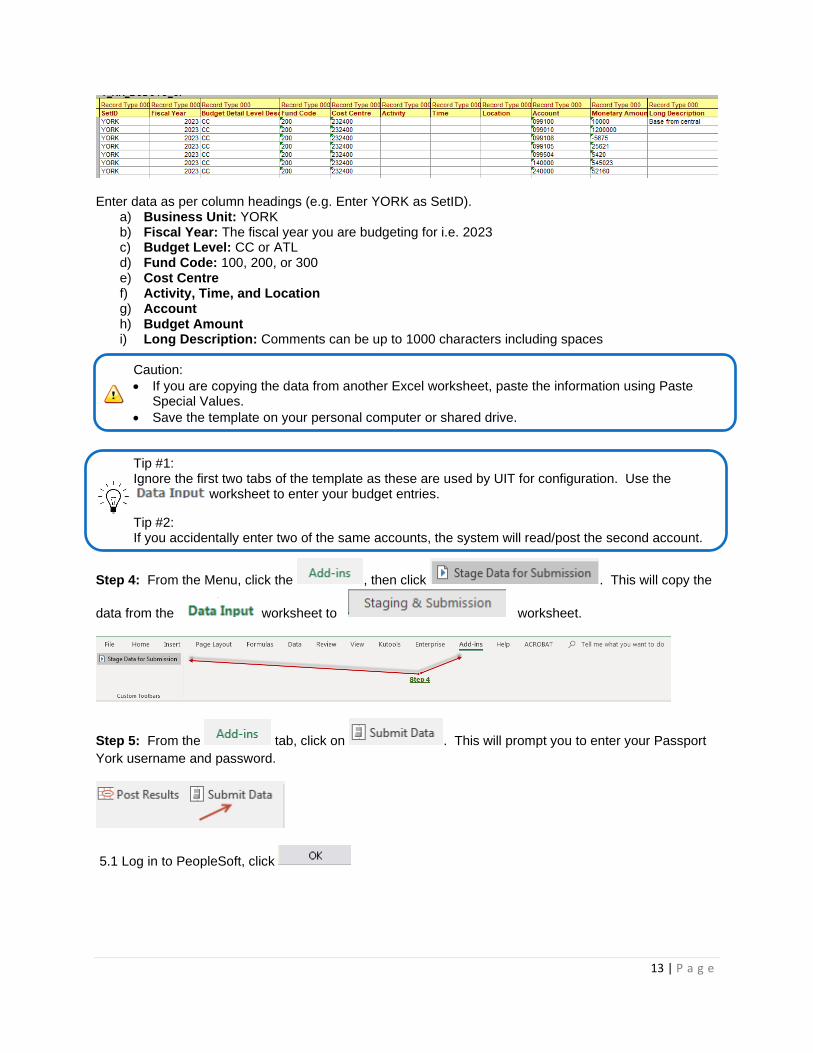
Enter data as per column headings (e.g. Enter YORK as SetID).
a) Business Unit: YORK b) Fiscal Year: The fiscal year you are budgeting for i.e. 2023 c) Budget Level: CC or ATL d) Fund Code: 100, 200, or 300 e) Cost Centre f) Activity, Time, and Location g) Account h) Budget Amount i) Long Description: Comments can be up to 1000 characters including spaces
Caution:
• If you are copying the data from another Excel worksheet, paste the information using Paste Special Values.
• Save the template on your personal computer or shared drive.
Tip #1: Ignore the first two tabs of the template as these are used by UIT for configuration. Use the
worksheet to enter your budget entries.
Tip #2: If you accidentally enter two of the same accounts, the system will read/post the second account.
Step 4: From the Menu, click the , then click . This will copy the
data from the worksheet to worksheet.
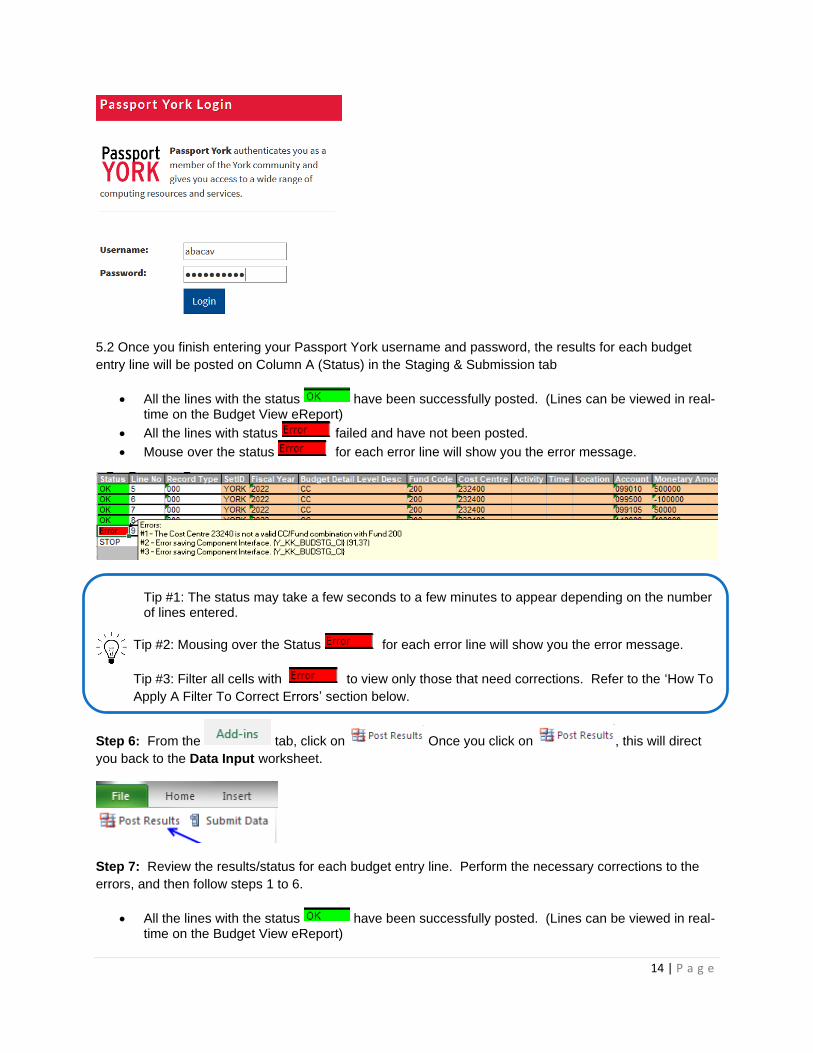
Step 5: From the tab, click on . This will prompt you to enter your Passport
York username and password.
5.1 Log in to PeopleSoft, click
14 | P a g e
5.2 Once you finish entering your Passport York username and password, the results for each budget
entry line will be posted on Column A (Status) in the Staging & Submission tab
• All the lines with the status have been successfully posted. (Lines can be viewed in real-time on the Budget View eReport)
• All the lines with status failed and have not been posted.
• Mouse over the status for each error line will show you the error message.
Tip #1: The status may take a few seconds to a few minutes to appear depending on the number of lines entered.
Tip #2: Mousing over the Status for each error line will show you the error message.
Tip #3: Filter all cells with to view only those that need corrections. Refer to the ‘How To
Apply A Filter To Correct Errors’ section below.
Step 6: From the tab, click on Once you click on , this will direct
you back to the Data Input worksheet.
Step 7: Review the results/status for each budget entry line. Perform the necessary corrections to the
errors, and then follow steps 1 to 6.
• All the lines with the status have been successfully posted. (Lines can be viewed in real-time on the Budget View eReport)
15 | P a g e
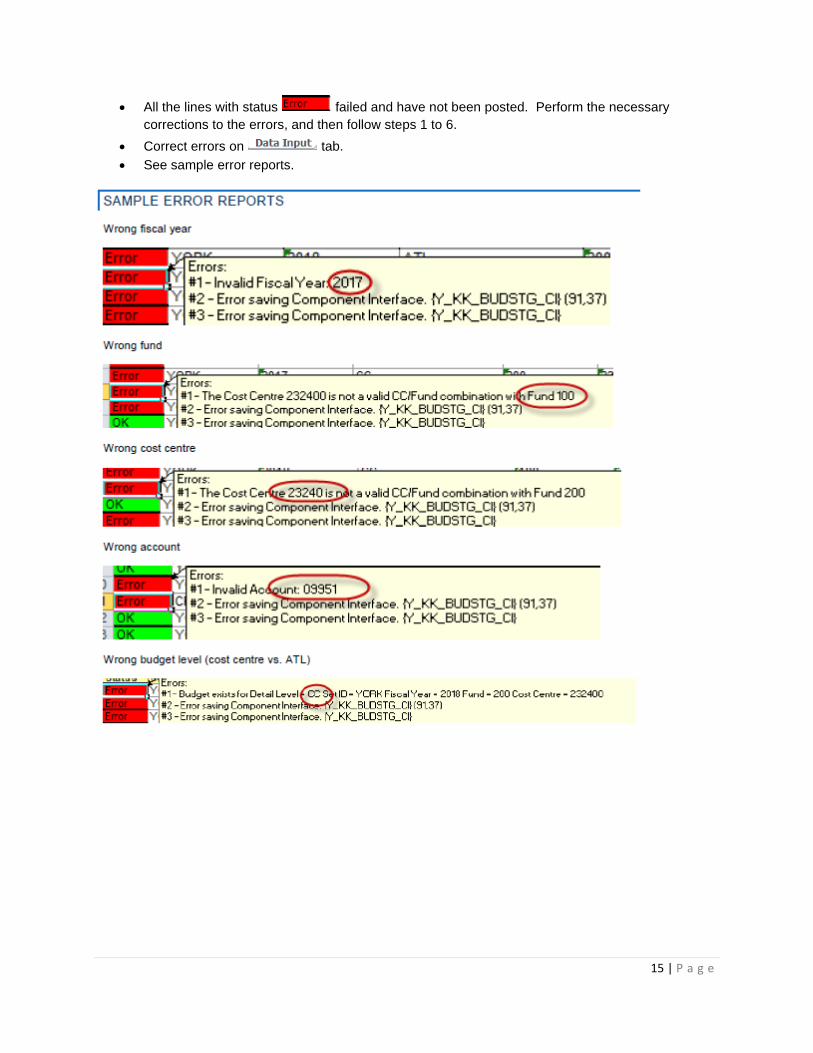
• All the lines with status failed and have not been posted. Perform the necessary
corrections to the errors, and then follow steps 1 to 6.
• Correct errors on tab.
• See sample error reports.

16 | P a g e
HOW TO APPLY A FILTER TO CORRECT ERRORS
Step 1: Select the 4th row in your spreadsheet. This is the row that contains your header fields.
Step 2: From Home tab, go to the Sort & Filter icon and select . This will create drop-down
arrows to allow for filtering of data.
Step 3:.Select the dropdown arrow in the Status column (column A); unselect .
Step 4: On the Data Input page, fix all errors.
Step 5: Repeat steps 1 to 7 under the section Budget Mass Upload Template Method.
17 | P a g e
STEP 2 - VERIFYING YOUR BUDGETS VIA EREPORTS
Once your budgets have been entered and uploaded into PeopleSoft, your budget information should be
verified in eReports. There are two reports which may be used:
• The Budget View Report, and
• The Budget Status Report
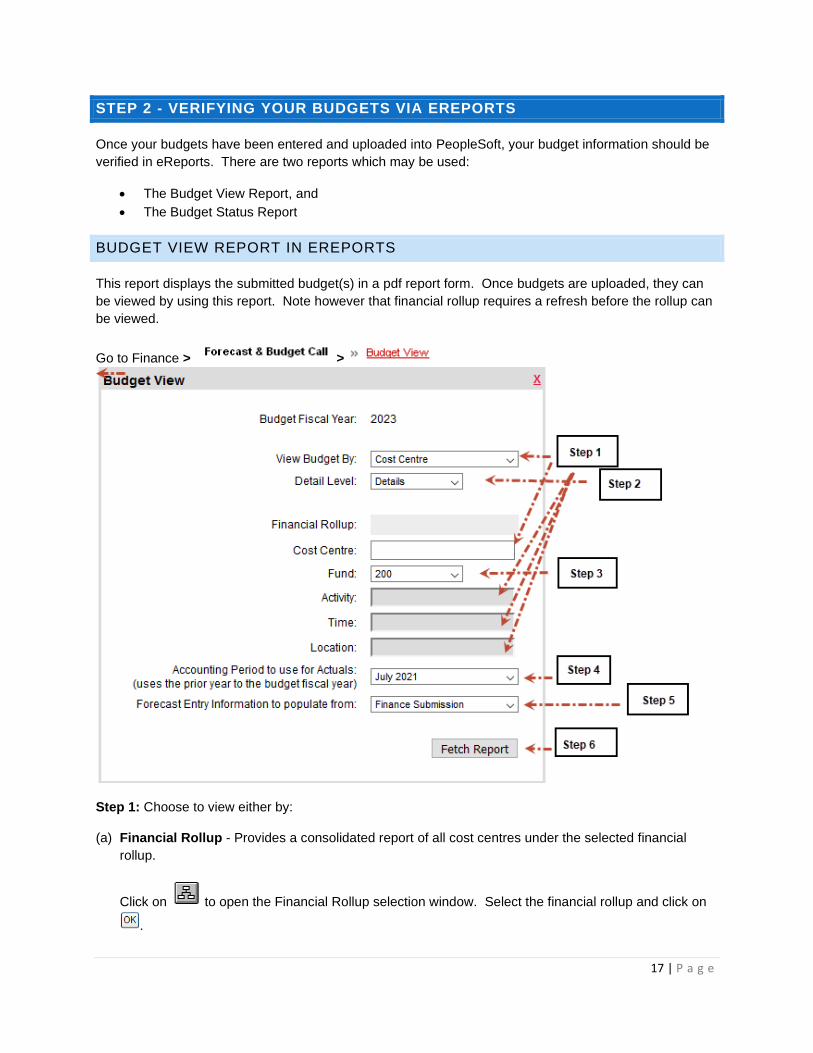
BUDGET VIEW REPORT IN EREPORTS
This report displays the submitted budget(s) in a pdf report form. Once budgets are uploaded, they can
be viewed by using this report. Note however that financial rollup requires a refresh before the rollup can
be viewed.
Go to Finance > >
Step 1: Choose to view either by:
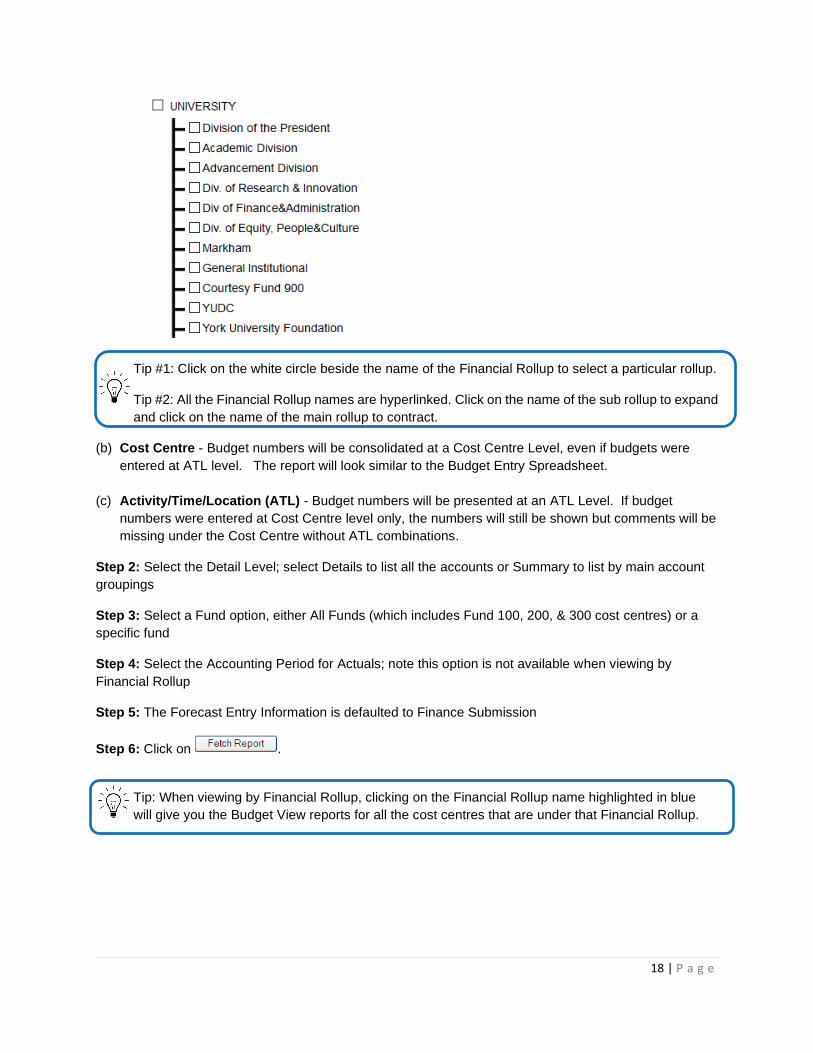
(a) Financial Rollup - Provides a consolidated report of all cost centres under the selected financial
rollup.
Click on to open the Financial Rollup selection window. Select the financial rollup and click on
.
18 | P a g e
Tip #1: Click on the white circle beside the name of the Financial Rollup to select a particular rollup.
Tip #2: All the Financial Rollup names are hyperlinked. Click on the name of the sub rollup to expand
and click on the name of the main rollup to contract.
(b) Cost Centre - Budget numbers will be consolidated at a Cost Centre Level, even if budgets were
entered at ATL level. The report will look similar to the Budget Entry Spreadsheet.
(c) Activity/Time/Location (ATL) - Budget numbers will be presented at an ATL Level. If budget
numbers were entered at Cost Centre level only, the numbers will still be shown but comments will be
missing under the Cost Centre without ATL combinations.
Step 2: Select the Detail Level; select Details to list all the accounts or Summary to list by main account
groupings
Step 3: Select a Fund option, either All Funds (which includes Fund 100, 200, & 300 cost centres) or a
specific fund
Step 4: Select the Accounting Period for Actuals; note this option is not available when viewing by
Financial Rollup
Step 5: The Forecast Entry Information is defaulted to Finance Submission
Step 6: Click on .
Tip: When viewing by Financial Rollup, clicking on the Financial Rollup name highlighted in blue
will give you the Budget View reports for all the cost centres that are under that Financial Rollup.
19 | P a g e
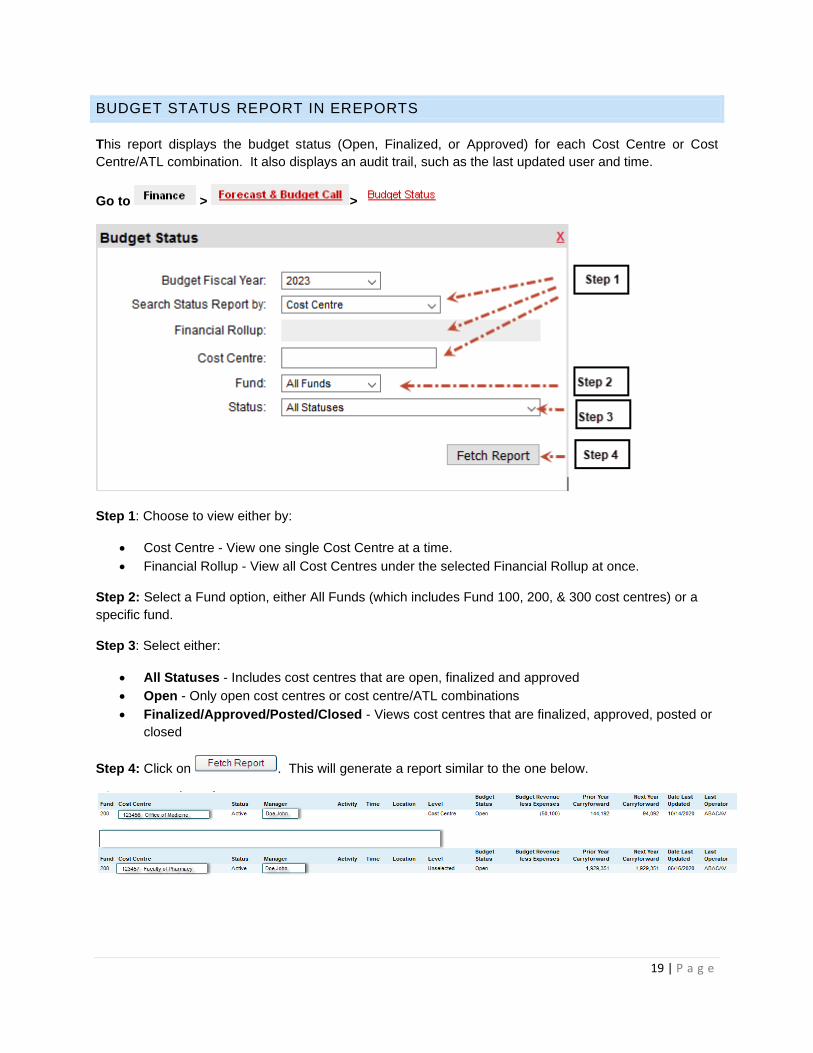
BUDGET STATUS REPORT IN EREPORTS
This report displays the budget status (Open, Finalized, or Approved) for each Cost Centre or Cost
Centre/ATL combination. It also displays an audit trail, such as the last updated user and time.
Go to > >
Step 1: Choose to view either by:
• Cost Centre - View one single Cost Centre at a time.
• Financial Rollup - View all Cost Centres under the selected Financial Rollup at once.
Step 2: Select a Fund option, either All Funds (which includes Fund 100, 200, & 300 cost centres) or a
specific fund.
Step 3: Select either:
• All Statuses - Includes cost centres that are open, finalized and approved
• Open - Only open cost centres or cost centre/ATL combinations
• Finalized/Approved/Posted/Closed - Views cost centres that are finalized, approved, posted or
closed
Step 4: Click on . This will generate a report similar to the one below.
20 | P a g e
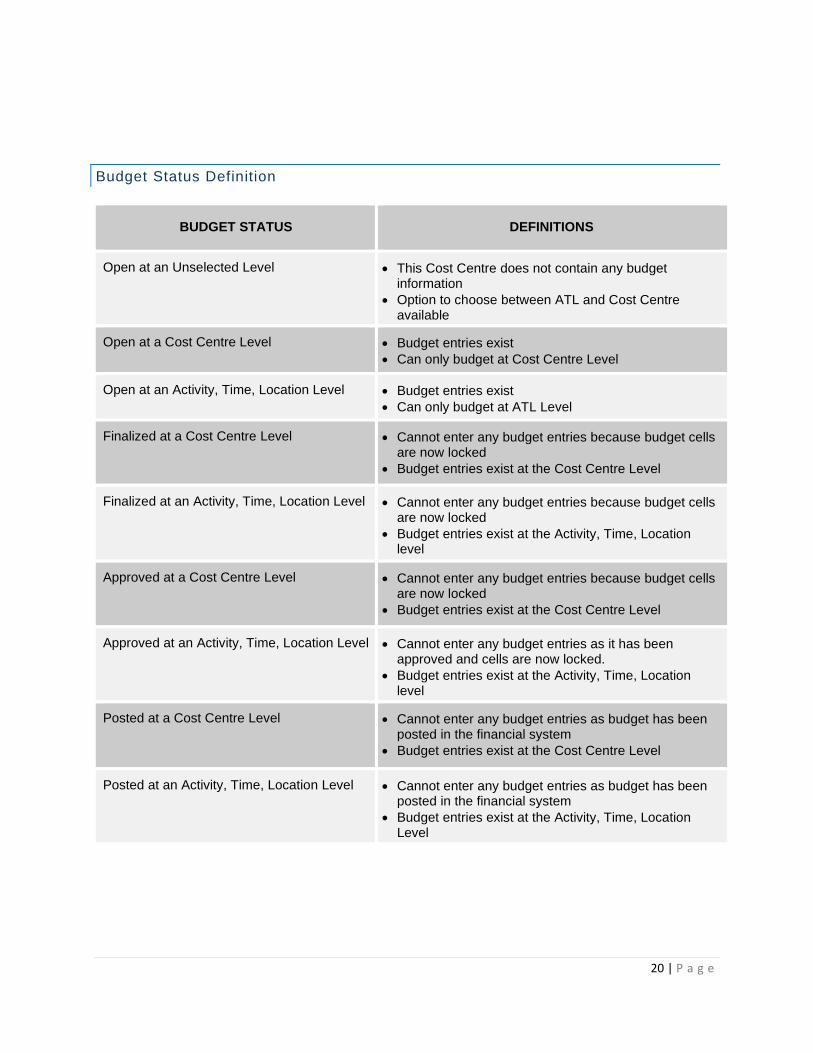
Budget Status Definition
BUDGET STATUS DEFINITIONS
Open at an Unselected Level • This Cost Centre does not contain any budget information
• Option to choose between ATL and Cost Centre available
Open at a Cost Centre Level • Budget entries exist
• Can only budget at Cost Centre Level
Open at an Activity, Time, Location Level • Budget entries exist
• Can only budget at ATL Level
Finalized at a Cost Centre Level • Cannot enter any budget entries because budget cells are now locked
• Budget entries exist at the Cost Centre Level
Finalized at an Activity, Time, Location Level • Cannot enter any budget entries because budget cells are now locked
• Budget entries exist at the Activity, Time, Location level
Approved at a Cost Centre Level • Cannot enter any budget entries because budget cells are now locked
• Budget entries exist at the Cost Centre Level
Approved at an Activity, Time, Location Level • Cannot enter any budget entries as it has been approved and cells are now locked.
• Budget entries exist at the Activity, Time, Location level
Posted at a Cost Centre Level • Cannot enter any budget entries as budget has been posted in the financial system
• Budget entries exist at the Cost Centre Level
Posted at an Activity, Time, Location Level • Cannot enter any budget entries as budget has been posted in the financial system
• Budget entries exist at the Activity, Time, Location Level
21 | P a g e
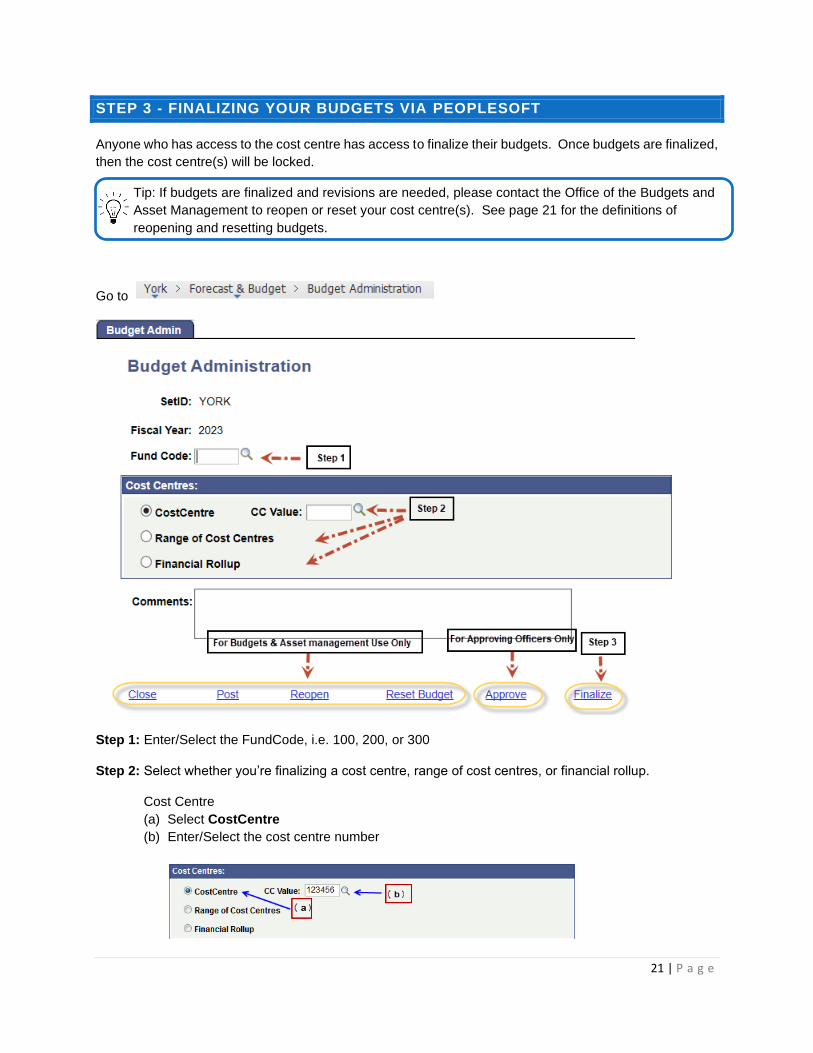
STEP 3 - FINALIZING YOUR BUDGETS VIA PEOPLESOFT
Anyone who has access to the cost centre has access to finalize their budgets. Once budgets are finalized,
then the cost centre(s) will be locked.
Tip: If budgets are finalized and revisions are needed, please contact the Office of the Budgets and
Asset Management to reopen or reset your cost centre(s). See page 21 for the definitions of
reopening and resetting budgets.
Go to
Step 1: Enter/Select the FundCode, i.e. 100, 200, or 300
Step 2: Select whether you’re finalizing a cost centre, range of cost centres, or financial rollup.
Cost Centre
(a) Select CostCentre
(b) Enter/Select the cost centre number
22 | P a g e
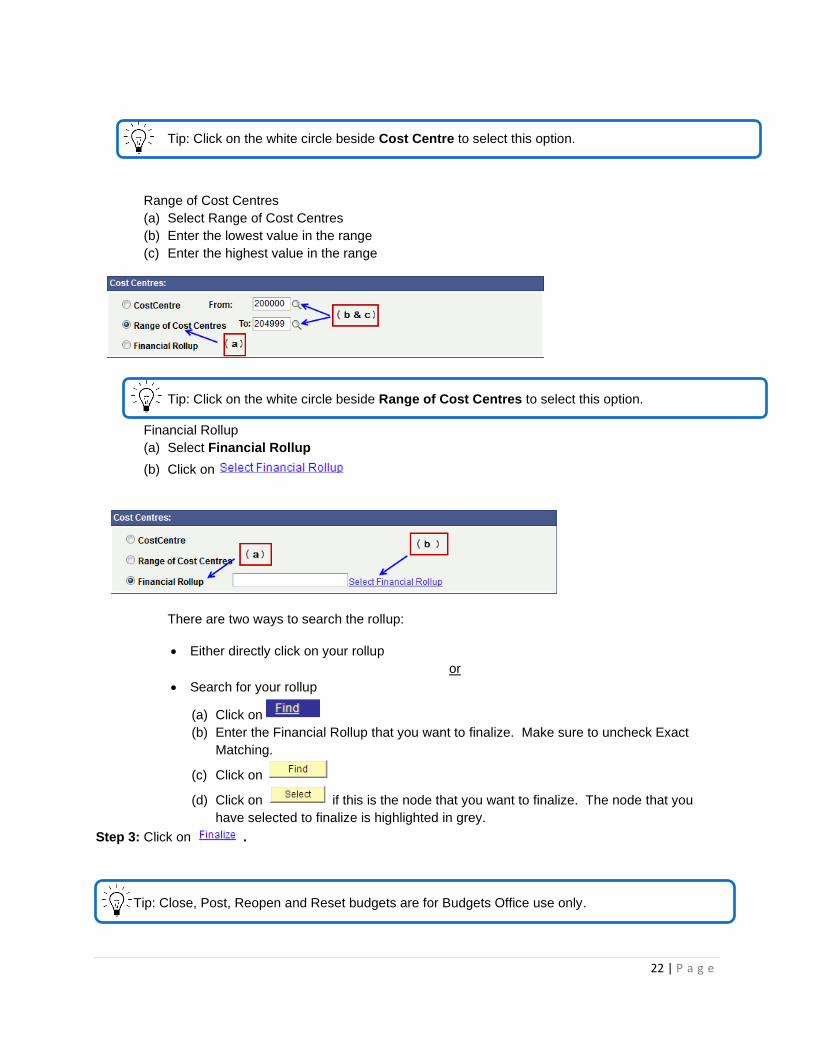
Tip: Click on the white circle beside Cost Centre to select this option.
Range of Cost Centres
(a) Select Range of Cost Centres
(b) Enter the lowest value in the range
(c) Enter the highest value in the range
Tip: Click on the white circle beside Range of Cost Centres to select this option.
Financial Rollup
(a) Select Financial Rollup
(b) Click on
There are two ways to search the rollup:
• Either directly click on your rollup
or
• Search for your rollup
(a) Click on
(b) Enter the Financial Rollup that you want to finalize. Make sure to uncheck Exact
Matching.
(c) Click on
(d) Click on if this is the node that you want to finalize. The node that you
have selected to finalize is highlighted in grey.
Step 3: Click on .
Tip: Close, Post, Reopen and Reset budgets are for Budgets Office use only.

23 | P a g e
STEP 4 - APPROVING YOUR BUDGETS VIA PEOPLESOFT
Only the divisions’ authorized budget approvers and their designates have access to the approval page.
Step 1: While logged on to PeopleSoft, select Budget Administration.
Step 2: Enter your fund code and select a cost centre option. Approvers have the option to approve one
cost centre, a range of cost centres, or all cost centres in a selected financial rollup.
Step 3: Click the Approve hyperlink to complete the approval process.
Caution:
Budgets which are approved at the financial rollup level will automatically approve underlying cost
centre budgets, even cost centres with an open and finalized status.
OTHER BUDGETING TOOLS
RESET AND REOPEN BUDGETS
Contact the Budgets and Planning Office if you need to reset or reopen your cost centres. The primary
differences are summarized below:
RESET REOPEN
1. Erase previous data entries 2. Can choose to re-enter by Cost Centre or ATL
1. Will not erase previous data entries 2. Can only enter at the same level as previously
selected (i.e. Cost Centre or ATL)
24 | P a g e
ROLLING BUDGETS
The rolling budgeting tool is used to budget for Funds 200 and 300 only for future years for up to five years, however community is required only to submit for three rolling years including the current year. Unlike the current budget which is entered using either the Budget Entry Spreadsheet or Budget Mass Upload template, the rolling budget can only be entered using the Rolling Budget Mass Upload template. Budget submission deadline of the rolling budgets is the same as the current budget deadlines.
ROLLING BUDGETS PROCESS SUMMARY
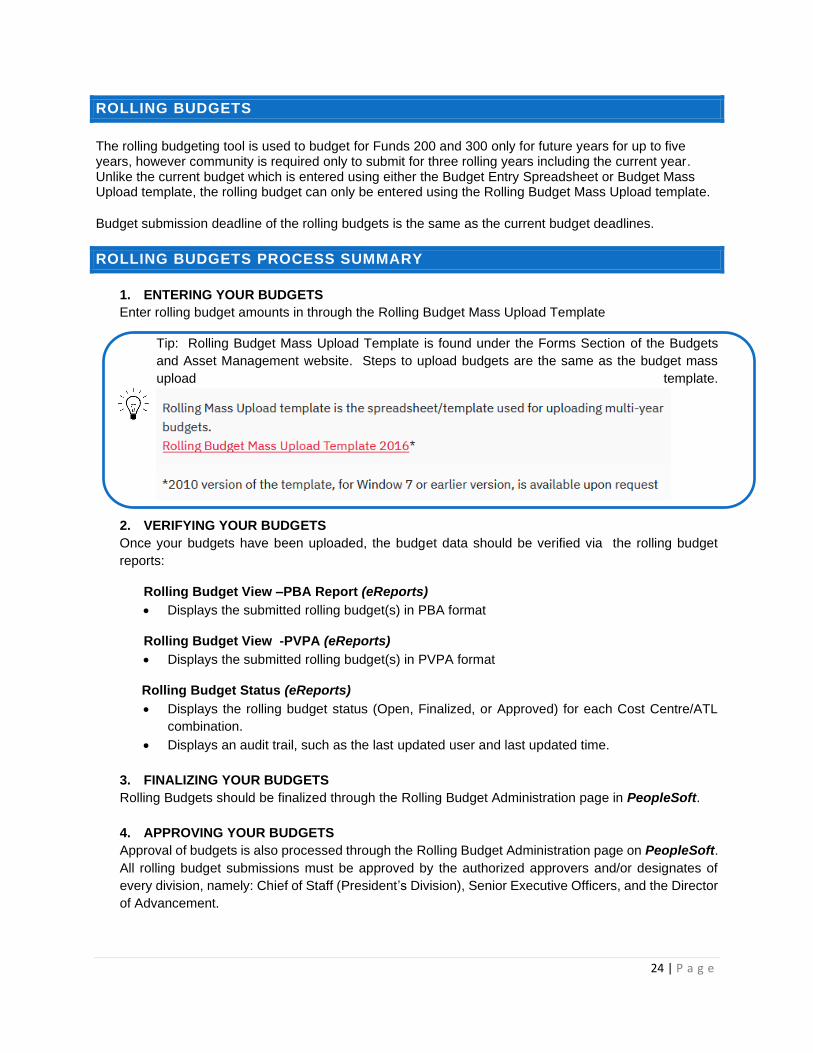
1. ENTERING YOUR BUDGETS
Enter rolling budget amounts in through the Rolling Budget Mass Upload Template
Tip: Rolling Budget Mass Upload Template is found under the Forms Section of the Budgets
and Asset Management website. Steps to upload budgets are the same as the budget mass
upload template.
2. VERIFYING YOUR BUDGETS
Once your budgets have been uploaded, the budget data should be verified via the rolling budget
reports:
Rolling Budget View –PBA Report (eReports)
• Displays the submitted rolling budget(s) in PBA format
Rolling Budget View -PVPA (eReports)
• Displays the submitted rolling budget(s) in PVPA format
Rolling Budget Status (eReports)
• Displays the rolling budget status (Open, Finalized, or Approved) for each Cost Centre/ATL
combination.
• Displays an audit trail, such as the last updated user and last updated time.
3. FINALIZING YOUR BUDGETS
Rolling Budgets should be finalized through the Rolling Budget Administration page in PeopleSoft.
4. APPROVING YOUR BUDGETS
Approval of budgets is also processed through the Rolling Budget Administration page on PeopleSoft.
All rolling budget submissions must be approved by the authorized approvers and/or designates of
every division, namely: Chief of Staff (President’s Division), Senior Executive Officers, and the Director
of Advancement.
25 | P a g e
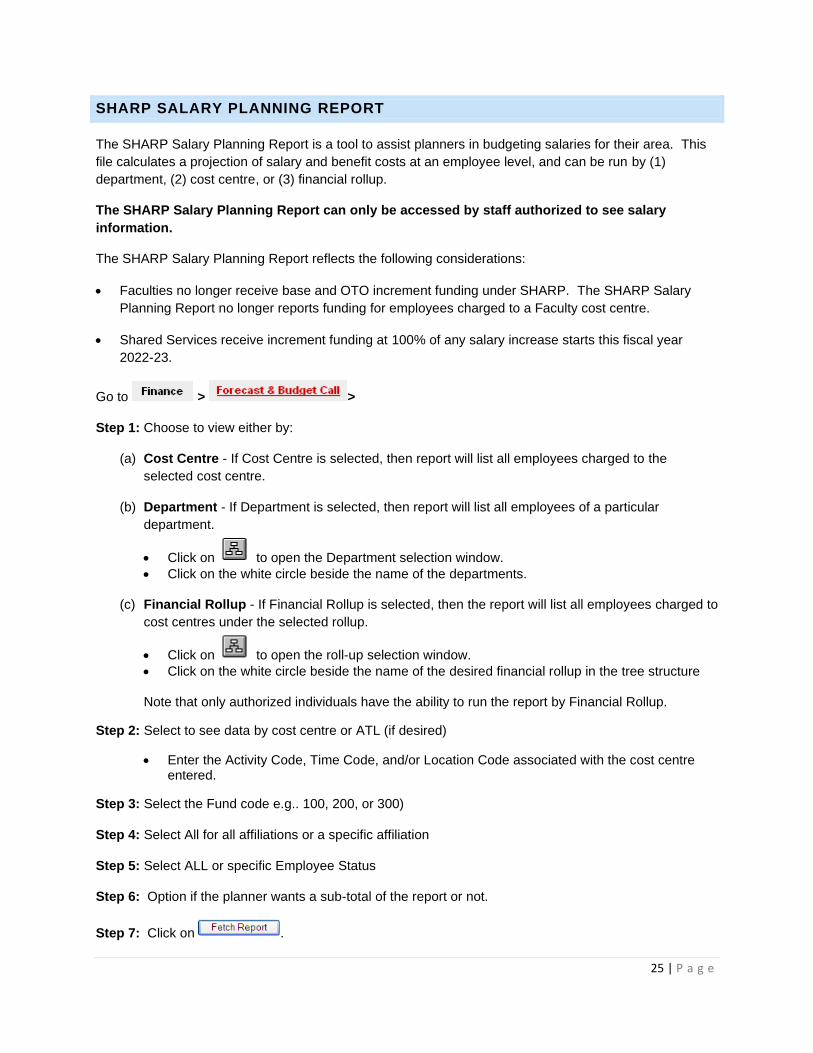
SHARP SALARY PLANNING REPORT
The SHARP Salary Planning Report is a tool to assist planners in budgeting salaries for their area. This
file calculates a projection of salary and benefit costs at an employee level, and can be run by (1)
department, (2) cost centre, or (3) financial rollup.
The SHARP Salary Planning Report can only be accessed by staff authorized to see salary
information.
The SHARP Salary Planning Report reflects the following considerations:
• Faculties no longer receive base and OTO increment funding under SHARP. The SHARP Salary
Planning Report no longer reports funding for employees charged to a Faculty cost centre.
• Shared Services receive increment funding at 100% of any salary increase starts this fiscal year
2022-23.
Go to > >
Step 1: Choose to view either by:
(a) Cost Centre - If Cost Centre is selected, then report will list all employees charged to the
selected cost centre.
(b) Department - If Department is selected, then report will list all employees of a particular
department.
• Click on to open the Department selection window.
• Click on the white circle beside the name of the departments.
(c) Financial Rollup - If Financial Rollup is selected, then the report will list all employees charged to
cost centres under the selected rollup.
• Click on to open the roll-up selection window.
• Click on the white circle beside the name of the desired financial rollup in the tree structure
Note that only authorized individuals have the ability to run the report by Financial Rollup.
Step 2: Select to see data by cost centre or ATL (if desired)
• Enter the Activity Code, Time Code, and/or Location Code associated with the cost centre entered.
Step 3: Select the Fund code e.g.. 100, 200, or 300)
Step 4: Select All for all affiliations or a specific affiliation
Step 5: Select ALL or specific Employee Status
Step 6: Option if the planner wants a sub-total of the report or not.
Step 7: Click on .
26 | P a g e
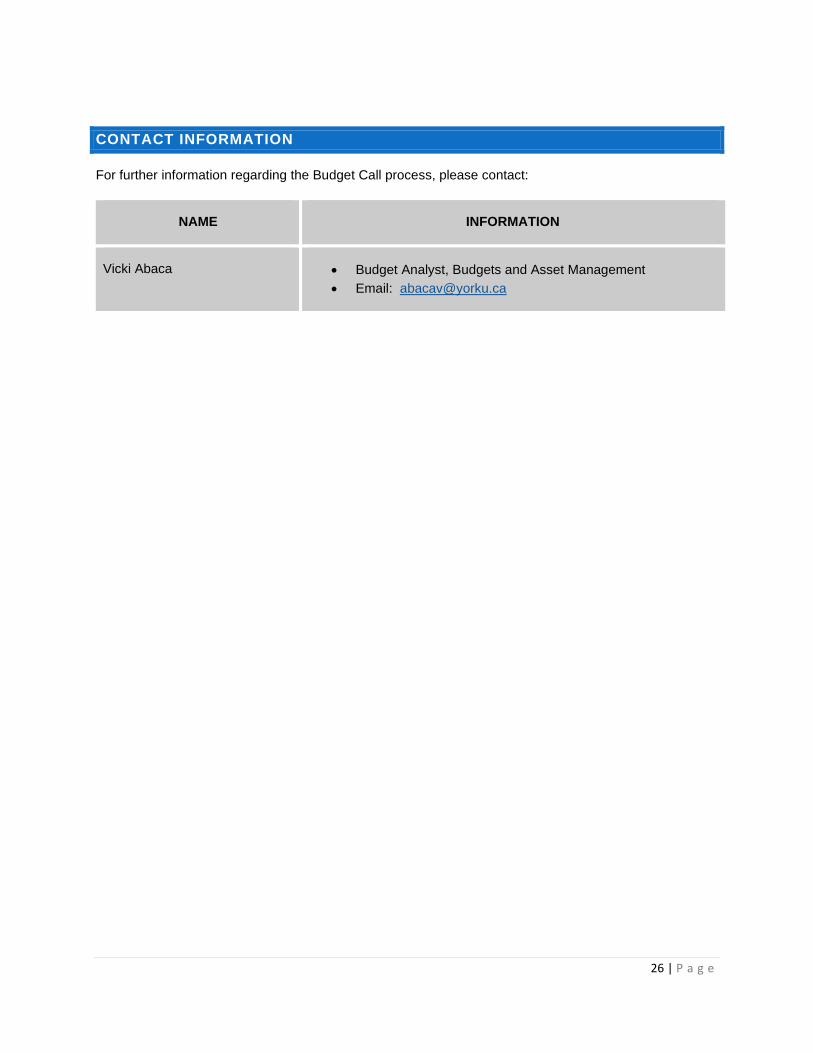
CONTACT INFORMATION
For further information regarding the Budget Call process, please contact:
NAME INFORMATION
Vicki Abaca • Budget Analyst, Budgets and Asset Management
• Email: [email protected]