2018 flying season is almost here rrcc club …riversidercclub.org/prop_talk/nov 2017.pdf ·...
TRANSCRIPT

RRCC CLUB OFFICERS
President: Jeff Szueber
Vice-President: Bob Baker
Secretary: Rob Evans
Treasurer: Larry Roberts
Safety Coordinator: Jim Bronowski
Field Director: Dale Yaney
Newsletter Editor: Jim Bronowski
Turbine Flying Director: Berry Hou
ALL OFFICERS MAY
BE CONTACTED AT:
RRCCCONTACT
@YAHOO.COM
Next meeting
saturday
Nov 18th
10:00 a.m.
crowley
field
2018 flying season is almost here
It’s time to consider submitting your dues for next year
That time of the year has crept upon us again. It’s time to think about
sending in next year’s dues. Did you ever stop to realize what your dues
provide for you at our flying field? The maintenance at the field includes
regular mowing and weed control along with covering for the parking
area. We pay monthly fees for the porta-potty, raffle prizes and the
mailing of the newsletter and all official correspondence. There are also
some yearly fees for various administrative purposes. We also put money
aside for runway upkeep and repair like re-surfacing and damage.
We used to have financial help with the contests we used to run. It was
not unusual to have up to three major events a year which brought in extra
funds. The interest in contests has diminished considerably in Southern
California as has attendance at those events. Several contests in the local
area were cancelled this year because not enough pilots signed up in
advance. We were lucky that we garnered the NSRCA, District 7 pattern
championships at our field which brought in some nice income. Each year
our club has fewer members (for various reasons), so the dues are a very
important part of maintaining a viable flying site.
So, the bottom line is for us to fill out the 2018 dues form located on the
last page of this newsletter (as it will also be in the December and January
issues) get that form and check off to Larry as soon as you can.
Remember that Larry can always work with you if you have a problem
and he may not cash your check until he gets a sufficient number to put in
the bank.
Our yearly dues are quite reasonable for the facility available to you and
we have not raised those dues in many years. Just think of it as being less
than $5 a month for one the best fields in Southern California.

At the Field Howard Born was once selling off some of his planes, when he moved from a two-story to a one-story home. I bought several of his well-constructed models from him at that time. One of them was a Bridi 40 with a Super Tigre 46 in it. This very small and clean airplane was too fast and “hot” for me to enjoy flying it. Much later when Paul Rinde was looking for a plane for his son Jonathan to fly in Classic Pattern events, he bought the Bridi 40 from me. Paul is a meticulous builder, and has made many improvements to the Bridi 40. Lately, Jonathan has been practicing his stall turns, and it is gratifying to see them patiently doing one stall turn after another. The Bridi 40 still moves out quickly and cleanly, and Paul continues to tweak it for better and crisper maneuvers. We need more wholesome Father-Son relationships like this in our hobby. My grandson Joshua, 16, will be staying with us during the Christmas holidays, so I have been flying his E-flite electric-powered Apprentice and my electric Kyosho Calmato Sport high-wing trainer “backup”, to be sure that they are ready for some rough and tumble beginner flying. Joshua has been practicing on a
computer flight simulator to prepare for this visit. I hope to get in a number of enjoyable flying sessions with him. It is a good thing that I have been doing these test flights, as the Apprentice lost its prop assembly during
a take-off. A member loaned me the missing metric set-screw and it flew fine. At a recent Thursday morning senior member flying session, Bob Jones was flying his Sig 4-Star 64 ARF with an OS .91 4-stroke engine. This beautiful aircraft is based on the old 4-Star 60, modified with slightly clipped wings and a handy top hatch. The brilliant red covering is eye-catching. Bob says that he can quickly change over the ship to electric power. At the previous Tuesday flying session, Bob’s brother Paul Jones mysteriously lost all control of his electric “Ugly Stik” and it became an “instant kit”. This was really a shame, as it was a brand-new airplane, with only a few flights to its credit. Tom Bingham has been flying up a storm with his Kyosho Calmato 60 ARF, powered by an OS 46. This plane was assembled by Don Lien, (Rest in Peace, Don), who gave it to me. I subsequently gave the now rather beat-up model to Tom, who fixed it up nicely. We call it the “Don-Oscar-Tom.” On Thursday, just for variety, Tom brought out his shoulder-wing Sig Mid-Star 40, powered by an OS 32. This ancient ship has survived a number of “unplanned hard landings”, but a moment of
inattention made it another instant kit. We have not seen “Big Jon” de Fries at our twice a week senior flying sessions lately, and I was starting to worry a bit about him. But at our abortive October 28 Club Meeting, there he was! It seems that he has to drop off his grandson at school during those mornings. (Not enough members showed up to call a meeting, so it was cancelled.) Happy Turkey Day, Oscar
Oscar’s Observations
By
Oscar Weingart
Above: Paul Rinde and his son
Jonathan with Bridi 40.
Below: Bob Jones with his Sig 4-
Star ARF with OS .91 4-Stroke.

Riverside Radio Control Club 2018 Dues
Name:_________________________________________
Address:_______________________________________
_______________________________________
E-Mail: ________________________________________
AMA Number: ____________Phone: _________________
Mail Dues to:
Larry Roberts
P.O. Box 295
Homeland, CA 92548
Check One:
$50 (Open)
$10 (Junior) Make checks payable to RRCC
It’s that time again; time to send in our 2018 dues. Annual fees are due by the end of January. The
annual dues are $50 for an Open membership and $10 for those under 18 years of age. Fill out the form
above, cut it out and mail it with your dues to Larry’s P.O. Box. A check is the preferred method of
payment as it makes Larry’s job so much easier. Again, if you have a hardship let Larry know. He can
help you work out a payment option. Just to let you know, Larry doesn't usually cash the checks until he
has number of them.
Scenes From the NSRCA District 7 Pattern Championships
MASTERING STRAIGHT LINES AND TURNSby David ScottILLUSTRATIONS BY DAVID SCOTT
How the pros make it look easy
Our good friend Dave Scott is going to take us step by step through fly-ing a plane in a straight line and making a textbook, picture-perfectprocedure turn. Dave is the flight instructor for the 1st U.S. R/C FlightSchool as well as a full-size aerobatic pilot. His insight into flying aircraftis derived from his personal accomplishments and from teaching thou-sands of students at his school. Enjoy.
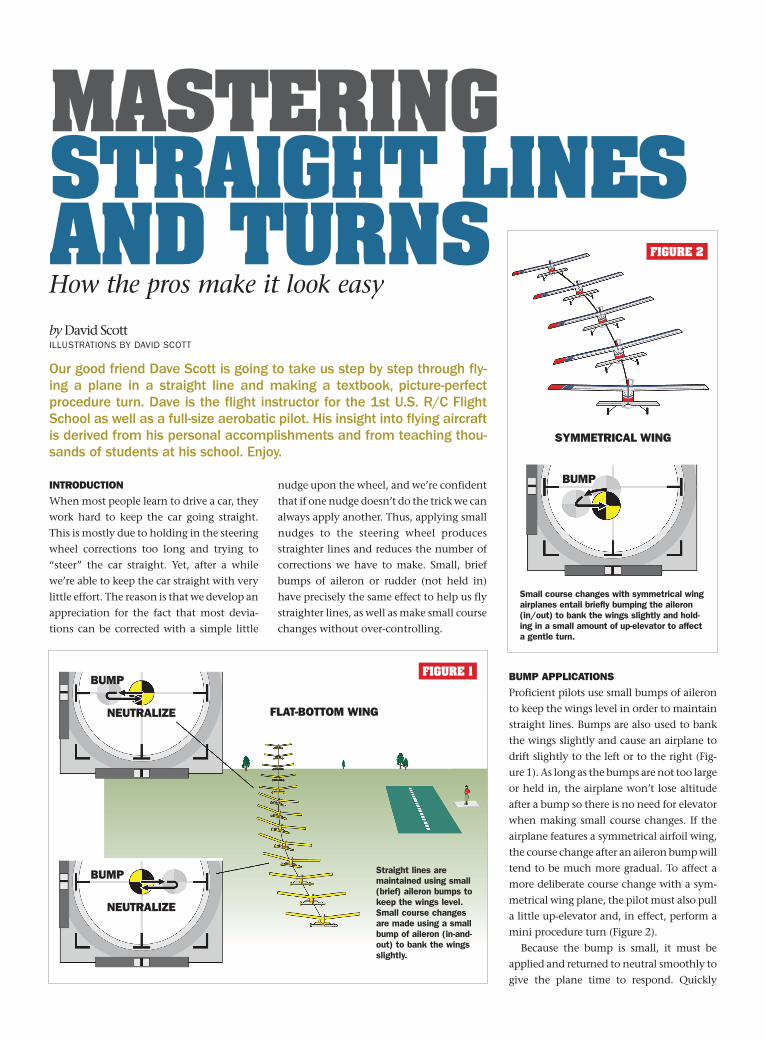
BUMP APPLICATIONS
Proficient pilots use small bumps of aileronto keep the wings level in order to maintainstraight lines. Bumps are also used to bankthe wings slightly and cause an airplane todrift slightly to the left or to the right (Fig-ure 1). As long as the bumps are not too largeor held in, the airplane won’t lose altitudeafter a bump so there is no need for elevatorwhen making small course changes. If theairplane features a symmetrical airfoil wing,the course change after an aileron bump willtend to be much more gradual. To affect amore deliberate course change with a sym-metrical wing plane, the pilot must also pulla little up-elevator and, in effect, perform amini procedure turn (Figure 2).
Because the bump is small, it must beapplied and returned to neutral smoothly togive the plane time to respond. Quickly
FIGURE 1
FIGURE 2
INTRODUCTION
When most people learn to drive a car, theywork hard to keep the car going straight.This is mostly due to holding in the steeringwheel corrections too long and trying to“steer” the car straight. Yet, after a whilewe’re able to keep the car straight with verylittle effort. The reason is that we develop anappreciation for the fact that most devia-tions can be corrected with a simple little
nudge upon the wheel, and we’re confidentthat if one nudge doesn’t do the trick we canalways apply another. Thus, applying smallnudges to the steering wheel producesstraighter lines and reduces the number ofcorrections we have to make. Small, briefbumps of aileron or rudder (not held in)have precisely the same effect to help us flystraighter lines, as well as make small coursechanges without over-controlling.
FLAT-BOTTOM WING
SYMMETRICAL WING
BUMP
BUMP
BUMP
NEUTRALIZE
NEUTRALIZE
Straight lines aremaintained using small(brief) aileron bumps tokeep the wings level.Small course changesare made using a smallbump of aileron (in-and-out) to bank the wingsslightly.
Small course changes with symmetrical wingairplanes entail briefly bumping the aileron(in/out) to bank the wings slightly and hold-ing in a small amount of up-elevator to affecta gentle turn.
Straightturns 5/9/08 10:39 AM Page 58

jabbing the aileron will likely produce littleor no response. Keep in mind that the slightwing bank and gradual course change aftera smooth, small bump may not be immedi-ately obvious. Thus, you must pause for afew moments after each bump to be certainwhether another bump is needed. Remem-ber, over-controlling is usually not causedby aggressive inputs at first, but is the resultof holding an input in too long and occursmost often when pilots hold in their inputswaiting to see an obvious reaction of theplane. Therefore, it’s better to make two sep-arate bumps, if necessary, rather than holdin the aileron! Bumping the rudder on air-planes without ailerons works just as well,but rudder bumps must be applied verysmoothly to have the desired effect. Thebump technique works great for gradualcourse adjustments up to 20 to 30 degrees. Alarger course change will require a deliberateturn involving aileron and elevator.
As pilots (like drivers) become morerelaxed, they start noticing deviations offthe intended path the instant they occur,thus the corresponding bumps become sosmall that anyone watching won’t even beable to tell that corrections are being made.That’s one of the main reasons why reallygood pilots make flying look so easy.
FLYING BETTER STRAIGHT LINES AND
A PARALLEL FOUNDATION
If you have ever watched proficient pilotsfly (you can tell by their ability to performone maneuver after another), you may havenoticed the absence of visible correctionsbetween their maneuvers–often referred toas being smooth. The primary reason fortheir smooth flying is that they posses asolid foundation of flying consistent paral-lel lines with the runway.
Establishing a parallel foundation startswith picturing the comfortable viewing dis-tance where you want the airplane to bewhen it passes in front of you, otherwiseknown as “show center.” Then, project thatdistance out to your left and right parallelwith the runway and pick some ground ref-erence “targets” on the horizon to use asparallel turnaround points (Figure 3). Guid-ing your airplane toward these points willgreatly add to your consistency in the air.
CROSSWIND POSITIONING BASICS
AND OBJECTS AS A WHOLE
As a rule, an airplane will fly in a straightline whenever the wings are level. If a cross-
wind exists, the plane will crab (point) intothe wind a bit, but as long as the wingsremain level, it will continue to trackstraight. From the ground, the position ofthe wings can often be difficult to judge, sorather than relying on the positions of thewing or fuselage, proficient pilots concen-trate on where the airplane “as a whole” istraveling (Figure 4).
It is easy to see deviations when guidingthe airplane as a whole toward a distinct tar-get on the horizon. It’s a bit trickier on thereturn path to show center. To detect devi-ations from parallel after turning around,keep your eye on where the airplane as awhole is traveling relative to yourself. Thatis, ask yourself, “Is it drifting away from
me?” (bump it in). “Is it drifting towardme?” (bump it out). When neither a devia-tion in nor away from you is detected, theairplane will be tracking generally parallelwith the runway (Figure 5).
While wind is often blamed for devia-tions, it’s actually the wind’s principle effectthat helps to exaggerate deviations and mis-takes that pilots can otherwise get awaywith in calmer conditions. For example,when a crosswind exists, amateur pilotsoften make the mistake of completing theirturns when the plane points where theywant it to go, and then input a crab into thewind after they detect wind drift. The cor-rect method is to finish your turns a littleearly or late so that the required crab angle
FIGURE 3
FIGURE 4
SHOW CENTER
SHOW CENTER
To improve your consistency and ease of flying, picture where you want the plane to be when it pass-es in front of you then project that distance to your left and right parallel with the runway and picksome ground references to use as parallel turnaround points.
Turnaroundpoint
Turnaroundpoint
An airplane will fly in a straight line when the wings are level. Flying in acrosswind causes the fuselage to crab into the wind, yet as long as thewings remain level the plane as a whole will continue to fly in a straight line.Pilots, therefore, need to pay attention to where the airplane as a whole istraveling, not where it is pointing.
Straightturns 5/9/08 10:39 AM Page 59

into the wind is already in place (Figure 6).How early or how late depends on thestrength of the crosswind.
A note to beginners regarding left/rightconfusion when the plane is approachingshow center: consider the fact that a persondriving a car doesn’t have to think aboutwhether to apply a left or right input.Because he’s facing in the direction that thecar is traveling, all he has to do is move thesteering wheel in the direction that hewants the car to go. With this in mind,rotate your body to face in the direction the
airplane is traveling and think in terms ofbumping the control stick in the directionyou want the plane to go. This reducesleft/right confusion when learning to fly(Figure 7). Body rotation will naturally startdisappearing within a few days as you shiftfrom thinking about your own orientationto thinking more about guiding the airplaneas if you were in it.
NOW FOR THE TURN
Once you have mastered flying straight andlevel you will need to apply what you
learned with bumps to make a smooth pro-cedure turn. Novice pilots typically attemptto turn by reacting to the airplane. By defi-nition, reactors need to see a mistake beforeit occurs to them that they have made one.For example, reactors tend to start theirturns by holding in some aileron andwatching the wings bank. As the bank getssteeper and the airplane starts to drop, thepilot becomes focused on increasing the ele-vator and trying to pull out of the dive, allwhile continuing to hold in the aileron. Theresult is an increasingly steep bank, a pro-
FIGURE 6
MASTERING STRAIGHT LINES & TURNS
SHOWCENTER
SHOWCENTER
PILOT
FIGURE 5
When the airplane as a whole is neither veering in noraway from you approaching show center, the airplanewill be flying generally parallel with the runway.
SHOWCENTER
When turning into a crosswind, exit the turn a little early toestablish the necessary crab angle and prevent getting blown.
When turning with acrosswind, overshootthe turn a little toestablish the necessarycrab angle and preventgetting blown.
Actual flight path when thefuselage is mistakenlypointed toward show centerin a crosswind.
Straightturns 5/9/08 10:39 AM Page 60

gressively tighter spiral, and confusionabout why the plane is going down whenthey are pulling up (Figure 8). Unless youintend to do aerobatics, never hold in theailerons, especially during a turn!
PROCEDURE TURNS (AILERON TURN)
The term “procedure turn” is taken fromfull-scale flying and refers to a course rever-sal turn executed to such precise standardsthat the results are the same whether per-formed day or night, in clouds or out. That’sprecisely our intention of executing inten-tional turn inputs that produce consistentturn results whether high or low, near or far.
The turn procedure utilized by proficientpilots starts with a smooth, yet brief, aileroninput to bank the wings. The aileron input isneutralized to avoid entering a downwardspiral, and then up-elevator is applied to pullthe nose into a turn and keep the turn level.Once the bank has been established, eleva-tor, not aileron, turns the plane (Figure 9).
The size of the aileron input determinesthe degree of bank and therefore the size ofthe turn, as well as how much elevator willbe needed to keep the turn level. For exam-ple, a smaller aileron input produces ashallower bank and therefore a wider turn,whereas a larger aileron input produces asteeper bank and a tighter turn. The objec-tive is to find the aileron input thatconsistently produces the degree of bankthat you are comfortable with, and thendetermine the correct amount of elevator topull each time to keep the turn level. Notethat during a mild bank, most of the wing’slift is still opposing the pull of gravity, andthus very little up-elevator is needed to keepthe turn level. During a steeper bank, there’sless upward component of lift to opposegravity. As a result, more up-elevator isrequired to keep the turn level (Figure 10).
CONSISTENT TURNS
The neutral stick position provides a distinctpoint from which to gauge the size of eachof your control inputs, therefore makingcorrect amounts easier to repeat, and incor-rect amounts easier to modify correctly. Forexample, if your initial turn is too tight,reducing the size of your aileron input fromneutral next time will result in a shallowerbank and wider turn. Or, if you initially pulltoo much elevator and affect a climbingturn, next time repeat the same aileroninput but pull less elevator from neutral andthe turn will be more level (Figure 11).
FIGURE 7
FIGURE 8
FIGURE 9
BODYROTATION
To reduce left/right confusion, face in the general direction that the airplane is traveling so that yourleft and right match that of the plane.
Fixating on watchingthe wings at the startof a turn may cause apilot to hold in theaileron, resulting in adescending spiral andeventually rollingupside-down.
Ailerons bank the wings. Pulling up-elevatorbegins the turn and keeps the turn level. Youwill not experience tight spiraling turns aslong as you do not hold in the ailerons!
“Right turn,left correction”
BANK
NEUTRALIZE
PULL
Straightturns 5/9/08 10:40 AM Page 61

Performing a procedure turn can besummed up by the motto, “Trust, and thenadjust.” That is, proactively initiate yourturns trusting your inputs then adjust (fine-tune) the amount of elevator you’reholding depending on what you see to keepthe turn level (Figure 12). If you see theplane start to lose altitude during the turn,pull more elevator. If the plane starts toclimb, lessen the amount of elevator thatyou’re holding in throughout the remain-der of the turn. Keep in mind that, as a rule,it is easier to add more input than it is torecover after over-controlling. Therefore,the best procedure is to target a smallamount of elevator at the start of a turn,and then fine-tune the elevator, if neces-sary, to maintain a perfectly level turn.
RESTARTING AND TIGHTENING TURNS
In the event that a turn needs to be tight-ened or restarted, the correct procedure is tosmoothly apply a small bump of aileron(in/out) in the direction of the turn whilecontinuing to hold in the elevator tosteepen the bank angle (Figure 13). For rea-sons stated earlier, the aileron bump needsto be briefly applied in and out, not held in!
PROCEDURE TURN CORRECTION
At the point that you want to exit the turn,neutralize the elevator and smoothly applyopposite aileron to level the wings (Figure14). Note that the key to applying theaileron in the proper direction is remindingyourself which way you’re turning andanticipating opposite aileron before it’stime to correct. The temptation to look atthe wings to determine which way to applythe aileron produces hesitation and confu-sion whenever the position of the wings isnot clear. Ultimately, applying the aileroncorrectly will hinge on how well you startand maintain level turns, because the lessdemanding the turn is in general, the easierit will be to remember which way to applythe aileron to level the wings. In fact, whena turn is kept level, a person can actually getaway with correcting the wrong direction,catch the mistake, and level the wings cor-rectly with minimal altitude loss. It canspell the end of an airplane if the pilot cor-rects the wrong way during a diving turn.
RUDDER TURNS
A rudder turn is performed using the rudderto yaw the nose of the airplane in the direc-tion you want to turn. When the rudder is
FIGURE 10
MASTERING STRAIGHT LINES & TURNS
FIGURE 11
FIGURE 12
FIGURE 13
A larger aileron input produces asteeper bank, a tighter turn, andrequires more up-elevator tokeep the turn level.
If you pull too much elevator at the start of your first turn resulting in aclimbing turn, repeat the same aileron input and bank next time but pullless up-elevator from neutral to affect a more level turn.
Focus on your inputs when initiating the turn then adjust the amount ofelevator you’re holding in to keep the turn level throughout.
Smoothly bump the aileron while continuing to holdin the elevator to tighten or restart a turn.
20°
A B
45°
PULL
BUMP
IN-OUT
Less
Less elevator
More elevator
More
Straightturns 5/9/08 10:40 AM Page 62
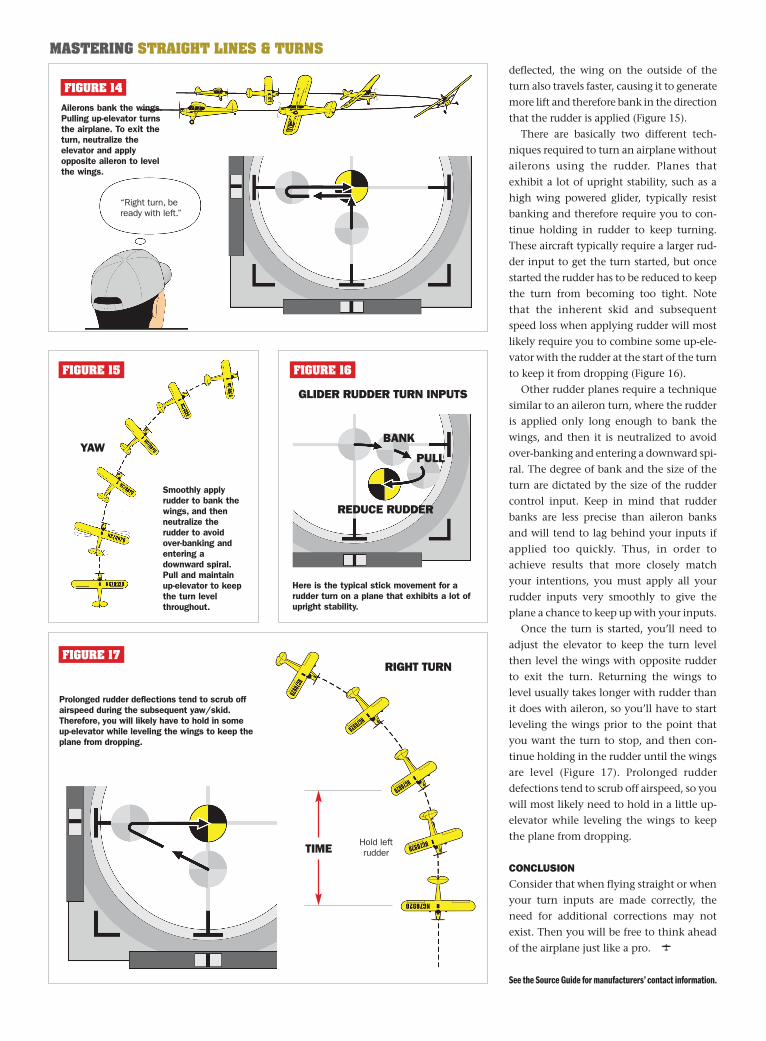
deflected, the wing on the outside of theturn also travels faster, causing it to generatemore lift and therefore bank in the directionthat the rudder is applied (Figure 15).
There are basically two different tech-niques required to turn an airplane withoutailerons using the rudder. Planes thatexhibit a lot of upright stability, such as ahigh wing powered glider, typically resistbanking and therefore require you to con-tinue holding in rudder to keep turning.These aircraft typically require a larger rud-der input to get the turn started, but oncestarted the rudder has to be reduced to keepthe turn from becoming too tight. Notethat the inherent skid and subsequentspeed loss when applying rudder will mostlikely require you to combine some up-ele-vator with the rudder at the start of the turnto keep it from dropping (Figure 16).
Other rudder planes require a techniquesimilar to an aileron turn, where the rudderis applied only long enough to bank thewings, and then it is neutralized to avoidover-banking and entering a downward spi-ral. The degree of bank and the size of theturn are dictated by the size of the ruddercontrol input. Keep in mind that rudderbanks are less precise than aileron banksand will tend to lag behind your inputs ifapplied too quickly. Thus, in order toachieve results that more closely matchyour intentions, you must apply all yourrudder inputs very smoothly to give theplane a chance to keep up with your inputs.
Once the turn is started, you’ll need toadjust the elevator to keep the turn levelthen level the wings with opposite rudderto exit the turn. Returning the wings tolevel usually takes longer with rudder thanit does with aileron, so you’ll have to startleveling the wings prior to the point thatyou want the turn to stop, and then con-tinue holding in the rudder until the wingsare level (Figure 17). Prolonged rudderdefections tend to scrub off airspeed, so youwill most likely need to hold in a little up-elevator while leveling the wings to keepthe plane from dropping.
CONCLUSION
Consider that when flying straight or whenyour turn inputs are made correctly, theneed for additional corrections may notexist. Then you will be free to think aheadof the airplane just like a pro.
See the Source Guide for manufacturers’ contact information.
FIGURE 14
FIGURE 15 FIGURE 16
FIGURE 17
MASTERING STRAIGHT LINES & TURNS
Ailerons bank the wings.Pulling up-elevator turnsthe airplane. To exit theturn, neutralize theelevator and applyopposite aileron to levelthe wings.
Smoothly applyrudder to bank thewings, and thenneutralize therudder to avoidover-banking andentering adownward spiral.Pull and maintainup-elevator to keepthe turn levelthroughout.
Here is the typical stick movement for arudder turn on a plane that exhibits a lot ofupright stability.
“Right turn, beready with left.”
Hold leftrudder
YAW
GLIDER RUDDER TURN INPUTS
BANK
PULL
REDUCE RUDDER
Prolonged rudder deflections tend to scrub offairspeed during the subsequent yaw/skid.Therefore, you will likely have to hold in someup-elevator while leveling the wings to keep theplane from dropping.
TIME
RIGHT TURN
Straightturns 5/9/08 10:40 AM Page 64