2018 field software user’s guide for construction staff · 2018 field software . user’s guide...
TRANSCRIPT

2018 Field Software User’s Guide For
Construction Staff
Wisconsin Department of Transportation Division of Transportation System Development Bureau of Project Development

Source file location - \\mad00fp1\w10bpd\DCTech\AWPAdmin\AWP-ClientServer\Construction\2018Season\FieldSoftwareUsersGuideForConstructionStaff.docx Pantry location – C:\ACMApplications\Pantry2018\StatewideManualsAndGuides\FieldSoftwareUsersGuideForConstructionStaff.pdf Created by Annette Czerneski / Updated by Annette Czerneski on February 27, 2018 pg. 1
TABLE OF CONTENTS
General Information ....................................................................................................................................................... 3
FieldManager
Logging on and selecting the appropriate database ............................................................................................... 4
Contract setup ......................................................................................................................................................... 5
Read only contract copy distribution at estimate generation .................................................................................. 8
Subcontractors ........................................................................................................................................................ 9
Inspector’s Daily Reports ...................................................................................................................................... 10
Daily Diaries .......................................................................................................................................................... 12
Contract Modifications ........................................................................................................................................... 14
Stockpiles .............................................................................................................................................................. 17
Creating Estimates ................................................................................................................................................ 18
Estimate Rollback - Deleting and recreating estimates ........................................................................................ 20
Miscellaneous Reports and Inquiries .................................................................................................................... 22
Contractor’s Performance
Weekly Report of Time Charges (Working Day Contracts only)
Inquiries
Adding users ......................................................................................................................................................... 23
Requesting reference files .................................................................................................................................... 24
Requesting a contract refresh ............................................................................................................................... 25
Requesting a FieldNet ID list................................................................................................................................. 26
Managing the FieldNet mailbox ............................................................................................................................ 27
Loading the Agency Configuration File (2018-FM53a.acp) .................................................................................. 28
Contract transfers
Transferring a contract to another FieldManager computer ........................................................................... 29
Transferring a contract to the AASHTOWare Project Administrator .............................................................. 32
Sending a read only contract to another FieldManager computer ................................................................. 33
Archiving and removing finaled contracts ....................................................................................................... 35
FieldBook ..................................................................................................................................................................... 36
Mobile Inspector .......................................................................................................................................................... 38
Source file location - \\mad00fp1\w10bpd\DCTech\AWPAdmin\AWP-ClientServer\Construction\2018Season\FieldSoftwareUsersGuideForConstructionStaff.docx Pantry location – C:\ACMApplications\Pantry2018\StatewideManualsAndGuides\FieldSoftwareUsersGuideForConstructionStaff.pdf Created by Annette Czerneski / Updated by Annette Czerneski on February 27, 2018 pg. 2
Field Information Tracking System (FIT)
Opening FIT and merging data ............................................................................................................................. 41
DQI tab – Entering Design Quality Index reports for ALL projects under a contract ............................................ 42
Field Reports tab – Daily Diary report, Explanation of Variation report ................................................................ 42
Acceptance tab – Entering ECIP, Plant Establishment Period, Punch List, Claim Submission Dates, etc. ........ 43
Structures .............................................................................................................................................................. 43
Staff field office tab – Field office location ............................................................................................................. 44
Sending FIT Data .................................................................................................................................................. 45
Installing FIT Software Updates ........................................................................................................................... 45
Tips for the MIT (Materials Information Tracking System) .......................................................................................... 47
Backing up FieldManager, FIT, and MIT data ............................................................................................................. 51
Support contacts .......................................................................................................................................................... 52
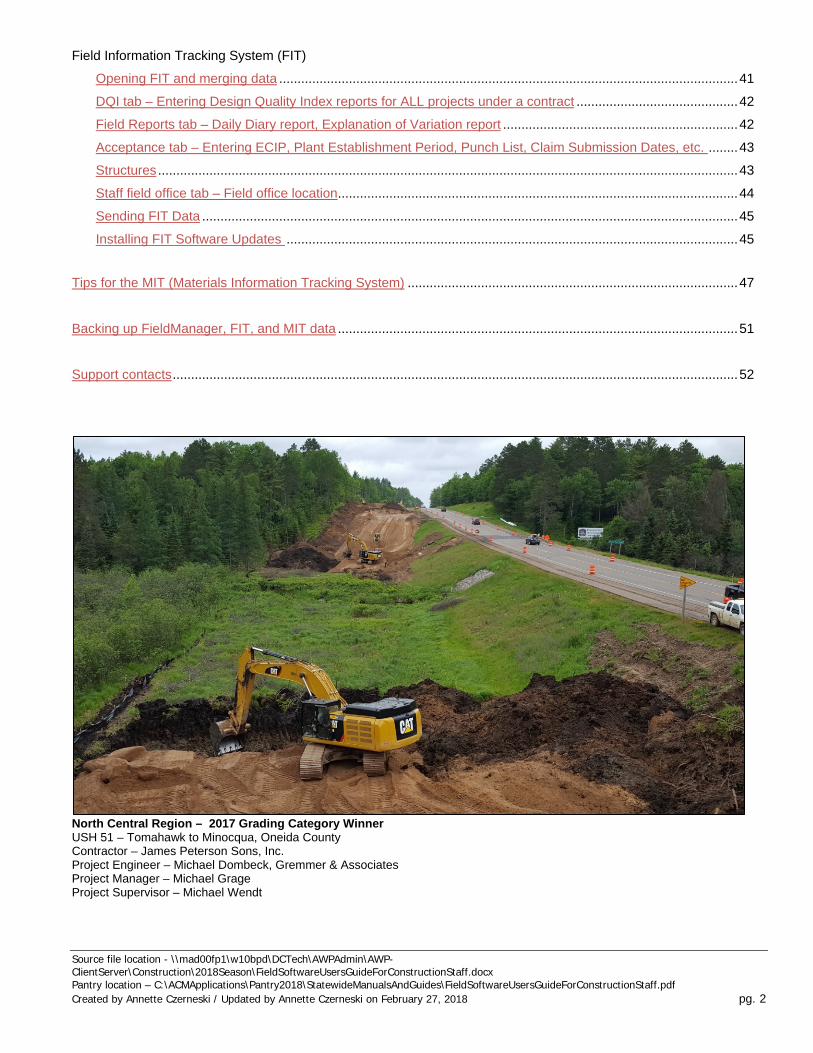
North Central Region – 2017 Grading Category Winner USH 51 – Tomahawk to Minocqua, Oneida County Contractor – James Peterson Sons, Inc. Project Engineer – Michael Dombeck, Gremmer & Associates Project Manager – Michael Grage Project Supervisor – Michael Wendt

Source file location - \\mad00fp1\w10bpd\DCTech\AWPAdmin\AWP-ClientServer\Construction\2018Season\FieldSoftwareUsersGuideForConstructionStaff.docx Pantry location – C:\ACMApplications\Pantry2018\StatewideManualsAndGuides\FieldSoftwareUsersGuideForConstructionStaff.pdf Created by Annette Czerneski / Updated by Annette Czerneski on February 27, 2018 pg. 3
General information
The purpose of the 2018 Field Software User’s Guide is to provide Project Engineers and support staff a data entry guide for FieldManager, FieldBook, Field Information Tracking (FIT), and Materials Information Tracking (MIT). The guide also covers the backup process and provides a list of support contacts. Remember that each region may have their own processes to follow for the creation and processing of contract modifications, estimates, adding projects or categories, etc. Please refer to the region-specific construction administration guide for more information. These guides can be found in the corresponding Pantry\RegionSpecific folder. WisDOTShortcuts folder information: Shortcuts to several WisDOT construction applications and programs are located in the WisDOTShortcuts folder on the desktop.
Shortcut Description ACM Support Portal Shortcut to the WisDOT ACM Support Portal that field staff use
to start a Bomgar support session with WisDOT support staff. https://acmsupport.dot.state.wi.us/
Construction & Materials Manual (CMM) Construction and Materials Manual (CMM): http://wisconsindot.gov/Pages/doing-bus/eng-consultants/cnslt-rsrces/rdwy/cmm.aspx
Contract Administration WisDOT Contract Administration site: http://wisconsindot.gov/Pages/doing-bus/eng-consultants/cnslt-rsrces/rdwy/admin.aspx
FieldBook Optional software that allows a construction Inspector to record Inspector’s Daily Report (IDR) information on a separate computer. The IDRs are imported into FieldManager.
FieldManager Automated construction management contract software used to enter contract status information, IDRs, daily diaries, contract modifications, stockpiles, and estimates.
Field Software User’s Guide A link to this guide. FIT Field Information Tracking System used to enter field office and
staff information, ECIP information, structure data, and design quality index reports. This information, along with data merged from FieldManager, is uploaded into the Project Tracking System that WisDOT staff use to track the progress of a contract.
Highway Construction Contract Info (HCCI) WisDOT Highway Construction Contract Information web site: http://wisconsindot.gov/Pages/doing-bus/contractors/hcci/default.aspx
MIT Materials Information Tracking System used to create test reports in the field. Data is uploaded to the Internet and the MIT LAN system and is accessible by WisDOT staff.
MRS – Atwood Systems Shortcut to the Highway Quality Management System web site: http://www.atwoodsystems.com/signin.cfm?gotoPage=/iibv2/default.cfm
Pantry2018 English and metric pantry software shells, DTSD forms, region-specific forms, and FieldManager User’s Guide.
Standard Specifications WisDOT Standard Specifications http://wisconsindot.gov/Pages/doing-bus/eng-consultants/cnslt-rsrces/rdwy/stndspec.aspx
Wisconsin Lane Closure System Shortcut to the Wisconsin Lane Closure System (LCS) web site for tracking closures and restrictions on Wisconsin highways. http://transportal.cee.wisc.edu/closures
Source file location - \\mad00fp1\w10bpd\DCTech\AWPAdmin\AWP-ClientServer\Construction\2018Season\FieldSoftwareUsersGuideForConstructionStaff.docx Pantry location – C:\ACMApplications\Pantry2018\StatewideManualsAndGuides\FieldSoftwareUsersGuideForConstructionStaff.pdf Created by Annette Czerneski / Updated by Annette Czerneski on February 27, 2018 pg. 4
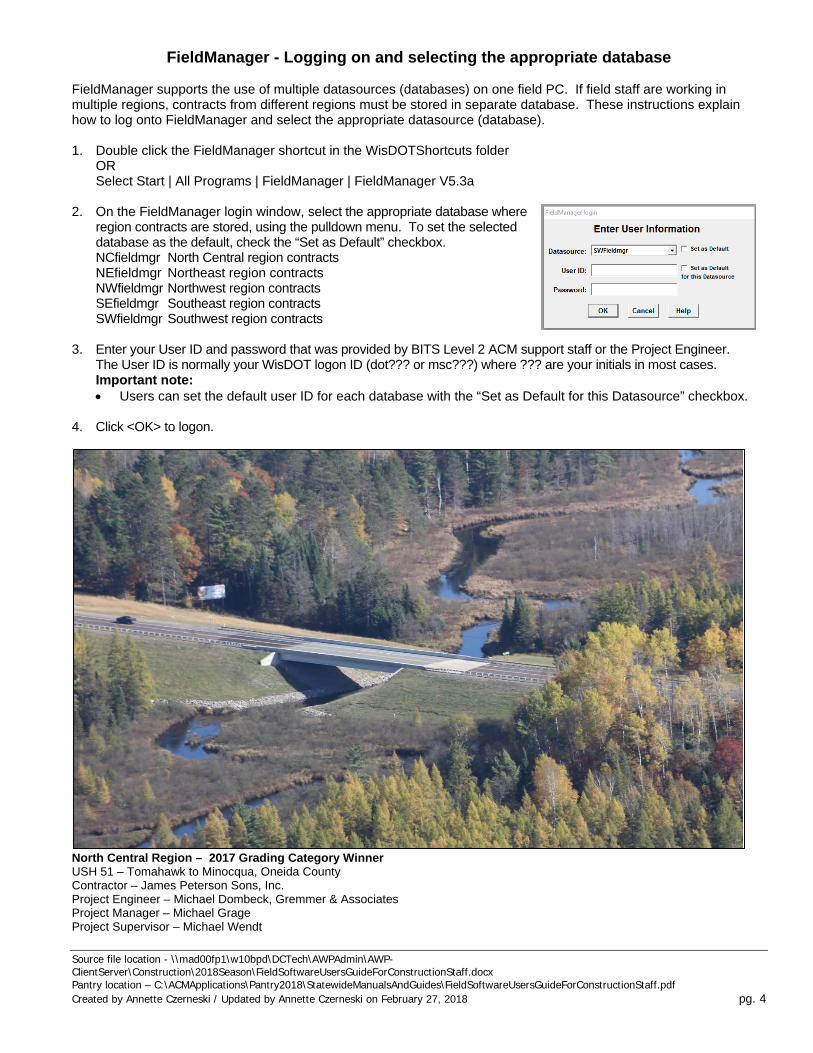
FieldManager - Logging on and selecting the appropriate database
FieldManager supports the use of multiple datasources (databases) on one field PC. If field staff are working in multiple regions, contracts from different regions must be stored in separate database. These instructions explain how to log onto FieldManager and select the appropriate datasource (database). 1. Double click the FieldManager shortcut in the WisDOTShortcuts folder
OR Select Start | All Programs | FieldManager | FieldManager V5.3a
2. On the FieldManager login window, select the appropriate database where region contracts are stored, using the pulldown menu. To set the selected database as the default, check the “Set as Default” checkbox. NCfieldmgr North Central region contracts NEfieldmgr Northeast region contracts NWfieldmgr Northwest region contracts SEfieldmgr Southeast region contracts SWfieldmgr Southwest region contracts
3. Enter your User ID and password that was provided by BITS Level 2 ACM support staff or the Project Engineer. The User ID is normally your WisDOT logon ID (dot??? or msc???) where ??? are your initials in most cases. Important note: • Users can set the default user ID for each database with the “Set as Default for this Datasource” checkbox.
4. Click <OK> to logon.
North Central Region – 2017 Grading Category Winner USH 51 – Tomahawk to Minocqua, Oneida County Contractor – James Peterson Sons, Inc. Project Engineer – Michael Dombeck, Gremmer & Associates Project Manager – Michael Grage Project Supervisor – Michael Wendt

Source file location - \\mad00fp1\w10bpd\DCTech\AWPAdmin\AWP-ClientServer\Construction\2018Season\FieldSoftwareUsersGuideForConstructionStaff.docx Pantry location – C:\ACMApplications\Pantry2018\StatewideManualsAndGuides\FieldSoftwareUsersGuideForConstructionStaff.pdf Created by Annette Czerneski / Updated by Annette Czerneski on February 27, 2018 pg. 5
FieldManager - Contract setup
There are some fields that are required for all new contracts and updated during the entire contract life cycle. This data is merged into FIT (Field Information Tracking system) and sent to WisDOT. The data is then accessible by WisDOT staff using the Project Tracking System. Please refer to the region-specific construction administration guide for more information. These guides can be found in the corresponding Pantry\RegionSpecific folder. 1. Log into the appropriate FieldManager database (if more than one exists) and highlight the contract. 2. Select the <Docu> toolbar option or double click on the contract ID. 3. Fill in the following fields on each tab. Required fields are highlighted in yellow.
Important note: • After entering or updating any fields on these tabs, save your changes and send the FieldManager outbox
message. Also, complete a FIT Merge and Send. See steps 4-6 of this section for details.
General Tab Field Name Data entry Managing Office Prefix for the region office overseeing the construction efforts. (Examples –
Northeast Region, Northeast Region I41, Northeast Region STH 441, NW Region-Eau Claire, NW Region-Superior, RHI, WIS, SE Region, SWR Mad, SWR Edg, or SWR Lax)
Managing Office Comments This is not a required field at this time. In some regions, Project Engineers are directed to enter the contract’s project ID(s) here.
Notice to Proceed Date Entered in AASHTOWare Project CAS and imported into FieldManager through a contract refresh. It must appear prior to creating first estimate. If the field is blank, complete these steps: 1. Utilities | FieldNet | Request Contract Refresh From FieldNet 2. Select the <Send Outbox> toolbar option. 3. Select the <Get Mail> toolbar option and process the message. 4. Check the contract documentation tab again for the Notice To Proceed
Date. If it does not appear, contact your region Contract Specialist for assistance.
Construction Started Date When work actually starts. This date is entered at the beginning of the contract. Use the calendar button to select a date or enter the date manually.
Closed to Traffic Date Use the calendar button to select a date or enter the date manually, if required by the region.
Open to Traffic Date The date the project is open to traffic. All Contract Work Completed Date when work is completed after punch list items and clean up are done. This
date must be entered before the region Contract Specialist can issue the conditional final acceptance. Use the calendar button to select a date or enter the date manually. Note: Don’t forget to enter the Punch List Complete Date in FIT too.
Contract Closed This field is updated by the system to <Yes> after the final estimate is created. If there are problems with the final estimate, field staff can select <No> to reopen the contract, make changes to the contract, and send another final estimate. Note: Once the final estimate is sent, approved, and the CAS contract refresh received in FieldManager, don’t forget to follow the region guidelines for contract archival.
Traffic Comments Enter if required by the region.

Source file location - \\mad00fp1\w10bpd\DCTech\AWPAdmin\AWP-ClientServer\Construction\2018Season\FieldSoftwareUsersGuideForConstructionStaff.docx Pantry location – C:\ACMApplications\Pantry2018\StatewideManualsAndGuides\FieldSoftwareUsersGuideForConstructionStaff.pdf Created by Annette Czerneski / Updated by Annette Czerneski on February 27, 2018 pg. 6
Administrators Tab Field Name Data entry Project Manager Name MUST be entered consistently for reporting purposes. Supervisor Name MUST be entered consistently for reporting purposes. Project Engineer Name MUST be entered consistently for reporting purposes.
Important note: • In most cases, these fields are entered by the Southwest
Region Contract Specialists prior to sending the FieldManager contract to the Project Engineer.
Site Times Tab Field Name Data entry Time Charges Start Date Use the calendar button to select a date or enter the date manually.
• Completion Date contract - When time starts on contract. • Working Day contract - Time starts within ten (10) days of the notice to start
Time Charges Stop Date Use the calendar button to select a date or enter the date manually. • When work is completed (last day for men and hours). • This field controls Liquidated Damages.
Important notes: • DO NOT send an estimate before you enter the time charges stop date if you are past the completion date or
over the allowable calendar or working days. See page 19, Creating Estimates, for more information and guidance.
• If you need to add additional sites to avoid charging liquidated damages, contact your region Contract Specialist for assistance. Additional sites may be added for new interim completion dates or for special sites to charge liquidated damages.
Breakdowns Tab – Not used by WisDOT Site Events Tab - Site events are used to suspend time and work. WisDOT uses two (2) types of events. Field Name Data entry TS:Time Suspended / TR:Time Resumed Used to temporarily suspend time on carry over contracts and
avoid charging liquidated damages. WS:Work Suspended / WR:Work Resumed Used to document suspension of work on carry over contracts
only. Has no effect on liquidated damages. To add a site event: • Click <Add Event> • Enter the following information followed by <OK>:
Site: Select from pull down list Action: Select from pull down list Date: Use the calendar button to select a date or enter the date manually. Remarks: Explanation
Important notes: • Remember that the entry of a suspend event REQUIRES the entry of a resume event when you are ready to
resume time or work. Failure to do this will cause issues when the next estimate is sent. • If you are using site events, it is recommended that you contact your Contract Specialist to ensure that the
event is recorded correctly in CAS and that liquidated damages have not been assessed on the contract. • Before creating a time resumed event, the Project Engineer should review all the sites to ensure that the
number of days or completion date are not exceeded on the contract. If time is exceeded, a time extension contract modification is required. Contact your Contract Specialist for assistance.

Source file location - \\mad00fp1\w10bpd\DCTech\AWPAdmin\AWP-ClientServer\Construction\2018Season\FieldSoftwareUsersGuideForConstructionStaff.docx Pantry location – C:\ACMApplications\Pantry2018\StatewideManualsAndGuides\FieldSoftwareUsersGuideForConstructionStaff.pdf Created by Annette Czerneski / Updated by Annette Czerneski on February 27, 2018 pg. 7
R/O Distribution Tab - Used by WisDOT to send read only copies of the contract automatically to selected contractors and subcontractors when an estimate is generated and sent. See page 8, Read only Distribution to a Contractor at Estimate Generation, for more details Users Tab - The Project Engineer selects the Mobile Inspectors for this specific contract. All users are entered under the Maintain Users section. Mobile device IDs are assigned to the users in that section. • Click <Add User> • Highlight the Mobile Inspector user from the Select Users window. Click <Select> to add the user. • Repeat the above steps if you have multiple Mobile Inspector users. Attachments Tab – field staff can use this tab to attach files or link web URLs to a contract.
4. Click <Save/Close> to save any changes that were made. 5. Field staff MUST send the messages in their FieldManager outbox. Select the <FN Mailbox> toolbar option
followed by the <Send Outbox> toolbar option. 6. Field staff MUST merge and send their FIT data if changes were made within the contract documentation section.
See page 45, Field Information Tracking System Steps to Follow to Send FIT data, for details.
North Central Region – 2017 Asphalt Paving Winner USH 45, Clintonville to Wittenberg, Shawano County Contractor – Northeast Asphalt, Inc. Project Engineer – Jason Hassler, Kapur & Associates Project Manager – Jim Volkmann Project Supervisor – Mike Wendt

Source file location - \\mad00fp1\w10bpd\DCTech\AWPAdmin\AWP-ClientServer\Construction\2018Season\FieldSoftwareUsersGuideForConstructionStaff.docx Pantry location – C:\ACMApplications\Pantry2018\StatewideManualsAndGuides\FieldSoftwareUsersGuideForConstructionStaff.pdf Created by Annette Czerneski / Updated by Annette Czerneski on February 27, 2018 pg. 8
FieldManager - Read only contract copy distribution at estimate generation Project Engineers can send a read only copy of their FieldManager contract at estimate generation to their contractor and/or Project Manager or Supervisor. Contractors have the option to purchase a FieldManager license and obtain a FieldNet ID from the AASHTOWare Project Administrators. The Project Engineer sets up FieldManager to automatically send a read only copy of the contract each time an estimate is generated and submitted providing others with the ability to view contract information. 1. Log into the appropriate FieldManager database (if more than one exists) and highlight the contract. 2. See page 26, Requesting a FieldNet ID List, to request and process an updated FieldNet ID list.
3. Select the <Docu> toolbar option or double click on the contract ID.
R/O Distribution Tab Column Data entry Contractor Read Only List Used to send a read only copy of the contract to the contractor at estimate
generation. • <Add Recipient> • The Select FieldNet Ids – Contractor Read only window appears. • Search for the contractor by FieldNet ID or FieldNet ID Description. • Highlight the contractor. Click <Select>.
Regular Read Only List Project Managers and Supervisors may use this feature to have field staff send a regular read only copy of the contract to selected FieldNet IDs at estimate generation. • <Add Recipient> • The Select FieldNet Ids – Regular Read only window appears. • Search for the Project Manager or Supervisor by FieldNet ID or FieldNet
ID Description. • Highlight their name. Click <Select>.
4. If this option is used each time an estimate is generated, three files will be placed in the FieldManager Outbox:
• Voucher • Regular read only copy of the contract for CAS • Contractor OR Regular read only copy of the contract.
Important notes:
• Items included in contractor read only contract - Item details, IDR posting and general information, daily diaries, contract modifications, reports, and estimate.
• Items excluded from contractor read only contract - Item documentation and notes, IDR general comments, and daily diary comments.

Source file location - \\mad00fp1\w10bpd\DCTech\AWPAdmin\AWP-ClientServer\Construction\2018Season\FieldSoftwareUsersGuideForConstructionStaff.docx Pantry location – C:\ACMApplications\Pantry2018\StatewideManualsAndGuides\FieldSoftwareUsersGuideForConstructionStaff.pdf Created by Annette Czerneski / Updated by Annette Czerneski on February 27, 2018 pg. 9
FieldManager - Subcontractors Subcontractors are entered in FieldManager, merged into FIT (Field Information Tracking system) and sent to WisDOT so that the data is accessible by WisDOT staff using the Project Tracking System. Please refer to the region-specific construction administration guide for more information. These guides can be found in the corresponding Pantry\RegionSpecific folder. 1. Log into the appropriate FieldManager database (if more than one exists) and highlight the contract. 2. Select the <Contractors> toolbar option. 3. Any subcontractors that have been previously selected, appear on this screen. To add more subcontractors, click
<Add>. 4. Highlight the contractor in the list. <Select>
Note: Only one subcontractor can be added at a time. 5. The entry of the contractor address, work type, subcontractor amount and associated items is not required. Click
<Save/Close>. The subcontractor will appear in the Contractors list. Note: This information can be found on the Approved Sublet Request.
6. Click <Add> to add another subcontractor. If a subcontractor does not appear in the Add Contractor list, complete the following steps: All subcontractors are required to register with WisDOT using an online process. 1. Have the subcontractor register in the Civil Rights Compliance System (CRCS),
http://wisconsindot.gov/Pages/doing-bus/civil-rights/dbe/certified-firms.aspx . • Required information includes:
o Company name and address o Company’s Federal Employer ID # o Vendor ID: User id "****" (four asterisks) for all new registrations. o Date the company was established.
Use January 1 if only the year is known. o Provide a Payroll and/or Bidding contact. Include an e-mail address for the person who would be
contacted by a firm seeking a bid quote or as the primary contact for our department. • Direct questions regarding CRCS registration can be directed to Paul Ndon, [email protected]
2. Once the registration process is complete, project staff should contact Annette Czerneski or Adam Bleskacek, the
AASHTOWare Project Administrators, for assistance and ask them to regenerate the FieldManager reference file from CAS because a new subcontractor has just completed the registration process. Important note: A new FieldManager reference file is generated every Friday for staff to request and download.
3. Project staff request and process the new reference file within FieldManager
• Log into the correct FieldManager database if more than one exists. • Select the <FN Mailbox> toolbar option • Select Utilities | FieldNet | Request Reference Files from FieldNet. • Select the <Send Outbox> toolbar option. Minimally one message should be sent. • Wait a few minutes. • Select the <Get Mail> toolbar option. • When the FieldNet Mail Box window appears process “unprocessed” messages in message ID order starting
with the lowest number. • Repeat steps 2-5 above to add the subcontractor to the Contractors list.

Source file location - \\mad00fp1\w10bpd\DCTech\AWPAdmin\AWP-ClientServer\Construction\2018Season\FieldSoftwareUsersGuideForConstructionStaff.docx Pantry location – C:\ACMApplications\Pantry2018\StatewideManualsAndGuides\FieldSoftwareUsersGuideForConstructionStaff.pdf Created by Annette Czerneski / Updated by Annette Czerneski on February 27, 2018 pg. 10
FieldManager - Inspector’s Daily Reports
Inspector’s Daily Reports (IDRs) are REQUIRED for each day that a contractor works at the job site. Input must include the following required fields:
• Weather • Inspector’s comments • Men & hours for the contractors present at the job site
Please refer to the region-specific construction administration guide for more information. These guides can be found in the corresponding Pantry\RegionSpecific folder. 1. Log into the appropriate FieldManager database (if more than one exists) and highlight the contract. 2. Select the <IDRs> toolbar option to access the IDR list window. 3. Click <Add> to access the Add IDR window.
4. Fill in the following fields on each tab. Required fields are highlighted in yellow.
General Tab Field Name Data entry Header information This information is automatically determined and displayed within FieldManager.
Here is an example:
IDR Date Automatically displays the current date but can be modified. Inspector Select from pull down list. Inspector’s Comments Required if there are no item postings. Weather Current weather conditions. Low Temperature High temperature of the day. High Temperature Low temperature of the day.
Contractors Tab - Men and hour entries are required for each contractor, subcontractor, and trucking company that worked at the job site on the date of the IDR. Repeat data entry the contractor and all subcontractors. Field Name Data entry Contractors Put a by each contractor that worked and was present at the job site. Add Personnel Enter type of personnel, number and hours worked for selected contractor. Add Equipment Enter type of equipment, number and hours worked for selected contractor.
Site Times Tab – Highlight the site (if there is more than one site for this contract). Field Name Data entry Time Charge Enter the amount of time to charge for the site for this date on a working day
contract. Note: This field only appears for working day contracts.
Contractor(s) Working Select the appropriate radio toolbar option <Yes> or <No>. Hours Available The number of hours the contractor was on site. Hours Worked The number of hours the contractor performed work. Controlling Operation The controlling bid item being worked on, like grading, or concrete paving. Reasons for Delays Reason for any delay in work due to weather or site conditions. Comments Additional comments if necessary.
Important note: Inspectors may now enter time charges and this data may be imported by the Project Engineer into the corresponding Daily Diary.

Source file location - \\mad00fp1\w10bpd\DCTech\AWPAdmin\AWP-ClientServer\Construction\2018Season\FieldSoftwareUsersGuideForConstructionStaff.docx Pantry location – C:\ACMApplications\Pantry2018\StatewideManualsAndGuides\FieldSoftwareUsersGuideForConstructionStaff.pdf Created by Annette Czerneski / Updated by Annette Czerneski on February 27, 2018 pg. 11
Postings Tab • Click <Add Posting> to access the Items list. • Double click on an item or highlight the item and click <Select>. Complete the fields noted below. • Click <OK> if there are no more items to post or click <Add More> to post more items.
Field Name Data entry Project ID Select the project to post this item to. Category Select the category to charge this item to. Quantity Enter quantity of item posted for the day or posting period. Station From / Station To Enter stationing and/or location.
Do not enter STA prefix Location Enter stationing and/or location.
Do not enter LOC prefix Attention Flag Check if the posting may require further review prior to creating an estimate. Breakdown Not used by WisDOT. Remarks May cross-reference information referring to other field documentation.
Note: For pay plan quantity items with a **P** in the item description, identify the plan sheet number.
Attachments Tab - Can be used to attach supporting documents to an IDR including photos, documents, spreadsheets, and web URLs. View Tab - Can be used to view the Inspector’s Daily Report. This report can be printed.
5. Postings are saved by clicking <Save/Close> or <Save>. 6. Once an IDR is correct and complete, generate it so that the item postings can be paid on the next estimate created
in FieldManager. To generate an IDR, click <Generate>. The system will ask for confirmation concerning the generation of the selected IDR. The system will also ask if you want to print a copy of the IDR.
Important notes: • If a file larger than 3 MB is attached to an IDR, a FieldManager error will appear stating the size of the attachment
is over 3072 KB. Reduce the file size (Photo editing application for images files and Adobe Acrobat for other document types like Word, Excel, etc.)
• The Federal government requires daily tracking of men and hour entries for labor compliance. • Staff can generate multiple IDRs at one time by selecting several from the IDR list using the <Ctrl> or <Shift>
keys. <Ctrl> to select IDRs that are not grouped together. <Shift> to select IDRs in a group/range. • If an item does not appear when adding items, follow these steps:
Select the <FN Mailbox> toolbar option. Select Utilities | FieldNet | Request Reference Files from FieldNet. Select the <Send Outbox> toolbar option. Minimally one message should be sent. Wait a few minutes. Select the <Get Mail> toolbar option. When the FieldNet Mail Box window appears process “unprocessed” message. Repeat step 7 above to add the item to the Posting tab. If the item still does not exist, contact Annette
Czerneski or Adam Bleskacek, the AASHTOWare Project Administrators, for assistance and ask them to update and regenerate the FieldManager reference file in CAS because a new subcontractor has just completed the registration process.
• Items may be posted daily on each IDR or accumulated and entered onto one IDR prior to estimate creation. • Every time you change an IDR that has already been generated, the IDR must be regenerated. • Once you change and resave an IDR, a revision number appears in the Revision Number field. • Inspectors CANNOT edit/change other Inspectors’ IDRs. • Staff CANNOT change an IDR once it has been posted to an estimate. • IDRs can also be created using FieldBook or Mobile Inspector.

Source file location - \\mad00fp1\w10bpd\DCTech\AWPAdmin\AWP-ClientServer\Construction\2018Season\FieldSoftwareUsersGuideForConstructionStaff.docx Pantry location – C:\ACMApplications\Pantry2018\StatewideManualsAndGuides\FieldSoftwareUsersGuideForConstructionStaff.pdf Created by Annette Czerneski / Updated by Annette Czerneski on February 27, 2018 pg. 12
FieldManager - Daily Diaries
Project Engineers MUST have a Daily Diary entry for each day of the week including Saturdays, Sundays, and holidays unless time has been suspended. If no work is done by the contractor/subcontractor, this should be noted in the diary. Input must include time charges, the controlling item of work, contractor forces and hours worked. Weather and Inspector comments can be imported from the corresponding IDR(s). The corresponding IDRs MUST be generated prior to importing IDR information into the Daily Diary. Please refer to the region-specific construction administration guide for more information. These guides can be found in the corresponding Pantry\RegionSpecific folder. Important notes: • If daily diaries are not entered on a regular basis and the FIT merge/send process completed, the Labor
Compliance unit cannot accurately monitor and correct possible discrepancies for the contractor and subcontractors working on the project on a weekly or bi-weekly basis.
• On a carryover project, you may state in your diary on the last day worked “No worked will be performed on this project until date.” Then resume your diary in the spring with the first diary page stating “First day worked since date.”
1. Log into the appropriate FieldManager database (if more than one exists) and highlight the contract. 2. Click the <Diaries> toolbar option to access the Daily Diaries window. 3. Click <Add> to access the Add Diary window.
4. Fill in the following fields on each tab. Required fields are highlighted in yellow.
General Tab Field Name Data entry Header information This information is automatically determined and displayed within FieldManager.
Here is an example:
Diary Date Automatically displays the current date. Author Defaults to the current user currently logged into FieldManager. Low Temperature Use the “Bring in Temperatures” toolbar option to import from a generated IDR
for this diary date. If no weather was entered in the corresponding IDR, manually complete this field.
High Temperature Use the “Bring in Temperatures” toolbar option to import from a generated IDR for this diary date. If no weather was entered in the corresponding IDR, manually complete this field.
Sunrise Local time of sunrise – not required. Sunset Local time of sunset – not required. Weather Use the “Bring in Weather and Comments” toolbar option to import from a
generated IDR for this diary date. If no weather was entered in the corresponding IDR, manually complete this field.
Comments Use the “Bring in Weather and Comments” toolbar option to import from a generated IDR for this diary date. If no comments were entered in the corresponding IDR, manually complete this field.
Important notes: • It is recommended that the Project Engineer imports temperatures, weather, and comments into the Daily
Diary to ensure that this data appears properly in the FIT and the Project Tracking Daily Diary reports. • ALWAYS import IDR weather and comments prior to the Project Engineer entering their comments in the
daily diary.

Source file location - \\mad00fp1\w10bpd\DCTech\AWPAdmin\AWP-ClientServer\Construction\2018Season\FieldSoftwareUsersGuideForConstructionStaff.docx Pantry location – C:\ACMApplications\Pantry2018\StatewideManualsAndGuides\FieldSoftwareUsersGuideForConstructionStaff.pdf Created by Annette Czerneski / Updated by Annette Czerneski on February 27, 2018 pg. 13
Site Times Tab - Highlight the site (if there is more than one site for this contract). Field Name Data entry Time Charge
Enter the amount of time to charge for the site for this date on a working day contract. Note: This field only appears for working day contracts.
Contractor(s) Working Hours Available Hours Worked Controlling Operation Reasons for Delays Comments
Use the “Bring in Site Data” toolbar option to import from a generated IDR for this diary date. If no site data was entered in the corresponding IDR, manually complete this field by selecting the appropriate radio toolbar option <Yes> or <No>
Attachments Tab - Can be used to attach supporting documents to a daily diary. This includes photos, documents, spreadsheets, and web URLs. View Tab - Can be used to view the Daily Diary Report. This report can be printed.
5. Daily Diaries are saved by clicking <Save/Close> or <Save>. 6. Once a Daily Diary is correct and complete, generate it so that it can be included on the next estimate created in
FieldManager. To generate a Daily Diary, select the <Generate> toolbar option. The system will ask for confirmation concerning the generation of the selected Daily Diary. The system will also ask if you want to print a copy of the Daily Diary.
Important notes: • If a file larger than 3 MB is attached to a Daily Diary, a FieldManager error will appear stating the
size of the attachment is over 3072 KB. Reduce the file size (Photo editing application for images files and Adobe Acrobat for other document types like Word, Excel, etc.)
• Staff can generate multiple daily diaries at one time using the <Ctrl> or <Shift> keys. <Ctrl> is used to select daily diaries that are not grouped together. <Shift> is used to select daily diaries in a group.
• FieldManager is designed for working day, calendar day, and completion date contracts. However, the FieldManager report, Weekly Report of Time Charges, is only for working day contracts. The reason there is no report for calendar and completion date contracts is that by definition, days are automatically charged for these contract types once time has started.
• For working day contracts, create and print the Weekly Report of Time Charges (found under FieldManager Utilities/Miscellaneous Reports). The report is signed by the Project Engineer and filed in the field office with the project records. It is recommended that the contractor also sign the report. A copy is posted in the field office. It is not necessary to send a copy of the report to region offices.

Source file location - \\mad00fp1\w10bpd\DCTech\AWPAdmin\AWP-ClientServer\Construction\2018Season\FieldSoftwareUsersGuideForConstructionStaff.docx Pantry location – C:\ACMApplications\Pantry2018\StatewideManualsAndGuides\FieldSoftwareUsersGuideForConstructionStaff.pdf Created by Annette Czerneski / Updated by Annette Czerneski on February 27, 2018 pg. 14
FieldManager - Contract Modifications
Contract modifications are generated using FieldManager to add new items, move items from one project or category to another, increase/decrease items quantities, or add a time extension on a contract. Contact your region Contract Specialist if you need to add a project, category, contract site, change a contract site time or change the retainer. It is recommended that project staff review CMM 2-42 prior to creating Contract Modifications. Please refer to the region-specific construction administration manual for guidance. Most manuals can be found in the corresponding Pantry\RegionSpecific folder. 1. Log into the appropriate FieldManager database (if more than one exists) and highlight the contract. 2. Click the <Cont Mods> toolbar option to access the Contract Modifications window. 3. Click <Add> to access the Add Contract Modifications window.
4. Fill in the following fields on each tab. Required fields are highlighted in yellow.
General Tab Field Name Data entry Short Description Brief summary of the contract modification. Description of Changes For non-standard bid items include a description of the items added, method of
measurement, basis of payment, etc. Time extensions are listed here.
Inc/Dec Tab - increase/decrease contract quantities for items already under contract. Lump Sum Items may not be increased or decreased because by definition they must equal a quantity of 1.0. • Click <Add Item> to add an item. • <Select> an item from the Items window. Field Name Data entry Qty Change Enter the quantity change (+/-). Reason Required entry (2 digit reason code + the description):
CR (Cost Reduction) RO (Request by Others) MI (Miscellaneous) SS (Change / Credit Standards & Specs) PC (Plan Change) SE (Safety Enhancement) PI (Plan Inadequacy or Omissions)
New Items Tab – to add an item that is not currently under contract. • Click <Add Item>. • ALWAYS select “Add a New Item” followed by <OK>. • ALWAYS select an item from the dropdown list and complete the following fields:
See the example on the next page for details. Field Name Data entry Supplemental description Required for some items including all SPV Items, ASP items, and any items with
parentheses in their item description. Important notes: • ALWAYS enter the description beginning on the first line of this field. • FieldManager has a built-in feature which determines if an item requires a
supplemental description. An error message will appear if it is not entered. Item type Select change order or force account. Reason Required entry (2 digit reason code + the description):
CR (Cost Reduction) RO (Request by Others) MI (Miscellaneous) SS (Change / Credit Standards & Specs) PC (Plan Change) SE (Safety Enhancement) PI (Plan Inadequacy or Omissions)
Unit Price Enter the unit price. Section Always “0001”. Contractor Select from pulldown list. Proposed Quantity Enter the proposed quantity for each project/category affected.

Source file location - \\mad00fp1\w10bpd\DCTech\AWPAdmin\AWP-ClientServer\Construction\2018Season\FieldSoftwareUsersGuideForConstructionStaff.docx Pantry location – C:\ACMApplications\Pantry2018\StatewideManualsAndGuides\FieldSoftwareUsersGuideForConstructionStaff.pdf Created by Annette Czerneski / Updated by Annette Czerneski on February 27, 2018 pg. 15
Contract Modification | New Items tab example Time Extensions Tab - For a Working Day or a Calendar Day contract, enter the number of days to extend the contract. For a completion date contract, enter the new completion date. Enter the reason for the time extension. Important note: • Special consideration should be given if you are extending time into the next calendar year in conjunction with
suspending time over the winter. Since each contract is unique, please contact your region Contract Specialist or Project Manager for assistance.
Attachments Tab - Can be used to attach supporting documents to a contract modification including photos, documents, spreadsheets, and web URLs.
Contract Modification Process – From Draft to Pending Approval to Approved Review this table to understand how to save, update and approve contract modifications.
Action FieldManager Option(s) Cont Mod Status
FieldManager Outbox File(s)
Initial creation of a contract modification.
Click <Save> OR <Save/Close>
Draft None
Editing a draft contract modification.
Click <Save> OR <Save/Close>
Draft None
Ready to print contract modification and use this document to obtain all the necessary approval signatures. Send signed contract modification to the region Contract Specialist.
1. Click <Generate> 2. Click <Yes> to “Are you sure
you want to generate Contract Modification No.?”.
3. Click <No> to “Does this require your supervisor’s approval?”.
4. Click <OK> to print the contract modification.
Pending Approval
004: Regular Read only Copy 009: Contmod Header .
Note: If <Yes> is selected for “Does this require supervisor’s approval?”, there will be 3 messages in the Outbox: 004: Regular Read only Copy 008: Contmod Approval 010: Contmod Body If you selected “Yes” to have your Project Manager or Supervisor approve this contract modification in error, please contact the AASHTOWare Project Administrators, Annette Czerneski or Adam Bleskacek, for assistance. Required signatures are obtained and the contract modification is ready for approval. (In some regions, the Contract Specialist will send an e-mail that the contract modification has been
1. Click <Approve> 2. Enter an approval date,
click <OK>. 3. Click <Yes> that you have
all the necessary approvals. 4. Click <Yes> that you will no
longer be able to change
Approved 010: Contmod Body

Source file location - \\mad00fp1\w10bpd\DCTech\AWPAdmin\AWP-ClientServer\Construction\2018Season\FieldSoftwareUsersGuideForConstructionStaff.docx Pantry location – C:\ACMApplications\Pantry2018\StatewideManualsAndGuides\FieldSoftwareUsersGuideForConstructionStaff.pdf Created by Annette Czerneski / Updated by Annette Czerneski on February 27, 2018 pg. 16
executed.) Once approved, no further changes can be made. If errors are found, a new contract modification will be required to correct them.
this contract modification. Payment can now be made on added or changed items.
Final Steps: 1. Send your FieldManager outbox. If the messages noted above do NOT appear in the FieldManager Outbox,
notify the AASHTOWare Project Administrators, Annette Czerneski and Adam Bleskacek, IMMEDIATELY!
2. Merge and send FIT data each time you change the status of a contract modification. This ensures that both CAS and Project Tracking are up-to-date and reflect the current status of the contract modification.
Important notes: • If a file larger than 3 MB is attached to a contract modification, a FieldManager error will appear stating the
size of the attachment is over 3072 KB. Reduce the file size (Photo editing application for images files and Adobe Acrobat for other document types like Word, Excel, etc.)
• Approvals are requested based on the dollar amount of the contract modification and the level of authority guidelines established by the region the Project Engineer is working for. Please refer to the region-specific construction administration guide for more information. Guides can be found in the corresponding Pantry\RegionSpecific folder.
• Contract modification generation will make the item quantity changes and time extensions a part of your contract. The items can be used for estimation purposes; however, payment on items is not allowed until the contract modification is approved.
• Sometimes when contract revisions are made, the net change dollar amount of the contract modification may not match the total for the item changes for all projects. This is a known FieldManager issue. Contact Annette Czerneski or Adam Bleskacek, the AASHTOWare Project Administrators, for assistance. Once it is corrected, field staff request a CAS contract refresh to update the contract modification net change amount in FieldManager.
North Central Region – 2017 Asphalt Paving Winner USH 45, Clintonville to Wittenberg, Shawano County Contractor – Northeast Asphalt, Inc. Project Engineer – Jason Hassler, Kapur & Associates Project Manager – Jim Volkmann Project Supervisor – Mike Wendt

Source file location - \\mad00fp1\w10bpd\DCTech\AWPAdmin\AWP-ClientServer\Construction\2018Season\FieldSoftwareUsersGuideForConstructionStaff.docx Pantry location – C:\ACMApplications\Pantry2018\StatewideManualsAndGuides\FieldSoftwareUsersGuideForConstructionStaff.pdf Created by Annette Czerneski / Updated by Annette Czerneski on February 27, 2018 pg. 17
FieldManager - Stockpiles
The preferred method to create and administer stockpiles is to create a stockpile for each item – 1 item per project per stockpile. This prevents confusion between the stockpile and the associated item. Contact your region Contract Specialist if you plan to make early payments on a stockpile. 1. Log into the appropriate FieldManager database (if more than one exists) and highlight the contract. 2. Click the <Stockpiles> toolbar option to access the Stockpiles window. 3. Click the <Add> toolbar option to access the Stockpile Wizard. 4. <Next> 5. Select a stockpile description from the dropdown list. Enter the subcontractor’s name in the comment field. 6. <Next> 7. Select a transaction date. Enter a transaction amount - total amount of all stockpiles on the delivered invoice.
Enter transaction comments (e.g. See invoice #). 8. <Next> 9. Click <Add Items>, highlight the item, and click <Select>.
Remember - Enter only 1 item per project for each stockpile.
10. Click <Next> 11. Assign dollars for the stockpile item. Since there is only 1 item, assign the entire transaction amount entered above. 12. Click <Next> 13. Identify the recovery factor or quantity for the item. This will determine the time it takes for WisDOT to recover the
already paid stockpile amount. By applying at a fast rate, the initial payments to contractor can be greatly reduced. By applying at a slower rate, the payments to contractor can be more balanced. Detailed explanation of the Recovery factor: • Item quantity = 40,000 units • Stockpile amount = $500 • Recovery factor = $0.025/unit • Recovery quantity = ½ x authorized quantity = 20,000 units In this case, the contractor’s payment for the first 20,000 units would equal $500. The stockpiled amount would be completely recovered.
14. Click <Finish> to save the stockpile.
15. Repeat the above steps for additional items.
16. If paying on a stockpile prior to your first estimate for work (i.e. for fabricated steel or aggregate), notify the region
contract specialist that you need a temporary Notice to Proceed date entered in CAS. Important notes: • When you are finished with your stockpile, make sure that the recovery factor is set to 0 (zero). • More information can be found in the FieldManager User’s Guide, Chapter 10 – Working with Stockpiles. • Region Contract Specialists – If you enter a temporary Notice to Proceed date in CAS for the purpose of early
payment on a stockpile, remember to update the Notice to Proceed data with the actual date.
Source file location - \\mad00fp1\w10bpd\DCTech\AWPAdmin\AWP-ClientServer\Construction\2018Season\FieldSoftwareUsersGuideForConstructionStaff.docx Pantry location – C:\ACMApplications\Pantry2018\StatewideManualsAndGuides\FieldSoftwareUsersGuideForConstructionStaff.pdf Created by Annette Czerneski / Updated by Annette Czerneski on February 27, 2018 pg. 18
FieldManager - Estimates
An estimate should be sent twice a month for any contract that has a payment due of $1,000 or more. After sending an estimate, project staff are required to send FIT (Field Information Tracking System) data. Please refer to the region-specific construction administration guide for more information. Guides can be found in the corresponding Pantry\RegionSpecific folder. Here are some things that Project Engineers should consider before creating an estimate:
• The “Notice to Proceed” date must appear on the contract Documentation General tab prior to submitting the 1st estimate. Request and process a Contract Refresh from FieldNet if this date is missing.
• All IDRs and Daily Diaries to be included with this estimate MUST be generated prior to creating the estimate. • If retainer needs to be reduced, contact the region Contract Specialist prior to creating an estimate. • Confirm that the contract does not require a site event to suspend or resume time prior to estimate creation. • Project Engineers may create a contract modification to extend contract time and avoid liquidated damages. • The “Time Charges Stop” date must appear on the contract Documentation Site Times tab if time has stopped
on this contract AND to avoid liquidated damages. • If the total dollar amount of the estimate is a negative amount, DO NOT generate the estimate. Do not save
the estimate and contact your Project Manager or Supervisor immediately for guidance. • Each contract is unique and Project Engineers should communicate with their Project Manager and Contract
Specialist if the estimate may involve something out of the ordinary. 1. Log into the appropriate FieldManager database (if more than one exists) and highlight the contract. 2. Click the <Estimates> toolbar option to access the Estimates window. 3. Click the <Add> toolbar option 4. On the Estimate data and type window:
• Estimate date – Enter date or select from the calendar. • Estimate type – Select Intermediate, Semi Final or Final.
• Reminder for first estimates - Prior to creating the first estimate, confirm under the Contract Documentation tab that the Notice to Proceed date appears. If the field is blank, complete these steps:
o Utilities | FieldNet | Request Contract Refresh From FieldNet o Select the <Send Outbox> toolbar option. o Select the <Get Mail> toolbar option and process the message. o Check the contract documentation tab again for the Notice To Proceed Date. If it does not
appear, contact your region Contract Specialist for assistance. 5. Click <OK> to create the estimate.
6. If you have ungenerated IDRs, a warning message will appear. You can choose <Yes> to continue with the estimate
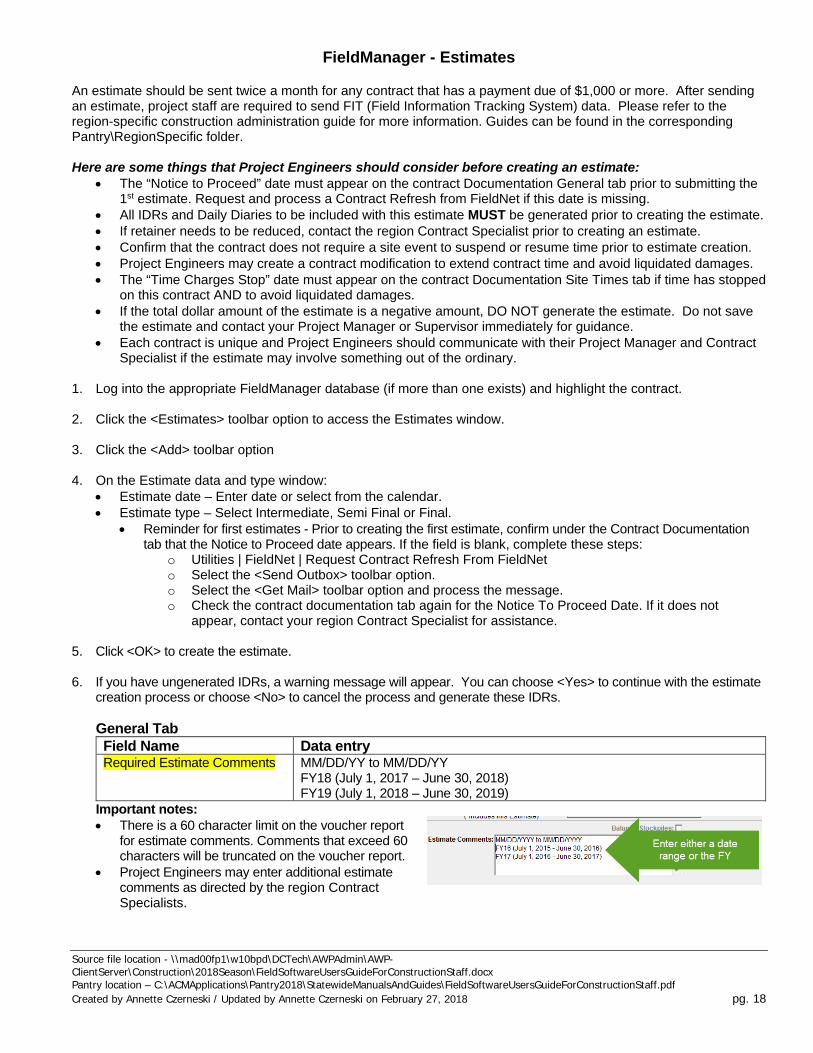
creation process or choose <No> to cancel the process and generate these IDRs. General Tab Field Name Data entry Required Estimate Comments MM/DD/YY to MM/DD/YY
FY18 (July 1, 2017 – June 30, 2018) FY19 (July 1, 2018 – June 30, 2019)
Important notes: • There is a 60 character limit on the voucher report
for estimate comments. Comments that exceed 60 characters will be truncated on the voucher report.
• Project Engineers may enter additional estimate comments as directed by the region Contract Specialists.

Source file location - \\mad00fp1\w10bpd\DCTech\AWPAdmin\AWP-ClientServer\Construction\2018Season\FieldSoftwareUsersGuideForConstructionStaff.docx Pantry location – C:\ACMApplications\Pantry2018\StatewideManualsAndGuides\FieldSoftwareUsersGuideForConstructionStaff.pdf Created by Annette Czerneski / Updated by Annette Czerneski on February 27, 2018 pg. 19
Item Usage Tab – Ensure the amount of the estimate and the items to be paid are correct. Important notes: • If the quantities are incorrect, do not generate the estimate! Close the estimate and make the corrections in the
IDRs. Regenerate the IDRs and recreate the estimate. • If the total dollar amount of the estimate is a negative amount, contact your Project Manager or Supervisor
prior to generating and sending the estimate. Discuss how to handle this estimate with a negative payment. o Intermediate Estimates - In most cases, these should not be negative. If possible, do not generate
the estimate until there are enough work items to create a positive payment. The reasons we end up with negative intermediate estimates include missing time charges stop dates, site time miscalculations, or creating a large dollar amount of liquidated damages. The Bureau of Financial Services (BFS) does not typically request money back from the contractor for a negative estimate unless specifically directed to by the region. If the negative estimate is unavoidable and correct, BFS holds onto it and makes payment after receiving the next positive estimate.
o Semi Final Estimates - In most cases, these should not be negative, unless there will be enough retainage to later cover the negative amount. All remaining retainage will be released on the final estimate. BFS does not typically request money back from the contractor for a negative estimate unless specifically directed to by the region. If the negative estimate is unavoidable and correct, BFS holds onto it and covers it with the final estimate.
Vouchers Tab – Verify that all the voucher boxes for each project under the contract are checked. By default, all projects should be checked.
View Estimate Tab - Can view and/or print the Construction Pay Estimate report.
View Amt Bal Tab - Can view and/or print the Construction Pay Estimate Amount Balance report.
Final Steps 7. Click <Generate> to create the estimate and place files in the FieldManager outbox.
8. Print the Construction Payment Estimate Report and the Construction Payment Estimate Amount Balance Report.
Review for accuracy before sending the FieldManager outbox. Place the reports in the project files.
9. Minimally there will be 2 files in your outbox (more if you send additional read only copies to the contractor or other project staff. 011: Estimate (Vouchers) 004: Read only Copy
10. Select the <Send Outbox> toolbar option.
11. Complete a FIT merge and send. See page 45, Field Information Tracking System Steps to Follow to Send FIT data, for details.
12. Notify the staff member who approves your estimates that it is ready for their review (e.g. Contract Specialist, Project Manager or Supervisor). Please refer to the region-specific construction administration guide for more information. Guides can be found in the corresponding Pantry\RegionSpecific folder.

Source file location - \\mad00fp1\w10bpd\DCTech\AWPAdmin\AWP-ClientServer\Construction\2018Season\FieldSoftwareUsersGuideForConstructionStaff.docx Pantry location – C:\ACMApplications\Pantry2018\StatewideManualsAndGuides\FieldSoftwareUsersGuideForConstructionStaff.pdf Created by Annette Czerneski / Updated by Annette Czerneski on February 27, 2018 pg. 20
FieldManager - Estimate rollbacks (deleting and recreating estimates)
Occasionally an estimate needs to be deleted and recreated within FieldManager. This may occur when Supervisors or contract administration staff deny an estimate approval or if a problem occurs processing the estimate. If you are notified that your estimate approval has been denied, complete these steps. 1. Log into the appropriate FieldManager database (if more than one exists) and highlight the contract. 2. Select the <FN Mailbox> toolbar option followed by the <Get Mail> toolbar option (at least 1 message should be
received). The FieldNet Mail Box will appear. Process the “Estimate Denial Warning” message by highlighting the message and either clicking <Process msg> toolbar option or double clicking on the message.
3. Close the FieldNet mailbox. 4. Highlight the contract ID that you want to create an estimate for. 5. Click the <Estimates> toolbar option to access the Estimates window. 6. Highlight the estimate you wish to delete.
NOTE: The estimate MUST BE in “Exported” status. If the status is “Refreshed”, contact Annette Czerneski or Adam Bleskacek, the AASHTOWare Project Administrators, for assistance.
7. Select the <Delete> toolbar option. 8. Because the estimate has already been sent to CAS and region or central office support staff have contacted you
to delete/rollback your estimate, the following warnings will appear. Respond <Yes> to both of them:
9. On the Estimate data and type window, select an estimate date for this estimate, an estimate type – intermediate,
tentative final or final. Do not use the monthly estimate type. Click <OK> to continue.
General Tab Field Name Data entry Required Estimate Comments MM/DD/YY to MM/DD/YY
FY18 (July 1, 2017 – June 30, 2018) FY19 (July 1, 2018 – June 30, 2019)
Important notes: • There is a 60 character limit on the voucher report
for estimate comments. Comments that exceed 60 characters will be truncated on the voucher report.

Source file location - \\mad00fp1\w10bpd\DCTech\AWPAdmin\AWP-ClientServer\Construction\2018Season\FieldSoftwareUsersGuideForConstructionStaff.docx Pantry location – C:\ACMApplications\Pantry2018\StatewideManualsAndGuides\FieldSoftwareUsersGuideForConstructionStaff.pdf Created by Annette Czerneski / Updated by Annette Czerneski on February 27, 2018 pg. 21
• Project Engineers may enter additional estimate comments as directed by the region Contract Specialists.
Item Usage Tab – Ensure the amount of the estimate and the items to be paid are correct. Important notes: • If the quantities are incorrect, do not generate the estimate! Close the estimate and make the corrections in the
IDRs. Regenerate the IDRs and recreate the estimate. • If the total dollar amount of the estimate is a negative amount, contact your Project Manager or Supervisor
prior to generating and sending the estimate. Discuss how to handle this estimate with a negative payment. • See additional notes about negative estimates under FieldManager - Estimates
Vouchers Tab – Verify that all the voucher boxes for each project under the contract are checked. By default, all projects should be checked.
View Estimate Tab - Can view and/or print the Construction Pay Estimate report.
View Amt Bal Tab - Can view and/or print the Construction Pay Estimate Amount Balance report.
Final Steps 13. Click <Generate> to create the estimate and place files in the FieldManager outbox.
14. Print the Construction Payment Estimate Report and the Construction Payment Estimate Amount Balance Report.
Review for accuracy before sending the FieldManager outbox. Place the reports in the project files.
15. Minimally there will be 2 files in your outbox (more if you send additional read only copies to the contractor or other project staff. 011: Estimate (Vouchers) 004: Read only Copy
16. Select the <Send Outbox> toolbar option.
17. Complete a FIT merge and send. See page 45, Field Information Tracking System Steps to Follow to Send FIT data, for details.
18. Notify the staff member who approves your estimates that it is ready for their review (e.g. Contract Specialist, Project Manager or Supervisor). Please refer to the region-specific construction administration guide for more information. Guides can be found in the corresponding Pantry\RegionSpecific folder.
Important information about deleting final estimates: If the final estimate has been submitted and must be deleted, you must unlock the contract before proceeding: 1. Highlight the contract ID that you want to work with. 2. Select the <Docu> toolbar option or double click on the contract ID. 3. On the General tab, click <No> on the Contract Closed field to reopen a contract and create a new final estimate. 4. Click <Save/Close> to save changes. 5. Select the <Send Outbox> toolbar option. 6. Complete the steps above to delete and recreate the final estimate.

Source file location - \\mad00fp1\w10bpd\DCTech\AWPAdmin\AWP-ClientServer\Construction\2018Season\FieldSoftwareUsersGuideForConstructionStaff.docx Pantry location – C:\ACMApplications\Pantry2018\StatewideManualsAndGuides\FieldSoftwareUsersGuideForConstructionStaff.pdf Created by Annette Czerneski / Updated by Annette Czerneski on February 27, 2018 pg. 22
Miscellaneous Reports and Inquiries
Within FieldManager, staff can create miscellaneous reports and inquiries with FieldManager. A few of these reports are required. Some of the inquiries assist with the contract oversight and the finals process. Please refer to the region-specific construction administration guide for more information. Guides can be found in the corresponding Pantry\RegionSpecific folder. Miscellaneous Reports All 4 miscellaneous reports can be used by field staff – Contractor’s Performance, FieldBook Import Report, Notice of Change in Construction Status, and Weekly Report of Time Charges. Two of them are required for certain types of contracts. Contractor’s Performance This is a required report that should be completed for each contractor and subcontractor. In addition, staff should continue to complete the DT2510 report. See the Timely Decision Making Manual, http://wisconsindot.gov/Pages/doing-bus/eng-consultants/cnslt-rsrces/rdwy/admin.aspx, for more details. 1. Log into the appropriate FieldManager database (if more than one exists) and highlight the contract. 2. Select the <Misc Rpts> toolbar option to access the Miscellaneous Reports window.
3. Double click on Contractor’s Performance.
4. Click <Add>.
5. Complete the required fields. Please refer to the region-specific construction administration guide for more
information. Guides can be found in the corresponding Pantry\RegionSpecific folder.
6. When data entry is complete: • Click <Save/Close> to save changes • Click <Generate> when the report is complete. • Complete a FIT merge and send to upload the report to Project Tracking.
Weekly Report of Time Charges (Working day contracts only) This is a required report for working day contracts. The report is created at the end of the week. 1. Log into the appropriate FieldManager database (if more than one exists) and highlight the contract. 2. Select the <Misc Rpts> toolbar option to access the Miscellaneous Reports window.
3. Double click on Weekly Report of Time Changes.
4. Click <Add>.
7. Complete the required fields. Please refer to the region-specific construction administration guide for more
information. Guides can be found in the corresponding Pantry\RegionSpecific folder.
8. When data entry is complete: • Click <Save/Close> to save changes • Click <Generate> when the report is complete • The Project Engineer will obtain the contractor’s signature on the report. A copy is placed in the project file
and the other copy posted in the field office. Inquiries Chose an inquiry based on your specific need. Common inquiries include the Item History to Date, Items That Are Not Completed, and Item Status.

Source file location - \\mad00fp1\w10bpd\DCTech\AWPAdmin\AWP-ClientServer\Construction\2018Season\FieldSoftwareUsersGuideForConstructionStaff.docx Pantry location – C:\ACMApplications\Pantry2018\StatewideManualsAndGuides\FieldSoftwareUsersGuideForConstructionStaff.pdf Created by Annette Czerneski / Updated by Annette Czerneski on February 27, 2018 pg. 23
FieldManager - Adding users
Project Engineers add Inspectors and support staff within FieldManager under the Users option. 1. Log into the appropriate FieldManager database (if more than one exists). 2. Select Utilities | System Management | Maintain Users from the FieldManager main menu. 3. Select <Add> to add a user. Complete the following fields (required fields are highlighted in yellow):
• User ID – required (e.g. dot??? or msc???) • User Initials – optional (e.g. amc) • User Name – Last Name (e.g. Czerneski), First Name (e.g. Annette), Middle Initial (e.g. M) • Phone No – optional • Device # ID – Required for Inspectors using Mobile Inspector. The Device ID appears on the Mobile Inspector
About screen within the app. Up to three iPad, iPhone, or Android mobile device IDs can be associated to a user; however, WisDOT is only authorizing one device per user because of the number of licenses purchased.
• Password (enter twice to confirm entry). • Select the Security Level for the user account:
Security Level Description FieldManager User Full read/write access except for user information (Project Staff/Inspectors)
Minimum security level for Mobile Inspectors FieldBook User Full read/write access to FieldBook and read only access to FieldManager
Minimum security level for FieldBook Inspectors Read Only Read only access to FieldManager System Administrator Full access to all FieldManager functionality (Project Engineers)
• Click <OK> to save changes.
4. Select the <Add> toolbar option to add additional users and repeat step 3. Repeat steps 1-3 to add users to other
FieldManager databases. Important notes:
• DO NOT delete or alter the FieldManager System Administrator account.
• DO NOT create an ID with a duplicate User ID. • Select the <Change> toolbar option to edit existing users or the <Delete> toolbar option to delete users. • Project staff set the default database and default user ID for each database on the FieldManager logon
screen.

Source file location - \\mad00fp1\w10bpd\DCTech\AWPAdmin\AWP-ClientServer\Construction\2018Season\FieldSoftwareUsersGuideForConstructionStaff.docx Pantry location – C:\ACMApplications\Pantry2018\StatewideManualsAndGuides\FieldSoftwareUsersGuideForConstructionStaff.pdf Created by Annette Czerneski / Updated by Annette Czerneski on February 27, 2018 pg. 24
FieldManager - Requesting reference files
Occasionally project staff will need to request a new reference file. This file includes any new subcontractors that were just added to CAS or any changes to the master item list. 1. Log into the appropriate FieldManager database. 2. Select the <FN Mailbox> toolbar option. 3. Select Utilities | FieldNet | Request Reference Files from FieldNet. 4. Select the <Send Outbox> toolbar option. Make sure that all messages are sent (minimally 1 message). 5. See page 27, Managing the FieldNet Mailbox, for instructions on retrieving and processing files. Important notes: • Contact Annette Czerneski or Adam Bleskacek, the AASHTOWare Project Administrators, and ask them to
update the FieldManager reference file in AASHTOWare Project CAS if a subcontractor has recently registered with WisDOT using CRCS.
• The reference file downloaded pertains only to the FieldManager database you are logged into. To update the reference file for another FieldManager database (if more than one exists), repeat the steps above.
Northeast Region – 2017 Concrete Paving Category Winner STH 42 (Lincoln Avenue) – Village of Two Rivers, Manitowoc County Contractor – Vinton Construction Company Project Engineer – Pat Bailey, REI Engineering Project Manager – Jeremy Ashauer Project Supervisor – Jim Thompson

Source file location - \\mad00fp1\w10bpd\DCTech\AWPAdmin\AWP-ClientServer\Construction\2018Season\FieldSoftwareUsersGuideForConstructionStaff.docx Pantry location – C:\ACMApplications\Pantry2018\StatewideManualsAndGuides\FieldSoftwareUsersGuideForConstructionStaff.pdf Created by Annette Czerneski / Updated by Annette Czerneski on February 27, 2018 pg. 25
FieldManager - Requesting a contract refresh
A request for a contract refresh from the AASHTOWare Project CAS system can be done manually. This is normally done if your Contract Specialist makes changes to your contract in the AASHTOWare Project CAS system and the changes need to be imported into your FieldManager contract prior to making additional entries or creating an estimate. 1. Log into the appropriate FieldManager database. 2. Select the <FN Mailbox> toolbar option. 3. Select Utilities | FieldNet | Request Contract Refresh from FieldNet. 4. Select the contract from the pulldown list. 5. Select the <Send Request> toolbar option. 6. Select the <Send Outbox> toolbar option. Make sure that all messages are sent (minimally 1 message). 7. This request takes a few minutes to process. Please be patient. See page 27, Managing the FieldNet Mailbox,
for instructions on retrieving and processing files.
Northeast Region – 2017 Concrete Paving Category Winner STH 42 (Lincoln Avenue) – Village of Two Rivers, Manitowoc County Contractor – Vinton Construction Company Project Engineer – Pat Bailey, REI Engineering Project Manager – Jeremy Ashauer Project Supervisor – Jim Thompson
Source file location - \\mad00fp1\w10bpd\DCTech\AWPAdmin\AWP-ClientServer\Construction\2018Season\FieldSoftwareUsersGuideForConstructionStaff.docx Pantry location – C:\ACMApplications\Pantry2018\StatewideManualsAndGuides\FieldSoftwareUsersGuideForConstructionStaff.pdf Created by Annette Czerneski / Updated by Annette Czerneski on February 27, 2018 pg. 26
FieldManager - Requesting a FieldNet ID list
The FieldNet ID list contains all the FieldNet Ids assigned to staff across the state and is constantly changing. An updated list is required on your computer prior to sending read only or transferring working copies of contracts to another FieldManager PC. 1. Log into the appropriate FieldManager database. 2. Select the <FN Mailbox> toolbar option. 3. Select Utilities | FieldNet | Request FieldNet ID List from FieldNet. 4. Select the <Send Outbox> toolbar option. Make sure that all messages are sent (minimally 1 message). 5. See page 27, Managing the FieldNet Mailbox, for instructions on retrieving and processing files.
Northwest Region – 2017 Small Structures Category Winner STH 27 – Augusta to Cadott, Eau Claire County Contractor – Radtke Contractors, Inc. Project Engineer – Jim Dzienkowski, KL Engineering Project Manager – David Koepp Project Supervisor – Tim Mason

Source file location - \\mad00fp1\w10bpd\DCTech\AWPAdmin\AWP-ClientServer\Construction\2018Season\FieldSoftwareUsersGuideForConstructionStaff.docx Pantry location – C:\ACMApplications\Pantry2018\StatewideManualsAndGuides\FieldSoftwareUsersGuideForConstructionStaff.pdf Created by Annette Czerneski / Updated by Annette Czerneski on February 27, 2018 pg. 27
FieldManager - Managing the FieldNet mailbox
The FieldNet server in Madison will automatically send all information concerning contracts and any information requested by the FieldNet ID to the appropriate FieldNet account assigned to your field database. The FieldNet IDs and associated FieldManager contracts are tracked in the FieldNet Administration system by BITS Level 2 ACM and Contract Specialist support staff. 1. Log into the appropriate FieldManager database. 2. Select the <Get Mail> toolbar option. A message box will appear stating “Receiving Messages from FieldNet”.
3. The FieldNet Mail Box will appear. The mailbox has two tabs.
The Inbox displays all the incoming processed and unprocessed messages. The Outbox displays all the sent and unsent messages.
4. Select the Inbox tab and process all the “unprocessed” messages in numeric order.
Highlight each message and clicking <Process M…> or double clicking on each message.
5. Select the Outbox tab to check if there are any messages appear in “Not Sent” status.
If there are, select the <Send Outbox> toolbar option. NOTE: After processing a “Contract Data (from CAS)”, a “Contract Status Update” file will be placed in your outbox
6. Close the FieldNet Mailbox.

Source file location - \\mad00fp1\w10bpd\DCTech\AWPAdmin\AWP-ClientServer\Construction\2018Season\FieldSoftwareUsersGuideForConstructionStaff.docx Pantry location – C:\ACMApplications\Pantry2018\StatewideManualsAndGuides\FieldSoftwareUsersGuideForConstructionStaff.pdf Created by Annette Czerneski / Updated by Annette Czerneski on February 27, 2018 pg. 28
Loading the Agency Configuration File 2018-FM53a.acp
The FieldManager Agency Configuration file includes options that are specific to WisDOT. Follow the steps below to apply this file to a new FieldManager database OR to existing FieldManager databases when a new file is released by the System Administrators. 1. Log into the appropriate FieldManager database. 2. From the main menu, select the Utilities | System Management | Load Agency Configuration.
3. Browse to the location of the file and select C:\ACMApplications\2018-FM53a.acp.
4. Click <Open>
5. Click <OK> on the Load ACP file window that states “The ACP file has been loaded successfully.” Report any errors importing the ACP file to BITS L2 ACM support staff or Annette Czerneski or Adam Bleskacek, the AASHTOWare Project Administrators.
6. Repeat the above steps for all the FieldManager databases on this computer.

Source file location - \\mad00fp1\w10bpd\DCTech\AWPAdmin\AWP-ClientServer\Construction\2018Season\FieldSoftwareUsersGuideForConstructionStaff.docx Pantry location – C:\ACMApplications\Pantry2018\StatewideManualsAndGuides\FieldSoftwareUsersGuideForConstructionStaff.pdf Created by Annette Czerneski / Updated by Annette Czerneski on February 27, 2018 pg. 29
FieldManager – Contract Transfers Transferring a contract to another FieldManager computer
Project Engineers may transfer a contract to another field computer or to a region Finals computer. This is done if another Project Engineer is taking over contract work OR the Project Engineer does not submit the semi-final or final estimate for this region office. Important notes: • ALL contract transfers MUST be coordinated with the region Contract Specialist. They will provide you with the
FieldNet ID of the computer you are transferring the contract too. • You must transfer contracts to FieldManager computer databases with the same region designation.
ALL THE STEPS BELOW MUST BE COMPLETED!!! Step 1 – Send and receive FieldManager mail 1. Log into the appropriate FieldManager database. 2. Select the <Get Mail> toolbar option.
A message box will appear stating “Receiving Messages from FieldNet”. The mailbox will automatically open. 3. Select the Inbox tab and process all the “unprocessed” messages in numeric order.
Highlight each message and clicking <Process M…> or double clicking on each message. 4. Select the Outbox tab to check if there are any messages appear in “Not Sent” status.
If there are, select the <Send Outbox> toolbar option. 5. Close FieldManager. Step 2 – Backup FieldManager and Field Information Tracking (FIT) databases on both computers. 1. Open Windows Explorer 2. Go to and run C:\ACMApplications\Backup\ACMBackup.bat.
During this process, a folder is created with the current date and time under C:\ACMApplications\Backup. Included in the contents of this folder are a copy of the FieldManager, FIT and MIT databases.
Step 3 – Export Field Information Tracking (FIT) contract from the origin computer. 1. Open FIT 2. Click <Yes, Merge> on the Merge FieldManager with Field Information Tracking window. 3. Respond appropriately to the Notice – Has FieldManager been shut down? <Yes> <No>
• Click <Yes> to continue with the merge. • Click <No> to provide an opportunity to close FieldManager and begin the merge process again.
4. Click <Close> when “Processing ended” and “Merge ended” notices appear. 5. Click Contract Transfer | TRANSFER FIT CONTRACT 6. Mark the checkbox to select the contract. Click <Continue>. 7. Select “Export the contract and keep a read only copy”. Click <Continue>. 8. On the Name the Export File window, enter the file name without the path. Click <Continue>.
Recommendation: Enter the contract ID with no extension (the .zip extension will be added automatically). 9. The FIT Data Export window will appear. Note the file name and location. The FIT export file will need to be sent
to the person to whom you are transferring the contract. It is located at: C:\ProgramData\AtwoodSystems\FIT\export\??????????.zip where ?????????? is the contract ID.
10. Click <Close>. 11. Close FIT.
Step 4 – Transfer FieldManager contract from the origin computer 1. Open FieldManager and log into the appropriate FieldManager database if more than one exists. 2. Select Utilities | FieldNet | Request FieldNet ID list from FieldNet. 3. Select the <FN Mailbox> toolbar option. 4. Select the <Send Outbox> toolbar option. 5. After a few minutes, select the <Get Mail> toolbar option. A message box will appear stating “Receiving
Messages from FieldNet”. See page 27, Managing the FieldNet Mailbox, for instructions on retrieving and processing files.
6. Select File | Export | Transfer Contract

Source file location - \\mad00fp1\w10bpd\DCTech\AWPAdmin\AWP-ClientServer\Construction\2018Season\FieldSoftwareUsersGuideForConstructionStaff.docx Pantry location – C:\ACMApplications\Pantry2018\StatewideManualsAndGuides\FieldSoftwareUsersGuideForConstructionStaff.pdf Created by Annette Czerneski / Updated by Annette Czerneski on February 27, 2018 pg. 30
7. Respond <Yes> to the question “Do you wish to use FieldNet for this export?” REMEMBER - Contracts must be transferred using FieldNet! Failure to use FieldNet to transfer contracts may lead to FieldNet contract ownership issues.
8. Within the Select FieldNet Ids – Transfer Contracts window, use the SORT or FILTER options to locate the FieldNet ID that you would like to send the contract to. Important note: Be careful so you don’t accidently send the contract to the wrong FieldNet ID.
Sort: a. Double click on the “FieldNet ID” header to sort the FieldNet IDs in numeric order. b. Type the FieldNet ID in the “Find FieldNet ID” field and that ID should automatically be found. c. Highlight the FieldNet ID and click <Select>.
Filter: d. Select the <Filter> toolbar option. e. Setup the filter:
FieldNet ID Description – Contains - Type value to search for Click <OK>.
f. From the filtered list, highlight the FieldNet ID you wish to send the contract to and click <Select>.
9. Select the <Send Outbox> toolbar option.
Note: If you accidently send your contract to an incorrect FieldNet ID, contact Annette Czerneski or Adam Bleskacek, the AASHTOWare Project Administrators. Provide the following information: Contract ID, FieldNet ID contract was transferred from, FieldNet ID the contract was transferred to AND the FieldNet ID the contract SHOULD be transferred to.

Source file location - \\mad00fp1\w10bpd\DCTech\AWPAdmin\AWP-ClientServer\Construction\2018Season\FieldSoftwareUsersGuideForConstructionStaff.docx Pantry location – C:\ACMApplications\Pantry2018\StatewideManualsAndGuides\FieldSoftwareUsersGuideForConstructionStaff.pdf Created by Annette Czerneski / Updated by Annette Czerneski on February 27, 2018 pg. 31
Step 5 – Import FieldManager contract on destination computer 1. Log into the appropriate FieldManager database.
Note: The region / district designation MUST match between the origin and destination computers. 2. Select the <Get Mail> toolbar option. A message box will appear stating “Receiving Messages from FieldNet”. 3. Select the Inbox tab and process all the “unprocessed” messages in numeric order.
Highlight each message and clicking <Process M…> or double clicking on each message. 4. Select the Outbox tab to check if there are any messages appear in “Not Sent” status.
If there are, select the <Send Outbox> toolbar option. 5. Close FieldManager.
Step 6 – Field Information Tracking (FIT) import on destination computer 1. Save the copy of the FIT file sent from the Project Engineer of the origin computer. 2. Open FIT and click <Close> to skip the merge process
Note: If you complete the FIT merge by accident, you will need to repeat Step #3 above to export and delete the contract from FIT. You cannot import a FIT contract if it already exists. Contact Annette Czerneski or Adam Bleskacek, the AASHTOWare Project Administrators, for assistance.
3. Click <Contract Transfer> 4. Select “IMPORT TRANSFERRED FIT CONTRACT” 5. Click <Locate Contract file and start importing> 6. Browse for the file from the origin computer. Click <Open> and wait for the import to complete. Confirm the FIT data
imported correctly.
If you have any questions or concerns about this process, please contact Annette Czerneski or Adam Bleskacek, the AASHTOWare Project Administrators.
Northwest Region – 2017 Small Structures Category Winner STH 27 – Augusta to Cadott, Eau Claire County Contractor – Radtke Contractors, Inc. Project Engineer – Jim Dzienkowski, KL Engineering Project Manager – David Koepp Project Supervisor – Tim Mason

Source file location - \\mad00fp1\w10bpd\DCTech\AWPAdmin\AWP-ClientServer\Construction\2018Season\FieldSoftwareUsersGuideForConstructionStaff.docx Pantry location – C:\ACMApplications\Pantry2018\StatewideManualsAndGuides\FieldSoftwareUsersGuideForConstructionStaff.pdf Created by Annette Czerneski / Updated by Annette Czerneski on February 27, 2018 pg. 32
FieldManager – Contract Transfers Transferring a contract to the AASHTOWare Project Administrator
Project Engineers may need to transfer their contract to the AASHTOWare Project Administrator when contract problems cannot be resolved remotely. Project Engineers will work directly with Annette Czerneski or Adam Bleskacek in these instances. 1. Close FieldManager, if necessary.
2. Open Windows Explorer and run the ACM Backup process:
• Run C:\ACMApplications\Backup\ACMBackup.bat. • A folder will appear with the current date and time under c:\ACMApplications\Backup with a copy of the
FieldManager database(s), FIT database and MIT database.
3. Open FieldManager and log into the appropriate FieldManager database is more than one exists. 4. Select Utilities | FieldNet | Request FieldNet ID list from FieldNet. 5. Select the <Send Outbox> toolbar option. 6. Wait a few minutes. Select the <Get Mail> toolbar option. A window appears stating “Receiving Messages from
FieldNet”. See page 27, Managing the FieldNet Mailbox, for instructions on retrieving and processing files.
7. Select File | Export | Transfer Contract 8. Respond <Yes> to the question “Do you wish to use FieldNet for this export?”
9. Highlight the contract and click the <Select> toolbar option. 10. On the Transfer the contract to another FieldManager window, select “Transfer the contract”. Click <OK>. 11. Within the Select FieldNet Ids – Transfer Contracts window search for the FMGRADMIN FieldNet ID.
a. Double click on the “FieldNet ID” header to sort the FieldNet IDs in numeric order. b. Type the “FMGRADMIN” in the “Find FieldNet ID” field and that ID should automatically be found. c. Highlight the FMGRADMIN FieldNet ID. Click <Select>.
12. Select the <Send Outbox> toolbar option.
13. Notify Annette Czerneski or Adam Bleskacek, the AASHTOWare Project Administrators, that transfer is complete.

Source file location - \\mad00fp1\w10bpd\DCTech\AWPAdmin\AWP-ClientServer\Construction\2018Season\FieldSoftwareUsersGuideForConstructionStaff.docx Pantry location – C:\ACMApplications\Pantry2018\StatewideManualsAndGuides\FieldSoftwareUsersGuideForConstructionStaff.pdf Created by Annette Czerneski / Updated by Annette Czerneski on February 27, 2018 pg. 33
FieldManager – Contract Transfers
Sending a read only contract to another FieldManager computer
These instructions are for field staff to use to send read only contracts to another FieldManager computer. If you do not know the FieldNet ID of the computer you wish to send the contract to, please contact your region Contract Specialist for assistance. 1. Log into the appropriate FieldManager database 2. Select Utilities | FieldNet | Request FieldNet ID list from FieldNet. 3. Select <FN Mailbox> toolbar option. 4. Select the <Send Outbox> toolbar option. 5. Wait a few minutes. Select <Get Mail>. A message box will appear stating “Receiving Messages from FieldNet”.
See page 27, Managing the FieldNet Mailbox, for instructions on retrieving and processing files. 6. Select File | Export | Transfer Contract 7. Respond <Yes> to the question “Do you wish to use FieldNet for this export?”
REMEMBER - Contracts must be transferred using FieldNet! Failure to use FieldNet to transfer contracts may lead to FieldNet contract ownership issues.
8. Highlight the contract and click the <Select> toolbar option. 9. On the Transfer the contract to another FieldManager window, select “Create a regular read only copy of the
contract”. <OK>
10. Within the Select FieldNet Ids – Transfer Contracts window, use the SORT or FILTER options to locate the FieldNet ID that you would like to send the contract to. Note: Be very careful so you don’t accidently send the contract to the wrong FieldNet ID. Sort: a. Double click on the “FieldNet ID” header to sort the FieldNet IDs in numeric order. b. Type the FieldNet ID in the “Find FieldNet ID” field and that ID should automatically be found. c. Highlight the FieldNet ID and click <Select>.

Source file location - \\mad00fp1\w10bpd\DCTech\AWPAdmin\AWP-ClientServer\Construction\2018Season\FieldSoftwareUsersGuideForConstructionStaff.docx Pantry location – C:\ACMApplications\Pantry2018\StatewideManualsAndGuides\FieldSoftwareUsersGuideForConstructionStaff.pdf Created by Annette Czerneski / Updated by Annette Czerneski on February 27, 2018 pg. 34
Filter: d. Select the <Filter> toolbar option. e. Setup the filter:
FieldNet ID Description – Contains - Type value to search for Click <OK>.
f. From the filtered list, highlight the FieldNet ID you wish to send the contract to and click <Select>.
11. Select the <Send Outbox> toolbar option.
12. Notify the recipient that you have sent a read only copy of the FieldManager contract to their FieldNet ID.
Southwest Region – 2017 Large Structures Category Winner USH 12, West Madison Beltline, High Point Structure, Dane County Contractor – Lunda Construction Company Project Engineer – Jon Maxwell, MSA Professional Services Project Manager – David Layton Project Supervisor – Brenda Schoenfeld

Source file location - \\mad00fp1\w10bpd\DCTech\AWPAdmin\AWP-ClientServer\Construction\2018Season\FieldSoftwareUsersGuideForConstructionStaff.docx Pantry location – C:\ACMApplications\Pantry2018\StatewideManualsAndGuides\FieldSoftwareUsersGuideForConstructionStaff.pdf Created by Annette Czerneski / Updated by Annette Czerneski on February 27, 2018 pg. 35
FieldManager – Contract Transfers Archiving and removing finaled contracts
Processes differ between the region offices on the project archival process.
• Some region offices have the Project Engineer send the final estimate and archive the FieldManager contract. • Some region offices have the Project Engineer or Project Manager send the working copy of the contract to
the region office prior to creation of the final estimate. Work with your Project Manager and Contract Specialist to ensure you complete the appropriate steps for your region. Important note:
• These steps cannot be completed until the finals process is done including the creation and approval of the final estimate and the appropriate records are archived with contract administration staff.
Person Responsible Action Steps Project Engineer Contract Transfer 1. If staff other than the Project Engineer send the final
estimate AND archive FieldManager contracts for the region, the Project Engineer MUST complete ALL the steps outlined on pages 29-31, FieldManager – Contract Transfers - Transferring a contract to another FieldManager computer, prior to archiving the contract.
Person archiving contract Check for FieldManager Mail
1. Log into the appropriate FieldManager database (if more than one exists) and highlight the contract.
2. Select the <Send Outbox> toolbar option followed by the <Get Mail> toolbar option to send and receive pending messages.
3. Process all the “unprocessed” messages in numeric order by highlighting each message and either clicking <Process Msg> or double clicking on the message.
4. Close the FieldNet Mailbox. 5. Close FieldManager.
Person archiving contract Send FIT Data 1. Open FIT. 2. Wait for database connection and click <Yes, Merge> 3. Select Send Data | Start Processing Send Data from the
menu bar. Complete the steps to send FIT data. 4. Close FIT.
Person archiving contract FieldManager Contract Archival
1. Log into the appropriate FieldManager database (if more than one exists) and highlight the contract.
2. Select File | Archive Contract. The Archive message window will appear. Click <Yes> to continue with the archival process.
3. Highlight the contract in the Select Contract to Archive window and click the <Select> toolbar option. The contract will be saved (archived) to C:\ProgramData\FieldManager\Archive. Note: If the final estimate has not been sent and the contract is not ready to be archived, the contract will not appear in the Select Contract to Archive window.
4. On the Archive window, select <Yes> to save another copy of the archived contract to a different location (CD, diskette, USB drive, etc.) Label the media with the contract ID, project ID, highway name, location, county and the FieldManager version. Send the labeled media to the region Contract Specialist or other designated person so it may be filed in the finals box.

Source file location - \\mad00fp1\w10bpd\DCTech\AWPAdmin\AWP-ClientServer\Construction\2018Season\FieldSoftwareUsersGuideForConstructionStaff.docx Pantry location – C:\ACMApplications\Pantry2018\StatewideManualsAndGuides\FieldSoftwareUsersGuideForConstructionStaff.pdf Created by Annette Czerneski / Updated by Annette Czerneski on February 27, 2018 pg. 36
FieldBook
FieldBook is designed to automate the construction Inspector’s task of documenting the progress of construction using a different computer. With FieldBook, Inspectors can record construction progress in Inspector’s Daily Reports (IDRs), upload the IDRs to FieldManager in the field office, download updates from FieldManager and access contract status information. More information can be found in the FieldManager User’s Guide, Chapter 16 – Using FieldBook, found in the Pantry\Manual folder. Exporting contract(s) from FieldManager: 1. Log into the appropriate FieldManager database (if more than one exists) and highlight the contract. 2. Select File | Export | Contracts to FieldBook or select <Export - FB> from the toolbar. 3. On the Export Contracts to FieldBook window, select <No> to the question “Do you wish to use FieldNet for this
export?”
4. On the Select Contracts to Export to FieldBook window • Highlight the contract • “Include reference files in the export” if this is the first time you are exporting the contract OR if you have
recently updated reference files for this Fieldmanager database. • <Select>
5. On the Export Contracts to FieldBook window, browse to the location to save the export file. Click <OK>. 6. After a successful export, an Export window will appear stating the location and name of the export file. Click
<OK>. Importing contract(s) into FieldBook Double click on the FieldBook shortcut in the WisDOTShortcuts folder or desktop OR select Start | All Programs | FieldBook | FieldBook 5.3a. Then select from one of the three situations outlined below. 1. If this is the first time you are importing a contract into FieldBook, you will need to create a FieldBook database:
• Browse and select the FieldManager export file. • On the Add FieldBook Database window, enter a database name:
Examples: NWFieldBook, NCI39, NEFieldBook, SWLacrosse, or SEFieldBook The name entered MUST relate to the FieldManager database that you are exporting the contract from.
• Log into FieldBook using one of the user IDs from the FieldManager database that the contract was exported from.
2. If you are importing a new contract into FieldBook and need to create a new database (and already have an
existing FieldBook database: • Select the “Database Management” toolbar option next to the Database dropdown menu on the logon screen. • Select <Add> • Browse to the location of the FieldManager export file. <Open> • <OK> • On the Add FieldBook Database window, enter a database name:
Examples: NWFieldBook, NCI39, NEFieldBook, SWLacrosse, or SEFieldBook The name entered MUST relate to the FieldManager database that you are exporting the contract from.
• Select the FieldBook database and log into FieldBook using the same logon credentials you would use to access this contract in FieldManager
3. If you are importing contract data into an existing FieldBook database.
• Log into the appropriate FieldBook database using the same logon credentials you would use to access this contract in FieldManager.
• Select File | Import | Contract from FieldManager or the <Import – FM> toolbar option from the toolbar. • Browse to the location of the FieldManager export file. <OK> to import and <OK> to confirm import.
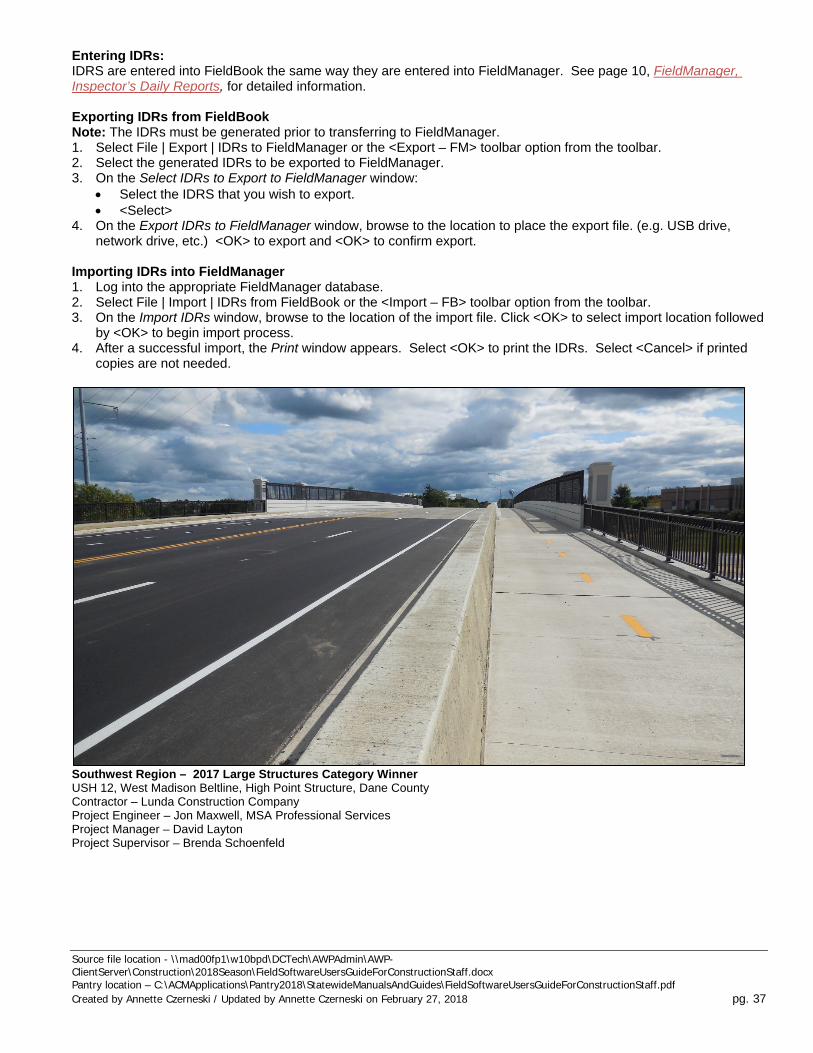
Source file location - \\mad00fp1\w10bpd\DCTech\AWPAdmin\AWP-ClientServer\Construction\2018Season\FieldSoftwareUsersGuideForConstructionStaff.docx Pantry location – C:\ACMApplications\Pantry2018\StatewideManualsAndGuides\FieldSoftwareUsersGuideForConstructionStaff.pdf Created by Annette Czerneski / Updated by Annette Czerneski on February 27, 2018 pg. 37
Entering IDRs: IDRS are entered into FieldBook the same way they are entered into FieldManager. See page 10, FieldManager, Inspector’s Daily Reports, for detailed information. Exporting IDRs from FieldBook Note: The IDRs must be generated prior to transferring to FieldManager. 1. Select File | Export | IDRs to FieldManager or the <Export – FM> toolbar option from the toolbar. 2. Select the generated IDRs to be exported to FieldManager. 3. On the Select IDRs to Export to FieldManager window:
• Select the IDRS that you wish to export. • <Select>
4. On the Export IDRs to FieldManager window, browse to the location to place the export file. (e.g. USB drive, network drive, etc.) <OK> to export and <OK> to confirm export.
Importing IDRs into FieldManager 1. Log into the appropriate FieldManager database. 2. Select File | Import | IDRs from FieldBook or the <Import – FB> toolbar option from the toolbar. 3. On the Import IDRs window, browse to the location of the import file. Click <OK> to select import location followed
by <OK> to begin import process. 4. After a successful import, the Print window appears. Select <OK> to print the IDRs. Select <Cancel> if printed
copies are not needed.
Southwest Region – 2017 Large Structures Category Winner USH 12, West Madison Beltline, High Point Structure, Dane County Contractor – Lunda Construction Company Project Engineer – Jon Maxwell, MSA Professional Services Project Manager – David Layton Project Supervisor – Brenda Schoenfeld
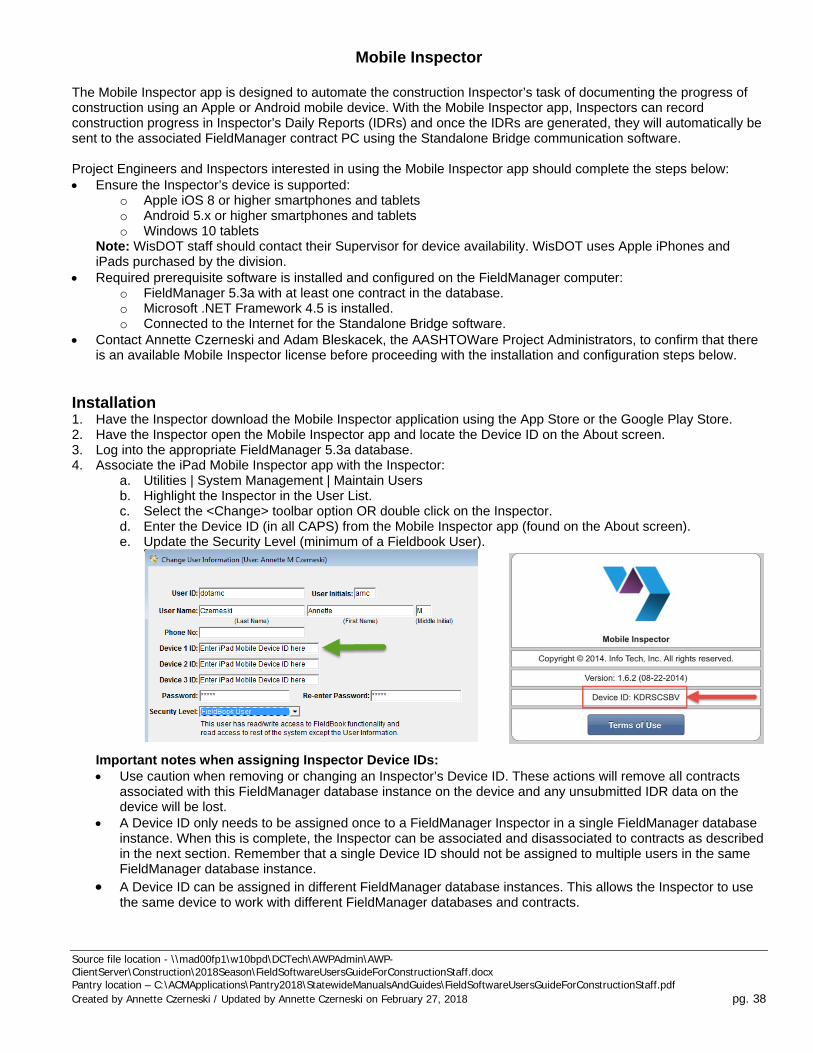
Source file location - \\mad00fp1\w10bpd\DCTech\AWPAdmin\AWP-ClientServer\Construction\2018Season\FieldSoftwareUsersGuideForConstructionStaff.docx Pantry location – C:\ACMApplications\Pantry2018\StatewideManualsAndGuides\FieldSoftwareUsersGuideForConstructionStaff.pdf Created by Annette Czerneski / Updated by Annette Czerneski on February 27, 2018 pg. 38
Mobile Inspector
The Mobile Inspector app is designed to automate the construction Inspector’s task of documenting the progress of construction using an Apple or Android mobile device. With the Mobile Inspector app, Inspectors can record construction progress in Inspector’s Daily Reports (IDRs) and once the IDRs are generated, they will automatically be sent to the associated FieldManager contract PC using the Standalone Bridge communication software. Project Engineers and Inspectors interested in using the Mobile Inspector app should complete the steps below: • Ensure the Inspector’s device is supported:
o Apple iOS 8 or higher smartphones and tablets o Android 5.x or higher smartphones and tablets o Windows 10 tablets
Note: WisDOT staff should contact their Supervisor for device availability. WisDOT uses Apple iPhones and iPads purchased by the division.
• Required prerequisite software is installed and configured on the FieldManager computer: o FieldManager 5.3a with at least one contract in the database. o Microsoft .NET Framework 4.5 is installed. o Connected to the Internet for the Standalone Bridge software.
• Contact Annette Czerneski and Adam Bleskacek, the AASHTOWare Project Administrators, to confirm that there is an available Mobile Inspector license before proceeding with the installation and configuration steps below.
Installation 1. Have the Inspector download the Mobile Inspector application using the App Store or the Google Play Store. 2. Have the Inspector open the Mobile Inspector app and locate the Device ID on the About screen. 3. Log into the appropriate FieldManager 5.3a database. 4. Associate the iPad Mobile Inspector app with the Inspector:
a. Utilities | System Management | Maintain Users b. Highlight the Inspector in the User List. c. Select the <Change> toolbar option OR double click on the Inspector. d. Enter the Device ID (in all CAPS) from the Mobile Inspector app (found on the About screen). e. Update the Security Level (minimum of a Fieldbook User).
Important notes when assigning Inspector Device IDs: • Use caution when removing or changing an Inspector’s Device ID. These actions will remove all contracts
associated with this FieldManager database instance on the device and any unsubmitted IDR data on the device will be lost.
• A Device ID only needs to be assigned once to a FieldManager Inspector in a single FieldManager database instance. When this is complete, the Inspector can be associated and disassociated to contracts as described in the next section. Remember that a single Device ID should not be assigned to multiple users in the same FieldManager database instance.
• A Device ID can be assigned in different FieldManager database instances. This allows the Inspector to use the same device to work with different FieldManager databases and contracts.

Source file location - \\mad00fp1\w10bpd\DCTech\AWPAdmin\AWP-ClientServer\Construction\2018Season\FieldSoftwareUsersGuideForConstructionStaff.docx Pantry location – C:\ACMApplications\Pantry2018\StatewideManualsAndGuides\FieldSoftwareUsersGuideForConstructionStaff.pdf Created by Annette Czerneski / Updated by Annette Czerneski on February 27, 2018 pg. 39
5. Associate the Inspector(s) with the contract: 1. From the main menu, highlight and double click the contract OR select the <Docu> toolbar option. 2. Go to the Users tab. 3. Click <Add User>. 4. Highlight the user. 5. Click <Select>.
Important notes when associating Inspectors to contracts: • Use caution when removing a user from a contract. This action will remove the contract from that user’s
mobile device(s) and any unsubmitted IDR data on that device for this contract will be lost. • If the Inspector changes devices, such as to replace a device, only the Inspector’s Device ID needs to be
updated, as the contract associations are tied to the user, rather than the Device ID. • You can add up to three Mobile Inspector Device Ids for the user; however, WisDOT is only authorizing one
device per user because of the limited number of available licenses. WisDOT receives a monthly license usage report from InfoTech.
6. Install the Standalone Bridge Communication Software: a. Go to Utilities | User Preferences | Bridge b. Under the Setup area, click <Install
Bridge> c. Click <Yes> on the “Install Bridge” window
after confirming you have an Internet connection.
d. Depending on your company’s security policies, select either <Save File> and run the installation once the download is complete OR wait for the installation to complete automatically. Note: DO NOT select <OK> on the “Please click ‘OK’ when the Bridge installation has completed” window until the installation is COMPLETE.

Source file location - \\mad00fp1\w10bpd\DCTech\AWPAdmin\AWP-ClientServer\Construction\2018Season\FieldSoftwareUsersGuideForConstructionStaff.docx Pantry location – C:\ACMApplications\Pantry2018\StatewideManualsAndGuides\FieldSoftwareUsersGuideForConstructionStaff.pdf Created by Annette Czerneski / Updated by Annette Czerneski on February 27, 2018 pg. 40
7. Register the CMS ID with InfoTech:
a. Click <Get CMS ID> and follow the prompts to copy the FieldManager Database ID to the clipboard. b. Send an e-mail to InfoTech Mobile Inspector Support Team ([email protected]) to register
the CMS ID. Include the following information in your e-mail: • E-mail address that will be used to send notifications about the Bridge’s instance activities • Mobile Inspector Device id for all connected devices • Name of the individual with the device • Company name (WisDOT or Consultant firm name) • CC: [email protected], [email protected] and [email protected]
c. Once the registration is complete and you receive a confirmation e-mail from InfoTech, proceed to the next section and complete the configuration.
Configuration 8. Log off and back into the appropriate FieldManager database. 9. Go to Utilities | User Preferences | Bridge 10. Under the “Configuration” section:
a. Check the "Run standalone Bridge for current databases” checkbox. b. Set the cycle time to user preference (e.g. 1 minutes). Set this value to the frequency at which to run the
Bridge service (in minutes). This is the interval of time the service will be inactive before checking for pending data to be retrieved from or sent to the SyncService (and the mobile devices).
11. Under the “Log of Most Recent Cycle” section: a. The allotted time and the log should show an active connection sending and retrieving information. b. Close the Mobile Inspector app on the mobile device and reopen it. In a few minutes, the contract should
appear on the mobile device.
Important notes:
• Prior to transferring a FieldManager contract to another computer, the Project Leader needs to make sure that all of the Inspectors have LOCKED their IDRs in Mobile Inspector and that they have been received in FieldManager. The Inspectors CANNOT LOCK anymore IDRs until the contract has been transferred and ALL users and mobile devices updated on the new FieldManager computer.
• Staff can download mobile versions of the Standard Specifications and Construction Materials Manual to their mobile device. Go to http://wisconsindot.gov/Pages/doing-bus/eng-consultants/cnslt-rsrces/rdwy/mobile.aspx for links to download these documents.

Source file location - \\mad00fp1\w10bpd\DCTech\AWPAdmin\AWP-ClientServer\Construction\2018Season\FieldSoftwareUsersGuideForConstructionStaff.docx Pantry location – C:\ACMApplications\Pantry2018\StatewideManualsAndGuides\FieldSoftwareUsersGuideForConstructionStaff.pdf Created by Annette Czerneski / Updated by Annette Czerneski on February 27, 2018 pg. 41
Field Information Tracking System (FIT) The Field Information Tracking (FIT) and Project Tracking (PT) systems are supplemental FieldManager programs, developed by Atwood Systems. • Field Information Tracking System (FIT) – Field staff use this system to remotely enter Design Quality Index
reports (DQIs), acceptance information, warranty information, field office location and staff information, and structure information.
• Project Tracking System (PT) – FIT data sent by field staff is imported into Project Tracking and accessible by WisDOT region staff, DOT central office staff, DMV, and State Patrol staff.
Opening FIT AND Merging databases 1. Close FieldManager before proceeding. 2. Open Field Information Tracking and the Merge FieldManager with Field Information Tracking window will appear. 3. Wait for FIT to connect to the FieldManager databases. 4. The Project Engineers MUST click <Yes, Merge>.
This is done to ensure that FieldManager AND FIT data is merged and ready to be sent to Project Tracking.
5. The following prompt appears to ensure that FieldManager is closed before FIT will start the Merge Process.
o If FieldManager is closed (shut down), click <Yes> to continue.
o If FieldManager is open, click <No>, close the FIT application, close FieldManager, reopen FIT and begin the merge process again.
DQI Tab Note: A Design Quality Index (DQI) report is REQUIRED for each PROJECT within the contract. Design Quality Index reports for construction projects are entered within FIT. Factors are rated on a scale of 1-7. Comments may also be included.
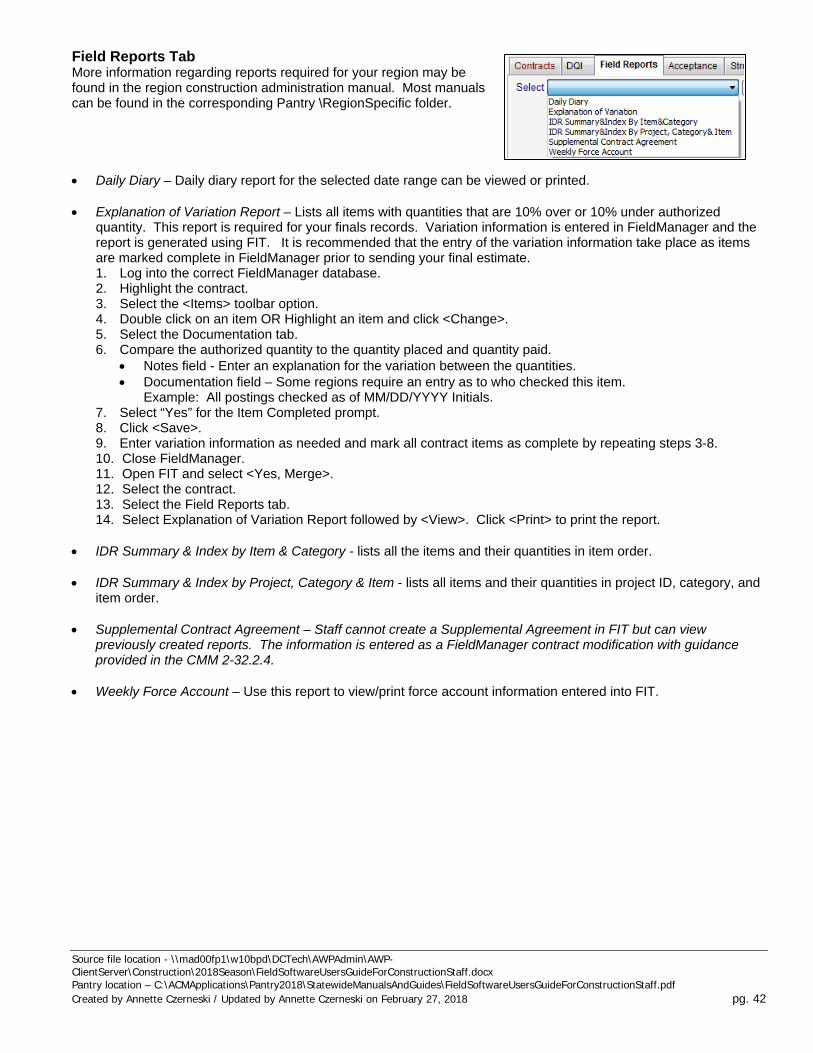
Source file location - \\mad00fp1\w10bpd\DCTech\AWPAdmin\AWP-ClientServer\Construction\2018Season\FieldSoftwareUsersGuideForConstructionStaff.docx Pantry location – C:\ACMApplications\Pantry2018\StatewideManualsAndGuides\FieldSoftwareUsersGuideForConstructionStaff.pdf Created by Annette Czerneski / Updated by Annette Czerneski on February 27, 2018 pg. 42
Field Reports Tab More information regarding reports required for your region may be found in the region construction administration manual. Most manuals can be found in the corresponding Pantry \RegionSpecific folder. • Daily Diary – Daily diary report for the selected date range can be viewed or printed.
• Explanation of Variation Report – Lists all items with quantities that are 10% over or 10% under authorized
quantity. This report is required for your finals records. Variation information is entered in FieldManager and the report is generated using FIT. It is recommended that the entry of the variation information take place as items are marked complete in FieldManager prior to sending your final estimate. 1. Log into the correct FieldManager database. 2. Highlight the contract. 3. Select the <Items> toolbar option. 4. Double click on an item OR Highlight an item and click <Change>. 5. Select the Documentation tab. 6. Compare the authorized quantity to the quantity placed and quantity paid.
• Notes field - Enter an explanation for the variation between the quantities. • Documentation field – Some regions require an entry as to who checked this item.
Example: All postings checked as of MM/DD/YYYY Initials. 7. Select “Yes” for the Item Completed prompt. 8. Click <Save>. 9. Enter variation information as needed and mark all contract items as complete by repeating steps 3-8. 10. Close FieldManager. 11. Open FIT and select <Yes, Merge>. 12. Select the contract. 13. Select the Field Reports tab. 14. Select Explanation of Variation Report followed by <View>. Click <Print> to print the report.
• IDR Summary & Index by Item & Category - lists all the items and their quantities in item order.
• IDR Summary & Index by Project, Category & Item - lists all items and their quantities in project ID, category, and item order.
• Supplemental Contract Agreement – Staff cannot create a Supplemental Agreement in FIT but can view previously created reports. The information is entered as a FieldManager contract modification with guidance provided in the CMM 2-32.2.4.
• Weekly Force Account – Use this report to view/print force account information entered into FIT.

Source file location - \\mad00fp1\w10bpd\DCTech\AWPAdmin\AWP-ClientServer\Construction\2018Season\FieldSoftwareUsersGuideForConstructionStaff.docx Pantry location – C:\ACMApplications\Pantry2018\StatewideManualsAndGuides\FieldSoftwareUsersGuideForConstructionStaff.pdf Created by Annette Czerneski / Updated by Annette Czerneski on February 27, 2018 pg. 43
Acceptance Tab Some fields are required – see details below. ALWAYS complete a FIT data merge and send if changes are made to the Acceptance tab. • All contracts require the Project Engineer to enter a “Punch List Complete Date” • Erosion Control Implementation information (ECIP) is REQUIRED if the contract requires the breaking of ground. • Only if the contract has a plant establishment period, the Project Engineer is required to enter BOTH the
“Initial Completion of Planting Date” AND the “Plant Estb Period (Years)”. • Select “Yes” if the project has Late Seeding (no or minimal germination prior to winter) • Select “Yes” if the project has Cold Weather Paving (after October 15) • Select “Yes” if the project has Raised Paved Markers. • If the project has painting (centerline/edge line), enter the “Paint Finish Date” and “Paint Proving Period (Days)”. • If a claim is submitted, the Project Engineer is required to enter a “Submission of Claim Date”.
Structures Tab Data entry of structure information in FIT is no longer required. 1. All falsework plans must be sealed by a P.E. Project Engineer should verify that falsework plan is being followed. 2. All temporary structures require a contractor inspection and Form DT2007 provided prior to opening to traffic. 3. Contact Bridge Designer / BOS for ANY structural field adjustment approvals. 4. Notify Region Bridge Maintenance Section immediately when any structure is completed to set up an initial
inspection (while contractor is still on site). 5. E-mail Vertical / Horizontal Clearance forms / pdf to [email protected] and to Region
Bridge Maintenance Engineer. (found in Statewide Pantry Forms) 6. E-mail all Structural Shop Drawings to [email protected]. 7. PILING RECORD (DT1315): E-mail to addresses below, with PM concurrence
ORIGINAL- FINAL BOX

Source file location - \\mad00fp1\w10bpd\DCTech\AWPAdmin\AWP-ClientServer\Construction\2018Season\FieldSoftwareUsersGuideForConstructionStaff.docx Pantry location – C:\ACMApplications\Pantry2018\StatewideManualsAndGuides\FieldSoftwareUsersGuideForConstructionStaff.pdf Created by Annette Czerneski / Updated by Annette Czerneski on February 27, 2018 pg. 44
E-MAIL COPY TO [email protected] E-MAIL COPY TO [email protected]
8. PILE DRIVING DATA (DT1924): E-mail to addresses below, with PM concurrence ORIGINAL- FINAL BOX E-MAIL COPY TO [email protected] E-MAIL COPY TO [email protected]
9. Bolt tightening - PreInstallVerifTestOfHighStrengthBoltsDT2114.dotm form (Statewide Pantry Forms) 10. Anchor Bolts and Sign Structure Installation – Complete forms below:
PreInstallVerifTestOfHighStrengthBoltsDT2114.dotm, HighStrengthSteelAnchorRodInstallTensioningRecDT2321.dotm, AncStrucPreInstallVerifTestOfHighStrengthBoltsDT2322.dotm (Statewide Pantry Forms)
Staff / Field Office Tab Staff / Field office information is required for all contracts. ALWAYS complete a FIT data send after changes are made to the Staff / Field Office tab. Notify your region Contract Specialist. This is very important so they can complete a process to ensure e-mails are automatically sent appropriate staff the substantially complete notice and semi-finals. • Contacts section –
o Provide e-mail addresses, cell and office phone numbers for the Project Engineer, Supervisor and Project Manager. Select WisDOT employee or consultant for each of these staff.
o Enter prime contractor and traffic company contact information. o Enter Contractor and WisDOT Project Material Coordinators’ contact information.
• Field Office Location – Provide address, directions and telephone number for the field office. • Staff Details – Create a staff listing of staff overseeing the contract including the Project Engineer. Staff can be
added using the FieldManager user table (Add / Select Name from List)
Force Account Tab Project Engineers can enter force account information, if applicable. Warranty Tab Field staff are required to enter warranty item information, if applicable. Project Controls Tab Do not enter data under this tab until further instruction is provided.

Source file location - \\mad00fp1\w10bpd\DCTech\AWPAdmin\AWP-ClientServer\Construction\2018Season\FieldSoftwareUsersGuideForConstructionStaff.docx Pantry location – C:\ACMApplications\Pantry2018\StatewideManualsAndGuides\FieldSoftwareUsersGuideForConstructionStaff.pdf Created by Annette Czerneski / Updated by Annette Czerneski on February 27, 2018 pg. 45
Sending FIT data Field staff are required to MERGE and SEND FIT data under the following circumstances: • When the ECIP is approved. • When contract time starts. • When a contract modification is created. • When a contract modification is approved. • When work is completed on the contract. • When a DQI report is completed. • When an estimate is submitted. • When a claim in submitted (enter date on Acceptance tab). • When the punch list is complete (enter date on the Acceptance tab). • After the Project Engineer enters the all the contact information for staff working on this contract plus the field
office location on the Staff / Field Office tab. • Weekly, at a minimum, for labor compliance reviews. Steps to follow to send FIT data: 1. Select Send Data | Start Processing Send Data from the menu bar. 2. Confirm and/or update the contact information on the FIT Data Send window. 3. Select the method to send your FIT data:
a. Consultant staff – Select “Direct Web Send” to send data to Atwood Systems b. WisDOT staff – Select “Send Via E-mail” to send using the WisDOT Exchange servers.
4. Click <Merge FieldManager Data> if you forgot to complete this step when you opened FIT 5. Click <Start Data Send> to continue the process. 6. Click <OK> on the window that the data send was successful. Important notes:
• There is a time delay between the FIT Data send and the appearance of the data in Project Tracking. FIT data is imported into the Project Tracking database twice a day. Contract Specialists will usually see data from sends after 11 a.m. and 4 p.m. each day so keep this in mind when sending FIT data.
• If your FIT data send is failing, check the FIT data send configuration settings. (Review these settings if you encounter a SMTP Server Connection failure error message.) 1. Select Send Data | Configure E-mail from the menu bar.
• FieldNet ID – fmgr??? where ??? is your FieldNet ID. • POP Server name
o Consultants – leave this field blank o WisDOT staff – mail.dot.state.wi.us
• SMTP Server name o Consultants – leave this field blank o WisDOT staff – mailx.dot.state.wi.us
• Select “A Userid and Password is NOT required” 2. Click <Save and Exit> to save any changes made to this information.
To check for and install FIT software updates WisDOT staff will receive FIT software updates automatically through SCCM. These will be applied to WisDOT laptops when they connect to the WisDOT network directly or remotely using Cisco Any Connect Client. Consultant staff need to complete the steps below to apply an update on their computers. In some cases, the updates may require administrative access.
1. Open FIT. 2. Click <Yes, Merge>. 3. Click <Yes> “Has Field Manager been shut down?” 4. When merge is complete, click <Close>. 5. Select Updates | Software Updates from the menu toolbar. 6. Click <Continue> on the “An Internet Connection is required!” window. 7. The application will check for available updates.
a. If you receive, “Software Version is Current”, go to step 9. b. If you receive, “A software update is available. What would you like to do?”, click <Update Now>

Source file location - \\mad00fp1\w10bpd\DCTech\AWPAdmin\AWP-ClientServer\Construction\2018Season\FieldSoftwareUsersGuideForConstructionStaff.docx Pantry location – C:\ACMApplications\Pantry2018\StatewideManualsAndGuides\FieldSoftwareUsersGuideForConstructionStaff.pdf Created by Annette Czerneski / Updated by Annette Czerneski on February 27, 2018 pg. 46
c. The FIT application will download the update and close the application in the background. Here are the installation steps:
i. Wait to see if the installation will begin on its own. If it does not, within Windows Explorer <Right Click> on C:\ProgramData\AtwoodSystems\FIT\Downloads\FITServicePack.exe and select <Run As Administrator>
ii. Click <Yes> for the question “Do you want to allow this application from an unknown publisher to make changes to your device?”
iii. Click <Install> and follow the steps to complete the installation process. Click <Finish> when complete.
8. Click <Yes, Merge> to merge again, then click <Close>. 9. From the top menu bar click Send Data | Start Processing Send Data, from the prompt choose <Start Data
Send> to send a FIT file to Atwood Systems for processing. If after working with their company’s IT staff, consultant project staff have issues downloading and installing the FIT and/or MIT updates, please contact BITS L2 ACM support staff for assistance. Support
Support website http://www.atwoodsystems.com/wisdot/ E-mail address [email protected] Telephone number 1-877-518-1920 (toll free)
Southeast Region – 2017 Large Contracts Category Winner Lakefront Gateway, IH 794 Ramps at Lincoln Memorial Drive, Milwaukee County Contractor – Zenith Tech Inc. Project Engineer – Brad Bacilek, Benesch Project Manager – Heather Sackman Project Supervisor – Brian Roper

Source file location - \\mad00fp1\w10bpd\DCTech\AWPAdmin\AWP-ClientServer\Construction\2018Season\FieldSoftwareUsersGuideForConstructionStaff.docx Pantry location – C:\ACMApplications\Pantry2018\StatewideManualsAndGuides\FieldSoftwareUsersGuideForConstructionStaff.pdf Created by Annette Czerneski / Updated by Annette Czerneski on February 27, 2018 pg. 47
Tips for MIT (Materials Information Tracking System) The Materials Information Tracking (MIT) and Materials Tracking System (MTS) are supplemental programs developed by Atwood Systems.
• Materials Information Tracking System (MIT) – Used by field personnel to remotely enter reports. After verifying the reports, they are sent by field staff and posted on the Internet. The reports are also for region and central office staff to review using the Materials Tracking System (MTS).
• Materials Tracking System (MTS) – WisDOT LAN application used by region and central office materials staff to enter reports directly into the Oracle database.
General system information System logon The MIT logon ID is “verifier” and the password is “person”. Projects
Projects are imported into MIT so that material reports can be entered. MIT Site ID – registering your computer
If this is the first time MIT is installed on this computer, complete the Application Registration window that appears when you log onto MIT:
• Project Engineer’s name • Company • Project Engineer’s e-mail address • Telephone number without special characters (no hyphens, parentheses, etc.) • Select <Get Installation Key> to register the computer
Download aggregate source, brand/mill, sub/supplier, test type, admixture, and project lists. To download the latest data for any of the above lists: 1. Select the <Get Updates> toolbar option followed by “Project Data”. 2. Wait for the download and import process to complete.
Adding / Removing Projects Projects are downloaded from the MRS system. Each project is added separately. Projects can be loaded on multiple materials PCs. 1. On the Projects tab, the list of projects added to this computer will appear. Use this screen to add or delete
projects from this computer. 2. To add new projects, select the <Add a Project> toolbar option. 3. Search for the project by entering the “partial project ID”. Scroll through the list and select the project to add.
Select the <Return w/selection> toolbar option. 4. If the project does not appear, select the <Get Updates> toolbar option followed by “Project Data” to obtain a new
project list. 5. All projects added in this area are available for use when creating MIT reports. Approved Lists The Approved Lists are located on the Internet at http://wisconsindot.gov/Pages/doing-bus/eng-consultants/cnslt-rsrces/tools/appr-prod/default.aspx. The lists include approved products, approved beam guard heat numbers, pre-tested white curing compounds, approved nuclear gauges and users and current the approved pit and quarry listing by county. Materials report information – list of reports that field staff may create Important notes: 1. On each report be sure to include the full name of the individual sampling and testing the specific material. 2. Staff MUST use the test data remarks field when a remark is required. DO NOT use the sample card remarks field. 130 Concrete cylinders 135 Concrete Probing Thickness 155 Miscellaneous Materials
This includes QMP Summary Reports and RFI’s for explanation on acceptance of Non-conforming Materials. The “test description” field is used to enter report comments. This information is entered on Test Data screen.

Source file location - \\mad00fp1\w10bpd\DCTech\AWPAdmin\AWP-ClientServer\Construction\2018Season\FieldSoftwareUsersGuideForConstructionStaff.docx Pantry location – C:\ACMApplications\Pantry2018\StatewideManualsAndGuides\FieldSoftwareUsersGuideForConstructionStaff.pdf Created by Annette Czerneski / Updated by Annette Czerneski on February 27, 2018 pg. 48
The “remarks” field is used to reference another report. This information is entered on the Sample Card screen.
162 Fine & coarse aggregate for concrete Summary report for concrete aggregate gradations - this includes all Concrete Aggregate Gradations.
217 Aggregates Summary report for all other aggregates - this includes Aggregate Field Gradations, Base Course, Backfill, Select Borrow.
232 Soil Nuclear Density 257 Asphalt Mix Testing
Only used by Asphalt Mix Testing laboratory. 262 Asphaltic Pavement Nuclear Density 900 External Test Reference – No longer used. 905 Material Diary Inspection
Standard report when required from EGuide comments, also includes ability to reference Certifications, Certified Report of Tests, Aggregate Quality Tests not sent to Madison under your Project ID and Asphalt Mix Designs.
DT1310 WisDOT Certification of Materials Report Project Materials Coordinator creates this report upon completion of the materials finals.
Test types Important notes: 1. The test type is a required entry. 2. Some test types are designated as reserved. DO NOT select these types unless you have been authorized. 3. Refer to the project specifications for correct test types. Analytical Test
Reserved for use by Central Office Laboratory personnel only. Typical AT test report would be design test data or test research information.
Certifications on File (CF) Report used for referencing external Certification of Compliance and Certified Report of test and Analysis documents.
Independent Assurance (IA) Report of test and observation done for the Independent Assurance Program. Reserved for use by Independent Assurance personnel.
Quality Control (QC) Report of tests done by the contracts as required under QMP specifications. Not commonly input at this time. Electronic entry of QC test is optional.
Verification (V) Report of tests done by WisDOT to verify product/material quality. These are tests of independent samples taken by the Department as required by certain QMP specifications or for non-QMP material acceptance. This type replaces Acceptance (A) and Quality Verification (QV).
Verifying and sending MIT reports Important note: All reports must be verified prior to sending to the web. Region materials support staff recommend sending verified reports to the Atwood Systems immediately after verifying. Lab Site and Verification Information: 1. Select the Create | Edit Tests tab. 2. Select the <Lab Site / Verifier> toolbar option. 3. Enter the verifier’s name. 4. Choose the lab site by selecting <Add / Change Lab Site>. 5. Use the Alphabet listing to locate the company. 6. Double click on the company name. 7. Double click on the correct company address. 8. Select <Save and Continue> OR select <Save / Stop Prompting>. 9. Select <Save> to save changes.

Source file location - \\mad00fp1\w10bpd\DCTech\AWPAdmin\AWP-ClientServer\Construction\2018Season\FieldSoftwareUsersGuideForConstructionStaff.docx Pantry location – C:\ACMApplications\Pantry2018\StatewideManualsAndGuides\FieldSoftwareUsersGuideForConstructionStaff.pdf Created by Annette Czerneski / Updated by Annette Czerneski on February 27, 2018 pg. 49
Verifying tests: 1. From the Create | Edit Tests tab, select <To Be Verified> from the pulldown list. 2. Double click on the report you would like to submit. 3. On the Labsite and Verification Information window, confirm the first and last name of the verifier along with the
company name. Select “Stop showing this window” followed by <Save> to use the same verifier for all the reports in this group.
4. Confirm that the report is accurate and complete. 5. Select <Create Verified Report>. 6. Select <Close Test>. 7. Repeat the steps 1-6 to verify other reports. Steps to follow to send MIT data: 1. Select Send Data | Start Processing Send Data on the menu bar. 2. Confirm and/or update the contact information on the FIT Data Send window. 3. Select the method to send your FIT data:
c. Consultant staff – Select “Direct Web Send” to send data to Atwood Systems d. WisDOT staff – Select “Send Via E-mail” to send using the WisDOT Exchange servers.
4. Click <Merge FieldManager Data> if you forgot to complete this step when you opened FIT. 5. Click <Start Data Send> to continue the process. 6. Click <OK> on the window that the data send was successful. If your FIT data send is failing, check the FIT data send configuration settings. (Review these settings if you encounter a SMTP Server Connection failure error message.) 1. Select Send Data | Configure E-mail from the menu bar.
• FieldNet ID – fmgr??? where ??? is your FieldNet ID. • POP Server name
o Consultants – leave this field blank o WisDOT staff – mail.dot.state.wi.us
• SMTP Server name o Consultants – leave this field blank o WisDOT staff – mailx.dot.state.wi.us
• Select “A Userid and Password is NOT required”. 2. Click <Save and Exit> to save any changes made to this information. Confirming that MIT reports are posted successfully on the Internet Important note: The Project Engineer is responsible for ensuring that reports are successfully posted to the Internet. After creating reports in the MIT system, the reports are verified, and sent to Atwood Systems. Atwood Systems replicates the reports to MTS and posts them on the Internet. 1. Staff should ensure the reports are posted and accurate by going to http://www.atwoodsystems.com/ . 2. Select and log into HQMS.
Note: New users must register online and obtain a logon ID and password. Materials finaling process Here are things to do to help expedite the Materials Finaling process. • All reports created in MIT should be verified and sent to the web prior to sending in for review. • In some regions, one hard copy of all reports for each project ID needs to be printed and submitted for review.
Check with your region representative for details on this process. • Once the reports are posted on the web, be sure to print all the reports. All region generated reports are now in
the MIT system (e.g. cylinder breaks, asphalt QMP reports). • Call one of the region materials support staff so they can generate an index from the MIT LAN system. A copy of
the index will be sent to the Project Engineer so that all reports are included in test report record. • Submit the Materials Diary and all reports along with the index to the region materials support staff for review. To check for and install MIT software updates WisDOT staff will receive MIT software updates automatically through SCCM. These will be applied to WisDOT laptops when they connect to the WisDOT network directly or remotely using Cisco Any Connect Client.

Source file location - \\mad00fp1\w10bpd\DCTech\AWPAdmin\AWP-ClientServer\Construction\2018Season\FieldSoftwareUsersGuideForConstructionStaff.docx Pantry location – C:\ACMApplications\Pantry2018\StatewideManualsAndGuides\FieldSoftwareUsersGuideForConstructionStaff.pdf Created by Annette Czerneski / Updated by Annette Czerneski on February 27, 2018 pg. 50
Consultant staff need to complete the steps below to apply an update on their computers. In some cases, the updates may require administrative access.
1. Open MIT. 2. Select Updates | Check for Atwood Systems Software Updates from the menu toolbar. 3. Click <Continue> on the “An Internet Connection is required!” window. 4. The application will check for available updates.
a. If you receive, “Software Version is Current”, go to step 9. b. If you receive, “A software update is available. What would you like to do?”, click <Update Now> c. The FIT application will download the update and close the application in the background. Here are
the installation steps: i. Wait to see if the installation will begin on its own. If it does not, within Windows Explorer
<Right Click> on C:\ProgramData\AtwoodSystems\MIT\Downloads\MITServicePack.exe and select <Run As Administrator>
ii. Click <Yes> for the question “Do you want to allow this application from an unknown publisher to make changes to your device?”
iii. Click <Install> and follow the steps to complete the installation process. Click <Finish> when complete.
If after working with their company’s IT staff, consultant project staff have issues downloading and installing the FIT and/or MIT updates, please contact BITS L2 ACM support staff for assistance. Support
Support website http://www.atwoodsystems.com/ E-mail address [email protected] Telephone number 1-877-518-1920 (toll free)
Southeast Region – 2017 Large Contracts Category Winner Lakefront Gateway, IH 794 Ramps at Lincoln Memorial Drive, Milwaukee County Contractor – Zenith Tech Inc. Project Engineer – Brad Bacilek, Benesch Project Manager – Heather Sackman Project Supervisor – Brian Roper

Source file location - \\mad00fp1\w10bpd\DCTech\AWPAdmin\AWP-ClientServer\Construction\2018Season\FieldSoftwareUsersGuideForConstructionStaff.docx Pantry location – C:\ACMApplications\Pantry2018\StatewideManualsAndGuides\FieldSoftwareUsersGuideForConstructionStaff.pdf Created by Annette Czerneski / Updated by Annette Czerneski on February 27, 2018 pg. 51
Backing up FieldManager, FIT, and MIT data
Weekly backups are recommended!
It is critical that WisDOT and consultant staff perform weekly backups of their FieldManager, FIT, and MIT databases. Below is a semi-automated process that the Project Engineer can setup and run from an USB drive or external hard drive. To setup the backup (contact BITS Level 2 ACM support for assistance)
1. Create a folder on your USB drive named \ACMApplications 2. Copy c:\acmapplications\backup\*.* to USB drive\ACMApplications
To run a backup
1. Go to USB Drive\ACMApplications a. Double click on ACMBackup.bat to backup the project databases.
2. A folder will be created on the USB or external hard drive with a date/time stamp. Example: \ACMApplications\Backup\20160420115631\
3. The folders and files noted in the table below will be backed up.
Folder/files Description Backup batch file C:\ProgramData\AtwoodSystems\FIT\database Field Information Tracking
database(s) ACMBackup.bat
C:\ProgramData\AtwoodSystems\MIT\database Materials Information Tracking database
ACMBackup.bat
C:\ProgramData\FieldBook\database FieldBook database ACMBackup.bat C:\ProgramData\FieldManager\database FieldManager database(s) ACMBackup.bat
Automatic prompt to backup the FieldManager database only Upon exiting your FieldManager database for the 5th time, a Warning window will appear prompting you to backup. 1. Click <Yes> to begin the backup process.
2. The Backup Database window will appear. Click <Backup>. 3. If any FieldManager windows are open, you will be asked to close them before proceeding. Click <Yes>. 4. A window will appear stating the backup was completed successfully. Click <OK>.
Note: The FieldManager database backup copy is saved to C:\ProgramData\FieldManager\database\Backup 5. A window will appear to copy the backup to an additional location. Click <Yes> to continue and <Browse> to an
external USB or hard drive to save an additional copy of the FieldManager database backup. 6. <Close> the Backup Database window when the process is complete. NOTE: If the contract computer experiences hardware or software issues and no backups were performed, work with BITS Level 2 ACM support staff and the AASHTOWare Project Administrators to see if the FieldManager contract can be restored. FIT and MIT data would most likely be lost. Contract restores are a very time-consuming process. Remember that if weekly backups are performed, a contract restore from a data backup is relatively easy to complete.
Don’t forget to keep your backup media offsite in case a disaster occurs!

Source file location - \\mad00fp1\w10bpd\DCTech\AWPAdmin\AWP-ClientServer\Construction\2018Season\FieldSoftwareUsersGuideForConstructionStaff.docx Pantry location – C:\ACMApplications\Pantry2018\StatewideManualsAndGuides\FieldSoftwareUsersGuideForConstructionStaff.pdf Created by Annette Czerneski / Updated by Annette Czerneski on February 27, 2018 pg. 52
Support contacts
Name Telephone number E-mail address AASHTOWare Project Administrators Statewide AASHTOWare Project application support and server administration. Handle issues as noted in the guide directly (bad contract transfers, missing vendors, data sync issues between FieldManager and AASHTOWare Project CAS, Mobile Inspector license availability, etc.). AASHTOWare Project Administrators work directly with the Contract Specialists listed below for elevated issues. Adam Bleskacek Eau Claire Annette Czerneski Wisconsin Rapids
715-833-5574 715-421-7319 or 715-459-4773 (M)
[email protected] [email protected]
Contract Specialists State project contract administration including assistance with contract modifications, estimates, site time and events, adding projects or categories to an active contract, liquidated damages, retainage, and other issues. Vacancy SWR Edgerton Kelly Addison SWR Madison Rolanda Barnes NWR Eau Claire Diane Cichy NCR Wisconsin Rapids Vicki Riepl NWR Superior Debra Howe SWR La Crosse Lisa Lumley NER Green Bay Jennifer Oldenburg NWR Eau Claire Karen Roberts SER Waukesha Jennifer Trudeau NCR Rhinelander Jennifer Zavada NER Green Bay Sandi Villiesse Statewide Local Program
Vacancy 608-246-7914 or 608-575-7810 (M) 715-836-2861 715-421-8036 715-635-4962 608-789-5537 920-492-3518 715-855-7662 262-548-8650 715-365-5723 920-492-5720 414-750-1485 (M & txt msg)
Vacancy [email protected] [email protected] [email protected] [email protected] [email protected] [email protected] [email protected] [email protected] [email protected] [email protected] [email protected]
BITS Level 2 ACM Support Staff From February 1 – July 31, 2018, contact BITS Level 2 ACM Support staff to schedule an appointment for software updates. Contact the WisDOT IT Service Desk at 1-800-362-3050 for software support issues. Kristie Robinson Green Bay Peter Dobrogowski Waukesha Tim Hintz Madison Richard Marko Rhinelander, WI Rapids Steve Nies Green Bay Gerry Postl Eau Claire Theresa Vydrzal La Crosse Sherry Wheaton Superior
920-492-5706 or 920-370-9451 (M) 262-548-8656 or 414-750-2214 (M) 608-242-8007 or 608-516-1034 (M) 715-365-5726 or 715-490-0009 (M) 920-492-5662 or 920-360-3610 (M) 715-836-7270 or 715-577-8331 (M) 608-789-7867 or 608-792-0083 (M) 715-392-7942 or 715-225-9458 (M)
[email protected] [email protected] [email protected] [email protected] [email protected] [email protected] [email protected] [email protected]
WisDOT IT Service Desk From August 1, 2018 – January 31, 2019, open a ticket through the WisDOT IT Service Desk to contact BITS L2 ACM support for software installs AND software support issues. WisDOT IT Service Desk 1-800-362-3050 (toll free)
OR 608-264-9434