2011 equipment packing instructions
TRANSCRIPT

7/31/2019 2011 Equipment Packing Instructions
http://slidepdf.com/reader/full/2011-equipment-packing-instructions 1/3
Page 1 of 3: Equipment Packing Procedure
© 2011 Connections Academy®, LLC. Questions? Call 800-382-6010. www.ConnectionsAcademy.com
Equipment Packing Procedure
Desktop
1. Figure 1.1 shows the foam packing materials for a Connections Academy desktop computer. The foam pieces are not the same.
They should be positioned like in Figure 1.1.
2. Place the desktop so that the face of the machine is positioned in the foam piece as shown in Figure 1.2.
3. Place second piece of foam on the rear of the desktop as shown in Figure 1.3.
Figure 1.1 Figure 1.2 Figure 1.3
4. Place desktop and foam into the box with the cut-out sections facing up as shown in Figure 1.4.
5. The accessories will also need to be packed properly. The keyboard should be placed in the large flat box as shown in Figure 1.5.
The mouse and power cords should be placed in the thin rectangular box for shipment as shown in Figure 1.6.
Figure 1.4 Figure 1.5 Figure 1.6
6. Place the keyboard and mouse boxes in the appropriate slots in the foam as shown in Figure 1.7.
7. Close the lid on the box and apply a minimum of 2 strips of tape to any open seams.
8. Attach the UPS label to the box and remove or black out any old UPS labels as shown in Figure 1.8.
Figure 1.7 Figure 1.8

7/31/2019 2011 Equipment Packing Instructions
http://slidepdf.com/reader/full/2011-equipment-packing-instructions 2/3
Connections Academy Equipment Packing Procedure
Page 2 of 3: Equipment Packing Procedure
© 2011 Connections Academy®, LLC. Questions? Call 800-382-6010. www.ConnectionsAcademy.com
CRT Monitor
1. Figure 2.1 shows the proper packing material for a Connections Academy monitor. Set up your packing materials exactly as
shown.
2. The base foam for the monitor looks identical on both sides but it is not. Place the foam in the box exactly as shown in Figure 2.2.
3. Place the monitor in the box face down as in Figure 2.3. The corners of the monitor will fit snuggly into the foam and the bottom o
the monitor should be oriented so that the stand is facing the side of the box with the most space between the box and the monitor
Figure 2.1 Figure 2.2 Figure 2.3
4. The remaining piece of foam is placed on top of the monitor as shown in Figure 2.4. The foam is oriented correctly when there is
space to pull the VGA cord through. The foam will not fit properly over the back of the monitor if it is not oriented correctly.5. Close the lid on the box and apply a minimum of 2 strips of tape to any open seams. Attach the UPS label to the box and be sure to
remove or black out any old UPS labels as shown in Figure 2.5.
Figure 2.4 Figure 2.5
Laptop
1. Figure 3.1 shows the packing materials for a Connections Academy laptop, including the carton, insert for power adapter, and foam
2. Place the foam on the laptop and slide into the carton, then place the cardboard insert in the carton and slide power adapter inside a
shown in Figure 3.2.
3. Close the lid on the box and apply a minimum of 2 strips of tape to any open seams. Attach the UPS label to the box and be sure to
remove or black out any old UPS labels as in Figure 3.3.
Figure 3.1 Figure 3.2 Figure 3.3
7/31/2019 2011 Equipment Packing Instructions
http://slidepdf.com/reader/full/2011-equipment-packing-instructions 3/3
Connections Academy Equipment Packing Procedure
Page 3 of 3: Equipment Packing Procedure
© 2011 Connections Academy®, LLC. Questions? Call 800-382-6010. www.ConnectionsAcademy.com
Flat Screen Monitor
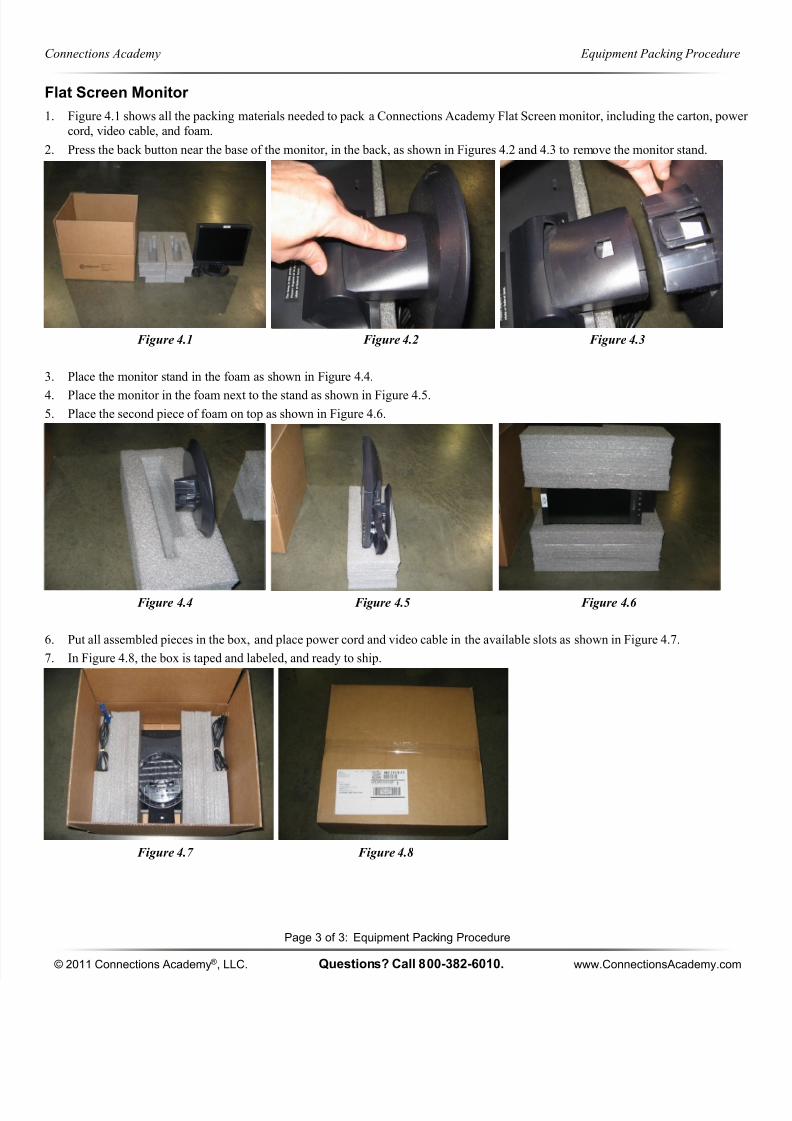
1. Figure 4.1 shows all the packing materials needed to pack a Connections Academy Flat Screen monitor, including the carton, powe
cord, video cable, and foam.
2. Press the back button near the base of the monitor, in the back, as shown in Figures 4.2 and 4.3 to remove the monitor stand.
Figure 4.1 Figure 4.2 Figure 4.3
3. Place the monitor stand in the foam as shown in Figure 4.4. 4. Place the monitor in the foam next to the stand as shown in Figure 4.5.
5. Place the second piece of foam on top as shown in Figure 4.6.
Figure 4.4 Figure 4.5 Figure 4.6 6. Put all assembled pieces in the box, and place power cord and video cable in the available slots as shown in Figure 4.7.
7. In Figure 4.8, the box is taped and labeled, and ready to ship.
Figure 4.7 Figure 4.8