2010 sportage owner's manual (5mb) - · pdf filekia, the company congratulations! ... kia...
TRANSCRIPT

kkiiaa,, tthhee ccoommppaannyy
Congratulations! Your selection of a Kia was a wise investment.
It will give you years of driving pleasure. Now that you are the
owner of a Kia vehicle, you’ll probably be asked a lot of ques-
tions about your vehicle and the company like “What is a Kia?”,
“Who is Kia?”, “What does ‘Kia’ mean?”.
Here are some answers. First, Kia is the oldest car company in
Korea. It is a company that has thousands of employees focused
on building high-quality vehicles at affordable prices.
The first syllable, Ki, in the word “Kia” means “to arise from to
the world” or “to come up out of to the world.” The second syl-
lable, a, means “Asia.” So, the word Kia, means “to arise from”
or “to come up out of Asia to the world.”
Drive safely and enjoy your Kia!

i
Thank you for choosing a Kia vehicle.
When you require service, remember that your dealerknows your vehicle best. Your Kia dealer has factory-trained technicians, recommended special tools, genuineKia replacement parts and is dedicated to your completesatisfaction.
Because subsequent owners require this important infor-mation as well, this publication should remain with thevehicle if it is sold.
This manual will familiarize you with operational, main-tenance and safety information about your new vehicle. Itis supplemented by a Warranty and ConsumerInformation manual that provides important informationon all warranties regarding your vehicle. We urge you toread these publications carefully and follow the recom-mendations to help assure enjoyable and safe operationof your new vehicle.
Kia offers a great variety of options, components and fea-tures for its various models.
Therefore, the equipment described in this manual, alongwith the various illustrations, may not all be applicable toyour particular vehicle.
The information and specifications provided in this man-ual were accurate at the time of printing. Kia reserves theright to discontinue or change specifications or design atany time without notice and without incurring any oblig-ation. If you have questions, always check with your KiaDealer.
We assure you of our continuing interest in your motor-ing pleasure and satisfaction in your Kia vehicle.
© 2009 Kia Canada Inc.
All rights reserved. Reproduction by any means, elec-tronic or mechanical, including photocopying, recording,or by any information storage and retrieval system ortranslation in whole or part is not permitted without writ-ten authorization from Kia Canada Inc..
Printed in Korea
Foreword
ii
1
2
3
4
5
6
7
8
9
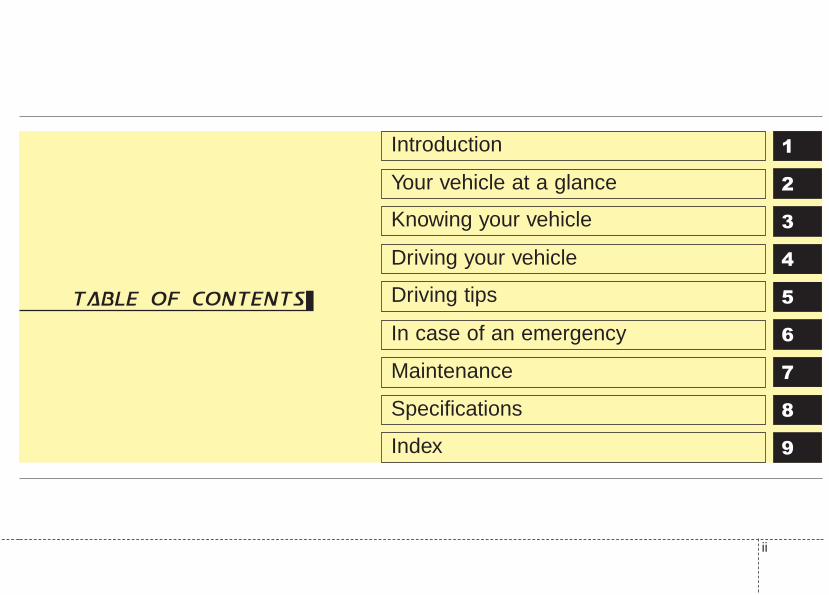
Introduction
Your vehicle at a glance
Knowing your vehicle
Driving your vehicle
Driving tips
In case of an emergency
Maintenance
Specifications
Index
table of contents

1
2
3
4
5
6
7
8
9
How to use this manual / 1-2Vehicle handling instructions / 1-3Vehicle break-in process / 1-3
Introduction

Introduction
21
1
2
3
4
5
6
7
8
9
We want to help you get the greatestpossible driving pleasure from yourvehicle. Your Owner’s Manual canassist you in many ways. We strong-ly recommend that you read theentire manual. At the very least, youmust read the WARNING and CAU-TION sections spread throughout themanual, which are easily recognizedby their special markings. These sec-tions have precautions that must befollowed to prevent personal injury ordeath.Illustrations complement the wordsin this manual to best explain how toenjoy your vehicle. By reading yourmanual, you will learn about fea-tures, important safety information,and driving tips under various roadconditions.
The general layout of the manual isprovided in the Table of Contents. Agood place to start is the index; it hasan alphabetical listing of all informa-tion in your manual.Sections: This manual has eight sec-tions plus an index. Each sectionbegins with a brief list of contents soyou can tell at a glance if that sectionhas the information you want.
You’ll find various WARNING’s,CAUTION’s, and NOTICE’s in thismanual. These WARNING’s,CAUTION’s and NOTICE’s were pre-pared to enhance your personal safe-ty and continued satisfaction with Kiavehicle.You should carefully read andfollow ALL procedures and recom-mendations provided in these WARN-ING’S, CAUTION’S and NOTICE’S.
✽✽ NOTICEA NOTICE indicates a situation inwhich damage to your vehicle couldresult if the notice is ignored.
HOW TO USE THIS MANUAL
WARNING A WARNING indicates a situationin which serious bodily injury ordeath could result if the warningis ignored.
CAUTIONA CAUTION indicates a situationin which personal injury, perhapssevere, could result if the cautionis ignored.

1 3
1
2
3
4
5
6
7
8
9
Introduction
VEHICLE HANDLINGINSTRUCTIONSAs with other vehicles of this type,failure to operate this vehicle correct-ly may result in loss of control, anaccident or vehicle rollover.Specific design characteristics (high-er ground clearance, track, etc.) givethis vehicle a higher center of gravitythan other types of vehicles. In otherwords they are not designed for cor-nering at the same speeds as con-ventional 2-wheel drive vehicles.Avoid sharp turns or abrupt maneu-vers. Again, failure to operate thisvehicle correctly may result in loss ofcontrol, an accident or vehiclerollover. Be sure to read the “on-pavement” and “off-road” drivingguidelines, in section 5 of thismanual.
VEHICLE BREAK-INPROCESSNo special break-in period is needed.By following a few simple precautionsfor the first 1,000 km (600 miles) youmay add to the performance, econo-my and life of your vehicle.• Do not race the engine.• Do not maintain a single speed for
long periods of time, either fast orslow. Varying engine speed isneeded to properly break-in theengine.
• Avoid hard stops, except in emer-gencies, to allow the brakes to seatproperly.
• Avoid full-throttle starts.
1
2
3
4
5
6
7
8
9
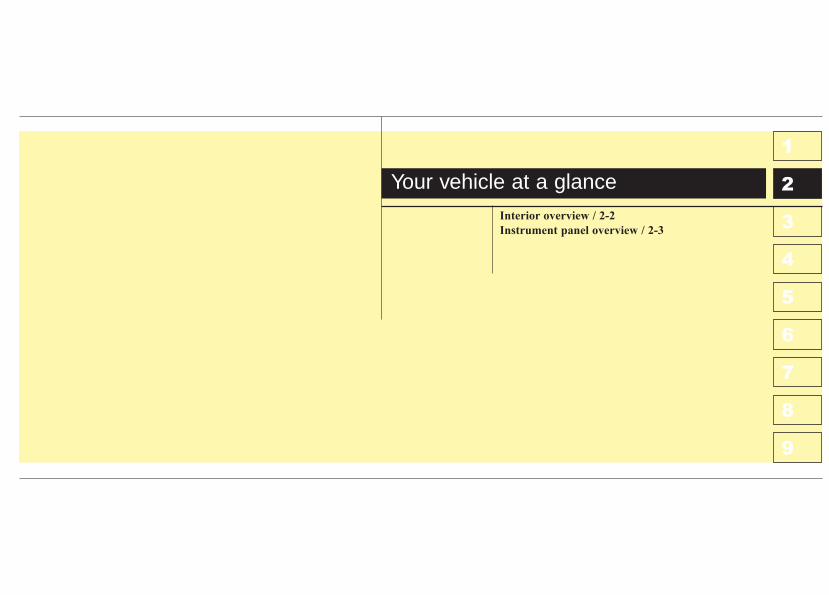
Interior overview / 2-2
Instrument panel overview / 2-3
Your vehicle at a glance

Your vehicle at a glance
22
1
2
3
4
5
6
7
8
9
INTERIOR OVERVIEW
1. Door lock/unlock button
2. Power window switches
3. Outside rearview mirror control switch(if equipped)
4. Hood release lever
5. Instrument panel illumination (if equipped)
6. Electronic stability control (if equipped)
7. 4WD LOCK button (if equipped)
8. Steering wheel tilt
9. Brake pedal
10. Accelerator pedal
11. Seat
12. Parking brake lever
13. Fuel filler lid release lever
OKM029001N/1KMA2019A
2 3
1
2
3
4
5
6
7
8
9
Your vehicle at a glance
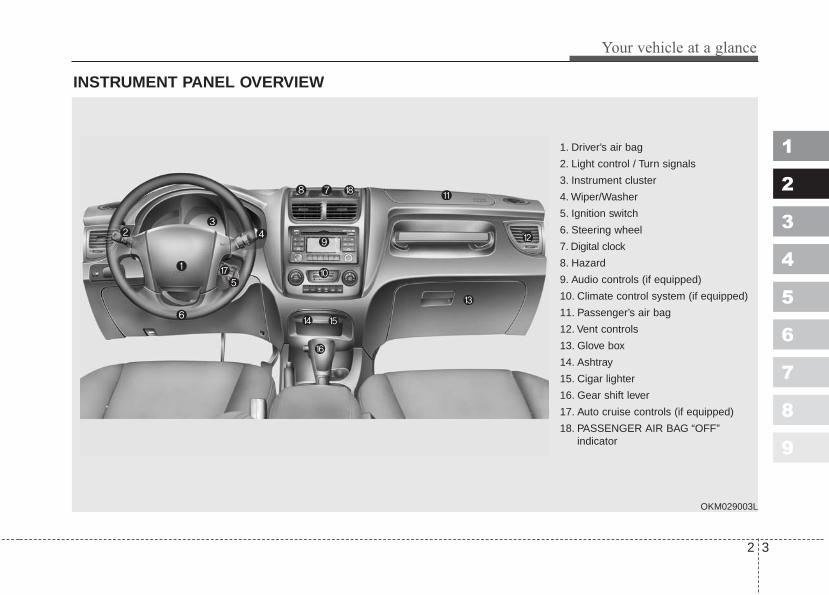
INSTRUMENT PANEL OVERVIEW
1. Driver’s air bag
2. Light control / Turn signals
3. Instrument cluster
4. Wiper/Washer
5. Ignition switch
6. Steering wheel
7. Digital clock
8. Hazard
9. Audio controls (if equipped)
10. Climate control system (if equipped)
11. Passenger’s air bag
12. Vent controls
13. Glove box
14. Ashtray
15. Cigar lighter
16. Gear shift lever
17. Auto cruise controls (if equipped)
18. PASSENGER AIR BAG “OFF”indicator
OKM029003L

1
2
3
4
5
6
7
8
9
Keys / 3-2Remote keyless entry / 3-3Theft-alarm system / 3-5Immobilizer system / 3-6Door locks / 3-9
Window / 3-16Seat / 3-19Safety belts / 3-31Airbags - advanced supplemental
restraint system / 3-55Hood / 3-80Fuel filler lid / 3-81Mirrors / 3-84Interior lights / 3-88Storage compartment / 3-89Interior features / 3-92Sunroof / 3-97Luggage net / 3-101Tonneau cover / 3-101Luggage center box / 3-103Roof rack / 3-104Audio system / 3-105
Knowing your vehicle
Knowing your vehicle
23
1
2
3
4
5
6
7
8
9
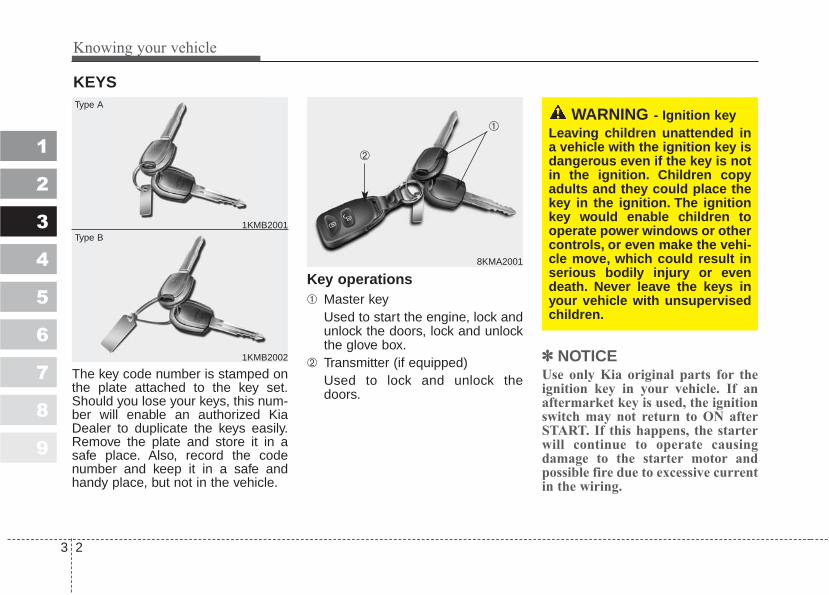
The key code number is stamped onthe plate attached to the key set.Should you lose your keys, this num-ber will enable an authorized KiaDealer to duplicate the keys easily.Remove the plate and store it in asafe place. Also, record the codenumber and keep it in a safe andhandy place, but not in the vehicle.
Key operations➀ Master key
Used to start the engine, lock andunlock the doors, lock and unlockthe glove box.
➁ Transmitter (if equipped)Used to lock and unlock thedoors.
✽✽ NOTICEUse only Kia original parts for theignition key in your vehicle. If anaftermarket key is used, the ignitionswitch may not return to ON afterSTART. If this happens, the starterwill continue to operate causingdamage to the starter motor andpossible fire due to excessive currentin the wiring.
KEYS
WARNING - Ignition keyLeaving children unattended ina vehicle with the ignition key isdangerous even if the key is notin the ignition. Children copyadults and they could place thekey in the ignition. The ignitionkey would enable children tooperate power windows or othercontrols, or even make the vehi-cle move, which could result inserious bodily injury or evendeath. Never leave the keys inyour vehicle with unsupervisedchildren.
Type A
1KMB2001
1KMB2002
Type B
8KMA2001
➀
➁

3 3
Knowing your vehicle
1
2
3
4
5
6
7
8
9
➀ Lock ( )All doors are locked if the lock but-ton is pressed.
➁ Unlock ( ) Two turn unlock modeDriver’s door is unlocked if theunlock button is pressed once. Alldoors are unlocked if the unlockbutton is pressed twice within 4seconds.After pressing this button, thedoors will be locked automati-cally unless you open themwithin 30 seconds.
Two turn unlock mode ↔↔ Centraldoor unlock mode
If the unlock button and the lock but-ton are pressed at the same time formore than 4 seconds, all the doorsare unlocked by pressing the unlockbutton once.After the both buttons are pressed atthe same time for more than 4 sec-onds again, the driver's door isunlocked if the unlock button ispressed once. And all doors areunlocked if the unlock button ispressed again within 4 seconds.
➂ Panic ( , if equipped)
The horn sounds and hazardwarning lights will flash for about30 seconds if this button ispressed. To stop the horn andlights, press any button on thetransmitter.
✽✽ NOTICEThe transmitter will not work if anyof following occur:• The ignition key is in ignition
switch.• You exceed the operating distance
limit (about 10 m [30 feet]).• The battery in the transmitter is
weak.• Other vehicles or objects may be
blocking the signal.• The weather is extremely cold.• The transmitter is close to a radio
transmitter such as a radio stationor an airport which can interferewith normal operation of thetransmitter.
When the transmitter does not workcorrectly, open and close the doorwith the ignition key. If you have aproblem with the transmitter, con-tact an authorized Kia Dealer.
✽✽ NOTICEKeep the transmitter away fromwater or any liquid. If the keylessentry system is inoperative due toexposure to water or liquids, it willnot be covered by your manufactur-er vehicle warranty.
REMOTE KEYLESS ENTRY (IF EQUIPPED)
8KMA2002/1KMN2002
➀ ➁
➂
Knowing your vehicle
43
1
2
3
4
5
6
7
8
9
Operational distance may varydepending upon the area the trans-mitter is used in. For example, if thevehicle is parked near police sta-tions, government and public offices,broadcasting stations, military instal-lations, airports, or transmitting tow-ers, etc.
This device complies withIndustry Canada Standard RSS-210. Operation is subject to the fol-lowing two conditions:1. This device may not cause inter-
ference, and 2. This device must accept any inter-
ference, including interference thatmay cause undesired operation ofthe device.
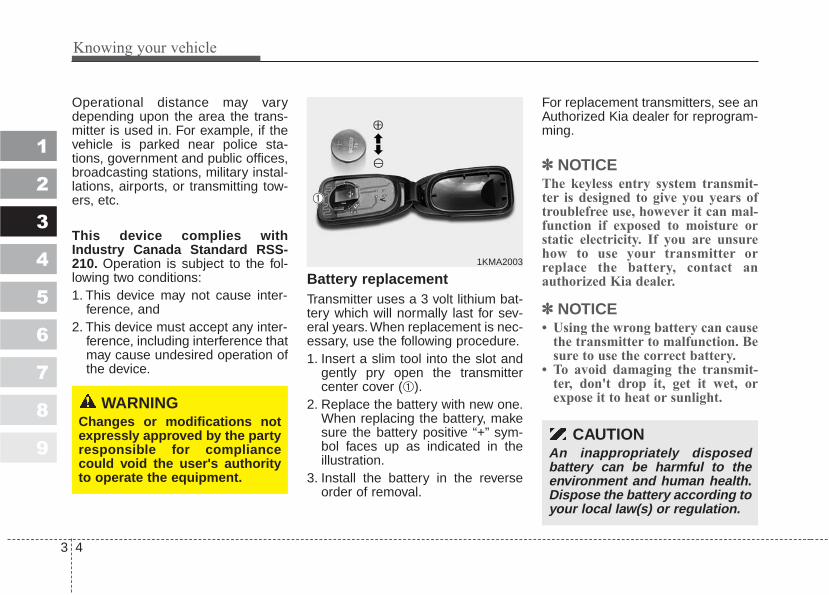
Battery replacementTransmitter uses a 3 volt lithium bat-tery which will normally last for sev-eral years. When replacement is nec-essary, use the following procedure.1. Insert a slim tool into the slot and
gently pry open the transmittercenter cover (➀).
2. Replace the battery with new one.When replacing the battery, makesure the battery positive “+” sym-bol faces up as indicated in theillustration.
3. Install the battery in the reverseorder of removal.
For replacement transmitters, see anAuthorized Kia dealer for reprogram-ming.
✽✽ NOTICEThe keyless entry system transmit-ter is designed to give you years oftroublefree use, however it can mal-function if exposed to moisture orstatic electricity. If you are unsurehow to use your transmitter orreplace the battery, contact anauthorized Kia dealer.
✽✽ NOTICE• Using the wrong battery can cause
the transmitter to malfunction. Besure to use the correct battery.
• To avoid damaging the transmit-ter, don't drop it, get it wet, orexpose it to heat or sunlight.
1KMA2003
➀
WARNINGChanges or modifications notexpressly approved by the partyresponsible for compliancecould void the user's authorityto operate the equipment.
CAUTION An inappropriately disposedbattery can be harmful to theenvironment and human health.Dispose the battery according toyour local law(s) or regulation.
3 5
Knowing your vehicle
1
2
3
4
5
6
7
8
9
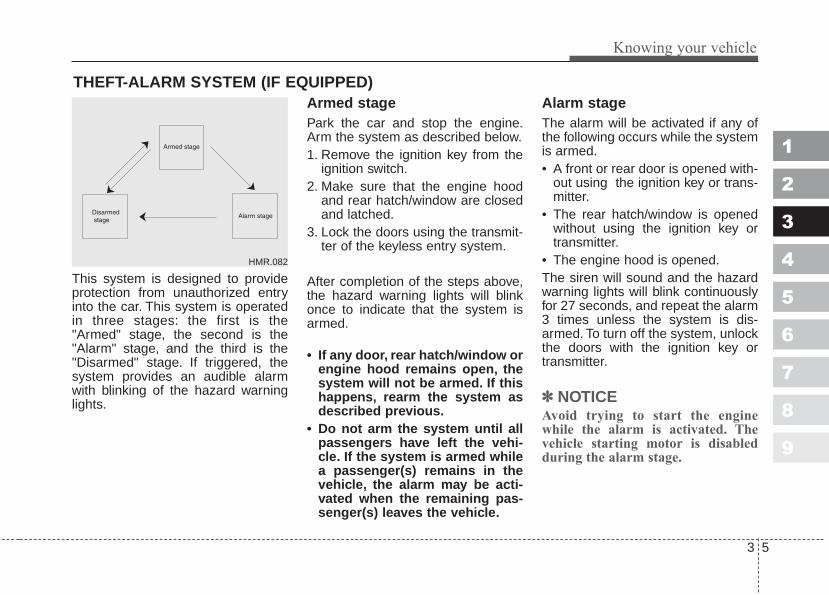
This system is designed to provideprotection from unauthorized entryinto the car. This system is operatedin three stages: the first is the"Armed" stage, the second is the"Alarm" stage, and the third is the"Disarmed" stage. If triggered, thesystem provides an audible alarmwith blinking of the hazard warninglights.
Armed stagePark the car and stop the engine.Arm the system as described below.1. Remove the ignition key from the
ignition switch.2. Make sure that the engine hood
and rear hatch/window are closedand latched.
3. Lock the doors using the transmit-ter of the keyless entry system.
After completion of the steps above,the hazard warning lights will blinkonce to indicate that the system isarmed.
• If any door, rear hatch/window orengine hood remains open, thesystem will not be armed. If thishappens, rearm the system asdescribed previous.
• Do not arm the system until allpassengers have left the vehi-cle. If the system is armed whilea passenger(s) remains in thevehicle, the alarm may be acti-vated when the remaining pas-senger(s) leaves the vehicle.
Alarm stageThe alarm will be activated if any ofthe following occurs while the systemis armed.• A front or rear door is opened with-
out using the ignition key or trans-mitter.
• The rear hatch/window is openedwithout using the ignition key ortransmitter.
• The engine hood is opened.The siren will sound and the hazardwarning lights will blink continuouslyfor 27 seconds, and repeat the alarm3 times unless the system is dis-armed. To turn off the system, unlockthe doors with the ignition key ortransmitter.
✽✽ NOTICEAvoid trying to start the enginewhile the alarm is activated. Thevehicle starting motor is disabledduring the alarm stage.
THEFT-ALARM SYSTEM (IF EQUIPPED)
HMR.082
Knowing your vehicle
63
1
2
3
4
5
6
7
8
9
Disarmed stageThe system will be disarmed whenthe doors are unlocked by depress-ing the unlock button on the transmit-ter or unlocked with the ignition key.After depressing unlock button, thehazard warning lights will blink twiceto indicate that the system is dis-armed.After depressing unlock button, if anydoor is not opened within 30 sec-onds, the system will be rearmed.If the system is not disarmed with theignition key or transmitter, insert thekey in the ignition switch, turn the keyto the ON position and wait for 30seconds.Then the system will be dis-armed.
Your vehicle is equipped with an elec-tronic engine immobilizer system toreduce the risk of unauthorized vehi-cle use.Your immobilizer system is comprisedof a small transponder in the ignitionkey, and antenna coil in the key cylin-der and Immobilizer Control Unit (orSmartra Unit).With this system, whenever you insertyour ignition key into the ignitionswitch and turn it to ON, the antennacoil in the ignition switch receives asignal from the transponder in theignition key and then sends the signalto the ECU (Engine Control Unit).The ECU checks the signal whetherthe ignition key is valid.If the key is determined to be valid,the engine will start.If the key is determined to be invalid,the engine will not start.
IMMOBILIZER SYSTEM (IF EQUIPPED)
CAUTION Do not change, alter or adjustthe theft-alarm system becauseit could cause the theft-alarmsystem to malfunction andshould only be serviced by anauthorized Kia dealer.Malfunctions caused by improp-er alterations, adjustments ormodifications to the theft-alarmsystem are not covered by yourvehicle manufacturer warranty.

3 7
Knowing your vehicle
1
2
3
4
5
6
7
8
9
To deactivate the immobilizer sys-tem:Insert the ignition key into the keycylinder and turn it to the ON posi-tion.To activate the immobilizer sys-tem:Turn the ignition key to the OFF posi-tion. The immobilizer system acti-vates automatically. Without a validignition key for your vehicle, theengine will not start.
✽✽ NOTICEWhen starting the engine, do not usethe key with other immobilizer keysaround. Otherwise the engine maynot start or may stop soon after itstarts. Keep each key separately notto have any malfunction after youreceive your new vehicle.
Limp home (override) proce-dureWhen you turn the ignition key to theON position, if the IMMO indicatorgoes off after blinking 5 times, yourtransponder equipped in the ignitionkey is out of order. You cannot startthe engine without the lime home pro-cedure. To start the engine, you haveto input your password by using theignition switch.The following procedure is how toinput your password of “2345” as anexample.1. Turn the ignition key to the ON posi-
tion. The IMMO indicator ( ) willblink 5 times and go off indicatingthe beginning of the limp home pro-cedure.
2. Turn the ignition key to the ACCposition.
3. To enter the first digit (in thisexample “2”), turn the ignition keyto the ON and ACC position twice.Perform the same procedure forthe next digits between 3 secondsand 10 seconds (for example, for“3”, turn the ignition ON and ACC3 times).
CAUTION Do not put metal accessoriesnear the key or ignition switch.The engine may not start for themetal accessories may interruptthe transponder signal fromnormally transmitting.
WARNINGIn order to prevent theft of yourvehicle, do not leave spare keysanywhere in your vehicle. YourImmobilizer password is a cus-tomer unique password andshould be kept confidential. Donot leave this number anywherein your vehicle.

Knowing your vehicle
83
1
2
3
4
5
6
7
8
9
4. If all of the digits have been inputsuccessfully, you have to start theengine within 30 seconds. If youattempt to start the engine after 30seconds, the engine will not startand you will have to input yourpassword again.
After performing the limp home pro-cedure, you have to see an autho-rized Kia dealer immediately toinspect and repair your ignition keyor immobilizer system.
✽✽ NOTICEIf you cannot start your engine inspite of limp home procedure, haveyour vehicle towed by an authorizedKia dealer for inspection and neces-sary repairs.
✽✽ NOTICEThe transponder in your ignitionkey is an important part of theimmobilizer system. It is designed togive years of troublefree service,however you should avoid exposureto moisture, static electricity andrough handling. Immobilizer sys-tem malfunction could occur.
✽✽ NOTICEDo not change, alter or adjust theimmobilizer system because it couldcause the immobilizer system tomalfunction and should only be ser-viced by an authorized Kia dealer. Malfunctions caused by improperalterations, adjustments or modifi-cations to the immobilizer systemare not covered by your vehiclemanufacturer warranty.
This device complies withIndustry Canada Standard RSS-210. Operation is subject to the fol-lowing two conditions:1. This device may not cause inter-
ference, and 2. This device must accept any inter-
ference, including interference thatmay cause undesired operation ofthe device.
WARNINGChanges or modifications notexpressly approved by the partyresponsible for compliancecould void the user's authorityto operate the equipment.
3 9
Knowing your vehicle
1
2
3
4
5
6
7
8
9
Operating door locks fromoutside the vehicle • Turn the key toward rear of vehicle
to unlock and toward front of vehi-cle to lock.
• Turn the key toward front of vehicleto lock all doors.
• Two turn unlock modeTurn the key to the right once tounlock the driver’s door and to theright twice within 4 seconds tounlock all doors. (if equipped)
• Doors can also be locked andunlocked with the transmitter key (ifequipped).
• Once the doors are unlocked, itmay be opened by pulling the doorhandle.
• When closing the door, push thedoor by hand. Make sure thatdoors are closed securely.
Two turn unlock mode ↔↔ Centraldoor unlock mode
If the unlock button and the lock but-ton of the transmitter are pressed atthe same time for more than 4 sec-onds, all the doors are unlocked byturning the key of the driver's sidedoor to the right once.After the both buttons are pressed atthe same time for more than 4 sec-onds again, the driver's door isunlocked by turning the key of thedriver's side door to the right onceand all the doors are unlocked if thekey is turned to the right again within4 seconds.
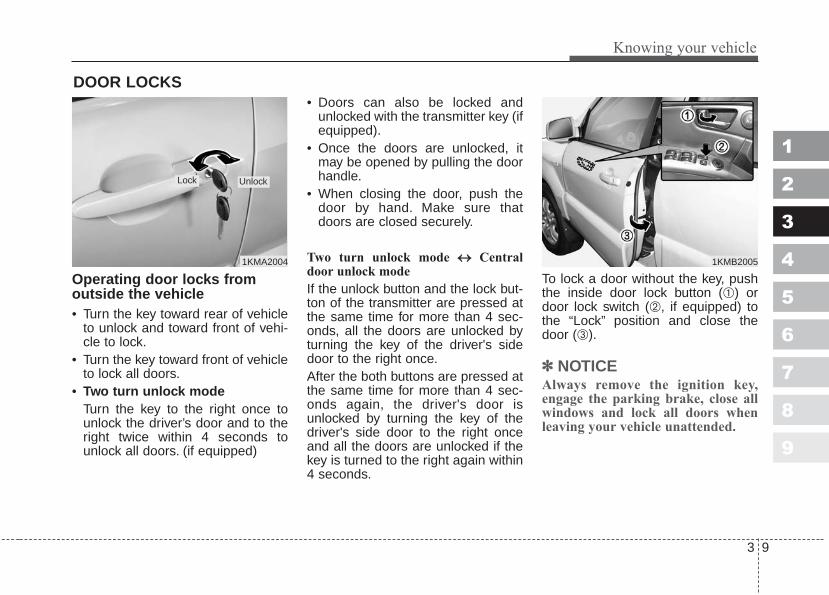
To lock a door without the key, pushthe inside door lock button (➀) ordoor lock switch (➁, if equipped) tothe “Lock” position and close thedoor (➂).
✽✽ NOTICEAlways remove the ignition key,engage the parking brake, close allwindows and lock all doors whenleaving your vehicle unattended.
DOOR LOCKS
1KMA2004
Lock Unlock
1KMB2005

Knowing your vehicle
103
1
2
3
4
5
6
7
8
9
✽✽ NOTICEIf the door is locked/unlocked multi-ple times in rapid succession witheither the vehicle key or door lockswitch, the system may stop operat-ing temporarily in order to protectthe circuit and prevent damage tosystem components.
Operating door locks frominside the vehicleWith the door lock button• To unlock a door, pull the door lock
button to the “Unlock” position (thered part (➁) of the button becomesvisible).
• To lock a door, push the door lockbutton (➀) to the “Lock” position. Ifthe door is locked, red part (➁) ofthe knob becomes invisible.
• To open a door, pull the door han-dle (➂).
• If the inner door handle of driver’sside door is pulled when the doorlock button is in lock position, thebutton is unlocked and door opens.
• Front doors cannot be locked if theignition key is in the ignition switchand door is open.
• If you lock the front door with doorlock button, all vehicle doors willlock automatically.
1KMA2006
Lock Unlock
WARNING - Door lockmalfunction
If a power door lock ever fails tofunction while you are in thevehicle, try one or more of thefollowing techniques to exit:• Operate the door unlock fea-
ture repeatedly (both electron-ic and manual) while simulta-neously pulling on the doorhandle.
• Operate the other door locksand handles, front and rear.
• Lower a front window and usethe key to unlock the doorfrom outside.
• Move to the cargo area andopen the rear hatch.

3 11
Knowing your vehicle
1
2
3
4
5
6
7
8
9
With central door lock switchIf any door is open when the switch isdepressed, the door will remainlocked when closed.
• When pushing down on the frontportion (➀) of the switch, all vehicledoors will lock.
• When pushing down on the rearportion (➁) of the switch, all vehicledoors will unlock.
• However, if the key is in the ignitionswitch and any front door is open,the doors will not lock when thefront portion of central door lockswitch is pressed.
CAUTION - Doors• The doors should always be
fully closed and locked whilethe vehicle is in motion to pre-vent accidental opening of thedoor. Locked doors will alsodiscourage potential intruderswhen the vehicle stops orslows.
• Be careful when openingdoors and watch for vehicles,motorcycles, bicycles orpedestrians approaching thevehicle in the path of the door.Opening a door when some-thing is approaching cancause damage or injury.
1KMB2007
1KMA2008
Driver’s door
Front passenger’s door (if equipped)
Knowing your vehicle
123
1
2
3
4
5
6
7
8
9
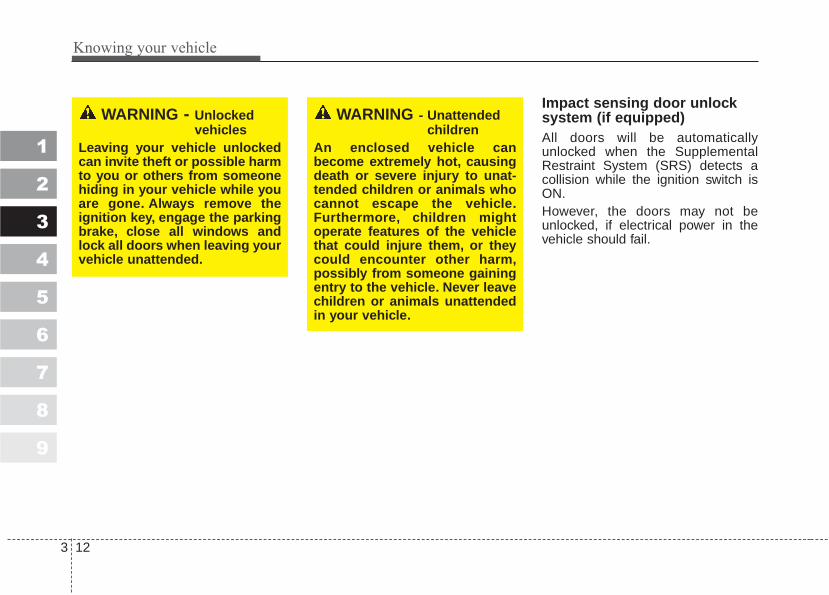
Impact sensing door unlocksystem (if equipped)All doors will be automaticallyunlocked when the SupplementalRestraint System (SRS) detects acollision while the ignition switch isON.However, the doors may not beunlocked, if electrical power in thevehicle should fail.
WARNING - Unlockedvehicles
Leaving your vehicle unlockedcan invite theft or possible harmto you or others from someonehiding in your vehicle while youare gone. Always remove theignition key, engage the parkingbrake, close all windows andlock all doors when leaving yourvehicle unattended.
WARNING - Unattendedchildren
An enclosed vehicle canbecome extremely hot, causingdeath or severe injury to unat-tended children or animals whocannot escape the vehicle.Furthermore, children mightoperate features of the vehiclethat could injure them, or theycould encounter other harm,possibly from someone gainingentry to the vehicle. Never leavechildren or animals unattendedin your vehicle.

3 13
Knowing your vehicle
1
2
3
4
5
6
7
8
9
Rear door child safety lockThe child safety lock is provided tohelp prevent children from acciden-tally opening the rear doors frominside the vehicle. The rear doorsafety locks should be used whenev-er children are in the vehicle.
1. Open the rear door.2. Push the child safety lock located
on the rear edge of the door to the“lock” position. When the childsafety lock is in the “lock ( )”position, rear door will not openwhen the inner door handle ispulled inside the vehicle.
3. Close the rear door.To open the rear door, pull the out-side door handle.Even though the doors may beunlocked, the rear door will not openby pulling the inner door handle untilrear door child safety lock isunlocked ( ).
WARNING - Rear doorlocks
If children accidentally open therear doors while the vehicle is inmotion, they could fall out of thevehicle, resulting in severeinjury or death. To prevent chil-dren from opening the reardoors from the inside, the reardoor safety locks should beused whenever children are inthe vehicle.
1KMA2009
Knowing your vehicle
143
1
2
3
4
5
6
7
8
9
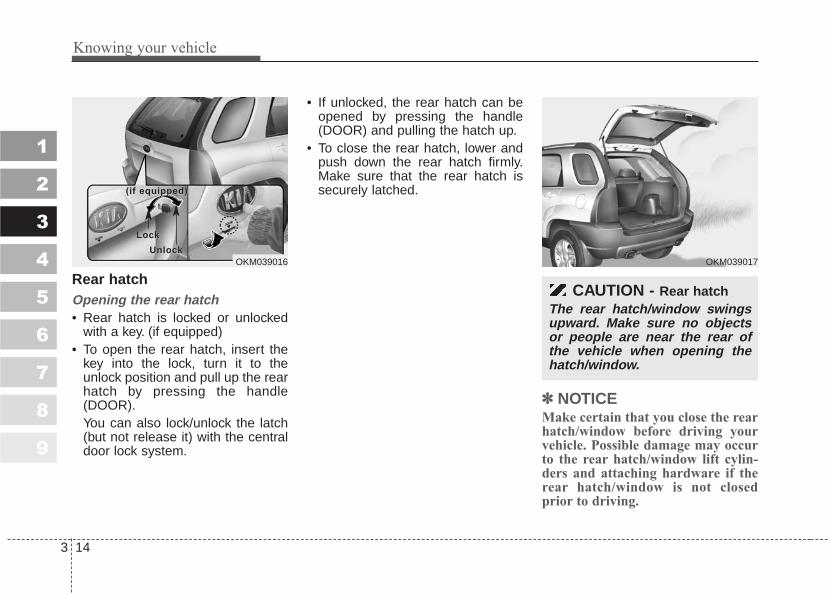
Rear hatchOpening the rear hatch• Rear hatch is locked or unlocked
with a key. (if equipped)• To open the rear hatch, insert the
key into the lock, turn it to theunlock position and pull up the rearhatch by pressing the handle(DOOR).You can also lock/unlock the latch(but not release it) with the centraldoor lock system.
• If unlocked, the rear hatch can beopened by pressing the handle(DOOR) and pulling the hatch up.
• To close the rear hatch, lower andpush down the rear hatch firmly.Make sure that the rear hatch issecurely latched.
✽✽ NOTICEMake certain that you close the rearhatch/window before driving yourvehicle. Possible damage may occurto the rear hatch/window lift cylin-ders and attaching hardware if therear hatch/window is not closedprior to driving.
CAUTION - Rear hatchThe rear hatch/window swingsupward. Make sure no objectsor people are near the rear ofthe vehicle when opening thehatch/window.
OKM039017OKM039016
LocLockk
UnlocUnlockk
(if equipped)(if equipped)

3 15
Knowing your vehicle
1
2
3
4
5
6
7
8
9
Opening the rear hatch window(if equipped)The rear hatch window lock is oper-ated in connection with the rearhatch lock.To open the rear hatch window;1. Unlock the rear hatch.2. Pull the release lever (GLASS) to
open the rear hatch window.
3. Raise the window by pulling up thehandle (➀).
To close the rear hatch window,lower the rear hatch window and itwill close by itself.To be sure the rear hatch window issecurely latched, always try to pull itup again.
WARNING - Exhaustfumes
If you drive with the rear hatch/window open, you will drawdangerous exhaust fumes intoyour vehicle which can causeserious injury or death to vehi-cle occupants.If you must drive with the rearhatch/window open, keep the airvents and all windows open sothat additional outside aircomes into the vehicle.
WARNING - Rear cargoarea
Occupants should never ride inthe rear cargo area where norestraints are available. To avoidinjury in the event of an acci-dent or sudden stops, occu-pants should always be proper-ly restrained.
OKM039019OKM039018
LocLockk
UnlocUnlockk
(if equipped)(if equipped)

Knowing your vehicle
163
1
2
3
4
5
6
7
8
9
Power windows ➀ Driver’s door power window switch➁ Front passenger’s door power win-
dow switch➂ Rear door (left) power window
switch➃ Rear door (right) power window
switch➄ Window opening and closing➅ Automatic power window down
(Driver’s window, if equipped)➆ Power window lock switch
(if equipped)
WINDOWS
7KMB2011

3 17
Knowing your vehicle
1
2
3
4
5
6
7
8
9
The ignition switch must be in the ONposition for power windows to oper-ate. Each door has a power windowswitch that controls that door’s win-dow. However, the driver has a powerwindow lock switch which can blockthe operation of passenger windows.The power windows can be operatedfor approximately 30 seconds afterthe ignition key is removed or turnedto the ACC or LOCK position.However, if the front doors areopened, the power windows cannotbe operated even within the 30 sec-onds after the ignition key removal.
✽✽ NOTICEWhile driving with the rear windowsdown or with the sunroof (ifequipped) in an open (or partiallyopen) position, your vehicle maydemonstrate a wind buffeting orpulsation noise. This noise is a nor-mal occurrence and can be reducedor eliminated by taking the follow-ing actions. If the noise occurs withone or both of the rear windowsdown, partially lower both frontwindows approximately one inch. Ifyou experience the noise with thesunroof open, slightly reduce thesize of the sunroof opening.
✽✽ NOTICE• To prevent the power window sys-
tem from the possibility of dam-age, do not open or close two win-dows at the same time. This willalso ensure the longevity of thefuse.
(Continued)
(Continued)• Never try to operate the main
switch on the driver's door and theindividual door window switch inopposing directions at the sametime. If this is done, the windowwill stop and cannot be opened orclosed.
CAUTION - Windows• Always double check to make
sure all arms, hands, head andother obstructions are safelyout of the way before closing awindow.
• Do not allow children to playwith the power windows. Keepthe driver’s door power win-dow lock switch in the LOCKposition (depressed). Seriousinjury can result from uninten-tional window operation bythe child.
• Do not extend face or armsoutside through the windowopening while driving.

Knowing your vehicle
183
1
2
3
4
5
6
7
8
9
Window opening and closingThe driver’s door has a master powerwindow switch that controls all thewindows in the vehicle. To open orclose a window, press down (➄) orpull up (➄) the front portion of thecorresponding switch.
Automatic power window down (driver’s window, if equipped)
Depressing the power window switchmomentarily to the second detentposition (➅) completely lowers thedriver’s window even when theswitch is released. To stop the win-dow at the desired position while thewindow is in operation, momentarilypull the switch in the direction oppo-site of the window’s movement.If the battery has been discharged ordisconnected, the automatic powerwindow system must be reset as fol-lows:1. Turn the ignition key to ON posi-
tion.2. Close driver’s window and contin-
ue pulling up on driver’s power win-dow switch for at least 2~3 sec-onds after the window is complete-ly closed.
Power window lock switch
• The driver can disable the powerwindow switches on a passengerdoor by depressing the power win-dow lock switch located on the dri-ver’s door to LOCK (pressed).
• When the power window lockswitch is ON, the driver’s mastercontrol cannot operate the pas-senger door power windowseither.
1KMA2013
1KMB2012
1KMB2015

3 19
Knowing your vehicle
1
2
3
4
5
6
7
8
9
Driver’s seat➀ Seat adjustment, forward /
backward➁ Seatback recliner➂ Seat adjustment, height*➃ Seat heater switch*➄ Headrest adjustment
Front passenger seat➅ Seat adjustment, forward /
backward ➆ Seatback recliner➇ Seat heater switch*➈ Headrest adjustment
Rear seat➉ Armrest
Headrest adjustmentSplit folding rear seat
* if equipped
SEAT
11
12
OKM020034
Type A
Type B

Knowing your vehicle
203
1
2
3
4
5
6
7
8
9
(Continued)• Always drive and ride with
your seatback upright and thelap portion of the safety beltsnug and low across the hips.This is the best position toprotect you in case of an acci-dent.
• In order to avoid unnecessaryand perhaps severe airbaginjuries, always sit as far backas possible from the steeringwheel so that your chest is atleast 250 mm (10 inches) awayfrom the steering wheel.
WARNING - Looseobjects
Loose objects in the driver’sfoot area could interfere withthe operation of the foot pedals,possibly causing an accident.Do not place anything under thefront seats.
WARNING - Driver’s seat• Never attempt to adjust seat
while the vehicle is moving.This could result in loss ofcontrol, and an accident caus-ing death, serious injury, orproperty damage.
• Do not allow anything to inter-fere with the normal positionof the seatback. Storing itemsagainst a seatback or in anyother way interfering withproper locking of a seatbackcould result in serious or fatalinjury in a sudden stop or col-lision.
(Continued)
WARNING - Uprightingseat
When you return the seatbackto its upright position, hold theseatback and return it slowlyand be sure there are no otheroccupants around the seat. Ifthe seatback is returned withoutbeing held and controlled, theback of the seat could springforward resulting in accidentalinjury to a person struck by theseatback.

3 21
Knowing your vehicle
1
2
3
4
5
6
7
8
9
Front seat adjustmentAdjusting the seat forward andbackwardTo move the seat forward or backward:1. Pull the seat slide adjustment lever
under the front edge of the seatcushion up and hold it.
2. Slide the seat to the position youdesire.
3. Release the lever and make surethe seat is locked in place.
Adjust the seat before driving, andmake sure the seat is locked securelyby trying to move forward and back-ward without using the control knob. Ifthe seat moves, it is not locked prop-erly.
Adjusting the seatback reclinerTo recline the seatback:1. Lean forward slightly and lift up on
the seatback recline lever locatedon the outside of the seat, at therear.
2. Carefully lean back on the seatand adjust the seatback of theseat to the position you desire.
3. Release the lever and make surethe seatback is locked in place.(The lever MUST return to its orig-inal position for the seatback tolock.)
8KMA2035 8KMA2037
WARNING - Driverresponsibility for front seatpassenger
Riding in a vehicle with a frontseatback reclined could lead toserious or fatal injury in an acci-dent. If a front seat is reclinedduring an accident, the occu-pant’s hips may slide under thelap portion of the safety beltapplying great force to theunprotected abdomen. Seriousor fatal internal injuries couldresult. The driver must advisethe front passengers to keep theseatback in a comfortablyupright position whenever thevehicle is in motion.
Knowing your vehicle
223
1
2
3
4
5
6
7
8
9
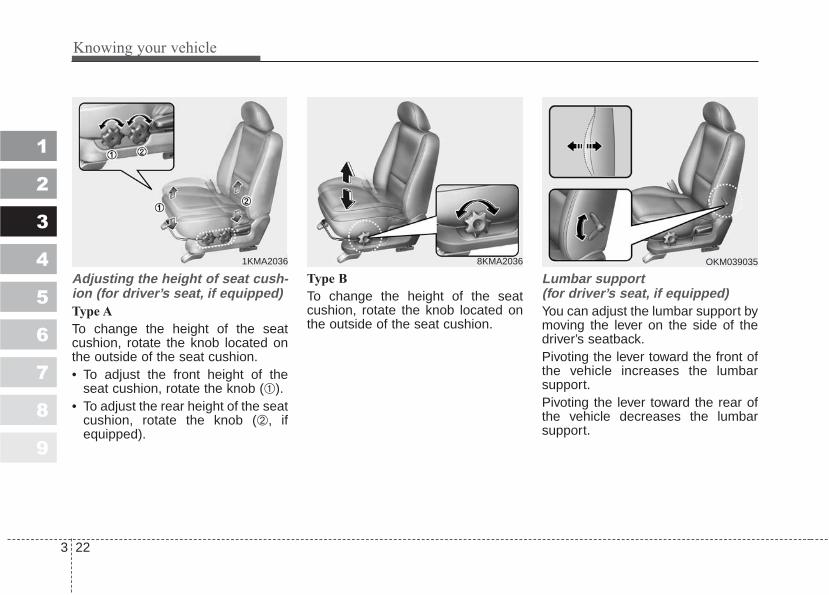
Adjusting the height of seat cush-ion (for driver’s seat, if equipped)Type A
To change the height of the seatcushion, rotate the knob located onthe outside of the seat cushion.• To adjust the front height of the
seat cushion, rotate the knob (➀).• To adjust the rear height of the seat
cushion, rotate the knob (➁, ifequipped).
Type B
To change the height of the seatcushion, rotate the knob located onthe outside of the seat cushion.
Lumbar support (for driver’s seat, if equipped) You can adjust the lumbar support bymoving the lever on the side of thedriver’s seatback.Pivoting the lever toward the front ofthe vehicle increases the lumbarsupport.Pivoting the lever toward the rear ofthe vehicle decreases the lumbarsupport.
8KMA2036 OKM0390351KMA2036
3 23
Knowing your vehicle
1
2
3
4
5
6
7
8
9
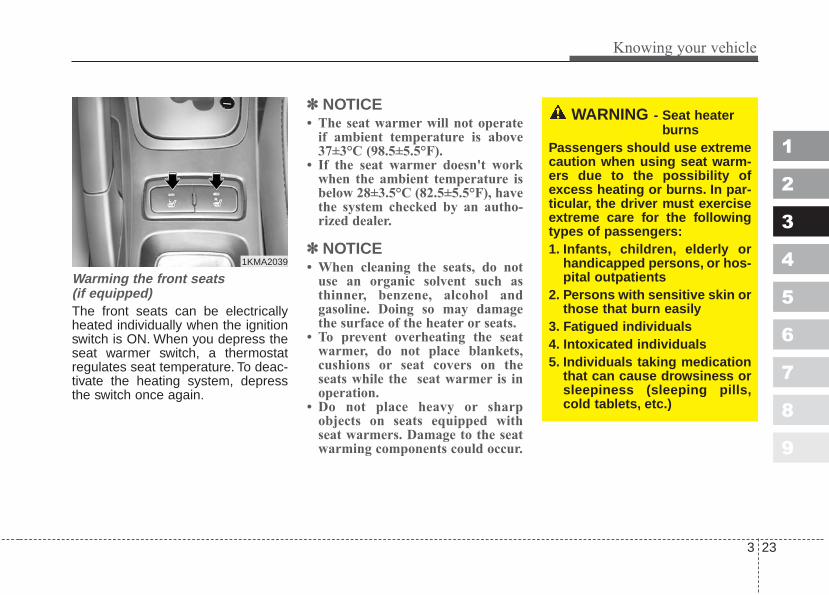
Warming the front seats(if equipped)The front seats can be electricallyheated individually when the ignitionswitch is ON. When you depress theseat warmer switch, a thermostatregulates seat temperature. To deac-tivate the heating system, depressthe switch once again.
✽✽ NOTICE• The seat warmer will not operate
if ambient temperature is above37±3°C (98.5±5.5°F).
• If the seat warmer doesn't workwhen the ambient temperature isbelow 28±3.5°C (82.5±5.5°F), havethe system checked by an autho-rized dealer.
✽✽ NOTICE• When cleaning the seats, do not
use an organic solvent such asthinner, benzene, alcohol andgasoline. Doing so may damagethe surface of the heater or seats.
• To prevent overheating the seatwarmer, do not place blankets,cushions or seat covers on theseats while the seat warmer is inoperation.
• Do not place heavy or sharpobjects on seats equipped withseat warmers. Damage to the seatwarming components could occur.
WARNING - Seat heaterburns
Passengers should use extremecaution when using seat warm-ers due to the possibility ofexcess heating or burns. In par-ticular, the driver must exerciseextreme care for the followingtypes of passengers:1. Infants, children, elderly or
handicapped persons, or hos-pital outpatients
2. Persons with sensitive skin orthose that burn easily
3. Fatigued individuals4. Intoxicated individuals5. Individuals taking medication
that can cause drowsiness orsleepiness (sleeping pills,cold tablets, etc.)
1KMA2039
Knowing your vehicle
243
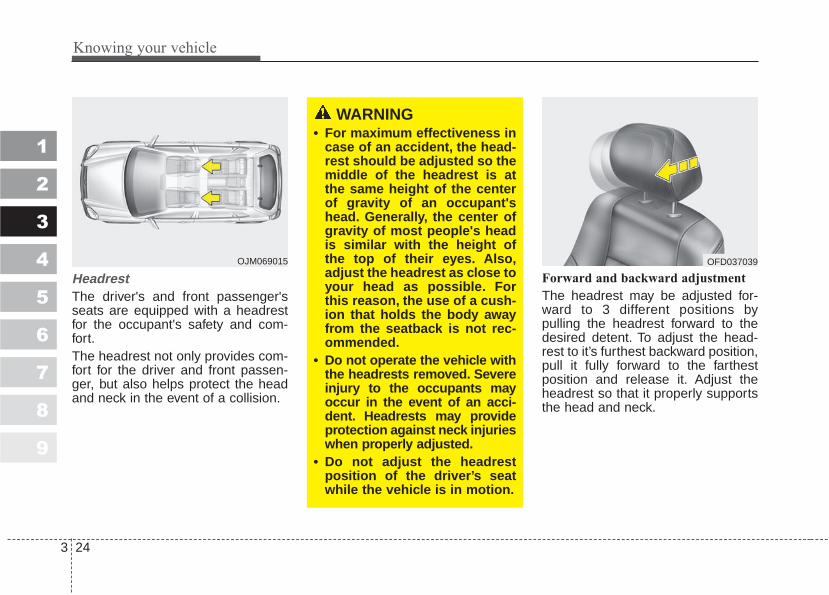
HeadrestThe driver's and front passenger'sseats are equipped with a headrestfor the occupant's safety and com-fort.The headrest not only provides com-fort for the driver and front passen-ger, but also helps protect the headand neck in the event of a collision.
Forward and backward adjustment
The headrest may be adjusted for-ward to 3 different positions bypulling the headrest forward to thedesired detent. To adjust the head-rest to it’s furthest backward position,pull it fully forward to the farthestposition and release it. Adjust theheadrest so that it properly supportsthe head and neck.
1
2
3
4
5
6
7
8
9
OJM069015
WARNING• For maximum effectiveness in
case of an accident, the head-rest should be adjusted so themiddle of the headrest is atthe same height of the centerof gravity of an occupant'shead. Generally, the center ofgravity of most people's headis similar with the height ofthe top of their eyes. Also,adjust the headrest as close toyour head as possible. Forthis reason, the use of a cush-ion that holds the body awayfrom the seatback is not rec-ommended.
• Do not operate the vehicle withthe headrests removed. Severeinjury to the occupants mayoccur in the event of an acci-dent. Headrests may provideprotection against neck injurieswhen properly adjusted.
• Do not adjust the headrestposition of the driver’s seatwhile the vehicle is in motion.
OFD037039

3 25
Knowing your vehicle
1
2
3
4
5
6
7
8
9
Adjusting the height up and down
To raise the headrest, pull it up to thedesired position (1). To lower theheadrest, push and hold the releasebutton (2) on the headrest supportand lower the headrest to the desiredposition (3).
Removal
To remove the headrest, raise it asfar as it can go then press therelease button (1) while pulling theheadrest up (2).To reinstall the headrest, put theheadrest poles (3) into the holeswhile pressing the release button (1).Then adjust it to the appropriateheight.
WARNINGMake sure the headrest locks inposition after adjusting it toproperly protect the occupants.
OFD037037 OFD039038
Knowing your vehicle
263
1
2
3
4
5
6
7
8
9
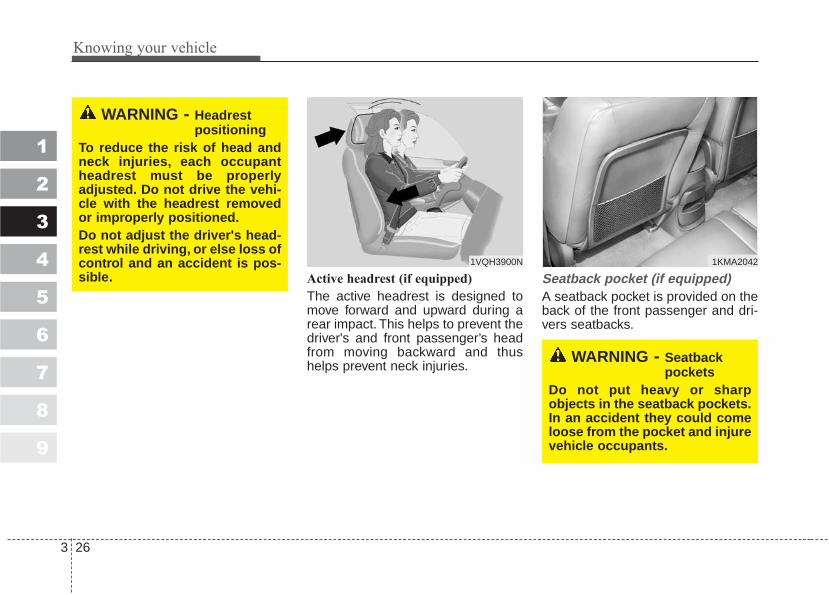
Active headrest (if equipped)
The active headrest is designed tomove forward and upward during arear impact. This helps to prevent thedriver's and front passenger’s headfrom moving backward and thushelps prevent neck injuries.
Seatback pocket (if equipped)A seatback pocket is provided on theback of the front passenger and dri-vers seatbacks.
WARNING - Headrestpositioning
To reduce the risk of head andneck injuries, each occupantheadrest must be properlyadjusted. Do not drive the vehi-cle with the headrest removedor improperly positioned.Do not adjust the driver's head-rest while driving, or else loss ofcontrol and an accident is pos-sible.
1VQH3900N 1KMA2042
WARNING - Seatbackpockets
Do not put heavy or sharpobjects in the seatback pockets.In an accident they could comeloose from the pocket and injurevehicle occupants.

3 27
Knowing your vehicle
1
2
3
4
5
6
7
8
9
Rear seat adjustmentAdjusting the seatback reclinerTo recline the seatback:1. Pull the lock release lever located
on the top of the seatback.2. Recline the seatback to the
desired position.3. Release the lever and make sure
the seatback is locked in place.
Split folding rear seat The rear seatbacks fold forward toprovide additional cargo space andto provide access to the cargo area.• To fold the rear seatback(s) down,
pull the lock release lever, then foldthe seatback forward and down.
• To raise the seatback, lift and pushit firmly until it clicks into place.
• When you return the seatback toits upright position, reposition therear safety belts so that they canbe used by rear seat passengers. To fold the rear seat;
1. Lower the headrest to the lowestposition.
2. Pull the lock release lever locatedon the top of the seatback.
3. Fold the seatback forward anddown firmly until it clicks intoplace.
1KMA2049
CAUTION - Rear seatbacklocks
When reclining the seatback,you should adjust the lockrelease lever while standing andholding the seatback.
WARNINGNo passenger should ride in thecargo area or sit or lie on foldedseatbacks while the vehicle ismoving. All passengers must bein seats and restrained properlywhile riding.
1KMA2052
Knowing your vehicle
283
1
2
3
4
5
6
7
8
9
CAUTION - Rear floorDo not remove the floor carpetin your vehicle. Emission con-trol system components in thearea of the rear seats causehigh exhaust temperaturesunder the floor.
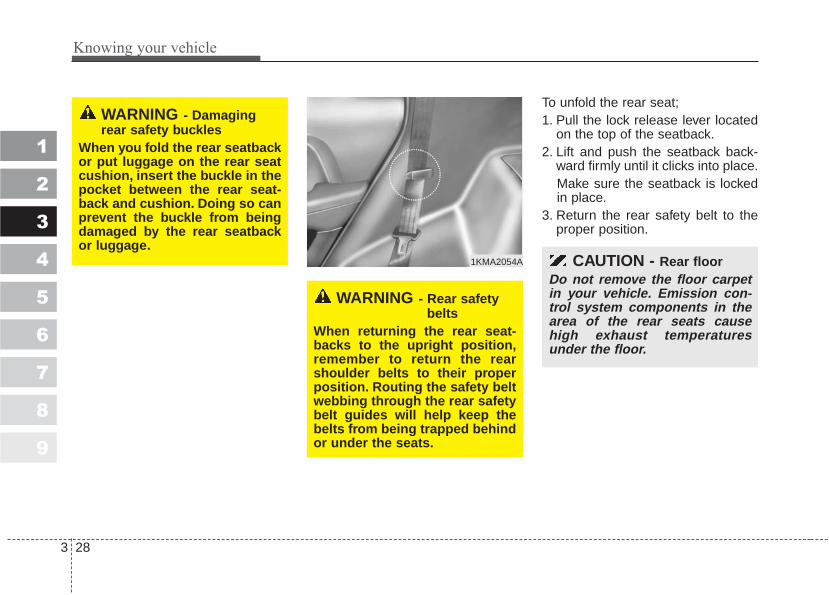
To unfold the rear seat;1. Pull the lock release lever located
on the top of the seatback.2. Lift and push the seatback back-
ward firmly until it clicks into place.Make sure the seatback is lockedin place.
3. Return the rear safety belt to theproper position.
1KMA2054A
WARNING - Damagingrear safety buckles
When you fold the rear seatbackor put luggage on the rear seatcushion, insert the buckle in thepocket between the rear seat-back and cushion. Doing so canprevent the buckle from beingdamaged by the rear seatbackor luggage.
WARNING - Rear safetybelts
When returning the rear seat-backs to the upright position,remember to return the rearshoulder belts to their properposition. Routing the safety beltwebbing through the rear safetybelt guides will help keep thebelts from being trapped behindor under the seats.
3 29
Knowing your vehicle
1
2
3
4
5
6
7
8
9
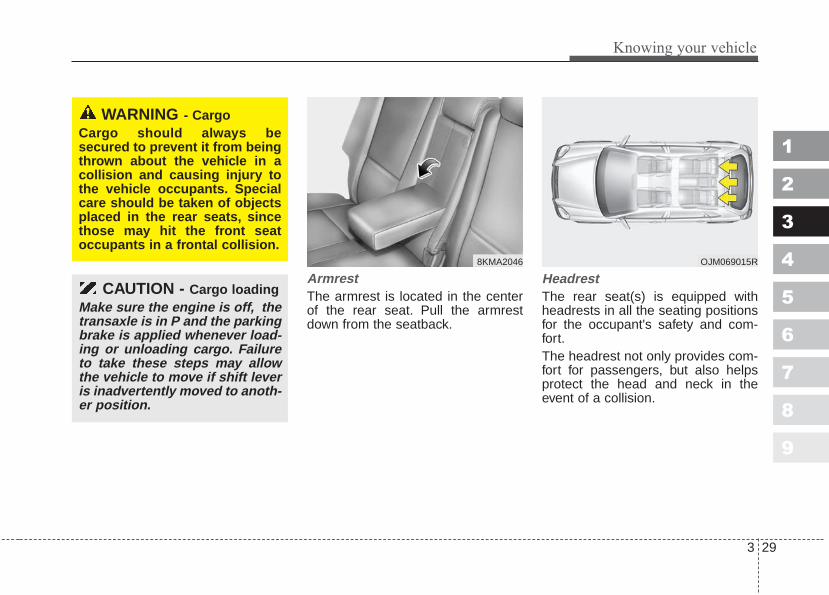
ArmrestThe armrest is located in the centerof the rear seat. Pull the armrestdown from the seatback.
HeadrestThe rear seat(s) is equipped withheadrests in all the seating positionsfor the occupant's safety and com-fort.The headrest not only provides com-fort for passengers, but also helpsprotect the head and neck in theevent of a collision.
WARNING - CargoCargo should always besecured to prevent it from beingthrown about the vehicle in acollision and causing injury tothe vehicle occupants. Specialcare should be taken of objectsplaced in the rear seats, sincethose may hit the front seatoccupants in a frontal collision.
CAUTION - Cargo loadingMake sure the engine is off, thetransaxle is in P and the parkingbrake is applied whenever load-ing or unloading cargo. Failureto take these steps may allowthe vehicle to move if shift leveris inadvertently moved to anoth-er position.
8KMA2046 OJM069015R

Knowing your vehicle
303
1
2
3
4
5
6
7
8
9
Adjusting the height up and down
To raise the headrest, pull it up to thedesired position (➀). To lower theheadrest, push and hold the releasebutton (➁) on the headrest supportand lower the headrest to the desiredposition (➂).
Removal
To remove the headrest, raise it asfar as it can go then press therelease button (➀) while pulling theheadrest up (➁).To reinstall the headrest, put theheadrest poles (➂) into the holeswhile pressing the release button(➀). Then adjust it to the appropriateheight.
WARNING• For maximum effectiveness in
case of an accident, the head-rest should be adjusted so themiddle of the headrest is atthe same height of the centerof gravity of an occupant'shead. Generally, the center ofgravity of most people's headis similar with the height ofthe top of their eyes. Alsoadjust the headrest as close toyour head as possible. Forthis reason, the use of a cush-ion that holds the body awayfrom the seatback is not rec-ommended.
• Do not operate the vehiclewith the headrests removed.Severe injury to an occupantmay occur in the event of anaccident. Headrests may pro-vide protection against severeneck injuries when properlyadjusted.
1KMA2047 1KMA2047
WARNINGMake sure the headrest locks inposition after adjusting it toproperly protect the occupants.
➀
➁

3 31
Knowing your vehicle
1
2
3
4
5
6
7
8
9
Pre-tensioner safety belt Your vehicle is equipped with driver'sand front passenger's pre-tensionersafety belts. The purpose of the pre-tensioner is to make sure that excessslack is taken up in certain frontalcollisions. The pre-tensioners mayactivate along with the front airbagsin frontal collisions based on angle ofimpact, seat belt usage and impactseverity.
The seat belt pre-tensioner systemconsists mainly of the following com-ponents.Their locations are shown inthe illustration.➀ SRS airbag warning light➁ Seatbelt pre-tensioner assembly➂ SRS airbag control module
SAFETY BELTS
OED030300
CAUTION The pre-tensioner seat belt isinstalled at the front seats, andthe sensor is equipped insidethe buckle, where presence ofpassenger is sensed by the fas-tening of the seat belts.Therefore, pre-tensioner will notactivate if the passenger is notfastened with the seat belts.Likewise, it will activate if buck-led even without a passenger inthe seat. Pre-tensioner seat beltis designed to activate when theseatbelt is in use. To ensure thepretensioner seatbelts activatein event of a possible seatbeltbuckle switch malfunction, thesystem is designed to activateregardless of whether a seatbelt is in use or if no seat beltuse is detected within 6 sec-onds of turning the ignitionswitch ON.
8KMB3311
➀
➁
➂
Knowing your vehicle
323
1
2
3
4
5
6
7
8
9
Load limiterWhen the pre-tentioner activates, ifthe system senses excessive seatbelt tension on the driver or passen-ger’s seat belt, the load limiter insidethe pre-tensioner will release someof the pressure on the affected seatbelt.
CAUTION - Airbag/Pre-tensioner dust
When the airbags and pre-ten-sioners are activated, a loudnoise may be heard and finedust, which may appear to besmoke, may be visible in thepassenger compartment. Thisdust is not toxic. The dust maycause skin irritation and shouldnot be breathed for prolongedperiods. Ventilate the vehicleafter impact and wash yourhands and face thoroughly afteran accident.
WARNING - Airbag/pre-tensioner warning light
If the SRS airbag warning lightdoes not illuminate when theignition key is turned to “ON”, orif it remains illuminated afterapproximately 6 seconds, or if itilluminates while the vehicle isbeing driven, please have anauthorized Kia dealer inspectthe pre-tensioner and airbagsystem as soon as possible.
WARNING - Safety beltadjustment
To obtain maximum benefit froma pre-tensioner seat belt:• The safety belt must be worn
correctly.• The safety belt must be
adjusted to the correct posi-tion.
3 33
Knowing your vehicle
1
2
3
4
5
6
7
8
9
WARNING - Replacingused pre-tensioners
• Pre-tensioners are designedto operate once. After activa-tion, pre-tensioner seat beltsmust be replaced. All seatbelts, of any type, shouldalways be replaced after theyhave been worn during a colli-sion.
• Do not attempt to replace thepre-tensioners yourself. Thismust be done by an autho-rized Kia dealer.
CAUTION - Hot partsThe pre-tensioner assemblymechanism become hot duringactivation. Do not touch the pre-tensioner seat belt assembly forseveral minutes after they havebeen activated.
WARNING - Damagingthe pre-tensioners
• Do not hit or strike the pre-tensioner assemblies, espe-cially with a tool or heavyobject.
• Do not attempt to service orrepair the pre-tensioners.
WARNINGIf the vehicle or pre-tensionerseat belt must be discarded, con-tact an authorized Kia dealer.
Knowing your vehicle
343
1
2
3
4
5
6
7
8
9
Safety belt restraint system We strongly recommend that the dri-ver and all passengers be properlyrestrained at all times by using thesafety belts provided with the vehi-cle. Proper use of the safety beltsdecreases the risk of severe injury ordeath in accidents or sudden stops.In most states, and in Canada, thelaw requires their use.
All seats have lap/shoulder belts.Inertial locks in the safety belt retrac-tors allow all of the lap/shoulder safe-ty belts to remain unlocked duringnormal vehicle operation. This allowsthe occupants some freedom ofmovement and increased comfortwhile using the safety belts. If a forceis applied to the vehicle, such as astrong stop, a sharp turn, or a colli-sion, the safety belt retractors willautomatically lock the safety belts.
Since the inertial locks do not requirea collision in order to lock up, youmay become aware of the safetybelts locking while braking or goingaround sharp corners.Always use the rear seat position(s)to install your child restraint(s).
WARNING - Safety beltsTo minimize the risk of seriousor fatal injury in an accident, thedriver and all passengersshould use the appropriatesafety restraints for their ageand size. The presence ofairbags does not change theneed to be properly restrainedby a safety belt or size-appropri-ate child restraint. In fact,airbags are designed to workthe best when passengers arecorrectly restrained in the vehi-cle.• Be sure you are familiar with
the information in this section,including the information oninfant and child restraints.
• Read the safety warnings onthe sun visors of your vehiclealso.
WARNING - Childrestraint in front seat
Never install a child restraintsystem in the front passengerposition, as an inflating airbagcould cause serious or fatalinjury to a child in that position.
3 35
Knowing your vehicle
1
2
3
4
5
6
7
8
9
The rear safety belts use a specialauto-lock feature designed to allow achild restraint to be used in thesepositions without an added lockingclip. They normally lock only underextreme or emergency conditions(emergency lock mode). Howeverthey can be adjusted so that theyremain fixed and locked when a childrestraint system is placed in thesepositions. (Use this auto-lock modeonly to secure a child restraint, neverfor passengers restrained by thesafety belts.) Page 3-48 givesinstructions on placing the safety beltin the auto lock mode.The drivers safety belt can only oper-ate in the emergency lock mode.
Safety belts provide the best restraintwhen:• The seatback is upright.• The occupant is sitting upright (not
slouched).• The lap belt is snug across the hips.• The shoulder belt is snug across
the chest.• The knees are straight forward.To help you remember to fasten yoursafety belt, a warning light will blink.
WARNING - After a colli-sion
• Lap/shoulder belt assembliesmay be stretched or damagedwhen subjected to the stressand forces of a collision.
• The entire restraint systemshould be inspected followingany collision. All belts, retrac-tors, anchors and hardwaredamaged by a collision shouldbe replaced before the vehicleis operated again.
WARNING - Cargo area Passengers should never beallowed to ride in the cargo areaof a vehicle. No safety belts areprovided for the cargo area.Persons riding in the vehiclewithout a fastened safety beltare much more likely to sufferserious bodily injury or deathduring an accident.
WARNING - Twisted beltsA twisted or jammed safety beltcannot restrain you properly. Ifyou cannot untwist or unjam thesafety belt, have an authorizedKia dealer service it immediate-ly. Never drive or ride with atwisted or jammed safety belt.

Knowing your vehicle
363
1
2
3
4
5
6
7
8
9
CAUTION Never close the doors on anypart of the lap or shoulder belt.It can damage the safety belt orbuckle which could increase therisk of injury in case of an acci-dent.
WARNING - Belt useSafety belts must be used cor-rectly to work properly in anaccident. Each seating positionin your vehicle has a specificsafety belt assembly thatincludes a buckle and tonguedesigned to be used together.Failure to heed these warningsand follow these instructionswill increase the risk and sever-ity of injuries and the likelihoodof death in an accident.• Use the shoulder portion of
the safety belt on the outsideshoulder only. Never wear theshoulder portion under thearm.
• Never swing the safety beltaround your neck to fit overthe inside shoulder.
• Never wear the shoulder por-tion of the safety belt acrossthe neck or face.
(Continued)
(Continued)• Wear the lap portion as low as
possible. Be sure that the lapbelt fits snugly around thehips. Never wear a lap portionof a lap/shoulder belt overyour waist; it should alwaysgo over the stronger area ofyour hips.
• Never use a single safety beltfor more than one person.
• The front seatbacks shouldalways remain in a comfort-able, upright position whenthe vehicle is moving.
(Continued)Pull the safety belt out and letit retract a number of times.Make sure that the lap/shoul-der belts return smoothly andeasily into the retractor.
• Check the latches to makesure they latch and releasewithout interference or delay.
• Never close the doors on anypart of the lap or shoulderbelt.
• Any belt not in good conditionor in good working ordershould be promptly replaced.
WARNING - Safety beltcare
• A damaged belt may not giveyou the protection you need inan accident.
• Inspect your safety belts peri-odically for excessive wear ordamage. Pull out each beltfully and look for fraying, cuts,burns or other damage.
(Continued)

3 37
Knowing your vehicle
1
2
3
4
5
6
7
8
9
Safety belt warning light andchimeIf the driver's safety belt is not fas-tened when the key is turned ON orif it is unfastened after the key isturned ON, the safety belt warninglight blinks until the belt fastened.If the driver's safety belt is not fas-tened when the key is turned ON orif it is unfastened after the key is ON,the safety belt warning chime willsound for approximately 6 seconds.At this time, if the safety belt is fas-tened, the chime will stop at once.
Lap/shoulder beltTo fasten the front lap/shoulderbelt:1. Grasp the buckle and tongue
plate.2. Slowly pull the lap/shoulder belt
out from the retractor.
3. Insert the tongue plate (➀) into theopen end of the buckle (➁) until anaudible “click” is heard, indicatingthe belt is locked in the buckle.
1GQA2083 1GHA2262 1GHA2263

Knowing your vehicle
383
1
2
3
4
5
6
7
8
9
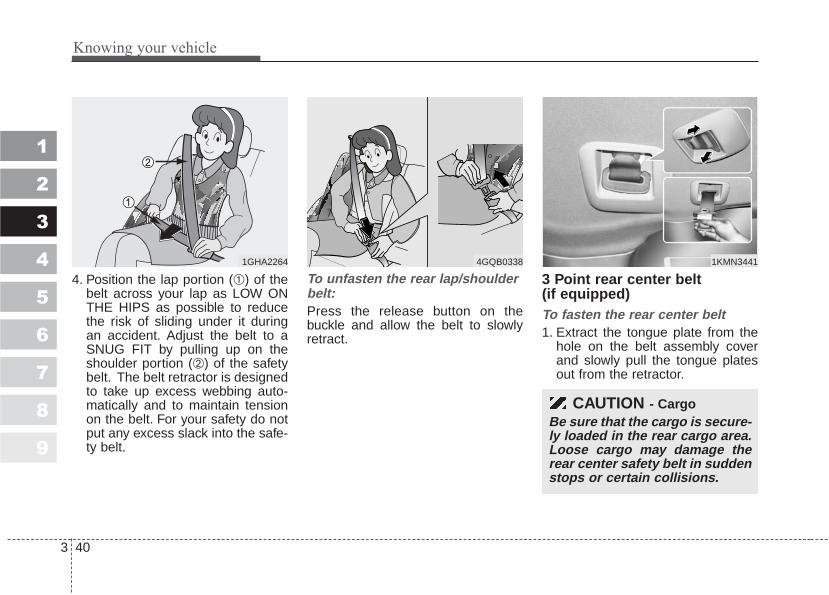
4. Position the lap portion (➀) of thebelt across your lap as LOW ONTHE HIPS as possible to reducethe risk of sliding under it duringan accident. Adjust the belt to aSNUG FIT by pulling up on theshoulder portion (➁) of the safetybelt. The belt retractor is designedto take up excess webbing auto-matically and to maintain tensionon the belt. For your safety, do notput any excess slack into the safe-ty belt at any location.
✽✽ NOTICEIf you are not able to pull out thesafety belt from the retractor, firmlypull the belt out and release it. Thenyou will be able to pull the belt outsmoothly.
5. Adjust the shoulder anchor posi-tion to your size. To raise theanchor position, push the anchorup (➀). To lower the anchor posi-tion, press (➁) the button ( ) andslide the anchor down (➂). Afteradjustment, make sure the anchoris locked in position.
If the height of the adjusting seat beltis too near your neck, you will not begetting the most effective protection.The shoulder portion should beadjusted so that it lies across yourchest and midway over your shouldernearest the door and not your neck.
1GHA2264 1KMA2050
A

3 39
Knowing your vehicle
1
2
3
4
5
6
7
8
9
To unfasten the front lap/shoulderbelt:Press the release button on thebuckle and allow the belt to slowlyretract.
Rear lap/shoulder belt To fasten the rear lap/shoulderbelt:1. Grasp the buckle and tongue
plate.2. Slowly pull the lap/shoulder belt
out.3. Insert the tongue plate (➀) into the
open end of the buckle (➁) until anaudible “click’’ is heard, indicatingthe belt is locked in the buckle.
4GQB0338 1GHA2263
WARNING• The height adjuster must be in
the locked position when thevehicle is moving.
• The misadjustment of heightof the shoulder belt couldreduce the effectiveness ofthe seat belt in a crash.
Knowing your vehicle
403
1
2
3
4
5
6
7
8
9
4. Position the lap portion (➀) of thebelt across your lap as LOW ONTHE HIPS as possible to reducethe risk of sliding under it duringan accident. Adjust the belt to aSNUG FIT by pulling up on theshoulder portion (➁) of the safetybelt. The belt retractor is designedto take up excess webbing auto-matically and to maintain tensionon the belt. For your safety do notput any excess slack into the safe-ty belt.
To unfasten the rear lap/shoulderbelt:Press the release button on thebuckle and allow the belt to slowlyretract.
3 Point rear center belt (if equipped) To fasten the rear center belt1. Extract the tongue plate from the
hole on the belt assembly coverand slowly pull the tongue platesout from the retractor.
1GHA2264 4GQB0338 1KMN3441
CAUTION - Cargo Be sure that the cargo is secure-ly loaded in the rear cargo area.Loose cargo may damage therear center safety belt in suddenstops or certain collisions.
3 41
Knowing your vehicle
1
2
3
4
5
6
7
8
9
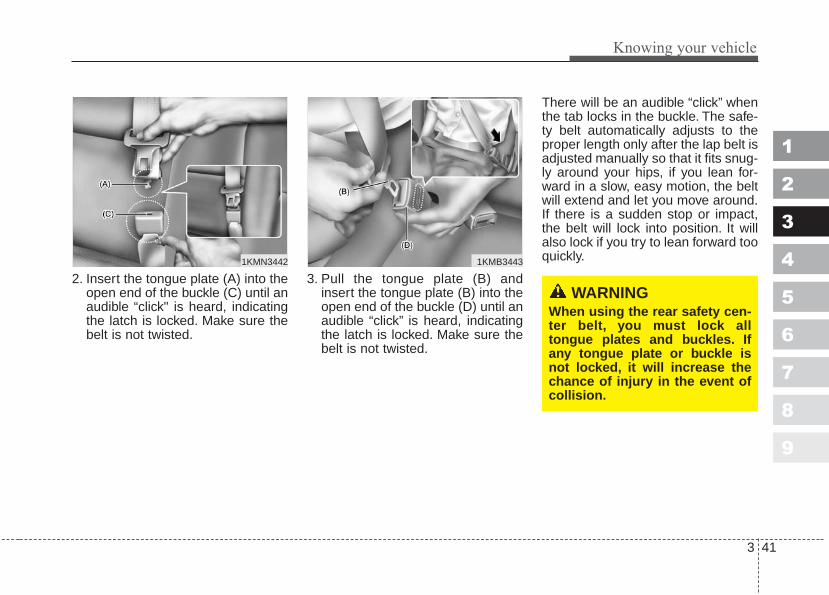
2. Insert the tongue plate (A) into theopen end of the buckle (C) until anaudible “click" is heard, indicatingthe latch is locked. Make sure thebelt is not twisted.
3. Pull the tongue plate (B) andinsert the tongue plate (B) into theopen end of the buckle (D) until anaudible “click” is heard, indicatingthe latch is locked. Make sure thebelt is not twisted.
There will be an audible “click” whenthe tab locks in the buckle. The safe-ty belt automatically adjusts to theproper length only after the lap belt isadjusted manually so that it fits snug-ly around your hips, if you lean for-ward in a slow, easy motion, the beltwill extend and let you move around.If there is a sudden stop or impact,the belt will lock into position. It willalso lock if you try to lean forward tooquickly.1KMN3442 1KMB3443
WARNINGWhen using the rear safety cen-ter belt, you must lock alltongue plates and buckles. Ifany tongue plate or buckle isnot locked, it will increase thechance of injury in the event ofcollision.

Knowing your vehicle
423
1
2
3
4
5
6
7
8
9
To unfasten the rear center belt 1. Press the release button on the
buckle (D) and remove the tongueplate (B) from the buckle (D).
2. To retract the rear center seatbelt,insert the key or similar small rigiddevice into the web release buttonon the anchor connector. Pull upon the seat belt web (A) and allowthe webbing to retract automatical-ly.
3. Insert the tongue plate (A) into thehole on the belt assembly cover.
1KMN34531KMN34521KMB3451
3 43
Knowing your vehicle
1
2
3
4
5
6
7
8
9
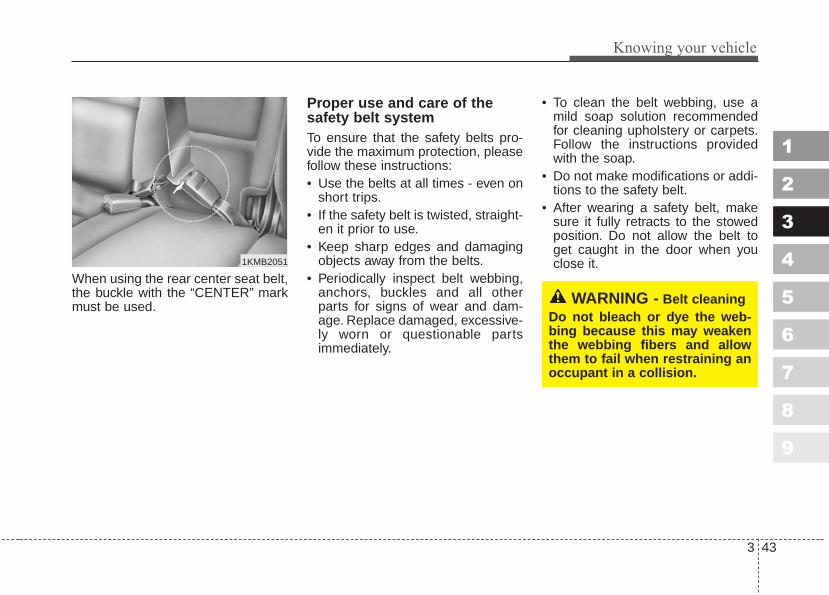
When using the rear center seat belt,the buckle with the “CENTER” markmust be used.
Proper use and care of thesafety belt system To ensure that the safety belts pro-vide the maximum protection, pleasefollow these instructions:• Use the belts at all times - even on
short trips.• If the safety belt is twisted, straight-
en it prior to use.• Keep sharp edges and damaging
objects away from the belts.• Periodically inspect belt webbing,
anchors, buckles and all otherparts for signs of wear and dam-age. Replace damaged, excessive-ly worn or questionable partsimmediately.
• To clean the belt webbing, use amild soap solution recommendedfor cleaning upholstery or carpets.Follow the instructions providedwith the soap.
• Do not make modifications or addi-tions to the safety belt.
• After wearing a safety belt, makesure it fully retracts to the stowedposition. Do not allow the belt toget caught in the door when youclose it.
WARNING - Belt cleaningDo not bleach or dye the web-bing because this may weakenthe webbing fibers and allowthem to fail when restraining anoccupant in a collision.
1KMB2051

Knowing your vehicle
443
1
2
3
4
5
6
7
8
9
Restraint of pregnant women Pregnant women should wearlap/shoulder belt assemblies when-ever possible according to specificrecommendations by their doctors.The lap portion of the belt should beworn AS SNUGLY AND LOW ASPOSSIBLE.
Restraint of infants and smallchildren To increase their safety, infants andyoung children should always berestrained by a restraint systemapproved for their age and size.Never allow a child to stand or kneelon the seat of a moving vehicle.Never allow a safety belt to be placedaround both a child and an adult oraround two children at the sametime.It is best for children to be seated inthe rear seats.
Many companies manufacture childrestraint systems (often called childseats) for infants and small children.An acceptable child restraint systemmust always satisfy Canadian MotorVehicle Safety Standards. Make surethat any child-restraint system youuse in your vehicle is labelled ascomplying with Federal SafetyStandards.The child-restraint system should bechosen to fit both the size of the childand the size of the vehicle seat. Besure to follow any instructions provid-ed by the child-restraint system man-ufacturer when installing the child-restraint system.
WARNING - Pregnantwomen
Pregnant women must neverplace the lap portion of the safe-ty belt over the area of theabdomen where the fetus islocated or above the abdomenwhere the belt could crush thefetus during an impact.

3 45
Knowing your vehicle
1
2
3
4
5
6
7
8
9
Restraint of larger children As children grow, they may need touse new child-restraint systems,including larger child seats or boost-er seats, which are appropriate fortheir increased size.A child who has outgrown availablechild-restraint systems should usethe belts provided in the vehicle.When seated in the rear outboardseats, the child should be restrainedby the lap/shoulder belt.If the shoulder belt portion slightlytouches the child’s neck or face, tryplacing the child closer to the centerof the vehicle. If the shoulder belt stilltouches their face or neck they needto be returned to a child restraint sys-tem. In addition, after-market devicesare available from independent man-ufacturers which help pull the shoul-der belt down and away from thechild’s face or neck.
WARNING - Infants andyoung children
• Infants and young children areat much greater risk of seriousinjury or death in an accidentor sudden stop if they are unre-strained or restrained improp-erly. Follow all instructions inthis section and the instruc-tions that came with anapproved child safety system.The child restraint must be cor-rectly installed in the vehicle,and the child must be correctlyplaced in the child restraint.
• All children under 12 aresafest in the back seat.
• Never install a child or infantseat in the front passengerposition. The baby will beinjured or killed by the airbagif it deploys.
• Never allow a child to stand orkneel on the seat of a movingvehicle.
WARNING - Children onlaps
Never hold a child on your lap orin your arms in a moving vehi-cle.Even a very strong person can-not hold onto a child in theevent of even a minor collision.
CAUTION - Hot metalparts
Safety belts and seats canbecome hot in a vehicle that hasbeen closed during warm/hotweather; they could burn achild. Check seat covers andbuckles before you place a childanywhere near them.

Knowing your vehicle
463
1
2
3
4
5
6
7
8
9
Child restraint system For small children and babies, theuse of a child seat or infant seat isstrongly recommended and isrequired by law in almost all states.This child seat or infant seat shouldbe of appropriate size for the childand should be installed in accor-dance with the manufacturer'sinstructions.Children riding in the car should siton the rear seat and must always beproperly restrained to minimize therisk of injury in an accident, suddenstop or sudden maneuver. Accordingto accident statistics, children aresafer when properly restrained in therear seats than in the front seat.Child restraint systems are designedto be secured in vehicle seats by lapbelts or the lap belt portion of alap/shoulder belt or by a LATCH sys-tem (if equipped).
Children could be injured or killed ina crash if their restraints are notproperly secured. For small childrenand babies, a child seat or infant seatmust be used. Before buying a par-ticular child restraint system, makesure it fits your car and seat belts,and fits your child. Follow all theinstructions provided by the childseat manufacturer when installingthe child restraint system.
WARNING - Shoulderbelts on small children
• Never allow a shoulder belt tobe in contact with a child’sneck or face while the vehicleis in motion.
• If safety belts are not properlyworn and adjusted, there is arisk of death or serious injuryto such a child.
3 47
Knowing your vehicle
1
2
3
4
5
6
7
8
9
WARNING - Childrestraints
• A child restraint system mustbe placed in the rear seat.Never install a child or infantseat on the front passenger'sseat.Should an accident occur andcause the passenger airbag todeploy, it could severely injureor kill an infant or child seatedin the front seat.
(Continued)
(Continued)• When using the vehicles
lap/shoulder safety belts,always make sure that theshoulder belt portion is posi-tioned midway over the shoul-der, never across the neck orbehind the back. The lap beltportion of the lap/shoulderbelt must always be posi-tioned as low as possible onthe child's hips and as snugas possible.
• If the vehicles safety belt willnot properly fit the child, youmust use an appropriate childrestraint or booster seat in therear.
(Continued)
(Continued)• Since a safety belt or child
restraint system can becomevery hot if it is in a closedvehicle, be sure to check theseat cover and buckles beforeplacing a child there.
• When the child restraint sys-tem is not in use, store it in thetrunk or fasten it with a safetybelt so that it will not bethrown forward in the case ofa sudden stop or an accident.
• Children who are too large tobe in a child restraint shouldsit in the rear seat and berestrained with the availablelap/shoulder belts.
(Continued)
E1BLA204
Knowing your vehicle
483
1
2
3
4
5
6
7
8
9
Installing a child restraint system For safety reasons, we recommendthat the child restraint system beused in the rear seats.Never place a rear-facing childrestraint in the front passengerseat, because of the danger thatan inflating passenger side air bagcould impact the rear-facing childrestraint and kill the child.Since all passenger safety beltsmove freely under normal conditionsand only lock under extreme oremergency conditions (emergencylock mode), you must manuallychange these safety belts to the autolock mode to secure a child restraint.
(Continued)• Never allow a child to stand up
or kneel while the vehicle ismoving.
• Never use an infant carrier orchild seat that "hooks" over aseatback. It will not provideadequate protection in anaccident.
• Never allow a child to be heldwhile they are in a movingvehicle, as this could result inserious injury to the child inthe event of an accident or asudden stop. Holding a childin a moving vehicle does notprovide the child with any pro-tection during an accident,even if the person holding thechild is wearing a seat belt.
WARNING - Child seatinstallation
• Before installing the childrestraint system, read theinstructions supplied by thechild restraint system manu-facturer.
• If the safety belt does notoperate as described in thissection, have the systemchecked immediately by yourauthorized Kia dealer.
• Failure to observe this manu-al's instructions regardingchild restraint system and theinstructions provided with thechild restraint system couldincrease the chance and/orseverity of injury in an acci-dent.

3 49
Knowing your vehicle
1
2
3
4
5
6
7
8
9
Placing a passenger safetybelt into the auto lock modeThe use of the auto lock mode willensure that the normal movement ofthe child in the vehicle does notcause the safety belt to be pulled outand loosen the firmness of its holdon the child restraint system. Tosecure a child restraint system, usethe following procedure.
Installing a child restraint system bylap/shoulder belt
To install a child restraint system onthe outboard or center rear seats, dothe following:1. Place the child restraint system in
the seat and route the lap/shoul-der belt around or through therestraint, following the restraintmanufacturer’s instructions. Besure the safety belt webbing is nottwisted.
2. Fasten the lap/shoulder belt latchinto the buckle. Listen for the dis-tinct “click” sound.
Position the release button so that itis easy to access in case of an emer-gency.
E2MS103005 E2BLD310
Knowing your vehicle
503
1
2
3
4
5
6
7
8
9
3. Pull the shoulder portion of thesafety belt all the way out. Whenthe shoulder portion of the safetybelt is fully extended, it will shiftthe retractor to the “Auto Lock”(child restraint) mode.
4. Slowly allow the shoulder portionof the safety belt to retract and lis-ten for an audible “clicking” or“ratcheting” sound. This indicatesthat the retractor is in the “AutoLock” mode. If no distinct sound isheard, repeat steps 3 and 4.
5. Remove as much slack from thebelt as possible by pushing downon the child restraint system whilefeeding the shoulder belt back intothe retractor.
6. Push and pull on the child restraintsystem to confirm that the safetybelt is holding it firmly in place. If itis not, release the safety belt andrepeat steps 2 through 6.
"Click"
MMSA3029MMSA3028 MMSA3030
3 51
Knowing your vehicle
1
2
3
4
5
6
7
8
9
7. Double check that the retractor isin the “Auto Lock” mode byattempting to pull more of the safe-ty belt out of the retractor. If youcannot, the retractor is in the “AutoLock” mode.
To remove the child restraint, pressthe release button on the buckle andthen pull the lap/shoulder belt out ofthe restraint and allow the safety beltto retract fully.
When the safety belt is allowed toretract to its fully stowed position,the retractor will automaticallyswitch from the “Auto Lock” modeto the emergency lock mode fornormal adult usage.
Securing a child restraint seatwith “Tether Anchor” system Child restraint hook holders arelocated on the floor behind the rearseats.1. Open the tether anchor cover on
the floor behind the rear seats.
WARNING - Auto lockmode
The lap/shoulder belt automati-cally returns to the “emergencylock mode” whenever the belt isallowed to retract fully.Therefore, the preceding sevensteps must be followed eachtime a child restraint isinstalled.If the safety belt is not placed inthe “Auto lock” mode, severeinjury or death could occur tothe child and/or other occupantsin the vehicle in a collision,since the child restraint will notbe effectively held in place.
8KMB3533
Knowing your vehicle
523
1
2
3
4
5
6
7
8
9
2. Route the child restraint seat strapover the seatback.For vehicles with adjustable head-rest, route the tether strap underthe headrest and between theheadrest posts, otherwise routethe tether strap over the top of theseatback.
3. Connect the tether strap hook tothe appropriate child restrainthook holder and tighten to securethe seat.
1KMB2049
WARNING - Tether strapIf the tether strap is securedincorrectly, the child restraintseat may not be restrainedproperly in the event of a colli-sion. Do not mount more thanone child restraint seat to a teth-er anchorage, since the anchor-age can then fail in a collision.
WARNING - Childrestraint check
Check that the child restraintsystem is secure by pushingand pulling it in different direc-tions. Incorrectly fitted childrestraints may swing, twist, tipor come away causing death orinjury.
WARNING - Childrestraint anchorage
• Child restraint anchorages aredesigned to withstand onlythose loads imposed by cor-rectly fitted child restraints.Under no circumstances arethey to be used for adult seatbelts or harnesses or forattaching other items orequipment to the vehicle.
• The tether strap may not workproperly if attached some-where other than the correcttether anchor.
3 53
Knowing your vehicle
1
2
3
4
5
6
7
8
9
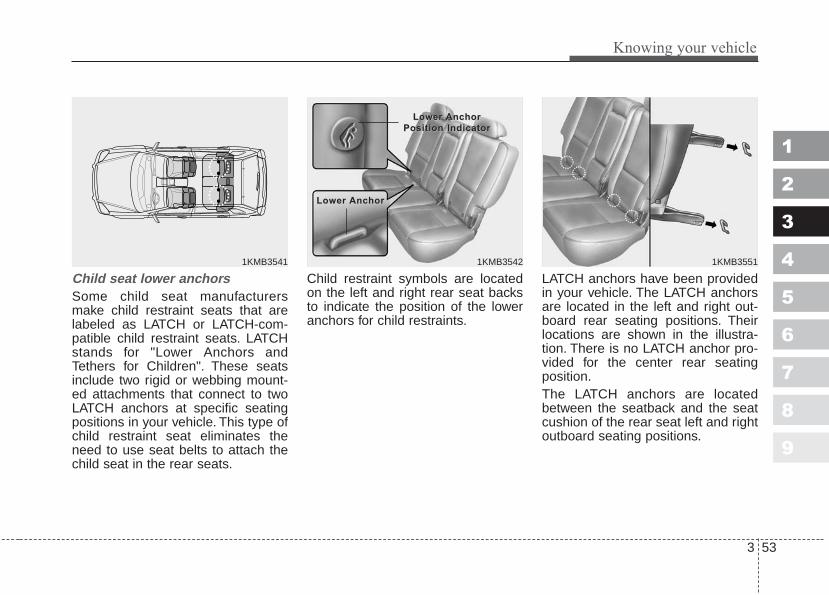
Child seat lower anchorsSome child seat manufacturersmake child restraint seats that arelabeled as LATCH or LATCH-com-patible child restraint seats. LATCHstands for "Lower Anchors andTethers for Children". These seatsinclude two rigid or webbing mount-ed attachments that connect to twoLATCH anchors at specific seatingpositions in your vehicle. This type ofchild restraint seat eliminates theneed to use seat belts to attach thechild seat in the rear seats.
Child restraint symbols are locatedon the left and right rear seat backsto indicate the position of the loweranchors for child restraints.
LATCH anchors have been providedin your vehicle. The LATCH anchorsare located in the left and right out-board rear seating positions. Theirlocations are shown in the illustra-tion. There is no LATCH anchor pro-vided for the center rear seatingposition.The LATCH anchors are locatedbetween the seatback and the seatcushion of the rear seat left and rightoutboard seating positions.
1KMB3541 1KMB35511KMB3542
Lower Lower AnchorAnchor
Lower Lower AnchorAnchor
Position IndicatorPosition Indicator
Knowing your vehicle
543
1
2
3
4
5
6
7
8
9
Follow the child seat manufacturer’sinstructions to properly install childrestraint seats with LATCH orLATCH-compatible attachments.Once you have installed the LATCHchild restraint, assure that the seat isproperly attached to the LATCH andtether anchors. Also, test the childrestraint seat before you place thechild in it. Tilt the seat from side toside. Also try to tug the seat forward.Check to see if the anchors hold theseat in place.
WARNING If the child restraint is notanchored properly, the risk of achild being seriously injured orkilled in a collision greatlyincreases.
WARNING - LATCH loweranchors
LATCH lower anchors are onlyto be used with the left and rightrear outboard seating positions.Never attempt to attach anLATCH equipped seat in thecenter seating position.You maydamage the anchors or theanchors may fail and break in acollision.
WARNINGWhen using the vehicle’s“LATCH” system to install achild restraint system in the rearseat, all unused vehicle rearseat belt metal latch plates ortabs must be latched securely intheir seat belt buckles and theseat belt webbing must beretracted behind the childrestraint to prevent the childfrom reaching and taking holdof unretracted seat belts.Unlatched metal latch plates ortabs may allow the child toreach the unretracted seat beltswhich may result in strangula-tion and a serious injury ordeath to the child in the childrestraint.
CAUTION Do not allow the rear seat beltwebbing to get scratched orpinched by the child-seat latchand LATCH anchor during theinstallation.

3 55
Knowing your vehicle
1
2
3
4
5
6
7
8
9
(1) Driver’s front air bag(2) Passenger’s front air bag(3) Side air bag*(4) Curtain air bag** : if equipped
AIRBAG - ADVANCED SUPPLEMENTAL RESTRAINT SYSTEM
OKM039055
* The actual air bags in the vehicle may differ from the illustration.
WARNINGEven in vehicles with air bags,you and your passengers mustalways wear the safety belts pro-vided in order to minimize therisk and severity of injury in theevent of a collision or rollover.

Knowing your vehicle
563
1
2
3
4
5
6
7
8
9
SRS components and func-tionsThe SRS consists of the followingcomponents:1. Driver's front air bag module2. Passenger's front air bag module3. Side air bag modules*4. Curtain air bag modules*5. Retractor pre-tensioner assem-
blies6. Air bag warning light7. SRS control module (SRSCM)8. Front impact sensors9. Side impact sensors*
10. PASSENGER AIR BAG “OFF”indicator (Front passenger’s seatonly)
11. Occupant classification system(Front passenger’s seat only)
12. Driver’s seat track position sen-sor
13. Driver’s and front passenger’sseat belt buckle sensors
*: if equipped
What your airbag system doesDriver’s airbag and front passenger’sairbag are designed to supplementthe protection offered by the safetybelt in certain frontal collisions.Likewise, side airbag and curtainairbags are designed to supplementthe protection offered by the safetybelt in side collisions. Safety beltsare designed to reduce the injury ofthe driver or passengers in case ofimpact or collision. No safety belt orairbag system can completely elimi-nate injuries that may cause in colli-sions or impacts. To help reduceimpact on driver or passengers inany collision, safety belts must becorrectly worn.
OKM039160N

3 57
1
2
3
4
5
6
7
8
9
Knowing your vehicle
What your airbag system doesnot doThe air bag system is designed tosupplement the protection offered bythe safety belt system. IT IS NOT ASUBSTITUTE FOR THE SAFETYBELT.
The importance of using safety beltsThere are four very important rea-sons to use safety belts even with anairbag supplemental restraint sys-tem. They:• help keep you in the proper posi-
tion (away from the airbag) when itinflates.
• reduce the risk of harm in rollover,side impact (vehicles not equippedwith side and curtain airbags) orrear impact collisions, because anairbag is not designed to inflate insuch situations and even a sidecurtain airbag is designed to inflateonly in certain side impact colli-sions.
• reduce the risk of harm in frontal orside collisions which are notsevere enough to actuate theairbag supplemental restraint sys-tem.
• reduce the risk of being ejectedfrom your vehicle.
Your vehicle’s SupplementalRestraint System Control Moduleis equipped with a recordingdevice that may record the use orstatus of the safety belt restraintsystem by the driver and frontpassenger in certain collisions.
WARNING - Airbags &safety belts
• Even in vehicles with air bags,you and your passengersmust always wear the safetybelts provided in order to min-imize the risk and severity ofinjury in the event of a colli-sion or rollover.
• Always wear your safety belt.It can help keep you awayfrom the air bags during heavybraking just before a collision.
(Continued)

Knowing your vehicle
583
1
2
3
4
5
6
7
8
9
The SRS uses a collection of sen-sors to gather information about thedriver’s and front passenger’s seatposition, the driver’s and front pas-senger’s safety belt usage andimpact severity.The driver's and front passenger'sseat position sensors, which areinstalled on the seat track let theairbag control module know wherethe seats are positioned. Similarly,the safety belt usage sensors mea-sure if the driver and front passen-ger’s safety belts are fastened.Thesesensors provide the ability to controlthe SRS deployment based on howclose the driver’s seat is to the steer-ing wheel, how close the passen-ger’s seat is to the instrument panel,whether or not the safety belts arefastened, and the severity of theimpact.
(Continued)• If your vehicle has been sub-
jected to flood conditions (e.g.soaked carpeting/standingwater on the floor of the vehi-cle, etc.) or if your vehicle hasbecome flood damaged in anyway, do not attempt to startthe vehicle or put the key inthe ignition. Have the vehicletowed to an authorized Kiadealer for inspection and nec-essary repairs.Disregarding this precautionmay cause an unexpectedairbag deployment, whichcould result in serious per-sonal injury or death.
(Continued)• If occupants are not wearing
safety belts or correctly seat-ed, they cannot be fully pro-tected, and thus face a greaterrisk of serious injury or death.
• Driver’s and front passenger’sairbag are designed to inflateonly in certain frontal colli-sion, and side and curtainairbags are designed to inflatein certain side impacts.Frontal airbags are notdesigned to provide protec-tion in side impacts, rearimpacts, rollovers, or lesssevere frontal collisions. Theywill not provide protectionfrom later impacts in a multi-impact collision.
(Continued)

3 59
1
2
3
4
5
6
7
8
9
Knowing your vehicle
The advanced SRS offers the abilityto control the airbag inflation with twolevels. A first stage level is providedfor moderate-severity impacts. A sec-ond stage level is provided for moresevere impacts.According to the impact severity,seating position and safety beltusage, the SRS Control Module con-trols the airbag inflation.Additionally, your SRS is equippedwith an occupant classification sys-tem in the front passenger’s seat.The occupant classification systemdetects the presence of a passengerin the front passenger’s seat and willturn off the front passenger’s airbagunder certain conditions in order toprotect smaller front passenger seatoccupants. For more detail, see“Occupant Classification System”later in this section.
WARNING - Seating sen-sors malfunction
If the seat position sensor is notworking properly, the airbagwarning light ( ) on the instru-ment panel will illuminatebecause the airbag warninglight is connected with the seatposition sensor. If the airbagwarning light does not illumi-nate when the ignition key isturned to the "ON" position, if itremains illuminated after illumi-nating for approximately 6 sec-onds, or if it illuminates whilethe vehicle is being driven, havean authorized Kia dealer inspectyour vehicle as soon as possi-ble.
WARNING - Seat usage• Modification to the seat struc-
ture can damage the seatposition sensor and cause theairbag to deploy at a differentlevel than should be provided.
• Do not place any objectsunderneath the front seatssince they could damage theseat position sensor or inter-fere with the occupant classi-fication system.
• Do not place any objects thatmay cause magnetic fieldsnear the front seat. These maycause a malfunction of theseat position sensor.
(Continued)
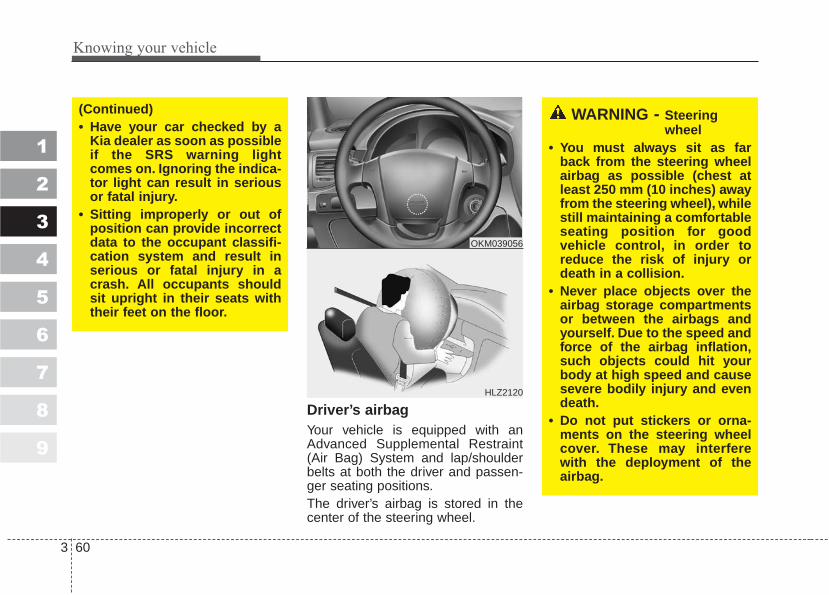
Knowing your vehicle
603
1
2
3
4
5
6
7
8
9
Driver’s airbagYour vehicle is equipped with anAdvanced Supplemental Restraint(Air Bag) System and lap/shoulderbelts at both the driver and passen-ger seating positions.The driver’s airbag is stored in thecenter of the steering wheel.
(Continued)• Have your car checked by a
Kia dealer as soon as possibleif the SRS warning lightcomes on. Ignoring the indica-tor light can result in seriousor fatal injury.
• Sitting improperly or out ofposition can provide incorrectdata to the occupant classifi-cation system and result inserious or fatal injury in acrash. All occupants shouldsit upright in their seats withtheir feet on the floor.
WARNING - Steeringwheel
• You must always sit as farback from the steering wheelairbag as possible (chest atleast 250 mm (10 inches) awayfrom the steering wheel), whilestill maintaining a comfortableseating position for goodvehicle control, in order toreduce the risk of injury ordeath in a collision.
• Never place objects over theairbag storage compartmentsor between the airbags andyourself. Due to the speed andforce of the airbag inflation,such objects could hit yourbody at high speed and causesevere bodily injury and evendeath.
• Do not put stickers or orna-ments on the steering wheelcover. These may interferewith the deployment of theairbag.
HLZ2120
OKM039056
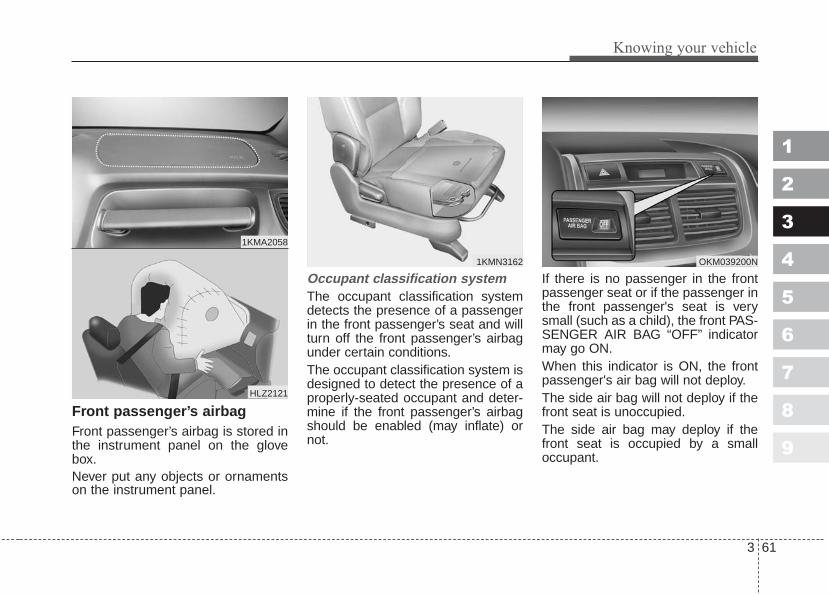
3 61
1
2
3
4
5
6
7
8
9
Knowing your vehicle
Front passenger’s airbagFront passenger’s airbag is stored inthe instrument panel on the glovebox.Never put any objects or ornamentson the instrument panel.
Occupant classification systemThe occupant classification systemdetects the presence of a passengerin the front passenger’s seat and willturn off the front passenger’s airbagunder certain conditions.The occupant classification system isdesigned to detect the presence of aproperly-seated occupant and deter-mine if the front passenger’s airbagshould be enabled (may inflate) ornot.
If there is no passenger in the frontpassenger seat or if the passenger inthe front passenger's seat is verysmall (such as a child), the front PAS-SENGER AIR BAG “OFF” indicatormay go ON.When this indicator is ON, the frontpassenger's air bag will not deploy.The side air bag will not deploy if thefront seat is unoccupied.The side air bag may deploy if thefront seat is occupied by a smalloccupant.
1KMN3162
1KMA2058
HLZ2121
OKM039200N

Knowing your vehicle
623
1
2
3
4
5
6
7
8
9
Main components of occupantclassification system• A detection device located within
the front passenger seat track.• Electronic system to determine
whether passenger air bag sys-tems (both front and side) shouldbe activated or deactivated.
• A warning light located on theinstrument panel which illuminatesthe words PASSENGER AIR BAG“OFF” indicating the front passen-ger air bag system is deactivated.
• The instrument panel air bag warn-ing light is interconnected with theoccupant classification system.
Always be sure that you and all vehi-cle occupants are seated andrestrained properly (sitting uprightwith the seat in an upright position,centered on the seat cushion, withthe person’s legs comfortablyextended, feet on the floor, and wear-ing the safety belt properly) for themost effective protection by the airbag and the safety belt.
• The OCS (Occupant ClassificationSystem) may not function properlyif the passenger takes actionswhich can defeat the detection sys-tem. These include:
(1) Failing to sit in an upright posi-tion.
(2) Leaning against the door or cen-ter console.
(3) Sitting towards the sides or thefront of the seat.
(4) Putting legs on the dashboard orresting them on other locationswhich reduce the passengerweight on the front seat.
(5) Improperly wearing the safetybelt.
(6) Reclining the seat back.
• The PASSENGER AIR BAG “OFF”indicator illuminates after the igni-tion key is turned to the “ON” posi-tion or after the engine is started. Ifthe front passenger’s seat is occu-pied by very small person, thePASSENGER AIR BAG “OFF” indi-cator will remain illuminated. If thefront passenger’s seat is occupiedby a person of adult size, the PAS-SENGER AIR BAG “OFF” indicatorwill turn off after 4 seconds.
• If the front passenger's seat isunoccupied, the PASSENGER AIRBAG “OFF” indicator will turn on,and the front passenger's airbagwill not deploy in frontal crashes.
• If the PASSENGER AIR BAG“OFF” indicator illuminates, thefront passenger’s airbag will notdeploy in frontal crashes.
• If the front passenger’s seat isoccupied by a person of adult size,the PASSENGER AIR BAG “OFF”indicator is not illuminated and thefront passenger’s airbag will deployin frontal crashes.

3 63
1
2
3
4
5
6
7
8
9
Knowing your vehicle
CAUTIONIf the PASSENGER AIR BAG“OFF” indicator illuminates orblinks continuously when a per-son of adult size sits in the frontpassenger’s seat, it could bebecause that person isn’t sittingproperly in the seat.If this happens, turn the vehicleoff, place the seat back in thefull upright position, sit uprightin the seat, centered on the seatcushion, with legs comfortablyextended. Restart the vehicleand have the person remain inthis position for about 1 minute.This will allow the system todetect the person and enablethe passenger’s airbag.
Condition and operation in the front passenger occupant classification system
Condition detected bythe occupant classifi-
cation system
1. Adult *1
2. Child *2
3. Unoccupied
4. There is a malfunc-tion in the system
Off
On
On
On
Off
Off
Off
On
Activated
Deactivated
Deactivated
Deactivated
PASSENGER AIR BAG“OFF” indicator light Airbag warning light
Front passengerairbag
Indicator/Warning light Devices
*1 The system judges a person of adult size as an adult. When a smaller adultsits in the front passenger seat, the system may recognize him/her as achild depending on his/her physique and posture.
*2 When a larger child who has outgrown a child restraint system sits in thefront passenger seat, the system may recognize him/her as an adultdepending on his/her physique or posture.

Knowing your vehicle
643
1
2
3
4
5
6
7
8
9
CAUTIONIf the occupant classificationsystem is not working properly,the airbag warning light ( ) onthe instrument panel will illumi-nate because the passenger’sairbag is connected with theoccupant classification system.If there is a malfunction of theoccupant classification system,the PASSENGER AIR BAG“OFF” indicator will illuminateand the front passenger'sairbag will not deploy in frontalcrashes even if there is adultoccupant in the front passen-ger's seat.
(Continued)
(Continued)Have an authorized Kia dealerinspect the occupant classifica-tion system with the SRS airbagsystem as soon as possible ifany of following occur;• The SRS airbag warning light
does not illuminate when theignition key is turned to "ON"position.
• The SRS airbag warning lightremains illuminated after illu-minating for approximately 6seconds.
• The SRS airbag warning lightilluminates while the vehicle isbeing driven.
WARNING• The occupant classification
system can function onlywhen the ignition key is in the"ON" position.
• For very small person, theoccupant classification sys-tem may or may not turn offthe right front passenger'sfrontal airbag, dependingupon the person's seatingposture and body build.Everyone in your vehicleshould wear a safety beltproperly -- whether or notthere is an air bag for that per-son.
(Continued)
WARNINGIf the front passenger seatshould be modified for personswith disabilities that may affectthe operation of the occupantclassification system, contactan authorized Kia dealer.

3 65
1
2
3
4
5
6
7
8
9
Knowing your vehicle
(Continued)• If the front seat passenger
changes their seating position(for example, by not sittingupright, by sitting on the edgeof the seat, or by otherwisebeing out of position), thePASSENGER AIR BAG “OFF”indicator may be turned on,and the passenger's airbagmay not deploy in a collision.Always be sure to sit properlyin the front passenger’s seatand wear the safety belt prop-erly and do not do any of thefollowing.
(Continued)
(Continued)
- Put a heavy load in the frontpassenger seat.
- Excessively recline the frontpassenger seatback.
(Continued)
1KMN3661
1KMN3662
(Continued)
- Sit with hips shifted towardsthe front of the seat.
- Lean on the door or centerconsole.
- Sit on one side of the frontpassenger seat.
(Continued)
1KMN3663
1KMN3664

Knowing your vehicle
663
1
2
3
4
5
6
7
8
9
✽✽ NOTICE• If luggage or other objects are
placed on the front passenger'sseat or if the temperature of theseat changes, the PASSENGERAIR BAG “OFF” indicator mayblink. These conditions do notindicate a problem.
• Do not put heavy objects on thefront passenger’s seat. This maycause the front passenger's airbagto deploy in a frontal collision.
(Continued)• Do not modify or replace the
front passenger’s seat. Don'tplace or attach anything onthe front passenger’s seat.This can adversely affect theoccupant classification sys-tem.
• Do not sit on sharp objectssuch as tools when occupyingthe front passenger’s seat.These can adversely affect theoccupant classification sys-tem.
• Do not install accessory seatcovers on the front seats.
(Continued)
- Place feet on the dashboard.
(Continued)
1KMN3665
1KMN3666
Normal position
3 67
1
2
3
4
5
6
7
8
9
Knowing your vehicle
(Continued)• If the driver brakes the vehicle
heavily in an urgent situa-tions, occupants will bethrown forward. If front pas-sengers are not wearing thesafety belts, they will bedirectly in front of the storagecompartment when inflationoccurs. In that situation, seri-ous injury or death is possi-ble.
• Never allow front passengerto put their hands or feet onthe instrument panel or puttheir face close to the instru-ment panel. The airbag willimpact the front passengerwhen it inflates.
(Continued)
(Continued)• Never allow children/old
and feeble persons/pregnantwomen to sit on the front pas-senger’s seat. Do not put childrestraint systems on the frontpassenger’s seat either. Theymay be seriously injured bythe airbag inflation whenairbag deploys.
• Do not put objects or stickerson the instrument panel. Donot apply any accessory onthe front windshield glass ordo not install aftermarket mir-rors or accessories on the fac-tory installed rearview mirror.These may interfere with thedeployment of airbag inflationor could hit your body at highspeed and cause severe bodi-ly injury and even death.
WARNING• The front seat passenger’s
airbag is much larger than thesteering wheel airbag andinflates with considerablymore force. It can seriouslyhurt or kill a passenger who isnot in the proper position andwearing the safety belt proper-ly. The front passengersshould always move their seatas far back as practical and sitback in their seat.
• It is essential that the frontpassengers always wear theirsafety belts, even when thevehicle is moving in a parkinglot or up a driveway intogarage.
(Continued)
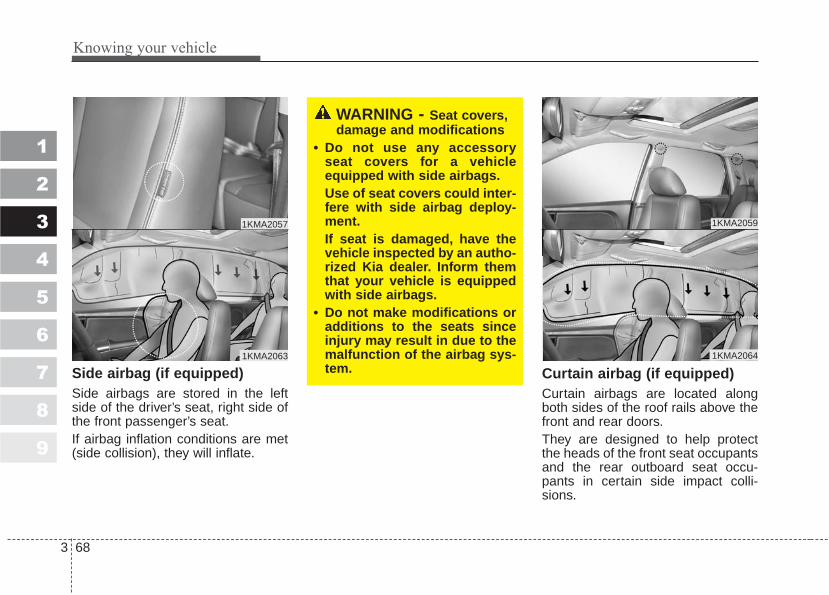
Knowing your vehicle
683
1
2
3
4
5
6
7
8
9
Side airbag (if equipped)Side airbags are stored in the leftside of the driver’s seat, right side ofthe front passenger’s seat.If airbag inflation conditions are met(side collision), they will inflate.
Curtain airbag (if equipped)Curtain airbags are located alongboth sides of the roof rails above thefront and rear doors.They are designed to help protectthe heads of the front seat occupantsand the rear outboard seat occu-pants in certain side impact colli-sions.
WARNING - Seat covers,damage and modifications
• Do not use any accessoryseat covers for a vehicleequipped with side airbags.Use of seat covers could inter-fere with side airbag deploy-ment.If seat is damaged, have thevehicle inspected by an autho-rized Kia dealer. Inform themthat your vehicle is equippedwith side airbags.
• Do not make modifications oradditions to the seats sinceinjury may result in due to themalfunction of the airbag sys-tem.
1KMA2063
1KMA2057 1KMA2059
1KMA2064
3 69
1
2
3
4
5
6
7
8
9
Knowing your vehicle
• The curtain airbag deploymentoccurs only on the side of the vehi-cle affected by the impact.
• The side airbags (side and curtainairbags) are not designed todeploy during collisions from thefront or rear of the vehicle or inmost rollover situations.
• The curtain airbags are designedto deploy only during certain side-impact collisions, depending on thecrash severity, angle, speed andimpact. The curtain airbags are notdesigned to deploy in all sideimpact situations.
WARNING• In order for side airbags (side
and curtain airbags) to pro-vide their best protection,occupants should sit in anupright position with the seatbelts properly fastened.
• Children must be seated in theproper child restraint system.Make sure to secure the childrestraint system in a lockedposition.
(Continued)
(Continued)• Advise occupants not to lean
their heads or bodies ontodoors, and not to placeobjects between the doorsand them since this maydefeat operation of the sideairbags.
• Never try to open or repair anycomponents of the side cur-tain airbag system. Thisshould only be done by anauthorized Kia dealer.
Failure to follow the above men-tioned instructions can result ininjury or death to the vehicleoccupants in an accident.

Knowing your vehicle
703
1
2
3
4
5
6
7
8
9
Why didn’t my airbag go off ina collision? (Inflation and non-inflation condi-tions of the airbag)There are many types of accidentsin which one or more of theairbags would not be expected toprovide additional protection.These include rear impacts, sec-ond or third collisions in multipleimpact accidents, as well as lowspeed impacts. Just because yourvehicle is damaged and even if itis totally unusable, don’t be sur-prised that the airbags did notinflate.
Airbag collision sensors➀ SRS control module➁ Front impact sensor
➂ Side impact sensor (if equipped)
OKM039065/OKM039062/OKM039061/OKM039060
➀ ➁ ➂

3 71
1
2
3
4
5
6
7
8
9
Knowing your vehicle
Airbag inflation conditionFront airbag
Front airbags are designed to inflatewhen the impact is delivered to frontcollision sensors depending on theintensity, speed or angles of impactof the front collision - generally froman area a little to the left to a little tothe right of straight ahead.
WARNING - Protectingairbag module and sensors
• Do not hit or allow any heavyobjects to hit the locationswhere airbags or sensors areinstalled.This may cause damage andunexpected airbag deploy-ment, which could result inserious personal injury ordeath.
• If the installation location orangle of the sensors is alteredin any way, the airbags maymalfunction, causing severeinjury or death.Therefore, do not try to per-form maintenance on oraround the airbag sensors.Have the vehicle repaired byan authorized Kia dealer.
WARNING - Bodychanges
• Problems may arise if the sen-sor installation angles arechanged due to the deforma-tion of front bumper, body or Bpillar where side collision sen-sors are installed. In the eventof a collision, have the vehicleinspected by an authorizedKia dealer.
• Your vehicle has beendesigned to deploy theairbag(s) in certain collisions.Installing aftermarket bumperguards or replacing a bumperwith non-genuine parts mayadversely affect your vehicle’sairbag deployment perfor-mance.
1VQA2084

Knowing your vehicle
723
1
2
3
4
5
6
7
8
9
Side airbag
Side airbags (side and curtainairbags) are designed to inflatedepending on the strength, speedand angles of impact of a side impactcollision or rollover.
If the vehicle chassis is impacted bybumps or objects on unimprovedroads or sidewalks, airbags maydeploy. Drive carefully on unim-proved roads or on surfaces notdesigned for vehicle traffic to preventunintended airbag deployment.
Airbag non-inflation conditions• In certain low-speed collisions the
airbags may not deploy. Theairbags are designed not to deployin such cases because the risk ofinjuries which can be caused bythe airbags exceeds the benefitsthey provide in protecting occu-pants.
OVQ036018N
1KMB2064
1VQA2086

3 73
1
2
3
4
5
6
7
8
9
Knowing your vehicle
• In this case, the front airbags donot provide protection, since theywould instantaneously inflate anddeflate while the occupants weremoving away from the frontairbags.
• Front airbags are also not general-ly designed to deploy in sideimpact collisions because occu-pants are moving sideways ad notforward into the front airbags.However, side or curtain airbagsare designed to inflate in sideimpacts depending on the intensi-ty, vehicle speed and angles ofimpact.
• In a slant or angled collision, theforce of impact may direct theoccupants in a direction betweenthe front and side airbags, andthus the sensors may not deployany airbags.
OVQ036018N 1VQA2089OUN036087

Knowing your vehicle
743
1
2
3
4
5
6
7
8
9
• Just before impact, drivers oftenbrake heavily. Such heavy brakinglowers the front portion of the vehi-cle and the vehicle dive under avehicle with a higher ground clear-ance. Airbags may not inflate inthis "underride" situation becausedeceleration forces are so radicallyaltered by such "underride" colli-sions.
• Front airbags do not generallyinflate in rollover accidents.However, side airbags may inflateduring a rollover, depending on theprecise impacts which the side ofthe vehicle experienced during arollover.
• Airbags may not inflate if the vehi-cle collides with objects such asutility poles or trees, where thepoint of impact is concentrated toone area and not the main bodystructures, so that the full force ofthe impact is not transmitted to thesensors.
1VQA2090 1VQA2091 1VQA2092

3 75
1
2
3
4
5
6
7
8
9
Knowing your vehicle
How does the airbag systemoperate • Airbags only operate when the
ignition switch is turned to the ONor START positions.
• Airbags inflate instantly in theevent of serious frontal or side col-lision in order to help protect theoccupants from physical injury.The airbag Electronic Control Unit(ECU) is a small computer whichcalculates the immediate impactinformation and sends out adeployment signal based on theECU's calculation of the likelyseverity of the developing collision.
• There is no single vehicle speed atwhich the airbags will inflate.
• Airbag deployment depends on anumber of factors including vehiclespeed, angles of impact and thedensity and stiffness of the vehi-cles or objects which your vehiclehits in the collision. However, fac-tors are not limited to those men-tioned above.
• The front airbags will completelyinflate and deflate in an instant.It is impossible for you to see theairbags inflate during an accident.It is much more likely that you willsimply see the deflated airbagshanging out of their storage com-partments after the collision.
• In order to help provide protectionin a severe collision, the airbagsmust inflate rapidly. The speed ofairbag inflation has been deter-mined by the Canadian MotorVehicle Safety Standard (CMVSS)to reduce the likelihood of seriousor life-threatening injuries and isthus a mandatory part of the airbagdesign.However, airbag inflation can alsocause injuries which normally caninclude facial abrasions, bruisesand broken bones, and sometimesmore serious injuries because thatinflation speed also causes theairbags to expand with a great dealforce.
• There are even circumstancesunder which contact with thesteering wheel airbag can causefatal injuries, especially if theoccupant is positioned exces-sively close to the steeringwheel.

Knowing your vehicle
763
1
2
3
4
5
6
7
8
9
Noise and smokeWhen the airbags inflate, they makea loud noise and they leave smokeand powder in the air inside of thevehicle. This is normal. After theairbag inflates, you may feel sub-stantial discomfort in breathing dueto the contact of your chest to boththe safety belt and the airbag, as wellas from breathing the smoke andpowder. We strongly urge you toopen your doors and/or windowsas soon as possible after impactin order to reduce discomfort andprevent prolonged exposure tothe smoke and powder.Though the smoke and powder arenon-toxic, they may cause irritation(eyes, nose and throat etc). Washand rinse with cold water immediate-ly and consult the doctor if the symp-tom persists.
WARNING - Seated posi-tioning
• Driver should sit as far backfrom the steering wheel airbagas possible to reduce the riskof injury or death in a collision(at least 250 mm (10 inches)away). The front passengershould always move their seatas far back as possible and sitback in their seat.
• Airbags inflate instantly in anevent of collision and passen-gers may be injured by theairbag expansion force if theyare too close to the dash-board.
• Airbag inflation may causeinjuries which normallyinclude facial or bodily abra-sions, injuries from brokeneyeglasses or burns from theairbag gases.
WARNING - Hot airbagparts
When the airbags deploy, theairbag related parts in steeringwheel and/or instrument paneland/or in both sides of the roofrails above the front and reardoors are very hot. To preventinjury, do not touch the airbagstorage area’s internal compo-nents immediately after anairbag has inflated.

3 77
1
2
3
4
5
6
7
8
9
Knowing your vehicle
Installing a child restraint on afront passenger’s seat is for-bidden.Never place a rear-facing childrestraint in the front passenger’sseat. If the airbag deploys, it wouldimpact the rear-facing child restraint,causing serious or fatal injury.In addition, do not place front-facingchild restraint in the front passen-ger’s seat either. If the front passen-ger airbag inflates, it would causeserious or fatal injuries to the child.
Airbag warning lightThe purpose of the airbag warninglight in your instrument panel is toalert you of a potential problem withyour airbag - Supplemental RestraintSystem (SRS).
WARNING - Childrestraints
• Never put a child restraint inthe front passenger’s seat. Ifthe front passenger airbaginflates, it would cause seri-ous or fatal injuries.
• When children are seated inthe rear outboard seats, besure to secure the childrestraint system into a lockedin position.
E1BLA204 W7-147

Knowing your vehicle
783
1
2
3
4
5
6
7
8
9
When the ignition switch is turnedON, the indicator light should illumi-nate for approximately 6 seconds,then go off.Have the system checked if:• The light does not turn on briefly
when you turn the ignition ON.• The light stays on after the engine
starts.• The light comes on while the vehi-
cle is in motion.
Airbag (SupplementalRestraint System) service Your Supplemental Restraint Systemis virtually maintenance-free. Thereare no parts which you can service.You must have the system servicedunder the following circumstances:• If an airbag ever inflates, the airbag
must be replaced. Do not try toremove or discard the airbag byyourself. This must be done by anauthorized Kia dealer.
• If the airbag warning indicator lightalerts you to a problem, have theairbag system checked as soon aspossible. Otherwise, your airbagsystem may be ineffective.
WARNING - No mainte-nance or repair
• Do not work on the airbag sys-tem’s components or wiring.This could cause the airbagsto inflate inadvertently, possi-bly seriously injuring some-one. Working on the systemcould also disable the systemso that the airbags would notdeploy in a collision.
• Any work on the airbag sys-tem, such as removing,installing, or repairing thesteering wheel must be per-formed by a qualified Kia tech-nician. Improper handling ofthe airbag system includingthe steering wheel may resultin serious personal injury ordeath.
WARNING - No modifica-tions
Do not modify any part of theairbag system modificationcould make the airbag systemineffective.

3 79
1
2
3
4
5
6
7
8
9
Knowing your vehicle
When repairing or scrapping thevehicle• Repairing the steering wheel,
instrument panel, center consoleor roofs, or installing a car audiosystem around the center consoleor painting the front metal sheetcould disable the airbag system.Have such repairs and mainte-nance performed by an authorizedKia dealer.
• Special care must be taken inscrapping or junking an airbag-equipped vehicle. Always refersuch activities to a qualified profes-sional.
Airbag warning labelAirbag warning labels which are nowrequired by the Canadian MotorVehicle Safety Standard (CMVSS)are attached to alert driver and pas-sengers of potential risk of airbagsystem.
Note that these government warn-ings focus on the risk to children, Kiaalso wants you to be aware of therisks which adults are exposed to.Those have been described in previ-ous pages.
OKM039036N
OKM039039
(if equipped)

Knowing your vehicle
803
1
2
3
4
5
6
7
8
9
Opening the hood:1. Pull the release lever on the lower
left side of the instrument panel tounlatch the hood. The hood shouldpop open slightly.
2. Go to the front of the vehicle, raisethe hood slightly, pull the sec-ondary latch (➀) inside of thehood center and lift (➁) the hood.
3. Lift the hood and hold it open withthe support rod by inserting thefree end of the rod into the slot(➀).
HOOD
1KMA2021 6KMA2022 1KMA2023
CAUTION - Hot partsGrasp the support rod in thearea wrapped in rubber.The rub-ber will help prevent you frombeing burned by hot metal whenthe engine is hot.
➀

3 81
1
2
3
4
5
6
7
8
9
Knowing your vehicle
Closing the hood1. Before closing the hood, check the
following:• All filler caps in engine compart-
ment must be correctly installed.• Gloves, rags or any other com-
bustible material must beremoved from the engine com-partment.
2. Secure the support rod in its clip.3. Lower the hood to about 30 cm
(12 inches) height and then let itdrop to properly lock in place.Make sure the hood is properlylocked before driving.
1. Stop the engine.2. To open the fuel filler lid, pull the
release lever.
3. Pull the fuel filler lid out to open.4. To remove the cap, turn the fuel
tank cap counter-clockwise.5. Refuel as needed.6. To install the cap, turn it clockwise
until it “clicks”. This indicates thatthe cap is securely tightened.
7. Close the fuel filler lid and push itlightly making sure that it issecurely closed.
CAUTION - Hood• Before closing the hood, make
sure that all engine parts andtools have been removed fromthe engine area and that noone’s hands are near the hoodopening.
• Do not leave gloves, rags orany other combustible materi-al in the engine compartment.Doing so may cause a heat-induced fire.
FUEL FILLER LID
1KMA2019 1KMB2020
CAUTIONTo avoid injury from sharpedges, it is recommended thatprotective gloves be worn ifthere is a need to open the fuelfiller door manually.
Knowing your vehicle
823
1
2
3
4
5
6
7
8
9
WARNING - RefuelingIf pressurized fuel sprays out, itcan cover your clothes or skinand thus subject you to the riskof fire and burns. Alwaysremove the fuel cap carefullyand slowly. If the cap is ventingfuel or if you hear a hissingsound, wait until the conditionstops before completely remov-ing the cap.
WARNING - Refuelingdangers
Automotive fuels are flammablematerials. When refueling,please note the following guide-lines carefully. Failure to followthese guidelines may result insevere personal injury, severeburns or death by fire or explo-sion.• Read and follow all warnings
posted at the gas station facil-ity.
• Before refueling note the loca-tion of the EmergencyGasoline Shut-Off, if available,at the gas station facility.
• Before touching the fuel noz-zle, you should eliminatepotentially dangerous staticelectricity discharge by touch-ing another metal part of thevehicle, a safe distance awayfrom the fuel filler neck, noz-zle, or other gas source.
(Continued)
(Continued)• Do not get back into a vehicle
once you have begun refuel-ing since you can generatestatic electricity by touching,rubbing or sliding against anyitem or fabric (polyester, satin,nylon, etc.) capable of produc-ing static electricity. Staticelectricity discharge canignite fuel vapors resulting inrapid burning. If you must re-enter the vehicle, you shouldonce again eliminate poten-tially dangerous static elec-tricity discharge by touching ametal part of the vehicle, awayfrom the fuel filler neck, nozzleor other gasoline source.
• When using a portable fuelcontainer be sure to place thecontainer on the ground priorto refueling. Static electricitydischarge from the containercan ignite fuel vapors causinga fire. Once refueling hasbegun, contact with the vehi-cle should be maintained untilthe filling is complete.
(Continued)
3 83
1
2
3
4
5
6
7
8
9
Knowing your vehicle
(Continued)Use only portable plastic fuelcontainers designed to carryand store gasoline.
• Do not use cellular phoneswhile refueling. Electric cur-rent and/or electronic interfer-ence from cellular phones canpotentially ignite fuel vaporscausing a fire.
• When refueling, always shutthe engine off. Sparks pro-duced by electrical compo-nents related to the enginecan ignite fuel vapors causinga fire. Once refueling is com-plete, check to make sure thefiller cap and filler door aresecurely closed, before start-ing the engine.
(Continued)
(Continued)• DO NOT use matches or a
lighter and DO NOT SMOKE orleave a lit cigarette in yourvehicle while at a gas stationespecially during refueling.Automotive fuel is highly flam-mable and can, when ignited,result in fire.
• If a fire breaks out during refu-eling, leave the vicinity of thevehicle, and immediately con-tact the manager of the gasstation and then contact thelocal fire department.
CAUTION• Make sure to refuel your vehi-
cle according to the “Fuelrequirements” suggested insection 5.
• Check to make sure the fuelfiller cap is securely closedafter refueling. A loose fuelfiller cap may cause the"Check Engine" (MalfunctionIndicator) light in the instru-ment panel to illuminateunnecessarily.
• If the fuel filler cap requiresreplacement, use only a gen-uine Kia cap or the equivalentspecified for your vehicle. Anincorrect fuel filler cap canresult in a serious malfunctionof the fuel system or emissioncontrol system.
• Do not spill fuel on the exteri-or surfaces of the vehicle. Anytype of fuel spilled on paintedsurfaces may damage thepaint.

Knowing your vehicle
843
1
2
3
4
5
6
7
8
9
Outside rearview mirror Be sure to adjust mirror anglesbefore driving.Your vehicle is equipped with bothleft-hand and right-hand outsiderearview mirrors. The mirrors can beadjusted remotely with the controllevers or remote switch, dependingon the type of mirror control installed.The mirror heads can be folded backto prevent damage during an auto-matic car wash or when passing in anarrow street.
✽✽ NOTICEDo not scrape ice off the mirrorface; this may damage the surface ofthe glass. If ice should restrict move-ment of the mirror, do not force themirror for adjustment. To removeice, use a deicer spray, or a spongeor soft cloth with very warm water.
Manual remote control (if equipped)To adjust an outside mirror, move thecontrol lever located at the forwardinside area of the window frame.
MIRRORS
CAUTION - Rearview mir-rors
• The right outside rearviewmirror is convex. Objects seenin the mirror are closer thanthey appear.
• Use your interior rearview mir-ror or direct observation todetermine the actual distanceof following vehicles whenchanging lanes. 1KMB3081
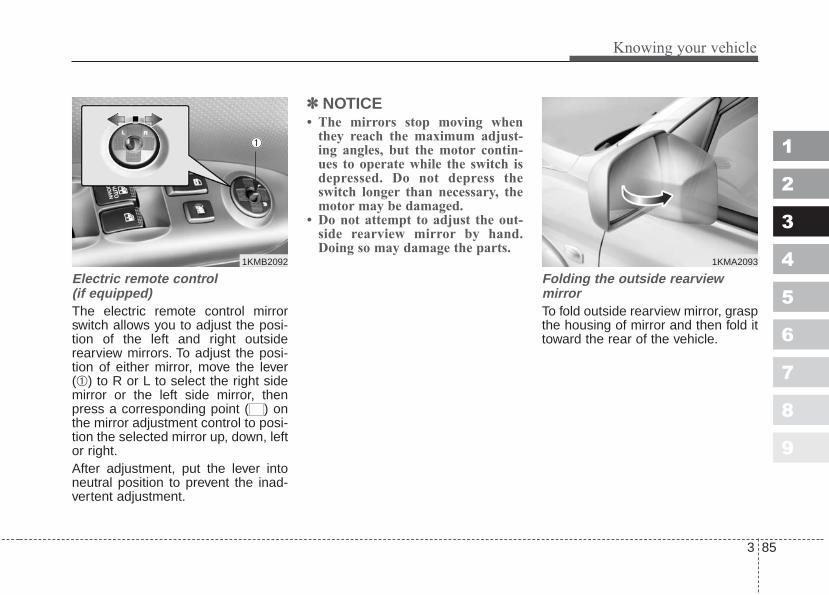
3 85
1
2
3
4
5
6
7
8
9
Knowing your vehicle
Electric remote control (if equipped)The electric remote control mirrorswitch allows you to adjust the posi-tion of the left and right outsiderearview mirrors. To adjust the posi-tion of either mirror, move the lever(➀) to R or L to select the right sidemirror or the left side mirror, thenpress a corresponding point ( ) onthe mirror adjustment control to posi-tion the selected mirror up, down, leftor right.After adjustment, put the lever intoneutral position to prevent the inad-vertent adjustment.
✽✽ NOTICE• The mirrors stop moving when
they reach the maximum adjust-ing angles, but the motor contin-ues to operate while the switch isdepressed. Do not depress theswitch longer than necessary, themotor may be damaged.
• Do not attempt to adjust the out-side rearview mirror by hand.Doing so may damage the parts.
Folding the outside rearview mirrorTo fold outside rearview mirror, graspthe housing of mirror and then fold ittoward the rear of the vehicle.
1KMB2092
➀
1KMA2093

Knowing your vehicle
863
1
2
3
4
5
6
7
8
9
Outside rearview mirror heater (if equipped) The outside rearview mirror heater isactuated in connection with the rearwindow defroster. To heat the outsiderearview mirror glass, push the but-ton for the rear window defroster.The rearview mirror heater (and rearwindow defroster) will not operateunless the engine is running.The outside rearview mirror glass willbe heated for defrosting or defoggingand will give you improved rearvision in inclement weather condi-tions. Push the button again to turnthe heater off. The outside rearviewmirror heater automatically turns offafter 20 minutes.
Inside rearview mirrorAdjust the rearview mirror to centeron the view through the rear window.Make this adjustment before youstart driving.
Day/night rearview mirror (if equipped) Manual type (if equipped)
Make this adjustment before youstart driving and while the day/nightlever is in the day position.Pull the day/night lever toward you toreduce glare from the headlights ofvehicles behind you during night dri-ving.Remember that you lose somerearview clarity in the night position.
CAUTION - Rear visibilityDo not place objects in the rearseat or cargo area which wouldinterfere with your vision outthe rear window.
1KMA2089
Day
Night
Day/Night lever

3 87
1
2
3
4
5
6
7
8
9
Knowing your vehicle
Electric type (if equipped)
The electric day/night rearview mir-ror automatically controls the glarefrom the headlights of the car behindyou in nighttime or low light drivingconditions. The sensor mounted inthe mirror senses the light levelaround the vehicle, and through achemical reaction, automaticallycontrols the headlight glare fromvehicles behind you.When the engine is running, theglare is automatically controlled bythe sensor mounted in the rearviewmirror.Whenever the shift lever is shiftedinto reverse (R), the mirror will auto-matically go to the brightest setting inorder to improve the drivers viewbehind the vehicle.
✽✽ NOTICEWhen cleaning the mirror, use apaper towel or similar materialdampened with glass cleaner. Do notspray glass cleaner directly on themirror as that may cause the liquidcleaner to enter the mirror housing.
Type A (with compass)To operate the electric rearview mir-ror:Press and hold the ON/OFF button(➀) for 3~6 seconds to turn the auto-matic- dimming function on. The mir-ror indicator light will illuminate.Press and hold the ON/OFF button(➀) for 3~6 seconds once again toturn the automatic- dimming functionoff. The mirror indicator light will turnoff.
Type B (with homelink wireless control system)To operate the electric rearview mir-ror:Press the “I” button (➀) to turn theautomatic- dimming function on. Themirror indicator light will illuminate.Press the “O” button (➁) to turn theautomatic- dimming function off. Themirror indicator light will turn off.
2GHN3310➀ ➁1KMA3084A➀
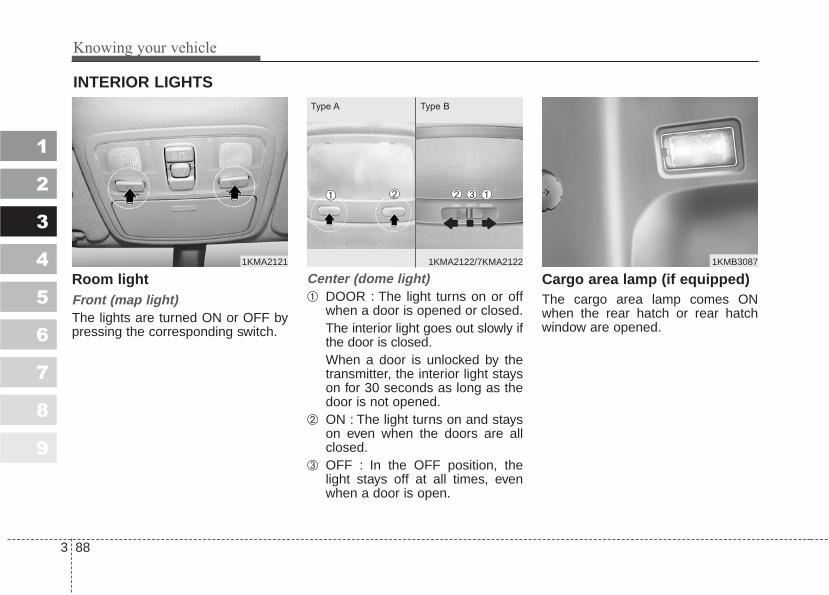
Knowing your vehicle
883
1
2
3
4
5
6
7
8
9
Room lightFront (map light)The lights are turned ON or OFF bypressing the corresponding switch.
Center (dome light)➀ DOOR : The light turns on or off
when a door is opened or closed.The interior light goes out slowly ifthe door is closed.When a door is unlocked by thetransmitter, the interior light stayson for 30 seconds as long as thedoor is not opened.
➁ ON : The light turns on and stayson even when the doors are allclosed.
➂ OFF : In the OFF position, thelight stays off at all times, evenwhen a door is open.
Cargo area lamp (if equipped)The cargo area lamp comes ONwhen the rear hatch or rear hatchwindow are opened.
INTERIOR LIGHTS
1KMA2121 1KMB30871KMA2122/7KMA2122
➀➂➁
Type A Type B
➀ ➁
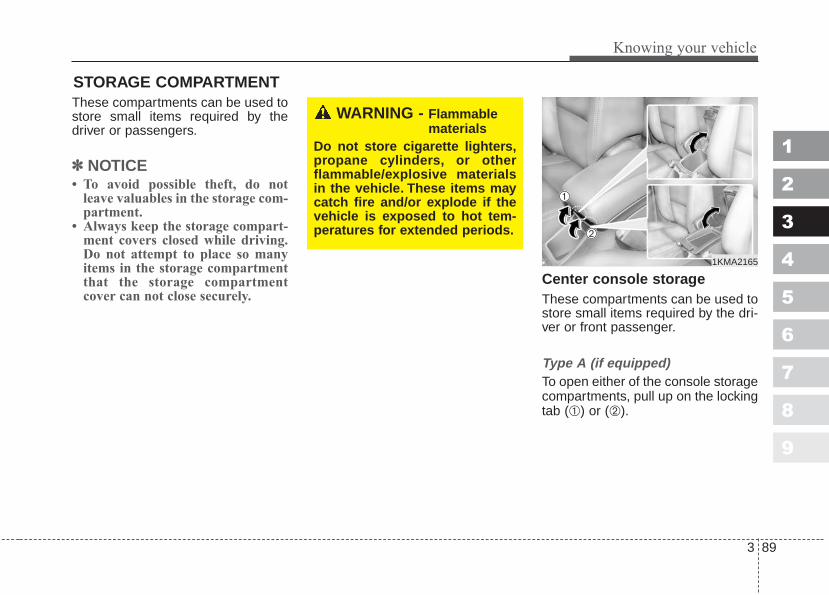
3 89
1
2
3
4
5
6
7
8
9
Knowing your vehicle
These compartments can be used tostore small items required by the driver or passengers.
✽✽ NOTICE• To avoid possible theft, do not
leave valuables in the storage com-partment.
• Always keep the storage compart-ment covers closed while driving.Do not attempt to place so manyitems in the storage compartmentthat the storage compartmentcover can not close securely.
Center console storageThese compartments can be used tostore small items required by the dri-ver or front passenger.
Type A (if equipped)To open either of the console storagecompartments, pull up on the lockingtab (➀) or (➁).
STORAGE COMPARTMENT
WARNING - Flammablematerials
Do not store cigarette lighters,propane cylinders, or otherflammable/explosive materialsin the vehicle. These items maycatch fire and/or explode if thevehicle is exposed to hot tem-peratures for extended periods.
1KMA2165
➀
➁

Knowing your vehicle
903
1
2
3
4
5
6
7
8
9
To use the center console as armrest(if equipped), push the release but-ton then it rises.To lower the center console, pushthe release button and press it down.
Type B (if equipped)To open the console storage com-partment, pull up on the locking tab.
Glove boxTo open the glove box, pull the han-dle (➀) and the glove box will auto-matically open (➁). Close the glovebox after use.
1KMA2190 OKM029164
➀
➁
WARNINGTo reduce the risk of injury in anaccident or sudden stop, alwayskeep the glove box door closedwhile driving.
1KMA2166

3 91
1
2
3
4
5
6
7
8
9
Knowing your vehicle
Sunglass holder A sunglass storage compartment isprovided on the overhead console.To open the sunglass holder, pressthe cover and the holder will slowlyopen. Place your sunglasses in thecompartment door with the lensesfacing out. Push to close.
✽✽ NOTICEMake sure the sunglass holder isclosed while driving.
1KMA2168

Knowing your vehicle
923
1
2
3
4
5
6
7
8
9
Cigarette lighterTo use the cigarette lighter, pull theassembly cover out.To operate the cigarette lighter, pressit in and release it. When it is heated,it automatically pops out ready foruse.If the engine is not running, the igni-tion switch must be in the ACC posi-tion for the lighter to operate.
✽✽ NOTICE• Do not hold the lighter in after it is
already heated because it willoverheat.
• Only a genuine Kia lighter shouldbe used in the cigarette lightersocket. The use of plug-in acces-sories (shavers, hand-held vacu-ums, and coffee pots, for example)may damage the socket or causeelectrical failure.
• If the lighter does not pop outwithin 30 seconds, remove it toprevent overheating.
Ashtrays To use the ashtray, pull the assemblycover out.To remove the ashtray to empty orclean it, lift it upward and pull it out.
INTERIOR FEATURES
WARNING - Ashtray use• Do not use the vehicle’s ash-
trays as waste receptacles.• Putting lit cigarettes or match-
es in an ashtray with othercombustible materials maycause a fire.
7KMS2159 7KMS2160

3 93
1
2
3
4
5
6
7
8
9
Knowing your vehicle
Cup holder
FrontCups or small beverage cans may beplaced in the cup holders.
Rear (if equipped)To use the cup holders in rear seat,pull down the rear seat armrest.
✽✽ NOTICEDo not place heavy cups or cans incup holders. Cup holders could bedamaged.
WARNING - Hot liquids• Do not place uncovered cups
of hot liquid in the cup holderwhile the vehicle is in motion.If the hot liquid spills, youcould be burned. Such a burnto the driver could cause aloss of control of the vehicle.
• To reduce the risk of personalinjury in the event of suddenstop or collision, do not placeuncovered or insecure bot-tles, glasses, cans, etc., in thecup holder while the vehicle isin motion.
9KMA2170 8KMA2171

Knowing your vehicle
943
1
2
3
4
5
6
7
8
9
SunvisorUse the sunvisor to shield direct lightthrough the front or side windows.To use a sunvisor, pull it downward.To use a sunvisor for a side window,pull it downward, unsnap it from thebracket (➀) and swing it to the side.Adjust the sunvisor forward or back-ward.To use the vanity mirror (if equipped),pull down the visor and pull up themirror cover (➁, if equipped).
Power socket (if equipped)The power outlets are designed toprovide power for mobile telephonesor other devices designed to operatewith vehicle electrical systems. Thedevices should draw less than 10amps with the engine running.
9KMB2158
1KMA2163
1KMB2162
Front (if equipped)
Rear (if equipped)
CAUTION - Vanity mirrorlamp (if equipped)
Close the vanity mirror cover (ifequipped) securely and returnthe sunvisor to its original posi-tion after use. If the vanity mir-ror is not closed securely, thelamp will stay on and couldresult in battery discharge andpossible sunvisor damage.
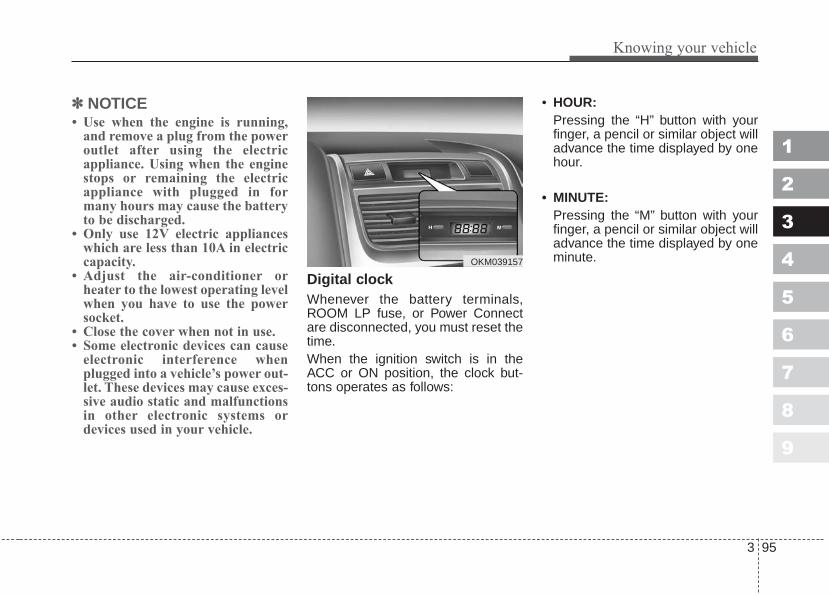
3 95
1
2
3
4
5
6
7
8
9
Knowing your vehicle
✽✽ NOTICE• Use when the engine is running,
and remove a plug from the poweroutlet after using the electricappliance. Using when the enginestops or remaining the electricappliance with plugged in formany hours may cause the batteryto be discharged.
• Only use 12V electric applianceswhich are less than 10A in electriccapacity.
• Adjust the air-conditioner orheater to the lowest operating levelwhen you have to use the powersocket.
• Close the cover when not in use.• Some electronic devices can cause
electronic interference whenplugged into a vehicle’s power out-let. These devices may cause exces-sive audio static and malfunctionsin other electronic systems ordevices used in your vehicle.
Digital clockWhenever the battery terminals,ROOM LP fuse, or Power Connectare disconnected, you must reset thetime.When the ignition switch is in theACC or ON position, the clock but-tons operates as follows:
• HOUR:Pressing the “H” button with yourfinger, a pencil or similar object willadvance the time displayed by onehour.
• MINUTE:Pressing the “M” button with yourfinger, a pencil or similar object willadvance the time displayed by oneminute.OKM039157

Knowing your vehicle
963
1
2
3
4
5
6
7
8
9
Aux, USB and iPod port(if equipped)If your vehicle has an aux and/orUSB(universal serial bus) port oriPod port, you can use an aux port toconnect audio devices and an USBport to plug in an USB and also aniPod port to plug in an iPod.
✽✽ NOTICEWhen using a portable audio deviceconnected to the power outlet, noisemay occur during playback. If thishappens, use the power source of theportable audio device.
Shopping bag holderFront (if equipped)To use the holder, push the lowerportion.
Rear (if equipped)To use the holder, pull out the topedge. (Type A)
✽✽ NOTICE• Do not hang a bag beyond 3 kg (7
lbs.). It may cause damage to theshopping bag holder.
• Return it to the original positionafter using the shopping bag holder.(Type B)
8KMA2190 OKM049173
8KMA2174
OKM049174
Type A (if equipped)
Type B (if equipped)
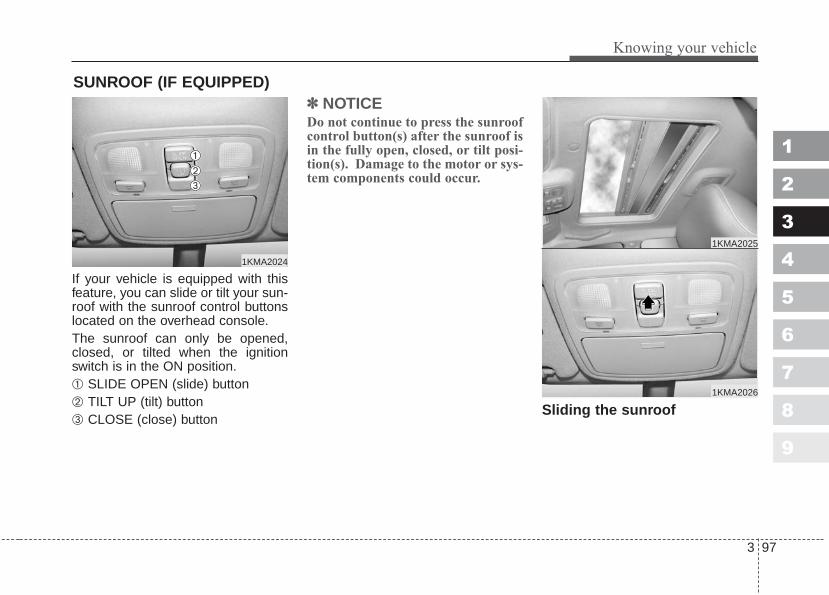
3 97
1
2
3
4
5
6
7
8
9
Knowing your vehicle
If your vehicle is equipped with thisfeature, you can slide or tilt your sun-roof with the sunroof control buttonslocated on the overhead console.The sunroof can only be opened,closed, or tilted when the ignitionswitch is in the ON position.➀ SLIDE OPEN (slide) button➁ TILT UP (tilt) button➂ CLOSE (close) button
✽✽ NOTICEDo not continue to press the sunroofcontrol button(s) after the sunroof isin the fully open, closed, or tilt posi-tion(s). Damage to the motor or sys-tem components could occur.
Sliding the sunroof
SUNROOF (IF EQUIPPED)
1KMA2024
➀➁➂
1KMA2026
1KMA2025
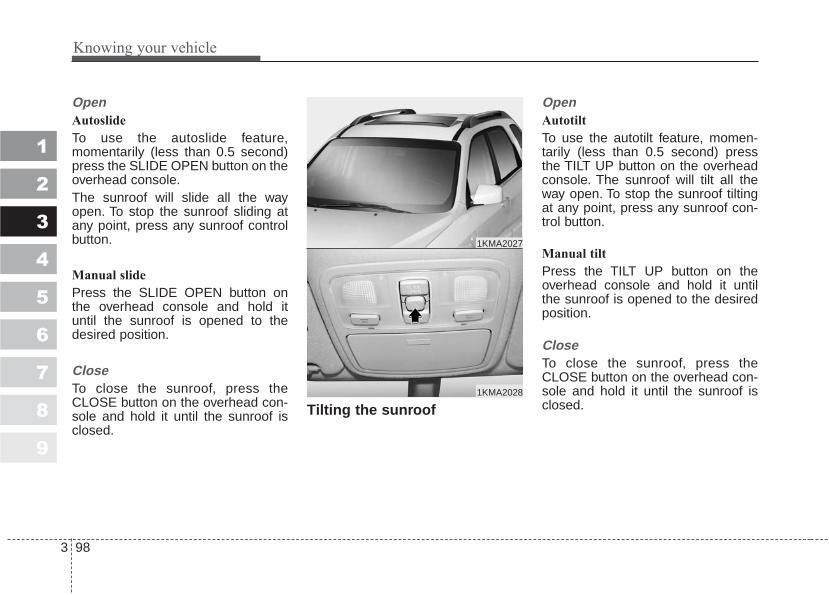
Knowing your vehicle
983
1
2
3
4
5
6
7
8
9
OpenAutoslide
To use the autoslide feature,momentarily (less than 0.5 second)press the SLIDE OPEN button on theoverhead console.The sunroof will slide all the wayopen. To stop the sunroof sliding atany point, press any sunroof controlbutton.
Manual slide
Press the SLIDE OPEN button onthe overhead console and hold ituntil the sunroof is opened to thedesired position.
CloseTo close the sunroof, press theCLOSE button on the overhead con-sole and hold it until the sunroof isclosed.
Tilting the sunroof
OpenAutotilt
To use the autotilt feature, momen-tarily (less than 0.5 second) pressthe TILT UP button on the overheadconsole. The sunroof will tilt all theway open. To stop the sunroof tiltingat any point, press any sunroof con-trol button.
Manual tilt
Press the TILT UP button on theoverhead console and hold it untilthe sunroof is opened to the desiredposition.
CloseTo close the sunroof, press theCLOSE button on the overhead con-sole and hold it until the sunroof isclosed.
1KMA2028
1KMA2027
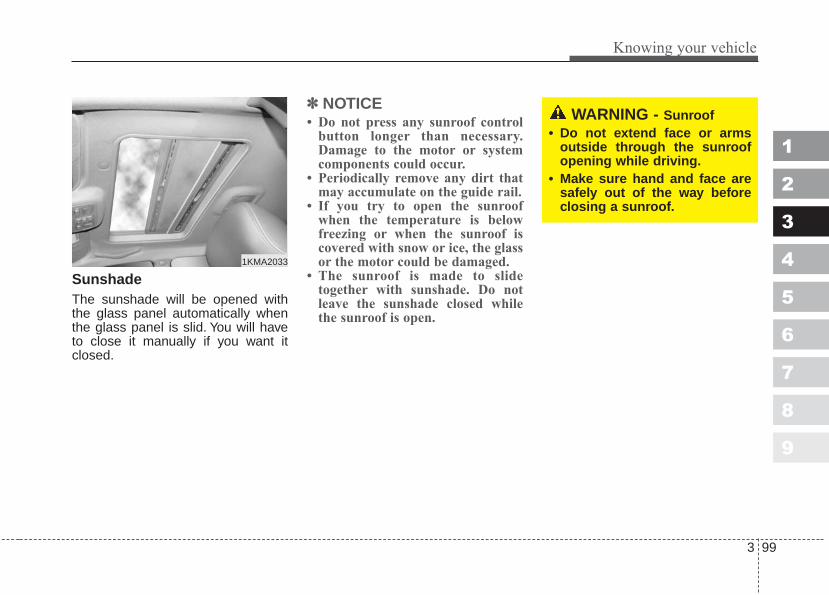
3 99
1
2
3
4
5
6
7
8
9
Knowing your vehicle
Sunshade The sunshade will be opened withthe glass panel automatically whenthe glass panel is slid. You will haveto close it manually if you want itclosed.
✽✽ NOTICE• Do not press any sunroof control
button longer than necessary.Damage to the motor or systemcomponents could occur.
• Periodically remove any dirt thatmay accumulate on the guide rail.
• If you try to open the sunroofwhen the temperature is belowfreezing or when the sunroof iscovered with snow or ice, the glassor the motor could be damaged.
• The sunroof is made to slidetogether with sunshade. Do notleave the sunshade closed whilethe sunroof is open.
1KMA2033
WARNING - Sunroof• Do not extend face or arms
outside through the sunroofopening while driving.
• Make sure hand and face aresafely out of the way beforeclosing a sunroof.
Knowing your vehicle
1003
1
2
3
4
5
6
7
8
9
Resetting the sunroofWhenever the vehicle battery is dis-connected or discharged, you haveto reset your sunroof system as fol-lows:
1. Turn the ignition key to the ONposition.
2. According to the position of thesunroof, do as follows.1) in case that the sunroof has
closed completely or been tilt-ed :Press the TILT UP button untilthe sunroof has tilted upwardcompletely.
2) in case that the sunroof hasslide-opened:Press and hold the CLOSE button for more than 5 secondsuntil the sunroof has closedcompletely. Press the TILT UPbutton until the sunroof has tilt-ed upward completely.
3. Release the TILT UP button.4. Press and hold the TILT UP button
once again until the sunroof hasreturned to the original position ofTILT UP after it is raised a littlehigher than the maximum TILT UPposition.
When this is complete, the sunroofsystem is reset.

3 101
1
2
3
4
5
6
7
8
9
Knowing your vehicle
To keep items from shifting in thecargo area, you can use the fourrings located in the cargo area toattach the luggage net.
✽✽ NOTICEDo not put fragile, bulky or anexcessive quantity of items into lug-gage net. They could be damaged.
Use the tonneau cover to hide itemsstored in the cargo area.
LUGGAGE NET (IF EQUIPPED)
9KMA2176
CAUTIONTo avoid eye injury, DO NOToverstretch the netting, allowingit to possibly snap back intoyour face.DO NOT use the luggage netwhen the strap has visible signsof wear or damage.
TONNEAU COVER (IF EQUIPPED)
OKM039181
OKM039182
Type A
Type B

Knowing your vehicle
1023
1
2
3
4
5
6
7
8
9
• To use the front shade of the ton-neau cover, pull the hook forwardand hang the hook on the headrestpole.
✽✽ NOTICEWhen folding the rear seatback for-ward, remove the hook from theheadrest pole. Otherwise, the frontshade of the tonneau cover may bedamaged or malformed.
• To use the rear shade of the ton-neau cover, pull the handle back-ward and insert the edges into theslots.
When not in use, place the tonneaucover on the lower portion of cargoarea.
✽✽ NOTICESince the tonneau cover may bedamaged or malformed, do not putthe luggage on it when it is used.
1KMA2181
CAUTION• Do not place objects on the
tonneau cover. Such objectsmay be thrown about insidethe vehicle and possibly injurevehicle occupants during anaccident or when braking.
• Never allow anyone to ride inthe luggage compartment. It isdesigned for luggage only.
• Maintain the balance of thevehicle and locate the weightas far forward as possible.

3 103
1
2
3
4
5
6
7
8
9
Knowing your vehicle
The luggage center box is locatedunder the floor in cargo area.You canplace a first aid kit, a reflector trian-gle, tools, etc. in the box for easyaccess.
1. Grasp the strap or handle on theedge of the cover and lift it.
2. Detach the hook from the coverand hang the hook on the weatherstrip.
When not in use, hang the hook onthe bottom of the cover.
LUGGAGE CENTER BOX (IF EQUIPPED)
1KMA2182 OKM039184
9KMA2183Type B
Type A
8KMA2183
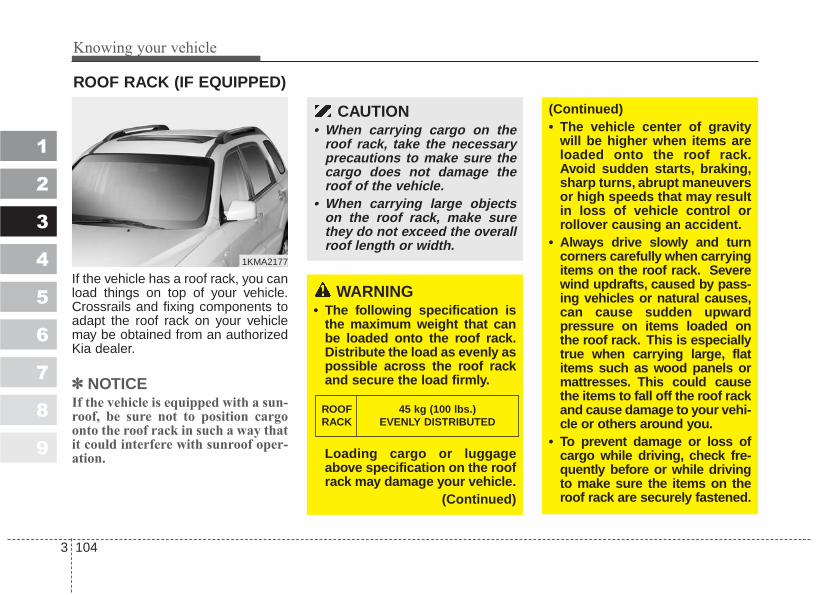
Knowing your vehicle
1043
1
2
3
4
5
6
7
8
9
If the vehicle has a roof rack, you canload things on top of your vehicle.Crossrails and fixing components toadapt the roof rack on your vehiclemay be obtained from an authorizedKia dealer.
✽✽ NOTICEIf the vehicle is equipped with a sun-roof, be sure not to position cargoonto the roof rack in such a way thatit could interfere with sunroof oper-ation.
ROOF RACK (IF EQUIPPED)
1KMA2177
CAUTION• When carrying cargo on the
roof rack, take the necessaryprecautions to make sure thecargo does not damage theroof of the vehicle.
• When carrying large objectson the roof rack, make surethey do not exceed the overallroof length or width.
WARNING• The following specification is
the maximum weight that canbe loaded onto the roof rack.Distribute the load as evenly aspossible across the roof rackand secure the load firmly.
Loading cargo or luggageabove specification on the roofrack may damage your vehicle.
(Continued)
(Continued)• The vehicle center of gravity
will be higher when items areloaded onto the roof rack.Avoid sudden starts, braking,sharp turns, abrupt maneuversor high speeds that may resultin loss of vehicle control orrollover causing an accident.
• Always drive slowly and turncorners carefully when carryingitems on the roof rack. Severewind updrafts, caused by pass-ing vehicles or natural causes,can cause sudden upwardpressure on items loaded onthe roof rack. This is especiallytrue when carrying large, flatitems such as wood panels ormattresses. This could causethe items to fall off the roof rackand cause damage to your vehi-cle or others around you.
• To prevent damage or loss ofcargo while driving, check fre-quently before or while drivingto make sure the items on theroof rack are securely fastened.
ROOF 45 kg (100 lbs.)RACK EVENLY DISTRIBUTED
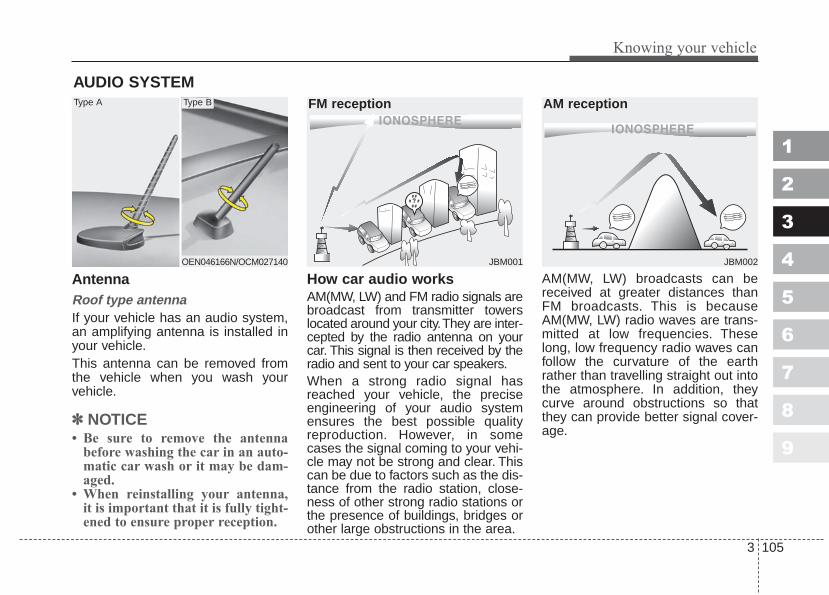
3 105
Knowing your vehicle
1
2
3
4
5
6
7
8
9
AntennaRoof type antennaIf your vehicle has an audio system,an amplifying antenna is installed inyour vehicle.This antenna can be removed fromthe vehicle when you wash yourvehicle.
✽✽ NOTICE• Be sure to remove the antenna
before washing the car in an auto-matic car wash or it may be dam-aged.
• When reinstalling your antenna,it is important that it is fully tight-ened to ensure proper reception.
How car audio worksAM(MW, LW) and FM radio signals arebroadcast from transmitter towerslocated around your city.They are inter-cepted by the radio antenna on yourcar. This signal is then received by theradio and sent to your car speakers.When a strong radio signal hasreached your vehicle, the preciseengineering of your audio systemensures the best possible qualityreproduction. However, in somecases the signal coming to your vehi-cle may not be strong and clear. Thiscan be due to factors such as the dis-tance from the radio station, close-ness of other strong radio stations orthe presence of buildings, bridges orother large obstructions in the area.
AM(MW, LW) broadcasts can bereceived at greater distances thanFM broadcasts. This is becauseAM(MW, LW) radio waves are trans-mitted at low frequencies. Theselong, low frequency radio waves canfollow the curvature of the earthrather than travelling straight out intothe atmosphere. In addition, theycurve around obstructions so thatthey can provide better signal cover-age.
AUDIO SYSTEM
OEN046166N/OCM027140
Type A Type B
¢ ¢ ¢
JBM001
¢ ¢ ¢ ¢ ¢ ¢
JBM002
FM reception AM reception
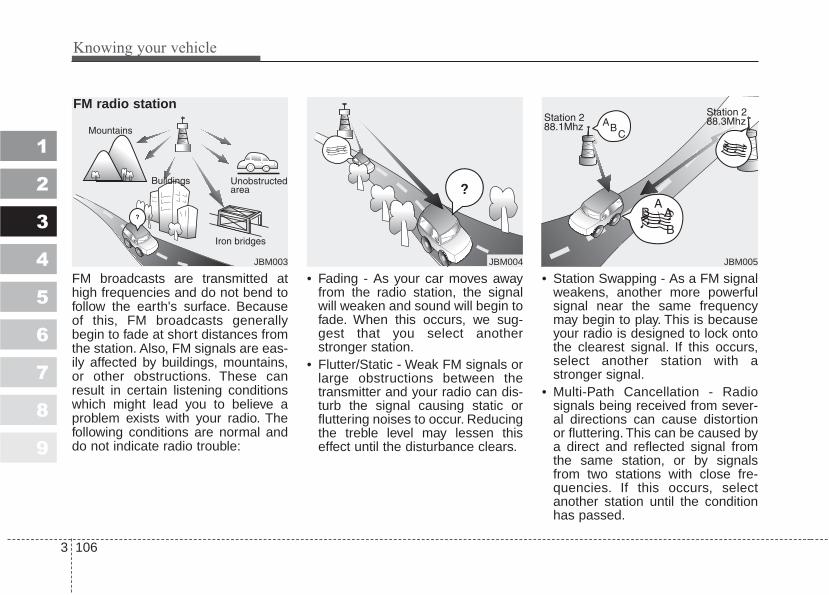
Knowing your vehicle
1063
1
2
3
4
5
6
7
8
9
FM broadcasts are transmitted athigh frequencies and do not bend tofollow the earth's surface. Becauseof this, FM broadcasts generallybegin to fade at short distances fromthe station. Also, FM signals are eas-ily affected by buildings, mountains,or other obstructions. These canresult in certain listening conditionswhich might lead you to believe aproblem exists with your radio. Thefollowing conditions are normal anddo not indicate radio trouble:
• Fading - As your car moves awayfrom the radio station, the signalwill weaken and sound will begin tofade. When this occurs, we sug-gest that you select anotherstronger station.
• Flutter/Static - Weak FM signals orlarge obstructions between thetransmitter and your radio can dis-turb the signal causing static orfluttering noises to occur. Reducingthe treble level may lessen thiseffect until the disturbance clears.
• Station Swapping - As a FM signalweakens, another more powerfulsignal near the same frequencymay begin to play. This is becauseyour radio is designed to lock ontothe clearest signal. If this occurs,select another station with astronger signal.
• Multi-Path Cancellation - Radiosignals being received from sever-al directions can cause distortionor fluttering. This can be caused bya direct and reflected signal fromthe same station, or by signalsfrom two stations with close fre-quencies. If this occurs, selectanother station until the conditionhas passed.
JBM003
FM radio station
¢ ¢ ¢
JBM004 JBM005

3 107
Knowing your vehicle
1
2
3
4
5
6
7
8
9
Satellite radio receptionYou may experience problems inreceiving SIRIUS satellite radio sig-nals in the following situations.
• If you are driving in a tunnel or acovered parking area.
• If you are driving beneath the toplevel of a multi-level freeway.
• If you drive under a bridge.• If you are driving next to a tall vechi-
cle(such as a truck or a bus) thatblock the signal.
• If you are driving in a valley wherethe surrounding hills or peaks blockthe signal from the satellite.
• If you are driving on a mountainroad where is blocked by moun-tains.
• If you are driving in an area with talltrees that block the signal(10m ormore), for example on an road thatgoes through a dense forset.
• The signal can become weak insome areas that are not covered bythe repeater station network.
please note that these may be otherunforeseen circumstances whenthere are problems with the recep-tion of SIRIUS satellite radio signal.
Using a cellular phone or a two-way radio When a cellular phone is used insidethe vehicle, noise may be producedfrom the audio equipment. This doesnot mean that something is wrongwith the audio equipment. In such acase, use the cellular phone at aplace as far as possible from theaudio equipment.
CAUTIONWhen using a communicationsystem such a cellular phone ora radio set inside the vehicle, aseparate external antenna mustbe fitted. When a cellular phoneor a radio set is used with aninternal antenna alone, it mayinterfere with the vehicle's elec-trical system and adverselyaffect safe operation of the vehi-cle.
WARNINGDon't use a cellular phone whenyou are driving. You must stopat a safe place to use a cellularphone.
SATELITE1
SATELITE2
Knowing your vehicle
1083
1
2
3
4
5
6
7
8
9
Care of disc (if equipped)• If the temperature inside the car is
too high, open the car windows forventilation before using your caraudio.
• It is illegal to copy and useMP3/WMA/AAC/WAVE files withoutpermission. Use CDs that are creat-ed only by lawful means.
• Do not apply volatile agents such asbenzene and thinner, normal clean-ers and magnetic sprays made foranalogue disc onto CDs.
• To prevent the disc surface fromgetting damaged. Hold and carryCDs by the edges or the edges ofthe center hole only.
• Clean the disc surface with a pieceof soft cloth before playback (wipe itfrom the center to the outsideedge.)
• Do not damage the disc surface orattach pieces of sticky tape or paperonto it.
• Make sure on undesirable matterother than CDs are inserted into theCD player (Do not insert more thanone CD at a time).
• Keep CDs in their cases after useto protect them from scratches ordirt.
• Depending on the type of CD-R/CD-RW CDs, certain CDs maynot operate normally according tomanufacturing companies or mak-ing and recording methods. In suchcircumstances, if you still continueto use those CDs, they may causethe malfunction of your car audiosystem.
✽✽ NOTICE - Playing anIncompatible Copy-ProtectedAudio CD
Some copy-protected CDs, which donot comply with the internationalaudio CD standards (Red Book),may not play on your car audio.Please note that if you try to playcopyprotected CDs and the CDplayer of your car audio is not per-forming to your expectation, thismay be caused by those CDs and nota defect in the device itself. Pleasereplace those CDs.

3 109
Knowing your vehicle
1
2
3
4
5
6
7
8
9
1. FM/AM Selection Button
2. SAT Selection Button
3. CD Selection Button
4. AUX Selection Button
5. Automatic Channel Selection Button
6. Power ON/OFF & VOLUME Button
7. SCAN Selection Button
8. MUTE Selection Button
9. INFO Selection Button
10. SET UP Selection Button
11. TUNE/ENTER Button
12. Pre-set Selection Button
RADIO, SET UP, VOLUME CONTROL
A-200KMU
Knowing your vehicle
1103
1
2
3
4
5
6
7
8
9
1. FM/AM Selection ButtonTurns to FM mode and toggles FM1and FM2 and AM when the button ispressed each time.
2. SAT Selection ButtonTurns to SAT mode, and toggles inthe order of SAT1➟SAT2➟SAT3➟SAT1➟... when the button ispressed each time.
3. CD Selection ButtonIf there is a cd in the CDP DECK itplays the CD.Press CD button to automaticallyinsert CD when the disc is ejectedfrom the deck by pressing CDEJECT.
4. AUX Selection ButtonIf the auxiliary device is connected, itturns to AUX MODE to play thesound from the auxiliary player.If no Disc and auxiliary device is con-nected, it displays "NO Media" for 5 sec-onds and returns to the previous mode.
5. Automatic ChannelSelection Button
• When the [SEEK ] button ispressed, it reduces the band fre-quency by 200KHz to automaticallyselect channel. Stops at the previ-ous frequency if no channel isfound.
• When the [SEEK ] button ispressed, it increases the band fre-quency by 200KHz to automaticallyselect channel. Stops at the previ-ous frequency if no channel isfound.
6. Power ON/OFF & VolumeControl Button
Turns on/off the set when the IGNI-TION SWITCH is on ACC or ON. Ifthe button is turned to the right, itincreases the volume and left,decreases the volume.
7. SCAN Selection ButtonWhen the button is pressed, it auto-matically only [SCAN] up. The soundhearing for 5 seconds per allsearched station preset.
8. MUTE Selection ButtonWhen inputting [MUTE] key, indicate"AUDIO MUTE" at the some timewith output [MUTE].
9. INFO Selection ButtonDisplays the information of the chan-nel currently played by SAT.
10. SET UP Selection ButtonPress this button to turn to theSCROLL, SDVC, SIRIUS and adjust-ment mode.If no action is taken for 5 secondsafter pressing the button, it will returnto the play mode. (After entering SETUP mode, move between items usingthe left, right and PUSH functions ofthe TUNE button.)The set up item changes fromSCROLL➟ SDVC➟SIRIUS➟SCROLL➟...

3 111
Knowing your vehicle
1
2
3
4
5
6
7
8
9
11. TUNE/ENTER ButtonTurn this button clockwise by onenotch to increase frequency by200KHz (AM: 10KHz) from currentfrequency.Turn this button counterclockwise byone notch to decrease frequency by200KHz (AM: 10KHz) from currentfrequency.Press this button while holding SETUP button to activate / inactivate theitem to.Select SET UP item using left andright function of the Tune button.
12. Pre-set Selection ButtonPush [1]~[6] buttons less than 0.8second to play the channel saved ineach button.Push pre-set button for 0.8 second orlonger to save current channel to therespective button with a beep.

Knowing your vehicle
1123
1
2
3
4
5
6
7
8
9
1. CD loading slot
2. CD indicator
3. CD Eject Button
4. AUX Selection Button
5. Automatic Track Selection Button
6. INFO Selection Button
7. TUNE/ENTER Button
8. REPEAT Selection Button
9. RANDOM Selection Button
10. SCAN Selection Button
A-200KMU
CD

3 113
Knowing your vehicle
1
2
3
4
5
6
7
8
9
1. CD loading slotPlease face printed side upward andgently push in. When the ignitionswitch is on ACC or ON and power isoff, power is automatically turned onif the CD is loaded. This CDP sup-ports both 8 cm and 12 cm CDs. Butif VCD, Data CD, MP3 CD areloaded, "Er-6" message will appearand CD will be ejected.
2. CD Indicator When car ignition switch is ACC orON and if the CD is loaded, this indi-cator is lighted. If the CD is ejectedthe light is turned off.
3. CD eject ButtonPush button to eject the CD duringCD playback. This button is enabledwhen ignition switch is off.
4. AUX Selection ButtonIf the auxiliary device is connected, itturns to AUX MODE to play thesound from the auxiliary player.If no Disc and auxiliary device is con-nected, it displays "NO Media" for 5seconds and returns to the previousmode.
5. Automatic Track SelectionButton
• Push [SEEK ] button for lessthan 0.8 second to play from thebeginning of current song.
• Push [SEEK ] button for lessthan 0.8 second and press againwithin 1 second to play the previ-ous song.
• Push [SEEK ] button for 0.8 sec-ond or longer to initiate reversedirection high speed sound searchof current song.
• Push [SEEK ] button for lessthan 0.8 second to play the nextsong.
• Push [SEEK ] button for 0.8 sec-ond or longer to initiate high speedsound search of current song.
6. INFO Selection ButtonDisplays the information of the cur-rent CD TRACK in the order of DISC TITLE➟DISC ARTIST➟TRACKTITLE➟TRACK ARTIST➟TOTALTRACK➟Play Screen➟ DISC TITLE➟... (not displayed if the informationis not available on the DISC.)
7. TUNE/ENTER ButtonTurn this button clockwise to displaysongs after current song.Also, turn this button counterclock-wise to display songs before currentsong.To listen to the displayed song, pressthe button to skip to the song andplay.
8. REPEAT Selection ButtonRepeats current song when the but-ton is pressed for less than 0.8 sec-ond.Repeats the entire DISC when thebutton is pressed for 0.8 second orlonger.

Knowing your vehicle
1143
1
2
3
4
5
6
7
8
9
9. RANDOM Selection ButtonTurns on/off the randomization of theplay list of files in the currently playedDISC.To cancel the mode, press the keyonce again.
10. SCAN Selection ButtonPlays first 10 seconds of each songin the DISC.To cancel the mode, press the keyonce again.
CAUTION - Using USBdevice
• To use the external USBdevice, make sure the deviceis not mounted when startingup the vehicle and mount thedevice after starting up.
• If you start the vehicle whenthe USB device is mounted, itmay damage the USB device.(USB is not ESA)
• If the vehicle is started up orturned off while the externalUSB device is connected, theexternal USB device may notwork.
• It may not play inauthenticMP3 or WMA files.1) It can only play MP3 files
with the compression ratebetween 8Kbps~320Kbps.
2) It can only play WMA musicfiles with the compressionrate between 8Kbps~320Kbps.
(Continued)
(Continued)• Take cautions for static elec-
tricity when mounting or dis-mounting the external USBdevice.
• Encoded MP3 PLAYER is notrecognizable.
• Depending on the condition ofthe external USB device, theconnected external USBdevice can be unrecognizable.
• When the formatted byte/sec-tor setting of External USBdevices is not either 512BYTEor 2048BYTE, then the devicewill not be recognized.
• Only the USB device format-ted to FAT 12/16/32.
• USB device without USB IFauthentication may not be rec-ognizable.
• Make sure the USB connectionterminal does not come incontact with human body orany object.
(Continued)

3 115
Knowing your vehicle
1
2
3
4
5
6
7
8
9
(Continued)• If you repeat mounting or dis-
mounting USB device in ashort period of time, it maybreak the device.
• You might hear strange noisewhen mounting or dismount-ing a USB device.
• If you dismount the externalUSB device during playback inUSB mode, the external USBdevice can be damaged or mal-function. Therefore, mount theexternal USB device when theengine is turned off or inanother mode.
• Depending on the type andcapacity of the external USBdevice or the type of the filesstored in the device, there is adifference in the time taken forrecognition of the device, butthis is not a trouble and youonly have to wait.
(Continued)
(Continued)• Do not use the USB device for
other purposes than playingmusic files.
• Use of USB accessories suchas the recharger or heaterusing USB I/F may lower theperformance or cause trouble.
• If you use devices such as theUSB hub you purchased sepa-rately, the vehicle’s audio sys-tem may not recognize theUSB device. Connect the USBdevice directly to the multime-dia terminal of the vehicle.
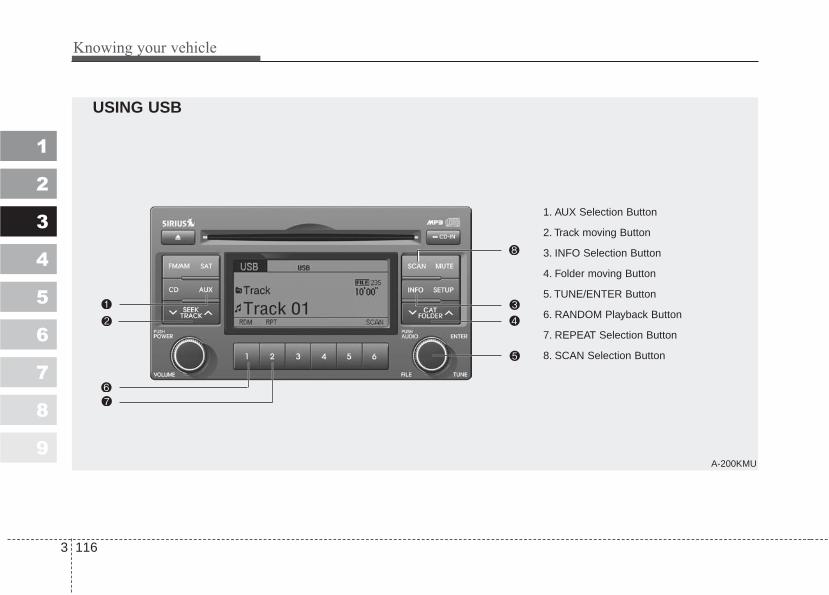
Knowing your vehicle
1163
1
2
3
4
5
6
7
8
9
1. AUX Selection Button
2. Track moving Button
3. INFO Selection Button
4. Folder moving Button
5. TUNE/ENTER Button
6. RANDOM Playback Button
7. REPEAT Selection Button
8. SCAN Selection Button
A-200KMU
USING USB

3 117
Knowing your vehicle
1
2
3
4
5
6
7
8
9
In case USB is connected to the mul-tiple terminal inside the console onthe right hand side of the driver’sseat. When USB is connected, the‘USB’ icon will be displayed on thetop right corner of the display screen.
1.AUX Selection ButtonIf USB is not connected, it switchesto the USB mode from the Radio andCD mode to play the song filesstored in the USB.If AUX is not connected, it is invalidkey.
2. Track Moving Button• Press the [SEEK ] button for
less than 0.8 second to play fromthe beginning of the song currentlyplayed.Press the button for less than 0.8second and press it again within 1second to move to and play the pre-vious track.Press the button for 0.8 second orlonger to play the song in reversedirection in fast speed.
• Press the [SEEK ] button for lessthan 0.8 second to move to thenext track.Press the button for 0.8 second orlonger to play the song in forwarddirection in fast speed.
3. INFO Selection ButtonDisplays the information of the filecurrently played in the order of FILENAME➟TITLE➟ARTIST➟ALBUM➟
FOLDER➟TOTAL FILE➟FILE NAME➟… (Displays no information if thefile has no song information.)
4. Folder moving Button• Moves [FLDR ] button child fold-
er of the current folder and displaysthe first song in the folder. PressTUNE/ENTER button to move tothe folder displayed. It will play thefirst song in the folder.
• Moves [FLDR ] button parentfolder and displays the first song inthe folder. Press TUNE/ENTERbutton to move to the folder dis-played. It will play the first song inthe folder.
5. TUNE/ENTER ButtonTurn this button clockwise to displaythe songs next to the currentlyplayed song.Turn the button counterclockwise todisplay the songs before the current-ly played song.Press the button to skip to and playthe selected song.
Knowing your vehicle
1183
1
2
3
4
5
6
7
8
9
6. RANDOM Playback ButtonPress the button for less than 0.8second to start or stop the randomplayback of the songs in the currentfolder.Press the button for more than 0.8second to randomly play the entiresongs in the USB device.Press the button again to cancel themode.
7. REPEAT Selection ButtonPress the button for less than 0.8second to repeat the song currentlyplayed.Press the button for more than 0.8second to repeat the entire songs inthe USB device.
8. SCAN Selection ButtonPlays 10 seconds of each song in theUSB device.Press the button once again to can-cel scanning.
3 119
Knowing your vehicle
1
2
3
4
5
6
7
8
9
1. iPod Selection Button
2. Track moving Button
3. INFO Selection Button
4. Category Selection Button
5. TUNE/ENTER Button
6. RANDOM Playback Button
7. REPEAT Selection Button
A-200KMU
RUNNING iPod®
iPod® is a trademark of Apple Inc.
Knowing your vehicle
1203
1
2
3
4
5
6
7
8
9
In case the iPod exclusive cable isconnected to the multiple terminalinside the console on the right handside of the driver’s seat. When theiPod is connected, the ‘iPod’ icon willbe displayed on the top right cornerof the display screen.
1. iPod Selection ButtonIf iPod is connected, it switches tothe iPod mode from the Radio andCD mode to play the song filesstored in the iPod.If there are no CD and AUX modefrom the Radio mode, it displays ‘NOMEDIA’.
2. Track Moving Button• Press the [SEEK ] button for less
than 0.8 second to play from thebeginning of the song currentlyplayed.Press the button for less than 0.8second and press it again within 1second to move to and play theprevious track. Press the button for0.8 second or longer to play thesong in reverse direction in fastspeed.
• Press the [SEEK ] button for lessthan 0.8 second to move to thenext track.Press the button for 0.8 second orlonger to play the song in forwarddirection in fast speed.
3. INFO Selection ButtonDisplays the information of the filecurrently played in the order of FILENAME ➟TITLE➟ARTIST➟ALBUM➟
FILE NAME ➟… (Displays no infor-mation if the file has no song infor-mation.)
4. Category Selection ButtonMoves to the upper category fromcurrently played category of the iPod.To move to (play) the category(song) displayed, press TUNE/ENTER key.You will be able to search throughthe lower category of the selectedcategory.The order of iPod’s category isSONG, ALBUMES, ARTISTS, GEN-RES, and iPod.
5. TUNE/ENTER ButtonWhen you turn the button clockwise,it will display the songs (category)next to the song currently played(category in the same level).Also, when you turn the button coun-terclockwise, it will display the songs(category) before the song currentlyplayed (category in the same level).If you want to listen to the song dis-played in the song category, pressthe button, then it will skip to theselected song and play.
6. RANDOM Playback ButtonPress the button for less than 0.8second to activate or deactivate therandom playback of the songs withinthe current category.Press the button for longer than 0.8second to randomly play all songs inthe entire album of the iPod.Press the button once again to can-cel the mode.
7. REPEAT Selection ButtonRepeats the song currently played.
3 121
Knowing your vehicle
1
2
3
4
5
6
7
8
9
✽✽ NOTICE - Using iPod device• Some iPod models might not sup-
port the communication protocoland the files will not be played.(iPod models supported: Mini, 4G,Photo, Nano, 5G)
• The order of search or playback ofsongs in the iPod can be differentfrom the order searched in theaudio system.
• If the iPod crashes due to its owntrouble, reset iPod. (Reset: Referto iPod manual)
• iPod may not operate normally onlow battery.
CAUTION - Using iPoddevice
• You need the power cableexclusive for iPod in order tooperate iPod with the buttonson the audio system. The PCcable provided by Apple maycause malfunction and do notuse it for vehicle use.
• When connecting the devicewith iPod cable, push in thejack fully not to interfere withcommunication.
• When adjusting the soundeffects of iPod and the audiosystem, the sound effects ofboth devices will overlap eachand might cause reduce ordistort the quality of thesound.
• Deactivate (turn off) the equal-izer function of iPod whenadjusting the audio system’svolume, and turn off the equal-izer of the audio system whenusing the equalizer of iPod.
(Continued)
(Continued)• When the iPod cable is con-
nected, the system can beswitched to the AUX modeeven without the iPod deviceand can cause noise.Disconnect iPod cable whenyou are not using the iPoddevice.

Knowing your vehicle
1223
1
2
3
4
5
6
7
8
9A-300KMU
1. FM/AM Selection Button
2. SAT Selection Button
3. CD Selection Button
4. AUX Selection Button
5. Automatic Channel Selection Button
6. Power ON/OFF & VOLUME Button
7. SCAN Selection Button
8. MUTE Selection Button
9. INFO Selection Button
10. SET UP Selection Button
11. TUNE/ENTER Button
12. Pre-set Selection Button
RADIO, SET UP, VOLUME CONTROL

3 123
Knowing your vehicle
1
2
3
4
5
6
7
8
9
1. FM Selection ButtonTurns to FM/AM mode and togglesFM1 and FM2 and AM when the but-ton is pressed each time.
2. SAT Selection ButtonTurns to SAT mode, and toggles inthe order of SAT1➟SAT2➟SAT3➟
SAT1➟... when the button is pressedeach time.
3. CD Selection ButtonIf there is a cd in the CDP DECK itplays the CD.Press CD button to automaticallyinsert CD when the disc is ejectedfrom the deck by pressing CDEJECT.
4. AUX Selection ButtonIf the auxiliary device is connected, itturns to AUX MODE to play thesound from the auxiliary player.If no Disc and auxiliary device is con-nected, it displays "NO Media" for 5seconds and returns to the previousmode.
5. Automatic ChannelSelection Button
• When the [SEEK ] button ispressed, it reduces the band fre-quency by 200KHz to automaticallyselect channel. Stops at the previ-ous frequency if no channel isfound.
• When the [SEEK ] button ispressed, it increases the band fre-quency by 200KHz to automaticallyselect channel. Stops at the previ-ous frequency if no channel isfound.
6. Power ON/OFF & VolumeControl Button
Turns on/off the set when the IGNI-TION SWITCH is on ACC or ON. Ifthe button is turned to the right, itincreases the volume and left,decreases the volume.
7. SCAN Selection ButtonWhen the button is pressed, it auto-matically only [SCAN] up. The soundhearing for 5 seconds per allsearched station preset.
8. MUTE Selection ButtonWhen inputting [MUTE] key, indicate"AUDIO MUTE" at the some time withoutput [MUTE].
9. INFO Selection ButtonDisplays the information of the chan-nel currently played by SAT.
10. SET UP Selection ButtonPress this button to turn to theSCROLL, SDVC, SIRIUS and adjust-ment mode.If no action is taken for 5 secondsafter pressing the button, it will returnto the play mode.(After entering SETUP mode, move between items usingthe left, right and PUSH functions ofthe TUNE button.)The set up item changes fromSCROLL➟ SDVC➟SIRIUS➟SCROLL➟...

Knowing your vehicle
1243
1
2
3
4
5
6
7
8
9
11. TUNE/ENTER ButtonTurn this button clockwise by onenotch to increase frequency by200kHz (AM: 10KHz) from currentfrequency.Turn this button counterclockwise byone notch to decrease frequency by200kHz (AM:10KHz) from currentfrequency.Press this button while holding SETUP button to activate / inactivate theitem to.Select SET UP item using left andright function of the Tune button.
12. Pre-set Selection ButtonPush [1]~[6] buttons less than 0.8 sec-ond to play the channel saved in eachbutton.Push pre-set button for 0.8 second orlonger to save current channel to therespective button with a beep.

3 125
Knowing your vehicle
1
2
3
4
5
6
7
8
9
1. CD loading slot
2. CD indicator
3. CD Eject Button
4. LOAD Selection Button
5. AUX Selection Button
6. Automatic Track Selection Button
7. INFO Selection Button
8. TUNE/ENTER Button
9. REPEAT Selection Button
10. RANDOM Selection Button
11. DISC selection Button
12. SCAN Selection Button
A-300KMU
CD

Knowing your vehicle
1263
1
2
3
4
5
6
7
8
9
1. CD loading slotPlease face printed side upward andgently push in. When the ignitionswitch is on ACC or ON and power isoff, power is automatically turned onif the CD is loaded. This CDP sup-ports both 8cm and 12 cm CDs. Butif VCD, Data CD, MP3 CD areloaded, "Er-6" message will appearand CD will be ejected.
2. CD Indicator When car ignition switch is ACC orON and if the CD is loaded, this indi-cator is lighted. If the CD is ejectedthe light is turned off.
3. CD eject ButtonPush button to eject the CD dur-ing CD playback. This button isenabled when ignition switch is off.
4. CD LOAD ButtonPush [LOAD] button to load CDs toavailable CDC deck (from 1~6). Push[LOAD] button for more than 2 sec-onds to load into all available decks.The last CD will play. 10 seconds idlestatus will disable loading process.
5. AUX Selection ButtonIf the auxiliary device is connected, itturns to AUX MODE to play thesound from the auxiliary player.If no auxiliary device is connected, itdisplays "NO MEDIA" for 5 secondsand returns to the previous mode.
6. Automatic Track SelectionButton
• Push [SEEK ] button for lessthan 0.8 second to play from thebeginning of current song.
• Push [SEEK ] button for lessthan 0.8 second and press againwithin 3 seconds to play the previ-ous song.
• Push [SEEK ] button for 0.8 sec-ond or longer to initiate reversedirection high speed sound searchof current song.
• Push [SEEK ] button for lessthan 0.8 second to play the nextsong.
• Push [SEEK ] button for 0.8 sec-ond or longer to initiate high speedsound search of current song.
7. INFO Selection ButtonDisplays the information of the cur-rent CD TRACK in the order of DISCTITLE➟ DISC ARTIST➟TRACK TITLE➟TRACK ARTIST➟TOTAL TRACK➟
Play Screen➟ DISC TITLE➟ ... (notdisplayed if the information is notavailable on the DISC.)

3 127
Knowing your vehicle
1
2
3
4
5
6
7
8
9
8. TUNE/ENTER ButtonTurn this button clockwise to displaysongs after current song.Also, turn this button counterclock-wise to display songs before currentsong.To listen to the displayed song, pressthe button to skip to the song andplay.
9. REPEAT Selection ButtonRepeats current song when the but-ton is pressed for less than 0.8 sec-ond.Repeats the entire DISC when thebutton is pressed for 0.8 second orlonger.
10. RANDOM Selection ButtonTurns on/off the randomization of theplay list of files in the currently playedDISC.To cancel the mode, press the keyonce again.
11. DISC Selection Button• [DISC ] Change Button
Changes disc to the previous disc.• [DISC ] Change Button
Changes disc to the next disc.
12. SCAN Selection ButtonPlays first 10 seconds of each songin the DISC.To cancel the mode, press the keyonce again.
CAUTION - Using USBdevice
• To use the external USBdevice, make sure the deviceis not mounted when startingup the vehicle and mount thedevice after starting up.
• If you start the vehicle whenthe USB device is mounted, itmay damage the USB device.(USB is not ESA)
• If the vehicle is started up orturned off while the externalUSB device is connected, theexternal USB device may notwork.
• It may not play inauthenticMP3 or WMA files.1) It can only play MP3 files
with the compression ratebetween 8Kbps~320Kbps.
2) It can only play WMA musicfiles with the compressionrate between 8Kbps~320Kbps.
(Continued)

Knowing your vehicle
1283
1
2
3
4
5
6
7
8
9
(Continued)• Take cautions for static elec-
tricity when mounting or dis-mounting the external USBdevice.
• Encoded MP3 PLAYER is notrecognizable.
• Depending on the condition ofthe external USB device, theconnected external USBdevice can be unrecognizable.
• When the formatted byte/sec-tor setting of External USBdevices is not either 512BYTEor 2048BYTE, then the devicewill not be recognized.
• Only the USB device format-ted to FAT 12/16/32.
• USB device without USB IFauthentication may not be rec-ognizable.
• Make sure the USB connectionterminal does not come incontact with human body orany object.
(Continued)
(Continued)• If you repeat mounting or dis-
mounting USB device in ashort period of time, it maybreak the device.
• You might hear strange noisewhen mounting or dismount-ing a USB device.
• If you dismount the externalUSB device during playback inUSB mode, the external USBdevice can be damaged or mal-function. Therefore, mount theexternal USB device when theengine is turned off or inanother mode.
• Depending on the type andcapacity of the external USBdevice or the type of the filesstored in the device, there is adifference in the time taken forrecognition of the device, butthis is not a trouble and youonly have to wait.
(Continued)
(Continued)• Do not use the USB device for
other purposes than playingmusic files.
• Use of USB accessories suchas the recharger or heaterusing USB I/F may lower theperformance or cause trouble.
• If you use devices such as theUSB hub you purchased sepa-rately, the vehicle’s audio sys-tem may not recognize theUSB device. Connect the USBdevice directly to the multime-dia terminal of the vehicle.

3 129
Knowing your vehicle
1
2
3
4
5
6
7
8
9
1. AUX Selection Button
2. Track moving Button
3. INFO Selection Button
4. Folder moving Button
5. TUNE/ENTER Button
6. RANDOM Playback Button
7. REPEAT Selection Button
8. SCAN Selection Button
A-300KMU
USING USB

Knowing your vehicle
1303
1
2
3
4
5
6
7
8
9
In case USB is connected to the mul-tiple terminal inside the console onthe right hand side of the driver’sseat. When USB is connected, the‘USB’ icon will be displayed on thetop right corner of the display screen.
1. AUX Selection ButtonIf USB is not connected, it switchesto the USB mode from the Radio andCD mode to play the song filesstored in the USB.If AUX is not connected, it is invalidkey.
2. Track Moving Button• Press the [SEEK ] button for
less than 0.8 second to play fromthe beginning of the song currentlyplayed.Press the button for less than 0.8second and press it again within 1second to move to and play the pre-vious track.Press the button for 0.8 second orlonger to play the song in reversedirection in fast speed.
• Press the [SEEK ] button for lessthan 0.8 second to move to thenext track.Press the button for 0.8 second orlonger to play the song in forwarddirection in fast speed.
3. INFO Selection ButtonDisplays the information of the filecurrently played in the order of FILENAME➟TITLE➟ARTIST➟ALBUM➟
FOLDER➟TOTAL FILE➟FILE NAME➟… (Displays no information if thefile has no song information.)
4. Folder moving Button• Moves [FLDR ] button child fold-
er of the current folder and displaysthe first song in the folder. PressTUNE/ENTER button to move tothe folder displayed. It will play thefirst song in the folder.
• Moves [FLDR ] button parentfolder and displays the first song inthe folder. Press TUNE/ENTERbutton to move to the folder dis-played. It will play the first song inthe folder.
5. TUNE/ENTER ButtonTurn this button clockwise to displaythe songs next to the currentlyplayed song.Turn the button counterclockwise todisplay the songs before the current-ly played song.Press the button to skip to and playthe selected song.
6. RANDOM Playback ButtonPress the button for less than 0.8second to start or stop the randomplayback of the songs in the currentfolder.Press the button for more than 0.8second to randomly play the entiresongs in the USB device.Press the button again to cancel themode.

3 131
Knowing your vehicle
1
2
3
4
5
6
7
8
9
7. REPEAT Selection ButtonPress the button for less than 0.8second to repeat the song currentlyplayed.Press the button for more than 0.8second to repeat the entire songs inthe USB device.
8. SCAN Selection ButtonPlays 10 seconds of each song in theUSB device.Press the button once again to can-cel scanning.
Knowing your vehicle
1323
1
2
3
4
5
6
7
8
9
1. iPod Selection Button
2. Track moving Button
3. INFO Selection Button
4. Category Selection Button
5. TUNE/ENTER Button
6. RANDOM Playback Button
7. REPEAT Selection Button
A-300KMU
RUNNING iPod
iPod® is a trademark of Apple Inc.

3 133
Knowing your vehicle
1
2
3
4
5
6
7
8
9
In case the iPod exclusive cable isconnected to the multiple terminalinside the console on the right handside of the driver’s seat. When theiPod is connected, the ‘iPod’ icon willbe displayed on the top right cornerof the display screen.
1. iPod Selection ButtonIf iPod is connected, it switches tothe iPod mode from the Radio andCD mode to play the song filesstored in the iPod.If there are no CD and AUX modefrom the Radio mode, it displays "NOMEDIA".
2. Track Moving Button• Press the [SEEK ] button for less
than 0.8 second to play from thebeginning of the song currentlyplayed.Press the button for less than 0.8second and press it again within 1second to move to and play theprevious track. Press the button for0.8 second or longer to play thesong in reverse direction in fastspeed.
• Press the [SEEK ] button for lessthan 0.8 second to move to thenext track.Press the button for 0.8 second orlonger to play the song in forwarddirection in fast speed.
3. INFO Selection ButtonDisplays the information of the filecurrently played in the order of FILENAME➟TITLE➟ARTIST➟ALBUM➟
FILE NAME➟… (Displays no infor-mation if the file has no song infor-mation.)
4. Category Selection ButtonMoves to the upper category fromcurrently played category of the iPod.To move to (play) the category(song) displayed, press TUNE/ENTER key.You will be able to search throughthe lower category of the selectedcategory.The order of iPod’s category isSONG, ALBUMES, ARTISTS, GEN-RES, and iPod.
5. TUNE/ENTER ButtonWhen you turn the button clockwise,it will display the songs (category)next to the song currently played(category in the same level).Also, when you turn the button coun-terclockwise, it will display the songs(category) before the song currentlyplayed (category in the same level).If you want to listen to the song dis-played in the song category, pressthe button, then it will skip to theselected song and play.
6. RANDOM Playback ButtonPress the button for less than 0.8second to activate or deactivate therandom playback of the songs withinthe current category.Press the button for longer than 0.8second to randomly play all songs inthe entire album of the iPod.Press the button once again to can-cel the mode.
7. REPEAT Selection ButtonRepeats the song currently played.
Knowing your vehicle
1343
1
2
3
4
5
6
7
8
9
✽✽ NOTICE - Using iPod device• Some iPod models might not sup-
port the communication protocoland the files will not be played.(iPod models supported: Mini, 4G,Photo, Nano, 5G)
• The order of search or playback ofsongs in the iPod can be differentfrom the order searched in theaudio system.
• If the iPod crashes due to its owntrouble, reset iPod. (Reset: Referto iPod manual)
• iPod may not operate normally onlow battery.
CAUTION - Using iPoddevice
• You need the power cableexclusive for iPod in order tooperate iPod with the buttonson the audio system. The PCcable provided by Apple maycause malfunction and do notuse it for vehicle use.
• When connecting the devicewith iPod cable, push in thejack fully not to interfere withcommunication.
• When adjusting the soundeffects of iPod and the audiosystem, the sound effects ofboth devices will overlap eachand might cause reduce ordistort the quality of thesound.
• Deactivate (turn off) the equal-izer function of iPod whenadjusting the audio system’svolume, and turn off the equal-izer of the audio system whenusing the equalizer of iPod.
(Continued)
(Continued)• When the iPod cable is con-
nected, the system can beswitched to the AUX modeeven without the iPod deviceand can cause noise.Disconnect iPod cable whenyou are not using the iPoddevice.

3 135
Knowing your vehicle
1
2
3
4
5
6
7
8
9
Satellite radio channels:SIRIUS Satellite Radio has over 130channels, including 69 channels of100% commercial-free music, plussports, news, talk and entertainmentavailable nationwide in your vehicle.For more information and a completelist of SIRIUS Satellite Radio chan-nels, visit sirius.com in the UnitedStates, sirius-canada.ca in Canada, orcall SIRIUS at 1-888-539-7474.
Satellite radio reception fac-tors:To receive the satellite signal, yourvehicle has been equipped with asatellite radio antenna located on theroof of your vehicle. The vehicle roofprovides the best location for anunobstructed, open view of the sky, arequirement of a satellite radio sys-tem. Like AM/FM, there are severalfactors that can affect satelliteradio reception performance:• Antenna obstructions: For optimal
reception performance, keep theantenna clear of snow and icebuild-up and keep luggage andother material as far away from theantenna as possible.
• Terrain: Hills, mountains, tall build-ings, bridges, tunnels, freewayoverpasses, parking garages,dense tree foliage and thunder-storms can interfere with yourreception.
SIRIUS Satellite Radio service:SIRIUS Satellite Radio is a subscrip-tionbased satellite radio service thatbroadcasts music, sports, news andentertainment programming to radioreceivers, which are available forinstallation in motor vehicles or facto-ry installed, as well as for the home,portable and wireless devices, andthrough an Internet connection onpersonal computer.Vehicles that are equipped with afactory installed SIRIUS SatelliteRadio system include:• Hardware and an introductory trial
subscription term, which begins onthe date of sale or lease of thevehicle.
• For a small upgrade fee, access toSIRIUS music channels, and otherselect channels over the Internetusing any computer connected tothe Internet (U.S. customers only).
For information on extended sub-scription terms, contact SIRIUS at1-888-539-7474.
✽✽ NOTICESatellite Radio requires SIRIUS®
compatible receiver and a subscrip-tion service fee after trial period.Vehicles without a factory-installedradio receiver require hardware pur-chase and installation. Please see yourdealer for further details. All fees andprogramming subject to change.Subscriptions governed by the SIR-IUS Terms & Conditions available atwww.sirius.com / serviceterms.Available only in the 48 contiguousUnited States and the District ofColumbia. Service available inCanada;see www.siriuscanada.caChrysler LLC shall not be responsi-ble for any such programmingchanges.
Satellite Radio Electronic SerialNumber (ESN): This 12-digitSatellite Serial Number is needed tore-activate, modify or track yoursatellite radio account. You will needthis number when communicatingwith SIRIUS.
SIRIUS SATELLITE RADIO INFORMATION (IF EQUIPPED)

Knowing your vehicle
1363
1
2
3
4
5
6
7
8
9
1. SATELLITE RADIO Selection Button
2. Channel Selection Button
3. Power ON/OFF button and VOLUME knob
4. SCAN Selection Button
5. MUTE Selection Button
6. INFO Selection Button
7. SETUP Selection Button
8. CAT FOLDER Button
9. Tune knob and Enter button
10. Preset Selection Button
A-300KMU
SIRIUS SATELLITE RADIO

3 137
Knowing your vehicle
1
2
3
4
5
6
7
8
9
How to Use SIRIUS SatelliteRadioYour vehicle is equipped with a 3month complimentary period of SIR-IUS Satellite Radio so you haveaccess to over 130 channels ofmusic, information, and entertain-ment programming.
ActivationIn order to extend or reactivate yoursubscription to SIRIUS SatelliteRadio, you will need to contact SIR-IUS Customer Care at 888-539-7474. Have your 12 digit SID (Sirius Identification Number)/ESN(Electronic Serial Number) ready. Toretrieve the SID/ESN, turn on theradio, press the “SAT” button, andtune to channel zero. Please notethat the vehicle will need to be turnedon, in Sirius mode, and have anunobstructed view of the sky in orderfor the radio to receive the activationsignal.
1. SATELLITE RADIO Selectionbutton (SIRIUS SatelliteRadio)
Press the [SAT] button to switch toSIRIUS Satellite Radio. It cyclesthrough the different bands as notedbelow.SAT1➝SAT2➝SAT3➝SAT1
2. Channel Selection Button• When the [SEEK ] button is
pressed, it decreases automaticallyselect channel.
• When the [SEEK ] button ispressed, it increases automaticallyselect channel.
3. Power ON/OFF button andVolume knob
Turns on/off the radio when the IGNI-TION SWITCH is on ACC or ON. Ifthe knob is turned to the right, itincreases the volume; if it is turned tothe left, it decreases the volume.
4. SCAN Selection ButtonWhen the button is pressed, it auto-matically only scans the radio sta-tions upwards. The sound hearing for10 seconds per all searched stationpreset.The SCAN feature steps througheach channel, starting from the initialchannel, for ten seconds.Press the [SCAN] button again tostop the scan feature and to listen tothe currently selected channel.
5. MUTE Selection ButtonWhen the [MUTE] key is pressed,the display will say "AUDIO MUTE"and the audio will be muted.

6. INFO Selection ButtonDisplays the information of the chan-nel currently played by in the order ofCATEGORY NAME➟ARTIST NAME➟COMPOSER NAME➟CHANNELNAME➟...(CAT /CH Selection) Displays the information of the chan-nel currently played in the order ofSONG TITLE➟ARTIST NAME➟
COMPOSER NAME ➟... (CH/TITLESelection) (If there is no informationof COMPOSER NAME, it returns tomain display.)
7. SETUP Selection ButtonPress this button to adjust to theSCROLL, SDVC, SIRIUS and adjust-ment modes.If no action is taken for 5 secondsafter pressing the button, it will returnto the play mode. (After entering SETUP mode, move between itemsusing the left, right and PUSH func-tions of the TUNE button.)The set up item changes fromSCROLL➟ SDVC➟SIRIUS➟SCROLL➟...
8. CAT/FOLDER ButtonPress this button to turn to theCategory search mode.Turn the tuneknob to see available categories.Press the tune button to go to thedesired category.
9. TUNE knob /ENTER ButtonTurn this button clockwise by onenotch to increase the channel.Turn this button counterclockwise byone notch to decrease the channel.Press this button while holding SETUP button to activate / inactivate theitem to.Select SET UP item using left andright function of the Tune button.
10. Preset Selection ButtonPush [1]~[6] buttons less than 0.8second to play the channel saved ineach button.Hold down the preset button for 0.8second or longer to save currentchannel to the respective button witha beep.
Troubleshooting1. Antenna Error If this message is displayed, theantenna or antenna cable is brokenor unplugged. Please consult withyour Kia dealership.
2. Acquiring Signal If this message is displayed, itmeans that the antenna is coveredand that the SIRIUS Satellite Radiosignal is not available. Ensure theantenna is uncovered and has aclear view of the sky.
9
8
7
6
5
4
3
2
1
3 138
Knowing your vehicle

1
2
3
4
5
6
7
8
9
Ignition switch / 4-2Starting the engine / 4-4Manual transaxle / 4-5Automatic transaxle / 4-6Four wheel drive (4WD) / 4-12Brake system / 4-18Steering wheel / 4-24Cruise control system / 4-26
Electronic stability control / 4-30Instrument cluster / 4-33Gauges / 4-34Warnings and indicators / 4-39Rear parking assist system / 4-48Compass / 4-51Lighting / 4-54Wipers and washers / 4-58Defroster / 4-61Hazard warning flasher / 4-62Manual climate control system / 4-63Automatic climate control system / 4-71Windshield defrosting and defogging / 4-81
Driving your vehicle
10
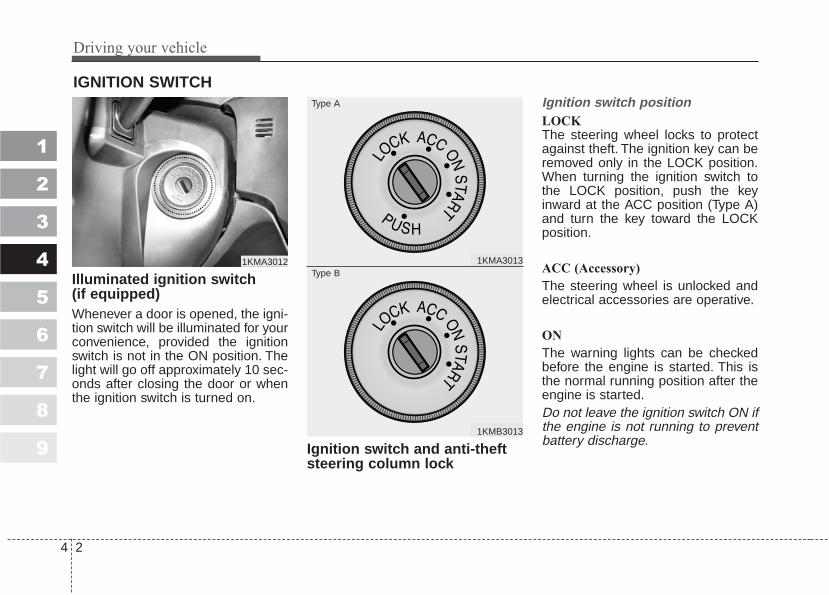
Driving your vehicle
24
1
2
3
4
5
6
7
8
9
Illuminated ignition switch (if equipped)Whenever a door is opened, the igni-tion switch will be illuminated for yourconvenience, provided the ignitionswitch is not in the ON position. Thelight will go off approximately 10 sec-onds after closing the door or whenthe ignition switch is turned on.
Ignition switch and anti-theftsteering column lock
Ignition switch positionLOCKThe steering wheel locks to protectagainst theft. The ignition key can beremoved only in the LOCK position.When turning the ignition switch tothe LOCK position, push the keyinward at the ACC position (Type A)and turn the key toward the LOCKposition.
ACC (Accessory)
The steering wheel is unlocked andelectrical accessories are operative.
ON
The warning lights can be checkedbefore the engine is started. This isthe normal running position after theengine is started.Do not leave the ignition switch ON ifthe engine is not running to preventbattery discharge.
IGNITION SWITCH
1KMA3012 1KMA3013
1KMB3013
Type A
Type B

4 3
Driving your vehicle
1
2
3
4
5
6
7
8
9
START
Turn the ignition key to the STARTposition to start the engine. Theengine will crank until you releasethe key; then it returns to the ONposition. The brake warning lampcan be checked in this position.
✽✽ NOTICEIf difficulty is experienced turningthe ignition switch to the ACC posi-tion, turn the key while turning thesteering wheel right and left torelease the tension.
Automatic transaxleWhen turning the ignition switch tothe LOCK position, the shift levermust be in the P (Park) position.
WARNING - Ignition key• Never turn the ignition switch
to LOCK or ACC while thevehicle is moving. This wouldresult in loss of directionalcontrol and braking function,which could cause an immedi-ate accident.
• Before leaving the driver’sseat, always make sure theshift lever is engaged in 1st
gear for manual transaxle or P(Park) for automatic transaxle,set the parking brake fully andshut the engine off.Unexpected and sudden vehi-cle movement may occur ifthese precautions are nottaken.
(Continued)
(Continued)• Never reach for the ignition
switch, or any other controlsthrough the steering wheelwhile the vehicle is in motion.The presence of your hand orarm in this area could cause aloss of vehicle control, anaccident and serious bodilyinjury or death.
• Do not place any movableobjects around the driver’sseat as they may move whiledriving, interfere with the dri-ver and lead to an accident.
WARNINGWhen you intend to park or stopthe vehicle with the engine on,be careful not to depress theaccelerator pedal for a longperiod of time. It may overheatthe engine or exhaust systemand cause fire.
Driving your vehicle
44
1
2
3
4
5
6
7
8
9
1. Make sure the parking brake isapplied.
2. Manual Transaxle - Depress theclutch pedal fully and shift thetransaxle into Neutral. Keep theclutch pedal depressed while turn-ing the ignition switch to the startposition. The starter will not oper-ate if the clutch pedal is not fullydepressed.Automatic Transaxle - Place thetransaxle shift lever in P (Park).Depress the brake pedal fully.You can also start the enginewhen the shift lever is in the N(Neutral) position.
3. Turn the ignition switch to STARTand hold it there until the enginestarts (a maximum of 10 seconds),then release the key.
4. In extremely cold weather (below -18°C / 0°F) or after the vehiclehas not been operated for severaldays, let the engine warm up with-out depressing the accelerator.
Whether the engine is cold or warm,it should be started withoutdepressing the accelerator.
✽✽ NOTICEDo not engage the starter for morethan 10 seconds. If the engine stallsor fails to start, wait 5 to 10 secondsbefore re-engaging the starter.Excessive or improper use of thestarter may damage it.
The starter will not operate if:• Manual Transaxle - the clutch
pedal is not fully depressed.• Automatic Transaxle - the shift
lever is NOT in the P (Park) or N(Neutral) position.
STARTING THE ENGINE
CAUTION - StallIf the engine stalls while you arein motion, do not attempt tomove the shift lever to the P(Park) position. If traffic androad conditions permit, you mayput the shift lever in the N(Neutral) position while thevehicle is still moving and turnthe ignition switch to the STARTposition in an attempt to restartthe engine.
CAUTIONAlways wear appropriate shoeswhen operating your vehicle.Unsuitable shoes (high heels,ski boots,etc.) may interferewith your ability to use thebrake and accelerator pedal,and the clutch (if equipped).

Manual transaxle operationThe manual transaxle has five for-ward gears.Press the clutch pedal down fullywhile shifting, then release it slowly.A special safety feature preventsinadvertent shifting from 5 (Fifth) toR (Reverse).The gearshift lever mustbe returned to the neutral positionbefore shifting into R (Reverse).Make sure the vehicle is completelystopped before shifting into R(Reverse).Never operate the engine with thetachometer (rpm) in the red zone.
✽✽ NOTICETo avoid premature clutch wear anddamage, do not drive with your footresting on the clutch pedal. Also,don’t use the clutch to hold the vehi-cle stopped on an upgrade, whilewaiting for a traffic light, etc.
DownshiftingWhen you must slow down in heavytraffic or while driving up steep hills,downshift before the engine starts tolabor. Downshifting reduces thechance of stalling and gives betteracceleration when you again need toincrease your speed. When the vehi-cle is traveling down steep hills,downshifting helps maintain safespeed and prolongs brake life.
MANUAL TRANSAXLE (IF EQUIPPED)
1KMA3052
WARNING - Manualtransaxle
Before leaving the driver’s seat,always set the parking brakefully and shut the engine off.Then make sure the transaxle isshifted into 1st gear when thevehicle is parked on a level oruphill grade, and shifted into R(Reverse) on a downhill grade.Unexpected and sudden vehiclemovement can occur if theseprecautions are not followed inthe order identified.
4 5
Driving your vehicle
1
2
3
4
5
6
7
8
9
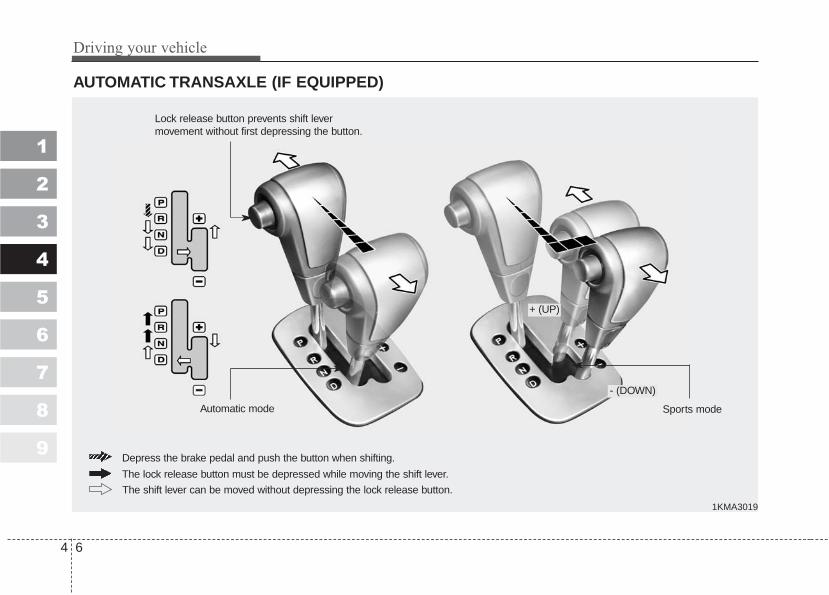
1
2
3
4
5
6
7
8
9
Driving your vehicle
64
AUTOMATIC TRANSAXLE (IF EQUIPPED)
1KMA3019
The lock release button must be depressed while moving the shift lever.
Depress the brake pedal and push the button when shifting.
The shift lever can be moved without depressing the lock release button.
+ (UP)
- (DOWN)
Sports modeAutomatic mode
Lock release button prevents shift levermovement without first depressing the button.

4 7
Driving your vehicle
1
2
3
4
5
6
7
8
9
Automatic transaxle operationAll normal forward driving is donewith the shift lever in the D (Drive)position.To move the shift lever from the P(Park) position, the brake pedal mustbe depressed and the lock releasebutton must be depressed.
For smooth operation, depress thebrake pedal when shifting from N(Neutral) to a forward or reversegear.
✽✽ NOTICE• To avoid damage to your
transaxle, do not accelerate theengine in R (Reverse) or any for-ward gear position with the brakeson.
• When stopped on an upgrade, donot hold the vehicle stationarywith engine power. Use the servicebrake or the parking brake.
• Do not shift from N (Neutral) or P(Park) into D (Drive), or R(Reverse) when the engine isabove idle speed.
WARNING - Automatictransaxle
Before leaving the driver’s seat,always make sure the shift leveris in the P (PARK) position; thenset the parking brake fully andshut the engine off. Unexpectedand sudden vehicle movementcan occur if these precautionsare not followed in the orderidentified.
1KMA3019
Automaticmode

Driving your vehicle
84
1
2
3
4
5
6
7
8
9
Transaxle rangesP (park)Always come to a complete stopbefore shifting into P. This positionlocks the transaxle and prevents thefront wheels from rotating.
✽✽ NOTICEThe transaxle may be damaged ifyou shift into P (Park) while thevehicle is in motion.
(Continued)• Before leaving the driver’s
seat, always make sure theshift lever is in the P (PARK)position. Set the parkingbrake fully, shut the engine offand take the key with you.Unexpected and sudden vehi-cle movement can occur if youdo not follow these precau-tions in the order specified.
• Never leave a child unattend-ed in a vehicle.
WARNING - Automatictransaxle
• Shifting into P (Park) while thevehicle is in motion will causethe drive wheels to lock whichwill cause you to lose controlof the vehicle.
• Do not use the P (Park) posi-tion in place of the parkingbrake. Always make sure theshift lever is latched in the P(Park) position so that it can-not be moved unless the lockrelease button is pushed in,AND set the parking brakefully.
(Continued)

4 9
Driving your vehicle
1
2
3
4
5
6
7
8
9
R (reverse)Use this position to drive the vehiclebackward.
✽✽ NOTICEAlways come to a complete stopbefore shifting into or out of R(Reverse); you may damage thetransaxle if you shift into R whilethe vehicle is in motion.
N (neutral)The wheels and transaxle are notlocked. The vehicle will roll freelyeven on the slightest incline unlessthe parking brake or service brakesare applied.
D (drive)This is the normal forward drivingposition. The transaxle will automati-cally shift through a 4-gearsequence, providing the best fueleconomy and power.
For extra power when passing anoth-er vehicle or climbing grades,depress the accelerator fully, atwhich time the transaxle will auto-matically downshift to the next lowergear.
✽✽ NOTICEAlways come to a complete stopbefore shifting into D (Drive).

Driving your vehicle
104
1
2
3
4
5
6
7
8
9
Sports modeWhether the vehicle is stationary orin motion, sports mode is selected bypushing the shift lever from the “D”position into the manual gate. Toreturn to “D” range operation, pushthe shift lever back into the maingate.
In sports mode, moving the shiftlever backwards and forwards willallow you to make gearshifts rapidly.The sports mode allows gearshiftswith the accelerator pedaldepressed.
Up (+) : Push the lever forwardonce to shift up one gear.
Down (-) : Pull the lever backwardsonce to shift down onegear.
Snow modeWhen taking off from a standstill on aslippery road, push the shift lever for-ward into the +(up) position. Thiscauses the transaxle to shift into the2nd gear which is better for smoothdriving on a slippery road.Push the shift lever to the -(down)side to shift back to the 1st gear.
✽✽ NOTICE• Upshifts take place automatically
in sports mode. However, the dri-ver must execute upshifts in accor-dance with road conditions, takingcare to keep the engine speedbelow the red zone becauseupshifts take place at the higherengine rpm.
• In sports mode, only the four for-ward gears can be selected. Toreverse or park the vehicle, movethe shift lever to the “R” or “P”position as required.
• In sports mode, downshifts aremade automatically when thevehicle slows down. When thevehicle stops, 1st gear is automati-cally selected.
• In sports mode, when the enginerpm approaches the red zone shiftpoints are varied to upshift auto-matically.
1KMA3020
+ (UP)
- (DOWN)
Sports mode
CAUTIONIn the sport mode, if you pushthe lever to shift and no shiftoccurs, the system is acting toprotect your safety and the vehi-cle.
4 11
Driving your vehicle
1
2
3
4
5
6
7
8
9
Moving up a steep grade froma standing startTo move up a steep grade from astanding start, depress the brakepedal, shift the shift lever to D(Drive). Select the appropriate geardepending on load weight and steep-ness of the grade, and release theparking brake. Depress the accelera-tor gradually while releasing the ser-vice brakes.When accelerating from a stop ona steep hill, the vehicle may have atendency to roll backwards.Shifting the shift lever into 2(Second Gear) while in Sportmode will help prevent the vehiclefrom rolling backwards.
Shift lock systemFor your safety, the AutomaticTransaxle has a shift lock systemwhich prevents shifting the transaxleout of P (Park) unless the brakepedal is depressed.To shift the transaxle out of P (Park):1. Depress and hold the brake pedal.2. Start the engine or turn the ignition
to the ON position.3. Depress the lock release button
and move the shift lever.When the ignition switch is in theACC or LOCK position, the transaxlecannot be shifted from P (Park).If the brake pedal is repeatedlydepressed and released with theshift lever in the P (Park) position, achattering noise near the shift levermay be heard. This is a normal con-dition.
Ignition key interlock systemThe ignition key cannot be removedunless the shift lever is in the P(Park) position. If the ignition switchis in any other position, the key can-not be removed.
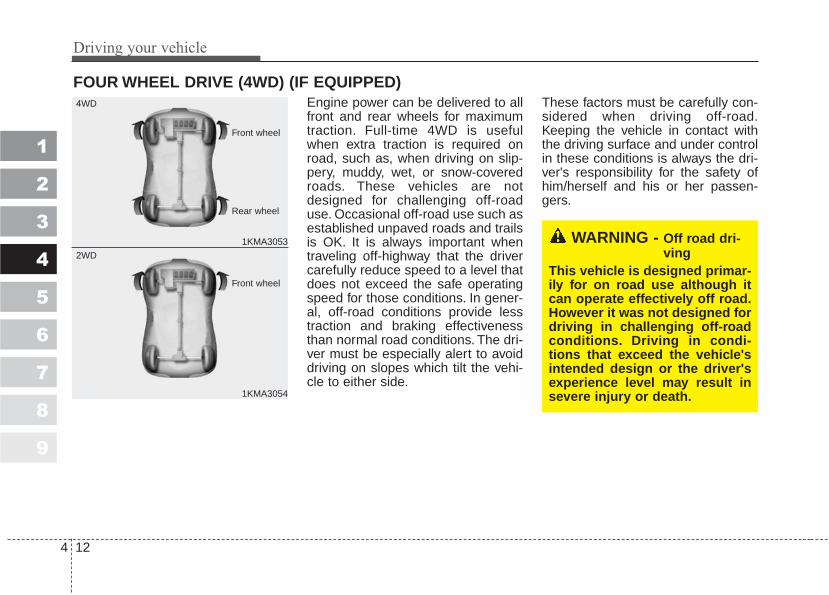
Driving your vehicle
124
Engine power can be delivered to allfront and rear wheels for maximumtraction. Full-time 4WD is usefulwhen extra traction is required onroad, such as, when driving on slip-pery, muddy, wet, or snow-coveredroads. These vehicles are notdesigned for challenging off-roaduse. Occasional off-road use such asestablished unpaved roads and trailsis OK. It is always important whentraveling off-highway that the drivercarefully reduce speed to a level thatdoes not exceed the safe operatingspeed for those conditions. In gener-al, off-road conditions provide lesstraction and braking effectivenessthan normal road conditions. The dri-ver must be especially alert to avoiddriving on slopes which tilt the vehi-cle to either side.
These factors must be carefully con-sidered when driving off-road.Keeping the vehicle in contact withthe driving surface and under controlin these conditions is always the dri-ver's responsibility for the safety ofhim/herself and his or her passen-gers.
FOUR WHEEL DRIVE (4WD) (IF EQUIPPED)
1
2
3
4
5
6
7
8
9
WARNING - Off road dri-ving
This vehicle is designed primar-ily for on road use although itcan operate effectively off road.However it was not designed fordriving in challenging off-roadconditions. Driving in condi-tions that exceed the vehicle'sintended design or the driver'sexperience level may result insevere injury or death.
1KMA3053
4WD
1KMA3054
2WD
Front wheel
Front wheel
Rear wheel

4 13
Driving your vehicle
Four Wheel Drive (4WD) transfer mode selection
1
2
3
4
5
6
7
8
9
Transfer mode Selection button Indicator light Description
• This mode is used for climbing or descending sharp grades,off-road driving, driving on sandy and muddy roads etc. tomaximize traction.
• This mode automatically begins to deactivate at speed above30 km/h (19 mph) and is shifted to 4WD AUTO mode atspeed above 40 km/h (25 mph). If the vehicle decelerates tospeeds below 30 km/h (19 mph), however, the transfer modeis shifted into 4WD LOCK mode again.
• When driving in AUTO mode, the vehicle operates similar tothe conventional 2WD vehicles under normal operating con-ditions. However, if the system determines that there is aneed for the 4WD mode, the engine’s driving power is dis-tributed to all four wheels automatically without driver inter-vention.
• When driving on normal roads and pavement, the vehiclemoves similar to the conventional 2WD vehicles.
4WD
LOCK4WD LOCK
4WD AUTO
(4WD LOCK is
deactivated)
44WWDD
LLOOCCKK
(Indicator light is
not illuminated)
(Indicator light is
illuminated)
✽✽ NOTICE• When driving on normal roads, deactivate the 4WD LOCK mode by pushing the 4WD LOCK button(the indica-
tor light goes off). Driving on normal roads with 4WD LOCK mode(especially, when cornering) may causemechanical noise or vibration. The noise and vibration will disappear when the 4WD LOCK mode is deactivated.Some parts of the power train may be damaged by prolonged driving with the noise and vibration.
• When the 4WD LOCK mode is deactivated, a shock may be felt as the drive power delivered entirely to the frontwheels. This shock is not a mechanical failure.
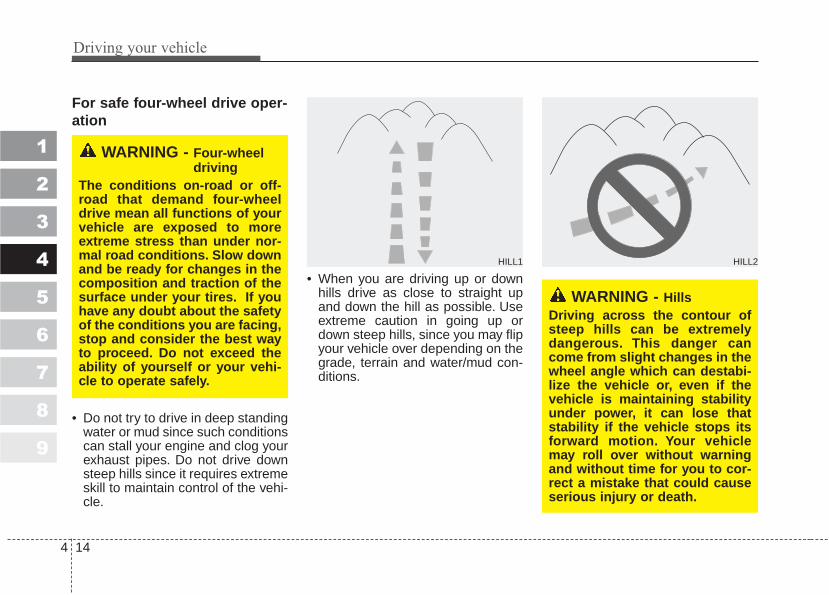
Driving your vehicle
144
1
2
3
4
5
6
7
8
9
For safe four-wheel drive oper-ation
• Do not try to drive in deep standingwater or mud since such conditionscan stall your engine and clog yourexhaust pipes. Do not drive downsteep hills since it requires extremeskill to maintain control of the vehi-cle.
• When you are driving up or downhills drive as close to straight upand down the hill as possible. Useextreme caution in going up ordown steep hills, since you may flipyour vehicle over depending on thegrade, terrain and water/mud con-ditions.
WARNING - HillsDriving across the contour ofsteep hills can be extremelydangerous. This danger cancome from slight changes in thewheel angle which can destabi-lize the vehicle or, even if thevehicle is maintaining stabilityunder power, it can lose thatstability if the vehicle stops itsforward motion. Your vehiclemay roll over without warningand without time for you to cor-rect a mistake that could causeserious injury or death.
WARNING - Four-wheeldriving
The conditions on-road or off-road that demand four-wheeldrive mean all functions of yourvehicle are exposed to moreextreme stress than under nor-mal road conditions. Slow downand be ready for changes in thecomposition and traction of thesurface under your tires. If youhave any doubt about the safetyof the conditions you are facing,stop and consider the best wayto proceed. Do not exceed theability of yourself or your vehi-cle to operate safely.
HILL1 HILL2

4 15
Driving your vehicle
• You must consciously take theeffort to learn how to corner in a4WD vehicle. Do not rely on yourexperience in conventional 2WDvehicles in choosing safe corneringspeed in 4WD mode. For starters,you must drive more slowly in4WD.
• Drive carefully off-road becauseyour vehicle may be damaged byrocks or roots of trees. Becomefamiliar with the off-road conditionswhere you are going to drivebefore you begin driving.
• Always hold the steering wheelfirmly when you are driving off-road.
• Make sure all passengers arewearing seat belts.
1
2
3
4
5
6
7
8
9
WARNING - 4WDReduce speed when you turncorners. The center of gravity of4WD vehicles is higher than thatof conventional 2WD vehicles,making them more likely to rollover when you turn corners toofast.
WARNING - Steeringwheel
Do not grab inside of the steer-ing wheel when you are drivingoff-road. Your arm may be hurtby a sudden steering maneuveror from steering wheel rebounddue to impact with objects onthe ground. You could lose con-trol of the steering wheel.
OKM049415N

Driving your vehicle
164
1
2
3
4
5
6
7
8
9
• If you need to drive in water, stopyour vehicle, set your transfer to“4WD LOCK” and drive at less than8 km/h (5 mph).
✽✽ NOTICE• Do not drive in water if the level is
higher than the bottom of the vehi-cle.
• Check your brake condition onceyou are out of mud or water. Pressthe brake pedal several times asyou move slowly until you feel nor-mal braking forces return.
• Shorten your scheduled mainte-nance interval if you drive in off-road conditions such as sand, mudor water (see “MaintenanceSchedule” in the Index). Alwayswash you car thoroughly after offroad use, especially cleaning theunder side of the vehicle.
• Since the driving torque is alwaysapplied to the 4 wheels the perfor-mance of the 4WD vehicle is great-ly affected by the condition of thetires. Be sure to equip the vehiclewith four tires of the same size andtype.
• A full time four wheel drive vehi-cle cannot be towed by an ordi-nary tow truck. Make sure thatthe vehicle is placed on a flat bedtruck for moving.
WARNING - Wind dangerIf you are driving in heavy wind,the vehicle's higher center ofgravity decreases your steeringcontrol capacity and requiresyou to drive more slowly.
WARNING - Drivingthrough water
Drive slowly. If you are drivingtoo fast in water, the water spraycan get into the engine com-partment and wet the ignitionsystem, causing your vehicle tosuddenly stall. If this happensand your vehicle is in a tiltedposition, your vehicle may rollover.

4 17
Driving your vehicle
1
2
3
4
5
6
7
8
9
WARNING - 4WD driving• Avoid high cornering speed.• Do not make quick steering
wheel movements, such assharp lane changes or fast,sharp turns.
• The risk of rollover is greatlyincreased if you lose controlof your vehicle at high speed.
• In a collision, an unbelted per-son is significantly more likelyto die compared to a personwearing a seat belt.
• Loss of control often occurs iftwo or more wheels drop offthe roadway and the driverover steers to re-enter theroadway. In the event yourvehicle leaves the roadway, donot steer sharply. Instead,slow down before pulling backinto the travel lanes.
WARNING - Jacked vehi-cle
While the full-time 4WD vehicleis being raised on a jack, neverstart the engine or cause thetires to rotate.There is the danger that rotatingtires touching the ground couldcause the vehicle to go off thejack and to jump forward.
WARNINGYour vehicle is equipped withtires designed to provide forsafe ride and handling capabili-ty. Do not use a size and type oftire and wheel that is differentfrom the one that is originallyinstalled on your vehicle. It canaffect the safety and perfor-mance of your vehicle, whichcould lead to handling failure orrollover and serious injury.When replacing the tires, besure to equip all four tires withthe tire and wheel of the samesize, type, tread, brand andload-carrying capacity. If younevertheless decide to equipyour vehicle with any tire/wheelcombination not recommendedby Kia for off road driving, youshould not use these tires forhighway driving.
CAUTION - Mud or snowIf one of the front or rear wheelsbegins to spin in mud, snow,etc. the vehicle can sometimesbe driven out by depressing theaccelerator pedal further; how-ever avoid running the enginecontinuously at high rpmbecause doing so could dam-age the 4WD system.

Driving your vehicle
184
1
2
3
4
5
6
7
8
9
Power brakes Your vehicle has power-assistedbrakes that adjust automaticallythrough normal usage.In the event that the power-assistedbrakes lose power because of astalled engine or some other reason,you can still stop your vehicle byapplying greater force to the brakepedal than you normally would. Thestopping distance, however, will besomewhat longer.When the engine is not running, thereserve brake power is partiallydepleted each time the brake pedalis applied. Do not pump the brakepedal when the power assist hasbeen interrupted.Pump the brake pedal only whennecessary to maintain steering con-trol on slippery surfaces.
In the event of brake failure If service brakes fail to operate whilethe vehicle is in motion, you canmake an emergency stop with theparking brake. The stopping dis-tance, however, will be much greaterthan normal.
BRAKE SYSTEM
WARNING - Parking brakeOperating the parking brakewhile the vehicle is moving atnormal speeds can cause a sud-den loss of control of the vehi-cle. If you must use the parkingbrake to stop the vehicle, usegreat caution in applying thebrake.
WARNING - Brakes• Do not drive with your foot
resting on the brake pedal.This will create abnormal highbrake temperatures, exces-sive brake lining and padwear, and increased stoppingdistances.
• When descending a long orsteep hill, shift to a lower gearand avoid continuous applica-tion of the brakes. Continuousbrake application will causethe brakes to overheat andcould result in a temporaryloss of braking performance.
(Continued)

4 19
Driving your vehicle
1
2
3
4
5
6
7
8
9
Disc brakes wear indicator Your vehicle has disc brakes.When your brake pads are worn andit's time for new pads, you will hear ahigh-pitched warning sound fromyour front brakes or rear brakes (ifequipped). You may hear this soundcome and go or it may occur when-ever you depress the brake pedal.Please remember that some dri-ving conditions or climates maycause a brake squeal when youfirst apply (or lightly apply) thebrakes. This is normal and doesnot indicate a problem with yourbrakes.
✽✽ NOTICETo avoid costly brake repairs, do notcontinue to drive with worn brakepads.
WARNING - Brake wearThis brake wear warning soundmeans your vehicle needs ser-vice. If you ignore this audiblewarning, you will eventually losebraking performance, whichcould lead to a serious accident.
CAUTIONAlways replace brake pads ascomplete front or rear axle setsto ensure smooth brake perfor-mance.
(Continued)• Wet brakes may result in the
vehicle not slowing down atthe usual rate and pulling toone side when the brakes areapplied. After going throughwater, apply the brakes lightlyto regain smooth braking per-formance.

Driving your vehicle
204
1
2
3
4
5
6
7
8
9
Parking brake To apply the parking brake, pull theparking brake handle fully and firmlyupward while applying the servicebrake.
To release the parking brake, pull thehandle up slightly and push therelease button, then lower the handleto the released position while holdingthe button in.
CAUTIONDriving with the parking brakeapplied will cause excessivebrake pad and brake rotor wear.
OKM049050 OKM049051
WARNING - Parking brake• To prevent unintentional
movement when stopped, donot use just the gear shiftlever to hold the vehicle inposition. Set the parkingbrake AND make sure thegearshift lever is securelypositioned in 1st (First) gearor R (Reverse) for manualtransaxle equipped vehiclesand in P (Park) for automatictransaxle equipped vehicles.
• Never allow a person who isunfamiliar with the vehicle orchildren to touch the parkingbrake. If the parking brake isreleased unintentionally, seri-ous injury may occur.
4 21
Driving your vehicle
1
2
3
4
5
6
7
8
9
Check the brake warning light byturning the ignition switch ON (do notstart the engine). This light will beilluminated when the parking brake isapplied with the ignition switch in theSTART or ON position.Before driving, be sure the parkingbrake is fully released and the brakewarning light is off.
If the brake warning light remains onafter the parking brake is released,there may be a malfunction in thebrake system. Immediate attention isnecessary.If at all possible, cease driving thevehicle immediately. If that is not pos-sible, use extreme caution whileoperating the vehicle and only con-tinue to drive the vehicle until youcan reach a safe location or repairshop.
Parking on curbed streets • When parking your vehicle on an
uphill grade, park as close to thecurb as possible and turn the frontwheels away from the curb so thatthe front wheels will contact thecurb if the vehicle moves back-ward.
• When parking your vehicle on adownhill grade, park as close to thecurb as possible and turn the frontwheels toward the curb so that thefront wheels will contact the curb ifthe vehicle moves forward.
W-75

Driving your vehicle
224
1
2
3
4
5
6
7
8
9
Anti-lock brake system (ABS)(if equipped)
The ABS system continuously sens-es the speed of the wheels. If thewheels are going to lock, the ABSsystem repeatedly modulates thehydraulic brake pressure to thewheels.When you apply your brakes underconditions which may lock thewheels, you may hear a “tik-tik’’sound from the brakes, or feel a cor-responding sensation in the brakepedal. This is normal and it meansyour ABS system is active.In order to obtain the maximum ben-efit from your ABS system in anemergency situation, do not attemptto modulate your brake pressure anddo not try to pump your brakes.Press your brake pedal as hard aspossible or as hard as the situationwarrants and allow the ABS systemto control the force being delivered tothe brakes.
• Even with the anti-lock brake sys-tem, your vehicle still requires suf-ficient stopping distance. Alwaysmaintain a safe distance from thevehicle in front of you.
• Always slow down when cornering.The anti-lock brake system cannotprevent accidents resulting fromexcessive speeds.
• On loose or uneven road surfaces,operation of the anti-lock brakesystem may result in a longer stop-ping distance than for vehiclesequipped with a conventionalbrake system.
WARNING - ABS BrakesYour ABS is not a substitute forgood driving judgement. Youcan still have an accident. Infact, your ABS system will notbe able to prevent an accident.You must especially avoid:• Dangerous driving, such as
neglecting safety precautions,speeding, or driving too closeto the vehicle in front of you.
• Driving at high speed in situa-tions providing considerablyless traction, such as wet con-ditions where hydroplaningcould occur.
• Driving too fast on poor roadsurfaces.The ABS is designedto improve maximum brakingeffectiveness on typical high-ways and roads in good con-dition. On poor road surfaces,the ABS may actually reducebraking effectiveness.

4 23
Driving your vehicle
1
2
3
4
5
6
7
8
9
✽✽ NOTICE• If the ABS warning light is on and
stays on, you may have a problemwith the ABS system. In this case,however, your regular brakes willwork normally.
• The ABS warning light will stay onfor approximately 3 seconds afterthe ignition switch is ON. Duringthat time, the ABS will go throughself-diagnosis and the light will gooff if everything is normal. If thelight stays on, you may have aproblem with your ABS system.Contact an authorized Kia dealeras soon as possible.
✽✽ NOTICE• When you drive on a road having
poor traction, such as an icy road,and operate your brakes continu-ously, the ABS will be active con-tinuously and the ABS warninglight may illuminate. Pull your carover to a safe place and stop theengine.
• Restart the engine. If the ABSwarning light is off, then your ABSsystem is normal. Otherwise, youmay have a problem with the ABS.Contact an authorized Kia dealeras soon as possible.
✽✽ NOTICEWhen you jump start your vehiclebecause of a drained battery, theengine may not run as smoothly andthe ABS warning light may turn onat the same time. This happensbecause of the low battery voltage. Itdoes not mean your ABS is malfunc-tioning.• Do not pump your brakes!• Have the battery recharged before
driving the vehicle.W-78
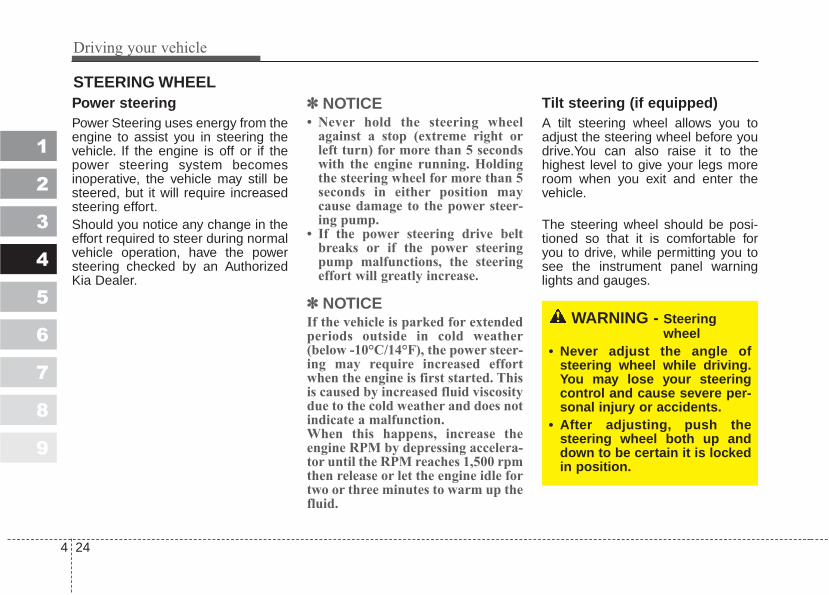
Driving your vehicle
244
1
2
3
4
5
6
7
8
9
Power steeringPower Steering uses energy from theengine to assist you in steering thevehicle. If the engine is off or if thepower steering system becomesinoperative, the vehicle may still besteered, but it will require increasedsteering effort.Should you notice any change in theeffort required to steer during normalvehicle operation, have the powersteering checked by an AuthorizedKia Dealer.
✽✽ NOTICE• Never hold the steering wheel
against a stop (extreme right orleft turn) for more than 5 secondswith the engine running. Holdingthe steering wheel for more than 5seconds in either position maycause damage to the power steer-ing pump.
• If the power steering drive beltbreaks or if the power steeringpump malfunctions, the steeringeffort will greatly increase.
✽✽ NOTICEIf the vehicle is parked for extendedperiods outside in cold weather(below -10°C/14°F), the power steer-ing may require increased effortwhen the engine is first started. Thisis caused by increased fluid viscositydue to the cold weather and does notindicate a malfunction.When this happens, increase theengine RPM by depressing accelera-tor until the RPM reaches 1,500 rpmthen release or let the engine idle fortwo or three minutes to warm up thefluid.
Tilt steering (if equipped)A tilt steering wheel allows you toadjust the steering wheel before youdrive.You can also raise it to thehighest level to give your legs moreroom when you exit and enter thevehicle.
The steering wheel should be posi-tioned so that it is comfortable foryou to drive, while permitting you tosee the instrument panel warninglights and gauges.
STEERING WHEEL
WARNING - Steeringwheel
• Never adjust the angle ofsteering wheel while driving.You may lose your steeringcontrol and cause severe per-sonal injury or accidents.
• After adjusting, push thesteering wheel both up anddown to be certain it is lockedin position.
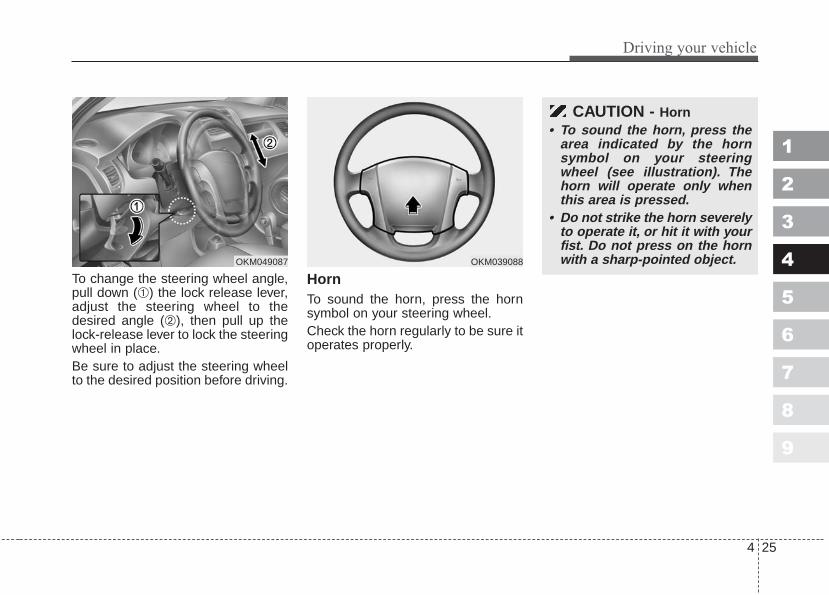
4 25
Driving your vehicle
1
2
3
4
5
6
7
8
9
To change the steering wheel angle,pull down (➀) the lock release lever,adjust the steering wheel to thedesired angle (➁), then pull up thelock-release lever to lock the steeringwheel in place.Be sure to adjust the steering wheelto the desired position before driving.
HornTo sound the horn, press the hornsymbol on your steering wheel.Check the horn regularly to be sure itoperates properly.
OKM049087
CAUTION - Horn• To sound the horn, press the
area indicated by the hornsymbol on your steeringwheel (see illustration). Thehorn will operate only whenthis area is pressed.
• Do not strike the horn severelyto operate it, or hit it with yourfist. Do not press on the hornwith a sharp-pointed object.OKM039088
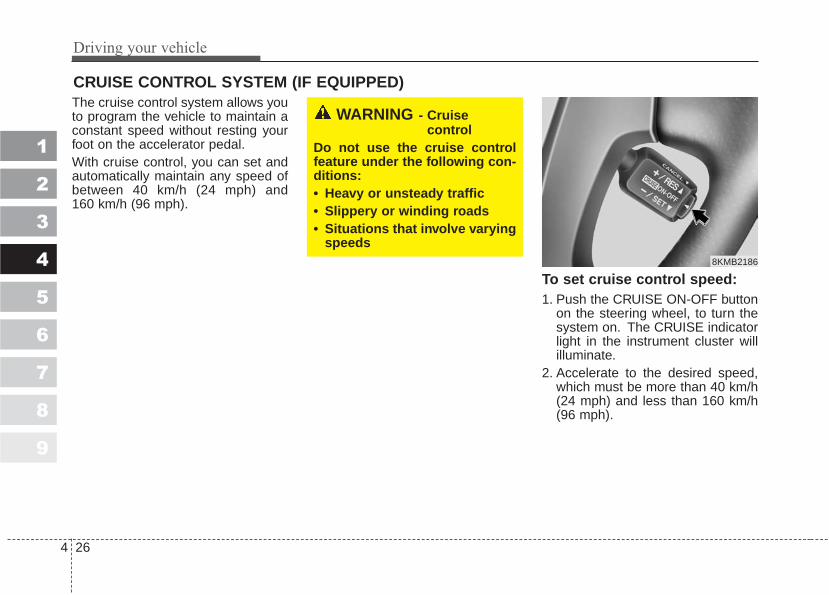
Driving your vehicle
264
1
2
3
4
5
6
7
8
9
The cruise control system allows youto program the vehicle to maintain aconstant speed without resting yourfoot on the accelerator pedal.With cruise control, you can set andautomatically maintain any speed ofbetween 40 km/h (24 mph) and 160 km/h (96 mph).
To set cruise control speed:1. Push the CRUISE ON-OFF button
on the steering wheel, to turn thesystem on. The CRUISE indicatorlight in the instrument cluster willilluminate.
2. Accelerate to the desired speed,which must be more than 40 km/h(24 mph) and less than 160 km/h(96 mph).
CRUISE CONTROL SYSTEM (IF EQUIPPED)
WARNING - Cruise control
Do not use the cruise controlfeature under the following con-ditions:• Heavy or unsteady traffic• Slippery or winding roads• Situations that involve varying
speeds8KMB2186

4 27
Driving your vehicle
1
2
3
4
5
6
7
8
9
3. Push down the - / SET switch, andrelease it at the speed you want.The “SET” indicator light in theinstrument cluster will illuminate.Release the accelerator at thesame time. The desired speed willautomatically be maintained.
The SET function cannot be activateduntil approximately 2 seconds after theCRUISE ON-OFF button has beenengaged.On a steep grade, the vehicle maymomentarily slow down while goingdownhill.
To cancel cruise control, doone of the following:• Press the brake pedal.• Press the clutch pedal with a manu-
al transaxle or shift into N (Neutral)with an automatic transaxle.
• Pull the CANCEL switch.Each of these actions will cancelcruise control operation (the “SET”indicator light in the instrument clus-ter will go OFF), but it will not turn thesystem off. If you wish to resumecruise control operation, push up the+ / RES switch located on your steer-ing wheel.You will return to your pre-viously preset speed.
WARNINGIf the cruise control is left on,(CRUISE indicator light in theinstrument cluster illuminated)the cruise control can beswitched on accidentally. Keepthe cruise control system off(CRUISE indicator light OFF)when cruise control is not inuse.
8KMB2187 8KMB2188

Driving your vehicle
284
1
2
3
4
5
6
7
8
9
To turn cruise control off, doone of the following:• Push the CRUISE ON-OFF button
(the CRUISE indicator light in theinstrument cluster will go OFF).
• Turn the ignition off.Both of these actions cancel cruisecontrol operation. If you want toresume cruise control operation,repeat the steps provided in “To SetCruise Control Speed” on the previ-ous page.
To increase cruise control setspeed:Follow either of these procedures:• Push up the + / RES switch and hold
it. Your vehicle will accelerate.Release the switch at the speed youwant.
• Push up the + / RES switch andrelease it immediately. The cruisingspeed will increase 1.6 km/h (1mph) by one touch and will be mem-orized to the reset speed.
To temporarily accelerate withthe cruise control onIf you want to speed up temporarilywhen the cruise control is on,depress the accelerator pedal.Increased speed will not interferewith cruise control operation orchange the set speed.To return to the set speed, take yourfoot off the accelerator.
8KMB2189
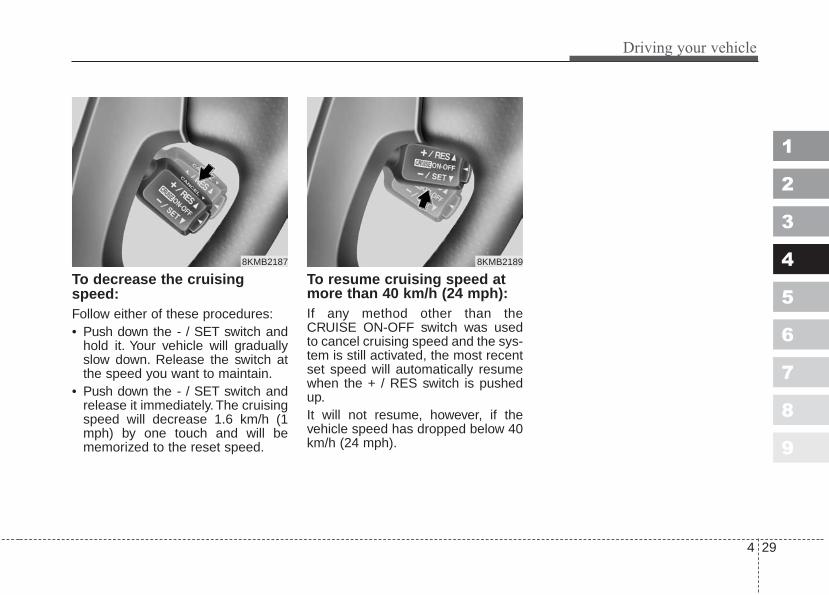
4 29
Driving your vehicle
1
2
3
4
5
6
7
8
9
To decrease the cruisingspeed:Follow either of these procedures:• Push down the - / SET switch and
hold it. Your vehicle will graduallyslow down. Release the switch atthe speed you want to maintain.
• Push down the - / SET switch andrelease it immediately. The cruisingspeed will decrease 1.6 km/h (1mph) by one touch and will bememorized to the reset speed.
To resume cruising speed atmore than 40 km/h (24 mph):If any method other than theCRUISE ON-OFF switch was usedto cancel cruising speed and the sys-tem is still activated, the most recentset speed will automatically resumewhen the + / RES switch is pushedup.It will not resume, however, if thevehicle speed has dropped below 40km/h (24 mph).
8KMB2187 8KMB2189
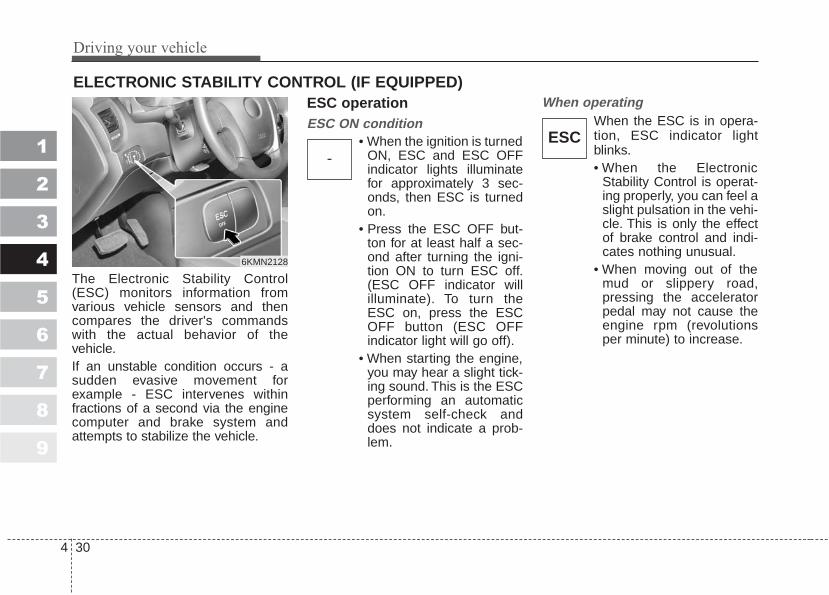
Driving your vehicle
304
1
2
3
4
5
6
7
8
9
The Electronic Stability Control(ESC) monitors information fromvarious vehicle sensors and thencompares the driver's commandswith the actual behavior of thevehicle.If an unstable condition occurs - asudden evasive movement forexample - ESC intervenes withinfractions of a second via the enginecomputer and brake system andattempts to stabilize the vehicle.
ESC operationESC ON condition
• When the ignition is turnedON, ESC and ESC OFFindicator lights illuminatefor approximately 3 sec-onds, then ESC is turnedon.
• Press the ESC OFF but-ton for at least half a sec-ond after turning the igni-tion ON to turn ESC off.(ESC OFF indicator willilluminate). To turn theESC on, press the ESCOFF button (ESC OFFindicator light will go off).
• When starting the engine,you may hear a slight tick-ing sound. This is the ESCperforming an automaticsystem self-check anddoes not indicate a prob-lem.
When operatingWhen the ESC is in opera-tion, ESC indicator lightblinks.• When the Electronic
Stability Control is operat-ing properly, you can feel aslight pulsation in the vehi-cle. This is only the effectof brake control and indi-cates nothing unusual.
• When moving out of themud or slippery road,pressing the acceleratorpedal may not cause theengine rpm (revolutionsper minute) to increase.
ELECTRONIC STABILITY CONTROL (IF EQUIPPED)
-ESC
6KMN2128

4 31
Driving your vehicle
1
2
3
4
5
6
7
8
9
ESC operation offESC OFF state• To cancel ESC operation,
press the ESC OFF button(ESC OFF indicator lightilluminates).
• If the ignition switch isturned to LOCK positionwhen ESC is off, ESCremains off. Upon restart-ing the engine, the ESCwill automatically turn onagain.
Indicator lightWhen ignition switch is turned to ON,the indicator light illuminates, thengoes off if ESC system is operatingnormally.The ESC indicator light blinks when-ever ESC is operating.ESC OFF indicator light comes onwhen either the ESC is turned offwith the button, or ESC malfunctionswhen turned on.
■ ESC indicator light (blinks)
■ ESC OFF indicator light (comes on)
WARNING - ESCThe Electronic Stability Controlsystem is only a driving aid; useprecautions for safe driving byslowing down on curved, snowy,or icy roads. Don’t attempt toaccelerate excessively justbecause the ESC indicator lightis blinking.
ESCOFF ESC
ESCOFF

Driving your vehicle
324
1
2
3
4
5
6
7
8
9
ESC OFF usageWhen driving• It’s a good idea to keep the ESC
turned on for daily driving whenev-er possible.
• To turn ESC off while driving, pressthe ESC OFF button while drivingon a flat road surface.
Never press ESC OFF button whileESC is operating (ESC indicator lightblinks).If ESC is turned off while ESC isoperating, the vehicle may slip out ofcontrol.
✽✽ NOTICE• When measuring the vehicle speed
with a chassis dynamo-meter,make sure the ESC is turned off(ESC OFF light illuminated). Ifthe ESC is left on, it may preventthe vehicle speed from increasing,and cause a false diagnosis of afaulty speedometer.
• Turning the ESC off does notaffect ABS or brake system opera-tion.
WARNING - ESCNever press the ESC OFF but-ton while ESC is operating.If the ESC is turned off whileESC is operating, the vehiclemay slip out of control.To turn ESC off while driving,press the ESC OFF button whiledriving on a flat road surface.
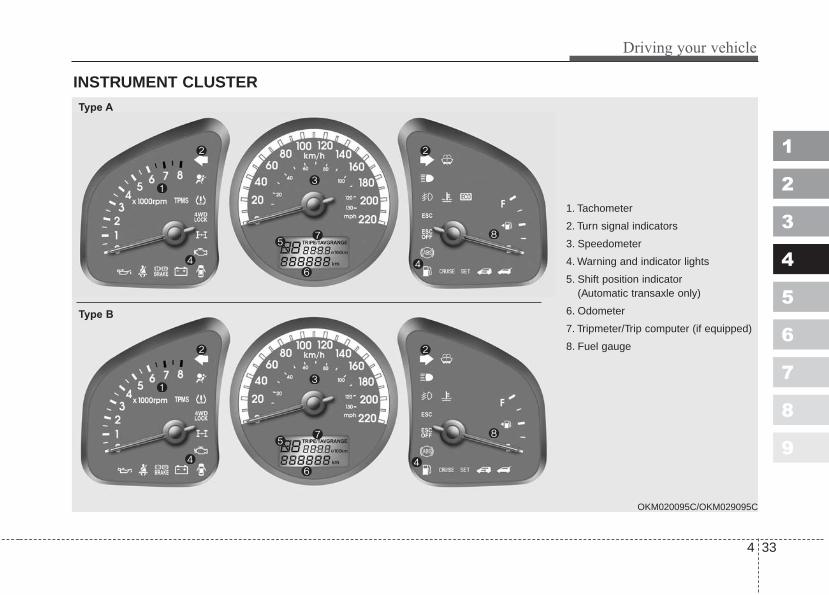
4 33
Driving your vehicle
1
2
3
4
5
6
7
8
9
INSTRUMENT CLUSTER
1. Tachometer
2. Turn signal indicators
3. Speedometer
4. Warning and indicator lights
5. Shift position indicator (Automatic transaxle only)
6. Odometer
7. Tripmeter/Trip computer (if equipped)
8. Fuel gauge
OKM020095C/OKM029095C
Type A
Type B

Driving your vehicle
344
1
2
3
4
5
6
7
8
9
Speedometer The speedometer indicates the for-ward speed of the vehicle.
Tachometer The tachometer indicates theapproximate number of engine revo-lutions per minute (rpm).Use the tachometer to select the cor-rect shift points and to prevent lug-ging and/or over-revving the engine.The tachometer pointer may moveslightly when the ignition switch is inACC or ON position with the engineOFF. This movement is normal andwill not affect the accuracy of thetachometer once the engine is run-ning.
✽✽ NOTICEDo not operate the engine within thetachometer's RED ZONE.This may cause severe engine dam-age.
Fuel gaugeThe fuel gauge indicates the approx-imate amount of fuel remaining in thefuel tank. The fuel tank capacity isgiven in section 8. The fuel gauge issupplemented by a low fuel warninglight, which will illuminate when thefuel tank is near empty.On inclines or curves, the fuel gaugepointer may fluctuate or the low fuelwarning light may come on earlierthan usual due to the movement offuel in the tank.
GAUGES
WARNING - Fuel gaugeRunning out of fuel can exposevehicle occupants to danger.You must stop and obtain addi-tional fuel as soon as possibleafter the warning light comes onor when the gauge indicatorcomes close to the E level.
CAUTIONAvoid driving with a very lowfuel level. If you run out of fuel,it could case the engine to mis-fire and result in excessive load-ing of the catalytic converter.

4 35
Driving your vehicle
1
2
3
4
5
6
7
8
9
OdometerThe odometer indicates the total dis-tance the vehicle has been driven.
Tripmeter (trip odometer)You can choose the tripmeter A andtripmeter B by pressing the tripmetermode button.
TRIP A: Tripmeter ATRIP B: Tripmeter BThe tripmeter indicates the distanceof individual trips selected by the dri-ver. Tripmeter A and B can be resetto 0 by pressing the reset button for1 second or more, and then releas-ing.
1KMA2102OKM0291001KMA2101

Driving your vehicle
364
1
2
3
4
5
6
7
8
9
Trip computer (if equipped)The trip computer is a microcomput-er-controlled driver information sys-tem that displays information relatedto driving, including distance traveled("tripmeter"), driving time, averagefuel consumption and distance toempty on the LCD. All stored drivinginformation is reset if the battery isdisconnected.
ModePush TRIP button to select tripmeter,driving time, average fuel consump-tion and distance to empty functions.Each push of the button changes thedisplay as follows;
Tripmeter (“TRIP” shown on display)This mode indicates the total dis-tance traveled since the last tripme-ter reset.The meter's working range is from0.0 to 999.9 km (0.0 to 999.9 miles).Pressing the TRIP button for morethan 1 second, when the tripmeter isbeing displayed, clears the tripmeterto zero.
Tripmeter
Driving time
Average fuel consumption
Distance to empty
1KMA2105OKM029100
ECO ON/OFF mode*
Instant fuel consumption*
* if equipped

4 37
Driving your vehicle
1
2
3
4
5
6
7
8
9
Driving time (“E/T” shown on display)This mode indicates the total timetraveled since the last driving timereset.Even if the vehicle is not in motion,the driving time keeps going whilethe engine is running.Pressing the TRIP button for morethan 1 second, when the driving timeis being displayed, clears the drivingtime to zero.
Average fuel consumption(“AVG.” shown on display)This mode calculates the averagefuel consumption from the total fuelused and the distance since the lastaverage consumption reset. The totalfuel used is calculated from the fuelconsumption input. For an accuratecalculation, drive more than 500 m(0.3 miles).The meter's working range is from0.0 to 99.9 l/100 km (0.0 to 99.9miles per gallon).
Instant fuel consumption (if equipped)This mode calculates the instant fuelconsumption during the last few sec-onds.
1KMC2107 OKM040306C1KMC2106

Driving your vehicle
384
1
2
3
4
5
6
7
8
9
Distance to empty (“RANGE”shown on display)This mode indicates the estimateddistance to empty based on the cur-rent fuel in the fuel tank and theamount of fuel delivered to theengine. When the remaining distanceis below 50 km (30 miles), a blinking“----” symbol will be displayed.
✽✽ NOTICE• If the vehicle is not on level ground
or the battery power has beeninterrupted, the “Distance toempty” function may not operatecorrectly.The trip computer may not regis-ter additional fuel if less than 6liters (1.6 gallons) of fuel areadded to the vehicle.
• The fuel consumption and dis-tance to empty values may varysignificantly based on driving con-ditions, driving habits, and condi-tion of the vehicle.
• The distance to empty value is anestimate of the available drivingdistance. This value may differfrom the actual driving distanceavailable.
ECO ON/OFF mode (if equipped)You can turn the ECO indicator on/offon the instrument cluster in thismode.If you push the TRIP button morethan 1 second in the ECO ON mode,ECO OFF is displayed in the screenand the ECO indicator turns off.If you want to display the ECO indi-cator again, press the TRIP buttonmore than 1 second in the ECO OFFmode and then ECO ON mode isdisplayed in the screen.When you press the TRIP button lessthan 1 second in the ECO mode, themode is changed to odometer.
1KMC2108 OKM040300

4 39
Driving your vehicle
Instrument panel illumination(if equipped)When the vehicle’s parking lights orheadlights are on, rotate the illumina-tion control knob to adjust the bright-ness of the instrument panel illumina-tion.
Warning lights / audible indi-cators Checking operation All warning lights are checked byturning the ignition switch ON (do notstart the engine). Any light that doesnot illuminate should be checked byan Authorized Kia Dealer.After starting the engine, check tomake sure that all warning lights areoff. If any are still on, this indicates asituation that needs attention. Whenreleasing the parking brake, thebrake system warning light should gooff. The fuel warning light will stay onif the fuel level is low.
ECO indicator (if equipped)
The ECO indicator is a system thatinforms you to drive economically.It is displayed if you drive fuel effi-ciently to help you improve fuel effi-ciency.• The ECO indicator (green) will turn
on when you are driving fuel effi-ciently in the ECO ON mode.If you don't want the indicator dis-played, you can turn the ECO ONmode to OFF mode by pressingthe TRIP button.As per ECO ON/OFF Mode opera-tion, refer to the previous page.
• The fuel-efficiency can be changedby the driver's driving habit androad condition.
• It doesn't work at the conditionwhich doesn't meet economicaldriving such as P (Park) and N(Neutral), R (Reverse).
1
2
3
4
5
6
7
8
9
7KMS2108
WARNINGS AND INDICATORS

Driving your vehicle
404
1
2
3
4
5
6
7
8
9
Engine temperaturewarning light
The warning light indicates the tem-perature of the engine coolant whenthe ignition switch is ON.The warning light illuminates if thetemperature of the engine coolant isvery hot above normal range.Do not continue driving with an over-heated engine. If your vehicle over-heats, refer to "Overheating" in theindex.
✽✽ NOTICEIf the engine temperature warninglight illuminates, it indicates over-heating that may damage theengine.
Anti-lock brake sys-tem (ABS) warninglight (if equipped) This light illuminates if the key isturned to ON and goes off in approx-imately 3 seconds if the system isoperating normally.If the light stays on, you may have aproblem with your ABS system.Contact an authorized Kia dealer assoon as possible.
Electronic brake forcedistribution (EBD)system warning light (if equipped)If two warning lights illumi-nate at the same timewhile driving, your vehiclehas a problem with ABSand EBD system.
WARNINGDon't keep watching the indica-tor while driving. It will distractyou while driving and cause anaccident that results in severepersonal injury.
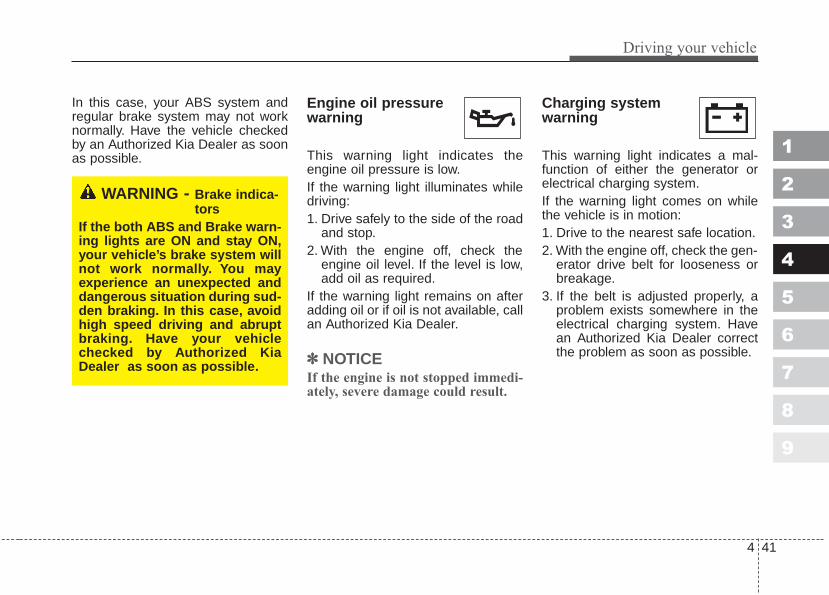
4 41
Driving your vehicle
1
2
3
4
5
6
7
8
9
In this case, your ABS system andregular brake system may not worknormally. Have the vehicle checkedby an Authorized Kia Dealer as soonas possible.
Engine oil pressurewarning
This warning light indicates theengine oil pressure is low.If the warning light illuminates whiledriving:1. Drive safely to the side of the road
and stop.2. With the engine off, check the
engine oil level. If the level is low,add oil as required.
If the warning light remains on afteradding oil or if oil is not available, callan Authorized Kia Dealer.
✽✽ NOTICEIf the engine is not stopped immedi-ately, severe damage could result.
Charging system warning
This warning light indicates a mal-function of either the generator orelectrical charging system.If the warning light comes on whilethe vehicle is in motion:1. Drive to the nearest safe location.2. With the engine off, check the gen-
erator drive belt for looseness orbreakage.
3. If the belt is adjusted properly, aproblem exists somewhere in theelectrical charging system. Havean Authorized Kia Dealer correctthe problem as soon as possible.
WARNING - Brake indica-tors
If the both ABS and Brake warn-ing lights are ON and stay ON,your vehicle’s brake system willnot work normally. You mayexperience an unexpected anddangerous situation during sud-den braking. In this case, avoidhigh speed driving and abruptbraking. Have your vehiclechecked by Authorized KiaDealer as soon as possible.

Driving your vehicle
424
1
2
3
4
5
6
7
8
9
Safety belt warning
If the driver's safety belt is not fas-tened when the key is turned ON orif it is unfastened after the key isturned ON, the safety belt warninglight blinks until the belt fastened.
Shift pattern indicators(if equipped)
The indicator displays which auto-matic transaxle shift lever is select-ed.
Immobilizer indicator (if equipped)
This light illuminates when the immo-bilizer key is inserted and turned tothe ON position to start the engine.At this time, you can start the engine.The light goes out after the engine isrunning. In case this light goes outbefore you start the engine, you mustturn to the LOCK position and restartthe engine.If this light blinks when the ignitionswitch is in the ON position beforestarting the engine, have the systemchecked by an authorized KiaDealer.
Parking brake & brakefluid warning Parking brake warning This light is illuminated when theparking brake is applied with the igni-tion switch in the START or ON posi-tion. The warning light should go offwhen the parking brake is released.
Low brake fluid level warningIf the warning light remains on, it mayindicate that the brake fluid level inthe reservoir is low.If the warning light remains on:1. Drive carefully to the nearest safe
location and stop your vehicle.
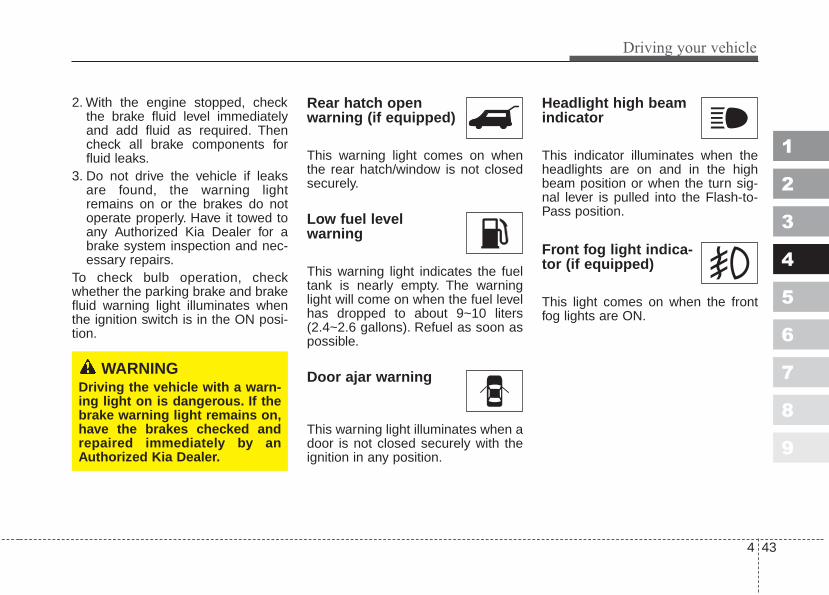
4 43
Driving your vehicle
1
2
3
4
5
6
7
8
9
2. With the engine stopped, checkthe brake fluid level immediatelyand add fluid as required. Thencheck all brake components forfluid leaks.
3. Do not drive the vehicle if leaksare found, the warning lightremains on or the brakes do notoperate properly. Have it towed toany Authorized Kia Dealer for abrake system inspection and nec-essary repairs.
To check bulb operation, checkwhether the parking brake and brakefluid warning light illuminates whenthe ignition switch is in the ON posi-tion.
Rear hatch openwarning (if equipped)
This warning light comes on whenthe rear hatch/window is not closedsecurely.
Low fuel level warning
This warning light indicates the fueltank is nearly empty. The warninglight will come on when the fuel levelhas dropped to about 9~10 liters(2.4~2.6 gallons). Refuel as soon aspossible.
Door ajar warning
This warning light illuminates when adoor is not closed securely with theignition in any position.
Headlight high beamindicator
This indicator illuminates when theheadlights are on and in the highbeam position or when the turn sig-nal lever is pulled into the Flash-to-Pass position.
Front fog light indica-tor (if equipped)
This light comes on when the frontfog lights are ON.
WARNINGDriving the vehicle with a warn-ing light on is dangerous. If thebrake warning light remains on,have the brakes checked andrepaired immediately by anAuthorized Kia Dealer.
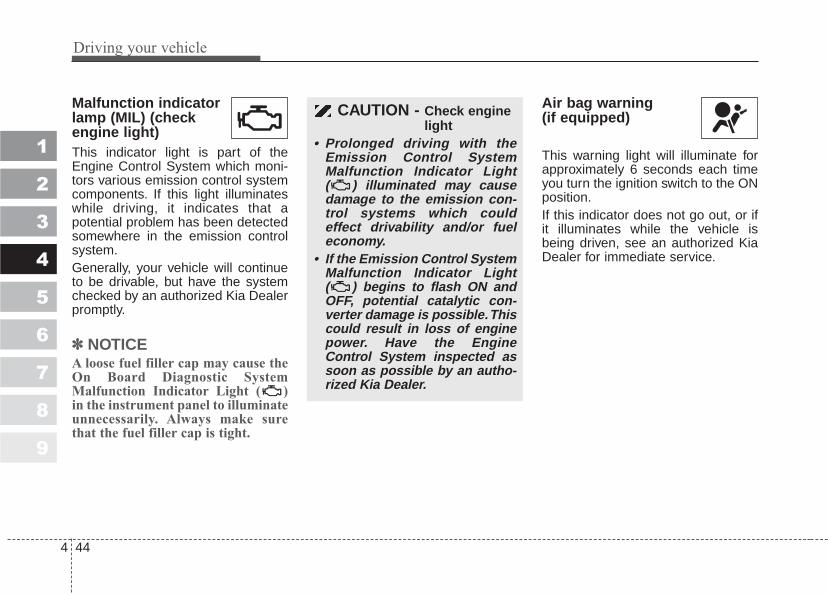
Driving your vehicle
444
1
2
3
4
5
6
7
8
9
Malfunction indicatorlamp (MIL) (checkengine light)This indicator light is part of theEngine Control System which moni-tors various emission control systemcomponents. If this light illuminateswhile driving, it indicates that apotential problem has been detectedsomewhere in the emission controlsystem.Generally, your vehicle will continueto be drivable, but have the systemchecked by an authorized Kia Dealerpromptly.
✽✽ NOTICEA loose fuel filler cap may cause theOn Board Diagnostic SystemMalfunction Indicator Light ( )in the instrument panel to illuminateunnecessarily. Always make surethat the fuel filler cap is tight.
Air bag warning (if equipped)
This warning light will illuminate forapproximately 6 seconds each timeyou turn the ignition switch to the ONposition.If this indicator does not go out, or ifit illuminates while the vehicle isbeing driven, see an authorized KiaDealer for immediate service.
CAUTION - Check enginelight
• Prolonged driving with theEmission Control SystemMalfunction Indicator Light ( ) illuminated may causedamage to the emission con-trol systems which couldeffect drivability and/or fueleconomy.
• If the Emission Control SystemMalfunction Indicator Light( ) begins to flash ON andOFF, potential catalytic con-verter damage is possible.Thiscould result in loss of enginepower. Have the EngineControl System inspected assoon as possible by an autho-rized Kia Dealer.
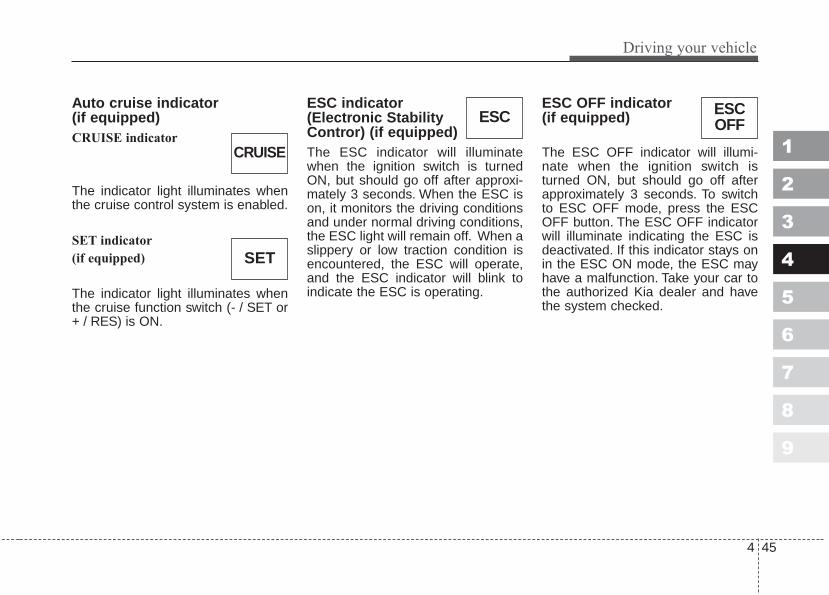
4 45
Driving your vehicle
1
2
3
4
5
6
7
8
9
Auto cruise indicator(if equipped)CRUISE indicator
The indicator light illuminates whenthe cruise control system is enabled.
SET indicator
(if equipped)
The indicator light illuminates whenthe cruise function switch (- / SET or+ / RES) is ON.
ESC indicator (Electronic StabilityContror) (if equipped) The ESC indicator will illuminatewhen the ignition switch is turnedON, but should go off after approxi-mately 3 seconds. When the ESC ison, it monitors the driving conditionsand under normal driving conditions,the ESC light will remain off. When aslippery or low traction condition isencountered, the ESC will operate,and the ESC indicator will blink toindicate the ESC is operating.
ESC OFF indicator(if equipped)
The ESC OFF indicator will illumi-nate when the ignition switch isturned ON, but should go off afterapproximately 3 seconds. To switchto ESC OFF mode, press the ESCOFF button. The ESC OFF indicatorwill illuminate indicating the ESC isdeactivated. If this indicator stays onin the ESC ON mode, the ESC mayhave a malfunction. Take your car tothe authorized Kia dealer and havethe system checked.
ESC
CRUISE
SET
ESCOFF
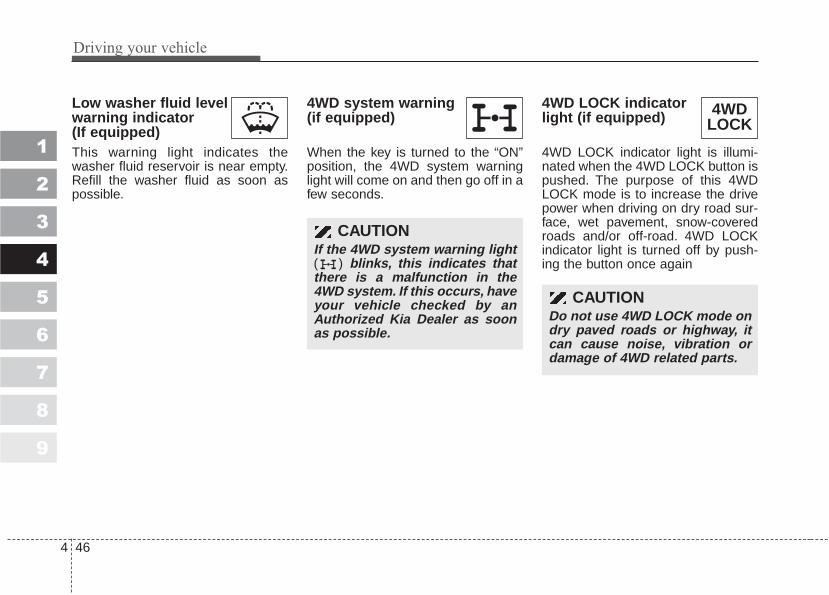
Driving your vehicle
464
1
2
3
4
5
6
7
8
9
Low washer fluid levelwarning indicator(If equipped) This warning light indicates thewasher fluid reservoir is near empty.Refill the washer fluid as soon aspossible.
4WD system warning (if equipped)
When the key is turned to the “ON”position, the 4WD system warninglight will come on and then go off in afew seconds.
4WD LOCK indicatorlight (if equipped)
4WD LOCK indicator light is illumi-nated when the 4WD LOCK button ispushed. The purpose of this 4WDLOCK mode is to increase the drivepower when driving on dry road sur-face, wet pavement, snow-coveredroads and/or off-road. 4WD LOCKindicator light is turned off by push-ing the button once again
CAUTIONIf the 4WD system warning light ( ) blinks, this indicates thatthere is a malfunction in the4WD system. If this occurs, haveyour vehicle checked by anAuthorized Kia Dealer as soonas possible.
4WDLOCK
CAUTIONDo not use 4WD LOCK mode ondry paved roads or highway, itcan cause noise, vibration ordamage of 4WD related parts.
4 47
Driving your vehicle
1
2
3
4
5
6
7
8
9
Safety belt warning chime If the driver's safety belt is not fas-tened when the ignition key is turnedON or if it is unfastened after the keyis ON, the safety belt warning chimewill sound for approximately 6 sec-onds. At this time, if the safety belt isfastened, the chime will stop at once.
Parking start warning chimeIf you drive over 10 km/h (6.2 mph)with the parking brake applied, theparking start warning chime willsound.
Key reminder warning chimeIf the driver’s door is opened whilethe ignition key is left in the ignitionswitch, the key reminder warningchime will sound. This is to preventyou from locking your keys in thevehicle.

Driving your vehicle
484
The rear parking assist systemassists the driver during backwardmovement of the vehicle by chimingif any object is sensed within a dis-tance of 120 cm (47 in.) behind thevehicle. This system is a supplemen-tal system and it is not intended tonor does it replace the need forextreme care and attention of the dri-ver. The sensing range and objectsdetectable by the back sensors arelimited. Whenever backing-up, payas much attention to what is behindyou as you would in a vehicle withouta rear parking assist system.
Operation of the rear parkingassist systemOperating condition• This system will activate when
backing up with the ignition switchON.If the vehicle is moving at a speedover 5 km/h (3 mph), the systemmay not be activated correctly.
• The sensing distance while therear parking assist system is inoperation is approximately 120 cm(47 in.).
• When more than two objects aresensed at the same time, the clos-est one will be recognized first.
Types of warning sound• When an object is 120 cm to 81 cm
(47 in. to 32 in.) from the rearbumper: Buzzer beeps intermit-tently.
• When an object is 80 cm to 41 cm(31 in. to 16 in.) from the rearbumper: Buzzer beeps more fre-quently.
• When an object is within 40 cm (15in.) of the rear bumper:Buzzer sounds continuously.
REAR PARKING ASSIST SYSTEM (IF EQUIPPED)
1
2
3
4
5
6
7
8
9
OKM029086
WARNINGThe rear parking assist systemis a supplementary functiononly. The operation of the rearparking assist system can beaffected by several factors(including environmental condi-tions). It is the responsibility ofthe driver to always check thearea behind the vehicle beforeand while backing up.
Sensors

4 49
Driving your vehicle
Non-operational conditions ofrear parking assist systemThe rear parking assist systemmay not operate properly when:1. Moisture is frozen to the sensor. (It
will operate normally when themoisture has been cleared.)
2. The sensor is covered with foreignmatter, such as snow or water, orthe sensor cover is blocked. (It willoperate normally when the mater-ial is removed or the sensor is nolonger blocked.)
3. Driving on uneven road surfaces(unpaved roads, gravel, bumps,gradient).
4. Objects generating excessivenoise (vehicle horns, loud motor-cycle engines, or truck air brakes)are within range of the sensor.
5. Heavy rain or water spray exists.6. Wireless transmitters or mobile
phones are within range of thesensor.
7. The sensor is covered with snow.8. Trailer towing
The detecting range may decreasewhen:1. The sensor is stained with foreign
matter such as snow or water.(The sensing range will return tonormal when removed.)
2. Outside air temperature isextremely hot or cold.
The following objects may not berecognized by the sensor:1. Sharp or slim objects such as
ropes, chains or small poles.2. Objects which tend to absorb the
sensor frequency such as clothes,spongy material or snow.
3. Undetectable objects smaller than1 m (40 in.) in height and narrowerthan 14 cm (6 in.) in diameter.
Rear parking assist systemprecautions• The rear parking assist system
may not sound sequentiallydepending on the speed andshapes of the objects detected.
• The rear parking assist systemmay malfunction if the vehiclebumper height or sensor installa-tion has been modified or dam-aged. Any non-factory installedequipment or accessories mayalso interfere with the sensor per-formance.
• The sensor may not recognizeobjects less than 40 cm (15 in.)from the sensor, or it may sense anincorrect distance. Use caution.
• When the sensor is frozen orstained with snow, dirt, or water,the sensor may be inoperative untilthe stains are removed using a softcloth.
• Do not push, scratch or strike thesensor. Sensor damage couldoccur.
1
2
3
4
5
6
7
8
9

Driving your vehicle
504
✽✽ NOTICEThis system can only sense objectswithin the range and location of thesensors; It can not detect objects inother areas where sensors are notinstalled. Also, small or slim objects,such as poles or objects locatedbetween sensors may not be detectedby the sensors.Always visually check behind thevehicle when backing up.Be sure to inform any drivers of thevehicle that may be unfamiliar withthe system regarding the systemscapabilities and limitations.
✽✽ NOTICEIf the trailer or towing bar isinstalled in your vehicle, the rearparking assist system could soundcontinuously when you back up.
Self-diagnosisIf you don’t hear an audible warningsound or if the buzzer sounds inter-mittently when shifting the gear tothe R (Reverse) position, this mayindicate a malfunction in the rearparking assist system. If this occurs,have your vehicle checked by anauthorized Kia dealer as soon aspossible.
1
2
3
4
5
6
7
8
9
WARNINGPay close attention when thevehicle is driven close toobjects on the road, particularlypedestrians, and especially chil-dren. Be aware that someobjects may not be detected bythe sensors, due to the object’sdistance, size or material, all ofwhich can limit the effective-ness of the sensor. Always per-form a visual inspection tomake sure the vehicle is clear ofall obstructions before movingthe vehicle in any direction.
WARNINGYour new vehicle warranty doesnot cover any accidents or dam-age to the vehicle or injuries toits occupants due to a rear park-ing assist system malfunction.Always drive safely and cau-tiously.
4 51
Driving your vehicle
1
2
3
4
5
6
7
8
9
To operate compass featureThe vehicle compass is a convenientfeature which displays the directionthe vehicle is heading.Push the ON/OFF button (➀) onlower part of mirror to display thedirection the vehicle is heading.Pushing the ON/OFF button (➀)again will turn off the display.
Heading display (➁) - E : East - W : West - S : South - N : Northex) NE : North East
Calibration procedureThe compass may not indicate thecorrect compass direction when youare driving in certain areas (tunnel,parking garage, underground park-ing lot, near transformer substation,etc.), and the following may occur:• The display read "C".• The compass headings become
inaccurate.• The compass heading doesn't
change when the vehicle changesdirection.
• Some compass headings are notdisplayed.
• The compass headings are inaccu-rate in long distance driving.
The compass will automatically re-calibrate itself while you drive yourevery day route, after the systemtracks the vehicle has completedthree complete circles.
If the vehicle's compass headingsbecome inaccurate continuously, thecompass should be manually cali-brated as follows:1) Move the vehicle away from any
large steel structures or powergenerating cables or equipment.
2) Turn on the compass by pressingthe ON/OFF button.
3) Check the zone number by press-ing the ON/OFF button for 6~9seconds until the current zonenumber appears in the display. Tore-calibrate, hold the ON/OFF but-ton for 9~12 seconds until C is dis-played.If the zone number is different foryour country, set the correct zonenumber referring to "Setting thecompass zone" and perform the"Calibration procedure" again.
COMPASS (IF EQUIPPED)
1KMA3084A➀
➁
Driving your vehicle
524
1
2
3
4
5
6
7
8
9
4) Make sure the vehicle windshieldwipers are turned off.
5) Drive your vehicle in at least 2complete (either clockwise orcounter-clockwise) circles at lessthan 8 km/h (5 mph) until the com-pass heading appears. Driving ina circle in right-handed directionand opposite direction is possibleand if possible, stop the wiperoperation.
6) If the vehicle's compass headingsbecome inaccurate again, repeatsteps 1 through 6 above.
✽✽ NOTICEIf new vehicle is first driven or if thebattery has been disconnected, dothe calibration procedure as above.
Setting the compass zoneThis compass must be set to com-pensate for the variation betweentrue north and magnetic north. To setvariation:1. Find your current location and
variance zone number on the zonemap.
2. Press and hold the ON/OFF but-ton for 6~9 seconds. The currentzone number will appear in thedisplay.
3. Release and press the ON/OFFbutton until the new zone numberappears in the display. After youstop pressing the button in, thedisplay will show a compass direc-tion within a few seconds.
✽✽ NOTICE1. Do not install a ski rack, antenna,
etc. that are attached to the vehi-cle using a magnet as anythingattached to the roof of the vehiclewith a magnet will effect compassoperation.
2. If the compass deviates from thecorrect indication soon afterrepeated adjustment, have thecompass checked at an authorizeddealer.
3. The compass may not indicate thecorrect compass point in tunnelsor while driving up or down asteep hill.(The compass returns to the cor-rect compass point when the vehi-cle moves to an area where thegeomagnetism is stabilized.)
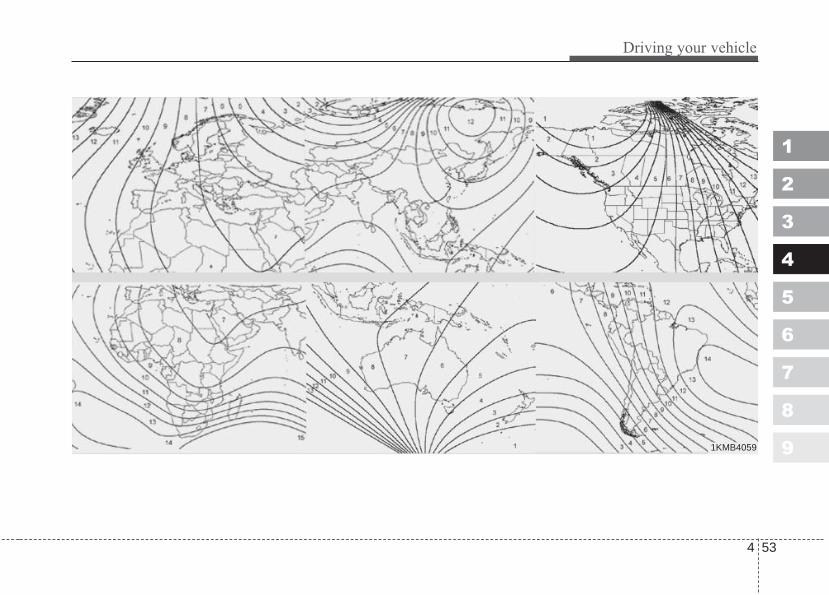
4 53
Driving your vehicle
1
2
3
4
5
6
7
8
91KMB4059
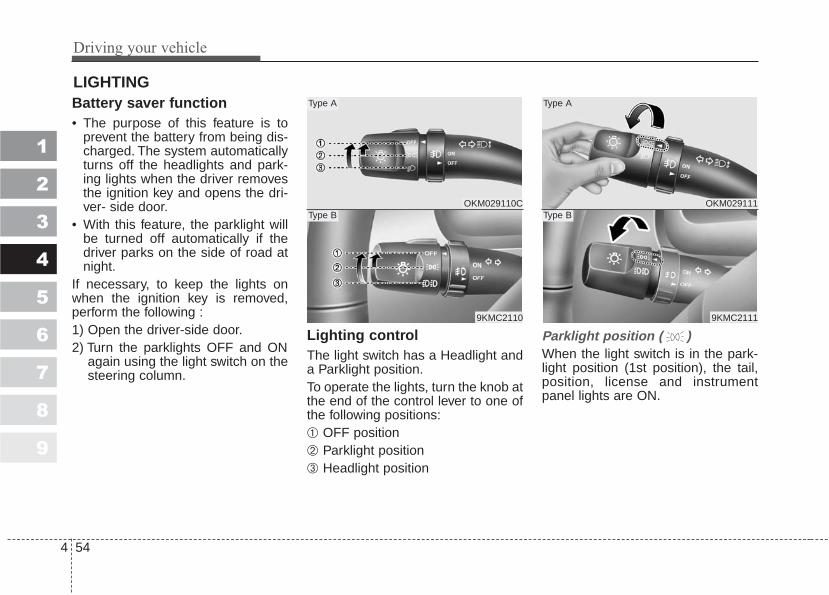
Driving your vehicle
544
1
2
3
4
5
6
7
8
9
Battery saver function • The purpose of this feature is to
prevent the battery from being dis-charged. The system automaticallyturns off the headlights and park-ing lights when the driver removesthe ignition key and opens the dri-ver- side door.
• With this feature, the parklight willbe turned off automatically if thedriver parks on the side of road atnight.
If necessary, to keep the lights onwhen the ignition key is removed,perform the following :1) Open the driver-side door.2) Turn the parklights OFF and ON
again using the light switch on thesteering column.
Lighting control The light switch has a Headlight anda Parklight position.To operate the lights, turn the knob atthe end of the control lever to one ofthe following positions:➀ OFF position➁ Parklight position➂ Headlight position
Parklight position ( )When the light switch is in the park-light position (1st position), the tail,position, license and instrumentpanel lights are ON.
LIGHTING
OKM029111
9KMC2111
Type A
Type BOKM029110C
9KMC2110
Type A
Type B

4 55
Driving your vehicle
1
2
3
4
5
6
7
8
9
Headlight position When the light switch is in the head-light position (2nd position) the head,tail, position, license and instrumentpanel lights are ON.
High - beam operation To turn on the high beam headlights,push the lever forward.The high-beam indicator will lightwhen the headlight high beams areswitched on.To prevent the battery from beingdischarged, do not leave the lightson for a prolonged time while theengine is not running.
Flashing headlights To flash the headlights, pull the levertowards you. It will return to the nor-mal (low-beam) position whenreleased. The headlight switch doesnot need to be on to use this flashingfeature.
OKM029112
9KMC2112
Type A
Type BOKM029115
9KMC2115
Type A
Type BOKM029114
9KMC2114
Type A
Type B
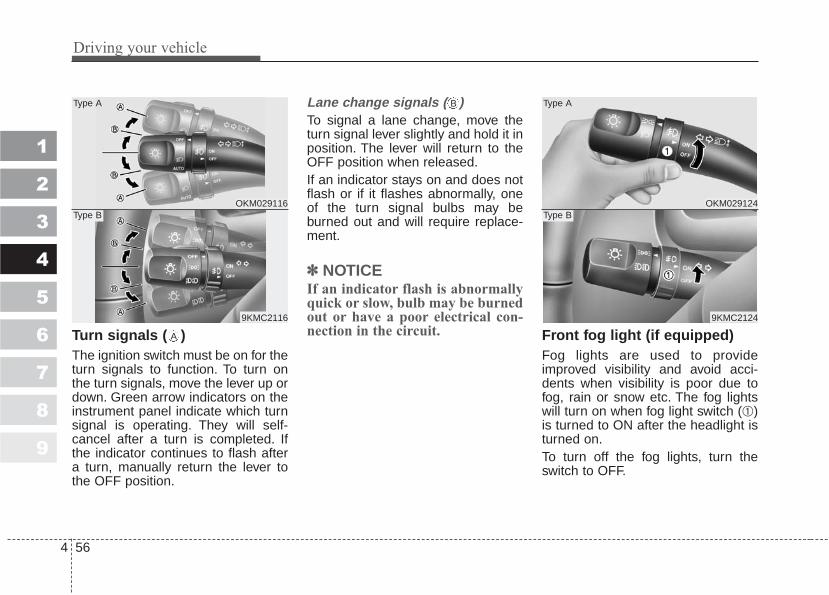
Driving your vehicle
564
1
2
3
4
5
6
7
8
9
Turn signals ( )The ignition switch must be on for theturn signals to function. To turn onthe turn signals, move the lever up ordown. Green arrow indicators on theinstrument panel indicate which turnsignal is operating. They will self-cancel after a turn is completed. Ifthe indicator continues to flash aftera turn, manually return the lever tothe OFF position.
Lane change signals ( )To signal a lane change, move theturn signal lever slightly and hold it inposition. The lever will return to theOFF position when released.If an indicator stays on and does notflash or if it flashes abnormally, oneof the turn signal bulbs may beburned out and will require replace-ment.
✽✽ NOTICEIf an indicator flash is abnormallyquick or slow, bulb may be burnedout or have a poor electrical con-nection in the circuit. Front fog light (if equipped)
Fog lights are used to provideimproved visibility and avoid acci-dents when visibility is poor due tofog, rain or snow etc. The fog lightswill turn on when fog light switch (➀)is turned to ON after the headlight isturned on.To turn off the fog lights, turn theswitch to OFF.
B
OKM029116
9KMC2116
Type A
Type B
A
OKM029124
9KMC2124
Type A
Type B

4 57
Driving your vehicle
1
2
3
4
5
6
7
8
9
✽✽ NOTICEWhen in operation, the fog lightsconsume large amounts of vehicleelectrical power. Only use the foglights when visibility is poor.Unnecessary battery and generatordrain could occur if the fog lightsare used excessively.
Daytime running light (if equipped)Daytime Running Lights (DRL) canmake it easier for others to see thefront of your vehicle during the day.DRL can be helpful in many differentdriving conditions, and it is especial-ly helpful after dawn and before sun-set.The DRL system will make yourhigh-beam headlights turn OFFwhen:1. The head light switch is ON.2. The parking brake engaged.3. Engine stops.
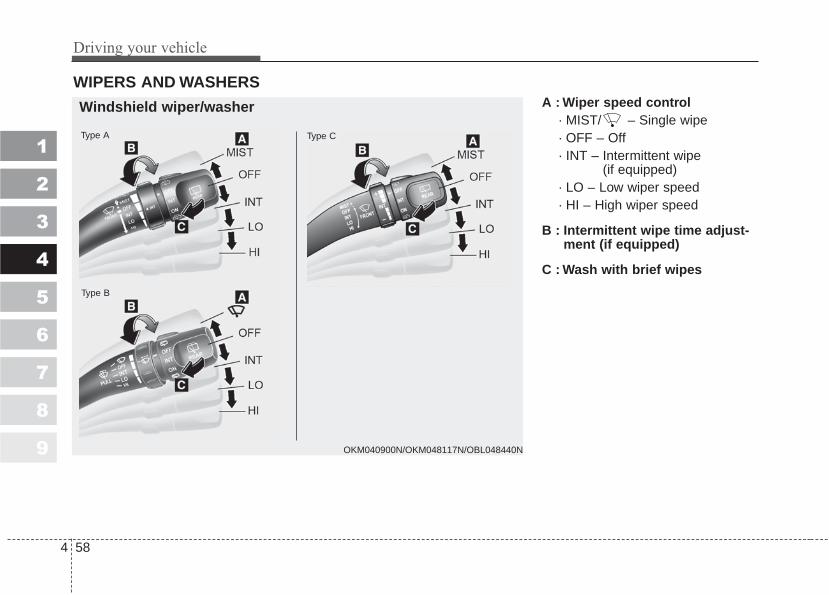
Driving your vehicle
584
1
2
3
4
5
6
7
8
9
A : Wiper speed control· MIST/ – Single wipe· OFF – Off· INT – Intermittent wipe
(if equipped) · LO – Low wiper speed· HI – High wiper speed
B : Intermittent wipe time adjust-ment (if equipped)
C : Wash with brief wipes
WIPERS AND WASHERS
Type A
Type B
Type C
OKM040900N/OKM048117N/OBL048440N
Windshield wiper/washer
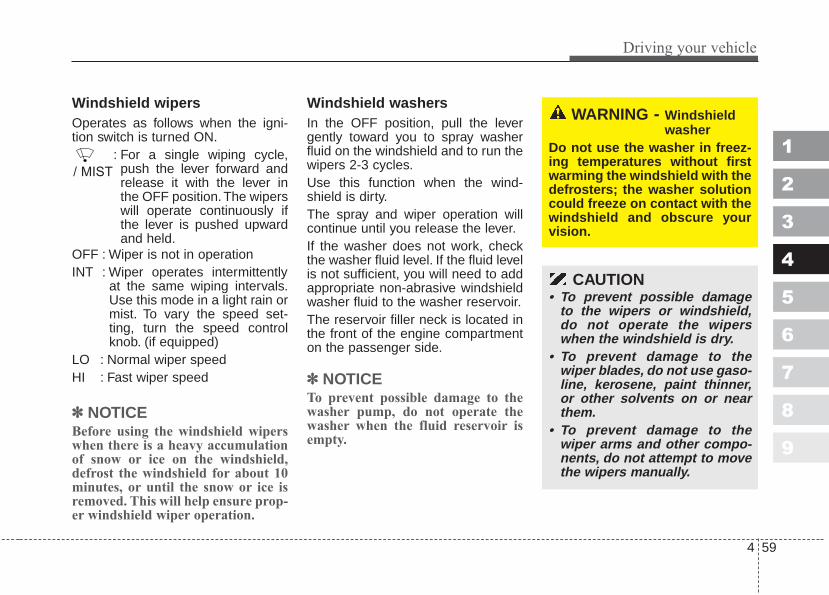
4 59
Driving your vehicle
1
2
3
4
5
6
7
8
9
Windshield wipers Operates as follows when the igni-tion switch is turned ON.
: For a single wiping cycle,push the lever forward andrelease it with the lever inthe OFF position.The wiperswill operate continuously ifthe lever is pushed upwardand held.
OFF : Wiper is not in operationINT : Wiper operates intermittently
at the same wiping intervals.Use this mode in a light rain ormist. To vary the speed set-ting, turn the speed controlknob. (if equipped)
LO : Normal wiper speedHI : Fast wiper speed
✽✽ NOTICEBefore using the windshield wiperswhen there is a heavy accumulationof snow or ice on the windshield,defrost the windshield for about 10minutes, or until the snow or ice isremoved. This will help ensure prop-er windshield wiper operation.
Windshield washers In the OFF position, pull the levergently toward you to spray washerfluid on the windshield and to run thewipers 2-3 cycles.Use this function when the wind-shield is dirty.The spray and wiper operation willcontinue until you release the lever.If the washer does not work, checkthe washer fluid level. If the fluid levelis not sufficient, you will need to addappropriate non-abrasive windshieldwasher fluid to the washer reservoir.The reservoir filler neck is located inthe front of the engine compartmenton the passenger side.
✽✽ NOTICETo prevent possible damage to thewasher pump, do not operate thewasher when the fluid reservoir isempty.
/ MIST
CAUTION• To prevent possible damage
to the wipers or windshield,do not operate the wiperswhen the windshield is dry.
• To prevent damage to thewiper blades, do not use gaso-line, kerosene, paint thinner,or other solvents on or nearthem.
• To prevent damage to thewiper arms and other compo-nents, do not attempt to movethe wipers manually.
WARNING - Windshieldwasher
Do not use the washer in freez-ing temperatures without firstwarming the windshield with thedefrosters; the washer solutioncould freeze on contact with thewindshield and obscure yourvision.

Driving your vehicle
604
1
2
3
4
5
6
7
8
9
D : Rear wiper/washer control· – Spraying washer fluid· ON – Continuous wipe · INT – Intermittent wipe
(if equipped)· OFF – Off· – Wash with brief wipes
Type A
Type B
Type C
OKM040901N/OKM048120N/OBL048441N
Rear window wiper/washer (if equipped)

4 61
Driving your vehicle
1
2
3
4
5
6
7
8
9
Rear window wiper and wash-er switch (if equipped)The rear window wiper and washerswitch is located at the end of thewiper and washer switch lever. Turnthe switch to desired position tooperate the rear wiper and washer.If the rear hatch window is open( ), the rear wiper will not oper-ate. Check the rear hatch windowwarning light in the instrument clus-ter, and make sure the rear hatchwindow is closed completely.
- Spraying washer fluid and wip-ing
OFF - Wiper is not in operationINT - Intermittent wiper operation
(if equipped) ON - Normal wiper opertion
- Spraying washer fluid and wip-ing The defroster heats the window to
remove frost, fog and thin ice fromthe interior and exterior of the rearwindow, while engine is running.
✽✽ NOTICE• To prevent damage to the conduc-
tors bonded to the inside surfaceof the rear window, never usesharp instruments or windowcleaners containing abrasives toclean the window.
• To prevent the battery from beingdischarged, the rear windowdefroster will only operate whenthe engine is running.
• If you want to defrost and defogon the front windshield, refer to“Windshield Defrosting andDefogging” in this section.
To activate the rear windowdefroster, press the rear windowdefroster button located in the centerconsole switch panel. The indicatoron the rear window defroster buttonilluminates when the defroster is ON.If there is heavy accumulation ofsnow on the rear window, brush it offbefore operating the rear defroster.
OKM049126
OKM049125
Type A
Type B
DEFROSTER (IF EQUIPPED)
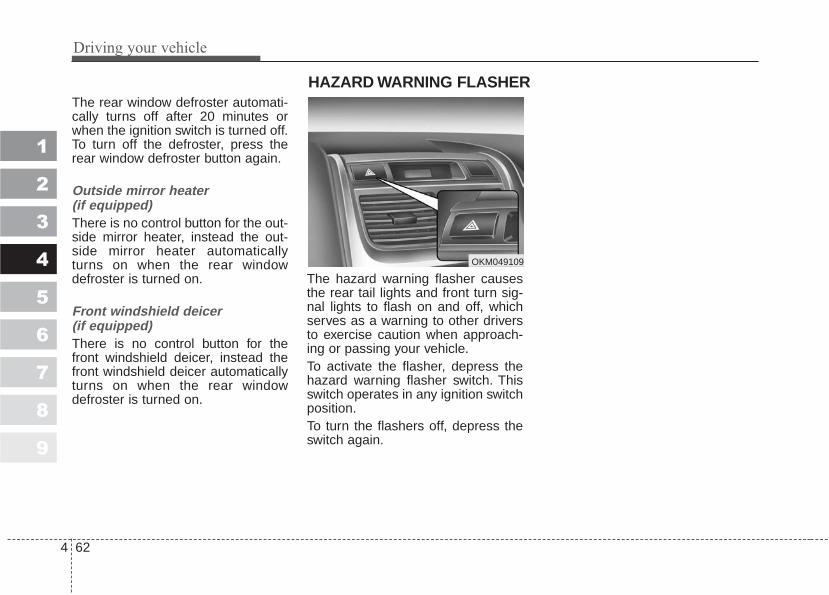
Driving your vehicle
624
1
2
3
4
5
6
7
8
9
The rear window defroster automati-cally turns off after 20 minutes orwhen the ignition switch is turned off.To turn off the defroster, press therear window defroster button again.
Outside mirror heater (if equipped)There is no control button for the out-side mirror heater, instead the out-side mirror heater automaticallyturns on when the rear windowdefroster is turned on.
Front windshield deicer(if equipped)There is no control button for thefront windshield deicer, instead thefront windshield deicer automaticallyturns on when the rear windowdefroster is turned on.
The hazard warning flasher causesthe rear tail lights and front turn sig-nal lights to flash on and off, whichserves as a warning to other driversto exercise caution when approach-ing or passing your vehicle.To activate the flasher, depress thehazard warning flasher switch. Thisswitch operates in any ignition switchposition.To turn the flashers off, depress theswitch again.
HAZARD WARNING FLASHER
OKM049109
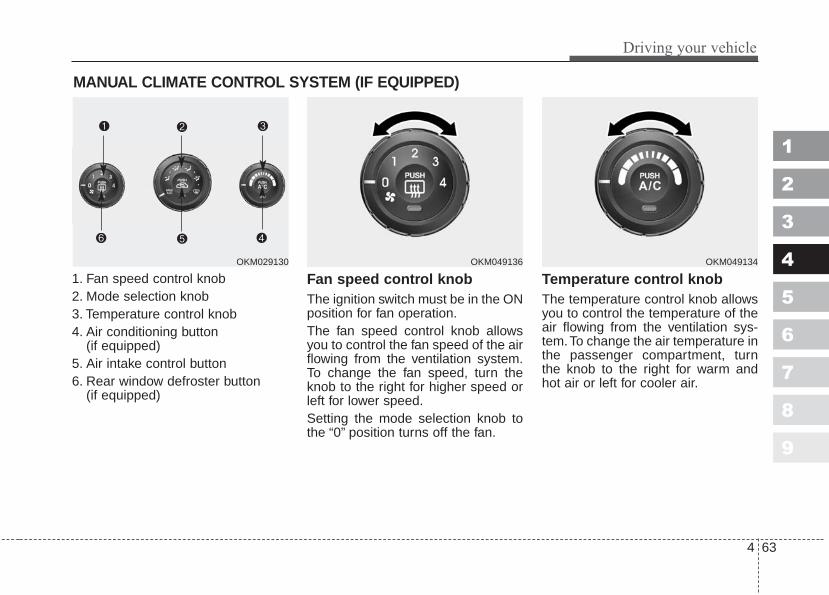
4 63
Driving your vehicle
1
2
3
4
5
6
7
8
9
1. Fan speed control knob2. Mode selection knob3. Temperature control knob4. Air conditioning button
(if equipped)5. Air intake control button6. Rear window defroster button
(if equipped)
Fan speed control knob The ignition switch must be in the ONposition for fan operation.The fan speed control knob allowsyou to control the fan speed of the airflowing from the ventilation system.To change the fan speed, turn theknob to the right for higher speed orleft for lower speed.Setting the mode selection knob tothe “0” position turns off the fan.
Temperature control knobThe temperature control knob allowsyou to control the temperature of theair flowing from the ventilation sys-tem.To change the air temperature inthe passenger compartment, turnthe knob to the right for warm andhot air or left for cooler air.
MANUAL CLIMATE CONTROL SYSTEM (IF EQUIPPED)
OKM049136 OKM049134OKM029130

Driving your vehicle
644
1
2
3
4
5
6
7
8
9
Mode selection knob The mode selection knob controlsthe direction of the air flow throughthe ventilation system.The steps (•) between the air flow posi-tions adjust the direction of the air flowto the middle position.
OKM049131
OKM049135

4 65
Driving your vehicle
1
2
3
4
5
6
7
8
9
MAX/ A/C position When you select the MAXA/C mode while the fanspeed is on, the followingsystem settings will bemade automatically;• the air conditioning sys-
tem will be turned on.• the recirculated air posi-
tion will be selected.• the face mode will be
selected.If you select MAX A/Cmode, you will not be ableto cancel the A/C systemoperation, or change therecirculated air mode posi-tion.Set the fan speed controlknob to the desired speedand rotate the tempera-ture control knob to theextreme left position formaximum cooling.(outlet port: , )
Face position Air flow is directed towardthe upper body and face.Additionally, each outletcan be controlled to directthe air discharged fromthe outlet.(outlet port: , )
Face - floor position Air flow is directed towardsthe face and the floor. Theair to the floor is warmerthan the air to the face(except when the temper-ature control is set to theextreme cold position).(outlet port: , , , )
OFF position The climate control sys-tem is turned off.
Floor position Most of the air flow isdirected to the floor, with asmall amount of the airbeing directed to the wind-shield and side windowdefroster.(outlet port: , , , , )
Floor - defrost position Most of the air flow isdirected to the floor andthe windshield with asmall amount directed tothe side windowdefrosters.(outlet port: , , , , )
Defrost position Most of the air flow isdirected to the windshieldwith a small amount of airdirected to the side win-dow defrosters.(outlet port: , , )
B
B C E F
CA D E F
CA D E F
E
A D E
OFF
B E
MAXA/C

Driving your vehicle
664
1
2
3
4
5
6
7
8
9
Instrument panel ventsIf air flow control is not satisfactory,check the instrument panel vents.The outlet port ( ) can be openedor closed separately using the hori-zontal thumbwheel. To close thevent, rotate it left to the maximumposition. To open the vent, rotate itright to the desired position.Also, you can adjust the direction ofair delivery from these vents usingthe vent control lever as shown.
Air intake control button This is used to select outside (fresh)air position or recirculated air posi-tion.To change the air intake control posi-tion, push the control button.
Recirculated air position The indicator light on thebutton is illuminated whenthe recirculated air posi-tion is selected.With the recirculated airposition selected, air frompassenger compartmentwill be drawn through theheating system and heat-ed or cooled according tothe function selected.
Outside (fresh) air position The indicator light on thebutton is not illuminatedwhen the outside (fresh)air position is selected.With the outside (fresh) airposition selected, airenters the vehicle fromoutside and is heated orcooled according to thefunction selected.
E
OKM049232
E
E
OKM049132A

4 67
Driving your vehicle
1
2
3
4
5
6
7
8
9
It should be noted that prolongedoperation of the heating in recir-culated air position will cause fog-ging of the windshield and sidewindows and the air within thepassenger compartment willbecome stale.In addition, prolonged use of theair conditioning with the “recircu-lated air position” selected, willresult in excessively dry air in thepassenger compartment.
Air conditioning button (if equipped) Push the A/C button to turn the airconditioning system on (indicatorlight will illuminate). Push the buttonagain to turn the air conditioning sys-tem off.
WARNING - Recirculatedair
• Continued use of the climatecontrol system operation inthe recirculated air positionmay allow humidity toincrease inside vehicle whichmay fog the glass andobscure visibility.
• Continued use of the climatecontrol system operation inthe recirculated air positioncan result in somewhatreduced oxygen levels, caus-ing drowsiness or sleepiness,and loss of vehicle control.Set the air intake control tothe outside (fresh) air positionas much as possible while dri-ving.
OKM049137

Driving your vehicle
684
1
2
3
4
5
6
7
8
9
System operationVentilation1. Set the mode to the position.2. Set the air intake control to the
outside (fresh) air position.3. Set the temperature control to the
desired position.4. Set the fan speed control to the
desired speed.
Heating1. Set the mode to the position.2. Set the air intake control to the
outside (fresh) air position.3. Set the temperature control to the
desired position.4. Set the fan speed control to the
desired speed.5. If dehumidified heating is desired,
turn the air conditioning system (ifequipped) on.
• If cool air is desired at face level forbi-level operation, set the mode tothe position.
• If the windshield fogs up, set themode to the , position.
Air conditioning (if equipped) All Kia Air Conditioning Systems arefilled with environmentally friendly R-134a refrigerant which is not dam-aging to the ozone layer.1. Start the engine. Push the air con-
ditioning button.2. Set the mode to the position.3. Set the air intake control to the
outside air or recirculated air posi-tion.
4. Set the temperature control knobto the desired position.
5. Set the fan speed control to thedesired speed.
6. Adjust the fan speed control andtemperature control to maintainmaximum comfort.
• If warmer air is desired at floorlevel for bi-level operation, set themode to the position andadjust the temperature control tomaintain maximum comfort.
4 69
Driving your vehicle
1
2
3
4
5
6
7
8
9
• When maximum cooling is desired,set the temperature control to theextreme left position, set the airintake control to the recirculated airposition, then set the fan speedcontrol to the highest speed.
✽✽ NOTICE• When using the air conditioning
system, monitor the temperaturegauge closely while driving uphills or in heavy traffic when out-side temperatures are high. Airconditioning system operationmay cause engine overheating.Continue to use the blower fan butturn the air conditioning systemoff if the temperature gauge indi-cates engine overheating.
• When opening the windows inhumid weather air conditioningmay create water droplets insidethe vehicle. Since excessive waterdroplets may cause damage toelectrical equipment, air condi-tioning should only be run withthe windows closed.
Air conditioning system oper-ation tips • If the vehicle has been parked in
direct sunlight during hot weather,open the windows for a short timeto let the hot air inside the vehicleescape.
• To help reduce moisture inside ofwindows on rainy humid days,decrease the humidity inside thevehicle by operating the air condi-tioning system.
• During air conditioning systemoperation, you may occasionallynotice a slight change in enginespeed at idle as the air condition-ing compressor cycles on. This is anormal system operation charac-teristics.
• Use the air conditioning systemevery month if only for a few min-utes to ensure maximum systemperformance.
• When using the air conditioningsystem, you may notice clear waterdripping (or even pudding) on theground under the passenger sideof the vehicle. This is a normal sys-tem operation characteristic.
• The air conditioning systemincludes a function that automati-cally turns the air conditioningcompressor off if engine coolanttemperature approaches an overheating level. The air conditioningcompressor operation will resumeonce engine coolant temperaturereturns to the normal range. Also,the air conditioning compressor isautomatically turned off for a fewseconds when the accelerator isfully depressed (wide open throt-tle).
• When operating the air condition-ing system use the outside (fresh)air position.
• Operating the air conditioning sys-tem in the recirculated air positiondoes provide maximum cooling,however, continual operation in thismode may cause the air inside thevehicle to become stale.
Driving your vehicle
704
1
2
3
4
5
6
7
8
9
Checking the amount of airconditioner refrigerant andcompressor lubricantWhen the amount of refrigerant islow, the performance of the air con-ditioning is reduced. Overfilling alsohas a bad influence on the air condi-tioning system.Therefore, if abnormal operation isfound, have the system inspected byan authorized Kia dealer.
✽✽ NOTICEWhen the performance of the airconditioning system is reduced it isimportant that the correct type andamount of oil and refrigerant isused. Otherwise, damage to thecompressor and abnormal systemoperation may occur.
CAUTION The air conditioner refrigerantcontainer is highly pressurized.Therefore it should be servicedby an authorized Kia dealer.Improper service may causeserious injury.
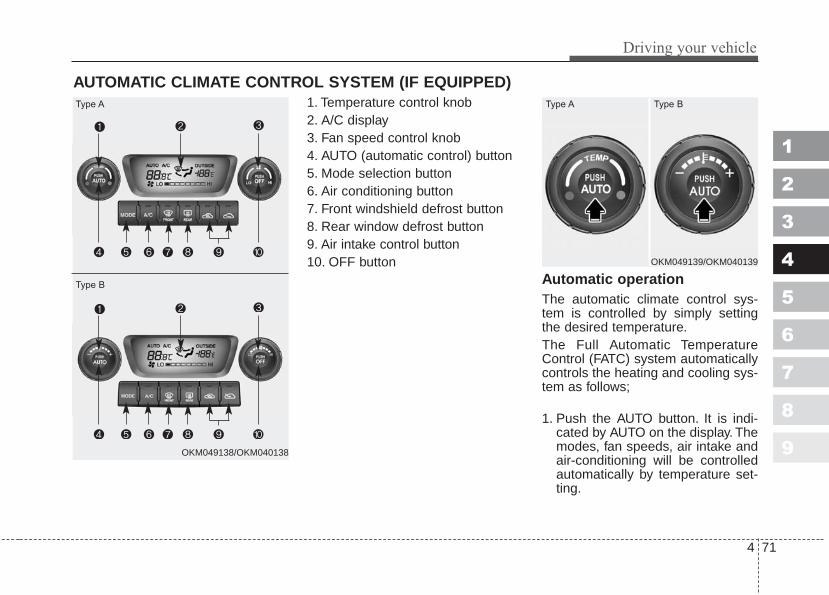
4 71
Driving your vehicle
1
2
3
4
5
6
7
8
9
1. Temperature control knob2. A/C display3. Fan speed control knob4. AUTO (automatic control) button5. Mode selection button6. Air conditioning button7. Front windshield defrost button8. Rear window defrost button9. Air intake control button 10. OFF button
Automatic operationThe automatic climate control sys-tem is controlled by simply settingthe desired temperature.The Full Automatic TemperatureControl (FATC) system automaticallycontrols the heating and cooling sys-tem as follows;
1. Push the AUTO button. It is indi-cated by AUTO on the display. Themodes, fan speeds, air intake andair-conditioning will be controlledautomatically by temperature set-ting.
AUTOMATIC CLIMATE CONTROL SYSTEM (IF EQUIPPED)
OKM049139/OKM040139
OKM049138/OKM040138
Type A Type A Type B
Type B

Driving your vehicle
724
1
2
3
4
5
6
7
8
9
2. Turn the TEMP knob to set thedesired temperature.If the temperature is set to thelowest setting (Lo), the air condi-tioning system will operate con-tinuously.
3. To turn the automatic operationoff, press any button or turn anyknob except temperature controlknob. If you press the mode selec-tion button, air-conditioning button,defrost button, air intake controlbutton or fan speed knob, theselected function will be controlledmanually while other functionsoperate automatically.
Regardless of the temperature set-ting, when using automatic opera-tion, the air conditioning system willautomatically turn on to decrease thehumidity inside the vehicle, even ifthe temperature is set to warm.
✽✽ NOTICENever place anything over the sen-sor located on the instrument panelto ensure better control of the heat-ing and cooling system.
Manual operation The heating and cooling system canbe controlled manually as well bypushing buttons other than the AUTObutton. In this case, the systemworks sequentially according to theorder of buttons selected.When pressing any button exceptAUTO button while automatic opera-tion, the functions of the buttons notselected will be controlled automati-cally.Press the AUTO button in order toconvert to full automatic control ofthe system.
1KMA2140

4 73
Driving your vehicle
1
2
3
4
5
6
7
8
9
Temperature control knobThe temperature will increase to themaximum HI by turning the knob tothe right extremely.The temperature will decrease to theminimum Lo by turning the knob to theleft extremely.When turning the knob, the tempera-ture will increase or decrease by0.5°C/1°F.When set to the lowest tem-perature setting, the air conditioningwill operate continuously.
Temperature conversionIf the battery has been discharged ordisconnected, the temperature modewill reset to display in Fahrenheitdegrees.This is a normal system operationand you can switch the temperatureswitch to display Fahrenheit toCentigrade as follows:While depressing the AUTO button,depress the OFF button for 3 sec-onds or more. The display willchange from Centigrade toFahrenheit, or from Fahrenheit toCentigrade.
Fan speed control knobThe fan speed can be set to thedesired speed by turning the fanspeed control knob.The higher the fan speed is, themore air is delivered.Pressing the OFF button turns off thefan.
OKM049143/OKM040143
Type A Type B
OKM049145/OKM040145
Type A Type B

Driving your vehicle
744
1
2
3
4
5
6
7
8
9
Air intake control button This is used to select outside (fresh)air position or recirculated air posi-tion.To change the air intake control posi-tion, push the control button.
Recirculated air positionWith the recirculated airposition selected, air frompassenger compartmentwill be drawn through theheating system and heat-ed or cooled according tothe function selected.
Outside (fresh) air positionWith the outside (fresh) airposition selected, airenters the vehicle fromoutside and is heated orcooled according to thefunction selected.
It should be noted that prolongedoperation of the heating in recir-culated air position will cause fog-ging of the windshield and sidewindows and the air within thepassenger compartment willbecome stale.In addition, prolonged use of theair conditioning with the “recircu-lated air position” selected, willresult in excessively dry air in thepassenger compartment.
WARNING - Recirculatedair
• Continued use of the climatecontrol system operation in therecirculated air position mayallow humidity to increaseinside vehicle which may fogthe glass and obscure visibility.
• Continued use of the climatecontrol system operation in therecirculated air position canresult in somewhat reducedoxygen levels, causing drowsi-ness or sleepiness, and loss ofvehicle control. Set the airintake control to the outside(fresh) air position as much aspossible while driving.
OKM049144

4 75
Driving your vehicle
1
2
3
4
5
6
7
8
9
Mode selection button The mode selection button controlsthe direction of the air flow throughthe ventilation system.The air flow outlet port is convertedas follows:
OKM049141
OKM049131

Driving your vehicle
764
1
2
3
4
5
6
7
8
9
Face position Air flow is directed towardthe upper body and face.Additionally, each outletcan be controlled to directthe air discharged from theoutlet. (outlet port: , )
Face - floor position Air flow is directed towardsthe face and the floor. Theair to the floor is warmerthan the air to the face(except when the temper-ature control is set to theextreme cold position).(outlet port: , , , )
Floor position Most of the air flow isdirected to the floor, with asmall amount of the airbeing directed to the wind-shield and side windowdefroster.(outlet port: , , , , )
Floor - defrost position Most of the air flow isdirected to the floor andthe windshield with a smallamount directed to theside window defrosters.(outlet port: , , , , )
Defrost button Most of the air flow is directed to thewindshield with a small amount of airdirected to the side windowdefrosters. (outlet port: , , )
OKM049142
A D E
B
B C E F
CA D E F
CA D E F
E
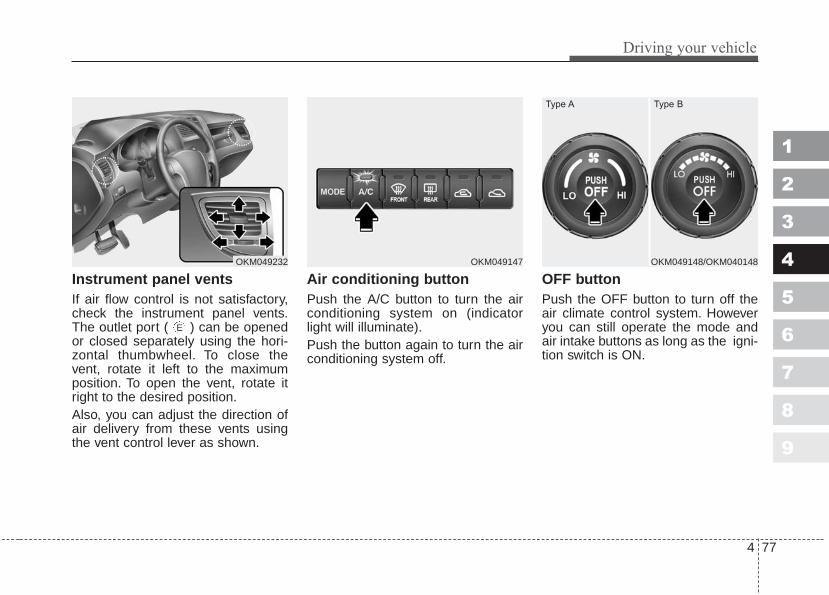
4 77
Driving your vehicle
1
2
3
4
5
6
7
8
9
Instrument panel ventsIf air flow control is not satisfactory,check the instrument panel vents.The outlet port ( ) can be openedor closed separately using the hori-zontal thumbwheel. To close thevent, rotate it left to the maximumposition. To open the vent, rotate itright to the desired position.Also, you can adjust the direction ofair delivery from these vents usingthe vent control lever as shown.
Air conditioning button Push the A/C button to turn the airconditioning system on (indicatorlight will illuminate).Push the button again to turn the airconditioning system off.
OFF buttonPush the OFF button to turn off theair climate control system. Howeveryou can still operate the mode andair intake buttons as long as the igni-tion switch is ON.
OKM049232 OKM049147
E
OKM049148/OKM040148
Type A Type B

Driving your vehicle
784
1
2
3
4
5
6
7
8
9
Outside tempmeter The current outer temperature is dis-played in 1°C (2°F) where the tem-perature range is between -40°C ~60°C (-40°F~140°F).Press and hold the OFF and AUTObuttons simultaneously for about 3~5seconds to change the display fromCelsius to Fahrenheit. Repeat theprocedure to switch the outside tem-perature display back to the previousstate.
System operationVentilation1. Set the mode to the position.2. Set the air intake control to the
outside (fresh) air position.3. Set the temperature control to the
desired position.4. Set the fan speed control to the
desired speed.
Heating1. Set the mode to the position.2. Set the air intake control to the
outside (fresh) air position.3. Set the temperature control to the
desired position.4. Set the fan speed control to the
desired speed.5. If dehumidified heating is desired,
turn the air conditioning systemon.
• If cool air is desired at face level forbi-level operation, set the mode tothe position.
• If the windshield fogs up, set themode to the , position.
OKM049150
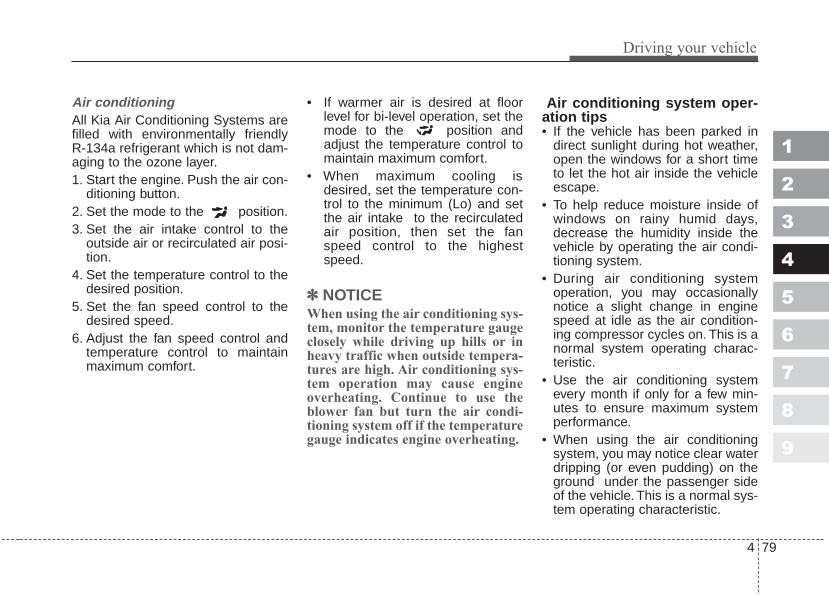
4 79
Driving your vehicle
1
2
3
4
5
6
7
8
9
Air conditioning All Kia Air Conditioning Systems arefilled with environmentally friendly R-134a refrigerant which is not dam-aging to the ozone layer.1. Start the engine. Push the air con-
ditioning button.2. Set the mode to the position.3. Set the air intake control to the
outside air or recirculated air posi-tion.
4. Set the temperature control to thedesired position.
5. Set the fan speed control to thedesired speed.
6. Adjust the fan speed control andtemperature control to maintainmaximum comfort.
• If warmer air is desired at floorlevel for bi-level operation, set themode to the position andadjust the temperature control tomaintain maximum comfort.
• When maximum cooling isdesired, set the temperature con-trol to the minimum (Lo) and setthe air intake to the recirculatedair position, then set the fanspeed control to the highestspeed.
✽✽ NOTICEWhen using the air conditioning sys-tem, monitor the temperature gaugeclosely while driving up hills or inheavy traffic when outside tempera-tures are high. Air conditioning sys-tem operation may cause engineoverheating. Continue to use theblower fan but turn the air condi-tioning system off if the temperaturegauge indicates engine overheating.
Air conditioning system oper-ation tips • If the vehicle has been parked in
direct sunlight during hot weather,open the windows for a short timeto let the hot air inside the vehicleescape.
• To help reduce moisture inside ofwindows on rainy humid days,decrease the humidity inside thevehicle by operating the air condi-tioning system.
• During air conditioning systemoperation, you may occasionallynotice a slight change in enginespeed at idle as the air condition-ing compressor cycles on. This is anormal system operating charac-teristic.
• Use the air conditioning systemevery month if only for a few min-utes to ensure maximum systemperformance.
• When using the air conditioningsystem, you may notice clear waterdripping (or even pudding) on theground under the passenger sideof the vehicle. This is a normal sys-tem operating characteristic.
Driving your vehicle
804
1
2
3
4
5
6
7
8
9
• The air conditioning systemincludes a function that automati-cally turns the air conditioningcompressor off if engine coolanttemperature approaches an overheating level. The air conditioningcompressor operation will resumeonce engine coolant temperaturereturns to the normal range. Also,the air conditioning compressor isautomatically turned off for a fewseconds when the accelerator isfully depressed (wide open throt-tle).
• When operating the air condition-ing system use the outside (fresh)air position.
• Operating the air conditioning sys-tem in the recirculated air positiondoes provide maximum cooling,however, continual operation in thismode may cause the air inside thevehicle to become stale.
Checking the amount of airconditioner refrigerant andcompressor lubricantWhen the amount of refrigerant islow, the performance of the air con-ditioning is reduced. Overfilling alsohas a bad influence on the air condi-tioning system.Therefore, if abnormal operation isfound, have the system inspected byan authorized Kia dealer.
✽✽ NOTICEWhen the performance of the airconditioning system is reduced it isimportant that the correct type andamount of oil and refrigerant isused. Otherwise, damage to thecompressor and abnormal systemoperation may occur.
CAUTION The air conditioner refrigerantcontainer is highly pressurized.Therefore it should be servicedby an authorized Kia dealer.Improper service may causeserious injury.
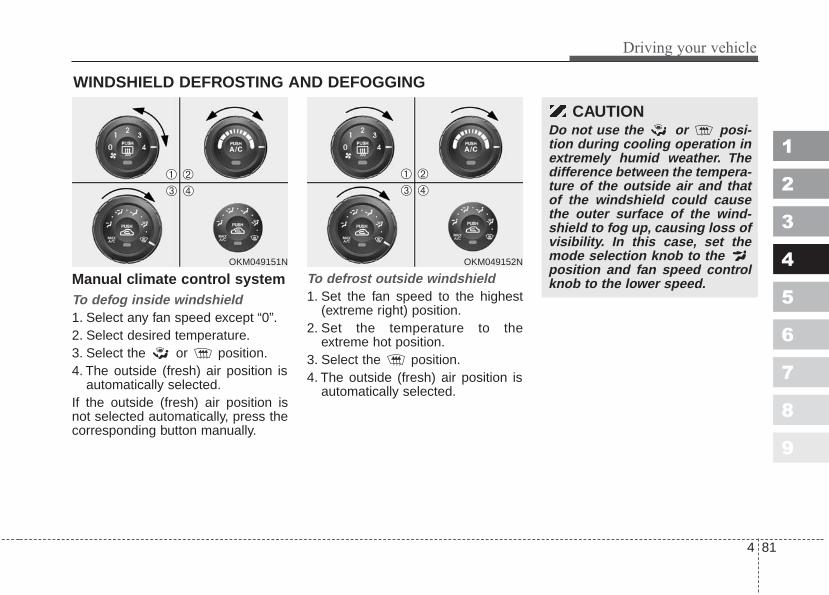
4 81
Driving your vehicle
1
2
3
4
5
6
7
8
9
Manual climate control systemTo defog inside windshield 1. Select any fan speed except “0”.2. Select desired temperature.3. Select the or position.4. The outside (fresh) air position is
automatically selected.If the outside (fresh) air position isnot selected automatically, press thecorresponding button manually.
To defrost outside windshield 1. Set the fan speed to the highest
(extreme right) position.2. Set the temperature to the
extreme hot position.3. Select the position.4. The outside (fresh) air position is
automatically selected.
WINDSHIELD DEFROSTING AND DEFOGGING
CAUTIONDo not use the or posi-tion during cooling operation inextremely humid weather. Thedifference between the tempera-ture of the outside air and thatof the windshield could causethe outer surface of the wind-shield to fog up, causing loss ofvisibility. In this case, set themode selection knob to the position and fan speed controlknob to the lower speed.
OKM049151N OKM049152N
➀ ➁➂ ➃
➀ ➁➂ ➃

Driving your vehicle
824
1
2
3
4
5
6
7
8
9
Automatic climate control systemTo defog inside windshield 1. Select desired fan speed.2. Select desired temperature.3. Press the defrost button ( ).
4. The outside (fresh) air position isautomatically selected.
If the outside (fresh) air position arenot selected automatically, press thecorresponding button manually.
To defrost outside windshield 1. Set fan speed to the highest
(extreme right) position.2. Set temperature to the extreme
hot (HI) position.3. Press the defrost button ( ).4. The outside (fresh) air position is
automatically selected.
OKM049153N
Type A
OKM040153N
Type B
➀ ➁➂ ➃
➀ ➁➂ ➃
OKM049154N
Type A
OKM040154N
Type B
➀ ➁➂ ➃
➀ ➁➂ ➃
4 83
Driving your vehicle
1
2
3
4
5
6
7
8
9
• For maximum defrosting, set thetemperature control to the extremeright/hot position and the fan speedcontrol to the highest speed.
• If warm air to the floor is desiredwhile defrosting or defogging, setthe mode to the floor-defrost posi-tion.
• Before driving, clear all snow andice from the windshield, rear win-dow, outside rear view mirrors, andall side windows.
• Clear all snow and ice from thehood and air inlet in the cowl grill toimprove heater and defroster effi-ciency and to reduce the probabili-ty of fogging up inside of the wind-shield.
Defogging logicManual climate control systemTo reduce the probability of foggingup the inside of the windshield, theair intake control is set to the outside(fresh) air position automatically ifany of following occur.• The mode is selected to the ,
or while the system isactivated.
• The ignition switch is turned onwhile the mode is selected to the
, or .• The ignition switch is turned off.• The fan is off.• The fan begins to be operated.Press the air intake control button toselect the recirculated air positionwhile the ignition switch is on.
CAUTIONDo not use the or posi-tion during cooling operation inextremely humid weather. Thedifference between the tempera-ture of the outside air and thatof the windshield could causethe outer surface of the wind-shield to fog up, causing loss ofvisibility. In this case, set themode selection knob to the position and fan speed controlknob to the lower speed.

Driving your vehicle
844
1
2
3
4
5
6
7
8
9
How to cancel or return defogginglogic of manual climate control sys-tem
1. Turn the ignition switch to the “ON”position.
2. Turn the fan speed control knob tothe “0” position.
3. Turn the mode selection knob tothe defrost position ( ).
4. Push the air intake control button( ) at least 5 times within 3 sec-onds.
The indicator light in the air intakecontrol button will blink 3 times at 0.5second intervals. This indicates thatthe defogging logic is canceled orhas returned to the programmedcondition.
If the battery has been discharged ordisconnected, the defog logic is resetto the original condition.
Automatic climate control systemTo reduce the probability of foggingup inside of the windshield, the airintake control is set to outside (fresh)air position automatically if any of fol-lowing occur.• The ignition switch is turned on
while the mode is selected to the, , .
• The OFF button is pushed.• The mode is selected to the ,
or position.Press the air intake control button toselect the recirculated air positionwhile the ignition switch is on.
OKM049155
➀ ➁➂ ➃

4 85
Driving your vehicle
1
2
3
4
5
6
7
8
9
How to cancel or return defogginglogic of automatic climate control sys-tem
1. Turn the ignition switch to the “ON”position.
2. Select the defrost position press-ing defrost button ( ).
3. While holding the air conditioningbutton (A/C) pressed, press the airintake control button ( ) at least5 times within 3 seconds.
The A/C display will blink 3 times at0.5 second intervals. This indicatesthat the defogging logic is canceledor has returned to the programmedcondition.
If the battery has been discharged ordisconnected, the defog logic is resetto the original condition.
OKM049156
➀ ➁➂

1
2
3
4
5
6
7
8
9
Fuel requirements / 5-2
Emission control system / 5-3
Before driving / 5-5
Suggestions for economical operation / 5-6
Special driving conditions / 5-8
Using four-wheel drive / 5-14
Weight of the vehicle / 5-32
Trailer towing / 5-33
Overloading / 5-40
Vehicle load limit / 5-41
Homelink® wireless control system / 5-45
Label information / 5-51
Driving tips

Driving tips
25
FUEL REQUIREMENTSGasoline engine (unleaded)Your new Kia vehicle is designed touse only unleaded fuel with a mini-mum Octane Rating of 87 Anti-Knock Index (AKI).
✽✽ NOTICENEVER USE LEADED FUEL. Theuse of leaded fuel is detrimental tothe catalytic converter and willdamage the engine control system’soxygen sensor and affect emissioncontrol.Never add any fuel system cleaningagents to the fuel tank other thanwhat Kia has specified. (Consult anAuthorized Kia Dealer for details.)
Gasoline containing alcoholand methanolGasohol, a mixture of gasoline andethanol (also known as grain alco-hol), and gasoline or gasohol con-taining methanol (also known aswood alcohol) are being marketedalong with or instead of leaded orunleaded gasoline.Do not use gasohol containing morethan 10% ethanol, and do not usegasoline or gasohol containing anymethanol. Either of these fuels maycause drivability problems and dam-age to the fuel system.Discontinue using gasohol of anykind if drivability problems occur.
Vehicle damage or driveability prob-lems may not be covered by themanufacturer’s warranty if they resultfrom the use of:1. Gasohol containing more than
10% ethanol.2. Gasoline or gasohol containing
methanol.3. Leaded fuel or leaded gasohol.
✽✽ NOTICENever use gasohol which containsmethanol. Discontinue use of anygasohol product which impairs dri-vability.
1
2
3
4
5
6
7
8
9

5 3
Driving tips
EMISSION CONTROL SYSTEMThe emission control system of yourvehicle is covered by a written limitedwarranty. Please see the warrantyinformation contained in theWarranty & Consumer InformationManual in your vehicle.
Vehicle modifications This vehicle should not be modified.Modification of your Kia could affectits performance, safety or durabilityand may even violate governmentalsafety and emissions regulations.In addition, damage or performanceproblems resulting from any modifi-cation may not be covered underwarranty.
Engine exhaust gas precau-tions (carbon monoxide)
• Carbon monoxide can be presentwith other exhaust fumes.Therefore, if you smell exhaustfumes of any kind inside your vehi-cle, have it inspected and repairedimmediately. If you ever suspectexhaust fumes are coming intoyour vehicle, drive it only with allthe windows fully open. Have yourvehicle checked and repairedimmediately.
• Do not operate the engine in con-fined or closed areas (such asgarages) any more than what isnecessary to move the vehicle in orout of the area.
• When the vehicle is stopped in anopen area for more than a shorttime with the engine running,adjust the ventilation system (asneeded) to draw outside air into thevehicle.
• Never sit in a parked or stoppedvehicle for any extended time withthe engine running.
• When the engine stalls or fails tostart, excessive attempts to re-start the engine may cause dam-age to the emission control sys-tem.
1
2
3
4
5
6
7
8
9
WARNING - ExhaustEngine exhaust gases containcarbon monoxide (CO). Thoughcolorless and odorless, it isdangerous and could be lethal ifinhaled. Follow the instructionsfollowing to avoid CO poison-ing.
Driving tips
45
Operating precautions for cat-alytic converters (if equipped)
Your vehicle is equipped with a cat-alytic converter emission controldevice.Therefore, the following precautionsmust be observed:• Use only UNLEADED FUEL for
gasoline engine (unleaded).• Do not operate the vehicle when
there are signs of engine malfunc-tion, such as misfire or a noticeableloss of performance.
• Do not misuse or abuse theengine. Examples of misuse arecoasting with the ignition off anddescending steep grades in gearwith the ignition off.
• Do not operate the engine at highidle speed for extended periods (5minutes or more).
• Do not modify or tamper with anypart of the engine or emission con-trol system. All inspections andadjustments must be made by anauthorized Kia dealer.
Failure to observe these precautionscould result in damage to the catalyt-ic converter and to your vehicle.Additionally, such actions could voidyour warranties.
1
2
3
4
5
6
7
8
9
WARNING - FireA hot exhaust system can igniteflammable items under yourvehicle. Do not park, idle ordrive the vehicle over or nearflammable objects, such asgrass, vegetation, paper, leaves,etc.

5 5
Driving tips
BEFORE DRIVING Before entering vehicle:• Be sure that all windows, outside
mirror(s), and outside lights areclean.
• Check the condition of the tires.• Check under the vehicle for any
sign of leaks.• Be sure there are no obstacles
behind you if you intend to back up.
Necessary inspections Fluid levels, such as engine oil,engine coolant, brake fluid, andwasher fluid should be checked on aregular basis, with the exact intervaldepending on the fluid. Furtherdetails are provided in Section 7,Maintenance.
Before starting • Close and lock all doors.• Position the seat so that all con-
trols are easily reached.• Adjust the inside and outside
rearview mirrors.• Be sure that all lights work.• Check all gauges.• Check the operation of warning
lights when the ignition switch isturned to the ON position.
• Release the parking brake andmake sure the brake warning lightgoes out.
For safe operation, be sure you arefamiliar with your vehicle and itsequipment.
1
2
3
4
5
6
7
8
9
WARNING - Driving underthe influence of alcohol ordrugs
Drinking and driving is danger-ous. Drunk driving is the num-ber one contributor to the high-way death toll each year. Even asmall amount of alcohol willaffect your reflexes, perceptionsand judgement. Driving whileunder the influence of drugs isas dangerous or more danger-ous than driving drunk.You are much more likely tohave a serious accident if youdrink or take drugs and drive.If you are drinking or takingdrugs, don’t drive. Do not ridewith a driver who has beendrinking or taking drugs.Choose a designated driver orcall a cab.
Driving tips
65
SUGGESTIONS FOR ECONOMICAL OPERATIONYour vehicle's fuel economy dependsmainly on your style of driving, whereyou drive and when you drive.Each of these factors affects howmany kilometers (miles) you can getfrom liter (a gallon) of fuel.To operateyour vehicle as economically as pos-sible, use the following driving sug-gestions to help save money in bothfuel and repairs:
• Avoid lengthy warm-up idling.Once the engine is runningsmoothly, begin driving.Remember, engine warm-up maytake a little longer on cold days.
• Save fuel by accelerating slowlyafter stopping.
• Keep the engine in tune and followthe recommended periodic mainte-nance schedule. This will increasethe life of all parts and lower youroperating costs.
• Do not use the air conditionerunnecessarily.
• Slow down when driving on roughroads.
• For longer tire life and better fueleconomy, always keep the tiresinflated to the recommended pres-sures.
• Maintain a safe distance from othervehicles to avoid sudden stops.This will reduce wear on brake lin-ings and pads. Driving in such away will also save fuel becauseextra fuel is required to accelerateback to driving speed.
• Do not carry unnecessary weightin the vehicle.
• Do not rest your foot on the brakepedal while driving. This can causeneedless wear, possible damageto the brakes, and poor fuel econo-my.
• Improper wheel alignment resultsin faster tire wear and lower fueleconomy.
• Open windows at high speeds canreduce fuel economy.
• Fuel economy is less in crosswindsand headwinds. To help offsetsome of this loss, slow down whendriving in these conditions.
1
2
3
4
5
6
7
8
9

5 7
Driving tips
Keeping a vehicle in good operatingcondition is important both for econ-omy and safety. Therefore, have anauthorized Kia dealer performscheduled inspections and mainte-nance.
1
2
3
4
5
6
7
8
9
WARNING - Engine offduring motion
Never turn the engine off tocoast down hills or anytime thevehicle is in motion. The powersteering and power brakes willnot function without the enginerunning. Instead, keep theengine on and downshift to anappropriate gear for enginebraking effect.

Driving tips
85
SPECIAL DRIVING CONDITIONS Hazardous driving conditions When hazardous driving conditionsare encountered such as water,snow, ice, mud, sand, or similar haz-ards, follow these suggestions:• Drive cautiously and allow extra
distance for braking.• Avoid sudden movements in brak-
ing or steering.• When braking with non-ABS
brakes pump the brake pedal witha light up-and-down motion untilthe vehicle is stopped.
• If stalled in snow, mud, or sand,use second gear. Accelerate slow-ly to avoid spinning the drivewheels.
• Use sand, rock salt, tire chains, orother non-slip material under thedrive wheels to provide tractionwhen stalled in ice, snow, or mud.
Rocking the vehicle If it is necessary to rock the vehicleto free it from snow, sand, or mud,first turn the steering wheel right andleft to clear the area around yourfront wheels. Then, shift back andforth between 1 (First) and R(Reverse) in vehicles equipped witha manual transaxle or R (Reverse)and any forward gear in vehiclesequipped with an automatictransaxle. Do not race the engine,and spin the wheels as little as pos-sible. If you are still stuck after a fewtries, have the vehicle pulled out by atow vehicle to avoid engine overheat-ing and possible damage to thetransaxle.
✽✽ NOTICEProlonged rocking may cause engineover-heating, transaxle damage orfailure, and tire damage.
1
2
3
4
5
6
7
8
9
WARNING - DownshiftingDownshifting with an automatictransaxle, while driving on slip-pery surfaces can cause anaccident. The sudden change intire speed could cause the tiresto skid. Be careful when down-shifting on slippery surfaces.
CAUTION - ABSDo not pump the brake pedal ona vehicle equipped with ABS.

5 9
Driving tips
1
2
3
4
5
6
7
8
9
Driving at night Because night driving presents morehazards than driving in the daylight,here are some important tips toremember:• Slow down and keep more dis-
tance between you and other vehi-cles, as it may be more difficult tosee at night, especially in areaswhere there may not be any streetlights.
• Adjust your mirrors to reduce theglare from other driver's head-lights.
• Keep your headlights clean andproperly aimed on vehicles notequipped with the automatic head-light aiming feature. Dirty orimproperly aimed headlights willmake it much more difficult to seeat night.
• Avoid staring directly at the head-lights of oncoming vehicles. Youcould be temporarily blinded, and itwill take several seconds for youreyes to readjust to the darkness.
WARNING - Spinning tiresDo not spin the wheels, espe-cially at speeds more than 56km/h (35 mph). Spinning thewheels at high speeds when thevehicle is stationary couldcause a tire to overheat, explodeand injure bystanders.

Driving tips
105
1
2
3
4
5
6
7
8
9
Driving in the rain Rain and wet roads can make drivingdangerous, especially if you’re notprepared for the slick pavement.Here are a few things to considerwhen driving in the rain:• A heavy rainfall will make it harder
to see and will increase the dis-tance needed to stop your vehicle,so slow down.
• Keep your windshield wipingequipment in good shape. Replaceyour windshield wiper blades whenthey show signs of streaking ormissing areas on the windshield.
• If your tires are not in good condi-tion, making a quick stop on wetpavement can cause a skid andpossibly lead to an accident. Besure your tires are in good shape.
• Turn on your headlights to make iteasier for others to see you.
• Driving too fast through large pud-dles can affect your brakes. If youmust go through puddles, try todrive through them slowly.
• If you believe you may have gottenyour brakes wet, apply them lightlywhile driving until normal brakingoperation returns.
Winter driving• We recommend that you carry
emergency equipment, includingtire chains, a window scraper,windshield de-icer, a bag of sandor salt, flares, a small shovel andjumper cables.
• Make sure you have sufficient eth-ylene-glycol coolant in the radiator.
• Check the battery condition andcables. Cold temperatures reducethe capacity of any battery, so itmust be in excellent condition toprovide enough winter startingpower.
• Make sure the engine oil viscosityis suitable for cold weather.
• Check the ignition system for looseconnections and damage.
5 11
Driving tips
1
2
3
4
5
6
7
8
9
• Use antifreeze-formulated wind-shield washer fluid. (Do not useengine coolant antifreeze.)
• Do not use the parking brake if itmight freeze. When parking, shiftto 1 (First) or R (Reverse) with amanual transaxle or P (Park) withan automatic transaxle and blockthe rear wheels.
Snow tires If you mount snow tires on your Kia,make sure they are radial tires of thesame size and load range as theoriginal tires. Mount snow tires on allfour wheels to balance your vehicle’shandling in all weather conditions.Keep in mind that the traction provid-ed by snow tires on dry roads maynot be as high as your vehicle's orig-inal equipment tires.You should drivecautiously even when the roads areclear. Check with the tire dealer formaximum speed recommendations.
Do not install studded tires withoutfirst checking local, state and munic-ipal regulations for possible restric-tions against their use.
WARNING - Snow tiresize
Snow tires should be equivalentin size and type to the vehicle'sstandard tires. Otherwise, thesafety and handling of yourvehicle may be adversely affect-ed.

Driving tips
125
1
2
3
4
5
6
7
8
9
Driving in flooded areas Avoid driving through flooded areasunless you are sure the water is nohigher than the bottom of the wheelhub. Drive through any water slowly.Allow adequate stopping distancebecause brake performance may beaffected.After driving through water, dry thebrakes by gently applying them sev-eral times while the vehicle is movingslowly.
Reducing the risk of a rolloverThis multi-purpose passenger vehi-cle is defined as a Sports UtilityVehicle (SUV). SUV’s have higherground clearance and a narrowertrack to make them capable of per-forming in a wide variety of off-roadapplications. Specific design charac-teristics give them a higher center ofgravity than ordinary cars. An advan-tage of the higher ground clearanceis a better view of the road, whichallows you to anticipate problems.They are not designed for corneringat the same speeds as conventionalpassenger drive vehicles, any morethan low-slung sports cars aredesigned to perform satisfactorily inoff-road conditions. Due to this risk,driver and passengers are stronglyrecommended to buckle their seat-belts. In a rollover crash, an unbelt-ed person is more likely to die than aperson wearing a seatbelt. Thereare steps that a driver can make toreduce the risk of a rollover. If at allpossible, avoid sharp turns or abruptmaneuvers, do not load your roofrack with heavy cargo, and nevermodify your vehicle in any way.
Rollover warning labelTo remind you of the danger of therollover, a rollover warning labelwhich is now required by the FederalSafety regulations is adhered to thedriver’s sunvisor.
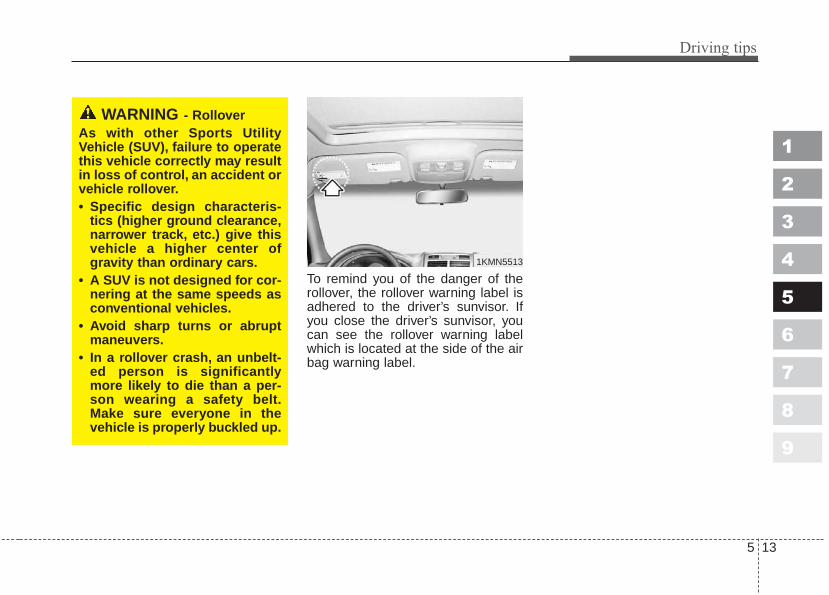
5 13
Driving tips
1
2
3
4
5
6
7
8
9
To remind you of the danger of therollover, the rollover warning label isadhered to the driver’s sunvisor. Ifyou close the driver’s sunvisor, youcan see the rollover warning labelwhich is located at the side of the airbag warning label.
WARNING - Rollover As with other Sports UtilityVehicle (SUV), failure to operatethis vehicle correctly may resultin loss of control, an accident orvehicle rollover.• Specific design characteris-
tics (higher ground clearance,narrower track, etc.) give thisvehicle a higher center ofgravity than ordinary cars.
• A SUV is not designed for cor-nering at the same speeds asconventional vehicles.
• Avoid sharp turns or abruptmaneuvers.
• In a rollover crash, an unbelt-ed person is significantlymore likely to die than a per-son wearing a safety belt.Make sure everyone in thevehicle is properly buckled up.
1KMN5513

Driving tips
145
1
2
3
4
5
6
7
8
9
USING FOUR-WHEEL DRIVEDriving on snow- or Ice-cov-ered roads (“4WD LOCK” forfull-time 4WD operation) • Use snow tires. See “Tires” in this
section for more information.• Keep an adequate distance
between yourself and other vehi-cles.
• Avoid sudden braking, accelerationor steering. These actions cancause your vehicle to lose traction.
Driving in sand or mud (“4WDLOCK” for full-time 4WD opera-tion) • Avoid sudden braking, acceleration
or steering. These actions cancause your vehicle to get stuck inthe sand or mud.
• Drive at low speeds whenever pos-sible.
• You may need to get out of yourvehicle at times to check road con-ditions.
• If you get stuck in the sand or mud,try placing stones, wood or othersimilar materials under the tires toget traction, or move forward andbackward repeatedly to getunstuck.
✽✽ NOTICEProlonged rocking may cause enginedamage, overheating, transaxle dif-ferential or transfer case damage orfailure and tire damage.
WARNING - TractionMake sure that no one stands infront of or behind the tires whenmaterials are placed under thetires to get more traction. Thetires may cause loose materialsto fly out from under the vehicle,potentially causing serious bod-ily injury or death.

5 15
Driving tips
1
2
3
4
5
6
7
8
9
Driving on a hill (“4WD LOCK”for full-time 4WD operation)• Use low gear when going uphill or
downhill and avoid sudden braking.• Do not shift gears or use your
clutch when going downhill. Do notcoast downhill in Neutral.
Crossing a ditch (“4WD LOCK”for full-time 4WD operation) • Avoid driving through ditches if
possible, especially if there iswater in the ditch.Your vehicle maystall if the electrical system getswet. If you must cross a ditch,select 4WD LOCK mode.
• Avoid driving where the water levelis higher than the bottom of thewheel hub. If the water level risesabove this mark, your vehicle willneed to be serviced.
• Tap lightly on the brake pedal dur-ing and after driving through water.This will help keep the brakes dryand in proper working order.
• Do not shift gears while crossing aditch.
Tight corner brake effect
This is called tight corner brakeeffect. Tight corner brake effect is aunique characteristic of four-wheeldrive vehicles caused by the differ-ence in tire rotation at the fourwheels and the zero-degree align-ment of the front wheels and sus-pension.Sharp turns at low speeds should becarried out with caution.
CAUTION - 4WDWhen turning sharply on apaved road at low speed whilein four-wheel drive, steeringcontrol will be difficult.

Driving tips
165
1
2
3
4
5
6
7
8
9
Off-road driving with yourfour-wheel drive vehicleOff-road driving can be great fun. Butit has definite hazards. The greatestof these is the terrain itself.“Off-roading” means you’ve left thepaved road system behind. Trafficlanes are not marked. Curves are notbanked.There are no carefully engineeredroad signs to warn you of dangerousconditions or to advise you of a safespeed. You have to assess the envi-ronment yourself. Surfaces can beslippery, rough, uphill or downhill.Off-road driving involves learningnew skills. That’s why it’s importantthat you read and understand thissection. You’ll find useful drivinginformation and suggestions. Thesewill help make your off-road drivingsafer and more enjoyable.
Before you go off-roadingThere are some things to do beforeyou leave the paved roads. Be sureto have all necessary maintenanceand service work done beforehand.Be sure to read all the informationabout your four-wheel drive vehiclein this manual. Is there enough fuel?Is the spare tire fully inflated? Are thefluid levels at the proper levels? Whatare the local laws that apply to off-roading where you’ll be driving? Ifyou don’t know, you should checkwith law enforcement people in thearea. Will you be on someone’s pri-vate land? If so, be sure to get thenecessary permission.
Loading your vehicle for off-roaddrivingThere are some important items toremember about how to properlyload your vehicle.• The heaviest things should be in
the cargo area and forward of yourrear axle. Place heavier items asfar forward as you can.
• Be sure the load is properlysecured, so driving over off-roadterrain doesn’t shift your load orthrow items toward the driver orpassengers.
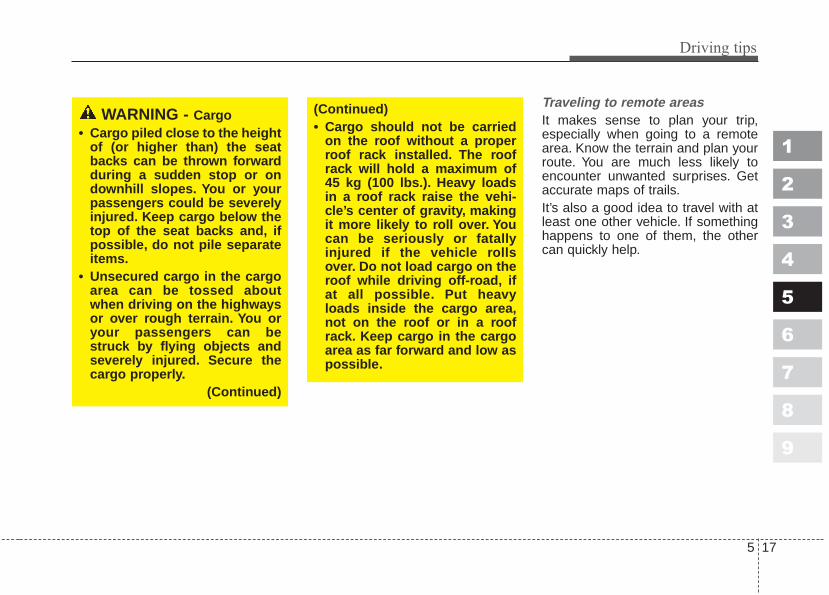
5 17
Driving tips
1
2
3
4
5
6
7
8
9
Traveling to remote areasIt makes sense to plan your trip,especially when going to a remotearea. Know the terrain and plan yourroute. You are much less likely toencounter unwanted surprises. Getaccurate maps of trails.It’s also a good idea to travel with atleast one other vehicle. If somethinghappens to one of them, the othercan quickly help.
WARNING - Cargo• Cargo piled close to the height
of (or higher than) the seatbacks can be thrown forwardduring a sudden stop or ondownhill slopes. You or yourpassengers could be severelyinjured. Keep cargo below thetop of the seat backs and, ifpossible, do not pile separateitems.
• Unsecured cargo in the cargoarea can be tossed aboutwhen driving on the highwaysor over rough terrain. You oryour passengers can bestruck by flying objects andseverely injured. Secure thecargo properly.
(Continued)
(Continued)• Cargo should not be carried
on the roof without a properroof rack installed. The roofrack will hold a maximum of45 kg (100 lbs.). Heavy loadsin a roof rack raise the vehi-cle’s center of gravity, makingit more likely to roll over. Youcan be seriously or fatallyinjured if the vehicle rollsover. Do not load cargo on theroof while driving off-road, ifat all possible. Put heavyloads inside the cargo area,not on the roof or in a roofrack. Keep cargo in the cargoarea as far forward and low aspossible.

Driving tips
185
1
2
3
4
5
6
7
8
9
Getting familiar with off-road driv-ingIt’s necessary for you to practice inan area that’s safe and close tohome before you begin serious off-road driving. Off-road drivingrequires new and different drivingskills.You need to tune your senses to dif-ferent kinds of signals. For example,constantly sweep the terrain withyour eyes looking for unexpectedobstacles. Listen for unusual tire,gear, or engine sounds. Feel andrespond to the vibrations of the vehi-cle with your hands, feet, and bodywhile still carefully controlling yourvehicle. You’ll also need to adjustyour expectations and greatly lowerthe number of miles you expect tocover in an hour or a day.
Controlling your vehicle is the key tosuccessful off-road driving. One ofthe best ways to control your vehicleis to control your speed. Here aresome things to keep in mind whentraveling at higher speeds:• You approach things faster and you
have less time to scan the terrainfor obstacles.
• You have less time to react.• You have much more vehicle
bounce when you drive over obsta-cles, giving you less vehicle con-trol.
• You’ll need more distance for brak-ing, especially since you’re on anunpaved surface. Such terrain willalways be more “slippery” than apaved road.
WARNING - Off road driv-ing
When you’re driving off-road,bouncing and quick changes indirection can easily throw youout of position in your seat.Thiscould cause you to lose controlof the vehicle and crash.Whether you are driving on oroff the road, you and your pas-sengers should always wearsafety belts.
5 19
Driving tips
1
2
3
4
5
6
7
8
9
Scanning the terrain
Off-road driving can take you overmany different kinds of terrain. Youneed to be familiar with the terrainand its many different features. Hereare some things to consider.
Surface conditionsOff-roading can take you over hard-packed dirt, gravel, rocks, grass,sand, mud, snow or ice. Each ofthese surfaces affects the steering,acceleration, and braking of yourvehicle in different ways.Depending upon the kind of surfaceyou are on, you may experience slip-ping, sliding, wheel spinning,delayed acceleration, poor traction,and longer braking distances.
Surface obstaclesUnseen or hidden obstacles can behazardous. A rock, log, hole, rut, orbump can startle you if you’re notprepared. Often these obstacles arehidden by grass, bushes, snow oreven the rise and fall of the terrainitself. Here are some things to con-stantly evaluate:• Is the path ahead clear?• Will the surface texture change
ahead?• Does the path take you uphill or
downhill?• Might you have to stop suddenly or
change direction quickly?When you drive over obstacles orrough terrain, it is critical that youkeep a firm grip on the steeringwheel. Ruts, troughs, or other sur-face features can force the wheel outof your hands if you’re not prepared.
When you drive over bumps, rocks,or other obstacles, your wheels canleave the ground. If this happens,even with one or two wheels, youcan’t control the vehicle as well orperhaps at all. Because you will beon an unpaved surface, it’s especial-ly important to avoid sudden acceler-ation, sudden turns, or sudden brak-ing. Any of these actions could causethe center of gravity of the vehicle toshift and destabilize the vehicle,leading to a collision or rollover acci-dent.Off-road driving requires a differentkind of alertness from driving onpaved roads and highways. Thereare no road signs, posted speed lim-its or signal lights. You have to useyour own judgment about what issafe and what isn’t. Bad judgment inthis uncontrolled environment can befatal.

Driving tips
205
1
2
3
4
5
6
7
8
9
Driving on off-road hillsOff-road driving often takes you up,down, or across a hill. Driving safelyon hills requires excellent judgmentand an understanding of what yourvehicle can and can’t do. There aresome hills that simply should not bedriven.
WARNING - Drinking &driving
Drinking and driving, or druguse and driving can be verydangerous on any road. Thiscertainly remains true for off-road driving. At the very timeyou need special alertness anddriving skills, your reflexes, per-ceptions and judgement can beaffected by even a small amountof alcohol or drugs. You couldhave a serious - or even fatal -accident if you drink or takedrugs and drive or ride with adriver who has been drinking ortaking drugs.
WARNING - Driving onhills
Many hills are simply too steepfor any vehicle. If you drive upthem, you will stall. If you drivedown them, you can’t controlyour speed. In either case, youcould flip over. If you driveacross them, you will roll over.You could be seriously or fatallyinjured. If you have any doubtabout the steepness, don’t driveup or down the hill, even if itmeans that you have to turnaround and find another route.Re-tracking is a normal part ofsafe off-roading.

5 21
Driving tips
1
2
3
4
5
6
7
8
9
Approaching a hillWhen you approach a hill, you needto decide if it’s one of those hillsthat’s just too steep to climb,descend, or cross. Steepness can bedifficult to judge. On a very small hill,for example, there may be a smooth,constant incline with only a smallchange in elevation where you caneasily see all the way to the top. Ona large hill, the incline may get steep-er as you near the top, but you maynot see this because the crest of thehill is hidden by bushes, grass, orshrubs.
Here are some other things to con-sider as you approach a hill:• Is there a constant incline, or does
the hill get sharply steeper inplaces?
• Is there good traction on the hill-side, or will the surface cause tireslipping?
• Is there a straight path up or downthe hill so you won’t have to maketurning maneuvers?
• Are there obstructions on the hillthat can block your path (boulders,trees, logs or ruts)?
• What’s beyond the hill? Is there acliff, an embankment, a drop-off, ora fence? Get out of the vehicle andwalk the hill if you are unsure. It’sthe smart way to find out.
• Is the hill simply too rough? Steephills often have ruts, gullies,troughs, and exposed rocksbecause they are more susceptibleto the effects of erosion.
• How have weather conditionsaffected the terrain? Is there likelyto be mud, snow or ice on the hill?
• What time of day is it? Are temper-atures dropping so that wet sur-faces will start to freeze?

Driving tips
225
1
2
3
4
5
6
7
8
9
Driving uphillOnce you decide you can safelydrive up the hill, you need to takesome special steps.• Use a low gear and get a firm grip
on the steering wheel.• Get a smooth start up the hill and
try to maintain your speed. Don’tuse more power than you need,because you don’t want yourwheels to start spinning or sliding.
• Try to drive straight up the hill, if atall possible. If the path twists andturns, you may have to find anoth-er route. • Slow down as you approach the
top of the hill.• Attach a flag to the vehicle to make
you more visible to approachingtraffic on trails or hills.
• Sound the horn as you approachthe top of the hill to let opposingtraffic know you’re there.
• Use your headlights even duringthe day. They make you more visi-ble to other drivers.
WARNING - Drivingacross hills
Turning or driving across steephills can be dangerous. Youcould lose traction, slide side-ways, or just reach an area toosteep to traverse. In any case, itcould cause you to roll over.Youcould be seriously or fatallyinjured. When driving up hills,always try to go as straight upas possible.
WARNING - Driving overhills
Driving to the top (crest) of a hillat full speed can cause an acci-dent and result in serious orfatal injury. There could be adrop-off, embankment, cliff,another vehicle or people sittingon the ground. As you near thetop of a hill, slow down and stayalert.
5 23
Driving tips
1
2
3
4
5
6
7
8
9
Stalling while driving uphillWhat should I do if my vehicle stalls,or is about to stall, and I can’t makeit up the hill?If your vehicle stalls, or is about tostall while driving uphill, there aresome things you should do, andthere are some things you must notdo. First, here’s what you should do:• Push the brake pedal to stop the
vehicle and keep it from rollingbackwards. Also, apply the parkingbrake.
• If your engine is still running, shiftthe transaxle into reverse, releasethe parking brake, and slowly backdown the hill in reverse.
• If your engine has stopped run-ning, you’ll need to restart it. Withthe brake pedal depressed and theparking brake still applied, shift amanual transaxle to N (Neutral), oran automatic transaxle to P (Park)and restart the engine. Then, shiftto reverse, release the parkingbrake, and slowly back down thehill in reverse.
• As you are backing down the hill,put your left hand on the steeringwheel at the 12 o’clock position.This way, you’ll be able to tell ifyour wheels are straight or turnedto the left or right as you backdown.
Here are some things you must notdo if you stall, or are about to stall,when going up a hill.• Never attempt to prevent a stall by
depressing the clutch or shifting toN (Neutral) to “rev-up” the engineand regain forward momentum.This won’t work. Your vehicle willroll backwards very quickly andyou could go out of control or rollover.
Instead, apply the brake to stop thevehicle. Then apply the parkingbrake. Shift into reverse, release theparking brake, and slowly backdown.

Driving tips
245
1
2
3
4
5
6
7
8
9
Stalled on a steep uphillIf your vehicle stalls and you can’tback down the hill, try this: Set theparking brake, put your transaxle in 1(First) gear or P (Park), and turn theengine off. Leave the vehicle and getsome help. If your vehicle is at anangle to the slope of the hill, exit thevehicle on the uphill side and stayclear of the path the vehicle wouldtake if it rolled downhill. Leave it in 1(First) gear for manual transaxle or P(Park) for automatic transaxle.
CAUTION - StallingNever attempt to turn around ifyou are about to stall whengoing up a hill. If the hill is steepenough to stall your vehicle, it’ssteep enough to cause you toroll over if you turn around. Ifyou can’t make it up, you mustback down the hill.
WARNING - Exiting vehicleGetting out on the downhill(low) side of a vehicle stoppedacross an incline is dangerous.If the vehicle rolls over, youcould be crushed or fatallyinjured. Always get out on theuphill (high) side of the vehicleand stay well clear of therollover path.
5 25
Driving tips
1
2
3
4
5
6
7
8
9
Driving downhillGoing downhill can be considerablymore dangerous than driving uphill.When off-roading takes you downhill,you’ll want to consider many of thesame things you thought aboutbefore you went uphill. As a briefreminder, those include:• How steep is the downhill? Will I be
able to maintain vehicle control?• What’s the surface like? Smooth?
Rough? Slippery? Hard-packeddirt? Gravel?
• Are there hidden surface obsta-cles? Ruts? Logs? Boulders?
• What’s at the bottom of the hill? Isthere a hidden creek bank or evena river bottom with large rocks?
• Have changes in the weather con-ditions and their effect on the ter-rain since you went uphill madeyour task more difficult?
Once you have decided that you cango down a hill safely, try to keep yourvehicle headed straight down, anduse a low gear. This way, enginebraking can help your brakes so theywon’t have to do all the work.Descend slowly, keeping your vehi-cle under control at all times.
WARNING - Leaving vehi-cle
If you are going to leave yourvehicle, set the parking brakeand shift a manual transaxle to1(First), or an automatictransaxle to P (Park).
Driving tips
265
1
2
3
4
5
6
7
8
9
Avoid turns that take you across theincline of the hill. A hill that’s not toosteep to drive down may be toosteep to drive across. You could rollover if you don’t drive straight down.Never go downhill with the clutchpedal depressed. This is called “free-wheeling.”Your brakes will have to doall the work and could overheat andfade.
If your wheels lock up during down-hill braking, you may feel the vehiclestarting to slide sideways. To regainyour direction, just ease off thebrakes and steer to keep the front ofthe vehicle pointing straight downhill.
CAUTION - DownhillBefore beginning to go down-hill, it is critical that you ensurethat no cargo can shift forwardwhile you are heading downhill.Such shifting could eitherendanger you and your occu-pants, or interfere with yourability to control the vehicle.
WARNING - BrakingHeavy braking when goingdown a hill can cause yourbrakes to overheat and fade.This could cause loss of controland a serious accident. Applythe brakes lightly whendescending a hill and use a lowgear to keep vehicle speedunder control.
CAUTION - Wheel lockingAvoid braking so hard that youlock the wheels when goingdownhill. If your front wheelsare locked, you can’t steer yourvehicle.

5 27
Driving tips
1
2
3
4
5
6
7
8
9
Stalling downhillStalling is much more likely to hap-pen going uphill. But if it happensgoing downhill, here’s what to do.• Stop your vehicle by applying the
brakes. Then apply the parkingbrake.
• Move the shift lever to P (Park) inautomatic transaxle or shift to N(Neutral) in manual transaxle and,while still braking, restart theengine.
• Shift back to a low gear, releasethe parking brake, and drivestraight down.
• If the engine won’t start, get outand seek help. Exit on the uphillside of the vehicle and stay clear ofthe path the vehicle would take if itrolled downhill.
Driving across an inclineSooner or later, an off-road trail willprobably go across the incline of ahill. If this happens, you have todecide whether or not to try to driveacross the incline. Here are somethings to consider:• A hill that can be driven straight up
or down may be too steep to driveacross. When you go straight up ordown a hill, the length of the wheelbase (the distance from the frontwheels to the rear wheels) reducesthe likelihood the vehicle will tum-ble end over end. But when youdrive across an incline, the muchnarrower track width (the distancebetween the left and right wheels)may not prevent the vehicle fromtilting and rolling over. Also, drivingacross an incline puts more weighton the downhill wheels. This couldcause a downhill slide or a rollover.
• Surface conditions can be a prob-lem when you drive across a hill.Loose gravel, muddy spots, oreven wet grass can cause yourtires to slip sideways. If the vehicleslips sideways, it can hit somethingthat will tip it (a rock, a rut, etc.) andcause it to roll over.
• Hidden obstacles can make thesteepness of the incline evenworse. If you drive across a rockwith the uphill wheels, or if thedownhill wheels drop into a rut ordepression, your vehicle can tilteven more.
For reasons like these, you need todecide carefully whether or not to tryto drive across an incline. Justbecause the trail goes across theincline doesn’t mean you have todrive it.

Driving tips
285
1
2
3
4
5
6
7
8
9
If your vehicle slides downhillIf you feel your vehicle starting toslide sideways, turn downhill immedi-ately. This should help straighten outthe vehicle and prevent the side slip-ping. However, a much better way toprevent this is to get out and “walkthe course” first so you know whatthe surface is like before you drive it.
Stalling while crossing an inclineIf your vehicle stalls when you’recrossing an incline, be sure you (andyour passengers) get out on theuphill side, even if that door is harderto open. If you get out on the down-hill side and the vehicle starts to rollover, you’ll be in its path.If you have to walk down the slope,stay out of the path the vehicle willtake if it does roll over.
WARNING - Roll overDriving across an incline that’stoo steep will make your vehicleroll over. You could be seriouslyor fatally injured. If you have anydoubt about the steepness ofthe incline, don’t drive across it.Find another route instead.

5 29
Driving tips
1
2
3
4
5
6
7
8
9
Driving in mud, sand, snow, oriceWhen you drive in mud, sand, snow,or ice, your wheels won’t get goodtraction. You can’t accelerate asquickly, turning is more difficult, andyou’ll need longer braking distances.It’s best to use a low gear whenyou’re in mud, the deeper the mud,the lower the gear. In extremely deepmud, the idea is to keep your vehiclemoving so you don’t get stuck.When you drive on sand, you’llsense a change in wheel traction.But it will depend upon how looselypacked the sand is. On looselypacked sand (as on beaches or sanddunes) your tires will tend to sink intothe sand. This has an effect on steer-ing, accelerating, and braking. Youmay want to reduce the air pressurein your tires slightly when driving onsand. This will improve traction.Remember to re-inflate them the firstchance that you have after you leavethe loosely packed sand.
✽✽ NOTICE• In case of loss of traction in mud,
loose soil, or sand, turn the steer-ing wheel rapidly from side-to-side. This can help generate addi-tional traction.
• Do not gun the engine. This willcause the tires to spin and digdown, not forward, and couldbury the vehicle to the frame.Smooth, easy power is better thantoo much power.
WARNING - Exiting vehi-cle
Getting out on the downhill(low) side of a vehicle stoppedacross an incline is dangerous.If the vehicle rolls over, youcould be crushed or fatallyinjured. Always get out on theuphill (high) side of the vehicleand stay well clear of therollover path.
Driving tips
305
1
2
3
4
5
6
7
8
9
Hard-packed snow and ice offer theworst tire traction. On these surfaces,it’s very easy to lose control. On wetice, for example, the traction is sopoor that you will even have difficultyaccelerating. And if you do get mov-ing, poor steering and difficult brak-ing can easily cause you to slide outof control.
Driving in waterLight rain causes no special off-roaddriving problems. However, heavyrain can cause flash flooding, andflood waters demand extreme cau-tion.Find out how deep the water isbefore you drive through it. If it’sdeep enough to cover your wheelbearing hubs, axles, or exhaust pipe,don’t try it, You probably won’t getthrough. Also, water that deep candamage your axle and other vehicleparts.If the water isn’t too deep, then drivethrough slowly. At fast speeds, watercan splash on your ignition systemand your vehicle can stall. Stallingcan also occur if your tailpipe goesunderwater. As long as your tailpipeis underwater, you will not be able tostart your engine. When you gothrough water, remember that it maytake you longer to stop when yourbrakes are wet.
If you have driven through water thatwas deep enough to cover yourwheel bearing hubs, it may be agood idea to have an Authorized Kiadealer or other competent servicecenter repack your front wheel bear-ings and examine your rear-end fluidfor evidence of water.
WARNING - Frozen sur-faces
Driving on frozen lakes, pondsor rivers can be dangerous.Underwater springs, currentsunder the ice, or sudden thawscan weaken the ice.Your vehiclecould fall through the ice andyou and your passengers coulddrown. Drive your vehicle onsafe surfaces only.

5 31
Driving tips
1
2
3
4
5
6
7
8
9
After off-road drivingRemove any brush or debris that hascollected on the underbody, chassisor under the hood. These accumula-tions can be a fire hazard.After driving in mud or sand, cleanand check the brake linings.Accumulation of mud or sand cancause glazing and uneven braking.Check the body structure, steering,suspension, wheels, tires, andexhaust system for damage. Also,check the fuel lines and cooling sys-tem for any leakage. Your vehicle willalso require more frequent servicedue to off-road use.
WARNING - WaterDriving through rushing watercan be dangerous. Deep watercan sweep your vehicle down-stream and you and your pas-sengers could drown. If it’s onlyinches deep, it can still washaway the ground from underyour tires, and you could losetraction and roll the vehicle.Never drive through rushingwater.

Driving tips
325
1
2
3
4
5
6
7
8
9
WEIGHT OF THE VEHICLE This section will guide you in theproper loading of your vehicle and/ortrailer, to keep your loaded vehicleweight within its design rating capa-bility, with or without a trailer.Properly loading your vehicle willprovide maximum return of the vehi-cle design performance. Before load-ing your vehicle, familiarize yourselfwith the following terms for determin-ing your vehicle's weight ratings, withor without a trailer, from the vehicle'sSpecifications and the VehicleCertification Label:
Base curb weight This is the weight of the vehicleincluding a full tank of fuel and allstandard equipment. It does notinclude passengers, cargo, or option-al equipment.
Vehicle curb weightThis is the weight of your new vehiclewhen you picked it up from your deal-er plus any aftermarket equipment.
Cargo weightThis figure includes all weight addedto the Base Curb Weight, includingcargo and optional equipment. Whentowing, trailer tongue load or king pinweight also is part of the CargoWeight.
GAW (Gross axle weight)This is the total weight placed oneach axle (front and rear) - includingvehicle curb weight and all payload.
GAWR (Gross axle weight rating)This is the maximum allowableweight that can be carried by a singleaxle (front or rear). These numbersare shown on the VehicleCertification Label. The total load oneach axle must never exceed itsGAWR.
GVW (Gross vehicle weight)This is the Base Curb Weight plusactual Cargo Weight plus passen-gers.
GVWR (Gross vehicle weightrating)
This is the maximum allowable weightof the fully loaded vehicle (includingall options, equipment, passengersand cargo). The GVWR is shown onthe Vehicle Certification Label locatedon the driver's door pillar.

5 33
Driving tips
1
2
3
4
5
6
7
8
9
TRAILER TOWING
✽✽ NOTICEPulling a trailer improperly candamage your vehicle and result incostly repairs not covered by yourwarranty. To pull a trailer correctly,follow the advice in this section.
Your Sportage equipped with a 2.7liter engine can tow a trailer.However, we do not recommendtrailer towing for the Sportageequipped with the 2.0 liter engine. Toidentify what the vehicle traileringcapacity is for your vehicle, youshould read the information in“Weight of the Trailer” that appearslater in this section.
Remember that trailering is differentthan just driving your vehicle by itself.Trailering means changes in han-dling, durability, and fuel economy.Successful, safe trailering requirescorrect equipment, and it has to beused properly.
This section contains many time-tested, important trailering tips andsafety rules. Many of these areimportant for your safety and that ofyour passengers. Please read thissection carefully before you pull atrailer.
Load-pulling components such asthe engine, transaxle, wheel assem-blies, and tires are forced to workharder against the load of the addedweight. The engine is required tooperate at relatively higher speedsand under greater loads. This addi-tional burden generates extra heat.The trailer also adds considerably towind resistance, increasing thepulling requirements.
WARNING - Towing atrailer
If you don't use the correctequipment and drive properly,you can lose control when youpull a trailer. For example, if thetrailer is too heavy, the brakesmay not work well - or even atall. You and your passengerscould be seriously or fatallyinjured. Pull a trailer only if youhave followed all the steps inthis section.
Item 2.7L EngineMaximum trailer Without trailer brakes 454 (1000)
weight kg (lbs.) With trailer brakes 907 (2000)
Maximum permissible static vertical
load on the coupling device kg (lbs.)91 (200)
Driving tips
345
1
2
3
4
5
6
7
8
9
If you do decide to pull a trailerHere are some important points ifyou decide to pull a trailer:• State, provincial, county and
municipal government have vary-ing trailering laws. Make sure yourhitch, mirrors, lights and wiringarrangements are legal, not onlywhere you live, but also whereyou’ll be driving. A good source forthis information is provincial orlocal law enforcement agencies.
• Consider using a sway control. Youcan ask a hitch dealer about swaycontrol.
• After your odometer indicates 800km (500 miles) or more, you cantow a trailer. For the first 800 km(500 miles) that you tow a trailer,don’t drive over 80 km/h (50 mph)and don’t make starts at full throt-tle. This helps your engine andother parts of your vehicle “wear” inat the heavier loads.
• Always drive at a safe speed (lessthan 100 km/h) commensuratewith road conditions.
• On a long uphill grade, do notexceed 70 km/h (45 mph) or theposted towing speed limit,whichever is lower.
• The important considerations haveto do with weight:
Weight of the trailer
How heavy can a trailer safely be? Itshould never weigh more than themaximum trailer weight with trailerbrakes. But even that can be tooheavy.It depends on how you plan to useyour trailer. For example, speed, alti-tude, road grades, outside tempera-ture and how much your vehicle isused to pull a trailer are all important.The ideal trailer weight can alsodepend on any special equipmentthat you have on your vehicle.
5 35
Driving tips
1
2
3
4
5
6
7
8
9
Weight of the trailer tongue
The tongue load of any trailer is animportant weight to measurebecause it affects the total grossvehicle weight (GVW) of your vehi-cle. This weight includes the curbweight of the vehicle, any cargo youmay carry in it, and the people whowill be riding in the vehicle. And if youwill tow a trailer, you must add thetongue load to the GVW becauseyour vehicle will also be carrying thatweight.The trailer tongue should weigh amaximum of 10% of the total loadedtrailer weight. After you've loadedyour trailer, weigh the trailer and thenthe tongue, separately, to see if theweights are proper. If they aren’t, youmay be able to correct them simplyby moving some items around in thetrailer.
Hitches It's important to have the correcthitch equipment. Crosswinds, largetrucks going by, and rough roads area few reasons why you’ll need theright hitch. Here are some rules tofollow:• Will you have to make any holes in
the body of your vehicle when youinstall a trailer hitch? If you do, thenbe sure to seal the holes laterwhen you remove the hitch.If you don’t seal them, deadly car-bon monoxide (CO) from yourexhaust can get into your vehicle,as well as dirt and water.
• The bumpers on your vehicle arenot intended for hitches. Do notattach rental hitches or otherbumper-type hitches to them. Useonly a frame-mounted hitch thatdoes not attach to the bumper.
WARNING - Trailer• Never load a trailer with more
weight in the rear than in thefront. The front should beloaded with approximately60% of the total trailer load;the rear should be loaded withapproximately 40% of the totaltrailer load.
• Never exceed the maximumweight limits of the trailer ortrailer towing equipment.Improper loading can result indamage to your vehicle and/orpersonal injury. Checkweights and loading at a com-mercial scale or highwaypatrol office equipped withscales.
• An improperly loaded trailercan cause loss of vehicle con-trol.

Driving tips
365
1
2
3
4
5
6
7
8
9
Safety chains You should always attach chainsbetween your vehicle and your trail-er. Cross the safety chains under thetongue of the trailer so that thetongue will not drop to the road if itbecomes separated from the hitch.Instructions about safety chains maybe provided by the hitch manufactur-er or by the trailer manufacturer.Follow the manufacturer’s recom-mendation for attaching safetychains. Always leave just enoughslack so you can turn with your trail-er. And, never allow safety chains todrag on the ground.
Trailer brakes If your trailer weighs more than themaximum trailer weight without trail-er brakes loaded, then it needs itsown brakes and they must be ade-quate. Be sure to read and follow theinstructions for the trailer brakes soyou’ll be able to install, adjust andmaintain them properly.• Don’t tap into your vehicle's brake
system.
Driving with a trailer Towing a trailer requires a certainamount of experience. Before settingout for the open road, you must getto know your trailer. Acquaint your-self with the feel of handling andbraking with the added weight of thetrailer. And always keep in mind thatthe vehicle you are driving is now agood deal longer and not nearly soresponsive as your vehicle is byitself.Before you start, check the trailerhitch and platform, safety chains,electrical connector(s), lights, tiresand mirror adjustment. If the trailerhas electric brakes, start your vehicleand trailer moving and then apply thetrailer brake controller by hand to besure the brakes are working.This letsyou check your electrical connectionat the same time.During your trip, check occasionallyto be sure that the load is secure,and that the lights and any trailerbrakes are still working.
WARNING - Trailer brakesDo not use a trailer with its ownbrakes unless you are absolute-ly certain that you have properlyset up the brake system. This isnot a task for amateurs. Use anexperienced, competent trailershop for this work.
5 37
Driving tips
1
2
3
4
5
6
7
8
9
Following distance Stay at least twice as far behind thevehicle ahead as you would whendriving your vehicle without a trailer.This can help you avoid situationsthat require heavy braking and sud-den turns.
Passing You’ll need more passing distanceup ahead when you’re towing a trail-er. And, because you’re a good deallonger, you’ll need to go much fartherbeyond the passed vehicle beforeyou can return to your lane.
Backing up Hold the bottom of the steeringwheel with one hand. Then, to movethe trailer to the left, just move yourhand to the left. To move the trailer tothe right, move your hand to theright. Always back up slowly and, ifpossible, have someone guide you.
Making turns When you’re turning with a trailer,make wider turns than normal. Dothis so your trailer won’t strike softshoulders, curbs, road signs, trees,or other objects. Avoid jerky or sud-den maneuvers. Signal well inadvance.
Turn signals when towing a trailer When you tow a trailer, your vehiclehas to have a different turn signalflasher and extra wiring. The greenarrows on your instrument panel willflash whenever you signal a turn orlane change. Properly connected,the trailer lights will also flash to alertother drivers you’re about to turn,change lanes, or stop.When towing a trailer, the greenarrows on your instrument panel willflash for turns even if the bulbs onthe trailer are burned out. Thus, youmay think drivers behind you areseeing your signals when, in fact,they are not. It’s important to checkoccasionally to be sure the trailerbulbs are still working. You must alsocheck the lights every time you dis-connect and then reconnect thewires.

Driving tips
385
1
2
3
4
5
6
7
8
9
Do not connect a trailer lighting sys-tem directly to your vehicle’s lightingsystem. Use only an approved trailerwiring harness.Your Authorized Kia Dealer canassist you in installing the wiring har-ness.
Driving on grades Reduce speed and shift to a lowergear before you start down a long orsteep downgrade. If you don’t shiftdown, you might have to use yourbrakes so much that they would gethot and no longer operate efficiently.On a long uphill grade, shift downand reduce your speed to around 70km/h (45 mph) to reduce the possi-bility of engine and transaxle over-heating.If your trailer weighs more than themaximum trailer weight without trail-er brakes and you have an automat-ic transaxle, you should drive in D(Drive) when towing a trailer.Operating your vehicle in D (Drive)when towing a trailer will minimizeheat build up and extend the life ofyour transaxle.
✽✽ NOTICE• When towing a trailer on steep
grades (in excess of 6%) pay closeattention to the engine coolanttemperature gauge to ensure theengine does not overheat. If theneedle of the coolant temperaturegauge moves across the dialtowards “H” (HOT), pull over andstop as soon as it is safe to do so,and allow the engine to idle until itcools down. You may proceed oncethe engine has cooled sufficiently.
• You must decide driving speeddepending on trailer weight anduphill grade to reduce the possibil-ity of engine and transaxle over-heating.
CAUTIONFailure to use an approved trail-er wiring harness could result indamage to the vehicle electricalsystem and/or personal injury.

5 39
Driving tips
1
2
3
4
5
6
7
8
9
Parking on hills Generally, if you have a trailerattached to your vehicle, you shouldnot park your vehicle on a hill. Peoplecan be seriously or fatally injured,and both your vehicle and the trailercan be damaged if unexpectedly rolldown hill.
However, if you ever have to parkyour trailer on a hill, here’s how to doit:1. Pull the vehicle into the parking
space. Turn the steering wheel inthe direction of the curb (right ifheaded down hill, left if headed uphill).
2. If the vehicle has a manualtransaxle, place the car in neutral.If the vehicle has an automatictransaxle, place the car in P (Park).
3. Set the parking brake and shut offthe vehicle.
4. Place chocks under the trailerwheels on the down hill side of thewheels.
5. Start the vehicle, hold the brakes,shift to neutral, release the parkingbrake and slowly release thebrakes until the trailer chocksabsorb the load.
6. Reapply the brakes, reapply theparking brake and shift the vehicleto R (Reverse) for manualtransaxle or P (Park) for automatictransaxle.
7. Shut off the vehicle and releasethe vehicle brakes but leave theparking brake set.
When you are ready to leave afterparking on a hill 1. With the manual transaxle in
Neutral or automatic transaxle in P(Park), apply your brakes and holdthe brake pedal down while you:• Start your engine;• Shift into gear; and• Release the parking brake.
2. Slowly remove your foot from thebrake pedal.
3. Drive slowly until the trailer is clearof the chocks.
4. Stop and have someone pick upand store the chocks.
WARNING - Parking brakeIt can be dangerous to get out ofyour vehicle if the parking brakeis not firmly set.If you have left the engine run-ning, the vehicle can move sud-denly. You or others could beseriously or fatally injured.
WARNING - Parking on ahill
Parking your vehicle on a hillwith a trailer attached couldcause serious injury or death,should the trailer break lose.
Driving tips
405
1
2
3
4
5
6
7
8
9
Maintenance when trailer tow-ing Your vehicle will need service moreoften when you regularly pull a trail-er. Important items to pay particularattention to include engine oil, auto-matic transaxle fluid, axle lubricantand cooling system fluid. Brake con-dition is another important item tofrequently check. Each item is cov-ered in this manual, and the Indexwill help you find them quickly. Ifyou’re trailering, it’s a good idea toreview these sections before youstart your trip.Don’t forget to also maintain yourtrailer and hitch. Follow the mainte-nance schedule that accompaniedyour trailer and check it periodically.Preferably, conduct the check at thestart of each day’s driving. Mostimportantly, all hitch nuts and boltsshould be tight.
✽✽ NOTICE• Due to higher load during trailer
usage, overheating might occur inhot days or during uphill driving.If the coolant gauge indicatesover-heating, switch off the A/Cand stop the vehicle in a safe areato cool down the engine.
• When towing check transaxlefluid more frequently.
• If your vehicle is not equippedwith the air conditioner, youshould install a condenser fan toimprove engine performancewhen towing a trailer.
OVERLOADING
CAUTION - Vehicle weightThe gross axle weight rating(GAWR) and the gross vehicleweight rating (GVWR) for yourvehicle are on the manufactur-er's label attached to the dri-ver's door. Exceeding these rat-ings can cause an accident orvehicle damage. You can calcu-late the weight of your load byweighing the items (and people)before putting them in the vehi-cle. Be careful not to overloadyour vehicle.

5 41
Driving tips
1
2
3
4
5
6
7
8
9
VEHICLE LOAD LIMIT
Tire and loading informationlabelThe tire label located on the driver'sdoor sill gives the original tire size,cold tire pressures recommended foryour vehicle, the number of peoplethat can be in your vehicle and vehi-cle capacity weight.
Steps for determining correctload limit1. Locate the statement "The com-
bined weight of occupants andcargo should never exceed XXXkg or XXX lbs.'' on your vehicle'splacard.
2. Determine the combined weight ofthe driver and passengers that willbe riding in your vehicle.
3. Subtract the combined weight ofthe driver and passengers fromXXX kg or XXX lbs.
4. The resulting figure equals theavailable amount of cargo and lug-gage load capacity. For example, ifthe "XXX" amount equals 635 kg(1400 lbs), and there will be five68 kg (150 lbs) passengers in yourvehicle, the amount of availablecargo and luggage load capacityis 295 kg (650 lbs).
635-340 (5 x 68) = 650 kg) or(1400-750 (5 x 150) = 295 lbs.
5. Determine the combined weight ofluggage and cargo being loadedon the vehicle. That weight maynot safely exceed the availablecargo and luggage load capacitycalculated in Step 4.
6. If your vehicle will be towing a trail-er, load from your trailer will betransferred to your vehicle. Consultthis manual to determine how thisreduces the available cargo andluggage load capacity of yourvehicle.
OKM050300L

Driving tips
425
1
2
3
4
5
6
7
8
9
C190F01JM C190F02JM C190F03JM
Example 1
A B C A B C A B C
Example 2 Example 3
Item Description Total
AVehicle Capacity 1400 lbs
Weight (635 kg)Subtract Occupant
B Weight 300 lbs
150 lbs (68 kg) × 2(136 kg)
CAvailable Cargo and 1100 lbs
Luggage weight (499 kg)
Item Description Total
AVehicle Capacity 1400 lbs
Weight (635 kg)Subtract Occupant
B Weight 750 lbs
150 lbs (68 kg) × 5(340 kg)
CAvailable Cargo and 650 lbs
Luggage weight (295 kg)
Item Description Total
AVehicle Capacity 1400 lbs
Weight (635 kg)Subtract Occupant
B Weight 860 lbs
172 lbs (78 kg) × 5(390 kg)
CAvailable Cargo and 540 lbs
Luggage weight (245 kg)

5 43
Driving tips
1
2
3
4
5
6
7
8
9
Refer to your vehicle's tire and load-ing information label for specificinformation about your vehicle'scapacity weight and seating posi-tions. The combined weight of thedriver, passengers and cargo shouldnever exceed your vehicle's capacityweight.
Compliance labelThe compliance label is located onthe driver's door sill.The label shows the size of your orig-inal tires and the inflation pressuresneeded to obtain the gross weightcapacity of your vehicle. This iscalled the GVWR (Gross VehicleWeight Rating). The GVWR includesthe weight of the vehicle, all occu-pants, fuel and cargo.This label also tells you the maxi-mum weights that can be supportedby the front and rear axles, calledGross Axle Weight Rating (GAWR).To find out the actual loads on yourfront and rear axles, you need to goto a weigh station and weigh yourvehicle.Your dealer can help you withthis. Be sure to spread out your loadequally on both sides of the center-line.
WARNING - Over loading• Never exceed the GVWR for
your vehicle, or the GAWR foreither the front or rear axle.
• Do not load your vehicle anyheavier than the GVWR, oreither the maximum front orrear GAWR. If you do, parts onyour vehicle can break, and itcan change the way your vehi-cle handles. This could causeyou to lose control and crash.Also, overloading can shortenthe life of your vehicle.

Driving tips
445
1
2
3
4
5
6
7
8
9
✽✽ NOTICE• Overloading your vehicle may
cause damage. Repairs would notbe covered by your warranty. Donot overload your vehicle.
• Using heavier suspension compo-nents to get added durabilitymight not change your weight rat-ings. Ask your dealer to help youload your vehicle the right way.
The label will help you decide howmuch cargo and installed equipmentyour vehicle can carry.
If you carry items inside your vehicle- like suitcases, tools, packages, oranything else - they are moving asfast as the vehicle. If you have to stopor turn quickly, or if there is a crash,the items will keep going and cancause an injury if they strike the driv-er or a passenger.
WARNING - Loose cargoItems you carry inside yourvehicle can strike and injurepeople in a sudden stop or turn,or in a crash.• Put things in the cargo area of
your vehicle. Try to spread theweight evenly.
• Never stack items, like suit-cases, inside the vehicleabove the tops of the seats.
• Do not leave an unsecuredchild restraint in your vehicle.
• When you carry somethinginside the vehicle, secure it.
• Do not drive with a seat foldeddown unless necessary.

5 45
Driving tips
1
2
3
4
5
6
7
8
9
HOMELINK® WIRELESS CONTROL SYSTEM (IF EQUIPPED)
Your new mirror comes with an inte-grated HomeLink UniversalTransceiver, which allows you to pro-gram the mirror to activate yourgarage door(s), estate gate, homelighting, etc. The mirror actuallylearns the codes from your variousexisting transmitters.
CAUTION• When programming the
HomeLink® Wireless ControlSystem, you may be operatinga garage door or gate opera-tor. Make sure that people andobjects are out of the way ofthe moving door or gate toprevent potential harm ordamage.
• Do not use HomeLink with anygarage door opener that lacksthe safety stop and reversefeature as required by federalsafety standards. (Thisincludes any garage dooropener model manufacturedbefore April 1, 1982.) A garagedoor opener which cannotdetect an object, signaling thedoor to stop and reverse, doesnot meet current federal safe-ty standards. Using a garagedoor opener without thesefeatures increases risk of seri-ous injury or death. For moreinformation, call 1-800-355-3515 or on the internet atwww.homelink.com.
(Continued)
(Continued)• Retain the original transmitter
for future programming proce-dures (i.e., new vehicle pur-chase). It is also suggestedthat upon the sale of the vehi-cle, the programmedHomeLink buttons be erasedfor security purposes (followstep 1 in the “Programming”portion of this text).MMSA5007Homelink buttons
Glare detection sensorIndicator light

Driving tips
465
1
2
3
4
5
6
7
8
9
ProgrammingYour vehicle may require the ignitionswitch to be turned to the ACC posi-tion for programming and/or opera-tion of HomeLink. It is also recom-mended that a new battery bereplaced in the hand-held transmitterof the device being programmed toHomeLink for quicker training andaccurate transmission of the radio-frequency.Follow these steps to train yourHomeLink mirror:
1. When programming the buttonsfor the first time, press and holdthe left and center buttons ( ,
) simultaniously until theindicator light begins to flash afterapproximately 20 seconds. (Thisprocedure erases the factory-setdefault codes. Do Not perform thisstep to program additional hand-held transmitters.)
✽✽ NOTICEFor non rolling code garage dooropeners, follow steps 2 - 3. For rolling code garage door open-ers, follow steps 2 - 6. For Canadian Programming, pleasefollow the Canadian Programmingsection.For help with determining whetheryour garage is non-rolling code orrolling code, please refer to thegarage door openers owner’s manu-al or contact HomeLink customerservice at 1-800-355-3515.
MMSA5005
Flashing

5 47
Driving tips
1
2
3
4
5
6
7
8
9
2. Press and hold the button on theHomeLink system you wish totrain and the button on the trans-mitter while the transmitter isapproximately 1 to 3 inches awayfrom the mirror. Do not release thebuttons until step 3 has been com-pleted.
3. The HomeLink indicator light willflash, first slowly and then rapidly.When the indicator light flashesrapidly, both buttons may bereleased. (The rapid flashing lightindicates successful programmingof the new frequency signal.)
✽✽ NOTICESome gate operators and garagedoor openers may require you toreplace step #3 with the “cycling”procedure noted in the “CanadianProgramming” section of this docu-ment.
Rolling code programmingTo train a garage door opener (orother rolling code equipped devices)with the rolling code feature, followthese instructions after completingthe “Programming” portion of thistext. (A second person may make thefollowing training procedures quicker& easier.) 4. Locate the “learn” or “smart” but-
ton on the device’s motor headunit. Exact location and color ofthe button may vary by productbrand. If there is difficulty locatingthe “learn” or “smart” button, refer-ence the device’s owner’s manualor contact HomeLink at 1-800-355-3515 or on the internet atwww.homelink.com.
5. Press and release the “learn” or“smart” button on the device’smotor head unit. You have 30 sec-onds to complete step number 6.
MMSA5006
Flashing
Transmitter
1-3inc
hes

Driving tips
485
1
2
3
4
5
6
7
8
9
6. Return to the vehicle and firmlypress and release the pro-grammed HomeLink button up tothree times. The rolling codeequipped device should now rec-ognize the HomeLink signal andactivate when the HomeLink but-ton is pressed. The remaining twobuttons may now be programmedif this has not previously beendone. Refer to the “Programming”portion of this text.
Operating HomeLink To operate, simply press the pro-grammed HomeLink button.Activation will now occur for thetrained product (garage door, securi-ty system, entry door lock, estategate, or home or office lighting). Forconvenience, the hand-held trans-mitter of the device may also be usedat any time. The HomeLink WirelessControls System (once programmed)or the original hand-held transmittermay be used to activate the device(e.g. garage door, entry door lock,etc.). In the event that there are stillprogramming difficulties, contactHomeLink at 1-800-355-3515 or onthe internet at www.homelink.com.
Erasing programmedHomeLink buttonsTo erase the three programmed but-tons (individual buttons cannot beerased):• Press and hold the left and center
buttons simultaniously, until theindicator light begins to flash(approximately 20 seconds).Release both buttons. Do not holdfor longer than 30 seconds.
HomeLink is now in the train (orlearning) mode and can be pro-grammed at any time.
MMSA5005
Flashing
5 49
Driving tips
1
2
3
4
5
6
7
8
9
Reprogramming a singleHomeLink buttonTo program a device to HomeLinkusing a HomeLink button previouslytrained, follow these steps:1. Press and hold the desired
HomeLink button. Do NOT releaseuntil step 4 has been completed.
2. When the indicator light begins toflash slowly (after 20 seconds),position the hand-held transmitter1 to 3 inches away from theHomeLink surface.
3. Press and hold the hand-heldtransmitter button (or press and“cycle” - as described in“Canadian Programming” above).
4. The HomeLink indicator light willflash, first slowly and then rapidly.When the indicator light begins toflash rapidly, release both buttons.
The previous device has now beenerased and the new device can beactivated by pushing the HomeLinkbutton that has just been pro-grammed. This procedure will notaffect any other programmedHomeLink buttons.
Gate operator programming &canadian programmingDuring programming, your hand-heldtransmitter may automatically stoptransmitting. Continue to press andhold the HomeLink button (notesteps 2 through 4 in the“Programming” portion of this text)while you press and re-press(“cycle”) your handheld transmitterevery two seconds until the frequen-cy signal has been learned. The indi-cator light will flash slowly and thenrapidly after several seconds uponsuccessful training.
✽✽ NOTICEIf programming a garage door open-er or gate, it is advised to unplug thedevice during the “cycling” processto prevent possible motor burn-up.
AccessoriesIf you would like additional informa-tion on the HomeLink WirelessControl System, HomeLink compati-ble products, or to purchase otheraccessories such as the HomeLink®Lighting Package, please contactHomeLink at 1-800-355-3515 or onthe internet at www.homelink.com.
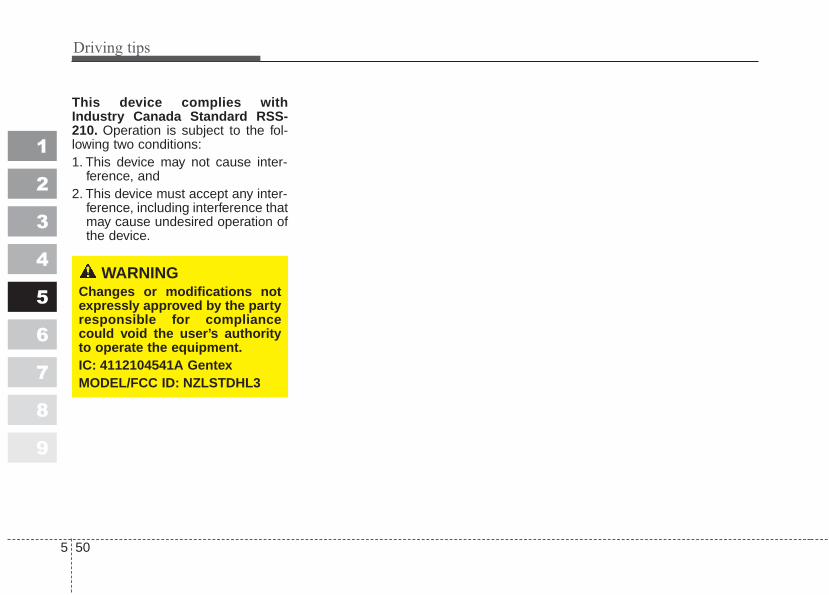
Driving tips
505
1
2
3
4
5
6
7
8
9
This device complies withIndustry Canada Standard RSS-210. Operation is subject to the fol-lowing two conditions:1. This device may not cause inter-
ference, and 2. This device must accept any inter-
ference, including interference thatmay cause undesired operation ofthe device.
WARNINGChanges or modifications notexpressly approved by the partyresponsible for compliancecould void the user’s authorityto operate the equipment.IC: 4112104541A Gentex MODEL/FCC ID: NZLSTDHL3

5 51
Driving tips
1
2
3
4
5
6
7
8
9
LABEL INFORMATION There are several important labelsand identification numbers locatedon your vehicle. The label locationsare identified in the illustrationsshown.
Vehicle identification number(VIN) To check the frame number underthe passenger seat, remove thecover by pulling one side markedwith “PULL”.
1KMA6001 1KMB5042
1KMN5043 1KMN5044
Compliance label VIN bar code
Frame number VIN label
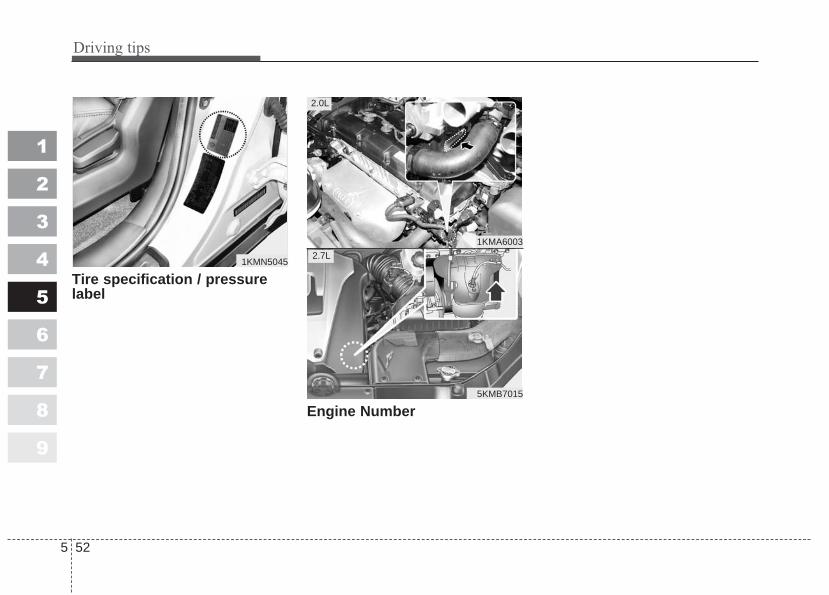
Driving tips
525
1
2
3
4
5
6
7
8
9
Tire specification / pressurelabel
Engine Number
1KMN5045
1KMA6003
5KMB7015
2.0L
2.7L
1
2
3
4
5
6
7
8
9
Road warning / 6-2
In case of an emergency while driving / 6-2
Overheating / 6-3
Emergency starting / 6-4
Electrical circuit protection / 6-7
Towing / 6-14
If you have a flat tire / 6-19
In case of an emergency
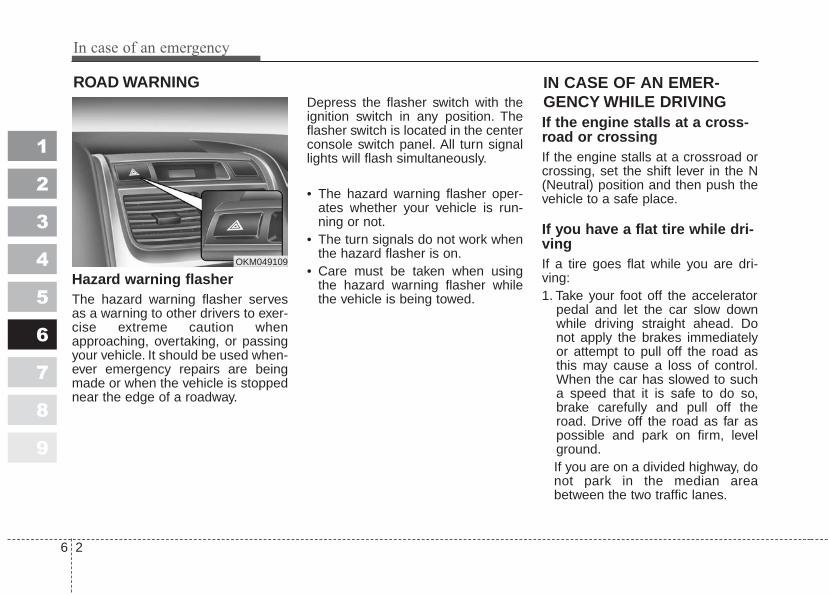
In case of an emergency
26
ROAD WARNING
Hazard warning flasher The hazard warning flasher servesas a warning to other drivers to exer-cise extreme caution whenapproaching, overtaking, or passingyour vehicle. It should be used when-ever emergency repairs are beingmade or when the vehicle is stoppednear the edge of a roadway.
Depress the flasher switch with theignition switch in any position. Theflasher switch is located in the centerconsole switch panel. All turn signallights will flash simultaneously.
• The hazard warning flasher oper-ates whether your vehicle is run-ning or not.
• The turn signals do not work whenthe hazard flasher is on.
• Care must be taken when usingthe hazard warning flasher whilethe vehicle is being towed.
If the engine stalls at a cross-road or crossingIf the engine stalls at a crossroad orcrossing, set the shift lever in the N(Neutral) position and then push thevehicle to a safe place.
If you have a flat tire while dri-vingIf a tire goes flat while you are dri-ving:1. Take your foot off the accelerator
pedal and let the car slow downwhile driving straight ahead. Donot apply the brakes immediatelyor attempt to pull off the road asthis may cause a loss of control.When the car has slowed to sucha speed that it is safe to do so,brake carefully and pull off theroad. Drive off the road as far aspossible and park on firm, levelground.If you are on a divided highway, donot park in the median areabetween the two traffic lanes.
1
2
3
4
5
6
7
8
9
OKM049109
IN CASE OF AN EMER-GENCY WHILE DRIVING

6 3
In case of an emergency
2. When the car is stopped, turn onyour emergency hazard flashers,set the parking brake and put thetransaxle in P (automatic transaxle)or reverse (manual transaxle).
3. Have all passengers get out of thecar. Be sure they all get out on theside of the car that is away from traf-fic.
4. When changing a flat tire, followthe instruction provided later inthis section.
If engine stalls while driving1. Reduce your speed gradually,
keeping a straight line. Move cau-tiously off the road to a safe place.
2. Turn on your emergency flashers.3. Try to start the engine again. If
your vehicle will not start, contactan authorised Kia dealer or seekother qualified assistance.
If your temperature gauge indicatesoverheating, if you experience a lossof power, or if you hear a loud knock-ing or pinging noise, the engine hasprobably overheated. Should any ofthese symptoms occur, use the fol-lowing procedure:1. Turn on the hazard warning flash-
er, then drive to the nearest safelocation and stop your vehicle; setthe automatic transaxle in P(Park), or shift the manualtransaxle to N (Neutral) and applythe parking brake.
2. Make sure the air conditioner isoff.
3. If coolant or steam is boiling out ofthe radiator, stop the engine andcall an Authorized Kia Dealer forassistance.If coolant is not boiling out, allowthe engine to idle and open thehood to permit the engine to coolgradually.If the temperature does not godown with the engine idling, stopthe engine and allow sufficienttime for it to cool.
4. The coolant level should then bechecked. If the level in the reser-voir is low, look for leaks at theradiator hoses and connections,heater hoses and connections,radiator, and water pump. If youfind a major leak or another prob-lem that may have caused theengine to overheat, do not operatethe engine until it has been cor-rected. Call an Authorized KiaDealer for assistance. If you do notfind a leak or other problem, care-fully add coolant to the reservoir.
If the engine frequently overheats,have the cooling system checkedand repaired by an Authorized KiaDealer.
1
2
3
4
5
6
7
8
9
WARNING - Removingradiator cap
Do not remove the radiator capwhen the engine and radiatorare hot. Scalding hot coolantand steam may blow out underpressure. This could cause seri-ous injury.
OVERHEATING
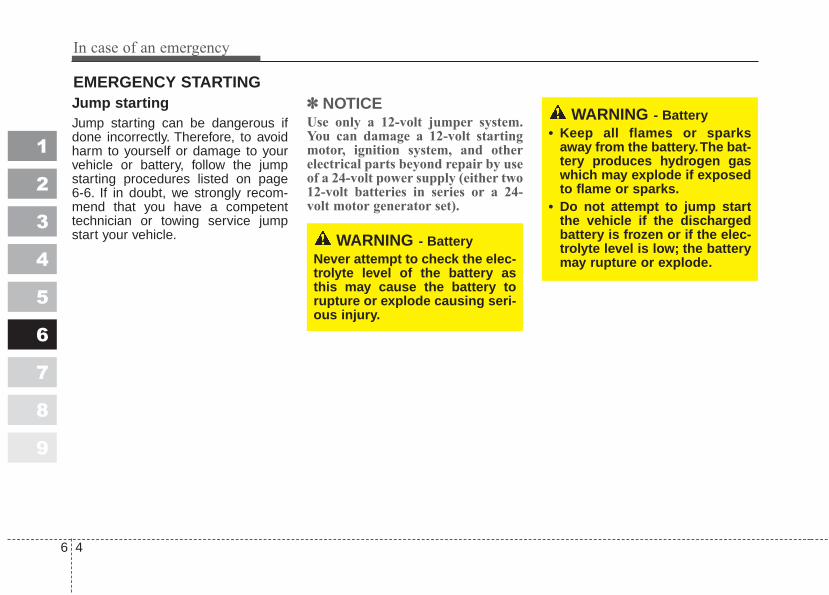
In case of an emergency
46
EMERGENCY STARTING Jump starting Jump starting can be dangerous ifdone incorrectly. Therefore, to avoidharm to yourself or damage to yourvehicle or battery, follow the jumpstarting procedures listed on page6-6. If in doubt, we strongly recom-mend that you have a competenttechnician or towing service jumpstart your vehicle.
✽✽ NOTICEUse only a 12-volt jumper system.You can damage a 12-volt startingmotor, ignition system, and otherelectrical parts beyond repair by useof a 24-volt power supply (either two12-volt batteries in series or a 24-volt motor generator set).
1
2
3
4
5
6
7
8
9
WARNING - Battery• Keep all flames or sparks
away from the battery.The bat-tery produces hydrogen gaswhich may explode if exposedto flame or sparks.
• Do not attempt to jump startthe vehicle if the dischargedbattery is frozen or if the elec-trolyte level is low; the batterymay rupture or explode.
WARNING - BatteryNever attempt to check the elec-trolyte level of the battery asthis may cause the battery torupture or explode causing seri-ous injury.
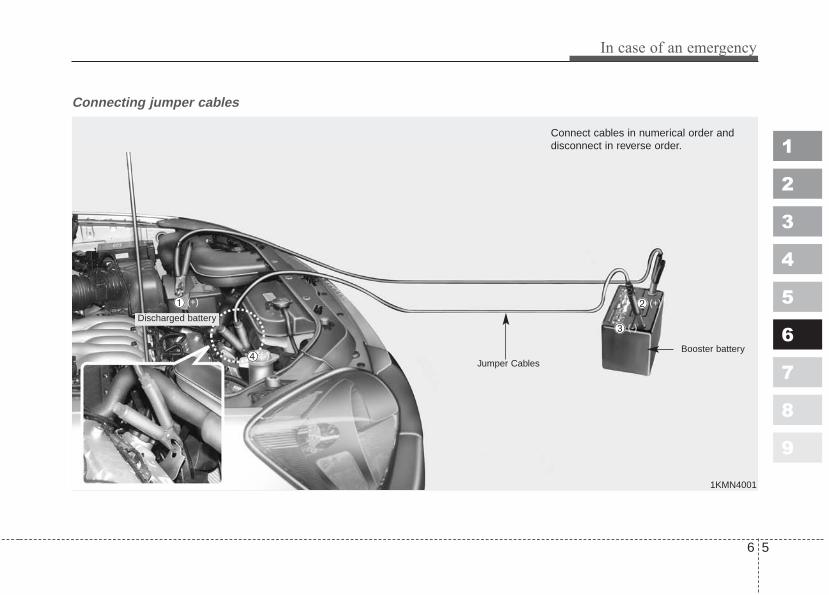
6 5
In case of an emergency
Connecting jumper cables
1
2
3
4
5
6
7
8
9
1KMN4001
Connect cables in numerical order anddisconnect in reverse order.
Discharged battery
(+)
Jumper Cables
Booster battery
➀ ➁
➂
➃ (-)
(+)
(-)
In case of an emergency
66
Jump starting procedure 1. Make sure the booster battery is
12-volt and that its negative termi-nal is grounded.
2. If the booster battery is in anothervehicle, do not allow the vehiclesto touch.
3. Turn off all unnecessary electricalloads.
4. Connect the jumper cables in theexact sequence shown in the pre-vious illustration. First connect oneend of a jumper cable to the posi-tive terminal of the discharged bat-tery (➀), then connect the otherend to the positive terminal on thebooster battery (➁). Proceed toconnect one end of the otherjumper cable to the negative ter-minal of the booster battery (➂),then the other end to a solid, sta-tionary, metallic point (for exam-ple, the engine lifting bracket)away from the battery (➃). Do notconnect it to or near any part thatmoves when the engine iscranked.
Do not allow the jumper cables tocontact anything except the cor-rect battery terminals or the cor-rect ground. Do not lean over thebattery when making connections.
5. Start the engine of the vehicle withthe booster battery and let it run at2,000 rpm, then start the engine ofthe vehicle with the dischargedbattery.
If the cause of your battery discharg-ing is not apparent, you should haveyour vehicle checked by anAuthorized Kia Dealer.
Refer to illustration on page 6-5.
Push-starting Your manual transaxle-equippedvehicle should not be push-startedbecause it might damage the emis-sion control system.Vehicles equipped with automatictransaxle cannot be push-started.Follow the directions in this sectionfor jump-starting.
1
2
3
4
5
6
7
8
9
CAUTIONNever tow a vehicle to start itbecause the sudden surge for-ward when the engine startscould cause a collision with thetow vehicle.
CAUTION - Battery cablesDo not connect the jumpercable from the negative terminalof the booster battery to thenegative terminal of the dis-charged battery. This can causethe discharged battery to over-heat and crack, releasing bat-tery acid.
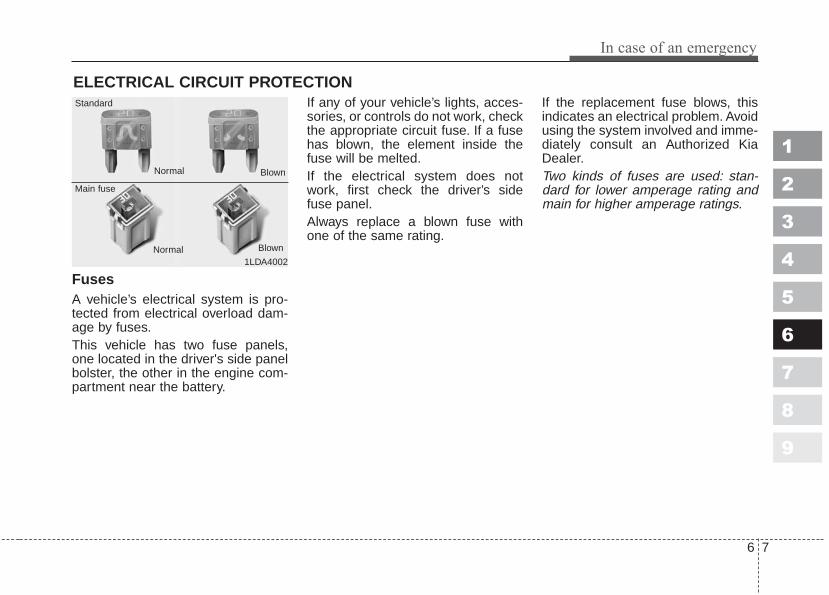
6 7
In case of an emergency
ELECTRICAL CIRCUIT PROTECTION
Fuses A vehicle’s electrical system is pro-tected from electrical overload dam-age by fuses.This vehicle has two fuse panels,one located in the driver's side panelbolster, the other in the engine com-partment near the battery.
If any of your vehicle’s lights, acces-sories, or controls do not work, checkthe appropriate circuit fuse. If a fusehas blown, the element inside thefuse will be melted.If the electrical system does notwork, first check the driver’s sidefuse panel.Always replace a blown fuse withone of the same rating.
If the replacement fuse blows, thisindicates an electrical problem. Avoidusing the system involved and imme-diately consult an Authorized KiaDealer.Two kinds of fuses are used: stan-dard for lower amperage rating andmain for higher amperage ratings.
1
2
3
4
5
6
7
8
9
1LDA4002
Standard
Main fuse
Normal
Normal Blown
Blown
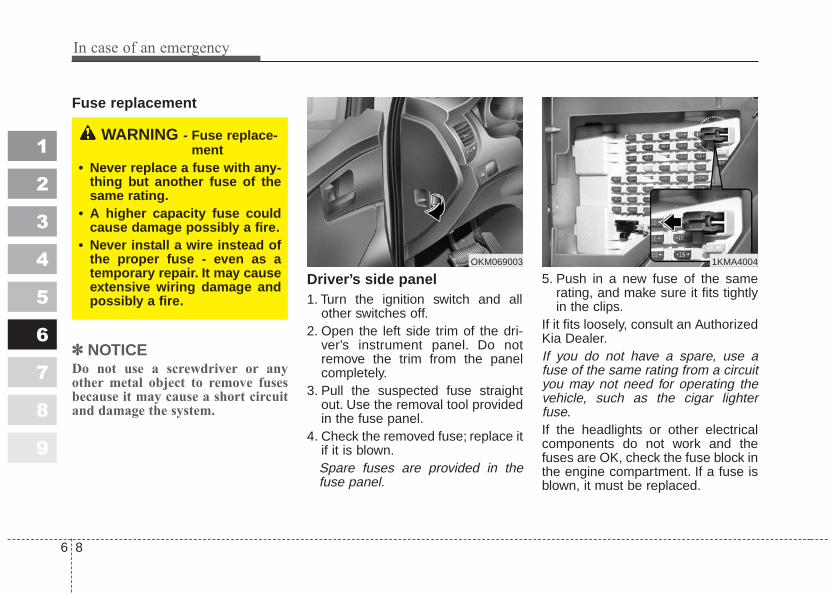
In case of an emergency
86
Fuse replacement
✽✽ NOTICEDo not use a screwdriver or anyother metal object to remove fusesbecause it may cause a short circuitand damage the system.
Driver’s side panel1. Turn the ignition switch and all
other switches off.2. Open the left side trim of the dri-
ver’s instrument panel. Do notremove the trim from the panelcompletely.
3. Pull the suspected fuse straightout. Use the removal tool providedin the fuse panel.
4. Check the removed fuse; replace itif it is blown.Spare fuses are provided in thefuse panel.
5. Push in a new fuse of the samerating, and make sure it fits tightlyin the clips.
If it fits loosely, consult an AuthorizedKia Dealer.If you do not have a spare, use afuse of the same rating from a circuityou may not need for operating thevehicle, such as the cigar lighterfuse.If the headlights or other electricalcomponents do not work and thefuses are OK, check the fuse block inthe engine compartment. If a fuse isblown, it must be replaced.
1
2
3
4
5
6
7
8
9
OKM069003 1KMA4004
WARNING - Fuse replace-ment
• Never replace a fuse with any-thing but another fuse of thesame rating.
• A higher capacity fuse couldcause damage possibly a fire.
• Never install a wire instead ofthe proper fuse - even as atemporary repair. It may causeextensive wiring damage andpossibly a fire.
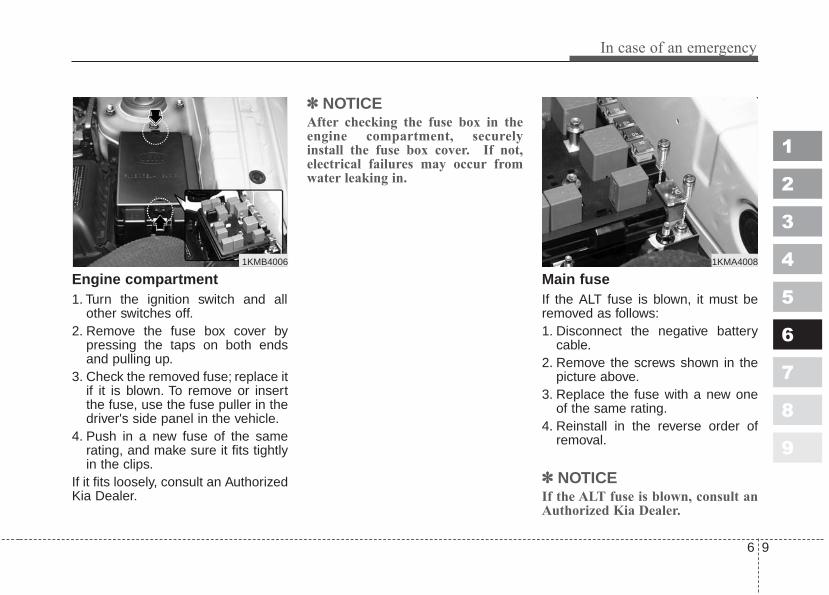
6 9
In case of an emergency
Engine compartment1. Turn the ignition switch and all
other switches off.2. Remove the fuse box cover by
pressing the taps on both endsand pulling up.
3. Check the removed fuse; replace itif it is blown. To remove or insertthe fuse, use the fuse puller in thedriver's side panel in the vehicle.
4. Push in a new fuse of the samerating, and make sure it fits tightlyin the clips.
If it fits loosely, consult an AuthorizedKia Dealer.
✽✽ NOTICEAfter checking the fuse box in theengine compartment, securelyinstall the fuse box cover. If not,electrical failures may occur fromwater leaking in.
Main fuseIf the ALT fuse is blown, it must beremoved as follows:1. Disconnect the negative battery
cable.2. Remove the screws shown in the
picture above.3. Replace the fuse with a new one
of the same rating.4. Reinstall in the reverse order of
removal.
✽✽ NOTICEIf the ALT fuse is blown, consult anAuthorized Kia Dealer.
1
2
3
4
5
6
7
8
9
1KMB4006 1KMA4008

1
2
3
4
5
6
7
8
9
Fuse/Relay panel descriptionInside the fuse/relay box covers, you can find the fuse/relay label describing fuse/relay name and capacity.
In case of an emergency
106
Driver’s side panel
1KMA4009/1KMR4010
Engine compartment

6 11
In case of an emergency
1
2
3
4
5
6
7
8
9
Description Fuse rating Protected componentTAIL RH 10A Taillight (right)RR HTR 30A Rear defrosterHAZARD 15A Hazard warning lightSAFETY P/WDW 15A Safety power windowHTD MIRR 10A Outside rearview mirror defrosterTAIL LH 10A Taillight (left)ECU (B+) 10A TCU, ImmobilizerP/OUTLET.RR 15A Power outlet (rear)RR FOG 10A Rear fog lampRR WIPER 15A Rear wiperF/MIRROR 10A Folding the outside rearview mirror
START 10AIgnition lock/inhibitor switch,Theft-alarm system
AV 10A AudioP/OUTLET.FR 15A Power outlet (front)OBD II 10A OBD II, DiagonosisS/HTR 20A Seat warmerSPARE 15A Spare fuseC/LIGHTER 15A Cigar lighter
AUDIO 10AETACS, Audio, Door lock,Electric remote control mirror
ROOM LP 10ACluster, ETACS, A/C, Clock,Room lamp
S/ROOF & D/LOCK 20A Sunroof, Door lockA/CON 10A Air conditionerIGN 10A Fuel filter heater, HeadlightP/WDW-1 30A Power window (left)
Description Fuse rating Protected componentP/WDW-2 30A Power window (right)SPARE 10A Spare fuseIG COIL 20A Ignition coilT/SIG 15A Turn signal lightA/BAG IND 10A ClusterCLUSTER 10A ClusterSPARE FUSE 15A Spare fuseSPARE FUSE 10A Spare fuseB/UP 10A Back-up lightA/BAG 15A AirbagABS 10A Anti-lock brake systemECU 10A ESC, ImmobilizerSPARE FUSE 30A Spare fuseSPARE FUSE 20A Spare fuseP/CONN 30A Power connector fuseSHUNT CONN - Shunt connector
Driver side panel

In case of an emergency
126
1
2
3
4
5
6
7
8
9
Engine compartment
Description Fuse rating Protected componentA/CON - Air conditioner relayATM - Automatic transaxle control relayCOND2 - Condenser (low) relay DEICE - Defroster relayF/FOG - Front fog light relayF/PUMP - Fuel pump relayHDLP HI - Headlight (high) relayHDLP LO - Headlight (low) relayHORN - Horn relayWIPER - Wiper relayCOND1 - Condenser (high) relay MAIN - Main relaySTART - Start motor relayCOND1 40A Condenser (high)COND2 30A Condenser (low)IGN1 30A Ignition switchIGN2 30A Start motorABS1 40A ABS, ESCABS2 40A ABS, ESCIP B+ 60A In panel B+BLOWER 40A Blower
ALT2.0L Gasoline 120A
Alternator2.7L Gasoline 140A
A/CON 10A Air conditionerSNSR 10A SensorsDEICE 15A Defroster
Description Fuse rating Protected componentDRL 15A Daytime running lightF/FOG 15A Front fog lightF/PUMP 15A Fuel pumpF/WIPER 20A Front wiperHDLP HI 20A Headlight (high)HDLP LO 15A Headlight (low)HORN 15A HornINJ 15A InjectorSTOP 15A Stop light4WD 20A 4WD ECMAMP 20A AmplifierATM 20A Automatic transaxle control ECU 30A Engine control unitSPARE 10A Spare fuseSPARE 15A Spare fuseSPARE 20A Spare fuseSPARE 30A Spare fuse

6 13
In case of an emergency
1
2
3
4
5
6
7
8
9
Power connector fuseYour vehicle is equipped with apower connector fuse to prevent bat-tery discharge if your vehicle isparked without being operated forprolonged periods. Use the followingprocedures before parking the vehi-cle for prolonged period.
1. Turn off the engine.2. Turn off the headlights and tail
lights.3. Open the driver’s side panel cover
and pull up the “P/CONN 30A”.
✽✽ NOTICE• If the power connector fuse is
pulled up from the fuse panel, thewarning chime, audio, clock andinterior lamps, etc., will not oper-ate. Some items must be reset afterreplacement. (Refer to “Items tobe reset···.” on page 7-34)
• Even though the power connectorfuse is pulled up, the battery canstill be discharged by operation ofthe headlights or other electricaldevices.
1KMA4005
Power connector fuse

In case of an emergency
146
1
2
3
4
5
6
7
8
9
TOWING
If emergency towing is necessary,we recommend having it done by anauthorized Kia dealer or a commer-cial tow-truck service. Proper liftingand towing procedures are neces-sary to prevent damage to the vehi-cle. The use of wheel dollies orflatbed is recommended.For trailer towing guidelines informa-tion, refer to section 5 “Driving Tips”.
On 4WD vehicles, your vehiclemust be towed with a wheel liftand dollies or flatbed equipmentwith all the wheels off the ground.
On 2WD vehicles, it is acceptable totow the vehicle with the rear wheelson the ground (without dollies) andthe front wheels off the ground.When being towed by a commercialtow truck and wheel dollies are notused, the front of the vehicle shouldalways be lifted, not the rear.
1KMA4022 1KMA40241KMA4023

6 15
In case of an emergency
1
2
3
4
5
6
7
8
9
✽✽ NOTICE• Do not tow the vehicle backwards
with the front wheels on theground as this may cause damageto the vehicle.
• Do not tow with sling-type equip-ment. Use wheel lift or flatbedequipment.
When towing your vehicle in anemergency without wheel dollies :1. Set the ignition switch in the ACC
position.2. Place the transaxle shift lever in N
(Neutral).3. Release the parking brake.
✽✽ NOTICEFailure to place the transaxle shiftlever in N (Neutral) may cause inter-nal damage to the transaxle.
Towing with a vehicle otherthan a tow truck If towing is necessary, we recom-mend you to have it done by anAuthorized Kia dealer or a commer-cial tow truck service.
1GHA4105A
1KMB4025
OKM069026
• Front
• Rear
OKM069027

In case of an emergency
166
1
2
3
4
5
6
7
8
9
If towing service is not available in anemergency, your vehicle may betemporarily towed using a cable orchain secured to the emergency tow-ing hook under the front or rear of thevehicle. Use extreme caution whentowing the vehicle. A driver must bein the vehicle to steer it and operatethe brakes.
Towing in this manner may be doneonly on hard-surfaced roads for ashort distance and at low speeds.Also, the wheels, axles, power train,steering and brakes must all be ingood condition.• Do not use the tow hooks to pull a
vehicle out of mud, sand or otherconditions from which the vehiclecannot be driven out under its ownpower.
• Avoid towing a vehicle heavier thanthe vehicle doing the towing.
✽✽ NOTICE• Attach a towing strap to the tow
hook.• Using a portion of the vehicle
other than the tow hooks for tow-ing may damage the body of yourvehicle.
• Use only a cable or chain specifi-cally intended for use in towingvehicles. Securely fasten the cableor chain to the towing hook pro-vided.
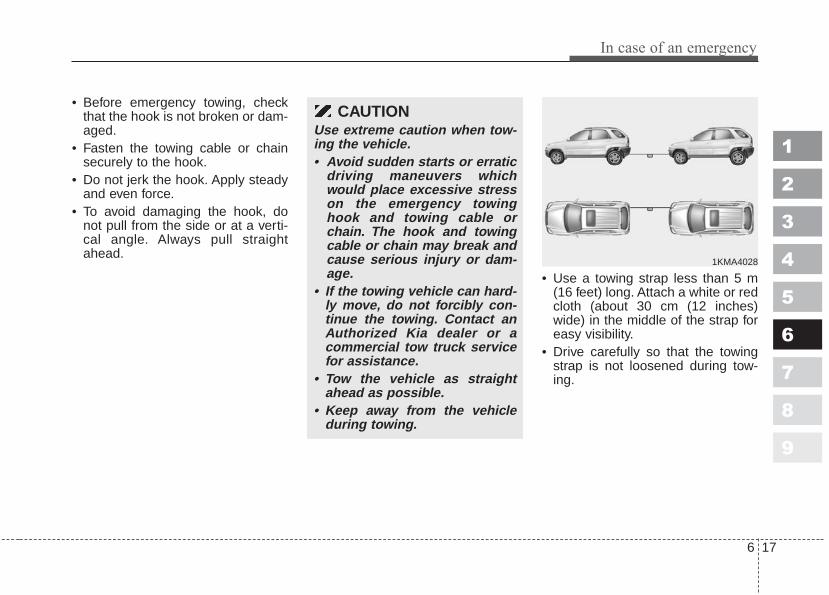
6 17
In case of an emergency
1
2
3
4
5
6
7
8
9
• Before emergency towing, checkthat the hook is not broken or dam-aged.
• Fasten the towing cable or chainsecurely to the hook.
• Do not jerk the hook. Apply steadyand even force.
• To avoid damaging the hook, donot pull from the side or at a verti-cal angle. Always pull straightahead.
• Use a towing strap less than 5 m(16 feet) long. Attach a white or redcloth (about 30 cm (12 inches)wide) in the middle of the strap foreasy visibility.
• Drive carefully so that the towingstrap is not loosened during tow-ing.
CAUTIONUse extreme caution when tow-ing the vehicle.• Avoid sudden starts or erratic
driving maneuvers whichwould place excessive stresson the emergency towinghook and towing cable orchain. The hook and towingcable or chain may break andcause serious injury or dam-age.
• If the towing vehicle can hard-ly move, do not forcibly con-tinue the towing. Contact anAuthorized Kia dealer or acommercial tow truck servicefor assistance.
• Tow the vehicle as straightahead as possible.
• Keep away from the vehicleduring towing.
1KMA4028

In case of an emergency
186
1
2
3
4
5
6
7
8
9
When your vehicle is beingtowed by another vehicleother than a tow truck (in caseof an emergency) • Turn the ignition switch to ACC so
the steering wheel isn’t locked.• Place the transaxle shift lever in N
(Neutral).• Release the parking bake.• Vehicles equipped with automatic
transaxles should not exceed 45km/h (28 mph) and should not betowed more than 80 km (50 miles).
• Vehicles equipped with manualtransaxle should not be towed inexcess of 88 km/h (55 mph) andshould not be towed more than645 km (400 miles).
• Press the brake pedal with moreforce than normal since you willhave reduced brake performance.
• More steering effort will berequired because the power steer-ing system will be disabled.
• If you are driving down a long hill,the brakes may overheat and brakeperformance will be reduced. Stopoften and let the brakes cool off.
✽✽ NOTICETo prevent internal damage to thetransaxle, never tow your vehiclefrom the rear (backwards) with allfour tires in contact with the sur-face.
Tips for towing a stuck vehicleThe following methods are effectivewhen your vehicle is stuck in mud,sand or similar substances that pre-vent the vehicle from being drivenout under its own power.• Remove the soil and sand, etc.
from the front and the back of thetires.
• Place a stone or wood under thetires.
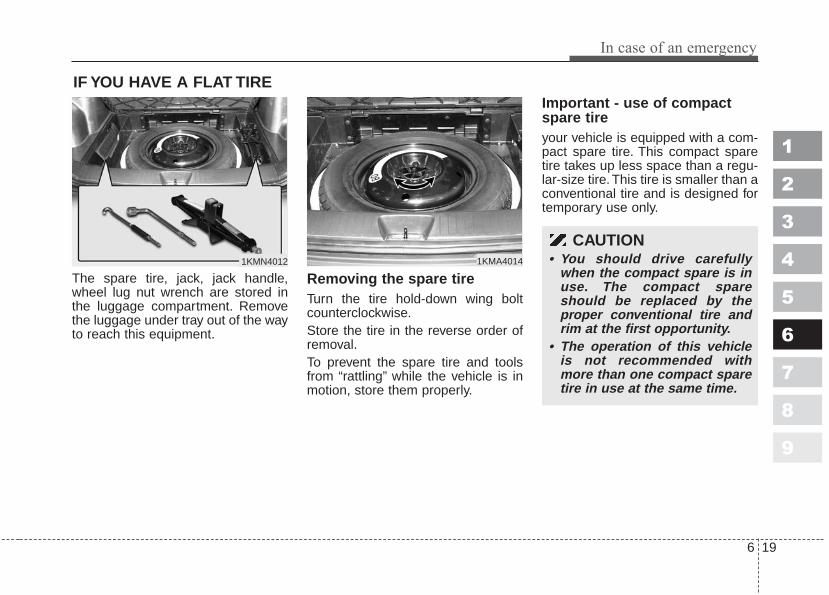
6 19
In case of an emergency
1
2
3
4
5
6
7
8
9
IF YOU HAVE A FLAT TIRE
The spare tire, jack, jack handle,wheel lug nut wrench are stored inthe luggage compartment. Removethe luggage under tray out of the wayto reach this equipment.
Removing the spare tire Turn the tire hold-down wing boltcounterclockwise.Store the tire in the reverse order ofremoval.To prevent the spare tire and toolsfrom “rattling” while the vehicle is inmotion, store them properly.
Important - use of compactspare tireyour vehicle is equipped with a com-pact spare tire. This compact sparetire takes up less space than a regu-lar-size tire. This tire is smaller than aconventional tire and is designed fortemporary use only.
1KMN4012 1KMA4014
CAUTION• You should drive carefully
when the compact spare is inuse. The compact spareshould be replaced by theproper conventional tire andrim at the first opportunity.
• The operation of this vehicleis not recommended withmore than one compact sparetire in use at the same time.

In case of an emergency
206
The compact spare should be inflat-ed to 420 kPa (60 psi).
✽✽ NOTICECheck the inflation pressure afterinstalling the spare tire. Adjust it tothe specified pressure, as necessary.
When using a compact spare tire,observe the following precautions:• Under no circumstances should
you exceed 80 km/h (50 mph); ahigher speed could damage thetire.
• Ensure that you drive slowlyenough for the road conditions toavoid all hazards. Any road hazard,such as a pothole or debris, couldseriously damage the compactspare.
• Any continuous road use of this tirecould result in tire failure, loss ofvehicle control, and possible per-sonal injury.
• Do not exceed the vehicle’s maxi-mum load rating or the load-carry-ing capacity shown on the sidewallof the compact spare tire.
• Avoid driving over obstacles. Thecompact spare tire diameter issmaller than the diameter of a con-ventional tire and reduces theground clearance approximately25 mm (1 inch), which could resultin damage to the vehicle.
• Do not take this vehicle through anautomatic car wash.
• This tire should not be installed onthe front axle if the vehicle must bedriven in snow or on ice.
• Do not use the compact spare tireon any other vehicle because thistire has been designed especiallyfor your vehicle.
• The compact spare tire’s tread lifeis shorter than a regular tire.Inspect your compact spare tireregularly and replace worn com-pact spare tires with the same sizeand design, mounted on the samewheel.
1
2
3
4
5
6
7
8
9
CAUTIONThis spare tire should be usedonly for VERY short distances.Compact spares should NEVERbe used for long drives orextended distances.
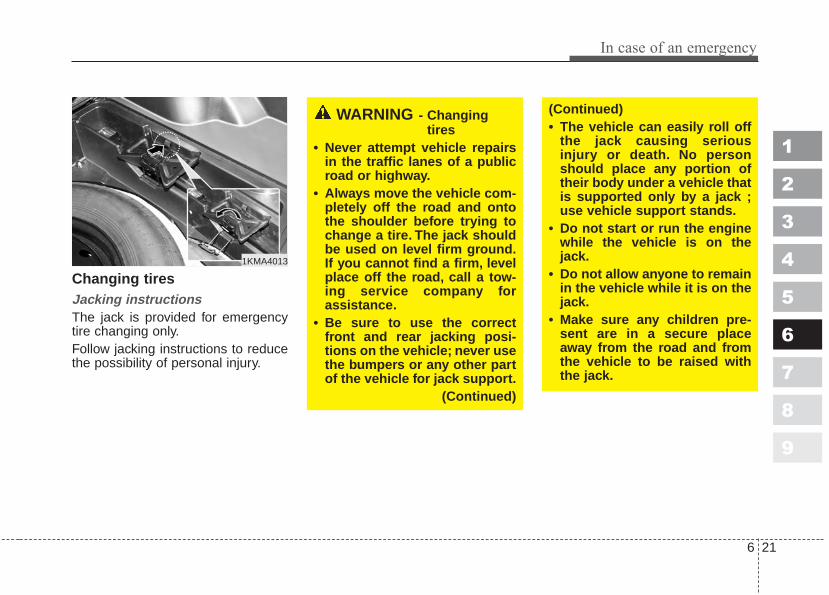
6 21
In case of an emergency
1
2
3
4
5
6
7
8
9
Changing tires Jacking instructions The jack is provided for emergencytire changing only.Follow jacking instructions to reducethe possibility of personal injury.
WARNING - Changingtires
• Never attempt vehicle repairsin the traffic lanes of a publicroad or highway.
• Always move the vehicle com-pletely off the road and ontothe shoulder before trying tochange a tire. The jack shouldbe used on level firm ground.If you cannot find a firm, levelplace off the road, call a tow-ing service company forassistance.
• Be sure to use the correctfront and rear jacking posi-tions on the vehicle; never usethe bumpers or any other partof the vehicle for jack support.
(Continued)
(Continued)• The vehicle can easily roll off
the jack causing seriousinjury or death. No personshould place any portion oftheir body under a vehicle thatis supported only by a jack ;use vehicle support stands.
• Do not start or run the enginewhile the vehicle is on thejack.
• Do not allow anyone to remainin the vehicle while it is on thejack.
• Make sure any children pre-sent are in a secure placeaway from the road and fromthe vehicle to be raised withthe jack.
1KMA4013
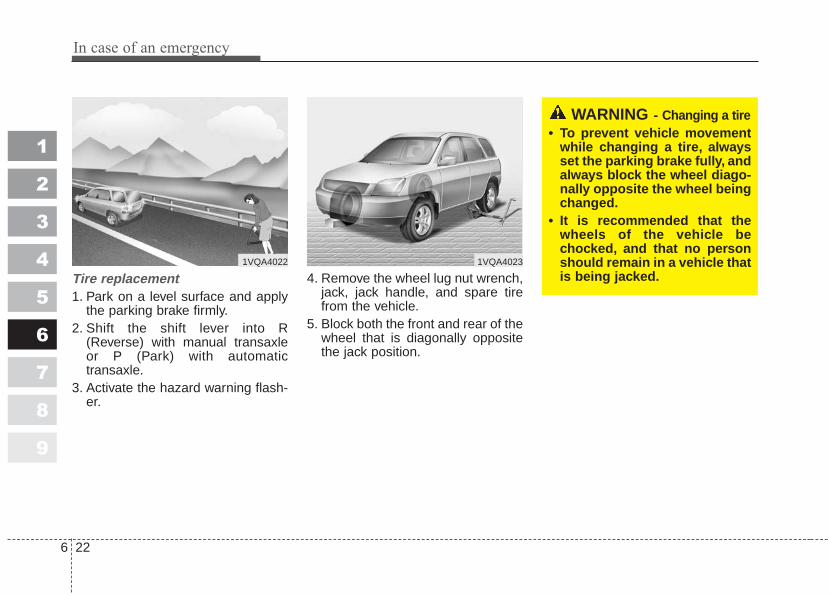
In case of an emergency
226
1
2
3
4
5
6
7
8
9
Tire replacement 1. Park on a level surface and apply
the parking brake firmly.2. Shift the shift lever into R
(Reverse) with manual transaxleor P (Park) with automatictransaxle.
3. Activate the hazard warning flash-er.
4. Remove the wheel lug nut wrench,jack, jack handle, and spare tirefrom the vehicle.
5. Block both the front and rear of thewheel that is diagonally oppositethe jack position.
WARNING - Changing a tire• To prevent vehicle movement
while changing a tire, alwaysset the parking brake fully, andalways block the wheel diago-nally opposite the wheel beingchanged.
• It is recommended that thewheels of the vehicle bechocked, and that no personshould remain in a vehicle thatis being jacked.
1VQA4022 1VQA4023

6 23
In case of an emergency
1
2
3
4
5
6
7
8
9
6. Loosen the wheel lug nuts coun-terclockwise one turn each, but donot remove any nut until the tirehas been raised off the ground.
7. Place the jack at the front or rearjacking position closest to the tireyou are changing. Place the jackat the designated locations underthe frame. The jacking positionsare plates welded to the framewith two tabs and a raised dot toindex with the jack.
WARNING - Jack locationTo reduce the possibility ofinjury, be sure to use only thejack provided with the vehicleand in the correct jack position;never use any other part of thevehicle for jack support.
OKM0690191KMA4018

In case of an emergency
246
1
2
3
4
5
6
7
8
9
8. Insert the jack handle into the jackand turn it clockwise, raising thevehicle until the tire just clears theground. This measurement isapproximately 30 mm (1.2 in).Before removing the wheel lugnuts, make sure the vehicle is sta-ble and that there is no chance formovement or slippage.
9. Remove the wheel lug nuts byturning them counterclockwise,then remove the wheel.
10. Mount the spare tire into positionand install the wheel lug nutswith the beveled edge inward.
11. Once the wheel lug nuts havebeen tightened, lower the vehiclefully to the ground and continue totighten the lug nuts until they arefully secured. Tighten the wheellug nuts firmly in a “star” pattern.If you are unsure of the tightnessof the wheel lug nuts, have themchecked at the nearest servicestation. The specified tighteningtorque is 9~11 kg•m (65-79 lb•ft,88-107 N•m). Improperly tight-ened wheel lug nuts could causebrake pedal vibration while brak-ing.
1KMA4020 1KMA4021
CAUTIONYour vehicle has metric threadson the wheel studs and nuts.Make certain during wheelremoval that the same nutsremoved are reinstalled - or, ifreplaced, that nuts with metricthreads and the same chamferconfiguration are used.Installation of a non-metricthread nut on a metric stud orvice-versa will not secure thewheel to the hub properly andwill damage the stud so that itmust be replaced.Note that most lug nuts do nothave metric threads. Be sure touse extreme care in checkingfor thread style before installingaftermarket lug nuts or wheels.If in doubt, consult anAuthorized Kia Dealer.

6 25
In case of an emergency
1
2
3
4
5
6
7
8
9
To prevent the jack, jack handle,wheel lug nut wrench and spare tirefrom rattling while the vehicle is inmotion, store them properly.
WARNING - Wheel studsIf the studs are damaged, theymay lose their ability to retainthe wheel.This could lead to theloss of the wheel and a collisionresulting in serious injuries.
WARNING - Inadequatespare tire pressure
Check the inflation pressures assoon as possible after installingthe spare tire. Adjust it to thespecified pressure, if necessary.Refer to Section 8, Specifications.

1
2
3
4
5
6
7
8
9
Maintenance services / 7-3
Maintenance schedule / 7-4
Explanation of scheduled maintenance items / 7-8
Owner maintenance / 7-12
Engine compartment / 7-15
Engine oil and oil filter / 7-17
Engine cooling system / 7-19
Brakes and clutch / 7-22
Parking brake / 7-23
Power steering / 7-24
Automatic transaxle / 7-25
Rear differential (4WD) / 7-27
Transfer case (4WD) / 7-27
Lubricants and fluids / 7-28
Air cleaner / 7-29
Climate control air filter / 7-30
Wiper blades / 7-31
Battery / 7-33
Tires and wheels / 7-36
Maintenance

1
2
3
4
5
6
7
8
9
Exterior care / 7-50
Interior care / 7-53
Maintenance
1
2
3
4
5
6
7
8
9
7 3
Maintenance
MAINTENANCE SERVICESYou should exercise the utmost careto prevent damage to your vehicleand injury to yourself whenever per-forming any maintenance or inspec-tion procedures.Should you have any doubts con-cerning the inspection or servicing ofyour vehicle, we strongly recom-mend that you have an AuthorizedKia Dealer perform this work.An Authorized Kia Dealer has facto-ry-trained technicians and genuineKia parts to service your vehicleproperly. For expert advice and qual-ity service, see an Authorized KiaDealer.Inadequate, incomplete or insuffi-cient servicing may result in opera-tional problems with your vehicle thatcould lead to vehicle damage, anaccident, or personal injury.
Owner’s responsibility
Maintenance Service and RecordRetention are the owner's respon-sibility.
You should retain documents thatshow proper maintenance has beenperformed on your vehicle in accor-dance with the scheduled mainte-nance service charts shown on thefollowing pages. You need this infor-mation to establish your compliancewith the servicing and maintenancerequirements of your Kia warranties.Detailed warranty information is pro-vided in your Warranty & ConsumerInformation manual.
Repairs and adjustments required asa result of improper maintenance ora lack of required maintenance arenot covered.We strongly recommend that all vehi-cle maintenance be performed by anauthorized Kia dealer using genuineKia parts.
1
2
3
4
5
6
7
8
9
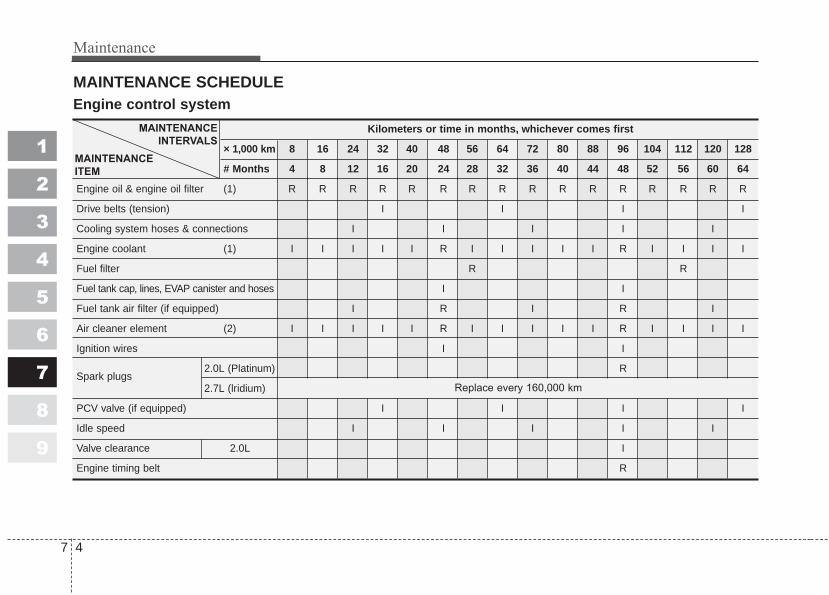
Maintenance
47
1
2
3
4
5
6
7
8
9
MAINTENANCE SCHEDULE
MAINTENANCE
INTERVALS
MAINTENANCE
ITEM
Engine control system
Kilometers or time in months, whichever comes first
× 1,000 km 8 16 24 32 40 48 56 64 72 80 88 96 104 112 120 128
# Months 4 8 12 16 20 24 28 32 36 40 44 48 52 56 60 64
Engine oil & engine oil filter (1) R R R R R R R R R R R R R R R R
Drive belts (tension) I I I I
Cooling system hoses & connections I I I I I
Engine coolant (1) I I I I I R I I I I I R I I I I
Fuel filter R R
Fuel tank cap, lines, EVAP canister and hoses I I
Fuel tank air filter (if equipped) I R I R I
Air cleaner element (2) I I I I I R I I I I I R I I I I
Ignition wires I I
Spark plugs2.0L (Platinum) R
2.7L (lridium)
PCV valve (if equipped) I I I I
Idle speed I I I I I
Valve clearance 2.0L I
Engine timing belt R
Replace every 160,000 km

7 5
Maintenance
1
2
3
4
5
6
7
8
9
MAINTENANCE SCHEDULE (CONTINUED)
Kilometers or time in months, whichever comes first
× 1,000 km 8 16 24 32 40 48 56 64 72 80 88 96 104 112 120 128
# Months 4 8 12 16 20 24 28 32 36 40 44 48 52 56 60 64
Air conditioner compressor operation & I I I I I
refrigerant amount (if equipped)
Exhaust pipes, heat shield & mountings I I I I I I I I
Transfer case fluid (4WD) I R
Rear differential fluid (4WD) I R
Front suspension ball joints I I I I
Brakes/clutch fluid (1) I I I I I I I R I I I I I I I R
Front brake pads & discs (3) I I I I I I I I I I I I I I I I
Rear brake pads & discs/drums (3) I I I I I I I I I I I I I I I I
Parking brake I I I I I I I I
Brake lines & connections I I I I I
(including booster)
Manual transaxle oil (1) I R
Clutch & brake pedal free play I I I I I I I I I I I I I I I I
MAINTENANCE
INTERVALS
MAINTENANCE
ITEM
Chassis and body

Maintenance
67
1
2
3
4
5
6
7
8
9
MAINTENANCE SCHEDULE (CONTINUED)
Kilometers or time in months, whichever comes first
× 1,000 km 8 16 24 32 40 48 56 64 72 80 88 96 104 112 120 128
# Months 4 8 12 16 20 24 28 32 36 40 44 48 52 56 60 64
Automatic transaxle fluid (1) I R
Chassis & underbody bolts & nuts I I I I I I I I I I I I I I I I
Tire condition & inflation pressure I I I I I I I I I I I I I I I I
Wheel alignment (4)
Tire rotation
Steering operation & linkage I I I I I I I I I I I I I I I I
Power steering fluid & lines I I I I I I I I
Driveshaft u-joints (4WD) (if equipped) L L L L L L L L L L L L L L L L
Driveshaft dust boots I I I I I
Safety belts, buckles & anchors I I I I I I I I I I I I I I I I
Lock, hinges & hood latch L L L L L L L L L L L L L L L L
MAINTENANCE
INTERVALS
MAINTENANCE
ITEM
Inspect when abnormal condition noted
Rotate the tires every 12,000 km
Chassis and body (Continued)
7 7
Maintenance
1
2
3
4
5
6
7
8
9
Chart symbols:I- Inspect these items and their related parts. If necessary, correct, clean, refill, adjust of replace.R- Replace or changeL- Lubricate.
(1) Refer to the lubricant and coolant specifications in the Owner’s Manual.(2) More frequent maintenance is required if driving under dusty conditions.(3) More frequent maintenance is required if the vehicle is operated under any of the following conditions:
a. Short-distance driving.b. Driving on dusty roads.c. Extensive idling or slow-speed driving in stop-and-go traffic.
(4) If necessary, rotate and balance the wheels.
* Note: Check the engine oil and coolant levels every week.

Maintenance
87
EXPLANATION OF SCHEDULED MAINTENANCE ITEMSEngine oil and filterThe engine oil and filter should bechanged at the intervals specified inthe maintenance schedule. If the caris being driven in severe conditions,more frequent oil and filter changesare required.
Drive beltsInspect all drive belts for evidence ofcuts, cracks, excessive wear or oilsaturation and replace if necessary.Drive belts should be checked peri-odically for proper tension andadjusted as necessary.
Fuel filter (cartridge)A clogged filter can limit the speed atwhich the vehicle may be driven,damage the emission system andcause multiple issues such as hardstarting. If an excessive amount offoreign matter accumulates in thefuel tank, the filter may requirereplacement more frequently.After installing a new filter, run theengine for several minutes, andcheck for leaks at the connections.Fuel filters should be installed by anauthorized KIA dealer.
Fuel lines, fuel hoses and con-nectionsCheck the fuel lines, fuel hoses andconnections for leakage and dam-age. Have an authorized KIA dealerreplace any damaged or leakingparts immediately.
1
2
3
4
5
6
7
8
9

7 9
Maintenance
Timing belt (if equipped)Inspect all parts related to the timingbelt for damage and deformation.Replace any damaged parts immedi-ately.
Vapor hose and fuel filler capThe vapor hose and fuel filler capshould be inspected at those inter-vals specified in the maintenanceschedule. Make sure that a newvapor hose or fuel filler cap is cor-rectly replaced.
Vacuum crankcase ventilationhoses Inspect the surface of hoses for evi-dence of heat and/or mechanicaldamage. Hard and brittle rubber,cracking, tears, cuts, abrasions, andexcessive swelling indicate deterio-ration. Particular attention should bepaid to examine those hose surfacesnearest to high heat sources, suchas the exhaust manifold.Inspect the hose routing to assurethat the hoses do not come in con-tact with any heat source, sharpedges or moving component whichmight cause heat damage ormechanical wear. Inspect all hoseconnections, such as clamps andcouplings, to make sure they aresecure, and that no leaks are pre-sent. Hoses should be replacedimmediately if there is any evidenceof deterioration or damage.
Air cleaner filterA Genuine KIA air cleaner filter isrecommended when the filter isreplaced.
Spark plugsMake sure to install new spark plugsof the correct heat range.
Valve clearanceInspect excessive valve noise and/orengine vibration and adjust if neces-sary. An authorized KIA dealershould perform the operation.
1
2
3
4
5
6
7
8
9

Maintenance
107
Cooling systemCheck cooling system components,such as radiator, coolant reservoir,hoses and connections for leakageand damage. Replace any damagedparts.
CoolantThe coolant should be changed atthe intervals specified in the mainte-nance schedule.
Automatic transaxle fluidThe fluid level should be in the "HOT"range of the dipstick, after the engineand transaxle are at normal operat-ing temperature. Check the automat-ic transaxle fluid level with the enginerunning and the transaxle in neutral,with the parking brake properlyapplied.
Brake hoses and linesVisually check for proper installation,chafing, cracks, deterioration andany leakage. Replace any deteriorat-ed or damaged parts immediately.
Brake fluidCheck brake fluid level in the brakefluid reservoir. The level should bebetween “MIN” and “MAX” marks onthe side of the reservoir. Use onlyhydraulic brake fluid conforming toDOT 3 or DOT 4 specification.
Parking brakeInspect the parking brake systemincluding the parking brake pedaland cables.
Rear brake drums and linings(if equipped)Check the rear brake drums and lin-ings for scoring, burning, leakingfluid, broken parts, and excessivewear.
Brake discs, pads, calipersand rotorsCheck the pads for excessive wear,discs for run out and wear, andcalipers for fluid leakage.
Exhaust pipe and mufflerVisually inspect the exhaust pipes,muffler and hangers for cracks, dete-rioration, or damage. Start theengine and listen carefully for anyexhaust gas leakage. Tighten con-nections or replace parts as neces-sary.
Suspension mounting boltsCheck the suspension connectionsfor looseness or damage. Retightento the specified torque.
1
2
3
4
5
6
7
8
9

7 11
Maintenance
Steering gear box, linkage &boots/lower arm ball jointWith the vehicle stopped and engineoff, check for excessive free-play inthe steering wheel.Check the linkage for bends or dam-age. Check the dust boots and balljoints for deterioration, cracks, ordamage. Replace any damagedparts.
Power steering pump, belt andhosesCheck the power steering pump andhoses for leakage and damage.Replace any damaged or leakingparts immediately. Inspect the powersteering belt for evidence of cuts,cracks, excessive wear, oiliness andproper tension. Replace or adjust it ifnecessary.
Drive shafts and bootsCheck the drive shafts, boots andclamps for cracks, deterioration, ordamage. Replace any damagedparts and, if necessary, repack thegrease.
Air conditioning refrigerant (if equipped)Check the air conditioning lines andconnections for leakage and dam-age.
1
2
3
4
5
6
7
8
9

Maintenance
127
1
2
3
4
5
6
7
8
9
OWNER MAINTENANCE Owner maintenance schedule The following lists are vehicle checksand inspections that should be per-formed by the owner or anAuthorized Kia Dealer at the fre-quencies indicated to help ensuresafe, dependable operation of yourvehicle.Any adverse conditions should bebrought to the attention of your deal-er as soon as possible.These Owner Maintenance Checksare generally not covered by war-ranties and you may be charged forlabor, parts and lubricants used.
When you stop for fuel:• Check the engine oil level.• Check coolant level in coolant
reservoir.
• Check the windshield washer fluidlevel.
• Look for low or under-inflated tires.
While operating your vehicle:• Note any changes in the sound of
the exhaust or any smell ofexhaust fumes in the vehicle.
• Check for vibrations in the steeringwheel. Notice any increased steer-ing effort or looseness in the steer-ing wheel, or change in its straight-ahead position.
• Notice if your vehicle constantlyturns slightly or “pulls” to one sidewhen traveling on smooth, levelroad.
• When stopping, listen and checkfor strange sounds, pulling to oneside, increased brake pedal travelor “hard-to-push” brake pedal.
• If any slipping or changes in theoperation of your transaxle occurs,check the transaxle fluid level.
• Check automatic transaxle P (Park)function.
• Check parking brake.• Check for fluid leaks under your
vehicle (water dripping from the airconditioning system during or afteruse is normal).
WARNING Be careful when checking yourengine coolant level when theengine is hot. Scalding hotcoolant and steam may blow outunder pressure.This could causeburns or other serious injury.

7 13
Maintenance
1
2
3
4
5
6
7
8
9
At least monthly:• Check coolant level in the coolant
recovery reservoir.• Check the operation of all exterior
lights, including the stoplights, turnsignals and hazard warning flash-ers.
• Check the inflation pressures of alltires including the spare.
At least twice a year (i.e., every Spring and Fall) :• Check radiator, heater and air con-
ditioning hoses for leaks or da-mage.
• Check windshield washer sprayand wiper operation. Clean wiperblades with clean cloth dampenedwith washer fluid.
• Check headlight alignment.• Check muffler, exhaust pipes,
shields and clamps.• Check the lap/shoulder belts for
wear and function.• Check for worn tires and loose
wheel lug nuts.
At least once a year :• Clean body and door drain holes.• Lubricate door hinges and checks,
and hood hinges.• Lubricate door and hood locks and
latches.• Lubricate door rubber weather-
strips.• Check the air conditioning system
before the warm weather season.• Check the power steering fluid
level.• Inspect and lubricate automatic
transaxle linkage and controls.• Clean battery and terminals.• Check the brake fluid level.

Maintenance
147
1
2
3
4
5
6
7
8
9
Owner maintenance precau-tions Improper or incomplete service mayresult in problems. This section givesinstructions only for the maintenanceitems that are easy to perform.As explained earlier in this section,several procedures can be done onlyby an Authorized Kia Dealer withspecial tools.
Improper owner maintenance dur-ing the warranty period may affectwarranty coverage. For details,read the separate Kia Warranty &Consumer Information Manualprovided with the vehicle. If you'reunsure about any servicing ormaintenance procedure, have itdone by an Authorized Kia Dealer.
WARNING - Maintenancework
• Performing maintenance workon a vehicle can be danger-ous. You can be seriouslyinjured while performing somemaintenance procedures. Ifyou lack sufficient knowledgeand experience or the propertools and equipment to do thework, have it done by anAuthorized Kia Dealer.
• Working under the hood withthe engine running is danger-ous. It becomes even moredangerous when you wearjewelry or loose clothing.These can become entangledin moving parts and result ininjury. Always remove allloose or hanging clothing andall jewelry before working onthe engine.

7 15
Maintenance
1
2
3
4
5
6
7
8
9
ENGINE COMPARTMENT
7KMS5001
1. Power steering fluid reservoir
2. Engine oil filler cap
3. Brake fluid reservoir
4. Air cleaner
5. Fuse box
6. Negative battery terminal
7. Radiator cap
8. Positive battery terminal
9. Auto transaxle oil dipstick (if equipped)
10. Engine oil dipstick
11. Engine coolant reservoir
12. Windshield washer fluid reser-voir
■■ 2.0L Gasoline Engine
* The actual engine room in the vehicle may differ from the illustration.

Maintenance
167
1
2
3
4
5
6
7
8
9
7KMB7015
1. Power steering fluid reservoir
2. Engine oil filler cap
3. Brake fluid reservoir
4. Air cleaner
5. Fuse box
6. Negative battery terminal
7. Radiator cap
8. Positive battery terminal
9. Auto transaxle oil dipstick (if equipped)
10. Engine coolant reservoir
11. Engine oil dipstick
12. Windshield washer fluid reser-voir
■■ 2.7L Gasoline Engine
* The actual engine room in the vehicle may differ from the illustration.

7 17
Maintenance
1
2
3
4
5
6
7
8
9
ENGINE OIL AND OIL FILTERChecking the engine oil level 1. Be sure the vehicle is on level
ground.2. Start the engine and allow it to
reach normal operating tempera-ture.
3. Turn the engine off and wait for afew minutes (about 5 minutes) forthe oil to return to the oil pan.
4. Pull the dipstick out, wipe it clean,and re-insert it fully.
5. Pull the dipstick out again andcheck the level. The level shouldbe between F and L.
7KMB7017
7KMS5003
2.0L Gasoline Engine
2.7L Gasoline Engine
WARNING - Radiatorhose
Be very careful not to touch theradiator hose when checking oradding the engine oil as it maybe hot enough to burn you.

Maintenance
187
1
2
3
4
5
6
7
8
9 If it is near or at L, add enough oil tobring the level to F. Do not overfill.
For 2.7L gasoline engine, use afunnel to refill the new oil comfort-ably.
Use only the specified engine oil.(Refer to "Recommended lubricantsor capacities" in section 8.)
Changing the engine oil andfilterHave engine oil and filter changed byan Authorized Kia Dealer accordingto the Maintenance Schedule at thebeginning of this section.
7KMB7018
7KMS5050
2.0L Gasoline Engine
2.7L Gasoline Engine
7 19
Maintenance
1
2
3
4
5
6
7
8
9
ENGINE COOLING SYSTEMThe high-pressure cooling systemhas a reservoir filled with year-roundantifreeze coolant. The reservoir isfilled at the factory.Check the antifreeze protection andcoolant level at least once a year, atthe beginning of the winter season,and before traveling to a colder cli-mate.
Checking the coolant level
WARNING - Removingradiator cap
• Never attempt to remove theradiator cap while the engineis operating or hot. Doing somight lead to cooling systemand engine damage and couldresult in serious personalinjury from escaping hotcoolant or steam.
• Turn the engine off and waituntil it cools down. Useextreme care when removingthe radiator cap. Wrap a thicktowel around it, and turn itcounterclockwise slowly tothe first stop. Step back whilethe pressure is released fromthe cooling system. When youare sure all the pressure hasbeen released, press down onthe cap, using a thick towel,and continue turning counter-clockwise to remove it.
(Continued)
(Continued)• Even if the engine is not oper-
ating, do not remove the radi-ator cap or the drain plugwhile the engine and radiatorare hot. Hot coolant and steammay still blow out under pres-sure, causing serious injury.

Maintenance
207
1
2
3
4
5
6
7
8
9
Check the condition and connectionsof all cooling system hoses andheater hoses. Replace any swollenor deteriorated hoses.
The coolant level should be filledbetween F and L marks on the sideof the coolant reservoir when theengine is cool.If the coolant level is low, add enoughspecified coolant to provide protec-tion against freezing and corrosion.Bring the level to F, but do not over-fill. If frequent additions are required,see an Authorized Kia Dealer for acooling system inspection.
Recommended engine coolant• Use only soft (de-mineralized)
water in the coolant mixture.• The engine in your vehicle has alu-
minum engine parts and must beprotected by an ethylene-glycol-based coolant to prevent corrosionand freezing.
• DO NOT USE alcohol or methanolcoolant or mix them with the spec-ified coolant.
• Do not use a solution that containsmore than 60% antifreeze or lessthan 35% antifreeze, which wouldreduce the effectiveness of thesolution.
7KMS5005 7KMS5007
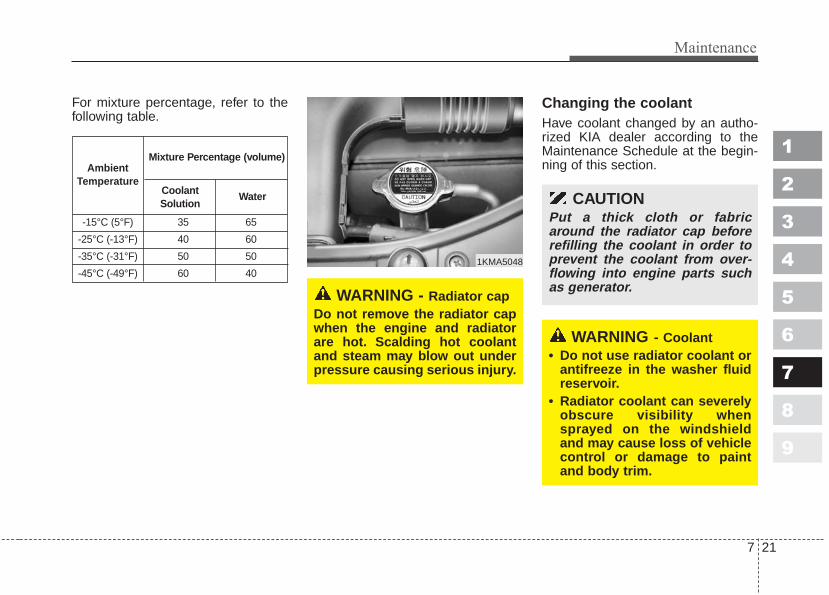
7 21
Maintenance
1
2
3
4
5
6
7
8
9
For mixture percentage, refer to thefollowing table.
Changing the coolantHave coolant changed by an autho-rized KIA dealer according to theMaintenance Schedule at the begin-ning of this section.
WARNING - Radiator capDo not remove the radiator capwhen the engine and radiatorare hot. Scalding hot coolantand steam may blow out underpressure causing serious injury.
1KMA5048
CAUTIONPut a thick cloth or fabricaround the radiator cap beforerefilling the coolant in order toprevent the coolant from over-flowing into engine parts suchas generator.
WARNING - Coolant• Do not use radiator coolant or
antifreeze in the washer fluidreservoir.
• Radiator coolant can severelyobscure visibility whensprayed on the windshieldand may cause loss of vehiclecontrol or damage to paintand body trim.
-15°C (5°F) 35 65
-25°C (-13°F) 40 60
-35°C (-31°F) 50 50
-45°C (-49°F) 60 40
AmbientTemperature
Mixture Percentage (volume)
CoolantSolution
Water

Maintenance
227
1
2
3
4
5
6
7
8
9
BRAKES AND CLUTCH (IF EQUIPPED)
Checking brake/clutch fluidlevel Check the fluid level in the reservoirperiodically. The fluid level should bebetween MAX and MIN marks on theside of the reservoir.Before removing the reservoir capand adding brake/clutch fluid, cleanthe area around the reservoir capthoroughly to prevent brake/clutchfluid contamination.
If the level is low, add fluid to theMAX level. The level will fall withaccumulated mileage. This is a nor-mal condition associated with thewear of the brake linings. If the fluidlevel is excessively low, have thebrake system checked by anAuthorized Kia Dealer.
Use only the specified brake/clutchfluid. (Refer to "Recommended lubri-cants and capacities" in section 8.)
Never mix different types of fluid.
WARNING - Brake fluidWhen changing and addingbrake/clutch fluid, handle itcarefully. Do not let it come incontact with your eyes. Ifbrake/clutch fluid should comein contact with your eyes, imme-diately flush them with a largequantity of fresh tap water. Haveyour eyes examined by a doctoras soon as possible.
WARNING - Loss of brakefluid
In the event the brake systemrequires frequent additions offluid, the vehicle should beinspected by an Authorized KiaDealer.
1KMN5020
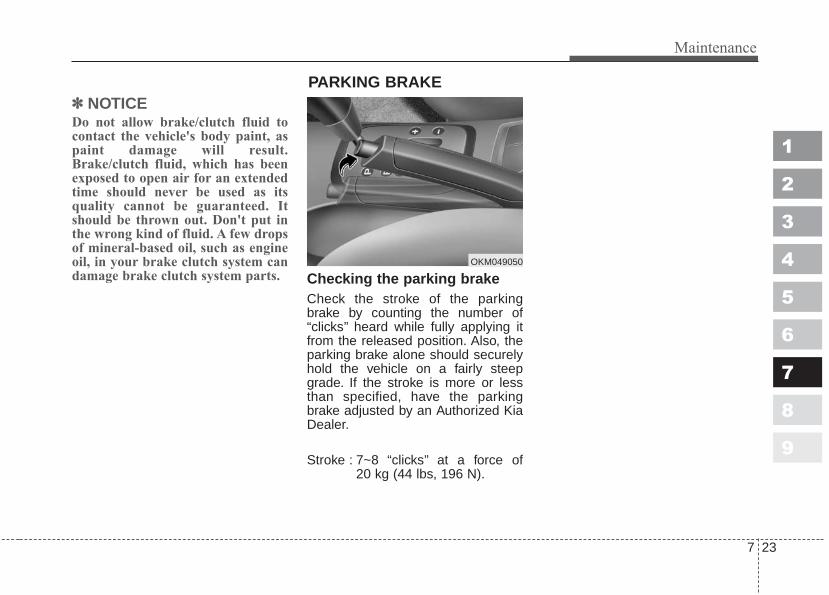
7 23
Maintenance
1
2
3
4
5
6
7
8
9
✽✽ NOTICEDo not allow brake/clutch fluid tocontact the vehicle's body paint, aspaint damage will result.Brake/clutch fluid, which has beenexposed to open air for an extendedtime should never be used as itsquality cannot be guaranteed. Itshould be thrown out. Don't put inthe wrong kind of fluid. A few dropsof mineral-based oil, such as engineoil, in your brake clutch system candamage brake clutch system parts. Checking the parking brake
Check the stroke of the parkingbrake by counting the number of“clicks’’ heard while fully applying itfrom the released position. Also, theparking brake alone should securelyhold the vehicle on a fairly steepgrade. If the stroke is more or lessthan specified, have the parkingbrake adjusted by an Authorized KiaDealer.
Stroke : 7~8 “clicks’’ at a force of 20 kg (44 lbs, 196 N).
OKM049050
PARKING BRAKE

Maintenance
247
1
2
3
4
5
6
7
8
9
POWER STEERING
Checking the power steeringfluid level With the vehicle on level ground,check the fluid level in the powersteering reservoir periodically. Thefluid should be between MAX andMIN marks on the side of the reser-voir at the normal temperature.Before adding power steering fluid,thoroughly clean the area around thereservoir cap to prevent power steer-ing fluid contamination.If the level is low, add fluid to theMAX level.
In the event the power steering sys-tem requires frequent addition offluid, the vehicle should be inspectedby an Authorized Kia Dealer.
✽✽ NOTICE• To avoid damage to the power
steering pump, do not operate thevehicle for prolonged periods witha low power steering fluid level.
• Never start the engine when thereservoir tank is empty.
• When adding fluid, be careful thatdirt does not get into the tank.
• Too little fluid can make the steer-ing wheel heavier or strange noisecan be generated.
• The use of the non-specified fluidcould reduce the effectiveness ofthe power steering wheel andcause damage to it.
Use only the specified power steeringfluid. (Refer to "Recommended lubri-cants and capacities" in section 8.)
Power steering hoseCheck the connections for oil leaks,severe damage and the twists in thepower steering hose before driving.
7KMS5018

7 25
Maintenance
1
2
3
4
5
6
7
8
9
AUTOMATIC TRANSAXLE (IF EQUIPPED)
Checking the automatictransaxle fluid level The automatic transaxle fluid levelshould be checked regularly.Keep the vehicle on the level groundwith the parking brake applied andcheck the fluid level according to thefollowing procedure.1. Place the selector lever in N
(Neutral) position and confirm theengine is running at normal idlespeed.
2. After the transaxle is warmed upsufficiently (fluid temperature70~80 °C (158~176 °F)), for exam-ple by 10 minutes usual driving,shift the selector lever through allpositions then place the selectorlever in N (Neutral) or P (Park)position.
3. Confirm that the fluid level is in“HOT” range on the level gauge. Ifthe fluid level is lower, add thespecified fluid from the fill hole. Ifthe fluid level is higher, drain thefluid from the drain hole.
4. If the fluid level is checked in coldcondition (fluid temperature 20~30 °C (68~86 °F) add the fluid to“COLD” line and then recheck thefluid level according to the abovestep 2.
1KMN5051 1LDE5009
COLD
HOT
Maintenance
267
1
2
3
4
5
6
7
8
9
✽✽ NOTICE“COLD” scale is for reference onlyand should NOT be used to deter-mine transaxle fluid level.
✽✽ NOTICENew automatic transaxle fluidshould be red. The red dye is addedso the assembly plant can identify itas automatic transaxle fluid and dis-tinguish it from engine oil orantifreeze. The red dye, which is notan indicator of fluid quality, is notpermanent. As the vehicle is driven,the automatic transaxle fluid willbegin to look darker. The color mayeventually appear light brown.Therefore, have an Authorized Kiadealer change the automatictransaxle fluid according to theScheduled Maintenance at thebeginning of this section.
Changing the automatictransaxle fluidHave automatic transaxle fluidchanged by an Authorized KiaDealer according to the MaintenanceSchedule at the beginning of thissection.
CAUTION• Low fluid level causes
transaxle slippage. Overfillingcan cause foaming, loss of fluidand transaxle malfunction.
• The use of a non-specified fluidcould result in transaxle mal-function and failure.
WARNING - Parking brakeTo avoid sudden movement ofthe vehicle, apply parking brakeand depress the brake pedalbefore moving the shift lever.
WARNING - Transaxlefluid
The transaxle fluid level shouldbe checked when the engine is atnormal operating temperature.This means that the engine, radi-ator, radiator hose and exhaustsystem etc., are very hot.Exercise great care not to burnyourself during this procedure.

7 27
Maintenance
1
2
3
4
5
6
7
8
9
Checking or changing rear dif-ferential fluidHave rear differential fluid checked orchanged by an Authorized KiaDealer according to the MaintenanceSchedule at the beginning of thissection.
Use only the specified rear differentialfluid. (Refer to "Recommended lubri-cants and capacities" in section 8.)
Checking or changing transfercase fluidHave transfer case fluid checked orchanged by an Authorized KiaDealer according to the MaintenanceSchedule at the beginning of thissection.
Use only the specified transfer casefluid. (Refer to "Recommended lubri-cants and capacities" in section 8.)
REAR DIFFERENTIAL (4WD) TRANSFER CASE (4WD)
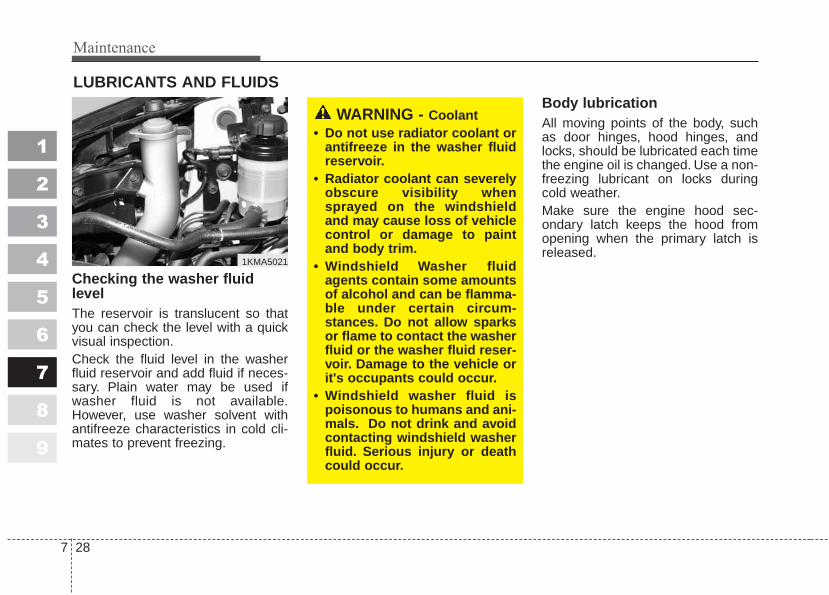
Maintenance
287
1
2
3
4
5
6
7
8
9
LUBRICANTS AND FLUIDS
Checking the washer fluidlevel The reservoir is translucent so thatyou can check the level with a quickvisual inspection.Check the fluid level in the washerfluid reservoir and add fluid if neces-sary. Plain water may be used ifwasher fluid is not available.However, use washer solvent withantifreeze characteristics in cold cli-mates to prevent freezing.
Body lubrication All moving points of the body, suchas door hinges, hood hinges, andlocks, should be lubricated each timethe engine oil is changed. Use a non-freezing lubricant on locks duringcold weather.Make sure the engine hood sec-ondary latch keeps the hood fromopening when the primary latch isreleased.
1KMA5021
WARNING - Coolant• Do not use radiator coolant or
antifreeze in the washer fluidreservoir.
• Radiator coolant can severelyobscure visibility whensprayed on the windshieldand may cause loss of vehiclecontrol or damage to paintand body trim.
• Windshield Washer fluidagents contain some amountsof alcohol and can be flamma-ble under certain circum-stances. Do not allow sparksor flame to contact the washerfluid or the washer fluid reser-voir. Damage to the vehicle orit's occupants could occur.
• Windshield washer fluid ispoisonous to humans and ani-mals. Do not drink and avoidcontacting windshield washerfluid. Serious injury or deathcould occur.

7 29
Maintenance
1
2
3
4
5
6
7
8
9
AIR CLEANER
Element replacement Have the air cleaner elementchecked and replaced in accordancewith the maintenance schedule.
✽✽ NOTICEDo not drive with the air cleanerremoved; this will result in excessiveengine wear.
1KMN5010
CAUTION - EngineDriving without an air cleanerencourages backfiring, whichcould cause a fire in the enginecompartment.

Maintenance
307
1
2
3
4
5
6
7
8
9
CLIMATE CONTROL AIR FILTER (IF EQUIPPED)
The climate control air filter installedbehind the glove box filters the dustor other pollutants that come into thevehicle from the outside through theheating and air conditioning system.If dust or other pollutants accumulatein the filter over a period of time, theair flow from the air vents maydecrease, resulting in moisture accu-mulation on the inside of the wind-shield even when the outside (fresh)are position is selected. If this hap-pens, have the climate control air fil-ter replaced by an Authorized KiaDealer.
If the vehicle is operated in theseverely air-polluted cities or ondusty rough roads for a long period,it should be inspected more fre-quently and replaced earlier. Whenyou try to replace the air filter byowner maintenance, replace it per-forming the following procedure, andin this case, be careful to avoid dam-aging other components.
1LDA5047
Outside air
Recirculatedair
Climate controlair filter
Blower
Evaporatorcore
Heater core
7 31
Maintenance
1
2
3
4
5
6
7
8
9
WIPER BLADES
Wiper blade maintenance Commercial hot waxes applied byautomatic car washes have beenknown to make the windshield dif-ficult to clean.
Contamination of either the wind-shield or the wiper blades with for-eign matter can reduce the effective-ness of the windshield wipers.Common sources of contaminationare insects, tree sap, and hot waxtreatments used by some commer-cial car washes. If the blades are notwiping properly, clean both the win-dow and the blades with a goodcleaner or mild detergent, and rinsethoroughly with clean water.
✽✽ NOTICETo prevent damage to the wiperblades, do not use gasoline,kerosene, paint thinner, or other sol-vents on or near them.
Windshield wiper bladereplacement When the wipers no longer cleanadequately, the blades may be wornor cracked, and require replacement.
✽✽ NOTICETo prevent damage to the wiperarms or other components, do notattempt to move the wipers manual-ly.
✽✽ NOTICEThe use of a non-specified wiperblade could result in wiper malfunc-tion and failure.
1KMA5022
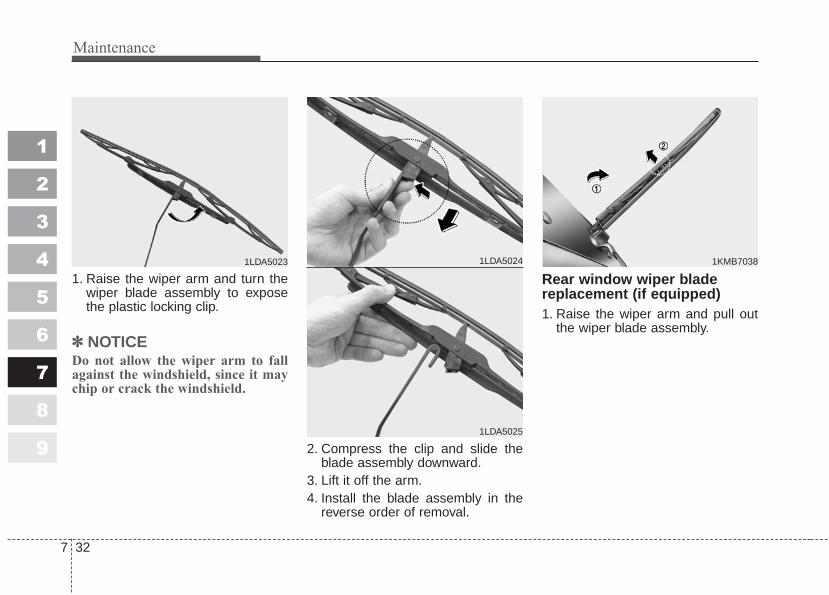
Maintenance
327
1
2
3
4
5
6
7
8
9
1. Raise the wiper arm and turn thewiper blade assembly to exposethe plastic locking clip.
✽✽ NOTICEDo not allow the wiper arm to fallagainst the windshield, since it maychip or crack the windshield.
2. Compress the clip and slide theblade assembly downward.
3. Lift it off the arm.4. Install the blade assembly in the
reverse order of removal.
Rear window wiper bladereplacement (if equipped)1. Raise the wiper arm and pull out
the wiper blade assembly.
1LDA5023 1LDA5024
1LDA5025
1KMB7038
7 33
Maintenance
1
2
3
4
5
6
7
8
9
2. Install the new blade assembly byinserting the center part (➀) intothe slot (➁) in the wiper arm until itclicks into place.
3. Make sure the blade assembly isinstalled firmly by gently pulling onthe blade.
WARNING - Battery dangers
Always read the follow-ing instructions carefullywhen handling a battery.
Keep lighted cigarettesand all other flames orsparks away from thebattery.
Hydrogen, a highly com-bustible gas, is alwayspresent in battery cellsand may explode if ignit-ed.
Keep batteries out of thereach of childrenbecause batteries con-tain highly corrosiveSULFURIC ACID. Do notallow battery acid to con-tact your skin, eyes,clothing or paint finish.
(Continued)
(Continued)
If any electrolyte getsinto your eyes, flush youreyes with clean water forat least 15 minutes andget immediate medicalattention. If possible,continue to apply waterwith a sponge or clothuntil medical attention isreceived.If electrolyte gets onyour skin, thoroughlywash the contacted area.If you feel a pain or aburning sensation, getmedical attention imme-diately.
Wear eye protectionwhen charging or work-ing near a battery.Always provide ventila-tion when working in anenclosed space.
(Continued)
1KMB7039
BATTERY
➀➁
Maintenance
347
1
2
3
4
5
6
7
8
9
For best battery service :• Keep the battery securely mount-
ed.• Keep the battery top clean and dry.• Keep the terminals and connec-
tions clean, tight, and coated withpetroleum jelly or terminal grease.
• Rinse any spilled electrolyte fromthe battery immediately with asolution of water and baking soda.
• If the vehicle is not going to beused for an extended time, discon-nect the battery cables.
Battery recharging Your vehicle has a maintenance-free,calcium-based battery.• If the battery becomes discharged
in a short time (because, for exam-ple, the headlights or interior lightswere left on while the vehicle wasnot in use), recharge it by slowcharging (trickle) for 10 hours.
• If the battery gradually dischargesbecause of high electric load whilethe vehicle is being used, rechargeit at 20-30A for two hours.
Items to be reset after the batteryhas been discharged or the bat-tery has been disconnected.• Clock (See Chapter 3)• Sunroof (See Chapter 3)• Trip computer (See Chapter 4)• Compass (See Chapter 4)• Climate control system
(See Chapter 4)• Audio (See Chapter 3)
1KMN5030
(Continued)An inappropriately dis-posed battery can beharmful to the environ-ment and human health.Dispose the batteryaccording to your locallaw(s) or regulation.
• When lifting a plastic-casedbattery, excessive pressure onthe case may cause batteryacid to leak, resulting in per-sonal injury. Lift with a batterycarrier or with your hands onopposite corners.
• Never attempt to recharge thebattery when the batterycables are connected.
• The electrical ignition systemworks with high voltage.Never touch these compo-nents with the engine runningor the ignition switched on.
Failure to follow the abovewarnings can result in seriousbodily injury or death.
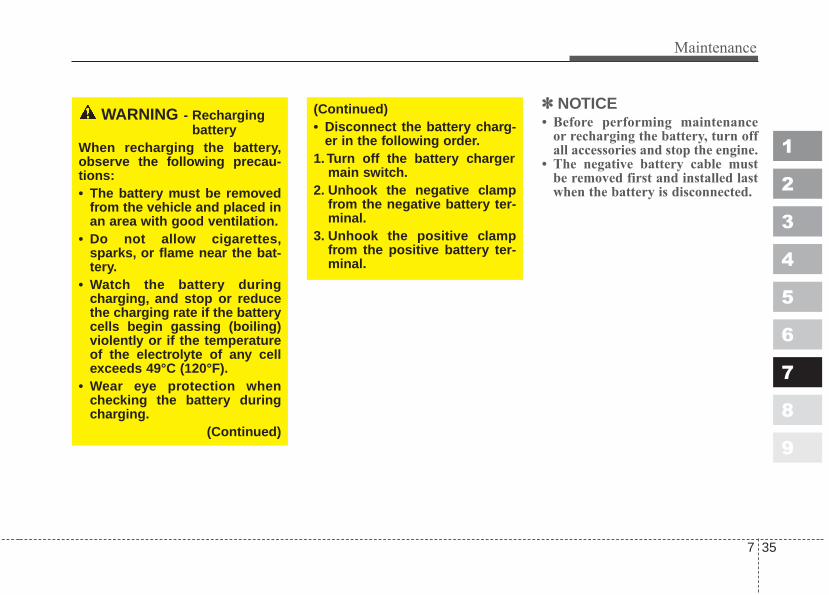
7 35
Maintenance
1
2
3
4
5
6
7
8
9
✽✽ NOTICE• Before performing maintenance
or recharging the battery, turn offall accessories and stop the engine.
• The negative battery cable mustbe removed first and installed lastwhen the battery is disconnected.
WARNING - Rechargingbattery
When recharging the battery,observe the following precau-tions:• The battery must be removed
from the vehicle and placed inan area with good ventilation.
• Do not allow cigarettes,sparks, or flame near the bat-tery.
• Watch the battery duringcharging, and stop or reducethe charging rate if the batterycells begin gassing (boiling)violently or if the temperatureof the electrolyte of any cellexceeds 49°C (120°F).
• Wear eye protection whenchecking the battery duringcharging.
(Continued)
(Continued)• Disconnect the battery charg-
er in the following order.1. Turn off the battery charger
main switch.2. Unhook the negative clamp
from the negative battery ter-minal.
3. Unhook the positive clampfrom the positive battery ter-minal.

Maintenance
367
1
2
3
4
5
6
7
8
9
TIRES AND WHEELSTires care For proper maintenance, safety, andmaximum fuel economy, you mustalways maintain recommended tireinflation pressures and stay withinthe load limits and weight distributionrecommended for your vehicle.
Inflation pressures All tire pressures (including thespare) should be checked every daywhen the tires are cold. “Cold Tires”means the vehicle has not been dri-ven for at least three hours or drivenless than 1.6 km (one mile).Recommended pressures must bemaintained for the best ride, top vehi-cle handling, and minimum tire wear.
All specifications (sizes and pres-sures) can be found on a labelattached to the front driver’s door sill.
✽✽ NOTICE• Underinflation also results in
excessive wear, poor handling andreduced fuel economy. Wheeldeformation also is possible. Keepyour tire pressures at the properlevels. If a tire frequently needsrefilling, have it checked by anAuthorized Kia Dealer.
• Overinflation produces a harshride, excessive wear at the centerof the tire tread, and a greater pos-sibility of damage from road haz-ards.
1KMN5045
WARNING - Tire underin-flation
Severe underinflation (10 psi (70kPa) or more) can lead to severeheat build-up, causing blowouts,tread separation and other tirefailures that can result in theloss of vehicle control leadingto severe injury or death. Thisrisk is much higher on hot daysand when driving for protractedperiods at high speeds.

7 37
Maintenance
1
2
3
4
5
6
7
8
9
✽✽ NOTICE• Warm tires normally exceed rec-
ommended cold tire pressures by28 to 41 kPa (4 to 6 psi). Do notrelease air from warm tires toadjust the pressure or the tires willbe underinflated.
• Be sure to reinstall the tire infla-tion valve caps. Without the valvecap, dirt or moisture could get intothe valve core and cause air leak-age. If the cap have been lost,install new one as soon as possible.
Checking tire inflation pres-sureCheck your tires once a month ormore.Also, check the tire pressure of thespare tire.
How to checkUse a good quality gage to check tirepressure.You can not tell if your tiresare properly inflated simply by look-ing at them. Radial tires may lookproperly inflated even when they'reunderinflated.Check the tire's inflation pressurewhen the tires are cold. - "Cold"means your vehicle has been sittingfor at least three hours or driven nomore than 1.6 km (1 mile).
WARNING - Tire InflationOverinflation or underinflationcan reduce tire life, adverselyaffect vehicle handling, and leadto sudden tire failure.This couldresult in loss of vehicle controland potential injury.
CAUTION - Tire pressureAlways observe the following:• Check tire pressure when the
tires are cold. (After vehiclehas been parked for at leastthree hours or hasn't been dri-ven more than 1.6 km (onemile) since startup.)
• Check the pressure of yourspare tire each time you checkthe pressure of other tires.
• Never overload your vehicle.Be careful not to overload avehicle luggage rack if yourvehicle is equipped with one.
• Worn, old tires can cause acci-dents. If your tread is badlyworn, or if your tires havebeen damaged, replace them.

Maintenance
387
1
2
3
4
5
6
7
8
9
Remove the valve cap from the tirevalve stem. Press the tire gage firm-ly onto the valve to get a pressuremeasurement. If the cold tire inflationpressure matches the recommendedpressure on the tire and loadinginformation label, no further adjust-ment is necessary. If the pressure islow, add air until you reach the rec-ommended amount.If you overfill the tire, release air bypushing on the metal stem in thecenter of the tire valve. Recheck thetire pressure with the tire gage. Besure to put the valve caps back onthe valve stems. They help preventleaks by keeping out dirt and mois-ture.
Tire rotation To equalize tread wear, it is recom-mended that the tires be rotatedevery 12,000 km (7,500 miles) orsooner if irregular wear develops.During rotation, check the tires forcorrect balance.When rotating tires, check for unevenwear and damage. Abnormal wear isusually caused by incorrect tire pres-sure, improper wheel alignment, out-of-balance wheels, severe braking orsevere cornering. Look for bumps orbulges in the tread or side of tire.Replace the tire if you find either ofthese conditions. Replace the tirealso if you can see fabric or cord.After rotation, be sure to bring thefront and rear tire pressures to spec-ification and check lug nut tightness.Refer to Section 8, Specifications.
CBGQ0707
CBGQ0707A
Without a spare tire
Directional tires (if equipped)

7 39
Maintenance
1
2
3
4
5
6
7
8
9
Disc brake pads should be inspectedfor wear whenever tires are rotated.
Rotate radial tires that have anasymmetric tread pattern onlyfrom front to rear and not fromright to left.
Tire replacementIf the tire is worn evenly, a tread wearindicator will appear as a solid bandacross the tread. This shows there isless than 1.6 mm (1/16 inch) of treadleft on the tire. Replace the tire whenthis happens.Do not wait for the band to appearacross the entire tread before replac-ing the tire.
Compact spare tire replace-ment (if equipped)A compact spare tire has a shortertread life than a regular size tire.Replace it when you can see thetread wear indicator bars on the tire.The replacement compact spare tireshould be the same size and designtire as the one provided with yournew Kia and should be mounted onthe same compact spare tire wheel.The compact spare tire is notdesigned to be mounted on a regularsize wheel, and the compact sparetire wheel is not designed for mount-ing a regular size tire.
1KMA5026
Tread wear indicator
CAUTIONDo not mix bias-ply and radial-ply under any circumstances.This may cause dangerous han-dling characteristics.
Maintenance
407
1
2
3
4
5
6
7
8
9
Wheel alignment and tire balance The wheels on your vehicle werealigned and balanced carefully at thefactory to give you the longest tire lifeand best overall performance.In most cases, you will not need tohave your wheels aligned again.However, if you notice unusual tirewear or your vehicle pulling one wayor the other, the alignment may needto be reset.If you notice your vehicle vibratingwhen driving on a smooth road, yourwheels may need to be rebalanced.
✽✽ NOTICEImproper wheel weights can dam-age your vehicle's aluminum wheels.Use only approved wheel weights.
WARNING - Replacingtires
• Driving on worn-out tires isvery hazardous and will reducebraking effectiveness, steeringaccuracy, and traction.
• Your vehicle is equipped withtires designed to provide forsafe ride and handling capabil-ity. Do not use a size and typeof tire and wheel that is differ-ent from the one that is origi-nally installed on your vehicle.It can affect the safety and per-formance of your vehicle,which could lead to handlingfailure or rollover and seriousinjury.When replacing the tires,be sure to equip all four tireswith the tire and wheel of thesame size, type, tread, brandand load-carrying capacity. Ifyou nevertheless decide toequip your vehicle with anytire/wheel combination not rec-ommended by Kia for off roaddriving, you should not usethese tires for highway driving.
(Continued)
(Continued)• The use of any other tire size
or type may seriously affectride, handling, ground clear-ance, stopping distance, bodyto tire clearance, snow tireclearance, and speedometerreliability.
• It is best to replace all fourtires at the same time. If that isnot possible, or necessary,then replace the two front ortwo rear tires as a pair.Replacing just one tire canseriously affect your vehicle’shandling.
• The ABS works by comparingthe speed of the wheels. Tiresize can affect wheel speed.When replacing tires, all 4tires must use the same sizeoriginally supplied with thevehicle. Using tires of a differ-ent size can cause the ABS(Anti-lock Brake System) andESC (Electronic StabilityControl) (if equipped) to workirregularly.
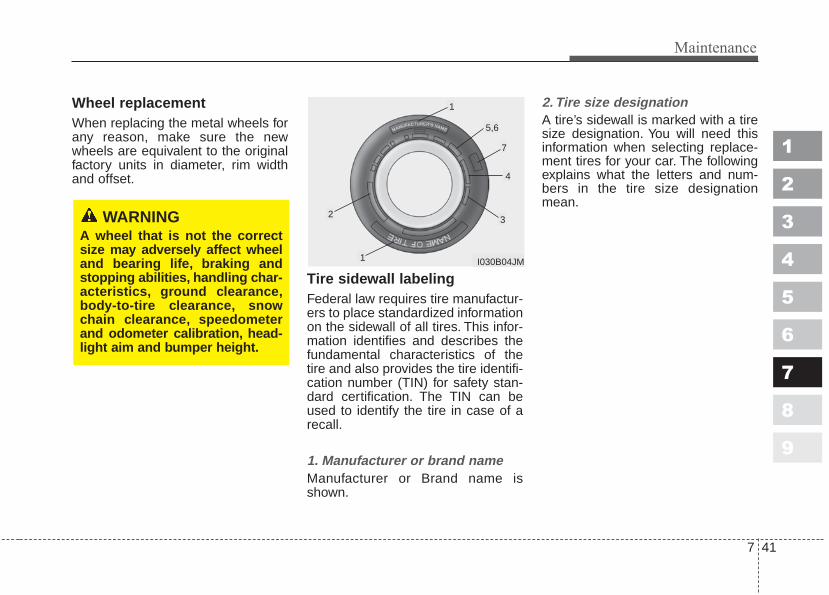
7 41
Maintenance
1
2
3
4
5
6
7
8
9
Wheel replacement When replacing the metal wheels forany reason, make sure the newwheels are equivalent to the originalfactory units in diameter, rim widthand offset.
Tire sidewall labelingFederal law requires tire manufactur-ers to place standardized informationon the sidewall of all tires. This infor-mation identifies and describes thefundamental characteristics of thetire and also provides the tire identifi-cation number (TIN) for safety stan-dard certification. The TIN can beused to identify the tire in case of arecall.
1. Manufacturer or brand nameManufacturer or Brand name isshown.
2. Tire size designation A tire’s sidewall is marked with a tiresize designation. You will need thisinformation when selecting replace-ment tires for your car. The followingexplains what the letters and num-bers in the tire size designationmean.
WARNINGA wheel that is not the correctsize may adversely affect wheeland bearing life, braking andstopping abilities, handling char-acteristics, ground clearance,body-to-tire clearance, snowchain clearance, speedometerand odometer calibration, head-light aim and bumper height.
I030B04JM
1
1
23
4
5,6
7

Maintenance
427
1
2
3
4
5
6
7
8
9
Example tire size designation:(These numbers are provided as anexample only; your tire size designa-tor could vary depending on yourvehicle.)P215/65R16 96T
P - Applicable vehicle type (tiresmarked with the prefix “P’’ areintended for use on passengercars or light trucks; however, notall tires have this marking).
215 - Tire width in millimeters.65 - Aspect ratio. The tire’s section
height as a percentage of itswidth.
R - Tire construction code (Radial).16 - Rim diameter in inches.96 - Load Index, a numerical code
associated with the maximumload the tire can carry.
T - Speed Rating Symbol. See thespeed rating chart in this sectionfor additional information.
Wheel size designation
Wheels are also marked with impor-tant information that you need if youever have to replace one. The follow-ing explains what the letters andnumbers in the wheel size designa-tion mean.
Example wheel size designation:6.5 J×16
6.5 - Rim width in inches.J - Rim contour designation.16 - Rim diameter in inches.
Tire speed ratings
The chart below lists many of the dif-ferent speed ratings currently beingused for passenger cars. The speedrating is part of the tire size designa-tion on the sidewall of the tire. Thissymbol corresponds to that tire'sdesigned maximum safe operatingspeed.
S 180 km/h (112 mph)
T 190 km/h (118 mph)
H 210 km/h (130 mph)
V 240 km/h (149 mph)
Z Above 240 km/h (149 mph)
Maximum SpeedSpeedRatingSymbol

7 43
Maintenance
1
2
3
4
5
6
7
8
9
3. Checking tire life (TIN : TireIdentification Number)
Any tires that are over 6 years, basedon the manufacturing date, tirestrength and performance, declinewith age naturally (even unusedspare tires). Therefore, the tires(including the spare tire) should bereplaced by new ones. You can findthe manufacturing date on the tiresidewall (possibly on the inside of thewheel), displaying the DOT Code.The DOT Code is a series of num-bers on a tire consisting of numbersand English letters. The manufactur-ing date is designated by the last fourdigits (characters) of the DOT code.
DOT : XXXX XXXX OOOOThe front part of the DOT means aplant code number, tire size andtread pattern and the last four num-bers indicate week and year manu-factured.For example:DOT XXXX XXXX 1608 representsthat the tire was produced in the 16thweek of 2008.
4. Tire ply composition and mate-rial
The number of layers or plies of rub-bercoated fabric in the tire. Tire man-ufacturers also must indicate thematerials in the tire, which includesteel, nylon, polyester, and others.The letter "R" means radial ply con-struction; the letter "D" means diago-nal or bias ply construction; and theletter "B" means belted-bias ply con-struction.
WARNING - Tire ageTires degrade over time, evenwhen they are not being used.Regardless of the remainingtread, it is recommended thattires generally be replaced aftersix (6) years of normal service.Heat caused by hot climates orfrequent high loading condi-tions can accelerate the agingprocess. Failure to follow thiswarning can result in suddentire failure, which could lead to aloss of control and an accidentinvolving serious injury ordeath.

Maintenance
447
1
2
3
4
5
6
7
8
9
5. Maximum permissible inflationpressure
This number is the greatest amountof air pressure that should be put inthe tire. Do not exceed the maximumpermissible inflation pressure. Referto the Tire and Loading Informationlabel for recommended inflationpressure.
6. Maximum load ratingThis number indicates the maximumload in kilograms and pounds thatcan be carried by the tire. Whenreplacing the tires on the vehicle,always use a tire that has the sameload rating as the factory installedtire.
7. Uniform tire quality grading Quality grades can be found whereapplicable on the tire sidewallbetween tread shoulder and maxi-mum section width.For example:TREADWEAR 200TRACTION AATEMPERATURE A
7 45
Maintenance
1
2
3
4
5
6
7
8
9
Tread wear
The tread wear grade is a compara-tive rating based on the wear rate ofthe tire when tested under controlledconditions on a specified govern-ment test course. For example, a tiregraded 150 would wear one-and-a-half times as well on the governmentcourse as a tire graded 100.The relative performance of tiresdepends upon the actual conditionsof their use. However, performancemay differ from the norm because ofvariations in driving habits, servicepractices and differences in roadcharacteristics and climate.These grades are molded on theside-walls of passenger vehicle tires.The tires available as standard oroptional equipment on Kia vehiclesmay vary with respect to grade.
Traction - AA, A, B & C
The traction grades, from highest tolowest, are AA, A, B and C. Thegrades represent the tires ability tostop on wet pavement as measuredunder controlled conditions on spec-ified government test surfaces ofasphalt and concrete. A tire markedC may have poor traction perfor-mance.
Temperature -A, B & C
The temperature grades are A (thehighest), B and C. The grades repre-sent the tire’s resistance to the gen-eration of heat and its ability to dissi-pate heat when tested under con-trolled conditions on a specifiedindoor laboratory test wheel.Sustained high temperature cancause the material of the tires todegenerate and reduce tires life, andexcessive temperature can lead tosudden tires failure. Grades A and Brepresent higher levels of perfor-mance on the laboratory test wheelthan the minimum required by thelaw.
WARNING - Tire temperature
The temperature grade for thistire is established for a tire thatis properly inflated and notoverloaded. Excessive speed,underinflation, or excessiveloading, either separately or incombination, can cause heatbuild-up and possible suddentires failure.This can cause lossof vehicle control and seriousinjury or death.

Maintenance
467
1
2
3
4
5
6
7
8
9
Tire terminology and defini-tionsAir Pressure: The amount of airinside the tire pressing outward onthe tire. Air pressure is expressed inkilopascal (kPa) or pounds persquare inch (psi).Accessory Weight: This means thecombined weight of optional acces-sories. Some examples of optionalaccessories are, automatic transmis-sion, power seats, and air condition-ing.Aspect Ratio: The relationship of atire's height to its width.Belt: A rubber coated layer of cordsthat is located between the plies andthe tread. Cords may be made fromsteel or other reinforcing materials.Bead: The tire bead contains steelwires wrapped by steel cords thathold the tire onto the rim.
Bias Ply Tire: A pneumatic tire inwhich the plies are laid at alternateangles less than 90 degrees to thecenterline of the tread.Cold Tire Pressure: The amount ofair pressure in a tire, measured inkilopascals (kPa) or pounds persquare inch (psi) before a tire hasbuilt up heat from driving.Curb Weight: This means the weightof a motor vehicle with standard andoptional equipment including themaximum capacity of fuel, oil andcoolant, but without passengers andcargo.
DOT Markings: The DOT codeincludes the Tire IdentificationNumber (TIN), an alphanumeric des-ignator which can also identify thetire manufacturer, production plant,brand and date of production.GVWR: Gross Vehicle Weight Rating GAWR FRT: Gross Axle WeightRating for the front Axle.GAWR RR: Gross Axle WeightRating for the rear axle.
7 47
Maintenance
1
2
3
4
5
6
7
8
9
Intended Outboard Sidewall: Theside of an asymmetrical tire, thatmust always face outward whenmounted on a vehicle.Kilopascal (kPa): The metric unit forair pressure.Load Index: An assigned numberranging from 1 to 279 that corre-sponds to the load carrying capacityof a tire.Maximum Inflation Pressure: Themaximum air pressure to which acold tire may be inflated. The maxi-mum air pressure is molded onto thesidewall.
Maximum Load Rating: The loadrating for a tire at the maximum per-missible inflation pressure for thattire.Maximum Loaded Vehicle Weight:The sum of curb weight; accessoryweight; vehicle capacity weight; andproduction options weight.Normal Occupant Weight: Thenumber of occupants a vehicle isdesigned to seat multiplied by 68 kg(150 pounds).Occupant Distribution: Designatedseating positions.
Outward Facing Sidewall: The sideof a asymmetrical tire that has a par-ticular side that faces outward whenmounted on a vehicle.The side of thetire that contains a whitewall, bearswhite lettering or bears manufactur-er, brand and or model name mold-ing that is higher or deeper than thesame moldings on the other sidewallof the tire.Passenger (P-Metric) Tire: A tireused on passenger cars and somelight duty trucks and multipurposevehicles.Recommended Inflation Pressure:Vehicle manufacturer's recommend-ed tire inflation pressure and shownon the tire placard.

Maintenance
487
1
2
3
4
5
6
7
8
9
Radial Ply tire: A pneumatic tire inwhich the ply cords that extend to thebeads are laid at 90 degrees to thecenterline of the tread.Rim: A metal support for a tire andupon which the tire beads are seat-ed.Sidewall: The portion of a tirebetween the tread and the bead.Speed Rating: An alphanumericcode assigned to a tire indicating themaximum speed at which a tire canoperate.Traction: The friction between thetire and the road surface. Theamount of grip provided.
Tread: The portion of a tire thatcomes into contact with the road.Treadwear Indicators: Narrowbands, sometimes called "wearbars", that show across the tread of atire when only 2/32 inch of treadremains.UTQGS: Uniform Tire QualityGrading Standards, a tire informationsystem that provides consumers withratings for a tire's traction, tempera-ture and treadwear. Ratings aredetermined by tire manufacturersusing government testing proce-dures. The ratings are molded intothe sidewall of the tire.Vehicle Capacity Weight: The num-ber of designated seating positionsmultiplied by 68 kg (150 lbs.) plus therated cargo and luggage load.
Vehicle Maximum Load on theTire: Load on an individual tire due tocurb and accessory weight plusmaximum occupant and cargoweight.Vehicle Normal Load on the Tire:That load on an individual tire that isdetermined by distributing to eachaxle its share of the curb weight,accessory weight, and normal occu-pant weight and driving by 2.Vehicle Placard: A label permanent-ly attached to a vehicle showing theoriginal equipment tire size and rec-ommended inflation pressure.

7 49
Maintenance
1
2
3
4
5
6
7
8
9
All season tires Kia specifies all season tires onsome models to provide good perfor-mance for use all year round, includ-ing snowy and icy road conditions.All season tires are identified by ALLSEASON and/or M+S (Mud andSnow) on the tire sidewall. Snow tireshave better snow traction than allseason tires and may be moreappropriate in some areas.
Summer tires Kia specifies summer tires on somemodels to provide superior perfor-mance on dry roads. Summer tireperformance is substantrally reducedin snow and ice. Summer tires do nothave the tire traction rating M+S(Mud and Snow) on the tire side wall.if you plan to operate your vehicle insnowy or icy conditions. Kia recom-mends the use of snow tires or allseason tires on all four wheels.
Snow tiresIf you equip your car with snow tires,they should be the same size andhave the same load capacity as theoriginal tires. Snow tires should beinstalled on all four wheels; other-wise, poor handling may result.Snow tires should carry 28 kPa (4psi) more air pressure than the pres-sure recommended for the standardtires on the tire label on the driver'sside of the center pillar, or up to themaximum pressure shown on the tiresidewall whichever is less.Do not drive faster than 120 km/h (75mph) when your car is equipped withsnow tires.

Maintenance
507
1
2
3
4
5
6
7
8
9
EXTERIOR CARE Exterior general caution It is very important to follow the labeldirections when using any chemicalcleaner or polish. Read all warningand caution statements that appearon the label.
Finish maintenanceWashing To help protect your vehicle’s finishfrom rust and deterioration, wash itthoroughly and frequently at leastonce a month with lukewarm or coldwater.If you use your vehicle for off-roaddriving, you should wash it after eachoff-road trip. Pay special attention tothe removal of any accumulation ofsalt, dirt, mud, and other foreignmaterials. Make sure the drain holesin the lower edges of the doors androcker panels are kept clear andclean.Insects, tar, tree sap, bird droppings,industrial pollution and similardeposits can damage your vehicle’sfinish if not removed immediately.Even prompt washing with plainwater may not completely remove allthese deposits. A mild soap, safe foruse on painted surfaces, may beused.After washing, rinse the vehicle thor-oughly with lukewarm or cold water.Do not allow soap to dry on the finish.
WARNING - Wet brakesAfter washing the vehicle, testthe brakes while driving slowlyto see if they have been affectedby water. If braking performanceis impaired, dry the brakes byapplying them lightly whilemaintaining a slow forwardspeed.
CAUTION• Do not use strong soap, chem-
ical detergents or hot water,and do not wash the vehicle indirect sunlight or when thebody of the vehicle is warm.
• Do not wash the side windowstoo close with high pressurewater. Water may leak throughthe windows and wet the inte-rior.
• To prevent damage to theplastic parts, do not clean withchemical solvents or strongdetergents.
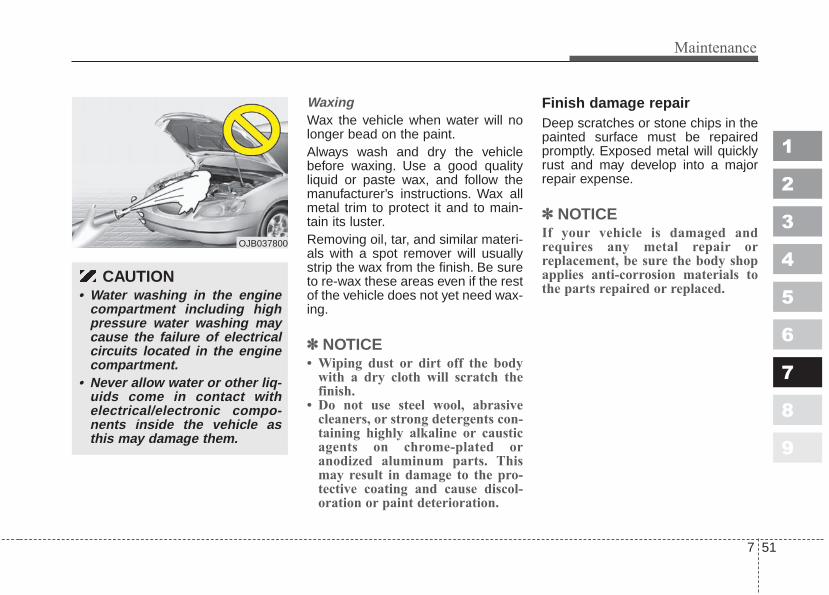
7 51
Maintenance
1
2
3
4
5
6
7
8
9
WaxingWax the vehicle when water will nolonger bead on the paint.Always wash and dry the vehiclebefore waxing. Use a good qualityliquid or paste wax, and follow themanufacturer’s instructions. Wax allmetal trim to protect it and to main-tain its luster.Removing oil, tar, and similar materi-als with a spot remover will usuallystrip the wax from the finish. Be sureto re-wax these areas even if the restof the vehicle does not yet need wax-ing.
✽✽ NOTICE• Wiping dust or dirt off the body
with a dry cloth will scratch thefinish.
• Do not use steel wool, abrasivecleaners, or strong detergents con-taining highly alkaline or causticagents on chrome-plated oranodized aluminum parts. Thismay result in damage to the pro-tective coating and cause discol-oration or paint deterioration.
Finish damage repair Deep scratches or stone chips in thepainted surface must be repairedpromptly. Exposed metal will quicklyrust and may develop into a majorrepair expense.
✽✽ NOTICEIf your vehicle is damaged andrequires any metal repair orreplacement, be sure the body shopapplies anti-corrosion materials tothe parts repaired or replaced.
OJB037800
CAUTION• Water washing in the engine
compartment including highpressure water washing maycause the failure of electricalcircuits located in the enginecompartment.
• Never allow water or other liq-uids come in contact withelectrical/electronic compo-nents inside the vehicle asthis may damage them.

Maintenance
527
1
2
3
4
5
6
7
8
9
Bright-metal maintenance• To remove road tar and insects,
use a tar remover, not a scraper orother sharp object.
• To protect the surfaces of bright-metal parts from corrosion, apply acoating of wax or chrome preserv-ative and rub to a high luster.
• During winter weather or in coastalareas, cover the bright metal partswith a heavier coating of wax orpreservative. If necessary, coat theparts with non-corrosive petroleumjelly or other protective compound.
Underbody maintenanceCorrosive materials used for ice andsnow removal and dust control maycollect on the underbody. If thesematerials are not removed, acceler-ated rusting can occur on underbodyparts such as the fuel lines, frame,floor pan and exhaust system, eventhough they have been treated withrust protection.
Thoroughly flush the vehicle under-body and wheel openings with luke-warm or cold water once a month,after off-road driving and at the endof each winter. Pay special attentionto these areas because it is difficultto see all the mud and dirt. It will domore harm than good to wet downthe road grime without removing it.The lower edges of doors, rockerpanels, and frame members havedrain holes that should not beallowed to clog with dirt; trappedwater in these areas can cause rust-ing.
Aluminum wheel maintenance The aluminum wheels are coatedwith a clear protective finish.• Do not use any abrasive cleaner,
polishing compound, solvent, orwire brushes on aluminum wheels.They may scratch or damage thefinish.
• Use only a mild soap or neutraldetergent, and rinse thoroughlywith water. Also, be sure to cleanthe wheels after driving on saltedroads. This helps prevent corro-sion.
• Avoid washing the wheels withhigh-speed car wash brushes.
• Do not use any cleaners containingacid or acid detergents. It maydamage and corrode the aluminumwheels coated with a clear protec-tive finish.
WARNINGAfter washing the vehicle, testthe brakes while driving slowlyto see if they have been affectedby water. If braking performanceis impaired, dry the brakes byapplying them lightly whilemaintaining a slow forwardspeed.

7 53
Maintenance
1
2
3
4
5
6
7
8
9
INTERIOR CARE Interior general precautions Prevent caustic solutions such asperfume and cosmetic oil from con-tacting the dashboard because theymay cause damage or discoloration.If they do contact the dashboard,wipe them off immediately. See theinstructions that follow for the properway to clean vinyl.
✽✽ NOTICENever allow water or other liquids tocome in contact with electrical/elec-tronic components inside the vehicleas this may damage them.
Cleaning the upholstery andinterior trim Vinyl Remove dust and loose dirt fromvinyl with a whisk broom or vacuumcleaner. Clean vinyl surfaces with avinyl cleaner.
Fabric Remove dust and loose dirt from fab-ric with a whisk broom or vacuumcleaner. Clean with a mild soap solu-tion recommended for upholstery orcarpets. Remove fresh spots imme-diately with a fabric spot cleaner. Iffresh spots do not receive immediateattention, the fabric can be stainedand its color can be affected. Also, itsfire-resistant properties can bereduced if the material is not proper-ly maintained.
✽✽ NOTICEUsing anything but recommendedcleaners and procedures may affectthe fabric’s appearance and fire-resistant properties.
Cleaning the lap/shoulder beltwebbing Clean the belt webbing with any mildsoap solution recommended forcleaning upholstery or carpet. Followthe instructions provided with thesoap. Do not bleach or re-dye thewebbing because this may weakenit.
Cleaning the interior windowglass If the interior glass surfaces of thevehicle become fogged (that is, cov-ered with an oily, greasy or waxyfilm), they should be cleaned withglass cleaner. Follow the directionson the glass cleaner container.
✽✽ NOTICEDo not scrape or scratch the insideof the rear window. This may resultin damage to the rear windowdefroster grid.
CAUTIONWhen cleaning leather products(steering wheel, seats etc.), useneutral detergents or low alco-hol content solutions. If you usehigh alcohol content solutionsor acid/alkaline detergents, thecolor of the leather may fade orthe surface may get stripped off.
1
2
3
4
5
6
7
8
9
Specifications / 8-2
Recommended lubricants and capacities / 8-4
Specifications

Specifications
28
1
2
3
4
5
6
7
8
9
SPECIFICATIONSThe specifications given here are for general information only. Please check with an authorized Kia dealer for moreprecise and more up-to-date information.
Item mm (in)
Overall length 4350 (171.3)
Overall width 1800 (70.9) / 1840 (72.4)*1
Overall height 1695 (66.7) / 1730 (68.1)*2
Front tread 1540 (60.6) / 1550 (61.0)*3 / 1560 (61.4)*4
Rear tread 1540 (60.6) / 1550 (61.0)*3 / 1560 (61.4)*4
Wheelbase 2630 (103.5)
Dimensions
*1 With side garnish*2 With roof rack*3 With 235/60R16 tire*4 With 235/55R17 tire
Light Bulb WattageHeadlights (Low/High) 55/60Front turn signal lights 28Position lights 5Front side mark lights 5Front fog lights (if equipped) 27Stop and tail lights 28/8Rear turn signal lights 28Back-up lights 16Rear side mark light 5High mounted stop light LED *1
License plate lights 5Front map lamp 10Center dome lamp 10Door courtesy lamps (if equipped) 5Cargo area lamp (if equipped) 5Glove box lamp (if equipped) 5
Light bulbs
*1 LED : Light-emitting diode

8 3
1
2
3
4
5
6
7
8
9
Specifications
Tires
Item Inflation Pressure Wheel lug nut torque
Tire Wheel kPa (psi) kg·m (lb·ft, N·m)
P215/65R16 96T 6.5J x 16 210 (30)9~11
(65~79, 88~107)
P235/60R16 99T 6.5J x 16 210 (30)9~11
(65~79, 88~107)
P235/55R17 98T 7.0J x 17 210 (30)9~11
(65~79, 88~107)
Compact spare tire
T155/90D16 110M 4.0T x 16 420 (60)9~11
(65~79, 88~107)
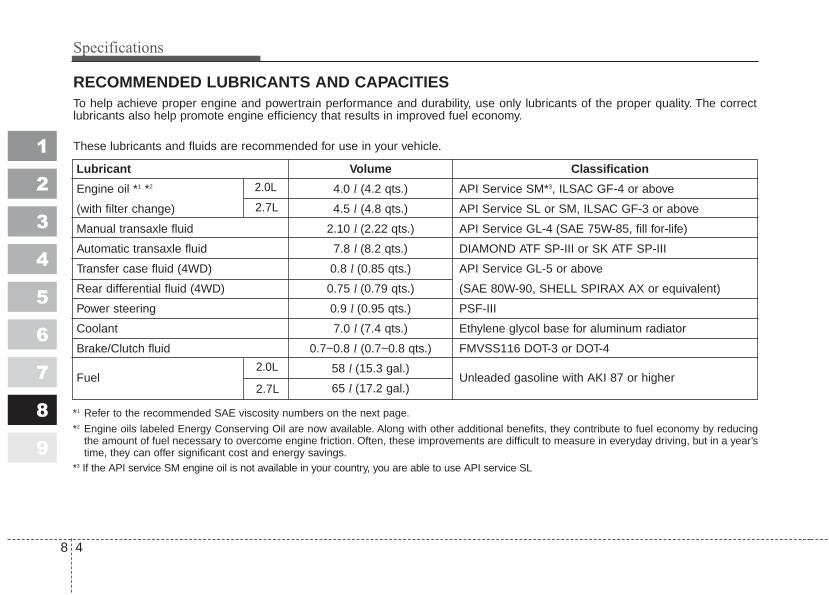
Specifications
48
1
2
3
4
5
6
7
8
9
RECOMMENDED LUBRICANTS AND CAPACITIES
*1 Refer to the recommended SAE viscosity numbers on the next page.
*2 Engine oils labeled Energy Conserving Oil are now available. Along with other additional benefits, they contribute to fuel economy by reducingthe amount of fuel necessary to overcome engine friction. Often, these improvements are difficult to measure in everyday driving, but in a year’stime, they can offer significant cost and energy savings.
*3 If the API service SM engine oil is not available in your country, you are able to use API service SL
Lubricant Volume Classification
Engine oil *1 *2 4.0 l (4.2 qts.) API Service SM*3, ILSAC GF-4 or above
(with filter change) 4.5 l (4.8 qts.) API Service SL or SM, ILSAC GF-3 or above
Manual transaxle fluid 2.10 l (2.22 qts.) API Service GL-4 (SAE 75W-85, fill for-life)
Automatic transaxle fluid 7.8 l (8.2 qts.) DIAMOND ATF SP-III or SK ATF SP-III
Transfer case fluid (4WD) 0.8 l (0.85 qts.) API Service GL-5 or above
Rear differential fluid (4WD) 0.75 l (0.79 qts.) (SAE 80W-90, SHELL SPIRAX AX or equivalent)
Power steering 0.9 l (0.95 qts.) PSF-III
Coolant 7.0 l (7.4 qts.) Ethylene glycol base for aluminum radiator
Brake/Clutch fluid 0.7~0.8 l (0.7~0.8 qts.) FMVSS116 DOT-3 or DOT-4
Fuel58 l (15.3 gal.)
Unleaded gasoline with AKI 87 or higher65 l (17.2 gal.)
2.0L
2.7L
2.0L
2.7L
To help achieve proper engine and powertrain performance and durability, use only lubricants of the proper quality. The correctlubricants also help promote engine efficiency that results in improved fuel economy.
These lubricants and fluids are recommended for use in your vehicle.

8 5
1
2
3
4
5
6
7
8
9
Specifications
Recommended SAE viscositynumber
Engine oil viscosity (thickness) hasan effect on fuel economy and coldweather operating (starting and oilflow). Lower viscosity engine oils canprovide better fuel economy and coldweather performance, however,higher viscosity engine oils arerequired for satisfactory lubrication inhot weather. Using oils of any viscos-ity other than those recommendedcould result in engine damage.
When choosing an oil, consider therange of temperature your vehiclewill be operated in before the next oilchange. Proceed to select the rec-ommended oil viscosity from thechart.
Temperature Range for SAE Viscosity Numbers
Temperature
Gasoline Engine Oil *1 *2
°C(°F)
-30 -20 -10 0 10 20 30 40 50-10 0 20 40 60 80 100 120
10W-30
5W-20, 5W-30
1. Gasoline Engine 2.0L - For better fuel economy, it is recommended to use the engine oil of aviscosity grade SAE 5W-20 (API SM / ILSAC GF-4). However, if the engine oil is not availablein your country, select the proper engine oil using the engine oil viscosity chart.
2. Gasoline Engine 2.7L - For better fuel economy, it is recommended to use the engine oil of aviscosity grade SAE 5W-20, 5W-30 (API SL or SM / ILSAC GF-3). However, if the engine oilis not available in your country, select the proper engine oil using the engine oil viscosity chart.
CAUTION Always be sure to clean the areaaround any filler plug, drainplug, or dipstick before check-ing or draining any lubricant.This is especially important industy or sandy areas and whenthe vehicle is used on unpavedroads. Cleaning the plug anddipstick areas will prevent dirtand grit from entering theengine and other mechanismsthat could be damaged.

1
2
3
4
5
6
7
8
9Index
Index
29
1
2
3
4
5
6
7
8
9
Air cleaner. . . . . . . . . . . . . . . . . . . . . . . . . . . . . . . . . . 7-29Airbags-supplemental restraint system . . . . . . . . . . 3-55Audio system. . . . . . . . . . . . . . . . . . . . . . . . . . . . . . . 3-105Automatic climate control system. . . . . . . . . . . . . . . 4-71Automatic transaxle . . . . . . . . . . . . . . . . . . . . . . 4-6, 7-25
Battery . . . . . . . . . . . . . . . . . . . . . . . . . . . . . . . . . . . . . 7-33Before driving . . . . . . . . . . . . . . . . . . . . . . . . . . . . . . . . 5-5Brake system. . . . . . . . . . . . . . . . . . . . . . . . . . . . . . . . 4-18Brakes and clutch. . . . . . . . . . . . . . . . . . . . . . . . . . . . 7-22
Climate control air filter . . . . . . . . . . . . . . . . . . . . . . 7-30Compass . . . . . . . . . . . . . . . . . . . . . . . . . . . . . . . . . . . 4-51Cruise control system. . . . . . . . . . . . . . . . . . . . . . . . . 4-26
Defroster . . . . . . . . . . . . . . . . . . . . . . . . . . . . . . . . . . . 4-61Door locks . . . . . . . . . . . . . . . . . . . . . . . . . . . . . . . . . . . 3-9
Electrical circuit protection. . . . . . . . . . . . . . . . . . . . . 6-7Electronic stability control . . . . . . . . . . . . . . . . . . . . 4-30Emergency starting . . . . . . . . . . . . . . . . . . . . . . . . . . . 6-4
Emission control system . . . . . . . . . . . . . . . . . . . . . . . 5-3Engine compartment . . . . . . . . . . . . . . . . . . . . . . . . . 7-15Engine cooling system . . . . . . . . . . . . . . . . . . . . . . . . 7-19Engine oil and oil filter . . . . . . . . . . . . . . . . . . . . . . . 7-17Explanation of scheduled maintenance items . . . . . . 7-8Exterior care . . . . . . . . . . . . . . . . . . . . . . . . . . . . . . . . 7-50
Four wheel drive (4WD) . . . . . . . . . . . . . . . . . . . . . . 4-12Fuel filler lid . . . . . . . . . . . . . . . . . . . . . . . . . . . . . . . . 3-81Fuel requirements . . . . . . . . . . . . . . . . . . . . . . . . . . . . 5-2
Gauges . . . . . . . . . . . . . . . . . . . . . . . . . . . . . . . . . . . . . 4-34
Hazard warning flasher. . . . . . . . . . . . . . . . . . . . . . . 4-62Homelink® wireless control system . . . . . . . . . . . . . 5-45Hood. . . . . . . . . . . . . . . . . . . . . . . . . . . . . . . . . . . . . . . 3-80How to use this manual . . . . . . . . . . . . . . . . . . . . . . . . 1-2
If you have a flat tire . . . . . . . . . . . . . . . . . . . . . . . . . 6-19Ignition switch . . . . . . . . . . . . . . . . . . . . . . . . . . . . . . . 4-2Immobilizer system . . . . . . . . . . . . . . . . . . . . . . . . . . . 3-6In case of an emergency while driving. . . . . . . . . . . . 6-2Instrument cluster . . . . . . . . . . . . . . . . . . . . . . . . . . . 4-33
A
B
C
D
E
G
F
H
I

9 3
1
2
3
4
5
6
7
8
9
Index
Instrument panel overview . . . . . . . . . . . . . . . . . . . . . 2-3Interior care . . . . . . . . . . . . . . . . . . . . . . . . . . . . . . . . 7-53Interior features . . . . . . . . . . . . . . . . . . . . . . . . . . . . . 3-92Interior lights . . . . . . . . . . . . . . . . . . . . . . . . . . . . . . . 3-88Interior overview . . . . . . . . . . . . . . . . . . . . . . . . . . . . . 2-2
Keys . . . . . . . . . . . . . . . . . . . . . . . . . . . . . . . . . . . . . . . . 3-2
Label information. . . . . . . . . . . . . . . . . . . . . . . . . . . . 5-51Lighting . . . . . . . . . . . . . . . . . . . . . . . . . . . . . . . . . . . . 4-54Lubricant specifications. . . . . . . . . . . . . . . . . . . . . . . 7-48Luggage center box . . . . . . . . . . . . . . . . . . . . . . . . . 3-103Luggage net. . . . . . . . . . . . . . . . . . . . . . . . . . . . . . . . 3-101
Maintenance schedule . . . . . . . . . . . . . . . . . . . . . . . . . 7-4Maintenance services . . . . . . . . . . . . . . . . . . . . . . . . . . 7-3Manual climate control system . . . . . . . . . . . . . . . . . 4-63Manual transaxle . . . . . . . . . . . . . . . . . . . . . . . . . . . . . 4-5Mirrors . . . . . . . . . . . . . . . . . . . . . . . . . . . . . . . . . . . . 3-84
Overheating. . . . . . . . . . . . . . . . . . . . . . . . . . . . . . . . . . 6-3Overloading. . . . . . . . . . . . . . . . . . . . . . . . . . . . . . . . . 5-40Owner maintenance . . . . . . . . . . . . . . . . . . . . . . . . . . 7-12
Parking brake . . . . . . . . . . . . . . . . . . . . . . . . . . . . . . . 7-23Power steering . . . . . . . . . . . . . . . . . . . . . . . . . . . . . . 7-24
Rear differential (4WD). . . . . . . . . . . . . . . . . . . . . . . 7-27Rear parking assist system . . . . . . . . . . . . . . . . . . . . 4-48Remote keyless entry . . . . . . . . . . . . . . . . . . . . . . . . . . 3-3Road warning . . . . . . . . . . . . . . . . . . . . . . . . . . . . . . . . 6-2Roof rack. . . . . . . . . . . . . . . . . . . . . . . . . . . . . . . . . . 3-104
Safety belts . . . . . . . . . . . . . . . . . . . . . . . . . . . . . . . . . 3-31Seat. . . . . . . . . . . . . . . . . . . . . . . . . . . . . . . . . . . . . . . . 3-19Special driving conditions . . . . . . . . . . . . . . . . . . . . . . 5-8Specifications . . . . . . . . . . . . . . . . . . . . . . . . . . . . . . . . 8-2Starting the engine . . . . . . . . . . . . . . . . . . . . . . . . . . . . 4-4Steering wheel. . . . . . . . . . . . . . . . . . . . . . . . . . . . . . . 4-24Storage compartment. . . . . . . . . . . . . . . . . . . . . . . . . 3-89Suggestions for economical operation . . . . . . . . . . . . 5-6Sunroof . . . . . . . . . . . . . . . . . . . . . . . . . . . . . . . . . . . . 3-97
Theft-alarm system . . . . . . . . . . . . . . . . . . . . . . . . . . . 3-5Tires and wheels . . . . . . . . . . . . . . . . . . . . . . . . . . . . . 7-36Tonneau cover. . . . . . . . . . . . . . . . . . . . . . . . . . . . . . 3-101Towing . . . . . . . . . . . . . . . . . . . . . . . . . . . . . . . . . . . . . 6-14
K
L
M
O
P
R
S
T
Index
49
1
2
3
4
5
6
7
8
9
Trailer towing . . . . . . . . . . . . . . . . . . . . . . . . . . . . . . . 5-33Transfer case (4WD) . . . . . . . . . . . . . . . . . . . . . . . . . 7-27
Using four-wheel drive. . . . . . . . . . . . . . . . . . . . . . . . 5-14
Vehicle break-in process . . . . . . . . . . . . . . . . . . . . . . . 1-3Vehicle handling instructions . . . . . . . . . . . . . . . . . . . 1-3Vehicle load limit . . . . . . . . . . . . . . . . . . . . . . . . . . . . 5-41
Warnings and indicators . . . . . . . . . . . . . . . . . . . . . . 4-39Weight of the vehicle . . . . . . . . . . . . . . . . . . . . . . . . . 5-32Window . . . . . . . . . . . . . . . . . . . . . . . . . . . . . . . . . . . . 3-16Windshield defrosting and defogging. . . . . . . . . . . . 4-81Wiper blades . . . . . . . . . . . . . . . . . . . . . . . . . . . . . . . . 7-31Wipers and washers . . . . . . . . . . . . . . . . . . . . . . . . . . 4-58
U
V
W