2009.strength training
TRANSCRIPT

The Complete Step-by-Step Guide to a Stronger, Sculpted Body


The Complete Step-by-Step Guide to a Stronger, Sculpted Body

3 LEGS
BACK SQUAT
FRONT BARBELL SQUAT
BARBELL HACK SQUAT
DUMBBELL SPLIT SQUAT
OVERHEAD SPLIT SQUAT
BULGARIAN BARBELL SPLIT SQUAT
BULGARIAN DUMBBELL SPLIT SQUAT
BARBELL LUNGE
OVERHEAD BARBELL LUNGE
FORWARD LUNGE
LATERAL LUNGE
BARBELL STEP-UP
45-DEGREE LEG PRESS
MACHINE LEG CURL
MACHINE LEG EXTENSION
HIP ABDUCTOR
HIP ADDUCTOR
CALF RAISE
STRAIGHT-LEG DEADLIFT
BARBELL DEADLIFT
ROMANIAN DEADLIFT
4 BACK
ASSISTED CHIN-UP
LAT PULL-DOWN
CHIN-UP
SEATED PULLEY ROW
STANDING PULLEY ROW
ONE-ARM ROW
BENT-OVER ROW
BARBELL PULL-OVER
GOOD MORNING BARBELL
BACK EXTENSION
PRONE ROW
STRAIGHT-ARM PULL-DOWN
INTRODUCTION
EXERCISE GALLERY
ANATOMICAL CHART
1 PRINCIPLES
UNDERSTANDING YOUR GOALS
TRAINING PHYSIOLOGY
TRAINING PSYCHOLOGY
NUTRITION: THE BASICS
NUTRITION AND FAT: FAQS
PLANNING YOUR TRAINING
SPORTS-SPECIFIC TRAINING
WARM UP, COOL DOWN
2 MOBILITY EXERCISES
NECK EXTENSION AND FLEXION
NECK ROTATION
NECK SIDE FLEXION
ARM CIRCLE
SHOULDER ROTATION
WRIST ROTATION
HIP CIRCLE
TORSO ROTATION
TRUNK FLEXION
FRANKENSTEIN WALK
PIKE WALK
HIP WALK
QUAD STRETCH
SQUAT
LEG FLEXION
LEG ABDUCTION
LUNGE
ROTATIONAL LUNGE
OVERHEAD LUNGE
CONTENTSLONDON, NEW YORK, MUNICH, MELBOURNE, and DELHI
Senior EditorSenior Art Editor
US EditorManaging Editor
Managing Art EditorProduction Controller
Creative Technical SupportJacket Designer
Art DirectorPublisher
Illustrators
Gareth JonesGillian Andrews Margaret ParrishStephanie FarrowLee GriffithsTony PhippsAdam BrackenburyMark CavanaghBryn WallsJonathan MetcalfMike Garland, Mark Walker, Darren R. Awuah, Debajyoti Dutta, Richard Tibbitts, Jon Rogers, Phil Gamble
First American Edition, 2009
Published in the United States by DK Publishing
375 Hudson Street New York, New York 10014
09 10 11 12 13 10 9 8 7 6 5 4 3 2 1
TD444—December/2009
Copyright © 2009 Dorling Kindersley Limited All rights reserved.
Without limiting the rights under copyright reserved above, no part of this publication may be reproduced, stored in or introduced into a
retrieval system, or transmitted, in any form, or by any means (electronic, mechanical, photocopying, recording, or otherwise), without the prior written permission of both the copyright owner and the
above publisher of this book.
The information in this book is designed to help you make informed decisions about your health,
diet, fitness, and exercise program. It is not intended as a substitute for professional fitness
and medical advice. If you suspect that you have a medical problem you should seek your doctor’s approval before you begin any exercise program. Neither the publisher, nor the author, nor anyone
else involved in the preparation of this book are engaged in rendering professional advice
or services to the individual reader. For further advice on safety, please see page 256.
Published in Great Britain by Dorling Kindersley Limited.
A catalog record for this book is available from the Library of Congress
ISBN 978-0-7566-5447-4
Printed and bound in Singapore by Tien Wah Press Ltd.
Discover more at www.dk.com
Editors Marek Walisiewicz, Maddy King
Art Editors Rebecca Johns, Paul Reid, Darren Bland, Claire Dale, Lloyd Tilbury, Annika Skoog
Produced for Dorling Kindersley by
The Stables, Wood Farm, Deopham Road, Attleborough, Norfolk NR17 1AJ
www.cobaltid.co.uk
6
8
12
16
18
20
24
30
32
40
46
50
51
51
52
52
53
54
54
55
56
56
57
57
58
58
59
60
60
61
64
66
67
68
69
70
71
72
73
74
75
76
78
80
80
82
82
84
85
86
88
92
93
94
96
98
98
100
102
104
104
106
106

5 CHEST
BARBELL BENCH PRESS
DUMBBELL BENCH PRESS
INCLINE BARBELL BENCH PRESS
INCLINE DUMBBELL BENCH PRESS
INCLINE FLY
CABLE CROSS-OVER
MACHINE BENCH PRESS
MACHINE FLY
PUSH-UP
FRAME-SUPPORTED PUSH-UP
6 SHOULDERS
MILITARY BARBELL PRESS
DUMBBELL SHOULDER PRESS
UPRIGHT ROW
DUMBBELL SHOULDER SHRUG
SHOULDER SHRUG FROM HANG
FRONT DUMBBELL RAISE
LATERAL DUMBBELL RAISE
REAR LATERAL RAISE
SCARECROW ROTATION
EXTERNAL DUMBBELL ROTATION
INTERNAL ROTATION
EXTERNAL ROTATION
7 ARMS
BENCH DIP
BAR DIP
DUMBBELL TRICEPS EXTENSION
BARBELL TRICEPS EXTENSION
PRONE TRICEPS EXTENSION
TRICEPS KICKBACK
CLOSE-GRIP BENCH PRESS
TRICEPS PUSH-DOWN
OVERHEAD TRICEPS EXTENSION
BARBELL CURL
HAMMER DUMBBELL CURL
INCLINE DUMBBELL CURL
CONCENTRATION CURL
PREACHER CURL
PULLEY CURL
REVERSE BARBELL CURL
REVERSE PULLEY CURL
WRIST EXTENSION
WRIST FLEXION
8 CORE AND ABS
ABDOMINAL CRUNCH
SIT-UP
REVERSE CRUNCH
FIGURE-4 CRUNCH
90-90 CRUNCH
BALL CRUNCH
BALL TWIST
BALL PUSH-UP
BALL JACK KNIFE
BALL BACK EXTENSION
SIDE BEND
ROMAN CHAIR SIDE BEND
PRONE PLANK
SIDE PLANK
V-LEG RAISE
SUITCASE DEADLIFT
WOODCHOP
9 DYNAMIC LIFTS
POWER CLEAN
POWER SNATCH
POWER CLEAN FROM HANG
POWER SNATCH FROM HANG
SQUAT CLEAN
HEAVY FRONT SQUAT
OVERHEAD SQUAT
JERK BALANCE
SNATCH BALANCE
SPLIT SNATCH
PUSH PRESS
KETTLEBELL HIGH-PULL
BARBELL JUMP SQUAT
10 STRETCHES
BICEPS STRETCH
SHOULDER STRETCH
UPPER BACK STRETCH
ERECTOR STRETCH
LAT STRETCH
PEC STRETCH
ITB STRETCH 1
ITB STRETCH 2
3-POINT QUAD STRETCH
HAMSTRING STRETCH 1
HAMSTRING STRETCH 2
HAMSTRING STRETCH 3
QUAD STRETCH 1
QUAD STRETCH 2
ADDUCTOR STRETCH 1
ADDUCTOR STRETCH 2
HAMSTRING STRETCH
CALF STRETCH
PIKE CALF STRETCH
WALKING LUNGE STRETCH
11 PROGRAMS
INTRODUCTION
EXERCISE FUNCTIONALITY MATRIX
MUSCULAR ENDURANCE
BODY SCULPTING
BODYBUILDING
MAXIMAL STRENGTH
CORE STRENGTH
SPORTS-SPECIFIC EXERCISES
SPORTS-SPECIFIC MATRIX
GLOSSARY
INDEX
ACKNOWLEDGMENTS
ABOUT THE BWLA
SAFETY INFORMATION
110
110
112
113
114
116
118
118
120
121
124
125
126
128
129
130
131
132
134
134
136
136
140
141
142
143
144
144
146
148
148
150
150
152
152
154
154
156
156
158
158
162
163
164
165
166
166
168
169
170
171
172
172
174
175
176
176
178
182
184
186
188
190
192
194
196
198
200
202
204
205
208
208
208
208
209
209
209
209
210
210
210
211
211
211
212
212
212
213
213
213
216
218
222
224
230
234
236
238
246
248
250
256
256
256

INTRODUCTION
Strength training is an increasingly popular activity
among men and women of all ages, and offers you
a wealth of health benefits—from bigger muscles
to stronger bones to increased confidence. With
so much conflicting information available, however,
how can you be sure that you are getting the best
out of your training?
This authoritative, comprehensive, and beautifully
illustrated guide, written in conjunction with the BWLA
(British Weight Lifters’ Association) by strength
training experts with more than thirty years' experience
of coaching, contains everything you need to know
to get the very best from your regimen, whether you
6 I N T R O D U C T I O N
want to develop your strength, or build your
physique, or are training for specific gains within
a chosen sport or activity.
The first chapter, Principles, provides you with
all the basic nuts-and-bolts information about how
strength training works, and the best ways to achieve
your goals, whether you are an experienced gym
user, or a complete novice.
The main section of the book covers more than
125 exercises in detail, working through the whole
body systematically, providing a section on dynamic
lifts for those with more experience. The exercises
feature detailed anatomical artworks to show you

7I N T R O D U C T I O N
exactly which muscles you are working, and clear
step-by-step artworks to guide you through each
movement. You are shown how to perform the
exercise with optimum technique, and offered a
range of helpful features such as variations, or tips
on avoiding common mistakes to keep you safe
and maximize the effectiveness of your training.
And should you know what a particular exercise
looks like but not what it’s called, you can locate it
at a glance using the Exercise Gallery on page 8–11.
The final section offers a pragmatic, no-nonsense
approach to the subject of training programs, and
includes a range of specially commissioned goal-
based examples to suit your needs, whatever your
aims or experience, along with useful information
on the key exercises for specific sports, to help
you tailor your training to suit a particular activity.
Clear, user-friendly, and packed with extremely
useful advice, Strength Training is the ultimate
resource for anyone engaged in strength training.
WARNINGAll sport and physical activity involves some risk
of injury. Please check the safety information on
page 256 before embarking on any of the exercises
or programs shown in this book.

8
EXERCISE GALLERY
E X E R C I S E G A L L E R Y
Barbell Pull-Over p.102
Good Morning Barbell p.104
Machine Bench Press p.118
Machine Fly p.118
Back Squat p.64
Front Barbell Squat p.66
Barbell Hack Squat p.67
Dumbbell Split Squat p.68
Machine Leg Extension p.80
Hip Abductor p.82
Hip Adductor p.82
Calf Raise p.84
Straight Leg Deadlift p.85
Barbell Deadlift p.86
Machine Leg Curl p.80
Bulgarian Barbell Split Squat p.70
Back Extension p.104
Prone Row p.106
Military Barbell Press p.124
Dumbbell Shoulder Press p.125
One-Arm Row p.98
Bent-Over Row p.100
Overhead Split Squat p.69
LEG
S
SHO
ULD
ERS
Press-Up p.120
Frame-Supported Press-Up p.121
Straight-Arm Pull-Down p.106
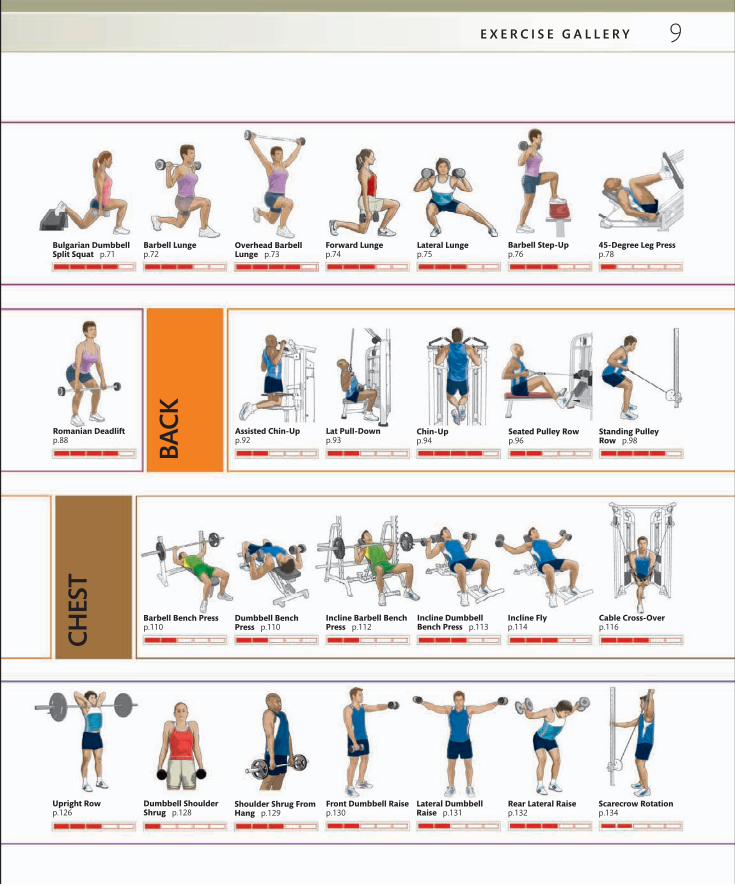
9E X E R C I S E G A L L E R Y
Seated Pulley Row p.96
Standing Pulley Row p.98
Incline Dumbbell Bench Press p.113
Incline Fly p.114
Barbell Lungep.72
Forward Lunge p.74
Lateral Lunge p.75
Barbell Step-Up p.76
Overhead Barbell Lunge p.73
Chin-Up p.94
Assisted Chin-Up p.92
Romanian Deadlift p.88
Lat Pull-Down p.93
45-Degree Leg Press p.78
Incline Barbell Bench Press p.112
Dumbbell Bench Press p.110
Upright Row p.126
Dumbbell Shoulder Shrug p.128
Shoulder Shrug From Hang p.129
Front Dumbbell Raise p.130
Rear Lateral Raise p.132
BACK
CHES
T
Barbell Bench Press p.110
Cable Cross-Over p.116
Scarecrow Rotation p.134
Lateral Dumbbell Raise p.131
Bulgarian Dumbbell Split Squat p.71

10
External Dumbbell Rotation p.134
Hammer Dumbbell Curl p.150
Bench Dip p.140
Internal Rotation p.136
External Rotation p.136
Incline Dumbbell Curl p.152
Concentration Curl p.152
Preacher Curl p.154
Pulley Curl p.154
Reverse Barbell Curl p.156
Reverse Pulley Curl p.156
90-90 Crunch p.166
Ball Crunch p.166
Ball Twist p.168
Ball Press-Up p.169
Ball Jack Knife p.170
Ball Back Extension p.171
Side Bend p.172
Power Clean p.182
Power Snatch p.184
Power Clean From Hang p.186
Power Snatch From Hang p.188
Squat Clean p.190
ARM
S
Bar Dip p.141
Dumbbell Triceps Extension p.142
Heavy Front Squat p.192
DYN
AM
IC
LIFT
S
E X E R C I S E G A L L E R Y

11
Kettlebell High-Pull p.204
Barbell Jump Squat p.205
Prone Triceps Extension p.144
Wrist Extension p.158
Wrist Flexion p.158
Abdominal Crunch p.162
Sit-Up p.163
Reverse Crunch p.164
Barbell Triceps Extension p.143
Triceps Kickback p.144
Close-Grip Bench Press p.146
Triceps Push-Down p.148
Overhead Triceps Extension p.148
Barbell Curl p.150
Figure-4 Crunch p.165
CORE
A
ND
ABS
Roman Chair Side Bend p.172
Prone Plank p.174
Side Plank p.175
V-Leg Raise p.176
Suitcase Deadlift p.176
Woodchop p.178
Overhead Squat p.194
Jerk Balance p.196
Snatch Balance p.198
Split Snatch p.200
Push Press p.202
E X E R C I S E G A L L E R Y

12
ANTERIOR MUSCLES
A N A T O M I C A L C H A R T
ANATOMICAL CHART
Tibialis anterior
Gastrocnemius
Peroneus brevisPeroneus tertius
Extensor digitorum longus
Extensor hallucis longus
Vastus medialis
Vastus lateralis
Rectus femoris
Gracilis
Pectineus
Sartorius
Tensor fasciae lataeTransversus abdominisAbductor pollicis longus
External obliques
Rectus abdominis
Triceps brachii
Serratus anterior
Anterior deltoidMedial deltoid
Pectoralis minor
Trapezius
Internal obliques(beneath external obliques)
Pectoralis major
Sternocleidomastoid
Levator scapulae
Biceps brachiiBrachialis
Pronator teresBrachioradialis
Flexor carpi ulnarisExtensor carpi radialis
Extensor digitorumGluteus medius
Extensor pollicis brevis
Gluteus minimus
Adductor longus
lliopsoas
Peroneus longusGastrocnemius
Soleus
Flexor digitorum longusFlexor hallucis longus
Vastus intermedius (beneath vastus lateralis)

13
POSTERIOR MUSCLES
A N A T O M I C A L C H A R T
Gastrocnemius, medial head
Gastrocnemius, lateral head
Biceps femoris, short head
Plantaris
Vastus intermedius
Vastus lateralisBiceps femoris
Gracilis
Gluteus maximus
Extensor carpi radialisExtensor digitorum
Anconeus
Brachioradialis
Coracobrachialis
Posterior deltoidMedial deltoid
Trapezius
Semispinalis capitis
Teres majorTeres minor
Infraspinatus
Flexor carpi ulnaris
Tensor fasciae latae
Iliotibial band
Peroneus longus
Peroneus brevis
Soleus
Adductor magnus
Semitendinosus
Semimembranosus
Erector spinae(beneath latissimus dorsi)
Brachialis
Latissimus dorsi
Supraspinatus
Rhomboid (beneath trapezius)
Levator scapulaeSplenius capitis
Triceps brachii
Gluteus medius(beneath gluteus maximus)
Soleus
Medial malleolus
Flexor hallucis longus


1
PRINCIPLES

16
UNDERSTANDING YOUR GOALS
Some of you will have picked up this book because you want greater strength and physical power, perhaps to boost self-confidence, to ease day-to-day activities, to prevent injury, or to improve your posture. It may be that you are not happy with your appearance and desire a more muscular, defined body—that elusive concept of looking more “toned.” Your primary goal may be to improve your performance in a particular sport, or you may be intrigued by the challenges of the strength sports—weightlifting and powerlifting.
Your progress toward all of these goals can be aided— to a greater or lesser degree—by strength training. There are other benefits, too, whether intended or incidental. Strength training helps build bone density and can offset the effects of conditions like osteoporosis; it raises your metabolic rate (the amount of energy your body uses at rest) and so can help keep your weight under control; it builds muscle mass, and so can counteract the muscle loss that accompanies aging beyond the age of 30.
P R I N C I P L E S
WHAT IS STRENGTH TRAINING?
Bodybuilding and strength trainingThe sport—or art—of bodybuilding differs from strength training in that its primary goals are to maximize muscle mass (promote hypertrophy) while reducing body fat, so sculpting your physique. It is a cosmetic activity, in which any gain in strength or power is a by-product.
On the positive side, bodybuilding has undoubtedly inspired many people to get involved in strength training and to think about improving their fitness. The sport certainly provides some spectacular visuals, especially at the highest competitive levels. However, for every person who is
The term “strength training” is often used interchangeably with “resistance training” and “weight training,“ but they are not synonymous.
Resistance training is any form of exercise that causes muscles to contract against an external resistance. Weights are just one tool: you can use elastic bands, your own bodyweight, cables, hydraulics, water, a partner, or even a vibration platform to provide resistance.
Strength training is any form of resistance training engaged in to enhance muscle strength.
Weight training is any form of resistance training where weights are used to provide resistance and challenge your strength.

17U N D E R S T A N D I N G Y O U R G O A L S
enthralled at the prospect of huge biceps and rippling abs, there is another who finds such displays unappealing, and whose primary goal is simply to keep his or her body healthy and in optimum condition for everyday life.
Training for the sport of lifeYou may not want to be a bodybuilder, weightlifter, or powerlifter. Instead, you may simply want to look a bit better, increase your muscle mass a small amount, and reduce your body fat levels. Perhaps you want to be able to cope better with the demands of daily life and be able to continue to do this effectively well into old age. Resistance training can assist you in achieving any or all of these goals.
Training for sports It is widely accepted today that athletes need to engage in strength and power training to enhance their sporting performance. Sport-specific conditioning may include aspects of general strength training (including those with a physiotherapy slant), weightlifting, powerlifting, and even bodybuilding (in sports where gains in bodyweight and muscle mass may be of benefit). The huge subject of training for sports is addressed further on pages 40–45.
Strength sports Another aspect of strength training is participation in the two strength sports of weightlifting and powerlifting. The object in both is to lift as much weight as physically possible, in particular styles of lift, for one repetition.
Weightlifting features two lifts; the snatch, and the clean and jerk. In the snatch, the objective is to lift as much weight overhead, as quickly as possible and in one movement; in the clean and jerk, two movements are utilized. Both these lifts are very technical and are performed powerfully and explosively. Weightlifting is an Olympic sport and weightlifters are arguably the most powerful athletes competing at an Olympic games. The abilities required by the weightlifter include technique, power, speed, strength, flexibility, and courage. Although weightlifting is a sport in its own right, the techniques of the clean and jerk and the snatch are used extensively within sport-specific
ONE SIZE DOESN’T FIT ALL
To succeed in any training program, you should have a clear idea of what you want to achieve, where you are starting from, and who you are. The responses of two people to the same training program are likely to be very different depending on the following factors:
Chronological age: age in years.
Biological age: age in relation to physical maturity—especially important for trainees in their early- to mid-teens.
Training age: age in relation to the number of years of experience of training with weights and of sport in general.
Emotional maturity: ability to concentrate during training and handle the fact that results may sometimes be elusive.
Gender: men and women respond differently to strength training in both physiological and psychological terms.
Physical capability: affected by both heredity (see below) and training history (degree of skill and fitness developed).
Heredity: some people have innate strength, or can add bone and muscle mass more quickly than others; the preponderance of fast- and slow-twitch muscle fibers (see page 19) and some aspects of personality are also genetically determined.
Lifestyle: the degree to which training programs can be fit into life outside the gym.
Having a firm grip on your goals is vital to developing an effective resistance training program that will, in the long run, leave you feeling satisfied with your achievements.
strength training and conditioning, as well as in more general strength training, due to their unparalleled ability to develop an individual’s power.
Powerlifting comprises the lifts of the bench press, squat, and deadlift. Ironically, powerlifting requires a large amount of pure strength but little explosive power, because the lifts are completed with incredibly heavy weights that can be moved only very slowly. Elite powerlifters are arguably the strongest athletes in the world.
18
Your body is an amazing machine. It adapts progressively to the amount and type of work that you demand of it, both physically and mentally.
If, for example, you habitually lift heavy weights, your body will respond by increasing your bone density; and if you get regular exercise that causes your muscles to contract against an external resistance, you will build
muscular strength and power. The basic principle of strength training is to
promote such adaptations through repetition of specific exercises in
a planned progression of activity.
TRAINING PHYSIOLOGY
P R I N C I P L E S
To understand how strength training brings about these changes in your muscles and other tissues of your body, we need to address a few basic questions about human biology.
Q | How do your muscles work? A | Your body contains three different types of muscle: cardiac muscle, which makes up the bulk of the heart; smooth muscle, which lines organs such as the stomach, bladder, and blood vessels; and skeletal muscle, which is attached to your bones through tendons and is the force behind nearly all your movements. Of the three, only skeletal muscle is under your
voluntary control and is, as such, “trainable.”
Skeletal muscle is made up of individual muscle cells, or fibers, bound together by connective tissue. Each muscle fiber contains many strands of protein that are capable of chemically “pulling against” one another when given a signal by your nervous system. This pull shortens the muscle and makes it contract.
Muscles are capable only of pulling, not pushing, and so are usually arranged in antagonistic pairs; for example, when you contract your biceps and relax your triceps, your arm bends; doing the opposite straightens your arm. The components of
antagonistic pairs are often called extensors (which straighten the limb) and flexors (which bend the limb).

19T R A I N I N G P H Y S I O L O G Y
Q | How does strength training work?A | Strength training works by overloading muscles, or groups of muscles, then allowing the muscle tissue to adapt, and then overloading the muscle again. On the cellular level, this works because overloading causes microscopic tears to the muscle cells. The damage is rapidly repaired by your body and the affected muscles regenerate and grow stronger. After you work out, testosterone, insulinlike growth factor, growth hormone, proteins, and other nutrients rush to your muscles to help repair them and make them stronger.
Q | How does your body respond to training?A | Your body responds to training in several ways. The first of these is typically adaptation of the central nervous system—what physiologists call neural adaptation. Put simply, you become more efficient and coordinated when performing a given movement. The gains in strength that occur during this skill-learning process can be quick and significant, but they tend to taper off after a fairly short time.
As you continue to train, your muscles grow in size because individual muscle fibers enlarge, or the fluid sac surrounding them increases in size, or both. You do not grow new muscle fibers. Changes also occur in the type of fiber in your muscles (see feature box, right). Most of your muscles contain both Type 1 and Type 2 fibers—the balance of which is partly determined by genetics. Training can change one type of fiber into another, or at least alter the way in which some muscle fibers work. The muscular changes are accompanied by shifts in enzyme and hormone levels, and changes in the way that your body stores the fuel needed to power muscle action.
MUSCLE FIBERS
It is not just your skeletal muscles that change in response to training. Your heart becomes larger, beats more slowly, and it pumps more blood with each beat. The length of time taken for your heart to return to its normal rate after exercise decreases; the volume of blood plasma increases; and the efficiency of your capillaries to deliver oxygen-rich blood to your tissues rises.
Another key training adaptation is psychological. You learn how to train and listen to your body (see overleaf). This comes with experience, but a good coach will give you guidance.
The fibers in your skeletal muscles are not all the same. Physiologists distinguish between two main types—Type 1, or slow-twitch fibers, and Type 2, or fast-twitch fibers.
Type 1 fibers■ Are responsible for long-duration, low-intensity activity
because they are efficient at using oxygen to “burn” the body’s fuel resources for repeated contractions over long periods (aerobic activity).
■ Are slow to fatigue and are brought into play during activities requiring endurance.
Type 2 fibers ■ Produce powerful bursts of contraction at high rates. ■ Are ideally suited to brief, high-intensity activity
in strength training or powerlifting. ■ Work without the need for oxygen (anaerobically)
and fatigue quickly. ■ Can be further divided into 2a, 2b, and 2x fibers. ■ The 2a fiber is a fast-twitch muscle fiber that has endurance
properties. It can be trained to act like a Type 1 or 2b fiber.■ The 2b fiber is the classic fast-twitch fiber—explosive,
powerful, and strong. ■ The 2x fiber is uncommitted and capable of developing into
a Type 1 or 2a fiber.
Most of our muscles contain both types of fibers, but some people are genetically gifted with a preponderance of Type 2 fibers, giving them a natural aptitude for high-intensity explosive activities, such as weightlifting or sprinting. Others have genetic weighting toward the slow-twitch Type 1 fibers; most long-distance runners and cyclists fall into this category.
“ Strength training works by overloading muscles, allowing them to adapt, and overloading them again ”

20
TRAINING PSYCHOLOGY
P R I N C I P L E S
Positive motivationTo succeed in your training objectives, you have to WANT to train and, for those drawn to competitive sport, to compete. Without the right motivation, it is unlikely that you will hit the volume and intensity of training (see page 32) that you need to achieve difficult goals. Getting to the gym regularly can itself become a chore, and what motivates you to start an exercise program may not be what motivates you to carry on through adversity.
Psychologists talk about two kinds of motivation. Extrinsic motivation is where the drivers come from outside—for example, the input of a coach, the opinion of your peer group or training partner, or the award of trophies and certificates. In intrinsic motivation, the drivers spring from within—for example, the personal satisfaction of mastering a skill, such as being able to move from machine-based to free weight exercises, and the satisfaction of feeling more in charge of your life and increasing your self esteem. Extrinsic motivation will only take you so far; intrinsic motivation is what will keep you going through adversity, such as injury or periods of limited progress.
Your motivation needs to be positive, predominantly about wanting to succeed, rather than about the fear of failure to make progress. For this reason, you must set yourself realistic goals and this demands an honest assessment of those goals relative to your potential.
Don’t forget that training should also be fun and suit your individual character: it is in this area that a good coach or instructor can make the difference between continuing with a program and losing momentum.
Too highly motivated?Motivation can be a destructive as well as a constructive force in training and in competition. Put simply, it is possible to want something too much. Psychologists have shown that there are increasing degrees of motivation that help you achieve peak performance, but when your motivation to succeed becomes too great and you try too hard, your hard-learned skills may, in fact, break down and you may forget your tactics.
Research suggests that a new trainee goes through a series of stages in learning new patterns of movement.
To make the most of your precious training time, it is important to understand how your body responds to physical demands. You also need to appreciate how you learn new skills and respond mentally to the challenges of training, both for peak performance and for fun. That’s where training psychology comes in.
LEARNING MOVEMENT PATTERNS
Unconscious incompetent
Conscious incompetent
Conscious competent
Unconscious competent
You don’t yet know what you don’t know and are unaware of your deficiencies. You may even deny the relevance of a particular skill or think that you “know better.” You need to understand the usefulness of the new skills you are learning.
You can see what the skills are that you need to learn, and recognize that you are not yet capable of performing them. This stage of learning is dangerous because your frustrations can lead you to select strategies hastily and without due consideration.
You understand and can perform the movements needed for effective training, but you do so self-consciously and require too much “thinking time” about the moves and positions you need to adopt. This is less of an issue in recreational training, but becomes far more important when performing under pressure or in competition.
You are highly skilled and mature, and so well versed in a wide variety of techniques that you can tailor a response to what is needed. You are able to “listen“ to your body about what is appropriate on any given training day and respond with a correct choice of movement patterns.
Progressive movement through these stages of development requires may hours of practice, patience, high levels of motivation, and the use of techniques such as visualization.

21T R A I N I N G P S Y C H O L O G Y
Visualization is a technique developed by psychologists in which an athlete creates mental images of actions that he or she performs—visualizing a perfect run up to a long jump, for example, or the ideal throw of a javelin. During this mental process, the athlete’s brain directs the muscles required for the move to work in the desired way, laying down a neural pattern that is identical to that created by the actual performance of the movements.
USING VISUALIZATION
In high-level sport, where the ability to perform under the most severe pressure makes the difference between success and failure, you need to find the most appropriate—rather than just the highest—level of motivation in order to succeed. This is the art of coaching.
Even if you don’t compete at a high level, too much motivation may still become a problem. You may be tempted to shorten or even eliminate the crucial rest and recovery phases of training and start to feel the symptoms of overtraining (see page 34). You should never forget that more training is not necessarily better, just as practice does not necessarily make perfect. Bad practice hampers performance and overtraining can result in both physical and psychological damage.
Not wanting it enoughJust as it is possible to want something too much it is also possible—often more likely—not to want something enough to be prepared to put in the considerable time and effort to achieve it.
Many people drop out of strength training because they lack the motivation to train hard enough to be able to compete successfully or to achieve their goals. This issue becomes critical when the rate of progress, which may have been fast and motivating at first, starts to slow. Progress can stall or seem to stop altogether. Self-motivation and realistic goal-setting are the keys to avoiding these pitfalls.
22 P R I N C I P L E S
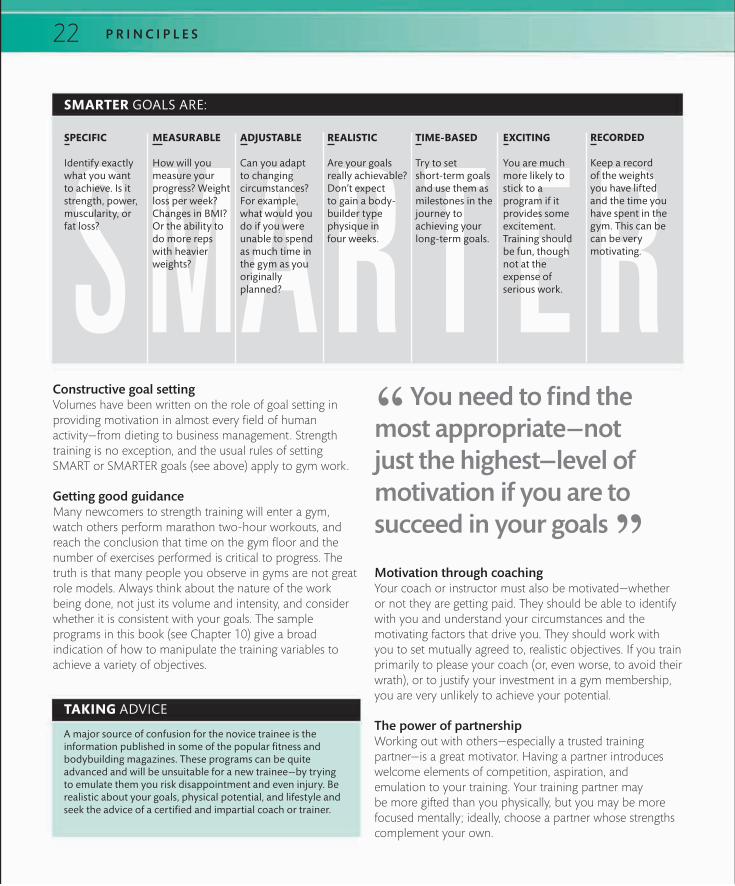
Constructive goal settingVolumes have been written on the role of goal setting in providing motivation in almost every field of human activity—from dieting to business management. Strength training is no exception, and the usual rules of setting SMART or SMARTER goals (see above) apply to gym work.
Getting good guidanceMany newcomers to strength training will enter a gym, watch others perform marathon two-hour workouts, and reach the conclusion that time on the gym floor and the number of exercises performed is critical to progress. The truth is that many people you observe in gyms are not great role models. Always think about the nature of the work being done, not just its volume and intensity, and consider whether it is consistent with your goals. The sample programs in this book (see Chapter 10) give a broad indication of how to manipulate the training variables to achieve a variety of objectives.
Motivation through coachingYour coach or instructor must also be motivated—whether or not they are getting paid. They should be able to identify with you and understand your circumstances and the motivating factors that drive you. They should work with you to set mutually agreed to, realistic objectives. If you train primarily to please your coach (or, even worse, to avoid their wrath), or to justify your investment in a gym membership, you are very unlikely to achieve your potential.
The power of partnershipWorking out with others—especially a trusted training partner—is a great motivator. Having a partner introduces welcome elements of competition, aspiration, and emulation to your training. Your training partner may be more gifted than you physically, but you may be more focused mentally; ideally, choose a partner whose strengths complement your own.
SMARTER GOALS ARE:
TAKING ADVICE
“ You need to find the most appropriate—not just the highest—level of motivation if you are to succeed in your goals ”
MS AR T E R
A major source of confusion for the novice trainee is the information published in some of the popular fitness and bodybuilding magazines. These programs can be quite advanced and will be unsuitable for a new trainee—by trying to emulate them you risk disappointment and even injury. Be realistic about your goals, physical potential, and lifestyle and seek the advice of a certified and impartial coach or trainer.
MEASURABLE
How will you measure your progress? Weight loss per week? Changes in BMI? Or the ability to do more reps with heavier weights?
ADJUSTABLE
Can you adapt to changing circumstances? For example, what would you do if you were unable to spend as much time in the gym as you originally planned?
REALISTIC
Are your goals really achievable? Don’t expect to gain a body- builder type physique in four weeks.
TIME-BASED
Try to set short-term goals and use them as milestones in the journey to achieving your long-term goals.
EXCITING
You are much more likely to stick to a program if it provides some excitement. Training should be fun, though not at the expense of serious work.
RECORDED
Keep a record of the weights you have lifted and the time you have spent in the gym. This can be can be very motivating.
SPECIFIC
Identify exactly what you want to achieve. Is it strength, power, muscularity, or fat loss?

23
If you recognize yourself in this description, you may respond better to extrinsic motivators and to directive approaches to coaching.
Introverts ■ Tend to be quiet, reflective personalities. ■ Avoid pushing themselves forward in a group or drawing attention to themselves. ■ May possess great mental strength in both training and competition.■ Will take a relatively long-term view of where they are and
where they want to be.
If you recognize yourself in this description, you will probably respond better to intrinsic motivators and to a nondirective approach to training.
T R A I N I N G P S Y C H O L O G Y
USING A TRAINING PARTNER
Personality factorsYour personality type has a strong effect on what will motivate you in training. The ways in which different personality factors come together in training situations are complicated and are influenced by both genetics and experience, and their intricacies are beyond the scope of this book. However, it is helpful to recognize two broad personality types and how they may respond to the challenges of training.
Extroverts ■ Are outgoing, sociable, and confident personalities. ■ Don’t spend too much time reflecting upon or planning their workouts in advance. ■ May have short attention spans and can be easily distracted if not immediately rewarded by success.
Choose your training partner carefully and reassess your compatibility with your current partner after each phase of training. Things can go wrong if your partner picks up poor exercise habits or takes bad training advice. Radically different physical types can also be a limiting factor in the success of the training partnership—even if the goals of both people are similar. Exercises that might suit one physical type with a slender build and long bones might be counterproductive for a short, stocky type, and vice versa.

24
NUTRITION: THE BASICS
P R I N C I P L E S
ENERGY DENSITY
Carbohydrate
Protein
Fat
Water, vitamins, and minerals
Eating well and staying hydrated are just as important to your training plan as doing the right exercises at the right intensity and volume. The objective of a nutrition program for strength training is to develop and maintain a body with appropriate lean muscle that has the reserves of strength, power, and endurance to meet the demands of daily life, training, and competition. The human body is a complex machine, but research has given us a good understanding of the role played by the various elements of nutrition in staying healthy, getting fit, and gaining and losing weight.
Foods, calories, and body weightThe weight of your body is made up principally of your skeleton, organs, and the muscle, fat, and water that the body carries. Muscular development (though not the number of muscle fibers), body fat, bone density, and the amount of water can all be changed by training and diet.
The basic facts about weight loss and gain are simple. You gain weight if you take on board more calories than you burn; and you lose weight if you eat fewer calories than you need to fuel your basic body functions and exercise regimen.
Some foods contain many calories for a given weight (they are energy-dense, see below), while others, such as dietary fiber or roughage (see page 30), minerals, and vitamins, contain few or no calories but are still a necessary component of your diet.
PROPORTIONS OF MAIN NUTRIENTS
Carbohydrates (carbs)Carbohydrates are our main source of energy. Nutritionists once distinguished between simple carbohydrates—those found in table sugar, cookies, fruits, and fruit juices—and complex carbohydrates, found in bread, pasta, potatoes, rice, and whole- grain foods. The advice was to eat more complex and fewer simple carbohydrates because complex carbohydrates took longer to break down and absorb and so led to fewer peaks and troughs in levels of blood sugar.
However, the relationship between carbohydrate intake and the effect on blood sugar turned out to be a little more complex. Today, it is more common to refer to foods as having a high or low glycemic index (GI). GI is a measure of the effect that a particular carbohydrate has on blood sugar levels. Low GI foods release their energy more slowly (preventing the feeling of “sugar rush”) and are believed to have other health benefits (see pages 30–31).
FatsDietary fat is a rich source of energy as well as an essential nutrient. It enables your body to absorb some vitamins and is important for proper growth, development, and health. Fat gives food much of its taste and helps you feel “full.”
Not all fats are the same and most foods contain a combination of several fats. Unsaturated fats, such as those found in oily fish and some vegetable and nut oils, are more beneficial than the saturated fats found in meat and animal products, such as butter. Saturated fat in large quantities is implicated in the development of coronary heart disease and needs to be kept to a minimum in a healthy diet. Eating too much fat of any kind will lead to an increase in weight.
113 calories per ounce (4 calories per gram)
113 calories per ounce (4 calories per gram)
255 calories per ounce (9 calories per gram)
Zero calorific value

25N U T R I T I O N : T H E B A S I C S
Proteins The building blocks of the human body, proteins are essential to the growth and repair of muscles and other body tissues. We all need protein, and competing athletes may need a little more than sedentary people because intense training places demands on the ability of the body to repair itself. Proteins are made up of chemical units called amino acids, and foods such as fish, meat, and eggs provide a complete source of the essential amino acids. Fruit, vegetables, and nuts contain protein, but on their own may not supply all the amino acids needed by an athlete in training. For this reason, vegetarian and vegan athletes should get nutritional advice before embarking on high-level training.
Protein needs to be taken in regularly because it is not readily stored by the body. However, the daily amount of protein needed—even by a competing athlete—may be within the range of a “normal” healthy diet.
Vitamins Vitamins are biologically active compounds used in the chemical processes that make the human body function. Vitamins are needed only in tiny amounts and come in two types—those soluble in fat and those soluble in water (which needs to be replenished regularly).
Minerals Minerals such as potassium, sodium, calcium, zinc, and iron are involved in many biochemical processes that maintain life and fuel growth. Mineral deficiency is rare in a balanced diet.
Water Water is crucial in maintaining health. The human body is composed largely of water and it is the medium in which most of the body’s chemistry is played out. Dehydration is potentially a very serious condition and in extreme cases can lead to death.
60% carbohydrate
25% fat
15% protein
PROPORTIONS OF MAIN NUTRIENTS IN THE DIET
There is no universally “correct” balance of daily nutrient intake; the proportions of the main nutrients you need depends on your individual characteristics and lifestyle. However, the following figures are a useful reference point:
26
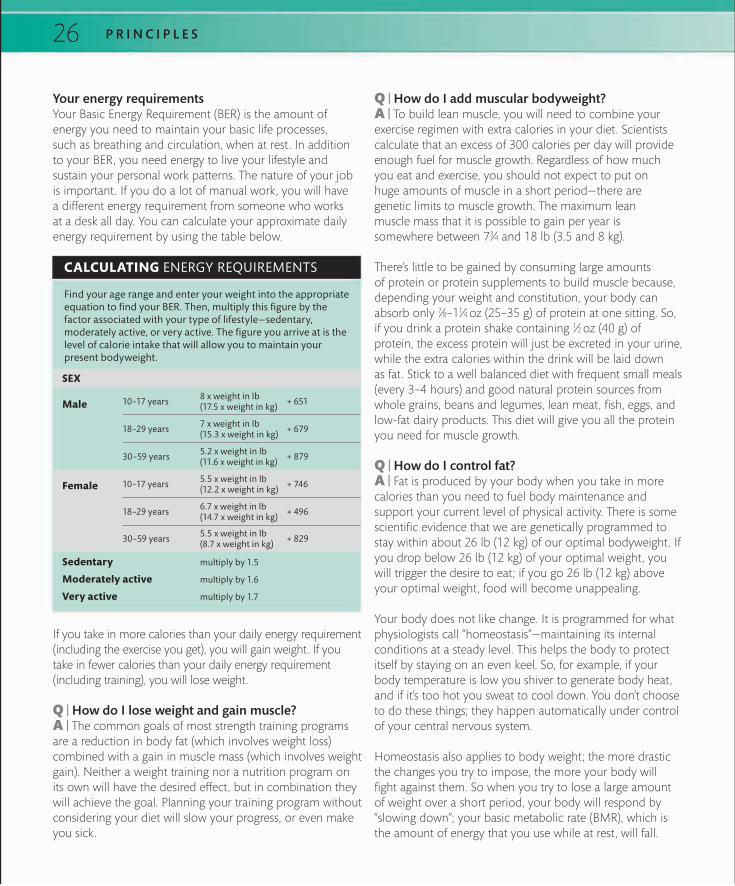
Your energy requirementsYour Basic Energy Requirement (BER) is the amount of energy you need to maintain your basic life processes, such as breathing and circulation, when at rest. In addition to your BER, you need energy to live your lifestyle and sustain your personal work patterns. The nature of your job is important. If you do a lot of manual work, you will have a different energy requirement from someone who works at a desk all day. You can calculate your approximate daily energy requirement by using the table below.
P R I N C I P L E S
If you take in more calories than your daily energy requirement (including the exercise you get), you will gain weight. If you take in fewer calories than your daily energy requirement (including training), you will lose weight.
Q | How do I lose weight and gain muscle? A | The common goals of most strength training programs are a reduction in body fat (which involves weight loss) combined with a gain in muscle mass (which involves weight gain). Neither a weight training nor a nutrition program on its own will have the desired effect, but in combination they will achieve the goal. Planning your training program without considering your diet will slow your progress, or even make you sick.
Q | How do I add muscular bodyweight?A | To build lean muscle, you will need to combine your exercise regimen with extra calories in your diet. Scientists calculate that an excess of 300 calories per day will provide enough fuel for muscle growth. Regardless of how much you eat and exercise, you should not expect to put on huge amounts of muscle in a short period—there are genetic limits to muscle growth. The maximum lean muscle mass that it is possible to gain per year is somewhere between 73⁄4 and 18 lb (3.5 and 8 kg).
There’s little to be gained by consuming large amounts of protein or protein supplements to build muscle because, depending your weight and constitution, your body can absorb only 7⁄8–11⁄4 oz (25–35 g) of protein at one sitting. So, if you drink a protein shake containing 1⁄2 oz (40 g) of protein, the excess protein will just be excreted in your urine, while the extra calories within the drink will be laid down as fat. Stick to a well balanced diet with frequent small meals (every 3–4 hours) and good natural protein sources from whole grains, beans and legumes, lean meat, fish, eggs, and low-fat dairy products. This diet will give you all the protein you need for muscle growth.
Q | How do I control fat?A | Fat is produced by your body when you take in more calories than you need to fuel body maintenance and support your current level of physical activity. There is some scientific evidence that we are genetically programmed to stay within about 26 lb (12 kg) of our optimal bodyweight. If you drop below 26 lb (12 kg) of your optimal weight, you will trigger the desire to eat; if you go 26 lb (12 kg) above your optimal weight, food will become unappealing.
Your body does not like change. It is programmed for what physiologists call “homeostasis”—maintaining its internal conditions at a steady level. This helps the body to protect itself by staying on an even keel. So, for example, if your body temperature is low you shiver to generate body heat, and if it’s too hot you sweat to cool down. You don’t choose to do these things; they happen automatically under control of your central nervous system.
Homeostasis also applies to body weight; the more drastic the changes you try to impose, the more your body will fight against them. So when you try to lose a large amount of weight over a short period, your body will respond by “slowing down”; your basic metabolic rate (BMR), which is the amount of energy that you use while at rest, will fall.
CALCULATING ENERGY REQUIREMENTS
Find your age range and enter your weight into the appropriate equation to find your BER. Then, multiply this figure by the factor associated with your type of lifestyle—sedentary, moderately active, or very active. The figure you arrive at is the level of calorie intake that will allow you to maintain your present bodyweight.
multiply by 1.5
multiply by 1.6
multiply by 1.7
SEX
Male
Female
8 x weight in lb (17.5 x weight in kg)
7 x weight in lb (15.3 x weight in kg)
5.2 x weight in lb (11.6 x weight in kg)
5.5 x weight in lb (12.2 x weight in kg)
6.7 x weight in lb (14.7 x weight in kg)
5.5 x weight in lb (8.7 x weight in kg)
10–17 years
18–29 years
30–59 years
+ 651
+ 679
+ 879
+ 746
+ 496
+ 829
10–17 years
18–29 years
30–59 years
Sedentary
Moderately active
Very active

27N U T R I T I O N : T H E B A S I C S
WHAT IS THE RIGHT LEVEL OF BODY FAT? “ Planning your training program without considering your diet will slow your progress, or even make you sick ”
Average personIt is generally accepted that men should have less than 18 percent of their bodyweight as fat and women 23 percent or less. A certain amount of body fat is essential to good health. There is plenty of evidence to indicate that carrying less than 5 percent body fat compromises your immune system, making you prone to illnesses and infections.
AthletesAthletes in training, especially at the elite level, will have significantly less body fat; around 8–10 percent for men and 10–12 percent for women. High levels of fat in relative terms are a serious disadvantage to most athletes, especially in disciplines where “making weight” for a specific competitive weight class is a priority.
HazardousCarrying more fat than the average person is not particularly hazardous to health until you accumulate 35 percent (men) or 40 percent (women) of total bodyweight as fat. Such levels constitute obesity and have a detrimental effect on health. Too low a level of body fat can also be hazardous, because fat is an important store of energy for aerobic activity.
Less than 18% fat
8–10%fat
35% fat
Less than 23% fat
10–12%fat
40% fat

28
This has the effect of reducing your performance in training and makes it harder to lose weight in the long run. Science also tells us that weight losses of more than 21⁄4 lb (1kg) per week will result in a far greater percentage of the loss coming from lean muscle tissue than from fat. This means that useless fat is retained at the expense of muscle. You should therefore limit weight loss to less than 21⁄4 lb (1 kg) per week in order to remain healthy and capable of training at high intensity.
There are numerous methods of assessing your body fat level. You may be familiar with the term BMI (Body Mass Index), which is a relationship of height to weight and is often used to determine obesity. BMI can be calculated using the following equation:
The problem is that BMI does not distinguish between the weight of muscle and that of fat; indeed, most bodybuilders and muscular athletes are deemed to be obese according to BMI only. So, while it is a useful gauge for the general public, BMI needs to be interpreted with caution by anyone with significant muscle mass. A far more useful gauge is actual body fat percentage, which can be measured in a number of ways, including bio-electrical impedance, skinfold callipers, hydrostatic weighing, and so on. Many health clubs and gyms offer such body fat testing.
Q | What type of exercise will help me lose fat? A | Getting regular exercise will burn calories; the more active you are, the more calories you burn. How much fat you burn depends on the quantity and quality of the exercise: to lose 21⁄4 lb (1 kg) of fat, you need to expend approximately 8,000 calories, but there is much debate surrounding the type of exercise that is most effective at burning fat. It is true that when performing cardiovascular exercise at lower
P R I N C I P L E S
intensities—from 68–79 percent of maximum heart rate— a greater percentage
of energy is provided by the
breakdown of fat. On the other hand, at higher
intensities during anaerobic exercise, while a smaller percentage of energy may be derived from fat metabolism, the total energy burned (from
fat and other fuel sources) may be so much higher. So even if fat metabolism forms a smaller percentage of the proverbial pie, the total pie may be so much larger as to make the fat slice of the pie (the contribution from fat in real terms) much greater. Some argue that training the fat-burning systems through low-intensity exercise on occasion may be of benefit because it “trains” your body to become a more efficient fat-
burning machine.
Gaining muscle through resistance training is another way of losing fat. As your muscle bulk
increases, so does your metabolic rate: muscle is living tissue and it is the furnace of your body. The more muscle mass you have, the more calories you’ll burn just to maintain it. Simply being more muscular means you are burning many more calories at all times, whether at rest or at play. So,
you should not discount strength training as a calorie burner in its own right.
YOUR WEIGHT LOSS STRATEGY
Your own weight loss plan needs to be tailored to your particular needs, taking into account age, physiology, lifestyle, and training patterns. We are all individuals, and our metabolic rates vary—so one size definitely does not fit all.
■ Whatever strategy you adopt, you should monitor your weight and body fat percentage.
■ Assess your weight and body fat percentage regularly against your food intake and exercise routines.
■ Don’t get obsessed—weigh yourself no more than once a week.
■ Don’t get overly worried if your weight fluctuates by a few pounds.
weight (in kg)
height2 ( in m2)BMI =
(in lbs)
703 x height2 ( in inches2)or

29N U T R I T I O N : T H E B A S I C S
THE BODY’S ENERGY SYSTEMS
Different types of activity are fueled by one of three principal energy systems, or biochemical pathways, within the body. These are the aerobic system, the anaerobic system, and the creatine phosphate system.
In practice, the three systems work at the same time, but one or another will predominate, depending on the intensity and the duration of the activity.
“ The more muscle mass you have, the more calories you’ll burn just to maintain it ”
AerobicThe aerobic system comes into play when you exercise constantly and rhythmically for a period of at least 30 minutes, while keeping your heart rate at around 60–80 percent of its maximum. Aerobic activity is long in duration but low in intensity and includes activities such as jogging, cycling, working on a cross-trainer, and swimming.
ExplosiveVery explosive anaerobic activity, such as weightlifting, shot putting, and short distance sprinting of up to 10 seconds’ duration, is fueled by the creatine phosphate system. Creatine phosphate is a substance stored in muscle, which is broken down in a chemical reaction to liberate energy to facilitate very high intensity activity.
AnaerobicThe anaerobic system is used during short-duration, high-intensity activity, where your body’s demand for oxygen exceeds the supply available. Anaerobic exercise relies on energy sources that are stored in the muscles in the form of glycogen and, unlike aerobic exercise, is not dependent on oxygen from the air (breathing). Anaerobic activities include sprinting and interval training.

30 P R I N C I P L E S
NUTRITION AND FAT: FAQS
Q | Can I target a specific part of my body for fat loss? A | No. It is not possible to “spot reduce”—target fat loss to a particular part of the body. If you exercise a particular part of your body, the muscle tissue beneath the fat will become firmer and improve the appearance of that region. However, the exercise will not specifically reduce the fat in the area; fat deposits will diminish with appropriate nutrition and training wherever they are on the body. So if you do 300 abs crunches every day but maintain your fatty diet, you will develop strong abs, but they will be hidden under a layer of fat.
Q | Will my muscle turn to fat if I stop exercising? A | Muscle does not turn into fat and, conversely, no amount of exercise will turn fat into muscle. The two are completely different types of tissue. When you stop a program of hard training but still eat in the way you did to fuel the regimen, you are taking in more calories than you are burning off and so a gain in body fat is inevitable. If you stop your healthy diet and start to eat junk then the problems get even worse and the fat builds up faster still.
Q | Can I “sweat off” fat in the sauna?A | Unfortunately not. The small weight loss you experience when you sit in a sauna or steam room comes from losing water, not fat. The weight returns immediately after you consume fluid.
Q | What is dietary fiber?A | Dietary fiber, also sometimes known as “roughage” is the edible parts of plants that cannot be digested in the human intestines. Taking in enough fiber—around 5⁄8 oz (18 g) per day for the average adult—is important because it helps prevent constipation and intestinal diseases, as well as lowering cholesterol levels and regulating blood sugar. Fiber is abundant in foods such as fruit, vegetables, beans, and whole-grain cereals.
Q | I’ve heard people use the terms “essential fat” and “storage fat.” What’s the difference? A | There are two types of body fat. Essential fat is needed for normal body function, especially of the hormone and immune systems. It is present in the heart, lungs, spleen, kidneys, and other organs. Women carry more essential fat than men. This gender-specific fat is important for child bearing and other hormone-related functions. Storage fat is the fat that you lose or put on as your weight changes; it is laid down by your body in various areas, especially your hips, thighs, and abdomen in times of plenty, to be used in times of need.
Q | Are all dietary fats created equal?A | No. The sort of fats you get from oily fish (Omega 3 fats) are important in a healthy diet. Saturated fats, which are found in foods like full-fat milk and in the skin of grilled chicken, are best avoided as much as possible.
Q | What are high and low GI foods?A | Low GI (glycemic index) foods are those that release their energy slowly. They are an excellent basic fuel for sports—and for life—because they increase blood sugar levels slowly for ready use and so provide a boost of energy without the big “surge” that typifies high GI foods. High GI foods are very quickly absorbed and will typically give you a “sugar rush” or spike, followed by a trough when your energy levels drop below where they were before you ate. The result is that you may feel lethargic and sleepy—not a desirable feeling before or during a training session. You can replenish after your session by eating small quantities of high GI foods along with a little protein. Typical GI values for different foods are given opposite (see box).

31N U T R I T I O N A N D F A T : F A Q S
Q | How frequently should I eat every day?A | Begin with a good breakfast of low GI foods, then try to eat at three-hour intervals so that your body always has fuel to burn. Try not to skip meals; go for lower-calorie alternatives instead—try snacking on fruits and yogurt and lean sources of protein. Skipping meals and feeling hungry puts the body on “red alert” and it starts to conserve fat. Q | What is glycogen?A | Glycogen is one of the body’s major fuel sources. It is basically the substance in which the body stores carbohydrate for the long term. The majority is stored in the muscles and the liver.
Q | Does the right mix of vitamins and minerals matter for healthy body function? A | Yes. A lack of minerals can cause serious problems. At one end of the scale, you may experience muscular cramp after severe sweating, but in the most serious cases mineral deficiency combined with dehydration can cause heart malfunction and even death. Vitamins are crucial to the chemical processes on which the healthy body depends. Some vitamins are fat soluble and so require some fat in the diet if they are to be absorbed.
Q | Should I eat anything special after my workout?A | If your training is recreational and of reasonable intensity and volume, the answer is “nothing special”; you should get everything you need from a healthy, balanced diet. However, if you are engaged in intense training with heavy weights, the period 30 minutes after finishing is a crucial window of opportunity when you should take in high GI foods (about 50 g/13⁄4 oz) to replenish your glycogen stores. Combine this with protein to repair the tissues stressed during the workout. Q | How big is a “portion”?A | You will often see references in nutritional articles to “portions.” In practice, a portion is a serving of food about the size of a pack of playing cards, which can be held in the palm of the average person’s hand.
FinallyThis book can provide only a very basic introduction to the complex issues of nutrition, where research into various foods and their effects, and into the body’s mode of functioning under a variety of conditions, is ongoing. The conclusion has to be, however, that most people’s lifestyles and sporting goals can be achieved by eating a “balanced” diet—one made up of natural, unprocessed foods, taken in moderate quantities. There is little need for supplements or tablets for the majority of non-elite, recreational athletes.
The GI of a food is given on a scale of 0–100, with 100 being pure sugar. Here are some examples of foods and their GIs :
Typical energy drink 95 GI
Orange juice 52 GI
White bread 78 GI
Whole-grain bread 51 GI
Cornflakes 80 GI
Bran cereal 30 GI
Spaghetti (white) 61 GI
Spaghetti (wholemeal) 32 GI
Ice cream 61 GI
A GI of 55 or less is considered low and 70+ high.
GI SCORES

32
Elite athletes work with their coaches to develop sophisticated training programs that run over months or years, manipulating intensities and loading patterns so that the athlete reaches peak performance at just the right time. But even if you are a recreational trainee, some degree of planning is highly desirable. Your body will respond optimally to training only if it is subjected to progressive overload at the right volume, intensity, and frequency, allowing sufficient periods for recovery between your sessions.
The world of strength training has its own jargon, so before considering the subject of planning, let’s introduce some key concepts and terms that are used in this area.
P R I N C I P L E S
Training intensityThe greater the load lifted, the greater is your training intensity. Intensity is commonly expressed as a percentage of your one repetition maximum (see box, left). Opinions vary, but it is generally assumed that an intensity of more than 70–80% 1RM is required to enhance strength.
Often you will see programs described in terms of %1RM (see box, left), although you will also see terms such as 3RM and 10RM; your 3RM is the weight you can lift a maximum of three times and your 10RM is the weight you can lift a maximum of ten times before your muscles fail: these are often a more useful measure than the 1RM.
To measure your 1RM for a particular exercise, first warm up, then choose and lift a weight that is achievable. After a rest of at least a few minutes, increase the weight and try again. Repeat until you arrive at the heaviest weight that you can lift while still maintaining good technique. This is your 1RM. Be sure to progress to the maximum weight without prior fatigue to your muscles.
Training volume and recoveryTraining volume is the total amount of weight shifted in a workout—the load multiplied by the number of reps and sets performed. The relationship between intensity and volume is not straightforward. Typically, as you increase intensity, you will decrease volume, and vice versa. Training at a high volume, with lots of reps and sets performed with comfortable weights, is an excellent way to learn movements, but if you avoid more challenging loads you will not develop power and strength. Conversely, performing high-intensity training for too many weeks can be detrimental.
KEY TERMS
PLANNING YOUR TRAINING
Weight/mass: the weight to be lifted.
Repetition (or “rep”): each time a weight is lifted is termed a repetition, or a rep for short.
Set: groups of repetitions are organized into sets. You could, for example, perform three sets of ten repetitions.
1RM (one repetition maximum): the maximum amount of weight you can lift in a single repetition of a given exercise.
%1RM: the percentage of your 1RM that a weight represents: if the maximum weight you can lift in one repetition is 220 lb (100 kg), a weight of 175 lb (80 kg) represents 80% of 1RM.
Inter-set rest period/interval: the time spent recovering between sets—usually seconds or minutes.
Inter-session rest period/interval: the amount of time spent recovering between sessions. Usually hours or days.
Work-to-rest ratio: the ratio of the time spent active during a set to the time spent recovering between sets. For example, if a set takes 20 seconds and you recover for 3 minutes, that is a work-to-rest ratio of 1:9. Basically, the lower the %1RM lifted, the lower the inter-set rest period required.
“ Training at a high volume with lots of reps and sets is an excellent way to learn movements ”

33P L A N N I N G Y O U R T R A I N I N G
TRAINING PRINCIPLES
Your training program should be appropriate to your goals, effective in achieving them, and take into account your particular needs and personal circumstances (for safety information see page 256). Before starting to plan a program, it helps to explore some of the key principles of strength training.
SpecificityIf your desire is to gain muscle bulk, it makes little sense to do long sessions of aerobic training on the treadmill or exercise bike. Similarly, if you want to enhance your explosive power there‘s little benefit in working with very heavy weights that you can only move incredibly slowly. Specificity means tailoring your training to your goals. It is a simple concept, but one that is generally given insufficient thought, especially by beginners in strength training.
If you are training for a particular sport, specificity gets a little more involved: the exercises you perform should in some way mimic the sporting movements and reflect the loads and speeds relevant to the sport. Sports specificity relates to selecting the correct muscles, joint angles, and postural positions to utilize during strength training. The exercise need not be identical to the sport, but it should include the same movements, in the same order, and be performed at the same speeds.
OverloadThis means subjecting yourself to a greater demand in training than you experience in everyday life. In other words, your training session should challenge you physically. Opinions about what constitutes overload do vary, but it is generally assumed that an intensity of around 70–80% 1RM (see box, opposite) is required to enhance strength.
ProgressionThe point of training is to overload your body, for your body to feel challenged by the demand, and for adaptation to occur. If you lift a 100 lb (45 kg) dumbbell today and find it challenging, your body will adapt. Next time you lift the same weight, it will be less difficult. After a few sessions your body will have largely adapted to that weight. Continuing to lift it for the same number of sets and repetitions will promote little or no further response; you will stagnate. The weight, or the number of times you repeat the movement, must increase to stimulate further development. Progression does not have to happen on every single training session—sometimes taking a step back for a session can allow you to take two steps forward in the long run.
RecoveryAn often overlooked, yet absolutely vital, element of any training program is recovery time. Your body adapts and strengthens after a training session while it is in recovery. If you don’t provide adequate rest you will, at best, stagnate and, at worst, suffer from overtraining and deteriorate (see page 34).
Continuous training is not necessarily better training, and many recreational gym-goers train intensely far too often and do not take enough advantage of the greatest training aid of all—sleep!

34
Recovery is as important an aspect of building strength as the training itself. If your recovery period between sessions is inadequate or excessive, you will simply not develop. It is often suggested that a muscle requires 48 hours to recover following a strength training session, which means that a training frequency of 2–3 times per week is optimal. While this is a good starting point, recovery capacity differs greatly between individuals: some people can train daily and still recover and adapt, while others can manage just one session a week. Working out your optimum training frequency is largely a process of trial and error, in which the best advice is to begin with less training volume and more recovery time.
Your body needs rest to repair its tissues and replace energy stores. If your training frequency, volume, and intensity are too high and your recovery phase too short, your body will suffer a progressive physical breakdown resulting in lower levels of performance. This “overtraining syndrome” may also result in poor sleeping patterns, an elevated resting heart rate, susceptibility to colds and other viral infections, aching limbs, reduced stamina, and a lack of explosive power. Ample recovery time is also vital to your psychological state. You need to switch off from time to time—especially after
heavy training or intense competition—in order to maintain your enthusiasm and prevent the mental staleness that can result from repetitious training programs. Good exercise habits such as performing “cool down” exercises (see page 47) are critical because your body’s recovery from the stress of training and competition starts at this point.
Keep it simpleWhen you are starting out in strength training, and even as you reach an intermediate level, the easiest program is usually the best. The worst mistake you can make is to adopt the training programs of the elite bodybuilder, often touted in magazines. You have to remember that these people are exceptional, endowed with genes that enable them to develop and perform at phenomenal rates. So swallow your pride, admit that you are probably genetically average, and become comfortable with this concept.
P R I N C I P L E S
“ You grow while you are resting—time in the gym just provides the impetus for growth ”

35
Many people begin strength training with a simple program that employs relatively low volumes, few exercises, and simple loading patterns. They achieve great results and start to think that they must adopt a more complex program in order to progress. More often than not, though, “complex” doesn’t equal better, and progress stagnates or even goes into reverse. Rather than admit that the “beginner” program was working for them, they increase the number of sets and exercises, spend more time in the gym and less time recovering, and wonder why they see little progress or, even worse, get injured.
This misconception is often compounded by a fitness industry that emphasizes the importance of changing exercises far too often. There may well be a benefit to altering the exercise composition of your program but such change should be for a reason, not because of some assumption that altering exercises is a panacea to progress. Variation is important to long-term development, but the variation should be more in terms of alterations to the reps, sets, and loads you use, rather than changing the nature of the exercises themselves.
Basic planning principlesHere are five basic pieces of advice to follow when you plan your strength training program.
Select a small number of highly effective exercises:put large, multijoint, compound exercises at the core of your workout. Exercises such as squats, deadlifts, bench presses, chin-ups and pull-ups, bent-over rows, and standing shoulder presses work the largest amounts of muscle mass and are associated with a hormone response that is key to muscle growth. Avoid doing three, four, or five separate exercises that target one body part; such multiple exercises will batter your muscles into submission, rather than stimulating them into more growth.
Rest more than you train: don’t get caught up in the macho mindset of feeling you have to live in the gym. If you do the above key exercises (see box) a couple of times a week, you will get great results. In fact, you will get far better results than doing it four times a week or doing a routine that has you in the gym almost every day, performing multiple exercises per body part. Remember
that you grow while you are resting—time you spend in the gym just provides the
impetus for growth.
P L A N N I N G Y O U R T R A I N I N G
KEY EXERCISES FOR A SIMPLE PROGRAM
Chest and triceps
Back and biceps
Legs and lower back
Shoulders
Biceps
Triceps
Bench presses
Pull-ups or bent-over rows
Squats or deadlifts
Standing shoulder presses
Standing biceps curls
Close-grip bench presses

36
Don’t overdo the sets: for the everyman or woman, performing many sets per exercise or body part is counterproductive. Your goal should be to stimulate growth, then put the barbell down and step away from it. You should do a couple of warm-up sets, followed by two, or at most three, actual work sets.
Alternate training: alternate periods of training to muscular failure with periods of working within your comfort zone. Muscular failure is the point at which you are no longer able to perform another repetition with the weight
you are lifting. Training to failure is believed to deliver greater muscle mass but
is less than optimal in developing strength, and when done to excess it may actually become detrimental to your strength. In strength training, the point at which your movement becomes shaky and irregular
is called “being on the nerve.” To develop strength you should try
to be just shy of this point.
Progress loads slowly: progressive overloading of your muscles is key
to developing strength. However, when working at high intensities, you will not be able to add large amounts of weight at every workout. The smallest plate in most gyms weighs 21⁄2 lb (1.25 kg),
P R I N C I P L E S
which means the smallest jump you can make on a barbell is 5 lb (2.5 kg). If you are able to bench press 165 lb (75 kg) for 10 repetitions, an addition of 5 lb (2.5 kg) equates to a load increase of about 3 percent. If you could add this amount to your bench press every session, for two sessions per week and for one year, you would be bench pressing well over 700 lb (330 kg) for 10 repetitions, making you one of the strongest people in the world! Smaller jumps are more sustainable. If you can find them, invest in some small, fractional plates. For a standard-diameter weight training bar it is easy to find 11⁄4 lb (0.5 kg) plates, but they are also available for Olympic-sized bars. Even a gradual increase of just 11⁄4–21⁄2 lb (0.5–1 kg) per week on your lifts will result in a gain of between 57 and 115 lb (26 and 52 kg) per year. That is immense.
If you cannot find small plates, there is another technique for progression that works well. Imagine you can perform ten repetitions of a shoulder press with 35 lb (16 kg) dumbbells and you decide to progress the weight to 40 lb (18 kg)—a total jump of 12.5 percent. You are very unlikely to be able to perform 10 repetitions with the new weight right away. Instead, try progressing loads slowly (see box, below). If your rate of adaptation outstrips the weekly weight increase, then try jumping by two reps per week instead of one. Remember, there is no rush. It’s a marathon, not a sprint.
“ Put large, multi-joint, compound exercises like the squat and deadlift at the core of your workout ”
Week 1
Week 2
Week 10
1 rep with 40 lb (18 kg) immediately followed
by 9 reps with 35 lb (16 kg)
2 reps with 40 lb (18 kg) immediately followed
8 reps with 35 lb (16 kg)
and so weekly on until
10 reps with 40 lb (18 kg)
PROGRESSING LOADS SLOWLY

37
Working to failure is what produces real results in building strength; however, it is very challenging and overtraining is a
distinct possibility if you continuously work at your limit.
After this 4–8 week period, in which you should have accumulated significant muscle
mass, go back to the beginning of the cycle and work in the 12–14 reps zone,
but with heavier weights, and so on.
P L A N N I N G Y O U R T R A I N I N G
Putting it all togetherBy taking all of these factors into account, you should be well on your way to creating your own tailored training program, which may resemble the one set out here (see box, right), based on visiting the gym twice a week. There are also some excellent programs outlined later in this book (see Programs, page 214). Above all, your program should reflect your individual objectives and your limitations.
Loading and progressionTo maximize the effects of your training, try the following plan for loading.
For the first 6–8 weeks of training: ■ Select a weight for each exercise that allows you to perform 12–14 reps before muscle failure, but perform only 10 reps.■ With each session, add around 3–5 lb (1.5–2 kg) to the lift. ■ Rest for around 3–5 minutes between sets, and try to complete 3 sets of each exercise. In these weeks you will enhance strength in the 12–14 repetition range. With this more manageable weight, focus on performing each exercise with a perfect technique to maximize neural adaptation (see page 19).
For the next 4–8 weeks of training: ■ Devote at least one session per week to training the lift to failure on each set. Failure on the first set should be on the 11th attempted rep, but on the second it will probably occur earlier. ■ Use small progressions from week to week, perhaps 21⁄2 lb (1 kg) on larger lifts and 11⁄4 lb (0.5 kg) on more isolated ones. ■ Take shorter rest periods of 1–2 minutes between sets. Perform just 2 sets to failure—this should be enough to stimulate muscular growth. In these weeks you are effectively taking advantage of the strength you built up in the first 6–8 weeks, so you can work to failure with heavier weights than you could have previously managed.
Chest and triceps
Back and biceps
Legs and lower back
Shoulders
Biceps
Triceps
Bench press: 2–3 sets of 10 reps
Bent over row: 2–3 sets of 10 reps
Back squat: 2–3 sets of 10 reps
Standing shoulder press: 2–3 sets of 10 reps
Standing biceps curl: 2–3 sets of 10 reps
Close-grip bench press: 2–3 sets of 10 reps
EXERCISES, REPETITIONS, AND SETS

38 P R I N C I P L E S
MACHINES OR FREE WEIGHTS?
Most gyms today contain different types of resistance training equipment. These broadly fall into two categories—machines and free weights. Often you will find the free weights in their own area of the gym, which is usually populated by some pretty large
people, while the machines occupy most of the floor space and appear more accessible and somehow “friendlier”. So which equipment should you use to make best use of the precious time you spend in the gym? Here are some of the pros and cons.
Machines require less effort to use than free weights. You sit on the machine, select the weight you want to lift with a pin, and perform an easily learnt movement. It’s simple to change the weight on the stack (making machines very good for drop sets, see opposite) and there are usually illustrated instructions on the side of the machine to guide you through the movement.
Machines often place you in a seated position; however, very few real-world physical activities or sports are performed while sitting. Seated machines do little to improve the balance and stabilization you need for real-life strength.
Machines dictate the exact direction and range of your movement in a particular exercise. If you apply any force in the general direction required by the machine, it will move along its dictated path.
Machines train only the main muscles involved in a movement: this has implications on real-life performance and, vitally, to injury risk. Continually lifting through a restricted range of motion may lead to long-term reductions in flexibility.
Machines are designed and hinged to fit an “average” person. However, no-one is really average; machines that are not specifically designed to fit your body can generate dangerous shearing forces at your working joints.
Machine weights make you stronger at using machine weights.
Working with free weights takes some learning. Seemingly subtle variations in movements carried out with identical weights may produce very different results in terms of muscular development, and you need to invest time to learn the correct movement paths for different exercises.
In the majority of sports and day-to-day movements, forces are transferred through your entire body while you are upright. These natural types of movements are far better reflected in exercises that use free weights than those using machines.
Free weights can and will deviate from the “ideal” movement path, forcing you to correct and stabilize the deviation. If you do not perform a movement correctly, the weight will deviate from its path and you may not complete the lift.
Free weights train not just your main muscles, but also the many muscle groups that stabilize a joint. There is little more hazardous than a joint with incredible strength in its prime movers but little or no strength in the stabilizing muscle groups around it.
Using free weights allows for natural movements that are not constrained by the design of a machine. Carried out with good form, free-weight exercises are not only more effective but arguably safer than machine exercises.
Free weights make you stronger in real life.
MACHINES FREE WEIGHTS
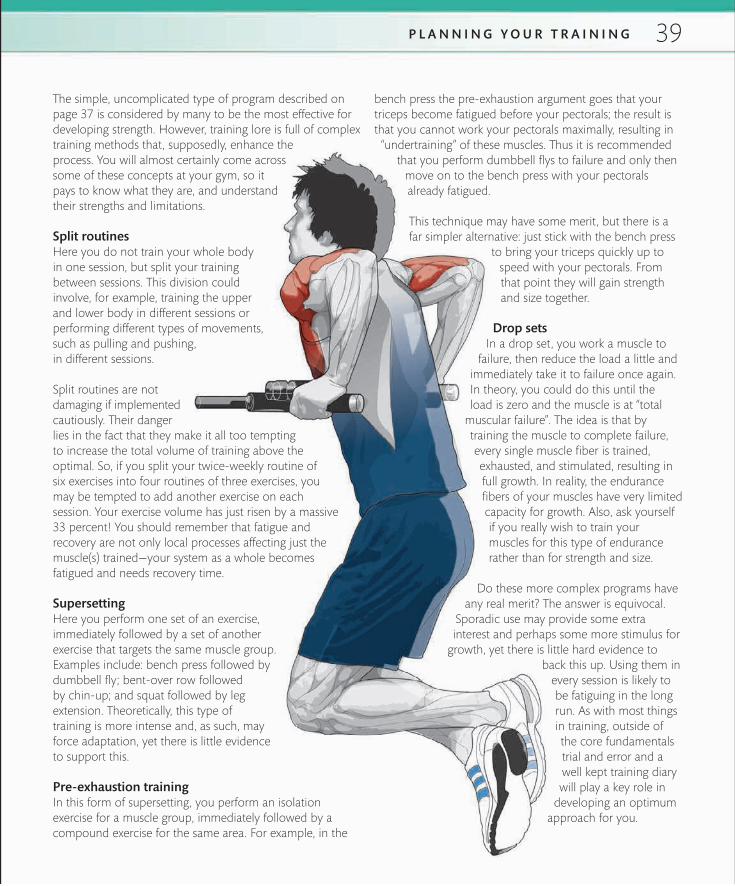
39P L A N N I N G Y O U R T R A I N I N G
The simple, uncomplicated type of program described on page 37 is considered by many to be the most effective for developing strength. However, training lore is full of complex training methods that, supposedly, enhance the process. You will almost certainly come across some of these concepts at your gym, so it pays to know what they are, and understand their strengths and limitations.
Split routinesHere you do not train your whole body in one session, but split your training between sessions. This division could involve, for example, training the upper and lower body in different sessions or performing different types of movements, such as pulling and pushing, in different sessions.
Split routines are not damaging if implemented cautiously. Their danger lies in the fact that they make it all too tempting to increase the total volume of training above the optimal. So, if you split your twice-weekly routine of six exercises into four routines of three exercises, you may be tempted to add another exercise on each session. Your exercise volume has just risen by a massive 33 percent! You should remember that fatigue and recovery are not only local processes affecting just the muscle(s) trained—your system as a whole becomes fatigued and needs recovery time.
SupersettingHere you perform one set of an exercise, immediately followed by a set of another exercise that targets the same muscle group. Examples include: bench press followed by dumbbell fly; bent-over row followed by chin-up; and squat followed by leg extension. Theoretically, this type of training is more intense and, as such, may force adaptation, yet there is little evidence to support this.
Pre-exhaustion trainingIn this form of supersetting, you perform an isolation exercise for a muscle group, immediately followed by a compound exercise for the same area. For example, in the
bench press the pre-exhaustion argument goes that your triceps become fatigued before your pectorals; the result is that you cannot work your pectorals maximally, resulting in
“undertraining” of these muscles. Thus it is recommended that you perform dumbbell flys to failure and only then
move on to the bench press with your pectorals already fatigued.
This technique may have some merit, but there is a far simpler alternative: just stick with the bench press
to bring your triceps quickly up to speed with your pectorals. From that point they will gain strength and size together.
Drop setsIn a drop set, you work a muscle to
failure, then reduce the load a little and immediately take it to failure once again. In theory, you could do this until the load is zero and the muscle is at “total
muscular failure”. The idea is that by training the muscle to complete failure, every single muscle fiber is trained, exhausted, and stimulated, resulting in full growth. In reality, the endurance fibers of your muscles have very limited capacity for growth. Also, ask yourself if you really wish to train your muscles for this type of endurance rather than for strength and size.
Do these more complex programs have any real merit? The answer is equivocal.
Sporadic use may provide some extra interest and perhaps some more stimulus for
growth, yet there is little hard evidence to back this up. Using them in
every session is likely to be fatiguing in the long run. As with most things in training, outside of the core fundamentals trial and error and a well kept training diary will play a key role in
developing an optimum approach for you.

40
SPORTS-SPECIFIC TRAINING
P R I N C I P L E S
Train movements, not musclesIf you have trained in a gym it is likely that you will have heard someone say something like: “I train my chest and biceps on Monday, my back and triceps on Wednesday, and my legs on Friday.” For bodybuilding, and even recreational training, such a muscle-centered approach may make some sense, but from the point of view of enhancing sports performance, who cares how developed your biceps are? What relevance is it to anyone how much weight you can lift in a leg extension? When will any athlete rely on specific, isolated strength in these exact movements in a sports environment? The answer is never.
Sport is all about movement, and your training should address your ability to perform movements more effectively, efficiently, and powerfully. Simply maximizing strength in the muscles involved in a movement, but in an isolated fashion, does not maximize strength development in that movement. To become stronger in squatting movements, you need to squat. To become more powerful in rotation, you need to rotate powerfully. It is common sense.
The reason for this is that the development of coordination (both within and between muscles), skill learning, and the adaptation of your nervous system to the movement patterns trained plays huge roles in the development of strength in movements. Unless you give your body many opportunities to do a movement, it has only limited ability to become better at performing it. All of this should lead you to the inevitable conclusion: train movements, not muscles.
General sports movementsAlthough each sport has its own specific movements, different sports have similarities in terms of the movements they require. Most team games, for example, involve triple extension through the hip, knee, and ankle (the motion required for jumping and straight-line acceleration), single leg strength and power (for running, changing direction, etc.), strength and stability through the core and pillar, trunk rotation, and so on. This means that sports can be broken down into the types of general movement that need to be trained (see box, opposite), as opposed to treating each sport as totally unique.
STRENGTH TRAINING ATTRIBUTES
Athletes will need to develop some of the following attributes through strength training:
Explosive power: think of a sprinter or a tennis player. Success in these and many other sports depends more on explosive power than it does upon pure, slow strength.
Muscular endurance: think of a rower or a cyclist. In sports like these, the ability to generate a moderate force over a prolonged period is far more important than being able to exert a huge force for a short period of time.
Maximal strength: think of a powerlifter, who needs to exert an enormous amount of force for one repetition. Here, pure strength is the key determinant of success. Similarly, members of the defensive line of a football team also require high levels of pure strength.
■ You should also not neglect the importance of pure strength to power output. Power (P) is a product of the force applied (F) and the velocity (V), or speed, at which it is applied: P=F x V. If the force applied is low, power will always be low, regardless of how much speed you can generate. For this reason, weightlifters wishing to develop their power will train for a high level of pure strength.
■ Maximal strength is also very relevant to muscular endurance. The more weight you can lift in a single repetition, the less challenging any given force will be. So if your 1RM for the bench press is 660 lb (300 kg), you will be able to perform many more repetitions with 220 lb (100 kg) than someone with a 265 lb (120 kg) 1RM.
Hypertrophy: think of a football player or a rugby player. For these athletes, sheer muscular bulk is required to counter aggressive body contact. However, for athletes in other sports, too much bulk can be a hindrance.
It is widely accepted today that athletes need to engage in some form of strength training to enhance their sports performance. However, the needs of a football player are obviously different from those of a swimmer, and a cyclist will not benefit from a program designed for a baseball player. The key point is that strength training for athletes must be specific to the demands of their sport.

41S P O R T S - S P E C I F I C T R A I N I N G
Rotation This is a common sports movement pattern, but is often neglected in training. Rotational sports include shot putt, hammer and discus throws, boxing, and golf, although there are few sports that require no rotation. There are two types of rotation that require targeted training. In trunk rotation, you rotate your shoulders through your trunk with little or no movement of your hips; an example is golf. In full pillar rotation, you rotate your body around your foot; a good example is tennis.
Triple extension One of the key buzz-phrases in athletic conditioning, this term describes the way in which your ankle, knee, and hip joints go through near-simultaneous extension in jumping, running, lifting, and some throwing actions. In some sports, you will see this triple extension take place off two legs and in others, just one. In either case, it is usually executed explosively. Athletes also use the single leg triple extension in a much less exaggerated, reactive fashion, when changing direction.
Push Many sports, for example, football or rowing, involve pushing actions, mostly with one arm, but sometimes two, and it makes sense to train these movements. However, the way in which you train a pushing action in the gym (for example, in a bench press) does not really replicate the way you may push in a sport, where your push may be combined with a rotation. As such, it may make sense to train the two together so that you do not neglect the muscles that fight to control torque.
Pull Many sports, including martial arts and kayaking, involve variations of pull movements. In traditional strength training exercises, the movement is often in just one plane (backward and forward, while in sports the movements are typically multiplanar—adding side-to-side and rotational moves. Training the pull in the context of a sport should also involve elements of balance—keeping your body stable while pulling.
Weight shifting, acceleration, and deceleration Weight shifting is a key skill in sports such as boxing, golf, and fencing. Acceleration and deceleration—getting the body moving and changing direction as quickly as possible (or “cutting”)—is key to activities such as sprinting, jumping, throwing, and lifting. While many athletes will consciously train their ability to accelerate, they will neglect their ability to decelerate. It is also common to see athletes struggle with deceleration as they enter a “cut”; injuries are a real risk at this point.
Squat This movement pattern occurs in the vast majority of sports, including cycling, running, and rowing. It can occur in exaggerated or less exaggerated forms, on one or two legs, to accelerate or decelerate the body or to bring about change of direction. Squatting is also a core component of triple extension (see above), so training this movement is vital to the development of peak performance.
KEY SPORTING MOVEMENT PATTERNS

42 P R I N C I P L E S
Sports movements and physical demandsUnderstanding the training regimen most appropriate to your sport means appreciating the basic movement patterns you will perform (see page 41), and analyzing how those movements are done.
Rate: many people overlook the rate or speed of a movement that they perform in their sport, and so train that movement inappropriately. Boxers, for example, often train too much like powerlifters or bodybuilders, utilizing slow lifting speeds. Given that a boxer’s success relies upon rapid, explosive movement, does this make any sense? There is an argument that boxers should develop some pure strength, but it is vital that they focus much of their strength training upon explosive movement, using weightlifting techniques or the ballistic propulsion of implements, such as shot putts or kettlebells, in specific movement patterns.
On the other hand, a rugby prop in a scrum has to apply large forces very slowly and sometimes even statically (isometrically), so high-intensity or isometric (working against an immovable force) training is more appropriate. That said, in the modern game the prop also has to be able to run with the ball explosively and get back into position to defend as quickly as possible. Changes in the prop’s role have been reflected in the training regimens used.
The above account seems to indicate a clear distinction between quick vs. slow, or power vs. strength. Yet it may not be so straightforward. In some of the classic Eastern bloc texts on strength training there is no single translation of the word “power.” Instead, two distinct phrases are used, the closest approximations of which are “strength–speed” and “speed–strength.” Strength–speed relates to movements involving large loads being accelerated moderately quickly, whereas speed–strength describes lighter objects being accelerated very rapidly. It is evident that the type of power
exhibited in the clean and jerk in weightlifting is very different from that of throwing a baseball. This is should be reflected in the way you train for each of these sports.
Frequency: certain sports, such as weightlifting, powerlifting, throwing sports, and golf require a single isolated effort; others, including racket sports, boxing, and rowing demand a more frequent application of force. As soon as more than one expression of force is required there is an endurance element to the sport, which needs to be addressed in your strength training.
It is possible to talk about pure strength vs. strength endurance, or pure power vs. power endurance. The boxer, for example, requires pure power but also needs to be able to reproduce that pure power with as little weakening as possible for the duration of a fight: this is power endurance. The rower, on the other hand, relies on the capacity to exert relatively high force continuously for the entire race: this is strength endurance.
There is a trend in modern athletic conditioning to develop the pure strength of endurance athletes in the gym and let their muscular endurance develop through their training for
running, cycling, rowing, or whatever sport. Consider the advantages of this approach through the example above (see box). For an endurance cyclist, every application of force to the pedal is like performing a mini-squat. If each one of these mini-squats is a smaller percentage of the cyclist’s maximum squat then it will be less fatiguing and will enhance cycling economy and muscular endurance.
“ Strength training for athletes must be specific to the demands of their sport: you should train movements, not muscles ”
Athlete A
Athlete B
Both athletes
For athlete A
For athlete B
can squat 550 lb (250 kg) for one repetition.
can squat 330 lb (150 kg) for one repetition.
are asked to perform as many squats as possible with a 265 lb (120 kg) weight.
this weight is only 48 percent of the one repetition maximum (1RM).
this is 80 percent of the 1RM, a challenging weight that will greatly limit how many repetitions they can perform; that is, their muscular endurance.
STRENGTH AND ENDURANCE

43
use exercises that isolate a muscle in a way in which it would never be used in sports performance, but many also utilize exercises, such as squats and bent-over rows, that fit into the “movements, not muscles” philosophy. The key to functional strength training is to think carefully about how applicable a particular exercise—including its rate, frequency, and direction—is to the movements you perform on the field or on court. Sometimes this means questioning exercise orthodoxy.
Consider, for example, the abdominal crunch, which has for years had a place in almost every athlete’s training program. Think about the way in which gravity loads the upper body when you perform this movement from a lying position. Then consider how dramatically this changes as soon as you are on your feet, where hip and spinal flexion require no effort at all. Unless you take part in a sport where you spend a great deal of time horizontal, such as wrestling, jiu-jitsu, and gymnastics, the crunch is of questionable functional benefit. That is not to say it is a bad exercise, but you should question its blanket use as an means of strengthening your trunk.
Direction of force and the impact of gravity: if a golfer wants to enhance driving power, should he train by swinging a club with a really heavy head? If a boxer wants to build straight punching power, should he train by throwing straight punches while holding heavy dumbbells? Both are forms of resistance training but neither is appropriate to its sport. To understand why, try to visualize the direction in which gravity acts upon the weight and then ask the question: “is this the direction in which force is applied in this sports movement?”
Returning to the golf example, you can see that force is applied through the swinging arc; at the point of contact with the ball, the direction of the force applied is parallel to the ground. If you train with a heavy club head, gravity acts vertically upon the head, making it more challenging to lift from the floor but not to swing, so it does not build horizontal strength. At best, this has no positive outcome, but, at worst, it could damage your swing.
Functional trainingFor anyone involved with health and fitness or sports preparation it has been impossible to escape the recent boom in the concept of “functional training.” This is training performed to make your body better at performing those movements that you will use in a particular sport or in daily life. Functional training is today at the cutting edge of preparing athletes for competition.
It is easy to start making huge distinctions between bodybuilding and athletic conditioning along the lines of nonfunctional vs. functional, but that certainly doesn’t tell the full story. Yes, most bodybuilders will
S P O R T S - S P E C I F I C T R A I N I N G

44
Planning sports-specific trainingDeveloping a program for sports-specific conditioning can be more challenging than planning a general strength training program. Even at its best, it is a far from precise science and requires a great deal of personal interpretation, careful monitoring, and trial and error. The skill of sports-specific training lies in the planning of the training year—manipulating intensities and loading patterns, judging how and when to focus on, for example, power more than strength, or agility more than endurance, and building in rest and regeneration at the correct time. Planning acknowledges that it is impossible for any athlete effectively to train power, strength, strength endurance, power endurance, speed, speed endurance, aerobic endurance, anaerobic endurance, agility, and flexibility to their maximum every single week. It also recognizes that athletes in most sports need to reach their peak performance at a particular time of year, or in a particular season.
Linear/classical periodizationYou may have heard the term “periodization” used interchangeably with training planning, but this is somewhat erroneous—periodization is the process of structuring training into phases and as such is simply one form of training planning.
P R I N C I P L E S
The idea of linear periodization originated in the Eastern bloc in the 1950s, and today most high-level athletes use some form of the technique. Imagine a boxer. He will train hard for three months prior to a fight and then, following the fight, build in a transition phase, doing little or no training. Then he will return to some light, general training before embarking on his next prefight buildup. Similarly, a baseball player will do most of his conditioning work during the off/pre-season period.
How linear/classical periodization works: linear/classical periodization is in essence the splitting up of the training year into numerous blocks, or cycles, each with a different focus, which may be power, strength, endurance, and so on, by stressing different modalities, training loads, lifts, speeds of contraction, intensities, etc.
During the off-season, the focus is typically placed on generalized training designed to redress imbalances that will have inevitably developed during the season, and on developing pure strength, which is essential for maximum power.
Later in the cycle, the volume of pure strength training is significantly reduced as focus on power increases (see diagram, opposite). A simple approach—applicable to all athletes—may be to maintain a ratio of two strength sessions to one power session early in the cycle, and then to reverse this toward competition. As the season or
competition approaches, sports-specific training sessions—in the boat, on the bike, or in the ring—are used to build
specific muscular endurance and sports-specific speed. It goes without saying that a poorly planned
program will result in poor performance, and programs should always be developed with
qualified coaches.
Conjugate/undulating planning Classical/linear approaches work exceptionally well in sports where the athlete is training for one, important competition—training to compete in the Olympic games, for example. However, in many sports, simply peaking for one meet,
game, or competition is inappropriate. A soccer or football season may last
for up to forty games, each as important as the last. This type of sport demands a method of

45S P O R T S - S P E C I F I C T R A I N I N G
the athlete will complete a maximal vertical jump test. If they fail to get within 90 percent of their personal best jump they will not engage in a high-intensity or power- based session. Instead, they may elect to do a higher volume, lower-intensity session.
Instinctive planning means that the athlete does what he or she feels like on the day. The problem is that subjective feelings may not reflect true physical state: it is not uncommon for an athlete to set a personal best when they report feeling lethargic, or to perform poorly when feeling great!
Combining planning methodsIt is not unusual for athletes to combine different forms of planning. In many team games, the off- and pre-seasons are perfect opportunities to utilize a form of linear periodization to get to the season in top condition. Then, when the season begins, and each weekly game requires good levels of fitness in multiple areas, conjugate methods may be employed. Within each of these phases, unplanned and perhaps even instinctive forms of planning can also play their own roles.
In conclusion, training for a sport is very different from general fitness training. The goal in athletic strength and conditioning is to maximize sports performance specific to an athlete’s sport, while minimizing injury risk, and then strive to push on to higher and higher levels. Sport is organized into competitive calendars and while winning is always great, who remembers who won the race before the Olympics? One of the true arts in athletic conditioning, therefore, is peaking perfectly for the big competition or game.
LINEAR PERIODIZATION
week 01week 02week 03week 04
week 05week 06week 07week 08
week 09week 10week 11week 12
week 13week 14week 15week 16
week 17week 18week 19week 20
COMPETITION DATE
S T R E N G T H
P O W E R
planning that maintains good—if not peak—levels of strength, power, strength endurance, power endurance, speed, agility, etc. Conjugate planning is exactly this: the simultaneous training of each of these components of fitness, with equal or similar focus placed on all. A “wave” type or undulating variation may be used in conjugate planning, in which different maximum repetition ranges and intensities are used in the same training week (see box, above right).
Unplanned and instinctive planning Unplanned planning does not mean following no training plan: it simply recognizes that an athlete will sometimes not be in a fit state to engage in the training session programmed for that day. Often, following a brief warm-up,
The basic concept of linear periodization is demonstrated in the diagram below. Note the progressive increase in intensity (and therefore focus on building power over pure strength) every four weeks in the buildup to competition.
This basic example of a wave program shows how workouts undulate from light to moderate to heavy over the course of one week; in the first session you work with weights that allow 12–15 reps before muscle failure, and so on. If you miss a workout one day, just do it on the next day and resume the cycle.
WORKOUT
Session 1
Session 2
Session 3
INTENSITY
12–15 RM
8–10 RM
4–6 RM
A SAMPLE UNDULATING PROGRAM

46
WARM UP, COOL DOWN
A warm-up need take no longer than 20 minutes; begin by skipping, jogging, or working on a cross-trainer for 10 minutes, and then perform 10 minutes of mobilization exercises (see opposite page). Consistently warming up will improve your level of performance.
P R I N C I P L E S
BENEFITS OF WARMING UP
■ Increased heart rate to prepare you for work.
■ Increased blood flow through active tissues, which leads to increased metabolism.
■ Increased speed of contraction and relaxation of warmed muscles.
■ Reduction in pre-workout muscle stiffness.
■ Better use of oxygen by warmed muscles.
■ Better quality and fluency of movement from warmed muscles.
■ Higher temperatures, which help nerve transmission and metabolism in muscles.
■ Specific warm-ups can help with what physiologists call “motor unit recruitment.” A motor unit consists of a nerve fiber together with all its associated muscle fibers. Warming up will increase both the number of motor units brought into play and the rate at which they fire (contract).
■ Increased mental focus on the training and competition.
Warming up and cooling down are too often overlooked in many training programs. Time pressures make it tempting to skip a warm-up, but you do so at your peril. Warming up is essential—it gets your body ready for intense work, while minimizing the risk of injury and maximizing your potential to learn and improve.

47W A R M U P, C O O L D O W N
BENEFITS OF COOLING DOWN
Mobilization exercisesSometimes called dynamic stretching, or movement preparation, mobilization exercises are controlled movements, where you go through a full range of motion without stopping (see pages 50–61).
They are an ideal way to prepare for a workout because they reduce muscle stiffness and help reduce the chance of injury. As you become more advanced and flexible, you can add a controlled swing to push a body part past its usual range of movement. The force of the swing may be gradually increased but should never become too extreme.
Warm-up is not the time for static stretches (see pages 208–13)—those in which you put your body into a position where the target muscles are under tension. Indeed, using static stretches before a workout may reduce your capacity to release power and does little or nothing to minimize the chances of injury.
Cooling down and recovery techniquesWhen you have finished your workout, you should
bring your body back down to its pre-exercise state in a controlled manner. During a workout, your body
is under stress: muscles get damaged and waste products build up. A good cool-down will help
your body to repair itself.
Cooling down need not be a lengthy process: start with 5–10 minutes of gentle jogging or walking, which decreases your body temperature and allows the waste products to be removed from your working muscles. Follow this with 5–10 minutes of static stretches, which help your muscles to relax and the muscle fibers to realign and reestablish their normal range of movement. To perform a static stretch (many are described on pages 208–13), extend the target muscle(s) as far as it can comfortably go, easing into the stretch, and then hold that position for around 10 seconds.
■ Allows the heart rate to recover to its resting rate.
■ Reduces the level of adrenaline in the blood.
■ Potentially reduces Delayed Onset Muscle Soreness (DOMS), pain that is sometimes experienced one to three days after intense muscle activity.
■ Aids in the reduction of waste products in the blood, including lactic acid.
Post-exercise static stretching is controversial. Some suggest the cool-down phase of the workout is an ideal time for “developmental stretching,” which is designed to increase muscle flexibility and your range of movement. Developmental stretches have the same form as simple static stretches: you first hold the static stretch for around 10 seconds, then take the stretch a little farther— 1⁄2 in (1–2 cm) will do—and hold for another 20–30 seconds.
Others propose that stretching a muscle after exercise may actually increase muscle damage and delay recovery. Picture a muscle like a pair of panty hose. Following intense exercise the muscle is full of small micro-tears that are akin to small runs in the hose. Stretching a muscle at this point is like stretching the hose; possibly not good news. A happy medium may be some light, gentle developmental stretching after your workout for muscles that feel particularly tight. Don’t compare yourself to others in the gym—some people have great mobility and you could be in trouble if you try to match their range of movement.
“ Warming up gets your body ready for intense work, while minimizing the risk of injury ”


2MOBILITY EXERCISES

50
Stand upright with your arms by your sides in a relaxed posture
or clasp your hands together to prevent your shoulders from rising. Look straight ahead and keep your spine in a neutral position.
NECK EXTENSION AND FLEXIONThis easy movement, which can be carried out standing or seated, will help prevent general neck stiffness and give you an advantage in sports
M O B I L I T Y E X E R C I S E S
Look straight ahead
Raise your chin without forcing it upward
in which head position and movement are important—for example, where you need to follow a fast-moving ball or other object.
Stand with your feet shoulder-width apart
Keep your shoulders and
your upper body relaxed
Tense your core muscles for support
Extend your neck by slowly raising your chin so you are
looking up at the ceiling. Hold for a few seconds. Do not force the movement beyond a position that feels comfortable.
Flex your neck by letting your head drop forward
without straining. Return your head to the start position and repeat the process slowly and with a gentle rhythm.
51
Begin by looking straight ahead, holding your spine in a neutral
position. Keep your upper body relaxed and your arms loose by your sides.
Stand upright, holding your body in a relaxed posture, with
your shoulders loose and your eyes looking straight ahead.
N E C K E X T E N S I O N A N D F L E X I O N , R O T A T I O N , A N D S I D E F L E X I O N
NECK ROTATIONThis very simple movement can help ease neck aches. It helps to maintain neck flexibility and delays or prevents age-related stiffening. You should be
NECK SIDE FLEXIONImbalances in the muscles of the neck and shoulders can arise from a poor sleeping position or bad posture; they may cause pain or even
Move your head slowly to the side to look over your
right shoulder. Turn as far as you can comfortably go, then hold for a few seconds.
Tilt your head so that your right ear moves toward your
right shoulder as far as comfortable. Hold for a few seconds.
Move your head back through the midline, until
you are looking over your left shoulder, without straining. Return to the start position.
Flex your neck in the opposite direction, passing
through the start position to the limit of flexion. Hold and return.
able to rotate your neck through at least 70 degrees to each side without feeling “pulls” or hearing cracking sounds.
Hold your chin level throughout the movement
Gaze straight ahead
headaches, especially in sedentary office workers. This useful mobility exercise is ideal for those suffering from aching muscles in the upper back and neck.
Keep your shoulders down
as you flex your neck
Do not allow your chin to drop down
M O B I L I T Y E X E R C I S E S
Let your arms hang loose by your sides.
Keep your shoulders down and relaxed. Look straight ahead and concentrate on maintaining a neutral spine.
Many strength training exercises involve your arms and shoulders, so it makes good sense to warm them up thoroughly. Get your blood flowing, your muscles warmed up, and your joints moving fluently by circling your arms in a continuous smooth motion.
SHOULDER ROTATION
ARM CIRCLE
The stability of your shoulder joints comes from the muscles and ligaments around them, rather than from your skeletal system. This exercise provides an excellent way of freeing up your shoulder joints, and also warming your trapezius muscles, before beginning a resistance training session.
Raise both arms to the front and start
to make wide circles. Breathe easily and do not arch your spine.
Let your arms hang loose by your sides
and keep your shoulders relaxed. Keep your head level and your spine in a neutral position.
Bring your shoulders
forward and inward and raise them slowly up toward your ears.
Allow your arms to hang loose without
bending them
Keep your chest high and your abs contracted
Keep your chest high and your abs contracted
Keep your shoulders low
52

A R M C I R C L E , A N D S H O U L D E R A N D W R I S T R O T A T I O N
WRIST ROTATIONGood grip is fundamental to performing many upper body exercises. This movement will help ensure that your wrist joints are mobile and ready for work. It also helps to prevent wrist injuries like carpal tunnel syndrome that commonly affect desk workers.
When you cannot move your arms
any farther back, bring them down and return to the start position.
Rotate your shoulders to
the rear and then back to the start position, still looking straight ahead.
Hold your arms out to
either side, level with your shoulders.
Make small circles with your
hands around your wrist joints. Move slowly, rolling your wrists, rather than moving them from side to side.
Continue the rolling action
for around 20 seconds before reversing the direction of rotation of your hands.
Move your hands down behind the line of your body
Breathe normally
Hold your abs and core tight throughout
Keep your arms straight
at your elbows
Breathe in deeply with your
chest high
Keep your wrists loose and relaxed
Move your wrist through all its
natural positions
Hold your body firmly and your spine neutral
Use your abs and core to hold your body solidly
Ensure that your shoulders remain in the same plane
53

54 M O B I L I T Y E X E R C I S E S
Stand upright with your hands
on your hips, your legs straight, and your feet shoulder- width—or slightly more—apart.
HIP CIRCLEThe core muscles of your torso are involved in many strength training movements, especially those performed standing up. This exercise, in which you rotate your hips as if swinging a hula-hoop around your body, helps to mobilize your core muscles.
TORSO ROTATIONThis exercise complements the hip circle (above) in mobilizing your core muscles, but here your upper body moves while your hips remain stationary.
Start to rotate your
hips slowly in a clockwise direction without arching your lower back.
Continue the rotation.
Do not jerk your body into position; smooth movement is essential throughout.
Stand upright, with your feet
shoulder-width apart and elbows raised to each side.
Rotate your upper body
with a smooth motion to your right, keeping your elbows and forearms in line.
Rotate back through the
start position, keeping your movement fluid, not jerky.
Take up a relaxed posture
Ensure that you circle
your hips only
Look straight ahead
Keep your forearms in line with your shoulders
Turn with your shoulders
55
Stand upright, with your arms by your sides and
close to your body. Keep your shoulders relaxed.
H I P C I R C L E , T O R S O R O T A T I O N , A N D T R U N K F L E X I O N
TRUNK FLEXIONAfter performing the hip circle and torso rotation (left) you should mobilize your upper body by flexing from side to side. This engages your core muscles at a different angle.
Flex your upper body sideways, sliding your left
hand down your leg as far as it will go. Don’t lean forward or back and don’t “bounce” at the end of the movement.
Repeat for your right-hand side, taking your
hand down as far as it will go. Return to the start position.
After 10–15 repetitions,
return to the start position and reverse your direction, rotating counterclockwise.
Keep your feet firmly planted on the floor
Hold your hands on your hips
Hold your chest high
Continue the rotation to your
left, keeping your elbows up. Return to the start position.
Keep your head up and level throughout
Keep your feet planted flat
on the floor
Keep your knees relaxed and not locked
Keep your legs straight throughout
Move only your upper body
Move only from side-to-side
Keep your feet planted on the floor
Ensure that your hips remain facing the front

56 M O B I L I T Y E X E R C I S E S
PIKE WALKThis challenging mobilizer works your calves, hamstrings, and the core muscles of your lower back. With practice, some people can bend almost in half, but persevere if your movement is more limited.
Position yourself as if you were about to perform a push-up, with your
hands shoulder-width apart and flat on the floor, and your arms straight.
“Walk” your hands into a position in front of your head. Then keeping your
legs straight, slowly walk your feet up toward your hands.
FRANKENSTEIN WALKThis exercise mobilizes your hips and hamstrings. You can perform it standing in one spot or walking. It is important to keep a steady tempo and extend your front leg under tight control rather than swinging too enthusiastically.
Start from a standing position. Keep your body upright, with
your right leg slightly behind the line of your body, resting on your toe; hold your left arm horizontally in front of your body.
Resting securely on your left leg,
kick your right leg up, while keeping your knee as straight as possible.
Keep your rear foot flat on the floor
Extend your hand with your
palm facing down
Keep your core and abs tight
Support your weight on your toes
Maintain a straight line through your hips
Keep your spine in a neutral position
Fold your body at your hips
Point your toes up

57F R A N K E N S T E I N W A L K , P I K E W A L K , H I P W A L K , A N D Q U A D S T R E T C H
Stand upright with a neutral spine and your head up. Lift your right leg up and across your body and grip it with your left hand across your shin. Ease your leg up, hold, and repeat with your left leg.
HIP WALKGood hip mobility helps keep your body steady, upright, and well balanced. This simple but effective mobilizer targets your hips and glutes and can be used as a developmental stretch (see page 57) as well as a warm-up exercise.
QUAD STRETCHThis stretch works the muscles at the front of your thigh, the function of which is to straighten your knee. Because you perform it in a standing position, the stretch emphasizes good posture and balance.
When you reach the point at which you cannot continue walking forward
and your body is piked, start to walk your feet back to the start position.
Bring your front leg up to touch your
hand (or as near as your flexibility will allow). Recover and repeat with your other leg.
Stand upright. Bring your right leg back so your knee points straight down. Grasp your ankle and ease your leg back, balancing with your opposite arm. Repeat on your left leg.
Do not drop your front arm down
toward your foot
Extend your arm for
balance
Grasp your ankle firmly
Keep your head forward and your spine neutral
Keep your knee just behind the
line of your body
Ensure that your legs
are straight
Keep your back flat throughout
Maintain straight arms
Keep your rear leg straight and solid
Hold your upper leg parallel to
the floor
Keep your hands flat
on the floor

58 M O B I L I T Y E X E R C I S E S
LEG FLEXIONYour hips and hamstrings are the targets for this mobilizer. Like the more difficult Frankenstein walk (see page 56) this exercise involves moving one leg at a time; however, here both your moving leg and your stabilizing limb are worked at once.
SQUATThis is the fundamental mobilizer for your lower body and core, and an essential warm- up for the squatting movement around which so much strength training and power work is based. Maintaining good form is key: go as low as possible to improve your range of motion and do not “bounce” at the bottom of the squat.
Start from a position in which your body is
upright, your spine is neutral, and your are feet slightly wider than shoulder-width.
Keep your left foot firm and flat on the
floor, and raise your right leg, stretching it out in front of you. Keep your right knee as straight as possible.
Breathe in and bend at your knees and hips,
allowing your hips to ease backward. Keep your spine neutral and your gaze level.
Stand on your left leg with your right leg
slightly behind the line of your body. Rest your right foot on tiptoe. Place your left palm lightly against a wall or piece of apparatus to help maintain your balance.
Keep your arms straight and parallel to the floor
Hold your chest up
Ensure that the bend in your knees follows the line of your feet
Ease your hips back
Keep your legs straight and your feet slightly turned out
Hold your arms out with your
palms facing down
Tense and hold your core muscles for support
Bend your knee very slightly for balance
Keep your trailing leg as straight as possible

59
Place both palms against a wall with
your body leaning slightly forward. Shift your weight on to your left leg.
Support yourself with both hands against a wall
Keep your hips facing forward
Keep your spine in a
neutral position
Move your leg across your body
S Q U A T, L E G F L E X I O N , A N D L E G A B D U C T I O N
Bring your right leg up as high as you can
manage, keeping it straight. Hold for a few seconds before recovering and repeating with your left leg.
Squat down until your thighs are parallel to
the floor (or farther if you have the mobility). Return to the start position.
Hold your torso upright throughout the exercise
Bend your knee slightly
Keep your foot flat on the floor
Keep your leg as straight as
possible
Keep your head level and your gaze forward
LEG ABDUCTIONIn this hip mobilizer you move your leg in a different arc to that in the leg flexion (left). It works to free up your glutes and the muscles in your groin area.
In a slow and controlled manner,
swing your right leg across your body, pointing your toes out at the end of the swing.
Swing your right leg across your body to full extension.
Do the required reps and repeat on your left leg.
Point your foot outward
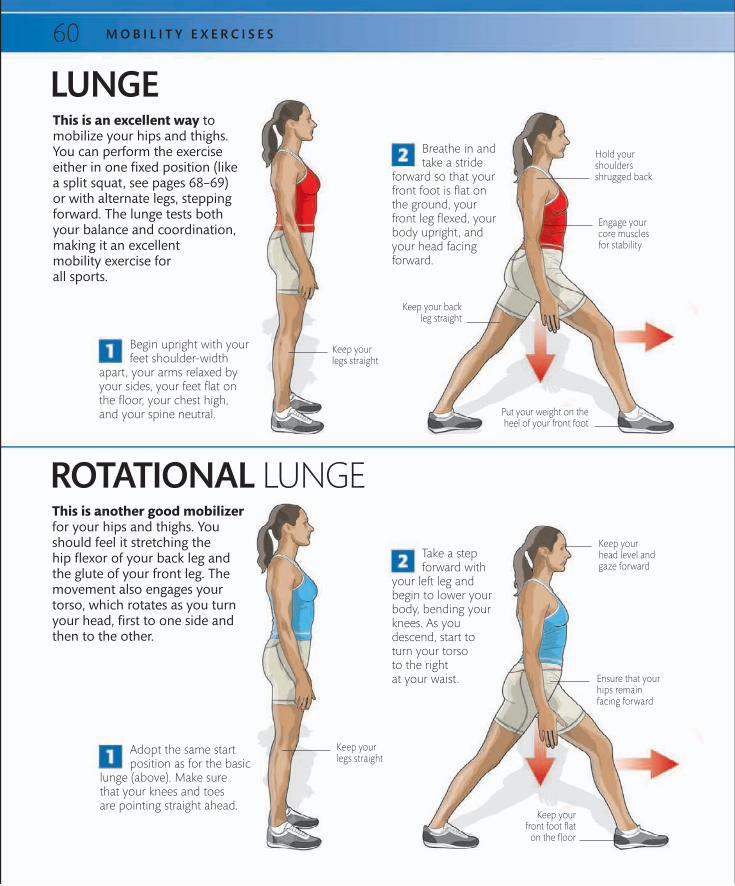
60 M O B I L I T Y E X E R C I S E S
Begin upright with your feet shoulder-width
apart, your arms relaxed by your sides, your feet flat on the floor, your chest high, and your spine neutral.
LUNGEThis is an excellent way to mobilize your hips and thighs. You can perform the exercise either in one fixed position (like a split squat, see pages 68–69) or with alternate legs, stepping forward. The lunge tests both your balance and coordination, making it an excellent mobility exercise for all sports.
ROTATIONAL LUNGEThis is another good mobilizer for your hips and thighs. You should feel it stretching the hip flexor of your back leg and the glute of your front leg. The movement also engages your torso, which rotates as you turn your head, first to one side and then to the other.
Breathe in and take a stride
forward so that your front foot is flat on the ground, your front leg flexed, your body upright, and your head facing forward.
Adopt the same start position as for the basic
lunge (above). Make sure that your knees and toes are pointing straight ahead.
Take a step forward with
your left leg and begin to lower your body, bending your knees. As you descend, start to turn your torso to the right at your waist.
Hold your shoulders shrugged back
Keep your legs straight
Keep your legs straight
Keep your head level and gaze forward
Engage your core muscles for stability
Keep your back leg straight
Ensure that your hips remain facing forward
Put your weight on the heel of your front foot
Keep your front foot flat
on the floor

61L U N G E , R O T A T I O N A L L U N G E , A N D O V E R H E A D L U N G E
Bend your front and back legs so
that your rear knee drops close to the floor. Push back up with your front heel and return to the standing position.
OVERHEAD LUNGEThis more demanding version of the lunge movement mobilizes your hips and thighs. Adding a light weight overhead works the stabilizers in your shoulders and puts emphasis on the mobility of your hips and lower back.
Adopt the start position for the basic lunge (see
left) while holding a light bar at arm’s length over your head with your hands widely spaced.
Take the lunge step with your
right leg, holding the bar over your centre of gravity, which falls between your legs. Return to the start position and repeat on your left leg.
Turn your head, extend your left arm across your body, and twist at your
waist. Recover to the start position; repeat the movement on your right leg.
Extend your knee above your toes
Maintain an upright torso and a neutral spine
Keep your chest high and your shoulders back
Hold the bar with your arms
straight above your shoulders
Engage your core muscles
Do not touch the floor with your rear knee
Raise your back heel from the floor
Extend your right arm out and behind your body, keeping it parallel to the floor
Bring your arm across your body
Rotate your whole torso, not just your arms
Lift your heel off the floor

3
LEGS

Gastrocnemius
Soleus
Quadriceps
Gluteals
Hamstrings
VARIATION
▪ Quadriceps
▪ Gluteals
▪ Hamstrings
TARGET
64
BACK SQUATThis multijoint exercise
L E G S
WARNING!

65B A C K S Q U A T
Take a balanced grip on the bar in the rack. Duck beneath it and stand up with your feet directly
under the bar. Step back and stand upright with the bar resting on the upper part of your back.
Breathe deeply, and tensing your abs and glutes, start the descent. Keep your feet pointing slightly outward
and ensure that your knees follow the angle of your feet as you bend your knees and ease your hips back.
Keep bending at your knees with your spine in neutral position. Lower your body slowly and
under tight control as you ease your hips farther back. Keep your knees over your toes.
Continue bending at your knees, easing your hips back until your thighs are parallel to the floor. Your
body should now be at a 45-degree angle. Return to the start position, breathing out as you stand up.
Place your feet just wider
than shoulder–width apart
Gaze straight ahead
Maintain a neutral spine
Hold your chest high
Feel the stabilizers in
your back and abs working to keep you solid
Keep your torso at a contant angle
Keep the bar stable and level
Keep the bar centered over
your feet
Maintain a neutral back position

66
TARGET MUSCLES
▪ Quadriceps
▪ Gluteals
▪ Hamstrings
FRONT BARBELL SQUATIn this key multijoint exercise you position the weight on the front of your shoulders. It demands a more upright body posture than the back squat and places more emphasis on your quads and core.
L E G S
With your chest held high, take a deep
breath and start to bend at the knees, easing your hips back and keeping your elbows pointing forward.
Keep your head level and your chest high,
squatting down until your thighs are parallel to the floor, or as close as possible. Return to the start position, breathing out as you stand.
Ease your hips back as you flex at your knees
Bend your knees in line with your outturned feet
Brace your hips and engage your core muscles
Hold the bar across your collar bone and deltoids
Point your elbows forward
Gaze straight ahead
Take the bar from a rack with your hands
outside your shoulders, or clean it (see page 182) to your shoulders. Stand upright with your feet a little more than shoulder-width apart and slightly out-turned.
Keep a relatively upright body position
WARNING!Keep your body at the same upright angle throughout the movement and do not allow your heels to lift off the floor. Ensure that you do not drop your elbows or let them touch your knees at the bottom of the lift. Never sacrifice good technique by overloading the bar with weight.
Pectorals
Latissimus dorsi
Serratus anterior
Biceps brachii
Gluteals
minimus
Hamstrings
Quadriceps
Soleus
Deltoids

67
TARGET MUSCLES
▪ Quadriceps
▪ Gluteals
▪ Hamstrings
F R O N T B A R B E L L S Q U A T A N D B A R B E L L H A C K S Q U A T
BARBELL HACK SQUATThis squat variation really works your quads. It is a great development exercise because it fosters the good back position and the correct angle at the hip joint that you need to perform the front squat.
Keeping your chest high and your heels
flat on the floor, take a deep breath and flex at your knees, allowing the bar to hang straight down.
Hold the bar with an overhand grip
outside your thighs. Start with your knees slightly flexed, your feet shoulder-width apart, and your feet turned slightly out. Keep your body upright and your chest high, and look straight ahead.
Keep your knees over your toes
Engage your core muscles and your lower back to support your body
Grip the bar with your hands outside your hips
Plant your heels flat on the floor
WARNING!Avoid rounding your back or bending at the waist when performing this action. Keep your hips low, your body as upright as possible, and the bar as close to your calves as you can.
Squat down until your thighs are parallel
to the floor and then return to the start position, breathing out as you stand.
Hamstrings
Gluteals
maximus
medius
minimus
Quadriceps
Triceps brachii
Latissimus dorsi
External obliques
Pectorals
abdominis
Soleus
brachii
Deltoids

68
TARGET MUSCLES
▪ Quadriceps
▪ Gluteals
▪ Hamstrings
DUMBBELL SPLIT SQUAT
L E G S
Flex at your knee and hip and drop slowly
into a split position. Your front knee should not move beyond your toes and your rear knee should not touch the ground.
Return to the start position and perform
the required number of reps on one leg before switching to the other and repeating the sequence.
From a standing position with your feet
shoulder-width apart and your arms hanging by your sides, take a stride forward keeping your chest high and looking straight ahead. Keep your body
upright throughout the movement
Use your lead leg to carry most of your weight
Hold your chest high
Shrug back your shoulders and keep your spine neutral
Keep your rear foot on tiptoe
This exercise builds on the basic lunge movement (see pages 60–61) but allows you to lift more weight. It is valuable for developing hip mobility and good shoulder posture as well as strength in your quads.
Rise up on your toes on the rear
foot and keep your front
foot flat
Hold the dumbbells
between your feet
Biceps brachii
Triceps brachii
Pectorals
Hamstrings
Gluteals
maximus
medius
minimus
Soleus
Quadriceps
Deltoids

69
TARGET MUSCLES
▪ Quadriceps
▪ Gluteals
▪ Hamstrings
D U M B B E L L A N D O V E R H E A D S P L I T S Q U A T
OVERHEAD SPLIT SQUATHolding a barbell overhead demands good shoulder and hip mobility but the payoff is that your body functions as a unit and you strengthen your core as well as your legs.
Drop slowly into the split position, ensuring
that your front knee doesn’t go beyond your toes and your rear knee doesn’t touch the floor.
Begin in a standing position with your feet
shoulder-width apart. Press the weight overhead and take a stride forward.
Straighten your front leg to return to the
start position. After you have completed your set, switch legs and repeat on the other side.
Keep the weight over the center of
gravity between your feet
Hold the weight directly over your shoulder joints
Push upward against the bar with your elbows locked
Pectorals
External obliques
Hamstrings
Gluteals
Soleus
Quadriceps
Triceps brachii
Deltoids

70
Begin with the barbell resting on
your upper back, your legs hip-width apart. Bend one leg and rest it on a bench behind you.
Slowly lower your rear knee toward the
floor. Stop when the top of your front thigh is parallel to the floor.
Engage your core muscles
Breathe freely on descent
Rest your foot on top of the bench
▪ Quadriceps
▪ Gluteals
▪ Hamstrings
▪ Gastrocnemius
▪ Soleus
This advanced exercise was designed by the Bulgarian National Weightlifting team to develop strength, balance, and flexibility, simulating the movements in the Olympic snatch.
BULGARIAN BARBELL SPLIT SQUATTARGET MUSCLES
L E G S
From the bottom of the movement,
straighten your front leg to the standing position; do not “lock” your knee. Complete your set and repeat on your other leg.
Your rear knee almost meets the floor at the bottom of the motion
Keep your torso upright during the squat
Gastrocnemius
Soleus
Gluteals
Pectorals
Serratus anterior
Latissimus dorsi
Internal obliques
External obliques
Rectus abdominis
HamstringsQuadriceps

71
Keep your torso upright
▪ Quadriceps
▪ Gluteals
▪ Hamstrings
▪ Gastrocnemius
▪ Soleus
This exercise is similar to the barbell split squat, but holding the dumbbells to your sides gives you a lower center of gravity and improves your stability. It is ideal for developing balance and strength in your hips and thighs.
Stand with your feet hip-width apart and
place one foot to the front with your knee slightly bent, and your rear foot on top of a bench behind you. Hold a dumbbell in each hand in an overhand grip.
Slowly straighten your front leg to
the start position but do not step or hop back with your front foot. Repeat for the required number of reps before switching to your other leg.
Engage your core stabilizer muscles.
Keep your body upright and your head facing forward. Gently lower your rear knee almost to the floor while breathing freely.
Rest your foot with your toes on the bench
Position your front leg just ahead of
your torso
Allow your arms to hang vertically
Maintain a flat lower back
Bend your knee toward a
right angle
Balance with your rear foot
BULGARIAN DUMBBELL SPLIT SQUATTARGET MUSCLES
B U L G A R I A N B A R B E L L A N D D U M B B E L L S P L I T S Q U A T
Soleus
Gastrocnemius
Biceps brachii
Triceps brachii
Latissimus dorsi
Brachialis
Erector spinae
Gluteals
HamstringsQuadriceps
Deltoids

72
TARGET MUSCLES
▪ Quadriceps
▪ Gluteals
▪ Hamstrings
BARBELL LUNGEThis underused exercise develops and tones the muscles of your legs and glutes. It is a dynamic movement that is useful in training for racket sports, since it improves your ability to reach those difficult shots.
L E G S
Engage your core muscles and take one
long step forward. At the same time, lower your rear knee toward the floor, breathing freely.
Let your rear knee almost touch the floor,
then straighten your front leg and step back to the start position. Complete your set and repeat for your other leg.
Look straight ahead
Keep your knees slightly bent
Bring your back foot up on your toes
Stand with your feet hip-width apart and
your knees soft. Rest the barbell across your upper back, holding it with a wide grip, knuckles facing back.
WARNING!Do not attempt this exercise with a weight that makes you feel you are being “forced” downward or that makes you unstable—you should feel in control of the barbell at all times. Ensure that you keep your torso upright throughout.
Ensure that your rear thigh
is vertical
Quadriceps
Gastrocnemius
Hamstrings
Gluteals
Soleus
Pectorals
Serratus anterior
External obliques
Deltoids
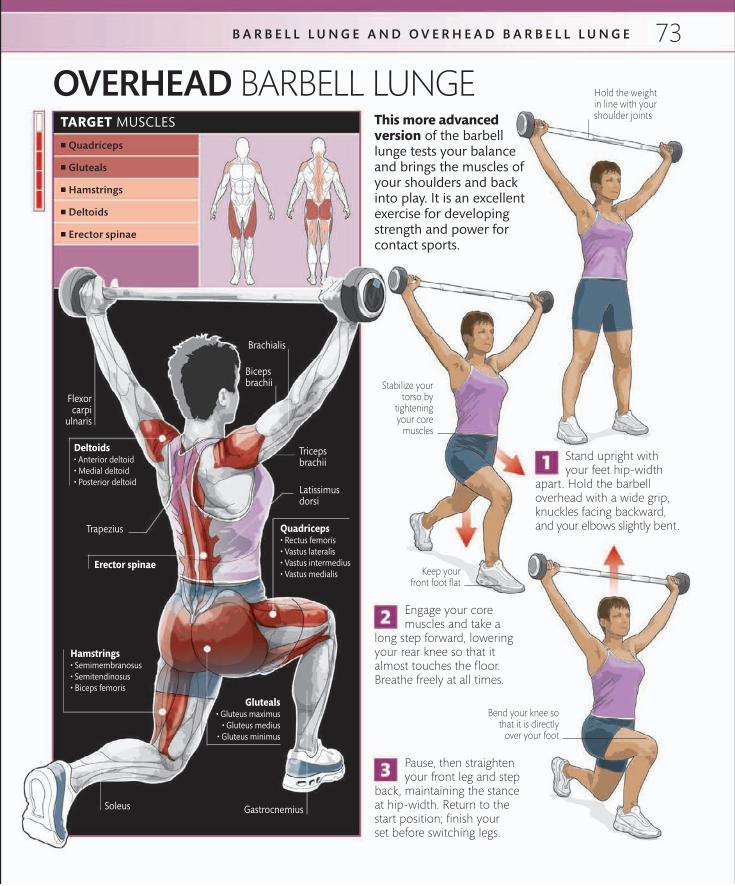
73
TARGET MUSCLES
▪ Quadriceps
▪ Gluteals
▪ Hamstrings
▪ Deltoids
▪ Erector spinae
B A R B E L L L U N G E A N D O V E R H E A D B A R B E L L L U N G E
Hold the weight in line with your shoulder joints
Stabilize your torso by
tightening your core
muscles
Keep your front foot flat
Bend your knee so that it is directly
over your foot
OVERHEAD BARBELL LUNGEThis more advanced version of the barbell lunge tests your balance and brings the muscles of your shoulders and back into play. It is an excellent exercise for developing strength and power for contact sports.
Engage your core muscles and take a
long step forward, lowering your rear knee so that it almost touches the floor. Breathe freely at all times.
Stand upright with your feet hip-width
apart. Hold the barbell overhead with a wide grip, knuckles facing backward, and your elbows slightly bent.
Pause, then straighten your front leg and step
back, maintaining the stance at hip-width. Return to the start position; finish your set before switching legs.
Hamstrings
Deltoids
Gluteals
Quadriceps
brachii
Soleus
Triceps brachii
Latissimus dorsi
Trapezius
Erector spinae
Flexor carpi
ulnaris

74
TARGET MUSCLES
▪ Quadriceps
▪ Gluteals
▪ Hamstrings
FORWARD LUNGEThis full body exercise is effective in developing strength in your leg and hip muscles. Holding the dumbbells by your sides rather than over your shoulders makes it easier for you to hold your body upright. Be sure to practice the movement before using weights.
L E G S
Take a step forward, holding your upper
body upright. Descend under tight control by bending at your hips, knees, and ankles. Don’t lean forward at any point.
Descend until both knees reach an angle
of 90 degrees. Your back knee should be directly under your hip and just off the floor. Hold before you return to the start.
Take up the start position with your
body upright, your spine neutral, your chest high, and your shoulders back. Hold a dumbbell in each hand, with your arms by your sides.
Engage your stabilizer muscles to keep your core tight
Position your feet hip-width apart
Keep your head up
Pull your shoulders back
Keep your back leg straight
Ensure that your thigh is parallel to the floor
Deltoids
Biceps brachiiGluteals
maximus
medius
minimus
Hamstrings
Quadriceps
Soleus
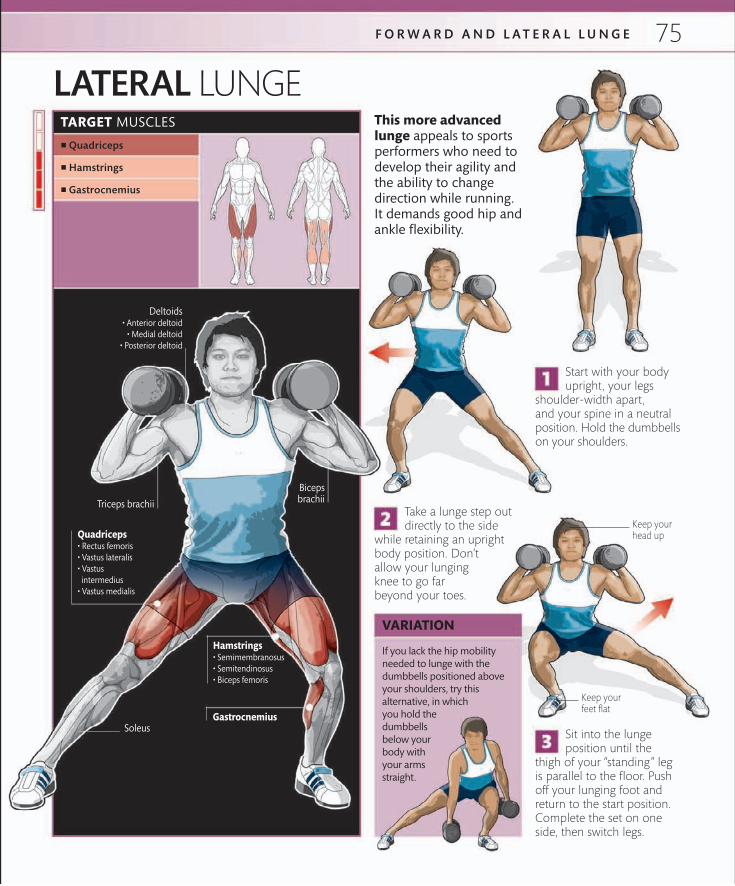
75
TARGET MUSCLES
▪ Quadriceps
▪ Hamstrings
▪ Gastrocnemius
F O R W A R D A N D L A T E R A L L U N G E
LATERAL LUNGEThis more advanced lunge appeals to sports performers who need to develop their agility and the ability to change direction while running. It demands good hip and ankle flexibility.
Take a lunge step out directly to the side
while retaining an upright body position. Don’t allow your lunging knee to go far beyond your toes.
Sit into the lunge position until the
thigh of your “standing” leg is parallel to the floor. Push off your lunging foot and return to the start position. Complete the set on one side, then switch legs.
Start with your body upright, your legs
shoulder-width apart, and your spine in a neutral position. Hold the dumbbells on your shoulders.
If you lack the hip mobility needed to lunge with the dumbbells positioned above your shoulders, try this alternative, in which you hold the dumbbells below your body with your arms straight.
VARIATION
Keep your feet flat
Keep your head up
Hamstrings
Gastrocnemius
Quadriceps
intermedius
Triceps brachii
Soleus
brachii
Deltoids

76
▪ Quadriceps
▪ Hamstrings
▪ Gluteals
▪ Gastrocnemius
▪ Soleus
TARGET MUSCLES
BARBELL STEP-UPThis excellent exercise targets the main muscles of your leg—the quads, hamstrings, and glutes. The muscles of your calves assist while your core muscles stop your body from leaning forward or twisting. The exercise helps develop, and also puts demands on, your heart and lungs. Beginners should start with body weight until they are familiar with the movement.
L E G S
Try this exercise holding dumbbells at your sides. They are easier to “load” and hold in place than a barbell, and can be safely jettisoned if you start to feel yourself losing balance. You can also make this exercise easier by using just your own body weight to work against gravity.
VARIATION
Quadriceps
Gastrocnemius
Hamstrings
Soleus
Gluteals
Biceps brachii
Pectorals
Serratus anterior
abdominisExternal obliques
Deltoids

77B A R B E L L S T E P - U P
WARNING!Avoid leaning forward or twisting when stepping up and down. Do not “round” your back.
Facing a bench, load a barbell
on to the top of your shoulders behind your neck. Grasp the bar with your hands just wider than shoulder-width apart, and take a solid upright stance with your feet parallel.
Step up on to the bench with
your left foot ensuring that your heel is not hanging over the edge. The bench, should be high enough to allow an angle of 90 degrees at your knee joint.
Push down with your left heel and use your
left thigh and glute muscles to lift your right foot up on to the bench. Drive your body up, exhaling as you do so.
Step down off the bench, right leg first.
Ensure you keep your body upright and your chest high. Finish the set leading with one leg, then switch to the other.
Hold your body upright
Take a deep breath before starting the exercise
Look straight ahead
Keep the bar stable across your shoulders
Maintain a relaxed leg position
Place your feet shoulder-width apart
Maintain a strong posture
throughout
Minimize any side-to-side movement
Bend your knee to a 90-degree angle
Hold your chest up throughout
Keep your heel flat on the floor
Keep the bar secure on your shoulders
Use your right leg as little as possible during the step up
Lean forward a little
Maintain your balance
Keep your feet shoulder-width apart
Point your toe toward the floor

78
Select your desired weight on the stack and sit on the machine. Place your feet hip-width apart on the
platform and take the weight on your legs. Release the safety lock on the machine and hold the handle supports.
45-DEGREE LEG PRESS
This simple movement is a good confidence builder for beginners who are preparing for more functional leg exercises, such as the squat. It places little stress on the lower back and is suitable for those who have not yet developed high core strength. It also allows relatively heavy weights to be used early on, providing welcome motivation for the novice. As when using all exercise machines, ensure that the leg press is set to match your height and limb length.
L E G S
▪ Quadriceps
▪ Hamstrings
TARGET MUSCLES
Keep your head and back well supported on
the pad
Bend your knees to at least a 90-degree angle
Deltoids
Gastrocnemius
Soleus
Triceps brachii
Biceps brachii
Brachialis
Hamstrings
Quadriceps

79
Extend your legs to push the platform away from you. Push slowly and continuously, keeping your
heels and your toes on the platform; do not allow your knees to splay outward as you push.
Continue pushing until your legs are almost fully extended. Pause for a moment at the top of the
movement and then return to the start position slowly and under control.
4 5 - D E G R E E L E G P R E S S
You can perform the leg press one leg at a time, which helps you to address any strength imbalances between them. Imbalances can reduce sports performance and make you more prone to injury. You can also change your foot position in the two-leg version to modify the focus of the exercise: spreading your feet wider and pointing your toes out will work your inner thighs more, while placing your feet higher on the platform will emphasize your glutes.
VARIATION
Align your knees with your feet Extend your legs
almost fully
Position your feet evenly on
the platformKeep your heels and toes pressed
against the platform
WARNING!Keep your lower back pressed firmly against the pads throughout the exercise; avoid raising your head from the support and cease lowering the weight if you feel your lower back begin to lift off the backrest. Do not lock out your knees at the top of the movement and be sure to raise and lower the weight slowly from the stack, without “clacking” at the bottom of the motion.

80
MACHINE LEG CURL
MACHINE LEG EXTENSION
L E G S
▪ Quadriceps
TARGET MUSCLESThis exercise isolates the quads—the largest muscle group in your body—as you flex and extend your legs at the knee joints. Quads work to straighten the knees, so this exercise can help protect your knees or assist with rehabilitation after a knee injury.
▪ Hamstrings
TARGET MUSCLESThe leg curl, usually performed on a machine, either sitting or lying face down, is a good exercise for the hamstrings; working these muscles balances the development of the quads on the front of your thigh.
Quadriceps
SoleusGastrocnemius
abdominis
Triceps brachiiBiceps brachii
Brachialis
Deltoids
Triceps brachiiBiceps brachii
Brachialis
Brachioradialis
Flexor digitorum superficialis
Quadriceps
Hamstrings
Deltoids

81M A C H I N E L E G C U R L A N D L E G E X T E N S I O N
Bring the moving arm back in a smooth motion to contract your
hamstrings fully, then return it under control to the start position. Keep your back stable against the seat.
Using a controlled movement—and no jerking—bring your
lower leg up while pressing your back and buttocks against the pads.
Select a weight from the stack and sit on the machine. Adjust
the moving arm so that it is under your ankles and doesn’t slide up your calves. Position the lap pad above your knees.
Select a weight from the stack and sit on the machine with your back
against the pad. Adjust the moving arm to suit the length of your lower leg.
Continue the movement until your legs are parallel to the floor.
Exhale and relax, allowing your legs to return to the start position.
VARIATION
You can perform a similar exercise using a cable pulley machine. This is more challenging because you have to stabilize your whole body—the machine does not support you in a fixed position. Attach an ankle strap to your ankle and ensure that the knee of your moving leg points down so that your hamstring pulls your heel toward your glutes. Move slowly, taking slightly longer to lower your leg than to raise it.
Align your knee joint with the machine’s pivot
Place your ankles on the
pad of the moving arm
Rest your back against the pad
Keep the pad behind your ankles
Place your feet under
the pad
Bend your knee to a 90-degree angle
Grip the handles for
stability
Keep your knee joint aligned with the machine’s pivot

82
HIP ABDUCTOR
HIP ADDUCTOR
L E G S
▪ Gluteals
▪ Tensor fasciae latae
TARGET MUSCLES
▪ Adductor magnus
▪ Adductor longus
TARGET MUSCLESThis exercise develops the muscles of your inner thighs. The job of the adductors is to pull your legs together, so they work in opposition to your abductors (above). The two are often exercised one after the other to eliminate muscle imbalance, which can potentially lead to injury.
This exercise isolates the muscles located on the outside of your thighs and the buttocks. It may make your hip joint less prone to injury and is a useful addition in sports disciplines where jumping and sprinting are involved. Golfers also benefit from strong abductors, because these muscles help
shift body weight during the swing.
Adductor magnus (deep muscle)
Adductor longus
Biceps brachii
Triceps brachii
Brachialis
External obliques
Rectus abdominis
Pectorals
Deltoids
Biceps brachii
External obliques
Brachialis
Rectus abdominis
Pectorals
GlutealsTensor fasciae latae
Deltoids

83H I P A B D U C T O R A N D A D D U C T O R
Press your upper body back into the seat and tense your core
muscles for stability. Push out steadily against the pads to achieve a full range of movement while breathing freely.
Slowly resist the inward force of the pads as you move slowly
back to the start position. Try to equalize the force borne on each of your legs.
Grip the side handles to stabilize your upper body and steadily
push your legs against the pads to bring them together while breathing freely. Do not bash the pads together.
Set the desired resistance on the weight stack. Sit on the machine
and adjust the height of the seat so that the sides of your knees rest comfortably against the pads.
Select the desired resistance on the weight stack. Sit on the
machine and adjust the height of the seat so that your knees rest comfortably against the pads.
In a slow, controlled manner, allow the pads to return to
the starting position. Keep your core muscles tensed throughout the movement.
Grip the handles of the machine to aid stability
Press back against the pad
Place your feet on the supports
Apply equal force to
both pads
Push equally against both pads
Push out as far as possible before returning

84
TARGET MUSCLES
▪ Gastrocnemius
▪ Soleus
CALF RAISE
L E G S
VARIATION
This exercise develops the muscles of your lower leg. The movement tests your balance, especially when performed with heavier free weights, so work on a Smith machine to stabilize your body.
Stand with the front of your feet
on a platform and set the bar on the Smith machine to a height at which it rests on your shoulders. Take a wide grip on the bar.
With your head facing forward,
raise both heels up through a full range of movement. Lower your heels by bending your ankles to return to the start position.
Engage your core muscles
Place the balls of your feet on the platform; your heels should hang over the edge
Extend your ankles
This exercise can be performed on a special calf raise machine on which you lift weighted pads rather than a barbell. Set the desired resistance and stand tall under the pads, gripping the
handles provided and keeping your elbows bent. Contract your calf muscles and fully extend your ankles. Hold the top position before lowering your body under full control.
Soleus
Gastrocnemius
Biceps brachii Teres minor
Triceps brachii
Brachialis
Teres major
Latissimus dorsi
External obliques
Erector spinae
Trapezius
GlutealsHamstrings

85
TARGET MUSCLES
▪ Hamstrings
▪ Gluteals
▪ Erector spinae
▪ Quadriceps
C A L F R A I S E A N D S T R A I G H T - L E G D E A D L I F T
STRAIGHT-LEG DEADLIFTThis underestimated exercise strengthens your lower back and develops your legs and glutes. Many football linebackers include this in their workout regimens.
Stand upright with your feet hip-width
apart and the barbell resting across your upper thighs. Hold the bar with an overhand grip.
With your head facing forward and your
knees almost locked, bend from your waist to lower the barbell. Inhale as you do so.
Maintaining control over your core stability,
slowly pivot at your hips to raise your upper body to the start position. Breathe out as you do so.
Keep your back straight throughout
Engage your core muscles
VARIATION
If you have good hip mobility, try standing on an elevated platform. This will allow the barbell to travel beyond the level of your feet and make your muscles work harder. However, do not be tempted to extend your muscles beyond what feels comfortable, and try to keep your motion fluid, without “bouncing” the barbell.
Gluteals
maximus
medius
minimus
Hamstrings
Quadriceps
Soleus
abdominis
Triceps brachii
Erector spinae
Deltoids

86
TARGET MUSCLES
▪ Gluteals
▪ Trapezius
▪ Erector spinae
▪ Rectus abdominis
▪ Hamstrings
▪ Quadriceps
BARBELL DEADLIFTSometimes called the “king of exercises” because of its effectiveness in building leg and back strength, the deadlift is also one of the three lifts performed in competitive powerlifting.
L E G S
Continue the lift as if pushing the
floor away from you with your feet, until you stand up straight with your knees locked.
Squat down so that your feet are under
the bar, and the bar rests against your shins. Grip the bar using an alternate hook grip to prevent it from rotating; your hands should be wider than shoulder-width apart.
Keep your back flat and tight throughout
Brace your shoulders back
Grip the bar with an alternate hook—one hand over, one under the bar
Grip tightly so that the bar does not
rotate in your hands
DeltoidsTriceps brachii
Gluteals
Hamstrings
Erector spinae
Trapezius
Quadriceps
intermedius
Rectus abdominis
Soleus

87
Correct lifting technique is essential in this movement. Never lift with your spine flexed forward: not only will the exercise be ineffective, but you also risk spinal injury. Always raise and lower your shoulders and hips together. Keep the bar close to your body and do not drop it at the end of the movement; always lower it under control.
WARNING!
B A R B E L L D E A D L I F T
Begin lifting the bar with a long,
strong leg push, extending your knees and hips. Your knees should be bent as you lift the bar past them.
Unlock your knees. Maintaining a tight,
flat back and keeping your head up, start to lower the bar under control. Your knees should be bent as you lower the bar past them.
Slowly move your hips and shoulders together when
lowering the bar back down to the start position. Do not drop the bar.
Pull your shoulders back
Push your hips in toward the bar
Keep the bar close to your body
throughout the lift
Pull your shoulder blades together
Ensure that your feet remain firmly planted
flat on the floor
Lower the bar under control
Bend at your knees
Move your hips back and down
VARIATION
Using dumbbells for the deadlift recruits more muscles to control and stabilize movement. It is a good way of developing strength and technique for heavier barbell lifts. Start with light weights to determine your range of motion. As with the barbell lift, keep your back flat and the weights close to your body; do not pause at the bottom of the movement or allow the weights to “bounce” as you lower them.
Drive off your feet

▪ Quadriceps
▪ Gluteals
▪ Hamstrings
▪ Erector spinae
TARGET MUSCLESTARGET MUSCLES
ROMANIAN DEADLIFTThis movement does a good job of balancing work on your quads with development of your hamstrings and glutes— the muscles that extend your hips. The Romanian deadlift makes an excellent, though difficult, addition to your general training program, especially if you wish to improve your power and leg speed.
L E G S
If using heavy weights, you should work off a rack adjusted to suit your height. When using heavy weights, reverse the grip on one hand (one over, one under grip) to stop the bar from rolling. You can also use wrist straps, which provide protection and enhance your grip.
VARIATION
88
Hamstrings
Quadriceps
Gluteals
Erector spinaeDeltoids
Triceps brachii
External obliques
Latissimus dorsi
Trapezius

R O M A N I A N D E A D L I F T
Stand straight with the barbell resting
across your upper thighs. Your knees should be unlocked and slightly bent and your feet around shoulder-width apart.
Breathe in deeply, then shrug your
shoulders back and lower the weight slowly down your thighs, making sure to maintain the neutral position of your spine.
Lower the bar toward your knees, keeping it
very close to your body. Your shoulders should come forward, ahead of the bar, as your hips ease back.
Recover to an upright position, breathing out
as you go. Your shoulders should be shrugged back and your spine in neutral before beginning again.
Keep your shoulders back and your
spine neutral
Allow your arms to hang straight down
Hold your chest up
Keep your core muscles tightTake an overhand grip on the
bar with your hands just wider than shoulder-width apart
Look straight ahead
Pull your shoulders back
Keep your spine neutral
Shrug back your shoulders
Safe and effective performance of this exercise depends on you keeping your back neutral. Do not bend over or be tempted to take the weight down below your knees. Be aware that this is an advanced move, first developed to help weightlifters train for the first part of the clean or snatch. When beginning, perfect the move with an unloaded bar and do not attempt too many repetitions.
WARNING!
89


4
BACK

92
ASSISTED CHIN-UP
This is a great way to work your big back muscles and practise the movement of the regular chin-up (see page 94) if you lack the strength to lift your whole body weight. Remember that adding weight to the stack makes the exercise easier.
B A C K
▪ Latissimus dorsi
▪ Biceps brachii
▪ Teres major
TARGET MUSCLES
Select the weight from the stack; and stand on the foot rests.
Choose your grip (see page 94) and place one knee then the other on the pad and ensure your arms are straight.
Pull your body up until your chin is above the line of the
hand grips. Pause, then lower your body by reversing the movement until your arms are fully straight.
Bend at your elbows and shoulders and use your lats to
pull your body up. Keep your body straight; breathe out going up and in going down.
Choose a suitable grip width
Hold your feet together
Kneel on the pad
Pull until your chin rises above the level
of your hands
The pad provides assistance
Biceps brachii
Latissimus dorsi
Teres major
Teres minor
Trapezius
Erector spinae
Triceps brachii
Rhomboid
Brachialis
Deltoids

93
▪ Latissimus dorsi
▪ Biceps brachii
▪ Trapezius
▪ Posterior deltoid
TARGET MUSCLES
LAT PULL-DOWN
This is another good exercise for your back if you lack the upper body strength to lift your own bodyweight in the regular chin-up. You can increase the resistance to build strength gradually.
A S S I S T E D C H I N - U P A N D L A T P U L L - D O W N
Select the desired resistance on the stack. Grip the bar a little
wider than shoulder-width then sit down and place your upper thighs under the pad.
Once the bar touches the upper part of your chest, allow
it to return under slowly and under full control until your arms are completely extended.
Easing your body back slightly, pull the bar down to the top of
your chest, making sure your elbows are drawn in to your upper body as far as possible.
Draw your elbows down
toward the floor
Keep your thighs anchored under
the pad
Arch your back slightly
Pull your chin back to avoid the
passing barKeep the movement continuous and
vertical
Keep your body upright under the
pulley and your arms straight
Latissimus dorsi
Trapezius
Biceps brachii
Brachialis
Teres major
Triceps brachii
Teres minor
Erector spinae
Posterior deltoid

94
TARGET MUSCLES
CHIN-UPOne of the most effective strength builders for the back, this challenging exercise is ideal in training for sports that involve gripping and grappling. When starting out, begin with the assisted version (see page 92) to build strength and promote muscular development.
B A C K
▪ Latissimus dorsi
▪ Teres major
▪ Trapezius
▪ Biceps brachii
Try varying your grip and hand spacing. An overhand grip uses your biceps less so is tougher than an underhand grip. A narrow grip hits the smaller muscles in your shoulders, while a wide grip is more challenging on your lats but stresses your elbows.
VARIATION
Latissimus dorsi
Triceps brachiiTeres major
Trapezius
Gluteals• Gluteus maximus• Gluteus medius • Gluteus minimus
Biceps brachii
Hamstrings• Semimembranosus
• Semitendinosus• Biceps femoris
Gastrocnemius
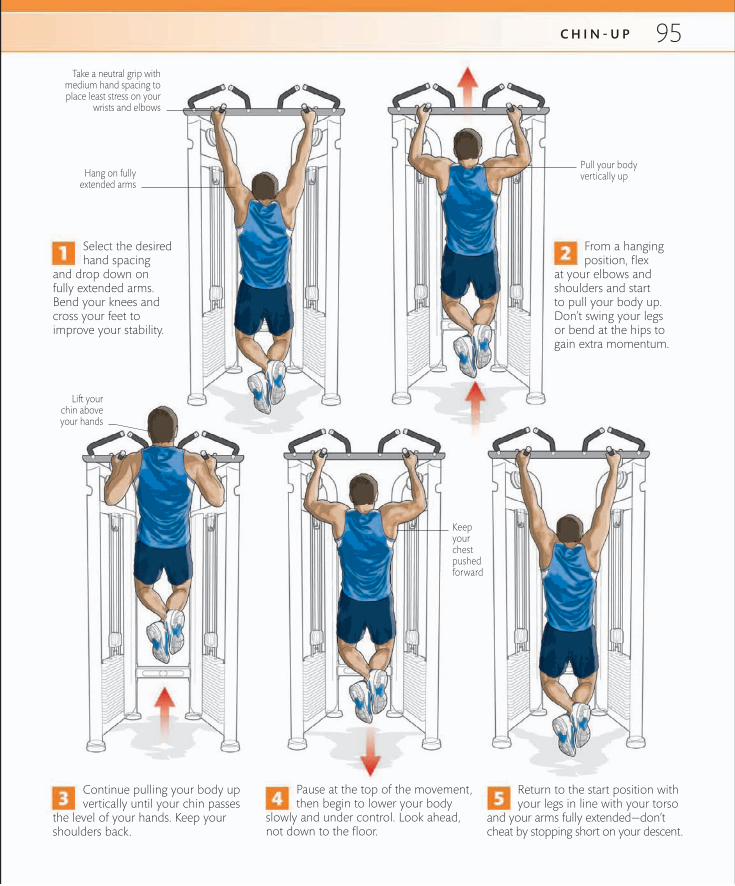
95C H I N - U P
Select the desired hand spacing
and drop down on fully extended arms. Bend your knees and cross your feet to improve your stability.
From a hanging position, flex
at your elbows and shoulders and start to pull your body up. Don’t swing your legs or bend at the hips to gain extra momentum.
Continue pulling your body up vertically until your chin passes
the level of your hands. Keep your shoulders back.
Pause at the top of the movement, then begin to lower your body
slowly and under control. Look ahead, not down to the floor.
Return to the start position with your legs in line with your torso
and your arms fully extended—don’t cheat by stopping short on your descent.
Take a neutral grip with medium hand spacing to place least stress on your
wrists and elbows
Pull your body vertically up
Keep your chest pushed forward
Lift your chin above your hands
Hang on fully extended arms

96
▪ Latissimus dorsi
▪ Teres major
▪ Trapezius
TARGET MUSCLES
SEATED PULLEY ROW
This is a key muscle builder and strength developer for your back. However, good technique is important if you are to achieve optimum results safely.
B A C K
The one-arm seated pulley row allows you to work your arms separately. This helps to balance your lat development because your weaker side cannot be supported by your stronger side. Select a lower weight than you would use for the two-handed exercise and hold your “spare” arm ahead of you or rest it on your thigh. Be careful to maintain good form throughout; and when you have completed your set with one arm, work the other side equally.
VARIATION
To keep from damaging your back, make sure that you keep your legs bent at the knee, and do not bend your back. Don’t allow the weight to pull you in, and avoid leaning back on the pull to get extra leverage. The path of the handles (or bar) should be straight back and horizontal, and your movement should be slow and continuous, not jerky.
WARNING!
Latissimus dorsi
Teres major
Trapezius
Triceps brachii
Rhomboid
Brachialis
External obliques
Erector spinae
Teres minor
Deltoids

97S E A T E D P U L L E Y R O W
Keep your back at a 90-degree angle to the bench
Do not move your glutes along the bench
Begin with straight arms
Maintain the same knee angle through the exercise
Select the desired resistance from the stack. Push with your legs until your arms are fully
extended and your back is in a neutral position. Bend your knees to an angle of around 90 degrees.
Draw your elbows back, maintaining a neutral spine position and an upright body.
Keep your feet braced flat against the foot rests of the rowing machine.
Pull the handles (or bar) back into your body at the level of your upper abdomen.
Draw your elbows back as far as possible. Breathe out as you pull.
In the return phase of the exercise, allow your arms to straighten in a controlled
manner, breathing in as you do so. Don’t let the weight pull you in toward the stack.
Bend at the knees

98
STANDING PULLEY ROW
ONE-ARM ROW
B A C K
This exercise will help you achieve great results in terms of your back strength and development, with minimal risk of injury.
This is an easy exercise from which to get great results in back strength and development, with minimal risk of injury.
▪ Latissimus dorsi
▪ Trapezius
▪ Biceps brachii
TARGET MUSCLES
▪ Latissimus dorsi
▪ Posterior deltoid
▪ Biceps brachii
TARGET MUSCLES
Rhomboid
Trapezius
Latissimus dorsi
Biceps brachii
Triceps brachii
Posterior deltoid
Latissimus dorsi
Teres majorTeres minor
Biceps brachii
Triceps brachii

99S T A N D I N G P U L L E Y A N D O N E - A R M R O W
Maintain the shallow squat position, ensuring that your back
stays flat. Pull the bar toward you, aiming for your upper abdomen.
Hold your back flat and your shoulders level. Raise the
dumbbell toward your body with your elbow pointing up.
Set the pulley low and select your desired weight on the stack.
Stand up with the weight and lower your body into a shallow squat.
Rest one knee on a bench. Holding your back flat, brace
your body with your free arm. Hold the dumbbell with one hand.
Pull the bar all the way into your body. Pause, then return to the
start position with straight arms, slowly and under full control.
Pull your elbow as high as possible before returning, under
control, to the start position. Complete your set, then repeat with your other arm.
Keep your spine neutral and fully extend your arms
Take an overhand grip
on the bar
You can choose to grip the bar
with knuckles up or down
Keep the angle of your back
constant throughout
Keep your chest high throughout
Draw back your elbows as far
as possible
Hold the dumbbell with your arm straight
Keep your head and
hips in line
Support part of your body
weight on your arm
Keep your back flat and well supported
Keep your head steady, and your eyes looking forward and
slightly down

100
▪ Latissimus dorsi
▪ Teres major
▪ Biceps brachii
▪ Gluteals
▪ Quadriceps
▪ Hamstrings
BENT-OVER ROWThis is one of the most important exercises for the large muscles of your back—the latissimus dorsi—and will give you the classic “V” shape. It is a multijoint exercise that builds good posture, helps prevent back injuries, and also provides a thorough lower-body and core workout.
B A C K
WARNING!Keep your back straight; if you allow it to become rounded and lose its flat, neutral position, the forces acting on the base of your spine increase dramatically and the risk of injury is high. Do not allow your shoulders to collapse forward either during or after the lift, when you return the bar to the floor.
TARGET MUSCLES
Quadriceps
Biceps brachii
Teres major
Triceps brachii
Latissimus dorsi
Hamstrings
GastrocnemiusSoleus
Trapezius
Erector spinae
External obliques
Gluteals

101B E N T - O V E R R O W
Bending your knees over the bar, lower your body, keeping
your spine neutral. Keep your feet shoulder-width apart and your gaze straight ahead.
Stand upright with your head level, your core muscles engaged,
and your toes under the bar. Shrug your shoulders back and slightly down, hollowing your back.
Grasp the bar in an overhand grip, with your arms outside your
knees. Keep your back flat, your heels pressed down on the floor, and your head forward.
Bring the barbell up, flexing your arms and raising your elbows,
until it touches your body. Pause, then let your elbows extend back to the start position (Step 3), and repeat.
Partially straighten your legs, keeping the angle of your back
constant until the bar is just below your knees. Your body should feel stable and braced at your hips.
At the end of your set, lower the barbell to the ground by
bending your knees, keeping your back at a constant angle. Don’t swing the weight at any point in the exercise.
Position your toes under the bar
Gaze straight ahead
Maintain a neutral spine
Move your shoulders over the bar
Grasp the bar outside your knees
Tighten your abs
Hold your body upright
Keep your back flat
Lift the barbell to the middle of your torso
Do not jerk the weight upward with your legs
Flex your hips to lower your body
Keep your back tight throughout
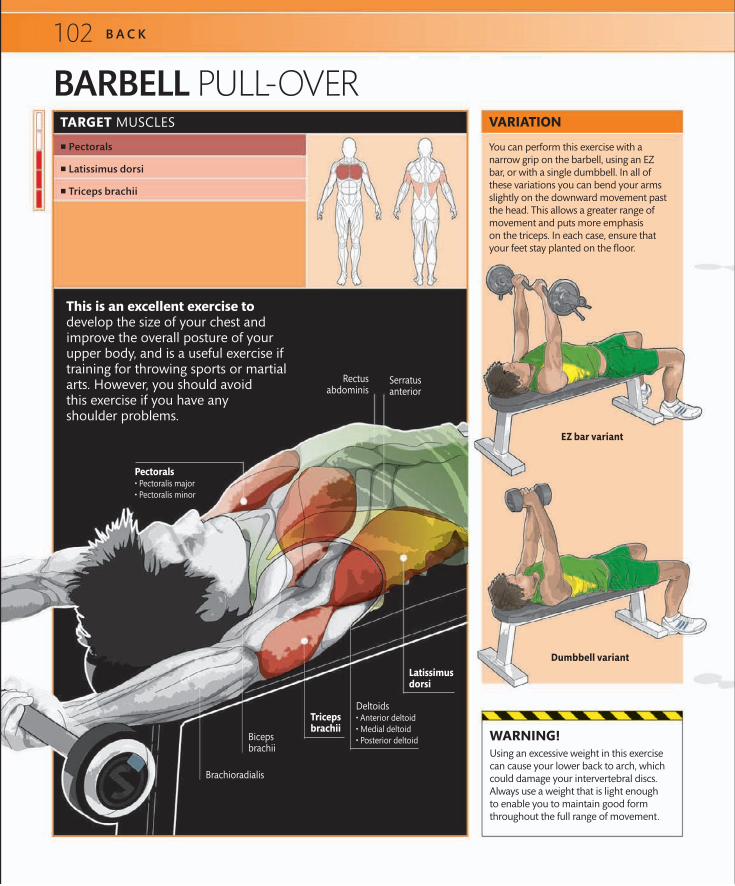
VARIATION
You can perform this exercise with a narrow grip on the barbell, using an EZ bar, or with a single dumbbell. In all of these variations you can bend your arms slightly on the downward movement past the head. This allows a greater range of movement and puts more emphasis on the triceps. In each case, ensure that your feet stay planted on the floor.
EZ bar variant
Dumbbell variant
BARBELL PULL-OVER
WARNING!Using an excessive weight in this exercise can cause your lower back to arch, which could damage your intervertebral discs. Always use a weight that is light enough to enable you to maintain good form throughout the full range of movement.
TARGET MUSCLES
▪ Pectorals
▪ Latissimus dorsi
▪ Triceps brachii
B A C K
This is an excellent exercise to develop the size of your chest and improve the overall posture of your upper body, and is a useful exercise if training for throwing sports or martial arts. However, you should avoid this exercise if you have any shoulder problems.
102
Latissimus dorsi
Triceps brachii
Biceps brachii
Brachioradialis
Rectus abdominis
Serratus anterior
Deltoids• Anterior deltoid• Medial deltoid• Posterior deltoid
Pectorals• Pectoralis major• Pectoralis minor
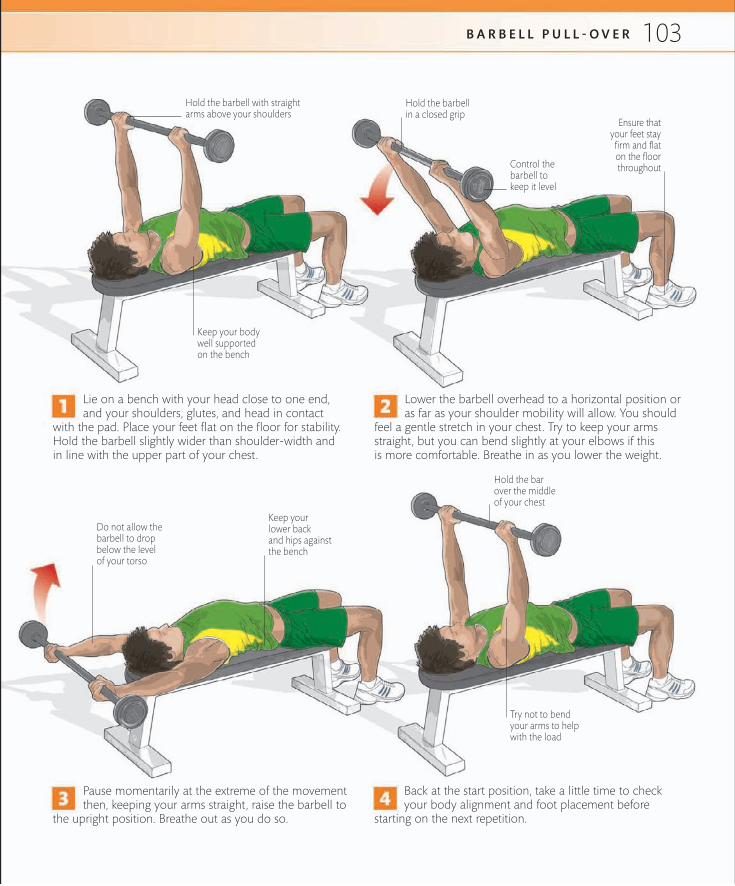
B A R B E L L P U L L - O V E R
Lie on a bench with your head close to one end, and your shoulders, glutes, and head in contact
with the pad. Place your feet flat on the floor for stability. Hold the barbell slightly wider than shoulder-width and in line with the upper part of your chest.
Lower the barbell overhead to a horizontal position or as far as your shoulder mobility will allow. You should
feel a gentle stretch in your chest. Try to keep your arms straight, but you can bend slightly at your elbows if this is more comfortable. Breathe in as you lower the weight.
Pause momentarily at the extreme of the movement then, keeping your arms straight, raise the barbell to
the upright position. Breathe out as you do so.
Back at the start position, take a little time to check your body alignment and foot placement before
starting on the next repetition.
Ensure that your feet stay firm and flat on the floor throughout
Hold the bar over the middle of your chest
Hold the barbell in a closed grip
Control the barbell to keep it level
Do not allow the barbell to drop below the level of your torso
Keep your lower back and hips against the bench
Keep your body well supported on the bench
Try not to bend your arms to help with the load
Hold the barbell with straight arms above your shoulders
103

GOOD MORNING BARBELL
BACK EXTENSION
B A C K
You can use this exercise to prepare for squats and deadlifts. It works the glutes and hamstrings, while the large spinal erector muscles hold your back flat. As your flexibility increases, you may be able to lower your upper body so that it is parallel to the floor.
This is a great core exercise in which you flex your body around your hip joints while keeping your spine neutral. Hamstring flexibility will determine the degree of flexion you can achieve.
▪ Gluteals
▪ Hamstrings
▪ Erector spinae
TARGET MUSCLES
▪ Erector spinae
▪ Gluteals
▪ Hamstrings
▪ Quadratus lumborum
TARGET MUSCLES
104
Erector spinae
TrapeziusBrachialis
Triceps brachii
Biceps brachii
Latissimus dorsi
External obliques
Quadriceps
Hamstrings
Gluteals
Trapezius
External obliques
Latissimus dorsi
Erector spinae
Quadratus lumborum (deep muscle)
HamstringsGluteals
Deltoids
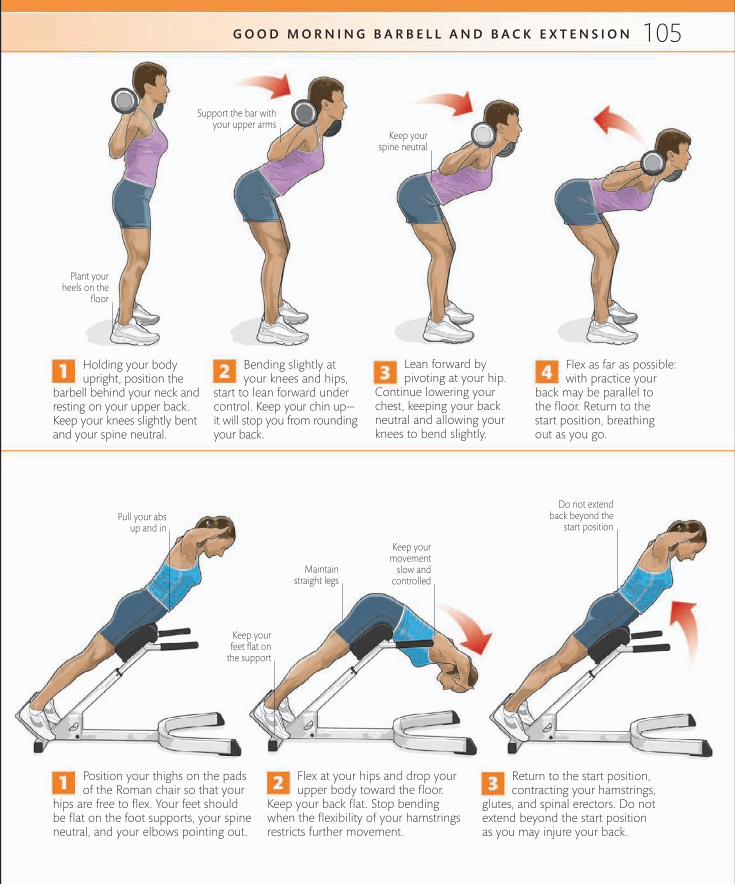
G O O D M O R N I N G B A R B E L L A N D B A C K E X T E N S I O N
Bending slightly at your knees and hips,
start to lean forward under control. Keep your chin up— it will stop you from rounding your back.
Flex at your hips and drop your upper body toward the floor.
Keep your back flat. Stop bending when the flexibility of your hamstrings restricts further movement.
Holding your body upright, position the
barbell behind your neck and resting on your upper back. Keep your knees slightly bent and your spine neutral.
Position your thighs on the pads of the Roman chair so that your
hips are free to flex. Your feet should be flat on the foot supports, your spine neutral, and your elbows pointing out.
Lean forward by pivoting at your hip.
Continue lowering your chest, keeping your back neutral and allowing your knees to bend slightly.
Flex as far as possible: with practice your
back may be parallel to the floor. Return to the start position, breathing out as you go.
Return to the start position, contracting your hamstrings,
glutes, and spinal erectors. Do not extend beyond the start position as you may injure your back.
Support the bar with your upper arms
Keep your spine neutral
Pull your abs up and in
Keep your feet flat on
the support
Keep your movement
slow and controlled
Do not extend back beyond the
start position
Maintain straight legs
Plant your heels on the
floor
105

PRONE ROW
STRAIGHT-ARM PULL-DOWN
B A C K
▪ Trapezius
▪ Posterior deltoid
▪ Biceps brachii
TARGET MUSCLES
▪ Latissimus dorsi
▪ Teres major
▪ Trapezius
TARGET MUSCLES
This twist on the dumbbell row is great for developing your upper back and strengthening your core. You could try it on an exercise ball rather than a bench to further work your stabilizers.
This important upper back exercise uses the stabilizers of your core, your quads, and your glutes to fix you in position. Avoid this exercise if you suffer from any shoulder problems.
106
Trapezius
Posterior deltoid Medial
deltoid
Biceps brachii
Triceps brachii
Teres minorTeres major
Rhomboid
Latissimus dorsi
External obliques
Erector spinae
Trapezius
Latissimus dorsi
Teres major
Triceps brachii
External obliques
Erector spinae
Teres minor
Rhomboid Deltoids

WARNING!Keep your hips pressed into the bench and do not lift or turn your head, or flex your neck. Your torso and legs should remain in one position throughout.
P R O N E R O W A N D S T R A I G H T - A R M P U L L - D O W N
Bending your elbows, pull your upper arms back as high as is
comfortable, while keeping them at right angles to your torso.
Bring the bar down slowly in a controlled movement. Do
not lean forward or allow your weight to shift forward into the movement.
Position your body on an incline bench at a 45-degree angle. Hold
the dumbbells in an overhand grip and lie chest-down against the pad.
Set the pulley high and select your desired weight. Hold a
straight bar in an overhand grip. Brace your legs and glutes.
Pause briefly at the top of the movement, then lower
the weights slowly and under control to the start position.
Bring the bar all the way down to your upper thighs in an arc.
Pause, then return slowly to the start postion, following the same arc.
Support your feet on the apparatus Hold the weights
with straight arms
Squeeze together your shoulder blades at the end of the movement Keep your
elbows in line with your wrists
Keep your head level and eyes
forward
Hold your arms straight
Maintain straight arms throughout the movement
Bend slightly at the knees
Do not bend your hips to “muscle down” the weight
Keep your body well braced
107

5
CHEST

BARBELL BENCH PRESS
DUMBBELL BENCH PRESS
C H E S T
▪ Pectorals
▪ Triceps brachii
▪ Anterior deltoid
TARGET MUSCLES
▪ Pectorals
▪ Triceps brachii
▪ Anterior deltoid
TARGET MUSCLES
Working the main muscles of your chest, the dumbbell bench press offers a better range of movement than when using a barbell (above), so can boost muscle growth even further.
This classic chest exercise is a great motivator. It offers huge potential for increasing strength and most people can progress rapidly to heavier weights.
110
Extensor digitorumBiceps brachii
Brachialis
Triceps brachii
Anterior deltoid
Pectorals
Triceps brachii
Biceps brachii
Extensor digitorum
Brachialis
Anterior deltoid
Pectorals

B A R B E L L A N D D U M B B E L L B E N C H P R E S S
Breathe in and lower the bar to your midchest area. Lower your
arms together until your forearms are vertical at the low point.
Lower the weights together slowly and under control,
keeping them aligned across the middle of your chest.
Lift the bar from the rack and hold it over your chest. Your
head, shoulders, and buttocks should be solidly on the bench.
Raise the dumbbells over your chest. Stabilize your body by
keeping your shoulders, head, and hips pressed against the bench.
Push the bar upward, following the same arc in which you
lowered it. Finish each rep over your chest with straight arms.
Press the weights back up in a shallow arc until they
are together above your chest once again.
Hold the bar on straight arms with a grip wider than shoulder-width
Lower the bar in a shallow arc
Wrap your thumbs around the bar
Hold your chest high
Allow the bar just to touch your chest at its
lowest point
Lower the weights under
control
Keep your forearms vertical under the weights
Lift the weights in a shallow arc
111

Grip the bar securely with your hands more than shoulder-width
apart. Place your feet flat on the floor and lift the bar from the rack.
Lower the bar to the top of your chest so that your forearms are
nearly vertical under the bar. Press your shoulders against the bench.
Keeping your head pressed against the bench and your spine
neutral, straighten your arms evenly until the bar reaches the start position.
INCLINE BARBELL BENCH PRESS
This is one of the basic movements for developing your chest. You will be able to lift less at an incline than flat because the smaller muscles of your shoulders come into play.
C H E S T
▪ Pectorals
▪ Triceps brachii
▪ Anterior deltoid
TARGET MUSCLES
Hold your chest high
Secure the weights on the bar with collars
Brace your feet firmly against the floor
112
Anterior deltoid
Triceps brachii
Pectorals
Biceps brachii
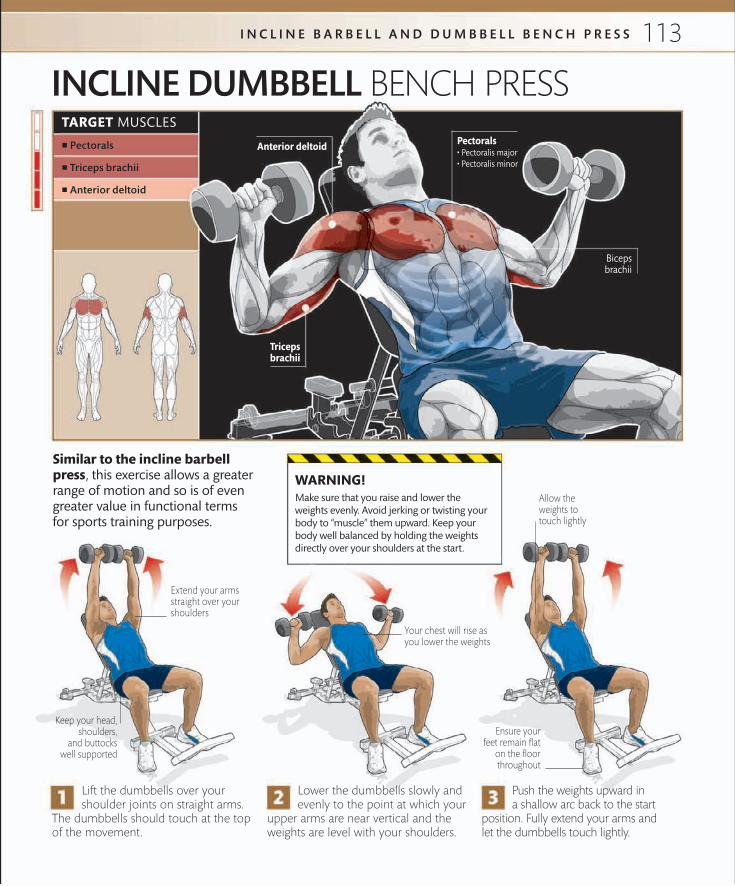
Lift the dumbbells over your shoulder joints on straight arms.
The dumbbells should touch at the top of the movement.
Lower the dumbbells slowly and evenly to the point at which your
upper arms are near vertical and the weights are level with your shoulders.
Push the weights upward in a shallow arc back to the start
position. Fully extend your arms and let the dumbbells touch lightly.
INCLINE DUMBBELL BENCH PRESS
Similar to the incline barbell press, this exercise allows a greater range of motion and so is of even greater value in functional terms for sports training purposes.
I N C L I N E B A R B E L L A N D D U M B B E L L B E N C H P R E S S
WARNING!Make sure that you raise and lower the weights evenly. Avoid jerking or twisting your body to “muscle” them upward. Keep your body well balanced by holding the weights directly over your shoulders at the start.
▪ Pectorals
▪ Triceps brachii
▪ Anterior deltoid
TARGET MUSCLES
Extend your arms straight over your shoulders
Keep your head, shoulders,
and buttocks well supported
Your chest will rise as you lower the weights
Allow the weights to touch lightly
Ensure your feet remain flat
on the floor throughout
113
Anterior deltoid
Triceps brachii
Pectorals
Biceps brachii

TARGET MUSCLES
INCLINE FLY
C H E S T
▪ Pectorals
▪ Anterior deltoid
This popular dumbbell chest exercise also helps develop your shoulders. An excellent companion exercise to the incline press (see page 112), it offers you a greater range of motion to work the large muscles of your chest.
The fly may be also done on a flat bench. Begin with the same dumbbell position as for the incline fly and use the same arm-hugging motion to bring the dumbbells together in a shallow arc.
VARIATION
WARNING!Make sure that you do not overdo the weight—this could lead to poor form and the risk of injury. Using heavy weights also means that you are likely to engage your triceps over your chest muscles.
114
Triceps brachii
Pectorals
Anterior deltoid
Soleus
Internal obliques
External obliques
Rectus abdominis
Biceps brachii
Teres major
Gastrocnemius
Hamstrings
Quadriceps

I N C L I N E F LY
Set the bench at a 45-degree angle. With
your palms facing in, lift the dumbbells to arm’s length above your shoulders so that they just touch. Ensure that your hips and back are well supported on the bench.
Breathe in deeply and bring the
dumbbells down slowly and under control in a wide arc. Do not let the dumbbells drop vertically or allow your arms to twist.
Finish the movement when the dumbbells
are level with your ears and begin the return phase, breathing out as you go.
Return to the start position, bringing
the weights together over your body slowly and under control.
Slightly unlock your elbows
Move your arms in a “hugging” action
Feel a stretch in your chest
Bring the weights together gently
Brace your feet against the floor
Move the dumbbells up in same arc as in descent
Hold the dumbbells so that
they just touch
Ensure that your lower back is well supported
Maintain a constant angle at your elbows
Keep your elbows
slightly bent
Keep your feet braced against the
floor throughout
115
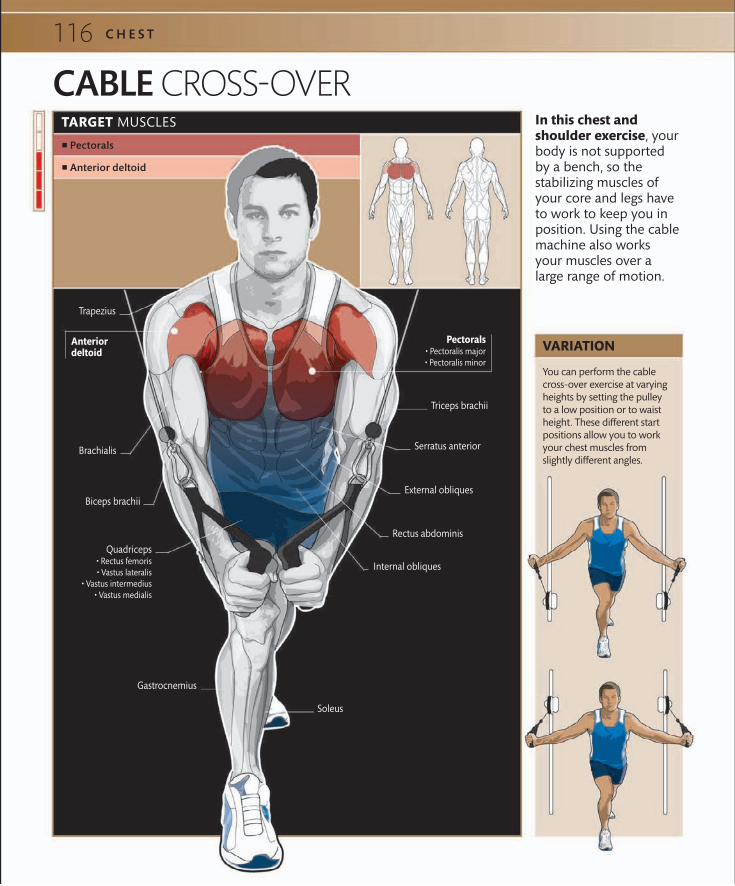
TARGET MUSCLES
CABLE CROSS-OVERIn this chest and shoulder exercise, your body is not supported by a bench, so the stabilizing muscles of your core and legs have to work to keep you in position. Using the cable machine also works your muscles over a large range of motion.
C H E S T
▪ Pectorals
▪ Anterior deltoid
You can perform the cable cross-over exercise at varying heights by setting the pulley to a low position or to waist height. These different start positions allow you to work your chest muscles from slightly different angles.
VARIATION
116
PectoralsAnterior deltoid
Biceps brachii
Triceps brachii
Gastrocnemius
Trapezius
Brachialis
Internal obliques
External obliques
Serratus anterior
Rectus abdominis
Soleus
Quadriceps

C A B L E C R O S S - O V E R
WARNING!Choose a weight that is not so heavy as to pull your body back from its braced position. Do not use the momentum of your body to complete the movement because you will almost certainly lose balance and risk injury.
Set the pulley to its highest position and select your
desired weight on the stack. Leaning slightly forward and with your legs braced, bring the pulley handles down across your body. Breathe in and let your arms travel back in a wide arc so that they are just behind the line of your torso. This is the start position.
Bring your arms down and across your body in a wide arc—like a hugging motion. Keep your head
up and maintain a slight bend in your arms as you pull the handles forward and down at a slight angle. Breathe out on the effort.
Bring your hands to the front of your body before starting the return phase, reversing the arc of
movement in Step 2. Make sure that your arms move at the same speed and that your elbows stay in the same slightly bent position throughout the movement.
Place one foot forward and one back for balance
Maintain a neutral spine
Ensure that your palms face in
Keep your head still and
your eyes forward
Slightly bend your front knee
Bring the cables together; you
can cross them over at the
center point
Control the momentum of
your body
Keep your elbows slightly unlocked
117

MACHINE BENCH PRESS
C H E S T
▪ Pectorals
▪ Anterior deltoid
▪ Pectorals
▪ Anterior deltoid
TARGET MUSCLES
TARGET MUSCLES
This is a good chest exercise for beginners or those who are nervous about working with free weights. Adjust the machine to match your height and limb length.
This can be a useful companion exercise to the machine bench press (see above). It allows you to work your chest muscles through a greater range of motion, while keeping your body well supported.
MACHINE FLY
118
Pectorals
Anterior deltoid
Triceps brachii Teres major
Biceps brachii
Serratus anterior
Rectus abdominis
Anterior deltoid
Pectorals
External obliques
Serratus anterior
Triceps brachii
Biceps brachii
Rectus abdominis

M A C H I N E B E N C H P R E S S A N D F LY
Breathe in deeply, then breathe out as you press the handles in a
slow and controlled movement; keep your body tight against the pads.
Breathe out, bringing the handles together in a wide arc,
with your elbows slightly bent, in a hugging motion.
Set your desired weight on the stack. Take an overhand grip on
the handles, which should be at midchest level.
Set your desired weight on the stack. Allow your arms to spread
in a wide arc so that the handles are just behind the line of your torso.
Fully extend your arms then return the handles to the start position,
breathing in. Don’t let the weight rest on the stack before starting another rep.
When the movement is complete and your knuckles touch, contract
your chest muscles and begin the return phase, back to the start position.
Adjust the grip width to suit your build
Keep your feet flat on the floor
Press on the handles and extend your arms
The handles of the machine swivel,
taking pressure off your wrists
Ensure that your body is well supported throughout
Closely control the movement
Keep your feet flat on the floor
119

PUSH-UP
This is one of the most simple but effective exercises for your chest, shoulders, and arms. Its added benefit is that it requires no apparatus—just your own body weight.
C H E S T
VARIATION
▪ Pectorals
▪ Anterior deltoid
▪ Triceps brachii
TARGET MUSCLES
Support your body on your toes with your arms straight, positioned
under, and just a little wider than, your shoulders. Breathe in and lower your body slowly and under control until your torso just touches the floor.
Tense your abs
Tense your spinal erectors
Hold the bottom position for a second, then breathe out and
push your torso up until your arms are straight and you are back at the start position. Keep the angle of your back constant and your head forward.
To engage the stabilizers of your torso more than in the regular push-up, try using a stability ball. Place your hands on the ball and lower your body to the point where your arms are bent at a 90-degree angle and press back up.
Support your weight on your toes
Keep your legs straight
Maintain a neutral spine
Point your fingers forward
Do not allow your trunk to sag
120
Anterior deltoid
Medial deltoid
Biceps brachii
Brachialis
Rectus abdominis
Posterior deltoid
Pectorals
Triceps brachii
Gluteals
Quadriceps

▪ Pectorals
▪ Anterior deltoid
▪ Triceps brachii
TARGET MUSCLES
FRAME-SUPPORTED PUSH-UP
Using a pair of frames will give you a greater range of motion than with the standard push-up (see opposite).
P U S H - U P A N D F R A M E - S U P P O R T E D P U S H - U P
WARNING!Do not let your torso sag as you push yourself up. This will cut down the range of your movement, diminishing the effect on your chest, shoulders, and arms. Failure to straighten your arms after
each rep will also make the exercise less effective.
Place the frames a little wider than shoulder-width apart. Hold
your body in a “plank” position, resting on your toes and your straightened arms. Breathe in and lower your body slowly until the line of your body is below your flexed elbows.
Pause for a second at the bottom of the motion. Press back up until
you return to the start position.
Support your weight on your toes
VARIATION
Increase the challenge by placing your feet on a bench. The higher your feet, the more your shoulders are brought into play. You can also try moving the frames wider or closer. Close spacing will work your triceps more.
Maintain straight legs
Keep your hips and upper torso in line
Point the frames inward at 45–degree angles
Keep your torso tight
121
Medial deltoidTrapezius
Brachialis
Brachioradialis
Flexor carpi radialis
Biceps brachii
External obliques
Internal obliques
Rectus abdominis
Posterior deltoid
Anterior deltoid
Triceps brachii
Pectorals
Quadriceps


6SHOULDERS

Hold the bar across the front
of your shoulders. Press the bar upward using your shoulders, moving it in a shallow arc around your face to a position above and slightly behind your head.
Gripping tightly, lower the bar back
to the start position in the same shallow arc past your head.
MILITARY BARBELL PRESS
The military or barbell press is simple but very effective, and is one of the basic exercises around which all shoulder routines are constructed.
S H O U L D E R S
VARIATION
You can perform the military press seated on a bench. The seated position means that you are not able to “help” the bar up by using your legs and so tends to isolate the effects of the exercise. Keep your back in an upright position and plant your feet securely on the floor.
▪ Anterior deltoid
▪ Triceps brachii
TARGET MUSCLES
WARNING!Ensure your back is in a neutral position. Bending your back not only engages your chest, aiding the shoulders, and thus reducing the effectiveness of the exercise, but it also places great stress on your lower spine. Keep your wrists rigid and directly under the bar at all times—turning them back can lead to a risk of wrist injury. Finally, make sure to move your head back a fraction as you lift the bar in order to keep from hitting your chin.
Keep the bar over your center of gravity
Engage your core muscles
Keep your feet flat on the floor, a little more than shoulder-width apart
124
Biceps brachii
Anterior deltoid
Triceps brachii
Pectorals
External obliques

▪ Anterior deltoid
▪ Triceps brachii
TARGET MUSCLES
DUMBBELL SHOULDER PRESS
You can perform this variant of the shoulder press seated (as shown), standing, or with alternate presses. The main advantage that it offers over the military press is that you do not need to move the bar around your face on the way up and down.
Sit on the end of a bench holding the dumbbells at shoulder height.
Press the weights upward to arm’s length with your shoulders, breathing out.
Briefly hold the weights at arm’s length without locking out your
elbows, then slowly lower the dumbbells to the start position.
M I L I T A R Y B A R B E L L P R E S S A N D D U M B B E L L S H O U L D E R P R E S S
If you lack the confidence to use free weights, try the overhead press on a machine. This is a less effective exercise than the seated or standing press, especially if you are training for sports, because your back is supported by the equipment and so you do not engage your stabilizers. As with all machine exercises, you should only use a machine
that adjusts to your height and limb length.
VARIATIONAllow the dumbbells to touch lightly behind your head
Engage your core muscles to stabilize your body
Twist the weights on the way up
Keep your feet flat on the floor
125
Rectus abdominis
Latissimus dorsi
Teres majorTeres minor
Biceps brachii
Serratus anterior
Triceps brachii
Anterior deltoid

TARGET MUSCLES
UPRIGHT ROW
S H O U L D E R S
▪ Trapezius
▪ Anterior deltoid
▪ Biceps brachii
Using dumbbells for the upright row works each arm independently, and prevents your elbows from rising much farther than parallel to the floor, arguably making this a safer exercise because you are less likely to damage your rotator cuffs.
Using a low cable pulley for the upright row offers you a steadier and more stable resistance through the movement than is possible when working with a barbell. Make sure that you stand close to the pulley and keep the bar tight to your body. Use a close grip to preferentially work your upper back; or a wider grip to engage your shoulders in the exercise.
VARIATION
VARIATION
This exercise is great for developing strength around your shoulder and upper back, and helps improve your posture. It should be avoided, however, if you suffer from shoulder pain or stiffness.
126
Biceps brachii Triceps brachii
Trapezius
Teres minor
Teres major
Anterior deltoid
Posterior deltoid
Medial deltoid
Latissimus dorsi
Serratus anterior
External obliques
Erector spinae
Gluteals

WARNING!The upright row demands good technique if you are to avoid back and shoulder injury, and it should not be done if you have a history of shoulder pain. Work within your limits and never arch your back or jerk the weight; if you are at all nervous about injury, do not lift the bar above midchest height—this avoids the extreme internal rotation of the shoulder at the top of the movement. Stop the exercise immediately if you experience any pain.
U P R I G H T R O W
Place your feet hip-width apart and take a narrow overhand grip
on the bar, with your palms facing toward your body. Lift the bar so that it rests across your thighs.
Lower the bar to the start position under close control. Use a smooth
motion, keeping your elbows over the bar and your back tight.
Pull the bar up toward your chin in a smooth motion. Lift
it close to your body, keeping your elbows high and over the bar. Keep your back tight and upright.
Return to the start position with your arms fully extended. Exhale
slowly as you do so. Return the bar to the floor at the end of your set.
Continue pulling the bar up until it reaches your chin, keeping
your hands below the level of your elbows. Pause briefly at the top of the movement.
Keep your core muscles tight throughout
Plant your feet firmly on the floor
Do not round your shoulders
Take a narrow grip on the bar to target the trapezius
Raise your elbows
Keep your torso upright
Ensure that the bar is level throughout
Keep your knees slightly bent
Keep your body upright
127

128 S H O U L D E R S
Stand upright with the dumbbells hanging by
your sides. Stand with your legs shoulder-width apart and your knees slightly bent. Keep your abs tight and your chest up.
Hold the weights up for 1–2 seconds at the
highest point before lowering them to the start position under control, following the same line of movement in which they were raised.
Holding the dumbbells in an overhand grip,
with your thumbs wrapped around each bar, shrug the weights upward by drawing your shoulders vertically up toward your ears.
VARIATION
You can perform the shrug with a barbell held in an overhand grip across the front of your thighs. The movement pathway is vertical, as with the dumbbell variant. Do not jerk the weight or arch your back—this motion will be much less effective at working your trapezius muscle.
This highly specific exercise uses limited motion to work your trapezius, which lies at the back of your neck. A strong trapezius will help protect your neck and spine—making it useful for all contact sports.
Allow your arms to hang straight by your sides
▪ Trapezius
▪ Rhomboid
TARGET MUSCLES
DUMBBELL SHOULDER SHRUG
Rhomboid
Triceps brachii
Brachialis
Deltoids
Trapezius

129
TARGET MUSCLES
▪ Trapezius
▪ Rhomboid
▪ Gastrocnemius
D U M B B E L L S H O U L D E R S H R U G A N D S H O U L D E R S H R U G F R O M H A N G
SHOULDER SHRUG FROM HANG
Once you have reached full body
extension, bend your knees, ease your hips back, and lower the bar under full control down your thighs to the start position.
This development of the basic shrug works the trapezius but also adds an upward extension of the whole body, making it a great exercise if your training calls for explosive pulling.
Stand holding the bar, arms outside your
thighs. Shrug your shoulders, bend at your knees and waist, and lower the bar to just above your knees.
Drive your body rapidly upward with a
strong vertical shrug, rising up on your toes. Bring your hips up but keep your arms hanging long and straight.
Move your shoulders in front of the bar
Ease your hips back
Keep an overhand
grip on the bar
Keep your arms straight
Do not arch your back
Keep your wrists
straight
WARNING!The movement of the body into the shrug position must be vertical, so resist the temptation to “roll” your shoulders or rotate your head back away from an upward path. Keep the bar close to your body throughout the movement to keep from putting stress on your back.
Gastrocnemius
Rhomboid
Triceps brachii
Erector spinae
Trapezius
Soleus
HamstringsGluteals

FRONT DUMBBELL RAISE
This exercise develops and defines the smaller muscles of your shoulders, which help you perform other exercises correctly. You can lift both arms at once or alternate left and right.
S H O U L D E R S
▪ Anterior deltoid
▪ Medial deltoid
TARGET MUSCLES
Stand upright, with
your feet hip-width apart and your knees soft. Hold the weights in an overhand grip.
Slightly bend your elbows
Rest the dumbbells on the front of your thighs
Keeping your elbows slightly
bent and your back straight, raise one dumbbell slowly to the front up to eye level while breathing in.
Lower the dumbbell
slowly and under control to the start position. Repeat the movement with your other arm.
Brace your abs
Raise the weight to your front, not
to your sideKeep your head steady and look
straight ahead
Breathe out when lowering
the weight
WARNING!Try not to lean back and swing the dumbbell upward; this not only reduces the effectiveness of the exercise, but could also cause you to injure your lower back. Instead, switch to a lower weight or try performing the movement with your back against a wall to improve your technique.
130
Medial deltoidAnterior deltoid
Triceps brachii
Brachialis Anconeus
Teres minor
Teres major
Trapezius
Pectorals

▪ Anterior deltoid
▪ Medial deltoid
TARGET MUSCLES
LATERAL DUMBBELL RAISE
This is a good exercise to develop the width of your upper back and is a valuable aid in most racket and field sports where power—the combination of strength and speed—can give you a competitive edge.
F R O N T A N D L A T E R A L D U M B B E L L R A I S E
Engage your core muscles.
With your elbows slightly bent, raise both dumbbells to either side of you up to eye level.
Adopt a hip-width stance
with your knees slightly bent. Hold each dumbbell in front of you, knuckles facing to the side.
Pause for a second, then
lower the dumbbells slowly and under control back to the start position while breathing out.
Brace your abs
Keep your back straight throughout
Move the dumbbells up
slowly and under control
Maintain a slight bend in your elbows throughout
Lift the dumbbells no higher than eye level
131
Anterior deltoid
Medial deltoid
Rectus abdominis
External obliques
Pectorals
Triceps brachii
Biceps brachii
Brachioradialis
Trapezius
Serratus anterior
Teres minor

TARGET MUSCLES
REAR LATERAL RAISE
S H O U L D E R S
Performing this exercise lying prone on a bench puts more emphasis on your medial deltoids and rhomboids. This variant is best performed with your legs fixed, making it a more advanced isolation exercise. You may also perform the exercise sitting at the end of a bench; here, keep your torso bent over to work your posterior deltoids, or more upright to emphasize your medial deltoids.
VARIATION
▪ Posterior deltoid
▪ Medial deltoid
▪ Anterior deltoid
▪ Rhomboid
This is a great raw strength exercise that develops your shoulders and the muscles in the middle section of your back—principally, your rhomboids. You can perform the exercise standing, seated, or lying, but in all cases ensure that you maintain good body position to avoid engaging the larger muscles of your back.
WARNING!Rounding your back during this exercise may cause injury to your back or spine. Keep the movement of the weights slow and well balanced on both sides, trying not to move your knees, head, or spine; your elbows should be slightly bent and fixed at this angle throughout. Do not allow your shoulders to rise.
132
SoleusFlexor
digitorum
Gastrocnemius
Latissimus dorsi
Teres major
Teres minor
Biceps brachii
Triceps brachii
Trapezius
Erector spinae Posterior deltoid
Anterior deltoidRhomboid
Medial deltoid
Gluteals
Quadriceps
Hamstrings

R E A R L A T E R A L R A I S E
Slightly bend your knees. Keeping your
back flat, drop your torso forward with your head looking to the front and a little down. Flex your elbows slightly and rest the plates of the dumbbells on your upper thighs.
Lift the dumbbells away from your
body in a smooth motion, with the weights moving symmetrically. Keep the weights in line with your shoulders and make sure that your back stays tight. Breathe out on exertion.
Bring the dumbbells up level with your
shoulders while depressing your shoulder blades. Hold your position briefly at the top of the motion, breathing freely.
Reverse the motion under tight control,
returning the dumbbells to the start position. Resist the weights on the way down rather than letting them drop under gravity.
Place your feet hip- width apart
Keep your shoulders down and your neck extended
Slightly bend your
elbows
Raise the weights to the level of your shoulders or just above
Try not to move your torso
during the lift
Keep your core muscles tight
Brace your abs and back muscles
Keep your spine in a neutral position
Breathe in during the return phase
Grip the dumbbells with your
palms facing in
Keep your spine neutral
133

▪ Infraspinatus
▪ Supraspinatus
▪ Teres major
▪ Teres minor
TARGET MUSCLES
SCARECROW ROTATION
S H O U L D E R S
EXTERNAL DUMBBELL ROTATION
▪ Infraspinatus
▪ Supraspinatus
▪ Teres major
▪ Teres minor
▪ Subscapularis
TARGET MUSCLES The muscles of the rotator cuff are vital in stabilizing shoulder movement, especially in sports that involve throwing. This exercise works your rotator cuff and helps prevent injury.
Similar to the scarecrow rotation (above), this exercise isolates the muscles located in the sides of the upper back and shoulders.
134
Supraspinatus(deep muscle)
Trapezius
Brachialis
Teres major
Teres minor
Infraspinatus
Subscapularis (deep muscle)
Erector spinaeExternal obliques
Latissimus dorsi
Triceps brachii
Biceps brachii
Teres minor
Teres major
Latissimus dorsi
Biceps brachii
Triceps brachiiBrachialis
Supraspinatus (deep muscle)
InfraspinatusDeltoids

S C A R E C R O W A N D E X T E R N A L D U M B B E L L R O T A T I O N
Stand facing a low pulley and grip the
handle in one hand. Raise your elbow to the side in line with your shoulder.
Keeping your upper arm motionless, slowly
pivot your forearm upward to a vertical position, breathing freely as you go.
Lower your forearm to the start position,
breathing freely. Complete the set and repeat with your other arm.
Take an overhand
grip on the handle
VARIATION
You can increase the range of movement for this exercise by working with dumbbells on a bench. Support your body on an incline bench at an angle of 45 degrees and pivot your forearms, as described in the main exercise. Try to fit the scarecrow rotation into your regimen; it is often omitted because the muscles targeted are deep, so developing them does not directly enhance your appearance. However, damage to the rotator cuff is a very common injury and one that takes a lot of rehabilitation.
Engage your core muscles
Move your forearm to
a vertical position
Keep your knees soft
Place your feet hip-width apart
Lie on an exercise mat on one side, leaning neither forward nor backward.
With your upper arm to your side and your forearm to the front of your body, take an overhand grip on a dumbbell; form a right angle at your elbow.
Keeping your upper arm as still as possible and your elbow fixed against
your side, gently raise your forearm through a comfortable range of movement in a smooth, controlled action.
Maintaining your elbow at a right angle and pressed against your side,
lower the dumbbell slowly to the start position and complete the set. Repeat with your other arm.
Keep your hips vertical
Stabilize your body with your foot
Keep your upper arm fixed
Do not rotate your forearm beyond the vertical position
Support your head on your inclined arm
135

▪ Infraspinatus
▪ Supraspinatus
▪ Subscapularis
▪ Teres major
▪ Teres minor
TARGET MUSCLES
INTERNAL ROTATION
EXTERNAL ROTATION
S H O U L D E R S
▪ Pectorals
▪ Supraspinatus
▪ Infraspinatus
▪ Subscapularis
▪ Teres major
▪ Teres minor
TARGET MUSCLES
This exercise develops the muscles at the rear of your shoulder. It is often used in the rehabilitation of the shoulder after injury but also makes good preparation for throwing and racket sports.
The purpose of this exercise is to develop your rotator cuff muscles and your pecs. A simple pulley exercise, it is mainly used in bodybuilding or in rehabilitation for a rotator cuff injury.
136
Teres major
Teres minor
Trapezius
Pectorals
Supraspinatus(deep muscle)
Subscapularis (deep muscle)
Infraspinatus
Supraspinatus(deep muscle)
Subscapularis (deep muscle)
Infraspinatus
Teres minor
Teres major

I N T E R N A L A N D E X T E R N A L R O T A T I O N
Keep your shoulders, hips, and feet in line. Pull the handle slowly
and under control toward the middle of your body.
Keep your shoulders, hips, and feet in line. With your elbow bent
and tight to your body, move your lower arm across and away from your body.
Stand sideways to a pulley set at about waist height. Bend your
elbow to 90 degrees and turn your arm out away from your body.
Stand sideways to a pulley set at about waist height. Reach across
your body and grip the handle, with your knuckles facing toward the pulley.
Bring your lower arm across as far as comfortable. Return slowly
to the start position. Finish the set and then repeat for your other arm.
When you reach your full range of movement return to the start
position under control. Finish the set and repeat for your other arm.
Grip a folded towel between
your arm and chest to help you maintain
correct position
Keep your head up and look forward Maintain a
right angle at your elbow
Grip a folded towel between
your arm and chest to help you maintain
correct position
Keep your head up and look straight ahead
Keep your shoulders level
Tuck your arm behind
your back
Keep your legs braced throughout
exercise
Keep your elbow tight to
your body Grip the
handle securely
Hold the frame for support if required
Encircle the handle with your thumb
137


7
ARMS
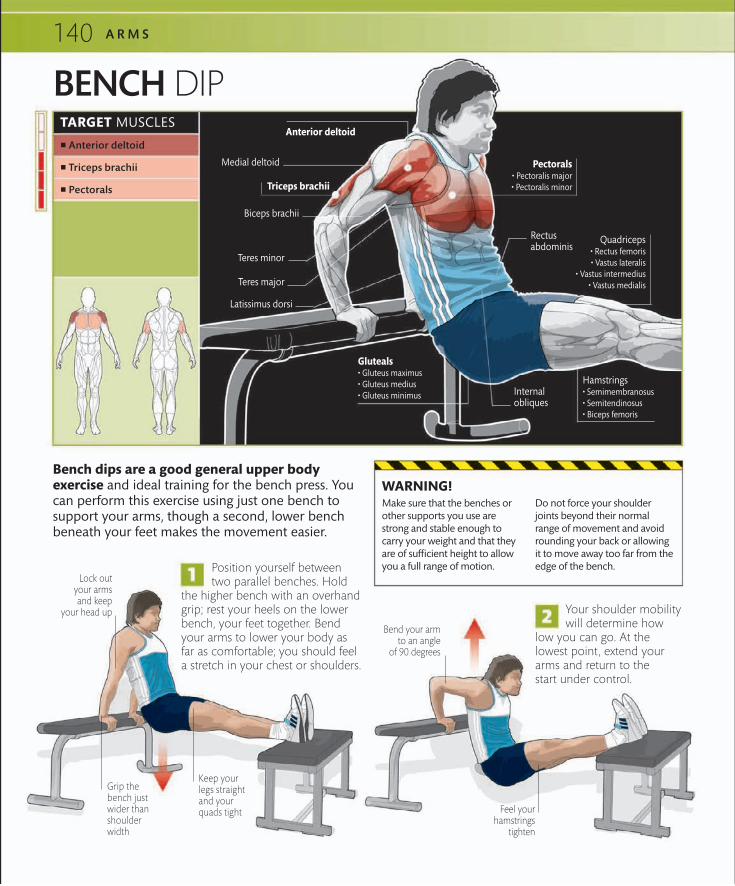
A R M S
Position yourself between two parallel benches. Hold
the higher bench with an overhand grip; rest your heels on the lower bench, your feet together. Bend your arms to lower your body as far as comfortable; you should feel a stretch in your chest or shoulders.
Your shoulder mobility will determine how
low you can go. At the lowest point, extend your arms and return to the start under control.
Feel your hamstrings
tighten
Keep your legs straight and your quads tight
Grip the bench just wider than shoulder width
Bend your arm to an angle
of 90 degrees
Lock out your arms and keep
your head up
Bench dips are a good general upper body exercise and ideal training for the bench press. You can perform this exercise using just one bench to support your arms, though a second, lower bench beneath your feet makes the movement easier.
Make sure that the benches or other supports you use are strong and stable enough to carry your weight and that they are of sufficient height to allow you a full range of motion.
Do not force your shoulder joints beyond their normal range of movement and avoid rounding your back or allowing it to move away too far from the edge of the bench.
WARNING!
BENCH DIP▪ Anterior deltoid
▪ Triceps brachii
▪ Pectorals
TARGET MUSCLES
140
Anterior deltoid
Pectorals
Triceps brachii
Biceps brachii
Teres minor
Teres major
Latissimus dorsi
Medial deltoid
Rectus abdominis
Internal obliques
Gluteals
Quadriceps
Hamstrings

TARGET MUSCLES
▪ Triceps brachii
▪ Anterior deltoid
▪ Pectorals
B E N C H A N D B A R D I P
BAR DIPBar dips help to build upper body strength and are ideal in training for throwing events. Good technique takes practice; if you are just starting out, let the knee pad on an assisted dip machine take part of your weight as you build strength.
Grip the parallel bars with your palms facing each
other. Hold your weight on locked arms and cross your feet to help keep you stable.
Take a deep breath. Keeping your body
straight, unlock your elbows and start to lower your body between the bars, trying to maintain an upright posture.
Once you have lowered yourself until your upper
arms are parallel to the floor or you cannot go any farther, immediately push up to return to the start position, exhaling as you go.
Keep your shoulders over your
hands
Do not let your elbows
splay out beyond
your wrists
Keep your hips beneath your
shoulders
141
Triceps brachii
Anterior deltoid
Pectorals• Pectoralis major• Pectoralis minor
Latissimus dorsi
Erector spinae
External obliques
Trapezius
Medial deltoid
Gastrocnemius
Soleus
Biceps brachii
Gluteals• Gluteus maximus• Gluteus medius • Gluteus minimus
Quadriceps• Rectus femoris• Vastus lateralis
• Vastus intermedius• Vastus medialis
Hamstrings• Semimembranosus• Semitendinosus• Biceps femoris

TARGET MUSCLES
▪ Triceps brachii
▪ Anconeus
DUMBBELL TRICEPS EXTENSIONThis exercise targets your triceps, which constitute most of the mass of your upper arm. Performed standing rather than seated or lying, this movement also engages your core muscles, providing the added benefit of building trunk strength.
A R M S
Lower the dumbbell behind your head,
keeping your back straight.Pause briefly at the bottom of the motion, then slowly raise the dumbbell to the start position.
Stand with your feet hip-width apart and
your knees relaxed. Hold a dumbbell in one hand and raise it overhead to arm’s length. Use your free arm to brace across your body.
VARIATION
If you are a beginner, keeping your body balanced while performing the exercise standing up can be tricky. To improve your stability, try holding on to a solid support with your free hand or perform the exercise sitting on a bench, preferably one with a back support.
Hold the dumbbell directly above your shoulder
Point your elbow upward
Engage your core muscles
142
Triceps brachii
Anconeus
Teres major
Biceps brachii
Pectorals
Trapezius
Brachialis
Internal obliques
External obliques
Deltoids

TARGET MUSCLES
▪ Triceps brachii
▪ Anconeus
D U M B B E L L A N D B A R B E L L T R I C E P S E X T E N S I O N
BARBELL TRICEPS EXTENSIONThis exercise works the triceps of both arms simultaneously. You can perform it using a regular barbell or an EZ bar, which lets your wrists and forearms assume a more natural position.
Slowly and gently lower the barbell
behind your head to your upper back until your forearms meet your biceps.
Keeping your core muscles tight, straighten
your forearms to the start position, moving your arms slowly and under control.
Sit on the end of a bench and hold
the barbell overhead with a shoulder-width grip, your knuckles facing backward.
WARNING!Lowering the barbell too fast can cause it to “bounce” off the back of your neck, potentially causing serious damage to your vertebrae. Always work within your capabilities and lower the weight under strict control to the upper back position.
Engage your core muscles for stability
Keep your upper arms close to the sides of your head
Keep your upper arms stationary
143
Triceps brachii
Anconeus
Biceps brachii
Teres major
Teres minor
Brachioradialis
Deltoids
Serratus anterior
Internal obliques
External obliques
Rectus abdominis
Quadriceps

PRONE TRICEPS EXTENSION
TRICEPS KICKBACK
A R M S
▪ Triceps brachii
▪ Anconeus
TARGET MUSCLES
▪ Triceps brachii
▪ Anconeus
TARGET MUSCLES
Also known as the “skullcrusher” because you bring the bar close to your head, this is a very effective, though rarely seen, triceps building exercise. It demands strict technique.
With a secure body position, this exercise isolates the triceps. Good technique and a flat back are vital; use a mirror to check that your form is correct.
144
Triceps brachii
Anconeus Internal obliques
External obliques
Pectorals
Serratus anterior
Biceps brachii
Rectus abdominis
Triceps brachii
Anconeus
Deltoids
Rectus abdominis
External obliques
Flexor carpi radialis
Latissimus dorsi
Biceps brachii
Brachioradialis
Brachialis

P R O N E T R I C E P S E X T E N S I O N A N D T R I C E P S K I C K B A C K
Fix your shoulders and core. Bend at your elbows only—not
your shoulders—to lower the barbell slowly to just above your forehead.
Brace your body. Pivot at your elbow to straighten your arm,
lifting the weight slowly and under close control to a horizontal position.
Lie on a bench with your feet flat on the floor and take a shoulder-
width grip on the EZ bar with your arms straight above your chest.
Support your left knee and left hand on a bench; bend from
the hips, while gripping a dumbbell in your right hand.
Pause at the bottom of the movement, then slowly straighten
your forearms under control back to the start position.
Pause briefly at the top of the motion; slowly bring the dumbbell
back to the start position. Complete the set, then repeat with your other arm.
Do not allow your elbows to splay out
Hold the weight with an overhand grip
Keep your core muscles engaged
Position your hands so that your knuckles point backward
Keep your upper arm in line with your back
Pivot only at the elbow
Kneel on the bench to stabilize your body
Raise and lower the dumbbell slowly; swinging the weight can cause twisting of your trunk making your lower back unstable and prone to injury.
This exercise is not called the skullcrusher for nothing! Keep your movement under close control and slow the descent of the bar as it nears your head. Be sure to lower the bar toward your forehead, not to the level of your nose; this helps to ease the strain on your wrists.
WARNING!
WARNING!
Keep your upper body
almost parallel to the floor
145

TARGET MUSCLES
▪ Triceps brachii
▪ Deltoids
▪ Pectorals
A R M S
This exercise is similar at first glance to the regular bench press, but bringing your hands closer together on the bar places far more emphasis on the triceps and anterior deltoids than on the chest. The close-grip bench press helps build big triceps and is a good assistance exercise for competition power lifting.
You can use an Olympic bar or a straight training bar for this exercise. Grip the bar a little narrower than shoulder-width, but don’t place your hands too close together, because the exercise will become less effective for your triceps and will likely place excessive stress on your wrists.
The close-grip push-up is a related exercise that targets the the triceps with a resistance of approximately two-thirds of your body weight. By adjusting the position of your hands and the direction of your elbows, you can isolate very specific areas of your triceps and deltoids. The exercise is also
very safe and does not require the use of any equipment.
CLOSE-GRIP BENCH PRESS
146
VARIATION VARIATION
Biceps brachii
Trapezius
Rectus abdominis
Internal obliques
External obliques
Pectorals• Pectoralis major• Pectoralis minor
Triceps brachii
Deltoids• Anterior deltoid
• Medial deltoid• Posterior deltoid

C L O S E - G R I P B E N C H P R E S S
Drive the bar to arm’s length, keeping it
vertically in line with your shoulders. Breathe out as you push the bar upward, while keeping your elbows tucked in and pushing down with your feet.
Bend your knees at a
right angle
Lie back on a bench with your head supported
and your feet firmly on the floor. Hold an EZ bar with an overhand grip just closer than shoulder-width. Extend your arms to hold the bar at upper chest level.
WARNING!You risk serious injury if your muscles fail during the lift.Perform this exercise in the presence of a competent and trusted spotter—never alone. Keep your feet in constant contact with the ground; failure to do so may cause you to twist your lower back, causing injury. As always, be sensible and train within your capabilities.
Ensuring that the bar is stable and fully under
control, unlock your elbows and, keeping them tucked in, start to lower the bar slowly toward your chest. Breathe in as you do so.
Continue lowering the bar until your hands
make contact with your chest. Don’t let your elbows flare out, since this will shift the emphasis of the exercise on to your pecs.
Fully extend your arms to the start position;
they should lock out at the top of the lift.
Your knuckles make contact with your chest at
about nipple level
Keep your back flat throughout the exercise
Keep the bar level and
under control
Push down hard with your feet
Keep the bar vertically over your shoulders
147

148
TRICEPS PUSH-DOWN
OVERHEAD TRICEPS EXTENSION
A R M S
▪ Triceps brachii
▪ Anconeus
TARGET MUSCLES
▪ Triceps brachii
▪ Anconeus
TARGET MUSCLES
This is a basic exercise for your triceps, the three heads of which form the bulk of your upper arm. Reversing the grip makes this into a pull-down that also works the muscles of your forearms.
This more advanced exercise works not only your triceps, but also your torso, legs, and shoulders in fixing your body in position. Using the cable allows your triceps
to be exercised under tension throughout.
Triceps brachii
Anconeus
Infraspinatus Deltoids
Trapezius
Teres major
Latissimus dorsi
Erector spinae
Teres minorBrachioradialis
Triceps brachii
Anconeus
Deltoids
Brachialis
Brachioradialis

149T R I C E P S P U S H - D O W N A N D O V E R H E A D T R I C E P S E X T E N S I O N
Push the bar down slowly and under
control, using your elbow joints as pivots. Keep your trunk, legs, and hips stationary.
From your braced position, with your abs and core muscles
tight, extend your arms and contract your triceps in a slow controlled pull. Keep your torso and hips in the same position throughout.
Set the pulley to a high position, select your
desired weight on the stack, and take an overhand grip on the bar.
Select your desired weight on the stack and attach a rope to the
high pulley cable. Take up a braced split-leg position. Grip the rope so that your elbows point forward and your arms are tight to the sides of your head.
Pause at the bottom of the movement with
your triceps fully contracted before returning slowly to the start position.
Extend your arms until your triceps are fully contracted,
exhaling as you go. Return slowly and under control to the start position, with your hands close to the sides of your head and your body well braced.
Keep your elbows tight to the sides of your body
Fully contract your triceps
Bend your elbow to an angle of 90 degrees
Hold your upper arms parallel to
the floor
Straighten your arms at the end of the movement
Keep your spine
neutral
VARIATION
You can perform the triceps push-down with a rope, a V-bar, or a handle (to work one arm at a time if your arms are unevenly developed). In each case, the basic principle remains the same. Your elbow joint acts as a pivot and should not move from your side.
Bend your knees slightly
Apply equal pressure to both sides of the bar
Keep your feet flat and slightly apart
Hold your body upright
and do not tilt forward

150
TARGET MUSCLES
BARBELL CURL
HAMMER DUMBBELL CURL
A R M S
▪ Biceps brachii
▪ Brachialis
TARGET MUSCLES
▪ Biceps brachii
▪ Brachialis
▪ Brachioradialis
This classic arm exercise develops the strength and size of your biceps muscles. There are numerous variations of the exercise, though the standing barbell curl works your biceps hard throughout the whole range of movement.
This variation of the biceps curl also works your forearms and is easier on your wrists, which remain in a more natural position. Try it seated on an incline bench to extend the range of possible movement.
Brachialis
Biceps brachii
Pectorals
Deltoids
Deltoids
Trapezius
Triceps brachii
Rectus abdominis
Rectus abdominis
External obliques
External obliques
Brachialis
Brachioradialis
Biceps brachii
Pectorals

151B A R B E L L C U R L A N D H A M M E R D U M B B E L L C U R L
Breathe in and start to curl the
bar in an upward arc, keeping your back straight and your elbows tight to the sides of your body. Breathe out on the effort.
Curl the dumbbell
in an upward arc toward your shoulder. Keep your abs tense and your chest high throughout the whole movement.
Stand solidly upright, your
feet shoulder-width apart, your shoulders down, and your back and chest high.
Stand with the dumbbells at your
sides, hanging on straight arms with your thumbs pointing forward. Pull your shoulders back, keep your chest high, and your spine neutral.
Curl the bar to the top of your chest. Pause at
the top of the movement when your biceps are fully contracted. Your elbows
should still be pointing directly down. Return to the start position. Hold the
bar in an underhand grip
WARNING!Be sensible when loading the bar: if the weight is too heavy, you will inevitably start to lean back, using your body momentum rather than your biceps to move the weight. This could damage your spine.
WARNING!Make sure not to lean back—you risk damaging your lower back,
as well as making the exercise less
effective. Don’t allow your elbows to travel forward, because your deltoids will take most of the strain and you won’t be working your biceps hard.
Point your elbow straight
down
Keep your elbows against
your body
Keep your body braced and your spine neutral
Begin with your arms hanging straight down
Hold your chest high
Keep the dumbbell close to your body
Pause for a second at the
top of the movement before returning the weight to the start position under control. Work your arms alternately.

INCLINE DUMBBELL CURL
A R M S
CONCENTRATION CURL▪ Biceps brachii
▪ Brachialis
TARGET MUSCLES
▪ Biceps brachii
▪ Brachialis
▪ Flextor digitorum
You perform this version of the biceps curl seated on an incline bench, which allows you a greater range of movement and more muscle isolation than the basic exercise and injects welcome variety into your arm workout.
As its name suggests, this exercise almost completely isolates the biceps, so you’ll need
to use a lower weight or fewer reps than for standard bicep curls. Be sure to move
through the full range and maintain good form.
152
TARGET MUSCLES
Biceps brachii
Triceps brachii
Brachialis
Flexor digitorum (deep muscle)
Pectorals
Serratus anterior
Rectus abdominis
Trapezius
Deltoids
Brachialis
Biceps brachii
Deltoids
Triceps brachii
Brachioradialis
Gastrocnemius

I N C L I N E D U M B B E L L C U R L A N D C O N C E N T R A T I O N C U R L
Curl the dumbbell in one hand in an upward arc toward your
shoulder, without allowing it to swing. As you do so, slowly turn your inner wrist toward your upper arm.
Sit on a bench inclined at a 45-degree angle. Grip a dumbbell
in each hand and allow your arms to hang down from your shoulders. Make sure your back is well supported.
Pause for a second at the top of the movement before
returning to the start position, with your arm hanging straight down. Repeat with your other arm.
Keep your body pressed against the bench and your feet flat on the floor
Curl the weight upward, making sure that your elbow does not
move forward and that the back of your upper arm stays in contact with your inner thigh.
Sit on the end of a bench with your thighs parallel to the floor
and your body braced. Hold the back of your upper arm against your inner thigh and let your arm hang down.
Pause once you have fully contracted your biceps to take
your forearm to a 45-degree angle. Return under control and finish the set before repeating with your other arm.
Rotate your wrist as you lift
the dumbbell
Keep your elbow pointing
downward
Keep your upper arm vertical
Point your elbow straight down
Lean your torso slightly forward
Move your forearm to a 45-degree angle
Brace yourself against your knee
Engage your core muscles
153

PREACHER CURL
PULLEY CURL
A R M S
▪ Biceps brachii
▪ Brachialis
▪ Brachioradialis
TARGET MUSCLES
▪ Biceps brachii
▪ Brachialis
▪ Brachioradialis
TARGET MUSCLES
Well defined upper arms are not only impressive, but their strength is called for in many sports. This exercise totally isolates the showpiece muscles at the front of the upper arms. Because your upper arms rest on the apparatus, shoulder flexion is removed from the lift.
The advantage of performing this exercise on a cable pulley machine instead of using a barbell or dumbbell is that the pulley keeps working your biceps muscles throughout the entire range of motion.
154
Biceps brachii
Brachioradialis
Brachialis
Deltoids
External obliques
Biceps brachii
Brachialis
Triceps brachii
Trapezius
Brachioradialis
Deltoids
Rectus abdominis

P R E A C H E R A N D P U L L E Y C U R L
Raise the dumbbell slowly toward your shoulder through
the full range of movement, while inhaling deeply.
Raise the bar slowly upward toward your chest by bending
your arm at your elbow. Breathe out as you do so. Do not lean back.
Sit or kneel on the bench with the back of your upper arm on
the pad. Grip the dumbbell with your palm facing upward.
Set the pulley to a low position. Stand with your feet hip-width
apart and your knees slightly bent. Grip the bar with your palms forward.
Lower the dumbbell slowly and under control to the start
position. Repeat to complete the set, then change to the other arm.
Pause briefly at the top of the movement, then lower the bar
slowly to rest across your thighs in the start position.
Keep your back flat Keep the
back of your upper arm in contact with the pad
Position your armpit on the top of the pad
Pull upward, not outwardEnsure that
your back is straight and your elbows are tight
to your sides
Keep your feet firmly planted
on the floor
Keep your body as close as possible to the apparatus
Keep your head level
155

REVERSE BARBELL CURL
REVERSE PULLEY CURL
A R M S
▪ Biceps brachii
▪ Brachioradialis
TARGET MUSCLES
▪ Biceps brachii
▪ Brachioradialis
TARGET MUSCLES Fairly simple to master, this exercise targets a small muscle group in your forearm as well as your biceps, and requires a very specific motion. The reverse curl is often used in rehabilitation from injury and as an assistance exercise for contact sports and martial arts that use grabbing movements.
Using a short bar attached to a low pulley makes the reverse curl slightly easier to perform than using free weights (above). The constant tension provided by the cable challenges the muscles of your forearm in a different way.
156
Biceps brachii
Brachioradialis
Pectorals
Deltoids
Brachioradialis
Biceps brachii
Rectus abdominis
Deltoids
Triceps brachii
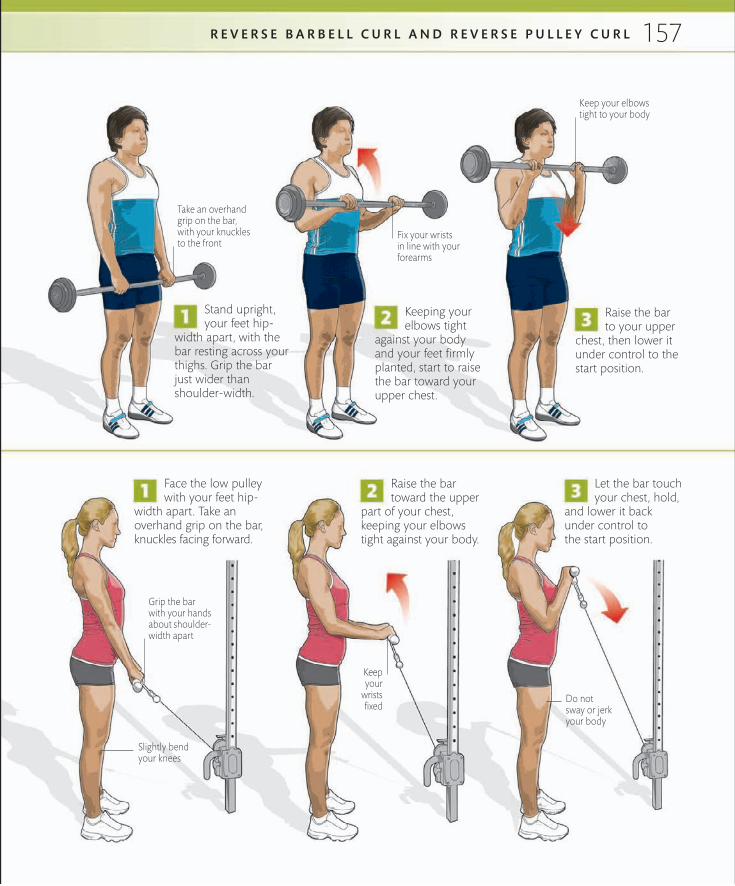
R E V E R S E B A R B E L L C U R L A N D R E V E R S E P U L L E Y C U R L
Keeping your elbows tight
against your body and your feet firmly planted, start to raise the bar toward your upper chest.
Stand upright, your feet hip-
width apart, with the bar resting across your thighs. Grip the bar just wider than shoulder-width.
Face the low pulley with your feet hip-
width apart. Take an overhand grip on the bar, knuckles facing forward.
Raise the bar to your upper
chest, then lower it under control to the start position.
Keep your
wrists fixed
Take an overhand grip on the bar, with your knuckles to the front
Fix your wrists in line with your forearms
Keep your elbows tight to your body
Grip the bar with your hands about shoulder- width apart
Raise the bar toward the upper
part of your chest, keeping your elbows tight against your body.
Let the bar touch your chest, hold,
and lower it back under control to the start position.
Slightly bend your knees
Do not sway or jerk your body
157
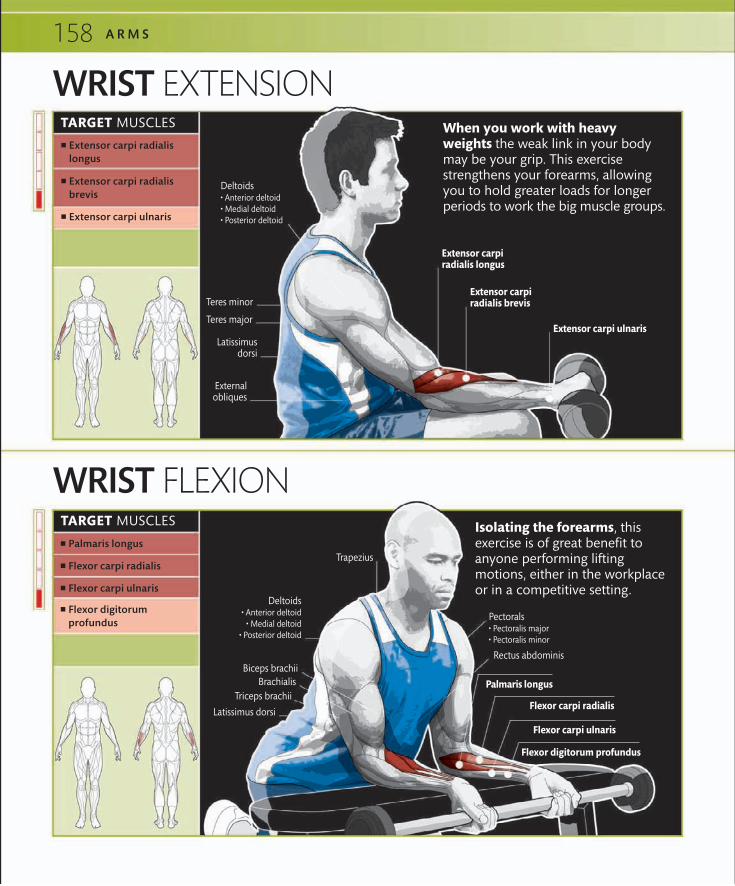
158
WRIST EXTENSION
WRIST FLEXION
A R M S
▪ Palmaris longus
▪ Flexor carpi radialis
▪ Flexor carpi ulnaris
▪ Flexor digitorum profundus
TARGET MUSCLES Isolating the forearms, this exercise is of great benefit to anyone performing lifting motions, either in the workplace or in a competitive setting.
When you work with heavy weights the weak link in your body may be your grip. This exercise strengthens your forearms, allowing you to hold greater loads for longer periods to work the big muscle groups.
▪ Extensor carpi radialis longus
▪ Extensor carpi radialis brevis
▪ Extensor carpi ulnaris
TARGET MUSCLES
Trapezius
Latissimus dorsi
Triceps brachiiBrachialis
Biceps brachii
Pectorals
Rectus abdominis
Palmaris longus
Flexor carpi radialis
Flexor carpi ulnaris
Flexor digitorum profundus
Extensor carpi radialis brevis
Latissimus dorsi
Teres minor
External obliques
Extensor carpi radialis longus
Extensor carpi ulnaris
Deltoids
Deltoids

159W R I S T E X T E N S I O N A N D F L E X I O N
Keeping your forearm motionless, use your wrist to raise the
dumbbell slowly and under control beyond the horizontal position.
Keeping your forearms motionless, pivot slowly
at your wrists to take the barbell up as high as you can manage.
Sit on a bench holding one dumbbell in an overhand
grip. Rest your forearm along the top of your thigh.
Kneel on the floor or on a mat, facing a bench. Holding a
barbell with your palms up, rest your forearms across the bench pad.
Slowly lower the dumbbell to the start position, using your
wrist alone. Complete the set before repeating with your other arm.
Lower the barbell slowly to the start position without extending
your arms or leaning forward. Keep a strong grip on the bar throughout.
Keep your forearm still
Maintain a neutral spine
Move the dumbbell
slowly as high as you can
Hold your wrist level with the front of your knee
Let your wrists hang over the front edge of the bench
Keep your feet flat on the floor
Maintain a tight grip on the barbell
Don’t let the bar roll toward your fingers in the lowering phase because you risk injuring your wrist or dropping the weight.
WARNING!
Take a shoulder-width grip on the barbell
Hold your chest up
Keep your shoulder position fixed


8
CORE AND ABS

TARGET MUSCLES
▪ Rectus abdominis
▪ External obliques
ABDOMINAL CRUNCH
C O R E A N D A B S
Engage your core and raise your shoulders and upper back slightly
off the floor. Hold for a moment.
Lower your upper body slowly to the floor; don’t let gravity or your
body’s momentum drive your movement.
Keep your hips stable throughout
Lie on a mat with your knees bent, your feet flat, and your
fingers against the sides of your head.
To work the external oblique muscles on the sides of your torso, add a twisting action to your crunches. Alternate your crunches, bringing your left elbow toward your right knee, then your right elbow toward your left knee.
The basic abdominal crunch is one of the most simple and popular of all exercises. It helps you to develop a strong core and improves your posture, but you must ensure you have good technique.
To work your abdominal area more effectively, use a pulsing action. Pause your crunch at the
top of the movement and slide your hands up and down your thighs. The movement involved in each pulse is very small, but
you should aim to squeeze your abs just a little bit tighter each time. Perform around
five “pulses” per crunch repetition.
VARIATION
Keep your chin up and your neck extended
VARIATION
162
External obliques
Rectus abdominis

TARGET MUSCLES
▪ Rectus abdominis
▪ External obliques
A B D O M I N A L C R U N C H A N D S I T - U P
SIT-UP
Engage your core muscles and raise your torso upward, leaving
just your buttocks and feet on the floor.
Pause at the upright position,
then slowly lower your upper body to the floor back to the start position.
Lie on your back with both feet flat on the
floor and your knees bent to reduce stress on your spine.
Changing the position of your arms alters the difficulty of the exercise. Extending your arms ahead of your knees provides the least resistance, while crossing your arms over your chest or holding them by your head
increases difficulty. For an advanced workout, hold a weight plate to your chest.
VARIATION
The classic sit-up is still used in many training programs. It is a good abdominal exercise but should be avoided if you have any lower back problems or have a weak core.
Resting your legs on a bench or other elevated platform isolates your abdominals from the assistance of your hip flexors during the sit-up exercise, providing a more intense abdominal workout.
Bend your elbows and place your
fingers against your temples
Avoid swinging yourself up
Strongly contract your
abs and breathe out as your rise
Curl in your shoulders
Keep your feet flat on
the floor
VARIATION
163
External obliques
Rectus abdominis
Internal obliques

164
REVERSE CRUNCH
In this version of the abdominal crunch, you move your legs rather than your torso. It is good for the lower abs as well as the rectus femoris and the hip flexors (iliopsoas) and is appropriate for many sports as a general conditioning exercise.
C O R E A N D A B S
Pause briefly at the top of the motion
▪ Rectus abdominis
▪ External obliques
▪ Iliopsoas
▪ Rectus femoris
TARGET MUSCLES
Lie with your head, shoulders, and buttocks in contact with
the surface of a stable bench. Flex your hips and knees to a right angle.
Extend your legs and slowly lift your buttocks off the bench.
Use your abs to do this, rather than the momentum of your legs.
Contract your abs hard and lower your legs slowly to the
start position; your buttocks should just make contact with the bench.
Grip the bench for stability
Keep your feet together
Bend your knees and keep them pressed together
Rectus abdominis
External obliques Iliopsoas (deep muscle)
Rectus femorisBiceps brachii
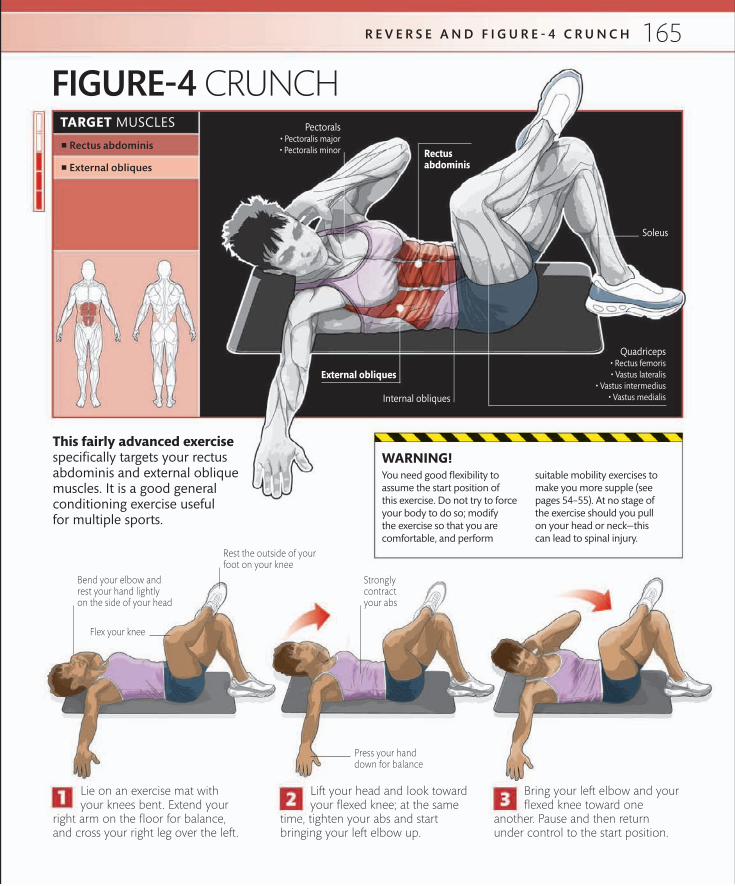
165
▪ Rectus abdominis
▪ External obliques
TARGET MUSCLES
FIGURE-4 CRUNCH
This fairly advanced exercise specifically targets your rectus abdominis and external oblique muscles. It is a good general conditioning exercise useful for multiple sports.
R E V E R S E A N D F I G U R E - 4 C R U N C H
Strongly contract your abs
Press your hand down for balance
Lie on an exercise mat with your knees bent. Extend your
right arm on the floor for balance, and cross your right leg over the left.
Lift your head and look toward your flexed knee; at the same
time, tighten your abs and start bringing your left elbow up.
Bring your left elbow and your flexed knee toward one
another. Pause and then return under control to the start position.
You need good flexibility to assume the start position of this exercise. Do not try to force your body to do so; modify the exercise so that you are comfortable, and perform
suitable mobility exercises to make you more supple (see pages 54–55). At no stage of the exercise should you pull on your head or neck—this can lead to spinal injury.
WARNING!
Flex your knee
Rest the outside of your foot on your knee
Bend your elbow and rest your hand lightly on the side of your head
Rectus abdominis
External obliques
Internal obliques
Quadriceps
Soleus
Pectorals

90-90 CRUNCH
BALL CRUNCH
C O R E A N D A B S
This fairly easy abdominal crunch puts emphasis on the upper part of your rectus abdominus muscles and takes pressure off your lower back. Perform it with your knees bent and feet fixed.
▪ Rectus abdominis
▪ External obliques
▪ Transversus abdominis
TARGET MUSCLES
▪ Rectus abdominis
▪ External obliques
TARGET MUSCLES Performing abdominal crunches on a stability ball helps you keep
your abs contracted throughout the entire exercise. You need to work constantly to fix
your body in position, using your deep core muscles on the inherently unstable ball.
166
External obliques
Rectus abdominis
Triceps brachii
Biceps brachii
External obliques
Rectus abdominis
Transversusabdominis (deep muscle)

9 0 - 9 0 A N D B A L L C R U N C H
Inhale deeply and lift your shoulders off the floor; actively
contract your abdominal muscles, curling your torso toward your knees.
Push your lower back into the ball, contract your abs,
and lift your shoulders a few inches, crunching your abs toward your hips.
Lie flat, with your hips and knees bent at 90 degrees.
Rest your calves on a bench, hooking your heels over the edge.
Begin with your feet flat on the floor and your knees bent at a
90-degree angle. Rest your hands on the sides of your head.
Exhale, and hold at the top of the movement for a second. Lower
your torso back to the starting position under tight control.
Lower your torso under tight control, still keeping the tension
in your abs. Make sure not to “flop” back on to the ball.
Start with your head, shoulders, and buttocks in contact with the floor
Rest your fingers lightly on the sides of your head
Hold your elbows wide on either side of your head
Rest your hands lightly on your head
Be sure to place your feet on top of the bench. Do not hook them underneath to provide leverage; this will place great stress on your lower back. Do not pull on your head or neck when performing
this exercise and make sure that your lower back and buttocks remain in contact with the floor. Do not fling your head or arms forward when your abdominal muscles start to tire.
WARNING!VARIATION
Keep your heels hooked over the edge of the bench
Try this exercise with a twist. Turn your torso slightly to one side as you rise, aiming your left elbow at your right knee. This variation will additionally work your oblique muscles.
Make sure that your body is balanced on the ball. Brace yourself with your feet flat on the floor. Don’t pull your head
forward as you lift and make sure you lift and lower your body slowly and deliberately, with concentration.
WARNING!
Keep your back straight
Support your lower back on the ball
167

BALL TWIST
This exercise not only builds strong abs, but also strengthens the rotational muscles of your torso. Working on the ball also promotes balance, making this a great exercise for activities such as golf and surfing.
▪ Rectus abdominis
▪ External obliques
▪ Internal obliques
TARGET MUSCLES
Lie on the stability ball with your lower back well supported, your
feet flat on the floor, and your knees at an angle of about 90 degrees. Hold your hands to the sides of your head.
Once you feel steady and stable, begin to crunch up.
About halfway up, twist your torso to one side—spreading your elbows wide helps you to balance.
Hold the top position for around one second, then return
to the start position. Keeping your lower body still, lower and untwist your upper body.
Use your feet to help stabilize
your body
Place your fingers lightly against the sides of your head
Strongly contract your abs
Do not pull your head forward
with your hands
C O R E A N D A B S 168
Internal obliques
Rectus abdominis
External obliques
Deltoids
Biceps brachii
Triceps brachii
Serratus anterior
Quadriceps
intermedius

▪ Rectus abdominis
▪ Pectorals
▪ Triceps brachii
TARGET MUSCLES
BALL PRESS-UP
In this exercise, you elevate your feet on to the stability ball to make your chest, shoulders, and upper arms work harder than in a regular push-up (see page 120). The core stabilizers of your torso and hips are also fully engaged, keeping your body in alignment, while your feet are supported on the inherently unstable ball.
Keeping your core muscles engaged, lower your body slowly
as far as you can, before pressing back up to the start position.
Hold your body parallel to the floor
Tense your glutesFlex at your elbows and shoulders
Place your feet on the ball so that your body is supported on your extended
toes and on your hands, which should be under your shoulder joints.
Keep your arms straight
WARNING!Your body should be straight throughout this exercise. Don’t allow your midsection to droop toward the floor because you’ll place great stress on your back. Exhaling while you push up and inhaling as you lower your torso will help you maintain good form.
B A L L T W I S T A N D P R E S S - U P 169
Triceps brachii
Trapezius
Erector spinae
Latissimus dorsi
External obliques
Biceps brachii Rectus abdominis
Pectorals
Deltoids
Gluteals
Hamstrings

170
TARGET MUSCLES
▪ Iliopsoas
▪ Rectus abdominis
BALL JACK KNIFE
C O R E A N D A B S
Place your toes on top of the ball
This valuable but relatively advanced exercise demands great balance and control. It works the core muscles that flex your hips and also stresses your abdominal muscles.
Start with your body in a push-up position (see page 168).
Keep your hands flat on the floor and your feet elevated on the ball. Align your head with your spine.
Maintain a line through your spine and neck
to your head
Draw your knees toward your chest, maintaining
a neutral spine as the ball rolls forward. Your hips will rise a little as the ball moves.
Keeping your neck stretched out, roll the ball back
by returning your legs to the extended position, with your knees straight.
Balance on your toes
Keep your elbows straight
Keep your spine neutral
Make sure that your knees do not drop down and keep from bending your elbows or letting your shoulders rise up toward your ears, because this will place stress on your back.
Choose a ball that has a diameter about the same as the length of your arm; it should allow your back to be parallel to the floor when you assume the push-up position.
WARNING!
Trapezius
Erector spinae
Latissimus dorsi
External oblique
Iliopsoas (deep muscle)
Rectus abdominis
Deltoids
Gluteals
Hamstrings

171
TARGET MUSCLES
▪ Erector spinae
▪ Gluteals
▪ Hamstrings
B A L L J A C K K N I F E A N D B A C K E X T E N S I O N
BALL BACK EXTENSION
Before starting the exercise, check that the ball is the correct size for your limb length. You should be able to touch the floor with straight arms. Keep your movement smooth and controlled; if you straighten
your torso too fast you risk compressing the vertebrae in your back and damaging your sciatic nerve. Do not pull your torso above the natural line of your spine—hyperextending your back may be dangerous.
WARNING!
This exercise helps to balance your trunk by conditioning your lower back muscles that work opposite your abs. A strong trunk provides good protection against back injury.
Lie with your abs and upper thighs “wrapped”
across the ball, with the tips of your toes touching the floor.
With the tips of your fingers touching the sides
of your head, slowly straighten your body while breathing in.
Gently and smoothly lower your upper body
to the start position, while breathing out.
Move your elbows back a little on ascent
Keep your knees slightly bent
Control your descent by contracting the muscles of your back
Keep your toes in contact with the floor
Erector spinae
Teres minor
Teres major
Latissimus dorsi
Gluteals
Hamstrings

172
SIDE BEND
ROMAN CHAIR SIDE BEND
C O R E A N D A B S
Side bends are the easiest way to work your obliques—the muscles that help to stabilize your core and maintain the good posture needed to get the most benefit from other resistance exercises. Obliques are involved in movements that demand rotational strength, typical of most sports that include throwing.
Targeting your obliques, this exercise is best performed on a Roman chair—a piece of apparatus that has a ledge behind which you can secure your feet. It may also be done on a regular bench, in which case you will need a partner to hold your feet.
▪ External obliques
▪ Internal obliques
▪ Serratus anterior
TARGET MUSCLES
▪ External obliques
▪ Internal obliques
▪ Serratus anterior
TARGET MUSCLES
Serratus anterior
External obliques
Internal obliques
Biceps brachii
Pectorals
Triceps brachii
Serratus anterior
Internal obliques
External obliques
Rectus abdominis
Triceps brachii

173S I D E B E N D A N D R O M A N C H A I R S I D E B E N D
Lean slowly sideways and slide the dumbbell down your thigh
to knee level, while breathing in. Do not allow the weight to swing.
Lean slowly sideways toward the floor, as far as is comfortable.
Make sure not to lean forward or back. Breathe in on the descent.
Stand upright with your knees slightly bent and one dumbbell
resting on the side of your thigh. Keep your weighted arm straight.
Lie sideways on the Roman chair; adjust it so that your upper
body can pivot comfortably at your hips toward the floor.
Straighten your torso by contracting your obliques on the
side opposite from the weight. Breathe out as you move to the upright position.
Pause at full extension, then gently raise your body to the
start position. Complete the set for one side and repeat on the other.
Move from side-to-side only
Breathe out on the upward movement
Lower the dumbbell to
knee level
Contract your obliques to straighten your torso
Move your torso laterally, not forward or backward
Keep your knees slightly bent
Keep your feet flat on the floor throughout
Rest your fingertips on your temples to help align your body
Hold your hands at head level or crossed over your chest
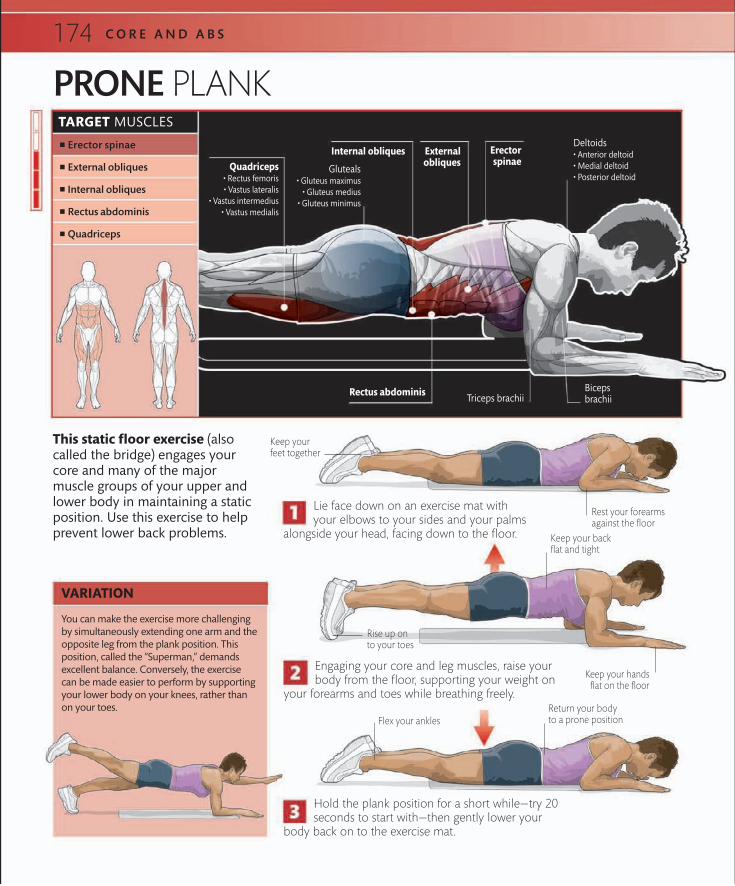
TARGET MUSCLES
▪ Erector spinae
▪ External obliques
▪ Internal obliques
▪ Rectus abdominis
▪ Quadriceps
PRONE PLANK
This static floor exercise (also called the bridge) engages your core and many of the major muscle groups of your upper and lower body in maintaining a static position. Use this exercise to help prevent lower back problems.
C O R E A N D A B S
Lie face down on an exercise mat with your elbows to your sides and your palms
alongside your head, facing down to the floor.
Engaging your core and leg muscles, raise your body from the floor, supporting your weight on
your forearms and toes while breathing freely.
Hold the plank position for a short while—try 20 seconds to start with—then gently lower your
body back on to the exercise mat.
Keep your feet together
Rest your forearms against the floor
Keep your hands flat on the floor
Rise up on to your toes
Flex your anklesReturn your body to a prone position
Keep your back flat and tight
VARIATION
You can make the exercise more challenging by simultaneously extending one arm and the opposite leg from the plank position. This position, called the “Superman,” demands excellent balance. Conversely, the exercise can be made easier to perform by supporting your lower body on your knees, rather than on your toes.
174
Triceps brachii
Quadriceps
Deltoids
Gluteals
Biceps brachii
Rectus abdominis
External obliques
Internal obliques Erector spinae

TARGET MUSCLES
▪ External obliques
▪ Internal obliques
▪ Quadriceps
P R O N E A N D S I D E P L A N K
SIDE PLANK
Lie side on, supporting your weight on your feet and forearm. Ensure that
your upper arm is vertical, your forearm is perpendicular to your body, and your legs are straight.
Hold for around 20 seconds, then slowly lower your upper arm to your
side and your hips to the floor. Repeat as required before switching sides.
Gently raise your hips off the floor to a point where your
head and spinal column are in line. At the same time, raise your upper arm to a vertical position, while breathing freely.
Balance on the sides of your stacked feet
This is an excellent exercise for developing the muscles located to the sides of your torso; these are vital in maintaining good posture in most activities. This waistline-toning exercise is
easy to do at home.
Rest your lower arm along your hips
175
Hold your glutes and core tight
Biceps brachii
Triceps brachii
Quadriceps
External obliques
Internal obliques
Deltoids

V-LEG RAISE
SUITCASE DEADLIFT
C O R E A N D A B S
This underused exercise works not only your legs, but also your entire body. As its name suggests, this is a deadlift rather than a side bend, so remember to move your body as a unit and do not flex your trunk.
▪ Rectus abdominis
TARGET MUSCLES
▪ Quadriceps
▪ External obliques
▪ Transversus abdominis
▪ Hamstrings
▪ Gluteals
TARGET MUSCLES
This exercise provides a powerful workout for your abdominal muscles; you can boost the intensity futher by placing a weight between your ankles. Make sure that the platform or bench you use is sufficiently stable.
176
External obliques
Hamstrings
Quadriceps
Gluteals
Transversus abdominis
Pectoralis major
Rectus abdominis
Hamstrings
Pectorals

V - L E G R A I S E A N D S U I T C A S E D E A D L I F T
Keeping your feet and knees together, bend your knees and
bring them toward your chest. Pull your torso forward a little for balance.
Maintaining good posture throughout, drive up strongly
with your legs: imagine that you are pushing your feet into the floor.
Sit on the bench, supporting yourself by gripping the pad
behind you. Lift your legs together, keeping your toes pointed.
Adopt the get set position with the kettlebell outside your foot,
your hips above your knees, and your back flat and tight.
Bring your knees as close to your body as possible. Return
by extending your hips and knees and leaning back to counterbalance.
Stand up straight with the weight by the side of your thigh. Return
to the start position and complete the set before switching sides.
Maintain your position by contracting the
muscles in your shoulder girdle
Extend your legs hard to return
Bend your knees
Balance your body on the edge of the bench
Keep your shoulder vertically above
the weight
Point your toes away from your body
Push forward at the hips when
standing up
Contract your hamstrings, quads, and calf muscles
Maintain a high chest
Keep your working arm
straight
Engage your core muscles to stabilize your body
Do not bend forward
Keep your head up throughout
Do not lock your knees in the final positionTurn out your
feet and keep them in line with your knees
177

TARGET MUSCLES
▪ External obliques
▪ Pectorals
▪ Serratus anterior
▪ Supraspinatus
▪ Teres major
▪ Teres minor
WOODCHOPThis powerful rotational exercise develops the muscles of your trunk, making it ideal for training in sports that involve a twisting motion, such as throwing or hitting a ball with a bat or racket.
C O R E A N D A B S
Position a cable pulley above
shoulder height and set the desired weight on the stack. Stand sideways to the pulley and reach across, taking a double- handed grip on the stirrup handle.
Keep your arms straight and
continue the rotation. Ensure that your shoulders remain in line with your hips and that your head continues facing your hands.
Bend and rotate at your knee
Adopt a comfortable stance with your feet wide apart
Keep both of your hands above your
shoulders
Keep your arms straight
178
Triceps brachii
Teres minor
SupraspinatusPectorals
Teres major
External obliques Serratus
anterior

W O O D C H O P
Start to pull the handle
down and across your body toward your inside hip, as if felling a tree with an ax. Rotate your body toward the midline.
Keep pulling the handle
down and around in a smooth motion, allowing your knees and hips to rotate a little.
Rotate until your head,
hips, shoulders, and hands are in line. Return to the start position; complete your set and repeat on the other side.
VARIATION
Try using a straight bar attachment instead of the stirrup handle. Begin facing away from the pulley, your feet hip-width apart. With your arms straight, rotate toward the pulley, keeping your feet in place. At the end of the movement, you should be looking over your shoulder toward the pulley. Pull down, keeping your arms straight, until your near hand becomes level with your opposite hip.
Be sure to warm up thoroughly before starting the woodchop. The exercise places strong rotational forces on your lower back, and warming up helps to prevent torsion injuries.
The woodchop builds power rapidly, especially when done at high speed, so be sure to work both sides equally to prevent potentially dangerous imbalances in development.
WARNING!
Strongly contract your glutes Align your
hands and shoulders with
the pulley
Pull the cable smoothly toward your inside hip
Look in the direction of your hands
Rotate your foot outward on to your toes
Pivot on the ball of your foot
Keep your trunk upright
Keep your outside shoulder higher than your inside shoulder
179


9
DYNAMIC LIFTS

TARGET MUSCLES
▪ Quadriceps
▪ Hamstrings
▪ Gastrocnemius
▪ Soleus
▪ Gluteals
▪ Pectorals
▪ Deltoids
D Y N A M I C L I F T S
Rotate your arms around the bar
POWER CLEANThough technically difficult, this explosive exercise is a fantastic all-round power-builder; when performed with lighter weights, it also makes an excellent warm-up.
Squat with your feet hip-width apart under the bar, and your
hips higher than your knees. Grip the barbell overhand, palms just wider than shoulder- width apart.
On reaching full extension,
lower your body under the bar, and drop and rotate your elbows down.
Biceps brachii
Triceps brachii
Pectorals
Gluteals
Hamstrings
Soleus
Gastrocnemius
Quadriceps
Serratus anterior
Latissimus dorsi
External obliques
Internal obliques
Deltoids
182

P O W E R C L E A N
Flex your hips and knees into
a semi-squat and catch the bar on the top of your shoulders. Stand up straight by extending your legs.
Keeping your back flat, let the
weight down under control to your thighs, and return the bar to the floor.
Punch your elbows forward to fix the bar
Tense your core muscles to stabilize
your body Drop into a semi-squat
Spread your feet slightly to the sides
Keep your feet flat on the floor
Raise the bar above your knees;
push in your hips, while driving up hard with your legs to give the weight momentum.
Forcefully extend your hips, knees,
and ankles, keeping the bar close to your body. Shrug your shoulders upward hard.
Your toes may leave the floor as you drive up explosively
Keep the bar close to
your body
Keep your shoulders over
the bar for as long as possible
Let the bar touch the tops of your thighs
Perform all dynamic lifts on a correct lifting platform. This complex movement demands excellent technique, balance,
and control. Practise with light weights until perfect, and, if possible, spend time with a qualified weight-lifting coach.
WARNING!Start to drop your elbows when your shoulders reach their highest point
Control the descent of
the bar
183

TARGET MUSCLES
▪ Quadriceps
▪ Hamstrings
▪ Gastrocnemius
▪ Soleus
▪ Gluteals
▪ Pectorals
▪ Triceps brachii
▪ Deltoids
D Y N A M I C L I F T S
Bend at your knees in a shallow squat
This fast, technically tough exercise is ideal for improving all-around power. Practice the movement with light weights initially.
Squat just low enough to
catch the bar at arm’s length. Punch your arms straight and catch the bar on “hard locked” elbows.
Keep your hips higher than your knees
POWER SNATCH
Squat with your feet hip-width apart under the bar. Grip the
bar overhand with your hands as far toward the weight collars as possible.
Lock out your arms
Keep your arms straight
Triceps brachii
Pectorals
Gluteals
Hamstrings
Quadriceps
Soleus
Gastrocnemius
Deltoids
Serratus anterior
Latissimus dorsi
184

Raise the bar above your knees; push in your hips while driving
up hard with your legs to give the weight momentum.
Make sure the bar is stable
and balanced on your locked arms before standing up with the weight overhead. Keep your back tight and your head up.
Lower the bar, keeping it close
to your body and under control. Bend your knees and catch the bar on your upper thighs before lowering it to the floor.
Forcefully extend your hips, knees and ankles, keeping the
bar close to your body. Shrug your shoulders upwards hard.
Lower your body underneath the bar as it rises, while rotating
your elbows downwards and under the bar.
Explode upward; your feet may leave the floor as you do soPush up off the
balls of your feet
Keep your feet flat on the floor, hip width apart
Move your shoulders back to a position above the bar
Keep the bar close to your body
WARNING!The power snatch is an explosive lift— faster still than the power clean—and you can injure your back if your technique is poor. Keep a flat, tight back at all times throughout this exercise.
Keep the bar close to your body
Bend your arms slightly to let the bar past your head
Engage your core muscles to stabilize your body
Bend your knees as you lower the
bar to your thighs
Keep your back flat and firm
Push the barbell to its highest point by straightening your legs
185

TARGET MUSCLES
▪ Quadriceps
▪ Hamstrings
▪ Gastrocnemius
▪ Soleus
▪ Gluteals
▪ Pectorals
▪ Deltoids
D Y N A M I C L I F T S
POWER CLEAN FROM HANGThis dynamic lift requires a great degree of coordination and power. It is a excellent power-builder for weightlifting and most other sports.
Squat with your feet hip-width apart and take a shoulder-width
overhand grip on the bar. Your hips should be higher than your knees, and your shoulders in front of the bar.
Continue the pull on the
bar, giving it as much upward momentum as possible. As the weight rises, start to dip your body below the bar.
Start to rotate your hands and elbows
around the bar
Face forward with your head
slightly down
Biceps brachii
Triceps brachii
Pectorals
Gluteals
Hamstrings
Soleus
Gastrocnemius
Quadriceps
Deltoids
Serratus anterior
Latissimus dorsi
External obliques
Internal obliques
186

This is an advanced exercise that places high loads on your lower back, so you should always warm up before starting this exercise. Work within your
capabilities, never sacrificing good technique for weight on the bar. Do not pull with your arms first—your legs and hips should do the work.
WARNING!
Make sure that the bar
remains level
P O W E R C L E A N F R O M H A N G
Bend at your knees and hips when lowering the weight
Fully extend your body, rising up onto your toes
Keep the bar as close as possible to your body throughout the lift
Pause with the bar just above your flexed knees
Engage your core muscles to stabilize
your body
Drive upwards, extending your quads
Lift the bar above your knees and hold
it with straight arms, resting gently on your thighs. Keep your back flat. This is the starting “hang” position for the exercise.
Keeping your arms straight at first, drive
your hips toward the bar and explosively straighten your legs to give the bar upward momentum.
As the bar reaches shoulder height,
punch your elbows through and catch the bar on the top of your shoulders. Bend your knees to absorb the impact, then straighten your legs to a stable standing position.
To return to the start position
(Step 2), rotate your wrists and elbows around the bar, keeping it close to your body. Lower the bar slowly and under control to rest on your thighs.
Keep your hips above your knees in a semi-squat position
Point your elbows straight ahead
Shrug your shoulders up high
Keep your back flat and tight
Keep your head up and your back flat
187

TARGET MUSCLES
▪ Quadriceps
▪ Hamstrings
▪ Gastrocnemius
▪ Soleus
▪ Gluteals
▪ Pectorals
▪ Deltoids
▪ Triceps
D Y N A M I C L I F T S
Squat with your feet hip-width apart under the bar. Take a wide snatch
grip on the bar (see page 184) with your head looking forward and down, your arms straight, and your back flat.
Continue pulling on the bar with
your elbows out and up. As the bar rises, start to dip and bend at your knees, bringing your wrists and elbows around under the bar.
POWER SNATCH FROM HANGThis explosive movement demands great technique but helps to develop whole-body power and athleticism.
Keep your hips higher than your knees
Biceps brachii
Triceps brachii
Pectorals
Gluteals
Hamstrings
Quadriceps
Soleus
Gastrocnemius
Deltoids
Transversus abdominis
Serratus anterior
Latissimus dorsi
188

P O W E R S N A T C H F R O M H A N G
Lift the bar from the floor to just above your knees, which
should be slightly bent. Rest the bar on your lower thighs. This is the starting “hang” position.
Drop into a semi-squat position,
with your back straight and your feet flat on the floor. Catch the bar at arm’s length above your head and stand up straight with the bar above your head.
Return to the start position (Step 2),
maintaining a tight back and lowering the bar under control to rest on your thighs. Keep the bar close to your body.
Continue driving strongly upward, extending your
hips, knees, and ankles and shrugging your shoulders hard to give the bar momentum.
Begin the explosive movement, driving your
hips in toward the bar, extending your legs, and shrugging your shoulders up.
Keep your back tight and your chest high
Lock out your elbows at the end of the lift
Begin the movement
with your hips and legs, rather than your arms
Point your elbows out to the ends
of the bar
Push off your toes
Bend at your knees to a semi-squat position
Push up and out on the bar
Unlock your elbows in
preparation for lowering
the bar
Hold your shoulders and chest over the bar
Drive up with your legs
Bend your knees as you lower the bar
Pull up hard on the bar
Engage your core muscles to stabilize your body
189

TARGET MUSCLES
▪ Quadriceps
▪ Hamstrings
▪ Gastrocnemius
▪ Soleus
▪ Gluteals
▪ Pectorals
▪ Deltoids
D Y N A M I C L I F T S
This is a fluid and explosive movement in which you drop into a deep squat to get below the weight. The exercise is good for developing dynamic strength.
Begin with your feet hip-width apart under the bar, your back
flat, and your head forward. Hold the bar with a shoulder-width grip.
Drop down into a deep squat, keeping your torso upright,
your knees in line with your feet, and your elbows high.
SQUAT CLEAN
Squat deeply, with your hips
lower than your knees
Rest the bar on the top of your shoulders, keeping your chest upright
Biceps brachii
Triceps brachii
Pectorals
Gluteals
Hamstrings
Soleus
Gastrocnemius
Quadriceps
Deltoids
Serratus anterior
Latissimus dorsi
External obliques
Internal obliques
190

S Q U A T C L E A N
Drop your elbows in preparation for lowering the bar
Push explosively upward with your legs, pulling hard on the bar and
keeping it close to your body. As the bar passes your knees, drive your hips in.
Stand up from the deep squatting position. First, raise your buttocks
and drive strongly with your legs, keeping your chest high.
Lower the bar slowly and under control to rest on your thighs.
Keeping a flat back, return the bar to the start position on the floor.
Dip and bend at your knees to catch the bar on your shoulders;
keep your shoulders shrugged and your knees in line with your feet.
Keep your elbows high
Unlock your knees before lowering
the bar
Keep your back tight and your
body upright
Extend your legs fully, coming up on to
your toes with the momentum of the bar
Drive your elbows up beneath the bar to fix it in positionKeep your knees in
line with your feet
Shrug your shoulders up
Engage your core muscles to stabilize your body
Drive upward with your quads
Push off the balls of your feet
191

D Y N A M I C L I F T S
HEAVY FRONT SQUATThis raw power-builder develops the physique for many sports, particularly where dynamic jumping or pushing is involved.
Keeping your elbows high, slowly squat as low as possible, while
maintaining good form.
Place the bar in a rack just below shoulder height. Grip the bar just
wider than shoulder-width and hold it on your upper chest and shoulders.
Keep your chest
upright
TARGET MUSCLES
▪ Quadriceps
▪ Hamstrings
▪ Gluteals
▪ Gastrocnemius
▪ Soleus
▪ Pectorals
▪ Deltoids
192
Biceps brachii
Triceps brachii
Gluteals
Quadriceps
Soleus
Gastrocnemius
Hamstrings
Erector spinae
Latissimus dorsi
Brachialis
Trapezius
Teres minor
Teres major
Deltoids

H E A V Y F R O N T S Q U A T
Position your hips directly beneath the bar
Engage your core muscles to stabilize
your body
Place your feet hip-width apart,
with your toes pointing slightly
outward
When squatting with heavy weights, use competent spotters to assist you, particularly when you take the bar to and from the rack. Take the descent
slowly and avoid “bouncing” when you reach the bottom position. Always keep your back tight and upright throughout the movement.
WARNING!
Lift the bar from the rack, straighten up, and take a couple of steps backward to
clear the weights away from the supports.
Bend your hips and knees to lower your body. Keep your back tight and upright,
and your knees in line with your feet.
Stand up, extending your
hips and knees, still keeping the weight fixed by your high elbows. Drive your elbows forward and upward as you stand.
Repeat Steps 3–5 as required to finish
the set, then step forwards between the racks and replace the bar, keeping your head up, your elbows high, and your back upright and tight.
Take an overhand grip with your palms facing upward and your elbows high
Keep the bar level and stable when
returning it to the rack
Keep your head up throughout
the exercise
Raise your elbows to fix the bar in place on your shoulders and upper chest
Drive up with your quads
193

TARGET MUSCLES
D Y N A M I C L I F T S
OVERHEAD SQUATThe overhead squat will help you develop strength, balance and flexibility in your legs, upper body and shoulder girdle. This makes it a worthwhile conditioning exercise for all sports.
Press the bar overhead from your upper back
to arm’s length. Lock out your elbows, maintaining a tight back throughout the exercise.
Lock out your elbows
Engage your core muscles to stabilize your body
Turn your toes outward
Ensure the barbell is stable prior to the squat and maintain a tight grip
▪ Quadriceps
▪ Hamstrings
▪ Gastrocnemius
▪ Soleus
▪ Gluteals
▪ Triceps brachii
▪ Deltoids
194
Deltoids• Anterior deltoid• Medial deltoid• Posterior deltoid
Triceps brachii
Rectus abdominis
Pectorals• Pectoralis major• Pectoralis minor
Soleus
Gastrocnemius
Serratus anterior
Latissimus dorsi
External obliques
Internal obliques
Teres minor
Teres major
Biceps brachii
Trapezius
Quadriceps• Rectus femoris• Vastus lateralis
• Vastus intermedius• Vastus medialis
Hamstrings• Semimembranosus• Semitendinosus• Biceps femoris
Gluteals• Gluteus maximus• Gluteus medius • Gluteus minimus

O V E R H E A D S Q U A T
Step forwards under the
bar with your knees bent; rest the bar across your upper back and hold it with your hands just wider than shoulder-width apart.
Stand up straight, with your feet hip-
width apart and toes turned slightly outward. Step back from the rack and widen your grip on the bar to snatch-width (see page 184), with your elbows bent to about 90 degrees.
Keeping your back tight, bend your hips and knees, and lower
your body into a deep squat position, pressing your heels downwards as you descend.
From the deep squat position drive upwards by extending
your hips and knees to return to the start position (Step 3). Finish your set before racking the bar.
Bend your knees, while pushing
your glutes back
Keep your chest and head up
Hold the bar vertically over your feet
Turn out your knees in line
with your feet
Keep your back flat and tight
and your core engaged
Rest the bar across your posterior deltoids
and upper trapezius
Ensure that you move well clear
of the rack
WARNING!This exercise is considered to be one of the most challenging strength training movements, and tests both your stability and balance. It is important to start with light weights or an unloaded bar to perfect your technique. When performing the movement always make sure that you have competent spotters to assist you.
195

TARGET MUSCLES
▪ Hamstrings
▪ Quadriceps
▪ Gluteals
▪ Deltoids
▪ Triceps brachii
▪ Gastrocnemius
▪ Soleus
D Y N A M I C L I F T S
JERK BALANCE
The jerk balance is a compound movement that develops strength in your whole body, in addition to improving your stability and balance.
Keeping your torso
upright, dip your knees and in a fast movement drive the bar upwards.
Begin with the bar racked just below shoulder height. Rest the
bar across the top of your shoulders. Keep your elbows high.
Keep your body upright, engaging your core, and your elbows high
Drive the bar up vigorously
196
Triceps brachii
Deltoids
Quadriceps
Gluteals
Hamstrings
SoleusGastrocnemius
Erector spinae
Latissimus dorsi
Teres minor
Internal obliques
Serratus anterior
Trapezius

J E R K B A L A N C E
Stand up with the barbell on top of your shoulders and walk
backwards to the back of the platform.
Assume an upright position with your feet hip-width apart. Keeping your elbows high and your
back upright and tight, take a long step forward into the start position for the jerk balance movement.
Drive the bar overhead to arm’s length and
lock your elbows while stepping a short pace forward with your front foot. The bar, your shoulders, and your hips are all aligned.
Keeping your feet fixed in this position,
straighten your front leg and recover to the start position. Lower the barbell slowly and under control to rest on the top of your chest and shoulders. Repeat Steps 3–6 to complete the set before carefully returning the bar to the rack.
Grip the bar just wider than shoulder-width
Rest the bar on your upper chest and shoulders
Start to lower the bar, keeping it fully under control
Keep your knee over and in line with your foot
Lock out your arms at your elbows
Maintain your foot position
Keep your rear heel high and in
line with your calf
Keep your core engaged, stabilizing your trunk
Keep your front foot flat on the floor
Put your weight on the ball of
your back foot
197
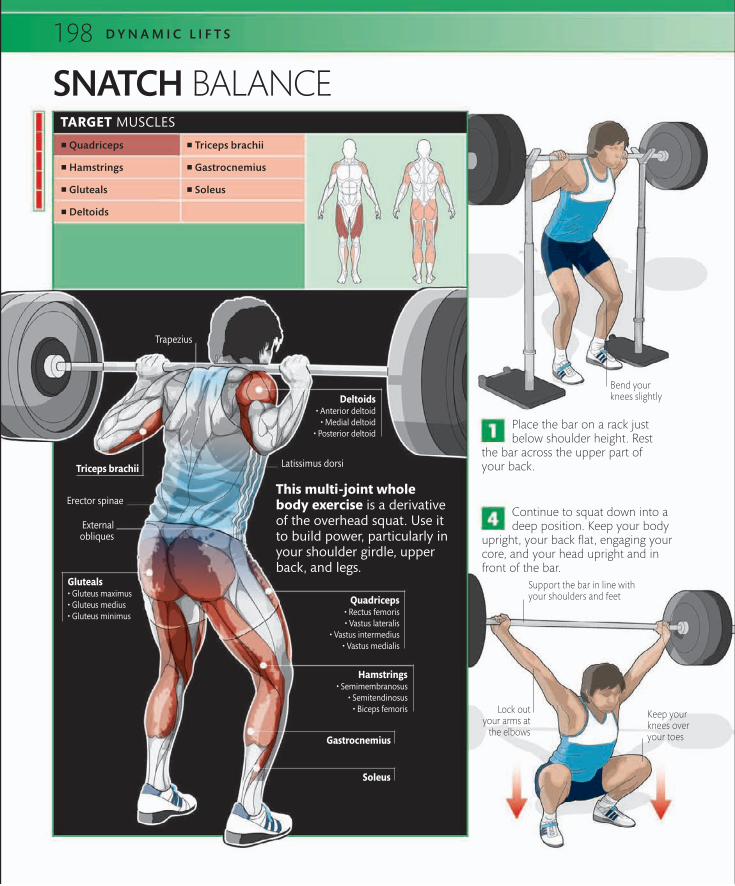
TARGET MUSCLES
▪ Quadriceps
▪ Hamstrings
▪ Gluteals
▪ Deltoids
▪ Triceps brachii
▪ Gastrocnemius
▪ Soleus
D Y N A M I C L I F T S
SNATCH BALANCE
Place the bar on a rack just below shoulder height. Rest
the bar across the upper part of your back.
Continue to squat down into a deep position. Keep your body
upright, your back flat, engaging your core, and your head upright and in front of the bar.
Support the bar in line with your shoulders and feet
Lock out your arms at
the elbows
Keep your knees over your toes
Bend your knees slightly
198
Gastrocnemius
Quadriceps
Hamstrings
Deltoids
Triceps brachii
Gluteals
Soleus
This multi-joint whole body exercise
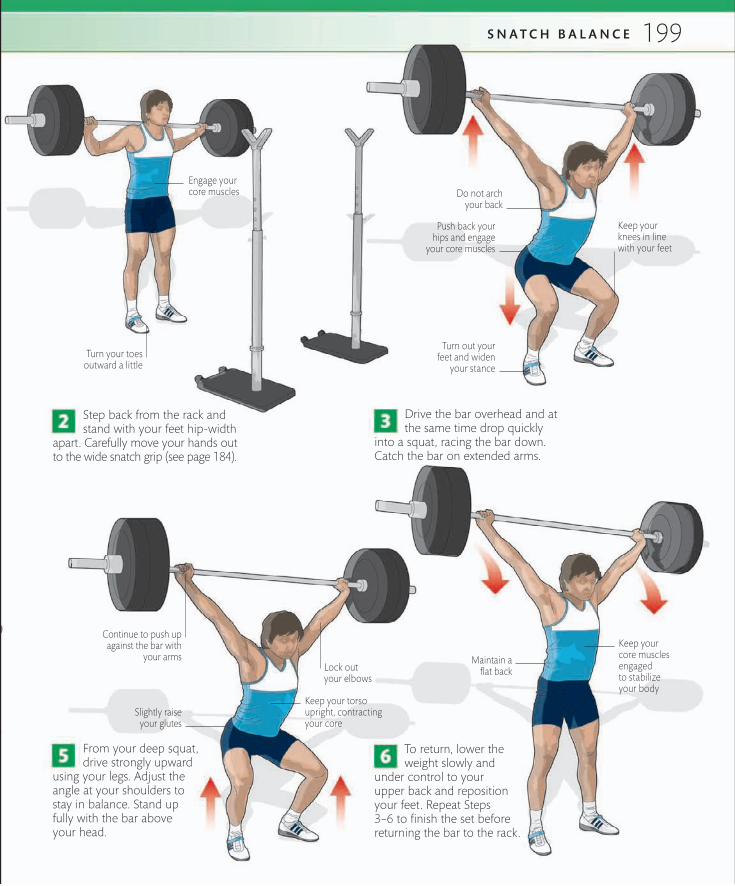
S N A T C H B A L A N C E
Drive the bar overhead and at the same time drop quickly
into a squat, racing the bar down. Catch the bar on extended arms.
From your deep squat, drive strongly upward
using your legs. Adjust the angle at your shoulders to stay in balance. Stand up fully with the bar above your head.
To return, lower the weight slowly and
under control to your upper back and reposition your feet. Repeat Steps 3–6 to finish the set before returning the bar to the rack.
Maintain a flat back
Keep your core muscles engaged to stabilize your body
Engage your core muscles
Keep your torso upright, contracting your core
Continue to push up against the bar with
your arms
Slightly raise your glutes
Lock out your elbows
Turn out your feet and widen
your stance
Push back your hips and engage
your core muscles
Do not arch your back
Keep your knees in line with your feet
Step back from the rack and stand with your feet hip-width
apart. Carefully move your hands out to the wide snatch grip (see page 184).
Turn your toes outward a little
199
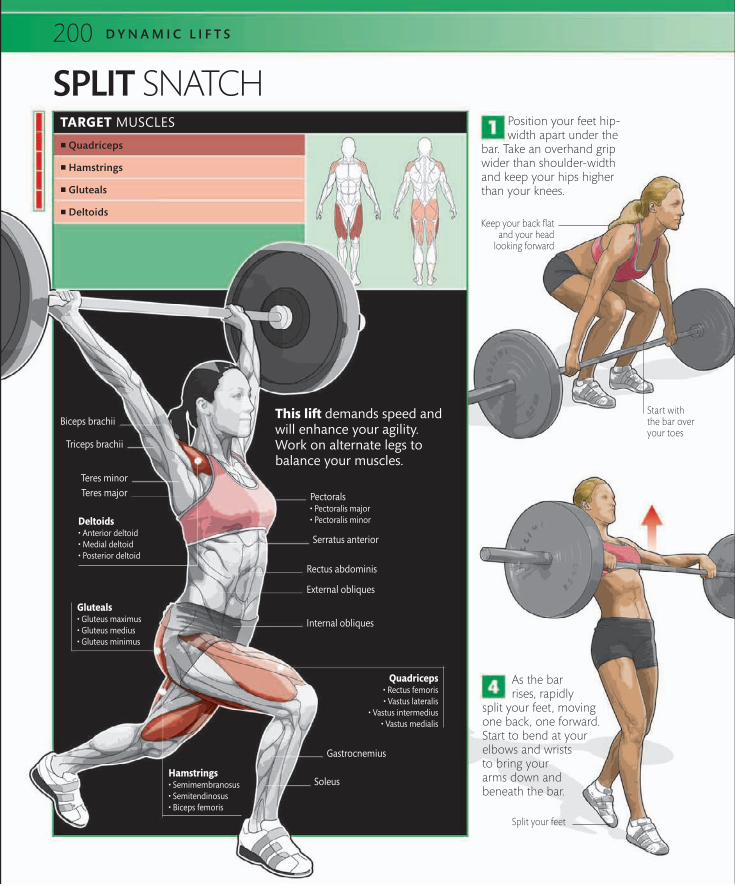
D Y N A M I C L I F T S
SPLIT SNATCHPosition your feet hip-width apart under the
bar. Take an overhand grip wider than shoulder-width and keep your hips higher than your knees.
As the bar rises, rapidly
split your feet, moving one back, one forward. Start to bend at your elbows and wrists to bring your arms down and beneath the bar.
Split your feet
Keep your back flat and your head
looking forward
Start with the bar over your toes
TARGET MUSCLES
▪ Quadriceps
▪ Hamstrings
▪ Gluteals
▪ Deltoids
This lift demands speed and will enhance your agility. Work on alternate legs to balance your muscles.
Hamstrings
Gluteals
Quadriceps
Pectorals
Triceps brachii
Soleus
Teres minor
Serratus anterior
Deltoids
200

S P L I T S N A T C H
Vigorously push with your legs to give the
bar upward momentum. Keep the bar close to your body and your back straight.
Continue extending your legs while
keeping your arms straight. Shrug your shoulders up hard to aid the bar’s upward momentum.
Catch the bar on locked elbows above
your head. Your legs should be in the split position and your feet hip-width apart. To recover, straighten first your front then your rear leg and lower the weight carefully to rest on your thighs. From this position, squat down and place the barbell on the floor.
WARNING!As with all dynamic lifts, the split snatch should be performed on a proper lifting platform with full size 51⁄2- or 11-lb (2.5- or 5-kg) discs. This is because there is always a risk of failing the lift and dropping the bar. In the event of a failed lift, it is important to move your body away from the line of the falling bar. Try to maintain your grip on the bar until it hits the ground. Once on the ground, let go of the bar and allow it to settle on the platform before resetting for the next attempt. Make sure you always work within your capabilities; practise and perfect the move with light weights.
Lock out your elbows
Engage your core muscles to stabilize your trunk
Hold the bar over the center of your body in line with your hips
Keep the bar close to your body
Hold your chest high and shrug your shoulders hard
Keep your arms straight
Drive your hips in as you lift the bar
above your knees
Keep your rear knee slightly
bent and your heel raised from
the floor
201

TARGET MUSCLES
▪ Triceps brachii
▪ Deltoids
▪ Quadriceps
▪ Gluteals
▪ Hamstrings
▪ Gastrocnemius
▪ Soleus
D Y N A M I C L I F T S
PUSH PRESSThis is a good warm-up exercise with light weights and a great all-around power-builder when more heavily loaded.
Squat with your feet hip-width
apart under the bar. Keep your hips higher than your knees, your back flat, and your shoulders over the bar.
Dip down into a
shallow squat by rapidly flexing your knees and hips. Keep the bar on your shoulders as you squat.
Take an overhand grip on the bar
Hold the bar at shoulder level
202
Pectorals
Gluteals
Hamstrings
Soleus
Gastrocnemius
Quadriceps
Deltoids
Triceps brachii
Serratus anterior
Latissimus dorsi
brachii
Keep your trunk upright and do not
arch your back

P U S H P R E S S
As soon as you reach the shallow squat
position, dip down then explosively extend your hips and legs onto your toes, immediately pressing the bar overhead as you do so. Keep the bar overhead on locked-out arms and stand up.
Lower the bar slowly and under control to
your shoulders to the start position (Step 3). Repeat Steps 3–6 to complete your set before lowering the bar to your thighs and then squat down to return the bar to the floor.
Extend your hips and legs
Lock out your elbows at the top of
the movement
Maintain a strong core to stabilize
your body
Push your elbows
forward to fix the bar
in position Engage your core muscles
Keep your core muscles engaged
Lift the bar to a position vertically in line over your feet
Raise your chest to stabilize the bar on
top of your shoulders and straighten your legs. This is the start position for the push press.
Clean the bar from the floor and catch it on
your shoulders (see pages 182–3). Alternatively, you could take the bar directly from a rack.
Keep the bar close to your body
203

D Y N A M I C L I F T S
KETTLEBELL HIGH-PULL
Squat down with your spine neutral, your
shoulders ahead of the weight, your feet shoulder- width apart, and your hips higher than your knees.
Begin the pull by pushing down through
your feet and driving your hips up and forward.
Use the force of the leg drive to extend your
body upward. Lift the kettlebell to chest level. Let your momentum carry you up on to your toes then squat down to the start position.
The kettlebell high-pull is a whole body exercise that builds power. It is great training for explosive movements in sprinting, jumping, boxing, and karate.
Ensure that your shoulders are in front of
the weight
Keep your arms extended through the first part of the pull
Elevate your elbows above
the weight
Keep your back flat
Keep your head up and look forward
TARGET MUSCLES
▪ Quadriceps
▪ Gluteals
▪ Trapezius
▪ Deltoids
▪ Biceps brachii
▪ Erector spinae
▪ Hamstrings
▪ Gastrocnemius
▪ Soleus
Gastrocnemius
Hamstrings
Deltoids
Gluteals
Quadriceps
Erector spinae
Trapezius
Biceps brachii
Latissimus dorsi
External obliques
Soleus
Teres minor
Teres major
Triceps brachii
204
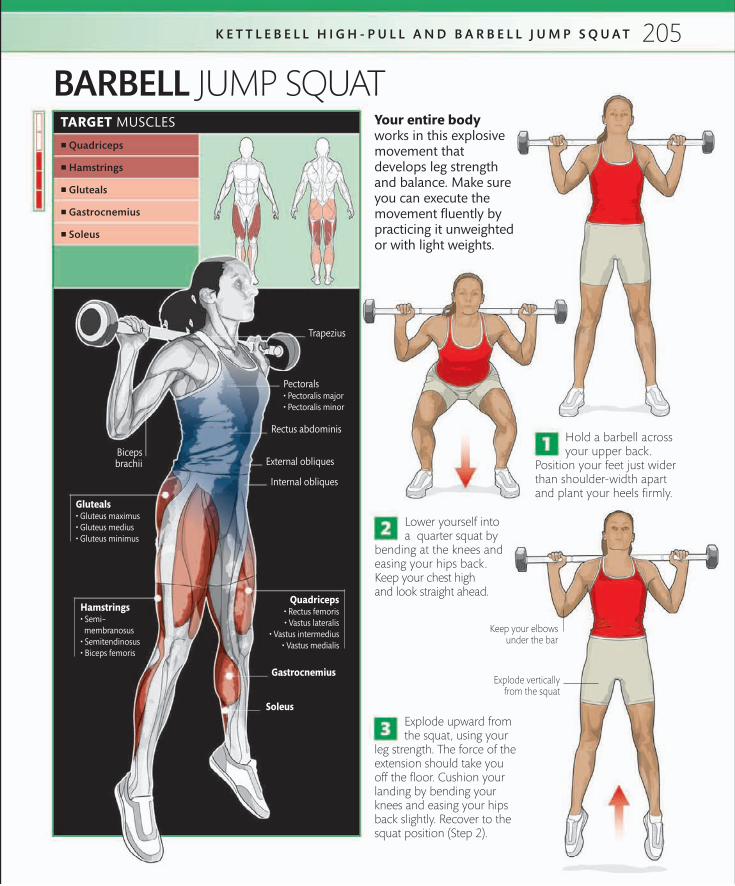
K E T T L E B E L L H I G H - P U L L A N D B A R B E L L J U M P S Q U A T
BARBELL JUMP SQUAT
Hold a barbell across your upper back.
Position your feet just wider than shoulder-width apart and plant your heels firmly.
Lower yourself into a quarter squat by
bending at the knees and easing your hips back. Keep your chest high and look straight ahead.
Explode upward from the squat, using your
leg strength. The force of the extension should take you off the floor. Cushion your landing by bending your knees and easing your hips back slightly. Recover to the squat position (Step 2).
Your entire body works in this explosive movement that develops leg strength and balance. Make sure you can execute the movement fluently by practicing it unweighted or with light weights.
Explode vertically from the squat
Keep your elbows under the bar
TARGET MUSCLES
▪ Quadriceps
▪ Hamstrings
▪ Gluteals
▪ Gastrocnemius
▪ Soleus
Hamstrings
membranosus
Gluteals
Quadriceps
Gastrocnemius
Soleus
External obliquesbrachii
Internal obliques
Trapezius
Pectorals
205


10
STRETCHES

208 S T R E T C H E S
UPPER BACK STRETCHThis easy stretch specifically mobilizes the muscles in your upper back, making it useful across a range of sports, particularly those that involve throwing actions.
Start with your arms extended at shoulder height and gradually push them backward. For best results, bring your arms forward between stretches and gradually increase the range of the movement. Never fling your arms backward quickly.
SHOULDER STRETCHThis easy and effective stretch specifically works the muscles around your shoulder joint. It is particularly useful for weightlifters and those engaged in throwing events.
ERECTOR STRETCHThis stretch works the erector spinae muscles that run on either side of your spine from the back of your head to your pelvis.
BICEPS STRETCHSimple to perform, this very specific stretch is particularly useful for gymnasts and swimmers. Move slowly and under control to avoid potential injury.
Lie back on an exercise mat. Bring your knees toward your chest and wrap your arms around them. Pull gently until you feel the stretch tension in your back.
Extend one arm across your body and place your other forearm over its elbow. Apply gentle pressure until you feel tension in the shoulder of your extended arm. Repeat on the other side.
Interlock your fingers, palms facing away from you. Bring your hands to chest level and extend your arms, locking out your elbows and pushing your shoulders forward.
Feel the stretch in your biceps
Push your arms forward, feeling the stretch in your upper back
Pull your knees gently toward your chest

209S T R E T C H E S
LAT STRETCHSpecifically targeting the latissimus dorsi muscles, this stretch is useful for weightlifters, rowers, and field athletes.
PEC STRETCHThis stretch targets the pectoral muscles of your upper chest, easing tightness and increasing flexibility. It is also helpful if you train for throwing events.
Feel the stretch in your lats
Push your hips backward
You should feel tension in
the outside of your rear leg
Feel the stretch on the outside
of your leg
Bring your front leg across
Rest your free hand on your hip
Keep a slight bend in your knees
ITB STRETCH 1The iliotibial band (ITB) is a band of connective tissue that runs down the outside of your thigh. Runners, hikers, gymnasts, and dancers should perform this stretch regularly to help prevent inflammation of the area above the knee—a common cause of pain.
Stand upright with your feet hip-width apart. Bring one leg across the other, while at the same time raising your opposite arm above your head for balance. Repeat on the other side.
ITB STRETCH 2This seated version of the iliotibial band stretch is more advanced than the one shown above because you need greater flexibility in your hip joint to perform it correctly.
Sit on the floor, with your legs extended. Bend one leg and cross it over your extended leg so that your foot is flat on the floor. Supporting yourself with one arm, reach over with your free hand and gently press on the outside of your knee until you can feel the stretch in your ITB.
Stand facing an upright support strong enough to take your weight. Grip the support with both hands and lean back, bending your knees. Push with your legs and pull with your arms.
Stand sideways to a solid vertical support. Rest one arm behind the upright support, with your upper arm in line with your shoulder. Rock your body gently forward until you can feel the stretch in your chest.
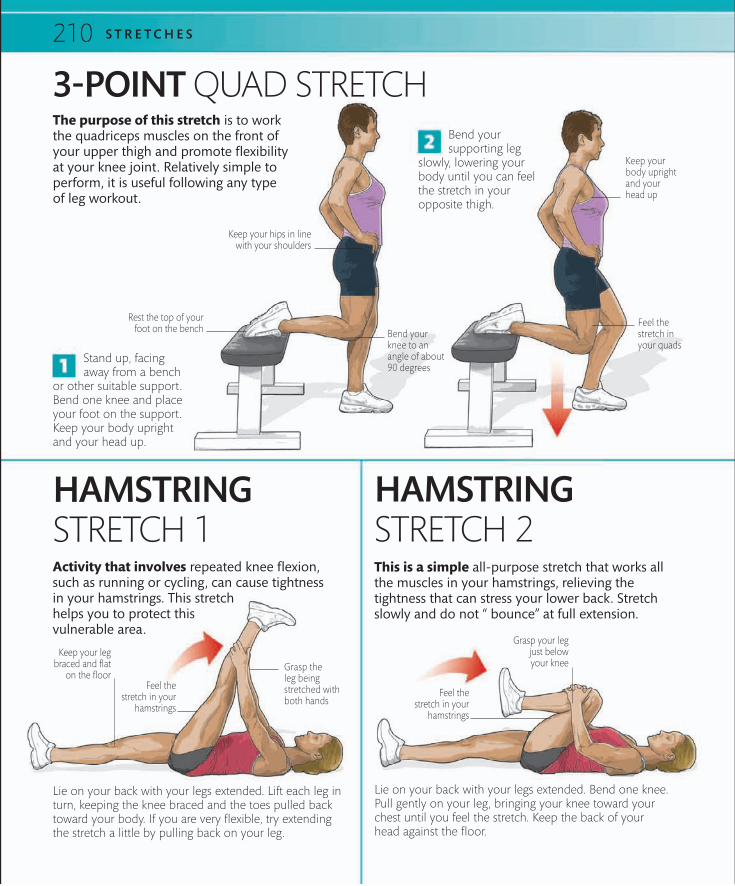
210 S T R E T C H E S
3-POINT QUAD STRETCHThe purpose of this stretch is to work the quadriceps muscles on the front of your upper thigh and promote flexibility at your knee joint. Relatively simple to perform, it is useful following any type of leg workout.
Stand up, facing away from a bench
or other suitable support. Bend one knee and place your foot on the support. Keep your body upright and your head up.
Bend your supporting leg
slowly, lowering your body until you can feel the stretch in your opposite thigh.
Keep your hips in line with your shoulders
Bend your knee to an angle of about 90 degrees
Feel the stretch in your quads
Feel the stretch in your
hamstrings
Feel the stretch in your
hamstrings
Keep your body upright and your head up
Grasp the leg being stretched with both hands
Keep your leg braced and flat
on the floor
Grasp your leg just below your knee
Rest the top of your foot on the bench
Lie on your back with your legs extended. Lift each leg in turn, keeping the knee braced and the toes pulled back toward your body. If you are very flexible, try extending the stretch a little by pulling back on your leg.
HAMSTRING STRETCH 1Activity that involves repeated knee flexion, such as running or cycling, can cause tightness in your hamstrings. This stretch helps you to protect this vulnerable area.
Lie on your back with your legs extended. Bend one knee. Pull gently on your leg, bringing your knee toward your chest until you feel the stretch. Keep the back of your head against the floor.
HAMSTRING STRETCH 2This is a simple all-purpose stretch that works all the muscles in your hamstrings, relieving the tightness that can stress your lower back. Stretch slowly and do not “ bounce” at full extension.
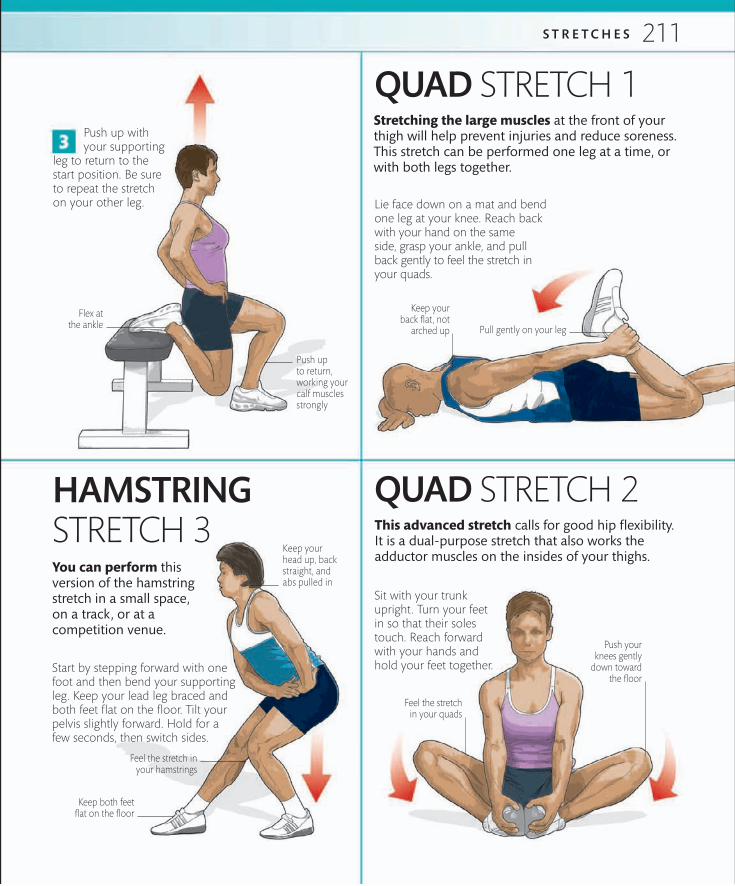
211S T R E T C H E S
Start by stepping forward with one foot and then bend your supporting leg. Keep your lead leg braced and both feet flat on the floor. Tilt your pelvis slightly forward. Hold for a few seconds, then switch sides.
HAMSTRING STRETCH 3You can perform this version of the hamstring stretch in a small space, on a track, or at a competition venue.
Push up with your supporting
leg to return to the start position. Be sure to repeat the stretch on your other leg.
Keep both feet flat on the floor
Feel the stretch in your hamstrings
Pull gently on your leg
Push up to return, working your calf muscles strongly
Feel the stretch in your quads
Flex at the ankle
Keep your back flat, not
arched up
Push your knees gently
down toward the floor
Keep your head up, back straight, and abs pulled in
Sit with your trunk upright. Turn your feet in so that their soles touch. Reach forward with your hands and hold your feet together.
QUAD STRETCH 1Stretching the large muscles at the front of your thigh will help prevent injuries and reduce soreness. This stretch can be performed one leg at a time, or with both legs together.
QUAD STRETCH 2This advanced stretch calls for good hip flexibility. It is a dual-purpose stretch that also works the adductor muscles on the insides of your thighs.
Lie face down on a mat and bend one leg at your knee. Reach back with your hand on the same side, grasp your ankle, and pull back gently to feel the stretch in your quads.

212 S T R E T C H E S
ADDUCTOR STRETCH 1Stretching your adductor or groin muscles is key to maintaining hip flexibility for many sports.
Keep your body upright and put your hands on your hips. Bend your lead leg so that your front knee stays over your foot. Keep the trailing leg extended with your foot flat. Rock gently to the side.
ADDUCTOR STRETCH 2This advanced version of the adductor stretch requires more agility to achieve the extended position: it is ideal for gymnasts and hurdlers.
Squat down on both legs then move one leg out, resting it on the heel of your foot. “Sit in” to apply stretch to your adductors, but do not “bounce.”
Stabilize your body with your arms
Pull your toes back toward
your bodyFeel the
stretch in your adductors
Feel the stretch in your adductors
Feel the stretch in your hamstrings
Flex your trunk forward
from your hips
Pull your toes back toward
your body
Grasp your upper foot
Lean forward gradually to your extended foot. If
you are able to grab your foot, pull it gently toward you to increase the stretch.
Sit on the floor with one leg straight ahead
of you and one bent behind, keeping your hips and shoulders in line.
HAMSTRING STRETCHTightness in your glutes often manifests itself as lower back pain after a workout. This fairly advanced stretch works your glutes as well as the muscles of your lower back and your hamstrings.

213S T R E T C H E S
PIKE CALF STRETCHThe muscles of your calf—the gastrocnemius and the deeper soleus—are stretched in this advanced movement.
Take up a pike position, with your body bent forward at your hips and your legs straight. Place your right foot behind your left ankle. Keeping your legs straight, press the heel of your left foot down. Repeat on the other side.
WALKING LUNGE STRETCHThis is a highly effective but simple multipurpose stretching exercise that mobilizes the whole of your hip region.
CALF STRETCHTight calf muscles are more prone to injury during explosive movements like sprinting, so this easy stretch for your lower legs is a must if you are a runner.
From a standing position, take a good step forward, keeping your feet hip-width apart. Bend the leading leg, keeping your knee over your foot.
Stand up with your
feet hip-width apart and your shoulders, hips, and feet in line.
With your trunk
upright, take a long step forward. Drop down; bend at your knees.
Step through with your
trailing leg, keeping your body upright and your head up.
Step forward and change legs,
maintaining your upper body posture throughout.
Feel the stretch in your calf
muscles
Feel the stretch in your calf
muscles
Keep your hips high
Extend your leg, pushing your heel into the floor
Push your heel down into the floor
Keep your trunk upright
and your head up Drop down
so your upper leg is parallel to the floor
Take a long step forward with your trailing leg
Step forward so that your knee is over your footFeel the stretch
in your hips
Push off with your trailing leg
Keep on the ball of your foot


11
PROGRAMS

216
INTRODUCTION
P R O G R A M S
The training programs featured in this section have been designed to help you get the very best out of your training, whatever your gender, age, experience, existing strength, or overall goal—be that increasing your strength, developing your physique, bodybuilding, or training for a sport. These tried-and-tested programs cover three main resistance-training goals—strength, body sculpting, and bodybuilding, and a range of basic and advanced programs are provided for each. Using a small number of targeted exercises, each of the programs allows you to complete your resistance training session in around 30–40 minutes, and reduce the chance of you overtraining.
means that the exercises are applicable to real-life movements, be they at home, work, or in the sports arena, as opposed to working single muscles in isolation. In short, these exercises move your body in the way it was designed to move, meaning that you will get better results, faster.
Q | What are the differences between training with free weights, body weight, and resistance machines?A | Free weights offer you the highest level of “functionality” of the three. This is because they enable you to perform exercises that closely replicate “real life” movements, without the support and uniformity provided by resistance machines. Unsupported, your body engages additional smaller muscles in order to stabilize you—thus working more muscles than those you are specifically targeting, and offering you “added value” from your workout. Using your own body weight is another highly functional and effective way of developing strength, especially since it means you can train on the move, with little or no equipment, although this form of training is obviously limited by the weight of your own body. Do not assume, however, that you will find using your body weight easier than other exercise methods. Resistance machines usually provide you with padded body supports, and enable you to perform exercises in a seated position, meaning that you tend to work targeted muscles in isolation. They can be a useful tool for those starting out, and for those looking to work specific muscles. The machine-based exercises included in these programs have been chosen because they offer as much functionality as possible.
Q | Why should I warm up and cool down?A | Warming up your muscles is essential because it gets your body ready for your workout while minimizing the risk
BASIC PRINCIPLES
Regardless of the program you follow, some basic training principles always apply:■ OVERLOAD: Your training should demand more of your muscles than would normally be the case for everyday activity. ■ RECOVERY: An essential component in any training regimen, recovery literally means rest. It is while your body is resting that it adapts and strengthens, ready to be overloaded again during the next training session.■ PROGRESSION: Your body adapts to the demands being placed on it. If you do not place extra demands on it, your training results will reach a plateau. So you have to gradually (and carefully) increase the number of sets, reps, and weight (or a combination of all three) to see continual progress (see page 33).
WARNING!Never do more than the programs suggest—you may overtrain, which can lead to illness and injury. Always consult your health-care practitioner before starting to train (see page 256).
Q | What can I expect from the programs?A | The featured programs allow you to tailor your training to help you realize your goals: this approach enables you to achieve the best possible results, and is known as “specificity” (see page 33). The basic programs in this section provide free- weight, body weight, and resistance machine variants, and none are excessively long. The days of workouts comprising dozens of obscure exercises are gone. Sports scientists recognize that simple, functional programs organized with specificity in mind and performed around 2–3 times per week are a far more effective (and less time-consuming) way to reach your goals. Where possible, the programs are also designed with high levels of “functionality” (see page 43) in mind—this

217I N T R O D U C T I O N
of injury and maximizing your potential to learn and improve. Cooling down is equally important, since it returns your body to a resting state in a controlled manner. So do not be tempted to skip your warm-up before your training session or your cool-down at the end of the session, since this will increase your risk of injury and ability to complete your next workout without the restrictions and discomfort caused by tight and aching muscles.■ A good basic warm-up comprises 10 minutes of jumping
rope, jogging, or working on the cross-trainer, followed by 10 minutes of dynamic mobility work (see pages 46–47). You can also tailor your warm-up to your training activity if you need something more specific. A certified coach or fitness instructor can advise you.
■ Likewise, cooling down can be achieved by 5–10 minutes of gentle jogging or walking, which decreases the body’s temperature and heart rate and helps your muscles get rid of waste products, such as lactic acid.
■ Finally, perform 5–10 minutes of developmental stretches, which help your muscles to relax and your muscle fibers to realign and reestablish their normal resting length and ranges of movement (see pages 208–13).
Q | Do results differ from person to person?A | Yes. No two people are the same, and there are a range of factors that will affect how quickly you progress:■ Your age: as well as your age in years, age refers to your emotional and biological maturity as well as the number of years of training experience you have—your “training age.”
■ Your gender: men and women have different physiologies and capabilities.
■ Your heredity: this is your innate ability, genetically determined.
■ Your physical capability: this is made up of two factors—your heredity and your training history.
■ Your lifestyle: how well you look after yourself in between training sessions has a major effect on your overall development (see also page 17).
Q | How long do I follow a program?A | Each of the programs has a predetermined duration (4–8 weeks). You should follow the program for the specified time, adhering to the program guidelines. If you follow a program for longer than stated, your body will adapt to it and your results will be less than expected. In fact, you can actually regress and get weaker if you follow a program for longer than prescribed.
UNDERSTANDING THE CHARTS
These are the terms you need to understand to use the charts effectively:■ SETS: A group of repetitions; for example, two sets of five repetitions.■ REPETITIONS: The number of times a weight should be lifted—“reps” for short■ WEIGHT: the weight to be lifted, expressed as a RM figure. 1RM, for example, means a weight that you can lift only once. 12RM, means a weight that you can lift 12 times before muscular failure.■ MUSCULAR FAILURE: This is the point at which you cannot perform another repetition of an exercise within a set.■ DURATION OF PROGRAM: A range is given for the number of weeks the program should be followed. You should not exceed this number.■ FREQUENCY OF PROGRAM: This is the number of workouts you should do per week, with the number of rest days you should take between workouts.■ RECOVERY TIME: This is the amount of rest time in seconds or minutes that you should take between exercises.■ APPLICATION OF SPLIT PROGRAM: This information applies to the split programs and details the days of the week that each half of the split should be performed, indicated by an A or a B. The splits are performed on an alternating two-week basis.
“ The featured programs allow you to tailor your
training to help you realize your goals: this approach
enables you to achieve the best possible results ”

218
EXERCISE FUNCTIONALITY MATRIX
LEGS
CHEST
■ Machine leg curl (pp. 80–81)■ Pulley leg curl (p. 81 var.) ■ Machine leg extension (pp. 80–81)■ Hip abductor (pp. 82–83)■ Hip adductor (pp. 82–83)
■ Pulley cross-over (pp. 116–17)■ Low pulley cross-over (p. 116 var.)■ Mid pulley cross-over (p. 116 var.)■ Machine fly (p. 119)
■ 45-degree leg press (pp. 78–79)■ One-leg 45-degree leg press (p. 79 var.)■ Machine calf raise (p. 84 var.)
■ Incline fly (pp. 114–15)■ Flat fly (p. 114 var.) ■ Machine bench press (pp. 118–19)■ Ball push–up (p. 120 var.)
■ Lat pull-down (p. 93) ■ Seated pulley row (pp. 96–97)■ Back extension (pp. 104–05)■ Prone row (pp. 106–07)■ Straight arm pulley (pp. 106–07)
BACK
Exercises can be graded by “functionality.” A “functional” exercise is one that carries over into real-life movements—the repetitive pulls, pushes, lifts, and standing—or stepping-up actions— needed for everyday life (and most sports movements) by working several muscles at once rather than in isolation, one at a time.
Q | What does the matrix show?A | The matrix below and on pages 220–21 lists all the exercises in the book (including their page number and any variations) and places them on a scale of functionality. On the far right are the most functional exercises—the ones that require you to work several muscles simultaneously. On the far left are the most isolated exercises—these are the ones
MOST ISOLATEDEXERCISE GROUP
P R O G R A M S
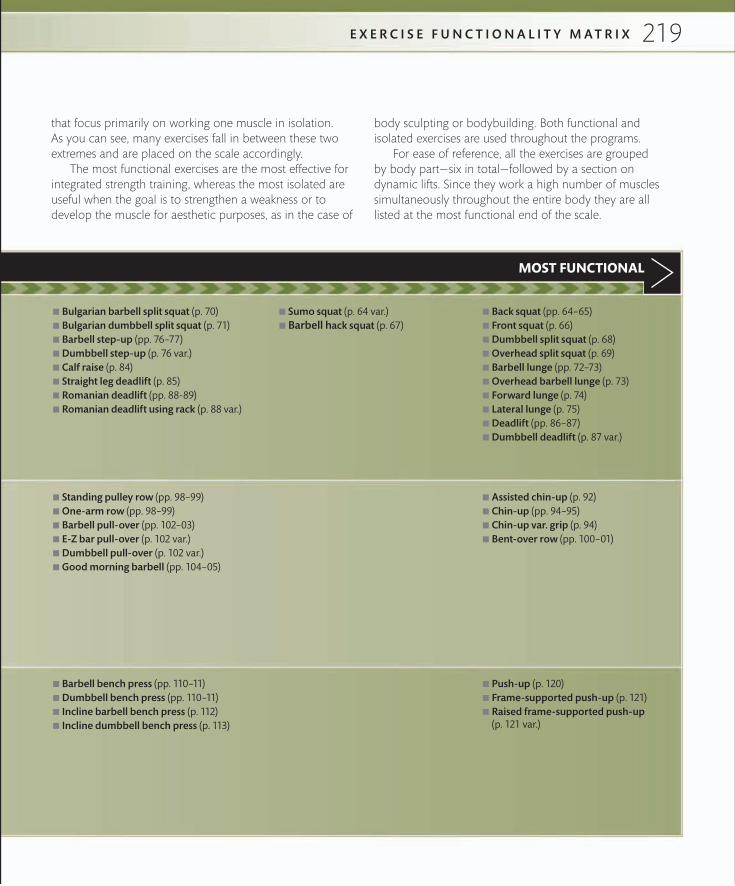
219
■ Bulgarian barbell split squat (p. 70) ■ Bulgarian dumbbell split squat (p. 71) ■ Barbell step-up (pp. 76–77)■ Dumbbell step-up (p. 76 var.)■ Calf raise (p. 84)■ Straight leg deadlift (p. 85) ■ Romanian deadlift (pp. 88-89)■ Romanian deadlift using rack (p. 88 var.)
■ Barbell bench press (pp. 110–11)■ Dumbbell bench press (pp. 110–11) ■ Incline barbell bench press (p. 112)■ Incline dumbbell bench press (p. 113)
■ Standing pulley row (pp. 98–99) ■ One-arm row (pp. 98–99)■ Barbell pull-over (pp. 102–03)■ E-Z bar pull-over (p. 102 var.)■ Dumbbell pull-over (p. 102 var.)■ Good morning barbell (pp. 104–05)
■ Back squat (pp. 64–65)■ Front squat (p. 66)■ Dumbbell split squat (p. 68)■ Overhead split squat (p. 69)■ Barbell lunge (pp. 72–73)■ Overhead barbell lunge (p. 73) ■ Forward lunge (p. 74) ■ Lateral lunge (p. 75)■ Deadlift (pp. 86–87)■ Dumbbell deadlift (p. 87 var.)
■ Push-up (p. 120)■ Frame-supported push-up (p. 121)■ Raised frame-supported push-up
(p. 121 var.)
■ Sumo squat (p. 64 var.)■ Barbell hack squat (p. 67)
that focus primarily on working one muscle in isolation. As you can see, many exercises fall in between these two extremes and are placed on the scale accordingly. The most functional exercises are the most effective for integrated strength training, whereas the most isolated are useful when the goal is to strengthen a weakness or to develop the muscle for aesthetic purposes, as in the case of
body sculpting or bodybuilding. Both functional and isolated exercises are used throughout the programs. For ease of reference, all the exercises are grouped by body part—six in total—followed by a section on dynamic lifts. Since they work a high number of muscles simultaneously throughout the entire body they are all listed at the most functional end of the scale.
MOST FUNCTIONAL
E X E R C I S E F U N C T I O N A L I T Y M A T R I X
■ Assisted chin-up (p. 92) ■ Chin-up (pp. 94–95)■ Chin-up var. grip (p. 94)■ Bent-over row (pp. 100–01)

220
MOST ISOLATEDMOST ISOLATEDEXERCISE GROUP
■ Prone lateral raise (p. 133 var.)■ Scarecrow rotation (pp. 134–35) ■ Prone scarecrow rotation (p. 135 var.)
■ Dumbbell shoulder shrug (p. 128)■ Shoulder shrug from hang (p. 129)■ Front dumbbell raise (p. 130)■ Lateral dumbbell raise (p. 131)■ Rear lateral raise (pp. 132–33)■ Machine shoulder press (p. 125 var.)
■ Incline bicep curl (pp. 152–53)■ Concentration curl (pp. 152–53)■ Preacher curl (pp. 154–55)■ Wrist flexion (pp. 158–59)■ Wrist extension (pp. 158–59) ■ Dumbbell triceps extension (p. 142) ■ Triceps kickback (pp. 144–45)
■ Triceps push-down (pp. 148–49) ■ Overhead triceps extension (pp. 148–49) ■ Barbell curl (pp. 150–51) ■ Dumbbell hammer curl (pp. 150–51) ■ Pulley curl (pp. 154–55) ■ Reverse barbell curl (pp. 156–57)■ Reverse pulley curl (pp. 156–57)■ Barbell triceps extension (p. 143) ■ Prone triceps extension (pp. 144–45)
■ Abdominal crunch (p. 162)■ Abdominal crunch var. (p. 162 var. 1)■ 90-90 crunch (pp. 166–67)■ 90-90 crunch with twist (p. 167)■ Ball crunch (pp. 166–67)
■ Figure-4 crunch (p. 165)■ Ball twist (p. 168)■ Ball push-up (p. 169)■ Ball jack knife (p. 170)■ Ball back extension (p. 171) ■ Roman chair side bend (pp. 172–73) ■ Abdominal crunch crunch with twist (p. 162 var. 2) ■ Sit-up (p. 163)■ Sit-up var. 2 (p. 163)
DYNAMIC LIFTS
ABS AND CORE
ARMS
SHOULDERS
P R O G R A M S
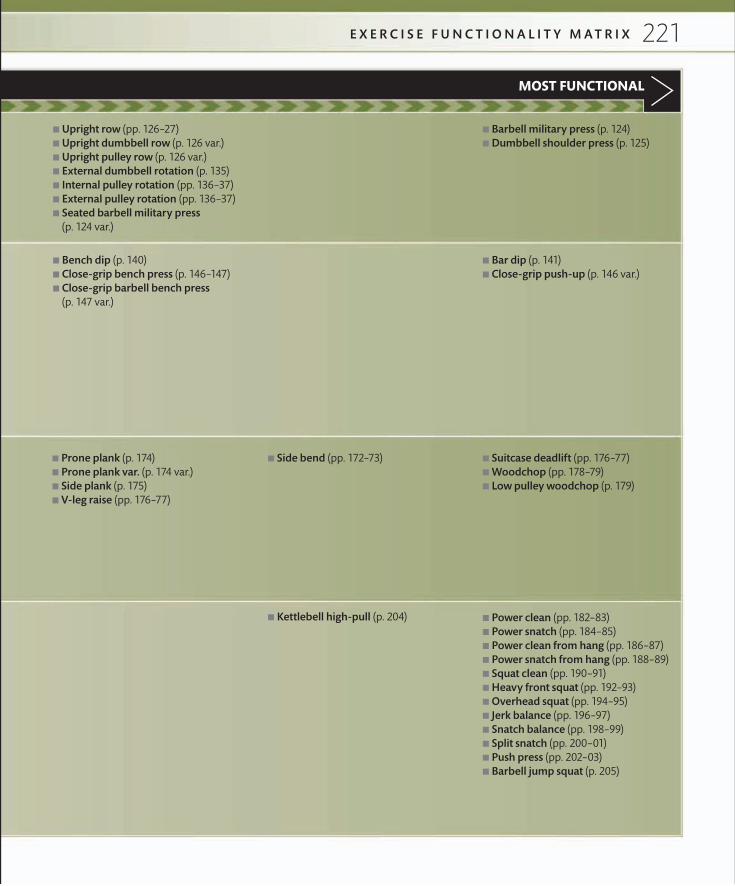
221
MOST FUNCTIONALMOST FUNCTIONAL
■ Power clean (pp. 182–83) ■ Power snatch (pp. 184–85) ■ Power clean from hang (pp. 186–87) ■ Power snatch from hang (pp. 188–89) ■ Squat clean (pp. 190–91)■ Heavy front squat (pp. 192–93)■ Overhead squat (pp. 194–95) ■ Jerk balance (pp. 196–97)■ Snatch balance (pp. 198–99)■ Split snatch (pp. 200–01)■ Push press (pp. 202–03)■ Barbell jump squat (p. 205)
■ Upright row (pp. 126–27)■ Upright dumbbell row (p. 126 var.) ■ Upright pulley row (p. 126 var.) ■ External dumbbell rotation (p. 135) ■ Internal pulley rotation (pp. 136–37) ■ External pulley rotation (pp. 136–37)■ Seated barbell military press
(p. 124 var.)
■ Barbell military press (p. 124) ■ Dumbbell shoulder press (p. 125)
■ Bench dip (p. 140)■ Close-grip bench press (p. 146–147)■ Close-grip barbell bench press
(p. 147 var.)
■ Bar dip (p. 141)■ Close-grip push-up (p. 146 var.)
■ Side bend (pp. 172–73)■ Prone plank (p. 174)■ Prone plank var. (p. 174 var.) ■ Side plank (p. 175)■ V-leg raise (pp. 176–77)
■ Suitcase deadlift (pp. 176–77)■ Woodchop (pp. 178–79) ■ Low pulley woodchop (p. 179)
E X E R C I S E F U N C T I O N A L I T Y M A T R I X
■ Kettlebell high-pull (p. 204)

222
MUSCULAR ENDURANCE At a basic level, strength training is about making sure that we are strong enough to cope with the demands of daily life—the repetitive pulls, pushes, lifts, and standing- or stepping-up actions—without undue fatigue or any injury.
Q | What will I achieve?A | The programs are designed to develop your strength endurance—the ability to move a relatively small weight through a specific range of motion lots of times.
Q | What do the charts show?A | The charts feature three different training programs, using either resistance machines, body weight, or free weights. Choose one type of training only, depending on your personal preference, your experience, and what equipment you have available. Do not attempt more than one program in a single training session, and do not be tempted to do exercises on an ad hoc basis.
Q | How do I follow the charts?A | You should work through each training program from the top down, after you have warmed up your muscles. Each of the featured exercises includes a page reference to its step-by-step instruction in the main part of the book. This is followed by the number of sets, reps, and amount of weight you should use, followed by a cool down routine. The weight you should use for each exercise is expressed either in terms of your personal RM (Rep Maximum) for the machines and free weights, or as NMF (Near Muscular Failure) when you are using your own body weight. The approximate duration, the frequency of each program, and the recovery time between each set of exercises is provided at the bottom of the chart.
Q | How will I progress?A | Two of the key concepts in resistance training are overload and progression. Once you reach a point at which you complete a set easily you can either increase the weight you are using by a small amount, such as 2–5 lb (1–2 kg) for the upper body and 4–9 lb (2–4 kg) for the lower body, or add another rep for each set, up to a maximum of 20 reps. Alternatively, reduce your recovery time by five seconds if starting at one minute’s rest between exercises or sets. Do not go below 30 seconds’ rest. At the end of the six-week period, review your progress and decide whether you should move on to one of the other programs.
MACHINE
Mobilization warm-up (pp. 46–47) 10 mins
EXERCISE PAGE SETS REPS WEIGHT
Machine bench press 118–19 2–3 12+ 12
Seated pulley row 96–97 2–3 12+ 12or Machine shoulder press 118–119 2–3 12+ 12
Upright pulley row 127 2–3 12+ 12
Lat pull-down 92–93 2–3 12+ 12
45-degree leg press 78–79 2–3 12+ 12
Smith machine calf raise 84 2–3 12+ 12
COOL DOWN ROUTINE
Warm down 5 mins
Developmental stretching (pp. 208–13) 15 mins
■ DURATION OF PROGRAM6 weeks
■ FREQUENCY OF PROGRAM3 workouts/week, 1–2 days’ rest between workouts
■ RECOVERY TIME30 secs–1 min between exercises
(RM)
P R O G R A M S

223
FREE WEIGHTBODY WEIGHT
Mobilization warm-up (pp. 46–47) 10 minsMobilization warm-up (pp. 46–47) 10 mins
EXERCISE PAGE SETS REPS WEIGHTEXERCISE PAGE SETS WEIGHT
Back squat 64–65 2–3 12+ 12Push-up 120 2–3 NMF*
Dumbbell bench press 110–11 2–3 12+ 12Chin-up 92–93 2–3 NMF*or Assisted chin-up 94–95
Chin-up 94 2–3 12+ 12 (Var.)
Body weight squat 58 2–3 NMF*
Dumbbell shoulder press 125 2–3 12+ 12Reverse crunch 164 2–3 NMF*
One-arm row 98–99 2–3 12+ 12Prone plank 174 2–3 NMF*
Barbell deadlift 86–87 2–3 12+ 12Side plank 175 2–3 NMF*
Sit-up 163 2–3 NMF*
COOL DOWN ROUTINECOOL DOWN ROUTINE
Warm down 5 minsWarm down 5 mins
Developmental stretching (pp. 208–13) 15 minsDevelopmental stretching (pp. 208–13) 15 mins
■ DURATION OF PROGRAM6 weeks
■ FREQUENCY OF PROGRAM3 workouts/week, 1–2 days’ rest between workouts
■ RECOVERY TIME30 secs–1 min between exercises
■ DURATION OF PROGRAM6 weeks
■ FREQUENCY OF PROGRAM3 workouts/week, 1–2 days’ rest between workouts
■ RECOVERY TIME30 secs–1 min between exercises
(RM)
*NMF—Near Muscular Failure
BASIC PROGRAMS
M U S C U L A R E N D U R A N C E

224
BODY SCULPTING
Q | What do the charts show?A | There are three programs here—a basic routine that uses resistance machines, body weight, and free weights (pp. 224–27), then two split routines (pp. 228–29) that enable you to split your training over different days and different types of exercises.
Q | How do I use the basic programs?A | Work through each training program from the top down, after you have warmed up your muscles. Each of the featured exercises includes a page reference to its step-by-step instruction in the main part of the book. This is followed by the number of sets, reps, and amount of weight you should use, followed by a cool down routine. The weight you should use for each exercise is expressed either in terms of your personal RM (Rep Maximum) for the machines and free weights, or as NMF (Near Muscular Failure) when you are using your own body weight. The approximate duration, the frequency of each program, and the recovery time between each set of exercises is provided at the bottom of the chart.
Q | What is the free weight “mix and match” chart?A | The “mix and match” chart divides the exercises by body part, starting with the chest then finishing with the biceps. You can create your own exercise program by choosing one exercise from each body part section, and perform the stated number of sets and reps. Program duration, frequency, and recovery time is given at the end. You can swap exercises for each training session as you require. As always, the chart starts with a warm-up and finishes with a cool down.
Q | What is a split program?A | A split program enables you to break up your training over more than one day, the theory being that you can train more intensively—for example, on Day 1 you
exercise your chest, shoulders and arms, and on Day 2 you train your back and legs, while your chest, shoulders and arms are in their recovery phase. There are two split programs provided on pp. 226–27.
Q | How do I use the split program (option 1)?A | Option 1 provides a program that runs over two days (a “two-day split”). The information is arranged in the same way as for the basic programs but the days of the week on which you train or rest are provided over an alternating two-week period in the box at the bottom. The letters A or B indicate which body parts are being trained. Once you reach the end of the two-week period, simply repeat it all over again for the duration of the program.
Q | How do I use the split program (option 2)?A | Option 2 provides a split that is broken up into functional exercises and isolation exercises. Functional exercises work more than one muscle at a time. Isolation exercises work only one muscle at a time. So this split program allows adequate recovery time by working your body in different ways. The information is arranged in the same way as for the Option 1 split program—the days of the week on which you train or rest are provided over an alternating two-week period in the box at the bottom. The letters A or B indicate whether you are on a functional or isolation day. Once you have completed the two-week period, simply repeat it for the duration of the program.
Q | What will I achieve?A | The programs are designed to increase your muscle mass and will help to reducing your body fat.
Q | Are the physique training exercises functional?A | As far as possible, yes. More often than not it is better to perform exercises that enhance the functional performance of the body and mimimise the risk of developing postural, muscular imbalances. Generally speaking, the more “isolated”—focused on one individual muscle—an exercise is, the less functional it will be. By their nature, resistance machines also provide a far less functional form of training. The compound, multijoint exercises, the pushes, pulls, squats and so on can be seen as more functional. The isolation exercises have, however, been included in some of the accompanying programs—these are fine to use as long as their limited nature is recognized.
Many people who take up resistance training want a better “physique.” By this, they imagine more muscle and better muscle definition provided not only by larger muscles but also by reduced body fat levels. A good analogy is to image the difference between a golf ball under a comforter and a soccer ball under a sheet. Aiming for that “beach” body is the purpose of the physique training programs.
P R O G R A M S

225
BASIC PROGRAMS
CONTINUED
Mobilization warm-up (pp. 46–47) 10 mins
EXERCISE PAGE SETS WEIGHT
Push-up 120 3–6 NMF*
Chin-up 94–95 3–6 NMF*or Assisted chin-up 92 3–6 NMF*
Body weight squat 58 3–6 NMF*
Bar dip 141 3–6 NMF*
Reverse crunch 164 3–6 NMF*
Prone plank 174 3–6 NMF*
COOL DOWN ROUTINE COOL DOWN ROUTINE
Warm down 5 mins
Developmental stretching (pp. 208–13) 15 mins Developmental stretching (pp. 208–13) 15 mins
Warm down 5 mins
Side plank 175 3–6 NMF*
Sit-up 163 3–6 NMF*
MACHINE BODY WEIGHT
Mobilization warm-up (pp. 46–47) 10 mins
EXERCISE PAGE SETS REPS WEIGHT
Machine bench press 118–19 3–6 6–12 12or Machine fly*
Seated pulley row 96–97 3–6 6–12 12
Machine shoulder press 1 25 3–6 6–12 12or Upright pulley row* 127 3–6 6–12 12
Lat pull-down 93 3–6 6–12 12
Machine leg extension 80–81 3–6 6–12 12or 45-degree leg press* 78–79
Machine calf raise 84–85 3–6 6–12 12
Triceps push-down 148–49 3–6 6–12 12
Pulley curl 154–55 3–6 6–12 12or Reverse pulley curl* 156–57
■ DURATION OF PROGRAM6–8 weeks
■ FREQUENCY OF PROGRAM3 workouts/week, 2 days’ rest between workouts
■ RECOVERY TIME30 secs–1 min 30 secs between exercises
■ DURATION OF PROGRAM6–8 weeks
■ FREQUENCY OF PROGRAM3 workouts/week, 2 days’ rest between workouts
■ RECOVERY TIME30 secs–1 min 30 secs between exercises
*NMF—Near Muscular Failure
(RM)
B O D Y S C U L P T I N G : B A S I C P R O G R A M S
*Alternate every session

226
BASIC PROGRAMS (CONTINUED)
Mobilization warm-up (pp. 46–47) 10 mins FREEWEIGHT “Mix and match” continued
EXERCISE PAGE SETS REPS WEIGHT EXERCISE PAGE SETS REPS WEIGHT
CHEST EXERCISES (CHOOSE ONE…) LEG EXERCISES (CHOOSE ONE…)
Dumbbell bench press 110–11 3–6 6–12 12–14 Back squat 64–65 3–6 6–12 12–14
Barbell bench press 110–11 3–6 6–12 12–14 Front barbell squat 66–67 3–6 6–12 12–14
Flat dumbbell fly 114 3–6 6–12 12–14 (Var.)
Forward lunge 74 3–6 6–12 12–14or Dumbbell split squat 68
Incline fly 114–15 3–6 6–12 12–14 Barbell step-up 76–77 3–6 6–12 12–14
BACK EXERCISES (CHOOSE ONE…) LOWER BACK EXERCISES (CHOOSE ONE…)
One-arm row 98–99 3–6 6–12 12–14 Good morning barbell 104–05 3–6 6–12 12–14
Bend forward barbell row 100–01 3–6 6–12 12–14 Back extension 104–05 3–6 6–12 12–14
Lat pull down 93 3–6 6–12 12–14 Straight-leg deadlift 85 3–6 6–12 12–14
Barbell pull-over 102–03 3–6 6–12 12–14 Ball back extension 171 3–6 6–12 12–14
SHOULDER EXERCISES (CHOOSE ONE…) TRUNK EXERCISES (CHOOSE ONE…)
Dumbbell shoulder press 125 3–6 6–12 12–14 Abs crunch or sit-up 162–63 3–6 6–12 12–14
Military barbell press 124 3–6 6–12 12–14 Prone pank 174 3–6 6–12 12–14
Upright row var 126–27 3–6 6–12 12–14 Side plank 175 3–6 6–12 12–14
Any shoulder raise 130–33 3–6 6–12 12–14 V leg raise 176 3–6 6–12 12–14
FREE WEIGHT “MIX AND MATCH”
(RM)(RM)
P R O G R A M S
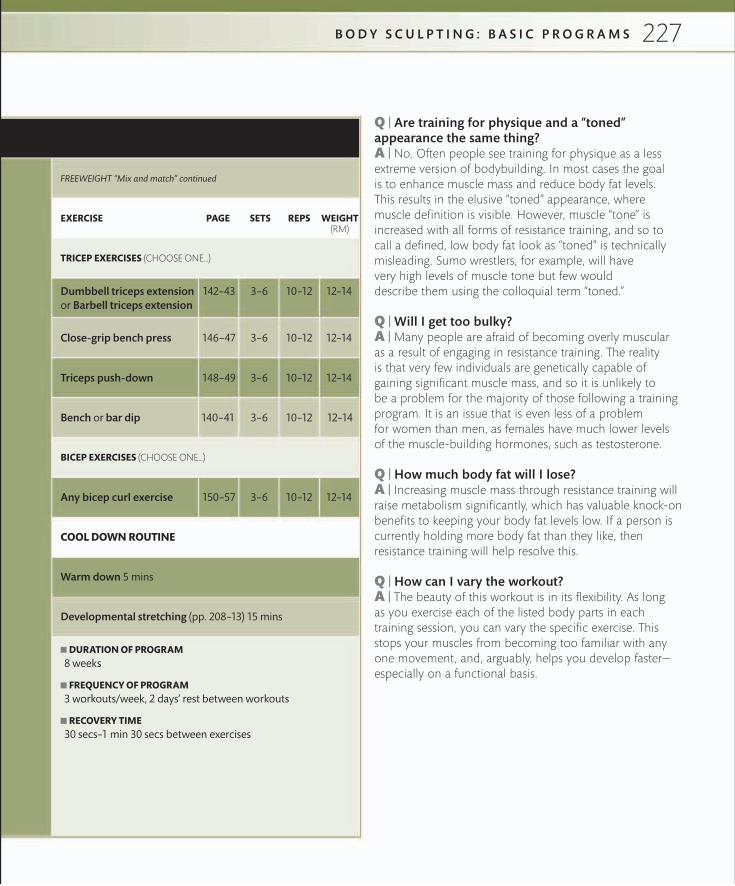
227
FREEWEIGHT “Mix and match” continued
EXERCISE PAGE SETS REPS WEIGHT
TRICEP EXERCISES (CHOOSE ONE…)
Dumbbell triceps extension 142–43 3–6 10–12 12–14or Barbell triceps extension
Close-grip bench press 146–47 3–6 10–12 12–14
Triceps push-down 148–49 3–6 10–12 12–14
Bench or bar dip 140–41 3–6 10–12 12–14
BICEP EXERCISES (CHOOSE ONE…)
Any bicep curl exercise 150–57 3–6 10–12 12–14
COOL DOWN ROUTINE
Warm down 5 mins
Developmental stretching (pp. 208–13) 15 mins
■ DURATION OF PROGRAM8 weeks
■ FREQUENCY OF PROGRAM3 workouts/week, 2 days’ rest between workouts
■ RECOVERY TIME30 secs–1 min 30 secs between exercises
(RM)
Q | Are training for physique and a “toned” appearance the same thing? A | No. Often people see training for physique as a less extreme version of bodybuilding. In most cases the goal is to enhance muscle mass and reduce body fat levels. This results in the elusive “toned” appearance, where muscle definition is visible. However, muscle “tone” is increased with all forms of resistance training, and so to call a defined, low body fat look as “toned” is technically misleading. Sumo wrestlers, for example, will have very high levels of muscle tone but few would describe them using the colloquial term “toned.”
Q | Will I get too bulky?A | Many people are afraid of becoming overly muscular as a result of engaging in resistance training. The reality is that very few individuals are genetically capable of gaining significant muscle mass, and so it is unlikely to be a problem for the majority of those following a training program. It is an issue that is even less of a problem for women than men, as females have much lower levels of the muscle-building hormones, such as testosterone.
Q | How much body fat will I lose?A | Increasing muscle mass through resistance training will raise metabolism significantly, which has valuable knock-on benefits to keeping your body fat levels low. If a person is currently holding more body fat than they like, then resistance training will help resolve this.
Q | How can I vary the workout?A | The beauty of this workout is in its flexibility. As long as you exercise each of the listed body parts in each training session, you can vary the specific exercise. This stops your muscles from becoming too familiar with any one movement, and, arguably, helps you develop faster—especially on a functional basis.
B O D Y S C U L P T I N G : B A S I C P R O G R A M S
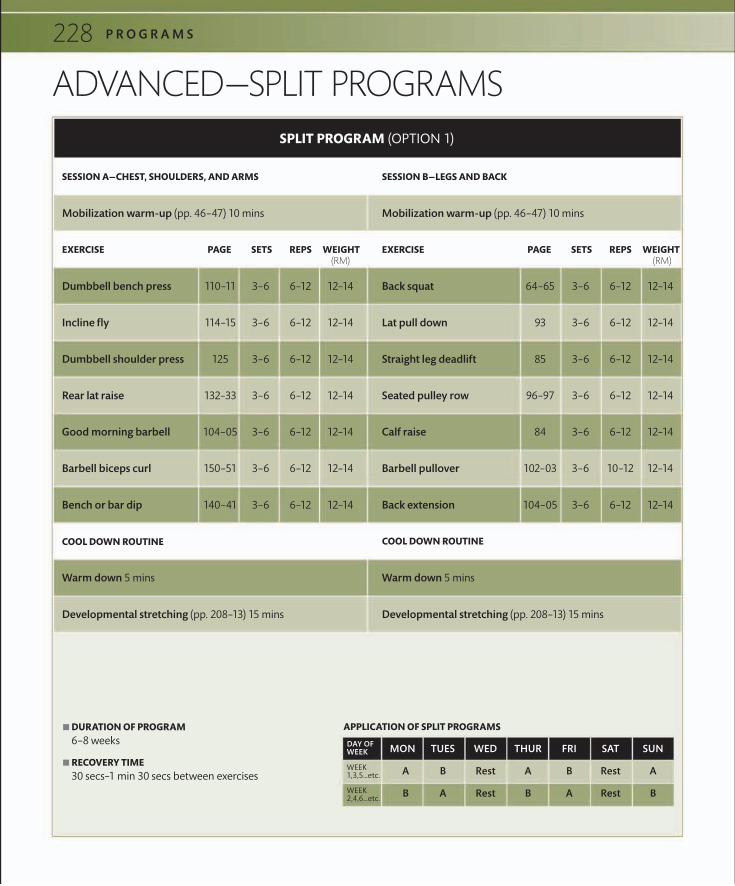
228
ADVANCED—SPLIT PROGRAMS
■ DURATION OF PROGRAM6–8 weeks
■ RECOVERY TIME30 secs–1 min 30 secs between exercises
APPLICATION OF SPLIT PROGRAMS
WEEK2,4,6…etc.
WEEK1,3,5…etc.
DAY OF WEEK
SESSION A—CHEST, SHOULDERS, AND ARMS
COOL DOWN ROUTINE
Warm down 5 mins
Developmental stretching (pp. 208–13) 15 mins
Mobilization warm-up (pp. 46–47) 10 mins
EXERCISE PAGE SETS REPS WEIGHT
Dumbbell bench press 110–11 3–6 6–12 12–14
Incline fly 114–15 3–6 6–12 12–14
Dumbbell shoulder press 125 3–6 6–12 12–14
Rear lat raise 132–33 3–6 6–12 12–14
Good morning barbell 104–05 3–6 6–12 12–14
Bench or bar dip 140–41 3–6 6–12 12–14
Barbell biceps curl 150–51 3–6 6–12 12–14
SPLIT PROGRAM (OPTION 1)
(RM)
SESSION B—LEGS AND BACK
COOL DOWN ROUTINE
Warm down 5 mins
Developmental stretching (pp. 208–13) 15 mins
Mobilization warm-up (pp. 46–47) 10 mins
EXERCISE PAGE SETS REPS WEIGHT
Back squat 64–65 3–6 6–12 12–14
Lat pull down 93 3–6 6–12 12–14
Straight leg deadlift 85 3–6 6–12 12–14
Seated pulley row 96–97 3–6 6–12 12–14
Calf raise 84 3–6 6–12 12–14
Back extension 104–05 3–6 6–12 12–14
Barbell pullover 102–03 3–6 10–12 12–14
(RM)
MON TUES WED THUR FRI SAT SUN
A B Rest A B Rest A
B A Rest B A Rest B
P R O G R A M S

229
SESSION A—FUNCTIONAL DAY SESSION B—ISOLATION DAY
Triceps push-down 148–49 2 10–12 12–14
Calf raise 84 2 10–12 12–14
COOL DOWN ROUTINE COOL DOWN ROUTINE
Warm down 5 mins Warm down 5 mins
Developmental stretching (pp. 208–13) 15 mins Developmental stretching (pp. 208–13) 15 mins
SPLIT PROGRAM (OPTION 2)
Mobilization warm-up (pp. 46–47) 10 mins Mobilization warm-up (pp. 46–47) 10 mins
EXERCISE PAGE SETS REPS WEIGHT EXERCISE PAGE SETS REPS WEIGHT
Barbell bench press 110–11 2 10–12 12–14 Pulley cross-over 116–17 2 10–12 12–14
Chin-up 94–95 2 10–12 12–14 Straight-arm pull-down 106–07 2 10–12 12–14
Dumbbell shoulder press 125 2 10–12 12–14 Any shoulder raise 130–33 2 10–12 12–14
Back squat 64–65 2 10–12 12–14 Machine leg extension 81 2 10–12 12–14
Straight-leg deadlift 85 2 10–12 12–14 Machine leg curl 80 2 10–12 12–14
Any bicep curl 150–57 2 10–12 12–14
Any upright row 126–27 2 10–12 12–14 Dumbbell shoulder shrug 128–29 2 10–12 12–14
■ DURATION OF PROGRAM6–8 weeks
■ RECOVERY TIME30 secs–1 min 30 secs between exercises
(RM) (RM)
B O D Y S C U L P T I N G : A D V A N C E D – S P L I T P R O G R A M S
APPLICATION OF SPLIT PROGRAMS
WEEK2,4,6…etc.
WEEK1,3,5…etc
DAY OF WEEK MON TUES WED THUR FRI SAT SUN
A B Rest A B Rest A
B A Rest B A Rest B
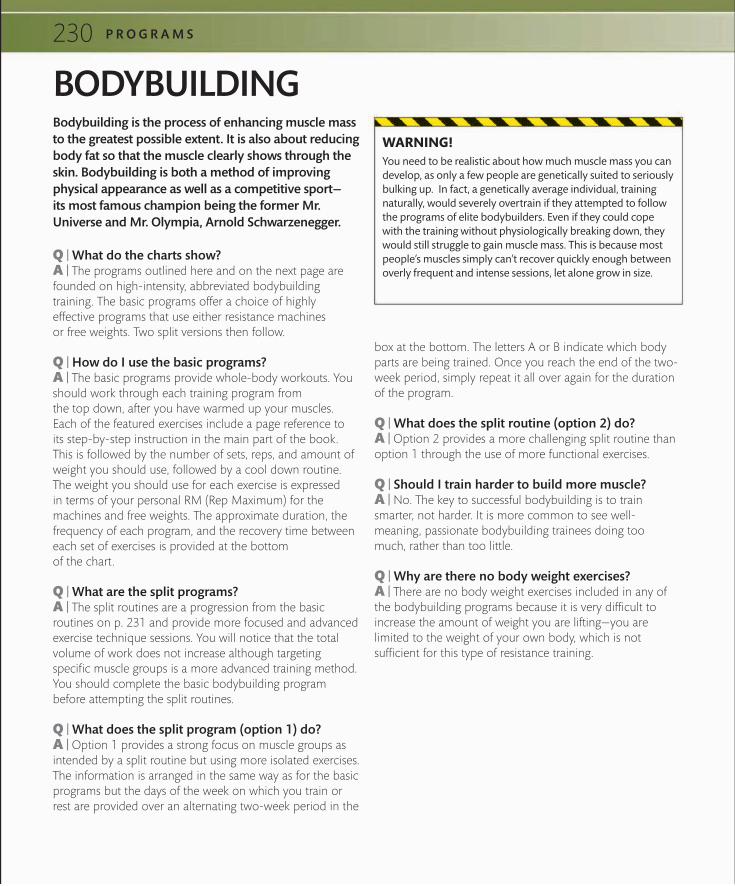
230
Q | What do the charts show?A | The programs outlined here and on the next page are founded on high-intensity, abbreviated bodybuilding training. The basic programs offer a choice of highly effective programs that use either resistance machines or free weights. Two split versions then follow.
Q | How do I use the basic programs?A | The basic programs provide whole-body workouts. You should work through each training program from the top down, after you have warmed up your muscles. Each of the featured exercises include a page reference to its step-by-step instruction in the main part of the book. This is followed by the number of sets, reps, and amount of weight you should use, followed by a cool down routine. The weight you should use for each exercise is expressed in terms of your personal RM (Rep Maximum) for the machines and free weights. The approximate duration, the frequency of each program, and the recovery time between each set of exercises is provided at the bottom of the chart.
Q | What are the split programs?A | The split routines are a progression from the basic routines on p. 231 and provide more focused and advanced exercise technique sessions. You will notice that the total volume of work does not increase although targeting specific muscle groups is a more advanced training method. You should complete the basic bodybuilding program before attempting the split routines.
Q | What does the split program (option 1) do?A | Option 1 provides a strong focus on muscle groups as intended by a split routine but using more isolated exercises. The information is arranged in the same way as for the basic programs but the days of the week on which you train or rest are provided over an alternating two-week period in the
BODYBUILDINGWARNING!You need to be realistic about how much muscle mass you can develop, as only a few people are genetically suited to seriously bulking up. In fact, a genetically average individual, training naturally, would severely overtrain if they attempted to follow the programs of elite bodybuilders. Even if they could cope with the training without physiologically breaking down, they would still struggle to gain muscle mass. This is because most people’s muscles simply can’t recover quickly enough between overly frequent and intense sessions, let alone grow in size.
box at the bottom. The letters A or B indicate which body parts are being trained. Once you reach the end of the two-week period, simply repeat it all over again for the duration of the program.
Q | What does the split routine (option 2) do?A | Option 2 provides a more challenging split routine than option 1 through the use of more functional exercises.
Q | Should I train harder to build more muscle?A | No. The key to successful bodybuilding is to train smarter, not harder. It is more common to see well- meaning, passionate bodybuilding trainees doing too much, rather than too little.
Q | Why are there no body weight exercises?A | There are no body weight exercises included in any of the bodybuilding programs because it is very difficult to increase the amount of weight you are lifting—you are limited to the weight of your own body, which is not sufficient for this type of resistance training.
Bodybuilding is the process of enhancing muscle mass to the greatest possible extent. It is also about reducing body fat so that the muscle clearly shows through the skin. Bodybuilding is both a method of improving physical appearance as well as a competitive sport— its most famous champion being the former Mr. Universe and Mr. Olympia, Arnold Schwarzenegger.
P R O G R A M S
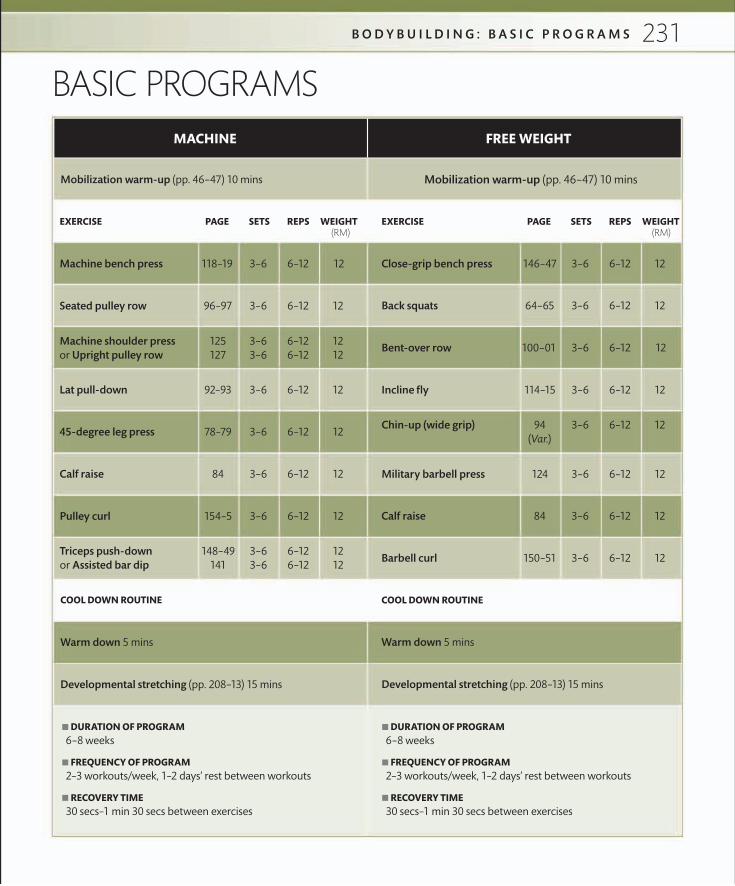
231
BASIC PROGRAMS
Mobilization warm-up (pp. 46–47) 10 mins
EXERCISE PAGE SETS REPS WEIGHT
Close-grip bench press 146–47 3–6 6–12 12
Back squats 64–65 3–6 6–12 12
Bent-over row 100–01 3–6 6–12 12
Incline fly 114–15 3–6 6–12 12
Chin-up (wide grip) 94 3–6 6–12 12 (Var.)
Military barbell press 124 3–6 6–12 12
COOL DOWN ROUTINE COOL DOWN ROUTINE
Warm down 5 mins
Developmental stretching (pp. 208–13) 15 mins Developmental stretching (pp. 208–13) 15 mins
Warm down 5 mins
Calf raise 84 3–6 6–12 12
Barbell curl 150–51 3–6 6–12 12
MACHINE FREE WEIGHT
Mobilization warm-up (pp. 46–47) 10 mins
EXERCISE PAGE SETS REPS WEIGHT
Machine bench press 118–19 3–6 6–12 12
Seated pulley row 96–97 3–6 6–12 12
Machine shoulder press 125 3–6 6–12 12or Upright pulley row 127 3–6 6–12 12
Lat pull-down 92–93 3–6 6–12 12
45-degree leg press 78–79 3–6 6–12 12
Calf raise 84 3–6 6–12 12
Triceps push-down 148–49 3–6 6–12 12or Assisted bar dip 141 3–6 6–12 12
Pulley curl 154–5 3–6 6–12 12
■ DURATION OF PROGRAM6–8 weeks
■ FREQUENCY OF PROGRAM2–3 workouts/week, 1–2 days’ rest between workouts
■ RECOVERY TIME30 secs–1 min 30 secs between exercises
■ DURATION OF PROGRAM6–8 weeks
■ FREQUENCY OF PROGRAM2–3 workouts/week, 1–2 days’ rest between workouts
■ RECOVERY TIME30 secs–1 min 30 secs between exercises
(RM)(RM)
B O D Y B U I L D I N G : B A S I C P R O G R A M S

232
SPLIT PROGRAMS
SESSION A: CHEST, SHOULDERS, AND ARMS SESSION B: LEGS AND BACK
Developmental stretching (pp. 208–13) 15 mins Developmental stretching (pp. 208–13) 15 mins
BASIC SPLIT PROGRAM (OPTION 1)
Mobilization warm-up (pp. 46–47) 10 mins Mobilization warm-up (pp. 46–47) 10 mins
EXERCISE PAGE SETS REPS WEIGHT EXERCISE PAGE SETS REPS WEIGHT
Machine bench press 118–19 3–6 6–12 10–12 Machine leg extension 80–81 3–6 6–12 10–12
Machine shoulder press 125 3–6 6–12 10–12 (Var.)
Seated pulley row 96–97 3–6 6–12 10–12
Pulley cross-over 116–17 3–6 6–12 10–12 Machine leg curl 80–81 3–6 6–12 10–12
Any lateral raise 131–33 3–6 6–12 10–12Dumbbell pull-over 104–05 3–6 6–12 10–12 (Var.)
Preacher curl 154–55 3–6 6–12 10–12 Calf raise 125 3–6 6–12 10–12
COOL DOWN ROUTINE COOL DOWN ROUTINE
Warm-down 5 mins Warm-down 5 mins
Tricep kickback 150–51 3–6 6–12 10–12 One-arm row 98–99 3–6 6–12 10–12
■ DURATION OF PROGRAM6–8 weeks
■ RECOVERY TIME30 secs–1 min 30 secs between exercises
(RM) (RM)
APPLICATION OF SPLIT PROGRAMS
WEEK2,4,6…etc.
WEEK1,3,5…etc.
DAY OF WEEK MON TUES WED THUR FRI SAT SUN
A B Rest A B Rest A
B A Rest B A Rest B
P R O G R A M S

233
SESSION A: CHEST, SHOULDERS, AND ARMS SESSION B: LEGS AND BACK
Developmental stretching (pp. 208–13) 15 mins Developmental stretching (pp. 208–13) 15 mins
ADVANCED SPLIT PROGRAM (OPTION 2 )
Mobilization warm-up (pp. 46–47) 10 mins Mobilization warm-up (pp. 46–47) 10 mins
EXERCISE PAGE SETS REPS WEIGHT EXERCISE PAGE SETS REPS WEIGHT
Barbell bench press 110–11 3–6 6–12 10–12 Back squat 64–65 3–6 6–12 10–12
Military barbell press 124 3–6 6–12 10–12 Barbell pull-over 102–03 3–6 6–12 10–12
Incline fly 114–15 3–6 6–12 10–12 Romanian deadlift 88–89 3–6 6–12 10–12
Upright barbell row 126–27 3–6 6–12 10–12 Bent-over row 100–01 3–6 6–12 10–12
Concentration curl 152–53 3–6 6–12 10–12 Calf raise 125 3–6 6–12 10–12
COOL DOWN ROUTINE COOL DOWN ROUTINE
Warm-down 5 mins Warm-down 5 mins
Barbell curl 150–51 3–6 6–12 10–12
■ DURATION OF PROGRAM6–8 weeks
■ RECOVERY TIME30 secs–1 min 30 secs between exercises
(RM) (RM)
B O D Y B U I L D I N G : S P L I T P R O G R A M S
APPLICATION OF SPLIT PROGRAMS
WEEK2,4,6…etc
WEEK1,3,5…etc
DAY OF WEEK MON TUES WED THUR FRI SAT SUN
A B Rest A B Rest A
B A Rest B A Rest B

234 P R O G R A M S
MAXIMAL STRENGTHThe following programs will help you to develop a high level of strength from head to toe—enabling you to perform any real-world movement that may ever be asked of you—through a series of functional exercises. They build on the strength endurance program given on pages 222–223 and will build your strength over a 14-week period.
Q | What do the charts show?A | There are two separate programs to follow. The first is a basic, but highly effective whole-body program, and the second a more advanced split program. The programs are equally effective in achieving your strength goals, but the split program allows you to focus specifically on a group of muscles during a training session, allowing a more targeted approach. The information is arranged in the same way as for the basic programs but the days of the week on which you train or rest are provided over an alternating two-week period in the box at the bottom. The letters A or B indicate which body parts are being trained. Once you reach the end of the two-week period, simply repeat it all over again for the duration of the program.
Q | How do I follow the programs?A | Begin the cycle by lifting a weight that is challenging for six repetitions, but that allows comfortable completion of all sets. The goal of the program is to progress toward lifting the largest weight you can, once only. Every two weeks, the number of repetitions decreases, but with a weekly increase of weight: 2 lb–5½ lb (1–2.5 kg) upper body; 4½ lb–9 lb (2–4 kg) lower body. You should be aiming to lift the largest amount of weight once in the final week—week 14.
■ DURATION OF PROGRAM8 weeks
■ FREQUENCY OF PROGRAM3 workouts/week, 2 days’ rest between workouts
■ RECOVERY TIME2–5 minutes between exercises
Mobilization warm-up (pp. 46–47) 10 mins
WHOLE-BODY PROGRAM
EXERCISE PAGE SETS REPS WEIGHT
Dumbbell bench press 110–11 3 6 6
Back squat 64–65 3 6 6
Lat pull-down 93 3 6
Military barbell press 124 3 6 6
Bent-over row 100–01 3 6 6
LOADS AND INTENSITIES
WEEK SETS REPS WEIGHT
Weeks 1–2 3 6 6
Weeks 3–4 3 4 4
Weeks 6–5 4 3 3
Weeks 7–8 4 1–2 2
COOL DOWN ROUTINE
Warm down 5 mins
Developmental stretching (pp. 208–13) 15 mins
(RM)
(RM)

235M A X I M A L S T R E N G T H
LOADS AND INTENSITIES LOADS AND INTENSITIES
WEEK SETS REPS WEIGHT WEEK SETS REPS WEIGHT
Weeks 1–2 3 6 6 Weeks 1–2 3 6 6
Weeks 3–4 3 4 4 Weeks 3–4 3 4 4
Weeks 6–5 4 3 3 Weeks 6–5 4 3 3
Weeks 7–8 4 1–2 2 Weeks 7–8 4 2 2
COOL DOWN ROUTINE COOL DOWN ROUTINE
Warm down 5 mins Warm down 5 mins
Developmental stretching (pp. 208–13) 15 mins Developmental stretching (pp. 208–13) 15 mins
SESSION A: CHEST, SHOULDERS, AND ARMS SESSION B: LEGS AND BACK
ADVANCED SPLIT PROGRAM
Mobilization warm-up (pp. 46–47) 10 mins Mobilization warm-up (pp. 46–47) 10 mins
EXERCISE PAGE SETS REPS WEIGHT EXERCISE PAGE SETS REPS WEIGHT
Dumbbell bench press 110–11 3 6 6 Straight arm pull down 106–07 3 6 6
Shoulder shrug fom hang 129 3 6 6 Front barbell squat 66 3 6 6
Incline fly 114–15 3 6 6 Good morning barbell 104–05 3 6 6
Incline bicep curl 152 3 6 6 Barbell step-up 76 3 6 6
Prone triceps extension 144 3 6 6 Prone row 106–07 3 6 6
■ DURATION OF PROGRAM8 weeks
■ RECOVERY TIME2–5 minutes between exercises
(RM)
(RM)
(RM)
(RM)
APPLICATION OF SPLIT PROGRAMS
WEEK2,4,6…etc.
WEEK1,3,5…etc.
DAY OF WEEK MON TUES WED THUR FRI SAT SUN
A B Rest A B Rest A
B A Rest B A Rest B
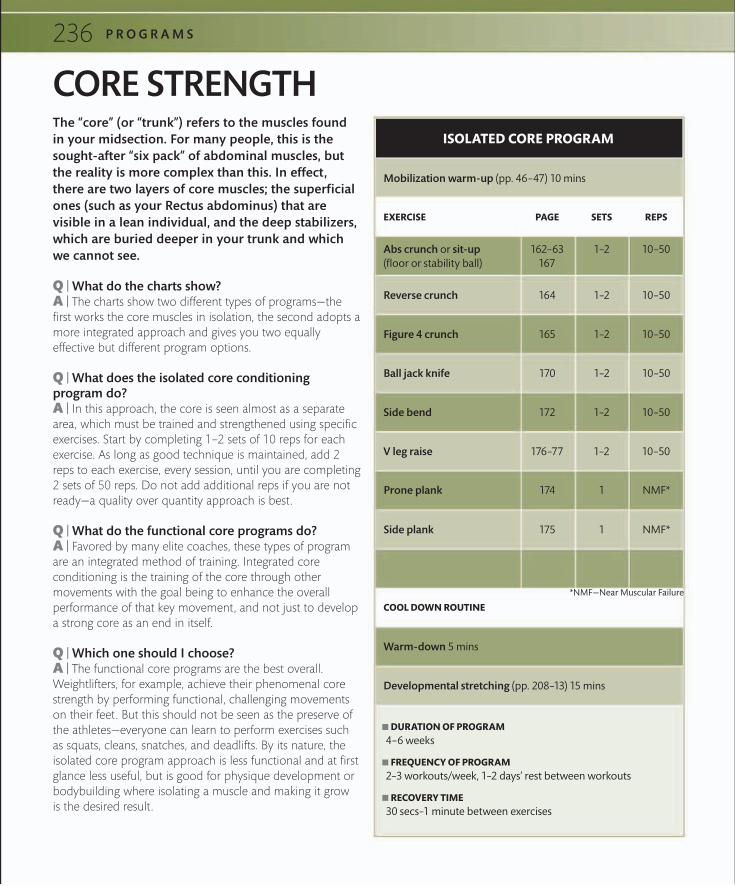
236
CORE STRENGTH The “core” (or “trunk”) refers to the muscles found in your midsection. For many people, this is the sought-after “six pack” of abdominal muscles, but the reality is more complex than this. In effect, there are two layers of core muscles; the superficial ones (such as your Rectus abdominus) that are visible in a lean individual, and the deep stabilizers, which are buried deeper in your trunk and which we cannot see.
Q | What do the charts show?A | The charts show two different types of programs—the first works the core muscles in isolation, the second adopts a more integrated approach and gives you two equally effective but different program options.
Q | What does the isolated core conditioning program do?A | In this approach, the core is seen almost as a separate area, which must be trained and strengthened using specific exercises. Start by completing 1–2 sets of 10 reps for each exercise. As long as good technique is maintained, add 2 reps to each exercise, every session, until you are completing 2 sets of 50 reps. Do not add additional reps if you are not ready—a quality over quantity approach is best.
Q | What do the functional core programs do?A | Favored by many elite coaches, these types of program are an integrated method of training. Integrated core conditioning is the training of the core through other movements with the goal being to enhance the overall performance of that key movement, and not just to develop a strong core as an end in itself.
Q | Which one should I choose?A | The functional core programs are the best overall. Weightlifters, for example, achieve their phenomenal core strength by performing functional, challenging movements on their feet. But this should not be seen as the preserve of the athletes—everyone can learn to perform exercises such as squats, cleans, snatches, and deadlifts. By its nature, the isolated core program approach is less functional and at first glance less useful, but is good for physique development or bodybuilding where isolating a muscle and making it grow is the desired result.
Mobilization warm-up (pp. 46–47) 10 mins
COOL DOWN ROUTINE
Warm-down 5 mins
Developmental stretching (pp. 208–13) 15 mins
ISOLATED CORE PROGRAM
EXERCISE PAGE SETS REPS
Abs crunch or sit-up 162–63 1–2 10–50(floor or stability ball) 167
Reverse crunch 164 1–2 10–50
Figure 4 crunch 165 1–2 10–50
Ball jack knife 170 1–2 10–50
Side bend 172 1–2 10–50
V leg raise 176–77 1–2 10–50
Prone plank 174 1 NMF*
Side plank 175 1 NMF*
■ DURATION OF PROGRAM4–6 weeks
■ FREQUENCY OF PROGRAM2–3 workouts/week, 1–2 days’ rest between workouts
■ RECOVERY TIME30 secs–1 minute between exercises
P R O G R A M S
*NMF—Near Muscular Failure

237
OPTION 1 OPTION 2
COOL DOWN ROUTINE COOL DOWN ROUTINE
Warm-down 5 mins Warm-down 5 mins
Developmental stretching (pp. 208–13) 15 mins Developmental stretching (pp. 208–13) 15 mins
FUNCTIONAL CORE PROGRAMS
Mobilization warm-up (pp. 46–47) 10 mins Mobilization warm-up (pp. 46–47) 10 mins
EXERCISE PAGE SETS REPS WEIGHT EXERCISE PAGE SETS REPS WEIGHT
Power clean 182–83 2–6 6 6 Power snatch 184–85 2–6 6 6
Standing pulley row 98–99 2–6 6 6 Frame-supported push-up 121 2–6 6 6
Barbell bench press 110–11 2–6 6 6 One-arm row 98–99 2–6 6 6
Bent-over row 100–01 2–6 6 6 Suitcase deadlift 177 2–6 6 6
Military barbell press 124–25 2–6 6 6 Back squat 64–65 2–6 6 6
Front barbell squat 66–67 2–6 6 6
Barbell deadlift 86–87 2–6 6 6
Straight-leg deadlift 85 2–6 6 6
Overhead squat 194–95 2–6 6 6 Overhead barbell lunge 73 2–6 6 6
LOAD AND VOLUME INCREASESAs long as good technique is maintained at all times you can either add:2–4 lb (1–2 kg) for upper body4–9 lb (2–4 kg) for lower body or add additional sets, up to a maximum of 6 sets.
■ DURATION OF PROGRAMS4–6 weeks
■ FREQUENCY OF PROGRAMS2–3 workouts/week, 1–2 days’ rest between workouts
■ RECOVERY TIME2–5 minutes between exercises
(RM) (RM)
C O R E S T R E N G T H

238
SPORTS-SPECIFIC EXERCISES
P R O G R A M S
Q | What do squats do?A | Squats are the key strength builder for the entire core of the body. Often squats are seen as a leg exercise or more specifically a quadriceps exercise, but they actually train the muscles of the feet, ankle stabilizers, muscles of the lower leg, knee stabilizers, hamstrings, abductors and adductors, groin, glutes, and almost every muscle of the core region.
EXERCISE GROUP:SQUATS
TypesBack squat (pp. 64–65) Sumo squat (p. 64 var.)Front barbell squat (pp. 66–67)Hack barbell squat (pp. 66–67)Heavy front squat (pp. 192–93)Overhead squat (pp. 194–95)
Q | What do split squats and lunges do?A | Split squats and lunges develop single leg strength. Most sports involve movements in which body weight is thrown onto the outside leg, which decelerates the athlete, who then has to accelerate rapidly in the opposite direction (“cutting”). This requires enormous strength and power in a single leg, so training to develop this strength is vital.
EXERCISE GROUP:SPLIT SQUATS AND LUNGES TypesDumbbell split squat (p. 68) Overhead split squat (p. 69)Bulgarian barbell split squat (p. 70)Bulgarian dumbbell split squat (p. 71)Barbell lunge (p. 72)Overhead barbell lunge (p. 73)Forward lunge (p. 74)Lateral lunge (p. 75)Barbell step-up (pp. 76–77)
Q | What do deadlifts (bent leg) do?A | The deadlifts (bent leg) are similar to squats (see above) but differ in terms of bar position. With the bar being lifted from the floor the mechanics of the exercise differs from squats in terms of how deeply the knees are bent and how much the torso leans forward. In the deadlift the bar is positioned forward on the athlete’s center of balance.
EXERCISE GROUP:DEADLIFTS (BENT LEG) TypesBarbell deadlift (pp. 86–87)Dumbbell deadlift (p. 87 var.) Suitcase deadlift (pp. 176–77)
All the exercises in this book provide great strength training in themselves. However, a large proportion are also of great benefit for training for specific sports. Almost all athletes, regardless of their chosen sport, will spend time in the gym performing specific strengthening and conditioning exercises that will help them excel in their chosen field.
Q | How do I read the charts?A | Each of the most sports-specific exercises featured in the book are grouped together into “exercise groups.” The “types” of exercise within each group are then listed beneath, with the corresponding page number to help you navigate around the book. Each exercise group is then discussed, reading across the page. Find out what each exercise group does for

239S P O R T S - S P E C I F I C E X E R C I S E S
Q | Why are squats important?A | Squats are vital for developing sports-specific leg strength, which is useful in its own right but is also the foundation for explosive jumping and sprinting power. Squats will make you stronger and more powerful, and improve your posture. They are also one of the best core strength exercises you can do. There are numerous variations of the squat. Which one you choose will depend on the exact demands of your sport.
Q | Which sports do squats apply to?A | The list of sports that benefit from squats is almost a comprehensive list of every sport ever invented. If you are a sportsperson you must include squats in your training program. (See pp. 246–47 for a full list of relevant sports.)
Q | Why are split squats and lunges important?A | In any sort of running action, an athlete is only ever on one leg, so strength and stability in a single leg is essential. For example, the potential for inefficiency, energy wastage, and injury in a sprinter (in track and field or on the wing in a team sport) who has not developed strength and stability in the ankle, knee, and hip joints is high. If your sport involves movement in multiple directions, as most do, practice lunging in multiple directions in training.
Q | Which sports do split squats and lunges apply to?A | There are very few sports where single leg strength is of little relevance—rowing and powerlifting are perhaps the key examples. So these exercises apply to lots of sports including soccer, rugby, basketball, tennis, and Australian rules football. Hockey players, wide receivers, cornerbacks, or running backs in football who are reguarly required to perform cutting movements will all benefit as well. (See pp. 246–47 for a full list of relevant sports.)
Q | Why are deadlifts (bent leg) important? A | As with the squats, deadlifts (bent leg) are important for all athletes but particularly those whose sports require high levels of gripping, lifting, and pulling. In addition, deadlifts variants, such as the suitcase deadlift, are highly effective core exercises, since in most sports, loads are rarely perfectly balanced. The suitcase deadlift is a very effective exercise for training the core to cope with lifting an uneven load.
Q | Which sports do deadlifts (bent leg) apply to?A | Deadlifts have been prescribed to judo players and hammer throwers and are of benefit to rowers, in terms of developing a base level of pulling strength, and rugby players, who are often expected to pull and lift opposition players physically. (See pp. 246–47 for a full list of relevant sports.)
the various muscles, why is it important for sports ability, and which sports the exercise is specifically useful for.
Q | Are these exercises only relevant to athletes?A | No. These exercises are useful for anyone interested in enhancing their sports performance, from beginner right through to high-level athletes.
Q | Why are these exercises termed sports-specific?A | Functional exercises that mirror the joint actions and forces experienced by athletes are also known as sports-specific. This is particularly the case when referring to dynamic lifts, favored by many elite coaches and athletes who work in sports that require highly explosive movements, such as football players and track and field athletes.

240 P R O G R A M S
Q | What do deadlifts (straight leg) do?A | The straight-leg versions of the deadlift (the “Good Morning” is a cross between a squat and a straight-leg deadlift) strengthen the hamstrings, lower back, and glutes. However, they are less functional than squats or deadlifts (bent leg), since the knees do not bend.
EXERCISE GROUP:DEADLIFTS (STRAIGHT LEG)
TypesStraight-leg deadlift (p. 85)Romanian deadlift (pp. 88–89)Good Morning barbell (pp. 104–05)
Q | What do pull- and chin-ups do?A | Pull- and chin-ups are excellent exercises for developing general strength in the pulling muscles of the arms and back as well as enhancing grip strength.
EXERCISE GROUP:PULL- AND CHIN-UPS TypesAssisted chin-up (pp. 92)Lat pull-down (p. 93)Wide-grip lat pull-down (p. 93 var.)Chin-up (pp. 94–95)Chin-up variable grip (p. 94 var.)
Q | What do standing rows do?A | The standing versions of the rowing exercises challenge and train the linkage of the upper body pulling movements to the lower body, via the core. Standing rows also develop grip strength.
EXERCISE GROUP:STANDING ROWS
TypesStanding pulley row (pp. 98–99)One-arm row (pp. 98–99)Bent-over row (pp. 100–01)Upright row (pp. 126–27)Upright dumbbell row (p. 126 var.)
Q | What do seated pulley rows do?A | Seated pulley rows work the upper body, particularly the back, and grip strength.
EXERCISE GROUP:SEATED PULLEY ROWS
TypesSeated pulley row (pp. 96–97)Standing pulley row (pp. 98–99)Prone row (pp. 106–07)

241S P O R T S - S P E C I F I C E X E R C I S E S
Q | Why are deadlifts (straight leg) important? A | The main importance for the deadlifts (straight leg) comes in enhancing hamstring strength to help prevent knee injuries, often in female athletes. Bodybuilders also use them for developing the hamstring muscle for aesthetic purposes.
Q | Which sports do deadlifts (straight leg) apply to?A | Aside from bodybuilding for aesthetic purposes, straight leg deadlifts are performed by MMA, judo, and hammer throwers, where superior hamstring strength and knee stability are required. (See pp. 246–47 for a full list of relevant sports.)
Q | Why are pull- and chin-ups important?A | Athough they are not particularly sports-specific (few sports require an athlete to lift their own body weight) they are important for climbers and gymnasts who need strength in these areas. They can also be useful in countering the development of muscular imbalances in athletes who place great emphasis on the development of chest exercises.
Q | Which sports do pull- and chin-ups apply to? A | Climbers and gymnasts, who constantly have to lift their own body weight, benefit most from these exercises. They are also useful for any sport that demands a high ability to grip and pull. Examples include hammer throwing, wrestling, judo, rowing, and rugby. Most other sports are also likely to benefit from these exercises during general conditioning phases of training. (See pp. 246–47 for a full list of relevant sports.)
Q | Why are standing rows important?A | In many sports, athletes attempt to lift and pull in a standing position. The standing row is very useful for training this action. The one-arm row is even more useful if performed without knee and hand support, which artificially helps support the body—in the real world, the body has to provide its own foundation internally.
Q | Which sports do standing rows apply to?A | Many sports benefit from the general, whole-body strength foundation that standing rows provide. Specifically, those sports which require pulling and lifting movements, executed in a standing position, such as hammer throwing, judo, MMA, rowing, and rugby. Standing rows are useful for most sports during foundation strength training. (See pp. 246–47 for a full list of relevant sports.)
Q | Which sports do seated pulley rows apply to? A | Rowing benefits most from seated pulley rows. As with pull- and chin-ups, these exercises may also benefit sports that require a high ability to grip and pull, such as hammer throwing, wrestling, judo, rowing, and rugby. However, the linkage of the pulling mechanics of the upper body, through the core and to the lower body will need to be trained separately. (See pp. 246–47 for a full list of relevant sports.)
Q | Why are seated pulley rows important?A | Developing strength in your back and upper body, especially for pulling movements, is very important for any athlete.

242 P R O G R A M S
Q | What do straight-arm pulls do?A | Straight-arm pulls strengthen the muscles used in bringing the arm down from an overhead postion through the sagital plane (head to toe direction) of the body.
EXERCISE GROUP:STRAIGHT-ARM PULLS
TypesBarbell pull-over (pp. 102–03)E-Z bar pull-over (p. 102 var.)Dumbbell pull-over (p. 102 var.)Straight-arm pull-down (pp. 106–07)
Q | What do pressing movements do?A | Pressing movements from a lying position, such as the ever-popular bench press, strengthen the chest, shoulders, and triceps.
EXERCISE GROUP:PRESSING MOVEMENTS: THE CHEST
TypesBarbell bench press (pp. 110–11)Dumbbell bench press (pp. 110–11) Bench press incline barbell (p. 112)Bench press incline dumbell (p. 113) Push-up (p. 120)Ball push-up (p. 120 var.)Frame-supported push-up (p. 121)Close-grip bench press (p. 146–47)Close-grip bench press (p. 147)Close-grip push-up (p. 146 var.)
Q | What do shoulder/overhead presses do?A | Overhead presses are similar to bench presses but with a different shoulder angle. They are excellent exercises for developing basic strength in overhead lifts and general shoulder strength and stability. These exercises are much better done in a standing position—the seated version is a bodybuilding variation.
EXERCISE GROUP:SHOULDER/OVERHEAD PRESSES
TypesMilitary barbell press (p. 124) Dumbbell shoulder press (p. 125)Push press (pp. 204–05)

243S P O R T S - S P E C I F I C E X E R C I S E S
Q | Why are straight-arm pulls important?A | Training the arms for sports where force is applied through a straight arm is important. As well as this, straight arm pulls are useful for injury prevention.
Q | Which sports do straight-arm pulls apply to?A | Sports that straight arm pulls apply to include swimming (butterfly and front crawl), fast bowling in cricket, and perhaps the tennis serve. However, the arm action in these sports is complex and needs other exercises for full strength conditioning. (See pp. 246–47 for a full list of relevant sports.)
Q | Why are pressing movements important?A | Developing the strength provided by pressing movements is useful in sports where competitors are required to perform one- or two-arm pressing movements such as pushing off from the floor or against an opponent.
Q | Which sports do pressing movements apply to?A | There is some benefit to wrestling, MMA, soccer (goalkeepers), and rugby, whose players need to apply pressing movements. There is also some carryover to sports such as boxing and shot-putting and to many other sports that require general shoulder strength, stability, and injury prevention. (See pp. 246–47 for a full list of relevant sports.)
Q | Which sports do shoulder/overhead presses apply to?A | Most sports will benefit from overhead pressing for general conditioning purposes. Punching in combat sports and shot-putting derive the greatest direct benefits. In rugby, the forward responsible for lifting in the line-out would also do well to press overhead. (See pp. 246–47 for a full list of relevant sports.)
Q | Why are shoulder/overhead presses important?A | When performed standing, shoulder/overhead presses involve the entire body from toe to finger tip. Unlike the pressing movements (above), the weight can be explosively driven up overhead. Exercises such as the push press are explosive versions of an overhead press and train almost every muscle, including legs, trunk, shoulders, and arms.

244 P R O G R A M S
Q | What do shoulder rotations do? A | The shoulder is a very mobile joint but because of this tends to be prone to injury, especially in the rotator cuff—the group of four muscles responsible for holding the ball and socket joint together and controlling all shoulder movements, such as internal and external rotations.
EXERCISE GROUP:SHOULDER ROTATIONS
TypesExternal dumbbell rotation (p. 135)Internal rotation (pp. 136–37)External rotation (pp. 136–37)
Q | What do cable chops/rotations do?A | Cable chops, such as the woodchop type exercises, help develop explosive rotational force and power, or conversely, help to train resisting rotational forces. Cable machines are very useful and versatile for this type of exercise so should be used to train almost any form of rotational exercise.
EXERCISE GROUP:CABLE CHOPS/ROTATIONS
TypesWoodchop (p. 178)Low pulley woodchop (p. 178 var.)
Q | What does the jump squat do?A | The jump squat delivers many of the benefits of the dynamic lifts, but without having to learn technical lifts.
EXERCISE GROUP:JUMP SQUAT
Q | What do dynamic lifts do?A | The dynamic lifts are designed to develop maximum power, which is perhaps the key determinant of sporting success. The dynamic lifts involve explosive, powerful, near simultaneous extension of the ankle, knee, and hip joints—the “triple extension.”
EXERCISE GROUP:DYNAMIC LIFTS
TypesPower clean (pp. 182–83)Power snatch (pp. 184–85)Power clean from hang (pp. 186–87)Power snatch from hang (pp. 188–89)Squat clean (pp. 190–91) Split snatch (pp. 200–01)Kettleball high pull (p. 204)

245S P O R T S - S P E C I F I C E X E R C I S E S
Q | Why are shoulder rotations important?A | Strengthening the muscles in the shoulder is very important for sports performance and injury prevention, so many strength coaches and physical therapists prescribe shoulder rotations for this reason. Be aware that other functional free weight exercises such as the snatch (see pp. 202–03) are also very useful for strengthening the rotator cuff.
Q | Which sports do shoulder rotations apply to?A | Almost all sports involving the shoulder joint will benefit from these exercises as a means of preventing shoulder injury. Even where other shoulder exercises are used it is still worth including shoulder rotations. Arm wrestling and perhaps racket sports may benefit from these exercises directly. (See pp. 246–47 for a full list of relevant sports.)
Q | Why are cable chops/rotations important?A | There are very few sports that do not require the development of rotational power—it is an essential part of any training program. If explosive rotation is desired the chop can be performed explosively in rotation. If stability and resistance is required the exercise can be performed with only the arms moving and the pillar (legs and core) fixed.
Q | Which sports do cable chops/rotations apply to?A | Almost every sport involves some movement in the transverse (rotational) plane. Some, such as golf, boxing, baseball, and shot-putting, are wholly reliant upon it. Sports which involve little rotation, such as powerlifting, are not likely to benefit much. Even in running, athletes are required to resist rotational forces which develop as a natural consequence of running mechanics. (See pp. 246–47 for a full list of relevant sports.)
Q | Why is the jump squat important?A | The dynamic lifts (above) are very important exercises but they are also take time to learn. Many athletes find that they spend so long trying to perfect the lifts that they never manage to handle any significant load in them. The jump squat is, however, simpler to perform but delivers similar benefits to the development of triple extension.
Q | Which sports does the jump squat apply to?A | As for the dynamic lifts, the jump squat is suitable for any sport that require speed, power, stability, balance, and control. (See pp. 246–47 for a full list of relevant sports.)
Q | Why are dynamic lifts important?A | Many sporting movements, such as jumping and sprinting, rely on the triple extension developed by dynamic lifts. As well as the lifting part of these exercises, the “catch” part is important, too, where the bar is decelerated. This can have a very important training effect, since in almost all sports the athlete is forced to decelerate; any change of direction or landing of a jump are key examples.
Q | Which sports do dynamic lifts apply to?A | Clearly dynamic weightlifters benefit from these exercises but almost every other sport that requires speed, power, stability, balance, and control will also benefit greatly. Something as simple as training the rapid splitting of the feet in the split versions of these lifts could have important impact on foot speed and agility. (See pp. 246–47 for a full list of relevant sports.)

246
SPORTS-SPECIFIC MATRIX
P R O G R A M S
American/Canadian Football
Australian Rules Football
Basketball
Boxing
Canoeing
Climbing
Cricket
Cycling
Fencing
Field Hockey
Gaelic Football
Golf
Gymnastics
Hurling
Ice Hockey
Ice Skating
Judo
Pressing m
ovemen
ts: the ch
est
Kayaking
Split sq
uats and lun
ges
KeyOn the right are all the exercise groups, as detailed on pp. 238–45. Below are the sports they are relevant to. The key is: Directly relevant Partial/general relevance
Distance Running
Jumping Sports
Dead
lifts (straight leg)
Hammer
Straight-arms p
ulls
Sho
ulder/overh
ead presses
Sho
ulder ro
tation
s
Cab
le cho
ps/ro
tation
s
Olym
pic lifts
Jump sq
uat
Squats
Dead
lifts (ben
t leg)
Pull- and chin
-ups
Seated pulley row
s
Stand
ing row
s
Baseball / Softball
Badminton
Javelin
The term “sports-specific” is applied to exercises that mirror the particular movements of an athlete in their chosen sport. This allows you to break different sports down into their general movement types and train those movements to improve your overall level of performance.
Q | What does the chart show?A | The chart has been developed by analyzing the movement patterns of each of the listed sports and categorizing each of the exercise groups in this book by their relevance to those specfic sports, as follows: “direct relevance” (black square), “partial/general relevance” (clear square), or no

247S P O R T S - S P E C I F I C M A T R I X
Lacrosse
Mixed Martial Arts
Netball
Powerlifting
KeyOn the right are all the exercise groups, as detailed on pp. 238–45. Below are the sports they are relevant to. The key is: Directly relevant Partialy/general relevance
Rowing
Rugby League
Rugby Union
Skiing
Soccer
Squash/Racketball
Striking Martial Arts
Surfing
Swimming
Table tennis
Tennis
Sprints
Middle Distance Running
Shot Putt & Discus
Volleyball
Waterskiing
Straight-arm
s pulls
Squats
Water Polo
Weightlifting
Windsurfing
Wrestling
Pressing m
ovemen
ts: the ch
est
Sho
ulder/overh
ead presses
Sho
ulder ro
tation
s
Cab
le cho
ps/ro
tation
s
Olym
pic lifts
Jump sq
uat
Split sq
uats and lun
ges
Dead
lifts (ben
t leg)
Dead
lifts (straight leg)
Pull- and chin
-ups
Seated pulley row
s
Stand
ing row
s
relevance (blank). In the case of squash/racketball, squats are of partial/general relevance, whereas split squats and lunges are of direct relevance. Although it is still important to develop your two-legged leg strength in squash/racketball at a foundation level (and hence the general relevance) single-leg strength is arguably more important and directly related, due
to the explosive multidirectional movements you would make when accelerating or lunging for the ball. Squats are typically associated with sports that require two-legged stability, such as skiing and windsurfing, or have skill-specific two-legged movements, such as scrimmaging in football or jumping to shoot a hoop in basketball.

248
GLOSSARY
%1RM The load lifted in an exercise as a percentage of your 1RM (one repetition maximum).
1RM (One Repetition Maximum) The maximum amount of weight that you can lift in a single repetition for a specific training exercise.
Abductor A muscle that functions to pull a limb away from your body.
Achilles tendon A long tendon in your body that attaches your calf muscles to your heel bone.
Adductor A muscle that functions to pull a limb toward your body.
Aerobic A process that requires oxygen. Aerobic metabolism occurs during long-duration, low-intensity exercises, such as long-distance running and swimming.
Alternating grip A grip taken on a bar in which one palm faces toward your body, the other away. This form of grip prevents a loaded bar from rolling in your hands and is recommended when working with very heavy weights, especially when performing deadlifts.
Anaerobic A process that takes place without oxygen. Anaerobic metabolism occurs during high-intensity, short-duration exercises, such as weightlifting and sprinting.
Antagonistic muscles Muscles that are arranged in pairs to carry out flexion and extension of a joint; for example, one muscle of the pair contracts to move a limb in one direction, and the other contracts to move it in the opposite direction.
Anterior The front part or surface, as opposed to posterior.
Barbell A type of free weight made up of a bar (usually metal) with weights at both ends, which is long enough for you to hold with at least a shoulder-width grip. The weights may be permanently fixed to the bar or may be removable disks (plates) that are fixed to the bar with a collar.
BER (Basic Energy Requirement) The number of calories expended by your body when you are at rest.
Biceps Any muscle that has two heads or origins, but commonly used as shorthand for the biceps brachii, which is located on your upper arm.
Blood sugar level The concentration of the sugar glucose in your blood.
BMR (Basic Metabolic Rate) The minimum amount of energy (in calories) that your body needs daily to stay alive. BMR accounts for approximately two-thirds of your total daily energy expenditure.
Body fat percentage The weight of your body fat expressed as a percentage of total body weight.
BMI (Body Mass Index) A measure of body fat based on height and weight that applies to adult men and women. It is a useful measure for “average” people, but should be interpreted with caution, especially when applied to athletes with considerable muscle bulk.
Bone density The amount of bone tissue in a given volume of bone.
Cable pulley machine A resistance training machine in which various attachments, such as a bar, handle, or rope, can be linked to weights by a metal cable. The force for moving the weight is transferred via a pulley or system of pulleys. These machines are designed to offer many exercise options while providing continual resistance throughout the full range of motion of the exercise.
Calorie A commonly used unit of energy taken in or expended.
Carbohydrates A group of organic compounds, including sugar, starch, and cellulose. An essential part of your diet, carbohydrates are the most common source of energy in living things.
Cardiac muscle A type of involuntary muscle found in the walls of your heart.
Circuit training A routine of several exercises performed in sequence, each for a specified number of repetitions. The exercises are separated by timed rest intervals, and circuits are separated by longer rest periods.
Clean and jerk A technical two-part lift that, with the snatch, is one of the two Olympic weightlifting disciplines. It involves lifting a barbell to shoulder height, then jerking it overhead to arm’s length.
Cool-down A period after completion of your main training session that includes activities such as slow jogging, walking, and stretching of your major muscle groups. It is designed to help return your body to its pre-exercise state.
Conditioning A program of exercise designed to improve your performance or to prepare you for a sporting event.
Creatine A chemical compound made by the body or taken in from food (principally meat); it is used to store energy and supply it to muscle tissue.
Drop set A form of weight training in which you perform one set of a particular exercise to muscle failure, then immediately lower the weight and carry out a subsequent set to failure.
Dumbbell A type of free weight made up of a short bar with a weight at each end. It can be lifted with one hand.
Dynamic exercise Any activity in which your joints and muscles are moving.
Erector A muscle that raises a body part.
Extensor A muscle that works to increase the angle at a joint—for example, straightening your elbow. It usually works in tandem with a flexor.
Fats A group of organic compounds, including animal fats, such as butter and lard, and vegetable fats, such as vegetable and bean oils. Fats are a significant source of energy in the diet and many play essential roles in your body’s chemistry.
Flexor A muscle that works to decrease the angle at a joint—for example, bending your elbow. It usually works in tandem with an extensor.
Free weight A weight—usually a barbell, dumbbell, or kettlebell—not tethered to a cable or machine.
GI (Glycaemic Index) A way of quantifying the effect that taking in a particular type of carbohydrate food has on your blood sugar level on a scale of 0–100. High GI foods are those that break down quickly, releasing energy soon after digestion; low GI foods break down more slowly and release their energy over a longer period.
Glucose A simple sugar used by the body’s cells as their primary source of energy.
Glycogen A type of carbohydrate found in the muscles and liver that provides energy during strength training. Glycogen is made up of linked units of glucose; any glucose that is not used by the body is converted into glycogen for storage.
Head (of a muscle) The point of origin of a muscle.
Homeostasis The processes by which your body regulates its internal environment to keep conditions stable and constant.
Hypertrophy The increase in size of a body tissue or cell, particularly an increase in muscle bulk.
Interval training A form of training in which short periods of work at near maximal intensity are alternated with periods of rest or lighter exercise, such as brisk walking or jogging.
Isometric A form of training in which your muscles work but do not contract significantly, such as when pushing against an immovable object.
Isotonic A form of training in which your muscles work against a constant resistance, so that the muscles contract while the resistance remains the same.
G L O S S A R Y

249G L O S S A R Y
ITB (Iliotibial Band) A tough group of fibers running along the outside of your thigh that primarily works as a stabilizer during running.
Kettlebell An iron weight resembling a ball with a handle.
Lactic acid A waste product of anaerobic respiration. It accumulates in your muscles during intense exercise and is involved in the chemical processes that cause muscular cramps.
Lateral Positioned toward the outside of your body or a part of your body. Movement in the lateral plane refers to a side-to-side movement.
Ligament A tough and fibrous connective tissue that connects your bones together at your joints.
Metabolism The sum of all your body’s chemical processes; it comprises anabolism (building up compounds) and catabolism (breaking down compounds).
Mineral Any one of many inorganic (non-carbon-based) elements that are essential for normal body function and that must be included in your diet.
Neural adaptation The adaptation of your nervous system in response to strength training. Increasing the neural activity in your muscles can provide dramatic increases in strength with little change in muscle size, especially at the beginning of a training program.
Neutral spine The position of the spine that is considered to be good posture. In this posture, the spine is not completely straight, but has slight curves in its upper and lower regions. It is the strongest and most balanced position for the spine and needs to be maintained in many exercises.
Olympic weightlifting A sport in which the goal is to lift dynamically a barbell loaded with the heaviest possible weights. The sport includes two distinct movements—the clean and jerk and the snatch.
Overload The progressive increase in weight used for a particular exercise. It is designed to promote adaptation of the body in response to training.
Periodization An approach to training planning that involves alternating cycling activities, loads, and intensities over a defined period of time, usually to prepare for optimum fitness for an event. It is a preparation technique used by elite athletes for competition or the start of a season.
Posterior The back part or surface, as opposed to anterior.
Power The amount of force produced in a given time—a combination of strength and speed.
Powerlifting A sport in which the goal is to lift a barbell loaded with the heaviest possible weights; it consists of three events—the squat, the bench press, and the deadlift.
Pre-exhaustion A form of training in which you perform a single joint exercise before a heavy compound movement for that body part, so stressing the target muscle before you start to work it properly.
Protein One of the three main nutrients (along with fats and carbohydrates) that supply energy to your body. Protein is required for muscular growth and repair.
Quadriceps Any muscle with four heads, but commonly used to describe the large muscle of your thigh.
Regimen A regulated course of exercise and diet designed to produce a pre-determined result.
Repetition (rep) One complete movement of a particular exercise, from start to finish and back.
Resistance training Any type of training in which your muscles work against a resistance; the resistance may be provided by a weight, an elastic or rubber band, or your own bodyweight.
Rest interval The pause between sets of an exercise that allows muscle recovery.
Rotator cuff The four muscles—the supraspinatus, infraspinatus, teres minor, and subscapularis—and their associated tendons that hold your humerus (the long bone of your upper arm) in place in your shoulder joint and enable your arm to rotate. Rotator cuff injuries are common in sports that involve throwing motions.
Set A specific number of repetitions.
Shoulder girdle The ring of bones (actually an incomplete ring) at your shoulder that provides an attachment point for the many muscles that allow your shoulder and elbow joints to move.
Skeletal muscle Also called striated muscle, this type of muscle is attached to your skeleton and is under voluntary control. Contracting your skeletal muscle allows you to move your body under control.
Smith machine A common piece of gym equipment made up of a barbell constrained within sets of parallel steel rails that allow the motion of the bar only in a limited vertical direction.
Smooth muscle A type of muscle found in the walls of all the hollow organs of your body that is not under voluntary control.
Snatch A technical lift that, along with the clean and jerk, is one of the two Olympic weightlifting disciplines. It involves lifting a barbell in one continuous movement from the ground (or more usually from a lifting platform) to a position where it is held overhead on your locked arms.
Split routine A pattern of training in which you focus on working one part of your body (for example, your upper body) in one strength training session, and another part of your body (for example, your legs) in the next session, rather than working the whole body each time.
Spotter A training partner who assists you with a lift, providing encouragement and physical support if necessary—for example, intervening if you are about to fail the lift.
Static exercise An exercise in which you hold one position—for example, pushing against an immovable object.
Strength training A form of resistance training in which your goal is to build the strength of your skeletal muscle.
Superset A type of training in which you perform two exercises in a row with no rest in between; the exercises can target the same or different parts of your body.
Supplement Any preparation in the form of a pill, liquid, or powder that contains nutrients.
Tendon A type of connective tissue that joins your muscles to your bones, so transmitting the force of muscle contraction to your bones.
Training to failure Performing repetitions of a particular exercise until you cannot lift the weight without assistance.
Triceps Any muscle with three heads, but commonly used as shorthand for the triceps brachii, which extends your elbow.
Vitamin Any one of a group of chemical compounds that is required by your body in small amounts for healthy growth and development. Most vitamins are not made by your body, so must be taken in the diet.
Warm-up A series of low-intensity exercises that prepares your body for a workout by moderately stimulating your heart, lungs, and muscles.

250
INDEXAabdominal crunch 43, 162abduction, leg 59abductor, hip 82–3abductor stretch 212abs
exercise functionality matrix 220–1
see also core and absacceleration 41adductor, hip 82–3adductor longus
hip adductor 82–3adductor magnus
hip adductor 82–3advice, seeking 22aerobic activity 29anaerobic exercise 29anconeus
barbell triceps extension 143dumbbell triceps extension
142overhead triceps extension
148–9prone triceps extension
144–5push-down 148–9triceps kickback 144–5
anterior deltoidbar dip 141barbell bench press 110–11bench dip 140cable cross-over 116–17dumbbell bench press
110–11dumbbell shoulder press 125frame-supported push-up
121front dumbbell raise 130incline barbell bench press
112incline dumbbell bench press
113incline fly 114–15lateral dumbbell raise 131machine bench press 118–19machine fly 118–19military barbell press 124
anterior deltoid (cont.)push-up 120rear lateral raise 132–3upright row 126–7
arm circle 52–3arms
bar dip 141barbell curl 150–1barbell triceps extension 143bench dip 140close-grip bench press 146–7concentration curl 152dumbbell triceps extension
142exercise functionality matrix
220–1hammer dumbbell curl 150–1incline dumbbell curl 152–3overhead triceps extension
148–9preacher curl 154–5prone triceps extension
144–5pulley curl 154–5reverse barbell curl 156–7reverse pulley curl 156–7triceps kickback 144–5triceps push-down 148–9wrist extension 158–9wrist flexion 158–9
assisted chin-up 92
Bback
assisted chin-up 92barbell pull-over 102–3bent-over row 100–1chin-up 94–5exercise functionality matrix
218–9extension 104–5good morning barbell 104–5lat pull-down 93one-arm row 98–9prone row 106–7pull-ups 35seated pulley row 96–7standing pulley row 98–9
back (cont.)straight-arm pull-down
106–7upper back stretch 208
back extension, ball 171back squat 64–5balance
jerk 198–9snatch 200–1
ball back extension 171ball crunch 166–7ball jack knife 170ball push-up 169ball twist 168bar dip 141barbell, good morning 104–5barbell bench press 110–11barbell curl 150–1barbell deadlift 86–7barbell jump squat 197barbell lunge 72barbell pull-over 102–3barbell step-up 76–7barbell triceps extension 143Basic Energy Requirement (BER)
26basic metabolic rate (BMR) 26“being on the nerve” 36bench dip 140bench press 17, 35
barbell 110–11close-grip 146–7dumbbell 110–11incline barbell 112incline dumbbell 113machine 118–19
bendRoman chair side 172–3side 172–3
bent-over row 35, 100–1biceps
kettlebell high-pull 196lat pull-down 93
biceps brachiiassisted chin-up 92barbell curl 150bent-over row 100–1chin-up 94concentration curl 152–3
biceps brachii (cont.)hammer dumbbell curl 150–1incline dumbbell curl 152–3one-arm row 98–9preacher curl 154prone row 106–7pulley curl 154–5reverse barbell curl 156–7reverse pulley curl 156–7standing pulley row 98–9upright row 126–7
biceps stretch 208BMI (Body Mass Index) 28body fat 227
assessing your level 28controlling 26, 28exercises that help to
reduce 28FAQs on 30–1right levels 27storage and essential 30“sweating off ” 30targeting of 30turning of muscle into 30
Body Mass Index (BMI) 28body weight 24, 216
basic programs for physique training 225–7
basic programs for strength endurance 222–3
split programs 232–3bodybuilding 16–17, 43, 230–33
basic program 231boxing 42brachialis
barbell curl 150concentration curl 152–3hammer dumbbell curl 150–1incline dumbbell curl 152–3preacher curl 154pulley curl 154–5
brachioradialishammer dumbbell curl 150–1preacher curl 154pulley curl 154–5reverse barbell curl 156–7reverse pulley curl 156–7
Bulgarian dumbbell split squat 71
I N D E X

251
Ccable cross-over 116–17calf raise 84calf stretch 213calories 26carbohydrates 24cardiac muscle 18cardiovascular exercise 28chest
barbell bench press 110–11bench press 35cable cross-over 116–17dumbbell bench press
110–11exercise functionality matrix
234–5frame-supported push-up
121incline barbell bench press
112incline dumbbell bench press
113incline fly 114–15machine bench press 118–19machine fly 118–19push-up 120
chin-up 35, 94–5, 240–1assisted 92
circlearm 52–3hip 54–5
clean, power 182–3close-grip bench press 35, 146–7coaching, motivation through 22concentration curl 152conjugate/undulating planning
45cooling down 46, 47, 217core and abs
90-90 crunch 166–7abdominal crunch 43, 162ball back extension 171ball crunch 166–7ball jack knife 170ball push-up 169ball twist 168figure-4 crunch 165prone plank 174
core and abs (cont.)reverse crunch 164Roman chair side bend 172–3side bend 172–3side plank 175sit-up 163suitcase deadlift 176–7V-leg raise 176–7woodchop 178–9
core strength 236–7integrated split program
237isolated core program 236
creatine phosphate system 29cross-over, cable 116–17crunch
90-90 166–7abdominal 162ball 166–7figure-4 165reverse 164
curlbarbell 150–1concentration 152–3hammer dumbbell 150–1incline dumbbell 152–3machine leg 80–1preacher 154–5pulley 154–5reverse barbell 156reverse pulley 156–7
Ddeadlift 17, 35, 238–9, 240–1
barbell 86–7Romanian 88–9straight-leg 85suitcase 176–7
deceleration 41dehydration 25, 31deltoids
close-grip bench press 146–7jerk balance 198–9overhead barbell lunge 73overhead squat 194–5power clean 182–3power clean from hang
186–7
deltoids (cont.)power snatch 184–5power snatch from hang
188–9push press 204–5snatch balance 200–1squat clean 190–1
deterioration 33developmental stretching 47diet see nutritiondip
bar 141bench 140
drop-sets 39dumbbell bench press 110–11dumbbell shoulder press 125dumbbell shoulder shrug 128dumbbell triceps extension 142dumbbell split squat 68dynamic lifts see lifts, dynamic
Eenergy requirements 26erector spinae
back extension 104–5ball back extension 171barbell deadlift 86–7good morning barbell 104–5kettleball high-pull 196overhead barbell lunge 73prone plank 174Romanian deadlift 88–9straight-leg deadlift 85
erector stretch 208exercise functionality matrix
218–21explosive anaerobic exercise 29explosive movement 42extension
back 104–5ball back 171barbell triceps 143dumbbell triceps 142machine leg 80–1neck 50overhead triceps 148–9prone triceps 144–5wrist 158–9
extensor carpi radialis brevis wrist extension 158extensor carpi radialis longus wrist extension 158extensor carpi ulnaris wrist extension 158extensors 18external dumbbell rotation
134–5external obliques
90-90 crunch 166–7abdominal crunch 162ball crunch 166–7ball twist 168figure-4 crunch 165prone plank 174reverse crunch 164Roman chair side bend
172–3side bend 172–3side plank 175sit-up 163suitcase deadlift 176–7woodchop 178–9
external rotation 136–7extroverts 23
Ffailure, training to 36, 37fat(s)
body see body fatcontrolling of 26, 28dietary 24, 30
figure-4 crunch 165flexion
leg 58–9neck 50neck side 51trunk 55wrist 158–9
flexor carpi radialiswrist flexion 158–9
flexor carpi ulnariswrist flexion 158–9
flexor digitorumincline dumbbell curl 152–3
flexor digitorum profunduswrist flexion 158–9
I N D E X

252 I N D E X
flexors 18fly
incline 114–15machine 118–19
45-degree leg press 78–9forward lunge 74frame-supported push-up 121Frankenstein walk 56–7free weights 38, 216
basic programs for bodybuilding 229
basic programs for physique training 224–5
basic programs for strength training 218–19
front barbell squat 66front dumbbell raise 130front squat, heavy 192–3functional training 43
Ggastrocnemius
barbell jump squat 197barbell step-up 76Bulgarian barbell split squat
70Bulgarian dumbbell split
squat 71calf raise 84heavy front squat 192–3jerk balance 198–9kettleball high-pull 196lateral lunge 75overhead squat 194–5power clean 182power clean from hang
186–7power snatch 184–5power snatch from hang
188–9push press 204–5shoulder shrug from hang
129snatch balance 200–1squat clean 190–1
GI foods 30, 30–1gluteals
back extension 104–5back squat 64–5ball back extension 171barbell deadlift 86–7barbell hack squat 67
gluteals (cont.)barbell jump squat 197barbell lungs 72barbell step-up 76–7bent-over row 100–1Bulgarian barbell split squat
70dumbbell split squat 68forward lunge 74front barbell squat 66good morning barbell
104–5heavy front squat 192–3hip abductor 82–3jerk balance 198–9kettlebell high-pull 196overhead barbell lunge 73overhead squat 194–5power clean 182power clean from hang
186–7power snatch 184power snatch from hang
188–9push press 204–5Romanian deadlift 88–9snatch balance 200–1split snatch 202–3squat clean 190–1straight-leg deadlift 85
glutesBulgarian dumbbell split
squat 71overhead split squat 69
glycaemic index (GI) 24glycogen 31goals/goal setting 17, 20, 22golf 43good morning barbell 104–5gravity 43
Hhammer dumbbell curl 150–1hamstring stretch 210–11, 212hamstrings
45-degree leg press 78–9back extension 104–5back squat 64–5ball back extension 171barbell deadlift 86–7barbell hack squat 67barbell jump squat 197barbell lungs 72
hamstrings (cont.)barbell step up 76–7bent-over row 100–1Bulgarian barbell split squat
70Bulgarian dumbbell split
squat 71dumbbell split squat 68forward lunge 74front barbell squat 66good morning barbell
104–5heavy front squat 192–3jerk balance 198–9kettlebell high-pull 196lateral lunge 75machine leg curl 80overhead barbell lunge 73overhead split squat 69overhead squat 194–5power clean 182power clean from hang
186–7power snatch 184–5power snatch from hang
188–9push press 204–5Romanian deadlift 88–9snatch balance 200–1split snatch 202–3squat clean 190–1straight-leg deadlift 85suitcase deadlift 176–7
hangpower clean from 186–7power snatch from 188–9shoulder shrug from 129
heart 19heavy front squat 192–3high-pull, kettlebell 196hip
circle 54–5walk 57
hip abductor 82–3hip adductor 82–3homeostasis 26
Iincline barbell bench press 112incline dumbbell bench press
113incline dumbbell curl 152–3incline fly 114–15
infraspinatusexternal dumbbell rotation
134–5external rotation 136–7internal rotation 136–7scarecrow rotation 134
instinctive planning 45intensity, training 32internal obliques
ball twist 168prone plank 174Roman chair side bend
172–3side bend 172–3side plank 175
internal rotation 136–7introverts 23ITB stretch 209
Jjack knife, ball 170jerk balance 198–9jump squat 244–5
barbell 197
Kkettlebell high-pull 196kickback, triceps 144–5
Llat pull-down 93lat stretch 209lateral lunge 75lateral raise, rear 132–3latissimus dorsi
barbell pull-over 102–3bent-over row 100–1chin-up 94lat pull-down 93one-arm row 98–9seated pulley row 96–7standing pulley row 98–9straight-arm pull-down 106–7
lateral dumbbell raise 131latissimus dorsi
assisted chin-up 92learning movement patterns 20leg press
45-degree 78–9leg raise
V 176–7
253I N D E X
leg(s)45-degree leg press 78–9abduction 59back squat 64–5barbell deadlift 86–7barbell hack squat 67barbell lunge 72barbell step-up 76–7Bulgarian barbell split squat
70Bulgarian dumbbell split
squat 71calf raise 84dumbbell split squat 68exercise functionality matrix
218–9flexion 58–9forward lunge 74front barbell squat 66hip abductor 82–3hip adductor 82–3lateral lunge 75machine leg curl 80–1machine leg extension 80overhead barbell lunge 73overhead split squat 69Romanian deadlift 88–9squats/deadlifts 35straight-leg deadlift 84
lifting technique, correct 87lifts, dynamic 244–5
barbell jump squat 197exercise functionality exercise
220–1heavy front squat 192–3jerk balance 198–9kettlebell high-pull 196–7overhead squat 194–5power clean 182–3power clean from hang 186–7power snatch 184–5power snatch from hang
188–9push press 204–5snatch balance 200–1split snatch 202–3squat clean 190–1
linear/classical periodization 44–5
llopsoasball jack knife 170reverse crunch 164
loads/loadingand progression 36, 37
lunge 60–1, 238–9barbell 72forward 74lateral 75overhead 61overhead barbell 73rotational 60–1
Mmachine bench press 118–19machine fly 118–19machine leg curl 80machine leg extension 80–1machines 38
basic programs for bodybuilding 229
basic programs for physique training 223
basic programs for strength training 218–19
meals, frequency of 31medial deltoid
front dumbbell raise 130lateral dumbbell raise 131rear lateral raise 132–3
metabolic rate 16military barbell press 1124minerals 25, 31mobility
arm circle 52–3Frankenstein walk 56–7hip circle 54–5hip walk 57leg abduction 59leg flexion 58lunge 60–1neck extension and flexion 50neck rotation 51neck side flexion 51overhead lunge 61pike walk 56–7quad stretch 57rotational lunge 60–1shoulder rotation 52–3squat 58–9torso rotation 54–5trunk flexion 55wrist rotation 53
mobilization exercises 47motivation 20–1
extrinsic 20intrinsic 20through coaching 22
movement(s)direction of force
application and impact of gravity 43
frequency 42key sporting 41rate or speed of 42train 40
muscle(s)building lean 26how they work 18turning of into body fat 30types of 18
muscle fibers, types of 19muscle mass 16, 26muscular cramps 31muscular failure 36
Nneck
extension and flexion 50rotation 51side flexion 51
neural adaptation 1990-90 crunch 166–7nutrition 24–31
adding muscular bodyweight 26
and body fat 26–8, 30–1carbohydrates 24and controlling fat 26energy requirements 26and fats (dietary) 24, 30frequency of meals 31high and low GI foods
30–1minerals 25portion size 31proteins 25vitamins 25
Oone-arm row 98–91RM 32overhead barbell lunge 73overhead lunge 61overhead split squat 69overhead squat 194–5overhead triceps extension
148–9overload 33, 216, 222overtraining 21, 23, 34
Ppalmaris longus
wrist flexion 158–9partners, training 22–3pec stretch 209pectoralis major
ball push-up 169pectorals
bar dip 141barbell bench press 110–11barbell pull-over 102–3bench dip 140cable cross-over 116–17close-grip bench press 146–7dumbbell bench press
110–11frame-supported push-up
121incline barbell bench press
112incline dumbbell bench press
113incline fly 114–15internal rotation 136–7machine bench press 118–19machine fly 118–19power clean 182power clean from hang
186–7power snatch 184power snatch from hang
188–9push-up 120squat clean 190–1woodchop 178–9
personality factors 23physique training 224–9
basic programs 225–7split programs 228–9
pike calf stretch 213pine walk 56–7plank
prone 174side 175
planning 32–9basic principles 35–9keep it simple 34–5measuring your 1RM 32and recovery 34and training frequency 34training intensity 32and training volume 32
portion size 31

254 I N D E X
posterior deltoidlat pull-down 93one-arm row 98–9prone row 106–7rear lateral raise 132–3
power clean 182–3power clean from hang 186–7power endurance 42power snatch 184–5power snatch from hang 188–9powerlifting 17pre-exhaustion 39preacher curl 154–5press 242–3
dumbbell shoulder 125military barbell 124push 204–5see also bench press
pressing movements 242–3programs
bodybuilding 230–3core strength 236–7 physique training 224–9strength 234–5strength endurance
222–3progression 33, 216, 222prone plank 174prone row 106–7prone triceps extension 144–5protein 31proteins 25, 26psychology, training 20–3
and goal setting 22and motivation 20–2personality factors 23and visualization 21
pull movement 41pull-down
lat 93straight-arm 106–7
pull-over 242–3barbell 102–3
pull-ups 35pulley curl 154–5pulley row
seated 96–7, 240–1standing 98–9
push movement 41push press 204–5push-down, triceps 148–9push-up 120
ball 169frame-supported 121
Qquad stretch 57, 211
3-point 210quadratus lumborum back
extension 104–5quadriceps
45-degree leg press 78–9back squat 64–5barbell deadlift 86–7barbell hack squat 67barbell jump squat 197barbell lungs 72barbell step up 76–7bent-over row 100–1Bulgarian barbell split squat
70Bulgarian dumbbell split
squat 71dumbbell split squat 68forward lunge 74front barbell squat 66heavy front squat 192–3jerk balance 198–9kettlebell high-pull 196lateral lunge 75machine leg extension 80–1overhead barbell lunge 73overhead split squat 69overhead squat 194–5power clean 182power clean from hang
186–7power snatch 184–5power snatch from hang
188–9prone plank 174push press 204–5Romanian deadlift 88–9side plank 175snatch balance 200–1split snatch 202–3squat clean 190–1straight-leg deadlift 85suitcase deadlift 176–7
Rraise
calf 84front dumbbell 130lateral dumbbell 131rear lateral 132–3V-leg 176–7
rear lateral raise 132–3recovery 33, 34, 47, 216rectus abdominis
90-90 crunch 166–7abdominal crunch 162ball crunch 166–7
rectus abdominis (cont.)ball jack knife 170ball push-up 169ball twist 168barbell deadlift 86–7figure-4 crunch 165prone plank 174reverse crunch 164sit-up 163V leg raise 176–7
rectus femorisreverse crunch 164
repetition 32resistance machines 216–17resistance training 16, 17, 28resting 35reverse barbell curl 156–7reverse crunch 164reverse pulley curl 156–7rhomboid
dumbbell shoulder shrug 128rear lateral raise 132–3shoulder shrug from hang 129
Roman chair side bend 172–3Romanian deadlift 88–9rotation 41, 244–5
external 136–7external dumbbell 134–5internal 136–7neck 51scarecrow 134–5shoulder 52–3torso 54–5wrist 53
rotational lunge 60–1row
bent-over 100–1one-arm 98–9prone 106–7upright 126–7
Sscarecrow rotation 134–5seated pulley row 96–7, 240–1serratus anterior
Roman chair side bend 172–3
serratus anterior (cont.)side bend 172–3woodchop 178–9
sets 32, 36shoulder shrug
dumbbell 128from hang 129
shoulder stretch 208shoulders
dumbbell shoulder press 125dumbbell shoulder shrug 128external dumbbell rotation
134–5exercise functionality
matrix 236–7external rotation 136–7front dumbbell raise 130internal rotation 136–7lateral dumbbell raise 131military barbell press 124rear lateral raise 132–3rotation 52–3scarecrow rotation 134–5shoulder shrug from hang
129standing shoulder press 35upright row 126–7
side bend 172–3Roman chair 172–3
side plank 175sit-up 163skeletal muscle 18SMARTER goals 22smooth muscle 18snatch 17
power 184–5split 202–3
snatch balance 200–1soleus
barbell jump squat 197Bulgarian barbell split squat
70Bulgarian dumbbell split
squat 71calf raise 84heavy front squat 192–3jerk balance 198–9overhead squat 194–5power clean 182power clean from hang
186–7power snatch 184power snatch from hang
188–9

255I N D E X
soleus (cont.)push press 204–5snatch balance 200–1squat clean 190–1
specificity 33speed-strength 42split programs 228, 232, 235split routines 39
physique training 226–7split snatch 202–3split squat 238–9
Bulgarian barbell 70Bulgarian dumbbell 71dumbell 68overhead 69
sports-specific training 17, 40–5squat 17, 35, 58–9, 238–9
back 64–5barbell jump 197Bulgarian barbell split 70Bulgarian dumbbell split 71dumbbell split 68front barbell 66barbell hack 67heavy front 192–3overhead 194–5overhead split 69Sumo 64
squat clean 190–1squat movement 41standing bicep curl 35standing pulley row 98–9standing rows 240–1standing shoulder press 35static stretch 47step-up, barbell 76–7straight-arm pull-down 106–7straight arm pulls 242–3straight-leg deadlift 84strength endurance 42strength training
advanced routine 220–1attributes 40basic routines 218–19benefits 16common goals of 26definition 16how does it work 19key principles of 18, 33
strength-speed 42stretches
3-point quad 210abductor 212biceps 208
stretches (cont.)calf 213erector 208hamstring 210, 212ITB 209lat 209pec 209pike calf 213quad 57, 211shoulder 208upper back 208walking lunge 213
subscapularisexternal rotation 136–7internal rotation 136–7scarecrow rotation 134
suitcase deadlift 176–7Sumo squat 64supersetting 39supraspinatus
external dumbbell rotation 134–5
external rotation 136–7internal rotation 136–7scarecrow rotation 134woodchop 178–9
Ttensor fasciae latae
hip abductor 82–3teres major
assisted chin-up 92bent-over row 100–1chin-up 94external dumbbell rotation
134–5external rotation 136–7internal rotation 136–7scarecrow rotation 134seated pulley row 96–7straight-arm pull-down
106–7woodchop 178–9
teres minorexternal dumbbell rotation
134–5external rotation 136–7internal rotation 136–7scarecrow rotation 134woodchop 178–9
3-point quad stretch 210“toned” appearance 227torso, rotation 54–5
trainingresponse of body to 19
training frequency 34, 35training intensity 32training partners 22–3training physiology 18–19training psychology 20–3training volume 32transversus abdominis
90-90 crunch 166–7suitcase deadlift 176–7
trapeziusbarbell deadlift 86–7chin-up 94dumbbell shoulder shrug
128kettlebell high-pull 196lat pull-down 93prone row 106–7seated pulley row 96–7shoulder shrug from hang
129standing pulley row 98–9straight-arm pull-down
106–7upright row 126–7
tricepsbar dip 141barbell pull-over 102–3bench press 35close grip bench press 35close-grip bench press
146–7dumbbell bench press
110–11incline barbell bench press
112overhead squat 194–5power snatch from hang
188–9triceps brachii
ball push-up 169barbell bench press 110–11barbell triceps extension 143bench dip 140dumbbell shoulder press 125dumbbell triceps extension
142frame-supported push-up
121incline dumbbell bench press
113jerk balance 198–9military barbell press 124
triceps brachii (cont.)overhead triceps extension
148–9power snatch 184prone triceps extension
144–5push press 204–5push-down 148–9push-up 120snatch balance 200–1triceps kickback 144–5
triceps extensionbarbell 143dumbbell 142overhead 148–9prone 144–5
triceps kickback 144–5triceps push-down 148–9triple extension 41trunk flexion 55twist, ball 168
Uunplanned planning 45upper back stretch 208upright row 126–7
VV leg raise 176–7vitamins 25, 31vizualization 21
Wwalk
Frankenstein 56–7hip 57pine 56–7
walking lunge stretch 213warm down exercises 34warming-up 46–7, 217water 25weight gain/loss 24, 26, 28weight shifting 41weight training 16weightlifting 17woodchop 178–9, 244–5work to rest ratio 32wrist
rotation 53extension 158–9flexion 158–9

256 A C K N O W L E D G M E N T S
ACKNOWLEDGMENTS
ABOUT THE AUTHORS
Len Williams is an International Weightlifting Referee and a Senior Coach for the British Weight Lifters’ Association. He tutors at colleges and universities on various training courses. Len is currently in the squad of officials preparing for the 2012 Olympic games in London.
Derek Groves is a professional sports coach and a staff coach with the British Weight Lifters’ Association and a Consultant Staff Coach to the Saudi Arabian Federation of Sport for Disability Powerlifting. He has over 30 years’ experience of strength training and conditioning for elite athletes and is currently an International Classifier for IPC Paralympic Powerlifting.
Glen Thurgood is a professional BWLA coach and Head of Strength and Conditioning at Northampton Town FC. With over 10 years’ combined experience as an elite athlete and coach, he has worked with rugby union, football, and baseball teams at university, professional, and national levels.
PUBLISHER’S ACKNOWLEDGMENTS
Dorling Kindersley would like to thank Jillian Burr, Joanna Edwards, Michael Duffy, Conor Kilgallon, and Phil Gamble.
Cobalt id would like to thank the following individuals and organizations for their generous help in producing this book:
Chris Chea, Caroline Pearce, William Smith, Michelle Grey, Sam Bias Ferrar, Sean Newton, and Anouska Hipperson for modelling so gracefully and professionally.
Anouska and Roscoe Hipperson, Matt, Jon and all the brilliant staff at Fit Club, Wymondham in Norfolk for allowing us access to their fantastic facilities, and for all their kind support and guidance during the photoshoots. Jackie Waite and the staff at Woking Leisure Centre & Pool in the Park and Karen Pearce and the staff at Fenner’s Fitness Suite at the University of Cambridge.
Many thanks also to all the illustrators who worked so hard throughout the project: Mark Walker, Mike Garland, Darren R. Awuah, Debajyoti Dutta, Richard Tibbitts (Antbits Illustration), Jon Rogers, and Phil Gamble. Many thanks to Patricia Hymans for indexing.
The British Weight Lifters’ Association (BWLA), the national governing body for weightlifting and weight training, was formed in 1910, becoming a limited company on 25 June, 1957. Now primarily recognized as the guardian and governing body of the Olympic sport of weightlifting in the UK, it remains deeply involved in weight training of all types, particularly as an aid to improved performance in other sports. As part of its aim to develop weightlifting and weight training, the BWLA has been involved in education for much of its history. In the late 1940s, it pioneered the application
of resistance training to other sports, collaborating with Athletics and Swimming, and drawing on the advanced, research-based knowledge of the Russian system. Recent work with sports coach UK has now set the BWLA’s coach award scheme to fall in line with the UK Coaching Certificate and the BWLA is committed to the UK Coaching Framework. The BWLA now has a small but knowledgeable group of coaches adept at the instruction of weightlifting and weight training with a strong grounding in academic theory, and, above all, an unrivalled level of practical skill in both performance and teaching.
All sport and physical activity involves some risk of injury. Participants must take all reasonable care to ensure that they are free from any medical condition that could contra-indicate participation in weightlifting, weight training, or any other form of resistance exercise.
The publishers of this book and its contributors are confident that, when properly performed, weightlifting and weight training are safe, and that the exercises described in this book, correctly executed, with gradual increases in resistance and proper supervision, are also safe.
However, it is incumbent upon users of weightlifting and weight training facilities to exercise sensible judgement, and to ensure that floors, equipment, ventilation, and hygiene are all fit for purpose.
Supervisors must all carry adequate insurance and have relevant up-to-date certifications, including emergency first aid. In the UK, the British Weight Lifters’ Association (BWLA) is recognized by the governmental authorities and its agencies as the National Governing Body for Weightlifting and Weight Training. Participants should check that their supervisors are current members of this body; participants should check that adequate insurance is in place if the supervisors are members of another body.
Although sports scientists have worked to improve the knowledge underpinning the construction of training programs, the choice of resistance, and the many other variables considered when creating them, there remain very few absolutes. Different combinations of exercises, diverse ordering, and the variation of volumes and intensities,
etc., may all work. The effectiveness of a schedule is markedly influenced by the individual using it, and the period of time before it is changed: coaches constantly observe athletes and vary programmes whenever they appear to be losing effectiveness. In training for sports other than Olympic weightlifting, it is clearly essential that a strength and conditioning coach works closely with well informed coaches of that sport.
All current research shows that weightlifting and weight training is safe for children, in comparison with traditional school sports, but, for obvious reasons, children should always be particularly well supervised.
The publishers and contributing authors of this book disclaim all responsibility for injury to persons or property consequent on embarking upon the exercises herein described.
ABOUT BWLA (THE BRITISH WEIGHT LIFTERS’ ASSOCIATION)
SAFETY INFORMATION