2007 tundra gb install
TRANSCRIPT
TOYOTA TUNDRA 2007 - TVIP V2 Preparation GLASS BREAKAGE SENSOR (GBS)
Page 1 of 14 pages Issue: A 12/18/06
Part Number: 08586-OC890 NOTE: Part number of this accessory may not be the same as the part number shown.
Conflicts Do not install into vehicles without Factory Alarm Systems.
Recommended Sequence of Application Item # Accessory 1 TVIP/RES Any TVIP or RES system 2 XM Radio
*Mandatory
Kit Contents Item # Quantity Description 1 1 GBS ECU w/bracket attached
Hardware Bag Contents Item # Quantity Description 1 1 M6 Flange Nut 2 1 GBS Microphone 3 2 V2 Window Label w/ red tag 4 2 V2 Window Label w/ red tag
SPANISH 5 2 V5 Window Label (discard) 6 2 V5 Window Label SPANISH
(discard) 7 1 V2 Owner’s Guide 8 1 V5 Owner’s Guide (discard) 9 1 Warranty Card
Additional Items Required For Installation Item # Quantity Description
Recommended Tools Personal & Vehicle Protection
Notes
Safety Glasses Safety Gloves (Optional) Vehicle Protection Blankets, Parts Boxes Special Tools Notes Striker Tool (PPO only) CAD-E IADS P/N ALL 02-
016-01 Installation Tools Notes Phillips Head Screwdriver #2, screwdriver or tip Flat Blade Screwdriver 1/8” wide screwdriver Nylon Panel Removal Tool e.g. Panel Pry Tool #1
Toyota SST # 00002-06001-01 Torque Wrench 36 in•bf (40.67 n•cm) Clear Tape Socket 10mm, Extension Special Chemicals Notes Cleaner VDC approved cleaner Glass Cleaner Household Windex
Legend
STOP: Damage to the vehicle may occur. Do not proceed until process has been complied with. OPERATOR SAFETY: Use caution to avoid risk of injury. CAUTION: A process that must be carefully observed in order to reduce the risk of damage to the accessory/vehicle and to ensure a quality installation.TOOLS & EQUIPMENT: Used in Figures calls out the specific tools and equipment recommended for this process. REVISION MARK: This mark highlights a change in installation with respect to previous issue.
Care must be taken when installing this accessory to ensure damage does not occur to the vehicle. The installation of this accessory should follow approved guidelines to ensure a quality installation These guidelines can be found in the "Accessory Installation Practices" document. This document covers such items as: • Vehicle Protection (use of covers and blankets, cleaning chemicals, etc.). • Safety (eye protection, rechecking torque procedure, etc.). • Vehicle Disassembly/Reassembly (panel removal, part storage, etc.). • Electrical Component Disassembly/Reassembly (battery disconnection, connector removal, etc.).
Please see your Toyota dealer for a copy of this document

TOYOTA TUNDRA 2007 - TVIP V2 Preparation GLASS BREAKAGE SENSOR (GBS)
Page 2 of 14 pages Issue: A 12/18/06
GB
S EC
U
GB
S M
icro
phon
e
A
B

TOYOTA TUNDRA 2007 - TVIP V2 Procedure GLASS BREAKAGE SENSOR (GBS)
Page 3 of 14 pages Issue: A 12/18/06
1. Vehicle Disassembly
(a) Vehicles with Automatic Transmission should be placed in Park and have the Parking Brake set before disconnecting the Battery.
(b) Remove the Negative Battery Cable. (Fig. 1-1)
(1) Protect the Fender before starting.
(2) Note the Battery Cable Position, as it will be re-installed in the same position.
DO NOT TOUCH THE POSITIVE BATTERY TERMINAL.
(c) Remove the Driver’s Step Cover. (Fig. 1-2)
(1) Begin by protecting the Vehicle Interior with Blankets.
(d) Remove the Driver’s Cowl Cover. (Fig. 1-3)
(1) Remove 1 Cowl Nut.
NegativeBattery Cable
Fig. 1-1
10mm Socket
Step Cover
Fig. 1-2
Nylon Panel Removal Tool
Cowl Cover
Cowl Nut
Fig. 1-3

TOYOTA TUNDRA 2007 - TVIP V2 Procedure GLASS BREAKAGE SENSOR (GBS)
Page 4 of 14 pages Issue: A 12/18/06
(e) Dislodge the Lower Dash Cover. (Fig. 1-4)
(1) Remove 2 Bolts.
(2) Disconnect any Connectors.
(f) Dislodge the Hood Release Lever from the Lower Dash Cover. (Fig. 1-5)
(1) Press down on the Retaining Clip while pushing the Lever out.
(g) Remove the Hood Latch Cable from the Hood Latch Lever. (Fig. 1-6)
(h) Remove the Lower Dash Cover.
(i) Remove the Metal Substructure. (Fig. 1-7)
(1) Remove 4 bolts.
CAUTION: SHARP METAL EDGES.
Bolts (x4) Fig. 1-7
10mm Socket
Fig. 1-4 Bolt
Bolt
Hood Release Lever
Nylon Panel Removal Tool, 10mm Socket
Fig. 1-6
Hood Release Lever
Hood Latch Cable
Fig. 1-5
Hood Release Lever
Lower Dash Cover
Retaining Clip
TOYOTA TUNDRA 2007 - TVIP V2 Procedure GLASS BREAKAGE SENSOR (GBS)
Page 5 of 14 pages Issue: A 12/18/06
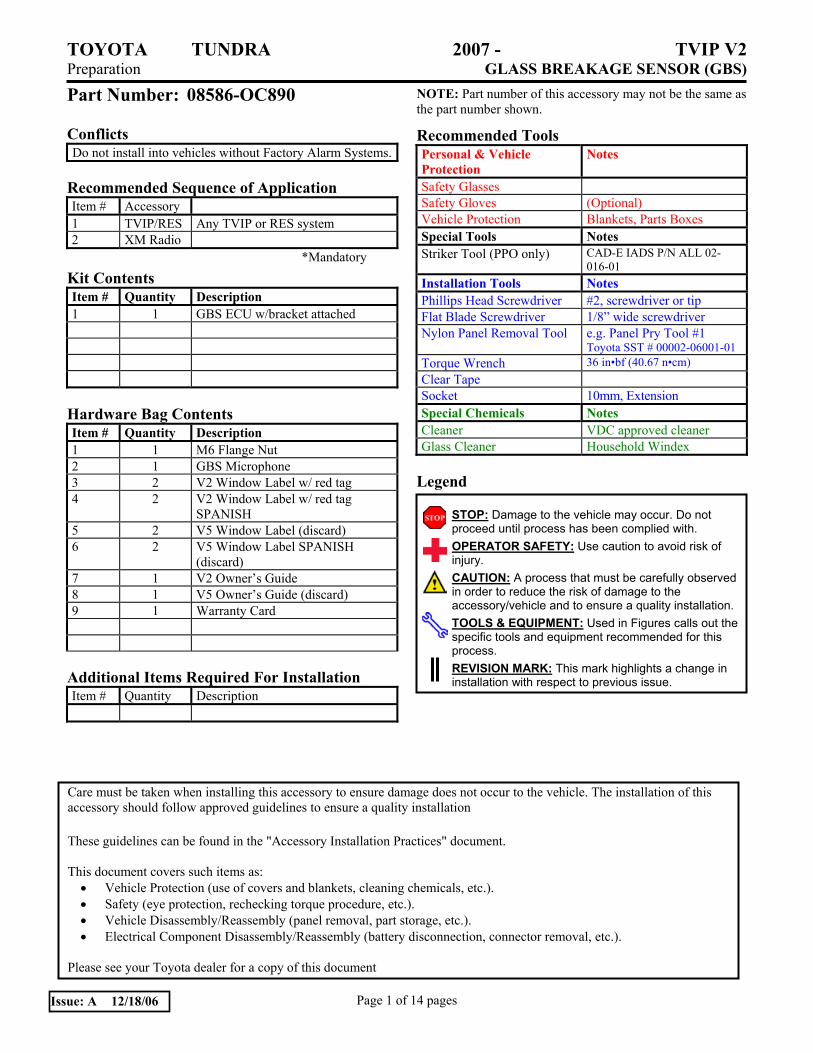
(j) Wrap the Metal Substructure in a blanket and use the TVIP Kit Box to support it. (Fig. 1-8)
CAUTION: SHARP METAL EDGES.
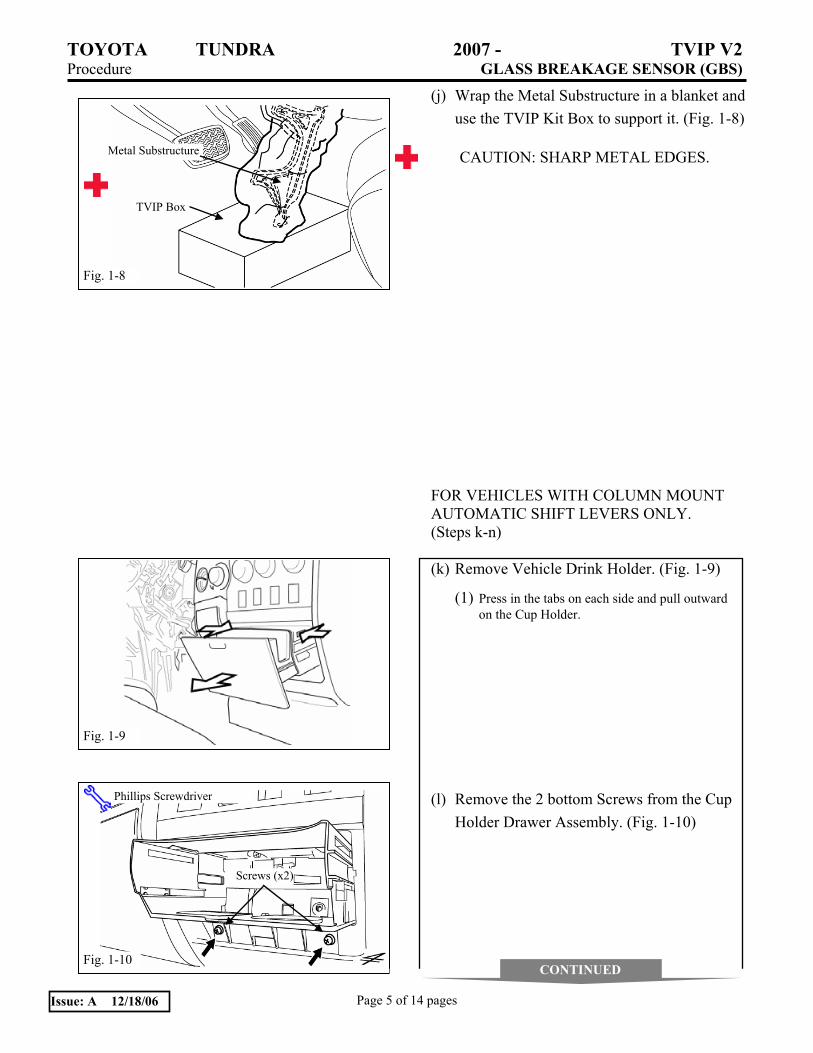
FOR VEHICLES WITH COLUMN MOUNT AUTOMATIC SHIFT LEVERS ONLY. (Steps k-n) (k) Remove Vehicle Drink Holder. (Fig. 1-9)
(1) Press in the tabs on each side and pull outward on the Cup Holder.
(l) Remove the 2 bottom Screws from the Cup Holder Drawer Assembly. (Fig. 1-10)
Fig. 1-9
Screws (x2)
Fig. 1-10
Phillips Screwdriver
TVIP Box
Fig. 1-8
Metal Substructure
CONTINUED
TOYOTA TUNDRA 2007 - TVIP V2 Procedure GLASS BREAKAGE SENSOR (GBS)
Page 6 of 14 pages Issue: A 12/18/06
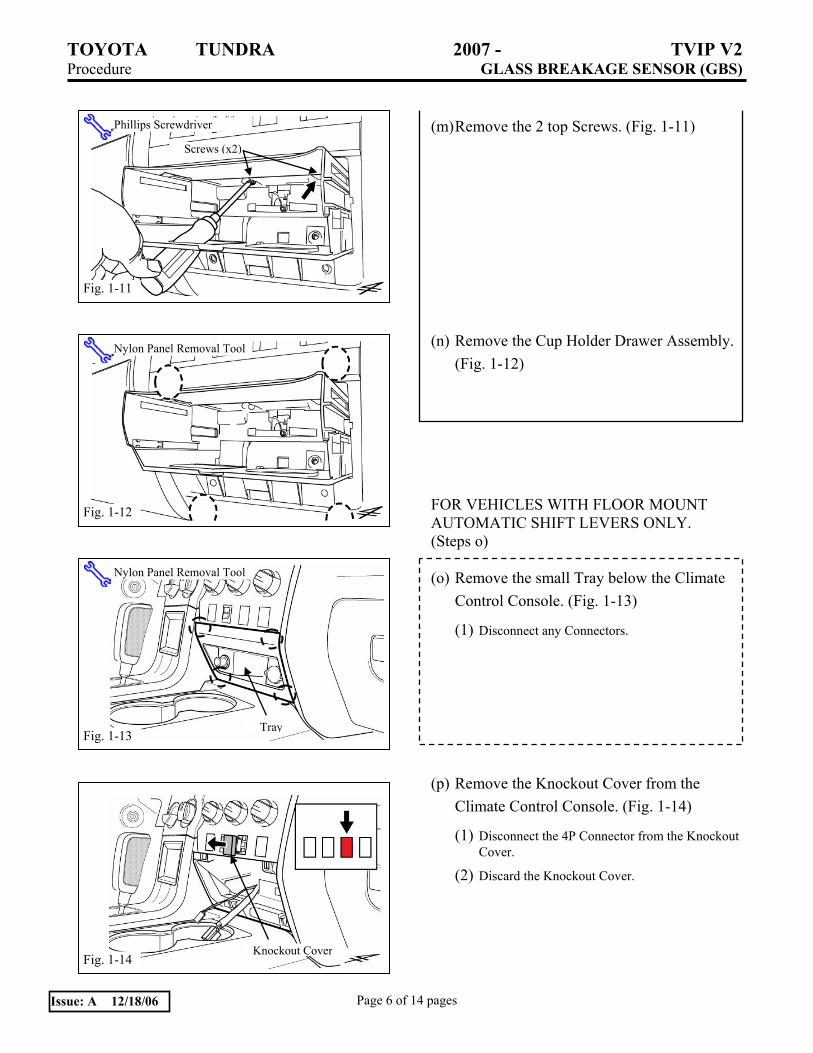
(m) Remove the 2 top Screws. (Fig. 1-11)
(n) Remove the Cup Holder Drawer Assembly. (Fig. 1-12)
FOR VEHICLES WITH FLOOR MOUNT AUTOMATIC SHIFT LEVERS ONLY. (Steps o)
(o) Remove the small Tray below the Climate
Control Console. (Fig. 1-13)
(1) Disconnect any Connectors.
(p) Remove the Knockout Cover from the Climate Control Console. (Fig. 1-14)
(1) Disconnect the 4P Connector from the Knockout Cover.
(2) Discard the Knockout Cover.
Screws (x2)
Fig. 1-11
Phillips Screwdriver
Fig. 1-12
Nylon Panel Removal Tool
Fig. 1-14 Knockout Cover
Fig. 1-13
Nylon Panel Removal Tool
Tray
TOYOTA TUNDRA 2007 - TVIP V2 Procedure GLASS BREAKAGE SENSOR (GBS)
Page 7 of 14 pages Issue: A 12/18/06
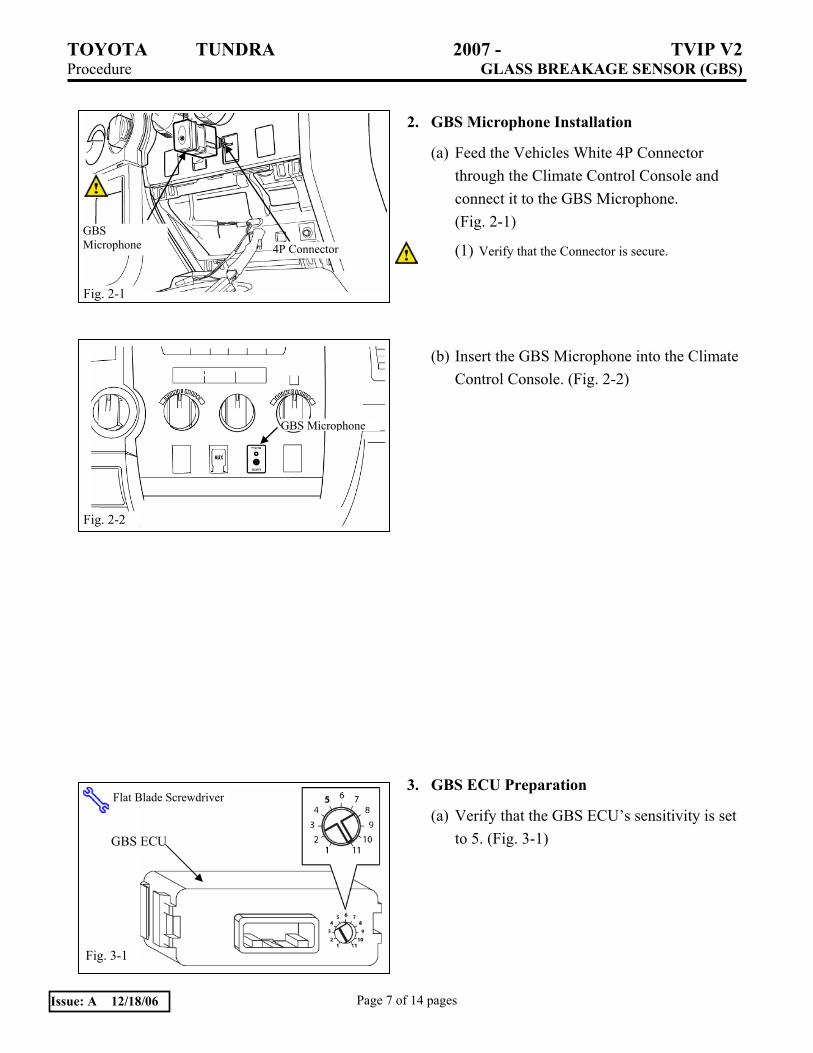
2. GBS Microphone Installation
(a) Feed the Vehicles White 4P Connector through the Climate Control Console and connect it to the GBS Microphone. (Fig. 2-1)
(1) Verify that the Connector is secure.
(b) Insert the GBS Microphone into the Climate Control Console. (Fig. 2-2)
3. GBS ECU Preparation
(a) Verify that the GBS ECU’s sensitivity is set to 5. (Fig. 3-1)
Fig. 3-1
Flat Blade Screwdriver
GBS ECU
Fig. 2-2
GBS Microphone
Fig. 2-1
GBS Microphone 4P Connector

TOYOTA TUNDRA 2007 - TVIP V2 Procedure GLASS BREAKAGE SENSOR (GBS)
Page 8 of 14 pages Issue: A 12/18/06
4. ECU installation
(a) Remove 2 Nuts from the Vehicle Brace near the Driver’s Side J/B. (Fig. 4-1)
(b) Pull the Brace away from the Vehicle Reinforcement. (Fig. 4-1)
(1) Do not remove the Brace from the studs.
(c) Install Bracket and GBS ECU. (Fig. 4-2)
(1) Make sure that the Bracket Pin seats properly.
(d) Use the M6 Flange Nut from the supplied kit to secure the ECU Bracket in place. (Fig. 4-3)
(e) Re-secure the Vehicle Brace by reinstalling 2 Nuts. (Fig. 4-3)
(1) Verify that the Bracket is secure.
(f) Locate the Vehicle’s White 8P Connector near the Driver’s Side J/B Area. (Fig. 4-4)
(1) Remove the Tape securing the Connector.
Fig. 4-4
8P Connector
Fig. 4-2
GBS ECU
Bracket Pin
Fig. 4-3
10mm Socket, Extension
Reinstall
M6 Flange Nut
Reinstall GBS ECU
Fig. 4-1
Remove Nuts (x2) Vehicle J/B
10mm Socket, Extension
Vehicle Brace
TOYOTA TUNDRA 2007 - TVIP V2 Procedure GLASS BREAKAGE SENSOR (GBS)
Page 9 of 14 pages Issue: A 12/18/06
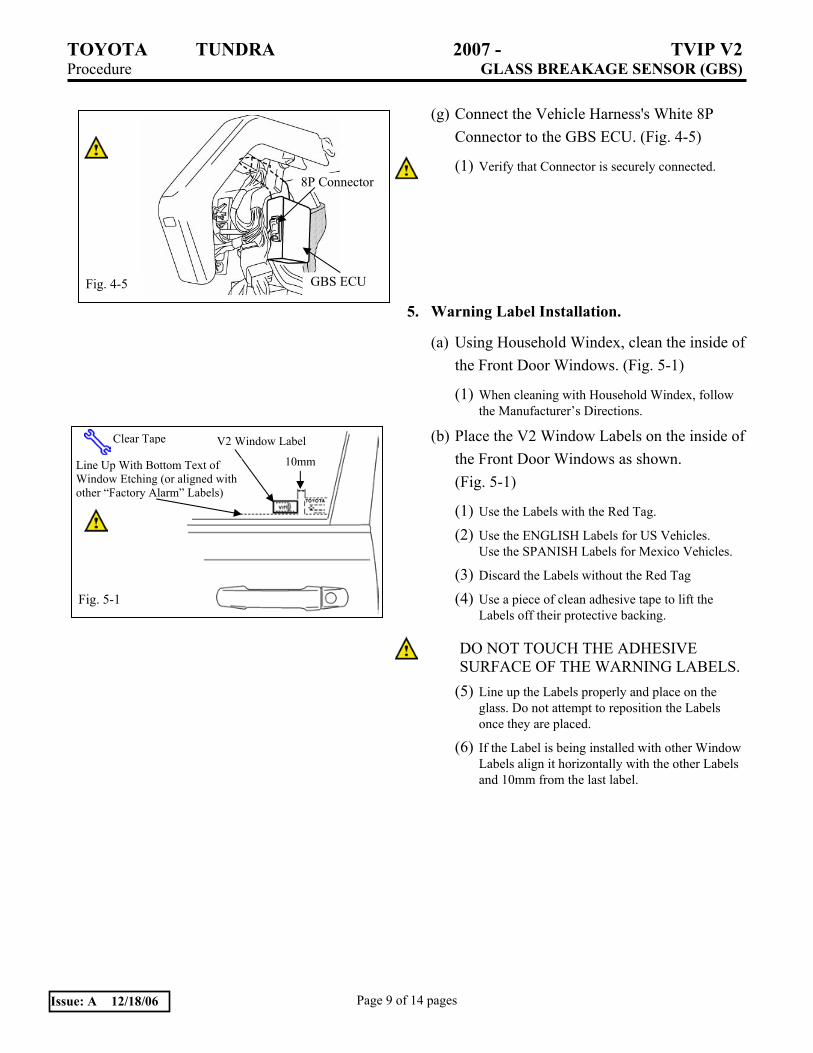
(g) Connect the Vehicle Harness's White 8P
Connector to the GBS ECU. (Fig. 4-5)
(1) Verify that Connector is securely connected.
5. Warning Label Installation.
(a) Using Household Windex, clean the inside of the Front Door Windows. (Fig. 5-1)
(1) When cleaning with Household Windex, follow the Manufacturer’s Directions.
(b) Place the V2 Window Labels on the inside of the Front Door Windows as shown. (Fig. 5-1)
(1) Use the Labels with the Red Tag.
(2) Use the ENGLISH Labels for US Vehicles. Use the SPANISH Labels for Mexico Vehicles.
(3) Discard the Labels without the Red Tag
(4) Use a piece of clean adhesive tape to lift the Labels off their protective backing.
DO NOT TOUCH THE ADHESIVE SURFACE OF THE WARNING LABELS.
(5) Line up the Labels properly and place on the glass. Do not attempt to reposition the Labels once they are placed.
(6) If the Label is being installed with other Window Labels align it horizontally with the other Labels and 10mm from the last label.
Fig. 4-5
8P Connector
GBS ECU
10mm
V2 Window Label
Line Up With Bottom Text of Window Etching (or aligned with other “Factory Alarm” Labels)
Fig. 5-1
Clear Tape
TOYOTA TUNDRA 2007 - TVIP V2 Procedure GLASS BREAKAGE SENSOR (GBS)
Page 10 of 14 pages Issue: A 12/18/06
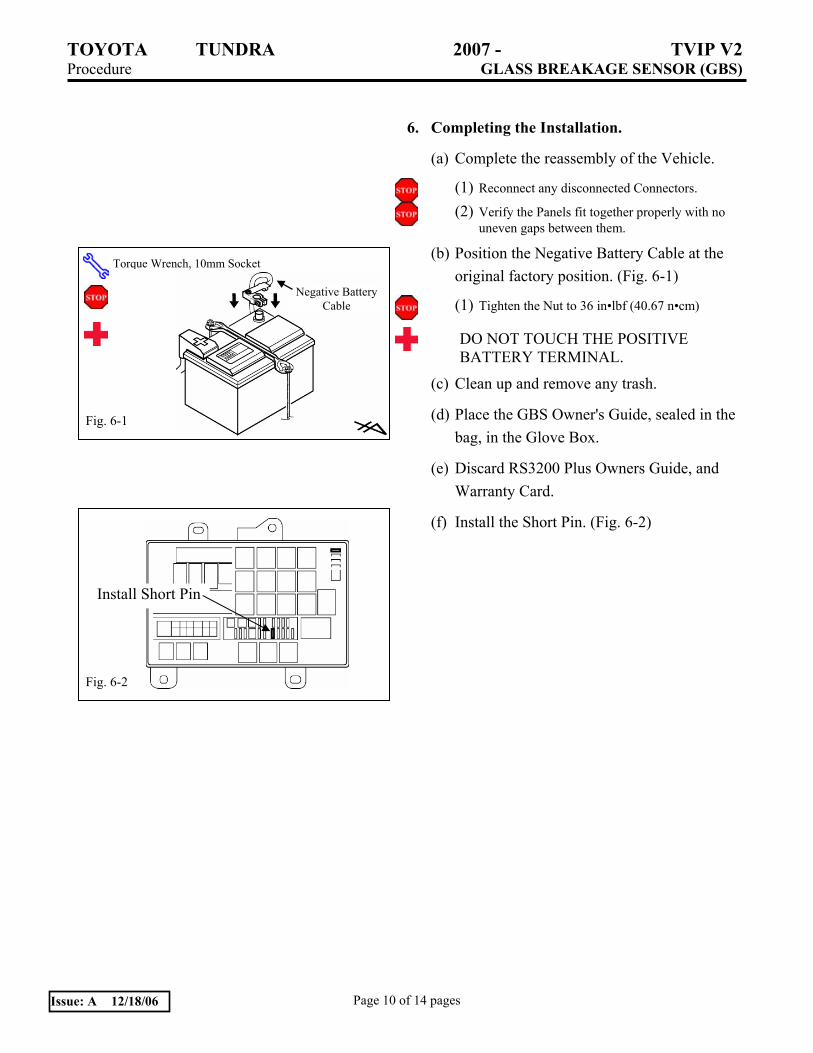
6. Completing the Installation.
(a) Complete the reassembly of the Vehicle.
(1) Reconnect any disconnected Connectors.
(2) Verify the Panels fit together properly with no uneven gaps between them.
(b) Position the Negative Battery Cable at the original factory position. (Fig. 6-1)
(1) Tighten the Nut to 36 in•lbf (40.67 n•cm)
DO NOT TOUCH THE POSITIVE BATTERY TERMINAL.
(c) Clean up and remove any trash.
(d) Place the GBS Owner's Guide, sealed in the bag, in the Glove Box.
(e) Discard RS3200 Plus Owners Guide, and Warranty Card.
(f) Install the Short Pin. (Fig. 6-2)
Torque Wrench, 10mm Socket
Fig. 6-1
Negative Battery Cable
Fig. 6-2
Install Short Pin

TOYOTA TUNDRA 2007 - TVIP V2 Checklist - these points MUST be checked to ensure a quality installation. GLASS BREAKAGE SENSOR (GBS) Check: Look For:
Page 11 of 14 pages Issue: A 12/18/06
Accessory Function Checks
Roll up all windows, and exit the vehicle
with remote.
Press and release the remote control’s lock
button to start the system’s arming process.
Wait 30 seconds.
Perform the following check in a
temperature- controlled environment
(50º-90º F)
With the tip of a key, or Striker Tool pulled
all the way out (PPO only), tap the center of
the driver’s door window to trigger the
alarm.
For all vehicles, press the unlock button of
the remote key to stop the alarm.
NOTE: If you do not disarm the system,
the alarm will last 20 seconds. It is not
necessary to check the alarm duration.
1. The turn signal lights flash once.
All doors lock.
The security LED lights up.
2. After 30 seconds the LED starts flashing;
the system is now armed.
3. The horn sounds repeatedly.
The headlights flash repeatedly.
The turn signal lights flash repeatedly.
The LED lights up.
NOTE: If the alarm does not trigger during
functional verifications, increase the GBS
sensitivity to the next setting.
4. The horn stops sounding.
All the lights stop flashing and/ or turn off.
The security LED turns off.

TOYOTA TUNDRA 2007 - TVIP V2 Checklist - these points MUST be checked to ensure a quality installation. GLASS BREAKAGE SENSOR (GBS) Check: Look For:
Page 12 of 14 pages Issue: A 12/18/06
Vehicle Function Checks
Head Lights
High Beams
Turn Signal Lights
Tail Lights
Stop Lights
Backup Lights
Hazard Lights
Marker Lights
Dome/Courtesy Lights
Panel/Switch Illumination
Accessory Controls/Illumination (if
equipped)
Key Sensor Buzzer
Fog Lights (if equipped)
Daytime Running Lights (if equipped)
Trunk/Tailgate/Bed Lights (if equipped)
Glove Box Light (if equipped)
Cruise Control Light (if equipped)
Functioning Head Lights
Functioning High Beams
Functioning Turn Signal Lights
Functioning Tail Lights
Functioning Stop Lights
Functioning Backup Lights
Functioning Hazard Lights
Functioning Marker Lights
Functioning Dome/Courtesy Lights
Functioning Controls/Illumination
Functioning Accessory
Functioning Key Sensor
Functioning Fog Lights
Functioning DR Lights
Functioning Lights
Functioning Glove Box Light
Functioning Cruise Control Light
TOYOTA TUNDRA 2007 - TVIP V2 Checklist - these points MUST be checked to ensure a quality installation. GLASS BREAKAGE SENSOR (GBS) Check: Look For:
Page 13 of 14 pages Issue: A 12/18/06
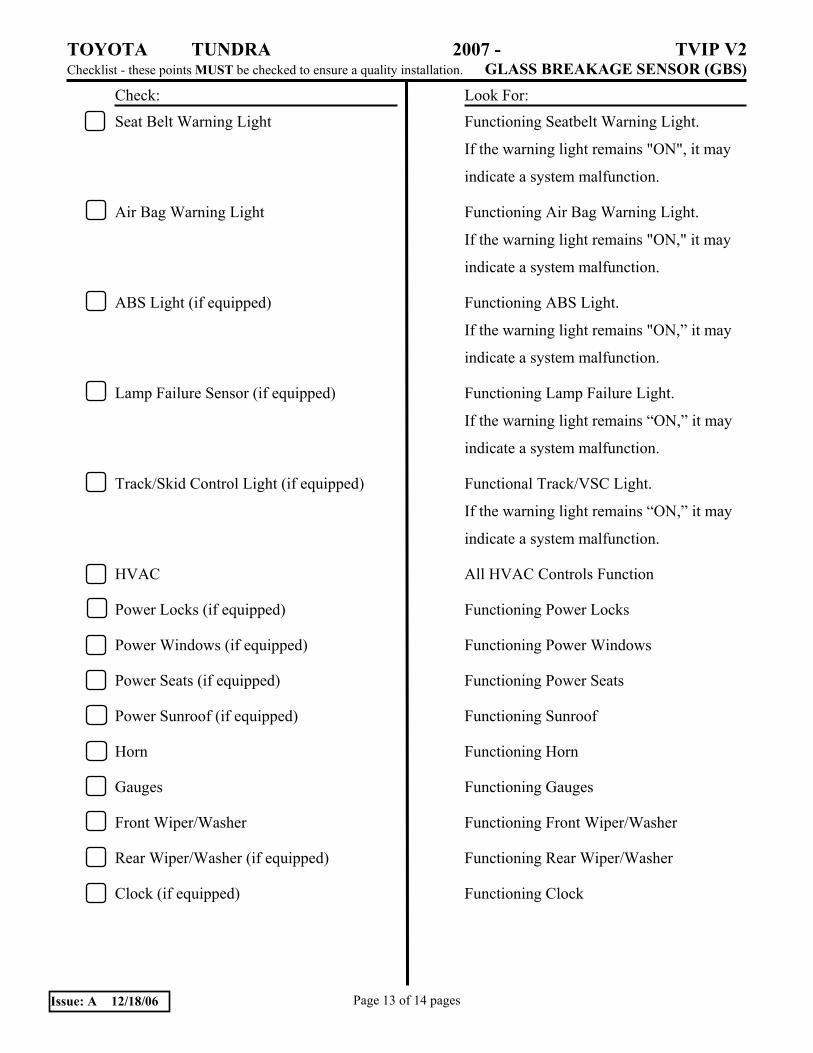
Seat Belt Warning Light
Air Bag Warning Light
ABS Light (if equipped)
Lamp Failure Sensor (if equipped)
Track/Skid Control Light (if equipped)
HVAC
Power Locks (if equipped)
Power Windows (if equipped)
Power Seats (if equipped)
Power Sunroof (if equipped)
Horn
Gauges
Front Wiper/Washer
Rear Wiper/Washer (if equipped)
Clock (if equipped)
Functioning Seatbelt Warning Light.
If the warning light remains "ON", it may
indicate a system malfunction.
Functioning Air Bag Warning Light.
If the warning light remains "ON," it may
indicate a system malfunction.
Functioning ABS Light.
If the warning light remains "ON,” it may
indicate a system malfunction.
Functioning Lamp Failure Light.
If the warning light remains “ON,” it may
indicate a system malfunction.
Functional Track/VSC Light.
If the warning light remains “ON,” it may
indicate a system malfunction.
All HVAC Controls Function
Functioning Power Locks
Functioning Power Windows
Functioning Power Seats
Functioning Sunroof
Functioning Horn
Functioning Gauges
Functioning Front Wiper/Washer
Functioning Rear Wiper/Washer
Functioning Clock

TOYOTA TUNDRA 2007 - TVIP V2 Checklist - these points MUST be checked to ensure a quality installation. GLASS BREAKAGE SENSOR (GBS) Check: Look For:
Page 14 of 14 pages Issue: A 12/18/06
Accessory Power Socket (if equipped)
Starter
Audio/Video (if equipped)
Power Sliding Door (if equipped)
Convenience Memory Settings (if
equipped)
Heated Seats (if equipped)
Massage Seats (if equipped)
Rear Window Defogger (if equipped)
Power Side Mirrors (if equipped)
Side Mirror Defogger (if equipped)
Front Windshield Defogger (if equipped)
Navigation System (if equipped)
Power Back Door (if equipped)
Steering Wheel Column Adjust
Hood Latch Release
Passenger Air Bag Switch (if equipped)
Rollover Side Curtain Air Bag (RSCA)
Switch (if equipped)
Remove the Short Pin fuse after the
checks are completed.
Functioning Power Socket
Functioning Starter
Functioning Audio/Video
Functioning Power Sliding Door
Functioning Memory Settings
Functioning Heated Seats
Functioning Massage Seats
Functioning Rear Window Defogger
Functioning Power Side Mirrors
Functioning Side Mirror Defogger
Functioning Front Windshield Defogger
Functioning Navigation System
Functioning Power Back Door
Steering Wheel Column Adjusts Without
Interference
Functioning Hood Latch Release
Functioning Passenger Air Bag Switch
Functioning RSCA Switch
Store Short Pin Here
2007 - TUNDRA TVIP V5 RS3200 PLUS OWNER’S GUIDE
Rev. A 06/20/05
RS3200 PLUS
SECURITY SYSTEMDESIGNED FOR USE WITH YOUR VEHICLE’SREMOTE KEYLESS ENTRY SYSTEM
OWNER’S GUIDE
SecuritySystemDesigned for Use With your Vehicle’s
Remote Keyless Entry System
owner’s guide
RS3200 plus
PROTECCIÓN DEL VEHÍCULO CONTRA INTRUSOS
SISTEMA DE SEGURIDADDISEÑADO PARA SER USADO CON EL SISTEMA DE ENTRADA A SU VEHÍCULO A CONTROL REMOTO SIN LLAVES
MANUAL DEL USUARIORev. A 6/20/05

To better understand the features and functions of this security system, please read this Owner’sGuide completely prior to use.
TABLE OF CONTENTS
DESCRIPTION PAGEINTRODUCTION 2
BRIEF DESCRIPTION–RS3200 PLUS FEATURES 3, 4
OPERATIONARMING THE RS3200 PLUS (except PASSIVE ARMING) 5DISARMING THE RS3200 PLUS (except PASSIVE DISARMING) 6PASSIVE (AUTOMATIC) ARMING & DISARMING 7AUTOMATIC REARMING 8ARMING SUSPENSION 8
ALARM INFORMATION 9ALARM TRIGGERS 9ALARM DESCRIPTIONS 10STOPPING AN ALARM 10
GLASS BREAKAGE SENSOR INFORMATIONGLASS BREAKAGE SENSOR CHECK PROCEDURE 11
PROGRAMMINGPASSIVE (AUTOMATIC) ARMING AND ENTRY DELAY 12(Not applicable to Highlander and Sienna. Please consult your Toyota Dealer for programming information.)
WARNING and CAUTION INFORMATION 13
TOYOTA RS3200 PLUS Security system Page 1
TOYOTARS3200 PLUSSISTEMA DE SEGURIDAD Página 1
Para comprender mejor las características y funciones de su sistema de seguridad, por favor lea este manual del usuario en su totalidad antes de usarlo.
CONTENIDO
DESCRIPCIÓNPÁGINAINTRODUCCIÓN2BREVE DESCRIPCIÓN DEL SISTEMA RS3200 PLUS. CARACTERÍSTICAS3, 4OPERACIÓN
ARMANDO EL RS3200 PLUS (EXCEPTO ARMADO PASIVO)5DESARMANDO EL RS3200 PLUS (EXCEPTO DESARMADO PASIVO)6ARMADO Y DESARMADO PASIVO (AUTOMÁTICO)7REARMADO AUTOMÁTICO8SUSPENSIÓN DEL ARMADO8
INFORMACIÓN DE LA ALARMA9PARTES QUE PROVOCAN EL DISPARO DE LA ALARMA9DESCRIPCIONES DE LA ALARMA10PARO DE LA ALARMA10
INFORMACIÓN DEL SENSOR CONTRA ROTURA DE CRISTALESPROCEDIMIENTO DE VERIFICACIÓN DEL SENSOR CONTRA ROTURA DE CRISTALES11
PROGRAMACIÓNARMADO PASIVO (AUTOMÁTICO) Y RETRASO DE ENTRADA12(No se aplica para el Highlander. Por favor consulte a su distribuidor Toyota para información de programación).
INFORMACIÓN DE ADVERTENCIAS Y PRECAUCIONES13

INTRODUCCIÓN
Felicidades en su elección del sistema de seguridad adicional RS3200 Plus para la protección desu vehículo. Para obtener el máximo provecho del sistema, le recomendamos que por favor leaeste manual de usuario en su totalidad para que así usted conozca todas sus funciones y características.
El RS3200 Plus protegerá su vehículo a través del monitoreo de los puntos de entrada, detecciónde rotura de cristales y monitoreo del interruptor de encendido. Mientras esté armado, el sistema sedisparará y hará sonar una alarma cuando alguna puerta, cofre o maletero sea desasegurado oabierto por la fuerza*, o cuando sea golpeado o roto algún cristal. Una vez que se dispara la alarma, el claxon del vehículo sonará al mismo tiempo que las luces del frente, las luces traseras ylas luces intermitentes parpadean. Además, el sistema de encendido del vehículo queda inhabilitado, evitando que el motor pueda ser arrancado. Además de la protección que ofrece el sistema RS3200 Plus, éste trabajará en conjunto con su sistema a control remoto de entrada sinllaves al vehículo, permitiéndole armar y desarmar el sistema de seguridad al mismo tiempo que losseguros de las puertas son abiertos y cerrados a control remoto. En vehículos equipados con zumbador, éste sonará brevemente cuando el sistema sea armado o desarmado a control remoto.
Nota importante acerca de su sistema
A lo largo de esta guía, encontrará referencias acerca del e status del monitor (1) (2) del sistema.Como se muestra abajo, este panel cuenta con el LED indicador (indica el estatus de operación delsistema) y el micrófono sensor de rotura de cristales. Los vehículos equipados con sistemas deinmovilización de motor cuentan con un LED ya instalado, por lo que el sistema RS3200 Plus utilizará ese mismo LED (3), además de un micrófono montado esta vez en una ubicación distinta.Si su automóvil cae dentro de esta categoría, recuerde mirar ese LED cuando la información serefiera al condición del monitor. Si usted no sabe dónde se encuentra ubicado dicho LED, refiéraseal manual de propietario de su vehículo para información específica.
* Cuando el sistema es armado pasivamente (automáticamente) existirá un retraso de tiempo al abrir una puerta, antes de que la alarma se dispare.
INTRODUCTIONCongratulations on your choice of the RS3200 PLUS add-on security system to protect your vehicle!To get the most from the system, we strongly recommend that you read this Owner’s Guide com-pletely to learn all of its features and functions.
The RS3200 PLUS provides security through point-of-entry monitoring, glass breakage detection andignition switch monitoring. While ARMED, the system will be TRIGGERED and sound an ALARM when adoor, trunk or hatch is forcibly unlocked or opened*, or when a window is tapped on or broken.During the ALARM, the vehicle’s horn sounds and the headlights, tail lights and front marker or turnsignal lights flash. Also, the vehicle’s starter is disabled, preventing engine start. In addition to thecomprehensive protection, the RS3200 PLUS works in conjunction with your vehicle’s remote key-less entry system, enabling you to ARM and DISARM the security system at the same time the doorsare remotely locked and unlocked. In vehicles equipped with a buzzer, it will chirp when the systemis REMOTE ARMED and DISARMED.
An important note about your system
Throughout this guide, there are references to the STATUS MONITOR for this system. Illustratedbelow, this panel holds the LED indicator (for the system’s operating status) and the GLASS
BREAKAGE SENSOR’S microphone. In vehicles equipped with an engine immobilizer system, there isa LED already installed, so the RS3200 PLUS utilizes the vehicle’s engine immobilizer system LEDinstead and a microphone mounted in a separate location. If your vehicle falls into this category,remember to look at that LED when the information refers to the STATUS MONITOR. If you do notknow where the LED is located, refer to your vehicle’s owner’s guide for specific information.
* When the system is PASSIVELY (AUTOMATICALLY) ARMED, there is an ENTRY DELAY that will elapse when a door is opened before an ALARM is TRIGGERED.
YOUR ENGINE IMMOBILIZER SYSTEM LED MAY LOOK
DIFFERENT THAN THE ONEILLUSTRATED HERE
Page 2 TOYOTA RS3200 PLUS Security system
LIGHTSFOR 30
SECONDS(PRE-
ARMING)THEN
STARTSFLASHING(SYSTEM
ISARMED)
➀ ➁
➀ ➁
➂
➂
12
SULEDDELSISTEMADE
INMOVILIZACIÓNDELMOTOR
PUEDESERDIFERENTEDEL
QUEILUSTRAMOSAQUÍ.
SEENCIENDE
PORTREINTA
SEGUNDOS
(PRE-ARMADO)YLUEGO
COMIENZAA
PARPADEAR
(CUANDOEL
SISTEMAESTÁ
ARMADO)
123
3
Página 2 TOYOTARS3200 PLUSSISTEMA DE SEGURIDAD

TOYOTA RS3200 PLUS Security system Page 3
REMOTEARMING/DISARMING
AUTOMATICREARMING
KEYARMING/DISARMING
ARMED MODESUSPENSION**
PASSIVE (AUTOMATIC)ARMING
PASSIVE DISARMING
ADJUSTABLE ENTRYDELAY
MANUAL ARMING
IGNITION KEY DISARMING
POINT-OF-ENTRYPROTECTION
GLASS BREAKAGE SENSOR
WARN AWAY ALARM
IGNITION SWITCH MONITORING
FEATURES FUNCTIONSThe RS3200 PLUS will ARM 30 seconds after the lock button on the remote keyless entry system’s remote control is pressed, and DISARM when the unlock button is pressed. If your vehicle is equipped with a buzzer that chirpswhen the lock and unlock buttons on the remote controls are pressed, the buzzer will also chirp when the system is REMOTE ARMED and DISARMED.The RS3200 PLUS will automatically REARM at the same time the vehicle’s remote keyless entry system relocks the vehicle’s doors, if no door is opened within 30 seconds after REMOTE DISARMING.The RS3200 PLUS will ARM 30 seconds after you close the trunk (if open) and lock the vehicle’s doors with the key, and will DISARM whenyou unlock a door with the key.While ARMED, the trunk may be opened with the key (or trunk release button on your remote control, if so equipped) without TRIGGERING an ALARM. Once the open trunk is closed, the system ARMS again.The RS3200 PLUS may be programmed to automatically ARM 30seconds after the ignition key is removed, the vehicle exited and the last door and the trunk closed, without the necessity of locking doors.The RS3200 PLUS may be DISARMED with the vehicle’s ignition key after it was PASSIVELY ARMED.When the RS3200 PLUS has been PASSIVELY ARMED, an ENTRY DELAY
(user-selectable at 0, 15, or 30 seconds) will start when a door is opened before an ALARM is TRIGGERED.When you lock the vehicle with the central lock switch (while a dooris open), the RS3200 PLUS will ARM 30 seconds after you close all the doors and the trunk (if open).The RS3200 PLUS may be DISARMED by inserting the key into the ignition switch and turning it to “ON.”Forcibly unlocking or opening a door or trunk while the RS3200 PLUS
is ARMED will TRIGGER an ALARM immediately. (If the system was PASSIVELY
ARMED, the ENTRY DELAY must pass after opening a door before the ALARM isTRIGGERED.)The RS3200 PLUS utilizes a microphone (usually mounted in the STATUS MONITOR) to sense the noise from tapping on window glass, orglass breaking, and TRIGGER the system to sound an ALARM. It is finetuned to “listen” for this type of noise, and ignore other sounds. When the GLASS BREAKAGE SENSOR’S microphone picks up tapping or breaking of window glass, it TRIGGERS a WARN AWAY ALARM; the headlightsand tail and marker or turn signal lights flash, and the horn sounds for 20 seconds, but the starter is not disabled. If there is another detection of glass tapping or breaking, or if a door is opened or unlocked without a key, the regular ALARM is TRIGGERED.While ARMED, the RS3200 PLUS monitors the ignition switch. If an attempt is made to start the vehicle without a key, an ALARM is TRIGGERED.
BRIEF DESCRIPTION–RS3200 PLUS FEATURES
**Starting from 2002 M.Y., Arming Suspension Mode by using the key to unlock the trunk is not applicable to Camry, Solara, and Corolla.
BREVE DESCRIPCIÓN DE LAS CARACTERÍSTICAS DEL SISTEMA RS3200 PLUS
El RS3200 Plus se armará 30 segundos después de que sea presionado elbotón para cerrar las puertas del control remoto de acceso al vehículo sinllaves y se desarmará al presionar el botón para abrir los seguros de las puertas. Si su vehículo se encuentra equipado con un zumbador que suenaal presionar los botones de su control remoto al abrir y cerrar los seguros,este zumbador también sonará cuando el sistema sea armado y desarmado.El RS3200 Plus se rearmará automáticamente al mismo tiempo que el sistema a control remoto de acceso al vehículo sin llaves cierre los segurosde las puertas, en caso de que ninguna puerta sea abierta dentro de los 30segundos siguientes de haber desarmado el auto a distancia. El RS3200 Plus se armará 30 segundos después de que usted cierre elmaletero (en caso de que se encontrara abierto) y cierre las puertas de suvehículo con la llave y se desarmará al abrir las puertas con la llave.Mientras se encuentra armado, el maletero puede ser abierto con la llave (ocon el botón liberador del maletero o a través del control remoto en caso deque así se encuentre equipado su vehículo), sin disparar la alarma. Una vezque cierre nuevamente el maletero, el sistema se armará otra vez.El RS3200 Plus puede ser programado para que se arme automáticamente30 segundos después de que sea retirada la llave de encendido, se hayasalido del vehículo y se haya cerrado la última puerta o maletero, sin necesidad de asegurar las puertas.
El RS3200 Plus puede ser desarmado con la llave de encendido del vehículo si previamente fue armado pasivamente.
Cuando el RS3200 Plus ha sido armado pasivamente, se activará un retrasode entrada (programable a 0, 15 ó 30 segundos) al abrir una puerta antes deque se dispare la alarma.
Cuando usted asegura su vehículo a través del interruptor central deseguros (mientras una puerta se encuentra abierta), el RS3200 Plus searmará 30 segundos después de que se hallan cerrado todas las puertas yel maletero (si es que se encontraba abierto).
El RS3200 Plus podrá ser desarmado al meter la llave dentro del interruptor de encendido y girándolo a la posición de encendido.
El sistema RS3200 Plus disparará inmediatamente la alarma cada vez quese levante el seguro o se abra con violencia alguna puerta, maletero o cofre.(Si el sistema fue armado pasivamente, la alarma no sonará hasta que haya transcurrido el tiempo de retraso de entrada, después de abierta la puerta).
El RS3200 Plus emplea un micrófono (generalmente montado en el monitorde condición) para registrar el ruido que se produce al golpear o romperalgún cristal de las ventanas de su auto, disparando el sistema para quesuene la alarma. Se encuentra cuidadosamente afinado para "escuchar"específicamente este tipo de ruidos, ignorando cualquier otro.
Cuando el micrófono sensor de rotura de cristales capta algún golpe o roturade cristales, dispara una alarma de advertencia; las luces delanteras,traseras e intermitentes parpadean y el claxon suena por 20 segundos, peroel encendido no es inhabilitado. En caso de que se vuelva a detectar otrogolpe o rotura de cristales o si algún seguro es levantado o alguna puertaabierta sin la llave, entonces se disparará la alarma competa.Mientras esta armado, el RS3200 Plus monitorea el interruptor de ignicion.Si se intenta prender el vehiculo sin la llave, se disparara alarma.
TOYOTARS3200 PLUSSISTEMA DE SEGURIDAD Página 3
ARMADO Y DESARMADO ADISTANCIA
REARMADOAUTOMÁTICO
ARMADO Y DESARMADO CON LALLAVE
MODO DE SUSPENSIÓN DELARMADO **
ARMADO PASIVO(AUTOMÁTICO)
DESARMADOPASIVO
TIEMPO DERETRASO DEENTRADA AJUSTABLE
ARMADO MANUAL
DESARMADO ATRAVÉS DE LA LLAVE DE ENCENDIDO
PROTECCIÓN EN LOSPUNTOS DE ENTRADA
SENSOR DE ROTURADE CRISTALES
ALARMA DE ADVERTENCIA
MONITORO DELINTERRUPTOR DEIGNICION
CARACTERÍSTICASFUNCIONES
**A partir de los modelos 2002, el modo de suspensión de armado al emplear la llave para abrir el maletero no aplica en el Camry, Solara y Corolla.
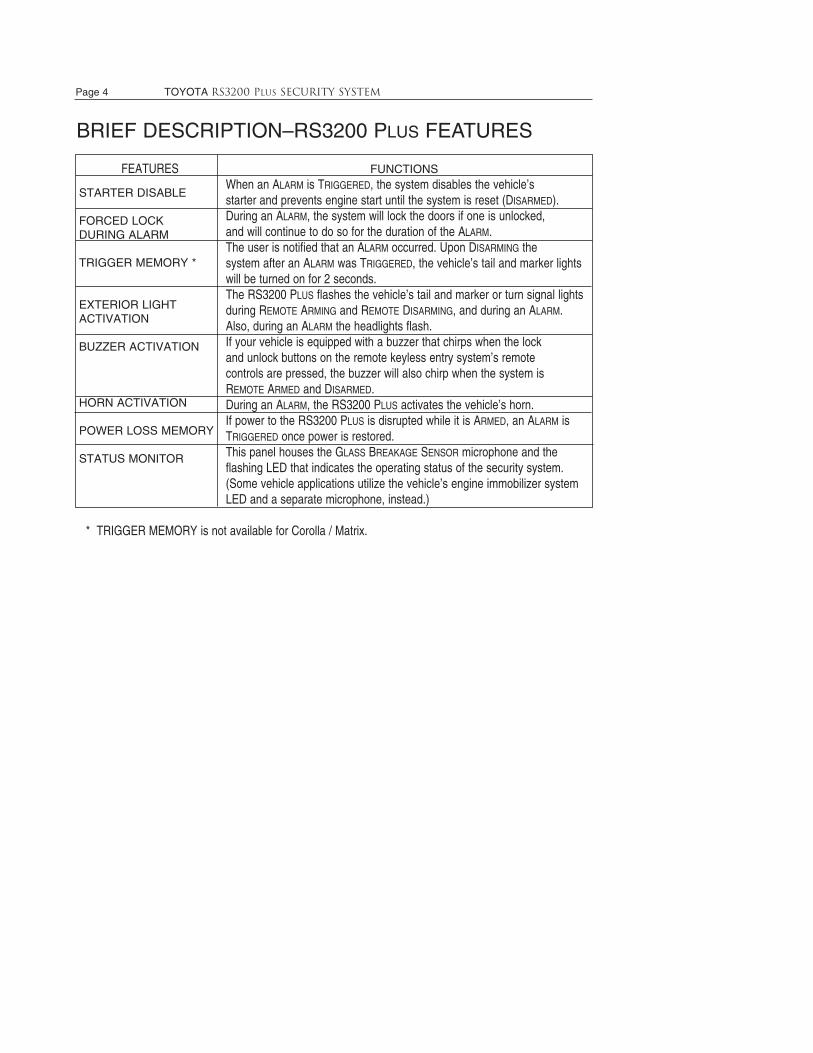
Page 4 TOYOTA RS3200 PLUS Security system
STARTER DISABLE
FORCED LOCK DURING ALARM
TRIGGER MEMORY *
EXTERIOR LIGHT ACTIVATION
BUZZER ACTIVATION
HORN ACTIVATION
POWER LOSS MEMORY
STATUS MONITOR
BRIEF DESCRIPTION–RS3200 PLUS FEATURES
FEATURES FUNCTIONSWhen an ALARM is TRIGGERED, the system disables the vehicle’s starter and prevents engine start until the system is reset (DISARMED).During an ALARM, the system will lock the doors if one is unlocked, and will continue to do so for the duration of the ALARM.The user is notified that an ALARM occurred. Upon DISARMING thesystem after an ALARM was TRIGGERED, the vehicle’s tail and marker lights will be turned on for 2 seconds.The RS3200 PLUS flashes the vehicle’s tail and marker or turn signal lights during REMOTE ARMING and REMOTE DISARMING, and during an ALARM.Also, during an ALARM the headlights flash.If your vehicle is equipped with a buzzer that chirps when the lockand unlock buttons on the remote keyless entry system’s remote controls are pressed, the buzzer will also chirp when the system is REMOTE ARMED and DISARMED.During an ALARM, the RS3200 PLUS activates the vehicle’s horn.If power to the RS3200 PLUS is disrupted while it is ARMED, an ALARM isTRIGGERED once power is restored.This panel houses the GLASS BREAKAGE SENSOR microphone and the flashing LED that indicates the operating status of the security system. (Some vehicle applications utilize the vehicle’s engine immobilizer system LED and a separate microphone, instead.)
* TRIGGER MEMORY is not available for Corolla / Matrix.
Página 4 TOYOTARS3200 PLUSSISTEMA DE SEGURIDAD
MONITOREO DEL INTERRUPTOR DE ENCENDIDODESHABILITADOR DELA ENCENDIDO
ASEGURADOFORZADO DURANTE ALARMAMEMORIA DE DISPARO*
ACTIVACIÓN DE LASLUCES EXTERIORES
ACTIVADOR DEL ZUMBADOR
ACTIVACIÓN DEL CLAXONMEMORIA CONTRAPÉRDIDA DE ENERGÍA
MONITOR DE CONDICIÓN
BREVE DESCRIPCIÓN DE LAS CARACTERÍSTICAS DEL SISTEMA RS3200 PLUS
Mientras se encuentre armado, el RS3200 Plus monitorea el interruptorde encendido. Si se realiza algún intento de arranque del vehículo sin lallave, se activará la alarma.Cuando se dispara la alarma, el sistema deshabilita el encendido delvehículo y evita que el motor pueda ser arrancado hasta que el sistema sea desarmado.Cuando se activa la alarma, el sistema cierra los seguros de las puertas, en caso de que alguno se encuentre levantado y continúa haciéndolo mientras esté activada la alarma.El usuario es notificado en caso de que durante su ausencia se hayadisparado la alarma. Si la alarma entró en funcionamiento, al desarmar el sistema se encenderán las luces delanteras y traserasdurante dos segundos. El RS3200 Plus parpadea las luces traseras e intermitentes cada vezque se arma o desarma a control remoto el sistema y cuando se dispara la alarma. Durante la alarma además se encienden las lucesdelanteras intermitentemente.Si su vehículo se encuentra equipado con un zumbador que suenabrevemente al presionar los botones del sistema a control remoto sinllaves, al abrir o cerrar los seguros, el zumbador también sonarácuando el sistema sea armado o desarmado a distancia.Cuando se activa la alarma, el RS3200 Plus activa el claxon delvehículo.Si el suministro de energía eléctrica es interrumpido mientras elRS3200 Plus se encuentra armado, una vez restablecida, la alarmasonará.Este panel alberga al micrófono sensor de rotura de cristales y al LEDintermitente que indica el condición de operación del sistema de seguridad. (En algunos casos, se emplea el LED del inmobilizador delmotor del vehículo y un micrófono por separado).
CARACTERÍSTICASFUNCIONES
*La memoria contra pérdida de energía no está disponible en el Corolla / Matrix.
TOYOTA RS3000 PLUS Security system Page 5
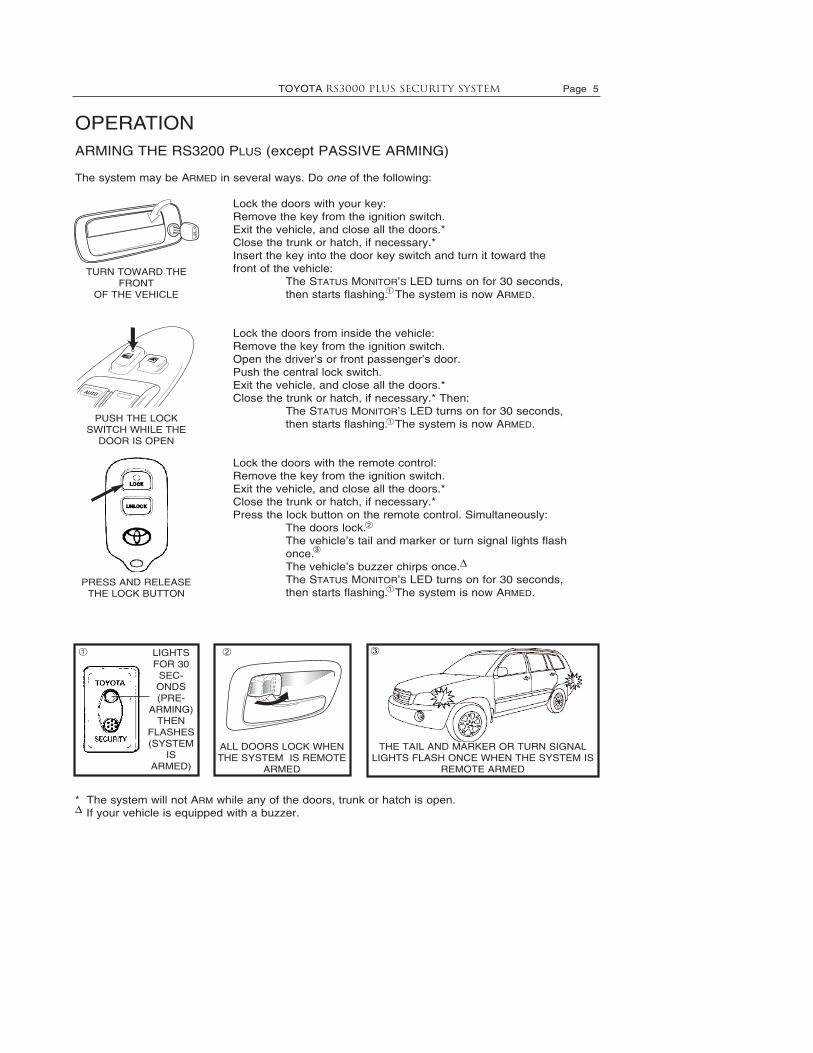
OPERATIONARMING THE RS3200 PLUS (except PASSIVE ARMING)
The system may be ARMED in several ways. Do one of the following:
Lock the doors with your key:Remove the key from the ignition switch.Exit the vehicle, and close all the doors.* Close the trunk or hatch, if necessary.* Insert the key into the door key switch and turn it toward the front of the vehicle:
The STATUS MONITOR’S LED turns on for 30 seconds, then starts flashing. The system is now ARMED.
Lock the doors from inside the vehicle:Remove the key from the ignition switch.Open the driver’s or front passenger’s door.Push the central lock switch.Exit the vehicle, and close all the doors.* Close the trunk or hatch, if necessary.* Then:
The STATUS MONITOR’S LED turns on for 30 seconds, then starts flashing. The system is now ARMED.
Lock the doors with the remote control:Remove the key from the ignition switch.Exit the vehicle, and close all the doors.* Close the trunk or hatch, if necessary.* Press the lock button on the remote control. Simultaneously:
The doors lock.The vehicle’s tail and marker or turn signal lights flash once.The vehicle’s buzzer chirps once.∆The STATUS MONITOR’S LED turns on for 30 seconds, then starts flashing. The system is now ARMED.
* The system will not ARM while any of the doors, trunk or hatch is open.∆ If your vehicle is equipped with a buzzer.
TURN TOWARD THEFRONT
OF THE VEHICLE
PRESS AND RELEASE THE LOCK BUTTON
PUSH THE LOCKSWITCH WHILE THE
DOOR IS OPEN
LIGHTSFOR 30
SEC-ONDS(PRE-
ARMING)THEN
FLASHES(SYSTEM
ISARMED)
THE TAIL AND MARKER OR TURN SIGNALLIGHTS FLASH ONCE WHEN THE SYSTEM IS
REMOTE ARMED
ALL DOORS LOCK WHENTHE SYSTEM IS REMOTE
ARMED
➀ ➁ ③
➀
➀
➁
③
➀
TOYOTARS3200 PLUSSISTEMA DE SEGURIDAD Página 5
OPERACIÓN
ARMADO DELRS3200 Plus (excepto ARMADO PASIVO)
El sistema podrá ser armado de varias maneras. Haga alguna de las siguientes cosas:
Asegure las puertas con su llave:Retire la llave del interruptor de encendido.Salga del vehículo, y cierre todas las puertas *.Cierre el maletero o puerta trasera, de ser necesario*.Inserte la llave en la puerta y gire el interruptor hacia el frente del vehículo:
El LED que monitorea el condición del sistema se encenderá por 30 segundos y después comenzará a parpadear (1). El sistema se encuentra ahora armado.
Cierre las puertas desde el interior del vehículo:Retire la llave del interruptor de encendido.Abra la puerta del conductor o del copiloto.Presione el interruptor central de los seguros.Salga del vehículo y cierre todas las puertas *.Cierre el maletero o puerta trasera, de ser necesario*. Luego:
El LED que monitorea el condición del sistema se encenderá por 30 segundos y después comenzará a parpadear (1). El sistema se encuentra ahora armado.
Cierre las puertas con el control remoto:Retire la llave del interruptor de encendido.Salga del vehículo y cierre todas las puertas *.Cierre el maletero o puerta trasera, de ser necesario*.Presione el botón para asegura las puertas en el control remoto.Simultáneamente:
Las puertas se cerrarán. (2)Las luces traseras e intermitentes del vehículo centellarán una sola vez. (3)
El zumbador del vehículo sonará una vez. ∆El LED que monitorea el condición del sistema se encenderá por 30 segundos y después comenzará a parpadear. El sistema se encuentra ahora armado.
* El sistema no se armará si cualquier puerta, maletero o cofre se encuentra abierto.∆En caso de que su vehículo se encuentre equipado con un zumbador.
GIREHACIAELFRENTEDEL
VEHÍCULO
PRESIONEYSUELTEELBOTÓN
QUEASEGURALASPUERTAS
(LOCK)
PRESIONEELINTERRUPTOR
DELOSSEGUROSMIENTRAS
LAPUERTASEENCUENTRA
ABIERTA
SEENCIENDE
PORTREINTA
SEGUNDOS
(PRE-ARMADO)
LUEGO
COMIENZAA
PARPADEAR
(ELSISTEMA
ESTÁ
ARMADO)
LASLUCESTRASERASEINTERMITENTES
PARPADEARÁNUNASOLAVEZ,CUANDOELSISTEMA
SEAARMADOREMOTAMENTE
TODASLASPUERTASSE
CERRARÁNCUANDOELSIS-TEMASEAARMADO
REMOTAMENTE
1
2
3
1
2
3
1
2
1
Page 6 TOYOTA RS3200 PLUS Security system
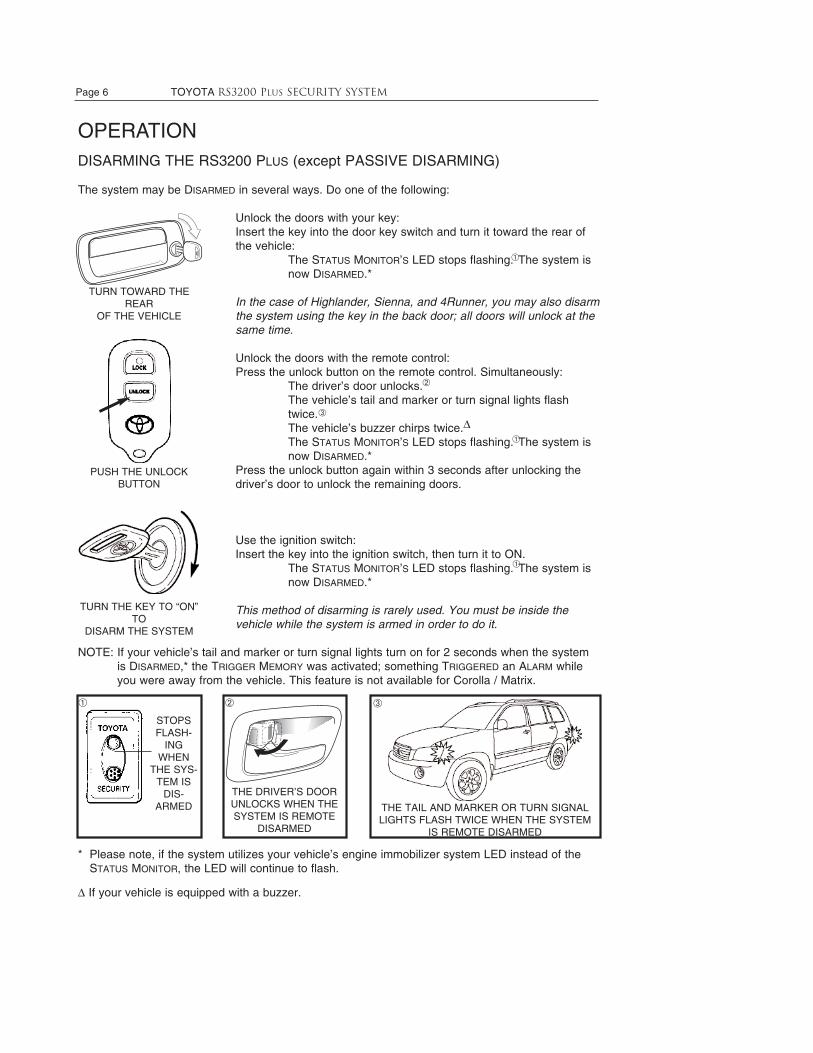
OPERATIONDISARMING THE RS3200 PLUS (except PASSIVE DISARMING)
The system may be DISARMED in several ways. Do one of the following:
Unlock the doors with your key:Insert the key into the door key switch and turn it toward the rear of the vehicle:
The STATUS MONITOR’S LED stops flashing. The system is now DISARMED.*
In the case of Highlander, Sienna, and 4Runner, you may also disarmthe system using the key in the back door; all doors will unlock at the same time.
Unlock the doors with the remote control:Press the unlock button on the remote control. Simultaneously:
The driver’s door unlocks.The vehicle’s tail and marker or turn signal lights flash twice.The vehicle’s buzzer chirps twice.∆The STATUS MONITOR’S LED stops flashing. The system is now DISARMED.*
Press the unlock button again within 3 seconds after unlocking the driver’s door to unlock the remaining doors.
Use the ignition switch:Insert the key into the ignition switch, then turn it to ON.
The STATUS MONITOR’S LED stops flashing. The system is now DISARMED.*
This method of disarming is rarely used. You must be inside the vehicle while the system is armed in order to do it.
NOTE: If your vehicle’s tail and marker or turn signal lights turn on for 2 seconds when the system is DISARMED,* the TRIGGER MEMORY was activated; something TRIGGERED an ALARM whileyou were away from the vehicle. This feature is not available for Corolla / Matrix.
* Please note, if the system utilizes your vehicle’s engine immobilizer system LED instead of the STATUS MONITOR, the LED will continue to flash.
∆ If your vehicle is equipped with a buzzer.
TURN TOWARD THEREAR
OF THE VEHICLE
TURN THE KEY TO “ON”TO
DISARM THE SYSTEM
THE DRIVER’S DOORUNLOCKS WHEN THESYSTEM IS REMOTE
DISARMED
THE TAIL AND MARKER OR TURN SIGNALLIGHTS FLASH TWICE WHEN THE SYSTEM
IS REMOTE DISARMED
PUSH THE UNLOCKBUTTON
STOPSFLASH-
INGWHEN
THE SYS-TEM IS
DIS-ARMED
➀ ➁ ➂
➀
➁
➂
➀
➀
Página 6 TOYOTARS3200 PLUSSISTEMA DE SEGURIDAD
GIREHACIALAPARTETRASERA
DELVEHÍCULO
GIRELALLAVEDEENCENDIDOA
LAPOSICIÓN"ON"PARAD
ESARMARELSISTEMA
PRESIONEELBOTÓNPARA
DESASEGURARLASPUERTAS
(UNLOCK)
ELSEGURODELAPUERTADEL
CONDUCTORSEABREAL
DESARMARREMOTAMENTEEL
VEHÍCULO
LASLUCESTRASERASEINTERMITENTESPARPADEANDOS
VECESALDESARMARREMOTAMENTEALSISTEMA
DEJADE
PARPADEARAL
DESARMAREL
SISTEMA
3 2 1
OPERACIÓN
DESARMADO DELRS3200 Plus (excepto DESARMADO PASIVO)
El sistema podrá ser desarmado de varias maneras. Haga una de las siguientes:
Desasegure las puertas con su llave: Inserte la llave en el interruptor de la puerta y gírela hacia la parte trasera del vehículo:El LED que monitorea el condición del sistema dejará de parpadear. (1) El sistema se encuentra ahora desarmado.
En caso del Highlander, Sienna y el 4Runner, también podrá desarmar el sistema empleando la llave desde la puerta trasera; todas las puertas se desasegurarán al mismo tiempo.
Desasegure las puertas a través del control remoto:Presione el botón para desasegurar las puertas desde el control remoto. Simultáneamente:La puerta del conductor se desasegura. (2)Las luces traseras e intermitentes del vehículo centellearán dos veces. (3)
El zumbador del vehículo sonará dos veces.∆El LED que monitorea el condición del sistema dejará de parpadear. (1)El sistema se encuentra ahora desarmado.Presione el botón para desasegurar las puertas nuevamente dentro de los siguientes tres segundos después de haber desasegurado la puerta del conductor, para desasegurar el resto de las puertas.
Use el interruptor de arranque del automóvil:Inserte la llave en el interruptor de arranque, después gírela a la posición de encendido (ON).El LED que monitorea la condición del sistema dejará de parpadear. (1)El sistema se encuentra ahora desarmado.
Este método de desarmado rara vez es usado. Usted deberá estar dentro del vehículo mientras éste se encuentre armado para poder hacerlo.
NOTA: Si las luces traseras e intermitentes se encienden durante dos segundos al desarmar el sistema, * significa que la memoria de disparo fue activada; algo hizo sonar la alarma mientras usted no estaba presente.
* Por favor note que, si su automóvil emplea el LED del inmovilizador del vehículo para monitorear la condición del sistema de alarma, el LED continuará parpadeando.
∆Sólo en caso de que su vehículo esté equipado con un zumbador.
1
23
1
1
TOYOTA RS3200 PLUS Security system Page 7
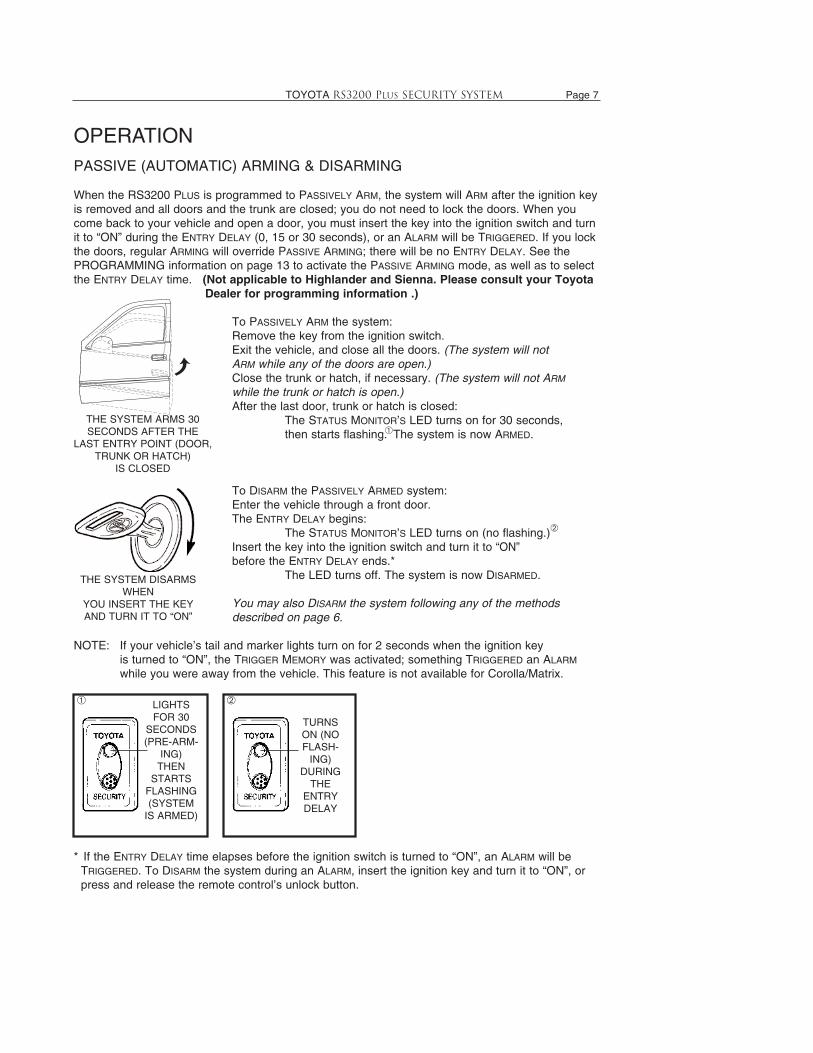
OPERATIONPASSIVE (AUTOMATIC) ARMING & DISARMING
When the RS3200 PLUS is programmed to PASSIVELY ARM, the system will ARM after the ignition keyis removed and all doors and the trunk are closed; you do not need to lock the doors. When youcome back to your vehicle and open a door, you must insert the key into the ignition switch and turnit to “ON” during the ENTRY DELAY (0, 15 or 30 seconds), or an ALARM will be TRIGGERED. If you lockthe doors, regular ARMING will override PASSIVE ARMING; there will be no ENTRY DELAY. See thePROGRAMMING information on page 13 to activate the PASSIVE ARMING mode, as well as to selectthe ENTRY DELAY time. (Not applicable to Highlander and Sienna. Please consult your Toyota
Dealer for programming information .)
To PASSIVELY ARM the system: Remove the key from the ignition switch.Exit the vehicle, and close all the doors. (The system will not ARM while any of the doors are open.)Close the trunk or hatch, if necessary. (The system will not ARM
while the trunk or hatch is open.)After the last door, trunk or hatch is closed:
The STATUS MONITOR’S LED turns on for 30 seconds, then starts flashing. The system is now ARMED.
To DISARM the PASSIVELY ARMED system:Enter the vehicle through a front door.The ENTRY DELAY begins:
The STATUS MONITOR’S LED turns on (no flashing.)Insert the key into the ignition switch and turn it to “ON”before the ENTRY DELAY ends.*
The LED turns off. The system is now DISARMED.
You may also DISARM the system following any of the methods described on page 6.
NOTE: If your vehicle’s tail and marker lights turn on for 2 seconds when the ignition key is turned to “ON”, the TRIGGER MEMORY was activated; something TRIGGERED an ALARM
while you were away from the vehicle. This feature is not available for Corolla/Matrix.
* If the ENTRY DELAY time elapses before the ignition switch is turned to “ON”, an ALARM will be TRIGGERED. To DISARM the system during an ALARM, insert the ignition key and turn it to “ON”, orpress and release the remote control’s unlock button.
TURNSON (NO FLASH-
ING)DURING
THEENTRYDELAY
THE SYSTEM ARMS 30SECONDS AFTER THE
LAST ENTRY POINT (DOOR,TRUNK OR HATCH)
IS CLOSED
THE SYSTEM DISARMSWHEN
YOU INSERT THE KEYAND TURN IT TO “ON”
LIGHTSFOR 30
SECONDS(PRE-ARM-
ING)THEN
STARTSFLASHING(SYSTEM
IS ARMED)
➁
➁➀
➀
OPERACIÓN
ARMADO Y DESARMADO PASIVO (AUTOMÁTICO)
Cuando el RS3200 Plus se programa para armarse pasivamente, el sistema se armará despuésde que sea retirada la llave de la encendido del vehículo y todas las puertas y el maletero sehayan cerrado; usted no tendrá que asegurar las puertas. Cuando usted regrese a su vehículo yabra alguna puerta, deberá insertar la llave en el interruptor de encendido y ponerlo en la posiciónde encendido (ON) dentro del lapso del retraso de tiempo de entrada previamente programado (0,15 ó 30 segundos) o se disparará la alarma. Si usted cierra las puertas, el armado regular pasarápor encima del armado automático, es decir, no habrá ningún retraso de tiempo de entrada. Veala información de PROGRAMACIÓN en la página 13 para activar el modo de armado pasivo, así
como para seleccionar el tiempo de retraso de entrada.(No aplica en elHighlander. Por favor consulte a su distribuidor Toyota para información de programación.)
Para armar pasivamente el sistema:Retire la lleve del interruptor de encendido.Salga del vehículo y cierre todas las puertas. (El sistema no se armará sialguna de las puertas se encuentra abierta).Cierre el maletero o puerta trasera, en caso de ser necesario. (El sisearmará si el maletero o puerta trasera se encuentra abierta).Después de que la última puerta, maletero o ventanilla trasera se haya cerrado: El LED que monitorea el condición del sistema se encenderá por 30 segundos y luego comenzará a parpadear. (1) El sistema se encuentra ahora armado.
Para desarmar el sistema armado previamente de forma pasiva(automática):Entre al vehículo a través de una puerta delantera.Comienza el cronómetro de atraso de entrada:El LED del monitor de condición se enciende (no parpadea.) (2)Inserte la lleve dentro del interruptor de encendido y gírelo hasta la posición de encendido (ON), antes de que el cronómetro de retraso deentada termine. *El LED se apaga. El sistema se encuentra ahora desarmado.
También podrá usted desarmar al sistema siguiendo cualquiera de los métodos descritos en la página 6.
*Si el cronómetro de atraso de entrada termina antes de que el interruptor de encendido haya sido gira-do a la posición de encendido (ON), se disparará la alarma. Para desarmar el sistema una vez que esté sonando la alarma, inserte la llave de encendido, gírela a la posición de encendido (ON) y presione ysuelte el botón para abrir los seguros del control remoto.
ELSISTEMASEARMARÁ30SEGUNDOSDESPUÉSDEQUEEL
ÚLTIMOPUNTODE
ENTRADAHAYASIDOCERRADO
(PUERTASOMALETERO)
ELSISTEMASEDESARMACUAN-DOUSTEDINSERTALALLAVEY
LAGIRAAENCENDIDO(ON)
SEENCIENDE
POR30SEGUNDOS
(PRE-ARMADO)Y
LUEGO
COMIENZAA
PARPADEAR
(ELSISTEMA
ESTÁ
ARMADO)
SE
ENCIENDE
(NO
PARPADEA)DURANTEEL
CRONÓMETR
ODE
ATRASODE
ENTRADA
TOYOTARS3200 PLUSSISTEMA DE SEGURIDAD Página 7
NOTA: Si las luces traseras e intermitentes se encienden durante dos segundos al girar la llave de arranque a la posición de encendido (ON), significa que la memoria de disparo fue activada; algo hizo sonar la alarma mientras usted no estaba presente. Esta característica no está disponible en el Corolla / Matrix.
12
2
1

OPERATIONAUTOMATIC REARMING
When you unlock the doors using the remote control, the RS3200 PLUS is DISARMED at the sametime. However, if you do not open a door or the trunk within 30 seconds, the keyless entry systemwill relock the doors and the RS3200 PLUS will REARM 30 seconds later.
How the RS3200 PLUS automatically REARMS:
ARMING SUSPENSION**
The ARMED state of the RS3200 PLUS can be suspended temporarily by using the key to unlock andopen the trunk. If your remote control is so equipped, you may also suspend the ARMED state usingthe trunk release button to open the trunk. When the ARMING is suspended, the STATUS MONITOR’SLED will turn off until the trunk is closed again.
**Starting from 2002 M.Y., Arming Suspension Mode by using the key to unlock the trunk is not applicable to Camry, Solara, and Corolla.
OPENING THE TRUNKSUSPENDS THE
ARMED STATE OF THE SECURITY SYSTEM
Page 8 TOYOTA RS3200 PLUS Security system
0
15
30
45
THE DOORS AREUNLOCKED BYPRESSING THE
UNLOCK BUTTONON THE REMOTE
CONTROL...
WHEN NO DOOR,TRUNK OR HATCH
IS OPENED...
FOR MORE THAN30
SECONDS...
THE KEYLESSENTRY
SYSTEM AUTOMAT-ICALLY RELOCKS
THE DOORS, THENTHE RS3200 PLUS AUTOMATICALLY
REARMS.
THE LED WILLLIGHT UP FOR 30
SECONDS(PRE-ARM), THEN FLASH WHEN THE SYSTEM IS ARMED
TURNSOFF
WHENTHE
ARMEDSTATEIS SUS-PENDED
➀ ➁
➀
➁
OPERACIÓN
REARMADO AUTOMÁTICO
Cuando usted desasegure las puertas a través del control remoto, el RS3200 Plus se desarmará almismo tiempo. Sin embargo, si usted no abre una puerta o el maletero dentro de los 30 segundossiguientes, el sistema de entrada sin llaves reasegurará las puertas y 30 segundos más tarde serearmará el sistema.
Cómo se rearma automáticamente el sistema RS3200 Plus:
SUSPENSIÓN DEL ARMADO **
El estado de armado del RS3200 Plus puede ser suspendido temporalmente al emplear la llavepara desasegurar y abrir el maletero. En caso de que su control remoto tenga la función para hacerlo, también podrá suspender el estado de armado al apretar el botón para abrir el maletero adistancia (1). Cuando el armado se encuentra suspendido, el LED que monitorea el condición se apagará (2) hasta que el maletero sea nuevamente cerrado.
** A partir de los automóviles modelo 2002, el estado de suspensión del armado al abrir el maletero no estará disponible para el Camry, Solara y Corolla.
ALABRIRELMALETEROSE
SUSPENDEELESTADODE
ARMADODELSISTEMADE
SEGURIDAD
0
15
30
45
LASPUERTASSE
DESASEGURAN
PRESIONANDOELBOTÓN
"DESASEGURAR"(UNLOCK)DEL
CONTROLREMOTO
CUANDONOESABIERTA
NINGUNAPUERTAO
MALETERO
PORMÁSDE30SEGUNDOS
ELSISTEMADEENTRADASIN
LLAVESAUTOMÁTICAMENTE
REASEGURALASPUERTAS,Y
LUEGOELSISTEMARS3200PLUSAUTOMÁTICAMENTESE
REARMA
ELLEDSEENCENDERÁ
POR30SEGUNDOS
(PRE-ARMADO)YLUEGO
PARPADEARÁCUANDOEL
SISTEMAESTÉARMADO
SEAPAGA
CUANDOEL
ESTADODE
ARMADOES
SUSPENDIDO
2 1
12
Página 8 TOYOTARS3200 PLUSSISTEMA DE SEGURIDAD
TOYOTA RS3200 PLUS Security system Page 9
ALARM INFORMATIONALARM TRIGGERS
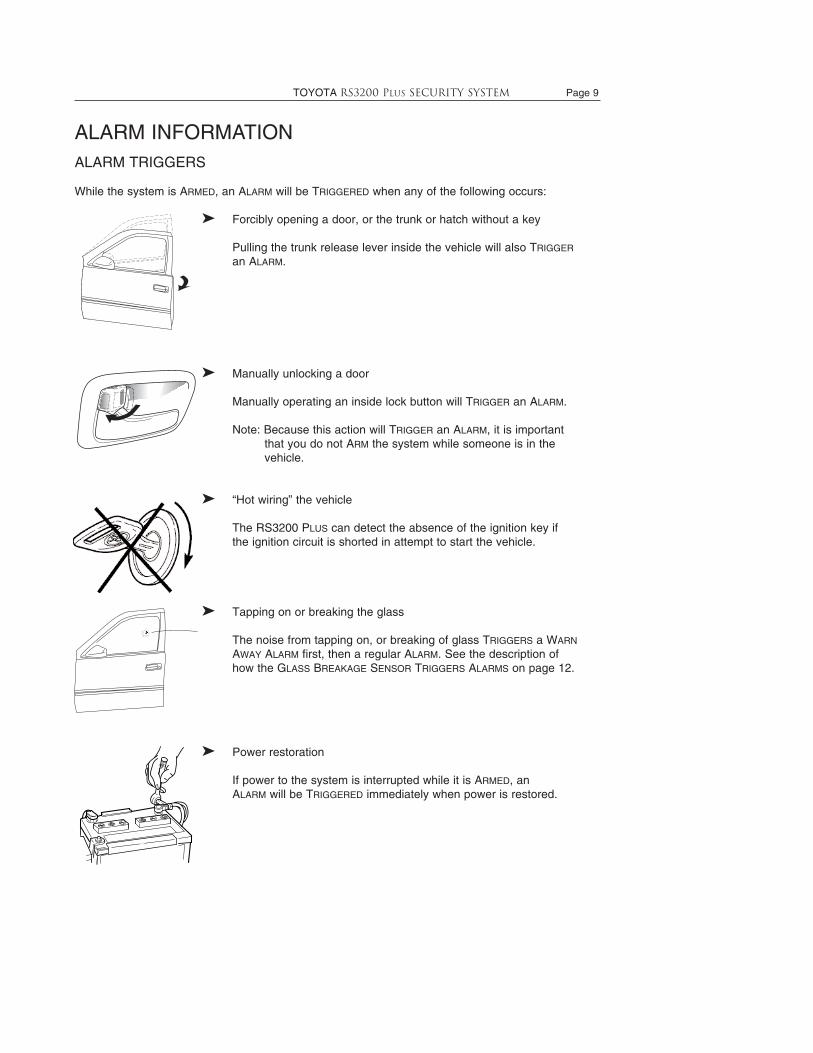
While the system is ARMED, an ALARM will be TRIGGERED when any of the following occurs:
➤ Forcibly opening a door, or the trunk or hatch without a key
Pulling the trunk release lever inside the vehicle will also TRIGGER
an ALARM.
➤ Manually unlocking a door
Manually operating an inside lock button will TRIGGER an ALARM.
Note: Because this action will TRIGGER an ALARM, it is important that you do not ARM the system while someone is in the vehicle.
➤ “Hot wiring” the vehicle
The RS3200 PLUS can detect the absence of the ignition key ifthe ignition circuit is shorted in attempt to start the vehicle.
➤ Tapping on or breaking the glass
The noise from tapping on, or breaking of glass TRIGGERS a WARN
AWAY ALARM first, then a regular ALARM. See the description of how the GLASS BREAKAGE SENSOR TRIGGERS ALARMS on page 12.
➤ Power restoration
If power to the system is interrupted while it is ARMED, an ALARM will be TRIGGERED immediately when power is restored.
TOYOTARS3200 PLUSSISTEMA DE SEGURIDAD Página 9
INFORMACIÓN DE LA ALARMA
COSAS QUE PROVOCAN QUE LA ALARMA SE DISPARE
Mientras el sistema se encuentre armado, la alarma se activará en caso de que suceda alguna delas siguientes cosas:
Abrir a la fuerza alguna puerta o maletero o puerta posterior, sin la llave.
El jalar la palanca liberadora del maletero desde el interior del automóvil también disparará la alarma.
Abrir manualmente una puerta
Si algún seguro es operado manualmente dentro del automóvil se disparará la alarma.
Nota: Ya que esta acción activará la alarma, es importante que elsistema no sea armado mientras haya alguien en elinterior del vehículo.
Tratando de arrancar externamente el vehículo
El RS3200 Plus es capaz de detectar la ausencia de la llave en el interruptor de encendido si el circuito es puenteado en un intento de arrancar el motor.
Golpear o romper algún cristal
El ruido que produce el golpear o romper alguna de las ventanillas del auto dispara primero una alarma de advertencia y después la alarma regular. Vea la descripción de cómo se dispara el sensor contra rompedura de cristales en la página 11.
Restablecimiento de la energía eléctrica
Si por alguna razón se interrumpe el suministro de energía eléctrica mientras el sistema se encuentra armado, la alarma se disparará automáticamente cuando la energía sea restaurada.

Page 10 TOYOTA RS3000 PLUS Security system
ALARM INFORMATION ALARM DESCRIPTIONS
Regular ALARM
When an ALARM is triggered in any way other than initial detection by the GLASS BREAKAGE SENSOR,the following occur:
The horn sounds repeatedly for 60 seconds.The headlights flash repeatedly for 60 seconds.The tail and marker or turn signal lights flash repeatedly for 60 seconds.The starter is disabled (no engine start) until the system is DISARMED.The door lock will be relocked if someone reaches in and unlocks the inside lock button.After 60 seconds of ALARM, the system will REARM and continue to protect the vehicle.
WARN-AWAY ALARM
Upon initial detection of noise from tapping on, or breaking glass, the GLASS BREAKAGE SENSOR
TRIGGERS a WARN AWAY ALARM:The horn sounds repeatedly for 20 seconds.The headlights flash repeatedly for 20 seconds.The tail and marker or turn signal lights flash repeatedly for 20 seconds.
If the GLASS BREAKAGE SENSOR detects noise again, or if a door or trunk is opened while the systemis still ARMED, the regular ALARM (described above) is activated.
STOPPING AN ALARM
Simply DISARM the system using the remote control or key as described on page 6.
THE HORNSOUNDS
FOR 20 SECONDS
THE HORNSOUNDS
FOR 60 SECONDS
HEAD LIGHTSFLASH
FOR 60 SECONDS
THE STARTER IS DIS-ABLED UNTIL THE SYSTEM
IS DISARMED
MARKER OR TURNSIGNAL LIGHTS
FLASHFOR 60 SECONDS
HEADLIGHTS FLASHFOR 20 SECONDS MARKER OR TURN
SIGNAL LIGHTS FLASH FOR 20 SECONDS
TAIL OR TURN SIG-NAL LIGHTS FLASH FOR 60 SECONDS
TAIL OR TURN SIG-NAL LIGHTS FLASH FOR 20 SECONDS
➀
➁
➀
➁
Página 10 TOYOTARS3200 PLUSSISTEMA DE SEGURIDAD
INFORMACIÓN DE LA ALARMADESCRIPCIONES DE LA ALARMAALARMAREGULAR
Cuando la alarma se dispara por cualquier motivo a excepción de la primera señal de advertenciadel sensor contra rotura de cristales, lo siguiente ocurrirá:
El claxon sonará repetitivamente durante 60 segundos.Las luces delanteras se encenderán intermitentemente durante 60 segundos.Las luces traseras y las intermitentes parpadearán durante 60 segundos.El sistema de arranque del vehículo quedará desactivado (no podrá ser arrancado el motor) hasta que el sistema sea desarmado.Los seguros de las puertas serán reasegurados en caso de que alguien los abriera manualmente.Después de 60 segundos de alarma, el sistema se rearmará, continuando con la protección del vehículo.
ALARMADEADVERTENCIA
Cuando se detecte por primera vez el sonido que produce el golpear o romper algún cristal, el sensor contra rotura de cristales activará una alarma de advertencia:
El claxon sonará repetitivamente durante 20 segundos.Las luces delanteras se encenderán intermitentemente durante 20 segundos.Las luces traseras y las intermitentes parpadearán durante 20 segundos.Si el sensor contra rotura de cristales detecta algún otro sonido nuevamente, o si alguna puerta o el maletero es abierto mientras el sistema continúe armado, la alarma regular (descrita anteriormente) se activará.
PARO DE LA ALARMA
Simplemente desarme el sistema empleando el control remoto o la llave, como se describió en lapágina 6.
ELCLAXON
SONARÁDURANTE
20SEGUNDOS
ELCLAXONSONARÁ
POR60SEGUNDOS
LAMPARASDLANTRAS
INTERMITENTEMENTEPOR60SEGUNDOS
ELARRANCADORQUEDARÁ
DESHABILITADOHASTAQUEEL
SISTEMASEADESARMADO
LASLUCESDELANTERAS
SEENCENDERÁN
INTERMITENTEMENTE
POR60SEGUNDOS
LASLUCESTRASERAS
YLASINTERMITENTES
PARPADEARÁNPOR
60SEGUNDOS
LASLUCES
TRASERASYLAS
INTERMITENTES
PARPADEARÁN
DURANTE20SEGUNDOS
1
2
1
2
LAMPARASDLANTRAS
INTERMITENTEMENTEPOR60SEGUNDOS
LASLUCESDELANTERAS
SEENCENDERÁN
INTERMITENTEMENTE
DURANTE20SEGUNDOS
TOYOTA RS3200 PLUS Security system Page 11
GLASS BREAKAGE SENSOR INFORMATIONThe RS3200 PLUS provides protection for your vehicle above and beyond entry point monitoring–it“listens” for the noise made by tapping on, or breaking of glass. Using a microphone designedspecifically for this task, the GLASS BREAKAGE SENSOR is capable of ignoring other noises, whichhelps to prevent “false alarms” from occurring.
GLASS BREAKAGE SENSOR CHECK PROCEDURE
When the RS3200 PLUS was installed in your vehicle, care was taken to adjust the sensitivity levelof the GLASS BREAKAGE SENSOR. You may observe how it works following the procedure listedbelow.
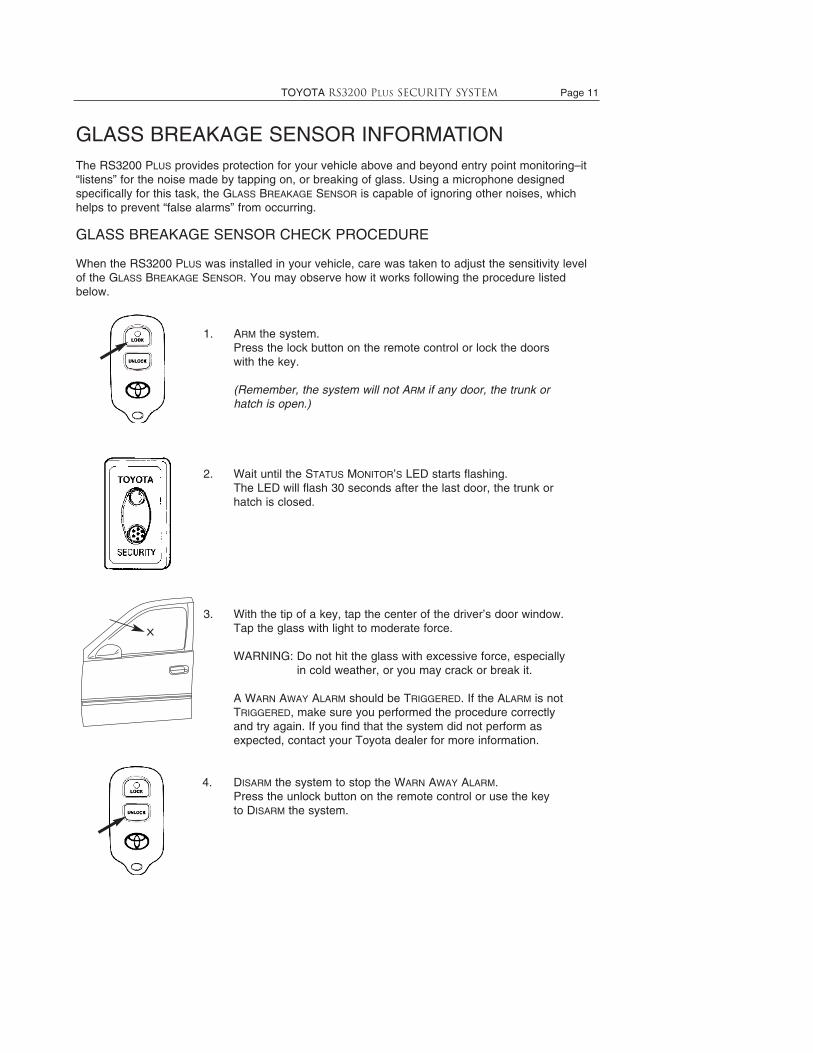
1. ARM the system.Press the lock button on the remote control or lock the doors with the key.
(Remember, the system will not ARM if any door, the trunk or hatch is open.)
2. Wait until the STATUS MONITOR’S LED starts flashing.The LED will flash 30 seconds after the last door, the trunk or hatch is closed.
3. With the tip of a key, tap the center of the driver’s door window.Tap the glass with light to moderate force.
WARNING: Do not hit the glass with excessive force, especially in cold weather, or you may crack or break it.
A WARN AWAY ALARM should be TRIGGERED. If the ALARM is not TRIGGERED, make sure you performed the procedure correctly and try again. If you find that the system did not perform as expected, contact your Toyota dealer for more information.
4. DISARM the system to stop the WARN AWAY ALARM.Press the unlock button on the remote control or use the key to DISARM the system.
TOYOTARS3200 PLUSSISTEMA DE SEGURIDAD Página 11
INFORMACIÓN SOBRE EL SENSOR CONTRA ROTURA DE CRISTALESEl RS3200 Plus es capaz de ofrecer protección a su vehículo más allá de los puntos de entrada aéste. Es capaz de "escuchar" el ruido que se produce al golpear o romper algún cristal. Empleandoun micrófono diseñado específicamente para cumplir esta misión, el sensor contra rotura decristales es capaz de ignorar cualquier otro ruido, previniendo las molestas "falsas alarmas".
PROCEDIMIENTO DE VERIFICACIÓN DEL SENSOR CONTRA ROTURA DECRISTALESCuando el RS3200 Plus fue instalado en su vehículo, la sensibilidad del sensor contra rotura decristales fue ajustada cuidadosamente. Usted puede observar cómo trabaja siguiendo el procedimiento que se menciona a continuación.
1.Arme el sistema.Presione el botón para cerrar los seguros desde su control remoto o cierre las puertas con la llave.(Recuerde que el sistema no se armará si alguna puerta o el maletero se encuentra abierta.)
2.Espere hasta que el LED que monitorea el estado del sistema comience a parpadear.El LED parpadeará 30 segundos después de que la última puerta o elmaletero haya sido cerrada.
3.Con la punta de una llave, golpee suavemente el centro de la ventana del conductor.Golpee la ventana con poca fuerza.
ADVERTENCIA:No golpee la ventana con fuerza excesiva especialmente en climas fríos, ya que podría quebrarla o romperla.
Se deberá activar una alarma de advertencia. Si la alarma no se activa, asegúrese de que llevó a cabo el procedimiento correctamente e inténtelo nuevamente. Si usted encuentra que el sistema no está trabajando satisfactoriamente, contacte a su distribuidor Toyota para más información.
4.Desarme el sistema para detener la alarma de advertencia.Presione el botón para liberar los seguros de la puertas desde su control remoto o utilice su llave para desarmar el sistema.

PROGRAMMINGThe RS3200 PLUS is factory-set to not PASSIVELY ARM. To change the system’s operation forPASSIVE ARMING operation, as well as adjust the ENTRY DELAY time, follow the procedure below. Formore information on this feature, please refer to page 7. (Not applicable to Highlander andSienna. Please consult your Toyota Dealer for programming information.)
PASSIVE ARMING ON/OFF SELECTION, ENTRY DELAY TIME SELECTION1. Before you begin:
Open the driver’s door. Close the remaining doorsand the trunk or hatch. Unlock all doors with the inside lock switch. Remove the key from the ignition switch.
Start the Programming Procedure. (Complete these steps within 40 seconds.)
3. Select the Operating Mode and Complete the Programming Procedure.
Page 12 TOYOTA RS3200 PLUS Security system
a. Close the driver’s door.
b. Lock and unlock alldoors 3 times by keyor remote control.
b. Lock then unlock thedriver’s door inside lock button 1 time.
a. Close, then Open the driver’s door:2 times = PASSIVE ARMING OFF3 times = PASSIVE ARMING ON,
0 Sec. ENTRY DELAY
4 times = PASSIVE ARMING ON,15 Sec. ENTRY DELAY
5 times = PASSIVE ARMING ON,30 Sec. ENTRY DELAY
c. Open and close the driver’s door.
c. The system locks the door in 2 seconds; if this does not happen, start over. Programming is now complete.
e. Open the driver’s door.
d. Lock, then unlockthe driver’s door inside lock button 3 times.
2. Insert and remove the key from the ignition key cylinder 3 times; this must be completed within 5 seconds.
f. The system locks the door in 2 seconds; if this does not happen, start over.
g. Unlock the driver’s door knob.
Página 12 TOYOTARS3200 PLUSSISTEMA DE SEGURIDAD
PROGRAMACIÓNEl RS3200 Plus se encuentra ajustado de fábrica para que no se arme pasivamente. Para cambiarla operación del sistema para que pueda armarse pasivamente (automáticamente), así como paraajustar el tiempo de retraso de entrada, siga el procedimiento a continuación. Para mayor información de esta característica, por favor refiérase a la página 7. (No se aplica para elHighlander. Por favor consulte a su distribuidor Toyota para información acerca de la progra-mación.)SELECCIÓN PARA LA ACTIVACIÓN O DESACTIVACIÓN DEL ARMADO PASIVO. SELECCIÓN DELRETRASO DE TIEMPO DE ENTRADA
1.Antes de comenzar:Cierre todas las puertas y el maletero. Desasegure todas las puertas con el interruptor de seguros interno. Retire la llave de la marcha.
d. Asegure y despusdesasegure tresveces el seguro interno de la puerta del conductor.
f.El sistema asegurará la puerta en dos segundos; si esto no sucede, vuelva a comenzar.
Comience el procedimiento de programación. (Complete todos los pasos en menos de 40segundos.)
b. Asegure y después desasegure el seguro interno del conductor una vez.
c. El sistema desasegurará la puerta en dos segundos; si esto no sucede, empiece nuevamente. El proceso de programación ha terminado.
3. Seleccione el modo de operación y complete el procedimiento de programación.
a. Cierre y después abra la puerta:2 veces = el armado pasivo está apagado3 veces= el armado pasivo está encendido y el tiempo de retraso de entrada es de 0 segundos.4 veces= el armado pasivo está encendido y el tiempo de retraso de entrada es de 15 segundos.5 veces= el armado pasivo está encendido y el tiempo de retraso de entrada es de 30 segundos.
a. Cierra la puerta del conductor.
b.A través del control remoto, asegure y después desasegure las puertas, tres veces.
c. Abra y cierre lapuerta del conductor.
e. Aba la puerta delconductor.
g. Libere el seguro de, la puerta delconductor.
2.Inserte y retire la llave del cilindro deignición tres veces; este procedimientotiene que completar en el espacio de cincosegundos. espacio de 40 segundos.)
TOYOTA RS3200 PLUS Security system Page 13
Warning• This product is applicable only to vehicles with 12V DC, negative grounding specifications. Do
not use in vehicles with 24V specifications. Otherwise, damage to the unit or a fire may result.
• Never attempt to disassemble or modify the product. Otherwise, an accident, fire or electricshock may result.
• When replacing fuses, be sure to use fuses with the same specified capacity (amperage.)Otherwise, damage to the unit or vehicle, fire or electric shock may result.
• If an abnormal condition occurs, such as liquids spilling onto the product, or the product emitting smoke or strange odors, stop using it immediately and consult the dealer from whomyou purchased the product. Continued use of the product before corrective actions are takenmay result in an accident, injury or fire.
• Never pull the plastic bag over your head. Otherwise, a serious injury or death from suffocationmay occur.
Caution• Do not use this product for applications other than in-vehicle use. Otherwise, an electric shock
or injury may result.
• Do not allow children to play with the remote controls. Otherwise, the doors may be locked orunlocked, the security system armed or disarmed, or an alarm triggered unintentionally.
• If this product is dropped or its case is damaged, disconnect the power supply lead and contact the dealer from whom you purchased it to obtain service. Otherwise, a fire or electricshock may result.
TOYOTARS3200 PLUSSISTEMA DE SEGURIDAD Página 13
PRECAUCION
ADVERTENCIA
• Este producto puede usarse solamente en vehículos de 12 volts de corriente directa con negativo a tierra. No se utilice en vehículos de 24 volts. De lo contrario se dañará la unidad o se provocará un incendio.
• Nunca trate de desarmar o modificar el producto. De lo contrario se podría provocar un accidente, fuego o choque eléctrico.
• Cuando reemplace fusibles, asegúrese de hacerlo con fusibles del mismo valor (amperaje). De lo contrario se podrá dañar la unidad, el vehículo o se podrá provocar un incendio o corto eléctrico.
• En caso de que sucediera alguna condición anormal, así como el derramamiento de líquidos dentro del producto, o la emisión de humos u olores extraños del producto, suspenda su uso inmediatamente y consulte al distribuidor de quien lo adquirió. El uso del producto de esta manera sin antes haber tomado acciones correctivas pueden dar como resultado un accidente, lesión o incendio.
• Jamás coloque la bolsa plástica sobre su cabeza. De lo contrario podría sufrir una seria lesión o la muerte a causa de sofocación.
• No utilice este producto en aplicaciones diferentes a su uso dentro de un automóvil. De lo contrario se podría provocar una lesión o corto eléctrico.
• No permita que los niños jueguen con los controles remoto. De lo contrario las puertas podrán asegurarse o desasegurarse, el sistema de seguridad armarse o desarmarse o se podrá disparar la alarma accidentalmente.
• Si este producto se deja caer o su cubierta se daña, desconecte el cable de alimentación a la unidad y contacte al distribuidor de quien lo adquirió para recibir servicio. De lo contrario podría producirse un incendio o choque eléctrico.

090002-28940700090002-28940700