2003 owner’s manual - calspas.com · 2003 owner’s manual us and canada journey series 5000 -...
TRANSCRIPT

2003 Owner’s ManualUS and Canada
JOURNEY SERIES
5000 - 5300ELECTRONIC CONTROL
Duplication without written consent is strictly prohibited.This Owner’s Manual is for spas manufactured after August 15, 2003
Initial Issue - August 15, 2003Due to continuous improvement programs, all models, operation, and/or specifications are subject to change without prior notice.
LTR17000175
Table of ContentsBenefits of Owning a Cal Spa ............................................................................................2
Safety Instructions ..............................................................................................................3
Contact Information ............................................................................................................4
Basic Spa Information ........................................................................................................6
Delivery and Set-Up............................................................................................................7
Electrical Information ......................................................................................................10
Starting Your Portable Spa................................................................................................13
Filter Maintenance ............................................................................................................14
Operating Instructions ......................................................................................................15
5000 Electric Operation ....................................................................................................18
Multi-Colored Spa Light Operation..................................................................................21
Cal Spas Clear Water Plan ................................................................................................22
Filters and Filtration..........................................................................................................25
Cleaning and Maintenance................................................................................................26
Water and Your Spa ..........................................................................................................29
Frequently Asked Questions ............................................................................................36
Warranty ............................................................................................................................37
Cal Spas Chemicals ..........................................................................................................39
Warranty Breakdown ........................................................................................................40
Parts List............................................................................................................................41
Owner’s Manual Page 1

Page 2 Owner’s Manual
BENEFITS OF OWNING A CAL SPAWarm Water WorkoutsAlmost any exercise that can be done on land, including walking or jogging, can be also done in water. If youhave arthritis and you're exercising in a spa or hot tub, however, you'll probably focus on range-of-motion exercises that work the toe, ankle, knee, leg, hip, hand, wrist and shoulder. The size and shape of the hot tub, ofcourse, will determine the specific types of exercises you can do in it. Cal Spas would like to share some tips onthe benefits of warm water therapy.
Forward Arm ReachWith both arms, reach straight in front of you. Raise your hands overhead as high as possible, keeping yourelbows as straight as you can. If one arm is very weak, use your other arm to help raise it.
Elbow BendStart with your elbows as straight as possible, fingers pointing down. Bend your elbows and try to touch yourthumbs to your shoulders. Keep your elbows close to your body. You do not have to touch your shoulders. Thenrelax your elbows and straighten your arms down at your sides.
Wrist BendBend both of your wrists upward and then downward. You can also exercise one wrist at a time by placing yourfree hand, thumb out, under the exercising wrist. Hands and fingers should be relaxed.
Finger CurlCurl your fingers into your palm to make a loose fist then straighten them out.
Ankle CirclesWhile seated, make large inward circles with your left foot, moving it from the ankle. Repeat circles in the opposite direction. Then repeat the exercise with your right foot.
Spread EagleWhile sitting on the edge of a bath seat, straighten one knee. While holding it straight, slowly move it out to theside. Hold it out for three seconds, then bring it back to the center and relax. Repeat these instructions with yourother leg.
Owner’s Manual Benefits of Owning a Cal Spa

SAFETY INSTRUCTIONSWhen installing and using this electrical equipment, basic safety precautions should always be followed.
READ AND FOLLOW ALL INSTRUCTIONS
WARNING: To reduce the risk of injury, do not allow children to use the spa unless they are supervised at alltimes.
All 110V spas require a DEDICATED 20 AMP GFCI SERVICE. Do not use extension cords.
NOTE: This may require a licensed electrician to upgrade your standard receptacle and/or circuit breaker.
All 220V spas require a DEDICATED 50 AMP GFCI SERVICE WITH FOUR #6 AWG COPPER WIRES.
DANGER RISK OF ACCIDENTAL DROWNING: Extreme caution must be exercised to prevent unauthorized access by children. To avoid accidents, ensure that children cannot use the spa unless they areclosely supervised at all times. (Keep the spa cover on and locked when not in use. See instructions enclosedwith your cover.)
DANGER - RISK OF INJURY: The suction fittings in this spa are sized to match the specific water flow created by the pump. Should the need arise to replace the suction fittings, or the pump, be sure the flow rates arecompatible.
DANGER - RISK OF INJURY: Never operate the spa if the suction fitting or filter baskets are broken ormissing.
DANGER - RISK OF INJURY: Never replace a suction fitting with one that is rated less than the flow ratemarked on the original suction fitting.
DANGER - RISK OF ELECTRIC SHOCK: Install the spa at least 5 feet (1.5 meters) from all metal surfaces. As an alternative. a spa may be installed within 5 feet of metal surfaces if each metal surface is permanently bonded by a minimum No. 8 AWG solid copper conductor to the outside of the spas control box.
DANGER - RISK OF ELECTRIC SHOCK: Do not permit any electrical appliances, such as lights, telephones, radios, televisions, and etc., within 5 feet (1.5 meters) of the spa. Never attempt to operate any electrical device from inside the spa.
WARNING RISK OF INJURYa. Before entering a spa, the user should measure the water temperature with an accurate thermometer, since
the tolerance of water temperature-regulating devices varies.b. The spa water should never exceed 104˚F (40˚C). Water temperatures between 100˚F (38˚C) and 104˚F
(40˚C) are considered safe for a healthy adult. Lower water temperatures are recommended for young children and when spa use exceeds 10 minutes.
c. Since excessive water temperatures have a high potential for causing fetal damage during pregnancy duringearly months of pregnancy, pregnant, or possibly pregnant women should always check with their physicianprior to spa usage.
d. The use alcohol, drugs or medication before or during spa use may lead to unconsciousness, with the possibility of drowning.
e. Person suffering from obesity, a medical history of heart disease, low or high blood pressure, circulatory system problems or diabetes should consult a physician before using the spa.
f. Persons using medications should consult a physician before using the spa since some medications mayinduce drowsiness while others may affect heart rate, blood pressure and circulation.
Owner’s Manual Page 3
Safety Instructions Owner’s Manual
Hyperthermia DangerProlonged exposure to hot air/water can induce hyperthermia. Hyperthermia occurs when the internal temperature of the body reaches a level 3˚ to 6˚ above the normal body temperature of 37˚C (98.6˚F). While hyperthermia has many health benefits, it is important not to allow your body’s core temperature to rise above103˚F. Symptoms of excessive hyperthermia include dizziness, lethargy, drowsiness and fainting. The effects ofexcessive hyperthermia may include failure to perceive heat, failure to recognize the need to exit, unawarenessof impending hazard, damage to pregnant women, physical inability to exit the spa and unconsciousness.
Following these instructions will make your first spa session a pleasurable one.
SAVE THIS INFORMATION.
CONTACT INFORMATION For customer service, please contact your authorized dealer immediately. If you need additional informationand/or assistance, please contact:
C.A.I. Customer Service Department1462 East Ninth StreetPomona, CA 91766Toll Free 1-800-CAL-SPASFax 1-909-629-3890 www.calspas.com
Owner’s Manual Contact Information
Page 4 Owner’s Manual
BASIC SPA INFORMATIONThe following operating and maintenance instructions are very important and must be followed carefully. Withthe proper care and maintenance, your Cal Spa will provide you with years of satisfaction and performance.
Do not be afraid to push buttons or turn knobs to learn about your new Cal Spa, as it is built with quality materials and excellent craftsmanship.
Your new Cal Spa has been engineered with a high-powered water pump that pushes water through various therapy jets, which will relax even the tightest muscles. In addition to the water pressure, you can add air intothe spa water with air venturi handles located seat-side that increase the intensity of your massage.
The filtering of this spa is very important. This alone will cut down on cleaning time and use of excess chemicals. We have pre-programmed two filter cycles of two hours for every twelve hours. This can be increasedto six hours every twelve hours through the topside control panel.
It is very important to keep the spa covered when not in use for four reasons. The first is heating efficiency.Covered spas will use less electricity in maintaining your set temperature. The second is to protect your spas finish from the suns’ ultraviolet rays. The third is it is mandatory to keep the spa covered to maintain warrantycoverage. The last, and most important, is to prevent children from drowning in the spa.
Your new Cal Spa comes equipped with an electric heater. Following the directions listed below will ensure themost efficient operation:
1. When not in use, make sure the spa is covered and securely fastened.
2. Set the spas operating temperature within 5˚ of the desired usage temperature and raise the temperature one or two hours prior to usage.
NOTE: This method is only for spa usage under two hours a week.
3. If the spa usage exceeds two hours a week, the set temperature should remain at the desired usage temperature.
4. The air venturi handles should be used sparingly. When open, water temperature drops quite rapidly andcan also dissipate chemicals.
NOTE: Allowing the water temperature to lower more than 10˚ below the desired usage temperature and reheating prior to usage will cause the heater to operate longer than it normally would maintaining the desired temperature and will increase the operating cost.
The filter needs to be cleaned on a regular basis. This is very simple and only takes a few minutes. The result isincreased water clarity and equipment longetivity.
The spa water level is very important to the operation of your spa. If the water level is too low or too high, yourspa will not operate properly. The water level should be to the middle of the skimmer area when the spa is notbeing used.
We recommend that your spa water be changed every 4 to 6 months. You may find the need to change your spawater more frequently with heavy use. When empty, your spa should be cleaned with a non-abrasive cleaner,such as Cal Spas All Surface Cleaner, then rinsed thoroughly.
When draining your spa, turn off all power to the spa and attach a garden hose to the hose-bib fixture located onthe floor of the equipment area.
When filling your spa, always fill through the skimmer filter canister. Use only regular tap water.
WARNING: DO NOT USE SOFT WATER.
Owner’s Manual Page 5
Basic Spa Information Owner’s Manual
Page 6 Owner’s Manual
DELIVERY AND SET-UPPlease make a record of the following. It will be valuable if service is required.
Cal Spa Model:Cal Spa Serial Number:Date Purchased:Date Installed:Cal Spa Dealer’s Phone Number:Cal Spa Dealer’s Address:
Most cities and counties require permits for exterior construction and electrical circuits. In addition, some communities have codes requiring residential barriers such as fencing and/or self-closing gates on property toprevent unsupervised access to the property by children under the age of 5. Your dealer can provide informationon which permits may be required and how to obtain them prior to the delivery of your Cal Spa.
Congratulations!!You have purchased a Cal Spa. With a little preparation and care, your spa will give you many years of enjoyment. This section has been designed to provide you with all the information you’ll need to ensure a safe,speedy and trouble-free spa delivery and set-up.
PLANNING THE BEST LOCATION FOR YOUR SPAHere are some of the things that you will need to consider when determining where to place your new spa.
Safety FirstDo not place your spa within 10’ (3m) of overhead power lines.
Make sure the spa is positioned so that access to the equipment compartment and all side panels will not beblocked. Be certain that your installation will meet all city and local safety codes and requirements.
How Will You Use Your Spa?How you intend to use your spa will help you determine where you should position it. For example, will you useyour spa for recreational or therapeutic purposes? If your spa is mainly used for family recreation, be sure toleave plenty of room around it for activity. If you will use it for relaxation and therapy, you’ll probably want tocreate a specific mood around it.
Environment If you live in a climate with snowfall in the winter, place the spa near a house entry. By doing this, you will havea place to change clothes and not be uncomfortable.
Consider Your Privacy In a cold-weather climate, bare trees won’t provide much privacy. Think of your spas surroundings during allseasons to determine your best privacy options. Consider the view of your neighbors as well, when you plan thelocation of your spa.
Owner’s Manual Delivery and Set-Up

Owner’s Manual Page 7
Provide A View With Your SpaThink about the direction you will be facing when sitting in your spa. Do you have a special landscaped area inyour yard that you find enjoyable? Perhaps there is an area that catches a soothing breeze during the day andlovely sunset in the evening. Consider these things when you plan your location.
Keep Your Spa CleanPrevent unclean things from being tracked into your spa by utilizing a foot mat at the entrance where the occupants can clean their feet before entering your spa.
Allow For Service AccessMany people choose to install a decorative structure around their spa. If you are installing your spa with any typeof structure on the outside, such as a gazebo, remember to allow access for service. It is always best to designspecial installations so that the spa can still be moved, or lifted off the ground.
ELECTRICAL SETUP BEFORE DELIVERY OF YOUR SPA
IMPORTANT: When installed in the United States, the electrical wiring of this spa must meet the requirements of the National Electric Code (NEC) and any applicable state or local codes.The electrical circuit must be installed by an electrical contractor and approved by a localbuilding/ electrical inspector.
1. All 240V spas must be permanently connected (hard wired) to the power supply. 120V spas may use aG.F.C.I. cord, plugged into a dedicated grounded outlet. Supplying power to a spa which is not in accordance with these instructions will void both the independent testing agency listing and the manufacturer’s warranty.
2. The power supplied to the spa must be on a dedicated circuit with no other appliances or lights sharingthe power.
3. To determine the current, voltage, and wire size required for the spa configuration to be connected, referto the following:- Wire size must be appropriate per NEC and/or local codes.- Wire size is determined by length of run from breaker box to spa and maximum current draw.- We recommend copper wire with THHN insulation.- All wiring must be copper to ensure adequate connections. Do not use aluminum wire.- When using wire larger than #6 (10mm2), add a junction box near the spa and reduce to short lengths
of #4 (10mm2) wire between the junction box and the spa.4. The electrical supply for the spa must include a suitably rated switch or circuit breaker to open all
ungrounded supply conductors to comply with Section 422-20 of the National Electric Code, NSI/NFPA70. The disconnection point must readily accessible to the spas occupant. Check with local municipalities for additional code requirements.
5. The electrical circuit for the spa must include a suitable GFCI as required by NEC Article 680-42.
Delivery and Set-Up Owner’s Manual
Page 8 Owner’s Manual
PREPARING A GOOD FOUNDATIONYour spa needs a solid and level foundation. The area that it sits on must be able to support the weight of the spaand the occupants who use it. If the foundation is inadequate, it may shift or settle after the spa is in place, causing stress that could DAMAGE YOUR SPA SHELL AND FINISH.
NOTE: Damage caused by inadequate or improper foundation support is not covered by the warranty. Itis the responsibility of the spa owner to provide a proper foundation for the spa.
Place the spa on an elevated foundation (preferably a 3” concrete slab). If you are installing the spa indoors,pay close attention to the flooring beneath it. Choose flooring that won’t be spoiled or stained.
* If you are installing your spa on an elevated wood deck or other structure, it is highly recommended thatyou consult a structural engineer or contractor to ensure the structure will support the weight of150 Lbs./ sq. ft.
* It is strongly recommended that a qualified, licensed contractor prepare the foundation for your spa.
Your Cal Spa Retailer Can Help You With Foundation And MoreYour retailer has a wealth of information and experience about how to get the most out of your spa. Your sparetailer also has a full line of accessories that are engineered to compliment your spa and increase your enjoyment
Owner’s Manual Set-Up and Delivery
Owner’s Manual Page 9
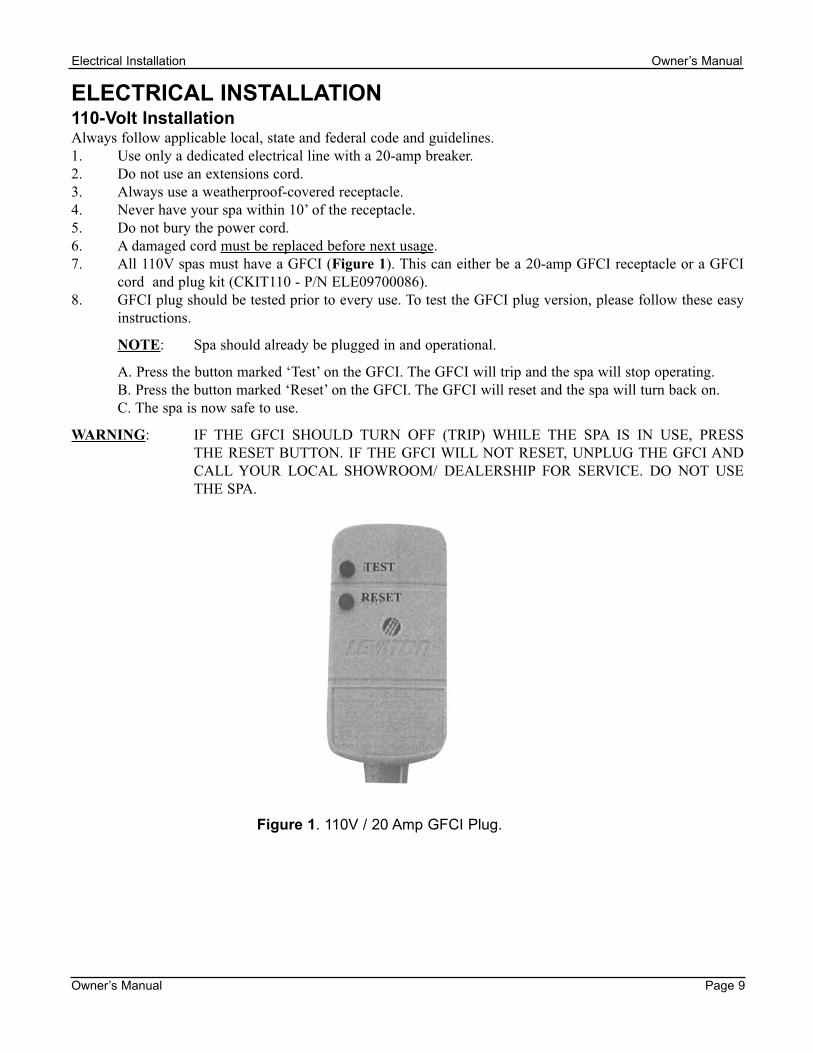
ELECTRICAL INSTALLATION110-Volt InstallationAlways follow applicable local, state and federal code and guidelines.1. Use only a dedicated electrical line with a 20-amp breaker.2. Do not use an extensions cord.3. Always use a weatherproof-covered receptacle.4. Never have your spa within 10’ of the receptacle.5. Do not bury the power cord.6. A damaged cord must be replaced before next usage.7. All 110V spas must have a GFCI (Figure 1). This can either be a 20-amp GFCI receptacle or a GFCI
cord and plug kit (CKIT110 - P/N ELE09700086).8. GFCI plug should be tested prior to every use. To test the GFCI plug version, please follow these easy
instructions.
NOTE: Spa should already be plugged in and operational.
A. Press the button marked ‘Test’ on the GFCI. The GFCI will trip and the spa will stop operating.B. Press the button marked ‘Reset’ on the GFCI. The GFCI will reset and the spa will turn back on.C. The spa is now safe to use.
WARNING: IF THE GFCI SHOULD TURN OFF (TRIP) WHILE THE SPA IS IN USE, PRESS THE RESET BUTTON. IF THE GFCI WILL NOT RESET, UNPLUG THE GFCI ANDCALL YOUR LOCAL SHOWROOM/ DEALERSHIP FOR SERVICE. DO NOT USETHE SPA.
Electrical Installation Owner’s Manual
Figure 1. 110V / 20 Amp GFCI Plug.

Page 10 Owner’s Manual
220V Installation
All 220V spas are required to have a dedicated 50-Amp GFCI breaker and should only be wired by a licensedelectrician. To ensure proper wiring of your GFCI, follow these diagrams (Figure 2 and Figure 3).1. Always follow applicable local, state, and federal codes and guidelines.2. Your new 220V Cal Spa requires a dedicated, 50-Amp GFCI Service with 4 #6 AWG copper wires.
This will include a black and a red wire for your incoming power, a white wire used for your neutral anda green wire for your ground.
NOTE: #6 AWG wire acceptable for a distance of up to 100’. Wire run over 100’ must increase to #4 gauge. Please be aware that this is the only acceptable electrical wiring procedure.Spas wired in any other way will void your warranty and may result in serious injury.
NOTE: Do not install GFCI breakers in main electrical panel. The further away a GFCI is installedfrom the spa, the higher the risk of false tripping or resetting of the GFCI breaker.
NOTE: C.A.I. can only recommend the use of square-cover Siemens GFCI breakers.
Before each use of your spa, you should check the GFCI. During this test, the spa should be operational.1. Press the test button on the GFCI. The GFCI will trip and the spa will shutoff.2. Wait 30 seconds and reset the GFCI breaker (this is accomplished by turning the breaker off then back
on). Your spa will be operational in about five seconds.3. Your spa is now safe to use.
Owner’s Manual Electrical Installation
Figure 2. GFCI Hook-Up.

Owner’s Manual Page 11
Electrical Installation Owner’s Manual
Figure 3. GFCI Hook-Up
Page 12 Owner’s Manual
STARTING YOUR PORTABLE SPANOTE: Be careful not to over-tighten the plumbing fittings.
NOTE: Never run the spa with the gate valves closed or without water circulating for long periods of time.
NOTE: Never fill your spa with soft water. Soft water makes it impossible to maintain the proper water chemistry and may cause the water to foam, which will ultimately harm the finish of the spa and voidyour warranty.
Filling and Powering-Up Your Cal Spa1. Once the spa has been placed on an approved surface and has been correctly wired by a licensed
electrician, inspect all plumbing connections in the equipment area of your spa. Ensure that these connections are secure and that they didn’t loosen during shipment.
2. If equipped, open all gate valves, or slice valves, in the equipment area.
NOTE: Before operating the spa, these valves must be in the up, or ’open’, position.
3. Remove the filter basket and cartridge from skimmer/ filter canister.4. Place a garden hose in the skimmer/ filter canister and continue filling your spa with regular tap water
up to the water level (halfway up the skimmer area).5. Open the air relief valve located on the front of the pump housing.6. After the air bubbles stop coming out of the air relief valve, hand-tighten the valve until it is closed
(do not over-tighten).7. Once the water is at the correct level, turn on the power at the GFCI breaker.
NOTE: Ensure that the 110V spas are connected to the proper electrical outlet.
8. The spa will perform a diagnostic check for 30 seconds. Once complete, the spa will automatically operate at filter speed and continue heating until the spa water temperature reaches 100˚F. (This is everyelectronically controlled default temperature.)
9. Re-install filter and filter basket into skimmer/filter canister.10. The spa is now ready for use. For operation instructions, see the “5000 and 5300 Electronic Operation”
section of this manual.
Owner’s Manual Starting Your Portable Spa

Owner’s Manual Page 13
FILTER MAINTENANCE Portable Spas:Filtration starts on electronically-controlled spas as soon as the pumps are primed and water flow is steady. Asthe flow of water goes through the filter, dirt and debris is removed and accumulated in the filter cartridge. Asthe filter cartridge accumulates dirt and debris, water flow is restricted and jet production is reduced. This cancause your spa to not run or heat effectively.
Clean your filter regularly and replace as needed.
Filter Cleaning:Your new Cal Spa has been designed for quick and easy filter maintenance. The filter cartridge should becleaned once a week.
1. Turn the power off at the breaker.2. Remove the filter(s) cover - if applicable.3. Remove the filter(s) basket (align the flat areas on the filter basket and the canister).4. Remove the filter(s) by pulling up and out.5. Clean the filter with a garden hose.
A. Hold the filter vertically.B. Spray the filter cartridges with a pressure nozzle, starting from the top and spraying down each
pleat.C. Turn the filter cartridge over and repeat Step 5B.D. Reinstall the filter cartridge in reverse order of removal.
6. Deep clean filter cartridge(s) every month. Use only a Cal Spa-approved filter-cleaning chemical.
Filter Maintenance Owner’s Manual
Figure 4. Filtration System.

Page 14 Owner’s Manual
OPERATING INSTRUCTIONSYour new Cal Spa is very versatile. You can direct the flow of water and air through various locations throughout your spa.
The following list of features are available on most spas.
Adjustable Jets (Figure 5)Almost all of the jets in your spa are adjustable. Rotating the face of an adjustable jet to the left(counter-clockwise) will decrease the amount of water flow through the jet. Rotating the face of an adjustable jetto the right (clockwise) will increase the amount of water flow through the jet.
NOTE: Neck jets will be reversed when adjusting pressure.
Owner’s Manual Operating Instructions
Figure 5. Adjustable Jets
Storm ZX Jet(7” Face)
Storm JX Jet(5 1/2” Face)
Micro-Swirl Jet(3” Face)
Micro-Flow Jet(3 1/4” Face)
Accu-Therapy Jet(2” Face)
24-hour Circulation Jet(1 1/2” Face)
Owner’s Manual Page 15
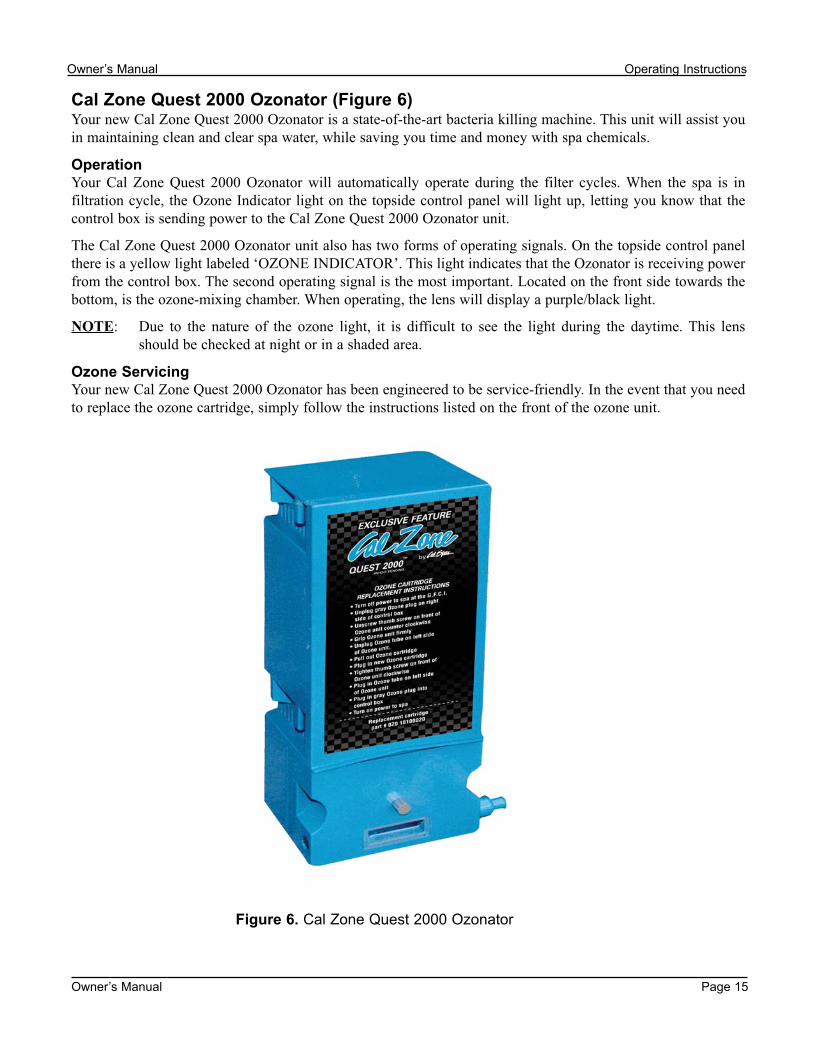
Cal Zone Quest 2000 Ozonator (Figure 6)Your new Cal Zone Quest 2000 Ozonator is a state-of-the-art bacteria killing machine. This unit will assist youin maintaining clean and clear spa water, while saving you time and money with spa chemicals.
OperationYour Cal Zone Quest 2000 Ozonator will automatically operate during the filter cycles. When the spa is in filtration cycle, the Ozone Indicator light on the topside control panel will light up, letting you know that the control box is sending power to the Cal Zone Quest 2000 Ozonator unit.
The Cal Zone Quest 2000 Ozonator unit also has two forms of operating signals. On the topside control panelthere is a yellow light labeled ‘OZONE INDICATOR’. This light indicates that the Ozonator is receiving powerfrom the control box. The second operating signal is the most important. Located on the front side towards thebottom, is the ozone-mixing chamber. When operating, the lens will display a purple/black light.
NOTE: Due to the nature of the ozone light, it is difficult to see the light during the daytime. This lens should be checked at night or in a shaded area.
Ozone ServicingYour new Cal Zone Quest 2000 Ozonator has been engineered to be service-friendly. In the event that you needto replace the ozone cartridge, simply follow the instructions listed on the front of the ozone unit.
Owner’s Manual Operating Instructions
Figure 6. Cal Zone Quest 2000 Ozonator

Page 16 Owner’s Manual
Air Venturies (Figure 7)Air venturies are the smaller knobs located around the top of your spa. Each one will let you add a mixture ofair with the jet pressure. This is accomplished by simply rotating the air venturi knob to the left (counter-clock-wise) to increase the amount of airflow through the jets. To decrease the amount of airflow through the jets, sim-ply rotate the handle to the right (clockwise).
Owner’s Manual Operating Instructions
Figure 7. Air Venturies

Owner’s Manual Page 17
5000 ELECTRONIC OPERATIONWhen first powered-up, the 5000 Electronic System (Figure 8) will perform a self-diagnostic check and then itwill automatically heat to, and maintain, a temperature of 100˚F until you change the set temperature as listed inthe ‘Temperature Adjustment’ section.
Temperature Adjustment (Range 80˚F to 104˚F)The display screen will always display the actual water temperature. To display the temperature that the spa isset to, simply depress the ‘Temp’ pad (Figure 9). The set set temperature will be flashing on the display panel.Each time you depress the Temp pad, the set temperature will change 1˚, either up or down. Letting the displayrevert back to the actual water temperature, then depressing the temp pad again will allow you to change thedirection of the temperature adjustment.
Standard and Economy ModesYour new spa is equipped with a Standard and Economy heating feature that gives you complete control of theheating system. When the spa is powered-up, it will automatically start in the Standard Heating Mode. In thismode, the heating system will automatically activate whenever the water temperature drops more than 1˚ belowthe set temperature. In the Economy Heating Mode, The heating system will activate during filtration times.
To switch from the Standard Heating Mode to the Economy Heating Mode, simply depress the Temp pad followed by the Light pad. Depress the same sequence to switch back to the Standard Heating Mode.
5000 Electronic Operation Owner’s Manual
Figure 8. 5000 Electronic System.
Figure 9. 5000 Electronic System ‘Temp’ pad.

Owner’s Manual 5000 Electronic Operation
Page 18 Owner’s Manual
Pump EquipmentOne Pump EquipmentDepress the ‘Jets’ (Figure 10) button once to activate the low-speed pump. Depress the ‘Jets’ button again toactivate the high-speed pump. Depress the ‘Jets’ button a third time to turn off the high-speed.
Two Pump Equipment w/Out Circulation PumpDepress the ‘Jets’ button once to activate the low-speed pump. Depress the ‘Jets’ pad again to activate the high-speed on pump 1. Depress the ‘Jets’ button a third time to activate the high-speed on pump 1 and high-speed on pump 2. Depress the ‘Jets’ button a fourth time and only the high-speed on pump 2 will be on.Depress the ‘Jets’ button a final time to turn off the high-speed off on pump 2.
Three Pump Equipment - 5300 Control Box (J-508 Only)Depress the ‘Jets’ button once to activate the low-speed pump. Depress the ‘Jets’ button again to activate thehigh-speed on pump 1. Depress the ’Jets’ button a third time to activate high-speed on pump 1, high-speed onpump 2, and high-speed on pump 3. Depress the ‘Jets’ button a fourth time and only the high-speed on pumps2 and 3 will be activated. Depress the ‘Jets’ button again to turn pumps 2 and 3 off.
LightsDepress the ‘Light’ button to turn the spa light on and off.
NOTE: J-505. J-506, J-507 and J-508 have different lighting instructions (see page 21).
Turbo (Optional)Depress the ‘Options’ button once to activate the Turbo system. Depress the ‘Options’ button again to turn offthe Turbo system.
Setting the Temperature Lock (Figure 11)This feature allows you to lock a temperature into the system. When engaged, the set temperature will blink offand on, while the ‘Temp’ button is depressed. However, the user will not be able to change the set temperature.The following will enable you to lock-in a set temperature. Depress the ‘Temp’ button, then depress the ‘Option’button to lock the set temperature. Repeat this step to unlock the set temperature.
Automatic Time OutsThe low-speed pump will automatically turn itself off after 4-hours if it is not turned off manually. The high-speed pump will automatically turn itself off after 15-minutes if it is not turned off manually.The optional Turbo system will automatically turn itself off after 15-minutes if it is not turned off manually.The light will automatically turn itself off after 15-minutes if it is not turned off manually.
Figure 10. Jets Button.
Figure 11. Temperature Lock.

Owner’s Manual Page 19
Setting Filtration CyclesYour spa will automatically filter itself twice a day. To set the filtration time, turn off the power to the spa at theGFCI breaker. Turn the GFCI breaker back on at the time of day you would like the filtration cycle to begin. Thefirst cycle will start after the spa is powered-up. The second filtration cycle will begin twelve hours later. Thefiltration cycle duration is preset to two hours (F2). To change the duration of the filtration time, depress theTemp pad, then press the Jets pad (Figure 11). Depress the Temp button again to choose from 2, 4, 6, 8 and 12hours twice a day (FC - Filtration Continuous). After selecting the desired filtration cycle duration, depress theJets pad to exit the filtration program. The circulating pump and ozone generator (optional) will run during filtration cycles.
NOTE: The filtration cycle settings of F8 and FC are only intended for use with the optional Cal Spa Filtration System.
5000 Electronic Operation Owner’s Manual
Figure 12. 5000 Electronic System Temp and Light Pads.
Figure 13. 5000 Electronic System Temp, Light, Jets and Option Pads.

Page 20 Owner’s Manual
Owner’s Manual Multi-Color Spa Light Operation
MULTI-COLORED SPA LIGHT OPERATIONThis section will discuss the operation of the Multi-Colored Spa Light that comes in the J-505, J-506, J-507 andJ-508 spas. The J-505 and J-506 spa models come with one light-emitting-diode (LED) waterfall and one LEDMulti-Colored Spa Lighting harness. The J-507 and J-508 spa models come with two LED waterfalls and oneLED Multi-Colored Spa Lighting harness.
Operating the Multi-Colored Spa Light
1. Turn the spa light on by depressing the ‘Light’ button on the top-side control panel.2. To filter through the different color choices, the user must depress the button within 1 to 2 seconds of each
button depression to advance to the next color.
NOTE: If the user waits any longer than the allotted 1 to 2 second time frame, the next depression will turnthe spa light off.
3. To turn the spa light off when not in use, depress the ‘Light’ button.
Using the Random Light Feature
1. Turn the spa light on by depressing the ‘Light’ button on the top-side control panel.2. Cycle through the color range 2 times. After the last light from the second cycle has been lit, the random light
feature will turn on and the spa light will cycle through each individual light.3. To turn the spa light off when not in use, depress the ‘Light’ button.
NOTE: The slow fade feature will come on right after the color white. The first color for the feature will begreen and then slowly goes through the color spectrum. The fast fade does the same thing as the slowfade, only faster.

Cal Spas Clear Water Plan™
Great spa water is easily achieved when the right chemicals are used and a Clear Water Plan is implemented.The key to clean, clear, safe water is to fully understand how spa water reacts to users, operation and chemicals.This Clear Water Plan will help give you that understanding.
IMPORTANT Chemical Safety Notices:
Chemical Directions:• All directions in this program are calculated for Cal Spas chemicals only. Other chemicals may have similar
names and/or usage descriptions. However, all chemicals are manufactured differently, increasing the likeli-hood of under or over dosing spa chemicals.
• Failure to follow chemical directions may result in serious injury, sickness and even death.
Chemical Usage:• Always introduce chemicals to spa water with all pumps operating on high speed.• Apply chemicals to the center of spa water.• Always wear protective clothing and eyewear when handling chemicals.• Spa users that notice skin irritation must immediately suspend spa usage and consult their physician.• Pregnant women should consult their physician prior to using a spa for both chemical and temperature recom-
mendations
Chemical Storage:• Chemicals must be stored completely out of the reach of children in an area that is well vented, cool, and dry.• Failure to provide a proper area for chemical storage may result in serious injury, sickness, fire, explosion and
even death.
Physical Chemical Hazards:• Do not allow chemicals to come in contact with skin, eyes or clothing. As mentioned previously, always wear
rubber gloves, protective eyewear and clothing to reduce the risk of chemical contact and irritation.• Remove and wash clothing that may have been exposed to chemical contact prior to wearing again.• Inhaling or digesting chemicals will cause serious injury, sickness, and even death.• Do not mix chemicals. Mixing chemicals together may cause chemical reactions that vary from poor water con-
ditions to fire and explosion.
44

Safety:1. This plan and its chemical dosages are intended for Cal Spas Chemicals only. Most chemical manufactures use different chemical for-
mulas and strengths. Cal Spas’ chemicals are specially formulated to provide proper chemical balance at lower dosages. Comparelabels and dosages and see for yourself. You will get greater protection and performance with Cal Spas Chemicals.
2. Read and follow all printed instructions listed on bottles, packages and owner’s manual.
3. Read and follow all printed instructions listed in chemical start-up kits. If Applicable, start-up kit chemicals are often more concen-trated that the over the counter full size bottles.
4. Do Not Exceed Chemical Dosages Per Gallon as listed in the owner’s manual, chemical bottles, packages, and kits. Most chemicalinstructions are figured for a 500 gallon spa. However, most spas hold less than 500 gallons. Always use less than the recommendedamount of any chemical. It is much easier to add additional chemicals than it is to remove excess chemicals from the spa water.
REMEMBER, LESS IS MORE WHEN DEALING WITH SPA CHEMICALS.
5. Never mix any chemicals together.
6. Never change chemical brands or types without completely draining, flushing and thoroughly cleaning the spa, pillows, and coverfirst.
7. Be careful not to add certain chemicals on the same day. (Refer to printed instructions on the chemical bottles, packages and ClearWater Plan.)
8. Always protect eyes while introducing chemicals into the spa. A slight breeze may cause powdered chemicals to blow into eyes.Pouring liquids may cause chemicals to splash into eyes. (Protective eyewear should always be worn when handling chemicals)
9. In the event of overdosing a sanitizing chemical (Chlorine , Bromine, etc.), immediately turn off power to the spa and proceed todrain spa water into a safe locally approved area. Carefully rinse pillows, jets, and spa surface with regular tap water. (Avoid spray-ing water directly into the equipment area.) Refill spa to proper water level, turn power back on, and then set the filtration time to“F6”. This will allow water to completely circulate to minimize the risk of chemical damage to your spa. (See setting filtration sec-tion of the owner’s manual for more information.)
Time and Expense:A better understanding of spa chemicals and their usage will help protect you from ugly, unsafe water and the expense associated withclean up. In some cases, it is less expensive to drain the spa and start over than it is to add additional chemicals and filtration time clean-ing up bad spa water.
Chemical Damage:The most common reason for spa failure is chemical abuse or customer neglect. For example, the pump seal used on a typical spa is thesame pump seal used to pump acid solutions for chemical companies. Yet this same pump seal will fail in numerous spas because theowners were not following a chemical plan. Chemical damage is not covered by Cal Spas limited warranty. So, in addition to wastedexpenses on excess chemicals, you will find yourself with a huge expense of replacing chemically damaged parts. Even the brand(s) ofspa chemicals that claim that they are not as harsh as chlorine or bromine, in fact, are. If you venture off some of these chemicals plans,the damage to your spa can be twice what chlorine or bromine damage would be.
The Bottom line: It pays to stick with a simple chemical plan and use a measuring cup rather than the conventional, “Yep, that looks like about 2 ounces”.
It sounds funny... but it is a huge issue, that can be easily avoided.
Why is a Chemical Plan Important
Cal Spas Clear Water Plan™
45
Stay with the PlanStaying with the Plan:Spa owners who enjoy the cleanest water with a minimum time investment, all have one thing in common: they use, and stay with a sim-ple chemical plan. Most chemical manufactures offer a maintenance plan printed in a small booklet, which contains nothing more thanhow much to use. The Cal Spas’ Clear Water Plan describes not only what and when, but why you need to use a particular chemical.
Avoiding Problems:Spa water issues cannot be fixed immediately. It is much easier, less expensive, and a lot less time consuming to maintain spa water, thanit is to troubleshoot and correct water issues. Ask yourself, which is easier, less expensive, and more convenient? Changing the oil inyour car four (4) times a year, or replacing the car every two (2) years.A chemical maintenance plan for your spa is not much different. Follow the Cal Spas’ Clear Water Plan, or replace your spa every twoyears. We know you don’t want to become a chemists. You just to enjoy your new spa. That is why the Cal Spas’ Clear Water plan is soeffective. Just 15 minutes, three days a week and you are ensuring your spa’s future.
Clear Water Plan Advantages:1. Chemical use is minimal.2. Chemical odor is almost non-existent.3. Pillows, Spa Covers, and Filter lids last for years.4. Spa usage is more enjoyable.5. Water is always clean, clear and safe.6. Little time invested.7. No smock required (Chemist Joke).
Spa vs. Small Pool?Most people think of spas as nothing more than a small pool. In fact, nothing could be further from the truth. If anything, spas are morelike an overgrown bathtub.
An average pool contains 30,000 gallons of water and operates at approximately 70˚ F (20˚ C).
An average spa only contains 350 gallons of water and operates at 100˚ F (38˚ C).
Since spas have more than 100 times less water than a swimming pool, they are very easily contaminated by bathers.
Example:Although spa users don’t realize it, they perspire a lot. An average person using a spa for one hour will leave approximately 3 pints ofperspiration per 350 gallons. A swimmer exercising in a pool leaves approximately one pint of perspiration per 30,000 gallons.
This and other body waste such as skin, oil, and personal hygiene products are left in a very small amount of hot water. The spa becomesprime environment for bacterial growth. In addition, water evaporates leaving a stronger concentration of T.D.S. (Total DissolvedSolids).
As stated before, spas are nothing like swimming pools. The former needs more attention than you may have first thought.
This information is not meant to scare you. It is to make you aware of why a chemical maintenance plan is so important.
Most chemical programs don’t provide this type of information to the average spa user. When in reality, without knowing what the possi-bilities are, you won’t be able to prevent problems from occurring or correct them easily.
Cal Spas believes educated spa owners are more able of recognizing a potential problem and correcting it with little effort. Thus, improv-ing the overall spa experience.
46

Filters and Filtration:Exclusive Bio-Clean Filter Cartridge:The average filter cartridge is designed to remove dirt, sand, minerals, phosphates, bather waste and other solids from the spa.Unfortunately, some spa owners fail to include filter cleaning as part of their chemical maintenance plan. Filters accumulate debris andbecome prime areas for bacteria growth.
The Cal Spas Exclusive Bio-Clean filter is the only antibacterial filter cartridge on the market today. What does this mean to you?Having a filter cartridge that prevents bacteria growth is simply added protection for those times you forget to clean the filter. We recom-mend that you only replace your spas filter cartridge with a Bio-Clean filter cartridge for ensured protection and peace of mind.
Why do I need to Clean the Filter Cartridge?Even though the Bio-Clean filter can protect itself from bacterial growth, it still needs to be cleaned on a regular basis to maximize yourspas performance and ensure that heating and filtration systems are functioning correctly. Most filter canisters are manufactured with abypass. When a filter becomes full of debris, the bypass will open allowing water to flow around rather than through the filter. Whenthis happens, your daily filtration cycles are no longer effective. Another casualty of a dirty filter cartridge, is the loss of water tempera-ture. The spas heating system will only function with the proper amount of water flow through the system. An overloaded filter, cancause the heating system to become inoperable.
Cleaning the Filter Cartridge:In addition to spraying the filter with a high pressure nozzle, deep cleaning the filter cartridge is also necessary. Even if the filter car-tridge may appear clean, you will still need to deep clean it regularly. Minerals and other contaminates are very difficult to see and canget lodged deep into the filter fibers causing water flow issues.
You will need to have an extra filter cartridge on hand for the deep cleaning process. It is necessary to always have one filter eithercleaning or drying, and the other installed in the spa. This process will double the filter cartridges overall life and performance.
Filter Cleaning:1. Place the dirty filter into a bucket with 8 oz. of Liquid
Filter Cartridge Clean.2. Soak for a minimum of 24 hours. 3. Remove filter and spray clean with a water hose, and
allow the filter to dry thoroughly. (Drying time should be a minimum of two days prior to reinstalling.)
4. Reinstall as described in the Clear Water plan.
Filtration:Filtration is one of the most important steps you can take ensuring clean, clear water. Regardless of what some people may think, it is farmore inexpensive to fix water clarity problems by filtering your spa than it is to use excessive amounts of chemicals, filtration times,and/or water replacement.
Cal Spas’ filtration system simply draws contaminated water through the (Exclusive) Bio-Clean filter removing debris from the water. Itthen pumps the newly cleaned water back into the spa through various jets.
Spas equipped with the optional, Quest 2000 Ozonator will also receive ozone injection into the filtered water for further protectionagainst contaminates during filtration cycles.
Filtration also ensures that chemicals are mixed thoroughly through the water, increasing performance.
Filtration Cycles:All electronically controlled spas run two filter cycles every day, one every twelve hours. Either the low speed of a two speed pump orseparate filter pump will perform the filtration function. We strongly recommend that you set your spas filtration time to the “F4” setting.(See the “Setting Filtration Cycles” section in the owner’s manual.) This will allow the spa to filter for four (4) hours every twelve hours.If it seems like a lot, just remember the pool analogy.
47

Cloudy Water: Cloudy Water:Everyone experiences cloudy water at one time or another.
The number one cause of cloudy water is the spa user and the things they bring into the spa. As discussed before, the average spa holdsonly 350 gallons of water. What you bring into the spa will stay in the water for some time. Think of the spa as a thorough body wash.Everything that is in your clothes, skin and hair will be washed off and left in the spa water causing cloudy water.
1. Never wash the clothes that you wear into the spa in laundry detergent or fabric softener. Laundry detergent and fabric softener stays in your clothes no matter how well you rinse them. This causes cloudy and foamy water that is almost impossible to clean up. The only thing you can do is wait for it to filter out. Adding Spa Brite, in this case, will only further delay the spas ability to clear up.
2. Never enter the spa with sunscreen or lotion on your skin. Oil is very difficult to remove from the water, and can cause a reactionwith some of the chemicals that you may add to your spa, further causing a cloudy water condition. It is best to rinse off prior toentering the spa.
3. Use caution when adding any chemicals to correct a problem. Most cloudy water problems are made worse by the spa owner addingchemical after chemical to correct a cloudy water problem that normally would have cleared up with a little Oxidizer Shock and fil-tration time.
4. Remember, swimming pool chemicals are completely different than spa chemicals. Entering a spa with wet clothes from a swimming pool can cause a possible chemical reaction to either the spa user and/or the spa water. Always rinse thoroughly whentransferring between a swimming pool and a spa.
5. Clean the spas filter(s) regularly as described in the Cal Spas Clear Water Plan.
Spa Brite: (Water Clarifier)Spa Brite:This chemical is used to help clear up cloudy water. The problem that most spa owners run into is being able to identify when Spa Brite should be used and when it should not be used.
Spa Brite’s only purpose is to draw very light debris together and making them large enough to be caught in the filter.
If your water clarity issue is caused by excessive amounts of oils, soap, or bacteria elements, Spa Brite will only add to the clarity prob-lem; an oily, clumpy mess will form around the entire water level of the spa.
How to use Spa Brite:1. Make sure that your clarity issue is not of an oily, soapy, or bacterial nature. (See Filter, Enzyme Oil Gone, or Oxidizer Shock
sections for these issues.)
2. Add 2 oz. of Spa Brite to a spa running on filter speed. Allow spa to filter until water is clear. We recommend placing your spa in filter mode “FC” (24Hour filtration Mode) during this time. (This may take some time, so be patient. See the Setting Filtration Cycles section in your owner’s manual.)
3. Clean filter thoroughly between, and after each application of Spa Brite.
48

Enzyme Oil Gone: (Oil Remover)Enzyme Oil Gone:This chemical will help break-down excessive amounts of body and other oils in the spa water.
Body oil, perspiration, lotions and tanning oil will quickly accumulate in your spa if your not careful.
The best solution is prevention. Always watch what goes onto your body because it will eventually end up in your spa water.
How to Use Enzyme Oil Gone:1. Add 1/2 oz. of Enzyme Oil Gone to a spa running on filter speed. Allow spa to filter until the spa water no longer feels or looks
oily. We recommend placing your spa in filter mode “FC” (24 Hour Filtration Mode) during this time.
(See the Setting Filtration Cycles section in your owners manual.)
2. You may find the need to add this product to your weekly chemical maintenance plan. If so, simply repeat step one (1) once aweek. (Weekly dosages do not generally require additional filtration time.)
Water Temperature and Its Effects: Water Temperature:The actual water temperature will greatly effect how efficient your spas chemistry is.
Here is an example of what hot water can do to your water and chemicals.
Hot Spa Water: (100˚ - 104˚ F) 1. Increases water evaporation.2. Increases chemical dissipation.3. Increases amount of spa user waste.4. Accumulation of minerals and salts.5. Increases Total Dissolved Solids (TDS).
As you can imagine, there is an inverse effect with cooler water temperatures.
Does this mean that you should not operate your spa at higher water temperatures? No. We just want you to be aware that your chemicalusage will increase or decrease with the actual water temperature.
Water pH and its Effects: Water pH: (Potential Hydrogen)pH is the measurement of the acidic level of water. The normal range of your spas pH level is between 7.2 to 7.8 and can be tested withsimple test strips. What will happen to my spa with pH levels either too high or too low?
Low pH:The lower your pH, the more acidic your water will become. That’s right. Acid! Effects of low pH are, dissolving or pitting heaters, man-ifolds, pump seals, and in some cases the acrylic finish itself.
High pH:The effects of high pH are increased scaling, calcium deposits, cloudy water, clogged filters and effectiveness of you sanitizers: Chlorineand Bromine.
What Affects the pH:Everything that is introduced into the spa water has its own pH level, including you. All of these different pH levels can cause conflictwith the spa waters ability to maintain its correct pH levels.
49
Example:Spa owners that use their spa three (3) or four (4) times a week will have lower pH than spa owners who use their spa once or twice aweek. Even the sanitizers (Bromine, Chlorine, etc.) that you use can effect the water’s pH levels. Did you know that Bromine has a pHlevel of 3.0 while chlorine has a pH level of 7.1. Other types of sanitizers have pH levels so low, it’s like adding straight acid to your spa.
Be very careful of what you are putting into your water.
Chlorine Users:Chlorine is very sensitive to pH levels. Readings higher than 7.8 will cause chlorine users to use twice the amount of chlorine to main-tain a proper level. If your are using excessive amounts of chlorine with little effect, check the pH and Total Alkalinity levels.
Water pH and its Effects: (Cont.)
Controlling pH:Controlling pH: (Potential Hydrogen)1. Always follow printed instructions on the bottle and/or packages.2. Always adjust Total Alkalinity and Sanitizers first.3. Chlorine users will generally use more “pH / Alkalinity Down.”4. Bromine users will generally use more “pH / Alkalinity Up.”5. Make sure test strips are not wet or outdated prior to testing.6. Never test immediately after using oxidizer shock.
(Allow 30 minutes of circulation with the spa cover half off prior to testing.)7. Always add chemicals when the pump(s) are on high speed.8. Always premix “pH Alkalinity Down” chemicals in half a bucket of water prior to introducing them to the spa.9. Never attempt to adjust pH or Total Alkalinity in large increments. Adjustments are made easier, and will stay set longer if you make
them in small increments.
Do Not Use Vinegar or Baking Soda to adjust pH and Total Alkalinity:Vinegar:You would need to use 100 times the amount of vinegar to equal 1/2 oz. of Cal Spas “pH / Alkalinity Down”. Vinegar will also add alarge amount of organic waste in the spa water requiring the need for more sanitizers.
Baking Soda:Although very similar to common baking soda, “pH / Alkalinity Up” is different. The primary difference is pH Alkalinity Up’s ability todissolve quickly. Common baking soda will cause a paste like substance to accumulate on the floor and seats of your spa.
What is Total Alkalinity? Water Total Alkalinity: Total Alkalinity is the basic capacity of the spa water to resist change in the pH.
When the alkalinity is low, the pH and alkalinity will change very easily with bather use or chemical adjustment. The opposite will hap-pen when the alkalinity is high. It will take a lot of bathers or chemicals to change the pH and alkalinity levels.
The optimum Total Alkalinity level is between 80 to 100 parts per million (ppm).
50
Controlling The Total Alkalinity: Controlling The Total Alkalinity:1. Always follow printed instructions on the bottle and/or packages.2. Always adjust Total Alkalinity and Sanitizers first even if it throws the pH further off.3. Chlorine users will generally use more “pH / Alkalinity Down.”4. Bromine users will generally use more “pH / Alkalinity Up.”5. Make sure test strips are not wet or outdated prior to testing.6. Never test immediately after using oxidizer shock. (Allow 30 minutes of circulation with the spa cover half off prior to testing.)7. Always add chemicals when the pump(s) are on high speed.8. Always premix “pH Alkalinity Down” chemicals in half a bucket of water prior to introducing them to the spa.9. Never attempt to adjust pH or Total Alkalinity in large increments. Adjustments are made easier, and will stay set longer if you make
them in small increments.
You will be using the same chemicals to lower the pH and Total Alkalinity. (Cal “Spas pH / Alkalinity Down” and “pH / Alkalinity UP.”)
This does create concern with some people of throwing off one level to correct another.
It is recommended to throw off the pH level in an effort to adjust the alkalinity level properly first. This will make it easier to adjust andmaintain the pH.
Questions and Answers
Q: My pH is low and the Total Alkalinity is high. What do I do?A: Add small amounts of “pH / Alkalinity Down” to bring down the alkalinity level first. Be sure to allow plenty of circulation and
standing time for the waters chemical levels to change. This may take anywhere from one (1) to three (3) hours depending on thesize of the adjustment. (Smaller adjustment amounts are always better than larger adjustments.) Then you may start adjusting the pHback up, by using “pH / Alkalinity Up”in small amounts at a time.
Q: My pH is high and the Total Alkalinity is low. What do I do?A: Add small amounts of “pH / Alkalinity UP” to bring up the alkalinity level first. Be sure to allow plenty of circulation and standing
time for the waters chemical levels to change. This may take anywhere from one (1) to three (3) hours depending on the size of theadjustment. (Smaller adjustment amounts are always better than larger adjustments.) Then you may start adjusting the pH backdown by using “pH / Alkalinity Down” in small amounts at a time.
Calcium and Scale: Calcium is one of the few minerals that does not dissolve in hot water. In fact, hotter water makes calcium more of a solid, gritty, chalkysubstance that attaches itself to the acrylic finish, heater, and everywhere else in the spa. We refer to these conditions as “Scaling”. HighpH can also increase the effects of this condition. If left untreated, scaling causes heater, pump, and jet failures; all, of which, are not cov-ered by the spa warranty.
Prevention and Treatment:1. Never allow the spas water temperature to exceed 104˚F.2. Check the pH levels and adjust if necessary at least 3 times a week.3. Never allow the pH level to exceed 7.8.4. Use “Metal Protector” every time you fill your spa. (See printed instructions on Bottle.)5. Use “Stain and Scale Defense” weekly as described in the Clear Water Plan.6. Applying Cal Spas “Fast Sheen” to the spas acrylic surface when you drain and clean your spa will greatly help your spas finish pro-
tect itself from scale build-up.
Calcium Clean-up:Unfortunately, there is very little that can help you remove calcium or scale completely in a spa. Prevention is the key.
Cleaning:When you drain the spa, clean the surface with Cal Spas “All Purpose Cleaner” and rinse well.
51

Calcium Hardness: (Hard and Soft Water)
Do Not Use Soft Water When Filling Your Spa
This is primarily for two reasons. 1. Soft water tends to be very unstable. This means that locking-in pH and Total Alkalinity levels becomes difficult.2. Soft water becomes quite foamy with very little turbulence. No amount of “Foam Gone” will stop it from foaming for very long.
What does this mean?
Your spas water needs to have some hardness to it.. If you live in an area where the water source is soft, you will need to add 1 oz. of“Liquid Hardness Increaser” to raise water hardness level 7 ppm at a time. This will make your water more manageable.
Please follow all printed instructions on the bottle and use in very small increments.
Well Water (Very Hard Water)In some areas, the water that you have may be very hard (i.e. well water). If this is so, fill half of the spa with hard water and the otherhalf with soft water from a water softener.
Metal Protector (Mineral Control at Start-up)
Your Cal Spas’ Clear Water Plan recommends draining and refilling of your spa every three (3) to four (4) months. Upon doing so, youwill want to add 3 oz. of Metal Protector to the center of the spa. Make sure all of the jets are on high speed.
Metal Protector will hold the active minerals in the newly added spa water in a state of “Solution”. The term solution means that miner-als in the water are being held in a suspended state, keeping them from bonding to anything in the spa and causing damage. Mineral con-trol is a critical part of maintaining spa components’ performance and longevity.
In addition to fill-up protection from minerals, the Clear Water Plan also recommends the weekly maintenance of mineral protection.This is accomplished by a adding a weekly dosage of Stain and Scale Defense. (See the following page for more information.)
DO NOT USE SPA BRITE OR LIKE PRODUCTS, ON THE SAME DAY YOU ADD METAL PROTECTOR TO THE WATER. Addingthese chemicals on the same day will result in cloudy water.
Stain and Scale Prevention (Weekly Mineral Control)
As part of your Cal Spas’ Clear Water Plan, weekly protection from minerals are also highly recommended. Add water to your spa week-ly, replacing water that has evaporated or spilled over.
Due to water replacement and overall chemical fluctuation, Stain and Scale Defense is an important part of weekly spa maintenance toprevent minerals from damaging spa components and effecting performance.
Weekly Dosage:Add 2 oz. of Stain and Scale Defense weekly directly to the center of the spa with all of the jets on high speed.
DO NOT USE SPA BRITE OR LIKE PRODUCTS, ON THE SAME DAY YOU ADD STAIN AND SCALE DEFENSE TO THEWATER. Doing so will result in cloudy water.
52
Use of Foam Gone:Foam Gone should be used sparingly. This product does not remove foam from your water, it only offers a temporary solution.
The recommended amount requires one gentle squeeze of the Foam Gone bottle to each of the heavy foaming areas.
Be sure to avoid applying Foam Gone near the immediate filter area of your spa; it is only effective in the main area. Once filtered out,the water will start to foam in a short amount of time, causing you to use more Foam Gone.
Tip: Add 3 oz. of Foam Gone and 29 oz. of water into a 32 oz. spray bottle and spray where needed.
Foam Gone (Foam Prevention and Assistance)
As mentioned on previous pages, foamy spa water can be caused by soft water. However, the most common causes of foamy water arethe users themselves and the things they bring into the spa. (i.e. clothes, shampoo, and oils.)
Products such as Foam Gone, only mask the problem of foamy water. There is no single chemical that will remove foam from your spawater. The only thing that removes contaminant’s that cause foamy water is plenty of filtration, future prevention, and patience.
Foamy Water Prevention:1. Never wash the clothes that you wear into the spa in laundry detergent or fabric softener. Laundry detergent and fabric softener stays
in your clothes no matter how well you rinse them. This causes cloudy and foamy water that is almost impossible to clean up. Theonly thing you can do is wait for it to eventually filter out.
Note: Adding water clarifier in this case will only further delay the spas ability to clear-up.
2. Never enter the spa with sunscreen or lotion on your skin. Oil is very difficult to remove from the spa water, and can cause a reactionwith some of the chemicals that you may add to your spa. In addition, soap and shampoo residues that are normally left on yourbody after a shower, only increase foamy and cloudy water. It is best to rinse off prior to entering the spa in these cases.
Vinyl & Leather Cleaner (Cover and pillow maintenance)
Due to the constant punishment your spa cover and pillows receive, you should protect them by applying Vinyl & Leather Cleaner as apart of monthly maintenance. Cal Spas’ Vinyl & Leather Cleaner is specifically designed to protect spa covers and pillows from chemicaland ultraviolet damage. It accomplishes this without leaving an oily residue behind that is normally associated with common automotivevinyl protectants.
Use of Vinyl & Leather Cleaner:Cal Spas’ Vinyl & Leather Cleaner should be used sparingly. Incorrect product usage may cause water clarity issues.
Spa Covers:1. Remove spa cover from spa.2. Allow spa cover to dry completely.3. Spray Vinyl & Leather Cleaner to cover evenly and wipe dry.4. Allow spa cover to dry completely.5. Reinstall cover on spa.
Pillows:1. Wipe pillows dry with a soft cloth.2. Carefully spray Vinyl & Leather Cleaner directly onto pillow.3. Wipe pillows dry.4. Allow pillows to dry completely.
Important: Do not use automotive vinyl protectants on spa covers or pillows. These products are generally oil based and will causesevere water clarity issues that are difficult to correct.
53
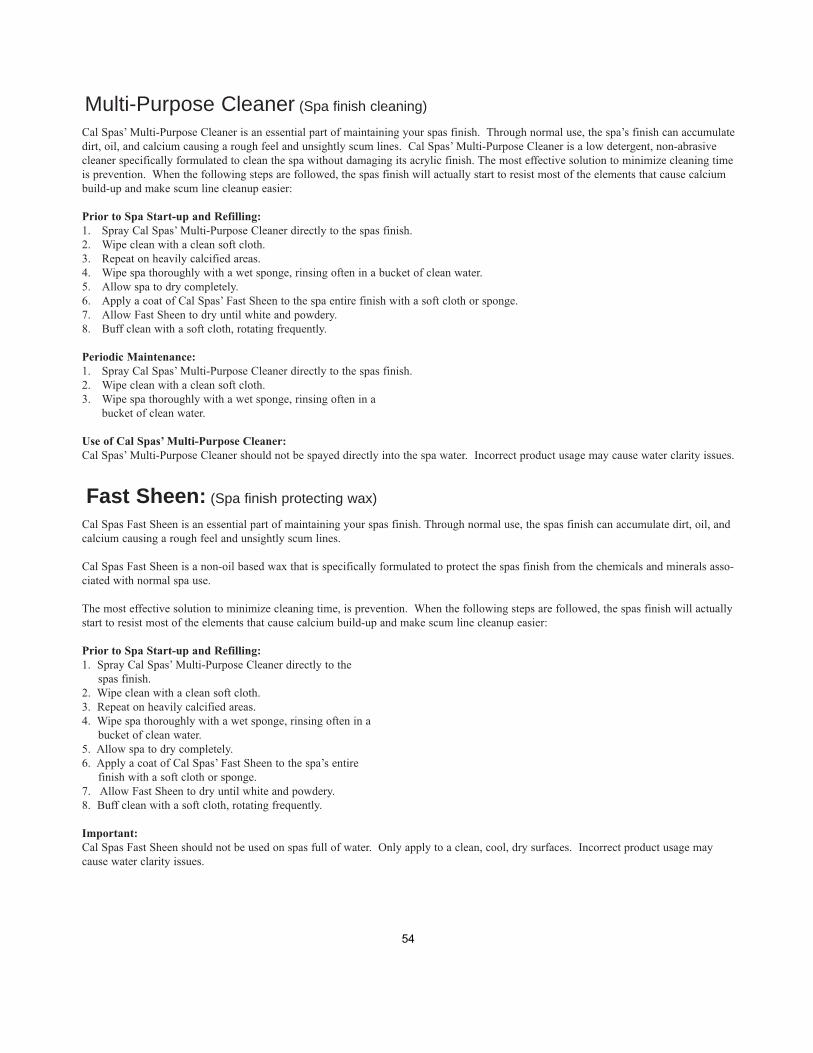
Multi-Purpose Cleaner (Spa finish cleaning)
Cal Spas’ Multi-Purpose Cleaner is an essential part of maintaining your spas finish. Through normal use, the spa’s finish can accumulatedirt, oil, and calcium causing a rough feel and unsightly scum lines. Cal Spas’ Multi-Purpose Cleaner is a low detergent, non-abrasivecleaner specifically formulated to clean the spa without damaging its acrylic finish. The most effective solution to minimize cleaning timeis prevention. When the following steps are followed, the spas finish will actually start to resist most of the elements that cause calciumbuild-up and make scum line cleanup easier:
Prior to Spa Start-up and Refilling:1. Spray Cal Spas’ Multi-Purpose Cleaner directly to the spas finish.2. Wipe clean with a clean soft cloth.3. Repeat on heavily calcified areas.4. Wipe spa thoroughly with a wet sponge, rinsing often in a bucket of clean water.5. Allow spa to dry completely.6. Apply a coat of Cal Spas’ Fast Sheen to the spa entire finish with a soft cloth or sponge.7. Allow Fast Sheen to dry until white and powdery.8. Buff clean with a soft cloth, rotating frequently.
Periodic Maintenance:1. Spray Cal Spas’ Multi-Purpose Cleaner directly to the spas finish.2. Wipe clean with a clean soft cloth.3. Wipe spa thoroughly with a wet sponge, rinsing often in a
bucket of clean water.
Use of Cal Spas’ Multi-Purpose Cleaner:Cal Spas’ Multi-Purpose Cleaner should not be spayed directly into the spa water. Incorrect product usage may cause water clarity issues.
Fast Sheen: (Spa finish protecting wax)
Cal Spas Fast Sheen is an essential part of maintaining your spas finish. Through normal use, the spas finish can accumulate dirt, oil, andcalcium causing a rough feel and unsightly scum lines.
Cal Spas Fast Sheen is a non-oil based wax that is specifically formulated to protect the spas finish from the chemicals and minerals asso-ciated with normal spa use.
The most effective solution to minimize cleaning time, is prevention. When the following steps are followed, the spas finish will actuallystart to resist most of the elements that cause calcium build-up and make scum line cleanup easier:
Prior to Spa Start-up and Refilling:1. Spray Cal Spas’ Multi-Purpose Cleaner directly to the
spas finish.2. Wipe clean with a clean soft cloth.3. Repeat on heavily calcified areas.4. Wipe spa thoroughly with a wet sponge, rinsing often in a
bucket of clean water.5. Allow spa to dry completely.6. Apply a coat of Cal Spas’ Fast Sheen to the spa’s entire
finish with a soft cloth or sponge.7. Allow Fast Sheen to dry until white and powdery.8. Buff clean with a soft cloth, rotating frequently.
Important:Cal Spas Fast Sheen should not be used on spas full of water. Only apply to a clean, cool, dry surfaces. Incorrect product usage maycause water clarity issues.
54

Sanitizers: (Bromine and Chlorine)
How Sanitizers Work:Sanitizers such and Bromine and Chlorine, basically kill bacteria and other organic waste by breaking them down to unharmful levels,thus eliminating them from the water.
You will need to know how each sanitizer performs this task to maximize their efficiency.
Bromine:Bromine is generally in tablet form, and requires a small plastic floater to dissolve slowly into the spa water.
With a proper understanding of how it works, it is quite an effective sanitizer, with a bonus of low chemical orders.
Unlike chlorine, bromine can breakdown bacteria and other contaminates to a safe level, then move on to other contaminates with a lowburnout rate.
The problem that most spa owners have with bromine is that they don’t follow a chemical plan, allowing the bromine tablets to complete-ly dissolve out of the floater. This causes bromine level to go up and down like a Yo Yo.
Not what you want from a sanitizer.
As mentioned before, bromine dissolves slowly into the water. The proper way to manage a bromine system is the following:
Sanitizers: (Bromine and Chlorine)
Bromine Management: (500 Gallon Spas at 100˚ F)Start-up:1. Add 2 oz. of Go Bro into the spa with all of the jets on high speed. This is your base bromine level as the tablets will take awhile to
dissolve enough to manage 500 gallons of water. 2. Add 2 oz. of Oxidizer Shock into the spa with all of the jets on high speed and the spa cover at least half off for 30 min. This will
remove any organic materials that may have been left in the plumbing lines after its last draining. 3. Start by placing 3 to 4 bromine tablets into 95% closed plastic floater and place into the spa. (Do not place bromine tablets into the
filter basket.)
Weekly:1. Test Bromine level with test strips. Note: Bromine Test
levels will vary if spa is equipped with Quest 2000 Ozonator.
Test Levels With Quest 2000 Ozonator: 1 to 3 Parts Per Million (ppm)Test Levels Without Quest 2000 Ozonator: 3 to 5 Parts Per Million (ppm)
2. Add one or two bromine tablets to the floater weekly. You want to replenish the same amount of bromine tablets equal to the tablet dissolve rate. (Dissolve rate will be faster at higher watertemperatures and slower at lower temperatures.) NEVER LET BROMINE TABLETS RUN COMPLETELY OUT OF THE FLOATER.
3. Add 2 oz. of Oxidizer Shock weekly into the spa with all of the jets on high speed and the spa cover at least half off for 30 minutes.This will remove organic material from the spa water, freeing-up your sanitizer to attack more bacteria, and other waste. This improvesyour sanitizers performance level, reduces spa odor, and refreshes your spa water.
55

Sanitizers: (Bromine and Chlorine)
Chlorine:Chlorine is generally in liquid form. However, in spa applications you will only want to use Granular Chlorine. This is primarily due toChlorine type and strengths. Unlike Bromine, chlorine can only breakdown bacteria and other contaminates to a safe level once, prior toburning out. The problem that most spa owners have with chlorine, is that levels either get too low from neglect, or too high from tryingto play chemical catch-up. As with all spa chemicals, LESS IS MORE. Take your time whenever adding chemicals to the spa water.Allowing proper filtration time and adding chemicals slowly, will greatly improve the length of your spa life and performance. You can-not super chlorinate spas and expect them to last. Be patient and stay with the plan.
Granular Chlorine:Weekly:1. Test Chlorine level with test strips. Note: Chlorine Test levels will vary if spa is equipped with Quest 2000 Ozonator.
Test Levels With Quest 2000 Ozonator: 0.5 to 1 Parts Per Million (ppm)Test Levels Without Quest 2000 Ozonator: 1 to 3 Parts Per Million (ppm)
2. Add 1 to 2 tablespoons of Cal Spas’ Granular Chlorine to the spa water weekly. Chlorine dissipation rate will be faster at higher watertemperatures and slower at lower temperatures.
3. Add 2 oz. of Oxidizer Shock weekly into the spa with all of the jets on high speed and the spa cover at least half off for 30 minutes.This will remove organic material from the spa water, freeing-up your sanitizer to attack more bacteria, and other user waste . Thisact greatly improves your sanitizers performance level and reduces spa odor.
Oxidizer Shock: Shock:All shock is not created equal. The most common shock you will find in pool and home improvement stores is Chlorinating Shock. Thiswill destroy your spas Jets, Pillows, Pump Seals and worse. The only shock that you should put in your spa is Cal Spas’ Oxidizer Shock!Oxidizer shock is the safe, easy way to maintain either Bromine or Chlorine spa chemical plans. By using 1 oz. weekly, you are remov-ing burnt-out chemicals, bacteria, and other organic material from you spas water. This will drastically improve chemical productiveness,spa odor, and minimize chemical irritation.
Using Oxidizer Shock:1. 1 oz. of Cal Spas Oxidizer Shock* Weekly. 2. 1 oz. of Cal Spas Oxidizer Shock* after heavy bather loads.3. 1 oz. of Cal Spas Oxidizer Shock* if water has a strong odor.
*Spa must be running with all of the jets on high for 30 minutes with the cover half off. If necessary you may repeat Oxidizer Shocktreatments in 30 minute intervals.
Big Water Clarity Issue?1. Identify the water clarity issue first: Is it Soap, Oil, Bacterial, or Chemical Imbalance.2. Select the proper treatment.3. Clean the filter cartridge and increase the amount of filtration until the water clears-up.4. Add 1 oz. of Oxidizer Shock at a time, in 30 minute intervals, with the spa cover at least half off. Make sure all of the jets are on high.5. Be patient! With few exceptions, spa water will not clean or clear-up overnight. Cloudy water requires proper identification, the cor-
rect treatment, and plenty of filtration.
56

Cal Spas Clear Water Plan (Start up)
Prior to filling a spa for the first time or after a routine draining, you will want to follow this start-up plan to extend water life and per-
formance.
If you are following either Bromine or Chlorine Clear Water plans, you will notice that both start up processes are the same with the
exception of step 4.
As with all chemical dosages listed in the Clear Water Plan, start up dosages are intended for 500 gallon spas. Please adjust chemical
dosages to the gallon capacity of your
particular spa.
Start up: (500 Gallon Spas)1. Clean spa thoroughly with Cal Spas Multi-Purpose Cleaner.2. Apply a protective coat of Cal Spas Fast Sheen to the Acrylic surface.3. Fill spa to proper water level with normal tap water. (Do not use soft water.)4. Bromine Plan: Add 2 oz. of Cal Spas Go Brom to establish a Bromine base level Chlorine Plan: Add two tablespoons of Cal Spas
Granular Chlorine to the spa water .5. Pour in 3 oz. of Cal Spas Metal Protector to the center of the spa.6. Sprinkle 2 oz. of Cal Spas Oxidizer Shock in the center of the spa and leave spa uncovered and turn on the jets for 30 minutes prior to
recovering. 7. Allow 24 hours prior to testing and implementing the Bromine or Chlorine Clear Water Plans.
Cal Spas Clear Water Plan (Bromine)
Bromine usersThis plan and its chemical dosages are intended for Cal Spas’ Chemicals only. Most chemical manufactures use different chemical for-mulas and strengths. Only Cal Spas’ chemicals are specially formulated to provide proper chemical balance at lower dosages. Comparelabels and dosages and see for yourself. You will get greater protection and performance with Cal Spas’ Chemicals.
Always read and follow all printed instruction on chemical bottles and packages.
Day One (Monday)1. Test spa water using test strips. (Be sure to check the expiration date prior to use.)2. Add two bromine tablets to floater. (Amount of tablets needed will vary with water temperature.)3. Adjust Total Alkalinity, then pH if needed. (See pH and Alkalinity sections for more information)4. Add 2 oz. of Stain and Scale Defense.5. Pull the dirty filter from the spa and place into Liquid Filter Cleaner solution.6. Place your extra, cleaned, fully dried filter cartridge in the spa.7. Vacuum your spa with the Cal Spas Vac.
Day Two (Wednesday)1. Test spa water using test strips. (Be sure to check the expiration date prior to use.)2. Adjust Total Alkalinity, then pH if needed. (See pH and Alkalinity sections for more information.)4. Pull the filter from Liquid Filter Cleaner solution, hose it off and allow to dry.
57
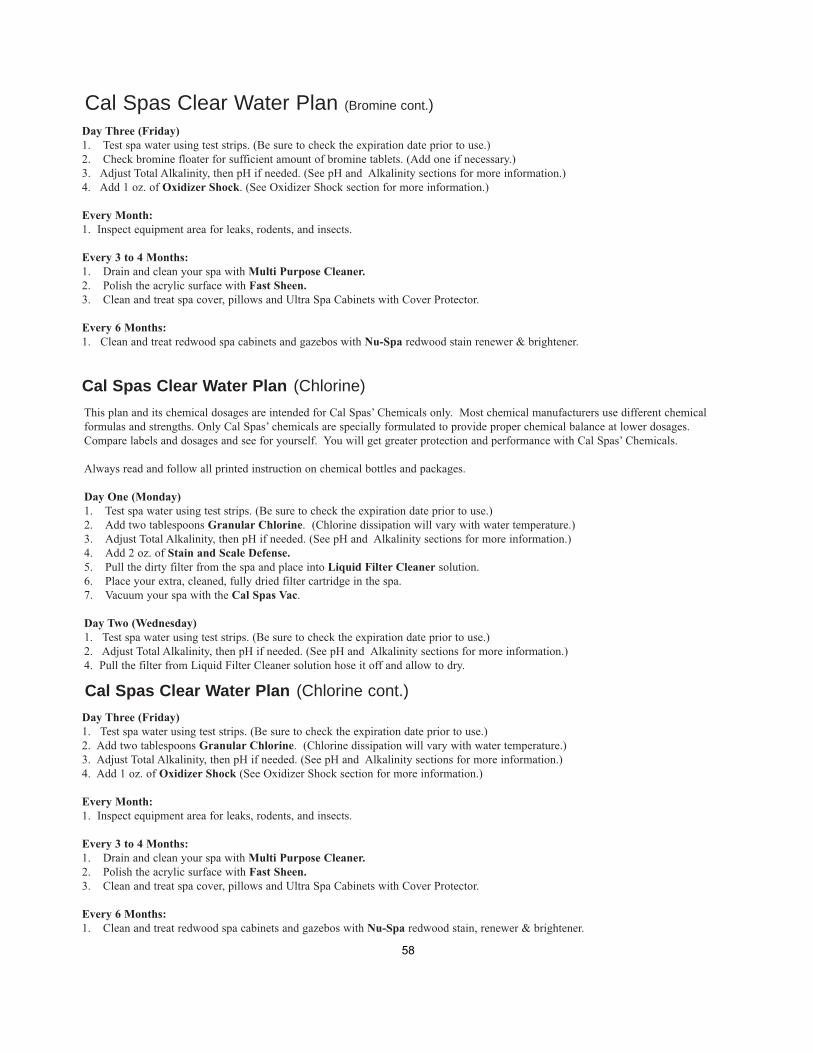
Cal Spas Clear Water Plan (Bromine cont.)
Day Three (Friday)1. Test spa water using test strips. (Be sure to check the expiration date prior to use.)2. Check bromine floater for sufficient amount of bromine tablets. (Add one if necessary.) 3. Adjust Total Alkalinity, then pH if needed. (See pH and Alkalinity sections for more information.)4. Add 1 oz. of Oxidizer Shock. (See Oxidizer Shock section for more information.)
Every Month:1. Inspect equipment area for leaks, rodents, and insects.
Every 3 to 4 Months:1. Drain and clean your spa with Multi Purpose Cleaner.2. Polish the acrylic surface with Fast Sheen. 3. Clean and treat spa cover, pillows and Ultra Spa Cabinets with Cover Protector.
Every 6 Months:1. Clean and treat redwood spa cabinets and gazebos with Nu-Spa redwood stain renewer & brightener.
Cal Spas Clear Water Plan (Chlorine)
This plan and its chemical dosages are intended for Cal Spas’ Chemicals only. Most chemical manufacturers use different chemicalformulas and strengths. Only Cal Spas’ chemicals are specially formulated to provide proper chemical balance at lower dosages.Compare labels and dosages and see for yourself. You will get greater protection and performance with Cal Spas’ Chemicals.
Always read and follow all printed instruction on chemical bottles and packages.
Day One (Monday)1. Test spa water using test strips. (Be sure to check the expiration date prior to use.)2. Add two tablespoons Granular Chlorine. (Chlorine dissipation will vary with water temperature.)3. Adjust Total Alkalinity, then pH if needed. (See pH and Alkalinity sections for more information.)4. Add 2 oz. of Stain and Scale Defense.5. Pull the dirty filter from the spa and place into Liquid Filter Cleaner solution.6. Place your extra, cleaned, fully dried filter cartridge in the spa.7. Vacuum your spa with the Cal Spas Vac.
Day Two (Wednesday)1. Test spa water using test strips. (Be sure to check the expiration date prior to use.)2. Adjust Total Alkalinity, then pH if needed. (See pH and Alkalinity sections for more information.)4. Pull the filter from Liquid Filter Cleaner solution hose it off and allow to dry.
Cal Spas Clear Water Plan (Chlorine cont.)
Day Three (Friday)1. Test spa water using test strips. (Be sure to check the expiration date prior to use.)2. Add two tablespoons Granular Chlorine. (Chlorine dissipation will vary with water temperature.) 3. Adjust Total Alkalinity, then pH if needed. (See pH and Alkalinity sections for more information.)4. Add 1 oz. of Oxidizer Shock (See Oxidizer Shock section for more information.)
Every Month:1. Inspect equipment area for leaks, rodents, and insects.
Every 3 to 4 Months:1. Drain and clean your spa with Multi Purpose Cleaner.2. Polish the acrylic surface with Fast Sheen.3. Clean and treat spa cover, pillows and Ultra Spa Cabinets with Cover Protector.
Every 6 Months:1. Clean and treat redwood spa cabinets and gazebos with Nu-Spa redwood stain, renewer & brightener.
58

Frequently Asked Chemical Questions: Q: My pH is High and my Alkalinity is low, What do I do?A: Adjust your Alkalinity first, even if it throws the pH further off. Use “pH / Alkalinity Up” or “pH / Alkalinity Down” adjust and sta-
bilize you Total Alkalinity level. This will make it easier to adjust you pH levels later and allow them to remain stable longer.
Q: When is the best time to use Oxidizer Shock?A: Every week, as described in Cal Spas’ Clear Water Plan, and after heavy bather loads. You may use Cal Spas’ Oxidizer Shock as
often as you like, as long as you allow you spa to run for 30 minutes with the spa cover at least half off.
Q: How long is the shelf life of Bromine? A: As with any chemical you will want to store them in a cool, dry place. When properly stored, bromine will last one year.
Q: Do I need Metal Protector and Stain and Scale Defense?A: Yes. Water sources are becoming more and more mineralized. These chemicals are every bit as important to your spa as Bromine or
Chlorine are.
Q: My skin is becoming irritated after spa use. Why?A: You are not using your Cal Spas’ Oxidizer Shock enough and/or your sanitizer level is too high. Because the spa and its chemicals
will strip some of your bodies oils away. We recommend that you use a moisturizer after spa use. If you still have skin irritation afterthese steps, see your doctor.
Q: How long should I wait to enter the spa after adding chemicals?A: With Cal Spas’ Chemicals, the longest you will need to wait is one (1) hour.
Q: What is the sand like substance in the bottom of my spa?A: Oxidized contaminant’s. Spas equipped with the Quest 2000 Ozonator will produce this generally after initial fill up and water addi-
tions. The debris is just oxidized solids that were in the water that are now visible. Simply vacuum them out as a part of you weeklyplan.
If you have any questions that were not answered in this guide, please call your local Cal Spas Dealer. They have plenty experience dealing with your local water chemistry and can offer the most efficient solution for you water issues.
59
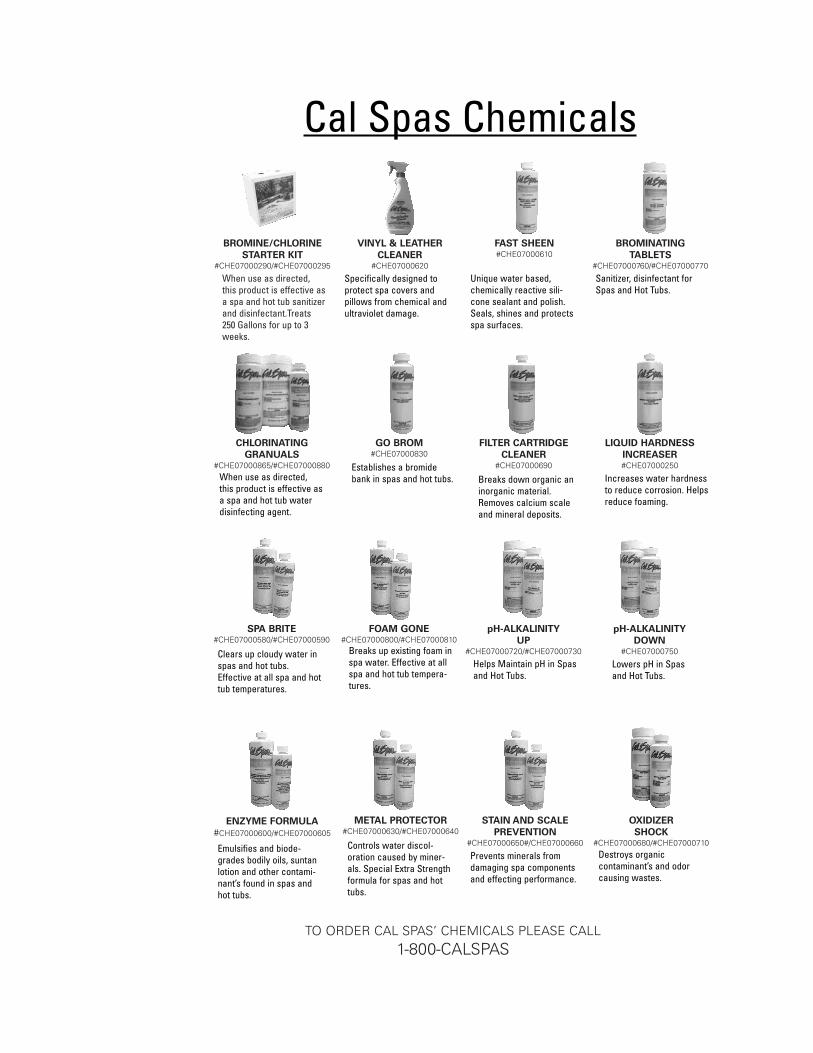
TO ORDER CAL SPAS’ CHEMICALS PLEASE CALL1-800-CALSPAS
ENZYME FORMULA
#CHE07000600/#CHE07000605
METAL PROTECTOR#CHE07000630/#CHE07000640
STAIN AND SCALE
PREVENTION#CHE07000650#/CHE07000660
OXIDIZER
SHOCK#CHE07000680/#CHE07000710
BROMINE/CHLORINE
STARTER KIT#CHE07000290/#CHE07000295
VINYL & LEATHER
CLEANER#CHE07000620
FAST SHEEN#CHE07000610
BROMINATING
TABLETS#CHE07000760/#CHE07000770
CHLORINATING
GRANUALS#CHE07000865/#CHE07000880
GO BROM#CHE07000830
FILTER CARTRIDGE
CLEANER#CHE07000690
LIQUID HARDNESS
INCREASER#CHE07000250
SPA BRITE#CHE07000580/#CHE07000590
FOAM GONE#CHE07000800/#CHE07000810
pH-ALKALINITY
UP#CHE07000720/#CHE07000730
pH-ALKALINITY
DOWN#CHE07000750
When use as directed,this product is effective asa spa and hot tub sanitizerand disinfectant.Treats250 Gallons for up to 3weeks.
Specifically designed toprotect spa covers andpillows from chemical andultraviolet damage.
Unique water based,chemically reactive sili-cone sealant and polish.Seals, shines and protectsspa surfaces.
Sanitizer, disinfectant forSpas and Hot Tubs.
When use as directed,this product is effective asa spa and hot tub waterdisinfecting agent.
Establishes a bromidebank in spas and hot tubs. Breaks down organic an
inorganic material.Removes calcium scaleand mineral deposits.
Increases water hardnessto reduce corrosion. Helpsreduce foaming.
Clears up cloudy water inspas and hot tubs.Effective at all spa and hottub temperatures.
Breaks up existing foam inspa water. Effective at allspa and hot tub tempera-tures.
Helps Maintain pH in Spasand Hot Tubs.
Lowers pH in Spasand Hot Tubs.
Destroys organic contaminant’s and odorcausing wastes.
Prevents minerals fromdamaging spa componentsand effecting performance.
Controls water discol-oration caused by miner-als. Special Extra Strengthformula for spas and hottubs.
Emulsifies and biode-grades bodily oils, suntanlotion and other contami-nant’s found in spas andhot tubs.
Cal Spas Chemicals


Page 40 Owner’s Manual
Parts List Owner’s Manual
PARTS LISTDescription Part NumberPlumbingAccu Therapy Jet (940123MG) PLU21702702Micro Flow Jet PLU21702403Micro Swirl PLU21702404Power Storm ZX PLU21702741Power Storm JX PLU217027401” Air Venturi PLU21700375On/Off Drain Valve PLU21400350Main Drain-Super High Flow Suction 2”, Sliver, 2002 PLU21400132Screen, Large Mesh, Insert, Clean Water System ‘02 PLU21703103Vent Wall Fitting, Black PLU21800625Diverter Valve, 2” PLU21300038Diverter Valve, 1” PLU21300037Ozone Injector, Complete PLU217006013/4” Grey Comp Ball Valve PLU21102002Gate Valve, 2” X Spigot PLU21100250
OZONECal Zone Quest 2000 w/Grey Plug OZO18000200Cal Zone Quest 2000 Replacement Cartridge OZO18100020Ozone Check Valve 3/8”Bx3/8”B OZO18102390
HEATERSXL Heater 5.5 w/Teflon & Switch Assembly 2003 HEA14100401Heater Union Black 2” Split HEA14700070Heater Union w/Out O’ring White 2” HEA14700080Heater Gasket 2” O’ring w/Rib HEA14700030Switch Pressure Heater ELE09500200
FILTERSFilter Cartridge, Bio-Clean™ FIL11100190Filter Locking Flange, Grey FIL11700134Filter Canister FIL11700137Filter Weir Skimmer FIL11700138
PUMPPump 1.5HP 2 SP 2” Wet End PUM22000390Pump Assembly 2 HP 2 SP PUM22000830Pump, 5HP 2 SP Switchless, Reg Wet Ends PUM2200092724-Hour Filtration Pump Assembly PUM22000975

Owner’s Manual Parts List
Owner’s Manual Page 41
Description Part NumberELECTRICALControl Box CS 5000 ELE09000197Control Box CS 5300 ‘03 (3 Pump) ELE09000194Circuit Board 2100 C2100RIA (2000) ELE09100205Topside Control Panel, CS 5000’03 ELE09200871Kit Mount Plastic Sensor Housing ELE09900240220V/110V Conversion KIt w/20’ Cord Installed ELE09700086CD Player, AM/FM, Clarion Marine ELE09300017Remote Control, Digital Readout Marine, ‘03 ELE09300002Clarion 4” Marine Speakers ELE09300023
LIGHTINGLight Bulb 12 Watts LIT16300000Light, LED Spas (OPT860-8, ‘03) LIT16000146LED Waterfall Assembly, 24+1 Lit, 2003 PLU21800601LED Waterfall Assembly, 24+2 Kit, 2003 PLU21800602
PILLOWSStandard Pillow, #965 Rectangular ‘03, J-series only ACC01400863
HARDWARETrim Lock Faceplate, “Cal” HAR13000011Lip Guard Genesis Chrome 7/16” HAR13000060
CABINETSDoor Panel, Red, Jet Wood Cabinet 26”x43 1/2” WOO27513193Door Panel, Red, Jet Wood Cabinet 28”x43 1/2” WOO27513131Door Panel, Red, Jet Wood Cabinet 34”x43 1/2” WOO27513012Front Access, Red, Jet Wood Cabinet 26”x8 1/2” WOO27513195Front Access, Red, Jet Wood Cabinet 28”x8” WOO27513134Front Access, Red, Jet Wood Cabinet 34”x12” WOO27513013Front Access, Red, Jet Wood Cabinet 34”x16 3/4” WOO27513024Round Corner, Red, Jet Wood Cabinet 26”x12” WOO27513197Round Corner, Red, Jet Wood Cabinet 28”x12” WOO27513130Round Corner, Red, Jet Wood Cabinet 34”x12” WOO27513014Side Panel, Red, Jet Wood Cabinet 26”x50 1/4” WOO27513181Side Panel, Red, Jet Wood Cabinet 26”x60 1/4” WOO27513138Side Panel, Red, Jet Wood Cabinet 28”x59 1/2” WOO27513132Side Panel, Red, Jet Wood Cabinet 28”x68” WOO27513136Side Panel, Red, Jet Wood Cabinet 34”x68” WOO27513011Side Panel, Red, Jet Wood Cabinet 34”x77 1/4” WOO27513022
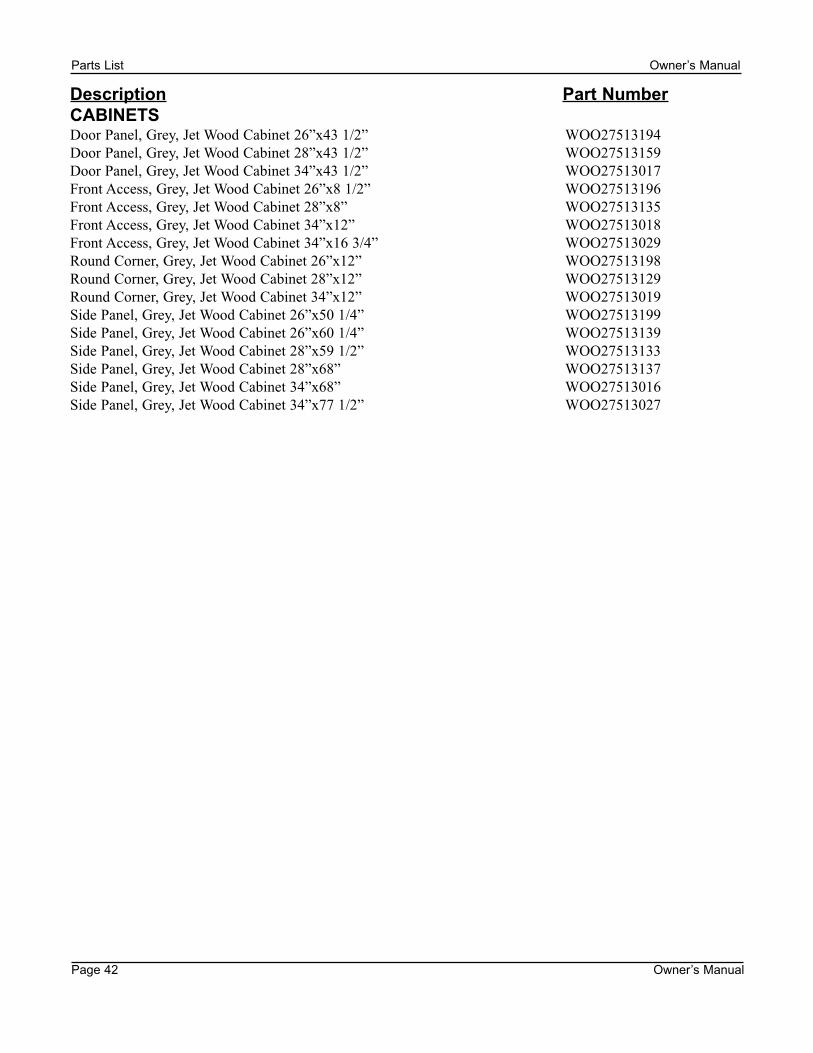
Description Part NumberCABINETSDoor Panel, Grey, Jet Wood Cabinet 26”x43 1/2” WOO27513194Door Panel, Grey, Jet Wood Cabinet 28”x43 1/2” WOO27513159Door Panel, Grey, Jet Wood Cabinet 34”x43 1/2” WOO27513017Front Access, Grey, Jet Wood Cabinet 26”x8 1/2” WOO27513196Front Access, Grey, Jet Wood Cabinet 28”x8” WOO27513135Front Access, Grey, Jet Wood Cabinet 34”x12” WOO27513018Front Access, Grey, Jet Wood Cabinet 34”x16 3/4” WOO27513029Round Corner, Grey, Jet Wood Cabinet 26”x12” WOO27513198Round Corner, Grey, Jet Wood Cabinet 28”x12” WOO27513129Round Corner, Grey, Jet Wood Cabinet 34”x12” WOO27513019Side Panel, Grey, Jet Wood Cabinet 26”x50 1/4” WOO27513199Side Panel, Grey, Jet Wood Cabinet 26”x60 1/4” WOO27513139Side Panel, Grey, Jet Wood Cabinet 28”x59 1/2” WOO27513133Side Panel, Grey, Jet Wood Cabinet 28”x68” WOO27513137Side Panel, Grey, Jet Wood Cabinet 34”x68” WOO27513016Side Panel, Grey, Jet Wood Cabinet 34”x77 1/2” WOO27513027
Parts List Owner’s Manual
Page 42 Owner’s Manual