2001 cadillac deville - gm extended warranty - vaden … cadillac deville owner's manual i. ii...
TRANSCRIPT


Every 2001 DeVille
under warranty is backed with the
following services:
Courtesy Transportation
Free lockout assistance
Free dead-battery assistance
Free out-of-fuel assistance
Free flat-tire change
Emergency towing
1-800-882-1112that provides in an emergency:
1-800-882-1112

Litho in U.S.A.Part Number 25711109 A First Edition
© Copyright General Motors Corporation 2000All Rights Reserved
2001 Cadillac DeVilleOwner's Manual
i

ii
Table of Contents
WindowsKeys and Door LocksRemote Keyless Entry SystemTrunk ReleaseAutomatic TransaxleParking BrakeTilt WheelTurn Signal/Multifunction LeverWindshield WipersCruise ControlExterior and Interior LampsMirrors
Storage CompartmentsConvenience NetAccessory Power OutletsOnStar® System (If Equipped)Sunroof (Option)HomeLink® Transmitter (If Equipped)Instrument Panel, Warning Lights and GagesDriver Information Center (DIC) Vehicle Programming and Personalization Features (If Equipped)Night Vision System (Option)Ultrasonic Rear Parking Assist (URPA) (Option)
Seats and Seat ControlsSafety Belts
Air Bag SystemsRestraint Systems for Children
Section 1
Section 2
Seats and Restraint Systems
Features and Controls

Section 3
Comfort Controls and Audio Systems
Section 4
Section 5
Table of Contents (cont'd)
Defensive DrivingDrunken DrivingControl of a VehicleBraking
SteeringDriving Tips for Various Road ConditionsLoading Your VehicleTowing a Trailer
Heating and Air ConditioningSetting the Radio ClockRadio/Cassette Player/CD Player
Radio Theft-Deterrent FeatureSteering Wheel Controls
Hazard Warning FlashersJump StartingTowing Your Vehicle
Engine OverheatingChanging a Flat TireIf You're Stuck
Problems on the Road
Your Driving and the Road
iii

FuelChecking Fluids and LubricantsGM Oil Life System™Engine Air Cleaner/FilterPassenger Compartment Air FilterBrakesBulb Replacement
Windshield Wiper Blade ReplacementTires and WheelsAppearance CareElectrical System/Fuses and Circuit BreakersCapacities and SpecificationsNormal Maintenance Replacement Parts
Table of Contents (cont'd)
Maintenance Schedule
Service and Appearance CareSection 6
Scheduled MaintenanceOwner Checks and ServicesPeriodic Maintenance Inspections
Recommended Fluids and LubricantsMaintenance Records
See separate Maintenance Schedule Booklet
iv

Table of Contents (cont'd)
Customer Assistance Information
In the Index you will find an alphabetical listing of almost every subject in this manual. You can use it to quickly find something you want to read.
Section 7 Customer Satisfaction ProceduresCustomer Assistance OfficesRoadside Assistance and Courtesy Transportation
Warranty Information (See Warranty Manual)Reporting Safety Defects on page 7-10Service Publications
IndexSection 8
Please refer to the last page of this manual for your Service Station Guidev

vi
GENERAL MOTORS, GM and the GM Emblem,CADILLAC, the CADILLAC Crest & Wreath and the name DEVILLE are registered trademarks ofGeneral Motors Corporation.
This manual includes the latest information at the time itwas printed. We reserve the right to make changes afterthat time without further notice. For vehicles first sold inCanada, substitute the name “General Motors of CanadaLimited” for Cadillac Motor Car Division whenever itappears in this manual.
Please keep this manual in your vehicle, so it will bethere if you ever need it when you’re on the road. If you sell the vehicle, please leave this manual in it sothe new owner can use it.
We support voluntarytechnician certification.
For Canadian Owners Who Prefer aFrench Language Manual:Aux propriétaires canadiens: Vous pouvez vousprocurer un exemplaire de ce guide en français chezvotre concessionaire ou au:
Helm, IncorporatedP.O. Box 07130Detroit, MI 48207

vii
How to Use this ManualMany people read their owner’s manual from beginningto end when they first receive their new vehicle. If youdo this, it will help you learn about the features andcontrols for your vehicle. In this manual, you’ll find that pictures and words work together to explain things quickly.
Safety Warnings and SymbolsYou will find a number of safety cautions in this book.We use a box and the word CAUTION to tell you about things that could hurt you if you were to ignorethe warning.
CAUTION:
These mean there is something that could hurtyou or other people.
In the caution area, we tell you what the hazard is. Then we tell you what to do to help avoid or reduce thehazard. Please read these cautions. If you don’t, you orothers could be hurt.
You will also find a circlewith a slash through it inthis book. This safetysymbol means “Don’t,”“Don’t do this” or “Don’tlet this happen.”

viii
Vehicle Damage WarningsAlso, in this book you will find these notices:
NOTICE:
These mean there is something that coulddamage your vehicle.
In the notice area, we tell you about something that candamage your vehicle. Many times, this damage wouldnot be covered by your warranty, and it could be costly.But the notice will tell you what to do to help avoid the damage.
When you read other manuals, you might see CAUTIONand NOTICE warnings in different colors or in different words.
You’ll also see warning labels on your vehicle. They usethe same words, CAUTION or NOTICE.

ix
For example,these symbolsare used on anoriginal battery:
CAUTIONPOSSIBLE
INJURY
PROTECTEYES BY
SHIELDING
CAUSTICBATTERY
ACID COULDCAUSEBURNS
AVOIDSPARKS OR
FLAMES
SPARK ORFLAMECOULD
EXPLODEBATTERY
These symbols are important foryou and your passengerswhenever your vehicle is driven:
CHILDRESTRAINTTOP STRAP
ANCHOR
DOOR LOCKUNLOCK
FASTENSEAT
BELTS
POWERWINDOW
AIR BAG
These symbolshave to do withyour lamps:
MASTERLIGHTING
SWITCH
TURNSIGNALS
PARKINGLAMPS
HAZARDWARNINGFLASHER
DAYTIMERUNNING
LAMPS
FOG LAMPS
These symbolsare on some ofyour controls:
WINDSHIELDWIPER
WINDSHIELDWASHER
WINDSHIELDDEFROSTER
REARWINDOW
DEFOGGER
VENTILATINGFAN
These symbolsare used onwarning andindicator lights:
ENGINECOOLANT
TEMP
BATTERYCHARGING
SYSTEM
BRAKE
COOLANT
ENGINE OILPRESSURE
ANTI-LOCKBRAKES
Here are someother symbolsyou may see:
FUSE
LIGHTER
HORN
FUEL
Vehicle SymbolsThese are some of the symbols you may find on your vehicle. Also see “Warning Lights and Gages” in the Index.

For
a More Detailed Look at
What's Under the HoodSee Section 6
Service Station Guide
Oil ViscosityEngine Oil
See Section 6
Engine Oil DipstickSee Section 6 Remote Fuel
Door ReleaseSee Section 6
Cooling SystemSee Section 5
Hood ReleaseSee Section 6
Windshield Washer Fluid
See Section 6
Spare Tire PressureSee Section 5
Alternate Fuel Door Release
See Section 6
BatterySee Section 6
Tire PressureSee Section 6
FuelUse unleaded only.
See Section 6for octane ratings.

1-1-1
Section 1 Seats and Restraint Systems
Here you’ll find information about the seats in your vehicle and how to use your safety belts properly. You can alsolearn about some things you should not do with air bags and safety belts.
1-2 Seats and Seat Controls1-9 Safety Belts: They’re for Everyone1-14 Here Are Questions Many People Ask About
Safety Belts -- and the Answers1-15 How to Wear Safety Belts Properly1-15 Driver Position1-22 Safety Belt Use During Pregnancy1-23 Right Front Passenger Position1-23 Air Bag Systems1-33 Safety Belt Pretensioners1-33 Center Front Passenger Position
1-34 Rear Seat Passengers1-38 Rear Safety Belt Comfort Guides for Children
and Small Adults1-40 Children1-44 Restraint Systems for Children1-55 Older Children1-58 Safety Belt Extender1-58 Checking Your Restraint Systems1-58 Replacing Restraint System Parts After
a Crash

1-2
Seats and Seat ControlsThis section tells you about the power seats -- how toadjust them, and also about the reclining front seatbacks,memory seats, lumbar adjustments and heated seats.
Power Seats
The power seat controls are located on the outboard side of the front seat cushions.
� Move the front of the seat control up or down toadjust the front portion of the cushion.
� Move the rear of the seat control up or down toadjust the rear portion of the cushion.
� Lift up or push down on the center of the seat controlto move the entire seat up or down.
� To move the seat forward or rearward, slide the seatcontrol forward or rearward.
Four Way Power Lumbar Control (If Equipped)
If you have this feature, thedriver’s and passenger’sseatback lumbar support can be adjusted four waysby moving a single switchlocated on the outboard sideof the seat.
To increase or decrease support, hold the switch forwardor rearward. To move the lumbar up or down, hold theswitch up or down.
Keep in mind that as your seating position changes, as itmay during long trips, so should the position of yourlumbar support. Adjust the seat as needed.

1-3
Massaging Lumbar (If Equipped)
Push the top of the lumbarcontrol located on theoutboard side of the seatwhere it is marked AUTObriefly to activate themassage feature.
The massage cycle will run continuously for up to 10 minutes and can be interrupted by pushing thelumbar control down briefly. The lumbar support can be adjusted during the massage cycle by moving theswitch forward to increase support and rearward todecrease support. The massage cycle will continue to run even if the ignition is turned to OFF, unless interrupted.
Four-Way Rear Power Lumbar (If Equipped)
Four-way lumbar, withoutthe massage feature, is alsoavailable for the outboardrear seating positions.
To activate the rear lumbar feature, push forward on theswitch located on the rear door trim to increase supportor rearward to decrease support. The lumbar switch canalso be moved up and down to adjust the location of the support.

1-4
Adaptive Seat Control (Option)
The adaptive seat control islocated on the outboard sideof the driver’s seat. Use thepower seat control first toget the proper position.
When the ignition is turned to ON, press the top of the power lumbar control where it is marked AUTO toactivate the adaptive feature. The seatback and cushionwill inflate to adjust to the driver’s body positioning infour-minute cycles.
To reshape the lower seatback, press the lumbar control forward to increase support and rearward todecrease support.
To turn off the adaptive seat feature, press the controldown. The seat will deflate when the adaptive seatcontrol or the ignition is turned off.

1-5
Memory Seat, Mirrors and Steering Wheel (Option)
The controls for thesefeatures are located on thedriver’s door panel, and areused to program and recallmemory settings for thedriver’s seating positions.
Adjust the driver’s seat (including the seatback recliner,lumbar and shoulder belt height adjustments), both theoutside mirrors and steering wheel to a comfortableposition and then press the MEMORY SET button.Within five seconds, press button “1” (for driver 1).
A second mirror, seating and steering wheel position can be programmed by repeating the above steps andpressing button “2” (for driver 2). Each time a memorybutton is pressed, a single beep will sound. Each timebutton 1 or 2 is pressed and released while the vehicle is in PARK (P), the memory positions will be recalled.Each time button 1 or 2 is pressed and held while thevehicle is out of PARK (P), the memory positions willbe recalled.
To stop recall movement of the memory seat andsteering wheel at any time, press one of the power seat,steering wheel or mirror controls.
Two personalized exit positions can be set by firstrecalling the driving position (by pressing 1 or 2), then positioning the steering wheel and seat in the desired exit positions and then pressing and releasing the MEMORY SET button and, within five seconds,pressing the EXIT button. With the vehicle in PARK (P),the exit position for either previously set driver can berecalled by pressing the EXIT button. The mirrors, power lumbar and shoulder belt height positions will not be stored or recalled for the exit positions.

1-6
If you use the remote keyless entry transmitter to enteryour vehicle, automatic seat and mirror movement willoccur. The numbers on the back of the transmitters, 1 and 2, correspond to the numbers on the buttons on the door panel.
When the key is placed in the ignition in OFF or whenthe unlock button is pressed on the remote keyless entrytransmitter, the seats and mirrors will automaticallyadjust to the programmed position.
Programming for automatic seat, steering wheel andmirror movement is done through the Driver InformationCenter (DIC). You can choose to either select or notselect automatic seat and mirror movement using theremote keyless entry transmitter, placing your key in the ignition, or by exiting the vehicle. For programminginformation, see “Vehicle Programming andPersonalization Features” in the Index.
Heated Seats (If Equipped)

1-7
Your vehicle may have heated front and rear seats. Thebuttons are located on the armrests. The HEAT/OFFbutton controls the temperature settings HI, MED and LO. The other button is to choose BACK ONLYheating. The LO setting warms the seatback and cushionuntil the seat approximates body temperature. The MEDand HI settings heat the seatback and seat cushion to aslightly higher temperature, and the BACK ONLY heatsonly the seatback. The temperature can be adjusted by pushing the button from HI to LO or, until thedesired setting is reached. You will be able to feel heatin approximately two minutes. To heat just the seatback,push the BACK ONLY button once, after first activatingthe heated seat feature. To turn off the heat in theseatback, push the button again. The feature will also shut off when the ignition is turned to OFF.
Reclining Front Seatbacks
Press the recliner controllocated on the outboard side of the seat, forward or rearward to adjust the seatback.
Push the recliner control up or down to adjust theshoulder belt height. See “Shoulder Belt HeightAdjuster” in the Index for more information.

1-8
But don’t have a seatback reclined if your vehicle is moving.
CAUTION:
Sitting in a reclined position when your vehicle isin motion can be dangerous. Even if you buckleup, your safety belts can’t do their job whenyou’re reclined like this.The shoulder belt can’t do its job. In a crash youcould go into it, receiving neck or other injuries.The lap belt can’t do its job either. In a crash thebelt could go up over your abdomen. The beltforces would be there, not at your pelvic bones.This could cause serious internal injuries.For proper protection when the vehicle is inmotion, have the seatback upright. Then sit well back in the seat and wear your safety belt properly.

1-9
Head Restraints
Slide the head restraint up or down so that the top of therestraint is closest to the top of your ears. This positionreduces the chance of a neck injury in a crash.
The head restraints tilt forward and rearward also.
The rear seat head restraints in your vehicle may beadjustable. They work the same as the front seat head restraints.
Safety Belts: They’re for EveryoneThis part of the manual tells you how to use safety beltsproperly. It also tells you some things you should not dowith safety belts.
And it explains the air bag system.
CAUTION:
Don’t let anyone ride where he or she can’t weara safety belt properly. If you are in a crash andyou’re not wearing a safety belt, your injuriescan be much worse. You can hit things inside thevehicle or be ejected from it. You can be seriouslyinjured or killed. In the same crash, you mightnot be if you are buckled up. Always fasten yoursafety belt, and check that your passengers’ beltsare fastened properly too.

1-10
CAUTION:
It is extremely dangerous to ride in a cargo area,inside or outside of a vehicle. In a collision,people riding in these areas are more likely to be seriously injured or killed. Do not allow peopleto ride in any area of your vehicle that is notequipped with seats and safety belts. Be sureeveryone in your vehicle is in a seat and using a safety belt properly.
Your vehicle has a light that comes on as a reminderto buckle up. See “SafetyBelt Reminder Light” in the Index.
In most states and Canadian provinces, the law says to wear safety belts. Here’s why: They work.
You never know if you’ll be in a crash. If you do have a crash, you don’t know if it will be a bad one.
A few crashes are mild, and some crashes can be soserious that even buckled up a person wouldn’t survive.But most crashes are in between. In many of them,people who buckle up can survive and sometimes walkaway. Without belts they could have been badly hurt or killed.
After more than 30 years of safety belts in vehicles, the facts are clear. In most crashes buckling up doesmatter ... a lot!

1-11
Why Safety Belts WorkWhen you ride in or on anything, you go as fast as it goes.
Take the simplest vehicle. Suppose it’s just a seat on wheels.
Put someone on it.

1-12
Get it up to speed. Then stop the vehicle. The riderdoesn’t stop.
The person keeps going until stopped by something.
In a real vehicle, it could be the windshield ...

1-13
or the instrument panel ... or the safety belts!
With safety belts, you slow down as the vehicle does.You get more time to stop. You stop over more distance,and your strongest bones take the forces. That’s whysafety belts make such good sense.

1-14
Here Are Questions Many People AskAbout Safety Belts -- and the AnswersQ: Won’t I be trapped in the vehicle after an
accident if I’m wearing a safety belt?
A: You could be -- whether you’re wearing a safetybelt or not. But you can unbuckle a safety belt,even if you’re upside down. And your chance ofbeing conscious during and after an accident, soyou can unbuckle and get out, is much greater if you are belted.
Q: If my vehicle has air bags, why should I have to wear safety belts?
A: Air bags are in many vehicles today and will be in most of them in the future. But they aresupplemental systems only; so they work withsafety belts -- not instead of them. Every air bagsystem ever offered for sale has required the use ofsafety belts. Even if you’re in a vehicle that has airbags, you still have to buckle up to get the mostprotection. That’s true not only in frontal collisions,but especially in side and other collisions.
Q: If I’m a good driver, and I never drive far fromhome, why should I wear safety belts?
A: You may be an excellent driver, but if you’re in anaccident -- even one that isn’t your fault -- you and your passengers can be hurt. Being a gooddriver doesn’t protect you from things beyond yourcontrol, such as bad drivers.
Most accidents occur within 25 miles (40 km) of home. And the greatest number of seriousinjuries and deaths occur at speeds of less than 40 mph (65 km/h).
Safety belts are for everyone.

1-15
How to Wear Safety Belts ProperlyAdultsThis part is only for people of adult size.
Be aware that there are special things to know aboutsafety belts and children. And there are different rules for smaller children and babies. If a child will be riding in your vehicle, see the part of this manual called“Children.” Follow those rules for everyone’s protection.
First, you’ll want to know which restraint systems yourvehicle has.
We’ll start with the driver position.
Driver PositionThis part describes the driver’s restraint system.
Lap-Shoulder BeltThe driver has a lap-shoulder belt. Here’s how to wear it properly.
1. Close and lock the door.
2. Adjust the seat so you can sit up straight. To see how, see “Seats” in the Index.
3. Pick up the latch plate and pull the belt across you.Don’t let it get twisted.
The lap-shoulder belt may lock if you pull the beltacross you very quickly. If this happens, let the beltgo back slightly to unlock it. Then pull the beltacross you more slowly.

1-16
4. Push the latch plate into the buckle until it clicks.
Be sure to use the correct buckle when buckling yourlap-shoulder belt. If you find that the latch plate willnot go fully into the buckle, see if you are using thebuckle for the center passenger position.
Pull up on the latch plate to make sure it is secure. If the belt isn’t long enough, see “Safety BeltExtender” at the end of this section.
Make sure the release button on the buckle ispositioned so you would be able to unbuckle thesafety belt quickly if you ever had to.
The lap part of the belt should be worn low and snug onthe hips, just touching the thighs. In a crash, this appliesforce to the strong pelvic bones. And you’d be less likelyto slide under the lap belt. If you slid under it, the beltwould apply force at your abdomen. This could causeserious or even fatal injuries. The shoulder belt should go over the shoulder and across the chest. These parts of the body are best able to take belt restraining forces.
The safety belt locks if there’s a sudden stop or crash, or if you pull the belt very quickly out of the retractor.

1-17
Shoulder Belt Height Adjuster
Before you begin to drive, move the shoulder beltadjuster to the height that is right for you.
To move it down, press down on the power seat reclinercontrol and move the height adjuster to the desiredposition. You can move the adjuster up just by pushingup on the power seat recliner control. After you movethe adjuster to where you want it, try to move it downwithout pushing the power seat recliner control to makesure it has locked into position.
Adjust the height so that the shoulder portion of the belt is centered on your shoulder. The belt should beaway from your face and neck, but not falling off your shoulder.

1-18
Q: What’s wrong with this?
A: The shoulder belt is too loose. It won’t give nearlyas much protection this way.
CAUTION:
You can be seriously hurt if your shoulder belt istoo loose. In a crash, you would move forwardtoo much, which could increase injury. Theshoulder belt should fit against your body.

1-19
Q: What’s wrong with this?
A: The belt is buckled in the wrong place.
CAUTION:
You can be seriously injured if your belt isbuckled in the wrong place like this. In a crash,the belt would go up over your abdomen. Thebelt forces would be there, not at the pelvicbones. This could cause serious internal injuries.Always buckle your belt into the buckle nearest you.

1-20
Q: What’s wrong with this?
A: The shoulder belt is worn under the arm. It shouldbe worn over the shoulder at all times.
CAUTION:
You can be seriously injured if you wear theshoulder belt under your arm. In a crash, yourbody would move too far forward, which wouldincrease the chance of head and neck injury.Also, the belt would apply too much force to theribs, which aren’t as strong as shoulder bones.You could also severely injure internal organslike your liver or spleen.

1-21
Q: What’s wrong with this?
A: The belt is twisted across the body.
CAUTION:
You can be seriously injured by a twisted belt. Ina crash, you wouldn’t have the full width of thebelt to spread impact forces. If a belt is twisted,make it straight so it can work properly, or askyour dealer to fix it.

1-22
To unlatch the belt, just push the button on the buckle.The belt should go back out of the way.
Before you close the door, be sure the belt is out of theway. If you slam the door on it, you can damage both thebelt and your vehicle.
Safety Belt Use During PregnancySafety belts work for everyone, including pregnantwomen. Like all occupants, they are more likely to be seriously injured if they don’t wear safety belts.
A pregnant woman should wear a lap-shoulder belt, andthe lap portion should be worn as low as possible, belowthe rounding, throughout the pregnancy.

1-23
The best way to protect the fetus is to protect themother. When a safety belt is worn properly, it’s morelikely that the fetus won’t be hurt in a crash. Forpregnant women, as for anyone, the key to makingsafety belts effective is wearing them properly.
Right Front Passenger PositionTo learn how to wear the right front passenger’s safetybelt properly, see “Driver Position” earlier in this section.
The right front passenger’s safety belt works the sameway as the driver’s safety belt -- except for one thing. If you ever pull the lap portion of the belt out all theway, you will engage the child restraint locking feature.If this happens, just let the belt go back all the way andstart again.
Air Bag SystemsThis part explains the frontal and side impact air bag systems.
Your vehicle has air bags -- a frontal air bag for thedriver and another frontal air bag for the right frontpassenger. Your vehicle also has a side impact air bagfor the driver and another side impact air bag for theright front passenger. Your vehicle may also have a sideimpact air bag for each of the two rear seat outboardpassenger positions.
If your vehicle has side impact air bags for each of thetwo rear seat outboard passenger positions, it will sayAIR BAG on each side of the rear seatback closest tothe door.
Frontal air bags are designed to help reduce the risk of injury from the force of an inflating frontal air bag.But these air bags must inflate very quickly to do theirjob and comply with federal regulations.

1-24
Here are the most important things to know about the airbag systems:
CAUTION:
You can be severely injured or killed in a crash ifyou aren’t wearing your safety belt -- even if youhave air bags. Wearing your safety belt during acrash helps reduce your chance of hitting thingsinside the vehicle or being ejected from it. Airbags are “supplemental restraints” to the safetybelts. All air bags are designed to work withsafety belts but don’t replace them.
CAUTION: (Continued)
CAUTION: (Continued)
Frontal air bags for the driver and right frontpassenger are designed to work only in moderateto severe crashes where the front of your vehiclehits something. They aren’t designed to inflate at all in rollover, rear, side or low-speed frontalcrashes. And, for unrestrained occupants, frontalair bags may provide less protection in frontalcrashes than more forceful air bags haveprovided in the past. Side impact air bags aredesigned to inflate only in moderate to severecrashes where something hits the side of yourvehicle. They aren’t designed to inflate in frontal, in rollover or in rear crashes. Everyone in your vehicle should wear a safetybelt properly -- whether or not there’s an air bagfor that person.

1-25
CAUTION:
Both frontal and side impact air bags inflate with great force, faster than the blink of an eye. If you’re too close to an inflating air bag, as youwould be if you were leaning forward, it couldseriously injure you. Safety belts help keep you in position for air bag inflation before and duringa crash. Always wear your safety belt, even withfrontal air bags. The driver should sit as far backas possible while still maintaining control of thevehicle. Occupants should not lean on or sleepagainst the door.
CAUTION:
Anyone who is up against, or very close to, anyair bag when it inflates can be seriously injuredor killed. Air bags plus lap-shoulder belts offerthe best protection for adults, but not for youngchildren and infants. Neither the vehicle’s safetybelt system nor its air bag system is designed for them. Young children and infants need theprotection that a child restraint system canprovide. Always secure children properly in yourvehicle. To read how, see the part of this manualcalled “Children.”

1-26
United States Canada (Analog Only)
There is an air bag readiness light on the instrumentpanel, which shows the words AIR BAG or an air bag symbol.
The system checks the air bag electrical system formalfunctions. The light tells you if there is an electricalproblem. See “Air Bag Readiness Light” in the Indexfor more information.
How the Air Bag Systems Work
Where are the air bags?
The driver’s frontal air bag is in the middle of thesteering wheel.

1-27
The right front passenger’s frontal air bag is in theinstrument panel on the passenger’s side.
The driver’s side impact air bag is in the side of thedriver’s seatback closest to the door.

1-28
The right front passenger’s side impact air bag is in theside of the passenger’s seatback closest to the door.
The side impact air bags for the rear seat outboardpassenger positions are in the sides of the rear seatbackclosest to the doors.

1-29
CAUTION:
If something is between an occupant and an air bag, the bag might not inflate properly or itmight force the object into that person. The pathof an inflating air bag must be kept clear. Don’tput anything between an occupant and an airbag, and don’t attach or put anything on thesteering wheel hub or on or near any other airbag covering and don’t let seat covers block the inflation path of a side impact air bag.
When should an air bag inflate?
The driver’s and right front passenger’s frontal air bagsare designed to inflate in moderate to severe frontal ornear-frontal crashes. But they are designed to inflateonly if the impact speed is above the system’s designed“threshold level.”
In addition, your vehicle has “dual stage” frontal airbags, which tailor the amount of restraint according tocrash severity. For moderate frontal impacts, these airbags inflate at a level less than full deployment.
For more severe frontal impacts, full deployment occurs.If the front of your vehicle goes straight into a wall that doesn’t move or deform, the threshold level for the reduced deployment is about 10 to 16 mph (16 to 26 km/h), and the threshold level for a fulldeployment is about 18 to 24 mph (29 to 38.5 km/h).The threshold level can vary, however, with specificvehicle design, so that it can be somewhat above orbelow this range.
If your vehicle strikes something that will move ordeform, such as a parked car, the threshold level will behigher. The driver’s and right front passenger’s frontalair bags are not designed to inflate in rollovers, sideimpacts, or rear impacts, because inflation would nothelp the occupant.
The side impact air bags are designed to inflate inmoderate to severe side crashes. A side impact air bagwill inflate if the crash severity is above the system’sdesigned “threshold level.” The threshold level can varywith specific vehicle design. Side impact air bags are notdesigned to inflate in frontal or near-frontal impacts,rollovers or rear impacts, because inflation would nothelp the occupant. A side impact air bag will onlydeploy on the side of the vehicle that is struck.

1-30
In any particular crash, no one can say whether an airbag should have inflated simply because of the damageto a vehicle or because of what the repair costs were. Forfrontal air bags, inflation is determined by the angle ofthe impact and how quickly the vehicle slows down infrontal and near-frontal impacts. For side impact airbags, inflation is determined by the location and severityof the impact.
What makes an air bag inflate?In an impact of sufficient severity, the air bag sensingsystem detects that the vehicle is in a crash. For bothfrontal and side impact air bags, the sensing systemtriggers a release of gas from the inflator, which inflatesthe air bag. The inflator, air bag and related hardware areall part of the air bag modules inside the steering wheel,instrument panel and the side of the front seatbacks andbehind the rear seatbacks closest to the door.
How does an air bag restrain?In moderate to severe frontal or near frontal collisions,even belted occupants can contact the steering wheel orthe instrument panel. In moderate to severe sidecollisions, even belted occupants can contact the insideof the vehicle. The air bag supplements the protectionprovided by safety belts. Air bags distribute the force ofthe impact more evenly over the occupant’s upper body,stopping the occupant more gradually.
But the frontal air bags would not help you in manytypes of collisions, including rollovers, rear impacts, andside impacts, primarily because an occupant’s motion isnot toward the air bag. Side impact air bags would nothelp you in many types of collisions, including frontalor near frontal collisions, rollovers, and rear impacts,primarily because an occupant’s motion is not towardthose air bags. Air bags should never be regarded asanything more than a supplement to safety belts, andthen only in moderate to severe frontal or near-frontalcollisions for the driver’s and right front passenger’sfrontal air bags, and only in moderate to severe sidecollisions for the side impact air bags.
What will you see after an air bag inflates?After an air bag inflates, it quickly deflates, so quickly thatsome people may not even realize the air bag inflated.Some components of the air bag module -- the steeringwheel hub for the driver’s air bag, the instrument panel forthe right front passenger’s bag, the side of the seatbackclosest to the door for the side impact air bags -- will behot for a short time. The parts of the bag that come intocontact with you may be warm, but not too hot to touch.There will be some smoke and dust coming from the ventsin the deflated air bags. Air bag inflation doesn’t preventthe driver from seeing or being able to steer the vehicle,nor does it stop people from leaving the vehicle.

1-31
CAUTION:
When an air bag inflates, there is dust in the air.This dust could cause breathing problems forpeople with a history of asthma or otherbreathing trouble. To avoid this, everyone in thevehicle should get out as soon as it is safe to do so.If you have breathing problems but can’t get outof the vehicle after an air bag inflates, then getfresh air by opening a window or a door.
Your vehicle has a feature that will automatically unlockthe doors and turn the interior lamps on when the airbags inflate (if battery power is available). You can lockthe doors again and turn the interior lamps off by usingthe door lock and interior lamp controls.
In many crashes severe enough to inflate an air bag,windshields are broken by vehicle deformation. Additionalwindshield breakage may also occur from the right frontpassenger air bag.
� Air bags are designed to inflate only once. After anair bag inflates, you’ll need some new parts for yourair bag system. If you don’t get them, the air bagsystem won’t be there to help protect you in anothercrash. A new system will include air bag modulesand possibly other parts. The service manual for your vehicle covers the need to replace other parts.
� Your vehicle is equipped with an electronic frontalsensor, which helps the sensing system distinguishbetween a moderate frontal impact and a moresevere frontal impact. Your vehicle is also equippedwith a crash sensing and diagnostic module, whichrecords information about the frontal air bag system.The module records information about the readinessof the system, when the system commands air baginflation and driver’s safety belt usage at deploymentor in a near-deployment crash. The module alsorecords speed, engine rpm, brake and throttle data.
� Let only qualified technicians work on your air bag systems. Improper service can mean that an air bag system won’t work properly. See your dealerfor service.

1-32
NOTICE:
If you damage the covering for the driver’s or the right front passenger’s air bag, or the air bagcovering on the driver’s, right front passenger’sor rear seatback, the bag may not work properly.You may have to replace the air bag module in the steering wheel, both the air bag moduleand the instrument panel for the right frontpassenger’s air bag, or both the air bag moduleand seatback for the side impact air bag. Do notopen or break the air bag coverings.
Servicing Your Air Bag-Equipped VehicleAir bags affect how your vehicle should be serviced.There are parts of the air bag systems in several placesaround your vehicle. Your dealer and the service manualhave information about servicing your vehicle and the air bag systems. To purchase a service manual, see “Service and Owner Publications” in the Index.
CAUTION:
For up to 10 seconds after the ignition key isturned off and the battery is disconnected, an airbag can still inflate during improper service. Youcan be injured if you are close to an air bag whenit inflates. Avoid yellow connectors. They areprobably part of the air bag systems. Be sure tofollow proper service procedures, and make surethe person performing work for you is qualifiedto do so.
The air bag systems do not need regular maintenance.

1-33
Safety Belt PretensionersYour vehicle has safety belt pretensioners. You’ll findthem on the buckle end of the safety belts for the driverand right front passenger. They help the safety belts reducea person’s forward movement in a moderate to severecrash in which the front of the vehicle hits something.
Pretensioners work only once. If they activate in a crash,you’ll need to get new ones, and probably other newparts for your safety belt system. See “ReplacingRestraint System Parts After a Crash” in the Index.
Center Front Passenger Position
Lap BeltIf your vehicle has a front bench seat, someone can sit inthe center position.
When you sit in the center front seating position, you have a lap safety belt, which has no retractor. To make the belt longer, tilt the latch plate and pull italong the belt.

1-34
To make the belt shorter, pull its free end as shown untilthe belt is snug.
Buckle, position and release it the same way as the lappart of a lap-shoulder belt. If the belt isn’t long enough,see “Safety Belt Extender” at the end of this section.
Make sure the release button on the buckle is positionedso you would be able to unbuckle the safety belt quicklyif you ever had to.
Rear Seat PassengersIt’s very important for rear seat passengers to buckle up!Accident statistics show that unbelted people in the rearseat are hurt more often in crashes than those who arewearing safety belts.
Rear passengers who aren’t safety belted can be thrownout of the vehicle in a crash. And they can strike othersin the vehicle who are wearing safety belts.
Rear Seat Passenger Positions

1-35
Lap-Shoulder Belt
All three rear seating positions have lap-shoulder belts.Here’s how to wear one properly.
1. Pick up the latch plate and pull the belt across you.Don’t let it get twisted.
The shoulder belt may lock if you pull the belt acrossyou very quickly. If this happens, let the belt go backslightly to unlock it. Then pull the belt across youmore slowly.
2. Push the latch plate into the buckle until it clicks.
If the belt stops before it reaches the buckle, tilt thelatch plate and keep pulling until you can buckle it.
Pull up on the latch plate to make sure it is secure.
If the belt is not long enough, see “Safety BeltExtender” at the end of this section. Make sure therelease button on the buckle is positioned so youwould be able to unbuckle the safety belt quickly if you ever had to.

1-36
3. To make the lap part tight, pull down on the buckleend of the belt as you pull up on the shoulder part.
The lap part of the belt should be worn low and snug onthe hips, just touching the thighs. In a crash, this appliesforce to the strong pelvic bones. And you’d be lesslikely to slide under the lap belt. If you slid under it, the belt would apply force at your abdomen. This couldcause serious or even fatal injuries. The shoulder beltshould go over the shoulder and across the chest. These parts of the body are best able to take beltrestraining forces.

1-37
The safety belt locks if there’s a sudden stop or a crash,or if you pull the belt very quickly out of the retractor.
CAUTION:
You can be seriously hurt if your shoulder belt istoo loose. In a crash, you would move forward toomuch, which could increase injury. The shoulderbelt should fit against your body.
To unlatch the belt, just push the button on the buckle.

1-38
Rear Safety Belt Comfort Guides forChildren and Small AdultsRear shoulder belt comfort guides will provide addedsafety belt comfort for older children who haveoutgrown booster seats and for small adults. Wheninstalled on a shoulder belt, the comfort guide betterpositions the belt away from the neck and head.
There is one guide for each outside passenger position in the rear seat. To provide added safety belt comfort for children who have outgrown child restraints and forsmaller adults, the comfort guides may be installed onthe shoulder belts. Here’s how to install a comfort guideand use the safety belt:
1. Remove the guide from its storage pocket on the topof the seatback.

1-39
2. Slide the guide under and past the belt. The elasticcord must be under the belt. Then, place the guideover the belt, and insert the two edges of the belt into the slots of the guide.
3. Be sure that the belt is not twisted and it lies flat. The elastic cord must be under the belt and the guideon top.

1-40
4. Buckle, position and release the safety belt asdescribed in “Rear Seat Passenger Positions” earlierin this section. Make sure that the shoulder beltcrosses the shoulder.
To remove and store the comfort guides, squeeze thebelt edges together so that you can take them out fromthe guides. Slide the guide into its storage pocket on thetop of the seatback.
ChildrenEveryone in a vehicle needs protection! This includesinfants and all other children. Neither the distancetraveled nor the age and size of the traveler changes the need, for everyone, to use safety restraints. In fact,the law in every state in the United States and in everyCanadian province says children up to some age must be restrained while in a vehicle.
Infants and Young ChildrenEvery time infants and young children ride in vehicles,they should have the protection provided by theappropriate restraint. Young children should not use the vehicle’s safety belts, unless there is no other choice.

1-41
CAUTION:
People should never hold a baby in their armswhile riding in a vehicle. A baby doesn’t weighmuch -- until a crash. During a crash a baby willbecome so heavy it is not possible to hold it.
CAUTION: (Continued)
CAUTION: (Continued)
For example, in a crash at only 25 mph (40 km/h),a 12-lb. (5.5 kg) baby will suddenly become a240-lb. (110 kg) force on a person’s arms. A babyshould be secured in an appropriate restraint.

1-42
CAUTION:
Children who are up against, or very close to, anyair bag when it inflates can be seriously injuredor killed. Air bags plus lap-shoulder belts offeroutstanding protection for adults and olderchildren, but not for young children and infants.Neither the vehicle’s safety belt system nor its airbag system is designed for them. Young childrenand infants need the protection that a childrestraint system can provide.
Q: What are the different types of add-on child restraints?
A: Add-on child restraints, which are purchased by thevehicle’s owner, are available in four basic types.Selection of a particular restraint should take intoconsideration not only the child’s weight, heightand age but also whether or not the restraint will be compatible with the motor vehicle in which itwill be used.
For most basic types of child restraints, there aremany different models available. When purchasinga child restraint, be sure it is designed to be used in a motor vehicle. If it is, the restraint will have a label saying that it meets federal motor vehiclesafety standards.
The restraint manufacturer’s instructions that come with the restraint state the weight and height limitations for a particular child restraint. In addition, there are many kinds of restraintsavailable for children with special needs.

1-43
CAUTION:
Newborn infants need complete support,including support for the head and neck. This is necessary because a newborn infant’s neck isweak and its head weighs so much compared with the rest of its body. In a crash, an infant in a rear-facing seat settles into the restraint, so the crash forces can be distributed across thestrongest part of an infant’s body, the back andshoulders. Infants always should be secured inappropriate infant restraints.
CAUTION:
The body structure of a young child is quiteunlike that of an adult or older child, for whomthe safety belts are designed. A young child’s hipbones are still so small that vehicle’s regularsafety belt may not remain low on the hip bones,as it should. Instead, it may settle up around thechild’s abdomen. In a crash, the belt would applyforce on a body area that’s unprotected by anybony structure. This alone could cause serious or fatal injuries. Young children always should be secured in appropriate child restraints.

1-44
Restraint Systems for Children
An infant car bed (A), a special bed made for use in amotor vehicle, is an infant restraint system designed torestrain or position a child on a continuous flat surface.Make sure that the infant’s head rests toward the centerof the vehicle.
A rear-facing infant seat (B) provides restraint with the seating surface against the back of the infant. Theharness system holds the infant in place and, in a crash,acts to keep the infant positioned in the restraint.

1-45
A forward-facing child seat (C-E) provides restraint forthe child’s body with the harness and also sometimeswith surfaces such as T-shaped or shelf-like shields.
A booster seat (F-G) is a child restraint designed to improve the fit of the vehicle’s safety belt system.Some booster seats have a shoulder belt positioner, and some high-back booster seats have a five-pointharness. A booster seat can also help a child to see outthe window.

1-46
Q: How do child restraints work?
A: A child restraint system is any device designed foruse in a motor vehicle to restrain, seat, or positionchildren. A built-in child restraint system is apermanent part of the motor vehicle. An add-onchild restraint system is a portable one, which ispurchased by the vehicle’s owner.
For many years, add-on child restraints have used the adult belt system in the vehicle. To helpreduce the chance of injury, the child also has to be secured within the restraint. The vehicle’s beltsystem secures the add-on child restraint in thevehicle, and the add-on child restraint’s harnesssystem holds the child in place within the restraint.
One system, the three-point harness, has straps that come down over each of the infant’s shouldersand buckle together at the crotch. The five-pointharness system has two shoulder straps, two hipstraps and a crotch strap. A shield may take theplace of hip straps. A T-shaped shield has shoulderstraps that are attached to a flat pad which rests lowagainst the child’s body. A shelf- or armrest-typeshield has straps that are attached to a wide,shelf-like shield that swings up or to the side.
When choosing a child restraint, be sure the childrestraint is designed to be used in a vehicle. If it is, it will have a label saying that it meets federal motorvehicle safety standards.
Then follow the instructions for the restraint. You mayfind these instructions on the restraint itself or in abooklet, or both. These restraints use the belt system inyour vehicle, but the child also has to be secured withinthe restraint to help reduce the chance of personal injury.When securing an add-on child restraint, refer to theinstructions that come with the restraint which may beon the restraint itself or in a booklet, or both, and to thismanual. The child restraint instructions are important, so if they are not available, obtain a replacement copyfrom the manufacturer.
Where to Put the RestraintAccident statistics show that children are safer if theyare restrained in the rear rather than the front seat.General Motors, therefore, recommends that childrestraints be secured in the rear seat including an infantriding in a rear-facing infant seat, a child riding in aforward-facing child seat and an older child riding in a booster seat. Never put a rear-facing child restraint in the front passenger seat. Here’s why:

1-47
CAUTION:
A child in a rear-facing child restraint can beseriously injured or killed if the right frontpassenger’s air bag inflates. This is because the back of the rear-facing child restraint wouldbe very close to the inflating air bag. Alwayssecure a rear-facing child restraint in a rear seat.You may secure a forward-facing child restraintin the right front seat, but before you do, alwaysmove the front passenger seat as far back as itwill go. It’s better to secure the child restraint in a rear seat.
CAUTION:
A child in a child restraint in the center front seatcan be badly injured or killed by the right frontpassenger air bag if it inflates. Never secure achild restraint in the center front seat. It’s alwaysbetter to secure a child restraint in the rear seat.You may secure a forward-facing child restraintin the right front passenger seat, but before youdo, always move the front passenger seat as farback as it will go. It’s better to secure the childrestraint in a rear seat.
Wherever you install it, be sure to secure the childrestraint properly.
Keep in mind that an unsecured child restraint can move around in a collision or sudden stop and injurepeople in the vehicle. Be sure to properly secure anychild restraint in your vehicle -- even when no child is in it.
1-48
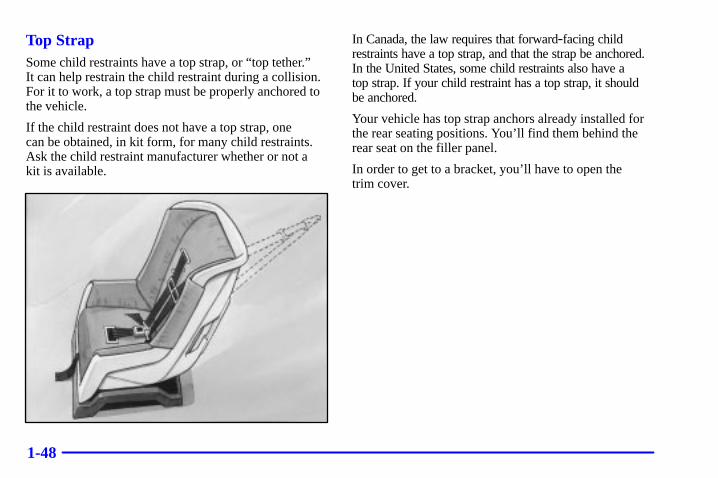
Top StrapSome child restraints have a top strap, or “top tether.” It can help restrain the child restraint during a collision.For it to work, a top strap must be properly anchored tothe vehicle.
If the child restraint does not have a top strap, one can be obtained, in kit form, for many child restraints.Ask the child restraint manufacturer whether or not a kit is available.
In Canada, the law requires that forward-facing childrestraints have a top strap, and that the strap be anchored.In the United States, some child restraints also have a top strap. If your child restraint has a top strap, it shouldbe anchored.
Your vehicle has top strap anchors already installed forthe rear seating positions. You’ll find them behind therear seat on the filler panel.
In order to get to a bracket, you’ll have to open the trim cover.

1-49
Anchor the top strap to one of these anchor points. Be sure to use an anchor point located on the same sideof the vehicle as the seating position where the childrestraint will be placed. If you have an adjustable headrestraint, raise the head restraint and route the top strapunder it.
Once you have the top strap anchored, you’ll be ready to secure the child restraint itself. Tighten the top strapwhen and as the child restraint manufacturer’sinstructions say.
Securing a Child Restraint in a Rear Seat Position
CAUTION:
A child in a child restraint in the center front seatcan be badly injured or killed by the right frontpassenger air bag if it inflates. Never secure achild restraint in the center front seat. It’s alwaysbetter to secure a child restraint in the rear seat.You may secure a forward-facing child restraintin the right front passenger seat, but before youdo, always move the front passenger seat as farback as it will go. It’s better to secure the childrestraint in the rear seat.

1-50
You’ll be using the lap-shoulder belt. See the earlier part about the top strap if the child restraint has one. Be sure to follow the instructions that came with thechild restraint. Secure the child in the child restraintwhen and as the instructions say.
1. Put the restraint on the seat.
2. Pick up the latch plate, and run the lap and shoulderportions of the vehicle’s safety belt through oraround the restraint. The child restraint instructionswill show you how.
Tilt the latch plate to adjust the belt if needed.
If the shoulder belt goes in front of the child’s face or neck, put it behind the child restraint.

1-51
3. Buckle the belt. Make sure the release button ispositioned so you would be able to unbuckle thesafety belt quickly if you ever had to.
4. To tighten the belt, pull up on the shoulder belt whileyou push down on the child restraint. If you’re usinga forward-facing child restraint, you may find ithelpful to use your knee to push down on the childrestraint as you tighten the belt.
5. Push and pull the child restraint in differentdirections to be sure it is secure.
To remove the child restraint, just unbuckle the vehicle’ssafety belt and let it go back all the way. The safety beltwill move freely again and be ready to work for an adultor larger child passenger.

1-52
Securing a Child Restraint in the Right Front Seat Position
Your vehicle has a right front passenger air bag. Neverput a rear-facing child restraint in this seat. Here’s why:
CAUTION:
A child in a rear-facing child restraint can beseriously injured or killed if the right frontpassenger’s air bag inflates. This is because theback of the rear-facing child restraint would bevery close to the inflating air bag. Always securea rear-facing child restraint in the rear seat.
Although a rear seat is a safer place, you can secure aforward-facing child restraint in the right front seat.
You’ll be using the lap-shoulder belt. See the earlier part about the top strap if the child restraint has one. Be sure to follow the instructions that came with thechild restraint. Secure the child in the child restraintwhen and as the instructions say.
1. Because your vehicle has a right front passenger airbag, always move the seat as far back as it will gobefore securing a forward-facing child restraint. See “Seats” in the Index.
2. Put the restraint on the seat.
3. Pick up the latch plate, and run the lap and shoulderportions of the vehicle’s safety belt through or aroundthe restraint. The child restraint instructions will showyou how.
If the shoulder belt goes in front of the child’s face orneck, put it behind the child restraint.

1-53
4. Buckle the belt. Make sure the release button ispositioned so you would be able to unbuckle thesafety belt quickly if you ever had to.
5. Pull the rest of the lap belt all the way out of theretractor to set the lock.

1-54
6. To tighten the belt, feed the lap belt back into theretractor while you push down on the child restraint.You may find it helpful to use your knee to pushdown on the child restraint as you tighten the belt.
7. Push and pull the child restraint in differentdirections to be sure it is secure.
To remove the child restraint, just unbuckle the vehicle’ssafety belt and let it go back all the way. The safety beltwill move freely again and be ready to work for an adultor larger child passenger.

1-55
Older Children
Older children who have outgrown booster seats shouldwear the vehicle’s safety belts.
If you have the choice, a child should sit next to awindow so the child can wear a lap-shoulder belt andget the additional restraint a shoulder belt can provide.
Q: What is the proper way to wear safety belts?
A: If possible, an older child should wear alap-shoulder belt and get the additional restraint a shoulder belt can provide. The shoulder beltshould not cross the face or neck. The lap beltshould fit snugly below the hips, just touching the top of the thighs. It should never be worn over the abdomen, which could cause severe oreven fatal internal injuries in a crash.
Accident statistics show that children are safer if theyare restrained in the rear seat.
In a crash, children who are not buckled up can strikeother people who are buckled up, or can be thrown out of the vehicle. Older children need to use safetybelts properly.

1-56
CAUTION:
Never do this.Here two children are wearing the same belt. The belt can’t properly spread the impact forces.In a crash, the two children can be crushedtogether and seriously injured. A belt must beused by only one person at a time.
Q: What if a child is wearing a lap-shoulder belt,but the child is so small that the shoulder belt isvery close to the child’s face or neck?
A: If the child is sitting in a seat next to a window,move the child toward the center of the vehicle. Ifthe child is sitting in the center rear seat passengerposition, move the child toward the safety beltbuckle. In either case, be sure that the shoulder beltstill is on the child’s shoulder, so that in a crash thechild’s upper body would have the restraint thatbelts provide. If the child is sitting in a rear seatoutside position, see “Rear Safety Belt ComfortGuides” in the Index.

1-57
If the child is so small that the shoulder belt is stillvery close to the child’s face or neck, you mightwant to place the child in the center seat position,the one that has only a lap belt.
CAUTION:
Never do this.Here a child is sitting in a seat that has alap-shoulder belt, but the shoulder part is behindthe child. If the child wears the belt in this way, in a crash the child might slide under the belt.The belt’s force would then be applied right onthe child’s abdomen. That could cause serious or fatal injuries.
The lap portion of the belt should be worn low and snugon the hips, just touching the child’s thighs. This appliesbelt force to the child’s pelvic bones in a crash.

1-58
Safety Belt ExtenderIf the vehicle’s safety belt will fasten around you, youshould use it.
But if a safety belt isn’t long enough to fasten, yourdealer will order you an extender. It’s free. When you go in to order it, take the heaviest coat you will wear, sothe extender will be long enough for you. The extenderwill be just for you, and just for the seat in your vehiclethat you choose. Don’t let someone else use it, and use it only for the seat it is made to fit. To wear it, just attachit to the regular safety belt.
Checking Your Restraint SystemsNow and then, make sure the safety belt reminder lightand all your belts, buckles, latch plates, retractors andanchorages are working properly. Look for any otherloose or damaged safety belt system parts. If you seeanything that might keep a safety belt system fromdoing its job, have it repaired.
Torn or frayed safety belts may not protect you in acrash. They can rip apart under impact forces. If a belt is torn or frayed, get a new one right away.
Also look for any opened or broken air bag covers, andhave them repaired or replaced. (The air bag systemdoes not need regular maintenance.)
Replacing Restraint System PartsAfter a CrashIf you’ve had a crash, do you need new belts?
After a very minor collision, nothing may be necessary.But if the belts were stretched, as they would be if wornduring a more severe crash, then you need new belts.
If belts are cut or damaged, replace them. Collisiondamage also may mean you will need to have safety beltor seat parts repaired or replaced. New parts and repairsmay be necessary even if the belt wasn’t being used atthe time of the collision.
If an air bag inflates, you’ll need to replace air bagsystem parts. See the part on the air bag system earlier in this section.
If the frontal air bags inflate, you’ll also need to replacethe driver’s and right front passenger’s safety beltbuckle assembly. Be sure to do so. Then the new buckleassembly will be there to help protect you in a collision.

2-2-1
Section 2 Features and Controls
Here you can learn about the many standard and optional features on your vehicle, and information on starting,shifting and braking. Also explained are the instrument panel and the warning systems that tell you if everything isworking properly -- and what to do if you have a problem.
2-2 Windows2-4 Keys2-6 Door Locks2-9 Remote Keyless Entry System2-13 Trunk2-16 Theft2-17 Theft-Deterrent System2-19 PASS-Key� III2-22 New Vehicle “Break-In”2-22 Ignition Positions2-24 Starting Your Engine2-25 Engine Coolant Heater (If Equipped)2-26 Automatic Transaxle Operation2-31 Parking Brake2-33 Shifting Into PARK (P)2-36 Shifting Out of PARK (P)2-38 Parking Over Things That Burn2-39 Engine Exhaust2-39 Running Your Engine While You’re Parked
2-40 Tilt Wheel2-42 Turn Signal/Multifunction Lever2-50 Exterior Lamps2-55 Interior Lamps2-57 Mirrors2-61 Storage Compartments2-65 Rear Power Sunshade (If Equipped)2-66 Cellular Telephone (Option)2-67 OnStar� System (If Equipped)2-71 Sunroof (Option)2-72 HomeLink� Transmitter (If Equipped)2-76 The Instrument Panel -- Your
Information System2-82 Warning Lights, Gages and Indicators2-96 Driver Information Center (DIC)2-114 Night Vision System (Option)2-117 Navigation (Option)2-118 Ultrasonic Rear Parking
Assist (URPA) (Option)

2-2
Windows
CAUTION:
Leaving children in a vehicle with the windowsclosed is dangerous. A child can be overcome bythe extreme heat and can suffer permanentinjuries or even death from heat stroke. Neverleave a child alone in a vehicle, especially with thewindows closed in warm or hot weather.

2-3
Power Windows
The power window controls are located on the armrestnear each window. Press the up or down arrows on thecontrols to raise or lower the windows.
Express-Down Window
All power windows have this feature. Pressing thecontrol rearward to the second detent then releasing it, will lower a window completely. If you want to stopthe window as it is lowering, press the control forwardbriefly. Press the control forward again to raise the window.
Rear Window Lockout
Pressing this button willdisable the rear windowcontrols and cause thebutton to light, indicatingthat the feature is in use. To restore power to the rear windows, press thebutton again.

2-4
Keys
CAUTION:
Leaving children in a vehicle with the ignitionkey is dangerous for many reasons. A child orothers could be badly injured or even killed.
They could operate the power windows or othercontrols or even make the vehicle move. If theyturned the ignition to ON and moved the shiftlever out of PARK (P), that would release theparking brake. Don’t leave the keys in a vehiclewith children.

2-5
Master Key Valet Key
There is a master key that works all of the lock cylinders(driver’s door, trunk, ignition and glove box).
There is also a VALET key which only operates thedriver’s door and the ignition.
Your vehicle has the PASS-Key� III vehicle theftsystem. Both the master and VALET key have atransponder in the key head that matches a decoder inthe vehicle’s steering column. If a replacement key orany additional key is needed, you must purchase this keyfrom your dealer. The key will have PK3 stamped on it.Keep the bar code tag that came with the original keys.Give this tag to your dealer if you need a new key made.
Any new PASS-Key III key must be programmed before it will start your vehicle. See “PASS-Key III” inthe Index for more information on programming yournew key.
NOTICE:
Your vehicle has a number of new features thatcan help prevent theft. You can have a lot oftrouble getting into your vehicle if you ever lockyour keys inside. You may even have to damageyour vehicle to get in. So be sure you have extra keys.

2-6
Door Locks
CAUTION:
Unlocked doors can be dangerous.� Passengers -- especially children -- can
easily open the doors and fall out of amoving vehicle. When a door is locked, thehandle won’t open it. You increase thechance of being thrown out of the vehicle ina crash if the doors aren’t locked. So, wearsafety belts properly and lock the doorswhenever you drive.
� Young children who get into unlockedvehicles may be unable to get out. A childcan be overcome by extreme heat and cansuffer permanent injuries or even deathfrom heat stroke. Always lock your vehiclewhenever you leave it.
� Outsiders can easily enter through anunlocked door when you slow down or stopyour vehicle. Locking your doors can helpprevent this from happening.
There are several ways to lock and unlock your vehicle.From the outside, use either of the keys or the remotekeyless entry transmitter.
With the theft-deterrent system, you must unlock thedoors with the key or remote keyless entry transmitter toavoid setting off the alarm.
Push down on the manuallock lever to lock the door from the inside. To unlock the door, pull up on the lever.

2-7
Central Door Unlocking SystemYour vehicle has a central door unlocking mode and atheft-deterrent system. When unlocking the driver’sdoor, you can unlock the other doors by holding the keyin the turned position for a few seconds or by quicklyturning the door key twice in the lock cylinder.
Power Door Locks
Press the bottom part of thepower door lock switchlocated on either front doorto lock all the doors at once.Press the top of the switchto unlock all the doors at once.
The power door lock switches located on the rear doorscan also lock all the doors at once by pressing thebottom part of them, but they cannot unlock the doors.
Automatic Door LocksYour vehicle is programmed so that when the doors areclosed, the ignition is on and the shift lever is moved outof PARK (P), all the doors will lock. The doors willunlock every time you stop the vehicle and move theshift lever back into PARK (P). If someone needs to getout while your vehicle is not in PARK (P), have thatperson use the manual lever or power lock switch. Whenthe door is closed again, it will not lock automatically.Use the manual lever or power lock switch to lock thedoor again. If you need to lock the doors before shiftingout of PARK (P), use the manual lever or power lockswitch to lock the doors.
Programmable Automatic Door LocksWith the ignition in ON, the door locks can beprogrammed through prompts displayed by the DriverInformation Center (DIC). These prompts allow thedriver to choose various lock settings. For programminginformation, see “Vehicle Programming andPersonalization Features” in the Index.

2-8
Rear Door Security Locks
Your vehicle is equippedwith rear door securitylocks that help preventpassengers from openingthe rear doors of yourvehicle from the inside.
To use this lock:
1. Turn the knob on the passenger’s side rear door clockwise all the way down to the ENGAGED position.
2. Close the door.
3. Turn the knob on the driver’s side rear doorcounterclockwise all the way down to theENGAGED position.
The rear doors of your vehicle cannot be opened fromthe inside when this feature is in use.
When you want to open a rear door when the securitylock is on, do the following:
1. Unlock the door from the inside.
2. Then open the door from the outside.
To cancel the rear door lock, do the following:
1. Unlock the door and open it from the outside.
2. Turn the knob on the passenger’s side of the reardoor counterclockwise all the way back to theoriginal position.
3. Turn the knob on the driver’s side of the rear doorclockwise all the way back to the original position.
The rear door locks will now work normally.
Anti-Lockout FeatureLeaving your key in any ignition position with any door open will disable the use of the power door lockswitches as well as the lock button on the remote keylessentry transmitter. If you close the doors, you can lockthem using the remote keyless entry transmitter. It isalways recommended that you remove the ignition keywhen locking your vehicle.
Also, the anti-lockout feature can be overridden byholding the driver’s power door lock switch for threeseconds or longer.

2-9
Leaving Your VehicleIf you are leaving the vehicle, open the door, set thelocks from the inside, get out and close the door.
Remote Keyless Entry SystemWith this feature, you can lock and unlock your doors orunlock your trunk from about 3 feet (1 m) up to 30 feet(9 m) away using the remote keyless entry transmittersupplied with your vehicle.
Your remote keyless entry transmitter operates on aradio frequency subject to Federal CommunicationsCommission (FCC) Rules and with Industry Canada.
This device complies with Part 15 of the FCC Rules.Operation is subject to the following two conditions: (1) this device may not cause harmful interference, and (2) this device must accept any interferencereceived, including interference that may causeundesired operation.
This device complies with RSS-210 of Industry Canada.Operation is subject to the following two conditions: (1) this device may not cause interference, and (2) thisdevice must accept any interference received, includinginterference that may cause undesired operation of the device.
Changes or modifications to this system by other than an authorized service facility could void authorization touse this equipment.
� Check the distance. You may be too far from yourvehicle. You may need to stand closer during rainyor snowy weather.
� Check the location. Other vehicles or objects may beblocking the signal. Take a few steps to the left orright, hold the transmitter higher, and try again.
� Check to determine if battery replacement isnecessary. See the instructions that follow.
� If you’re still having trouble, see your dealer or aqualified technician for service.

2-10
Operation
When you press thissymbol to unlock thedriver’s door, the parkinglamps on your vehicle will flash twice. You canprogram your vehicle so the parking lamps will not flash. (For more information, see “Lock/UnlockConfirmation” in the Index.)
The parking lamps will also not flash if they have beenturned on manually. Pressing this symbol again withinfive seconds will unlock the other doors. Pressing thissymbol will disarm the theft-deterrent system and turnon the interior lamps at night.
When you press this symbol to lock the doors, the parking lamps will flash once and the horn willsound. The parking lamps will not flash, however, if themanual parking lamps are left on. (You can programyour vehicle so the parking lamps will not flash and the horn will not sound. For more information, see “Lock/Unlock Confirmation” in the Index.) This arms the theft-deterrent system.
Press this symbol to open the trunk. (The VALETlockout switch must be off for this feature to work.)
Your transmitter comes equipped with an instant panic alarm. To use the alarm, press the hornsymbol with the ignition off. The horn will sound andthe exterior lamps will flash for up to 30 seconds. To stop the instant panic alarm, press the symbol again or turn the ignition to ON.
The remote keyless entry transmitter can be used to recall the memory settings for up to two drivers. For more information, see “Memory Seat, Mirrors and Steering Wheel” in the Index.

2-11
Matching Transmitter(s) to Your VehicleEach remote keyless entry transmitter is coded toprevent another transmitter from unlocking your vehicle.If a transmitter is lost or stolen, a replacement can bepurchased through your dealer. Remember to bring anyremaining transmitters with you when you go to yourdealer. When the dealer matches the replacementtransmitter to your vehicle, any remaining transmittersmust also be matched. Once your dealer has coded thenew transmitter, the lost transmitter will not unlock yourvehicle. Each vehicle can have only four transmittersmatched to it.
Since all vehicles come with only two transmitters, youmust check with your dealer for information on how toobtain additional transmitters.
All transmitters must be present when replacement oradditional transmitters are being programmed.
Battery ReplacementUnder normal use, the battery in your remote keylessentry transmitter should last about four years.
You can tell the battery is weak if the transmitter won’twork at the normal range in any location. If you have toget close to your vehicle before the transmitter works,it’s probably time to change the battery.
NOTICE:
When replacing the battery, use care not to touchany of the circuitry. Static from your bodytransferred to these surfaces may damage the transmitter.

2-12
1. Use a coin to pry open the transmitter.
2. Once the transmitter is separated, use a pencil (or similar object) to remove the old battery. Do not use a metal object.
3. Replace the battery. Insert the new battery as theinstructions under the cover indicate.
4. Snap the transmitter back together tightly to be sureno moisture can enter.
5. Check the operation of the transmitter.

2-13
Trunk
CAUTION:
It can be dangerous to drive with the trunk lidopen because carbon monoxide (CO) gas cancome into your vehicle. You can’t see or smellCO. It can cause unconsciousness and even death.If you must drive with the trunk lid open or ifelectrical wiring or other cable connections mustpass through the seal between the body and thetrunk lid:� Make sure all other windows are shut.� Turn the fan on your heating or cooling
system to its highest speed with the settingon AUTO and the temperature between 65� F (18� C) and 85� F (29� C). That willforce outside air into your vehicle. See “Comfort Controls” in the Index.
� If you have air outlets on or under theinstrument panel, open them all the way.
See “Engine Exhaust” in the Index.
Trunk Lock Release
To use this feature, your vehicle must be in PARK (P) orNEUTRAL (N) and the VALET lockout switch must be off.
Press the trunk release button, located on the left side ofthe instrument panel, to open the trunk.
You can also press the trunk button on the remotekeyless entry transmitter to access the trunkcompartment. To disable this feature, see “Valet LockoutSwitch” in the Index.

2-14
Rear Seat Pass-Through Door (If Equipped)
The rear seat pass-throughrelease button is located inthe trunk. To release thepass-through door, press thePUSH button located in thecenter of the trunk panel.
The rear-seat armrest must be down for thepass-through door to open. The rear seat pass-through door can also be opened from
inside the vehicle. To release the pass-thru door, movethe release up with your fingers.
The rear seat armrest must be down for the pass-throughdoor to open. You may close the door so it latches frominside the vehicle.

2-15
Trunk Lid Tie Down
CAUTION:
Driving with the trunk lid open can allowdangerous CO (carbon monoxide) gas to comeinto your vehicle. You can’t see or smell CO. It can cause unconsciousness and even death. If you ever need to drive with your trunk lidopen, then:� Make sure all windows, the rear seat
pass-through and sunroof are closed.� Turn the fan on your heating and cooling
system to its highest speed, with the setting on AUTO and temperature between65�F (18�C) and 85�F (29�C). This forcesfresh outside air into your vehicle.
� Open all air ducts on the instrument panel.Don’t use the trunk lid tie down if you are towinga trailer because of the danger of CO.
This feature is used to secure the trunk lid if it will notclose completely, such as when carrying large packagesin the trunk.
1. Attach the clip end of the tie down to the “D” ring on the trunk lid (see view A).
2. Attach the hook end of the tie down to the strikerlocated at the center of the trunk sill (see view B).
3. Tighten the tie down by pulling the free end of thecord until secure.
4. To remove the tie down, press the clip end releaseand loosen the cord.

2-16
Trunk Release Handle (If Equipped)
NOTICE:
The trunk release handle was not designed to beused to tie down the trunk lid or as an anchorpoint when securing items in the trunk. Improperuse of the trunk release handle could damage it.
There is a glow-in-the-dark trunk release handle located inside the trunk near the latch. This handle willglow following exposure to light. Pull the release handleup to open the trunk from the inside.
TheftVehicle theft is big business, especially in some cities.Although your vehicle has a number of theft-deterrentfeatures, we know that nothing we put on it can make it impossible to steal. However, there are ways you can help.
Key in the IgnitionIf you leave your vehicle with the keys inside, it’s aneasy target for joy riders or professional thieves -- sodon’t do it.
When you park your vehicle and open the driver’s door,you’ll hear a chime reminding you to remove your keyfrom the ignition and take it with you. Always do this.Your steering wheel will be locked, and so will yourignition and transaxle. And remember to lock the doors.
2-17
Parking at NightPark in a lighted spot, close all windows and lock yourvehicle. Remember to keep your valuables out of sight.Put them in a storage area, or take them with you.
Parking LotsEven if you park in a lot where someone will bewatching your vehicle, it’s still best to lock it up andtake your keys. But what if you have to leave yourignition key?
� If possible, park in a busy, well-lit area.
� Put your valuables in a storage area, like your trunk or glove box. Be sure to close and lock thestorage area.
� Close all windows.
� Move the valet lockout switch to ON.
� Leave only the valet key.
� Take all other keys and the Remote Keyless Entrytransmitter with you.
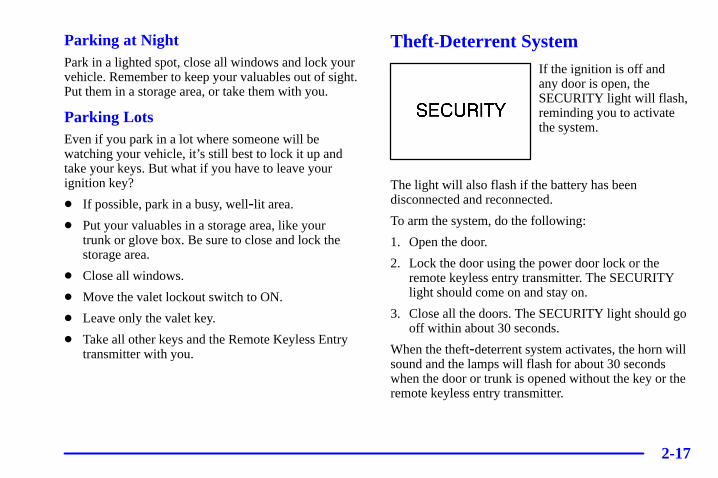
Theft-Deterrent SystemIf the ignition is off and any door is open, theSECURITY light will flash,reminding you to activatethe system.
The light will also flash if the battery has beendisconnected and reconnected.
To arm the system, do the following:
1. Open the door.
2. Lock the door using the power door lock or theremote keyless entry transmitter. The SECURITYlight should come on and stay on.
3. Close all the doors. The SECURITY light should gooff within about 30 seconds.
When the theft-deterrent system activates, the horn willsound and the lamps will flash for about 30 secondswhen the door or trunk is opened without the key or theremote keyless entry transmitter.

2-18
Remember, the theft-deterrent system won’t activate ifyou lock the doors with a key or use the manual doorlock. It activates only if you use a power door lockbutton or the remote keyless entry transmitter.
To avoid activating the alarm by accident, do the following:
� Always unlock a door with a known key or use theremote keyless entry transmitter. (Using a knownkey or pressing the unlock button on the remotekeyless entry transmitter disables the theft-deterrentsystem.) Unlocking a door any other way, such as using an unknown key, will activate the alarm system.
� The vehicle should be locked with the door key afterthe doors are closed if you don’t want to activate thetheft-deterrent system.
If you activate the alarm by accident, unlock the driver’sdoor with your key. You can also turn off the alarm byusing the unlock button on the remote keyless entrytransmitter or by starting the vehicle with a known key.The alarm won’t stop if you try to unlock a door anyother way.
Testing the Alarm1. From inside the vehicle, roll down the window, then
get out of the vehicle, keeping the door open.
2. From outside of the vehicle, with the door open, lockthe vehicle using the power door lock or the remotekeyless entry transmitter and close the door. Wait30 seconds until the SECURITY light goes off.
3. Reach in and unlock the door using the manual locklever and open the door. The horn will sound and theheadlamps will flash.
If the alarm does not sound when it should, check to see if the horn works. The horn fuse may be blown. To replace the fuse, see “Fuses and Circuit Breakers” in the Index. If the fuse does not need to be replaced,you may need to have your vehicle serviced.
To reduce the possibility of theft, always activate thetheft-deterrent system when leaving your vehicle.

2-19
Valet Lockout Switch
The valet lockout switch islocated inside the glovebox.
Pushing the VALET lockout switch to ON will disablethe use of the power trunk, fuel door and garage dooropeners. Pushing the switch to OFF again will makethese features reusable. Locking the glove box with thekey will also help to secure your vehicle.
The remote keyless entry transmitter cannot be used toopen the trunk or fuel door if the valet lockout switch isin ON. Also, the valet key will not unlock the gloveboxor trunk.
PASS-Key� IIIYour vehicle is equippedwith the PASS-Key III(Personalized AutomotiveSecurity System)theft-deterrent system.PASS-Key III is a passivetheft-deterrent system. Thismeans you don’t have to doanything different to arm ordisarm the system. It workswhen you insert or removethe key from the ignition.
Your PASS-Key III system operates on a radiofrequency subject to Federal CommunicationsCommission (FCC) Rules and with Industry Canada.
This device complies with Part 15 of the FCC Rules.Operation is subject to the following two conditions: (1) this device may not cause harmful interference, and (2) this device must accept any interferencereceived, including interference that may causeundesired operation.

2-20
This device complies with RSS-210 of Industry Canada.Operation is subject to the following two conditions: (1)this device may not cause interference, and (2) thisdevice must accept any interference received, includinginterference that may cause undesired operation of the device.
Changes or modifications to this system by other than anauthorized service facility could void authorization touse this equipment.
PASS-Key III uses a radio frequency transponder in thekey that matches a decoder in your vehicle.
When the PASS-Key III system senses that someone isusing the wrong key, it shuts down the vehicle’s starterand fuel systems. The starter will not work and fuel willstop being delivered to the engine. Anyone using atrial-and-error method to start the vehicle will bediscouraged because of the high number of electricalkey codes.
When trying to start the vehicle, if the engine does notstart and the SECURITY light comes on, the key mayhave a damaged transponder. Turn the ignition off andtry again.
If the engine does not start, and the key appears to beundamaged, try another ignition key. At this time, youmay also want to check the fuse (see “Fuses and CircuitBreakers” in the Index). If the engine still does not startwith the other key, your vehicle needs service. If yourvehicle does start, the first key may be faulty. See yourdealer who can service the PASS-Key III to have a newkey made.
It is possible for the PASS-Key III decoder to learn thetransponder value of a new or replacement key. Up to10 additional keys may be programmed for the vehicle.This procedure is for learning additional keys only.

2-21
Canadian Owners: If you lose or damage your keys,only a GM dealer can service PASS-Key III to have newkeys made. To program additional keys you will requiretwo current driver’s keys (black in color). You must adda step to the following procedure. After Step 2 repeatSteps 1 and 2 with the second current driver’s key. Then continue with Step 3.
To program the new key:
� Insert the current driver’s key (black in color) in theignition and start the engine. If the engine will notstart see your dealer for service.
� After the engine has started, turn the key to OFF, andremove the key.
� Insert the key to be programmed and turn it to ONwithin ten seconds of removing the previous key.
� The SECURITY light will turn off once the key hasbeen programmed. It may not be apparent that theSECURITY light went on due to how quickly thekey is programmed.
� Repeat the Steps 1 through 4 if additional keys are to be programmed.
If you are ever driving and the SECURITY light comeson and stays on, you will be able to restart your engine if you turn it off. Your PASS-Key III system, however,is not working properly and must be serviced by yourdealer. Your vehicle is not protected by the PASS-Key III system at this time.
If you lose or damage a PASS-Key III key, see yourdealer to have a new key made.

2-22
New Vehicle “Break-In”
NOTICE:
Your vehicle doesn’t need an elaborate “break-in.”But it will perform better in the long run if youfollow these guidelines:
� Don’t drive at any one speed -- fast or slow -- for the first 500 miles (805 km).Don’t make full -throttle starts.
� Avoid making hard stops for the first200 miles (322 km) or so. During this timeyour new brake linings aren’t yet brokenin. Hard stops with new linings can meanpremature wear and earlier replacement.Follow this breaking-in guideline everytime you get new brake linings.
� Don’t tow a trailer during break -in. See “Towing a Trailer” in the Index formore information.
Ignition PositionsWith the key in the ignition switch, you can turn theswitch to four different positions.
If you cannot start your vehicle and you are unable toremove your key from the ignition, see “Shift LockRelease” in the Index.
OFF (A): This is the only position in which you caninsert or remove the key. This position locks the ignition,steering wheel and transaxle. It’s a theft-deterrent feature.

2-23
NOTICE:
If your key seems stuck in OFF and you can’tturn it, be sure you are using the correct key; if so, is it all the way in? If it is, then turn thesteering wheel left and right while you turn thekey hard. But turn the key only with your hand.Using a tool to force it could break the key or theignition switch. If none of this works, then yourvehicle needs service.
ACCESSORY (B): This position allows you to usethings like the radio and the windshield wipers when theengine is off. This position will allow you to turn off theengine, but still turn the steering wheel. If your vehiclehas a column shifter, you will still be able to move theshift lever. Use ACCESSORY if you must have yourvehicle in motion while the engine is off (for example, if your vehicle is being pushed or towed).
ON (C): This position is for driving. If your vehicle hasa floor (console) shifter and you turn off the engine, thetransaxle will lock. If you need to shift the transaxle outof PARK (P), the ignition key has to be in ON.
START (D): This position starts the engine.
Retained Accessory Power (RAP)The following accessories on your vehicle may be usedfor up to 10 minutes after the ignition key is turned fromON to OFF:
� Radio
� Power Windows
� Sunroof
Power to these accessories will stop after 10 minutes orif any door is opened. If you want power for another10 minutes, turn the ignition key to ACCESSORY, then back to OFF. Always leave your key in OFF whenusing RAP.

2-24
Starting Your EngineMove your shift lever to PARK (P) or NEUTRAL (N).Your engine won’t start in any other position -- that’s asafety feature. To restart when you’re already moving,use NEUTRAL (N) only.
NOTICE:
Don’t try to shift to PARK (P) if your vehicle ismoving. If you do, you could damage thetransaxle. Shift to PARK (P) only when yourvehicle is stopped.
1. With your foot off the accelerator pedal, turn yourignition key to START. When the engine starts, letgo of the key. The idle speed will go down as yourengine gets warm.
NOTICE:
Holding your key in START for longer than15 seconds at a time will cause your battery to be drained much sooner. And the excessive heatcan damage your starter motor. Wait about15 seconds between each try to help avoiddraining your battery or damaging your starter.
2. If it doesn’t start within 10 seconds, hold your key in START for about 10 seconds at a time until yourengine starts. Wait about 15 seconds between each try.

2-25
3. If your engine still won’t start (or starts but thenstops), it could be flooded with too much gasoline.Try pushing your accelerator pedal all the way to thefloor and holding it there as you hold the key inSTART for about three seconds. If the vehicle startsbriefly but then stops again, do the same thing.
NOTICE:
Your engine is designed to work with theelectronics in your vehicle. If you add electricalparts or accessories, you could change the waythe engine operates. Before adding electricalequipment, check with your dealer. If you don’t,your engine might not perform properly.
Engine Coolant Heater (If Equipped)
A. Engine Oil Dipstick LocationB. Engine Coolant Heater Cord
C. Transaxle Dipstick/Fluid Fill Location
In very cold weather, 0�F (-18�C) or colder, the enginecoolant heater can help. You’ll get easier starting andbetter fuel economy during engine warm-up. Usually,the coolant heater should be plugged in a minimum offour hours prior to starting your vehicle.

2-26
To Use the Engine Coolant Heater1. Turn off the engine.
2. Open the hood and unwrap the electrical cord.
The electrical cord is located on the driver’s side ofthe engine, behind the transaxle dipstick/fluid filllocation (C) and next to the engine.
3. Plug it into a normal, grounded 110-volt AC outlet.
CAUTION:
Plugging the cord into an ungrounded outletcould cause an electrical shock. Also, the wrongkind of extension cord could overheat and causea fire. You could be seriously injured. Plug thecord into a properly grounded three-prong110-volt AC outlet. If the cord won’t reach, use aheavy-duty three-prong extension cord rated forat least 15 amps.
4. Before starting the engine, be sure to unplug andstore the cord as it was before to keep it away from moving engine parts. If you don’t, it could be damaged.
How long should you keep the coolant heater pluggedin? The answer depends on the outside temperature, thekind of oil you have, and some other things. Instead oftrying to list everything here, we ask that you contactyour dealer in the area where you’ll be parking yourvehicle. The dealer can give you the best advice for thatparticular area.
Automatic Transaxle OperationThe automatic transaxle may have a shift lever locatedon either the steering column or on the console betweenthe seats.
There are severaldifferent positions for the shift lever.
Console Shifter

2-27
Column Shifter (Digital and Analog Cluster similar)
PARK (P): This position locks the front wheels. It’s thebest position to use when you start the engine becauseyour vehicle can’t move easily.
CAUTION:
It is dangerous to get out of your vehicle if theshift lever is not fully in PARK (P) with theparking brake firmly set. Your vehicle can roll.
CAUTION: (Continued)
CAUTION: (Continued)
Don’t leave your vehicle when the engine isrunning unless you have to. If you have left theengine running, the vehicle can move suddenly.You or others could be injured. To be sure yourvehicle won’t move, even when you’re on fairlylevel ground, always set your parking brake andmove the shift lever to PARK (P).
See “Shifting Into PARK (P)” in the Index. If you’re pulling a trailer, see “Towing a Trailer”in the Index.
Ensure the shift lever is fully in PARK (P) beforestarting the engine. Your vehicle has an automatictransaxle shift lock control system. You have to fullyapply your regular brakes before you can shift fromPARK (P) when the ignition key is in ON. If you cannotshift out of PARK (P), ease pressure on the shift lever -- push the shift lever all the way into PARK (P) as you maintain brake application. Then move the shiftlever into the gear you wish. See “Shifting Out of PARK (P)” in the Index.

2-28
REVERSE (R): Use this gear to back up.
NOTICE:
Shifting to REVERSE (R) while your vehicle ismoving forward could damage your transaxle.Shift to REVERSE (R) only after your vehiclehas stopped.
Also use this gear to rock your vehicle back and forth to get out of snow, ice or sand without damaging yourtransaxle. See “Stuck in Sand, Mud, Ice or Snow” in the Index for additional information.
NEUTRAL (N): In this position, the engine doesn’tconnect with the wheels. To restart when you’re already moving, use NEUTRAL (N) only. Also, useNEUTRAL (N) when your vehicle is being towed.
CAUTION:
Shifting out of PARK (P) or NEUTRAL (N) whileyour engine is “racing” (running at high speed) is dangerous. Unless your foot is firmly on thebrake pedal, your vehicle could move veryrapidly. You could lose control and hit people or objects. Don’t shift out of PARK (P) orNEUTRAL (N) while your engine is racing.
NOTICE:
Damage to your transaxle caused by shifting outof PARK (P) or NEUTRAL (N) with the engineracing isn’t covered by your warranty.

2-29
DRIVE (D): This position is for normal driving. If youneed more power for passing, and you’re:
� Going less than 35 mph (55 km/h), push theaccelerator pedal about halfway down.
� Going about 35 mph (55 km/h) or more, push theaccelerator all the way down.
The transaxle will shift down to the next gear andhave more power.
NOTICE:
If your vehicle seems to start up rather slowly, orif it doesn’t seem to shift gears as you accelerate,something may be wrong with a transaxle systemsensor. If you drive very far that way, yourvehicle can be damaged. So if this happens, haveyour vehicle serviced right away. Until then, youcan use SECOND (2) when you are driving lessthan 35 mph (55 km/h) and DRIVE (D) forhigher speeds.
THIRD (3): This position is also used for normaldriving, however, it offers more power and lower fueleconomy than DRIVE (D).
Here are examples for using THIRD (3) instead of DRIVE (D).
� When driving on hilly, winding roads.
� When towing a trailer, so there is less shiftingbetween gears.
� When going down a steep hill.
SECOND (2): This position gives you more power. You can use SECOND (2) on hills. It can help controlyour speed as you go down steep mountain roads, butthen you would also want to use your brakes off and on.
NOTICE:
Don’t shift into SECOND (2) unless you are going slower than 65 mph (105 km/h), or you can damage your engine.

2-30
FIRST (1): This position gives you even more powerthan SECOND (2). You can use it on very steep hills, or in deep snow or mud. (If the shift lever is put inFIRST (1), the transaxle won’t shift into first gear untilthe vehicle is going slowly enough.)
NOTICE:
If your front wheels can’t turn, don’t try to drive.This might happen if you were stuck in very deepsand or mud or were up against a solid object.You could damage your transaxle.Also, if you stop when going uphill, don’t holdyour vehicle there with only the acceleratorpedal. This could cause overheating and damagethe transaxle. Use your brakes to hold yourvehicle in position on a hill.
Performance Shifting (DTS Only)When your vehicle detects a change in drivingconditions, it will automatically initiate the appropriateperformance shift mode. When this occurs the geardisplay on the instrument panel cluster will change toindicate that the transaxle has shifted to a different gear.For example, the gear display on the cluster mayindicate D, 3, 2, or 1 even though the gearshift is still in DRIVE (D). Once the performance shift mode ends,the gear display on the instrument panel cluster willreturn to normal.

2-31
Parking BrakeHold the regular brakepedal down with your rightfoot and push the parkingbrake pedal down with your left foot to set theparking brake.
If the ignition is on, the BRAKE indicator light on theinstrument panel cluster should come on. If it doesn’t,you need to have your vehicle serviced.
When you move out of PARK (P) or NEUTRAL (N)and the engine is running, the parking brake shouldrelease. If the parking brake has not been fully releasedand you try to drive off with the parking brake on, theBRAKE indicator light will come on and stay on.
If the parking brake doesn’t fully release, you canmanually release the lever. Before attempting to release the lever however, be sure to read the following paragraphs.
CAUTION:
Always shift to PARK (P) before pulling themanual release lever. If your hand or arm is inthe way of the pedal you could be hurt. The pedalsprings back quickly. Keep your hand and armaway when you use the manual release lever.
Before releasing the manual parking brake, be sure to put the vehicle in PARK (P) and turn the ignition to OFF.

2-32
Reach under the driver’s side of the instrument paneland pull on the manual release lever, which is locatedabove the parking brake pedal. If the parking brake doesnot release, your vehicle needs service.
NOTICE:
Driving with the parking brake on can causeyour rear brakes to overheat. You may have toreplace them and you could also damage otherparts of your vehicle.
If you are towing a trailer and are parking on a hill, see“Towing a Trailer” in the Index. This section showswhat to do first to keep the trailer from moving. Formore information, see “Brake System Warning and ParkBrake Indicator Light” in the Index.
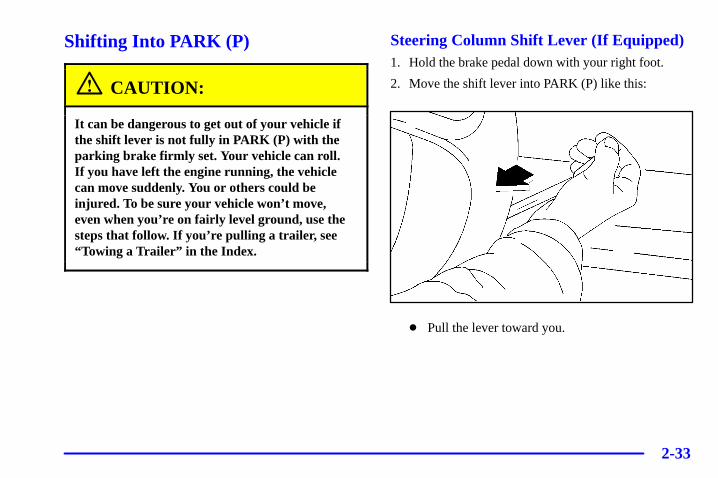
2-33
Shifting Into PARK (P)
CAUTION:
It can be dangerous to get out of your vehicle ifthe shift lever is not fully in PARK (P) with theparking brake firmly set. Your vehicle can roll. If you have left the engine running, the vehiclecan move suddenly. You or others could beinjured. To be sure your vehicle won’t move, even when you’re on fairly level ground, use thesteps that follow. If you’re pulling a trailer, see“Towing a Trailer” in the Index.
Steering Column Shift Lever (If Equipped)1. Hold the brake pedal down with your right foot.
2. Move the shift lever into PARK (P) like this:
� Pull the lever toward you.
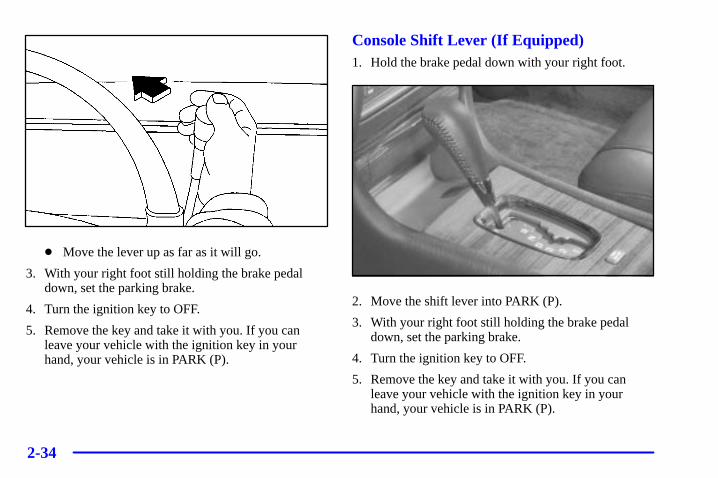
2-34
� Move the lever up as far as it will go.
3. With your right foot still holding the brake pedaldown, set the parking brake.
4. Turn the ignition key to OFF.
5. Remove the key and take it with you. If you canleave your vehicle with the ignition key in yourhand, your vehicle is in PARK (P).
Console Shift Lever (If Equipped)1. Hold the brake pedal down with your right foot.
2. Move the shift lever into PARK (P).
3. With your right foot still holding the brake pedaldown, set the parking brake.
4. Turn the ignition key to OFF.
5. Remove the key and take it with you. If you canleave your vehicle with the ignition key in yourhand, your vehicle is in PARK (P).

2-35
Leaving Your Vehicle With the Engine Running
CAUTION:
It can be dangerous to leave your vehicle with the engine running. Your vehicle could movesuddenly if the shift lever is not fully in PARK (P)with the parking brake firmly set. And, if youleave the vehicle with the engine running, it couldoverheat and even catch fire. You or others couldbe injured. Don’t leave your vehicle with theengine running unless you have to.
If you have to leave your vehicle with the enginerunning, be sure your vehicle is in PARK (P) and yourparking brake is firmly set before you leave it. Afteryou’ve moved the shift lever into PARK (P), hold theregular brake pedal down. Then, see if you can move theshift lever away from PARK (P) without first pulling ittoward you. If you can, it means that the shift leverwasn’t fully locked into PARK (P).
Torque LockIf you are parking on a hill and you don’t shift yourtransaxle into PARK (P) properly, the weight of thevehicle may put too much force on the parking pawl inthe transaxle. You may find it difficult to pull the shiftlever out of PARK (P). This is called “torque lock.” To prevent torque lock, set the parking brake and thenshift into PARK (P) properly before you leave thedriver’s seat. To find out how, see “Shifting Into PARK (P)” in the Index.
If torque lock does occur, you may need to have another vehicle push yours a little uphill to take some of the pressure from the parking pawl in the transaxle,so you can pull the shift lever out of PARK (P).

2-36
Shifting Out of PARK (P)Your vehicle has an automatic transaxle shift lockcontrol system. You have to fully apply your regularbrakes before you can shift from PARK (P) when theignition key is in ON. See “Automatic TransaxleOperation” in the Index.
If you cannot shift out of PARK (P), ease pressure onthe shift lever -- push the shift lever all the way intoPARK (P) as you maintain brake application. Thenmove the shift lever into the gear you want. If you everhold the brake pedal down, but still can’t shift out ofPARK (P), try the following:
1. Turn the ignition to ACCESSORY.
2. Apply and hold the brake until the end of Step 4.
3. Shift to NEUTRAL (N).
4. Start the vehicle and then shift to the drive gear you want.
5. Have the vehicle fixed as soon as you can.
Shift Lock ReleaseThis vehicle is equipped with an electric shift lockrelease system. The shift lock release is designed to dothe following:
� Prevent the ignition key from being removed unlessthe shift lever is in PARK (P), and
� Prevent movement of the console shift lever (DTSonly) out of PARK (P) unless the ignition is in aposition other than OFF. The shift lock release isalways functional except in the case of a dead batteryor low voltage (less than 9 V) battery.
If your vehicle has a dead battery or a battery with lowvoltage, there is a procedure that will allow you tooverride the shift lock release.

2-37
The following procedure allows the ignition to be turnedto OFF and for key removal in case of a dead or lowvoltage battery.
1. Verify that the shift leveris in PARK (P).
2. Locate the overrideaccess slot underneaththe steering columnbelow the lock cylinder.
3. Remove the override access slot cap.
4. Insert a screwdriver into the access slot, press in and hold.
5. Turn the ignition to OFF.
6. Remove the screwdriver from the slot.
7. Remove the key from the ignition.
8. Replace the override access slot cap.
The following procedure applies only to vehicles withthe console shift lever and is used to shift the transaxleout of PARK (P) (if the vehicle needs to be towed, for example) in case of a dead or low voltage battery.
The console shift lockrelease is located on thefront of the center console.
To access the shift lock release, do the following:
1. Verify that the shift lever is in PARK (P).
2. Pull up the rubber mat located on the front of thecenter console.
3. Remove the shift lock release hole cover by prying itopen with a coin or small diameter screwdriver.

2-38
4. Press the shift lockrelease toward the frontof the vehicle and hold it there.
5. While applying the brakes, shift the transaxle fromPARK (P) as needed.
6. Reinstall the shift lock release hole cover and therubber mat.
Parking Over Things That Burn
CAUTION:
Things that can burn could touch hot exhaustparts under your vehicle and ignite. Don’t parkover papers, leaves, dry grass or other things thatcan burn.

2-39
Engine Exhaust
CAUTION:
Engine exhaust can kill. It contains the gascarbon monoxide (CO), which you can’t see orsmell. It can cause unconsciousness and death.
You might have exhaust coming in if:� Your exhaust system sounds strange
or different.� Your vehicle gets rusty underneath.� Your vehicle was damaged in a collision.� Your vehicle was damaged when driving over
high points on the road or over road debris.� Repairs weren’t done correctly.� Your vehicle or exhaust system had been
modified improperly.If you ever suspect exhaust is coming into your vehicle:� Drive it only with all the windows down to
blow out any CO; and� Have your vehicle fixed immediately.
Running Your Engine While You’re ParkedIt’s better not to park with the engine running. But if youever have to, here are some things to know.
CAUTION:
Idling the engine with the climate control system off could allow dangerous exhaust intoyour vehicle. See the earlier Caution under“Engine Exhaust.”Also, idling in a closed-in place can let deadlycarbon monoxide (CO) into your vehicle even ifthe fan switch is at the highest setting. One placethis can happen is a garage. Exhaust -- with CO -- can come in easily. NEVER park in agarage with the engine running.Another closed-in place can be a blizzard. See “Blizzard” in the Index.

2-40
CAUTION:
It can be dangerous to get out of your vehicle ifthe shift lever is not fully in PARK (P) with theparking brake firmly set. Your vehicle can roll.Don’t leave your vehicle when the engine isrunning unless you have to. If you’ve left theengine running, the vehicle can move suddenly.You or others could be injured. To be sure yourvehicle won’t move, even when you’re on fairlylevel ground, always set your parking brake afteryou move the shift lever to PARK (P).
Follow the proper steps to be sure your vehicle won’tmove. See “Shifting Into PARK (P)” in the Index.
If you are parking on a hill and if you’re pulling atrailer, also see “Towing a Trailer” in the Index.
HornNearly the entire surface of the center pad of thesteering wheel is an active horn switch. Press on the pad near the horn symbols to sound the horn.
Tilt WheelThe tilt wheel control islocated on the outboard sideof the steering column.
Tilt steering allows you to adjust the steering wheelbefore you drive. Raising the steering wheel to thehighest level gives your legs more room when you enterand exit the vehicle.
Hold the steering wheel and pull the lever toward you tobring the steering wheel close to you. Adjust the steeringwheel to a comfortable position and then release thelever to lock it into place.
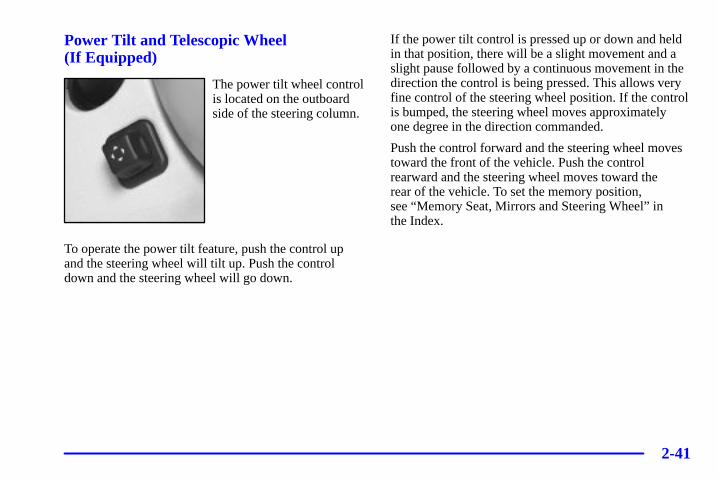
2-41
Power Tilt and Telescopic Wheel (If Equipped)
The power tilt wheel controlis located on the outboardside of the steering column.
To operate the power tilt feature, push the control up and the steering wheel will tilt up. Push the controldown and the steering wheel will go down.
If the power tilt control is pressed up or down and heldin that position, there will be a slight movement and aslight pause followed by a continuous movement in thedirection the control is being pressed. This allows veryfine control of the steering wheel position. If the controlis bumped, the steering wheel moves approximately one degree in the direction commanded.
Push the control forward and the steering wheel movestoward the front of the vehicle. Push the controlrearward and the steering wheel moves toward the rear of the vehicle. To set the memory position, see “Memory Seat, Mirrors and Steering Wheel” in the Index.

2-42
Turn Signal/Multifunction Lever
The lever on the left side of the steering columnincludes the following:
� Turn and Lane Change Signals
� Headlamp High/Low-Beam Changer
� Flash-To-Pass
� Windshield Wipers
� Windshield Washer
Turn and Lane Change SignalsTo signal a turn, move the lever all the way up or down.The lever returns automatically when the turn is complete.
An arrow on the instrumentpanel cluster will flash inthe direction of the turn or lane change.
Raise or lower the lever until the arrow starts to flash tosignal a lane change. Hold it there until the lane changeis complete. The lever returns when it’s released.
If the turn signal is left on, a warning chime will soundand the Driver Information Center (DIC) will displayTURN SIGNAL ON (after driving about a mile) toremind you to turn it off.
Arrows that flash rapidly when signaling for a turn orlane change may be caused by a burned out signal bulb.Other drivers won’t see the turn signal.
Replace burned-out bulbs to help avoid possibleaccidents. Check the fuse (see “Fuses and CircuitBreakers” in the Index) and for burned-out bulbs if the arrow fails to work when signaling a turn.

2-43
Headlamp High/Low-Beam ChangerPush forward to change the headlamps from low beamto high. Pull the lever back and then release it to changefrom high beam to low.
This light located on theinstrument panel cluster will come on to indicatehigh-beam usage.
Flash-To-PassThis feature lets you use the high-beam headlamps tosignal the driver in front of you that you want to pass.
Pull and hold the turn signal lever toward you to use.When you do, the following will occur:
� If the headlamps are either off or in the DRL mode,the high-beam headlamps will turn on. They’ll stayon as long as you hold the lever there. Release thelever to turn them off.
� If the headlamps are on high beam, they will switchto low beam. To return to high beam, push the leveraway from you.
Windshield Wipers
WIPER: Turn the band on the turn signal lever tocontrol the wipers.
MIST: Turn the band toward you to MIST and thenrelease it for a single wiping cycle. For more cycles,hold the band on MIST longer.
LO or HI: Turn the band away from you to either LO (low speed) or to HI (high speed), depending on the wiper speed you want.

2-44
DELAY: Turn the band to one of the DELAY positionsto set the wiper speed for a long or a short delaybetween wipes. The closer you move it to LO, theshorter the delay.
OFF: Turn the band to OFF to turn off the wipers.
Be sure to clear ice and snow from the wiper bladesbefore using them. If they’re frozen to the windshield,carefully loosen or thaw them. If the blades do becomedamaged, get new blades or blade inserts.
Heavy snow or ice can overload the wiper motor. A circuit breaker will stop the motor until it cools. Clear away snow or ice to prevent an overload.
Rainsense�II Wipers (If Equipped)
The moisture sensor is mounted on the interior side ofthe windshield behind the rearview mirror and is used toautomatically operate the wipers by monitoring theamount of moisture build-up on the windshield. Wipesoccur as needed to clear the windshield depending ondriving conditions and the sensitivity setting. In lightrain or snow, fewer wipes will occur. In heavy rain orsnow, wipes will occur more frequently. The Rainsensewipers operate in a delay mode as well as a continuouslow or high speed as needed. If the system is left on for long periods of time, occasional wipes may occurwithout any moisture on the windshield. This is normaland indicates that the Rainsense system is activated.

2-45
The Rainsense system can be activated by turning thewiper band to one of the five sensitivity levels indicatedon the wiper stalk. The position closest to OFF is thelowest sensitivity setting, level one. This allows morerain or snow to collect on the windshield between wipes.Turning the wiper band away from you to highersensitivity levels increases the sensitivity of the systemand frequency of wipes. The highest sensitivity setting,level five is closest to LO. A single wipe will occur eachtime you turn the wiper stalk to a higher sensitivity levelto indicate that the sensitivity level has been increased.
NOTICE:
The wipers must be turned off when goingthrough a car wash to avoid damage.
The MIST and “wash” cycles operate as normal and arenot affected by the Rainsense function. The Rainsensesystem can be overridden at any time by manuallyturning the wiper band to LO or HI speed.
NOTICE:
Do not place stickers or other items on theexterior glass surface directly in front of themoisture sensor. Doing this could cause themoisture sensor to malfunction.

2-46
Windshield Washer
CAUTION:
In freezing weather, don’t use your washer untilthe windshield is warmed. Otherwise the washerfluid can form ice on the windshield, blockingyour vision.
At the top of the turn signal/multifunction lever there isa paddle with the word PUSH on it. To spray washerfluid on the windshield, press and release this paddle.The wipers will clear the windshield and either stop orreturn to your preset speed. For more washer cycles,press and hold the paddle.
LOW WASHER FLUID will be displayed on the DriverInformation Center (DIC) when the washer fluid reachesa low level.
Cruise Control
The controls to operate cruise control are located on thesteering wheel.
With cruise control, you can maintain a speed ofapproximately 25 mph (40 km/h) or more withoutkeeping your foot on the accelerator. This is helpful onlong trips. Cruise control does not work at speeds belowabout 25 mph (40 km/h). When cruise control is on, youwill see a CRUISE light on the instrument panel cluster.
When you apply your brakes, the cruise control shuts off.

2-47
CAUTION:
� Cruise control can be dangerous where you can’t drive safely at a steady speed. So, don’t use your cruise control onwinding roads or in heavy traffic.
� Cruise control can be dangerous onslippery roads. On such roads, fast changesin tire traction can cause needless wheelspinning, and you could lose control. Don’t use cruise control on slippery roads.
If your vehicle is in cruise control when the tractioncontrol system begins to limit wheel spin, the cruisecontrol will automatically disengage. See “TractionControl System” in the Index. When road conditionsallow you to safely use it again, you may turn the cruisecontrol back on.
Setting Cruise Control
CAUTION:
If you leave your cruise control switch on whenyou’re not using cruise, you might hit a buttonand go into cruise when you don’t want to. Youcould be startled and even lose control. Keep thecruise control switch off until you want to usecruise control.
1. Press the CRUISE ON/OFF button to turn cruisecontrol on. (The button is located on the bottom leftof the steering wheel.) An indicator light will comeon to show that the cruise control is on.
2. Get up to the speed you want.
3. Press the SET/CST (coast) button. (The button islocated on the bottom right of the steering wheel.)The CRUISE light will display on the instrumentpanel cluster.
4. Remove your foot from the accelerator pedal.

2-48
Resuming a Set Speed
Suppose you set your cruise control at a desired speedand then you apply the brake. This, of course, shuts offthe cruise control. But you don’t need to reset it.
Once the vehicle is traveling approximately 25 mph (40 km/h) or more, you can press the RES/ACC(resume/accelerate) button briefly to return to yourdesired preset speed. The CRUISE light will display again.
The vehicle will return to and stay at your preset speed.If you press and hold the RES/ACC button, the vehiclespeed will increase until you release the button or applythe brake. Again, unless you want to go faster, do notpress and hold the RES/ACC button.
Increasing Speed While Using Cruise Control
There are two ways to go to a higher speed:
� Use the accelerator pedal to get to the higherspeed. Press the SET/CST button, then releasethe button and the accelerator pedal. You willnow cruise at the higher speed.
� Press the RES/ACC button. Hold it there untilyou get up to the speed that you want, and thenrelease the button. To increase your speed in verysmall amounts, briefly press the RES/ACC button and then release it. Each time you do this, your vehicle will speed up approximately 1 mph (1.6 km/h).
The accelerate feature will only work after you have set the cruise control speed by pressing the SET/CST button.

2-49
Reducing Speed While Using Cruise Control
There are two ways to reduce your speed while usingcruise control:
� Press the SET/CST button until you reach thelower speed you want, then release it.
� To slow down in very small amounts, push theSET/CST button briefly. Each time you do this, the vehicle will slow down approximately 1 mph (1.6 km/h).
Passing Another Vehicle While Using Cruise Control
Use the accelerator pedal to increase your speed. Whenyou take your foot off the pedal, your vehicle will slowdown to the cruise control speed you set earlier.
Using Cruise Control on Hills
How well your cruise control will work on hills dependsupon your speed, load and the steepness of the hills.When going up steep hills, you may have to step on theaccelerator pedal to maintain your speed. When goingdownhill, you may have to brake or shift to a lower gearto keep your speed down. Applying the brake or shiftinginto a lower gear will take you out of cruise control. If you need to apply the brake or shift to a lower geardue to the grade of the downhill slope, you may notwant to attempt to use your cruise control feature.
Ending Cruise Control
To turn off the cruise control, step lightly on the brakepedal, or press the CRUISE ON/OFF button on thesteering wheel.
Erasing Speed Memory
When you turn off the cruise control or the ignition,your cruise control set speed memory is erased.

2-50
Exterior LampsThis control on the left side of the instrument panel operates the following:
� Headlamps
� Taillamps
� Parking Lamps
� Sidemarker Lamps
� License Plate Lamps
Parking LampsTurn the knob clockwise to the first stop, to turn on theparking lamps, taillamps, sidemarker and license platelamps. If it is night, the instrument panel switchbacklighting will also illuminate. Turn the knobcounterclockwise all the way back to turn off the lampsand lights.
HeadlampsTurn the knob clockwise all the way to turn on theparking lamps and headlamps. Turn the control knobcounterclockwise to turn the lamps off.
Wiper-Activated Headlamps
This feature activates the headlamps and parking lampsafter the windshield wipers have been in use forapproximately six seconds. To operate, the TwilightSentinel� feature must be turned on. See “TwilightSentinel” in the Index for more information.
When the exterior lamp control is in the off or parkinglamp position and the wiper control is on (delay, LO orHI), the HEADLAMPS SUGGESTED message willappear on the Driver Information Center (DIC).

2-51
When the ignition is turned to OFF, the wiper-activatedheadlamps will immediately turn off. Thewiper-activated headlamps will also turn off if theTwilight Sentinel or the windshield wipers are turned off.
Lamps on ReminderIf the manual headlamp control is left on and a door isopened, a warning chime will sound. An exception iswhen the Twilight Sentinel function is active.
Daytime Running LampsDaytime Running Lamps (DRL) can make it easier forothers to see the front of your vehicle during the day.DRL can be helpful in many different drivingconditions, but they can be especially helpful in theshort periods after dawn and before sunset. Fullyfunctional daytime running lights are required on allvehicles first sold in Canada.
The DRL system will make the low-beam headlampscome on at reduced intensity when the followingconditions are met:
� it is still daylight and the ignition is on,
� the headlamp switch is off and
� the transaxle is not in PARK (P).
When DRL are on, only your low-beam headlamps (at reduced intensity) will be on. No other exteriorlamps such as the parking lamps, taillamps, etc. will beon when the DRL are being used. Your instrument panelwon’t be lit up either.
When the Twilight Sentinel switch is on and it’s darkenough outside, the low-beam headlamps (at reducedintensity) will turn off and automatic low-beamheadlamp operation will occur. When the TwilightSentinel switch is on and it’s bright enough outside, the automatic lamps will go off, and the low-beamheadlamps at reduced intensity will take over.

2-52
If it’s dark enough outside and the Twilight Sentinelcontrol is off, a HEADLAMPS SUGGESTED messagewill display on the Driver Information Center (DIC).This message informs the driver that turning on theexterior lamps is recommended even though the DRLare still illuminated (it’s become dark enough outside torequire the headlamps and/or other exterior lamps).Turning on the Twilight Sentinel, the headlamp switchor the fog lamp switch will remove the HEADLAMPSSUGGESTED message.
To idle your vehicle at night with the DRL off, turn off the Twilight Sentinel and shift the transaxle into PARK (P). Placing your vehicle in PARK (P)disables the DRL. The DRL will stay off until you shift out of PARK (P).
To drive your vehicle at night with the DRL off, turn off the Twilight Sentinel and manually turn on theparking lamps.
As with any vehicle, you should turn on the regularheadlamp system when you need it.
Fog Lamps (If Equipped)
Use the fog lamps for bettervision in foggy or mistyconditions. When you pressthe fog lamp button, a foglamp symbol located in theinstrument panel will comeon to indicate that the foglamps and the parkinglamps are on.
Press the button again to turn them off.
If you turn on the high-beam headlamps, the fog lampswill turn off. They’ll turn back on again when youswitch to low-beam headlamps.
When the Twilight Sentinel is on and the fog lampswitch is activated, the fog lamps will remain on as wellas the headlamps and parking lamps.

2-53
Cornering LampsThe cornering lamps come on when the headlamps or parking lamps are on and you signal a turn with the multifunction lever. They provide more light for cornering.
Twilight Sentinel�
This control is located next to the headlamp knob.It automatically switchesthe lamps on and off by sensing how dark it is outside.
To operate the Twilight Sentinel, leave the lamp knoboff and move the TWILIGHT control to any position but OFF.
If you move the control all the way to the right, thelamps will remain on for approximately three minutesafter the ignition has been turned to OFF. If you movethe control so it is barely on, the lamps will go offquickly when you turn the ignition switch out of OFF.You can adjust the delay time from only a few secondsto about three minutes.
If it’s dark enough outside and the Twilight Sentinelcontrol is off, a HEADLAMPS SUGGESTED messagewill display on the Driver Information Center (DIC).This message informs the driver that turning on theexterior lamps is recommended (it’s become darkenough outside to require the headlamps and/or otherexterior lamps). Turning on the Twilight Sentinel, theheadlamp switch or the fog lamp switch will remove theHEADLAMPS SUGGESTED message.

2-54
Light Sensor
The light sensor for the DRL and the Twilight Sentinelis located in the center of the front defogger grille. If you cover the sensor, it will read “dark” and the lamps or the HEADLAMPS SUGGESTED messagewill be on whenever the ignition is on.
Exterior Lighting Battery SaverIf the headlamp or manual parking lamp control has been left on, the exterior lamps will turn offapproximately 10 minutes after the ignition is turned to OFF. This protects draining the battery in case youhave accidentally left the headlamps or parking lampson. If you need to purposely leave the lamps on for more than 10 minutes with the ignition in OFF orACCESSORY, turn the manual control knob off andthen back on. To delay the lamps from turning off, see “Twilight Sentinel” in the Index.
If the headlamp switch is turned on after the ignition keyis moved to either OFF or ACCESSORY, the lamps willnot time out.

2-55
Interior LampsInstrument Panel Intensity/Brightness ControlThe displays automatically dim when it becomes darkoutside and your lights are on. The displays automaticallybrighten when it becomes light outside. Backlighting will only remain active as long as the parking lamps are on and it is dark outside. The brightness of thebacklighting can be adjusted by using the instrumentpanel brightness control.
The button is located to the right of the TwilightSentinel control. Push thebutton in to release it to the outward position.
Turn the button counterclockwise to dim and clockwiseto brighten the lighting. Push the button in to return it tothe original storage position.
Courtesy LampsThe courtesy lamps are located on the headliner abovethe rear seat. These lamps come on by turning theinstrument panel brightness control fully clockwise orwhen any door is opened and it is dark outside. Puddlelamps are located on the bottom of the front and reardoor trim.
Illuminated EntryThe illuminated entry system turns on the courtesylamps and the backlighting to the door switches and to the lamp control knob when a door is opened or ifyou press the remote keyless entry transmitter unlockbutton. If activated due to the transmitter, the lightingwill remain active for about 40 seconds. Since theilluminated entry system uses the light sensor, it must bedark outside in order for the courtesy lamps to turn on.The courtesy lamps turn off approximately 25 secondsafter the last door is closed. They will dim to off if theignition key is placed in ON, or immediately deactivateif the power locks are activated.

2-56
Parade DimmingThis feature prohibits dimming of the digital displaysand backlighting during daylight hours when the key isin the ignition and the headlamps are on. This featureoperates with the light sensor for the Twilight Sentineland is fully automatic. When the light sensor readsdarkness outside and the parking lamps are active, the digital displays can be adjusted by turning the lampcontrol knob counterclockwise to dim and clockwise tobrighten lighting.
Reading Lamps
The reading lamps are located on the overhead consoleon the headliner and in the rear door opening. Theselamps come on automatically when any door is openedand it is dark outside. For manual operation, press thebutton to turn them on. Press it again to turn them off.
If the reading lamps are left on, they automatically shutoff 10 minutes after the ignition has been turned off.
Battery Load ManagementThe battery load management feature is designed tomonitor the vehicle electrical load and determine whenthe battery is in a heavy discharge condition. Duringtimes of high electrical loading, the engine may idle at a higher RPM (revolutions per minute) setting thannormal to make sure the battery charges. High electricalloads may occur when several of the following are on: headlamps, high beams, fog lamps, rear windowdefogger, high blower fan, heated seats and enginecooling fans.

2-57
If the battery continues to discharge, even with theengine idling at a higher RPM setting, some electricalloads will automatically be reduced. When this occurs,the rear window defogger may take slightly longer toclear the glass, the heated seats may not get as warm asthey usually do and the fan blower may cut back to alower speed. For more battery saving information, see “Battery Saver Active Message” in the Index.
Inadvertent Power Battery SaverThis feature is designed to protect your vehicle’s batteryagainst drainage from the interior lamps, trunk lamp,glove box lamp, cigarette lighters or the garage dooropener. When the ignition is turned off, the power tothese features will automatically turn off after10 minutes (three minutes if a new car has 15 miles (24 km) or less). Power will be restored for an additional10 minutes if any door is opened, the trunk is opened orthe courtesy lamp switch is turned on.
MirrorsElectrochromic Day/Night Rearview Mirrorwith Compass
Your vehicle has an electrochromic inside rearviewmirror with a compass. Your vehicle’s mirror alsocontains OnStar� controls. For more information about OnStar, see “OnStar” in the Index.

2-58
This is the on/off button, located on the lower leftside of the mirror for the electrochromic and compassfunctions of the rearview mirror.
The mirror also includes an eight-point compass display in the upper right corner of the mirror face.When on, the compass automatically calibrates as thevehicle is driven.
When cleaning the mirror, use a paper towel or similarmaterial dampened with glass cleaner. Do not sprayglass cleaner directly on the mirror as that may cause theliquid cleaner to enter the mirror housing.
Mirror Operation
To turn on the automatic dimming feature, press and hold the on/off button for about three seconds. To turn off automatic dimming, press and hold theon/off button for about three seconds again. The greenindicator light will be illuminated when this feature isactive. The automatic dimming feature will be activeeach time the vehicle is started.
Compass Operation
Press the on/off button once to turn the compass on or off.
When the ignition and the compass feature are on, the compass will show two character boxes forapproximately two seconds. After two seconds, the mirror will display the compass heading.
Compass Calibration
If after two seconds, the display does not show acompass heading (“N” for North, for example), there may be a strong magnetic field interfering with the compass. Such interference may be caused by amagnetic antenna mount, magnetic note pad holder or a similar magnetic item. If the letter “C” should everappear in the compass window, the compass may need calibration.
The mirror can be calibrated by driving the vehicle incircles at 5 mph (8 km/h) or less until the display reads a direction.
The compass can be placed in calibration mode bypressing and holding the on/off button until a “C” isshown in the compass display.

2-59
Compass Variance
The mirror is set in zone eight upon leaving the factory.It will be necessary to adjust the compass to compensatefor compass variance if you live outside zone eight.Under certain circumstances, as during a long distancecross-country trip, it will be necessary to adjust forcompass variance. Compass variance is the differencebetween earth’s magnetic north and true geographicnorth. If not adjusted to account for compass variance,your compass could give false readings.
To adjust for compass variance, do the following:
1. Find your current location and variance zone numberon the following zone map.
2. Press and hold the on/off button until a zone numberappears in the display.
3. Once the zone number appears in the display, pressthe on/off button quickly until the correct zonenumber appears in the display. Stop pressing thebutton and the mirror will return to normaloperation. If “C” appears in the compass window, the compass may need calibration. See “CompassCalibration” explained previously.

2-60
Power Remote Control Mirror (Heated)
The control on the driver’sdoor armrest operates bothoutside rearview mirrors.Press (R) on the controlswitch to choose the rightmirror or (L) to choose theleft mirror. The centerswitch position is off andwill not move the mirrors ifthe control pad is touched.
To adjust the mirror, push the arrows on the control padin the direction you want the mirror to go. Adjust eachmirror so you can see the side of your vehicle and thearea behind your vehicle.
When you operate the rear window defogger, it alsowarms both outside mirrors to help clear them of fog or ice. See “Rear Window Defogger” in the Index formore information.
The mirrors can also be programmed for personalizationif you have the optional memory package. For moreinformation, see “Memory Seat and Mirrors” in the Index.
Driver’s Outside Auto-Dimming Rearview MirrorThe driver’s side outside mirror will adjust for the glareof headlamps behind you. This feature is controlled bythe on and off settings on the electrochromic mirror. See “Electrochromic Day/Night Rearview Mirror withCompass” in the Index.
Curb View Assist Mirror (If Equipped)If your vehicle is equipped with memory mirrors, it will also be capable of performing the curb view assistmirror feature. This feature will cause the passenger’smirror to tilt to a preselected position when the vehicleis in REVERSE (R). This feature may be useful in allowing you to view the curb when you are parallel parking.
When the vehicle is shifted out of REVERSE (R) and afive-second delay has occurred, the passenger’s mirrorwill return to its original position.
If further adjustment is needed after the mirror is tilted,the mirror switch may be used.
This feature can be enabled/disabled through the Driver Information Center. See “Vehicle Programmingand Personalization Features” in the Index for more information.

2-61
Convex Outside MirrorYour passenger’s side mirror is convex. A convexmirror’s surface is curved so you can see more from thedriver’s seat.
CAUTION:
A convex mirror can make things (like othervehicles) look farther away than they really are.If you cut too sharply into the right lane, youcould hit a vehicle on your right. Check yourinside mirror or glance over your shoulder beforechanging lanes.
Storage CompartmentsGlove BoxThe glove box is located in front of the passenger’s seat.To lock the glove box door, insert the master key intothe lock cylinder and turn it clockwise. Turn the keycounterclockwise to unlock the door.
Front Storage Area (If Equipped)The front storage area comes with a coinholder, astorage compartment for CDs or tapes, an optionalcellular telephone and a dual cupholder.
Map PocketThe map/storage pockets are located on each front doorand on the rear door trim as well as on the back of bothfront seatbacks.
Center Instrument Panel Compartment (If Equipped)This storage compartment is located in the center of theinstrument panel below the radio. Pull the door out toreveal the accessory power outlet and storagecompartment. To clean the storage compartment, lift outwhile pulling on the sides.
Center Console Storage (If Equipped)The center console includes a storage tray, storagecompartment for CDs or tapes, a dual cupholder thatunfolds, a coinholder, an optional cellular telephone andan armrest. The cupholder can be opened by pressing onthe surface panel located in front of the armrest andunfolding it.

2-62
Full Floor Console Storage (If Equipped)The full floor console has an upper and lower storagearea. The lower storage area has two removable bins thatcan hold tapes and/or CDs. There is also a removablecoinholder that attaches to the side of one of the bins.The upper storage area is available for the optionalcellular telephone. A dual cupholder is located in frontof the console. Open and close by pressing on thecupholder. To open the console, pull up on either leverto open the upper or lower storage area.
Rear Storage Center ArmrestYour vehicle is equipped with a rear seat armrest whichincludes an open storage compartment and a dualcupholder. To open, release the latch at the front edge.
Rear Storage Door Trim Armrest (If Equipped)Your vehicle may be equipped with a rear storage doortrim armrest. The storage area is located in the rear doortrim under the switch plate lid and includes an accessorypower outlet.
Center Flex Storage Unit (If Equipped)
Your vehicle may be equipped with a center flex storageunit that includes a front center seat with a lap belt andan underseat storage compartment. The center seatbackcan also be used as a fold down armrest with extra spacefor CDs or tapes. An optional cellular telephone islocated in the underseat storage compartment.Cupholders are also located at the front edge of thestorage unit and can be accessed by pulling the strap and folding the compartment forward.

2-63
When not being used, the center seat lap belt can bestored in the underseat storage compartment as shown.
Convenience NetThe convenience net is located inside the back wall ofthe trunk. Put small loads, like grocery bags, behind thenet. It can help keep them from falling over during sharpturns or quick starts and stops.
The net is not for larger, heavier loads. Store them in thetrunk as far forward as you can. When not using the net,hook the net to the tabs securing it to the sill plate.
Ashtrays and Cigarette Lighter
NOTICE:
Don’t put papers or other flammable items into your ashtrays. Hot cigarettes or othersmoking materials could ignite them, causing adamaging fire.
Front AshtrayWith the full floor console, the ashtray is located belowthe climate control system. To open, push down on the cover. To clean the ashtray, lift it out by gripping the sides.
For vehicles without the floor console, pull the traylocated below the radio to reveal the ashtray. Theashtray can be removed for cleaning.
Rear AshtrayTo use the side rear ashtray located on the armrest, lift the lid.

2-64
Cigarette LighterThe cigarette lighter is located near the ashtray. Press itall the way in and release. It will pop back out by itselfwhen it’s ready to light. You may also have a lighterlocated at the rear seat air outlet.
Cigarette lighters can be used to provide electricalpower to accessories. See “Accessory Power Outlets” inthe Index.
NOTICE:
Don’t hold a cigarette lighter in with your handwhile it is heating. If you do, it won’t be able toback away from the heating element when it’sready. That can make it overheat, damaging thelighter and the heating element.
Sun VisorsSwing down the primary visor to block out glare. It canalso be detached from the center mount and moved tothe side while the auxiliary sunshade remains to blockthe glare from the front. The visors also haveside-to-side slide capability.
The driver’s sunshade is also equipped with a storage flap.
Lighted Visor Vanity MirrorPull the visor down and lift the cover. Move the slideswitch up or down to brighten or dim the lamp.
Lighted Rear Vanity Mirror (If Equipped)Pull the vanity cover down to see the mirror. Move theslide switch up or down to brighten or dim the lamps.
Coat HooksYour vehicle is equipped with flip-out coat hooks. They are located above the rear doors, behind the rearassist handles. Return them to the stowed position whennot in use.

2-65
Rear Power Sunshade (If Equipped)The rear power sunshade helps to reduce the amount ofheat and light entering the rear window.
The rear power sunshade is located in the rear shelf. Toraise the power sunshade, press and release the REARSHADE switch located on the front overhead console.
To close the power sunshade, press and release theREAR SHADE switch again. The rear power sunshadeswitch only works when the ignition is on or when theRetained Accessory Power is active. See “RetainedAccessory Power” in the Index.
Never store objects on the rear shelf because they may get caught in the sunshade or be tossed about inyour vehicle.
Manual Rear Side Door Sunshade (If Equipped)To use the manual rear side door sunshades, lower theside windows and hook the top edge of the retractablesunshades over the edge of the windows and raise thewindows. To remove the shades, lower the windows andthe hooks will disengage automatically.

2-66
Cellular Telephone (Option)With this option, your vehicle is equipped with aportable cellular telephone system. The system hassteering wheel telephone controls and informationoutput through the Driver Information Center (DIC).Voice activation with remote record and hands-freeoperation are standard features. For more information,see the “Cellular Phone System Supplement.” A user’sguide is provided with the telephone.
Accessory Power OutletsYour vehicle may be equipped with accessory poweroutlets. If you have the rear storage door trim armrest,the power outlet is located under the storage lid. If youhave a vehicle with a center storage compartmentlocated on the instrument panel, you may also have an accessory power outlet in the storage drawer.
The outlets can be used to plug in electrical equipmentsuch as a cellular telephone, CB radio, etc. Follow theproper installation instructions that are included withany electrical equipment you install.
Certain power accessory plugs may not be compatible to the power accessory outlet and could result in blownvehicle or adapter fuses. If you experience a problem see your dealer for additional information on the poweraccessory plugs.
The accessory power outlet will only operate when theignition is in ON and for 10 minutes after turning theignition OFF. If you would like the accessory poweroutlet to operate regardless of ignition position, and for unlimited periods of time, see “Engine CompartmentBussed Electrical Center” in the Index or see your dealer.
Leaving an accessory on for a long period of time, or afuse in the wrong place, can drain the vehicle’s battery.
NOTICE:
When using the accessory power outlet, themaximum load of any electrical equipmentshould not exceed 15 amps.

2-67
OnStar� System (If Equipped)OnStar is a vehicle communications system that offers a variety of services and provides a hands-freecommunication link between you and the OnStar Center.A service subscription agreement and fee are required inorder to receive OnStar service. Services are available24 hours a day, 7 days a week. For more information,call 1-888-ONSTAR-7 (1-888-667-8277).
OnStar Services Button: Press this button once to contact an advisor who will be able to assist you withthese services. If you are not quickly connected, thesystem will automatically reset and redial. This ensuresconnection to the center; there is no additional actionrequired. Press the Call Answer/End button to cancel theautomatic redial.
Emergency Button: In an emergency situation,press the emergency service button. Upon receiving thecall, an advisor at the center will locate your vehicle andassess the situation. If necessary, the advisor will alertthe nearest emergency service provider.
Call ANSWER/END Button: Use this button to answer a call. (If you are receiving a call, the audiosystem will mute, and the ring will be heard). Press thisbutton at the end of a call to disconnect and return theaudio system to its previous settings. This button willalso cancel a call if one of the buttons is accidentallypressed or if the automatic redial function is activated.

2-68
Volume Control: You can control the volume of theOnStar System using the steering wheel volume control.
Telltale Light: This light will indicate the status ofthe system. A solid green light will come on when youstart the vehicle to let you know that the system is onand is ready to make or receive calls.
If the light blinks green it means that an incoming or outgoing call is in progress. Press the Call ANSWER/END button if you notice the light blinking and you are not on a call.
The light will be red in the event of an OnStar systemmalfunction. If this occurs press the OnStar button toattempt to contact an advisor. If the connection is made,the advisor will assist you with steps to take to makesure that the system is functioning properly. If youcannot contact the advisor, take your vehicle to yourdealership as soon as possible for assistance.
Safety and Security Services� Automatic Notification of Air Bag
Deployment -- If an air bag deploys, a priorityemergency signal is automatically sent to thecenter. An advisor will locate your vehicle’sposition, try to contact you and assist you in thesituation. If the center is unable to contact you, an emergency service provider will be contacted.
� Stolen Vehicle Tracking -- Call the center at1-888-4-ONSTAR (1-888-466-7827) to reportyour vehicle stolen. The system can then locateand track your vehicle and the advisor will beable to notify the proper authorities.
� Roadside Assistance with Location -- Forvehicle breakdowns, press the OnStar button. An advisor will contact the appropriate help.
� Remote Diagnostics -- If an instrument panellight comes on, the center can perform a check ofthe engine on-board computer. An advisor canthen recommend what action needs to be taken.

2-69
� OnStar MED-NET -- Med-Net can store your personal medical history and provide it to emergency personnel if necessary. (Requires activation and additional fee.)
� Accident Assist -- An advisor can providestep-by-step guidance following an accident.
� Remote Door Unlock -- To contact the center,call 1-888-4-ONSTAR. You will be required to provide your security information. An advisorwill send a command to your vehicle to unlockitself. The advisor can delay unlocking yourvehicle. Remote Door Unlock is disabled48 hours after the vehicle is parked to maintainthe battery charge.
� Vehicle Locator Service -- To contact the center,call 1-888-4-ONSTAR. You will be required toprovide your security information. An advisorwill send a command to your vehicle to sound thehorn and/or flash the lamps.
In order to provide you with excellent service, calls withthe OnStar Center may be monitored or recorded.
Premium Services (Includes Safety andSecurity Services)
� Route Support -- An advisor can providedirections or guidance to anywhere you want togo. In addition, they can help you locate gasstations, rest areas, ATMs, hospitals, hotels,stores, eateries and more.
� Concierge Services -- The concierge advisor can obtain tickets, reservations, or help withvacation/trip planning and other unique items and services.
� Ride Assist -- An advisor can locatetransportation in the event that you are unable to drive.

2-70
OnStar System LimitationsComplete limitations can be found on the SubscriberServices Agreement.
OnStar Service is:
� available in the 48 contiguous United States,Alaska, Hawaii and Canada;
� available when the vehicle is within the operatingrange of a cellular provider;
� subject to limitations caused by atmosphericconditions, such as severe weather ortopographical conditions, such as mountainous terrain;
� subject to cellular carrier equipment limitations.
Global positioning capabilities used to deliver OnStar service will not be available if satellite signalsare obstructed.
OnStar will not function if the vehicle’s battery isdischarged or disconnected. It may also be inoperative if the vehicle is in an accident and the OnStar or vehicleelectrical system components are damaged.
Safety and security services are provided by existinggovernment emergency service providers. OnStar willuse reasonable efforts to contact the appropriateemergency service provider and request assistance butcannot promise that they will respond to the call in atimely manner or at all.
Assist HandlesA handle above each door can be used when getting outof your vehicle.
Umbrella HolderThe driver’s and passenger’s front seat cushion isequipped with an umbrella holder. Gently slide theumbrella into the slot located under the front portion of the driver’s or passenger’s seat cushion.
Floor MatsYour vehicle is equipped with rubber-backed front andrear floor mats. Keep them clean by vacuuming andusing a spot cleaner, if necessary. Do not machine wash.

2-71
Sunroof (Option)
The two control switches to operate the sunroof arelocated on the overhead console and include VENT,ROOF, open and close.
The control switches work only when the ignition is on or the Retained Accessory Power (RAP) is active.See “Retained Accessory Power” in the Index.
To open the glass panel and sunshade, press and hold the ROOF switch rearward to the first position. The sunshade can also be opened by hand. To close theglass panel, press and hold the ROOF switch forward.As the glass panel closes, it will open slightly toward thevent to provide a better seal. The sunshade can only beclosed by hand.
To express-open the glass panel to a partially openposition, press and release the ROOF switch rearward to the second position. The glass panel may be fullyopened by pressing the ROOF switch again.
To stop the glass panel when express opening, presseither the ROOF or VENT switch in any direction.
If you press and hold the ROOF switch in the expressopen position for more than one second, the expressopen operation will be over-ridden and the sunroof willstop when the switch is released.
To vent the glass panel, press and hold the VENT switchin the open position. The sunshade must be opened byhand. To close the glass panel, press and hold the VENTswitch in the close position.

2-72
HomeLink� Transmitter (If Equipped)
This device complies with Part 15 of the FCC Rules.Operation is subject to the following two conditions: (1) this device may not cause harmful interference, and (2) this device must accept any interferencereceived, including interference that may causeundesired operation.
This device complies with RSS-210 of Industry Canada.Operation is subject to the following two conditions: (1) this device may not cause interference, and (2) thisdevice must accept any interference, includinginterference that may cause undesired operation of the device.
Changes and modifications to this system by other thanan authorized service facility could void authorization touse this equipment.
Programming the HomeLink TransmitterDo not use the HomeLink Transmitter with any garagedoor opener that does not have the “stop and reverse”safety feature. This includes any garage door openermodel manufactured before April 1, 1982.
Be sure that people and objects are clear of the garagedoor you are programming.

2-73
Your vehicle’s engine should be turned off whileprogramming the transmitter. Follow these steps toprogram up to three channels:
1. If you have previously programmed a transmitterchannel, proceed to Step 2. Otherwise, hold downthe two outside buttons on the HomeLinkTransmitter until the indicator light begins to flashrapidly (after 20 seconds). Then release the buttons.This procedure initializes the memory and erases anyprevious settings for all three channels.
2. Decide which one of the three channels you want toprogram. Hold the end of the hand-held transmitterabout 2 to 5 inches (5 to 13) away from the surfaceof the HomeLink Transmitter so that you can still seethe indicator light.
3. Using both hands, press the hand-held transmitterbutton and the desired button on the HomeLinkTransmitter. Continue to press both buttons through Step 4.
4. Hold down both buttons until you see the indicatorlight on the HomeLink Transmitter flash slowly andthen rapidly. The rapid flashing indicates that theHomeLink Transmitter has been programmed.Release both buttons once the indicator light starts to flash rapidly.
If you have trouble programming the HomeLinkTransmitter, make sure that you have followed thedirections exactly as described. The HomeLinkTransmitter may not work with older garage dooropeners that do not meet current Federal ConsumerSafety Standards. If you cannot program the transmitter after repeated attempts, refer to “RollingCode Programming” later in this section or contact the HomeLink Transmitter manufacturer at 1-800-355-3515.
Be sure to keep the original hand-held transmitter in case you need to erase and reprogram the HomeLink Transmitter.
Canadian Programming: During programming, the hand-held transmitter may automatically stoptransmitting after one or two seconds. In this case, youshould press and re-press the button on the hand-heldtransmitter every two seconds without ever releasing thebutton on the HomeLink Transmitter. Release bothbuttons when the indicator light on the HomeLinkTransmitter begins to flash rapidly.

2-74
Operating the HomeLink TransmitterPress and release the appropriate button on theHomeLink Transmitter. The indicator light comes onwhile the signal is being transmitted.
The HomeLink Transmitter is disabled when theVALET lockout switch inside the glove box is activated.For more information, see “Valet Lockout Switch” in the Index.
If the hand-held transmitter appears to program theHomeLink Transmitter but does not open your garagedoor, and if the garage door opener was manufacturedafter 1996, the garage door opener may have a “rollingcode” system. A rolling code system changes the codeof the garage door opener every time you open or closethe garage door.
To determine if you have this system, press the buttonon the HomeLink Transmitter that you haveprogrammed already. If the indicator light on theHomeLink Transmitter flashes rapidly for two secondsand then turns solid, the garage door opener has a rolling code system. In a rolling code system, the garage door motor head unit must be trained to theHomeLink Transmitter.
“Rolling Code” Programming (If Equipped)If you have not previously programmed the hand-heldtransmitter to the HomeLink Transmitter, see“Programming the HomeLink Transmitter” listedpreviously. If you have completed this programmingalready, you now need to train the garage door openermotor head unit to recognize the HomeLink Transmitter.Refer to your garage door opener owner’s manual forthe proper transmitter training procedure for your garagedoor opener brand.
1. Find the training button on the garage door openermotor head unit. The exact location and color of thebutton may vary by garage door opener brand. If youhave difficulty finding the training button, refer toyour garage door opener owner’s manual.
Because of the steps involved, it may be helpful to have another person available to assist in programmingthe transmitter.
2. Press the training button on the garage door openermotor head unit.
Following this step, you have 30 seconds to start Step 3.

2-75
3. Return to the HomeLink Transmitter in your vehicleand firmly press and release the HomeLinkTransmitter button you have already programmed fortwo to three seconds. Press and release the buttonagain (you may need to do this step up to threetimes) to make sure that the HomeLink Transmitterhas been trained to the garage door opener motorhead unit. Check that the training was successful.
The garage door opener should now recognize theHomeLink Transmitter. You may either use theHomeLink Transmitter or the hand-held transmitter toopen the garage door.
If after following these instructions, you still haveproblems training the garage door opener, contact the HomeLink Transmitter manufacturer at 1-800-355-3515.
Erasing ChannelsTo erase all three programmed channels, hold down thetwo outside buttons until the indicator light begins toflash (after 20 seconds). Release both buttons.
AccessoriesAccessories for the HomeLink Transmitter are availablefrom the manufacturer of the unit. If you would likeadditional information, please call 1-800-355-3515.

2-76
The Instrument Panel -- Your Information System

2-77
The main components of the instrument panel are the following:
A. Air Outlets
B. Turn Signal/Multifunction Lever
C. HVAC Steering Wheel Controls (or CellularTelephone Controls, If Equipped)
D. Instrument Panel Cluster
E. Audio Steering Wheel Controls
F. Driver Information Center Buttons
G. Electronic Climate Controls
H. Lamp Controls
I. Night Vision Controls (Option)
J. Hood Release
K. Cruise Control
L. Horn
M. Cruise Control
N. Radio
O. Ashtray
P. Glove Box

2-78
Digital ClusterThe instrument panel cluster is designed to let you know at a glance how your vehicle is running. You’ll know how fast you’re going, how much fuel you’re using and many of the other things you’ll need to know to drive safely and economically.
United States version shown, Canada similar

2-79
Analog Cluster (If Equipped)
United States version shown, Canada similar

2-80
Speedometer and OdometerThe speedometer lets you see your speed in both miles per hour (mph) and kilometers per hour (km/h).The odometer shows how far your vehicle has beendriven, in either miles (used in the United States) orkilometers (used in Canada).
You may wonder what happens if a vehicle has to have a new odometer installed. The new one may read thecorrect mileage. This is because your vehicle’s computerhas stored the mileage in memory.
Trip Odometer
Press this button to tell how far you’ve traveledsince you last set the tripodometer back to zero.
English/Metric Button
By pressing this button, you can go back and forthfrom English (miles) tometric (kilometers).
Other readings such as temperature, fuel and tripodometer also go back and forth between English and metric.
Display Mode
On the analog cluster, this button is located between thetrip odometer and ENG/Metric button. Press DSPLMODE to turn the backlighting and the digital speedimage on and off.
On the digital cluster, press DSPL MODE to turn thedigital displays other than the speedometer and geardisplay on and off.

2-81
Vehicle Speed Limiter
This feature prevents your vehicle from exceedingspeeds that the tires are not rated for. When thishappens, the engine’s fuel supply is shut off. When thevehicle speed slows, the fuel supply will come on again.
Tachometer (Analog Cluster Only)
This gage indicates theengine speed in revolutionsper minute (rpm).
NOTICE:
Do not operate the engine with the tachometer inthe red area or engine damage may occur.
Engine Speed Limiter
This feature prevents the engine from operating at toomany revolutions per minute (rpm). When the engine’srpm are critically high, the fuel supply to the engine isshut off. When the engine speed slows, the fuel supplywill come on again. This helps prevent damage to the engine.
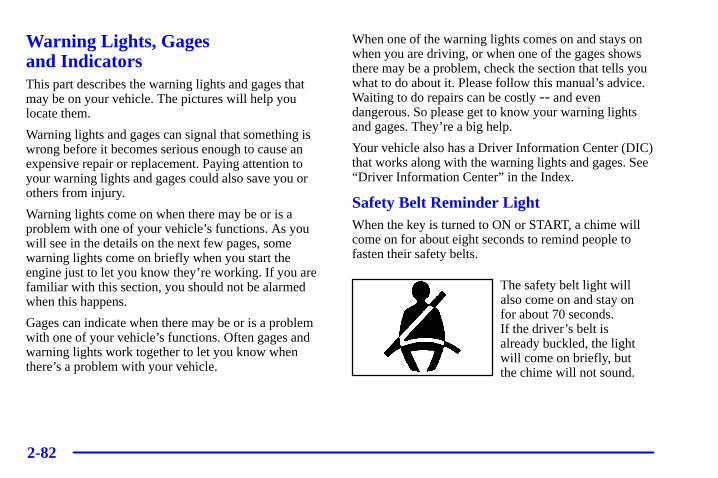
2-82
Warning Lights, Gages and IndicatorsThis part describes the warning lights and gages thatmay be on your vehicle. The pictures will help youlocate them.
Warning lights and gages can signal that something iswrong before it becomes serious enough to cause anexpensive repair or replacement. Paying attention toyour warning lights and gages could also save you orothers from injury.
Warning lights come on when there may be or is aproblem with one of your vehicle’s functions. As youwill see in the details on the next few pages, somewarning lights come on briefly when you start theengine just to let you know they’re working. If you arefamiliar with this section, you should not be alarmedwhen this happens.
Gages can indicate when there may be or is a problemwith one of your vehicle’s functions. Often gages andwarning lights work together to let you know whenthere’s a problem with your vehicle.
When one of the warning lights comes on and stays onwhen you are driving, or when one of the gages showsthere may be a problem, check the section that tells youwhat to do about it. Please follow this manual’s advice.Waiting to do repairs can be costly -- and evendangerous. So please get to know your warning lightsand gages. They’re a big help.
Your vehicle also has a Driver Information Center (DIC)that works along with the warning lights and gages. See“Driver Information Center” in the Index.
Safety Belt Reminder LightWhen the key is turned to ON or START, a chime willcome on for about eight seconds to remind people tofasten their safety belts.
The safety belt light willalso come on and stay onfor about 70 seconds. If the driver’s belt is already buckled, the lightwill come on briefly, but the chime will not sound.

2-83
Air Bag Readiness LightThere is an air bag readiness light on the instrumentpanel, which shows AIR BAG or the air bag symbol.The system checks the air bag’s electrical system formalfunctions. The light tells you if there is an electricalproblem. The system check includes the air bag sensors,the air bag modules, the wiring and the crash sensingand diagnostic module. For more information on the airbag system, see “Air Bag” in the Index.
United States Analog ClusterCanada
This light will come on when you start your vehicle, andit will flash for a few seconds. Then the light should goout. This means the system is ready.
If the air bag readiness light stays on after you start thevehicle or comes on when you are driving, your air bagsystem may not work properly. Have your vehicleserviced right away.
CAUTION:
If the air bag readiness light stays on after youstart your vehicle, it means the air bag systemmay not be working properly. The air bags inyour vehicle may not inflate in a crash, or theycould even inflate without a crash. To help avoidinjury to yourself or others, have your vehicleserviced right away if the air bag readiness lightstays on after you start your vehicle.
The air bag readiness light should flash for a fewseconds when you turn the ignition key to ON. If thelight doesn’t come on then, have it fixed so it will beready to warn you if there is a problem.
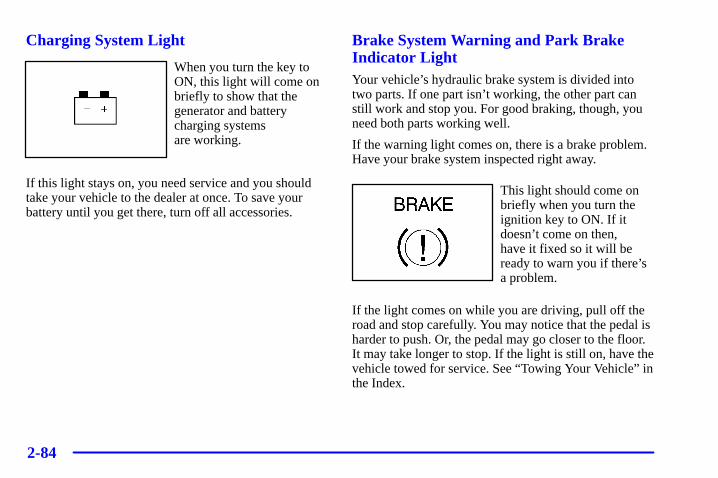
2-84
Charging System Light
When you turn the key toON, this light will come onbriefly to show that thegenerator and batterycharging systems are working.
If this light stays on, you need service and you shouldtake your vehicle to the dealer at once. To save yourbattery until you get there, turn off all accessories.
Brake System Warning and Park BrakeIndicator LightYour vehicle’s hydraulic brake system is divided intotwo parts. If one part isn’t working, the other part canstill work and stop you. For good braking, though, youneed both parts working well.
If the warning light comes on, there is a brake problem.Have your brake system inspected right away.
This light should come onbriefly when you turn theignition key to ON. If itdoesn’t come on then, have it fixed so it will beready to warn you if there’sa problem.
If the light comes on while you are driving, pull off theroad and stop carefully. You may notice that the pedal isharder to push. Or, the pedal may go closer to the floor.It may take longer to stop. If the light is still on, have thevehicle towed for service. See “Towing Your Vehicle” inthe Index.

2-85
CAUTION:
Your brake system may not be working properlyif the brake system warning light is on. Drivingwith the brake system warning light on can leadto an accident. If the light is still on after you’vepulled off the road and stopped carefully, havethe vehicle towed for service.
When the ignition is on, the brake system warning lightwill also come on when you set your parking brake. The light will stay on if your parking brake doesn’trelease fully. If it stays on after your parking brake isfully released, it means you have a brake problem.
Anti-Lock Brake System Warning Light
With the anti-lock brakesystem, the light(s) willcome on when your engine is started and maystay on for several seconds.That’s normal.
If the light stays on, turn the ignition to OFF. Or, if thelight comes on when you’re driving, stop as soon aspossible and turn the ignition off. Then start the engineagain to reset the system. If the light still stays on, orcomes on again while you’re driving, your vehicle needsservice. If the regular brake system warning light isn’ton, you still have brakes, but you don’t have anti-lockbrakes. If the regular brake system warning light is also on, you don’t have anti-lock brakes and there’s aproblem with your regular brakes. See “Brake SystemWarning Light” earlier in this section.
The anti-lock brake system warning light should comeon briefly when you turn the ignition key to ON. If thelight doesn’t come on then, have it fixed so it will beready to warn you if there is a problem.

2-86
Traction Control System Warning Light
United States Canada (Analog Only)
This warning light should come on briefly when theengine is started.
If the warning light doesn’t come on then, have it fixedso it will be ready to warn you if there’s a problem. If itstays on, or comes on when you’re driving, there may bea problem with your traction control system and yourvehicle may need service. When this warning light is on, the system will not limit wheel spin. Adjust yourdriving accordingly.
The traction control system warning light may come onfor the following reasons:
� If there’s a brake system problem that is specificallyrelated to traction control, the traction control systemwill turn off and the warning light will come on.
� If the traction control system is affected by anengine-related problem, the system will turn off andthe warning light will come on.
If the traction control system warning light comes onand stays on for an extended period of time when thesystem is turned on, your vehicle needs service.
Engine Coolant Temperature Warning Light
This light tells you that yourengine has overheated. Youshould stop your vehicleand turn the engine off assoon as possible. A warningchime should also sound ifthis light comes on.
As a check, the light should come on for a few secondswhen you start your engine. See “Engine Overheating”in the Index.

2-87
Engine Coolant Temperature Gage
United States (Analog Only)
Canada(Analog Only)
This gage shows theengine coolanttemperature. If thegage pointer movesinto the red area, theengine is too hot.
Digital Cluster
That reading means the same thing as the warning light -- the engine coolant has overheated. See “EngineOverheating” in the Index.

2-88
Malfunction Indicator Lamp (ServiceEngine Soon Light in the United States or Check Engine Light in Canada)
United States Canada (Analog Only)
Your vehicle is equipped with a computer whichmonitors operation of the fuel, ignition and emissioncontrol systems.
This system is called OBD II (On-BoardDiagnostics-Second Generation) and is intended to assurethat emissions are at acceptable levels for the life of thevehicle, helping to produce a cleaner environment. TheSERVICE ENGINE SOON or CHECK ENGINE lightcomes on to indicate that there is a problem and service isrequired. Malfunctions often will be indicated by thesystem before any problem is apparent. This may preventmore serious damage to your vehicle. This system is alsodesigned to assist your service technician in correctlydiagnosing any malfunction.
NOTICE:
If you keep driving your vehicle with this lighton, after a while, your emission controls may notwork as well, your fuel economy may not be asgood and your engine may not run as smoothly.This could lead to costly repairs that may not becovered by your warranty.

2-89
NOTICE:
Modifications made to the engine, transaxle,exhaust, intake or fuel system of your vehicle orthe replacement of the original tires with otherthan those of the same Tire Performance Criteria(TPC) can affect your vehicle’s emission controlsand may cause the SERVICE ENGINE SOON or CHECK ENGINE light to come on.Modifications to these systems could lead tocostly repairs not covered by your warranty. This may also result in a failure to pass arequired Emission Inspection/Maintenance test.
This light should come on, as a check to show you it isworking, when the ignition is on and the engine is notrunning. If the light doesn’t come on, have it repaired.This light will also come on during a malfunction in oneof two ways:
� Light Flashing -- A misfire condition has beendetected. A misfire increases vehicle emissions andmay damage the emission control system on yourvehicle. Dealer or qualified service center diagnosisand service may be required.
� Light On Steady -- An emission control systemmalfunction has been detected on your vehicle.Dealer or qualified service center diagnosis andservice may be required.

2-90
If the Light Is Flashing
The following may prevent more serious damage toyour vehicle:
� Reducing vehicle speed.
� Avoiding hard accelerations.
� Avoiding steep uphill grades.
� If you are towing a trailer, reduce the amount ofcargo being hauled as soon as it is possible.
If the light stops flashing and remains on steady, see “If the Light Is On Steady” following.
If the light continues to flash, when it is safe to do so,stop the vehicle. Find a safe place to park your vehicle.Turn the key off, wait at least 10 seconds and restart theengine. If the light remains on steady, see “If the LightIs On Steady” following. If the light is still flashing,follow the previous steps, and drive the vehicle to yourdealer or qualified service center for service.
If the Light Is On Steady
You may be able to correct the emission systemmalfunction by considering the following:
Did you recently put fuel into your vehicle?
If so, reinstall the fuel cap, making sure to fully installthe cap. See “Filling Your Tank” in the Index. Thediagnostic system can determine if the fuel cap has beenleft off or improperly installed. A loose or missing fuelcap will allow fuel to evaporate into the atmosphere. A few driving trips with the cap properly installedshould turn the light off.
Did you just drive through a deep puddle of water?
If so, your electrical system may be wet. The conditionwill usually be corrected when the electrical systemdries out. A few driving trips should turn the light off.
Are you low on fuel?
As your engine starts to run out of fuel, your engine may not run as efficiently as designed since smallamounts of air are sucked into the fuel line causing amisfire. The system can detect this. Adding fuel shouldcorrect this condition. Make sure to install the fuel capproperly. See “Filling Your Tank” in the Index. It will take a few driving trips to turn the light off.

2-91
Have you recently changed brands of fuel?
If so, be sure to fuel your vehicle with quality fuel. See “Fuel” in the Index. Poor fuel quality will causeyour engine not to run as efficiently as designed. You may notice this as stalling after start-up, stallingwhen you put the vehicle into gear, misfiring, hesitationon acceleration or stumbling on acceleration. (Theseconditions may go away once the engine is warmed up.)This will be detected by the system and cause the lightto turn on.
If you experience one or more of these conditions,change the fuel brand you use. It will require at least one full tank of the proper fuel to turn the light off.
If none of the above steps have made the light turn off,have your dealer or qualified service center check thevehicle. Your dealer has the proper test equipment anddiagnostic tools to fix any mechanical or electricalproblems that may have developed.
Emissions Inspection and Maintenance Programs
Some state/provincial and local governments have ormay begin programs to inspect the emission controlequipment on your vehicle. Failure to pass thisinspection could prevent you from getting a vehicle registration.
Here are some things you need to know in order to helpyour vehicle pass an inspection:
Your vehicle will not pass this inspection if theSERVICE ENGINE SOON or CHECK ENGINE light is on or not working properly.
Your vehicle will not pass this inspection if the OBD(on-board diagnostic) system determines that criticalemission control systems have not been completelydiagnosed by the system. The vehicle would beconsidered not ready for inspection. This can happen if you have recently replaced your battery or if yourbattery has run down. The diagnostic system is designedto evaluate critical emission control systems duringnormal driving. This may take several days of routinedriving. If you have done this and your vehicle still does not pass the inspection for lack of OBD systemreadiness, see your dealer or qualified service center toprepare the vehicle for inspection.

2-92
Oil Pressure Light
This light tells you if therecould be a problem withyour engine oil pressure.
The light goes on when you turn your key to ON. It goesoff once you start your engine. That’s a check to be surethe light works. If it doesn’t come on, be sure to have it fixed so it will be there to warn you if something goes wrong.
When the light comes on and stays on, it means that oil isn’t flowing through your engine properly. Youcould be low on oil and you might have some othersystem problem.
CAUTION:
Don’t keep driving if the oil pressure is low. If you do, your engine can become so hot that it catches fire. You or others could be burned.Check your oil as soon as possible and have your vehicle serviced.
NOTICE:
Damage to your engine from neglected oilproblems can be costly and is not covered by your warranty.

2-93
Security Light
For information regardingthis light, see “TheftDeterrent-System” in the Index.
Fog Lamp Light (If Equipped)
This light will come onwhen the fog lamp button is pressed. For moreinformation about the foglamps, see “Fog Lamps” inthe Index.
Lights On Reminder
United States Canada(Analog Only)
This light comes on as a reminder that your headlampsare on.
Cruise Control Light
This light comes onwhenever you set yourvehicle’s cruise control.

2-94
Fuel Gage
Analog (United States) Analog (Canada)
Digital
The fuel gage shows approximately how much fuel is in the tank. It works only when the ignition is in ON.
If the fuel supply gets down to approximately three gallons (11.4 L) of fuel remaining in the tank, the FUEL LEVEL LOW message will appear on theDriver Information Center (DIC).
On the digital cluster, if the fuel is less thanapproximately 1.2 gallons (4.7 L) the “E” segment on the gage will flash.
Here are a few concerns some owners have had aboutthe fuel gage. All of these situations are normal and donot indicate that anything is wrong with the fuel gage:
� At the gas station the gas pump shuts off before thegage reads F.
� GAL FUEL USED on the Driver Information Centerdoes not correspond exactly to the amount of fuelremaining as shown on the fuel gage.
� The gage may change when you turn, stop or speed up.

2-95
Fuel Data Display (Digital Cluster)
The fuel data display tells you all you about the fuel economy and how far you can travel with the fuel remaining.
The average fuel economy (AVG) display shows theaverage miles per gallon.
To reset the average fuel economy, press the INFObutton until the MPG AVG is displayed on the DriverInformation Center (DIC). Press and hold the INFORESET button until both the fuel data display and DICdisplay reads 0.0.
The RANGE display shows how far the computer thinks you can travel with the fuel that is in the tank.The computer does not know what driving conditionswill be like for the rest of your trip, so the range isestimated based on the recent fuel economy. Therefore,the range reading may change as your driving habitschange. Going from city to highway driving mayincrease the range reading.
If the range display shows LO, you should stop for fuel as soon as possible.
On the analog cluster, fuel data can be obtained bypressing the INFO button. See “Driver InformationCenter” in the Index.

2-96
Driver Information Center (DIC)This display gives you the status of many of yourvehicle’s systems. The DIC is also used to display driverpersonalization features and warning/status messages.
DIC Controls and Displays
INFO: Pressing this button up or down will display theMILES RANGE (Analog Cluster), MPG AVG, MPGINST, GAL FUEL USED, AVG MPH, TIMER,BATTERY VOLTS, LF-RF-LR-RR TIRE (If Equipped), RPM TACHOMETER (Digital Cluster),ENGINE OIL LIFE, TRANS FLUID LIFE, PHONE (If Equipped), FEATURE PROGRAMMING and Blank Display.
INFO RESET: Pressing this button will reset the MPG AVG, GAL FUEL USED, MPH AVG, TIMER,ENGINE OIL LIFE, TRANS FLUID LIFE, when eachmode is individually selected. For more informationabout the trip odometer, see “Odometer” in the Index.
ON/OFF: Pressing this button turns the Programmingand Personalization Features on and off. (FEATUREPROGRAMMING must be displayed on the DIC tobegin actual programming.) This button also starts andstops the timer.
MILES RANGE: (Analog Cluster Only.) This messageshows about how many miles you can drive withoutrefilling your fuel tank. Once the range drops below40 miles (64 km) remaining, the display will show LOW.

2-97
MPG AVG (Reset): This message shows theapproximate fuel economy you have averaged since thelast time you reset the value. To reset the MPG AVG(Average Fuel Economy), press the INFO button todisplay the MPG AVG then press and hold the INFORESET button until 0.0 MPG AVG is displayed.
MPG INST: This message shows the instantaneous fuel economy which varies with your driving conditions,such as acceleration, braking and the grade of the roadbeing traveled. The INFO RESET button does notfunction in this mode.
GAL FUEL USED (Reset): This message shows howmuch fuel has been used since the last reset. To learnhow much fuel is used from a new starting point, pressthe RESET button while the GAL FUEL USED isdisplayed in the DIC.
AVG MPH (Reset): This message shows the averagespeed you have traveled at since the last time you resetthe value. To reset the value, press the INFO button todisplay AVG MPH then press and hold the INFORESET button until 0.0 AVG MPH is displayed.
TIMER: This feature is like a stopwatch, in that you can clock the time it takes to get from one point to another.
To operate, press the INFO button to display TIMER.Each of the fields for the hours, minutes and seconds aretwo numeric digits.
Once TIMER 00:00:00 is displayed, press the ON/OFFbutton to start the timing feature. Press the ON/OFFbutton again to stop it. If you will be starting andstopping your vehicle, during a trip for instance, theTIMER feature will automatically start timing where itleft off when you last stopped. To reset it, press and holdthe INFO RESET button until the display reads TIMER00:00:00. Press the INFO button to exit from theTIMER display.
BATTERY VOLTS: This message shows the currentbattery voltage. If the voltage is normal the display willshow BATTERY VOLTS OK. If the voltage dropsbelow 10.5 volts, the display will show BATTERYVOLTS LOW. If the voltage is above 16 volts, thedisplay will show BATTERY VOLTS HIGH. If thedisplay shows the high or low message, you will need to have your battery checked. See “Driver InformationCenter (DIC) Messages” in the Index for more information.

2-98
LF-RF-LR-RR TIRE (If Equipped): On vehiclesequipped with the Tire Pressure Monitor, this messageshows the tire pressure for each tire (left front, rightfront, left rear and right rear). Pressing the INFO buttonwill scroll through the tire pressure for each of the four tires, such as:
� 34 PSI LF TIRE OK or
� 234 kPa LF TIRE OK
If a tire pressure is below 24 PSI (165 kPa) or above36 PSI (248 kPa), the message will appear as shownabove except it will show TIRE LOW or TIRE HIGH as appropriate. If desired, the tire pressure informationcan be programmed not to appear when using the INFO button to scroll through the DIC displays. See “Vehicle Programming and PersonalizationFeatures” in the Index.
If a low or high tire pressure is detected by the systemwhile driving, a CHECK TIRE PRESSURE messagewill appear in the display. If this occurs, press the INFO button to scroll to the tire(s) with a low or highpressure condition. See “Driver Information Center(DIC) Messages” in the Index for more information.
ENGINE OIL LIFE (Reset): Press the INFO button to display ENGINE OIL LIFE, then press and hold theINFO RESET button until 100% ENGINE OIL LIFE isdisplayed. (This only needs to be reset after you havehad the oil changed.)
TRANSMISSION FLUID LIFE MONITOR: Undernormal conditions, the rate of deterioration of thetransmission fluid is slow. See the MaintenanceSchedule booklet for proper fluid and change intervals.Press the INFO button to display TRANS FLUID LIFE,then press and hold the INFO RESET button until 100% TRANS FLUID LIFE is displayed. (This onlyneeds to be reset after you have had the fluid changed.)
ENG/MET: Press this button to display information inthe English (miles) or metric (kilometers) system.

2-99
Driver Information Center (DIC) MessagesThese messages will appear if there is a problem sensedin one of your vehicle’s systems. Vehicles that are firstsold in Canada will have a number after each message.This number helps to identify the problem. You mustthen press INFO or INFO RESET to clear the displayscreen for further use. However, be sure to take anymessage that appears on the display screen seriously and remember that pressing the INFO or INFO RESETbutton will only make the message disappear, not the problem.
DIC messages can also be displayed in French, German,Spanish and Japanese. Contact your dealer to have thelanguage display adjusted for your vehicle.
BATTERY NOT CHARGING - 7: This message willappear if the battery is not being charged. Have theelectrical system checked by your dealership at yourearliest convenience.
BATTERY SAVER ACTIVE - 27: This message is displayed when the vehicle has detected that thebattery voltage is dropping beyond a reasonable point.The battery saver system will start reducing certainfeatures of the vehicle that you may not be able tonotice. At the point that features are disabled, thismessage is displayed. It means that the vehicle is tryingto save the charge in the battery. Turn off unnecessaryaccessories to allow the battery to recharge.
BATTERY VOLTAGE HIGH - 8: This messageshows that the electrical charging system isovercharging (more than 16 volts). To avoid beingstranded, have the electrical system checked by yourdealership. You can reduce the charging overload byusing the accessories. Turn on the lamps and radio, setthe climate control on AUTO and the fan speed on HI,and turn the rear window defogger on. You can monitorbattery voltage on the DIC by pressing the INFO button.The normal range is 11.5 to 15.5 volts when the engineis running.

2-100
BATTERY VOLTAGE LOW - 6: This message will appear when the electrical system is charging lessthan 10 volts or if the battery has been drained. If thismessage appears immediately after starting, it is possible that the generator can still recharge the battery.The battery should recharge while driving but may take afew hours to do so. Consider using an auxiliary charger(be sure to follow the manufacturer’s instructions) toboost the battery after returning home or to a finaldestination. If this message appears while driving or after starting your vehicle and stays on, have it checkedimmediately to determine the cause of this problem. To help the generator recharge the battery quickly, youcan reduce the load on the electrical system by turning offthe accessories. You can monitor battery voltage on theDIC by pressing the INFO button. The normal range is 11.5 to 15.5 volts.
CHANGE ENGINE OIL - 82: This means that the life of the engine oil has expired and it should bechanged within 200 miles. See “Engine Oil” and “Filter Recommendations” in the Maintenance Schedulebooklet. After an oil change, the Oil Life Indicator mustbe reset. See “Oil Life Indicator, How to Reset” in the Index.
CHANGE TRANS FLUID - 47: This message willappear when it is time to replace the transaxle fluid. Seethe Maintenance Schedule booklet for the proper fluidand change intervals.
CHECK BRAKE FLUID - 37: This message willdisplay if the ignition is in ON to inform the driver thatthe brake fluid level is low. Have the brake systemserviced by a technician as soon as possible. See “BrakeSystem Warning Light” in the Index.
CHECK COOLANT LEVEL - 2: This message will appear when there is a low level of engine coolant.Have the cooling system serviced by a technician assoon as possible.
CHECK FUEL GAGE - 50: (Analog Cluster Only)This message will appear when the fuel supply is lessthan 5 gallons (18.9 L) and the display is turned off. A single chime will also sound when this message is displayed.
CHECK GAS CAP - 61: This message will appear ifthe gas cap has not been fully tightened. You shouldrecheck your gas cap to ensure that it’s fully tightened.

2-101
CHECK OIL LEVEL - 36: For correct operation ofthe low oil sensing system, your vehicle should be on alevel surface. A false CHECK OIL LEVEL messagemay appear if the vehicle is parked on a grade. The oillevel sensing system does not check for actual oil levelif the engine has been off for a short period of time, and the oil level is never checked while the engine isrunning. If the CHECK OIL LEVEL message appears,and your vehicle has been parked on level ground withthe engine off for at least 30 minutes, the oil levelshould be checked by observing the oil dipstick. Prior to checking the oil level, be sure the engine hasbeen off for a few minutes and your vehicle is on a level surface. Then check the dipstick and add oil ifnecessary. See “Engine Oil” in the Index.
CHECK TIRE PRESSURE - 144: This message isdisplayed when the Tire Pressure Monitor (TPM) systemdetects a low or high tire pressure condition in one ormore of the road tires. By pressing the INFO button up or down the DIC display will show which tire or tiresdo not have the correct inflation pressure.
A “LOW TIRE” condition exists when the tire’s airpressure is under 24 psi (165 kPa) and a “HIGH TIRE”condition exists when the tire’s air pressure is above 36 psi (248 kPa).
The system will display the air pressure, the tire location(LF, RF, RR or LR) and if the air pressure is low orhigh. The tire pressure information is available inEnglish or metric measurements. For example, a driver’sside front tire that is low may be shown as: 22 PSI LFTIRE LOW.
The correct tire inflation pressure should be set to thoseshown on the Tire Loading-Information Label, located onthe rear edge of the driver’s door. For more informationregarding proper tire inflation, see “Inflation -- TirePressure” in the Index. If a tire is low, you should stop as soon as possible and inspect your tire(s) for damage. If a tire is flat, see “If a Tire is Flat” in the Index.
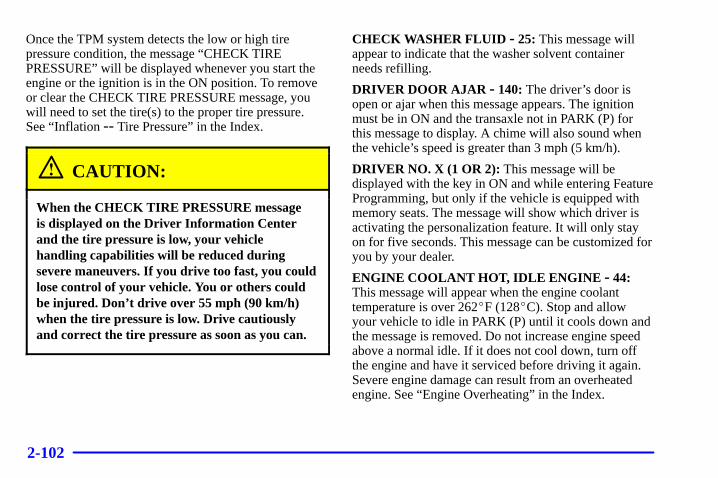
2-102
Once the TPM system detects the low or high tirepressure condition, the message “CHECK TIREPRESSURE” will be displayed whenever you start theengine or the ignition is in the ON position. To removeor clear the CHECK TIRE PRESSURE message, youwill need to set the tire(s) to the proper tire pressure. See “Inflation -- Tire Pressure” in the Index.
CAUTION:
When the CHECK TIRE PRESSURE message is displayed on the Driver Information Centerand the tire pressure is low, your vehicle handling capabilities will be reduced duringsevere maneuvers. If you drive too fast, you couldlose control of your vehicle. You or others couldbe injured. Don’t drive over 55 mph (90 km/h)when the tire pressure is low. Drive cautiouslyand correct the tire pressure as soon as you can.
CHECK WASHER FLUID - 25: This message willappear to indicate that the washer solvent containerneeds refilling.
DRIVER DOOR AJAR - 140: The driver’s door isopen or ajar when this message appears. The ignitionmust be in ON and the transaxle not in PARK (P) forthis message to display. A chime will also sound whenthe vehicle’s speed is greater than 3 mph (5 km/h).
DRIVER NO. X (1 OR 2): This message will bedisplayed with the key in ON and while entering FeatureProgramming, but only if the vehicle is equipped withmemory seats. The message will show which driver isactivating the personalization feature. It will only stayon for five seconds. This message can be customized foryou by your dealer.
ENGINE COOLANT HOT, IDLE ENGINE - 44:This message will appear when the engine coolanttemperature is over 262�F (128�C). Stop and allow your vehicle to idle in PARK (P) until it cools down andthe message is removed. Do not increase engine speedabove a normal idle. If it does not cool down, turn offthe engine and have it serviced before driving it again.Severe engine damage can result from an overheatedengine. See “Engine Overheating” in the Index.

2-103
ENGINE HOT-AC OFF - 16: This message displayswhen the engine coolant becomes hotter than the normaloperating temperature. To avoid added strain on a hotengine, the air conditioning compressor is automaticallyturned off. When the coolant temperature returns tonormal, the A/C operation will automatically resume.You can continue to drive your vehicle. If this messagecontinues to appear, have the system repaired as soon aspossible to avoid compressor damage.
ENGINE OVERHEATED, STOP ENGINE - 42: Thismessage will appear when the engine has overheated.Stop and turn the engine off immediately to avoid severeengine damage. See “Engine Overheating” in the Index.A multiple chime will also sound when this message is displayed.
ENGINE POWER REDUCED - 41: This messageinforms you that the vehicle is reducing engine powerbecause the transaxle is being placed in gear underconditions that may cause damage to the vehicle’sengine, transaxle or ability to accelerate.
FUEL LEVEL LOW - 11: This message serves as awarning that the fuel level in the tank is critically low.Stop for fuel soon. A single chime will also sound whenthis message is displayed.
HEADLAMPS SUGGESTED - 23: If it’s dark enoughoutside and the headlamps and Twilight Sentinel�
controls are off, this message will display on the DIC.This message informs the driver that turning on theexterior lamps is recommended even though theDaytime Running Lamps (DRL) are still illuminated. It has become dark enough outside to require theheadlamps and/or other exterior lamps. This messagewill also appear if the optional Rainsense� wipingfeature is on and the Twilight Sentinel is off.
ICE POSSIBLE - 13: This message appears when the outside air temperature is cold enough to create icyroad conditions.
LEFT REAR DOOR AJAR - 142: The left rear dooris open or ajar when this message appears. The ignitionmust be in ON and the transaxle not in PARK (P) forthis message to display. A chime will also sound whenthe vehicle’s speed is greater than 3 mph (5 km/h).

2-104
OIL PRESSURE LOW STOP ENGINE - 35: If thismessage appears while the engine is running, stop theengine and do not operate it until the cause of low oilpressure is corrected. Severe damage to the engine canresult. A multiple chime will also sound when thismessage is displayed.
PASSENGER DOOR AJAR - 141: The right frontpassenger’s door is open or ajar when this messageappears. The ignition must be in ON and the transaxlenot in PARK (P) for this message to display. A chimewill also sound when the vehicle’s speed is greater than3 mph (5 km/h).
RIGHT REAR DOOR AJAR - 143: The right rear door is open or ajar when this message appears. The ignition must be in ON and the transaxle not inPARK (P) for this message to display. A chime will also sound when the vehicle’s speed is greater than 3 mph (5 km/h).
SERVICE AC SYSTEM - 14: This message appears when the electronic sensors that control the airconditioning and heating systems are no longer working.Have the climate control system serviced if you notice adrop in heating and air conditioning efficiency.
SERVICE AIR BAG - 83: There is a problem with the supplemental inflatable restraint (air bag) systemwhen this message appears. Let only a qualifiedtechnician work on your vehicle. See your dealership for service at once.
SERVICE CHARGING SYS - 102: This message will display when a problem with the charging systemhas been detected. Have your vehicle serviced at your dealership.
SERVICE ELECTRICAL SYS - 106: This messagewill display if an electrical problem has occurred withinthe Powertrain Control Module (PCM) or the ignitionswitch. Have your vehicle serviced by your dealership.
SERVICE FUEL SYSTEM - 101: The PowertrainControl Module (PCM) has detected a problem withinthe fuel system when this message appears. See yourdealership for service.
SERVICE IDLE CONTROL - 107: A problem withthe idle control has occurred when this message displays. Take your vehicle to your dealership for service.

2-105
SERVICE STABILITY SYS - 54: If you ever see the SERVICE STABILITY SYS message, it means there may be a problem with your stability enhancementsystem. If you see this message, try to reset the system(stop; turn off the engine; then start the engine again). If the SERVICE STABILITY SYS message still comes on, it means there is a problem. You should seeyour dealer for service. Reduce your speed and driveaccordingly. A single chime will also sound when thismessage is displayed.
STABILITY SYS ENGAGED - 55: You may see the STABILITY SYS ENGAGED message on theDriver Information Center. It means that an advanced,computer-controlled system has come on to help yourvehicle continue to go in the direction in which you’resteering. This stability enhancement system activateswhen the computer senses that your vehicle is juststarting to spin, as it might if you hit a patch of ice orother slippery spot on the road. When the system is on,you may hear a noise or feel a vibration in the brakepedal. This is normal.
When the STABILITY SYS ENGAGED message is on,you should continue to steer in the direction you want togo. The system is designed to help you in bad weather orother difficult driving situations by making the most ofwhatever road conditions will permit. If the STABILITYSYS ENGAGED message comes on, you’ll know thatsomething has caused your vehicle to start to spin, soyou should consider slowing down.
SERVICE STEERING - 127: This message isdisplayed when a problem has been detected in theMagnasteer� variable effort steering system. If messagecomes on, service is required.
SERVICE SUSPENSION SYS - 84: This message isdisplayed to indicate that the suspension system is notoperating properly. To correct this problem, have yourvehicle serviced at your dealership.
SERVICE THEFT SYSTEM - 34: This messagemeans there is a problem in the PersonalizedAutomotive Security System (PASS-Key� III). A fault has been detected in the system which meansthat the PASS-Key III system is disabled and is not protecting the vehicle. The vehicle usually restarts,however, you may want to take your vehicle to a properservice center before turning off the engine.

2-106
SERVICE TPM SYSTEM - 51: When this message isdisplayed, the Tire Pressure Monitor (TPM) system isnot working properly. See your dealer for service.
SERVICE TRANSMISSION - 100: See your dealerfor repair.
SERVICE VEHICLE SOON - 3: This message isdisplayed when a non-emissions related powertrainmalfunction occurs. Have your vehicle serviced by atechnician as soon as possible.
SPEED LIMITED TO 90 - 113: A failure in thesuspension control system has occurred when thismessage appears. The Powertrain Control Module(PCM) determines the speed to which your vehicle is limited. Have your vehicle serviced if this message appears.
STARTING DISABLED REMOVE KEY - 33: Thismessage will appear when the Personalized AutomotiveSecurity System (PASS-Key� III) senses that animproper ignition key is being used to try to start thevehicle. Check the ignition key for damage. If it isdamaged, it may need to be replaced. If you see nodamage, remove the key and try to start the vehicleagain. If it still does not start, try another ignition key.
THEFT ATTEMPTED - 40: This message isdisplayed if the theft system has detected a break-inattempt while you were away from your vehicle.
TOP SPEED FUEL CUT-OFF - 111: This messagewill appear when the Powertrain Control Module (PCM)senses that the maximum speed for your vehicle hasbeen reached. The speed of your vehicle will surge asthe fuel supply is cut off. This allows your vehicle tostay in a safe tire operating range. The top speed is setbased on the top speed rating of the tires.
TRACTION ENGAGED - 91: When your tractioncontrol system is limiting wheel spin, the TRACTIONENGAGED message will be displayed. Slippery roadconditions may exist if this message is displayed, soadjust your driving accordingly. This message will stayon for a few seconds after the traction control systemstops limiting wheel spin.
TRACTION OFF - 89: This message will be displayedafter the traction control has been turned off by thebutton on the center console.

2-107
TRACTION READY - 90: This message informs the driver that the traction control system is available.This occurs when the traction control switch on theconsole has been returned to on (pressing the buttononce turns the traction control system off: pressing thebutton again turns the system back on). This messagewill automatically disappear from the display afterfive seconds.
TRACTION SUSPENDED - 56: This messagedisplays when the traction control system has beentemporarily shut off because your vehicle’s brakes haveoverheated. This message does not indicate a problemwith your vehicle’s traction control system. After a few minutes, the traction control system will beavailable again and the TRACTION READY messagewill appear.
TRANS HOT IDLE ENGINE - 112: This messageindicates that the transaxle fluid in your vehicle is toohot. Stop and allow your vehicle to idle until it coolsdown or until this message is removed.
TRUNK OPEN - 24: This message indicates that thetrunk is open when the ignition is on.
TURN SIGNAL ON - 20: This message is a reminder,after driving about a mile, that you have the turn signalon. A multiple chime will also sound when this messageis displayed.
VEHICLE OVERSPEED - 52: This message isdisplayed when the vehicle speed exceeds a certain limitas required by some export countries. A continuouschime will also sound when this message is displayed.

2-108
Vehicle Programming andPersonalization Features (If Equipped)If your vehicle is equipped with personalization, you can program certain features to a preferred settingfor up to two people. If your vehicle does not havepersonalization then some of the features on yourvehicle have been programmed for all drivers. On allvehicles, other features such as HVAC settings, radiopreset settings, exterior lighting at unlock, remote lockand unlock confirmation, and automatic door locks havealready been programmed for your convenience. If thevehicle is equipped with personalization then the seatposition, steering column position (if equipped) andoutside mirror position can also be programmed. The Navigation screen preferences (if equipped) willremain at the last set position.
If your vehicle is equipped with personalization thedriver’s preferences are recalled by pressing the unlockbutton on the remote keyless entry transmitter or bypressing the appropriate memory button “1” or “2”located on the driver’s door. Certain features can beprogrammed not to recall until the key is placed in theignition. To change feature preferences you must enterfeature programming (see below).
Entering Feature ProgrammingTo begin programming, the ignition must be in ON, your vehicle in PARK (P), and if your vehicle hasmemory, you must press the appropriate memory button“1” or “2”, located on the driver’s door panel, prior toprogramming. The display will show either “1” or “2”,depending on which was selected. Press the INFObutton one or more times until the FEATUREPROGRAMMING prompt appears on the DIC display.Press the ON/OFF button to enter FEATUREPROGRAMMING. To exit, press the INFO RESET or INFO buttons.
Remote Recall Memory (If Equipped)To enter feature programming, follow the instructionslisted previously, then press the down arrow on theINFO button one or more times until the REMOTERECALL MEMORY prompt appears. To turn thefeature on, press the ON/OFF button until ON isdisplayed on the DIC. The seat and mirror memorysettings that have been previously programmed can berecalled by pressing the unlock button on the remotekeyless entry transmitter. The steering column willmove when the key is inserted in the ignition and turnedto ON. To turn the feature off, press the ON/OFF buttonuntil OFF is displayed.

2-109
Key in Recall Memory (If Equipped)To enter feature programming, follow the instructionslisted previously, then press the down arrow on theINFO button one or more times until the KEY INRECALL MEMORY prompt appears on the DICdisplay. To turn the feature on, press the ON/OFF buttonuntil ON appears. The seat and mirror memory settingsthat have been previously programmed will be recalledwhen the key is inserted in the ignition. The steeringcolumn will move when the key is turned to ON. To turn the feature off, press the ON/OFF button untilOFF appears.
Auto Exit Seat (If Equipped)To enter feature programming, follow the instructionslisted previously, then press the down arrow on theINFO button one or more times until the AUTO EXITSEAT prompt shows on the DIC display. This featurewill move the seat to the driver’s exit position that waspreviously programmed when the ignition is turned offand the driver’s door is opened. To turn this feature on,press the ON/OFF button until ON appears on the DIC.To turn this feature off, press the ON/OFF button untilOFF shows.
Auto Exit Steering Wheel (If Equipped)Press the down arrow on the INFO button one or moretimes until the AUTO EXIT STRG WHEEL promptappears on the DIC display. This feature will move thecolumn to the driver’s previously stored exit positionwhen the ignition is turned off and the driver’s door is opened.
Lights Flash at UnlockTo enter feature programming follow the instructionslisted previously, then press the down arrow on theINFO button one or more times until the LIGHTSFLASH AT UNLOCK prompt appears. To turn thisfeature on, press the ON/OFF button until ON isdisplayed on the DIC. If all the doors are closed, theparking lamps will flash twice when the unlock buttonon the remote keyless entry transmitter is pressed. The lamps will not flash if the manual parking lamps orheadlamps are active. To turn the feature off, press theON/OFF button until the OFF prompt appears.

2-110
Lights Flash at LockTo enter feature programming, follow the instructionslisted previously, then press the down arrow on theINFO button one or more times until the LIGHTSFLASH AT LOCK prompt appears on the DIC display.To turn the feature on, press the ON/OFF button untilON appears. If all the doors are closed, the parkinglamps will flash once when the lock button on theremote keyless entry transmitter is pressed. To turn thefeature off, press the ON/OFF button until OFF appears.
This feature will not work if any door is open.
Horn Sounds at LockTo enter feature programming follow the instructionslisted previously, then press the down arrow on theINFO button one or more times until the HORNSOUNDS AT LOCK prompt appears on the DICdisplay. To turn the feature on, press the ON/OFF buttonuntil ON appears. If all the doors are closed, the hornwill sound once when the lock button on the remotekeyless entry transmitter is pressed. To turn the featureoff, press the ON/OFF button until OFF appears.
This feature will not work if any door is open.
Exterior Lights at UnlockThis personalization feature enables the driver toprogram the exterior lamps to turn on or to remain offwhen using the remote keyless entry transmitter tounlock the vehicle.
During dark or night conditions, if exterior lighting isselected, the parking lamps, taillamps, reverse lamps,high-beam headlamps, etc. will turn on for about20 seconds or until a door is opened, the key is turnedout of OFF or the remote keyless entry transmitter isused to lock the vehicle.
To turn the feature on, press the ON/OFF button until ON is displayed. To turn the feature off, press the ON/OFF button until OFF is displayed.
Doors Lock in GearTo enter feature programming follow the instructionslisted previously, then press the down arrow on theINFO button one or more times until the DOORSLOCK IN GEAR prompt appears. This feature willautomatically lock all doors when the vehicle is shiftedout of PARK (P) and all doors are closed. To turn thefeature on, press ON/OFF until ON is displayed on theDIC. To turn the feature off, press ON/OFF until OFF is displayed.

2-111
Driver Unlock in PARK (P)To enter feature programming follow the instructionslisted previously, then press the down arrow on theINFO button one or more times until the DRIVERUNLOCK IN PARK (P) prompt appears. This featurewill automatically unlock only the driver’s door whenthe vehicle is shifted into PARK (P). To turn the featureon, press ON/OFF until ON is displayed on the DIC. To turn the feature off, press ON/OFF until OFF is displayed.
Driver Unlock Key OffTo enter feature programming follow the instructionslisted previously, then press the down arrow on theINFO button one or more times until the DOORSUNLOCK KEY OFF prompt appears. This feature willautomatically unlock the driver’s door when the ignitionkey is turned to OFF. To turn the feature on, pressON/OFF until ON is displayed on the DIC. To turn thefeature off, press ON/OFF until OFF is displayed.
Doors Unlock in PARK (P)To enter feature programming follow the instructionslisted previously, then press the down arrow on theINFO button one or more times until the DOORSUNLOCK IN PARK prompt appears. This feature will automatically unlock all doors when the vehicle isshifted into PARK (P). To turn the feature on, pressON/OFF until ON is displayed on the DIC. To turn thefeature off, press ON/OFF until OFF is displayed.
Doors Unlock Key OffTo enter feature programming follow the instructionslisted previously, then press the down arrow on theINFO button one or more times until the DOORSUNLOCK KEY OFF prompt appears. This feature willautomatically unlock all doors when the ignition key isturned to OFF. To turn the feature on, press ON/OFFuntil ON is displayed on the DIC. To turn the featureoff, press ON/OFF until OFF is displayed.

2-112
Mirror to Curb In Reverse (If Equipped)Press the down arrow on the INFO button one or moretimes until the MIRROR TO CURB IN REV promptsappears on the DIC display. This feature will move thepassenger’s outside rearview mirror to a curb viewposition when the shifter is placed in REVERSE (R) and it will return the mirror to the last known driving position when the shifter is moved out ofREVERSE (R). To turn this feature on, press theON/OFF button until ON is displayed on the DIC. To turn the feature off, press the ON/OFF button until OFF is displayed. See “Curb View Assist Mirror”in the Index for more information.
Tire Pressure Display (If Equipped)To enter feature programming follow the instructionslisted previously, then press the down arrow on theINFO button one or more times until the TIREPRESSURE DISPLAY prompt appears. This featurewill allow each of the four (left front, right front, leftrear, right rear) tire pressure readings to be displayedwhen using the INFO button to scroll through the DIC displays. To turn the feature on, press ON/OFFuntil ON is displayed on the DIC.
To turn the feature off, press ON/OFF until OFF isdisplayed. Even with this feature programmed to beturned off, a low or high tire pressure condition will stillcause the CHECK TIRE PRESSURE message to bedisplayed on the DIC. See “Driver Information Center(DIC) Messages” in the Index for more information.
Driver’s Names Set/Recall (If Equipped)After the FEATURE PROGRAMMING prompt isdisplayed on the DIC and the ON/OFF button is pressed,the prompts DRIVER NO 1 or DRIVER NO 2 willappear. These prompts correspond to which remotekeyless entry transmitter button or memory recall buttonhas been pressed on the driver’s door armrest. You mayhave your name and a second driver’s name displayedhere, replacing the prompts DRIVER NO 1 andDRIVER NO 2. A dealership can program your vehicleto display the names you want. The names will appearwhenever the key is turned to ON only if remote keylessentry transmitters 1 or 2 are used to enter the vehicle orbuttons 1 or 2 on the driver’s door are pressed.

2-113
Comfort Controls and Radio System PersonalizationThese features allow both drivers to personalize theirown climate control settings as well as their radiosettings. For more information, see “Climate ControlPersonalization” and “Radio Personalization” in the Index.
Continuous Variable Road SensingSuspension (CVRSS) (If Equipped)The CVRSS automatically adjusts the ride of yourvehicle. Automatic ride control is achieved through acomputer used to control and monitor the suspensionsystem. The controller receives input from varioussensors to determine the proper system response. If the controller detects a problem within the system, the DIC will display a SERVICE SUSPENSION SYSmessage. If this message appears, have your vehicleserviced at your dealership.
Oil Life Indicator
This feature lets you know when to change the engineoil. It’s based on the engine oil temperatures and yourdriving patterns. To see the display, press the INFObutton several times until ENGINE OIL LIFE appears.If you see 99% ENGINE OIL LIFE, 99 percent of yourcurrent oil life remains.

2-114
The DIC may display a CHANGE ENGINE OILmessage. Always keep a written record of the mileageand date when you changed your oil. For moreinformation, see the Maintenance Schedule booklet. If you see CHANGE ENGINE OIL, it means the oil life is gone and you should change the oil right away.The system doesn’t check how much oil you have, so you’ll still have to check for that. To see how, see “Engine Oil” in the Index.
When the oil is changed, you’ll need to reset the system.See “Oil Life Indicator, How to Reset” in the Index.
Night Vision System (Option)The Night Vision System can help you see better whenyou drive at night. The system works by sensing heatgiven off by objects in its field of view. Warmer objects,such as pedestrians, animals and other moving vehicles,will appear whiter. Colder objects, such as the sky, signsand parked vehicles, will appear darker.

2-115
Use this system as an aid to help you in seeing objectsbeyond the headlamps. Do this by occasionally glancingat the image as you would a rearview mirror. Do notstare at the image.
The Night Vision System can be operated if:
� The brightness control is in any position except OFF
� it is dark enough outside,
� the headlamps or fog lamps (if equipped) are on and
� the ignition is turned to ON.
The controls are located to the left of and below thesteering wheel. They are used to adjust the brightnessand location of the image. Adjust the IMAGE control sothe image is as low as possible while remaining visible.
Slide the dimmer control until the image is no brighterthan necessary to clearly and comfortably see the image.
When the system comes on, you’ll see the Night VisionSystem symbol in the image. After about one minute,you should see the view of the road ahead. If you don’tsee the image after about two minutes (on cold days itmay take longer for the image to display), there may be something wrong with the system. See your dealerfor service.
CAUTION:
If the Night Vision System image is too bright, or too high in your field of view, it may take youmore time to see things you need to see when it’sdark outside. Be sure to keep the image dim andplaced low in your field of view.

2-116
Remember that the Night Vision System can only help you see objects that are warmer or colder than thesurroundings. It can’t sense things like brake lights, turn signals or emergency flashers, traffic lights or signs.
In dry, clear weather, the system can see pedestrians,animals and the direction of the road ahead. In light rain,light snow or light fog the image may not be as clearand you may not be able to see the direction of the roadahead. In more severe weather conditions, the imagemay be unclear and not usable.
CAUTION:
Don’t use the Night Vision System to replaceyour normal view of the road ahead. It can’t tell you how far away things are. It senses onlywarmer or colder objects, not all objects. Drivingby staring at the image might cause you not to see important objects in the road ahead. If youdon’t see something in time, you could have acrash in which you and others could be injured.Use the Night Vision System only as a driving aid.
It is also important to keep your windshield, the HUD(Head-Up Display for the night Vision System) lens andthe camera lens clean. If you do not keep everythingclean, system performance may be affected. The HUDsystem is located on the driver’s side of the instrumentpanel, next to the windshield and the camera is locatedbehind the center of the front grille. Use only householdglass cleaner and a soft cloth. Wipe gently and dry thoroughly.
NOTICE:
When cleaning, be careful not to scratch theHUD or camera lenses. Do not spray glasscleaner directly on the HUD lens because the cleaner could leak inside the unit and cause damage.
The camera must also be aligned to work correctly. If the camera needs adjustment, see your dealer. Do not attempt to adjust the camera yourself.

2-117
Navigation (Option)
Navigation Display Controls
The display screen is located in the center on theinstrument panel. There are seven “hard” buttons and a touch sensitive screen.
Your vehicle may be equipped with a turn by turnnavigation guidance system that includes a CD ROMmap media covering nine regional areas throughout thecontiguous United States. In addition, the systemincludes intersection and freeway entrances, routeplanning, a programmable address book, points ofinterest, a list of restaurants, emergency phone numbers,and a list of hotels and motels for all of the major citieson each regional CD. The navigation system can alsocommunicate with the radio data system to receivebroadcast announcements on traffic, weatherinformation and emergency alert communications. For more information on how to use this system, see “Navigation” supplement.

2-118
Ultrasonic Rear Parking Assist(URPA) (Option)Ultrasonic Rear Parking Assist can help you todetermine how close an object is to your rear bumperwithin a given area, making parking easier.
The URPA display islocated inside the vehicle,above the rear window. It has three color-codedlights that can be seenthrough the rearview mirroror by turning around.
How the System WorksURPA comes on automatically when the shift lever ismoved into REVERSE (R) and the vehicle speed is lessthan 3 mph (5 km/h). When the system comes on,the three lights on the display will illuminate to let youknow that the system is working. URPA senses howclose your vehicle is to an object. The distance isdetermined by the four ultrasonic sensors located on therear bumper. When shifting into REVERSE (R) and anobject is detected, one of the following will occur:

2-119
A chime will sound the first time an object is detected.
URPA can detect objects 3 inches (7.6 cm) and wider,and at least 10 inches (25.4 cm) tall, but it cannot detectobjects that are above trunk level. In order for the rearsensors to recognize an object, it must be withinoperating range.
If the URPA system is not functioning properly, thedisplay will flash red, indicating that there is a problem.The light will also flash red while driving if a trailer isattached to your vehicle, or a bicycle or object is on theback of, or hanging out of your trunk. The light willcontinue to flash until the trailer or the object isremoved and your vehicle is driven forward at least15 mph (25 km/h). It may also flash red if the ultrasonicsensors are not kept clean. So be sure to keep your rearbumper free of mud, dirt, snow, ice and slush or thesystem may not work properly.
If after cleaning the rear bumper and driving forward atleast 15 mph (25 km/h), the display continues to flashred, see your dealer. It may also flash red if your vehicleis moving in REVERSE (R) at a speed greater than 3 mph (5 km/h). Other conditions that may affect system performance include things like the vibrationsfrom a jackhammer or the compression of air brakes on a very large truck.
As always, drivers should use care when backing up avehicle. Always look behind you, being sure to checkfor other vehicles, obstructions and blind spots. Forcleaning instructions, see “Cleaning Your Vehicle” in the Index.

3-3-1
Section 3 Comfort Controls and Audio Systems
In this section, you’ll find out how to operate the comfort control and audio systems offered with your vehicle. Be sure to read about the particular systems supplied with your vehicle.
3-2 Comfort Controls3-2 Climate Control Panel3-6 Electronic Solar Sensor3-6 Air Conditioning3-6 Heating3-7 Defogging and Defrosting3-7 Rear Window Defogger3-8 Rear Climate Control3-9 Ventilation System3-10 HVAC Steering Wheel Controls (If Equipped)3-10 Climate Control Personalization (If Equipped)3-11 Audio Systems3-11 Setting the Clock3-11 AM-FM Stereo with Cassette Tape Player3-15 AM-FM Stereo with Cassette Tape and
Compact Disc Player3-19 AM-FM Stereo with Cassette Tape and
Compact Disc Player with Radio DataSystems (RDS) and Digital Signal Processing(DSP) (If Equipped)
3-29 AM-FM Stereo with Cassette Tape andMiniDisc Player with Radio Data Systems(RDS) and Digital Signal Processing (DSP) (If Equipped)
3-39 Radio Data Systems (RDS) Program Type (PTY) Selections
3-40 Navigation/Radio System (Option)3-40 CD Adapter Kits3-41 Glovebox-Mounted CD Changer (Option)3-44 Radio Personalization with Home and Away
Feature (If Equipped)3-44 Theft-Deterrent Feature3-45 Audio Steering Wheel Controls3-46 Understanding Radio Reception3-46 Tips About Your Audio System3-47 Care of Your Cassette Tape Player3-49 Care of Your Compact Discs3-49 Care of Your Compact Disc Player3-49 Diversity Antenna System
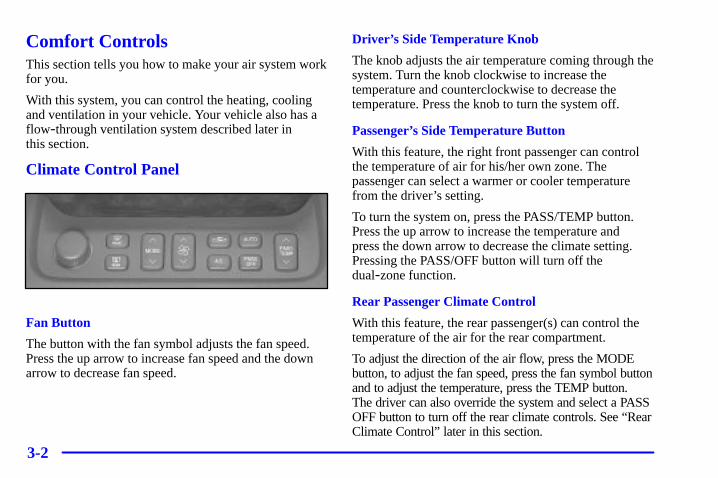
3-2
Comfort ControlsThis section tells you how to make your air system workfor you.
With this system, you can control the heating, coolingand ventilation in your vehicle. Your vehicle also has aflow-through ventilation system described later in this section.
Climate Control Panel
Fan Button
The button with the fan symbol adjusts the fan speed.Press the up arrow to increase fan speed and the downarrow to decrease fan speed.
Driver’s Side Temperature Knob
The knob adjusts the air temperature coming through thesystem. Turn the knob clockwise to increase thetemperature and counterclockwise to decrease thetemperature. Press the knob to turn the system off.
Passenger’s Side Temperature Button
With this feature, the right front passenger can controlthe temperature of air for his/her own zone. Thepassenger can select a warmer or cooler temperaturefrom the driver’s setting.
To turn the system on, press the PASS/TEMP button.Press the up arrow to increase the temperature and press the down arrow to decrease the climate setting.Pressing the PASS/OFF button will turn off thedual-zone function.
Rear Passenger Climate Control
With this feature, the rear passenger(s) can control thetemperature of the air for the rear compartment.
To adjust the direction of the air flow, press the MODEbutton, to adjust the fan speed, press the fan symbol buttonand to adjust the temperature, press the TEMP button. The driver can also override the system and select a PASSOFF button to turn off the rear climate controls. See “RearClimate Control” later in this section.

3-3
Outside Temperature Display
The outside temperature is always displayed when yourvehicle is running. You can change it from Fahrenheit toCelsius by pressing the ENG/MET (English/metric)button on the left side of the instrument panel cluster.
The outside temperature sensor is located near the frontgrille. The sensor can be affected by road or engine heatduring idling, slow driving or when the engine is firststarted after a short trip. In order to ensure properautomatic climate control operation, the outside airtemperature display may not update as quickly asexpected. This is to allow the air surrounding the outsidetemperature sensor to be as close to the actual outsideconditions as possible. This is determined by how muchtime has elapsed since the vehicle has been turned offand by vehicle speed.
Mode Button
Press the MODE button to deliver air through the floor,middle or windshield outlets. The system will stay in theselected mode until the MODE button is pressed again.Press the up or down arrow to cycle through theavailable modes.
Automatic Operation
When the system is set for automatic operation, sensorswill control the air delivery mode. Air will come fromthe floor, middle or windshield outlets. The fan speedwill vary as the system maintains the selectedtemperature setting.
Be careful not to put anything over the solar sensorlocated in the middle of the instrument panel near thewindshield. This sensor is used by the automatic systemto regulate temperature.
To find your comfort zone, start with the 75�F (24�C)setting and allow about 30 minutes for the system toregulate. Turn the knob to adjust the temperature ifnecessary. If you choose 60�F (16�C), the system willremain at that maximum cooling setting and will notregulate fan speed. If you choose the temperature of90�F (32�C), the system will remain at that maximumheating setting and will not regulate fan speed. Choosingeither maximum setting will not cause the system to heator cool any faster.

3-4
With the automatic setting, the air conditioningcompressor automatically cycles when needed to coolthe air. In cold weather, when the system senses the needfor heat, the airflow will be directed out the flooroutlets. As the interior temperature approaches a desiredsetting, the blower speed will decrease. To maintaininterior comfort, the airflow may move to the instrumentpanel air outlets and floor outlets (bi-level mode). Onbright sunny days in cold weather, the airflow may comeout of the air conditioning outlets (AC mode) tomaintain comfort and prevent stuffiness.
If your vehicle is sitting out on a hot day and you have itset on AUTO, the air will first flow out the floor airoutlets for a few seconds. That is normal. This is toexpel hot air from the air outlets. As the air is cooled,the airflow will move through the air conditioningoutlets. If you start your vehicle with the fan setting onHI, it will skip the air conditioning purge.
To avoid blowing cold air in cold weather, the systemwill delay turning on the fan until warm air is available.The length of delay depends on the outside airtemperature, engine coolant temperature or the timesince the engine was last started. As the coolant warmsup, the blower fan speed will gradually increase and air will flow from the heater outlets, with some airflowto the windshield to prevent fogging under most normal conditions.
If you leave your vehicle, the system will remember thecontrol setting the next time you start your engine,except for recirculation and defrost. Each ignition cyclecancels recirculation, whereas, FRONT DEFROST willchange to automatic operation when the ignition is shutoff and then turned back on.
Manual Operation
You may manually adjust the air delivery mode or fan speed.
AC: This setting directs airflow through the fourinstrument panel outlets.
BI-LEVEL: This setting directs air into yourvehicle in two ways. Cool air is directed to the upperportion of your body through the four instrument paneloutlets while warmed air is directed to the floor.
HEATER/DEFROST: This setting directs air tothe floor outlets and toward the windshield.
HEATER: This setting directs warmed airthrough the floor outlets. Some warm air is diverted tothe windshield to minimize fogging.

3-5
DEFROST: Press this button to quickly removefog or frost from the windshield. This setting sends mostof the airflow to the windshield with only a smallamount to the floor outlets.
FAN SPEEDS: Press the AUTO. At this setting,the fan speed is automatically controlled. If it is coldoutside, the blower may not run in the maximum highfan speed right away. The system checks thetemperature of the engine coolant to assure that it iswarm enough to provide heat. When the engine coolantis warm, the controller allows the fan to graduallyincrease to a higher speed. This prevents cold air fromblowing into the passenger compartment.
OFF: Press the knob to turn the system off. Fresh airwill continue to flow through the vehicle, and thesystem will try to maintain the previously settemperature. The outside temperature will show on thedisplay when the system is OFF.
AC: Press this button to turn the air conditioning on and off. The system will cool and dehumidify the airinside the vehicle. In the AUTO mode the airconditioning compressor only operates when the systemdetermines it is needed. The display will show A/C OFFwhen the air conditioning is off.
RECIRCULATION: Press this button to limit theamount of fresh air entering your vehicle. This is helpfulwhen you are trying to cool the air quickly or limit odorsentering your vehicle. In the AUTO mode, the systemwill use recirculation as necessary to cool the air.Pressing the recirculation button will change theoperation to a manual mode and the air will recirculatenon-stop. Press this button again to turn off therecirculation feature.
If you notice the windows fogging, press therecirculation button to exit the recirculation mode.

3-6
Electronic Solar Sensor
The sensor monitors the sun’s solar radiation and islocated on top of the instrument panel near thewindshield. The ECC panel uses this information toautomatically make the necessary temperature andairflow adjustments to maintain your comfort.
Air ConditioningOn hot days, open the windows long enough to let hotinside air escape. This reduces the time it takes for yourvehicle to cool down. Then keep your windows closedfor the air conditioner to work its best.
Press the AUTO button or the TEMP knob to turn thesystem on. The system will cool and dehumidify the airinside the vehicle. Also while in the AUTO mode, thesystem will use recirculation as necessary to cool the air.You may also need to adjust the interior temperature andthe fan speed as needed.
HeatingPress the MODE button to select heater. Adjust theinterior temperature to a comfortable level and if the fanspeed needs adjusting, press the up or down arrow.
Outside air will be brought in and sent through the floor,air conditioning or bi-level outlets (depending on thecondition). The heater works best if you keep yourwindows closed while using it.

3-7
Defogging and DefrostingOn cool, humid days, use defog HEATER/DEFROST tokeep the windshield and side windows clear. Use defrostto remove fog or ice from the windshield quickly inextremely humid or cold conditions.
Press the DEFROST button to select DEFROST. Adjustthe fan speed by pressing the fan button up or down. Ifyou select DEFROST from AUTO, the system willcontrol the fan speed. The temperature also needs to beadjusted by turning the TEMP knob.
RECIRCULATION is not available in the defrost mode.The air conditioning will run when in the defrost mode.
Rear Window Defogger
The lines you see on therear window warm theglass. Press this button toturn on the rear defogger.With it, the rear windowand both outside rearviewmirrors are heated.
The system will automatically shut off after 10 minutesof use. If you turn it on again, the defogger will operatefor about five minutes. However, if your vehicle istraveling above 30 mph (48 km/h) the system will notshut off. You can also turn the defogger off by turningoff the ignition or by pressing the button again.
Do not attach a temporary vehicle license, tape or decalsacross the defogger grid on the rear window.
NOTICE:
Don’t use a razor blade or something else sharpon the inside of the rear window. If you do, youcould cut or damage the warming grid or theintegrated rear window antenna, and the repairswouldn’t be covered by your warranty.

3-8
Rear Climate Control Your vehicle is equipped with a rear climate control.With this system, the rear passengers can control thetemperature of the air flow for his/her own zones. Theclimate control has three buttons:
MODE: Press this button to adjust the direction of theairflow. If you press down until “AUTO” is displayed,automatic mode will be active. During automaticoperation, the system will decide the mode for you.
Fan: Press the button with the fan symbol on it to adjustthe blower speed. Press up to increase and down todecrease blower speed. You can turn the system off bycontinuing to press down until “OFF” is displayed.
TEMP: Press this button to adjust the temperature.Press up to make it warmer and down to make it cooler.
The front system also has an AUTO button that canautomatically change the temperature of the rear seatingarea. When this button is pressed, the rear auto mode isselected and the rear air temperature and mode willreadjust to coincide with the front seat setting.
A PASS-OFF button located on the front climate controlpanel allows the driver to turn off the rear passengerclimate controls from the front seat.

3-9
Ventilation SystemYour vehicle’s flow-through ventilation system suppliesoutside air into the vehicle when it is moving. Outsideair will also enter the vehicle when the heater or the airconditioning fan is running.
The front outlets are located in the center and at eachside of the instrument panel. You can adjust thedirection of airflow by moving the center control leversor you can stop the airflow by moving the thumbwheelslocated on each side of the outlets downward.
Ventilation Tips
� Keep the hood and front air inlet free of ice, snow orany other obstruction (such as leaves). The heaterand defroster will work far better, reducing thechance of fogging the inside of the windows.
� Keep the air path under the front seats clear ofobjects. This helps circulate air throughout your vehicle.
Passenger Compartment Air Filter
This ventilation system includes a charcoal air filter thathelps to remove dust, pollen, etc. from the air flowinginto your vehicle. A restriction in the airflow cominginto the passenger compartment could be the result ofdirt in the filter. For more information, see “PassengerCompartment Air Filter Replacement” in the Index.Also see the Maintenance Schedule booklet for when tochange the filter.

3-10
HVAC Steering Wheel Controls (If Equipped)
Some heating and coolingcontrols can be adjusted atthe steering wheel. Othertouch controls operate someaudio controls. See “AudioSteering Wheel Controls” inthe Index.
FAN SPEED: Press the up arrow lever to increase the fan speed and the down arrow lever todecrease fan speed.
TEMP: Press the up arrow lever to increase the temperature and the down arrow lever to decrease temperature.
Climate Control Personalization (If Equipped)With this feature, your vehicle will recall the latestclimate control settings as adjusted the last time yourvehicle was operated. This feature allows two differentdrivers to store and recall their own climate controlsettings. The settings recalled by the climate controlsystem are determined by which remote keyless entrytransmitter (“1” or “2”) was used to enter the vehicle.The number on the back of the remote keyless entrytransmitter corresponds to driver 1 or to driver 2. Afterthe unlock button is pressed on the remote keyless entrytransmitter or the ignition key is placed in the ignition(the ignition must be turned to OFF), the climate controlsettings will automatically adjust to where they were last set. The settings can also be changed by brieflypressing the memory seat buttons 1 or 2 located on thedriver’s door.

3-11
Audio SystemsYour audio system has been designed to operate easilyand give years of listening pleasure. You will get themost enjoyment out of it if you acquaint yourself with itfirst. Find out what your audio system can do and howto operate all its controls, to be sure you’re getting themost out of the advanced engineering that went into it.
Setting the ClockPress and hold HR or MN until the time display beginsto change. Release the button as you get close to thecorrect time. The time may be set anytime the clock isdisplayed. There is a two-second delay before the clockgoes into time-set mode.
AM-FM Stereo with Cassette Tape Player
Playing the Radio
PWR/VOL: Press this knob lightly to turn the systemon. Press the knob again to turn the system off. Toincrease volume, turn the knob clockwise. Turn itcounterclockwise to decrease volume.
HR or MN: Display the time with the ignition off bypressing this button.

3-12
SOURCE: Press this button to select a source. Sourcesinclude cassette and compact disc. The audio sourcemust be loaded to play. Available loaded sources areshown on the display. If a source is being used, it will beunderlined on the display. If none of the audio sourcesare loaded, NO SOURCE LOADED will appear on thedisplay. Press this button again or press BAND to switchback to the radio.
MUTE: Press this button to silence the system. Press itagain to turn on the sound.
Finding a Station
BAND: Press this button to select AM, FM1 or FM2.
TUNE-SEEK: When this button is pressed it hastwo positions. Press this button to the first position tomanually tune to higher or lower stations. If this buttonis held at the first position for a few seconds, the radiowill continue tuning until this button is released. Pressthis button to the second position and release to seek tothe next higher or lower radio station.
SCAN: Press this button for less than two seconds toscan radio stations. The radio will go to a station, stopfor five seconds, then go on to the next station. Pressthis button again to stop scanning.
PUSHBUTTONS: The six numbered pushbuttons letyou return to your favorite stations. You can set up to18 stations (six AM, six FM1 and six FM2). Just:
1. Turn the radio on.
2. Press BAND to select AM, FM1 or FM2.
3. Tune in the desired station.
4. Press and hold one of the six numbered buttons formore than two seconds until you hear a beep.Whenever you press that numbered button for lessthan two seconds, the station you set will return.
5. Repeat the steps for each pushbutton.
When battery power is removed and later applied, youwill not have to reset your radio presets because theradio remembers them.
PRESET SCAN: Press and hold SCAN for more thantwo seconds until you hear a beep to listen to each ofyour preset stations for five seconds. The radio will goto the first preset station stored on your pushbuttons,stop for five seconds, then go on to the next presetstation. Press SCAN again to stop scanning. If a presetstation has weak reception, the radio will not stop at thepreset station.

3-13
Setting the Tone
TONE: Press and release this button until the desiredtone control (BASS or TREBLE) is found. The radiokeeps separate tone settings for each band, each presetand each source.
LEVEL: After selecting the desired tone control, pressthe plus (+) or minus (-) symbol on this button to selectthe desired level.
To save the tone settings for your presets, press and holdthe numbered button for the desired preset for more thantwo seconds until you hear a beep.
Adjusting the Speakers
SPEAKER: Press and release this button until thedesired BALANCE or FADE control is found.
LEVEL: After selecting the desired BALANCE orFADE control, press the plus (+) or minus (-) symbol onthis button to select the desired level.
Playing a Cassette Tape
With the radio on, insert a cassette tape. The tape willbegin playing as soon as it is inserted. When one side ofyour cassette tape is done playing, auto reverse plays theother side of your cassette tape.
Cassette tapes may be loaded with the radio off but theywill not start playing until the radio is on. If you want toinsert a cassette tape when the ignition is off, first pressthe eject button.
While the tape is playing, use the VOL, TONE, LEVEL,and SPEAKER controls just as you do for the radio.Other controls may have different functions when a tapeis inserted. The display will show an underlined tapesymbol. TAPE PLAY will appear on the display when atape is playing, with an arrow to indicate which side ofthe tape is playing.
If an error occurs while trying to play a cassette tape, itcould be that:
� The cassette tape is tight and the cassette playercannot turn the hubs of the tape. Hold the cassettetape with the open end down and try turning the righthub counterclockwise with a pencil. Flip the tapeover and repeat. If the hubs do not turn easily, yourcassette tape may be damaged and should not beused in the player. Try a new tape to be sure yourplayer is working properly.
� The cassette tape is broken. (Check to see if yourtape is broken. Try a new tape.)

3-14
RW: Press the left arrow to rewind the tape rapidly. Theradio will play while the tape rewinds. You may useyour station pushbuttons to tune to another radio stationwhile in RW mode. Press the left arrow again to returnto playing speed.
FF: Press the right arrow to fast forward to another partof the tape. The radio will play while the tape advances.You may use your station pushbuttons to tune to anotherradio station while in FF mode. Press the right arrowagain to return to playing speed.
TUNE-SEEK: When this button is pressed, it has twopositions. This button works the same, whether it ispressed to the first or second position. Press this buttonto seek to the next or previous selection on the tape.Your tape must have at least three seconds of silencebetween each selection for TUNE-SEEK to work. Thesound will mute while seeking.
SCAN: Press this button to listen to selections for a fewseconds. The tape will go to a selection, stop for a fewseconds, then go on to the next selection. Press thisbutton again to stop scanning.
SIDE: Press this button to change the side of the tapethat is playing.
EJECT: Press the upward triangle button to theright of the cassette tape player to remove a tape. Theradio will play. Eject may be activated with the radio offand/or the ignition off.
CLEAN TAPE: If this message appears on the display,the cassette tape player needs to be cleaned. It will stillplay tapes, but you should clean it as soon as possible toprevent damage to the tapes and player. See “Care ofYour Cassette Tape Player” in the Index. After you cleanthe player, press and hold the eject button for threeseconds to reset the CLEAN TAPE indicator.
Your cassette tape player automatically reducesbackground noise from tapes. Dolby Noise Reduction is manufactured under a license from DolbyLaboratories Licensing Corporation. Dolby and thedouble-D symbol are trademarks of Dolby LaboratoriesLicensing Corporation.
Auto CrO2 allows the cassette tape player to adjust tothe type of cassette tape for clearer sound for CrO2cassette tapes.

3-15
AM-FM Stereo with Cassette Tape andCompact Disc Player
Playing the Radio
PWR/VOL: Press this knob lightly to turn the systemon. Press the knob again to turn the system off. Toincrease volume, turn the knob clockwise. Turn itcounterclockwise to decrease volume.
HR or MN: Display the time with the ignition off bypressing this button.
SOURCE: Press this button to select a source. Sourcesinclude cassette and compact disc. The audio sourcemust be loaded to play. Available loaded sources areshown on the display. If a source is being used, it will beunderlined on the display. If none of the audio sourcesare loaded, NO SOURCE LOADED will appear on thedisplay. Press this button again or press BAND to switchback to the radio.
MUTE: Press this button to silence the system. Press itagain to turn on the sound.
Finding a Station
BAND: Press this button to select AM, FM1 or FM2.
TUNE SEEK: When this button is pressed it has twopositions. Press this button to the first position tomanually tune to higher or lower stations. If this buttonis held at the first position for a few seconds, the radiowill continue tuning until this button is released. Pressthis button to the second position and release to seek tothe next higher or lower radio station.
SCAN: Press this button for less than two seconds toscan radio stations and associated tone settings. Theradio will go to a station, stop for five seconds, then go on to the next station. Press this button again to stop scanning.

3-16
PUSHBUTTONS: The six numbered pushbuttons letyou return to your favorite stations. You can set up to18 stations (six AM, six FM1 and six FM2). Just:
1. Turn the radio on.
2. Press BAND to select AM, FM1 or FM2.
3. Tune in the desired station.
4. Press and hold one of the six numbered buttons formore than two seconds until you hear a beep.Whenever you press that numbered button for lessthan two seconds, the station you set will return.
5. Repeat the steps for each pushbutton.
When battery power is removed and later applied, youwill not have to reset your radio presets because theradio remembers them.
PRESET SCAN: Press and hold SCAN for more thantwo seconds until you hear a beep to listen to each ofyour preset stations for five seconds. The radio will goto the first preset station stored on your pushbuttons,stop for five seconds, then go on to the next presetstation. Press SCAN again to stop scanning. If a presetstation has weak reception, the radio will not stop at thepreset station.
Setting the Tone
TONE: Press and release this button until the desiredtone control (BASS or TREBLE) is found. The radiokeeps separate tone settings for each band, each presetand each source.
LEVEL: After selecting the desired tone control, pressthe plus (+) or minus (-) symbol on this button to selectthe desired level.
To save the tone settings for your presets, press and holdthe numbered button for the desired preset for more thantwo seconds until you hear a beep.
Adjusting the Speakers
SPEAKER: Press and release this button until thedesired BALANCE or FADE control is found.
LEVEL: After selecting the desired BALANCE orFADE control, press the plus (+) or minus (-) symbol onthis button to select the desired level.
Playing a Cassette Tape
With the radio on, insert a cassette tape. The tape willbegin playing as soon as it is inserted. When one side of your cassette tape is done playing, auto reverse playsthe other side of your cassette tape.

3-17
Cassette tapes may be loaded with the radio off but theywill not start playing until the radio is on. If you want toinsert a cassette tape when the ignition is off, first pressthe eject button.
While the tape is playing, use the VOL, TONE, LEVEL,and SPEAKER controls just as you do for the radio.Other controls may have different functions when a tapeis inserted. The display will show an underlined tapesymbol. TAPE PLAY will appear on the display when atape is playing, with an arrow to indicate which side ofthe tape is playing.
If an error occurs while trying to play a cassette tape, itcould be that:
� The cassette tape is tight and the cassette playercannot turn the hubs of the tape. Hold the cassettetape with the open end down and try turning the righthub counterclockwise with a pencil. Flip the tapeover and repeat. If the hubs do not turn easily, yourcassette tape may be damaged and should not beused in the player. Try a new tape to be sure yourplayer is working properly.
� The cassette tape is broken. (Check to see if yourtape is broken. Try a new tape.)
RW: Press the left arrow to rewind the tape rapidly. The radio will play while the tape rewinds. You may useyour station pushbuttons to tune to another radio stationwhile in RW mode. Press the left arrow again to returnto playing speed.
FF: Press the right arrow to fast forward to another partof the tape. The radio will play while the tape advances.You may use your station pushbuttons to tune to anotherradio station while in FF mode. Press the right arrowagain to return to playing speed.
TUNE SEEK: When this button is pressed, it has two positions. This button works the same, whether it ispressed to the first or second position. Press this buttonto seek to the next or previous selection on the tape.Your tape must have at least three seconds of silencebetween each selection for TUNE SEEK to work. Thesound will mute while seeking.
SCAN: Press this button to listen to selections for a fewseconds. The tape will go to a selection, stop for a fewseconds, then go on to the next selection. Press thisbutton again to stop scanning.
SIDE: Press this button to change the side of the tapethat is playing.

3-18
EJECT: Press the upward triangle button to theright of the cassette tape player to remove a tape. Theradio will play. Eject may be activated with the radio offand/or the ignition off.
CLEAN TAPE: If this message appears on the display,the cassette tape player needs to be cleaned. It will stillplay tapes, but you should clean it as soon as possible toprevent damage to the tapes and player. See “Care ofYour Cassette Tape Player” in the Index. After you cleanthe player, press and hold the eject button for threeseconds to reset the CLEAN TAPE indicator.
Your cassette tape player automatically reducesbackground noise. Dolby Noise Reduction ismanufactured under a license from Dolby LaboratoriesLicensing Corporation. Dolby and the double-D symbolare trademarks of Dolby Laboratories Licensing Corporation.
Auto CrO2 allows the cassette tape player to adjust to the type of cassette tape for clearer sound for CrO2 cassette tapes.
Playing a Compact Disc
Insert a disc partway into the slot, label side up. Theplayer will pull it in. If the ignition and the radio are onand the underlined compact disc symbol appears on thedisplay, the disc will begin playing. Compact discs maybe loaded with the radio off but they will not startplaying until the radio is on. If you want to insert a discwhen the ignition is off, first press the eject button.
The integral CD player can play the smaller 8 cmcompact discs. Full-size compact discs and the smallercompact discs are loaded in the same manner.
If you’re driving on a very rough road or if it’s very hot,the disc may not play. If the disc comes out, it could be that:
� The disc is upside down.
� It is dirty, scratched or wet.
� The air is very humid. (If so, wait about an hour and try again.)
If any error occurs repeatedly or if an error can’t becorrected, please contact your dealer.

3-19
RW: Press and hold the left arrow to reverse thecompact disc. Release it to return to playing speed.
FF: Press and hold the right arrow to fast forward toanother part of the compact disc. Release it to return toplaying speed.
TUNE SEEK: When this button is pressed, it has two positions. This button works the same, whether it is pressed to the first or second position. Press thisbutton to seek to the next or previous selection on thecompact disc.
SCAN: Press this button to listen to selections for a fewseconds. The compact disc will go to a selection, stopfor a few seconds, then go on to the next selection. Press this button again to stop scanning.
RDM: Press this button to hear the tracks in random,rather than sequential, order. Press RDM again to turnoff random play.
EJECT: Press the upward triangle button to theright of the CD player to remove a compact disc. Theradio will play. Eject may be activated with the radio offand/or the ignition off.
AM-FM Stereo with Cassette Tape andCompact Disc Player with Radio DataSystems (RDS) and Digital SignalProcessing (DSP) (If Equipped)
Playing the Radio
PWR/VOL: Press this knob lightly to turn the systemon. Press the knob again to turn the system off. Toincrease volume, turn the knob clockwise. Turn itcounterclockwise to decrease volume.

3-20
HR or MN: Display the time with the ignition off bypressing this button.
SOURCE: Press this button to select a source. Sourcesinclude cassette and compact disc. The audio sourcemust be loaded to play. Available loaded sources areshown on the display. If a source is being used, it will beunderlined on the display. If none of the audio sourcesare loaded, NO SOURCE LOADED will appear on thedisplay. Press this button again or press BAND to switchback to the radio.
Finding a Station
BAND: Press this button to select AM, FM1, FM2 or weather.
TUNE SEEK: When this button is pressed it has two positions. Press this button to the first position tomanually tune to higher or lower stations. If this buttonis held at the first position for a few seconds, the radiowill continue tuning until this button is released. Pressthis button to the second position and release to seek tothe next higher or lower radio station.
SCAN: Press this button for less than two seconds toscan radio stations. The radio will go to a station, stopfor five seconds, then go on to the next station. Pressthis button again to stop scanning.
PUSHBUTTONS: The six numbered pushbuttons letyou return to your favorite stations and associated toneand DSP settings. The RDS PTY mode must be off touse this mode. You can set up to 24 stations (six AM, six FM1, six FM2 and six weather). Just:
1. Turn the radio on.
2. Press BAND to select AM, FM1, FM2 or weather.
3. Tune in the desired station.
4. Press and hold one of the six numbered buttons formore than two seconds. Whenever you press thatnumbered button for less than two seconds, thestation you set will return.
5. Repeat the steps for each pushbutton.
When battery power is removed and later applied, youwill not have to reset your radio presets because theradio remembers them.
PRESET SCAN: Press and hold SCAN for more thantwo seconds until you hear a beep to listen to each ofyour preset stations for five seconds. The radio will goto the first preset station stored on your pushbuttons,stop for five seconds, then go on to the next presetstation. Press SCAN again to stop scanning. If a presetstation has weak reception, the radio will not stop at thepreset station.

3-21
Using RDS Mode
Your audio system is equipped with Radio Data Systems(RDS). RDS mode gives you many useful new features.When RDS is on, the radio can:
� seek only to stations with the types of programs youwant to listen to,
� seek to stations with traffic announcements,
� receive announcements concerning local andnational emergencies,
� receive and display messages from radio stations and
� search for a stronger station when a station is tooweak for listening.
RDS features are only available for use on FM stationswhich broadcast RDS information.
RDS SELECT: Press this button to use thealternate RDS functions (RDS, TA, MSG, PTY and�PTY�) located on the six numbered pushbuttons.RDS SELECT: will appear on the display. The alternateRDS functions are only available when you are usingthe FM band of your radio.
RDS (1): With RDS off, press the RDS SELECT button,followed by this button to turn RDS on. The RDSdisplay will turn on. You must have RDS on to use thenew RDS functions. The RDS display will also turn onif one of the other RDS function buttons has beenpressed on. If you are tuned to a station broadcastingRDS information, the station’s call letters and ProgramType (PTY) will replace the station’s frequency on thedisplay. After five seconds, the program type will bereplaced on the display by the station’s program typename. The program type and program type name may bethe same or different. Press BAND to recall thefrequency and program type displays. If the radio istuned to a station that is not broadcasting RDSinformation, the station’s frequency will remain on thedisplay. While RDS is on, the radio will search for astronger station in the network when a station gets tooweak for listening. Press the RDS SELECT button,followed by this button again to turn RDS off. All RDSfunctions will be turned off.

3-22
REGION: You can also use the RDS button to accessthe region function. When an RDS station becomesweak, this function searches for a stronger station withinthe same network. A network can span a great distance.One network can have stations spread across a countryor continent. Each network breaks down into regions.
With regions, local news items like weather and trafficare available to you. When the region function is on, theradio only searches for stations in the same network andregion. You can only use the region function when RDSis already on. Press the RDS SELECT button. Thenpress and hold the RDS button for two seconds.REGION: ON will appear on the display. WhileREGION: ON appears on the display, press the RDSbutton again to turn the region function off. REGION:OFF will appear on the display. The region function canbe turned on again by pressing the RDS button.
TA (2): Press the RDS SELECT button, followed bythis button to receive traffic announcements. The radiowill turn on the TA display. TP will appear on thedisplay if the tuned station broadcasts trafficannouncements. You may also receive trafficannouncements from stations in the network related tothe tuned station. If the current tuned station does notbroadcast traffic announcements, the radio will seek to a
station which does. When the radio finds a station whichbroadcasts traffic announcements, it will stop. If nostation is found, NONE FOUND will appear on thedisplay and the TA icon will turn off. When SEEK orSCAN is pressed with the traffic announcement functionon, the radio will only stop at stations which broadcasttraffic announcements.
While a traffic announcement plays, the radio uses aspecial type of volume called TA volume. To increaseTA volume, turn the PWR/VOL knob clockwise. Turn it counterclockwise to decrease volume. TAVOLUME will appear on the display while the volumeis being adjusted.
When a traffic announcement comes on the tuned radiostation or a related network station, you will hear it,even if the volume is muted or a cassette tape orcompact disc is playing. If the radio tunes to a relatednetwork station for a traffic announcement, it will returnto the original station when the announcement isfinished. If the cassette tape or compact disc player wasbeing used, the tape or compact disc will stay in theplayer and resume play at the point where it stopped.
Press the RDS SELECT button, followed by this buttonagain to turn TA off.

3-23
MSG (3): When RDS is on, if the current station has amessage, MSG will appear on the display. Press theRDS SELECT button, followed by this button to see themessage. If the whole message does not appear on thedisplay, parts of the message will appear every threeseconds until the message is completed. To see the partsof the message faster than every three seconds, press thisbutton again. A new group of words will appear on thedisplay. Once the complete message has been displayed,MSG will disappear from the display until another newMSG is received.
PTY (4): This button is used to turn on and off ProgramType (PTY) seeks and scans. Press the RDS SELECTbutton, followed by this button. The PTY display willturn on. RDS SELECT: PTY NEWS will appear on thedisplay for three seconds. (The PTY shown will be thelast PTY selected.) Press the RDS SELECT button,followed by this button again to turn the PTY display off.
�PTY� (5) (6): With RDS on, press the RDSSELECT button, followed by � or �. The PTYdisplay will turn on, if it is not already on. RDSSELECT: PTY NEWS will appear on the display forthree seconds. (The PTY shown will be the last PTYselected.) While this message is displayed, use � and� to move up and down the PTY list. If you pause on a PTY for three seconds, PRESET PTY: NEWS willappear on the display. While this message is displayed,you can save the PTY in a preset by pressing one of thesix numbered pushbuttons until you hear a beep. Allowthree seconds for the message to disappear if you do notwant to save the PTY in a preset. See “Radio DataSystems (RDS) Program Type (PTY) Selections” in the Index.
When the PTY display is on, press SEEK and SCAN tofind radio stations of the PTY you want to listen to. Thelast PTY selected will be used for seek and scan modes.If a station with the selected PTY is not found, NONEFOUND will appear on the display. If both PTY and TAare on, the radio will search for stations with trafficannouncements and the selected PTY.

3-24
PUSHBUTTONS: The six numbered pushbuttons letyou return to your favorite Program Types (PTYs).These buttons have factory PTY presets. See “RadioData Systems (RDS) Program Type (PTY) Selections”in the Index. You can set up to 12 PTYs (six FM1 andsix FM2). Just:
1. Turn PTY on.
2. Press BAND to select FM1 or FM2.
3. Tune in an RDS station with the PTY you desire.
4. Press and hold one of the six numbered buttons formore than two seconds until you hear a beep.Whenever you press that numbered button for lessthan two seconds, the PTY you set will return.
5. Repeat the steps for each pushbutton.
When battery power is removed and later applied, youwill not have to reset your RDS presets because theradio remembers them.
HR or MN: Press the RDS SELECT button, followedby one of these buttons to display the time for thecurrent station. STATION TIME IS will be displayed. If a time has not been sent to the radio, NO STATIONTIME will be displayed. If you have recently tuned tothe station, you may need to wait a minute before the
time is available to the radio. To set the clock to thecurrent displayed station time, press and hold HR or MNuntil TIME UPDATED is displayed. There is a twosecond delay before the time is updated. RDS modedoes not have to be on to use this function, but you mustbe tuned to an FM RDS station.
ALERT: This type of announcement warns of nationalor local emergencies. You will not be able to turn offalert announcements. Alert announcements will come oneven if RDS mode is turned off. ALERT appears on thedisplay when an alert announcement plays. The radiouses TA volume during these announcements. Toincrease volume, turn the PWR/VOL knob clockwise.Turn it counterclockwise to decrease volume. TAVOLUME will appear on the display while the volumeis being adjusted. When an alert announcement comeson the tuned radio station or a related network station,you will hear it, even if the volume is muted or acassette tape or compact disc is playing.
If the radio tunes to a related network station for an alertannouncement, it will return to the original station whenthe announcement is finished. If the cassette tape orcompact disc player is playing, play will stop for theannouncement and resume when the announcement is finished.

3-25
Setting the Tone
TONE: Press and release this button until the desiredtone control (BASS or TREBLE) is found. The radiokeeps separate tone settings for each band, preset(except weather band presets) and source.
LEVEL: After selecting the desired tone control, pressthe plus (+) or minus (-) symbol on this button to selectthe desired level.
To save the tone settings for your presets, press and holdthe numbered button for the desired preset for more thantwo seconds until you hear a beep.
Using DSP Mode
DSP: The Digital Signal Processing (DSP) feature isused to provide a choice of four different listeningexperiences: TALK, FRONT SEAT, AMBIENCE andSPACIOUS. DSP can be used while listening to theradio, the cassette tape player or the CD player.
Press this button to turn DSP on. Press and release thisbutton until you reach the desired selection. To turn DSPoff, press and hold this button until DSP OFF appears onthe display. When DSP OFF is displayed, the systemwill provide the best overall audio performance. Theradio keeps separate DSP settings for each band (except weather band, which is always set to TALK),preset and source.
� TALK: This setting is used when listening tonon-musical material such as news, talk shows,sports broadcasts and books on tape. TALK makesspoken words sound very clear.
� FRONT SEAT: This setting adjusts the audio togive the driver the best possible sound qualities.DRIVER SEAT can be used at any time for anymaterial. Rear seat passengers in the vehicle may notget the same effect.
� AMBIENCE: This setting is used to enhance thestereo effect.
� SPACIOUS: This setting is used to make thelistening space seem larger.

3-26
Adjusting the Speakers
TONE: Press and release this button until the desiredBALANCE or FADE control is found.
LEVEL: After selecting the desired BALANCE orFADE control, press the plus (+) or minus (-) symbol onthis button to select the desired level.
Playing a Cassette Tape
With the radio on, insert a cassette tape. The tape willbegin playing as soon as it is inserted. When one side ofyour cassette tape is done playing, auto reverse plays theother side of your cassette tape. Cassette tapes may beloaded with the radio off but they will not start playinguntil the radio is on. If you want to insert a cassette tapewhen the ignition is off, first press the eject button.
While the tape is playing, use the VOL, TONE, LEVELand DSP controls just as you do for the radio. Othercontrols may have different functions when a tape isinserted. The display will show an underlined tapesymbol. TAPE PLAY will appear on the display when atape is playing, with an arrow to indicate which side ofthe tape is playing.
If an error occurs while trying to play a cassette tape, itcould be that:
� The cassette tape is tight and the cassette playercannot turn the hubs of the tape. Hold the cassettetape with the open end down and try turning the righthub counterclockwise with a pencil. Flip the tapeover and repeat. If the hubs do not turn easily, yourcassette tape may be damaged and should not beused in the player. Try a new tape to be sure yourplayer is working properly.
� The cassette tape is broken. (Check to see if yourtape is broken. Try a new tape.)
RW: Press the left arrow to rewind the tape rapidly. The radio will play while the tape rewinds. You may useyour station pushbuttons to tune to another radio stationwhile in RW mode. Press the left arrow again to returnto playing speed.
FF: Press the right arrow to fast forward to another partof the tape. The radio will play while the tape advances.You may use your station pushbuttons to tune to anotherradio station while in FF mode. Press the right arrowagain to return to playing speed.

3-27
TUNE SEEK: When this button is pressed, it has two positions. This button works the same, whether it ispressed to the first or second position. Press this buttonto seek to the next or previous selection on the tape.Your tape must have at least three seconds of silencebetween each selection for TUNE SEEK to work. The sound will mute while seeking.
SCAN: Press this button to listen to selections for a fewseconds. The tape will go to a selection, stop for a fewseconds, then go on to the next selection. Press thisbutton again to stop scanning.
SIDE: Press this button to change the side of the tapethat is playing.
EJECT: Press the upward triangle button to theright of the cassette tape player to remove a tape. Theradio will play. Eject may be activated with the radio offand/or the ignition off.
CLEAN TAPE: If this message appears on the display,the cassette tape player needs to be cleaned. It will stillplay tapes, but you should clean it as soon as possible toprevent damage to the tapes and player. See “Care ofYour Cassette Tape Player” in the Index. After you cleanthe player, press and hold the eject button for threeseconds to reset the CLEAN TAPE indicator. The radiowill display CLEAN TAPE MSG CLEARED to showthat the indicator was reset.
Your cassette tape player automatically reducesbackground noise. Dolby Noise Reduction ismanufactured under a license from Dolby LaboratoriesLicensing Corporation. Dolby and the double-D symbolare trademarks of Dolby Laboratories Licensing Corporation.
Auto CrO2 allows the cassette tape player to adjust tothe type of cassette tape for clearer sound for CrO2cassette tapes.

3-28
Playing a Compact Disc
Insert a disc partway into the slot, label side up. Theplayer will pull it in. If the ignition and the radio are onand the underlined compact disc symbol appears on thedisplay, the disc will begin playing. Compact discs maybe loaded with the radio off but they will not startplaying until the radio is on. If you want to insert a discwhen the ignition is off, first press the eject button.
The integral CD player can play the smaller 8 cmcompact discs. Full-size compact discs and the smallercompact discs are loaded in the same manner.
If you’re driving on a very rough road or if it’s very hot,the disc may not play. If the disc comes out, it could be that:
� The disc is upside down.
� It is dirty, scratched or wet.
� The air is very humid. (If so, wait about an hour and try again.)
If any error occurs repeatedly or if an error can’t becorrected, please contact your dealer.
RW: Press and hold the left arrow to reverse thecompact disc. Release it to return to playing speed.
FF: Press and hold the right arrow to fast forward toanother part of the compact disc. Release it to return toplaying speed.
TUNE SEEK: When this button is pressed, it has two positions. This button works the same, whether it is pressed to the first or second position. Press thisbutton to seek to the next or previous selection on thecompact disc.
SCAN: Press this button to listen to selections for a few seconds. The compact disc will go to a selection,stop for a few seconds, then go on to the next selection.Press this button again to stop scanning.
RDM: Press this button to hear the tracks in random,rather than sequential, order. Press RDM again to turnoff random play.
EJECT: Press the upward triangle button to theright of the compact disc player to remove a compactdisc. The radio will play. Eject may be activated with theradio off and/or the ignition off.

3-29
AM-FM Stereo with Cassette Tape andMiniDisc Player with Radio Data Systems(RDS) and Digital Signal Processing (DSP)(If Equipped)
Playing the Radio
PWR/VOL: Press this knob lightly to turn the systemon. Press the knob again to turn the system off. Toincrease volume, turn the knob clockwise. Turn itcounterclockwise to decrease volume.
AVC: Your system has a feature called AutomaticVolume Control (AVC). With AVC, your audio systemmonitors the noise in the vehicle. Then, AVCautomatically adjusts the volume level so that it alwayssounds the same to you. To use AVC, press and hold theTONE button until AUTO VOLUME CONTROL OFFappears on the display. Then press the LEVEL plus (+)symbol. AUTO VOLUME CONTROL ON will appearon the display. AVC VOLUME will appear on thedisplay any time you adjust the volume while AVC ison. To turn AVC off, press and hold the TONE buttonuntil AUTO VOLUME CONTROL ON appears on thedisplay. Then press the LEVEL minus (-) symbol.AUTO VOLUME CONTROL OFF will appear on the display.
HR or MN: Display the time with the ignition off bypressing this button.
SOURCE: Press this button to select a source. Sourcesinclude cassette and MiniDisc. The audio source mustbe loaded to play. Available loaded sources are shownon the display. If a source is being used, it will beunderlined on the display. If none of the audio sourcesare loaded, NO SOURCE LOADED will appear on thedisplay. Press this button again or press BAND to switchback to the radio.

3-30
Finding a Station
BAND: Press this button to select AM, FM1, FM2 or weather.
TUNE SEEK: When this button is pressed it has two positions. Press this button to the first position tomanually tune to higher or lower stations. If this buttonis held at the first position for a few seconds, the radiowill continue tuning until this button is released. Pressthis button to the second position and release to seek tothe next higher or lower radio station.
SCAN: Press this button for less than two seconds toscan radio stations. The radio will go to a station, stopfor five seconds, then go on to the next station. Pressthis button again to stop scanning.
PUSHBUTTONS: The six numbered pushbuttons letyou return to your favorite stations and associated toneand DSP settings. The RDS PTY mode must be off touse this mode. You can set up to 24 stations (six AM, six FM1, six FM2 and six weather). Just:
1. Turn the radio on.
2. Press BAND to select AM, FM1, FM2 or weather.
3. Tune in the desired station.
4. Press and hold one of the six numbered buttons formore than two seconds until you hear a beep.Whenever you press that numbered button for lessthan two seconds, the station you set will return.
5. Repeat the steps for each pushbutton.
When battery power is removed and later applied, youwill not have to reset your radio presets because theradio remembers them.

3-31
PRESET SCAN: Press and hold SCAN for more thantwo seconds until you hear a beep to listen to each ofyour preset stations for five seconds. The radio will goto the first preset station stored on your pushbuttons,stop for five seconds, then go on to the next presetstation. Press SCAN again to stop scanning. If a presetstation has weak reception, the radio will not stop at thepreset station.
Using RDS Mode
Your audio system is equipped with Radio Data Systems(RDS). RDS mode gives you many useful new features.When RDS is on, the radio can:
� seek only to stations with the types of programs youwant to listen to,
� seek to stations with traffic announcements,
� receive announcements concerning local andnational emergencies,
� receive and display messages from radio stations and
� search for a stronger station when a station is tooweak for listening.
RDS features are only available for use on FM stationswhich broadcast RDS information.
RDS SELECT: Press this button to use thealternate RDS functions (RDS, TA, MSG, PTY and�PTY�) located on the six numbered pushbuttons.RDS SELECT will appear on the display. The alternateRDS functions are only available when you are usingthe FM band of your radio.
RDS (1): With RDS off, press the RDS SELECT button,followed by this button to turn RDS on. The RDSdisplay will turn on. You must have RDS on to use thenew RDS functions. The RDS display will also turn onif one of the other RDS function buttons has beenpressed on. If you are tuned to a station broadcastingRDS information, the station’s call letters and ProgramType (PTY) will replace the station’s frequency on thedisplay. After five seconds, the program type will bereplaced on the display by the station’s program typename. The program type and program type name may be the same or different. Press BAND to recall thefrequency and program type displays. If the radio istuned to a station that is not broadcasting RDSinformation, the station’s frequency will remain on thedisplay. While RDS is on, the radio will search for astronger station in the network when a station gets tooweak for listening. Press the RDS SELECT button,followed by this button again to turn RDS off. All RDS functions will be turned off.

3-32
REGION: You can also use the RDS button to accessthe region function. When an RDS station becomesweak, this function searches for a stronger station withinthe same network. A network can span a great distance.One network can have stations spread across a countryor continent. Each network breaks down into regions.With regions, local news items like weather and trafficare available to you. When the region function is on, theradio only searches for stations in the same network andregion. You can only use the region function when RDSis already on. Press the RDS SELECT button. Thenpress and hold the RDS button for two seconds.REGION: ON will appear on the display. WhileREGION: ON appears on the display, press the RDSbutton again to turn the region function off. REGION:OFF will appear on the display. The region function canbe turned on again by pressing the RDS button.
TA (2): Press the RDS SELECT button, followed by this button to receive traffic announcements. The radio will turn on the TA display. TP will appear on the display if the tuned station broadcasts trafficannouncements. You may also receive trafficannouncements from stations in the network related tothe tuned station. If the current tuned station does notbroadcast traffic announcements, the radio will seek to astation which does.
When the radio finds a station which broadcasts trafficannouncements, it will stop. If no station is found,NONE FOUND will appear on the display. When SEEKor SCAN is pressed with the traffic announcementfunction on, the radio will only stop at stations whichbroadcast traffic announcements.
While a traffic announcement plays, the radio uses aspecial type of volume called TA volume. To increaseTA volume, turn the PWR/VOL knob clockwise. Turn it counterclockwise to decrease volume. TA VOLUME will appear on the display while thevolume is being adjusted.
When a traffic announcement comes on the tuned radiostation or a related network station, you will hear it,even if the volume is muted or a cassette tape orMiniDisc is playing. If the radio tunes to a relatednetwork station for a traffic announcement, it will returnto the original station when the announcement isfinished. If the cassette tape or MiniDisc player wasbeing used, the tape or MiniDisc will stay in the playerand resume play at the point where it stopped.
Press the RDS SELECT button, followed by this buttonagain to turn TA off.

3-33
MSG (3): When RDS is on, if the current station has amessage, MSG will appear on the display. Press theRDS SELECT button, followed by this button to see themessage. If the whole message does not appear on thedisplay, parts of the message will appear every threeseconds until the message is completed. To see the partsof the message faster than every three seconds, press thisbutton again. A new group of words will appear on thedisplay. Once the complete message has been displayed,MSG will disappear from the display until another newMSG is received.
PTY (4): This button is used to turn on and off ProgramType (PTY) seeks and scans. Press the RDS SELECTbutton, followed by this button. The PTY display willturn on. RDS SELECT: PTY NEWS will appear on the display for three seconds. (The PTY shown will be the last PTY selected.) Press the RDS SELECTbutton, followed by this button again to turn the PTYdisplay off.
�PTY� (5) (6): With RDS on, press the RDSSELECT button, followed by � or �. The PTYdisplay will turn on, if it is not already on. RDSSELECT: PTY NEWS will appear on the display forthree seconds. (The PTY shown will be the last PTYselected.) While this message is displayed, use � and� to move up and down the PTY list. If you pause on aPTY for three seconds, PRESET PTY: NEWS willappear on the display. While this message is displayed,you can save the PTY in a preset by pressing one of thesix numbered pushbuttons until you hear a beep. Allowthree seconds for the message to disappear if you do notwant to save the PTY in a preset. See “Radio DataSystems (RDS) Program Type (PTY) Selections” in the Index.
When the PTY display is on, press SEEK and SCAN tofind radio stations of the PTY you want to listen to. Thelast PTY selected will be used for seek and scan modes.If a station with the selected PTY is not found, NONEFOUND will appear on the display. If both PTY and TAare on, the radio will search for stations with trafficannouncements and the selected PTY.

3-34
PUSHBUTTONS: The six numbered pushbuttons letyou return to your favorite Program Types (PTYs).These buttons have factory PTY presets. See “RadioData Systems (RDS) Program Type (PTY) Selections”in the Index. You can set up to 12 PTYs (six FM1 andsix FM2). Just:
1. Turn PTY on.
2. Press BAND to select FM1 or FM2.
3. Tune in an RDS station with the PTY you desire.
4. Press and hold one of the six numbered buttons formore than two seconds until you hear a beep.Whenever you press that numbered button for lessthan two seconds, the PTY you set will return.
5. Repeat the steps for each pushbutton.
When battery power is removed and later applied, youwill not have to reset your RDS presets because theradio remembers them.
HR or MN: Press the RDS SELECT button, followedby one of these buttons to display the time for thecurrent station. STATION TIME IS will be displayed. If a time has not been sent to the radio, NO STATIONTIME will be displayed. If you have recently tuned tothe station, you may need to wait a minute before thetime is available to the radio.
To set the clock to the current displayed station time,press and hold HR or MN until TIME UPDATED isdisplayed. There is a two second delay before the time isupdated. RDS mode does not have to be on to use thisfunction, but you must be tuned to an FM RDS station.
ALERT: This type of announcement warns of nationalor local emergencies. You will not be able to turn offalert announcements. Alert announcements will come oneven if RDS mode is turned off. ALERT appears on thedisplay when an alert announcement plays. The radiouses TA volume during these announcements. Toincrease volume, turn the PWR/VOL knob clockwise.Turn it counterclockwise to decrease volume. TAVOLUME will appear on the display while the volumeis being adjusted. When an alert announcement comeson the tuned radio station or a related network station,you will hear it, even if the volume is muted or acassette tape or MiniDisc is playing. If the radio tunes toa related network station for an alert announcement, itwill return to the original station when theannouncement is finished. If the cassette tape orMiniDisc player is playing, play will stop for theannouncement and resume when the announcement is finished.

3-35
Setting the Tone
TONE: Press and release this button until the desiredtone control (BASS, TREBLE or MIDRANGE) isfound. The radio keeps separate tone settings for eachband, preset (except weather band presets) and source.
LEVEL: After selecting the desired tone control, pressthe plus (+) or minus (-) symbol on this button to selectthe desired level.
To save the tone settings for your presets, press and holdthe numbered button for the desired preset for more thantwo seconds until you hear a beep.
Using DSP Mode
DSP: The Digital Signal Processing (DSP) feature isused to provide a choice of four different listeningexperiences: TALK, FRONT SEAT, AMBIENCE andSPACIOUS. DSP can be used while listening to theradio, the cassette tape player or the MiniDisc player.Press this button to turn DSP on. Press and release thisbutton until you reach the desired selection. To turn DSPoff, press and hold this button until DSP OFF appears onthe display. When DSP OFF is displayed, the systemwill provide the best overall Bose performance. Theradio keeps separate DSP settings for each band (except weather band, which is always set to TALK),preset and source.
� TALK: This setting is used when listening tonon-musical material such as news, talk shows,sports broadcasts and books on tape. TALK makesspoken words sound very clear.
� FRONT SEAT: This setting adjusts the audio togive the front seat occupants the best possible soundqualities. FRONT SEAT can be used at any time forany material. Rear seat passengers in the vehicle maynot get the same effect.
� AMBIENCE: This setting is used to enhance thestereo effect.
� SPACIOUS: This setting is used to make thelistening space seem larger.
Adjusting the Speakers
TONE: Press and release this button until the desiredBALANCE or FADE control is found.
LEVEL: After selecting the desired BALANCE orFADE control, press the plus (+) or minus (-) symbol onthis button to select the desired level.

3-36
Playing a Cassette Tape
With the radio on, insert a cassette tape. The tape willbegin playing as soon as it is inserted. When one side ofyour cassette tape is done playing, auto reverse plays theother side of your cassette tape. Cassette tapes may beloaded with the radio off but they will not start playinguntil the radio is on. If you want to insert a cassette tapewhen the ignition is off, first press the eject button.
While the tape is playing, use the VOL, TONE, LEVELand DSP controls just as you do for the radio. Othercontrols may have different functions when a tape isinserted. The display will show an underlined tapesymbol. TAPE PLAY will appear on the display when atape is playing, with an arrow to indicate which side ofthe tape is playing.
If an error occurs while trying to play a cassette tape, itcould be that:
� The cassette tape is tight and the cassette playercannot turn the hubs of the tape. Hold the cassettetape with the open end down and try turning the righthub counterclockwise with a pencil. Flip the tapeover and repeat. If the hubs do not turn easily, yourcassette tape may be damaged and should not beused in the player. Try a new tape to be sure yourplayer is working properly.
� The cassette tape is broken. (Check to see if yourtape is broken. Try a new tape.)
RW: Press the left arrow to rewind the tape rapidly. The radio will play while the tape rewinds. You may useyour station pushbuttons to tune to another radio stationwhile in RW mode. Press the left arrow again to returnto playing speed.

3-37
FF: Press the right arrow to fast forward to another partof the tape. The radio will play while the tape advances.You may use your station pushbuttons to tune to anotherradio station while in FF mode. Press the right arrowagain to return to playing speed.
TUNE SEEK: When this button is pressed, it has two positions. This button works the same, whether it ispressed to the first or second position. Press this buttonto seek to the next or previous selection on the tape.Your tape must have at least three seconds of silencebetween each selection for TUNE-SEEK to work. The sound will mute while seeking.
SCAN: Press this button to listen to selections for a fewseconds. The tape will go to a selection, stop for a fewseconds, then go on to the next selection. Press thisbutton again to stop scanning.
SIDE: Press this button to change the side of the tapethat is playing.
EJECT: Press the upward triangle button to theright of the cassette tape player to remove a tape. Theradio will play. Eject may be activated with the radio offand/or the ignition off.
CLEAN TAPE: If this message appears on the display,the cassette tape player needs to be cleaned. It will stillplay tapes, but you should clean it as soon as possible toprevent damage to the tapes and player. See “Care ofYour Cassette Tape Player” in the Index. After you clean the player, press and hold the eject button for three seconds to reset the CLEAN TAPE indicator. Theradio will display CLEAN TAPE MSG CLEARED toshow that the indicator was reset.
Your cassette tape player automatically reducesbackground noise. Dolby Noise Reduction ismanufactured under a license from Dolby LaboratoriesLicensing Corporation. Dolby and the double-D symbolare trademarks of Dolby Laboratories Licensing Corporation.
Auto CrO2 allows the cassette tape player to adjust to the type of cassette tape for clearer sound for CrO2 cassette tapes.

3-38
Playing a MiniDisc
Insert a disc partway into the slot, label side up. Theplayer will pull it in. If the ignition and the radio are onand the underlined MiniDisc symbol appears on thedisplay, the disc will begin playing. MiniDiscs may beloaded with the radio off but they will not start playinguntil the radio is on. If you want to insert a disc whenthe ignition is off, first press the eject button.
While a MiniDisc is playing, MD TRACK number willappear on the display followed by ALBUM title, thenTRACK title. The display then reverts back to showingMD TRACK number.
If you’re driving on a very rough road or if it’s very hot, the disc may not play. If the disc comes out, it could be that:
� It is dirty, scratched or wet.
� The air is very humid. (If so, wait about an hour andtry again.)
If any error occurs repeatedly or if an error can’t becorrected, please contact your dealer.
RW: Press and hold the left arrow to reverse theMiniDisc. Release it to return to playing speed.
FF: Press and hold the right arrow to fast forward toanother part of the MiniDisc. Release it to return toplaying speed.
TUNE SEEK: When this button is pressed, it has two positions. This button works the same, whether it is pressed to the first or second position. Press thisbutton to seek to the next or previous selection on the MiniDisc.
SCAN: Press this button to listen to selections for a fewseconds. The MiniDisc will go to a selection, stop for afew seconds, then go on to the next selection. Press thisbutton again to stop scanning.
RDM: Press this button to hear the tracks in random,rather than sequential, order. Press RDM again to turnoff random play.
EJECT: Press the upward triangle button to theright of the MiniDisc player to remove a MiniDisc. Theradio will play. Eject may be activated with the radio offand/or the ignition off.

3-39
Radio Data Systems (RDS) Program Type (PTY) Selections
PTY List DescriptionAdlt Hit Adult Hits. . . . . . . . . . . . . . . . . . . . . . . . . . . Any Any. . . . . . . . . . . . . . . . . . . . . . . . . . . . . . . . . . . . Classicl Classical. . . . . . . . . . . . . . . . . . . . . . . . . . . . . Cls Rock Classical Rock. . . . . . . . . . . . . . . . . . . . . . . College College. . . . . . . . . . . . . . . . . . . . . . . . . . . . . . Country Country. . . . . . . . . . . . . . . . . . . . . . . . . . . . . Info Information. . . . . . . . . . . . . . . . . . . . . . . . . . . . . . Jazz Jazz. . . . . . . . . . . . . . . . . . . . . . . . . . . . . . . . . . . . Language Language. . . . . . . . . . . . . . . . . . . . . . . . . . . News News. . . . . . . . . . . . . . . . . . . . . . . . . . . . . . . . . Nostalga Nostalgia. . . . . . . . . . . . . . . . . . . . . . . . . . . . Oldies Oldies. . . . . . . . . . . . . . . . . . . . . . . . . . . . . . . . Persnlty Personality. . . . . . . . . . . . . . . . . . . . . . . . . . Public Public. . . . . . . . . . . . . . . . . . . . . . . . . . . . . . . . R & B Rhythm and Blues. . . . . . . . . . . . . . . . . . . . . . . Rel Musc Religious Music. . . . . . . . . . . . . . . . . . . . . Rel Talk Religious Talk. . . . . . . . . . . . . . . . . . . . . . . .
PTY List DescriptionRock M Rock Music. . . . . . . . . . . . . . . . . . . . . . . . . . . Soft Soft. . . . . . . . . . . . . . . . . . . . . . . . . . . . . . . . . . . . Soft Rock Soft Rock. . . . . . . . . . . . . . . . . . . . . . . . . . Sports Sports. . . . . . . . . . . . . . . . . . . . . . . . . . . . . . . . Talk Talk. . . . . . . . . . . . . . . . . . . . . . . . . . . . . . . . . . . Top 40 Top 40. . . . . . . . . . . . . . . . . . . . . . . . . . . . . . . Weather Weather. . . . . . . . . . . . . . . . . . . . . . . . . . . . .
Factory PTY Presets
Preset FM1 FM2
Preset 1 Adult Hits Jazz
Preset 2 Classical Oldies
Preset 3 News Religious Music
Preset 4 Public Soft Rock
Preset 5 Rock R & B
Preset 6 Country Top 40
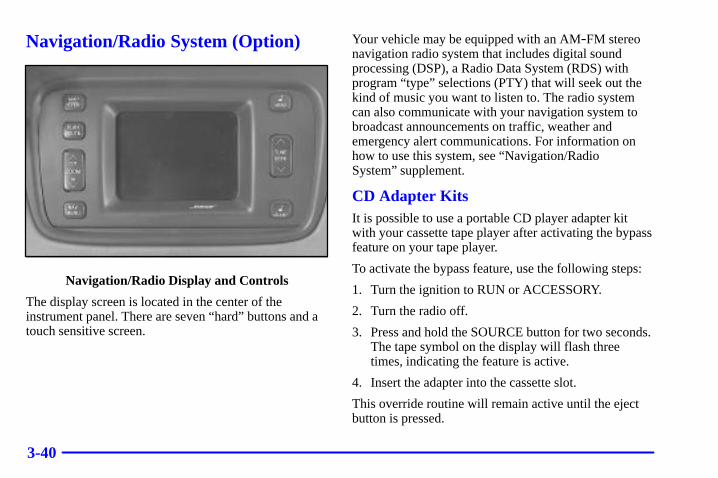
3-40
Navigation/Radio System (Option)
Navigation/Radio Display and Controls
The display screen is located in the center of theinstrument panel. There are seven “hard” buttons and atouch sensitive screen.
Your vehicle may be equipped with an AM-FM stereonavigation radio system that includes digital soundprocessing (DSP), a Radio Data System (RDS) withprogram “type” selections (PTY) that will seek out thekind of music you want to listen to. The radio systemcan also communicate with your navigation system tobroadcast announcements on traffic, weather andemergency alert communications. For information onhow to use this system, see “Navigation/Radio System” supplement.
CD Adapter KitsIt is possible to use a portable CD player adapter kitwith your cassette tape player after activating the bypassfeature on your tape player.
To activate the bypass feature, use the following steps:
1. Turn the ignition to RUN or ACCESSORY.
2. Turn the radio off.
3. Press and hold the SOURCE button for two seconds.The tape symbol on the display will flash threetimes, indicating the feature is active.
4. Insert the adapter into the cassette slot.
This override routine will remain active until the ejectbutton is pressed.

3-41
Glovebox-Mounted CD Changer (Option)With the compact disc changer, you can play up to 6 discs continuously. Normal size discs may be playedusing the trays supplied in the magazine. The smallerdiscs (8 cm) can be played only with specially designed trays.
You must first load the magazine with discs before youcan play a compact disc. Each of the 6 trays holds onedisc. Load the trays from bottom to top, placing a disc inthe tray label side up. If you load a disc label side down,the disc will not play and an error will occur. Repeat thisprocedure for loading up to 6 discs in the magazine.
Once you have loaded the discs in the magazine, slideopen the door of the compact disc (CD) changer. Pushthe magazine into the changer in the direction of thearrow marked on top of the magazine.

3-42
Close the door by sliding it all the way to the right.When the door is closed, the changer will beginchecking for discs in the magazine. This will continuefor up to one and a half minutes, depending on thenumber of discs loaded.
To eject the magazine from the player, slide the CDchanger door all the way open. Press the EJECT buttonand the magazine will eject. Remember to keep the doorclosed whenever possible to keep dirt and dust fromgetting inside the changer.
Whenever a CD magazine with discs is loaded in thechanger, the CD changer symbol will appear on theradio display. If the CD changer is checking themagazine for CDs, the CD symbol will flash on thedisplay until the changer is ready to play. When a CDbegins playing, a disc and track number will bedisplayed. The disc numbers are listed on the front ofthe magazine.
All of the CD functions are controlled by the radiobuttons, except for ejecting the CD magazine.
PUSHBUTTONS: Press buttons one through six to gofrom one compact disc to another that is loaded in thechanger. These pushbuttons represent the order of thediscs loaded in the changer.
RW: Press and hold this button to reverse quicklythrough a track selection.
FF: Press and hold this button to advance quicklythrough a track selection.

3-43
TUNE-SEEK: Press the upward arrow to the firstdetent to seek to the next selection on the compact disc.If playing last track of disc, pressing the upward arrowwill seek to the first track of disc. Press the downwardarrow to the first detent to seek to the previous selectionon the compact disc. If playing the first track of disc,pressing the downward arrow will seek to the last trackof disc. The sound will mute while seeking.
SCAN: Press this button. You will hear the first fewseconds of the first track on each disc. Press this buttonagain to stop scanning. The CD will mute whilescanning and SCAN will appear on the display.
RDM: Press this button to hear the tracks in random,rather than sequential, order. RDM will appear on thedisplay. Press TUNE-SEEK while RDM is on thedisplay to randomly seek through discs. Press RDMagain to turn off random play. This feature may not beavailable on your radio.
SIDE: Press this button to select the next disc in thechanger. Each time you press this button, LOADINGwill appear on the display and the disc number on theradio display will go to that of the next available CD.
SOURCE: Press this button if you have a disc loaded inthe changer and the radio is on, to play a compact disc.To return to playing the radio, press BAND. Pressingsource also switches between a tape or compact disc (or mini disc) if both are loaded (if equipped).
EJECT: Slide the CD changer door all the way open.Press the EJECT button and the magazine will eject.
Compact Disc Changer Errors
CD CHANGER ERROR could be displayed for the following:
� The road is too rough. The disc should play when theroad is smoother.
� The disc is dirty, scratched, wet or loaded label side up.
� The air is very humid. If so, wait about an hour andtry again.
If any error occurs repeatedly or if an error cannot becorrected, please contact your dealer. If your radiodisplays an error number, write it down and provide thisinformation to your dealer when reporting the problem.

3-44
Radio Personalization with Home and AwayFeature (If Equipped)If DRIVER 1 (HOME or AWAY) PRESETS orDRIVER 2 (HOME or AWAY) PRESETS appears in thedisplay when the radio is first turned on, your vehicle isequipped with this feature.
With this feature, your vehicle will recall the latest radiosettings as adjusted the last time your vehicle wasoperated. This feature allows two different drivers tostore and recall their own radio settings. The settingsrecalled by the radio are determined by which RKEtransmitter (“1” or “2”) was used to enter the vehicle.The number on the back of the RKE transmittercorresponds to driver 1 or to driver 2. The radio settingswill automatically adjust to where they were last set bythe identified driver. The settings can also be recalled bybriefly pressing the MEMORY seat buttons 1 or 2located on the driver’s door.
Your radio can store home and away presets. Home andaway presets allow you to use one set of preset radiosettings in the area where you live, and another set whenyou go out of town. That way, you will not need toreprogram your presets every time you travel. With theradio off and the clock displayed, use FF and RW toselect home or away presets. To select the away presets,press and hold FF for five counts until you hear a beep.
The next time the radio comes on, the away presets willbe active. To select the home presets, press and hold RWfor five counts until you hear a beep. The next time theradio comes on, the home presets will be active.
When battery power is removed and later applied, youwill not have to reset your home radio presets becausethe radio remembers them. However, you will have toreset your away radio presets.
Theft-Deterrent FeatureTHEFTLOCK� is designed to discourage theft of yourradio. Your vehicle has a “built-in” theft-deterrentfeature on each radio that is automatic -- there is noprogramming required. The radio in your vehicle cannotbe used in any other vehicle. When the radio wasoriginally installed in your vehicle at the factory, itstored the Vehicle Identification Number (VIN). Eachtime the ignition is turned on, the VIN is verified. If thevehicle’s VIN does not match the VIN stored in theradio, THEFTLOCK will be activated and the audiosystem will not play. If the radio is removed from yourvehicle, the original VIN in the radio can be used totrace the radio back to your vehicle.

3-45
Audio Steering Wheel Controls
Some audio controlscan be adjusted at thesteering wheel. Theyinclude the following:
VOL: Press the up arrow button to increase volume andthe down arrow button to decrease volume.
SEL: When listening to the radio, press the up or downarrow button to tune to the next or previous preset radiostation. When listening to a cassette tape, the up or downarrow button can be used to SEEK forward and rearwardthrough the tape. Pressing the up or down arrow buttonwhen listening to a CD will cause the player to go to thenext or previous selection. When in Radio Data Systems(RDS) Program Type (PTY) mode, the up or downarrow button can be used to perform a PTY preset seek.PSEEK will appear on the display while the PTY presetseek is performed. The radio will seek all of the PTYsstored in presets, except for the PTY Any.
3-46
Understanding Radio Reception
AM
The range for most AM stations is greater than for FM,especially at night. The longer range, however, cancause stations to interfere with each other. AM can pickup noise from things like storms and power lines. Tryreducing the treble to reduce this noise if you ever get it.
FM Stereo
FM stereo will give you the best sound, but FM signalswill reach only about 10 to 40 miles (16 to 65 km). Tallbuildings or hills can interfere with FM signals, causingthe sound to come and go.
Cellular Phone Usage
Cellular phone usage may cause interference with yourvehicle’s radio. This interference may occur whenmaking or receiving phone calls, charging the phone’sbattery or simply having the phone “on”. Thisinterference is described as an increased level of staticwhile listening to the radio. If you notice static whilelistening to the radio, unplug the cellular phone and turn if off.
Weather Band (If Equipped)
Weather band is restricted to speech and the audioquality is not as good as with the AM or FM bands.Depending on location, the radio should receive one ortwo channels.
Tips About Your Audio SystemHearing damage from loud noise is almost undetectableuntil it is too late. Your hearing can adapt to highervolumes of sound. Sound that seems normal can be loudand harmful to your hearing. Take precautions byadjusting the volume control on your radio to a safesound level before your hearing adapts to it.

3-47
To help avoid hearing loss or damage:
� Adjust the volume control to the lowest setting.
� Increase volume slowly until you hear comfortablyand clearly.
NOTICE:
Before you add any sound equipment to yourvehicle -- like a tape player, CB radio, mobiletelephone or two-way radio -- be sure you canadd what you want. If you can, it’s veryimportant to do it properly. Added soundequipment may interfere with the operation ofyour vehicle’s engine, radio or other systems, andeven damage them. Your vehicle’s systems mayalso interfere with the operation of soundequipment that has been added improperly.So, before adding sound equipment, check withyour dealer and be sure to check Federal rulescovering mobile radio and telephone units.
Care of Your Cassette Tape PlayerA tape player that is not cleaned regularly can causereduced sound quality, ruined cassettes or a damagedmechanism. Cassette tapes should be stored in theircases away from contaminants, direct sunlight andextreme heat. If they aren’t, they may not operateproperly or may cause failure of the tape player.
Your tape player should be cleaned regularly after every50 hours of use. Your radio may display CLEAN TAPEto indicate that you have used your tape player for50 hours without resetting the tape clean timer. If thismessage appears on the display, your cassette tapeplayer needs to be cleaned. It will still play tapes, butyou should clean it as soon as possible to preventdamage to your tapes and player. If you notice areduction in sound quality, try a known good cassette tosee if it is the tape or the tape player at fault. If this othercassette has no improvement in sound quality, clean thetape player.
The recommended cleaning method for your cassettetape player is the use of a scrubbing action,non-abrasive cleaning cassette with pads which scrubthe tape head as the hubs of the cleaner cassette turn.The recommended cleaning cassette is available throughyour dealer (GM Part No. 12344789).

3-48
When using a scrubbing action, non-abrasive cleaningcassette, it is normal for the cassette to eject becauseyour unit is equipped with a broken tape detectionfeature and a cleaning cassette may appear as a brokentape. To prevent the cleaning cassette from beingejected, use the following steps.
1. Turn the ignition to RUN or ACCESSORY.
2. Turn the radio off.
3. Press and hold the SOURCE button for two seconds.The tape symbol on the display will flash three times.
4. Turn the radio on and insert the scrubbing actioncleaning cassette.
5. Eject the cleaning cassette after the manufacturer’srecommended cleaning time.
When the cleaning cassette has been ejected, the brokentape detection feature is active again.
You may also choose a non-scrubbing action, wet-typecleaner which uses a cassette with a fabric belt to cleanthe tape head. This type of cleaning cassette will noteject on its own. A non-scrubbing action cleaner maynot clean as thoroughly as the scrubbing type cleaner.The use of a non-scrubbing action, dry-type cleaningcassette is not recommended.
After you clean the player, press and hold the ejectbutton for three seconds to reset the CLEAN TAPEindicator. The radio will display CLEAN TAPE MSGCLEARED to show the indicator was reset.
Cassettes are subject to wear and the sound quality may degrade over time. Always make sure the cassettetape is in good condition before you have your tapeplayer serviced.

3-49
Care of Your Compact DiscsHandle discs carefully. Store them in their original casesor other protective cases and away from direct sunlightand dust. If the surface of a disc is soiled, dampen aclean, soft cloth in a mild, neutral detergent solution andclean it, wiping from the center to the edge.
Be sure never to touch the side without writing whenhandling discs. Pick up discs by grasping the outer edgesor the edge of the hole and the outer edge.
Care of Your Compact Disc PlayerThe use of CD lens cleaner discs is not advised, due tothe risk of contaminating the lens of the CD optics withlubricants internal to the CD mechanism.
Diversity Antenna SystemYour AM-FM antennas are located in the frontwindshield and rear window. Be sure that the insidesurfaces of the front windshield and rear window are notscratched and that the lines on the glass are notdamaged. If the inside surfaces are damaged, they couldinterfere with radio reception.
Do not apply aftermarket glass tinting. The metallic filmin some tinting materials will interfere with or distort theincoming radio reception.
NOTICE:
Do not try to clear frost or other material fromthe inside of the rear window with a razor bladeor anything else that is sharp. This may damagethe rear defogger grid and affect your radio’sability to pick up stations clearly. The repairswouldn’t be covered by your warranty.
If, when you turn on your rear window defogger, youhear static on your radio station, it could mean that adefogger grid line has been damaged. If this is true, thegrid line must be repaired.
If you choose to add an aftermarket cellular telephone toyour vehicle, and the antenna needs to be attached to theglass, be sure that you do not damage the grid lines forthe AM-FM antennas or place the cellular telephoneantenna over the grid lines.

4-4-1
Section 4 Your Driving and the Road
Here you’ll find information about driving on different kinds of roads and in varying weather conditions. We’ve also included many other useful tips on driving.
4-2 Defensive Driving4-3 Drunken Driving4-6 Control of a Vehicle4-6 Braking4-9 Traction Control System4-10 Steering4-13 Off-Road Recovery4-13 Passing4-15 Loss of Control4-16 Driving at Night
4-18 Driving in Rain and on Wet Roads4-21 City Driving4-22 Freeway Driving4-23 Before Leaving on a Long Trip4-24 Highway Hypnosis4-24 Hill and Mountain Roads4-26 Winter Driving4-30 Recreational Vehicle Towing4-30 Loading Your Vehicle4-32 Towing a Trailer

4-2
Defensive DrivingThe best advice anyone can give about driving is: Drive defensively.
Please start with a very important safety device in yourvehicle: Buckle up. See “Safety Belts” in the Index.
Defensive driving really means “be ready for anything.”On city streets, rural roads or freeways, it means“always expect the unexpected.”
Assume that pedestrians or other drivers are going to be careless and make mistakes. Anticipate what theymight do. Be ready for their mistakes.
Rear-end collisions are about the most preventable of accidents. Yet they are common. Allow enoughfollowing distance. It’s the best defensive drivingmaneuver, in both city and rural driving. You neverknow when the vehicle in front of you is going to brake or turn suddenly.
Defensive driving requires that a driver concentrate on the driving task. Anything that distracts from thedriving task -- such as concentrating on a cellulartelephone call, reading, or reaching for something on the floor -- makes proper defensive driving moredifficult and can even cause a collision, with resultinginjury. Ask a passenger to help do things like this, orpull off the road in a safe place to do them yourself.These simple defensive driving techniques could saveyour life.

4-3
Drunken DrivingDeath and injury associated with drinking and driving isa national tragedy. It’s the number one contributor to the highway death toll, claiming thousands of victimsevery year.
Alcohol affects four things that anyone needs to drive a vehicle:
� Judgment
� Muscular Coordination
� Vision
� Attentiveness.
Police records show that almost half of all motorvehicle-related deaths involve alcohol. In most cases,these deaths are the result of someone who was drinkingand driving. In recent years, about 16,000 annual motorvehicle-related deaths have been associated with the useof alcohol, with more than 300,000 people injured.
Many adults -- by some estimates, nearly half the adult population -- choose never to drink alcohol, so they never drive after drinking. For persons under 21,it’s against the law in every U.S. state to drink alcohol.There are good medical, psychological anddevelopmental reasons for these laws.
The obvious way to solve the leading highway safetyproblem is for people never to drink alcohol and thendrive. But what if people do? How much is “too much”if the driver plans to drive? It’s a lot less than manymight think. Although it depends on each person and situation, here is some general information on the problem.
The Blood Alcohol Concentration (BAC) of someonewho is drinking depends upon four things:
� The amount of alcohol consumed
� The drinker’s body weight
� The amount of food that is consumed before andduring drinking
� The length of time it has taken the drinker toconsume the alcohol.
According to the American Medical Association, a180-lb. (82 kg) person who drinks three 12-ounce (355 ml) bottles of beer in an hour will end up with aBAC of about 0.06 percent. The person would reach thesame BAC by drinking three 4-ounce (120 ml) glassesof wine or three mixed drinks if each had 1-1/2 ounces(45 ml) of a liquor like whiskey, gin or vodka.

4-4
It’s the amount of alcohol that counts. For example, ifthe same person drank three double martinis (3 ouncesor 90 ml of liquor each) within an hour, the person’sBAC would be close to 0.12 percent. A person whoconsumes food just before or during drinking will have a somewhat lower BAC level.
There is a gender difference, too. Women generally havea lower relative percentage of body water than men.Since alcohol is carried in body water, this means that a woman generally will reach a higher BAC level than aman of her same body weight when each has the samenumber of drinks.
The law in many U.S. states sets the legal limit at a BACof 0.10 percent. In a growing number of U.S. states, andthroughout Canada, the limit is 0.08 percent. In someother countries, it’s even lower. The BAC limit for allcommercial drivers in the United States is 0.04 percent.
The BAC will be over 0.10 percent after three to six drinks (in one hour). Of course, as we’ve seen, it depends on how much alcohol is in the drinks, and how quickly the person drinks them.

4-5
But the ability to drive is affected well below a BAC of 0.10 percent. Research shows that the driving skills of many people are impaired at a BAC approaching 0.05 percent, and that the effects are worse at night. Alldrivers are impaired at BAC levels above 0.05 percent.Statistics show that the chance of being in a collisionincreases sharply for drivers who have a BAC of 0.05 percent or above. A driver with a BAC level of0.06 percent has doubled his or her chance of having a collision. At a BAC level of 0.10 percent, the chanceof this driver having a collision is 12 times greater; at alevel of 0.15 percent, the chance is 25 times greater!
The body takes about an hour to rid itself of the alcoholin one drink. No amount of coffee or number of coldshowers will speed that up. “I’ll be careful” isn’t theright answer. What if there’s an emergency, a need totake sudden action, as when a child darts into the street?A person with even a moderate BAC might not be ableto react quickly enough to avoid the collision.
There’s something else about drinking and driving thatmany people don’t know. Medical research shows thatalcohol in a person’s system can make crash injuriesworse, especially injuries to the brain, spinal cord orheart. This means that when anyone who has beendrinking -- driver or passenger -- is in a crash, thatperson’s chance of being killed or permanently disabledis higher than if the person had not been drinking.
CAUTION:
Drinking and then driving is very dangerous.Your reflexes, perceptions, attentiveness andjudgment can be affected by even a small amountof alcohol. You can have a serious -- or even fatal -- collision if you drive after drinking.Please don’t drink and drive or ride with a driver who has been drinking. Ride home in a cab; or if you’re with a group, designate adriver who will not drink.

4-6
Control of a VehicleYou have three systems that make your vehicle go whereyou want it to go. They are the brakes, the steering andthe accelerator. All three systems have to do their workat the places where the tires meet the road.
Sometimes, as when you’re driving on snow or ice, it’seasy to ask more of those control systems than the tiresand road can provide. That means you can lose controlof your vehicle. Also see “Traction Control System” in the Index.
BrakingBraking action involves perception time and reaction time.
First, you have to decide to push on the brake pedal.That’s perception time. Then you have to bring up your foot and do it. That’s reaction time.
Average reaction time is about 3/4 of a second. Butthat’s only an average. It might be less with one driverand as long as two or three seconds or more withanother. Age, physical condition, alertness, coordinationand eyesight all play a part. So do alcohol, drugs andfrustration. But even in 3/4 of a second, a vehiclemoving at 60 mph (100 km/h) travels 66 feet (20 m).That could be a lot of distance in an emergency, sokeeping enough space between your vehicle and othersis important.
And, of course, actual stopping distances vary greatlywith the surface of the road (whether it’s pavement orgravel); the condition of the road (wet, dry, icy); tiretread; the condition of your brakes; the weight of thevehicle and the amount of brake force applied.

4-7
Avoid needless heavy braking. Some people drive in spurts -- heavy acceleration followed by heavybraking -- rather than keeping pace with traffic. This is a mistake. Your brakes may not have time to cool between hard stops. Your brakes will wear outmuch faster if you do a lot of heavy braking. If you keep pace with the traffic and allow realistic followingdistances, you will eliminate a lot of unnecessarybraking. That means better braking and longer brake life.
If your engine ever stops while you’re driving, brakenormally but don’t pump your brakes. If you do, thepedal may get harder to push down. If your enginestops, you will still have some power brake assist. But you will use it when you brake. Once the powerassist is used up, it may take longer to stop and the brake pedal will be harder to push.
Anti-Lock Brakes (ABS)Your vehicle has anti-lock brakes (ABS). ABS is anadvanced electronic braking system that will helpprevent a braking skid.
When you start your engine and begin to drive away,your anti-lock brake system will check itself. You mayhear a momentary motor or clicking noise while this testis going on, and you may even notice that your brakepedal moves a little. This is normal.
If there’s a problem with the anti-lock brake system,this warning light will stayon. See “Anti-Lock BrakeSystem Warning Light” inthe Index.

4-8
Here’s how anti-lock works. Let’s say the road is wet.You’re driving safely. Suddenly an animal jumps out infront of you.
You slam on the brakes and continue braking. Here’s what happens with ABS.
A computer senses that wheels are slowing down. If oneof the wheels is about to stop rolling, the computer willseparately work the brakes at each front wheel and atboth rear wheels.
The anti-lock system can change the brake pressure fasterthan any driver could. The computer is programmed tomake the most of available tire and road conditions. This can help you steer around the obstacle while braking hard.
As you brake, your computer keeps receiving updates onwheel speed and controls braking pressure accordingly.

4-9
Remember: Anti-lock doesn’t change the time you needto get your foot up to the brake pedal or always decreasestopping distance. If you get too close to the vehicle infront of you, you won’t have time to apply your brakesif that vehicle suddenly slows or stops. Always leaveenough room up ahead to stop, even though you haveanti-lock brakes.
Using Anti-Lock
Don’t pump the brakes. Just hold the brake pedal downfirmly and let anti-lock work for you. You may hear theanti-lock pump or motor operate, and feel the brakepedal pulsate, but this is normal.
Braking in EmergenciesWith anti-lock, you can steer and brake at the sametime. In many emergencies, steering can help you morethan even the very best braking.
Traction Control SystemYour vehicle has a traction control system that limitswheel spin. This is especially useful in slippery roadconditions. The system operates only if it senses that one or both of the front wheels are spinning orbeginning to lose traction. When this happens, thesystem works the front brakes and reduces engine power to limit wheel spin.
The TRACTION ENGAGED message will display onthe Driver Information Center when the traction controlsystem is limiting wheel spin. See “Driver InformationCenter Messages” in the Index. You may feel or hear the system working, but this is normal.
If your vehicle is in cruise control when the tractioncontrol system begins to limit wheel spin, the cruisecontrol will automatically disengage. When roadconditions allow you to safely use it again, you mayreengage the cruise control. See “Cruise Control” in the Index.
United States Canada
This warning light will come on to let you know ifthere’s a problem with your traction control system.
See “Traction Control System Warning Light” in theIndex. When this warning light is on, the system will not limit wheel spin. Adjust your driving accordingly.

4-10
The traction control system automatically comes onwhenever you start your vehicle. To limit wheel spin,especially in slippery road conditions, you should alwaysleave the system on. But you can turn the traction controlsystem off if you ever need to. You should turn thesystem off if your vehicle ever gets stuck in sand, mud or snow and rocking the vehicle is required. See “Rocking Your Vehicle” in the Index.
To turn the system off, press the button located on the center console. (For vehicles with a columnshifter, the button is locatedat the end of the shift lever.)
The TRACTION OFF message will display on theDriver Information Center. If the system is limitingwheel spin when you press the button, the TRACTIONOFF message will display -- but the system won’t turn off right away. It will wait until there’s no longer a current need to limit wheel spin.
You can turn the system back on at any time by pressingthe button again. The TRACTION READY messageshould display briefly on the Driver Information Center.
The traction control system monitors the front brakerotor temperature. If the traction control system comeson while the front brake rotors are hot due to heavy useof braking or previous traction control, the TRACTIONSUSPENDED message will be displayed -- but thesystem won’t turn off right away. It will wait untilthere’s no longer a current need to limit wheel spin. The TRACTION READY message should appear when the brake rotors are no longer hot and the tractioncontrol system will resume normal operation.
SteeringPower SteeringIf you lose power steering assist because the enginestops or the system is not functioning, you can steer but it will take much more effort.
Magnasteer�
This system continuously adjusts the effort you feelwhen steering at all vehicle speeds. It provides easewhen parking yet a firm, solid feel at highway speeds.

4-11
Steering Tips
Driving on Curves
It’s important to take curves at a reasonable speed.
A lot of the “driver lost control” accidents mentioned on the news happen on curves. Here’s why:
Experienced driver or beginner, each of us is subject to the same laws of physics when driving on curves. The traction of the tires against the road surface makes itpossible for the vehicle to change its path when you turnthe front wheels. If there’s no traction, inertia will keepthe vehicle going in the same direction. If you’ve evertried to steer a vehicle on wet ice, you’ll understand this.
The traction you can get in a curve depends on thecondition of your tires and the road surface, the angle at which the curve is banked, and your speed. Whileyou’re in a curve, speed is the one factor you can control.
Suppose you’re steering through a sharp curve. Then yousuddenly accelerate. Both control systems -- steering andacceleration -- have to do their work where the tires meetthe road. Adding the sudden acceleration can demand toomuch of those places. You can lose control. Refer to“Traction Control System” in the Index.
What should you do if this ever happens? Ease up on the accelerator pedal, steer the vehicle the way you wantit to go, and slow down.
If you have Stabilitrak�, you may see the STABILITYSYS ENGAGED message on the Driver InformationCenter. See “Stability Sys Engaged Message” in the Index.
Speed limit signs near curves warn that you shouldadjust your speed. Of course, the posted speeds arebased on good weather and road conditions. Under lessfavorable conditions you’ll want to go slower.
If you need to reduce your speed as you approach acurve, do it before you enter the curve, while your frontwheels are straight ahead.
Try to adjust your speed so you can “drive” through the curve. Maintain a reasonable, steady speed. Wait to accelerate until you are out of the curve, and thenaccelerate gently into the straightaway.
To help you steer in the direction you want to go, during certain sharp or sudden cornering maneuvers,gear selection is controlled. This will maximize theavailable drive wheel torque and minimize the transaxleresponse time and shift activity. During this kind ofmaneuver, the transaxle shifts automatically as vehiclespeed changes.

4-12
Steering in EmergenciesThere are times when steering can be more effectivethan braking. For example, you come over a hill andfind a truck stopped in your lane, or a car suddenly pullsout from nowhere, or a child darts out from betweenparked cars and stops right in front of you. You canavoid these problems by braking -- if you can stop in time. But sometimes you can’t; there isn’t room.That’s the time for evasive action -- steering around the problem.
Your vehicle can perform very well in emergencies like these. First apply your brakes. See “Braking inEmergencies” earlier in this section. It is better toremove as much speed as you can from a possiblecollision. Then steer around the problem, to the left or right depending on the space available.
An emergency like this requires close attention and aquick decision. If you are holding the steering wheel atthe recommended 9 and 3 o’clock positions, you canturn it a full 180 degrees very quickly without removingeither hand. But you have to act fast, steer quickly, and just as quickly straighten the wheel once you haveavoided the object.
The fact that such emergency situations are alwayspossible is a good reason to practice defensive driving at all times and wear safety belts properly.

4-13
Off -Road RecoveryYou may find that your right wheels have dropped off theedge of a road onto the shoulder while you’re driving.
If the level of the shoulder is only slightly below thepavement, recovery should be fairly easy. Ease off theaccelerator and then, if there is nothing in the way, steerso that your vehicle straddles the edge of the pavement.You can turn the steering wheel up to one-quarter turnuntil the right front tire contacts the pavement edge.Then turn your steering wheel to go straight down the roadway.
PassingThe driver of a vehicle about to pass another on atwo-lane highway waits for just the right moment,accelerates, moves around the vehicle ahead, then goesback into the right lane again. A simple maneuver?
Not necessarily! Passing another vehicle on a two-lanehighway is a potentially dangerous move, since thepassing vehicle occupies the same lane as oncomingtraffic for several seconds. A miscalculation, an error injudgment, or a brief surrender to frustration or anger can suddenly put the passing driver face to face with theworst of all traffic accidents -- the head-on collision.
So here are some tips for passing:
� “Drive ahead.” Look down the road, to the sides and to crossroads for situations that might affect yourpassing patterns. If you have any doubt whatsoeverabout making a successful pass, wait for a better time.
� Watch for traffic signs, pavement markings and lines. If you can see a sign up ahead that mightindicate a turn or an intersection, delay your pass. A broken center line usually indicates it’s all right topass (providing the road ahead is clear). Never crossa solid line on your side of the lane or a double solid line, even if the road seems empty ofapproaching traffic.
4-14
� Do not get too close to the vehicle you want to pass while you’re awaiting an opportunity. For onething, following too closely reduces your area of vision, especially if you’re following a largervehicle. Also, you won’t have adequate space if the vehicle ahead suddenly slows or stops. Keep back a reasonable distance.
� When it looks like a chance to pass is coming up,start to accelerate but stay in the right lane and don’t get too close. Time your move so you will beincreasing speed as the time comes to move into theother lane. If the way is clear to pass, you will have a “running start” that more than makes up for thedistance you would lose by dropping back. And ifsomething happens to cause you to cancel your pass,you need only slow down and drop back again andwait for another opportunity.
� If other cars are lined up to pass a slow vehicle, waityour turn. But take care that someone isn’t trying topass you as you pull out to pass the slow vehicle.Remember to glance over your shoulder and checkthe blind spot.
� Check your mirrors, glance over your shoulder, andstart your left lane change signal before moving outof the right lane to pass. When you are far enoughahead of the passed vehicle to see its front in yourinside mirror, activate your right lane change signaland move back into the right lane. (Remember thatyour right outside mirror is convex. The vehicle youjust passed may seem to be farther away from youthan it really is.)
� Try not to pass more than one vehicle at a time on two-lane roads. Reconsider before passing thenext vehicle.
� Don’t overtake a slowly moving vehicle too rapidly.Even though the brake lamps are not flashing, it maybe slowing down or starting to turn.
� If you’re being passed, make it easy for the followingdriver to get ahead of you. Perhaps you can ease alittle to the right.

4-15
Loss of ControlLet’s review what driving experts say about what happenswhen the three control systems (brakes, steering andacceleration) don’t have enough friction where the tiresmeet the road to do what the driver has asked.
In any emergency, don’t give up. Keep trying to steer andconstantly seek an escape route or area of less danger.
SkiddingIn a skid, a driver can lose control of the vehicle.Defensive drivers avoid most skids by taking reasonablecare suited to existing conditions, and by not “overdriving”those conditions. But skids are always possible.
The three types of skids correspond to your vehicle’sthree control systems. In the braking skid, your wheelsaren’t rolling. In the steering or cornering skid, toomuch speed or steering in a curve causes tires to slip and lose cornering force. And in the acceleration skid,too much throttle causes the driving wheels to spin.
A cornering skid is best handled by easing your foot off the accelerator pedal.
Remember: Any traction control system helps avoidonly the acceleration skid.
If your traction control system is off, then an accelerationskid is also best handled by easing your foot off theaccelerator pedal.
If your vehicle starts to slide, ease your foot off theaccelerator pedal and quickly steer the way you want the vehicle to go. If you start steering quickly enough,your vehicle may straighten out. Always be ready for a second skid if it occurs.
If you have Stabilitrak�, you may see the STABILITYSYS ENGAGED message on the Driver InformationCenter. See “Stability Sys Engaged Message” in the Index.

4-16
Of course, traction is reduced when water, snow, ice,gravel or other material is on the road. For safety, you’llwant to slow down and adjust your driving to theseconditions. It is important to slow down on slipperysurfaces because stopping distance will be longer andvehicle control more limited.
While driving on a surface with reduced traction, tryyour best to avoid sudden steering, acceleration orbraking (including engine braking by shifting to a lowergear). Any sudden changes could cause the tires to slide. You may not realize the surface is slippery untilyour vehicle is skidding. Learn to recognize warningclues -- such as enough water, ice or packed snow onthe road to make a “mirrored surface” -- and slow down when you have any doubt.
Remember: Any anti-lock brake system (ABS) helpsavoid only the braking skid.
Driving at Night
Night driving is more dangerous than day driving. One reason is that some drivers are likely to be impaired -- by alcohol or drugs, with night visionproblems, or by fatigue.

4-17
Here are some tips on night driving.
� Drive defensively.
� Don’t drink and drive.
� Adjust your inside rearview mirror to reduce theglare from headlamps behind you.
� Since you can’t see as well, you may need to slow down and keep more space between you and other vehicles.
� Slow down, especially on higher speed roads. Yourheadlamps can light up only so much road ahead.
� In remote areas, watch for animals.
� If you’re tired, pull off the road in a safe place and rest.
No one can see as well at night as in the daytime. But aswe get older these differences increase. A 50-year-olddriver may require at least twice as much light to see thesame thing at night as a 20-year-old.
What you do in the daytime can also affect your nightvision. For example, if you spend the day in brightsunshine you are wise to wear sunglasses. Your eyes will have less trouble adjusting to night.
But if you’re driving, don’t wear sunglasses at night.They may cut down on glare from headlamps, but theyalso make a lot of things invisible.
You can be temporarily blinded by approachingheadlamps. It can take a second or two, or even several seconds, for your eyes to readjust to the dark.When you are faced with severe glare (as from a driverwho doesn’t lower the high beams, or a vehicle withmisaimed headlamps), slow down a little. Avoid staringdirectly into the approaching headlamps.
Keep your windshield and all the glass on your vehicleclean -- inside and out. Glare at night is made muchworse by dirt on the glass. Even the inside of the glasscan build up a film caused by dust. Dirty glass makeslights dazzle and flash more than clean glass would,making the pupils of your eyes contract repeatedly.
Remember that your headlamps light up far less of aroadway when you are in a turn or curve. Keep youreyes moving; that way, it’s easier to pick out dimlylighted objects. Just as your headlamps should bechecked regularly for proper aim, so should your eyesbe examined regularly. Some drivers suffer from nightblindness -- the inability to see in dim light -- and aren’t even aware of it.

4-18
Driving in Rain and on Wet Roads Rain and wet roads can mean driving trouble. On a wetroad, you can’t stop, accelerate or turn as well becauseyour tire-to-road traction isn’t as good as on dry roads.And, if your tires don’t have much tread left, you’ll geteven less traction. It’s always wise to go slower and becautious if rain starts to fall while you are driving. Thesurface may get wet suddenly when your reflexes aretuned for driving on dry pavement.
The heavier the rain, the harder it is to see. Even if yourwindshield wiper blades are in good shape, a heavy raincan make it harder to see road signs and traffic signals,pavement markings, the edge of the road and evenpeople walking.
It’s wise to keep your windshield wiping equipment in good shape and keep your windshield washer tankfilled with washer fluid. Replace your windshield wiperinserts when they show signs of streaking or missingareas on the windshield, or when strips of rubber start to separate from the inserts.

4-19
Driving too fast through large water puddles or evengoing through some car washes can cause problems, too.The water may affect your brakes. Try to avoid puddles.But if you can’t, try to slow down before you hit them.
CAUTION:
Wet brakes can cause accidents. They won’t workas well in a quick stop and may cause pulling toone side. You could lose control of the vehicle.
After driving through a large puddle of water ora car wash, apply your brake pedal lightly untilyour brakes work normally.
HydroplaningHydroplaning is dangerous. So much water can build upunder your tires that they can actually ride on the water.This can happen if the road is wet enough and you’regoing fast enough. When your vehicle is hydroplaning,it has little or no contact with the road.
Hydroplaning doesn’t happen often. But it can if yourtires do not have much tread or if the pressure in one ormore is low. It can happen if a lot of water is standing onthe road. If you can see reflections from trees, telephonepoles or other vehicles, and raindrops “dimple” thewater’s surface, there could be hydroplaning.

4-20
Hydroplaning usually happens at higher speeds. There just isn’t a hard and fast rule about hydroplaning.The best advice is to slow down when it is raining.
Driving Through Deep Standing Water
NOTICE:
If you drive too quickly through deep puddles or standing water, water can come in throughyour engine’s air intake and badly damage yourengine. Never drive through water that is slightlylower than the underbody of your vehicle. If youcan’t avoid deep puddles or standing water, drivethrough them very slowly.
Driving Through Flowing Water
CAUTION:
Flowing or rushing water creates strong forces. If you try to drive through flowing water, as youmight at a low water crossing, your vehicle can be carried away. As little as six inches of flowingwater can carry away a smaller vehicle. If thishappens, you and other vehicle occupants coulddrown. Don’t ignore police warning signs, andotherwise be very cautious about trying to drivethrough flowing water.
Some Other Rainy Weather Tips� Besides slowing down, allow some extra following
distance. And be especially careful when you passanother vehicle. Allow yourself more clear roomahead, and be prepared to have your view restrictedby road spray.
� Have good tires with proper tread depth. See “Tires” in the Index.

4-21
City Driving
One of the biggest problems with city streets is theamount of traffic on them. You’ll want to watch out forwhat the other drivers are doing and pay attention totraffic signals.
Here are ways to increase your safety in city driving:
� Know the best way to get to where you are going. Get a city map and plan your trip into anunknown part of the city just as you would for across-country trip.
� Try to use the freeways that rim and crisscross mostlarge cities. You’ll save time and energy. See thenext part, “Freeway Driving.”
� Treat a green light as a warning signal. A traffic lightis there because the corner is busy enough to need it.When a light turns green, and just before you start to move, check both ways for vehicles that have not cleared the intersection or may be running thered light.

4-22
Freeway Driving
Mile for mile, freeways (also called thruways, parkways,expressways, turnpikes or superhighways) are the safestof all roads. But they have their own special rules.
The most important advice on freeway driving is: Keep up with traffic and keep to the right. Drive at the same speed most of the other drivers are driving.Too-fast or too-slow driving breaks a smooth trafficflow. Treat the left lane on a freeway as a passing lane.
At the entrance, there is usually a ramp that leads to thefreeway. If you have a clear view of the freeway as youdrive along the entrance ramp, you should begin tocheck traffic. Try to determine where you expect toblend with the flow. Try to merge into the gap at close to the prevailing speed. Switch on your turn signal,check your mirrors and glance over your shoulder asoften as necessary. Try to blend smoothly with thetraffic flow.
Once you are on the freeway, adjust your speed to theposted limit or to the prevailing rate if it’s slower. Stayin the right lane unless you want to pass.
Before changing lanes, check your mirrors. Then useyour turn signal.
Just before you leave the lane, glance quickly over yourshoulder to make sure there isn’t another vehicle in your“blind” spot.

4-23
Once you are moving on the freeway, make certain youallow a reasonable following distance. Expect to moveslightly slower at night.
When you want to leave the freeway, move to the proper lane well in advance. If you miss your exit, do not, under any circumstances, stop and back up.Drive on to the next exit.
The exit ramp can be curved, sometimes quite sharply.
The exit speed is usually posted.
Reduce your speed according to your speedometer, notto your sense of motion. After driving for any distanceat higher speeds, you may tend to think you are goingslower than you actually are.
Before Leaving on a Long TripMake sure you’re ready. Try to be well rested. If youmust start when you’re not fresh -- such as after a day’swork -- don’t plan to make too many miles that first partof the journey. Wear comfortable clothing and shoes youcan easily drive in.
Is your vehicle ready for a long trip? If you keep itserviced and maintained, it’s ready to go. If it needsservice, have it done before starting out. Of course,you’ll find experienced and able service experts inCadillac dealerships all across North America. They’ll be ready and willing to help if you need it.
Here are some things you can check before a trip:
� Windshield Washer Fluid: Is the reservoir full? Are all windows clean inside and outside?
� Wiper Blades: Are they in good shape?
� Fuel, Engine Oil, Other Fluids: Have you checkedall levels?
� Lamps: Are they all working? Are the lenses clean?
� Tires: They are vitally important to a safe,trouble-free trip. Is the tread good enough forlong-distance driving? Are the tires all inflated to the recommended pressure?
� Weather Forecasts: What’s the weather outlookalong your route? Should you delay your trip a shorttime to avoid a major storm system?
� Maps: Do you have up-to-date maps?

4-24
Highway HypnosisIs there actually such a condition as “highway hypnosis”?Or is it just plain falling asleep at the wheel? Call ithighway hypnosis, lack of awareness, or whatever.
There is something about an easy stretch of road withthe same scenery, along with the hum of the tires on theroad, the drone of the engine, and the rush of the windagainst the vehicle that can make you sleepy. Don’t let it happen to you! If it does, your vehicle can leave theroad in less than a second, and you could crash and be injured.
What can you do about highway hypnosis? First, beaware that it can happen.
Then here are some tips:
� Make sure your vehicle is well ventilated, with acomfortably cool interior.
� Keep your eyes moving. Scan the road ahead and to the sides. Check your rearview mirrors and yourinstruments frequently.
� If you get sleepy, pull off the road into a rest, serviceor parking area and take a nap, get some exercise, orboth. For safety, treat drowsiness on the highway asan emergency.
Hill and Mountain Roads
Driving on steep hills or mountains is different fromdriving in flat or rolling terrain.

4-25
If you drive regularly in steep country, or if you’replanning to visit there, here are some tips that can make your trips safer and more enjoyable.
� Keep your vehicle in good shape. Check all fluidlevels and also the brakes, tires, cooling system and transaxle. These parts can work hard onmountain roads.
� Know how to go down hills. The most importantthing to know is this: let your engine do some of the slowing down. Shift to a lower gear when you go down a steep or long hill.
CAUTION:
If you don’t shift down, your brakes could get so hot that they wouldn’t work well. You wouldthen have poor braking or even none going down a hill. You could crash. Shift down to let your engine assist your brakes on a steepdownhill slope.
CAUTION:
Coasting downhill in NEUTRAL (N) or with theignition off is dangerous. Your brakes will have todo all the work of slowing down. They could getso hot that they wouldn’t work well. You wouldthen have poor braking or even none going downa hill. You could crash. Always have your enginerunning and your vehicle in gear when you go downhill.
� Know how to go uphill. You may want to shift downto a lower gear. The lower gears help cool your engineand transaxle, and you can climb the hill better.
� Stay in your own lane when driving on two-laneroads in hills or mountains. Don’t swing wide or cutacross the center of the road. Drive at speeds that letyou stay in your own lane.
� As you go over the top of a hill, be alert. There could besomething in your lane, like a stalled car or an accident.
� You may see highway signs on mountains that warn ofspecial problems. Examples are long grades, passing orno-passing zones, a falling rocks area or windingroads. Be alert to these and take appropriate action.

4-26
Winter Driving
Here are some tips for winter driving:
� Have your vehicle in good shape for winter.
� You may want to put winter emergency supplies inyour trunk.
Include an ice scraper, a small brush or broom, a supplyof windshield washer fluid, a rag, some winter outerclothing, a small shovel, a flashlight, a red cloth and acouple of reflective warning triangles. And, if you willbe driving under severe conditions, include a small bagof sand, a piece of old carpet or a couple of burlap bagsto help provide traction. Be sure you properly securethese items in your vehicle.

4-27
Driving on Snow or IceMost of the time, those places where your tires meet theroad probably have good traction.
However, if there is snow or ice between your tires andthe road, you can have a very slippery situation. You’llhave a lot less traction or “grip” and will need to be very careful.
What’s the worst time for this? “Wet ice.” Very coldsnow or ice can be slick and hard to drive on. But wetice can be even more trouble because it may offer theleast traction of all. You can get wet ice when it’s aboutfreezing (32�F; 0�C) and freezing rain begins to fall.Try to avoid driving on wet ice until salt and sand crewscan get there.
Whatever the condition -- smooth ice, packed, blowingor loose snow -- drive with caution.
Keep your traction control system on. It improves yourability to accelerate when driving on a slippery road.Even though your vehicle has a traction control system,you’ll want to slow down and adjust your driving to theroad conditions. See “Traction Control System” in the Index.

4-28
Your anti-lock brakes improve your vehicle’s stabilitywhen you make a hard stop on a slippery road. Eventhough you have the anti-lock braking system, you’llwant to begin stopping sooner than you would on drypavement. See “Anti-Lock” in the Index.
� Allow greater following distance on any slippery road.
� Watch for slippery spots. The road might be fineuntil you hit a spot that’s covered with ice. On anotherwise clear road, ice patches may appear inshaded areas where the sun can’t reach: aroundclumps of trees, behind buildings or under bridges.Sometimes the surface of a curve or an overpass mayremain icy when the surrounding roads are clear. If you see a patch of ice ahead of you, brake beforeyou are on it. Try not to brake while you’re actuallyon the ice, and avoid sudden steering maneuvers.
If You’re Caught in a Blizzard
If you are stopped by heavy snow, you could be in aserious situation. You should probably stay with yourvehicle unless you know for sure that you are near helpand you can hike through the snow. Here are somethings to do to summon help and keep yourself and your passengers safe:
� Turn on your hazard flashers.

4-29
� Tie a red cloth to your vehicle to alert police thatyou’ve been stopped by the snow.
� Put on extra clothing or wrap a blanket around you.If you have no blankets or extra clothing, make bodyinsulators from newspapers, burlap bags, rags, floormats -- anything you can wrap around yourself ortuck under your clothing to keep warm.
You can run the engine to keep warm, but be careful.
CAUTION:
Snow can trap exhaust gases under your vehicle.This can cause deadly CO (carbon monoxide) gasto get inside. CO could overcome you and killyou. You can’t see it or smell it, so you might notknow it is in your vehicle. Clear away snow fromaround the base of your vehicle, especially anythat is blocking your exhaust pipe. And checkaround again from time to time to be sure snowdoesn’t collect there.Open a window just a little on the side of thevehicle that’s away from the wind. This will helpkeep CO out.
Run your engine only as long as you must. This savesfuel. When you run the engine, make it go a little fasterthan just idle. That is, push the accelerator slightly. Thisuses less fuel for the heat that you get and it keeps thebattery charged. You will need a well-charged battery to restart the vehicle, and possibly for signaling later onwith your headlamps. Let the heater run for a while.

4-30
Then, shut the engine off and close the window almostall the way to preserve the heat. Start the engine againand repeat this only when you feel really uncomfortablefrom the cold. But do it as little as possible. Preserve thefuel as long as you can. To help keep warm, you can getout of the vehicle and do some fairly vigorous exercisesevery half hour or so until help comes.
Recreational Vehicle TowingYour vehicle was not designed to be towed with all four wheels on the ground. If your vehicle must betowed, see “Towing Your Vehicle” in the Index.
NOTICE:
Towing your vehicle with all four wheels on theground will damage drivetrain components.
Loading Your Vehicle
Two labels on your vehicle show how much weight itmay properly carry. The Tire-Loading Information labelfound on the rear edge of the driver’s side rear door tellsyou the proper size, speed rating and recommendedinflation pressures for the tires on your vehicle. It alsogives you important information about the number ofpeople that can be in your vehicle and the total weightthat your vehicle can carry. This weight is called theVehicle Capacity Weight and includes the weight of all occupants, cargo and all options not installed in the factory.

4-31
The other label is the Certification label, found on therear edge of the driver’s door. It tells you the grossweight capacity of your vehicle, called the GrossVehicle Weight Rating (GVWR). The GVWR includesthe weight of the vehicle, all occupants, fuel and cargo.Never exceed the GVWR for your vehicle or the GrossAxle Weight Rating (GAWR) for either the front or rear axle.
If you do have a heavy load, you should spread it out.Don’t carry more than 203 lbs. (92 kg) in the trunk.
CAUTION:
Do not load your vehicle any heavier than theGVWR, or either the maximum front or rearGAWR. If you do, parts on your vehicle canbreak, and it can change the way your vehiclehandles. These could cause you to lose controland crash. Also, overloading can shorten the lifeof your vehicle.
NOTICE:
Your warranty does not cover parts orcomponents that fail because of overloading.

4-32
If you put things inside your vehicle -- like suitcases,tools, packages or anything else -- they will go as fast asthe vehicle goes. If you have to stop or turn quickly, orif there is a crash, they’ll keep going.
CAUTION:
Things you put inside your vehicle can strike and injure people in a sudden stop or turn, or in a crash.
� Put things in the trunk of your vehicle. In atrunk, put them as far forward as you can.Try to spread the weight evenly.
� Never stack heavier things, like suitcases,inside the vehicle so that some of them areabove the tops of the seats.
� Don’t leave an unsecured child restraint inyour vehicle.
� When you carry something inside thevehicle, secure it whenever you can.
Electronic Level ControlThis feature keeps the rear of your vehicle level as theload changes. It’s automatic -- you don’t need to adjust anything.
Towing a Trailer
CAUTION:
If you don’t use the correct equipment and driveproperly, you can lose control when you pull atrailer. For example, if the trailer is too heavy, the brakes may not work well -- or even at all.You and your passengers could be seriouslyinjured. You may also damage your vehicle; theresulting repairs would not be covered by yourwarranty. Pull a trailer only if you have followedall the steps in this section. Ask your dealer foradvice and information about towing a trailerwith your vehicle.

4-33
Your vehicle can tow a trailer if it is equipped with theproper trailer towing equipment. To identify what thevehicle trailering capacity is for your vehicle, youshould read the information in “Weight of the Trailer”that appears later in this section. But trailering isdifferent than just driving your vehicle by itself.Trailering means changes in handling, durability and fuel economy. Successful, safe trailering takescorrect equipment, and it has to be used properly.
That’s the reason for this part. In it are manytime-tested, important trailering tips and safety rules.Many of these are important for your safety and that of your passengers. So please read this section carefullybefore you pull a trailer.
Load-pulling components such as the engine, transaxle,wheel assemblies and tires are forced to work harderagainst the drag of the added weight. The engine isrequired to operate at relatively higher speeds and undergreater loads, generating extra heat. What’s more, thetrailer adds considerably to wind resistance, increasingthe pulling requirements.
If You Do Decide To Pull A TrailerIf you do, here are some important points:
� There are many different laws, including speed limitrestrictions, having to do with trailering. Make sureyour rig will be legal, not only where you live butalso where you’ll be driving. A good source for this information can be state or provincial police.
� Consider using a sway control if your trailer willweigh 2,000 lbs. (900 kg) or less. You should alwaysuse a sway control if your trailer will weigh morethan 2,000 lbs. (900 kg). You can ask a hitch dealer about sway controls.
� Don’t tow a trailer at all during the first 1,000 miles(1 600 km) your new vehicle is driven. Your engine,axle or other parts could be damaged.
� Then, during the first 500 miles (800 km) that youtow a trailer, don’t drive over 50 mph (80 km/h) anddon’t make starts at full throttle. This helps yourengine and other parts of your vehicle wear in at the heavier loads.
� Obey speed limit restrictions when towing a trailer.Don’t drive faster than the maximum posted speedfor trailers, or no more than 55 mph (90 km/h), to save wear on your vehicle’s parts.

4-34
Three important considerations have to do with weight:
� the weight of the trailer,
� the weight of the trailer tongue
� and the total weight on your vehicle’s tires.
Weight of the TrailerHow heavy can a trailer safely be?
It should never weigh more than 2,000 lbs. (900 kg). These are total maximum weights including the load.But even that can be too heavy.
The maximum trailer weight for your vehicle can bedetermined from the Gross Combined Vehicle Weight(GCVW). The GCVW = curb weight + passenger’sweight + cargo weight + trailer weight. The GCVWshould never be more than 7,200 lbs. (3 273 kg).
It depends on how you plan to use your rig. For example,speed, altitude, road grades, outside temperature and how much your vehicle is used to pull a trailer are allimportant. And, it can also depend on any specialequipment that you have on your vehicle.
You can ask your dealer for our trailering information oradvice, or you can write us at:
Cadillac Customer Assistance CenterCadillac Motor Car DivisionP.O. Box 33169Detroit, MI 48232-5169
In Canada, write to:
General Motors of Canada LimitedCustomer Communication Centre, 163-0051908 Colonel Sam DriveOshawa, Ontario L1H 8P7

4-35
Weight of the Trailer TongueThe tongue load (A) of any trailer is an importantweight to measure because it affects the total or grossweight of your vehicle. The Gross Vehicle Weight(GVW) includes the curb weight of the vehicle, anycargo you may carry in it, and the people who will beriding in the vehicle. And if you tow a trailer, you mustadd the tongue load to the GVW because your vehiclewill be carrying that weight, too. See “Loading YourVehicle” in the Index for more information about yourvehicle’s maximum load capacity.
If you’re using a weight-carrying hitch, the trailertongue (A) should weigh 10 percent of the total loadedtrailer weight (B). If you have a weight-distributinghitch, the trailer tongue (A) should weigh 12 percent of the total loaded trailer weight (B).
After you’ve loaded your trailer, weigh the trailer andthen the tongue, separately, to see if the weights areproper. If they aren’t, you may be able to get them right simply by moving some items around in the trailer.
Total Weight on Your Vehicle’s TiresBe sure your vehicle’s tires are inflated to the upperlimit for cold tires. You’ll find these numbers on theTire-Loading Information label at the rear edge of thedriver’s side rear door or see “Loading Your Vehicle” in the Index. Then be sure you don’t go over the GVW limit for your vehicle, including the weight of the trailer tongue.

4-36
HitchesIt’s important to have the correct hitch equipment.Crosswinds, large trucks going by and rough roads are a few reasons why you’ll need the right hitch. Here are some rules to follow:
� The rear bumper on your vehicle is not intended for hitches. Do not attach rental hitches or otherbumper-type hitches to it. Use only a frame-mountedhitch that does not attach to the bumper.
� If you’ll be pulling a trailer that, when loaded, willweigh more than 2,000 lbs. (900 kg), be sure to use a properly mounted, weight-distributing hitch andsway control of the proper size. This equipment isvery important for proper vehicle loading and goodhandling when you’re driving.
� Will you have to make any holes in the body of yourvehicle when you install a trailer hitch? If you do,then be sure to seal the holes later when you removethe hitch. If you don’t seal them, deadly carbonmonoxide (CO) from your exhaust can get into your vehicle. See “Carbon Monoxide” in the Index.Dirt and water can, too.
Safety ChainsYou should always attach chains between your vehicleand your trailer. Cross the safety chains under the tongueof the trailer so that the tongue will not drop to the roadif it becomes separated from the hitch. Instructionsabout safety chains may be provided by the hitchmanufacturer or by the trailer manufacturer. Follow themanufacturer’s recommendation for attaching safetychains and do not attach them to the bumper. Alwaysleave just enough slack so you can turn with your rig.And, never allow safety chains to drag on the ground.
Trailer BrakesBecause you have anti-lock brakes, don’t try to tap into your vehicle’s hydraulic brake system. If you do,both brake systems won’t work well, or at all. If you tow more than 1,000 lbs. (450 kg), use trailer brakes. Be sure to follow the instructions that come with thetrailer or from the brake manufacturer.
Be sure to read and follow the instructions for the trailerbrakes so you’ll be able to maintain them properly.

4-37
Driving with a TrailerTowing a trailer requires a certain amount of experience.Before setting out for the open road, you’ll want to get to know your rig. Acquaint yourself with the feel of handling and braking with the added weight of thetrailer. And always keep in mind that the vehicle you are driving is now a good deal longer and not nearly as responsive as your vehicle is by itself.
Before you start, check the trailer hitch and platform(and attachments), safety chains, electrical connector,lamps, tires and mirror adjustment. If the trailer haselectric brakes, start your vehicle and trailer moving and then apply the trailer brake controller by hand to be sure the brakes are working. This lets you check your electrical connection at the same time.
During your trip, check occasionally to be sure that theload is secure, and that the lamps and any trailer brakesare still working.
Following DistanceStay at least twice as far behind the vehicle ahead as youwould when driving your vehicle without a trailer. Thiscan help you avoid situations that require heavy brakingand sudden turns.
PassingYou’ll need more passing distance up ahead whenyou’re towing a trailer. And, because you’re a good deal longer, you’ll need to go much farther beyond the passed vehicle before you can return to your lane.
Backing UpHold the bottom of the steering wheel with one hand.Then, to move the trailer to the left, just move that hand to the left. To move the trailer to the right, moveyour hand to the right. Always back up slowly and, if possible, have someone guide you.

4-38
Making Turns
NOTICE:
Making very sharp turns while trailering couldcause the trailer to come in contact with thevehicle. Your vehicle could be damaged. Avoidmaking very sharp turns while trailering.
When you’re turning with a trailer, make wider turnsthan normal. Do this so your trailer won’t strike softshoulders, curbs, road signs, trees or other objects.Avoid jerky or sudden maneuvers. Signal well in advance.
Turn Signals When Towing a TrailerWhen you tow a trailer, your vehicle may need adifferent turn signal flasher and/or extra wiring. Checkwith your dealer. The arrows on your instrument panelwill flash whenever you signal a turn or lane change.Properly hooked up, the trailer lamps will also flash,telling other drivers you’re about to turn, change lanesor stop.
When towing a trailer, the arrows on your instrumentpanel will flash for turns even if the bulbs on the trailerare burned out. Thus, you may think drivers behind youare seeing your signal when they are not. It’s importantto check occasionally to be sure the trailer bulbs are still working.
Driving On GradesReduce speed and shift to a lower gear before you startdown a long or steep downgrade. If you don’t shiftdown, you might have to use your brakes so much that they would get hot and no longer work well.
On long uphill grades, reduce speed to 45 to 50 mph (70 to 90 km/h) and avoid prolonged use of SECOND (2)gear and engine speeds above 3800 rpm.
Climbing grades steeper than four percent at temperaturesabove 90� F (32� C) with a loaded vehicle and trailer isnot recommended. The cooling system may temporarilyoverheat. See “Engine Overheating” in the Index.

4-39
Parking on Hills
CAUTION:
You really should not park your vehicle, with a trailer attached, on a hill. If something goeswrong, your rig could start to move. People canbe injured, and both your vehicle and the trailercan be damaged.
But if you ever have to park your rig on a hill, here’show to do it:
1. Apply your regular brakes, but do not shift into PARK (P).
2. Have someone place chocks under the trailer wheels.
3. When the wheel chocks are in place, release theregular brakes until the chocks absorb the load.
4. Reapply the regular brakes. Then shift into PARK (P) firmly and apply your parking brakes.
5. Release the regular brakes.
When You Are Ready to Leave AfterParking on a Hill1. Apply your regular brakes and hold the pedal down
while you:
� Start your engine;� Shift into a gear; and� Be sure the parking brake has released.
2. Let up on the brake pedal.3. Drive slowly until the trailer is clear of the chocks.4. Stop and have someone pick up and store the chocks.
Maintenance When Trailer TowingYour vehicle will need service more often when you’repulling a trailer. See the Maintenance Schedule bookletfor more on this. Things that are especially important intrailer operation are automatic transaxle fluid (don’toverfill), engine oil, drive belt, cooling system and brakesystem. If you’re trailering, it’s a good idea to reviewthis information before you start your trip.Check periodically to see that all hitch nuts and bolts are tight.
Engine Cooling When Trailer TowingYour cooling system may temporarily overheat duringsevere operating conditions. See “Engine Overheating”in the Index.

5-5-1
Section 5 Problems on the Road
Here you’ll find what to do about some problems that can occur on the road.
5-2 Hazard Warning Flashers5-3 Other Warning Devices5-3 Jump Starting5-9 Towing Your Vehicle5-9 Engine Overheating
5-12 Cooling System5-18 If a Tire Goes Flat5-19 Changing a Flat Tire5-30 Compact Spare Tire5-31 If You’re Stuck: In Sand, Mud, Ice or Snow

5-2
Hazard Warning Flashers
Your hazard warning flashers let you warn others. Theyalso let police know you have a problem. Your front andrear turn signal lamps will flash on and off.
The hazard warning buttonis located on the center of the instrument panelbetween the two air vents.
Press the button in to make the front and rear turn signallamps flash on and off.
The light in the center of thebutton will flash, indicatingthat the hazard warningflashers are on.
Your hazard warning flashers work no matter whatposition your key is in, and even if the key isn’t in.
Press the button again to turn your hazard warningflashers off. When the hazard warning flashers are on,the turn signals won’t work.

5-3
Other Warning DevicesIf you carry reflective triangles, you can set one up atthe side of the road about 300 feet (100 m) behind your vehicle.
Jump StartingIf you cannot start your vehicle and you are unable toremove your key from the ignition, see “Shift LockRelease” in the Index.
If your battery has run down, you may want to useanother vehicle and some jumper cables to start yourvehicle. Please follow the steps below to do it safely.
CAUTION:
Batteries can hurt you. They can be dangerous because:� They contain acid that can burn you.� They contain gas that can explode or ignite.� They contain enough electricity to burn you.
If you don’t follow these steps exactly, some or allof these things can hurt you.
NOTICE:
Ignoring these steps could result in costly damageto your vehicle that wouldn’t be covered by your warranty.
The ACDelco� battery in your vehicle has abuilt -in hydrometer. Do not charge, test or jump start the battery if the hydrometer looksclear or light yellow. Replace the battery whenthere is a clear or light yellow hydrometer and a cranking complaint.Trying to start your vehicle by pushing or pullingit won’t work, and it could damage your vehicle.
1. Check the other vehicle. It must have a 12-voltbattery with a negative ground system.
NOTICE:
If the other system isn’t a 12-volt system with anegative ground, both vehicles can be damaged.

5-4
2. Get the vehicles close enough so the jumper cablescan reach, but be sure the vehicles aren’t touchingeach other. If they are, it could cause a groundconnection you don’t want. You wouldn’t be able to start your vehicle and the bad grounding coulddamage the electrical systems.
To avoid the possibility of the vehicles rolling, setthe parking brake firmly on both vehicles involved inthe jump start procedure. Put an automatic transaxlein PARK (P) or a manual transaxle in NEUTRALbefore setting the parking brake.
3. Turn off the ignition on both vehicles. Unplugunnecessary accessories plugged into the cigarettelighter or accessory power outlets. Turn off all lampsthat aren’t needed as well as radios. This will avoidsparks and help save both batteries. In addition, it could save your radio!
NOTICE:
If you leave your radio on, it could be badlydamaged. The repairs wouldn’t be covered byyour warranty.
Open the hoods and locate the battery on the othervehicle and the remote positive (+) terminal locatedon the passenger’s side of the engine compartment of your vehicle. (You will not see the battery underthe hood of your vehicle, since it is located under the rear seat on the passenger’s side.) Find thepositive (+) and negative (-) terminals on the battery in the other vehicle.
You do not need to access your battery for jumpstarting. The remote positive (+) terminal, located on the passenger’s side of the engine compartment,is for this purpose.

5-5
CAUTION:
An electric fan can start up even when the engineis not running and can injure you. Keep hands,clothing and tools away from any underhoodelectric fan.
4. Lift and move thered positive (+)terminal coveraway from therelay center.
CAUTION:
Using a match near a battery can cause batterygas to explode. People have been hurt doing this,and some have been blinded. Use a flashlight ifyou need more light.Be sure the battery has enough water. You don’tneed to add water to the ACDelco� batteryinstalled in every new GM vehicle. But if abattery has filler caps, be sure the right amountof fluid is there. If it is low, add water to take care of that first. If you don’t, explosive gas could be present.
Battery fluid contains acid that can burn you.Don’t get it on you. If you accidentally get it inyour eyes or on your skin, flush the place withwater and get medical help immediately.

5-6
5. Check that the jumper cables don’t have loose ormissing insulation. If they do, you could get a shock.The vehicles could also be damaged.
Before you connect the cables, here are some basicthings you should know. Positive (+) will go topositive (+) and negative (-) will go to a heavy,unpainted metal engine part. Don’t connect positive (+) to the negative (-) or you will get a short that would damage the battery and maybe otherparts, too. Also, don’t connect the negative (-) cableto the negative (-) terminal on the dead batterybecause this can cause sparks.
CAUTION:
Fans or other moving engine parts can injure youbadly. Keep your hands away from moving partsonce the engine is running.
6. Connect the red positive (+) cable to the remote positive (+)terminal of your vehicle.
7. Don’t let the other end of the positive (+)cable touch metal. Now, connect the redpositive (+) terminal to the red positive (+)terminal of the othervehicle’s battery. Use a remote positive (+)terminal if the vehiclehas one.

5-7
8. Now connect the black negative (-) cableto the good battery’snegative (-) terminal.
Don’t let the other end of the negative (-) cable touchanything until the next step. The other end of thenegative (-) cable doesn’t go to the dead battery.
Your vehicle has aremote negative (-)terminal, marked“GND (-)” locatednear the powersteering fluid reservoir.Attach the cable to theremote negative (-)terminal provided.
If the SECURITY light flashes, wait until the lightstops flashing before starting the engine.
9. Now start the vehicle with the good battery and runthe engine for a while.
10. Try to start the vehicle with the dead battery. If it won’t start after a few tries, it probably needs service.

5-8
11. Remove the cables in reverse order (as shown in thefollowing procedure) to prevent electrical shorting.Take care that they don’t touch each other or anyother metal. Return the red positive (+) remoteterminal cover to its original position.
Jumper Cable Removal Procedure
A. Remote Positive (+) Terminal
B. Good Battery
C. Heavy, Unpainted Metal Engine Part
1. Disconnect the black negative (-) cable from theremote negative terminal (GND) or the heavy,unpainted metal engine part on the vehicle thathad the dead battery.
2. Disconnect the black negative (-) cable from the negative (-) terminal on the vehicle with thegood battery.
3. Disconnect the red positive (+) cable from thevehicle with the good battery.
4. Disconnect the red positive (+) cable from theother vehicle.

5-9
Towing Your VehicleConsult your dealer or a professional towing service ifyou need to have your vehicle towed. See “RoadsideAssistance” and “Recreational Vehicle Towing” in the Index.
Engine OverheatingYou will find an ENGINE COOLANT HOT, IDLEENGINE message or an ENGINE OVERHEATED,STOP ENGINE message on the Driver InformationCenter (DIC). You will also hear a chime. There is also an engine temperature warning light and/or gage on the instrument panel cluster. See “Engine CoolantTemperature Warning Light” or “Engine CoolantTemperature Gage” in the Index.
Overheated Engine Protection Operating ModeShould an overheated engine condition exist and themessage ENGINE OVERHEATED, STOP ENGINE isdisplayed, an overheat protection mode which alternatesfiring groups of cylinders helps prevent engine damage.In this mode, you will notice a loss in power and engineperformance. This operating mode allows your vehicleto be driven to a safe place in an emergency; you maydrive up to 50 miles (80 km). Towing a trailer in theoverheat protection mode should be avoided.
NOTICE:
After driving in the overheated engine protectionoperating mode, to avoid engine damage, allowthe engine to cool before attempting any repair.The engine oil will be severely degraded. Repairthe cause of coolant loss, change the oil and reset the oil life indicator. See “Engine Oil” in the Index.

5-10
If Steam Is Coming From Your EngineCAUTION:
Steam from an overheated engine can burn youbadly, even if you just open the hood. Stay awayfrom the engine if you see or hear steam comingfrom it. Just turn it off and get everyone awayfrom the vehicle until it cools down. Wait untilthere is no sign of steam or coolant before youopen the hood.
If you keep driving when your engine isoverheated, the liquids in it can catch fire. You or others could be badly burned. Stop yourengine if it overheats, and get out of the vehicleuntil the engine is cool. See “Overheated EngineProtection Operating Mode” in the Index.

5-11
NOTICE:
If your engine catches fire because you keepdriving with no coolant, your vehicle can bebadly damaged. The costly repairs would not be covered by your warranty. See “OverheatedEngine Protection Operating Mode” in the Index.
If No Steam Is Coming From Your EngineIf you get an engine overheat warning but see or hear nosteam, the problem may not be too serious. Sometimesthe engine can get a little too hot when you:
� Climb a long hill on a hot day.
� Stop after high-speed driving.
� Idle for long periods in traffic.
� Tow a trailer.
If you get the overheat warning with no sign of steam,try this for a minute or so:
1. If your air conditioner is on, turn it off.
2. Dial the temperature control to the highest heatsetting and open the windows, as necessary.
3. If you’re in a traffic jam, shift to NEUTRAL (N);otherwise, shift to the highest gear while driving -- DRIVE (D) or THIRD (3).
If you no longer have the overheat warning, you can drive. Just to be safe, drive slower for about 10 minutes. If the warning doesn’t come back on, you can drive normally.
If the warning continues, pull over, stop, and park yourvehicle right away.
If there’s still no sign of steam, idle the engine for three minutes while you’re parked. If you still have thewarning, turn off the engine and get everyone out of the vehicle until it cools down. Also, see “OverheatedEngine Protection Operating Mode” listed previously inthis section.
You may decide not to lift the hood but to get servicehelp right away.

5-12
Cooling SystemWhen you decide it’s safe to lift the hood, here’s whatyou’ll see:
A. Coolant Surge Tank with Pressure Cap
B. Electric Engine Cooling Fans
CAUTION:
An electric engine cooling fan under the hood canstart up even when the engine is not running andcan injure you. Keep hands, clothing and toolsaway from any underhood electric fan.
If the coolant inside the coolant surge tank is boiling,don’t do anything else until it cools down.

5-13
A low coolant level should be indicated by a CHECKCOOLANT LEVEL message on the Driver InformationCenter. If it is, you may have a leak in the radiatorhoses, heater hoses, radiator, water pump or somewhereelse in the cooling system.
CAUTION:
Heater and radiator hoses, and other engineparts, can be very hot. Don’t touch them. If you do, you can be burned.
Don’t run the engine if there is a leak. If you runthe engine, it could lose all coolant. That couldcause an engine fire, and you could be burned.Get any leak fixed before you drive the vehicle.
NOTICE:
Engine damage from running your enginewithout coolant isn’t covered by your warranty.See “Overheated Engine Protection OperatingMode” in the Index.
NOTICE:
When adding coolant, it is important that you use only DEX-COOL� (silicate-free) coolant.If coolant other than DEX-COOL is added to the system, premature engine, heater core orradiator corrosion may result. In addition, theengine coolant will require change sooner -- at30,000 miles (50 000 km) or 24 months,whichever occurs first. Damage caused by the use of coolant other than DEX-COOL� is notcovered by your new vehicle warranty.

5-14
If there seems to be no leak, with the engine on, check to see if the electric engine cooling fans are running. If the engine is overheating, both fans should berunning. If they aren’t, your vehicle needs service.
How to Add Coolant to the Coolant Surge TankIf you haven’t found a problem yet, but the coolant levelisn’t at the proper level (2.5 inches (6.4 cm) below thebase of the fill neck), add a 50/50 mixture of clean,drinkable water and DEX-COOL� coolant at thecoolant surge tank, but be sure the cooling system,including the coolant surge tank pressure cap, is coolbefore you do it. See “Engine Coolant” in the Index for more information.
CAUTION:
Steam and scalding liquids from a hot coolingsystem can blow out and burn you badly. Theyare under pressure, and if you turn the coolant
CAUTION: (Continued)
CAUTION: (Continued)
surge tank pressure cap -- even a little -- theycan come out at high speed. Never turn the cap when the cooling system, including thecoolant surge tank pressure cap, is hot. Wait for the cooling system and coolant surge tankpressure cap to cool if you ever have to turn the pressure cap.

5-15
CAUTION:
Adding only plain water to your cooling systemcan be dangerous. Plain water, or some otherliquid like alcohol, can boil before the propercoolant mixture will. Your vehicle’s coolantwarning system is set for the proper coolantmixture. With plain water or the wrong mixture,your engine could get too hot but you wouldn’tget the overheat warning. Your engine couldcatch fire and you or others could be burned. Use a 50/50 mixture of clean, drinkable waterand DEX-COOL� coolant.
NOTICE:
In cold weather, water can freeze and crack the engine, radiator, heater core and other parts.So use the recommended coolant.
CAUTION:
You can be burned if you spill coolant on hotengine parts. Coolant contains ethylene glycoland it will burn if the engine parts are hotenough. Don’t spill coolant on a hot engine.

5-16
1. You can remove the coolant surge tank pressure capwhen the cooling system, including the coolant surgetank pressure cap and upper radiator hose, is no longerhot. Turn the pressure cap slowly counterclockwise (left)until it first stops. (Don’t press down while turning thepressure cap.)
If you hear a hiss, wait for that to stop. A hiss meansthere is still some pressure left.
2. Then keep turning the cap, but now push down asyou turn it. Remove the pressure cap.

5-17
3. Then fill the coolant surge tank with the propermixture, to the base of the filler neck.
4. With the coolant surge tank pressure cap off, start the engine and let it run until you can feel the upperradiator hose getting hot. Watch out for the enginecooling fans.
By this time, the coolant level inside the coolantsurge tank may be lower. If the level is lower, addmore of the proper mixture to the coolant surge tank until the level reaches about 2.5 inches (6.4 cm)below the base of the filler neck.

5-18
5. Then replace the pressure cap. Be sure the arrows onthe pressure cap line up like this.
Start the engine and allow it to warm up. If the CHECKCOOLANT LEVEL message does not appear on theDriver Information Center, coolant is at the proper filllevel. If a CHECK COOLANT LEVEL message doesappear, repeat Steps 1 to 3 and reinstall the pressure capor see your dealer.
If a Tire Goes FlatIt’s unusual for a tire to “blow out” while you’re driving,especially if you maintain your tires properly. If air goesout of a tire, it’s much more likely to leak out slowly.But if you should ever have a “blowout,” here are a few tips about what to expect and what to do:
If a front tire fails, the flat tire will create a drag thatpulls the vehicle toward that side. Take your foot off the accelerator pedal and grip the steering wheel firmly.Steer to maintain lane position, and then gently brake to a stop well out of the traffic lane.
A rear blowout, particularly on a curve, acts much like a skid and may require the same correction you’d use in a skid. In any rear blowout, remove your foot fromthe accelerator pedal. Get the vehicle under control bysteering the way you want the vehicle to go. It may bevery bumpy and noisy, but you can still steer. Gentlybrake to a stop -- well off the road if possible.
If a tire goes flat, the next part shows how to use yourjacking equipment to change a flat tire safely.

5-19
Changing a Flat TireIf a tire goes flat, avoid further tire and wheel damageby driving slowly to a level place. Turn on your hazardwarning flashers.
CAUTION:
Changing a tire can cause an injury. The vehiclecan slip off the jack and roll over you or otherpeople. You and they could be badly injured.Find a level place to change your tire. To helpprevent the vehicle from moving:
1. Put the shift lever in PARK (P).2. Set the parking brake firmly.3. Turn off the engine.
To be even more certain the vehicle won’t move,you can put blocks at the front and rear of thetire farthest away from the one being changed.That would be the tire on the other side of thevehicle, at the opposite end.
The following steps will tell you how to use the jack andchange a tire.
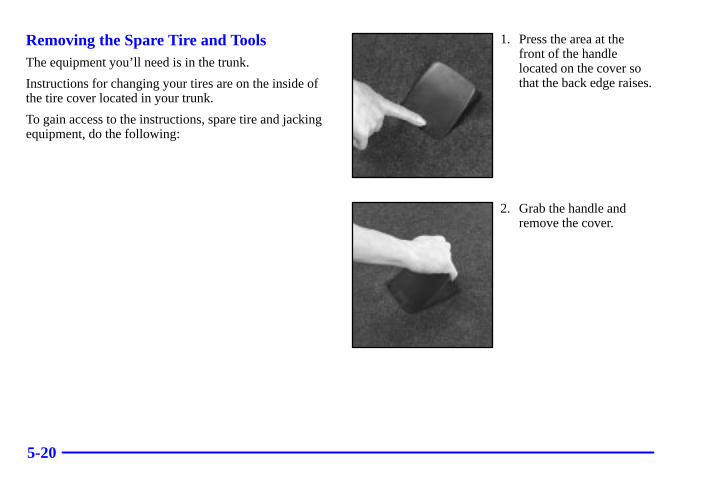
5-20
Removing the Spare Tire and ToolsThe equipment you’ll need is in the trunk.
Instructions for changing your tires are on the inside ofthe tire cover located in your trunk.
To gain access to the instructions, spare tire and jackingequipment, do the following:
1. Press the area at thefront of the handlelocated on the cover sothat the back edge raises.
2. Grab the handle andremove the cover.

5-21
3. Unscrew the wing nuts to remove the container thatholds the wrench and jack.
4. Remove the wheel wrench, jack and spare tire fromthe trunk. See “Compact Spare Tire” later in thissection for more information about the compactspare tire.
The tools you’ll be using include the jack (A) and thewheel wrench (B).

5-22
Removing the Wheel Cover
Models with Center Wheel Cover
For models having aluminum wheels with a centerwheel cover, use the flat end of the wheel wrench togently pry the wheel covers off. Be careful not to scratchthe aluminum wheel edge and don’t try to remove itwith your hands.
For models having wheel nuts exposed, use the wheelwrench to remove the wheel nut covers.
Removing the Flat Tire and Installing theSpare Tire
1. Using the wheel wrench, loosen all the wheel nuts.Don’t remove them yet.

5-23
2. Find the jacking location from the diagrams aboveand corresponding hoisting notches located in theplastic molding. The notches may be labeled“JACK” with an arrow pointing to the jackinglocation on the vehicle.

5-24
CAUTION:
Getting under a vehicle when it is jacked up isdangerous. If the vehicle slips off the jack, youcould be badly injured or killed. Never get undera vehicle when it is supported only by a jack.
CAUTION:
Raising your vehicle with the jack improperlypositioned can damage the vehicle and even makethe vehicle fall. To help avoid personal injury and vehicle damage, be sure to fit the jack lifthead into the proper location before raising the vehicle.
3. Turn the jack handle counterclockwise to lower thejack lift head until the jack fits under the vehicle.
4. Raise the jack until the metal flange fits firmly intothe channel of the jack head.
5. Put the compact spare near you.
6. Raise the vehicle by turning the jack handleclockwise. Raise the vehicle far enough off theground for the spare tire to fit under the vehicle.

5-25
7. Remove all wheel nuts and take off the flat tire.
8. Remove any rust or dirtfrom the wheel bolts,mounting surfaces andspare wheel.
CAUTION:
Rust or dirt on the wheel, or on the parts towhich it is fastened, can make the wheel nutsbecome loose after a time. The wheel could comeoff and cause an accident. When you change awheel, remove any rust or dirt from the placeswhere the wheel attaches to the vehicle. In anemergency, you can use a cloth or a paper towelto do this; but be sure to use a scraper or wirebrush later, if you need to, to get all the rust ordirt off.
CAUTION:
Never use oil or grease on studs or nuts. If youdo, the nuts might come loose. Your wheel couldfall off, causing a serious accident.
9. Place the spare tire on thewheel-mountingsurface.

5-26
10. Put the wheel nuts backon with the roundedend of the nuts towardthe wheel. Tighten eachnut by hand until thewheel is held againstthe hub.
11. Lower the vehicle by turning the jack handlecounterclockwise. Lower the jack completely.

5-27
12. Tighten the wheelnuts firmly in acrisscross sequenceas shown.
If your vehicle is equipped with wheel nut covers,screw them on with your fingers, then tightenone-quarter turn with the wheel wrench.
CAUTION:
Incorrect wheel nuts or improperly tightenedwheel nuts can cause the wheel to become looseand even come off. This could lead to an accident.Be sure to use the correct wheel nuts. If you haveto replace them, be sure to get new GM originalequipment wheel nuts.Stop somewhere as soon as you can and have the nuts tightened with a torque wrench to 100 lb-ft (140 N·m).

5-28
NOTICE:
Improperly tightened wheel nuts can lead tobrake pulsation and rotor damage. To avoidexpensive brake repairs, evenly tighten the wheelnuts in the proper sequence and to the propertorque specification.
13. Don’t try to put a wheel cover on your compactspare tire. It won’t fit. Store the wheel cover andlug nut caps in the trunk until you have the flat tirerepaired or replaced.
NOTICE:
Wheel covers won’t fit on your compact spare. If you try to put a wheel cover on your compactspare, you could damage the cover or the spare.
Storing the Flat Tire and Tools
CAUTION:
Storing a jack, a tire or other equipment in thepassenger compartment of the vehicle couldcause injury. In a sudden stop or collision, looseequipment could strike someone. Store all thesein the proper place.
After you’ve put the compact spare tire on your vehicle,you’ll need to store the flat tire in your trunk.
Store the flat tire as far forward in the trunk as possible.Store the jack and wheel wrench in their compartment inthe trunk. For storage, the jack must be raised until thescrew end is flush with the edge of the jack.

5-29
Storing the Spare Tire and Tools
CAUTION:
Storing a jack, a tire or other equipment in thepassenger compartment of the vehicle couldcause injury. In a sudden stop or collision, looseequipment could strike someone. Store all thesein the proper place.
The compact spare is for temporary use only. Replacethe compact spare tire with a full-size tire as soon as youcan. See the storage instructions label for information on how to properly position and store the compact spare tire.

5-30
Compact Spare TireAlthough the compact spare tire was fully inflated when your vehicle was new, it can lose air after a time.Check the inflation pressure regularly. It should be 60 psi (420 kPa).
After installing the compact spare on your vehicle, you should stop as soon as possible and make sure your spare tire is correctly inflated. The compact spareis made to perform well at speeds up to 65 mph (105 km/h) for distances up to 3,000 miles (5 000 km),so you can finish your trip and have your full-size tirerepaired or replaced where you want. Of course, it’s bestto replace your spare with a full-size tire as soon as youcan. Your spare will last longer and be in good shape incase you need it again.
NOTICE:
When the compact spare is installed, don’t takeyour vehicle through an automatic car wash withguide rails. The compact spare can get caught onthe rails. That can damage the tire and wheel,and maybe other parts of your vehicle.
Don’t use your compact spare on other vehicles.
And don’t mix your compact spare tire or wheel withother wheels or tires. They won’t fit. Keep your sparetire and its wheel together.
NOTICE:
Tire chains won’t fit your compact spare. Usingthem can damage your vehicle and can damagethe chains too. Don’t use tire chains on yourcompact spare.

5-31
If You’re Stuck: In Sand, Mud, Ice or SnowIn order to free your vehicle when it is stuck, you willneed to spin the wheels, but you don’t want to spin your wheels too fast. The method known as “rocking”can help you get out when you’re stuck, but you mustuse caution.
CAUTION:
If you let your tires spin at high speed, they canexplode, and you or others could be injured. And, the transaxle or other parts of the vehiclecan overheat. That could cause an enginecompartment fire or other damage. When you’restuck, spin the wheels as little as possible. Don’tspin the wheels above 35 mph (55 km/h) as shownon the speedometer.
NOTICE:
Spinning your wheels can destroy parts of yourvehicle as well as the tires. If you spin the wheelstoo fast while shifting your transaxle back andforth, you can destroy your transaxle.
For information about using tire chains on your vehicle,see “Tire Chains” in the Index.
Rocking Your Vehicle To Get It OutFirst, turn your steering wheel left and right. That willclear the area around your front wheels. You should turnyour traction control system off. See “Traction ControlSystem” in the Index. Then shift back and forth betweenREVERSE (R) and a forward gear, spinning the wheelsas little as possible. Release the accelerator pedal whileyou shift, and press lightly on the accelerator pedalwhen the transaxle is in gear. By slowly spinning yourwheels in the forward and reverse directions, you willcause a rocking motion that may free your vehicle. If that doesn’t get you out after a few tries, you mayneed to be towed out. If you do need to be towed out,see “Towing Your Vehicle” in the Index.

6-6-1
Section 6 Service and Appearance Care
Here you will find information about the care of your vehicle. This section begins with service and fuel information,and then it shows how to check important fluid and lubricant levels. There is also technical information about yourvehicle, and a part devoted to its appearance care.
6-2 Service6-3 Fuel6-5 Fuels in Foreign Countries6-5 Filling Your Tank6-8 Filling a Portable Fuel Container6-8 Checking Things Under the Hood6-11 Engine Oil6-16 Engine Air Cleaner/Filter6-20 Automatic Transaxle Fluid6-24 Engine Coolant6-27 Surge Tank Pressure Cap6-27 Power Steering Fluid6-28 Windshield Washer Fluid6-30 Brakes6-33 Battery6-35 Bulb Replacement6-45 Windshield Wiper Blade Replacement
6-46 Tires6-57 Appearance Care6-57 Cleaning the Inside of Your Vehicle6-60 Cleaning the Outside of Your Vehicle6-62 Cleaning Aluminum or Chrome-Plated
Wheels (If Equipped)6-63 Underbody Maintenance6-63 Chemical Paint Spotting6-64 GM Vehicle Care/Appearance Materials6-65 Vehicle Identification Number (VIN)6-65 Service Parts Identification Label6-66 Electrical System6-70 Removing the Rear Seat Cushion6-75 Replacement Bulbs6-75 Capacities and Specifications6-76 Normal Maintenance Replacement Parts

6-2
ServiceYour dealer knows your vehicle best and wants you tobe happy with it. We hope you’ll go to your dealer forall your service needs. You’ll get genuine GM parts andGM-trained and supported service people.
We hope you’ll want to keep your GM vehicle all GM.Genuine GM parts have one of these marks:
Doing Your Own Service WorkIf you want to do some of your own service work, you’llwant to use the proper service manual. It tells you muchmore about how to service your vehicle than this manualcan. To order the proper service manual, see “Serviceand Owner Publications” in the Index.
Your vehicle has an air bag system. Before attempting todo your own service work, see “Servicing Your AirBag-Equipped Vehicle” in the Index.
You should keep a record with all parts receipts and listthe mileage and the date of any service work youperform. See “Maintenance Record” in the MaintenanceSchedule booklet.

6-3
CAUTION:
You can be injured and your vehicle could bedamaged if you try to do service work on avehicle without knowing enough about it.
� Be sure you have sufficient knowledge,experience, the proper replacement partsand tools before you attempt any vehiclemaintenance task.
� Be sure to use the proper nuts, bolts andother fasteners. “English” and “metric”fasteners can be easily confused. If you usethe wrong fasteners, parts can later breakor fall off. You could be hurt.
Adding Equipment to the Outside of Your VehicleThings you might add to the outside of your vehicle canaffect the airflow around it. This may cause wind noiseand affect windshield washer performance. Check withyour dealer before adding equipment to the outside ofyour vehicle.
FuelUse regular unleaded gasoline rated at 87 octane orhigher. However, for best performance and for trailertowing, you may wish to use middle grade or premiumunleaded gasoline.
It is recommended that the gasoline meet specificationswhich were developed by the American AutomobileManufacturers Association (AAMA) and endorsed bythe Canadian Motor Vehicle Manufacturers Associationfor better vehicle performance and engine protection.Gasolines meeting the AAMA specification couldprovide improved driveability and emission controlsystem performance compared to other gasolines.
In Canada, look for the“Auto Makers’ Choice”label on the fuel pump.
Canada Only

6-4
Be sure the posted octane for regular is at least 87 (at least 91 for premium). If the octane is less than87, you may get a heavy knocking noise when youdrive. If it’s bad enough, it can damage your engine.
If you’re using fuel rated at the recommended octane orhigher and you hear heavy knocking, your engine needsservice. But don’t worry if you hear a little pingingnoise when you’re accelerating or driving up a hill.That’s normal, and you don’t have to buy a higheroctane fuel to get rid of pinging. It’s the heavy, constantknock that means you have a problem.
If your vehicle is certified to meet California EmissionStandards (indicated on the underhood emission controllabel), it is designed to operate on fuels that meetCalifornia specifications. If such fuels are not availablein states adopting California emissions standards, your vehicle will operate satisfactorily on fuels meetingfederal specifications, but emission control systemperformance may be affected. The malfunction indicatorlamp on your instrument panel may turn on and/or yourvehicle may fail a smog-check test. See “MalfunctionIndicator Lamp” in the Index. If this occurs, return to your authorized Vehicle dealer for diagnosis todetermine the cause of failure. In the event it isdetermined that the cause of the condition is the type offuels used, repairs may not be covered by your warranty.
Some gasolines that are not reformulated for lowemissions may contain an octane-enhancing additivecalled methylcyclopentadienyl manganese tricarbonyl(MMT); ask your service station operator whether or not the fuel contains MMT. General Motors does notrecommend the use of such gasolines. If fuels containingMMT are used, spark plug life may be reduced and youremission control system performance may be affected.The malfunction indicator lamp on your instrumentpanel may turn on. If this occurs, return to yourauthorized Cadillac dealer for service.
To provide cleaner air, all gasolines in the United Statesare now required to contain additives that will helpprevent deposits from forming in your engine and fuelsystem, allowing your emission control system tofunction properly. Therefore, you should not have to addanything to the fuel. In addition, gasolines containingoxygenates, such as ethers and ethanol, andreformulated gasolines may be available in your area tocontribute to clean air. General Motors recommends thatyou use these gasolines, particularly if they comply withthe specifications described earlier.

6-5
NOTICE:
Your vehicle was not designed for fuel thatcontains methanol. Don’t use it. It can corrodemetal parts in your fuel system and also damageplastic and rubber parts. That damage wouldn’tbe covered under your warranty.
Fuels in Foreign CountriesIf you plan on driving in another country outside theUnited States or Canada, the proper fuel may be hard tofind. Never use leaded gasoline or any other fuel notrecommended in the previous text on fuel. Costly repairscaused by use of improper fuel wouldn’t be covered byyour warranty.
To check on fuel availability, ask an auto club, orcontact a major oil company that does business in thecountry where you’ll be driving.
Filling Your Tank
CAUTION:
Gasoline vapor is highly flammable. It burnsviolently, and that can cause very bad injuries.Don’t smoke if you’re near gasoline or refuelingyour vehicle. Keep sparks, flames and smokingmaterials away from gasoline.
The cap is located behind a hinged door on the driver’sside of your vehicle.

6-6
The fuel door release buttonis located to the left of thesteering wheel next to theheadlamp knob.
The button only works when the vehicle is in PARK (P)or NEUTRAL (N), when the key is in the ignition andthe VALET lockout button is in OFF.
An alternate fuel doorrelease is located inside ofthe trunk on the driver’sside. Pull it to release thefuel door.
While refueling, hang the cap by the tether from thehook on the filler door.
To remove the cap, turn it slowly to the left(counterclockwise). The cap has a spring in it; if you letgo of the cap too soon, it will spring back to the right.

6-7
CAUTION:
If you get gasoline on yourself and thensomething ignites it, you could be badly burned.Gasoline can spray out on you if you open thefuel filler cap too quickly. This spray can happenif your tank is nearly full, and is more likely inhot weather. Open the fuel filler cap slowly andwait for any “hiss” noise to stop. Then unscrewthe cap all the way.
Be careful not to spill gasoline. Clean gasoline frompainted surfaces as soon as possible. See “Cleaning theOutside of Your Vehicle” in the Index.
When you put the cap back on, turn it to the right(clockwise) until you hear a clicking sound. Make sureyou fully install the cap. The diagnostic system candetermine if the fuel cap has been left off or improperlyinstalled. This would allow fuel to evaporate into theatmosphere. See “Malfunction Indicator Lamp” in the Index.
NOTICE:
If you need a new cap, be sure to get the righttype. Your dealer can get one for you. If you getthe wrong type, it may not fit properly. This maycause your malfunction indicator lamp to lightand your fuel tank and emissions system may bedamaged. See “Malfunction Indicator Lamp” inthe Index.

6-8
Filling a Portable Fuel Container
CAUTION:
Never fill a portable fuel container while it is inyour vehicle. Static electricity discharge from thecontainer can ignite the gasoline vapor. You canbe badly burned and your vehicle damaged if thisoccurs. To help avoid injury to you and others:
� Dispense gasoline only into approved containers.
� Do not fill a container while it is inside avehicle, in a vehicle’s trunk, pickup bed oron any surface other than the ground.
� Bring the fill nozzle in contact with theinside of the fill opening before operatingthe nozzle. Contact should be maintaineduntil the filling is complete.
� Don’t smoke while pumping gasoline.
Checking Things Under the Hood
CAUTION:
An electric fan under the hood can start up andinjure you even when the engine is not running.Keep hands, clothing and tools away from anyunderhood electric fan.
CAUTION:
Things that burn can get on hot engine parts andstart a fire. These include liquids like gasoline,oil, coolant, brake fluid, windshield washer andother fluids, and plastic or rubber. You or otherscould be burned. Be careful not to drop or spillthings that will burn onto a hot engine.

6-9
Hood Release
Pull the lever inside thevehicle to open the hood. Itis located on the lower leftside of the instrument panel.
With Night Vision
Without Night Vision
Then go to the front of the vehicle and find thesecondary hood release lever. The lever is located underthe front edge of the grille on vehicles with Night Visionand under the bottom edge of the grille on vehicleswithout Night Vision. Move the release lever as youraise the hood.

6-10
Engine Compartment OverviewWhen you open the hood, you’ll see:
A. Windshield Washer Fluid ReservoirB. Engine Compartment Bussed
Electrical CenterC. Engine Coolant Surge Tank
D. Power Steering FluidE. Engine Oil Fill CapF. Engine Oil DipstickG. Brake Master Cylinder
H. Transaxle Dipstick/Fluid Fill Location
I. Engine Air Cleaner Filter
Before closing the hood, be sure all filler caps are on properly. Then pull the hood down and close it firmly.

6-11
Underhood Lamp
The underhood lamp will come on when the hood isopened and the parking lamps are turned on.
Engine Oil
If the CHECK OIL LEVEL message appears on theinstrument panel, it means you need to check yourengine oil level right away. For more information, see“Checking Engine Oil” in the Index.
You should check your engine oil level regularly; this isan added reminder.
Checking Engine OilIt’s a good idea to check your engine oil every time youget fuel. In order to get an accurate reading, the oil mustbe warm and the vehicle must be on level ground.
The engine oil dipstick islocated behind the radiatoron the driver’s side of theengine. The handle is ayellow loop that saysENGINE OIL on it.
For more information onlocation, see “EngineCompartment Overview” inthe Index.
Turn off the engine and give the oil several minutes todrain back into the oil pan. If you don’t, the oil dipstickmight not show the actual level.

6-12
Pull out the dipstick and clean it with a paper towel orcloth, then push it back in all the way. Remove it again,keeping the tip down, and check the level.
When to Add Engine OilIf the oil is at or below the ADD line, then you’ll needto add at least one quart of oil. But you must use theright kind. This part explains what kind of oil to use. Forcrankcase capacity, see “Capacities and Specifications”in the Index.
NOTICE:
Don’t add too much oil. If your engine has somuch oil that the oil level gets above the uppermark that shows the proper operating range,your engine could be damaged.
The engine oil fill cap islocated behind the radiatoron the passenger’s side ofthe engine. Turn the capcounterclockwise to remove it.
For more information on location, see “EngineCompartment Overview” in the Index.
Be sure to fill it enough to put the level somewhere inthe proper operating range. Push the dipstick all the wayback in when you’re through.

6-13
What Kind of Engine Oil to UseOils recommended for your vehicle can be identified bylooking for the starburst symbol.
This symbol indicates that the oil has been certified bythe American Petroleum Institute (API). Do not use anyoil which does not carry this starburst symbol.
If you change your own oil,be sure you use oil that hasthe starburst symbol on thefront of the oil container. Ifyou have your oil changedfor you, be sure the oil putinto your engine isAmerican PetroleumInstitute certified forgasoline engines.
You should also use the proper viscosity oil for yourvehicle, as shown in the following chart:

6-14
As in the chart shown previously, SAE 5W-30 is best foryour vehicle. However, you can use SAE 10W-30 if it’sgoing to be 0�F (-18�C) or above. These numbers on anoil container show its viscosity, or thickness. Do not useother viscosity oils, such as SAE 20W-50.
NOTICE:
Use only engine oil with the American PetroleumInstitute Certified For Gasoline Enginesstarburst symbol. Failure to use therecommended oil can result in engine damage notcovered by your warranty.
GM Goodwrench� oil meets all the requirements foryour vehicle.
If you are in an area where the temperature falls below-20�F (-29�C), consider using either an SAE 5W-30synthetic oil or an SAE 0W-30 oil. Both will provideeasier cold starting and better protection for your engineat extremely low temperatures.
Engine Oil AdditivesDon’t add anything to your oil. The recommended oilswith the starburst symbol are all you will need for goodperformance and engine protection.
When to Change Engine OilYour vehicle has a computer that lets you know when tochange your engine oil. This is not based on mileage,but on engine revolutions and engine operatingtemperature. When the computer has calculated that theoil needs changing, the GM Oil Life System� willindicate that a change is necessary. The mileage betweenoil and filter changes will vary depending on how youdrive your vehicle -- usually between 3,000 miles (5 000 km) and 10,000 miles (16 000 km) since yourlast oil and filter change. Under severe conditions, thesystem may come on before 3,000 miles (5 000 km).Never drive your vehicle more than 10,000 miles (16 000 km) or 12 months (whichever occurs first)without an oil change.
The system won’t detect dust in the oil. So, if you drivein a dusty area, be sure to change your oil and filterevery 3,000 miles (5 000 km) or sooner. Remember toreset the Oil Life Indicator whenever the oil is changed.
6-15
How to Reset the Oil Life Indicator
After the oil has been changed, display the OIL LIFEmessage by pressing the INFO button. Then press andhold the RESET button until the display shows 100%ENGINE OIL LIFE. This resets the oil life index. Thepercentage of oil life remaining may be checked at anytime by pressing the INFO button several times until theOIL LIFE message appears. For more information onthe oil life feature, see “Oil Life Indicator” in the Index.
What to Do with Used OilDid you know that used engine oil contains certainelements that may be unhealthy for your skin and couldeven cause cancer? Don’t let used oil stay on your skinfor very long. Clean your skin and nails with soap andwater, or a good hand cleaner. Wash or properly throwaway clothing or rags containing used engine oil. Seethe manufacturer’s warnings about the use and disposalof oil products.
Used oil can be a real threat to the environment. If youchange your own oil, be sure to drain all free-flowing oilfrom the filter before disposal. Don’t ever dispose of oilby putting it in the trash, pouring it on the ground, intosewers, or into streams or bodies of water. Instead,recycle it by taking it to a place that collects used oil. Ifyou have a problem properly disposing of your used oil,ask your dealer, a service station or a local recyclingcenter for help.

6-16
Engine Air Cleaner/FilterThe engine air cleaner/filter is located on the driver’sside of the engine. Be sure the engine has cooled beforefollowing these steps to replace the air cleaner filter:
For more information on location, see “EngineCompartment Overview” in the Index.
1. Loosen both wing screws on the top of the engine aircleaner/filter assembly.
2. Lift up the outboard side of the engine aircleaner/filter cover at an angle while pulling towardyou. This is necessary due to the three tabs locatedon the rear of the engine air cleaner/filter cover.
3. Remove the engine air cleaner/filter element and anyloose debris that may be found lying in the aircleaner base.
4. Replace the air filter element.

6-17
Follow these steps to reinstall the air cleaner cover to theengine air cleaner/filter housing:
1. When installing the engine air cleaner/filter cover, besure to align the three tabs located on the back of thecover with the three slots on the back of the housing.
2. After aligning the tabs with the slots, push the coverslightly down and towards the engine to engage thetabs in the slots and align the two wing screws.
3. Engage and tighten the two wing screws on the topof the air cleaner cover assembly.
Refer to the Maintenance Schedule to determine when toreplace the air filter.
See “Scheduled Maintenance Services” in theMaintenance Schedule booklet.
CAUTION:
Operating the engine with the air cleaner/filteroff can cause you or others to be burned. The aircleaner not only cleans the air, it stops flame ifthe engine backfires. If it isn’t there, and theengine backfires, you could be burned. Don’tdrive with it off, and be careful working on theengine with the air cleaner/filter off.
NOTICE:
If the air cleaner/filter is off, a backfire can cause a damaging engine fire. And, dirt can easilyget into your engine, which will damage it.Always have the air cleaner/filter in place whenyou’re driving.

6-18
Passenger Compartment Air Filter ReplacementThe passenger compartment air filter traps most of thepollen from the air entering your vehicle. Like yourvehicle’s air cleaner filter, it may need to be changedperiodically. For how often to change the passengercompartment air filter, see your Maintenance Schedule booklet.
The access panel for the passenger compartment airfilter is located under the hood near the windshield, onthe passenger’s side of the vehicle.
1. To access the passenger compartment air filter, insertthe flat tip of a screwdriver into the outer edge of thecover and gently pry the cover up. (If your vehiclehas tabs that allow you to unlatch the cover withyour fingers, you will not need a screwdriver for this step.)

6-19
2. Then, insert the flat tip of the screwdriver behind thepush pin located on the inboard side of the air filtercompartment to carefully pry the pin out.
3. To remove the air filter, insert the flat tip of thescrewdriver between the air filter and thecompartment wall on the outboard side of thevehicle. Then, push in to flatten the pin holding theair filter in place. Gently remove the air filter andany loose debris that may be inside the air filter compartment.
Insert the new air filter, by pushing until you hear aclick. Then, reinstall the push pin and snap the coverinto place.

6-20
Automatic Transaxle FluidWhen to Check and ChangeA good time to check your automatic transaxle fluidlevel is when the engine oil is changed.
Change both the fluid and filter every 50,000 miles (83 000 km) if the vehicle is mainly driven under one ormore of these conditions:
� In heavy city traffic where the outside temperatureregularly reaches 90�F (32�C) or higher.
� In hilly or mountainous terrain.
� When doing frequent trailer towing.
� Uses such as found in taxi, police or delivery service.
� Use such as limousine service.
If you do not use your vehicle under any of theseconditions, the fluid and filter do not require changeuntil the message CHANGE TRANS FLUID appears onthe Driver Information Center.
See “Scheduled Maintenance Services” in theMaintenance Schedule booklet.
How to CheckBecause this operation can be a little difficult, you may choose to have this done at the dealership service department.
If you do it yourself, be sure to follow all theinstructions here, or you could get a false reading on the dipstick.
NOTICE:
Too much or too little fluid can damage yourtransaxle. Too much can mean that some of thefluid could come out and fall on hot engine partsor exhaust system parts, starting a fire. Be sure toget an accurate reading if you check yourtransaxle fluid.
6-21
Wait at least 30 minutes before checking the transaxlefluid level if you have been driving:
� When outside temperatures are above 90�F (32�C).
� At high speed for quite a while.
� In heavy traffic -- especially in hot weather.
� While pulling a trailer.
To get the right reading, the fluid should be at normaloperating temperature, which is 180�F to 200�F (82�C to 93�C).
Get the vehicle warmed up by driving about 15 miles(24 km) when outside temperatures are above 50�F(10�C). If it’s colder than 50�F (10�C), you may haveto drive longer.
Checking the Fluid Level
Prepare your vehicle as follows:
� Park your vehicle on a level place. Keep the engine running.
� With the parking brake applied, place the shift leverin PARK (P).
� With your foot on the brake pedal, move the shiftlever through each gear range, pausing for aboutthree seconds in each range. Then, position the shiftlever in PARK (P).
� Let the engine run at idle for three to five minutes.

6-22
Then, without shutting off the engine, follow these steps:
The transaxle fluid capis located next to theradiator hose and below the engine aircleaner/filter assemblyon the driver’s side ofthe engine. See “EngineCompartmentOverview” in the Indexfor more informationon location.
1. After removing the air cleaner/filter assembly toreach the transaxle fluid cap, turn the capcounterclockwise to remove. Pull out the dipstickand wipe it with a clean rag or paper towel.
2. Push it back in all the way, wait three seconds andthen pull it back out again.
3. Check both sides of the dipstick, and read the lower level. The fluid level must be in thecross-hatched area.
4. If the fluid level is in the acceptable range, push the dipstick back in all the way and turn the handle clockwise. Reinstall the engine aircleaner/filter assembly.

6-23
How to Add FluidRefer to the Maintenance Schedule to determine whatkind of transaxle fluid to use. See “RecommendedFluids and Lubricants” in the Maintenance Schedule booklet.
If the fluid level is low, add only enough of the properfluid to bring the level into the cross-hatched area on the dipstick.
1. Pull out the dipstick.
2. Using a long-neck funnel, add enough fluid at thedipstick hole to bring it to the proper level.
It doesn’t take much fluid, generally less than one pint (0.5 L). Don’t overfill.
NOTICE:
We recommend you use only fluid labeledDEXRON�-III, because fluid with that label ismade especially for your automatic transaxle.Damage caused by fluid other thanDEXRON�-III is not covered by your newvehicle warranty.
3. After adding fluid, recheck the fluid level asdescribed under “How to Check.”
4. When the correct fluid level is obtained, push the dipstick back in all the way and turn the handle clockwise.
How to Reset the Transaxle Fluid Change IndicatorAfter the transaxle fluid has been changed, display thetransaxle FLUID LIFE message by pressing the INFObutton. Then press and hold the INFO RESET buttonuntil the display shows “100”. This resets the transaxlefluid life index. The percentage of transaxle fluid liferemaining may be checked at any time by pressing theINFO button several times until the transaxle FLUIDLIFE message appears.

6-24
Engine CoolantThe cooling system in your vehicle is filled withDEX-COOL� engine coolant. This coolant is designedto remain in your vehicle for 5 years or 150,000 miles(240 000 km), whichever occurs first, if you add onlyDEX-COOL� extended life coolant.
The following explains your cooling system and how toadd coolant when it is low. If you have a problem withengine overheating, see “Engine Overheating” in the Index.
A 50/50 mixture of clean, drinkable water andDEX-COOL� coolant will:
� Give freezing protection down to -34�F (-37�C).
� Give boiling protection up to 265�F (129�C).
� Protect against rust and corrosion.
� Help keep the proper engine temperature.
� Let the warning lights and gages work as they should.
NOTICE:
When adding coolant, it is important that you useonly DEX-COOL� (silicate-free) coolant.If coolant other than DEX-COOL is added to thesystem, premature engine, heater core orradiator corrosion may result. In addition, theengine coolant will require change sooner -- at30,000 miles (50 000 km) or 24 months,whichever occurs first. Damage caused by the useof coolant other than DEX-COOL� is notcovered by your new vehicle warranty.

6-25
What to UseUse a mixture of one-half clean, drinkable water andone-half DEX-COOL� coolant which won’t damagealuminum parts. If you use this coolant mixture, youdon’t need to add anything else.
CAUTION:
Adding only plain water to your cooling systemcan be dangerous. Plain water, or some otherliquid like alcohol, can boil before the propercoolant mixture will. Your vehicle’s coolantwarning system is set for the proper coolantmixture. With plain water or the wrong mixture,your engine could get too hot but you wouldn’tget the overheat warning. Your engine couldcatch fire and you or others could be burned. Use a 50/50 mixture of clean, drinkable waterand DEX-COOL� coolant.
NOTICE:
If you use an improper coolant mixture, yourengine could overheat and be badly damaged.The repair cost wouldn’t be covered by yourwarranty. Too much water in the mixture canfreeze and crack the engine, radiator, heater coreand other parts.
If you have to add coolant more than four times a year,have your dealer check your cooling system.
NOTICE:
If you use the proper coolant, you don’t have toadd extra inhibitors or additives which claim toimprove the system. These can be harmful.

6-26
Checking Coolant
The surge tank is located on the passenger’s side of theengine. For more information on location, see “EngineCompartment Overview” in the Index.
The cooling system is under a lot of pressure when it ishot. If the CHECK COOLANT LEVEL messageappears on the Driver Information Center (DIC), youwill need to add coolant.
CAUTION:
Turning the surge tank pressure cap when theengine and radiator are hot can allow steam andscalding liquids to blow out and burn you badly.Never turn the surge tank pressure cap -- even alittle -- when the engine and radiator are hot.
The vehicle must be on a level surface. When yourengine is cold, the coolant level should be at the FULLCOLD mark, located on the side of the surge tank thatfaces the engine.
If the CHECK COOLANT LEVEL message comes onand stays on, it means you’re low on engine coolant.
For more information, see “Check Coolant LevelMessage” in the Index.

6-27
Adding Coolant
If you need more coolant, add the proper DEX-COOL�
coolant mixture at the surge tank, but only when theengine is cool.
CAUTION:
You can be burned if you spill coolant on hotengine parts. Coolant contains ethylene glycol,and it will burn if the engine parts are hotenough. Don’t spill coolant on a hot engine.
When replacing the pressure cap, make sure it ishand-tight.
Surge Tank Pressure Cap
NOTICE:
The surge tank cap is a 18 psi (124 kPa)pressure-type cap and must be tightly installed toprevent coolant loss and possible engine damagefrom overheating. Be sure the arrow on the caplines up with the overflow hose.
Power Steering FluidThe power steering fluidreservoir is located betweenthe fuse block relay centerand the engine on thepassenger’s side of the vehicle.
For more information onlocation, see “EngineCompartment Overview” in the Index.

6-28
When to Check Power Steering FluidIt is not necessary to regularly check power steeringfluid unless you suspect there is a leak in the system oryou hear an unusual noise. A fluid loss in this systemcould indicate a problem. Have the system inspected and repaired.
How to Check Power Steering FluidTurn the key off, let the engine compartment cool down,wipe the cap and the top of the reservoir clean, thenunscrew the cap and wipe the dipstick with a clean rag.Replace the cap and completely tighten it. Then removethe cap again and look at the fluid level on the dipstick.
The level should be at the FULL COLD mark. Ifnecessary, add only enough fluid to bring the level up tothe mark.
What to UseTo determine what kind of fluid to use, see“Recommended Fluids and Lubricants” in theMaintenance Schedule booklet. Always use the properfluid. Failure to use the proper fluid can cause leaks anddamage hoses and seals.
Windshield Washer FluidWhat to UseWhen you need windshield washer fluid, be sure to readthe manufacturer’s instructions before use. If you will beoperating your vehicle in an area where the temperaturemay fall below freezing, use a fluid that has sufficientprotection against freezing.

6-29
Adding Washer FluidThe CHECK WASHER FLUID message will bedisplayed on the Driver Information Center (DIC) whenthe fluid is low.
The windshield washer fluid reservoir is located in frontof the fuse block relay center on the passenger’s side ofthe vehicle. For more information on location, see“Engine Compartment Overview” in the Index.
Open the cap labeled WASHER FLUID. Add washerfluid until the tank is full.
NOTICE:
� When using concentrated washer fluid,follow the manufacturer’s instructions foradding water.
� Don’t mix water with ready-to-use washerfluid. Water can cause the solution to freezeand damage your washer fluid tank andother parts of the washer system. Also,water doesn’t clean as well as washer fluid.
� Fill your washer fluid tank onlythree-quarters full when it’s very cold. Thisallows for expansion if freezing occurs,which could damage the tank if it iscompletely full.
� Don’t use engine coolant (antifreeze) inyour windshield washer. It can damageyour washer system and paint.

6-30
BrakesBrake Fluid
Your brake master cylinder reservoir is on the driver’sside of the engine compartment. See “EngineCompartment Overview” in the Index. It is filled withDOT-3 brake fluid.
There are only two reasons why the brake fluid level inthe reservoir might go down. The first is that the brakefluid goes down to an acceptable level during normalbrake lining wear. When new linings are put in, the fluid
level goes back up. The other reason is that fluid isleaking out of the brake system. If it is, you should haveyour brake system fixed, since a leak means that sooneror later your brakes won’t work well, or won’t work at all.
So, it isn’t a good idea to “top off” your brake fluid.Adding brake fluid won’t correct a leak. If you add fluidwhen your linings are worn, then you’ll have too muchfluid when you get new brake linings. You should add(or remove) brake fluid, as necessary, only when work isdone on the brake hydraulic system.
CAUTION:
If you have too much brake fluid, it can spill onthe engine. The fluid will burn if the engine is hot enough. You or others could be burned, and your vehicle could be damaged. Add brakefluid only when work is done on the brakehydraulic system.
When your brake fluid falls to a low level, your brakewarning light will come on. See “Brake System WarningLight” in the Index.
6-31
What to Add
When you do need brake fluid, use only DOT-3 brakefluid. Use new brake fluid from a sealed container only.Refer to “Recommended Fluids and Lubricants” in theMaintenance Schedule booklet.
Always clean the brake fluid reservoir cap and the areaaround the cap before removing it. This will help keepdirt from entering the reservoir.
CAUTION:
With the wrong kind of fluid in your brakesystem, your brakes may not work well, or theymay not even work at all. This could cause acrash. Always use the proper brake fluid.
NOTICE:
� Using the wrong fluid can badly damagebrake system parts. For example, just a fewdrops of mineral-based oil, such as engineoil, in your brake system can damage brakesystem parts so badly that they’ll have to bereplaced. Don’t let someone put in thewrong kind of fluid.
� If you spill brake fluid on your vehicle’spainted surfaces, the paint finish can bedamaged. Be careful not to spill brake fluidon your vehicle. If you do, wash it offimmediately. See “Appearance Care” in the Index.

6-32
Brake WearYour vehicle has four-wheel disc brakes.
Disc brake pads have built-in wear indicators that makea high-pitched warning sound when the brake pads are worn and new pads are needed. The sound maycome and go or be heard all the time your vehicle ismoving (except when you are pushing on the brakepedal firmly).
CAUTION:
The brake wear warning sound means that soonyour brakes won’t work well. That could lead toan accident. When you hear the brake wearwarning sound, have your vehicle serviced.
NOTICE:
Continuing to drive with worn -out brake padscould result in costly brake repair.
Some driving conditions or climates may cause a brakesqueal when the brakes are first applied or lightlyapplied. This does not mean something is wrong withyour brakes.
Properly torqued wheel nuts are necessary to helpprevent brake pulsation. When tires are rotated, inspectbrake pads for wear and evenly tighten wheel nuts in theproper sequence to GM torque specifications.
Brake linings should always be replaced as completeaxle sets.
See “Brake System Inspection” in the MaintenanceSchedule booklet under Part C “Periodic Maintenance Inspections.”
Brake Pedal TravelSee your dealer if the brake pedal does not return tonormal height, or if there is a rapid increase in pedaltravel. This could be a sign of brake trouble.
Brake AdjustmentEvery time you apply the brakes, with or without thevehicle moving, your brakes adjust for wear.

6-33
Replacing Brake System PartsThe braking system on a vehicle is complex. Its manyparts have to be of top quality and work well together ifthe vehicle is to have really good braking. Your vehiclewas designed and tested with top-quality GM brakeparts. When you replace parts of your braking system -- for example, when your brake linings weardown and you have to have new ones put in -- be sureyou get new approved GM replacement parts. If youdon’t, your brakes may no longer work properly. Forexample, if someone puts in brake linings that are wrongfor your vehicle, the balance between your front andrear brakes can change -- for the worse. The brakingperformance you’ve come to expect can change in manyother ways if someone puts in the wrong replacementbrake parts.
BatteryYour new vehicle comes with a maintenance freeACDelco� battery. When it’s time for a new battery, getone that has the replacement number shown on the originalbattery’s label. We recommend an ACDelco battery.
WARNING: Battery posts, terminals and relatedaccessories contain lead and lead compounds, chemicalsknown to the State of California to cause cancer andreproductive harm. Wash hands after handling.
The battery is located under the rear seat cushion. To access the battery, see “Removing the Rear SeatCushion” in the Index. You don’t need to access thebattery to jump start your vehicle. See “Jump Starting”in the Index.
CAUTION:
A battery that isn’t properly vented can letsulfuric acid fumes into the area under the rearseat cushion. These fumes can damage your rearseat safety belt systems. You may not be able tosee this damage, and the safety belts might notprovide the protection needed in a crash. If areplacement battery is ever needed, it must bevented in the same manner as the originalbattery. Always make sure that the vent hose is properly reattached before reinstalling the seat cushion.

6-34
To be sure the vent hose (A) is properly attached, thevent hose connectors (B) must be securely reattached tothe vent outlets (C) on each side of the battery, and thevent assembly grommet (D) must be secured to the floor pan (E).
Vehicle StorageIf you’re not going to drive your vehicle for 25 days or more, remove the black, negative (-) cable from the battery. This will help keep your battery fromrunning down.
CAUTION:
Batteries have acid that can burn you and gasthat can explode. You can be badly hurt if youaren’t careful. See “Jump Starting” in the Indexfor tips on working around a battery withoutgetting hurt.
Contact your dealer to learn how to prepare your vehiclefor longer storage periods.
Also, for your audio system, see “Theft-DeterrentFeature” in the Index.

6-35
Bulb ReplacementFor the proper type of replacement bulb, see“Replacement Bulbs” in the Index.
For any bulb changing procedure not listed in thissection, contact your dealer’s service department.
Halogen Bulbs
CAUTION:
Halogen bulbs have pressurized gas inside andcan burst if you drop or scratch the bulb. You orothers could be injured. Be sure to read andfollow the instructions on the bulb package.
Headlamps
1. To access theheadlamps, remove allof the push-pins thathold the filler panelcover in place. Do thisby pressing in the centerof each pin and thenpulling up on the outercircle to remove the pin.

6-36
2. Remove the two bolts at the top of the headlamp assembly.
3. Loosen the bolt at the bottom of the headlampassembly to gain access to the bulb socket.
4. Use a screwdriver to help pry the headlampassembly away from the vehicle.

6-37
5. Firmly grasp the outboard side of the headlampassembly with both hands and pull hard enough sothat the whole assembly opens freely.
6. Use a screwdriver toremove the bulb socketdust cover.
7. Turn the headlamphousing socketcounterclockwise tounlock the socket fromthe lamp housing.

6-38
8. Pull the old bulb out ofthe socket.
9. Install the new bulb into the socket. Make sure thatthe bulb is locked firmly into the bulb socket.
10. Reinstall the headlamp housing socket back into theheadlamp assembly.
11. Reinstall the headlamp assembly by reversing Steps 2 through 6.
To reinstall the filler panel:
1. Place the filler panel in the correct location.
2. Reset each push-pin by holding each by the outercircle while pushing up on the pin assembly frombelow. The center portion of the push-pin shouldnow be above the outer circle.
3. After placing each push-pin into the opening, pressdown on the outer circle until it is seated against thesurface of the filler panel.
4. Lock each push-pin in place by pressing the centerof each down until they are level with the outercircles. Use care not to press down so far that thepush-pin releases again.

6-39
Headlamp Aiming
Your vehicle has a visual optical headlamp aimingsystem equipped with horizontal aim indicators. Theaim has been pre-set at the factory and should need no further adjustment. This is true even though yourhorizontal aim indicators may not fall exactly on the “0” (zero) marks on their scales.
If your vehicle is damaged in an accident, the headlampaim may be affected. Aim adjustment to the low beammay be necessary if it is difficult to see lane markers(for horizontal aim), or if oncoming drivers flash theirhigh beams at you (for vertical aim). If you believe yourheadlamps need to be re-aimed, we recommend that youtake your vehicle to your dealer for service. However, itis possible for you to re-aim your headlamps asdescribed in the following procedure.
NOTICE:
To make sure your headlamps are aimedproperly, read all the instructions beforebeginning. Failure to follow these instructionscould cause damage to headlamp parts.

6-40
The vehicle should be properly prepared as follows:
� The vehicle should be placed so the headlamps are25 ft. (7.6 m) from a light colored wall or other flat surface.
� The vehicle must have all four tires on a perfectlylevel surface which is level all the way to the wall orother flat surface.
� The vehicle should be placed so it is perpendicular tothe wall or other flat surface.
� The vehicle should not have any snow, ice or mudattached to it.
� The vehicle should be fully assembled and all otherwork stopped while headlamp aiming is being done.
� The vehicle should be normally loaded with a fulltank of fuel and one person or 160 lbs. (75 kg) on the driver’s seat.
� Tires should be properly inflated.
Headlamp aiming is done with the vehicle low beamlamps. The high beam lamps will be correctly aimed ifthe low beam lamps are aimed properly.
The headlamp aiming devices are under the hood nearthe headlamps.
If you believe your headlamps need horizontal(left/right) adjustment, follow the horizontal aimingprocedure. If you believe your headlamps need onlyvertical (up/down) adjustment, follow only the verticalaiming procedure.
Adjustment screws can be turned with an E8 Torx�
socket or T15 Torx screwdriver.

6-41
Headlamp Horizontal Aiming
Turn the horizontal aiming screw (A) until the indicator (B) is lined up with zero.
Once the horizontal aim is adjusted, then adjust thevertical aim.
Headlamp Vertical Aiming
1. Find the aim dot on the lens of the lamps.
2. Measure the distance from the ground to the aim doton each lamp; if left low beam, subtract two inches.Record this distance.

6-42
3. At the wall or other flat surface, measure from thefloor to the recorded distance and draw a horizontalline the width of the vehicle.
4. Turn on the low beam headlamps and place a piece ofcardboard or equivalent in front of the headlamp notbeing dimed. This should allow the beam cut-off of theheadlamp being aimed to be seen on the flat surface.
NOTICE:
Do not cover a headlamp to improve beamcut-off when diming. Covering a headlamp maycause excessive heat build-up which may causedamage to the headlamp.

6-43
5. Turn the vertical aiming screw (C) until theheadlamp beam is aimed to the horizontal tape line.
Front Cornering Lamps1. Follow Steps 1 through 4 in “Headlamps”
described previously.
2. Disconnect the cornering lamp bulb by pulling thebulb out of the socket. Do not twist or turn the bulb.
3. Replace cornering lamp bulb by pushing the bulbdirectly into the socket.
4. Reinstall the cornering lamp housing socket backinto the headlamp assembly.
5. Reverse Steps 1 through 4 in “Headlamps”described previously.

6-44
Front Turn Signal Lamps1. The turn signal lamps are located beside the
headlamps. To access, lift off the bulb socket dust cover. See Step 1 under “Headlamps” described previously.
2. Press the tab down and turn the housing socket clockwise to unlock the socket from the lamp housing.
3. Remove the turn signal lamp housing socket andreplace the bulb.
4. Reverse Steps 1 and 2 to reinstall.

6-45
Windshield Wiper Blade ReplacementWindshield wiper blades should be inspected at leasttwice a year for wear or cracking. See “Wiper BladeCheck” in the Maintenance Schedule booklet underPart B “Owner Checks and Services” for more information.
It’s a good idea to clean or replace the wiper bladeassembly on a regular basis or when worn. For properwindshield wiper blade length and type, see “NormalMaintenance Replacement Parts” in the Index
To replace the wiper blade assembly, do the following:
1. Turn the ignition to ACC and turn the wipers on.Position the wipers on the windshield in the “mid”wipe position. Then with the door open, turn theignition to OFF.
2. Tip the blade up almost to a “T” position and pushdown on the tab to release the wiper blade assembly.
3. To install, align the wiper blade with the loop on the wiper blade assembly, and push up to snap it into place.

6-46
TiresYour new vehicle comes with high-quality tires made bya leading tire manufacturer. If you ever have questionsabout your tire warranty and where to obtain service, seeyour Vehicle Warranty booklet for details.
CAUTION:
Poorly maintained and improperly used tires are dangerous.� Overloading your tires can cause
overheating as a result of too much friction.You could have an air-out and a seriousaccident. See “Loading Your Vehicle” in the Index.
CAUTION: (Continued)
CAUTION: (Continued)
� Underinflated tires pose the same danger asoverloaded tires. The resulting accidentcould cause serious injury. Check all tiresfrequently to maintain the recommendedpressure. Tire pressure should be checkedwhen your tires are cold.
� Overinflated tires are more likely to be cut, punctured or broken by a suddenimpact -- such as when you hit a pothole.Keep tires at the recommended pressure.
� Worn, old tires can cause accidents. If yourtread is badly worn, or if your tires havebeen damaged, replace them.
See “Inflation -- Tire Pressure” in this section for inflation pressure adjustment for higherspeed driving.

6-47
Inflation -- Tire PressureThe Tire-Loading Information label, which is located onthe rear edge of the driver’s side rear door, shows thecorrect inflation pressures for your tires when they’recold. “Cold” means your vehicle has been sitting for atleast three hours or driven no more than 1 mile (1.6 km).
If you’ll be driving at high speeds (e.g., speeds of 100 mph (160 km/h) or higher), where it is legal, set thecold inflation pressure to the maximum inflation pressureshown on the tire sidewall, or to 38 psi (265 kPa),whichever is lower. See the example below. When youend this high-speed driving, return to the cold inflationpressure shown on the Tire-Loading Information label.
Example:
You’ll find maximum load and inflation pressuremolded on the tire’s sidewall, in small letters, near therim flange. It will read something like this: Maximumload 690 kg (1521 lbs.) @ 300 kPa (44 psi) Max. Press.
For this example, you would set the inflation pressurefor high-speed driving at 38 psi (265 kPa).
NOTICE:
Don’t let anyone tell you that underinflation oroverinflation is all right. It’s not. If your tiresdon’t have enough air (underinflation), you canget the following:� Too much flexing� Too much heat� Tire overloading� Bad wear� Bad handling� Bad fuel economy.If your tires have too much air (overinflation),you can get the following:� Unusual wear� Bad handling� Rough ride� Needless damage from road hazards.

6-48
When to Check
Check your tires once a month or more.
Don’t forget your compact spare tire. It should be at 60 psi (420 kPa).
How to Check
Use a good quality pocket-type gage to check tirepressure. You can’t tell if your tires are properly inflatedsimply by looking at them. Radial tires may lookproperly inflated even when they’re underinflated.
Be sure to put the valve caps back on the valve stems. They help prevent leaks by keeping out dirt and moisture.
Tire Pressure Monitor (TPM) System (If Equipped)The Tire Pressure Monitor (TPM) system uses radio and sensor technology to check tire pressure levels.Sensors, mounted on each road wheel, transmit tirepressure readings to a receiver located in the trunk. Tire pressure status and tire pressure warnings areshown on the Driver Information Center (DIC) display.See “Driver Information Center (DIC)” in the Index for details regarding DIC controls and displays.
The system operates on a radio frequency subject toFederal Communications Commission (FCC) Rules and with Industry and Science Canada.
This device complies with Part 15 of the FCC Rules.Operation is subject to the following two conditions: (1) this device may not cause harmful interference, and (2) this device must accept any interferencereceived, including interference that may causeundesired operation.
This device complies with RSS-210 of Industry and Science Canada. Operation is subject to thefollowing two conditions: (1) this device may not cause interference, and (2) this device must accept anyinterference received, including interference that maycause undesired operation of the device.

6-49
Changes or modifications to this system by other than anauthorized service facility could void authorization touse this equipment.
If the TPM system detects low tire pressure, below24 psi (165 kPa), or high tire pressure, above 36 psi (248 kPa), a message, CHECK TIRE PRESSURE, willappear on the Driver Information Center (DIC) display.By pressing the INFO button, the DIC screen will showwhich tire(s) has the low or high pressure condition. See “Inflation -- Tire Pressure” in the Index forinformation regarding correct tire inflation. If a tire islow, you should stop as soon as possible and check allyour tires for damage. If a tire is flat, see “If a Tire Goes Flat” in the Index.
NOTICE:
Do not use a tire sealant if your vehicle is equippedwith Tire Pressure Monitors. The liquid sealantcan damage the tire pressure monitor sensors.
Once a low or high tire pressure condition is detected,the TPM system will display the CHECK TIREMESSAGE each time the engine is started, until thetire(s) are set to the correct inflation pressure.
The Certification/Tire Label, which is located on therear edge of the driver’s side rear door, shows thecorrect inflation pressure for the tires on your vehicle.
The TPM system also allows the driver to check the air pressure status of each road tire using the DriverInformation Center (DIC). Each tire’s air pressure will belisted individually, in the following order: LF (left frontor driver’s side front tire), RF (right front or passenger’sside front tire), RR (right rear or passenger’s side rear tire) and LR (left rear or driver’s side rear tire). See “Inflation -- Tire Pressure” in the Index forinformation regarding correct tire inflation. Also, see“Driver Information Center (DIC)” in the Index forinformation on the DIC controls and displays.
If the DIC display doesn’t show tire pressures or theSERVICE TPM SYSTEM message appears, see yourdealer for service. The TPM system may not workproperly while the compact spare tire is installed.
Anytime you replace one or more tires or rotate yourtires the TPM system will need to be reset. A specialtool is needed to reset the sensor identification codes.See your dealer for service.
The TPM system can alert you about a low or high tire pressure condition, but it doesn’t replace normal tire maintenance. See “Tires” in the Index.
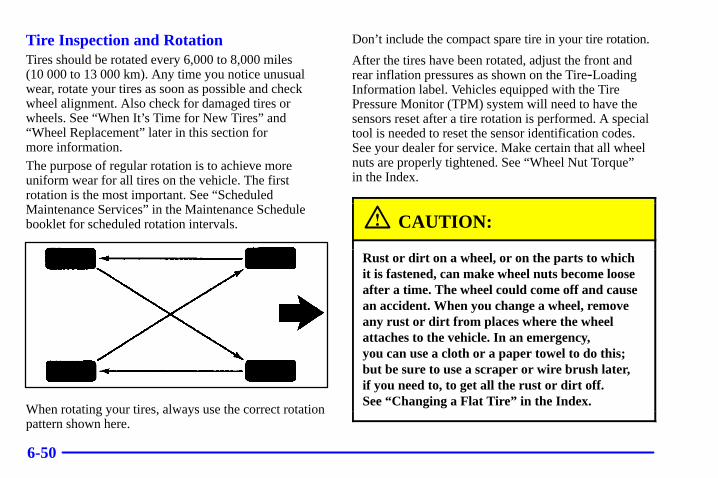
6-50
Tire Inspection and RotationTires should be rotated every 6,000 to 8,000 miles (10 000 to 13 000 km). Any time you notice unusualwear, rotate your tires as soon as possible and checkwheel alignment. Also check for damaged tires orwheels. See “When It’s Time for New Tires” and“Wheel Replacement” later in this section for more information.The purpose of regular rotation is to achieve moreuniform wear for all tires on the vehicle. The firstrotation is the most important. See “ScheduledMaintenance Services” in the Maintenance Schedulebooklet for scheduled rotation intervals.
When rotating your tires, always use the correct rotationpattern shown here.
Don’t include the compact spare tire in your tire rotation.
After the tires have been rotated, adjust the front andrear inflation pressures as shown on the Tire-LoadingInformation label. Vehicles equipped with the TirePressure Monitor (TPM) system will need to have thesensors reset after a tire rotation is performed. A specialtool is needed to reset the sensor identification codes.See your dealer for service. Make certain that all wheelnuts are properly tightened. See “Wheel Nut Torque” in the Index.
CAUTION:
Rust or dirt on a wheel, or on the parts to whichit is fastened, can make wheel nuts become looseafter a time. The wheel could come off and causean accident. When you change a wheel, removeany rust or dirt from places where the wheelattaches to the vehicle. In an emergency, you can use a cloth or a paper towel to do this;but be sure to use a scraper or wire brush later, if you need to, to get all the rust or dirt off. See “Changing a Flat Tire” in the Index.

6-51
When It’s Time for New Tires
One way to tell when it’stime for new tires is tocheck the treadwearindicators, which willappear when your tires haveonly 1/16 inch (1.6 mm) orless of tread remaining.
You need a new tire if any of the following statementsare true:
� You can see the indicators at three or more placesaround the tire.
� You can see cord or fabric showing through the tire’s rubber.
� The tread or sidewall is cracked, cut or snagged deepenough to show cord or fabric.
� The tire has a bump, bulge or split.
� The tire has a puncture, cut or other damage thatcan’t be repaired well because of the size or locationof the damage.

6-52
Buying New TiresTo find out what kind and size of tires you need, look atthe Tire-Loading Information label.
The tires installed on your vehicle when it was new hada Tire Performance Criteria Specification (TPC Spec)number on each tire’s sidewall. When you get new tires,get ones with that same TPC Spec number. That wayyour vehicle will continue to have tires that are designedto give proper endurance, handling, speed rating,traction, ride and other things during normal service onyour vehicle. If your tires have an all-season treaddesign, the TPC number will be followed by an “MS” (for mud and snow).
If you ever replace your tires with those not having aTPC Spec number, make sure they are the same size, load range, speed rating and construction type (bias, bias-belted or radial) as your original tires.
CAUTION:
Mixing tires could cause you to lose control whiledriving. If you mix tires of different sizes or types(radial and bias-belted tires), the vehicle may nothandle properly, and you could have a crash.Using tires of different sizes may also causedamage to your vehicle. Be sure to use the samesize and type tires on all wheels.
It’s all right to drive with your compact spare,though. It was developed for use on your vehicle.
CAUTION:
If you use bias-ply tires on your vehicle, thewheel rim flanges could develop cracks aftermany miles of driving. A tire and/or wheel couldfail suddenly, causing a crash. Use only radial-plytires with the wheels on your vehicle.

6-53
Uniform Tire Quality GradingQuality grades can be found where applicable on the tiresidewall between tread shoulder and maximum sectionwidth. For example:
Treadwear 200 Traction AA Temperature A
The following information relates to the systemdeveloped by the United States National HighwayTraffic Safety Administration, which grades tires bytreadwear, traction and temperature performance. (This applies only to vehicles sold in the United States.)The grades are molded on the sidewalls of mostpassenger car tires. The Uniform Tire Quality Gradingsystem does not apply to deep tread, winter-type snowtires, space-saver or temporary use spare tires, tires withnominal rim diameters of 10 to 12 inches (25 to 30 cm),or to some limited-production tires.
While the tires available on General Motors passengercars and light trucks may vary with respect to thesegrades, they must also conform to federal safetyrequirements and additional General Motors TirePerformance Criteria (TPC) standards.
Treadwear
The treadwear grade is a comparative rating based onthe wear rate of the tire when tested under controlledconditions on a specified government test course. For example, a tire graded 150 would wear one and a half (1 1/2) times as well on the government course as a tire graded 100. The relative performance of tiresdepends upon the actual conditions of their use,however, and may depart significantly from the normdue to variations in driving habits, service practices anddifferences in road characteristics and climate.
Traction -- AA, A, B, C
The traction grades, from highest to lowest, are AA, A, B, and C. Those grades represent the tire’s ability tostop on wet pavement as measured under controlledconditions on specified government test surfaces ofasphalt and concrete. A tire marked C may have poortraction performance. Warning: The traction gradeassigned to this tire is based on straight-ahead brakingtraction tests, and does not include acceleration,cornering, hydroplaning, or peak traction characteristics.

6-54
Temperature -- A, B, C
The temperature grades are A (the highest), B, and C,representing the tire’s resistance to the generation ofheat and its ability to dissipate heat when tested undercontrolled conditions on a specified indoor laboratorytest wheel. Sustained high temperature can cause thematerial of the tire to degenerate and reduce tire life, andexcessive temperature can lead to sudden tire failure.The grade C corresponds to a level of performancewhich all passenger car tires must meet under theFederal Motor Vehicle Safety Standard No. 109. Grades B and A represent higher levels of performanceon the laboratory test wheel than the minimum requiredby law.
Warning: The temperature grade for this tire isestablished for a tire that is properly inflated and notoverloaded. Excessive speed, underinflation, orexcessive loading, either separately or in combination,can cause heat buildup and possible tire failure.
Wheel Alignment and Tire BalanceThe wheels on your vehicle were aligned and balancedcarefully at the factory to give you the longest tire lifeand best overall performance.
Scheduled wheel alignment and wheel balancing are notneeded. However, if you notice unusual tire wear oryour vehicle pulling one way or the other, the alignmentmay need to be reset. If you notice your vehiclevibrating when driving on a smooth road, your wheelsmay need to be rebalanced.
Wheel ReplacementReplace any wheel that is bent, cracked, or badly rustedor corroded. If wheel nuts keep coming loose, the wheel,wheel bolts and wheel nuts should be replaced. If thewheel leaks air, replace it (except some aluminumwheels, which can sometimes be repaired). See your dealer if any of these conditions exist.
Your dealer will know the kind of wheel you need.
Each new wheel should have the same load-carryingcapacity, diameter, width, offset and be mounted thesame way as the one it replaces.

6-55
If you need to replace any of your wheels, wheel boltsor wheel nuts, replace them only with new GM originalequipment parts. This way, you will be sure to have theright wheel, wheel bolts and wheel nuts for your vehicle.
CAUTION:
Using the wrong replacement wheels, wheel boltsor wheel nuts on your vehicle can be dangerous.It could affect the braking and handling of yourvehicle, make your tires lose air and make youlose control. You could have a collision in whichyou or others could be injured. Always use thecorrect wheel, wheel bolts and wheel nuts for replacement.
NOTICE:
The wrong wheel can also cause problems withbearing life, brake cooling, speedometer orodometer calibration, headlamp aim, bumperheight, vehicle ground clearance and tire or tirechain clearance to the body and chassis.
See “Changing a Flat Tire” in the Index for more information.
Used Replacement Wheels
CAUTION:
Putting a used wheel on your vehicle isdangerous. You can’t know how it’s been used orhow far it’s been driven. It could fail suddenlyand cause an accident. If you have to replace awheel, use a new GM original equipment wheel.

6-56
Tire Chains
NOTICE:
If your vehicle has P235/55R17 size tires, don’tuse tire chains. They can damage your vehiclebecause there’s not enough clearance.
Use another type of traction device only if its manufacturer recommends it for use on your vehicle and tire size combination and road conditions.Follow that manufacturer’s instructions. To helpavoid damage to your vehicle, drive slowly,readjust or remove the device if it’s contactingyour vehicle, and don’t spin your wheels.
NOTICE: (Continued)
NOTICE: (Continued)
If you do find traction devices that will fit, installthem on the front tires.If you have other tires, use tire chains only wherelegal and only when you must. Use only SAEClass “S” type chains that are the proper size foryour tires. Install them on the front tires andtighten them as tightly as possible with the endssecurely fastened. Drive slowly and follow thechain manufacturer’s instructions. If you canhear the chains contacting your vehicle, stop and retighten them. If the contact continues, slow down until it stops. Driving too fast orspinning the wheels with chains on will damageyour vehicle.

6-57
Appearance CareRemember, cleaning products can be hazardous. Someare toxic. Others can burst into flame if you strike amatch or get them on a hot part of the vehicle. Some aredangerous if you breathe their fumes in a closed space.When you use anything from a container to clean yourvehicle, be sure to follow the manufacturer’s warningsand instructions. And always open your doors orwindows when you’re cleaning the inside.
Never use these to clean your vehicle:
� Gasoline
� Benzene
� Naphtha
� Carbon Tetrachloride
� Acetone
� Paint Thinner
� Turpentine
� Lacquer Thinner
� Nail Polish Remover
They can all be hazardous -- some more than others -- and they can all damage your vehicle, too.
Don’t use any of these unless this manual says you can.In many uses, these will damage your vehicle:
� Alcohol
� Laundry Soap
� Bleach
� Reducing Agents
Cleaning the Inside of Your VehicleUse a vacuum cleaner often to get rid of dust and loosedirt. Wipe vinyl, leather, plastic and painted surfaceswith a clean, damp cloth.
Cleaning of Fabric/CarpetYour dealer has two cleaners, Multi-Purpose InteriorCleaner and Capture Non-Solvent Dry Spot and SoilRemover for cleaning fabric and carpet. They will cleannormal spots and stains very well. You can getGM-approved cleaning products from your dealer. See “Appearance Care and Materials” in the Index.

6-58
Here are some cleaning tips:
� Always read the instructions on the cleaner label.
� Clean up stains as soon as you can -- before they set.
� Carefully scrape off any excess stain.
� Use a clean cloth or sponge, and change to a clean area often. A soft brush may be used if stainsare stubborn.
� If a ring forms on fabric after spot cleaning, clean theentire area immediately or it will set.
Cleaning VinylUse warm water and a clean cloth.
� Rub with a clean, damp cloth to remove dirt. You may have to do it more than once.
� Things like tar, asphalt and shoe polish will stain ifyou don’t get them off quickly. Use a clean cloth and a vinyl/leather cleaner. See your dealer for this product.
Cleaning LeatherUse a soft cloth with lukewarm water and a mild soap orsaddle soap and wipe dry with a soft cloth. Then, let theleather dry naturally. Do not use heat to dry.
� For stubborn stains, use a leather cleaner. See yourdealer for this product.
� Never use oils, varnishes, solvent-based or abrasivecleaners, furniture polish or shoe polish on leather.
� Soiled or stained leather should be cleanedimmediately. If dirt is allowed to work into thefinish, it can harm the leather.
Cleaning the Top of the Instrument PanelUse only mild soap and water to clean the top surfacesof the instrument panel. Sprays containing silicones orwaxes may cause annoying reflections in the windshieldand even make it difficult to see through the windshieldunder certain conditions.
Cleaning Interior Plastic ComponentsUse only a mild soap and water solution on a soft cloth or sponge. Commercial cleaners may affect thesurface finish.

6-59
Cleaning Wood PanelsUse a clean cloth moistened in warm, soapy water (usemild dish washing soap). Dry the wood immediatelywith a clean cloth.
Cleaning Speaker CoversVacuum around a speaker cover gently, so that thespeaker won’t be damaged. Clean spots with just waterand mild soap.
Care of Safety BeltsKeep belts clean and dry.
CAUTION:
Do not bleach or dye safety belts. If you do, itmay severely weaken them. In a crash, theymight not be able to provide adequate protection.Clean safety belts only with mild soap andlukewarm water.
Cleaning Glass SurfacesGlass should be cleaned often. GM Glass Cleaner or a liquid household glass cleaner will remove normaltobacco smoke and dust films on interior glass. See “Appearance Care and Materials” in the Index.
Don’t use abrasive cleaners on glass, because they maycause scratches. Avoid placing decals on the inside rearwindow, since they may have to be scraped off later. If abrasive cleaners are used on the inside of the rearwindow, an electric defogger element may be damaged.Any temporary license should not be attached across the defogger grid.

6-60
Cleaning the Outside of theWindshield and Wiper BladesIf the windshield is not clear after using the windshieldwasher, or if the wiper blade chatters when running, wax,sap or other material may be on the blade or windshield.
Clean the outside of the windshield with GM WindshieldCleaner, Bon Ami� Powder (non-scratching glasscleaning powder), GM Part No. 1050011. The windshieldis clean if beads do not form when you rinse it with water.
Grime from the windshield will stick to the wiper bladesand affect their performance. Clean the blade by wipingvigorously with a cloth soaked in full-strength windshieldwasher solvent. Then rinse the blade with water.
Check the wiper blades and clean them as necessary;replace blades that look worn.
WeatherstripsSilicone grease on weatherstrips will make them lastlonger, seal better, and not stick or squeak. Applysilicone grease with a clean cloth at least everysix months. During very cold, damp weather morefrequent application may be required.
See “Recommended Fluids and Lubricants” in theMaintenance Schedule booklet.
Cleaning the Outside of Your VehicleThe paint finish on your vehicle provides beauty, depthof color, gloss retention and durability.
Washing Your VehicleThe best way to preserve your vehicle’s finish is to keep it clean by washing it often with lukewarm or cold water.
Don’t wash your vehicle in the direct rays of the sun.Use a car washing soap. Don’t use strong soaps orchemical detergents. Be sure to rinse the vehicle well,removing all soap residue completely. You can getGM-approved cleaning products from your dealer. See“Appearance Care and Materials” in the Index. Don’tuse cleaning agents that are petroleum based, or thatcontain acid or abrasives. All cleaning agents should beflushed promptly and not allowed to dry on the surface,or they could stain. Dry the finish with a soft, cleanchamois or an all-cotton towel to avoid surfacescratches and water spotting.
High pressure car washes may cause water to enter your vehicle.

6-61
Cleaning Exterior Lamps/LensesUse only lukewarm or cold water, a soft cloth and a carwashing soap to clean exterior lamps and lenses. Followinstructions under “Washing Your Vehicle.”
Finish CareOccasional waxing or mild polishing of your vehicle byhand may be necessary to remove residue from the paintfinish. You can get GM-approved cleaning productsfrom your dealer. See “Appearance Care and Materials”in the Index.
Your vehicle has a “basecoat/clearcoat” paint finish. The clearcoat gives more depth and gloss to the coloredbasecoat. Always use waxes and polishes that arenon-abrasive and made for a basecoat/clearcoat paint finish.
NOTICE:
Machine compounding or aggressive polishing ona basecoat/clearcoat paint finish may dull thefinish or leave swirl marks.
Foreign materials such as calcium chloride and othersalts, ice melting agents, road oil and tar, tree sap, birddroppings, chemicals from industrial chimneys, etc., candamage your vehicle’s finish if they remain on paintedsurfaces. Wash the vehicle as soon as possible. Ifnecessary, use non-abrasive cleaners that are markedsafe for painted surfaces to remove foreign matter.
Exterior painted surfaces are subject to aging, weatherand chemical fallout that can take their toll over a periodof years. You can help to keep the paint finish lookingnew by keeping your vehicle garaged or coveredwhenever possible.

6-62
Cleaning Aluminum orChrome-Plated Wheels (If Equipped)Keep your wheels clean using a soft clean cloth withmild soap and water. Rinse with clean water. Afterrinsing thoroughly, dry with a soft clean towel. A waxmay then be applied.
The surface of these wheels is similar to the paintedsurface of your vehicle. Don’t use strong soaps,chemicals, abrasive polishes, abrasive cleaners, cleanerswith acid or abrasive cleaning brushes on them becauseyou could damage the surface. Do not use chrome polishon aluminum wheels.
Use chrome polish only on chrome-plated wheels, butavoid any painted surface of the wheel, and buff offimmediately after application.
Don’t take your vehicle through an automatic car washthat has silicon carbide tire cleaning brushes. Thesebrushes can also damage the surface of these wheels.
Cleaning TiresTo clean your tires, use a stiff brush with a tire cleaner.
NOTICE:
When applying a tire dressing always take care towipe off any overspray or splash from all paintedsurfaces on the body or wheels of the vehicle.Petroleum-based products may damage the paintfinish and tires.
Sheet Metal DamageIf your vehicle is damaged and requires sheet metalrepair or replacement, make sure the body repair shopapplies anti-corrosion material to the parts repaired orreplaced to restore corrosion protection.
Original manufacturer replacement parts will providethe corrosion protection while maintaining the warranty.

6-63
Finish DamageAny stone chips, fractures or deep scratches in the finishshould be repaired right away. Bare metal will corrodequickly and may develop into a major repair expense.
Minor chips and scratches can be repaired with touch-upmaterials available from your dealer or other serviceoutlets. Larger areas of finish damage can be correctedin your dealer’s body and paint shop.
Underbody MaintenanceChemicals used for ice and snow removal and dustcontrol can collect on the underbody. If these are notremoved, accelerated corrosion (rust) can occur on theunderbody parts such as fuel lines, frame, floor pan and exhaust system even though they have corrosion protection.
At least every spring, flush these materials from theunderbody with plain water. Clean any areas where mudand other debris can collect. Dirt packed in closed areasof the frame should be loosened before being flushed.Your dealer or an underbody car washing system can dothis for you.
Chemical Paint SpottingSome weather and atmospheric conditions can create achemical fallout. Airborne pollutants can fall upon andattack painted surfaces on your vehicle. This damage cantake two forms: blotchy, ringlet-shaped discolorations,and small irregular dark spots etched into the paint surface.
Although no defect in the paint job causes this, Cadillacwill repair, at no charge to the owner, the surfaces ofnew vehicles damaged by this fallout condition within12 months or 12,000 miles (20 000 km) of purchase,whichever occurs first.

6-64
GM Vehicle Care/Appearance Materials
PART NUMBER SIZE DESCRIPTION USAGE
994954 23 in. x 25 in. Polishing Cloth – Wax Treated Exterior polishing cloth
1050172 16 oz. (0.473 L) Tar and Road Oil Remover Removes tar, road oil and asphalt
1050173 16 oz. (0.473 L) Chrome Cleaner and Polish Use on chrome, stainless steel, nickel, copper and brass
1050174 16 oz. (0.473 L) White Sidewall Tire Cleaner Removes soil and black marks from whitewalls
1050214 32 oz. (0.946 L) Vinyl Cleaner Cleans vinyl tops, upholstery and convertible tops
1050427 23 oz. (0.680 L) Glass Cleaner Removes dirt, grime, smoke and fingerprints
1052918** 8 oz. (0.237 L) Armor All� Protectant Protects leather, wood, acrylics, Plexiglas�, plastic,rubber and vinyl
1052925 16 oz. (0.473 L) Multi-Purpose Interior Cleaner
Cleans carpets, seats, interior trim, door panels and floor mats
1052929 16 oz. (0.473 L) Wheel Cleaner Spray on and rinse with water
1052930 8 oz. (0.237 L) Capture Dry Spot Remover Attracts, absorbs and removes soils on fabric
12345721 2.5 sq. ft. Synthetic Chamois Shines vehicle without scratching
12345725 12 oz. (0.354 L) Silicone Tire Shine Spray on tire shine
12377964* 16 oz. (0.473 L) Finish Enhancer Removes dust, fingerprints and surface contaminants
12377966* 16 oz. (0.473 L) Cleaner Wax Removes light scratches and oxidation and protects finish
12377984* 16 oz. (0.473 L) Surface Cleaner Removes contaminants, blemishes and swirl marks
See your General Motors Parts Department for these products.See “Recommended Fluids and Lubricants” in the Maintenance Schedule booklet.* For exterior use only.**Not recommended for use on instrument panels.
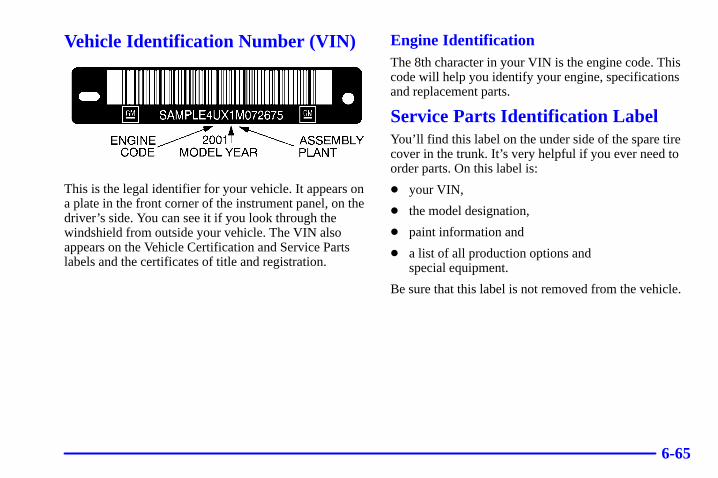
6-65
Vehicle Identification Number (VIN)
This is the legal identifier for your vehicle. It appears ona plate in the front corner of the instrument panel, on thedriver’s side. You can see it if you look through thewindshield from outside your vehicle. The VIN alsoappears on the Vehicle Certification and Service Partslabels and the certificates of title and registration.
Engine IdentificationThe 8th character in your VIN is the engine code. Thiscode will help you identify your engine, specificationsand replacement parts.
Service Parts Identification LabelYou’ll find this label on the under side of the spare tirecover in the trunk. It’s very helpful if you ever need toorder parts. On this label is:
� your VIN,
� the model designation,
� paint information and
� a list of all production options and special equipment.
Be sure that this label is not removed from the vehicle.

6-66
Electrical SystemAdd-On Electrical Equipment
NOTICE:
Don’t add anything electrical to your vehicleunless you check with your dealer first. Someelectrical equipment can damage your vehicleand the damage wouldn’t be covered by yourwarranty. Some add-on electrical equipment can keep other components from working as they should.
Your vehicle has an air bag system. Before attempting toadd anything electrical to your vehicle, see “ServicingYour Air Bag-Equipped Vehicle” in the Index.
Headlamp WiringThe headlamp wiring system has four individual fuses,LF low, RF low, LF high and RF high. An electricaloverload will cause the lamps to go on and off, or insome cases to remain off. If this happens, have theheadlamp wiring checked right away.
Windshield Wiper FusesA circuit breaker protects the wiper motor. If the wipermotor overheats due to heavy snow, the wipers will stopuntil the motor cools and will then restart.
A MiniFuse� powers the wiper motor. If the MiniFuseblows, there is an electrical problem. Be sure to have it fixed.
Power Windows and Other Power OptionsCircuit breakers protect the power windows and powerseats. When the current load is too heavy, the circuitbreaker opens and closes, protecting the circuit until theproblem is fixed or goes away.

6-67
Fuses and Circuit BreakersThe wiring circuits in your vehicle are protected fromshort circuits by a combination of fuses and circuitbreakers. This greatly reduces the chance of fires causedby electrical problems.
Look at the silver-colored band inside the fuse. If theband is broken or melted, replace the fuse. Be sure youreplace a bad fuse with a new one of the identical sizeand rating. If a MaxiFuse� should blow, see your dealerfor service immediately.
If you ever have a problem on the road and don’t have aspare fuse, you can “borrow” one that has the sameamperage. Pick some feature of your vehicle that youcan get along without -- like the radio or cigarettelighter -- and use its fuse, if it is the correct amperage.Replace it as soon as you can.
The MaxiFuses are located in two Bussed ElectricalCenters (BEC), one located in the engine compartmenton the passenger’s side and the other under the rear seaton the driver’s side. If a MaxiFuse should blow, haveyour vehicle serviced by your dealer immediately.
Engine Compartment Bussed Electrical Center
The Engine Compartment Bussed Electrical Center(BEC) is located next to the engine on the passenger’sside of the vehicle. For more information on location,see “Engine Compartment Overview” in the Index.
To access the fuse block, push in the two tabs located onthe top and the bottom of the fuse block cover.
Fuse 22 or 23 can be moved to the outer position toenable the accessory power outlets or cigarette lighterwhen the ignition is not on. See your dealer foradditional assistance, if needed.

6-68
Minifuses Usage
1 Assembly Line Diagnostic Link
2 Accessory
3 Windshield Wipers
4 Not Used
Minifuses Usage
5 Headlamp Low Beam Left
6 Headlamp Low Beam Right
7 Instrument Panel
8 Powertrain Control Module Battery
9 Headlamp High Beam Right
10 Headlamp High Beam Left
11 Ignition 1
12 Fog
13 Transmission
14 Cruise Control
15 Coil Module
16 Injector Bank #2
17 Not Used
18 Not Used
19 Powertrain Control Module Ignition

6-69
Minifuses Usage
20 Oxygen Sensor
21 Injector Bank #1
22 Cigar Lighter #2
23 Cigar Lighter #1
24 Daytime Running Lamps
25 Horn
26 Air Conditioner Clutch
Micro Relays Usage
27 Headlamp High Beam
28 Headlamp Low Beam
29 Fog Lamps
30 Daytime Running Lamps
31 Horn
32 Air Conditioner Clutch
Mini Relays Usage
33 Not Used
34 Accessory
Mini Relays Usage
35 Not Used
36 Starter 1
37 Cooling Fan Secondary
38 Ignition 1
39 Cooling Fan Series/Parallel
40 Cooling Fan Primary
Maxibreaker Usage
41 Starter
MaxiFuses Usage
42 Not Used
43 Not Used
44 Anti-Lock Brake System
45 Air Pump
46 Cooling Fan Secondary
47 Cooling Fan Primary
The spare fuses are located in numbers 48 through 52.The fuse puller is located in number 53.

6-70
Removing the Rear Seat Cushion
NOTICE:
The battery and main fuse blocks are locatedunder the rear seat cushion. The battery’s groundterminal and some relay wires are exposed. Tohelp avoid damage to the battery and wires, becareful when removing or reinstalling the seatcushion. Do not remove covers from coveredparts. Do not store anything under the seat, asobjects could touch exposed wires and cause a short.
To Remove the Rear Seat Cushion
1. Pull up on the front of the cushion to release thefront hooks.
2. Pull the cushion up and out toward the front of the vehicle.
To Reinstall the Rear Seat Cushion

6-71
CAUTION:
A safety belt that isn’t properly routed throughthe seat cushion or is twisted won’t provide theprotection needed in a crash. If the safety belthasn’t been routed through the seat cushion atall, it won’t be there to work for the nextpassenger. The person sitting in that positioncould be badly injured. After reinstalling the seatcushion, always check to be sure that the safetybelts are properly routed and are not twisted.
1. Buckle the center passenger position safety belt, thenroute the safety belts through the proper slots in theseat cushion. Don’t let the safety belts get twisted.
2. Slide the rear of the cushion up and under theseatback so the rear-locating guides hook into thewire loops on the back frame.
3. With the seat cushion lowered, push rearward andthen press down on the seat cushion until the springlocks on both ends engage.
4. Check to make sure the safety belts are properlyrouted and that no portion of any safety belt istrapped under the seat. Also make sure the seatcushion is secured.
Rear Underseat Bussed Electrical Center
The rear BEC is located under the rear seat on thedriver’s side. The rear seat cushion must be removed toaccess the BEC. See “Removing the Rear Seat Cushion”in the Index.

6-72
Minifuses Usage
1 Fuel Pump
2 Heater, Ventilation and AirConditioning Battery
3 Memory Seat, Tilt andTelescoping Steering
Minifuses Usage
4 RR Lumbar, Antenna
5 Driver Door Module
6 Heated Seat Left Rear
7 Power Tilt and Telescoping Steering
8 Supplemental Inflation Restraint
9 Not Used
10 Lamps Park Right
11 Fuel Tank Ventilation Solenoid
12 Ignition 1
13 Interior Lamp Dimmer Module
14 Sunshade
15 Navigation
16 Heated Seat Left Front
17 Interior Lamps
18 Right Rear Door Module
19 Stoplamps

6-73
Minifuses Usage
20 Park/Reverse
21 Audio
22 Retained Accessory Power for Sunroof
23 Lamps, Parking Left
24 Night Vision
25 Passenger Door Module
26 Body
27 Export Lights, Power Locks
28 Rear HVAC Blower
29 Ignition Switch
30 Hazard Signal
31 Reverse, Locks
32 Continuous Variable Road Sensing Suspension
33 Heating, Ventilation, Air Conditioning
Minifuses Usage
34 Ignition 3 Rear
35 Antilock Braking System
36 Heated Seat, Right Front
37 Heated Seat, Right Rear
38 Dimmer
Micro Relays Usage
39 Fuel Pump
40 Parking Lamps
41 Ignition 1
42 Park Brake A
43 Park Brake B
44 Park Shift Interlock
45 Reverse Lamps
46 Retained Accessory Power for Sunroof

6-74
Micro Relays Usage
47 Reverse Lockout
48 CVRSS Dampers
49 Ignition 3
50 Fuel Tank Door Release
51 Interior Lamps
52 Trunk Release
53 Not Used
54 Lock, Cylinder
55 Electronic Level Control Compressor
CircuitBreakers
Usage
56 Power Seats
57 Power Windows
Mini Relays Usage
58 Cigar Lighter
59 Right Rear Defog
MaxiFuses Usage
60 Park Brake
61 Rear Defog
62 HVAC Blower
63 Audio Amplifier
64 ELC Compressor/Exhaust
65 Cigar Lighter
66 Not Used
The spare fuses are located in numbers 70 through 74.The fuse puller is located in number 75.

6-75
Replacement BulbsApplication Number
Headlamps, Composite
Inner High Beam 9005. . . . . . . . . . . . . . . . . . . . . . . .
Outer Low Beam 9006. . . . . . . . . . . . . . . . . . . . . . . .
Front Turn Signal 3157. . . . . . . . . . . . . . . . . . . . . . . .
Cornering Lamps 3157. . . . . . . . . . . . . . . . . . . . . . . .
Capacities and SpecificationsThe following approximate capacities are given inEnglish and metric conversions. Please refer to“Recommended Fluids and Lubricants” in theMaintenance Schedule booklet for more information.
Engine SpecificationsDisplacement 279 cubic inches (4 565 cc). . . . . . . . . Type 4.6 L DOHC V8. . . . . . . . . . . . . . . . . . . . . . . . . VIN Engine Code
DeVille and DHS Y. . . . . . . . . . . . . . . . . . . . . . . . . DTS 9. . . . . . . . . . . . . . . . . . . . . . . . . . . . . . . . . . . .
HorsepowerDeVille and DHS 275 (bhp) @ 5600 rpm. . . . . . . .
205 (kW) @ 5600 rpmDTS 300 (bhp) @ 6000 rpm. . . . . . . . . . . . . . . . . . . .
224 (kW) @ 6000 rpmTorque
DeVille and DHS 300 (lb-ft) @ 4000 rpm. . . . . . . 407 (N·m) @ 4000 rpm
DTS 295 (lb-ft) @ 4400 rpm. . . . . . . . . . . . . . . . . . 400 (N·m) @ 4400 rpm
Firing Order 1-2-7-3-4-5-6-8. . . . . . . . . . . . . . . . . . . Thermostat Starts To Open 177-184�F (81-85�C). .
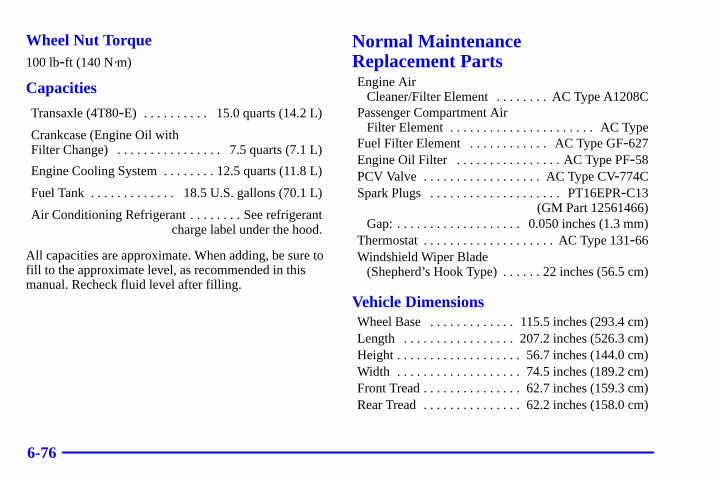
6-76
Wheel Nut Torque100 lb-ft (140 N·m)
Capacities
Transaxle (4T80-E) 15.0 quarts (14.2 L). . . . . . . . . .
Crankcase (Engine Oil with Filter Change) 7.5 quarts (7.1 L). . . . . . . . . . . . . . . .
Engine Cooling System 12.5 quarts (11.8 L). . . . . . . .
Fuel Tank 18.5 U.S. gallons (70.1 L). . . . . . . . . . . . .
Air Conditioning Refrigerant See refrigerant. . . . . . . . charge label under the hood.
All capacities are approximate. When adding, be sure tofill to the approximate level, as recommended in thismanual. Recheck fluid level after filling.
Normal Maintenance Replacement PartsEngine Air
Cleaner/Filter Element AC Type A1208C. . . . . . . . Passenger Compartment Air
Filter Element AC Type. . . . . . . . . . . . . . . . . . . . . . Fuel Filter Element AC Type GF-627. . . . . . . . . . . . Engine Oil Filter AC Type PF-58. . . . . . . . . . . . . . . . PCV Valve AC Type CV-774C. . . . . . . . . . . . . . . . . . Spark Plugs PT16EPR-C13. . . . . . . . . . . . . . . . . . . .
(GM Part 12561466)Gap: 0.050 inches (1.3 mm). . . . . . . . . . . . . . . . . . .
Thermostat AC Type 131-66. . . . . . . . . . . . . . . . . . . . Windshield Wiper Blade
(Shepherd’s Hook Type) 22 inches (56.5 cm). . . . . .
Vehicle DimensionsWheel Base 115.5 inches (293.4 cm). . . . . . . . . . . . . Length 207.2 inches (526.3 cm). . . . . . . . . . . . . . . . . Height 56.7 inches (144.0 cm). . . . . . . . . . . . . . . . . . . Width 74.5 inches (189.2 cm). . . . . . . . . . . . . . . . . . . Front Tread 62.7 inches (159.3 cm). . . . . . . . . . . . . . . Rear Tread 62.2 inches (158.0 cm). . . . . . . . . . . . . . .

7-7-1
Section 7 Customer Assistance Information
Here you will find out how to contact Cadillac if you need assistance. This section also tells you how to obtain servicepublications and how to report any safety defects.
7-2 Customer Satisfaction Procedure7-3 Customer Assistance for Text Telephone
(TTY) Users7-4 Customer Assistance Offices7-5 GM Mobility Program for Persons
with Disabilities7-5 Roadside Service7-7 Roadside Service for the Hearing or
Speech Impaired
7-8 Courtesy Transportation7-8 Transportation Options7-10 Warranty Information7-10 Reporting Safety Defects to the United
States Government7-11 Reporting Safety Defects to the
Canadian Government7-11 Reporting Safety Defects to
General Motors

7-2
Customer Satisfaction Procedure
Your satisfaction and goodwill are important to yourdealer and to Cadillac. Normally, any concerns with thesales transaction or the operation of your vehicle will beresolved by your dealer’s sales or service departments.Sometimes, however, despite the best intentions of all concerned, misunderstandings can occur. If yourconcern has not been resolved to your satisfaction, the following steps should be taken:
STEP ONE -- Discuss your concern with a member ofdealership management. Normally, concerns can bequickly resolved at that level. If the matter has alreadybeen reviewed with the sales, service or parts manager,contact the owner of the dealership or the general manager.
STEP TWO -- If after contacting a member of dealership management, it appears your concern cannot be resolved by the dealership without further help, contact the Cadillac Customer Assistance Center, 24 hours a day, by calling 1-800-458-8006. In Canada, contact GM of Canada Customer Communication Centre in Oshawa by calling 1-800-263-3777 (English) or 1-800-263-7854 (French).
We encourage you to call the toll-free number in orderto give your inquiry prompt attention. Please have thefollowing information available to give the CustomerAssistance Representative:
� Vehicle Identification Number (This is availablefrom the vehicle registration or title, or the plate at the top left of the instrument panel and visiblethrough the windshield.)
� Dealership name and location
� Vehicle delivery date and present mileage

7-3
When contacting Cadillac, please remember that yourconcern will likely be resolved at a dealer’s facility. That is why we suggest you follow Step One first if you have a concern.
STEP THREE -- Both General Motors and your dealerare committed to making sure you are completelysatisfied with your new vehicle. However, if youcontinue to remain unsatisfied after following theprocedure outlined in Steps One and Two, you shouldfile with the GM/BBB Auto Line Program to enforceany additional rights you may have. Canadian ownersrefer to your Warranty and Owner AssistanceInformation booklet for information on the CanadianMotor Vehicle Arbitration Plan (CAMVAP).
The BBB Auto Line Program is an out of court programadministered by the Council of Better Business Bureaus to settle automotive disputes regarding vehicle repairs orthe interpretation of the New Vehicle Limited Warranty.Although you may be required to resort to this informaldispute resolution program prior to filing a court action,use of the program is free of charge and your case willgenerally be heard within 40 days. If you do not agreewith the decision given in your case, you may reject it andproceed with any other venue for relief available to you.
You may contact the BBB using the toll-free telephonenumber or write them at the following address:
BBB Auto LineCouncil of Better Business Bureaus, Inc.4200 Wilson BoulevardSuite 800Arlington, VA 22203-1804
Telephone: 1-800-955-5100
This program is available in all 50 states and the Districtof Columbia. Eligibility is limited by vehicle age,mileage and other factors. General Motors reserves theright to change eligibility limitations and/or discontinueits participation in this program.
Customer Assistance for TextTelephone (TTY) UsersTo assist customers who are deaf, hard of hearing, orspeech-impaired and who use Text Telephones (TTYs),Cadillac has TTY equipment available at its CustomerAssistance Center. Any TTY user can communicate with Cadillac by dialing: 1-800-833-CMCC (2622). (TTY users in Canada can dial 1-800-263-3830.)

7-4
Customer Assistance OfficesCadillac encourages customers to call the toll-free numberfor assistance. If a U.S. customer wishes to write toCadillac, the letter should be addressed to Cadillac’sCustomer Assistance Center.
United StatesCadillac Customer Assistance CenterCadillac Motor Car DivisionP.O. Box 33169Detroit, MI 48232-5169
1-800-458-80061-800-833-2622 (For Text Telephone devices (TTYs))Roadside Assistance: 1-800-882-1112
From:Puerto Rico: 1-800-496-9992 (English)
1-800-496-9993 (Spanish)
U.S. Virgin Islands: 1-800-496-9994
Fax Number: 313-381-0022
CanadaGeneral Motors of Canada LimitedCustomer Communication Centre, 163-0051908 Colonel Sam DriveOshawa, Ontario L1H 8P7
1-800-263-3777 (English)1-800-263-7854 (French)1-800-263-3830 (For Text Telephone devices (TTYs))Roadside Assistance: 1-800-268-6800
Mexico, Central America and CaribbeanIslands/Countries (Except Puerto Rico andU.S. Virgin Islands)
General Motors de Mexico, S. de R.L. de C.V. Customer Assistance CenterPaseo de la Reforma # 2740Col. Lomas de BezaresC.P. 11910, Mexico, D.F.
01-800-508-0000Long Distance: 011-52 - 53 29 0 800

7-5
GM Mobility Program for Personswith Disabilities
This program, available toqualified applicants, canreimburse you up to $1,000toward aftermarket driver or passenger adaptiveequipment you may requirefor your vehicle (handcontrols, wheelchair/scooterlifts, etc.).
This program can also provide you with free resourceinformation, such as area driver assessment centers andmobility equipment installers. The program is availablefor a limited period of time from the date of vehiclepurchase/lease. See your dealer for more details or callthe GM Mobility Assistance Center at 1-800-323-9935.Text telephone (TTY) users, call 1-800-833-9935.
GM of Canada also has a Mobility Program. Call1-800-GM-DRIVE (463-7483) for details. When calling from outside Canada, please dial 1-905-644-3063.All TTY users call 1-800-263-3830.
Roadside Service
Cadillac’s exceptional Roadside Service is more than anauto club or towing service. It provides every Cadillacowner with the advantage of contacting a Cadillacadvisor and, where available, a Cadillac trained dealertechnician who can provide on-site service.

7-6
Each technician travels with a specially equippedservice vehicle complete with the necessary Cadillacparts and tools required to handle most roadside repairs.
Cadillac Roadside Service� can be reached by dialing1-800-882-1112, 24 hours a day, 365 days a year. This service is provided at no charge for anywarranty-covered situation and for a nominal charge if the Cadillac is no longer under warranty. RoadsideService is available only in the United States and Canada.
Cadillac Owner Privileges�Roadside Service provides several Cadillac Owner Privileges� at “no charge,” throughout your 2001 Cadillac Warranty Period -- 48 months/ 50,000 miles (80 000 km).
Emergency Road Service is performed on site for thefollowing situations:
� Towing Service
� Battery Jump Starting
� Lock Out Assistance
� Fuel Delivery
� Flat Tire Change (Covers change only)

7-7
� Trip Interruption -- If your trip is interrupted due to a warranty failure, incidental expenses may bereimbursed during the 48 months/50,000 miles (80 000 km) warranty period. Items covered arehotel, meals and rental car.
Roadside Service AvailabilityWherever you drive in the United States or Canada, an advisor is available to assist you over the phone. A dealer technician, if available, can travel to yourlocation within a 30 mile (50 km) radius of aparticipating Cadillac dealership. If beyond this radius,we will arrange to have your car towed to the nearestCadillac dealership.
Reaching Roadside ServiceDial the toll-free Roadside Service number:1-800-882-1112. An experienced Roadside Service Advisor will assist you and request thefollowing information:
� A description of the problem
� Name, home address, home telephone number
� Location of your Cadillac and number you arecalling from
� The model year, Vehicle Identification Number(VIN), mileage and date of delivery
Roadside Service for the Hearing or Speech ImpairedRoadside Service is prepared to assist owners who havehearing difficulties or are speech impaired. Cadillac hasinstalled special telecommunication devices called TextTelephone (TTY) in the Roadside Service Center.
Any customer who has access to a (TTY) or aconventional teletypewriter can communicate withCadillac by dialing from the United States or Canada1-888-889-2438 -- daily, 24 hours.

7-8
Courtesy TransportationCadillac has always exemplified quality and value in itsoffering of motor vehicles. To enhance your ownershipexperience, we and our participating dealers are proud to offer Courtesy Transportation, a customer supportprogram for new vehicles.
The Courtesy Transportation program is offered to retail purchase/lease customers in conjunction with the Bumper-to-Bumper coverage provided by the New Vehicle Limited Warranty. Several transportationoptions are available when warranty repairs arerequired. This will reduce your inconvenience duringwarranty repairs.
Plan Ahead When PossibleWhen your vehicle requires warranty service, youshould contact your dealer and request an appointment.By scheduling a service appointment and advising yourservice consultant of your transportation needs, yourdealer can help minimize your inconvenience. If yourvehicle cannot be scheduled into the service departmentimmediately, keep driving it until it can be scheduled forservice, unless, of course, the problem is safety-related.If it is, please call your dealership, let them know this,and ask for instructions.
If the dealer requests that you simply drop the vehicleoff for service, you are urged to do so as early in thework day as possible to allow for same day repair.
Transportation OptionsWarranty service can generally be completed while youwait. However, if you are unable to wait Cadillac helpsminimize your inconvenience by providing severaltransportation options. Depending on the circumstances,your dealer can offer you one of the following:
Shuttle ServiceParticipating dealers can provide you with shuttle service to get you to your destination with minimal interruption of your daily schedule. This includes a one way shuttle ride to a destination up to 10 miles from the dealership.
Public Transportation or Fuel ReimbursementIf your vehicle requires overnight warranty repairs,reimbursement up to $30 per day (five days maximum)may be available for the use of public transportationsuch as taxi or bus. In addition, should you arrange transportation through a friend or relative,reimbursement for reasonable fuel expenses up to $10 per day (five day maximum) may be available.Claim amounts should reflect actual costs and besupported by original receipts.

7-9
Courtesy Rental Vehicle
When your vehicle is unavailable due to warranty repairs,your dealer may arrange to provide you with a courtesyrental vehicle or reimburse you for a rental vehicle youobtained, at actual cost, up to a maximum of $37.00 perday supported by receipts. This requires that you sign andcomplete a rental agreement and meet state, local andrental vehicle provider requirements. Requirements varyand may include minimum age requirements, insurancecoverage, credit card, etc. You are responsible for fuelusage charges and may also be responsible for taxes,levies, usage fees, excessive mileage or rental usagebeyond the completion of the repair.
Generally it is not possible to provide a like-vehicle as a courtesy rental.
Additional Program InformationCourtesy Transportation is available during theBumper-to-Bumper warranty coverage period, but it is not part of the New Vehicle Limited Warranty.A separate booklet entitled “Warranty and OwnerAssistance Information” furnished with each new vehicle provides detailed warranty coverage information.
Courtesy Transportation is available only atparticipating dealers and all program options, such asshuttle service, may not be available at every dealer.Please contact your dealer for specific information aboutavailability. All Courtesy Transportation arrangementswill be administered by appropriate dealer personnel.
Canadian Vehicles: For warranty repairs during theComplete Vehicle Coverage period of the GeneralMotors of Canada New Vehicle Limited Warranty,alternative transportation may be available under theCourtesy Transportation Program. Please consult yourdealer for details.

7-10
General Motors reserves the right to unilaterally modify,change or discontinue Courtesy Transportation at anytime and to resolve all questions of claim eligibilitypursuant to the terms and conditions described herein at its sole discretion.
Warranty InformationYour vehicle comes with a separate warranty bookletthat contains detailed warranty information.
REPORTING SAFETY DEFECTS TO THE UNITEDSTATES GOVERNMENTIf you believe that your vehicle has a defect which could cause a crash or could cause injury or death, you should immediately inform the National HighwayTraffic Safety Administration (NHTSA), in addition tonotifying General Motors.
If NHTSA receives similar complaints, it may open aninvestigation, and if it finds that a safety defect exists ina group of vehicles, it may order a recall and remedycampaign. However, NHTSA cannot become involvedin individual problems between you, your dealer orGeneral Motors.
To contact NHTSA, you may either call the Auto SafetyHotline toll-free at 1-800-424-9393 (or 366-0123 in the Washington, D.C. area) or write to:
NHTSA, U.S. Department of TransportationWashington, D.C. 20590
You can also obtain other information about motorvehicle safety from the hotline.

7-11
REPORTING SAFETY DEFECTS TO THE CANADIAN GOVERNMENTIf you live in Canada, and you believe that your vehiclehas a safety defect, you should immediately notifyTransport Canada, in addition to notifying GeneralMotors of Canada Limited. You may write to:
Transport Canada330 Sparks StreetTower COttawa, Ontario K1A 0N5
REPORTING SAFETY DEFECTSTO GENERAL MOTORSIn addition to notifying NHTSA (or Transport Canada)in a situation like this, we certainly hope you’ll notifyus. Please call us at 1-800-458-8006, or write:
Cadillac Customer Assistance CenterCadillac Motor Car DivisionP.O. Box 33169Detroit, MI 48232-5169
In Canada, please call us at 1-800-263-3777 (English)or 1-800-263-7854 (French). Or, write:
General Motors of Canada LimitedCustomer Communication Centre, 163-0051908 Colonel Sam DriveOshawa, Ontario L1H 8P7

7-12
2001 CADILLAC SERVICE PUBLICATIONS ORDERING INFORMATION
The following publications covering the operation and servicing of your vehicle can be purchased by filling outthe Service Publication Order Form in this book and mailing it in with your check, money order,
or credit card information to Helm, Incorporated (address below.)
CURRENT PUBLICATIONS FOR 2001 CADILLACSERVICE MANUALSService Manuals have the diagnosis and repair informationon engines, transmission, axle, suspension, brakes,electrical, steering, body, etc.RETAIL SELL PRICE: $120.00
TRANSMISSION, TRANSAXLE, TRANSFER CASEUNIT REPAIR MANUALThis manual provides information on unit repair serviceprocedures, adjustments and specifications for the 2001 GM transmissions, transaxles and transfer cases.RETAIL SELL PRICE: $50.00
SERVICE BULLETINSService Bulletins give technical service information neededto knowledgeably service General Motors cars and trucks.Each bulletin contains instructions to assist in thediagnosis and service of your vehicle.
OWNER’S INFORMATIONOwner publications are written directly for Owners andintended to provide basic operational information about the vehicle.
Owner’s Manual.RETAIL SELL PRICE: $15.00
CURRENT & PAST MODEL ORDER FORMSService Publications are available for current and pastmodel GM vehicles. To request an order form, pleasespecify year and model name of the vehicle.
PLEASE COMPLETE THE ORDER FORM SHOWN ONTHE FOLLOWING PAGE AND MAIL TO:
Helm, Incorporated � P.O. Box 07130 � Detroit, MI 48207
OR ORDER TOLL FREE: 1-800-551-4123Monday-Friday 8:00 AM – 6:00 PM Eastern Time
Visit Helm, Inc. on the World Wide Web at: www.helminc.com
For Credit Card Orders Only (VISA–MasterCard–Discover)

7-13
PUBLICATION FORMNUMBER
Orders will be mailed within 10 days of receipt. Please allow adequate time for postalservice. If further information is needed, write to the address shown below or call1-800-551-4123. Material cannot be returned for credit without packing slip with returninformation within 30 days of delivery. On returns, a re-stocking fee may be appliedagainst the original order.
ORDER TOLL FREE(NOTE: For Credit Card Holders Only)
1-800-551-4123(Monday-Friday 8:00 AM – 6:00 PM EST)
FAX Orders Only 1-313-865-5927
Service Manual
NOTE: Dealers and Companies please provide dealer or company name, and also thename of the person to whose attention the shipment should be sent. Mail completed order form to:
HELM, INCORPORATED � P.O. Box 07130 � Detroit, MI 48207For purchases outside U.S.A. please write to the above address for quotation.
2001 $120.00
2001 $50.00
2001 $15.00
TOTAL MATERIAL
Michigan Purchasers
U.S. Order Processing $6.00
Canadian Postage
GRAND TOTAL
add 6% sales tax
GM-CAD-ORD99 *(Prices are subject to change without notice and without incurringobligation. Allow ample time for delivery.)
Note to Canadian Customers: All listed prices are quoted in U.S. funds. Canadian residentsare to make checks payable in U.S. funds.
(CUSTOMER’S NAME) (ATTENTION)
(STREET ADDRESS—NO P.O. BOX NUMBERS)
(CITY) (ZIP CODE)
DAYTIME TELEPHONE NO.
(STATE)
AREA CODE
( )
PCheck or Money Order payable to
Helm, Inc. (USA fundsonly — do not send cash.)
VISA
Discover
AccountNumber:
ExpirationDate mo/yr:
CUSTOMER SIGNATURE
S
ITEM DESCRIPTIONNAME YEAR
VEHICLE MODELQTY. PRICE
EACH*TOTALPRICE2
001
GM
HIP TO
AYMENT
Owner’s Manual
Car & Light TruckTransmission Unit Repair
MasterCard
Check here if your billing address is different from your shipping address shown.
PUBLICATION FORMNUMBER