20 steps on completing a glas nmp - teagasc · 20 steps on completing a glas nmp 1. ... it is...
TRANSCRIPT

20/06/2016 15:38
1
20 Steps on Completing a GLAS NMP
1. Log into NMP online https://nmp.teagasc.ie using your username and password.
2. For Teagasc users search for the client under “Agency Clients”, “All Plan Types” then using the
“Search” function input the herd number. (With Teagasc users all clients are present on the
system. All Agencies other than Teagasc must create their own client list, by selecting “Add
Client” on the home page, then enter all the client’s details, name, address, herd number etc.)
3. Once found, click on the clients name and on the top right hand corner click on the red button
“Create Plan”.
4. Click on the green button to “Create Plan” and follow the next few steps and input the relevant
data under client details (Select GLAS plan and “Yes” to Plan Safety Option), optional settings,
and units and finally click on the red button, “Create plan”. Red Boxes must have data entered
into them. As per screen grab below you must select Soil sampling, Use Maps and Winter
Housing as Yes. Make sure to ask the farmer whether he/she imports or exports organic
manures.
5. This will then bring you to the following screenshot with soil samples and menu on the side.

20/06/2016 15:38
2
6. For Teagasc users you can “Import LIMS Samples” by searching under the herd number once
selected or “Add soil samples manually”. Ensure to enter all pH, lime requirements, P and K
values. All soil sample results entered manually and imported from LIMS must be checked to
ensure that the data entered/imported is correct.
7. Once soil samples are entered the user needs to allocate a plot to the soil sample which is
done on the “Land setup” page. Click on “Full screen” to enlarge the map, click on “Ortho-
photo” and click the “Draw” button over the map. Locate your plot by entering the townland
in the “Find a place” box or zoom in using the roller ball on the mouse. On the map the blue
lines are LPIS boundaries and the yellow lines are exclusions.

20/06/2016 15:38
3
8. Using the mouse, left click to draw a plot as below and double left click back where you started
and this will close the plot boundary. The screen shot shows when drawing what the plot
outline will look like.
It is important to name the fields so that they appear on the maps and the reports for the farmer or
adviser. Each plot that is drawn is linked to a crop and to a soil sample.
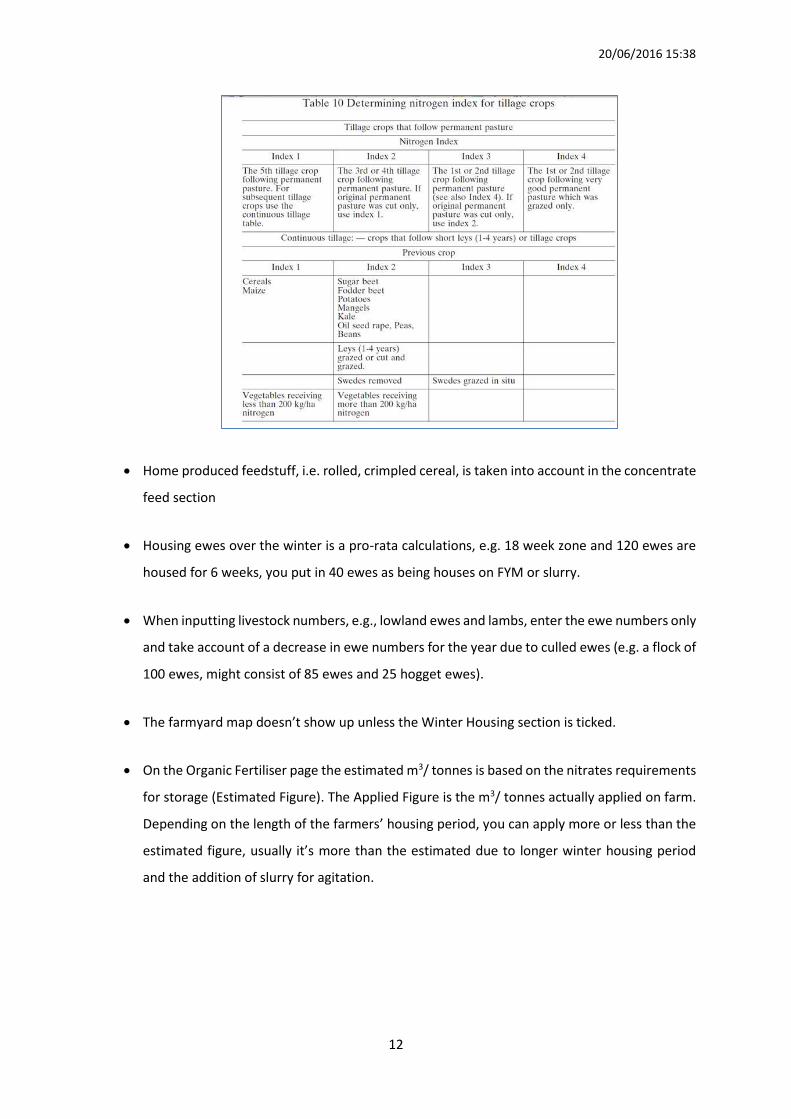
Select crop and if it’s a tillage crop the N Index must also be selected (Table 10 page 39 of S.I. No. 31
of 2014).
Under the soil samples the list of soil samples will appear and click on the appropriate soil sample
and using >> this will allocate this soil sample to the plot, just draw.
Tip is to click on “Save + New” and then select “Cancel” to remain on the mapping home screen and
then start drawing the next plot. If you click “Save” it will bring you back to the original map and you
will have to find the townland and plots again.
The screen shot below will popup when you double click to close the plot.

20/06/2016 15:38
4
9. It is important before the mapping is done that the user has done a rough table containing the
following information. This will help speed up this section of mapping and it will prevent
having to split or merge plots after mapping.
Plot Name Crop Area Ha (roughly) N Index Soil sample ID
Top Field GLAS LIPP 5Ha? N/A GAQ 123
Lower Field GLAS WBC 2Ha? 3 (In silage in 2015) GAQ 124
Middle Field Grazing 4.6Ha N/A GAQ 125
Tom’s GLAS LIPP 3.6Ha? N/A GAQ 125 Same soil sample as they have had the same cropping history
Well Field Silage 1 Cut 5Ha N/A GAQ 126
Barley Field Spring Barley 6Ha 1 (Continuous Tillage) GAQ 127
10. Draw all plots as above and assign a crop, N Index and a soil sample.
11. Livestock – Animal Numbers add in livestock by clicking on “Add Livestock”, and insert the
average numbers of each animal type for the year and average animal numbers over the
winter.

20/06/2016 15:38
5
12. Plan – Concentrate Feeds see screen grab below and select the Accounting Method and Add
Feed and save. Put in Last Year’s total Organic N and click “Apply”. Last year’s Total Organic
N is the total N produced by grazing livestock including bovines, ovines, equines and any other
grazing livestock.

20/06/2016 15:38
6
13. Plan - Winter Housing is associated with the red text “Warning! Not all over-winter animals
housed”. This means that the animal numbers the user selected in animal numbers over the
winter have not been allocated to a straw/FYM or to slurry/slatted sheds. This can be
completed by clicking on the animal type in the “Winter Housing” section and by allocating
the animals to out-wintering, FYM or Slurry.
14. Fertiliser Plan – Lime. Split lime application into two separate years and two years apart if the
Lime Requirement is >5 t/ha. Select the row involved and the popup screen below will appear.

20/06/2016 15:38
7
15. Fertiliser Plan – Land and Fert Max is a summary of the plots, crops, soil samples and Available
N and P allowances from the Nitrates Directive.
16. Fertiliser Plan – Organic Fertiliser use the screen enlargement option to show the screen grab
below, click on the “+ under Organic Fertilisers” and select “P Index 1 and 2”.
If the farmer imports organic manure, make sure to include this in the start of the plan
before assigning chemical and organic manure.
Check that “Estimated Organic Manures” are allocated. It is recommended to apply
all estimated organic manures.
Check organic manures
produced are allocated
Organic Fertilisers
P Index 1 and 2

20/06/2016 15:38
8
If FYM is produced as well these can be added in the same way.
Allocate all organic manures to P index 1, 2, 3 and 4 in this order with a guideline
maximum of 33m3/ha or 3,000 gallons/acre of slurry; 37m3 or tonnes FYM /ha or 15
m3/Tonnes/acre.
Advice is to spread up to the maximum amount of organic manures on P Index 1 and
2 lands as best practice.
The brown section on top left of this page which will show the organic manures
created on the holding, the organic manures spread and the Organic P allocated to P
Index 1 & 2 and Index 3 & 4 lands.
GLAS LIPP and THM areas could be P index 1, or care would need to be exercised
allocating organic manures to these areas to ensure that species composition is not
affected by increasing the P allocation to such lands.
A suggested order for allocating organic fertiliser could be: Silage fields (2nd cut) (P 1,
2) – Silage fields (1st cut) (P1, 2) – fields for grazing – fields for tillage.
Remember to click save on the bottom left of this screen, otherwise all works
completed will be lost.
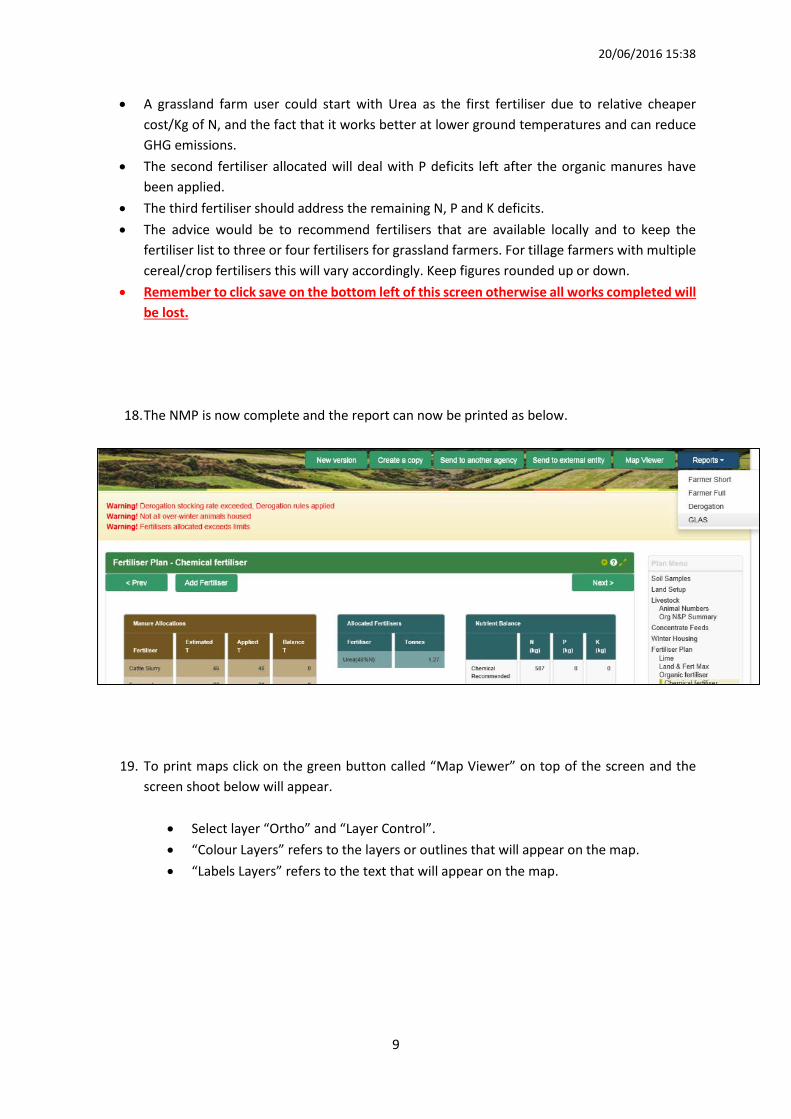
17. Fertiliser Plan – Chemical Fertiliser use the screen enlargement option.
Allocated fertiliser will total the different types of fertiliser types in tonnes.
Nutrient Balance will check the allocated fertiliser against the “Chemical
Recommended”, which is the fertiliser, recommended for the stocking rate on the
farm, and also check against the “Max Chemical Allowed” as per Nitrates and GLAS.
Add chemical fertilisers to meet the nutrient advice in grey above. The Nutrient Advice is the
same as chemical recommended.
Chemical fertilisers
Nutrients Advice
20/06/2016 15:38
9
A grassland farm user could start with Urea as the first fertiliser due to relative cheaper
cost/Kg of N, and the fact that it works better at lower ground temperatures and can reduce
GHG emissions.
The second fertiliser allocated will deal with P deficits left after the organic manures have
been applied.
The third fertiliser should address the remaining N, P and K deficits.
The advice would be to recommend fertilisers that are available locally and to keep the
fertiliser list to three or four fertilisers for grassland farmers. For tillage farmers with multiple
cereal/crop fertilisers this will vary accordingly. Keep figures rounded up or down.
Remember to click save on the bottom left of this screen otherwise all works completed will
be lost.
18. The NMP is now complete and the report can now be printed as below.
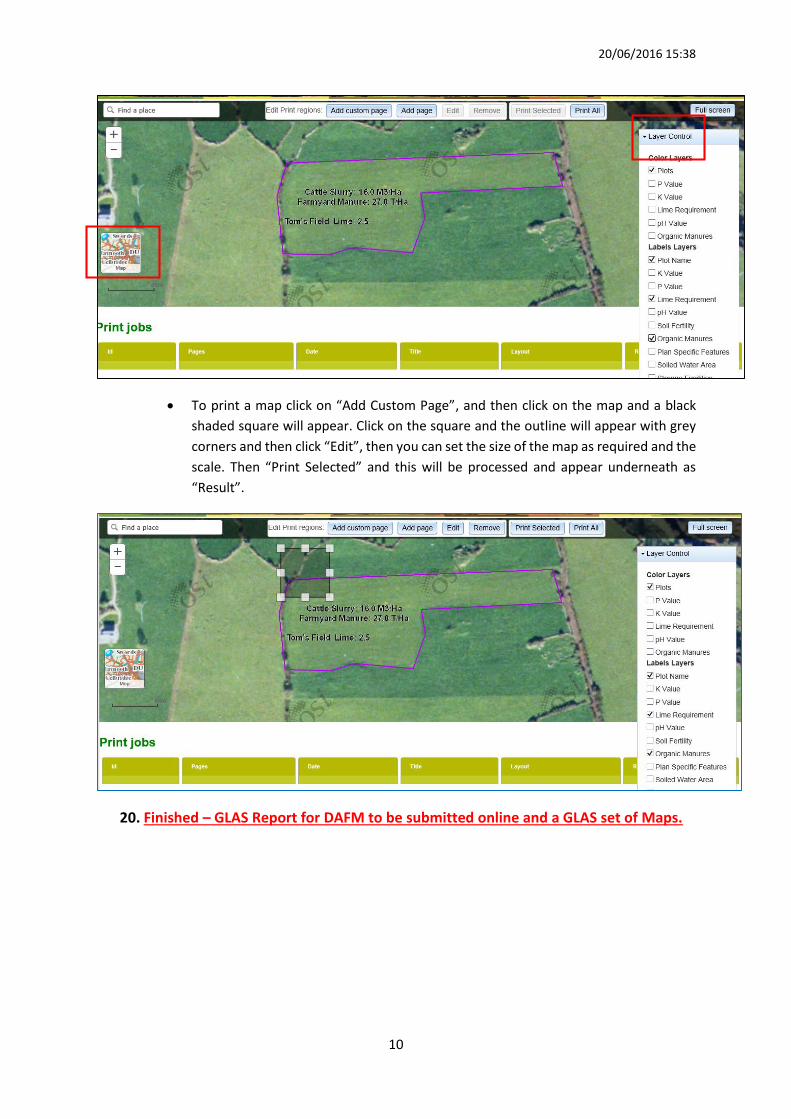
19. To print maps click on the green button called “Map Viewer” on top of the screen and the
screen shoot below will appear.
Select layer “Ortho” and “Layer Control”.
“Colour Layers” refers to the layers or outlines that will appear on the map.
“Labels Layers” refers to the text that will appear on the map.
20/06/2016 15:38
10
To print a map click on “Add Custom Page”, and then click on the map and a black
shaded square will appear. Click on the square and the outline will appear with grey
corners and then click “Edit”, then you can set the size of the map as required and the
scale. Then “Print Selected” and this will be processed and appear underneath as
“Result”.
20. Finished – GLAS Report for DAFM to be submitted online and a GLAS set of Maps.

20/06/2016 15:38
11
Useful Tips for using NMP Online
Where possible use a large screen, this will make more data available on the screen and
ensure less scrolling up, down and across.
Using a mouse makes the use of mapping and other aspects of the system easier.
If you click the little question mark symbol on the top of every page it will bring up a help text
in relation to the page you are on, which will guide you if you are unsure of something.
If you find that an action you are carrying out is unresponsive this means that the session has
timed out, however, you will not have to sign back in just click the refresh button.
Data should be saved every 5 minutes; > 5 minutes data entered will be lost.
Remember to ‘SAVE’ after entering data into the following pages otherwise all works
completed will be lost:
Fertiliser Plan – Organic Fertiliser
Fertiliser Plan – Chemical Fertiliser
Soiled Water – Winter Dairy Herd
Soiled Water – Soiled Water Storage Facilities
The overall land area drawn onto the maps must match the BPS overall farm area (tolerance
of <0.5 ha is recommended).
All lands declared on the farmers BPS are included in NMP (this includes rough grazing and
commonage areas). Forestry and yards are not included in the farmed area. GLAS Commonage
or GLAS rough grazing can be used for non-trafficable/ non-fertilised areas.
When drawing plots on the mapping system, zoom into the map to avoid overlapping plots.
If a farmer has GLAS bird cover, ‘tillage’ needs to be ticked in the Optional Settings and user
will need to select a Nitrogen Index as per the table below
20/06/2016 15:38
12
Home produced feedstuff, i.e. rolled, crimpled cereal, is taken into account in the concentrate
feed section
Housing ewes over the winter is a pro-rata calculations, e.g. 18 week zone and 120 ewes are
housed for 6 weeks, you put in 40 ewes as being houses on FYM or slurry.
When inputting livestock numbers, e.g., lowland ewes and lambs, enter the ewe numbers only
and take account of a decrease in ewe numbers for the year due to culled ewes (e.g. a flock of
100 ewes, might consist of 85 ewes and 25 hogget ewes).
The farmyard map doesn’t show up unless the Winter Housing section is ticked.
On the Organic Fertiliser page the estimated m3/ tonnes is based on the nitrates requirements
for storage (Estimated Figure). The Applied Figure is the m3/ tonnes actually applied on farm.
Depending on the length of the farmers’ housing period, you can apply more or less than the
estimated figure, usually it’s more than the estimated due to longer winter housing period
and the addition of slurry for agitation.

20/06/2016 15:38
13
NMP Online Help Desk
Website: https://nmp.teagasc.ie
Email: [email protected]
Phone Number: 076-1111339