document1
DESCRIPTION
226596338-TRANSCRIPT

Chapter 1. Getting Started
Have you ever looked at some gadget and wondered how it really worked?Maybe it was a remote control boat, the system that controls an elevator, avending machine, or an electronic toy? Or have you wanted to create yourown robot or electronic signals for a model railroad, or perhaps you’d liketo capture and analyze weather data over time? Where and how do youstart?
The Arduino board (shown in Figure 11) can help you find some of theanswers to the mysteries of electronics in a handson way. The originalcreation of Massimo Banzi and David Cuartielles, the Arduino systemoffers an inexpensive way to build interactive projects, such as remotecontrolled robots, GPS tracking systems, and electronic games.
The Arduino project has grown exponentially since its introduction in2005. It’s now a thriving industry, supported by a community of peopleunited with the common bond of creating something new. You’ll find bothindividuals and groups, ranging from interest groups and clubs to localhackerspaces and educational institutions, all interested in toying with theArduino.
Figure 11. The Arduino board
To get a sense of the variety of Arduino projects in the wild, you cansimply search the Internet. You’ll find a list of groups offeringintroductory programs and courses with likeminded, creative people.
The Possibilities Are EndlessA quick scan through this book will show you that you can use the Arduino to dosomething as simple as blinking a small light, or even something morecomplicated, such as interacting with a cellular phone—and many differentthings in between.
For example, have a look at Philip Lindsay’s device, shown in Figure 12. It canreceive text messages from cellular phones and display them on a large sign foruse in dance halls. This device uses an Arduino board and a cellular phone shieldto receive text messages from other phones (similar to Project 65). The textmessage is sent to a pair of large, inexpensive dotmatrix displays for everyone tosee.
PREVAcknowledgments
NEXT2. Exploring the Ar…
ὐ
Arduino Workshop Recent
Topics
Tutorials
Highlights
Settings
Feedback(http://community.safaribooksonline.com)
Sign Out
Settings
10 days left in your trial. Subscribe.
Feedback(http://community.safaribooksonline.com/)
Sign Out

Figure 12. SMS (short message service) text marquee
You can purchase large display boards that are easy to interface with an Arduino,so you don’t have to make your own display from scratch. (For moreinformation, visit http://www.labradoc.com/i/follower/p/projectsmstextscroller(http://www.labradoc.com/i/follower/p/projectsmstextscroller).)
How about creating a unique marriage proposal? Tyler Cooper wanted anoriginal way to propose to his girlfriend, so he built what he calls a “reversegeocache box”—a small box that contained an engagement ring, as shown inFigure 13. When the box was taken to a certain area (measured by the internalGPS), it unlocked to reveal a romantic message and the ring. You can easilyreproduce this device using an Arduino board, a GPS receiver, and an LCDmodule (as used in Chapter 13), with a small servo motor that acts as a latch tokeep the box closed until it’s in the correct location. The code required to createthis is quite simple—something you could create in a few hours. The most timeconsuming part is choosing the appropriate box in which to enclose the system.(For more information, visit http://learn.adafruit.com/reversegeocacheengagementbox/(http://learn.adafruit.com/reversegeocacheengagementbox/).)
Figure 13. Marriage proposal via Arduino
Here’s another example. Kurt Schulz was interested in monitoring the batterycharge level of his moped. However, after realizing how simple it is to work withArduino, his project morphed into what he calls the “Scooterputer”: a completemoped management system. The Scooterputer can measure the battery voltage,plus it can display the speed, distance traveled, tilt angle, temperature, time, date,GPS position, and more. It also contains a cellular phone shield that can becontrolled remotely, allowing remote tracking of the moped and engine shutdownin case it’s stolen. The entire system can be controlled with a small touchscreen,shown in Figure 14. Each feature can be considered a simple building block, andanyone could create a similar system in a couple of weekends. (Seehttp://www.janspace.com/b2evolution/arduino.php/2010/06/26/scooterputer/(http://www.janspace.com/b2evolution/arduino.php/2010/06/26/scooterputer/).)
Figure 14. The Scooterputer display (courtesy of Kurt Schulz)
Then there’s John Sarik, who enjoys the popular Sudoku math puzzles; he also

likes working with Nixie numeric display tubes. With those two drivers in mind,John created a huge 81digit Sudoku game computer! The user can play a full 9by9 game, with the Arduino in control of the digits and checking for validentries. Although this project might be considered a more advanced type, it iscertainly achievable and the electronics are not complex. The device is quitelarge and looks great mounted on a wall, as shown in Figure 15. (Seehttp://trashbearlabs.wordpress.com/2010/07/09/nixiesudoku/(http://trashbearlabs.wordpress.com/2010/07/09/nixiesudoku/).)
The team at Oomlout even used the Arduino to create a TwypeWriter. They fittedan Arduino board with an Ethernet shield interface connected to the Internet,which searches Twitter for particular keywords. When a keyword is found, thetweet is sent to an electric typewriter for printing. The Arduino board isconnected to the typewriter’s keyboard circuit, which allows it to emulate a realperson typing, as shown in Figure 16. (See http://oomlout.co.uk/blog/twittermonitoringtypewrittertwypwriter/(http://oomlout.co.uk/blog/twittermonitoringtypewritter
twypwriter/).)
These are only a few random examples of what is possible using an Arduino.You can create your own projects without much difficulty—and after you’veworked through this book, they are certainly not out of your reach.
Figure 15. Nixie tube Sudoku
Figure 16. The TwypeWriter
Strength in NumbersThe Arduino platform increases in popularity every day. If you’re more of asocial learner and enjoy classoriented situations, search the Web for “Cult ofArduino” to see what people are making and to find Arduinorelated groups.Members of Arduino groups introduce the world of Arduino from an artist’sperspective. Many group members work to create a small Arduinocompatibleboard at the same time. These groups can be a lot of fun, introduce you tointeresting people, and let you share your Arduino knowledge with others.
Parts and AccessoriesAs with any other electronic device, the Arduino is available from many retailersthat offer a range of products and accessories. When you’re shopping, be sure topurchase the original Arduino, not a knockoff, or you run the risk of receivingfaulty or poorly performing goods; why risk your project with an inferior boardthat could end up costing you more in the long run? For a list of Arduinosuppliers, visit http://arduino.cc/en/Main/Buy/(http://arduino.cc/en/Main/Buy/).
Here’s a list of current suppliers (in alphabetical order) that I recommend foryour purchases of Arduinorelated parts and accessories:
Adafruit Industries (http://www.adafruit.com/(http://www.adafruit.com/))
DigiKey (http://www.digikey.com/(http://www.digikey.com/))
Enjoy Safari? Subscribe Today
You have 10days left inyour trial,
Mihai.bogan.Safari is your trusted guide for buildinga remarkable career. We hope you've
been enjoying your trial—ready to join?
Subscribe Today
/ ContactUs(http://safaribooksonline.com/contact/) /Blog(http://blog.safaribooksonline.com)
© 2015 Safari(http://www.safaribooksonline.com)
Terms of Service /Membership Agreement / Privacy Policy

Jameco Electronics (http://www.jameco.com/(http://www.jameco.com/))
Little Bird Electronics(http://www.littlebirdelectronics.com/(http://www.littlebirdelectronics.com/))
Newark (http://www.newark.com/(http://www.newark.com/))
nicegear (http://www.nicegear.co.nz/(http://www.nicegear.co.nz/))
Oomlout (http://www.oomlout.co.uk/(http://www.oomlout.co.uk/))
RadioShack (http://www.radioshack.com/(http://www.radioshack.com/))
RS Components (http://www.rscomponents.com/(http://www.rscomponents.com/))
SparkFun Electronics (http://www.sparkfun.com/(http://www.sparkfun.com/))
As you’ll see in this book, I use several Arduinocompatible products fromFreetronics (http://www.freetronics.com/(http://www.freetronics.com/)). However, you
will find that all the required parts are quite common and easily available fromvarious resellers.
But don’t go shopping yet. Take the time to read the first few chapters to get anidea of what you’ll need so that you won’t waste money buying unnecessarythings immediately.
Required SoftwareYou should be able to program your Arduino with just about any computer usinga piece of software called an integrated development environment (IDE). To runthis software, your computer should have one of the following operating systemsinstalled:
Mac OS X or higher
Windows XP 32 or 64bit, or higher
Linux 32 or 64bit (Ubuntu or similar)
Now is a good time to download and install the IDE, so jump to the heading thatmatches your operating system and follow the instructions. Make sure you haveor buy the matching USB cable for your Arduino from the supplier as well. Evenif you don’t have your Arduino board yet, you can still download and explore theIDE. Because the IDE version number can change quite rapidly, the number inthis book may not match the current version, but the instructions should stillwork.
NOTEUnfortunately, as this book went to press, there were issueswith Windows 8 installations. If you have Windows 8, visit theArduino Forum athttp://arduino.cc/forum/index.php/topic,94651.15.html(http://arduino.cc/forum/index.php/topic,94651.15.html)for guidance and discussion.
Mac OS X
In this section, you’ll find instructions for downloading and configuring theArduino IDE in Mac OS X.
Installing the IDE
To install the IDE on your Mac, follow these instructions:
1. Using a web browser such as Safari, visit the software download pagelocated athttp://arduino.cc/en/Main/Software/(http://arduino.cc/en/Main/Software/), as shown
in Figure 17.
Figure 17. The IDE download page in Safari
2. Click the Mac OS X link. The file will start downloading, and it willappear in the Downloads window shown in Figure 18.

Figure 18. File download is complete.
3. Once it’s finished downloading, doubleclick the file to start theinstallation process. You will then be presented with the window shown inFigure 19.
Figure 19. Your new Arduino IDE folder
NOTEThe third file icon shown in Figure 19 needs to beinstalled only if you have an Arduino board older thanthe current Uno.
4. Drag the Arduino icon over the Applications folder and release the mousebutton. A temporary status window will appear as the file is copied.
5. Now connect your Arduino to your Mac with the USB cable. After amoment, the dialog shown in Figure 110 will appear.
Figure 110. A new Arduino board is detected. Your dialog may readUno instead of Eleven.
6. Click Network Preferences..., and then click Apply in the Network box.You can ignore the “not configured” status message.
Setting Up the IDE
Once you have downloaded the IDE, use the following instructions to open andconfigure the IDE:
1. Open the Applications folder in Finder (shown in Figure 111) and doubleclick the Arduino icon.
Figure 111. Your Applications folder

2. A window may appear warning you about opening a web app. If it does,click Open to continue. You will then be presented with the IDE, asshown in Figure 112.
Figure 112. The IDE in Mac OS X
3. You’re almost there—just two more things to do before your Arduino IDEis ready to use. First, you need to tell the IDE which type of socket theArduino is connected to. Select Tools Serial Port and select the/dev/tty.usbmodem1d11 option, as shown in Figure 113.
Figure 113. Selecting the USB port
4. The final step is to tell the IDE which Arduino board you have connected.This is crucial, since Arduino boards do differ. For example, if you havethe most common board, the Uno, then select Tools Board ArduinoUno, as shown in Figure 114. The differences in Arduino boards areexplained in more detail in Chapter 11.
Now your hardware and software are ready to work for you. Next, move on toSafety.
Figure 114. Selecting the correct Arduino board
Windows XP and Later
In this section, you’ll find instructions for downloading the IDE, installingdrivers, and configuring the IDE in Windows.
Installing the IDE
To install the Arduino IDE for Windows, follow these instructions:
1. Using a web browser such as Firefox, visit the software download pagelocated athttp://arduino.cc/en/Main/Software/(http://arduino.cc/en/Main/Software/), as shown
in Figure 115.

Figure 115. The IDE download page in Windows Firefox
2. Click the Windows link, and the dialog shown in Figure 116 will appear.Select Open with Windows Explorer, and then click OK. The file willstart to download, as shown in Figure 117.
Figure 116. Downloading the file
Figure 117. Firefox shows the progress of your download.
3. Once the download is complete, doubleclick the file, and the windowshown in Figure 118 will appear.
Figure 118. The IDE package
4. Copy the folder named arduino0022 (or something similar) to thelocation where you store your applications. Once the copying is finished,locate the folder and open it to reveal the Arduino application icon, asshown in Figure 119. You may wish to copy the icon and place a shortcuton the desktop for easier access in the future.
Figure 119. Your IDE folder with the Arduino application icon selected
Installing Drivers
The next task is to install the drivers for your Arduino board’s USB interface.
1. Connect your Arduino to your PC with the USB cable. After a fewmoments an error message will be displayed, which will say somethinglike “Device driver software not successfully installed.” Just close thatdialog or balloon.

2. Navigate to the Windows Control Panel. Open the Device Manager andscroll down until you see the Arduino, as shown in Figure 120.
Figure 120. The Device Manager
3. Rightclick Arduino Uno under Other Devices and select Update DriverSoftware. Then, select the Browse my computer for driver softwareoption that appears in the next dialog. Another Browse For Folder dialogwill appear; click Browse, and navigate to the drivers folder in the newlyinstalled Arduino software folder (shown in Figure 121). Click OK.
Figure 121. Locating the drivers folder
4. Click Next in the dialog that follows. Windows may present a messagestating that it “cannot verify the publisher of the driver software.” ClickInstall this software anyway. After a short wait, Windows will tell youthat the driver is installed and the COM port number the Arduino isconnected to, as shown in Figure 122.
Figure 122. The drivers have been updated successfully.
Setting Up the IDE
Okay, we’re almost there—just two more things to do to finish setting up theIDE.
1. Open the Arduino IDE. You need to tell the IDE which type of socket theArduino is connected to by selecting Tools Serial Port and selecting theCOM port number that appeared in the Update Driver Software window.
2. The final step is to tell the IDE which Arduino board we have connected.This is crucial, as the Arduino boards do differ. For example, if you havethe Uno, select Tools Board Arduino Uno. The differences inArduino boards are explained in more detail in Chapter 11.
Now that your Arduino IDE is set up, you can move on to Safety.
Ubuntu Linux 9.04 and Later
If you are running Ubuntu Linux, here are instructions for downloading andsetting up the Arduino IDE.
Installing the IDE
Use the following instructions to install the IDE:
1. Using a web browser such as Firefox, visit the software download page
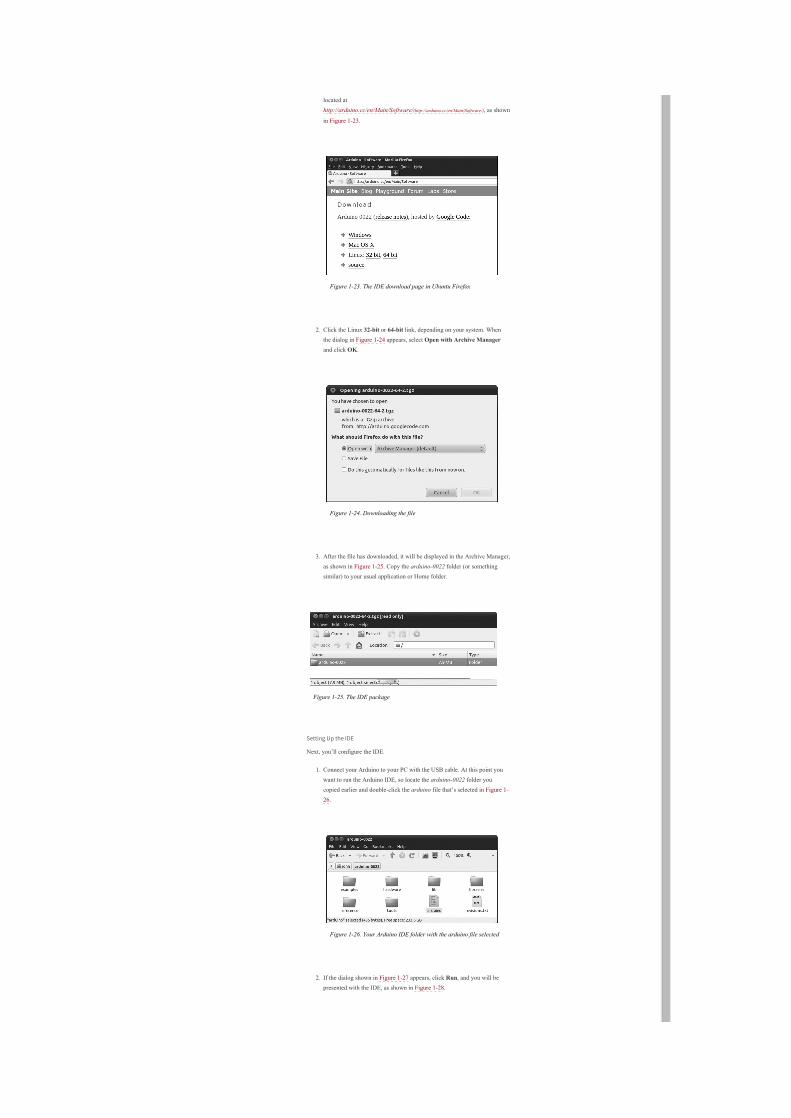
located athttp://arduino.cc/en/Main/Software/(http://arduino.cc/en/Main/Software/), as shown
in Figure 123.
Figure 123. The IDE download page in Ubuntu Firefox
2. Click the Linux 32bit or 64bit link, depending on your system. Whenthe dialog in Figure 124 appears, select Open with Archive Managerand click OK.
Figure 124. Downloading the file
3. After the file has downloaded, it will be displayed in the Archive Manager,as shown in Figure 125. Copy the arduino0022 folder (or somethingsimilar) to your usual application or Home folder.
Figure 125. The IDE package
Setting Up the IDE
Next, you’ll configure the IDE.
1. Connect your Arduino to your PC with the USB cable. At this point youwant to run the Arduino IDE, so locate the arduino0022 folder youcopied earlier and doubleclick the arduino file that’s selected in Figure 126.
Figure 126. Your Arduino IDE folder with the arduino file selected
2. If the dialog shown in Figure 127 appears, click Run, and you will bepresented with the IDE, as shown in Figure 128.

Figure 127. Granting permission to run the IDE
Figure 128. The IDE in Ubuntu
3. Now that the IDE is running, we need to tell it which type of socket theArduino is connected to. Select Tools Serial Port and select the/dev/ttyACMx port, where x is a single digit (there should be only oneport with a name like this).
4. Next, tell the IDE which Arduino you have connected. This is crucial, asArduino boards do differ. For example, if you have the Uno, select Tools Board Arduino Uno. The differences in Arduino boards are explainedin more detail in Chapter 11.
Now your hardware and software are ready to work for you.
SafetyAs with any hobby or craft, it’s up to you to take care of yourself and thosearound you. As you’ll see in this book, I discuss working with basic hand tools,batterypowered electrical devices, sharp knives, and cutters—and sometimessoldering irons. At no point in your projects should you work with the mainscurrent. Leave that to a licensed electrician who is trained for such work.Remember that contacting the mains current will kill you.
Looking AheadYou’re about to embark on a fun and interesting journey, and you’ll be creatingthings you may never have thought possible. You’ll find 65 Arduino projects inthis book, ranging from the very simple to the relatively complex. All aredesigned to help you learn and make something useful. So let’s go!
Recommended / Queue / Recent / Topics / Tutorials / Settings / Blog(http://blog.safaribooksonline.com) /Feedback(http://community.safaribooksonline.com/) / Sign Out© 2015 Safari(http://www.safaribooksonline.com/). Terms of Service / Privacy Policy