150 pint commercial dehumidifier - pdf.lowes.com
TRANSCRIPT

150 PINT
Before using your commercial dehumidifier, please read this manual carefully and keep itfor future reference, along with your receipt.
FOR MODEL:
PROCD150
COMMERCIALDEHUMIDIFIER
USER MANUAL
-1-
General Information .................................................................................. 1
Important Safety Instructions .................................................................... 2
Structure Diagram .................................................................................... 3
Setup Instructions ................................................................................ 4 – 5
Control Panel ....................................................................................... 6 – 7
Operating Instructions .............................................................................. 8
Maintenance ...................................................................................... 9 – 10
Troubleshooting ...................................................................................... 11
Error Codes ............................................................................................ 12
Purchase/Maintenance Records ............................................................ 13
• Please DO NOT dispose of any packaging until you have checked that the appliance is operational.
• After removing the packaging, ensure the contents are intact and complete. In the unlikely event of missing parts, contact Consumer Services at 844-472-2473.
• DO NOT leave children unattended with any of the packaging as it is a potential source of danger.
• Disposal of all packaging must be carried out responsibly, safely, and in accordance with your local regulations.
• ALWAYS recycle the packaging material where possible.
• When using any electrically powered product, basic safety precautions should always be followed.
• Please read these instructions carefully and in full before using the product.
TABLE OF CONTENTS
GENERAL INFORMATION

-2-
WARNING - to reduce the risk of fire, electrical shock or injury to persons or property:1. Always operate the product from a power source of the same
voltage, frequency and rating as indicated on the product identification plate.
2. To minimize shock and fire hazards, proper grounding is important. The power cord is equipped with a three-prong grounding plug for protection against shock hazards. Never cut off the third prong.
3. Your unit must be used in a properly grounded wall receptacle. If the wall receptacle you intend to use is not adequately grounded or protected by a time delay fuse or circuit breaker, have a qualified electrician install the proper receptacle.
4. Do not use extension cords or an adapter plug with this unit. If it is necessary to use an extension cord, use an approved heavy duty extension cord only (available at most local hardware stores).
5. Do not operate this product with a damaged power cord plug. If the supply cord is damaged it must be replaced by qualified repair person in order to avoid hazard.
6. To reduce the risk of electric shock, do not expose the unit or power cord to moisture of any kind.
7. Turn off and unplug from the power socket when not in use, before assembling or before cleaning.
8. The dehumidifier is not intended for use by young children without supervision. Young children should be supervised to ensure that they do not play with the dehumidifier.
9. Disabled persons and the elderly may require assistance with set up and usage.
10. Do not place objects on the product or allow objects to obstruct the inlet or outlet openings; do not operate in close proximity to walls, curtains, etc.
11. Use of attachments or accessories not recommended or sold by the product distributor may cause injury to persons or damage to property.
12. This product is intended for normal, light commercial use only.13. Contact a qualified service technician for repair or maintenance of
this unit. Do not attempt to dismantle the appliance.14. Do not operate the appliance on a metal surface.15. Do not use the appliance in artificially hot or humid conditions or
allow it to be used in a hazardous environment.16. Do not clean the appliance with organic solvent.17. This instruction manual is an integral part of the appliance and
should be stored for future reference. It must accompany the unit in event of ownership transfer or for reference by a service engineer.
IMPORTANT SAFETY INSTRUCTIONS

-3-
DO NOT OBSTRUCT THE AIR INLET OR OUTLET.WARNING
1. Metal handle
2. Control panel
3. Wheels
4. Drain hose bracket
5. Air outlet grille
6. Air inlet grille
7. Power cord
8. Drain hose
STRUCTURE DIAGRAM
NOTE: You will need to install the handle. Six bolts are included for the installation.

-4-
IMPORTANTPlace dehumidifier in the upright position. When transporting a dehumidifier to site, allow the dehumidifier to stand upright for 30 minutes before switching ON. This is necessary to allow the refrigerant system to stabilize and avoid system damage.
SETTING UP THE DEHUMIDIFIER: Operate the dehumidifier in an enclosed area as this creates a drying chamber. Close all doors, windows and areas that open to external areas to maximize the dehumidifier’s water removal efficiency. Keep traffic through the drying chamber to a minimum. Place the dehumidifier in the center of the room, away from walls and furnishings. DO NOT allow the airflow to be obstructed.
Illustration of correct positioning for best performance.
SETUP INSTRUCTIONS

-5-
NOTE: The drain hose for the ejector pump is 40 ft long and can drain up to 16 ft vertically. Attempting to push water vertically more than 16 ft vertically may cause water backup in the pump, which can result in leakage. See image above.
DRAINAGE:The dehumidifier pump connects to a plastic drainage hose. The hose is stored on the back of the appliance. Uncoil the entire hose, ensuring there are no kinks or restrictions, and place the unattached end into a drain or run outdoors.
Ensure that draining running to the outdoors does not create a hazard that could cause someone to slip.
Water drains MUST be checked regularly when used.
SETUP INSTRUCTIONS (continued)

-6-
ON/OFF: Press the key to turn the unit ON or OFF.
PURGE: Press the key to empty water from the pump reservoir. During normal operation the pump purges automatically when the reservoir is full. Use “PURGE” before moving the machine to avoid water spillage. The pump will close automatically after 40 seconds of continuous operation.
and : Press and keys to set or adjust humidity in the range of 26% and 90%. When the environmental humidity is below 26%, “CO” will be displayed.
Defrost Indicator: The unit begins to defrost when the defrost indicator illuminates; the unit has stopped defrosting when the light is no longer illuminated. When defrosting is complete, the unit begins to dehumidify again automatically.
1. ON/OFF Key
2. UP and DOWN Keys
3. Purging Indicator
4. Defrosting Indicator
CONTROL PANEL
5. PURGE Key
6. HUMIDITY and TIME Display
7. TIME Key
8. Operating Indicator

-7-
TIME: Press this to display working hours and total working time.
• Once the unit is running, the display will show the humidity setting (left) and current humidity (right). Humidity setting can be changed by pressing “Up” or “Down.”
• Time settings are based on minutes. For example, if the display shows “0000:50,” this means that the unit has worked for 50 minutes since powered on. If you want to view the total working time, press “T” again and the display will show this for 10 seconds, then return automatically to the original working hours. (Pressing “T” before the 10 seconds will return the display to the original working hours.)
• If the unit is powered on but not in operation, the LED will not display anything. If “T” is pressed once, the working hours from the previous time the unit ran will display for 10 seconds. Within the 10 seconds, if “T” is pressed again, the total working time will display for 10 seconds. If there is no action within those 10 seconds, the LED will automatically shut off.
• If “T” is pressed when LED displays the total working time, the LED will shut off immediately. The current working time will be deleted by pressing and holding down “T” for 5 seconds; the time will be reset, but the deleted time will be added into the total working time.
NOTE: The total working time cannot be deleted. If the time is beyond the range of what the LED can show, it will be deleted and restart from zero.
NOTE: If a power outage occurs while the unit is powered on, the unit automatically resumes operation at the most recent settings when power is restored.
Error Messages (E1, E2, E3, E4): See the troubleshooting guide at the back of this manual for meanings/assistance.
CONTROL PANEL (continued)

-8-
General Use:Press the ON/OFF key to turn the unit on. It will begin working automatically.
After use, press ON/OFF key to turn the unit off. Water pump will turn on automatically for 40 seconds to drain the remaining water in the unit, then turn off automatically.
Key Lock FunctionIf the keys of “T” and “P” are pressed for 2 seconds simultaneously, the operation light will continue to illuminate at the speed of 50 Hz and all of the keys on the control panel will lock. The control panel can then be unlocked by pressing the “T” and “P” keys together again for 2 seconds.
Vent Hose FunctionTo speed up drying in very damp place, use a plastic pipe (vent hose) with a diameter larger than 6.7 inches. Attach the vent hose to the exhaust ring (see below) to expedite drying by directing the heat (exhaust) toward the wet area.
OPERATING INSTRUCTIONS
Vent Hose (not included)
ATTENTION:• DO NOT switch the power OFF by disconnecting at the main
socket outlet.• To avoid water spillage, DO NOT move the dehumidifier for at least
3 minutes after turning the power OFF.

-9-
To clean the air filter: Ensure the dehumidifier is turned OFF and the plug is removed from the power outlet before performing maintenance.
The working performance of the dehumidifier will be greatly reduced if the filter becomes blocked.
1. Remove the filter as shown in the diagram below.
2. Vacuum any debris from the filter using the vacuum hose and nozzle attachment.
3. Using lukewarm water and a mild detergent, wash the filter and allow to air dry completely.
4. Once completely dry, re-install the filter into the dehumidifier.
MAINTENANCE
Lift upwards to removefilter for cleaning
Air Filter

-10-
MAINTENANCE (continued)
The battery allows the user to check the total working time of the unit even when the unit is powered off. (Press the “T” button to check this.)
1. Remove the screws in the four corners of the control panel.
2. Once the screws are removed, carefully lift the control panel to access the PCB.
3. On the PCB is a 6F22 9V battery. Remove the battery and replace with a new battery.
4. Refit the control panel onto the PCB.
5. Replace the four screws.
• Check the electrical cord for damage before each use.
• Additionally, it is a good practice to check the drain hose on a monthly basis for any obstructions. Disconnect and clear any debris present, then reconnect the hose.
• When cleaning the surface of the unit, do not use any harsh or abrasive cleaners. Additionally, do not expose the power cord/plug, control panel, and/or motor to direct moisture.
Battery (6F22 9V)
Changing the battery:
Maintenance Notes:

-11-
Please check the following troubleshooting tips before calling for assistance.
NOTE: If you have tried the above troubleshooting and need additional assistance, contact Consumer Services at 844-472-2473.
PROBLEM CAUSE SOLUTIONDehumidifier does not operate
No power to appliance. Connect plug to power outlet.
Power not turned on. Switch power on.E4 error is displayed. Check drainage flow.
Dehumidifier collects little/no water
Insufficient working time Allow more working timeFilter is blocked Clean filterLow ambient temperature
Increase ambient temperature
Condensate hose is blocked
Check hose for restrictions
Difference between set humidity and current actual humidity is minimal
Adjust humidity setting to a lesser setting
Humidity is too low for the unit to run.
No need to run the unit.
Dehumidifier is operating but room is not drying
Doors and windows are open
Seal room from external areas by closing doors, windows, etc.
TROUBLESHOOTING

-12-
WARNING: DO NOT attempt to rectify errors using unqualified personnel. To remedy the following errors, a qualified professional is required.
NOTE: With any error code, it is suggested to turn the unit off, wait five minutes, and then turn the unit on again. If the error code is still present, a qualified professional is required to fix the problem.
CODE MEANING DISPLAY READING SOLUTION*
E1 Coil sensor error
Flashes every 30 seconds
Replace coil sensor. Call for replacement part.
E2 Humidity sensor error
Flashes every 30 seconds
Replace humidity sensor. Call for replacement part.
E3 Low or no refrigerant
Flashes continually
Turn the unit off, wait 5 minutes, and power the unit ON. If E3 shows again within 15 mins after turning the unit back on, then we can confirm the unit refrigerant leak requires professional repair. Call your local HVAC repair shop for assistance.
E4 Water pump fault or blockage
Flashes continually
Dehumidifier will turn OFF automatically. Check for blockages in the water hose. If there are no visible blockages, the pump or water pipe may need to be replaced.
ERROR CODES
*NOTE: If the error occurs within one year from the date of purchase,contact Consumer Services at 844-472-2473 for warranty assistanceprior to contacting a repair person. You must have the originalpurchase receipt for warranty assistance.

-13-
PURCHASE RECORD
MAINTENANCE RECORD
Purchase Date:
Serial Number:
Distributor: Tel.
DATE SERVICE PERFORMED PERFORMED BY

Distributed by:
Perfect Aire, LLC5401 Dansher Rd.Countryside, IL 60525
Specification and performance data is subject to change without notice.
Printed in China
844-4PA-AIRE | 844-472-2473www.perfectaire.us
PA/PROCD150Manual/06082018

70 LITRES / 95 LITRES
MODÈLE:
PROCD150PROCD200
DESHUMIDIFICATEUR D'AIR MOBIL PROFESSIONNEL
MANUEL D'INSTALLATION & D'UTILISATION
PROCD150
PROCD200

I INFORMATIONS GENERALESI
Ne pas jeter les emballages avant d'avoir verifie que l'appareil est bien operationnel.
Apres avoir enleve l'emballage, s'assurer que le contenu est intact et complet. Dans le cas contraire contacter votre revendeur.
NE PAS laisser les enfants sans surveillance avec l'un des emballages, c'est une source potentielle de danger.
TOUJOURS recycler les ma抬riaux d'emballage si possible.
Lors de !'utilisation d'un produit alimente electriquement, les precautions de securite elementaires doivent etre respectee.
VEUILLEZ LIRE ATTENTIVEMENT LES INSTRUCTIONS AVANT D'UTILISER LE PRODUIT.
2
I INSTRUCTIONS IMPORTANTESI
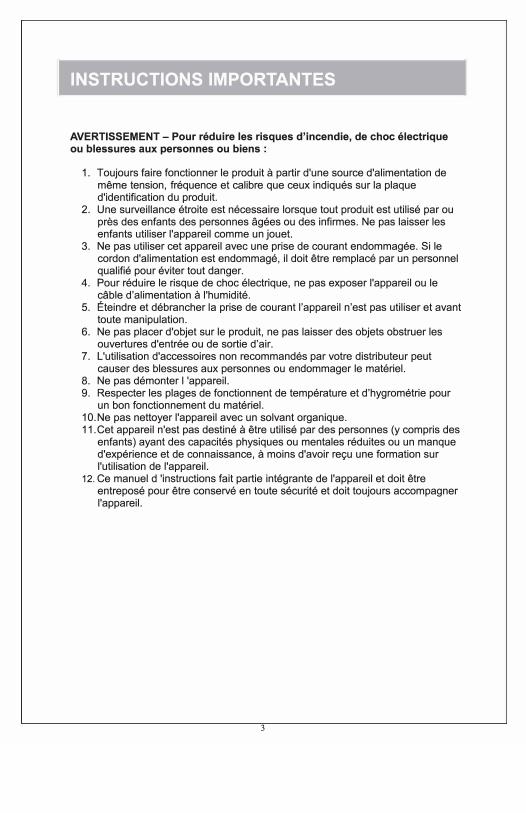
AVERTISSEMENT - Pour reduire les risques d'incendie, de choc electrique ou blessures aux personnes ou biens
1. Toujours faire fonctionner le produit a partir d'une source d'alimentation dememe tension, frequence et calibre que ceux indiques sur la plaqued'identification du produit.
2. Une surveillance etroite est necessaire lorsque tout produit est utilise par oupres des enfants des personnes agees ou des infirmes. Ne pas laisser lesenfants utiliser l'appareil comme un jouet.
3. Ne pas utiliser cet appareil avec une prise de courant endommagee. Si lecordon d'alimentation est endommage, ii doit etre remplace par un personnelqualifie pour eviter tout danger.
4. Pour reduire le risque de choc electrique, ne pas exposer l'appareil ou le氓ble d'alimentation a l'humidite.
5. Eteindre et debrancher la prise de courant l'appareil n'est pas utiliser et avanttoute manipulation.
6. Ne pas placer d'objet sur le produit, ne pas laisser des objets obstruer lesouvertures d'ent沧e ou de sortie d'air.
7. L'utilisation d'accessoires non recommandes par votre distributeur peutcauser des blessures aux personnes ou endommager le materiel.
8. Ne pas demonter I'appareil.9. Respecter les plages de fonctionnent de temperature et d'hygrometrie pour
un bon fonctionnement du ma抬riel.10. Ne pas nettoyer l'appareil avec un solvant organique.11. Cet appareil n'est pas destine a etre utilise par des personnes (y compris des
enfants) ayant des capacites physiques ou mentales reduites ou un manqued'experience et de connaissance, a moins d'avoir rec;u une formation sur!'utilisation de l'appareil.
12. Ce manuel d 'instructions fait partie integrante de l'appareil et doit etreentrepose pour etre conserve en toute securite et doit toujours accompagnerl'appareil.
3

I INSTRUCTIONS IMPORTANTESI
AVERTISSEMENT - Pour reduire les risques d'incendie, de choc electrique ou blessures aux personnes ou biens
1. Toujours faire fonctionner le produit a partir d'une source d'alimentation dememe tension, frequence et calibre que ceux indiques sur la plaqued'identification du produit.
2. Une surveillance etroite est necessaire lorsque tout produit est utilise par oupres des enfants des personnes agees ou des infirmes. Ne pas laisser lesenfants utiliser l'appareil comme un jouet.
3. Ne pas utiliser cet appareil avec une prise de courant endommagee. Si lecordon d'alimentation est endommage, ii doit etre remplace par un personnelqualifie pour eviter tout danger.
4. Pour reduire le risque de choc electrique, ne pas exposer l'appareil ou le氓ble d'alimentation a l'humidite.
5. Eteindre et debrancher la prise de courant l'appareil n'est pas utiliser et avanttoute manipulation.
6. Ne pas placer d'objet sur le produit, ne pas laisser des objets obstruer lesouvertures d'ent沧e ou de sortie d'air.
7. L'utilisation d'accessoires non recommandes par votre distributeur peutcauser des blessures aux personnes ou endommager le materiel.
8. Ne pas demonter I'appareil.9. Respecter les plages de fonctionnent de temperature et d'hygrometrie pour
un bon fonctionnement du ma抬riel.10. Ne pas nettoyer l'appareil avec un solvant organique.11. Cet appareil n'est pas destine a etre utilise par des personnes (y compris des
enfants) ayant des capacites physiques ou mentales reduites ou un manqued'experience et de connaissance, a moins d'avoir rec;u une formation sur!'utilisation de l'appareil.
12. Ce manuel d 'instructions fait partie integrante de l'appareil et doit etreentrepose pour etre conserve en toute securite et doit toujours accompagnerl'appareil.
3
5
8
6
6
8
5
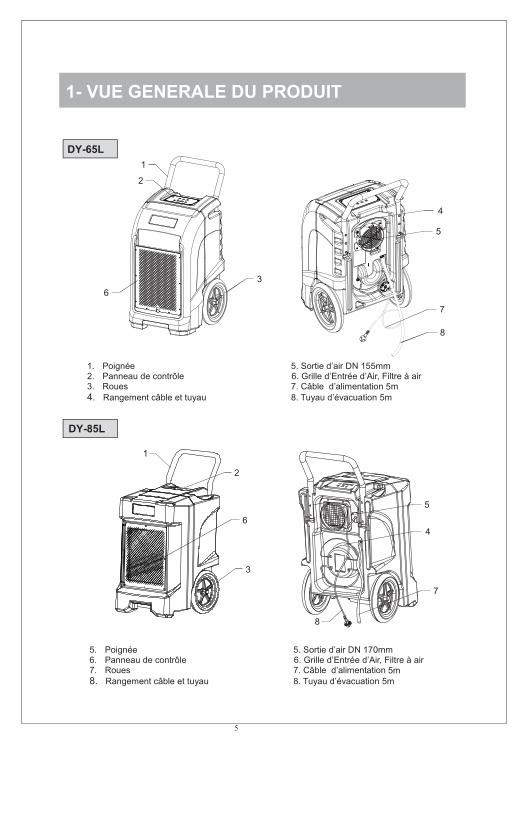
DY-65L
DY-85L

5
8
6
6
8
5
DY-65L
DY-85L
≥30cm≥30cm
≥50cm
≥80cm

≤5.
m4
≤5.
m4
I 3 - PANNEAU DE COMMANDEI
尸!
了I
尸I
产]
了I
尸I
痄胃郓
|了
|丁
|丿
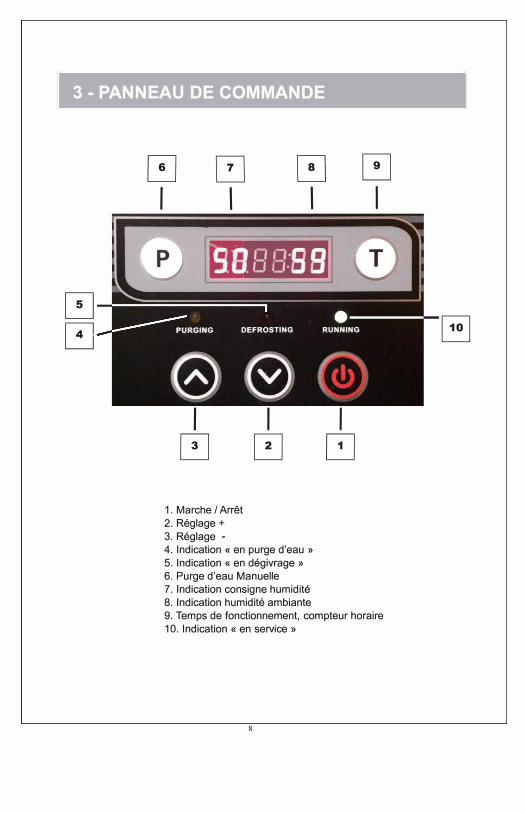
1. Marche / Arr创2. Reglage +3. Reglage4. Indication«en purge d'eau»5. Indication«en degivrage»6. Purge d'eau Manuelle7. Indication consigne humidite8. Indication humidite ambiante9. Temps de fonctionnement, compteur horaire10. Indication«en service»
8

T
T
T

T
T
T
(Gaine de ventilation (En option)
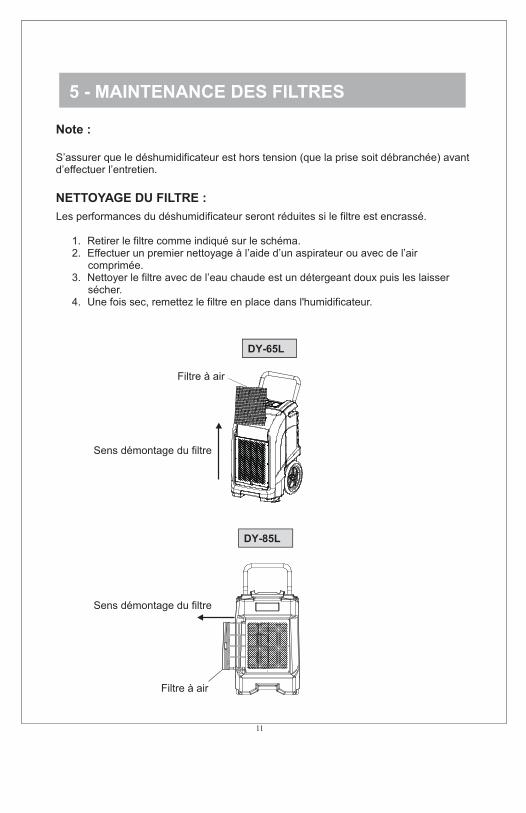
Sens démontage du filtre
Sens démontage du filtre
Filtre à air
Filtre à air
DY-65L
DY-85L

Sens démontage du filtre
Sens démontage du filtre
Filtre à air
Filtre à air
DY-65L
DY-85L
9V 6F22 battery

I 7 - DEPANNAGEI
PROBLEME CAUSE SOLUTION
Pas d'alimentation a l'appa「eil Connecter la prise elect「iqueLe deshumidificateur ne
fonctionne pas Bouton marche non enclenche Appuyer sur marche
E4 est affiche Ve「ifier le tuyau de vidange
Temps fonctionnement insuffisant Laisser l'appareil en fonctionnement
Le deshumidificateur produit Filtres obstrues Nettoyer les filtres
peu d'eau Temperature ambiante basse Augmenter la temperature ambiante
Tuyau bloque Verifier le tuyau
Le deshumidificateur fonctionne mais la piece ne Porte(s) ou fenetre(s) ouvertes Rendre la piece le plus herm铀que
seche pas
Note: Un depannage ne doit etre effectue que par du personnel qualifie.
CODE E1 E2 E3
Erreur sonde de Erreur sonde hygrometrique Refrigerant faible au absen1 Message d'erreu, 啦givrage
Affichage de Clignote toutes les 30s Clignote toutes les 30s Clignote en permanence Lecture
Deshumidificateur en 50% H.R. affiche, cours de degivrage, Mode continue en Eteindre l'appareil puis le l'appareil fonctionne fonctionnement remettre en fonction
Raisons normalement
Zone d'affichage En haut a gauche En bas a gauche Coin superieur droit
Note:
En cas de code inconnu, contacter votre agent de maintenance.
13
possible
E
Panne de pompe a eau
Clignote en permanence
L'appareil s'eteint automatiquement. Corrigez
le probleme pour le remettre en fonction
Coin in伦rieu「droit

PA/PROCD150_PROCD200_FR/05292018
Distributed by:
Perfect Aire, LLC5401 Dansher Rd.Countryside, IL 60525
Specification and performance data is subject to change without notice.
Printed in China
844-4PA-AIRE | 844-472-2473www.perfectaire.us