12.0 armies - wargame academy€¦ · 2019-06-13 · historical armies; with all their manifold...
TRANSCRIPT

This is an unofficial Wargame Academy (WGA) 3rd edition rulebook
to support tournament level PBEM play. The intent is to generate a
standardized rulebook with all interpretations of original vague rules
identified and clarified. “House Rules” are not valid in WGA
tournament play unless agreed upon in advance by all players in that
match.
This rulebook will be the basis for the ongoing optimization of the Civil
War module of the VASSAL Java game engine for PBEM and server
play (www.vassalengine.org)/
The 1st edition rulebook was published by Victory Games in 2/83,
followed quickly by the 2nd edition, which was published in 9/83. The only
known official errata was published in 11/83. All changes from the 2nd
edition rulebook are noted by highlighted “blue” text. Where an entire
rules section has been added or changed, only the heading will be
highlighted. Where substantive original rules have been deleted, the
original language is noted by highlighted "yellow" text.
Please contact me regarding any remaining “typos” and additional
rule clarifications and/or suggestions.
Bill Thomson, WGA Project Manager. [email protected] Rules Incorporate Errata published 11/83.
Contents
I. Designer’s Note to New Gamers 2
1.0 INTRODUCTION 2
1.1 Game Questions 2
2.0 GAME EQUIPMENT 2
2.1 The Game Map 3
2.2 Tracks and Boxes 4
2.3 The Playing Pieces 4
2.4 Game Components 4 2.5 Summary of Unit Types 5
3.0 HOW THE GAME PLAYS 6
3.1 Sequence of Play 6 3.2 Reinforcement Phase 6
3.3 Command Phase 6 3.4 CSA Commerce Raider Phase 6
3.5 Blockade Effects Phase 6
3.6 Action Phase 6 3.7 Command Point Table Use Phase 6
3.8 Confederate Control of Washington, D.C. 6
3.9 Rally Phase 6 3.10 End Phase 6
4.0 COMMAND POINTS 7
4.1 Resource Allocation 7
4.2 The Action Phase 7 5.0 LEADERS 9
5.1 Leader Rank 9
5.2 Leader Promotions 9
5.3 Army Leader Removal 10
5.4 Leader Losses 10
5.5 Revealed and Unrevealed Leaders 10 5.6 Leader Effects on Rally 10
6.0 GROUND MOVEMENT 11
6.1 Ground Movement Procedure 11 6.2 Leaders and Ground Movement 11
6.3 Terrain Effects on Movement 13
6.4 Theater Boundary Effects on Movement 13 6.5 Movement in Friendly, Enemy, and Neutral Territory 13
6.6 Rail Movement 13
7.0 GROUND COMBAT 14 7.1 Combat Procedure 14
7.2 How to Use the Combat Results Table 15
7.3 Manual Combat Ratio/Differential Determination 15 7.4 Leader Effects on Combat 15
7.5 Terrain Effects on Combat 17
7.6 Overrun Combat 17 7.7 Combat Results 17
8.0 NAVAL MOVEMENT AND COMBAT 19
8.1 Naval Force Types 19 8.2 Naval Leaders 19
8.3 Naval Movement 20 8.4 River Movement 20
8.5 Naval River Control 20
8.6 Union Sea Lift Capacity 21 8.7 Union Sea Movement 21
8.8 Union Amphibious Movement 21
8.9 Combined Land and Naval Combat 22 8.10 Naval Combat 24
8.11 CSA Commerce Raiders 24
9.0 SUPPLY 24 9.1 Supply Determination and Effects 25
9.2 Tracing a Supply Line 25
9.3 Combination Supply lines 25 9.4 Confederate Supply 26
10.0 REINFORCEMENTS 27
10.1 When Reinforcements Enter the Game 27
10.2 Strength Points 27
10.3 Leaders 28
10.4 Union Naval Reinforcements 28 10.5 Confederate Naval Reinforcements 28
11.0 RAILROADS 28
11.1 Rail Line Control 28 11.2 Rail Conversion 29
12.0 ARMIES 29
12.1 Army Creation and Destruction 29 12.2 Army Movement and Stacking 29
12.3 Army Reaction Movement 30
13.0 CAVALRY 33 13.1 Cavalry Retreat Before Combat 33
13.2 Cavalry Control of Hexes 33
14.0 FORTS, FORTRESSES, AND STOCKADES 33 14.1 Fortification Types 33
14.2 Fort/Fortress Construction 33
14.3 Fort/Fortress Destruction 33 14.4 Supply Effects on Unmanned Fortifications 34
15.0 NEUTRAL STATES 34
15.1 Neutral States 34 15.2 Neutral State Victory Points 34
15.3 Territorial Conversion 34
15.4 West Virginia 34 15.5 Indian Territory 34
15.6 Missouri 34
15.7 Kentucky 34 16.0 STATE MILITIA MOBILIZATION 35
17.0 VICTORY 35
17.1 Victory Points 35 17.2 Victory Point Awards 35
17.3 Victory Determination 36
17.4 Victory Schedules 36 18.0 SCENARIOS 37
19.0 FAR WEST OPTION 41
19.1 Far West Command Points 42
19.2 Tribal Indians 42 19.3 Civilized Indians and Stand Watie 43
19.4 Texas Rangers 43
19.5 Reinforcements 43
19.6 States 44
19.7 Scenarios and Victory 44
19.8 Scenario Additions 44 20.0 ORIGINAL OPTIONAL RULES 45
20.1 Jackson and Lyon are Not Killed 45
20.2 Army Size and Placement 45 20.3 Solitaire Play 45
20.4 Cavalry Intelligence Gathering 45
20.5 Random Leader Entry 45 21.0 ADDITIONAL OPTIONAL RULES 46
21.1 Confederate Supply by River 46
21.2 Declining the Initiative Reinforcement 46 21.3 Revealed Leaders 46
21.4 No Effect Combat Results and Supply Depots 46
21.5 Additional Victory Point Awards 46 21.6 Confederate Navy 46
21.7 Stacking 46
21.8 Attrition 46 21.9 Non-Army Leader Reaction 47
21.10 Untried Leaders 47
21.11 Union Usage of Captured Railroads 47 21.12 Union Off-Map Rail Movement 47
21.13 Other Resources 47 22.0 VARIANT LEADER SYSTEM 48
22.1 Variant Leader Promotion & Casualty 48
22.2 Modified Historical Leaders 48 22.3 Additional Leaders 49
22.4 Confederate Naval Leaders 50
I. A Note to New Gamers If this is your first historical game, let me welcome you to the world of
historical board gaming. Historical board gaming is one area of a larger hobby, known generally as Adventure Gaming. There are several types of
Adventure Games, each of which comprises an almost distinct hobby in its
own right. These types include historical board games (such as The Civil
War), contemporary military board games, science fiction board games,
fantasy board games, and role-playing game. There are several hundred
thousand gamers in the United States alone. These people have found gaming to be a rewarding hobby that provides hours of pleasure.
Now that you have opened this box and begun to peruse the rules
booklet, it is important that you DON’T PANIC! You may be dismayed by the length of the rules, by the alien appearance of the playing pieces, and by
the strange hexagon-mottled mapsheets. These components are all standard
fare for the usual historical game. The rules are long, because an historical game must inject a healthy amount of detail into its design in order to
realistically simulate a richly complex topic. The playing pieces, representing historical armies; with all their manifold strengths, weaknesses, and quirks;
look odd at first glimpse, but as you read the rules it will become clear that
the function of each number and symbol on each counter is designed to fulfill a logical purpose. As you read these rules and play your first game,
remember that the game is a simulation of reality. The concepts of how pieces
move and engage in combat are basically similar from one game to another. Once you have learned to play The Civil War, your second historical game
will be much easier to learn.
An average historical board game usually takes an average gamer at
least one entire evening to learn, that is, to learn the rules, without necessarily
mastering the subtleties of play. Your first game will probably take you
longer to grasp, but with a bit of patience, you will be playing The Civil War in less time than you might think. Gamers are notoriously patient people,
because they consider the games worth the time spent learning them.
The best way to approach this game is to read the Designer’s Notes at the beginning of each chapter before reading the bulk of the rules. (Please do
not read or attempt to play the Far West Option until you feel confident with
the rest of the game.) Then start at the beginning of the rules and read each chapter carefully. When you come to an example, punch out the depicted
counters, set them up on your map, and go through the example. Repeat the
example and try variations until you understand what is happening. If some point is unclear, don’t let yourself be bogged down; make a note to yourself
and read on; the answer to your question is most likely in one of the following
chapters. Once you have finished your first reading, set up the 1861 scenario and
begin playing. If you have an opponent for your first game, you will find
playing cooperatively, rather than competitively, will be much more
educational; save the head to head contest for your second play-through. As you play, look up the rules you need and stick to the Sequence of Play. Play a
turn or two, until you become familiar with what is happening. Many gamers
re-read the rules after their first trial game to find their mistakes and to clarify complex procedures.
Thanks for buying The Civil War, and I hope that it brings you many
hours of entertainment. If you have comments about the game or want to know more about Victory Games, feel free to write me.
Eric Lee Smith
Designer
1.0 Introduction
The Civil War is a strategic level game of the entire American Civil War. The map covers all the theaters of the war, from the deserts of New
Mexico to the beaches of New Jersey. The main emphasis of the game is on
the diverse nature of the war in the three main theaters: the East, the West, and the Trans-Mississippi. Leadership is highlighted through the use of
counters representing the actual combat leaders of the war. Ground
movement and combat are the primary activities of the game, with naval movement and combat providing an important secondary element. The Far
West map is optional and includes rules for the Indian campaigns that
occurred there throughout the period of the greater struggle. The Civil War is not exceptionally complex for a game of its type, yet it
does contain more detail than is usual in a strategic game. Our intention is to provide you with an entertaining and competitive game that realistically
simulates the strategic problems of the war. We have attempted to balance
the complexity level by trading off low complexity in some areas with greater concentration on detail in others. Thus, the supply rules are quite simple,
while the rules for combat resolution are unusually complex for a strategic
game. We have provided a series of scenarios that allow you to start and end
the war at different points. The Far West option is included to illustrate an
interesting sidelight that few people have had the opportunity to investigate. We hope that you enjoy playing The Civil War, and that the game will be as
enlightening for you as it is challenging.
1.1 Game Questions The publisher of The Civil War, Victory Games was sold to Hasbro in
1998 , as part of The Avalon Hill Game Company The copyright may be held
by Hasbro or the game designer as a function of the status of the game at the time of sale, the terms of the contract of the game designer, and/or the terms
of the Hasbro sale. To the knowledge of WGA, no effort towards re-
publication has been made by Hasbro, or any other publisher. The best source of Questions and Answers for this title would be the designer. Other
sources include the WGA player group, the grognards website, and the
Consimworld and Boardgame Geek message boards for The Civil War. No knowledge base is known to exist at Hasbro for this title. WGA will serve to
act as the rules czar for all questions and for events/tournaments that are WGA administrated.
2.0 Game Equipment
DESIGNER’S NOTES: The American Civil War was fought over an area larger than Europe. In an area this size, the lay of the land was of
critical importance to the outcome of the war. The Appalachian Mountains
and the Mississippi River divided the Confederacy into 3 sections. In each
section, the terrain is very different. Consequently, the way the war was
fought in each section was different. The game map shows those features
which make each area unique, such as the rivers, mountains, cities, swamps, and rail lines. One of the main elements of this game is an attempt to
realistically portray terrain and show its effect on the strategies of both sides.
If this is your first game, then the map probably looks very strange. Adventure board games usually use hexagons to divide the map into spaces.
The hexagon is used because it is the only shape which comes together on
sides. Thus, each hex is always adjacent to six others, and there are no diagonals.

2.1 The Game Map 2.1.1 The Maps: This game includes two maps: the Main Map (labeled Map A) and the Far West Map (labeled Map B). Map A is always used, while
Map B is used only when playing the Far West Option. Map B overlaps the
lower west edge of Map A. All scenarios in the game can be played using
only Map A or using both maps.
The maps are based on data gathered from dozens of sources, including
the Official Records of the War of the Rebellion, various physical atlases, and numerous historical narratives.
2.1.2 Terrain: The terrain on the map is color-coded as listed on the
Terrain Key. The Terrain Effects Chart summarizes the effects of terrain on combat and movement. Often there is more than one type of terrain in a
hexagon (hereafter called “hex”). The types of terrain which apply are usually
self-evident; a hex is clear terrain unless it contains swamp, forest, or mountains. Man-made features such as cities and rail lines co-exist in a hex
with the main terrain feature (clear, forest, etc.).
A hex may be bordered along its hexsides by a river, mountain, or boundary. These terrain features may affect a force that crosses that hexside.
2.1.3 Friendly Territory: Each hex on the map is either friendly,
enemy, or neutral to each side. Thus, blue-tinted hexes are Union friendly, gray-tinted hexes are Confederate friendly, and untinted hexes are neutral. In
addition, red-tinted Indian Territory is neutral to both sides. Neutral states,
except Indian Territory, become friendly to one player, and thus enemy to the other, during play according to the Neutral States rules section. A tinted hex
always remains friendly to its original owner. However, it does not
necessarily remain enemy to its opponent. If the opponent controls all the Victory Point cities in that state at the end of a Game-Turn, the state becomes
neutral to that player, while remaining friendly to its original owner. It
remains neutral to that player unless the state’s original owner manages to regain and hold control of all the state’s Victory Point cities at the end of a
Game-Turn. If this occurs, the state returns to being enemy to the enemy
player. EXAMPLE 2.1.3: Tennessee will remain friendly to the South and
enemy to the North until the Union player controls all the Victory Point cities
in the state at the end of a Game-Turn. Then it becomes neutral to the Union and remains friendly to the South. It will return to being enemy to the Union
player only if the Confederate player manages to re-take and hold
Tennessee’s Victory Point cities at the end of a Game-Turn. 2.1.4 This rule is very important for movement of forces as explained
later in the movement rules. In addition, territorial control affects
reinforcement placement and victory determination. 2.1.5 Certain terrain features, such as rail lines, cities, Confederate
resource VP sites, stockades, and fortresses printed on the map may be
controlled when the hex containing that feature is entered by a force. A Control marker (flag) for the entering side's force is placed on any such
Controlled terrain feature in neutral or enemy territory. The status of the hex
itself (friendly/neutral/enemy) is unaffected by Control markers, but the hex is considered to be "Controlled" by the entering side.
2.1.6 Neither the presence of enemy Strength Points (SP’s) in a friendly
hex, nor friendly SP’s in an enemy hex changes or converts the underlying friendly/neutral/enemy status of the hex. A coastal hex in enemy territory, or
any hex without one of the above terrain features, only remains Controlled by the friendly side so long as a friendly SP is in the hex. A Control marker
cannot be placed on a hex which does not contain one of the above terrain
features. A hex in friendly territory is always considered to be Controlled by the friendly side, unless it is occupied by an enemy force, or by an enemy
Control marker. A friendly force which enters, or ends its pulse in, an
unoccupied hex containing an enemy Control marker removes that Control marker. See section 13.2 for restrictions on cavalry Control of hexes.
2.1.7 Border Hexes: Hexes that contain a combination of friendly,
enemy, and/or neutral territory are called border hexes. A border hex is classified as having dual territorial control. Thus, a hex containing both
friendly and enemy territory is indeed enemy to both sides. When entering a
border hex, you are entering a hex in all states that share that border. Entering a border hex may have consequences such as mobilizing militia, and entering
enemy territory (requiring a leader for movement) should a portion of the
border hex be in a state which is currently enemy territory. 2.1.8 Port Boxes: Also printed on the map are boxes representing each
Confederate port city. These show the number of Import Points that arrive
through each port each Game-Turn. If the Union player captures a port, he
places a Union Control marker in that city’s Port Box. Some boxes also have
listed hexes, which - if controlled by the Union - cause that port to be shut
down and a Union Control marker to be placed in the Port Box. 2.1.9 At Sea Box: Confederate Commerce Raiders are placed in this box
when they enter play and remain there until they are destroyed.
2.1.10 Florida: Union ocean-going ship counters may move from a hex in the Atlantic Ocean to one in the Gulf of Mexico even though the Florida
peninsula divides the two on the game map. River-going Naval Strength
Points cannot move from one coastal hex to another by crossing an impassable hexside. In addition, they may not move around Florida.
2.1.11 Coastal Hexes: It is usually obvious which hexes are coastal
hexes. There are some, however, that are less obvious. Any hex adjacent to an all-sea hex is by definition a coastal hex. In addition, hexes bordering the
Chesapeake Bay, Delaware Bay, Albemarle Sound, and Pamlico Sound are
coastal hexes. If a question arises, players should use common sense to determine which hexes are coastal hexes. Charleston, South Carolina, and
hexes 4423 and 4324 are coastal hexes. In the VASSAL module, coastal
hexes are delineated by light blue shading of the sea portion of the hex.
2.1.12 New Orleans Approaches: The hexsides forming Lake
Pontchartrain (1829/1830, 1829/1930, and 1929/1930) are navigable river
hexsides. Hexes bordering these hexsides are not coastal hexes; thus, Ft. Pike in hex 1930 controls the approach to New Orleans by way of Lake
Pontchartrain.
2.1.13 Ft. Pickens, Ft. Pulaski, and Roanoke Island: Ft. Pickens (2730) is separated from the mainland by a navigable river hexside between it
and Pensacola. Ft. Pickens is Union friendly territory. Ft. Pulaski (4425) is
located in the Western Theater and is separated from the mainland by navigable river hexsides, as is Roanoke Island (5613). Thus, a force may
move from the mainland to one of these, or vice versa. However, a force may
not cross a navigable river into a hex containing an enemy-held supplied fortress.
EXAMPLE 2.1.13: Fort Pulaski is separated from the mainland as there is no ―land‖ in the hexside containing the fort.

2.1.14 City Dot Location: The location of each red city dot determines
which state the city is a part of, even if it occupies a border hex. EXAMPLE 2.1.14: Chattanooga (3217) is in Tennessee, and Corinth
(2317) is in Mississippi.
2.1.15 Ft. Monroe: If Ft. Monroe is captured by the Confederates, it
does not generate naval combat for any naval movement from/to the
Chesapeake Bay, since Union NSP’s may traverse hex 5510. Ft. Monroe is
Union friendly territory and cannot be entered by Confederate SP’s moving without a leader.
2.1.16 Printing error on map: Hexside 1012/1112 is a mountain
hexside (which folded over in printing) and is thus an impassible hexside. This correction has been made on the VASSAL module map.
2.1.17 Hexside 5004/5005 is a mountain hexside, and thus impassable.
Hexside 4905/5004 is not a mountain gap.
2.2 Tracks and Boxes 2.2.1 Game-Turn Record Track: This Track lists each side’s
reinforcements, the Union Blockade Percentage, the Confederate Rail Capacity, and the Union Sea Lift Capacity for each Game Turn. In addition,
the Far West map has a separate Game-Turn Record Track indicating arrival
of units specific to the Far West option. 2.2.2 Reinforcement Tracks: Each side has a set of Reinforcement
Tracks where they record the reinforcements they are due to receive each
Game-Turn.
2.2.3 Command Tracks: Each side has a set of Command Tracks on
which players record the number of Command Points they have to spend
during a Game-Turn. In addition, the Far West Map has a separate set of Tracks to record Far West Command Point totals.
2.2.4 Dice Difference Reminder Track: This Track is provided as a
convenience to players, and its use is not mandatory. It is used to record which side has won the Initiative during a Pulse and to record the Initiative
Dice Difference. We recommend using a Control marker to record the dice
difference expenditures during the Pulse. When one player is finished, simply turn the Control marker over and the other player then uses it to track his dice
difference expenditures.
2.2.5 Table Use Track: This Track is used to mark the number of times the players have used the Command Table in a single Game-Turn. Listed on
the Track in each box are the numbers which, if rolled, cause the Action Phase to end immediately. In the VASSAL module, these numbers are directly on
the Table Use counter.
2.2.6 General Record Track: This Track is used in several ways: to record each player’s Victory Point total; to track the Union player’s Sea Lift
total for each turn; to track the Confederate player’s supply and import
situations; and to record the total number of times the players have used the Command Point Table thus far in the game.
2.2.7 Resource Allocation Track: Each player places his Resource
Allocation markers on this Track to indicate his resource allocation for the following Game-Turn.
2.2.8 Boxes: There are also several boxes used by the player: the Leader
Pool is where leaders are placed face-down when ready to enter play; the Removed Leaders Box and the Killed Leaders Box are where leaders are
placed for the reasons indicated. In addition to these, the Union player has a
Naval Pool where he places his naval forces when they are ready to enter the game as reinforcements.
2.3 The Playing Pieces 2.3.1 The 520 playing pieces in the game are divided into two basic types: counters and markers. Counters represent the forces, armies, and
installations under each player’s control, while markers are placed on tracks,
on counters, or on the map itself to denote specific information.
2.3.2 Before beginning the game, carefully punch out the pieces. Each
player controls the pieces color-coded for his side. Some counters are Union
on one side and Confederate on the other, and are simply flipped over to indicate ownership.
2.3.3 The number of counters provided in the game is the maximum that
may be used in the game. Do not add additional counters to the game unless you are making a variant of your own. Markers, on the other hand, may be
added if you run out of them (which is unlikely). There are no counter limits
in the VASSAL module, except as noted in these rules. 2.3.4 Each Strength Point represents approximately 5000 men.
Strength Points are interchangeable, like money. Thus, if you have 7 Strength
Points in a hex, they could be represented by a 5 and a 2, a 4 and a 3, or some other combination. The Strength Point counters may be freely interchanged
during play, so long as the total strength remains the same.
2.3.5 Each Confederate ironclad represents one ironclad and an escort group, usually comprising a dozen or fewer gunboats. Each Union ironclad
represents 2 or 3 ironclads. Union transports represent shipping sufficient to
move a Strength Point. Confederate Commerce Raiders represent one ship each. Commerce Raiders and ironclads have strength of 1 each. Transports
have strength of 1 on the front of their counter, and 2 on the back. Transports
are used like change. Thus, 4 transports in a hex could be represented by two counters flipped to their 2 sides.
2.3.6 Each Indian counter represents a party of between 200 and 1000
braves, but is classified as a Strength Point for game purposes. Indians are printed for Confederate control on the front, and for Union control on the
back. Each Texas Ranger counter represents between 200 and 1000 men and
is classified as one Strength Point for game purposes. Stand Watie is the only leader able to move Civilized Indian counters out of Indian Territory or
Kansas, and he is always in Confederate control and is always placed face-up
on the map. 2.3.7 The Army counters are placed on the map to show the location of
the Army. The Army’s strength is recorded on the owner’s Army Track, or
directly on the Army counter in the VASSAL module. Leaders in an Army remain on the map. If an Army stack gets too tall, players may place the
leaders aside or on the Army Track.
2.4 Game Components A complete copy of The Civil War includes the following components:
One Rules Booklet
Two identical 11” x 16” cards of charts and tables
Two different 22”x 32” mapsheets
Four identical six-sided dice
520 playing pieces
One counter storage tray.

3.0 How the Game Plays
DESIGNER’S NOTES: After the fall of Ft. Sumter, Jefferson Davis and
Abraham Lincoln were faced with the most difficult problem a president at war can face, that of determining a national strategy. For Davis the solution
was easier: ―...All we ask is to be let alone.‖ For Lincoln, the question was
more formidable - the United States had overwhelming power in production and population that must somehow be brought to bear. As a player of The
Civil War, you will face these same problems.
Each Game Turn in the Civil War represents two months of real time, except for the winter Game-Turn, which represents four months. Historically,
both armies usually spent the winter encamped. Thus, the winter turn
represents more time to show that less happened at that time of the year. In a war of the magnitude of the Civil War, uncertainty was a way of
life. The structure of the turn in The Civil War is designed to help recreate
this uncertainty. You never know how long a turn will last - it could be very short, or it could last for many battles and mark the turning point of the war.
Furthermore, in a turn you will have many choices to make. What you do is
up to you. However, you must choose a turn in advance where your main push will be. It can be in only one of the three theaters of the war: the East,
the West, or the Trans-Mississippi. Disaster can occur if you choose to make
a theater a backwater and your opponent chooses to launch his main offensive there. Such are the challenges of directing a strategic war.
3.1 The Sequence of Play
Each turn is broken down into a series of steps called Phases, which are
performed in the order of the following Sequence of Play. The Sequence of Play is performed once per Game-Turn until the end of the last turn, when the
winner of the game is determined.
3.2 Reinforcement Phase
The Strength Point reinforcements and leaders each player receives each turn are listed on the Game-Turn/Reinforcement Track. Strength Points are
recorded on each player’s Reinforcement Tracks. Leaders are placed face-
down in each player’s Leader Pool so that neither player knows the identity of either their own or their opponent’s leaders. The Union player records his Sea
Lift Capacity for this turn on the General Records Track using the Sea Lift
marker and places his naval reinforcements in his Naval Pool.
3.3 Command Phase
To determine how many Command Points each player receives, both players turn over their Resource Allocation markers and reveal them to each
other. Then both players roll two dice and locate their result on the Command
Points Table. Each player then records the results on his Command Point Tracks. Then the Command Point Table Use marker is placed on the first
space of the Table Use Track. Then both players decide their Resource
Allocations for the next turn by placing their Resource Allocation markers face-down on the Resource Allocation Track.
3.4 CSA Commerce Raider Phase
For each commerce raider currently in the At Sea Box, the
Confederate player rolls two dice, the result of which is the number of United States merchant ships sunk. These are recorded on the General Records Track
using the US Ships Sunk marker. If the Confederate player rolls a 12, then he
sinks no Union ships, and instead his raider is eliminated. Before the
Confederate player rolls, the Union player has the option to spend Naval
Commands to modify the Confederate dice roll result. For each Union Naval
Command spent, one is added to the Confederate result. If the modified result is 12 or more, the Confederate raider is eliminated at no loss to the Union in
ships sunk.
3.5 Blockade Effects Phase
The Confederate player counts the number of VP City and VP Site
Points he controls in friendly territory and places his Production marker at that level on the General Records Track. Then he determines his Port Capacity by
counting the value of his ports which he still controls. He cross-references
this Port Capacity with the Union Blockade Percentage for that Game-Turn
on the Blockade Table to determine his total Imports. The Import total is then added to the General Records Track after the Production total. If the Import
marker is at 99 or less, then the Confederacy will begin to feel the effects of
dwindling supply.
3.6 Action Phase Both players roll 2 dice and compare results. The player with the higher
total has the Initiative for the Pulse. Record the difference between the two
dice rolls on the Dice Difference Reminder Track using the Initiative winner’s side of the Dice Difference marker. To begin the Pulse, the player with the
Initiative must enter 1 reinforcement (either a Strength Point or a Leader) if he
has any on his Reinforcement Tracks or in his Leader Pool. Then he must perform actions which use up a number of Command Points equal to the die
roll difference between his Initiative dice roll and his opponent’s dice roll.
Alternatively, he may bring on reinforcements, each of which uses one point of the Initiative dice difference, but costs no Command Points. As he spends
Command Points and brings on reinforcements, the Initiative player marks
them by moving his Command and Reinforcement markers down his Command Point and Reinforcement Tracks. When he has expended the
Initiative dice difference, his half of the Pulse is over. His opponent then
spends Commands or enters reinforcements equal to the Initiative dice difference. Then both players roll for Initiative again, and a new Pulse is
begun.
The preceding procedure is repeated indefinitely, until the end of the Action Phase is triggered. The end is triggered in one of two ways. If both
players have used all their Command Points, entered all their reinforcements,
and picked all their leaders from their Leader Pools, the Phase ends. If both players roll the same Initiative dice total and the number each rolls is listed at
the bottom of the Table Use Track on the space currently occupied by the
Command Point Table Use marker, the Phase ends immediately. If both roll the same total and the number each rolls is not listed, then each player
receives additional Command Points listed for that result on the Command
Points Table, the Command Point Table Use marker is advanced one space on the Table Use Track, and the Action Phase continues.
3.7 Command Point Table Use Phase
Move the CP Table Total marker up the General Records Track a
number of boxes equal to the total number of times that the Command Point Table has been used in the immediately preceding Action Phase.
3.8 Confederate Control of Washington, D.C. If a Confederate force occupies Washington, D.C. at the end of the
action phase, then the effects described in rules section 4.1.6 occur. The
effects of Confederate control are determined before the rally phase takes place.
3.9 Rally Phase
Each stack of demoralized forces loses one Strength Point. If a force is
in supply, then the Demoralization marker is removed. If a force is out of supply, then it remains demoralized. A force of one Strength Point would be
eliminated, and any leaders stacked with the force would be placed face-down
in the owner’s Leader Pool. This is considered to occur simultaneously for all forces on the map. Supply status is assessed after all demoralized forces
lose one Strength Point, thus a force that is out of supply due to the presence
of a single demoralized enemy SP would become supplied when that SP is eliminated.
3.10 End Phase The players advance the Game-Turn marker one space on the Game-
Turn Track and begin the next Game-Turn.
3.10.1 All unused Command point tracks are set to zero. 3.10.2 All unused Reinforcements are maintained.
3.10.3 The Confederacy earns Victory Points equal to the table use in
the concluded turn. 3.10.4 Victory Points are checked and state conversions are scored.

4.0 Command Points
DESIGNER’S NOTES: Each activity in the game is given a cost in
Command Points (often called simply Commands). EXAMPLE: if you want to move one Strength Point (5000 men), then the one Command Point that must
be spent represents the time and effort necessary to organize the men and
move the miles. If you have a terrible leader in command of one of your armies, then two Command Points can be spent to get rid of him, in which
case the Command Point cost represents the ―political‖ cost to remove such a
highly ranked man from such an important post. The map is divided into three theaters: the East, the West, and the
Trans-Mississippi. This is done so that Command Points can be allocated to
each theater, assuring that activity will occur in each theater on each Game-Turn and that the effects of cutting off the Trans-Mississippi from the rest of
the South, or isolating Washington, D. C., from the remainder of the North,
can be simulated accurately. In all previous strategic Civil War games, most of the action has occurred in only one area per turn, or - worse yet - nothing
at all has happened in the Trans-Mississippi. Both situations are grossly
ahistorical. During the Action Phase, each player will have the opportunity to
expend Command Points to move and attack, build forts and armies, and to
perform a host of other options. It is up to you to decide your priorities and spend your Commands wisely, since you will never have enough Commands to
do everything you want to do. The player who develops an idea, a grand
strategy, and sticks to it will ultimately win over a player who thinks on his feet and does not plan ahead. Read the following rules closely, since they are
the heart and soul of the game.
4.1 Resource Allocation 4.1.1 Procedure: During the Command Phase, both players decide
among the three theaters (the East, the West, and the Trans-Mississippi) which will be their primary, secondary, and tertiary theaters by placing their
Resource markers face-down on the Resource Allocation Track. Once the
markers are placed, they may not be changed, nor may they be examined by the enemy player.
4.1.2 During the Command Point Phase, the Resource Allocations from
the previous turn are revealed. Then both players roll two dice and locate their results on the Command Points Table. The Command Point results are
then recorded on each player’s Command Point Tracks using their CP
markers. Note that the Union player has an additional allocation for Union Naval Commands, which are recorded on the Union Discretionary Command
Track using the Naval CP marker. Then both players decide their Resource
Allocations for the following turn and place their Resource Allocation markers face down on the Resource Allocation Track again. Players who
“forget” to decide their next turn Allocations must use the same Allocations
used during their previous turn. EXAMPLE 4.1.2: if you as the Union player choose the East as
primary, the Trans-Mississippi as secondary, and the West as tertiary, and
then roll an 8 on the Command Points Table, you would place the East CP marker at 6 on the East Track, the Trans-Mississippi CP marker at the 4 on
the Trans-Mississippi Track, the West CP marker at the 1 space of the West Track, the Discretionary marker on the 1 space of the Discretionary Track,
and the Naval CP marker on the 3 space of the Discretionary Track.
Additional Command Points are received if you use the optional Far West Option.
4.1.3 First Turn Allocation: On the first turn of the game, both players
decide their theater choices secretly, place their Resource Allocation markers, and then reveal them to determine the Commands they receive. After they
have received their Commands, they then place their Resource Allocation
markers on the Resource Track for the second following turn. This is the only
turn where both will choose and reveal their Resource Allocations on the same
turn.
4.1.4 Mississippi River Control: The Confederacy loses control of the Mississippi River the instant the following cities are in Union control: New
Orleans, Baton Rouge, Port Hudson, Vicksburg, Memphis, Cairo, and St.
Louis. Once the Confederates have lost control of the Mississippi, the following rules come into effect.
The Trans-Mississippi must be Confederate tertiary choice during
each Resource Allocation Phase. This effect takes place during the Confederate player’s next Resource Allocation choice.
The Confederate player may not spend Discretionary Commands or take Discretionary reinforcements in the Trans-Mississippi
theater.
The Confederate supply net is broken into two sections, and the Production and Import totals for the Trans-Mississippi are
determined separately from the rest of the Confederacy.
4.1.5 Control of the Mississippi River is regained by the Confederates
the instant the Union player does not control all of the cities listed. Thus, control can change hands from turn to turn, or even from Pulse to Pulse.
The Confederates ran into severe Resource Allocation problems in the
Trans-Mississippi once they lost control of the Mississippi River. Essentially, this area became a country unto itself (sometimes referred to as Kirby
Smithdom after the theater’s commander).
4.1.6 Confederate Control of Washington: If a Confederate force occupies Washington, D.C. at the end of a turn, then the following effects
occur:
There is a Victory Determination Check to see whether or not the Confederates have won the war. The Confederate player receives
20 Victory Points if his occupying force is in supply and not demoralized. The Confederate player receives 10 Victory Points if
his occupying force is demoralized or out of supply. These
Victory Points are recorded on the General Records Track using the Confederate Victory Points marker. See section 17.2.9 for
further details.
If the Confederates have not won an immediate victory, the game continues, but the Union Blockade Percentage and Sea Lift
Capacity are permanently reduced to zero due to the effects of Foreign Intervention.
As long as the Confederates hold Washington, all Union
Discretionary Commands must be spent in the East, and the East
must be the Union player’s primary theater choice starting with the
next Resource Allocation. Thus, if Washington is held on turn 10,
during the Resource Allocation for turn 12 the Union player must make the East the primary theater. The Resource Allocation for
turn 11 was already made and remains unchanged.
4.1.7 The Union regains control of Washington when it is reoccupied by a Union force, regardless of whether or not it is in supply or demoralized.
Confederate Victory Points scored up to that point are not lost; rather, they remain Confederate Victory Points for the duration of the game.
It is doubtful whether the United States government could have
prevented foreign intervention if their capital had fallen. Victory Point awards of this size will usually mean that the game ends immediately in a
Confederate victory, but not always. These awards are further discussed in
the Victory Points section of the rules. 4.1.8 Isolation of Washington: If a continuous line of Union
controlled rail hexes cannot be traced from Washington, D.C. to at least 15
Points of Union VP cities at the end of a turn, the following effects occur:
The Confederate player receives 2 Victory Points, which are
recorded on the General Records Track.
The East must be the Union player’s primary theater choice starting with the next Resource Allocation. Thus, if Washington is
isolated on turn 10, during the Resource Allocation for turn 12 the Union player must make the East the primary theater. The
Resource Allocation for turn 11 was already made and remains
unchanged.
All Union Discretionary Commands must be spent in the Eastern
Theater until Washington is again able to trace a rail line to 15 Points of VP cities.
4.1.9 Isolation of Washington is relieved the instant a line of Union-
controlled rail hexes may be traced to either 15 VP city points, or to the northern map edge. The reaction radius of a Confederate Army blocks rail
lines, and could isolate Washington. The 2 Victory Points scored by the
Confederate player at the end of each turn of isolation is not lost if Washington ceases to be isolated in a future turn; rather, they remain
Confederate Victory Points for the duration of the game.
Merely cutting Washington’s line of communication to the rest of the North would have caused serious problems for the Lincoln administration. If
you examine the map, you will note that essentially this means the
Confederate player must cut the rail lines to York and Philadelphia, Pennsylvania.
4.2 The Action Phase 4.2.1 Definition: Most game activities occur in the Action Phase,
which comprises a varying number of Pulses. To begin a Pulse, both players
roll two dice and compare totals to determine which one has the Initiative. The player with the Initiative goes first during the Pulse, the other player goes
after the first player has finished. During a Pulse, both players may spend
Command Points to activate forces located on the map, or they may bring on reinforcements, or they may perform a combination of the two functions. Each
Command Point spent or reinforcement entered always uses up one point of
the Initiative Dice Difference. A force is said to be “activated” when Commands are expended for it to perform one of the actions listed on the
Command Cost Chart. Each action is a separate Activation; thus, a force may

be activated more than once during a Pulse. However, a force can never move
more than once per Pulse. When a Pulse ends, it is followed by another Pulse. This continues indefinitely, until the end of the Action Phase.
4.2.2 Procedure: The Action Phase uses the following procedure,
which is repeated each Pulse until the end of the Action Phase.
4.2.3 Each player rolls 2 dice for Initiative: The player who rolls the
higher total has the Initiative for that Pulse. If both players roll the same dice
total, one of two things will happen: either the Action Phase will end immediately, or both players will receive additional Commands and the
Action Phase will continue. The effects of rolling the same total are described
in How the Action Phase Ends, following. 4.2.4 Record the Initiative Dice Difference: Subtract the lower
Initiative roll from the higher to determine the Initiative Dice Difference.
This may then be recorded on the Dice Difference Reminder Track using the player with the Initiative’s side of the marker.
4.2.5 The player with Initiative enters 1 reinforcement: The
reinforcement must be entered, and it must be a Strength Point from one of his Reinforcement Tracks or a leader from his Leader pool. Entering this
reinforcement does not expend a part of the Initiative Dice Difference. If he
has no reinforcements remaining on his Reinforcement Tracks or leaders in his Leader Pool, there is no penalty. Strength Point reinforcements are
recorded by moving the appropriate marker down one space on its
Reinforcement Track. 4.2.6 Initiative player’s half of the Pulse: The player who has won the
Initiative roll must now expend the difference between his Initiative roll and
his opponent’s in Commands and/or Reinforcements. Each Command spent or Strength Point or leader reinforcement entered uses up one Point of the
Initiative Dice Difference. Command Points spent are recorded on his Command Tracks by moving down those markers, and Strength Point
reinforcements are recorded on his Reinforcement Tracks. His half of the
Pulse ends when he has spent the Initiative Dice Difference. If the player has no more Commands or Reinforcements, or he runs out before he has spent all
the Dice Difference, then his half of the Pulse ends (there is no penalty).
4.2.7 Non-Initiative player’s half of the Pulse: The player who lost the Initiative roll must now spend the exact same Initiative Dice Difference in
Commands and/or Reinforcements as the player who won the Initiative, in the
exact same manner as the Initiative player. However, the non-Initiative player does not enter a reinforcement as the Initiative winner did. As he expends
Commands and/or enters Reinforcements, they are recorded on the non-
Initiative player’s Command and Reinforcement Tracks. When he has expended the Initiative Dice Difference, or when he runs out of Commands
and Reinforcements, proceed to the following step.
4.2.8 Return to the first step, unless the Action Phase ends: If either
player still has even a single Command on his Command Tracks, a leader in
his Leader Pool, or a Reinforcement on his Reinforcement Tracks, then the
Action Phase continues and a new Pulse is begun by starting again. However, if both players have expended all of their Commands and entered all their
Strength Point and leader reinforcements, then the Action Phase ends and
players proceed to the Command Point Table Use Phase of the Sequence of Play.
EXAMPLE 4.2.8: If you rolled a 9 and your opponent rolled a 4, there
would be a Dice Difference of 5 to expend on Commands and/or Reinforcements. The difference is recorded on the Dice Difference Reminder
Track using your side of the marker. Then you would enter one Strength
Point as a reinforcement from one of your Reinforcement Tracks (provided you have a reinforcement remaining) or one leader from your Leader Pool.
You would then spend the Initiative Dice Difference of 5 to bring on
additional reinforcements or to spend Commands for any of the actions listed on the Command Point Cost Chart. These activities include moving your
forces (which triggers combat if you enter an enemy-occupied hex), building
forts, and more. You may also enter reinforcements, which does not cost Commands, but which does use up part of the Dice Difference. Thus, if you
were to spend 3 of your 5 Dice Difference to move Strength Points, you could
spend the other 2 to enter two reinforcements. The 3 Commands are subtracted from your Command Point Tracks while Strength Point
Reinforcements are subtracted from your Reinforcement Tracks. When you
have spent the Dice Difference, your half of the Pulse is over and the other player’s half begins. Your opponent expends the exact same Dice Difference,
in this case 5. When he has finished the Pulse is over. If either of you has any
Commands or Reinforcements remaining (either Strength Points or leaders), then another Pulse is begun by rolling for Initiative again. This continues
indefinitely, until the Action Phase ends.
4.2.9 How the Action Phase Ends: The Action Phase may end in one of two ways. First, if both players have used all their Command Points from
their Command Point Tracks, have brought in all their Strength Points from
their Reinforcement Tracks, and picked all the leaders from their Leader Pools, then the Phase ends. This occurs the instant the last reinforcement or
Command is used. It is likely that one of you, usually the Confederate player,
will run out of Commands and reinforcements first. If this occurs, the Phase
still continues as usual with you both rolling for Initiative, even if one of you has nothing to do with the resulting Dice Difference.
4.2.10 The second way the Phase may end is very unconventional - each
time you and your opponent roll the same Dice Difference total for Initiative,
one of two things will occur: the Action Phase will end immediately or you
will receive additional Command Points and the Action Phase will continue.
4.2.11 During the Command Phase of each turn, the Command Point Table Use Marker is placed on the 1 space of the Table Use Track. This
indicates that the Command Point Table was used once by each player during
the Command Phase. At the bottom of each box on this Track is a code. Each time both players roll the same Initiative Dice total at the beginning of a
Pulse, they consult the Table Use Track. If the total they each rolled is listed
in the box currently occupied by the CP Table Use marker, then the Action Phase ends immediately.
4.2.12 There is no number listed in the first box on the Table Use Track;
thus, the first time both players roll the same Initiative total during a turn, the Action Phase will not end. Instead, both players consult the Command Point
Table and add the Command Points listed for that dice result to their
Command Point Tracks. The Commands are added to Tracks according to the Resource Allocation for the turn in progress.
EXAMPLE 4.2.12: Thus, if you both rolled a 5, you would advance the
marker to the second space on the Table Use Track and you would each receive 5 additional Commands for your primary theater’s Command Track, 3
for your secondary’s, 2 for your tertiary’s, 2 for your discretionary’s, and 2
Naval Commands for the Union only. 4.2.13 The players then move the Table Use marker to the second space
on the Table Use Track and continue the Action Phase. 4.2.14 The second time both players roll the same Initiative total during
a turn, there is a chance the turn will end immediately. The number listed in
the second box on the Table Use Track is 7; thus if both players roll a 7, then the Action Phase ends immediately. If the result is a total other than 7, both
players receive additional Command Points from the Command Point Table;
the Table Use marker is advanced into the third space on its track, and the Action Phase continues.
4.2.15 The third time both players roll the same Initiative total, the
Action Phase ends if the result is a 5, 6, 7, 8, or 9. The fourth time they roll the same result, the Action Phase automatically ends; thus “Any” is listed in
the last box of the Table Use Track as the result causing the Action Phase to
end. 4.2.16 If the Action Phase ends due to the first cause, there will be no
reinforcements or Commands remaining on either player’s Reinforcement or
Command Tracks. However, if the Action Phase ends due to the second
method, it is possible that Commands and/or Reinforcements will remain. In
this case, all Commands are lost, but all reinforcements are retained.
Reinforcements may be held over from one turn to the next if the Action Phase ends this way, up to a maximum of 19 reinforcements per
Reinforcement Track, and an unlimited number of leaders may remain in the
Leader pool. 4.2.17 Turns with No Pulses: There is a slight chance that the Action
Phase will end without a single Pulse being played. This happens if both
players roll the same total on their first Initiative roll, and then both roll 7 on the next. If this occurs, ignore the second result and roll again. Thus, each
turn will have a minimum of one Pulse.
4.2.18 Command Point Maximum: If your total on one of your Command Point Tracks exceeds 9, turn the marker over to its + 10 side; thus,
you have 10 Commands, plus the number listed in the space the marker
occupies. The maximum number of Commands you may ever have in one Command Point Track is 19; any extras are lost.
4.2.19 Mandatory Expenditure: The Initiative Dice Difference must
be spent by each player during each Pulse if he has Commands or Reinforcements remaining on his Tracks or leaders remaining in his Leader
Pool. If he has Commands remaining and does not wish to perform an action,
then the Points are expended although no action is taken. If Strength Points remain on their Reinforcement Tracks they must be entered. Each Command
Point spent always uses up one point of the dice difference. Commands
cannot be saved from turn to turn, nor moved from one Command Point Track to another, nor loaned to an opponent. In other words, there is no “passing” in
the game - if you have any Commands and/or Reinforcements, the Initiative
Dice Difference must be spent on them. 4.2.20 Command Point Types: Commands on the East, West, and
Tran s-Mississippi Command Tracks can be spent only in the East, West, and
Trans-Mississippi theaters, respectively. Thus, Commands are spent from the Track of the theater in which the Action is to occur, unless Discretionary or
Union Naval Commands are used. Discretionary Commands can be spent in
any theater, on naval leaders and forces, and in combination with other Commands. Naval Commands can be spent only to activate naval leaders,
SP's, naval forces, and ground leaders using sea, amphibious, or river
movement. Each Command Point spent, regardless of type, uses up one Point
of the owner’s Initiative Dice Difference. EXAMPLE 4.2.20 Thus, if you build a depot in the West, you spend 2
Command Points from your West Command Point Track, or 2 from your
Discretionary Command Point Track, or 1 Command Point from each Track. 4.2.21 Confederate Supply Problems: The Command Point cost of
some Confederate Actions will increase due to the effects of loss of territory
and the Union blockade of Southern ports. These effects are described in the Supply rules.
5.0 Leaders
DESIGNER’S NOTES: The American Civil War was above all a test of leadership. When you think of the great battles and campaigns of the war,
you immediately think of Lee and Jackson, Sherman and Grant. But the Civil
War was more than a war of great men - there were also Bragg, McClellan, Banks, and worse. In fact, for every good leader, it seems there were four bad
ones. Without good leaders, the effects of even massive superiority in
numbers could be lost. Lee was able to defeat Hooker and his Army of the Potomac even though the Army of Northern Virginia was outnumbered almost
3 to 1.
As a player you represent the Davis or Lincoln administration faced with the problems those men faced historically. A basic truth is that Lincoln
was initially served by a host of incompetent generals claiming to have the
secret to a short and successful war. It took years for good Union leaders to emerge. When they finally did, they fought and won the world’s first ―total
war.‖ The Confederate government, on the other hand, had the advantage of having better leaders, of higher rank, earlier. However, attrition took a more
fearful toll on Confederate leadership. Worse yet, few new Confederate
leaders rose to prominence, and those who did were not Shermans or Grants. The game shows these historical realities.
In order to move your armies and fight your battles, you will need to put
your forces under the control of leaders. Leaders are necessary to invade enemy territory, move more than one Strength Point at a time, and to win
important battles. During the course of the game, new leaders enter play at
the approximate date they rose to prominence historically. Leaders may be promoted, wounded, killed, or you may even remove them from the game.
Each leader is given three ratings which are used in movement and combat.
These ratings are subjective, but are based on solid research. Making numerical evaluations of a man’s abilities is a difficult thing to do, but we
hope they give you a real sense of the men these cardboard counters
represent.
5.1 Leader Rank 5.1.1 Each leader in the game has a rank in stars printed on his counter.
The greater the number of stars, the higher the leader's rank. In addition, each leader has a seniority number printed on his counter which is his relative rank
among leaders with the same number of stars and from the same branch of the
service: infantry, cavalry, or navy. Leaders of the same rank are ranked in the following priority: first infantry, then cavalry. Naval leaders are handled
separately and may never command Strength Points for ground movement or ground combat.
EXAMPLE 5.1.1: A two-star infantry leader outranks all two-star
cavalry leaders, regardless of respective seniority numbers. 5.1.2 When more than one leader is located in the same hex, there will
always be one leader who outranks all others. He is referred to as the ranking
general and is in command of that force. This concept is important when determining which leader affects a combat or commands an Army.
The star ranks in the game have real rank equivalents: one star is a
division commander; two stars designate a corps commander or admiral;
three stars denote an army commander (although a three-star cavalry general
represents a corps commander); and four stars indicate a theater commander.
For example, A.S.Johnston is the highest ranking Confederate general, while Robert E. Lee is the second highest.
EXAMPLE 5.1.2 Fremont outranks Grant, since his seniority among
three-star generals is 2, and Grant’s is 4. Both Fremont and Grant outrank Hooker and Lyon. If Grant were promoted to four-star rank, he would
outrank all other leaders in this example.
5.2 Leader Promotions 5.2.1 Starting Rank: Most leaders in the game are represented by more than one counter. A leader’s lowest ranked counter is the first counter to enter
play, and his higher ranked counters enter only due to promotion. Many
leaders have only one counter, and thus they may not be promoted. At the
start of the game, place the leaders on the Turn Record Track on the turn they
enter to remind you to put them in the Leader Pool on the correct turn.
5.2.2 Promotion Procedure: When a leader becomes eligible for promotion, his next higher ranked counter is placed on the Game-Turn Record
Track on the turn after the turn in progress. When a leader becomes eligible
for promotion, his counter must be placed on the Game-Turn Record Track. When the next turn begins, this counter is removed from the Game-Turn
Record Track and placed face-down in the owner’s Leader Pool. When a
leader reinforcement is picked and it turns out to be a promotion counter for a leader already on the map, the promotion immediately replaces the lower
ranked counter in the hex occupied by the lower ranked counter.
This manipulation becomes necessary because some leaders are better at a low rank than when promoted, which simulates the reality that some
leaders were better suited to smaller commands.
5.2.3 Picking a leader from the Leader Pool costs the owner one point of his Initiative Dice Difference; however, it costs no Command Points.
Furthermore, a leader may be entered at no cost in Initiative Dice Difference
when a player wins the Initiative Dice roll. 5.2.4 One-Star Promotion: A one-star general becomes eligible for
promotion to two-star rank on a roll of 7 or more on two dice, after he has
been in a combat in which he was not killed, wounded, or placed in the Leader Pool. Overrun is not considered combat for purposes of leader promotion.
The leader becomes eligible for promotion whether or not his Tactical Combat
Rating was used in the battle. EXAMPLE 5.2.4: In other words, if a one-star leader becomes eligible
for promotion on turn 1, you place his two-star counter on turn 2. When turn 2 begins, place the two-star counter face-down in the Leader Pool.
5.2.5 Two-Star Promotion: A two-star general becomes eligible for
promotion to three-star rank in one of two ways. First, he becomes eligible in the same way as a one-star general. Second, if a two-star leader is in an
Army, and the Army commander is killed or wounded and there is no other
three-star general in that Army to take command, then the most senior two-star general in that Army is immediately promoted to three-star rank. This
promotion occurs automatically, at no cost in Command Points or Initiative
Dice Difference and with no time delay. EXAMPLE 5.2.5: Two-star Sherman is the highest two-star general in
a hex and is in an Army under the command of Buell when Buell is killed.
There is no other three-star general in the hex; thus, Sherman is immediately promoted to three-star rank and takes command of the army.
5.2.6 Three-Star Promotion: The only three-star generals eligible for
promotion to four-star rank are the Union generals Sherman and Grant. They become eligible for promotion, on a roll of 7 or more on two dice, when they
are not wounded or killed in a battle in which they are a three-star general in
command of an Army. The battle must occur on or after turn 8; before turn 8 they may not become eligible for promotion to four stars.
5.2.7 Promotion Anomalies: Anomalous situations may arise due to a
leader having two counters in the Leader Pool at once, having his promotion counter in the pool and then becoming wounded, etc. If a leader has more
than one counter in the Leader Pool and his higher ranked counter is picked
first, place it on the map and - when the lower ranked counter is picked - discard the lower ranked counter and pick again. If the lower ranked counter
is picked first, place it and leave the higher ranked counter in the pool. If a
leader’s promotion counter is on the Turn Record Track and the lower ranked counter becomes wounded, place the lower ranked counter with the higher
ranked one on the Turn Record Track. Both are then placed in the Leader
Pool on the following turn. If a promotion counter is in the Leader Pool and the lower ranked counter is killed, discard the higher ranked counter when
picked and pick again. If the promotion is on the Turn Record Track when
death occurs, remove the promotion. If a promotion is in the Leader Pool and the lower ranked counter is wounded, place both promotion and wounded
counters on the Turn Record Track for the next turn.

5.3 Army Leader Removal 5.3.1 The highest ranking three or four-star general in an Army is in command of that Army. An Army commander must remain with his Army at
all times. The only way an Army commander may leave his Army’s hex is if
he is killed or wounded in combat, a higher-ranked leader enters the hex and
takes command of the Army, or you remove him.
5.3.2 The highest ranking three- or four-star general to enter an Army’s
hex immediately assumes command of that Army. The lower-ranked commander no longer commands the Army and may now leave the hex.
5.3.3 A player may also remove a leader from Army command by
expending two Command Points. To do so, the Army must contain a second, lower-ranked three-star leader to take command of the Army when the higher-
ranked leader is removed. Three-star leaders in command of Armies are the
only leaders that may be removed; one-star, two-star, and four-star generals can never be removed, except when allowed by the optional Variable Leader
Promotion & Casualty Table. The owner has three options for the fate of
removed leaders:
The leader can be removed from play by placing him in the
Removed Leaders Box. Leaders in this box remain there indefinitely and may re-enter play only using the procedure
outlined in Leader Losses.
The removed leader can be moved out of the Army’s hex. It does not cost additional Command Points to move him since the
removal cost pays for movement as well.
The removed leader can be demoted. A leader can be demoted only if the game includes a two-star counter for him. When
removed, the leader’s three-star counter is immediately replaced by his two-star counter and the three-star counter is placed in the
Removed Leaders Box. It remains there for the duration of the
game and may never re-enter play. EXAMPLE 5.3.3: If the three-star Union generals Burnside (Seniority
11) and Hooker (Seniority 12) were both in the same Army, Burnside would
be in command of the Army. The only way Hooker could take command is if Burnside were killed or wounded due to a Leader Loss Check or if the Union
player removed him. Burnside cannot be moved out of the hex to allow
Hooker to take over by default. If McClellan (Seniority1) were to enter the Army’s hex, he would immediately take command, since he is Senior to both
Burnside and Hooker.
5.3.4 Even though he is promotable to three-star rank, Union general Sheridan can never command an Army.
5.4 Leader Losses and Promotion Procedure 5.4.1 When Leader Loss Checks Are Made: Leader Loss Checks are made under the following circumstances:
A check must be made for each leader involved in a ground combat. Checks are made for each leader in the hex, even for
those who did not affect the combat with their Tactical or Army
Command Ratings.
A cavalry leader who attempts to retreat before combat must make
a Leader Loss Check; if he is killed or wounded, his force cannot retreat.
Naval leaders and leaders being carried by naval forces must also
check for Leader Loss when they are in a combat, including naval combats and attacks by enemy fortifications. These are explained
in more detail in the Naval rules.
A leader in a hex by himself, or in a hex with only other leaders, depots, or a fort/fortress, is not killed when an enemy force or
army reaction radius enters the hex. Instead, a Leader Loss check is made and, if he is not killed, place his counter on the Turn
Record Track for the following turn.
If a leader is being transported by naval unit and the naval force is sunk, roll for Leader Loss, and place the leader on the Game-Turn
Record Track if he is not wounded or killed.
A Leader Loss Check is not made for a force that overruns an
enemy force. Leaders of the force being overrun do make Leader Loss Checks, and if they are not killed or wounded are placed on
the Game-Turn Record Track for the next turn.
5.4.2 Procedure: Roll two dice for each leader and locate the result on the Leader Loss Table. If the result lists the rank in stars of that leader, he
suffers the indicated result - either being killed or wounded. If the dice total is
7 or more, the leader is promoted, if eligible. Any other result has no effect. Leader loss rolls for all leaders involved in the same battle are considered to
occur simultaneously.
EXAMPLE 5.4.2: When you roll for a three or four-star leader, you
must roll a 2 for there to be any possibility of loss; re-roll the dice if a 2 is rolled the first time, and on a result of 7, the leader is killed or - on any result
other than 7 - he is wounded. If you are making a check for a one-star
general, he is killed on a roll of 4, wounded on 5; any other roll has no effect on leader loss.
5.4.3 A killed leader is placed in the owner’s Killed Leaders Box. If a
promotion counter is picked for a leader who has already been killed, do not place it on the map and pick again. A wounded leader is placed on the Game-
Turn Record Track for the following turn.
5.4.4 Army Leader Loss: If an Army commander is killed or wounded in a Leader Loss Check, then the most senior three or four-star general in the
Army becomes its new commander. If there is no three-star leader, then the
most senior two-star general is immediately promoted to three-star rank at no cost in Commands or Initiative Dice Difference and takes command. If there
is no two-star general in the hex capable of promotion to three-star rank, then
the most senior three-star general on the map who is not in command of an Army is immediately placed on the Army and takes command. This move
does not cost Commands or expend Movement Points. If there is no three-star
general on the map available, then the highest-ranking three-star general in the Removed Leaders Box is immediately returned to play as the leader of the
Army. If there is still no eligible leader available, the most senior two-star
general on the map, who is capable of promotion to three-star, is immediately promoted, placed on the Army, and takes command. [Original language: If
there are no leaders in the box, or all of them have been demoted rather than
removed, then the Army counter is permanently eliminated and is replaced with Strength Point markers.]
EXAMPLE 5.4.4: Union General Thomas is killed while commanding the Army of the Cumberland. Being the most senior three- or four-star
general on the map not in command of an Army, McClellan is moved from his
location in Virginia and immediately placed in command of Thomas’ Army.
5.4.5 An army cannot be eliminated due to the lack of an eligible leader.
5.5 Revealed and Unrevealed Leaders 5.5.1 Leader counters have no values on their backs so that their identities can be concealed. Leaders that begin a scenario already deployed
on the map are placed face-up on the map for both players to see. Leaders
that enter later are placed facedown when put in the Leader Pool. When picked from the Pool, the owner first places them on their reinforcement hex;
then he may look to see the leader’s identity, being careful not to reveal it to
the enemy player. The leader remains on the map face-down until his identity is revealed (even leaders that have already been in play and were subsequently
placed in the Leader Pool).
5.5.2 A leader’s identity is revealed for the following reasons:
Revelation is triggered by the first combat the leader is involved in.
The leader need not affect the combat with his Tactical or Army Command Ratings in order to be revealed; his mere presence in the
hex is sufficient.
Cavalry leaders are revealed as soon as they are used to move SP’s more than four hexes in a single Pulse or when they attempt to
Retreat Before Combat.
Naval leaders are revealed when they are first activated to move
naval forces.
5.5.3 When a leader is revealed, he remains face-up on the map for both players to see. When leaders are placed in the Leader Pool, they are always
turned face-down. When a leader is promoted, his promotion counter is placed face-up if the leader is already face-up on the map; otherwise, he is
placed face-down.
5.6 Leader Effects on Rally 5.6.1 A Demoralized force may be rallied only in one of two ways.
First, a force which is in supply during the Rally Phase loses one Strength
Point and is rallied. Second, a force which contains a leader may be rallied during the Action Phase by the owner spending a number of Commands equal
to the Initiative Rating of the highest ranking, most senior leader in the hex.
Forces that contain no leaders cannot be rallied by the expenditure of Commands. A force may be rallied even if the senior leader in the hex lacks
the rank to activate the entire force.
EXAMPLE 5.6.1: Confederate General Cleburne is the senior leader in a hex containing 4 demoralized SP’s. The Confederate Player may rally
this force by paying 3 Commands (Cleburne’s Initiative Rating) even though
Cleburne could not, as a one-star leader, activate the entire force for movement.
5.6.2 Leaders are very important to rally forces; see Demoralization for
more detail. 5.6.3 Naval leaders cannot be used to rally ground forces.
6.0 Ground Movement
DESIGNER’S NOTES: There are two types of movement in this game:
ground movement and naval movement. Forces moving overland may also use friendly rail lines to speed their movement. The War Between the States
was one of the first wars in which rail and naval movement were of such
decisive importance. Each hex represents 25 miles of real terrain from side to side. In an
area this large, it is impossible for forces the size of those in the game to
influence more than the 25-mile piece of terrain they occupy. Thus, there are no Zones of Control in the game. However, forces organized into Armies do
have the ability to react to enemy forces that move adjacent.
Each turn represents a great enough length of time that it is theoretically possible for a force to move the length of the map in a single
turn. For logistical and administrative reasons, movements of this length
were not made historically. Long marches, such as Sherman’s march to the sea, were made, and they can be made in the game. The movement of forces
is affected by supply, the location of enemy forces, the number of Commands
available, and the number of Pulses in the current turn. To move your forces and fight your battles, you will need to use your
leaders. They are decisively important, since it is only with them that you can
move more than one Strength Point at a time and enter enemy territory.
6.1 Ground Movement Procedure 6.1.1 Ground Movement Definition: During your half of a Pulse, you can spend Commands to move your forces. The Command costs are
summarized on the Command Point Cost Chart. Command expenditures are
recorded on the owner’s Command Point Tracks. 6.1.2 There are no separate movement and combat Phases in this game.
When you enter an enemy-occupied hex, you automatically initiate combat,
unless the enemy is cavalry which Retreats Before Combat. Thus, while moving you must also be concerned with combat.
6.1.3 Movement Procedure: Forces moving by land always move from
one hex into an adjacent hex; hexes cannot be skipped. Each SP has a Movement Point Allowance of 4 Movement Points, except for SP’s under the
command of cavalry leaders, which have Movement Point Allowances of 6.
Each hex an SP enters uses up one of its Movement Points, except swamp hexes, which cost 2 Movement Points to enter.
6.1.4 Each force moves separately, one at a time. You must finish the
movement (and combat) of one force before you can spend Commands to move another force, or to conduct another operation. There is one exception:
a combined land and naval combat, which is discussed later in the Naval rules.
EXAMPLE 6.1.4: A force cannot move 2 Movement points, build a fort or a depot, or an army, and then continue with the rest of its move. If the
phasing player wishes to conduct such an operation, he will have to do so
either before the force begins its move, or after its move is complete, or both. 6.1.5 A force, regardless of its composition, can move in any direction
or combination of directions, so long as its Movement Point Allowance is not
exceeded and it does not enter prohibited terrain. A force may always move less than its Movement Point Allowance, and movement is never mandatory.
Movement Points cannot be saved from turn to turn or from Pulse to Pulse. Nor may they be lent from one force to another.
6.1.6 Movement continues until the force has either used all its
Movement Points, the owner has decided it has moved far enough, or when it enters an enemy-occupied hex and combat is initiated. When one player is
moving, the other player may not move. The non-moving player may be
allowed to roll for Army Reaction Movement or cavalry Retreat Before Combat in some cases. These types of movement are explained elsewhere in
these rules.
6.1.7 A force can be activated for movement only once per Pulse.
However, a force can be activated more than once per Pulse, so long as only
one activation is used to move the force. The other activations can be used to
rally from Demoralization, to build a fort, or any combination of actions listed on the Command Point Cost Chart.
EXAMPLE 6.1.7: If you are the Confederate and both the Army of
Northern Virginia and the Army of the Potomac are Demoralized, it is a good idea to rally your Army and then move to attack the still Demoralized Union
Army.
6.1.8 Reaction Movement by a non-phasing force does not count as an activation. Thus, a force can be activated for movement during a Pulse and
still make Reaction Movement during the opponent’s half of the Pulse.
6.1.9 Stacking Limit: There is no limit to the number of SP’s, leaders (exception, see 6.2.11), armies, markers, or any other combination of counters
that can enter the same hex.
6.1.10 Demoralized Movement: A Demoralized force can move, and its Movement Point Allowance is unaffected; however, the Demoralized force
cannot enter a hex occupied by an enemy force, unless it can overrun the
enemy force. Furthermore, a Demoralized force may not move into the
Reaction Radius of an enemy army (because this act may precipitate combat). A Demoralized force may retreat into a hex occupied by an enemy force if
there is no other retreat route, only if it can overrun that enemy force. A
Demoralized force that enters a hex containing a non-Demoralized force
causes that friendly force to become Demoralized as well. However, SP’s are
the only forces that are Demoralized; leaders, naval SP’s, forts, and so forth,
never become Demoralized. 6.1.11 Supply Effects on Movement: An unsupplied force has its
Movement Point Allowance reduced by 1 Movement Point until it again
begins a Pulse in supply. Confederate Movement Point Allowances may also be reduced due to the effects of the Union Blockade and loss of territory (this
is explained in the Confederate Supply rules.)
6.2 Leaders and Ground Movement 6.2.1 Leader Movement Point Allowances: Leaders have a
Movement Point Allowance of 12 Movement Points when moving alone.
When a leader is used to move SP’s, his Movement Point Allowance is reduced to 4 Movement Points. However, the Movement Point Allowance of
a cavalry leader is only reduced to 6, and the SP’s he is moving also have a
Movement Point Allowance of 6. This simulates the greater speed of cavalry forces.
6.2.2 Movement of Strength Points: It costs one Command to activate
a leader for movement if the leader is going to move alone. However, leaders can move SP’s.
6.2.3 Normally, SP’s must move separately, one at a time, at a cost of
one Command each. However, SP’s that are stacked with a leader at the beginning of a Pulse can be moved by that leader as a group. Remember, an
SP can never be activated for movement more than once per Pulse; thus the
SP’s must begin the Phasing Player’s half of the Pulse in the hex with the leader, or enter during the pulse as reinforcements, in order to be moved by
him.
6.2.4 To move SP’s the owner must spend Commands equal to the leader’s Initiative Rating. Then the leader and his SP’s move together as a
group. As they move, the leader cannot pick up any additional SP’s. Only
SP’s that begin the Phasing Player’s half of the Pulse stacked with a leader can be moved by that leader. However, as they move, SP’s can be left in
hexes entered by the force. The SP’s left behind cannot continue to move. A
player cannot activate a leader and then move his SP’s independently; the leader must “move” the SP’s. A leader who enters as a reinforcement during
the Pulse may subsequently activate SP’s in his hex and/or move in that same
Pulse. 6.2.5 Leaders can be activated separately when more than one occupies
the same hex.
EXAMPLE 6.2.5: If Sherman is in the Army of the Tennessee under Grant, Sherman can be activated separately at a cost of two Commands and
can move SP’s from that hex. This is true even if the leader activated is
lower-ranked than the highest-ranked leader in the hex. 6.2.6 SP Movement Limits: The number of SP’s a leader can move
depends on his rank and whether or not he is a cavalry or infantry leader. A
leader can never move more SP’s than his rank allows. If he is unable to move the SP’s, they remain in their hex. The number of SP’s each rank can
move is summarized as follows:
RANK MAXIMUM STRENGTH
1 Star Infantry 1 or 2 SP’s
1 Star Cavalry 1 SP
2 Star 1 to 6 SP’s
2 Star Cavalry 1 to 2 SP’s
3 Star 1 to 6 SP’s, or an Army (except cavalry 3 star Sheridan)
4 Star 1 to 6 SP’s, or an Army, or all Armies in a hex.
A leader’s limit is used only for Movement purposes and not for rallying.
6.2.7 Army Leaders: The highest ranked leader in an Army’s hex is
in command of that Army. If there is more than one Army in the same hex,
then each must have its own Army Commander. A general in command of an Army can move that Army plus all other leaders in that hex at his Initiative
cost in Commands. Leaders and SP’s under the command of an
Army Commander must move as one force, together with the Army Commander, unless dropped off along the path of movement. Leaders
activated by an Army Commander may not move independently of the army,
during that activation. Each Army is limited in the number of SP’s it can contain, based on the historical size of each. These limits are printed on the

Army Strength Tracks, and listed in rules sections 12.1.3 and 12.1.4. All SP's
in a hex containing an Army are considered to be in the Army, up to its maximum strength. Armies cannot pick up forces in hexes into which they
move, unless they end their pulse in the hex (exception: see Army Reaction
movement, 12.3.12). All leaders in a hex containing an Army are considered
to be in the Army.
EXAMPLE 6.2.7: The size limit of the Army of Northern Virginia is
20 SP’s; thus Beauregard - a Confederate three-star general – could move all 20 of those SP’s (if the Army were at full strength) plus all other leaders in the
Army at a total cost of 3 Commands. Thus, an Army commander allows you to
move large quantities of SP’s and leaders simultaneously while paying only the Army commander’s Initiative Rating in Commands.
6.2.8 Army Subordinate Leader Requirement (the "Red Tape"
rule): An Army Commander (AC) has a limit to the number of SP’s and leaders which he may command in combat or overrun, as the attacker. These
limits never apply to movement, to the defender in a combat, or to Reaction.
An AC may command up to 6 SP’s or subordinate (i.e., lower ranked/lower seniority) leaders. Subordinate leaders command SP’s or lower ranked
leaders up to their star rank. Cavalry leaders cannot command other leaders.
Uncommanded SP’s are not counted in an attack or overrun, although they would retreat and suffer Demoralization with the entire Army. The Tactical
Combat Rating of each leader is used, even for those in excess of the
command limit. EXAMPLE 6.2.8A: McDowell*** forms the Army of the Potomac in
Washington DC on turn 1. Although the Army contains 7 SP’s, McDowell can
only command 6 SP’s in battle until he adds subordinate leaders. McDowell can however, move and react normally with the entire Army.
EXAMPLE 6.2.8B: Beauregard***, Polk**, and Smith* command the Army of Tennessee with 15 SP’s. Beauregard commands 4 SP’s, Polk** and
Smith*; Polk** commands 6 SP’s, and Smith* commands 2 SP’s. Total
strength for an attack is therefore 12 SP’s. Without additional leaders (or a promotion), 3 SP’s are uncommanded and thus unavailable for an attack.
6.2.9 If there is more than one Army in a hex, then the Army Command
Rating of the higher-ranked, more senior leader is used if they are attacked (unless a four-star leader is in the hex). The other leader uses his Tactical
Combat Rating.
6.2.10 Movement of Leaders Alone: A leader must always begin and end a Pulse in a hex occupied by a friendly SP, NSP (subject to 6.2.11), or
depot. A player cannot intentionally place a leader such that he ends a Pulse
in a hex alone (or only with other leaders). A leader that inadvertently ends a Pulse alone in a hex is immediately placed on the Turn Record Track for the
following turn.
EXAMPLE 6.2.10: Polk is stacked with only a depot in Camden, AR. The Confederate player cannot destroy the depot during his pulse, to avoid its
capture, without first moving Polk. If part of a supply conduit, the depot in
Camden could not be removed for combat supply. If the depot is a stand-alone source of combat supply, then it would have to be consumed by combat,
even if Polk was left alone in the hex.
6.2.11 Stacks of leaders without sufficient forces is forbidden. Each ground leader must command at least 1 friendly SP, or depot (not NSP’s) per
leader. Only Washington DC is exempt from this rule. A player cannot move
excess leaders who are moving alone without SP's into a hex, nor enter excess leader reinforcements. When part of a force leaves a hex, the leaders for each
part must adhere to stacking requirements. A force with excess leaders may
move, React, or retreat into a hex containing other leaders. An Army may contain unlimited excess leaders. Naval leaders may also stack with an NSP;
at least one per leader.
EXAMPLE 6.2.11: Due to combat losses, a Confederate force is reduced to 4 SP’s, but it has 5 leaders. The Confederate player could not add
additional leaders until each leader commanded at least 1 SP or depot.
Otherwise he would suffer no penalty, since he did not intentionally create excess leaders.
6.2.12 A leader moving by himself may never enter a hex occupied by an
enemy SP, depot, fort/fortress, or Army Reaction Radius. He may enter a hex adjacent to an enemy Army if the hex entered contains a friendly SP. He may
move in enemy and neutral territory. He may never use river hexsides or rail
lines that are under enemy control. 6.2.13 A leader that begins a Pulse stacked with an SP can be moved by
himself; he is not forced to remain with the SP. The only exception to this is
for Army commanders, who must remain with their Army at all times (until killed, wounded, removed, or replaced by a higher-ranked three or four-star
leader).
6.2.14 It costs only one Command to move a leader alone, and he can spend up to 12 Movement Points. A leader moving alone for even a single
hex cannot move SP’s in the same Pulse. Leaders can move by rail freely;
i.e., they do not need to begin the Pulse on a rail hex, and they may use more than one rail line in a single Pulse. Leaders moved by rail do not count
against the owner’s rail capacity; they move for free. Furthermore, Union
leaders can be moved by sea or along navigable river hexsides without the aid
of a naval transport and at no cost in Sea Lift Capacity. These different types of movement can be used together during the same Pulse. Leaders, like other
counter types, can be activated for movement only once per Pulse.
EXAMPLE 6.2.14: A leader moving alone could move 4 Movement Points to a friendly rail line, move along that rail line to a river, move by
river, then along another rail line, and up to 8 additional Movement Points.
6.2.15 Four-Star Generals: There are only two four-star leaders in the
game: Union Generals Grant and Sherman. Both reach four star rank only by promotion.
6.2.16 A four-star leader can command an Army in exactly the same
way as a three-star general; however, they are more powerful than that. A four-star leader can command all Armies in the same hex if each army also
contains a three-star leader. An Army group such as this may be moved as a
whole by activating the four-star leader. The Army group may use either the four-star leader's initiative rating when rolling for Reaction (see 12.3), or each
individual Army commander may roll for Reaction, at the player's option.
Furthermore, when engaged in combat, the four-star leader uses his Army Command Rating, and the other leaders in the hex use their Tactical Combat
Ratings.
6.2.17 A four-star leader in command of an Army (or Armies) can freely be moved out of that hex, providing there is a three-star general in the
hex to take command of each Army when he leaves. This is an exception to
the Army leader removal rules. 6.2.18 Cavalry Leaders: Cavalry generals use a different system
since there were so few cavalry troopers historically, in comparison with the
number of infantry. Each cavalry leader can command a number of SP’s equal to the number of stars in his rank. When the cavalry leader moves SP’s,
the Movement Point Allowance of both is 6.
EXAMPLE 6.2.18: General Thomas can move only 2 SP’s, since he is
a one-star leader. As he moves, one SP drops off and he continues moving the
other. General Hooker is moving the Army of the Potomac with 23 SP’s and 2 lower ranked leaders at a cost of only 3 Commands, Hooker’s Initiative
Rating. General Sheridan is a one-star leader and is moving one SP six hexes
as cavalry. General Hancock is moving alone, which costs only one Command, along the rail line leading off the diagram.

6.3 Terrain Effects on Movement
6.3.1 To enter a hex costs the moving force 1 Movement Point, except for swamp hexes which cost 2. However, movement into some hexes may be
prevented due to enemy naval forces or restricted terrain.
6.3.2 The four types of restricted terrain are mountain hexes, mountain
hexsides, all-sea hexes, and impassable hexsides. Mountain hexes can be
entered or exited only by crossing a road hexside. If the mountain hex has no
road or the hexside to be crossed is not a road hexside, then the hex cannot be entered. Mountain hexsides are simply smaller mountains (in game terms)
and can be crossed only across gap hexsides. All-sea hexes can be entered
only by Union Naval SP’s, which can carry SP’s if they are Ocean Transports. Impassable hexsides cannot be crossed by SP’s unless carried by Union Naval
Transport or Sea Lift. The Naval Rules explain these procedures in detail.
6.3.3 Gap hexsides should not be confused with the valleys, such as the Shenandoah Valley (hexes 4905, 4906, 4806, 4807, 4708, and 4709).
6.3.4 A force cannot enter a hex occupied by an enemy fort or fortress
(manned or unmanned) by crossing a navigable river hexside. Thus, the Confederate player cannot enter Fort Pickens (2730) or Fort Pulaski (4425) if
they are occupied by a Union SP or are unmanned but in supply, since they
are separated from hexes 2629 (Pickens) and 4325 or 4424 (Pulaski) by navigable river hexsides.
6.3.5 Regardless of the type of movement - ground, retreat, reaction, etc.
- all are subject to these rules. Thus, a force cannot retreat across a hexside it could not cross in movement.
6.4 Theater Boundary Effects on Movement 6.4.1 To move a force, the owner must spend Commands from either his
Discretionary Command Track or from the Track corresponding to the theater
in which the force is located. 6.4.2 Discretionary Commands can be spent regardless of the force’s
location.
6.4.3 Discretionary Commands can be used in combination with non-Discretionary Commands.
6.4.4 Regardless of the type of Commands spent to activate a force, it
may move from one theater to another. Thus, it is possible for a force to have Commands spent on it from more than one Command Track in the same Pulse
so long as the force is located in that theater when the Commands are spent or
Discretionary Commands are spent. EXAMPLE 6.4.4: If you start in the West, for instance, move to the East
and then build a fort, the Commands to move would come from the West (or
Discretionary) and the Commands to dig in would come from the East (or Discretionary).
6.5 Movement in Friendly, Enemy, And Neutral
Territory 6.5.1 A player can move his SP’s into friendly or neutral hexes without the aid of a leader. To enter an enemy hex, SP’s must be moved by a leader.
There are no exceptions; if a force in enemy territory becomes leaderless due
to a Leader Loss Check, then that force cannot be activated for movement until another leader is moved into the hex. A leaderless force in enemy
territory may retreat as a result of combat; retreat is not movement.
6.5.2 A hex is an enemy hex when it is located in a state that is enemy, and which has not been converted, or in a neutral state that has been converted
by the enemy player.
6.5.3 A leaderless force on the border, inside enemy territory, may move directly into friendly or neutral territory, but may not cross enemy hexsides.
EXAMPLE 6.5.3A: A leaderless Union force is in Columbia, SC. SC has been converted and is a neutral state to the Union. The force desires to move
to Augusta, GA, which is directly adjacent to the SC border. There is a Union
force already in Augusta which it wishes to join. If GA is an enemy state, the force cannot move into Augusta without a leader.
EXAMPLE 6.5.3B: A Union force in hex 5106 (Arlington/Alexandria,
VA) can cross the Potomac River into MD or Washington, D.C. 6.5.4 A force without a leader can enter a border hex that contains neutral
and friendly territory, but not one containing neutral and enemy territory or
friendly and enemy territory. 6.5.5 SP’s moved by rail are not subject to these limitations. An SP can
move along friendly controlled rail lines in enemy territory without aid of a
leader. Reinforcements can also be brought in by rail in enemy territory. One thing to keep in mind is that you never convert hex status until you
convert the entire state. The fact that you can place Control markers on the
map may make this confusing. You can control rail lines and cities in enemy territory, but the hex status in terms of friendly/enemy/neutral remains
unchanged, until the entire state has been converted.
6.6 Rail Movement 6.6.1 Procedure: SP’s that begin their Pulse on a friendly rail hex can move by rail. To do so, the owner spends Commands as he normally would to
activate a force for movement, but instead of moving only 4 or 6 hexes, the
force can move an unlimited number of hexes along his own rail lines. A
force can move only from one rail hex to another along the rail line; hexes
cannot be skipped, nor can enemy-controlled hexes be entered. Hexes in the
Reaction Radius of an enemy army can be entered only if the hex contains a friendly force (see Armies for more detail). To use rail movement, a force
must begin and end its movement on the rail line. It cannot combine rail with
non-rail movement in the same Pulse. Historically, there was a rail line gap between Selma and Montgomery,
Alabama, which was serviced by a short run river boat line. Instead of
making a special rule for this gap, we have connected the two by rail. 6.6.2 Leaders moving alone can use rail movement also, but they can
combine rail and non-rail movement in the same Pulse. In addition, they need
not start the Pulse on the rail line, may use more than one line in a Pulse, and do not expend Rail Capacity when traveling by rail.
6.6.3 An SP can be moved by rail in enemy territory without aid of a
friendly leader as long as it moves along friendly controlled rail lines. 6.6.4 Rail Movement Across Rivers: Examine the map and note that
rail lines are considered continuous across navigable rivers if there is a
railhead on each side of the river. Thus, a force that begins in Monroe, Louisiana can move by rail across the Mississippi at Vicksburg and on into
the heart of the Confederacy. Naval forces exert a river control radius along
river hexsides. A rail line crossing a hexside controlled by a naval SP of the opposing player is considered cut and cannot be crossed using rail movement.
EXAMPLE 6.6.4: Force A may move by rail since it begins the Pulse
on a rail hex. Force B may not use rail movement this Pulse, because it does not begin on a rail hex. The force moving by rail may cross the navigable
river hexside at Vicksburg unless force C is an enemy NSP. An enemy NSP
would cut the rail line because it would control that navigable river hexside. 6.6.5 SP Limits: The number of SP’s each player can move in a
single Game-Turn (not Pulse) is limited. A player’s rail movement limit
applies to those rail lines he begins the game in control of, plus those enemy lines that he converts during play. Each SP moved by rail expends 1 Point of
the owner’s rail capacity points. Leaders move freely, however.
6.6.6 Rail Capacities:
Union: 6 SP’s per turn maximum
Confederate: 4 SP’s on turns 1 through 7
3 SP’s on turns 8 through 12
2 SP’s on turns 13 through 17
1 SP on turns 18 and 19
Confederate rail limits are also shown on the Confederate Game-Turn Record Track.
These limits show the effects of wear and tear on the vastly
undermaintained Confederate rail net. 6.6.7 Rail Movement Prohibitions: Armies cannot be moved by
rail, nor can Naval Strength Points. Naval leaders can be moved by rail, just
as any other leader. An army represents a very large logistical tail composed of hundreds
of wagons and other gear. It was not practical to move these by rail.

7.0 Ground Combat
DESIGNER’S NOTES: More Americans died in the American Civil War
than in all of America’s other wars combined. At the one-day battle of Antietam, there were more American casualties than in all of America’s
previous wars. The Civil War was the most deadly war fought between 1815
and the First World War. The great casualty rate in the Civil War had several causes. First, the
rifled musket was a deadly weapon. It had an effective range four times
greater than the previously used smooth bore musket. The tactics used with the smooth bore were then used with the rifled weapon — the result was
carnage. The old style Napoleonic tactics of mass and shock were proven
obsolete and deadly to those who attempted to use them. The final result of the rifled musket was to make the defense much more powerful than the
offense, and to make all combat more bloody. The second reason the war was
so destructive was the sheer number of men involved. In a large Civil War battle, it was typical to have over 100,000 men directly involved in combat on
a single day.
With the large size and huge casualty rate of the Civil War battle, it was impossible for either side to win a crushing total victory. Without exception,
no Civil War battle resulted in the destruction of either side’s army. Some
people claim that the battle of Nashville was a crushing victory, but in fact it was not. Hood’s Army of Tennessee was not destroyed in a single battle, but
was destroyed in two battles - Franklin and Nashville - and a disastrous
retreat over barren lands in the dead of winter. The general result of a Civil War battle was that one side or the other
would win a tactical victory and the other would retreat away in good order. Pursuit was impossible because the winner was as exhausted by victory as the
loser was by defeat. The armies would regroup and face each other again.
On some occasions, one army would recover faster and would be able to turn the tide of initiative and launch a counteroffensive. Lee’s two invasions of the
North are such campaigns.
This game reflects the realities of Civil War combat - both sides will suffer almost equal losses; both sides will usually become demoralized, and
small battles will be tactically more decisive than large ones. The army that
recovers from demoralization first has an advantage and may launch a counteroffensive. Both sides will lose strength if they are unable to rally their
forces by the end of the turn. This reflects the high desertion rate on both
sides during the Civil War. Leaders are very important to combat in this game. A leader can affect
a combat in one of two ways. A leader adds his Tactical Combat Rating to
either his own or the enemy’s die roll when resolving combat. This reflects that leader’s ability to fight a tactical battle. If the leader is in command of
an Army, he may affect the battle with his Army Command Rating. This
represents the leader’s ability to control and lead an Army in combat. Historically, leadership was as important as numbers, and in the game, the
same is true.
7.1 Combat Procedure 7.1.1 When Combat Occurs: Combat occurs when the player whose
half of the Pulse is in progress moves a force of at least one SP into a hex containing an opposing force. For purposes of the rules which follow, the
player whose half of the Pulse is in progress is termed the Phasing Player, and
his opponent is termed the non-Phasing player. 7.1.2 Forces are activated for movement one at a time and move
separately; in addition, combats are resolved one at a time. A force must
finish its movement and combat before another force can be activated. A Demoralized force can never initiate combat, although it must defend if
attacked.
7.1.3 Combat Procedure: The following outline describes the
procedure used in resolving combat.
7.1.4 Movement: The Phasing player activates one of his forces through
the expenditure of Commands and begins moving. If he wishes to enter a hex in the Reaction Radius of one of the non-Phasing player’s Armies, then he
must verbally announce this intention; go to Step 7.1.5. If the Phasing
player’s force enters a hex containing one of the non-Phasing player’s cavalry forces, go to Step 7.1.6. If the Phasing player’s force enters a hex containing
a non-Phasing player’s force that is not an army or cavalry force, go to Step
7.1.7. 7.1.5 Army Reaction Option: If the non-Phasing player’s force is an
Army, then that player can roll for Army Reaction when the Phasing player
announces his intention to enter that Army’s Reaction Radius. If Reaction is successful, the non-Phasing player’s Army can move one hex. The Phasing
player must announce whether any part of his force will be left behind, before
the non-Phasing player rolls for Reaction. If the hex entered is the hex the Phasing player announced his intention to enter, combat is initiated; go to Step
7.1.8. If the army enters another hex, then the Phasing player’s force can
continue to move (if it has Movement Points remaining). If it enters the non-
Phasing player’s Reaction Radius again, the Reaction procedure is repeated. If Reaction fails, or the non-Phasing player decides not to roll for Reaction,
combat is initiated when the Phasing player’s force enters the hex occupied by
the non-Phasing player’s force; go to Step 7.1.8.
7.1.6 (Optional) Non-Army Reaction Option: If the non-Phasing
player’s force is not an Army, and includes a Ground Leader, then he can roll
for non-Army Reaction when the Phasing player announces his intention to enter that hex. If Reaction is successful, the non-Phasing player’s force can
move one hex (see Optional rule 21.9). If Reaction fails, or the non-Phasing
player decides not to roll for Reaction, combat is initiated when the Phasing player’s force enters the hex occupied by the non-Phasing player’s force.
7.1.7 Cavalry Retreat Before Combat Option: When the Phasing
player’s force enters a hex containing one of the non-Phasing player’s cavalry forces, the non-Phasing player has the option to Retreat Before Combat.
However, Retreat Before Combat may not be made if the Phasing player’s
force contains a cavalry leader or if the non-Phasing player’s force is currently Demoralized. If the non-Phasing player’s force retreats, then the Phasing
force must stop movement and has been successfully “screened” by the non-
Phasing cavalry. If no Retreat Before Combat is made, then combat is initiated; go to Step 7.1.8.
7.1.8 Combat Ratio/Differential Determination: If both forces
occupy the same hex, then combat is initiated. The Phasing player is always the attacker, even if the non-Phasing player uses Reaction Movement to
initiate combat. Consult the Combat Ratio/Differential Determination Chart
and cross reference the attacker’s SP strength with the defender’s SP strength to determine the Combat Results Table Column to be used in resolving the
combat. The defender’s strength consists of all the SP’s in the hex, regardless of the presence of leaders. Thus, if 8 SP’s and a one-star leader occupied the
same hex and were attacked, the defense strength would be 8 (not 2, which is
the number of SP’s the leader would be allowed to move and thus attack with).
7.1.9 Combat Results Table Column Shifts: The number of Combat
Results Table column shifts which will apply to the combat is determined. The column will be shifted to the left due to terrain in the combat hex, and to
the right one column if the defending force is already Demoralized. If both
apply, then the Demoralization shift is subtracted from the terrain shift to determine the final shift applied to the combat.
7.1.10 Overrun Determination: If the result from the Combat
Ratio/Differential Determination Chart indicates that an overrun has occurred, then the non-Phasing force is eliminated and the Phasing force can continue to
move (if it has Movement Points remaining). If there is a possibility that
overrun will occur, then the column shift total from Step 5 is subtracted from
the number listed on the Combat Ratio/Differential. If the result is 1 or
greater, then an overrun occurs; if the result is zero or less, then no overrun
occurs and the combat is resolved on the L column (4 to 1) of the Combat Results Table.
7.1.11 Combat Resolution: If no overrun has occurred, then the final
Combat Results Table Column is located on the Combat Results Table and the combat is resolved.
7.1.12 Both Players Roll a Die: Each player rolls one die and locates
his result on the Combat Results Table under the column determined by use of the Combat Ratio/Differential Determination Chart. The Phasing player
locates his result under the “Def” column to determine the damage he has
done to the defender (the non-Phasing player). The non-Phasing player does likewise, but locates his result under the “Att” column. If neither side has a
leader present, then the results are applied; go to Step 7.1.16. If one or both
players have a leader or leaders present, go to Step 7.1.13. 7.1.13 Leaders without Armies: If either player’s force contains an
Army, then skip this step and go to Step 7.1.14. If either player has a leader
or leaders in his force, then only the highest ranked leader in each player’s force affects the combat. Thus, a maximum of only 2 leaders - one per side -
may affect a combat that does not involve an Army. The Tactical Combat
Rating of the Phasing player’s leader (if he has a leader) is added to his die roll result from Step 7.1.12; likewise, the non-Phasing leader’s Tactical
Combat Rating is added to the non-Phasing player’s die roll result. However,
if a Union leader’s Tactical Combat Rating is tinted red, his Rating is added to the Confederate die roll; likewise, a Confederate leader whose Tactical
Combat Rating is tinted white adds his Rating to the Union die roll. The final
die roll results are then found on the Combat Results Table, and results are determined; go to Step 7.1.16.
7.1.14 Army Combat: When an Army is present in combat, then all
leaders in that Army except the Army commander use their Tactical Combat Ratings to modify the combat resolution die roll result. Leaders whose
Tactical Combat Ratings are tinted with the opponent’s color add their
Ratings to their opponent’s die roll (as in Step 7.1.13). If the Army commander, or both Army commanders, if both sides have an Army present,
has an Army Command Rating of zero, then the preceding modifications are

applied and are located on the Combat Results Table; go to Step 7.1.16.
However, if one or both sides’ Army commanders have a Rating greater than zero, the following procedure is used.
7.1.15 Each Army Command Point allows one of the two combat die
rolls to be re-rolled. This is called a Re-Roll Option. Leaders whose Army
Command Ratings are tinted in their opponent’s color give their Re-roll
Options to their opponent. The opponent receives the re-roll even if his force
does not contain an army. When one or both players receive Re-Roll Options, use the following procedure:
If the Phasing (i.e., attacking) player has a Re-Roll Option, he may have either his own or the non-Phasing player’s combat resolution
die roll re-rolled once. This expends one of his Re-Roll Options.
If he is satisfied with the results from Step 7.1.12, he may choose to pass instead of re-rolling.
If the non-Phasing (i.e., defending) player has a Re-Roll Option, he may have either his own or the Phasing player’s combat resolution
die roll re-rolled. If he is satisfied with the combat results, he may
pass instead of expending one of his Re-Roll Options.
The two players continue this procedure until one of two things
occurs: either both players have expended all their Re-Roll
Options; or both players pass in succession. A player must pass if he has no Re-Roll Options remaining. The final die roll results are
located on the Combat Results Table and the results are
determined.
7.1.16 Combat Results Application: The attacker’s (Phasing player’s)
final die roll result is located under the “Def” column to determine the damage
he has done to the defending (non-Phasing) force. The result depends on the size of the attacking force, which is either Small (1 to 3 SP’s), Medium (4 to 9
SP’s), or Large (10 or more SP’s). The defender (non-Phasing player) does
likewise by locating his result under the “Att” column next to his force size. Combat results are applied, and both sides make Leader Loss Checks for any
leaders they have present in the hex.
7.2 How to Use the Combat Results Table 7.2.1 Determining the Combat Ratio/Differential: To determine the
column of the Combat Results Table (hereafter CRT) to be used in a combat, cross-reference the attacking player’s strength with that of the defender on the
Combat Ratio/ Differential Determination Chart. If the result is a single letter,
then that letter is located on the top row of the Combat Results Table as a column.
7.2.2 If the result is an (o), then an overrun has occurred, and the
defending force is immediately eliminated after making any Leader Loss
Checks for the defending force. Leaders who are not killed in an overrun
force are placed on the Game-Turn Record Track for the next turn. The
Phasing player’s attacking force is unaffected and may continue to move if it has Movement Points remaining.
7.2.3 If the result is less than 1 to 3, the table will show a dash (--). This
indicates that the defender’s force so greatly outnumbers the attacker’s that the attacker is automatically eliminated if the attack is made, at no loss to the
defender. The defender does not make Leader Loss Checks whereas the
attacker does. Unless the attacker’s leader dies in the Leader Loss Check, he is placed on the next turn on the Game-Turn Record Track.
7.2.4 If the result is an “L” followed by a number, this indicates that the
“L” column of the CRT is used, unless the defender occupies terrain that gives him the listed number of column shifts (after subtracting one column if he is
Demoralized) to reduce the ratio to 3 to 1 (the “K” column). If the number of column shifts is less than the number listed next to the “L” then the “L”
column is used to resolve the combat. If the number of column shifts exactly
equals the listed number, then the 3 to 1 column is used. If the number of shifts exceeds the listed number, then begin at 3 to 1 and shift the Combat
Results Table column one column to the left for each point of difference
between the defender’s column shifts and the number accompanying the “L”. 7.2.5 If the result is an “o” followed by a number, this indicates that the
defending force is overrun unless the defender receives at least the number of
column shifts listed. If the defender does have that number of column shifts or more in his favor, then the combat is resolved on the “L” (4 to 1) column; if
the defender lacks sufficient column shifts, then he is overrun.
7.2.6 Within the above limitations, the Combat Results Table may never be shifted above 4 to 1 or below 1 to 3. Combats involving column shifts that
push the column below 1 to 3 are resolved on the 1 to 3 (A) column. Combat
in which the column is shifted above 4 to 1 (L) due to the defender being Demoralized are resolved on the 4 to 1 column.
7.2.7 Combat Resolution: To resolve a combat, players use the column
on the Combat Results Table determined by the preceding procedure and both roll one die. Their results are located on that column under “Def” for the
attacker (Phasing player) and “Att” for the defender (non-Phasing player).
The final die result may be affected by the presence of leaders and/or Armies.
7.3 Manual Combat Ratio/Differential Determination 7.3.1 In the unlikely event that a combat involves more than 25 SP’s on one or both sides, use the following procedure to determine the Combat
Results Table column. You may skip the following rules if you like and refer
back to it only when and if the need arises.
7.3.2 Combat Ratio Determination: Divide the total number of
attacking SP’s by the total number of defending SP’s. Any remaining
fractions are rounded off, in the defender’s favor. The result is a ratio called the Combat Ratio. If the Combat Ratio is less than 2 to 1, but more than 1 to
2, then you use a Combat Differential instead of a Combat Ratio.
EXAMPLE 7.3.2: 6 SP’s attacking 2 SP’s would be a 3 to 1 Combat Ratio. 5 SP’s attacking 2 SP’s would be a 2 to 1 Combat Ratio, because the
fraction is rounded off in the defender’s favor (i.e., 5 divided by 2 equals 2.5
to 1, rounded to 2 to 1). 7.3.3 Combat Differential Determination: To determine a combat
differential, subtract the defending SP’s from the attacking SP’s; the result is
the Combat Differential. EXAMPLE 7.3.3: 5 SP’s attacking 3 SP’s would be a ratio of 1.66 to 1,
which is less than the mandatory 2 to 1 combat ratio, but more than 1 to 2.
Thus, a Combat Differential is used instead; 3 from 5 equals a Combat Differential of +2.
7.3.4 Combat Ratio Limitations: The CRT has a Combat Ratio limit
of 4 to 1 and 1 to 3 on the high and low ends. Combat Ratios are determined first, and then column shifts are applied to any combat where the initial odds
are at least 1 to 3. If the final modified Combat Ratio is greater than 4 to 1,
but less than 8 to 1 (overrun), use the 4 to 1 column to resolve the combat. If the final result is less than 1 to 3, then the attack is resolved on the 1 to 3
column.[original language: results in an automatic elimination for the
attacker, while the defender is completely unaffected.] EXAMPLE 7.3.4: The ratio is 5 to 1, but the defender occupies a
swamp hex; the final Combat Ratio adjusted for terrain is 3 to 1. If the final
Combat Ratio is 8 to 1 or more, then the defender has been overrun. 7.3.5 Combat Differential Limitations: If the combat is resolved as a
Combat Differential, use the +5 and -3 columns if the differential is greater
than +5 or less than -3, respectively. However, unlike Combat Ratios, you determine the Differential column first, and then shift it for terrain and
Demoralization.
EXAMPLE 7.3.5: If the differential were +7, it would be located on the +5 column; then you would apply any column shifts. Note that, if you use the
Combat Ratio/Differential Determination Chart, this is done for you
automatically.
7.4 Leader Effects on Combat 7.4.1 When Leaders Affect Combat: If a leader is in command of a moving force that enters an enemy-occupied hex, then he affects that combat.
If the defending hex contains a leader, he also affects the combat. Only one
leader per side affects a combat unless an Army is present. When a leader is present in a hex where combat occurs, his Tactical Combat Rating or Army
Command Rating (if he is in command of an Army) must be used in that
combat resolution. A player does not have the option to withhold a leader if one is present. In some cases, a leader will not be able to affect a combat die
roll; however, he is still considered involved in the combat and must make a
Leader Loss Check at its conclusion. 7.4.2 Leaders without Armies: If there are no Armies on either side,
only the highest ranking leader on each side affects the combat. Since leaders
may not move as a group unless they are part of an Army, the attacker’s force will contain only one leader. However, the defending force may be composed
of any number of SP’s and leaders. In this case, only the highest ranking
leader in the hex affects the combat, although all SP’s in the hex are used in combat.
7.4.3 To resolve the combat, determine the column used on the Combat
Results Table and then both players roll one die. Then the Tactical Combat Ratings of the leaders who may affect the combat are added to the appropriate
die rolls. A player adds his leader’s Tactical Combat Rating to his own result
unless it is tinted with his opponent’s color on that leader’s counter. If a Union leader’s Tactical Combat Rating is tinted red, it is added to the
Confederate die roll; likewise, a white-tinted Confederate Tactical Combat
Rating is added to the Union die roll. 7.4.4 A leader whose Tactical Combat Rating is tinted in the enemy’s
favor never adds that Rating to his owner’s die roll; only to the opponent’s.

EXAMPLE 7.4.4A: Confederate General Jackson increases the
Confederate player’s die result by 2, while Confederate General Polk
increases the Union player’s result by 1. EXAMPLE 7.4.4B: General Meade may command up to 6 SP’s since he
is a two-star general. In the example above he is attacking Jackson with 5
against 2. By cross-referencing the attacking strength of 5 against a defending strength of 2 on the Combat Ratio/Differential Determination
Chart, we see that this combat will be resolved using the J column of the CRT
(it is a 2 to 1 attack). Each player rolls one die and modifies the result for any Tactical Combat Ratings used. In this case, Meade adds +1 to the Union roll
and Jackson adds +2 to the Confederate. The Union die roll was a 3 modified
to a 4, while the Confederate result was a 6 modified to an 8. Cross-referencing the Union result on the CRT we find that the 4 roll yields a result
of d1 since we use the result under the Def column and the medium size row
(the Union force is medium size). The Confederate roll is located under the Att column and yields a result of d in the small force size row (the
Confederate force is small) against the Union. Thus, the final result is that
the Confederate loses an SP and is Demoralized, while the Union is only Demoralized. Had Polk been the Confederate leader instead of Jackson, his
Tactical Combat Rating would have been added to the Union result. Thus, the
final Union die roll would have been 5, the Confederate 6. Leader Loss Checks are made for both leaders at the conclusion of combat resolution.
7.4.5 Leaders in Armies: The Tactical Combat Rating of every leader
in an Army, except the Army commander, is used to affect one or both of the combat resolution die rolls. Some leaders may have their Rating tinted in the
opponent’s favor, in which case that Rating is added to the opponent’s die
roll. An Army’s commander does not use his Tactical Combat Rating; instead, his Army Command Rating is used. Each point of his Rating allows
one combat resolution die roll to be re-rolled. This is called the Re-Roll
Option, and all three- and four-star Army leaders whose Ratings are tinted in their opponent’s color give their Re-roll Options to their opponent. This is
true even if the opponent’s force is not an Army.
7.4.6 To resolve a combat involving an Army on one or both sides, the players roll one die each, modify these results for the effects of Tactical
Command Ratings of the leaders present, and locate the results on the Combat Results Table. Then the players begin the procedure following to determine
the final combat resolution die rolls.
1. Attacker’s Re-Roll Option: If the attacker’s force is an Army, and that Army has a commander allowed a Re-Roll Option - or if the
defending force is an Army commanded by a leader allowing the
attacking player a Re-Roll Option - then the attacker must decide whether or not to expend an Option. If he spends an Option, he may
re-roll his own combat die or have his opponent re-roll his. This
expends one Re-Roll Option. If the attacker is satisfied with the original combat die rolls, he may pass instead of spending any of his
Options. Once a die is re-rolled, the first result is lost. In other
words, if you re-roll a die and achieve a worse result, you may not use the original roll; it is lost.
2. Defender’s Re-Roll Option: If the defending force contains an
Army and the Army commander’s Army Command Rating is greater than 0 and not tinted in his opponent’s color, then the defender
receives Re-Roll Options equal to that leader’s Rating. In addition,
the defender receives Re-Roll Options if the attacking player’s Army commander gives Re-Roll Options to the opposing side. The
defender then has the option to expend one of his Re-Roll Options to
have his own or the attacker’s combat resolution die roll re-rolled. If
he is satisfied with the results as they are, he may pass, thus saving
his Re-Roll Options. 3. Re-Roll Options Continue: If either player has any Re-Roll
Options remaining, then Steps 1 and 2 are repeated. This continues
until both players have expended all their Re-Roll Options, or until
both players have passed in succession. Passing is mandatory on the
part of a player with no Re-Roll Options remaining. However, if a
player has Re-Roll Options remaining, and his opponent also passes, then the preceding procedure is terminated, even if one or both
players have Re-Roll Options remaining. The final die results,
modified for the Tactical Combat Ratings of the other leaders involved in the combat, are located on the CRT to determine the final
results of the combat.
EXAMPLE 7.4.6: Grant and Lee have Army Command Ratings of 2 and 3, respectively. Assuming that neither player passes, then if Grant were
attacking Lee, Grant would have the first Re-Roll Option, then Lee, then
Grant, then Lee, then Lee again. Thus, Lee has a one re-roll advantage over Grant. However, if Grant passed on his first Option and Lee did not, then
when his second Option began, Grant would have two Re-Roll Options
remaining, and so would Lee. 7.4.7 Maximum Leader Modifications: The maximum amount a die
roll may be modified is by adding 6. Modifications above 6 are ignored. The
same is true for Army Command Ratings: the maximum number of Re-Roll Options a player may have in a particular combat is 6.
EXAMPLE 7.4.7: The Union army under Grant moves to attack the
Confederate army of Mississippi under Johnston. Cross-referencing the Union attacking strength of 9 with the Confederate defending strength of 6 on
the Combat Ratio/Differential Determination Chart, we find that the combat
will be resolved on the +3 (G) column on the CRT. The combat dice rolls will be modified as follows: the Union player receives +3 to his roll for the
Tactical Combat Ratings of Sherman, McPherson and Confederate leader
Polk; the Confederate player receives +2 to his die roll for the Tactical Combat Ratings of SD Lee and Union leader McClernand. Furthermore, the
Union player has two reroll options for Grant’s Army Command Rating while
the Confederate player receives one option for Johnston. Both players roll a die; the Union result is 2 which is modified to a 5, the Confederate result is a
5 modified to a 7. Cross-referencing the Union result under the Def portion
of the +3 column we find the result inflicted on the Confederate force next to the Medium size row (the Union force is medium sized) which is a d1. Cross-
referencing the Confederate 7 result under the Att portion we find the result
against the Union is d2 (next to the M size because the Confederate force is medium sized also). Thus, at this point the Union has lost the battle and will
be forced to retreat. The Union player decides to have the Confederate player
reroll his die by spending one of Grant’s reroll options. Unfortunately for the Union the Confederate rolls a 6 which is then modified to an 8, which means
that the result against the Union is still d2. The Confederate player then has
the option to use his one reroll option but passes instead. The Union player then decides to spend his second reroll option, the Confederate rolls a 1,
which is modified to a 3 yielding a d1 result against the Union. The
Confederate player then decides to spend his reroll option, he rerolls his own die and receives a modified 6 which is still a d1 against the Union. The Union
player has spent both of his options and the Confederate has none remaining,
so the final result is that both sides inflict a d1 result against each other, the battle is a draw and the attacker, the Union, must retreat. Leader Loss
Checks are then made for all the leaders.
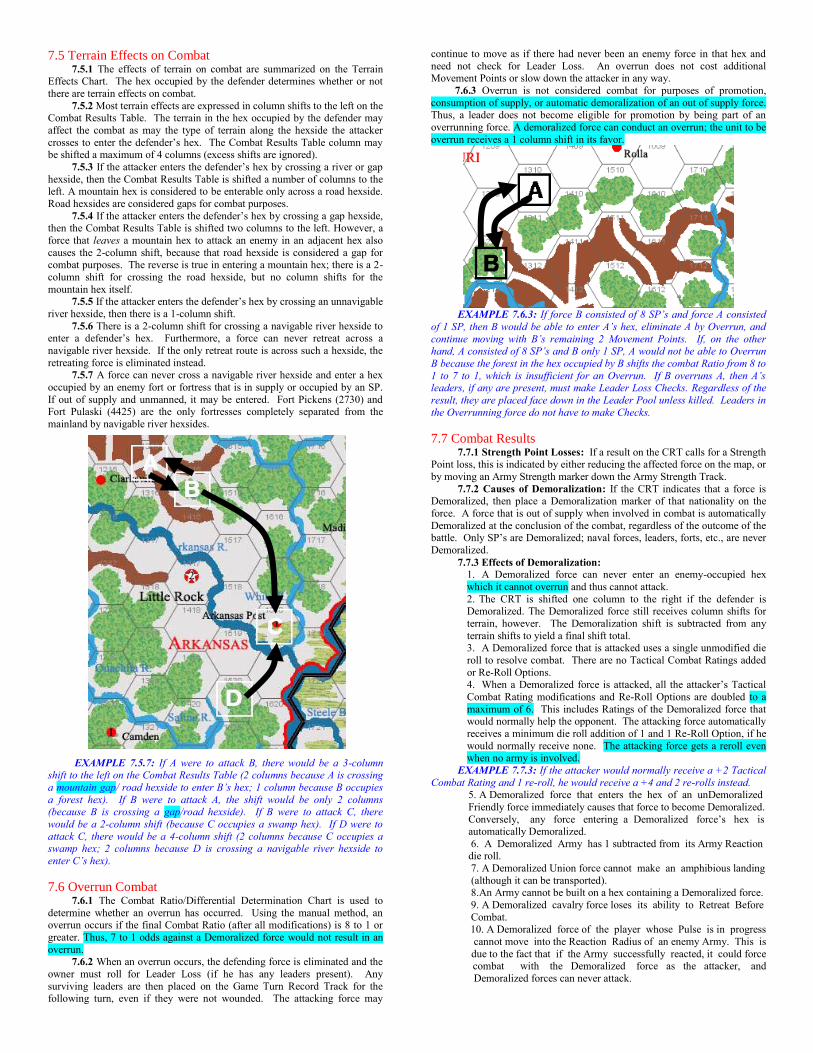
7.5 Terrain Effects on Combat 7.5.1 The effects of terrain on combat are summarized on the Terrain Effects Chart. The hex occupied by the defender determines whether or not
there are terrain effects on combat.
7.5.2 Most terrain effects are expressed in column shifts to the left on the
Combat Results Table. The terrain in the hex occupied by the defender may
affect the combat as may the type of terrain along the hexside the attacker
crosses to enter the defender’s hex. The Combat Results Table column may be shifted a maximum of 4 columns (excess shifts are ignored).
7.5.3 If the attacker enters the defender’s hex by crossing a river or gap
hexside, then the Combat Results Table is shifted a number of columns to the left. A mountain hex is considered to be enterable only across a road hexside.
Road hexsides are considered gaps for combat purposes.
7.5.4 If the attacker enters the defender’s hex by crossing a gap hexside, then the Combat Results Table is shifted two columns to the left. However, a
force that leaves a mountain hex to attack an enemy in an adjacent hex also
causes the 2-column shift, because that road hexside is considered a gap for combat purposes. The reverse is true in entering a mountain hex; there is a 2-
column shift for crossing the road hexside, but no column shifts for the
mountain hex itself. 7.5.5 If the attacker enters the defender’s hex by crossing an unnavigable
river hexside, then there is a 1-column shift.
7.5.6 There is a 2-column shift for crossing a navigable river hexside to enter a defender’s hex. Furthermore, a force can never retreat across a
navigable river hexside. If the only retreat route is across such a hexside, the
retreating force is eliminated instead. 7.5.7 A force can never cross a navigable river hexside and enter a hex
occupied by an enemy fort or fortress that is in supply or occupied by an SP.
If out of supply and unmanned, it may be entered. Fort Pickens (2730) and Fort Pulaski (4425) are the only fortresses completely separated from the
mainland by navigable river hexsides.
EXAMPLE 7.5.7: If A were to attack B, there would be a 3-column shift to the left on the Combat Results Table (2 columns because A is crossing
a mountain gap/ road hexside to enter B’s hex; 1 column because B occupies
a forest hex). If B were to attack A, the shift would be only 2 columns
(because B is crossing a gap/road hexside). If B were to attack C, there
would be a 2-column shift (because C occupies a swamp hex). If D were to
attack C, there would be a 4-column shift (2 columns because C occupies a swamp hex; 2 columns because D is crossing a navigable river hexside to
enter C’s hex).
7.6 Overrun Combat 7.6.1 The Combat Ratio/Differential Determination Chart is used to
determine whether an overrun has occurred. Using the manual method, an overrun occurs if the final Combat Ratio (after all modifications) is 8 to 1 or
greater. Thus, 7 to 1 odds against a Demoralized force would not result in an
overrun. 7.6.2 When an overrun occurs, the defending force is eliminated and the
owner must roll for Leader Loss (if he has any leaders present). Any
surviving leaders are then placed on the Game Turn Record Track for the following turn, even if they were not wounded. The attacking force may
continue to move as if there had never been an enemy force in that hex and
need not check for Leader Loss. An overrun does not cost additional Movement Points or slow down the attacker in any way.
7.6.3 Overrun is not considered combat for purposes of promotion,
consumption of supply, or automatic demoralization of an out of supply force.
Thus, a leader does not become eligible for promotion by being part of an
overrunning force. A demoralized force can conduct an overrun; the unit to be
overrun receives a 1 column shift in its favor.
EXAMPLE 7.6.3: If force B consisted of 8 SP’s and force A consisted
of 1 SP, then B would be able to enter A’s hex, eliminate A by Overrun, and
continue moving with B’s remaining 2 Movement Points. If, on the other
hand, A consisted of 8 SP’s and B only 1 SP, A would not be able to Overrun
B because the forest in the hex occupied by B shifts the combat Ratio from 8 to
1 to 7 to 1, which is insufficient for an Overrun. If B overruns A, then A’s leaders, if any are present, must make Leader Loss Checks. Regardless of the
result, they are placed face down in the Leader Pool unless killed. Leaders in
the Overrunning force do not have to make Checks.
7.7 Combat Results 7.7.1 Strength Point Losses: If a result on the CRT calls for a Strength Point loss, this is indicated by either reducing the affected force on the map, or
by moving an Army Strength marker down the Army Strength Track.
7.7.2 Causes of Demoralization: If the CRT indicates that a force is Demoralized, then place a Demoralization marker of that nationality on the
force. A force that is out of supply when involved in combat is automatically
Demoralized at the conclusion of the combat, regardless of the outcome of the battle. Only SP’s are Demoralized; naval forces, leaders, forts, etc., are never
Demoralized.
7.7.3 Effects of Demoralization:
1. A Demoralized force can never enter an enemy-occupied hex
which it cannot overrun and thus cannot attack.
2. The CRT is shifted one column to the right if the defender is Demoralized. The Demoralized force still receives column shifts for
terrain, however. The Demoralization shift is subtracted from any
terrain shifts to yield a final shift total. 3. A Demoralized force that is attacked uses a single unmodified die
roll to resolve combat. There are no Tactical Combat Ratings added
or Re-Roll Options. 4. When a Demoralized force is attacked, all the attacker’s Tactical
Combat Rating modifications and Re-Roll Options are doubled to a
maximum of 6. This includes Ratings of the Demoralized force that would normally help the opponent. The attacking force automatically
receives a minimum die roll addition of 1 and 1 Re-Roll Option, if he
would normally receive none. The attacking force gets a reroll even when no army is involved.
EXAMPLE 7.7.3: If the attacker would normally receive a +2 Tactical
Combat Rating and 1 re-roll, he would receive a +4 and 2 re-rolls instead. 5. A Demoralized force that enters the hex of an unDemoralized
Friendly force immediately causes that force to become Demoralized.
Conversely, any force entering a Demoralized force’s hex is automatically Demoralized.
6. A Demoralized Army has 1 subtracted from its Army Reaction die roll.
7. A Demoralized Union force cannot make an amphibious landing
(although it can be transported). 8.An Army cannot be built on a hex containing a Demoralized force.
9. A Demoralized cavalry force loses its ability to Retreat Before
Combat. 10. A Demoralized force of the player whose Pulse is in progress
cannot move into the Reaction Radius of an enemy Army. This is
due to the fact that if the Army successfully reacted, it could force combat with the Demoralized force as the attacker, and
Demoralized forces can never attack.
7.7.4 Rally from Demoralization: A force can be rallied only if it is in
supply. There are two ways to rally a force. First, during the Rally Phase any force that is currently Demoralized loses one Strength Point. Forces that are
in supply are then rallied; out of supply forces remain Demoralized. Second,
a player can rally a force during the Action Phase by spending a number of
Commands equal to the Initiative Rating of the highest ranked leader in the
hex.
7.7.5 Retreat Priorities: At the conclusion of a combat, only one force can occupy the combat hex. The second force will be either eliminated or
forced to retreat. Retreat is a move of one hex which does not cost
Commands or expend Movement Points. The results of the combat will determine which side is forced to retreat. Following are the retreat priorities
in descending order. If the first priority does not apply, proceed to the second,
and so forth. If a result is reached that is applicable, ignore all results following it.
7.7.6: If one side is totally eliminated, then the opposing side remains in
the combat hex; no retreat.
EXAMPLE 7.7.6: If A eliminates B, there is no retreat, regardless of the
result against A; A automatically occupies B’s hex.
7.7.7: If no result is achieved by either side, then the attacker must
retreat.
EXAMPLE 7.7.7: If A attacks B and no effect results for both sides, or
neither side is Demoralized, attacker A must retreat into the hex from which it entered the defender’s hex.
7.7.8: A defender occupying a fortress in supply, or a friendly hex adjacent to the map edge is never forced to retreat from it, regardless of the
combat result. A defender occupying a fortress, but out of supply, is subject
to the rules of retreat following.
EXAMPLE 7.7.8: If B is in supply in a fortress when attacked by A, A
must retreat regardless of the results on either side.
7.7.9: If the defender is already Demoralized before the attacker enters
his hex, then any additional Demoralization result will cause the defender to retreat.
EXAMPLE 7.7.9: lf B is already demoralized when attacked by A, a
second demoralization will cause B to retreat, regardless of the result against A.
7.7.10: If the combat Demoralizes one force, but not the other, the
Demoralized force must retreat.
EXAMPLE 7.7.10 If A attacks B and, as a result, only B is
demoralized, B must retreat.
7.7.11 If both forces suffer Demoralization or neither suffers
Demoralization, but one force loses more SP’s, then the side with greater loss must retreat.
EXAMPLE 7.7.11 If A attacks B and, as a result, both forces are
demoralized - but B loses 2 SP’s and A loses only 1 SP - B must retreat.
7.7.12: If both sides suffer the exact same result, then the attacker
must retreat.
EXAMPLE 7.7.12: If A attacks B and both suffer identical results, A
must retreat.
7.7.13 Retreat Procedure: A retreating force is subject to the same
rules of terrain effects on movement as is any other force. If the attacker retreats, he must retreat back into the hex from which he entered the
defender’s hex. A defending force must retreat into one of the three hexes
adjacent to the combat hex, but not adjacent to the hex from which the attacker entered the combat hex. In other words, the defender must retreat
such that there is at least one hex between himself and the hex occupied by the
attacker before he entered the defender’s hex.
EXAMPLE 7.7.13A: An attacker that is forced to retreat must always return to the hex from which it entered the defender’s hex.
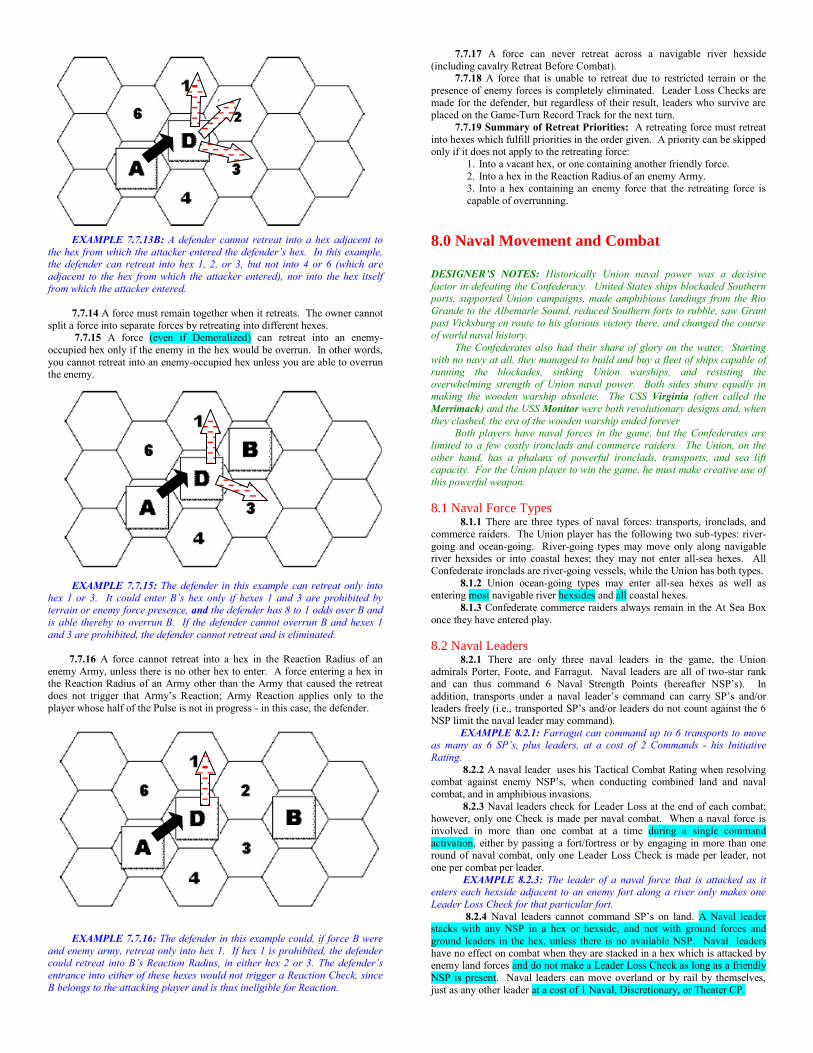
EXAMPLE 7.7.13B: A defender cannot retreat into a hex adjacent to
the hex from which the attacker entered the defender’s hex. In this example, the defender can retreat into hex 1, 2, or 3, but not into 4 or 6 (which are
adjacent to the hex from which the attacker entered), nor into the hex itself
from which the attacker entered.
7.7.14 A force must remain together when it retreats. The owner cannot
split a force into separate forces by retreating into different hexes. 7.7.15 A force (even if Demoralized) can retreat into an enemy-
occupied hex only if the enemy in the hex would be overrun. In other words,
you cannot retreat into an enemy-occupied hex unless you are able to overrun the enemy.
EXAMPLE 7.7.15: The defender in this example can retreat only into
hex 1 or 3. It could enter B’s hex only if hexes 1 and 3 are prohibited by terrain or enemy force presence, and the defender has 8 to 1 odds over B and
is able thereby to overrun B. If the defender cannot overrun B and hexes 1
and 3 are prohibited, the defender cannot retreat and is eliminated.
7.7.16 A force cannot retreat into a hex in the Reaction Radius of an
enemy Army, unless there is no other hex to enter. A force entering a hex in the Reaction Radius of an Army other than the Army that caused the retreat
does not trigger that Army’s Reaction; Army Reaction applies only to the
player whose half of the Pulse is not in progress - in this case, the defender.
EXAMPLE 7.7.16: The defender in this example could, if force B were
and enemy army, retreat only into hex 1. If hex 1 is prohibited, the defender could retreat into B’s Reaction Radius, in either hex 2 or 3. The defender’s
entrance into either of these hexes would not trigger a Reaction Check, since
B belongs to the attacking player and is thus ineligible for Reaction.
7.7.17 A force can never retreat across a navigable river hexside
(including cavalry Retreat Before Combat). 7.7.18 A force that is unable to retreat due to restricted terrain or the
presence of enemy forces is completely eliminated. Leader Loss Checks are
made for the defender, but regardless of their result, leaders who survive are
placed on the Game-Turn Record Track for the next turn.
7.7.19 Summary of Retreat Priorities: A retreating force must retreat
into hexes which fulfill priorities in the order given. A priority can be skipped only if it does not apply to the retreating force:
1. Into a vacant hex, or one containing another friendly force.
2. Into a hex in the Reaction Radius of an enemy Army. 3. Into a hex containing an enemy force that the retreating force is
capable of overrunning.
8.0 Naval Movement and Combat
DESIGNER’S NOTES: Historically Union naval power was a decisive
factor in defeating the Confederacy. United States ships blockaded Southern ports, supported Union campaigns, made amphibious landings from the Rio
Grande to the Albemarle Sound, reduced Southern forts to rubble, saw Grant
past Vicksburg en route to his glorious victory there, and changed the course of world naval history.
The Confederates also had their share of glory on the water. Starting
with no navy at all, they managed to build and buy a fleet of ships capable of running the blockades, sinking Union warships, and resisting the
overwhelming strength of Union naval power. Both sides share equally in making the wooden warship obsolete. The CSS Virginia (often called the
Merrimack) and the USS Monitor were both revolutionary designs and, when
they clashed, the era of the wooden warship ended forever Both players have naval forces in the game, but the Confederates are
limited to a few costly ironclads and commerce raiders. The Union, on the
other hand, has a phalanx of powerful ironclads, transports, and sea lift capacity. For the Union player to win the game, he must make creative use of
this powerful weapon.
8.1 Naval Force Types 8.1.1 There are three types of naval forces: transports, ironclads, and
commerce raiders. The Union player has the following two sub-types: river-
going and ocean-going. River-going types may move only along navigable river hexsides or into coastal hexes; they may not enter all-sea hexes. All
Confederate ironclads are river-going vessels, while the Union has both types.
8.1.2 Union ocean-going types may enter all-sea hexes as well as entering most navigable river hexsides and all coastal hexes.
8.1.3 Confederate commerce raiders always remain in the At Sea Box
once they have entered play.
8.2 Naval Leaders 8.2.1 There are only three naval leaders in the game, the Union admirals Porter, Foote, and Farragut. Naval leaders are all of two-star rank
and can thus command 6 Naval Strength Points (hereafter NSP’s). In
addition, transports under a naval leader’s command can carry SP’s and/or leaders freely (i.e., transported SP’s and/or leaders do not count against the 6
NSP limit the naval leader may command).
EXAMPLE 8.2.1: Farragut can command up to 6 transports to move as many as 6 SP’s, plus leaders, at a cost of 2 Commands - his Initiative
Rating.
8.2.2 A naval leader uses his Tactical Combat Rating when resolving combat against enemy NSP’s, when conducting combined land and naval
combat, and in amphibious invasions.
8.2.3 Naval leaders check for Leader Loss at the end of each combat; however, only one Check is made per naval combat. When a naval force is
involved in more than one combat at a time during a single command
activation, either by passing a fort/fortress or by engaging in more than one round of naval combat, only one Leader Loss Check is made per leader, not
one per combat per leader.
EXAMPLE 8.2.3: The leader of a naval force that is attacked as it enters each hexside adjacent to an enemy fort along a river only makes one
Leader Loss Check for that particular fort.
8.2.4 Naval leaders cannot command SP’s on land. A Naval leader stacks with any NSP in a hex or hexside, and not with ground forces and
ground leaders in the hex, unless there is no available NSP. Naval leaders
have no effect on combat when they are stacked in a hex which is attacked by enemy land forces and do not make a Leader Loss Check as long as a friendly
NSP is present. Naval leaders can move overland or by rail by themselves,
just as any other leader at a cost of 1 Naval, Discretionary, or Theater CP.

8.2.5 Naval leaders can travel with an army. If stacked with a ground
force which engages in combat, the naval leader can be killed or wounded, if there are no friendly NSP’s present. When using the optional Variable Leader
Promotion & Casualty Table, treat any “capture” or “promotion” result as
having no effect.
8.3 Naval Movement The following rules apply to all types of naval movement and naval forces.
8.3.1 NSP’s can never enter non-navigable river hexsides, cross land
hexsides, or enter all-land hexes. 8.3.2 NSP’s that enter coastal hexes ignore the land there unless a hex
contains an enemy fort or fortress. An NSP that enters such a hex is subject to
attack by that fortification. Furthermore, if a coastal hex contains an enemy NSP, then combat is initiated when the hex is entered. The terrain types and
enemy SP’s in the hex are used to determine the outcome of amphibious
invasion. This rule does not permit movement of NSP’s, or the tracing of a supply line, from a coastal hex to a river hexside in order to bypass a
fort/fortress.
EXAMPLE 8.3.2: An NSP in 2031 (near Ft. Jackson) cannot “ignore the land” in order to proceed up the Mississippi River thus avoiding Ft. Jackson;
nor could supply be traced into 2031 and then along the Mississippi River by
passing a supplied or manned Ft. Jackson. 8.3.3 NSP’s, like SP’s, move one NSP at a time, unless they are
commanded by a leader. Naval leaders and non-naval leaders can command
NSP’s. 8.3.4 NSP’s are not affected by the presence of friendly, enemy, and
neutral territory in a hex or adjacent to a navigable river hexside (unlike SP’s).
8.3.5 NSP’s have an unlimited Movement point Allowance and expend no Movement points to enter hexes or hexsides. Once you activate an NSP, it
may move until you decide to stop or until it performs an action forcing it to
stop. These actions include: being sunk in combat; performing an amphibious landing or combined land/naval combat; and debarking an SP. Embarking
does not stop movement if the SP and NSP began the Pulse stacked in the
same hex (but you may not move into a hex and embark SP’s). 8.3.6 Union ocean-going NSP’s can enter the Gulf of Mexico by going
around Florida. There is no penalty for such movement.
8.3.7 Union ocean-going NSP’s may enter the Mississippi River, but may not enter navigable river or control hexsides north of Memphis. Ocean-
going NSP’s may not enter or extend hexside control from the Mississippi
River onto tributaries of the Mississippi (e.g., Red River, Arkansas River, etc.). River hexsides which ocean-going NSP’s may not cross are designated
on the VASSAL map by a blue cross.
8.3.8 The Confederate player can use only Discretionary Command Points to activate his NSP’s. The Union player can use Discretionary and
Naval Commands to move NSP’s, conduct sea and amphibious movement,
and move naval leaders. Naval leaders moving alone can also use Theater CP's.
8.3.9 SP’s cannot remain indefinitely embarked on NSP’s, they have to
disembark at the end of the pulse.
8.4 River Movement 8.4.1 River-going NSP’s can never enter all-sea hexes or cross impassable hexsides from one coastal hex to another, but may otherwise travel
along and cross impassable navigable river hexsides. Thus, a Confederate
ironclad cannot cross the Chesapeake Bay. However, all NSP’s may enter coastal hexes, thus a Confederate ironclad could move up the bay along the
western shore. In addition, river-going NSP’s cannot move around Florida as
ocean-going NSP’s are allowed to do. EXAMPLE 8.4.1: A Confederate ironclad on the James River would
have to risk three shots from a Union controlled Ft. Monroe (one for each
river hexside it entered, then one as it entered the fortress hex) if it tried to move up the coast past the fortress.
8.4.2 River Movement Procedure: NSP’s located on rivers occupy a
river hexside, not a hex. Each naval counter has a bow (front) which is pointed at the hexside it occupies. This is indicated by an arrow on those
NSP’s where the front is not obvious. The counter itself may be located on
either side of the river. An NSP located on a river moves from one navigable river hexside into another navigable river hexside.
8.4.3 An NSP cannot end its movement in a hexside controlled by an
enemy fort/fortress. It must either move past the fortification, be destroyed by the fortification, or aid in the successful capture of the fortification by
amphibious invasion or combined land and naval attack. If a combined
land/naval attack or amphibious landing is unsuccessful, the attacking NSP’s must retreat into the hex or hexside from which they began that movement.
This may mean repassing forts along the same river. For this reason,
bypassing forts can be dangerous if the amphibious landing or combined
attack is unsuccessful. 8.4.4 River Transport: A Union transport NSP (either river or ocean-
going) may transport an SP if the NSP begins the Pulse on a navigable river
hexside bordering the hex occupied by the SP. The location of the naval
counter does not matter as long as it is pointed at the correct hexside. The
Union player then pays one Naval or Discretionary Command to activate the
NSP. No Commands are spent to activate the SP. The SP counter is placed under the NSP to denote that it is being transported and the two move together
along the river.
8.4.5 An SP that is being transported can be debarked only into a Union friendly hex, a Union occupied hex, or a neutral hex, unless the transporting
force contains a ground or naval leader. If a leader is present, either ground or
naval, the SP can debark into an enemy hex, but this is amphibious invasion. An SP that has moved by transport ends its move in the hex of debarkation
and is considered to have moved during the Pulse and thus cannot be
activated for movement again until a later Pulse. 8.4.6 Leader Effects on River Transport: A naval leader may
command up to 6 naval transports at a time, plus the SP’s being carried, plus
any other leaders in the force. The combined ground/naval force is then activated by paying a number of Discretionary and/or Naval Commands equal
to the Initiative Rating of the naval leader.
EXAMPLE 8.4.6: If Farragut and 4 river transports began a Pulse adjacent to a hex containing 7 Union SP’s and 2 leaders, then 4 of those SP’s
and both leaders could be transported by Farragut and his NSP’s at a cost of
only 2 Commands. 8.4.7 A non-naval leader can command a number of transport NSP’s
equal to the number of SP’s his rank allows him to command (Army command excluded). However, SP’s transported also count against this
amount. In addition, other leaders cannot be transported with that force.
EXAMPLE 8.4.7: A three-star general can command a maximum of 3 transports carrying 3 SP’s, or some other combination not exceeding a total
of 6 SP’s plus NSP’s.
8.4.8 NSP’s may disembark transported SP’s and/or leaders into hexes which are not occupied or Controlled by the Confederates, in friendly or
neutral territory. In enemy (Confederate) territory, NSP's may disembark only
into Union occupied or Controlled hexes. For purposes of debarkation of transported forces, a vacant hex in a converted Confederate state (17.2.4) is
considered to be enemy territory, unless there is a Union Control marker in the
hex. 8.4.9 SP's may be "dropped off" into eligible hexes along the path of
the ground/naval force’s movement towards its ultimate destination. Each
NSP which disembarks an SP must end its movement.
8.4.10 SP’s adjacent to the same navigable river hexside, but
physically located in different hexes cannot be transported together, as part of
the same force.
8.5 Naval River Control 8.5.1 Hexside Control Definition: An NSP, either ironclad or
transport, located on a river hexside controls the hexside it occupies. In addition, it controls all the navigable river hexsides within a five-hexside
radius of its location. 8.5.2 An NSP river control radius never extends into or past a
navigable river hexside that borders a hex occupied by an enemy fort or
fortress that is in supply or manned. These fortifications always control the navigable river hexsides bordering their hexes, with only one exception -
unmanned forts and fortresses that are out of supply do not control their
hexsides and have no effect on the game at all. This represents the fact that forts and fortresses were manned by small
garrisons, usually amounting to less than a Strength Point’s worth.
8.5.3 Enemy and friendly NSP’s may exert river control into the same
hexside. An ironclad always negates the control of an enemy transport, except
in the hex occupied by the transport and those hexsides on the other side of
the transport. If both players have ironclad control into a hexside, then they both have control of the hexside. This is called a contested hexside and both
sides are affected as if the enemy had control of the hexside. However, each
player’s ironclad has control of the hexside it occupies and those on the side away from the enemy ironclad.
NSP’s located on rivers are very powerful because they influence more
than one hexside. This simulates the fact that naval power is very flexible and can move in a fraction of the time it takes to move comparable land force.
8.5.4 River Control Effects: Forces moving by land cannot cross a
navigable river hexside that is controlled by an enemy NSP unless the hex they are entering contains a friendly SP or depot.
Thus, a land force can always cross a navigable river hexside into a
hex containing a friendly fort/fortress that is in supply or manned, depot, or Strength point.

8.5.5 A rail line that crosses a navigable river hexside is cut if that
hexside is controlled by an enemy NSP. 8.5.6 A supply path cannot be traced across a navigable river hexside
controlled by an enemy NSP, regardless of the presence of a friendly SP or
depot on the other side.
8.5.7 An Army’s Reaction Radius does not extend across an enemy-
controlled navigable river hexside.
Confederate Control
Union Control
Contested
EXAMPLE 8.5.7: The US ironclad Ozark controls its own hexside and
those north of its position. It shares contested control of hexside 2425/2526
along with the Confederate ironclad Virginia. The Virginia controls its own hexside plus those leading up to the hexside occupied by the US transport,
because ironclad control negates transport control. The Union fortress in Mobile controls its two hexsides, even though the Confederate ironclad is
within 5 hexsides. The US transport controls its own hexside, plus those north
of its position.
8.6 Union Sea Lift Capacity 8.6.1 On the Union Game-Turn Record Track is listed the Union Sea
Lift Capacity, which is the number of SP’s the Union player can move using sea movement and ocean transports each turn. The Sea Lift marker is used on
the General Records Track to keep a running total of the SP’s moved by sea
each turn. 8.6.2 An SP is considered to have moved by sea if it enters an all-sea
hex, a coastal hex, or a Chesapeake Bay hex anywhere along its path of
movement during a Pulse. All SP’s moved by sea are recorded, including those involved in amphibious invasions or using sea movement.
You will note that, after Game-Turn 4, the Union Sea Lift Capacity
becomes very large indeed. If both players agree, you may decide to keep
track of Sea Lift only on those turns when the Union player moves a great
many SP’s by sea.
8.7 Union Sea Movement 8.7.1 Definition: Union Sea Movement is a special type of movement
that does not use naval transport counters. Instead, it is assumed the SP’s are
being transported by a part of the Union ocean-going fleet, which is not depicted in the game.
8.7.2 Procedure: Any Union SP which begins the Pulse in any coastal hex may use Sea Movement. In addition, an SP that begins a Pulse in a hex
that has a navigable river hexside can use Sea Movement. However, this hex
must be located in one of the following states: Maryland, Delaware, New Jersey, or Pennsylvania. Hexes along the Ohio River or adjacent to the
Potomac River, but in Virginia cannot be used. SP’s adjacent to the same
navigable river hexside, but physically located in different hexes cannot be transported together, as part of the same force.
8.7.3 The SP is then moved by tracing a path through all-sea hexes,
coastal hexes, and/or along navigable river hexsides until it ends its move by debarking into a Union-controlled or a neutral hex not Controlled or occupied
by the Confederates. Union Control of a hex exists if: 1) the hex is
unoccupied and Union friendly, or 2) there is a Union SP in the hex, or 3) the
hex is unoccupied and contains a Union Control marker. An unoccupied hex
in a converted Confederate state may not be used for Sea Movement.
Otherwise, a Union force may use Sea Lift or may be transported into a neutral, unoccupied hex, which is not Controlled by the Confederates. An
SP using Sea Lift may not enter a hex or move along a river into or past a
hexside controlled by an enemy fort/fortress or NSP. Sea Movement into an enemy Army Reaction Hex is not allowed.
EXAMPLE 8.7.3: A force in Washington will not be able to exit the
Potomac River using Sea Movement if the Confederates have built a fort along the river between Washington and the Bay.
8.7.4 Sea Movement is a point-to-point move. Unlike movement using
transports where NSP’s may be dropped off at several different locations, forces using Sea Movement cannot drop off SP’s at multiple locations. Sea
Movement is permitted from unblocked Union-controlled ports in Confederate
territory even if those ports are not located in coastal hexes. 8.7.5 Leader Effects on Sea Movement: Ground leaders can be used
to move SP’s by Sea Movement. The leader must start the Pulse with the SP’s
and the Union player must pay that leader’s Initiative Rating in Discretionary or Naval Commands to activate the force for movement. Each leader may
move up to his command limit in SP’s, just as though it were normal land
movement (ignore Army command ability, however). Ground leaders must move one at a time, however.
8.7.6 Naval leaders can move up to 6 SP’s by Sea Movement or an entire Army at the naval leader’s Initiative Rating in Discretionary or Naval
Commands. Furthermore, the naval leader can move all of the leaders that
are in the Army or stacked with the force being moved. EXAMPLE 8.7.6A: A one-star general could move up to 2 SP’s by sea
at his Initiative Rating cost in Naval Commands.
EXAMPLE 8.7.6B: The Union player spends 2 Naval Commands to activate Farragut, who then moves force A (Army of the Potomac) down the
Potomac River into coastal hexes 5308 and 5309, then into the York River.
The Army debarks into Union-occupied hex 5209. However, to reverse the process, the Union player would be unable to Sealift from hex 5209, since it is
not a coastal hex or a navigable river hexside located in the North. Instead,
the Union player would first have to move the Army to a coastal hex such as 5309 or 5310 and use Sea Lift in a later Pulse.
8.7.7 Leaders moving SP’s by Sea Movement must accompany the SP’s
being moved.
8.8 Union Amphibious Movement 8.8.1 Amphibious Movement Prerequisites: The Union player may
move SP’s by sea or river and land them in an enemy controlled hex, by using amphibious movement. To make an amphibious move, the SP’s cannot be
Demoralized. SP’s and ground leaders must begin the Pulse in a hex
containing the NSP’s and naval leaders either in the same hex or along an adjacent navigable river hexside. Each SP requires at least one transport NSP
to carry it. An Army, regardless of its size, can never make an amphibious invasion.

8.8.2 Amphibious Movement Procedure:
1. The Union player spends the leader’s Initiative Rating in Naval or Discretionary Commands to activate the leader for amphibious
movement. A ground leader is not required for an invasion if a naval
leader is present.
2. The leader, SP, and NSP are moved to the desired location and the
invasion is resolved.
3. If the invasion hex contains a Confederate ironclad, a round of naval combat is resolved. The Naval Combat Results Table is used; both
players roll a die and find their result. Results are applied
immediately. 4. If the invasion hex contains a Confederate fort/fortress that is in
supply or manned, the fortification performs a naval combat against
the invading force. The Naval Combat Results Table is used; the Confederate player rolls one die and the results are applied
immediately. The Union player does not get to roll.
5. If there is still a Confederate ironclad in the invasion hex, then Steps 3 and 4 are repeated. If there are no Confederate ironclads, proceed
to Step 6.
6. The Union player determines his invasion strength. Each SP and Union ironclad is worth one point. In addition, the total number of
transports in the invading force is divided by 2 to determine their
strength. Fractions are ignored, except in the case where the total would be reduced to zero, which is instead treated as 1 point. Thus, 5
NSP’s are worth 2 points, while 1, 2, or 3 NSP’s would be worth 1
point. 7. The Confederate player determines his defense strength. Any
Confederate friendly, Controlled or occupied hex has a strength composed of the following, which are added together to make a
cumulative total. A hex has an intrinsic defense of 1 against invasion,
regardless of the terrain type; to this is added the number of SP’s in the hex; plus 1 if the hex contains a city plus 1 if the hex contains a
fort; and plus 2 if the hex contains a fortress. The column shifts a
force would normally receive in ground combat for occupying certain types of terrain are ignored for purposes of invasion. These effects
are accounted for in the strength of the hex as summarized in the
following:
1: Intrinsic value.
1 For each SP in the hex.
1: If hex contains a city.
1: If hex contains a fort.
2: If hex contains a fortress.
These are cumulative; terrain is ignored during invasions
8. The invasion is resolved using the Combat Ratio/Differential
Determination Chart and the Combat Results Table with the Union player as the attacker. However, column shifts for terrain are
ignored.
8.8.3 Landing in a non-Confederate Controlled, unoccupied neutral hex is simply transport, not invasion. A vacant hex in a converted Confederate
state is considered to be enemy (Confederate) territory, unless there is a
Union Control marker in the hex. An invasion of a Confederate Controlled hex in Union or neutral territory is performed in exactly the same way as any
other invasion. The defender receives the benefits for intrinsic hex value, etc. 8.8.4 If a Union force attempts to land by amphibious movement, or by
transport using NSP's, in a hex within the Reaction Radius of a Confederate
Army, the Army may roll for reaction, and may enter the hex to be invaded this forcing combat, if successful.
8.8.5 The ground combat procedure is used to resolve the invasion.
Leaders in the Confederate force modify the combat die rolls as in ground combat. Union leader effects are described in the following. Results are
applied to each side as they would be in ground combat. However, if the
Union player achieves a result causing the Confederate to retreat, then the Confederate force (if there is one) retreats and the invading Union force
occupies the hex, and can move no further during that pulse.
8.8.6 Confederate losses must be taken first from SP’s occupying the invasion hex. For determination of retreat priorities, the defending
Confederate force is only considered eliminated where the invading Union
force eliminates all SP's in the hex, plus 1 additional to account for all of the non-SP defense factors.
8.8.7 If the hex contains no SP’s, then an SP loss is considered to
eliminate the Confederate force in the hex for retreat purposes. Thus, if the Union invades a hex with no SP’s and suffers a d result, but inflicts a d l result
on the hex, the invasion succeeds because the Confederate is eliminated – a
more extreme result than a d (see Retreat priority 1). If the Union had inflicted only a “d” then the invasion would have failed because the intrinsic
force was neither forced to retreat nor eliminated.
EXAMPLE 8.8.7A: A Union force makes an amphibious move against
an empty enemy hex. Any result which calls for an SP loss by the defending force will result in its elimination, thus fulfilling the conditions of the first
retreat priority (Rule 7.7.6 “one side is totally eliminated”). The Union force
remains in the invaded hex. EXAMPLE 8.8.7B: A Union force makes an amphibious move against
an enemy hex containing 1 SP. Any result which calls for a loss of 2 or more
SP’s by the defending force will result in its elimination, thus fulfilling the conditions of the first retreat priority. The loss of a second SP is considered to
eliminate all of the non-SP defense factors. The Union force remains in the
invaded hex. EXAMPLE 8.8.7C: A Union force makes an amphibious move against
an enemy hex containing 1 SP. The Union force inflicts a d1 result upon the
defending hex, but itself suffers a d1 result. Since the defending force is not considered to be “totally eliminated”, the first retreat priority does not apply.
Had the Union force suffered a d or a 1 result instead, the Union could
remain in the hex due to another retreat priority (Rule 7.7.11 If both forces suffer Demoralization or neither suffers Demoralization, but one force loses
more SP’s, then the side with greater loss must retreat.) If the defending SP
had already been Demoralized before the amphibious move, the Union would remain in the hex following a d1/d1 result, due to a higher retreat priority
(Rule7.7.9: If the defender is already Demoralized before the attacker enters
his hex, then any additional Demoralization result will cause the defender to retreat.)
EXAMPLE 8.8.7D: A Union force makes an amphibious move against
an enemy hex containing 1 SP. The Union force inflicts a d2 result upon the defending hex, but itself suffers a d2 result. Since the defending force is
considered to be “totally eliminated”, the first retreat priority does apply. The Union force remains in the invaded hex. Had the defending hex contained 2
SP’s, the defending force would not be “totally eliminated” by a d2 result for
purposes of the first retreat priority, and another retreat priority would determine which side retains the hex.
8.8.8 If the combat results cause the Union to retreat, then the invading
force returns to the hex from which it began its movement. As it retreats, the Union force may undergo further attack if it passes supplied or manned
Confederate fortifications along its path of retreat. If all Union ground SP’s
are eliminated, then the invasion fails, and all NSP’s must return to the hex from which they began their movement.
8.8.9 Amphibious Movement with Non-Naval Leaders: The number
of SP’s and NSP’s a non-naval leader may command may not exceed a total of 6, or 2 if he is of one-star rank. This total may consist of a combination of
SP’s, transports, and ironclads. The leader’s Initiative Rating is used to
determine the Command point cost of the movement. Furthermore, only the
one leader may be used; other leaders may not be a part of the force.
8.8.10 The Tactical Combat Rating of the leader is used when resolving
the invasion combat, as it would normally be used in a ground combat. EXAMPLE 8.8.10: Burnside could command 2 SP’s, 2 transport
NSP’s, and 2 ironclad NSP’s, or some other combination not exceeding 6
total points, as long as they all began the Pulse in the same hex. One-star generals may command a total of only 2 points: 1 SP and 1 NSP.
8.8.11 Amphibious Movement with Naval Leaders: Naval leaders
may command up to 6 NSP’s. SP’s and ground leaders being moved do not count against the naval leader’s command ability; they are transported “free”.
The Initiative Rating of the naval leader is used to determine the Command
cost of the movement. 8.8.12 The Tactical Combat Rating of the highest ranked naval leader
is used to resolve the invasion plus the Tactical Combat Rating of the highest
ranked ground leader (if one is present). EXAMPLE 8.8.12: You could use Farragut to move 4 ironclads, 2
transports, 2 SP’s, and Ben Butler to make the invasion of New Orleans.
8.8.13 Amphibious Combat Losses: When a landing force suffers losses, they are removed from the SP’s, not the NSP’s. Naval losses may be
suffered if the amphibious force enters a hex containing a Confederate fort,
fortress, or ironclad as described in Steps 3 and 4 of the invasion procedure. Demoralization results against the invading force apply only to the SP’s, not
to the NSP’s.
8.8.14 Each leader in the invasion hex, both Confederate and Union, must make one Leader Loss Check.
8.9 Combined Land and Naval Combat 8.9.1 Prerequisites: NSP’s and SP’s may make combined attacks,
such as the historical attack on forts Henry and Donelson. NSP’s commanded
by a naval leader which begin the Pulse in the hexside of a hex containing SP’s and a ground leader may move and attack together. This is not an
amphibious landing, because the SP’s move overland, and the NSP’s support
the attack. 8.9.2 Transports may not carry SP’s and make a joint attack in the
same Pulse. The two forces need not follow the same movement path so long

as they end the movement in/along the same hex. Commands are spent from
the Discretionary and/or theater Tracks for the ground leader. Thus, the total cost of a joint move will be at least 4 Commands: 2 for the naval leader and 2
for the ground leader.
Union
Force B
(4 Ironclads)
EXAMPLE 8.8: Union force B under Farragut has left Washington
to make an amphibious landing against Mobile. The force enters the river hexside 2429/2530 which is controlled by Fort Morgan and occupied by the
CS ironclad Tennessee. The first round of naval combat is initiated; the
Confederate player rolls on the 1 NSP column while the Union rolls on the 5+ column (4 NSP’s for his ironclads, plus 1 NSP for the two transports). The
Confederate player rolls a 4 for no effect. The Union rolls a 1, which is
modified to a 3 for Farragut’s Tactical Combat Rating, for no effect. Then the Confederate fortress attacks on the Unmanned Fortress row; the roll is a 5,
damaging one Union NSP. The Union player chooses an ironclad rather than
a transport to keep from losing an SP as well. He places the Mahopac on the Game-Turn Record Track for the next turn. In the second round of combat,
the Confederate rolls a 5 for no effect; the Union uses the 3-4 column because
his ironclad loss reduces his strength to 4 NSP’s. He rolls a 3, which is modified to 5 for Farragut, and the Tennessee is damaged; since it is
Confederate, it is eliminated. The fortress gets one more shot and a 4 is
rolled for no effect. The Union force moves into hexside 2429/2529 and the Confederate fortress gets to attack again since the Union force is ―running
the fortress.‖ A 1 is rolled for no effect. The Union force enters hex 2428 to
launch the invasion against Mobile. First, the manned fort in the hex gets to attack the Union force; the result is no effect. Then the invasion is resolved.
The Confederate strength is 4 (1 point each for the hex, the fort, the SP, and
the city); the Union strength is 6 (3 for the ironclads, 1 for the two transports, and 2 for the SP’s). Using the Combat Ratio/Differential Determination
Chart we find this is a +1, +2 combat (Column F). The Union player rolls
one die and adds the Tactical Combat Ratings of Farragut and Schofield to the result; the modified result is 7, which is located under the Def column
beside the Medium size result (because the Union force is medium size, 4-9 SP
equivalents). The result against the Confederate is d2. The Confederate rolls a 4, which is located under the Att column beside the Medium force result
(since the Confederate force is also medium); the result is d1 against the
Union. Thus, the Confederate force, including the fort, is eliminated; the Union force loses 1 SP and is demoralized, but successfully occupies Mobile.
Leader Loss Checks are now made for Farragut and Schofield. A second
effect of the invasion is that Confederate Fort Morgan is now out of supply and has no effect on the game. Had the Union lost more NSP’s to the
Tennessee or to the fortress, the invasion might have failed. If it failed, the
Union would have had to retreat back to Washington by passing Fort Morgan a second time, being attacked as it passed.
8.9.3 Procedure: The subsequent joint attack is resolved in the
following order: 1. Naval Force Movement and Combat: First, the naval force is
moved and fights any naval battles made necessary by its movement
path into hexsides controlled by enemy NSP’s, forts, or fortresses. Then the naval force enters the first hexside shared by the hex
occupied by the target of the combined attack. If the hexside contains a Confederate ironclad, naval combat is resolved. Naval combat
continues until the Confederate ironclad is sunk; furthermore, if the
combined attack target hex contains a fort or fortress, it gets to attack the Union force each round until the Confederate ironclad is sunk.
Once the fort/fortress had had its last shot after the sinking of the
CSA ironclad, that combat is over and the combined attack is resolved.
2. Ground Movement: The ground force is activated and moves into
the target hex using the rules for ground movement.
3. Combat Resolution: The combat is resolved as a normal ground
combat using the SP strengths of the moving and defending forces
and any column shifts for terrain. The attack strength of the moving force is increased by l for each ironclad point and by l for every 2
transport points (round fractions down) of the jointly attacking naval
force. In addition, the Tactical Combat Rating of the naval leader is added to the attacking player’s die roll. The total naval strength
addition may not exceed the number of attacking SP’s. Ignore excess
NSP’s for purposes of strength computation (they still suffer the results of the combat).
EXAMPLE 8.9.3: if you attacked with 2 SP’s, then the maximum
number that could be added to the force by NSP’s would be 2. Excess NSP’s are not counted.
8.9.4 Combined Attack Losses: All leaders, both ground and naval,
involved in the attack must make Leader Loss Checks. Only one Check is made per naval leader, even though they may have been attacked by a fort,
ironclad, or other combination of forces.
8.9.5 Loss results listed on the CRT for the attacking force are taken in the following manner: the first loss must come from the attacking SP’s; the
second loss (if any) must be an ironclad (if none were involved in the attack,
a transport NSP is eliminated); if there is a third loss, it is again taken from the ground force. Demoralization results apply only to ground forces. The
defending force suffers the result as printed on the CRT. 8.9.6 If the attack results in the defender having to retreat, then the
attacking ground force occupies the hex. If the attacker is forced to retreat,
then the attacking naval force retreats back to the hexside from which it began the Pulse and the land force retreats normally.
8.9.7 NSP Effect on Defense of a Hex: The presence of naval forces
has no effect on the strength of adjacent SP’s when they are attacked. The only effect these naval forces have is in control of navigable river hexsides.
Furthermore, naval forces may not be attacked by enemy SP’s in any way.
EXAMPLE 8.9.7: The Union player expends 4 commands (2 Naval
and 2 Western) to activate its forces for the combined attack. First Foote and
the naval force move into hexside 2618/2718 and fight one round of naval combat against the Confederate ironclad. The result is that the Union has an
ironclad damaged and the Confederate is unharmed. Then the Confederate
fort attacks the Union naval force; result, no effect. Another round of naval combat occurs, the Union eliminates the Confederate ironclad and the Union
is unscathed by the Confederate NSP. The Confederate fort sinks another
Union NSP, and the Union player chooses a transport. The naval combat is over. Now the Union land force under Grant moves into the Confederate hex
and ground combat is resolved. The Confederate has a strength of 3 SP’s
while the Union has a strength of 4 (2 for the Union SP’s plus 2 more for the Union ironclads). The additional Union ironclad and transport are ignored
since the naval force may not contribute a greater strength than the ground
force to a combined attack. The combat differential is +1, but there is a
column shift of 1 to the left because the Confederates occupy a fort. The
Union player rolls one die and adds the Tactical Combat Ratings of Grant
and Foote to the result. The modified result is 5, which is then located under the Def column beside the Medium size result to find the effect on the
Confederate force. The result is dl. The Confederate player rolls a 6, which
when cross-referenced under the Att column beside the small size result yields a d result against the Union. Thus, the Union has won the battle and the
remaining two Confederate SP’s must retreat. A force may not retreat across
a navigable river hexside nor into a hex adjacent to the attacker; thus, the two SP’s are eliminated. The Union SP’s occupy the fort, destroying it, and are
demoralized. The naval force remains in its hexside and is not demoralized.
Leader Loss Checks are then made for Foote and Grant.
B
A C
B
8.10 Naval Combat 8.10.1 Definition of Naval Combat: Naval combat occurs between a naval force and a fort/fortress or between two naval forces. The Naval
Combat Results Table is used to resolve naval combats. Naval combat occurs
between the naval force in an amphibious landing or combined attack if the
attack is made against an enemy fort/fortress, or if the force moves past an
enemy fort/fortress, or if the invasion hex contains an enemy naval force
along one of its hexsides. Naval combats are resolved before the combined attack or amphibious landing is resolved.
8.10.2 Naval Combat Results Table: The Naval Combat Results Table
(hereafter NCRT) is used to resolve all naval combats. To use the table, locate the strength of the attacking naval force or type of fort/fortress on the
NCRT. Each attacking ironclad has a strength of 1 while the number of
transports is divided by 2, dropping fractions to determine their strength. Fractions are rounded down; however, transport totals of 3 or less are
considered to have a strength of 1 point. Naval forces with a strength greater
than 5 use the 5 column of the NCRT. 8.10.3 The die roll may be modified in combat between two naval forces
if there is a Union naval leader present. Otherwise, leaders have no effect on
use of the NCRT. 8.10.4 Naval Combat Results: There are two results on the Naval
Combat Results Table: Damaged and Sunk. A sunk result causes the
permanent loss of the affected ship. A damaged result has the following effects: Confederate ironclads are considered sunk; Union transports or
ironclads are considered damaged. Damaged ironclads or transports are
immediately placed on the Game-Turn Record Track for the next turn. They may then enter as normal naval reinforcements. A damaged Union NSP is
placed on the Turn Record Track immediately, even if it can be demonstrated
that it would be passing enemy fortification hexsides while returning to its starting hex.
8.10.5 If a force transporting an SP consists of more transport NSP’s
than SP’s, and a transport is sunk, then no SP’s are lost. An SP is lost only if there are an equal number of SP’s and transports and a transport is sunk. If a
naval force containing more than one type of NSP suffers a loss, the owner
has his choice of which to eliminate. If a transport is damaged, any SP it is carrying is returned to the starting hex. Do not roll for additional losses or
move the SP across the map; simply place it on the starting hex. If there are
more transports than SP’s, then no SP is moved back as long as there is at least one transport per SP.
8.10.6 Naval Combat by a Fort/Fortress: There are four types of
combat between naval forces and fortifications. First, a fort/fortress may attack the naval force when an amphibious landing is made against its hex.
Second, a fort/fortress may attack a naval force which enters one of its
hexsides in an attempt to move past the fort along the river. Third, a fort/fortress may attack a naval force as part of a Combined Land/Naval
Combat. Fourth, if a fort/fortress is built in a hex which shares a hexside with
an enemy NSP, the fort/fortress immediately initiates one round of naval combat. If the NSP is not damaged, it must then move one hexside at a time,
until it no longer shares an enemy fort/fortress hexside. For each hexside it
moves that is shared with an enemy fort/fortress, the NSP is subject to one round of naval combat. 8.10.7 Only one naval combat is made by a Confederate fort/fortress against a Union naval force which is invading its hex unless there is a
Confederate ironclad present. In this case, the fortification may attack after
each round of ironclad combat. This means that usually a maximum of only one Union SP will be sunk
by the fortification. This simulates the fact that NSP’s supporting amphibious
invasions of forts tended to stay out of range of the fort’s heavy guns as much as possible.
8.10.8 Naval combat also occurs when NSP’s try to “run” enemy
forts/fortresses. Each running force is attacked once per fort/fortress hexside
it enters. If a running force enters a hex occupied by an enemy NSP, then the
naval combat between the two is resolved before the fort/fortress attack for
that hexside. If the running force survives the naval combat, it may continue moving into another river hexside.
8.10.9 Each fort fires on enemy NSP's as follows:
Ft. Monroe 2 shots, as ships move up the James River.
Ft. Fisher 2 shots, as ships move up the Cape Fear River.
Ft. Sumter 1 shot, as ships approach Charleston.
Ft. Pulaski 1 shot, as ships approach Savannah.
Ft. Gadsden 2 shots, as ships move up the Chattahoochee River.
Ft. Morgan 2 shots, as ships move into Mobile Bay.
Ft. Pike 3 shots, as ships cross Lake Pontchartrain.
Ft. Jackson 2 shots, as ships move up the Mississippi River.
8.10.10 Naval Combat Between Naval Forces: Combat between
opposing naval forces occurs when enemy NSP’s occupy the same river hexside (regardless of whether or not one side intends to pass through that
hexside), when they occupy the same coastal hex, or when they occupy an
amphibious invasion hex. Naval combat is resolved before combat between
the fort/fortress and the enemy NSP.
8.10.11 When combat between ironclads and transports is resolved, the
transport total is divided by 2, rounded down, to determine their strength (again, totals of 3 or fewer transports are treated as 1 point).
8.10.12 Combat between NSP’s is resolved simultaneously; each player
rolls one die and consults the NCRT under the appropriate column. Results of the Confederate roll are applied to the Union force, and results of the Union
roll are applied to the Confederate force. Combat continues until one side or
the other is completely eliminated. A Union naval leader adds his Tactical Combat Rating to the Union die roll when engaging Confederate ironclads.
EXAMPLE 8.10.12: Naval combat between 2 NSP’s would be resolved
until one or both players rolled a 6, thus damaging the enemy’s NSP.
8.11 CSA Commerce Raiders 8.11.1 Confederate Commerce Raiders are placed in the At Sea Box when they are purchased. Then, during the CSA Commerce Raider Phase, the
Confederate player rolls two dice for each Raider in the box. The resulting
total is the number of US merchant ships sunk on the high seas. These ships are not represented by counters; instead, the US Ships Sunk marker is used on
the General Records Track to keep a running total of ships sunk.
8.11.2 A Commerce Raider is sunk if the Confederate rolls a two - dice total of 12 for the raider. The raider sinks no ships and instead is eliminated.
Before the Confederate player rolls, the Union player may spend Naval
Commands to increase the Confederate dice total. The Confederate dice roll for a raider is increased by 1 for each Union Naval Command spent to
influence the roll for that raider. If the final modified total is 12 or more, then
the raider is sunk. If the modified total is less than 12, the modified total of merchant ships is sunk. If there are two or more raiders at sea, Union naval
Commands spent affect the die roll for each raider.
This increase in lost ships simulates the increased number of Union ships at sea due to the expenditure of the Naval Command.
9.0 Supply
DESIGNER’S NOTE: Supply was one of the most critical problems in
the American Civil War. Each side has its own set of woes. The South’s main
problem was a lack of heavy industry, which caused critical shortages of shot, shell, and weapons, and limited their ability to build heavy cannon, construct
an ironclad fleet, and maintain their factories. The Confederacy was an
agrarian nation, and as such food problems should have been minimal. This was not the case. The prime cash crop was cotton, and this was grown even
in time of war when people were hungry for bread. The arteries of
Confederate supply - the rail lines - broke down quickly and were so badly managed that the Confederate armies suffered continual and severe food
problems. The Union blockade and the capture of Southern ports eventually became decisive factors in the Southern defeat. The South, unable to provide
for itself or import what it needed, died on the vine after 1863.
The Union had plenty of everything. The Northern industrial economy was booming, as it built up for war. Union supply problems began with the
advance south. It was not a matter of having enough to eat; it was a matter of
getting that food to the army. The deeper into the South the armies went, the longer became the supply line back to the North. Confederate raiders like
Nathan Bedford Forrest swept out of nowhere to burn depots, wreck wagon
trains, tear up rail lines, and create havoc behind Union lines. At one point,
Sherman’s army had almost half its total strength spread out guarding the rail
line from Nashville to Atlanta.
An army that was out of supply moved slower so that its horses and men could live off the land. Hunger-stricken soldiers gave as good as they took in
battle till their ammunition was gone. Then the army would fall back until it
could resupply itself. Armies that were out of supply for long periods of time suffered high losses due to desertion and disease. It was vitally important to
keep an army in supply or, over time, it would melt away.
The Union blockade is handled abstractly, since the South could not oppose the Union deep water fleet. As time goes on, the Southern player will
begin to feel the effects of the Union blockade on his supply net. Although it
is only through the capture of Confederate ports, in addition to the blockade, that the blockade itself proved decisive.
9.1 Supply Determination and Effects 9.1.1 Affected Forces: Supply affects both the Union and Confederate forces. Only Strength Points (including Armies), forts, and fortresses are
affected by supply and trace supply lines. Leaders and Naval Strength Points
are unaffected by supply.
9.1.2 Movement Supply: The supply status of a force must be
determined before it is activated for movement. If a force begins movement
in supply, it remains in supply while moving, even if it moves into a hex which would put it out of supply. The reverse is also true; a force that begins
movement out of supply remains out of supply for that movement, even if it
moves into supply. A force that is out of supply when activated for movement has its Movement Point Allowance reduced by 1 Movement Point.
9.1.3 Combat Supply: Combat supply for the attacking force, including
a force conducting an amphibious landing, is determined when it is activated for movement, as defined in movement supply, preceding. Supply for the
defender is determined just before the attacker enters the defender’s hex. The
path of supply is traced from the defender’s hex to his supply source and may not enter the adjacent hex occupied by the attacker (or the attacker’s Reaction
Radius, if an Army). A force that is out of supply for combat automatically
suffers Demoralization, regardless of the result of the combat. This Demoralization occurs after the combat is resolved and has no effect on the
combat or on the results of that combat. In other words, the combat is
resolved normally, and then a Demoralization marker is placed on the out of supply force. If the force was already Demoralized, or suffered a
Demoralization result in combat, there is no additional effect for being out of
supply. An unsupplied force conducting an overrun is not Demoralized, as a result thereof.
9.1.4 Rally Supply: To rally a Demoralized force, in either the Rally
Phase or during a Pulse, you must be able to trace a valid supply line at the instant of rally. A Demoralized force that is out of supply cannot rally.
9.1.5 Fort/Fortress Supply: Supply is determined the moment a
fort/fortress is built and at the instant of combat. An unoccupied fort/fortress that is out of supply has no effect on the game. Thus, an unoccupied
fort/fortress must be in supply when enemy naval forces enter its hex/hexside
in order to attack those naval forces. A fort/fortress may not be built in a hex that is out of supply. If a fortress is out of supply during combat, the
occupying force may be required to retreat (see Retreat for more details).
9.1.6 Reinforcement Placement: Leaders, SP’s, and NSP’s that enter the game as reinforcements can be placed only in hexes that are in supply at
the moment placement occurs.
9.2 Tracing a Supply Line 9.2.1 Procedure: A force is required to trace a supply line at various
times during the turn. The supply line procedure remains the same regardless of when supply is determined. To determine whether or not a hex is in
supply, a path of hexes is counted from that hex to a supply source or to a
supply source conduit that leads to a supply source. The hex to be supplied is not counted, but the hex occupied by the supply source or conduit is counted.
The number of hexes counted depends on the supply source or conduit type to
which the supply line is traced. There are only three sources of supply: 9 points of Victory Point cities in friendly territory connected by friendly rail
lines; a friendly supply depot; or, for the Union only, a rail line leading off the
north edge of the map. 9.2.2 Connected Victory Point Cities: A supply line may be traced two
hexes to a friendly rail line. The hex is then in supply if a series of connected
friendly controlled rail hexes can be traced to 9 Victory Points of Victory Point cities located in friendly territory. Victory Point cities in neutral or
enemy territory, and Confederate VP resource sites, do not provide their
points for supply. The rail line connection may be of any length, subject only to rules for terrain and presence of enemy forces. If the force is able to trace a
line to only 8 or fewer Victory Points of Victory Point cities, then it is out of
supply. 9.2.3 Union Off Map Supply: The Union player may trace a supply line
two hexes to a Union rail line, then from there off the Northern edge of the
map by a series of connected Union controlled rail hexes. The Northern map edge may supply an unlimited number of forces in this way.
9.2.4 Supply Depots: A supply line may be traced 4 hexes to a friendly
supply depot. A supply depot may be used as a supply source or as a supply conduit for a supply line leading to another supply source.
9.2.5 A supply depot that is used as a supply source for combat, is
eliminated. In amphibious moves, a defending hex must contain an SP in order to cause consumption of a supply depot. A fortification which fires
upon an NSP does not thereby consume a supply depot. Supply for the
attacking player is judged when his force begins moving, but if the movement results in combat, then the supply depot is eliminated.
9.2.6 Supply for the defender is judged just before the attacker enters the
defender’s hex. Depots used to provide combat supply are eliminated at the
conclusion of the combat, regardless of its outcome. A depot is not eliminated
if the combat is an overrun or if the defender is cavalry that Retreats Before Combat. Neither an overrunning force nor a force being overrun consumes a
depot. A depot in the same hex as a force being overrun is either captured or
destroyed, at the discretion of the Phasing Player. A supply depot may provide
supply for only one combat and then is eliminated.
9.2.7 A depot used as a supply source for movement (which does not
lead to combat), rally, fort/fortress construction, or reinforcement placement is not eliminated. Furthermore, a single supply depot can supply unlimited
forces performing these actions. Each depot costs a player two Commands to
build. A depot can be built only in a hex the player controls that contains a city or stockade. A depot can be built in any such hex, even though located in
enemy or neutral territory, and even if the hex itself is out of supply. There
may never be more than one depot per hex. Once a depot is built, it remains on the map until expended by providing combat supply or until destroyed by
the owner or enemy.
Supply depots may be built on a hex which is out of supply. This represents "living off the land" and is one of the primary tactics in the game.
9.2.8 A player who owns a depot may destroy it voluntarily during his
half of the Pulse at no cost in Commands or Dice Differential, by simply removing it from the map. A depot that is not stacked with an SP is captured
if an enemy force enters the hex by ground movement. The enemy player has
the option to take the depot as his own by flipping it over, or of eliminating it immediately by removing it from the map. If combat occurs in a hex which
contains a depot, the depot is eliminated if the attacking player wins the battle
and captures the hex. If the attacking player loses the battle, the depot is only destroyed if the defender used it as the supply source for that combat.
9.3 Combination Supply Lines 9.3.1 Definition: A supply line may be traced in several ways so long as
the final path leads to a friendly supply source. A supply line may be traced
through hexes of a supply conduit. There are four types of supply conduits: rail hexes, depots, or - for the Union - navigable river hexsides or all-sea
hexes. The supply line may use a number of different conduits so long as the
supply line is legal in each of its conduit segments and it leads ultimately to a source of supply.
9.3.2 Depot Combinations: A depot is the only supply source that is
also a supply conduit. A supply line may be traced four hexes to a depot, and then that depot may trace a four-hex path to another depot, thus forming a
chain of depots. The two depots must be within four hexes of each other; that
is, there may be a maximum of three hexes intervening. There is no limit to the number of depots that may form such a chain. When tracing combat
supply, the owner would have his choice to eliminate either the first depot in
the chain, or another depot further down the supply chain. 9.3.3 Depot and Rail Combinations: A supply line may be traced four
hexes to a supply depot and, if that depot occupies a rail hex, then the supply
line may continue to be traced along the rail line to a supply source. The depot is a supply conduit and is not eliminated if that supply line is used to
provide combat supply. Furthermore, the depot on the rail line may be a part
of a supply depot chain, in which case none of the depots along the chain are eliminated to provide combat supply. The rail line could then connect to a
supply source to provide supply to the force tracing the supply line. 9.3.4 A supply line can be traced two hexes to a rail line and, if that rail
line leads to a depot, then the depot could be used as a source of supply. If the
rail line was used to provide combat supply, then the depot would be eliminated. The supply line must be traced along the rail line; it may not be
traced part of the way by rail and then in part overland.
9.3.5 Union Supply by River: A Union force adjacent to a navigable river hexside may trace a supply line along that river. The river line may be
any length, but at some point it must lead to a hex adjacent to the river that
contains a Union depot, rail line, or into an all-sea hex. The depot may then
be connected to a chain of depots or to a rail line as described above, or the
rail line may be connected to a supply source. A river supply line may not be
traced into an enemy controlled river hexside. 9.3.6 A supply line may be traced four hexes to a depot, then if the depot
is adjacent to a navigable river hexside, the supply line may continue down
the river to another source of supply. 9.3.7 The depot would not be eliminated to provide combat supply since
it is a conduit in this case. Furthermore, the depot on the river may be a part
of a longer depot chain leading away from the river. 9.3.8 A supply line may be traced to a rail line and the rail line may then
connect to a navigable river by entering a hex adjacent to that river. The
supply line then continues along the river until it links up with another supply line or supply source. The force must be within two hexes of the rail line and
the rail hex need not contain a depot.
9.3.9 A supply line may not be traced along a river into a river hexside controlled by an enemy fort/fortress which is in supply or manned, or into a
hexside controlled by an enemy NSP.
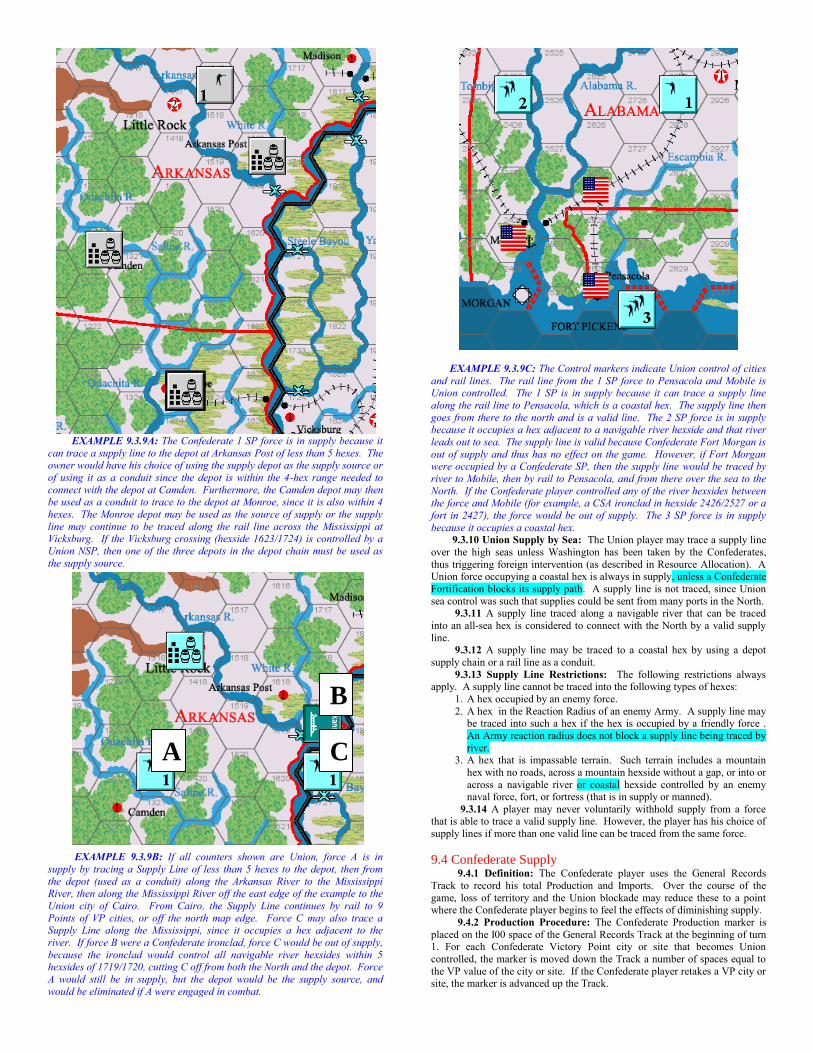
EXAMPLE 9.3.9A: The Confederate 1 SP force is in supply because it
can trace a supply line to the depot at Arkansas Post of less than 5 hexes. The owner would have his choice of using the supply depot as the supply source or
of using it as a conduit since the depot is within the 4-hex range needed to
connect with the depot at Camden. Furthermore, the Camden depot may then be used as a conduit to trace to the depot at Monroe, since it is also within 4
hexes. The Monroe depot may be used as the source of supply or the supply
line may continue to be traced along the rail line across the Mississippi at Vicksburg. If the Vicksburg crossing (hexside 1623/1724) is controlled by a
Union NSP, then one of the three depots in the depot chain must be used as
the supply source.
EXAMPLE 9.3.9B: If all counters shown are Union, force A is in
supply by tracing a Supply Line of less than 5 hexes to the depot, then from
the depot (used as a conduit) along the Arkansas River to the Mississippi River, then along the Mississippi River off the east edge of the example to the
Union city of Cairo. From Cairo, the Supply Line continues by rail to 9
Points of VP cities, or off the north map edge. Force C may also trace a Supply Line along the Mississippi, since it occupies a hex adjacent to the
river. If force B were a Confederate ironclad, force C would be out of supply,
because the ironclad would control all navigable river hexsides within 5 hexsides of 1719/1720, cutting C off from both the North and the depot. Force
A would still be in supply, but the depot would be the supply source, and
would be eliminated if A were engaged in combat.
EXAMPLE 9.3.9C: The Control markers indicate Union control of cities
and rail lines. The rail line from the 1 SP force to Pensacola and Mobile is Union controlled. The 1 SP is in supply because it can trace a supply line
along the rail line to Pensacola, which is a coastal hex. The supply line then
goes from there to the north and is a valid line. The 2 SP force is in supply because it occupies a hex adjacent to a navigable river hexside and that river
leads out to sea. The supply line is valid because Confederate Fort Morgan is
out of supply and thus has no effect on the game. However, if Fort Morgan were occupied by a Confederate SP, then the supply line would be traced by
river to Mobile, then by rail to Pensacola, and from there over the sea to the
North. If the Confederate player controlled any of the river hexsides between the force and Mobile (for example, a CSA ironclad in hexside 2426/2527 or a
fort in 2427), the force would be out of supply. The 3 SP force is in supply
because it occupies a coastal hex. 9.3.10 Union Supply by Sea: The Union player may trace a supply line
over the high seas unless Washington has been taken by the Confederates,
thus triggering foreign intervention (as described in Resource Allocation). A
Union force occupying a coastal hex is always in supply, unless a Confederate
Fortification blocks its supply path. A supply line is not traced, since Union
sea control was such that supplies could be sent from many ports in the North. 9.3.11 A supply line traced along a navigable river that can be traced
into an all-sea hex is considered to connect with the North by a valid supply
line. 9.3.12 A supply line may be traced to a coastal hex by using a depot
supply chain or a rail line as a conduit.
9.3.13 Supply Line Restrictions: The following restrictions always apply. A supply line cannot be traced into the following types of hexes:
1. A hex occupied by an enemy force.
2. A hex in the Reaction Radius of an enemy Army. A supply line may be traced into such a hex if the hex is occupied by a friendly force .
An Army reaction radius does not block a supply line being traced by
river. 3. A hex that is impassable terrain. Such terrain includes a mountain
hex with no roads, across a mountain hexside without a gap, or into or
across a navigable river or coastal hexside controlled by an enemy naval force, fort, or fortress (that is in supply or manned).
9.3.14 A player may never voluntarily withhold supply from a force that is able to trace a valid supply line. However, the player has his choice of
supply lines if more than one valid line can be traced from the same force.
9.4 Confederate Supply 9.4.1 Definition: The Confederate player uses the General Records
Track to record his total Production and Imports. Over the course of the
game, loss of territory and the Union blockade may reduce these to a point where the Confederate player begins to feel the effects of diminishing supply.
9.4.2 Production Procedure: The Confederate Production marker is
placed on the I00 space of the General Records Track at the beginning of turn 1. For each Confederate Victory Point city or site that becomes Union
controlled, the marker is moved down the Track a number of spaces equal to
the VP value of the city or site. If the Confederate player retakes a VP city or site, the marker is advanced up the Track.
A C
B
9.4.3 During the Blockade Effects Phase, the Confederate player double
checks his Production total to make sure it reflects the actual number of VP city and site points in friendly territory that he controls. VP city points
located in neutral or enemy territory are not added to the Track. If a neutral
state, such as Missouri, joins the Confederacy, then the VP cities in that state
are added to the Production total.
9.4.4 Blockade Procedure: After the Confederate player has
determined his Production total, he determines the effects of the Union Blockade. On the Union Game-Turn Record Track is listed the Union
Blockade percentage for each turn. This is the percent of the Confederate
imports captured by the Union blockade historically. Each Confederate port has a value listed in its Port Box. On turn 1, the Imports marker is placed on
the 140 space of the General Records Track. It starts there because the ports
of Petersburg, Norfolk, and Pensacola are already lost due to the presence of Union controlled fortresses.
9.4.5 During the Blockade Effects Phase, the Confederate player
determines the total number of port points in his control. Then he cross-indexes the Union Blockade percentage with the number of Confederate port
points to determine the number of Supply Points, called Imports, which make
it through the blockade. These are added to the General Records Track after the Production total marker using the CSA Import marker.
EXAMPLE 9.4.5: If the Confederate player had 88 VP city and site
points and 12 Import Points, then the Production marker would be placed at 88 and the Import mariner would be placed at 100.
9.4.6 Confederate port points may be reduced in several ways. A port is
always lost if the Union player gains control of the port hex. In addition, many ports can be shut down by Union control of nearby hexes. In each port
box on the map are listed additional hexes that will cause a port’s points to be lost to the Confederacy. Ports without additional hexes listed lose their
Import Points only if the port hex itself is in Union control. When the Union
shuts down a port by either method, place a Union control marker in the Port Box as a reminder.
EXAMPLE 9.4.6: The port points of Charleston are lost if the Union
captures Fort Sumter. 9.4.7 Supply Loss Effects: Confederate supply effects are determined
in the Blockade Effects Phase and last for the duration of that turn. When the
Confederate supply total of Production plus Imports is reduced to 100 or less, then the effects listed on the Supply Loss Schedule, following, begin to take
effect. The effects are cumulative.
EXAMPLE 9.4.7: If the Confederate total is reduced to between 90 and 99, then his cost to build a depot, fort, or to upgrade a fort to a fortress is
increased to 3 Commands each. When the total falls below 90, then the cost
to enter an ironclad or commerce raider is increased to 3 Commands each in addition to the increased depot, fort, and fortress costs.
9.4.8 Supply Loss Schedule: As the Confederate supply total is
reduced to the following levels, the indicated effects occur (all effects are cumulative):
99 to 90: Command Point cost to build a depot, fort, or to upgrade a fort to a fortress is increased by 1.
89 to 80: Entering a naval reinforcement costs 3 Commands.
79 to 70: Upgrading a fort to a fortress costs 5 Commands (the cost to build a fort remains 4).
69 to 50: A supply line may be traced only 3 hexes to a depot, instead of
4 hexes.
49 to 40: A supply line may be traced only 1 hex to a rail line, instead of
2 hexes.
39 to 30: The Movement Point Allowance of all forces is reduced by 1
Movement Point.
29 to 20: Entering a naval reinforcement costs 4 Commands.
19 to 10: No Confederate naval forces may enter play as reinforcements.
9 to 0: The Movement Point Allowance of all forces is reduced by 1
Movement Point.
9.4.9 Loss of the Mississippi: If the Confederacy is cut in half by loss of the Mississippi River, then it is divided into two countries, as mentioned in
Resource Allocation. This has a dramatic effect on Confederate supply.
Reduce the Confederate Production and Import totals by the number of Confederate Victory City Points and Port Points still in Confederate control in
the Trans-Mississippi. If the Far West map is not being used, increase the VP
City total by 4 and the Port Point total by 7 to account for the cities and ports in Texas. Then place the Trans-Mississippi Production and Import markers at
the correct totals on the General Records Track using the same modifications
if the Far West map is not used. Thereafter, the Confederate player must keep track of the two sets of markers separately. Thus, the two areas will suffer
separate, usually different, effects for supply loss. The Confederate player
determines supply effects for each separately during the Blockade Effects
Phase. If the Confederate player is able to reopen the Mississippi, then in the
next Blockade Phase the Trans-Mississippi Production and Import markers are removed and their totals are again added to the Confederate Import and
Production markers.
EXAMPLE 9.4.9: The Trans-Mississippi Production plus Import total has been reduced to 18, while the CSA total has been reduced to 42. Thus, the
supply loss effects for the East and West theaters are those listed for 42 and
above, while the effects for the Trans-Mississippi are more extreme and include those for 18 and above.
10.0 Reinforcements
DESIGNER’S NOTES: The exact number of men who fought in the Civil War will never be known. In fact, estimations vary a great deal, especially on
the strength of the Confederate armies. The number of Strength Points used
in this game is based on strength totals from several sources, including Numbers and Losses in the Civil War by Thomas Livermore, Regimental
Losses in the Civil War by William Fox, The Numerical Strength of the
Confederate Army by Randolph McKim, and numerous general sources such as Battles and Leaders of the Civil War and Shelby Foote’s The Civil War: A
Narrative. These totals were reduced by one third to reflect the fact that great
numbers of men were not in combat units, but were garrison troops, wagon drivers, and other non-combatants. The final number of Strength Points in
this game is as accurate as we could determine. The most important thing is
that the ratio of Confederate to Union SP’s reflects the historical ratio. Reinforcements enter the game during each turn. The number available
each turn varies depending on the season and when the two sides made recruitment drives and drafts. Naval Strength Points enter on the turn each
ship or group of ships was launched. Leaders enter the Leader Pools a turn
or two before the ―turn‖ in which they rose to prominence historically.
10.1 When Reinforcements Enter the Game 10.1.1 Both players receive a varying number of SP’s, NSP’s, and
leaders each turn as reinforcements. The number of SP’s, NSP’s, and individual leaders received are listed on the Game-Turn Record Track for
each side. Before starting the game, place reinforcing leaders and NSP’s on
the Game-Turn Record Track. SP’s need not be placed on the Track. 10.1.2 During the Reinforcement Phase, both players record their SP
reinforcements for that turn on their Reinforcement Tracks. Thus, Western
reinforcements are recorded on the Western Reinforcement Track, Discretionary on the Discretionary Track, etc. Leaders are removed from the
Game-Turn Record Track and are placed face-down in the owner’s Leader
Pool. Union NSP’s are placed in the Union Naval Pool, and Confederate NSP’s remain on the Game-Turn Record Track until the Confederate pays for
them by expending Commands during the Action Phase. Reinforcements
enter play during the Action Phase. The method of entry differs for each reinforcement type. Reinforcement is not movement; thus a reinforcement of
any type can move in the Pulse it enters.
10.2 Strength Points 10.2.1 SP’s enter the game in one of two ways, as a result of winning an
Initiative roll or being entered in the Action Phase. The player who wins the Initiative in a Pulse must enter one (and only one) SP from one of his
Reinforcement Tracks or a leader from his Leader Pool. This is a “free”
reinforcement and does not use up the Dice Difference, although it is marked off the Reinforcement Track from which it was entered. If he has no SP’s or
leaders to enter, there is no penalty. During the Action Phase, a player may
spend a part of the Initiative Dice Difference to enter reinforcements. Each reinforcement costs one point of the difference; however, reinforcement entry
costs no Commands.
EXAMPLE 10.2.1: Suppose you win the Initiative die roll and the difference is 4. First you would place one SP or leader on the map for having
won the Initiative. Then, during the Pulse, you could spend the 4 Dice
Difference to enter up to 4 more reinforcements if you chose. 10.2.2 If both players roll the same Initiative dice total, and this causes
the Action Phase to end before all reinforcing SP’s are entered, they are not
lost. Instead, they remain on their respective Reinforcement Tracks. The reinforcements for the next turn are then added to the previously unentered
totals. If the resulting sum of SP’s in a Reinforcement Track exceeds 9, then
turn over that marker to its +10 side. This means that the number of SP’s on that Track is 10 plus the number on the box the counter occupies. If the +10
counter were in the 2 box, there would be 12 reinforcement SP’s on that
Track. If you exceed 19 SP’s on a single Track, which is very unlikely, you should keep track of the excess on scratch paper.
10.2.3 SP’s may only be placed on hexes which are in supply in the
same theater as the Reinforcement Track from which they were taken. Thus, Eastern reinforcements must be placed in the east, Western in the west, and so
forth. Discretionary reinforcements may be placed in any theater. However,
the Confederate player may not place Discretionary reinforcements in the
Trans-Mississippi theater if control of the Mississippi River has been lost.
SP’s may be placed in the following locations:
10.2.4 VP City Placement: SP’s may be placed on VP cities in a hex the player controls which is located in friendly territory. They may not be
placed on VP cities in enemy or neutral territory or in a hex occupied by an
enemy force. 10.2.5 St. Louis is tinted blue and is thus a Union friendly VP city even
though Missouri is not friendly to the Union at the start of the game. This is
the only Trans-Mississippi VP city friendly to the Union at the beginning of the game, and the only hex where Union Trans-Mississippi reinforcements
can be placed until Missouri becomes friendly to the Union by joining the
Union side. 10.2.6 The following VP cities are unsupplied at the start of the game:
North Carolina: Plymouth
Louisiana: Port Hudson, Alexandria, Shreveport Texas: Marshall, Sabine City, Galveston, Austin,
San Antonio, Corpus Christi, Brownsville
10.2.7 Army Placement: SP’s may also be placed directly into a friendly Army. To do so, the Army must be able to trace a supply line to a supply
source located in friendly territory. However, the Union supply line may not
be traced by sea, or through the Chesapeake Bay. The Union supply line may be traced by river. Thus, the Union player cannot simply occupy Savannah
and begin taking reinforcements there. This is true even if Georgia is converted since it will only be neutral to the Union then, not friendly. SP’s
must be shipped to Savannah by union Sea Lift or amphibious landing nearby.
Furthermore, the Confederate player would only be able to reinforce the Army of Northern Virginia occupying Philadelphia if a valid supply line could be
traced to a supply source located in Confederate territory (i.e., Virginia).
10.2.8 Within these limitations, SP’s may be entered into an Army occupying enemy territory (i.e., the SP is not considered to be moving in
enemy territory when it is entered as a reinforcement).
10.2.9 Reinforcements may not be taken into an army which is already at its maximum strength. They may be taken into the hex if it contains an
eligible VP city, as in 10.2.4 above. SP's may not be "dropped off" outside an
army, in the same hex, for the purpose of taking reinforcements to an army already at its maximum strength.
10.3 Leaders 10.3.1 A leader may enter the game by winning an Initiative roll or being entered in the Pulse. Entering a leader for winning initiative is free,
while entering in a Pulse costs the player one point of Initiative Dice
Difference, but no Command Points. The player picks a leader randomly and places it face-down on the map. He can examine the leader to discover his
identity after placing it on the map. Once placed, the leader cannot be
relocated or replaced in the Leader Pool. The identity of the leader is not revealed to the enemy player.
10.3.2 Leaders must always be placed in a hex containing either a friendly SP or depot. Leaders may never be placed in an empty hex or into a
hex containing only other leaders. Within these limitations, leaders must be
placed in VP cities or into an Army within the same restrictions as those for SP’s.
10.3.3 Union naval leaders are placed in exactly the same manner as
other leaders. 10.3.4 When a promotion counter is picked, place it on the hex currently
occupied by the lower ranked counter, and remove the lower ranked counter
from the game.
10.4 Union Naval Reinforcements 10.4.1 Union NSP’s listed on the Union Game-Turn Record Track are
placed in the Union Naval Pool each turn. During his half of a Pulse, the Union player may spend two Commands to enter all of the NSP’s currently in
the Naval Pool, regardless of the NSP total. NSP’s that are not entered during
a turn remain in the Naval Pool and may be entered on a subsequent turn. There is no limit to the number of NSP’s that can occupy the Naval Pool or
that may enter in a single turn.
10.4.2 Union river-going NSP’s must be placed in a navigable river hexside bordering a hex that contains a Union controlled city in friendly
territory that is in supply. The city need not be a VP city, although it could be.
Place the NSP such that it faces the river hexside it occupies. If the placement hexside is controlled by an enemy fortification, that fortification immediately
fires upon the NSP. The city need not be a VP city, although it could be.
Place the NSP such that it faces the river hexside it occupies
EXAMPLE 10.4.2: A good example of such a hex is Cairo, Illinois
(2211) and its river hexsides. 10.4.3 Union ocean-going NSP’s are placed in coastal cities or on a river
hexside adjacent to a city (as above), but the cities must be located in the
Eastern theater. However, NSP’s may not be placed adjacent to Pittsburg,
Pennsylvania. In other words, place ocean-going NSP’s so that they can reach
the ocean.
Due to the limitation on the number of Union transport counters, it is possible that transport markers will be unavailable for placement in the Naval
Pool. Entry is delayed until counters are available. This is intentional and
tends to make the Union player keep his transports in groups, which is historical.
10.5 Confederate Naval Reinforcements 10.5.1 There are two types of Confederate naval reinforcements (or
NSP’s): ironclads and commerce raiders. Confederate NSP’s remain on the
Game-Turn Record Track until the turn in which they are able to be entered. To enter an NSP, the Confederate player must spend two Discretionary
Commands each. If he does not spend the Commands during a turn, then the
NSP is moved to the next turn on the Track. Confederate NSP’s remain indefinitely on the Turn Record Track until they are “bought”.
EXAMPLE 10.5.1: The Confederate player may choose to ―buy‖ the
Virginia on Turn 4; if he does not, it moves to the Turn 5 box. 10.5.2 Confederate ironclad NSP’s must be placed in a navigable river
hexside that is adjacent to a Confederate city in friendly territory that is in
supply. However, the Confederate player may place a maximum of one ironclad per city, per turn. If the placement hexside is controlled by an enemy
fortification, that fortification immediately fires upon the ironclad.
10.5.3 Confederate commerce raider NSP’s are placed in the At Sea Box on the map when they enter. They remain there until they are destroyed or
until the game ends, whichever comes first.
11.0 Railroads
DESIGNER’S NOTES: Railroads were of critical importance to the
movement and supply of armies during the Civil War The location of the rail
lines was more often than not the deciding factor in determining each side’s line of attack and defense. Without rail supply, it was very difficult to supply
an army in enemy or even friendly territory. Thus, both sides guarded their
rail supply lines very closely. In fact, the Union kept as many as 25,000 men stationed along the B&O line running from Harper’s Ferry, Virginia over to
Grafton, West Virginia. Likewise, the Confederacy fought viciously to
preserve control of rail crossroads such as Corinth, Mississippi and Chattanooga, Tennessee.
When railroads were destroyed or damaged, both sides made mighty
efforts to repair them as quickly as possible. Both became very adept at repair of even the most badly damaged roadbeds and bridges. The Union
could repair a 20-mile stretch of badly damaged rail in a matter of a few days.
The Confederates could not match that proficiency, but they could repair such damage in as little as two weeks. In addition, the Confederates had the
benefit of interior lines, which made it harder and more dangerous for Union raiders to cut rails behind Confederate lines.
In the game, rail repair is very simple. The time scale is such that a
detailed rail maintenance and repair rule is inappropriate. Yet, control of rail lines is of critical importance to the game for the historical reasons of
movement and supply. The Union player will find his rail lines in the West in
constant danger of being cut by the likes of John Morgan, Joe Wheeler, and Nathan Bedford Forrest. Garrisoning of rail lines will sap Union strength
and should be a constant headache if the Confederate player plays well. On
the other hand the Union player can move sizeable forces by rail each turn
and can alter his strategic options by such movement.
Remember that rail connections between 9 points of VP cities is the
primary source of supply for both sides. Thus, control of a continuous line of rails between your cities is very important. Remember also that enemy NSP’s
may cut your rail lines that cross navigable rivers. For the Confederates
especially, preservation of a good rail net is critical.
11.1 Rail Line Control 11.1.1 At the start of the game, both players control a large network of
connected rail lines. Each player controls all the rail hexes shaded in his color, either gray or blue. In addition, a player may also use rail lines that
enter border hexes, unless those border hexes also contain enemy territory.
The Union player also controls all the rail lines in Missouri and West Virginia, even though he does not control those states.
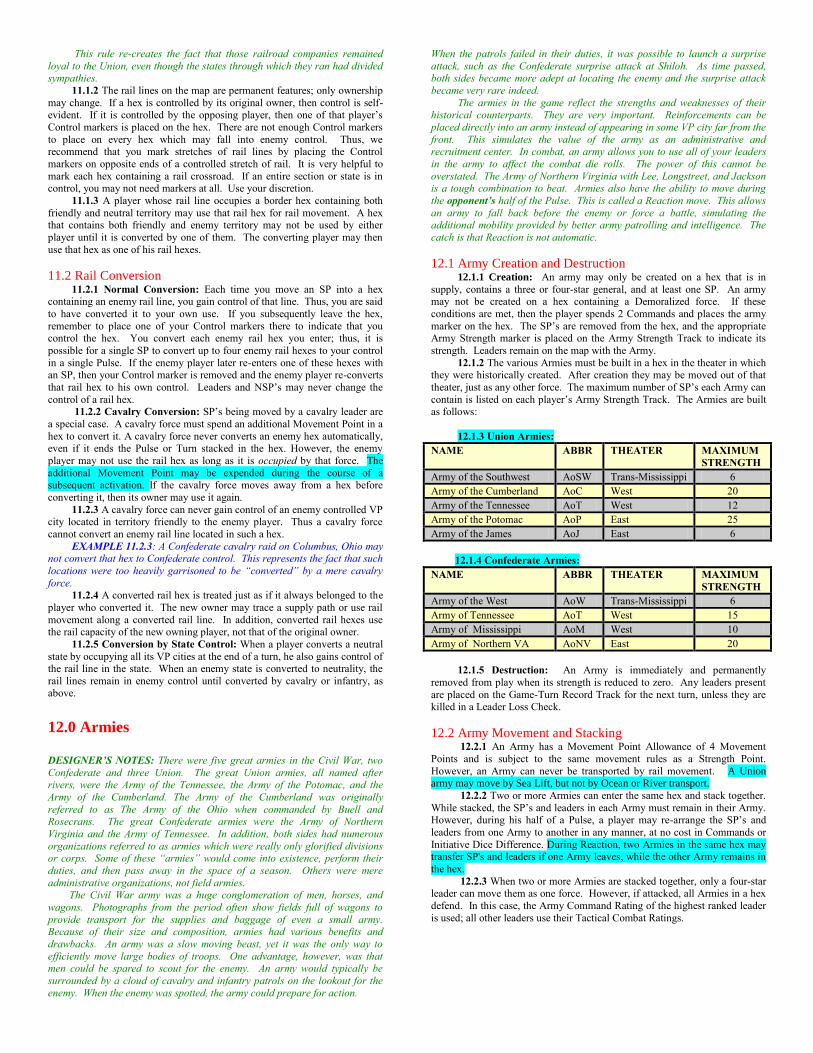
This rule re-creates the fact that those railroad companies remained
loyal to the Union, even though the states through which they ran had divided sympathies.
11.1.2 The rail lines on the map are permanent features; only ownership
may change. If a hex is controlled by its original owner, then control is self-
evident. If it is controlled by the opposing player, then one of that player’s
Control markers is placed on the hex. There are not enough Control markers
to place on every hex which may fall into enemy control. Thus, we recommend that you mark stretches of rail lines by placing the Control
markers on opposite ends of a controlled stretch of rail. It is very helpful to
mark each hex containing a rail crossroad. If an entire section or state is in control, you may not need markers at all. Use your discretion.
11.1.3 A player whose rail line occupies a border hex containing both
friendly and neutral territory may use that rail hex for rail movement. A hex that contains both friendly and enemy territory may not be used by either
player until it is converted by one of them. The converting player may then
use that hex as one of his rail hexes.
11.2 Rail Conversion 11.2.1 Normal Conversion: Each time you move an SP into a hex containing an enemy rail line, you gain control of that line. Thus, you are said
to have converted it to your own use. If you subsequently leave the hex,
remember to place one of your Control markers there to indicate that you control the hex. You convert each enemy rail hex you enter; thus, it is
possible for a single SP to convert up to four enemy rail hexes to your control
in a single Pulse. If the enemy player later re-enters one of these hexes with an SP, then your Control marker is removed and the enemy player re-converts
that rail hex to his own control. Leaders and NSP’s may never change the
control of a rail hex. 11.2.2 Cavalry Conversion: SP’s being moved by a cavalry leader are
a special case. A cavalry force must spend an additional Movement Point in a
hex to convert it. A cavalry force never converts an enemy hex automatically, even if it ends the Pulse or Turn stacked in the hex. However, the enemy
player may not use the rail hex as long as it is occupied by that force. The
additional Movement Point may be expended during the course of a subsequent activation. If the cavalry force moves away from a hex before
converting it, then its owner may use it again.
11.2.3 A cavalry force can never gain control of an enemy controlled VP city located in territory friendly to the enemy player. Thus a cavalry force
cannot convert an enemy rail line located in such a hex.
EXAMPLE 11.2.3: A Confederate cavalry raid on Columbus, Ohio may not convert that hex to Confederate control. This represents the fact that such
locations were too heavily garrisoned to be ―converted‖ by a mere cavalry
force. 11.2.4 A converted rail hex is treated just as if it always belonged to the
player who converted it. The new owner may trace a supply path or use rail
movement along a converted rail line. In addition, converted rail hexes use the rail capacity of the new owning player, not that of the original owner.
11.2.5 Conversion by State Control: When a player converts a neutral
state by occupying all its VP cities at the end of a turn, he also gains control of the rail line in the state. When an enemy state is converted to neutrality, the
rail lines remain in enemy control until converted by cavalry or infantry, as above.
12.0 Armies
DESIGNER’S NOTES: There were five great armies in the Civil War, two
Confederate and three Union. The great Union armies, all named after rivers, were the Army of the Tennessee, the Army of the Potomac, and the
Army of the Cumberland. The Army of the Cumberland was originally
referred to as The Army of the Ohio when commanded by Buell and Rosecrans. The great Confederate armies were the Army of Northern
Virginia and the Army of Tennessee. In addition, both sides had numerous
organizations referred to as armies which were really only glorified divisions or corps. Some of these ―armies‖ would come into existence, perform their
duties, and then pass away in the space of a season. Others were mere
administrative organizations, not field armies. The Civil War army was a huge conglomeration of men, horses, and
wagons. Photographs from the period often show fields full of wagons to
provide transport for the supplies and baggage of even a small army. Because of their size and composition, armies had various benefits and
drawbacks. An army was a slow moving beast, yet it was the only way to
efficiently move large bodies of troops. One advantage, however, was that men could be spared to scout for the enemy. An army would typically be
surrounded by a cloud of cavalry and infantry patrols on the lookout for the
enemy. When the enemy was spotted, the army could prepare for action.
When the patrols failed in their duties, it was possible to launch a surprise
attack, such as the Confederate surprise attack at Shiloh. As time passed, both sides became more adept at locating the enemy and the surprise attack
became very rare indeed.
The armies in the game reflect the strengths and weaknesses of their historical counterparts. They are very important. Reinforcements can be
placed directly into an army instead of appearing in some VP city far from the
front. This simulates the value of the army as an administrative and recruitment center. In combat, an army allows you to use all of your leaders
in the army to affect the combat die rolls. The power of this cannot be
overstated. The Army of Northern Virginia with Lee, Longstreet, and Jackson is a tough combination to beat. Armies also have the ability to move during
the opponent’s half of the Pulse. This is called a Reaction move. This allows
an army to fall back before the enemy or force a battle, simulating the additional mobility provided by better army patrolling and intelligence. The
catch is that Reaction is not automatic.
12.1 Army Creation and Destruction 12.1.1 Creation: An army may only be created on a hex that is in
supply, contains a three or four-star general, and at least one SP. An army may not be created on a hex containing a Demoralized force. If these
conditions are met, then the player spends 2 Commands and places the army
marker on the hex. The SP’s are removed from the hex, and the appropriate Army Strength marker is placed on the Army Strength Track to indicate its
strength. Leaders remain on the map with the Army.
12.1.2 The various Armies must be built in a hex in the theater in which they were historically created. After creation they may be moved out of that
theater, just as any other force. The maximum number of SP’s each Army can
contain is listed on each player’s Army Strength Track. The Armies are built as follows:
12.1.3 Union Armies:
NAME ABBR THEATER MAXIMUM
STRENGTH
Army of the Southwest AoSW Trans-Mississippi 6
Army of the Cumberland AoC West 20
Army of the Tennessee AoT West 12
Army of the Potomac AoP East 25
Army of the James AoJ East 6
12.1.4 Confederate Armies:
NAME ABBR THEATER MAXIMUM
STRENGTH
Army of the West AoW Trans-Mississippi 6
Army of Tennessee AoT West 15
Army of Mississippi AoM West 10
Army of Northern VA AoNV East 20
12.1.5 Destruction: An Army is immediately and permanently
removed from play when its strength is reduced to zero. Any leaders present
are placed on the Game-Turn Record Track for the next turn, unless they are killed in a Leader Loss Check.
12.2 Army Movement and Stacking 12.2.1 An Army has a Movement Point Allowance of 4 Movement
Points and is subject to the same movement rules as a Strength Point.
However, an Army can never be transported by rail movement. A Union army may move by Sea Lift, but not by Ocean or River transport.
12.2.2 Two or more Armies can enter the same hex and stack together.
While stacked, the SP’s and leaders in each Army must remain in their Army. However, during his half of a Pulse, a player may re-arrange the SP’s and
leaders from one Army to another in any manner, at no cost in Commands or
Initiative Dice Difference. During Reaction, two Armies in the same hex may transfer SP's and leaders if one Army leaves, while the other Army remains in
the hex.
12.2.3 When two or more Armies are stacked together, only a four-star leader can move them as one force. However, if attacked, all Armies in a hex
defend. In this case, the Army Command Rating of the highest ranked leader
is used; all other leaders use their Tactical Combat Ratings.

12.3 Army Reaction Movement
12.3.1 Each army has a Reaction Radius comprising the hex it occupies and the six adjacent hexes.
12.3.2 A Reaction Radius never extends into the following:
Across a mountain hex or hexside which does not contain a road or gap. A Reaction Radius may extend into a mountain hex or across a
mountain hexside if that hexside is crossed by a road or gap.
Across a navigable river hexside controlled by an enemy NSP or
supplied fortification. A Naval Strength Point controls river hexsides and the Reaction Radius of an opposing Army does not extend across
such a controlled hexside.
Into an all-sea hex.
Across an impassable hexside.
Into a hex occupied by an enemy force. A Reaction Radius does not extend into a hex occupied by an enemy force. However, it does
extend into a hex occupied by a friendly force. Thus, a Reaction Radius attempt is not triggered by entering a hex adjacent to an
enemy Army if that hex already contains a friendly force.
12.3.3 The Reaction Radius of an Army does extend into an unmanned, supplied enemy fortification, except where restricted by navigable river
hexsides controlled by the fortification.
12.3.4 Armies that May React: Reaction movement may be made only by Armies of the player whose half of the Pulse is not in progress. The
Armies of the player whose half of the Pulse is in progress may not move by
Reaction Movement, although they still have Reaction Radii for purposes of supply, retreat, and Reaction movement by the opposing player.
12.3.5 Reaction Procedure: The player whose half of the Pulse is in
progress is termed the Phasing player; his opponent is the non-Phasing player for purposes of the following rules.
12.3.6 The Phasing player must verbally announce his intention to enter
the Reaction Radius of an enemy Army. The Phasing player must also announce which SP’s and leaders will remain behind, if any. Then the Army’s
owner (the non-Phasing player) has the option to roll for Army Reaction. If
he declines to roll, then the force that triggered the Reaction roll must enter the hex announced by its owner. If the non-Phasing player decides to roll for
Reaction, follow the following procedure. In PBEM, it is customary for the
Phasing player to roll for Army Reaction, since if the Reaction roll fails, the phasing player may continue with his move.
12.3.7 The non-Phasing player rolls one die; if the result is greater than
the Initiative Rating of the Reacting Army’s commander, the Army may use Reaction Movement. If the die result is equal to or less than the Army
commander’s Initiative Rating, the Army may not use Reaction movement.
12.3.8 If a Phasing player's force moves so that 2 or more forces are
eligible for Reaction, the non-Phasing player may roll for each such force
before deciding which, if any will react. A four-star leader in command of an
Army group could use his initiative rating to roll once for Reaction for all Armies, or the non-Phasing player may choose instead to roll for each Army
individually. Each Army may React to separate hexes if desired. Partial
Reaction is allowed, and SP's and leaders of a Reacting Army may be left behind. Otherwise, the composition of Armies may not be changed during the
non-Phasing player's (i.e., the Reacting player's) half of the pulse.
12.3.9 An Army that has rolled successfully for Reaction Movement has
the option to move one hex; movement is not mandatory. SP's stacked in the Army's hex, in excess of the Army's maximum strength, cannot React with the
Army and must remain in the hex. Reaction Movement does not cost
Commands or expend Movement Points, but is subject to the same rules for
terrain as it would be when moving normally. A Reacting force may cross a
navigable river which it could otherwise cross during normal movement.
12.3.10 A Reacting Army, including one that is Demoralized, can move into the hex the Phasing player announced he was entering. The
Phasing player’s force must move into the announced hex; therefore, combat
is initiated. However, the non-Phasing player’s Reacting Army is the defender in the combat, and the Phasing player’s force is the attacker,
regardless of the fact that the Reacting force also moved during the Phasing
player’s half of the Pulse. 12.3.11 A Reacting Army can also move into a hex other than the one
the Phasing player announced he was entering, within the following
limitations. 12.3.12 If the Phasing player’s force which triggered the Reaction is an
Army, the Reacting Army cannot enter a hex in that Phasing Army’s Reaction
Radius. The only exception is the hex the Phasing player announced his force was entering. The Reaction Radius of the Phasing player’s Army is judged
from the hex it occupies before it enters the announced hex. The Reaction
Radii of other Armies belonging to the Phasing player have no effect and may be entered by the Reacting Army.
(GRAPHIC)
EXAMPLE 12.3.12: Army A is commanded by Grant; Army D is commanded by Lee. The Union player announces his intention to enter hex 2,
within the Confederate Army’s Reaction Radius. The Confederate player
decides to roll for Reaction, rolling a 3 on one die. Lee’s Initiative Rating is 2, and the die roll of 3 is greater, thus allowing Lee’s Army to React. The
Confederate player reacts into hex 2, triggering combat, even though moving,
as the defender. The Confederate force cannot enter hex 3, because this hex is in the Union Army’s Reaction Radius and is not the hex into which the Union
player announced he would move. The Confederate Army could also React
into hex 1, 4, 5, or 6, since these hexes are not within the Union Reaction Radius. A Reaction move into any of these hexes would not trigger combat.
The Confederate player could also elect not to move. If A were not an Army,
D could enter hex 3, since A would have no Reaction Radius. 12.3.13 Thus, the non-Phasing player may choose to React away from
the Phasing player’s force, in which case the Phasing player may continue to
move his force, if he still has Movement Points remaining. If the force enters the non-Phasing player’s Reaction Radius again, he may roll for Reaction
again. If successful, the non-Phasing player may make another Reaction
move with his Army. An Army may use Reaction Movement as many times in a Pulse as Reaction is triggered and successfully rolled for. During
Reaction Movement, SP’s and leaders not in an Army are “picked up” by a
Reacting Army moving into their hex, up to its maximum Army strength limit. Such SP’s and leaders are absorbed into the Army, and will move with it in
any subsequent Reaction Movement.
12.3.14 A Reacting Army, even if Demoralized, can react into a hex occupied by one of the Phasing player’s forces only if the Reacting Army can
overrun that force [ original language: and the Reacting Army is not already
Demoralized]. If overrun is not possible, then the hex cannot be entered.
2
1
3
4
5
6
D
A
D A

(GRAPHIC)
EXAMPLE 12.3.14 Force A has Movement Points remaining, so the Union player announces his intention to enter the hex occupied by
Confederate force D, which is part of force D’s Reaction Radius. The
Confederate player rolls a 5 on one die, thus permitting Reaction. If Union force A is an Army, Confederate Reaction into hexes 1 and 3 is prohibited,
since these are within A’s Reaction Radius. If A is not an Army, Reaction into
these hexes is possible. D may also React into hexes 4 and 6. Additionally, the Confederates can React into hex 5, which is occupied by Union force B, if
the Confederates can overrun that Union force. If unable to achieve 8 to 1
odds against B, the Confederate Army cannot enter hex 5. If force B were a Union Army, the Confederate force could react into hexes 4 and 6, since only
the moving Union Army has a Reaction Radius for Confederate Reaction purposes.
12.3.15 Reaction Die Roll Modifiers: A Demoralized Army subtracts
1 from its Reaction die roll. An Army that contains a cavalry leader adds the Tactical Combat Rating of the highest ranked cavalry leader in the Army to its
Reaction die roll. If both of these modifiers apply to the same Reaction
attempt, subtract one from the other to determine the final modifier. An army always fails its Reaction die roll on an unmodified die roll of 1.
EXAMPLE 12.3.15: Union force A enters the Reaction Radius of
Demoralized Confederate Army D. The Confederate player decides to roll for
Reaction, rolling a 4 on one die. Bragg’s Initiative Rating is 3, and the die roll of 4 is greater, which would normally allow force D to React. However,
since force D is Demoralized, one is subtracted from the die roll, making it a
3, which is equal to Bragg’s Initiative Rating, prohibiting Reaction. If General Forrest were a member of Army D, his Tactical Combat Rating of 2
would have been added to the Reaction die roll, resulting in a final Reaction
modifier of +1 (Demoralization modifier subtracted from Forrest s Tactical Combat Rating), and Reaction would have been possible.
12.3.16 Partial Reaction Movement: When an Army rolls successfully
for Reaction, the owner has the option of moving the entire Army or just a part of it, to one hex. If he chooses to move just a part of it, he must use one
of the leaders from the Army to command the part being moved. The SP’s
moved are subject to the command limit for the rank of the moving leader. Using partial Reaction is a way to intercept a moving enemy without
displacing an entire Army.
EXAMPLE 12.3.16: The Confederate cavalry leader Nathan Bedford Forrest enters the Reaction Radius of the Army of the Cumberland. The
Union player rolls successfully for Reaction and decides to send out his
cavalry leader, General Sheridan, to stop Forrest. The combat would he resolved with Forrest as the attacker.
12.3.17 Conversely, when an Army Reacts, the owner may leave SP’s
behind in the hex. The force left behind need not have a leader present and any number of SP’s may be left behind.
EXAMPLE 12.3.17: The Union player announces his intention to
move his force A into the Reaction Radius of Confederate Army D. The Confederate player decides to roll for Reaction, rolling a 6 on one die. Van
Dorn’s Initiative Rating is 2, and the die roll of 6 is greater, thus allowing
Confederate Army D to React. The Confederate player decides to leave 6 SP’s in the hex and move the remainder of the Army into hex 3.
12.3.18 Reaction into a Friendly Occupied Hex: An Army’s
Reaction Radius extends into a hex containing other forces of the same side. Thus, an Army can React into an adjacent hex containing another friendly
force. EXAMPLE 12.3.18A: if the Army of Tennessee under Bragg were
adjacent to another Confederate force consisting of 3 SP’s and the Union
player announced his intention to enter the hex, then the Confederate player may roll for Reaction for Bragg and his Army. If successful, Bragg’s Army
(or part of it) may React into the smaller force’s hex.
EXAMPLE: 12.3.18B: Union force A has Movement Points
remaining, and the Union player announces his intention to enter the hex
occupied by 6 Confederate SP’s. Since this hex is within the Reaction Radius of Confederate Army D, the Confederate player decides to roll for Reaction,
rolling a 3 on one die. Van Dorn’s Initiative Rating is 2, and the die roll of 3
is greater, thus allowing Confederate Reaction. The Confederate Army can React into the hex occupied by the 6 SP’s, since this is the hex that the Union
force intends to enter; the Confederate force could alternatively enter hex 3,
4, or 5. The Confederate Army cannot React into Union force A’s hex, because this is the hex force A is leaving to enter the hex occupied by the 6
SP’s. The Confederate Army can React into hex 2 if force A is not an Army.
If force A is an Army, the Confederates cannot enter hex 2, because it is within the Reaction Radius of Army A and not the hex Army A intends to enter.
The Confederate player ultimately decides to enter the hex occupied by the 6
SP’s, forcing the Union player to attack both the army and the 6 Strength Points as a combined defensive force.
12.3.19 Reaction Radius Effect on Leader Movement: A leader
moving by himself may not enter an enemy occupied hex or a hex in the Reaction Radius of an enemy army. If an enemy force enters his hex, or an
enemy army moves such that its Reaction Radius occupies his hex, the leader
is immediately removed from the map, a Leader Loss Check is made, and if he survives, his counter is placed on the Turn Record Track for the next turn.
This rule applies only to leaders in a hex without friendly SP’s.
A
A A
D
5
4
3
2
4
5
6
1
2
3
5
6
1
4
3
2
1
6
4
3
D
D D
D
D
A
B
D
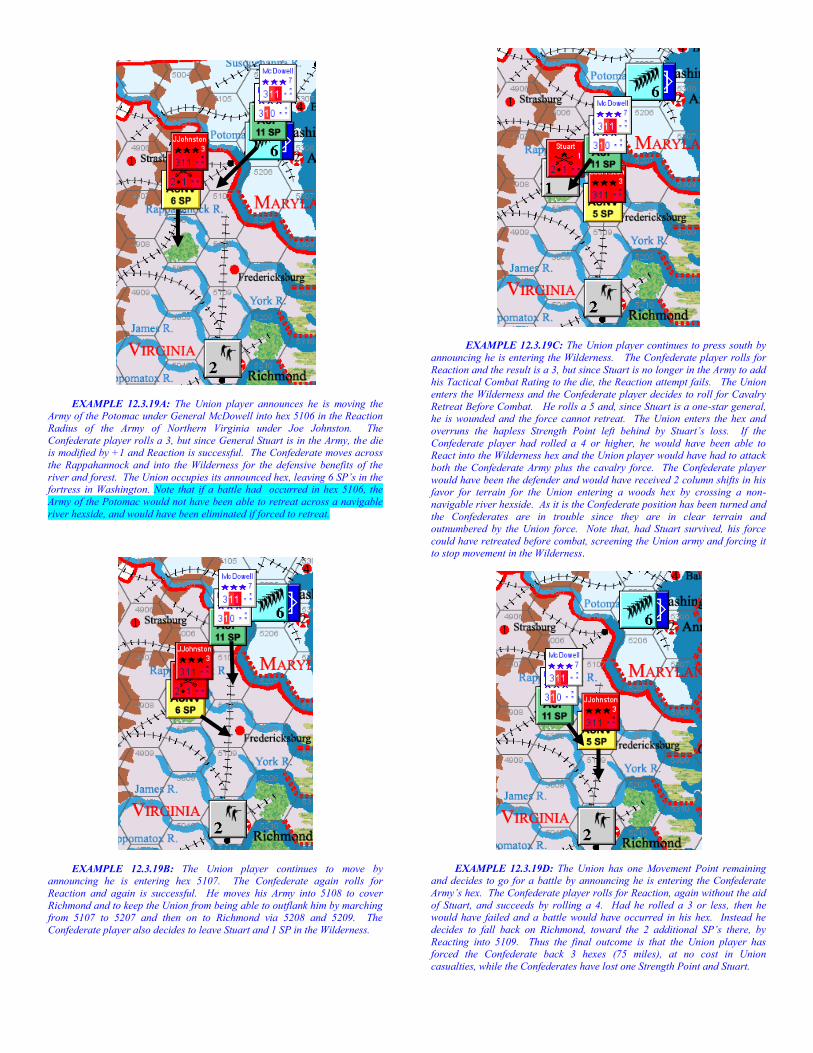
EXAMPLE 12.3.19A: The Union player announces he is moving the Army of the Potomac under General McDowell into hex 5106 in the Reaction
Radius of the Army of Northern Virginia under Joe Johnston. The
Confederate player rolls a 3, but since General Stuart is in the Army, the die is modified by +1 and Reaction is successful. The Confederate moves across
the Rappahannock and into the Wilderness for the defensive benefits of the
river and forest. The Union occupies its announced hex, leaving 6 SP’s in the fortress in Washington. Note that if a battle had occurred in hex 5106, the
Army of the Potomac would not have been able to retreat across a navigable
river hexside, and would have been eliminated if forced to retreat.
EXAMPLE 12.3.19B: The Union player continues to move by announcing he is entering hex 5107. The Confederate again rolls for
Reaction and again is successful. He moves his Army into 5108 to cover
Richmond and to keep the Union from being able to outflank him by marching from 5107 to 5207 and then on to Richmond via 5208 and 5209. The
Confederate player also decides to leave Stuart and 1 SP in the Wilderness.
EXAMPLE 12.3.19C: The Union player continues to press south by
announcing he is entering the Wilderness. The Confederate player rolls for
Reaction and the result is a 3, but since Stuart is no longer in the Army to add his Tactical Combat Rating to the die, the Reaction attempt fails. The Union
enters the Wilderness and the Confederate player decides to roll for Cavalry
Retreat Before Combat. He rolls a 5 and, since Stuart is a one-star general, he is wounded and the force cannot retreat. The Union enters the hex and
overruns the hapless Strength Point left behind by Stuart’s loss. If the
Confederate player had rolled a 4 or higher, he would have been able to React into the Wilderness hex and the Union player would have had to attack
both the Confederate Army plus the cavalry force. The Confederate player
would have been the defender and would have received 2 column shifts in his favor for terrain for the Union entering a woods hex by crossing a non-
navigable river hexside. As it is the Confederate position has been turned and
the Confederates are in trouble since they are in clear terrain and outnumbered by the Union force. Note that, had Stuart survived, his force
could have retreated before combat, screening the Union army and forcing it to stop movement in the Wilderness.
EXAMPLE 12.3.19D: The Union has one Movement Point remaining and decides to go for a battle by announcing he is entering the Confederate
Army’s hex. The Confederate player rolls for Reaction, again without the aid
of Stuart, and succeeds by rolling a 4. Had he rolled a 3 or less, then he would have failed and a battle would have occurred in his hex. Instead he
decides to fall back on Richmond, toward the 2 additional SP’s there, by
Reacting into 5109. Thus the final outcome is that the Union player has forced the Confederate back 3 hexes (75 miles), at no cost in Union
casualties, while the Confederates have lost one Strength Point and Stuart.
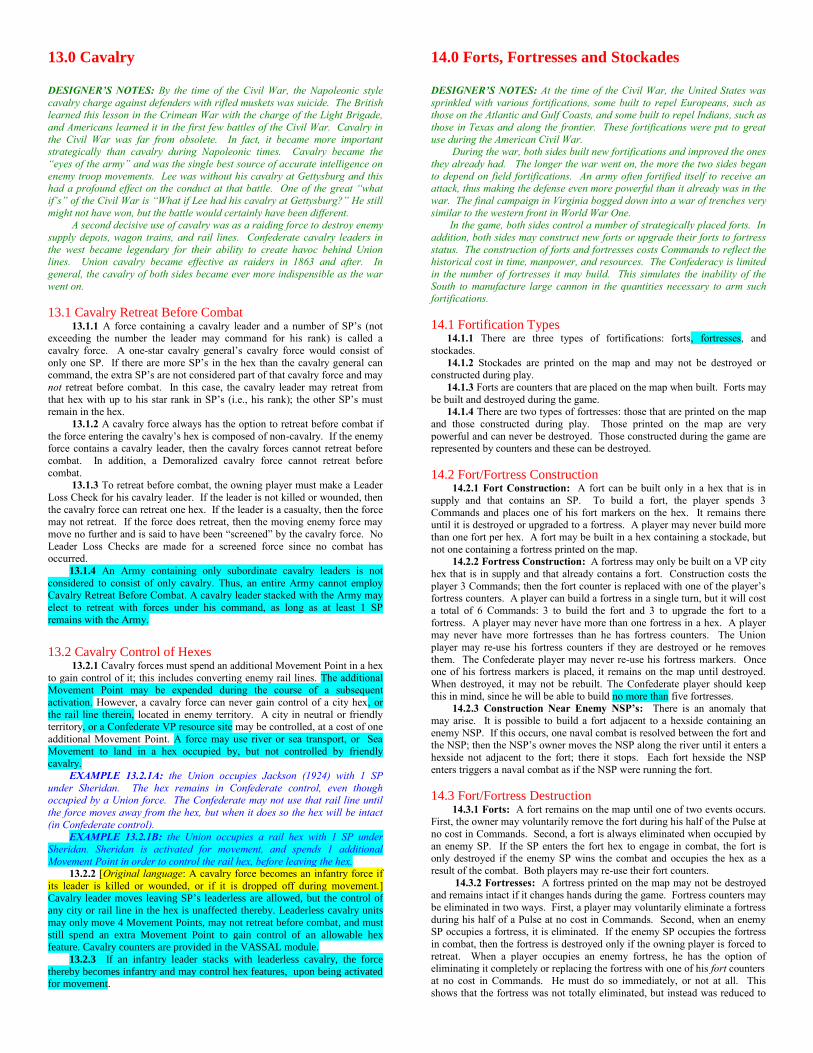
13.0 Cavalry
DESIGNER’S NOTES: By the time of the Civil War, the Napoleonic style
cavalry charge against defenders with rifled muskets was suicide. The British learned this lesson in the Crimean War with the charge of the Light Brigade,
and Americans learned it in the first few battles of the Civil War. Cavalry in
the Civil War was far from obsolete. In fact, it became more important strategically than cavalry during Napoleonic times. Cavalry became the
―eyes of the army‖ and was the single best source of accurate intelligence on
enemy troop movements. Lee was without his cavalry at Gettysburg and this had a profound effect on the conduct at that battle. One of the great ―what
if’s‖ of the Civil War is ―What if Lee had his cavalry at Gettysburg?‖ He still
might not have won, but the battle would certainly have been different. A second decisive use of cavalry was as a raiding force to destroy enemy
supply depots, wagon trains, and rail lines. Confederate cavalry leaders in
the west became legendary for their ability to create havoc behind Union lines. Union cavalry became effective as raiders in 1863 and after. In
general, the cavalry of both sides became ever more indispensible as the war
went on.
13.1 Cavalry Retreat Before Combat 13.1.1 A force containing a cavalry leader and a number of SP’s (not exceeding the number the leader may command for his rank) is called a
cavalry force. A one-star cavalry general’s cavalry force would consist of
only one SP. If there are more SP’s in the hex than the cavalry general can command, the extra SP’s are not considered part of that cavalry force and may
not retreat before combat. In this case, the cavalry leader may retreat from
that hex with up to his star rank in SP’s (i.e., his rank); the other SP’s must remain in the hex.
13.1.2 A cavalry force always has the option to retreat before combat if
the force entering the cavalry’s hex is composed of non-cavalry. If the enemy force contains a cavalry leader, then the cavalry forces cannot retreat before
combat. In addition, a Demoralized cavalry force cannot retreat before
combat. 13.1.3 To retreat before combat, the owning player must make a Leader
Loss Check for his cavalry leader. If the leader is not killed or wounded, then
the cavalry force can retreat one hex. If the leader is a casualty, then the force may not retreat. If the force does retreat, then the moving enemy force may
move no further and is said to have been “screened” by the cavalry force. No
Leader Loss Checks are made for a screened force since no combat has occurred.
13.1.4 An Army containing only subordinate cavalry leaders is not
considered to consist of only cavalry. Thus, an entire Army cannot employ Cavalry Retreat Before Combat. A cavalry leader stacked with the Army may
elect to retreat with forces under his command, as long as at least 1 SP
remains with the Army.
13.2 Cavalry Control of Hexes 13.2.1 Cavalry forces must spend an additional Movement Point in a hex
to gain control of it; this includes converting enemy rail lines. The additional Movement Point may be expended during the course of a subsequent
activation. However, a cavalry force can never gain control of a city hex, or
the rail line therein, located in enemy territory. A city in neutral or friendly territory, or a Confederate VP resource site may be controlled, at a cost of one
additional Movement Point. A force may use river or sea transport, or Sea
Movement to land in a hex occupied by, but not controlled by friendly cavalry.
EXAMPLE 13.2.1A: the Union occupies Jackson (1924) with 1 SP
under Sheridan. The hex remains in Confederate control, even though occupied by a Union force. The Confederate may not use that rail line until
the force moves away from the hex, but when it does so the hex will be intact
(in Confederate control). EXAMPLE 13.2.1B: the Union occupies a rail hex with 1 SP under
Sheridan. Sheridan is activated for movement, and spends 1 additional
Movement Point in order to control the rail hex, before leaving the hex. 13.2.2 [Original language: A cavalry force becomes an infantry force if
its leader is killed or wounded, or if it is dropped off during movement.]
Cavalry leader moves leaving SP’s leaderless are allowed, but the control of any city or rail line in the hex is unaffected thereby. Leaderless cavalry units
may only move 4 Movement Points, may not retreat before combat, and must
still spend an extra Movement Point to gain control of an allowable hex feature. Cavalry counters are provided in the VASSAL module.
13.2.3 If an infantry leader stacks with leaderless cavalry, the force
thereby becomes infantry and may control hex features, upon being activated for movement.
14.0 Forts, Fortresses and Stockades
DESIGNER’S NOTES: At the time of the Civil War, the United States was
sprinkled with various fortifications, some built to repel Europeans, such as those on the Atlantic and Gulf Coasts, and some built to repel Indians, such as
those in Texas and along the frontier. These fortifications were put to great
use during the American Civil War. During the war, both sides built new fortifications and improved the ones
they already had. The longer the war went on, the more the two sides began
to depend on field fortifications. An army often fortified itself to receive an attack, thus making the defense even more powerful than it already was in the
war. The final campaign in Virginia bogged down into a war of trenches very
similar to the western front in World War One. In the game, both sides control a number of strategically placed forts. In
addition, both sides may construct new forts or upgrade their forts to fortress
status. The construction of forts and fortresses costs Commands to reflect the historical cost in time, manpower, and resources. The Confederacy is limited
in the number of fortresses it may build. This simulates the inability of the
South to manufacture large cannon in the quantities necessary to arm such fortifications.
14.1 Fortification Types 14.1.1 There are three types of fortifications: forts, fortresses, and
stockades.
14.1.2 Stockades are printed on the map and may not be destroyed or constructed during play.
14.1.3 Forts are counters that are placed on the map when built. Forts may
be built and destroyed during the game. 14.1.4 There are two types of fortresses: those that are printed on the map
and those constructed during play. Those printed on the map are very
powerful and can never be destroyed. Those constructed during the game are represented by counters and these can be destroyed.
14.2 Fort/Fortress Construction 14.2.1 Fort Construction: A fort can be built only in a hex that is in
supply and that contains an SP. To build a fort, the player spends 3
Commands and places one of his fort markers on the hex. It remains there until it is destroyed or upgraded to a fortress. A player may never build more
than one fort per hex. A fort may be built in a hex containing a stockade, but
not one containing a fortress printed on the map.
14.2.2 Fortress Construction: A fortress may only be built on a VP city
hex that is in supply and that already contains a fort. Construction costs the
player 3 Commands; then the fort counter is replaced with one of the player’s fortress counters. A player can build a fortress in a single turn, but it will cost
a total of 6 Commands: 3 to build the fort and 3 to upgrade the fort to a
fortress. A player may never have more than one fortress in a hex. A player may never have more fortresses than he has fortress counters. The Union
player may re-use his fortress counters if they are destroyed or he removes
them. The Confederate player may never re-use his fortress markers. Once one of his fortress markers is placed, it remains on the map until destroyed.
When destroyed, it may not be rebuilt. The Confederate player should keep
this in mind, since he will be able to build no more than five fortresses. 14.2.3 Construction Near Enemy NSP’s: There is an anomaly that
may arise. It is possible to build a fort adjacent to a hexside containing an
enemy NSP. If this occurs, one naval combat is resolved between the fort and the NSP; then the NSP’s owner moves the NSP along the river until it enters a
hexside not adjacent to the fort; there it stops. Each fort hexside the NSP
enters triggers a naval combat as if the NSP were running the fort.
14.3 Fort/Fortress Destruction 14.3.1 Forts: A fort remains on the map until one of two events occurs. First, the owner may voluntarily remove the fort during his half of the Pulse at
no cost in Commands. Second, a fort is always eliminated when occupied by
an enemy SP. If the SP enters the fort hex to engage in combat, the fort is only destroyed if the enemy SP wins the combat and occupies the hex as a
result of the combat. Both players may re-use their fort counters.
14.3.2 Fortresses: A fortress printed on the map may not be destroyed and remains intact if it changes hands during the game. Fortress counters may
be eliminated in two ways. First, a player may voluntarily eliminate a fortress
during his half of a Pulse at no cost in Commands. Second, when an enemy SP occupies a fortress, it is eliminated. If the enemy SP occupies the fortress
in combat, then the fortress is destroyed only if the owning player is forced to
retreat. When a player occupies an enemy fortress, he has the option of eliminating it completely or replacing the fortress with one of his fort counters
at no cost in Commands. He must do so immediately, or not at all. This
shows that the fortress was not totally eliminated, but instead was reduced to

fort status. When a fort is created in this way, it may be necessary to use the
procedure in Construction Near Enemy NSP’s to resolve combat between the new fort and any enemy NSP’s occupying its hexsides.
14.3.3 Stockades: Stockades are permanent map features that can never
be destroyed.
14.4 Supply Effects on Unmanned Fortifications 14.4.1 Unmanned forts and fortresses control river hexsides and the hexes they occupy for purposes of naval movement and amphibious landing.
However, an unmanned fort/fortress that is out of supply has no effect on the
game at all. It is not eliminated; rather, it is simply ignored for the preceding purposes.
15.0 Neutral States
DESIGNER’S NOTES: The reactions of various parts of the country to the Secession crisis of 1860-61 varied greatly. Some states joined the
Confederacy and others waited until after open warfare broke out with the
bombing of Ft. Sumter. Other states, with divided sympathies, joined neither side initially. The Confederacy consisted of 11 states, yet there were 13 stars
on the Confederate flag. Slave states bordering the Confederate and Union
states were caught in a bind, since their loyalties were divided. Thus, there were stars in the Confederate nag for Kentucky and Missouri, although these
states never really joined the Confederacy.
Control of the border states was of decisive importance to both sides. Lincoln considered Kentucky so important that without it the Union cause was
doomed. Missouri he considered only slightly less important. The fighting in
these two states was particularly vicious, since it was a brother against brother, clan against clan, guerrilla war. The primary goal of the first year of
the war for both sides was to gain and keep control of the border states.
Ultimately the Union won, and the border states remained with the old flag. The Union begins the game with a very definite advantage which
reflects the early Union victories in these states, and their superior policies
toward the neutrals. The Confederate player will have to work hard to gain control of even a single neutral state, yet the effort, even if ultimately
successful, is of great strategic worth.
West Virginia was actually part of Virginia until the Civil War. Then, ironically, it seceded from Virginia to become a separate state, which
officially joined the Union in 1863.
The Five Civilized Tribes, as the Indians of Indian Territory were called, owned black slaves and had embraced a culture more Southern than
Northern. When the Civil War broke out, they turned to the Confederacy,
except for the Creek Nation which was divided in its loyalties. As the first year of the war came and went, the Indian Nations became more and more
disenchanted with the Confederacy. Old tribal feuds re-surfaced. Indian
turned against Indian and the bickering became vicious. It became a guerrilla war with the likes of Quantrill and his raiders helping to foment
racial genocide. When prisoners were taken by either side, Indian or White,
they were killed. Some of the most bitter infighting of the war occurred in Indian territory.
More military actions occurred in the state of Missouri than in any other state except Virginia and Tennessee. The fact that the Union was able to gain
control of the state is owed largely to the efforts of one man, General Nathan
Lyon. Missouri was in total chaos and on the verge of going over to the Confederacy when he made his move. He broke up the state militia and
forced the Confederate sympathetic governor out of office. He re-established
federal control in the cities and marched south to drive the last vestige of Confederate strength from the state. This is where the game begins.
The state of Kentucky attempted to have itself treated as a neutral by
both sides. It was almost as if it were a separate nation. Finally it sided with
the North, but control was contested in numerous battles.
15.1 Neutral States In the game, the control of neutrals is very important for victory purposes. The following states begin the game in neutral status: New Mexico
(Far West, optional map), Indian Territory, Missouri, Kentucky, and West
Virginia.
15.2 Neutral State Victory Points 15.2.1 Victory Point Cities: A Victory Point (VP) city in a neutral state is worth its value to whichever player controls it. Control of the city may pass
from one player to another during the course of the game.
15.2.2 When a neutral state joins one side, that player receives an
immediate Victory Point award equal to the value of the VP cities in the state. EXAMPLE 15.2.2: if Missouri joins the Union, then the Union player
receives 6 Victory Points. These Victory Points may only be lost if the state
joins the Confederate side later in the game, which is highly unlikely. In addition, the Union player receives the Victory Points for each VP city in the
state that he controls. Thus, Missouri is worth a total of 12 Victory Points: 6
for joining and 6 for the VP cities there.
15.3 Territorial Conversion 15.3.1 Each neutral state is considered neutral territory until it joins one side or the other. When it joins, it immediately becomes friendly to that
player and enemy territory to his opponent. Once a state joins one side, it
remains part of that player’s friendly territory, even if control of some of its VP cities is lost. The only way a neutral state which has joined one side will
switch sides is if all its VP cities are in control of the enemy player at the end
of a turn. 15.3.2 Victory Point sites have no effect on conversion. Thus, the Union
player need not control the ironworks (2713) to convert Tennessee.
15.3.3 Thus, once Kentucky joins the Union, the Confederacy will have to retake all of its VP cities for it to join the Confederacy.
Remember that either side may also convert enemy states; however, they
do not become friendly to the new controller, only neutral. Thus, if the Union player gains control of all of Tennessee’s VP cities at the end of a turn, he
receives additional Victory Points equal to the VP city points in the state and
the state becomes neutral to him. Once neutral, it remains neutral until the end of a turn in which the Confederate player controls all the Tennessee VP
cities simultaneously. The VP’s the Union player received for converting the
state are lost only if it is reconverted to Confederate control. Thus, the Union does not lose the conversion VP’s due to the loss of a single VP city.
15.4 West Virginia 15.4.1 On turn 1, West Virginia is almost in Union control. It joins
whichever side controls all three of its VP cities at the end of a turn. It is
worth 5 Victory Points for joining and 5 for its VP city values. 15.4.2 The rail hexes in West Virginia are controlled by the Union
player at the start of the game. They remain Union controlled until converted
by the Confederacy or until the state joins the Confederacy, if ever.
15.5 Indian Territory 15.5.1 The Indian Territory is always neutral to both sides. There are no
VP cities there, and thus the area has no Victory Points. Civilized Indian
tribal borders are included for historical interest, they have no effect on play.
15.6 Missouri 15.6.1 Missouri begins the campaign game with the Union already occupying all the VP cities in Missouri. Unless the Confederate player is able
to take control of one of these cities at the end of the first turn, then the state
will join the Union. 15.6.2 The Union controls the rail lines in Missouri regardless of
whether or not Missouri joins the Union on Game-Turn 1. Control of the rail
lines is lost if they are converted by the Confederate player or if the state joins the Confederacy. St. Louis is a Union controlled VP city and is friendly to
the Union. St. Louis becomes friendly to the South only if Missouri joins the
Confederacy. If Missouri joins the Confederacy, the Union loses all subsequent Trans-Mississippi reinforcements. If Missouri is retaken by the
Union, Trans-Mississippi reinforcements for turns following reconversion are
not lost.
15.7 Kentucky 15.7.1 If either side enters Kentucky on Game-Turn 1 or 2, the state
immediately joins the other side and is enemy territory to the entering player.
Both players may use the navigable rivers that border the state without
triggering this. Border hexes may be entered if they contain a part of the entering player’s territory.
15.7.2 On Game-Turn 3, the rail lines in Kentucky become Union
controlled and the state may be entered by either side without causing Kentucky to join the other side. On Game-Turn 3 and after, Kentucky joins
whichever side controls all of its VP cities at the end of a turn.
15.7.3 A Union SP moving by rail through a VP city in Kentucky does gain control of that hex. Place a Union Control marker in the hex.
16.0 State Militia Mobilization
DESIGNER’S NOTES: Each state had a small militia force which it could
call to arms when enemy forces threatened the state. These forces usually amounted to more than a Strength Point worth, but are classified as a single
Strength Point because of the low quality of the troops in the force.
16.1 State Militia: Each state has only a single militia point, and once it enters, then the state has lost its ability to mobilize militia. The following
states have no militia, since they are already mobilized at the start of Game-
Turn 1: Indian Territory, New Mexico, Missouri, West Virginia, Kentucky, Maryland, and Virginia.
16.2 Most states (both Confederate and Union) have one Strength Point
of militia which enters play if an enemy force enters the state. The SP is placed on a VP city in the state after the enemy force enters a hex in the state
(including border hexes). If the state has no available friendly VP city on the
map, place the militia on any hex in the state. It is impossible for the militia to be placed in the hex the enemy force enters. There is no requirement that
the placement hex be in supply. Militia is placed after the conclusion of the
phasing player’s movement. EXAMPLE 16.2: If militia is triggered by a Union amphibious invasion,
then the militia is placed after the invasion is resolved.
16.3 Militia mobilization is not triggered by the movement of enemy naval forces alone. Mobilization is triggered by amphibious invasion or
combined land/naval attack, regardless of any failure of the invasion or
combined attack.
17.0 Victory
DESIGNER’S NOTES: The Civil War was a war with only two possible outcomes: independence for the South, or utter destruction of the Southern
Confederacy. Historically, both sides expected a short, victorious war - the
magnitude and length of the war was totally unexpected and unplanned for. The Northern victory, although it seems inevitable today, was anything but a
foregone conclusion in 1861.
It is generally agreed that the South’s best hope for independence lay in fighting a defensive war and gaining foreign recognition and intervention by
victory on the field. This strategy was aided by the sheer size of the
Confederacy, which made a quick Northern victory impossible. This increased the duration of the war, which in turn created war weariness in the
North. If the South had been able to hold the Union armies out of the
Southern heartland for only a few more months, it is likely that a ―peace‖ candidate would have beaten Lincoln in the 1864 election, thus ending the
war and leaving the South independent.
We have attempted to make this game as balanced as possible, and yet have it reflect history. Thus we have emphasized the importance of the 1864
election and de-emphasized the importance of foreign intervention, since it
was more a fantasy/nightmare than a real possibility. Finally, even if the South is completely destroyed, as they were historically, there is still a chance
that the Confederate player may have ―won‖ the game by not losing the war
as badly as it was lost historically The game may be begun and ended at several points, allowing for a
shorter game, at the expense of a complete historical overview, which only the
campaign game allows. Play balance varies from one stopping point to the next but, regardless of when the game is ended, we have attempted to keep the
game balanced.
The Union player has more decisions to make and rules to remember; therefore, the more experienced player should play the Union side. If players
are of equal experience, then the Confederate player should realize that he
has the easier side to play.
17.1 Victory Points 17.1.1 Victory Definition: Victory is determined through the accumulation of Victory Points. Victory Points are awarded for control of VP
cities, conversion of territory, sinking Union merchant ships, for cutting off
Washington, D.C. and for use of the Command Point Table. 17.1.2 Victory Point Accumulation: During play, Victory Points are
recorded on the General Records Track with the Victory Point markers
provided. A player gains VP’s for control of enemy and neutral VP cities, sites, and conversions. A player does not gain or lose VPs for control of his
own original territory. The original territory is tinted blue on the map, and
Confederate is tinted gray. Thus, the Confederate player does not gain or lose VP’s for control or loss of gray tinted hexes, but the Union player gains VP’s
for those Confederate hexes. Both players gain VP’s for control of VP cities
in and conversion of neutral states. Record each VP you gain by moving your marker on the General Records Track. If you subsequently lose VP’s you
have gained, then record that loss as well.
EXAMPLE 17.1.2: the Union begins Game Turn 1 with 9 VP’s. If the
Confederate then takes the Union VP city of Cairo, Illinois, the Union does not lose 2 VP’s; rather, the Confederate player gains 2 VP’s. However, if
instead the Confederate takes Jefferson City, Missouri, a neutral VP city in
Union control and one of the Union’s 9 VP’s, then the Union player loses that VP and the Confederate gains it.
17.2 Victory Point Awards Victory Points are awarded for the following:
17.2.1 CSA Receives 1 VP per CP Table Use: During the Command
Point Table Use Phase of each turn, record on the General Records Track the number of times the Command Point Table was used that turn. It will always
be used at least once per turn, and may be used as many as four times. When
Victory Determination is made, the Confederate player receives 1 VP for each CP Table Use.
17.2.2 VP City Value for Enemy or Neutral VP City: Both players
receive VP’s for controlling enemy and neutral VP cities. Thus, when the Union player takes a Confederate VP city he should move his Victory Point
marker up that number of spaces on the General Records Track. If the
Confederate then retakes the city, those VP’s are lost to the Union. Thus the Confederate regains and the Union loses the VP value of the city.
17.2.3 USA Receives l VP per CSA VP Site: There are three
Confederate resource sites not located in cities: the salt mine (4012), lead mine (4112), and ironworks (2713). Each site is worth 1 VP to the Union
player if he controls them. Depots cannot be built in resource site hexes.
Cavalry may control such hexes. Confederate states may be converted even absent Union control of resource sites within the state. Confederate resource
sites do not contribute towards the 9 points of rail-connected Victory Point
cities necessary to form a supply nexus. 17.2.4 VP’s Equal to VP City Value for State Conversion: A player
receives VPs for the control of VP cities in neutral states just as he does for
enemy VP cities. In addition, when a neutral state joins his side, he receives VP’s equal to the VP city point total for that state. These VP’s are in addition
to those he received for the cities themselves. Thus, Missouri is worth 6
Points for joining and 6 Points for its cities. When a player has control of all VP cities in an enemy state at the end of a turn, that state is converted to being
neutral towards him. In addition, he receives VP’s equal to the VP city total
for this conversion. These are awarded in addition to the VP’s for the cities themselves. Thus, Tennessee is worth 27 VP’s to the Union: 14 for its VP
cities and 13 for its conversion (the ironworks is not a VP city and thus does
not give a second VP for conversion). VP’s awarded for gaining control of a neutral state or for converting an enemy state are only lost if the enemy player
manages to retake and hold all the VP cities in that state at the end of a Game-
Turn. Simply retaking one or two VP cities will not cause conversion points to be lost (although VP’s for the cities themselves do change hands).
17.2.5 Florida can be converted despite the absence of part of the state
from the map. There are no off-map Florida VP cities. 17.2.6 Texas can be converted regardless of whether or not the Far West
map is being used. When the Far West map is not in use, the Union converts
Texas by controlling all VP cities on the standard map. In that event, the CSA gets credit for the Imports and VP cities on the Far West Map, even if Texas is
converted. 17.2.7 CSA Receives 1 VP per 25 US Merchant Ships Sunk: The
Confederate player receives 1 VP for every 25 merchant ships his Commerce
Raiders sink. Thus, during Victory Determination, divide the US ships sunk total by 25 to determine the VP award. However, fractions are lost. Thus, if
there were 65 ships sunk, the Confederate would receive only 2 VPs.
17.2.8 CSA Receives 2 VP’s for Isolation of Washington from Rest of
Eastern Theater: If, at the end of a turn, a continuous line of Union rail hexes
cannot be traced from Washington, D.C. to 15 VP’s worth of Union cities in
the Eastern theater, then the Confederate player receives 2 permanent VP’s.
The Confederate player continues to receive 2 VP’s at the end of each turn as
long as he continues to isolate Washington. These VP’s are not lost if
Washington is no longer isolated at the end of a later turn. These VP’s are not awarded if the Confederates occupy Washington at the end of a turn; the VP’s
in rule 17.2.9 are awarded instead.
17.2.9 CSA Receives 20 VP’s for Control of Washington; if the CSA
Force is Out of Supply or Demoralized, l0 VP’s: If, at the end of a turn, the
Confederates occupy Washington, D.C. with a force that is in supply and not
Demoralized, then the Confederate player receives 20 permanent VP’s. If the Confederate force is out of supply or Demoralized, then the award is only 10
permanent VP’s. Regardless of the VP’s awarded, a Victory Determination is
made, the Union Sea Lift Capacity and Blockade are permanently reduced to zero, and the East must be the Union primary theater during the next
following Resource Allocation; existing Resource Allocations are not altered.
The Confederates are eligible for an award of 10 or 20 VP’s at the end of each turn during which they occupy Washington.
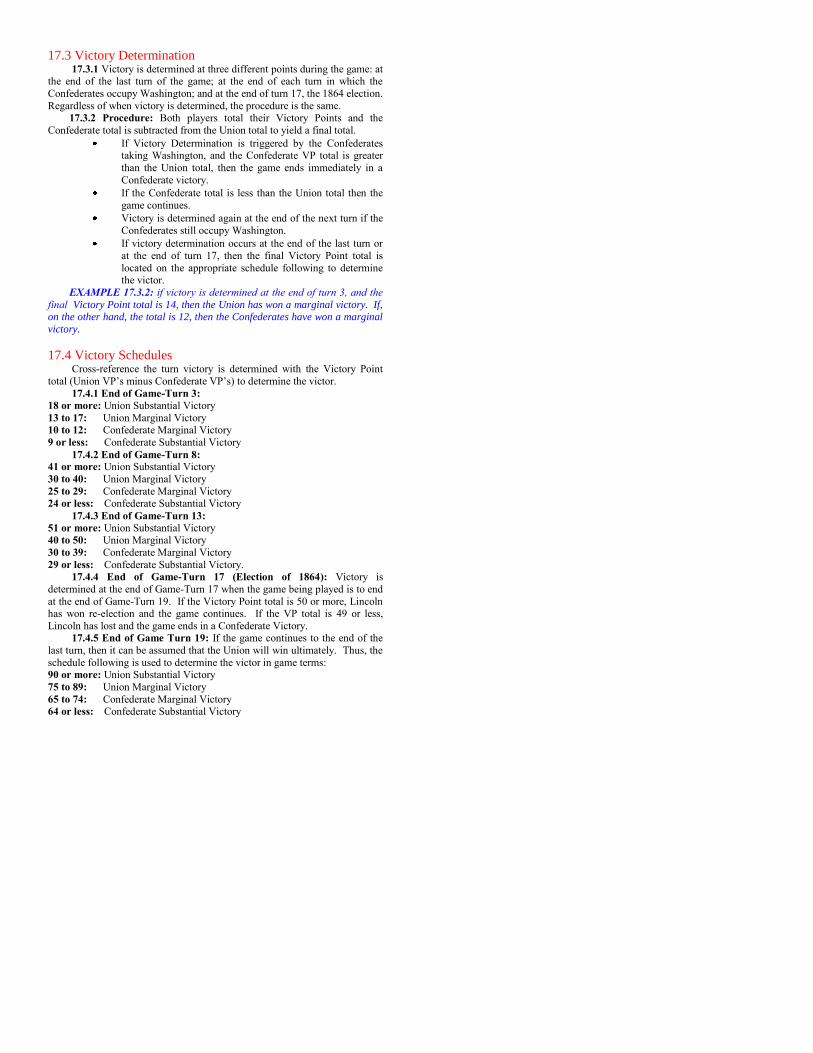
17.3 Victory Determination 17.3.1 Victory is determined at three different points during the game: at the end of the last turn of the game; at the end of each turn in which the
Confederates occupy Washington; and at the end of turn 17, the 1864 election.
Regardless of when victory is determined, the procedure is the same.
17.3.2 Procedure: Both players total their Victory Points and the
Confederate total is subtracted from the Union total to yield a final total.
If Victory Determination is triggered by the Confederates taking Washington, and the Confederate VP total is greater
than the Union total, then the game ends immediately in a
Confederate victory.
If the Confederate total is less than the Union total then the
game continues.
Victory is determined again at the end of the next turn if the
Confederates still occupy Washington.
If victory determination occurs at the end of the last turn or
at the end of turn 17, then the final Victory Point total is
located on the appropriate schedule following to determine the victor.
EXAMPLE 17.3.2: if victory is determined at the end of turn 3, and the
final Victory Point total is 14, then the Union has won a marginal victory. If, on the other hand, the total is 12, then the Confederates have won a marginal
victory.
17.4 Victory Schedules Cross-reference the turn victory is determined with the Victory Point
total (Union VP’s minus Confederate VP’s) to determine the victor.
17.4.1 End of Game-Turn 3:
18 or more: Union Substantial Victory
13 to 17: Union Marginal Victory 10 to 12: Confederate Marginal Victory
9 or less: Confederate Substantial Victory
17.4.2 End of Game-Turn 8:
41 or more: Union Substantial Victory
30 to 40: Union Marginal Victory
25 to 29: Confederate Marginal Victory 24 or less: Confederate Substantial Victory
17.4.3 End of Game-Turn 13:
51 or more: Union Substantial Victory 40 to 50: Union Marginal Victory
30 to 39: Confederate Marginal Victory
29 or less: Confederate Substantial Victory.
17.4.4 End of Game-Turn 17 (Election of 1864): Victory is
determined at the end of Game-Turn 17 when the game being played is to end
at the end of Game-Turn 19. If the Victory Point total is 50 or more, Lincoln has won re-election and the game continues. If the VP total is 49 or less,
Lincoln has lost and the game ends in a Confederate Victory. 17.4.5 End of Game Turn 19: If the game continues to the end of the
last turn, then it can be assumed that the Union will win ultimately. Thus, the
schedule following is used to determine the victor in game terms: 90 or more: Union Substantial Victory
75 to 89: Union Marginal Victory
65 to 74: Confederate Marginal Victory 64 or less: Confederate Substantial Victory

18.0 Scenarios
18.1 How to Start: To begin the game, the players choose sides and
decide the turns on which the game will begin and end. We have included
four starting set-ups, listed below - Turn 1(1861); Turn 4 (1862); Turn 9
(1863); and Turn 14 (1864) - and four turns on which the game may end,
listed in the Victory Schedules above - Turns 3, 8, 13, or 19. The Campaign Game begins on Game-Turn 1 and ends on Game-Turn 19, but shorter games
may be played by beginning and/or ending on different Turns.
EXAMPLE 18.1: If you want a really short game, you could begin on Game-Turn 1 and determine victory at the end of Game-Turn 3. A medium
length game could begin on Game-Turn 9 and end at the end of Game-Turn
19. 18.2 Note that the Confederate Victory Point totals used in the set-ups
for Game-Turns 4, 9, and 14 are to balance the game from those starting
points and do not reflect the historical “Victory Points” the Confederates had scored to that point.
18.3 Scenario Parameters: Set up the game by placing the counters
and markers as listed on the scenario set-ups within the parameters set forth in the set-ups and in the Summary of Playing Pieces, which indicates the various
Tracks and Markers used in conjunction with one another.
1861 SET-UP: Game-Turn 1 Confederate
HEX LOCATION SP’s LEADERS OTHER
0419 Bonham Depot
0613 Ft. Gibson Depot
0914 Fayetteville Depot
1011 2 * Price
1215 Clarksville Depot
1417 Little Rock 1 Depot
1813 1
1816 Madison Depot
2016 Memphis 2 ** Polk
2113 1
2428 Mobile 1
2513 1 Fort
2629 Pensacola 1
2814 Nashville 1 *** AS Johnston
4507 1
4623 Ft. Sumter 1
4814 Raleigh 1
4905 2 *** J Johnston
5006 4 *** Beauregard
5108 Fredericksburg 1
5110 Richmond 2
5310 1 * Magruder Fort
5411 Norfolk 1 * Huger
1861 CSA GENERAL RECORDS TRACK:
Confederate Victory Points Marker: 0
Command Point Table Total Use Marker: 0
Confederate Production Marker: 100
Confederate Imports Marker: 140
US Ships Sunk Marker: 0
Trans-Mississippi Production Marker: Not set up
Trans-Mississippi Imports Marker: Not set up
Confederate Leader Pool: None.
Confederate Dead Leaders: None.
Confederate Removed Leaders: None.
Confederate Commerce Raiders At Sea: None.
Eliminated: None.
1861 SET-UP: Game-Turn 1 Union
1861 USA GENERAL RECORDS TRACK:
Union Victory Points Marker: 9
For VP Cities in Missouri and West Virginia.
ON MAP Union Control: Wheeling (4303); Grafton (4505);
all rail hexes in Missouri and all rail hexes in West Virginia except 4806 and 4905.
Port Boxes: Pensacola; Norfolk; Petersburg.
Union Leader Pool: None.
Union Dead Leaders: None.
Union Removed Leaders: None.
Eliminated: None.
HEX LOCATION SP’s LEADERS OTHER
0808 Ft. Scott Depot
1005 Lexington 1 Depot
1111 Springfield 1 * Lyon
1507 Jefferson City 1
1509 Rolla Depot
1908 St. Louis 2 *** Fremont
2104 Springfield 2
2211 Cairo 1
2608 Evansville 1
2730 Ft. Pickens 1
3004 Indianapolis 2
3007 New Albany 1
3405 Cincinnati 2
3704 Columbus 2
4106 Parkersburg 1
4406 2 *** McClellan
4502 Pittsburg 1
5004 3
5106 1
5202 Harrisburg 1
5205 Washington DC 7 *** McDowell Fort
5305 Baltimore 1
5410 Ft. Monroe 2 *** Butler
5503 Philadelphia 2
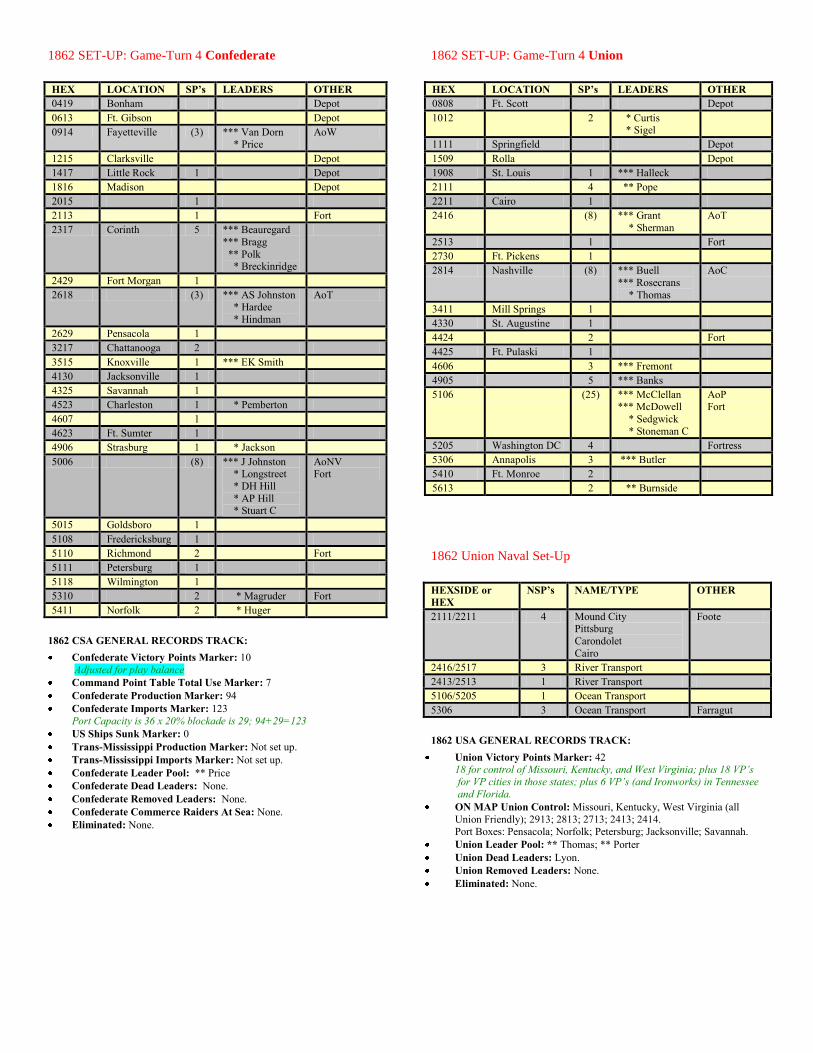
1862 SET-UP: Game-Turn 4 Confederate
HEX LOCATION SP’s LEADERS OTHER
0419 Bonham Depot
0613 Ft. Gibson Depot
0914 Fayetteville (3) *** Van Dorn * Price
AoW
1215 Clarksville Depot
1417 Little Rock 1 Depot
1816 Madison Depot
2015 1
2113 1 Fort
2317 Corinth 5 *** Beauregard
*** Bragg
** Polk * Breckinridge
2429 Fort Morgan 1
2618 (3) *** AS Johnston * Hardee
* Hindman
AoT
2629 Pensacola 1
3217 Chattanooga 2
3515 Knoxville 1 *** EK Smith
4130 Jacksonville 1
4325 Savannah 1
4523 Charleston 1 * Pemberton
4607 1
4623 Ft. Sumter 1
4906 Strasburg 1 * Jackson
5006 (8) *** J Johnston * Longstreet
* DH Hill
* AP Hill * Stuart C
AoNV Fort
5015 Goldsboro 1
5108 Fredericksburg 1
5110 Richmond 2 Fort
5111 Petersburg 1
5118 Wilmington 1
5310 2 * Magruder Fort
5411 Norfolk 2 * Huger
1862 CSA GENERAL RECORDS TRACK:
Confederate Victory Points Marker: 10
Adjusted for play balance
Command Point Table Total Use Marker: 7
Confederate Production Marker: 94
Confederate Imports Marker: 123
Port Capacity is 36 x 20% blockade is 29; 94+29=123
US Ships Sunk Marker: 0
Trans-Mississippi Production Marker: Not set up.
Trans-Mississippi Imports Marker: Not set up.
Confederate Leader Pool: ** Price
Confederate Dead Leaders: None.
Confederate Removed Leaders: None.
Confederate Commerce Raiders At Sea: None.
Eliminated: None.
1862 SET-UP: Game-Turn 4 Union
HEX LOCATION SP’s LEADERS OTHER
0808 Ft. Scott Depot
1012 2 * Curtis * Sigel
1111 Springfield Depot
1509 Rolla Depot
1908 St. Louis 1 *** Halleck
2111 4 ** Pope
2211 Cairo 1
2416 (8) *** Grant
* Sherman
AoT
2513 1 Fort
2730 Ft. Pickens 1
2814 Nashville (8) *** Buell
*** Rosecrans
* Thomas
AoC
3411 Mill Springs 1
4330 St. Augustine 1
4424 2 Fort
4425 Ft. Pulaski 1
4606 3 *** Fremont
4905 5 *** Banks
5106 (25) *** McClellan *** McDowell
* Sedgwick
* Stoneman C
AoP Fort
5205 Washington DC 4 Fortress
5306 Annapolis 3 *** Butler
5410 Ft. Monroe 2
5613 2 ** Burnside
1862 Union Naval Set-Up
HEXSIDE or
HEX
NSP’s NAME/TYPE OTHER
2111/2211 4 Mound City Pittsburg
Carondolet
Cairo
Foote
2416/2517 3 River Transport
2413/2513 1 River Transport
5106/5205 1 Ocean Transport
5306 3 Ocean Transport Farragut
1862 USA GENERAL RECORDS TRACK:
Union Victory Points Marker: 42 18 for control of Missouri, Kentucky, and West Virginia; plus 18 VP’s
for VP cities in those states; plus 6 VP’s (and Ironworks) in Tennessee
and Florida.
ON MAP Union Control: Missouri, Kentucky, West Virginia (all
Union Friendly); 2913; 2813; 2713; 2413; 2414.
Port Boxes: Pensacola; Norfolk; Petersburg; Jacksonville; Savannah.
Union Leader Pool: ** Thomas; ** Porter
Union Dead Leaders: Lyon.
Union Removed Leaders: None.
Eliminated: None.

1863 SET-UP: Game-Turn 9 Confederate
HEX LOCATION SP’s LEADERS OTHER
0419 Bonham Depot
0430 Houston * Huger Depot
0532 Galveston 1 * Magruder
0815 Ft. Smith 1 * Hindman
0923 Shreveport *** EK Smith Depot
1019 Washington Depot
1125 Grand Ecore Depot
1226 Alexandria 1 ** Taylor Depot
1417 Little Rock 2 ** Price
1528 Port Hudson 3 Fort
1724 Vicksburg (6) *** Pemberton AoM
Fortress
1820 Fort
1924 Jackson 1
2319 Tupelo 1
2428 Mobile 1 *** J Johnston Fort
2613 1 * Wheeler C
2629 Pensacola 1
2716 2 ** Forrest C
2916 (8) *** Bragg
** Polk ** Hardee
* Breckinridge
* Cleburne
AoT
3015 1 * Morgan C
3217 Chattanooga 1
3514 3 * Magruder Fort
4111 1
4325 Savannah 1 Fort
4508 1
4523 Charleston 2 *** Beauregard Fort
4623 Ft. Sumter 1
5015 Goldsboro 2 ** DH Hill
5108 Fredericksburg (12) *** RE Lee
** Jackson
** AP Hill * Early
** Stuart C
AoNV
Fort
5110 Richmond 1 Fortress
5111 Petersburg 1 Fort
5112 3 ** Longstreet
* Hood
5118 Wilmington 2
1863 CSA GENERAL RECORDS TRACK:
Confederate Victory Points Marker: 10 Adjusted for play balance
Command Point Table Total Use Marker: 19
Confederate Production Marker: 72
Confederate Imports Marker: 92 Port Capacity is 25 x 20% blockade; 72+20=92
US Ships Sunk Marker: 9
Trans-Mississippi Production Marker: Not set up
Trans-Mississippi Imports Marker: Not set up.
Confederate Leader Pool:** Ewell; ** Hood
Confederate Dead Leaders: AS Johnston; Van Dorn
Confederate Removed Leaders: None.
Confederate Commerce Raiders At Sea: Florida; Alabama.
Eliminated: Army of the West; Virginia; Arkansas
1863 SET-UP: Game-Turn 9 Union
HEX LOCATION SP’s LEADERS OTHER
0613 Ft. Gibson 1 * Blunt
0808 Ft. Scott Depot
0812 Ft. Wayne Depot
0914 Fayetteville 1 Depot
0915 (2) *** Curtis AoSW
1005 Lexington 1 Depot
1111 Springfield 1 Depot
1430 2 *** Banks
1507 Jefferson City 1
1509 Rolla 1 Depot
1623 (9) *** Grant
** McClernand ** Sherman
** McPherson
* Logan
AoT
1628 Baton Rouge 3 Fort
1817 1
1830 New Orleans 1
1908 St. Louis 1 Fort
1910 Ironton 1
2016 Memphis 6 ** Ord ** Steele
Fort
2115 1
2211 Cairo 2
2213 1
2216 1 * Grierson C
2316 1
2317 Corinth 2 Fort
2513 1 Fort
2713 1
2730 Ft. Pickens 1
2814 Nashville 4 Fort
5291 Bowling
Green
1
2915 (12) *** Rosecrans
** Thomas * Sheridan C
AoC
3008 Louisville 1
3014 1
3411 Mills Springs 6 ** Burnside
3704 Columbus 1
4106 Parkersburg 1
4108 Charleston Depot
4128 Brunswick 1
4130 Jacksonville 1
4208 1
4424 1 Fort
4425 Ft. Pulaski 1
4505 Grafton 1
4524 2 Fort
4905 1
5106 2
5107 (22) *** Hooker ** Meade
** Sedgwick
** Howard * Hancock
* Reynolds
* Pleasonton C ** Stoneman C
AoP
5202 Harrisburg 1 Fort
5205 Washington DC
8 Fortress
5216 New Bern 3 Fort
5305 Baltimore 1
5306 Annapolis 1
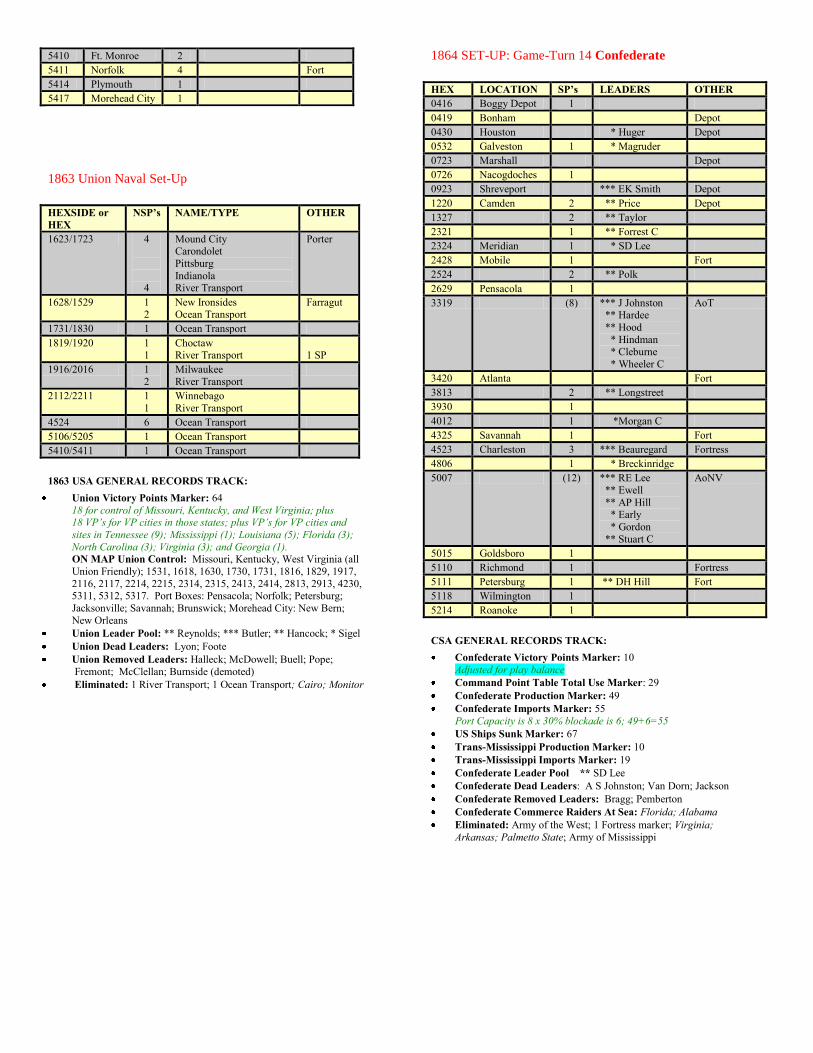
5410 Ft. Monroe 2
5411 Norfolk 4 Fort
5414 Plymouth 1
5417 Morehead City 1
1863 Union Naval Set-Up
HEXSIDE or
HEX
NSP’s NAME/TYPE OTHER
1623/1723 4
4
Mound City Carondolet
Pittsburg
Indianola River Transport
Porter
1628/1529 1 2
New Ironsides Ocean Transport
Farragut
1731/1830 1 Ocean Transport
1819/1920 1 1
Choctaw River Transport
1 SP
1916/2016 1
2
Milwaukee
River Transport
2112/2211 1
1
Winnebago
River Transport
4524 6 Ocean Transport
5106/5205 1 Ocean Transport
5410/5411 1 Ocean Transport
1863 USA GENERAL RECORDS TRACK:
Union Victory Points Marker: 64
18 for control of Missouri, Kentucky, and West Virginia; plus 18 VP’s for VP cities in those states; plus VP’s for VP cities and
sites in Tennessee (9); Mississippi (1); Louisiana (5); Florida (3);
North Carolina (3); Virginia (3); and Georgia (1). ON MAP Union Control: Missouri, Kentucky, West Virginia (all
Union Friendly); 1531, 1618, 1630, 1730, 1731, 1816, 1829, 1917,
2116, 2117, 2214, 2215, 2314, 2315, 2413, 2414, 2813, 2913, 4230, 5311, 5312, 5317. Port Boxes: Pensacola; Norfolk; Petersburg;
Jacksonville; Savannah; Brunswick; Morehead City: New Bern;
New Orleans
Union Leader Pool: ** Reynolds; *** Butler; ** Hancock; * Sigel
Union Dead Leaders: Lyon; Foote
Union Removed Leaders: Halleck; McDowell; Buell; Pope;
Fremont; McClellan; Burnside (demoted)
Eliminated: 1 River Transport; 1 Ocean Transport; Cairo; Monitor
1864 SET-UP: Game-Turn 14 Confederate
HEX LOCATION SP’s LEADERS OTHER
0416 Boggy Depot 1
0419 Bonham Depot
0430 Houston * Huger Depot
0532 Galveston 1 * Magruder
0723 Marshall Depot
0726 Nacogdoches 1
0923 Shreveport *** EK Smith Depot
1220 Camden 2 ** Price Depot
1327 2 ** Taylor
2321 1 ** Forrest C
2324 Meridian 1 * SD Lee
2428 Mobile 1 Fort
2524 2 ** Polk
2629 Pensacola 1
3319 (8) *** J Johnston ** Hardee
** Hood
* Hindman
* Cleburne
* Wheeler C
AoT
3420 Atlanta Fort
3813 2 ** Longstreet
3930 1
4012 1 *Morgan C
4325 Savannah 1 Fort
4523 Charleston 3 *** Beauregard Fortress
4806 1 * Breckinridge
5007 (12) *** RE Lee
** Ewell
** AP Hill * Early
* Gordon
** Stuart C
AoNV
5015 Goldsboro 1
5110 Richmond 1 Fortress
5111 Petersburg 1 ** DH Hill Fort
5118 Wilmington 1
5214 Roanoke 1
CSA GENERAL RECORDS TRACK:
Confederate Victory Points Marker: 10
Adjusted for play balance
Command Point Table Total Use Marker: 29
Confederate Production Marker: 49
Confederate Imports Marker: 55
Port Capacity is 8 x 30% blockade is 6; 49+6=55
US Ships Sunk Marker: 67
Trans-Mississippi Production Marker: 10
Trans-Mississippi Imports Marker: 19
Confederate Leader Pool ** SD Lee
Confederate Dead Leaders: A S Johnston; Van Dorn; Jackson
Confederate Removed Leaders: Bragg; Pemberton
Confederate Commerce Raiders At Sea: Florida; Alabama
Eliminated: Army of the West; 1 Fortress marker; Virginia;
Arkansas; Palmetto State; Army of Mississippi
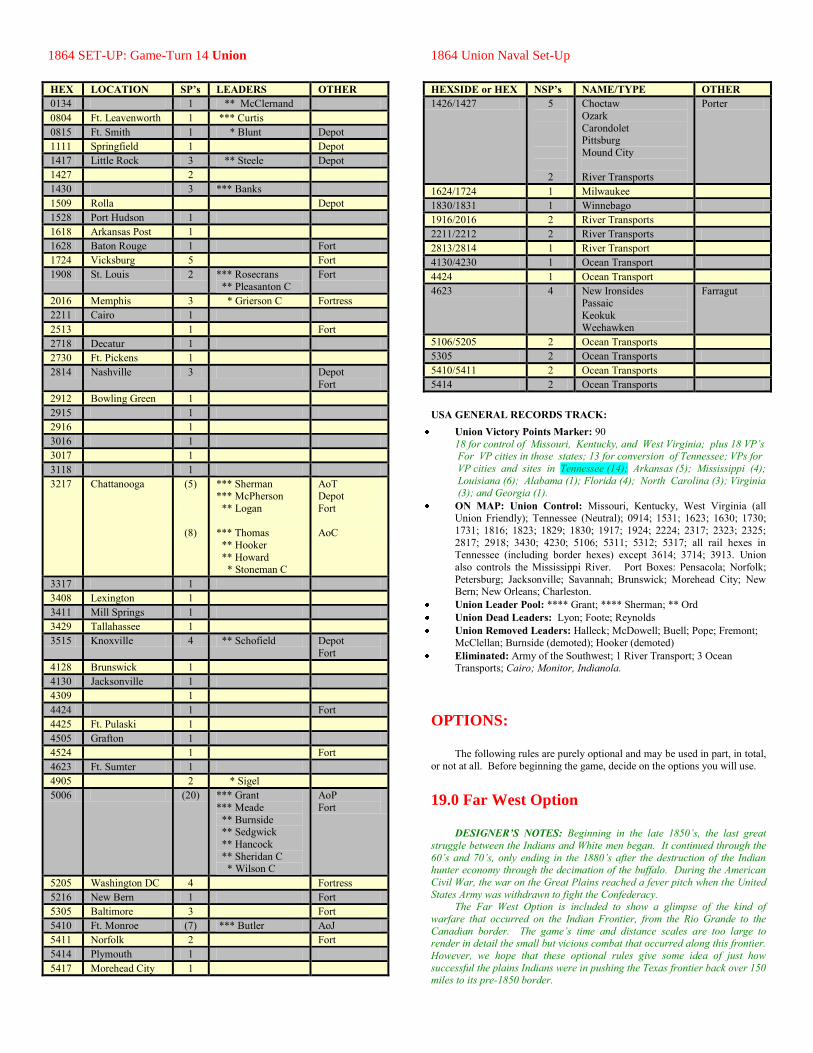
1864 SET-UP: Game-Turn 14 Union
HEX LOCATION SP’s LEADERS OTHER
0134 1 ** McClernand
0804 Ft. Leavenworth 1 *** Curtis
0815 Ft. Smith 1 * Blunt Depot
1111 Springfield 1 Depot
1417 Little Rock 3 ** Steele Depot
1427 2
1430 3 *** Banks
1509 Rolla Depot
1528 Port Hudson 1
1618 Arkansas Post 1
1628 Baton Rouge 1 Fort
1724 Vicksburg 5 Fort
1908 St. Louis 2 *** Rosecrans
** Pleasanton C
Fort
2016 Memphis 3 * Grierson C Fortress
2211 Cairo 1
2513 1 Fort
2718 Decatur 1
2730 Ft. Pickens 1
2814 Nashville 3 Depot
Fort
2912 Bowling Green 1
2915 1
2916 1
3016 1
3017 1
3118 1
3217 Chattanooga (5)
(8)
*** Sherman *** McPherson
** Logan
*** Thomas
** Hooker
** Howard * Stoneman C
AoT Depot
Fort
AoC
3317 1
3408 Lexington 1
3411 Mill Springs 1
3429 Tallahassee 1
3515 Knoxville 4 ** Schofield Depot
Fort
4128 Brunswick 1
4130 Jacksonville 1
4309 1
4424 1 Fort
4425 Ft. Pulaski 1
4505 Grafton 1
4524 1 Fort
4623 Ft. Sumter 1
4905 2 * Sigel
5006 (20) *** Grant
*** Meade
** Burnside ** Sedgwick
** Hancock
** Sheridan C * Wilson C
AoP
Fort
5205 Washington DC 4 Fortress
5216 New Bern 1 Fort
5305 Baltimore 3 Fort
5410 Ft. Monroe (7) *** Butler AoJ
5411 Norfolk 2 Fort
5414 Plymouth 1
5417 Morehead City 1
1864 Union Naval Set-Up
HEXSIDE or HEX NSP’s NAME/TYPE OTHER
1426/1427 5
2
Choctaw
Ozark
Carondolet Pittsburg
Mound City
River Transports
Porter
1624/1724 1 Milwaukee
1830/1831 1 Winnebago
1916/2016 2 River Transports
2211/2212 2 River Transports
2813/2814 1 River Transport
4130/4230 1 Ocean Transport
4424 1 Ocean Transport
4623 4 New Ironsides Passaic
Keokuk
Weehawken
Farragut
5106/5205 2 Ocean Transports
5305 2 Ocean Transports
5410/5411 2 Ocean Transports
5414 2 Ocean Transports
USA GENERAL RECORDS TRACK:
Union Victory Points Marker: 90
18 for control of Missouri, Kentucky, and West Virginia; plus 18 VP’s For VP cities in those states; 13 for conversion of Tennessee; VPs for
VP cities and sites in Tennessee (14); Arkansas (5); Mississippi (4);
Louisiana (6); Alabama (1); Florida (4); North Carolina (3); Virginia (3); and Georgia (1).
ON MAP: Union Control: Missouri, Kentucky, West Virginia (all Union Friendly); Tennessee (Neutral); 0914; 1531; 1623; 1630; 1730;
1731; 1816; 1823; 1829; 1830; 1917; 1924; 2224; 2317; 2323; 2325;
2817; 2918; 3430; 4230; 5106; 5311; 5312; 5317; all rail hexes in Tennessee (including border hexes) except 3614; 3714; 3913. Union
also controls the Mississippi River. Port Boxes: Pensacola; Norfolk;
Petersburg; Jacksonville; Savannah; Brunswick; Morehead City; New Bern; New Orleans; Charleston.
Union Leader Pool: **** Grant; **** Sherman; ** Ord
Union Dead Leaders: Lyon; Foote; Reynolds
Union Removed Leaders: Halleck; McDowell; Buell; Pope; Fremont; McClellan; Burnside (demoted); Hooker (demoted)
Eliminated: Army of the Southwest; 1 River Transport; 3 Ocean Transports; Cairo; Monitor, Indianola.
OPTIONS:
The following rules are purely optional and may be used in part, in total,
or not at all. Before beginning the game, decide on the options you will use.
19.0 Far West Option
DESIGNER’S NOTES: Beginning in the late 1850’s, the last great
struggle between the Indians and White men began. It continued through the
60’s and 70’s, only ending in the 1880’s after the destruction of the Indian hunter economy through the decimation of the buffalo. During the American
Civil War, the war on the Great Plains reached a fever pitch when the United
States Army was withdrawn to fight the Confederacy. The Far West Option is included to show a glimpse of the kind of
warfare that occurred on the Indian Frontier, from the Rio Grande to the
Canadian border. The game’s time and distance scales are too large to render in detail the small but vicious combat that occurred along this frontier.
However, we hope that these optional rules give some idea of just how
successful the plains Indians were in pushing the Texas frontier back over 150 miles to its pre-1850 border.

We have included counters for the various tribes that were active in
Texas during the war. In addition, there is a Mescalero counter, representing Mexican raiders who crossed the Rio Grande to raid Texas during the war.
This is not to be confused with the Mescalero Apaches, who are labeled as
Apaches. The Texas Rangers were depleted during the war to provide troops for
Lee and Bragg. The Ranger counters provided in the game represent the
Texas Rangers and assorted Texas State Troops raised during the war. The quality of the Rangers and troopers was low, but they were able to provide
some protection to the people of the frontier.
Frontier settlements were located near frontier forts to provide security for the populace. During the Civil War, the Confederates were unable to
provide troops to garrison these forts. Thus, when the Indian raids became
fierce, the forts were abandoned and the people moved further toward the Texas coast and away from the raiding tribes. Thus, when an Indian tribe
makes a raid in the game, it does not represent a single cataclysmic raid, but
instead a series of raids forcing the abandonment of the towns around the stockade or city and thus the abandonment of the stockade or city as well.
When using the Far West Option, the Standard Game rules remain
unchanged, except for the additions and modifications listed in the rules that follow.
19.1 Far West Command Points 19.1.1 The number of Commands a player receives in the Far West
theater is determined using the Discretionary row of the Command Points
Table. These Commands are then recorded on the player’s Command Track located on the Far West Map.
19.1.2 Far West Commands can be spent only to perform actions in
hexes located on the Far West Map. They cannot be spent on hexes located on the Main Map. Thus, Trans-Mississippi Commands can be spent only in
hexes occupying the Main Map that are located west of the Mississippi.
Hexes that overlap the two Maps are considered Main Map hexes. Discretionary Commands may be used in the Far West.
19.2 Tribal Indians 19.2.1 Movement: A player must expend one Far West or Discretionary
Command to activate a Tribal Indian counter for movement. Once activated it
has a Movement Point Allowance of 6 Movement Points. Each Tribal Indian counter must move separately. Thus, a player may never use one of his
leaders to command a Tribal Indian counter or counters.
19.2.2 Tribal Indians never trace supply lines and are always considered in supply for all game purposes. They are unaffected by the Confederate
Supply Loss results on the Confederate Supply Loss Chart. In addition, they
ignore the effects of friendly, enemy, and neutral territory and may thus enter any type of territorial hex. However, a Tribal Indian may never enter any of
the following:
A hex containing a depot, regardless of who owns the depot.
A hex containing an SP, regardless of who owns the SP.
A hex containing a Civilized Indian counter, regardless of who
controls the Civilized Indian.
A hex containing a Texas Ranger counter.
Any hex in Louisiana, Arkansas, Missouri, or Iowa, even if the hex entered is a border hex.
A hex containing a supplied fort/fortress, regardless of who owns the fortification.
19.2.3 Retreat Before Combat: A Tribal Indian may retreat before
combat using a procedure similar to that of regular cavalry. When a Texas Ranger, Civilized Indian, or SP enters a hex occupied by a Tribal Indian as a
result of movement or Texas Ranger interception, then the player controlling
the Tribal Indian has the option of rolling for retreat before combat. A Tribal
Indian does not screen like cavalry. A Tribal Indian counter may make a
retreat roll each time a force attempts to enter its hex. If he decides to attempt
to retreat, he rolls l die; on a result of 1 through 4, the Tribal Indian counter cannot retreat. On a result of 5 or 6, the Tribal Indian counter can retreat one
hex toward its setup hex (printed on the map). If two or more hexes are
equidistant from the setup hex, the controlling player has his choice of hexes into which the counter can retreat. A Tribal Indian that is unable to retreat
suffers the consequences of being attacked by the force entering its hex.
19.2.4 Tribal Indian Combat: A Tribal Indian counter may never initiate combat. They initiate raids instead. Combat is not allowed since the
Indian counter is not allowed to enter a hex occupied by an SP, Ranger, or
Civilized Indian. However, a Tribal Indian counter may never initiate combat against even another Tribal Indian counter, even if that counter is controlled
by the opposing player. The two opposing players may occupy the same hex,
but no combat is permitted.
19.2.5 SPs, Civilized Indians, and Texas Rangers may attack Tribal
Indians. When an SP enters a Tribal Indian’s hex, the Indian is immediately eliminated and placed on the next turn on the Far West Game-Turn Record
Track. The SP does not require supply for combat against Tribal Indians.
Thus, no supply line is traced, nor are there any other consequences such as
automatic demoralization if out of supply. The attacking force may continue
to use up its movement points as desired.
19.2.6 If a Texas Ranger or Civilized Indian enters a Tribal Indian’s hex, use the following procedure: both players roll one die and whoever rolls the
higher number is the winner (on a tie, roll again). The winning force is
unaffected, but the losing force is eliminated and placed on the Game-Turn Record Track for the next turn. A force containing both a Civilized Indian
and an SP is considered an SP for purposes of this rule.
19.2.7 Indian Raids: A Tribal Indian counter may make a Raid against a stockade or city hex that contains no SP, Texas Ranger, Depot, or Civilized
Indian.
19.2.8 Each stockade and city has an Indian Raid Alert Radius consisting of all the hexes within a 3 hex radius of the stockade or city. When
a Tribal Indian counter enters a hex within this radius, the stockade or city
owner may roll one die to alert the stockade or city. The die roll necessary for alert depends on the distance between the hex the Indian enters and the
stockade or city. If the distance is 3 hexes, then the stockade/ city owner must
roll a 1; at a distance of 2 hexes, the owner must roll a l or 2; at a distance of l hex (adjacent to the stockade or city), the owner must roll a 1, 2, or 3. The
player rolls once for each hex the Indian counter enters. However, if the hex
is in the Alert Radius of more than one city/stockade, then a separate roll is made for each.
EXAMPLE 19.2.8: Shown above are the die roll ranges for each hex in
the Alert Radius of a city or stockade.
19.2.9 When a stockade/city owner rolls successfully for alert, place an Alert marker on the stockade or city. If there is a Texas Ranger in the hex,
it may immediately make an Interception attempt against the Indian. Alert
markers remain on the map until the end of the Game Turn. They are then removed if there is no Tribal Indian counter within their Alert Radius. If a
Tribe occupies a hex within the Radius, the Alert marker remains on the map
through the next Game Turn. 19.2.10 When a Tribal Indian counter enters a hex occupied by a city or
stockade, an Indian Raid is resolved using the Indian Raid Table. The player
controlling the Indian rolls one die and finds his result on the Table. One is subtracted from the die roll if the stockade/city has an Alert marker on it, and
one is added to the die roll if the stockade/city has no Alert marker on it. Die
rolls of less than 1 or more than 6 are considered 1 and 6 respectively. Resolving a Raid ends the Indian’s movement for that Pulse. The Indian may
not be activated again in that Pulse [although it may still roll for retreat before
combat). Note that a destroyed stockade or city is considered eliminated from the map and Destruction marker remains on the map for the duration of the
game (see Raid Table Results).
19.2.11 Any time a Tribal Indian is called upon to return to its setup hex as a result of a raid, the setup hex is occupied by a counter that prohibits the
Tribe from entering that hex, the Tribe is placed adjacent to the setup hex.

19.2.12 Indian Allegiance: Each Tribal Indian counter is color coded
for control. The player who brings the counter in as reinforcement places it with his side of the counter face up. It remains under his control until
eliminated, until a side change occurs as a result of a Raid, or until the enemy
player successfully wins control.
19.2.13 A player may, during his half of the Pulse, attempt to gain
control of a Tribe controlled by his opponent. To do so, a player expends one
Far West or Discretionary Command and rolls one die; if the result is 1 through 4, there is no result (except that the Command is spent); if the result is
5 or 6, the player gains control of the Tribe, flipping the counter over to
indicate the change of control. The Indian counter remains in the hex it occupies regardless of the result.
19.2.14 A player may attempt to gain control of a Tribe only once per
Pulse. A player may, however, attempt to gain control of more than one Tribe in a Pulse, but each is resolved as a separate attempt, and each costs one
Command. The allegiance of a Tribe may change many times in a Turn with
no additional effects on the Tribe.
19.3 Civilized Indians and Stand Watie 19.3.1 Movement: A player must expend one Trans-Mississippi or Discretionary Command to activate a Civilized Indian counter for movement.
Once activated, it has a Movement Point Allowance of 4 Movement Points,
like an SP. Civilized Indians are subject to the same supply rules as an SP, including the effects of Confederate Supply Loss (i.e., if out of supply, their
Movement Point Allowance is reduced to 3 and they are Demoralized if they
engage in combat). Civilized Indians control the hexes they enter in the same manner as SP’s.
19.3.2 Civilized Indian counters may be commanded by leaders,
including the Confederate Indian leader, Stand Watie. Each counter equals one SP for purposes of the number of SP’s a leader may command due to his
rank. Watie may command Civilized Indians under control of the Confederate
player. Watie may never Command Confederate SP’s; he may command only Civilized Indians.
19.3.3 Civilized Indians always ignore the effects of friendly, enemy,
and neutral territory; however, they may not enter a hex in Texas, Arkansas, Missouri, or Iowa. They may enter a border hex containing a part of Kansas
or Indian Territory. The Confederate player may move a Confederate
Civilized Indian into Arkansas or Missouri if the counter is commanded by Watie or if it is part of an Army and Watie is also present in the Army. If a
Civilized Indian occupies a hex in Arkansas or Missouri and Watie is killed or
wounded, the Indian counter is immediately eliminated and is placed on the Far West Game Turn Record Track for the following turn. A Confederate
Civilized Indian will activate militia if it enters Kansas.
19.3.4 Civilized Indians cannot retreat before combat as Tribal Indian counters.
19.3.5 Combat: Combat between opposing Civilized Indians is
resolved using the standard combat and supply procedures. Stand Watie uses his Tactical Combat Rating and must make a Leader Loss Check at the end of
the combat. Thus, if Watie and one Confederate Civilized Indian attacked a
Union Civilized Indian, then the combat would be resolved on the zero column of the CRT (column E) and the Confederate player adds one to his die
roll result for Watie’s Tactical Combat Rating. 19.3.6 Combat between Civilized Indians and SP’s is allowed, but the
combat procedure is modified as follows. Before the combat is resolved,
regardless of who is attacking and defending, each player must roll 1 die for each Civilized Indian counter he controls in the combat hex to determine
which Indians participate in the combat. If the result is 1 through 5, then the
Indian counter is eliminated before combat is resolved. If the result is a 6, the Indian counter remains in the hex and counts as 1 SP during combat
resolution. If Stand Watie is present in the hex, the Confederate player adds
one to his die roll for each of his Indian counters. If all the Confederate
Indian counters in the hex are eliminated, Watie is also eliminated.
19.3.7 Once it has been determined which Civilized Indian counters are
to participate, the combat is resolved using the Combat Results Table and the standard combat procedure. If Watie is present in the hex, the Confederate
player adds one to his combat die roll for Watie’s Tactical Combat Rating.
The combat results are determined and applied. However, if a force contains both an Indian counter and an SP, then the Indian counter is eliminated first if
losses are suffered. If Watie is present and all Confederate Indians are
eliminated, then he is eliminated as well, after making a Leader Loss Check. 19.3.8 A Demoralized Civilized Indian counter may be rallied by a
leader belonging to the same side using the standard rally procedure. If
unable to rally at the end of the Rally Phase, the Indian counter is eliminated. Eliminated Civilized Indian counters are always placed on the Far West Game
Turn Record Track for the following turn, as is Watie, unless he is killed in a
Leader Loss Check. EXAMPLE 19.3.8: the historical battle of Pea Ridge occurred in
Arkansas in hex 1012. The Confederate Army of the West under Van Dorn
attacked the Union Army of the Southwest under Curtis. In game terms, the
Confederates had 3 SP’s plus Watie and one Civilized Indian, and the Union had 2 SP’s. However, the Indians did not ―roll a 6,’ even though Watie was
there, and thus they were not a factor in the battle. The Confederates lost the
battle.
19.4 Texas Rangers 19.4.1 Movement: The Confederate player must expend one Far West
or Discretionary Command to activate a Texas Ranger counter for movement. Once activated, it has a Movement Point Allowance of 6 Movement Points.
Each Texas Ranger must move separately and may not be commanded by a
Confederate leader. Texas Rangers, like Tribal Indians, never trace supply lines, are not affected by Confederate Supply Loss, and are always in supply
for game purposes.
19.4.2 Texas Rangers must remain in the state of Texas but may also enter the Main Map, as long as they remain in Texas, restricted the same as
tribal Indians.[Original language: and on the Far West Map. They cannot
enter a hex on the Main Map.] In addition, a Texas Ranger cannot enter the following hexes:
A hex occupied by a Union SP. If a Union SP enters a Ranger’s hex, then the Ranger is immediately eliminated and placed on the Far
West Game Turn Record Track for the next turn. The SP does not
require supply for such an attack and may continue to move if it has Movement Points remaining.
A hex occupied by a Union depot, fort, or fortress.
A hex occupied by a Confederate SP. 19.4.3 Texas Ranger Combat and Interception: A Texas Ranger may
initiate combat against only Tribal Indian counters. Combat is initiated by the Ranger entering the Indian’s hex by movement or interception. Combat may
be initiated by the Texas Ranger begin activated for movement and then
successfully entering the Indian’s hex. The Indian may attempt to retreat before combat when the Ranger enters its hex; if the retreat attempt is
unsuccessful, combat is resolved.
19.4.4 Interception occurs if the Ranger occupies a city or stockade at the instant that the city or stockade makes a successful Alert Check;
interception can be triggered only at this time, it cannot be triggered later in
the Pulse or on the following turn, if the Alert marker remains in the hex. When interception is triggered, the Texas Ranger is immediately placed in the
Indian’s hex. The Indian may then roll for retreat before combat; if
successful, the Indian retreats a hex and the Ranger is returned to the city or stockade; if the retreat attempt is unsuccessful, combat is resolved.
19.4.5 To resolve combat both players roll one die; the player with the
higher result is the winner (reroll in the event of ties). The winner’s force is
unaffected. The loser’s force is eliminated and placed on the Far West Game
Turn Record Track for the following turn.
19.5 Reinforcements 19.5.1 Entry Procedure: Far West Reinforcements are placed on the
Far West Game Turn Record Track. In addition, eliminated Far West forces are also placed on the Track. Forces remain on the Track until a player spends
one Far West or Discretionary Command each to enter them. Tribal and
Civilized Indians may be entered by either player; Texas Rangers and Stand Watie may be entered only by the Confederate Player. Supply need not exist
for entry of any Far West counter, with the exception of any discretionary
SP’s entered by the Confederate player. Far West commands or discretionary commands must be used to enter all Far West units (except Watie). SP’s
eliminated through combat in the Far West are not sent to the Game Turn
Record Track – they are simply eliminated. SP’s may be entered as reinforcements by the Confederate player using VP- city placement.
19.5.2 Placement. Counters are placed according to the following
restrictions:
Tribal Indians: The player who expends a Command to enter a
Tribal Indian counter places that counter on its setup hex printed on the map with the owning player’s side of the counter face-up. If its
setup hex is occupied by a non-Tribal Indian counter, place the Indian
in an adjacent hex using a die roll to determine the exact hex.
Civilized Indians: The player who expends a Command to enter a
Civilized Indian counter places that counter on a hex in Indian Territory with the owning player’s side of the counter face up. The
hex may contain a stockade, but may not contain any counters of any
kind, friendly or enemy. Civilized Indians and Watie may be placed in the Trans-Mississippi portion of Indian Territory.
Stand Watie: The Confederate player may place Watie on a hex
in Indian Territory containing a Confederate Civilized Indian counter. Note that Watie’s counter is tinted a different color from other leaders
to indicate that he is always placed face up. Watie is placed with a
Confederate Civilized Indian as an initiative reinforcement or a dice difference point (but supply need not be traced).
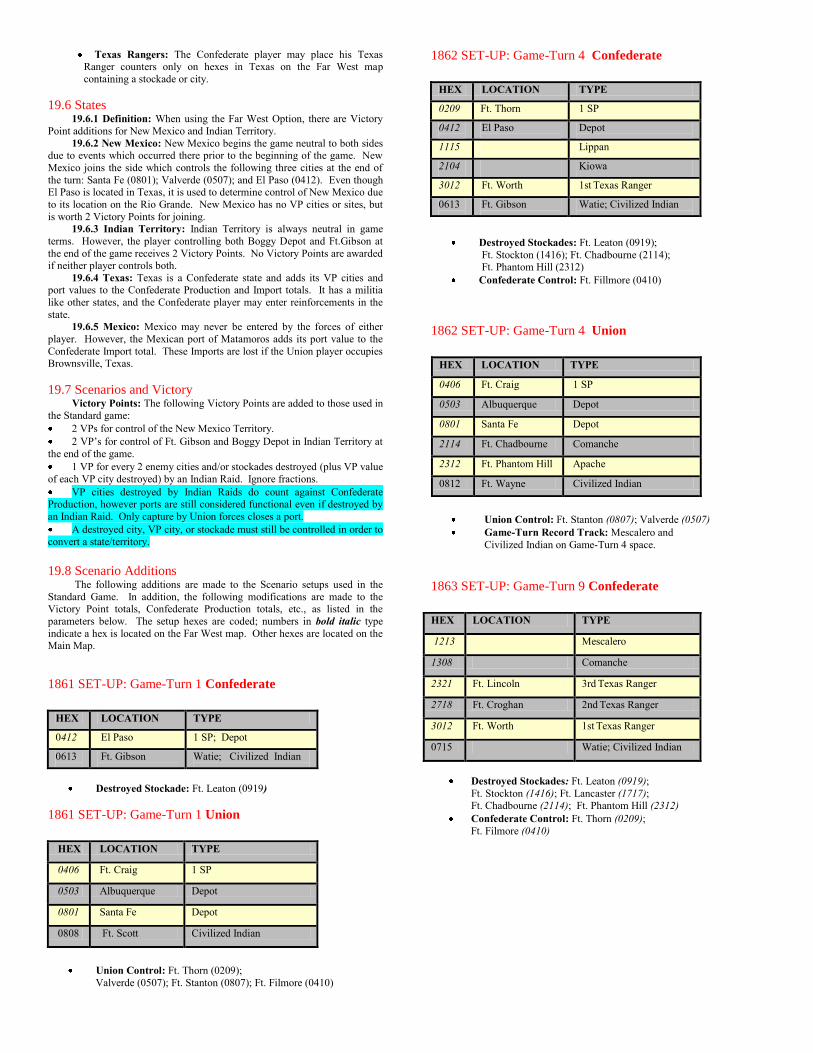
Texas Rangers: The Confederate player may place his Texas Ranger counters only on hexes in Texas on the Far West map
containing a stockade or city.
19.6 States 19.6.1 Definition: When using the Far West Option, there are Victory
Point additions for New Mexico and Indian Territory.
19.6.2 New Mexico: New Mexico begins the game neutral to both sides due to events which occurred there prior to the beginning of the game. New
Mexico joins the side which controls the following three cities at the end of
the turn: Santa Fe (0801); Valverde (0507); and El Paso (0412). Even though El Paso is located in Texas, it is used to determine control of New Mexico due
to its location on the Rio Grande. New Mexico has no VP cities or sites, but
is worth 2 Victory Points for joining. 19.6.3 Indian Territory: Indian Territory is always neutral in game
terms. However, the player controlling both Boggy Depot and Ft.Gibson at
the end of the game receives 2 Victory Points. No Victory Points are awarded if neither player controls both.
19.6.4 Texas: Texas is a Confederate state and adds its VP cities and port values to the Confederate Production and Import totals. It has a militia
like other states, and the Confederate player may enter reinforcements in the
state. 19.6.5 Mexico: Mexico may never be entered by the forces of either
player. However, the Mexican port of Matamoros adds its port value to the
Confederate Import total. These Imports are lost if the Union player occupies Brownsville, Texas.
19.7 Scenarios and Victory Victory Points: The following Victory Points are added to those used in the Standard game:
2 VPs for control of the New Mexico Territory.
2 VP’s for control of Ft. Gibson and Boggy Depot in Indian Territory at
the end of the game.
1 VP for every 2 enemy cities and/or stockades destroyed (plus VP value
of each VP city destroyed) by an Indian Raid. Ignore fractions.
VP cities destroyed by Indian Raids do count against Confederate Production, however ports are still considered functional even if destroyed by
an Indian Raid. Only capture by Union forces closes a port.
A destroyed city, VP city, or stockade must still be controlled in order to
convert a state/territory.
19.8 Scenario Additions The following additions are made to the Scenario setups used in the
Standard Game. In addition, the following modifications are made to the Victory Point totals, Confederate Production totals, etc., as listed in the
parameters below. The setup hexes are coded; numbers in bold italic type
indicate a hex is located on the Far West map. Other hexes are located on the Main Map.
1861 SET-UP: Game-Turn 1 Confederate
HEX LOCATION TYPE
0412
El Paso
1 SP; Depot
0613
Ft. Gibson
Watie; Civilized Indian
Destroyed Stockade: Ft. Leaton (0919)
1861 SET-UP: Game-Turn 1 Union
HEX LOCATION TYPE
0406 Ft. Craig 1 SP
0503 Albuquerque Depot
0801 Santa Fe Depot
0808 Ft. Scott Civilized Indian
Union Control: Ft. Thorn (0209);
Valverde (0507); Ft. Stanton (0807); Ft. Filmore (0410)
1862 SET-UP: Game-Turn 4 Confederate
HEX LOCATION TYPE
0209
Ft. Thorn
1 SP
0412
El Paso
Depot
1115
Lippan
2104
Kiowa
3012
Ft. Worth
1st Texas Ranger
0613
Ft. Gibson
Watie; Civilized Indian
Destroyed Stockades: Ft. Leaton (0919);
Ft. Stockton (1416); Ft. Chadbourne (2114); Ft. Phantom Hill (2312)
Confederate Control: Ft. Fillmore (0410)
1862 SET-UP: Game-Turn 4 Union
HEX LOCATION TYPE
0406 Ft. Craig 1 SP
0503 Albuquerque Depot
0801 Santa Fe Depot
2114 Ft. Chadbourne Comanche
2312 Ft. Phantom Hill Apache
0812 Ft. Wayne Civilized Indian
Union Control: Ft. Stanton (0807); Valverde (0507)
Game-Turn Record Track: Mescalero and
Civilized Indian on Game-Turn 4 space.
1863 SET-UP: Game-Turn 9 Confederate
HEX LOCATION TYPE
1213 Mescalero
1308 Comanche
2321 Ft. Lincoln 3rd Texas Ranger
2718 Ft. Croghan 2nd Texas Ranger
3012 Ft. Worth 1st Texas Ranger
0715 Watie; Civilized Indian
Destroyed Stockades: Ft. Leaton (0919);
Ft. Stockton (1416); Ft. Lancaster (1717);
Ft. Chadbourne (2114); Ft. Phantom Hill (2312)
Confederate Control: Ft. Thorn (0209);
Ft. Filmore (0410)
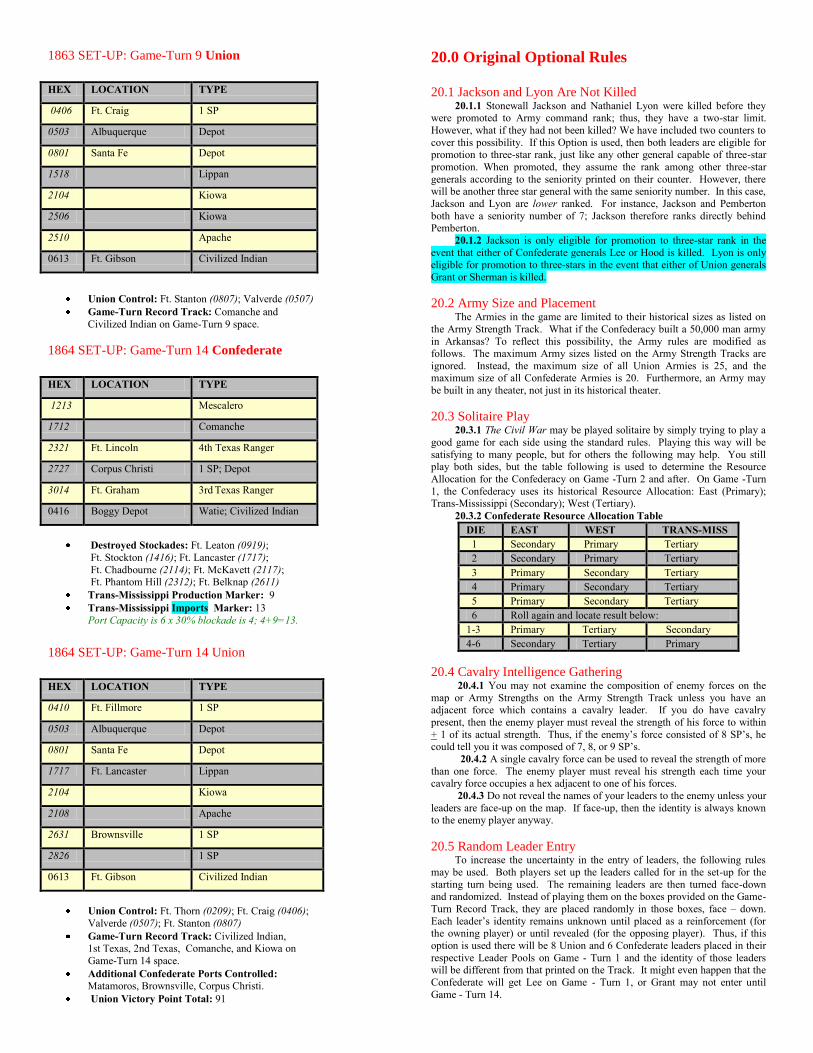
1863 SET-UP: Game-Turn 9 Union
HEX LOCATION TYPE
0406 Ft. Craig 1 SP
0503 Albuquerque Depot
0801 Santa Fe Depot
1518 Lippan
2104 Kiowa
2506 Kiowa
2510 Apache
0613 Ft. Gibson Civilized Indian
Union Control: Ft. Stanton (0807); Valverde (0507)
Game-Turn Record Track: Comanche and
Civilized Indian on Game-Turn 9 space.
1864 SET-UP: Game-Turn 14 Confederate
HEX LOCATION TYPE
1213 Mescalero
1712 Comanche
2321 Ft. Lincoln 4th Texas Ranger
2727 Corpus Christi 1 SP; Depot
3014 Ft. Graham 3rd Texas Ranger
0416 Boggy Depot Watie; Civilized Indian
Destroyed Stockades: Ft. Leaton (0919);
Ft. Stockton (1416); Ft. Lancaster (1717);
Ft. Chadbourne (2114); Ft. McKavett (2117); Ft. Phantom Hill (2312); Ft. Belknap (2611)
Trans-Mississippi Production Marker: 9
Trans-Mississippi Imports Marker: 13
Port Capacity is 6 x 30% blockade is 4; 4+9=13.
1864 SET-UP: Game-Turn 14 Union
HEX LOCATION TYPE
0410 Ft. Fillmore 1 SP
0503 Albuquerque Depot
0801 Santa Fe Depot
1717 Ft. Lancaster Lippan
2104 Kiowa
2108 Apache
2631 Brownsville 1 SP
2826 1 SP
0613 Ft. Gibson Civilized Indian
Union Control: Ft. Thorn (0209); Ft. Craig (0406);
Valverde (0507); Ft. Stanton (0807)
Game-Turn Record Track: Civilized Indian, 1st Texas, 2nd Texas, Comanche, and Kiowa on
Game-Turn 14 space.
Additional Confederate Ports Controlled: Matamoros, Brownsville, Corpus Christi.
Union Victory Point Total: 91
20.0 Original Optional Rules
20.1 Jackson and Lyon Are Not Killed 20.1.1 Stonewall Jackson and Nathaniel Lyon were killed before they
were promoted to Army command rank; thus, they have a two-star limit.
However, what if they had not been killed? We have included two counters to
cover this possibility. If this Option is used, then both leaders are eligible for promotion to three-star rank, just like any other general capable of three-star
promotion. When promoted, they assume the rank among other three-star
generals according to the seniority printed on their counter. However, there will be another three star general with the same seniority number. In this case,
Jackson and Lyon are lower ranked. For instance, Jackson and Pemberton
both have a seniority number of 7; Jackson therefore ranks directly behind Pemberton.
20.1.2 Jackson is only eligible for promotion to three-star rank in the
event that either of Confederate generals Lee or Hood is killed. Lyon is only eligible for promotion to three-stars in the event that either of Union generals
Grant or Sherman is killed.
20.2 Army Size and Placement The Armies in the game are limited to their historical sizes as listed on
the Army Strength Track. What if the Confederacy built a 50,000 man army
in Arkansas? To reflect this possibility, the Army rules are modified as
follows. The maximum Army sizes listed on the Army Strength Tracks are
ignored. Instead, the maximum size of all Union Armies is 25, and the maximum size of all Confederate Armies is 20. Furthermore, an Army may
be built in any theater, not just in its historical theater.
20.3 Solitaire Play 20.3.1 The Civil War may be played solitaire by simply trying to play a
good game for each side using the standard rules. Playing this way will be
satisfying to many people, but for others the following may help. You still play both sides, but the table following is used to determine the Resource
Allocation for the Confederacy on Game -Turn 2 and after. On Game -Turn
1, the Confederacy uses its historical Resource Allocation: East (Primary); Trans-Mississippi (Secondary); West (Tertiary).
20.3.2 Confederate Resource Allocation Table
DIE EAST WEST TRANS-MISS
1 Secondary Primary Tertiary
2 Secondary Primary Tertiary
3 Primary Secondary Tertiary
4 Primary Secondary Tertiary
5 Primary Secondary Tertiary
6 Roll again and locate result below:
1-3 Primary Tertiary Secondary
4-6 Secondary Tertiary Primary
20.4 Cavalry Intelligence Gathering 20.4.1 You may not examine the composition of enemy forces on the
map or Army Strengths on the Army Strength Track unless you have an adjacent force which contains a cavalry leader. If you do have cavalry
present, then the enemy player must reveal the strength of his force to within
+ 1 of its actual strength. Thus, if the enemy’s force consisted of 8 SP’s, he could tell you it was composed of 7, 8, or 9 SP’s.
20.4.2 A single cavalry force can be used to reveal the strength of more
than one force. The enemy player must reveal his strength each time your cavalry force occupies a hex adjacent to one of his forces.
20.4.3 Do not reveal the names of your leaders to the enemy unless your
leaders are face-up on the map. If face-up, then the identity is always known to the enemy player anyway.
20.5 Random Leader Entry
To increase the uncertainty in the entry of leaders, the following rules
may be used. Both players set up the leaders called for in the set-up for the
starting turn being used. The remaining leaders are then turned face-down and randomized. Instead of playing them on the boxes provided on the Game-
Turn Record Track, they are placed randomly in those boxes, face – down.
Each leader’s identity remains unknown until placed as a reinforcement (for the owning player) or until revealed (for the opposing player). Thus, if this
option is used there will be 8 Union and 6 Confederate leaders placed in their
respective Leader Pools on Game - Turn 1 and the identity of those leaders will be different from that printed on the Track. It might even happen that the
Confederate will get Lee on Game - Turn 1, or Grant may not enter until
Game - Turn 14.

21.0 Additional Optional Rules
21.1 Confederate Supply by River 21.1.1 The Confederate player may trace supply by river in the same
manner as Union supply by river (see 9.3.5), however there are additional
limitations. Confederate supply by river is permitted only via hexsides where
the Union has neither Implied nor Direct Control. Direct control exists along any hexsides contested or controlled by a Union NSP (see 8.5.5). Implied
Control exists along any hexsides where the Union could send an NSP from a
VP city in Union friendly territory, without running the guns of a Confederate fortification or entering the uncontested river control radius of a Confederate
NSP. In hexsides where control is contested, neither side has river supply.
Note: the Union does not need to actually have an NSP on the board to exert Implied Control on hexsides.
21.1.2 Even though the Confederate player has no transports, he enjoys
the same benefits of river control as the Union player, such as the ability to move leaders by river, in those areas over which he has Implied Control. The
Union player's benefits are also restricted to areas in which he has Implied or
Direct Control. The Union cannot trace supply or move leaders on river hexsides over which he does not have Implied or Direct Control.
EXAMPLE 21.1: The Union has implied control of the Mississippi,
Yazoo, Arkansas, and Red Rivers on Turn 1 because a hypothetical NSP in Cairo could be moved to any of those rivers without running the guns of a
Confederate fortification . If the Confederate player builds a fort at Memphis
the Union loses implied control of the Mississippi River from Memphis to Ft. Jackson as well as the Yazoo, Arkansas, and Red Rivers. The Confederate
player may now use these waterways to trace supply until they are reopened
to Union implied control, or until the Union runs the guns of a Confederate fortification to block supply with direct control. Note: unlike implied control,
direct control affects only those hexsides the NSP controls directly.
Implied control represents the operations of smaller naval forces not depicted by NSP’s.
21.2 Declining the Initiative Reinforcement Instead of requiring the Confederate player with the initiative to enter
one SP or leader as reinforcement, entry may be declined during any pulse, if
the Confederate player began the turn with fewer reinforcements and leaders in the pool than his opponent.
21.3 Revealed Leaders In PBEM it is difficult, if not impossible, to use the Unrevealed
Leaders rule (see 5.5). Instead, leaders are placed in the pool face-up. When
the phasing player wishes to enter a leader, he is selected randomly, by roll of
the dice. Each player’s leaders remain visible at all times, both on the board and in the Leader Pool.
21.4 No Effect Combat Results and Supply Depots The provisions of Rules 21.4 and 21.5 may be employed separately, or be combined at the players' option.
21.4.1 Players may take issue with the ability of forces to attack at poor odds, for the purpose of consuming supply depots, and for causing out of
supply forces to become Demoralized. When the odds are 1 to 2 or worse, if
the result of combat is such that there is “no effect” on the defending force, it does not become Demoralized following the combat, if out of supply. Also,
the defending force does not consume a supply depot, if the result of combat
is “no effect”. 21.4.2 Supply from depots may be withheld from any combat; the
supply depot is not consumed and the unsupplied force will become
Demoralized (exception 21.4.1).
21.4.3 Depots may be constructed in any hex containing a fort.
21.5 Additional Victory Point Awards 21.5.1 If a Union force occupies Richmond, and the Confederates do not retake it by the end of the turn, the Union receives a one-time award of 5
permanent VP’s, even if the Union force occupying Richmond is Demoralized
or out of supply 21.5.2 Beginning on Turn 4, the Confederates receive 1 permanent VP at
the end of each turn, for each of the three neutral states (Kentucky, Missouri,
and West Virginia) which have not been converted by the Union. 21.5.3 Each turn that Confederate forces occupy Washington at any time
during the course of a turn, but do not occupy it at the end of the turn, the
Confederates receive 5 permanent VP’s, even if the Confederate force occupying Washington is Demoralized or out of supply.
21.5.4 Each Army Commander who is removed from command, per rule
5.3, results in 1 VP awarded to the enemy side.
21.6 Confederate Navy 21.6.1 Confederate NSP's may be entered into play at a cost of 1 Discretionary CP. The Confederate Supply Loss Schedule (9.4.8) overrides
the 1 CP cost. If the Confederate supply total falls below 89, the cost to enter
an NSP is increased to 2 Discretionary CP's. If Confederate supply falls below
29, the cost to enter an NSP is increased to 3 Discretionary CP's. Should
Confederate supply fall below 19, no NSP's may be entered. Should the
Confederacy suffer Loss of the Mississippi (9.4.9), the ability to enter NSP's is computed separately for the Trans-Mississippi Theater. In that event,
Commerce Raiders are entered in accordance with the supply level east of the
Mississippi. 21.6.2 Confederate ironclads involved in combat against only Union
transports receive a die roll modification of +1.
21.6.3 Confederate ironclads may engage in combined Land and Naval Combat (8.9).
21.6.4 Commerce Raiders are eliminated by a modified roll of 2, rather
than a roll of 12, using 2 dice. 21.6.5 Union Naval CP's do not directly affect the dice rolls of
Commerce Raiders. Instead, the Union may affect commerce raiders' dice
rolls through the movement of Union ocean-going NSP's and naval leaders into the At Sea Box.
Though not really capable of chasing Raiders on the high seas, Union
ironclads represent flotillas of warships, rather than just a single ironclad. 21.6.6 During any Pulse in which Union ocean-going NSP's may move,
the Union player may expend Naval or Discretionary CP's to move them into
the At Sea Box. NSP’s entering the At Sea Box must first move into an all-sea hex. For each ocean ironclad in the At Sea Box during the Commerce Raider
Phase, 1 is subtracted from the dice roll of each Commerce Raider. For ocean
transports, the number of transports is divided by 2, dropping fractions to determine their total subtraction from the dice roll. Fractions are rounded
down; however, transport totals of 3 or less are considered to have an effect
of 1 subtracted from the dice roll. 21.6.7 Union naval leaders may move into the At Sea Box either
alone, or in command of ocean-going NSP's. If a Union naval leader is present
in the At Sea Box during the Commerce Raider Phase, his tactical combat rating is subtracted from the dice roll. Union ground leaders in the At Sea Box
never affect Commerce Raider dice rolls.
21.6.8 Union NSP's, and any troops they may be carrying, never suffer any adverse results due to Commerce Raider dice rolls.
21.6.9 Movement into the At Sea Box is a final destination. That is,
NSP's which are part of a naval force cannot be dropped off in the At Sea Box, with the remaining force continuing to move. Any NSP's and leaders
entering the At Sea Box must stop, and may move no further during that
Pulse. 21.6.10 NSP's and leaders in the At Sea Box can only be withdrawn
through the normal expenditure of Naval or Discretionary CP's, during a
subsequent Union Pulse. NSP's and leaders withdrawn from the At Sea Box are placed in any all-sea hex, and may continue to move normally.
21.6.11 (Drewry's Bluff) Any Confederate fortification in hex 5110
(Richmond, VA) negates Union navigability of the James River past the 5209/5210 hexside. Removal of the Confederate fortification or Union
control of Richmond immediately restores James River navigability to the Richmond hexsides.
21.7 Stacking A maximum of 10 SP’s not in an Army may stack in a hex. Any number of Armies may also be stacked in the same hex. No friendly force in excess
of the maximum stacking limit may enter a hex whether by Reaction
movement, retreat, or reinforcement. A friendly force may move through such a hex, but no SP's may end their move in a hex which contains the maximum
stacking limit.
21.8 Attrition In lieu of the stacking restriction of rule 21.7 (a maximum of 10 SP's
not in an army may stack in a hex), allow unlimited stacking. Any hex which exceeds the 10 SP stacking restriction during the rally phase of each turn loses
1 SP, in addition to any loss for Demoralization. If the hex is out of supply, it
becomes Demoralized. If already Demoralized, it suffers no additional penalty, other than the loss of 1 SP.
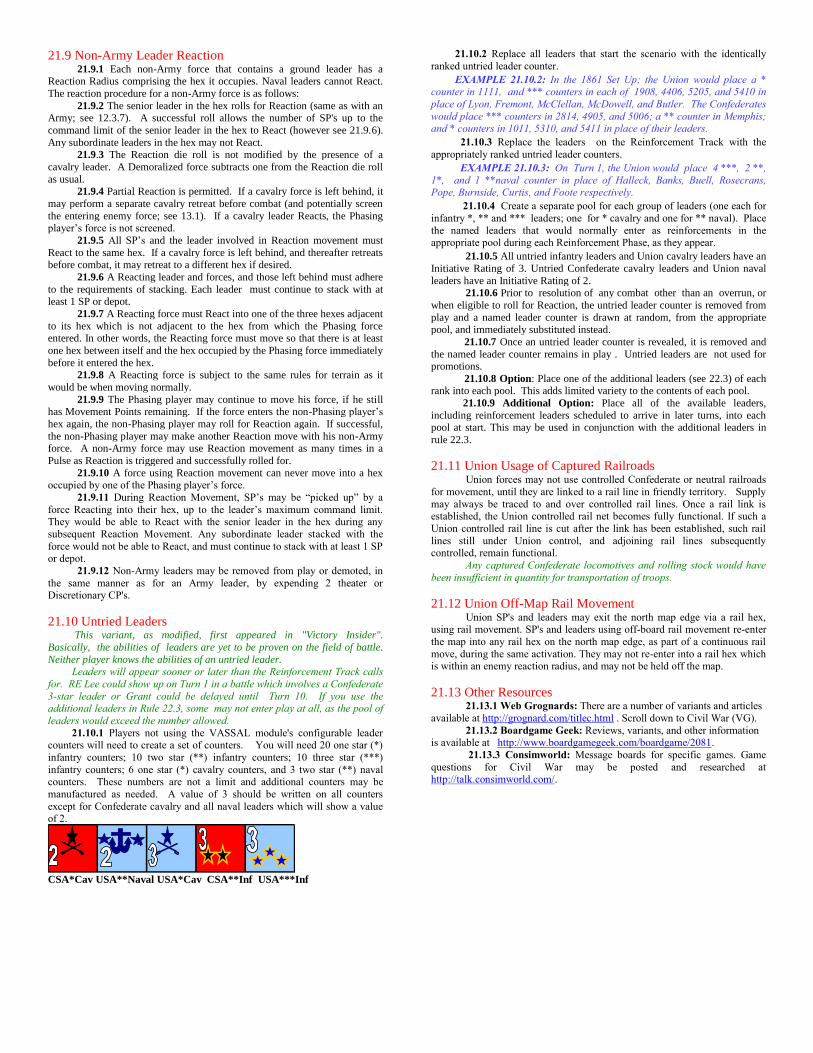
21.9 Non-Army Leader Reaction 21.9.1 Each non-Army force that contains a ground leader has a Reaction Radius comprising the hex it occupies. Naval leaders cannot React.
The reaction procedure for a non-Army force is as follows:
21.9.2 The senior leader in the hex rolls for Reaction (same as with an
Army; see 12.3.7). A successful roll allows the number of SP's up to the
command limit of the senior leader in the hex to React (however see 21.9.6).
Any subordinate leaders in the hex may not React. 21.9.3 The Reaction die roll is not modified by the presence of a
cavalry leader. A Demoralized force subtracts one from the Reaction die roll
as usual. 21.9.4 Partial Reaction is permitted. If a cavalry force is left behind, it
may perform a separate cavalry retreat before combat (and potentially screen
the entering enemy force; see 13.1). If a cavalry leader Reacts, the Phasing player’s force is not screened.
21.9.5 All SP’s and the leader involved in Reaction movement must
React to the same hex. If a cavalry force is left behind, and thereafter retreats before combat, it may retreat to a different hex if desired.
21.9.6 A Reacting leader and forces, and those left behind must adhere
to the requirements of stacking. Each leader must continue to stack with at least 1 SP or depot.
21.9.7 A Reacting force must React into one of the three hexes adjacent
to its hex which is not adjacent to the hex from which the Phasing force entered. In other words, the Reacting force must move so that there is at least
one hex between itself and the hex occupied by the Phasing force immediately
before it entered the hex. 21.9.8 A Reacting force is subject to the same rules for terrain as it
would be when moving normally.
21.9.9 The Phasing player may continue to move his force, if he still has Movement Points remaining. If the force enters the non-Phasing player’s
hex again, the non-Phasing player may roll for Reaction again. If successful,
the non-Phasing player may make another Reaction move with his non-Army force. A non-Army force may use Reaction movement as many times in a
Pulse as Reaction is triggered and successfully rolled for.
21.9.10 A force using Reaction movement can never move into a hex occupied by one of the Phasing player’s force.
21.9.11 During Reaction Movement, SP’s may be “picked up” by a
force Reacting into their hex, up to the leader’s maximum command limit. They would be able to React with the senior leader in the hex during any
subsequent Reaction Movement. Any subordinate leader stacked with the
force would not be able to React, and must continue to stack with at least 1 SP or depot.
21.9.12 Non-Army leaders may be removed from play or demoted, in
the same manner as for an Army leader, by expending 2 theater or Discretionary CP's.
21.10 Untried Leaders This variant, as modified, first appeared in "Victory Insider".
Basically, the abilities of leaders are yet to be proven on the field of battle.
Neither player knows the abilities of an untried leader. Leaders will appear sooner or later than the Reinforcement Track calls
for. RE Lee could show up on Turn 1 in a battle which involves a Confederate
3-star leader or Grant could be delayed until Turn 10. If you use the additional leaders in Rule 22.3, some may not enter play at all, as the pool of
leaders would exceed the number allowed.
21.10.1 Players not using the VASSAL module's configurable leader counters will need to create a set of counters. You will need 20 one star (*)
infantry counters; 10 two star (**) infantry counters; 10 three star (***)
infantry counters; 6 one star (*) cavalry counters, and 3 two star (**) naval counters. These numbers are not a limit and additional counters may be
manufactured as needed. A value of 3 should be written on all counters
except for Confederate cavalry and all naval leaders which will show a value of 2.
4
CSA*Cav USA**Naval USA*Cav CSA**Inf USA***Inf
21.10.2 Replace all leaders that start the scenario with the identically
ranked untried leader counter.
EXAMPLE 21.10.2: In the 1861 Set Up; the Union would place a * counter in 1111, and *** counters in each of 1908, 4406, 5205, and 5410 in
place of Lyon, Fremont, McClellan, McDowell, and Butler. The Confederates
would place *** counters in 2814, 4905, and 5006; a ** counter in Memphis; and * counters in 1011, 5310, and 5411 in place of their leaders.
21.10.3 Replace the leaders on the Reinforcement Track with the
appropriately ranked untried leader counters.
EXAMPLE 21.10.3: On Turn 1, the Union would place 4 ***, 2 **,
1*, and 1 **naval counter in place of Halleck, Banks, Buell, Rosecrans, Pope, Burnside, Curtis, and Foote respectively.
21.10.4 Create a separate pool for each group of leaders (one each for
infantry *, ** and *** leaders; one for * cavalry and one for ** naval). Place
the named leaders that would normally enter as reinforcements in the appropriate pool during each Reinforcement Phase, as they appear.
21.10.5 All untried infantry leaders and Union cavalry leaders have an
Initiative Rating of 3. Untried Confederate cavalry leaders and Union naval
leaders have an Initiative Rating of 2. 21.10.6 Prior to resolution of any combat other than an overrun, or
when eligible to roll for Reaction, the untried leader counter is removed from
play and a named leader counter is drawn at random, from the appropriate pool, and immediately substituted instead.
21.10.7 Once an untried leader counter is revealed, it is removed and
the named leader counter remains in play . Untried leaders are not used for promotions.
21.10.8 Option: Place one of the additional leaders (see 22.3) of each rank into each pool. This adds limited variety to the contents of each pool.
21.10.9 Additional Option: Place all of the available leaders,
including reinforcement leaders scheduled to arrive in later turns, into each pool at start. This may be used in conjunction with the additional leaders in
rule 22.3.
21.11 Union Usage of Captured Railroads Union forces may not use controlled Confederate or neutral railroads
for movement, until they are linked to a rail line in friendly territory. Supply
may always be traced to and over controlled rail lines. Once a rail link is established, the Union controlled rail net becomes fully functional. If such a
Union controlled rail line is cut after the link has been established, such rail
lines still under Union control, and adjoining rail lines subsequently controlled, remain functional.
Any captured Confederate locomotives and rolling stock would have
been insufficient in quantity for transportation of troops.
21.12 Union Off-Map Rail Movement Union SP's and leaders may exit the north map edge via a rail hex, using rail movement. SP's and leaders using off-board rail movement re-enter
the map into any rail hex on the north map edge, as part of a continuous rail
move, during the same activation. They may not re-enter into a rail hex which is within an enemy reaction radius, and may not be held off the map.
21.13 Other Resources 21.13.1 Web Grognards: There are a number of variants and articles
available at http://grognard.com/titlec.html . Scroll down to Civil War (VG).
21.13.2 Boardgame Geek: Reviews, variants, and other information is available at http://www.boardgamegeek.com/boardgame/2081.
21.13.3 Consimworld: Message boards for specific games. Game
questions for Civil War may be posted and researched at http://talk.consimworld.com/.

22.0 Variant Leader System
22.1 Variant Leader Promotion & Casualty (LP & C) The original game system Leader Promotion & Casualty (LP & C) system guarantees leader promotion for every battle in which the leader is not
killed or wounded. This encourages players to stuff leaders into an army to
quickly elevate the rank of their leader pool. This questionable but technically legal practice serves to minimize game variety and takes
advantage of the game system.
One LP & C variation was detailed in the French Volunteer publication which enabled any leader to go up and down in rank, and have
changes in both directions for leader tactical and strategic ratings.
Significant deviations from historical leader values could occur (i.e., Fremont could become a good leader while Grant could transform into a poor leader).
Although potentially resulting in a radical change in leader quality, this
system encouraged a lot of lopsided combats as modifiers existed for winning or losing, regardless of the odds. Leaders in the winning forces were treated
favorably and those in losing forces were penalized. The Volunteer chart
creates great fluctuations in leader ratings that were too extreme and ahistorical
For this reason, the Volunteer system was further developed. The
result is that a baseline of ―8‖ on the LP & C (based on a 2d6) is required for promotion. This chart preserves the rare possibility of a change in rating, and
allows for rare results such as capture, severe wounds and non-combat loss.
Also the Union handicap of poor generals is eased by the ability of removal or demotion of poor leaders, without additional cost in CP’s. (Yes, this
includes being able to ship a bad two-star general to the Removed Box.) Bias
of variant is debated: It is Pro-Union in that Mr. Lincoln can remove poor leaders at no CP cost on the ―May Relieve if Loss‖ result. However as the
Confederate will typically win many early battles due to leadership, the
results of ―7‖ favor Confederate promotion, which reinforces their leadership superiority.
22.1.1 Additional Variant LP&C Codes:
Captured: The leader is captured. Place him on the opponent’s track for return in 3 turns unless exchanged for an opponent’s
POW. Leaders are exchanged by order of capture without regard to rank. Captured leaders must be exchanged prior to turn 14; they
may not be exchanged after Turn 14. Exchanged leaders are placed
in the next turn’s pool. Union admirals involved in naval combat cannot be captured; ignore a “capture” result.
EXAMPLE 22.1.1A: Stuart is captured on Turn 1. The Union
returns Stuart to the Confederate leader pool for return on Turn 4, unless he is exchanged earlier.
Historically, a rate of exchange was defined as a certain rank
being worth a specific number of privates: 1 general = 46 privates, 1 major general = 40 privates, 1 brigadier general = 20 privates.
After 3 turns, It can be assumed that 2 brigadiers who are below
the game scale were exchanged for a major general game counter, etc. Grant halted all officer exchanges when he took command of
the Union Armies. The loss of experienced officers accelerated the
decline of the Confederate forces.
May Remove if Loss: The player may exercise the choices from
rule 5.3 without spending 2 CP’s. Leaders of all ranks may be “Removed,” and be moved into the Removed Leaders pool, or
moved to a new hex, or (if a ***star) demoted. The “If Loss”
requirement is met whenever the leader’s force was forced to retreat or suffered greater losses.
The increased ability of the Union to remove poor leaders after
using them in at least one fight, but without CP cost is an intentional design decision.
Promote if Win: The leader is promoted if his force is either not required to retreat or suffers fewer losses.
Non Combat Termination (NCT): If designated as subject to
NCT, then the leader must be removed from the game entirely and permanently as if dead. (Exceptions: AP Hill and P. G. T.
Beauregard are merely “wounded” by their mystery illnesses; see
Variant Leader table). If not subject to Non - Combat Termination, the player may relieve the general, as per rule above, if the battle
was a loss. Removed leaders sit out the game in the Removed
Leader Box. EXAMPLE 22.1.1B: Historical examples of non-combat
casualties include: Shot during an act of adultery (Van Dorn), court martial (Fitz-John Porter), died of old age (Bull Sumner),
shot by a fellow general from his own side (Nelson shot in cold
blood by Davis, USA / Walker shot by Marmaduke in a duel), binge drinking (GB Crittenden), and more.
Severely Wounded: Remove leader from map. The severe wound keeps the leader out until the turn after the current turn (i.e. if
severely wounded on turn 2, he returns to the leader pool on turn
4).
Killed/Severely Wounded: Roll 1 die. If the result is a 1-4, the
leader is killed, on a 5-6 he’s only Severely Wounded.
22.2 Modified Historical Leaders This variant modifies the ratings of several leaders contained within the
standard game to reflect one researched viewpoint of a more accurate historical perception. It is realized however, that such a perception may vary
between individual viewpoints. The current consensus is that this variant
accentuates the initial Confederate leadership superiority. It is also assumed that the Optional Confederate Jackson*** and Union Lyon *** leaders are
in play, in addition to the Variant Leader Promotion and Casualty (LP&C)
system which includes removal for Non-Combat Termination (NCT). Changes in the 1861/Campaign game include AS Johnston, J Johnston,
McClellan, and Rosecrans. Similar to the justification of adding a
Jackson*** and Lyon*** counter, the actual published game leaders may be influenced by a historical death preventing a higher potential rank.
(EXAMPLE: Reynolds, Sedgwick)
22.2.1 USA Notes:
George Brinton McClellan: Was there a less mobile army
commander than McClellan? Lincoln and Stanton rightly declared
that he had “the slows”. Translating his historical record, he only
moved twice by Turn 8. He clearly earned the lowest initiative
rating of 4; but playtesting showed that players would not put him in command of an army as a 4. His opposition to the Emancipation
Proclamation makes him subject to Non Combat Termination
(NCT) after turn 8. McClellan excelled at re-organizing and rallying the AoP on several occasions but was reluctant to “use” it
effectively. *** Rating change: 2 for rally.
Henry Wager Halleck: At Corinth, Halleck commanded the combined Army of the Tennessee, Army of the Ohio
(Cumberland), and other commands totaling more than 120,000 men (about 24 SP). Then he left for DC while Buell and Grant
marched their separate ways. Also, Halleck (as General-in-Chief)
was in Wash DC without “taking” command of the eastern armies in the capital. A four star Halleck matches history very well.
Halleck is eligible for ****(4-2-1) starting Turn 4.
Joseph Hooker: At one star/division command, Hooker, like Kearny showed great aggressiveness. A good 1* addition. As a 3
***, Hooker brought superior forces to bear on Lee, but lost at Chancellorsville after being knocked senseless by a shell. In game
terms R E Lee with 3 re-rolls and +6 DRM beat Hooker d3 vs d2.
Hooker showed as much skill as AS Johnston and other three-star leaders who the game awards a zero (not negative) re-rolls. Enter
as a * (2+1) in turn 4 instead of as ** (3+1) in turn 5; add a ***
counter (300) with seniority of 12.
John A. McClernand: Subject to being removed for non-combat
reasons. If you use him, you will hope to shelve him like Grant
did. Subject to NCT.
John Fulton Reynolds: Turned down command of the Army of
the Potomac just before Meade was ordered to take command. Lincoln could have ordered Reynolds to command. Reynolds was
killed at Gettysburg after organizing the initial defense before he
had another chance at higher command. Was considered one of the finest generals in the Union army destined for high command.
Add a (3+1+1) counter with seniority of 14B, between Thomas
(14) and Meade (15).
William Starke Rosecrans: Rosecrans fought hard and well in
West Virginia and Mississippi before taking an army command in Oct 1862 (Turn 7). His placement as a three star on Turn 1 is
historically untenable, and in standard play immediately displaces
one of the *** leaders that Lincoln was historically forced to use. Starts game as a ** counter (3+1).
Phil Sheridan: Sheridan spent more time commanding infantry than cavalry. Allow the player to select Sheridan as infantry or
cavalry before 1st entry. If entered as a * infantry leader, he may
later permanently convert to cavalry for the cost of 2 dice diff, but no CP’s. Add a * and ** infantry counter (no *** infantry) which
may be used at the Union player’s option, with the same rating as
his cavalry counter.
Franz Sigel: If you use him, you will hope he repeats history and
resigns his Corps command in protest to others getting promoted
above him. Subject to NCT.
22.2.2 CSA Notes:
Pierre Gustave Toutant Beauregard: Subject to being removed for non-combat reasons due to his mysterious illnesses. Thus, the
end result for P G T Beauregard is same as a WIA. Is this a pain if Beauregard is in command of a field army? YES! Now you know
how Davis felt in 1862.
Ambrose Powell Hill: Subject to being removed for non-combat reasons due to his mysterious illnesses. Thus, the end result for AP
Hill is same as a WIA.
Thomas Carmichael Hindman: Raised 20,000 Troops in Arkansas while holding command of the Trans-Miss. Add ** (30)
counter.
Albert Sidney Johnston: A S Johnston stood on the defensive as a
theater commander, but when he led an army at Shiloh his aggressiveness showed. Giving AS Johnston the “attack only” re-
roll reflects this specific strength; has zero re-rolls one defense.
*** Rating changed to (3+1A0).
Joseph Eggleston Johnston: J E Johnston excelled at retreat and
finding justification not to attack. The standard game J E Johnston has a 1 re-roll, making him a much better commander than history;
yet to reduce him to 0 re-rolls ignores his ability to make a stand.
Counter changed to have a re-roll on defense only; zero re-rolls on attack. *** Rating changed to (3+1D+1).
James Longstreet: Longstreet was R E Lee’s heir apparent,
should he have fallen after Jackson’s death. His *** counter is conditional upon either 1) his presence in an army, and his army
commander suffering a WIA or KIA or 2) the death or capture of
R E Lee. He has a “defend only” re-roll & zero as attacker. Historically, he was a poor independent commander in both SE
VA and East TN., but conflicting missions and the onus of attack
hampered him as it would have any Confederate leader. His philosophy of tactical defense best met the needs and manpower
limits of the Confederacy. Add (3+1D+1) counter which is only entered if conditions above are met, with seniority of 6.
John Clifford Pemberton: Lt. General J C Pemberton was ranked
lower than Longstreet, Polk and many other standard game ** leaders. Pemberton may only command the Confederate Army of
the West or the Army of Mississippi. Why is Major General Van
Dorn senior to Lt. Gen. J C Pemberton in the game? Pemberton relieved Van Dorn at Vicksburg (and in games terms, stayed in the
hex), but Pemberton took command of the army.
Earl Van Dorn: Van Dorn’s placement among the highest
ranking Confederate generals is among the most anomalous and
historically inaccurate mistake in the game. He enters as an infantry leader, but may permanently convert to cavalry for 2 dice
diff., but no CP’s. His maximum cavalry rank is **. Van Dorn is
subject to being removed for non-combat reasons. For those who insist, the Confederate player has the option to enable a Van Dorn
*** infantry counter into the game. Van Dorn may only command
the Confederate Army of the West or the Army of Mississippi. Van Dorn is always the least senior *** Confederate leader in the
game, and is subject to NCT. Cavalry ** (20) counter (and ***
infantry) may be used at Confederate player’s option. Historically, the Confederates had 4 ranks of generals. Major General
Van Dorn and Lieutenant General Pemberton both lacked the rank and
gravitas to command the premier Armies of Northern Virginia or Tennessee.
22.3 Additional Leaders Excessive leader losses can be decisive in the outcome, especially if a
side is hard hit by the loss of admirals. There could be smaller but significant impact with the loss of multiple cavalry or infantry leaders. Realistically,
should such losses have occurred, other leaders (perhaps less capable) would
be promoted, rather than disbanding the navy or cavalry. This variant assumes the use of Modified Historical Leaders and the Variant LP&C table.
The leaders represented played significant roles in the war.
Players may be required to create their own leader counters. 22.3.1 Procedure: Whenever a leader is KIA, or goes to the “removed
leaders box” either as a result of being killed, NCT, or captured without
possibility of exchange, randomly add a variant leader to the pool for the next turn from the Leader Variant Chart. The eligible leaders are those with a turn
of entry earlier than, or current with the game turn. Add the leaders on their turn of entry, and then follow the standard rules.
EXAMPLE 22.3.1: Thomas is killed on Turn 3. The Union player
randomly chooses any variant leader with a turn of entry on Turn 4 or earlier; the counter goes on the track for Turn 4.
22.3.2 Naval and cavalry leaders are only replaced by a leader from the
same branch of service.
22.3.3 Seniority of Variant Leaders: All *** variant leaders have a
stated seniority on the counter. For those that do not, treat variants as senior to any leader whose turn of entry is later than theirs. All leaders that share a
turn of entry or earlier are senior to the variant. If two variant leaders share a
turn of entry, the first alphabetically is the senior leader.
22.3.4 USA Additional Leaders:
Darius N. Couch: Second in command of the Army of the Potomac at Chancellorsville. Alter the aim of the near-miss
cannon shell that “stunned” Army Commander Hooker, and Couch
would become the interim commander of the Army of the Potomac. Couch quit his command in disgust after the battle.
TOE 4; * (30); ** (3+1); *** (30+1); seniority 12B between
Hooker 12 & Sherman 13; subject to NCT.
Thomas L. Crittenden: Corps leader at Perryville, Oct., 1862, and
at Stones River, but faltered at Chickamauga in Sept., 1863. TOE 3; ** (30); subject to NCT.
William B. Franklin: A division, corps, and wing (2 corps)
commander who led 1/3 of the Army of the Potomac at Fredericksburg. TOE 4; ** (30); subject to NCT.
Gordon Granger: Without Granger, “The Rock of Chickamauga” would have been pulverized. TOE 7; * (30); ** (3+1).
Philip Kearny: Many see Kearny in the East as similar to Lyon in the West. Killed before called to higher commands, both men
showed great initiative, skillful combat leadership, and restlessness
with plodding superiors. Kearny served alongside Hooker and was about as likely as Hooker to get a shot at army command. For
game balance considerations, Kearny *** can only entered if either
Grant, Lyon, or Sherman is removed from the game (killed or captured without possibility of exchange). TOE 4; * (2+2); **
(2+2); ***(2+1+2); seniority 12C between Hooker 12 or Couch
12B & Sherman 13.
Alexander McCook: Solid Corps leader at Perryville, and Stones
River, but faltered at Chickamauga. TOE 3; ** (30); subject to NCT.
William Nelson: Former Naval officer pulled into army duty in
KY. Wrongly blamed for a defeat at Richmond, KY; corps commander Nelson had a dispute with a fellow Union general who
then murdered Nelson, in the presence of the Indiana Governor.
TOE: 1; * (3+1); ** (30); subject to NCT.
Fitz John Porter: His strong defensive stand at Mechanicsville
and Gaines Mill during the Peninsula Campaign was followed by more timid and passive leadership. His court martial was
overturned post-war. TOE: 5; * (3+1); ** (40); subject to NCT.
Dan Sickles: Politician without military training seeking political gain. Aggressive and willing to seize the initiative regardless of
tactical realities. Sickles commanded the Army of the Potomac’s III Corps (13,000 men) during 1863. TOE 8; * (20); ** (2-2);
subject to NCT.
Edwin V. Sumner: Solid hard fighting Corps and Wing commander who led 1/3 of the army at Fredericksburg. Died of
old age en route to command in Missouri. TOE: 4; ** (30); subject
to NCT.
Gouverneur K Warren: Subject to being removed for non-
combat reasons. Warren rose to high command after Gettysburg and led about 1/4 of the Army of the Potomac during the late 1863
(post-Gettysburg) campaign; Removed from command by
Sheridan in 1865 for non-aggressiveness. TOE: 11;* (2+1); ** (40); subject to NCT.
[Cavalry] Hugh Judson Kilpatrick: Aggressive to a fault, Sherman requested him to lead his cavalry, and tear up the CSA
interior. Has no effect on Army Reaction rolls. TOE: After death
or removal of any Cavalry leader; * (2 -1).
[Admiral] Samuel Francis du Pont: du Pont was not as skilled as
the three admirals in the original game, but his entry allows continuation of Union Naval operations. TOE: After removal of
any Naval leader; ** (20). 22.3.5 CSA Additional Leaders:
Richard Herron Anderson: Anderson is one of the highest
ranking of Lee’s Lieutenants not in the game. Rose to Corps
command and one of the 17 Lieutenant-Generals. TOE: 6; * (3+1); ** (3+1).
Simon Bolivar Buckner: Buckner, as division, corps and department commander, rose to be a lieutenant general. TOE 3: *
(3+1); ** (3+0).
Benjamin Franklin Cheatham: Victor over Grant at Belmont, Cheatham later rose to corps command. Accusations about

drinking almost cost him his command. TOE: 4; * (30); ** (3+1);
subject to NCT.
George Bibb Crittenden: Lost at Mill Springs then lost corps
command to the bottle. TOE: 1; * (30); ** (3-1); subject to NCT.
Theophilus Hunter Holmes: Holmes became a lieutenant general
by Oct., 1862. He spent most of the war commanding the Trans-
Miss and the District of Arkansas. TOE: 3; * (3-1); ** (30); subject to NCT.
Lafayette McLaws: McLaws skillfully led at least a division from mid-1862 until the end. He was never able to gain corps command.
He received blame from Longstreet after Knoxville, but was
cleared by Confederate inquiry. TOE: 5; * (3+1); subject to NCT.
Gustavus Woodson Smith: Subject to being removed for non-
combat reasons. In the months after Manassas, J E Johnston, Beauregard, and G W Smith were the army’s triumvirate making
plans with Pres. Davis. When Johnston was wounded in battle
(and with Beauregard out west), Smith took over the Army for a day. He suffered a mental breakdown under the stress and was
replaced by RE Lee. If Smith had been distant from Davis and
thus stayed in command, Smith might have been a bigger disaster in army command than Bragg or Burnside. Smith also served as
Confederate Secretary of War…for a few days.
TOE: 2; ** (30); *** (4 -2 0) seniority 5B (just under Bragg and above Van Dorn if Van Dorn is ***).
Alexander Peter Stewart: Stewart rose to corps command and was one of the Confederacy’s 17 Lieutenant-Generals. Good at
division command, but only passable in higher positions. TOE:
10; * (3+1); ** (30).
[Cavalry] Wade Hampton: Hampton commanded the Army of
Northern Virginia cavalry after the death of Stuart and became a
lieutenant general. TOE: After death or removal of any Cavalry leader; ** (2+2).
Semmes
1
2 * 1
B uchan
2
2 * 2
22.4 Confederate Naval Leaders 22.4.1 Confederate naval leaders can use their Tactical Combat Rating
to increase the die roll for Confederate ironclads in ship to ship battle, or to
modify the commerce raider dice roll . One Confederate naval leader (chosen
at random) is eligible for entry on Turn 6. Confederate naval leaders require Discretionary CP's for activation.
22.4.2 The Union is allowed a maximum of 3 naval leaders, and the
Confederates a maximum of 1 in play during the game. If a naval leader is
killed or permanently removed, then the next leader in seniority is eligible to
enter play via the Reinforcement Track on the next game turn. All naval
leaders have a 2 initiative. 22.4.3 The Confederate player can place his naval leader on any
Commerce Raider in play. During the Commerce Raider phase, the naval
leader adds his tactical rating to the Commerce Raider's dice roll. This decision may be made when the naval leader enters play, or 1 Discretionary
CP can be used to move a naval leader to or from a Commerce Raider.
22.4.4 Commerce Raiders are not eliminated if the dice total is 12 or more (or a roll of 2, when using optional rule 21.6) due solely to the Tactical
Combat Rating of a Confederate naval leader.
22.4.5 Confederate naval leaders can move multiple Confederate Ironclads, stacked in the same hex with them, at a cost of 2 Discretionary
CP's.
The VASSAL module contains player configurable leader counters. Players may create leaders with variable attributes. Presently, there are no
counters for Confederate naval leaders.
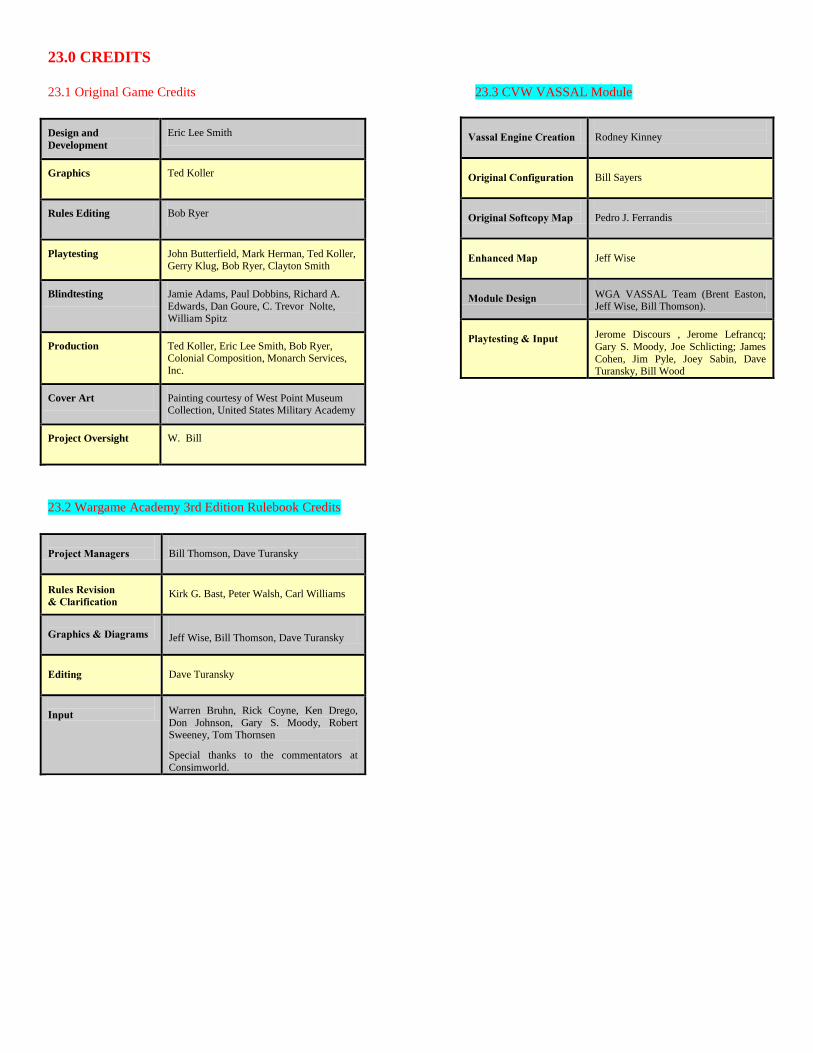
23.0 CREDITS
23.1 Original Game Credits 23.3 CVW VASSAL Module
Design and
Development
Eric Lee Smith
Graphics Ted Koller
Rules Editing Bob Ryer
Playtesting John Butterfield, Mark Herman, Ted Koller, Gerry Klug, Bob Ryer, Clayton Smith
Blindtesting Jamie Adams, Paul Dobbins, Richard A.
Edwards, Dan Goure, C. Trevor Nolte, William Spitz
Production Ted Koller, Eric Lee Smith, Bob Ryer, Colonial Composition, Monarch Services,
Inc.
Cover Art Painting courtesy of West Point Museum Collection, United States Military Academy
Project Oversight W. Bill
23.2 Wargame Academy 3rd Edition Rulebook Credits
Project Managers
Bill Thomson, Dave Turansky
Rules Revision
& Clarification
Kirk G. Bast, Peter Walsh, Carl Williams
Graphics & Diagrams Jeff Wise, Bill Thomson, Dave Turansky
Editing
Dave Turansky
Input Warren Bruhn, Rick Coyne, Ken Drego,
Don Johnson, Gary S. Moody, Robert Sweeney, Tom Thornsen
Special thanks to the commentators at
Consimworld.
Vassal Engine Creation
Rodney Kinney
Original Configuration
Bill Sayers
Original Softcopy Map
Pedro J. Ferrandis
Enhanced Map
Jeff Wise
Module Design WGA VASSAL Team (Brent Easton, Jeff Wise, Bill Thomson).
Playtesting & Input Jerome Discours , Jerome Lefrancq;
Gary S. Moody, Joe Schlicting; James
Cohen, Jim Pyle, Joey Sabin, Dave Turansky, Bill Wood
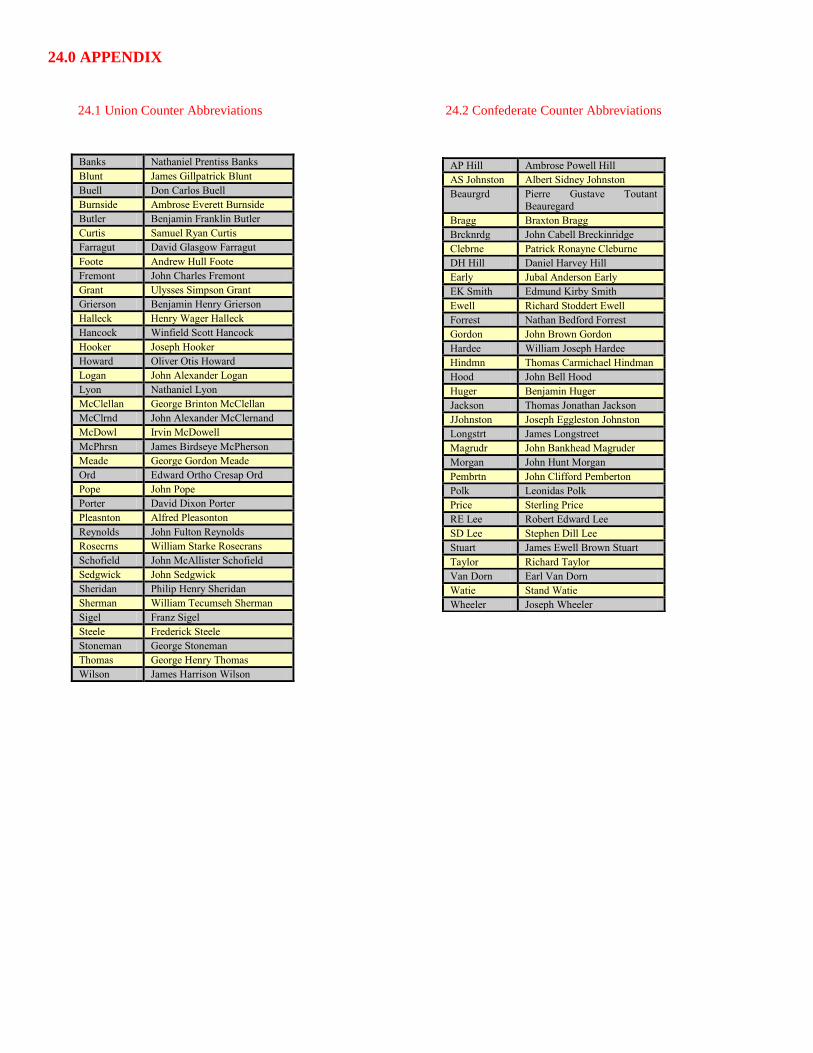
24.0 APPENDIX
24.1 Union Counter Abbreviations 24.2 Confederate Counter Abbreviations
Banks Nathaniel Prentiss Banks
Blunt James Gillpatrick Blunt
Buell Don Carlos Buell
Burnside Ambrose Everett Burnside
Butler Benjamin Franklin Butler
Curtis Samuel Ryan Curtis
Farragut David Glasgow Farragut
Foote Andrew Hull Foote
Fremont John Charles Fremont
Grant Ulysses Simpson Grant
Grierson Benjamin Henry Grierson
Halleck Henry Wager Halleck
Hancock Winfield Scott Hancock
Hooker Joseph Hooker
Howard Oliver Otis Howard
Logan John Alexander Logan
Lyon Nathaniel Lyon
McClellan George Brinton McClellan
McClrnd John Alexander McClernand
McDowl Irvin McDowell
McPhrsn James Birdseye McPherson
Meade George Gordon Meade
Ord Edward Ortho Cresap Ord
Pope John Pope
Porter David Dixon Porter
Pleasnton Alfred Pleasonton
Reynolds John Fulton Reynolds
Rosecrns William Starke Rosecrans
Schofield John McAllister Schofield
Sedgwick John Sedgwick
Sheridan Philip Henry Sheridan
Sherman William Tecumseh Sherman
Sigel Franz Sigel
Steele Frederick Steele
Stoneman George Stoneman
Thomas George Henry Thomas
Wilson James Harrison Wilson
AP Hill Ambrose Powell Hill
AS Johnston Albert Sidney Johnston
Beaurgrd Pierre Gustave Toutant
Beauregard
Bragg Braxton Bragg
Brcknrdg John Cabell Breckinridge
Clebrne Patrick Ronayne Cleburne
DH Hill Daniel Harvey Hill
Early Jubal Anderson Early
EK Smith Edmund Kirby Smith
Ewell Richard Stoddert Ewell
Forrest Nathan Bedford Forrest
Gordon John Brown Gordon
Hardee William Joseph Hardee
Hindmn Thomas Carmichael Hindman
Hood John Bell Hood
Huger Benjamin Huger
Jackson Thomas Jonathan Jackson
JJohnston Joseph Eggleston Johnston
Longstrt James Longstreet
Magrudr John Bankhead Magruder
Morgan John Hunt Morgan
Pembrtn John Clifford Pemberton
Polk Leonidas Polk
Price Sterling Price
RE Lee Robert Edward Lee
SD Lee Stephen Dill Lee
Stuart James Ewell Brown Stuart
Taylor Richard Taylor
Van Dorn Earl Van Dorn
Watie Stand Watie
Wheeler Joseph Wheeler

24.3 Bibliography
1 Boatner, Mark, The Civil War Dictionary. David McKay Co., 1959.
2 Carter, Samuel, The Final Fortress: The Campaign for Vicksburg. St.
Martin’s Press, 1980.
3 Catton, Bruce, The Army of the Potomac, 3 Vols. Vol 1: Mr.
Lincoln’s Army; Vol 2: Glory Road; Vol 3: A Stillness at Appomattox. Doubleday and Co., 1951, 1953.
4 Catton, Bruce, The Centennial History of the Civil War, 3 Vols. Vol. 1: The Coming Fury; Vol. 2: Terrible Swift Sword; Vol. 3: Never
Call Retreat. Doubleday and Co., 19611965.
5 Davis, William C., Ed., The Image of War, 1861-1865. Vols. 1 and 3.
Vol. 1: Shadows of the Storm; Vol. 3: The Embattled Confederacy. Doubleday and Co., 1981, 1982.
6 Evans, Clement, Ed., Confederate Military History, Volumes 1
through 12. The Blue and Gray Press. 1970.
7 Fehrenback, T. R., Lone Star. Macmillan Publishing, 1968.
8 Fischer, Leroy H., Ed., The Western Territories in the Civil War.
Sunflower University Press, 1977.
9 Foote, Shelby, The Civil War: A Narrative. 4 Volumes. Random
House, 1958 - 1974.
10 Fox, William F., Regimental Losses in the American Civil War, 1861 -
1865. Albany Publishing Co., 1898.
11 Freeman, Douglas Southhall, Lee’s Lieutenants: A Study in Command
4 Vols. Charles Scribner’s Sons, 1942, 1946.
12 Gates, Paul, Agriculture in the Civil War. Alfred A. Knopf, 1965.
13 Goff, Richard, Confederate Supply. Duke University Press, 1969.
14 Johnson, Robert Underwood, Ed., Battles and Leaders of the
Civil War; 4 Vols. The Century Co., 1887.
15 Livermore, Thomas L., Numbers and Losses in the Civil War in
America. Houghton Mifflin Co., 1901.
16 Long, E. B., The Civil War Day by Day. Doubleday Co., 1971.
17 McKim, Randolph, The Numerical Strength of the Confederate Army.
New York, 1912.
18 McPherson, James, Ordeal by Fire. Alfred A. Knopf, 1982.
19 McWhiney, Grady, Attack and Die. University of Alabama Press,
1982.
20 Monaghan, Jay, Civil War on the Western Border, 1854 - 1865. Little,
Brown and Co., 1955.
21 Murfin, James V., The Gleam of Bayonets. A. S. Barnes and Co., 1955.
22 Nash, Howard P., A Naval History of the Civil War. A. S. Barnes and Co., 1972.
23 Rampp, Larry, The Civil War in the Indian Territory. Presidio Press,
1975.
24 Reed, Rowena, Combined Operations in the Civil War. Naval
Institute Press, 1978.
25 Sharf, J. Thomas, History of the Confederate States Navy. Crown
Publishers, 1866.
26 Tanner, Robert, Stonewall in the Valley. Doubleday and Co., 1976.
27 Thomas, Emory, The Confederate Nation. Harper and Row, 1979.
28 Warner, Ezra J., Generals in Blue. Louisiana State University Press,
1964.
29 Warner, Ezra J., Generals in Gray. Louisiana State University Press,
1959.
30 United States, Department of the Navy, Civil War Naval Chronology,
1861 - 1865. 1971.
31 United States, War Department, The Official Atlas of the Civil War. Arno Press, 1978.
32 Wilson, Edmund, Patriotic Gore. Farrar, Strauss and Giroux, 1962.

25.0 The Civil War: Player Aid Card
CAMPAIGN REINFORCEMENT TABLE
Turn
USA
RR
USA
SL
USA
RXP
USA
OXP
USA
RIC
USA
OIC
USA
East
USA
West
USA
TM
USA
Disc
USA
Ldr
CSA
RR
CSA
Raid
CSA
Icld
CSA
East
CSA
West
CSA
TM
CSA
Disc
CSA
Lder
Blkd
%
Turn
0 - - - - - - 21 11 5 - 5 - - - 14 6 5 - 7 -
1 6 2 1 1 - - 3 3 1 2 8 4 - - 3 3 1 1 7 0 1
2 6 6 1 - - - 8 8 1 1 7 4 - - 7 7 - 2 6 10 2
3 6 8 2 3 4 - 4 4 - 1 1 4 - - 4 4 - 1 3 10 3
4 6 20 1 3 - 1 7 7 1 2 3 4 - 1 6 6 1 2 5 20 4
5 6 20 1 1 1 1 7 7 - 2 3 4 - - 5 5 - 2 1 20 5
6 6 20 1 1 - - 6 6 1 2 2 4 - 1 4 4 1 2 1 20 6
7 6 21 - 2 2 - 5 5 - 1 3 4 1 - 2 2 - 1 2 20 7
8 6 22 2 - 1 - 1 1 - 1 3 3 1 - - - - 1 - 20 8
9 6 24 - 1 1 3 4 4 1 1 1 3 - - 3 3 - 1 1 20 9
10 6 26 1 - - - 2 2 - 1 - 3 - 1 2 2 - - - 20 10
11 6 28 - - - - 1 1 - - - 3 - - 1 1 - - - 20 11
12 6 30 - 2 - - 4 4 - 1 - 3 - - 1 1 - - 1 20 12
13 6 30 - 1 - - 1 1 - - 1 2 - - - - - - -- 30 13
14 6 34 - - - - 5 5 1 1 - 2 - 2 1 1 1 - - 30 14
15 6 36 - - - - 3 3 - 1 - 2 - - 1 1 - - - 30 15
16 6 40 - 1 - 2 2 2 - 1 - 2 - - - - - - - 40 16
17 6 42 - - - 1 3 3 - - - 2 1 - - - - - - 40 17
18 6 42 - - - - - - - - - 1 - - - - - - - 50 18
19 6 42 - - - - 2 2 - 1 - 1 - - - - - - - 50 19
Total 114 493 10 16 9 8 88 78 11 19 37 56 3 5 56* 51* 12* 13 34 Turn
LEGEND: RR (Rail Road Capacity); SL (Sea Lift); RXP (River Transport); RIC (River Ironclad); OXP (Ocean Transport); OIC (Ocean Ironclad); Rdr (Commerce Raider); Icld (Confederate
Ironclad); Ldr (Leader); B% (Blockade %); * (includes State Militia; 2 East, 5 West, 3 Trans-Mississippi)
USA River Iron Clad: Mound City-3; Carondonet-3; Cairo-3; Pittsburg-3; Chocktaw-5; Milwaukee-7; Winnebago-7; Indianola-8; Ozark-9
USA Ocean Iron Clad: Monitor-4; N. Ironside-5; Passaic-9; Weehawken-9; Keokuk-9; Manhattan-16; Mahopac-16; Oneonta-17
CSA Raider: Alabama-7; Florida-8; Shenandoah-17
CSA Ironclad: Virginia-4; Arkansas-6; Palmetto-10; Tennessee-14; Albermarle-14
COMMAND POINTS TABLE
DICE PRIMARY SECONDARY TERTIARY DISCRETIONARY US NAVAL
2 6 3 2 3 1
3 4 3 2 1 3
4 4 3 2 2 2
5 5 3 2 2 2
6 6 3 2 1 3
7 6 4 1 2 2
8 6 4 1 1 3
9 5 3 2 2 2
10 4 3 2 2 2
11 5 4 2 2 2
12 5 4 2 3 1
Players receive Command Points for the Far West equal to the Discretionary Command Points received. To use the table, each
player rolls two dice and records the indicated number of Command Points on his Command Tracks. In the event that both players
roll the same total, the Game-Turn may end (see Table Use Track, on map).
CONFEDERATE SUPPLY LOSS SCHEDULE CSA PRODUCTION
PLUS IMPORTS
EFFECT
99-90 Command Point cost to build a depot, fort or to upgrade a fort to a fortress is increased by one.
89-80 Entering an NSP cost 3 Commands.
79-70 Upgrading a fort to a fortress increased to a cost of 5 Commands.
69-50 A supply line can be traced only 3 hexes to a depot instead of 4.
49-40 A supply line can be traced only 1f hex to a rail line instead of 2.
39-30 The Movement Point Allowance of all forces is reduced by 1 Movement Point.
29-20 Entering a NSP cost 4 Commands.
19-10 No Confederate NSP’s may be entered.
9-0 The Movement Point Allowance of all forces is reduced by 1 Movement Point.
During the Blockade Effects Phase, the Confederate Import/Production total is cross-reference with the preceding chart if the total is less than 100.
The listed results apply only the Confederacy. In addition, all results are cumulative. If the Union has control of the Mississippi, the Confederacy is divided into two Import/Production totals - one for the Trans-Mississippi and one for the East/West theaters.

BLOCKADE TABLE
BLOCKADE PERCENTAGE
PORT
CAPACITY
10% 20% 30% 40% 50%
1 1 1 1 1 1
2 2 2 1 1 1
3 3 2 2 2 2
4 4 3 3 2 2
5 5 4 4 3 3
6 5 5 4 4 3
7 6 6 5 4 4
8 7 6 6 5 4
9 8 7 6 5 5
10 9 8 7 6 5
11 10 9 8 7 6
12 11 10 8 7 6
13 12 10 9 8 7
14 13 11 10 8 7
15 14 12 11 9 8
16 14 13 11 10 8
17 15 14 13 11 9
18 16 14 13 11 9
19 17 15 13 11 10
20 18 16 14 12 10
21 19 17 15 13 11
22 20 18 15 13 11
23 21 18 16 14 12
24 22 19 17 14 12
25 23 20 18 15 13
26 23 21 18 16 13
27 24 22 19 16 14
28 25 22 20 17 14
29 26 23 20 17 15
30 27 24 21 18 15
31 28 25 22 19 16
32 29 26 22 19 16
33 30 26 23 20 17
34 31 27 24 20 17
35 32 28 25 21 18
36 32 29 25 22 18
37 33 30 26 22 19
38 34 30 27 23 19
39 35 31 27 23 19
40 36 32 28 24 20
41 37 33 29 25 20
42 38 34 29 25 20
43 39 34 30 26 21
44 40 35 31 26 22
45 40 36 31 27 22
46 41 37 32 28 23
47 42 38 33 29 23
48 43 38 34 29 24
49 44 39 34 29 24
Cross-index current Confederate Port Capacity with current Union Blockade Percentage to
determine total Import Points.

COMMAND POINT COST CHART
ACTIVITY COST NOTES
Move 1 SP 1 May use Discretionary CP or one from the SP’s theater location. An SP may move only once per Pulse, although it
may be activated more than once per Pulse.
Move 1 NSP 1 May use Discretionary or Naval CP only. An NSP may be activated only once per pulse. When a Union naval transport moves an SP, there is no cost to activate the SP; the NSP activation cost includes the SP activation in this
case.
Move Leader 1 May use Discretionary CP or one from the leader’s theater location. The leader may then move up to 12 Movement
Points by himself, and along rail lines for free. The leader must end his movement on a hex containing a friendly SP or depot. He may not end in a hex by himself or in a hex containing only leaders. Like an SP, a leader can move
only once per Pulse, although it may be part of a force that is activated more than once per Pulse.
Use Leader to
move SP's / NSP's
Leader’s
Initiative
Rating
May use Discretionary CP's or CP's from the theater location. However, naval leaders may be activated only with
Discretionary or Naval CP’s. The leader may then move a number of SP’s or NSP’s that begin the Pulse stacked with
the leader. He cannot “pick up” the SP’s or NSP’s as he moves. The leader must move with the SP’s/NSP’s for the duration of the movement. SP’s/NSP’s may be “dropped off “as the leader moves the force.
Pick Leader 0 Entering a leader as a reinforcement never costs Command Points. If the reinforcement leader enters due to winning
an Initiative dice roll, there is no cost in Initiative Dice Difference; if entered during a Pulse, there is a cost of one
point of Initiative Dice Difference.
Remove Leader 2 Only a three-star leader in command of an Army can be removed. A player can use Discretionary CP's or CP's from
the leader's theater location. When removed, the leader may be either moved (at no additional cost), placed in the Removed Leaders Box, or demoted. Only a leader with a two-star rank counter available may be demoted. When
demoted, his three-star counter is placed in the Removed Leaders Box and his two-star counter is placed on the map.
Build Army 2 May be built in a hex that is in supply and contains either a three or four-star leader and at least one SP. The hex
cannot contain a Demoralized force. May use either Discretionary or theater Command Points.
Build Depot 2 May be built in a supplied or unsupplied city or stockade hex controlled by the player. A maximum of one depot may occupy a hex. May use either Discretionary or theater Command Points.
Build Fort 3 May be built in a supplied [ Original language : VP city] hex that contains an SP. A maximum of one fort may occupy a hex. May not be built in a hex containing a map-printed fortress symbol. May use either Discretionary or
theater Command Points.
Build Fortress 3 May be built only in a supplied VP city hex that contains an SP and a fort. A maximum of one fortress may occupy
a hex. Confederates may build a maximum of 5 fortresses and, once destroyed, a Confederate fortress cannot be rebuilt. May use either Discretionary or theater Command Points.
Enter CSA NSP 2 Each NSP costs 2 Discretionary Command Points to enter. If not entered, the NSP remains on the Game-Turn Record Track and may be entered later.
Enter USA NSP 2 the Union player spends 2 Discretionary or Naval Commands to enter all of the NSP's in the Naval Pool (i.e., they
are not paid for individually). NPSs remain in the Naval Pool until they have entered.
Enter SP 0 Entering an SP as reinforcement never cost Commands. If the reinforcement SP enters due to winning an Initiative
dice roll, there is no cost in Initiative Dice Difference; if entered during a Pulse, there is a cost of one point of
Initiative Dice Difference.
Recovery from Demoralization Leader’s Initiative
Rating
A force that is in supply and stacked with a ground leader can be rallied by expending that leader’s Initiative Rating in discretionary or theater Command Points. If there is more than one leader in the hex, use the value of the highest
ranked, most senior leader.
Combined Land/Naval Combat Both
Leaders’
Initiative
To make a combined land/naval attack, both forces must occupy the same hex/hexside. Commands must be spent to
activate each of the leaders, using Discretionary or Naval commands for the naval leader and Discretionary or theater
Commands for the ground leader.
FAR WEST ADDITIONAL COMMANDS
Move Tribal Indian 1 May use Discretionary or Far West Command Points.
Change Tribal Indian Allegiance
1 A player may spend a Discretionary or Far West Command to attempt to gain control of an enemy Tribal Indian. He spends a Command and rolls a die. On a roll of 1 through 4, there is no effect. On a roll of 5 or 6, the Tribal counter
changes allegiance. A player may make only one attempt per Pulse for a given Indian counter.
Move Texas Ranger 1 May use Discretionary or Far West Command Point.
Move Civilized Indian 1 May use Discretionary or Trans-Mississippi Command Point.
Reinforcement 1 All Far West counter types enter the game at a cost of one Far West or Discretionary Command Points each.
Important: Regardless of type, each Command Point spent uses up one Point of the Dice Difference for the player spending the Command.

NAVAL COMBAT RESULTS TABLE
DIE ROLL UNMANNED
FORT OR 1 NSP
UNMANNED
FORTRESS OR 2
NSP’S
MANNED FORT
OR
3-4 NSP’S
MANNED
FORTRESS OR
5 OR MORE
NSP’S
1-3 No Effect No Effect No Effect No Effect
4 No Effect No Effect No Effect Damaged
5 No Effect Damaged Damaged Damaged
6 Damaged Damaged Sunk Sunk
The Naval Combat Results Table (NCRT) is used to resolve combat between naval forces or between a naval force and
a fort or fortress. Combat between naval forces is initiated when opposing naval forces occupy the same coastal hex or navigable river hexside. Each player determines the strength of his force: ironclads are worth 1 NSP each; two
transports together are worth 1 NSP, rounding down (transport totals of 3 or less are worth 1 NSP). Both players find
their strength at the top of the table, each on the column applicable to his force. Then both players roll one die and apply the results. If a Union naval leader is present, the Union player adds his Tactical Combat Rating to his die roll
(results of more than 6 are treated as 6). If both players have a part of their naval forces remaining, another round is
fought - and rounds continue until one or both sides are completely eliminated. A fort or fortress may attack an enemy naval force that occupies its hex or one that occupies a navigable adjacent hexside. The naval force may not attack the
fort/fortress, however. To resolve the combat, locate the fortification type at the top of the table, roll one die, and apply
the results. There are no modifiers for leaders. The results from both types of combat are the same. Sunk: The NSP is permanently eliminated. Damaged: A Confederate NSP is sunk on a damaged result; A Union NSP
is placed on the Game - Turn Record Track for the following turn on a damaged result.
TERRAIN EFFECTS CHART
TERRAIN TYPE GROUND MOVEMENT
POINT COST
AMPHIBIOUS DEFENSE
STRENGTH
CRT COLUMN SHIFTS
TO THE LEFT
Clear Hex 1 1 •
Forest Hex 1 1 1
Swamp Hex 2 1 2
Mountain Hex 1 (1) na • (2)
Mountain Hexside • (3) • •
Road/Gap Hexside • • 2 (4)
Unnavigable River • • 1 (5)
Navigable River (6) (7) 2 (8)
All-Sea Hex (9) • •
Impassable Hex na • (15) •
Fort (10) +1 1
Fortress (10) +2 2 (11)
Stockade (12) • • •
City (13) • +1 •
Rail Line (14) • •
•: No effect. na: Not allowed. (#): See numbered note, following. Ground Movement Point Cost: Number of Movement Points a force moving by land must expend to enter the hex.
Amphibious Defense Strength: The defense strength of a hex being invaded is determined by adding together all the strengths
for terrain in the hex. Thus, a swamp hex with a fort has a defense strength of 2: l for the swamp and l for the fort. These strengths are used instead of the column shift modifiers used in regular ground combat.
CRT Column Shifts to the Left: These column shift modifiers are used to determine which column on the Combat Results Table
is used to resolve combat. Column shifts are cumulative, but there is a maximum of four column shifts per combat. (1) A mountain hex can be entered only by crossing a road hexside.
(2) A mountain hex itself has no effect on combat; however, there is a two-column shift to the left for crossing a road hexside to enter or exit the mountain hex. Thus, a defender in a mountain hex receives two column shifts.
(3) A mountain hexside can be crossed only through a gap hexside.
(4) There is a two-column shift to the left if the attacker enters the defender’s hex by crossing a road or gap hexside. This is true even if the attacker is leaving a mountain hex and entering a non-mountain hex.
(5) Effect applies if the attacker enters the defender’s hex by crossing the river hexside.
(6) A force cannot cross a navigable river hexside that is controlled by an enemy NSP, unless the hex entered contains a friendly SP or depot. Nor may a force cross the river into a hex occupied by an enemy fort/fortress, manned or
unmanned.
(7) A navigable river hexside may be used as a movement path for NSP’s, including amphibious landings and transport. (8) Effect applies if the attacker enters the defender’s hex by crossing the river hexside. A retreating force cannot retreat
across a navigable river hexside.
(9) May be entered only by Union ocean-going NSP’s or Union SP’s using Sea Lift. (10) A fort/fortress controls adjacent navigable river hexsides. Naval combat is initiated when a naval force enters such a
hex that already contains an enemy NSP.
(11) A defending force that is in supply is not required to retreat, regardless of the combat result. (12) A depot or fort may be built on a hex containing a stockade.
(13) A fortress may be built only on a city hex. Depots may be built on city or stockade hexes.
(14) A player may move SP’s along his rail lines at no cost in Movement Points. However, the Union player is limited to 6 SP’s per turn, while the Confederate limit is listed on the Game-Turn Record Track.
(15) A river-going NSP may not cross an impassable hexside from one coastal hex to another
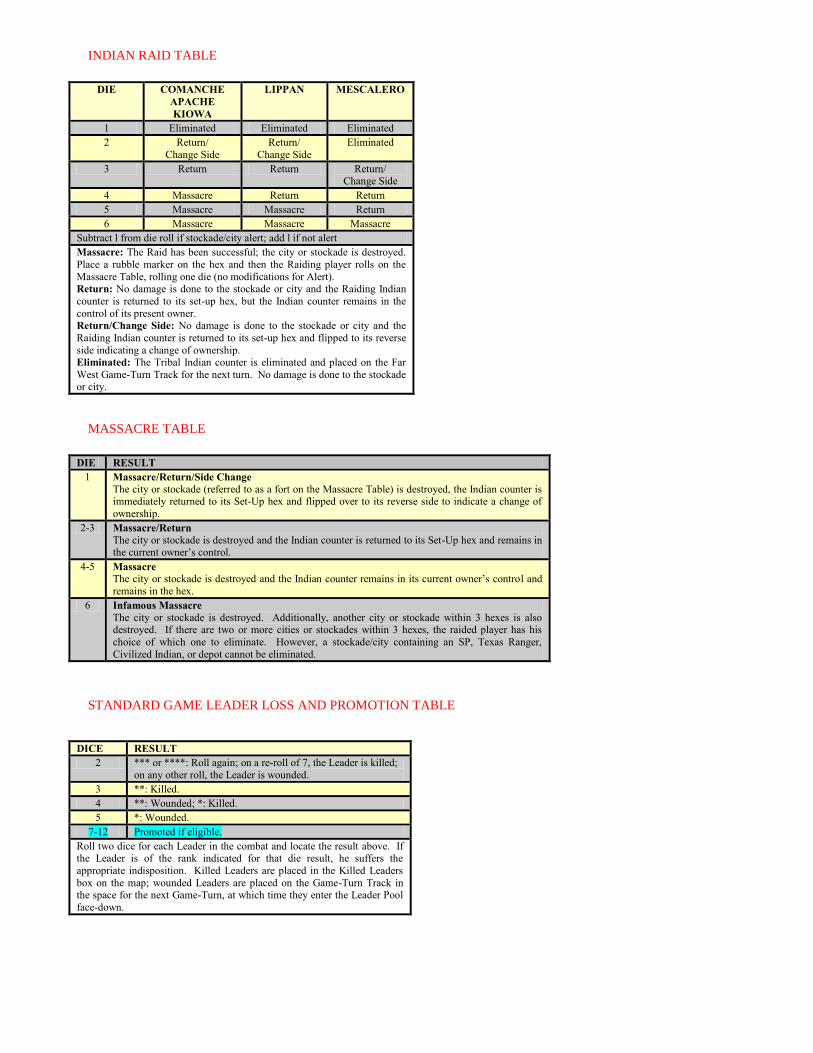
INDIAN RAID TABLE
DIE COMANCHE
APACHE
KIOWA
LIPPAN MESCALERO
1 Eliminated Eliminated Eliminated
2 Return/
Change Side
Return/
Change Side
Eliminated
3 Return Return Return/ Change Side
4 Massacre Return Return
5 Massacre Massacre Return
6 Massacre Massacre Massacre
Subtract l from die roll if stockade/city alert; add l if not alert
Massacre: The Raid has been successful; the city or stockade is destroyed.
Place a rubble marker on the hex and then the Raiding player rolls on the
Massacre Table, rolling one die (no modifications for Alert). Return: No damage is done to the stockade or city and the Raiding Indian
counter is returned to its set-up hex, but the Indian counter remains in the
control of its present owner. Return/Change Side: No damage is done to the stockade or city and the
Raiding Indian counter is returned to its set-up hex and flipped to its reverse
side indicating a change of ownership. Eliminated: The Tribal Indian counter is eliminated and placed on the Far
West Game-Turn Track for the next turn. No damage is done to the stockade or city.
MASSACRE TABLE
DIE RESULT
1 Massacre/Return/Side Change
The city or stockade (referred to as a fort on the Massacre Table) is destroyed, the Indian counter is immediately returned to its Set-Up hex and flipped over to its reverse side to indicate a change of
ownership.
2-3 Massacre/Return
The city or stockade is destroyed and the Indian counter is returned to its Set-Up hex and remains in the current owner’s control.
4-5 Massacre
The city or stockade is destroyed and the Indian counter remains in its current owner’s control and
remains in the hex.
6 Infamous Massacre
The city or stockade is destroyed. Additionally, another city or stockade within 3 hexes is also destroyed. If there are two or more cities or stockades within 3 hexes, the raided player has his
choice of which one to eliminate. However, a stockade/city containing an SP, Texas Ranger,
Civilized Indian, or depot cannot be eliminated.
STANDARD GAME LEADER LOSS AND PROMOTION TABLE
DICE RESULT
2 *** or ****: Roll again; on a re-roll of 7, the Leader is killed;
on any other roll, the Leader is wounded.
3 **: Killed.
4 **: Wounded; *: Killed.
5 *: Wounded.
7-12 Promoted if eligible.
Roll two dice for each Leader in the combat and locate the result above. If the Leader is of the rank indicated for that die result, he suffers the
appropriate indisposition. Killed Leaders are placed in the Killed Leaders
box on the map; wounded Leaders are placed on the Game-Turn Track in the space for the next Game-Turn, at which time they enter the Leader Pool
face-down.
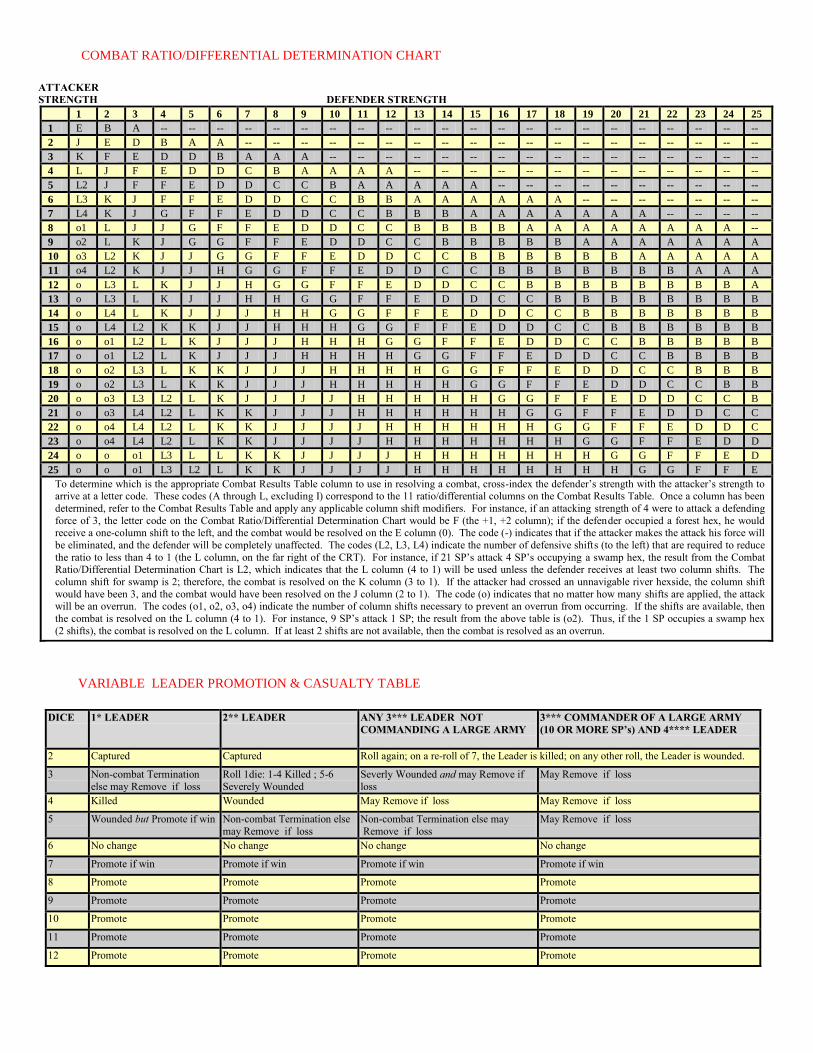
COMBAT RATIO/DIFFERENTIAL DETERMINATION CHART
ATTACKER
STRENGTH DEFENDER STRENGTH
1 2 3 4 5 6 7 8 9 10 11 12 13 14 15 16 17 18 19 20 21 22 23 24 25
1 E B A -- -- -- -- -- -- -- -- -- -- -- -- -- -- -- -- -- -- -- -- -- --
2 J E D B A A -- -- -- -- -- -- -- -- -- -- -- -- -- -- -- -- -- -- --
3 K F E D D B A A A -- -- -- -- -- -- -- -- -- -- -- -- -- -- -- --
4 L J F E D D C B A A A A -- -- -- -- -- -- -- -- -- -- -- -- --
5 L2 J F F E D D C C B A A A A A -- -- -- -- -- -- -- -- -- --
6 L3 K J F F E D D C C B B A A A A A A -- -- -- -- -- -- --
7 L4 K J G F F E D D C C B B B A A A A A A A -- -- -- --
8 o1 L J J G F F E D D C C B B B B A A A A A A A A --
9 o2 L K J G G F F E D D C C B B B B B A A A A A A A
10 o3 L2 K J J G G F F E D D C C B B B B B B A A A A A
11 o4 L2 K J J H G G F F E D D C C B B B B B B B A A A
12 o L3 L K J J H G G F F E D D C C B B B B B B B B A
13 o L3 L K J J H H G G F F E D D C C B B B B B B B B
14 o L4 L K J J J H H G G F F E D D C C B B B B B B B
15 o L4 L2 K K J J H H H G G F F E D D C C B B B B B B
16 o o1 L2 L K J J J H H H G G F F E D D C C B B B B B
17 o o1 L2 L K J J J H H H H G G F F E D D C C B B B B
18 o o2 L3 L K K J J J H H H H G G F F E D D C C B B B
19 o o2 L3 L K K J J J H H H H H G G F F E D D C C B B
20 o o3 L3 L2 L K J J J J H H H H H G G F F E D D C C B
21 o o3 L4 L2 L K K J J J H H H H H H G G F F E D D C C
22 o o4 L4 L2 L K K J J J J H H H H H H G G F F E D D C
23 o o4 L4 L2 L K K J J J J H H H H H H H G G F F E D D
24 o o o1 L3 L L K K J J J J H H H H H H H G G F F E D
25 o o o1 L3 L2 L K K J J J J H H H H H H H H G G F F E
To determine which is the appropriate Combat Results Table column to use in resolving a combat, cross-index the defender’s strength with the attacker’s strength to arrive at a letter code. These codes (A through L, excluding I) correspond to the 11 ratio/differential columns on the Combat Results Table. Once a column has been
determined, refer to the Combat Results Table and apply any applicable column shift modifiers. For instance, if an attacking strength of 4 were to attack a defending
force of 3, the letter code on the Combat Ratio/Differential Determination Chart would be F (the +1, +2 column); if the defender occupied a forest hex, he would receive a one-column shift to the left, and the combat would be resolved on the E column (0). The code (-) indicates that if the attacker makes the attack his force will
be eliminated, and the defender will be completely unaffected. The codes (L2, L3, L4) indicate the number of defensive shifts (to the left) that are required to reduce
the ratio to less than 4 to 1 (the L column, on the far right of the CRT). For instance, if 21 SP’s attack 4 SP’s occupying a swamp hex, the result from the Combat Ratio/Differential Determination Chart is L2, which indicates that the L column (4 to 1) will be used unless the defender receives at least two column shifts. The
column shift for swamp is 2; therefore, the combat is resolved on the K column (3 to 1). If the attacker had crossed an unnavigable river hexside, the column shift
would have been 3, and the combat would have been resolved on the J column (2 to 1). The code (o) indicates that no matter how many shifts are applied, the attack will be an overrun. The codes (o1, o2, o3, o4) indicate the number of column shifts necessary to prevent an overrun from occurring. If the shifts are available, then
the combat is resolved on the L column (4 to 1). For instance, 9 SP’s attack 1 SP; the result from the above table is (o2). Thus, if the 1 SP occupies a swamp hex
(2 shifts), the combat is resolved on the L column. If at least 2 shifts are not available, then the combat is resolved as an overrun.
VARIABLE LEADER PROMOTION & CASUALTY TABLE
DICE 1* LEADER 2** LEADER ANY 3*** LEADER NOT
COMMANDING A LARGE ARMY
3*** COMMANDER OF A LARGE ARMY
(10 OR MORE SP’s) AND 4**** LEADER
2 Captured Captured Roll again; on a re-roll of 7, the Leader is killed; on any other roll, the Leader is wounded.
3 Non-combat Termination
else may Remove if loss
Roll 1die: 1-4 Killed ; 5-6
Severely Wounded
Severly Wounded and may Remove if
loss
May Remove if loss
4 Killed Wounded May Remove if loss May Remove if loss
5 Wounded but Promote if win Non-combat Termination else
may Remove if loss
Non-combat Termination else may
Remove if loss
May Remove if loss
6 No change No change No change No change
7 Promote if win Promote if win Promote if win Promote if win
8 Promote Promote Promote Promote
9 Promote Promote Promote Promote
10 Promote Promote Promote Promote
11 Promote Promote Promote Promote
12 Promote Promote Promote Promote
VARIABLE LEADER PROMOTION & CASUALTY (LP & C) LEGEND
CODE MEANING
Captured The leader is captured. Place him on the opponent’s track for return in 3 turns unless exchanged for an opponent’s POW. Leaders are
exchanged by order of capture without regard to rank. Players may not refuse to exchange until Turn 14, and may not be exchanged after
Turn 14. Exchanged leaders return the next turn. Example: Stuart is captured Turn 1. Union places him on his track for return to CSA leader
pool Turn 4. Union admirals involved in naval combat cannot be captured; ignore a “capture” result.
Promote Player places the leader’s promotion counter on the track for next turn.
May Remove
if Loss
Player may exercise the choices from rule 5.3 without spending 2 CP's. Leaders of all ranks may be Removed, and placed into the Removed
Box, or moved to a new hex, or (if ***star) demoted. The “If Loss” requirement is met whenever the leader’s force was forced to retreat or
suffered greater losses. Note: the increased ability of the Union to remove poor leaders after using them in at least one fight but without CP cost is an intentional design decision.
Promote if Win The leader is promoted if his force is either not required to retreat or suffers fewer losses.
Non-combat
Termination
If the leader is “Subject to being removed for non-combat reasons,” then he must be removed from the game entirely and permanently as if
dead. [Exceptions: AP Hill and P. G. T. Beauregard are merely “wounded” by their mystery illnesses; see Variant leader table] . Historical examples of non-combat casualties include: Shot during an act of adultery (Van Dorn), court martial (Fitz-John Porter), died of old age (Bull
Sumner), shot by a fellow general from his own side (Nelson shot in cold blood by Davis, USA / Walker shot by Marmaduke in a duel, CSA),
binge drinking (GB Crittenden), and more.
Wounded Place leader on the track for next turn (use promoted counter only if 1* roll of 5).
Severely Wounded The severe wound keeps the general out until the turn after the next.
Killed/Severely
Wounded
On a roll of 1-4 the leader is killed; on 5-6 he’s only Severely Wounded.
CSA LEADERS; STANDARD GAME RATINGS
# NAME COUNTER TOE *
RATING
SR **
RATING
SR ***
RATING
SR
1 PierreGustaveToutant
Beauregard
Beaurgrd AS 3 0 1 4
2 Braxton Bragg Bragg 1 3(1)1 5
3 John Cabell Breckinridge Brcknrdg 3 3*1 12
4 Patrick Ronayne Cleburne Clebrne 7 3*2 16
5 Jubal Anderson Early Early 7 2*1 17 2*0 12
6 Richard Stoddert Ewell Ewell 4 3*1 8 3*0 7
7 John Brown Gordon Gordon 12 3*1 19 3*1 15
8 William Joseph Hardee Hardee 1 3*1 3 3*1 5
9 Ambrose Powell Hill AP Hill 3 2*2 13 2*1 8
10 Daniel Harvey Hill DH Hill 2 2*1 10 3*1 9
11 Thomas Carmichael Hindman Hindmn 3 3*0 11
12 John Bell Hood Hood 6 2*2 15 2*1 10 2(1)1 9
13 Benjamin Huger Huger AS 4*(2) 5
14 Thomas Jonathan Jackson Jackson 1 2*2 2 2*2 4 2 2 2 7
15 Joseph Eggleston Johnston J Johnston AS 3 1 1 3
16 Albert Sidney Johnston AS Johnston AS 3 0 0 1
17 Robert Edward Lee RE Lee 4 2 3 1 2
18 Stephen Dill Lee SD Lee 9 3*0 18 3*1 13
19 James Longstreet Longstrt 1 3*2 1 3*2 1
20 John Bankhead Magruder Magrudr AS 3*1 4
21 John Clifford Pemberton Pembrtn 2 3*0 7 3*0 6 3(1)0 7
22 Leonidas Polk Polk AS 3*(1) 3
23 Sterling Price Price AS 3*0 9 3*0 14
24 Edmund Kirby Smith EK Smith 1 3*1 6 3*1 2 3 0 0 8
25 Richard Taylor Taylor 4 3*1 14 3*1 11
26 Earl Van Dorn Van Dorn 2 3(2)(1) 6
27 Nathan Bedford Forrest Forrest 4 2*2 3 2*2 2
28 John Hunt Morgan Morgan 5 2*0 4
29 James Ewell Brown Stuart Stuart 1 2*1 1 2*1 1
30 Joseph Wheeler Wheeler 4 2*1 2
31 Stand Watie Watie AS 2*2 1

USA LEADERS; STANDARD GAME RATINGS
# NAME COUNTER TOE *
RATING
SR **
RATING
SR ***
RATING
SR **** RATING SR
1 Nathaniel Prentiss Banks Banks 1 3(2)(2) 5
2 James Gillpatrick Blunt Blunt 4 3*0 15
3 Don Carlos Buell Buell 1 3(2)(1) 8
4 Ambrose Everett Burnside Burnside 1 3*(1) 7 3(1)(1) 11
5 Benjamin Franklin Butler Butler AS 4(2)(2) 6
6 Samuel Ryan Curtis Curtis 1 3*0 3 3*0 3 3 0 0 18
7 John Charles Freemont Fremont AS 4(3)(2) 2
8 Ulysses Simpson Grant Grant 2 2*2 5 2 2 2 4 222 1
9 Henry Wager Halleck Halleck 1 4(2)(1) 3
10 Winfield Scott Hancock Hancock 5 3*1 9 3*2 14
11 Joseph Hooker Hooker 5 3*1 8 3(1)0 12
12 Oliver Otis Howard Howard 8 3*(2) 19 3 0(1) 17
13 John Alexander Logan Logan 5 3*0 12 3*1 17
14 Nathaniel Lyon Lyon AS 2*2 1 2*2 2 2 1 2 5
15 George Brinton McClellan McClelln AS 3(1)0 1
16 John Alexander McClernand McClrnd 7 4*(1) 4
17 Irvin McDowell McDowl AS 3(1)(1) 7
18 James Birdseye McPherson McPhrsn 7 3*1 13 3*1 13 3 0 1 16
19 George Gordon Meade Meade 6 3*1 6 3*1 9 3 1 1 15
20 Edward Ortho Cresap Ord Ord 4 3*0 7 3*0 11 3 0 0 19
21 John Pope Pope 1 3*0 1 3(1)0 10
22 John Fulton Reynolds Reynolds 7 3*1 14 3*1 18
23 William Starke Rosecrans Rosecrns 1 3(1)0 9
24 John McAllister Schofield Schofld 9 3*0 10 3*1 15
25 John Sedgwick Sedgwck 2 3*0 8 3*1 12
26 William Tecumseh Sherman Sherman 2 2*0 2 2*1 6 2 2 2 13 222 2
27 Franz Sigel Sigel 2 3*(2) 4
28 Frederick Steele Steele 4 3*0 11 3*0 16
29 George Henry Thomas Thomas 2 3*1 5 3*2 10 3 2 2 14
30 Benjamin Henry Grierson Grierson 8 2*0 5
31 Alfred Pleasonton Pleasnton 8 3*1 2 3*0 1
32 George Stoneman Stonemn 3 3*0 1
33 Philip Henry Sheridan Sheridan 6 2*1 3 2*1 2 2*2 1
34 James Harrison Wilson Wilson 13 2*1 4 2*1 3
35 David Glasgow Farragut Farragut 2 2*2 1
36 Andrew Hull Foote Foote 1 2*1 3
37 David Dixon Porter Porter 2 2*1 2
USA HISTORICAL VARIANT LEADERS
HISTORICAL CHANGES
TO UNION LEADERS IN
THE STANDARD GAME
CHANGES TO
EXISTING
COUNTER
ADDITIONAL
COUNTER
HISTORICAL NOTE
George Brinton McClellan 2 for rally. Subject to being
removed for non-
combat reasons, starting on Turn
8.
Translating his record into game terminology, McClellan took command of the army on Turn 1. He moved twice before his removal on Turn 8. In a standard game, does any player ever
have him move this slowly and infrequently? McClellan clearly earned the lowest initiative
rating of 4; but playtesting showed that players would not put him in command of an army as a 4. Due to his political disagreements with Lincoln, starting on Turn 8, subject to Non-Combat
Termination.
Henry Wager Halleck Four **** Star
4 -2 -1.
Seniority 1B between Grant
1 & Sherman 2.
A four-star Halleck matches history very well. At Corinth, Halleck commanded the combined
Army of the Tennessee, Army of the Ohio (Cumberland), and other commands totaling more
than 120,000 men (about 24 SP). Then, he left for D.C. while Buell and Grant marched their separate ways. As General-in-Chief, he was in the capital without “taking” command of the
eastern armies. Halleck is eligible for **** starting Turn 1.
Joseph Hooker Three ***Star
3 0 0. Seniority remains 12.
One * Star
2 +1. Change entry to Turn 4.
Hooker, like Kearny, showed great aggressiveness at division command. As a 3 star, Hooker
brought superior forces to bear on Lee, but lost after being knocked senseless by a shell at Chancellorsville. Lee’s 3 re-rolls & +6 DRM beat Hooker d3 vs d2. Hooker showed as much
skill as many other 3 star leaders that the game awards a zero (not negative) re-roll.
John A. McClernand Subject to being
removed for non-
combat reasons.
Subject to being removed for non-combat reasons. If you use him, you will hope to shelve
him like Grant did.
John Fulton Reynolds Three *** Star 3 +1 +1.
Seniority 14B.
He turned down command of the Army of the Potomac just before Meade was ordered to take command. Lincoln could have ordered Reynolds to assume command. Reynolds was killed
at Gettysburg before he had another chance at higher command.
William Starke Rosecrans Enters T1 as
Two ** Star 3 +1.
Rosecrans fought hard and well in West Virginia and Mississippi before taking an army
command in Oct. 1862 (Turn 7). His placement as a three star on Turn 1 is historically untenable and he immediately displaces one of the leaders that Lincoln (or a player) is forced
to use
Phil Sheridan Add * & ** but
not *** Infantry
counters with identical ratings
as his cavalry
counters.
Sheridan spent more time commanding infantry than cavalry. Allow the player to select
Sheridan as infantry or cavalry before 1st entry. If entered as a 1*star infantry leader, he may
later permanently convert to cavalry for the cost of 2 dice differential, but no Command Points.
Franz Sigel Subject to being removed for non-
combat reasons.
Subject to being removed for non-combat reasons. If you use him, you will hope he repeats history and resigns his corps command in protest to others getting promoted above him.
Italics indicate subject to removal for non-combat reasons.
CSA HISTORICAL VARIANT LEADERS
HISTORICAL CHANGES
TO CONFEDERATE
LEADERS IN THE
STANDARD GAME
CHANGES TO
EXISTING
COUNTER
ADDITIONAL
COUNTER
HISTORICAL NOTE
P G T Beauregard
Subject to being removed for non-combat reasons due to his mysterious illnesses. Merely
place him on the turn track for next turn. Thus, the end result is the same as a WIA. Is this a pain if Beauregard is in command of a field army? Yes! Now you know how Davis felt in
1862.
AP Hill
Subject to being removed for non-combat reasons due to his mysterious illnesses. Merely
place him on the turn track for next turn. Thus, the end result is the same as a WIA. Hill’s poor health broke at unfortunate times for the CSA.
Thomas Hindman Two ** Star 3 0 Raised 20,000 troops in Arkansas while holding command of the Trans-Miss.
AS Johnston Three *** Star
3 +1 0 attack
re-roll only.
AS Johnston stood on the defensive as a theater commander, but when he led an army at
Shiloh his aggressiveness showed. Giving AS Johnston the “attack only” re-roll and JE
Johnston the “defend only” re-roll encourages these generals to “be themselves.”
JE Johnston Three *** Star 3 +1 0 defense
re-roll only.
JE Johnston excelled at retreat and finding justification not to attack. The standard game JE Johnston has a 1 re-roll, making him a better commander than history; yet to reduce him to 0
re-rolls ignores his ability to make a good stand.
James Longstreet
Three *** Star
3 +1 +1 defense re-roll only.
Seniority 6.
His *** counter is conditional upon either 1) his presence in an army and his army
commander suffering a WIA or KIA, or 2) the death or capture of RE Lee. He has a “defend only” re-roll. Historically, he was a poor independent commander in both SE VA and East
TN., but conflicting missions and the onus of attack hampered him, as it would have any CSA
leader. His philosophy of tactical defense, best met the needs and limits of the Confederacy.
John C. Pemberton Change his seniority to 10.
Lt. General Pemberton ranked lower than Longstreet, Polk and many other standard game ** leaders. Pemberton may only command the CSA Army of the West or Army of Mississippi.
Earl Van Dorn Two ** Star infantry 2 -1.
Three *** Star
infantry, change seniority to 11.
Two **Star Cavalry 2 0.
Earl Van Dorn’s placement among the highest ranking CSA generals is among the most anomalous and historically inaccurate mistake in the game. Van Dorn is subject to being
removed for non-combat reasons. He enters as an infantry leader, but may permanently
convert to cavalry for 2 CSA dice diff, but no CP. He may only command the CSA Army of the West or Army of Mississippi. Van Dorn is always the least senior *** CSA leader in the
game. Historically, the CSA had 4 ranks of generals. Van Dorn was neither one of the 8 full
generals, nor even one of the 17 CSA lieutenant generals.
Italics indicate subject to removal for non-combat reasons.
USA ADDITIONAL VARIANT LEADERS
UUNNIIOONN VVAARRIIAANNTT
LLEEAADDEERRSS
TURN
OF
ENTRY
* RATING ** RATING *** RATING HISTORICAL NOTE
INFANTRY
Darius N. Couch 4 3 0 3 +1 3 0 +1. Seniority 12B
between
Hooker 12 &Sherman 13.
Subject to being removed for non-combat reasons. As second in command at Chancellorsville, Couch would have commanded the Army of Potomac if
the near-miss cannon shell had inflicted more than a concussion on Hooker.
Couch resigned his position in disgust after the battle.
Thomas L. Crittenden 3 3 0 Subject to being removed for non-combat reasons. His good work on Day 2
of Shiloh was negated as a corps leader. He was idle at Perryville, average
at Stones River, but fled the field of Chickamauga.
William B. Franklin 4 3 0 Subject to being removed for non-combat reasons. A division, corps, and
wing (2 corps) commander who led 1/3 of the Army of the Potomac at Fredericksburg.
Gordon Granger 7 3 0 3 +1 Without Granger, General Thomas, “The Rock of Chickamauga,” would
have been pulverized.
Philip Kearny 4 2 +2
2 +2
2 +1 +2.
Seniority 12C between
Couch 12B &
Sherman 13.
Many see Kearny in the East as similar to Lyon in the West. Killed before
called to higher command, both men showed great initiative, skillful combat leadership, and restlessness with plodding superiors. Kearny served
alongside Hooker and was about as likely as Hooker to get a shot at army
command. Due to game balance, some players prefer allowing Kearny (& Lyon) at 3 star only with the death of Grant or Sherman.
Alexander McCook 3 3 0 Subject to being removed for non-combat reasons. McCook did good work
at Day 2 of Shiloh and against Early’s 1864 Raid. He was solid at
Perryville, but crumbled under the forceful attacks at Stones River and
Chickamauga.
William Nelson
1 3 +1 3 0
Subject to being removed for non-combat reasons. A former naval officer pulled into army duty in KY, Nelson was wrongly blamed for a defeat at
Richmond, KY. Later, Nelson was murdered in a dispute with a fellow
Union general just before assuming his first corps command.
Fitz John Porter 5 3 +1 4 0 Subject to being removed for non-combat reasons. More timid and passive
leadership followed his strong, praiseworthy defense at Mechanicsville and Gaines Mill during the Peninsula Campaign. His court martial for actions
at 2nd Bull Run was reviewed post-war and overturned.
Dan Sickles 8 2 0 2 -2 Subject to being removed for non-combat reasons. Aggressive and willing
to seize the initiative regardless of tactical realities. Sickles commanded the AoP’s III Corps (13,000) during 1863.
Edwin V Sumner 4 3 0 Subject to being removed for non-combat reasons. He was a solid, hard fighting division, corps, and wing commander from the 7 Days through
Fredericksburg. Died of old age en route to a new command in Missouri.
Gouverneur K Warren 11 2 +1 4 0 Subject to being removed for non-combat reasons. Warren at 1 star
represents his great moment at Gettysburg. He later rose to high command and eventually led about 1/4 of the Army of the Potomac.
CAVALRY
Hugh Judson Kilpatrick
13 2 -1 Aggressive to a fault, Sherman requested him to lead the cavalry to tear up the CSA interior. Union cavalry operations should not be impaired due to a
lack of cavalry leaders. Kilpatrick may enter on the turn after the death or
removal of any USA cavalry leader. Has no effect upon Army reaction rolls.
NAVAL
Admiral Samuel
Francis du Pont
Enters the turn after the
death of any USA admiral.
2 0;
seniority 4.
Union naval operations should not be stopped because of losses in the
Admiralty. Du Pont was not as skilled as the three admirals in the original game, but he allows the USA to maintain both river and ocean operations.
Italics indicate subject to removal for non-combat reasons.

CSA ADDITIONAL VARIANT LEADERS
CCOONNFFEEDDEERRAATTEE
VVAARRIIAANNTT
LLEEAADDEERRSS
TURN
OF
ENTRY
* RATING ** RATING *** RATING HISTORICAL NOTE
Richard Herron Anderson
6 3 +1 3 +1 The highest ranking of “Lee’s Lieutenants” not in the game, Anderson rose to corps command as one of the CSA’s 17 lieutenant generals.
Simon Bolivar
Buckner
3 3 +1 3 0 Buckner, as division, corps, and department commander, rose to be a
lieutenant general.
Benjamin Franklin
Cheatham
4 3 0 3 +1 Subject to being removed for non-combat reasons. Victor over Grant at
Belmont, Cheatham later rose to corps command. Accusations about
drinking almost removed him.
George Bibb Crittenden
1 3 0 3 -1 Subject to being removed for non-combat reasons. Lost at Mill Springs then lost corps command to the bottle.
Theophilus Hunter Holmes
3 3 -1 3 0 Subject to being removed for non-combat reasons. Holmes became a lieutenant general by Oct. 1862. He spent most of the war commanding the
Trans-Miss and the District of Arkansas.
Lafayette McLaws
5 3 +1 Subject to being removed for non-combat reasons. McLaws skillfully led at
least a division from mid-1862 until the end. Longstreet wrongly blamed him for failures, but a CSA inquiry cleared him.
Gustavus Woodson
Smith
2 3 0 4 -2 0.
Seniority 5B
below Bragg.
Subject to being removed for non-combat reasons. In the months after
Manassas, the triumvirate of JE Johnston, Beauregard, and GW Smith drafted
war plans with Davis. When Johnston fell in battle, Smith led the Army for a
day, but he suffered a mental breakdown. Smith also served as CSA Secretary of War…for a few days.
Alexander Peter
Stewart
10 3 +1 3 0 Stewart rose to corps command and was one of the CSA’s 17 Lieutenant-
Generals. Good at division command but only passable in higher positions.
CAVALRY
Wade Hampton Enters the turn after the
death of any CSA
cavalry leader.
2 +1 Hampton commanded the AoNV cavalry after the death of Stuart and became
a lieutenant general. Critical CSA cavalry operations require Hampton as a
replacement leader.
Italics indicate subject to removal for non-combat reasons
COMBAT RESULTS TABLE
ATTACKER/DEFENDER COMBAT RATIO/DIFFERENTIAL
1 – 3 1 – 2 -3, -4 -2, -1 0 +1, +2 +3, +4 +5 2 – 1 3 – 1 4 – 1
DIE Att A Def Att B Def Att C Def Att D Def Att E Def Att F Def Att G Def Att H Def Att J Def Att K Def Att L def
1
d S .
d1 M .
d2 L .
>
d S .
d1 M .
d1 L .
. S .
1 M .
1 L .
. S .
1 M . 1 L 1
. S .
1 M . 1 L 1
. S .
. M . 1 L 1
. S .
. M . 1 L 1
L
. S .
. M .
. L 1
. S .
. M 1
. L 1
. S .
. M 1
. L 1
. S d
. M d1
. L d1
2
d1 S .
d2 M .
d2 L .
d S .
d1 M . d2 L 1
d S .
d1 M . d1 L 1
d S .
d1 M .
d1 L 1
. S .
1 M 1
1 L 1
. S . 1 M 1
1 L 1
. S .
. M 1
1 L 1
. S .
. M 1
1 L 1
. S d
. M d1
1 L d1
. S d
. M d1
1 L d1
L
. S d
. M d1
. L d2
3
d1 S .
d2 M .
d2 L 1
d1 S .
d2 M .
d2 L 1
d S .
d1 M . d2 L 1
d S . d1 M 1
d1 L 1
d S .
d1 M 1
d1 L 1
d S .
d1 M 1
d1 L 1
. S . 1 M 1
1 L 1
. S d
1 M d1
1 L d1
. S d
. M d1
1 L d2
. S d
. M d1
1 L d2
. S d1
. M d2
1 L d2
4
d1 S .
d2 M . d3 L 1
d1 S .
d2 M .
d2 L 1
d S . d1 M 1
d2 L 1
d S .
d1 M 1
d2 L 1
d S d
d1 M d1
d1 L d1
d S d
d1 M d1
d1 L d1
d S d
d1 M d1
d1 L d1
d S d
d1 M d1
d1 L d2
. S d
1 M d1
1 L d2
. S d1
. M d2
1 L d2
. S d1
. M d2
1 L d2
5
d1 S .
d2 M .
d3 L 1
d1 S .
d2 M 1
d3 L 1
d1 S .
d2 M 1
d2 L 1
d S d
d1 M d1
d2 L d1
d S d
d1 M d1
d2 L d1
d S d
d1 M d1
d1 L d1
d S d
d1 M d1
d1 L d2
d S d
d1 M d1
d1 L d2
d S d1
d1 M d2
d1 L d2
. S d1
1 M d2
1 L d2
. S d1
. M d2
1 L d3
6
d2 S .
d3 M .
d3 L 1
d1 S . d2 M 1
d3 L 1
d1 S d
d2 M d1
d2 L d1
d1 S d
d2 M d1
d2 L d1
d S d
d1 M d1
d2 L d2
d S d
d1 M d1
d2 L d2
d S d
d1 M d1
d2 L d2
d S d1
d1 M d2
d2 L d2
d S d1
d1 M d2
d1 L d2
. S d1
1 M d2
1 L d3
. S d2
1 M d3
1 L d3
7
d2 S . d3 M 1
d3 L 1
d2 S . d3 M 1
d3 L 1
d1 S d
d2 M d1
d3 L d1
d1 S d
d2 M d1
d2 L d2
d1 S d
d2 M d1
d2 L d2
d1 S d1
d2 M d2
d2 L d2
d1 S d1
d2 M d2
d2 L d2
d S d1
d1 M d2
d2 L d2
d S d1
d1 M d2
d2 L d3
d S d1
d1 M d2
d1 L d3
. S d2
1 M d3
1 L d3
8
d2 S . d3 M 1
d3 L 1
d2 S d
d3 M d1
d3 L d1
d1 S d
d2 M d1
d3 L d2
d1 S d
d2 M d1
d2 L d2
d1 S d1
d2 M d2
d2 L d2
d1 S d1
d2 M d2
d2 L d2
d1 S d1
d2 M d2
d2 L d2
d S d1
d1 M d2
d2 L d3
d S d1
d1 M d2
d2 L d3
d S d1
d1 M d2
d1 L d3
. S d2
1 M d3
1 L d3
9
d2 S . d3 M 1
d3 L 1
d2 S d
d3 M d1
d3 L d1
d2 S d
d3 M d1
d3 L d2
d1 S d1
d2 M d2
d3 L d2
d1 S d1
d2 M d2
d3 L d2
d1 S d1
d2 M d2
d3 L d3
d1 S d1
d2 M d2
d2 L d3
d1 S d1
d2 M d2
d2 L d3
d1 S d1
d2 M d2
d2 L d3
d S d2
d1 M d3
d2 L d3
d S d2
d1 M d3
d1 L d3
10
d2 S d
d3 M d1
d3 L d1
d2 S d
d3 M d1
d3 L d2
d2 S d
d3 M d1
d3 L d2
d2 S d1
d3 M d2
d3 L d2
d1 S d1
d2 M d2
d3 L d3
d1 S d1
d2 M d2
d3 L d3
d1 S d1
d2 M d2
d3 L d3
d1 S d1
d2 M d2
d3 L d3
d1 S d2
d2 M d3
d3 L d3
d1 S d2
d2 M d3
d2 L d3
d S d2
d1 M d3
d2 L d3
11
d2 S d
d3 M d1
d3 L d2
d2 S d
d3 M d1
d3 L d2
d2 S d1
d3 M d2
d3 L d2
d2 S d1
d3 M d2
d3 L d3
d2 S d1
d3 M d2
d3 L d3
d2 S d2
d3 M d3
d3 L d3
d2 S d2
d3 M d3
d3 L d3
d2 S d2
d3 M d3
d3 L d3
d1 S d2
d2 M d3
d3 L d3
d1 S d2
d2 M d3
d3 L d3
d1 S d2
d2 M d3
d2 L d3
12
d2 S d1
d3 M d2
d3 L d2
d2 S d1
d3 M d2
d3 L d2
d2 S d1
d3 M d2
d3 L d2
d2 S d1
d3 M d2
d3 L d3
d2 S d2
d3 M d3
d3 L d3
d2 S d2
d3 M d3
d3 L d3
d2 S d2
d3 M d3
d3 L d3
d2 S d2
d3 M d3
d3 L d3
d2 S d2
d3 M d3
d3 L d3
d2 S d2
d3 M d3
d3 L d3
d1 S d2
d2 M d3
d3 L d3
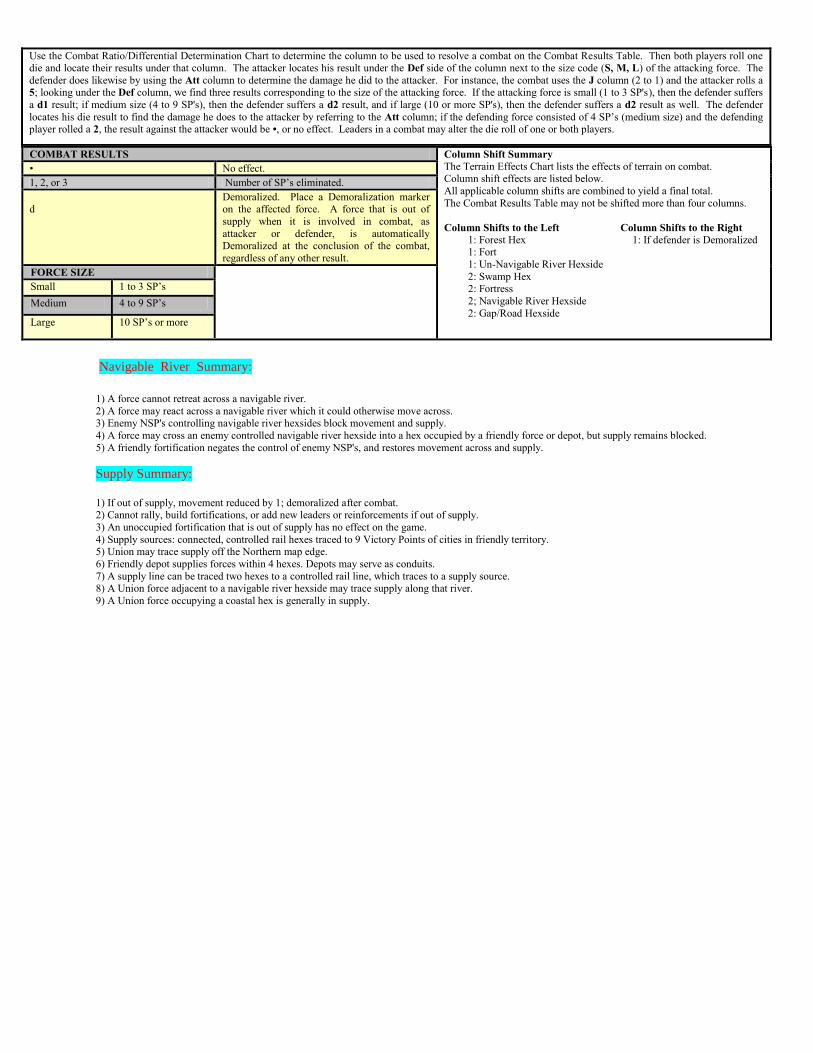
Use the Combat Ratio/Differential Determination Chart to determine the column to be used to resolve a combat on the Combat Results Table. Then both players roll one die and locate their results under that column. The attacker locates his result under the Def side of the column next to the size code (S, M, L) of the attacking force. The
defender does likewise by using the Att column to determine the damage he did to the attacker. For instance, the combat uses the J column (2 to 1) and the attacker rolls a 5; looking under the Def column, we find three results corresponding to the size of the attacking force. If the attacking force is small (1 to 3 SP's), then the defender suffers
a d1 result; if medium size (4 to 9 SP's), then the defender suffers a d2 result, and if large (10 or more SP's), then the defender suffers a d2 result as well. The defender
locates his die result to find the damage he does to the attacker by referring to the Att column; if the defending force consisted of 4 SP’s (medium size) and the defending player rolled a 2, the result against the attacker would be •, or no effect. Leaders in a combat may alter the die roll of one or both players.
COMBAT RESULTS Column Shift Summary
The Terrain Effects Chart lists the effects of terrain on combat. Column shift effects are listed below.
All applicable column shifts are combined to yield a final total.
The Combat Results Table may not be shifted more than four columns.
Column Shifts to the Left Column Shifts to the Right
1: Forest Hex 1: If defender is Demoralized 1: Fort
1: Un-Navigable River Hexside
2: Swamp Hex 2: Fortress
2; Navigable River Hexside
2: Gap/Road Hexside
• No effect.
1, 2, or 3 Number of SP’s eliminated.
d
Demoralized. Place a Demoralization marker on the affected force. A force that is out of
supply when it is involved in combat, as
attacker or defender, is automatically Demoralized at the conclusion of the combat,
regardless of any other result.
FORCE SIZE
Small 1 to 3 SP’s
Medium 4 to 9 SP’s
Large 10 SP’s or more
Navigable River Summary:
1) A force cannot retreat across a navigable river.
2) A force may react across a navigable river which it could otherwise move across. 3) Enemy NSP's controlling navigable river hexsides block movement and supply.
4) A force may cross an enemy controlled navigable river hexside into a hex occupied by a friendly force or depot, but supply remains blocked.
5) A friendly fortification negates the control of enemy NSP's, and restores movement across and supply.
Supply Summary:
1) If out of supply, movement reduced by 1; demoralized after combat. 2) Cannot rally, build fortifications, or add new leaders or reinforcements if out of supply.
3) An unoccupied fortification that is out of supply has no effect on the game.
4) Supply sources: connected, controlled rail hexes traced to 9 Victory Points of cities in friendly territory. 5) Union may trace supply off the Northern map edge.
6) Friendly depot supplies forces within 4 hexes. Depots may serve as conduits.
7) A supply line can be traced two hexes to a controlled rail line, which traces to a supply source. 8) A Union force adjacent to a navigable river hexside may trace supply along that river.
9) A Union force occupying a coastal hex is generally in supply.