11.10 accounts payable end user guide
TRANSCRIPT

ONESolution
Accounts Payable
End User Guide

2
SunGard Public Sector1000 Business Center DriveLake Mary, Florida 32746
Phone: (800) 695-6915Fax: (407) 304-1005
Web site: http://www.sungardps.com© 2011 SunGard Public Sector Inc.
All Rights Reserved
This document is covered by copyright. All rights reserved. SunGard Public Sector grants permission tothe customer to whom it was sent to copy any part of this document for internal use only. It may bereproduced for use only by the party to whom it is sent directly by SunGard Public Sector for internaluse only. It may not be reproduced in any other from or by any means, graphical, electronic ormechanical, including photocopying, recording, taping, or information and retrieval system, or used byor distributed to any third party without written permission of SunGard Public Sector. SunGard PublicSector reserves the right to modify or revise all or part of this document without notice.
Printed in the U.S.A

3
Table of Contents
SECTION 1: OH OPEN HOLD AP BATCH ENTRY .....................................5
SECTION 2: BATCH PO EXTRACTION....................................................8
SECTION 3: BATCH DIRECT PAYS.......................................................10
SECTION 4: DIRECT PAY INVOICE APPROVALS..................................17
SECTION 5: BATCH PROOF SET-APOHBTBP........................................19
SECTION 6: DISTRIBUTING SET-APOHBTDS ......................................21
SECTION 7: OH OPEN HOLD AP INVOICE ENTRY................................24
SECTION 8: INVOICE ENTRY PO EXTRACTION ...................................27
SECTION 9: INVOICE ENTRY-DIRECT PAYS........................................29
SECTION 10: INVOICE APPROVALS-DIRECT PAYS .............................37
SECTION 11: BATCH PROOF INVOICES-APOHINBP............................39
SECTION 12: POSTING INVOICES-APOHINVP....................................41
SECTION 13: AP CHECK RUN PROCESS ..............................................43
SECTION 14: SELECT FOR PAYMENT-APOHPPSP ................................44
SECTION 15: REPORT FOR PAYMENT-APOHPPRP...............................47
SECTION 16: LOAD ELF FORM AP CHECK............................................49
SECTION 17: CUT CHECKS-APOHPPPA ...............................................54
SECTION 18: UNDO AP INVOICE POSTING REQUIREMENTS...............58
SECTION 19: UNDO AP POSTING UTILITY-APOHUTUG.......................59
SECTION 20: REPRINT CHECKS FROM LAST CHECK RUN....................62

4
SECTION 21: REPRINT CHECK RUN-FROM AN EARLIER CHECK RUN...64
SECTION 22: UNDO AP CHECK RUN POSTING ....................................68

5
Section 1: OH Open Hold AP Batch Entry
Type APOHBTUB into the search bar in the top right corner of the home screen andclick on the UB-Create/Update Set link to launch the APOHBTUB screen:
(1) Once the APOHTUB screen opens, click on the Add button to create a NEW Set onthe top ribbon Bar. If the Set is only going to be edited click on Open Sets Button:
Set ID- Click on the Generate Button and Click on BTCHIDOH to Assign the nextnumber:
(2) Click on the to assign the next

6
User Set Total- Enter in the Amount of User Set Total:
(3) Enter in the
Click on the Save Button

7
(4) Add-Click on the Add button to create a NEW Invoice on the top ribbonBar:
(5) Enter the invoice number, invoice date & user invoice total:

8
Section 2: Batch PO Extraction
(1) PO – Enter in the PO number in the header portion of the screen:
(2) Partial –Select P- Partial and then click on the Extract Button:
The following extraction screen will display:
The PO Extract screen displays the information from the PO and allows the user toselect which line items are to be brought into the Invoice record.
(3) Enter the pay quantity or click on the check box to pay the full quantity of theline items and click save. It is also possible to modify the Amount and Pay Quantity onthis screen if they are different on the Invoice than on the PO. Click on the SaveButton to close the PO Extract screen and to pull the data into the Invoice.
This process will update the Invoice details tab:

9

10
Section 3: Batch Direct Pays
(1) If the invoice doesn’t have PO, enter the vendor ID once the invoice number,invoice date and user invoice total is entered:
Vendor Lookup-To look up a vendor click on the Lookup icon on the top ribbonbar:
The data lookup window will display:
Type in the vendor name and click apply.

11
Another option is to type a portion of the vendor’s name and use a (*) wildcard at theend to view all vendors that begin with that name. For example: if OFFICE* is usedthe system will look for vendors that start with ‘OFFICE’.
Double-click on the vendor to pull the information into the invoice screen:

12
If the invoice doesn’t have PO, the line item information will need to be enteredmanually:
(1) Account – Enter the GL Key/Object Code. If the numbers are known, simply typethem into the Key/Object Code fields:
Access the lookup for Key Code by placing the cursor in the Key field and clicking onthe lookup icon in the top ribbon bar with the cursor is in the Key/Object fields:
The data Lookup will display:

13
And a list will appear of key codes for your department. Double-click on theappropriate code to have the system bring it into the invoice record:
Repeat this process for the object code lookup but make sure to place the cursor inthe object code field to have the Lookup icon display Object:

14
(2) Description-Enter a line item description:
(3) Quantity – Enter in the correct quantity in the field if it is different from thedefault value of 1:
(4) Unit Price – Enter in the correct unit price:
(2) Due Date-Enter the due date of the invoice:
(3) Division- Select the appropriate division:

15
Press Enter to save the first line item on the Invoice. A message saying “SavingRecord” will appear in the bottom left corner then “Record Accepted” will display witha green checkmark on the lower portion of the screen if all required fields arecomplete and there are not any budget warnings or blocks.
Until the “Ready” message is displayed the record is not saved in the database. Onceit is saved the invoice will appear in the entity list:
Adding Line Items to Invoices
If additional line items are necessary, click on the icon on the left toolbar in thebottom portion of the screen. The bottom portion will then clear out and allow the userto add the next line item:

16
Simply repeat the steps outlined for data entry of Item Information in Section 7.
**Note Make sure the User Invoice Total and System Total Match when youare finished with the invoice.

17
Section 4: Direct Pay Invoice Approvals
(1) Approvals- To submit the invoice for approval click on the pending approvals tabon top ribbon bar:
If there are no issues with the record click Approve:
Write any necessary comments and then click on the Submit Button:
The system will display a check next to the invoice that has been sent to Workflowshowing it has been submitted on the pending approval tab:
If no additional invoices are to be entered, simply close the screen by clicking on the
on the upper left corner of the screen.

18
There will be times when the “Record Accepted” message is not received and a budgetwarning appears instead. These warnings are intended to inform the User that fundsare not available and to take the necessary steps to move money into the account orchoose another account to expense the purchase. Budget warnings can be overriddenand the record saved by simply pressing the Enter key again until the “RecordAccepted” message is received.

19
Section 5: Batch Proof Set-APOHBTBP
Once the invoices are entered, run a Batch Proof of the set by launching theAPOHBTBP which is used to verify the data:
Enter in the name of your OH Set. Click on the submit button to run the proof:
Once the job is launched a job number will display in the bottom left corner:
If the Batch proof report is archived access the report by clicking in the documentssection on the finance desktop:

20
Click on the plus sign and then click on the Open A/p Batch Proof link to view thearchived APOHBTBP report:
Sample APOHBTBP report:

21
Section 6: Distributing Set-APOHBTDS
(1) After Running a Batch Proof you will run Distribute Set to OH and GL bylaunching the APOHBTDS screen:
(2) Enter in the name of the Set and click on the Submit button:
(2) Enter in the
(3) And Click on
Once the system displays the job number if the reports were archived:

22
Go to the finance desktop and click on the plus sign next to the job:

23
Make sure the “Audit report” displays and verify all distribution reports postedcorrectly:
Sample Audit report:
24
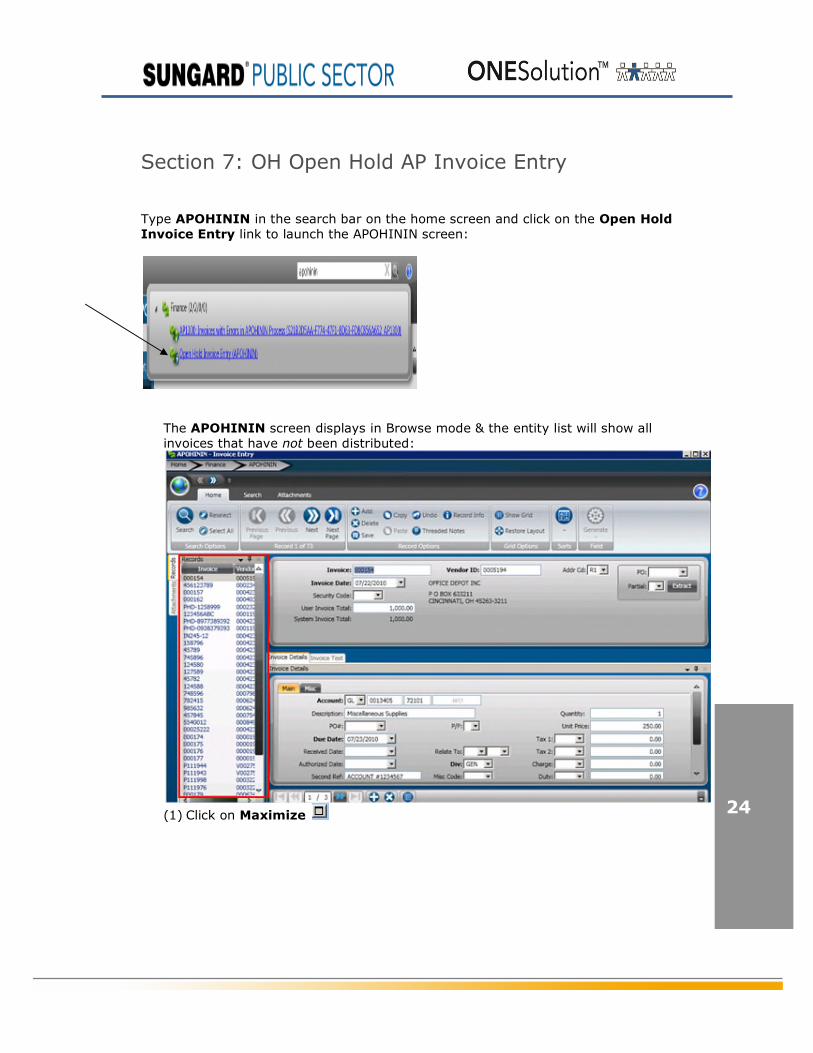
Section 7: OH Open Hold AP Invoice Entry
Type APOHININ in the search bar on the home screen and click on the Open HoldInvoice Entry link to launch the APOHININ screen:
The APOHININ screen displays in Browse mode & the entity list will show allinvoices that have not been distributed:
(1) Click on Maximize

25
(6) Add-Click on the Add button to create a NEW Invoice on the top ribbonBar:
The bottom right corner will show add mode:

26
(7) Enter the invoice number, invoice date & user invoice total:

27
Section 8: Invoice Entry PO Extraction
(1) PO – Enter in the PO number in the header portion of the screen:
(2) Partial –Select P- Partial and then click on the Extract Button:
The following extraction screen will display:
The PO Extract screen displays the information from the PO and allows the user toselect which line items are to be brought into the Invoice record.
(3) Enter the pay quantity or click on the check box to pay the full quantity of theline items and click save. It is also possible to modify the Amount and Pay Quantity onthis screen if they are different on the Invoice than on the PO. Click on the SaveButton to close the PO Extract screen and to pull the data into the Invoice.
This process will update the Invoice details tab:

28
Proceed to 1.2.7 Save the Invoice Record:

29
Section 9: Invoice Entry-Direct Pays
(2) If the invoice doesn’t have PO, enter the vendor ID once the invoice number,invoice date and user invoice total is entered:
Vendor Lookup-To look up a vendor click on the Lookup icon on the top ribbonbar:
The data lookup window will display:
Type in the vendor name and click apply.

30
Another option is to type a portion of the vendor’s name and use a (*) wildcard at theend to view all vendors that begin with that name. For example: if OFFICE* is usedthe system will look for vendors that start with ‘OFFICE’.
Double-click on the vendor to pull the information into the invoice screen:
If the invoice doesn’t have PO, the line item information will need to be enteredmanually:
31
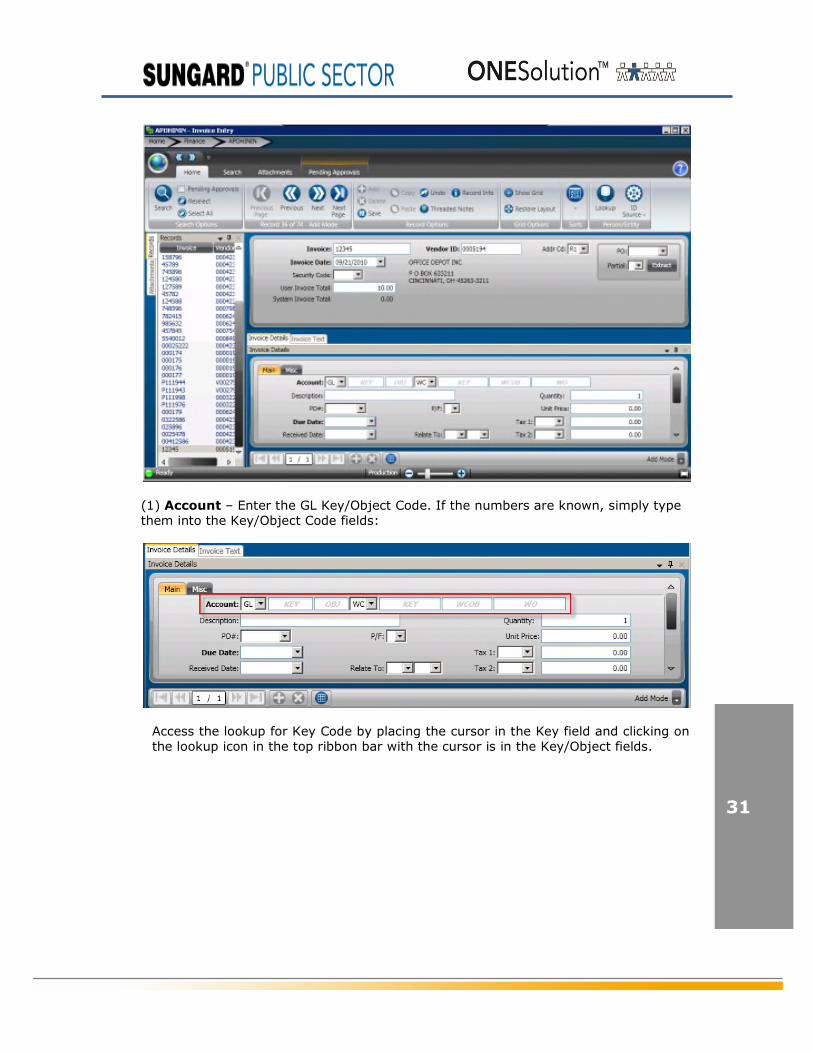
(1) Account – Enter the GL Key/Object Code. If the numbers are known, simply typethem into the Key/Object Code fields:
Access the lookup for Key Code by placing the cursor in the Key field and clicking onthe lookup icon in the top ribbon bar with the cursor is in the Key/Object fields.

32
The data Lookup will display:
And a list will appear of key codes for your department. Double-click on theappropriate code to have the system bring it into the invoice record.

33
Repeat this process for the object code lookup but make sure to place the cursor inthe object code field to have the Lookup icon display Object:
(2) Description-Enter a line item description:
(3) Quantity – Enter in the correct quantity in the field if it is different from thedefault value of 1:

34
(4) Unit Price – Enter in the correct unit price:
(2) Due Date-Enter the due date of the invoice:
Save the Invoice Record
Press Enter to save the first line item on the Invoice. A message saying “SavingRecord” will appear in the bottom left corner then “Record Accepted” will display witha green checkmark on the lower portion of the screen if all required fields arecomplete and there are not any budget warnings or blocks.
Until the “Ready” message is displayed the record is not saved in the database. Onceit is saved the invoice will appear in the entity list:
35
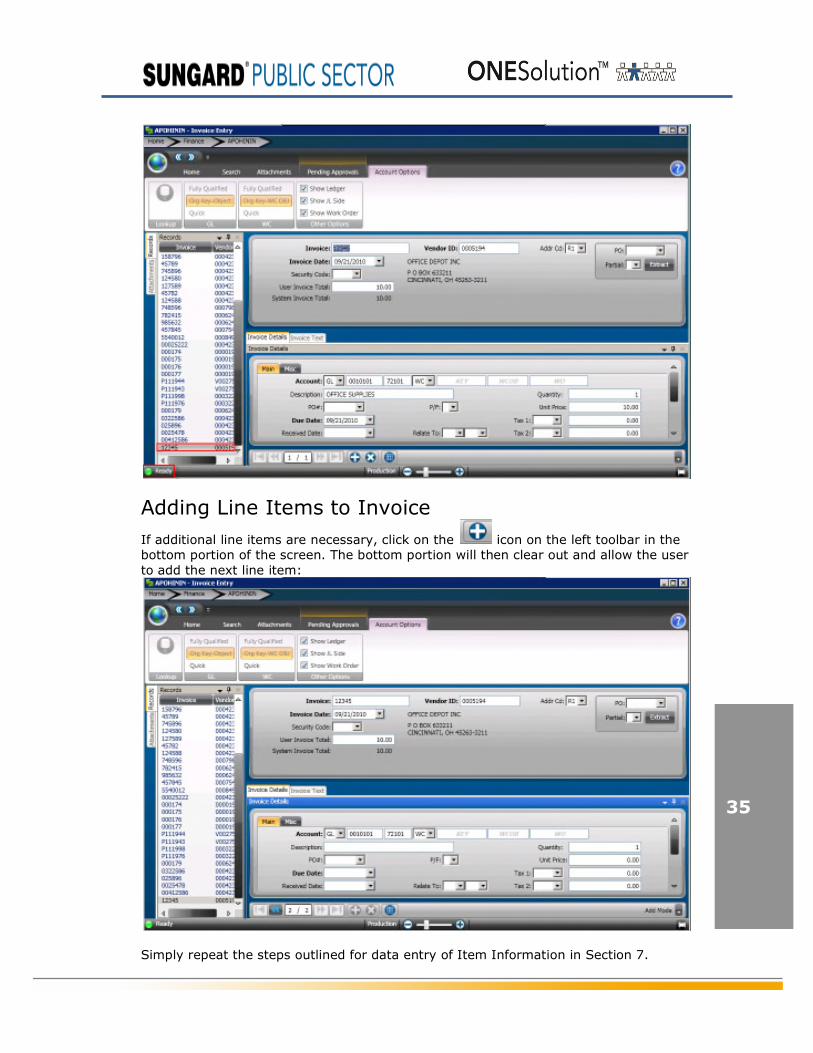
Adding Line Items to Invoice
If additional line items are necessary, click on the icon on the left toolbar in thebottom portion of the screen. The bottom portion will then clear out and allow the userto add the next line item:
Simply repeat the steps outlined for data entry of Item Information in Section 7.
36
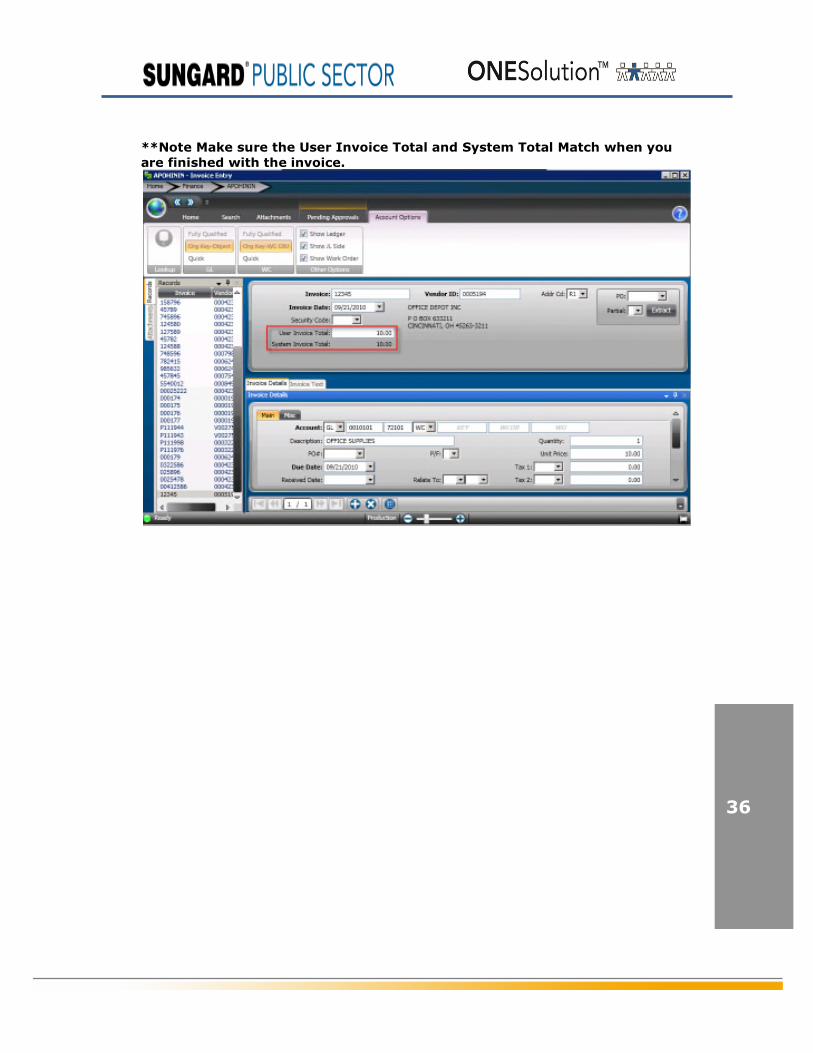
**Note Make sure the User Invoice Total and System Total Match when youare finished with the invoice.

37
Section 10: Invoice Approvals-Direct Pays
(1) Approvals- Typically users will only set up a WF for direct pay invoices since theinvoices that have a PO# have already gone through an approval process. To submitthe invoice for approval click on the pending approvals tab on top ribbon bar:
If there are no issues with the record click Approve:
Write any necessary comments and then click on the Submit Button:
The system will display a check next to the invoice that has been sent to Workflowshowing it has been submitted on the pending approval tab:

38
If no additional invoices are to be entered, simply close the screen by clicking on the
on the upper left corner of the screen:
There will be times when the “Record Accepted” message is not received and a budgetwarning appears instead. These warnings are intended to inform the User that fundsare not available and to take the necessary steps to move money into the account orchoose another account to expense the purchase. Budget warnings can be overriddenand the record saved by simply pressing the Enter key again until the “RecordAccepted” message is received.

39
Section 11: Batch Proof Invoices-APOHINBP
Once the invoices are entered, run a Batch Proof by launching the APOHINBP screenwhich is used to verify the data:
Click on the submit button to run the proof. If needed, use the AP selection criteriasuch as: User name, invoice #, etc to only view specific invoices
Once the job is launched a job number will display in the bottom left corner:
If the Batch proof report is archived access the report by clicking in the documentssection on the finance desktop:

40
Click on the plus sign and then click on the Open A/p Batch Proof link to view thearchived APOHINBP report:
Sample APOHINBP report

41
Section 12: Posting Invoices-APOHINVP
(1) After Running a Batch Proof you will Validate and Post the batch by launchingthe APOHINVP screen:
(2) Click on the Submit button. No selection criteria is needed for this report since itvalidates each approved invoice. If the invoice passes, then it will post. If the invoicedoes not pass, then it will not post and it will create error text on the APOHININscreen:
Once the system displays the job number if the reports were archived:

42
Go to the finance desktop and click on the plus sign next to the job:
Make sure the “Audit report” displays and verify all distribution reports postedcorrectly:
Sample Audit report:

43
Section 13: AP Check Run Process
Steps to Process AP checks:APOHPPSP-Select for Payment
APOHPPRP-Report for PaymentLoad AP ELF form to printer
APOHPPPA-Cut Checks

44
Section 14: Select for Payment-APOHPPSP
Select Entries for PaymentIt is necessary to change the status of the AP distributed records to WP in order for
them to be included in the Check Run. This is done by accessing the maskAPOHPPSP.
Clicking on the Select OH Invoice Entries for Payment (APOHPPSP) link will display thefollowing screen:
Selection criteria can be used to select records. If only one Set, one Invoice or oneVendor needs to be paid, only records meeting the selection criteria entered will be
updated.

45
Clicking on the Test button will show how many records and the Total Amount of thoserecords but will not update them.
The next step is to hit the Update button. The process of updating the batcheswill change their status from Distributed(DS) to Waiting for Payment(WP):
Clicking on Update Now will update the records with the WP status. Note themessage at the bottom of the screen which tells the user how many records were
updated.

46

47
Section 15: Report for Payment-APOHPPRP
Report of Items Selected for PaySimilar to using the batch proof the APOHPPRP creates a report like a batch proofshowing what checks would be issued or blocked. This step is optional as the checkrun process will produce the same report. If it is necessary to see all records to be
included in the check run prior to cutting checks this report will provide the followinginformation
Individual Invoice Record informationCheck total by Vendor listed alphabetically
Total number of checks to be issued
Enter APOHPPRP in the search bar and click on the Report of OH Invoice Entries forPayment link:
The following window will display:
Once submit is selected the following report will be archived to documents online.
Sample APOHPPRP report:

48

49
Section 16: Load ELF Form AP Check
Loading the AP ELF Form
Open the ELF Application to load the ELF forms Click the ELF icon
The following window will display:
Click on Select Form and following window will appear:

50
Click ‘apcheck’ and click ‘Open’
Once you have clicked ‘Open’ the following window will appear where you willenter the check password and click ‘OK’:
The apcheck form should now be shown at the top of the ELF window:

51

52
Click on Add Form:
The following window will display where you will select the correct printer fromthe drop down menu.
53
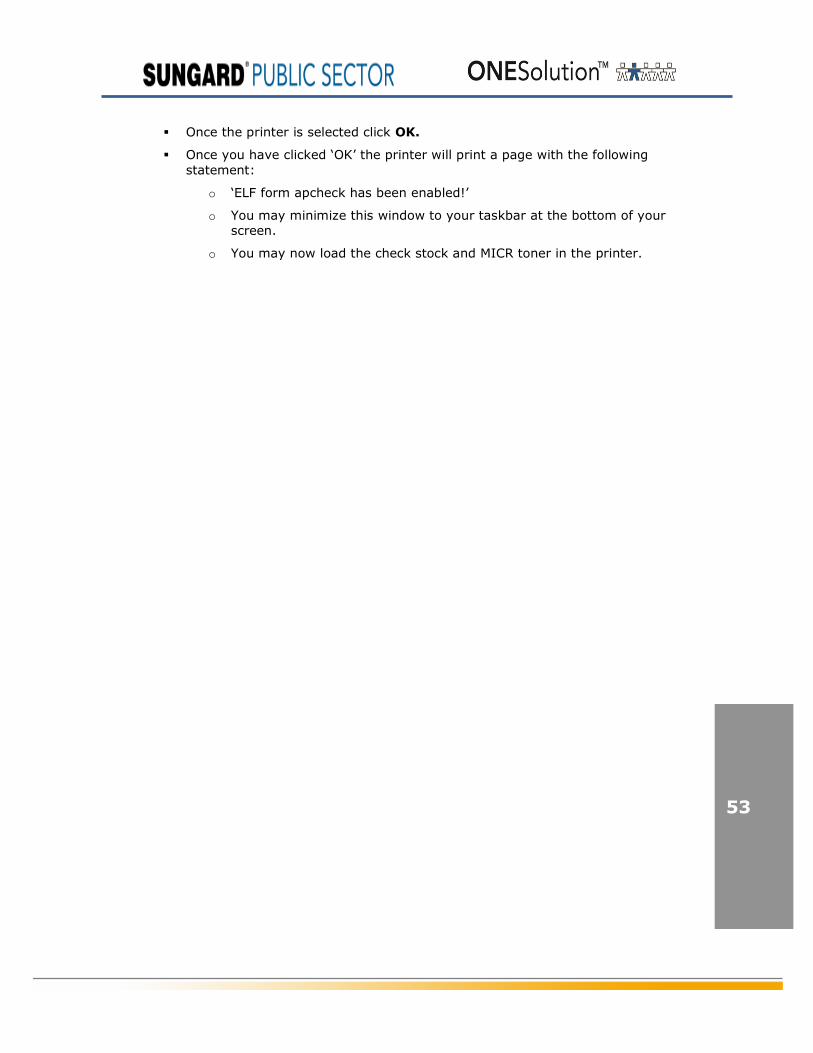
Once the printer is selected click OK.
Once you have clicked ‘OK’ the printer will print a page with the followingstatement:
o ‘ELF form apcheck has been enabled!’
o You may minimize this window to your taskbar at the bottom of yourscreen.
o You may now load the check stock and MICR toner in the printer.
54
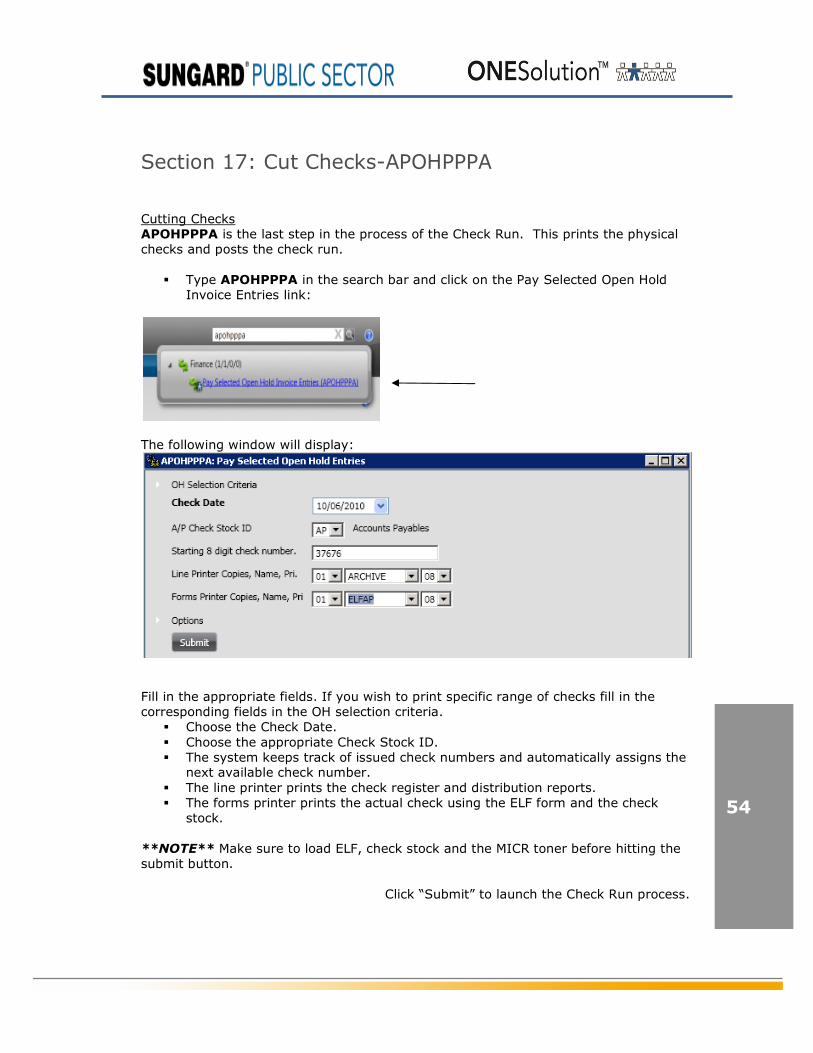
Section 17: Cut Checks-APOHPPPA
Cutting ChecksAPOHPPPA is the last step in the process of the Check Run. This prints the physicalchecks and posts the check run.
Type APOHPPPA in the search bar and click on the Pay Selected Open HoldInvoice Entries link:
The following window will display:
Fill in the appropriate fields. If you wish to print specific range of checks fill in thecorresponding fields in the OH selection criteria.
Choose the Check Date. Choose the appropriate Check Stock ID. The system keeps track of issued check numbers and automatically assigns the
next available check number. The line printer prints the check register and distribution reports. The forms printer prints the actual check using the ELF form and the check
stock.
**NOTE** Make sure to load ELF, check stock and the MICR toner before hitting thesubmit button.
Click “Submit” to launch the Check Run process.

55
If checks printed properly, the system will complete the check run process andgenerate the following reports.
Items Selected for PayCheck Register
OH Distribution ReportPO Status UpdateDisencumbrancesOH Posting to GL
Audit Report

56
Sample Check register report:

57
58
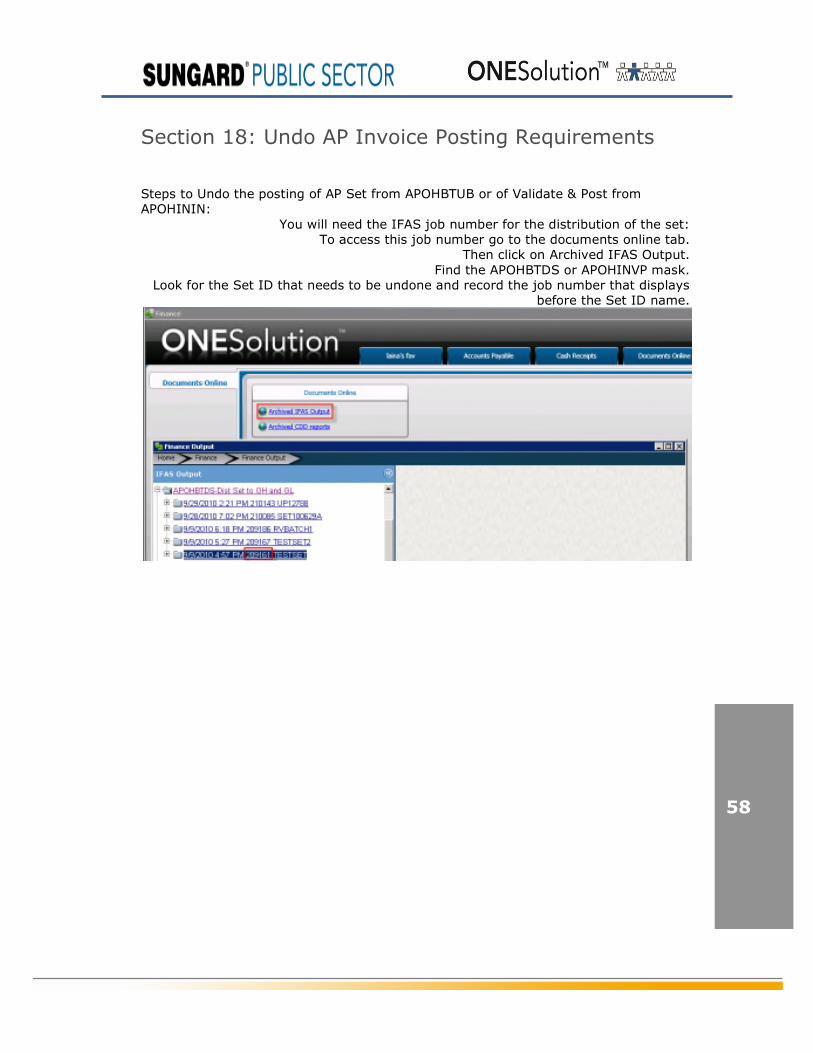
Section 18: Undo AP Invoice Posting Requirements
Steps to Undo the posting of AP Set from APOHBTUB or of Validate & Post fromAPOHININ:
You will need the IFAS job number for the distribution of the set:To access this job number go to the documents online tab.
Then click on Archived IFAS Output.Find the APOHBTDS or APOHINVP mask.
Look for the Set ID that needs to be undone and record the job number that displaysbefore the Set ID name.

59
Section 19: Undo AP Posting Utility-APOHUTUG
Once the job number is recorded, type APOHUTUG in the search bar and click on theUNDO Trans from OH and GL link:
The following window will display:
Enter the distribution job number that needs to be undone:

60
Test the Undo process first by making sure the “Is this a Test Run?” box is checkedReview the reports to make sure everything looks ok and that you have selected the
correct job to undo.Then undo the distribution by un-checking the “Is this a Test Run?” box and clicking
submit a second time
Check documents online to verify the process undid the correct set:
Make any necessary changes to the set in APOHBTUB once the undo postingcompletes and re-distribute:

61

62
Section 20: Reprint Checks from last check run
To reprint checks from the last check run, type APOHUTRP into the search bar andclick on the link:
The following window will display:
You will need the job number from the check run, checks numbers from the last checkrun, the first check number that was printed and to select the correct printers. Re-loadthe ELF form to the forms printer.

63
(3) Click the “Submit” button to re-print the checks.

64
Section 21: Reprint Check Run-From An EarlierCheck Run
You will need the job number for the distribution of the set. (The job number is in BK)APOHUTUG – Accounts Payable, Open Hold AP, Utilities, Undo Trans from OH and GL.
Test the Undo process first by making sure the “Is this a Test Run?” box is checked.Review the reports to make sure everything looks ok and that you have selected the
correct job to undo.
Undo the distribution by un-checking the “Is this a Test Run?” box:

65
(1) Change the invoices back to distributed in APOHPPSP:
** Change the drop downs to WP to DS **
(2) Delete the checks from BKUPCD:
*If there is more than one invoice, child record, being paid by the check (look for ablue right arrow in the bottom left hand corner) you will need to delete all but one ofthe invoice records before you can delete the check, parent, record.

66
**Note** If you receive the following error message when you delete the check,there is more than one invoice, child record, that needs to be deleted first:
If necessary undo the distribution of the AP (expense) transaction as well.If no changes to the AP (expense) posting then re-run APOHPPRP and re-print the
checks using APOHPPPA.If changes were made to the AP (expense) posting then re-select for payment with
APOHPPSP, re-run APOHPPRP, and re-print the checks.

67

68
Section 22: Undo AP Check Run Posting
(1) To Undo the AP check run posting go to APOHUTUC by typing this in the searchbar and clicking the link:
The following window will display:
(2) Uncheck trial run and enter the job number of the APOHPPPA posting. Selectarchive and then click on the submit button to undo the distribution.

69
AP Non-CDD Reports that may be useful:
(1) APOHRESR-AG Open A/P Aged Report Listing, SM Summary Report and TRTransaction Report:
Once AG Aged report is selected the following prompts display:

70
Click submit to archive the report to documents online.
APOHRESR-SM Summary Report:
Click submit to archive the report to documents online.

71
TR-Transaction Report
Click submit to archive the report to documents online.
Run APOHREUN (Unpaid Open A/P Invoices Report Listing) by typing this in thesearch bar and clicking the link:

72
The following window will display:
Click submit to archive the report to documents online.