11002, 11003 adora s, sl - appliancesonline.com.au · thank you for choosing to buy one of our...
TRANSCRIPT

V-ZUG Ltd
Washing machine
Adora S
Operating instructions
Thank you for choosing to buy one of our products. Your appliance is made tohigh standards and is easy to use. Nevertheless, please take the time to readthese operating instructions in order to familiarize yourself with the applianceand get the best use out of it.
Please follow the safety precautions.
Modifications
Text, diagrams and data correspond to the technical standard of the applianceat the time these operating instructions went to press. The right to make tech-nical modifications for the purpose of the further development of the applianceis reserved.
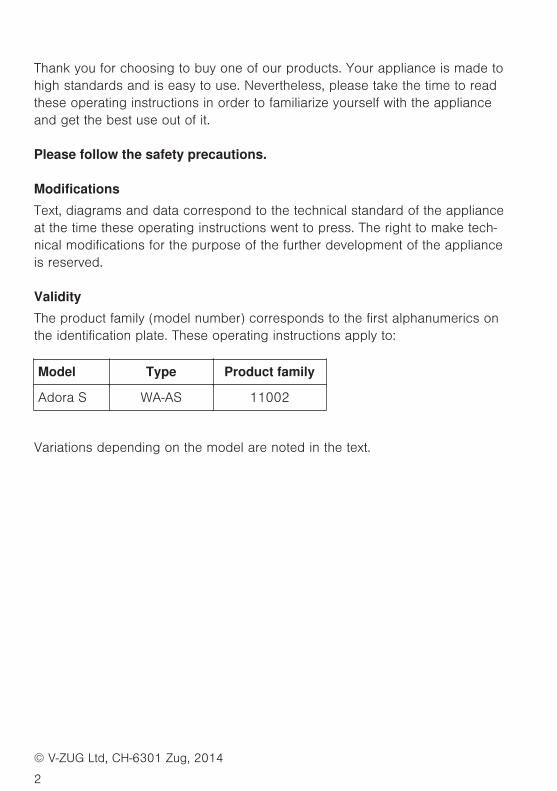
Validity
The product family (model number) corresponds to the first alphanumerics onthe identification plate. These operating instructions apply to:
Model Type Product family
Adora S WA-AS 11002
Variations depending on the model are noted in the text.
© V-ZUG Ltd, CH-6301 Zug, 2014
2

Contents
1 Safety precautions 5 1.1 Symbols used ......................................................................................... 5 1.2 General safety precautions .................................................................. 6 1.3 Appliance-specific safety precautions ................................................ 8 1.4 Instructions for use ................................................................................ 9
2 Disposal 12
3 Using for the first time 13 3.1 Where is the identification plate? ........................................................ 14
4 Appliance description 15 4.1 Appliance overview ................................................................................ 15 4.2 Appliance construction .......................................................................... 16 4.3 Operating and display elements ......................................................... 17
5 Programme overview 19 5.1 Main programmes .................................................................................. 19 5.2 2 programmes for normally soiled cotton load ................................ 20 5.3 Extra programmes ................................................................................. 21 5.4 Additional programmes ......................................................................... 22 5.5 Additional functions ............................................................................... 28
6 User settings 29 6.1 Adjusting user settings .......................................................................... 29 6.2 Language ................................................................................................. 32 6.3 Time .......................................................................................................... 33 6.4 AquaPlus .................................................................................................. 34 6.5 Soft water ................................................................................................. 35 6.6 Spin speed .............................................................................................. 36 6.7 Hygiene recommendation .................................................................... 37 6.8 Childproof lock ....................................................................................... 38 6.9 Automatic door opener ......................................................................... 38 6.10 Loosening up the washing ................................................................... 39 6.11 Brightness ................................................................................................ 40 6.12 Restoring factory settings ..................................................................... 41
7 Washing 42 7.1 Preparing the appliance ........................................................................ 42 7.2 Loading the appliance ........................................................................... 43
3

7.3 Adding washing detergent ................................................................... 44 7.4 Selecting a programme ........................................................................ 47 7.5 Changing selection ................................................................................ 56 7.6 Programme selection with childproof lock activated ...................... 57 7.7 Programme selection for a normally soiled cotton load ................. 58 7.8 End of programme ................................................................................. 59 7.9 At the end of the wash day .................................................................. 60
8 Care and maintenance 61 8.1 Cleaning the detergent dispenser drawer ......................................... 61 8.2 Cleaning the water inlet filter ................................................................ 62 8.3 Emergency draining ............................................................................... 63 8.4 Cleaning the foreign body trap ............................................................ 64
9 Trouble-shooting 65 9.1 What to do if … ....................................................................................... 65 9.2 Opening the appliance door in the event of a power failure ......... 76
10 Washing tips 77 10.1 Fabric care symbols .............................................................................. 77 10.2 Washing detergent ................................................................................. 77 10.3 General tips ............................................................................................. 77 10.4 Net curtains ............................................................................................. 78 10.5 Saving energy and water ..................................................................... 79 10.6 Unsatisfactory wash results .................................................................. 80
11 Spare parts 84
12 Technical data 85 12.1 Dimensions .............................................................................................. 85 12.2 Plumbing in .............................................................................................. 85 12.3 Electrical connection ............................................................................. 85 12.4 Spin speed .............................................................................................. 85 12.5 Consumption data .................................................................................. 86 12.6 Note for testing institutes ...................................................................... 87 12.7 VAS Vibration Absorbing System ........................................................ 87 12.8 Water and energy economy ................................................................. 88 12.9 Automatic energy-saving stand-by ...................................................... 88
14 Index 91
15 Repair service 95
4
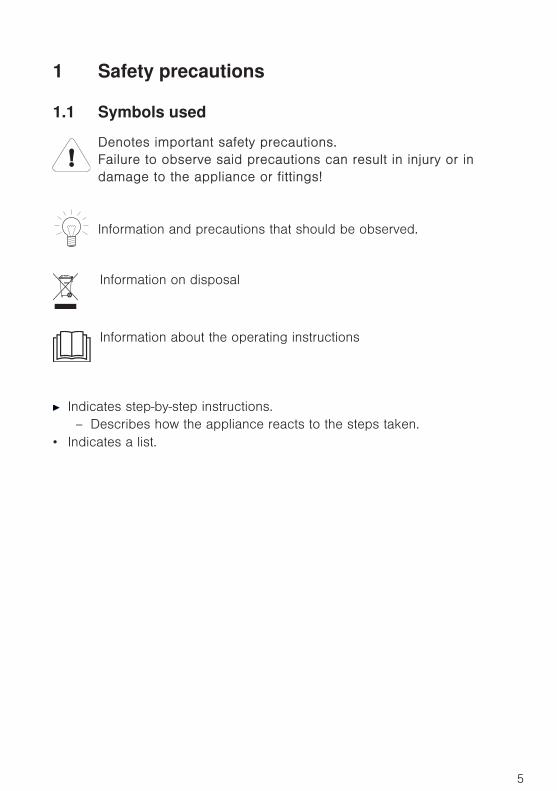
1 Safety precautions
1.1 Symbols used
Denotes important safety precautions.Failure to observe said precautions can result in injury or indamage to the appliance or fittings!
Information and precautions that should be observed.
Information on disposal
Information about the operating instructions
Indicates step-by-step instructions.– Describes how the appliance reacts to the steps taken.
• Indicates a list.
5

1.2 General safety precautions
• Read the operating instructions before usingthe appliance for the first time!
• This appliance can be used by children aged8 and above and by persons with reducedphysical, sensory or mental capabilities, orlack of experience and/or knowledge,provided they are supervised or have beeninstructed on the safe use of the applianceand have understood the hazards involved.Children shall not play with the appliance.Cleaning and user maintenance shall not beundertaken by children without supervision.
1 Safety precautions
6
• If an appliance is not equipped with a mainscable and a plug or other means for discon-necting from the mains with a contact openingon each pole complying with the conditions ofovervoltage category III for full isolation, anisolating device must be incorporated into thepermanently installed electrical installation inaccordance with the installation regulations.
• If the mains cable of this appliance isdamaged, it must be replaced by the manu-facturer or its Customer Services or a similarlyqualified person in order to avoid hazard.
1 Safety precautions
7
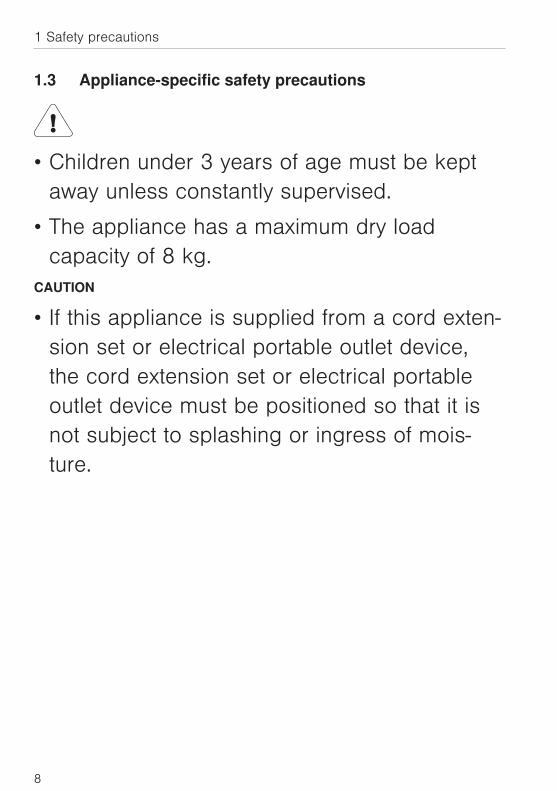
1.3 Appliance-specific safety precautions
• Children under 3 years of age must be keptaway unless constantly supervised.
• The appliance has a maximum dry loadcapacity of 8 kg.
CAUTION
• If this appliance is supplied from a cord exten-sion set or electrical portable outlet device,the cord extension set or electrical portableoutlet device must be positioned so that it isnot subject to splashing or ingress of mois-ture.
1 Safety precautions
8
1.4 Instructions for use
Before using for the first time
• The appliance must be installed and connected to the electricity supply inaccordance with the separate installation instructions. Have a qualified fitter/electrician carry out the necessary work.
• Ensure access to the place of disconnection (e.g. socket outlet, wall switch,fuse) and the water tap.
• The transportation lock must be removed. Failure to remove the transporta-tion locks can result in damage to the appliance or apartment or laundryroom fittings.
Correct use
• The appliance is suitable for washing home textiles with water and regularwashing machine detergent. It is designed for use in the home and for theabove-mentioned purpose only. No liability is assumed for any damagecaused by improper or incorrect use.
• Any repairs, modifications or manipulations to the appliance, especially anyelectrically live parts, may only be carried out by the manufacturer, itsCustomer Services or a similarly qualified person. Repairs if carried outincorrectly could cause serious injury or damage to the appliance andfittings as well as affect the functioning of the appliance. If the appliance isnot working properly or in case of a repair order, follow the instructionsgiven in the 'Repair service' section. If necessary, please contact ourCustomer Services.
• Use original spare parts only.
Note on use
• If the appliance is not operating properly, disconnect it from the powersupply immediately.
• To protect your washing, follow the fabric care symbols and the hints andadvice in the 'Washing tips' section.
1 Safety precautions
9
Caution: Burns hazard!
• Textiles that have been cleaned, treated or soaked with flammable chemi-cals, detergents or solvents such as benzene, alcohol, stain remover, oil,paint, wax, etc. are not to be washed in the appliance. Fire or explosionhazard! Wash materials containing such substances first by hand with wateror allow the solvent to evaporate completely.
Caution: Risk of injury!
• Ensure the washing drum has stopped moving before reaching inside. Donot touch the washing drum while it is still in motion – risk of serious injury!
• Disconnect the appliance from the mains before carrying out maintenancework.
Caution: Risk to life!
• Packaging material, e.g. plastic film and polystyrene, can be dangerous forchildren. Danger of suffocation! Keep packaging material away from chil-dren.
1 Safety precautions
10

How to avoid damaging the appliance
• Close the appliance door carefully. • Before closing the appliance door and starting a programme, ensure that
there are no foreign objects or pets in the washing drum, detergentdispenser drawer or around the foreign body trap. Foreign objects such ascoins, nails, paper clips, etc. can damage parts of the appliance, as well asthe washing.
• During longer periods of absence, turn off the water tap before switching offthe power by pulling out the mains plug. Never pull the mains plug out bythe cable. Please note: the built-in overflow protection is rendered inactivewhen the power is switched off.
• When cleaning the appliance make sure no water gets inside it. Use amoderately damp cloth. Do not spray the outside or the inside of the appli-ance with water. If water gets inside the appliance, it will cause damage.
• Textiles with metal reinforcements are not to be washed in the appliance(risk of damage).
• Trainers, diving suits, rucksacks, carpets, etc. are not to be washed in theappliance.
1 Safety precautions
11

2 Disposal
Packaging
• All packaging materials (cardboard, plastic film (PE) and polystyrene (EPS))are marked and should, if possible, be collected for recycling and disposedof in an environmentally friendly way.
Disconnection
• Disconnect the appliance from the mains. With a fixed appliance, this is tobe carried out by a qualified electrician!
Safety
• Disable the appliance to prevent accidents caused by improper use, espe-cially through children playing.
• Pull the plug out of the mains socket or have the appliance disconnectedfrom the mains by an electrician. Then cut the mains cable off flush with theappliance.
• Remove or disable the lock on the appliance door.
Disposal
• The old appliance should not be discarded as worthless rubbish. Ifdisposed of correctly, the raw materials can be recovered for recycling.
• The symbol on the identification plate warns that the appliance may notbe disposed of in normal household waste.
• The appliance must be disposed of in accordance with local regulations onwaste disposal. For more information on the handling, disposal and recy-cling of the product, please contact the local authorities, the local recyclingfacilities for household waste or the retailer from whom you purchased theappliance.
12
3 Using for the first timeThe appliance must be installed and connected to the electricity supply inaccordance with the separate installation instructions. Have a qualified fitter/electrician carry out the necessary work.
The appliance was tested with water before being shipped. There maytherefore still be traces of water left in the appliance.
Transport lock
Before using the appliance for the first time, the transportation lockmust be removed (3 screws with washers at the back of the appli-ance), in order to avoid damage to the appliance.
Setting the language and time
Set the language and time in the usersettings.
Hold the button depressed until thefollowing appears in the plain text display:
User settingsFN XXXXX XXXXXX
Press the button repeatedly until «Language» or «Time set?» appear inthe plain text display.
Use the 60 button to make the desired settings.
To ensure the user settings are saved, the power supply to the appli-ance should not be switched off for at least 30 minutes.
Running the first wash cycle without any washing
Run an empty wash cycle to remove any residues from the manufacturingprocess.
Add a little washing detergent to compartment II.Select coloureds 60 °C.
13
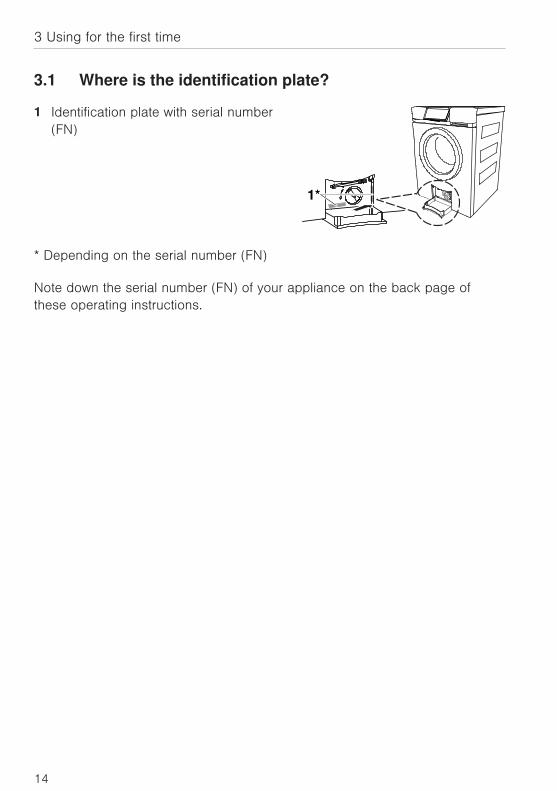
3.1 Where is the identification plate?
1 Identification plate with serial number(FN)
1*
* Depending on the serial number (FN)
Note down the serial number (FN) of your appliance on the back page ofthese operating instructions.
3 Using for the first time
14

4 Appliance description
4.1 Appliance overview
• Load capacity: 8 kg dry washing• 6 main programmes• 2 standard programmes• 4 extra programmes • Additional programmes• Load capacity: 8 kg dry washing• 6 main programmes• 2 programmes for normally soiled cotton load• 4 extra programmes • 6 favourite programmes• Additional programmes
– Eco – Programmes for lightly to heavilysoiled washing incl. anti-mite– Sprint
– Easy care– Pre-wash – Soaking– Steam anti-crease – Soap wash– Programmes for various
types of fabric– Bio wash
– AquaPlus incl. skin protec-tion
• Additional functions
– Spin speed setting – Stop after rinsing– Temperature selection – Deselect parts of programmes– Delayed start
• Sensors for optimizing the wash cycle• Automatic energy-saving stand-by• Plain text display• Automatic door opener• Language selection• Childproof lock• Aquastop with anti-leak protection
15

4.2 Appliance construction
The appliance door can be set to open to the left or to the right. OurCustomer Services can make the necessary adjustments to the appli-ance.
1 Operating and display elements(pivoting operating panel)
1
2
3
4
5
6
7
8*
2 Detergent dispenser drawer3 Appliance door4 Drain tray5 Foreign body trap6 Emergency door release tool7 Emergency door release8 Identification plate / Serial number (FN)
* Depending on the serial number (FN)
Detergent dispenser drawer
9 Pre-wash detergent, compartment I 109
13
12 11
10 Main wash detergent, compartment II11 Liquid detergent flap12 Siphon for fabric conditioner (softener)13 Fabric conditioner (softener), compartment
4 Appliance description
16
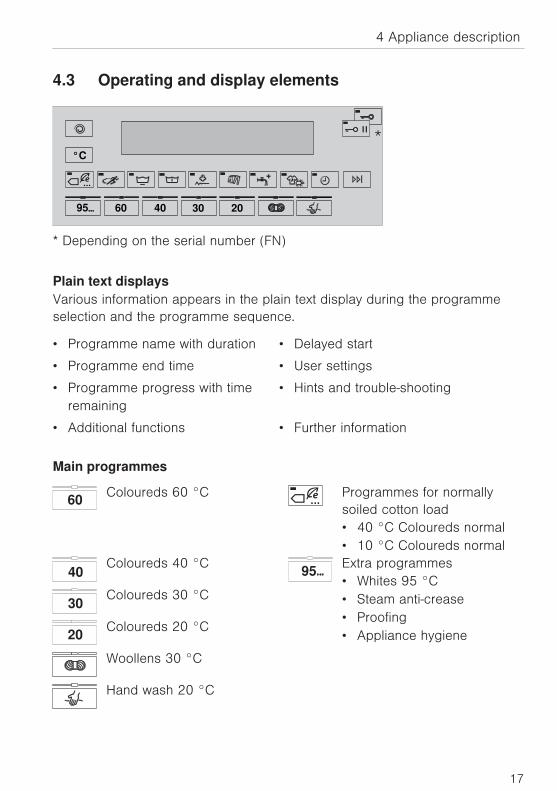
4.3 Operating and display elements
60 40 30 20
°C
95
*
* Depending on the serial number (FN)
Plain text displaysVarious information appears in the plain text display during the programmeselection and the programme sequence.
• Programme name with duration • Delayed start
• Programme end time • User settings
• Programme progress with timeremaining
• Hints and trouble-shooting
• Additional functions • Further information
Main programmes
60Coloureds 60 °C Programmes for normally
soiled cotton load• 40 °C Coloureds normal• 10 °C Coloureds normal
40Coloureds 40 °C
95Extra programmes• Whites 95 °C• Steam anti-crease• Proofing• Appliance hygiene
30Coloureds 30 °C
20Coloureds 20 °C
Woollens 30 °C
Hand wash 20 °C
4 Appliance description
17

Additional programmes
Eco Steam anti-crease
Sprint Fabric types
Easy care AquaPlus
Pre-wash Degree of soiling, anti-mite
Additional functions
Spin speed Delayed start
°C Temperature setting Fast forward / End ofprogramme
/Pause / Door opener* or Door opener*
* Depending on the serial number (FN)
Indicator lights
Indicator light flashesProgramme or function can be selected.Indicator light is illuminatedProgramme or function is active.Indicator light is darkProgramme or function is switched off.
4 Appliance description
18

5 Programme overview
5.1 Main programmes
To select the right programme, follow the fabric care symbols on the
labels of the wash items, e.g. 40 .
95 Whites 95 °C 1–8 kg
1x White cottons, linens with the 95 fabric care symbol e.g. bed andtable linen, towels, white or colour-fast underwear.
60 Coloureds 60 °C 1–8 kg
Coloured cottons with the 60 fabric care symbol e.g. bright blouses,overalls, shirts, bed linen.
40 Coloureds 40 °C 1–8 kg
Coloured cottons and mixed washing with the 40 fabric care symbole.g. coloured sweatshirts, t-shirts.
30 Coloureds 30 °C 1–8 kg
Coloured cottons and mixed fabrics with the 30 fabric care symbole.g. t-shirts.
19
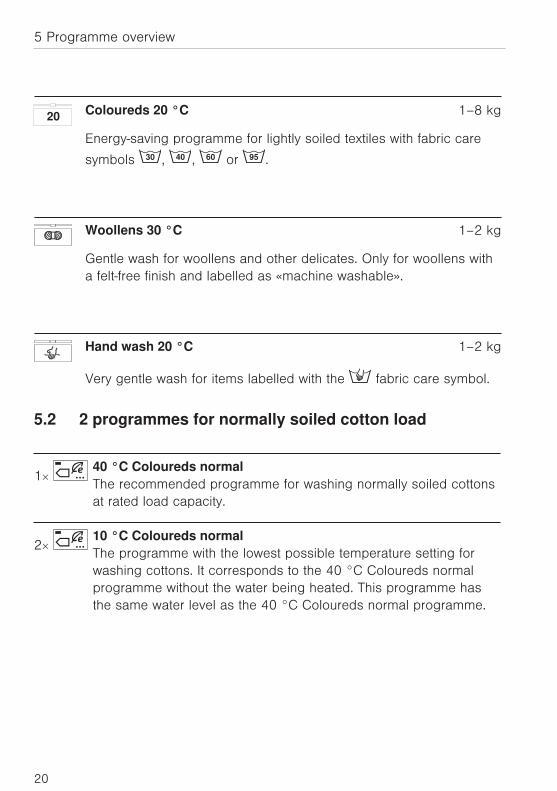
20 Coloureds 20 °C 1–8 kg
Energy-saving programme for lightly soiled textiles with fabric care
symbols 30 , 40 , 60 or 95 .
Woollens 30 °C 1–2 kg
Gentle wash for woollens and other delicates. Only for woollens witha felt-free finish and labelled as «machine washable».
Hand wash 20 °C 1–2 kg
Very gentle wash for items labelled with the fabric care symbol.
5.2 2 programmes for normally soiled cotton load
1× 40 °C Coloureds normalThe recommended programme for washing normally soiled cottonsat rated load capacity.
2× 10 °C Coloureds normalThe programme with the lowest possible temperature setting forwashing cottons. It corresponds to the 40 °C Coloureds normalprogramme without the water being heated. This programme hasthe same water level as the 40 °C Coloureds normal programme.
5 Programme overview
20

5.3 Extra programmes
95 Steam anti-crease 1–1.5 kg
2× Dry, creased washing that can be washed at min. 40°C is partiallyuncreased and made damp, ready to iron.
95 Proofing 1–3 kg
3× For starching or proofing fabrics. The starching or proofing agent can
be added to the fabric conditioner compartment .
95 Appliance hygiene 0 kg
4× Without any washing. A small amount of water is heated up toaround 80 °C and the steam produced sharply reduces the germcount.
5 Programme overview
21

5.4 Additional programmes
Eco
Large energy savings due to reduced wash temperature. Theextended washing time ensures the washing performance is main-tained.• Programme duration extended: 25–60 minutes• Energy saving depending on programme: 10–40 %
Water savings due to reduced amount of water for rinsing. Theextended rinsing time ensures the rinsing performance is maintained.• Water saving: 10–20 %
Sprint
Short programme for lightly soiled washing • Programme duration for 2.5 kg wash load
+ : 28 minutes + : 32 minutes + : 35 minutes + : 45 minutes
• 2 instead of 3 rinsing cycles
Add a small quantity of washing detergent.A large washing load or too much washing detergent can significantlylengthen the programme duration.
Easy care
For washing requiring very gentle treatment • Reduced washing action• Higher water level during washing and rinsing• Reduced spin speed: 800 rpm• Optimum wash load: max. 3.5 kg
5 Programme overview
22

Pre-wash
Suitable for heavily soiled washing • Programme duration extended: about 15 minutes
Steam anti-crease
The steam finish at the end of the programme significantly reducescreasing in the washing. Recommended for items that crease easily,e.g. shirts and blouses. • The washing is warm and should be hung up immediately to dry
– for easy ironing – or tumble dried.• To avoid renewed creasing at the end of the programme, the
washing is loosened up for an extended period (min.60 minutes). The washing can be unloaded at any time.
– Press the or button and unload the washing.• Programme duration extended: about 20 minutes• Limited spin speed: max. 1000 rpm• Optimum wash load: max. 2 kg
Fabric types
Depending on which main programme is selected, optimizedprogrammes for different fabric types are available.
«Coloureds» Can be selected with 20 , 30 , 40 , 60 and95
• Standardprogramme
«Shirts» Can be selected with 40 and 60
• Minimizes creasing• Uses steam anti-crease• Optimum wash load: max. 7 shirts/blouses
5 Programme overview
23

«Outdoor garments» Can be selected with 20 , 30 , 40 and 60
• Suitable for waterproof and breathable clothing• Higher water level during washing and spinning• Intermediate spinning for optimal removal of water out of water-
impermeable textiles• Optimum wash load: max. 3 kg
«Net curtains» Can be selected with 20 , 30 and 40
• Reduced washing action for very gentle treatment• Higher water level during washing and spinning• Very gentle intermediate spinning• Washing remains lying in the water after the final rinse (stop after
rinsing)
Press the button 1× • Start draining with spinning at 400 rpm
Press the button 2× • Start draining without spinning
• Optimum wash load: max. 2 kg
«Black garments» Can be selected with 20 , 30 , 40 and
Higher water level and extended rinsing
Optimum wash load: max. 4 kg if 20 , 30 or 40 is selected
max. 2 kg if is selected
«Denim» Can be selected with 20 , 30 and 40
• Optimized for colour run from denim articles• Optimum wash load: max. 4 kg
«Baby garments» Can be selected with 20 , 30 , 40 , 60 and95
• Very thorough rinsing for the protection of sensitive baby skin• At 95 °C: additional pre-wash• Optimum wash load: max. 5 kg
5 Programme overview
24

«Down filling» Can be selected with 20 , 30 , 40 and 60
• Optimized for the particular wetting characteristics of down fabrics• Short spin at the beginning of the programme to get rid of any air in
down textiles.• Intermediate spinning for optimal draining• Optimum wash load: 1 item of washing, max. 2 kg
Add the detergent to the detergent dispenser drawer. Do not use adosing ball.
«Silks» Can be selected with
• Optimized for silk fabrics• Reduced spinning to minimize creasing• Optimum wash load: max. 1.5 kg
AquaPlus
There are 5 different settings for rinsing intensity. «Standard»
• Normal water level «More water»
• The water level is increased by 1–3 cm during the main wash andeach rinse cycle.
«+1 rinse»
• An extra rinse cycle is added to each programme. «More water +1 rinse»
• An extra rinse cycle is added to each programme and the waterlevel is also increased by 1–3 cm during the main wash and eachrinse cycle.
5 Programme overview
25

«Skin protection»
• Two extra rinse cycles are added to each programme and thewater level is also increased by 5 cm during each rinse cycle. Thisfunction is particularly suitable for people with sensitive skin or witha suspected allergy to washing detergent.
Degree of soiling / Anti-mite
Adjustment to the degree of soiling of the washing «Soiling light»
• Suitable for lightly soiled washing «Soiling normal»
• Wash time extended: 25–80 minutes «Soiling heavy»
• Extended wash time• Higher water level during washing• Additional rinse cycle
«Anti-mite»
• Can only be selected with 60 and 95
• Suitable for individuals with an allergy to mites– The main wash is extended and intensified at the temperature
set. The mites are killed and the allergens are rinsed out thor-oughly.
«Soaking»
• An additional soaking cycle is carried out before the main wash.
– Press the button to set the soaking time (0.5–6 hours).
5 Programme overview
26

Separate rinsing / Separate spinning
It is possible to skip parts of the programme selected. Select main programme according to fabric care labels.
Press the button 1×.– Rinsing and final spin are selected.
Press the button 2×.– Final rinse / Conditioning and final spin are selected.
Press the button 3×.– Separate final spin is selected.
Bio wash (alkaline detergent + bleach)The programme sequence is adapted for the use of multi-component deter-gents (alkaline detergent + bleach). First the alkaline detergent with softener(compartment II) is added to the wash and the suds are heated up to 40 °C.Then after around 6 minutes the bleach (compartment I) is added.
Select main programme.
Press the button 2×.– «Bio wash» appears in the plain text display.
Soap wash (softener + soap detergent)The programme sequence is adapted for the use of multi-component deter-gents (softener + soap detergent). The softener (compartment I) and the soapdetergent (compartment II) are added to the wash one after the other.
Select main programme.
Press the button 3×.– «Soap wash» appears in the plain text display.
5 Programme overview
27
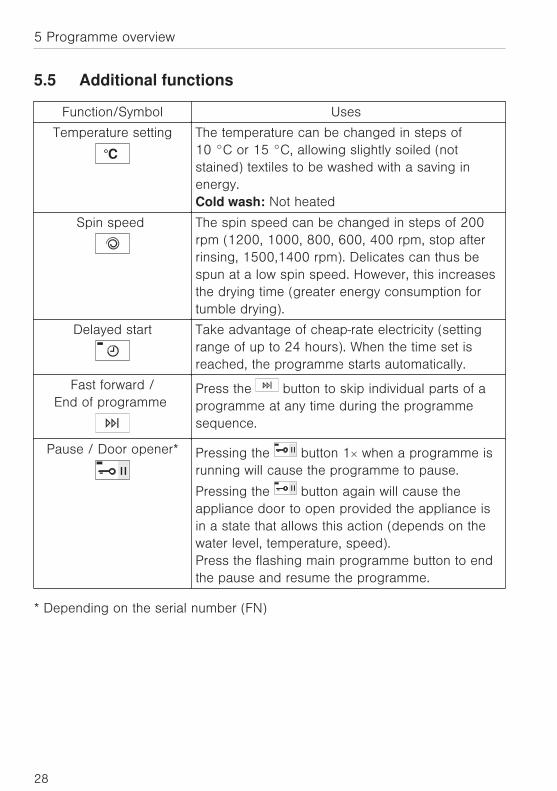
5.5 Additional functions
Function/Symbol Uses
Temperature setting
°C
The temperature can be changed in steps of10 °C or 15 °C, allowing slightly soiled (notstained) textiles to be washed with a saving inenergy.Cold wash: Not heated
Spin speed The spin speed can be changed in steps of 200rpm (1200, 1000, 800, 600, 400 rpm, stop afterrinsing, 1500,1400 rpm). Delicates can thus bespun at a low spin speed. However, this increasesthe drying time (greater energy consumption fortumble drying).
Delayed start Take advantage of cheap-rate electricity (settingrange of up to 24 hours). When the time set isreached, the programme starts automatically.
Fast forward /End of programme
Press the button to skip individual parts of aprogramme at any time during the programmesequence.
Pause / Door opener* Pressing the button 1× when a programme isrunning will cause the programme to pause.
Pressing the button again will cause theappliance door to open provided the appliance isin a state that allows this action (depends on thewater level, temperature, speed).Press the flashing main programme button to endthe pause and resume the programme.
* Depending on the serial number (FN)
5 Programme overview
28
6 User settings
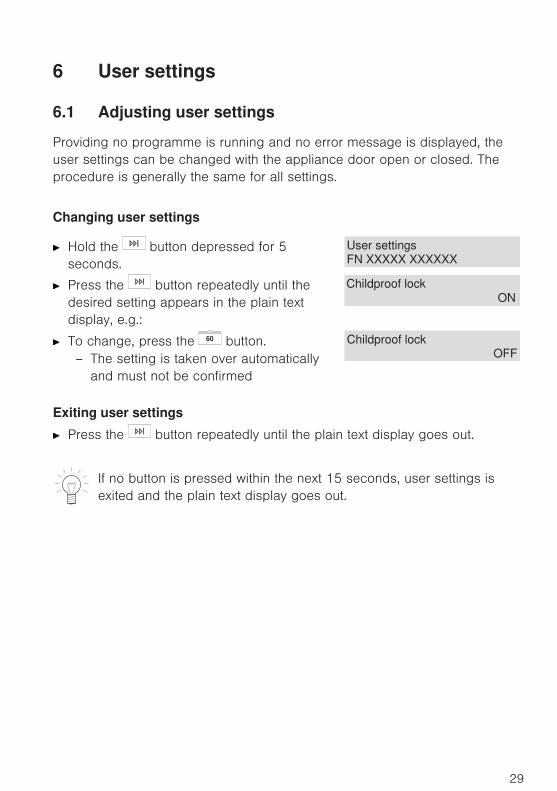
6.1 Adjusting user settings
Providing no programme is running and no error message is displayed, theuser settings can be changed with the appliance door open or closed. Theprocedure is generally the same for all settings.
Changing user settings
Hold the button depressed for 5seconds.
User settingsFN XXXXX XXXXXX
Press the button repeatedly until thedesired setting appears in the plain textdisplay, e.g.:
Childproof lock ON
To change, press the 60 button.– The setting is taken over automatically
and must not be confirmed
Childproof lockOFF
Exiting user settings
Press the button repeatedly until the plain text display goes out.
If no button is pressed within the next 15 seconds, user settings isexited and the plain text display goes out.
29
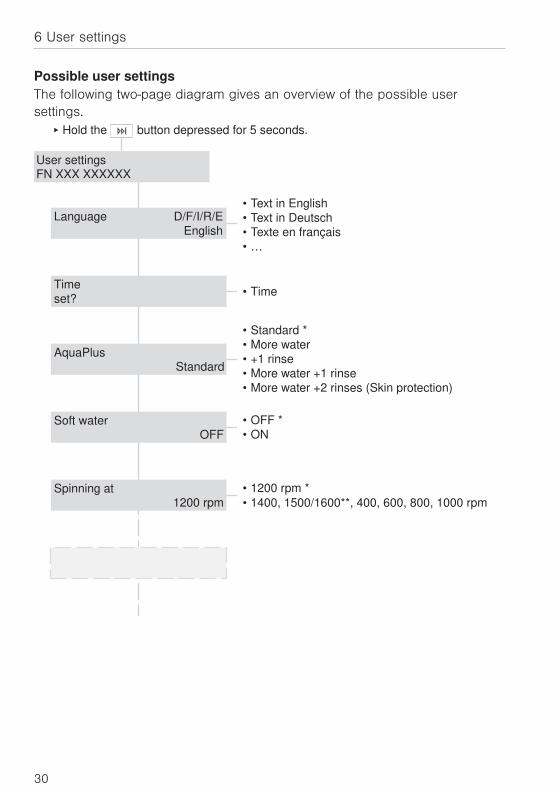
Possible user settingsThe following two-page diagram gives an overview of the possible usersettings.
▸ Hold the button depressed for 5 seconds.
• Time
• OFF *
• ON
• 1200 rpm *
• 1400, 1500/1600**, 400, 600, 800, 1000 rpm
• Text in English
• Text in Deutsch
• Texte en français
• …
• Standard *
• More water
• +1 rinse
• More water +1 rinse
• More water +2 rinses (Skin protection)
User settingsFN XXX XXXXXX
Language
Time
AquaPlus
Soft water
Spinning at
set?
D/F/I/R/E English
Standard
OFF
1200 rpm
6 User settings
30
• 1 very dark
• 2 dark
• 3 medium *
• 4 bright
• 5 very bright
• 30 seconds *
• 10 minutes
• 30 minutes
• 6 hours
• OFF
• ON *
• YES
• NO
• OFF *
• ON
• OFF
• ON *
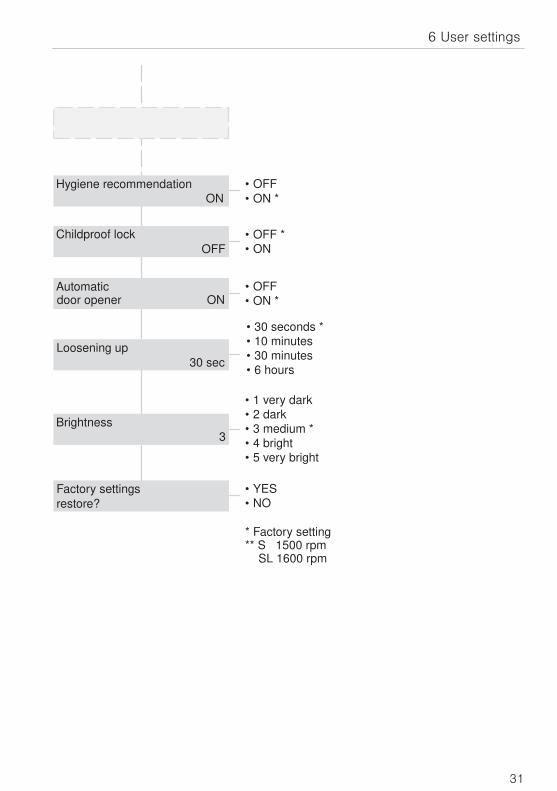
* Factory setting** S 1500 rpm SL 1600 rpm
Hygiene recommendation
Childproof lock
Automaticdoor opener
Brightness
Factory settings
restore?
ON
OFF
ON
3
Loosening up
30 sec
6 User settings
31

6.2 Language
The language in the plain text display can be changed.
Changing the language
Hold the button depressed for 5seconds.
User settingsFN XXXXX XXXXXX
Press the button repeatedly until thecurrent language setting appears in theplain text display, e.g.:
D/F/I/R/E
English
Language
Press the 60 button repeatedly until thedesired setting appears in the plain textdisplay, e.g.:– The setting is taken over automatically
and must not be confirmed.
Language D/F/I/R/EEnglish
Press the button repeatedly until theplain text display goes out.
6 User settings
32
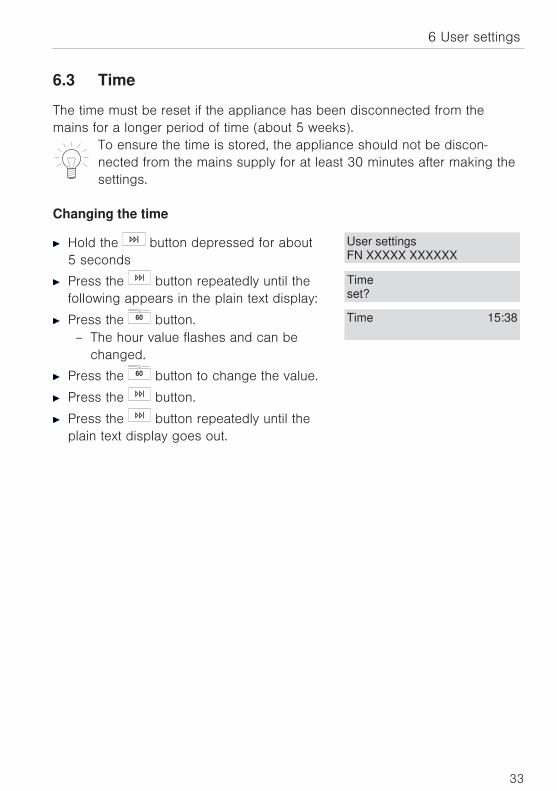
6.3 Time
The time must be reset if the appliance has been disconnected from themains for a longer period of time (about 5 weeks).
To ensure the time is stored, the appliance should not be discon-nected from the mains supply for at least 30 minutes after making thesettings.
Changing the time
Hold the button depressed for about5 seconds
User settingsFN XXXXX XXXXXX
Press the button repeatedly until thefollowing appears in the plain text display:
Time
set?
Press the 60 button.– The hour value flashes and can be
changed.
Time 15:38
Press the 60 button to change the value.
Press the button.
Press the button repeatedly until theplain text display goes out.
6 User settings
33

6.4 AquaPlus
There are 5 different settings for rinsing intensity.
«Standard»• Normal water level«More water»• The water level is increased by around 1–3 cm during the main wash and
each rinse cycle.«+1 rinse»• An extra rinse cycle is added to each programme.«More water +1 rinse»• An extra rinse cycle is added to each programme and the water level is
also increased by around 1–3 cm during the main wash and each rinsecycle.
«Skin protection»• Two extra rinse cycles are added to each programme and the water level is
also increased by about 5 cm during each rinse cycle. This function isparticularly suitable for people with sensitive skin or with a suspectedallergy to washing detergent.
Changing the rinsing intensity
Hold the button depressed for 5seconds.
User settingsFN XXXXX XXXXXX
Press the button repeatedly until thecurrent setting appears in the plain textdisplay, e.g.:
AquaPlusStandard
Press the 60 button repeatedly until thedesired setting appears in the plain textdisplay, e.g.:– The setting is taken over automatically
and must not be confirmed.
AquaPlus more water
Press the button repeatedly until theplain text display goes out.
6 User settings
34

6.5 Soft water
The programmes can be adjusted for use with very soft water. The slightly reduced wash action prevents excessive foaming. Since the deter-gent does not rinse out as well with soft water, the amount of water used forrinsing is increased slightly and an extra rinse cycle is added.
Switching soft water on/off
Hold the button depressed for 5seconds.
User settingsFN XXXXX XXXXXX
Press the button repeatedly until thecurrent setting appears in the plain textdisplay, e.g.:
Soft water
OFF
Press the 60 button.– The setting is taken over automatically
and must not be confirmed.
Soft water
ON
Press the button repeatedly until theplain text display goes out.
6 User settings
35

6.6 Spin speed
Each programme and combination of programmes is assigned an optimumspin speed at the factory. This can be adjusted to suit individual needs.
Increasing the spinspeed:
To protect delicates, can only be used with suitableprogrammes (e.g. whites).
Reducing the spinspeed:
Can be used with all programmes.
Setting maximum spin speed
Hold the button depressed for 5seconds.
User settingsFN XXXXX XXXXXX
Press the button repeatedly until thecurrent spin speed appears in the plaintext display, e.g.:
Spinning at 1200 rpm
Press the 60 button repeatedly until thedesired setting appears in the plain textdisplay, e.g.:– The setting is taken over automatically
and must not be confirmed.
Spinning at 800 rpm
Press the button repeatedly until theplain text display goes out.
6 User settings
36

6.7 Hygiene recommendation
It is common nowadays to select programmes with temperatures below 60° Cin order to save energy. These achieve perfectly good results with lightlysoiled everyday washing. Washing almost exclusively with low temperatureswill result in the formation of foul smelling coatings in the appliance. Toprevent this, a «hygiene recommendation» indicates when it is recommend-able to wash with a wash temperature of at least 60° C, or to use the hygieneprogramme.
Switching hygiene recommendation on/off
Hold the button depressed for 5seconds.
User settingsFN XXXXX XXXXXX
Press the button repeatedly until thecurrent setting appears in the plain textdisplay, e.g.:
Hygiene recommendation
ON
Press the 60 button repeatedly until thedesired setting appears in the plain textdisplay, e.g.:– The setting is taken over automatically
and must not be confirmed.
Hygiene recommendation
OFF
Press the button repeatedly until theplain text display goes out.
6 User settings
37

6.8 Childproof lock
The childproof lock is to prevent children accidentally starting or stopping aprogramme. When the childproof lock is on, a programme can only be startedby pressing two buttons simultaneously.
Switching the childproof lock on/off
Hold the button depressed for 5seconds.
User settingsFN XXXXX XXXXXX
Press the button repeatedly until thecurrent setting appears in the plain textdisplay, e.g.:
Childproof lockOFF
Press the 60 button.– The setting is taken over automatically
and must not be confirmed.
Childproof lock ON
Press the button repeatedly until theplain text display goes out.
6.9 Automatic door opener
If the automatic door opener is switched on, the appliance door opens auto-matically at the end of the programme. Otherwise it remains closed and can
be opened by pressing the or button.
Switching the automatic door opener on/off
Hold the button depressed for5 seconds.
User settingsFN XXXXX XXXXXX
Press the button repeatedly until thecurrent setting appears in the plain textdisplay, e.g.:
Automatic door opener OFF
Press the 60 button.– The setting is taken over automatically
and must not be confirmed.
Automaticdoor opener ON
Press the button repeatedly until theplain text display goes out.
6 User settings
38
6.10 Loosening up the washing
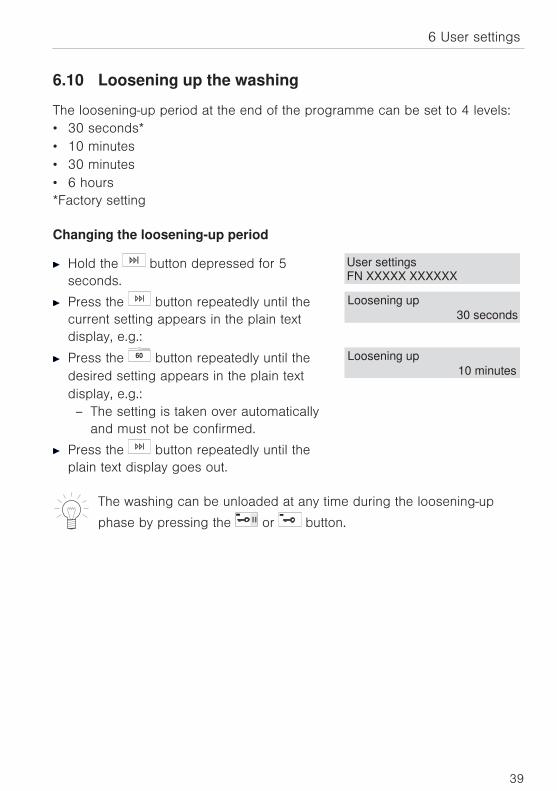
The loosening-up period at the end of the programme can be set to 4 levels:• 30 seconds*• 10 minutes• 30 minutes• 6 hours*Factory setting
Changing the loosening-up period
Hold the button depressed for 5seconds.
User settingsFN XXXXX XXXXXX
Press the button repeatedly until thecurrent setting appears in the plain textdisplay, e.g.:
Loosening up
30 seconds
Press the 60 button repeatedly until thedesired setting appears in the plain textdisplay, e.g.:– The setting is taken over automatically
and must not be confirmed.
Loosening up
10 minutes
Press the button repeatedly until theplain text display goes out.
The washing can be unloaded at any time during the loosening-up
phase by pressing the or button.
6 User settings
39
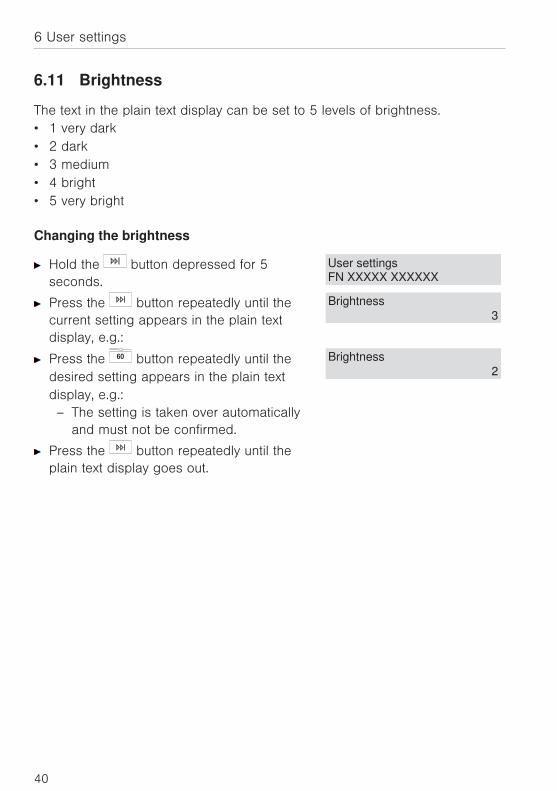
6.11 Brightness
The text in the plain text display can be set to 5 levels of brightness. • 1 very dark• 2 dark• 3 medium• 4 bright• 5 very bright
Changing the brightness
Hold the button depressed for 5seconds.
User settingsFN XXXXX XXXXXX
Press the button repeatedly until thecurrent setting appears in the plain textdisplay, e.g.:
Brightness
3
Press the 60 button repeatedly until thedesired setting appears in the plain textdisplay, e.g.:– The setting is taken over automatically
and must not be confirmed.
Brightness
2
Press the button repeatedly until theplain text display goes out.
6 User settings
40
6.12 Restoring factory settings
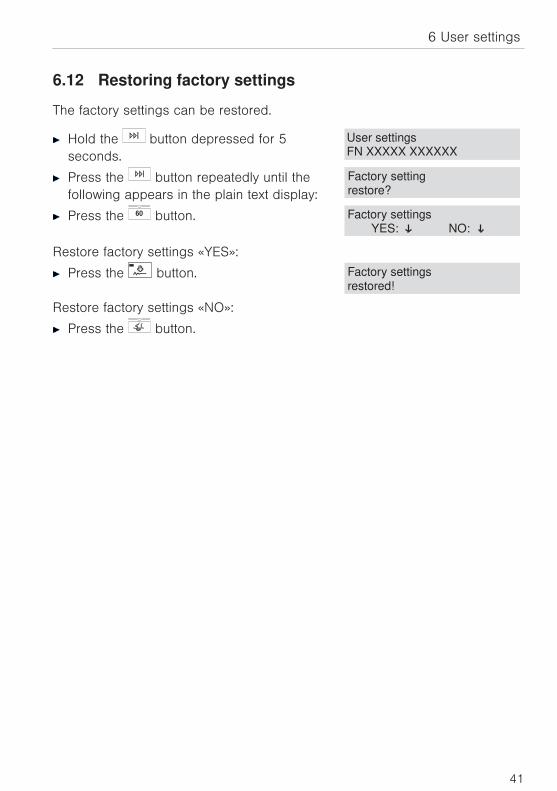
The factory settings can be restored.
Hold the button depressed for 5seconds.
User settingsFN XXXXX XXXXXX
Press the button repeatedly until thefollowing appears in the plain text display:
Factory settingrestore?
Press the 60 button.
Restore factory settings «YES»:
Factory settingsYES: NO:
Press the button. Factory settingsrestored!
Restore factory settings «NO»:
Press the button.
6 User settings
41
7 Washing
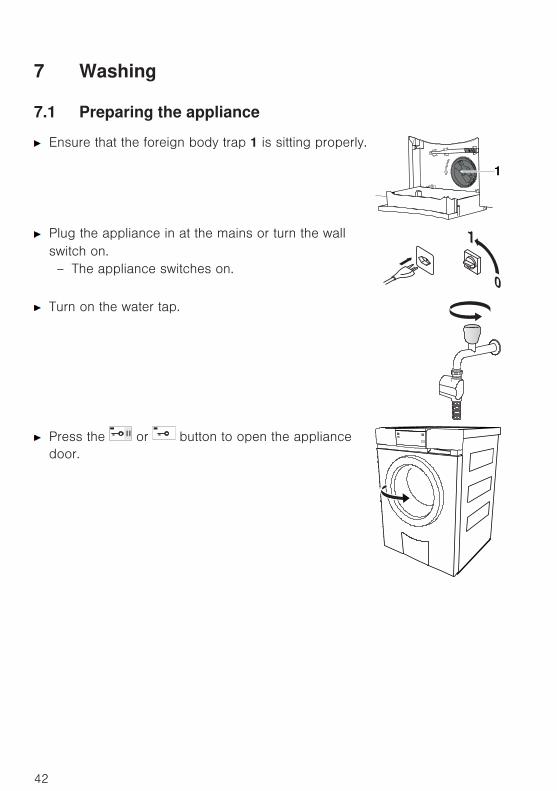
7.1 Preparing the appliance
Ensure that the foreign body trap 1 is sitting properly.
1
Plug the appliance in at the mains or turn the wallswitch on.– The appliance switches on.
1
0
1
0
Turn on the water tap.
Press the or button to open the appliancedoor.
42
7.2 Loading the appliance
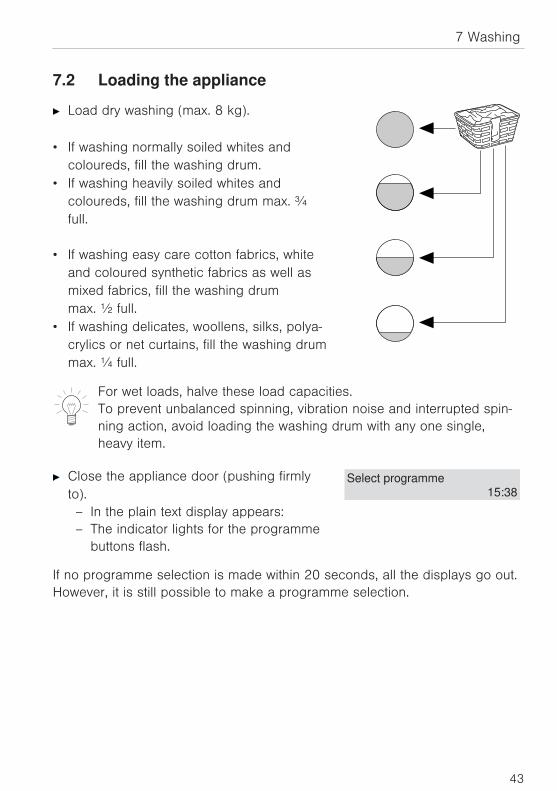
Load dry washing (max. 8 kg).
• If washing normally soiled whites andcoloureds, fill the washing drum.
• If washing heavily soiled whites andcoloureds, fill the washing drum max. ¾full.
• If washing easy care cotton fabrics, white
and coloured synthetic fabrics as well asmixed fabrics, fill the washing drummax. ½ full.
• If washing delicates, woollens, silks, polya-crylics or net curtains, fill the washing drummax. ¼ full.
For wet loads, halve these load capacities.To prevent unbalanced spinning, vibration noise and interrupted spin-ning action, avoid loading the washing drum with any one single,heavy item.
Close the appliance door (pushing firmlyto).– In the plain text display appears:– The indicator lights for the programme
buttons flash.
Select programme15:38
If no programme selection is made within 20 seconds, all the displays go out.However, it is still possible to make a programme selection.
7 Washing
43
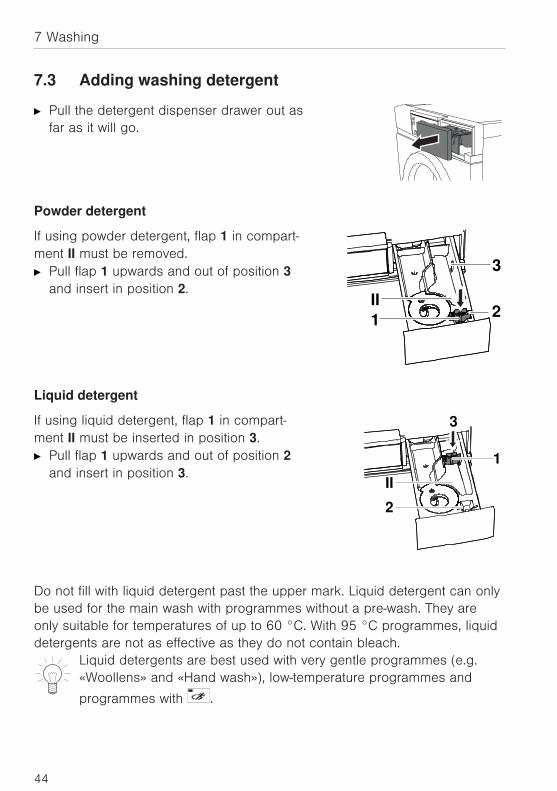
7.3 Adding washing detergent
Pull the detergent dispenser drawer out asfar as it will go.
Powder detergent
If using powder detergent, flap 1 in compart-ment II must be removed.
Pull flap 1 upwards and out of position 3and insert in position 2.
2
3
II
1
Liquid detergent
If using liquid detergent, flap 1 in compart-ment II must be inserted in position 3.
Pull flap 1 upwards and out of position 2and insert in position 3.
3
1
II
2
Do not fill with liquid detergent past the upper mark. Liquid detergent can onlybe used for the main wash with programmes without a pre-wash. They areonly suitable for temperatures of up to 60 °C. With 95 °C programmes, liquiddetergents are not as effective as they do not contain bleach.
Liquid detergents are best used with very gentle programmes (e.g.«Woollens» and «Hand wash»), low-temperature programmes and
programmes with .
7 Washing
44

Liquid detergent and a delayed start
If a delayed start has been selected, after loading the washing the liquid deter-gent should be added to a dosing aid (e.g. ball). It is important that the liquiddetergent does not spill onto the washing during the delayed start period,otherwise the washing could be damaged through a possible chemical reac-tion.
Detergent dosage
Adding too much washing detergent can cause excess foaming,giving a poor wash result and, in the worst case, causing damageto the appliance.
The amount of detergent required depends on the degree of soiling as well asthe wash load, the hardness of the water and the product being used. Followthe detergent manufacturer’s dosing instructions.The hardness of the water is measured using the French degree of water hard-ness (° fH) and is subdivided into three categories:
• Soft 0 °fH to 15 °fH
• Medium 15 °fH to 25 °fH
• Hard over 25 °fH
(NB Use water softener to reduce amount of washing detergent required.)
The local water authorities can provide information on the level of water hard-ness in your area.
7 Washing
45
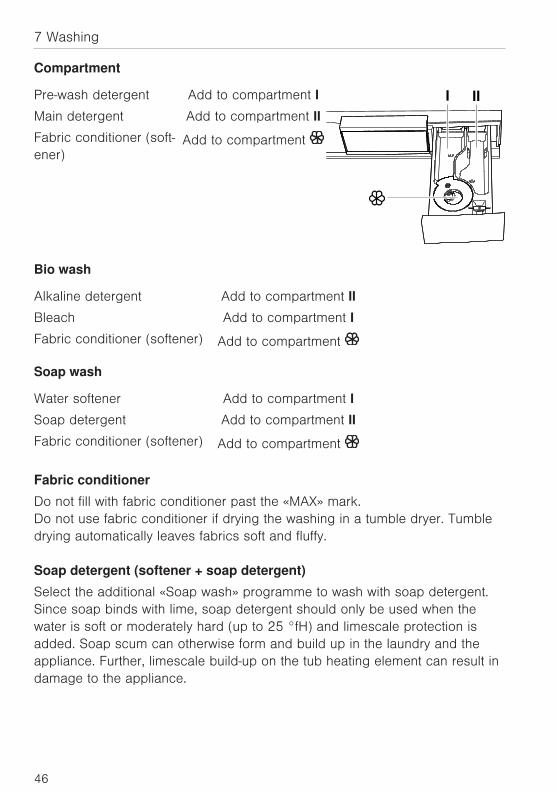
Compartment
Pre-wash detergent Add to compartment I I II
Main detergent Add to compartment II
Fabric conditioner (soft-ener)
Add to compartment
Bio wash
Alkaline detergent Add to compartment II
Bleach Add to compartment I
Fabric conditioner (softener) Add to compartment
Soap wash
Water softener Add to compartment I
Soap detergent Add to compartment II
Fabric conditioner (softener) Add to compartment
Fabric conditioner
Do not fill with fabric conditioner past the «MAX» mark.Do not use fabric conditioner if drying the washing in a tumble dryer. Tumbledrying automatically leaves fabrics soft and fluffy.
Soap detergent (softener + soap detergent)
Select the additional «Soap wash» programme to wash with soap detergent.Since soap binds with lime, soap detergent should only be used when thewater is soft or moderately hard (up to 25 °fH) and limescale protection isadded. Soap scum can otherwise form and build up in the laundry and theappliance. Further, limescale build-up on the tub heating element can result indamage to the appliance.
7 Washing
46

Dyeing textiles
Textiles can be dyed in the appliance using suitable dyeing agents. Pleasefollow the manufacturer’s safety instructions and warnings carefully.
Each wash programme starts with brief draining and for this reasonliquid dye components should be added after this.
After adding the wash detergent
Push the detergent dispenser drawer back in.Select main programme.
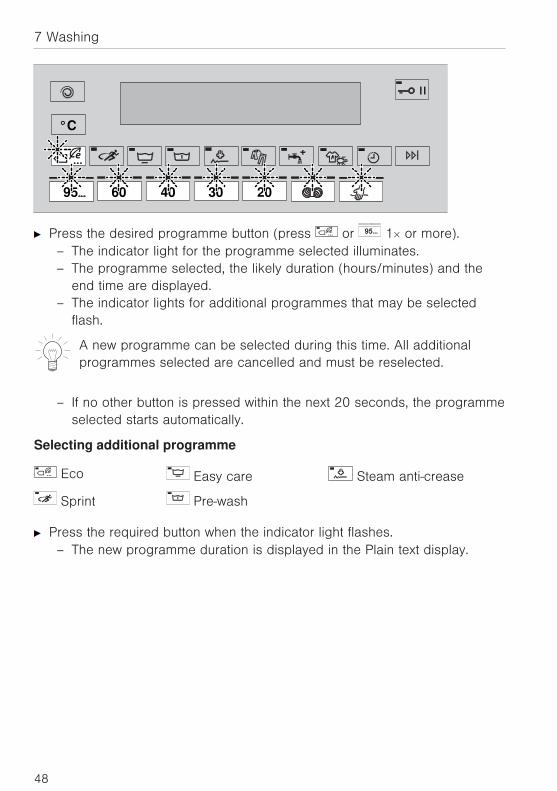
7.4 Selecting a programme
«Press and go»A main programme can be started at the press of a single button. All thenecessary settings for the programme are provided automatically. Select or deselect any additional programmes or functions by pressing therelevant buttons.If no other button is pressed within the next 20 seconds, the programmeselected starts automatically.
Use the programme overview to determine which programme is themost suitable for your washing.
Selecting main programmeClose the appliance door. – The indicator lights for the programme buttons flash.
7 Washing
47
°C
60 40 30 2095
Press the desired programme button (press or 95 1× or more).– The indicator light for the programme selected illuminates.– The programme selected, the likely duration (hours/minutes) and the
end time are displayed.– The indicator lights for additional programmes that may be selected
flash.
A new programme can be selected during this time. All additionalprogrammes selected are cancelled and must be reselected.
– If no other button is pressed within the next 20 seconds, the programmeselected starts automatically.
Selecting additional programme
Eco Easy care Steam anti-crease
Sprint Pre-wash
Press the required button when the indicator light flashes. – The new programme duration is displayed in the Plain text display.
7 Washing
48
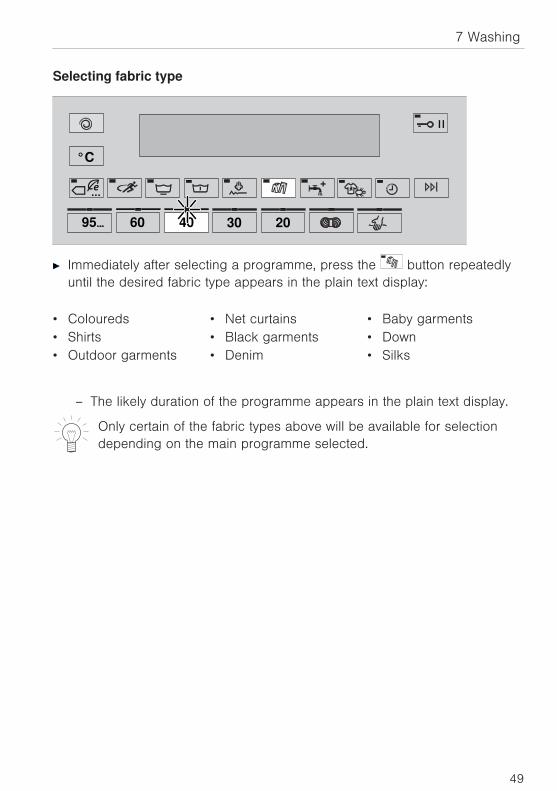
Selecting fabric type
°C
95 60 40 30 20
Immediately after selecting a programme, press the button repeatedlyuntil the desired fabric type appears in the plain text display:
• Coloureds • Net curtains • Baby garments• Shirts • Black garments • Down• Outdoor garments • Denim • Silks
– The likely duration of the programme appears in the plain text display.
Only certain of the fabric types above will be available for selectiondepending on the main programme selected.
7 Washing
49
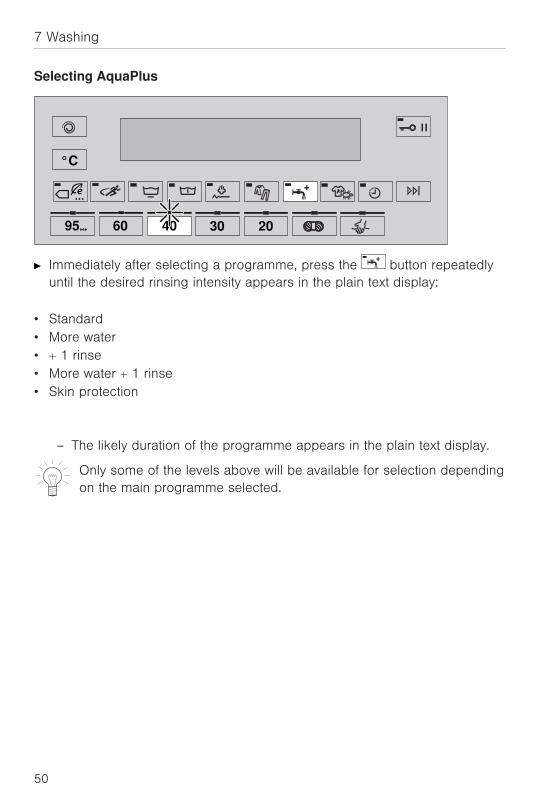
Selecting AquaPlus
°C
95 60 40 30 20
Immediately after selecting a programme, press the button repeatedlyuntil the desired rinsing intensity appears in the plain text display:
• Standard• More water• + 1 rinse• More water + 1 rinse• Skin protection
– The likely duration of the programme appears in the plain text display.
Only some of the levels above will be available for selection dependingon the main programme selected.
7 Washing
50

Selecting degree of soiling / anti-mite / soaking
°C
95 60 40 30 20
Immediately after selecting a programme, press the button repeatedlyuntil the desired degree of soiling appears in the plain text display:
• Soiling light • Soiling heavy • Soaking• Soiling medium • Anti-mite
– The likely duration of the programme appears in the plain text display.
Anti-mite can only be selected with temperatures 95 and 60 .
Setting the soaking timeSelect «Soaking» as the degree of soiling.
Press the button repeatedly until the desired soaking time appears inthe plain text display.
The soaking time can be set at intervals of 30 minutes, starting initially at 2hours and going down to 30 minutes and then at 6 hours and going down to30 minutes.
The soaking and delayed start functions cannot be used at the sametime.If the water used for soaking is not to be used for the main wash, pre-
wash has also to be selected using the button.
7 Washing
51

Changing the spin speed
°C
95 60 40 30 20
Immediately after selecting a programme, press the button repeatedlyuntil the desired spin speed appears in the plain text display.
It is possible to change the current setting while a programme isrunning.
The recommended and maximum settable spin speeds depend on theprogramme selected.With «No spinning / Stop after rinsing», the washing remains lying in the waterafter the final rinse. There is no spinning nor intermediate spinning.
7 Washing
52

Changing the temperature
°C
95 60 40 30 20
Immediately after selecting a programme, press the °C button repeatedlyuntil the desired temperature appears in the Plain text display.
It is still possible to change the temperature once the programme hasstarted running.
7 Washing
53

Selecting a delayed start
°C
95 60 40 30 20
Immediately after programme selection, hold the button depressed orpress repeatedly until until the desired programme-end time (max. 24hours) appears in the plain text display. – The Plain text display goes dark.– When the the time set is up, the programme selected starts automati-
cally.
Washing can be added at any time.
The time remaining to the delayed start can be reduced (in 30-minute inter-
vals) to null by repeatedly pressing the button.
Selecting bio wash / soap wash
Select main programme.
Press the button 2×. Bio wash
Wash detergent + bleach
1h15
Press the button 3×. Soap wash 1h15Softener + soap
7 Washing
54

Selecting separate rinsing / separate spinning
Select main programme.
Press the button 1×. Rinsing 0h4015:38
Press the button 2×. Final rinse 0h18
15:16
Press the button 3×. Final spin 0h1215:10
Opening the appliance door during operationThe appliance door can only be opened if the water level and temperature arestill low and there is no spinning in progress. As long as the indicator light for
the or button is illuminated, the appliance door can be opened.
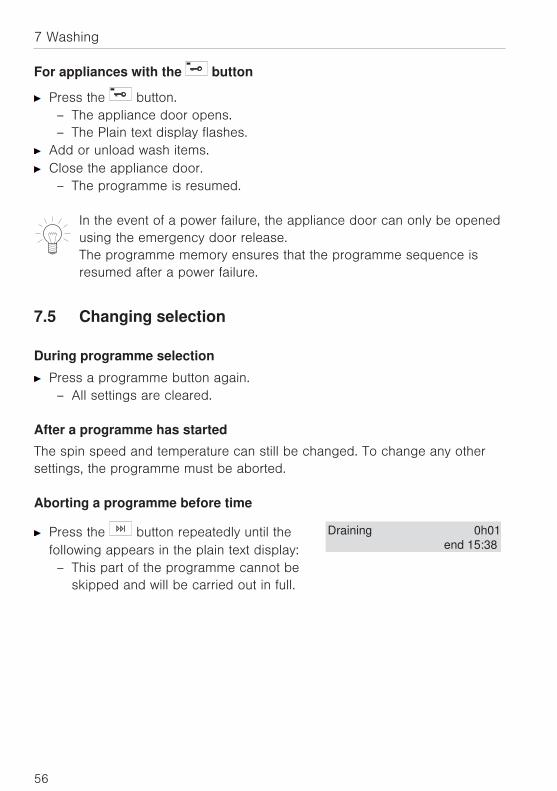
For appliances with the button
Press the button 1×.– The appliance changes over to the «Pause» mode.
Press the button again.– The appliance door opens.– The Plain text display flashes.
Add or unload wash items.Close the appliance door.– The programme is resumed.
7 Washing
55
For appliances with the button
Press the button.– The appliance door opens.– The Plain text display flashes.
Add or unload wash items.Close the appliance door.– The programme is resumed.
In the event of a power failure, the appliance door can only be openedusing the emergency door release.The programme memory ensures that the programme sequence isresumed after a power failure.
7.5 Changing selection
During programme selection
Press a programme button again. – All settings are cleared.
After a programme has started
The spin speed and temperature can still be changed. To change any othersettings, the programme must be aborted.
Aborting a programme before time
Press the button repeatedly until thefollowing appears in the plain text display:– This part of the programme cannot be
skipped and will be carried out in full.
Draining 0h01
end 15:38
7 Washing
56
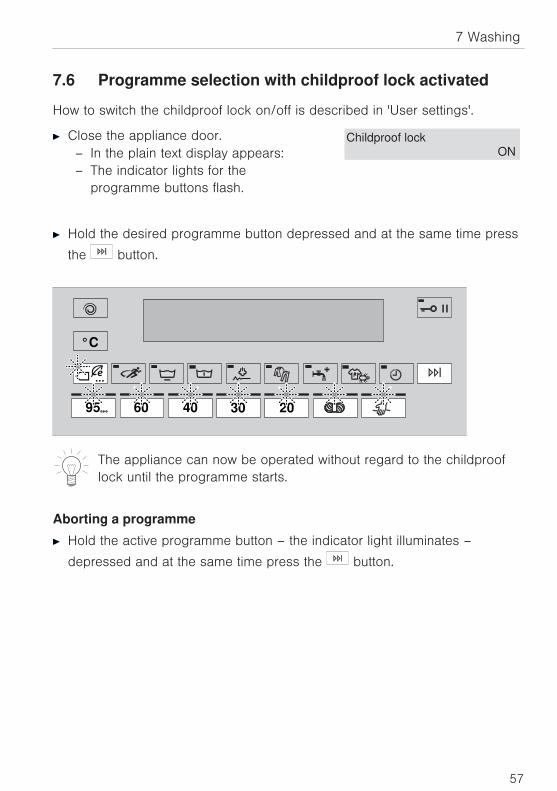
7.6 Programme selection with childproof lock activated
How to switch the childproof lock on/off is described in 'User settings'.
Close the appliance door. – In the plain text display appears:– The indicator lights for the
programme buttons flash.
Childproof lock ON
Hold the desired programme button depressed and at the same time press
the button.
°C
95 60 40 30 20
The appliance can now be operated without regard to the childprooflock until the programme starts.
Aborting a programme
Hold the active programme button – the indicator light illuminates –
depressed and at the same time press the button.
7 Washing
57
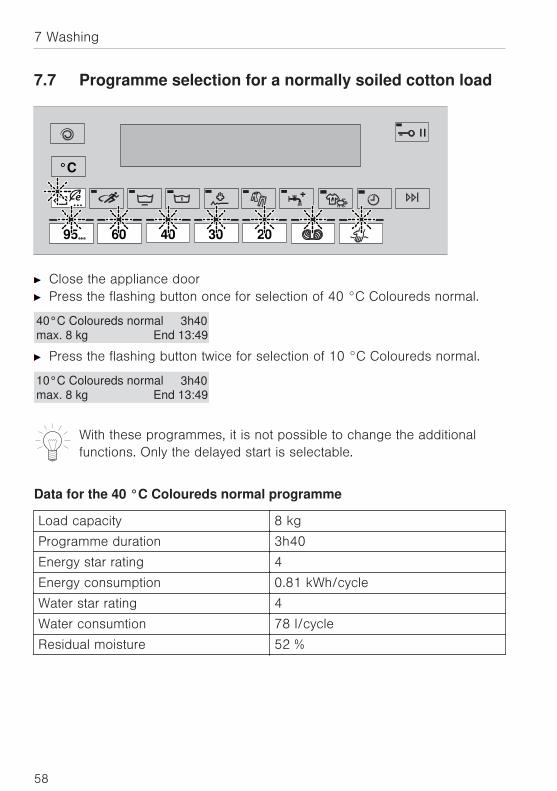
7.7 Programme selection for a normally soiled cotton load
°C
60 40 30 2095
Close the appliance doorPress the flashing button once for selection of 40 °C Coloureds normal.
40°C Coloureds normal 3h40End 13:49max. 8 kg
Press the flashing button twice for selection of 10 °C Coloureds normal.
10°C Coloureds normal 3h40End 13:49max. 8 kg
With these programmes, it is not possible to change the additionalfunctions. Only the delayed start is selectable.
Data for the 40 °C Coloureds normal programme
Load capacity 8 kg
Programme duration 3h40
Energy star rating 4
Energy consumption 0.81 kWh/cycle
Water star rating 4
Water consumtion 78 l/cycle
Residual moisture 52 %
7 Washing
58
7.8 End of programme
Loosening up the washing
Shortly before the end of the programme, the washing is loosened up. Thistakes about 1–2 minutes. If steam anti-crease has been selected, the loos-ening-up period is extended to about 60 minutes to prevent further creasing.
Press the or button to unload the washing at any time duringthe loosening-up phase.
With «Automatic door opener OFF»
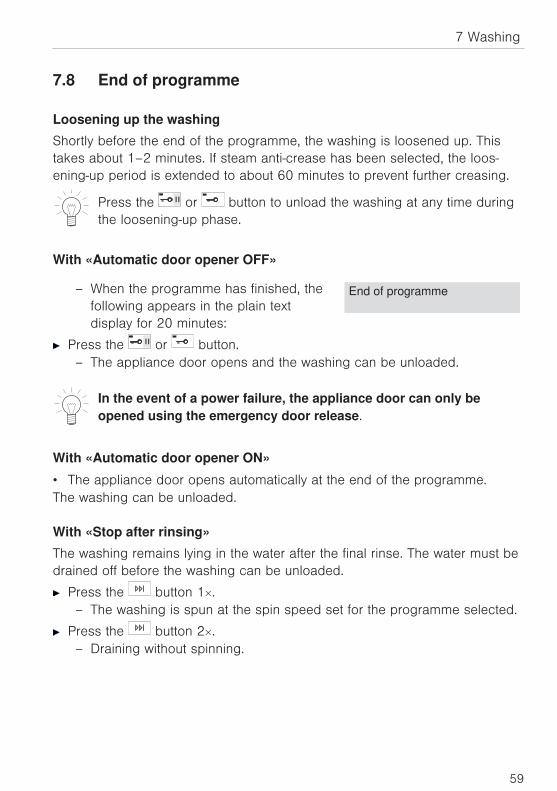
– When the programme has finished, thefollowing appears in the plain textdisplay for 20 minutes:
End of programme
Press the or button.– The appliance door opens and the washing can be unloaded.
In the event of a power failure, the appliance door can only beopened using the emergency door release.
With «Automatic door opener ON»
• The appliance door opens automatically at the end of the programme.The washing can be unloaded.
With «Stop after rinsing»
The washing remains lying in the water after the final rinse. The water must bedrained off before the washing can be unloaded.
Press the button 1×.– The washing is spun at the spin speed set for the programme selected.
Press the button 2×.– Draining without spinning.
7 Washing
59

With the hygiene recommendation display
Hygiene recommendation:at least 60 °C programme /
or select appliancehygiene
With one of the next wash cycles carry out a wash with at least 60°C.
or:Unload the washing.
Press the 95 4× button.– The «Appliance hygiene» programme starts.
7.9 At the end of the wash day
Clean the detergent dispenser drawer if necessary.After finishing washing for the day, remove anydeposits or foreign bodies from out of the door seal Push the appliance door to, but do not close.– This allows the washing drum and the door seal
to dry.
7 Washing
60
8 Care and maintenanceUsing the correct dosage of detergent will automatically clean the inside of theappliance. Immediately wipe away all traces of detergent with a soft cloth toavoid staining.
8.1 Cleaning the detergent dispenser drawer
If the correct dosage of detergent is used, the compartments in the detergentdispenser drawer are cleaned by the water flowing in. Wash out the detergentcompartments if particularly soiled.
Cleaning the detergent compartments
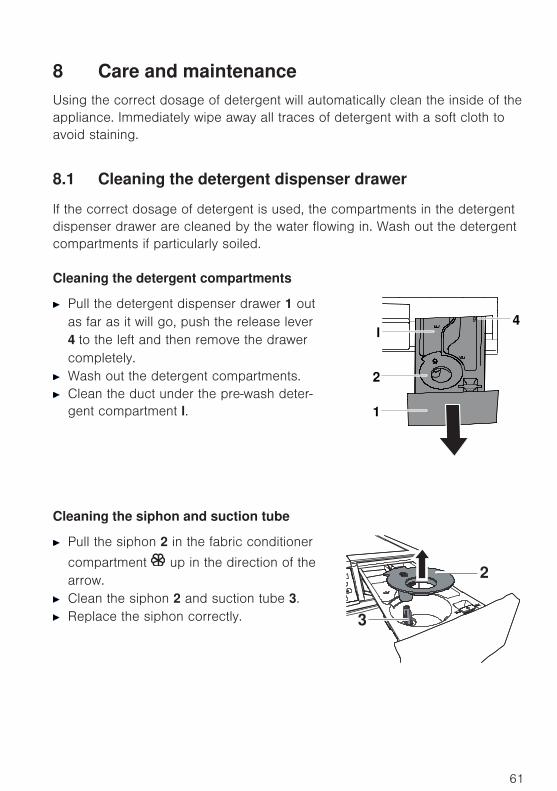
Pull the detergent dispenser drawer 1 outas far as it will go, push the release lever4 to the left and then remove the drawercompletely.Wash out the detergent compartments.Clean the duct under the pre-wash deter-gent compartment l.
2
1
4
l
Cleaning the siphon and suction tube
Pull the siphon 2 in the fabric conditioner
compartment up in the direction of thearrow. Clean the siphon 2 and suction tube 3.Replace the siphon correctly. 3
2
61

8.2 Cleaning the water inlet filter
To avoid blockages, the filter 1 in the water inlet mustbe periodically checked and, if necessary, cleaned.
1
The water inlet should be tested for leaks following maintenance work.
8 Care and maintenance
62

8.3 Emergency draining
The water in the appliance may be hot. Scalding hazard! Allow tocool before emergency draining.In the event of a blocked water outlet or drain pump, a malfunctionor a power failure, if there is water still in the appliance it must bedrained off as follows:
Open the drain tray 1 by pressing it atthe bottom.
1
1
1
2
1 or:
Open the drain tray 1 with the liquiddetergent flap.
Fold the drain tray 1 right down.– The drain tray also functions as a
receptacle for collecting the waterbeing drained off.
Release the foreign body trap 2slightly by slowly turning it anti-clock-wise. Steadily drain off the water.
From time to time the drain traymay have to be emptied.
Close the foreign body trap by turningit clockwise and remove the drain tray1 from the front.
Empty the drain tray and then put itback in position (push it straight inuntil it clicks into position).
When draining off the water, the drain tray can be removed and alarger receptacle used in its place. The appliance can hold up to 30litres of water.
8 Care and maintenance
63
8.4 Cleaning the foreign body trap
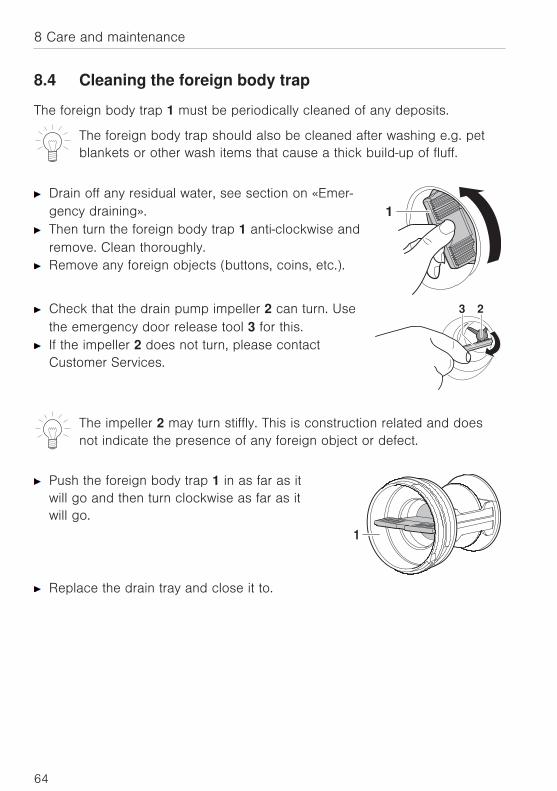
The foreign body trap 1 must be periodically cleaned of any deposits.
The foreign body trap should also be cleaned after washing e.g. petblankets or other wash items that cause a thick build-up of fluff.
Drain off any residual water, see section on «Emer-gency draining».Then turn the foreign body trap 1 anti-clockwise andremove. Clean thoroughly.Remove any foreign objects (buttons, coins, etc.).
1
Check that the drain pump impeller 2 can turn. Usethe emergency door release tool 3 for this.If the impeller 2 does not turn, please contactCustomer Services.
23
The impeller 2 may turn stiffly. This is construction related and doesnot indicate the presence of any foreign object or defect.
Push the foreign body trap 1 in as far as itwill go and then turn clockwise as far as itwill go.
1
Replace the drain tray and close it to.
8 Care and maintenance
64
9 Trouble-shooting
9.1 What to do if …
This section lists faults that can be solved simply by following the instructionsgiven. If another fault is displayed or the fault cannot be remedied, please callCustomer Services.
Before calling Customer Services, please note down the error
message in full. FXX / EXX see instructions
FN XXXXX XXXXXX
... in the display appearsA2 Check water outlet
Possible cause Solution
• The foreign body trap or drainpump is blocked.
• The drain hose is bent orkinked.
• The outlet or drain trap isclogged.
Resolve the cause of the problem.Cancel the error message by pressing
the button.Restart the programme.
... in the display appears
A3 Foreign body trap clean
Possible cause Solution
• The foreign body trap isclogged.
• The circulation nozzle isclogged.
Resolve the cause of the problem.Cancel the error message by pressing
the button.Restart the programme.
65

... in the display appearsA5 Spin stop:
Unbalanced load
Possible cause Solution
• Large items are unevenlydistributed in the washingdrum.
Wash large and small items together toreduce the possibility of unbalancedloads forming.
• Pillows or similar items in thewash.
Remove the pillows.Spin the washing again.Spin the pillows separately.
• Wash items are tangled. Separate the wash items.Fasten duvet covers and pillow cases.Spin the washing again.
... in the display appearsA6 Foreign body trap
check
Possible cause Solution
• The foreign body trap ismissing or is not sittingcorrectly.
Ensure the foreign body trap is sittingcorrectly.Cancel the error message by pressing
the button.Restart the programme.
9 Trouble-shooting
66

... in the display appearsA9 Check water inlet?
Possible cause Solution
• The water tap is turned off.• The mesh filter in the water
connection is clogged.• Interruption in water supply.• The water pressure is too low.
Remove the cause of the problem orwait until the water supply is restored.Cancel the error message by pressing
the button.Restart the programme.
... in the display appearsF6 / E77 see instructions
FN XXXXX XXXXXX
Possible cause Solution
• Related to anti-leak protection. Turn off the water tap.Note down the error message in full(message, F and E number).Cancel the error message by pressing
the button.Call Customer Services.
9 Trouble-shooting
67
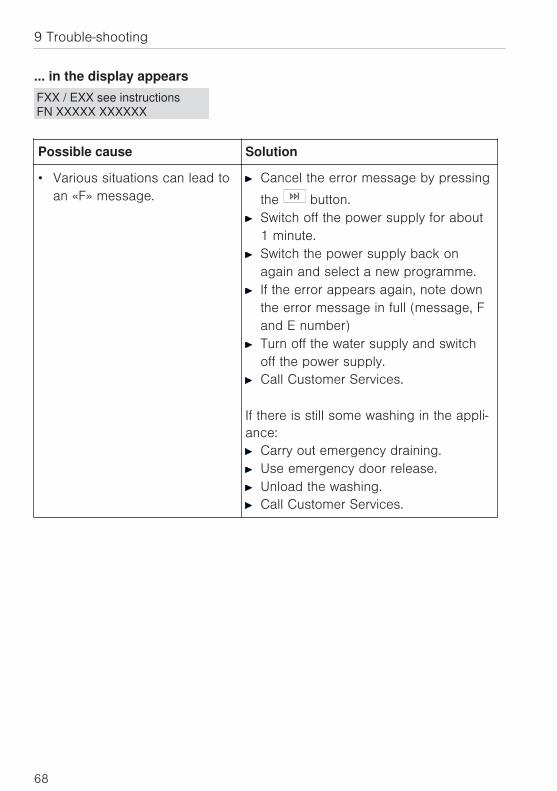
... in the display appearsFXX / EXX see instructions
FN XXXXX XXXXXX
Possible cause Solution
• Various situations can lead toan «F» message.
Cancel the error message by pressing
the button.Switch off the power supply for about1 minute.Switch the power supply back onagain and select a new programme.If the error appears again, note downthe error message in full (message, Fand E number)Turn off the water supply and switchoff the power supply.Call Customer Services.
If there is still some washing in the appli-ance:
Carry out emergency draining.Use emergency door release.Unload the washing.Call Customer Services.
9 Trouble-shooting
68
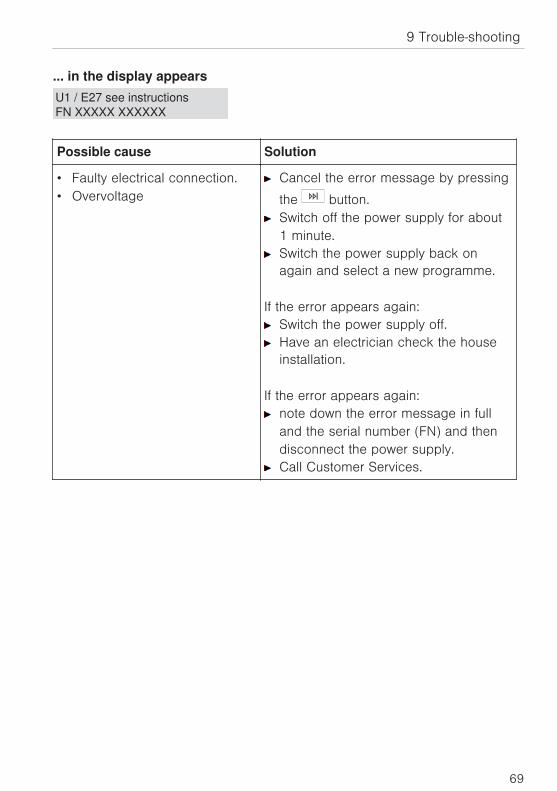
... in the display appearsU1 / E27 see instructions
FN XXXXX XXXXXX
Possible cause Solution
• Faulty electrical connection.• Overvoltage
Cancel the error message by pressing
the button.Switch off the power supply for about1 minute.Switch the power supply back onagain and select a new programme.
If the error appears again:Switch the power supply off.Have an electrician check the houseinstallation.
If the error appears again:note down the error message in fulland the serial number (FN) and thendisconnect the power supply.Call Customer Services.
9 Trouble-shooting
69
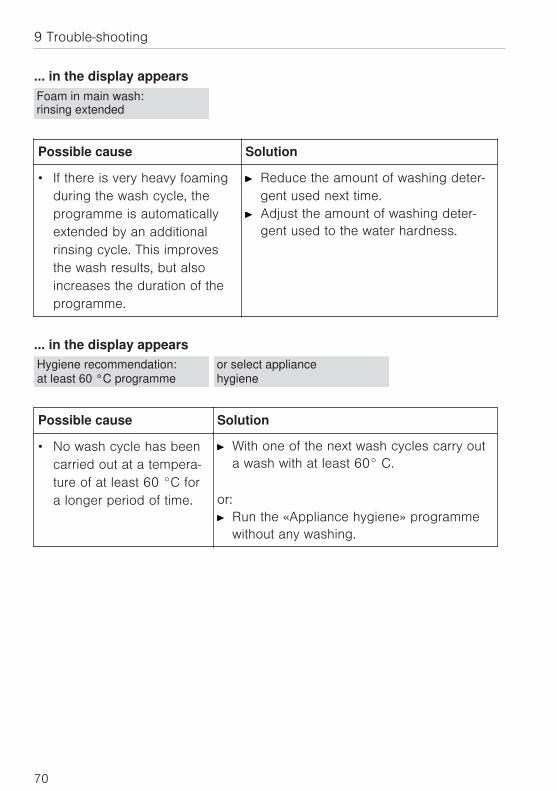
... in the display appearsFoam in main wash:rinsing extended
Possible cause Solution
• If there is very heavy foamingduring the wash cycle, theprogramme is automaticallyextended by an additionalrinsing cycle. This improvesthe wash results, but alsoincreases the duration of theprogramme.
Reduce the amount of washing deter-gent used next time.Adjust the amount of washing deter-gent used to the water hardness.
... in the display appearsHygiene recommendation:at least 60 °C programme
or select appliancehygiene
Possible cause Solution
• No wash cycle has beencarried out at a tempera-ture of at least 60 °C fora longer period of time.
With one of the next wash cycles carry outa wash with at least 60° C.
or:Run the «Appliance hygiene» programmewithout any washing.
9 Trouble-shooting
70

... the programme takes significantly longer than indicated
Possible cause Solution
• Using too much washingdetergent. Lengtheningthe rinsing time.
Reduce the amount of washing detergentused next time.
• Large unbalanced load inthe washing drum.
Wash large and small items together toreduce the possibility of unbalanced loadsforming.
• Inlet water very cold.Heating is extended.
... in the display appearsInlet water very coldheating extended
Possible cause Solution
• Inlet water very cold.Heating is extended.
9 Trouble-shooting
71
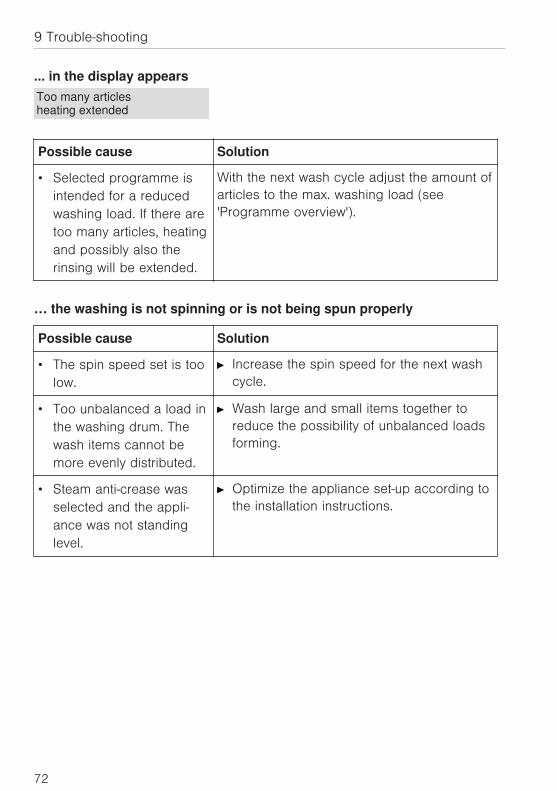
... in the display appearsToo many articlesheating extended
Possible cause Solution
• Selected programme isintended for a reducedwashing load. If there aretoo many articles, heatingand possibly also therinsing will be extended.
With the next wash cycle adjust the amount ofarticles to the max. washing load (see'Programme overview').
… the washing is not spinning or is not being spun properly
Possible cause Solution
• The spin speed set is toolow.
Increase the spin speed for the next washcycle.
• Too unbalanced a load inthe washing drum. Thewash items cannot bemore evenly distributed.
Wash large and small items together toreduce the possibility of unbalanced loadsforming.
• Steam anti-crease wasselected and the appli-ance was not standinglevel.
Optimize the appliance set-up according tothe installation instructions.
9 Trouble-shooting
72
... in the display appearsLarge unbalanced loadspin extended
Possible cause Solution
• Large unbalance in thewashing drum. The appli-ance tries to improve thedistribution of the washload. The final spin isextended.
Wash large and small items together toreduce the possibility of unbalanced loadsforming.
… vibrating heavily when spinning
Possible cause Solution
• The transportation lockhas not been removed.
Remove transportation lock.
• The feet of the applianceare not properly adjusted.
Optimize the appliance set-up according tothe installation instructions.
• The load could not beoptimally balanced in thewashing drum. This is nota malfunction.
Wash large and small items together toreduce the possibility of unbalanced loadsforming.
… at the end of the programme, the appliance door cannot be opened bypressing the door opener button
Possible cause Solution
• The appliance door isstuck.
Press hard against the lock side of theappliance door (i.e. front edge of appliancedoor).Some text appears in the plain text display.
Press the or button.
• An interruption in thepower supply.
Use emergency door release.
9 Trouble-shooting
73
… at the end of the programme water sounds can be heard when thewashing drum is turned by hand
Possible cause Solution
• The water that the vaneswere filled with tocompensate the unbal-anced load could not becompletely drained beforethe end of theprogramme.
No action is necessary. The expelled water isautomatically pumped off and there are nonegative consequences.
... traces of washing detergent left behind in the washing detergentcompartment
Possible cause Solution
• Damp or lumpy washingdetergent.
Store washing detergent in a dry place.
• The washing detergentcompartment was dampand a delayed start wasselected.
Wipe the washing detergent compartmentdry before adding the detergent.
• The water flow pressure istoo low.
Open water tap fully.
• The water inlet is scaledup.
Check the water supply and, if necessary,clean the filter.Clean nozzles above detergent dispenserdrawer.
• The liquid detergent flapwas inserted.
Remove the flap and stow away.
9 Trouble-shooting
74

... traces of fabric conditioner or water left behind in the fabric conditionercompartment
Possible cause Solution
• The siphon in the fabricconditioner compartmentis missing or is not inplace correctly.
Ensure the siphon is in place correctly.
• The siphon or suctiontube is clogged.
Clean the siphon and suction tube.
… the washing load is still dry at the end of the programme and no errormessage is displayed
Possible cause Solution
• «Demo mode» is acti-vated.
Open the appliance door.
Hold the 95 and 40 buttons depressed
Simultaneously press the button.
- In the plain text display appears:Demo mode
ON
Press the 60 button.
- In the plain text display appears:Demo mode
OFF
Press the button.
9 Trouble-shooting
75
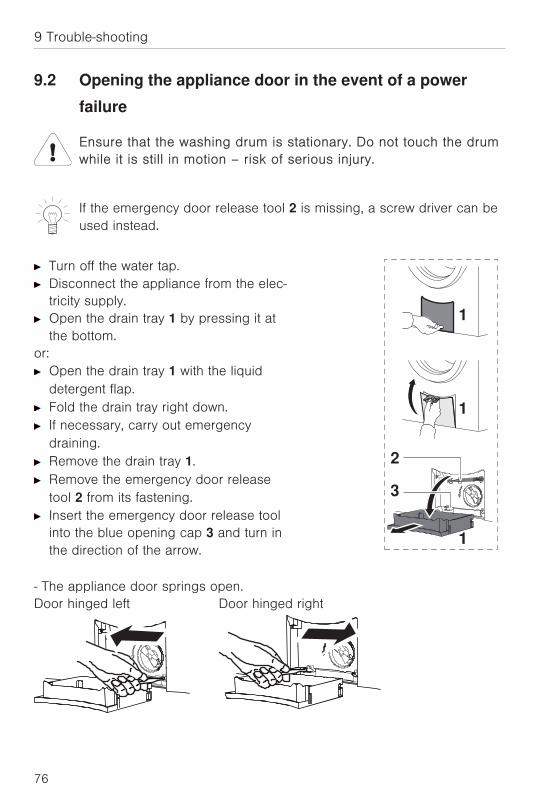
9.2 Opening the appliance door in the event of a power
failure
Ensure that the washing drum is stationary. Do not touch the drumwhile it is still in motion – risk of serious injury.
If the emergency door release tool 2 is missing, a screw driver can beused instead.
Turn off the water tap.Disconnect the appliance from the elec-tricity supply.
1
3
2
1
1Open the drain tray 1 by pressing it atthe bottom.
or:Open the drain tray 1 with the liquiddetergent flap.Fold the drain tray right down.If necessary, carry out emergencydraining.Remove the drain tray 1.Remove the emergency door releasetool 2 from its fastening.Insert the emergency door release toolinto the blue opening cap 3 and turn inthe direction of the arrow.
- The appliance door springs open.Door hinged left Door hinged right
9 Trouble-shooting
76

10 Washing tips
10.1 Fabric care symbols
To wash items correctly, please follow the fabric care symbols on the labels ofthe wash items.
10.2 Washing detergent
The wash temperature selected should agree with the recommended tempera-ture range of the washing detergent to ensure the washing detergent is at itsmost effective.
10.3 General tips
• Wash white and coloured textiles separately. • Empty pockets and turn inside out. Remove any foreign objects (coins,
nails, paper clips, etc.).• Empty and brush out pockets of work overalls worn in the metal industry
(metal shavings can damage the washing and cause rust stains).• Fasten duvet covers and pillow cases; close zips and hook and eye
fasteners; fasten cloth belts and apron ties.• Wash smaller items (e.g. nylon tights, belts) and items with zips and hooks
in a washing net or cushion cover.• Remove stains before washing using a suitable stain remover.• Pre-treat heavily soiled areas (collars, cuffs, etc.) with soap, special deter-
gent or paste.
• For medium or heavily soiled washing, select the additional pre-washprogramme or select a heavier degree of soiling.
• Wash woollens and other textiles with the fabric care label using the
main hand wash programme only. Use detergent suitable for woollensand delicates.
• Textiles, such as dog or horse blankets, that are covered in animal hairshould be brushed out before washing
77
10.4 Net curtains
If washing curtains made from mixed or man-made fibres: • Ask the retailer whether the curtains are machine washable and, if so, at
what water temperature.• Fill the washing drum only a quarter full.• Tie up metal rollers and plastic sliders using an open weave fabric.• Use a mild detergent (use sparingly due to foaming).• With older, faded curtains, the material is weaker and may be easily
damaged if machine washed.• A special programme is available for gently washing net curtains.
Select main programme 20 , 30 or 40 .
Press the button repeatedly until «Net curtains» appears in the plaintext display.
10 Washing tips
78
10.5 Saving energy and water
• Use the maximum wash load capacity of the particular programme. • Select «Pre-wash» or «Soaking» only for washing that is heavily soiled or
stained.
• For lightly soiled washing without staining select the main 20 programmeor the additional «Sprint» function.
• Select the additional Eco function if programme duration plays no role.
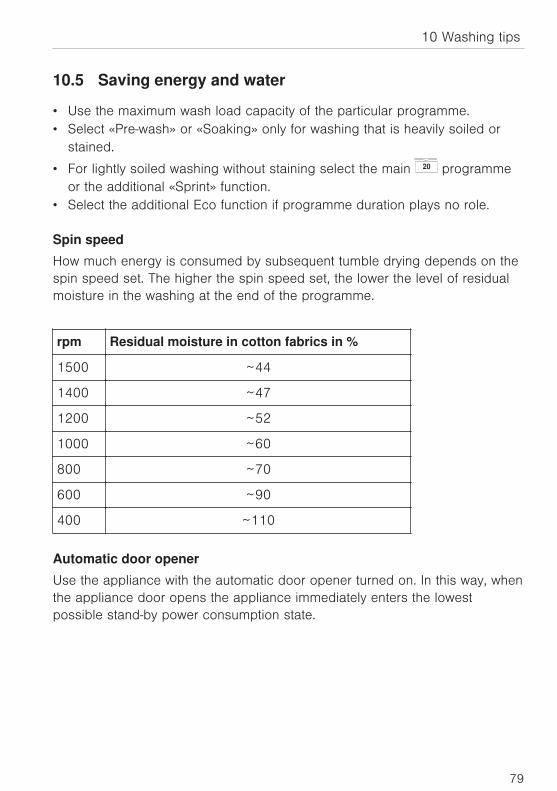
Spin speed
How much energy is consumed by subsequent tumble drying depends on thespin speed set. The higher the spin speed set, the lower the level of residualmoisture in the washing at the end of the programme.
rpm Residual moisture in cotton fabrics in %
1500 ~44
1400 ~47
1200 ~52
1000 ~60
800 ~70
600 ~90
400 ~110
Automatic door opener
Use the appliance with the automatic door opener turned on. In this way, whenthe appliance door opens the appliance immediately enters the lowestpossible stand-by power consumption state.
10 Washing tips
79

10.6 Unsatisfactory wash results
White residue on washing
Possible cause Solution
• Despite thorough rinsing,badly soluble compounds(zeolites) in the detergentcan be left on thewashing.
Shake out or brush the wash items.Wash the items again with just a littlewashing detergent.Use a liquid detergent that does notcontain zeolites.Select the additional «Black garments»programme.
Grey residue on washing
Possible cause Solution
• Grease and dirt particleshave not been removedfrom fabric effectively.
• Residue from detergent,limescale and dirt.
Use more detergent next time.Use heavy-duty washing detergent.Adjust amount of detergent to water hard-ness and degree of soiling of washing.
• Overloaded washingdrum.
Put less laundry into the washing drum.
Washing feels hard to the touch
Possible cause Solution
• Poor rinse effect from«very soft» water (below15 °fH).
Select the «Soft water» user setting.
10 Washing tips
80

Unsatisfactory wash result using detergent for coloureds
Possible cause Solution
• Exceptionally heavilysoiled washing.
Select stronger wash programme, e.g.degree of soiling «heavy».
• Washing detergent useddoes not contain bleach.Fruit, coffee and teastains cannot beremoved.
Use washing detergent containing bleach.
Unsatisfactory wash result using liquid detergent
Possible cause Solution
• Liquid detergent useddoes not contain bleach.Fruit, coffee and teastains cannot beremoved.
Use washing detergent containing bleach.
Soap deposits on washing
Possible cause Solution
• Water too hard. Only use soap detergent if the water hard-ness does not exceed 25 °fH.
Colour run
Possible cause Solution
• Non-fast colours in thewash.
Wash white and coloured textiles sepa-rately.Follow the fabric care instructions on theitems of washing.
• Objects in the washwhose colour has run.
Empty garment pockets.
10 Washing tips
81

Unsatisfactory rinsing performance
Possible cause Solution
• Too much washing deter-gent.
Adjust washing detergent dosage to waterhardness and degree of soiling.
• Very «soft» water (below15 °fH).
Set to the soft water setting (see 'Usersettings').
Fabric stains
Possible cause Solution
• Rust stains.• Chemical effect.
Brush out work overall pockets.Residues from hair care products,cosmetics and plants can react with thesuds to cause a chemical reaction that canresult in staining.Wash items with metal parts separately.
Holes, rips or tears
Possible cause Solution
• Washing items with zipsor hooks (e.g. bras)open.
Fasten zip fasteners and hooks beforewashing.Wash delicates in a laundry bag or pillowcase.Turn garment pockets inside out.
• Chemical effect ofwashing detergent.
• Fabric quality, wear andtear, weathering of fibres.
Do not put washing detergent directly on tofabrics.
• Washing drum damagedby foreign objects (e.g.nails, paper clips, brahooks).
Inspect the washing drum for foreignobjects and for damage.Remove foreign objects.Call Customer Services if the washingdrum is damaged.
10 Washing tips
82

Fabric wear
Possible cause Solution
• Washing drum over-loaded.
Put less laundry into the washing drum.
• Friction between fabricsduring washing.
Select the additional «Easy care»programme.
• Pilling. Turn items inside out before washing.
10 Washing tips
83

11 Spare partsPlease give product family and exact designation when ordering parts.
Drain hose 1.5 m / 4.0 m
Emergency door release tool
Foreign body trap
Drain tray
Siphon
Detergent dispenser drawer
Liquid detergent flap
84

12 Technical data
12.1 Dimensions
Height: 85 cm
Width: 59.5 cm
Depth: 60 cm
Empty weight: 64 kg
Dry load capacity: 8 kg
12.2 Plumbing in
Connection to water supply: Cold water G¾"
Permitted pressure of water supply: 0.1–0.6 MPa (1–6 bar)
Max. pumping height of drain pump: 1.2 m
12.3 Electrical connection
See identification plate 1
1*
* Depending on the serial number (FN)
12.4 Spin speed
400, 600, 800, 1000, 1200, 1400, 1500 rpm
85
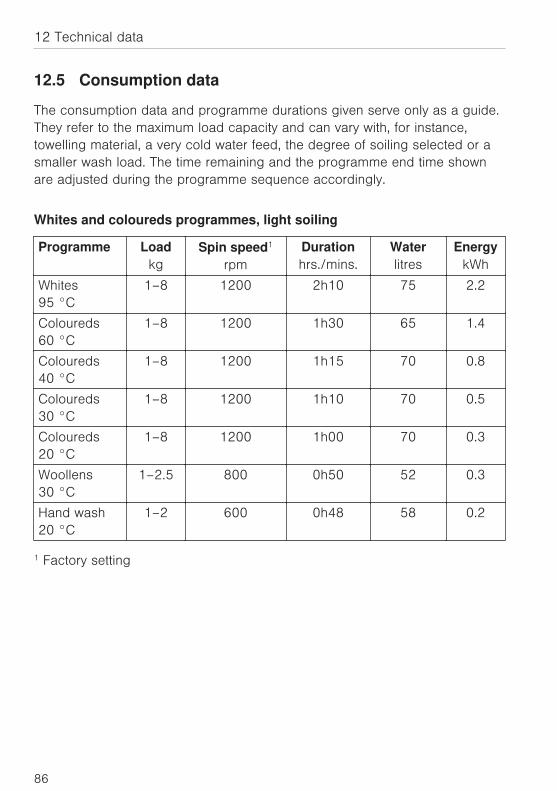
12.5 Consumption data
The consumption data and programme durations given serve only as a guide.They refer to the maximum load capacity and can vary with, for instance,towelling material, a very cold water feed, the degree of soiling selected or asmaller wash load. The time remaining and the programme end time shownare adjusted during the programme sequence accordingly.
Whites and coloureds programmes, light soiling
Programme Loadkg
Spin speed1
rpmDurationhrs./mins.
Waterlitres
EnergykWh
Whites 95 °C
1–8 1200 2h10 75 2.2
Coloureds 60 °C
1–8 1200 1h30 65 1.4
Coloureds 40 °C
1–8 1200 1h15 70 0.8
Coloureds 30 °C
1–8 1200 1h10 70 0.5
Coloureds 20 °C
1–8 1200 1h00 70 0.3
Woollens30 °C
1–2.5 800 0h50 52 0.3
Hand wash 20 °C
1–2 600 0h48 58 0.2
1 Factory setting
12 Technical data
86
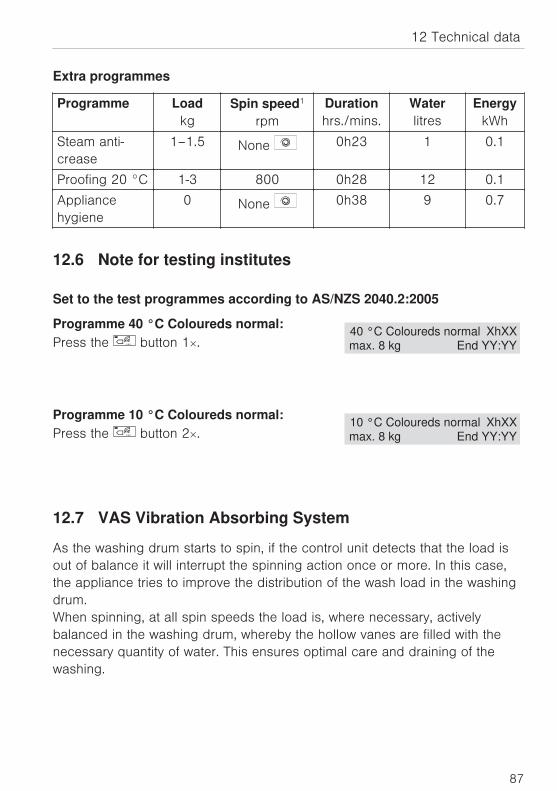
Extra programmes
Programme Loadkg
Spin speed1
rpmDurationhrs./mins.
Waterlitres
EnergykWh
Steam anti-crease
1–1.5 None 0h23 1 0.1
Proofing 20 °C 1-3 800 0h28 12 0.1
Appliancehygiene
0 None 0h38 9 0.7
12.6 Note for testing institutes
Set to the test programmes according to AS/NZS 2040.2:2005
Programme 40 °C Coloureds normal:XhXX
End YY:YY40 °C Coloureds normalmax. 8 kg
Press the button 1×.
Programme 10 °C Coloureds normal:XhXX
End YY:YY10 °C Coloureds normalmax. 8 kg
Press the button 2×.
12.7 VAS Vibration Absorbing System
As the washing drum starts to spin, if the control unit detects that the load isout of balance it will interrupt the spinning action once or more. In this case,the appliance tries to improve the distribution of the wash load in the washingdrum.When spinning, at all spin speeds the load is, where necessary, activelybalanced in the washing drum, whereby the hollow vanes are filled with thenecessary quantity of water. This ensures optimal care and draining of thewashing.
12 Technical data
87

12.8 Water and energy economy
During the first few minutes of a programme running, sensors automaticallydetermine the type and the size of the load being washed. Water levels are then optimally adjusted to the wash load so that only the strictamount of water needed is used.
12.9 Automatic energy-saving stand-by
The appliance is equipped with automatic energy-saving stand-by to avoidconsuming energy unnecessarily. All displays go out within minutes of a programme finishing. Energy consump-tion is reduced to an absolute minimum. The safety functions, however, remainactivated.Power consumption in accordance with AS/NZS 2040.2:2005
• In «OFF mode»: 0 watts
• In «Left-on mode»: 0 watts
12 Technical data
88

13 Notes
89

13 Notes
90

14 IndexAAdditional functions ................18, 28Additional programmes ... 15, 18, 22
Selecting ..................................... 48Allergies ....................................26, 34Anti-mite ....................................26, 51Appliance
Construction ..............................16Preparing .................................... 42
Appliance description .................... 15Appliance door ............................... 16
Checking the door seal ........... 60Door does not open ................. 73Opening during operation ....... 55Opening in the event of a power
failure ..................................... 76Appliance hygiene .......................... 21
Hygiene recommendation ....... 60Appliance overview ........................ 15AquaPlus .......................................... 25
Selecting ..................................... 50AquaPlus/Rinsing ........................... 34Automatic door opener .......... 38, 79
OFF .............................................. 59ON ............................................... 59Switching on/off ........................38
Automatic water and energyeconomy ..................................... 88
BBefore using for the first time .........9Bio wash ...................................27, 54Brightness ........................................ 40
CCare ..................................................61Caution: Burns hazard! .................. 10Caution: Risk of injury! ..................10Childproof lock ........................38, 57Cleaning
Detergent dispenser drawer ... 61Foreign body trap .....................64Siphon ......................................... 61Water inlet filter .........................62
Cleaning the foreign body trap .... 65Cold wash ........................................ 28Colour run ........................................ 81Correct use .........................................9
DDamage to fabrics .........................82Degree of soiling .....................26, 51Delayed start .....................28, 45, 54Deposits on washing .....................81Detergent dispenser drawer .. 16, 84
Cleaning .....................................61Traces .........................................74
Detergent dosage ..........................45Dimensions ...................................... 85Disconnection .................................12Display
A messages .................65, 66, 67F messages ........................67, 68
Display elements ............................17Disposal ...........................................12Door seal
Checking ....................................60Drain hose .......................................84Drain tray ..................................16, 84Dyeing ..............................................47
91

EEasy care ..................................22, 48Eco .............................................22, 48Electrical connection ..................... 85
Faulty ........................................... 69Emergency door release .............. 16Emergency door release tool ... 16,
76, 84Emergency draining ....................... 63End of the wash day ...................... 60Extra programmes ......................... 87
FFabric care symbols ...................... 77Fabric conditioner ...................16, 46
Conditioning ..............................27Traces .........................................75
Fabric stains .................................... 82Fabric types ..................................... 23
Selecting ..................................... 49Fabric wear ...................................... 83Factory settings .............................. 41Fast forward .................................... 28Favourite programmes .................. 15Foam in main wash ........................ 70Foreign body trap ............. 16, 64, 84
Checking ....................................66Cleaning ..................................... 64
GGeneral note .................................... 79Grey residue on washing .............. 80
HHow to avoid damaging the appli-
ance ............................................11Hygiene recommendation ... 37, 60,
70
IIdentification plate ..........................16Inlet water very cold ....................... 71
LLanguage .........................................32
Changing .................................... 32Large unbalanced load .................73Liquid detergent .............................. 44Liquid detergent flap ............... 16, 84Load capacity .................................. 15Loosening up the washing ....39, 59
MMain programme
Selecting ..................................... 47Main programmes .......................... 17Main wash detergent .....................16Maintenance .................................... 61Malfunctions ....................................65Model no. ............................................2
NNet curtains .....................................78Note on use ........................................9
OOpening the appliance door during
operationOpening ...................................... 55Pause ..........................................55
Operating elements .......................17Overvoltage .....................................69
14 Index
92

PPackaging ........................................ 12Pause
Door opener ..............................28Programme pause .................... 28Resuming the programme ...... 28
Plain text display ............................. 17Plumbing .......................................... 85Possible settings ............................ 30Powder detergent ........................... 44Power failure ................................... 76Press and go ................................... 47Pre-wash ...................................23, 48Pre-wash detergent ........................ 16Product family ....................................2Programme
Aborting ...................................... 56End .......................................28, 59Selecting ..................................... 47Taking too long ......................... 71
Programmes for normally soiledcotton load ................................. 15
Proofing ............................................ 21
QQuick instructions ........................... 96
RRepair service ................................. 95Rinsing performance
Unsatisfactory ............................ 82
SSafety ................................................ 12Safety precautions
Before using for first time ...........9General ..........................................6
SavingEnergy ......................................... 79Water ........................................... 79
Separate rinsing/spinning .....27, 55Serial number (FN) .................14, 16Siphon ..............................................84Siphon for fabric conditioner ........ 16
Cleaning .....................................61Skin protection .........................26, 34Soaking .....................................26, 51
Setting time ................................ 51Soap detergent ...............................46Soap wash ................................27, 54Soft water ......................................... 35Softener .....................................16, 46Spare parts ...................................... 84Spin speed .................28, 36, 79, 85
Changing .................................... 52Spin stop .......................................... 66Sprint .........................................22, 48Standard programmes ..................15Stand-by
Energy-saving ............................ 88Steam anti-crease ............21, 23, 48Stop after rinsing .....................52, 59Symbols ..............................................5
14 Index
93
TTears in washing ............................82Technical data ................................. 85Technical questions ....................... 95Temperature
Changing .................................... 53Setting ..................................28, 53
Time ..................................................33Too many articles ........................... 72Traces of washing detergent in the
detergent dispenser drawer ...74Type .....................................................2
UUnsatisfactory wash result using
detergent for coloureds ........... 81Unsatisfactory wash result using
liquid detergent ......................... 81User settings ...................................29
Changing .................................... 29Exiting .........................................29
Using for the first time ......................9
VValidity .................................................2VAS Vibration Absorbing System 87Vibrating ........................................... 73
WWarranty extensions ...................... 95Wash results
Unsatisfactory ............................ 80Washing ...........................................42
Adding washing detergent ...... 44Changing selection ..................56Dry ...............................................75End of programme ...................59Loading ....................................... 43Preparing appliance ................. 42Selecting a programme ........... 47Spinning unsatisfactory ...........72
Washing detergent ......................... 77Adding ........................................44
Washing feels hard to the touch .80Washing tips .................................... 77Water hardness ..............................45Water inlet
Checking ....................................67Water inlet filter
Cleaning .....................................62Water outlet
Checking ....................................65Water sounds ..................................74White residue on washing ............80Whites ............................................... 19
14 Index
94

15 Repair service
The «Trouble-shooting» section gives you valuable tips on how tocorrect minor functions yourself, saving you the time and trouble ofcalling out a service technician and the cost that goes along with it.
Register your V-ZUG appliance today online via our website at vzug.com orusing the card supplied and benefit from the best possible support in theevent of a malfunction – including during the manufacturer's warranty period.You need the serial number (FN) and designation of the appliance to register.You can also note them down here or on the service sticker which comes withthe appliance:
FN _______________________ Appliance _______________________
Please have these details to hand when contacting V-ZUG in connection with amalfunction. You will find them on the identification plate of your appliance.
Open up drain tray.– The identification plate* is located next to the foreign body trap.
* Depending on the serial number (FN)
Your repair order
You will find contact information for your nearest V-ZUG Service Centre atvzug.com. In most countries you will also be able to contact V-ZUG Service &Support using the toll-free service number 00800 850 850 00 (or+800 850 850 00).
Technical questions, accessories, warranty extensions
Your V-ZUG Service Centre will be happy to help you with any technical ques-tions, to accept your orders for accessories and spare parts and to inform youabout the progressive warranty extensions.
95

Quick instructionsPlease first read the safety precautions in the operating instructions!
Switch on the appliance and turn on the water tap
Open the appliance door by pressing the or buttonLoad the washing and then close the appliance doorPull the detergent dispenser drawer out and add the washing detergentPush the detergent dispenser drawer back inSelect programmeIf required, select any additional programme/functions– The appliance starts automatically after about 20 seconds
When the programme has finished:
Press the or button and unload the washing
At the end of the wash day:If necessary, clean the detergent dispenser drawerPush the appliance door to, but do not close
V-ZUG Ltd
Industriestrasse 66, CH-6301 [email protected], www.vzug.com
J11002.360-2