101739256 solaris commands
DESCRIPTION
Solaris CommandsTRANSCRIPT

Search bash history: control R then type – control R to skip to next occurence
Reboot server: init 6
******************************************************************************
delete mail on solarislogon to the users mail #maild1-$or then remove the mailbox altogether it will be recreated automaticlaly
or cat /dev/zero>/var/mail/mailboxname
or run maix command and then d1-$ will clear it out
******************************************************************************inetd - /etc/inetd.conf file
inetd also called the super server will load a network program based upon a request from the network. The inetd.conf file tells inetd which ports to listen to and what server to start for each port.
For security reasons check /etc/inetd.conf file for services enabled and disable all not required
to setup inetd::::1. Change the permissions on this file to 600. [root@deep] /#chmod 600 /etc/inetd.conf
Ensure that the owner is root. [root@deep] /# stat /etc/inetd.conf 2. Edit the inetd.conf file vi /etc/inetd.conf and disable services like: ftp, telnet, shell, login, exec, talk, ntalk, imap, pop-2, pop-3, finger, auth, etc. unless you plan to use it.
restart inetd use : killall -HUP inetd
One more security measure you can take to secure the inetd.conf file is to set it immutable, using the chattr command. To set the file immutable simply, execute the following command: [root@deep] /# chattr +i /etc/inetd.conf This will prevent any changes accidental or otherwise to the inetd.conf file.******************************************************************************
Tar:
To tar a file into an archive
tar cvf /tmp/nameoffile <filetoaddtotar1><filetoaddtotar2>
cat /etc/release to find the update level of Solaris cat /etc/release Solaris 10 8/07 s10x_u4wos_12b X86 Copyright 2007 Sun Microsystems, Inc. All Rights Reserved. Use is subject to license terms. Assembled 16 August 2007

the above info tell us that solaris version is 10, latest as of 08/07 and the next string tells us it is an update 4.
The latest update release is Solaris 10 10/09.
Bunzip2 –c filename : to open bz2 files on solaris
prtpicl:::::display hba card details
SOLARIS :::::::::::
NIC related:::
daffcav001# dladm show-dev ipge0 link: unknown speed: 100 Mbps duplex: full ipge1 link: unknown speed: 100 Mbps duplex: full ipge2 link: unknown speed: 100 Mbps duplex: full ipge3 link: unknown speed: 100 Mbps duplex: half
nic speed: ndd -get /dev/NICNAMEDIR [link_speed | link_duplex | link_status | link_mode | \?]
ndd -get /dev/hme link_status# ndd -get /dev/hme link_speed# ndd -get /dev/hme link_mode
Where a return value of 0 = half duplex, and 1 = full duplex
To force to full duplex:
ndd -sec /dev/hme adv_100fdx_capndd -set /dev/hme adv_autoneg_cap 0
dmesg -a | grep "copper", dmesg -a | grep interfacename,
Configure NIC::
Find NIC details, check in /boot/solairs/devicedb/master for compatibilitycheck in /etc/driver_aliases to see if NIC is there means driver available otherwise need to download
ifconfig hme0 xx.xx.xx.xx netmask xx.xx.xx.xx upifconfig hme0:1 xx.xx.xx.xx netmask xx.xx.xx.xx up and create hsotname.interfacename:n file also now configure TCP/IP and then plumb interface
configure TCP/IP::::
/etc/hostname.interface ::: define physical interface, create this file echo "solarishome" > /etc/hostname.e1000g0/etc/nodename::: defines hostname, create using echo "solarishome" >/etc/nodename/etc/defaultdomain:: FQDN domain, echo "tsprod.com.au" >/dev/defaultdomain

etc/defaultrouter::: default gateway, echo "10.100.100.1" > /etc/defaultrouter/etc/inet/hosts (/etc/hosts is symlink for compatibility) have host entries as below::bash-3.00# cat hosts## Internet host table#::1 localhost 127.0.0.1 localhost 10.100.100.20 solaris loghost
In Solaris 10 11/06 and earlier releases, ipnodes databaseedit /etc/inet/ipnodes file and add entry for interface as below:
192.168.84.3 interface-2
netmasks database (optional)/etc/netmaks e.e. 192.168.20.0 255.255.255.0
now configure as dns client if required:
/etc/nsswitch.conf shud be using files, dns for hsots and ipnodes/etc/resolv.conf, create : echo "search domain.name" > /etc/resolv.conf, echo "nameserver xx.xx.xx.xx" >> /etc/resolv.confcheck if dns client running, svcs -a | grep dns, svcadm enable svc:/network/dns/client:default
ifconfig interfacename plumb #enable NIC and associate interface with NIC
solaris DHCP:add hostname to /etc/nodename and touch /etc/dhcp.interfacename e.g. /etc/dhcp.e1000g0
Auto startup scripts:
write script, copy to /etc/init.d, create link in /etc/rc?.d folders as required, now create links to startup script as ln filename /etc/rc2.d/Snnnnfilename and ln filename /etc/rc2.d/Knnnnfilenameset permissions on startup script to chmod o=rwx,g=r,o=r
SERVICES::
svcs -xv: shows hung up servicessvcs -a:svcs -n network/smtp:sendmailinetd daemon for internet services, mamnage with svcadm, svcs, inetadm
inetadm shows services and their statusinetadm can be used to start/stop serices as wellsvcadm restart svc:/network/physical #restart network services
svcs \*dns\* check dns services running or not
restart network service svcadm restart network/physical

to disable a service:::svcs -a | grep "name of package/applicaiton"once the SMF value is known run svdadm disable svc:/path/path/path:servicename
CRONTAB:::crontab -e edits crontab file, can exit without savingcrontab -l displays the current crontab filecat crontab -l > mycronentries and then can make changes if anything wrong, edit and paste the entries againNOTE: if crontab started without any argument dont close by ^d it deletes the file, use ^c to safely exit the mode./var/spool/cron
Check cron.allowcron.deny
If only cron.deny exists and is empty, all users can use crontab. If neither file exists, only the root user can use crontab. The allow/deny files consist of one user name per line.
crontab -e Edit your crontab file, or create one if it doesn’t already exist.crontab -l Display your crontab file.crontab -r Remove your crontab file.crontab -v Display the last time you edited your crontab file. (This option is only available on a few systems.)
Crontab Environmentcron invokes the command from the user’s HOME directory with the shell, (/usr/bin/sh).cron supplies a default environment for every shell, defining:HOME=user’s-home-directoryLOGNAME=user’s-login-idPATH=/usr/bin:/usr/sbin:.SHELL=/usr/bin/sh
Users who desire to have their .profile executed must explicitly do so in the crontab entry or in a script called by the entry.
Disable EmailBy default cron jobs sends a email to the user account executing the cronjob. If this is not needed put the following command At the end of the cron job line .
>/dev/null 2>&1
Generate log fileTo collect the cron execution execution log in a file :

30 18 * * * rm /home/someuser/tmp/* > /home/someuser/cronlogs/clean_tmp_dir.log
HARDDISK INFO::
#prtdiag –v will display system hardware information (memory, cpu, serial etc)
Check if running 64bit or 32 bit? isainfo –v
HARDDISK INFO::
iostat -En
/usr/platform/`uname -i`/sbin/prtdiag
for i in `ls /dev/rdsk/c*s2`; dp prtvtoc $i;done ::::: shows all hard disk info
cat /etc/mnttab for all mounted disks
for disk geometry and partition info check /dev/rdsk/ and see the different files there then prtvtoc /dev/rdsk/c0d0p0 or prtvtoc /dev/rdsk/c0d0s0
metastat to find the status of disks on solaris serverwe can run metastat diskID to find details about sepcific disk see example below:
$ metastatd0: Mirror Submirror 0: d10 State: Okay Submirror 1: d20 State: Okay Pass: 1 Read option: roundrobin (default) Write option: parallel (default) Size: 4202688 blocks
$ metastat d6d6: Mirror Submirror 0: d16 State: Needs maintenance Submirror 1: d26 State: Needs maintenance Pass: 1 Read option: roundrobin (default) Write option: parallel (default) Size: 122325696 blocks

d16: Submirror of d6 State: Needs maintenance Invoke: metasync d6 Size: 122325696 blocks Stripe 0: Device Start Block Dbase State Hot Spare c1t0d0s6 0 No Resyncing
http://www.brandonhutchinson.com/Replacing_a_failed_disk_with_DiskSuite.html
/var/crash/has crash dumps when a host crashes (solaris), need tools to analyze the crash cant be read directly
mdb is one tool to analyze crash dumps
PROCESSES::
Processes sometimes are run under inetd. Check /etc/inetd.conf to find what processesps -fu <username> : displays a users processes
ps -o pid,pcpu,ruser,args | sort +1nr display top cpu using processes with details and sorted in reserve on colum 1 (pcpu)
ps -o pid,vsz,pmem | sort +2nr display top mem using proceses sorted on mem %
fuser -c -u <filesystem> will display all processes accessing the filesystemthe -k flag will kill all those processes
ptools /prun/pstop these tools stop/restart processes
file systems:find . -size +400 -print
cd /du -sk * | sort -n if largest is a folder go to italso check mounted filesystem to make sure what are munts and what are folders
du -akd / | sort -nr | more
check /.wastebasket and /lost+foundcheck for .CPR file in /
ls -lRt / | more to list files by modification time
ls –al (display file size in bytes) On solaris 9+ use ls –alh for human readable
to calculate how big a file size is use example below:if size is 8882048000 (10 digits) take 9 digits off and the left over is Gigabytes hence 8 GB

here, if size is 882048000 (9 digits) take 6 digits off and the left over is Megabytes hence 882 MB
df -k gives space in Kilobytes to convert to GB, remove 6 digits/dev/md/dsk/d10 2064103 1743062 259118 88% equals this in GB/dev/md/dsk/d10 2.0G 1.7G 253M 88% /
ls displays results in bytes, to convert to KB remove 3 digits, for MB remove
route -n get <network address> to display route tot he given network
snoop -d bge0 src 10.117.1.45snoop –d bge0 –o /tmp/log src 10.117.1.45
create an account who does not login: assign shell as /bin/false
/etc/logadm.conf
/etc/syslog.conf
configure sshd/etc/ssh/sshd_config change IP and restart svdadm restart sshd
on solaris 8: /usr/local/etc/sshd_config/etc/init.d/sshd restart

PATCHING:
The Recommended Patch Cluster reflects the current version of all of the patches required toaddress all Sun Alert issues. Some customers have adopted a policy of periodically applyingthe current Recommended Patch Cluster to a system. While this strategy does address all SunAlert issues, it also introduces more change to the system than is necessary. Similarly,reapplying the current Recommended Patch Cluster on a scheduled basis is also notnecessary.
The Sun Alert Pack reflects the lowest revision of all of the patches necessary to address allSun Alert issues, and the least possible change to your system while still addressing all SunAlert issues.
The patch ID consists of a six-digit base identifier and a two-digit revision number of the form xxxxxx-yy.
Patches are also cumulative. Later revisions contain all of the functionality delivered inprevious revisions. For example, patch 123456-02 contains all the functionality of patch123456-01, plus the new bug fixes or features that have been added in Revision 02
Sun Patch Manager 2.0 for Solaris 10
For patches check the sun site for latest recommended Patch cluster
showrev -w display version of open windowsshowrev -p | more (list currently installed patches)
patches could be installed using the script mentioned in the readme file of the cluster we download or use install_cluster
psrinfo -v for processor info
Packages: pkgadd: adds/install packages
prodreg:
showrev:
psrinfo: processor info prtconf | grep -i memory
Solaris boot process

after post and intial boot loader 1.init phase2. inittab file3. rc scripts and run levels
init phase:/sbin/init starts and reads /etc/inittab and starts all processes as defined there. this file defines all processes to be run at different run levels. identification:runlevel:action:processS3:3:wait:/sbin/rc3 > /dev/console 2>&1 < /dev/console hence means to run the command /sbin/rc3 at run level 3 and to wait until the process is complete. action could be : initdefault: default run level of systemRespawn: start and restart the process if it stopspowerail: stop on powerfailsysinit: start and wait until console is accessiblewait: wait till process completesbefore going to next step
rc scripts: rc stands for run control scripts
check and mount filesystemsstart and stop processesperform some house keeping jobs
system after booting goes into the default run level defined in inittab file. the diff run levels are:0 : boot prom level1: single user mode2: multi user mode with no resouce sharing3: multi user mode with resource sharing4:not used5: shutdown and poweroff6: reboot to defrault run levelS single user mode with user logins disabled
grep '^b' starting with b ^\. starts with period
grep '\$' look for $ sign
pkill -n pid
pkill -HUP snmpd
uptime
arch:::::::;;; shows architecture
psrinfo -v
prtconf | grep "Memory size"

kstat command
crontab –l display crontab file
account lock out:::need to enable lockout policy globally use /etc/security/policy.conf and add LOCK_AFTER_RETRIES=YES# of failed attempts are defined in /etc/default/login
to define lockout for certain users only
use /etc/user_attr and make an entry for the user and add lock_after_retries=yes as in example belowroot::::auths=solaris.*,solaris.grant;profiles=Web Console Management,All;lock_after_retries=yes
if the lockout policy is globally enabled we can overwrite it using above entry set to no
show failed authentication attempts of usersawk -F: '$NF >= 0 { print; }' /etc/shadow
passwd -s username :::::::::: displays status of accountwhen a new user account is created, it is locked by default, when the passwd is set the status changes to PS from LK
passwd -l username locks the account, check /etc/shadow will show LK for usernamepasswd -u username unlock account
to check if a password has expired check the /etc/shadow file root:$1$PyxwFKQT$zhOrZh4lWyms4zWekO/aJ/:15167:::::: (nothing defined before the last 3 colons i.e. field 5 in below the account will expire intadmin:*LK*$1$5h5fbanE$EdHg5BFQoIA9CJlvHZjO/1:13990:7:56:7:::15 (56:7)
passwd –x -1 root (to turn off passwd aging) or passwd –x9999 rootintadmin:$1$JHQpTWjW$0x7KYnaVluf0LemiBW5EY0:15229:0:99999:7::: means do not expire
solaris ftp :::
inetadm -e ftp ::::::::::: enable ftp inetadm -d ftp ::::::::: disable ftpinetadm -l ftp :::::::::: status of ftp svcs /network/ftp:::::: status/config of ftpsvcadm enable ftp

need to configure an account for the ftp : add to /etc/passwdftp:x:123:1:Anonymous FTP:/export/home/ftp:/bin/true
sync with /etc/shadow by using "pwconv" command
create a folder for tthis ftp account as /export/home/ftp
Root Kit :
The hackers in some cases installs a "root" kit which changes various files in the system in order to gain super user privileges and to conceal the compromise.
You can determine with pkgchk command if certain files have changed :
/bin/su /usr/sbin/ping /usr/bin/du /usr/bin/passwd /usr/bin/find /bin/ls /bin/netstat /usr/bin/strings
If there is any error reported on any of these files then system is compromised . The best resort in these cases is to take system off the network and do a fresh operating system installation .
check newer files on system
find . -type f -printf "%TY-%Tm-%Td %TT %p\n" | sort | lessor then create a file "test" and use this version of commandfind . -newer test –print
echo '$v' | sendmail -bt ::: check sendmail version
pkginfo -l packagename
pkginfo -lp path/file:::::::: whch package the file belongs to
mailq ::::::::: displays mailq
time <command> calculates the time taken by the processs
check free space and free inodes: df -F ufs -o i
NFS:::::

showmount -e (for NFS)ps -eaf | grep automount/etc/automaster
on client modify auto.master, auto.homekill -HUP automountPID
iostat -En find total diskspace on solaris
/ space issue::: if /proc is taking lots of space check for zombie processes running
find / -mount -type f -mtime -10 find files modified inlast 10 days
1. du -akd / | sort -nr | more solaris check space in root, here -d means dont cross partition boundaries, -a means show file sizes as well ,
2. df -skd / and then compare the values given by both if big difference then there might be files in directories that are used as mount points, need to unmount the filesystem, check direcotries for files and remove these file or move to otehr locations
if /dev is taking lots of space check for wrong device name used e.g. /dev/rmto instaed of /dev/rmt0
check / for .wastebasket and lost+founduse ls -lRt / | more to find out files modified recently sorted by modified date
NOHUP:start your process as normal............
cntrl-z it to stop and put it in the background
%1 & (This will resume the background job and keep it there while running)
disown -ar (will basicly do a NOHUP on your running proc)
logout!
slow performance for services on solaris: check the wait interval before connections are closed.. if many waiting to be closed, perfromance effectedndd -get /dev/tcp tcp_time_wait_intervalndd -set /dev/tcp tcp_time_wait_interval 60000 (default s 240000 milliseconds)
-)Verify the current value of this:ndd -get /dev/tcp tcp_keepalive_interval2-) Set the new value:ndd -set /dev/tcp tcp_keepalive_interval 300000
(Default Value is 7200000 milliseconds. Recommended is 15000 milliseconds

- Connection backlogIt means that a high number of incoming connections results in failure.
1-)Verify the current value of this:ndd -get /dev/tcp tcp_conn_req_max_q2-) Set the new value:ndd -set /dev/tcp tcp_conn_req_max_q 8000
(Default value is 128. Recommended is 8000)
The above changes with ndd will be lost after reboot
swap –l
/usr/platform/`uname -i`/sbin/scadm show
/usr/platform/`uname -i`/sbin/scadm shownetwork
/var/crash/has crash dumps when a host crashes (solaris), need tools to analyze the crash cant be read directly
mdb is one tool to analyze crash dumps
no process core dump is configured on the server.
/etc/coreadm.conf
dewsmtp001# coreadm global core file pattern: /var/core/core_%n_%f_%u_%g_%t_%p global core file content: default init core file pattern: /var/core/core_%n_%f_%u_%g_%t_%p init core file content: default global core dumps: enabled per-process core dumps: disabled global setid core dumps: enabled per-process setid core dumps: disabled global core dump logging: enabled
By default, the global core dump is disabled. You need to use the coreadm command with the -e global option to enable it. The -g option causes the command to append the program name (%f) and the runtime process ID (%p) to the core file name
*************************************** sun developer packages are below: *****************************

1. Verify all of the following SUNW* developer packages have been installed:SUNWarcSUNWbtoolSUNWheaSUNWlibmSUNWsprotSUNWtoo
solaris disk issues:
check how many disks are in the server:
iostat -E (display list of all disks)
daffcav002# iostat -En (increasing # of transport and hard errors show failing disk)c0t0d0 Soft Errors: 2706 Hard Errors: 88 Transport Errors: 178 Vendor: SEAGATE Product: ST914602SSUN146G Revision: 0400 Serial No: 071791V7FX Size: 146.80GB <146800115712 bytes>
Media Error: 74 Device Not Ready: 0 No Device: 14 Recoverable: 652 Illegal Request: 0 Predictive Failure Analysis: 15
c0t1d0 Soft Errors: 0 Hard Errors: 0 Transport Errors: 0 Vendor: SEAGATE Product: ST914602SSUN146G Revision: 0400 Serial No: 071491L1GV Size: 146.80GB <146800115712 bytes>Media Error: 0 Device Not Ready: 0 No Device: 0 Recoverable: 0 Illegal Request: 0 Predictive Failure Analysis: 0
check if the disks are mirrored :
#df (to find if using software mirroring device names show up as /dev/md/dsk/nnn)#raidctl -l (to find if hardware raid controller is being used)Disks would show up ad /dev/dsk in this caseThis commands hows the logical volume daffcav002# raidctl -lController: 0 Volume:c0t0d0 Volume:c0t133d0 Disk: 0.0.0 Disk: 0.1.0 Disk: 0.2.0
To delete a raid daffcav002# raidctl -d c0t133d0Deleting RAID volume c0t133d0 will destroy all data it contains, proceed (yes/no)? yesVolume c0t133d0 is deleted successfully!
Use devfsadm –Cv (to clear stale device definitions)Use cfgadm –al (to list all configurable devices)To create raid volume raidctl –c disk1 disk2

get software mirror details:
daffcav002# metastat -pd60 -m d61 d62 1 (this is mirrored to the below 2 entries)d61 1 1 c0t0d0s6d62 1 1 c0t1d0s6
d40 -m d41 d42 1d41 1 1 c0t0d0s4d42 1 1 c0t1d0s4
d30 -m d31 d32 1d31 1 1 c0t0d0s3d32 1 1 c0t1d0s3
d20 -m d21 d22 1d21 1 1 c0t0d0s1d22 1 1 c0t1d0s1
d10 -m d11 d12 1d11 1 1 c0t0d0s0d12 1 1 c0t1d0s0
d50 -m d51 d52 1d51 1 1 c0t0d0s5d52 1 1 c0t1d0s5
find mirroring details of a specific disk:daffcav002# metastat -p | grep c0t0d0 d61 1 1 c0t0d0s6d41 1 1 c0t0d0s4d31 1 1 c0t0d0s3d21 1 1 c0t0d0s1d11 1 1 c0t0d0s0d51 1 1 c0t0d0s5
find more details about the mirrored partitions:
#metastat (and look for mirrors)
d40: Mirror Submirror 0: d41 State: Needs maintenance Submirror 1: d42 State: Needs maintenance Pass: 1 Read option: roundrobin (default)

Write option: parallel (default) Size: 244590336 blocks (116 GB)
d41: Submirror of d40 State: Needs maintenance Invoke: after replacing "Maintenance" components: metareplace d40 c0t0d0s4 <new device> Size: 244590336 blocks (116 GB) Stripe 0: Device Start Block Dbase State Reloc Hot Spare c0t0d0s4 0 No Last Erred Yes
d42: Submirror of d40 State: Needs maintenance Invoke: metareplace d40 c0t1d0s4 <new device> Size: 244590336 blocks (116 GB) Stripe 0: Device Start Block Dbase State Reloc Hot Spare c0t1d0s4 0 No Maintenance Yes
daffcav002# prtvtoc /dev/dsk/c0t0d0s4* /dev/dsk/c0t0d0s4 partition map** Dimensions:* 512 bytes/sector* 848 sectors/track* 24 tracks/cylinder* 20352 sectors/cylinder* 14089 cylinders* 14087 accessible cylinders** Flags:* 1: unmountable* 10: read-only** First Sector Last* Partition Tag Flags Sector Count Sector Mount Directory 0 2 00 16790400 4212864 21003263 1 3 01 0 16790400 16790399 2 5 00 0 286698624 286698623 3 8 00 21003264 4212864 25216127 4 4 00 25216128 244590336 269806463 5 7 00 269806464 8405376 278211839 6 4 00 278211840 8405376 286617215 7 0 00 286617216 81408 286698623
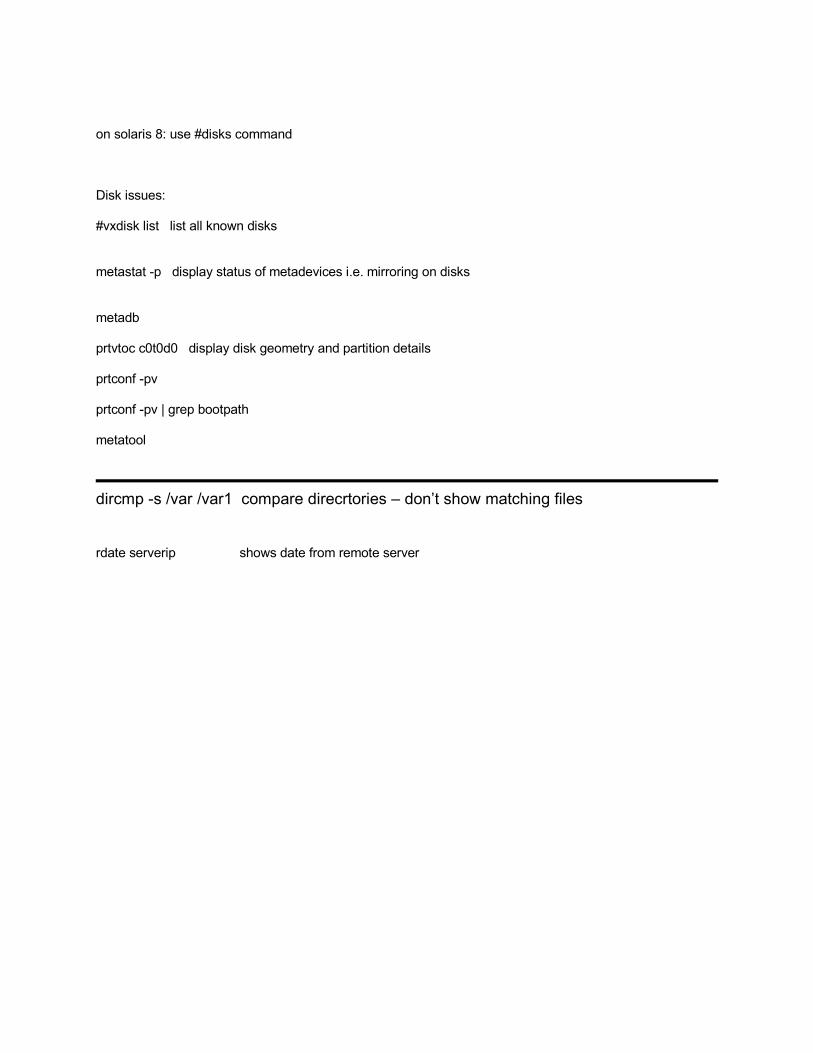
on solaris 8: use #disks command
Disk issues:
#vxdisk list list all known disks
metastat -p display status of metadevices i.e. mirroring on disks
metadb
prtvtoc c0t0d0 display disk geometry and partition details
prtconf -pv
prtconf -pv | grep bootpath
metatool
dircmp -s /var /var1 compare direcrtories – don’t show matching files
rdate serverip shows date from remote server

**************************** replace faulty hard drive with software mirroring *****************
Before we replace the hard drive we need to know the partition details on the drive, we can preserve the partitioning details by using command# prtvtoc /dev/rdsk/c1t0d0s2 > /tmp/format.out
To format new replacement drive with identical partitions we can usefmthard -s /tmp/format.out /dev/rdsk/c1t1d0s2
but before we pull the faulty drive out we need to detach the mirrors. See below details to do it:
In this example, two disks, c1t0d0 and c1t1d0, are mirrored to each other using Solaris Volume Manager. c1t1d0 is showing signs of impending failure and has to be replaced.solaris_1# iostat -En c1t1d0c1t1d0 Soft Errors: 0 Hard Errors: 28473 Transport Errors: 107662Vendor: SEAGATE Product: ST336607LSUN36G Revision: 0307 Serial No: 0344A6E4EGSize: 36.42GB <36418595328 bytes>Media Error: 0 Device Not Ready: 0 No Device: 28473 Recoverable: 0Illegal Request: 0 Predictive Failure Analysis: 0
Find out if the failing disk contains SVM metadatabase replicas and delete them.solaris_1# metadb flags first blk block count a m p luo 16 8192 /dev/dsk/c1t0d0s7 a p luo 8208 8192 /dev/dsk/c1t0d0s7 a p luo 16400 8192 /dev/dsk/c1t0d0s7 a u 16 8192 /dev/dsk/c1t1d0s7 a u 8208 8192 /dev/dsk/c1t1d0s7 a u 16400 8192 /dev/dsk/c1t1d0s7solaris_1#solaris_1# metadb | grep c1t1d0 a u 16 8192 /dev/dsk/c1t1d0s7 a u 8208 8192 /dev/dsk/c1t1d0s7 a u 16400 8192 /dev/dsk/c1t1d0s7solaris_1#solaris_1# metadb -d c1t1d0s7solaris_1#solaris_1# metadb flags first blk\tblock count a m p luo 16 8192 /dev/dsk/c1t0d0s7 a p luo 8208 8192 /dev/dsk/c1t0d0s7 a p luo 16400 8192 /dev/dsk/c1t0d0s7solaris_1#
Detach the submirrors in the failing disk.solaris_1# metastat -pd0 -m d10 d20 1d10 1 1 c1t0d0s0d20 1 1 c1t1d0s0d6 -m d16 d26 1d16 1 1 c1t0d0s6d26 1 1 c1t1d0s6

d5 -m d15 d25 1d15 1 1 c1t0d0s5d25 1 1 c1t1d0s5d4 -m d14 d24 1d14 1 1 c1t0d0s4d24 1 1 c1t1d0s4d3 -m d13 d23 1d13 1 1 c1t0d0s3d23 1 1 c1t1d0s3d1 -m d11 d21 1d11 1 1 c1t0d0s1d21 1 1 c1t1d0s1solaris_1#solaris_1# metastat -p | grep c1t1d0d20 1 1 c1t1d0s0d26 1 1 c1t1d0s6d25 1 1 c1t1d0s5d24 1 1 c1t1d0s4d23 1 1 c1t1d0s3d21 1 1 c1t1d0s1solaris_1#solaris_1# metadetach d0 d20d0: submirror d20 is detachedsolaris_1# metadetach d6 d26d6: submirror d26 is detachedsolaris_1# metadetach d5 d25d5: submirror d25 is detachedsolaris_1# metadetach d4 d24d4: submirror d24 is detachedsolaris_1# metadetach d3 d23d3: submirror d23 is detachedsolaris_1# metadetach d1 d21d1: submirror d21 is detachedsolaris_1#solaris_1# metastat -pd0 -m d10 1d10 1 1 c1t0d0s0d6 -m d16 1d16 1 1 c1t0d0s6d5 -m d15 1d15 1 1 c1t0d0s5d4 -m d14 1d14 1 1 c1t0d0s4d3 -m d13 1d13 1 1 c1t0d0s3d1 -m d11 1d11 1 1 c1t0d0s1d20 1 1 c1t1d0s0d26 1 1 c1t1d0s6d25 1 1 c1t1d0s5d24 1 1 c1t1d0s4d23 1 1 c1t1d0s3d21 1 1 c1t1d0s1solaris_1#
Remove the detached submirrors from the SVM metadatabase.

solaris_1# metaclear d20d20: Concat/Stripe is clearedsolaris_1# metaclear d26d26: Concat/Stripe is clearedsolaris_1# metaclear d25d25: Concat/Stripe is clearedsolaris_1# metaclear d24d24: Concat/Stripe is clearedsolaris_1# metaclear d23d23: Concat/Stripe is clearedsolaris_1# metaclear d21d21: Concat/Stripe is clearedsolaris_1#solaris_1# metastat -pd0 -m d10 1d10 1 1 c1t0d0s0d6 -m d16 1d16 1 1 c1t0d0s6d5 -m d15 1d15 1 1 c1t0d0s5d4 -m d14 1d14 1 1 c1t0d0s4d3 -m d13 1d13 1 1 c1t0d0s3d1 -m d11 1d11 1 1 c1t0d0s1solaris_1#
Verify that all SVM objects have been removed from the failing disk.solaris_1# metastat -p | grep c1t1d0solaris_1#solaris_1# metadb | grep c1t1d0solaris_1#
Unconfigure the failing disksolaris_1# cfgadm -alAp_Id Type Receptacle Occupant Conditionc0 scsi-bus connected configured unknownc0::dsk/c0t0d0 CD-ROM connected configured unknownc1 scsi-bus connected configured unknownc1::dsk/c1t0d0 disk connected configured unknownc1::dsk/c1t1d0 disk connected configured unknownc2 scsi-bus connected unconfigured unknownusb0/1 unknown empty unconfigured okusb0/2 unknown empty unconfigured oksolaris_1#solaris_1# cfgadm -c unconfigure c1::dsk/c1t1d0cfgadm: Component system is busy, try again: failed to offline:Resource Information------------------ -------------------------/dev/dsk/c1t1d0s2 Device being used by VxVMsolaris_1#
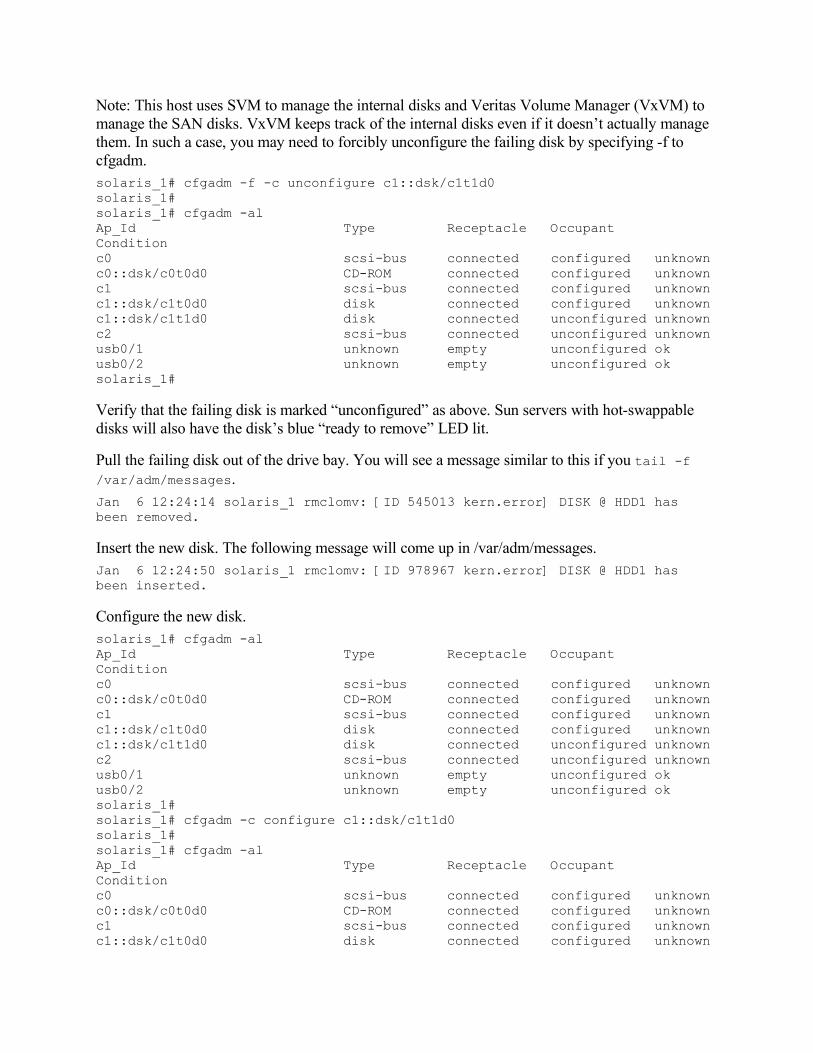
Note: This host uses SVM to manage the internal disks and Veritas Volume Manager (VxVM) to manage the SAN disks. VxVM keeps track of the internal disks even if it doesn’t actually manage them. In such a case, you may need to forcibly unconfigure the failing disk by specifying -f to cfgadm.solaris_1# cfgadm -f -c unconfigure c1::dsk/c1t1d0solaris_1#solaris_1# cfgadm -alAp_Id Type Receptacle Occupant Conditionc0 scsi-bus connected configured unknownc0::dsk/c0t0d0 CD-ROM connected configured unknownc1 scsi-bus connected configured unknownc1::dsk/c1t0d0 disk connected configured unknownc1::dsk/c1t1d0 disk connected unconfigured unknownc2 scsi-bus connected unconfigured unknownusb0/1 unknown empty unconfigured okusb0/2 unknown empty unconfigured oksolaris_1#
Verify that the failing disk is marked “unconfigured” as above. Sun servers with hot-swappable disks will also have the disk’s blue “ready to remove” LED lit.
Pull the failing disk out of the drive bay. You will see a message similar to this if you tail -f /var/adm/messages.Jan 6 12:24:14 solaris_1 rmclomv: [ID 545013 kern.error] DISK @ HDD1 has been removed.
Insert the new disk. The following message will come up in /var/adm/messages.Jan 6 12:24:50 solaris_1 rmclomv: [ID 978967 kern.error] DISK @ HDD1 has been inserted.
Configure the new disk.solaris_1# cfgadm -alAp_Id Type Receptacle Occupant Conditionc0 scsi-bus connected configured unknownc0::dsk/c0t0d0 CD-ROM connected configured unknownc1 scsi-bus connected configured unknownc1::dsk/c1t0d0 disk connected configured unknownc1::dsk/c1t1d0 disk connected unconfigured unknownc2 scsi-bus connected unconfigured unknownusb0/1 unknown empty unconfigured okusb0/2 unknown empty unconfigured oksolaris_1#solaris_1# cfgadm -c configure c1::dsk/c1t1d0solaris_1#solaris_1# cfgadm -alAp_Id Type Receptacle Occupant Conditionc0 scsi-bus connected configured unknownc0::dsk/c0t0d0 CD-ROM connected configured unknownc1 scsi-bus connected configured unknownc1::dsk/c1t0d0 disk connected configured unknown

c1::dsk/c1t1d0 disk connected configured unknownc2 scsi-bus connected unconfigured unknownusb0/1 unknown empty unconfigured okusb0/2 unknown empty unconfigured oksolaris_1#
Verify that the new disk has been configured as above.
Copy the volume table of contents (VTOC) from the other disk in the mirror set, c1t0d0, onto the new disk.solaris_1# prtvtoc /dev/rdsk/c1t0d0s2 | fmthard -s - /dev/rdsk/c1t1d0s2fmthard: New volume table of contents now in place.solaris_1#
If prtvtoc returns with an error similar to this, “/dev/rdsk/c1t1d0s2: Cannot get disk geometry“, you will need to run format to label the disk.solaris_1# formatSearching for disks...done
c1t1d0: configured with capacity of 136.71GB
AVAILABLE DISK SELECTIONS: 0. c1t0d0 /pci@780/pci@0/pci@9/scsi@0/sd@0,0 1. c1t1d0 /pci@780/pci@0/pci@9/scsi@0/sd@1,0 2. c1t2d0 /pci@780/pci@0/pci@9/scsi@0/sd@2,0 3. c1t3d0 /pci@780/pci@0/pci@9/scsi@0/sd@3,0Specify disk (enter its number): 1selecting c1t1d0[disk formatted]Disk not labeled. Label it now? y
FORMAT MENU: disk - select a disk type - select (define) a disk type partition - select (define) a partition table current - describe the current disk format - format and analyze the disk repair - repair a defective sector label - write label to the disk analyze - surface analysis defect - defect list management backup - search for backup labels verify - read and display labels save - save new disk/partition definitions inquiry - show vendor, product and revision volname - set 8-character volume name ! - execute , then return quitformat> q
solaris_1#

Recreate the metadatabase replicas on the new disk.solaris_1# metadb -a -c 3 c1t1d0s7solaris_1#solaris_1# metadb flags first blk block count a m p luo 16 8192 /dev/dsk/c1t0d0s7 a p luo 8208 8192 /dev/dsk/c1t0d0s7 a p luo 16400 8192 /dev/dsk/c1t0d0s7 a u 16 8192 /dev/dsk/c1t1d0s7 a u 8208 8192 /dev/dsk/c1t1d0s7 a u 16400 8192 /dev/dsk/c1t1d0s7solaris_1#
Initialize the SVM submirrors on the new disk.solaris_1# metainit d21 1 1 c1t1d0s1d21: Concat/Stripe is setupsolaris_1# metainit d23 1 1 c1t1d0s3d23: Concat/Stripe is setupsolaris_1# metainit d24 1 1 c1t1d0s4d24: Concat/Stripe is setupsolaris_1# metainit d25 1 1 c1t1d0s5d25: Concat/Stripe is setupsolaris_1# metainit d26 1 1 c1t1d0s6d26: Concat/Stripe is setupsolaris_1# metainit d20 1 1 c1t1d0s0d20: Concat/Stripe is setupsolaris_1#solaris_1# metastat -pd0 -m d10 1d10 1 1 c1t0d0s0d6 -m d16 1d16 1 1 c1t0d0s6d5 -m d15 1d15 1 1 c1t0d0s5d4 -m d14 1d14 1 1 c1t0d0s4d3 -m d13 1d13 1 1 c1t0d0s3d1 -m d11 1d11 1 1 c1t0d0s1d20 1 1 c1t1d0s0d26 1 1 c1t1d0s6d25 1 1 c1t1d0s5d24 1 1 c1t1d0s4d23 1 1 c1t1d0s3d21 1 1 c1t1d0s1solaris_1#
Attach the new submirrors.solaris_1# metattach d1 d21d1: submirror d21 is attachedsolaris_1# metattach d3 d23d3: submirror d23 is attachedsolaris_1# metattach d4 d24d4: submirror d24 is attached

solaris_1# metattach d5 d25d5: submirror d25 is attachedsolaris_1# metattach d6 d26d6: submirror d26 is attachedsolaris_1# metattach d0 d20d0: submirror d20 is attachedsolaris_1#solaris_1# metastat -pd0 -m d10 d20 1d10 1 1 c1t0d0s0d20 1 1 c1t1d0s0d6 -m d16 d26 1d16 1 1 c1t0d0s6d26 1 1 c1t1d0s6d5 -m d15 d25 1d15 1 1 c1t0d0s5d25 1 1 c1t1d0s5d4 -m d14 d24 1d14 1 1 c1t0d0s4d24 1 1 c1t1d0s4d3 -m d13 d23 1d13 1 1 c1t0d0s3d23 1 1 c1t1d0s3d1 -m d11 d21 1d11 1 1 c1t0d0s1d21 1 1 c1t1d0s1solaris_1#
Update the new disk’s device ID entry in SVM. This step may not be required but it’s a good idea to do it just in case.solaris_1# metadevadm -u c1t1d0Updating Solaris Volume Manager device relocation information for c1t1d0Old device reloc information:id1,sd@SSEAGATE_ST336607LSUN36G_3JAX5SL30000731858TJNew device reloc information:id1,sd@SSEAGATE_ST336607LSUN36G_3JAX5SL30000731858TJsolaris_1#
SVM will resync the submirrors in the new disk as soon as they are attached. This is done in the background and may take a fair amount of time depending on the size of the submirrors. Now is a good time to go for a cup of coffee. Don’t forget to check the progress of the resync when you return
************************************************************
Container/zoneZoneadm list (show the zones configured on server)
Metadisk:::installboot /usr/platform/`uname -i`/lib/fs/ufs/bootblk /dev/rdsk/c0t0d0s0

Alex Vrdoljak(14/04/2011 10:29:12 AM):heres something a bit more for you.If only one metadevice is in "needs maintainance" you can try remap busted ass sectors and fix it..
(d41 "needs maintinance for example)# Metadetach d40 d41# Format Select c0t1d0 (see metastat for which slice!!) Analyse0 (read - does not harm SunOS)# let it do its stuff - takes a long time. Should repair probs# Metadetach d40 d41Format Select c0t1d0 Analyse0 (read - does not harm SunOS)# let it do its stuff - takes a long time. Should repair probs
Solaris disk space issues:
If pacct files growing
check solaris services::
svcs -a | more
if a process is not starting properly we need to check all services on which this application is dependent are running.
to check dependencies for ssh e.g. use
svcs -l sshsvcs -l svc:/network/physical
this will show the status of all the services
if any of the service is not online we need to bring it online first...
to bring a service online.... use svcadm enable servicename.... and svcadm restart servicename
if a service is shown in maintenance but is working fine we can clear the database to correct the status of that service by using
svcadm clear svc:/network/physical
SOLARIS BOOT
sun server boot :::

if auto-boot? is set to false machine will boot to OK prompt.we can check what is configured by using the command on OK prompt"printenv auto-boot?if auto-boot? is false we can still boot the machine by issuing boot disk or boot cdrom command to boot it
to set it to auto boot we use the command OK setenv auto-boot? true then we can issue the command "reset all" to restart and autoboot.
to boot from a cdrom (in case auto-boot? is true) then we need to break the boot sequence by sending a break signal to the boot
we can also boot the machine in single user mode "boot -s" and then run fsck and start the machine
to check whats the default run level to multi user boot "grep default /etc/inittab
what process is accessing a filesystem:2 ways: one is :run the command $ ps -o pid,ppid,rss,args -p “$(fuser / 2>/dev/null)”
second is :
fuser -c /mnt (check mnt fielsystem and tell what proceses are using it currently)
fuser -cu /mnt (also show username running the process)
fuser -ck /mnt (kill all processes using the /mnt file system) could be required b4 unmounting /mnt
du and df space reprted difference
df calls filesystem for free space and du uses file counts and calculates the space used and the free available, if a file is deleted but is used by some process like a log file for example, the filesystem will have this space as free but du will still consider it in use hence the diff, another possibility is something underneath the mouint point= hidden data...
flush dns on solaris.... kill nscd process and restart /usr/sbin/nscd
reset password::
on OK promot type boot cdrom -s or boot net -s (boot from jump server)mount the rroot filesystem (mount /dev/dsk/c0t0d0s0 /a) assuming /c0t0d0s0 is root filesystem/a is a temp mount point that is available when booting from cd or netvi /a/etc/shadow and remove encrypted password, reboot system in single user mode nowcd /, umount /a, init s , once in single user mode change password for root and then use command reboot to go to multi user mode
to add static routes *persisent)create a script file named S76static-routes change permissions so its executable by root, write all the routes inside this file and create links to file in /etc/rc2.d/S76static-routes

change IP on solaris 8 and 9 :edit IP in /etc/hostsin solaris 10: change iP in /etc/hosts and also /etc/inet/ipnodes and then svcadm restart network/physical
add default route::::: route add default xx.xx.xx.xx (also writes it to the file /etc/defaultrouter)
find where the files for a package are installed:::find apckage name -> pkginfo -l | grep processname i.e. wget, sshnow run pkginfo -l SUNWwgetu i.e package name and details to find the actual files use pkginfo -v SUNWwgetu
mount CDROM::
normally mounted automatically under /cdrom or then /cdrom/labelonthecd, if not mounted we can manually mount as root find the cdrom device (usually /dev/dsk/c0t6d0s2... use command to find ls -al /dev/sr* | awk '{print "/" $11}'now mount ..... mount -F hsfs -o ro /dev/dsk/devicename.. /cdromor mount remoteserver:/cdrom/cdrom0 /cdrom (for NFS cdrom)
crontab file should not have blank lines in between entries,
FATAL : system is not bootable boot command is disabled error :reset-all on the OK prompt will fix
in the interface file .e.g hsotname.e1000g0 :
either put the machine's IP like mycomputer xx.xx.xx.xx or then use the DNS Name in host file and also then define it in /etc/inet/hosts
sys-unconfig does the following:
o Saves current /etc/inet/hosts file information in/etc/inet/hosts.saved.
o If the current /etc/vfstab file contains NFS mountentries, saves the /etc/vfstab file to/etc/vfstab.orig.
o Restores the default /etc/inet/hosts file.
o Removes the default hostname in /etc/hostname.interfacefiles for all interfaces configured when this commandis run. To determine which interfaces are configured,run the command 'ifconfig-a'. The/etc/hostname.interface files corresponding to all ofthe interfaces listed in the resulting output, with the

exception of the loopback interface (lo0), will beremoved.
o Removes the default domainname in /etc/defaultdomain.
o Restores the timezone to PST8PDT in /etc/TIMEZONE.
o Disables the Network Information Service (NIS) and Net-work Information Service Plus (NIS+) if either NIS orNIS+ was configured.
o Removes the file /etc/inet/netmasks.
o Removes the file /etc/defaultrouter.
o Removes the password set for root in /etc/shadow.
o Removes the file /etc/.rootkey.
o Executes all system configuration applications. Theseapplications are defined by prior executions of asysidconfig -a application. (See sysidconfig(1M)). Whensys-unconfig is run, all system configuration applica-tions are passed one argument, -u.
o Removes the file /etc/resolv.conf.
o Disables LDAP by removing /var/ldap/ldap_client_cache,/var/ldap/ldap_client_file, /var/ldap/ldap_client_cred,and /var/ldap/cachemgr.log.
o Regenerates keys for sshd(1M).
When sys-unconfig is finished, it performs a system shut-down. sys-unconfig is a potentially dangerous utility andcan only be run by the super user.
******************************************************************************************************SOLARIS ZONES::::::
/etc/zones for configuration
zonename: zone1zonepath ????????????????define capped-memory resourceconfigure data-link names for the zone i.e. bge0:1 etccheck zone.cpu-shares it is better than using the cpu-hares rctl
check zone privilige set
zones service needs to be enabled to autoboot a zoneto set it usescvadm enable zones
inehrit-pkg-dir shares the below by default

/lib/plawtform/usr/sbin
using template file to create zone???
clone a zone????
if using local files for name resolution then it uses /etc/inet/hosts file
to log in to a container /zonezlogin zonename
*********************************************************************************************
Log rotationlog rotation is defined under /etc/logadm.conf
logadm is called from cron job and rotates the file
sample cron tasks on psrcav001:psrcav001# crontab -l #ident "@(#)root 1.21 04/03/23 SMI"## The root crontab should be used to perform accounting data collection.##10 3 * * * /usr/sbin/logadm15 3 * * 0 /usr/lib/fs/nfs/nfsfind30 3 * * * [ -x /usr/lib/gss/gsscred_clean ] && /usr/lib/gss/gsscred_clean0 2 * * 4 /usr/lib/acct/dodisk20 00 * * 6 /usr/local/sbin/sysconfig -f > /var/configdir/sysconfig.log25 0 * * * /usr/local/sbin/logrot
sample /etc/logadm.conf:
psrcav001# cat /etc/logadm.conf# Copyright 2007 Sun Microsystems, Inc. All rights reserved.# Use is subject to license terms.##ident "@(#)logadm.conf 1.7 07/01/10 SMI"## logadm.conf## Default settings for system log file management.# The -w option to logadm(1M) is the preferred way to write to this file,# but if you do edit it by hand, use "logadm -V" to check it for errors.## The format of lines in this file is:
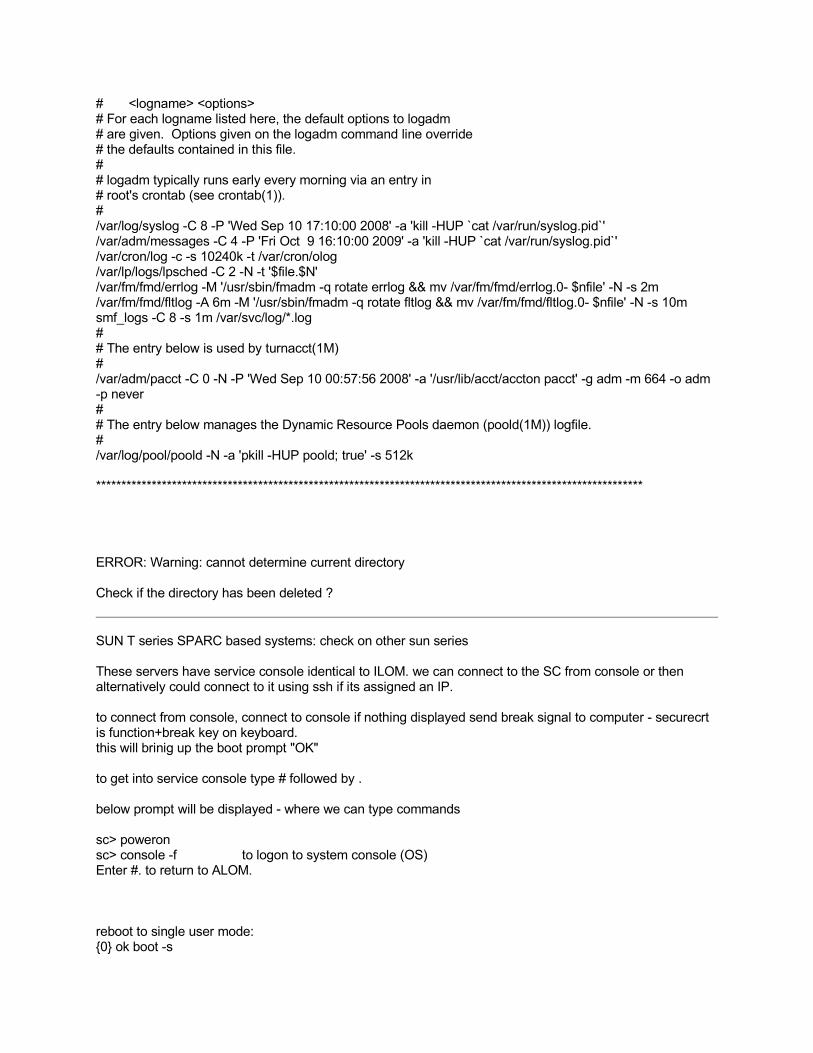
# <logname> <options># For each logname listed here, the default options to logadm# are given. Options given on the logadm command line override# the defaults contained in this file.## logadm typically runs early every morning via an entry in# root's crontab (see crontab(1)).#/var/log/syslog -C 8 -P 'Wed Sep 10 17:10:00 2008' -a 'kill -HUP `cat /var/run/syslog.pid`'/var/adm/messages -C 4 -P 'Fri Oct 9 16:10:00 2009' -a 'kill -HUP `cat /var/run/syslog.pid`'/var/cron/log -c -s 10240k -t /var/cron/olog/var/lp/logs/lpsched -C 2 -N -t '$file.$N'/var/fm/fmd/errlog -M '/usr/sbin/fmadm -q rotate errlog && mv /var/fm/fmd/errlog.0- $nfile' -N -s 2m/var/fm/fmd/fltlog -A 6m -M '/usr/sbin/fmadm -q rotate fltlog && mv /var/fm/fmd/fltlog.0- $nfile' -N -s 10msmf_logs -C 8 -s 1m /var/svc/log/*.log## The entry below is used by turnacct(1M)#/var/adm/pacct -C 0 -N -P 'Wed Sep 10 00:57:56 2008' -a '/usr/lib/acct/accton pacct' -g adm -m 664 -o adm -p never## The entry below manages the Dynamic Resource Pools daemon (poold(1M)) logfile.#/var/log/pool/poold -N -a 'pkill -HUP poold; true' -s 512k
************************************************************************************************************
ERROR: Warning: cannot determine current directory
Check if the directory has been deleted ?
SUN T series SPARC based systems: check on other sun series
These servers have service console identical to ILOM. we can connect to the SC from console or then alternatively could connect to it using ssh if its assigned an IP.
to connect from console, connect to console if nothing displayed send break signal to computer - securecrt is function+break key on keyboard. this will brinig up the boot prompt "OK"
to get into service console type # followed by .
below prompt will be displayed - where we can type commands
sc> poweronsc> console -f to logon to system console (OS)Enter #. to return to ALOM.
reboot to single user mode: {0} ok boot -s

daffcav002# raidctl -c -r 1 c0t2d0 c0t3d0Creating RAID volume will destroy all data on spare space of member disks, proceed (yes/no)? yesNo enough disk space.
daffcav002# formatSearching for disks...WARNING: /pci@780/pci@0/pci@9/scsi@0/sd@2,0 (sd0): drive offline
WARNING: /pci@780/pci@0/pci@9/scsi@0/sd@2,0 (sd0): drive offline
done
daffcav002 console login: sc> sc> helpAvailable commands------------------Power and Reset control commands: powercycle [-y] [-f] poweroff [-y] [-f] poweron [-c] [FRU] reset [-y] [-c]Console commands: break [-D] [-y] [-c] console [-f] consolehistory [-b lines|-e lines|-v] [-g lines] [boot|run]Boot control commands: bootmode [normal|reset_nvram|bootscript="string"|config="configname"] setkeyswitch [-y] <normal|stby|diag|locked> showkeyswitchBoot timer commands: boottimer <seconds> bootretry <number> bootfailaction [reset|none] bootrecoveraction [reset|poweroff|none]Locator LED commands: setlocator [on|off] showlocatorStatus and Fault commands: clearasrdb clearfault <UUID> disablecomponent [asr-key] enablecomponent [asr-key] removefru [-y] <FRU> setfru -c [data] showcomponent [asr-key] showenvironment showfaults [-v] showfru [-g lines] [-s|-d] [FRU] showlogs [-b lines|-e lines|-v] [-g lines] [-p logtype[r|p]]

shownetwork [-v] showplatform [-v]ALOM Configuration commands: setdate <[mmdd]HHMM | mmddHHMM[cc]yy][.SS]> setsc [param] [value] setupsc showdate showhost [version] showsc [-v] [param]ALOM Administrative commands: flashupdate <-s IPaddr -f pathname> [-v] help [command] logout password resetsc [-y] restartssh [-y] setdefaults [-y] [-a] ssh-keygen [-l|-r] <-t {rsa|dsa}> showusers [-g lines] useradd <username> userdel [-y] <username> userpassword <username> userperm <username> [c][u][a][r] usershow [username]

APACHE on SOLARIS 8:
Conf in /usr/local/apache/etc/init.d/apachectl2 start/stop/restart/status (kill all PIDs if not working )
ALOM Console~. (on logon promt)#. on console to get back to ALOM
Uname –a, uname –p, uname –X
Default profile parameters are defined under /etc/skel, depending on the initial shell assigned to user, system will copy the related profile to the new user created as his startup parameters
Find / -user UID (find all files owned by a specific user)
Create useruseradd -u 557 -g 1 -d /export/home/tsyed -s /bin/bash -c my first testuser tsyeduser id 0-99 reserved for system accountsallowed range is 100-60000, multiple users can have same UID but then their access to files will be the same so better avoid it , the same ranges are applicable to GIDs as well
delete files owned by certain userfind / -user tsyed –exec rm{} \;
------------------------------------------------------------------------------------
NTP: =====Solaris NTP daemon is xntpd
sample config for server: /etc/inet/ntp.server
If we need to configure our own ntp server which could be referenced by clients in the environment, the best is that we configure this server to synch with a stratum 1 server on the internet - below is an example of a solaris 9 ntp master server which is serving as ntp server for the clients in their environment
qridmapp3$ cat ntp.confserver 216.218.254.202server 66.220.9.122server 192.189.54.33server 192.189.54.17

#server 203.110.136.148#multicastclient 224.0.1.1restrict default nomodify
# optionsdriftfile /var/run/ntp.driftpidfile /var/run/ntp.pid
NOTE: No need to run multicasting - unicast requests are good enough
Check below as well:
start xntpd (solaris 9: /usr/lib/inet/xntpd solaris 10: svcadm enable ntp)
check ownership of files# chown root:root /etc/inet/ntp.conf# chmod 600 /etc/inet/ntp.conf
Also the drift file:
# touch /var/ntp/drift# chown root:root /var/ntp/drift# chmod 600 /var/ntp/drift
commands: pgrep -lf ntp
ntpq: query ntp server about statusntpq -p adjtime - correct the time to allow synchronization of the system clock
ntpd -qg (synchronize the clock once) same as ntpdateThe -g option allows shifting the clock further than the panic threshold (15 min by default) without a warning. Note that such offset is abnormal and might indicate either wrong timezone setting, clock chip failure, or simply a very long period of neglect. If in these cases you would rather not set the clock and print an error to syslog, remove -g.
After updating the system clock, store the time to the hardware clock so that it is preserved when rebooting: #hwclock -w