10 fat burning dessert recipes - dr. jockers · pdf file10 fat burning dessert recipes growing...
TRANSCRIPT


10 Fat Burning Dessert Recipes
Growing up, I always thought that eating healthy equated to eating boring and bland recipes. This is
because our idea of natural health in the 80’s and 90’s was a macrobiotic style diet that was low-fat,
low flavor foods such as tofu, steamed kale and lima beans…. oh the lima beans!!!
Most people are surprised by this, but I rebelled against this sort of “healthy lifestyle,” and would load up on sugary and processed foods whenever I had the chance. Unfortunately, this caught up with me
and I developed irritable bowel syndrome in my early 20’s that caused me incredible pain and
embarrassment. It forced me to look hard and deep at my lifestyle and helped make me the person I am
today!
Today’s Science For Healthy Recipes As science has progressed, we have realized that many foods we once thought were fattening are
actually incredibly healthy! Take for example coconut, it was vilified for years due to its saturated fat
content. Coconut oil is basically 90% saturated fat! Doctors and nutritionists warned people for years that coconut oil would clog our arteries and cause heart attacks and strokes!
Today science has shown that coconut oil may actually be the BEST THING to consume in order to
reduce your risk of heart attack and stroke! In Sri Lanka, the natives eat 144 coconut per year and their rates of heart disease are 1 in 500. This is because saturated fat is not bad for us at all, in fact, it is
extraordinarily good for us!
In America, we were told to avoid saturated fat and eat lots of low-fat grains and carbs. What was the
result? Heart disease effects 1 out of 2 and diabetes, cancer, autoimmunity and neurodegenerative diseases like Alzheimer’s and Parkinson’s are through the roof!
Eat More Fats and Cut Out Sugar & Carbs Coconut has been shown to help stabilize blood sugar levels, improve our immune system, enhance brain function and reduce scarring in our arteries. Not only that, but coconut products taste amazing!
You know what else is awesome…. butter (from grass-fed cows) has been shown to be one of the
BEST THINGS for us to consume as well due to its micronutrient levels and the healthy fatty acids it
contains!
Here is what we want – more good fats and micronutrients and less carbohydrates and sugar. These
recipes fall into the category of the micronutrient dense ketogenic style nutritional program to help you
cleanse and detoxify your body effectively. They are completely gluten & grain-free and we use stevia
(all natural and no effect on your blood sugar) as our main sweetener!
Most of these are simple to make and you and your family will absolutely LOVE the taste! Even
better – by consuming these recipes you will be improving your health as your blood sugar stabilizes
and you reduce inflammation in your body! Ready to get started? Let’s do it!

Table of Contents Page Number
Introduction: 1
Table of Contents 2
Resources 2-4
Glazed Cookie Bites 5
Blueberry Coconut Parfait 6
Chocolate Raspberry Cream 7
Chocolate Avocado Truffles 8
Frozen Keto Almond Butter Cups 9
Coconut Short Bread Cookies 10
Turmeric Coconut Cups 11
Keto Chocolate Chip Cookies 12
Keto Collagen Chocolate Squares 13
Keto Collagen Cookies 14
Author Biographies 15
Resource List
These ingredients are used in many of the recipes on this plan. You can find recommended brands in
the blue link that is provided in each product narrative. Additionally, Thrive Market is a buying
club where you can get many of these things at a discounted rate.
Canned & Carton Coconut Milk – You want to get this in a BPA-free can without Guar Gum. The
best brand that I have found is Natural Value here. I recommend getting this by the case as you will
most likely use a lot of this during the plan. For Carton – So Delicious Unsweetened is the best
because they have no sweetener and no carrageenan.
Himalayan Sea Salt: I recommend pink salts (Redmond’s Real Salt and Himalayan Sea Salt) as
they have the most trace minerals and in their pure state. Here is the brand that I use.
Grass-Fed Butter and Ghee: Ghee is clarified butter. Grass-fed butter is full of healing nutrients
but it also contains trace amounts of casein, whey and lactose. Most people tolerate grass-fed butter
and Kerry Gold is a good brand you can pick up at your local health food store (make sure it says
“milk from grass-fed cows” on the label. If you don’t tolerate dairy well, we strongly recommend
ghee. Ghee is completely free of casein, whey and lactose. Try the Purity Farms brand here
Coconut Butter: This is similar to coconut oil but contains good coconut fibers. Here is my
favorite brand here

High Quality Protein Powder: We recommend either a collagen protein, grass-fed whey protein or
an organic pea, brown rice or hemp protein powder. Our absolute favorite protein is bone broth
protein which you can find here. Be sure the powder is from a reputable brand. We also have the
Gut Healing Protein in the Gut Healing Protein pudding recipe. You can find all of our
recommended proteins on DrJockers.com here
Coconut Flour: This is the fiber of the coconut and it can be used for baking! It is rich in good
coconut fats and high-quality fiber and is low carbohydrate and gluten-free. This is preferred over
almond flour due to the quality of the fat and the lower quantity of anti-nutrients as compared to
almond flour or other nut flours. Here is a great brand recommendation.
Raw Cacao Powder: This is raw chocolate. Raw chocolate is very rich in anti-oxidants and
benefits circulation and brain function. This tastes slightly bitter on its own but tastes great when
used in the various recipes in this program. Be sure to get raw cacao for the best health benefits.
Here is a great brand recommendation.
Stevia: This is a natural sweetener that is 100 times stronger than sugar and has no ill effect on
blood sugar. This is the preferred sweetener we use in this program. We recommend the Sweet Leaf
brand of liquid stevia droplets for highest quality. You can find this here
We find that people like the flavor of the liquid dropper better than the white powder. If you are
noticing an unwanted aftertaste, try adding a bit more salt in your dish. The salt acts to blunt the
aftertaste of the stevia.
Specialty Flavors: Sweet Leaf has multiple specialty flavors and we use them in some of the
recipes in this booklet.
Chocolate Flavored Stevia Link here
Vanilla Flavored Stevia Link here
Cinnamon Flavored Stevia Link here
Lemon Flavored Stevia Link here
Hazelnut Flavored Stevia Link here
Grape Flavored Stevia Link here
Root Beer Flavored Stevia Link here
Berry Flavored Stevia Link here
English Toffee Flavored Stevia Link here
Coconut Flavored Stevia Link here
Chocolate Raspberry Stevia Link here
Apricot Nectar Flavored Stevia Link here

Monk Fruit: Monk fruit is a melon-like fruit found indigenously (and almost exclusively) in
southeast Asia. It is all natural and has no impact on our blood sugar. You can read about the health
benefits of monk fruit here
The most popular and easiest to use form of monk fruit is called Lakanto and is a combination of the
sugar alcohol erythritol and monk fruit. The combination of these 2 sweeteners forms a great
flavor. For some people, erythritol contributes to stomach bloating and gut irritation. For these
people, you can find a really good pure monk fruit here but it is slightly bitter.
Sprouted Seeds: Sprouted seeds are used in many of these recipes. Sprouting seeds removes anti-
nutrients and makes the nutrition in the seeds more bioavailable. You can find sprouted pumpkin
seeds here and sunflower seeds here and chia seeds here
Coconut Flakes: Coconut flakes are used in several of these recipes and are also a great snack.
Here are the large flakes and here are the finely shredded flakes.
Chocolate Chips: The sugar-free chocolate chips that we recommend are the Lily’s dark chocolate
that you can find here
MCT Oil: This is a byproduct of coconut and palm oils that turns into ketones quickly. It has no
flavor and can be used in cooking, smoothies or as a salad dressing. I use the XCT brand daily as it
helps me stay in ketosis.
Baking Powder and Baking Soda: We recommend Bob’s Red Mill as a superior brand for these
baking necessities. Here is baking powder and baking soda.
Thrive Market: This is an online shopping community where you can get discounted pricing on
many of the non-perishable items such as olive & coconut oil, ACV, herbs, organic soaps &
shampoos and so much more. They have great customer service and free shipping.

Glazed Cookie Bites Ingredients 1/2 cup shredded coconut 1 tablespoon coconut oil 1 tbsp vanilla 1 tbsp lemon juice
1/4 heaping cup almond butter 30 drops stevia
For the Glaze 1/2 cup coconut butter 2 tbsp coconut oil 1 tbsp lemon juice 1 teaspoon vanilla
15 drops stevia
To Make Bottom Layer 1. Place coconut flakes, vanilla, lemon juice, stevia, coconut oil and almond butter into food
processor or hand mix in a bowl.
2. Either form dough into balls or press into pan in the shape you want
3. Place in Fridge to harden while making frosting
To Make Top Layer 1. Place ingredients into food processor and blend till combined.
2. Spread onto of bottom layer.
3. Let set in fridge for a few hours – enjoy!
Notes: You can use a few drops of lemon essential oil instead of lemon juice Can use other sweetener such as honey or maple syrup instead of stevia
Can use tahini or other nut butter instead of almond butter
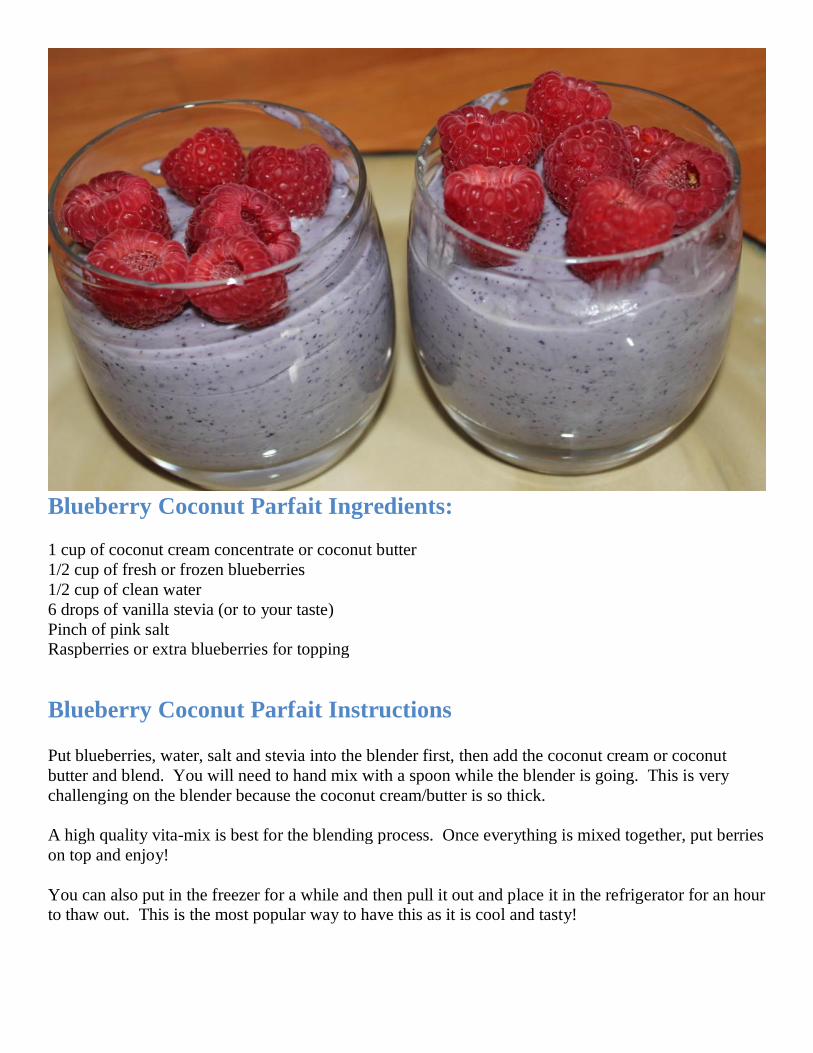
Blueberry Coconut Parfait Ingredients: 1 cup of coconut cream concentrate or coconut butter
1/2 cup of fresh or frozen blueberries
1/2 cup of clean water
6 drops of vanilla stevia (or to your taste)
Pinch of pink salt Raspberries or extra blueberries for topping
Blueberry Coconut Parfait Instructions Put blueberries, water, salt and stevia into the blender first, then add the coconut cream or coconut
butter and blend. You will need to hand mix with a spoon while the blender is going. This is very
challenging on the blender because the coconut cream/butter is so thick.
A high quality vita-mix is best for the blending process. Once everything is mixed together, put berries
on top and enjoy!
You can also put in the freezer for a while and then pull it out and place it in the refrigerator for an hour to thaw out. This is the most popular way to have this as it is cool and tasty!

Chocolate Raspberry Cream
¼ can frozen organic raspberries
1 can organic coconut cream (made with full-fat coconut milk – check instructions below)
3 Tbsps. raw cacao powder
1 scoop high quality protein powder
Liquid stevia to taste 1 Tbsp. turmeric
Pinch pink salt and pinch of black pepper
Servings: 2 (1/2 cup is very satiating due to all the healthy fat)
Instructions
Step #1: Turn the coconut milk can upside down and put in the refrigerator for 12 hours or
so. This separates the cream from the water in the milk. When you open the can (from the
bottom – which is now the top, if that makes sense) you will notice the water on the top.
Step #2: Pour the water in a glass cup and keep as it is good for smoothies and shakes. Scoop
out the cream, as that is what you will use for this recipe.
Step #3: Put all the ingredients into blender and blend until smooth and creamy.

Chocolate Avocado Truffles
1 avocado ¾ cup unsweetened dark chocolate ½ tsp vanilla extract Pinch of cinnamon
1-2 tsp of cacao powder to coat Pinch of pink salt
10-15 drops of stevia (chocolate flavor is best for these)
Servings: Makes 10-12 truffles
Instructions
Step #1: Melt dark chocolate slowly
Step #2: In a different bowl, mash avocado. When the chocolate is melted, combine it with the mashed avocado and stir them together. Then add in the vanilla, cinnamon and stevia.
Step #3: When this is combined and free of clumps, place in the refrigerator for about 30
minutes. When cooled and hardened, scoop it into 10-12 balls and roll them until they are
smooth.
Step #4: Roll each ball in cocoa powder and serve. Step #5: Place any leftover truffles in an air tight container in the refrigerator.

Frozen Keto Almond Butter Cups
4 tbsps of coconut almond butter 1 tbsp of coconut oil
½ cup of sugar-free chocolate chips Pinch of pink salt
5-10 drops of chocolate stevia or to taste
Servings: 12 ice cup sized cups
Instructions
Step #1: Get an ice cube tray and grease it with coconut oil
Step #2: Mix the chocolate and coconut oil and melt it on low heat
Step #3: Pour half of the coconut-chocolate melted mix into the ice cube tray – so you layer the
bottom of each section of the ice tray. This will form the bottom layer of the cups.
Step #4: Mix together the almond butter and stevia
Step #5: Put the almond butter on the coconut-chocolate mix in each of the sections of the ice
tray. This will form the middle section of the cups.
Step #6: Cover all the cups with the remaining chocolate, which will make up the top of the cups.
Step #7: Place the ice tray in the freezer for 10-20 minutes and then they should be ready to
enjoy!
Step #8: Keep in the freezer to keep them good until you have them. Take out about 30 minutes before enjoying to let thaw out so they are easier to remove from the ice tray.

Coconut Short Bread Cookies 6 tbsp of coconut flour
4 large tbsp. of grass-fed butter (melted)
15 drops of vanilla stevia ¼ tsp of vanilla extract
Servings: Makes about 5-6 cookies
Instructions:
Step #1: Turn the oven on and preheat to 350 degrees
Step #2: Mix all the ingredients together until it has the consistency of a thick paste
Step #3: Shape the batter into balls and place on a lined baking sheet.
Step #4: Press the cookies down gently on the tops with a fork or a knife. Step #5: Bake the cookies for 8-10 minutes until they are lightly browned on the bottom
Step #6: Let the cookies cool completely on the pan, otherwise they will crumble.

Turmeric Coconut Cream Cups Ingredients
1.5 cups unsweetened shredded coconut ½ cup Coconut Butter
½ cup Coconut Oil
1 tsp lemon juice
1/2 tsp turmeric
1/2 cup grass-fed butter or ghee Pinch of black pepper
20-25 drops Stevia extract optional
Turmeric Coconut Cream Cups Instructions 1. Melt butter or ghee on low and mix in the turmeric and black pepper- stir until well combined.
2. Place shredded coconut, coconut butter, coconut oil, lemon juice and stevia into a food
processor and blend until well mixed.
3. Use spoon to scoop out about 2 tbsps worth of coconut mixture and place into silicone or regular
muffin liners.
4. Once all your muffins liners are filled, melt butter or ghee and mix in spices.
5. Use a spoon again to scoop out about 1 tablespoon of turmeric liquid and pour onto your coconut cups until the coconut is completely covered. Repeat on all your coconut cups.
6. Place in freezer for about 20 minutes or until chocolate is frozen.
7. Keep in fridge.
Notes: Can also use 2 tablespoons of raw, local honey or grade B maple syrup or 1 tbsp of xylitol if
you don’t want to use stevia. Honey and maple syrup do contain sugar.

Keto Chocolate Chip Cookies 1 cup organic almond butter 2 squirts liquid vanilla stevia 3 squirts liquid stevia 1/4 cup golden monk fruit
1 tsp vanilla extract 1/2 tsp baking soda
1/4 cup stevia chocolate chips 1/2 tsp pink salt
1/4 cup chopped organic walnuts 1 pasture-raised egg
Servings: 21 cookies
Instructions
Step #1: Preheat oven to 350 degrees.
Step #2: Line cookie sheet with parchment paper. Step #3: Using an electric hand-held mixer, mix all ingredients together except for the walnuts
and the chocolate chips
Step #4: Add in the walnuts and chocolate chips and mix together with a spoon.
Step #5: Place 1 heaping tablespoon of cookie dough batter onto parchment paper and repeat
until you run out, spacing the cookies about 1/2 inch apart. (Flatten the cookies into a round shape—not a ball shape.)
Step #6: Bake in oven for 10 minutes. Insert a fork or a toothpick inside a cookie gently. If no
batter comes off, pull the cookies out. Otherwise, you can try cooking it another minute or so.
Step #7: Take cookie sheet out of the oven. Let the cookies cool off for about 20 minutes (still sitting on the cookie sheet).
Step #8: After about 20 minutes, place the cookies onto a cooling rack, using a spatula. The
cookies will harden and become less crumbly as they cool off.

Keto Collagen Chocolate Squares
½ cup of coconut oil 5 tbsps of cacao powder
½ tsp vanilla extract 2 tbsps of nut butter
Optional Ingredients:
1 tbsp of MCT oil 10-15 drops of chocolate stevia 2 tbsps of chocolate bone broth protein Pinch of pink salt
**If you use the chocolate bone broth protein, it is already flavored with stevia and tastes
amazing, so you don’t need to add in any additional stevia!
Servings: Makes about 12 (2” x 2” squares)
Instructions
Step #1: Melt the coconut oil over low heat and add in the cacao powder, sweetener, vanilla
extract, nut butter and protein powder. Be sure to whisk well to remove any lumps from the cacao and make sure that it mixes in well!
Step #2: Pour into a loaf pan lined with parchment paper.
Step #3: Refrigerate until it is firm (coconut oil naturally hardens when refrigerated)
Step #4: Cut into squares or any bar size you like
Step #5: Enjoy!!!

Coconut Collagen Cookies 1 cup of sprouted pumpkin seeds or sunflower seeds
2 cups of coconut flakes 1 tsp of vanilla extract
1 cup of cacao powder 3 tbsps coconut oil
4 tbsps monk fruit or 30 drops of stevia 2 tbps of bone broth protein
Servings: 12 medium sized cookies
Instructions Step #1: Put your seeds (pumpkin or sunflower) and coconut flakes into your blender or food processer and pulse until it takes on a flour like texture.
Step #2: Put in your bone broth protein or collagen protein, vanilla extract, raw cacao and
monk fruit and combine it all together.
Step #3: If the recipe is too thick you can add in more coconut oil and if it is too runny, you can
add in more bone broth protein or collagen. I would recommend just a little at a time until you get your desired consistency.
Step #4: Take a scoop with a mini ice cream scooper and scoop about 2-3 tbsps by hand and
place on parchment paper.
Step #5: Shape the cookies into whatever shape or size you like by pressing down on them. The
batter may be a bit runny, but don’t worry about making them into perfect shapes. Our goal is nutrition, not looks.
Step #7: Place the cookies in the refrigerator until they are firm. Keep the cookies in the fridge
to keep them fresh before eating them.

About Megan Kelly:
Megan is a Licensed Esthetician specializing in holistic
nutrition, woman’s hormones, and spiritual health. Her
mission is empowering people to live a life of bliss
through nourishing their mind, body, and spirit.
Megan blogs at renewingallthings.com where she
explores the incredible healing power of real food, a
balanced lifestyle, and how to get our bodies working
exactly how our Creator intended them to. It is Megan's
goal to see people restored and experience true health and joy like never before.
In her spare time, Megan loves hiking, wake boarding, cooking, and spending time in the
beautiful mountains of Colorado.
About Dr. David Jockers DNM, DC, MS
Dr. David Jockers is a doctor of natural medicine, a
functional nutritionist and corrective care chiropractor.
He currently owns and operates Exodus Health Center
Kennesaw, Georgia and runs one of the hottest natural
health websites in DrJockers.com
He has developed 6 revolutionary online programs with
thousands of participants. These programs include E-guides,
recipe guides, meal plans and video instructions including
“The Sugar Detox,” “The Cancer Cleanse,” “Navigating the
Ketogenic Diet,” “The Digestive Health Restoration Program,”
“The AutoImmune Elimination Program,” and “The Super
Brain Program.”
Dr Jockers is also a sought after speaker around the country on such topics as weight loss, brain
health, healing leaky gut, thyroid function, natural detoxification and disease prevention.