1.0 connecting opengn to an fx-3500 i manual, and lt …€¦ · 4 lt-6621 rev 1 connecting opengn...
TRANSCRIPT
LT-6621 Rev 1 1
1.0 Connecting OpenGN to an FX-3500
You need:
• Antaira STE-501C 1-Port RS-232/422/485 To Ethernet Device Server
• Antaira software CD
• Ethernet cable (maximum 300’)
• 9 pin male to female serial cable
• OpenGN and OpenGN Gateway version 3.2 or later
• OpenGN license key
• Ethernet cable
• The MGC-3000 Series Configurator Utility version 2.8.3 or later
• The FX-3500 Fire Alarm Control Panel with firmware version 1.7.6S or later
1.1 Connect the Antaira STE-501C
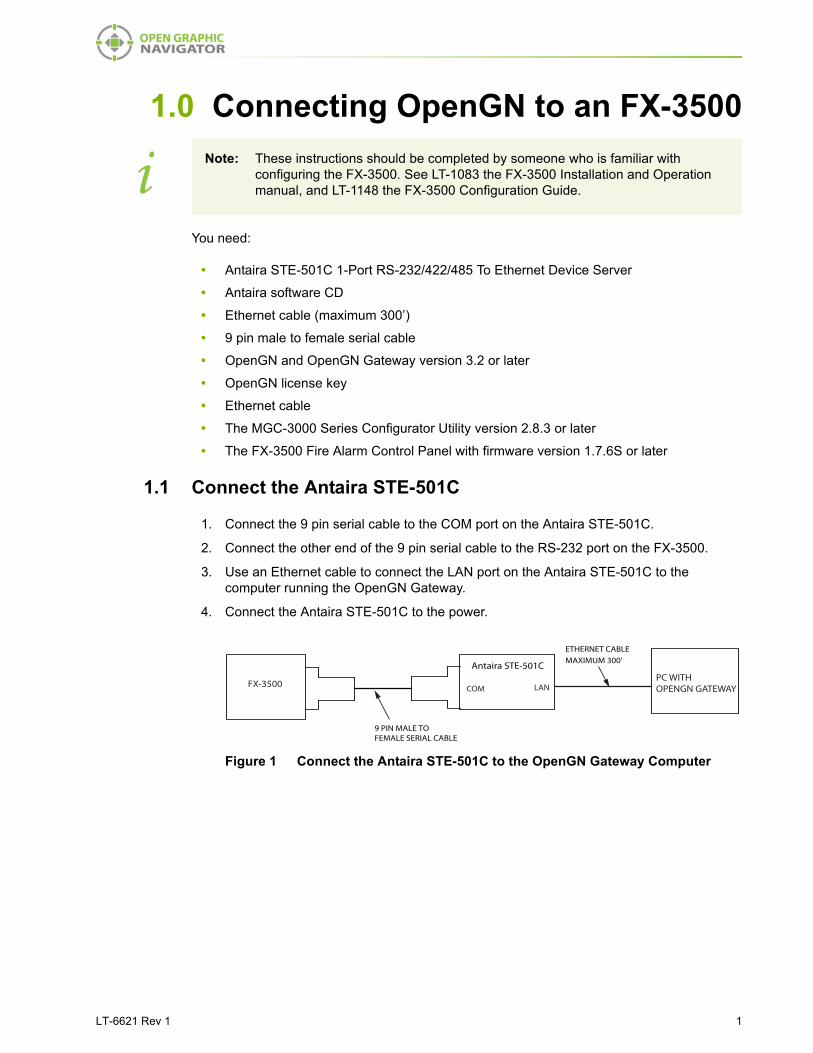
1. Connect the 9 pin serial cable to the COM port on the Antaira STE-501C.
2. Connect the other end of the 9 pin serial cable to the RS-232 port on the FX-3500.
3. Use an Ethernet cable to connect the LAN port on the Antaira STE-501C to thecomputer running the OpenGN Gateway.
4. Connect the Antaira STE-501C to the power.
Figure 1 Connect the Antaira STE-501C to the OpenGN Gateway Computer
Note: These instructions should be completed by someone who is familiar with configuring the FX-3500. See LT-1083 the FX-3500 Installation and Operation manual, and LT-1148 the FX-3500 Configuration Guide.i
Antaira STE-501C
LAN
ETHERNET CABLEMAXIMUM 300'
PC WITHOPENGN GATEWAYCOM
9 PIN MALE TO FEMALE SERIAL CABLE
FX-3500
2 LT-6621 Rev 1
Connecting OpenGN to an FX-3500
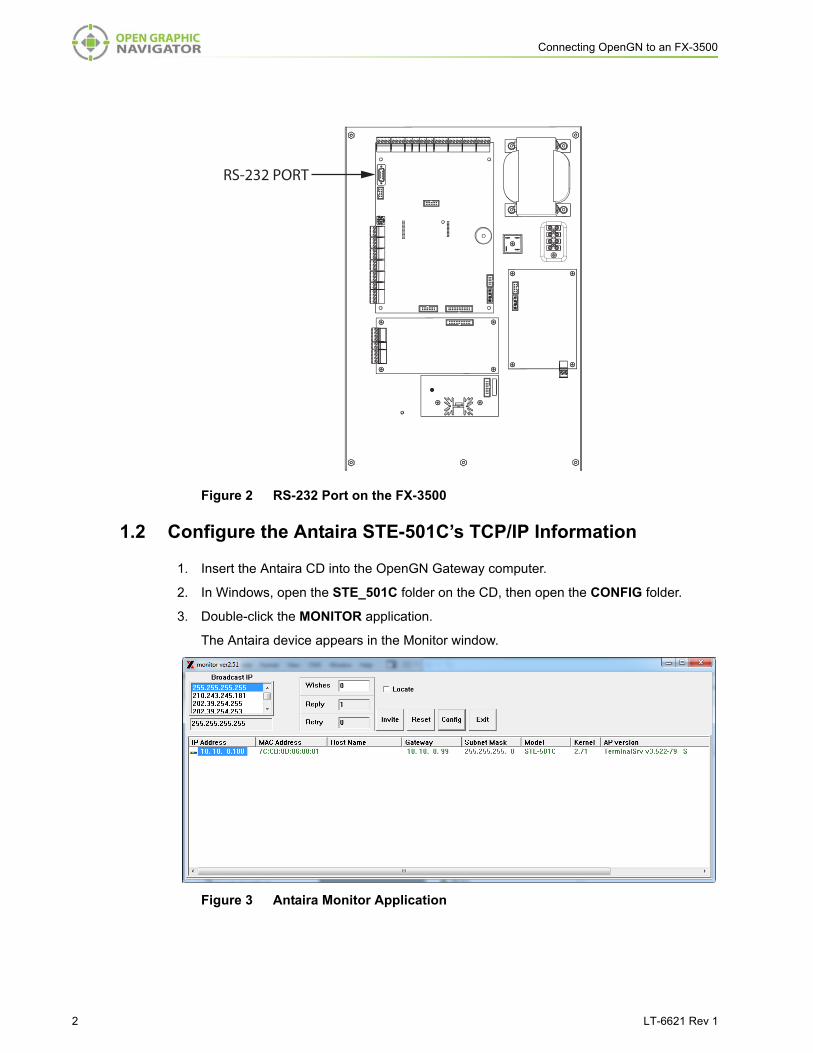
Figure 2 RS-232 Port on the FX-3500
1.2 Configure the Antaira STE-501C’s TCP/IP Information
1. Insert the Antaira CD into the OpenGN Gateway computer.
2. In Windows, open the STE_501C folder on the CD, then open the CONFIG folder.
3. Double-click the MONITOR application.
The Antaira device appears in the Monitor window.
Figure 3 Antaira Monitor Application
RS-232 PORT

LT-6621 Rev 1 3
Connecting OpenGN to an FX-3500
4. Double-click the Antaira device.
A windows shows the TCP/IP information for the device.
Figure 4 Antaira Device Details
5. Type the IP configuration settings for the Antaira STE-501C. Consult your network administrator for assistance.
6. Type a User ID and Password for the Antaira STE-501C, or leave them as they are. This information is for connecting to the configuration page in section 1.3 below.
7. In the Host Name field, type a name for the Antaira STE-501C to identify it on the network.
8. Click Config Now.
1.3 Configure the Antaira STE-501C
1. Open a Web browser and type the IP address of the Antaira STE-501C, and then press Enter.
2. The default User ID is admin and the Password is blank.
The configuration page for the Antaira STE-501C appears.
Note: To ensure a constant connection to OpenGN, you must assign a static IP address to the Antaira STE-501C.i
4 LT-6621 Rev 1
Connecting OpenGN to an FX-3500
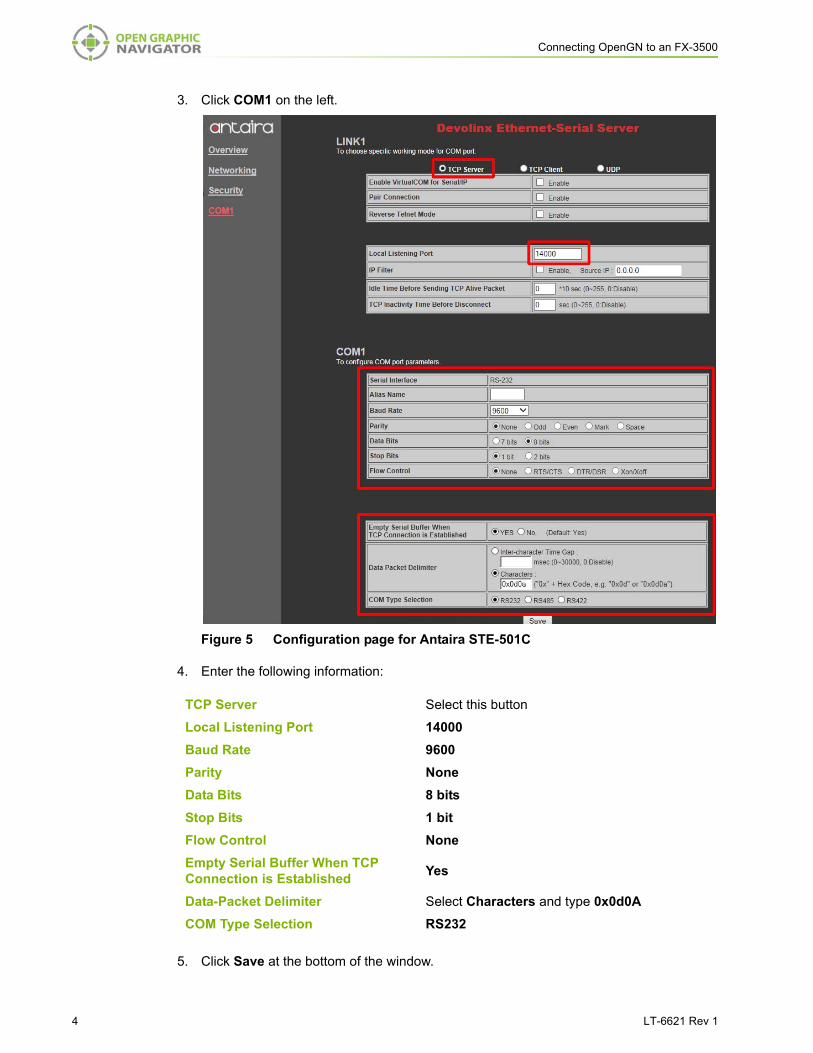
3. Click COM1 on the left.
Figure 5 Configuration page for Antaira STE-501C
4. Enter the following information:
5. Click Save at the bottom of the window.
TCP Server Select this button
Local Listening Port 14000
Baud Rate 9600
Parity None
Data Bits 8 bits
Stop Bits 1 bit
Flow Control None
Empty Serial Buffer When TCP Connection is Established
Yes
Data-Packet Delimiter Select Characters and type 0x0d0A
COM Type Selection RS232
LT-6621 Rev 1 5
Connecting OpenGN to an FX-3500
1.4 Export the Job File
You need:
• The MGC-3000 Series Configurator Utility version 2.8.3 or later
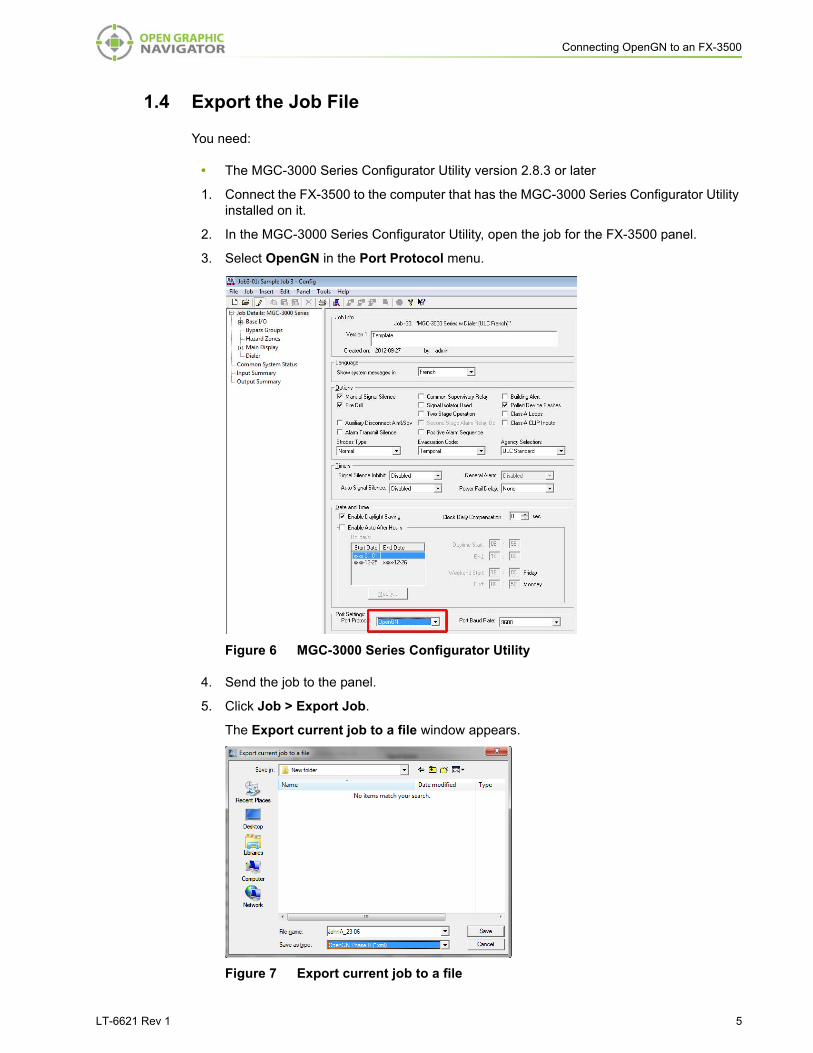
1. Connect the FX-3500 to the computer that has the MGC-3000 Series Configurator Utility installed on it.
2. In the MGC-3000 Series Configurator Utility, open the job for the FX-3500 panel.
3. Select OpenGN in the Port Protocol menu.
Figure 6 MGC-3000 Series Configurator Utility
4. Send the job to the panel.
5. Click Job > Export Job.
The Export current job to a file window appears.
Figure 7 Export current job to a file
6 LT-6621 Rev 1
Connecting OpenGN to an FX-3500
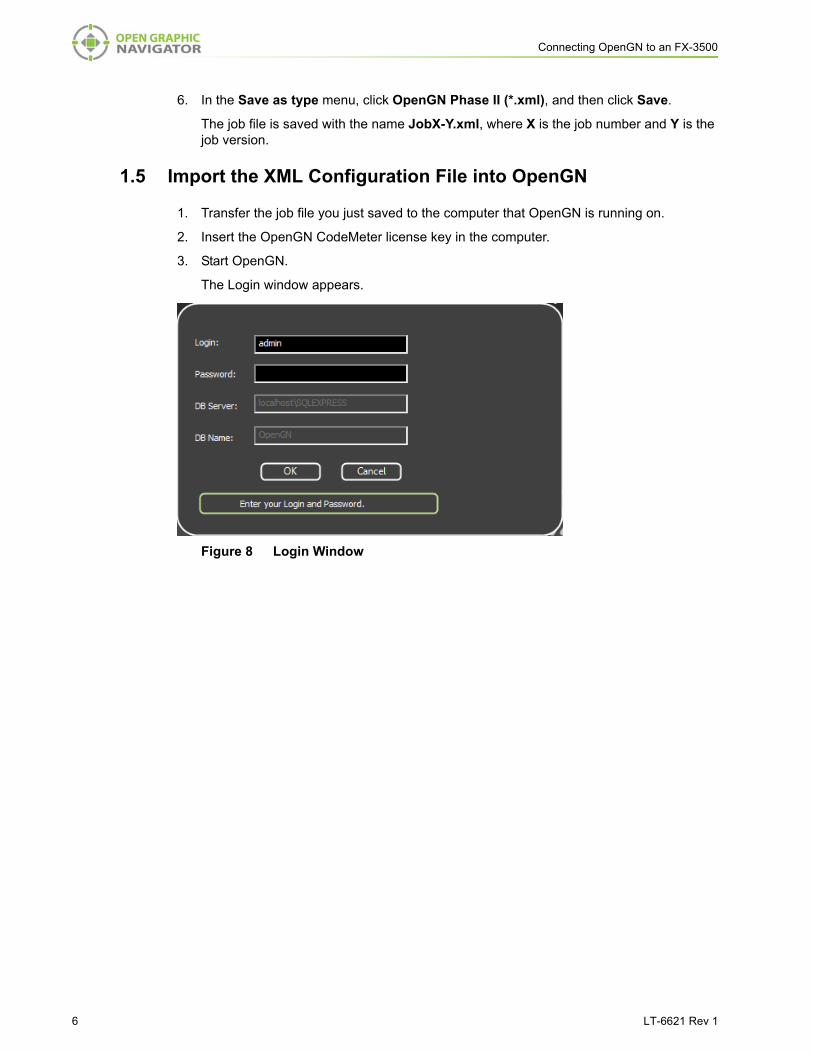
6. In the Save as type menu, click OpenGN Phase II (*.xml), and then click Save.
The job file is saved with the name JobX-Y.xml, where X is the job number and Y is the job version.
1.5 Import the XML Configuration File into OpenGN
1. Transfer the job file you just saved to the computer that OpenGN is running on.
2. Insert the OpenGN CodeMeter license key in the computer.
3. Start OpenGN.
The Login window appears.
Figure 8 Login Window

LT-6621 Rev 1 7
Connecting OpenGN to an FX-3500
4. Select the user from the Login menu.
5. Type the password.
6. Click OK.
The OpenGN Main Display window appears.
Figure 9 OpenGN Main Display Window
7. Click the Config button from the Main Display window. Click Yes to confirm that you want to enter the configuration section.
The Configuration window appears.
8. Click the Settings button in the lower right-hand corner of the Configuration window.
The Panel Settings window appears.
Figure 10 Panel Settings
8 LT-6621 Rev 1
Connecting OpenGN to an FX-3500
9. Click Browse in the Panel Configuration section, and then navigate to the job file.
10. Select Auto-associate default icons if you want to associate the object icons with the existing system icon images.
11. Click Import XML.
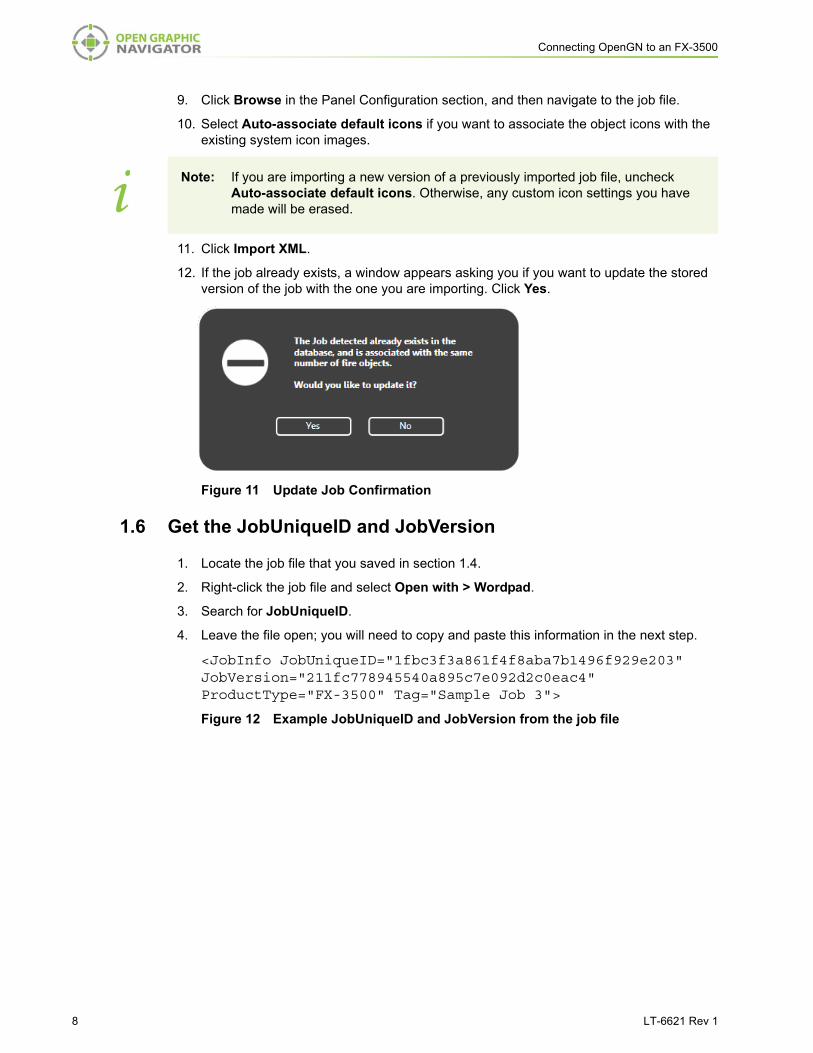
12. If the job already exists, a window appears asking you if you want to update the stored version of the job with the one you are importing. Click Yes.
Figure 11 Update Job Confirmation
1.6 Get the JobUniqueID and JobVersion
1. Locate the job file that you saved in section 1.4.
2. Right-click the job file and select Open with > Wordpad.
3. Search for JobUniqueID.
4. Leave the file open; you will need to copy and paste this information in the next step.
<JobInfo JobUniqueID="1fbc3f3a861f4f8aba7b1496f929e203" JobVersion="211fc778945540a895c7e092d2c0eac4" ProductType="FX-3500" Tag="Sample Job 3">
Figure 12 Example JobUniqueID and JobVersion from the job file
Note: If you are importing a new version of a previously imported job file, uncheck Auto-associate default icons. Otherwise, any custom icon settings you have made will be erased.i
LT-6621 Rev 1 9
Connecting OpenGN to an FX-3500
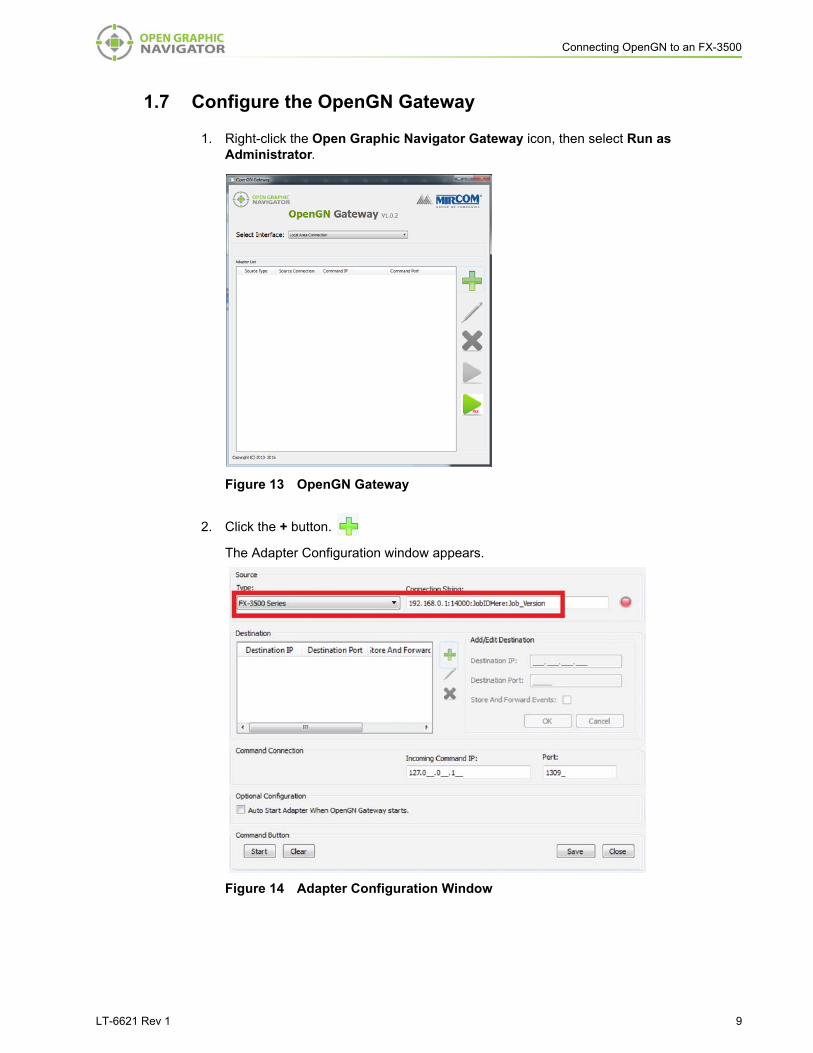
1.7 Configure the OpenGN Gateway
1. Right-click the Open Graphic Navigator Gateway icon, then select Run as Administrator.
Figure 13 OpenGN Gateway
2. Click the + button.
The Adapter Configuration window appears.
Figure 14 Adapter Configuration Window

10 LT-6621 Rev 1
Connecting OpenGN to an FX-3500
3. Enter the following information.
4. Click the green button beside Destination, and then provide the following information:
Figure 15 Destination
Type FX-3500 Series
Connection String
The connection string consists of 4 pieces of information separated by colons:
• The IP address of the Antaira STE-501C: you assigned this in section 1.2 on page 2.
• The port: 14000
• Job Unique Id: copy and paste the JobUniqueID from the job file (section 1.6 on page 8).
• Job Version: copy and paste the JobVersion from the job file (section 1.6 on page 8).
For example, if the IP address is 10.10.8.37, and the Job Unique Id and Job Version are the ones shown in section 1.6, then the connection string is:
10.10.8.37:14000:1fbc3f3a861f4f8aba7b1496f929e203:211fc778945540a895c7e092d2c0eac4
Destination IP The IP address of the OpenGN computer. If the OpenGN Gateway and OpenGN are on the same computer, use 127.0.0.1.
Destination Port 1209
Store and Forward Events
Reserved for future use.
LT-6621 Rev 1 11
Connecting OpenGN to an FX-3500
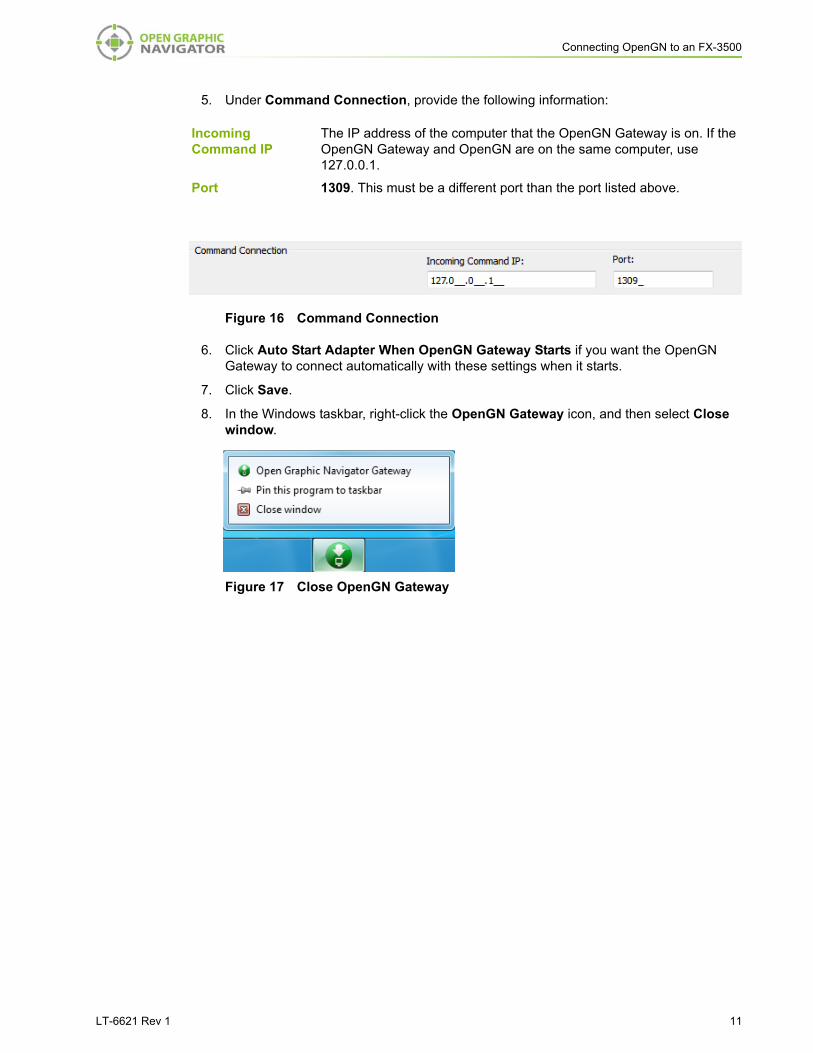
5. Under Command Connection, provide the following information:
Figure 16 Command Connection
6. Click Auto Start Adapter When OpenGN Gateway Starts if you want the OpenGN Gateway to connect automatically with these settings when it starts.
7. Click Save.
8. In the Windows taskbar, right-click the OpenGN Gateway icon, and then select Close window.
Figure 17 Close OpenGN Gateway
Incoming Command IP
The IP address of the computer that the OpenGN Gateway is on. If the OpenGN Gateway and OpenGN are on the same computer, use 127.0.0.1.
Port 1309. This must be a different port than the port listed above.
12 LT-6621 Rev 1
Connecting OpenGN to an FX-3500
9. Restart the OpenGN Gateway: right-click the Open Graphic Navigator Gateway icon, then select Run as Administrator.
10. Select the adapter you created, and then click the green arrow icon:
When OpenGN is connected, the adapter in the Adapter List is green.
Figure 18 OpenGN Gateway with One Connection
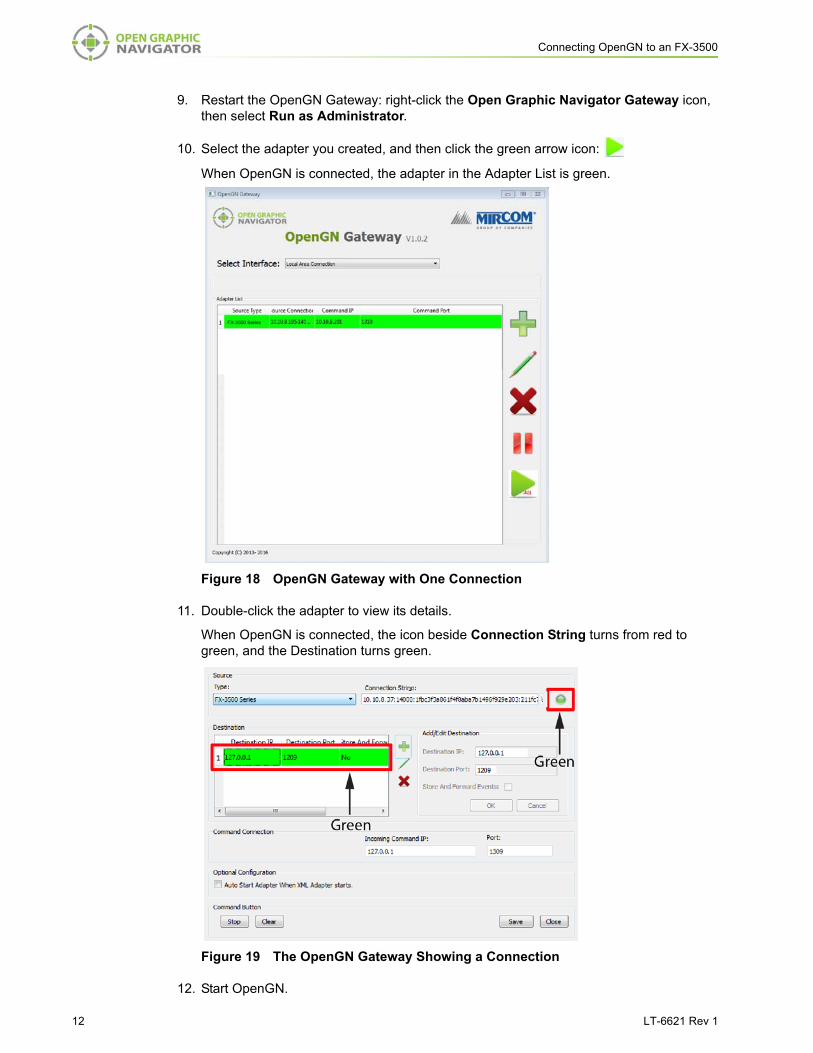
11. Double-click the adapter to view its details.
When OpenGN is connected, the icon beside Connection String turns from red to green, and the Destination turns green.
Figure 19 The OpenGN Gateway Showing a Connection
12. Start OpenGN.

Canada25 Interchange Way Vaughan, ON L4K 5W3 Tel: (888) 660-4655 Fax: (888) 660-4113
© MGC 2017Printed in CanadaSubject to change without prior notice
http://www.mircomgroup.com/opengn
U.S.A.4575 Witmer Industrial Estates Niagara Falls, NY 14305Tel: (888) 647-2665
Technical Support North America OnlyTel: (888) Mircom5
(888) 647-2665InternationalTel: (905) 660-4655