1. walkout processing from the account window 2 walkout processing from onschedule (fast walkout)...
TRANSCRIPT

1

Walkout Processing from the Account Window
2
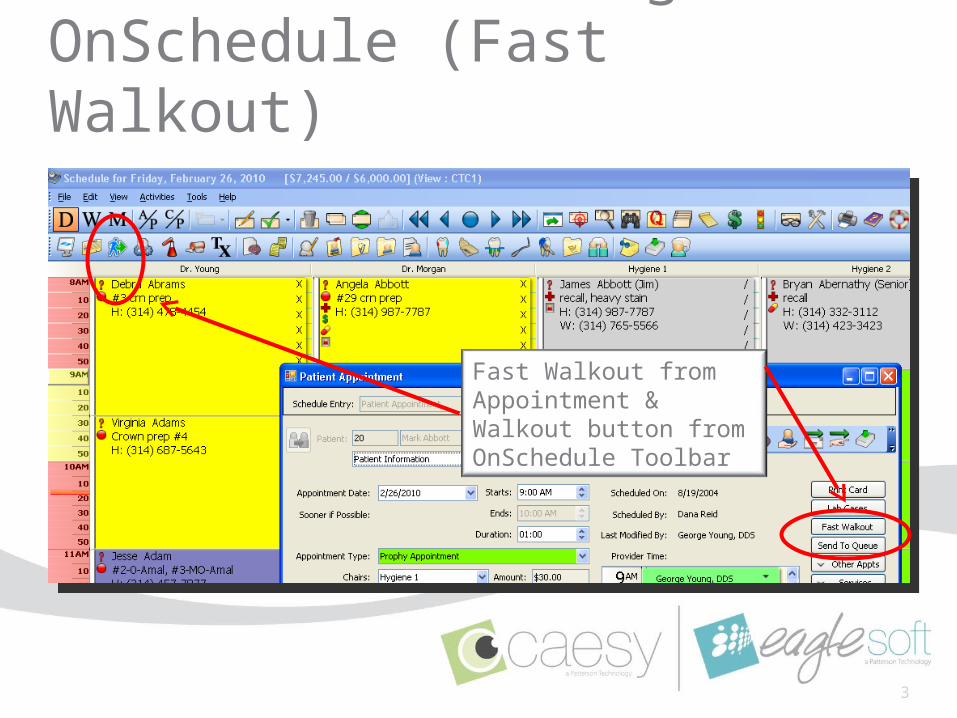
Walkout Processing from OnSchedule (Fast Walkout)
Fast Walkout from Appointment & Walkout button from OnSchedule Toolbar
3

Patient Benefit DetailsEaglesoft 15 – Displays employer
Eaglesoft 16 – Displays insurance company instead of employer as well as the dollar amount for this walkout and previous outstanding balance.
4

Selecting ServicesIf planned services exist for the selected
patient, the Treatment Plan window appears.Select the checkbox associated with any
planned services and select Use Selected Planned Services to add the selected services to the current Walkout.
In the Options section, select ‘Use Date of Service from Planned Procedure’ or ‘Use Fee From Treatment Plan’
5

Service Code ListIf no Planned Services exist for the patient,
use the add services drop-down to add services to the Walkout.
Start typing the service code and the system will narrow the search accordingly.
The entire Service Code list is now available
from the Walkout grid. F2 is still available.
6

Edit Service Select the Edit Service button to open “More Information”.
Decide on the fly to Create Lab or Create Post Op.
Summary of charges including Estimated Patient Portion for each service on the Walkout
7

Show EstimationShow Estimation button available below
Services, or select the drop-down in the Estimated Insurance field.
8

Tooth SelectorSelect the drop-down arrow to use the new
Tooth Selector to attach a tooth or teeth to a Service Code.
9

Surface SelectorSelect the drop-down arrow to use the
Detailed or Summary Surface chart to assign surfaces to the service code.
Defaults to “summary” or “detailed” surfaces based on Chart Preferences.
10
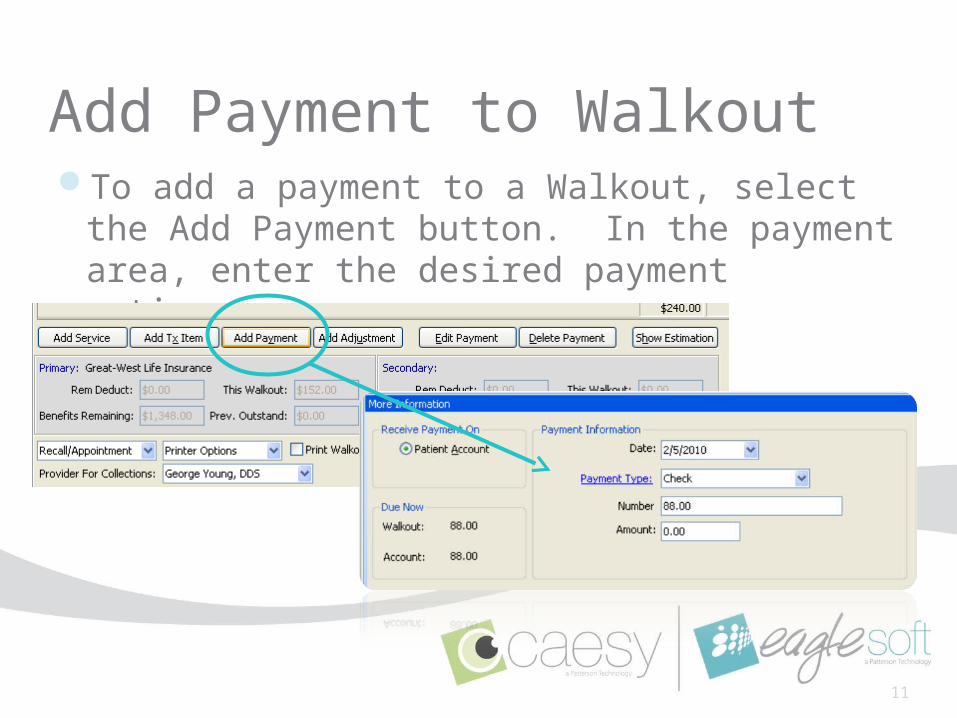
Add Payment to WalkoutTo add a payment to a Walkout, select the Add
Payment button. In the payment area, enter the desired payment options.
11

Walkout Payments cont.The payment information will be listed
alongside the services in the Walkout.Apply multiple payments to one Walkout (ex:
½ Check, ½ Credit Card payment).Use the Edit Payment or Delete Payment
buttons to make further adjustments to an added payment.
12

Walkout Payment DistributionDistribution of payments added to Walkout will appear
after user has hit “Save”.* Credit Distribution checkbox must be checked
If multiple payments are added to one Walkout, one distribution window per each payment will appear in the order they were added to the Walkout.
Default distribution on Walkout payments is:Payments made on Walkout will distribute to items on the Walkout first, before being applied to additional unpaid debits in the account unless the Preference ‘Automatically distribute credits to services on the walkout first’ is UNCHECKED.
13

Credit Distribution CheckboxCheck this box to open the payment
distribution window.Box will stay checked on that workstation.
14

Walkout Payment DistributionUse the checkbox to automatically distribute
credits made at the time of the walkout to the items on the walkout first. If you do not select this option, payments made at the time of the walkout will apply to the oldest balance.(This will keep a running preference per workstation)
15
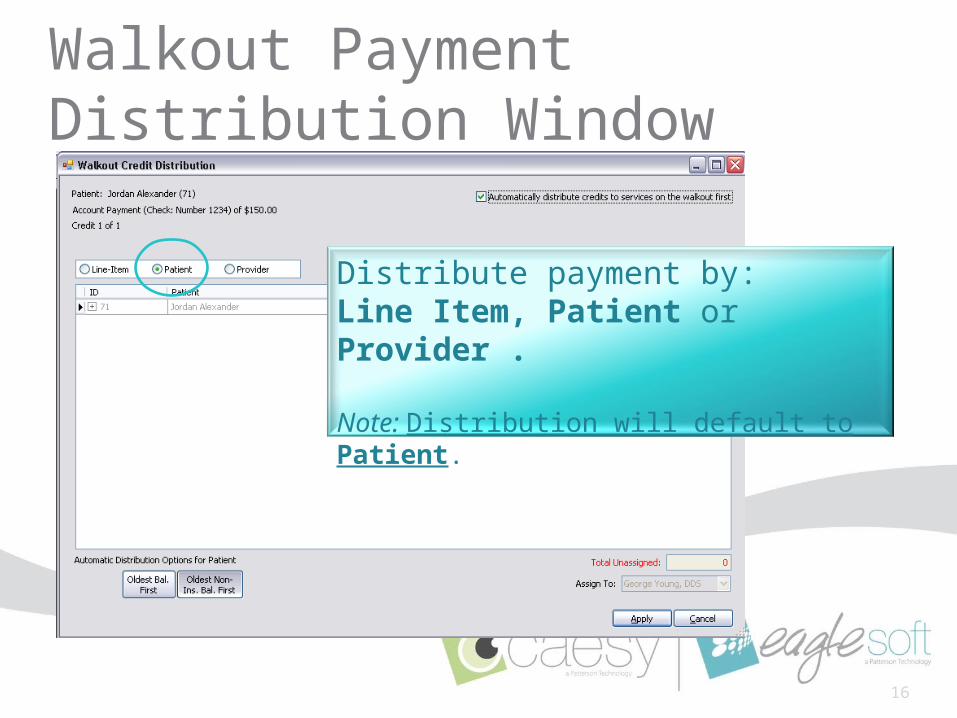
Walkout Payment Distribution Window
16
Distribute payment by:Line Item, Patient or Provider .
Note: Distribution will default to Patient.

Unassigned CreditsUnassigned credits are applied to the Walkout by default.
Notice the informational “warning” icon when it occurs.
Single left-click the icon to choose which payments NOT to apply to this Walkout (uncheck to remove credits from services).
Note: The unassigned Credits in Walkout will follow whatever you choose to do with the Walkout Distribution Preference . If you uncheck the preference to distribute payments to items on walkout first - then the next walkout you do, the unassigned credits will NOT be checked by default.
17

Unassigned Credits Cont.Icons along the left margin of account show
unassigned credits.Double click the icon to distribute unassigned
credits to unpaid debits.
Double click icon to open the “Apply Unassigned Credit” window.
Note: Offsetting debits and credits now assign unassigned credits to unpaid debits (indicated by icons). No adjustment will display on the Account ledger, as opposed to previous versions.
18
Unassigned credit icon.

Add Adjustment to WalkoutTo add an adjustment to a Walkout, select the
Add Adjustment button. In the adjustment area, enter the desired adjustment options.
19

Adjustments cont.The Adjustment will show as a Line Item in the
Walkout.
Upon processing the Walkout, the Credit Distribution window will appear.
20

Walkout Credit Distribution (to apply the Adjustment)
Select Oldest Balance First or Oldest Non-Insurance Balance First to distribute the Adjustment automatically.
21
Select Line-Item, Patient or Provider

Recall/AppointmentSelect the drop-down to enter a New Recall
Date, Recall Frequency, and update today’s appointment as completed.
Uncheck additional appointments that have not yet been completed (i.e. pt. has hygiene and regular appointments on the same day).
22

Printing OptionsSelect the drop-down to enter how many
copies of the receipt to print, a Message for Walkouts and the Printer Setup.
23

Quick WalkoutEaglesoft 15
Eaglesoft 16
24

Family WalkoutWalkout multiple family members at the same
time!To add another patient to the Walkout, select the
patient and then add the appropriate Walkout information (services, payment, etc.).
Select patient from the patient grid or from the patient drop-down in the
Walkout grid.
HINT: If the pt. is selected from the top pt. grid, their ‘Planned Tx. Items’ window will appear
as they are selected.
25

Family Walkout - PaymentDistribute one payment amongst family
members.Print one receipt.
26

27