1 user manual zonal railways version 1. manual ver 1.1.pdf · 24. view user audit trail ... view...
TRANSCRIPT
Zo
nal R
ailw
ays
Vers
ion
1.1
Use
r M
anua
l
Document Prepared By:
Centre for Railway Information System

Adminst
2
Administrator User Manual Version 1.1 / 22 November 2010
Contents 1. Administration Login Screen ........................................................................................................... 4
2. Manage Profile ................................................................................................................................ 5
3. Change Password ............................................................................................................................ 6
4. Manage Site Configuration ............................................................................................................. 7
5. Manage Divisions ............................................................................................................................ 8
6. Manage Departments ................................................................................................................... 10
7. Manage Website Header Links ..................................................................................................... 11
8. Manage Users ............................................................................................................................... 12
9. Manage User Rights ...................................................................................................................... 13
10. Mange Website Static Content ................................................................................................. 14
11. Mange Scrolling / Ticker Text .................................................................................................... 15
12. Create Banners .......................................................................................................................... 16
13. Remove/Delete Banners ........................................................................................................... 17
14. Manage Tender Notice ............................................................................................................. 17
15. Manage Tender Document ....................................................................................................... 20
16. Manage Tender Corrigendum ................................................................................................... 23
17. Manage Store Tender ............................................................................................................... 24
18. Manage Awarded Tender ......................................................................................................... 26
19. Manage Bill Status..................................................................................................................... 29
20. Manage News/Announcements ............................................................................................... 34
21. Manage Press Releases ............................................................................................................. 35
22. Manage Press Release Issuing Officer....................................................................................... 36
23. Manage Photo Gallery .............................................................................................................. 37
24. View User Audit Trail ................................................................................................................ 39
25. View Tender Download Log ...................................................................................................... 39

Adminst
3
Administrator User Manual Version 1.1 / 22 November 2010
History
S. No. Version Date Prepared By Reviewed by 1. 1.0 Created on 08-Nov-2010 Vinod Kumar Mr. Prabhat / CRIS 2. 1.1 Updated on 22-Nov-2010 Vinod Kumar Mr. Prabhat / CRIS
Key Points to remember:
1. The fields which are mandatory has been marked as “Mandatory”.
2. In case of any image upload, please don’t use heavy size image and proportionality large images. User gif, jpg image if possible.
3. In case of any problem , while adding the content, please contact your administrator for any technical assistance.
Adminst
4
Administrator User Manual Version 1.1 / 22 November 2010
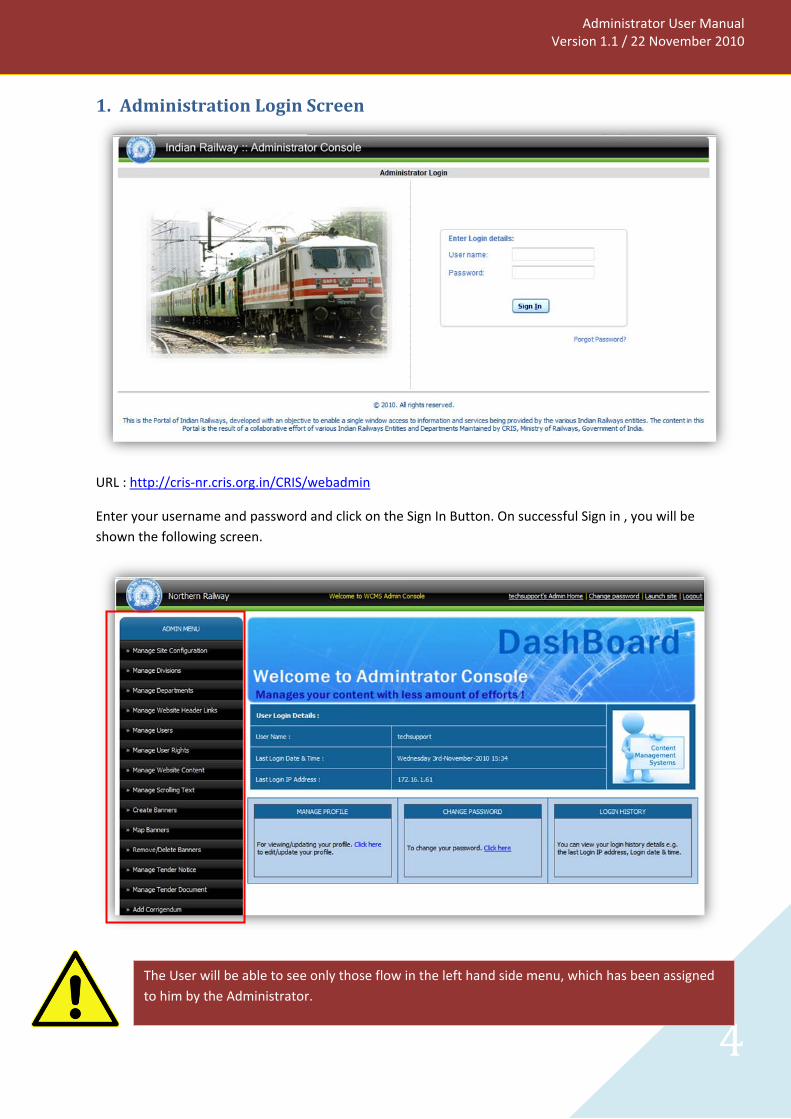
1. Administration Login Screen
URL : http://cris-nr.cris.org.in/CRIS/webadmin
Enter your username and password and click on the Sign In Button. On successful Sign in , you will be shown the following screen.
The User will be able to see only those flow in the left hand side menu, which has been assigned to him by the Administrator.

Adminst
5
Administrator User Manual Version 1.1 / 22 November 2010
You can only change the following details:
Email-id
Display Name
2. Manage Profile For managing your profile, click on the Manage Profile link (Screen shot is given below)
If you click on this link, the following details will be displayed.
The rest of the fields are disabled and hence can not be changed.
Change the details which you wanted to change and then click on the update button. Subsequently, the details will be updated.

Adminst
6
Administrator User Manual Version 1.1 / 22 November 2010
3. Change Password For changing your login password, click on the Change Password link (Screen shot is given below)
You have to enter your existing password, new Password and Confirm Password.
Once your have entered all the details, click on the “Change Password” button and your password will be changed successfully.
Please Note: Your New Password and Confirm Password should be same.

Adminst
7
Administrator User Manual Version 1.1 / 22 November 2010
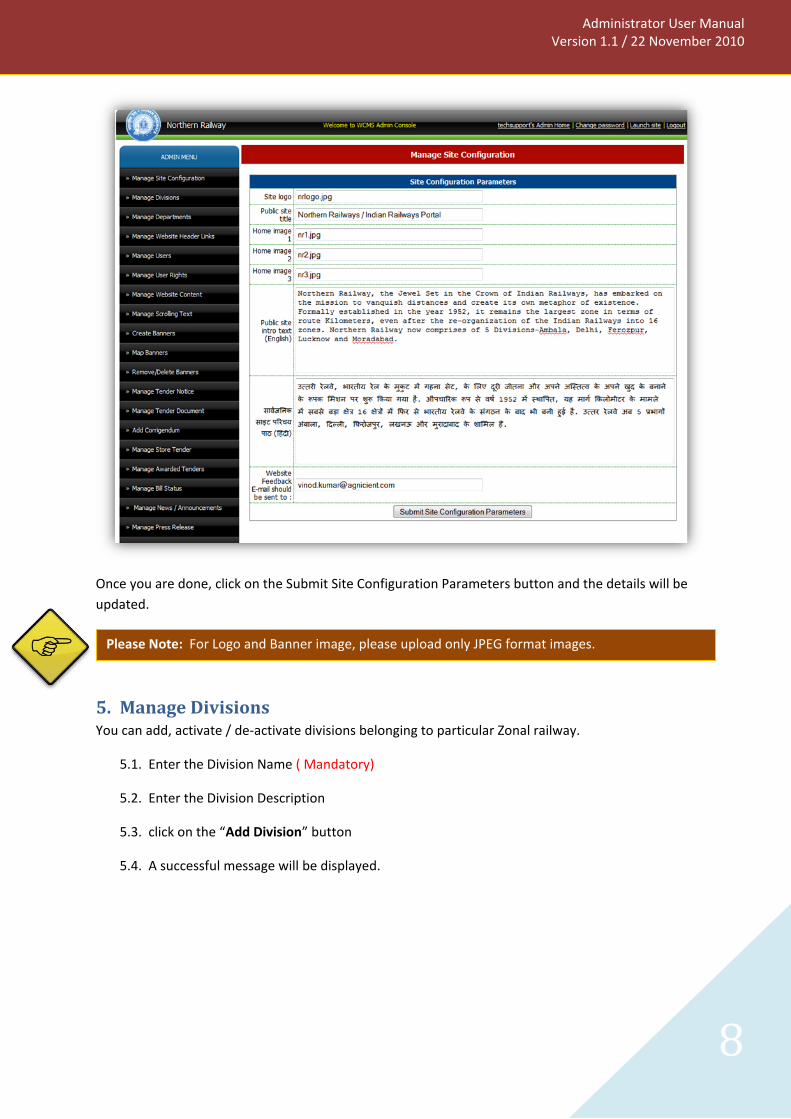
4. Manage Site Configuration Here you can manage the following things:
4.1. Site Logo
If you want to change the public site logo, then upload the logo with fixed width and height ( JPEG format) and upload it.
4.2. Public Site Title ( English / Hindi)
If you want to change the public site title , then put the relevant text here.
4.3. Homepage Banner Images
If you want to change the images which are displayed on the homepage , then upload the images with fixed width and height i.e. width : 667px, height : 156px ( preferably jpeg format)
4.4. Public Site Into Text on the Homepage
If you want to change the public site intro text, then put the relevant text here.
4.5. Website Feedback email to
Enter the email-id where you want all the feedback received from the public site should go.
Adminst
8
Administrator User Manual Version 1.1 / 22 November 2010
Once you are done, click on the Submit Site Configuration Parameters button and the details will be updated.
5. Manage Divisions You can add, activate / de-activate divisions belonging to particular Zonal railway.
5.1. Enter the Division Name ( Mandatory)
5.2. Enter the Division Description
5.3. click on the “Add Division” button
5.4. A successful message will be displayed.
Please Note: For Logo and Banner image, please upload only JPEG format images.
Adminst
9
Administrator User Manual Version 1.1 / 22 November 2010
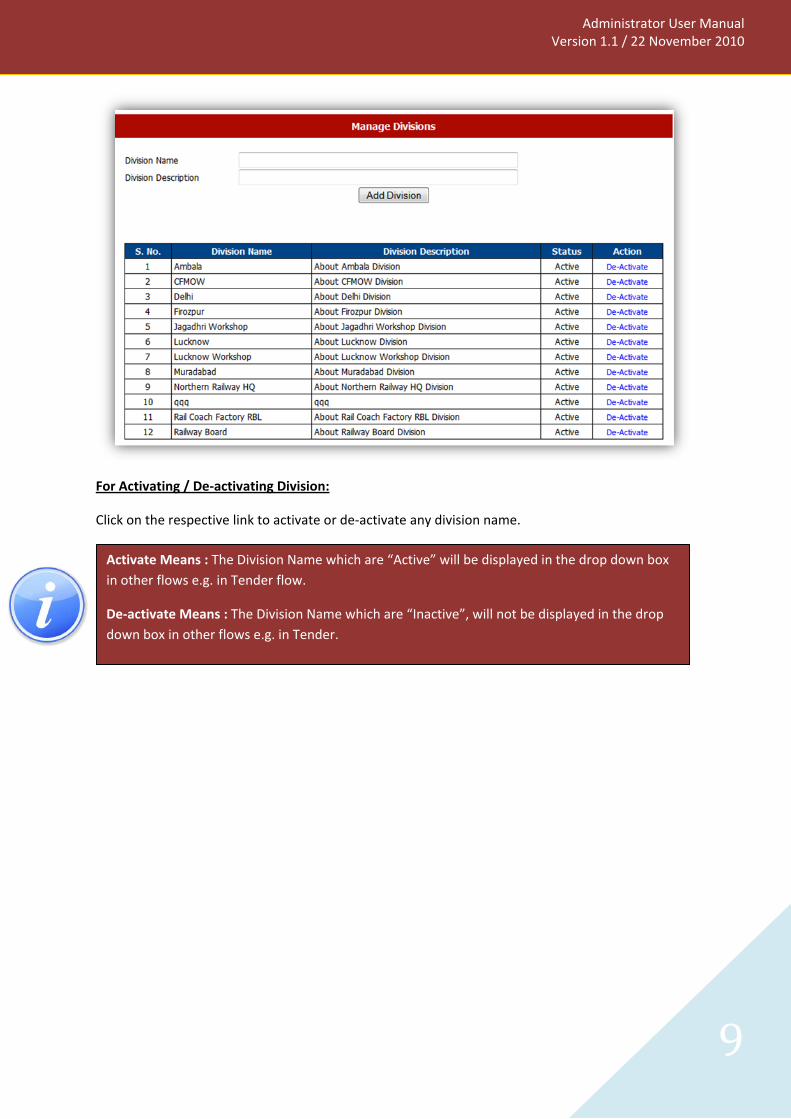
Click on the respective link to activate or de-activate any division name.
For Activating / De-activating Division:
Activate Means : The Division Name which are “Active” will be displayed in the drop down box in other flows e.g. in Tender flow.
De-activate Means : The Division Name which are “Inactive”, will not be displayed in the drop down box in other flows e.g. in Tender.

Adminst
10
Administrator User Manual Version 1.1 / 22 November 2010
6. Manage Departments
Steps for adding a new Department
1. Select Division Name under which you want to add the Department.
2. Enter the Department Name ( Mandatory)
3. Enter the Department Description
4. Click on the Add Department Button.
Steps for Activating / De-activating any particular Department.
1. Click on the Activate or De-activate link for that particular department in the grid.

Adminst
11
Administrator User Manual Version 1.1 / 22 November 2010
7. Manage Website Header Links
Steps for Showing/hiding any particular Menu Item from the Main Menu.
1. Select the check box if that menu item is to be displayed in the Main Menu.
2. Un-select the check box if that that menu item is not to be displayed in the Main Menu.
3. Click on the save button.
Steps for Setting the priority/ order of the menu item in the Main Menu.
For setting the priority /order in which the menu item should appear in the Main Menu , follow the following steps:
1. Select the Number from the drop down list as per the order required.
2. Click on the Save button.

Adminst
12
Administrator User Manual Version 1.1 / 22 November 2010
8. Manage Users
Steps for Adding a new User
1. Select Division/Department from the list available.
2. Enter Login Username ( Mandatory)
3. Enter Display Name ( Mandatory)
4. Enter Email-id. ( Mandatory)
5. Click on the Add User Button.
Steps for Activating/De-activating any particular User
1. Click on the Edit Link
2. Select Activate if that user to be activated
3. Select De-activate if that user to be deactivated.
4. Click on the Save button.
A system generated automatic email will go the user on his/her account creation giving his/her username and password to login to the application.

Adminst
13
Administrator User Manual Version 1.1 / 22 November 2010
9. Manage User Rights
Steps for Managing the user access rights:
1. Select the particular User from the list available.
2. Click on the Select User button.
3. Select the Section name which will be managed by that particular User.
4. Click on the “Assign Rights to user” button.

Adminst
14
Administrator User Manual Version 1.1 / 22 November 2010
10. Mange Website Static Content
Action Links description
• Preview – To view the content of the page.
• Activate / Deactivate – to activate or deactivate any page or content
• Edit – To edit / update the page content.
• Create Sub-Section – To create sub-section under the respective main section.
Steps for creating a link under Main Manu Item e.g. About us
1.) Click on the “Create Sub-Section” link .
2.) Click on the “Make New Entry” link on the top right hand side.
3.) Enter details
4.) Click on the “Create Section” button.

Adminst
15
Administrator User Manual Version 1.1 / 22 November 2010
11. Mange Scrolling / Ticker Text
Steps for Adding a new Ticker:
1. Click on the “Create New Ticker” link.
2. Enter Label
3. Enter Ticker Details.
4. Tick on the Active Ticker check box if that is to be shown in the ticker. Or uncheck the check box if that is not to be shown on the ticker.
5. Click on the Update Ticker button.

Adminst
16
Administrator User Manual Version 1.1 / 22 November 2010
12. Create Banners
Steps for Adding a Banner:
1. Select the Banner type
2. Select the Section name where it is to be linked/displayed.
3. Or Select any specific page where it is to be shown.
4. Or enter any specific URL.
5. Enter the Mouse over text ( English / Hindi)
6. Select the Banner file type
7. Browse and Upload the Banner
8. Click on the Create Banner button.

Adminst
17
Administrator User Manual Version 1.1 / 22 November 2010
13. Remove/Delete Banners
Steps for removing Banner:
1. Deselect the check box from the section where it is not to be shown.
2. Click on the remove button.
14. Manage Tender Notice
Steps for Adding a New Tender Notice
1. Click on the Click here link.
2. Enter the Tender details.
3. Click on the Save button.

Adminst
18
Administrator User Manual Version 1.1 / 22 November 2010
Key things to remember while adding a new Tender Notice:
1. Tender Type – Select the appropriate value from the drop down for which the tender notice is to be added. ( Mandatory)
2. Division – Select the appropriate division from the drop down for which tender notice is to be added. ( Mandatory)
3. Department – Select the appropriate department from the drop down for which tender notice is to be added. ( Mandatory)
4. Tender Number – Enter the tender /notice number. ( Mandatory)
5. Publication Date of Website / Time– This is the date when you want the tender notice to be displayed on the website. E.g. if the “Publication date of website” has been entered as 25-Nov-2010 11:00 , then that particular tender notice will start appearing on the website from 25-Nov-2010 11:00 onwards. It will not be displayed before 25-Nov-2010 11:00 even if it has been added before 25-Nov-2010 11:00. ( Mandatory)
6. Last date of Document collection – Please enter the date and time for the document collection. ( Mandatory)
Adminst
19
Administrator User Manual Version 1.1 / 22 November 2010
7. Last date of submission – please enter the date and time for the submission of document. ( Mandatory)
8. Tender Opening Date / Time – This is the date up to which the tender notice will be displayed on the website. E.g. if the Tender Opening Date/ time has been entered as 31-Nov-2010 17:00, then this tender notice will be displayed till 31-Nov-2010 17:00, and after that it will get disappeared from the website and will move to the Archive Section. ( Mandatory)
9. Tender value, EMD & Cost of Tender Document – Please enter the numeric figure of these fields. E.g. 5000.
10. Tender Title ( English / Hindi)– Please enter the tender subject. E.g. “Tender for procurement of Hardware & Software”. Please enter the Hindi text for the title in Hindi. ( Mandatory)
11. Tender Description ( English/Hindi)- Please enter the tender description ( approx 100 words) describing the tender information. Please enter the relevant hindi text in Hindi field.
12. Tender File ( English / Hindi) – Upload the tender notice file ( English / Hindi).
13. Contact Details – Enter the contact details Name, address, contact number , email-id for the person who is responsible for the tender.
14. “Last Date of Document collection Date/ time” will always be equal or greater than “Publication date/time on website”.
15. “Last date of submission “will always be equal or greater than “Last Date of Document collection”.
16. “Tender Opening Date” will always be equal or greater than “Last date of Submission”.

Adminst
20
Administrator User Manual Version 1.1 / 22 November 2010
Steps for Editing/Deleting Tender Notice details
1. Click on the Click here link.
2. Search the Particular tender by keyword, or by other given parameters.
3. Click on the Edit link if the details are to be edited/updated.
4. Or click on the Delete link if the tender notice to be deleted.
15. Manage Tender Document
Steps for Adding a New Tender Document:
1. Click on the “Click here” link.
2. Select Tender type from the drop down box. ( Mandatory)

Adminst
21
Administrator User Manual Version 1.1 / 22 November 2010
3. Select the division name. ( Mandatory)
4. Select Department name( Mandatory)
5. Select Notice number( Mandatory)
6. Click on “Add Document” button.
After clicking on “Add Document” button , the following fields will be displayed
1. Tender Number – This will come automatically.
2. Publication Date on website – This will come automatically.
3. Last Date of Document Collection – This will come automatically.
4. Last date of document submission – This will come automatically.
5. Date of opening – this will come automatically.
6. Title ( English / Hindi) – This is the title for the tender document.
7. Tender Description ( English / Hindi) – please enter the tender document description ( approx 100 words).
8. Tender Value , EMDl , Cost of Tender Document – Please enter the value in numeric figure e.g. 5000000
9. Upload file ( English) – You can upload maximum 10 tender document file. Click on the upload button to upload the file.
10. Upload file ( Hindi) – Please click on the upload button to attach respective Hindi file.

Adminst
22
Administrator User Manual Version 1.1 / 22 November 2010
Steps for Editing Tender Document
1. Click on the “Click here” link.
2. Search the tender document using the search parameter provided.
3. Click on the Edit Link to edit/update details.
4. Click on the Update button.

Adminst
23
Administrator User Manual Version 1.1 / 22 November 2010
16. Manage Tender Corrigendum
Steps for Adding a New Tender Corrigendum:
1. Select Division Name – Please select division name from the drop down for which tender corrigendum to be added. ( Mandatory)
2. Select Department Name – Please select the Department Name from the drop down for which tender corrigendum to be added. ( Mandatory)
3. Select Corrigendum for – Please select for which tender corrigendum to be added. ( Mandatory)
a. Notice – select notice if it is the corrigendum against the Notice.
b. Tender – Select Tender if it is the corrigendum against the tender document.
4. Select Notice No – If It is against Notice, then select the appropriate Notice No from the drop down list. ( Mandatory)
5. Select Tender No – If it is against Tender Document, then select the appropriate Tender No from the drop down list. ( Mandatory)
6. Enter Revised Date – Please enter revised date if the date for the Notice or the Tender Document has been revised.
7. Enter Corrigendum title in English / Hindi – Please enter the corrigendum title in English / Hindi. ( Mandatory)
8. Enter Corrigendum decription in English/Hindi – Please enter the corrigendum description in English / Hindi ( approx 100 words.)

Adminst
24
Administrator User Manual Version 1.1 / 22 November 2010
9. Upload file ( English / Hindi) – Please click on the Upload button to attach English / Hindi corrigendum file.
10. Click on the Add Button.
17. Manage Store Tender
Steps for Adding a New Store Tender Notice
1. Click on the respective “Click here” link.
2. The following fields will be displayed.
a. Tender Type – Please select the tender type for which the tender is to be added. ( Mandatory)
b. Tender Number – Please enter the appropriate tender number. ( Mandatory)
c. Notice Due Date / Time – Please enter the due date and time for the tender.
d. Quantity – Please enter the quantity. Please enter only numeric value e.g. 1000
e. Cost , EMD – Please enter the cost and EMD amount. Please enter only numeric value e.g. 200000
f. Description English / Hindi – Please enter tender description both in English and Hindi. ( Mandatory)
g. File attach ( English / Hindi) – Please click on the upload button to attached English / Hindi file.
3. Click on the Save button.

Adminst
25
Administrator User Manual Version 1.1 / 22 November 2010
Steps for Editing / Deleting Store Tender Notice Details
1. Click on the respective “Click here” link.
2. Click on the Edit link if the details to be edited/updated.
3. Click on the delete link if that particular Tender notice to be deleted.
Steps for Adding a Store tender Corrigendum:
1. Select Notice number
2. Select Document type
3. Browse / Upload file.
4. Click on the Save button.

Adminst
26
Administrator User Manual Version 1.1 / 22 November 2010
Logic for the Public site:
1. The Tender Document can only be downloaded by the registered User. There is an option for the user to register themselves.
2. The Tender Document will be available for downloading till the date of opening. Once that date has expired, then the download link will be removed automatically.
3. An automatic email will be sent to the registered user at his/her email-id if a new corrigendum has been issued against a tender notice or tender document.
18. Manage Awarded Tender
Steps for Adding a New Awarded Tender
1. Click on the “Click here” link.
2. The following fields will be displayed
a. Select Division – please select the appropriate division name for which the details to be added. ( Mandatory)
b. Select Department – please select the appropriate department name for which the details to be added. ( Mandatory)
c. Select Tender No – please select the tender no from the list . ( Mandatory)
3. Click on the “Award This Tender“ button.

Adminst
27
Administrator User Manual Version 1.1 / 22 November 2010
Adminst
28
Administrator User Manual Version 1.1 / 22 November 2010
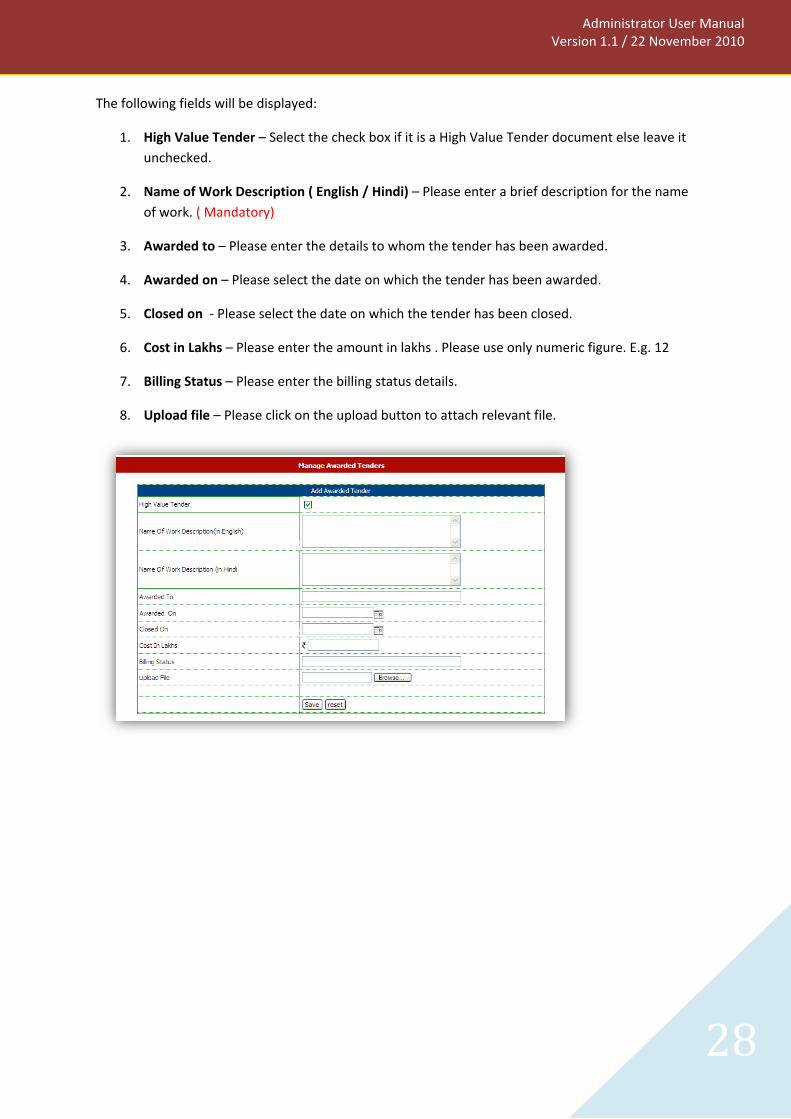
The following fields will be displayed:
1. High Value Tender – Select the check box if it is a High Value Tender document else leave it unchecked.
2. Name of Work Description ( English / Hindi) – Please enter a brief description for the name of work. ( Mandatory)
3. Awarded to – Please enter the details to whom the tender has been awarded.
4. Awarded on – Please select the date on which the tender has been awarded.
5. Closed on - Please select the date on which the tender has been closed.
6. Cost in Lakhs – Please enter the amount in lakhs . Please use only numeric figure. E.g. 12
7. Billing Status – Please enter the billing status details.
8. Upload file – Please click on the upload button to attach relevant file.

Adminst
29
Administrator User Manual Version 1.1 / 22 November 2010
19. Manage Bill Status
1. Steps for Uploading date file through pdf/xls/doc
1.) Click on the respective “Click here” link.
2.) Select Division
3.) Select Department
4.) Enter Description in English / Hindi
5.) Enter date
6.) Select Status
7.) Upload file (English/ Hindi)
8.) Click on the Save button.

Adminst
30
Administrator User Manual Version 1.1 / 22 November 2010
Steps for Editing / Deleting the Uploaded date file ( through pdf/xls/doc)
1.) Select Division from the list available
2.) Select Department from the list available.
3.) Click on the Show button.
4.) Result is displayed.
5.) Click on the Edit link to edit/update details.
6.) Or Click on the Delete link to delete the details.
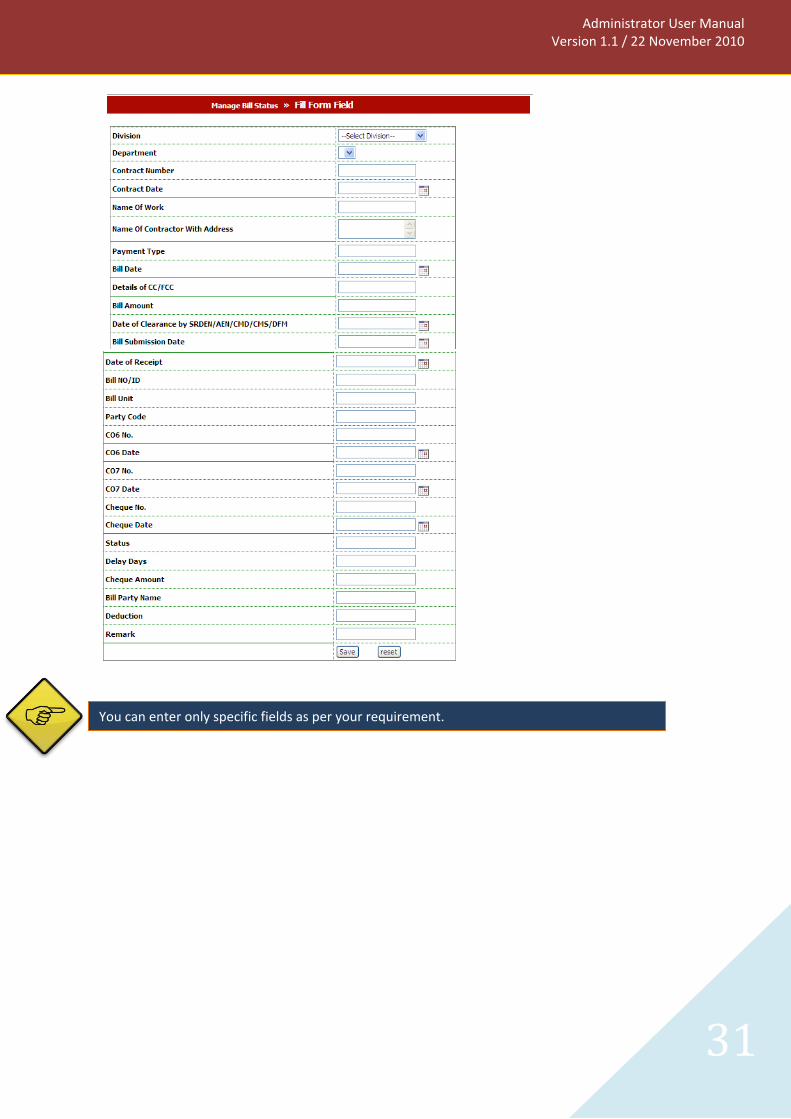
2. Steps for adding data using Form
1.) Select Division
2.) Select department
3.) Enter details.
4.) Click on the Save button.
-
Adminst
31
Administrator User Manual Version 1.1 / 22 November 2010
You can enter only specific fields as per your requirement.

Adminst
32
Administrator User Manual Version 1.1 / 22 November 2010
Steps for Editing / deleting Details using Form
1.) Select Division
2.) Select Department
3.) Click on the Show buton.
4.) Search result is displayed.
5.) Click on the edit link to edit/update details.
6.) Or click on the delete button to delete details.

Adminst
33
Administrator User Manual Version 1.1 / 22 November 2010
3. Steps for Uploading date file using csv format
1.) Select Division
2.) Select Department
3.) Enter date
4.) Browse / Upload csv file.
5.) Click on the Upload button.
6.) Click on the Data Processing “Click here” link.
7.) Select Division
8.) Select Department
9.) Click on the show button.
10.) Select the file and click on the Submit button.
11.) Click on the View Snapshot to view the details.

Adminst
34
Administrator User Manual Version 1.1 / 22 November 2010
20. Manage News/Announcements
Steps for adding a new News/Announcement
1. Enter Label in English / Hindi.
2. Enter Start date ( Date from which the news/announcement should start appearing on the website)
3. Enter End date ( date when the news/announcement should get disappeared from the website)
4. Enter News/Announcement description
5. Click on the Save button.

Adminst
35
Administrator User Manual Version 1.1 / 22 November 2010
21. Manage Press Releases
Steps for adding a new Press Release
6. Enter Label in English / Hindi.
7. Select Press release Issuing Officer Name
8. Enter Location
9. Enter Press Release Number
10. Enter Start date ( Date from which the press release should start appearing on the website)
11. Enter End date ( date when the press release should get disappeared from the website)
12. Enter Press release description
13. Click on the Save button.

Adminst
36
Administrator User Manual Version 1.1 / 22 November 2010
22. Manage Press Release Issuing Officer
Steps for Adding Press Release Issuing Officer details
1. Enter Press Release Issuing Officer Name
2. Enter Designation
3. Browse / Upload signature.
4. Click on the Add button.

Adminst
37
Administrator User Manual Version 1.1 / 22 November 2010
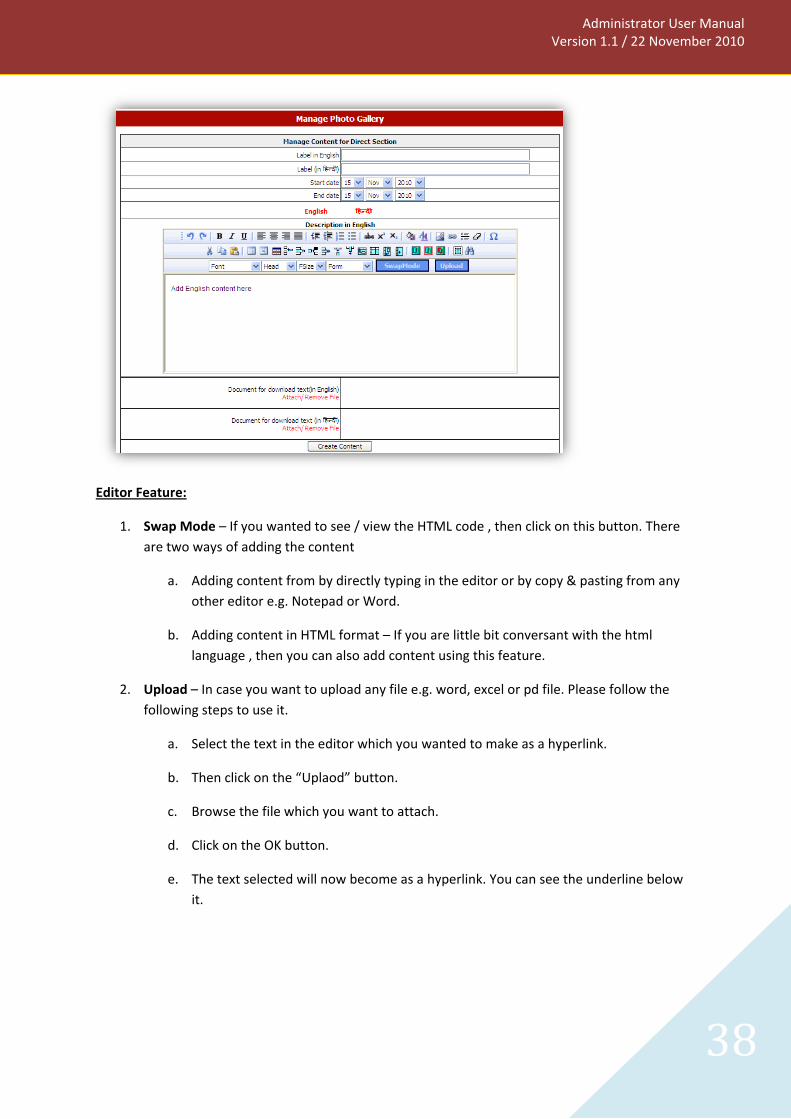
23. Manage Photo Gallery
Steps for creating a new Photo Gallery
1. Enter Photo gallery title ( English / Hindi)
2. Enter Start date ( the date from which the photo gallery should start appearing on the website)
3. Enter End Date ( the date when the photo gallery should disappear from the website)
4. Enter photo gallery description.
5. Click on the attach/remove file link to upload images
a. Enter Caption
b. Enter Description
c. Browse / Upload image.
6. Click on the create content button.
Adminst
38
Administrator User Manual Version 1.1 / 22 November 2010
1. Swap Mode – If you wanted to see / view the HTML code , then click on this button. There are two ways of adding the content
Editor Feature:
a. Adding content from by directly typing in the editor or by copy & pasting from any other editor e.g. Notepad or Word.
b. Adding content in HTML format – If you are little bit conversant with the html language , then you can also add content using this feature.
2. Upload – In case you want to upload any file e.g. word, excel or pd file. Please follow the following steps to use it.
a. Select the text in the editor which you wanted to make as a hyperlink.
b. Then click on the “Uplaod” button.
c. Browse the file which you want to attach.
d. Click on the OK button.
e. The text selected will now become as a hyperlink. You can see the underline below it.

Adminst
39
Administrator User Manual Version 1.1 / 22 November 2010
24. View User Audit Trail
Steps for Viewing User Audit Trail Details:
1. Select Username from the list available.
2. Select Date for which you want the Audit Trail.
3. Click on the Search button.
4. Search result will be displayed.
5. Click on the View Details link for detailed information.
25. View Tender Download Log
Steps for Viewing Tender Download Log Details
14. Enter Notice/Tender No or the Download Date .
15. Click on the Search Button.
16. Search result will be displayed.
17. Click on the View Details link for detailed information

Adminst
40
Administrator User Manual Version 1.1 / 22 November 2010