1 of 61 basic exercises basic exercises (1-6) e-prime 2002 workshop files on my documents\my...
Post on 21-Dec-2015
231 views
TRANSCRIPT

1 of 61Basic Exercises
Basic Exercises (1-6)Basic Exercises (1-6)E-Prime 2002 WorkshopE-Prime 2002 Workshop
Files on My Documents\My Experiments\Workshop\Files on My Documents\My Experiments\Workshop\E-Prime ExercisesE-Prime Exercises
E-Prime Basic ExercisesE-Prime Basic Exercises
Copyright Psychology Software Tools Inc. 2002Copyright Psychology Software Tools Inc. 2002
These materials may be used for local educational purposes only. all These materials may be used for local educational purposes only. all other use requires approval in writing. Please send requests to other use requires approval in writing. Please send requests to
[email protected]@pstnet.com

2 of 61Basic Exercises
RecommendedRecommended Rules for Exercise Rules for Exercise If working in pairs, alternate typing with each If working in pairs, alternate typing with each
exercise. Ask questions of each other to be sure exercise. Ask questions of each other to be sure you understand why each action was done.you understand why each action was done.
Check off each item when completed and Check off each item when completed and understoodunderstood. If you have questions write them . If you have questions write them down or ask for assistance.down or ask for assistance.
Resist proceeding ahead of instructor. If you Resist proceeding ahead of instructor. If you have extra time examine the help topics and do have extra time examine the help topics and do the optional questions.the optional questions.

3 of 61Basic Exercises
Basic E-Prime TutorialsBasic E-Prime Tutorials 1. Conceptualize and implement core experimental
procedure
2. Add feedback (optional)
3. Making a nested list version
4. Analysis of behavioral data
5. Merging data files
6. Add picture presentation and sound to lexical decision
Files on My Documents\My Experiments\Workshop\E-Prime Files on My Documents\My Experiments\Workshop\E-Prime ExercisesExercises

4 of 61Basic Exercises
Exercise 1 Implement Basic Experiment
This exercise creates the core components of an This exercise creates the core components of an experiment. (A list of stimuli and expected experiment. (A list of stimuli and expected responses, a procedure for the task that includes responses, a procedure for the task that includes a presenting a fixation and a stimulus.) a presenting a fixation and a stimulus.)
The goal is to learn to use the E-Studio interface The goal is to learn to use the E-Studio interface and to learn to implement the basic structure of and to learn to implement the basic structure of an experiment. an experiment.

5 of 61Basic Exercises
Exercise 1: Conceptualize and implement the core experimental procedure
Sample AbstractThe experiment will measure the time it takes to make a lexical decision. The independent variable is whether a letter string is a word or non-word. The stimuli will be text strings of words and non-words, presented in random order in black text on a white background. The subject will be presented with a fixation (+) displayed in the center of the screen for one second. Then a probe display will present a letter string stimulus in the center of the screen for up to 2 seconds. The stimulus display will terminate when the subject responds. Subjects are to respond as quickly as possible whether the stimulus was a word or a non-word by pressing the “1” or “2” key respectively. The dependent measures are the response (i.e., key pressed), response time, and response accuracy of the probe display.
Design Structure Displays
6 of 61Basic Exercises
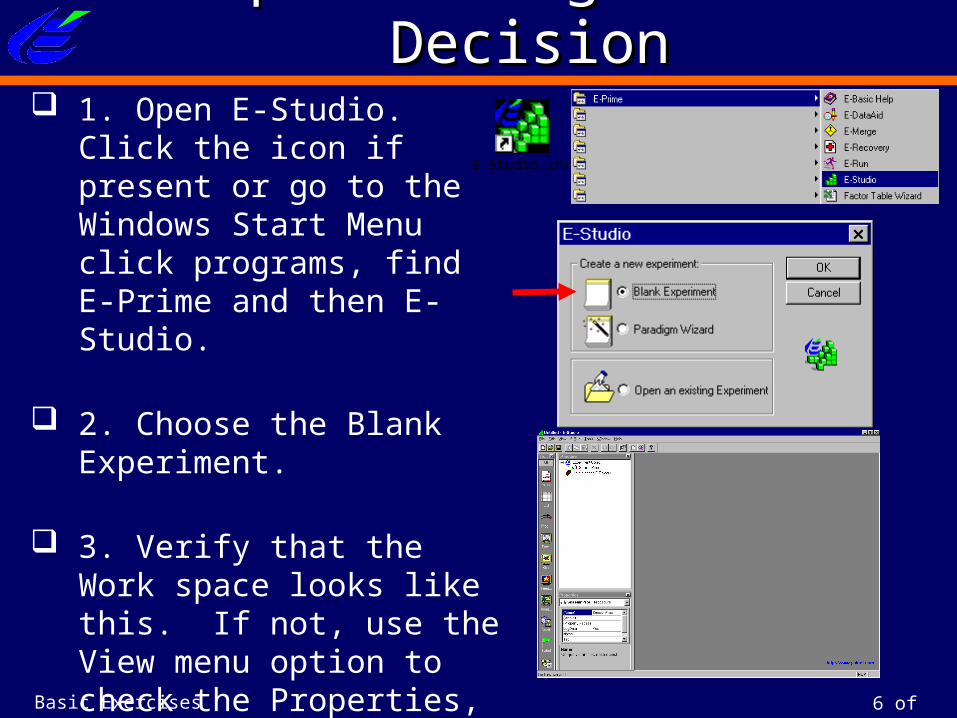
Implementing Lexical DecisionImplementing Lexical Decision 1. Open E-Studio. Click the
icon if present or go to the Windows Start Menu click programs, find E-Prime and then E-Studio.
2. Choose the Blank Experiment.
3. Verify that the Work space looks like this. If not, use the View menu option to check the Properties, Structure and Toolbox to on and all others to off.
E-Studio.lnk

7 of 61Basic Exercises
Create the Design ListCreate the Design List 4. Drag and drop a List onto the
SessionProc (session procedure) in the Structure ViewRename (click F2) to
DesignList, double click on the DesignList to edit
Double click the list object to open it up

8 of 61Basic Exercises
Specify Stimuli and Trial EventsSpecify Stimuli and Trial Events 5. Add 3 Attributes to the
DesignList: Condition, Stimulus and CorrectResponse. Click on each to enter the name.
6. Add another row to the DesignList
7. Fill in Procedure and Condition attributes (to either Word/NonWord), Stimulus (to cat, jop), CorrectResponse (1,2)

9 of 61Basic Exercises
Specify Stimuli and Trial EventsSpecify Stimuli and Trial Events9. Double click the
Fixation object and type text “+” in the window. On the Probe type [Stimulus]. (Note: [Stimulus] selects the text from the stimulus attribute of that trial)
8. Copy 2 text display 8. Copy 2 text display objects from the toolbar objects from the toolbar to the to the TrialProcTrialProc. . Rename them Rename them Fixation and Probe
10 of 61Basic Exercises
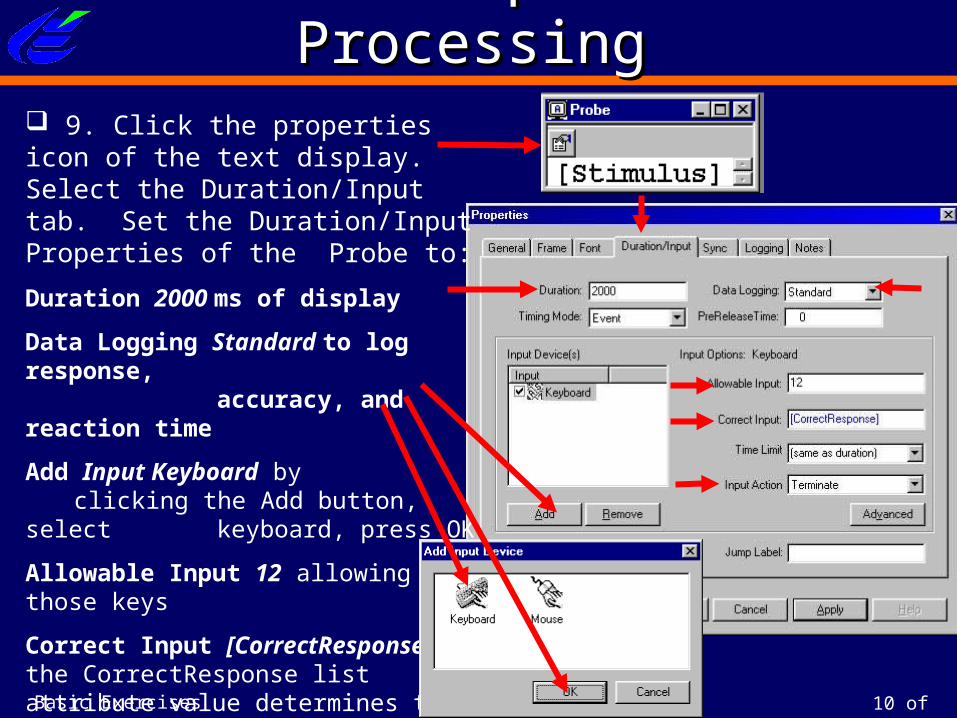
Set Response ProcessingSet Response Processing 9. Click the properties icon of the text display. Select the Duration/Input tab. Set the Duration/Input Properties of the Probe to:
Duration 2000 ms of display
Data Logging Standard to log response, accuracy, and reaction time
Add Input Keyboard by clicking the Add button, select
keyboard, press OK
Allowable Input 12 allowing those keys
Correct Input [CorrectResponse] so the CorrectResponse list attribute value determines the correct response.
Input Action Terminate display after an allowable input response.
11 of 61Basic Exercises
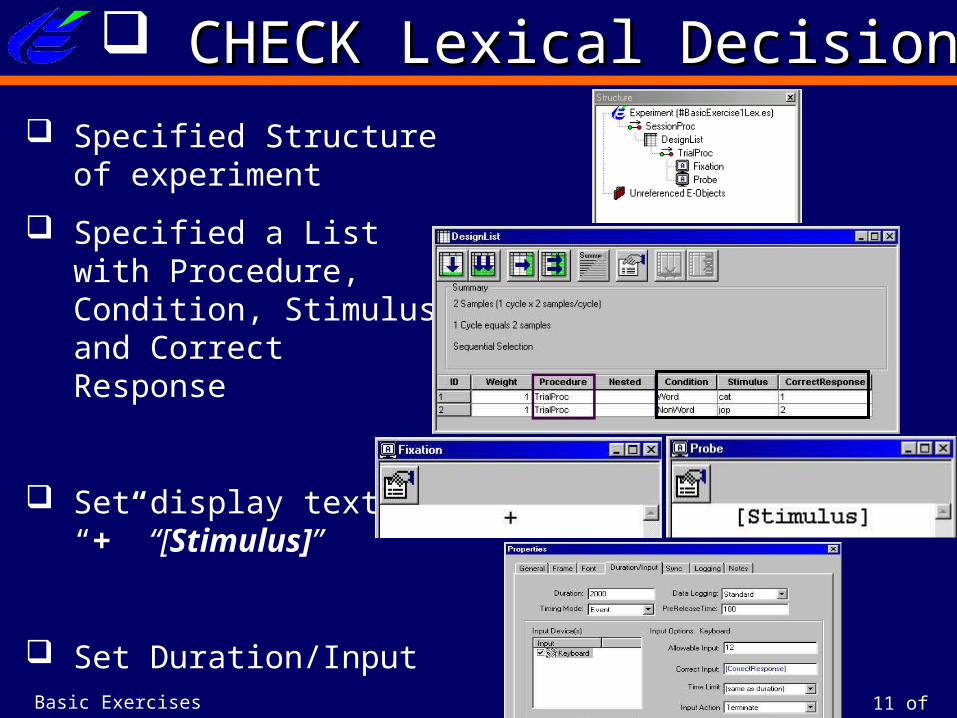
CHECK Lexical DecisionCHECK Lexical Decision Specified Structure of
experiment
Specified a List with Procedure, Condition, Stimulus and Correct Response
Set display text to “+” “[Stimulus]”
Set Duration/Input

12 of 61Basic Exercises
Saving and Running Saving and Running 9. Save file on directory My Documents\My Experiments\Workshop\E-Prime Exercises\ filename Basic Exercise1Lex.es or open finished version #BasicExcerise1LexFinal.es.
10. Run Lexical Decision.
11. Run 2 trials to verify that it ran as expected.
+ cat jop++ cat jop+

13 of 61Basic Exercises
Basic Exercise 1 Study QuestionsBasic Exercise 1 Study Questions
Can you at this point?Can you at this point?
1.1. Increase the number of words/non-words?Increase the number of words/non-words?
2.2. Change the keyboard to a mouse response?Change the keyboard to a mouse response?
3.3. Change the duration of the display to 4 Change the duration of the display to 4 seconds?seconds?
4.4. Change the font color and size?Change the font color and size?
5.5. Alter the color of the probe with a stimulus Alter the color of the probe with a stimulus attribute? attribute?
6.6. Change the sampling method to random?Change the sampling method to random?
Short Answers are included in the Exercise AppendixShort Answers are included in the Exercise Appendix

14 of 61Basic Exercises
Verify Program and have checkedVerify Program and have checked 12. Have an Assistant verify program before 12. Have an Assistant verify program before
moving on. moving on. Please put the display into this form and Please put the display into this form and raise your hand.raise your hand. Assistant InitialsAssistant Initials ___ ___

15 of 61Basic Exercises
Exercise 2 Add Feedback (Optional)Exercise 2 Add Feedback (Optional)
This exercise adds a feedback frame to tell the This exercise adds a feedback frame to tell the subject their response accuracy and response subject their response accuracy and response reaction. Feedback helps the subject to learn the reaction. Feedback helps the subject to learn the task. task.
Either Continue with the program from Exercise 1 Either Continue with the program from Exercise 1 or load My Documents\My Experiments\or load My Documents\My Experiments\Workshop\E-Prime Exercises\#Basic Workshop\E-Prime Exercises\#Basic Exercise1LexFinal.esExercise1LexFinal.es

16 of 61Basic Exercises
Optional Exercise 2 Add FeedbackOptional Exercise 2 Add Feedback 1. Add Feedback object after Probe, and open1. Add Feedback object after Probe, and open 2. Set InputObjectName to Probe. This tells the feedback 2. Set InputObjectName to Probe. This tells the feedback
object what object collected the responseobject what object collected the response 2. Select Feedback Object2. Select Feedback Object 3. Select properties3. Select properties
3322
11
4. Select Input Object Name4. Select Input Object Name 5. Select 5. Select Probe Probe as object that provides the response dataas object that provides the response data
4455

17 of 61Basic Exercises
Run Experiment With FeedbackRun Experiment With Feedback Run the Experiment Run the Experiment
Note - for finished version open Note - for finished version open #BasicExercise2FeedbackFinal.es #BasicExercise2FeedbackFinal.es
Make both correct and incorrect responsesMake both correct and incorrect responses Check to be sure you get both reaction time and Check to be sure you get both reaction time and
accuracy feedbackaccuracy feedbackCommon bugs with use of Feedback objectCommon bugs with use of Feedback object• If error Input Object Name not specified - If error Input Object Name not specified - Feedback Slide Object General Tab and set Feedback Slide Object General Tab and set to Probeto Probe• If scoring not correct check Probe If scoring not correct check Probe Duration/Input property page and check to Duration/Input property page and check to see if [CorrectResponse]. see if [CorrectResponse].

18 of 61Basic Exercises
Basic Exercise 2 Study QuestionsBasic Exercise 2 Study Questions
Can you at this point? Can you at this point?
1.1. Change the text of the correct message?Change the text of the correct message?
2.2. Delete the average percent correct display?Delete the average percent correct display?
Short Answers are included in the Exercise AppendixShort Answers are included in the Exercise Appendix

19 of 61Basic Exercises
Exercise 3 Nested ListExercise 3 Nested List
In many experiments you want to choose stimuli from a In many experiments you want to choose stimuli from a list (e.g. a list of verbs). E-Prime allows you to specify list (e.g. a list of verbs). E-Prime allows you to specify a list of stimuli to use in different conditions. The list a list of stimuli to use in different conditions. The list items can be chosen in a different order than the list of items can be chosen in a different order than the list of trials (e.g., alternate trials of words and non-words but trials (e.g., alternate trials of words and non-words but select particular words/non-words in sequential order). select particular words/non-words in sequential order).
Either Continue with the output from Exercise 1 or load Either Continue with the output from Exercise 1 or load My Documents\My Experiments\Workshop\Exercises\ My Documents\My Experiments\Workshop\Exercises\ #BasicExercise1LexFinal.es#BasicExercise1LexFinal.es

20 of 61Basic Exercises
Exercise 3: Making a Nested List VersionExercise 3: Making a Nested List Version Add Nested listsAdd Nested lists
1. Open Design List1. Open Design List 2. Add to the Nested column “Words” list, answer yes to “Do you want to 2. Add to the Nested column “Words” list, answer yes to “Do you want to
create”create” 3. Add to the Nested column “NonWords”, answer yes to “Do you want to 3. Add to the Nested column “NonWords”, answer yes to “Do you want to
create”create” 4. Select “Stimulus”, right click and Click the Remove Attribute (note the value 4. Select “Stimulus”, right click and Click the Remove Attribute (note the value
of stimulus will come from the Words or NonWords listsof stimulus will come from the Words or NonWords lists
11
22 33 44
21 of 61Basic Exercises
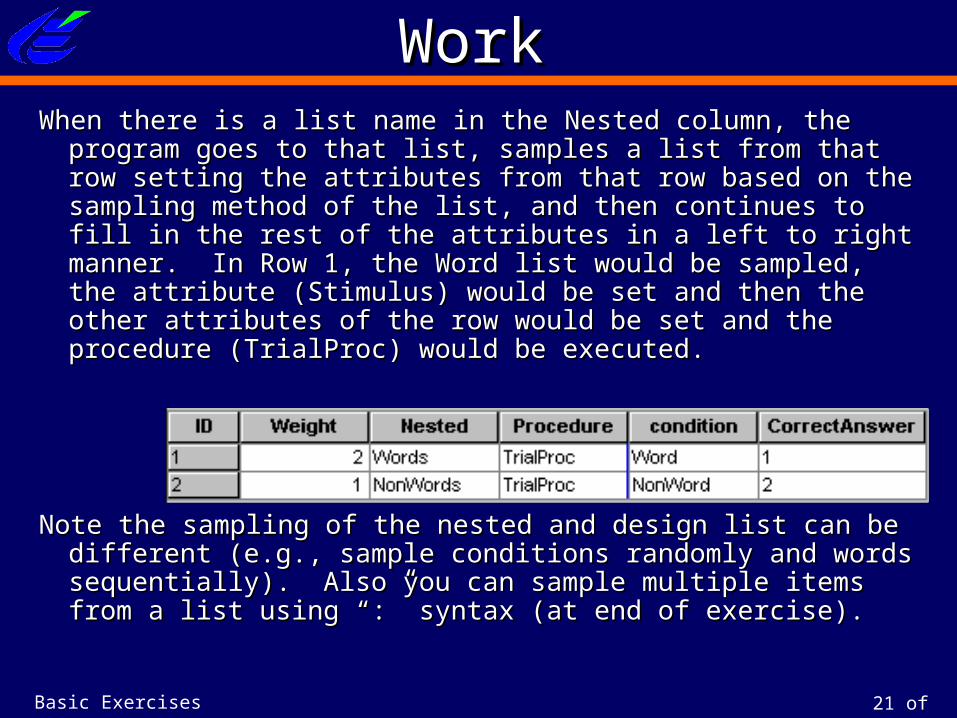
How Nested Lists WorkHow Nested Lists WorkWhen there is a list name in the Nested column, the program goes to When there is a list name in the Nested column, the program goes to
that list, samples a list from that row setting the attributes from that that list, samples a list from that row setting the attributes from that row based on the sampling method of the list, and then continues to row based on the sampling method of the list, and then continues to fill in the rest of the attributes in a left to right manner. In Row 1, fill in the rest of the attributes in a left to right manner. In Row 1, the Word list would be sampled, the attribute (Stimulus) would be the Word list would be sampled, the attribute (Stimulus) would be set and then the other attributes of the row would be set and the set and then the other attributes of the row would be set and the procedure (TrialProc) would be executed. procedure (TrialProc) would be executed.
Note the sampling of the nested and design list can be different (e.g., Note the sampling of the nested and design list can be different (e.g., sample conditions randomly and words sequentially). Also you sample conditions randomly and words sequentially). Also you can sample multiple items from a list using “:” syntax (at end of can sample multiple items from a list using “:” syntax (at end of exercise). exercise).

22 of 61Basic Exercises
Exercise 3: Making a Nested List VersionExercise 3: Making a Nested List Version 5. Open Words List to add the words5. Open Words List to add the words
6. Add an Attribute and name it “Stimulus”6. Add an Attribute and name it “Stimulus” 7. Add 4 rows and enter the values (cat, dog, time, bike, glove)7. Add 4 rows and enter the values (cat, dog, time, bike, glove)
8. Open NonWords, add Stimulus, enter (jop, lih, det, jat, muw)8. Open NonWords, add Stimulus, enter (jop, lih, det, jat, muw)
55
77
66
88

23 of 61Basic Exercises
Changing the number of samplesChanging the number of samples 9. Change the weight to 2 for Words and 1 for 9. Change the weight to 2 for Words and 1 for
NonWords. NonWords.
99
Note the weight sets the relative Note the weight sets the relative frequency that the row is frequency that the row is selected, in this case there would selected, in this case there would be 2 samples of Words and 1 on be 2 samples of Words and 1 on nonwords for every 3 trials.nonwords for every 3 trials.

24 of 61Basic Exercises
Set the number of CyclesSet the number of Cycles 10. Select the 10. Select the
propertiesproperties 11. Select 11. Select
Reset/ExitReset/Exit 12. Set Exit List 12. Set Exit List
after 5 cyclesafter 5 cycles 13 Verify there 13 Verify there
will be 15 will be 15 samples (5 samples (5 cycles 3 cycles 3 samples/cycle).samples/cycle).

25 of 61Basic Exercises
Run the Nested List ExperimentRun the Nested List Experiment 13. Run the experiment (press F7 key or Run icon)13. Run the experiment (press F7 key or Run icon)14. Verify that the words and non-words are presented sequentially 14. Verify that the words and non-words are presented sequentially
and the words are selected from each list in sequential order (default and the words are selected from each list in sequential order (default ordering) the list should include ordering) the list should include cat, dog, jop, thing, bike, lihcat, dog, jop, thing, bike, lih …). …).
15. Set sampling method 15. Set sampling method to to RandomRandom
16. Select properties16. Select properties
17. Select Selection tab17. Select Selection tab
18. Set order to Random18. Set order to Random
19. Test the program to 19. Test the program to verify random samplingverify random sampling

26 of 61Basic Exercises
Save ExperimentSave Experiment 20. Select File, Save As20. Select File, Save As
21. Enter name 21. Enter name “BasicExercise3NestedList”“BasicExercise3NestedList”

27 of 61Basic Exercises
Nested List Extended Multiple Samples (Optional)Nested List Extended Multiple Samples (Optional)
You can take multiple samples from a given list or sample from multiple You can take multiple samples from a given list or sample from multiple lists. You can change the DesignList and Probe objects to show 2 lists. You can change the DesignList and Probe objects to show 2 stimuli either two words or a word and a nonword. stimuli either two words or a word and a nonword.
This is done by use of the colon syntax with colon and the sample number. This is done by use of the colon syntax with colon and the sample number. The default [WordStim] samples from the initial sample sample 0 The default [WordStim] samples from the initial sample sample 0 [WordStim:0]. The second sample would be [WordStim:1]. [WordStim:0]. The second sample would be [WordStim:1].
Sample WordStim Attribute nested list Words Sample 0Sample WordStim Attribute nested list Words Sample 0Sample WordStim Attribute nested list Words Sample 1Sample WordStim Attribute nested list Words Sample 1Sample NonWordStim Attribute nested list NonWords Sample 0Sample NonWordStim Attribute nested list NonWords Sample 0

28 of 61Basic Exercises
Nested List Multiple SamplesNested List Multiple Samples 22. Add Attributes Stim1 and Stim2 to design list and fill in the sample selection 22. Add Attributes Stim1 and Stim2 to design list and fill in the sample selection
using the colon syntax ([WordStim:0], [WordStim:1],[Word],[NonWordStim:0]using the colon syntax ([WordStim:0], [WordStim:1],[Word],[NonWordStim:0] 23. Set nested lists to row 1 Words, and row 2 Words,Nonwords23. Set nested lists to row 1 Words, and row 2 Words,Nonwords 24. Change the Probe display to show [Stim1], [Stim2]24. Change the Probe display to show [Stim1], [Stim2] 25. Change the attribute name of Words list to WordStim and NonWords list to 25. Change the attribute name of Words list to WordStim and NonWords list to
NonwordStimNonwordStim 26. Save & Run.26. Save & Run.

29 of 61Basic Exercises
Basic Exercise 3 Study QuestionsBasic Exercise 3 Study Questions
Can you at this point? Can you at this point?
1.1. Predict what would be the presentation if the Predict what would be the presentation if the DesignList had a weights of 2DesignList had a weights of 2
2.2. Predict the stimuli if the Design List had weights of 1 Predict the stimuli if the Design List had weights of 1 and the word lists had weight of 2 all sequential and the word lists had weight of 2 all sequential sampling sampling
3.3. Predict Random ordering design list sequential Predict Random ordering design list sequential ordering of Words, and random of NonWordsordering of Words, and random of NonWords
4.4. Sample stimuli from 3 listsSample stimuli from 3 lists
5.5. Sample multiple items from the same list in a sampleSample multiple items from the same list in a sample
Short Answers are included in the Exercise AppendixShort Answers are included in the Exercise Appendix

30 of 61Basic Exercises
Exercise 4 Analysis of Lexical decision ExperimentExercise 4 Analysis of Lexical decision Experiment
This exercise shows how to use E-Prime for basic This exercise shows how to use E-Prime for basic analysis of behavioral data. This provides a way analysis of behavioral data. This provides a way to examine data or export data to other programs to examine data or export data to other programs like Excellike ExcelTMTM or SPSS or SPSSTMTM. .

31 of 61Basic Exercises
Exercise 4: Analysis of Lexical DecisionExercise 4: Analysis of Lexical Decision 1. Start E-DataAid application from 1. Start E-DataAid application from
the Tools menu in E-Studio or you the Tools menu in E-Studio or you can load it from the Start Menu.can load it from the Start Menu.
2. Open data file My Documents\My 2. Open data file My Documents\My Experiments\Workshop\E-Prime Experiments\Workshop\E-Prime Exercises\#BasicExercise Exercises\#BasicExercise 4BehavioralAnalysis1-1.edat 4BehavioralAnalysis1-1.edat
3. Examine 15 rows note many 3. Examine 15 rows note many columnscolumns

32 of 61Basic Exercises
Analysis Build Table of key variablesAnalysis Build Table of key variables
Select columns.Select columns. 4. Select Arrange 4. Select Arrange
columns. (use Tools columns. (use Tools or select the icon)or select the icon)
5. Remove all from 5. Remove all from show.show.
6. Alphabetize 6. Alphabetize 7. Select and add the 7. Select and add the
rows of rows of Condition, Condition, Stimulus, probe.RT, Stimulus, probe.RT, Probe.ACCProbe.ACC
55
66
44
77
77
33 of 61Basic Exercises
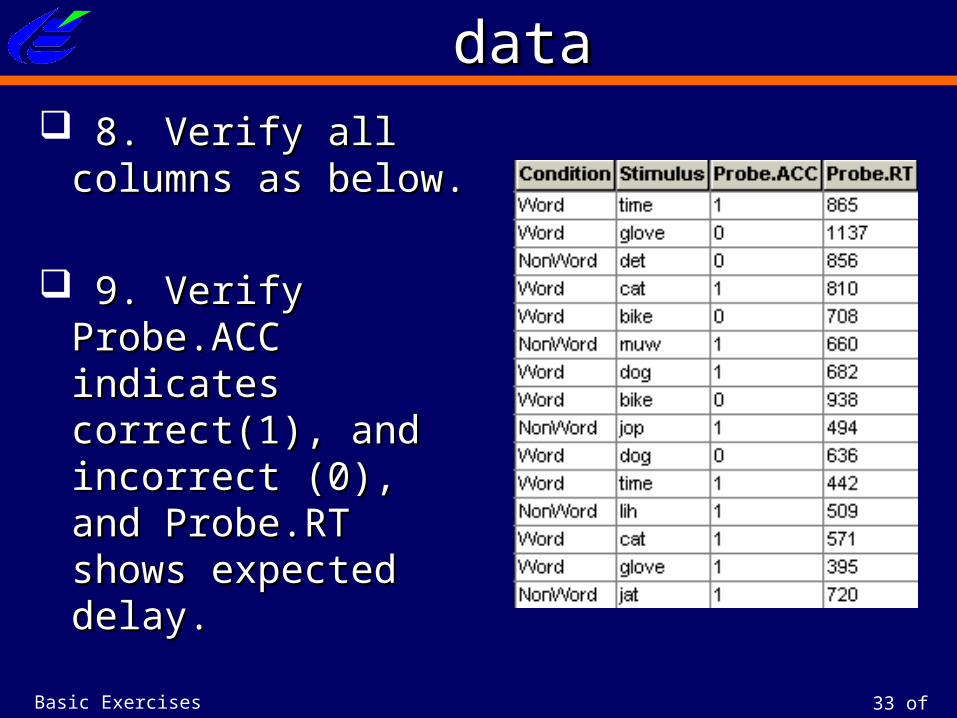
Examine the columns of dataExamine the columns of data 8. Verify all columns 8. Verify all columns
as below.as below.
9. Verify Probe.ACC 9. Verify Probe.ACC indicates correct(1), indicates correct(1), and incorrect (0), and and incorrect (0), and Probe.RT shows Probe.RT shows expected delay.expected delay.
34 of 61Basic Exercises
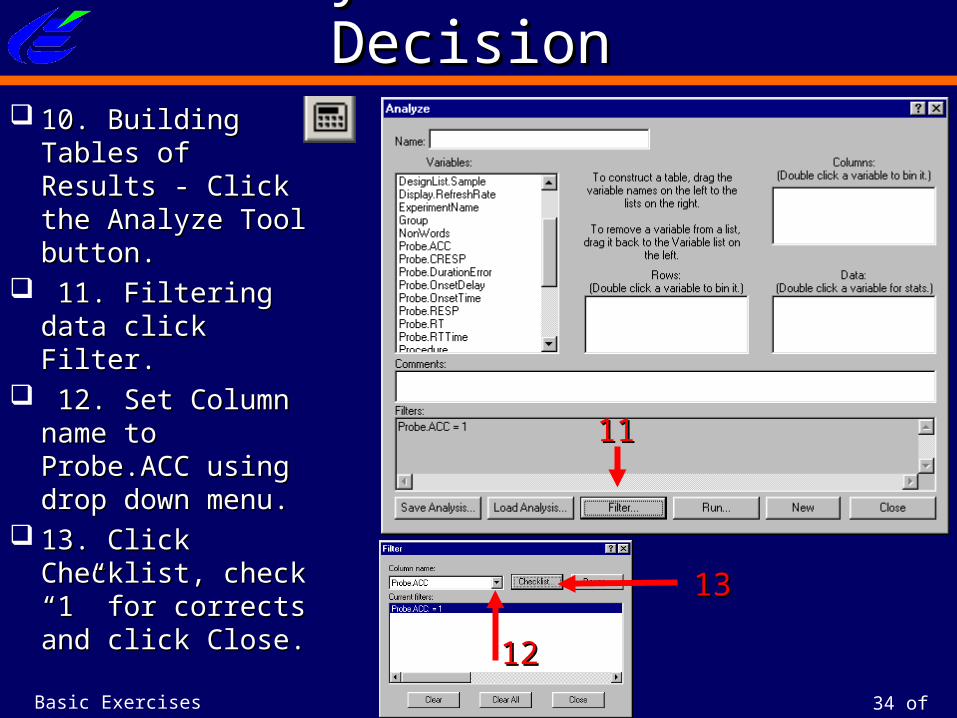
Analysis Lexical DecisionAnalysis Lexical Decision 10. Building Tables 10. Building Tables
of Results - Click of Results - Click the Analyze Tool the Analyze Tool button.button.
11. Filtering data 11. Filtering data click Filter.click Filter.
12. Set Column 12. Set Column name to Probe.ACC name to Probe.ACC using drop down using drop down menu.menu.
13. Click Checklist, 13. Click Checklist, check “1” for check “1” for corrects and click corrects and click Close.Close.
1111
1212
1313

35 of 61Basic Exercises
Analysis Lexical DecisionAnalysis Lexical Decision 14. Move (drag/drop) 14. Move (drag/drop)
Condition Condition toto RowsRows
15. Move 15. Move Probe.RT Probe.RT to Datato Data
16. 16. Double clickDouble click thethe
Probe.RT set to stats Probe.RT set to stats to Meanto Mean
1717. Press Run to . Press Run to output table.output table.
1414
1717
16161515
36 of 61Basic Exercises
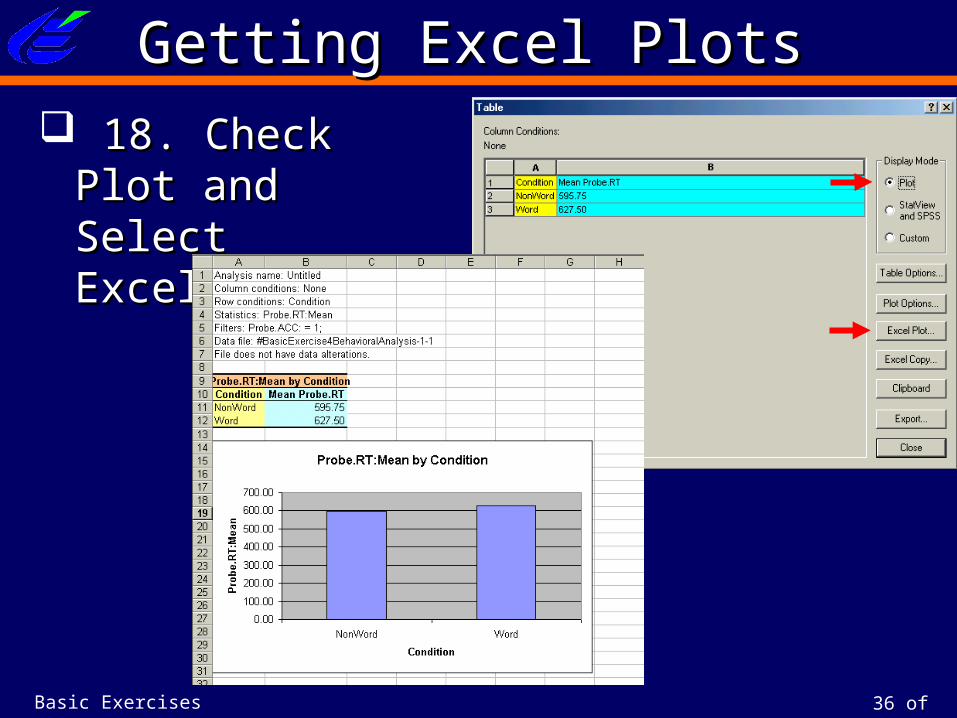
Getting Excel PlotsGetting Excel Plots 18. Check Plot 18. Check Plot
and Select Excel and Select Excel Plot.Plot.

37 of 61Basic Exercises
Verify Program and have checkedVerify Program and have checked
Have an Assistant verify data tables reasonable Have an Assistant verify data tables reasonable (note values will vary). (note values will vary). Assistant InitialsAssistant Initials ___ ___

38 of 61Basic Exercises
Basic Exercise 4 Study QuestionsBasic Exercise 4 Study Questions
Can you at this point? Can you at this point?
1.1. Filter reaction times to be greater than 200 and Filter reaction times to be greater than 200 and less than 2000 ms?less than 2000 ms?
2.2. Plot the accuracy data across conditions?Plot the accuracy data across conditions?
3.3. Plot RTs by Block number to look at sequential Plot RTs by Block number to look at sequential effects?effects?
Short Answers are included in the Exercise AppendixShort Answers are included in the Exercise Appendix

39 of 61Basic Exercises
Exercise 5 Merging Data FilesExercise 5 Merging Data Files
From the Start menu, select Programs, E-Prime, and E-Merge.
Click Close to dismiss the Quick Reference dialog, or simply reposition it by clicking on the title bar and dragging the dialog to the side of the screen.

40 of 61Basic Exercises
Locate Your Data FilesLocate Your Data Files
Open the C:\My Experiments\Workshop\E-Prime Exercises\Data folder. Located within the Data
folder are 5 subject data files for the Tutorial experiment. The data files are displayed in the File List window on the right side of the display.
In the File List (on the right side of the display), you should see a list of files as shown to the right.

41 of 61Basic Exercises
Merge Data FilesMerge Data Files Click Select Unmerged tool to
select all E-Prime data files (*.edat) not yet merged. An individual file may be selected by
clicking on the file name.
Click the Merge tool button on the toolbar.
Click Next for Standard Merge in the Select the Merge Operation dialog.
Using Set Target File open the C:\My Experiments\Workshop\E-Prime Exercises\Data folder and type “Merged Tutorial Data” in the File name field. Click OK. The results of the merge operation will
be sent to the target file (Merged Tutorial Data.emrg in the Data folder).

42 of 61Basic Exercises
Merge Data Files (continued)Merge Data Files (continued)
Since the target file does not already exist, a dialog is displayed asking if you would like to create it. Click Yes.
A dialog is displayed summarizing the results of the merge operation. Click OK to dismiss the Merge Results dialog.
43 of 61Basic Exercises
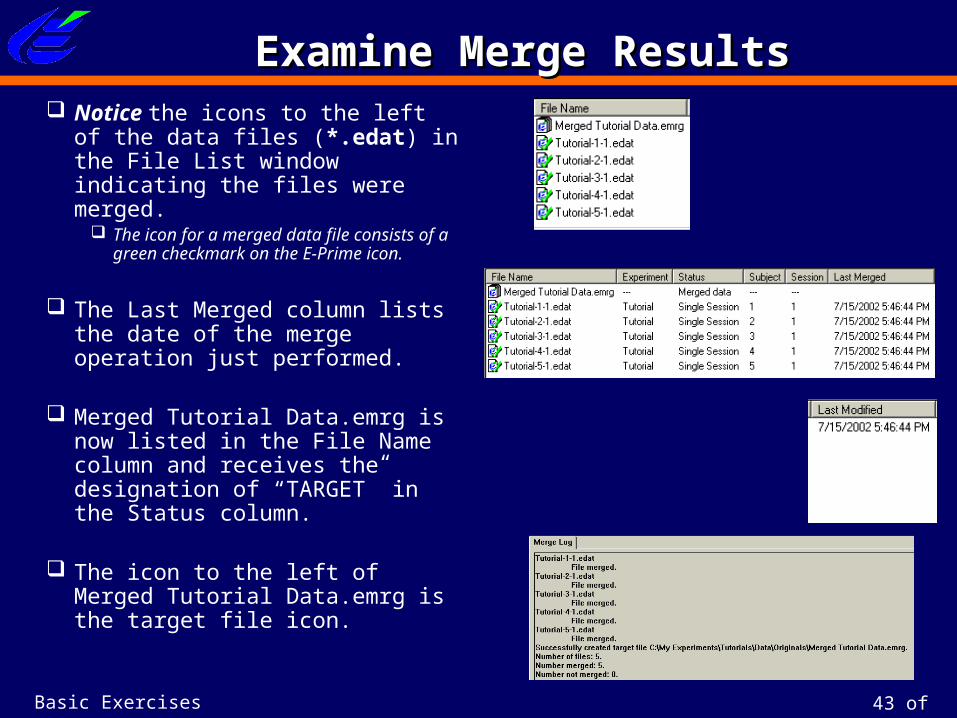
Examine Merge ResultsExamine Merge Results Notice the icons to the left of the
data files (*.edat) in the File List window indicating the files were merged.
The icon for a merged data file consists of a green checkmark on the E-Prime icon.
The Last Merged column lists the date of the merge operation just performed.
Merged Tutorial Data.emrg is now listed in the File Name column and receives the designation of “TARGET” in the Status column.
The icon to the left of Merged Tutorial Data.emrg is the target file icon.
44 of 61Basic Exercises
Exercise 6 Add Picture/Sound (Optional)Exercise 6 Add Picture/Sound (Optional)
This exercise shows how to add picture and sound files to This exercise shows how to add picture and sound files to experiments. E-Prime supports multiple methods to experiments. E-Prime supports multiple methods to present stimuli. You can present pictures, sounds, and present stimuli. You can present pictures, sounds, and animations. animations.
In this case we present a simple slide picture sound In this case we present a simple slide picture sound combination. combination.
Load My Documents\My Experiments\Workshop\Load My Documents\My Experiments\Workshop\Exercises\Exercises\#BasicExercise6Slide.es#BasicExercise6Slide.es

45 of 61Basic Exercises
Exercise 6: Modify Lexical Decision to displayExercise 6: Modify Lexical Decision to displayPictures and SoundPictures and Sound
In this exercise you will need to:In this exercise you will need to: Add Attributes to the List.Add Attributes to the List. Create 2 Slide objects to present text, image and sound.Create 2 Slide objects to present text, image and sound. Run the experiment.Run the experiment.Note – for finished version open #BasicExercise6SlideCompleteNote – for finished version open #BasicExercise6SlideComplete
leftleft
Hear LeftHear Left
leftleft
Hear RightHear Right
The task requires the subject to respond 1 to the written text “Left”, and 2 to the The task requires the subject to respond 1 to the written text “Left”, and 2 to the text “Right”. The probe presents an arrow on the left or right with the spoken text “Right”. The probe presents an arrow on the left or right with the spoken word Left or Right. The visual and auditory probes can be compatible and word Left or Right. The visual and auditory probes can be compatible and incompatible with the written text. incompatible with the written text.
leftleft
Hear LeftHear Left
Visual ProbeVisual Probe Compatible Compatible Incompatible Incompatible IncompatibleIncompatibleAuditory ProbeAuditory Probe Compatible Compatible Incompatible Incompatible CompatibleCompatible

46 of 61Basic Exercises
Enable Sound OutputEnable Sound Output 1. Double Click the 1. Double Click the
Experiment Object.Experiment Object. 2. Select Devices2. Select Devices 3. Check on Sound 3. Check on Sound
if needed, Select if needed, Select sound.sound.
4. Edit sound.4. Edit sound. 5. Set sampling 5. Set sampling
mode Channels 1, mode Channels 1, Samples 22050, Samples 22050, Bits Per Sample 0, Bits Per Sample 0, select OK Sound, select OK Sound, OK Experiment OK Experiment Object.Object.

47 of 61Basic Exercises
Creating a new SlideCreating a new Slide 6. From the tool bar drag and drop a Slide object 6. From the tool bar drag and drop a Slide object
and drop it between the Fixation and Probeand drop it between the Fixation and Probe 7. Delete the Probe object.7. Delete the Probe object.
BeforeBefore AfterAfter

48 of 61Basic Exercises
Modify the Design ListModify the Design List 8.8. Open the DesignList. Note the new conditions. The Condition identifies Open the DesignList. Note the new conditions. The Condition identifies
the whether the trial is Compatibly/Incompatible in the Visual and Auditory the whether the trial is Compatibly/Incompatible in the Visual and Auditory Probe. Probe.
9. Run the experiment once. It will present text for that the visual and 9. Run the experiment once. It will present text for that the visual and auditory probe should be. auditory probe should be.
49 of 61Basic Exercises
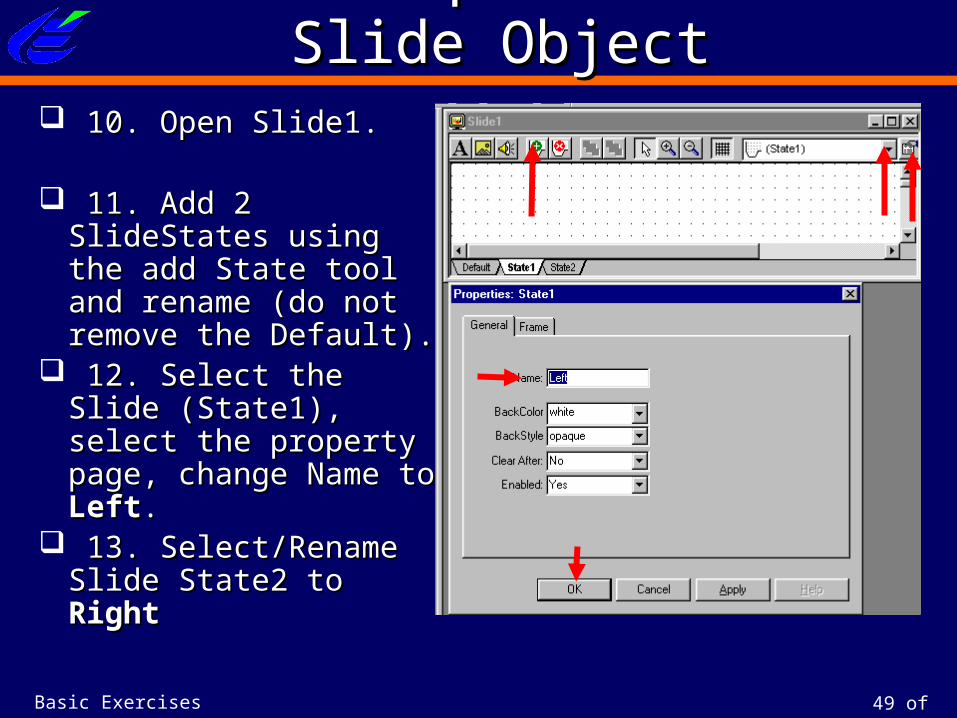
Set Properties of Slide ObjectSet Properties of Slide Object 10. Open Slide1.10. Open Slide1.
11. Add 2 SlideStates 11. Add 2 SlideStates using the add State tool using the add State tool and rename (do not and rename (do not remove the Default).remove the Default).
12. Select the Slide 12. Select the Slide (State1), select the (State1), select the property page, change property page, change Name to Name to LeftLeft. .
13. Select/Rename 13. Select/Rename Slide State2 to Slide State2 to RightRight

50 of 61Basic Exercises
Set Properties of Slide ObjectSet Properties of Slide Object 14. Set ActiveState property to [StateName]14. Set ActiveState property to [StateName]
Select the Slide object from drop down menuSelect the Slide object from drop down menu
Click on the Properties buttonClick on the Properties button

51 of 61Basic Exercises
Add Image to SlideAdd Image to Slide 15. Select “Left” SlideState 15. Select “Left” SlideState
object. Click on SlideImage object. Click on SlideImage tool button and then click in tool button and then click in Slide grid area.Slide grid area.
16. Select Image object from 16. Select Image object from drop down box and click the drop down box and click the Properties button to edit image.Properties button to edit image. Add Add left.bmpleft.bmp to Filename field to Filename field Select Frame and Center objectSelect Frame and Center object
17. Select “Right” SlideState, 17. Select “Right” SlideState, add SlideImage and set add SlideImage and set properties (repeat steps 12&13).properties (repeat steps 12&13). Add Add right.bmpright.bmp to Filename to Filename
fieldfield Select Frame and Center objectSelect Frame and Center object
52 of 61Basic Exercises
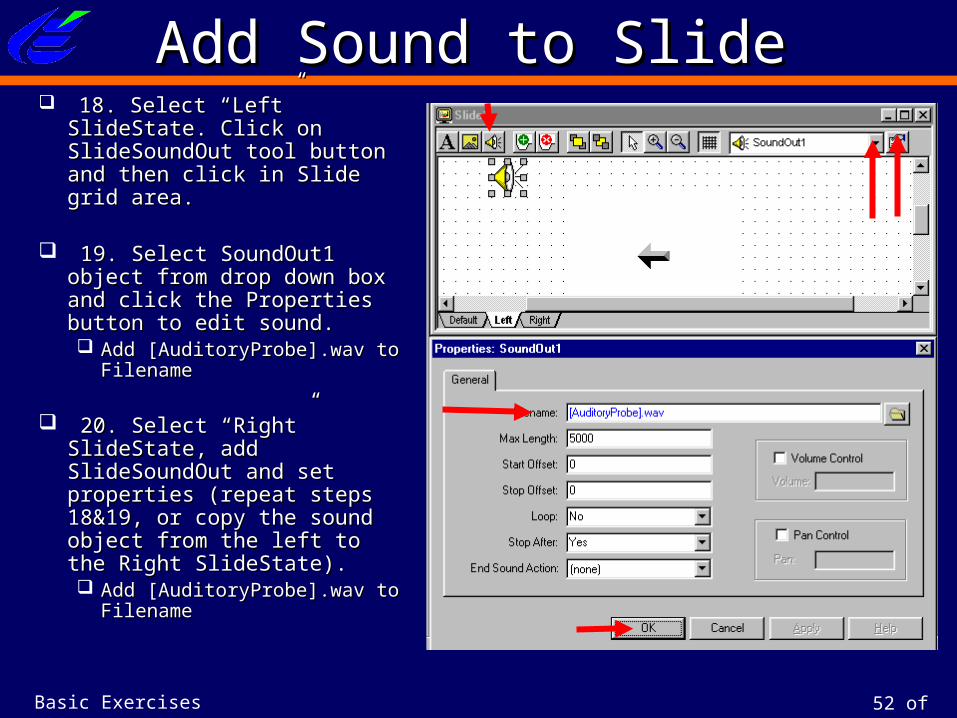
Add Sound to SlideAdd Sound to Slide 18. Select “Left” SlideState. 18. Select “Left” SlideState.
Click on SlideSoundOut tool Click on SlideSoundOut tool button and then click in Slide button and then click in Slide grid area.grid area.
19. Select SoundOut1 object 19. Select SoundOut1 object from drop down box and click from drop down box and click the Properties button to edit the Properties button to edit sound.sound. Add [AuditoryProbe].wav to Add [AuditoryProbe].wav to
FilenameFilename
20. Select “Right” SlideState, 20. Select “Right” SlideState, add SlideSoundOut and set add SlideSoundOut and set properties (repeat steps 18&19, properties (repeat steps 18&19, or copy the sound object from or copy the sound object from the left to the Right SlideState).the left to the Right SlideState). Add [AuditoryProbe].wav to Add [AuditoryProbe].wav to
FilenameFilename

53 of 61Basic Exercises
Add Second Slide ObjectAdd Second Slide Object 21. Make a copy of Slide1 on the TrialProc 21. Make a copy of Slide1 on the TrialProc
(Ctrl + click and drag). This will automatically (Ctrl + click and drag). This will automatically be renamed to Slide2.be renamed to Slide2.
BeforeBefore AfterAfter
Ctrl + DragCtrl + Drag

54 of 61Basic Exercises
Set Response Input on Slide2Set Response Input on Slide2
22. Set the Duration/Input Properties of Slide2 to:22. Set the Duration/Input Properties of Slide2 to:Duration 2000
Data Logging Standard
Add Input Keyboard
Allowable Input 12
Correct [CorrectResponse]
Input Action Terminate

55 of 61Basic Exercises
Add Text to Slide2Add Text to Slide2 23. Click “Left” 23. Click “Left”
SlideState of Slide2.SlideState of Slide2. 24. Delete SlideSoundOut 24. Delete SlideSoundOut
object (hit delete key or object (hit delete key or right click delete).right click delete).
25. Click the SlideText 25. Click the SlideText tool button and then click tool button and then click in Slide grid area to the in Slide grid area to the left of the arrow.left of the arrow.
26. Click “Right” 26. Click “Right” SlideState, delete SlideState, delete SlideSoundOut object, SlideSoundOut object, add SlideText and set add SlideText and set properties (repeat steps properties (repeat steps 23-25).23-25).
56 of 61Basic Exercises
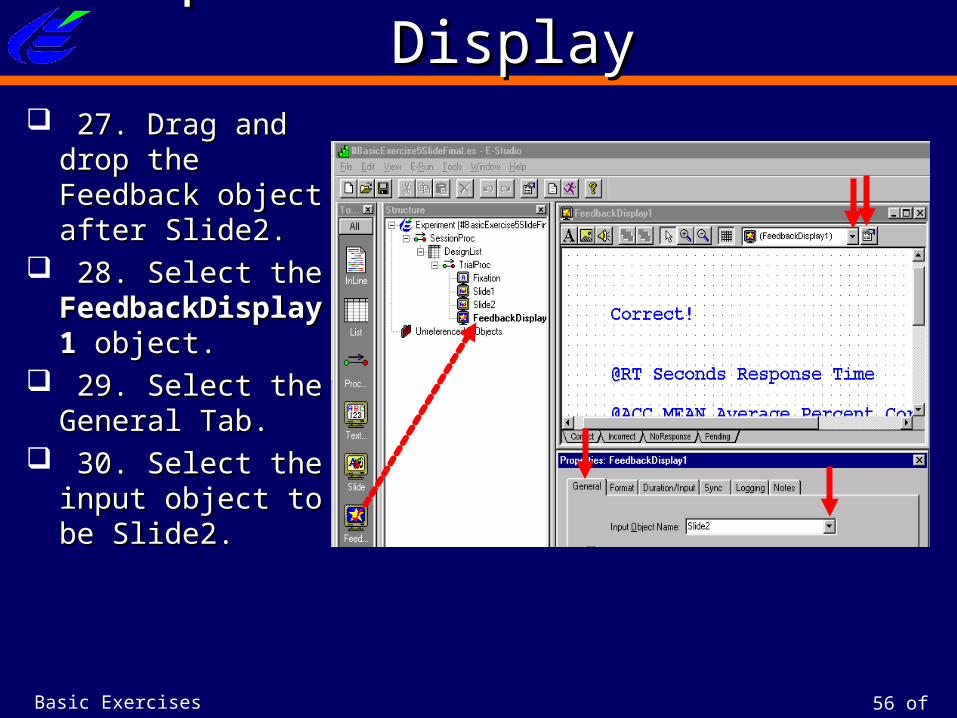
Optional Add Feedback DisplayOptional Add Feedback Display 27. Drag and drop 27. Drag and drop
the Feedback object the Feedback object after Slide2.after Slide2.
28. Select the 28. Select the FeedbackDisplay1FeedbackDisplay1 object.object.
29. Select the 29. Select the General Tab.General Tab.
30. Select the input 30. Select the input object to be Slide2.object to be Slide2.
57 of 61Basic Exercises
Test SlideTest Slide 33. Save as BasicExercise6Slide.33. Save as BasicExercise6Slide.
Note: you may just run C:\E-PrimeExercises\Note: you may just run C:\E-PrimeExercises\
#BasicExercise6SlideComplete.es. #BasicExercise6SlideComplete.es.
34. Run the experiment. You should hear either 34. Run the experiment. You should hear either the word the word “left”“left” or or “right”“right” spoken along with an spoken along with an arrow on the screen, followed by the arrow arrow on the screen, followed by the arrow pointing to a word. pointing to a word.
Verify that only the first slide presents auditory Verify that only the first slide presents auditory sounds and the feedback is correct.sounds and the feedback is correct.

58 of 61Basic Exercises
Verify Slide ProgramVerify Slide Program
Have an Assistant verify program check 1 Have an Assistant verify program check 1 trial. trial. Assistant InitialsAssistant Initials ___ ___

59 of 61Basic Exercises
Review SlideReview Slide
This illustrates how you can use the slide This illustrates how you can use the slide to show different combinations of text, to show different combinations of text, bitmaps, and sound in different slide state bitmaps, and sound in different slide state conditions.conditions.
How to attributes to change the stimuli for How to attributes to change the stimuli for text, sound and pictures.text, sound and pictures.
60 of 61Basic Exercises
Basic Exercise 6 Study QuestionsBasic Exercise 6 Study Questions
Can you at this point? Can you at this point?
1.1. Use an attribute to set the picture in Slide1 and Use an attribute to set the picture in Slide1 and the position of the text in Slide 2 and have only the position of the text in Slide 2 and have only the default state and still execute the same the default state and still execute the same experiment.experiment.
2.2. Present the Slide 1 for only 50 ms but have the Present the Slide 1 for only 50 ms but have the sound continue for 100 ms.sound continue for 100 ms.
Short Answers are included in the Exercise AppendixShort Answers are included in the Exercise Appendix