1. introduction and overview - nvidiadownload.nvidia.com/.../2004/eurographics/eg_04_tuto… ·...
TRANSCRIPT
EUROGRAPHICS 2004 Tutorial
© The Eurographics Association 2004 1
Programming Graphics Hardware
Randy Fernando, Mark Harris, Matthias Wloka and Cyril Zeller
NVIDIA Corporation Abstract The tutorial is an introduction to programming today’s PC graphics hardware. It covers basic hardware architecture, optimization, programming interfaces and languages. It presents graphics and non-graphics applications. While the tutorial assumes basic knowledge in programming and principles of 3D computer graphic, familiarity with PC graphics hardware is unnecessary. The tutorial notes below are complementary to the tutorial slides. 1. Introduction and Overview In the past ten years, graphics hardware has undergone a true revolution: Not only has its computation power increased at a higher pace than the already exponential pace of general purpose hardware, but its cost has also dropped so much that it has become available in every personal computer on the market. Both this ubiquity and the formidable levels of computation power that have been reached over the years have prompted software developers to leverage graphics hardware in ever increasing creative ways, from the production of video games and computer generated movies to computer aided design and scientific visualization, or even by using it to solve non–graphics–related problems. In addition to becoming very powerful and cheap and continuing to do so, graphics hardware has also become far more flexible: It went from being a simple memory device to a configurable unit and relatively recently, to a fully programmable parallel processor. This tutorial presents the basic notions required for programming PC graphics hardware, from a low level point of view – architecture, programming interfaces –, as well as from a high level point of view – optimization, application. The first presentation – Introduction to the Hardware Graphics Pipeline – lays down the overall framework of the tutorial by describing the PC graphics hardware architecture and introducing the terminology and concepts assumed in the subsequent presentations. It assumes familiarity with the principles of 3D computer graphics. A graphics application that makes use of the graphics hardware has two components: One that gets executed on the main processor unit of the PC and the other one that gets executed on the graphics hardware itself. The second presentation – Controlling the GPU from the CPU: The 3D API – focuses on the first component that is in charge of controlling the graphics hardware by managing high level tasks, as well as the data flow
between the two components. The third presentation – Programming the GPU: High-Level Shading Languages – focuses on the second component that performs all the work of computing the output from the graphics hardware – usually images –. Both presentations assume basic knowledge in software programming. The fourth presentation – Optimizing the Graphics Pipeline – deals with the subject of optimization that is obviously a key part of graphics hardware programming since speed is the main motivation behind it. The two last presentations are content–oriented: The first one – Advanced Rendering Techniques –describes a variety of graphics effects that current graphics processors are capable of rendering in real–time; the second one – General-Purpose Computation on GPUs – is devoted to non–graphics applications, how they manage to map to the graphics pipeline and leverage its computation horsepower. 2. Introduction to the Hardware Graphics Pipeline By using graphics hardware, applications can achieve real–time rendering. This means that they’re able to compute images from a complex 3D scene at fast enough rates that users can comfortably interact with the scene. It is generally admitted that such interactivity starts at 10 frames per second, but the required minimum display rate varies from one application to another.

Randy Fernando, Mark Harris, Matthias Wloka and Cyril Zeller / Programming Graphics Hardware
© The Eurographics Association 2004
2
Figure 1: From triangles to pixels in real-time
There are obviously several techniques to create an image from a 3D scene, but one that has proved to map very well to hardware and be most effective for real–time rendering is to tessellate the scene into triangles and process those triangles using a pipeline architecture. Several units are working in parallel on different triangles at different stages of their transformation into pixels. The graphics pipeline splits into three functional stages (figure 2): The application stage that outputs the 3D triangles representing the scene, the geometry stage that transforms these 3D triangles into 2D triangles, projecting them onto the screen based on the point of view, and the rasterization stage that fragments these 2D triangles into pixels and computes a color for each of these pixels to form the final image; these colors are computed from some attributes attached to every vertex of the initial 3D triangles and linearly interpolated across the triangles.
Figure 2: The graphics hardware pipeline
architecture
The bulk of the presentation describes how the graphics pipeline is implemented in a PC. For our purpose, a PC can be modeled as a mother board connected to a video board through a bus. The mother board hosts the central processor unit or CPU and the system memory. The graphics board hosts the graphics processor unit or GPU and the video memory. The approach taken is to follow this implementation as it evolved through time starting in 1995 and focus along the way on the various hardware units and features as they’ve been introduced for the first time in the pipeline. The 3dfx Voodoo is generally credited as the first graphics processor unit for the PC architecture. It is limited to processing 2D triangles only: The geometry stage is entirely done in the CPU. The rasterization stage is composed of:
- A rasterizer that computes the pixels belonging to each 2D triangle being passed from system memory to video memory by the CPU through
the Peripheral Component Interconnect or PCI bus; every pixel comes with a depth value that will be used subsequently to resolve visibility between triangles;
- A texture unit that assigns some color to each of these pixels using textures that are stored in video memory and mapped to the triangles based on the triangle vertices’ texture coordinates; a final color for every pixel is computed by modulating the texture color with the interpolated vertex colors (Gouraud shading);
- A raster operations unit that determines how each of the pixels of a given triangle affects the final image stored as a color buffer in a part of the video memory called frame buffer; the frame buffer also contains a depth buffer or z–buffer that is used to resolve visibility for opaque triangles at the pixel level by using the pixels’ depth values; the color of a new–coming pixel is either discarded, or is blended with or simply overwrites the color stored in the color buffer at the same position.
In general, each unit described above and below is duplicated multiple times in a single GPU to increase parallelism. Visibility solving using a z–buffer and texture mapping are the two main features of this first GPU.
Figure 3: Texture mapping
Texture mapping (figure 3) consists in wrapping an image – a texture map – around a triangle mesh. Every vertex of the mesh is assigned 2D coordinates defining the point it maps to in the image. These texture coordinates are interpolated across the triangles in a so–called perspective–correct fashion, which means that the interpolation is linear in 3D space and not 2D screen space like it was the case on some simpler hardware at the time. Texture filtering is used to compute the color of a screen pixel based on its footprint in the texture map. A pixel of the texture map is usually referred as a texel. When a screen pixel covers one texel or less – texture magnification –, its color is taken as the closest texel from the pixel’s footprint center, or is computed by bilinear filtering, that is bilinear interpolation of the four closest texels. When it covers several texels – texture minification –, mipmapping is the preferred solution: Precomputed lower resolution versions of the original texture map –

Randy Fernando, Mark Harris, Matthias Wloka and Cyril Zeller / Programming Graphics Hardware
© The Eurographics Association 2004
3
called mipmap levels – are stored along with the full resolution version and the right mipmap level is selected to come down back to the magnification case. Trilinear filtering is when bilinear filtering is performed twice based on two consecutive mipmap levels and the results are averaged together. In addition to the filtering method, anisotropic filtering can also be optionally selected when performing a texture lookup. Anisotropic filtering increases quality for the cases where the pixel’s footprint is elongated in one direction: It consists in performing the filtering computations above at several points in the pixel’s footprint along this direction. In 1998, NVIDIA and ATI introduce the TNT and Rage GPUs respectively that come with multitexturing capabilities: One pixel can be colored using more than one texture without having to send the triangle twice. A very common and direct application of this feature is the light map technique (figure 4), which amounts to modulating base textures, representing the material colors, with textures containing precomputed lighting information for static lighting.
Figure 4: Light mapping
The bandwidth between the CPU and the GPU also doubles this year as the PCI bus gets replaced with the Accelerated Graphics Port or AGP bus which has the other advantages of using:
- A serial connection, making it cheaper and more scalable,
- A point–to–point protocol, so that bandwidth isn’t shared among devices,
- A dedicated piece of system memory that serves as non–local video memory when the system gets short of local video memory.
In 1999–2000, with NVIDIA’s GeForce 256 and GeForce2, ATI’s Radeon 7500, and S3’s Savage3D, the geometry stage moves from the CPU to the GPU with the addition of a Transform and Lighting or TnL unit. The GPU is now fed with 3D triangles along with all the necessary information for lighting these triangles. Many more operations can also be performed at the pixel level through the new register combiner unit. True bump mapping (figure 5) becomes possible by fetching the normal at every pixel from a texture instead of using the interpolated normal.
Figure 5: Bump mapping
These GPUs also support new texture formats: Cube textures used for environment mapping (figure 6) and projective texture used to project textures onto the scene (shadows or simple decal textures).
Figure 6: Environment mapping
2001 is the first introduction of some programmability into the GPU with NVIDIA’s GeForce 3 and GeForce 4 Ti and ATI’s Radeon 8500. Per–vertex operations are downloaded to the GPU in the form of a small program that gets executed by a vertex shader unit. Note that this program is also very often called vertex shader. The only programming feature missing from the programming model at this time is flow control. These GPUs also support volume textures that add a third dimension to the regular 2D texture and hardware shadow mapping (figure 7; available on NVIDIA’s GPUs only) that significantly accelerates the very popular shadow buffer technique used to compute shadows for moving objects and lights.
Figure 7: Hardware shadow mapping
In the context of computer graphics, antialiasing refers to the process of reducing image aliasing, which regroups all the undesirable visual artifacts due to
Randy Fernando, Mark Harris, Matthias Wloka and Cyril Zeller / Programming Graphics Hardware
© The Eurographics Association 2004
4
insufficient sampling of primitives, textures or shaders. Shader antialiasing can be tricky, especially with conditionals – available in GPUs after 2002 –. New pixel shader instructions are added to today’s GPUs that allows shader writers to implement their own filtering. Texture antialiasing is largely handled by proper mipmapping and anisotropic filtering. Various primitive antialiasing methods have been present in GPUs since 1995, but bad performance limited their usage. 2001’s GPUs come with a new method, called multisampling, which for the first time really enables primitive antialiasing without dramatically limiting frame rates. In 2002–2003, with NVIDIA’s GeForce FX Series and ATI’s Radeon 9000 and X800 Series, per–pixel operations are also now specified as a program that gets executed on a pixel shader unit. Full flow control is available for vertex shaders, but only static flow control for pixel shaders. Flow control is defined as static when the conditionals used to control the flow only depend on global variables that are set per batch of triangles, as opposed to dynamic flow control for which conditionals are evaluated each time the program is executed for a given pixel.
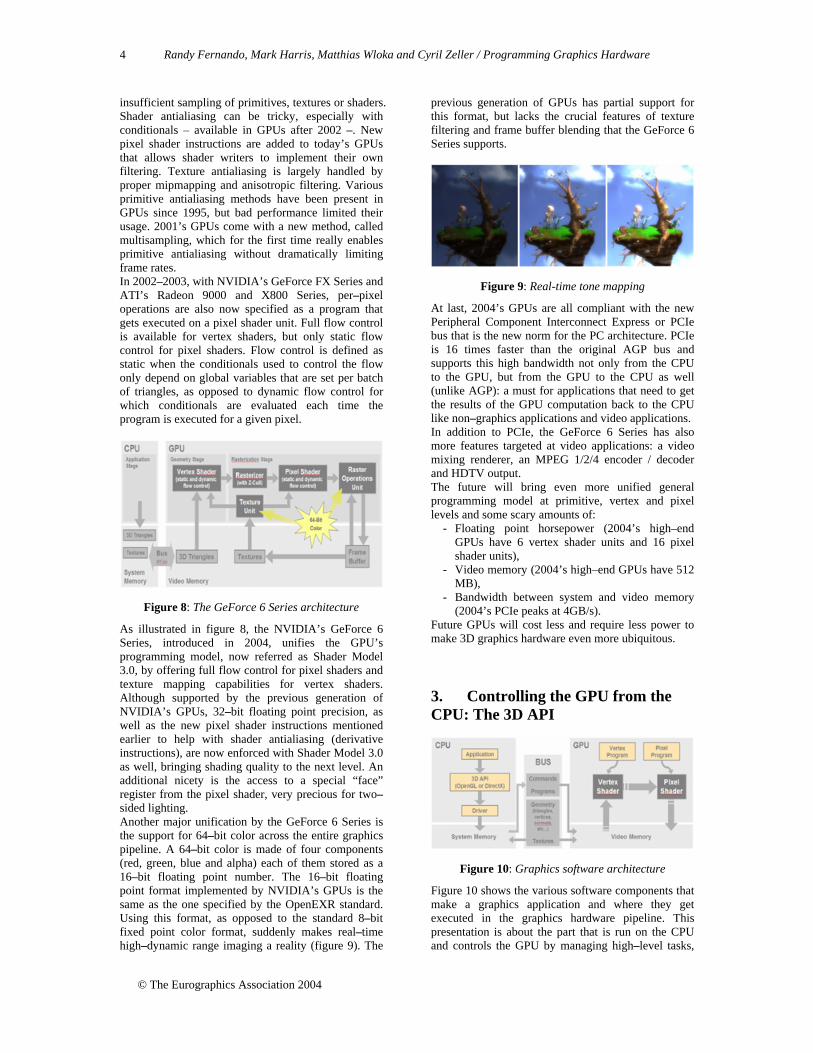
Figure 8: The GeForce 6 Series architecture
As illustrated in figure 8, the NVIDIA’s GeForce 6 Series, introduced in 2004, unifies the GPU’s programming model, now referred as Shader Model 3.0, by offering full flow control for pixel shaders and texture mapping capabilities for vertex shaders. Although supported by the previous generation of NVIDIA’s GPUs, 32–bit floating point precision, as well as the new pixel shader instructions mentioned earlier to help with shader antialiasing (derivative instructions), are now enforced with Shader Model 3.0 as well, bringing shading quality to the next level. An additional nicety is the access to a special “face” register from the pixel shader, very precious for two–sided lighting. Another major unification by the GeForce 6 Series is the support for 64–bit color across the entire graphics pipeline. A 64–bit color is made of four components (red, green, blue and alpha) each of them stored as a 16–bit floating point number. The 16–bit floating point format implemented by NVIDIA’s GPUs is the same as the one specified by the OpenEXR standard. Using this format, as opposed to the standard 8–bit fixed point color format, suddenly makes real–time high–dynamic range imaging a reality (figure 9). The
previous generation of GPUs has partial support for this format, but lacks the crucial features of texture filtering and frame buffer blending that the GeForce 6 Series supports.
Figure 9: Real-time tone mapping
At last, 2004’s GPUs are all compliant with the new Peripheral Component Interconnect Express or PCIe bus that is the new norm for the PC architecture. PCIe is 16 times faster than the original AGP bus and supports this high bandwidth not only from the CPU to the GPU, but from the GPU to the CPU as well (unlike AGP): a must for applications that need to get the results of the GPU computation back to the CPU like non–graphics applications and video applications. In addition to PCIe, the GeForce 6 Series has also more features targeted at video applications: a video mixing renderer, an MPEG 1/2/4 encoder / decoder and HDTV output. The future will bring even more unified general programming model at primitive, vertex and pixel levels and some scary amounts of:
- Floating point horsepower (2004’s high–end GPUs have 6 vertex shader units and 16 pixel shader units),
- Video memory (2004’s high–end GPUs have 512 MB),
- Bandwidth between system and video memory (2004’s PCIe peaks at 4GB/s).
Future GPUs will cost less and require less power to make 3D graphics hardware even more ubiquitous. 3. Controlling the GPU from the CPU: The 3D API
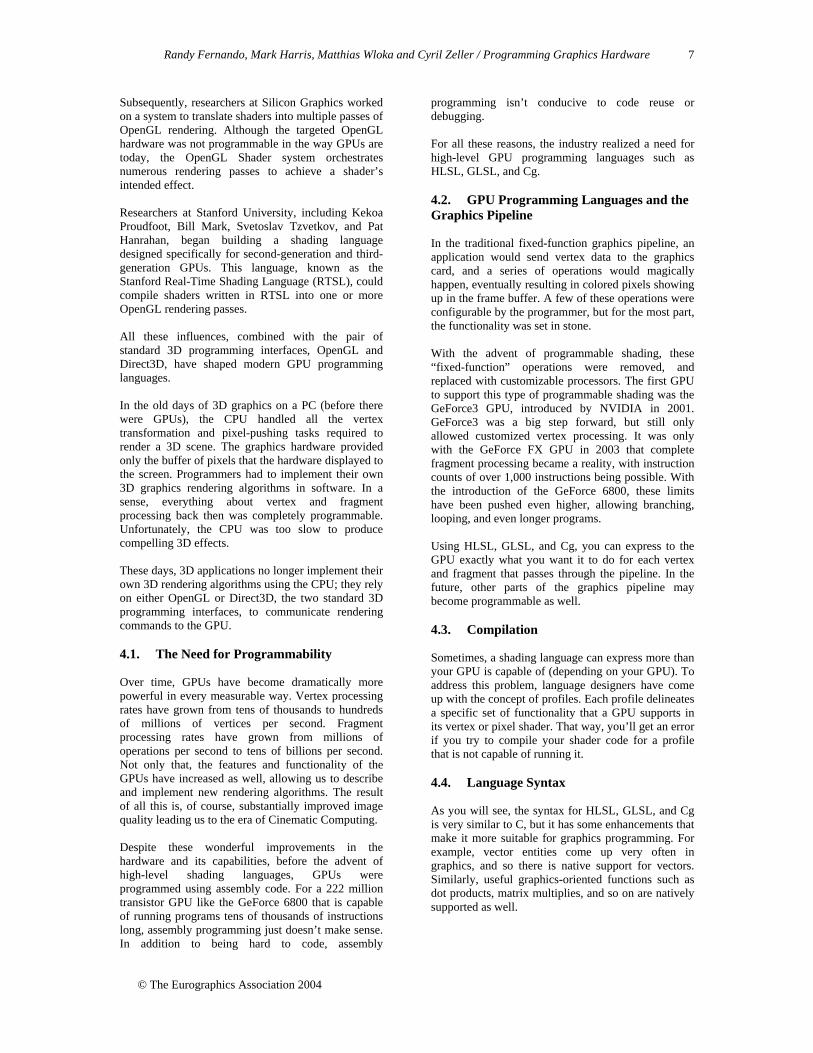
Figure 10: Graphics software architecture
Figure 10 shows the various software components that make a graphics application and where they get executed in the graphics hardware pipeline. This presentation is about the part that is run on the CPU and controls the GPU by managing high–level tasks,

Randy Fernando, Mark Harris, Matthias Wloka and Cyril Zeller / Programming Graphics Hardware
© The Eurographics Association 2004
5
as well as the data flow between the two processors. This program is typically written in C or C++ and is made up of two parts that are compiled separately and link to each other dynamically: One part is application–specific and hardware independent and sits on top of the other part that deals with the hardware specifics. This second part is mostly made of what is called the hardware driver. The application can thus run on different GPUs and with different drivers without the need of recompilation. The decoupling between these two parts is done the usual way by making them communicate through an application programming interface or API that basically abstracts away the hardware and driver implementations from the application–specific code. As of today, there are two 3D APIs: DirectX and OpenGL. DirectX is maintained by Microsoft Corporation and OpenGL by the OpenGL Architectural Review Board or ARB composed of several companies (see http://www.opengl.org/about/arb). DirectX is C++–based and up until now, a new version of the API was released every year or so, although this pace seems to slow down a bit now. It is compatible with the Windows operating system only and very popular in the PC game industry. OpenGL is C–based and evolves through a system of extensions that may or may not ultimately be moved into the API core. It is available for most common operating systems and very popular in the academic world and all the non game–related graphics industries. The presentation focuses on the most common usage of these APIs to develop a real–time graphics application. Such applications generally use double–buffering to display animation frames without tearing: One frame is stored into a part of video memory, called the front buffer, that is displayed on the monitor (or other output device) while the next frame is computed by the GPU into an invisible part of video memory called the back buffer; when the computation is done, the two buffers are swapped. The basic skeleton of a real–time graphics application is thus:
- Initialization - For each frame:
o Draw to the back buffer o Swap back buffer with front buffer
The initialization encompasses the initialization of the API and the creation of all the resources needed to render the scene. The initialization of the API consists in first creating a window and then creating a render context or device that defines the mode used by the application to operate with the graphics hardware, including the back buffer pixel format, the front and back buffer swapping method and whether the application is in windowed or fullscreen mode. This initialization always involves code that is specific to the operating system. Libraries like GLUT or AUX advantageously complement OpenGL by providing APIs that simplify this initialization step and hide its operating system specific code. The resources allocated at initialization are:
- Render targets - Vertex and pixel shaders - Textures - Index and vertex buffers
Render targets are pieces of the video memory that can be used as color or depth buffers to compute intermediate images that are then used as textures to contribute to the final image in the back buffer. This process is called offscreen rendering or render–to–texture (RTT). In DirectX, render targets are created as special textures. In OpenGL, several extensions already offer offscreen rendering capabilities, like the pixel buffer or pbuffer extension, and simpler and more efficient extensions are being designed. The models composing the scene are defined as a list of meshes; each mesh is usually defined as a list of 3D vertices and a list of indices specifying the triangles (one can use non–indexed triangles as well). The vertices get loaded into vertex buffers and the indices into index buffers. OpenGL offers several extensions to load the geometry this way, the most modern one being the vertex buffer object or VBO extension. To every mesh also usually corresponds a list of textures and shaders. Textures are read from files and loaded into the API; some format conversion may happen in the driver to make them hardware–friendly. Pixel and vertex shaders are programs written in a high–level language, most of the time. They can be either stored as text files – or generated within the application – and compiled at load time, or precompiled and stored as binary files in assembly code. They are loaded into the API and the driver often optimizes them further for the specific hardware the application happens to run on. DirectX also comes with a file format that encapsulates vertex and pixel shaders in one file, along with all the additional information necessary to achieve a particular graphics effect. This effect file format, as well as high–level languages in general, is described in the next presentation. Once the initialization is done, the application enters the drawing loop. For each frame, each mesh is drawn the following way:
- For each rendering pass: o Set the vertex buffer o Set the index buffer o Set the vertex shader and its parameters o Set the pixel shader and its parameters o Set the render states o Set the render target o Draw
Multiple rendering passes may be necessary, either because of hardware limitations, or for structural reasons because of the way the various components that contribute to the final rendering (lights, materials, etc.) are managed. Inside a rendering pass, except for the vertex and index buffers, all the other settings are optional and have default behaviors: If a shader is missing, the fixed function pipeline is used; if the render target is missing, the back buffer is used. When using DirectX effect’s framework, all these settings are actually embedded in the effect file and DirectX provides specific functions to render with an effect file.

Randy Fernando, Mark Harris, Matthias Wloka and Cyril Zeller / Programming Graphics Hardware
© The Eurographics Association 2004
6
The vertex data can be stored in various layouts in the vertex buffer: The vertex attributes can be interleaved or not, or a bit of both. Setting the vertex buffer involves specifying where each attribute is located in the buffer, so that the correct attributes are input into the vertex shader. The shader parameters correspond to the uniform variables defined in the shader code. One of the vertex shader parameters is the transformation matrix used in the vertex shader to project the vertices onto the render target. Textures are typical pixel shader parameters. Apart from the fixed function pipeline render states and a few other exceptions, the render states are essentially setting up the raster operations unit. Once all the setting has been done for a rendering pass, a draw command is sent to the GPU. Like any command sent by the driver to the GPU, it gets added to a FIFO buffer called the pushbuffer for further processing by the GPU. Note that OpenGL also natively supports a different mode of drawing called immediate mode: Instead of being passed as buffers, the vertices and their attributes are specified by issuing an API function call per vertex and attributes in an orderly and hierarchical way. For optimization purposes, real–time graphics applications usually process the scene each frame and before rendering it by:
- Culling triangles that aren’t visible for the current point of view,
- Sorting the remaining triangles to minimize state changes between draw calls and maximize the effectiveness of the z–buffer algorithm.
To remain beneficial to the application this culling and sorting should be fast and thus, not done per triangle, but per reasonably large groups of triangles whose visibility can be efficiently determined. 4. Programming the GPU: High-Level Shading Languages The heritage of modern GPU programming languages comes from three sources. First, they base their syntax and semantics on the general-purpose C programming language. Second, they incorporate many concepts from offline shading languages such as the RenderMan Shading Language, as well as prior hardware shading languages developed by academia. Third, modern GPU programming languages base their graphics functionality on the OpenGL and Direct3D programming interfaces for real-time 3D. The RenderMan Interface Standard describes the best-known shading language for noninteractive shading. Pixar developed the language in the late 1980s to generate high-quality computer animation with sophisticated shading for films and commercials. Pixar has created a complete rendering system with its implementation of the RenderMan Interface Standard,
the offline renderer PRMan (PhotoRealistic RenderMan). The RenderMan Shading Language is just one component of this system. The inspiration for the RenderMan Shading Language came from an earlier idea called shade trees. Rob Cook, then at Lucasfilm Ltd., which later spun off Pixar, published a SIGGRAPH paper about shade trees in 1984. A shade tree organizes various shading operations as nodes within a tree structure. The result of a shade tree evaluation at a given point on a surface is the color of that point. Shade trees grew out of the realization that a single predefined shading model would never be sufficient for all the objects and scenes one might want to render. Shade tree diagrams are great for visualizing a data flow of shading operations. However, if the shade trees are complex, their diagrams become unwieldy. Researchers at Pixar and elsewhere recognized that each shade tree is a limited kind of program. This realization provided the impetus for a new kind of programming language known as a shading language. The RenderMan Shading Language grew out of shade trees and the realization that open-ended control of the appearance of rendered surfaces in the pursuit of photorealism requires programmability. Today most offline renderers used in actual production have some type of support for a shading language. The RenderMan Shading Language is the most established and best known for offline rendering, and it was significantly overhauled and extended in the late 1990s. A hardware implementation of an algorithm is most efficient when the task decomposes into a long sequence of stages in which each stage’s communication is limited to its prior stage and its subsequent stage (that is, when it can be pipelined). The vertex-based and fragment-based pipeline is extremely amenable to hardware implementation. However, the Reyes algorithm used by PhotoRealistic RenderMan is not very suitable for efficient hardware implementation, primarily due to its higher-level geometry handling. Contemporary GPUs rely completely on a graphics pipeline based on vertices and fragments. Researchers at the University of North Carolina (UNC) began investigating programmable graphics hardware in the mid-1990s, when UNC was developing a new programmable graphics hardware architecture called “PixelFlow.” This project fostered a new line of computer graphics research into hardware-amenable shading languages by Marc Olano and others at UNC. Unfortunately, PixelFlow was too expensive and failed commercially.
Randy Fernando, Mark Harris, Matthias Wloka and Cyril Zeller / Programming Graphics Hardware
© The Eurographics Association 2004
7
Subsequently, researchers at Silicon Graphics worked on a system to translate shaders into multiple passes of OpenGL rendering. Although the targeted OpenGL hardware was not programmable in the way GPUs are today, the OpenGL Shader system orchestrates numerous rendering passes to achieve a shader’s intended effect. Researchers at Stanford University, including Kekoa Proudfoot, Bill Mark, Svetoslav Tzvetkov, and Pat Hanrahan, began building a shading language designed specifically for second-generation and third-generation GPUs. This language, known as the Stanford Real-Time Shading Language (RTSL), could compile shaders written in RTSL into one or more OpenGL rendering passes. All these influences, combined with the pair of standard 3D programming interfaces, OpenGL and Direct3D, have shaped modern GPU programming languages. In the old days of 3D graphics on a PC (before there were GPUs), the CPU handled all the vertex transformation and pixel-pushing tasks required to render a 3D scene. The graphics hardware provided only the buffer of pixels that the hardware displayed to the screen. Programmers had to implement their own 3D graphics rendering algorithms in software. In a sense, everything about vertex and fragment processing back then was completely programmable. Unfortunately, the CPU was too slow to produce compelling 3D effects. These days, 3D applications no longer implement their own 3D rendering algorithms using the CPU; they rely on either OpenGL or Direct3D, the two standard 3D programming interfaces, to communicate rendering commands to the GPU. 4.1. The Need for Programmability Over time, GPUs have become dramatically more powerful in every measurable way. Vertex processing rates have grown from tens of thousands to hundreds of millions of vertices per second. Fragment processing rates have grown from millions of operations per second to tens of billions per second. Not only that, the features and functionality of the GPUs have increased as well, allowing us to describe and implement new rendering algorithms. The result of all this is, of course, substantially improved image quality leading us to the era of Cinematic Computing. Despite these wonderful improvements in the hardware and its capabilities, before the advent of high-level shading languages, GPUs were programmed using assembly code. For a 222 million transistor GPU like the GeForce 6800 that is capable of running programs tens of thousands of instructions long, assembly programming just doesn’t make sense. In addition to being hard to code, assembly
programming isn’t conducive to code reuse or debugging. For all these reasons, the industry realized a need for high-level GPU programming languages such as HLSL, GLSL, and Cg. 4.2. GPU Programming Languages and the Graphics Pipeline In the traditional fixed-function graphics pipeline, an application would send vertex data to the graphics card, and a series of operations would magically happen, eventually resulting in colored pixels showing up in the frame buffer. A few of these operations were configurable by the programmer, but for the most part, the functionality was set in stone. With the advent of programmable shading, these “fixed-function” operations were removed, and replaced with customizable processors. The first GPU to support this type of programmable shading was the GeForce3 GPU, introduced by NVIDIA in 2001. GeForce3 was a big step forward, but still only allowed customized vertex processing. It was only with the GeForce FX GPU in 2003 that complete fragment processing became a reality, with instruction counts of over 1,000 instructions being possible. With the introduction of the GeForce 6800, these limits have been pushed even higher, allowing branching, looping, and even longer programs. Using HLSL, GLSL, and Cg, you can express to the GPU exactly what you want it to do for each vertex and fragment that passes through the pipeline. In the future, other parts of the graphics pipeline may become programmable as well. 4.3. Compilation Sometimes, a shading language can express more than your GPU is capable of (depending on your GPU). To address this problem, language designers have come up with the concept of profiles. Each profile delineates a specific set of functionality that a GPU supports in its vertex or pixel shader. That way, you’ll get an error if you try to compile your shader code for a profile that is not capable of running it. 4.4. Language Syntax As you will see, the syntax for HLSL, GLSL, and Cg is very similar to C, but it has some enhancements that make it more suitable for graphics programming. For example, vector entities come up very often in graphics, and so there is native support for vectors. Similarly, useful graphics-oriented functions such as dot products, matrix multiplies, and so on are natively supported as well.

Randy Fernando, Mark Harris, Matthias Wloka and Cyril Zeller / Programming Graphics Hardware
© The Eurographics Association 2004
8
4.5. HLSL FX Framework If you’re familiar with the graphics pipeline, you may be wondering whether things such as texture state, blending state, alpha test, and so on can be controlled in addition to just the vertex and fragment processors. In HLSL (and Cg), you can package all these things along with vertex and fragment programs to create the notion of an “effect.” This allows you to apply an effect to any arbitrary set of geometry and textures. In addition, the .fx format confers several other advantages. It makes shaders easier to specify and exchange, allows multiple shader versions to be specified (for LOD, functionality, and performance reasons), and clearly specifies render and texture states. 5. Optimizing the Graphics Pipeline 5.1. Overview Over the past few years, the hardware-accelerated rendering pipeline has rapidly increased in complexity, bringing with it increasingly complex and potentially confusing performance characteristics. What used to be a relatively simple matter of reducing the CPU cycles of the inner loops in your renderer to improve performance, has now become a cycle of determining bottlenecks and systematically attacking them. This loop of Identification and Optimization is fundamental to tuning a heterogeneous multiprocessor system, with the driving idea being that a pipeline is, by definition, only as fast as its slowest stage. The logical conclusion is that, while premature and unfocused optimization in a single processor system can lead to only minimal performance gains, in a multi-processor system it very often leads to zero gains. Working hard on graphics optimization and seeing zero performance improvement is no fun. The goal of this article is to keep you from doing exactly that. 5.1.1 Pipeline Overview
Figure 11: The graphics pipeline
The pipeline, at the very highest level, can be broken into two parts: the CPU and GPU. While CPU optimization is a critical part of optimizing your application, it will not be the main focus of the article, as much of this optimization has little to do with the graphics pipeline. Figure 11 shows that within the GPU there are a number of functional units operating in parallel, which can essentially be viewed as separate special purpose processors, and a number of spots where a bottleneck can occur. These include vertex and index fetching, vertex shading (transform and lighting), fragment shading, and raster operations (ROP). 5.1.2. Methodology Optimization without proper bottleneck identification is the cause of much wasted development effort, and so we formalize the process into the following fundamental identification and optimization loop:
1. Identify the bottleneck - for each stage in the pipeline, either vary its workload, or vary its computational ability (clock speed). If performance varies, you’ve found a bottleneck.
2. Optimize - given the bottlenecked stage, reduce its workload until performance stops improving, or you achieve your desired level of performance.
3. Repeat steps 1 and 2 until the desired performance level is reached
5.2. Locating the Bottleneck
Figure 12: Locating the bottleneck
Locating the bottleneck is half the battle in optimization, as it enables you to make intelligent decisions on focusing your actual optimization efforts. Figure 12 shows a flow chart depicting the series of steps required to locate the precise bottleneck in your application. Note that we start at the back end of the pipeline, with the framebuffer operations (also called raster operations) and end at the CPU. Note also that, while any single primitive (usually a triangle), by definition, has a single bottleneck, over the course of a frame the bottleneck most likely changes, so modifying the workload on more than one stage in the pipeline often influences performance. For example, it’s often the case that a low polygon skybox is bound
Randy Fernando, Mark Harris, Matthias Wloka and Cyril Zeller / Programming Graphics Hardware
© The Eurographics Association 2004
9
by fragment shading or framebuffer access, while a skinned mesh that maps to only a few pixels on screen is bound by CPU or vertex processing. For this reason, it often helps to vary workloads on an object-by-object, or material-by-material, basis. For each pipeline stage, we also mention the GPU clock that it’s tied to (core or memory). This information is useful in conjunction with tools such as PowerStrip (http://www.entechtaiwan.com), which allows you to reduce the relevant clockspeed and observe performance changes in your application. 5.2.1. Raster Operations The very backend of the pipeline, often called the ROP, is responsible for reading / writing depth and stencil, doing the depth / stencil comparisons, reading / writing color, and doing alpha blending and testing. As you can see, much of the ROP workload taxes the available framebuffer bandwidth. The best way to test if your application is framebuffer bandwidth bound is to vary the bit depths of the color and / or depth buffers. If reducing your bit depth from 32-bit to 16-bit significantly improves your performance, then you are definitely framebuffer bandwidth bound. Framebuffer bandwidth is a function of GPU memory clock, so modifying memory clocks is another technique for helping to identify this bottleneck. 5.2.2. Texture Bandwidth Texture bandwidth gets consumed anytime a texture fetch request goes out to memory. Although modern GPUs have texture caches designed to minimize extraneous memory requests, they obviously still occur and consume a fair amount of memory bandwidth. Since modifying texture formats can be trickier than modifying framebuffer formats as we did when inspecting the ROP, we instead recommend changing the effective texture size by using a large amount of positive mipmap LOD bias. This has the effect of making texture fetches access very coarse levels of the mipmap pyramid, which effectively reduces the texture size. If this causes performance to improve significantly, you are bound by texture bandwidth. Texture bandwidth is also a function of GPU memory clock. 5.2.3. Fragment Shading Fragment shading refers to the actual cost of generating a fragment, with associated color and depth values. This is the cost of running the “pixel shader” or “fragment shader”. Note that fragment shading and framebuffer bandwidth are often lumped together under the heading “fillrate”, since they are both a function of screen resolution, but they are two distinct stages in the pipeline, and being able to tell the difference between the two is critical to effective optimization.
Before the advent of highly programmable fragment processing GPUs, it was fairly rare to be bound by fragment shading, it was often framebuffer bandwidth that caused the inevitable correlation between screen resolution and performance. This pendulum is now starting to swing towards fragment shading, however, as the new found flexibility enables developers to spend oodles of cycles making fancy pixels. The first step in determining if fragment shading is the bottleneck is to simply change the resolution. Since we’ve already ruled out framebuffer bandwidth by trying different framebuffer bitdepths, if changing resolution causes performance to change, the culprit is most likely fragment shading. A supplementary approach would be to modify the length of your fragment programs, and see if this influences performance, while being careful to not add instructions that can be easily optimized away by a clever device driver. Fragment shading speed is a function of the GPU core clock. 5.2.4. Vertex Processing The vertex transformation stage of the rendering pipeline is responsible for taking an input set of vertex attributes (e.g. model-space positions, vertex normals, texture coordinates, etc.) and producing a set of attributes suitable for clipping and rasterization (e.g. homogeneous clip-space position, vertex lighting results, texture coordinates, etc.). Naturally, performance in this stage is a function of the work done per-vertex, along with the number of vertices being processed. With programmable transformations, determining if vertex processing is your bottleneck is a simple matter of changing the length of your vertex program. If performance changes, you are vertex processing bound. If you’re adding instructions, be careful to add ones that actually do meaningful work, otherwise the instructions may be optimized away by the compiler or driver. For example, no-ops that refer to constant registers (such as adding a constant register which has a value of zero) often cannot be optimized away since the driver usually doesn’t know the value of constants at program compile time. If using fixed-function transformations, it’s a little bit trickier, try modifying the load by changing vertex work like specular lighting or texture coordinate generation state. Vertex processing is a function of the GPU core clock. 5.2.5. Vertex and Index Transfer Vertices and indices are fetched by the GPU as the first step in the GPU part of the pipeline. The performance of vertex and index fetching can vary depending on where the actual vertices and indices are placed, which is usually either system memory, which means they will be transferred to the GPU over a bus like AGP or PCI-Express, or local framebuffer memory. Often, on PC platforms especially, this
Randy Fernando, Mark Harris, Matthias Wloka and Cyril Zeller / Programming Graphics Hardware
© The Eurographics Association 2004
10
decision is left up to the device driver instead of the application, though modern graphics APIs allow applications to provide usage hints to help the driver choose the correct memory type. Determining if vertex or index fetching is a bottleneck in your application is a simple matter of modifying the vertex format size. Vertex and index fetching performance is a function of the AGP / PCI-Express rate if the data is placed in system memory, and a function of the memory clock if placed in local framebuffer memory. If none of these tests influence your performance significantly, you are primarily CPU bound. You may verify this fact by underclocking your CPU; if performance varies proportionally, you are CPU bound. 5.3. Optimization Now that we have identified the bottleneck, we must optimize that particular stage in order to improve application performance. The following tips are broken up depending on the offending stage. 5.3.1. CPU Optimizations Many applications are CPU-bound. This is sometimes due to good reason, such as complex physics or AI, and sometimes due to poor batching and resource management. If you’ve found that your application is CPU-bound, try the following suggestions to reduce CPU work in the rendering pipeline: Reduce Resource Locking Anytime you perform a synchronous operation which demands access to a GPU resource, there is the potential to massively stall the GPU pipeline, which costs both CPU and GPU cycles. CPU cycles are wasted because the CPU must sit and spin in a loop waiting for the (very deep) GPU pipeline to idle and return the requested resource. GPU cycles are then wasted as the pipeline sits idle and has to refill. This can occur anytime you: • Lock or read from a surface you were previously
rendering to. • Write to a surface the GPU is reading from, like a
texture or a vertex buffer. You should, in general, avoid accessing a resource the GPU is using during rendering. Maximize Batch Size This tip can alternately be phrased as minimizing the number of batches. We define a “batch” as a group of primitives rendered with a single API rendering call (for example, DrawIndexedPrimitive in DirectX 9). The “size” of a batch refers to the number of primitives contained in it. As a wise man once said, “Batch, Batch, Batch!” – Huddy, Richard. Personal communication; see also Wloka, Matthias. “Batch, Batch, Batch: What Does it Really Mean?.
http://developer.nvidia.com/docs/IO/8230/BatchBatchBatch.pdf –. Every API function call to draw geometry has an associated CPU cost, so maximizing the number of triangles submitted with every draw call will minimize the amount of CPU work used for a given number of triangles rendered. Some tips to maximize the sizes of your batches: • If using triangle strips, use degenerate
triangles to stitch together disjoint strips. This will enable you to send multiple strips, provided they share material, in a single draw call.
• Use texture pages. Batches are frequently broken when different objects use different textures. By arranging many textures into a single 2D texture and setting your texture coordinates appropriately, you can send geometry that uses multiple textures in a single draw call. Note that this technique can have issues with mipmapping and anti-aliasing. One technique that sidesteps many of these issues is to pack individual 2D textures into each face of a cubemap.
• Use GPU shader branching to increase batch size. Modern GPUs have flexible vertex and fragment processing pipelines that allow for branching inside the shader. For example, if two batches are separate because one requires a 4 bone skinning vertex shader, while the other requires a 2 bone skinning vertex shader, you could instead write a vertex shader that looped over the number of bones required, accumulating blending weights, and broke out of the loop when the weights summed to one. This way, the two batches could be combined into one. On architectures that don’t support shader branching, similar functionality can be implemented, at the cost of shader cycles, by using a 4 bone vertex shader on everything, and simply zeroing out the bone weights on vertices that have fewer than 4 bone influences.
• Use the vertex shader constant memory as a lookup table of matrices. Often batches get broken when many small objects share all material properties but differ only in matrix state (for example, a forest of similar trees, or a particle system). In these cases, you can load N of the differing matrices into the vertex shader constant memory and store indices into the constant memory in the vertex format for each object. Then you use this index to lookup into the constant memory in the vertex shader and use the correct transformation matrix, thus rendering N objects at once.
• Defer decisions as far down in the pipeline as possible. It’s faster to use the alpha channel of your texture as a gloss factor, rather than breaking the batch to set a pixel shader constant for glossiness. Similarly, putting shading data in your textures and vertices can allow for larger batch submissions.
5.3.2. Reducing the Cost of Vertex Transfer

Randy Fernando, Mark Harris, Matthias Wloka and Cyril Zeller / Programming Graphics Hardware
© The Eurographics Association 2004
11
Vertex transfer is rarely the bottleneck in an application, but it’s certainly not impossible. If the transfer of vertices or, less likely, indices, is the bottleneck in your application, try the following: • Use the fewest number of bytes possible in
your vertex format. Don’t use floats for everything if bytes would suffice (for colors, for example).
• Generate potentially derivable vertex attributes inside the vertex program instead of storing them inside of the input vertex format. For example, there’s often no need to store a tangent, binormal, and normal, since given any two, the third can be derived using a simple cross-product in the vertex program. This technique trades vertex processing speed for vertex transfer rate.
• Use 16-bit indices instead of 32-bit indices. 16-bit indices are cheaper to fetch, cheaper to move around, and take less memory.
• Access vertex data in a relatively sequential manner. Modern GPUs cache memory accesses when fetching vertices. As in any memory hierarchy, spatial locality of reference helps maximize hits in the cache, thus reducing bandwidth requirements.
5.3.3. Optimizing Vertex Processing Vertex processing is pretty rarely the bottleneck on modern GPUs, but it certainly may be, depending on your usage patterns and target hardware. Try these suggestions if you’re finding that vertex processing is the bottleneck in your application: • Optimize for the post-TnL vertex cache.
Modern GPUs have a small FIFO cache that stores the result of the most recently transformed vertices; a hit in this cache saves all transform and lighting work, along with all work earlier in the pipeline. To take advantage of this cache, you must use indexed primitives, and you must order your vertices to maximize locality of reference over the mesh. There are tools available, including D3DX and NVTriStrip (http://developer.nvidia.com/object/nvtristrip_library.html), to help you with this task.
• Reduce the number of vertices processed. This is rarely the fundamental issue, but using a simple level-of-detail scheme, like a set of static LODs, certainly helps reduce vertex processing load.
• Use vertex processing LOD. Along with using LODs for the number of vertices processed, try LODing the actual vertex computations themselves. For example, it is likely not necessary to do full 4-bone skinning on distant characters, and you can probably get away with cheaper approximations for the lighting. If your material is multi-passed, reducing the number of passes for lower LODs in the distance will also reduce vertex processing cost.
• Pull out per-object computations onto the CPU. Often, a calculation that changes once per-object or per-frame is done in the vertex shader for convenience. For example, transforming a directional light vector to eye space is sometimes done in the vertex shader, although the result of the computation only changes per-frame.
• Use the correct coordinate space. Frequently, your choice of coordinate space impacts the number of instructions required to compute a value in the vertex program. For example, when doing vertex lighting, if your vertex normals are stored in object space, and the light vector is stored in eye space, then you will have to transform one of the two vectors in the vertex shader. If the light vector was instead transformed into object space once per-object on the CPU, no per-vertex transformation would be necessary, saving GPU vertex instructions.
• Use vertex branching to “early-out” of computations. If looping over a number of lights in the vertex shader, and doing normal, low dynamic range [0..1] lighting, you can check for saturation to one, or if you’re facing away from the light, and break out of further computations. A similar optimization can occur with skinning, where you can break when your weights sum to 1 (and therefore all subsequent weights would be zero). Note that this depends on the way that the GPU implements vertex branching, and isn’t guaranteed to improve performance on all architectures.
5.3.4. Speeding Up Fragment Shading If you’re using long and complex fragment shaders, it is often likely that you’re fragment shading bound. If you find that to be the case, try these suggestions: • Render depth first. Rendering a depth-only (no
color) pass before rendering your primary shading passes can dramatically boost performance, especially in scenes with high depth complexity, by reducing the amount of fragment shading and framebuffer memory access that needs to be performed. To get the full benefits of a depth-only pass, it’s not sufficient to just disable color writes to the framebuffer, you should also disable all shading on fragments, even shading that affects depth as well as color (e.g. alpha-test).
• Help early-Z optimizations throw away fragment processing. Modern GPUs have silicon devoted to not shading fragments you can’t see, but these rely on knowledge of the scene up to the current point, and can be dramatically helped out by rendering in a roughly front-to-back order. Also, laying depth down first (see above) in a separate pass can help dramatically speed up subsequent passes (where all the expensive shading is done) by effectively reducing their shaded depth complexity to one.
Randy Fernando, Mark Harris, Matthias Wloka and Cyril Zeller / Programming Graphics Hardware
© The Eurographics Association 2004
12
• Store complex functions in textures. Textures can be enormously useful as lookup tables, with the additional benefit that their results are filtered for free. The canonical example here is a normalization cubemap, which allows you to normalize an arbitrary vector at high precision for the cost of a single texture lookup.
• Move per-fragment work to the vertex shader. Just as per-object work in the vertex shader should be moved to the CPU instead, per-vertex computations (along with computations that can be correctly linearly interpolated in screen-space) should be moved to the vertex shader. Common examples include computing vectors and transforming vectors between coordinate systems.
• Use the lowest precision necessary. APIs like DirectX 9 allow you to specify precision hints in fragment shader code for quantities or calculations that can work with reduced precision. Many GPUs can take advantage of these hints to reduce internal precision and improve performance.
• Avoid excessive normalization. A common mistake is to get overly normalization-happy and normalize every single vector every step of the way when performing a calculation. Recognize which transformations preserve length (like a transformation by an orthonormal basis) and which computations do not depend on vector length (such as a cubemap lookup).
• Consider using fragment shader level-of-detail. While not as high a bang for the buck as vertex LOD (simply because objects in the distance naturally LOD themselves with respect to pixel processing due to perspective), reducing the complexity of the shaders in the distance, along with reducing the number of passes over a surface, can reduce the fragment processing workload.
• Disable trilinear filtering where unnecessary. Trilinear filtering, even when not consuming extra texture bandwidth, costs extra cycles to compute in the fragment shader on most modern GPU architectures. On textures where miplevel transitions are not readily discernable, turn trilinear filtering off to save fillrate.
5.3.5. Reducing Texture Bandwidth If you’ve found that you’re memory bandwidth bound, but mostly when fetching from textures, consider these optimizations: • Reduce the size of your textures. Consider
your target resolution and texture coordinates. Do your users ever get to see your highest miplevel? If not, consider scaling back the size of your textures. This can be especially helpful if overloaded framebuffer memory has forced texturing to occur from non-local memory (like system memory, over the AGP or PCI-Express bus). The tool NVPerfHUD can help diagnose
this problem, as it shows the amount of memory allocated by the driver in various heaps.
• Compress all color textures. All textures that are used just as decals or detail textures should be compressed, using one of DXT1, DXT3, or DXT5, depending on the specific texture’s alpha needs. This will reduce memory usage, reduce texture bandwidth requirements, and improve texture cache efficiency.
• Avoid expensive texture formats if not necessary. Large texture formats, like 64-bit or 128-bit floating point formats, obviously cost much more bandwidth to fetch from. Only use these as necessary.
• Always use mipmapping on any surface that may be minified. In addition to improving quality by reducing texture aliasing, mipmapping improves texture cache utilization by localizing texture memory access patterns for minified textures. If you find that mipmapping on certain surfaces makes them look blurry, avoid the temptation to disable mipmapping or add a large negative LOD bias. Prefer anisotropic filtering instead.
5.3.6. Optimizing Framebuffer Bandwidth The final stage in the pipeline, the ROP, interfaces directly with the framebuffer memory and is the single largest consumer of framebuffer bandwidth. For this reason, if bandwidth is an issue in your application, it can often be traced to the ROP. Here’s how to optimize for framebuffer bandwidth: • Render depth first. Not only does this reduce
fragment shading cost (see above), it also reduces framebuffer bandwidth cost.
• Reduce alpha blending. Note that alpha blending, with a destination blending factor set to anything other than ZERO, requires both a read and a write to the framebuffer, thus potentially consuming double the bandwidth. Reduce alpha blending to only those situations that require it, and be wary of high levels of alpha blended depth complexity.
• Turn off depth writes when possible. Writing depth is an additional consumer of bandwidth, and should be disabled in multi-pass rendering (where the final depth is already in the depth buffer), when rendering alpha blended effects, such as particles, and when rendering objects into shadow maps (in fact, for rendering into color-based shadow maps, you can turn off depth reads as well).
• Avoid extraneous color buffer clears. If every pixel is guaranteed to be overwritten in the framebuffer by your application, then clearing color should be avoided as it costs precious bandwidth. Note, however, that you should clear the depth and stencil buffers whenever you can, as many early-Z optimizations rely on the deterministic contents of a cleared depth buffer.

Randy Fernando, Mark Harris, Matthias Wloka and Cyril Zeller / Programming Graphics Hardware
© The Eurographics Association 2004
13
• Render front-to-back. In addition to the fragment shading advantages to rendering front-to-back mentioned above, there are also similar benefits in the area of framebuffer bandwidth, as early-Z hardware optimizations can discard extraneous framebuffer reads and writes. In fact, even older hardware without these optimizations will benefit from this, as more fragments will fail the depth-test, resulting in fewer color and depth writes to the framebuffer.
• Optimize skybox rendering. Skyboxes are often framebuffer bandwidth bound, but there is a decision to be made in how to optimize them. You can either render them last, reading (but not writing) depth, and allow the early-Z optimizations along with regular depth buffering to save bandwidth, or render the skybox first, and disable all depth reads and writes. Which of these will save you more bandwidth is a function of the target hardware and how much of the skybox is visible in the final frame; if a large portion of the skybox is obscured, the former technique will likely be better, otherwise the latter may save more bandwidth.
• Only use floating point framebuffers when necessary. These obviously consume much more bandwidth than smaller integer formats. The same applies for multiple render targets.
• Use a 16-bit depth buffer when possible. Depth transactions are a huge consumer of bandwidth, so using 16-bit instead of 32-bit can be a huge win and is often enough for small-scale indoor scenes that don’t require stencil. It is also often enough for render-to-texture effects that require depth, such as dynamic cubemaps.
• Use 16-bit color when possible. This is especially applicable to render-to-texture effects, as many of these, such as dynamic cubemaps and projected color shadow maps, work just fine in 16-bit color.
5.4. Conclusion As power and programmability increase in modern GPUs, so does the complexity of extracting every bit of performance out of the machine. Whether your goal is to improve the performance of a slow application, or look for areas where you can improve image quality “for free”, a deep understanding of the inner workings of the graphics pipeline is required. As the GPU pipeline continues to evolve in the coming years, the fundamental ideas of optimization will still apply: first identify the bottleneck, by varying the load or computational power of each of the units; then systematically attack those bottlenecks with an understanding of the behavior of the various units in the pipeline.
6. Advanced Rendering Techniques This presentation showcases the effects that current graphics processors are capable of rendering in real-time. For example, NVIDIA’s latest demos include Nalu, the mermaid (figure 13), featuring life-like hair and iridescent scales that smoothly transition into skin. The presentation describes how to achieve these and other effects in detail. Along the way, we highlight the latest features available on current graphics hardware, and how to best take advantage of them.
Figure 13: Nalu
7. General-Purpose Computation on GPUs The graphics processor (GPU) on today's video cards has evolved into an extremely powerful and flexible processor. The latest graphics architectures provide tremendous memory bandwidth and computational horsepower, with fully programmable vertex and pixel processing units that support vector operations up to full IEEE floating point precision. High level languages have emerged for graphics hardware, making this computational power accessible. Architecturally, GPUs are highly parallel streaming processors optimized for vector operations, with both MIMD (vertex) and SIMD (pixel) pipelines. Not surprisingly, these processors are capable of general-purpose computation beyond the graphics applications for which they were designed. Researchers have found that exploiting the GPU can accelerate some problems by over an order of magnitude over the CPU. These notes are adapted from (Harris, 2003a). 7.1. Why use Graphics Hardware for General-Purpose Computation? GPUs are designed to be efficient coprocessors for rendering and shading. The programmability now available in GPUs such as the NVIDIA GeForce 6 Series makes them useful coprocessors for more

Randy Fernando, Mark Harris, Matthias Wloka and Cyril Zeller / Programming Graphics Hardware
© The Eurographics Association 2004
14
diverse applications. Because the time between new generations of GPUs is currently much less than for CPUs, faster coprocessors are available more often than faster central processors. GPU performance tracks rapid improvements in semiconductor technology more closely than CPU performance. This is because CPUs are designed for low latency computations, while GPUs are optimized for high throughput of vertices and fragments. Low latency on memory-intensive applications typically requires large caches, which use a lot of silicon area. Additional transistors are used to greater effect in GPU architectures because they are applied to additional processors and functional units that increase throughput. In addition, programmable GPUs are inexpensive, readily available, easily upgradeable, and compatible with multiple operating systems and hardware architectures. 7.2. A Brief History of GPGPU The use of computer graphics hardware for general-purpose computation has been an area of active research for many years, beginning on machines like the Ikonas (England, 1978), the Pixel Machine (Potmesil and Hoffert, 1989), and Pixel-Planes 5 (Rhoades et al., 1992). The wide deployment of GPUs in the last several years has resulted in an increase in experimental research with graphics hardware. Trendall and Steward gave a detailed summary of the types of computation available on GPUs circa 2000 (Trendall and Steward, 2000). Within the realm of graphics applications, programmable graphics hardware has been used for procedural texturing and shading (Rhoades et al., 1992; Olano and Lastra, 1998; Peercy et al., 2000; Proudfoot et al., 2001). Graphics hardware has also been used for volume visualization (Cabral et al., 1994; Wilson et al., 1994; Kniss et al., 2002). Recently, new methods have been developed for using current GPUs for global illumination, including ray tracing (Carr et al., 2002; Purcell et al., 2002), photon mapping (Purcell et al., 2003), and radiosity (Carr et al., 2003; Coombe et al., 2004). Other researchers have found ways to use graphics hardware for non-graphics applications. The use of rasterization hardware for robot motion planning was described in (Lengyel et al., 1990). Hoff et al. (1999) described the use of z-buffer techniques for the computation of Voronoi diagrams. The PixelFlow SIMD graphics computer (Eyles et al., 1997) was used to crack UNIX password encryption (Kedem and Ishihara, 1999), and graphics hardware has been used in the computation of artificial neural networks (Bohn, 1998). Harris et al. (2002) used a Coupled Map Lattice (CML) to simulate dynamic phenomena that can be described by partial differential equations. Related to this is the visualization of flows described by PDEs, which has been implemented using graphics hardware to accelerate line integral convolution and Lagrangian-Eulerian advection (Heidrich et al., 1999; Jobard et al.,
2001; Weiskopf et al., 2001). James (2001) has demonstrated the “Game of Life” cellular automata and a 2D physically-based water simulation running on NVIDIA GPUs. More recently, Kim and Lin used GPUs to simulate dendritic ice crystal growth (Kim and Lin, 2003), and Li et al. used them to perform Lattice Boltzmann simulation of fluid flow (Li et al., 2003). Research on general-purpose uses of GPUs has seen a minor boom recently. Strzodka showed how to combine multiple 8-bit texture channels to create virtual 16-bit precise operations (Strzodka, 2002). Level set segmentation of images and volume data on GPUs has been demonstrated by (Strzodka and Rumpf, 2001; Lefohn and Whitaker, 2002; Lefohn et al., 2003). Other recent GPGPU research includes image-based modeling (Yang et al., 2002; Hillesland et al., 2003), collision detection (Hoff et al., 2001; Govindaraju et al., 2003), and computational geometry (Mustafa et al., 2001; Krishnan et al., 2002; Guha et al., 2003; Stewart et al., 2003). Researchers have recently embraced the power of the GPU for performing matrix computations. Larsen and McAllister used texturing operations to perform large matrix-matrix multiplies (Larsen and McAllister, 2001). This work was mostly a proof-of-concept application, because they used GPUs without support for floating point textures. Thompson, et al. used the programmable vertex processor of an NVIDIA GeForce 3 GPU to solve the 3-Satisfiability problem and to perform matrix multiplication (Thompson et al., 2002). Fatahalian et al. (2004) have done detailed analysis of matrix multiplication on the GPU and found that due to cache bandwidth limitations, GPUs are not yet as efficient for these computations as CPUs. Others have used the GPU to solve sparse linear systems, using techniques such as Red-Black Jacobi iteration, Conjugate Gradient and multigrid methods (Bolz et al., 2003; Goodnight et al., 2003; Harris et al., 2003; Krüger and Westermann, 2003). These four papers also all demonstrate fluid simulation on the GPU. This wide variety of applications demonstrates that the GPU has become an extremely powerful computational workhorse. It is especially adept at SIMD computation applied to grid or matrix data. As GPGPU research has boomed, many more applications have appeared. For an up-to-date source of information on the topic, visit http://www.gpgpu.org on the World Wide Web. 7.3. CPU–GPU Analogies Fundamental to any computer are its memory and processing models, so any application must consider data representation and computation. Here, we’ll touch on the differences between CPUs and GPUs with regard to both of these, and draw analogies between them to aid in understanding GPGPU concepts.

Randy Fernando, Mark Harris, Matthias Wloka and Cyril Zeller / Programming Graphics Hardware
© The Eurographics Association 2004
15
7.3.1 Textures = Arrays or Data Streams GPGPU computations typically represent data in textures. These textures can be thought of as arrays. Textures are especially well-suited to physically-based simulations and other computations in which data are represented on two- or three-dimensional grids. The natural representation for this grid on the CPU is an array. The analog of an array on the GPU is a texture. Although textures are not as flexible as arrays, their flexibility is improving as graphics hardware evolves. Textures on current GPUs support all the basic operations necessary to implement a fluid dynamics simulation, for example. Because textures usually have three or four color channels, they provide a natural data structure for vector data types with two to four components. Alternatively, multiple scalar fields can be stored in a single texture. The most basic operation is an array (or memory) read, which is accomplished by using a texture lookup. Thus, the GPU analog of an array offset is a texture coordinate. An alternative view is that of stream processing, in which data are not represented in arrays, but in data streams. These streams are processed by applying simple programs, or kernels, to each element of the stream in an identical manner. This is the approach taken by the Brook programming language (Buck et al., 2004), and it appears to be a good fit for modern GPUs. 7.3.2 Fragment Programs = Loop Bodies or Kernels Imagine simulating a dynamic phenomenon, such as fluid dynamics, on a two-dimensional grid. A CPU implementation of the simulation performs steps in the algorithm by looping, using a pair of nested loops to iterate over each cell in the grid. At each cell, the same computation is performed. GPUs do not have the capability to perform this inner loop over each texel in a texture. However, the fragment pipeline is designed to perform identical computations at each fragment. Conceptually, it is as if there is a processor for each fragment, and that all fragments are updated simultaneously. Thus, the GPU analog of computation inside nested loops over an array is a fragment program (or pixel shader) applied in data-parallel fashion to each fragment. In stream processing, such as used by the Brook programming language, this data-parallel computation is a kernel. 7.3.3 Feedback = Texture Update Certain numerical computations, such as linear equation solvers, use iterative techniques in which the result of an iteration is used as input for the next iteration. This feedback is common in numerical methods. In a CPU implementation, one typically does not even consider feedback, because it is trivially implemented using variables and arrays that can be both read and written. On the GPU, though, the output of fragment processors is always written to the frame
buffer. Think of the frame buffer as a two-dimensional array that cannot be directly read. There are two ways to get the contents of the frame buffer into a texture that can be read:
1. Copy to texture (CTT) copies from the frame buffer to a texture.
2. Render to texture (RTT) uses a texture as the frame buffer so the GPU can write directly to it.
These three concepts – data storage in textures processed by fragment programs and returned to texture storage via CTT or RTT – are the basis for most general-purpose GPU applications. 7.4. Conclusion These notes have given a brief overview of GPGPU concepts and the history of GPGPU. The course itself will provide examples of these concepts, including fluid dynamics simulation, chemical reaction-diffusion simulation, and more. For news, examples, utilities, and source code, please visit http://www.gpgpu.org on the World Wide Web. 7.5. References Bohn, C.-A. (1998). Kohonen feature mapping through graphics hardware. In Proceedings of the 3rd Int. Conference on Computational Intelligence and Neurosciences.
Bolz, J., Farmer, I., Grinspun, E., and Schr¨oder, P. (2003). Sparse matrix solvers on the GPU: Conjugate gradients and multigrid. In Proceedings of SIGGRAPH 2003, pages 917–924.
Buck, I., Foley, T., Horn, D., Sugerman, J., Fatahalian, K., Houston, M., and Hanrahan, P. Brook for GPUs: Stream Computing on Graphics Hardware. In Proceedings of SIGGRAPH 2004.
Cabral, B., Cam, N., and Foran, J. (1994). Accelerated volume rendering and tomographic reconstruction using texture mapping hardware. In Proceedings of the 1994 Symposium on Volume Visualization, pages 91–98.
Carr, N. A., Hall, J. D., and Hart, J. C. (2002). The ray engine. In Proceedings of the ACM SIGGRAPH/EUROGRAPHICS conference on Graphics hardware, pages 37–46.
Carr, N. A., Hall, J. D., and Hart, J. C. (2003). GPU algorithms for radiosity and subsurface scattering. In Proceedings of the ACM SIGGRAPH/EUROGRAPHICS conference on Graphics hardware, pages 51–59.
Coombe, G., Harris, M. J., and Lastra, A. (2004). Radiosity on graphics hardware. In Proceedings of Graphics Interface 2004.
England, J. N. (1978). A system for interactive modeling of physical curved surface objects. In Proceedings of SIGGRAPH 1978, pages 336–340.

Randy Fernando, Mark Harris, Matthias Wloka and Cyril Zeller / Programming Graphics Hardware
© The Eurographics Association 2004
16
Eyles, J., Molnar, S., Poulton, J., Greer, T., and Lastra, A. (1997). Pixelflow: The realization. In Proceedings of the ACM SIGGRAPH/EUROGRAPHICS workshop on Graphics hardware, pages 57–68.
Fatahalian, K., Sugerman, J., and Hanrahan, P. (2004). Understanding the Efficiency of GPU Algorithms for Matrix-Matrix Multiplication. In Proceedings of the ACM SIGGRAPH / EUROGRAPHICS conference on Graphics Hardware.
Goodnight, N., Woolley, C., Lewin, G., Luebke, D., and Humphreys, G. (2003). A multigrid solver for boundary value problems using graphics hardware. In Proceedings of the ACM SIGGRAPH/EUROGRAPHICS conference on graphics hardware, pages 102–111.
Govindaraju, N., Redon, S., Lin, M. C., and Manocha, D. (2003). Cullide: Interactive collision detection between complex models in large environments using graphics hardware. In Proceedings of the ACM SIGGRAPH/EUROGRAPHICS conference on graphics hardware, pages 25–32.
Guha, S., Krishnan, S., Munagala, K., and Venkatasubramanian, S. (2003). Application of the two-sided depth test to CSG rendering. In Proceedings of the 2003 symposium on Interactive 3D graphics, pages 177–180.
Harris, M.J. (2003a). Real-Time Cloud Simulation and Rendering. Ph.D. Dissertation. University of North Carolina Technical Report #TR03-040.
Harris, M. J., Baxter, W. V., Scheuermann, T., and Lastra, A. (2003b). Simulation of cloud dynamics on graphics hardware. In Proceedings of the ACM SIGGRAPH / EUROGRAPHICS conference on Graphics hardware, pages 92–101.
Harris, M. J., Coombe, G., Scheuermann, T., and Lastra, A. (2002). Physically-based visual simulation on graphics hardware. In Proceedings of the ACM SIGGRAPH / EUROGRAPHICS conference on Graphics hardware, pages 109–118.
Heidrich, W., Westermann, R., Seidel, H.-P., and Ertl, T. (1999). Applications of pixel textures in visualization and realistic image synthesis. In Proceedings of the 1999 symposium on Interactive 3D graphics, pages 127–134.
Hillesland, K., Molinov, S., and Grzeszczuk, R. (2003). Nonlinear optimization framework for image-based modeling on programmable graphics hardware. In Proceedings of SIGGRAPH 2003, pages 925–934.
Hoff, K. E., Culver, T., Keyser, J., Lin, M., and Manocha, D. (1999). Fast computation of generalized voronoi diagrams using graphics hardware. In Proceedings of SIGGRAPH 1999, pages 277–286.
Hoff, K. E., Zaferakis, A., Lin, M., and Manocha, D. (2001). Fast and simple 2D geometric proximity queries using graphics hardware. In Proceedings of the
2001 Symposium on Interactive 3D Graphics, pages 145–148.
James, G. (2001). Operations for hardware-accelerated procedural texture animation. In Deloura, M., editor, Game Programming Gems 2, pages 497–509. Charles River Media.
Jobard, B., Erlebacher, G., and Hussaini, M. Y. (2001). Lagrangian-eulerian advection for unsteady flow visualization. In Proceedings of IEEE Visualization 2001.
Kedem, G. and Ishihara, Y. (1999). Brute force attack on UNIX passwords with SIMD computer. In Proceedings of The 8th USENIX Security Symposium.
Kim, T. and Lin, M. C. (2003). Visual simulation of ice crystal growth. In Proceedings of the 2003 ACM SIGGRAPH / Eurographics Symposium on Computer Animation, pages 86–97.
Kniss, J., Premoˇze, S., Hansen, C., and Ebert, D. S. (2002). Interactive translucent volume rendering and procedural modeling. In Proceedings of IEEE Visualization 2002, pages 109–116.
Krishnan, S., Mustafa, N. H., and Venkatasubramanian, S. (2002). Hardware-assisted computation of depth contours. In Proceedings of the thirteenth annual ACM-SIAM symposium on Discrete algorithms.
Krüger, J. and Westermann, R. (2003). Linear algebra operators for GPU implementation of numerical algorithms. In Proceedings of SIGGRAPH 2003.
Larsen, E. S. and McAllister, D. K. (2001). Fast matrix multiplies using graphics hardware. In Proceedings of the 2001 ACM/IEEE conference on Supercomputing (CDROM).
Lefohn, A. E., Kniss, J., Hansen, C., and Whitaker, R. T. (2003). Interactive deformation and visualization of level set surfaces using graphics hardware. In Proceedings of IEEE Visualization 2003.
Lefohn, A. E. and Whitaker, R. T. (2002). A GPU-based, three-dimensional level set solver with curvature flow. Technical Report UUCS-02-017, University of Utah.
Lengyel, J., Reichert, M., Donald, B. R., and Greenberg, D. P. (1990). Real-time robot motion planning using rasterizing computer graphics hardware. In Proceedings of SIGGRAPH 1990, pages 327–335.
Li, W., Wei, X., and Kaufman, A. (2003). Implementing Lattice Boltzmann computation on graphics hardware. Technical Report 010416, State University of New York at Stony Brook.
Mustafa, N. H., Koutsofios, E., Krishnan, S., and Venkatasubramanian, S. (2001). Hardware assisted view dependent map simplification. In Proceedings of the 17th Annual Symposium on Computational Geometry.

Randy Fernando, Mark Harris, Matthias Wloka and Cyril Zeller / Programming Graphics Hardware
© The Eurographics Association 2004
17
Olano, M. and Lastra, A. (1998). A shading language on graphics hardware: The pixelflow shading system. In Proceedings of SIGGRAPH 1998, pages 159–168.
Peercy, M. S., Olano, M., Airey, J., and Ungar, P. J. (2000). Interactive multi-pass programmable shading. In Proceedings of SIGGRAPH 2000, pages 425–432.
Potmesil, M. and Hoffert, E. M. (1989). The pixel machine: A parallel image computer. In Proceedings of SIGGRAPH 1989, pages 69–78.
Proudfoot, K., Mark, W. R., Tzvetkov, S., and Hanrahan, P. (2001). A real-time procedural shading system for programmable graphics hardware. In Proceedings of SIGGRAPH 2001, pages 159–170.
Purcell, T. J., Buck, I., Mark, W. R., and Hanrahan, P. (2002). Ray tracing on programmable graphics hardware. In Proceedings of SIGGRAPH 2002, pages 703–712.
Purcell, T. J., Donner, C., Cammarano, M., Jensen, H. W., and Hanrahan, P. (2003). Photon mapping on programmable graphics hardware. In Proceedings of the ACM SIGGRAPH/EUROGRAPHICS conference on Graphics hardware, pages 41–50.
Rhoades, J., Turk, G., Bell, A., State, A., Neumann, U., and Varshney, A. (1992). Real-time procedural textures. In Proceedings of the 1992 Symposium on Interactive 3D Graphics, pages 95–100.
Stewart, N., Leach, G., and John, S. (2003). Improved CSG rendering using overlap graph subtraction sequences. In Proceedings of the International Conference on Computer Graphics and Interactive Techniques in Australasia and South East Asia (GRAPHITE 2003), pages 47–53.
Strzodka, R. (2002). Virtual 16 bit precise operations on RGBA8 textures. In Proceedings of Vision, Modeling, and Visualization.
Strzodka, R. and Rumpf, M. (2001). Level set segmentation in graphics hardware. In Proceedings of the International Conference on Image Processing.
Thompson, C. J., Hahn, S., and Oskin, M. (2002). Using modern graphics architectures for general-purpose computing: A framework and analysis. In Proceedings of the International Symposium on Microarchitecture (IEEE MICRO), pages 306–320.
Trendall, C. and Steward, A. J. (2000). General calculations using graphics hardware, with applications to interactive caustics. In Proceedings of the Eurographics Workshop on Rendering, pages 287–298.
Weiskopf, D., Hopf, M., and Ertl, T. (2001). Hardware-accelerated visualization of time-varying 2D and 3D vector fields by texture advection via programmable per-pixel operations. In Proceedings of Vision, Modeling, and Visualization, pages 439–446.
Wilson, O., Van Gelder, A., and Wilhelms, J. (1994). Direct volume rendering via 3D textures. Technical Report UCSC-CRL-94-19, University of California at Santa Cruz.
Yang, R., Welch, G., and Bishop, G. (2002). Real-time consensus-based scene reconstruction using commodity graphics hardware. In Proceedings of Pacific Graphics 2002.