1. download vpn software
TRANSCRIPT

1. Download VPN Software If you haven't enrolled in the university's 2-Factor Authentication (2FA), visit https://identity.uillinois.edu and follow the steps. You will need to be enrolled to connect to the VPN.
1. To download UIC’s AnyConnect VPN software, navigate your browser to https://go.uic.edu/getVPN, add the offering to your cart, and checkout (note: there is no charge for this software).
2. On the resulting order confirmation page, select to download the AnyConnect client for MacOS. Save the file at an easily findable location, such as your desktop or downloads folder.
2. Install the VPN Software 1. Install the software with the steps below.
a. Find the downloaded file on your computer (typically in your Downloads folder). b. Double click anyconnect-macos-XXXXXX.dmg. It will open a standard MacOS
installer. Click AnyConnect.pkg.

c. At the Introduction, click Continue.
d. Accept the License Agreement and click Continue and then Agree.

e. At the Installation type screen, click Install.
f. You will be prompted to allow the application to install - you must have
administrator rights on your computer to allow this to proceed. Click Install Software to finish installing the software.
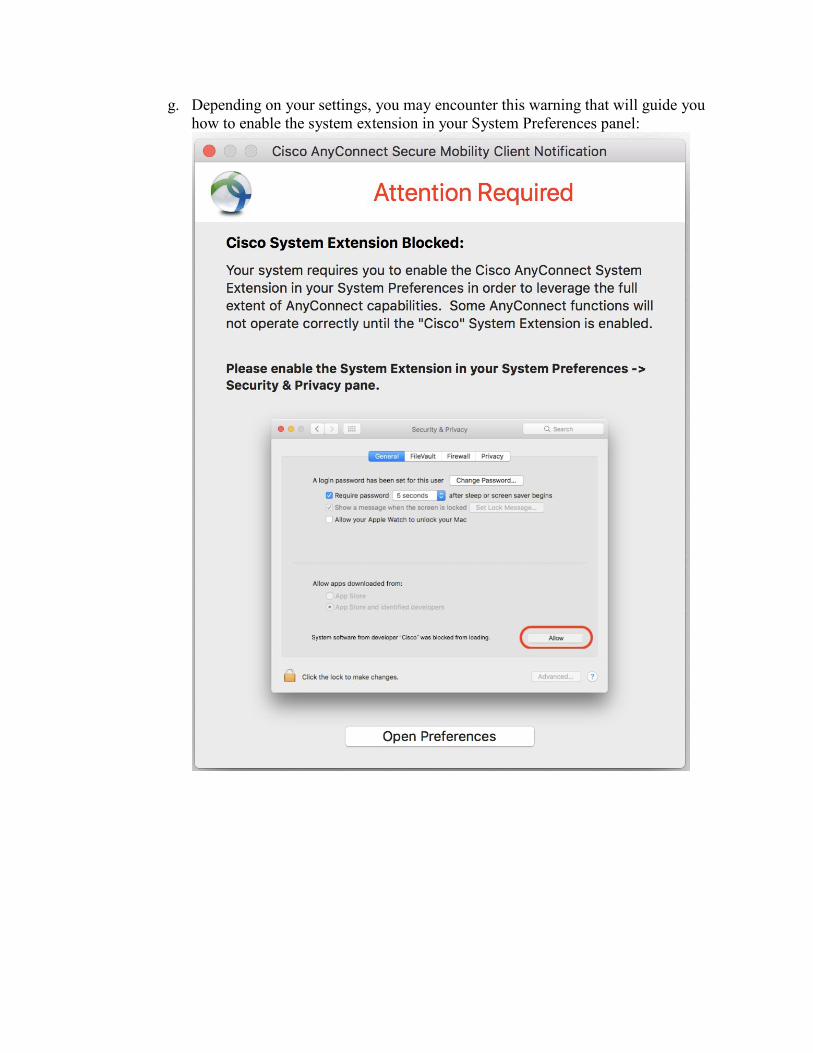
g. Depending on your settings, you may encounter this warning that will guide you how to enable the system extension in your System Preferences panel:

h. After the warning prompt, this error will appear. Click on Open Security Preferences.
i. Click Allow.

j. You will receive confirmation that the extension was enabled. Click Dismiss.
3. Run the VPN software 1. Once installed, find the Cisco AnyConnect application from one of two areas:
a. In your Launchpad:
b. In the Application folder, find the Cisco folder, then click AnyConnect Secure
Mobility Client.
2. This will launch the AnyConnect Secure Mobility Client.
1. Type vpn.uic.edu into the space provided. 2. Click Connect.

3. You will need to enter your credentials to connect to the VPN. The application will remember your Group and Username. Next time you use the VPN, you will only need to re-enter your UIC common password and the 2FA method of your choice.
. The Group will be pre-selected as General-Use, but you may want to change this (you will need to change the group in order to access Library resources). Review What group should I use for AnyConnect VPN? .
a. In the Username field type your UIC NetID b. In the Password field type your UIC common password. c. In the Second Password field, what you enter will depend on the 2FA method
you want to use. Follow the instructions below for the method of your choice: Type push if you have the Duo App installed in your smart phone, then
click OK. Your phone will prompt you to authorize the login request via the Duo app. Approve the login request to proceed. For more information about the Duo mobile app, see 2FA - Installing the Duo Mobile app.

Or type phone if you want to receive a phone call to your registered phone number, then click OK. Answer the call and follow the instructions given.
Or type sms if you want to get a code via text message to your registered mobile device, then click OK. Your login attempt will ‘fail’ and you will be prompted to login to AnyConnect again. This time, re-enter your common password, and in the Second Password field enter the 6-digit code received via the text message. Note: the passcode expires after 5 minutes.
If the above methods do not work for you, or you prefer not to use them, you can also directly enter the 6-digit code generated by your Duo mobile app or your registered OTP C100 physical token.
To use the Yubikey model physical tokens, click within the Second Password field, and press the button on the Yubikey device. This will enter a long set of characters, and you can then click OK to log in.

4. The AnyConnect Secure Mobility Client will appear again, confirming your connection.

UIC School of Public Health
4. Connect to Remote Desktop
AnyConnect – Mac OS
Once you have the vpn AnyConnect connection you can securely connect to your remote desktop or view/access the files on the SPH file server.
Install “Microsoft Remote Desktop 10”
• Go to https://itunes.apple.com/us/app/microsoft-remote- desktop/id1295203466?mt=12 and click “View in Mac App Store”.
• Select Install, you may or not get a prompt to enter your Apple ID account password.
Access Your Remote Desktop
• Once installed, select Open or go to your applications folder and select “MicrosoftRemote Desktop,” then click Add Desktop.

UIC School of Public Health
AnyConnect – Mac OS
• Type in your PC Name and click save (example SPH-DO-1119D1.ad.uic.edu).
Note: To find your office computer name (on PC), right-click (Start) button and select System. In the pop-up menu under Device specifications, you will see your device name (SPH-DO-1119D1).
• Once saved, right-click on the icon and select Connect. Type in your netid andpassword then click “Done” and “Continue” to connect to your pc.
4. View Network Files
Connect Network Drives Remotely
• After connecting to AnyConnect vpn, go to Finder.
• Click Go, and then select “Connect to Server”.

UIC School of Public Health
• In the server address bar, type the following:• smb://sph-fileserver.ad.uic.edu
• Click Connect, and then enter your NetID and password.
• Choose the volume you want to access, explanation below:
• Public - Open to all of SPH and used for sharing between departments.• Research - used for all SPH Research projects• Units - Open to each department (CHS has access to CHS folder, etc).• Users - Open to the individual user.
AnyConnect – Mac OS
All folders are accessible to SPH IT Admin for backup purposes. If you need access to a folder, or need to setup folder sharing, please contact [email protected].