01e61 legend 6 lingue - mr.cappuccino · leggere attentamente le avvertenze contenute nel presente...
TRANSCRIPT

������������������ �����������
����������������������������������������������� ������!���"������#��������� ���$���
"��� ��%%&����� '��#��� ��'��#��� !��� $�� #������ ���� ���$���� "��� ��%%&�#"��##�� �(������������� ��#������� #������� �� "�)� ����*���"�����"���������������� ������+����� ���$�����$������#�������&� ��� ������ ��� �%%���!�� ���� "��%����� #����#�� ��� �%%�����*�� �%��*�������,� �� �������������#"�#�*���������������#��� �����"�����!�����-#�����**�������������� �����-�.�����#���������������������"��������� "������������������'��#����/����������#���*�����"����(�#����#���������#����������������!���"�����������%����*������ ������������� ���$���+���#�������$��#�� ��������!�������������,�"���� �����!��������� ��/�����������
01�21��"1
3������#�� ���4���������������5��$�6���%���6������5�0�� ��
4��$��$�#�"���$�#��6��7����$�#�������"���������� ��$����/����� �%���� �$�� �#�� ��������� "�����"��#� �%� ��������$�����6�� �� ������ 5$��$� ����#� 6��� ���� ���6� �� "��%���#6��$�#�#� �%� � �%%������6� ���� %����������6�� /��� "��#� ��#�� ��6������#"�#�������6�$����6�������� %����������5��8����9$���������5�������6����%�#"���������/����%� 6���� �� �� �����������$�#� �������� �#�%�� �������#�����%�$��"����6���������$�����������8��5�������%� 6������5� ��$����4�7���#�����%�%�������6����%��$��#� ���������4��$�����/�#��5�#$�#��%� �������5��8�
01�21��"1
��$�����$�����:�����4��� ������������ �$���� *��� �$���� ������2�#�$���
���� $��##��� #��� ��� ��#��� � :�����8���#� 5���8� ���� 2�����#� ����;��$�/������������2�#�$������#��5;$�����������$���� ���*���� ���$��#�$��� � ���5��8������� ��%� ���#� � ��8�����/���� 5����<� ����� 2�#�$���� � ���� �$�� ��#� ���� "��%�8���6��$�#�� *5�#�$��� !��#����#%;$��8���� � ���� 0��8��������;���/�����<��; ���$�������5�##$����������/�����/#��$���#��#�����1�%��/��� ��5��$#���#����;�� � *�� � /�#��*���4���� "%�$�����$�������#�#�=���/��$�*� ������� ��5�##������##� ���� �� ��� �$��� :������##�� >/��� �$��� ����� 2�#�$���������%��� 8?�����4��� ���/���/��� ��� ��#�����/�#����4>�#�$��� %>����������#1�/������ ����$�� ����������;��
01�21��"1
�$����������@��#����#� � %A�������#�"���� �7��'��#��������������
���������0�� ��1����������$�������#����*��$��#������ ��$����,���%A� ����������#�������#�������#�"�����"�#���#�"��#������A#����������$��'���7��B����7$�������� ��$����'������#��%%�������"��%�����#6��$&#��7�%%������A�������%�����������������'��� ���C���������#"�#���������������������#����*�/�#����"�����/���������/�����������!�����#����'������#����#�������#�������#���������"������������� "#�,���������������������/���$��������������A#���'�����#�����#�������#�������,���������������/�����������##���������������������� ��$����@��#�#� �#��������#�'������#�#���*���� C �����#��1�����#� �������#�#��$���#����/������������
01�21��"1
�D E�����$������D F�����$���0������� ���#�����#��"����#��������0�� ��
�� ����#�����'��#�GH����#���$���� �� I'������"������%A������������������#���J���#��������#� ��#�����G���#�"�����"��#����A������ ��������� �� I'�����'����#�I��H���#� ������ �����GK�#�����$���%�������� ��#����#��"��%���������%���C������ %��������������� �#� "K�� ,� � #��� ��#"�#�GH�� � ����#� �#��#��� ����#�"��������$����-#������G��������/��$��� ��$��-�L����#��$�������������� �"���������� "��,�����������#��������������#���� ������GH����#��������#�B��������B��������� ��%� ������������� ���#�������� I'����+���#�B��'����#�� �#�����#�"�����$��I�"���� �����3�#�B� �#�$��/� ����/��$��
01�21��"1
�D E�����$������D F�����$���0������� ���#�����#��"����#�������� I'������"���
��%A��� ����#�����'��#�GH����#���$���� �� I'������"������%A������������������#���J���#��������#� ��#�����G���#�"�����"��#����A������ ��������� �� I'�����'����#�I��H���#� ������ �����GK�#�����$���%�������� ��#����#��"��%���������%���C������ %��������������� �#� "K�� ,� � #��� ��#"�#�GH�� � ����#� �#��#��� ����#�"��������$����-#������G��������/��$��� ��$��-�L����#��$�������������� �"���������� "��,�����������#��������������#���� ������GH����#��������#�B��������B��������� ��%� ������������� ���#�������� I'����+���#�B��'����#�� �#�����#�"�����$��I�"���� �����3�#�B� �#�$��/� ����/��$��
01�21��"1
�
�
��
�
�
�
����
������������� ����������� ���

Manuale - Manual - Manuel - Handbuch - Manual - Manual
E61
GB Read the instructions in this manual carefully before using orhandling the machine in any way. The instructions provideimportant information regarding the safety precautions to befollowed.The coffee machine is to be used solely for preparingexpresso coffee and hot drinks made with hot water orsteam and for heating cups.Improper use of the machine for operations other than theabove can constitute a safety risk to persons and to theequipment.The producer disclaims all liability in case of damage due toimproper use of the coffee machine.
Bevor Sie die Maschine einschalten oder gebrauchen, solltenSie die vorliegende Bedienungsanleitung genau durchlesen,da sie wichtige Angaben zum sicheren Einsatz der Maschineenthält.Die Maschine darf ausschließlich zur Zubereitung vonEspressokaffee und von mit heißem Wasser und Dampfzubereiteten Getränken sowie zum Vorwärmen vonKaffeetassen eingesetzt werden.Alle anderen Arten des Einsatzes gelten als unsachgemäßund beinhalten die Gefahr der Verletzung oder derBeschädigung der Maschine.Der Hersteller übernimmt keine Haftung für Schäden oderVerletzungen, die auf einen unsachgemäßen Einsatz derKaffeemaschine zurückzuführen wären.
DF Lire attentivement les informations contenues dans ce manuelavant que vous n’utilisiez et que vous ne manipuliez la machineà café de manière erronnée. En effet, ces informations vousfourniront d’importantes indications concernant la sécuritéd’utilisation de votre machine à café.La machine à café n’est apte qu’à la préparation de cafésespresso et de boissons chaudes, en n’utilisant que de l’eauchaude ou de la vapeur , ou encore, pour chauffer vos tasses.Toute opération différente de celles qui sont indiquées ci-dessus ne peut être effectuée car elle pourrait être la sourcede dangers pour les personnes et pour la machine même.Le producteur ne s’assume aucune responsabilité dans lecas de dommages provenant d’une utilisation incorrecte de lamachine à café.
I Leggere attentamente le avvertenze contenute nel presentemanuale, prima di utilizzare o manipolare in qualsiasi modo lamacchina, in quanto forniscono importanti indicazioniriguardanti la sicurezza d'uso della stessa.La macchina per caffè è prevista unicamente per lapreparazione di caffè espresso e bevande calde medianteacqua calda o vapore e per il preriscaldamento delle tazzine.Ogni utilizzazione diversa da quella sopra descritta è impropriae può essere fonte di pericolo per persone e macchina.Il produttore non assume responsabilità alcuna in caso di dannirisultanti da un uso improprio della macchina per caffè.
E Leer cuidadosamente las advertencias contenidas en elpresente manual antes de utilizar o manejar de cualquier formala máquina, ya que proporcionan importantes indicacionessobre la seguridad de manejo de la misma.La máquina para café sólo está prevista para la preparaciónde café expreso y bebidas calientes mediante agua caliente opor vapor, así como para el calentamiento de las tacitas.Cualquier utilización diferente de la anteriormente descrita esimpropia y puede ser fuente de peligro para las personas y lamáquina.El fabricante no se asume ninguna responsabilidad en el casode daños causados por un empleo impropio de la máquinapara café.
Ler atentamente as advertências contidas no presentemanual, antes de utilizar a máquina ou de a manusear, vistofornecerem indicações importantes relativas à segurançade utilização da mesma.
A máquina de café destina-se unicamente à preparação decafé expresso e bebidas quentes com água quente ou vapore para o aquecimento prévio das chávenas.
Qualquer utilização diferente das acima descritas é imprópria,podendo tornar-se fonte de perigo para as pessoas e amáquina.
O construtor não assume nenhuma responsabilidade perantedanos decorrentes de um uso impróprio da máquina de café.
P

10
15
1
2
13
5
6
7
10
14
9
8
16
2
18
15 1
213
5 6
7149 8 162
18
27
6 E61 3 GR
E61 2 GR

Legenda - Legend - Legende - Legende - Leyenda - Legenda
17
19
LEGENDE
1 Interrupteur général2 Levier de débit du café5 Levier de chargement de l’eau dans la chaudière6 Tuyau (lance) de la vapeur7 Poignée de réglage de la vapeur8 Tuyau (lance) d’eau chaude9 Poignée de débit de l’eau chaude.10 Porte-filtres13 Indicateur du niveau d’eau dans la chaudière14 Manomètre de la chaudière15 Cuvette16 Manomètre17 Plan chauffe-tasses18 Interrupteur verre rétro-éclairée19 Verre rétro-éclairée
FI LEGENDA
1 Interruttore generale2 Levetta erogazione caffè5 Leva caricamento acqua in caldaia6 Tubo (lancia) vapore7 Manopola regolazione vapore8 Tubo (lancia) acqua calda9 Manopola erogazione acqua calda10 Portafiltro13 Indicatore livello acqua in caldaia14 Manometro caldaia15 Bacinella16 Manometro pompa17 Piano scaldatazze18 Interruttore cristallo retroilluminato19 Cristallo retroilluminato
LEGEND
1 Main ON/OFF switch2 Coffee dispensing lever5 Boiler water filling lever6 Steam jet pipe7 Steam adjustment knob8 Hot water dispensing pipe9 Hot water dispensing knob10 Filter holder13 Boiler water level indicator14 Boiler pressure gauge15 Pan16 Pressure gauge pump17 Cup warmer tray18 Backlit glass switch19 Backlit glass
GB
LEGENDA
1 Interruptor geral2 Botão de distribuição do café5 Botão de carregamento da água na
caldeira6 Tubo (bico) do vapor7 Manípulo de regulação do vapor8 Tubo (bico) da água quente9 Manípulo de distribuição da água quente10 Porta-filtro13 Indicador do nível da água na caldeira14 Manómetro caldeira15 Tabuleiro16 Manómetro da bomba17 Tabuleiro para aquecer as chávenas18 Interruptor de cristal retro-iluminado19 Cristal retro-iluminado
PLEYENDA
1 Interruptor general2 Palanca para erogacion del café5 Palanca para cargar agua en la caldera6 Tubo (lanza) vapor7 Mando regulación vapor8 Tubo (lanza) agua caliente9 Mando erogación agua caliente10 Portafiltro13 Indicador nivel agua en la caldera14 Manómetro caldera15 Bandeja16 Manómetro bomba17 Bandeja calienta-tazas18 Interruptor cristal retroiluminado19 Cristal retroiluminado
ELEGENDE
1 Hauptschalter2 Hebel Kaffeeabgabe5 Hebel Wasserauffüllung in Heizkessel6 Dampfabgaberohr7 Dampfabgaberegler8 Rohr Heißwasserabgabe9 Regler Heißwasserabgabe10 Filterhalter13 Anzeige Wasserstand in Heizkessel14 Manometer Heizkessel15 Wanne16 Manometer Pumpe17 Abstellfläche zur Tassenvorwärmung18 Schalter Leuchttaste aus Glas19 Leuchttaste aus Glas
D

Installazione - Installation - Installation - Installation - Instalación - Instalação
!
I GBGBGBGBGB
!
DF
! !
ATTENZIONE
L'installazione, lo smontaggio e leregolazioni devono essere eseguiteesclusivamente da personale tecnicoqualificato.
ATTENTION
Installation, disassembly and setting shouldbe carried out by qualified technical per-sonnel only.
ATTENTION
L’installation, le démontage et les réglagesdoivent être faits uniquement par lepersonnel technique qualifié et autorisé.
ACHTUNG!
Die Installation, die Demontage und dieEinstellung des Gerätes darf nur durchentsprechend qualifizierte Fachkräftevorgenommen werden.
E
!
ATENCIÓN
Las operaciones de instalación, desmontajey regulación tienen que ser realizadas porpersonal técnico capacitado.
P
ATENÇÃO
A instalação, a desmontagem e asregulações terão de ser executadasexclusivamente por pessoal técnicoqualificado.
!

Installazione - Installation - Installation - Instalación
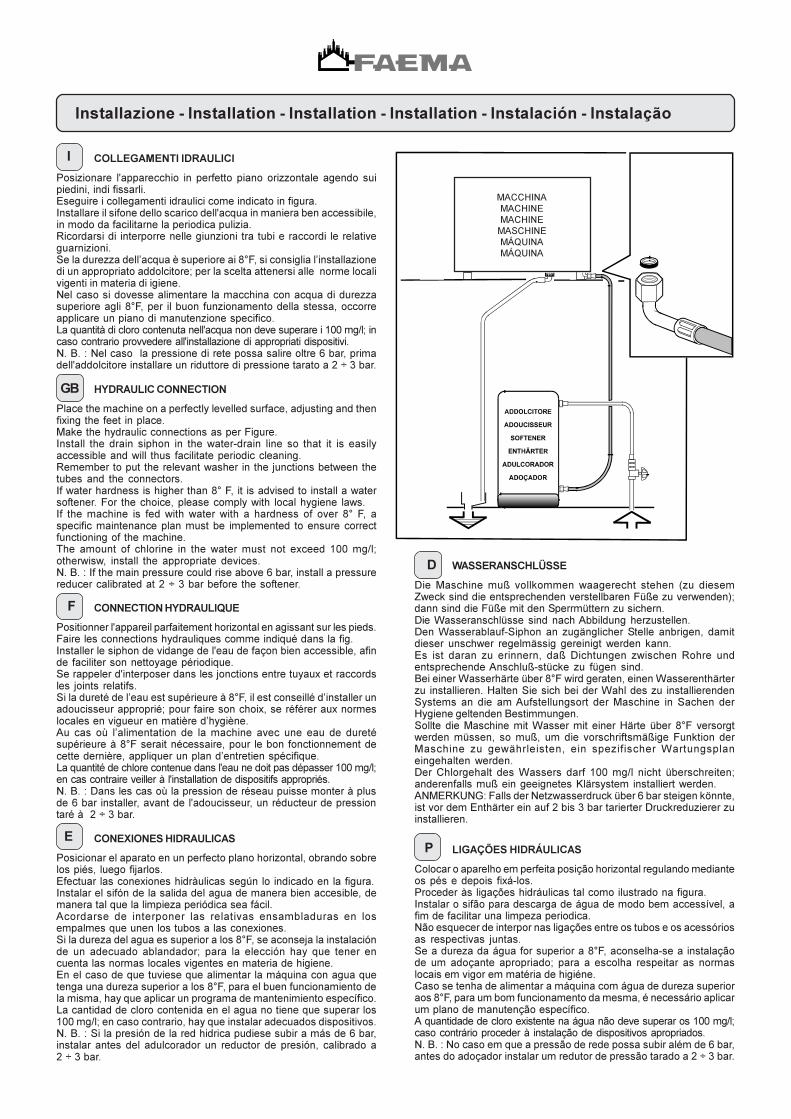
� INDICAZIONI PER L'INSTALLAZIONE
1. Leggere attentamente le avvertenze contenute nel presente librettoin quanto forniscono importanti indicazioni riguardanti la sicurezzadi installazione, d'uso e di manutenzione. Conservare con curaquesto libretto per ogni ulteriore consultazione.
2. Questo apparecchio dovrà essere destinato solo all'uso per il qualeè stato espressamente concepito. Il costruttore non può essereconsiderato responsabile per eventuali danni derivanti da usiimpropri, erronei ed irragionevoli.
3. Dopo aver tolto l'imballaggio assicurarsi dell'integritàdell'apparecchio. Gli elementi dell'imballaggio (sacchetti in plastica,polistirolo espanso, chiodi, ecc.) non devono essere lasciati allaportata dei bambini in quanto potenziali fonti di pericolo.
4. Prima di collegare l'apparecchio accertarsi che i dati di targa sianorispondenti a quelli della rete di distribuzione elettrica e idrica.
5. La macchina per caffè deve essere appoggiata su una superficiepiana e stabile, ad una distanza minima di 20 mm dalle pareti edalla superficie d'appoggio. Inoltre deve essere installata tenendoconto che la superficie d’appoggio più alta (scaldatazze) sia adun’altezza non inferiore a 1,5 metri.
6. Deve avere i collegamenti di alimentazione (energia elettrica edacqua) e lo scarico dell'acqua dotato di sifone nelle immediatevicinanze; inoltre occorre prevedere una superficie di appoggio pergli accessori.
7. All'installazione occorre prevedere un interruttore onnipolare condistanza di apertura dei contatti uguale o superiore a 3 mm e unaprotezione da corrente di dispersione con valore pari a 30 mA.
8. La sicurezza elettrica di questo apparecchio è assicurata soltantoquando lo stesso è correttamente collegato ad un efficace impianto
I
di messa a terra come previsto dalle vigenti norme di sicurezzaelettrica. E' necessario verificare questo fondamentale requisito disicurezza e, in caso di dubbio, richiedere un controllo accuratodell'impianto da parte di personale professionalmente qualificato. Ilcostruttore non può essere considerato responsabile per eventualidanni causati dalla mancanza di messa a terra dell'impianto.
9. In generale è sconsigliabile l'uso di adattatori, prese multiple e/oprolunghe. Qualora il loro uso si rendesse indispensabile ènecessario utilizzare solamente adattatori semplici o multipli eprolunghe conformi alle vigenti norme di sicurezza, facendo peròattenzione a non superare il limite di portata in valore di corrente,marcato sull'adattatore semplice e sulle prolunghe, e quello dimassima potenza marcato sull'adattatore multiplo.
10. Per evitare surriscaldamenti pericolosi, si raccomanda di svolgereper tutta la sua lunghezza il cavo di alimentazione.
11. Per salvaguardare le caratteristiche di funzionalità e di sicurezza,si raccomanda di non lasciare la macchina per caffè esposta adagenti atmosferici (pioggia, sole, gelo).
12. Non installare in locali (cucine) in cui sia prevista la pulizia mediantegetti d'acqua.
13. Non ostruire le aperture o fessure di ventilazione o di smaltimentocalore.
14. In caso di danneggiamento del cavo di alimentazione, lo stessodeve essere sostituito solo dall'assistenza tecnica autorizzata.
15. Se la macchina viene immagazzinata in locali in cui la temperaturapuò scendere sotto il punto di congelamento, vuotare in ogni casola caldaia e le tubazioni di circolazione acqua.
NOTICE FOR THE SERVICEMAN
1. Carefully read the instruction herein, which contain importantinformation for safe installation, use and maintenance. Keep thisbooklet on hand for further reference.
2. This appliance shall only be used for its specific purpose. Themanufacturers shall not be liable for damages due to improper,wrong or unreasonable use.
3. Unpack and check machine for soundness. Do not leave packagingcomponents ( plastic bags, expanded polystyrene, nails, etc.) withinchildren's reach, as they represent potential hazards.
4. Prior to plugging in, check that nameplate data correspond withthose of the electric and water mains.
5. The coffee machine should be placed on a stable flat surface withthe bodywork at a minimum distance of 20 mm from the supportingsurface and the walls. Furthermore, it must be installed taking intoaccount that the highest shelf (cup warmer) must sit at a heightthat is at least 1.5 meters.
6. The (electricity and water) supply connections and a water outletfitted with a siphon should be close to the machine. A supportsurface should also be available for accessories.
7. Install an omnipolar switch with minimum 3 mm. gap betweencontacts and 30 mA dispersion-current protection.
GB
8. This appliance is electrically safe only when properly earthed asset forth in the current electric safety specifications. Check forcompliance and, when in doubt, have the wiring thorougly inspectedby skilled personnel. The manufacturers shall not be liable for anydamage caused by faulty earting.
9. Using adapters, multiple plugs and cable extensions is notrecommended. Should they be indispensable, use simple or multipleadapters and extensions that comply with the current safetyregulations, take care not to exceed the limit current load shown onsimple adapters and extensions, and the limit power load shown onmultiple adapters.
10. To prevent dangerous overheating, uncoil the power cable to its fulllength.
11. To ensure correct operation and safety, the coffee machine shouldnot be exposed to outdoor weather conditions (rain, sun, ice).
12. Do not install in rooms (kitchens) cleaned using water jets.
13. Do not plug or clog the ventilation and heat-exhausting louvres.
14. If the machine’s electrical cord is damaged, it should be replaced.This should only be done by an authorized service technician.
15. If the machine is stored on premises where the temperature maydrop below freezing point, always empty the boiler and the watercirculation pipes
�

Installazione - Installation - Installation - Installation - Instalación - Instalação
!
! INDICATIONS POUR L'INSTALLATION
1. Lire attentivement les avertissements contenus dans le présentlivret du fait qu'ils fournissent d'importantes indicationsconcernant la sécurité d'installation, d'utilisation et d'entretien.Conserver ce livret avec soin pour toute consultation ultérieure.
2. Cet appareil dévora être employé seulement par l'usage par lequel a été expressivement construit. Le constructeur ne peutêtre tenu pour responsable des dommages éventuels provoquéspar usage impropres, erronées où non corrigés.
3. Après avoir retiré l'emballage, s'assurer de l'integrité de l'appareil.Les éléments de l'emballage (sachets de plastique, polystyréneexpansé, clous, etc.) ne doivent pas être laissées à la portéedes enfants dans la mesure où ils constituent des sources dedanger potentielles.
4. Avant de brancher, l'appareil s'assurer que les donnée de laplaque correspondent à celles du réseau de distribution électriqueet hydrique.
5. La machine pour café doit être plaçée sur une surface plate etstable, à une distance minimum de 20 mm des cloisons et de lasurface d'appui. En outre, elle doit être installée en tenant comptedu fait que la surface d'appui la plus élevée (chauffe-tasses) setrouve bien à une hauteur qui n'excède pas 1,5 m.
6. Elle doit avoir les connexions d’alimentation (énergie électriqueet eau) ainsi que le déchargement de l’eau, doté de siphon à unendroit très proche; en outre, vous devrez prévoir un plan d’appuipour les accessoires de la machine.
7. Lors de l'installation, il convient de prèvoir un interrupteur omnipolaireavec un écartement des contacts supérieur ou égal à 3 mm et protectioncontre la dispersion de courant ayant une valeur égale à 30 mA.
8. La sécurité électrique de cet appareil est assurée seulement lorsqu'ilest correctement raccordé à une installation de mise à terre efficace,
F
comme prévu par les normes de sécurité électrique en vigueur. Il estnécessaire de vérifier cette condition fondamentale de sécurité et, encas de doute, de demander un contrôle complet de l'installation par dupersonnel professionnellement qualifié. Le constructeur ne peut êtretenu pour responsable des dommages éventuels provoqués par lanon mise à terre de l'installation.
9. En géneral, il est déconseillé d'utiliser des adaptateurs, prisesmultiples et/uo des rallonges. S'avérerait au cas où leur utilisationindispensable, il est nécessaire d'utiliser seulement desadaptateurs simples ou multiples et des rallonges conformesaux normes de securité en vigueur, en prêtant cependant attentionà ne pas dépasser la limite de débit maximum en valeur de courant,indiquée sur l'adaptateur simple et sur les rallonges, ou celle depuissance maximum figurant sur l'adaptateur multiple.
10. Afin d'éviter des surchauffes dangereuses, on recommande dedérouler le câble d'alimentation sur toute sa longueur.
11. Pour sauve-garder les caractéristiques de bon fonctionnementet de sécurité de votre machine à café, il est recommandé de nepas l’exposer à des agents atmosphériques tels que la pluie, lesoleil, le gel, etc...
12. Ne pas installer votre machine à café dans des pièces (sur unecuisinière par exemple) où l’on prévoit un nettoyage par jets d’eau.
13. Ne pas obstruer les ouvertures ou fentes de ventilation etd'evacuation de la chaleur.
14. Si le câble d’alimentation est endommagé, s’adresser uniquementà un centre d’assistance technique autorisé pour le substituer.
15. Si l’appareil devait être mis dans des pièces où la température pourraitdescendre sous un degré de congélation, vider de toute manière lachaudière ainsi que les conduites de circulation de l’eau.
ANGABEN ZUR INSTALLATION
1. Die im vorliegenden Anleitungsheft enthaltenen Anweisungen sindaufmerksam zu lesen, da sie wichtige Hinweise zur Installation,Bedienungs- und Wartungssicherheit liefern. Dieses Anleiungshefttist zum späteren Nachschlagen sorgfältig aufzubewahren.
2. Dieses Gerät darf ausschließlich nur für den vorgesehenenVerwendungszweck eingesetzt werden. Der Hersteller kann nichtfür eventuelle eintretende Schäden herangezogen werden, die aufunsachgemäßen, fehlerhaften oder fahrlässigen Gebrauchzurückzuführen sind.
3. Nach Entfernung des Verpackungsmaterials ist das Gerät aufUnversehrtheit zu überprüfen. Das Verpackungsmaterial(Kunststoffbeutel, Styropor, Nägel usw.) kann für Kinder gefährlichsein - halten Sie es von ihnen fern.
4. Bevor Sie das Gerät anschließen, vergewissern Sie sich, daß dieAngaben auf dem Typenschild den Lieferwerten des Strom- und desWassernetzes entsprechen.
5. Stellen Sie die Kaffeemaschine auf eine stabile und ebene Fläche, ineinem Abstand von mindestens 20 mm zu den Wänden und zurAufstellfläche. Die Maschine muß so installiert werden, daß dieBodenhöhe der höchsten Auflagefläche (Tassenvorwärmer)wenigstens 1,5 m beträgt.
6. Vergewissern Sie sich, daß in unmittelbarer Nähe derAufstellungsfläche die verschieden Anschlüsse zur Versorgung derMaschine (Strom und Wasser) sowie ein Ablaß mit Syphon vorhandensind und daß eine weitere Fläche zur Ablage der Zubehörteilevorhanden ist. ri.
7. Bei der Installation des Geräts ist ein allpoliger Schalter mit einerKontaktöffnungsweite von mindestens 3 mm. vorzusehen undfehlerstromschutz für 30 mA.
8. Die elektrische Betriebssicherheit dieses Geräts ist nur gewährleistet,wenn es sachgerecht mit einer wirksamen Erdschlußanlage
D
verbunden ist, wie von den einschlägigen Bestimmungen zur Sicherheitvon Elektroanlagen vorgesehen. Es muß garantiert sein, daß diesegrundlegende Sicherheitsanforderung erfüllt wird; lassen Sie imZweifelsfall eine sorgfältige Kontrolle der Elektroanlage durchqualifiziertes Fachpersonal vornehmen. Der Hersteller kann nicht füreventuelle Schäden herangezogen werden, die auf mangelnde Erdungder Elektroanlage zurückzuführen sind.
9. Vom Gebrauch von Stecker-Adaptern, Mehrfachsteckern und/oderVerlängerungskabeln wird allgemein abgeraten. Sollte ihre Verwendungunerläßlich sein, dürfen ausschließlich Ein- bzw. Mehrfach-Adapterund Verlängerungskabel benutzt werden, die den einschlägigenSicherheitsbestimmungen entsprechen; man muß jedoch sicherstellen,daß bei Einfach-Adaptern und Verlängerungskabeln der daraufmarkierte Stromabgabe-Grenzwert nicht überschritten wird bzw. dermarkierte Leistungs-Höchstwert bei Mehrfach-Adaptern.
10. Um gefährliche Überhitzungen zu verhüten, empfiehlt es sich, dasSpeisungskabel in seiner ganzen Länge abzuwickeln.
11. Um eine einwandfreie Funktion und den sicheren Betrieb der Maschinezu gewährleisten, darf die Kaffeemaschine keinen kritischenUmgebungsbedingungen (Regen, starke Sonneneinstrahlung, Frost)ausgesetzt werden.
12. Stellen Sie die Maschine nicht in Räumen auf (Küche), in denen eineReinigung mittels Wasserstrahl vorgesehen ist.
13. Die Öffnungen oder Schlitze zur Belüftung bzw. zur Wärmeableitungsind frei zu halten.
14. Wenn das Netzkabel beschädigt wird, darf es nur durch einenautorisierten Kundendiensttechniker ersetzt werden.
15. Sollte die Maschine in Räumen gelagert werden, in denen Frostgefahrgegeben ist, so müssen in jedem Falle sowohl der Wassertank alsauch die Leitungen des Wasserkreises geleert werden.

Installazione - Installation - Installation - Installation - Instalación - Instalação
!
!
INDICACIONES PARA LA INSTALACIÓN
1. Leer atentamente las advertencias contenidas en el presentemanual ya que las mismas suministran importantes indicacionescon respecto a la seguridad de instalación, de uso y demanutención. Conservar con cuidado este manual para cualquierulterior consulta.
2. Este aparato deberá ser destinado solo par el uso por el cual hasido expresamente concebido. El fabricante no puede serconsiderado responsable de los eventuales daños derivadospor usos impropios, erróneos o irracionales.
3. Después de haber quitado el embalaje, controlar la integridaddel aparato. Los elementos del embalaje (bolsitas de plástico,poliestirol expandido, clavos, etc.) no deben ser dejados alalcance de los niños ya que constituyen potenciales fuentes depeligro.
4. Antes de conectar el aparato, controlar que los datos de la placacorrespondan a los de la red de distribución eléctrica e hidrica.
5. La máquina para café se tiene que apoyar sobre una superficieplana y estable, a una distancia mínima de 20 mm de las paredesy de la superficie de apoyo. Además se tiene que instalar teniendoen cuenta que la superficie de apoyo más alta (calienta-tazas)esté a una altura no inferior a 1,5 metros.
6. Tiene que tener las conexiones de alimentación (energía eléctricay agua) y el desagüe del agua equipado con un sifón cerca,además hay que prever una superficie de apoyo para losaccesorios.
7. En el momento de la instalación es necesario preveer uninterruptor omnipolar con distancia de abertura de los contáctosigual o superior a 3 mm e una proteccion contra corriente dedispersion con valor de 30 mA.
8. La seguridad eléctrica de este aparato está aseguranda
E
solamente cuando el mismo se halla correctamente conectadocon una eficaz instalación de puesta a tierra, según lo previstopor las normas de seguridad eléctrica en vigor. Es necesariocontrolar este fundamental requisito de seguridad y, en caso deduda, requerir un cuidadoso control de la instalación por partede personal profesionalmente cualificado. El fabricante no puedeser considerado responsable de los eventuales daños causadospor la falta de puesta a tierra de la instalación.
9. En general no es aconsehable el uso de adaptadores, tomasmúltiples y/o extensiones. En el caso de que el uso de losmismos fuera indispensable, es necesario utilizar solamenteadaptadores simples o múltiples y extensiones conformes a lasnormas de seguridad en vigor, prestando atención a no superarel limite de alcance en valor de corriente, marcado en el adaptadorsimple o en las extensiones, o el de maxima potencia marcadoen el adaptador múltiple.
10. Para evitar peligrosos recalentamientos, se recomiendadesenvolver en toda su longitud el cable de alimentación.
11. Para salvaguardar las características de funcionalidad y deseguridad, se aconseja no dejar la máquina de café expuesta ala acción de los agentes atmosféricos (lluvia, sol, hielo).
12. No instalar en locales (cocinas) en los que se prevea la limpiezamediante chorros de agua.
13. No obstruir las aberturas u orificios de ventilación o de dispersiónde calor.
14. En caso de que el cable de alimentación resulte dañado, el mismodebe ser substituido sólo por la asistencia técnica autorizada.
15. Si la máquina se almacena en locales en los que la temperaturapuede descender por debajo del punto de congelación, vaciaren cualquier caso la caldera y los tubos de circulación del agua.
INDICAÇÕES PARA A INSTALAÇÃO
1. Ler atentamente todas as advertências contidas na presentepublicação as quais fornecem indicações importantes relativasà segurança da instalação, uso e manutenção. Conservardevidamente esta publicação para futuras consultas.
2. Este aparelho deverá ser usado apenas para a finalidade para aqual foi especificamente concebido. O construtor não pode serconsiderado responsável por eventuais danos derivados deusos impróprios, errados ou irracionais.
3. Depois de se ter retirado a embalagem, controlar que o aparelhose encontre em perfeitas condições. Os vários componentes daembalagem (sacos de plástico, esferovit, agrafes, etc.) devemser mantidos fora do alcance das crianças dado que se podemdemonstrar muito perigosos
4. Antes de conectar el aparato, controlar que los datos de la placacorrespondan a los de la red de distribución eléctrica e hidrica.
5. A máquina de café deve ser apoiada sobre uma superfície planae estável e a uma distância de 20 mm das paredes e da superfíciede apoio. Além disso, tem de ser instalada, considerando que asuperfície de apoio mais alta (aquecedor de chávenas) seencontra a uma altura não inferior a 1,5 metros.
6. As ligações de alimentação (energia eléctrica e água) e adescarga da água dotada de sifão deverão ficar muito próximas;é necessário ainda prever uma superfície de apoio para osacessórios.
7. É necessário montar na instalação um interruptor omnipolar comuma distância entre os contactos igual ou superior a 3 mm, umaprotecção da corrente de dispersão com valor igual a 30 mA.
8. A segurança eléctrica deste aparelho è garantida apenas quandoo mesmo se encontra devidamente ligado a uma eficaz instalação
P
de terra, tal como previsto pelas vigentes normas de segurança.É necessário verificar esta importante norma de segurança e, nocaso de dúvida, solicitar um controle da instalação por parte depessoal técnico profissionalmente qualificado. O fabricante nãopode ser considerado responsável por eventuais danos causadospela falta de ligação á terra da instalação.
9. Em geral é desaconselhável o emprego de adaptadores, tomadasmúltiplas e extensões. No caso em que o seu uso fosseindispensável é necessário usar apenas adaptadores simplesou múltiplos e extensões conformes às vigentes normas desegurança, prestando no entanto atenção a não ultrapassar olimite maximo de capacidade do valor da corrente, marcado sobreo adaptador simples ou sobre as extensões e aquele de potênciamáxima marcado sobre o adaptador múltiplo.
10. A fim de evitar sobreaquecimentos perigosos, recomenda-seutilizar o cabo eléctrico de alimentação completamentedesenrolado.
11. Para proteger as características de funcionalidade e desegurança, recomenda-se não deixar a máquina de café expostaaos agentes atmosféricos (chuva, sol, gelo).
12. Não instalar em locais (cozinha) em que a limpeza seja realizadamediante jactos de água.
13. Não obstruir a aberturas ou canais de ventilação e de dispersãodo calor.
14. No caso de desarranjo do cabo de alimentação, o mesmo deveser substituído apenas pela assistência técnica autorizada.
15. Se a máquina for armazenada em locais em que a temperaturapossa baixar para além do ponto de congelação, esvaziar acaldeira e os tubos de circulação da água.

RUMOROSITA'NOISEBRUIT
GERÄUSCHRUIDOSIDAD
RUIDO
L'apparecchio non supera i 70 dBThe equipment does not exceed 70dBL'appareil ne depasse pas 70 dBDas Gerät überschreitet 70 dB nichtEl aparato no supera los 70 dBO aparelho não ultrapassa os 70 dB
� IMPIANTO CLIENTE� CONNECTIONS WHICH MUST BE PREPARED BY THE CUSTOMER� BRANCHEMENTS, QUI DOIVENT ÉTRE PRÉPARÉS PAR LE CLIENT� VOM KUNDEN ZU ERSTELLENDE ANSCHLÜSSE� CONEXIONES, QUE DEBEN SER PREPARADAS POR EL CLIENTE� CONEXÕES QUE DEVEM SER PREPARADAS PELO CLIENTE
Min. Ø 50 mm.
Ø 3/8 GAS
(per pressioni più alte installare un riduttore di pressione)(for pressure beyond this value, install a pressure reducer)
(pour pression plus haute installer un deténdeur)(bei höheren Druckwerten Druckreduzierer erforderlich)
(para presiones más altas instalar un reductor de presión)(para pressões mais elevadas instalar um redutor de pressão)
PRESSIONE MAX. RETEWATER MAINS MAX. PRESSUREPRESSION MAX. EAU DE VILLE
MAX. DRUCK DER WASSERLEITUNGPRESION MAX. RED
PRESSÃO MAX. REDE
6 bar
Vedere la targa dati della macchinaSee the machine's nameplateVoir la plaque signalétique de la machineSiehe Datenschild der MaschineVer la placa con los datos de la máquinaVer a placa das características damáquina
Dati tecniciTechnical data
Données techniquesTechnische Daten
Datos técnicosDatos técnicos
ADDOLCITORESOFTENER
ADOUCISSEURENTHÄRTER
ADULCORADORADOÇADOR
SCARICO A PAVIMENTODRAIN
VIDANGE DU LOCALBODENABFLUSS
DESCARGADESCARGA
INTERRUTTORE :
Onnipolare con distanza di apertura contatti 3 mmProtezione da corrente di dispersione con valore pari a 30 mA
SWITCH :
Omnipolar switch with 3 mm contact opening30 mA dispersion-current protection
INTERRUPTEUR:
Omnipolaire, avec distance d’ouverture des contacts égale à 3 mm.
Protection contre la dispersion de courant ayant une valeur égale à 30 mA.
SCHALTER:
Allpoliger Schalter mit Kontaktöffnungsweite von 3 mmFehlerstromschutz für 30 mA
INTERRUPTOR:
Omnipolar con distancia de apertura contactos 3 mmProteccion contra corriente de dispersion con valor de 30 mA
INTERRUPTOR:
Omnipolar com uma distância de abertura dos contatos de 3 mm
Protecção da corrente de dispersão com valor igual a 30 mA
MESSA A TERRAGROUNDING
MISE A TERREERDUNG
PUESTA A TIERRAINSTALAÇÃO DE
TERRA
OBBLIGATORIACOMPULSORYOBLIGATOIREVORGESCHRIEBENOBLIGATORIAOBRIGATORIA
Installazione - Installation - Installation - Installation - Instalación - Instalação
����������������������������������������
��������������������������������������������������������������� ���������������
�������������� ��� �
M�#����������(�""������"��%���� ����$���*������������##����#�����#�"���#�0�������#�����������#�$6������'��#��� ������'�A����#����%���.�#����������#�"$������������������(�������%�G���/��������##�/�����%�����%���������#��������6����"A�����'��������""������(�����"�#������#���#�B�������#���������6��D�����������#��#� B����#�������%#������������A�����7�����#��#�"A�������,�NF0������#�����#����A��7��#���������������##�����""��"��A+�"����%�����#����$��D��#���A%A������D���� �#������#��������������� ���&����7$6��&���1�� ��#� �)� �7��� ��������� ��� ��� ��$���� ����� ���� ���� ��� �����A#�"A�������,�NF0�#�������A��##������"���� ���/���%��������� �����������������&�����""��'�������"�����7����������#"A��%�'���!��'������A�����$�����������������#��(������������"�#��A"�##���O��� ���+�����#�������������������,��(��#���������������#"�#���%#��""��"��A#�@��P��<�3��#���#���#��)����"��##��������A#����"��##�� ������,�"��#�����/�����#������������������(������##���������A�����������"��##������A�,����Q���/���
�
� ��������������� �����
M�#������������"������������"��%�����"�����$���*��������/������#�/����#�"�A#��������%�B����#��%���������#�����D����#�$���,�����#�#��R��������������������%������.�#���������#�%S��������#������������������ ������/��������#�/������ ����������'�������� "��*��"���S�����#���%I����1������#�� ��� �����"����� ��#� ��������#� ��#� /������#� ��� ��#� "�� �#�'����������#���/�#�����#�����D����#�����������*������������#�#�"����������#�NF0��#������#�B�������#������S���� ��� ��������� �/��������+� "���� ��� ������S�� $�6� '��� ������ �����������#���� �#�������#��������#���� ����������$���������������#�����'��������#��'������ ��������� I'��������������'����������������*��#�"����������#�NF0��"�������/����%������� ����������� �# ���$�6�'����"���������"����� ����� ������ �������#"��J%����!��������������������������������������������������'���#�"�������#O��� ���+������#�������������$�6�'�����#��������������#���#"�#�����#�@��P��<�������"��#�S������������$�������"����#��#�/����� I#������/�����#������ ����#����� ��������������� ��������� ���"��#�S��� ����/��������Q���/���
���������������� ����
M�#�*������� �(�""�����$��� ��� "��%�����"��������**��������������#��"�������������%�##������#���������������� ����������������� ��������������%������.�#�����������#�%����������#�����������(��'������ �������/�������##�/������� �������%��������������"���������"���*���T�������#����� �����"���������������*�����������/������������������������������*���������������**������7��'���&�#�"����������NF0��#�����#�������7��#�����*�����������""��"�����������������+�"������#�������������#����������� ������������������� �����������������@�����#��#������##����� ���������� ���$����������'����������**�#�"������������NF0��"��� ���/����%��*���� �����������#��##�����������""����������"�������� ������*�����#"���%����!��'������,������������������������(��'������������#�"��������O��� ���+�����#������������"�������������(��#�����*���������""��"��������#"�#������@��P��<�@�����#������"��##�������������"�##��#��������������/����"�� �����(��������������#������������������������"��##����������������Q���/���
�
��� ��������������
M������$�� ��$���������"��%����6����������#��%�������B�#����������$��%�D�����$��%�������"�����2�8���$��$6������������������#��#�"���0������.�#����� �$�� ������ #�"$��� ��� �$��5���������� ����� #�� �$��� ��� �#� ��#��6����##�/�������5���� �$�#�%����������"�����������������T� � /������"����$�����������5�#$�������$��B�������#�/��5�����$���/�#����� �$�����������#�.%�5�����$�����##��#�$��$����$���NF�0������#�����#��������#�������5����#�%�������0��� �$���$������"���#���� "�6�5��$� ������$6������ ��5#�.%� �$�� ��$���� �#� %���5��$�5�����5��$� �� $�����##� �%� ����� NF� 0�� �#"���%��� �����������"���� �#��/�� � "�� ������ �����#�����������%������������%��$�� ��$����9$�� � ����� �%� �$������� ��� �$��5����� �#�� ���� �D����� O��� ���+��$��5�#5�� ��#����� �$�� �""��"������ ������#�@��P��<�.%��$�� ����"��##������������#���/������/������#�������"��##���������������/�����������Q���/���/�%�����$��#�%������
��
������������� �����
�����������"����$��� �"��%�����"�#�GH��$���*���������������� ��������#�"A#�����"��#� %�DI��#�M��������,#�����GK�#�$���I�����#������� �����#���������%������.�#��������#�%H��"������#���������I������� ����/� �����##J������%� ����%��������������� "�*��"���������@H���#'��������������"�����#�����GK�#��������#���/�#����#����##S���#�#� ��#"������#� B����#����������*�����I����%���#�"��������NF0������#��$�#������#����GH����� ����G����� �"��"�����+� "���� �� �#���$�� ��#"������ �#� ��� �#�����#�� �������� � ��A�������$���A�����#��#�����$�������� �������� I'������� �I�����������*��#�"�������#�NF0��"����� �/� �%������� �������� �# ���A�����##I�����"������ �"�������� ������GH���#"��J%����1�'��������������������D�#���������I�����H�������#�"������#�O��� ���+��#�������I����"��������,���#����GH�������#"�#�����#��"��"�����#�@��P��<�@����#��� �'�����"��##H����������"�##��#�/�����A ������/�������#�������G�������#������� ������������"��##H�������������Q���/���
�
�� ����������������
3���2�#�$���� �U� ����8� ���5�������$�� #��$��� *�� ���#� V5��8�#�����������#"���$���������#����/�����0>U��*�����5������+�����#��������0>U�� ��������"��� >������*��#��$����3���4�##����#�$�>##��#�������$�1//�������$��*�#�������3���4�##���/���%��"$������ *��;�����$���������� ��/������� �� �����#��� ��#�$5��� ����� ;##�������������5������8�����#� �#�� ������ *�� ���������� ��U�3��$������� *5�#�$���T�$��� ������#"���$�����1�#�$��U#�>�8�� *�� %>���� #����P���������4�##��$;����>/���NF0�5�������������������4�##�����$;����*����#�����������=����������#��$�/�������4�$����#�*����#�������������6#�� #���� ���� � �1�%#�������#���� ����2�#�$���� ������$��� ���=6����������������P�#�� �����������������2�#�$���� ���4�##��� ���������=;����>/���NF0����#����5������ >##���� #�� �U�� � ����� ���#�$��%�# ;U����0��8����� ���2�#�$���� *�� ��5;$����#����� ���� #"�*�%�#�$���4������#"��������$������5������3����$�����$���� ��#�4�##��#� ���%� O��� ���� ���$�� >/��#�$������+�������%���#� �U��������������#�:�;�#6#�� ���#���������5������1@2�T:W@�<�0���#�����@��*5�##������8�>/�����/���#�������8?������#�������� ����$;�����������%���/�#���/�������������3���8����*������*���#����������

��������������������������������������������������������������� ���������������
� ������������������
� C�������� ������������������ �������'���������������� ������������ �������2������������������������������������#�������������������������������+� ������� #�����Faema�7�������������������������� ������������� �������� ������������������� ���+� �����������������������"���������'���������������� ����������
� 2������������������b
��� ������� ������������ ��� ���� �������� #���������� ��� ������������������
��� ������������ �������������������� ��� ��������� ����������������� ���� #��� ������
� ����� #������������������������ �����������b�������������]D����� GF
� K��� ������""������� ���� ��� ��������������D]F���D∆F�� ��������������������������� #������� ��������������H�
� ����� #���� ��� �������������������� ���� ��� �"�������� ��� �� D����T�F�
����������������
� 6��������/�����#�� ���� �����������,��#����#����� ��� �-�������������",��#�� ������������-��#�� ����������������������#������#��"���������� ���������������������+����"����#���Faema�7��������������"��� ���� ��������� ��� �� ���� �� ��� ��� ��� ���� ������������#���������#�����#�������������������"������ ������������
� 6���� �#���"����� #� /b
�#���,������ ���� �������� ��������#����"������������#����-�� �"���
�#��� �#���������� �������� ��� �#��� ��� ������� �#������������������������#��"�!� �����
� .#���� #��������������������#��� ���� ����b��������,�]�D����GF�
� *�� �#�� ���� �����"��-����D]F����D∆F����� ���"�� #������ ��� ��-��#������� ���������#������������L������H�
� .#���� #����-��#��������#��� ���� �����#�������� ����-�� ����,����D���T�F�
��
������������������
� ��������"��� #������������������'��������������� ���������������������� ���������� �������������������������������������������������(�������������+������������Faema�7����������������������� ��������� ���� ���������� "��� #������ ��� �������+����������������� ��� � ������"������ �� �'������������ ��� �����M��
� 2����N�������������b
��� �,��� �� "��� #������ ������� ��� �'���������� ������� ��� �� M"���'�������������
�������������� ������������ �������������������������������������������������������� ����� ��������"�c���
� ����� #�������������������������"��� #�����b������������]�
� ��� ���P���������� �������� �� �������������#����� D]F��� � D∆F� ������ �� ������� ����������� ��� ������� ��� #�����������������������H�
� ����� #���� �� �� �������������#��� ���� ����� 5��� M "������� �������D�����T*F�
�
������� ������� �������� �������� �������� ��������
�d *����������������������� �&���������-�� #*������������������������ ������������7 #�����*��������������������� �*��������������������
���d *��������������������� �8����&KI&LL�-�� #*�������������������� �A���� #�����*������������������� �*��������������� ����
������� ��� ����� � ������ ��� �������� �������������� ����� � ������� ���� ������ ������ � ���������� ����� � �� ���� ����
�� �������� �6���� �6��� =#���6���� ������ �����
�� >�������)����� �>��,��*���� 6�� />����)� ��� �>�����+��,�-�>����)������ �2������.�����
�� 8������� �6��-�� �6���6����� �8��)�� �8�����
�� K���� �6�� /� �K���7 #-���� �K����� �C����
����
����!

��������������������������������������������������������������� ���������������
�������������
� W"����B����7��� ���� ���3�����������7������ #����� �"������� @����� ���"��������� 3��/���������� ��� ��� #�9�����6����������������� #�����B"����������� #�����9;����3��������B����=���-������������������#�����;����L�����Faema k��������A������� �B��7 #9��� B"��������� ��� �� #� ����� ��� #���9;�3��/���������� ������ #��-������=��� ��������� ��;����������A���"��/������*������������B����������������#����7 #9���
� L������ ��������/������������b
������7����/�"���������"������ #��;���
�"� ��� K����������� ���� �������"��� �� .,��� #��B"������������ �� ���� ��� >�#9��� /��� �� >��9�����"�� #�� ���
� :��� >��9��� ��� �B�� �������� �� #��;������ ������#��bK�������-����7���� ?��"������ D�]� F�
� >�#���7��� ����8����/���������?��"�������-� #��� D]F���� D∆F-����������""������H��������������b
� :���8� #�������������#�������� #��;�#�"�������������� #�?����#����� D��#��T�F�
�
����"�����������
� ������� ��� ������ ������ ����� ��� ������ �%����� ��� ����� ����������� ����������� �������� ��������������������,������������������������������������A� �������������������Faema�7������������ �� ��� �4�� ����� ���� ���� ������ �%�� ��� ��� ���� ������+� ��������������������"����������������������� ����������������� �����4��
� �����#�,����� ��������b
�������������������� ��������������� ��� ����"����� �"��������������
�������%������������ ������������������ ������������ �� ����������������"�������������� ���������
� ��� �������� ����� ,�� ���������� ����� ��� �������� ���!�%��b�������������]�
� 3����� �������������������������� ������ ���!�%����D]F���D∆F�#�,������������������������������������� ����������������H�
� ��� �������� ��� ���!�%�� ������� �� ������� ��� �"������� 1�� �� D�����T�F�
�
����#$���%�����
� ����� �� �������� ������ ��� �� �� ������������ ��� ��� �� �������������2�����������������������������������������������������������������������+� ������������Faema�7��������������������������� ���������������������� ��� �
� ?����� ��� ����b
���������� ���!�%����� ������������������������������ �"������������ �%��
�� ���������� ����������������� ��� ����"�������� ������ ��� ����"������������� ��!��
� ��������������������������������������b������������]�D����GF�
� K�� �������������������� ���������������D]F������D∆F����� ��������������������������������� �������������H�
� ���������� ��������������� ��� ���������� �"��������� 1�� ��D����T�F�
�
������� ������� �������� �������� �������� ��������
�d *����������������������� �&���������-�� #*������������������������ ������������7 #�����*��������������������� �*��������������������
���d *��������������������� �8����&KI&LL�-�� #*�������������������� �A���� #�����*������������������� �*��������������� ����
������� ��� ����� � ������ ��� �������� �������������� ����� � ������� ���� ������ ������ � ���������� ����� � �� ���� ����
�� �������� �6���� �6��� =#���6���� ������ �����
�� >�������)����� �>��,��*���� 6�� />����)� ��� �>�����+��,�-�>����)������ �2������.�����
�� 8������� �6��-�� �6���6����� �8��)�� �8�����
�� K���� �6�� /� �K���7 #-���� �K����� �C����
����
����!

Installazione - Installation - Installation - Installation - Instalación - Instalação
GB POTENTIAL-EQUALIZING CONNECTION
This connection, which is the one called for by several norms, avoidselectrical potential differences building up between any equipment thatmay be installed in the same room.There is a terminal clip on the under side of the base of the machine towhich an external potential-equalizing wire should be connected.This connection is ABSOLUTELY NECESSARY and must be made rightafter the machine is installed.- Use a wire whose cross-sectional area conforms to the existing
norms.- Make the terminal connection (see diagram) and then connect the
other end to the ground connections located on the adjacentequipment.
Failure to do observe these safety precautions will exempt themanufacturer from any responsibility as regards damage caused topersons or property.NOTE: DO NOT CONNECT THE MACHINE’S TERMINAL CLIP TO THEMAINS GROUND TERMINAL BECAUSE THE GROUND TERMINAL OFANY MAIN SOURCE OF ELECTRICAL POWER IS NOT CONSIDEREDTO BE A POTENTIAL-EQUALIZING CONNECTION.
I COLLEGAMENTO EQUIPOTENZIALE
Questo collegamento previsto da alcune norme, ha la funzione di evitarele differenze di livello di potenziale elettrico, tra le masse delleapparecchiature installate nello stesso locale.Questo apparecchio è predisposto con un morsetto posto sotto ilbasamento per il collegamento di un conduttore esterno equipotenziale.Terminata l'installazione è NECESSARIO eseguire questo tipo dicollegamento:- usare un conduttore avente una sezione nominale in conformità con
le norme vigenti.- collegare al morsetto (vedi figura) e l'altro capo alle masse delle
apparecchiature adiacenti.La mancata attuazione di questa norma di sicurezza scagiona il costruttoreda ogni responsabilità per guasti o danni che possano essere causati apersone o cose.N.B. NON COLLEGARE ALLA MESSA A TERRA DELL'IMPIANTO DIDISTRIBUZIONE ELETTRICA IN QUANTO IL CONDUTTORE DI MESSAA TERRA IN UN CAVO DI ALIMENTAZIONE NON VIENE CONSIDERATOUN CONDUTTORE DI COLLEGAMENTO EQUIPOTENZIALE.
D STROMANSCHLUSS MIT POTENTIALAUSGLEICH
Dieses Gerät ist unter dem Untergestell mit einer Anschlußklemmeversehen, die mit einem externen Stromausgleichsleiter zu verbindenist.Nach der Installation MUSS der Stromanschluß wie folgt vorgenommenwerden:- Einen Leiter verwenden, dessen Nennquerschnitt den einschlägigen
Unfallschutzbestimmungen entspricht;- ihn wie in der Abbildung gezeigt an die Klemme anschließen.Bei Nichtbeachtung dieses Sicherheitshinweises schließt der Herstellerjedwede Haftungsansprüche für Personen- oder Sachschäden aus.HINWEIS: NICHT AN DIE ERDUNG DER STROMZUFUHRANLAGEANSCHLIESSEN, DA DER ERDUNGSLEITER EINESSPEISUNGSKABELS NICHT ALS AUSGLEICHSLEITER GELTEN KANN.
LIGAÇÃO EQÜIPOTENCIAL
Este aparelho está equipado com um borne, colocado sob a sua base,para a ligação a um condutor externo eqüipotencial.Uma vez terminada a instalação é NECESSÁRIO efectuar este tipo deligação:- usar um condutor com uma secção nominal em conformidade com as
normas vigentes;- ligar o borne, ver a figura.A falta de cumprimento desta norma de segurança alivia o fabricante dequalquer responsabilidade por avarias ou danos que poderiam sercausados a pessoas ou bens.NOTA.NÃO LIGAR À LIGAÇÃO DE TERRA DA INSTALAÇÃO DEDISTRIBUIÇÃO ELÉCTRICA ENQUANTO O CONDUTOR DE LIGAÇÃODE TERRA NÃO É CONSIDERADO UM CONDUTOR DE LIGAÇÃOEQÜIPOTENCIAL.
P
E CONEXION EQUIPOTENCIAL
Este aparato está preajustado con un borne ubicado debajo de la basepara la conexión de un conductor externo equipotencial.Una vez terminada la instalación es NECESARIO efectuar este tipo deconexión:- usar un conductor con una sección nominal conforme con las normas
vigentes.- conectar al borne (ver figura).La falta de respeto de esta norma de seguridad exime al fabricante detoda responsabilidad por desperfectos o daños que puedan sercausados a personas o cosas.NOTA: NO CONECTAR CON LA PUESTA A TIERRA DE LAINSTALACION DE DISTRIBUCION ELECTRICA DADO QUE ELCONDUCTOR DE PUESTA A TIERRA EN UN CABLE DE ALIMENTACIONNO ES CONSIDERADO UN CONDUCTOR DE CONEXIONEQUIPOTENCIAL.
F CONNEXION EQUIPOTENTIELLE
Ce raccordement, prévu par certaines normes, permet d'éviter lesdifférences de niveau de potentiel électrique entre les masses desappareils installés dans une même pièce.Cet appareil poss de sous sa base d’une borne servant pour la connexiond’un conducteur externe équipotentiel.Une fois terminée l’installation, il est NECESSAIRE d’effectuer ce type deconnexion:- utiliser un conducteur ayant une section nominale conforme aux
normes en vigueur;- relier à la borne (voir figure) et l'autre extrémité aux masses des
appareils adjacents.Le non-respect de cette norme de sécurité libère le fabricant de touteresponsabilité en cas de panne ou de dommages causés aux personnesou aux choses.N.B.: NE PAS RELIER A LA TERRE DE L’INSTALLATION DEDISTRIBUTION ELECTRIQUE CAR LE CONDUCTEUR DE TERRE D’UNCABLE D’ALIMENTATION N’EST PAS CONSIDERE COMME ETANTUN CONDUCTEUR DE CONNEXION EQUIPOTENTIEL.

CHECK-UP FUNCIONAMIENTOVerificar las condiciones para un buenfuncionamiento:
1) ENLACE HIDRAULICONo deben verificarse pérdidas en las conexiones o en las tuberías.
2) FUNCIONAMIENTOHermeticidad de la válvula contra el rechupe (anterechupe).Presión en caldera y del ejercicio correspondiente a los valoresnormales.Funcionamiento correcto del presóstato.Funcionamiento correcto del auto-nivel.Correcto funcionamiento de las válvulas de expansión.Comprobación de la erogación de agua del grupoComprobación de las dósisComprobación de la temperatura de erogación de agua caliente.Comprobación de las dósis del molido y del funcionamiento del molinillo.
CHECK-UP FUNCIONAMENTOVerificar as condições necessária para se obter umbom funcionamento:
1) LIGAÇÃO DA ÁGUAAusência de perdas
2) FUNCIONAMENTOVedação da válvula "anti-chupagem"Pressão da caldeira e de funcionamento correspondentesmaosvalores normaisPerfeito funcionamento do pressostatoPerfeito funcionamento do auto-nivelPerfeito funcionamento das válvulas de expançãoControle da saida de água do grupoVerificar as dosesControle temperatura do fornecimento de água quenteControle da dose de café moido e do funcionamento do moínho decafé
RUNDUM-ÜBERPRÜFUNG FUNKTIONSTÜCHTIGKEITÜberprüfen Sie, ob die Bedingungen für eineeinwandfreie Funktionstüchtigkeit gegeben sind:
1) WASSERANSCHLUSSkeine Austritte bei den Anschlüssen und Leitungen vorhanden.
2) BETRIEBDichtigkeit des RuecksaugschutzventilsKessel- und Betriebsdruckwert entsprechen den NormalwertenEinwandfreie Funktion des DruckschaltersEinwandfreie Funktion des WasserniveaureglersEinwandfreie Funktion der ÜberdruckventileÜberprüfung der Soll-Wasserausgabe aus der Ausgabe-GruppeÜberprüfung der DosiermengenÜberprüfung der Kaffeepulver-Dosiermengen und derFunktionstüchtigkeit der Kaffeemühle
Installazione - Installation - Installation - Installation - Instalación - Instalação
ICHECK UP FUNZIONAMENTO Verificare le condizioni per un buon funzionamento
1) ALLACCIAMENTO IDRAULICOAssenza di perdite dagli allacciamenti o dai tubi.
2) FUNZIONAMENTOTenuta valvola antirisucchioPressione in caldaia e d’esercizio rispondenti ai valori normaliCorretto funzionamento del pressostatoCorretto funzionamento dell’autolivelloCorretto funzionamento delle valvole di espansioneVerifica dell’erogazione di acqua dal gruppoVerifica dosiVerifica temperatura di erogazione acqua caldaVerifica della dose di macinato e della funzionalità del macinacaffé
CHECK-UP OPERATIONSFor correct operation, check these conditions:
1) HYDRAULIC CONNECTIONAbsence of leaks from the connection or from the tubes.
2) OPERATIONAntisuction valve sealBoiler pressure and operating pressure in conformity with normalvaluesCorrect functioning of the pressurestatCorrect functioning of the autolevelCorrect functioning of the expansion valveCheck of the water output of the groupDose checkTemperature check of the hot water outputCheck of the ground doses and of the functioning of the coffeegrinder
GB
FCHECK-UP FONCTIONNEMENTVérifier les conditions pour un bon fonctionnement
1) RACCORDEMENT HYDRAULIQUEAbsence de pertes des raccords ou des tuyaux.
2) FONCTIONNEMENTTenue valve anti-remousPression en chaudière et de fonctionnement répondant aux valeursnormalesFonctionnement correct du pressostatFonctionnement correct des valves d’expansionVérification du débit d’eau du groupeVérification des dosesVérification de la température du débit d’eau chaudeVérification des doses de moulu et du bon fonctionnement du moulinà café
D
E P

!!
!
!ATTENTION: AFTER INSTALLING THE MACHINEAND BEFORE STARTING TO OPERATE IT, CLEANALL THE INTERNAL COMPONENTS AS DESCRIBEDBELOW:
COFFEE DISPENSERS:- Connect the (empty) filter-holders to the dispenser units.- Dispense water from each dispenser for about one minute.
HOT WATER:- Dispense hot water repeatedly (using the relative command) until at
least 6 liters of water have been dispensed from the 2-groupmachine, 9 liters of water from the 3-group machine and 12 litersfrom the 4-group machine.
STEAM:- Allow the steam to flow through the nozzles for approximately one
minute, using the appropriate commands.
NOTE: See the instructions in the USE and MAINTENANCE MANUALfor dispensing water, hot water and steam.
ACHTUNG: IST DIE AUFSTELLUNG ERFOLGTMÜSSEN DIE INNEREN BESTANDTEILE GESPÜLTWERDEN, BEVOR DIE MASCHINE IN BETRIEBGESETZT WIRD. MAN MUß DABEIFOLGENDERMAßEN VORGEHEN:
FUNKTIONSEINHEITEN:- Die Filterhalter in die Einheiten einrasten (ohne Kaffee).- Aus jeder Einheit etwa 1 Minute lang Wasser ausströmen lassen.
WARMES WASSER:- Wiederholt (über den entsprechenden Steuerbefehl) Heißwasser
austreten lassen, bis bei Maschinen mit 2 Abgabeeinheitenwenigstens 6 Liter, bei Maschinen mit 3 Abgabeeinheiten wenigstens9 Liter und bei Maschinen mit 4 Abgabeeinheiten wenigstens 12Liter abgegeben wurden.
DAMPF:- Führen Sie den Zyklus zur Wasserdampfabgabe etwa eine Minute
lang durch, indem Sie wiederholt die entsprechenden Tasten drücken.
Nebenbemerkung: In dieser Gebrauchs- und Wartungsanleitung wirderklärt wie man das Wasser, bzw. das warmeWasser oder den Dampf ausströmen läßt.
ATTENTION: UNE FOIS TERMINÉE L’INSTALLATIONET AVANT DE COMMENCER À UTILISER LAMACHINE, EFFECTUER UN LAVAGE DESCOMPOSANTS INTERNES EN SUIVANT LESINDICATIONS REPORTÉES CI-APRÈS.
GROUPES:- fixer les porte-filtres aux groupes (sans café);- faire couler l’eau par chaque groupe pendant 1 minute environ.
EAU CHAUDE:- Débiter de façon répétée de l’eau chaude (en enclenchant la
commande correspondante) jusqu’à ce que vous ayez prélevé aumoins 6 litres d’eau par machine à 2 groupes, 9 litres par machine à3 groupes, 12 litres par machine à 4 groupes.
VAPEUR:- Faire sortir la vapeur des tuyaux pendant environ une minute, en
utilisant ses propres touches de commande.
N.B.: pour l’émission de l’eau froide ou chaude ou de la vapeur, voirles instructions reportées sur le MANUEL D’UTILISATION ETD’ENTRETIEN.
!
ATENCION: UNA VEZ TERMINADA LAINSTALACION, ANTES DE COMENZAR ELTRABAJO EFECTUAR UN LAVADO DE LOSCOMPONENTES INTERNOS SIGUIENDO LASINSTRUCCIONES MENCIONADAS ACONTINUACION.
GRUPOS.- Enganchar los portafiltros a los grupos (sin café)- Erogar agua de cada grupo durante cerca de 1 minuto.
AGUA CALIENTE:- Abrir el agua caliente de forma continua, accionando el mando
correspondiente, hasta sacar al menos 6 litros de agua de la máquinaa 2 grupos, 9 litros de la máquina a 3 grupos, 12 litros de la máquinaa 4 grupos.
VAPOR:- Erogar vapor de las lanzas durante aproximadamente un minuto,
usando los mandos correspondientes.
NOTA: para efectuar la erogación de agua, agua caliente y vapor verlas instrucciones en el MANUAL DE USO Y MANUTENCION.
F D
ATTENZIONE: TERMINATA L'INSTALLAZIONEPRIMA DI INIZIARE IL LAVORO ESEGUIRE UNLAVAGGIO DEI COMPONENTI INTERNI SEGUENDOLE ISTRUZIONI SOTTOINDICATE:
GRUPPI- Agganciare i portafiltri ai gruppi (senza caffè).- Eseguire erogazioni per circa un minuto, per ogni gruppo.
ACQUA CALDA- Erogare ripetutamente acqua calda (azionando il relativo comando)
sino a prelevare almeno 6 litri di acqua per macchina a 2 gruppi, 9 litriper macchina a 3 gruppi, 12 litri per macchina a 4 gruppi.
VAPORE- Erogare vapore dalle lance per circa un minuto, usando i relativi
comandi.
NB. per eseguire le operazioni sopra riportate vedere le istruzioniriportate nei capitoli EROGAZIONE.....
I GB
E
!
ATENÇÃO: UMA VEZ TERMINADA A INSTALAÇÃODA MÁQUINA, ANTES DE INICIAR O TRABALHOPROCEDER À LAVAGEM DO INTERIOR SEGUINDOAS INSTRUÇÕES A SEGUIR INDICADAS.
GRUPOS:- Prender o manípulo dos filtros aos grupos (sem café).- Mandar sair água de cada grupo durante cerca de 1 minuto.
ÁGUA QUENTE:- Distribuir mais vezes água quente (accionando o respectivo co-
mando) até levantar pelo menos 5 litros de água para a máquina de2 grupos, 8 litros para a máquina de 3 grupos, 10 litros para amáquina de 4 grupos.
VAPOR:- Mandar sair vapor dos esguichos por cerca de um minuto, utilizando
os comandos específicos.
NB: para proceder à distribuição de água, água quente e vaporconsultar as instruções contidas no MANUAL DE UTILIZAÇÃO EMANUTENÇÃO.
!P
Installazione - Installation - Installation - Installation - Instalación - Instalação

��������������
����������� ������ ����������������� ������������������������������������������������������������������������������������������������������ ����������������������������������������������� ��������� !���������������������""�������������������������� ���""����� ��������"�# $% �������������# ����������������&������ ����������# �� ��� ����������������������
����������������� ������� �!��"������������������� ����!�����#�"��������#$���%�!������������� ������ ���&&'����('�$#��������������)���*
�""�����������'�� ()*)+%� ()*)+)� ($,--.+%� ($,--.+)+%.�/�������# (..,%0� ($%,,,+-� ($%,,,+0� ($,--.+)+1.
��������� ������������� ��� ������������������ ��������������������������������������������������������������2�������"�����������������3����������������������"��������������������������������������������������������"�����������������������������������4���5�����
�������������������� �������
+���
/������������ )��� %--6� ����7���� %% %1�.
��$������)�*
��'���&�!'�,����
+���
4���8������� %)��� %--6� ���� ,�$. ) -
-.�/�����0����"��
��'���&�!'�,����
��$�����)�*
�""�����������# &��������/�9/&���'����:1;�:*.
/��������""������������# # 9�����'���%1�<������2��3�=���
���# ,% %% ),,-
/�������#
���
�����
����� �������
�����������
���������������������
������������������
����������������������������
��������������������
�������
���� ����
����������!����������
��'���&
��'���&

EnglishEnglish
“Before using the machine make sure that:the main electricity supply ON/OFF switch is ON;the water supply and water softener taps are open .”
Electric switching onTurn the main switch (1) to position 1.The boiler is filled until the set level is reached.Turn the main ON/OFF switch (1) to position 2.“Heating” now begins.
Daily Switch-On
!
At the end of the day, turn the machine OFF by turning the main ON/OFF switch (1) to position 0.
Heating phase
While awaiting for the machine to be ready for use, insert the filter baskets(10) in the groups.Do not cover the cup warmer with cloths to prevent over-heating of themachine.
When the pressure gauge (14) indicates normal working pressure, themachine is ready to be used.
Delivery of the coffee
1. Unhook the filter-holder (10) from the group.
2. Place the grounds in the grounds drawer.
3. Fill the filter with a dose of ground coffee.
4. Level out with the coffee press.
5. Insert the filter-holder (10) into the group ensuring it that the gasketprovides a good seal.
6. Place the cups (or cup) under the dispensing spouts.
7. Raise the lever (2) of the group to a vertical position.From this moment, no coffee will be issued for 5-6 seconds. Thisis the time required for the pressure to reach pump delivery headvalue. Infusion occurs at this time, i.e. the preliminary “cooking” ofthe coffee. Dispensing commences at the end of the infusion, duringwhich the coffee flows out continuously. Once the required quantityof coffee has been obtained, dispensing is stopped by replacingthe lever (2) in the horizontal position.
14
2
10
1
01 2

���� ����
��������������
��������� �����������
9$�� ��$�����#�%������5��$���#����#��%����� �������������������������#���8��"��$��5���������$��/�����������"��#���������
,&""&���-.��!/&"�#�0&-.�0�-�#�12&���-.��$��1�"�2�#3&4��-�59$�#�%��������#$�����/���#������6��%��$���������������������������������#��������5��8������������6�M��##��$��%������������� 6�����8�����������������D������$��21a�����������$��/������5��������������������� (7��
�-��$��&25��2&��M�������"�5��$��$��/��������6���5�#$����$�����������$�����$�������%�#��� ���**��� 8���� "�����6�� ��#���$��#��� ���**�������$��/����������������6��"����"��$��#��� ���� 9��������5��$��/�����������$��������$���#������� "���������#��"��$��%��5��%�#��� �/6���������8��/� 9����$����$��5�6� ��5���#�b�c��
&25��2&���./-�0�-�#M����$��"���/���5��%�"�"�� :�������"����$����"� ;��
��
�
���-&���$&"<�%/#�%#/-. �4/%%���=4�55144&�/>W#��������������5�B�������%��������"�����/�����$��$��%5�6� ��8��9$��"�������$��#��� �B���"�"�� 8��������$�� ��8���������6��"����"��$��#��� ���"� 9������$�����$�� ��8�%�����%�5�#�����#�4$����$����'������� ������%�%���$�$�#�/���� ���������$���� "��������#�#�%%�������6�$��$��#��"��$��%��5��%�#��� �/6���������8��/� 9���$����$��5�6� ��5���#�b�c��4$����$��#��� �B���"�"�� 8���#�������������'�����������������$�����$�65��$���#"���������������������$�
�/-�? �-� -.�� 4/�4"12&/�� /%� ��4.� 2-��$� �&25��2&��� 5.�2�@4"���� -.�� &�2&��� /%� -.�� 2-��$� �/AA"�� �2� %/""/02?�1#�� -.�� �/AA"�� -/0�#�2� -.�� 415� -#� � ���� 4�#�%1"" �4-&3�-�� 2-��$� �&25��2&��� �-� "��2-� /�4�'
� �
� �
���
� � �

���� ����
�
��������������������
�"���&���-.���&25��2�#�1�&-2
���������������� �������������������������������������������� ���������������
O� �������$�������"�����#8���5��$���/��#$�
�� 0����$��/���8������������$��%������$������
�� M��������$��%������$�������$�����������%���#��$�������� ��#�����%����������"�5����
�� ���������$��%������������������$������"�����"��%�� ���%�5��6���#�
� T� �����$��%����������������������$��#"����5��$���#"�����
�� T��#��/6���#"��#����5�����%�� ����$�����"�%����/������-�
������������
O� M����O��������%������5�������������#���%������������������#����/������"������
�� T� �����$��%�����#�%�� ��$��%������$�����#�
�� !������$��%�����#�����%������$�����#�����$��#��������%���������#���5�$���#�
�� T� ������6���#����#�5��$���#"������������#�����"����6��%�����5�����
� T�%����$��%�����#�����$��%������$�����#�� �8����#�����$����$��%������%�D���#"������#�����$����������"�#������
�-��$�����./-�0�-�#��&25��2&���5&5�W#������������#"������5�#$�5��$�$���5������� ��������6�����������#����"��#�����T��#������%���6�9���������$����#�����%��$��#��� ���**����%����5��$�#��#��"#<9�����$����**�����5���#��$����"����6���������%���6����������#��� ��#"��#������� ���#�������
#&5�5��T� �����$�����"�"���������� "������$�����������5��$���������5����
&24.�#���-��<1���$�������%��$��5��8������6��"������B����%�$���5�����������$����#�$�������8���� ��������6�����������#�����"��#����
�/� 0/#<W#�� �� #�%�� ����$� ���� ��������� "������#� 4.9=LW9� � ����� ���/��#���#���� ��������6�����������#�����"��#��������$��5��8������@�P��3������#"��6���'���#�������$��"�����#���#�
���������
4$����$�� ��$����$�#�����/�����#���%��� �����$���N$���#�� ���� ��� ��6� ��#�� ����� �� ��6�� �$�� ���������� "�����#� �#�� /�� 5�#$��� /�%���� �#��� �����������������$��%����5������#��������#<
�155" ��#/152.�#�����$��%�������������#�������$������"#� 5��$������%%����������#"��#�%�� ����$�����"�%������� ������
�/-�0�-�#
3�#"��#��$���5�������"������6� �#�����$������������� ����������������#���������#��%�5�����$����/������#"��#���%�� ��$�������"� ��$����������������#�%�� ��$�������"� ��$����
�-��$3�#"��#��#��� �%�� ��$��#��� �"�"��%����/�������� �������#�����$������������� ���#�

���� ����
�
GENERAL
�.��$��1%�4-1#�#��&24"�&$2��""�"&�!&"&- �%/#���$���2�-/�&-�$2�/#5�#2/�2��1��-/�&$5#/5�#�12��/#��1��-/�-.��4/%%���$�4.&���!�&��12���%/#�#��2/�2�/-.�#�-.���&-2�&�-������12�'
@�����5��8��$����%%��� ��$����5��$�5���$���#������8���%����
Cup-warming plate
M��������6���%%�����"#����"#��������##�#����/���#���������B�������5��$��$����%%��� ��$��������$����"5�� ����"�����
��#���� �$��� �$����%%�����"#������� "�����6���������/�%����"�������$� �����$����"5�� ����"�����
@����$����/B���#�#$����/��"����������$����"5�� ����"�����
����#� /%��1#�2
3������"������$��$���#������$���"���#��%��$��/��6����#������$����%%����#���/������"����#��������������$��#��� �����$���5�������**��#�
��#�����$����$�� ��$�����#�����$�������/6��$����������"��#��#�5$�$��������/������#�������������#����������#��
MAINTENANCE AND REPAIR
.%� �$�� ��$�������#�����%����������������6��#5���$�����%%�� ������%%� �$� ����#5���$�����������$��#�������������
��" �B1�"&%&��������1-./#&2���2�#3&4&���5�#2/���"�2./1"��!��4�""��'
2��/�" �/#&�&��"�25�#��5�#-2'
��&�-����4���4-&3&-&�2�5�#%/#$���! �1�B1�"&%&���5�#2/���"�$� C�/5�#�&2��-.��2�%�- �/%�-.��$�4.&��'
.%��$�������������/����#��� ������#5���$��%%��$�� ��$���������""�6����$��#�����������"��� ����%�������"���� ����
Regeneration of the Water Softener
9$�� ��$���� �#��/����#�������5��$������������#���5�����#�%������
9$��5����� #�%������ �6�/���%� ��%%������ �6"�#��5��$� ��%%������ ��#����"������#�������%%������"�����#��%��������6�
9$����#��#�����������������/6������������#��8���$���#�������#����"�#�����#����$��5�����#�%������
.%��$����������������%��$����#��#��#����� ��������$����������#�����������#��"�#��#�5����%�� �5$��$�"�����##����6�������#���$�� ��$���7#��%%������6��������#�%�������#������� "�����6�/���8���
9$�����������������������#����� ��$����$����%� �6�/��%���������$���#��������#�"��������5��$��$���'��" ����
.%���������������#�"��%�� �������$����������#���$�� ��$�����#� ������������������5��8�������������#�
�.�� %/""/0&���$��21#�2��#�� &��&25��2�!"�� %/#��21#&���/5�#�-&/��"�����%1�4-&/��"�2�%�- ?
� �/$5" �0&-.��""�-.��$��1%�4-1#�#D2�&�2-#14-&/�2'
� ��21#��-.�-�25�4&�"&A���-�4.�&4&��2�5�#&/�&4�"" 3�#&% �-.�-�-.��5#/-�4-&/����3&4�2��#��&�-�4-����-.�-��""�-.��2�%�- ���3&4�2�%1�4-&/��4/##�4-" �=-.�%-�&�25�4-&/��2./1"��!��$����0&-.&��7� ��#2����21!2�B1��-" �/�4�� ��#" >'
Danger of burns9$������#� ��8���5��$��$�#�#����/��� ��$����#��-� 4�#�� 2./1"��!�� -�<���0.��� &�� -.�3&4&�&- �/%�-.�2���#��2'
���������=���#��%����������=��##��L/��%�;�$����� ������%�����$��������� ������"��%����������
�
�������
������������������.��� -.��$�4.&��� #�$�&�2� 1��--������ %/#�� "/��� 5�#&/�� /%� -&$�� =�-� �&�.-@� �1#&��� -.�0��<" � 4"/2&��� �� � /#� �1#&��� ./"&�� 2>� -.�%/""/0&��� /5�#�-&/�2� 2.�""� !�� 5�#%/#$��?� ��$/3�� -.�� 5"1�� /#� 20&-4.� /%%� -.��$�&�
20&-4.'� �"/2�� -.��0�-�#� -�5'� �"/2�� -.�� ��2� -�5'
�/��4/$5"&��4��0&-.� -.�2�� 2�%�- �$��21#�2�E/��#�-�2� -.��$��1%�4-1#�#� %#/$��""� "&�!&"&- %/#�$�"%1�4-&/�2� /#� ��$���� -/� 5�#2/�2� /#&-�$2'
�

EnglishEnglish
Every group is independently thermoregulated, with its own separate“THERMOSIPHON CIRCULATION”.The following devices are found on the front of the machine wherethe filter-holder is inserted:- the flow block (M)- the spout (N)- the under cup gasket (P)On the rear are the water entry and exit perforations (A and B respectively)for the themosiphon circulation water and for the coffee.The three group valves perform the following functions:1. The dispensing valve (E). When the group is operating this valve
is open and allows the passage of water to the ground coffee.The valve is closed when the group is not operating and allowsthe thermosiphon circulation.
2. Infusion valve (I). Determines the “cooking” of the coffee thanksto a play on the pressure.
3. Drainage valve (S). This valve is closed during dispensing. Itopens and drains the group at the end of the dispensing,controlled by the command lever cam wheel.
HOW THE GROUP FUNCTIONSA. Group at rest.
1. Group command lever (2) - horizontal.2. Thermosiphon circulation - the water circulates in the changer
around the central head (G) .(metal tube), maintaining the groupthermoregulated.
3. Dispensing valve (E) - Closed.4. Infusion valve (I) - Kept open by the cam (C).5. Drainage valve (S) - Kept open by the cam (C).6. Filter-holder - Inserted and containing the previous coffee
grounds.7. Pump - Standstill.
B. Group in operation
1. Filter-holder - Inserted with freshly ground coffee.2. Group command lever (2) - Vertical.3. Pump - In operation.4. Dispensing valve (E) - Kept open by the cam (C).5. Infusion valve (I) - Closed.6. Drainage valve (S) - Closed.Group command lever (2) in vertical position acts on the cam shaft whichpresses on the microswitch button of the pump motor.
INFUSION TIME- The pressure in the thermosiphone circulation reaches the pump
delivery head value (8 ÷ 9 bar).- The water under pressure enters the chamber above the nozzle (H)
via the 4 perforations in the central head.- Nozzle (H) permits the passage of a small calibrated quantity of water
into the group (cam chamber, dispensing chamber, ducts and spaceon the ground coffee) which gradually fills up until the level of pressureis reached that opens the infusion valve (I).
- At this point, the infusion chamber (L) is filled.- While the infusion chamber is being filled, the air contained therein
has contact with the ground coffee. Steam is formed in this air bubble.- The entire group is now at infusion pressure and remains at this level
until the entire infusion chamber is filled. At this point, the pressurerises to reach the pump delivery head value.
- Completion of the infusion requires about 6 seconds from the momentthe group command lever (2) rises. This is the “INFUSION PERIOD”.
- During this period hot water comes into contact with the ground coffeeat a pressure that is not sufficient to overcome the resistance.
- The water pressure gradually increases on the ground coffee, causingits preliminary swelling and “cooking”.
The Group
COFFEE DISPENSING- At the end of the infusion period, i.e. when the water pressure on
the ground coffee has reached the pump delivery head, dispensingof the “coffee cream” commences and continues until the group ishalted. Dispensing of a normal coffee must last about 25 seconds.
- These times are based on the type of coffee (blend) used, its correctroast level and above all to its grinding degree.
NOTE: The closure of the group must be made quickly so that the cushionof steam that forms upon contact with the coffee grounds can contributeto an effective drainage from the group and consequently the drying ofthe coffee grounds.Upon completion of the dispensing, the group drains automatically toremove the pressure and thus making it safe to remove the filter-holder.
C. DISPENSING COMPLETION
1. All the group components return to the point A position.2. The opening of the infusion valves (I) and drainage valves (S)
via the cam (C) empties the spaces under the dispensing valve.
H
A
B
G
E
2
C
I
SL
M
N
P

EnglishEnglish
Defects - Malfunctions
PROBLEM SOLUTIONCAUSE
Direct action by the customer
Before calling service personnel, to avoid useless expense, check whether the machine problem corresponds to one of the cases listed below.
Leaking from the filter-holder rim (10). Clean using the special brush provided.Underpan gasket dirty with coffee.
Coffee dispensing time too short. Use a finer grind.Use new coffee.
Coffee ground too coarse.Coffee too old.
Coffee drips out of machine. Clean.
Use a coarser grind.
Filter holes blocked or filter-holder (10)outlet hole dirty.Coffee ground too fine.
Loss of water under the machine. Clean.Clean.
Discharge well clogged up.Discharge pan hole blocked.
Defects - Malfunctions
Interventions by a specializes technician
PROBLEM COMMENTSCAUSE
Infusion time too shortRapid dispensing.Coffee very bland, without cream.(Same defects on all groups).
Infusion time very short.Rapid dispensing.Coffee very bland, without cream.(Same defects on all groups).
Low coffee yield.Slow dispensing.Coffee cold and bland.
Fast dispensing, coffee bland.Pressure gauge pump indicates pressuregreater than 9 bar.
Low coffee yield.Fast dispensing.Coffee hot and bland.
Coffee cold, bland and without cream.Normal infusion and dispensing times.
Coffee cold in the morning at start of work.
Dispensing slow.Coffee burnt and cold.Cream very dark, with tendency of formationof an “eye”.
This defect is associated to other secondarysymptoms which may be caused by a numberof other causes as per the previous points.Do not adjust the machine until all othercauses have been excluded.
The capacity of the group without filter mustbe 100 cm³ in 8 ÷ 10 seconds.
If the group is operated without the filter-holder, thin, isolated jets will be dispensedinstead of one central jet.
Coffee grounds in cup.
Move group to and fro to remove air bubble.When touching the water tube it is warm nearto the machine.
Pressure gauge calibrated with values that aretoo low.
See switching on instructions.
Coffee grounds too course.Old coffee.
Group nozzle widened through use.OR gasket in cone-shaped section leaks.Infusion valve remains openFilter edge broken.
Spout dirty.
Pump out of calibration.By-pass valve blocked.
Filters with perforations widened.Coarse grinding.
Air bubble in thermosiphon circulation.Check valve does not hold (with lowpressure in system).Heat exchangers emptied.Heat exchanger defective (shows pressureshigher than real values).
Air in boiler.
Coffee grounds too fine.Low pressure in pump.Mesh filter above spout dirty.Spout partially blocked.

EnglishEnglish
Defects - Malfunctions
Interventions by a specializes technician
PROBLEM COMMENTSCAUSE
Dispensing slow, coffee burnt.Pressure gauge pump lower than 9 bar.
Drainage tube leaks when group is at rest(defect only on one group).Coffee dispensed normally.
Group at restDispensing valve gasket fails rapidly.Water leak from the drainage tube.Coffee dispensed normally.Defect on all groups.
Group at rest.Continuous loss of cold water in the drainagetray.Groups do not dispense any more coffee andthe pressure gauge pump shows low values.
Group in operation.Drainage tube leaks.No coffee.
Group in operation.Loss of cold water in drainage tray.Coffee bland.Dispensing slow.
Group leaks at cam shaft.
Difficult to move the groups.
Machine does not go into pressure or reachespressure level slowly.
Groups function normally.Pressure gauge pump does not give correctpressure reading (8 ÷ 9 bar).
Pump does not reach pressure level.No dispensing.
Pump noisy.
If this defect is not corrected immediately, thewater softener runs out long before the expirytime, with consequent scale deposit.
If this defect is not corrected immediately, thewater softener runs out long before the expirytime, with consequent scale deposit.
If this defect is not corrected immediately, thewater softener runs out long before the expirytime, with consequent scale deposit.
Remove the glands taking care not to markthe housings.Do not use tools made of steel or other hardmaterials.Before remounting, clean the shaft thoroughly,especially the grooves
Steam taps leak:
Pump out of calibration.Pump with reduced capacity.
Dispensing valve does not hold.
Expansion valve with calibration too high(above 12 bar).
Expansion valve remained open.
Drainage valve does not hold.
Expansion valve out of calibration (opens atless than 9 bar).
Leak on the two glands.
Cam profile worn.
No electricity.Automatic switch gone off.Resistances burned.Electric circuit to resistance interrupted.No water in boiler.
Pressure gauge defective.
Motor does not work:- No electricity.- Capacitor burnt.- Microswitch burnt.- Motor burnt.Check valve pump open.By pass valve completely opened.
Pump defective.No water in system.

Smontaggio - Disassembly - Demontage - Abmontierung - Desmontaje - Desmontage
C
CSmontaggio pannelli superioreSvitare le viti (C) e rimuovere il pannello.
Disassembly of top panelsUnscrew screws (C) and remove the panel.
Démontage des panneaux supérieursDévisser les vis (C) et retirer le panneau.
Demontage der oberen PaneeleLösen Sie die Schrauben (C), und nehmen Sie das oberePaneel ab.
Desmontaje panel superiorDestornillar los tornillos (C) y quitar el panel.
Desmontagem dos painéis superioresDesaparafusar os parafusos (C) e remover o painel.
I
GB
F
D
E
P
B
Smontaggio piano scaldatazze e vetrinettaAllentare i fissaggi (B) e rimuovere il piano.
Disassembly of the cup warmer tray and glass panelsLoosen fasteners (B) and remove the tray.
Démontage du plan de chauffe-tasses et de petitevitrineDesserrer les fixages (B) et retirer le plan.
Demontage der Abstellfläche zur TassenvorwärmungLösen Sie die Feststellklemmen (B), und nehmen SieAbstellfläche zur Tassenvorwärmung ab.
Desmontaje bandeja calienta-tazas y vitrinaDestornillar las fijaciones (B) y quitar la bandeja
Desmontagem do tabuleiro para aquecer as chávenase da montraAfrouxar os parafusos de fixação (B) e remover o tabuleiro.
F
GB
I
D
E
P
A
Smontaggio pannelli lateraliSvitare la vite (A) e rimuovere il pannello.
Disassembly of side panelsUnscrew screw (A) and remove the panel.
Démontage des panneaux latérauxDévisser la vis (A) et retirer le panneau.
Demontage der SeitenpaneeleLösen Sie die Schrauben (A), und nehmen Sie dasSeitenpaneel ab.
Desmontaje paneles lateralesDestornillar el tornillo (A) y quitar el panel.
Desmontagem dos painéis lateraisDesaparafusar o parafuso (A) e remover o painel
D
E
P
F
GB
I

Smontaggio carrozzeria
1 - Svitare le manopole (D) ai 4 angoli della carrozzeria.2 - Estrarre la carrozzeria dal retro, prendendola dai duelati inferiori e facendola ruotare leggermente verso l'alto.3 - Scollegare il connettore del pannello illuminato.4 - Appoggiare la carrozzeria con cautela sui 4 prigionieriverso terra, lontano dalla zona di lavoro.5 - Alla fine della riparazione, seguire le istruzioni in senso inverso da 5 a 1.
IDisassembly of the framework
1 - Unscrew the knobs (D) at the four corners.2 - Remove the framework from the rear, holding it by thetwo lower sides and slightly rotating towards the top.3 - Disconnect the connector of the lighted panel.4 - Place the framework down carefully on the the 4 studbolts towards the ground, away from the work area.5 - Upon completion of the repair, follow the instructions from5 to 1.
GB
Smontaggio - Disassembly - Demontage - Abmontierung - Desmontaje - Desmontage
Desmontaje revestimiento
1 - Destornillar los pomos (D) situados en los 4 ángulos de lacarrocería.2 - Quitar la carrocería de la parte posterior, cogiéndola delos dos lados inferiores y haciéndola girar ligeramente haciaarriba.3 - Desconectar el conector del panel iluminado.4 - Apoyar la carrocería con cautela su los 4 pernosprisioneros hacia tierra, lejos de la zona de trabajo.5 - Al final de la reparación, volver a realizar las mismasinstrucciones pero desde el punto 5 al 1.
EDesmontagem da estrutura1 - Desaparafusar os manípulos (D) colocados nos 4 cantosda estrutura.2 - Extrair a estrutura a partir da parte traseira, pegando nelanos dois lados inferiores e fazendo-a rodear levemente paracima.3 - Desligar o conector do painel iluminado.4 - Apoiar a estrutura cuidadosamente sobre os 4 parafusosprisioneiros para terra, longe da zona de trabalho.5 - No final da reparação, seguir as instruções em sentidocontrário de 5 a 1.
P
Démontage de la carrosserie
1 - Dévisser les poignées (D) aux 4 angles du châssis2 - Extraire le châssis du derrière en le prenant par les deuxCôtés inférieurs et en le faisant pivoter légèrement vers lehaut3 - Débrancher le connecteur du tableau illuminé4 - Poser soigneusement le châssis sous les 4 prisonniersvers le sol, loin de la zone de travail5 - A la fin de la réparation, suivre les instructions de 5 à 1.
FDemontage des Gehäuses
1 - Schrauben Sie die Drehschrauben (D) an den 4 Eckendes Gehäuses ab.2 - Nehmen Sie das Gehäuse von der Rückwand ab, indemSie es an der unteren Kante anfassen und leicht nach obendrehen.3 - Ziehen Sie den Steckverbinder von der beleuchtetenTafel ab.4 - Setzen Sie das Gehäuse vorsichtig mit den 4Feststellbolzen auf dem Boden in einem angemessenenAbstand zum Arbeitsbereich ab.5 - Führen Sie die o.a. Arbeitschritte nach Ausführung derReparatur in umgekehrter Reihenfolge aus.
D
DD
DD

Regolazioni - Setting - Reglages - Einstellungen - Regulaciones - Regulações
+-
A
A
IPRESSOSTATOA - Vite di regolazione pressione caldaia
GBPRESSURESTATA - Screw for adjusting the boiler pressure
FPRESSOSTATA - Vis de réglage pression chaudière
DDRUCKSCHALTERA - Kesseldruck-Einstellschraube
EPRESSOSTATOA - Tornillo regulación presión caldera
PPRESSOSTATOA - Parafuso de regulação pressão caldeira
IMACCHINA EQUIPAGGIATA CON TERMOSTATO DISICUREZZAIn caso di intervento del termostato, riarmare
GBMACHINE EQUIPPED WITH SAFETY THERMOSTATIn case of thermostat intervention, switch on again
FMAQUINE EQUIPÉE DE THERMOSTAT DE SURETÉEn cas d'intervention du thermostat, brancher de nouveau
DMIT SICHERHEITSTHERMOSTAT AUSGESTATTETEMASCHINEFalls der Thermostat ausgelöst wird, ihn wiedereinschalten
EMAQUINAS EQUIPADAS CON THERMOSTATO DESEGURIDADEn caso de intervención del thermostato, reencender de nuevo
PMAQUINA EQUIPADA COM THERMOSTATO DESEGURANÇAEm caso de intervenção do thermostato, reacender de novo
PBY-PASSA - Parafuso de regulação pressão bomba
EBY-PASSA - Tornillo regulación bomba
DBY-PASSA - Pumpendruck-Einstellschraube
FBY-PASSA - Vis de réglage pression pompe
GBBY-PASSA - Screw for adjusting the pump pressure
IBY-PASSA - Vite di regolazione pressione pompa

Regolazioni - Setting - Reglages - Einstellungen - Regulaciones - Regulações
+ -
A
REGULACIÓN CIRCULACIÓN TERMOSIFÓNPara regular la temperatura del grupo, utilizar el pomo de lasiguiente forma:- en sentido contrario a las agujas del reloj (+) para grupo
más caliente;- en el sentido de las agujas del reloj (-) para grupo más frío.A – índice de referencia: regulación estándar = 8.
E
REGULAÇÃO DA CIRCULAÇÃO DO TERMOSIFÃOPara regular a temperatura do grupo, actuar sobre o manípulocomo se segue:- em sentido contrário aos ponteiros do relógio (+) para o
grupo mais quente;- em sentido horário (-) para o grupo mais frio.A- Índice de referência: ajuste standard = 8
P
EINSTELLUNG DES WÄRMEUMLAUFKREISESGehen Sie zur Einstellung der Betriebstemperatur der Einheitwird folgt vor:- Drehen Sie den Regler zur Erhöhung der Betriebstemperatur
gegen den Uhrzeigersinn (+);- Drehen Sie den Regler zur Reduzierung der
Betriebstemperatur im Uhrzeigersinn (-);A - Bezugsmarke - Standardeinstellung: 8
D
FRÉGLAGE DU CHAUFFAGE À THERMOSIPHONPour régler la température du groupe, agir sur la poignéecomme suit:- dans le sens contraire des aiguilles d’une montre (+) pour le
groupe le puls chaud;- dans le sens des aiguilles d’une montre (-) pour le groupe le
plus froid.A - index de référence: tarage standard: 8.
IREGOLAZIONE CIRCOLAZIONE TERMOSIFONICAPer regolare la temperatura del gruppo, agire sulla manopolacome segue:- in senso antiorario (+), per gruppo più caldo;- in senso orario (-), per gruppo più freddo.A - Indice di riferimento: taratura standard = 8
GBSETTING THE THERMOSIPHON CIRCULATIONTo set the group temperature, turn the knob as follows:- Anticlockwise (+), for a warmer group.- Clockwise (-), for a colder group.A - Reference index: standard calibration - 8

�������������� �������������� ����������������� ��������������������� �� ����������������� ����������������

� �������������������� ����������������� ������������ �������������� �������� ������������ ������������������ ������������ ������������������ ������������������������� ����������������� ��������� ���������������� ��������������
����������� � ����������������������������!�������������������"
�������� �������� ��������� ��������� ��������� ��������
� ����������� #������������������� $���������� #�������� ����� �������� ������ ���������� �������������� ��������������� %������������������� %��������������� ���� ���������������� $������������������ $�������������!�����
��������&�� � ���!������������������
���!��������� ���'"
(()(*(+,-,*.).(../0/-/*0+
�������������
�
� ������������������ 1��2���������3����� ���������� ��������4����� ������ ����������� ����������������� ����������� ������������������� ����������5������������� ���������������� 1��2������� ����������������������������
$���������� � ����������������3�������������!���������������������"
(()(*(+,-,*.).(../0/-/*0+
��������
� 6������������� 7�������&��������� ����&��������� ����!8����� �����������9����������� ������������ ������&����������� :���&�;������ 6�����������6���&������ �������������6���&������ ������������������� $�� 7����� $�� �������� ���������������
:����� � �&�������������7������������������������������������������������"
(()(*(+,-,*.).(../0/-/*0+
�������
��������
(()(*(+,-,*.).(../0/-/*0+
�
� ������������5�5���� �������������������<��� ����������� ������������ ������� ������������ ������������������ ����������� �5��������������=��� ����������������<��������=��� ����������������� ��������� ������������������������������
$���5����� � �����������<�5�<�>?������������!������������������"
(()(*(+,-,*.).(../0/-/*0+
�������
�
� ���������������� ����� �����@���� �����@���� ��������4����� �@���� ����������� ����������������� �����3������ ������A�������������� ����������5�������������� ���������������� ��������� ������������������@�����������
B����������� � �C���������������������������!����DE�����������"
(()(*(+,-,*.).(../0/-/*0+
�������

Circuito idraulico - Hydraulic circuit - Circuit hydrauliqueHydraulikplan - Circuito hidraulico - Circuito hidráulico
��
��
��
��
��

Legenda - Legend - Legende - Legende - Leyenda - Legenda
LEGENDAI
1234569
101112151819202122232627293132363738394041
= Manometro rete/pompa= Filtro per pompa= Pompa= Regolazione pressione pompa= Valvola non ritorno scambiatori= Valvola espansione= Caldaia= Valvola di sicurezza= Valvola anti-depressione= Gruppo erogatore= Valvola non ritorno caldaia= Rubinetto acqua calda= Valvola carico manuale= Perno esclusione elettrovalvola= Elettrovalvola livello= Strozzatura autolivello= Rubinetto vapore= Pressostato= Livello ottico= Manometro caldaia= Scambiatori di calore= Sonda autolivello= Valvola scarico= Valvola infusione= Valvola erogazione= Ugello infusione= Filtro ugello= Regolatore circolazione termosifonica
LEGEND GB
1234569
101112151819202122232627293132363738394041
= Pump pressure gauge= Pump filter= Pump= Pump pressure regulator= Non return valve (heat exch.)= Expansion valve= Boiler= Safety valve= Vacuum release valve= Coffee dispenser group= Boiler non return valve= Hot water tap= Water filling manual valve= Pin-tap for solenoid valve 21= Automatic filling solenoid valve= Automatic filling neck= Steam tap= Pressure switch= Level indicator= Boiler pressure gauge= Heat exchangers= Automatic level probe= Drain valve= Infusion valve= Dispensing valve= Infusion nozzle= Nozzle filter= Thermosiphon setup valve
D LEGENDE
1234569
101112151819202122232627293132363738394041
= Manometer Leitung / Pumpe= Pumpenfilter= Pumpe= Druckregler Pumpe= Rückschlagventil Wärmetauscher= Ausdehnungsventil= Heizkessel= Sicherheitsventil= Druckablaßventil= Abgabeeinheit= Rückschlagventil Heizkessel= Ventil Heißwasser= Ventil manueller Ablaß= Bolzen zum Ausschluß Magnetventil= Magnetventil Wasserstand= Drosselung elektronische Standkontrolle= Dampfventil= Druckwächter= Optische Standanzeige= Manometer Heizkessel= Wärmetauscher= Sonde elektronische Standkontrolle= Ablaßventil= Aufgußventil= Ventil Ausgabe= Aufgußdüse= Filter Düse= Regler Siphon-Wärmeumlaufkreis
F LEGENDE
1234569
101112151819202122232627293132363738394041
= Manomètre réseau/pompe= Filtre pour la pompe= Pompe= Réglage de la pression de la pompe= Valve non-retour des échangeurs= Valve d'expansion= Chaudière= Valve de sécurité= Valve anti-dépression= Groupe de débit= Valve de non retour de la chaudière= Robinet eau chaude= Valve de chargement manuel= Pivot d'exclusion de l'électrovalve 21= Electrovalve niveau= Etranglement niveau automatique= Robinet de la vapeur= Pressostat= Niveau optique= Manomètre chaudière= Echangeurs de chaleur= Sonde niveau automatique= Soupape d'échappement= Soupape d'infusion= Soupape de débit= Buse d'infusion= Filtre pour la buse= Régleur circulation à thermosiphon
E LEYENDA
1234569
101112151819202122232627293132363738394041
= Manómetro red/bomba= Filtro para bomba= Bomba= Regulación presión bomba= Válvula de retención cambiadores= Válvula expansión= Caldera= Válvula de seguridad= Válvula anti-depresión= Grupo erogador= Válvula de retención caldera= Válvula agua caliente= Válvula carga manual= Perno exclusión electroválvula= Electroválvula nivel= Estrangulación autonivel= Válvula vapor= Presostato= Nivel óptico= Manómetro caldera= Cambiadores de calor= Sonda autonivel= Válvula de descarga= Válvula de infusión= Válvula de erogación= Boquilla de infusión= Filtro para boquilla= Regulador circulación por termosifón
P LEGENDA
1234569
101112151819202122232627293132363738394041
= Manómetro rede/bomba= Filtro para bomba= Bomba= Regulação da pressão na bomba= Válvula de não regresso permutadores= Válvula de expansão= Caldeira= Válvula de segurança= Válvula anti-depressão= Grupo distribuidor= Válvula de não regresso caldeira= Torneira da água quente= Válvula de carga manual= Pino de exclusão da electroválvula= Electroválvula nível= Estrangulamento autonível= Torneira do vapor= Pressóstato= Nível óptico= Manómetro caldeira= Permutadores de calor= Sonda autonível= Válvula de descarga= Válvula de infusão= Válvula de distribuição= Injector de infusão= Filtro do injector= Regulador circulação por termosifão

� ��
�� ��/ " � 9�����'����%1),,;)<������2�=3=���!�� -*)*, ,0 ;%��8 -*)*, .0 ;%;��� ����� �
�� ���������������������""������������������:����"�����������������������������������������'����������5�������������������������������������'��������"�������������� (������"����������"�������'����"�>�������������"����"�����������'���"���������������� ��/ " � ?��"��������� ��/ " � �������!����������������
� ��
�� ��/ " � 9�����'����%1),,;)<������2�=3=���!��#@-*+)+*, ,0 ;%��8#@-*+)+*, .0 ;%;��� ����� �
A�����BB�� �����B������������:�""�����������������C�:B���"���� �� �� ������� ����� ��� �8������� ��� "���� ��:�������� ��� ������������ �D�� ��8 ���������� �� "����E��������� ������"���������"�����������"��F�������B����"�B���"����B������:����������B�������� ��/ " � ?��"��������� ��/ " � �������!��� ����� �B����B�
�� ��/ " � 9�����'����%1),,;)<������2�=3=���!��#@-*+)+*, ,0 ;%��8#@-*+)+*, .0 ;%;��� ����� �
�� �����G� ���� ����H�����������������������"���������� �"�'�������� ��������� I����������� ����� ���"���������������������!���������������'��J���� ��� ����������� 9��J����������� ���� �� ������ !����� �������"��������I�������������������� ��/ " � ��������G������"��� ���� ���J�������������� ?��"��������� ��/ " � �����������&��������������
� �
�� ��/ " � 9�����'����%1),,;)<������2�=3=���!��#@-*+)+*, ,0 ;%��8#@-*+)+*, .0 ;%;��� ����� �
�� �����������������������"�����������������"�����������K��������L�����8����������������������"�M�����������'�� �������������� ������� � ��� ����������� ��� "��������B����� (������"��������"��������N���"�����������"����"������������"���������������� ��/ " � ?��"��������� ��/ " � ����K�!���� �������������K� ����������
�� ��/ " � 9�����'����%1),,;)<������2�=3=���!��#@-*+)+*, ,0 ;%��8#@-*+)+*, .0 ;%;��� ����� �
�� �� �������� �� ���� � ���� ������� � �� �������� �������������������������������������������������������� ������������ "��������� !���"�������������������������������"������������"�����"������������� ���������������������� ��/ " � ?��"��������� ��/ " � �������=������ ����� ��������
�� ��/ " � 9�����'����%1),,;)<������2�=3=���!��#@-*+)+*, ,0 ;%��8#@-*+)+*, .0 ;%;��� ����� �
�� ���������+�������������������������"��������K���������������8��F�����������5�M��������������OP����������������O����"�������� �����N���� (������"�������"������OQ�"����K�������'������"������"����������������'�OQ����������� ��/ " � ?��"��������� ��/ " � �������!������������� �Q� ����������

I FAEMA e il "SERVICE LINE"
Il servizio assistenza della società FAEMA, nell'intento di essere vicino ai SIGG. Clienti nella scelta dei prodotti per il miglior utilizzo della macchinada caffè, visualizza la linea:ECO LINE - Prodotti per la puliziaA) 4991-134458 liquido per i cappuccinatori;B) 4991-134682 in polvere per i gruppi, i portafiltri, le tazze da caffè;C) 4991-134681 bustine per i gruppi, i portafiltri, le tazze da caffè;D) 4991-134683 pastiglie per i gruppi nelle macchine superautomatiche.Per ordinare trasmettete il numero di codice al Vs. Concessionario.
FAEMA and the "SERVICE LINE"
The FAEMA Company's client service, the aim of which is to assure top coffee-machine performance for its clients at all times, also makesavailable its ECO LINE, a series of specific cleaning products expressly designed for this purpose.ECO LINE - Cleaning productsA) For cappuccino makers in liquid form 4991-134458;B) For dispensers, filter-holders, coffee cups in powder form 4991-134682;C) For dispensers, filter-holders, coffee cups in small envelops 4991-134681;D) For superautomatic-machine dispensers in tablet form 4991-134683.Order directly from your local distributor and refer to the particular item you require by its number, as shown above.
FAEMA et la "SERVICE LINE"
La service d'assistance de la société FAEMA, dans l'intention d'être à côté de ses clients, dans le choix des produits et en vue d'une meilleureutilisation de la machine à café, propose la ligne:ECO LINE - Produits de nettoyageA) 4991-134458 liquide pour les fouettes-lait;B) 4991-134682 en poudre pour les groupes, les porte-filtre, les tasses à café;C) 4991-134681 sachets pour les groupes, les porte-filtre, les tasses à café;D) 4991-134683 pastilles pour les groupes des machines tout-auto.Pour commander, transmettre le numéro de code à votre concessionnaire.
F
D FAEMA und die "SERVICE LINE"
Mit der Absicht dem Kunden bei der Produktwahl für den bestmöglichen Gebrauch der Kaffeemaschine beizustehen, weist der Kundendienst derFAEMA Gesellschaft auf folgende Produktlinie hin:ECO LINE - Produkte für die SäuberungA) 4991-134458 Flüssig für die Cappuccino-Bereiter;B) 4991-134682 in Pulverform für die Gruppen, die Filterhalter, die Kaffeetassen;C) 4991-134681 Tüten für die Gruppen, die Filterhalter, die Kaffeetassen;D) 4991-134683 Tabletten für die Kaffeegruppen der vollautomat Maschinen.Für eine Bestellung bitte dem Vertreter die Katalog-Nr. angeben.
E FAEMA y el "SERVICE LINE"
Con el deseo de facilitar a los Srs. CLIENTES la selección de los productos para el uso correcto de la máquina de café, el servicio de asistenciade la sociedad FAEMA les muestra la linea:ECO LINE - Productos para la limpiezaA) 4991-134458 líquido para los cappuccinadores;B) 4991-134682 en polvos para los equipos, los portafiltros, las tazas de café;C) 4991-134681 en sobres para los equipos, los portafiltros, las tazas de café;D) 4991-134683 en pastillas para los equipos de las máquinas superautomáticas.Para los pedidos, envío el número de código a su Concesionario.
P FAEMA e o "SERVICE LINE"
O Serviço de Assistência de empresa FAEMA, com a finalidade de aconselhar os Clientes na escolha dos produtos para a melhor utilização damáquina de café, apresenta a linha:ECO LINE - Produtos para a limpezaA) 4991-134458 líquido para o kit cappuccino;B) 4991-134682 en pó para os grupos, manípulo dos filtros, chávenas de café;C) 4991-134681 carteiras para os grupos, manípulo dos filtros, chávenas de café;D) 4991-134683 pastilhas para os grupos das máquinas superautomáticas.Para encomendar, indicar o número de código ao seu Concessionário.
GB
SERVICE LINE