01/2008 creating user-defined block icons with simatic · pdf filefaq 01/2008 creating...
TRANSCRIPT
http://support.automation.siemens.com/WW/view/en/16514590
FAQ � 01/2008
Creating User-defined BlockIcons with SIMATIC PCS 7SIMATIC PCS 7 V6.x / V7.x
Create own icon blocksEntry ID: 16514590, V1.0, 01/2008 2
ãSi
emen
sAG
2008
-201
5Al
lrig
hts
rese
rved
This entry originates from the Siemens Industry Online Support. The conditions ofuse specified there apply (www.siemens.com/nutzungsbedingungen).
SecurityNotes
Siemens offers products and solutions with industrial security functions whichsupport the secure operation of plants, solutions, machines, devices and/ornetworks. They are important components in a comprehensive industrial securityconcept. The Siemens products and solutions continue to be developed underthis aspect. Siemens recommends that you keep yourself regularly informedabout product updates.
For the safe operation of Siemens products and solutions it is necessary to takeappropriate security measures (cell protection concept, for example) and tointegrate each component in an overall industrial security concept which is stateof the art. This should also cover the third-party products used. Additionalinformation about industrial security is available at:http://www.siemens.com/industrialsecurity.
In order to keep yourself informed about product updates, we recommendsubscribing to our product-specific newsletter. Additional information about this isavailable at: http://support.automation.siemens.com.
Contents1 Task ..................................................................................................................... 3
2 Using the Template Files .................................................................................. 4
3 Creating User-defined Block Icons .................................................................. 5
3.1 Copy Block Icon ................................................................................... 5
3.2 Replace Object Icon ............................................................................. 5
3.3 Generate Different Block Icons for the Same Technological Block inthe CFC ................................................................................................ 9
4 History............................................................................................................... 12
1 Task
Create own icon blocksEntry ID: 16514590, V1.0, 01/2008 3
ãSi
emen
sAG
2008
-201
5Al
lrig
hts
rese
rved
1 Task
With SIMATIC PCS 7 block icons are supplied by default in the WinCC picture"@@PCS7Typicals.PDL" and are automatically available to the user in the project.If you call the "Create/Update Block Icons" function in the SIMATIC Manager, therelevant block icons are created for the technological blocks in the process pictureand are connected automatically with the measuring point. In this way the operatorgets a display of the status and alarm information in the process picture. You clicka block icon to open the associated faceplate.Proceed as described below if you want to change this block icon, create your ownblock icons or use the option in SIMATIC PCS 7 V6.x and higher of using multipleicons for the same type of block.
2 Using the Template Files
Create own icon blocksEntry ID: 16514590, V1.0, 01/2008 4
ãSi
emen
sAG
2008
-201
5Al
lrig
hts
rese
rved
2 Using the Template Files
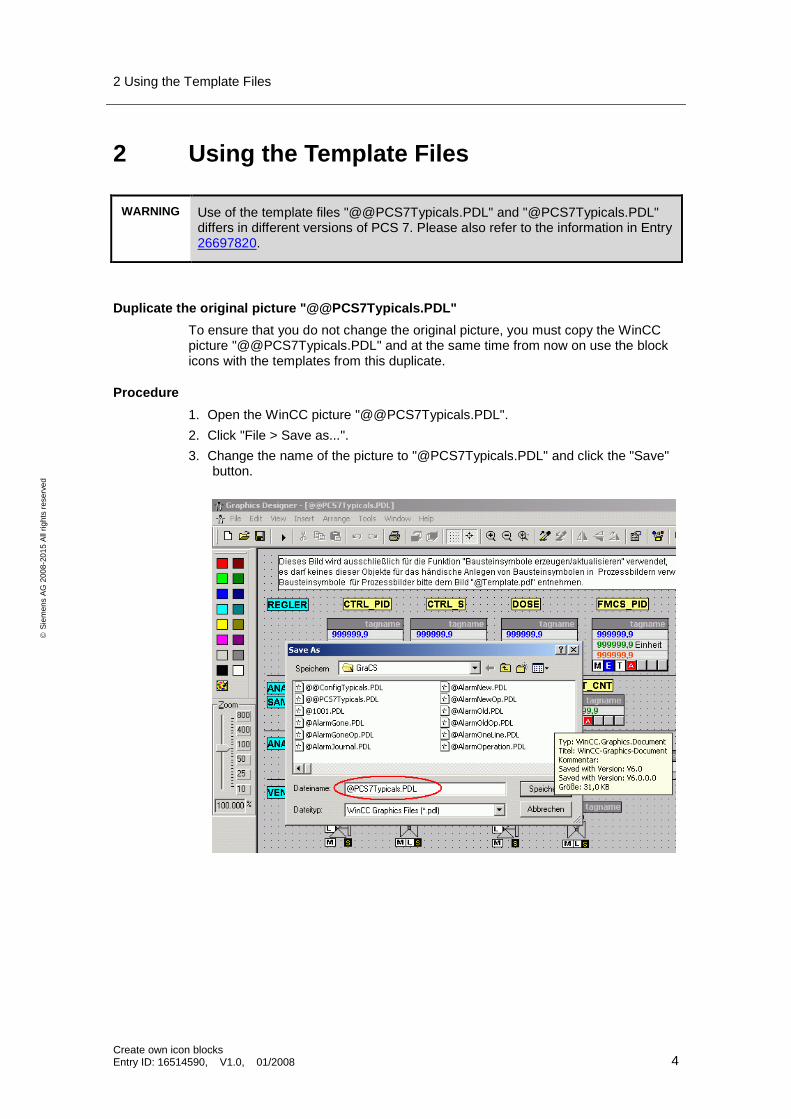
WARNING Use of the template files "@@PCS7Typicals.PDL" and "@PCS7Typicals.PDL"differs in different versions of PCS 7. Please also refer to the information in Entry26697820.
Duplicate the original picture "@@PCS7Typicals.PDL"To ensure that you do not change the original picture, you must copy the WinCCpicture "@@PCS7Typicals.PDL" and at the same time from now on use the blockicons with the templates from this duplicate.
Procedure1. Open the WinCC picture "@@PCS7Typicals.PDL".2. Click "File > Save as...".3. Change the name of the picture to "@PCS7Typicals.PDL" and click the "Save"
button.
3 Creating User-defined Block Icons
Create own icon blocksEntry ID: 16514590, V1.0, 01/2008 5
ãSi
emen
sAG
2008
-201
5Al
lrig
hts
rese
rved
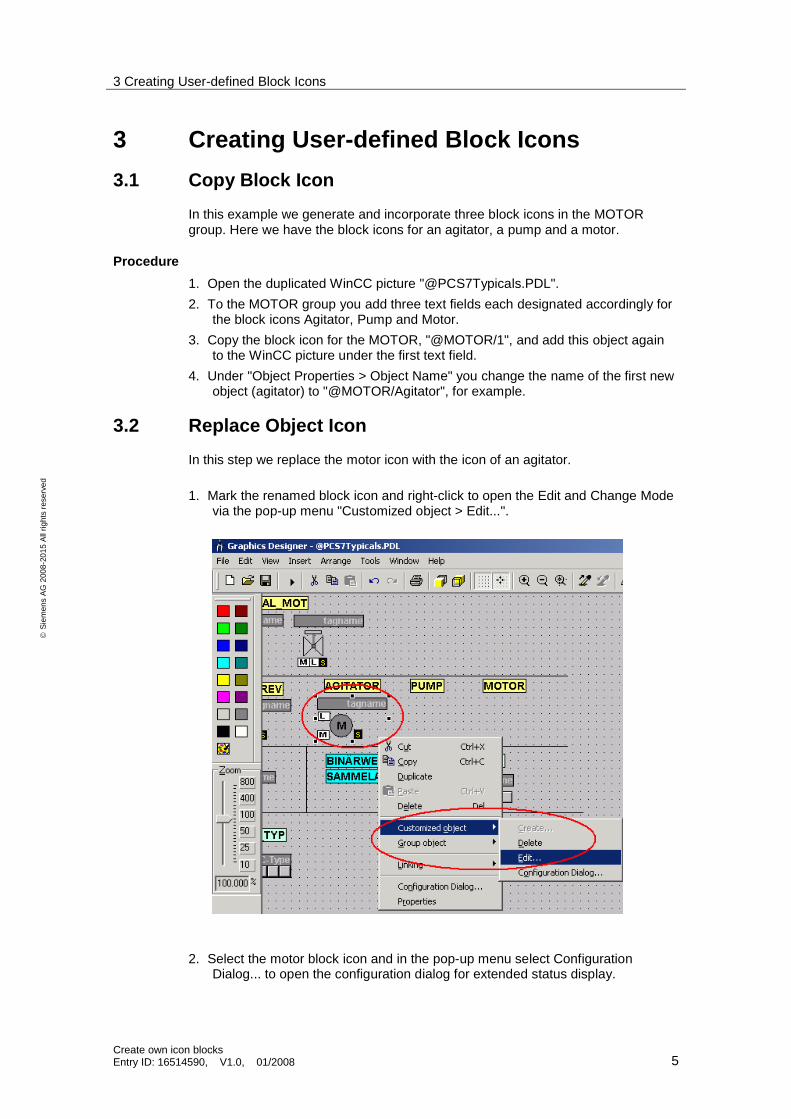
3 Creating User-defined Block Icons3.1 Copy Block Icon
In this example we generate and incorporate three block icons in the MOTORgroup. Here we have the block icons for an agitator, a pump and a motor.
Procedure1. Open the duplicated WinCC picture "@PCS7Typicals.PDL".2. To the MOTOR group you add three text fields each designated accordingly for
the block icons Agitator, Pump and Motor.3. Copy the block icon for the MOTOR, "@MOTOR/1", and add this object again
to the WinCC picture under the first text field.4. Under "Object Properties > Object Name" you change the name of the first new
object (agitator) to "@MOTOR/Agitator", for example.
3.2 Replace Object IconIn this step we replace the motor icon with the icon of an agitator.
1. Mark the renamed block icon and right-click to open the Edit and Change Modevia the pop-up menu "Customized object > Edit...".
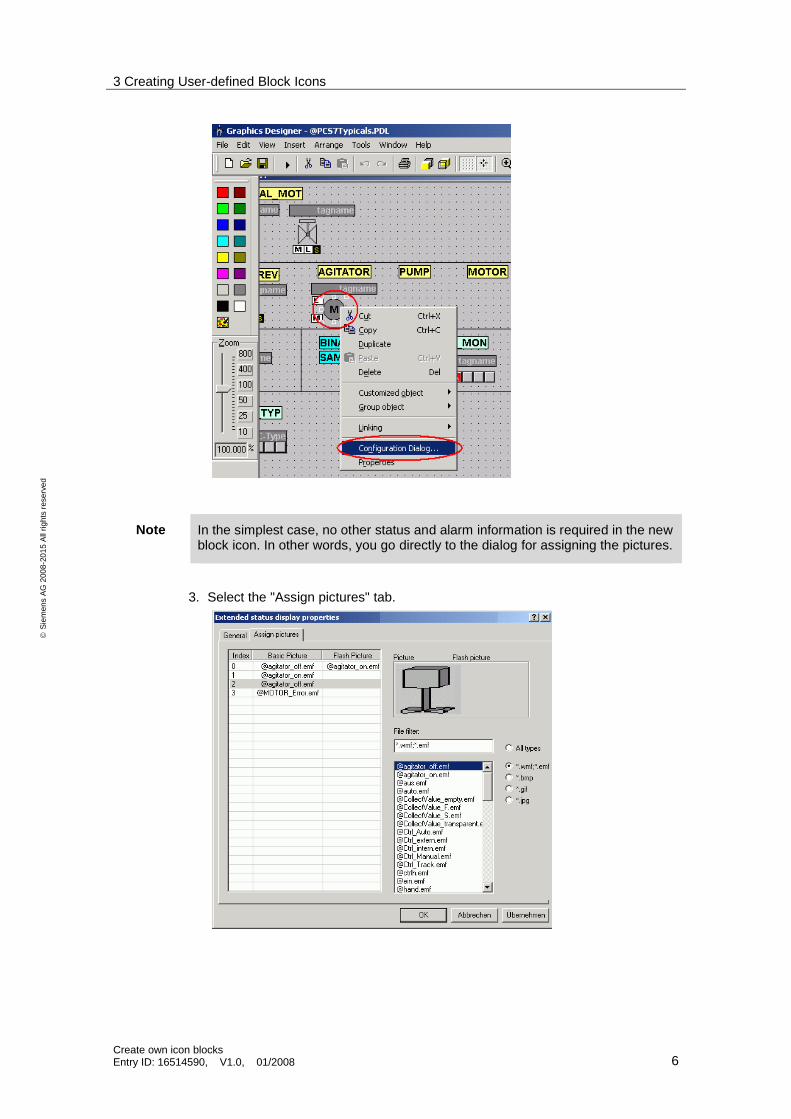
2. Select the motor block icon and in the pop-up menu select ConfigurationDialog... to open the configuration dialog for extended status display.
3 Creating User-defined Block Icons
Create own icon blocksEntry ID: 16514590, V1.0, 01/2008 6
ãSi
emen
sAG
2008
-201
5Al
lrig
hts
rese
rved
Note In the simplest case, no other status and alarm information is required in the newblock icon. In other words, you go directly to the dialog for assigning the pictures.
3. Select the "Assign pictures" tab.
3 Creating User-defined Block Icons
Create own icon blocksEntry ID: 16514590, V1.0, 01/2008 7
ãSi
emen
sAG
2008
-201
5Al
lrig
hts
rese
rved
4. Mark the separate lines (Index 0 to 3) and double-click to select your preparedpicture from the available list ("@agitator_off.emf", for example).
5. Double-click the same picture again or a different picture to configure thecorresponding flashing picture.
6. Save the changes by clicking the "Apply" button and close the Configurationdialog.
Note The extended status display makes the standard WinCC graphics file types *.emfand *.wmf available as well as the standard graphics file types *.bmp, *.gif and*.jpg. Copy the template pictures into your project in the folder "<Projectname>\GraCS". EMF pictures can also be created in the Graphics Designer byexporting WinCC pictures (PDL).
7. Align all the single objects of the block icon as required and add more elementsif you want.

3 Creating User-defined Block Icons
Create own icon blocksEntry ID: 16514590, V1.0, 01/2008 8
ãSi
emen
sAG
2008
-201
5Al
lrig
hts
rese
rved
8. Mark all the objects of the block icon and via the pop-up menu you select"Customized object > Finish editing".
Note Please note that you must mark all the objects of the block icon, otherwiseany unmarked objects will no longer be components of the block icon.
9. Repeat these steps for all the block icons to be changed or created.

3 Creating User-defined Block Icons
Create own icon blocksEntry ID: 16514590, V1.0, 01/2008 9
ãSi
emen
sAG
2008
-201
5Al
lrig
hts
rese
rved
3.3 Generate Different Block Icons for the SameTechnological Block in the CFCIt is still necessary to make a difference in the "type" attribute of the block icon forthe automatic generation of different block icons for the same technological block inthe CFC (FB66, MOTOR, for example).
Procedure1. Open the Object Properties of the desired block icon in the Graphics Designer.2. Select the menu item "General".
In the right window pane you have the option for the "type" attribute ofselecting a name for the special block icon.
3. Leave "@MOTOR" unchanged for the assignment of the block icon to the motorblock and add after the slash "/" a name of your choice for this icon (Agitator,for example).
Note You must specify this name as attribute in the corresponding instance of themotor block in the CFC (see also Entry 16519629).

3 Creating User-defined Block Icons
Create own icon blocksEntry ID: 16514590, V1.0, 01/2008 10
ãSi
emen
sAG
2008
-201
5Al
lrig
hts
rese
rved
4. Save your changes via "File > Save All" and close the Graphics Designer.5. Execute the function "Create/Update Block Icons..." in the plant hierarchy of the
SIMATIC Manager.
Note Please make sure that all the requirements are met for the correspondingpicture - see also Entry 7779197.

3 Creating User-defined Block Icons
Create own icon blocksEntry ID: 16514590, V1.0, 01/2008 11
ãSi
emen
sAG
2008
-201
5Al
lrig
hts
rese
rved
6. After completing automatic generation of the block icons, the objects areincorporated in the configured WinCC picture and connected with themeasuring point.
4 History
Create own icon blocksEntry ID: 16514590, V1.0, 01/2008 12
ãSi
emen
sAG
2008
-201
5Al
lrig
hts
rese
rved
4 History
Version Date Amendments
V1.0 01/2008 First edition