001-012 connect thesis gb
TRANSCRIPT


Dear Customer,
this supplement is an integral part of the Owner Handbook and describes all the functions of theCONNECT system, certain functions are optional for versions/markets where applicable. As a conse-quence, you should consider only the information which is related to the CONNECT system config-uration version of the car you purchased.
THESIS is fitted with the infotelematic CONNECT system which includes: colour TV set, soundsystem with cassette player, CD-ROM/Audio CD player, CD-changer, GSM cell phone, navigator, on-board computer and voice commands (for certain phone, audio and navigator functions), designed inaccordance with the specific features of the passenger compartment and with a personalised design.
The system is installed in a user-friendly position for the driver and passenger and the graphics onthe front panel make it easy to quickly locate the controls which facilitates the use of them.
The pages that follow contain the instructions for use, which we advise you to read carefully andalways keep within reach (e.g. in the glove compartment).
So, enjoy your reading and have a good journey.
IMPORTANT For the CONNECT navigation system, only use the original CD provided with thecar or in any case other CDs of the same brand.
001-012 connect thesis GB 22-10-2007 10:38 Pagina 1


3
CONTENTS
IMPORTANT INSTRUCTIONS, USEFUL ADVICE AND GENERAL INFORMATION
CONTROLS – REMOTE CONTROL – CD-CHANGER
MAIN SCREEN (MAIN)
SOUND SYSTEM (AUDIO)
CELL PHONE (TEL)
NAVIGATOR (NAV)
VOICE COMMANDS AND OUTPUTS
ON-BOARD COMPUTER (TRIP) – SETUP
TARGASYS SERVICES – ASSISTANCE SERVICES AND FUNCTIONS (SOS)
TABLE OF CONTENTS
001-012 connect thesis GB 22-10-2007 10:38 Pagina 3

All manoeuvres must be carried outabiding by the highway code,regardless of the advice given by thenavigation system. Should you leavethe recommended route, the naviga-tion system will calculate a new onefor you and suggest it to you.
4
IMPORTANT INSTRUCTIONSFOR USE AND TRAFFIC SAFETY
The CONNECT system makes thedriver’s task easier in controlling themain functions of the vehicle.However, to avoid creating dangerfor yourself and for others whenusing your CONNECT, please payattention to the following points:
– the CONNECT system must beused when you are in full control ofyour car; in the event of doubt, stopto carry out the different operations;
– use of the cell phone is prohibit-ed near explosive substances.
You are recommended to learn howto use the different functions of theCONNECT system and in particularof the sound system (e.g. storingradio stations) before starting todrive.
The navigation system allows youto reach your destination throughthe traffic and indicates to you anychange of route memorised on thenavigation CD-ROM. In fact the sys-tem takes account of all informationconcerning the roads when calculat-ing the route, advising the best way.However, it does not take into con-sideration traffic conditions or sud-den obstructions or any other incon-venience.
Too high a volume whendriving can put the dri-ver’s life at risk and that
of other people. Therefore thevolume should always be adjust-ed in such a way that it is alwayspossible to hear the noises of thesurrounding environment (e.g.:horns, ambulance, police sirens,etc.).
The navigation systemhelps the driver while hedrives, by suggesting
vocally or graphically, the opti-mum routing to reach his presetdestination. Navigation systemsuggestions do not excuse the dri-ver from his full responsibilitiesdue to his driving behaviour and tohis compliance with road andother traffic regulations. Theresponsibility for road safetyalways lies with the vehicle driver,and it falls on him in any case.
IMPORTANT INSTRUCTIONS, USEFUL ADVICE AND GENERAL INFORMATION
001-012 connect thesis GB 22-10-2007 10:38 Pagina 4

5
RECEPTION CONDITIONS
The radio reception conditions orcell phone reception/transmissionconditions change constantly whendriving. Reception/transmissionmay be disturbed by the presence ofmountains, buildings or bridges par-ticularly when far away from thestation being listened to the GSMcell.
TV reception can also be disturbedby the presence of mountains, build-ings or bridges: in this case move thecar to another place.
IMPORTANT When receivingtraffic information, the volume maybe higher than normal.
CASSETTES
To obtain optimum playing condi-tions we give the following advice:
– Do not use poor quality cassettes,with distortions or labels detached.
– Never leave the cassette inside theCONNECT when not in use.
– Never insert other objects in thecassette slot.
– Do not expose cassettes to the sunor high temperatures.
– Put cassettes back in their boxesafter use.
– Over time, dirt on the playinghead caused by tapes may reducethe high notes when playing. Youare therefore advised to clean thehead routinely using a special clean-er tape of the non abrasive type.
– Preferably use C-60 cassettes andin any case no longer than C-90 toensure the best playing conditions.
– Avoid inserting cassettes withdamaged tapes in the radio, espe-cially if using C-90 cassettes, as thetape might come out and get stuck.
– Do not lubricate the cassettemechanism.
– Do not touch the player headwith magnetic or hard objects.
001-012 connect thesis GB 22-10-2007 10:38 Pagina 5

6
COMPACT DISCS
When using the Audio CD player,remember that the presence of dirtor marks on Compact Discs maycause skipping when playing andpoor sound quality. The same hap-pens if Compact Discs are bent byaccident.
To obtain optimum playing condi-tions we give the following advice:
– Only use Compact Discs with thebrand:
– After listening to them putCompact Discs back in their boxes toavoid marking or scoring whichcould cause skipping when playing.
– Do not expose Compact Discs todirect sunlight, high temperatures ordamp for prolonged lengths of timeto prevent them from bending.
– Do not stick labels or write on therecorded surface of Compact Discs.
– To remove a Compact Disc fromits container, press on the centre andraise the disc holding carefully fromthe edges.
– To remove fingerprints and dust,use a soft cloth starting from thecentre of the Compact Disc towardsthe circumference.
– Carefully clean all Compact Discsof any fingerprints and dust using asoft cloth. Support Compact Discson the edges and clean from the cen-tre outwards.
– Never use chemical products forcleaning (e.g. spray cans, antistaticsor thinners) as they might damagethe surface of Compact Discs.
Proper way to holdthe compact disc
Removing the disc
– New discs may be rough aroundthe edges. When using these discsthe player might not work or thesound might skip. To remove rough-ness from the edge of a disc use aball-point pen, etc.
No
Ball-point pen
Roughness
– Always hold a Compact Disc bythe edge. Never touch the surface.
001-012 connect thesis GB 22-10-2007 10:38 Pagina 6

7
IMPORTANT Do not use the pro-tective sheets for CDs in commerceor discs with stabilisers, etc. as theymight get stuck in the internalmechanism and damage the disc.
Notes about Compact Discs
– Do not stick labels on the sur-faces of a Compact Disc or write onthe surface with pens or pencils.
– Do not use highly scratched,cracked or distorted Compact Discs.This could damage the player orprevent it from working properly.
– Do not expose Compact Discs todirect sunlight or any other source ofheat.
– Do not use solvents such as stainremovers, antistatic sprays or thin-ners in commerce for cleaningCompact Discs.
No
No
No
No
001-012 connect thesis GB 22-10-2007 10:38 Pagina 7

8
MULTIFUNCTIONINFORMATION DISPLAY
The system uses a graphic 7“, 16:9LCD 256-colour TFT display with aresolution of 480 x 234 pixels(153.4 x 86.4 mm active matrix).
The display brightness can bechanged depending on the environ-ment conditions and the driver’srequirements, storing two settings,day and night, which are can be setmanually by the user or automatical-ly when turning on/off of the carexternal lights.
GENERAL INFORMATION
The CONNECT system controlsand provides information for the fol-lowing systems and functions:
– Sound system with radio, cassetteplayer, CD-ROM/Audio CD player,CD-changer and voice commands
– colour TV set with voice com-mands
– GSM cell phone with voice com-mands
– Navigation system with voicecommands
– On-board computer
– Targasys assistance services andfunctions.
The interface is the multifunctioninformation display for all the inte-grated components.
TURNING THE SYSTEM ON/OFFAND STAND-BY FEATURE
The system may be in one of thefollowing conditions:
– off, all functions disabled
– normal status, all functions areactive or can be enabled
– stand-by, functions partiallyactive and screen darkened.
Turning the system on
The system is turned on automati-cally turning the ignition key or theignition switch knob to MAR. Whenit is turned on the system is in thecondition that was active before thelast time it was turned off (excludingthe stand-by status that is notrestored).
When the ignition key is at STOPor removed or the ignition switchknob is at STOP, the system isturned on pressing the left knob orthe SOS key for the call for assis-tance (to use the phone it is neces-sary to enter the SIM card and thePIN code, exception made for the“emergency 112” call).
001-012 connect thesis GB 22-10-2007 10:38 Pagina 8

9
Turning the system off
The system is turned off automati-cally when turning the ignition keyor the ignition switch knob to STOP.The conditions and functions activebefore turning off are memorisedand brought back the next time theengine is started (excluding thestand-by status).
Turning off is delayed if a phonecall or an emergency call is inprogress and it will take place at theend of the call.
If the system was turned on withthe left knob or the SOS key, withthe ignition key at STOP or removedor ignition switch knob at STOP, itis turned off pressing the left knobagain or automatically after about20 minutes, to preserve the battery.
Stand-by
During operation with the ignitionkey or ignition switch knob at MAR,the system may be set to stand-by bypressing the left knob. This operatingcondition (Stand-by) corresponds to adark screen with the volume off, butthe system continues working invisi-bly, therefore the phone is ready toreceive.
DarkDuring CONNECT operation, the
system may be set to Dark conditionby pressing the relevant key, regard-less of the ignition key or ignitionswitch knob position. This operatingcondition corresponds to a darkscreen but the system continues toperform its functions (audio, naviga-tion instructions, voice commands,etc). The Dark function can also beactivated through the voice com-mands as described in the relevantsection.
To bring the system back to thenormal operating condition, pressthe DARK key again or pronouncethe relevant voice command.
CHOOSING THE OPERATINGMODE
The operating mode is selectedpressing one of the following keys:
– MAIN key = Main screen
– AUDIO key = Sound system set-tings
– FM/AM (multifunction keys) =Radio waveband selection
– CC/CD/CDC (multifunction keys)= Audio source selection (cassetteplayer/Compact Disc player/CD-changer)
– TV (multifunction key) = TVfunction selection (only with carstopped)
– TEL key = Telephone
– VOICE (key on steering wheel) =Voice commands for telephone andsound system (brief press) – Voicerecorder (prolonged press)
– NAV key = Navigator
001-012 connect thesis GB 22-10-2007 10:38 Pagina 9

10
CHOOSING THE MENU FUNCTIONS
The different operating modes ofthe CONNECT allow access to dif-ferent menus, with functions that inturn show other submenus on thedisplay and so on. The proceduresfor choosing and confirming thefunctions of the different menus andsubmenus are however the same andthey are described below.
To go back to the previous screenfrom a submenu or to quit the vari-ous operating modes, press the ESCkey.
Choosing and confirming a function
To select a function of the menu onthe display, simply turn the rightknob in one of the two directionsuntil showing the function required.To confirm the function selected,press the right knob.
The knob enables to scroll quicklylong lists or the alphabet to enternames; to speed up scrolling simplyturn the knob fast or slow asrequired.
IMPORTANT On the menu orsubmenu pages showing “OK”, tostore the new settings or the modi-fied parameters it is necessary to exitthe corresponding screen confirming“OK”. Leaving the page of themenu or submenu with the ESC key,the previous settings are restored.
– TRIP key = On-board computer
– • key = Targasys services
– SETUP key = System settings
– SOS key = Assistance servicesand functions.
For each operating mode the corre-sponding menu is shown on the dis-play.
Multifunction keys
At the base of the CONNECT dis-play there are six double keys whosefunction depends on the systemoperating condition active, which isshown on the display.
The function corresponding to each“multifunction” key is identifiedeach time by a label displayed on thescreen next to the relevant key.
In certain cases a label covers someadjacent keys: the function of allthese keys will be the same.
001-012 connect thesis GB 22-10-2007 10:38 Pagina 10

11
ADJUSTING THE VOLUME
To increase the volume: turn theleft knob clockwise.
To lower the volume: turn the leftknob counterclockwise.
IMPORTANT The volume ofPTY31 Alarm/Traffic Announcement(TA), telephone, telephone ringerand voice recognition can be adjust-ed separately.
MUTE function
This function mutes automaticallythe active audio source when aphone call is being received or made.
NAV MUTE function (excludingnavigator voice instructions)
This function enables to turn offthe navigator voice instructions.
Soft Mute function
Function that gradually increasesor lowers the volume when the Mutefunction is turned on/off.Too high a volume when
driving can put the dri-ver’s life at risk and that
of other people. Therefore thevolume should always be adjust-ed in such a way that it is alwayspossible to hear the noises of thesurrounding environment (e.g.:horns, ambulance, police sirens,etc.).
CARE AND MAINTENANCE
The structure of the CONNECTensures long years of operation withno need for particular maintenance.In the event of a fault, contactLancia Dealership.
Some care must however be takento ensure the complete efficiency ofthe CONNECT system:
– the monitor is sensitive toscratching, liquid detergents and UVrays
– liquids that penetrate inside maydamage the device irreparably.
Clean the front panel and displayonly using a soft, dry antistaticcloth. Cleaning and polishing prod-ucts may damage the surface.
001-012 connect thesis GB 22-10-2007 10:38 Pagina 11

12
SYSTEM SOFTWARE UPDATES
The system software can be updat-ed as soon as new versions for theCONNECT navigation module soft-ware are available to benefit of theimprovements made on certainfunctions.
Software updating shall be per-formed by specialised staff atLancia Dealership.
INTERNAL FAULTS
If the system detects an internalfault on a certain module (audio,phone, navigator, etc..), it will tem-porarily freeze the last screen dis-played and it will start diagnostics.
For a set period of time the systemwill monitor the involved module fortroubleshooting. If time-out expireswith no result, the system will adoptthe best repair action (e.g.: resettingthe involved module hardware).
Should it be impossible to operatethe system, reset it manually bypressing the Reset key 33 (fig. 1)with a pen or a pencil.
PROTECTION AGAINST OVERHEATING
The components of the telematicsystem are protected against over-heating. This device stops it fromworking when the temperature ofthe module exceeds the preset limit.
When the system temperatureexceeds the max. preset limit, theCONNECT system is switched offautomatically until the regular oper-ating temperature is restored.
Be careful not to knockthe display with pointedor hard objects and avoid
touching with the hands. Do notpress on the display when clean-ing.
WARNINGS
– In the event of a fault the CON-NECT should be checked andrepaired only by Lancia Dealership.
– In case of particularly low tem-peratures the display might take acertain time to reach the optimumbrightness.
– In the case of prolonged parkingwith high outside temperature, theautomatic thermal protection of thesystem may come into action sus-pending operation until the passen-ger compartment temperature fallsto acceptable levels.
001-012 connect thesis GB 22-10-2007 10:38 Pagina 12

13
CONTROLS AND REMOTE CONTROLCONTROLS ON CONNECT FRONT PANEL (See fig. 1 on overleaf)
On the CONNECT system front panel there are 29 keys and 2 knobs for selecting the different functions. Certain controlshave multiple functions which depend on the system operating conditions active.
Turning on the function chosen is in some cases controlled by the length of time the key is pressed (brief or prolongedpress), as shown in the table below.
CONTROLS – REMOTE CONTROL – CD-CHANGER
Key
1 – SOS
2
3
4 – CD
5 – CC
6 – ¯
Press briefly(less than 2 seconds)
Assistance services and functions
Navigation CD-ROM or Audio CD slot
Cassette slot
Eject navigation CD-ROM or Audio CD
Eject cassette
Radio mode: seeking the first station that can betuned with lower frequency.Cassette mode: fast tape rewinding to the begin-ning of the track being played or to previous track.CD mode: select previous track.TV mode: seeking the first channel that can be tuned with lower frequency.
Press for longer than 2 seconds
–
–
–
–
–
Radio mode: “Scan” function on. Station scanningin the band tuned starting from those with lowerfrequency.Cassette mode: fast tape rewind.CD mode: fast backward.
013-023 connect thesis GB 22-10-2007 10:39 Pagina 13

14
Key
7 – ˙
8
9 – SETUP
10 – TRIP
11 – AUDIO
12 – SRC
13 – MAIN
14 – DARK
15 – £
16 – TEL
17 – RPT
18 – NAV
19 – MAP
Press briefly(less than 2 seconds)
Radio mode: seeking the first station that can betuned with higher frequency.Cassette mode: fast tape forward to the end of thetrack being played or to next track.CD mode: select next track.TV mode: seeking the first channel that can be tuned with higher frequency.
System on/off: press the knob.Volume adjustment: turn the knob.
System settings and car functions that can be modified
Select on-board computer screen
Audio mode on and/or specific screen selection
Select audio source: FM1, FM2, FM3-AS, MW, LW, CC, CD, CDC, TV
Select MAIN screen
DARK mode on: dark screen
Forwarding the phone call set.Accepting the incoming call.Ending the call in progress.
Phone mode on and/or select specific screen
Repetition of last navigator voice instruction
Navigation mode on and/or select specific screen
Select navigator map mode
Press for longer than 2 seconds
Radio mode: “Scan” function on. Station scanningin the band tuned starting from those with higherfrequency.Cassette mode: fast tape forward.CD mode: fast forward.
–
–
–
Audio mode off (Radio, CC, CD/CDC)
–
–
–
Refusing the incoming call
Phone mode off
–
–
–
013-023 connect thesis GB 22-10-2007 10:39 Pagina 14

15
Key
20 – •
21
22
23 – ESC
24 – SIM
25 – ¯ ˙
2627-28-29-30-31-32
33
Press briefly(less than 2 seconds)
Access to Targasys services
Select the required function by turning the knob.Confirm the required function by pressing theknob.
Remote control receiver
Exit screen selected or return to higher level menu
Eject SIM card
Reverse cassette side
SIM card slot
Double “multifunction” keys whose function depends on the system operating condition active,which is shown on the display.The function corresponding to each “multifunction” key is identified each time by a label displayed on the screen next to the relevant key. In certain cases a label covers some adjacent keys: the function of all these keys will be the same.Radio/TV mode: select stored stations.CD-changer mode: select CD in the magazine.System Reset key
Press for longer than 2 seconds
–
–
–
–
–
–
–
Radio/TV mode: station storage
–
013-023 connect thesis GB 22-10-2007 10:39 Pagina 15
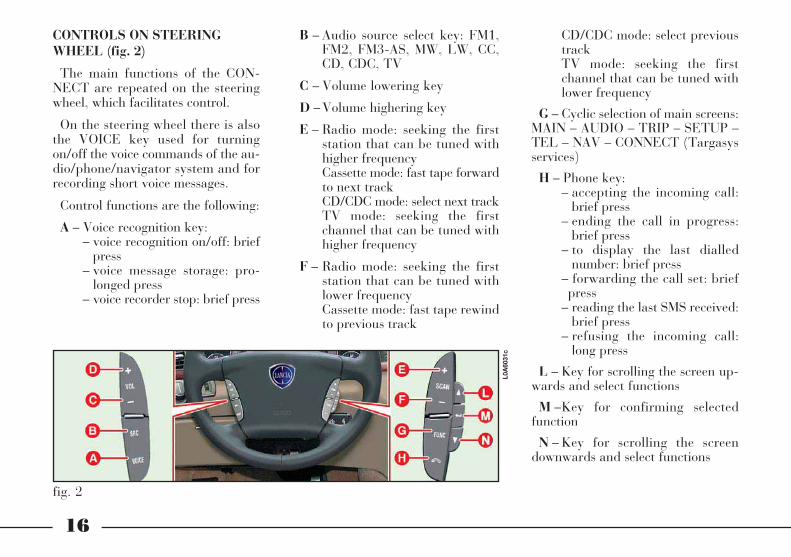
CONTROLS ON STEERINGWHEEL (fig. 2)
The main functions of the CON-NECT are repeated on the steeringwheel, which facilitates control.
On the steering wheel there is alsothe VOICE key used for turningon/off the voice commands of the au-dio/phone/navigator system and forrecording short voice messages.
Control functions are the following:
A – Voice recognition key:– voice recognition on/off: brief
press– voice message storage: pro-
longed press– voice recorder stop: brief press
16
B – Audio source select key: FM1,FM2, FM3-AS, MW, LW, CC,CD, CDC, TV
C – Volume lowering key
D – Volume highering key
E – Radio mode: seeking the firststation that can be tuned withhigher frequencyCassette mode: fast tape forwardto next track CD/CDC mode: select next trackTV mode: seeking the firstchannel that can be tuned withhigher frequency
F – Radio mode: seeking the firststation that can be tuned withlower frequencyCassette mode: fast tape rewindto previous track
CD/CDC mode: select previoustrackTV mode: seeking the firstchannel that can be tuned withlower frequency
G – Cyclic selection of main screens:MAIN – AUDIO – TRIP – SETUP –TEL – NAV – CONNECT (Targasysservices)
H – Phone key:– accepting the incoming call:
brief press– ending the call in progress:
brief press– to display the last dialled
number: brief press– forwarding the call set: briefpress
– reading the last SMS received:brief press
– refusing the incoming call:long press
L – Key for scrolling the screen up-wards and select functions
M –Key for confirming selectedfunction
N – Key for scrolling the screendownwards and select functions
fig. 2L0
A60
31c
013-023 connect thesis GB 22-10-2007 10:39 Pagina 16

17
REMOTE CONTROL (fig. 3-4)
The infrared ray remote control isused to control some main functionsof the audio and TV system.
Remote control can be used onlywhen CONNECT is on.
To use the remote control A (fig. 3)remove it from support B.
Remote control key functions are thefollowing (fig. 4):
A – Radio mode: “Audio Mute”function on/off (volume muting)only with TP function active(symbol “ ” near TP on themain Radio screen).CC/CD/CDC mode: play/stopcurrent track.
TV mode: TV off and return topreviously active Audio sourcescreen
B – Volume lowering
C – Volume highering
D – Radio mode:– brief press = seeking the first
station that can be tuned withhigher frequency
– long press = “Scan” functionon. Station scanning in theband tuned starting fromthose with higher frequency
Cassette mode: – brief press = fast tape forward
to next track– long press = fast tape forward
CD mode:– brief press = select next track– long press = fast forward
TV mode: seeking the firstchannel that can be tuned withhigher frequency
E – Radio mode:– brief press = seeking the first
station that can be tuned withlower frequency
– long press = “Scan” functionon. Station scanning in theband tuned starting fromthose with lower frequency
fig. 3
L0A60
32c
fig. 4L0
A60
33c
013-023 connect thesis GB 22-10-2007 10:39 Pagina 17

18
Cassette mode: – brief press = fast tape rewind
to previous track– long press = fast tape rewind
CD mode:– brief press = select previous
track– long press = fast backward
TV mode: seeking the firstchannel that can be tuned withlower frequency
F – Radio mode:– brief press = seeking the first
station that can be tuned withhigher frequency
– long press = “Scan” functionon. Station scanning in theband tuned starting fromthose with higher frequency
Cassette mode: – brief press = fast tape forward
to next track– long press = fast tape forward
CD mode:– brief press = select next track– long press = fast forward
TV mode: seeking the firstchannel that can be tuned withhigher frequency
G – Radio mode:– brief press = seeking the first
station that can be tuned withlower frequency
– long press = “Scan” functionon. Station scanning in theband tuned starting fromthose with lower frequency
Cassette mode: – brief press = fast tape rewind
to previous track– long press = fast tape rewind
CD mode:– brief press = select previous
track
– long press = fast backward
TV mode: seeking the firstchannel that can be tuned withlower frequency
H – Audio source select key: FM1,FM2, FM3-AS, MW, LW, CC, CD,CDC, TV
1-2-3-4-5-6 – Radio mode:
– brief press = calling stored sta-tions no. 1-2-3-4-5-6
– long press = storing currentstation
CDC mode: select CD, 1 to 6
TV mode: select stored channels,1 to 6
013-023 connect thesis GB 22-10-2007 10:39 Pagina 18

19
Function
Audio module on
Audio module off
Audio mute (only with TP active on the main Radio screen)
Select audio source
Volumehighering/lowering
Select stored stations
Store radio stations
Seeking the first station that can be tuned with higher frequency
Seeking the first station that can be tuned with lower frequency
CONNECT keys
Brief press on AUDIO key
Long press on AUDIO key
“Audio Mute” selection and con-firmation on Radio menu by theright knob
Press multifunction keys FM,AM, CC, CD, CDC, TVor the SOURCE key
Turn the left knob
Brief press on keys 1 - 6
Long press on keys 1 - 6
Brief press on key ˙
Brief press on key ¯
Steering wheel keys
–
–
–
Press the SOURCE key
Press the VOL+/- keys
–
–
Brief press on the SCAN+ key
Brief press on the SCAN- key
Remote control keys
–
–
Press the ON/OFF key
Press the SOURCE key
Press the VOL+ or VOL- keys
Brief press on keys 1 - 6
Long press on keys 1 - 6
Brief press on key N
Brief press on key O
AUDIO AND TV FUNCTIONS: CONTROLS SUMMARY TABLE
The sound system (radio FM/AM and CC player/CD player/CDC) and the TV functions can be turned on/off through thecontrols on CONNECT, steering wheel or remote control. For a quick guide, the following table groups the different func-tions with the corresponding keys.
For voice commands refer to the relevant section.
013-023 connect thesis GB 22-10-2007 10:39 Pagina 19

20
Function
“Scan” function on.Station scanning in the band tuned starting from those with higher frequency
“Scan” function on. Station scanning in the band tuned starting from those with lower frequency
Reversing tape side
Fast tape rewindto previous track
Fast tape rewind
Fast tape forwardto next track
Fast tape forward
Play/pausecurrent CC/CD track
Select next track while playing a CD
CONNECT keys
Long presson key ˙
Long press on key ¯
Press key ¯ ˙
Brief press on key ¯
Long press on key ¯
Brief press on key ˙
Long press on key ˙
Press the Play/Pause multifunction keys
Short press on key ˙
Steering wheel keys
Long press on the SCAN+ key
Long press on the SCAN- key
–
Short press on the SCAN- key
Long press on the SCAN- key
Short press on the SCAN+ key
Long press on the SCAN+ key
–
Short press on the SCAN+ key
Remote control keys
Long press on key N
Long press on key O
–
Short press on key O or¯
Long press on key OShort press on key N or˙
Long press on keyN
Press the ON/OFF key
Short press on key ˙
013-023 connect thesis GB 22-10-2007 10:39 Pagina 20

21
Function
Select previous track while playing a CD
Select CD in CDC mode
Play/stopcuttent track in CDC mode
Select stored TV channels
Select next TV channel
Select previous TVchannel
TV module off (return to previously active Audio source screen)
CONNECT keys
Brief press on key ¯
Press keys 1 to 6
–
Press keys 1 to 6
Brief press on key ˙
Brief press on key ¯
Press OFF multifunction key
Steering wheel keys
Brief press on the SCAN- key
–
–
–
Press the SCAN+ key
Press the SCAN- key
–
Remote control keys
Brief press on key ¯
Press keys 1 to 6
Press the ON/OFF key
Press keys 1 to 6
Short press on key N
Short press on key O
Press the ON/OFF key
013-023 connect thesis GB 22-10-2007 10:39 Pagina 21
22
LOADING THE MAGAZINE
The magazine contains 6 trays forone CD each.
To playback a CD, extract a tray D(fig. 7) from the magazine and insertthe CD (fig. 8).
IMPORTANT Make sure the CD la-bel is facing the right way, i.e. to-wards the tray. If not, the player willnot work.
The player cannot be used to play 8cm CDs unless a specific adapter(which can be purchased at HI-FIstores) is fitted.
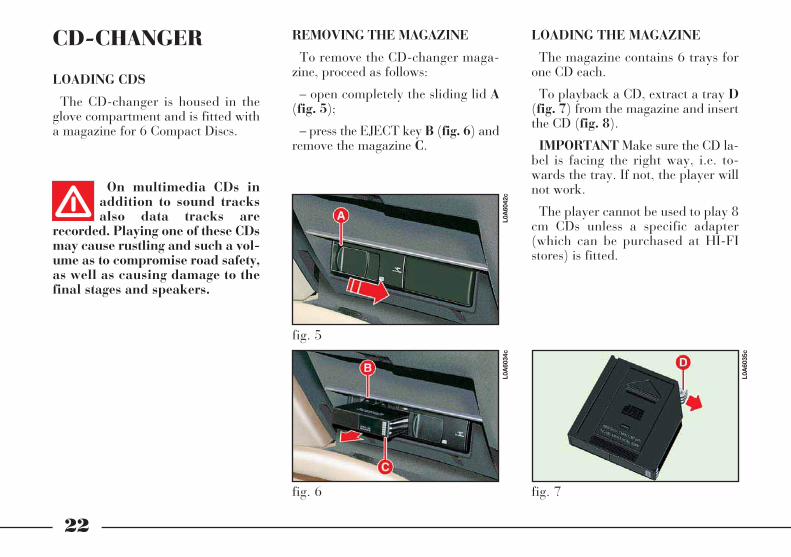
CD-CHANGER
LOADING CDS
The CD-changer is housed in theglove compartment and is fitted witha magazine for 6 Compact Discs.
On multimedia CDs inaddition to sound tracksalso data tracks are
recorded. Playing one of these CDsmay cause rustling and such a vol-ume as to compromise road safety,as well as causing damage to thefinal stages and speakers.
REMOVING THE MAGAZINE
To remove the CD-changer maga-zine, proceed as follows:
– open completely the sliding lid A(fig. 5);
– press the EJECT key B (fig. 6) andremove the magazine C.
fig. 6L0
A60
34c
fig. 5
L0A60
42c
fig. 7
L0A60
35c
013-023 connect thesis GB 22-10-2007 10:39 Pagina 22

23
INSERTING THE MAGAZINE
To insert the magazine in the CD-changer, after loading the CDs, pro-ceed as follows:
– check that the sliding lid A (fig. 5)is completely open;
– insert the magazine C (fig. 9) intothe CD-changer with the chamferededge facing rightwards;
– close the sliding lid A (fig. 10), af-ter inserting the magazine to avoidgrit and dust from getting inside theplayer.
EJECTING CDS FROM THEMAGAZINE
Remove the CDs in sequence after re-moving the respective supports D(fig. 7) from the magazine.
fig. 8
L0A60
36c
fig. 9L0
A60
37c
fig. 10
L0A60
38c
013-023 connect thesis GB 22-10-2007 10:39 Pagina 23

24
MAIN SCREEN (MAIN)
The MAIN screen shown in fig. 11 isreferred to the CONNECT versionwith navigator; on versions withoutnavigator the MAIN screen has a dif-ferent configuration but gives thesame general information.
MAIN SCREENOPTIONS
TIME - DATE - TEMPERATURE
On the top of the display on the leftside are shown:
– time “hh:mm” (in hours and min-utes) with 24 or 12 hour settings, inthe second case “am” or “pm” arespecified;
– date with day (1 to 31), month (1to 12) and year “yyyy”;
– outside temperature in °C (Celsius)or °F (Fahrenheit), (according to setparameter).
GENERALINFORMATION
The MAIN screen is shown pressingthe key 13 (fig. 1) and shows themain data of the CONNECT systemincluding the manoeuvres recom-mended by the navigation system (ifon).
The multifunction keys at the baseof the CONNECT display shall beused to change the audio source(FM1-FM2-FM3-AS-MW-LW-CC-CD-CDC), to select a previouslystored station or to select a CD in theCD-changer (multifunction keys “1”to “6”) or to switch the TV functionon (where provided).
fig. 11L0
A50
83g
024-027 connect thesis GB 22-10-2007 10:40 Pagina 24

25
RADIO
When the radio is on, the followinginformation is shown on the display:
– band and station selected;
– station name (if available) or fre-quency after tuning;
– frequency during station seek;
– z symbol if the “Audio Mute”function is on;
– “Warning” during a traffic infor-mation bulletin;
– “Search”, station search inprogress;
– “TP” abbreviation if traffic infor-mation reception is activated.
CASSETTE PLAYER
When the cassette player is working,the central section of the displayshows the following information:
– cassette symbol with the corre-sponding function symbol:
– play ˙;
– fast tape forward §;
– fast tape rewind ù;
– fast tape forward/rewind tonext/previous track §/ù;
– pause II;
– “TP” abbreviation if traffic infor-mation reception is activated.
CD PLAYER
When the CD player is working, thecentral section of the display showsthe following information:
– “CD” symbol;
– track number (number of trackbeing played);
– operating mode: play ˙ or pauseII, RND (Random) or repeat track ;
– “TP” abbreviation if traffic infor-mation reception is activated.
024-027 connect thesis GB 22-10-2007 10:40 Pagina 25

26
CD-CHANGER
When the CD-changer is working,the central section of the displayshows the following information:
– “CDC” symbol;
– track number (number of trackbeing played);
– operating mode: play ˙, RND(Random) or repeat track or repeatCD;
– “TP” abbreviation if traffic infor-mation reception is activated.
AUDIO SOURCE CHANGE OR CD SELECTION
When changing the audio source,the display can shown the followingmessages: “No CD changer”, “NoCD”, “No cassette” or “Magazineempty” according to applications.
CELL PHONE
Cell phone information is shown onthe top of the display on the rightside:
– name of telephone networkprovider and reception signal inten-sity;
– name or telephone number andduration of conversation (min:sec)during a telephone connection;
– symbols and wordings associatedwith phone settings:æ ring tone off√ “call divert” function onø “lock” function on¡ phone not available or no net-
work
ó SMS message received, not read;
– display of “No card” or “EnterPIN” or “SIM card faulty” or “Net-work search” warnings in the “phoneoff” conditions;
– Ring Tone “Off”, Diversion andLock are displayed only when phonefunction is active;
– warning “Call locking” if key 15(fig. 1) is pressed again during thecall;
– warning “End of call”;
– warning “Busy”;
– warning “Ready in X sec.”;
– warning “No connection” if con-nection is cut off by the network.
024-027 connect thesis GB 22-10-2007 10:40 Pagina 26
27
NAVIGATOR
Navigation system information de-pends on system condition.
When the navigator is on, the dis-play shows “Start navigation system”,when the navigation system is loadingthe data.
When driving the display will showthe following:
– graphic display of next manoeuvreby pictogram with integral graphicbar;
– display of distance from next ma-noeuvre “XXX m”;
– name of recommended road forreaching the destination or map dis-play.
When the navigator is off, the dis-play shows “Navigation system notavailable”.
ON-BOARD COMPUTER
On-board computer information de-pends on the CONNECT system con-figuration installed on the car. If thesystem is not provided with the navi-gation function, the display area ded-icated to the on-board computer willshow the following information:
– Average speed (in km/h);
– Range (in km);
– Travel time (in hours and min-utes);
– Average consumption (in km/l orl/100km according to set unit).
On versions fitted with the naviga-tion system it is possible to choosewhether to display the above fourfunctions all together or separately, asfollows:
– Average speed (in km/h) andRange (in km);
or
– Travel time (in hours and min-utes) and Average consumption (inkm/l or l/100km according to setunit).
The displayed item sequence can bemodified using the steering wheel keysL (fig. 2) or N (fig. 2) or turning theright knob 21 (fig. 1).
024-027 connect thesis GB 22-10-2007 10:40 Pagina 27

28
Through the audio system of theCONNECT it is possible to control:
– the RDS radio with FM/AM recep-tion;
– the cassette player with autore-verse;
– the CD player;
– the CD-changer;
– the colour TV tuner (only with carstopped).
SCREEN OPTIONSAND FUNCTIONS
According to operating conditions,the audio system options and func-tions displayed are as follows:
– audio source selection (RadioFM/AM, Cassette CC, Compact DiscCD, CD-changer CDC and TV tuner)through the corresponding multi-function keys;
– waveband selection (FM, AM)through the corresponding multi-function keys;
– name of broadcaster (if available)and stored station number;
– storage of 30 stations (18 in theFM band and 12 in the AM band);
– display of pause symbol in cassettemode;
– display of cassette, CD and CD-changer symbols;
GENERALINFORMATION
The audio system is turned on press-ing key 11 (fig. 1) which gives accessto the main functions of the radio (fig.12). Press the key for longer than 2seconds to switch the audio system off(“Audio OFF” displayed on MAINscreen). Press the key briefly again toswitch the system on.
fig. 12
L0A
5084
g
AUDIO SYSTEM (AUDIO)
028-061 connect thesis GB 22-10-2007 10:41 Pagina 28
29
– display of current tape side (A orB);
– display of CD number, track num-ber and playing time;
– “Scan” and “Random” functions;
– “Dolby NR” function for sup-pressing noise when listening tapes;
– stand-by engagement function fortraffic information bulletins (TP) withpossibility of deactivation;
– sound setting functions: Loudness,Treble, Bass, Balance, Fader, SDV(speed depending volume) and Startvol. (volume at start-up);
– display of status indications, suchas date, time, outside temperature etc.
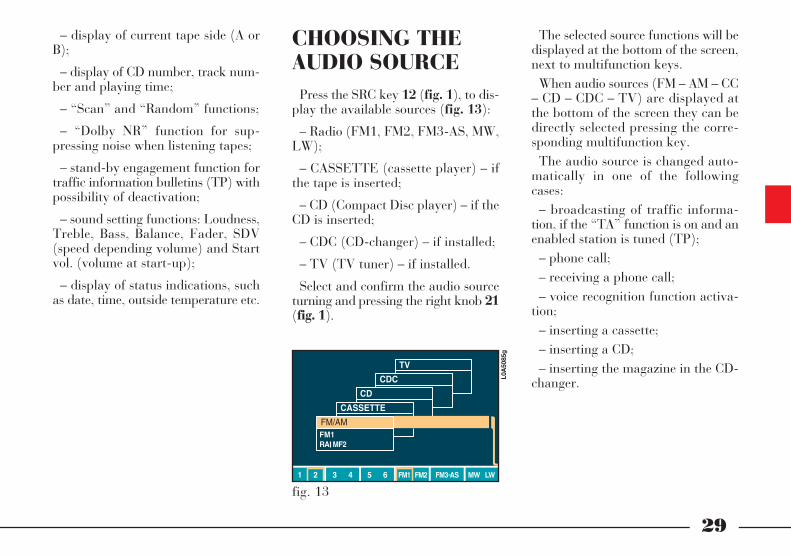
CHOOSING THEAUDIO SOURCE
Press the SRC key 12 (fig. 1), to dis-play the available sources (fig. 13):
– Radio (FM1, FM2, FM3-AS, MW,LW);
– CASSETTE (cassette player) – ifthe tape is inserted;
– CD (Compact Disc player) – if theCD is inserted;
– CDC (CD-changer) – if installed;
– TV (TV tuner) – if installed.
Select and confirm the audio sourceturning and pressing the right knob 21(fig. 1).
The selected source functions will bedisplayed at the bottom of the screen,next to multifunction keys.
When audio sources (FM – AM – CC– CD – CDC – TV) are displayed atthe bottom of the screen they can bedirectly selected pressing the corre-sponding multifunction key.
The audio source is changed auto-matically in one of the followingcases:
– broadcasting of traffic informa-tion, if the “TA” function is on and anenabled station is tuned (TP);
– phone call;– receiving a phone call;– voice recognition function activa-
tion;– inserting a cassette;– inserting a CD;– inserting the magazine in the CD-
changer.
fig. 13L0
A50
85g
028-061 connect thesis GB 22-10-2007 10:41 Pagina 29
30
“LOUDNESS” FUNCTION
The “Loudness” function improvesthe level of the sound when listeningat low volume, increasing the bassand treble tones.
To turn the function on/off, selectand confirm it with the right knob 21(fig. 1). When the function is on,symbol “ ” appears in the smallsquare near the wording.
On versions fitted with Bose SoundSystem, the “Loudness” is always ac-tive and cannot be deactivated.
AUDIO SETTINGSThe audio parameters described in
this paragraph can be activated andadjusted with all the audio sources(Radio, CASSETTE, CD, CD-Changer); for TV audio settings seethe relevant paragraph in this section.
Select and confirm the “Settings”function (fig. 12) from the mainmenu of the audio sources by turningand pressing the right knob 21 (fig.1).
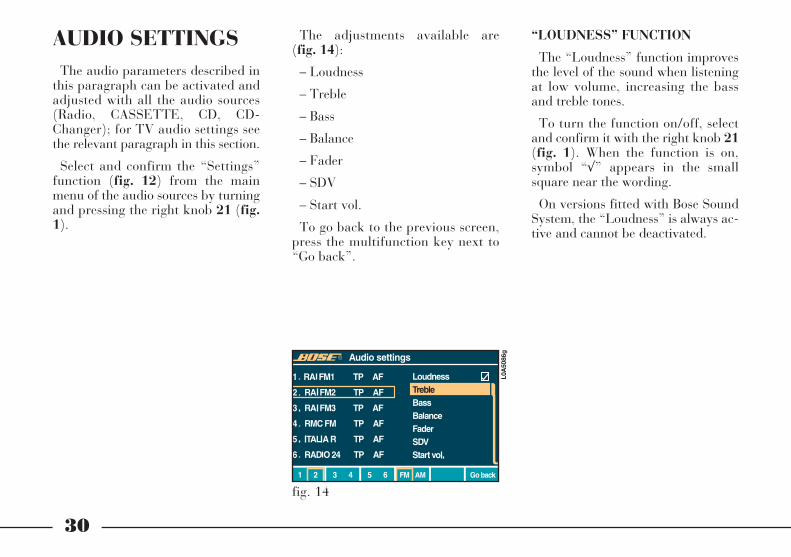
The adjustments available are (fig. 14):
– Loudness
– Treble
– Bass
– Balance
– Fader
– SDV
– Start vol.
To go back to the previous screen,press the multifunction key next to“Go back”.
fig. 14L0
A50
86g
028-061 connect thesis GB 22-10-2007 10:41 Pagina 30
31
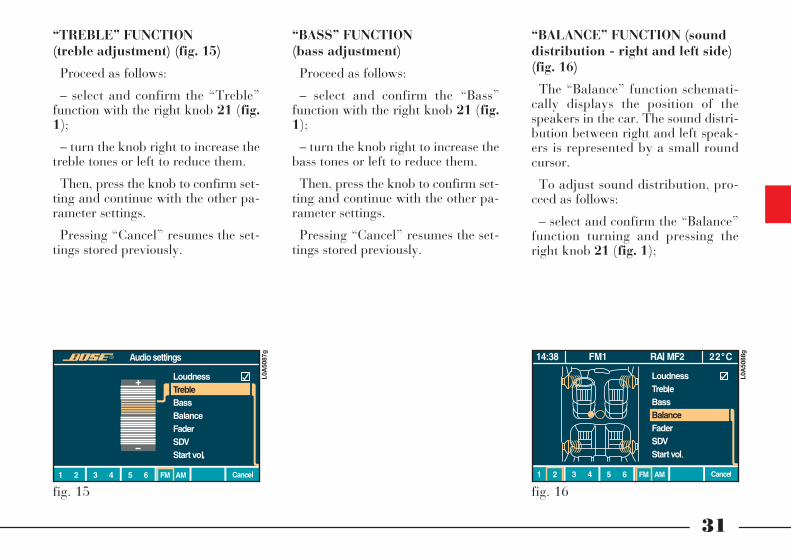
“TREBLE” FUNCTION (treble adjustment) (fig. 15)
Proceed as follows:
– select and confirm the “Treble”function with the right knob 21 (fig.1);
– turn the knob right to increase thetreble tones or left to reduce them.
Then, press the knob to confirm set-ting and continue with the other pa-rameter settings.
Pressing “Cancel” resumes the set-tings stored previously.
“BASS” FUNCTION (bass adjustment)
Proceed as follows:
– select and confirm the “Bass”function with the right knob 21 (fig.1);
– turn the knob right to increase thebass tones or left to reduce them.
Then, press the knob to confirm set-ting and continue with the other pa-rameter settings.
Pressing “Cancel” resumes the set-tings stored previously.
“BALANCE” FUNCTION (sounddistribution - right and left side)(fig. 16)
The “Balance” function schemati-cally displays the position of thespeakers in the car. The sound distri-bution between right and left speak-ers is represented by a small roundcursor.
To adjust sound distribution, pro-ceed as follows:
– select and confirm the “Balance”function turning and pressing theright knob 21 (fig. 1);
fig. 15
L0A
5087
g
fig. 16
L0A
5088
g
028-061 connect thesis GB 22-10-2007 10:41 Pagina 31

32
– turn the knob, right or left, tochange the sound distribution in thepassenger compartment between theright and left speakers, then press theknob to confirm.
Pressing “Cancel” resumes the set-tings stored previously.
“FADER” FUNCTION (sounddistribution - front and rear) (fig. 17)
The “Fader” function schematicallydisplays the position of the speakersin the car. The sound distribution be-tween front and rear speakers is rep-resented by a small round cursor.
To adjust sound distribution, pro-ceed as follows:
– select and confirm the “Fader”function turning and pressing theright knob 21 (fig. 1);
– turn the knob, right or left, tochange the sound distribution in thepassenger compartment between thefront and rear speakers, then press theknob to confirm.
Pressing “Cancel” resumes the set-tings stored previously.
fig. 17L0
A50
89g
028-061 connect thesis GB 22-10-2007 10:41 Pagina 32

33
“SDV” FUNCTION (volume changing with speed)(fig. 18)
The “SDV” function makes it possi-ble to automatically adjust the radiovolume level to the speed of the car,increasing it as the speed increases tomaintain the correct ratio with thenoise level in the passenger compart-ment.
The adjustment levels available are:
– OFF (function off)
– 1 (very weak)
– 2 (weak)
– 3 (medium)
– 4 (strong)
– 5 (very strong).
To turn the function on/off or enterthe setting, proceed as follows:
– select and confirm the “SDV”function turning and pressing theright knob 21 (fig. 1);
– turn the knob right or left to selecta setting or turn the function off, thenpress the knob to confirm.
Pressing “Cancel” resumes the set-tings stored previously.
“START VOL.” FUNCTION(volume level at power on) (fig. 19)
The “Start vol.” function shall beused to set the max. volume level atCONNECT power on.
If when switching the system off, thevolume is higher that the set one, thesystem will restore automatically theset volume level.
Proceed as follows: select and con-firm the “Start vol.” function with theright knob 21 (fig. 1); turn the knobright to increase the max. power onvolume or left to reduce it.
fig. 18L0
A50
90g
fig. 19
L0A
5091
g
028-061 connect thesis GB 22-10-2007 10:41 Pagina 33

34
RADIO MODE
RDS SYSTEM
This is an additional radio informa-tion system which uses the 57 kHzsubcarrier of normal FM broadcasts.
With this function it is possible to re-ceive different types of informationsuch as traffic bulletins, stationnames, alternative frequencies or spe-cial programmes selected through the“PTY” function.
EON (Enhanced Other Network)
The radio integrated in the CON-NECT system can receive informationfrom the EON infotraffic system ac-tive in certain Countries. The EONsystem groups together several sta-tions enabled to broadcast traffic in-formation, interrupting temporarilythe programme of the station beinglistened to.
When the station tuned belongs toan EON circuit, the display shows“EON”.
This function available to RDSchannels (only with “TP” functionon), can be disabled by turning the“TP” or “RDS-AF” function off.
Press the knob to confirm the re-quired setting.
Pressing “Cancel” resumes the set-tings stored previously.
If the volume was muted beforeswitching off, at next turning on thesystem will set to volume level 3 cor-responding to the lowest volume
028-061 connect thesis GB 22-10-2007 10:41 Pagina 34

35
RADIO FUNCTION MAINSCREEN (fig. 20)
Selecting the Radio source with theSRC key 12 (fig. 1) or pressing thecorresponding multifunction key (onscreens with audio sources at the bot-tom of the display), the followingfunctions are displayed:
– Audio Mute
– TP
– RDS-AF
– PTY
– Autostore
– Frequency
– Settings.
“AUDIO MUTE” FUNCTION
The “Audio Mute” function enablesto bring the volume to zero, keepingthe Radio module active.
To switch the function on/off, selectand confirm it with the right knob 21(fig. 1).
The “Audio Mute” function can alsobe turned on/off by pressing the“ON/OFF” key on the remote control.
When the function is on (volume tozero) symbol“ ” appears near thewording “Audio Mute”.
The “Audio Mute” function can beenabled only if the TP function is on(symbol “ ” near TP).
“TP” FUNCTION (traffic information)
Certain stations in the FM band arealso enabled to broadcast informationabout the conditions of the traffic.
In this case the displays shows theabbreviation “TP”.
To turn the “TP” function on, selectit with the right knob 21 (fig. 1), andthen press the knob to confirm it.When the function is on, symbol “ ”appears in the small square near thewording.
With the “TP” function on it is pos-sible:
– to seek only RDS stations thatbroadcast in the FM band, enabled tobroadcast traffic information;
– to receive traffic information alsoif the cassette player or the CD playerare working;
– to receive traffic information at apreset minimum level also with theradio volume down completely or instand-by.
fig. 20
L0A
5084
g
028-061 connect thesis GB 22-10-2007 10:41 Pagina 35

36
The operations to be carried out foreach of the three above conditions arelisted below.
Receiving stations enabled tobroadcast traffic information:
– select band FM1, FM2 or FM3-AS;
– turn the “TP” function on;
– start seeking the frequencies.
Receiving traffic informationwhen the cassette player or theCD player are working:
If you wish to receive traffic infor-mation while listening to a tape or CD,before inserting the tape or the CD,tune to a station enabled to broadcasttraffic information (TP) and turn the“TP” function on. If, while playing thetape or CD, this station broadcaststraffic information, tape or CD play-ing will be temporarily stopped andresumed automatically at the end ofthe message.
If the cassette or CD player is al-ready working and at the same timeyou wish to receive traffic informa-tion, turning on the “TP” function,the radio tunes to the last stationheard in the FM band and the trafficannouncements are transmitted. If thestation selected does not broadcasttraffic information, an enabled stationis sought automatically.
If you wish to interrupt a traffic an-nouncement, turn off the “TP” func-tion while the announcement is beingbroadcast.
Receiving traffic informationthough not listening to the radio:
– turn the “TP” function on;
– tune to a station enabled to broad-cast traffic information;
– set the system to stand-by pressingthe DARK key 14 (fig. 1).
This way, if that station broadcaststraffic information, this will heard ata minimum predefined volume.
IMPORTANT In certain countries,radio stations exist which though the“TP” function is active (the displayshows “TP”), do not broadcast traf-fic information.
If the radio is working in the AMband, choosing the FM band tunes tothe last station heard. If the chosenstation does not broadcast traffic in-formation (“TP” not shown on thedisplay), an automatic search isstarted for an enabled station.
If the volume is changed during atraffic bulletin the value is not shownon the display and the new value iskept only for the bulletin in progress.
028-061 connect thesis GB 22-10-2007 10:41 Pagina 36

37
IMPORTANT If the “TP” functionis on and the station tuned is not en-abled to provide traffic information oris no longer able to broadcast this in-formation (the display does not show“TP”), after about 1 minute in whichthe radio is in these conditions:
– if a cassette or CD is being playedanother station enabled to broadcasttraffic information is sought auto-matically;
– if the radio is in use a warning issounded to alert that it is not possibleto receive traffic information; to in-terrupt it, it is necessary to tune to abroadcaster enabled to give traffic in-formation or switch off the “TP”function.
“RDS-AF” FUNCTION(seeking alternative frequencies)
Within the RDS system the radiocan work in two different modes:
– alternative frequency search on;
– alternative frequency search off.
When the signal of the RDS stationtuned weakens, the following twocases may occur:
– With “RDS-AF” on, the RDS sys-tem activates automatic tuning of theoptimum frequency of the stationchosen, with the stations enabled,therefore the radio is automaticallytuned to the station with the strongestsignal that is broadcasting the sameprogramme. During the journey it willthus be possible to continue listeningto the station chosen without havingto change the frequency when chang-ing area. Of course, the station beinglistened to must be receivable in thearea the car is crossing.
– With “RDS-AF” off, the radio willnot tune the strongest station auto-matically and it will have to be foundmanually using the tuner buttons.
To turn the “RDS-AF” functionon/off, select it with the right knob21 (fig. 1), then press the knob toconfirm. When the function is on,symbol “ ” appears in the smallsquare near the wording.
The RDS channel name (if avail-able) is still shown on the display.
If the radio is working in the AMband, when the SRC key 12 (fig. 1) ispressed, it moves the FM band on thelast station chosen.
028-061 connect thesis GB 22-10-2007 10:41 Pagina 37

38
“PTY” FUNCTION (choosing atype of programme) (fig. 21)
The “PTY” function (ProgramType) makes it possible to give prior-ity to broadcasters transmitting pro-grammes classified according to thetype of PTY. PTY programmes mayconcern emergency announcements orvarious subjects (e.g. music, news).To access the list of PTY pro-grammes, select and confirm the“PTY” function with the right knob21 (fig. 1); the display will show thescreen with the list of PTY pro-grammes and the subject of the laststation heard (e.g. “NEWS”).
To scroll the list of PTY pro-grammes, turn the right knob 21 (fig.1). To choose a type of programme,press the knob after choosing thetype.
IMPORTANT The “PTY” functioncan only be turned on in the FMband.
If the station does not broadcast inthe PTY mode, the display will show“NO-PTY” for 5 seconds.
After 2 seconds the display showsthe station name or frequency.
The list of PTY programmes is thefollowing:
– None (no PTY programme)
– News
– Current Affairs
– Info
– Sport
– Education
– Drama
– Culture
– Science
– Varied
– Pop Music
– Rock Music
– Easy Listening Music
– Light Classical Music
– Serious Classical Music
– Other Music
– Weather
– Finance
– Children
– Soc. Affairs
– Religion
– Call
– Travel
– Leisure
– Jazz Music
– Country Music
– National Music
– Oldies Music
– Folk Music
– Documentary
– Alarm.fig. 21
L0A
5092
g
028-061 connect thesis GB 22-10-2007 10:41 Pagina 38
39
To change the type of PTY pro-gramme, press the keys 6 or 7 (fig. 1)or one of the 6 preset keys. If the dis-play shows the frequency or stationname, pressing the keys 6 or 7 (fig. 1)the type of current programme will beshown.
To store the current programmetype on one of the 6 preset keys, pressthe preset key at length (over 2 sec-onds).
To seek a station with PTY pro-gramme proceed as follows:
– select an FM band with the SRCkey 12 (fig. 1);
– set the PTY programme type;
– press key 6 or 7 (fig. 1) to start theautomatic search for tuning the nextstation that can be received in the di-rection chosen, respectively loweringor highering the frequency. The tunerwill only seek PTY stations.
If no station is available with thistype of programme, the station se-lected previously is returned and forabout 2 seconds the display will show“NO-PTY”.
To exit the screen with the list ofPTY programmes, choose a type ofprogramme, or “None” if you do notwish to set a programme type.
“AUTOSTORE” FUNCTION(automatic station storage)
To turn on the “Autostore” function(automatic station storage), select andconfirm it with the right knob 21(fig. 1).
When this function is on, the radioautomatically stores the 6 stations withthe strongest signal, in decreasing or-der of intensity of the signal in theFM3-AS frequency band.
If the “TP” function (traffic informa-tion) is on, only stations that broadcasttraffic information will be stored. Thisfunction can be turned on also whenplaying a cassette or a CD.
During automatic storage the dis-play shows the wording “Search inProgress”. To interrupt the automaticstorage process, turn off the “Auto-store” function pressing the ESC key23 (fig. 1); the radio will tune to thestation heard previously before thefunction was activated.
028-061 connect thesis GB 22-10-2007 10:41 Pagina 39
40
On preset keys (1), (2), (3), (4), (5),(6) the stations that have a strong sig-nal in that moment will be stored, inthe FM3-AS band. After storage theradio tunes automatically to the firststation of the FM3-AS band corre-sponding to the frequency stored onpreset key (1).
Every station is stored only once, ex-cept in the case of regional pro-grammes, which in certain casesmight be stored twice.
The behaviour of the set during“Autostore” is as follows:
– at the beginning of the “Autostore”function all the other functions aredisabled;
– any change in volume is not shownon the display;
– pressing one of the preset keysfrom “1” to “6” the automatic stor-age process is interrupted and the sta-tion stored with that key is tuned;
– selecting and activating a radiofunction (e.g. “PTY”) the automaticstorage process is interrupted, the laststation heard before tuning on “Au-
tostore” is tuned and the function as-sociated with the key pressed is run;
– selecting and activating one orboth “TP” and “AF” functions dur-ing the automatic storage process, au-tomatic storage will be interrupted,the “TP” (traffic information) and“AF” (alternative frequencies) func-tions will be turned on/off and a newautomatic storage process will bestarted;
– changing the audio source (Cas-sette, CD or CD-Changer) during theautomatic storage process, the “Auto-store” function is not interrupted.
IMPORTANT It may occur that theAutostore function is unable to find 6stations with a strong signal; in thiscase only the stations found arestored.
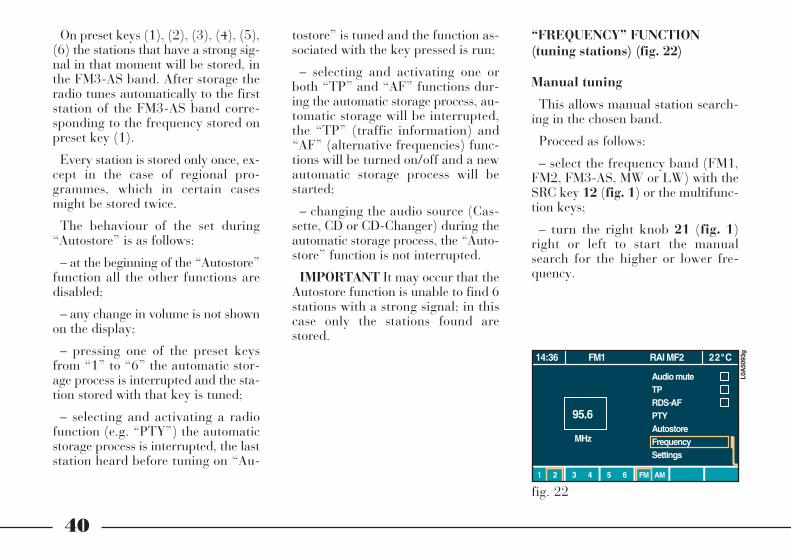
“FREQUENCY” FUNCTION(tuning stations) (fig. 22)
Manual tuning
This allows manual station search-ing in the chosen band.
Proceed as follows:
– select the frequency band (FM1,FM2, FM3-AS, MW or LW) with theSRC key 12 (fig. 1) or the multifunc-tion keys;
– turn the right knob 21 (fig. 1)right or left to start the manualsearch for the higher or lower fre-quency.
fig. 22
L0A
5093
g
028-061 connect thesis GB 22-10-2007 10:41 Pagina 40

41
Listening to stored stations
Proceed as follows:
– select the required frequency band(FM1, FM2, FM3-AS, MW or LW)with the SRC key 12 (fig. 1) or themultifunction keys;
– briefly press one of the stationstorage keys (1), (2), (3), (4), (5) or(6).
In the FM1, FM2 and FM3-ASbands, if reception is poor and the“RDS-AF” alternative frequency seekfunction is on, a station with thestrongest signal that is broadcastingthe same programme is automaticallysought.
Automatic tuning
This function automatically seeksstations in the chosen band.
Proceed as follows:
– select the frequency band (FM1,FM2, FM3-AS, MW or LW) with theSRC key 12 (fig. 1) or the multifunc-tion keys;
– press key 6 or 7 (fig. 1) to start theautomatic search for tuning the nextstation that can be received in the di-rection chosen, respectively loweringor highering the frequency.
If the “TP” function (traffic infor-mation) is on, the tuner only seeksstations that broadcast traffic bul-letins.
If the “PTY” function is on, thetuner only seeks PTY stations.
Manual station storage
The station being listened to can bestored in the range chosen with themultifunction keys (1), (2), (3), (4),(5) and (6).
Keep one of these keys pressed untilthe display shows the number of thekey with which the station has beenstored.
Automatic station storage
The CONNECT tuner is providedwith the “Autostore” function. Whenthis function is on the radio automat-ically stores, in the FM3-AS band, the6 stations with the strongest signal.To turn this function on, see previousparagraph “Autostore function”.
028-061 connect thesis GB 22-10-2007 10:41 Pagina 41

42
“SETTINGS” FUNCTION (audioparameter adjustments) (fig. 23)
To adjust the audio parameters, se-lect and confirm the “Settings” func-tion with the right knob 21 (fig. 1) todisplay the relevant menu, then fol-low the instructions given in para-graph “Audio settings”.
CASSETTE PLAYERMODE (CC)
CC MAIN FUNCTION PAGE(fig. 24)
The CC main function page is dis-played pressing the SRC key 12 (fig.1) and selecting the “CASSETTE”mode, or with the CC multifunctionkey (in screens with audio sources FM– AM – CC – CD – CDC – TV at thebottom of the display), or by directlyinserting the tape.
IMPORTANT The CC main func-tion page is displayed only if the tapeis inserted.
On the top of the display are shownthe time, the last selected wavebandwith the relevant frequency or broad-caster name and the outside temper-ature.
In the centre of the display areshown the cassette, the wording“Play”, the tape side (A or B) and themain functions:
– Break for TA (playing break fortraffic announcement);
– Dolby NR (noise reduction circuit)(*);
– Blank skip;
– Settings.
(*) The DOLBY NR reduction cir-cuit is made under the licence ofDolby Laboratories Licensing Corpo-ration.
fig. 23
L0A
5084
g
fig. 24L0
A50
94g
028-061 connect thesis GB 22-10-2007 10:41 Pagina 42

43
DOLBY and the “M” symbol withdouble D are patented brands ofDolby Laboratories Licencing Corpo-ration.
At the bottom of the display on themultifunction keys are shown theother available functions:
– II (pause);
– ˙ (playing restart);
– Scan (all tracks played for few sec-onds);
– Side A/B (reverse tape side);
– FM – AM – CC – CD – CDC – TV(audio sources that can be selected).
IMPORTANT The cassette playeridentifies automatically the differenttape types (CrO
2, Metal or Normal),
to play them with the best soundquality.
“BREAK FOR TA” FUNCTION (to receive traffic information)
If you wish to receive traffic informa-tion while listening to a cassette, beforeinserting the tape, tune to a station en-abled to broadcast traffic information(TP) and turn the “TP” function on. Ifwhile playing the cassette, this stationbroadcasts traffic information, tapeplaying will be temporarily stopped andresumed automatically at the end of themessage.
To turn this function on/off, selectthe “Break for TA” function with theright knob 21 (fig. 1), then press theknob to confirm. When the functionis on, symbol “ ” appears in the smallsquare near the wording.
“DOLBY NR” FUNCTION
The “Dolby NR” function reducestape noises, use it when playing cas-settes recorded with this technique inorder to optimise sound quality. Turnthis function off when playing cas-settes not recorded with the Dolby NRtechnique. To turn the “Dolby NR”function on, select it with the rightknob 21 (fig. 1), then press it to con-firm. When the function is on, symbol“ ” appears in the small square nearthe wording.
(*) The DOLBY NR reduction cir-cuit is made under the licence ofDolby Laboratories Licensing Corpo-ration.
DOLBY and the “M” symbol withdouble D are patented brands ofDolby Laboratories Licencing Corpo-ration.
028-061 connect thesis GB 22-10-2007 10:41 Pagina 43

44
“BLANK SKIP” FUNCTION
The “Blank skip” function is used toeliminate the blank spaces between atrack and the other. When playing atape with this function on, at the endof a track the next one is played au-tomatically.
To turn this function on, select andconfirm it wit the right knob 21 (fig.1). When the function is on, symbol“ ” appears in the small square nearthe wording.
“SETTINGS” FUNCTION(audio parameters setting) (fig. 25)
To set audio parameters, select andconfirm the “Settings” function withthe right knob 21 (fig. 1) to displaythe relevant menu, then follow the in-structions given in paragraph “Audiosettings”.
CHANGING THE TAPE PLAYING SIDE
Insert the cassette in the slot 3 (fig.1) with the tape facing rightwards,the tape starts playing automatically.
To change side before the end of thetape, press key 25 (fig. 1) or the mul-tifunction key “Side A/B”. After play-ing a tape, the cassette side is changedautomatically (“Autoreverse” func-tion). The display shows the side ofthe cassette that is being played (sideA or B).
If the cassette is already inserted, se-lecting “CASSETTE” with the SRCkey 12 (fig. 1) or the multifunctionkey will start playing from the lastside played.
fig. 25L0
A50
95g
028-061 connect thesis GB 22-10-2007 10:41 Pagina 44

45
TAPE FORWARD/REWIND
To move the tape forward press key7 (fig. 1); to rewind it press key 6(fig. 1).
Press briefly the keys (less than twoseconds) to start fast forward/rewindof the tape to the beginning/end of thetrack being played or to next/previ-ous track. Press these keys (for longerthan two seconds) to start fast tapeforward/rewind. At the end of thetape, the cassette side is changed au-tomatically.
Press again keys 7 or 6 (fig. 1) tostop tape forward/rewind.
“SCAN” FUNCTION
The “Scan” function makes it possi-ble to listen to all the cassette tracksfor about 12 seconds.
To turn this function on, press the“Scan” key. To turn the function off,press again the “Scan” key or themultifunction keys “II”, “˙” or “SideA/B” or one of the two forward/rewind keys.
EJECTING THE CASSETTE
To eject the cassette, press 5 (fig. 1).
CASSETTE PLAYER PAUSE
To pause the cassette player, pressthe multifunction key “II”. To listento the track again press the multi-function key “˙”.
028-061 connect thesis GB 22-10-2007 10:41 Pagina 45
46
COMPACT DISC PLAYERMODE (CD)
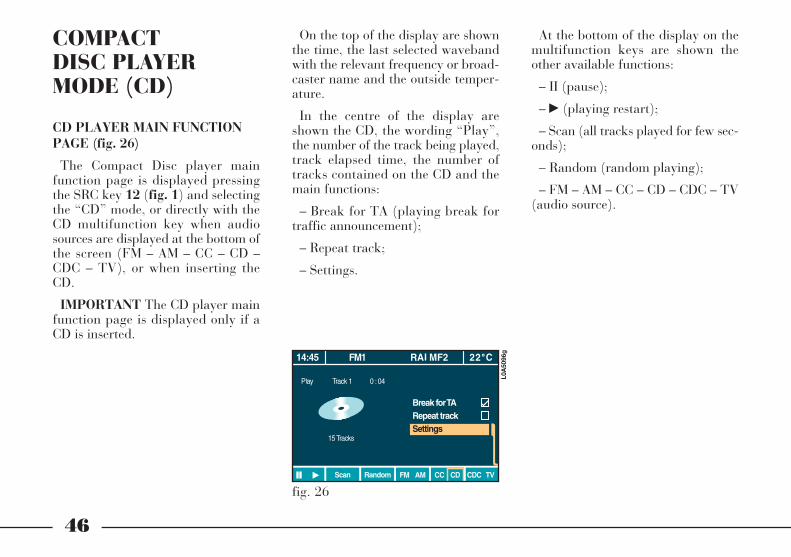
CD PLAYER MAIN FUNCTIONPAGE (fig. 26)
The Compact Disc player mainfunction page is displayed pressingthe SRC key 12 (fig. 1) and selectingthe “CD” mode, or directly with theCD multifunction key when audiosources are displayed at the bottom ofthe screen (FM – AM – CC – CD –CDC – TV), or when inserting theCD.
IMPORTANT The CD player mainfunction page is displayed only if aCD is inserted.
On the top of the display are shownthe time, the last selected wavebandwith the relevant frequency or broad-caster name and the outside temper-ature.
In the centre of the display areshown the CD, the wording “Play”,the number of the track being played,track elapsed time, the number oftracks contained on the CD and themain functions:
– Break for TA (playing break fortraffic announcement);
– Repeat track;
– Settings.
At the bottom of the display on themultifunction keys are shown theother available functions:
– II (pause);
– ˙ (playing restart);
– Scan (all tracks played for few sec-onds);
– Random (random playing);
– FM – AM – CC – CD – CDC – TV(audio source).
fig. 26L0
A50
96g
028-061 connect thesis GB 22-10-2007 10:41 Pagina 46
47
“REPEAT TRACK” FUNCTION
With this function it is possible toturn on/off the continuous repetitionof the current track.
To turn this function on/off, selectand confirm it with the right knob 21(fig. 1). When the function is on,symbol “ ” appears in the smallsquare near the wording.
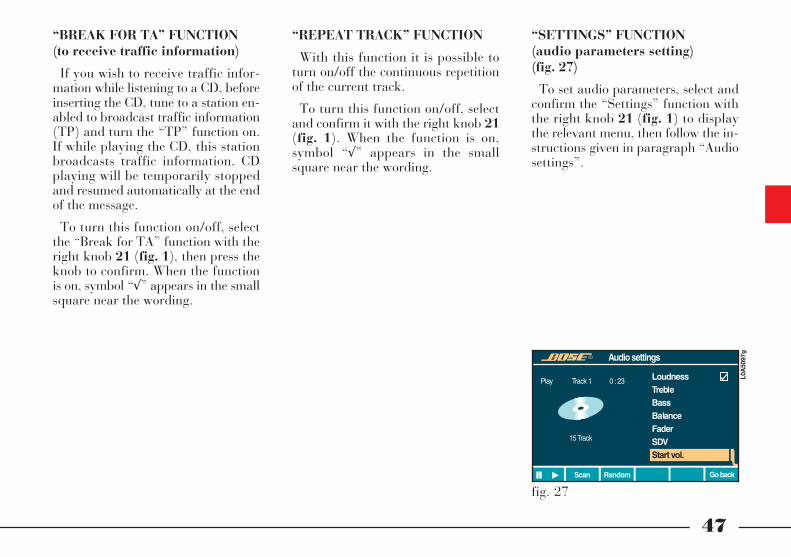
“SETTINGS” FUNCTION (audio parameters setting) (fig. 27)
To set audio parameters, select andconfirm the “Settings” function withthe right knob 21 (fig. 1) to displaythe relevant menu, then follow the in-structions given in paragraph “Audiosettings”.
“BREAK FOR TA” FUNCTION (to receive traffic information)
If you wish to receive traffic infor-mation while listening to a CD, beforeinserting the CD, tune to a station en-abled to broadcast traffic information(TP) and turn the “TP” function on.If while playing the CD, this stationbroadcasts traffic information, CDplaying will be temporarily stoppedand resumed automatically at the endof the message.
To turn this function on/off, selectthe “Break for TA” function with theright knob 21 (fig. 1), then press theknob to confirm. When the functionis on, symbol “ ” appears in the smallsquare near the wording.
fig. 27
L0A
5097
g
028-061 connect thesis GB 22-10-2007 10:41 Pagina 47

48
CD PLAYER PAUSE
To pause the CD player, press themultifunction key “II”. To listen tothe track again press the multifunc-tion key “˙”.
“SCAN” FUNCTION
The “Scan” function makes it possi-ble to listen to all the CD tracks forabout 12 seconds.
To turn this function on, press the“Scan” key. To turn the function off,press again the “Scan” key or themultifunction keys “II”, “˙” or “Ran-dom” or one of the two search for-ward/rewind keys.
“RANDOM” FUNCTION
With the “Random” function on, thecurrent CD tracks are played in ran-dom sequence. When all tracks areplayed random playing restarts.
To turn this function on, press the“Random” key. To turn the functionoff, press again the “Random” key orthe multifunction keys “II”, “˙” or“Scan” or one of the two search for-ward/rewind keys.
PLAYING A CD
Playing starts automatically after in-serting a CD in the slot 2 (fig. 1).
If a CD is already inserted, selecting“CD” mode with the SRC key 12 (fig.1) or the multifunction key will startplaying from the last track beingplayed before stopping.
SELECTING PREVIOUS/NEXTTRACK AND FASTFORWARD/BACKWARD
Press briefly (less than 2 seconds)the keys 6 or 7 (fig. 1) to play theprevious or next track. If playing thetrack started more than three secondsago, pressing 6the track is playedagain from the start.
Press keys 6 or 7 (fig. 1) for overtwo seconds for fast forward/ back-ward.
EJECTING THE CD
To eject the CD, press 4 (fig. 1).
028-061 connect thesis GB 22-10-2007 10:41 Pagina 48

49
IMPORTANT The CD-changermain function page is displayed onlyif the CD-changer is installed and atleast one CD is inserted.
On the top of the display are shownthe time, the last selected wavebandwith the relevant frequency or broad-caster name and the outside temper-ature.
In the centre of the display areshown the CDs, the wording “Play”,the number of the track being played,track elapsed time, the number oftracks contained on the CD and themain functions:
– Break for TA (playing break fortraffic announcement);
– Repeat track;
– Repeat CD;
– Random CD;
– Scan;
– Settings.
At the bottom of the display on themultifunction keys are shown theother available functions:
– CD in the magazine (1 to 6);
– audio sources (FM – AM – CC –CD – CDC – TV).
The number of the CD being playedis shown on both the display and thecorresponding multifunction key.
IMPORTANT The CD-changercontains 6 CDs; for loading CDs intothe C-changer, see paragraph “CD-changer” in the second chapter.
CD-CHANGERMODE (CDC)
CDC MAIN FUNCTION PAGE(fig. 28)
The CD-changer main function pageis displayed pressing the SRC key 12(fig. 1) and selecting the “CDC”mode, or directly with the CDC mul-tifunction key in screens with audiosources (FM – AM – CC – CD – CDC– TV) at the bottom of the display.
fig. 28
L0A
5098
g
028-061 connect thesis GB 22-10-2007 10:41 Pagina 49

50
“REPEAT TRACK” FUNCTION
With this function it is possible toturn on/off the continuous repetitionof the current track.
To turn this function on/off, selectand confirm it with the right knob 21(fig. 1). When the function is on,symbol “ ” appears in the smallsquare near the wording.
“REPEAT CD” FUNCTION
With this function it is possible toturn on/off the continuous playing ofthe current CD.
To turn this function on/off, selectand confirm it with the right knob 21(fig. 1). When the function is on,symbol “ ” appears in the smallsquare near the wording.
“BREAK FOR TA” FUNCTION (toreceive traffic information)
If you wish to receive traffic infor-mation while listening to CD, beforeselecting the CD-changer mode, tuneto a station enabled to broadcast traf-fic information (TP) and turn the“TP” function on. If while playing theCD, this station broadcasts traffic in-formation, CD playing will be tem-porarily stopped and resumed auto-matically at the end of the message.
To turn this function on/off, selectthe “Break for TA” function with theright knob 21 (fig. 1), then press theknob to confirm. When the functionis on, symbol “ ” appears in the smallsquare near the wording.
028-061 connect thesis GB 22-10-2007 10:41 Pagina 50

51
“SETTINGS” FUNCTION (audio parameters setting) (fig. 29)
To set audio parameters, select andconfirm the “Settings” function withthe right knob 21 (fig. 1) to displaythe relevant menu, then follow the in-structions given in paragraph “Audiosettings”.
“RANDOM CD” FUNCTION
With the “Random CD” function on,all the CDs in the CD-changer areplayed in random sequence. When alltracks are played random playingrestarts.
To turn this function on, select andconfirm “Random CD” with the rightknob 21 (fig. 1). When the functionis on, symbol “ ” appears in the smallsquare near the wording.
To turn this function off, select itagain and then press the right knob21 (fig. 1). The function is tuned offautomatically when turning on“Scan”, “Repeat track” or “RepeatCD” function, or when pressing oneof the search forward/backward keysor one of the CD selection multifunc-tion key.
“SCAN” FUNCTION
The “Scan” function makes it possi-ble to listen to all the CD tracks forabout 12 seconds.
To turn this function on, select andconfirm “Scan” with the right knob21 (fig. 1). When the function is on,symbol “ ” appears in the smallsquare near the wording.
To turn this function off, select itagain and then press the right knob21 (fig. 1). The function is tuned offautomatically when turning on “Ran-dom CD”, “Repeat track” or “RepeatCD” function, or when pressing oneof the search forward/backward keysor one of the CD selection multifunc-tion key.
fig. 29
L0A
5099
g
028-061 connect thesis GB 22-10-2007 10:41 Pagina 51

52
SELECTING AND PLAYING A CD
Selecting the CD-changer, playbackstarts from the last CD heard previ-ously or from the first CD after in-serting the magazine.
To change the current CD use themultifunction keys from 1 to 6.
If the CD selected is not available inthe CD-changer, the display shows“NO CD”.
If the CD is illegible or is not an au-dio CD, the display will show “CD Er-ror”.
PLAYING NEXT TRACK
To play the next track on the currentCD, press key 7 (fig. 1) for less than1 second.
If playing the last CD track, press-ing key 7 will play the first track onnext CD. When the “Random CD” ison, a new track (not played yet) se-lected randomly is played.
PLAYING PREVIOUS TRACK
To play the previous track on thecurrent CD, press key 6 (fig. 1) forless than 1 second.
If playing the track started morethan 3 seconds ago, pressing 6 thetrack is played again from the start.
If the first track of a CD is played,pressing 6 will play the last track onthe previous CD. If the first track ofthe first CD is played, the last track ofthe last CD will be played. When the“Random CD” is on, a new track (notplayed yet) selected randomly isplayed.
028-061 connect thesis GB 22-10-2007 10:41 Pagina 52

53
FAST FORWARD/BACKWARD
Press key 6 or 7 (fig. 1) for longerthan 1 second for fast forward/ back-ward.
STOPPING CD PLAYBACK
Current CD is stopped automaticallywhen selecting another Audio modeusing the multifunction keys or press-ing the “ON/OFF” key on the remotecontrol.
TV TUNER MODE
TV MAIN FUNCTION PAGE (fig. 30)
TV tuner main function page is dis-played pressing the SRC key 12 (fig.1) and selecting the “TV” mode, orwith the TV multifunction key inscreens with audio sources (FM – AM– CC – CD – CDC – TV) at the bot-tom of the display.
IMPORTANT For safety reasons,the TV tuner video signal is displayedonly with the car in stand still (speedlower than 8 km/h). The audio signalis kept also when the car is running.
The main functions are the follow-ing:
– TV standard;
– Autostore;
– Settings.
fig. 30L0
A50
29g
028-061 connect thesis GB 22-10-2007 10:41 Pagina 53
54
“TV STANDARD” FUNCTION
This function shall be used to set theTV standard of the Country whereyou are driving in. The alternativesavailable are the following:
– PAL Mid Europe;
– PAL Italy;
– PAL UK;
– Secam East E.;
– Secam France.
Proceed as follows: select and con-firm the “TV standard” function withthe right knob 21 (fig. 1), then useagain this knob to select and confirmthe required standard.
“AUTOSTORE” FUNCTION(automatic channel storage)
To turn on the “Autostore” function(automatic channel storage), selectand confirm it with the right knob 21(fig. 1).
When this function is on, the TVtuner automatically stores the 5 chan-nels with the strongest signal, in de-creasing order of intensity of the sig-nal, in the TV standard set.
During automatic storage the dis-play shows the wording “Autostore”.To interrupt the automatic storageprocess, press the “Cancel” key; theTV will tune to the channel receivedpreviously before the function was ac-tivated.
Channels tuned with the “Auto-store” function will be stored auto-matically on preset keys (1), (2), (3),(4) and (5). After storage the TVtunes automatically to the first chan-nel stored on preset key (1).
Every channel is stored only once,except in the case of regional chan-nels, which in certain cases might bestored more than once.
028-061 connect thesis GB 22-10-2007 10:41 Pagina 54
55
The behaviour of the set during“Autostore” is as follows:
– at the beginning of the “Autostore”function all the other functions aredisabled;
– any change in volume is not shownon the display;
– pressing one of the preset keysfrom “1” to “5” the automatic stor-age process is interrupted and thechannel stored with that key is tuned;
– pressing the “Cancel” key the au-tomatic storage process is interruptedand the TV will tune to the last chan-nel received before the function wasactivated;
– pressing “Off”, automatic storageprocess is interrupted and TV isswitched off;
– changing the audio source duringthe automatic storage process, the“Autostore” function is not inter-rupted.
IMPORTANT It may occur that the“Autostore” function is unable to find5 channels with a strong signal; in thiscase only the channels found arestored.
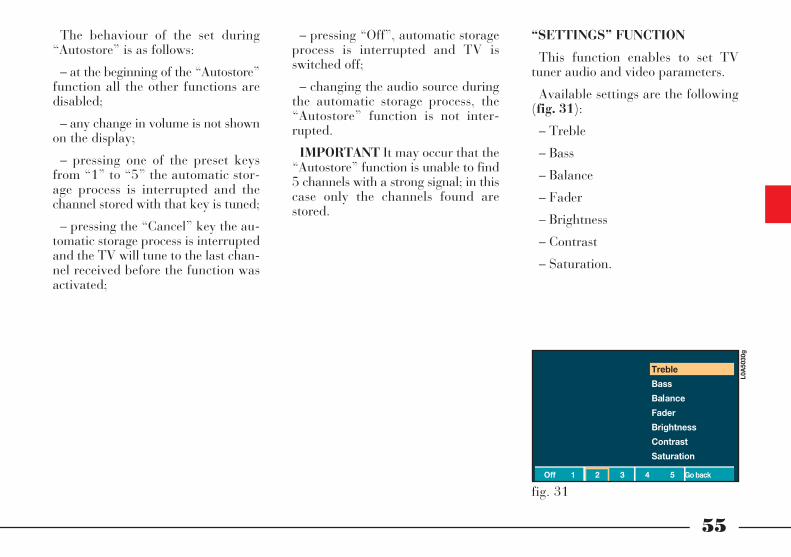
“SETTINGS” FUNCTION
This function enables to set TVtuner audio and video parameters.
Available settings are the following(fig. 31):
– Treble
– Bass
– Balance
– Fader
– Brightness
– Contrast
– Saturation.
fig. 31
L0A
5030
g
028-061 connect thesis GB 22-10-2007 10:41 Pagina 55

56
“TREBLE” FUNCTION (treble adjustment) (fig. 32)
Proceed as follows:
– select and confirm the “Settings”function on the TV tuner main func-tion page;
– select and confirm the “Treble”function with the right knob 21 (fig.1) to display the screen with the set-ting cursor;
– turn the knob 21 left to increasethe treble tones or right to reducethem.
Then, press the knob to confirm set-ting and continue with the other pa-rameter settings. Pressing “Cancel”resumes the settings stored previously.
“BASS” FUNCTION (bass adjustment) (fig. 33)
Proceed as follows:
– select and confirm the “Settings”function on the TV tuner main func-tion page;
– select and confirm the “Bass”function with the right knob 21 (fig.1) to display the screen with the set-ting cursor;
– turn the knob 21 left to increasethe bass tones or right to reduce them.
fig. 33
L0A
5032
g
fig. 32
L0A
5031
g
028-061 connect thesis GB 22-10-2007 10:41 Pagina 56

57
Then, press the knob to confirm set-ting and continue with the other pa-rameter settings. Pressing “Cancel”resumes the settings stored previously.
“BALANCE” FUNCTION (sounddistribution - right and left side)(fig. 34)
The “Balance” function enables tochange the sound distribution be-tween right and left speakers in thepassenger compartment.
To adjust sound distribution, pro-ceed as follows:
– select and confirm the “Settings”function on the TV tuner main func-tion page;
– select and confirm the “Balance”function with the right knob 21 (fig.1) to display the screen with the set-ting cursor;
– turn the knob, right or left, tochange the sound distribution in thepassenger compartment between theright and left speakers, then press theknob to confirm.
Pressing “Cancel” resumes the set-tings stored previously.
fig. 34L0
A50
33g
028-061 connect thesis GB 22-10-2007 10:41 Pagina 57

58
“FADER” FUNCTION (sounddistribution - front and rear) (fig. 35)
The “Fader” function enables tochange the sound distribution be-tween front and rear speakers in thepassenger compartment.
To adjust sound distribution, pro-ceed as follows:
– select and confirm the “Settings”function on the TV tuner main func-tion page;
– select and confirm the “Fader”function with the right knob 21 (fig.1) to display the screen with the set-ting cursor;
– turn the knob right to increase thesound from rear speakers or left to in-crease the sound from front speakers,then press the knob to confirm.
Pressing “Cancel” resumes the set-tings stored previously.
“BRIGHTNESS” FUNCTION(fig. 36)
Proceed as follows:
– select and confirm the “Settings”function on the TV tuner main func-tion page;
– select and confirm the “Bright-ness” function with the right knob 21(fig. 1) to display the screen with thesetting cursor;
– Turn the knob 21 left to increasebrightness and right to reduce it.
fig. 36
L0A
5035
g
fig. 35
L0A
5034
g
028-061 connect thesis GB 22-10-2007 10:41 Pagina 58

59
Then, press the right knob to con-firm setting. Pressing “Cancel” re-sumes the settings stored previously.
“CONTRAST” FUNCTION (fig. 37)
Proceed as follows:
– select and confirm the “Settings”function on the TV tuner main func-tion page;
– select and confirm the “Contrast”function with the right knob 21 (fig.1) to display the screen with the set-ting cursor;
– turn the knob 21 left to sharpencontrast and right to reduce it.
Then, press the right knob to con-firm setting. Pressing “Cancel” re-sumes the settings stored previously.
fig. 37L0
A50
36g
028-061 connect thesis GB 22-10-2007 10:41 Pagina 59

60
“SATURATION” FUNCTION (fig. 38)
Proceed as follows:
– select and confirm the “Settings”function on the TV tuner main func-tion page;
– select and confirm the “Satura-tion” function with the right knob 21(fig. 1) to display the screen with thesetting cursor;
– turn the knob 21 left to increasedisplay colour intensity and right toreduce it.
Then, press the right knob to con-firm setting. Pressing “Cancel” re-sumes the settings stored previously.
TUNING TV CHANNELS
Automatic tuning
This function automatically seeksTV channels.
Proceed as follows:
– select the TV tuner mode with theSRC key 12 (fig. 1) or the multifunc-tion keys;
– press key 6 or 7 (fig. 1) to start theautomatic search for tuning the nextchannel that can be received in the di-rection chosen, respectively loweringor highering the frequency.
fig. 38
L0A
5037
g
028-061 connect thesis GB 22-10-2007 10:41 Pagina 60

61
VOICE COMMANDSCertain functions of the Audio sys-
tem can be activated or deactivatedthrough voice commands.
For further information about voicecommands and voice prompts see sec-tion “Voice commands”.
Manual channel storage
The channel being watched can bestored with the multifunction keys(1), (2), (3), (4) and (5).
Keep one of these keys pressed untilthe display shows the number of thekey with which the channel has beenstored.
Automatic channel storage
The CONNECT TV tuner is pro-vided with the “Autostore” function.When this function is on the 5 chan-nels with the strongest signal arestored automatically. To turn thisfunction on, see previous paragraph“Autostore function”.
Watching stored channels
Proceed as follows:
– select the TV tuner mode with theSRC key 12 (fig. 1) or the multifunc-tion keys;
– briefly press one of the channelstorage keys(1), (2), (3), (4) or (5).
028-061 connect thesis GB 22-10-2007 10:41 Pagina 61

62
The cell phone functions are dis-played by pressing the TEL key 16(fig. 1).
Press the 16 key for longer than 2seconds to switch the phone functionoff. Press the key briefly to switch thephone on again.
Press key 15 to call the last diallednumber.
The cellular telephone has the fol-lowing functions which simplify use:
– PIN code (Personal IdentificationNumber) to prevent unauthorisedtelephone use
– PIN change
– activating and deactivating PIN re-quest at access
– PUK code entry
– incoming calls acceptance and re-fusal
– start a telephone call
– time form the beginning of the call
– interlocutor’s phone number (ifavailable) or interlocutor’s name (ifpresent on the phone book) for callsmade or received
– during a call, sound warning for anew incoming call
– holding on a call to switch to an-other incoming call or to start a newcall
– automatic number redialling acti-vation/deactivation
– call divert activation/deactivation
GENERALINFORMATION
The CONNECT system is fitted witha GSM cellular phone with hands-freefeature and with an additional tele-phone handset (optional).
The GSM standard (Global Systemfor Mobile Communication) is cur-rently implemented in many countriesand has excellent coverage; for infor-mation about the areas served by theGSM networks at present and in thefuture, please contact your networkprovider.
IMPORTANT The provided phoneis of the Single-Band type and there-fore if your network provider is notoperating with the 900 Mhz GSMstandard, coverage troubles may arisenotwithstanding the roaming. Contactyour network provider for further in-formation.
CELL PHONE (TEL)
062-086 connect thesis GB 22-10-2007 10:42 Pagina 62

63
– call lock activation/deactivation
– “incognito” function (to send or tohide your own phone number for out-going calls) activation/deactivation
– manual number dialling
– emergency call (even without SIMcard and without entering PIN code)
– reading the phone numbers storedon the SIM card
– entering a new phone number onthe SIM card
– deleting a phone number from theSIM card
– information on SIM card condi-tions (correct or wrong insertion andspace available in the memory)
– display of remaining credit in caseof prepaid SIM card (if this info ismade available by the networkprovider)
– access to the list of the last 10numbers dialled to facilitate frequentcalls
– access to the list of the last 10 callsreceived
– access and change of the lists con-taining the most frequently diallednumbers and to phone book stored onSIM card
– repeat dialling of the last number
– SMS function (Short Message Ser-vice) to receive and send short textmessages
– DTMF (Dual Tone Multi Fre-quency) setting activation/deactiva-tion
– setting volume and ring tone of in-coming calls
– selection of network provider
– volume change during a call
– display of signal field strength andother status warnings with symbolsand words.
062-086 connect thesis GB 22-10-2007 10:42 Pagina 63

64
PRELIMINARYOPERATIONS
INSERTING THE TELEPHONE CARD
If no valid SIM card is inserted whencalling the telephone function, the dis-play shows the relevant warning mes-sage (fig. 39).
The insertion of a valid SIM cardmakes it possible to make the tele-phone operational and access its func-tions. The telephone card is to be in-serted in the special slot 26 (fig. 1)with the integrated chip at the frontright in relation to the direction oftravel, until it is held in.
IMPORTANT If SIM card adapteris required, before buying it checkwhether it can be friendly fitted intoand removed from the CONNECTslot.
Correct card insertion is confirmedby the prompt to type the card PINcode (fig. 40).
When the card is already inserted,access to the operating system is ob-tained by pressing the TEL key 16(fig. 1).
To remove the SIM card press thekey 24 (fig. 1).
IMPORTANT Removing the SIMcard with the phone on may causetemporary faults; before removing theSIM card the user should select an-other operating mode or turn theCONNECT off. In the event of faultsdue to removing the SIM card withthe phone working, normal operationwill be resumed switching the CON-NECT off and on again.
PIN CODE ENTRY (fig. 40)
The PIN code, initially formed offour digits must be entered using themultifunction keys at the bottom ofthe display or the voice commands. Ifusing the multifunction keys, select“OK” with the right knob 21 (fig. 1)to confirm the PIN code. The digitsentered are shown by asterisks.
If a code digit needs to be corrected,select and confirm the “Correct” func-tion in order to write it again cor-rectly.
fig. 39
L0A50
52g
fig. 40
L0A51
00g
062-086 connect thesis GB 22-10-2007 10:42 Pagina 64

65
EMERGENCY CALL
After recalling the main phone func-tion page with the TEL key 16 (fig.1), an emergency 112 call can bemade even without the SIM card orwithout the PIN code.
Select and confirm the “Emergency”function with the right knob 21 (fig.1); before placing the call, the systemwill ask again for confirmation.
The emergency 112 call can be sentby pressing the SOS key 1 (fig. 1), ifthe SIM card is inserted and the PINcode has been entered. By pressing theSOS key, the car co-ordinates will ap-pear on the display (fig. 41) with the“Emergency 112” function selected.To start the call confirm the functionby pressing the right knob 21 (fig. 1).Before placing the call, the system willask again for confirmation (fig. 42);press “Yes” to confirm, otherwisepress “No”.
IMPORTANT After three unsuc-cessful PIN code entries, the card islocked. To unlock the card, enter boththe PUK code (Pin Unblocking Key)and the new PIN (minimum 4 char-acters, maximum 8 characters).
The network signal search begins af-ter entering the PIN code and the dis-play shows the main telephone func-tion page. After connection, the dis-play shows the network provider’sname.
fig. 41L0
A51
01g
fig. 42
L0A51
02g
062-086 connect thesis GB 22-10-2007 10:42 Pagina 65

66
ø “call lock” function on
ó SMS message received and notread yet
– display of the list of received calls
– display of the dial message (bymultifunction keys or voice com-mands).
ACCEPTING CALLSWhichever is the audio system active
mode (radio, CD player, etc.), whenan external call comes in, the ringerwill sound and the display will showthe caller’s name (if present in thephone book) and number (if avail-able) with the options accept orrefuse.
To accept the call, press key 15 (fig.1), to refuse press the left knob 8(fig. 1).
To end a call press key 15 (fig. 1).
SCREEN OPTIONS When using the phone, on the top of
the display are shown: time, audiosystem info (radio frequency tuned,tape side played, CD track, etc.), out-side temperature or interlocutor’sname or number and the time fromthe beginning of the call.
Info in the middle of the display de-pends on active functions:
– display of signal field strength andother status warnings with the fol-lowing symbols:
¿ field strength shown by six sec-tors
¡ phone off or no network or phonenot connected to network
æ ring tone off
√ “call divert” function on
062-086 connect thesis GB 22-10-2007 10:42 Pagina 66

67
OUTGOING CALLSTo start a call, select the phone func-
tion with the TEL key 16 (fig. 1),then insert the SIM card and enter thePIN code.
The display will show the mainphone function page (fig. 43/a). Dialthe required number using the multi-function keys or recall it using the“Book & Lists” function. After di-alling the number with the multi-function keys, press 15 (fig. 1) to con-firm.
To call again the last diallednumber
To call the last dialled number presskey 15 (fig.1) or the relevant key onthe steering wheel controls. The dis-play will show the page with the lastdialled number (fig.43/b). To startthe call press again key 15 (fig.1) orthe multifunction key "Yes" or therelevant key on the steering wheelcontrols. Press the multifunction key"No" to stop dialling and to go backto the previous condition.
fig. 43/a
L0A51
03g
fig. 44
L0A51
04g
Books and Lists
Selecting and confirming “Book &Lists” will display a new page (fig.44) with the following functions:
– Manual dial– Direct dial– Phone book– Last dialled nos.– Calls list.
The “Manual dial” function is usedfor dialling manually the requirednumber, whereas the other functionsshall be used to recall directly a num-ber from the relevant lists.
To display a list (phone book, lastdialled nos. list or calls list, etc.), se-lect and confirm the required functionwith the right knob 21 (fig. 1).
fig. 43/bL0
A51
63g
062-086 connect thesis GB 22-10-2007 10:42 Pagina 67

68
ADDITIONAL PRIVACYTELEPHONE HANDSET (optional)
The phone module may be integratedwith an additional handset housed in thefront armrest. To reach the handset liftthe armrest coverA (fig. 45) and pressbutton B (fig. 46). To take it off from itssupport, press button C (fig. 47).
To hang it up, refit it on the supportand press it down. To fit the handsetsupport into the armrest, press itdown until it catches then reclose thearmrest cover.
After selecting a list, choose and con-firm the required number with theright knob 21 (fig. 1). Press “Cancel”or key 15 (fig. 1) to cancel. Use the“Options” multifunction key to dis-play directly the phone settings pages.
When calling, the display left-handside shows information associatedwith the call in progress, the soundsystem is switched off, connection ismade and, if the called person an-swers, the call duration counter isstarted.
To end the call press key 15 (fig. 1).
HANDS-FREE FEATURE
A hands-free microphone allowstalking on the phone without usingthe handset. The volume is adjustedby the left knob 8 (fig. 1).
The handset functions provide foreasy and convenient use, in particu-lar:
– picking it up when ringing acceptsthe call;
– taking it off its housing during ahands-free conversation moves thecall to the handset;
– hanging it up during a conversa-tion ends the conversation;
– taking it off its housing and thenpressing the handset key for the firsttime connect with the additionalhandset.
fig. 45L0
A60
39c
fig. 46
L0A60
40c
062-086 connect thesis GB 22-10-2007 10:42 Pagina 68
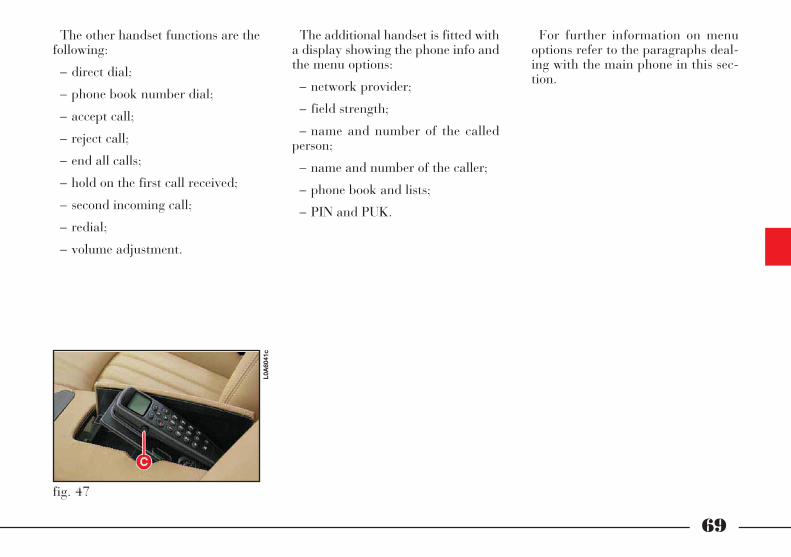
69
The other handset functions are thefollowing:
– direct dial;
– phone book number dial;
– accept call;
– reject call;
– end all calls;
– hold on the first call received;
– second incoming call;
– redial;
– volume adjustment.
The additional handset is fitted witha display showing the phone info andthe menu options:
– network provider;
– field strength;
– name and number of the calledperson;
– name and number of the caller;
– phone book and lists;
– PIN and PUK.
For further information on menuoptions refer to the paragraphs deal-ing with the main phone in this sec-tion.
fig. 47
L0A60
41c
062-086 connect thesis GB 22-10-2007 10:42 Pagina 69

70
“BOOK & LISTS” FUNCTION
Selecting and confirming the “Book& Lists” function with the right knob21 (fig. 1) displays the menu pagewith the following options (fig. 49):
– Manual dial
– Direct dial
– Phone book
– Last dialled nos.
– Calls list.
The functions available with themultifunction keys are the following:
– Options
– Cancel.
“Manual dial” function
This option display the phone menupage to dial the required numbermanually.
To dial the number use the multi-function keys or the voice commands(for voice commands refer to the rel-evant section). The dialled numbercan be corrected using the “Correct”option and stored with the “Store”option.
fig. 49L0
A51
04g
MAIN MENUFUNCTIONS
The main cell phone functions thatmay be accessed by pressing brieflythe TEL key 16 (fig. 1), are the fol-lowing (fig. 48):
– Book & Lists
– Call mailbox
– Options
– Store
– Correct.
fig. 48
L0A51
03g
062-086 connect thesis GB 22-10-2007 10:42 Pagina 70

71
“Direct dial” function
With the “Direct dial” function it ispossible to create and display a listcontaining the 10 most importantnumbers for the user or the most di-alled ones.
To dial a number from the list, se-lect and confirm it with the right knob21 (fig. 1).
To store a new number press the“Edit” multifunction key and then se-lect “New entry” with the right knob21 (fig. 1): the whole SIM card phonebook will be displayed in order tochoose the 10 numbers to be includedin the list.
“Phone book” function
The “Phone book” function shall beused to display the phone numberstored in the SIM card phone book.
To dial a phone book number, selectand confirm it with the right knob 21(fig. 1).
To store a new number press the“Store” multifunction key, a newpage with name and number entryoptions will be displayed.
“Last dialled nos.” function
Selecting this function accesses thelist with the last 10 numbers dialled.Each item of the list includes the nameof the person called (if stored in thephone book) and the correspondingnumber. To directly call one of the en-tries in the list simply select it and con-firm it with the right knob 21 (fig. 1).
062-086 connect thesis GB 22-10-2007 10:42 Pagina 71

72
fig. 50
L0A51
05g
“Calls list” function
Selecting this function accesses thelist with the last 10 calls received.Each item of the list includes thename of the person that made the call(if stored in the phone book and if thecall was not in the incognito mode)and the corresponding telephone num-ber. To directly call one of the entriesin the list simply select it and confirmit with the right knob 21 (fig. 1).
“CALL MAILBOX” FUNCTION
Select and confirm this function withthe right knob 21 (fig. 1), to call themailbox number previously set withthe “Mailbox number” on the firstpage of the phone settings.
“OPTIONS” FUNCTION
Select and confirm this function onthe main phone function page to dis-play a new page (fig. 50) to set thephone settings:
– SMS
– Copy SIM
– Merge SIMs
– Call lock
– Call divert
– Set.
062-086 connect thesis GB 22-10-2007 10:42 Pagina 72
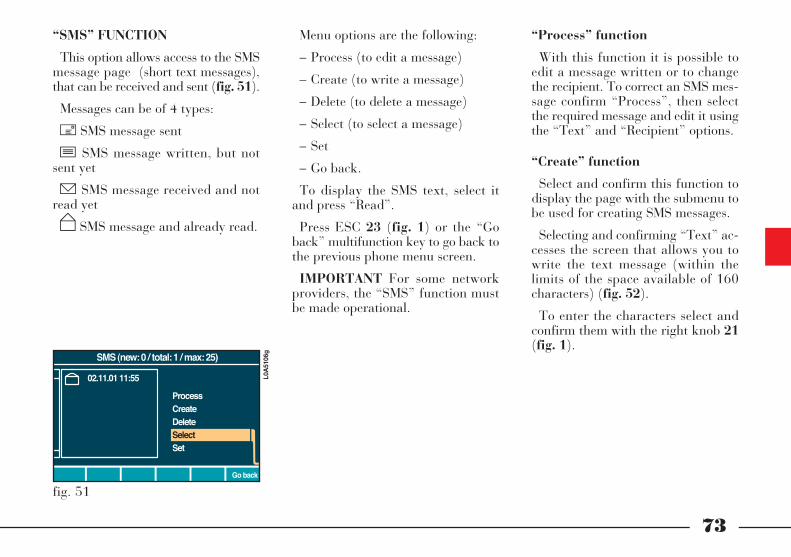
73
“SMS” FUNCTION
This option allows access to the SMSmessage page (short text messages),that can be received and sent (fig. 51).
Messages can be of 4 types:
í SMS message sent
î SMS message written, but notsent yet
ó SMS message received and notread yet
ñ SMS message and already read.
Menu options are the following:
– Process (to edit a message)
– Create (to write a message)
– Delete (to delete a message)
– Select (to select a message)
– Set
– Go back.
To display the SMS text, select itand press “Read”.
Press ESC 23 (fig. 1) or the “Goback” multifunction key to go back tothe previous phone menu screen.
IMPORTANT For some networkproviders, the “SMS” function mustbe made operational.
“Process” function
With this function it is possible toedit a message written or to changethe recipient. To correct an SMS mes-sage confirm “Process”, then selectthe required message and edit it usingthe “Text” and “Recipient” options.
“Create” function
Select and confirm this function todisplay the page with the submenu tobe used for creating SMS messages.
Selecting and confirming “Text” ac-cesses the screen that allows you towrite the text message (within thelimits of the space available of 160characters) (fig. 52).
To enter the characters select andconfirm them with the right knob 21(fig. 1).
SMS (new: 0 / total: 1 / max: 25)
ProcessCreateDeleteSelectSet
02.11.01 11:55
fig. 51
L0A51
06g
062-086 connect thesis GB 22-10-2007 10:42 Pagina 73

74
To speed up character entry, the sys-tem automatically moves to the be-ginning or the end of the text bypressing keys ¯ ˙.
To enter a blank space use “_”.
The multifunction keys “ABC abc”allow you to pass from CAPITAL tosmall letters and vice versa.
To confirm the message press “OK”,and to correct it press “Correct”.Press “Cancel” to quit without stor-ing the message.
After writing and confirming themessage with “OK”, select “Recipi-ent” to insert the recipient phonenumber with the following options:
– Manual enter
– Phone book
– Calls list
– Correct
– OK
– Cancel.
Select “Manual enter” to dial theSMS recipient number manually. Thisoption will be available only afterwriting the message. To dial the num-ber use the multifunction keys.
Select “Phone book” to choose therecipient number in the phone bookinstead of dialling it manually. Thenumber chosen will be displayed.
Select “Calls list” to choose recipientnumber in the list of the last 10 callsreceived.
Select “Correct” to edit the numberdialled.
Then press “OK” to confirm or“Cancel” to quit and cancel the num-ber dialled.
Select “Store” to file one or moremessages to send them later on. Adedicated signal will warn the userthat the memory is full; in this casepress ESC 23 (fig. 1) to return to theprevious screen and possibly deleteother messages.
Select “Send” to send the message:the user is warned that the message isbeing sent and, at the end, the mes-sage SMS received or SMS error.
fig. 52
L0A51
07g
062-086 connect thesis GB 22-10-2007 10:42 Pagina 74

75
“Delete” function
use this function to delete in se-quence one or messages sent or re-ceived. To delete a message, selectand confirm “Delete”, then select themessage to be deleted and press theright knob 21 (fig. 1).
IMPORTANT Deleted messagescannot be recovered.
“Select” function
Use this function to select a messagewritten or received among those dis-played.
“Set” function
This function displays the optionsrelevant to SMS settings (fig. 53):
– Service Center (SMS service cen-ter number)
– Validity
– Code
– Go back.
“Service Center” is used to displaythe phone function page for choosingthe service center number among thestored ones or for manual dialling aspreviously described for phone num-bers.
“Validity” shall be used to select theSMS validity days (1 to 441 days).
“Code” shall be used to give a code(0 to 255) to SMS messages. To con-firm settings press “OK”, otherwisepress “Cancel”. Press “Go back” toreturn to previous screen.
fig. 53L0
A51
08g
062-086 connect thesis GB 22-10-2007 10:42 Pagina 75

76
“COPY SIM” FUNCTION
With “Copy SIM” it is possible tocopy the phone book numbers of aSIM card to another SIM card (targetcard). To copy SIM card data proceedas follows:
– select and confirm “Copy SIM”with the right knob 21 (fig. 1); a newscreen asking to insert the target cardwill be displayed;
– remove the origin SIM card press-ing key 24 (fig. 1);
– insert the target SIM card;
– select “OK” and type the PIN codeof the target card, if required. If awrong PIN is entered it can be cor-rected following the instructions givenin paragraph “PIN code entry”. Af-ter entering the proper PIN code, themessage “Caution! Phone book is be-ing re-written!” will be displayed onthe function page with options “Over-write” and “Go back”;
– select “Go back” if a wrong targetcard has been inserted and select“Overwrite” to start copying;
“Edit phone book”
“Edit phone book” shall be used todisplay a page of the phone book tobe copied and to edit it as required.During this operation the number ofitems to be cut yet is displayed. Selectthese items with “Select” and choose“Cut” to edit the phone book, then se-lect “Write” if paste is required.
“Write until card full”
Use “Write until card full” to copyautomatically to the card as muchnumbers as possible.
“Cancel”
Select “Cancel” to go back to the“Phone options” screen.
– after completing the operation, thesystem will ask if you want to copythe same phone book numbers toother SIM cards. Select “No” to returnto the “Options” page.
If the target SIM card has enoughmemory to store all the new data ofthe origin SIM card phone book afterthe copy operation the target card willshow the new data otherwise a newpage with options “Edit phone book”,“Write until card full” and “Cancel”will be displayed.
062-086 connect thesis GB 22-10-2007 10:42 Pagina 76

77
“MERGE SIMS” FUNCTION
Use this function to merge the phonebook numbers of two SIM cards andto copy them to a third target SIMcard. Select this function, insert thesecond SIM card after removing thefirst one and confirm with “OK”. Af-ter inserting the second SIM card itcould be necessary to enter the rele-vant PIN code, remember that awrong code entry can be corrected fol-lowing the instructions given in para-graph “PIN code entry”. Then thetarget SIM card is requested, proceedas above. A new screen will be dis-played automatically, now select“Overwrite” to start the copy opera-tion to the target SIM card. The samescreen features also the “Go back” op-tion to return to the previous screen.
IMPORTANT The Merge SIMs op-eration takes place with the same pro-cedure previously described for “CopySIM”.
“CALL LOCK” FUNCTION
Select and confirm this function todisplay the call locking screen (fig.54):
– Call type
– Mode
– Network PW (password).
To activate the call lock optionspress the “Query” multifunction key.Press “Go back” to return to the pre-vious screen.
fig. 54
L0A51
09g
062-086 connect thesis GB 22-10-2007 10:42 Pagina 77

78
fig. 55
L0A51
10g
The call lock options available with“Call type” are:
– ? outgoing (= out) = locking out-going
– ? out international = locking out-going international
– ? out except. home = locking out-going except to “home”
– ? incoming = locking incoming
– ? incom. if in other network =locking incoming if in other net
– ? all calls = locking outgoing andincoming.
The symbol next to each optionidentifies the current status:
– “?” = not yet activated or deacti-vated;
– “-“ = deactivated;
– “ ” = activated.
The options available with the“Mode” functions are “activate”, “de-activate” and “query”.
“Activate” and “deactivate” respec-tively activate and deactivate the calllock with the selected settings.“Query” activates the call lock withall available settings, regardless of theset ones.
“Network PW” function allows toenter the password for the call lock.Enter the password using the multi-function keys and confirm it with the“OK” option; this option is enabledonly if the password consists of atleast 4 digits. To correct the passwordentered use “Correct”; press brieflythe right knob (less than 1 second) todelete the last digit entered and pressthe knob for longer than 1 second todelete the entire password.
To return to the previous screenwithout storing the password selectand confirm “Cancel”.
“CALL DIVERT” FUNCTION
Select and confirm this function todisplay the call divert settings screen(fig. 55):
– Conditions
– Mode
– Number
– Time lapse.
This screen shows the “Query” mul-tifunction key to activate the call di-vert with the selected settings and the“Go back” multifunction key to re-turn to previous screen without acti-vating the call divert.
062-086 connect thesis GB 22-10-2007 10:42 Pagina 78

79
Call divert options available with the“Conditions” function are:
– ? always
– ? if busy
– ? with delay
– ? if not available
– ? all reasons
– ? all cond. reasons.
The symbol next to each optionidentifies the current status:
– “?” = not yet activated or deacti-vated;
– “-“ = deactivated;
– “ ” = activated.
Options available with the “Mode”function are: “activate”, “deactivate”,“query”, “set” and “delete”.
“Activate” and “deactivate” respec-tively activate or deactivate the calldivert with selected settings. “Query”activates call divert with all availablesettings, regardless of the set ones. Se-lect “set” to directly activate the calldivert, in this case the number towhich calls shall be diverted will bedemanded. Select and confirm“delete” to cancel the activated set-tings.
Select “Number” to enter the phonenumber to which calls shall be di-verted. The number can be enteredmanually using the multifunctionkeys or by directly recalling it fromthe phone book or the calls list, withthe same procedure previously de-scribed for calls.
With the “Time lapse” function,available only if the “with delay” op-tion is active, it is possible to set thetime delay that shall elapse betweenthe arrival and transfer of the call. Inthis way the user can decide if he/shewants to accept the call or not. Timelapse shall be set with steps of 5 sec-onds, from minimum 5 seconds tomax. 30 seconds.
062-086 connect thesis GB 22-10-2007 10:42 Pagina 79

80
“SET” FUNCTION
Select and confirm this function withthe right knob 21 (fig. 1) on the“Phone options” screen (fig. 56), todisplay the two phone settingsscreens.
To move from “Phone settings 1” to“Phone settings 2” and vice versa se-lect and confirm the option “Other”.Press “Go back” to return to the“Phone options” screen.
Options available on the “Phone set-tings 1” screen (fig. 57) are the fol-lowing:
– Netw. operator
– Cell broadcast
– Pre-paid card
– Mailbox number
– Own number
– PIN
– Other.
Options available on the “Phone set-tings 2” (fig. 58) are the following:
– Send DTMF
– Redial
– Incognito
– Call waiting
– Ring tone
– Other.
Press ESC 23 (fig. 1) to return to theprevious phone menu screen or con-firm the option “Other”.
fig. 57L0
A51
12g
fig. 58
L0A51
13g
fig. 56
L0A51
11g
062-086 connect thesis GB 22-10-2007 10:42 Pagina 80

81
With the “Roaming” function is itpossible to pass automatically to an-other authorized network providerwhen the previous one cannot be re-ceived. When the “Roaming” functionis disabled, only the manually selectednetwork can be accessed.
The “Automatic” function enablesto activate an authorised network ac-cording to the priority list of the SIMcard. When the “Automatic” functionis disabled, only the manually selectednetwork can be accessed.
The “Manual” function enables toset the chosen network provider.
With “Network list” the list of thenetworks that can be received is dis-played. The required network can bedirectly selected among those in-cluded in the list.
Use the “Preferred list” function tocreate and edit the network list as pre-ferred.
“Netw. operator” function
This function displays the networkoperator settings menu (fig. 59).
Functions and options available arethe following:
– Roaming
– Automatic
– Manual
– Network list
– Preferred list.
Press “Go back” to display the pre-vious screen.
fig. 59
L0A51
14g
“Cell broadcast” function
This function enables to receive mes-sages from special public utility chan-nels.
Functions and options available (fig.60) are the following:
– Receive
– Display at once
– Channel no.
– Read (multifunction key).
Press the “Read” multifunction keyto display the last received message.
fig. 60
L0A51
15g
062-086 connect thesis GB 22-10-2007 10:42 Pagina 81

82
“Pre-paid card” function
With this function it is possible tomake use of the services providedupon subscription by certain card ser-vice providers.
IMPORTANT Service availabilityand activation procedure depend onthe card service provider.
The functions available after select-ing and confirming “Pre-paid card”are the following:
– Balance query
– Phone number
– Store
– Correct
– Go back.
The “Balance query” function, ifmade available by the serviceprovider, enables to know the creditleft.
The “Phone number” function shallbe used to enter the phone number ofthe card service provider; to enter thenumber use the multifunction keys.
To store the entered phone number,select and confirm “Store”.
To correct the entered number usethe “Correct” function: press brieflyfor less than 1 second the right knobto delete the last entered digit andpress the knob for longer than 1 sec-ond to delete the whole phone num-ber.
Select and confirm “Go back” to re-turn to the previous screen.
fig. 61L0
A51
16g
Press “Go back” to return to theprevious screen.
The “Receive” option shall be acti-vated to receive messages.
“Display at once” displays immedi-ately the received messages.
To choose the required channel, se-lect and confirm “Channel no.” withthe right knob 21 (fig. 1). Then turnthe knob to set the required channel(0 to 999) and press it when the dis-play shows the chosen channel num-ber.
062-086 connect thesis GB 22-10-2007 10:42 Pagina 82

83
To enter the mailbox number, select“Phone number” with the right knob21 (fig. 1), enter the number with themultifunction keys and then store itby “Store”. To correct the enterednumber use the “Correct” function:press briefly for less than 1 second theright knob to delete the last entereddigit and press the knob for longerthan 1 second to delete the wholephone number. Select and confirm“Go back” to return to the previousscreen.
“Own number” function
This function enables to store thephone number of the SIM card in-serted.
Options displayed after selecting thefunction on the first phone settingsscreen are the following:
– Own number
– Store
– Correct
– Go back.
To enter the number, select “Ownnumber” with the right knob 21 (fig.1) enter the number with the multi-function keys and then store it by“Store”. To correct the entered num-ber use the “Correct” function: pressbriefly for less than 1 second the rightknob to delete the last entered digitand press the knob for longer than 1second to delete the whole phonenumber. Select and confirm “Goback” to return to the previous screen.
“Mailbox number” function
This function enables to store themailbox number where received voicemessages are stored. To select thisfunction activate first the option“Send DTMF” on the second phonesettings screen; otherwise a messageasking for its activation will be dis-played.
After selecting the “Mailbox num-ber” the following options will be dis-played (fig. 62):
– Phone number
– Store
– Correct
– Go back.
fig. 62
L0A51
17g
062-086 connect thesis GB 22-10-2007 10:42 Pagina 83

84
“PIN query” makes it possible to ac-tivate or deactivate PIN code querywhen inserting the SIM card. Dis-abling this function allows use of thephone without asking for PIN codeentry when the SIM card is inserted.Access to and changing this setting re-quires PIN code entry (fig. 65). Cor-rect any mistaken entries with “Cor-rect”.
Then select “OK” to confirm thePIN code otherwise select “Cancel” torestore the previous setting and returnto the previous screen.
The “Change PIN” function enablesto change the PIN code of the SIMcard. Select the function (fig. 64), en-ter first the old PIN code and then en-ter the new PIN code twice on thescreen displayed. If necessary, correctit with “Correct”.
At the end of these operations, select“OK” to enable the new PIN codeotherwise select “Cancel” to restorethe old PIN.
IMPORTANT “Change PIN” func-tion cannot be selected if the the “PINquery” function is disabled (see nextparagraph).
fig. 64L0
A51
19i
fig. 65
L0A51
20i
“PIN” function
The “PIN” function, displayed onthe first phone settings screen, enablesto display the PIN code settingsscreen. The functions and optionavailable are the following (fig. 63):
– Change PIN
– PIN query
– Use last PIN.
Press “Go back” to return to theprevious screen.
fig. 63
L0A51
18g
062-086 connect thesis GB 22-10-2007 10:42 Pagina 84

85
The option “Use last PIN”, if en-abled, allows the PIN code memorisedlast to be entered automatically whenthe SIM card is inserted. This functionis available only for a SIM card forwhich no PIN code entry errors havebeen made.
“Send DTMF” function
This option - displayed on the sec-ond phone settings screen - when en-abled, makes it possible to transmitDTMF (Dual Tone Multi Frequency)numbers during a telephone connec-tion. The use of these control codesmakes it possible to access particularnetwork services or communicationequipment (e.g. a remote phone an-swering device).
“Redial” function
This option - displayed on the sec-ond phone settings screen - when en-abled, makes it possible to automati-cally repeat dialling a busy number(up to 10 times). Automatic repeat di-alling is interrupted pressing key 15(fig. 1).
“Incognito” function
This option - displayed on the sec-ond phone settings screen - when en-abled, makes it possible not to showyour number on the called person’sset. The availability of this functiondepends on the network provider.
“Call waiting” function
This option - displayed on the sec-ond phone settings screen - when en-abled, makes it possible to accept andhold on an incoming call during acall. To activate this function selectand confirm “On”; to deactivate it se-lect and confirm “Off”.
062-086 connect thesis GB 22-10-2007 10:42 Pagina 85

86
“Ring tone” function
Select this function to display thering tone settings screen. The optionsavailable are the following (fig. 66):
– Tone
– Volume.
To change the ring tone, select andconfirm “Tone” with the right knob21 (fig. 1), then turn the knob to se-lect the required tone. Press the knobto confirm the required tone that willbe played for a few seconds.
Press “Cancel” to return to the pre-vious screen without storing the newsettings.
To adjust the ring tone volume, se-lect “Volume” with the right knob 21(fig. 1) then turn the knob right to in-crease volume or left to lower it (fig.67). Move the cursor to “Off” to mutethe ring tone volume. Press the knobto confirm or press “Cancel” to returnto the previous screen without storingthe new settings.
VOICE COMMANDSCertain phone functions can be ac-
tivated or deactivated through voicecommands.
For further information about voicecommands and voice prompts see sec-tion “Voice commands”.
fig. 66
L0A51
21g
fig. 67L0
A51
22g
062-086 connect thesis GB 22-10-2007 10:42 Pagina 86

87
The car position is determinedthrough the GPS system (Global Po-sitioning System) installed on the car.The GPS system is fitted with an aer-ial and a reception module integratedin the telematic system. This systemconfiguration dynamically processesthe satellite signals, those from theright and left odometer, the reversingsignal and the information of the gy-roscope integrated in the navigationcomputer, integrating them with thecurrent position of the car to obtainan “estimated car point”.
The signals from the right and leftodometer make it possible to deter-mine the movement of the car andany turning (identified by the differ-ent path between the right and leftwheel), while the reversing sensor dis-tinguishes the direction of travel.
The navigation system helps the dri-ver while he/she drives by suggestingvocally and graphically the optimumrouting to reach his/her preset desti-nation.
GENERALINFORMATION
The navigator integrated in theCONNECT allows you to reach theselected destination through visualand voice instructions. Use of the nav-igation system is fast, convenient, safeand above all highly flexible becauseyou can call up already programmeddestinations or reference points suchas hotels, monuments, public struc-tures, fuel stations or Lancia Deal-erships.
The navigation systemsuggestions do not excusethe driver from his/her full
responsibility due to his/her dri-ving behaviour and to his/hercompliance with road and othertraffic regulations. The responsi-bility for road safety always lieswith the car driver, and it falls onthe driver in any case.
NAVIGATOR (NAV)
087-102 connect thesis GB 22-10-2007 10:43 Pagina 87

88
WARNINGS
– GPS reception is difficult undertrees, among high buildings, in multi-storey car parks, in tunnels and any-where satellite aerial reception can behindered. The GPS system needs afew seconds to determine the new po-sition of the car after missing the sig-nal.
– The GPS system needs a few min-utes to determine the new position ofthe car if the engine is turned off andthe car is moved with the system off(e.g.: by breakdown van, ferryboat,etc.) or the battery is disconnected.
– In the lack of satellite information,the system uses information from thegyroscope and from the wheel sensorfor temporary data analysis.
– The GPS satellite aerial must notbe covered with metal or damp ob-jects.
The instantaneous car position isidentified in the CD-ROM and shownon the display together with the topo-graphic characteristics of the areamemorised on the CD-ROM. Accessto data on the CD-ROM requires afew moments waiting for the map dis-plays.
The system constantly comparesdata from the right and left odometer,from the reverse gear sensor, from theGPS antenna and the gyroscope toautomatically compensate changes intemperature, pressure or any otheroccurrence that may lead to a falseposition detection in any way.
WARNINGS
– Precise self-adjustment of the nav-igation system requires approx. 10km of travel the first time and whentyres are changed.
– Continuous lack of grip at thewheels (for example skidding on ice),makes the system temporarily detectan incorrect position.
– During precision self-adjustment,the position is not detected absolutelycompletely.
The navigation system is completelymanaged by the telematic system,therefore the only operations that maybe necessary are replacement of theCD-ROM to set the map of anotherarea or an updated map.
Access to navigation main functionscreen is gained pressing the NAV key18 (fig. 1).
Pressing the “Mute” multifunctionkey on the main navigation functionscreen, engages the navigation systemMute function, which will therefore nolonger provide the voice instructions.When the Mute function is on, the dis-play shows the wording “Nav Mute”.To turn off the Mute function pressagain the “Mute” key.
087-102 connect thesis GB 22-10-2007 10:43 Pagina 88

89
When first calling the navigationfunction after starting the engine, apage with all system use cautions isdisplayed (fig. 68). To continue sys-tem use this page must be confirmedpressing the “OK” multifunction key.This page will no longer be displayedas long as the system is on.
The text displayed is the following:
“The Lancia navigation systemwill guide you through traffic andhelp you reach your destination.Motor vehicle laws in each coun-try must be observed. They havepriority over instructions issued bythe navigation system. Responsi-bility for steering the vehicle andobserving all road regulations restsolely with the driver.”
SCREEN OPTIONSAND FUNCTIONS
The main information and functionsprovided and managed by the navi-gation system are:
– number and position of receivedsatellites;
– voice and visual instructions withindications of distance from the des-tination and calculated arrival time;
– detailed map in different coloursand with different scales to clearlyshow the car position, route and des-tination;
– customisation of the navigationsystem with possibility of enteringpre-memorised destinations withstreet and house no.;
– automatic memorising of the last8 destinations;
– name of current street;
– possibility to choose the route ac-cording to personal preference;
– information about current posi-tion;
fig. 68
L0A
5123
g
087-102 connect thesis GB 22-10-2007 10:43 Pagina 89

90
GRAPHICINSTRUCTIONS
The main navigation function pageand the MAIN page display the ma-noeuvres to be made using arrows orsymbols.
The downward arrow representsnext manoeuvre (turn left, right,straight on, U-turn) while the upwardarrow or the symbol on top representthe next one. The number displayedunder the arrow indicates the car dis-tance from the turn point.
The two-colour arrow (on the MAINscreen - fig. 69) or on the left-handbox (on the main navigation functionpage) indicates the destination direc-tion. Next to this arrow the calculatedarrival time and the distance still tobe covered are also indicated.
With navigation system on, the atlascan be displayed instead of arrows onthe MAIN screen. To switch from ar-rows to atlas and vice versa, press theright knob.
– information about arrival time;
– system diagnostics and warningsabout possible disturbances.
If the system contains a wrong CD-ROM, an audio CD or no CD, when-ever the system asks for the naviga-tion CD-ROM for route calculation ormap up-date, the insertion promptwill appear on the display.
navigation functions are mainly con-trolled using the right knob 21 (fig.1) and the multifunction keys.
fig. 69
L0A
5083
g
087-102 connect thesis GB 22-10-2007 10:43 Pagina 90

91
VOICEINSTRUCTIONS
The voice instructions provided bythe system guide you to your destina-tion and suggest all manoeuvres to becarried out in due time: in particular,the manoeuvres is announced firstand then detailed instructions aregiven.
Press the RPT key 17 (fig. 1) to re-peat the last voice instruction.
To adjust the volume of the voice in-structions turn the right knob 8 (fig.1) during voice information. If neces-sary, press the RPT key 17 (fig. 1) torepeat the voice instruction and ad-just the volume.
NAVIGATION CD-ROM PLAYER
The navigation CD-ROM player 2(fig. 1) is located on the dashboardunder the CONNECT and it is thesame used for the audio CD. There-fore, it is not possible to use the playerfor audio and navigation CD-ROM atthe same time: however, the naviga-tion system can operate partially evenwithout inserting the navigation CD-ROM.
In this case, when pressing key 4(fig. 1) to remove the CD-ROM withnavigation function engaged (to theninsert an audio CD), the following twocases may occur:
– the system cannot calculate the re-quired route at present;
– the route calculated before remov-ing the navigation CD-ROM is stillvalid.
In the first case, only the car positionand request to insert the navigationCD-ROM will be displayed, while inthe second case, the system is still ableto provide instructions to the reachthe destination and therefore the useris asked whether he/she intends tomaintain the route guiding functionor not.
If the user selects and confirms “NO”the system continues and behaves asin the first case, with “YES” the sys-tem stores in its memory the con-cerned map section; this operation re-quires a few seconds and the displaywill prompt the message to wait.
After loading, the CD-ROM isejected and the system restarts itsnavigation function with the maxi-mum scale of “2 km”; therefore itmay be possible that not all of theroute is visible.
Moreover, navigation in these con-ditions involves limitations and there-fore some functions and commandswill not be available. Also informationshown on the map will be limited.
087-102 connect thesis GB 22-10-2007 10:43 Pagina 91

92
NAVIGATIONSYSTEM MAINMENU
Press the NAV key 18 (fig. 1) to dis-play the navigation system mainmenu. On the left-hand side of thedisplay is shown the last destinationset. The functions available (fig. 70)are:
– Destination
– Route
– Settings.
The options that can be activatedduring or after entering the destina-tion are the following:
– Guidance (to start the route calcu-lation)
– Deactivate (to stop route calcula-tion)
– Detour (to cut one or morestreets(roads or whole road sectionsduring route calculation)
– Info (to display navigation info)
– Mute (to mute voice guidanceinfo).
When the navigation system is nolonger able to continue destination guid-ance or the car is now out of the loadedmap section, the system prompts for in-serting the navigation CD-ROM. If theuser does not insert the CD-ROM, thesystem adopts the operating conditionsfor the above-mentioned first case,therefore it interrupts all information onthe map and continues with GPS infor-mation (car position indication andnumber of available satellites).
WARNINGS
– When the new CD-ROM is entered,the system software is automatically up-dated to the new map material or to thenew functions. During the time requiredfor this operation, a stand-by messageis displayed. After the updating opera-tion the destination memory is empty.
– The driver is always responsible forabiding by current traffic regulations:any instructions on the basis of incor-rect maps which induce prohibited dri-ving manoeuvres must NOT be fol-lowed.
fig. 70L0
A51
24g
087-102 connect thesis GB 22-10-2007 10:43 Pagina 92

93
“Address” - Destination entry
To enter the destination, select andconfirm “Address” with the rightknob 21 (fig. 1) thus displaying thesubmenu with the following items(fig. 72):
– City
– Street
– No.
– Special chars.
“DESTINATION” FUNCTION
Select and confirm “Destination”with the right knob 21 (fig. 1) to dis-play the destination settings screen(fig. 71):
– Address
– Intersection
– Points of interest
– Destination memory
– Recent destinations
– Home destination.
Options available through the mul-tifunction keys are “Info” and “Goback”.
Select “Go back” to display the mainnavigation menu screen.
The options that can be activatedwith the multifunction keys are:
– Street 2
– ¯ ˙
– Correct
– OK
– Cancel.
To enter the characters select andconfirm them with the right knob 21(fig. 1).
To speed up character entry, the sys-tem automatically moves to the be-ginning or the end of the text bypressing keys ¯ ˙.
To enter a blank space use “_”.
To confirm the city name and thestreet press “OK” whereas press “Cor-rect” to correct it. Press briefly the keyto delete the last character entered andpress it longer to delete the entire name.Press “Cancel” to quit the screen with-out storing the destination entered.
fig. 71
L0A
5125
g
fig. 72L0
A51
26g
087-102 connect thesis GB 22-10-2007 10:43 Pagina 93

If the “Street” field is not filled in,the city “centre” is set and thereforeit will not be necessary to fill in the“House no.” and “Street 2”.
The navigation system always takesyou to the centre in case of very smalltowns.
After setting the street name, press“OK” to confirm and continue to en-ter the street number; press “Cancel”to return to the previous screen.
Entering the destination street num-ber is obtained, after entering thestreet, by selecting and confirming“No.” with the right knob 21 (fig. 1).
94
The “Special chars.” function dis-plays a new screen (fig. 73) showingthe automotive abbreviations forCountries to which special charactersare associated, in order to make itpossible to enter the destination namein its original language.
For city name entry, it is advisableto press the “List” multifunction keyafter entering a few characters andthen select the destination directly inthe list displayed. In fact, when “List”is selected, the system starts a quicksearch for a city name matching theentered characters in the stored list.The city field is automatically filled assoon as a matching city is found onthe list.
In order to quicken character entry,the system automatically moves to thebeginning or the end of the list whenthe cursor is taken in front of the firstcharacter and after the last one, re-spectively. To scroll the list you canuse also, in addition to the right knob,the multifunction keys “Down” and“Up”.
After setting the required city name,press “OK” to confirm and then con-tinue to enter the street; press “Can-cel” to return to the previous screenwithout setting new city.
To enter the street, select and con-firm “Street” with the right knob 21(fig. 1) and then proceed as describedfor entering “City”.
fig. 73
L0A
5127
g
087-102 connect thesis GB 22-10-2007 10:43 Pagina 94

95
After entering the street number,press “OK” to confirm or “Cancel” toreturn to the previous screen.
The “Street 2” option is used to en-ter the name of a second street thatintersects the first entered street, sothat the selected destination is the in-tersection between the two streets.
The second street may be entered af-ter the city and the first street entry,by pressing “Street 2”, thus display-ing the relevant list.
To enter the second street, select andconfirm it directly in the list dis-played.
IMPORTANT If the name of thesecond street is not entered, or it is notavailable in the list, the first street isconsidered as destination.
After confirming the destinationwith “OK”, the display will show anew screen (fig. 74) with the “Store”,“Guidance” and “Cancel” options.
To store the destination, select andconfirm “Store” with the right knob21 (fig. 1). To start route calculationpress “Guidance”, otherwise press“Cancel” to cancel the destinationand return to the previous screen toenter a new destination.
fig. 74L0
A51
28g
“Intersection”
The option “Intersection” displays anew page (fig. 75) for entering thecity and two streets, the intersectionpoint of which is the required desti-nation.
Entering the city name and thestreets follow the same procedure de-scribed previously. The name of thesecond street can also be selected di-rectly from the list displayed afterpressing the multifunction key “Street2”.
IMPORTANT If the name of thesecond street is not entered, or it is notavailable in the list, the first street isconsidered as destination.
fig. 75
L0A
5129
g
087-102 connect thesis GB 22-10-2007 10:43 Pagina 95

“Destination memory”
This option displays the screen withthe list of memorised navigation des-tinations of up to a maximum of 20destinations. The same screen alsocontains the options “Guidance”,“Create”, “Edit”, “Delete”, “Deleteall” and “Go back” that can be acti-vated with the multifunction keys.
Select a destination using the rightknob 21 (fig. 1); the display will showthe data relevant to the destination se-lected. Press “Guidance” to start theroute calculation.
Select “Create” to store new desti-nations following the procedures de-scribed previously.
Press “Edit” to edit a stored desti-nation.
To delete a destination from the des-tination memory, select it and thenpress “Delete”.
To delete all stored destinations,press “Delete all”.
Press “Go back” to return to theprevious screen.
96
“Points of interest”
This function is used to obtain a filecontaining the location and informa-tion on points of general interest suchas, for example, restaurants, muse-ums, stations etc., divided by cate-gory. Under the option “Service” youwill find also Lancia Dealerships.
Service selection criteria are the fol-lowing (fig. 76):
– Traffic (public sport airport, air-port, rest area, etc.)
– Recreation (shopping, golf course,etc.)
– Service (petrol stations, LanciaDealerships etc.)
– Other (library, convention centre,etc.).
To select the category, the type andthe point of interest, turn and pressthe right knob 21 (fig. 1). Press “Goback” to return to the previous screen.
IMPORTANT The Points of interestfile is conditioned by the updatinglevel of navigation CD ROM data.
fig. 76
L0A
5130
g
087-102 connect thesis GB 22-10-2007 10:43 Pagina 96

“INFO” FUNCTION – Navigation info
Pressing the “Info” multifunction key,when present on the displayed screen,will display the navigation info screen(fig. 77).
Options displayed are the following:
– Destination set
– Distance to destination (only withguidance to destination active)
– Current car position: longitude(E/W) and latitude (N/S) in degrees(°), minutes (’) and seconds (”)
– number of satellites that can be re-ceived (0 to 6)
– car positioning condition (0, 2 or3) as follows:
0D-GPS: positioning impossible;
2D-GPS: at least 3 satellites are re-ceivable for bidimensional posi-tioning;
3D-GPS: at least 4 satellites are re-ceivable for three-dimensional po-sitioning.
The car position is also representedgraphically on the left-hand side ofthe display.
fig. 77L0
A51
31g
97
IMPORTANT If the destinationmemory already contains 20 items, toenter new destinations it is necessaryto delete an item from the existing list.
“Recent destinations”
This option displays the screen witha list of the last 10 destinations en-tered with the options “Guidance”,“Delete all”, “Delete”, “Store”, and“Go back”. To select and delete des-tinations proceed as described in theprevious paragraph.
“Home destination”
This function makes it possible tostore a destination as “Home” to eas-ily recall it later. To enter the homedestination proceed as described pre-viously.
087-102 connect thesis GB 22-10-2007 10:43 Pagina 97

Select “Store” to store the currentposition as “Home” destination or inthe “Destination memory” (fig. 78). Tostore the destination as “Home” pressthe multifunction key “Store 1” andpress “Store 2” to store it in the “Des-tination memory”.
Press “Zoom +” to enlarge the textand press “Zoom –” to reset its nor-mal dimension.
Press “Go back” to return to theprevious screen.
“ROUTE” FUNCTION - Routeselection criteria
The “Route” function, on the mainnavigation function screen (fig. 79),makes it possible to affect route cal-culation according to determinate pa-rameters.
Select and confirm this function withthe right knob 21 (fig. 1), to displaythe “Select route criteria” screen (fig.80). The following possibilities ofchoice are offered:
– Shortest time
– Shortest distance
– Prefer motorways
– Avoid motorways.
fig. 79L0
A51
33g
fig. 80
L0A
5134
G
fig. 78
L0A
5132
g
98
Press “Go back” to return to theprevious screen.
The settings made remain active un-til the criteria are modified again.
“Route preview” displays the screen(fig. 81) showing in sequence the cal-culated route streets with the indica-tion of the length of each section andarrows to indicate left/right turns. Toscroll the list use the right knob 21(fig. 1) moving the cursor to the laststreet.
087-102 connect thesis GB 22-10-2007 10:43 Pagina 98

fig. 81
L0A
5135
g
99
With “Detour” it is possible to cutout one or more streets or entire roadsections when calculating the routeaccording to the criteria describedlater. The “Info” multifunction keydisplays the screen showing the cur-rent car position info as describedpreviously.
Press “Go back” to return to theprevious screen.
“Shortest time”
This function allows you to reachyour destination as fast as possible,therefore motorways and freewayswill be preferred.
IMPORTANT When calculating theshortest route, the navigation systemcannot take into account queues orobstacles (e.g. works in progress) onthe chosen freeways or motorways.
“Shortest distance”
This setting allows you to choose theshortest route to reach your destina-tion.
“Prefer motorways”
This setting considers the use of mo-torways in calculating the route.
“Avoid motorways”
This setting considers the less possi-ble use of motorways in calculatingthe route.
“Detour”
Select this function to display thescreen (fig. 82) for selecting the de-tour criteria to exclude one or morestreets or entire road sections.
Criteria available are the following:
– Current street
– Next … km
– Specific streets.
Select and confirm “Current street”to exclude the street you are crossing,select and confirm “Next … km” toenter the road section to cut.
fig. 82
L0A
5136
g
087-102 connect thesis GB 22-10-2007 10:43 Pagina 99

Confirming function “Display POIon map” will actually display thescreen (fig. 85) with the icons repre-senting the points of interest: selectand confirm the points of interest tobe displayed on the map with theright knob. To return to previousscreen confirming the new settings,press “OK”, otherwise press “Cancel”to restore the previous settings.
100
“Specific streets” displays the screen(fig. 83) listing in sequence the calcu-lated route streets with lengths and ar-rows for left/right turns. To scroll thelist use the right knob 21 (fig. 1) mov-ing the cursor to the last street. To cutstreets from the calculated route, selectthe required streets and then confirmthem with the right knob.
Press “Go back” to display the pre-vious screen and activate the selectedcriteria.
fig. 85
L0A
5139
g
“SETTINGS” FUNCTION(Settings)
Selecting and confirming “Settings”with the right knob 21 (fig. 1) on themain navigation function screen (fig.84), will display a new screen withthe “Display POI on map” functionto choose the points of interest (POI)to be displayed on the map.
fig. 83
L0A
5137
g
fig. 84L0
A51
38g
087-102 connect thesis GB 22-10-2007 10:43 Pagina 100

101
“ATLAS” FUNCTION
The “Atlas” function (fig. 87)makes it possible to move through themap by the selectable sections usingthe multifunction keys; key optionsare the following:
– Multifunction key 1 = to move sec-tion “1” to the centre of the display
– Multifunction key 2 = to move sec-tion “2” to the centre of the display
– Multifunction key 3 = to move sec-tion “3” to the centre of the display
– Multifunction key 4 = to move sec-tion “4” to the centre of the display
Pressing the MAP key 20 (fig. 1) itis possible to display the map screen,where the car is shown with an arrowwith the tip pointing in the direction oftravel (fig. 86). The destination to bereached is shown by a red cross whilethe items of the route: roads, rivers,railway lines are shown with colouredlines.
Use the mltifunction keys to activatethe following options:
– Atlas– Route ¯ and Route ˙– Zoom + and Zoom –– Options.
Press the “Atlas” multifunction keyto move the cursor on the map fol-lowing the procedure described in thefollowing paragraphs.
The multifunction keys “Route ¯”and “Route ˙” shall be used to movethe cursor along the calculated route, re-spectively towards the start and towardsthe destination; these keys are activeonly if the route has been calculated.
Multifunction keys “Zoom +” and“Zoom –” shall be used to enlargeand reduce the visible area of themap. The map scale is shown at thebottom of the display on the left-handside.
Scales available are: 50 m, 100 m,200 m, 500 m, 1 km, 2 km, 5 km, 10km, 20 km, 50 km, 100 km, 200 kmand 500 km. To enlarge or reduce themap you can also use the right knobturning it respectively counterclock-wise and clockwise.
The “Options” multifunction keydisplays the menu for map options asdescribed in the following paragraphs.
fig. 86
L0A
5140
g
MAP REPRESENTATION
fig. 87
L0A
5141
g
087-102 connect thesis GB 22-10-2007 10:43 Pagina 101
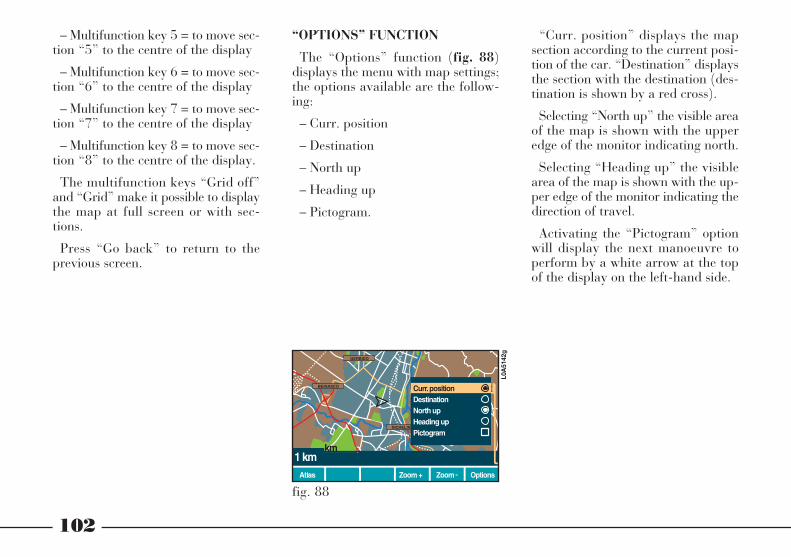
102
– Multifunction key 5 = to move sec-tion “5” to the centre of the display
– Multifunction key 6 = to move sec-tion “6” to the centre of the display
– Multifunction key 7 = to move sec-tion “7” to the centre of the display
– Multifunction key 8 = to move sec-tion “8” to the centre of the display.
The multifunction keys “Grid off”and “Grid” make it possible to displaythe map at full screen or with sec-tions.
Press “Go back” to return to theprevious screen.
“OPTIONS” FUNCTION
The “Options” function (fig. 88)displays the menu with map settings;the options available are the follow-ing:
– Curr. position
– Destination
– North up
– Heading up
– Pictogram.
“Curr. position” displays the mapsection according to the current posi-tion of the car. “Destination” displaysthe section with the destination (des-tination is shown by a red cross).
Selecting “North up” the visible areaof the map is shown with the upperedge of the monitor indicating north.
Selecting “Heading up” the visiblearea of the map is shown with the up-per edge of the monitor indicating thedirection of travel.
Activating the “Pictogram” optionwill display the next manoeuvre toperform by a white arrow at the topof the display on the left-hand side.
fig. 88L0
A51
42g
087-102 connect thesis GB 22-10-2007 10:43 Pagina 102

103
CONNECT voice control system isbased on an algorithm not related tothe user’s voice tone and inflexiontherefore, it does not require to be“trained” to recognise the user’s voice.The user may store with his/her voicewhatever word (e.g. names for thephone book), which will be thenrecognised by the system only if re-peated by the person who storedthem.
The system can also recognise, inaddition to single words, sequences ofwords since it is provided with a glos-sary consisting of 45 sentences. Thesystem glossary is divided into organ-ised sections each one referred to aparticular voice-controlled function.In this way the glossary section activewill be restricted to the terms requiredby the specific function, thus reduc-ing to a minimum the margin of errorin understanding the voice command.
IMPORTANT Voice commandshave always priority on the manualcontrols of the CONNECT.
ACTIVATING/DEACTIVATINGVOICE COMMANDS
To turn on/off the voice control sys-tem, press briefly (less than 2 sec-onds) the VOICE button A (fig. 2) lo-cated on the steering wheel. Afterturning on, the system identifies thecurrent audio function and will set todialog; a beep tells the user that thesystem is ready to receive commands.
VOICE COMMANDSVoice commands are extremely im-
portant to improve safety when trav-elling since they enable to control cer-tain secondary (but frequently used)functions such as changing the audiosource (e.g from a CD to a tape) ormaking a call - without using yourhands or taking your eyes off theroad.
The functions that can be controlledthrough voice commands are thosethat can be completely controlled bya “dialog” between user and CON-NECT. The CONNECT will actuallycommunicate any information via au-dio and so the driver is not distractedfrom driving to watch the display.
Furthermore, the voice commandsadopted are just those standing a goodchance to be recognised by the systemwithout having to be repeated by theuser several times.
VOICE COMMANDS AND MESSAGES
103-131 connect thesis GB 22-10-2007 10:43 Pagina 103
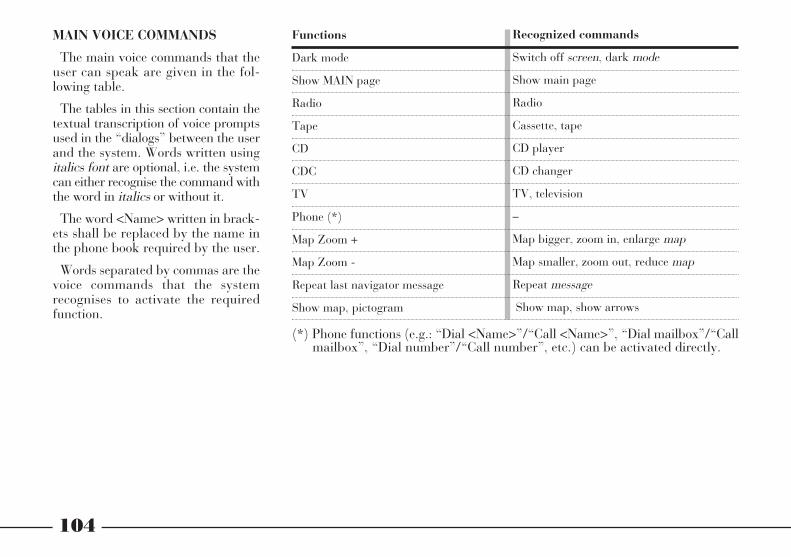
104
MAIN VOICE COMMANDS
The main voice commands that theuser can speak are given in the fol-lowing table.
The tables in this section contain thetextual transcription of voice promptsused in the “dialogs” between the userand the system. Words written usingitalics font are optional, i.e. the systemcan either recognise the command withthe word in italics or without it.
The word <Name> written in brack-ets shall be replaced by the name inthe phone book required by the user.
Words separated by commas are thevoice commands that the systemrecognises to activate the requiredfunction.
Functions
Dark mode
Show MAIN page
Radio
Tape
CD
CDC
TV
Phone (*)
Map Zoom +
Map Zoom -
Repeat last navigator message
Show map, pictogram
(*) Phone functions (e.g.: “Dial <Name>”/“Call <Name>”, “Dial mailbox”/“Callmailbox”, “Dial number”/“Call number”, etc.) can be activated directly.
Recognized commands
Switch off screen, dark mode
Show main page
Radio
Cassette, tape
CD player
CD changer
TV, television
–
Map bigger, zoom in, enlarge map
Map smaller, zoom out, reduce map
Repeat message
Show map, show arrows
103-131 connect thesis GB 22-10-2007 10:43 Pagina 104

Required action
Cancel
Help
General help
105
After pronouncing one of the abovecommands, the “dialog” between userand system continues as shown in thefollowing paragraphs.
Certain voice commands (see nexttable) stand valid regardless of thefunction activated:
Recognized commands
Cancel, abort
Help
General help, help general
103-131 connect thesis GB 22-10-2007 10:43 Pagina 105

106
TELEPHONE
After pronouncing the control to ac-tivate one of the telephone functions,system will check for the presence ofthe SIM card.
The following cases could take place:
– if the SIM card is not inserted 26(fig. 1), the system will ask to insertit to continue
– if the card is inserted but the PINcode has not been entered, the systemwill ask to enter it to continue
– the card is inserted and the PINcode is entered.
For the first two cases insert the SIMcard and/or enter the PIN code as de-scribed in the following paragraph. Forthe third case or after entering the PINcode for the first two cases, the systemwill invite the user to select an option.
If there is no network the system will interrupt the function and will warn theuser.
The voice prompts used by the system during phone function activation are thefollowing:
Used voice prompts
Please insert a SIM card!
Please enter your PIN!
There is no net available!
Which function?
Phone status
No SIM card
SIM inserted but no PIN code
No network
Phone options active
103-131 connect thesis GB 22-10-2007 10:43 Pagina 106

Required action
Dial <Name>
Mailbox
Number
Phone book
Redial
Help
Cancel
107
Voice commands to be used forphone options are the following:
Recognized commands
Dial <Name>, call <Name>
Dial mailbox, call mailbox
Dial number, call number
Phone book
Redial
Help
Cancel, abort
103-131 connect thesis GB 22-10-2007 10:43 Pagina 107
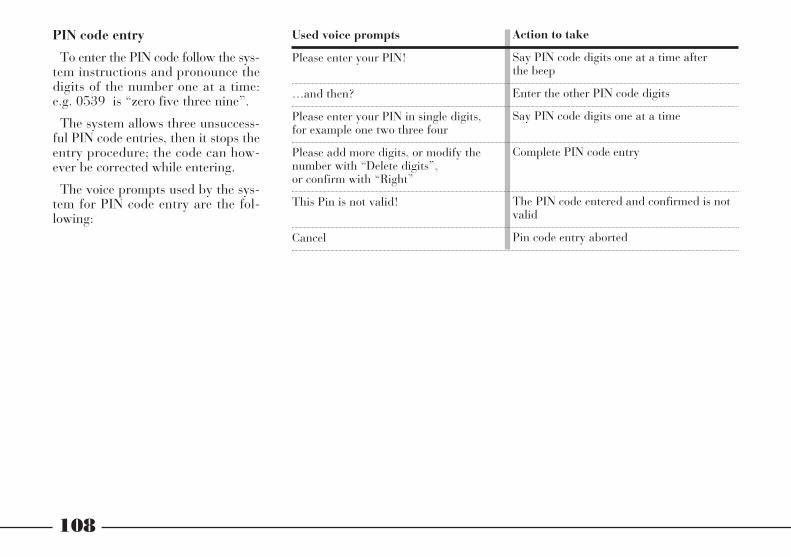
108
PIN code entry
To enter the PIN code follow the sys-tem instructions and pronounce thedigits of the number one at a time:e.g. 0539 is “zero five three nine”.
The system allows three unsuccess-ful PIN code entries, then it stops theentry procedure; the code can how-ever be corrected while entering.
The voice prompts used by the sys-tem for PIN code entry are the fol-lowing:
Used voice prompts
Please enter your PIN!
…and then?
Please enter your PIN in single digits, for example one two three four
Please add more digits, or modify thenumber with “Delete digits”, or confirm with “Right”
This Pin is not valid!
Cancel
Action to take
Say PIN code digits one at a time after the beep
Enter the other PIN code digits
Say PIN code digits one at a time
Complete PIN code entry
The PIN code entered and confirmed is notvalid
Pin code entry aborted
103-131 connect thesis GB 22-10-2007 10:43 Pagina 108

109
Required action
Correct
Finish
Help
Cancel
The voice commands the user shallsay to enter the PIN code are the fol-lowing:
Recognized commands
Modify digits, wrong
Right, finish, dial, enter
Help
Cancel, abort
103-131 connect thesis GB 22-10-2007 10:43 Pagina 109
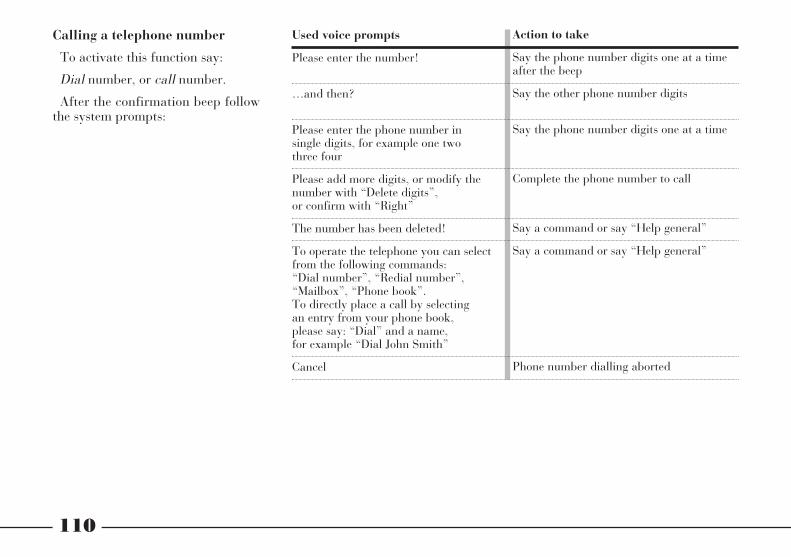
110
Calling a telephone number
To activate this function say:
Dial number, or call number.
After the confirmation beep followthe system prompts:
Used voice prompts
Please enter the number!
…and then?
Please enter the phone number in single digits, for example one two three four
Please add more digits, or modify the number with “Delete digits”, or confirm with “Right”
The number has been deleted!
To operate the telephone you can select from the following commands: “Dial number”, “Redial number”, “Mailbox”, “Phone book”. To directly place a call by selecting an entry from your phone book, please say: “Dial” and a name, for example “Dial John Smith”
Cancel
Action to take
Say the phone number digits one at a timeafter the beep
Say the other phone number digits
Say the phone number digits one at a time
Complete the phone number to call
Say a command or say “Help general”
Say a command or say “Help general”
Phone number dialling aborted
103-131 connect thesis GB 22-10-2007 10:43 Pagina 110

111
The voice commands the user shallsay to dial a phone number are thefollowing:
Required action
Correct
Delete
Finish
Help
Cancel
Recognized commands
Modify digits, wrong
Delete
Right, finish, dial, enter
Help
Cancel, abort
103-131 connect thesis GB 22-10-2007 10:43 Pagina 111

112
Calling a number by speechsample
To activate this function say:
Dial <Name> or, call <Name>.
IMPORTANT The procedure forstoring the speech sample associatedto the phone book number is de-scribed in the following paragraph.
The voice prompts used by the sys-tem when calling a number by speechsample, after the confirmation beep,are the following:
Used voice prompts
Call <Name> now?
To call <Name>, say “Dial”otherwise say “Cancel”
Please repeat the name!
To operate the telephone you can select from the following commands: “Dial number”, “Redial number”, “Mailbox”, “Phone book”. To directly place a call by selecting an entry from your phone book, please say: “Dial” and a name, for example “Dial John Smith”
Cancel
Action to take
Confirm, correct or cancel
Confirm the name or cancel
Repeat the name
Say a command or say “Help general”
Calling procedure aborted
103-131 connect thesis GB 22-10-2007 10:43 Pagina 112

113
The voice commands the user shallsay to start the call are the following:
Recognized commands
Yes, dial, connect, call, okay
No, no that’s wrong, delete
Help
Required action
Connect <Nome>
No <Nome>
Help
103-131 connect thesis GB 22-10-2007 10:43 Pagina 113

114
Entering a speech sample in thephone book
This function makes it possible tostore a name associated to a phonenumber in the phone book.
Voice prompts to use to activate thisfunction are the following:
New name, New entry
Speech sample storing procedure isguided by the system after the beepby the following prompts:
Action to take
Pronounce the name to store.
Repeat the name to store.
If the second name is different from the firstone said or if it is too similar to an already ex-isting entry the system will abort the proce-dure. To restart the procedure, press theVOICE button again.
Say the number associated to the name figureby figure, e.g.: one, two, three, four.
If the number repeated by the system is right,confirm by saying one of the followingprompts: “Finish, Right”, otherwise say “Mod-ify digit, Wrong” and repeat the number to beassociated to the name.
The procedure for entering a speech sample inthe phone book has been concluded success-fully.
Used voice prompts
Say name!
Repeat name
Enter number
Repeat the phone number digits just pronounced
If recognition is successful, the system will store the entry and confirm by prompt “Name stored”
103-131 connect thesis GB 22-10-2007 10:43 Pagina 114

115
Reading the phone book
To activate this function say:
Phone book.
The voice prompts used by the sys-tem when reading the phone book, af-ter the confirmation beep, are the fol-lowing:
Used voice prompts
I did not understand you. Please say a command or say “Help”
Sorry, I did not understand you. If you would like to say a new command, please press the “Voice” button first
To operate the telephone you can select from the following commands: “Dial number”, “Redial number”, “Mailbox”, “Phone book”. To directly place a call by selecting an entry from your phone book, please say: “Dial” and a name, for example “Dial John Smith”
Active commands for the phone book are: “Connect”, “Delete”, “Continue reading”,“Cancel”. To be connected to another numberfrom your phone book, please say: “Dial” and a name, for example “Dial John Smith”
Action to take
Say a command or say “Help”
Error, procedure aborted. To start anew procedure press the VOICE but-ton and then say the required com-mand after the beep
Say a command or say “Help general”
Say one of the commands suggestedby the system
103-131 connect thesis GB 22-10-2007 10:43 Pagina 115

116
The voice commands the user shallsay to read the phone book are thefollowing:
Required action
Continue
Dial
Dial <Name>
Help
Delete <Name>
Delete
Cancel
Recognized commands
Continue reading
Dial, connect, call
Dial <Name>, call <Name>
Help
Delete <Name>
Delete
Cancel, abort
103-131 connect thesis GB 22-10-2007 10:43 Pagina 116

117
Deleting a speech sample fromthe phone book
To activate this function say:
Delete <Name>.
The voice prompts used by the sys-tem during the deleting procedure, af-ter the confirmation beep, are the fol-lowing:
Used voice prompts
Do you want to delete <Name> now?
If you want to delete <Name>, please say “Yes”, otherwise say “No”
To operate the telephone you can select from the following commands: “Dial number”, “Redial number”, “Mailbox”, “Phone book”. To directly place a call by selecting an entry from your phone book, please say: “Dial” and a name, for example “Dial John Smith”
Cancel
The voice commands the user shall say are the following:
Recognized commands
Yes, okay, yes that’s right
No, no that’s wrong, delete
Help
Required action
Confirm
Cancel
Help
Action to take
Confirm or delete
Confirm or delete as suggested bythe system
Say a command or say “Help general”
Repeat the procedure
103-131 connect thesis GB 22-10-2007 10:43 Pagina 117

118
RADIO
To control the radio functionsthrough voice commands, say “Ra-dio” after pressing the VOICE buttonA (fig. 2).
The radio functions that will be con-trolled are the following:
– band selection (AM-FM)
– “Autostore” function (see nextparagraph)
– tuning to the first station withhigher or lower frequency
– direct frequency selection
– stored station selection
– storing radio stations.
The voice prompts used by the sys-tem during radio function activationare the following:
Used voice prompts
I did not understand you. Please say a command or say “Help”
To operate the radio, you can select from the following commands: “Next channel”, “Previous channel”, “Autostore”,“AM”, “FM”. Commands such as: “Frequency ninety-nine point five”, “Channel number three”, “Store at number three” are also possible.To get more help, please say “Help general”.
The following commands are available: “Main page”, “Dark mode”, “Show arrows”, “Zoom in”, “Zoom out”, “Repeat message”. You can always activate a device with the following commands: “Radio”, “CD player”,“CD changer”, “Tape”, “TV”, “Telephone”. You can always exit the dialog with “Cancel”. Please say a command after the beep
Sorry I did not understand you. If you would like to say a new command, please press the “Voice” button first
Action to take
Say a command or say “Help”
Say one of the commands suggested by the system
Say one of the commands suggestedby the system or exit the dialog
Error, procedure aborted. To start a new procedure press theVOICE button and then say the required command after the beep
103-131 connect thesis GB 22-10-2007 10:43 Pagina 118

119
The voice commands the user shallsay to control the radio functions arethe following:
Required action
“Autostore” on
Select AM
Select FM
Tune to the first radio station with higher frequency
Tune to the first radio station with lower frequency
Select a station frequency
Tune to one stored station
Store the tuned station
Help
Help general
Cancel
Recognized commands
Autostore
AM, medium wave, long wave
FM 1/2/3, short wave
Next channel, next station, search forward
Previous channel, previous station, searchbackward back
Frequency 87…108 point 0…9 Megahertz
Channel number 1…6, station number1…6, key number 1…6
Store at key number 1…6
Help
General help, help general
Cancel, abort
103-131 connect thesis GB 22-10-2007 10:43 Pagina 119

120
“Autostore” function
When the user say “Autostore” toactivate the corresponding function,the system will ask for confirmation.After the beep the user can confirm,cancel or ask for “Help”. The voiceprompts used by the system and thevoice commands the user shall say aregiven in the following table:
Dialog between user and system to activate the “Autostore” function
User
System
User (after the beep)
System (if the user asks for help)
System (if dialog is stoppeddue to errors)
Autostore
Would you like to have the station keys to be setautomatically?
Yes, okay, yes that’s right No, no that’s wrong, deleteHelp
To have a selection of channels stored automatically, say “Yes”, otherwise “No”
Cancel
103-131 connect thesis GB 22-10-2007 10:43 Pagina 120

121
CASSETTE PLAYER
To control the cassette player func-tions through voice commands, say“Cassette, tape” after pressing theVOICE button A (fig. 2).
The cassette player functions thatwill be controlled are the following:
– play next track
– play previous track
– fast tape forward
– fast tape rewind
– side change
– pause
– playback.
The voice prompts used by the sys-tem to activate the cassette playerfunctions are the following:
Used voice prompts
I did not understand you. Please say a command or say “Help”
For playing tapes you can choose from the following commands: “Next track”, “Previous track”, “Other side”. To get more help, please say “Help general”
The following commands are available: “Main page”, “Dark mode”, “Show arrows”, “Zoom in”, “Zoom out”, “Repeat message”.You can always activate a device with the following commands: “Radio”, “CD player”, “CD changer”, “Tape”, “TV”, “Telephone”.You can always exit the dialog with “Cancel”. Please say a command after the beep
There is no tape!
Sorry I did not understand you. If you would like to say a new command, please press the “Voice” button first
Action to take
Say a command or say “Help”
Say a command or say “Help general”
Say one of the commands suggestedby the system or exit the dialog
Insert a tape in the cassette player
Error, procedure aborted. To start a new procedure press the VOICE button and then say the required commandafter the beep
103-131 connect thesis GB 22-10-2007 10:43 Pagina 121

122
The voice commands the user shallsay are the following:
Required action
Play next track
Play previous track
Change tape side
Fast tape forward
Fast tape rewind
Stop playing tape
Play
Help
Help general
Cancel
Recognized commands
Next track, next song, next title
Previous track, previous song, previous title
Side A/B, change side, other side, switch sides
Fast forward
Fast rewind
Stop, pause
Play tape
Help
General help, help general
Cancel, abort
103-131 connect thesis GB 22-10-2007 10:43 Pagina 122

123
COMPACT DISC PLAYER (CD)
To control the CD player functionsthrough voice commands, say “CDplayer” after pressing the VOICE but-ton A (fig. 2).
The CD player functions that will becontrolled are the following:
– play next track
– play previous track
– play
– pause
– playback.
The voice prompts used by the sys-tem to activate the CD player func-tions are the following:
Used voice prompts
I did not understand you. Please say a command or say “Help”
To operate the CD-player, you can select from the following commands: “Next track”, “Previous track”. To select a special track, say for example “Track number three”. You can also say “Stop” and “Play”. To get more help, please say “Help general”
The following commands are available: “Main page”, “Dark mode”, “Show arrows”, “Zoom in”, “Zoom out”, “Repeat message”.You can always activate a device with the following commands: “Radio”, “CD player”, “CD changer”, “Tape”, “TV”, “Telephone”.You can always exit the dialog with “Cancel”. Please say a command after the beep
This track is not available!
There is no such CD!
Sorry, I did not understand you. If you would like to say a new command, please press the “Voice” button first
Action to take
Say a command or say “Help”
Say a command or say “Help general”
Say one of the commands suggestedby the system or exit the dialog
Say the number of a CD track
Insert a CD in the player
Error, procedure aborted. To start a new procedure press theVOICE button and then say the required command after the beep
103-131 connect thesis GB 22-10-2007 10:43 Pagina 123

124
The voice commands the user shallsay are the following:
Required action
Play next track
Play previous track
Play a CD track
Stop playing CD
Play the CD
Help
Help general
Cancel
Recognized commands
Next track, next song, next title
Previous track, previous song, previous title
Track number 1…25, song number 1…25,title number 1…25,
Stop, pause
Play CD
Help
General help, help general
Cancel, abort
103-131 connect thesis GB 22-10-2007 10:43 Pagina 124

125
CD-CHANGER (CDC)
To control the CD player functionsthrough voice commands, say “CDchanger” after pressing the VOICEbutton A (fig. 2).
The CD changer functions that willbe controlled are the following:
– play next track
– play previous track
– play next CD
– play previous CD
– play a track
– play a CD
– stop playing
– playback.
The voice prompts used by the sys-tem to activate the CD changer func-tions are the following:
Used voice prompts
I did not understand you. Please say a command or say “Help”
To operate the CD changer you can choose from the following commands: “Next track”, “Previous track”, “Next CD”, “Previous CD”. To select a special CD, say for example “CD number three”. To select a special track, say for example “Track number three”. You can also say “Stop” and “Play”. To get more help, please say “Help general”
The following commands are available: “Main page”, “Dark mode”, “Show arrows”, “Zoom in”, “Zoom out”, “Repeat message”.You can always activate a device with the following commands: “Radio”, “CD player”, “CD changer”, “Tape”, “TV”, “Telephone”.You can always exit the dialog with “Cancel”. Please say a command after the beep
This track is not available!
There is no such CD!
Sorry, I did not understand you. If you would like to say a new command, please press the “Voice” button first
Action to take
Say a command or say “Help”
Say a command or say “Help general”
Say one of the commands suggestedby the system or exit the dialog
Say the number of a CD track
Say the number of a CD in the CD-changer
Error, procedure aborted. To start a new procedure press theVOICE button and then say the required command after the beep
103-131 connect thesis GB 22-10-2007 10:43 Pagina 125

126
The voice commands the user shallsay are the following:
Required action
Play next track
Play previous track
Play a CD track
Play next CD
Play previous CD
Play a CD
Stop playing CD
Play CD
Help
Help general
Cancel
Recognized commands
Next track, next song, next title
Previous track, previous song, previous title
Track number 1…25, song number 1…25,title number 1…25
Next CD
Previous CD
CD number 1…6
Stop, pause
Play CD
Help
General help, help general
Cancel, abort
103-131 connect thesis GB 22-10-2007 10:43 Pagina 126

127
TELEVISION (TV)
To control the TV functions throughvoice commands, say “TV, television”after pressing the VOICE button A(fig. 2).
The TV functions that will be con-trolled are the following:
– tuning to the first channel withhigher or lower frequency
– “Autostore” on
– direct channel tuning
– channel storing.
The voice prompts used by the sys-tem during TV function activation arethe following:
Used voice prompts
I did not understand you. Please say a command or say “Help”
To operate the TV, you can select from the following commands: “Next channel”, “Previous channel”, “Autostore”. Commands such as: “Channel number three”, “Store at number three” are also possible.To get more help, please say “Help general”
The following commands are available: “Main page”, “Dark mode”, “Show arrows”, “Zoom in”, “Zoom out”, “Repeat message”.You can always activate a device with the following commands: “Radio”, “CD player”, “CD changer”, “Tape”, “TV”, “Telephone”.You can always exit the dialog with “Cancel”. Please say a command after the beep
Sorry, I did not understand you. If you would like to say a new command, please press the “Voice” button first
Action to take
Say a command or say “Help”
Say one of the commands suggestedby the system or say “Help general”
Say one of the commands suggestedby the system or exit the dialog
Error, procedure aborted. To start a new procedure press theVOICE button and then say the required command after the beep
103-131 connect thesis GB 22-10-2007 10:43 Pagina 127

128
The voice commands the user shallsay are the following:
Required action
“Autostore” on
Tune to the first TV channel with higher frequency
Tune to the first TV channel with lower frequency
Tune to a stored channel
Store the tuned channel
Help
Help general
Cancel
Recognized commands
Autostore
Next channel, next station, search forward
Previous channel, previousstation, searchbackward, back
Channel number 1…5, station number 1…5, keynumber 1…5
Store at key number 1…5
Help
General help, help general
Cancel, abort
103-131 connect thesis GB 22-10-2007 10:43 Pagina 128

129
VOICE MESSAGES– VOICE MEMO
This function allows the user torecord and obviously listen to thevoice messages and calls again, for amaximum duration of 3 minutes.When the time available is over, theoperation is automatically ended.
To turn the voice recorder on, pressthe VOICE button A (fig. 2) on thesteering wheel for longer than twoseconds. When the voice recorder ison, the CONNECT display will showthe screen with the stored message listand the menu with the following op-tions:
– Delete all
– Delete
– Select
– Record (multifunction key)
– Play (multifunction key).
Messages will be listed according tothe recording sequence by date.
The “Play” option is displayed onlyif there are recorded messages; a spe-cial message will be displayed if thereis no message recorded.
To select a message to be listened toor to be cleared, select and confirm“Select” with the right knob 21 (fig.1). Turn the knob right or left to se-lect the required message and thenpress the knob.
The display will show only the mes-sages that can be contained in thescreen, to scroll the entire list turn theknob 21 (fig. 1) left after selecting thelast displayed message. To go back tothe beginning of the list turn the knobright after selecting the first displayedmessage.
To listen to the selected message,press “Play”. To clear the message,select and confirm “Delete” with theright knob 21 (fig. 1).
To clear all the voice messages, se-lect and confirm “Delete all”.
The system will ask for confirmationbefore deleting one or all the mes-sages.
IMPORTANT Deleted messagescannot be recovered.
The “Record” option is always avail-able, even when the memory is full. Inthis case, after activating the function,a message warning that the memoryis full and that you have to clear somemessages before recording new oneswill be displayed. A beep will indicatethat the system is ready to startrecording.
While listening to a message, the dis-play will show the message number,the date and its length.
103-131 connect thesis GB 22-10-2007 10:43 Pagina 129

130
LISTENING TO VOICEMESSAGES
To listen to a voice message select iton the voice recorder main screen us-ing the right knob 21 (fig. 1), thenpress the knob. After selecting themessage the following options (multi-function keys) will be displayed:
– Play/Pause
– Zoom +/Zoom -
– Repeat
– End.
To play a message press “Play”; topause it press “Pause”. To restartplaying it press “Play” again. To playthe message again from the beginningpress “Repeat”. To end playing press“End”.
Press “Zoom +” to zoom in the mes-sage displayed and press “Zoom -” torestore its original dimension.
Playing a message will be ended au-tomatically in one of the followingcases:
– pressing the multifunction key“End” on the “Voice recorder” mainscreen;
– selecting an audio source afterpressing the AUDIO key 11 (fig. 1) orthe SRC key 12 (fig. 1);
– when the memory is “full”;
– pressing the VOICE button on thesteering wheel;
– pressing key 15 (fig. 1) to acceptan incoming call;
– making a call;
– turning the CONNECT off.
This function is not interruptedwhen the user selects other functions(e.g. navigator), excluding the audiosources.
RECORDING VOICE MESSAGES
To record a voice message, turn thevoice recorder on pressing the VOICEbutton A (fig. 2) on the steering wheelfor longer than two seconds. Thenpress again the VOICE button forlonger than two seconds or press themultifunction key “Record” on the“Voice recorder” main screen.
To record a message when the mainscreen of the “Voice recorder” is dis-played yet, directly press the VOICEbutton for longer than 2 seconds orpress the the multifunction key“Record”.
A beep will indicate that recordingis in progress and the display willshow a new screen with the followingoptions:
– Pause/Continue
– Zoom +/Zoom -
– End
103-131 connect thesis GB 22-10-2007 10:43 Pagina 130

131
While recording, the display willshow the message number, the dateand the remaining record time or thefull memory message.
Press “Zoom +” to zoom in the mes-sage displayed and press “Zoom -” torestore its original dimension.
To pause recording press “Pause”;to restart it press “Continue”. To endrecording press “End”.
Recording will be ended automati-cally in one of the following cases (themessage will be stored automatically):
– pressing “End” on the “Voicerecorder” main screen;
– selecting an audio source afterpressing the AUDIO key 11 (fig. 1) orthe SRC key 12 (fig. 1);
RECORDING CALLS
To record a call, press the VOICEbutton A (fig. 2) on the steering wheelfor longer than two seconds. Record-ing will start immediately withoutbeep and without displaying the mainscreen of the “Voice recorder”.
To stop recording press the VOICEbutton again. Recording will bestopped automatically when the callis over or when accepting another in-coming call.
– when the memory is “full”;
– pressing the VOICE button on thesteering wheel;
– pressing key 15 (fig. 1) to acceptan incoming call;
– making a call;
– turning the CONNECT off.
This function is not interruptedwhen the user selects other functions(e.g. navigator), excluding the audiosources.
If a call is received while recordinga message, the ring tone will not beactivated until ending recording butthe display will show the incomingcall symbol to warn the user. If theuser accepts the call recording will beended automatically.
An incoming call (with ring tone on)or a navigator indication will stopplaying a recorded message.
103-131 connect thesis GB 22-10-2007 10:43 Pagina 131
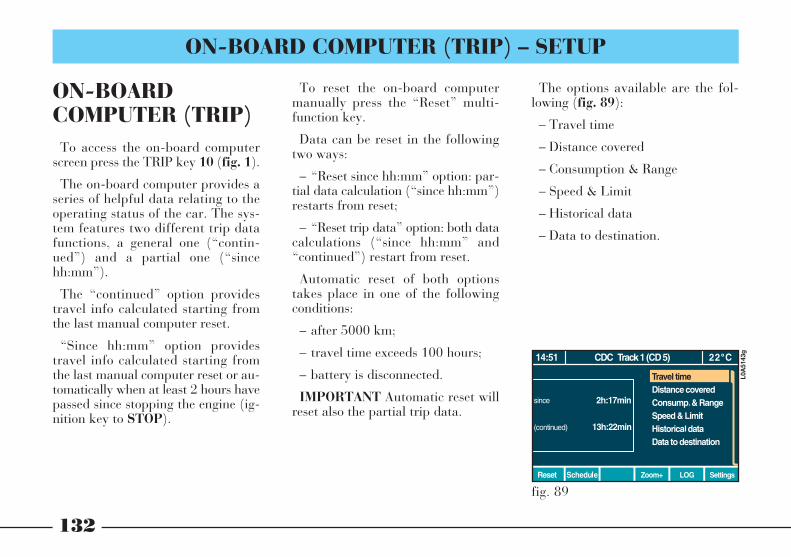
132
To reset the on-board computermanually press the “Reset” multi-function key.
Data can be reset in the followingtwo ways:
– “Reset since hh:mm” option: par-tial data calculation (“since hh:mm”)restarts from reset;
– “Reset trip data” option: both datacalculations (“since hh:mm” and“continued”) restart from reset.
Automatic reset of both optionstakes place in one of the followingconditions:
– after 5000 km;
– travel time exceeds 100 hours;
– battery is disconnected.
IMPORTANT Automatic reset willreset also the partial trip data.
The options available are the fol-lowing (fig. 89):
– Travel time
– Distance covered
– Consumption & Range
– Speed & Limit
– Historical data
– Data to destination.
ON-BOARDCOMPUTER (TRIP)
To access the on-board computerscreen press the TRIP key 10 (fig. 1).
The on-board computer provides aseries of helpful data relating to theoperating status of the car. The sys-tem features two different trip datafunctions, a general one (“contin-ued”) and a partial one (“sincehh:mm”).
The “continued” option providestravel info calculated starting fromthe last manual computer reset.
“Since hh:mm” option providestravel info calculated starting fromthe last manual computer reset or au-tomatically when at least 2 hours havepassed since stopping the engine (ig-nition key to STOP).
fig. 89
L0A
5143
g
ON-BOARD COMPUTER (TRIP) – SETUP
132-151 connect thesis GB 22-10-2007 10:45 Pagina 132
133
“DISTANCE COVERED”FUNCTION
This function shows on the left-handside of the display the distance cov-ered by the car in kilometres from thelast manual or automatic reset of theon-board computer. The max. valuedisplayed is 5000 km.
The value is expressed in “km”(kilometres) with an accuracy of 0.1km.
When the navigation system is on,also the distance to destination is dis-played.
At the bottom of the display thereare the following multifunction keysfor options:
– Reset
– Schedule
– Zoom +
– LOG
– Settings.
Press “Zoom +” to enlarge the textand press “Zoom –” to reset its nor-mal dimension.
“TRAVEL TIME” FUNCTION
Select and confirm this function onthe main screen of the on-board com-puter (TRIP) (fig. 89) with the rightknob 21 (fig. 1) to display on the left-hand side of the screen the timeelapsed from the last manual reset(“since hh:mm”) and automatic reset(“continued”); the value is expressedin “(hh) (mm)” (hours and minutes).When the navigation system is on, theestimated arrival time and the timeelapsed from the start of the journeyare displayed.
IMPORTANT With the ignition keyat MAR, counting continues even ifthe engine is stopped.
132-151 connect thesis GB 22-10-2007 10:45 Pagina 133

134
“CONSUMPTION & RANGE”FUNCTION
This function shows on the left-handside of the display (fig. 90) the aver-age consumption, the current con-sumption and the range for km K.The average consumption values arecalculated from the last manual (since“hh:mm”) and automatic (“contin-ued”) reset of the on-board computer.
The average consumption indicatesthe average consumption values cal-culated from the last reset. The aver-age consumption value is obtained bydividing the distance covered by thefuel. At starting the on-board com-puter shows the last value measuredbefore turning off.
The value is expressed in “km/l”(km covered with 1 litre fuel) or in“l/100km ” (fuel litres per 100 km),with an accuracy of 0.1 km/l. Thevalue is updated every 10 seconds orevery 0.1 km, depending on the firstvalue reached.
The current consumption value in-dicates the fuel consumption of thecar when travelling and it is thereforehelpful to learn the fuel consumptionin relation to the driving styleadopted. This value is the same withboth on-board computer functions(manual or automatic reset) and isdisplayed 10 seconds after the engineis started or the on-board computer isreset.
The value is expressed in “km/l”(km covered with 1 litre fuel) or in“l/100km” (fuel litres per 100 km),with an accuracy of 0.1 km/l.
Range shows the distance in km thatthe car can still cover before needingfuel, assuming that driving style is un-varied. The travel distance to emptycalculated depends on the amount offuel still in the tank and on the aver-age consumption rate. At starting theon-board computer shows the lastvalue measured before turning off.The updated value will be displayed30 seconds after the engine is startedor the on-board computer is reset.
fig. 90
L0A
5144
g
132-151 connect thesis GB 22-10-2007 10:45 Pagina 134

135
When stopping the car with the en-gine running, the range value will bedisplayed for about 3 seconds andthen it will be replaced by somedashes. Proper indication will be au-tomatically resumed a few seconds af-ter restarting the car.
GENERAL NOTES
– The data to destination and arrivaltime are available with the navigationsystem guidance to destination acti-vated.
– The system ceases indicating resid-ual range for values less than 50 km(dashes are displayed in lieu of kmrange values and with a message forrefuelling).
– In case of refuelling with fuelwarning light on, the system will up-date the residual range value only ifat the end of refuelling the fuel con-tained in the tank is equal to or ex-ceeds approx. 5 litres. In case of lowerrefuelling, residual range display willremain the same as before refuelling.
“SPEED AND LIMIT”FUNCTION
This function shows on the left-handside of the display (fig. 91) the aver-age speed of the car calculated fromthe last manual or automatic reset ofthe on-board computer. The value isexpressed in “km/h” with an accuracyof 1.0 km/h and is updated every 10seconds.
At starting, the on-board computerdisplays the last value measured be-fore turning off. The new value willbe available after approx. 10 seconds.
fig. 91
L0A
5145
g
132-151 connect thesis GB 22-10-2007 10:45 Pagina 135

136
After resetting or when starting anew journey, dashes “----“ are shownfor 10 seconds before displaying theaverage speed value.
This function also enables to set andactivate the speed limit. When thespeed limit set is exceeded a beep anda message on the display will warn thedriver. The message will be displayedfor about 3 seconds then it goes al-though the car speed is exceeding theset limit value. The message will bedisplayed each time the speed limit isexceeded.
To set the speed limit, select andconfirm the “Set limit speed” with theright knob 21 (fig. 1), then turn theknob right to increase the limit andleft to reduce it. Confirm the requiredvalue by pressing the knob or resetthe previous value by pressing the“Cancel” multifunction key. To acti-vate the warning buzzer select “Ac-tive” with the right knob and confirm;the warning message is always dis-played, except when the set limit is re-set.
Press “Go back” to return to theprevious screen.
“HISTORICAL DATA”FUNCTION
This function shows on the left-handside of the display (fig. 92) the totaltime of the journey, the distance cov-ered and the average speed calculatedfrom the last reset. To reset data press“Reset”.
fig. 92
L0A
5146
g
132-151 connect thesis GB 22-10-2007 10:45 Pagina 136

137
“DATA TO DESTINATION”FUNCTION
This function shows on the left-handside of the display the distance to des-tination, the estimated time of arrivaland the time elapsed from the start ofthe journey. Distance is expressed inkm; when the destination is near thevalue is expressed in metres (m).
If the navigation system is not in-stalled or if off, when selecting thisfunction the relevant warning mes-sage will be displayed.
DATA RESET
To reset the on-board computerdata, press the “Reset” multifunctionkey on the main TRIP screen. Afterpressing the key a new screen with thefollowing options (fig. 93) will be dis-played:
– Reset since hh:mm
– Reset all data.
Press “Go back” to return to themain on-board computer screen.
The left-hand side of the displayshows the data that can be reset:
– Travel time
– Distance covered
– Average consumption (Avg. cons.)
– Average speed.
Select and confirm “Reset sincehh:mm” to reset partial data. Selectand confirm “Reset all data” to clearall the on-board computer data. Be-fore resetting the system will ask forconfirmation: press “Yes” to reset oth-erwise press “No”.
fig. 93L0
A51
47g
132-151 connect thesis GB 22-10-2007 10:45 Pagina 137

138
“SCHEDULE” FUNCTION
This function, that is turned on bypressing the “Schedule” multifunctionkey on the main on-board computerscreen (TRIP) (fig. 89), makes it pos-sible to create an agenda with mes-sages or events (e.g. birthdays, etc.)that can be triggered both on set dateor mileage. Three days before the setdate or 200 km before the set mileage,the display will show automaticallythe relevant message.
After pressing the “Schedule” keythe page with stored messages and setdeadlines will be displayed. To scrollthe list use the right knob. Press “Goback” to return to the previous screen.To edit the text or deadline of a mes-sage, select and confirm it with theright knob and then press the “Cor-rect” multifunction key.
Messages marked with the acronym“Servicing” (messages relevant toscheduled servicing) can only be readby pressing the “Check” key.
Press “New” to display the screen (fig.94) for entering new messages with therelevant deadlines.
To write the message select and con-firm “Text item”; to enter the char-acters select and confirm them withthe right knob 21 (fig. 1).
To speed up character entry, the sys-tem automatically moves to the be-ginning or the end of the list by press-ing keys “¯ ˙”.
To enter a blank space use “_”.
The multifunction keys “ABC abc”allow you to pass from CAPITAL tosmall letters and vice versa.
To confirm the message press “OK”,and to correct it press “Correct”.Press “Cancel” to quit without stor-ing the message.
To set the deadline warning messageselect “Date” or “Mileage”.
Press “Go back” to return to theprevious screen.
fig. 94L0
A51
48g
132-151 connect thesis GB 22-10-2007 10:45 Pagina 138

139
“LOG” FUNCTION
This function, that is turned on bypressing the “LOG” multifunction keyon the main on-board computerscreen (TRIP) (fig. 89), makes it pos-sible to store the most significant tripdata (e.g. kind and purpose of thetrip, visitor, name of the driver, dis-tance covered, etc.).
The “LOG” function memory is pro-vided with three different lists, eachone can store 13 trips that can be ac-cessed by selecting the user’s name.
The system identifies the users by“User 1”, “User 2” and “User 3” buteach user can customize his/hername.
To customize the name, press“Name”, then select and confirm therequired name with the right knob 21(fig. 1).
Enter the user’s name on the newscreen displayed selecting and con-firming the characters with the rightknob. To speed up character entry,the system automatically moves to thebeginning or the end of the list bypressing keys “¯ ˙”.
To enter a blank space use “_”.
The multifunction keys “ABC abc”allow you to pass from CAPITAL tosmall letters and vice versa.
To confirm the name press “OK”,and to correct it press “Correct”.
Press “Cancel” to quit without stor-ing the name.
To access the main “LOG” screen(fig. 95) after pressing the relevantmultifunction key, select and confirmthe user’s name with the right knob.
The options available are the fol-lowing:
– Read
– Edit
– Create
– Delete
– Select.
To select a stored item, select andconfirm the “Select” option with theright knob, then turn the knob tomove the cursor to the required itemand confirm it by pressing the knob.
Press “Go back” to return to theprevious screen.
fig. 95
L0A
5149
g
132-151 connect thesis GB 22-10-2007 10:45 Pagina 139

140
To display the text of the selecteditem select “Read”.
Use “Edit” to edit a stored item andselect “Delete” to delete it.
To prevent accidental editing of im-portant data, the following main tripdata cannot be edited:
– Starting point
– End point
– Date & Time
– Distance covered
– Consumption.
“Create” function
Select and confirm this function todisplay the first screen of the menu tobe used for entering the characteristictrip data (fig. 96). To go to the secondand third page of the menu press themultifunction key “Next page”. Press“Go back” to return to the previouspage. Press “Page 1” to return to thefirst page.
The options available are the fol-lowing:
– Driver name
– Licence no.
– Date & Time
– Kind of trip
– Purpose of trip
– Visitor
– Starting point
– End point
– Use NAV info (only if the naviga-tion system is installed).
fig. 96L0
A51
50g
132-151 connect thesis GB 22-10-2007 10:45 Pagina 140

141
To enter info select and confirm thecharacters with the right knob. Tospeed up character entry, the systemautomatically moves to the beginningor the end of the list by pressing keys“¯ ˙”.
To enter a blank space use “_”.
The multifunction keys “ABC abc”allow you to pass from CAPITAL tosmall letters and vice versa.
To correct the entered info press“Correct”.
Press “Cancel” to quit without stor-ing the info.
Info to enter with listed options arethe following:
– Driver name = name of the driver(User 1, 2 or 3 or customized name)
– Licence no. = number plate num-ber (if available)
– Date & Time = trip start/end dateand time (these data are entered au-tomatically by the system)
– Kind of trip = choose “Private” or“Business”
– Purpose of trip = choose the pur-pose among those listed
– Visitor = name of the person or thecompany to be visited
– Starting point = point of start
– End point = destination
– Use NAV info = when this functionis on, the starting and end points areentered automatically by the naviga-tion system. Should this function beoff or the navigation system be not in-stalled, enter the starting and endpoints manually.
To start trip data recording, press“Record”.
The LOG function can only recordone trip at a time.
132-151 connect thesis GB 22-10-2007 10:45 Pagina 141

142
“TRIP SETTINGS” FUNCTION
This function, that is turned on bypressing the “Settings” multifunctionkey on the main on-board computerscreen (TRIP) (fig. 89), makes it pos-sible to change the consumption unit,the distance unit and the distance todrive unit.
The options available are the fol-lowing (fig. 97):
– Consumption unit
– Distance unit
– Distance to drive.
The distance to drive unit can be se-lected only when the navigation sys-tem is off or is not installed.
To change the required unit, selectand confirm it with the right knob,then turn the knob to move the cur-sor on the required unit and press theknob to confirm.
Consumption units available are thefollowing:
– km/l = km per 1 litre fuel
– l/100km = litres per 100 km.
Distance unit available is:
– km = kilometres.
Press “Go back” to return to theprevious screen; press “Cancel” tocancel the entered unit.
fig. 97
L0A
5151
g
132-151 connect thesis GB 22-10-2007 10:45 Pagina 142

143
SETTINGS (SETUP)To access the CONNECT settings
screen, press the SETUP key 9 (fig.1).
The SETUP screen can be displayedonly with the key at MAR.
The system makes it possible tochoose among 4 settings sets: one“Standard” (that cannot be edited)and three that can be customized withthe user’s name.
The CONNECT settings that can beedited are the following (fig. 98):
– CONNECT (Language – Temper-ature – Pictogram on MAIN – Screen– Voice commands volume)
– Doors & interior
– Heater
– Seat comfort
– Date & Time
– Other setting (automatic parkingbrake).
The options that can be activatedtrough the multifunction keys are:“View”, “Recall” and “Store”.
With “Recall” it is possible to acti-vate one of the four settings sets or tocustomize one of the three settingssets that can be edited. “View” dis-plays the active settings of the selectedset. “Store” makes it possible to storenew settingsi.
SELECTING SETTINGS SET
The CONNECT system makes itpossible to control 4 settings sets: one“Standard” and three that can be cus-tomized with the user’s name. To se-lect the required settings set press“Recall” on the main SETUP screen:the following page will be displayed(fig. 99):
– Standard
– Set 1
– Set 2
– Set 3.
fig. 98L0
A51
52g
fig. 99
L0A
5153
g
132-151 connect thesis GB 22-10-2007 10:45 Pagina 143
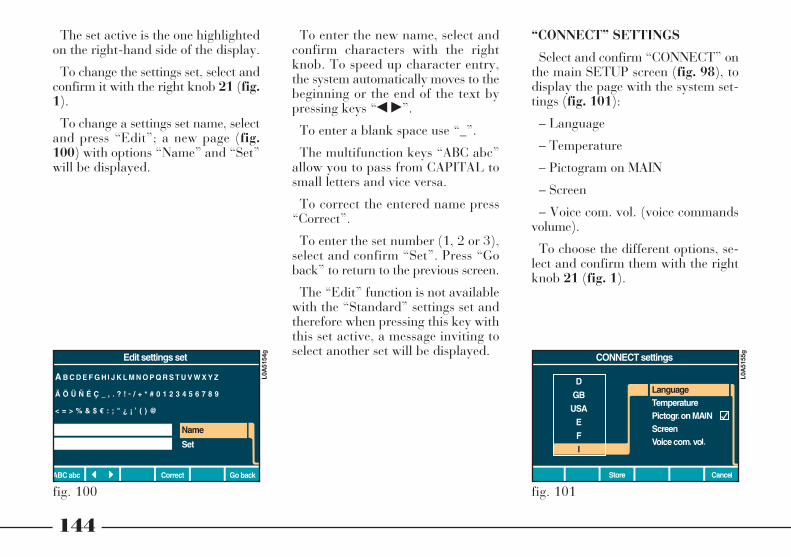
144
The set active is the one highlightedon the right-hand side of the display.
To change the settings set, select andconfirm it with the right knob 21 (fig.1).
To change a settings set name, selectand press “Edit”; a new page (fig.100) with options “Name” and “Set”will be displayed.
To enter the new name, select andconfirm characters with the rightknob. To speed up character entry,the system automatically moves to thebeginning or the end of the text bypressing keys “¯ ˙”.
To enter a blank space use “_”.
The multifunction keys “ABC abc”allow you to pass from CAPITAL tosmall letters and vice versa.
To correct the entered name press“Correct”.
To enter the set number (1, 2 or 3),select and confirm “Set”. Press “Goback” to return to the previous screen.
The “Edit” function is not availablewith the “Standard” settings set andtherefore when pressing this key withthis set active, a message inviting toselect another set will be displayed.
“CONNECT” SETTINGS
Select and confirm “CONNECT” onthe main SETUP screen (fig. 98), todisplay the page with the system set-tings (fig. 101):
– Language
– Temperature
– Pictogram on MAIN
– Screen
– Voice com. vol. (voice commandsvolume).
To choose the different options, se-lect and confirm them with the rightknob 21 (fig. 1).
fig. 100
L0A
5154
g
fig. 101
L0A
5155
g
132-151 connect thesis GB 22-10-2007 10:45 Pagina 144

145
“Language”
This option makes it possible to setthe CONNECT language for the mes-sages/functions shown on the displayand for the voice command dialogs; itis only possible to set one language.
Languages available are the follow-ing:
– D (German)
– GB (English UK)
– USA (English US)
– E (Spanish)
– F (French)
– I (Italian).
To change language, select and con-firm it with the right knob 21 (fig. 1).Press “Cancel” to quit without stor-ing the new setting.
IMPORTANT To change the lan-guage the system requires, through amessage on the display, the SETUPCD (versions without navigation sys-tem) or the navigation CD.
If the required CD is not inserted thelanguage will not be changed. The lan-guage change could take a few min-utes, during this period certain CON-NECT functions may not be available;in this condition the display will showa dedicated warning message.
If the CD is not inserted, the displaywill show the following message:“Please insert Setup CD!” or “Pleaseinsert Navi CD! ” (system fitted withnavigation function).
Should the inserted CD be not rec-ognized or be unsuitable for languagechange, the display will show a dedi-cated warning message.
When starting the language changeprocedure, the system requires theuser’s confirmation through a dedi-cated message, press “Yes” to con-tinue otherwise press “No”. Duringlanguage change the status bar (indi-cating that the procedure is inprogress) together with message“Please wait! Language change inprogress ...” are displayed.
This message will stay on until theprocedure is over then the system goesback to the screen used to enter thenew setting. New language setting re-mains active also after switching thesystem off.
“Temperature”
The temperature units are the fol-lowing:
– °C (Celsius degrees)
– °F (Fahrenheit degrees).
To change the temperature unit, se-lect and confirm it with the right knob21 (fig. 1), then press the “Store”key. Press “Cancel” to quit withoutstoring the new setting.
“Pictogram on MAIN”
This option makes it possible to ac-tivate or deactivate the navigationfunction symbols (arrow representingthe car, next manoeuvres, etc.) on theMAIN screen.
To turn the option on/off, select andconfirm it with the right knob 21 (fig.1).
132-151 connect thesis GB 22-10-2007 10:45 Pagina 145
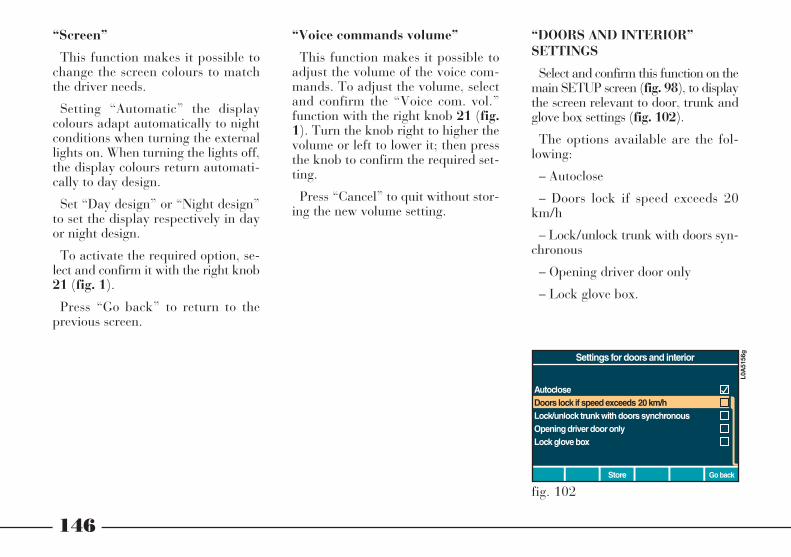
146
“Screen”
This function makes it possible tochange the screen colours to matchthe driver needs.
Setting “Automatic” the displaycolours adapt automatically to nightconditions when turning the externallights on. When turning the lights off,the display colours return automati-cally to day design.
Set “Day design” or “Night design”to set the display respectively in dayor night design.
To activate the required option, se-lect and confirm it with the right knob21 (fig. 1).
Press “Go back” to return to theprevious screen.
“Voice commands volume”
This function makes it possible toadjust the volume of the voice com-mands. To adjust the volume, selectand confirm the “Voice com. vol.”function with the right knob 21 (fig.1). Turn the knob right to higher thevolume or left to lower it; then pressthe knob to confirm the required set-ting.
Press “Cancel” to quit without stor-ing the new volume setting.
“DOORS AND INTERIOR”SETTINGS
Select and confirm this function on themain SETUP screen (fig. 98), to displaythe screen relevant to door, trunk andglove box settings (fig. 102).
The options available are the fol-lowing:
– Autoclose
– Doors lock if speed exceeds 20km/h
– Lock/unlock trunk with doors syn-chronous
– Opening driver door only
– Lock glove box.
fig. 102
L0A
5156
g
132-151 connect thesis GB 22-10-2007 10:45 Pagina 146

147
To activate/deactivate options, selectand confirm them with the right knob21 (fig. 1).
The “Autoclose” option, only avail-able on versions fitted with KeylessSystem, makes it possible to acti-vate/deactivate door and trunk auto-matic lock when the owner leaves thecar (> 4 metres) with the CID device(“Autoclose” function).
The option “Doors lock if speed ex-ceeds 20 km/h” makes it possible toset the automatic door, trunk and fuelcap lock when the car speed exceeds20 km/h.
The option “Lock/unlock trunk withdoors synchronous” makes it possibleto lock/unlock the trunk lock whenoperating the central door lock.
When the “Opening driver dooronly” option is off, pressing the re-mote control button will open all thedoors; while with this option on, onlythe driver door will open. When thisoption is active, it is however possibleto open all the doors through the but-ton set on the driver door panel, (af-ter opening the driver door obvi-ously).
The option “Lock glove box” makesit possible to lock/unlock the glovebox when removing the key from theignition switch.
“HEATER” SETTINGS
Select and confirm this function onthe main SETUP screen (fig. 98), todisplay the parked-car heater settingsscreen (where provided).
The settings available are the fol-lowing:
– Operate now
– Timer 1
– Timer 2.
To activate/deactivate the requiredfunction, select and confirm it withthe right knob 21 (fig. 1).
The option “Operate now” enablesto warm the passenger compartmentwith engine stopped and warm andignition key to MAR, using the enginecoolant.
The timer cannot be programmedwhen this function is on.
132-151 connect thesis GB 22-10-2007 10:45 Pagina 147
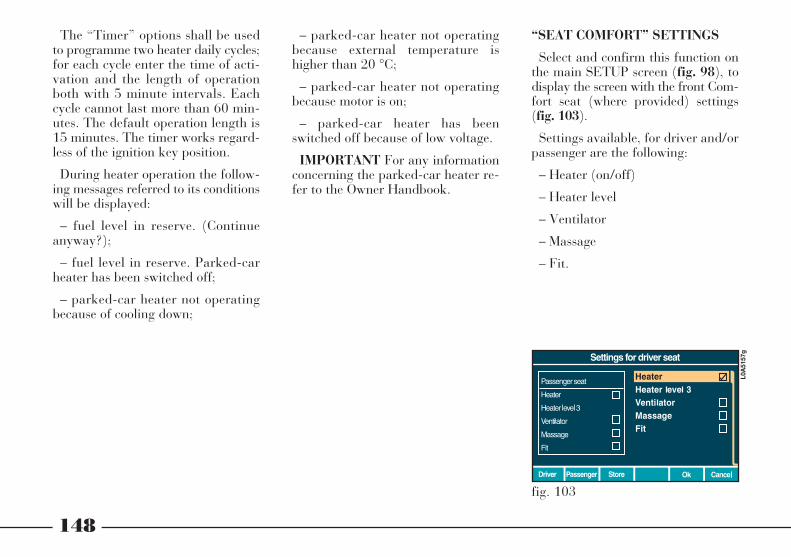
148
The “Timer” options shall be usedto programme two heater daily cycles;for each cycle enter the time of acti-vation and the length of operationboth with 5 minute intervals. Eachcycle cannot last more than 60 min-utes. The default operation length is15 minutes. The timer works regard-less of the ignition key position.
During heater operation the follow-ing messages referred to its conditionswill be displayed:
– fuel level in reserve. (Continueanyway?);
– fuel level in reserve. Parked-carheater has been switched off;
– parked-car heater not operatingbecause of cooling down;
– parked-car heater not operatingbecause external temperature ishigher than 20 °C;
– parked-car heater not operatingbecause motor is on;
– parked-car heater has beenswitched off because of low voltage.
IMPORTANT For any informationconcerning the parked-car heater re-fer to the Owner Handbook.
“SEAT COMFORT” SETTINGS
Select and confirm this function onthe main SETUP screen (fig. 98), todisplay the screen with the front Com-fort seat (where provided) settings (fig. 103).
Settings available, for driver and/orpassenger are the following:
– Heater (on/off)
– Heater level
– Ventilator
– Massage
– Fit.
fig. 103
L0A
5157
g
132-151 connect thesis GB 22-10-2007 10:45 Pagina 148

149
The options available with the mul-tifunction keys are:
– Driver
– Passenger
– Store
– OK
– Cancel.
To select the seat press “Driver” or“Passenger”. To activate or deactivatethe different settings, select and con-firm them with the right knob 21 (fig.1). To store new settings press “OK”.Press “Store” to go back to the mainSETUP screen storing the settings. Togo back to the main SETUP screenwithout storing the new settings press“Cancel”.
“Heater”
To set the heater level select andconfirm “Heater level”, thus display-ing a new screen (fig. 104) for settingthe required level turning the rightknob. The available heating levels are“1”, “2” and “3” (max). After settingthe required level to return the mainseat settings page and store the set-ting, press the right knob; otherwisepress “Cancel”.
To turn the seat heating on/off withthe level set and displayed, select andconfirm “Heater”.
“Ventilator”
The “Ventilator” option makes aircome out of the seat holes in order tofacilitate sweat evaporation duringlong trips, specially in summer.
To turn this function on/off, selectand confirm “Ventilator” with theright knob.
fig. 104L0
A51
58g
132-151 connect thesis GB 22-10-2007 10:45 Pagina 149

150
“Massage”
This option shall be used to reducefatigue during long trips. To turn thisfunction on/off, select and confirm“Massage” with the right knob.
“Fit”
This function makes the seat backfit to the passenger thus improvingthe back support. To turn this func-tion on/off, select and confirm “Fit”with the right knob.
“DATE & TIME” SETTINGS
Select and confirm this function onthe main SETUP screen (fig. 98), todisplay the screen with the date andtime settings (fig. 105).
The settings available are the fol-lowing:
– Date (lacking the GPS signal only)– Time (lacking the GPS signal only)– Time offset– Summer time– 12/24 h (multifunction key).To enter the date (day-month-year)
select and confirm “Date”.
To enter the time, select and confirm“Time”; the time (hours-minutes-sec-onds) will start to be displayed whenpressing the knob.
The option “Time offset” displaysthe difference between GreenwichGMT (Greenwich Mean Time) andthe MEZ/CET (Central EuropeanTime), GMT, ATLANTIC, EAST-ERN, CENTRAL, MOUNTAIN andPACIFIC time zones.
The option “Summer time”, whenactivates, makes it possible to updatetime during the summer time periodwithout changing the setting. At theend of the summer time period justdeactivate this function.
The “12/24 h” multifunction keymakes it possible to indicate the timewith the 12 or 24 hour system.
To turn the required functionson/off, select and confirm them withthe right knob 21 (fig. 1). Press “Goback” to return to the main SETUPscreen.
fig. 105L0
A51
60g
132-151 connect thesis GB 22-10-2007 10:45 Pagina 150

151
“OTHER SETTING” FUNCTION
Select and confirm this function onthe main SETUP screen (fig. 98), todisplay the screen to be used for ex-cluding the automatic parking brakeengagement when turning the engineoff, in order to move the car manually(e.g. in the garage).
Automatic parking brake shall bedeactivated before turning the igni-tion key to STOP and only with thecar at a standstill. When turningagain the key to STOP the parkingbrake will not be engaged. The auto-matic parking brake will be restoredwhen turning the key to MAR.
The automatic parking brake canalso be deactivated by directly turn-ing the ignition key as described inthe Owner Handbook.
To deactivate the automatic parkingbrake, select and confirm “Automaticparking brake” with the right knob21 (fig. 1).
Press “Go back” to return to themain SETUP screen.
IMPORTANT If after deactivatingthe parking brake, the car starts tomove at a speed higher than that of anormal manual movement, this func-tion will be automatically deactivatedand the parking brake will be imme-diately engaged.
DISPLAYING ACTIVE SETTINGS
Press “View” on the main SETUPscreen (fig. 98), to display in se-quence the settings active for the se-lected set (automatic door lock/un-lock, automatic parking brake, etc.).
Press “Repeat” to display again theactive settings sequence.
Press “Go back” to return to themain SETUP screen.
132-151 connect thesis GB 22-10-2007 10:45 Pagina 151

152
The options available with the mul-tifunction keys are:
– Options
– Settings
“MEDICAL ADVICE” FUNCTION
Selecting and confirming this func-tion with the right knob 21 (fig. 1)displays the screen for forwarding thecall for medical assistance to the Tar-gasys operator, completed with theposition of the car to allow it to be lo-cated. The user has approx. 10 sec-onds to interrupt the call by pressing“Abort” otherwise he/she can confirmit by pressing “OK”. If no key ispressed, the call will be forwarded au-tomatically after 10 seconds.
A first message will then warn theuser that the call has been forwardedand a second one will confirm that thecall has been received inviting theuser to wait for the Targasys opera-tor call.
TARGASYSSERVICES
Press the key • 20 (fig. 1) to dis-play the Targasys services (pay ser-vices) screen (fig. 106):
– Medical Advice
– Road Assistance
– Infomobility
– Follow Me
– Infomobility messages
– Traffic messages.
fig. 106
L0A
5161
g
TARGASYS SERVICES – ASSISTANCE SERVICES AND FUNCTIONS (SOS)
152-162 connect thesis GB 22-10-2007 10:46 Pagina 152

153
CALLS FOR MEDICAL ADVICEAND ROAD ASSISTANCE
For both “Road Assistance” and“Medical Advice” calls, if transmis-sion of the telematic call is not suc-cessful, the display will show a warn-ing message and the user is asked ifhe/she wants to activate the call toTargasys centre (*) in any case toinform of the need for assistance(this call will be successful only if thearea in which the car is has GSM 900coverage).
(*) In this case the operating centrewill not be able to locate the car.
IMPORTANT If the user accepts anincoming call, the Targasys operatormight have difficulty in contacting theuser since the number could be busy.
“ROAD ASSISTANCE”FUNCTION
Selecting and confirming this func-tion with the right knob 21 (fig. 1)displays the screen for forwarding thecall for road assistance to the Tar-gasys operator, completed with theposition of the car to allow it to be lo-cated. The user has approx. 10 sec-onds to interrupt the call by pressing“Abort” otherwise he/she can confirmit by pressing “OK”. If no key ispressed, the call will be forwarded au-tomatically after 10 seconds.
A first message will then warn theuser that the call has been forwardedand a second one will confirm that thecall has been received inviting theuser to wait for the Targasys opera-tor call.
152-162 connect thesis GB 22-10-2007 10:46 Pagina 153
154
“INFOMOBILITY” SERVICE
Selecting and confirming the “Info-mobility” function with the rightknob 21 (fig. 1) displays a screen tobe used to request Targasys pay as-sistance services.
The functions available with themultifunction keys are the following:
– Connect
– Cancel.
Services are available only uponsubscription. If the user hasn’t sub-scribed yet or if the Targasys sub-scription expired, then the “Connect”multifunction key is disabled and themessage “Subscribed services not en-abled” will be displayed.
User can call the Targasys operatorto get information to (re)activate theservice.
If the Targasys subscription ex-pired, it is always possible to consultstored information.
Press “Cancel” to go back to theprevious screen without sending therequest for information.
“Connect” functionSelecting “Infomobility” and con-
firming the “Connect” function, sendsthe request for information. A messagewill confirm that the call has been re-ceived and to wait for the Targasysoperator call. Upon receiving the re-quest, Targasys activates a telephoneconnection. When the connection is ac-tivated the user can ask an operator forthe information required.
If it is not possible to activate thetelematic connection, the display willshow the corresponding warning mes-sage. Some information will be givenonly vocally by the operator, while oth-ers may also be sent with SMS mes-sages, that will be received regardless ofthe function active (MAIN, AUDIO,etc.). The message will be shown di-rectly on the screen active at that mo-ment, in a window containing the“Read” and “Store”.
Pressing the “Read” key will displaythe text of the message: if the text istoo long, use keys “Pg. �” and “Pg.�” to scroll the message.
After reading the message the fol-lowing options will be available:
– Store– Delete– Drive Me (if the message contains
geographical indications)– Call (if a telephone number is pre-
sent).Pressing the “Store” key will store
the message, while “Delete” will clearit from the display and from memory.
Pressing the “Drive Me” key will setthe point indicated in the message asdestination of the navigation system.In this case the message will be storedautomatically.
Choosing “Call” the telephone num-ber contained in the message will bedialled automatically and the messagewill be stored.
Should a sequence of messages bereceived, a specific window will beopened for each of them and for eachof them it will be possible to performthe above operations.
152-162 connect thesis GB 22-10-2007 10:46 Pagina 154

155
“FOLLOW ME” FUNCTION
This function makes it possible toreceive traffic information accordingto the car position.
To activate this function, ask Tar-gasys for “Infomobility” services orselect and confirm the “Follow Me”function (where provided) with theright knob 21 (fig. 1), thus display-ing the screen for activating the ser-vice. To send the service activation re-quest press “Yes” otherwise press“No”.
A message will confirm that the ac-tivation request has been sent suc-cessfully.
Selecting the “Follow Me” functionwhen the service is active, will displaythe screen for deactivating it. To sendthe service deactivation request press“Yes” otherwise press “No”.
A message will confirm that the de-activation request has been sent suc-cessfully.
Using the “Settings” option (de-scribed in the relevant paragraph),the user can set the frequency fortransmitting the car position to theTargasys centre.
“INFOMOBILITY MESSAGES”FUNCTION
Selecting and confirming the “Info-mobility messages” function with theright knob 21 (fig. 1) displays thescreen with the messages sent by Tar-gasys. The options available with themultifunction keys are the following:
– Read
– Delete
– Delete all
– Go back.
Any received message, if not deleted,will be stored. When the memory isfull, new messages will replace the oldones.
Every message is identified by anicon indicating the type of the mes-sage and whether it has been read ornot (closed envelope stands for mes-sage not read).
152-162 connect thesis GB 22-10-2007 10:46 Pagina 155

156
To display the messages, that cancontain information on points of in-terest or on weather conditions, scrollthe list (also the part not displayed)by turning the right knob 21(fig. 1) and confirm the chosen mes-sage by pressing the knob. To readthe selected message, press “Read”.To delete the selected message press“Delete” and press “Delete all” todelete all the messages. Press “Goback” to return to the previous screen.
Information on points of interestand generic information
After selecting the message andpressing the “Read” key, the text ofthe message will be displayed with thefollowing options:
– Drive Me
– Call
– Delete
– Go back.
If the text of the message is too long,use keys “Pg. �” and “Pg. �” toscroll the message.
Press “Drive Me” (available only ifthe message contains geographicalinfo on the point of interest), to set thepoint of interest as destination.
Press “Call” (available only if themessage contains the phone numberof the point of interest), to send aphone call directly to the numbergiven in the message.
Press “Delete” to erase definitivelythe message from the list. Press “Goback” to return to the previous screen.
152-162 connect thesis GB 22-10-2007 10:46 Pagina 156

157
“TRAFFIC MESSAGES” FUNCTION
Selecting and confirming the “Traf-fic messages” function with the rightknob 21 (fig. 1) displays the screenwith the messages sent by Targasys.The options available are the follow-ing:
– Read
– Delete
– Delete all
– Go back.
Each message is identified by thetime of arrival and a short wording.Any received message, if not deleted,will be stored. When the memory isfull, new messages will replace the oldones. Messages will be delete auto-matically 24 hours after.
To display messages, scroll the list(also the part not displayed) by turn-ing the right knob 21 (fig. 1) andconfirm the chosen message by press-ing the knob.
To read the selected message, press“Read”. To delete the selected mes-sage press “Delete” and press “Deleteall” to delete all the messages. Press“Go back” to return to the previousscreen.
After selecting the message andpressing the “Read” key, the text ofthe message will be displayed with thefollowing options:
– Delete
– Go back.
Press “Delete” to erase definitivelythe message from the list. Press“Store” to store the message. Press“Go back” to return to the previousscreen.
“SETTINGS” FUNCTION
Press the “Settings” multifunctionkey on the main Targasys servicescreen to display the screen with op-tions:
– General
– Follow Me.
The option “General”, selected andconfirmed with the right knob 21 (fig.1), displays the identification code ofthe system terminal (used by the Tar-gasys centre) and the SIM card codesin use.
The option “Follow Me”, selectedand confirmed with the right knob 21(fig. 1), makes it possible to set thefrequency for transmitting the car po-sition to the Targasys centre:
– Never
– Low
– Regular
– Frequent.
152-162 connect thesis GB 22-10-2007 10:46 Pagina 157

158
Press “OK” to quit and confirm thesettings. Press “Cancel” to return tothe previous screen restoring the pre-vious setting.
“OPTIONS” FUNCTION
Press “Options” on the main Tar-gasys service screen to display the“SOS” function screen:
– Personal Nr. 1
– Personal Nr. 2.
“Personal Nr.” function
The functions “Personal Nr. 1” and“Personal Nr. 2” make it possible toenter two personal numbers (e.g. yourdoctor) with the relevant names, thatcan be dialled directly after pressingthe SOS key 1 (fig. 1).
Select and confirm “Personal Nr. 1”or “Personal Nr. 2” with the rightknob 21 (fig. 1) to display the screento b eused for enter the requiredphone number and name.
The multifunction keys “ABC abc”allow you to pass from CAPITAL tosmall letters and vice versa, whilekeys “¯ ˙” shall be used to move tothe beginning or the end of the list bypressing keys.
Then, press “OK” to return to theprevious screen storing the numberentered. Press “Cancel” to return tothe previous screen without storingthe number entered.
152-162 connect thesis GB 22-10-2007 10:46 Pagina 158

159
ASSISTANCE SERVICES AND FUNCTIONS (SOS)
When the SOS key 1 (fig. 1) ispressed, the screen (fig. 107), isshown for requesting information andassistance services, regardless of thepage shown previously on the display:
– Emergency 112
– Medical Advice *
– Road Assistance *
– Personal Nr. 1
– Personal Nr. 2.
(*) These pay services, run by Tar-gasys, can be activated on request. Ifthe user has not yet subscribed tothem, the associated menu functionsare inactive and the display shows“Subscribed services not enabled”.During subscription you will be giventhe activation and deactivation pro-cedures of the services offered byTargasys.
GENERAL NOTES
– “112” is the emergency call servicefor all countries in which this publicservice is available. The “Emergency112” call can always be activated,even if the telephone card is not in-serted in the slot 26 (fig. 1).
– If the PIN code has not been en-tered, in the case of a request for ser-vices the user is warned of the need tothe enter the PIN code.
– The activation of calls for assis-tance is subordinate to whether thecell phone is working and correctlysupplied electrically. Therefore in theevent of accidents or damage to thecar it might not be available.
fig. 107
L0A
5101
g
152-162 connect thesis GB 22-10-2007 10:46 Pagina 159

160
“EMERGENCY 112” FUNCTION
Selecting and confirming this func-tion with the right knob 21 (fig. 1) onthe “SOS” main screen, directly sendsa call to the police force. The usershall confirm the call by pressing“Yes” or interrupt it by pressing“No”.
IMPORTANT “112” is the emer-gency call service for all countries inwhich this public service is available.The “Emergency 112” call can al-ways be activated, even if the tele-phone card is not inserted in the slot26 (fig. 1).
“MEDICAL ADVICE”FUNCTION
Selecting and confirming this func-tion with the right knob 21 (fig. 1) onthe “SOS” main screen, a messagecalling for medical assistance is for-warded to the Targasys operator,completed with the position of the carto allow it to be located. The user hasapprox. 10 seconds to interrupt thecall by pressing “Abort” otherwisehe/she can confirm it by pressing“OK”. If no key is pressed, the callwill be forwarded automatically after10 seconds.
A first message will then warn theuser that the call has been forwardedand a second one will confirm that thecall has been received inviting theuser to wait for the Targasys opera-tor call.
IMPORTANT If the user accepts anincoming call, the Targasys operatormight have difficulty in contacting theuser since the number could be busy.
152-162 connect thesis GB 22-10-2007 10:46 Pagina 160

161
“ROAD ASSISTANCE” FUNCTION
Selecting and confirming this func-tion with the right knob 21 (fig. 1) onthe “SOS” main screen, a messagecalling for technical assistance is sentto the Targasys, operator, completedwith the position of the car to allow itto be located. The user has approx. 10seconds to interrupt the call by press-ing “Abort”, otherwise he/she canconfirm it by pressing “OK”. If no keyis pressed, the call will be forwardedautomatically after 10 seconds.
A first message will then warn theuser that the call has been forwardedand a second one will confirm that thecall has been received inviting theuser to wait for the Targasys opera-tor call.
CALLS FOR MEDICAL ADVICEAND ROAD ASSISTANCE
For both “Road Assistance” and“Medical Advice” calls, if transmis-sion of the telematic call is not suc-cessful, the display will show a warn-ing message and the user is asked ifhe/she wants to activate the call toTargasys centre (*) in any case to in-form of the need for assistance (thiscall will be successful only if the thearea in which the car is has GSM 900coverage).
(*) In this case the operating centrewill not be able to locate the car.
“PERSONAL NR.” FUNCTION
Select and confirm “Personal Nr. 1”or “Personal Nr. 2” with the rightknob 21 (fig. 1) on the main “SOS”screen, will send automatically a callto the one of these numbers previouslyset by the user.
The procedure for setting the per-sonal numbers is described under the“Options” function in the previousparagraph “TARGASYS SERVICES”.
152-162 connect thesis GB 22-10-2007 10:46 Pagina 161


