webapps.spcollege.edu · web viewsince computers and hard discs can develop problems, you should...
TRANSCRIPT

MICROSOFT OUTLOOK
BASIC SURVIVAL GUIDE
Revised

OUTLOOK WEB ACCESSNOTES
TABLE OF CONTENTS
Security Issues.............................................................................................. 1Lock/Log Off.......................................................................................... 1For Backup – Enable a Password-Protected Screen Saver..................... 1
What is Microsoft Outlook.......................................................................... 2It Enables Us to..................................................................................... 2Outlook vs Eudora, Some Differences................................................... 2
Icon to Open Outlook................................................................................... 3Outlook Today............................................................................................... 4
Navigation Selection............................................................................. 4Folder List ............................................................................................ 4Outlook Today – Mailbox....................................................................... 5Inbox..................................................................................................... 6
Toolbars in Outlook...................................................................................... 6Standard Toolbar................................................................................... 6Turning Toolbars On/Off........................................................................ 6Advanced Toolbar................................................................................. 6
Email in Outlook........................................................................................... 6Create and Send a Message.................................................................. 7Using the “New” Button........................................................................ 7Using the Action menu.......................................................................... 9Using Ctrl + N....................................................................................... 9
Outlook Address Lists..................................................................................10Inbox View Options......................................................................................11
No Preview............................................................................................11AutoPreview..........................................................................................11Preview Pane.........................................................................................12To Select the Desired View...................................................................12
Receiving and Storing Email.......................................................................13Displaying and Reading Messages........................................................13Replying to Email..................................................................................14Reading Replies....................................................................................15Forwarding Email..................................................................................15Deleting a Message...............................................................................16
Important Information Regarding Your Eudora Account....................... 16Setting The Universal Formats..................................................................17
Stationery.............................................................................................18Signatures.............................................................................................19
Create a Signature........................................................................19Insert a Signature.........................................................................21
Out of Office/Vacation Messages...............................................................22Attachments..................................................................................................22
Create and Attachment.........................................................................22Send an Attachment from the Creating Program..................................22Send an Attachment from Outlook........................................................22
ii

OUTLOOK WEB ACCESSNOTES
Open and Read Attachments................................................................23Save Attachments.................................................................................23Delete Attachments from Messages......................................................23
Requesting Message Receipt Notifications..............................................24Read or Delivery Receipt for a Specific Message..................................24Read or Delivery Receipt for All Messages............................................24Weigh the Need for Receipts.................................................................24Responding to Message Receipt Requests............................................24
Organizing Email..........................................................................................25Using Folders and Subfolders................................................................25Sorting Messages..................................................................................25Using Colors..........................................................................................26Copying and Moving Messages.............................................................27
BREAK – 10 minute break (Please return on time)Archiving........................................................................................................27
Reasons for Archiving...........................................................................27Archiving Methods.................................................................................27When to Manually Archive.....................................................................27Archive Manually...................................................................................28The Archived Data.................................................................................28Backing-up Archived Data.....................................................................28Displaying Archived Data......................................................................28Open An Archive File.............................................................................28
Notes..............................................................................................................29Contacts.........................................................................................................30
Create Contacts....................................................................................30Create a Contact from a Message.........................................................33Searching for Contacts..........................................................................33Displaying a Map to a Contact’s Address..............................................33Using an Address List to Send a Message.............................................33
Distribution Lists (Groups in Eudora)...........................................................34Creating a Distribution List....................................................................34-36Distribution Lists Display in Contacts List..............................................36Hiding Recipient Names........................................................................37
Calendar.........................................................................................................38Calendar Overview ...............................................................................38Appointments, Meetings, and Events....................................................38Controlling Your Calendar View.............................................................39Day, Work Week, Week, Month Calendar Views....................................40Scheduling Appointments, Meetings, and Events..................................41Scheduling Recurring Appointments.....................................................42Scheduling Meetings.............................................................................42Planning a Meeting................................................................................43Responding to Meeting Requests..........................................................44Tracking Responses to Meeting Requests.............................................44Scheduling an Event.............................................................................44
iii

OUTLOOK WEB ACCESSNOTES
Deleting Appointments.........................................................................44Controlling Reminders...........................................................................45Easy Calendar Changes.........................................................................45
WWW Access to Email.................................................................................46Outlook Web Access..............................................................................46Connecting to Outlook Web Access.......................................................46Logging Off............................................................................................47The Screen............................................................................................47Reading Your Email...............................................................................47Replying To/Forwarding Email...............................................................47Sending Email to SPC Addresses...........................................................48Sending Email to Contacts....................................................................48Sending Attachments............................................................................48Reading Attachments............................................................................49Printing Messages.................................................................................49Checking for New Messages..................................................................49Deleting Messages................................................................................49Viewing Your Calendar..........................................................................49Creating an Appointment......................................................................50
Tasks..............................................................................................................51Tasks Overview.....................................................................................52Creating Tasks......................................................................................52Creating Recurring Tasks......................................................................53Editing Tasks.........................................................................................53Copying Tasks.......................................................................................54Completing Tasks..................................................................................54Changing the Tasks View......................................................................54Sorting Tasks........................................................................................54Color Coding Tasks................................................................................54Deleting Tasks.......................................................................................54
Notes..............................................................................................................55Notes Overview.....................................................................................55Configuring Note Options......................................................................56Creating a Note.....................................................................................56Saving a Note........................................................................................56Reading a Note.....................................................................................56Editing a Note.......................................................................................56Printing your Notes...............................................................................56Deleting Your Notes..............................................................................56Resizing a Note.....................................................................................56Creating an Appointment, Contact or Task from a Note........................57Creating a New Folder for Notes...........................................................57Moving and Copying Notes....................................................................57Copying a Note to your Desktop...........................................................57Forwarding Notes..................................................................................57Sending a Note as the Email Message..................................................57
iv

OUTLOOK WEB ACCESSNOTES
v

OUTLOOK WEB ACCESSNOTES
SECURITY ISSUES
Lock/Log Off
1. Use “Control” plus “Alt” plus “Delete” keys and selecting either Lock or Log off
2. In Windows XP by using the “Windows Key” on your keyboard plus the “L” key lock your computer.
3. Or under “Start” select “Shut Down . . . “
4. Using the drop down arrow on the prompt log yourself off the computer
For Backup Enable a Password-Protected Screen Saver
1. Right-click on an unused area of your desktop.
2. Choose Properties.
3. Choose Screen Saver.
4. Display the drop-down list of screen savers and choose one.
5. Enter the amount of time that the computer must be “idle” before the screen saver displays.
6. Select Password Protect. After the screen saver activates, you will have to enter your network password to disable it so you can access your computer.
NOTES______________________________________________________________________
____________________________________________________________________________
____________________________________________________________________________
____________________________________________________________________________
____________________________________________________________________________
____________________________________________________________________________
____________________________________________________________________________
____________________________________________________________________________
____________________________________________________________________________
____________________________________________________________________________
____________________________________________________________________________
____________________________________________________________________________
1

OUTLOOK WEB ACCESSNOTES
WHAT IS MICROSOFT OUTLOOK
Outlook is Personal Information Management Program software.
It Enables us to:
Schedule events Share calendars Schedule meetings Schedule resources Maintain contact lists Create reminder notes Create task (to-do) lists Send and receive messages
Eudora Outlook
Is an E-Mail Program Is an Personal Information Management Program (PIM)
OUTLOOK VS EUDORA, SOME DIFFERENCES Outlook is a Personal Information Management Program that includes E-Mail
capabilities. Eudora possesses only the E-Mail features.
Outlook works with Microsoft Exchange Server to process and store all of our E-Mail and other Outlook items, on a server named Gemini. Eudora works with a Netscape mail server named Voyager.
With Outlook and Exchange Server our E-Mail is stored on the server; with Eudora, our E-Mail was downloaded to our local computer. Since our E-Mail is going to be stored on a server with limited storage capacity and there are about 2500 of us with E-Mail accounts, we must “clean-out” our mailboxes more often than we had to with Eudora. One of the things you will learn in this course is how to archive, that is move items from the server to your work computer.
One other difference between Outlook and Eudora relates to passwords. With Eudora, there are two passwords: one to log in to the network and another to allow access to your E-Mail. The significance of this is that with Eudora, you can be logged in to the network while having password-protected E-Mail.
With Outlook, your E-Mail is always available and accessible after you log in to the network; there is only one password. In order to provide some security for your E-Mail and contents of your computer, in the Outlook environment, we strongly suggest that you lock your system anytime the computer is unattended. The procedures are described on the previous page.
2

OUTLOOK WEB ACCESSNOTES
ICON TO OPEN OUTLOOK
Open Outlook from your Start menu or from a desktop shortcut.
Class Will Begin on the Outlook Today Screen
7.
3
Open Outlook

OUTLOOK WEB ACCESSNOTES
4

OUTLOOK WEB ACCESSNOTES
NAVIGATION SELECTION
From the View menu, make sure the Outlook Shortcuts bar and the Folder List, are selected, noting where each one appears and which features each one displays.
FOLDER LIST
Note that the Folder List contains the same shortcuts to Outlook features as the Outlook Shortcuts bar, and more.
The objects under the Archive Folders item and above the Outlook Today item are archive folders that reside in your work computer. They will not appear in the Folder List until something has been archived.
All of the objects beneath the Outlook Today-[Mailbox] item reside on the server.
For Class today we will use the “Folder List” to navigate through Outlook.
5

OUTLOOK WEB ACCESSNOTES
OUTLOOK FEATURES
Access the following from the Folder List.
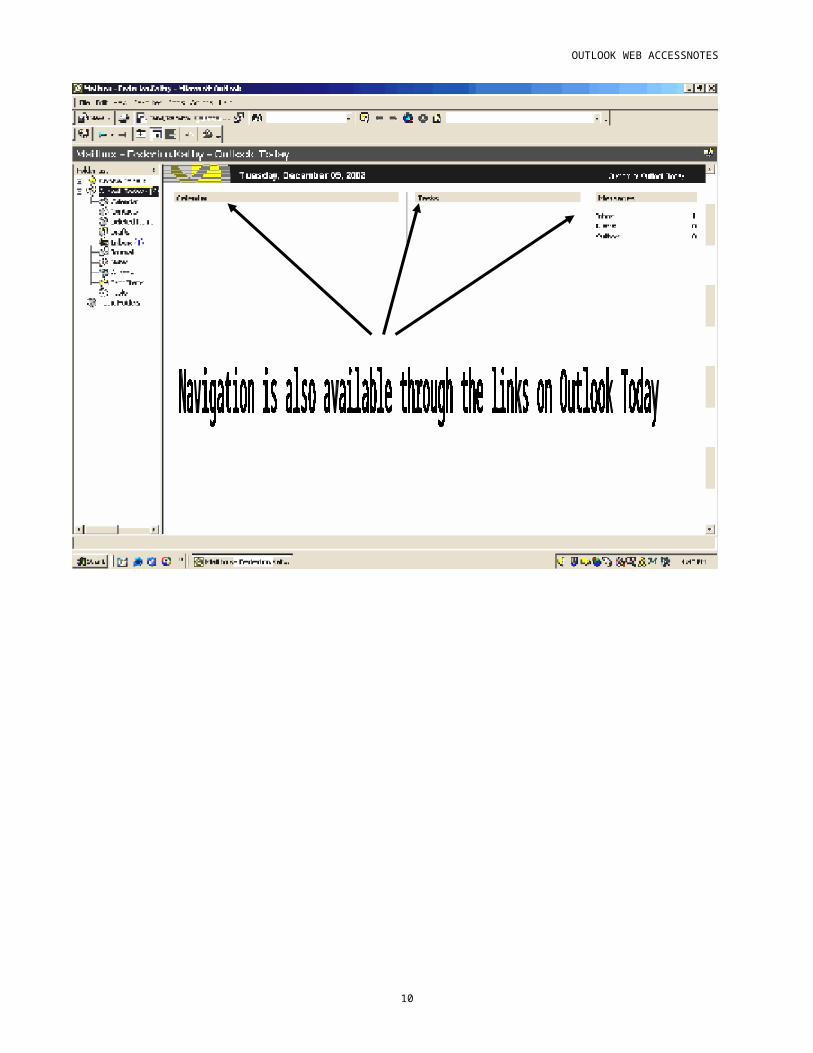
Outlook Today-Mailbox
in the Shortcut Bar OR Outlook Today in the Folder List
From the Outlook Shortcuts bar, select Outlook Today –Mailbox and observe your screen. Open the View menu and make sure the Show Folder Home Page option is selected. You should see a summary of the Outlook Calendar, Tasks, and Messages.
6

OUTLOOK WEB ACCESSNOTES
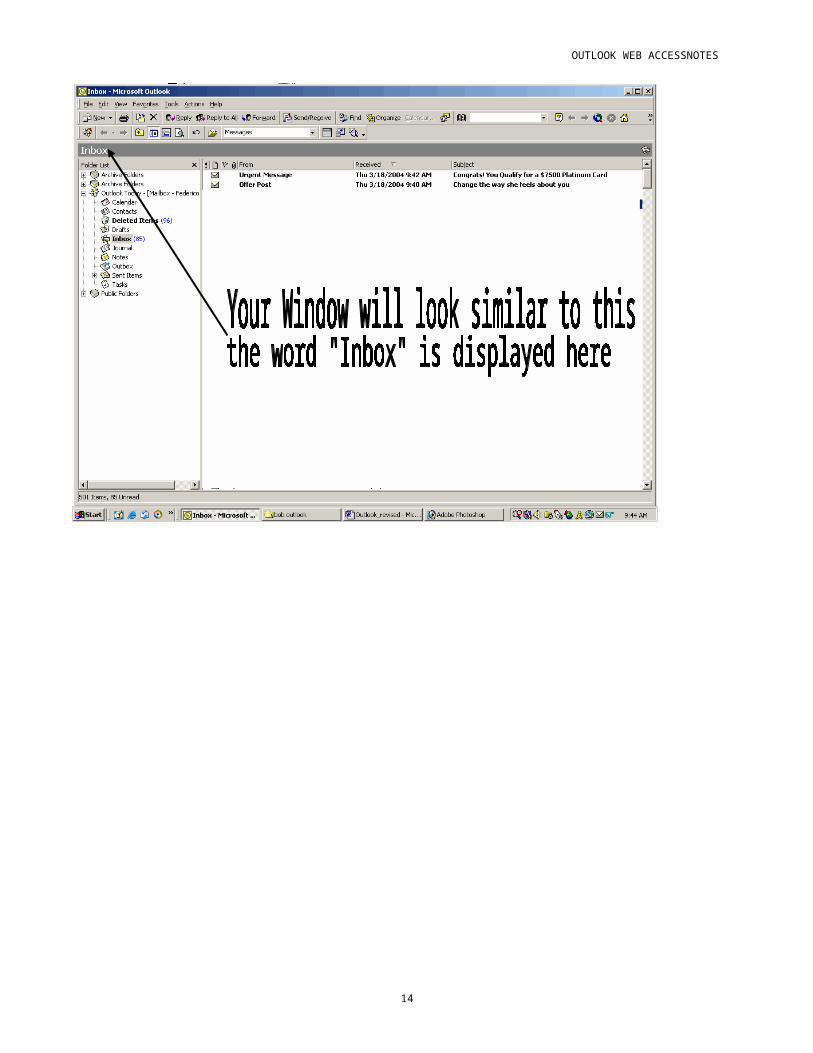
INBOX
Icon in the Short Cut Bar or Select “INBOX” from the “Folder List”
As the name implies, this is where you will find your incoming mail as well as all other incoming items.
TOOLBARS IN OUTLOOK
If this view of the Menu, Standard and Advanced Toolbars does not display on your screen you will need to:
1. “Right Click” in any gray area of the tool bar or menu2. Select the Advanced as well as the Standard Toolbar for display – Activated toolbar
shows a check mark.
The Advanced Toolbar
If the Advanced toolbar (shown above) is not displayed, open the View menu, select Toolbars, and then select Advanced. Pause the mouse pointer on each tool and read the tool tips. Open the Current View drop-down list (the one next to the word “Messages”) to see what choices are available. This list will be different for each Outlook feature, i.e., Calendar, Contacts, Inbox, etc. Using the “right click” on the standard toolbar, and selecting the Advanced Toolbar from the list will also display the Advanced Toolbar. Note: both the Standard and Advanced Toolbars will need to be displayed for this class.
NOTES:___________________________________________________________________________________________________________________________________________________________ _______________________________________________________________________________________________________________________________________________________________________________________________________________________________________________________________
7

OUTLOOK WEB ACCESSNOTES
E-MAIL IN OUTLOOK
E-mail will be covered at a fast pace since most employees are familiar with this process, if you need addition help are have not used an e-mail program before please let the instructor know now.
CREATE & SEND A MESSAGE
Now to sending the first message in Outlook:
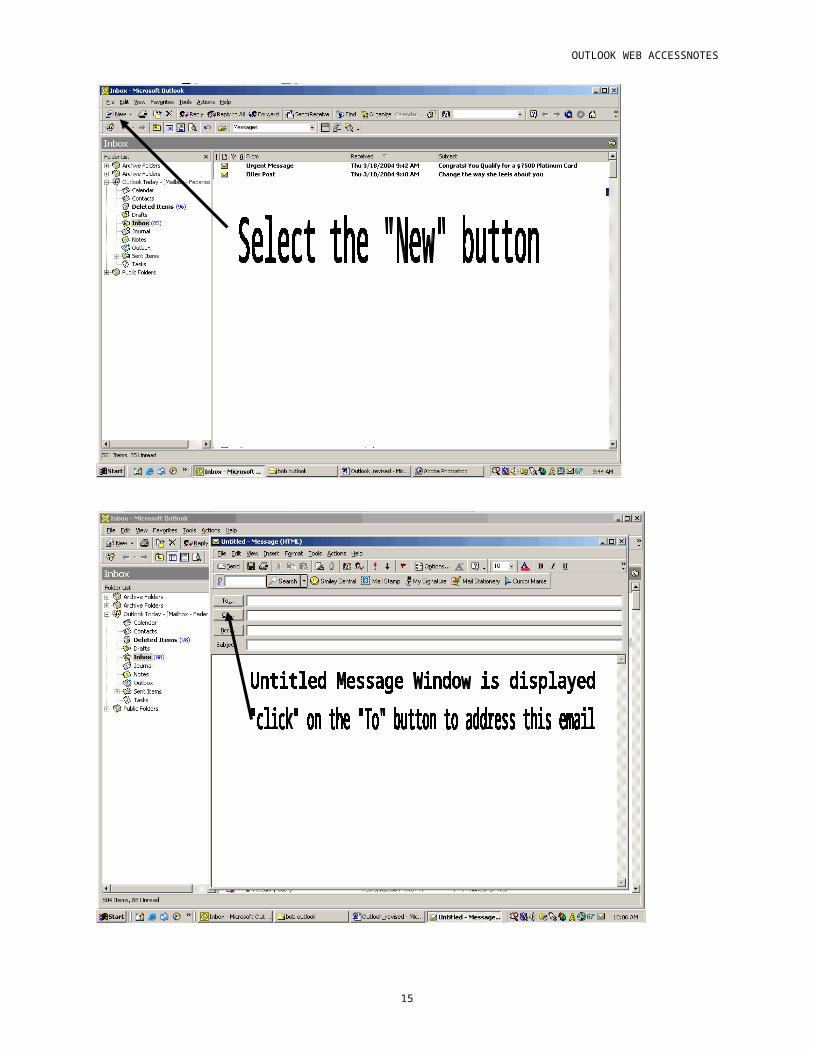
1. Open the Inbox and click on the New tool at the extreme left end of the toolbar or choose Mail Message from the drop-down list. NOTE: New will create a New Whatever depending on what is displayed at the time – Inbox, Task, Note, Contact. There is a drop down menu available by the New tool which gives you selections that are not being displayed at the moment.
2. Type an E-Mail address in the To: field.
3. Enter a subject, such as “Favorite Food,” “Hobby,” or “Hello.” In the body of the message, identify your favorite food, etc..
4. Send the message.
8

OUTLOOK WEB ACCESSNOTES
9
OUTLOOK WEB ACCESSNOTES
Sending e-mail using the Action menu
1. With Inbox selected, open Actions from the menu and select New Mail Message.
2. Create an E-Mail message (to your class partner, about your hobby, etc.)
3. Apply some formatting to the body text.
4. Send the message.
Sending an E-mail Using Ctrl+N
With one of the mailboxes selected, tap Ctrl+N on your keyboard. This opens a new message window just as if you had opened the File menu and selected
New > Mail Message. If, however, you had Contacts displayed when you tapped Ctrl+N, the results would have been totally different: a new contact form would have appeared.
Also, when you use Outlook Web Access, Ctrl+N doesn’t do what you would expect; rather, it opens a duplicate window.
NOTES:______________________________________________________________________
_____________________________________________________________________________________________________________________
_____________________________________________________________________________________________________________________
_____________________________________________________________________________________________________________________
_____________________________________________________________________________________________________________________
_____________________________________________________________________________________________________________________
_____________________________________________________________________________________________________________________
_____________________________________________________________________________________________________________________
_____________________________________________________________________________________________________________________
10

OUTLOOK WEB ACCESSNOTES
OUTLOOK ADDRESS LISTS
Until the Entire College switches to Outlook, there will be 3 different address lists:
The Contact list will be your personal “electronic rolodex”. It can store and provide information about SPC employees and individuals outside our organization. Don’t worry we will cover Contacts today. NOTE: This is the only list to which you can make changes.
The Global Address List consists of E-Mail addresses of College personnel using Outlook as their primary E-Mail program. Eventually it will contain the E-Mail addresses of all employees who have SPC E-Mail accounts.
The LDAP list is temporary and can be used to find E-Mail addresses of SPC employees who are still using Eudora as their primary E-Mail program. This list will be terminated when we fully transition to Outlook.
To display the lists: In the “Active” Inbox (not an Archive Inbox), select “new”
11

OUTLOOK WEB ACCESSNOTES
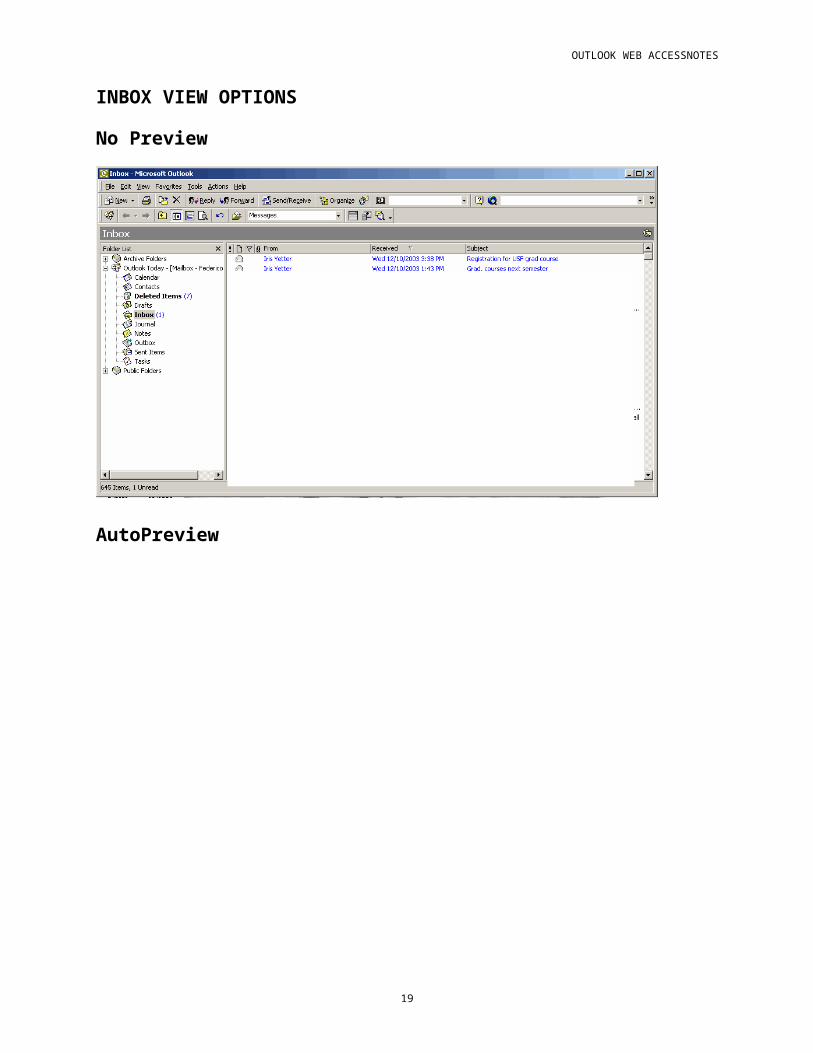
INBOX VIEW OPTIONS
No Preview
AutoPreview
12

OUTLOOK WEB ACCESSNOTES
Preview Pane
To select the desired View
1. Select “View” from the Menu at the top of your screen2. Select your personal preference for viewing, Preview Pane, AutoPreview or No Preview.3. To keep mail in the inbox showing as unread when using the Preview Pane – select
a. Tools from the Main Menu Bar, b. “Options”, c. “Other” tab d. “Preview Pane” {Button}e. Uncheck “Mark item as read when selection changes”
NOTES:______________________________________________________________________
_____________________________________________________________________________________________________________________
___________________________________________________________________________________________________________________
13
OUTLOOK WEB ACCESSNOTES
Receiving And Storing E-Mail
With Outlook/Exchange Server, your incoming E-mail, as well as your “sent” E-Mail, is stored on the server. It will stay there until it is archived, i.e., moved to a storage location on your work computer every 14 days, or deleted.
With Eudora/Netscape Server, your incoming E-Mail is downloaded from the server to your computer, where it remains until you move or delete it. Your sent messages also reside on your computer.
In either case, at some point in time, all your messages end up being stored in your work computer; therefore, it is essential that you get in the habit of backing-up just in case your computer gets sick.
Displaying And Reading Messages
1. Open the Inbox. You should see a list of your messages.
2. Double-click on the message you want to read.
If you open the Current View drop-down list and select Messages with AutoPreview. You will see, in the “messages list” pane, a portion of each unread message.
You can also select Preview Pane from the View menu to display a preview pane below the messages list. This pane will display a preview of whichever message you select in the messages list pane.
In your Inbox
14
OUTLOOK WEB ACCESSNOTES
Replying To E-Mail
Replying is essentially the same in Eudora and Outlook. Even the Reply and Reply to All icons in the respective program’s toolbars are similar. As with Eudora, Be careful with “Reply to All”!1. Display the Inbox
2. Double-click the message to which you want to reply.
3. Click Reply to reply to the people named in the From line or click Reply to All to reply to the people named in the Cc line as well as those in the From line. The Reply screen should appear and the insertion point should display at the upper left.
4. Click wherever you want to insert text.
5. Type your message.
6. Click the Send button.
15

OUTLOOK WEB ACCESSNOTES
Reading Replies
Some organizations require their employees to reply at the bottom of the original message instead of the top and others encourage their folks to reply throughout the message, as appropriate. If you don’t see a reply where you expect one, check the entire message.
Forwarding E-Mail
Forwarding mail is essentially the same in Outlook as it is in Eudora and the icons (tools) are similar.
1. Double-click the title of the message you want to forward.2. Click the Forward button.3. Enter the E-Mail address of the person to whom you’re forwarding in the To: field.4. Do the same for the Cc recipients if any.5. In the text area, type any comments that you want to add.6. Click the Send button.
NOTES:_____________________________________________________________________
____________________________________________________________________________
____________________________________________________________________________
____________________________________________________________________________
____________________________________________________________________________
____________________________________________________________________________
____________________________________________________________________________
____________________________________________________________________________
____________________________________________________________________________
____________________________________________________________________________
____________________________________________________________________________
____________________________________________________________________________
____________________________________________________________________________
____________________________________________________________________________
____________________________________________________________________________
____________________________________________________________________________
____________________________________________________________________________
____________________________________________________________________________
16

OUTLOOK WEB ACCESSNOTES
Deleting a Message
Although the delete tool icon in Outlook is different from Eudora’s, it’s function is the same.
1. First, make sure you understand what may and may not be deleted.
2. Click the title of the message that you want to delete.
3. Click the Delete tool on the toolbar or tap the Delete key on your keyboard. The deleted message will go into the Deleted Items folder and remain there until that folder is emptied.
Your computer will be configured so that your Deleted Items folder is emptied automatically every time you close Outlook. (If it does not empty, make sure you empty it periodically because it consumes server space.)
IMPORTANT INFORMATION
IMPORTANT INFORMATION REGARDINGYOUR EUDORA ACCOUNT
Until everyone at the College has been migrated to Outlook it will be necessary FOR YOU TO DELETE the mail in your Eudora account. Once you have check to make sure your Outlook account is functioning perfectly, the deletion of Eudora e-mail from the Voyager server may be accomplished by using the following URL on the Internet:
http://www/central/utilities/vd/
When you input your username and password on this web page it will DELETE all of your Eudora voyager e-mail. Important: No user should even visit this site until after they have been migrated to Outlook on the Exchange Server. Again, please make sure your e-mail is being properly forwarded to Outlook before deleting. Once you choose the delete button, there is not turning back. Once you are confident you are getting all e-mails you should visit this site approximately every 2 weeks.
NOTES:_____________________________________________________________________
____________________________________________________________________________
____________________________________________________________________________
____________________________________________________________________________
17

OUTLOOK WEB ACCESSNOTES
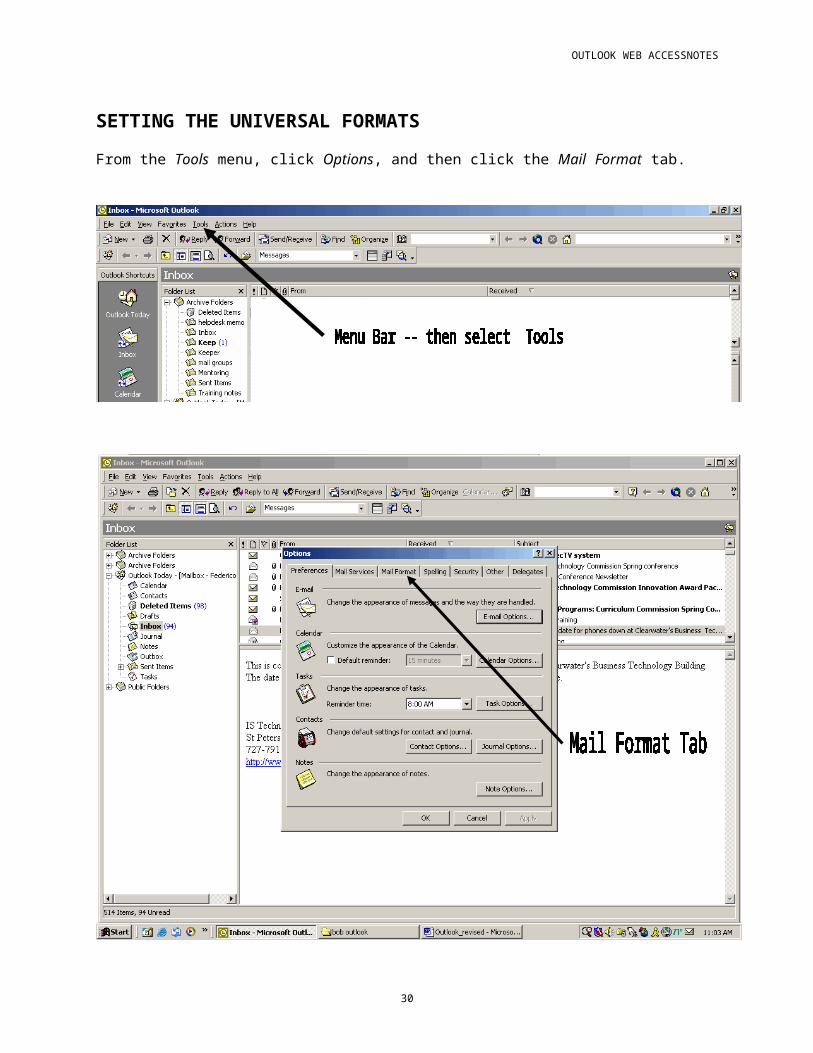
SETTING THE UNIVERSAL FORMATS
From the Tools menu, click Options, and then click the Mail Format tab.
18
OUTLOOK WEB ACCESSNOTES
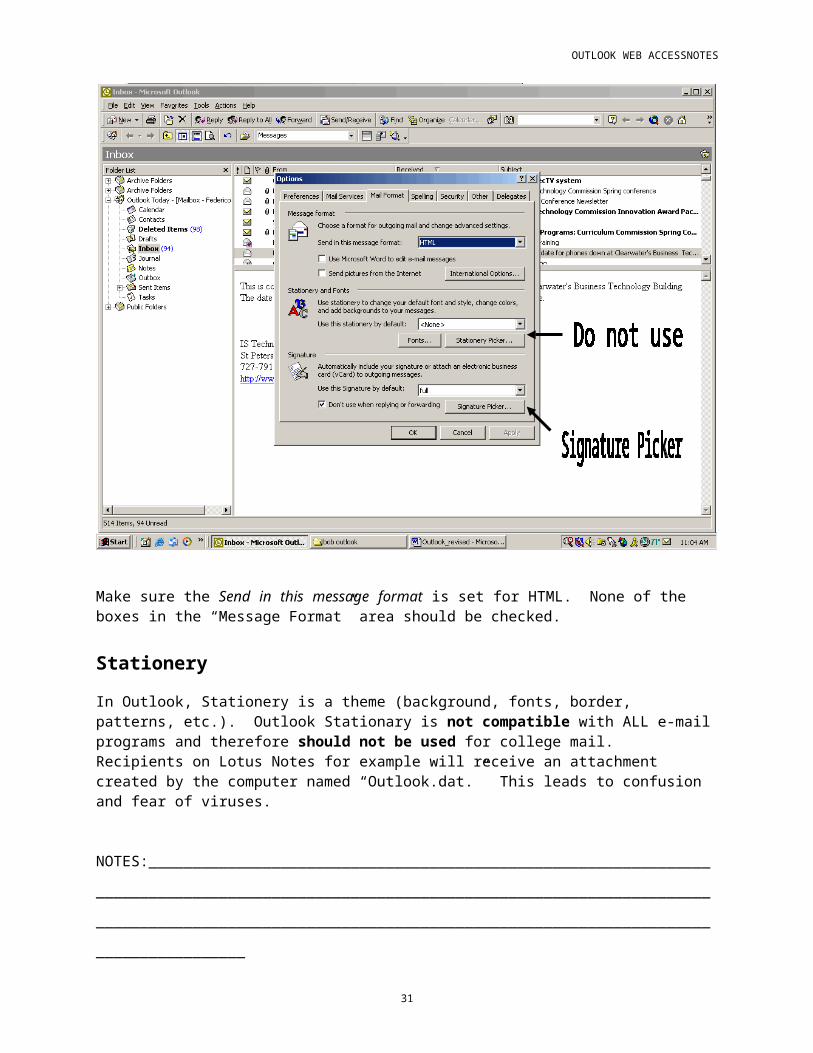
Make sure the Send in this message format is set for HTML. None of the boxes in the “Message Format” area should be checked.
Stationery
In Outlook, Stationery is a theme (background, fonts, border, patterns, etc.). Outlook Stationary is not compatible with ALL e-mail programs and therefore should not be used for college mail. Recipients on Lotus Notes for example will receive an attachment created by the computer named “Outlook.dat.” This leads to confusion and fear of viruses.
NOTES:_____________________________________________________________________
____________________________________________________________________________
____________________________________________________________________________
____________________________________________________________________________
____________________________________________________________________________
____________________________________________________________________________
19

OUTLOOK WEB ACCESSNOTES
SIGNATURES
Signatures, in Outlook, are the same as signatures in Eudora. They allow you to insert pre-made information about yourself and/or your position in outgoing messages. As with Eudora, you can create multiple signatures and choose which one you want to use. And, you can insert the signature wherever you want it.
Also, signatures can also be used to insert information that you need to send on a repetitive basis.
Create a Signature
1. From the Tools on the main menu bar, click Options, and then click the Mail Format tab.
2. The Send in this message format option should always be set for HTML.
3. The selected stationary should always be <None>
4. Click Signature Picker (bottom of tab
NOTES:__________________________________________________________________
___________________________________________________________________________________________________________________________________________________________________________________________________________________________________________________
20

OUTLOOK WEB ACCESSNOTES
then click New. In the Enter a name for your new signature box, enter a name.
Under Choose how to create your signature, select whether to start from scratch or use an existing signature.
5. Now click Next.
21

OUTLOOK WEB ACCESSNOTES
6. In the Signature text box, type the text you want to include in the signature. You can also paste text to this box from another document. To change the paragraph or font format, select the text, click Font or Paragraph, and then select the options you want.
7. Click Finish, then at the next prompt click OK.
Once you've created the signature, you can insert it in all new messages, in all messages you reply to or forward, or in specific messages.
Insert a Signature
1. Create a message.
2. Click in the message where you want to insert the signature.
3. From the Insert menu, choose Signature. If you have more than one signature, you will be able to choose which one you want to insert.
NOTES:_____________________________________________________________________
____________________________________________________________________________
____________________________________________________________________________
22

OUTLOOK WEB ACCESSNOTES
OUT OF OFFICE/VACATION MESSAGES
As with Eudora, you can create “vacation” messages with Outlook. Information varies from operating system to operating system and from version to version of Outlook. For the most current information on this topic please go to the SPC HelpDesk URL listed below.
URL for Helpdesk Outlook Web Page: http://www.spjc.edu/helpdesk/outlook/
ATTACHMENTS
With Eudora, attachments are automatically downloaded to an attachments folder in your computer; in Outlook, they are stored in the server with their parent message but you may save them to your computer.
As with Eudora, attachments display a paperclip icon in the attachments column of the Inbox.
IMPORTANT DIFFERENCE: Remember in Outlook Attachments stay with the e-mail. Delete the e-mail and you delete the attachment. Picture the paperclip, as actually attaching the attachment to the e-mail message in Outlook, if that will help you remember.
Create an Attachment
Open Word and type a short note about a place you would like to visit. Save and name the Word document, but don’t close Word.
Send an Attachment from the Creating Program, e.g., MS Word
1. Open the File menu and choose Send To.2. Select Mail Recipient (as Attachment)…3. In the Message window that appears, enter a name in the To: field, type a little text in the
body, and click Send. If you don’t like the format that Word intends to use, open the message Format menu and change it.
Send an Attachment from Outlook
1. Open Outlook, display the Inbox, and create a new message.2. Click on the paperclip icon (Insert File) and find the attachment you want to send.3. Click Insert.4. Send the message and attachment.
NOTES:_____________________________________________________________________
____________________________________________________________________________
____________________________________________________________________________
____________________________________________________________________________
23

OUTLOOK WEB ACCESSNOTES
Open & Read Attachments
1. Display the Inbox and open a message that contains an attachment (has a paperclip icon in the attachments column). The opened message should display an icon that represents the attachment at the bottom left of the message.
2. Double-click on the attachment icon. The attachment will open if your computer has a program installed that can open it. You will not be able to open certain attachments that contain executable files because of their virus spreading potential.
If someone is trying to send you an attachment that you cannot open, ask the Helpdesk for advice. They might be able to suggest alternate ways for the sender to get the attachment to you.
Save Attachments
1. Open the item that contains the file attachment you want to save.
2. Right-click the attachment icon, and then click Save As.
3. In the Save in: area, select a destination folder.
4. If you wish, rename the file, and then click Save..
Delete Attachments from Messages
1. Open (read) the message.
2. Right-click on the attachment.
3. Choose Remove from the menu that appears. If you think you will need the attachment in the future, save it before you delete it; the deleted attachment may disappear.
NOTES:_____________________________________________________________________
____________________________________________________________________________
____________________________________________________________________________
____________________________________________________________________________
____________________________________________________________________________
____________________________________________________________________________
____________________________________________________________________________
____________________________________________________________________________
____________________________________________________________________________
____________________________________________________________________________
____________________________________________________________________________
24

OUTLOOK WEB ACCESSNOTES
25
OUTLOOK WEB ACCESSNOTES
REQUESTING MESSAGE RECEIPT NOTIFICATIONS
Read or Delivery Receipt for a Specific Message
1. Select Options from the message composition window’s View menu or click the Options button on the Standard toolbar.
2. Under Voting and Tracking, select “Request a delivery receipt for this message” or “Request a read receipt for this message”—or both, and click Close.
Read or Delivery Receipt for All Messages
1. From the Tools menu, select Options.
2. From Preferences, select E-Mail Options and then click Tracking Options.
3. Select the “Read receipt” and/or “Delivery receipt” options, then click OK.
Weigh the Need for Receipts
Requesting a “receipt notification” doesn’t mean you’re going to get one. Some E-Mail clients don’t recognize the requests and/or aren’t capable of responding. Also, many recipients find the requests annoying and even insulting, and will choose to not respond if given the option. Even if Outlook or the recipients respond, it doesn’t mean that the message was really read.
26

OUTLOOK WEB ACCESSNOTES
Responding to Message Receipt Requests
Outlook will automatically send “Received” and “Read” notifications. As soon as they are sent, the notification messages with special icons denoting the type of response sent will appear in your inbox.
NOTES:_____________________________________________________________________
____________________________________________________________________________
____________________________________________________________________________
____________________________________________________________________________
____________________________________________________________________________
____________________________________________________________________________
____________________________________________________________________________
____________________________________________________________________________
____________________________________________________________________________
____________________________________________________________________________
27

OUTLOOK WEB ACCESSNOTES
ORGANIZING E-MAIL
Using Folders & Subfolders
You can create folders and subfolders with Outlook just as you could with Eudora. And, as with Eudora you can copy and/or move messages between folders. The big difference is that with Outlook you can create folders and subfolders on the server as well as on your local computer.
1. Right-click on the folder in which you want a new folder.2. Select New Folder3. Name the folder 4. Specify whether or not you want a shortcut to appear on the Outlook bar.
To create a sub-folder, right-click on the newly created folder and repeat the above steps.
Sorting Messages
The Inbox view shows the message header for each message, including such information as sender, subject, date and time received, and size.
You can easily sort messages by clicking on the column label for the column you want to use as the sort criterion.
To switch between ascending and descending sorts, simply click the column label again. An up arrow beside the column name indicates an ascending sort and a down arrow, a descending sort.
NOTES:_____________________________________________________________________
____________________________________________________________________________
____________________________________________________________________________
____________________________________________________________________________
____________________________________________________________________________
____________________________________________________________________________
____________________________________________________________________________
____________________________________________________________________________
____________________________________________________________________________
____________________________________________________________________________
____________________________________________________________________________
____________________________________________________________________________
28

OUTLOOK WEB ACCESSNOTES
Using Colors
You can organize your e-mail messages with color to alert you to specific person or people’s e-mail.
1. From your In Box, select an e-mail from the “important” person
2. Click the organize button from on the standard toolbar.
3. Or on the menu bar select tools
4. Select Organize from the drop down menu listings
5. A prompt will appear that looks like the picture on the next page.
6. Select Using Colors and a new prompt appears
7. Select a color you wish to have the e-mails in from the drop down box. Notice the second selection available Show messages sent only to me in with a drop down box to select a color. We will not use this today but you may find it useful in your daily e-mail usage.
8. Select Apply Color, notice that the e-mail select appear in color as will all future e-mails from this individual or e-mail group.
29
OUTLOOK WEB ACCESSNOTES
Copying and Moving Messages
1. Select the message you want to copy.2. Choose the Copy command from the Edit menu or tap
Ctrl+C on the keyboard.3. Open the folder you want to copy to and select the Paste
command from the Edit menu or tap Ctrl+V on the keyboard.4. Right-click the message you want to move 5. Click on the Move to Folder command6. Select from the list that appears, the folder into which you
want to move the message.
You can also drag and drop messages and other Outlook items from one folder to another. In many cases, if you right-drag, you will see a special menu from which you can select either copy or move.
BREAK – A 10-minute break will be taken when time permits, please return on time.
ARCHIVING
Archiving, in general, is the process of saving old material. With Eudora, we archived by manually copying older messages to a diskette or some other storage media. In Outlook, we archive by storing messages in an archive file on our local computer, which we should back-up periodically. In Outlook, archiving removes archived data from the server and stores it on your computer.
Reasons for Archiving
As a public institution, we are required to archive (store) all “sent” messages. Because of this and the fact that you will have limited storage space on Gemini, you must archive regularly and perhaps frequently.
Archiving Methods
You can archive manually and automatically. Your computer will be setup to archive automatically every fourteen (14) days.
When to Manually Archive
If you send and receive numerous messages or messages with graphics, animation, or large attachments, you may have to give AutoArchive some help by manually archiving.If you receive quota warnings from the server, you will know that it is time to archive.You can also get an idea of how much server storage space your Outlook items are using by right-clicking on folders and checking their Folder Size property. If you see that your Folder Size
30
OUTLOOK WEB ACCESSNOTES
increases by 4 - 5 Megabytes (MB) per working day, you may need to manually archive every week.
31

OUTLOOK WEB ACCESSNOTES
Archive Manually
1. Open the File menu and choose Archive.
2. In the Archive dialog box, select Archive this folder and all subfolders.
3. Click the browse button and select the folder to receive your archive file
4. Type an appropriate name for your archive file (something descriptive of what it contains) and then click the OK button.
5. Select the area of the program you wish to archive IE: inbox or sent items
6. In the Archive items older than text box, enter a date that is about two (2) weeks old. (For the Outlook class, enter tomorrow’s date.)
7. Make sure there is NO checkmark in the Include items with “Do not Auto archive” checkbox so that we don’t archive Calendar items. and then click the OK button
The Archived Data
Your archived data will be stored in an archive file. The default file name is archive.pst, which will reside on the hard-drive in your local computer. The path to the storage location (folder) will depend on the Operating System in your computer. In order to determine the location, perform a Windows Search for archive.pst and note (write down) the path. It should resemble something like this:
C:\Documents and Settings\chase.gilbert\Local Settings\Application Data\Microsoft\Outlook.
Backing-Up Archived Data
Archived data is stored on the hard disc of your computer. Since computers and hard discs can develop problems, you should back-up your archived data on some other storage media. There are numerous options such as “zip discs”, CD “burners”, or College servers. If you aren’t sure of what to use or how to back-up, ask your CSS (via the Help Desk, of course).
Displaying Archived Data
You can retrieve items from an archive file either by importing the archive file or by opening the archive file.
If you import the archive file, you move all the archived items back into your mailbox, into the folders from which they were archived. You can also choose to import the archived items into a new folder.
If you open the archive folder, it is added to your folder list.
Open an Archive File.
1. From the File menu, choose Open, and then click Personal Folders File (.pst)
32

OUTLOOK WEB ACCESSNOTES
2. Click the Archive.pst file (or whatever you named your file) and then click the OK button. It should now appear in your Folder list.
33

OUTLOOK WEB ACCESSNOTES
NOTES:
____________________________________________________________________________
____________________________________________________________________________
____________________________________________________________________________
____________________________________________________________________________
____________________________________________________________________________
____________________________________________________________________________
____________________________________________________________________________
____________________________________________________________________________
____________________________________________________________________________
____________________________________________________________________________
____________________________________________________________________________
____________________________________________________________________________
____________________________________________________________________________
____________________________________________________________________________
____________________________________________________________________________
____________________________________________________________________________
____________________________________________________________________________
____________________________________________________________________________
____________________________________________________________________________
____________________________________________________________________________
____________________________________________________________________________
____________________________________________________________________________
____________________________________________________________________________
____________________________________________________________________________
____________________________________________________________________________
____________________________________________________________________________
____________________________________________________________________________
____________________________________________________________________________
____________________________________________________________________________
____________________________________________________________________________
____________________________________________________________________________
__________________________________________________________________________________________
34

OUTLOOK WEB ACCESSNOTES
CONTACTS
or From the Folder List select “Contacts”
NOTE: The screen you see will be determined by the selection in the Current View drop-down list in the toolbar. Contacts is where you can enter just about everything you need to know about a person or business such as cell phone numbers, birth dates, et cetera. Contacts will be your personal electronic Rolodex for SPC employees as well non-College individuals.
Create Contacts
The Contacts folder is where you store information about the individuals and businesses with whom you communicate. Think of it as an “electronic rolodex.”
1. Click the Contacts feature in the Folder List.
35

OUTLOOK WEB ACCESSNOTES
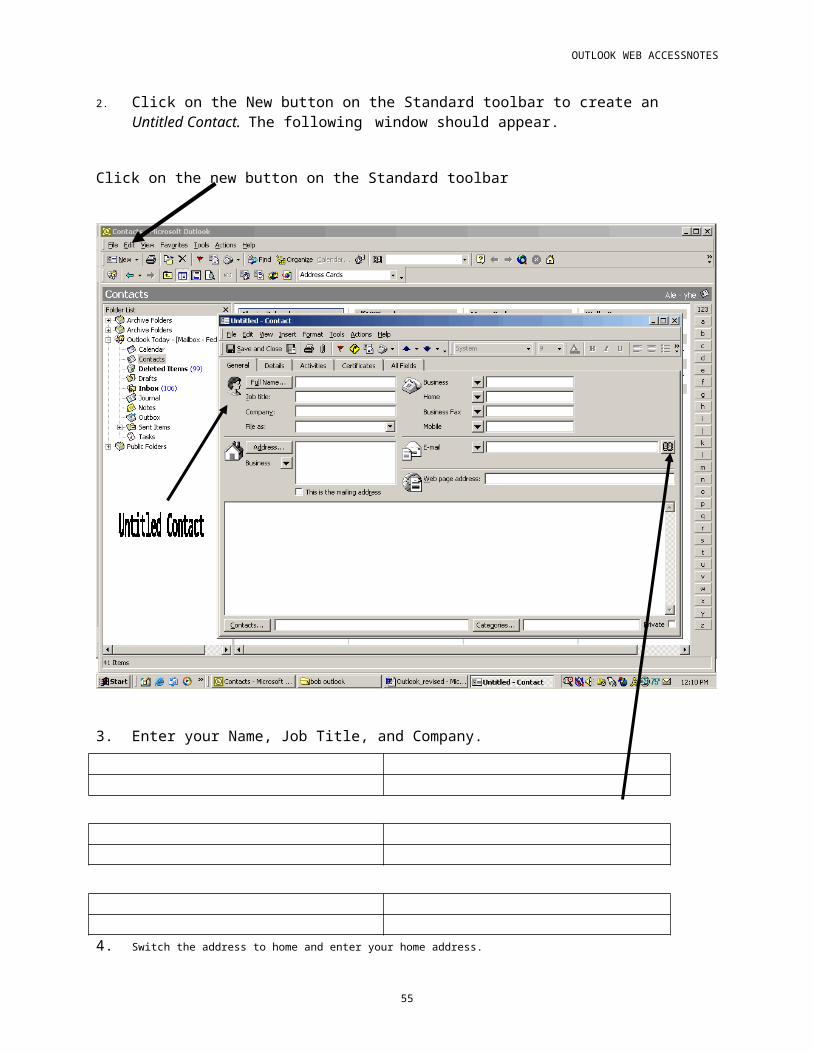
2. Click on the New button on the Standard toolbar to create an Untitled Contact. The following window should appear.
Click on the new button on the Standard toolbar
3. Enter your Name, Job Title, and Company.
4. Switch the address to home and enter your home address.
5. Enter a telephone number.
6. Enter your student e-mail address (Use the book icon to the right of the field.)
36

OUTLOOK WEB ACCESSNOTES
37

OUTLOOK WEB ACCESSNOTES
7. Switch to the details tab
8. Enter your birth date
9. Answer yes when prompted to save
10. Click the button on the standard toolbar that looks like a curve sign (Road sign).
11. Close the resulting map
12. Save and close your contact
If you enter more than one address for a contact, select the one that is the mailing address, and then select the This is the mailing address check box. This establishes which address will be used for mail merges.
NOTES:_____________________________________________________________________
____________________________________________________________________________
____________________________________________________________________________
____________________________________________________________________________
38

OUTLOOK WEB ACCESSNOTES
Create a Contact from a Message
Drag the E-Mail message to the Contacts folder. A new form containing the name and E-Mail address should appear. The text of the message will probably be included in the free-form text field on the contact form. (You may delete it.)ORIn an open message or a message in the Preview pane, right-click any E-Mail address and choose Add to Contacts.
Searching for Contacts
It doesn’t take long to amass a large number of contacts so Outlook 2000 provides a way to search for them. The following steps should enable you to find for a contact.
1. On the toolbar, type the name of the contact you want to find in the Find a Contact box. Enter a partial name, a first or last name, an e-mail alias, display as name, or company name.
2. To quickly open a contact you previously searched for, click the Find a contact arrow and select a name.
Displaying a Map to a Contact’s Address
Microsoft Outlook 2000 has a feature integrated with Contacts that allows you to display a map to the address of a contact. If you are hosting a meeting at a College facility, you can enter that site as a Contact. Then you can generate a map to that site and send the map as an attachment. You must be connected to the Internet for this feature to work. Perform the following steps to display a map for the address of a contact.
1. Create a new contact (ST. PETERSBURG COLLEGE DISTRICT OFFICE) with this business address: 8580 66TH ST N, PINELLAS PARK FL 33733)
2. Open the contact for which you want a map (if it’s not already open).
3. Under the Address button, click the down arrow, and then click the type of address you want to find on a map—Business, Home, or Other.
4. On the Actions menu, click Display Map of Address.
This feature works only for addresses within the United States
Use an Address List to Send a Message
1. Click on the To: button in the new message. The Select Names dialog box should appear.
2. Open the drop-down list that appears at the upper right, select the Global Address List, select a name (in class—your student partner), click the To: button, and then click OK.
3. Enter a subject in the header, some text in the body, and send.
39

OUTLOOK WEB ACCESSNOTES
DISTRIBUTION LISTS
In Outlook, a group of E-Mail addresses is called a distribution list.
1. From the New drop-down list at the left of the toolbar, select Distribution List. In the Name box, type a name for the list. The distribution list is saved in your Contacts folder by the name you give it.
NOTES:_____________________________________________________________________
____________________________________________________________________________
____________________________________________________________________________
____________________________________________________________________________
____________________________________________________________________________
____________________________________________________________________________
40
OUTLOOK WEB ACCESSNOTES
2. Click Select Members.
NOTES:_____________________________________________________________________
____________________________________________________________________________
____________________________________________________________________________
____________________________________________________________________________
____________________________________________________________________________
____________________________________________________________________________
41

OUTLOOK WEB ACCESSNOTES
3. In the Type name or select from list box, enter or select a name, and then click Add. To select non-contiguous names, hold down the Ctrl key while clicking on the names. To select adjacent names, click on the first name, hold down the Shift key and click on the final name you want to include.
4. Click OK.
If you want to enter a longer description of the distribution list, click the Notes tab, and then type the text.
5. Click Save and Close.
REMEMBER DISTRIBUTION LISTS WILL BE LOCATED IN THE CONTACTS LIST.
42

OUTLOOK WEB ACCESSNOTES
Hiding Recipient Names
To send a message to a distribution list while hiding the list of addressees, insert the distribution list name in the Bcc field. If you leave the To: field empty, some recipients will see your name in that field and others will see their name there, depending on their E-Mail system.
Send a Message to a Group while Hiding the Recipients
1. Create a new contact.
2. Put a “bogus” group name in the Company field and your E-Mail address in the E-mail field. Don’t enter any other data.
3. Click the Save And Close button.
4. Create a new message and address it to the new contact. That is, place the name from the company field in the To: field.
5. Place all the recipients or the distribution list names in the Bcc field, separated by semicolons. Commas work in Eudora, but the default here is the semicolon.
6. Compose and send the message.
NOTES______________________________________________________________________
____________________________________________________________________________
____________________________________________________________________________
____________________________________________________________________________
____________________________________________________________________________
____________________________________________________________________________
____________________________________________________________________________
____________________________________________________________________________
____________________________________________________________________________
____________________________________________________________________________
____________________________________________________________________________
____________________________________________________________________________
____________________________________________________________________________
____________________________________________________________________________
____________________________________________________________________________
____________________________________________________________________________
43
OUTLOOK WEB ACCESSNOTES
CALENDAR
From Outlook Shortcuts, select Contacts. The “day”: view of Calendar appears on your screen. You can make entries, such as appointments, in any of the time slots and your appointments will appear in the day view and in weekly and monthly views as well.
Calendar Overview
You can use the outlook calendar to create new appointments and events, and schedule meetings and resources.
Appointments, Meetings, and Events
Outlook recognizes three unique types of Calendar activities:
Appointments are activities that occur at specific times on specific days. They require little planning and coordination and are scheduled for only yourself. For example, if you are going to attend a 4 hour class, you can schedule it as an appointment. If you are going to be conducting the class, you would schedule it as a meeting.
Meetings are also date- and time-specific, but include other people and sometimes require resources (like a conference room or a projector). Meetings typically require planning and coordination.
Events are often special occasions, such as birthdays, anniversaries, or holidays that occur on a recurring basis. Events can also be one-time activities, such as a project, conference, convention, or trade show. Events differ from appointments and meetings in that they do not occur at specific times and typically last 24 hours or more.
Items created as one type can be easily changed to another. For example, if an appointment you’ve created turns into a meeting, you can simply open the appointment item, click the Invite Attendee button on the toolbar, and enter a list of people you want to invite.
NOTES______________________________________________________________________
____________________________________________________________________________
____________________________________________________________________________
____________________________________________________________________________
____________________________________________________________________________
____________________________________________________________________________
44

OUTLOOK WEB ACCESSNOTES
Controlling Your Calendar View
The Calendar displays its items in a layout called a view. There are several views available, with each one displaying a different layout or arrangement.
From the View menu, select the number of days that you want the calendar to display on one screen (Day, Work Week, Week, or Month) or point to Current View and select the items you want displayed.
Select View on the menu to see the View selections
45
OUTLOOK WEB ACCESSNOTES
NOTES:_____________________________________________________________________
____________________________________________________________________________
____________________________________________________________________________
____________________________________________________________________________
____________________________________________________________________________
____________________________________________________________________________
46
OUTLOOK WEB ACCESSNOTES
Controlling your Calendar View
On the Standard Toolbar try the Buttons selections – Day Work Week Week Month
For today’s class please select the “Day” button.
NOTES______________________________________________________________________
____________________________________________________________________________
____________________________________________________________________________
____________________________________________________________________________
____________________________________________________________________________
____________________________________________________________________________
47
OUTLOOK WEB ACCESSNOTES
Scheduling Appointments, Meetings, and Events
1. Select Calendar from either the Outlook Bar or Folder List
2. Click on the New Appointment icon (tool) at the left end of the Standard toolbar or select New Appointment from the Actions menu. The Untitled – Appointment form (window) should appear. Pictured below:
3. Enter the subject (e.g. “Attend Outlook Class”) in the Subject field and the location (e.g. SE127) in the Location field.
4. Enter the Start time and End time for the activity. Make sure the All day event checkbox is empty.
5. Request a reminder by selecting the Reminder checkbox and specifying when you want to be reminded of the appointment.
6. Choose a Show time as option so that anyone viewing your calendar will know your availability status. Exchange server will automatically keep track of your availability status.
7. Enter any information you want to in the text area, and then click Save and Close.
48

OUTLOOK WEB ACCESSNOTES
Scheduling Recurring Appointments
Calendar enables you to schedule repetitive activities. For example, if you have a department meeting every Monday from 12:00 to 1:00, Outlook can schedule all of the meetings well into the future.
1. Open the appointment or meeting that you want to make recurring.
2. From the Actions menu, select Recurrence or click the Recurrence button on the Standard toolbar. The Appointment Recurrence dialog box should display.
3. Verify the Start and End times and the Duration of the meeting.
4. Enter the Recurrence pattern information. Note that the fields to the right change, depending on whether you selected Daily, Weekly, Monthly, or Yearly occurrences.
5. Enter the information that will identify the range or calendar period during which the meetings will take place.
6. Click OK.
7. Click Save and Close.
Scheduling Meetings
1. Select the Calendar function and display the Day or Work Week view.
2. Select the day and time-frame for the meeting.
3. Right-click on the selected time(s), and then choose New Meeting Request. This opens the New Meeting dialog box (form).
4. Click on To: to choose whom to invite. Note that you can specify whether attendance is required or optional.
5. Select the attendees, and then click OK.
6. Click Send to add the meeting to your Calendar and send the “invitations” out via E-Mail.
7. This method of scheduling a meeting may require several back and forth messages before a mutually agreeable time and date can be reached.
NOTES:_____________________________________________________________________
____________________________________________________________________________
____________________________________________________________________________
____________________________________________________________________________
____________________________________________________________________________
____________________________________________________________________________
49

OUTLOOK WEB ACCESSNOTES
Planning a Meeting
1. From any Calendar window, open the Actions menu and select Plan a Meeting. This opens the Plan a Meeting dialog box that is identical to the Attendee Availability tab on a Meeting form.
2. There are two vertical bars on the timeline graph: green indicates the start time, red the end time. You can adjust the times by dragging the vertical bars or by using the drop-down list at the bottom right of the dialog box.
3. To add attendees, click on Invite others and select the names from the list on the left. Note that you have to “send” their names to one of the three status boxes on the right. When you’re done. Click OK. This updates the All Attendees list on the Plan a Meeting form.
4. Click the Options button and select Update Free/Busy. This forces a refresh of the free/busy information for all attendees listed. (Exchange Server analyzes the attendees’ Calendar entries to determine when they are available. Consequently, we must keep our Calendars up to date if we expect this feature to work.)
5. Click AutoPick and Outlook will find a time slot when everyone is available. If that’s not the case, you can scroll forward or backward in time until you find the best time.
6. Click Make Meeting. A new Meeting Request form is generated with the attendees appearing in the To: field. The resources will appear in the Location field and the time/duration will appear as the Start and End times.
7. Fill in a subject and click Send.
NOTES______________________________________________________________________
____________________________________________________________________________
____________________________________________________________________________
____________________________________________________________________________
____________________________________________________________________________
____________________________________________________________________________
____________________________________________________________________________
____________________________________________________________________________
____________________________________________________________________________
____________________________________________________________________________
____________________________________________________________________________
____________________________________________________________________________
____________________________________________________________________________
____________________________________________________________________________
____________________________________________________________________________
50

OUTLOOK WEB ACCESSNOTES
Responding to Meeting Requests
1. Open the meeting request like any other E-Mail.
2. Click Accept, Decline, or Tentative.
3. Send the message.
Tracking Responses to Meeting Requests
Open the appointment for the meeting and switch to the Tracking tab. The tab form lists each invitee, whether they are required or requested at the meeting, and any responses you have received from them.
Scheduling an Event
1. From within Calendar, open the Actions menu and select New All Day Event.
2. Fill in the Untitled – Event form.
3. Note that no times are involved. You might also want to see how the event is displayed in your Calendar by displaying the Month view.
Deleting Appointments
1. Open the appointment you want to delete.
2. On the toolbar, click the Delete icon. The item is moved to the Deleted Items folder and disappears from your Calendar.
NOTES
____________________________________________________________________________
____________________________________________________________________________
____________________________________________________________________________
____________________________________________________________________________
____________________________________________________________________________
____________________________________________________________________________
____________________________________________________________________________
____________________________________________________________________________
____________________________________________________________________________
____________________________________________________________________________
____________________________________________________________________________
51
OUTLOOK WEB ACCESSNOTES
Controlling Reminders
You have several options for displaying and reacting to Reminders.
Open Tools > Options > Other > Advanced Options > Reminder Options. The dialog box that displays will enable you to determine whether a reminder will be displayed, a sound is played, neither, or both. You can also select a default sound.
If and when a reminder is displayed, you can choose Dismiss, Snooze, or Open Item. Dismiss closes the dialog box and cancels the reminder. It does NOT cancel the activity that triggered the reminder. Snooze lets you temporarily close the Reminder dialog box and be reminded again after the time period selected in the drop-down list. Open Item opens the activity attached to the reminder. The reminder remains active until you choose Dismiss or Snooze, or until you go back to the activity and de-select Reminder.
Easy Calendar Changes
Rescheduling is a fact of life. When it’s time to shuffle, choose drag and drop. Open one of the Calendar’s views, select an activity, and drag it to a new time and/or date.
In the Day or Work Week view, you can also adjust activity durations by simply dragging the upper or lower edge of an entry’s border.
NOTES______________________________________________________________________
____________________________________________________________________________
____________________________________________________________________________
____________________________________________________________________________
____________________________________________________________________________
____________________________________________________________________________
____________________________________________________________________________
____________________________________________________________________________
____________________________________________________________________________
____________________________________________________________________________
____________________________________________________________________________
____________________________________________________________________________
____________________________________________________________________________
52
OUTLOOK WEB ACCESSNOTES
WWW ACCESS TO E-MAIL
As with Eudora, Outlook and Exchange Server enable you to access to your E-Mail via the Internet and World Wide Web.
Outlook Web Access Outlook Web Access (OWA) is a program that lets you gain access to your E-Mail account and, to a lesser degree, most of Outlook’s other features, such as Calendar, Contacts, and so forth. As you become familiar with OWA, you will discover some limitations. For example, you can create Appointments, Notes and Tasks but with far fewer options than in Outlook. And, unlike Outlook, OWA doesn’t contain a spelling checker, reminders, or rules for processing messages.
OWA gives you access to only items on Gemini; it does not give you access to archived items, which are stored on the hard disc of your desktop (work) computer.
You must keep in mind that if you delete items or move them to your off-campus computer via OWA, you will remove them from the server. Consequently, you won’t have access to them from your work computer. Also, any changes to the folders will affect your folders on the server.
Connecting to Outlook Web Access
1. Launch Internet Explorer
2. In the Address box, enter http://webmail.admin.spcollege.edu or http://gemini.spcollege.edu there is also a link off of Staff Central on the Web site.
3. Tap Enter. If, you receive a Security Alert asking if you want to proceed, click Yes.
4. Enter your User name and Password in the appropriate text boxes. These will be the same ones you use to log-in to our College network.
53

OUTLOOK WEB ACCESSNOTES
Logging Off
When you have finished using Outlook Web Access, MAKE SURE YOU LOG OFF and close ALL browser windows. This will prevent someone else from accessing your E-Mail account. This is especially important if you have accessed OWA from a public computer, such as those in libraries or our computer labs. Failure to log off might also prevent you from logging in to College network.
The Screen
When you open Outlook Web Access, you should see at the left, either the Folders list or the Outlook Shortcuts. Unlike Outlook, you can’t display both bars simultaneously. You can display one or the other by clicking either the Folder or Shortcuts button.
At the top of the screen, your Web browser’s Title bar, Menu bar, Standard toolbar, Address bar, and the OWA toolbar. If the browser’s toolbars are distracting, open the browser’s View menu and de-select as many as you wish. The OWA toolbar will then be much more obvious.
Click each of Outlook’s features and note that some of the tools on the OWA toolbar change. Take a few minutes to pause your mouse pointer on each tool and read the tool tips.
Reading Your E-Mail
1. Be sure that your Inbox is selected. It will say Inbox in the header of the Outlook screen.
2. Click on the sender’s name in the From column of the Inbox to open the message.
3. Click Close when you are done reading the message.
Replying To/Forwarding E-Mail
1. Open the E-Mail you want to reply to or forward.
2. Click the appropriate button (Reply, Reply to all, or Forward) on the Standard toolbar.
3. Enter your message. You can omit this step if your forwarding a message and don’t want to enter any text of your own.
4. Click the Send button.
NOTES:_____________________________________________________________________
____________________________________________________________________________
____________________________________________________________________________
____________________________________________________________________________
54
OUTLOOK WEB ACCESSNOTES
Sending E-Mail to SPC Addresses
1. Click on the Compose New Message button located at the upper left of the Outlook window.
2. Type the recipient’s E-Mail address into the To: field of the new message window. Or,
a. click the To: button and display the Find Names dialog box.
b. if you know the recipient’s Display name, type it in that field. If not, type their last name in the Last name field.
c. click Find.
d. assuming OWA found the recipient, select their name and click To: in the Add recipient to… area.
e. click Close to return to the message.
3. Enter the subject of the message.
4. Enter the body of the message.
5. Click the Send button.
Sending E-Mail to “Contacts”
1. Click on the Compose New Message button located at the upper left of the Outlook window.
2. Type the recipient’s complete E-Mail address into the To: field of the new message window. Alternately, you can open an individual’s Contact form and click the Send mail to contact button, which appears at the top of the Contact form.
3. Enter the subject of the message.
4. Enter the body of the message.
5. Click the Send button.
Sending Attachments
1. Select the Compose New Message button.
2. Click the Attachments tab at the top of the new message window.
3. Click the Browse… button and select the file you want to attach.
4. Click Open. The path to the document will appear in the browse field.
5. Click the Add Attachment Now button.
6. Click the Message tab and complete your E-Mail.
7. Click Send.
55

OUTLOOK WEB ACCESSNOTES
Reading Attachments
1. Open the message that contains the attachment. Messages containing attachments will display a paper clip to the right of the closed message envelope (icon) in your Inbox.
2. Within the body of the message, click on the icon that represents the attachment. OWA may ask you to save the attachment prior to opening it.
Printing Messages
1. Open the message you want to print.
2. Select Print from the File menu.
Checking for New Messages
1. Display the Inbox window.
2. Click the Check New Mail button on the Standard toolbar.
Deleting Messages
1. Open the folder that contains the message you want to delete.
2. Select the message you want to delete.
3. Click the Delete tool on the Standard toolbar.
If the message is open, click the Delete button on the open message’s toolbar.
Viewing Your Calendar
1. In the Outlook Shortcuts bar or the Folder List, select Calendar. The current day should be displayed.
2. From the Calendar toolbar, select the Weekly View or the Monthly View.
NOTES:_____________________________________________________________________
____________________________________________________________________________
____________________________________________________________________________
____________________________________________________________________________
____________________________________________________________________________
____________________________________________________________________________
56

OUTLOOK WEB ACCESSNOTES
Creating an Appointment
1. Display the Calendar.
2. From the New drop-down list, select Appointment.
3. Enter the Subject, Location, and Start and End times of the activity.
4. Type in any relevant information in the body of the appointment.
5. If the activity is going to be a meeting, you can Invite Attendees and identify their status as Required or Optional; and you can schedule resources. You can also check the Availability of the attendees and resources.
6. Click on the Save button to save the appointment to your Calendar or the Send button to schedule the meeting.
NOTES______________________________________________________________________
____________________________________________________________________________
____________________________________________________________________________
____________________________________________________________________________
____________________________________________________________________________
____________________________________________________________________________
____________________________________________________________________________
____________________________________________________________________________
____________________________________________________________________________
____________________________________________________________________________
____________________________________________________________________________
____________________________________________________________________________
____________________________________________________________________________
____________________________________________________________________________
____________________________________________________________________________
____________________________________________________________________________
____________________________________________________________________________
____________________________________________________________________________
____________________________________________________________________________
57

OUTLOOK WEB ACCESSNOTES
TASKS
From Outlook Shortcuts, select Tasks. You should see a columnar form with column headings that identify the potential content of each column. You should also see the area in which you can click to add a new task to your “to-do” list.
58
OUTLOOK WEB ACCESSNOTES
Tasks Overview
A task is something that you do as part of your job, such as assigning instructors to classes or scheduling rooms for the next session. A task can occur once or repeatedly (a recurring task).
With Outlook’s Task feature, you can enter your tasks and track them from start to completion. You can even have Outlook nag you (display reminders).
Click on Task in the Folder List to display this window:
Creating Tasks
1. Select the Tasks option in the Folder List or Outlook Bar
2. Click in the “main pane” area where it says Click here to add a new Task.
3. Type the Subject (name) of the task.
4. Tap the Enter key.
5. If you want to enter amplifying information, double-click the task in the list.
OR:
59

OUTLOOK WEB ACCESSNOTES
1. Select the Tasks container (option, folder) in the Folder List or Outlook Bar.
2. Click on the New Task icon located at the left end of the Standard toolbar. The Untitled – Task window should appear.
3. Type a subject (name) for the task (e.g. schedule rooms, order books, etc.)
4. Enter the Due Date, Start Date, Status, and Priority information.
5. Click the Reminder check box and select when Outlook should remind you of the task.
6. Fill out any information you would like to enter about the task in the large text area.
7. Click Save and Close. The next time you open Tasks you should see, in the contents (main) pane, a list of all the tasks you’ve entered.
Creating Recurring Tasks
A lot of tasks occur on a regular basis. To save you the effort of entering repetitive tasks such as monthly meetings or quarterly reports, just set them up as recurring tasks.
1. Open the task by double-clicking it.
2. Click the Recurrence button in the dialog box toolbar.
3. Choose the Daily, Weekly, Monthly, or Yearly option. Note that as you choose different options, the dependent options change.
4. Fill-in/select the remaining Recurrence pattern options.
5. Fill-in/select the options in the Range of recurrence area.
6. Click OK and then click Save and Close.
Editing Tasks
Display your Tasks and select the item you want to change.Enter the new information.Tap the Enter key.
If the item you want to change doesn’t appear, you may have to try another approach.
1. Display your tasks using a Current View (from the View menu) such as Simple List.2. Double-click the name (subject) of the task that you want to change. A dialog box for the
selected task should appear. Note that the dialog box contains 2 tabs. You’ll probably due most of your editing via the Task tab.
3. Explore until you find the item you want to change.4. Make the change.5. Click Save and Close.
60

OUTLOOK WEB ACCESSNOTES
Copying Tasks
Sometimes you may have to perform the same task again. If you wish you can copy and paste tasks to minimize typing.
1. Select the task that you want to copy.2. Tap Ctrl+C to copy the task.3. Tap Ctrl+V to paste the task.4. Edit the pasted task as appropriate.
Completing Tasks
To mark a task as complete, click the little checkbox next to the task in the Contents (main) pane.
Changing the Tasks View
61

OUTLOOK WEB ACCESSNOTES
1. Open the View menu and choose Current View. Several choices will appear.2. Display a few of the choices, and then select the one you want.
Sorting Tasks
1. Select Tasks from the Folder List or the Outlook Bar.2. Click on the field you want to sort by, probably Due Date.
Color Coding TasksWhen you complete a task or when it becomes overdue, Outlook changes the color of the text for completed tasks to gray and overdue tasks to red. If you don’t like Outlook’s color choices, you can pick different colors. Note: this functions can also be used to highlight incoming mail.
1. Choose Tools > Options.2. Click the Task Options Button.3. Select the colors you like from the appropriate drop-down lists. 4. Click OK.
Deleting Tasks
1. Select the task to delete. You can select multiple items by holding down the Shift or Ctrl key while clicking.
2. On the toolbar, click Delete. The deleted item is moved into the Deleted Items folder.
NOTES
From Outlook Shortcuts, select Notes. Unless one or more notes have already been created, you will see a large empty windowpane. After you create a note, an icon representing the note and the first line of the note will appear. You can use Notes to jot down phone numbers, E-Mail addresses, reminders, or just about anything you wish.
Notes Overview
You can use Outlook Notes to keep track of any kind of text-based information. For example, you might make a note to record a new contact’s e-mail address, to display a new Web address, or to keep track of the different voice-mail messages you just played-back. The notes you create
62

OUTLOOK WEB ACCESSNOTES
will reside, by default, in the Notes folder unless you re-position them to another location, such as your desktop.
Configuring Note Options
Before you start creating notes, you might want to set the options that control the notes’ appearance. From any Outlook screen, select Tools>Options>Note Options. You can then change the color, size, or font.
Creating a Note
1. Select the Notes option.2. Double-click a blank area of the large (contents) pane.3. Type directly on the note that appears.4. Close the note and observe its location.
Saving a Note
Notes are saved automatically when you close the note, as long as you have typed something. Closing an empty note cancels the note.
63

OUTLOOK WEB ACCESSNOTES
Reading a Note1. Select the Notes option.2. Double-click the note or right-click it and choose Open
Editing a Note
1. Open the note you want to edit.2. Select what you want to change or position the insertion point wherever you want to insert
text.3. Type, and then click the close button.
Printing your Notes
1. Select a note or group of notes.
2. Choose File>Print, Tap Ctrl+P, click the Print button on the Standard toolbar, or right-click the note(s) and choose Print.
Deleting a Note
Select the note and tap the Delete key or right-click the note and choose Delete.
Resizing a Note
If you can’t see all of the text in a note, you can move down in the note with the down-arrow key on your keyboard or you can drag the lower right corner of the note to make the note larger (or smaller).
Creating an Appointment, Contact, or Task from a Note
Drag a closed note to any of these folders to create a new item of the specified type. For all item types, the note text is entered into the item form (dialog box). For appointments and tasks, the first line of the note text becomes the subject of the appointment or task. Outlook doesn’t extract data from your note to fill in the respective fields, it just transports you to the Calendar, for example, and displays the note; you have to do the data entry.
1. Create a note that contains a person’s name and e-mail address.
2. Drag and drop the note on the Contacts icon and observe the result.
Create a New Folder for Notes
1. Choose File>New>Folder. The New Folder dialog box should appear.
2. Select New Folder.
3. Name the new folder.
4. Identify the type of items the folder will contain (store).
64

OUTLOOK WEB ACCESSNOTES
5. Choose the location for the new folder.
Moving and Copying Notes
The best way to copy or move a note is to right-drag it to its destination. From the special menu that appears when you right-drag, select copy or moving depending on your goal.
Copy a Note to your Desktop
1. Drag an open note to the desktop to view it there. The note should close when you close Outlook.
2. Drag a closed note to the desktop to copy it there. You can open and edit the note even when Outlook is closed. The icon remains on the desktop, and you can manipulate it just like any other file
3. Right-drag a note to the desktop, then choose copy or move, depending on your goal.
Forwarding Notes
Right-click the note that you want to forward (e-mail) to someone.
Select Forward from the menu that appears.
Fill-in the e-mail header and click on Send. The note will be sent as an attachment
Send a Note as the E-Mail Message
Drag a closed note to a message-type folder, such as the Inbox, to create a new e-mail message. The text of the note automatically becomes the message body.
3. Fill-in the e-mail header and click on Send
65