mrhanleyc.commrhanleyc.com/makerspace/arduino/arduino2.docx · web viewin this example you will...
TRANSCRIPT

Activity 4.2.2 Introduction to MicrocontrollersIntroductionUp until now your selection of input devices and output devices has been limited to the sensors and human input devices available in your classroom. In today’s world of electronics, there are a tremendous number of other devices you could use in you designs.
In this activity you will create your first programs (sketches) to control systems with unique sensors, human input controls, motors, and servos that you may not have used previously. The ATmega328 microcontroller found on the Arduino Uno Microcontroller Board will be used to explore these controls and inputs.
Programming languages have their own grammar called syntax. Programs written with the Ardiuno software are called Sketches. A Sketch (program written with Arduino) will contain: a title, constants, variables, setup() functions, and loop() functions.
If the syntax of a language is not followed the program will not compile correctly. This means that no executable code will be produced. Fortunately, the Arduino IDE (integrated development environment) will provide you with error messages that will help you fix your bad grammar… those are called syntax errors. One of the most common syntax errors that students make is that lines of code need to end with a semicolon.
Structure of a Sketch (Program)The “Blink” program used to test your Arduino is shown below to illustrate the parts of a program (sketch).
/* Title: Description and comments. Blink: This example make the LED at pin 13 blink. This example code is in the public domain. */
// Constants: Constants won't change. They're used here to set the pin numbers: const int ledPin = 13; // constant ledPin assigned to pin 13
// Variables: Variables will change. They’re used do assign variable names:// there are no variables in this example
// Setup: The setup routine runs once when you start or press reset:void setup() // put your setup code here, to run once pinMode(ledPin, OUTPUT); // initialize the LED pin as an output
// Loop: The loop routine runs over and over again forever:void loop() // put your main code here, to run repeatedly: digitalWrite(ledPin, HIGH); // turn the LED on (HIGH is the voltage level) delay(1000); // wait for one second digitalWrite(ledPin, LOW); // turn the LED off by making the voltage LOW delay(1000); // wait for one second
© 2014 Project Lead The Way, Inc. Digital Electronics Activity 4.2.2 Introduction to Microcontrollers – Page 1

Equipment Parallax student DE bundle with Arduino
o Arduino Uno Microcontroller Boardo PIR Sensor (Passive Infra-Red)o 2-Axis Joystick
Arduino IDE Software Breadboard #22 Gauge solid wire Resistors (220Ω) (10 kΩ) LED Pushbutton or VEX bumper switch VEX potentiometer
ProceduresSketch 1: “Blink” 1. Open the Arduino software and create the “Blink” sketch.
2. Title the project and add a description. Save.
3. Define constant integer, named ledPin, assigned to pin 13.
4. void setup()
Add a pinMode function so that variable ledPin is an OUTPUT.
5. void loop()
Add a digitalWrite function to make ledPin HIGH for delay 1000 ms.
Add a digitalWrite function to make ledPin LOW for delay 1000 ms.
6. Save the code as “Blink”. Have your instructor verify the circuit works as expected. The LED on the Arduino (pin 13) should be blinking.
Sketch 2: “AltBlink” 7. Create the circuit “AltBlink” using:
an Arduino Microcontroller Board
an LED
220Ω resistor
8. Modify the “Blink” code to create a new sketch called “AltBlink” Circuit “AltBlink”
“AltBlink” Circuit9. With LED A defined as the resistor on the Arduino, and LED B defined as the LED on the
breadboard: Make the two LEDs blink in alternating pattern.
LED A (on Arduino) is “off” when LED B (on breadboard) is “on”.
© 2014 Project Lead The Way, Inc. Digital Electronics Activity 4.2.2 Introduction to Microcontrollers – Page 2

LED A (on Arduino) is “on” when LED B (on breadboard) is “off”.
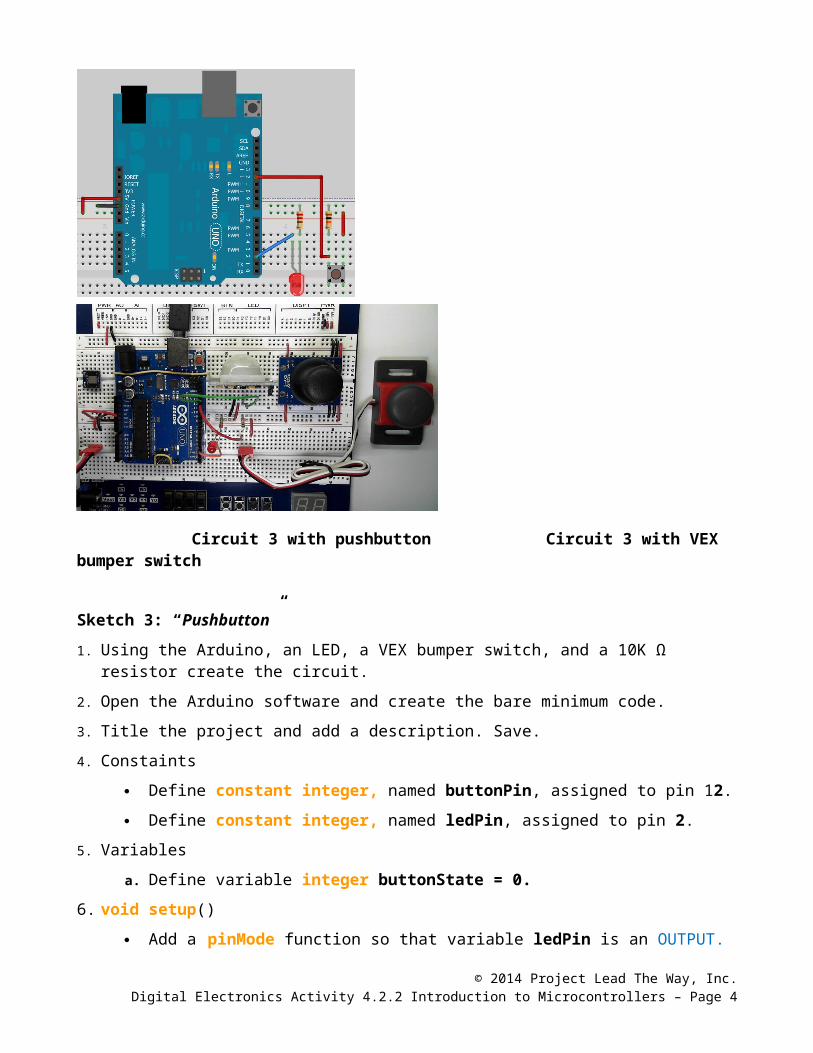
Sketch 3: “Pushbutton”This sketch reads a VEX bumper switch (or pushbutton) and turns on an LED. Note: If a VEX bumper switch is not available you may use a pushbutton on your Digital MiniSystem or a simple pushbutton on a breadboard as pictured below.
Circuit 3 with pushbutton Circuit 3 with VEX bumper switch
Sketch 3: “Pushbutton”1. Using the Arduino, an LED, a VEX bumper switch, and a 10K Ω resistor create the circuit.
2. Open the Arduino software and create the bare minimum code.
3. Title the project and add a description. Save.
4. Constaints
Define constant integer, named buttonPin, assigned to pin 12.
Define constant integer, named ledPin, assigned to pin 2.
5. Variables
a. Define variable integer buttonState = 0.6. void setup()
Add a pinMode function so that variable ledPin is an OUTPUT.
Add a pinMode function so that variable buttonPin is an INPUT.
7. void loop()
Read the input pin buttonState = digitalRead (buttonPin)
o If (buttonState == HIGH) turn on the LED.
o If (buttonState == LOW) turn off the LED.
8. Have your instructor verify the circuit works as expected.
© 2014 Project Lead The Way, Inc. Digital Electronics Activity 4.2.2 Introduction to Microcontrollers – Page 3
Sketch 4: “DigitalReadSerial”This sketch reads a pushbutton and prints the outputs to the serial monitor. The wiring for this circuit is the same and this new sketch can be created by modifying Sketch 2 “Pushbutton”.
1. Open the Arduino software and create the bare minimum code.
2. Title the project and add a description. Save.
3. Constaints
Define constant integer, named buttonPin, assigned to pin 12.
4. Variables
Define variable integer buttonState = 0.
5. void setup()
Add Serial.begin at 9600 b/s to initialize serial communication.
Add pinMode function so that variable buttonPin is an INPUT.
6. void loop()
1. Read the input pin.int buttonState = digitalRead (buttonPin)
2. Print the state of the button to the monitor.Serial.printIn (buttonState)
3. Add delay(1) so you can see the change when it is writing to the monitor.
7. Have your instructor verify the circuit works as expected.
Sketch 5: “DigitalReadSerialLED”1. From what you have learned create a new program “DigitalReadSerialLED” that that
prints the digital output of a pushbutton to the Arduino serial monitor and has an LED indicator showing when the signal is high.
2. Have your instructor verify the circuit works as expected.
Input Sensor: PIR Sensor (Passive Infra-red)The PIR (Passive Infra-Red) Sensor is a pyroelectric device that detects motion by measuring changes in the infrared (heat) levels emitted by surrounding objects. This motion can be detected by checking for a sudden change in the surrounding IR patterns. When motion is detected the PIR sensor outputs a high signal on its output pin. This logic signal can be read by a microcontroller or used to drive a transistor to switch a higher current load.
Features © 2014 Project Lead The Way, Inc.
Digital Electronics Activity 4.2.2 Introduction to Microcontrollers – Page 4

Detection range up to 20 feet away Single bit output Jumper selects single or continuous trigger output mode
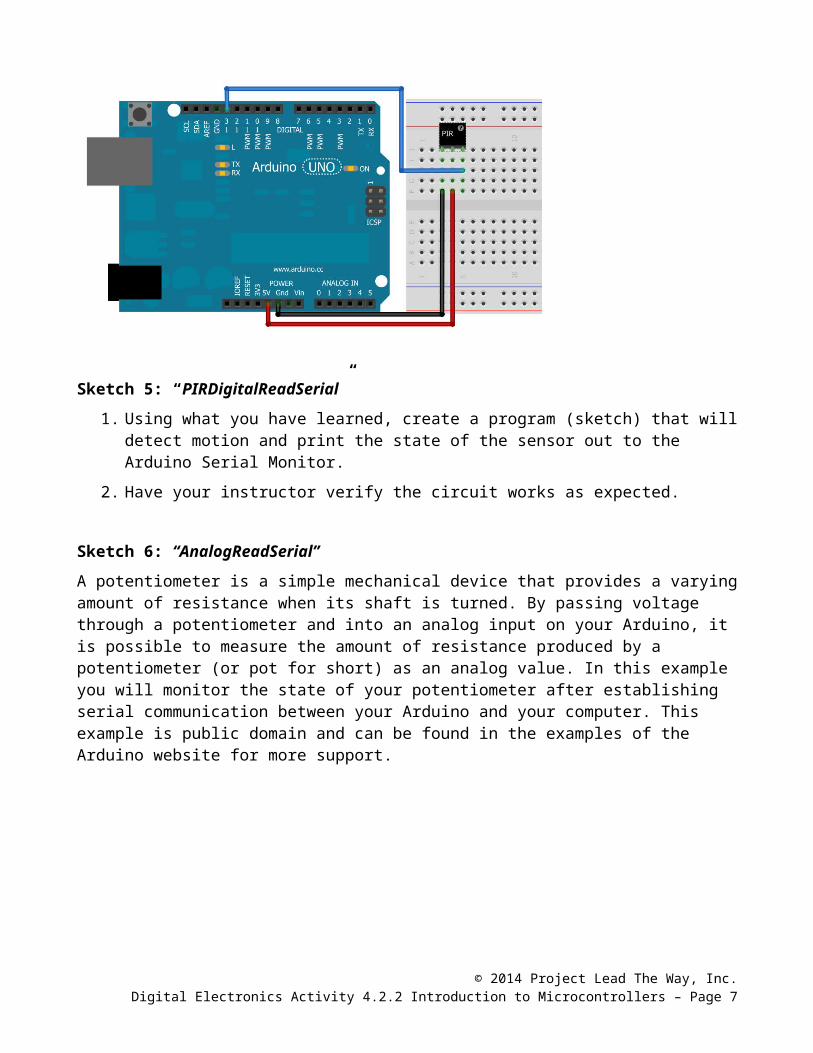
Wire the PIR Sensor and Test1. Wired in the following configuration. If motion is detected, the PIR dome will light up
sending a signal out to the LED wired to pin 13 on the Arduino. Make sure the sensor is in a location with no movement to test.
Sketch 5: “PIRDigitalReadSerial”1. Using what you have learned, create a program (sketch) that will detect motion and
print the state of the sensor out to the Arduino Serial Monitor.
2. Have your instructor verify the circuit works as expected.
Sketch 6: “AnalogReadSerial”A potentiometer is a simple mechanical device that provides a varying amount of resistance when its shaft is turned. By passing voltage through a potentiometer and into an analog input on your Arduino, it is possible to measure the amount of resistance produced by a potentiometer (or pot for short) as an analog value. In this example you will monitor the state of your potentiometer after establishing serial communication between your Arduino and your computer. This example is public domain and can be found in the examples of the Arduino website for more support.
© 2014 Project Lead The Way, Inc. Digital Electronics Activity 4.2.2 Introduction to Microcontrollers – Page 5

VEX Potentiometer with PWM PotentiometerSketch 6: “AnalogReadSerial”
1. Using the Arduino and a VEX and potentiometer create the circuit.
2. Open the Arduino software and create the bare minimum code.
3. Title the project and add a description. Save.
4. Constaints
Define constant integer, named potPin, assigned to pin A0.
5. Variables
Define variable integer potValue = analogRead (potPin).6. void setup()
Add Serial.begin at 9600 b/s to initialize serial communication.
7. void loop()
Read the input on the anolog pin.int potValue = analogRead (A0)
Print the state of the potentiometer to the monitor.Serial.printIn (potValue)
Add delay(1) so you can see the change when it is writing to the monitor.
8. Have your instructor verify the circuit works as expected.
Sketch 7: “Joystick”The 2-Axis Joystick contains two independent potentiometers (one per axis) for reporting the joystick's position, with wiring options for voltage or resistance outputs.
© 2014 Project Lead The Way, Inc. Digital Electronics Activity 4.2.2 Introduction to Microcontrollers – Page 6
2-AxisJoystick
MicrocontrollerBoard
L/R+ 5V
U/D+ 5V
GND GND
U/D U/D A0
L/R L/R A1
Sketch 7: “Joystick”1. Based on what you learned in Sketch 6 “AnalogReadSerial” create a new sketch
that will read the analog value for each axis and print those values to the Arduino serial monitor.
2. To distinguish which value you are reading, you will want to add a:
Serial.print("Up/Down value = "); // “words in quotes print on the serial monitor”
Serial.print("Left/Right value = "); // “words in quotes print on the serial monitor”
3. What are the values roughly when the joystick is sitting in the middle?
4. What are the roughly the maximum value you see and the minimum value you see when you move the joystick?
5. What do you think this range should be exactly? (Hint: think base 2 numbers)
6. Have your instructor verify the circuit works as expected.
© 2014 Project Lead The Way, Inc. Digital Electronics Activity 4.2.2 Introduction to Microcontrollers – Page 7

Libraries and CommunitiesIt is a good practice keep all you programs (sketches) organized so that you can use/ build upon in the future. Make sure you have captured the seven introductory programs and turned them into your instructor in the format they want them to be presented.
Because Arduino is an open source community, there are hundreds of examples of code online you can use for your own projects.
Conclusion1. Looking around the room or building you are in, identify 3-5 devices that most likely
have a microcontroller embedded in them.
2. What are some of the major parts to a program or sketch?
© 2014 Project Lead The Way, Inc. Digital Electronics Activity 4.2.2 Introduction to Microcontrollers – Page 8

3. Without worrying about syntax, what conditional statement would you write to create the following outputs on the serial monitor based on the inputs of a 2-axis joystick.
© 2014 Project Lead The Way, Inc. Digital Electronics Activity 4.2.2 Introduction to Microcontrollers – Page 9
“You are moving forward.”
“You are moving backward.”
“You are moving to the right.”
“You are moving to the left.”