wear proper eye protection, ear protection, and protective clothing. secure hair and loose...
TRANSCRIPT

Tools and Safety

Wear proper eye protection, ear protection, and protective clothing.
Secure hair and loose clothing. Work in areas with good lighting. Make sure all personnel are at a safe distance
before using the tool. Keep tools free of oil, grease, and foreign matter. Use the tool for its designed use. Secure small work in a clamp or vise. Repair or replace damaged tools. Report any injuries to the supervisor.
General Tool Safety

Hand Tools◦ Hand tools are tools that are powered by hand.
Power Tools◦ Power tools are tools that are electrically,
pneumatically, or hydraulically powered for greater efficiency when performing service and repair tasks.
◦ Power tools can be portable or stationary. Portable power tools can be transported with the
operator. Stationary power tools cannot be transported, and are commonly installed in a fixed position.
Power tools may cause serious injury if proper safety procedures are not followed.
Tool Types

Keep tools sharp and in proper working order. Look for wear that could cause an injury, such as a pitted hammer face, damaged insulation on a pliers, or splintered handle.
Point cutting tools away from the body during use.
Grind excess metal from mushroomed chisels.
Organize tools to protect and conceal sharp cutting surfaces.
Hand Tool Safety

Never use a hammer on another hammer. The impact of the hardened surfaces may cause the heads to shatter.
Do not carry tools in a pocket. Transport sharp tools in a holder or with the blade pointed down.
Remove fasteners by pulling the tool toward the body or pushing the tool away from the face
Hand Tool Safety

Follow all manufacturers’ recommended operating instructions.
Use UL or CSA approved power tools that are installed in compliances with the NEC.
Do not use electrical tools on or near a wet or damp area.
Use power tools that are doubled-insulated or have a third conductor grounding terminal to provide a path for fault current.
Ensure power switch is in OFF position before connecting to power source.
Power Tool Safety

Ensure that all safety guards are in place before starting.
Arrange cords and hoses to prevent accidental tripping.
Stand to one side when starting and using a grinder.
Stand clear of operating power tools. Keep hands and arms away from moving parts.
Use tools designed for compressed air service. Shut off, lock out, and tag out disconnect
switches of power tools requiring service.
Power Tool Safety

Measuring Fastening – Wrenches Fastening – Screwdrivers Fastening – Pliers Cutting Striking/Driving Testing Specialty Tools
Classification of Tools

A. Feeler GaugesB. MicrometerC. Telescoping GaugeD. Dial CaliperE. TachometerF. Ruler
Measuring
A B
C D
E
F

Measuring Tools
Feeler Gauge – To verify distance between parts. Ie. The gap in a spark plug.
Micrometer - measure thickness and diameter

Measuring Tools
Telescoping Gauge – transfer distance from parts to measurement tool
Dial Caliper – measure inside, outside, and depth of parts

Measuring Tools
Tachometer – measure engine speed in RPM
Ruler – Measure linear distance

A. Open EndB. Box EndC. CombinationD. Ratchet & SocketE. AdjustableF. HexG. ImpactH. Torque
Fastening – Wrenches
A
B
C
D
E
F
G
H
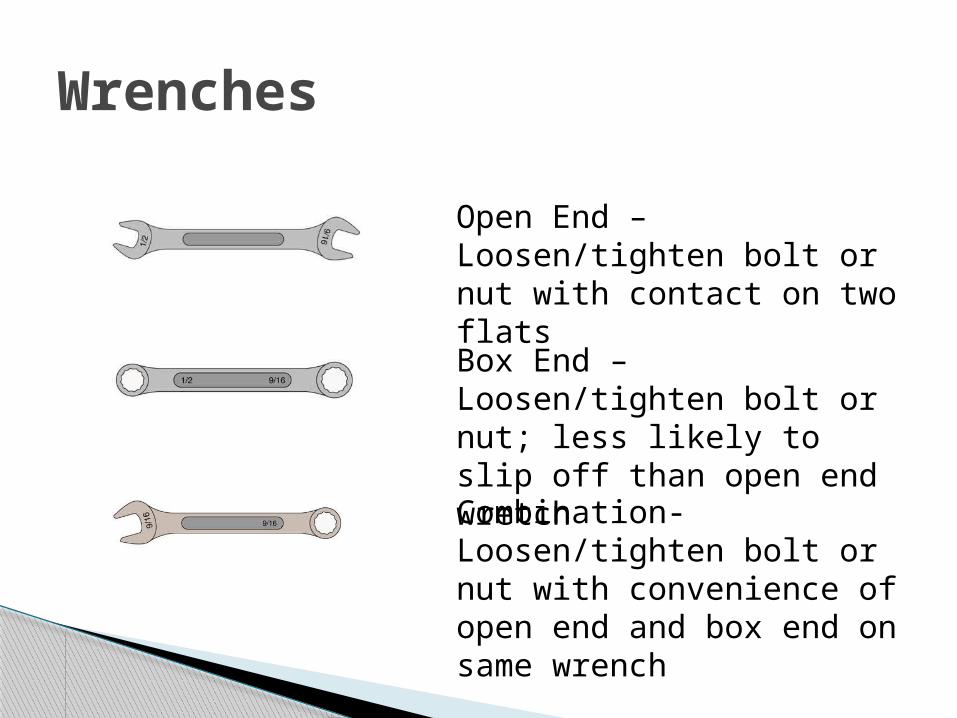
Wrenches
Open End – Loosen/tighten bolt or nut with contact on two flats
Combination- Loosen/tighten bolt or nut with convenience of open end and box end on same wrench
Box End – Loosen/tighten bolt or nut; less likely to slip off than open end wretch

Wrenches
Ratchet and Socket – Loosen/tighten bolt or nut in tight locations
Hex – Loosen/tighten hex screws
Adjustable – Loosen/tighten bolt or nut in tight locations

Wrenches
Impact – Loosen/tighten bolt or nut with air or electric power with short, rapid impulses to socket
Torque – Tighten bolt or nut specified torque

A. StandardB. PhillipsC. TorxD. OffsetE. Hex
Fastening – Screwdrivers
A
B
C
D
C A B B

Screwdrivers
Standard – Drive slotted head fastener
Phillips – Drive Phillips head fastener

Screwdrivers
Torx – Drive Torx head fastener
Offset – Drive slotted, Phillips, or Torx head fasteners in tight locations

Fastening – Pliers
A. Slip JointB. AdjustableC. LockingD. Needle
NoseE. Snap Ring
A
B
C
D
E

Pliers
Slip-Joint – Grip fasteners and parts
Locking – Lock on fasteners and/or hold parts
Adjustable – Grip large fasteners and parts

Pliers
Needle Nose – Grip fasteners and/or parts in tight locations
Snap Ring – Install and remove snap ring fasteners

A. HacksawB. DrillC. Cold ChiselD. FileE. TapF. DieG. SnipH. Diagonal
Cutting Pliers
Cutting
A
B
C
D
E
F
G
H

Cutting
Hacksaw – Cut metal
Cold Chisel – Cut and/or remove fasteners and metal
Drill – Drill holes in material

Cutting
Tap – Cut internal threads in predrilled holes
File – Form and/or smooth material
Die – Cut external threads

Cutting
Snips – Cut sheet metal
Diagonal Cutting Pliers – Cut wire and other material

Striking/Driving
A. Ball Peen Hammer
B. Rubber MalletC. Soft-Faced
HammerD. Center PunchE. Drive Pin
Punch
A
B
C
D
E

Striking/Driving
Ball Peen Hammer – Hammer and/or shape parts
Soft-Faced Hammer – Hammer/drive tools and parts without damaging surfaces
Rubber Mallet – Hammer parts without damaging surfaces

Striking/Driving
Center Punch – Mark center point for drilling a hole
Drive Pin Punch – Drive fasteners, shafts, and bearings

Testing
A. Digital Multi Meter (DMM)
B. Spark TesterC. Cylinder
Leakdown Tester
A
B C

Testing
DMM – Measure electrical values
Cylinder Leakdown Tester – Test sealing capability of compression components
Spark Tester – Test condition of ignition system

Specialty
A. Valve Spring Compressor
B. Flywheel PullerC. Starter Clutch
WrenchD. Ring
CompressorE. Flywheel HolderF. Tab Bender
A
B
C
D
E
F

Specialty
Valve Spring Compressor – Compress valve springs for installation or removal
Starter Clutch Wrench – Remove and torque rewind started clutch
Flywheel Puller – Remove flywheel

Specialty
Ring Compressor – Compress piston rings for installation
Tab Bender – Adjust governor tabs for top no-load speed
Flywheel Holder – Hold flywheel while removing or installing flywheel nut or rewind starter clutch