contentsdl.trimble.com/sketchup/gsu7/docs/en/stylebuilder1help.pdfnote - style builder saves styles...
TRANSCRIPT

Contents Contents ....................................................................................................................... 1 Welcome to the Style Builder Getting Started Guide............................................... 2
Concepts .................................................................................................................... 3 Creating a Sketchy Edge Style .................................................................................. 8 Generating a Style Template (Microsoft Windows) ................................................... 9 Generating a Style Template (Mac OS X) ............................................................... 11 Drawing and Editing Strokes.................................................................................... 13 Transferring Strokes to the Template ...................................................................... 17 Creating a Sketchy Edge Style File ......................................................................... 19
Welcome to the Style Builder User's Guide............................................................ 21 Adding Strokes to a Style......................................................................................... 22 Deleting Libraries of Strokes (Mac OS X)................................................................ 23 Deleting Library of Strokes (Microsoft Windows)..................................................... 24 Deleting Strokes....................................................................................................... 25
Welcome to the Style Builder Reference Guide ..................................................... 26 Style Builder Menu (Mac OS X) ............................................................................... 27 File Menu (Microsoft Windows)................................................................................ 28 File Menu (Mac OS X) ............................................................................................. 29 Edit Menu (Microsoft Windows) ............................................................................... 30 Edit Menu (Mac OS X) ............................................................................................. 31 Strokes Menu (Microsoft Windows) ......................................................................... 32 Strokes Menu (Mac OS X) ....................................................................................... 33 Preview Menu .......................................................................................................... 34 Help Menu (Microsoft Windows) .............................................................................. 35 Help Menu (Mac OS X)............................................................................................ 36
Preferences Dialog Box ............................................................................................ 37 Sets Pane................................................................................................................. 38 Settings Tab............................................................................................................. 39 Strokes Tab.............................................................................................................. 44 Strokes Tab Context Menu (Microsoft Windows) .................................................... 45
Style Builder User Interface...................................................................................... 46 Styles Preview Window............................................................................................. 47
Google Style Builder 1 Help
Page 1 Copyright Google Inc. 2008

Welcome to the Style Builder Getting Started Guide The Style Builder Getting Started Guide contains step-by-step instructions on how to use Style Builder. The following sections appear in this guide:
• Concepts - Defines the concepts you need to understand before using Style Builder.
• Creating a Sketchy Edge Style
1. Generating a Style Template (Microsoft Windows) and Exporting a Style Template (Mac OS X) - Explains how to create a style template.
2. Drawing and Editing Strokes - Defines how to draw and edit your strokes.
3. Transferring Strokes to the Template - Identifies how to transfer your strokes to a style template.
4. Creating a Sketchy Edge Style File - Explains how to create a sketchy edge file from a template containing strokes.
Google Style Builder 1 Help
Page 2 Copyright Google Inc. 2008

Concepts This section of the Getting Started Guide covers the concepts found within the Style Builder product and in the user community. This section was written for users who are new Style Builder.
What are Styles? A style is a predefined collection of display settings that can be applied to a model and the drawing area. Styles give a model and the drawing area a specific look-and-feel. For example, a style can consist of the blue sky color, brown ground color, gray default front face color, and purple default back face color.
One of the building blocks of a style is the edge style or the appearance of edges that will be applied to your model. One specific type of edge style is the sketchy edge which is an edge that appears to be hand drawn.
The following image shows a SketchUp model with standard vector edges.
The following image shows a SketchUp model with sketchy edges.
Google Style Builder 1 Help
Page 3 Copyright Google Inc. 2008
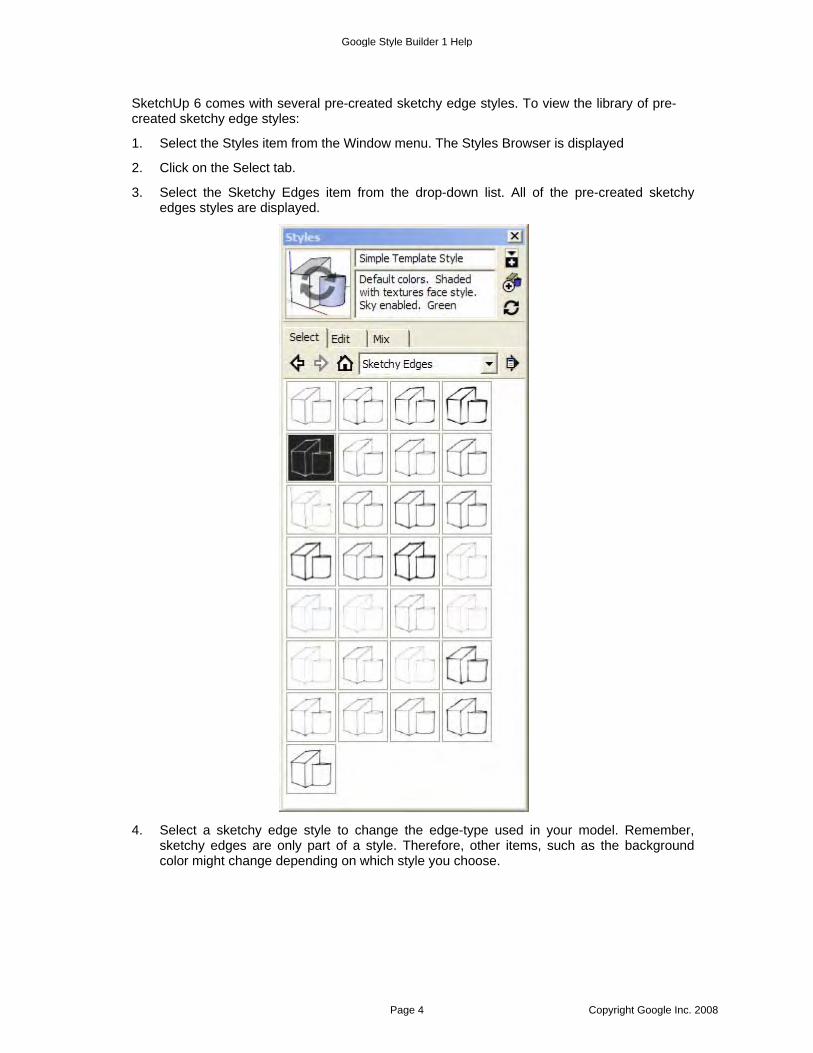
SketchUp 6 comes with several pre-created sketchy edge styles. To view the library of pre-created sketchy edge styles:
1. Select the Styles item from the Window menu. The Styles Browser is displayed
2. Click on the Select tab.
3. Select the Sketchy Edges item from the drop-down list. All of the pre-created sketchy edges styles are displayed.
4. Select a sketchy edge style to change the edge-type used in your model. Remember,
sketchy edges are only part of a style. Therefore, other items, such as the background color might change depending on which style you choose.
Google Style Builder 1 Help
Page 4 Copyright Google Inc. 2008

You can create your own sketchy edge and apply it, as part of a style, to your models in SketchUp. This customization feature allows you to create models that appear as though you drew them by hand.
Note - Style Builder saves styles with hidden line face style (to emphasize edges in the thumbnail image).
Note - Sketchy edge styles created with Style Builder can be mixed into other styles using the Mix tab of the Styles Browser.
How are Sketchy Edge Styles Constructed? A sketchy edge style is composed of multiple strokes of some length and width. Each stroke is a grayscale image that is painted on top of SketchUp’s vector edges to give the edges a hand-drawn appearance. Two or more strokes of the same length are referred to as a stroke set or just a set. For example, your style might contain a stroke set of 3 strokes that are 32 pixels in length, a stroke set containing 3 strokes that are 64 pixels in length, and a stroke set containing 3 strokes that are 128 pixels in length.
Tip - Nice hand-drawn looking sketchy edge styles have five or more stroke sets (32, 64, 128, 256, and 512 lengths). It is also best to have three or more strokes in each set. The more strokes in your style, the more hand-drawn the style will appear when applied SketchUp.
Note - All stroke sets must have the same number of strokes.
The following image shows a sketchy edge style with 5 stroke sets (32, 64, 128, 256, and 512 pixels in length). Each stroke set has 3 strokes.
The slight variation of strokes in each set allows for a hand-drawn look-and-feel for your models.
Google Style Builder 1 Help
Page 5 Copyright Google Inc. 2008
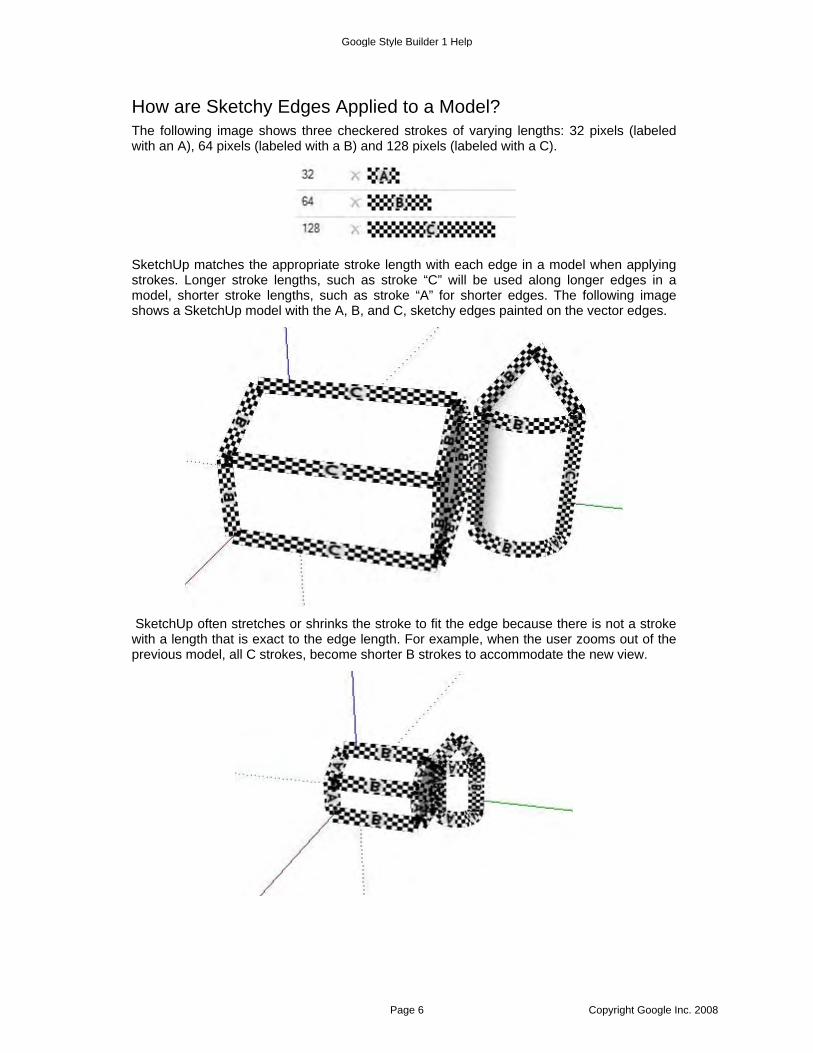
How are Sketchy Edges Applied to a Model? The following image shows three checkered strokes of varying lengths: 32 pixels (labeled with an A), 64 pixels (labeled with a B) and 128 pixels (labeled with a C).
SketchUp matches the appropriate stroke length with each edge in a model when applying strokes. Longer stroke lengths, such as stroke “C” will be used along longer edges in a model, shorter stroke lengths, such as stroke “A” for shorter edges. The following image shows a SketchUp model with the A, B, and C, sketchy edges painted on the vector edges.
SketchUp often stretches or shrinks the stroke to fit the edge because there is not a stroke with a length that is exact to the edge length. For example, when the user zooms out of the previous model, all C strokes, become shorter B strokes to accommodate the new view.
Google Style Builder 1 Help
Page 6 Copyright Google Inc. 2008

What are Templates, Style Files, and Stroke Files? Strokes can be stored in template files, style files, or stroke files.
A template file is a single image file (.png) containing fields where you can draw your strokes or place previously drawn strokes. Templates help you ensure you draw your strokes to the correct dimensions for proper alignment in SketchUp.
A sketchy edge style file (.style) contains a series of strokes that form the edge style. Predefined style files are located in the styles directory beneath the SketchUp installation directory.
Individual strokes can also be stored in image files, such as JPEG (.jpg) files. These files, termed stroke files, cannot be used directly in SketchUp, but can be opened in Style Builder and combined with other strokes to create a new sketchy edge style.
Google Style Builder 1 Help
Page 7 Copyright Google Inc. 2008

Creating a Sketchy Edge Style Sketchy edge styles can be created from strokes you draw yourself or from existing strokes (either found in a .style file or in individual stroke files). The most common method to create a new sketchy edge is to draw your strokes and copy them into a template for import into Style Builder. This method consists of the following steps:
1. Generate a style template in Style Builder. This template contains fields for the exact number and size of strokes for your style.
2. Draw and edit your strokes. There are two ways to draw your own strokes:
a. Draw strokes digitally, such as with a tablet device in an image editor.
b. Draw strokes traditionally, with pen and paper, and then scan them into a digital format. Import your scan into an image editor. This method, while more tedious then method a, is the reason for sketchy edge styles: marrying the uniqueness of traditional line drawing with digital media.
3. Transfer strokes from the image editor into template.
4. Create a sketchy edge style file.
Google Style Builder 1 Help
Page 8 Copyright Google Inc. 2008

Generating a Style Template (Microsoft Windows) One way to create a new sketchy edge style is to generate a style template from Style Builder for use in your drawing program (where you will paste your strokes). A style template is a PNG file containing drawing fields for every stroke you decide you want in your style. For example, if you want three strokes per set and you want 5 different sizes, you will have 15 drawing boxes in your template.
Note - The number of strokes you choose to have really depends on the variation of your sketchy edge style. If you have a simple style, with no variation in width per stroke, you might only need one stroke (that SketchUp can then stretch or shrink to fit a model).
To create and export a template:
1. Select "File > Generate Template..." The Style Template Generator is displayed.
2. Enter a comma-separated list of stroke lengths in the first field. Stroke lengths and widths
must be multiples of 4 pixels and should increase by 2x, such as 16, 32, 64, and so on.
3. Select the number of strokes per set (number strokes of a specific length) in your style. It is common to have at least three strokes as three will provide SketchUp with enough variation to render an authentic hand drawn look.
4. Select a stroke width for the strokes in your style.
5. Click on the "Save As" button. The Save As dialog box appears.
6. Navigate to the location for the template file.
7. Type the name of the template to save in the file name field.
Google Style Builder 1 Help
Page 9 Copyright Google Inc. 2008

8. Click on the "Save" button. The template will be saved at your predefined location as a PNG file.
Note - You can also create a sketchy edge style by combining pre-drawn strokes (strokes that appear in other styles or collections). Generally, however, most users will want to create a whole new sketchy edge style by drawing their own strokes.
The following image contains a style template file. This template has 15 fields for 15 strokes.
Google Style Builder 1 Help
Page 10 Copyright Google Inc. 2008

Generating a Style Template (Mac OS X) One way to create a new sketchy edge style is to generate a style template from Style Builder for use in your drawing program (where you will paste your strokes). A style template is a PNG file containing drawing fields for every stroke you decide you want in your style. For example, if you want three strokes per set and you want 5 different sizes, you will have 15 drawing boxes in your template.
Note - The number of strokes you choose to have really depends on the variation of your sketchy edge style. If you have a simple style, with no variation in width per stroke, you might only need one stroke (that SketchUp can then stretch or shrink to fit a model).
To create and export a template:
1. Select "File > Generate Template..." The Style Template Generator is displayed.
2. Enter a comma-separated list of stroke lengths in the Sets field. Stroke lengths and widths
must be multiples of 4 pixels and should increase by 2x, such as 16, 32, 64, and so on.
3. Select the number of strokes per set (number strokes of a specific length) in your style. It is common to have at least three strokes as three will provide SketchUp with enough variation to render an authentic hand drawn look.
4. Select a stroke width for the strokes in your style. The width must also be a multiple of 4 pixels and is identical for all strokes in the style.
5. Click the down arrow next to the Save As field. The file navigator is displayed.
6. Navigate to the location for the template file.
7. Type the name of the template to save in the Save As field.
Google Style Builder 1 Help
Page 11 Copyright Google Inc. 2008

8. Click on the "Save" button. The template will be saved at your predefined location as a PNG file.
Note - You can also create a sketchy edge style by combining pre-drawn strokes (strokes that appear in other styles or collections). Generally, however, most users will want to create a whole new sketchy edge style by drawing their own strokes.
The following image contains a style template file. This template has 15 fields for 15 strokes.
Google Style Builder 1 Help
Page 12 Copyright Google Inc. 2008

Drawing and Editing Strokes Creating strokes for import into a template is a two part process: draw your strokes and then edit your strokes to ensure they will appear correctly as a sketchy edge.
Drawing Strokes To draw your strokes:
1. Load a drawing program, such as Adobe Photoshop.
2. Create a series of strokes. You will want to create a minimum of 5 stroke sets (each of varying length) with 3 strokes per set. You can create as many strokes as you like during this step, the goal is to achieve strokes that are similar in length, as straight as possible, and look as though you drew them by hand. There are two ways to draw your strokes:
a. Draw your strokes by hand on paper and scan to create an image file.This method will obtain the most hand-drawn strokes.
b. Draw your strokes directly in a drawing program.
Google Style Builder 1 Help
Page 13 Copyright Google Inc. 2008
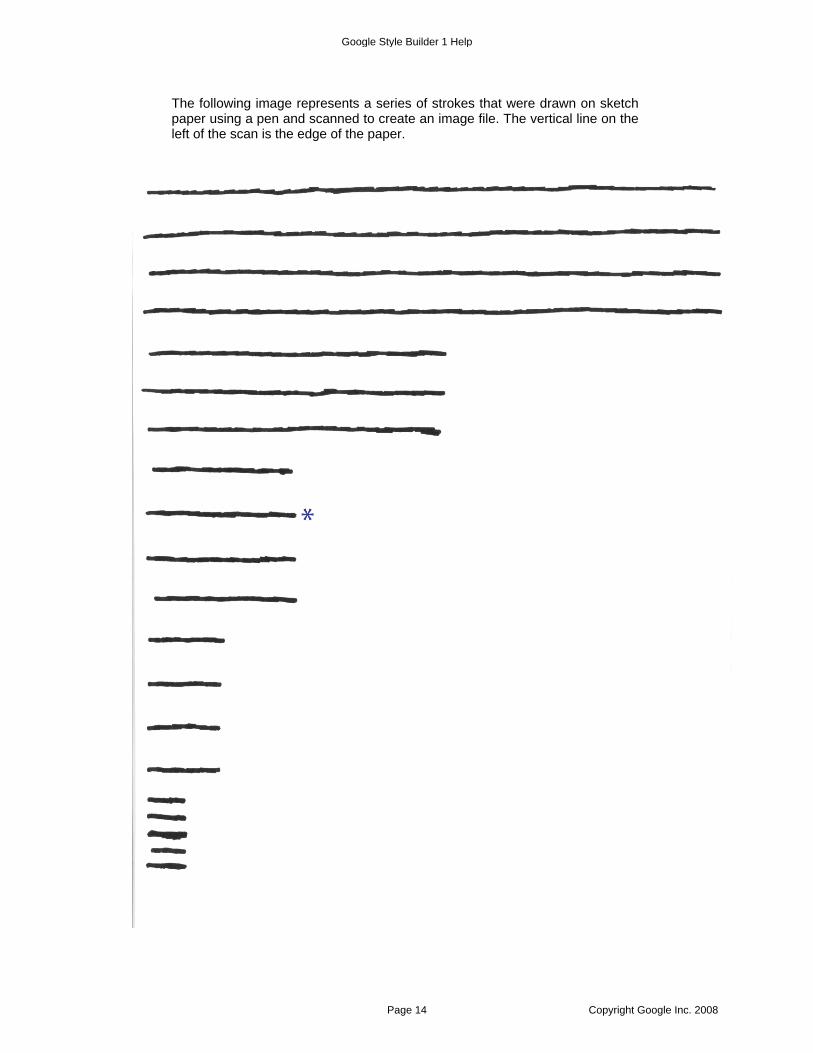
The following image represents a series of strokes that were drawn on sketch paper using a pen and scanned to create an image file. The vertical line on the left of the scan is the edge of the paper.
Google Style Builder 1 Help
Page 14 Copyright Google Inc. 2008

Editing Strokes The strokes that you draw by hand will likely not be of the correct number of pixels when scanned. Also, these strokes might be askew or contain a background color other than white. Therefore, you must edit the strokes as part of placement into the Style Template. To edit individual strokes in an image editor, such as PhotoShop:
1. Select the Rectangular Marquee Tool ( )
2. Change the Style to Fixed Aspect Ratio .
3. Enter a width (length) representing the length, in pixels, of the stroke you will edit. The width and height should match one of the sizes used in your template. For example, 128 width and 16 height. These dimensions will constrain the selection box to your particular aspect ratio (and allow you to reduce the stroke to the correct size in pixels).
4. Zoom in on the stroke. The stroke in this example is the stroke with the asterisk in the previous image.
5. Draw a selection box around the stroke you want to edit. Ensure the selection box just touches the ends of your stroke. The following image shows the selected stroke.
6. Copy the stroke to the clipboard.
7. Select "File > New" to create a new document.
8. Paste the stroke to the new document window. The following image shows the stroke before adjustments.
9. Make adjustments to the stroke. The following adjustments might be made:
• Ensure the background is white by removing as much gray as possible.
• Ensure the stroke is straight such that both ends end at approximately the middle of the document area.
• Ensure the stroke fills the full length of the document area.
• Scale the stroke to the correct size in pixels.
The following image shows the stroke after it has been edited. This stroke is now officially 128 pixels long by 16 pixels wide and has been rotated slightly to be straight.
10. Select "File > Save" to save your stroke file as a bitmap file. You should end up with a
stroke file for each individual stroke you edit.
Google Style Builder 1 Help
Page 15 Copyright Google Inc. 2008

11. Repeat steps 1 to 10 for each stroke in your sketchy edge style.
Note - You might wonder why you simply do not draw your strokes directly in the style template. Generally it is hard to create a good, natural, stroke when you are confined to the border of the template boxes. That’s why it is recommended that you draw the strokes first, edit them, and then paste them to the confines of the template boxes.
Google Style Builder 1 Help
Page 16 Copyright Google Inc. 2008

Transferring Strokes to the Template You can transfer your strokes to the template file once you have an edited set of strokes. To transfer a stroke:
1. Load the style template in an image editor, such as PhotoShop.
2. Load a stroke file in an image editor, such as PhotoShop.
3. Copy and paste the stroke to its respective place in the template file. Ensure stroke fits the boarder of the template field and that ends of the strokes align with middle of template field. The following image contains a style template file containing the new stroke.
Google Style Builder 1 Help
Page 17 Copyright Google Inc. 2008

4. Repeat steps 2 and 3 until the template is filled. The following image shows a filled template.
Google Style Builder 1 Help
Page 18 Copyright Google Inc. 2008

Creating a Sketchy Edge Style File You can create a style file from within Style Builder. This style file will contain your sketchy edge and default values for other style attributes, such as sky and ground color, front and back face color, and so on. To create a sketchy edge style file:
1. Use the "File > Load Template" (Microsoft Windows) or "File > Open Template..." (Mac OS X) menu item to load your previously created template (now containing strokes). Each of the strokes appears in the Strokes tab, within sets in the Sets Pane, and are applied to the sample model in the Style Preview pane. The following image shows Style Builder with the strokes from TestStyleTemplateFilled.png template.
2. (optional) Use the menu items in the Strokes menu to load additional strokes from folders
(collections), other styles, or other templates.
Note - Strokes loaded using these menu items will appear only in the Strokes tab. Then you must drag-and-drop the strokes from the stroke tab to the Sets Pane to include them in your style.
3. Zoom, pan, and rotate the model in the style preview window to examine how your sketchy edges will be applied. Refer to the Style Preview Window section for further information on using the zoom, pan, and orbit functions with a three-button mouse.
4. Click on the "Settings" tab and provide a style name.
Google Style Builder 1 Help
Page 19 Copyright Google Inc. 2008

5. (optional) Adjust other style settings within the Settings tab. Refer to the Settings Tab section for further information.
6. (optional) Zoom, pan, and rotate the model in the style preview window to examine how additional style settings affect your style. Make adjustments as necessary.
7. Select "File > Save" to save your new style when you are satisfied with the result.
Note - You will receive a warning if your style contains any empty grey boxes (unless you turned off the warning by unchecking the checkbox in the "Edit > Preferences" (Microsoft Windows) or "Style Builder > Preferences" (Mac OS X) dialog box. You will also receive a warning if your style does not contain a style name (refer to the Settings Tab section for further information).
Google Style Builder 1 Help
Page 20 Copyright Google Inc. 2008

Welcome to the Style Builder User's Guide The Style Builder p User's Guide contains step-by-step instructions on how to perform most all basic Style Builder tasks. The content in this guide answers the "How Do I..." questions of end-users.
Google Style Builder 1 Help
Page 21 Copyright Google Inc. 2008

Adding Strokes to a Style You can drag and drop strokes from the Strokes tab directly into empty grey boxes in the Sets Pane (if they exist). You can also drag and drop strokes from the Strokes tab, above or below current strokes in the Sets Pane. Keep in mind, however, that all sets in the Sets Pane, must have the same number of strokes. So, if all sets in the Sets Pane have 1 stroke, and you add another stroke to one of the sets, the Style Builder will automatically create a blank stroke in the remaining sets to even out the sets. The following image shows the Sets Pane with four sets, each with a single stroke.
The following image shows the Sets Pane after a second stroke has been added to the first set (the set whose stroke size is 32). Notice that all of the other sets (64, 129, and 256) have been expanded to accommodate the same number of strokes as the first set. This expansion is accomplished by adding empty grey boxes, or blank strokes, in the remaining sets.
Note - You will want to have the same number of strokes per set before you save your style, otherwise the empty gray boxes will appear in SketchUp as part of your style. You can fill in the blanks by adding duplicate strokes as in the previous image where two of the same 32 pixel strokes were used.
Google Style Builder 1 Help
Page 22 Copyright Google Inc. 2008

Deleting Libraries of Strokes (Mac OS X) Highlight a stroke library name in the Strokes tab and then select the "Strokes > Remove Stroke" menu item to remove the stroke library from the Strokes tab.
Google Style Builder 1 Help
Page 23 Copyright Google Inc. 2008

Deleting Library of Strokes (Microsoft Windows) Click on the "X" ( ), next to library of strokes in the Strokes tab, to remove the library.
Google Style Builder 1 Help
Page 24 Copyright Google Inc. 2008

Deleting Strokes Click on the eraser icon ( ) next to any stroke,in the Sets Pane, to replace the stroke with an empty gray box.
Google Style Builder 1 Help
Page 25 Copyright Google Inc. 2008

Welcome to the Style Builder Reference Guide The Style Builder Reference contains descriptions for all of the features in Style Builder. The reference specifically addresses all features found in the user interface, from menu items to specific dialog box options.
Google Style Builder 1 Help
Page 26 Copyright Google Inc. 2008

Style Builder Menu (Mac OS X) The Style Builder Menu contains menu items that control the Style Builder application, including items to show and hide Style Builder and application preferences.
About Style Builder Use the About Style Builder menu item to display the About Style Builder dialog box, containing the Style Builder version number, technical support contact information, and a link to the SketchUp web site.
Preferences Use the Preferences menu item to display Style Builder's application preferences for setting various global settings for the program.
Check for Update Use the Check for Update menu item to check if you have the most current version of Style Builder. You will be prompted to download the current version if your version is out-of-date. A Internet connection is required to use this feature.
Services The Services menu item provides access to Mac OS X's system-wide services, which might vary on different computers depending on additional functionality of your other applications.
Hide Style Builder Use the Hide Style Builder menu item to hide Style Builder and all of its open windows, allowing you access to other programs running in Mac OS X. Clicking on the Style Builder icon in your Dock returns Style Builder to view.
Hide Others Use the Hide Others menu item to hide all visible applications except Style Builder allowing you to focus on Style Builder alone. Clicking on any icon in the doc will return that application to view.
Show All Use the Show All menu item to unhide all running programs in Mac OS X.
Quit Style Builder Use the Quit Style Builder menu item to quite Style Builder and close all open documents. You will be prompted to save any unsaved work before Style Builder exits.
Google Style Builder 1 Help
Page 27 Copyright Google Inc. 2008

File Menu (Microsoft Windows) The File menu contains menu items for creating and loading templates. This menu is also used for loading and saving styles.
New Use the New menu item to start a new style.
Open... Use the Open menu item to open an existing style, such as from the installation directory for SketchUp. The opened style will populate the Strokes tab, Sets pane, and Style Preview window.
Save Use the Save menu item to save the current style, as it appears in the Sets Pane and preview window, to a file (.style).
Save As... Use the Save As… menu item to save the current style, as it appears in the Sets Pane in the preview window, to a file (.style) with a new name.
Load Template... Use the Load Template menu item to load a previously created template. The opened template's strokes will populate the Strokes tab, Sets pane, and Style Preview window.
Generate Template... Use the Generate Template menu item to create a new template image. Refer to Step 1: Creating a Style Template for further information.
Exit Use the Exit menu item to exit the Style Builder program.
Google Style Builder 1 Help
Page 28 Copyright Google Inc. 2008

File Menu (Mac OS X) The File menu contains menu items for creating and loading templates. This menu is also used for loading and saving styles.
New Use the New menu item to create a new, blank, Style Builder window.
Open... Use the Open menu item to open an existing style file, such as from the installation directory for SketchUp. The opened style will populate the Strokes tab, Sets pane, and Style Preview window.
Open Template... Use the Open Template menu item to load a previously created template in a new Style Builder window. The opened template's strokes will populate the Strokes tab, Sets pane, and Style Preview window.
Open Recent Use the Open Recent menu item to select a recently opened file from a list of files.
Close Use the Close menu item to close the currently active Style Builder window.
Save Use the Save menu item to save the current style, as it appears in the Sets Pane and preview window, to a file (.style).
Save As... Use the Save As… menu item to save the current style, as it appears in the Sets Pane in the preview window, to a file (.style) with a new name.
Generate Template... Use the Generate Template menu item to create a new template image. Refer to Step 1: Creating a Style Template for further information.
Google Style Builder 1 Help
Page 29 Copyright Google Inc. 2008

Edit Menu (Microsoft Windows) The edit menu contains menu items for undoing and redoing your changes.
Undo Use the Undo menu item to undo your previous command.
Redo Use the Redo menu item to redo your previously undone command.
Preferences Use the Preferences menu item to display the Preferences dialog box. Refer to the Preferences Dialog Box section later in this document for further information.
Google Style Builder 1 Help
Page 30 Copyright Google Inc. 2008

Edit Menu (Mac OS X) The edit menu contains menu items for undoing and redoing your changes.
Undo Use the Undo menu item to undo your previous command.
Redo Use the Redo menu item to redo your previously undone command.
Cut Use the Cut menu item to remove text from the Style Builder window and place it in the clipboard. The contents of the clipboard can then be inserted back into any open Style Builder document by using the Paste menu item.
Contents of the clipboard will remain on the clipboard until replaced with other content using an additional Cut or a Copy command.
Copy Use the Copy menu item to copy text to the clipboard without deleting the items from the Style Builder window. The contents of the clipboard can then be inserted back into any open Style Builder document by using the Paste menu item.
Contents of the clipboard will remain on the clipboard until replaced with other content using an additional Cut or a Copy operation.
Paste Use the Paste menu item to paste text from clipboard into the current Style Builder document. The pasted items will be placed at the location of the cursor.
Delete Use the Delete menu item to remove the currently selected items from your document.
Select All Use the Select All menu item to select all selectable items in the document.
Special Characters... Use the Special Characters menu item to insert special characters, such as mathematical symbols, letters with accent marks, and arrows into your document. Refer to the Mac OS X help system for additional help on this feature.
Google Style Builder 1 Help
Page 31 Copyright Google Inc. 2008

Strokes Menu (Microsoft Windows) The Strokes menu contains menu items for loading strokes from folders (collections), styles, and templates. Strokes loaded using these menu items only appear in the Strokes tab.
Load From Folder... Use the Load From Folder menu item to load a collection of strokes stored in a folder. Simply select a folder of stroke files (individual files, each containing a single stroke) to load all the strokes in the folder. The opened stroke will populate the Strokes tab.
Note - Files containing strokes can be of the png and jpeg file type.
Load From Style... Use the Load From Style menu item to load a collection of strokes stored in a style file. Simply select a style file (.style) from the file system to load. The opened stroke will populate the Strokes tab.
Load From Template... Use the Load From Template menu item to load a collection of strokes stored in a template file. Simply select a template file (.PNG file) from the file system to load. The opened stroke will populate the Strokes tab.
Google Style Builder 1 Help
Page 32 Copyright Google Inc. 2008

Strokes Menu (Mac OS X) The Strokes menu contains menu items for loading strokes from folders (collections), styles, and templates. Strokes loaded using these menu items only appear in the Strokes tab.
Load From Folder... Use the Load From Folder menu item to load a collection of strokes stored in a folder. Simply select a folder of stroke files (individual files, each containing a single stroke) to load all the strokes in the folder. The opened stroke will populate the Strokes tab.
Note - Files containing strokes can be of the png and jpeg file type.
Load From Style... Use the Load From Style menu item to load a collection of strokes stored in a style file. Simply select a style file (.style) from the file system to load. The opened stroke will populate the Strokes tab.
Load From Template... Use the Load From Template menu item to load a collection of strokes stored in a template file. Simply select a template file (.PNG file) from the file system to load. The opened stroke will populate the Strokes tab.
Remove Strokes... Use the Remove Strokes menu item to remove the currently selected stroke set in the Strokes tab.
Google Style Builder 1 Help
Page 33 Copyright Google Inc. 2008

Preview Menu The Preview menu contains a menu item allowing you to load a different SketchUp model into the Style Preview window.
Change Model... Use the Change Model option to load a new SketchUp model into the Style Preview window.
Google Style Builder 1 Help
Page 34 Copyright Google Inc. 2008

Help Menu (Microsoft Windows) The Help menu contains items relating to receiving help with the product. These items include theStyle Builde r on-line help, a quick reference card, and video tutorials.
Online Help Center The Online Help Center menu item invokes your default web browser and connects you to the Online Help Center. The web site contains support articles, additional training information, and links to user forums and other resources.
Contact Us Select the Contact Us menu to contact Google SketchUp technical support.
Check for Update The Check For Update menu item checks to see if you have the most current version of SketchUp. You will be prompted to download the current version if your version is out-of-date. An Internet connection is required to use this feature.
About Style Builder... The About Style Builder menu item activates the About Style Builder dialog box. This dialog box provides information about your Style Builder version.
Google Style Builder 1 Help
Page 35 Copyright Google Inc. 2008

Help Menu (Mac OS X) The Help menu contains items relating to receiving help with the product. These items include the Style Builder on-line help, a quick reference card, and video tutorials.
Online Help Center The Online Help Center menu item invokes your default web browser and connects you to the Online Help Center. The web site contains support articles, additional training information, and links to user forums and other resources.
Contact Us Select the Contact Us menu to contact Google SketchUp technical support.
Google Style Builder 1 Help
Page 36 Copyright Google Inc. 2008

Preferences Dialog Box The Preferences dialog box (Edit > Preferences) contains settings for Style Builder.
Saving The Saving section of the Preferences dialog box contains warning settings appearing when saving a style.
Warn When The Style Contains Blank Strokes Check this box if you want to receive a warning when your style has blank strokes. Blank strokes will appear as 50% transparent gray boxes, that are as wide as the stroke width, in SketchUp.
Warn When the Style Has No Name Check this box if you want to receive a warning when your style has no name.
Strokes The Strokes section of the Preferences dialog box contains settings affecting the appearance of strokes in your style.
Apply Auto-Contrast to Strokes When Added to the Style Check the Apply auto-contrast to stroke when added to the style when you want pixels added automatically to the stroke to achieve a better balance between bright and dark pixels.
Always Warn Me When the Length of a Stroke Image Must be Adjusted Check the Always warn me when the length of a stroke image must be adjusted checkbox if you want Style Builder to warn you when you place a stroke in a set whose set length is larger than the stroke length.
When the Width of a Stroke Image Must be Adjusted Select one item from the list to identify how Style Builder should adjust the width of a stroke (when it must do so automatically).
Scale the image: Select the Scale the image option to have the stroke stretched to fit new width.
Crop or pad the image: Select the Crop or pad the image to either remove pixels to make stroke thinner or add pixels to make it wider.
Ask me what to do: Select the Ask me what to do option to have Style Builder prompt you for an option when the width of a stroke must be adjusted.
Google Style Builder 1 Help
Page 37 Copyright Google Inc. 2008

Sets Pane The Sets Pane contains all of the strokes that will be contained in your saved style. The Sets pane has five empty sets of strokes, 32, 64, 128, 256, and 512 pixel in length, by default. There are empty gray boxes in the Sets Pane to accept new strokes. You populate the Sets Pane by either loading a Template, using File > Load Template (Microsoft Windows), File > Open Template (Mac OS X), or by loading Strokes using the menu items in the Strokes menu and dragging and dropping those strokes into the Sets Pane.
Note - Strokes loaded using the File > Load Template (Microsoft Window) or File > Open Template (Mac OS X) menu item will automatically populate the Sets Pane. Strokes loaded using menu items in the Strokes menu will populate the Strokes tab and must be dragged and dropped into the Sets Pane.
Lengths Click on the plus button next to the Lengths field to display a list of common stroke set sizes. Select a stroke length to add to the style, or click on the Other option and enter a custom stroke length.
Strokes Select the number of strokes per set from the Strokes drop-down list. The greater the number of strokes per set, the more hand drawn your model will appear.
Width Click on width drop-down list to change the width of all of the strokes. Select a stroke width from the drop-down list. Depending on the settings in the Preferences dialog box, a warning message will either appear or your strokes will automatically be resized to the new width. Refer to the Preferences Dialog Box for further information.
X Click on the X ( ), next to any set, to remove the set.
Eraser Icon Click on the eraser icon ( ) next to any stroke, to replace the stroke with an empty gray box.
Google Style Builder 1 Help
Page 38 Copyright Google Inc. 2008

Settings Tab The Settings tab contains global settings for all strokes appearing in the Sets Pane. The following image contains the Settings tab. The following image contains an image of the Settings tab:
Style Name Type in a style name to appear in SketchUp when the style is loaded.
Strokes The Strokes section contains settings that affect stroke length, fade, and color.
Dropout length Type in a percentage value used to determine when strokes should drop from view. Dropout length can be specifically defined as a percentage of the diagonal length of the Style Preview Window from zero to 100 percent.
If the Dropout length is set to 5.0, edges will not be displayed when their length is shorter than 5% of the Style Preview window's diagonal length.
Note - Dropout length is only editable from Style Builder (not SketchUp).
Google Style Builder 1 Help
Page 39 Copyright Google Inc. 2008

Fade factor Type a fade factor value used to determine when small strokes start fading from view. Fade factor is a multiple of dropout length. If the dropout length is 5% and the fade factor is 4, the edges will begin to fade when they reach 20% of the diagonal of the Style Preview window in length.
If the Fade factor is then set to 4.0, edges will start fading from black to gray when their length is shorter than 20% (5.0 x 4.0) of the Style Preview window's diagonal length.
Note - Fade factor is only editable from Style Builder (not SketchUp).
Color Click on the Color swatch to change the color of the strokes (displayed in SketchUp). The Color dialog box is displayed. Click on a new color. Click on the OK button.
Edge Effects The Edge Effects section contains settings that affect a stroke's appearance.
Google Style Builder 1 Help
Page 40 Copyright Google Inc. 2008

Halo Check the Halo checkbox to create a halo affect where lines overlap in your model by ending lines, that would normally overlap, a certain distance away from the overlap point.
Type a number (pixels) in the halo text field representing the distance away from the intersection where lines will end. The following images show two cubes with a sketchy edge. The two cubes on the left have no special edge effects enabled. The two cubes on the right have a halo effect enabled with the overlapping lines ending 15 pixels before they overlap.
Google Style Builder 1 Help
Page 41 Copyright Google Inc. 2008

Extensions Check the Extension checkbox to extend each line slightly past its endpoint, giving your model hand-drawn sketched appearance. This edge rendering style does not affect inference behavior. Enter a length, in pixels, for the extension lines in the pixels field. The following images show two cubes with a sketchy edge. The cube on the left has no special edge effects enabled. The cube right has extension lines of 15 pixels enabled.
Profiles Check the Profiles checkbox to emphasize the outer lines or profiles of major shapes in your model. This style is particularly useful in ensuring the 3D nature of geometry is emphasized and borrows from a proven traditional media drawing technique. The cube on the left has no special edge effects enabled. The cube on the right has profile lines enabled. Notice that the outer lines on right cube are slightly more emphasized (thicker).
Google Style Builder 1 Help
Page 42 Copyright Google Inc. 2008

Depth cueing Check the Depth cueing checkbox to emphasize the lines of the sample model in the foreground over the lines of sample model in the background. The following images show two cubes with a sketchy edge. The cube on the left has no special edge effects enabled. The cube on the right has depth cueing enabled. Notice that the edges on right cube get progressively thinner from front to back.
Google Style Builder 1 Help
Page 43 Copyright Google Inc. 2008

Strokes Tab The Strokes tab displays all of the available strokes that can be combined, in the Sets Pane, to create a sketchy edge style. Click on the down arrow next to a library of strokes to minimize or maximize the library of strokes. Drag-and-drop strokes to the Sets Pane to design a new sketchy edge style. The following image contains the Strokes tab.
Note - An X ( ) is placed next to strokes loaded using items in the Strokes menu. Click on the "X" to remove library of strokes from the Strokes tab. This option is only available on Microsoft Windows. Mac OS X users must select the stroke library name and then use the Strokes > Remove Stroke menu item to delete a stroke library.
Google Style Builder 1 Help
Page 44 Copyright Google Inc. 2008

Strokes Tab Context Menu (Microsoft Windows) Context-click (right-click) on any stroke library title to invoke a context menu. The following menu items appear:
Add Strokes to Current Style Use the Add strokes to current style to automatically populate the Sets Pane with all strokes from the stroke library. You can perform this option on multiple stroke libraries as a way to combine libraries into a single style.
Create New Style With Strokes Use the Create new style with strokes option to automatically populate the Sets Pane with all strokes from the stroke library. Unlike the Add strokes to current style menu item, this menu item is not additive; it will not add strokes from two different libraries into the Sets Pane.
Google Style Builder 1 Help
Page 45 Copyright Google Inc. 2008

Style Builder User Interface The Style Builder user interface consists of menus (1), a Strokes tab (2), a Settings tab (3), a Sets pane (4), and a Style Preview window (5).
Note - The user interface for Microsoft Windows and Mac OS X is identical except in two places: there are a few differences between menu items and there is no icon ( ) on Mac OS X to delete an entire collection of strokes (in the Strokes tab). Mac OS X users must select the stroke library name and then use the Strokes > Remove Stroke menu item to delete a stroke library.
Google Style Builder 1 Help
Page 46 Copyright Google Inc. 2008

Styles Preview Window The Style Preview window provides a preview of a model with the strokes in the Sets Pane. Refer to the SketchUp documentation for further information on these tools.
The Orbit Tool ( ) Click on the Orbit tool and click and hold the left mouse button in the preview window to rotate the model. Alternatively, click on the middle mouse wheel and move the mouse to rotate the model.
The Pan Tool ( ) Click on the Pan tool and click and hold the left mouse button in the preview window to pan the model. Alternatively, press and hold the "Shift" Key, click on the middle mouse button and move the mouse to pan.
The Zoom Tool ( ) Click on the Zoom tool, click and hold the left mouse button, move the mouse forward or backward in the preview window to zoom in or zoom out. Alternatively, click and roll the middle mouse button forward to zoom in on the model or click and roll the middle mouse button back to zoom out from the model.
The Zoom Extents Tool ( ) Click on the Zoom Extents tool to center the sample model within the Style Preview pane.
The Show/Hide Shadows Button ( ) Click on the Show/Hide Shadows button to toggle the display of shadows.
Google Style Builder 1 Help
Page 47 Copyright Google Inc. 2008