`çåíÉåíë sony ericsson z - cellphones.ca
TRANSCRIPT

This is the Internet version of the user's guide. © Print only for private use.
1
`çåíÉåíë
Getting started .............................................. 3SIM card, battery, make a call
Getting to know your phone........................ 6Key functions, quick keys, entering letters
Personalizing your phone.......................... 15Choose ring signal, theme and other settings
Calling.......................................................... 22Use the phonebook, call options
Setting up WAP........................................... 37WAP browser
Messaging ................................................... 42Text messaging
Using WAP................................................... 48WAP browser, bookmarks
More features .............................................. 51Alarm clock, stopwatch, calculator, calendar, games
Security........................................................ 54SIM card lock, phone lock
Troubleshooting.......................................... 56Why doesn’t the phone work the way I want?
Additional information................................ 58Safe and efficient use, warranty, declaration
of conformity
Icons............................................................. 66
Index............................................................. 70
Sony Ericsson Z200

ivate use.
Guidelines for safe and efficient use warranty chapters before you use your
is a trademark or a registered gic Communications.
is licensed under one or more of .S. Pat. Nos. 5,818,437, 5,953,541, 5,928, and 6,011,554; Canadian Pat. United Kingdom Pat. No. 2238414B; ndard Pat. No. HK0940329; Republic t. No. 51383; Euro. Pat. No. 0 842 463 E/DK, FI, FR, IT, NL, PT, ES, SE, GB; atents are pending worldwide.
nd company names may be the heir respective owners.
xpressly granted herein are reserved.
This is the Internet version of the user's guide. © Print only for pr
2
Sony EricssonGSM 900/1800/1900
Second edition (July 2003)This user guide is published by Sony Ericsson Mobile Communications AB, without any warranty. Improvements and changes to this user guide necessitated by typographical errors, inaccuracies of current information, or improvements to programs and/or equipment, may be made by Sony Ericsson Mobile Communications AB at any time and without notice. Such changes will, however, be incorporated into new editions of this user guide.
All rights reserved.© Sony Ericsson Mobile Communications AB, 2003
Publication number: EN/LZT 108 6475 R2A.
Please note:Some of the services in this user guide are not supported by all networks. This also applies to the GSM International Emergency Number 112.
Please contact your network operator or service provider if you are in doubt whether you can use a particular service or not.
Please read theand the Limitedmobile phone.
T9™ Text Inputtrademark of Te
T9™ Text Inputthe following: U5,187,480, 5,94No. 1,331,057, Hong Kong Staof Singapore Pa(96927260.8) Dand additional p
Other product atrademarks of t
Any rights not e

ivate use.
Getting started 3
ster as a subscriber with a network et a SIM (Subscriber Identity The SIM card contains a computer track of your phone number, the ed in your subscription, and your ormation, among other things.
our information is saved to the
e you remove it from another phone.
honebook entries may be saved in
ory.
use your phone you need to:M card.harge the battery.
This is the Internet version of the user's guide. © Print only for pr
Getting started
SIM card, battery, make a call
About this user’s guideFor ease of reference, the “Getting to know your phone” chapter gives a quick overview of the main functions of the phone, shortcuts and general information.
More information and downloads are available at www.SonyEricsson.com or wap.SonyEricsson.com.
Available servicesSome services and functions described in this user’s guide are network- or subscription-dependent. Because of this, all menus may not be available in your phone.
This symbol indicates that a service or function is network or subscription dependent.
Please consult your network operator for more information about your subscription.
The SIM cardWhen you regioperator, you gModule) card. chip that keepsservices includphonebook inf
Tip: Check if y
SIM card befor
For example, p
the phone mem
AssemblyBefore you can• Insert the SI• Attach and c

ivate use.
IM card and charge the batterycard. Make sure the SIM card is e silvery holders.
ry on the back of the phone with the ing each other, and push until you
cover into the slots on the phone you hear a click.arger to the phone at the flash symbol l on the charger plug facing upwards.to 30 minutes before the battery ppears in the display.ately 4 hours or until the icon he battery is fully charged. If you do ery icon after this time, press any key display.arger by tilting the plug upwards.
e phone and making callsonal Identity Number) is provided k operator but not all operators o activate services.starts with the same digits as an ber, for example 112, the digits
with an * when you enter them.
This is the Internet version of the user's guide. © Print only for pr
4 Getting started
SIM card and battery informationAlways turn off the phone and detach the charger before you insert or remove a SIM card.
To insert the S1. Insert the SIM
placed under th2. Place the batte
connectors fachear a click.
3. Place the back and push until
4. Connect the chwith the symbo
5. It may take up charging icon a
6. Wait approximindicates that tnot see the battto activate the
7. Remove the ch
Turning on thYour PIN (Persby your networrequire a PIN t
If your PIN emergency numare not hidden
ivate use.
Getting started 5
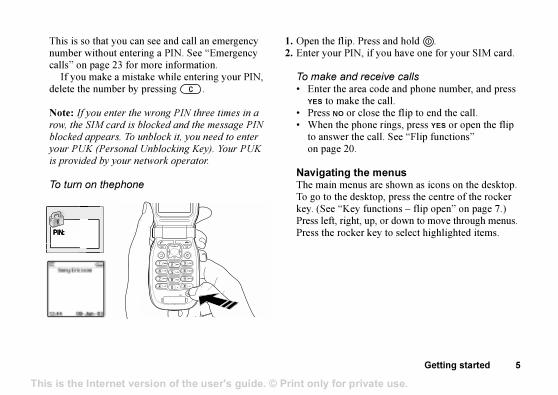
ress and hold ., if you have one for your SIM card.
receive callsa code and phone number, and press the call.close the flip to end the call.one rings, press YES or open the flip e call. See “Flip functions”
e menuss are shown as icons on the desktop.
sktop, press the centre of the rocker functions – flip open” on page 7.) , up, or down to move through menus. r key to select highlighted items.
This is the Internet version of the user's guide. © Print only for pr
This is so that you can see and call an emergency number without entering a PIN. See “Emergency calls” on page 23 for more information.
If you make a mistake while entering your PIN, delete the number by pressing .
Note: If you enter the wrong PIN three times in a
row, the SIM card is blocked and the message PIN
blocked appears. To unblock it, you need to enter
your PUK (Personal Unblocking Key). Your PUK
is provided by your network operator.
To turn on thephone
1. Open the flip. P2. Enter your PIN
To make and • Enter the are
YES to make• Press NO or • When the ph
to answer thon page 20.
Navigating thThe main menuTo go to the dekey. (See “KeyPress left, rightPress the rocke

ivate use.
attery atus
A red light indicates charging or low battery.
tatus splay
Shows, for example, the time, battery status, network strength, profile, signal off, incoming call, missed call, new text message.
This is the Internet version of the user's guide. © Print only for pr
6 Getting to know your phone
Getting to know your phone
Key functions, quick keys, entering letters
Key functions – flip closed
Volume keys
Increase or decrease the speaker volume during a call. Enter the status menu in standby. Press twice to reject an incoming call. Press once to turn off the ring signal when receiving a call.
Infrared Exchange data via the IR port.
Bst
Sdi

ivate use.
Getting to know your phone 7
calls. Select a menu, submenu or
ey. Press to enter the desktop menus. down, left, right to move through sts and texts. rocker key as an alternative to . options or help. Press and hold .and letters.
Shift between lower or upper case.
ject a call, go back one level in the n option unchanged. Press and hold to y mode from menus.mbers, letters or an item from a list.
r a space.
hold to switch the phone on or off.
This is the Internet version of the user's guide. © Print only for pr
Key functions – flip open
1
2
345
6
7
8
9
10
1112
1 Speaker.
2 Main display.
3 Make and answeran option.
4 Rocker kPress up,menus, liPress the
5 Press forfor WAP
6 Enter digits, 0-9,
7 Enter *.
8 Microphone.
9 Press to end or remenus, or leave ago back to standb
10 Delete nu
11 Enter # o
12 Press and

ivate use.
number sition.
press the position number and
press any of the number keys – and YES
s menu date, se and the f the phone
press a volume key once.
guage press 8888
guage press 0000
quickly press a volume key twice when receiving a call or press NO
In standby when flip
is closed:
ation y
press a volume key once
When in standby:
This is the Internet version of the user's guide. © Print only for pr
8 Getting to know your phone
Quick keysUseful key combinations (using shortcuts) are described below.
To... When in standby:
make an emergency call enter the international emergency number and press YES
enter the menus press the rocker key or
enter the first submenu in My shortcuts
press
enter Find and call press or
enter Call list press YES
call your voice mail press and hold
enter the + sign press and hold
turn off the ring signal when receiving a call
press , or a volume key once
set the phone to silent, options
press and hold orpress , YES
reach a phonebook entry beginning with a specific letter
press and hold any of the keys –
reach a phone at a specific po
speed dial
enter the Statu
to see today’s the profile in umodel name o
change the lanto Automatic
change the lanto English
reject a call
To...
change informin status displa
To...

ivate use.
Getting to know your phone 9
ultitap or methods
press and hold
nput other meric input
press and hold
When entering letters
using multitap text input:
press
When entering letters
using T9™ Text Input:
e words press or and add a press
p press
e arks
press , then or repeatedly
When entering letters:
This is the Internet version of the user's guide. © Print only for pr
To... During a call:
put a call on hold press YESretrieve a call press YES again
To... When in the menus:
move through menus or lists
use the rocker key or press a volume key
enter a quick options menu or help, if available
press
delete an item press and hold when in lists
go back to standby press and hold NO
To... When entering letters:
shift between capital and lower-case letters
press , then the letter
enter numbers press and hold any of the number keys
delete letters and numbers press
shift between mT9 Text input shift between ilanguages andcharacter or numethods
To...
enter a space
To...
view alternativaccept a word spaceenter a full sto
view alternativpunctuation m
To...

ivate use.
ess are customized d by network operators, of mobile phones and mobile turers.
which supports Online services works y as a normal SIM card. When you our SIM card and turned on your twork operator can download data rd. When you restart your phone after wnload, a new submenu appears ectivity menu.
u only appears if your SIM card
rvice. Some operators may not use
ine services”. Your phone may not
he services offered.
new menu systemectivity, YES, Online services, YES.
This is the Internet version of the user's guide. © Print only for pr
10 Getting to know your phone
Using shortcutsA quicker way to move through the menus is to use shortcuts. Enter the menus by pressing and then simply press the rocker key to enter the menu. To get back to standby, press and hold NO.
You can quickly and easily reach the settings you use most by placing them in the menu My shortcuts. See “My shortcuts” on page 20.
Delete, edit and renameIf you add items, for example, a phonebook entry, a calendar item or a WAP bookmark, it can be deleted, edited or renamed.
To delete an item• Select an item and press .• Select an item, press , select Delete or
Delete all.
To edit itemsSelect an item, press , select Edit.
Online servicOnline serviceservices offereindependently phone manufac
A SIM card in the same wahave inserted yphone, your neto your SIM cathe first data dounder the Conn
Note: This men
supports this se
the name “Onl
support all of t
To enter yourScroll to Conn

ivate use.
Getting to know your phone 11
Messaging
Write newInboxCall voice mailUnsentTemplatesSent itemsOptionsArea infoSMS memory
*Please note
that some
menus are
operator,
network and
subscription
dependent.
Ongoing call* **Only
available
during a call
or conference
call.
Turn off tones**Hold call**Switch calls**Release active**Retrieve call**Join calls**Transfer call**Extract part**Release all**Release part**Parties in conf.Calls**
This is the Internet version of the user's guide. © Print only for pr
Menu overview
Calls WAP services My shortcuts Fun & Games
Missed callsCall listManage callsTime and costNext callOptions
Sony EricssonBookmarksPush inboxEnter addressResumeSelect profileAdvancedOptions
Write newRing volumeSelect profileMy numbersEdit shortcuts
GamesMy picturesMy soundsThemesComposerDownload*Operator link*
Organizer Connectivity Phonebook Settings
CalendarAlarmsTimerStopwatchCalculator
Online services*Infrared portGSM NetworksData comm.Accessories
Find and callAdd numberFind and editPicturesPersonal ringsGroupsEmail addressesOptionsMemory statusSpecial numbers
Sounds & alertsProfilesDisplayLanguageTime and dateLocksHandsfreeFlip functionsMaster reset

ivate use.
nputames in the phonebook or when ddresses, you enter letters using put. You press each key as many
d to show the letter you want.
ection of input languages and
meric input methods determines
ee or enter.
example shows how to write a name ok.
rs using multitap text inputbook, YES, Add number, YES,
.r, YES.priate key, – , tedly until the character you want isplay e.g., to enter an A, press B, quickly press twice, to shift l and lower-case letters, press , etter.
This is the Internet version of the user's guide. © Print only for pr
12 Getting to know your phone
Entering letters and charactersYou can enter letters, for example, when you add names to the phonebook, write text messages or enter WAP addresses.
Apart from the way you normally enter letters in your phone, using multitap input, you can use T9™ Text Input for entering text messages, if the input language you select supports this. T9 Text Input is a predictive input method and is a quicker way to write texts.
Input languagesBefore you start entering letters, you need to select the input languages that you want to use when writing.
To select input languages1. Scroll to Settings, YES, Language, YES, Input, YES.2. Scroll to the language or alphabet that you want to
use for entering letters and press for each language you want.
3. Press YES to exit the menu.When writing, you can switch to one of your selected input languages by pressing and then selecting Language. See “The list of options” on page 14.
Multitap text iWhen saving nwriting WAP amultitap text intimes as neede
Note: Your sel
character or nu
what you can s
The following in the phonebo
To enter lette1. Scroll to Phone
Add new?, YES2. Add the numbe3. Press the appro
or , repeaappears in the donce, to enter abetween capitathen enter the l
ivate use.
Getting to know your phone 13
sequence of key presses. This way, key only once, even if the letter you first letter on the key.
ge must be selected to be able to use
nput method. If you change input
ngs/Language/T9 input, this is valid
texts – not only for the text you are
g.
shows how to start writing .
to enter a full stop. To enter other
rks, press and then or
ss to accept and add a space.
to select an input method for
currently writing.
rs using T9™ Text Inputging, YES, Text, YES, Write new, YES.
f you want to write “Jane”, press , . A list of alternative words
re shown. If the candidates do not you want, you can add a new word to electing.
This is the Internet version of the user's guide. © Print only for pr
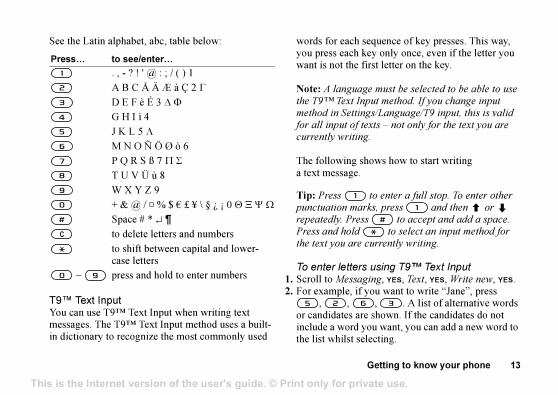
See the Latin alphabet, abc, table below:
T9™ Text InputYou can use T9™ Text Input when writing text messages. The T9™ Text Input method uses a built-in dictionary to recognize the most commonly used
words for eachyou press eachwant is not the
Note: A langua
the T9™ Text I
method in Setti
for all input of
currently writin
The following a text message
Tip: Press
punctuation ma
repeatedly. Pre
Press and hold
the text you are
To enter lette1. Scroll to Messa2. For example, i
, , or candidates ainclude a wordthe list whilst s
Press… to see/enter…
. , - ? ! ' @ : ; / ( ) 1A B C Å Ä Æ à Ç 2 ΓD E F è É 3 ∆ Φ
G H I ì 4J K L 5 ΛM N O Ñ Ö Ø ò 6P Q R S ß 7 Π Σ
T U V Ü ù 8W X Y Z 9+ & @ / ¤ % $ € £ ¥ \ § ¿ ¡ 0 Θ Ξ Ψ Ω
Space # * ↵ ¶to delete letters and numbersto shift between capital and lower-case letters
– press and hold to enter numbers

ivate use.
For T9™ Text Input only.gested word by using multitap
– Edit size, style, alignment or aragraph.
Select an input language.d – A list of input methods available nt input language is shown.– For T9™ Text Input only.ff the alternative words list.r. – Turn off language-specific save space. This option only appears ut languages.
Text Input on or offgs, YES, Language, YES, T9 input, YES ld when writing.
This is the Internet version of the user's guide. © Print only for pr
14 Getting to know your phone
3. Scroll to select Jane.4. When the word is highlighted, press YES to accept
without a space, or press to accept and add a space.
To add a word to candidates1. Scroll to a similar candidate to the word you want
to add, press , select Edit word, YES.2. Press repeatedly to delete one letter at a time.
Write the new word using multitap text input, YES.The word is added to the dictionary. The next time you enter the word you just added to the dictionary, it appears as one of the alternative words.
3. Continue writing your message. See also “Text messages (SMS)” on page 43.
The list of optionsPress when writing to enter a list of options:• Add symbol – Symbols and punctuation marks
such as ? and , are shown. Move between the symbols by using the rocker key.
• Insert item – Add a picture, sound effect, melody or animation to a message.
• Edit word – Edit the sugtext input.
• Text format start a new p
• Language –• Input metho
for the curre• Candidates
Turn on or o• National cha
characters tofor some inp
• Help.
To turn T9™ Scroll to Settinor press and ho

ivate use.
Personalizing your phone 15
ck and white picture in a text message.re via IR. picture via WAP.
uresdd, delete or rename pictures in he number of pictures that can be on the size of the pictures. File d are GIF, JPEG and WBMP.
ing your pictures in Fun & Games/
u can set a wallpaper by pressing .
pictures Games, YES, My pictures, YES.
e shown in thumbnail view. To get ss YES.can only be viewed when inserting an essage. See “To insert an item in a
on page 43.
cture as wallpapergs, YES, Display, YES, Wallpaper, YES, YES., YES.
This is the Internet version of the user's guide. © Print only for pr
Personalizing your phone
Choose ring signal, theme and other settings
ThemesYou can change the appearance of the display, for example, the colours and wallpaper, by using themes. Your phone comes with a number of preset themes.
To select a themeScroll to Fun & Games, YES, Themes, YES.
To adjust the display contrastScroll to Settings, YES, Display, YES, Contrast, YES.
PicturesYour phone comes with a number of pictures. All pictures are saved in Fun & Games/My pictures. You can:• Set a picture as a wallpaper when in standby mode.• Assign a picture to an entry in the phonebook.
When that person calls, the picture appears in the display (provided your subscription supports the Calling Line Identification service). See “To add a picture to a phonebook entry” on page 26.
• Enclose a bla• Send a pictu• Download a
Handling pictYou can also aMy pictures. Tsaved dependstypes supporte
Tip: When view
My pictures, yo
To view your Scroll to Fun &The pictures ara full view, pre
Animations item in a text mtext message”
To select a pi1. Scroll to Settin
Select picture, 2. Select a picture

ivate use.
by using the rocker key to select it, select Save to save it in My pictures.
a picture Games, YES, Download, YES.
u want to download and follow the t appear, YES. (For more information, ing” on page 49.)
and melodiesmes with a number of standard melodies which can be used as e “Icons” on page 66 for more
ou can create and edit melodies, to a friend, in a text message. xchange melodies via IR or download
not allowed to exchange copyright-
rial.
g signals and melodiesoud ring volume may damage er the call or lower the volume before ne to your ear.
This is the Internet version of the user's guide. © Print only for pr
16 Personalizing your phone
To turn the wallpaper on or offScroll to Settings, YES, Display, YES, Wallpaper, YES, Activate, YES.
Exchanging picturesYou can send and receive pictures via IR and in text messages. For more information on sending pictures in messages, see “Messaging” on page 42.
Note: You are not allowed to exchange copyright-
protected material.
To send a picture1. Scroll to Fun & Games, YES, My pictures, YES.2. Select a picture, YES. Press .3. Select Send, YES.4. Select a transfer method, YES.
To receive a picture via Infrared1. From standby, press , scroll to Activate IR, YES.2. When you receive the picture, press YES to save it in
My pictures.
To receive a picture via a messageWhen you receive a picture via a message, a new message appears in your Inbox. Highlight the picture
in the messagepress and
To download 1. Scroll to Fun &2. Select what yo
instructions thasee “Download
Ring signalsYour phone coand polyphonicring signals. Seinformation. Yand send them You can also enew via WAP.
Note: You are
protected mate
Managing rinExposure to a lhearing. Answplacing the pho

ivate use.
Personalizing your phone 17
ring signal Games, YES, Composer, YES.
ring signal using the options e.r ring signal, press YES. to save and name it, or press NO posing.
ing signals and melodiesnd receive a sound, ring signal or text messages, or download it via WAP. signal or melody in a text message, n item in a text message” on page 43.
ot exchange a polyphonic melody es.
lody Games, YES, My sounds, YES.
y and press .S.r method.
ound or melody via Infraredpress , scroll to Activate IR, YES.ive the sound or melody, press YES sounds.
This is the Internet version of the user's guide. © Print only for pr
To select a ring signalScroll to Settings, YES, Sounds & alerts, YES, Ring signals, YES.
To set the ring signal volume1. Scroll to Settings, YES, Sounds & alerts, YES,
Ring volume, YES.2. Press or to increase or decrease the volume.3. Press YES to save the setting.
To turn the ring signal on or offPress or press and hold from standby and select Turn on silent or Turn off silent. All signals except the alarm signal are turned off.
To compose your own ring signalYou can compose up to ten personal ring signals.
Options available when composing a ring signal are:• Press a key to enter a note. Press and hold the key
to make it a long note.• Press to raise the note one octave.• Press once to raise the note one semitone.• Press twice to lower the note one semitone.• Press to remove notes.
To compose a1. Scroll to Fun &2. Compose your
described abov3. To listen to you4. Press YES again
to continue com
Exchanging rYou can send amelody via IR, To send a ring see “To insert a
Note: You cannvia text messag
To send a me1. Scroll to Fun &2. Select a melod3. Select Send, YE4. Select a transfe
To receive a s1. From standby, 2. When you rece
to save it in My

ivate use.
rating alertgs, YES, Sounds & alerts, YES, , YES.ng you want, YES.
ges automatically set the menu language of the country where r SIM card. If this is not the case,
uage is English.
always choose Automatic by pressing
standby. You can always choose
ssing 0000 in standby.
menu languagegs, YES, Language, YES, Menus, YES.ge, YES.
ht can be set to Automatic, Off or On. ode, the display light is turned off a ter you press the last key.
On, the display light consumes extra
and reduces standby time.
This is the Internet version of the user's guide. © Print only for pr
18 Personalizing your phone
To download a sound or melody1. Scroll to Fun & Games, YES, Download, YES.2. Select what you want to download and follow the
instructions that appear, YES. (For more information, see “Downloading” on page 49.)
Increasing ringYou can choose a ring signal that rises in steps from the lowest volume to the highest, or you can choose a ring signal with constant volume.
To turn increasing ring On or OffScroll to Settings, YES, Sounds & alerts, YES, Increasing ring, YES.
Sounds & alertsYou can choose to be notified of an incoming call by the buzzing of the vibrating alert. You can set the phone’s vibrating alert to On, On if silent or Off.
From Settings/Sounds & alerts, you can also select:• Message alert when messages are received.• Key sound when using the keypad.• Minute minder to beep after every minute
during calls.
To set the vib1. Scroll to Settin
Vibrating alert
2. Select the setti
Menu languaMost SIM cardlanguage to theyou bought youthe preset lang
Note: You can
8888 in
English by pre
To change the1. Scroll to Settin2. Select a langua
Display lightThe display ligIn automatic mfew seconds af
Note: If set to
battery power

ivate use.
Personalizing your phone 19
e is in standby, you can always see the main display or you can press one eys to see the date in the status menu. ndby, wait a few seconds.
egs, YES, Time and date, YES,
e formatgs, YES, Time and date, YES, ES.
e settingsd in the Settings/Time and
can set time zone and time. Changing these, e accordingly, if your or supports this service.phone changes network, and the time e network operator deviates from the one, you are asked whether you want e if you have turned on Auto time zone.
S, the time is updated automatically.
This is the Internet version of the user's guide. © Print only for pr
To set the display lightScroll to Settings, YES, Display, YES, Light, YES.
To set the display contrastScroll to Settings, YES, Display, YES, Contrast, YES.
Time settingsThe time is displayed in the status display when the phone is closed.
You can also see the time in the main display in standby. The time can be displayed in a 12-hour or a 24-hour clock.
Note: If you select the 12-hour clock, you can
alternate between am and pm by pressing
when setting the time.
To set the timeScroll to Settings, YES, Time and date, YES, Set time, YES.
To set the time formatScroll to Settings, YES, Time and date, YES, Time format, YES.
DateWhen the phontoday’s date in of the volume kTo return to sta
To set the datScroll to SettinSet date, YES.
To set the datScroll to Settin
Date format, Y
Advanced timUnder Advance
date menu, youdaylight savingchanges the timnetwork operat
When your sent out from thtime in your phto update the timIf you press YE

ivate use.
our favourite functions that you want y and easily in the My shortcuts menu.
ortcut from standbyter the first shortcut in My shortcuts.
tion to my shortcutsortcuts, YES, Edit shortcuts, YES.n from the list by pressing .
ion number you want for this function nd press YES.ve and exit the list.
s a number of preset profiles which certain environment. You can add rename or change these profiles. hen you go to a meeting, you can the Meeting profile and a number changed, such as the ring signal is can reset all profile settings to the ay they were set when you bought
r example Normal.
This is the Internet version of the user's guide. © Print only for pr
20 Personalizing your phone
Note: Contact your network operator for more
information.
Answering modeWhen using a portable handsfree kit, you can choose to answer a call by open the flip, pressing any key (except the NO key), or set the phone to answer the call automatically.
To select answering modeScroll to Settings, YES, Handsfree, YES, Answering mode, YES.
Flip functionsYou can answer a call by opening the flip.
To set the flip functions1. Scroll to Settings, YES, Flip functions, YES.2. Select Answer call or Off.
My phone numbersYou can check your own phone number(s).
To check your phone numberScroll to Phonebook, YES, Special numbers, YES, My numbers, YES. If your number is not saved on your SIM card, you can enter it yourself.
My shortcutsYou can place yto reach quickl
To reach a shPress to en
To add a func1. Scroll to My sh
2. Select a functio3. Enter the posit
in your menu a4. Press YES to sa
ProfilesYour phone haare set to suit aaccessories to, For example, wsimply choose of settings are turned off. Youdefault or the wyour phone: fo

ivate use.
Personalizing your phone 21
ll the settings in the phone to the way n you bought your phone by selecting
ant to delete all phonebook entries, ther personal data, select Reset all
lect Reset all, content such as
ictures that you have downloaded,
ted are also deleted.
honegs, YES, Master reset, YES.ttings or Reset all, YES.ntinue.e lock code (0000 or the new code nged it) and press YES.
(IR) portrt can be used to transfer and mation with another device equipped d port. See “Getting to know your e 6 to locate the infrared port.
This is the Internet version of the user's guide. © Print only for pr
Accessories may change the selected profile in your phone automatically. For example, when using a portable handsfree the profile switches from Normal to Port h-free. The profile should automatically change back when the accessory is disconnected.
To select a profileScroll to Settings, YES, Profiles, YES, Select profile, YES.
To change a profile setting1. Scroll to Settings, YES, Profiles, YES,
Edit profile, YES.2. Select a setting, YES.3. Change the profile settings and press YES to confirm.
To rename a profileScroll to Settings, YES, Profiles, YES, Edit profile, YES, Profile name, YES.
To reset all profilesScroll to Settings, YES, Profiles, YES, Reset profiles, YES.
Master resetYou can reset athey were wheReset settings.
If you also wmessages and oinstead.
Note: If you se
melodies and p
received or edi
To reset the p1. Scroll to Settin2. Select Reset se
3. Press YES to co4. Enter the phon
if you have cha
The infrared The infrared poexchange inforwith an infrarephone” on pag

ivate use.
ook, call options
make or receive any calls, you must ne and be within range of a network. and battery information” on page 4.
all numbers from the call list and the
e “Call list” on page 25 and
on page 25.
llode and the phone number, and press
e call.se the flip to end the call. See “Flip age 20.
se or decrease the speaker volume he microphone must be turned on to aker volume during a call.
This is the Internet version of the user's guide. © Print only for pr
22 Calling
When used with certain functions, such as sending a picture, IR is automatically activated for 10 minutes.
Note: Infrared ports must be facing each other
at a distance of 20 to 30 cm when used.
The infrared port can be activated in the following ways:• Press from standby, scroll to Activate IR, YES.• Scroll to Connectivity, YES, Infrared port, YES,
select an option, YES.• When selecting a transfer method, for example
when sending a picture.
To turn infrared offScroll to Connectivity, YES, Infrared port, YES, Off, YES.
Calling
Use the phoneb
Making callsBefore you canturn on the phoSee “SIM card
Tip: You can c
phonebook. Se
“Phonebook”
To make a ca1. Enter the area c
YES to make th2. Press NO or clo
functions” on p
During callsYou can increaduring a call. Tchange the spe

ivate use.
Calling 23
callsnter the + sign and country code in the phonebook as they can then whether home or abroad.
national calls until a + sign appears in the replaces the international prefix country from which you are calling.try code, area code (without the nd phone number, YES.
allspports international
bers such as 112, 911, eans that these numbers can ed to make an emergency ntry, with or without a SIM card SM network is within range.
twork operators may require that a
erted, or in some cases, that a correct
in order to make an emergency call.
This is the Internet version of the user's guide. © Print only for pr
To change the speaker volumePress the volume keys to change the speaker volume.
To turn off the microphone during a call1. Press and hold until the display shows Muted.2. Press again to resume the conversation.
Automatic re-diallingAutomatic re-dialling is available for all calls except data calls.
Note: Do not hold the phone to your ear while
waiting. When the call is connected, the phone gives
a loud signal.
The phone re-dials the number up to ten times or until:• the call is connected• you receive a call• you press a key.
To re-dial a numberIf the connection of the call failed and the display shows Retry?, press YES.
InternationalIt is useful to efor all numbersbe easily used
To make inter1. Press and hold
display. The + number of the
2. Enter the counleading zero) a
Emergency cYour phone suemergency numand 08. This mnormally be uscall in any couinserted, if a G
Note: Some ne
SIM card is ins
PIN is entered,

ivate use.
ect callsa call when the flip is closed, the d a phone icon appears in the status lip is open, Answer? appears in the
allp and press YES.p (if the flip function Answer call See “Flip functions” on page 20.).already open, press YES.
llp.
ss a volume key twice.
ssed a call, Missed calls:1 appears in ay and in the main display, indicating missed calls.
This is the Internet version of the user's guide. © Print only for pr
24 Calling
In some countries, other emergency numbers may also be promoted. Your operator may therefore have saved additional local emergency numbers on the SIM card.
To make an emergency callEnter, for example, 112 (the international emergency number), YES.
To view your local emergency numbersScroll to Phonebook, YES, Special numbers, YES, SOS numbers, YES.
Receiving callsIf your subscription includes the Calling Line Identification service and the caller’s number is identified, the number appears in the status display when the flip is closed. If you have saved the number in your phonebook, the name and number appear.
If the number is a restricted number, Withheld appears.
Answer or rejIf you receive phone rings andisplay. If the fmain display.
To answer a c• Open the fli• Open the fli
is activated.• If the flip is
To reject a ca• Close the fli• Press NO.• Quickly pre
Missed callsIf you have mithe status displthe number of

ivate use.
Calling 25
all list YES, Options, YES, Clear call list, YES.
ll list on or off YES, Options, YES, Call listing, YES.
s a phonebook in which you can save ccompanying names (an entry).that you can retrieve a number from instead of entering the number again.
bert to save a phone number, you use the nction in the phonebook menu. If you ade and received calls, you can find in the Add numbers list. number you save also gets a position want to, you can choose to sort your ries according to their position of the name. to use your phone both at home and ood idea to save all phone numbers
l phone numbers, i.e. with the + sign,
This is the Internet version of the user's guide. © Print only for pr
The most recent missed call is first on the call list, and the oldest call is last. Scroll to select and press to show the time if the call occurred on the same day. Otherwise, only the date appears for older missed calls.
To check your missed calls1. When Missed calls: 1 is displayed, open the flip
and press YES to display the missed calls.2. To call a number from the list, scroll to the
number, YES.
Call listThe numbers of the last calls that you have made or received are saved in the call list. If your subscription includes the Calling Line Identification service and the caller’s number is identified, you will also find the numbers of answered and missed calls in the call list.
To call a number from the call list1. To enter the call list, press YES from standby.2. Scroll to the number you want to call, YES.
To clear the cScroll to Calls,
To turn the caScroll to Calls,
PhonebookYour phone hanumbers and a
This means the phonebook
Saving a numWhen you wanAdd number fuhave already mthese numbers
Every phonenumber. If youphonebook entnumber instead
If you intendabroad, it is a gas internationa
ivate use.
to the phonebook, YES. to Pictures. Select a picture
signal to a phonebook entrybook, YES, Personal rings, YES.?, press YES.to the phonebook, YES.to Personal rings. Select a ring signal
ber saved in the phonebooknd and call function to call a number aved in the phonebook.
ber saved in the phonebookhe Find and call menu appears. or the first few letters of the name ame) associated with the number that l. If the name displayed is not the one s or until you find the correct ber.ake the call.
This is the Internet version of the user's guide. © Print only for pr
26 Calling
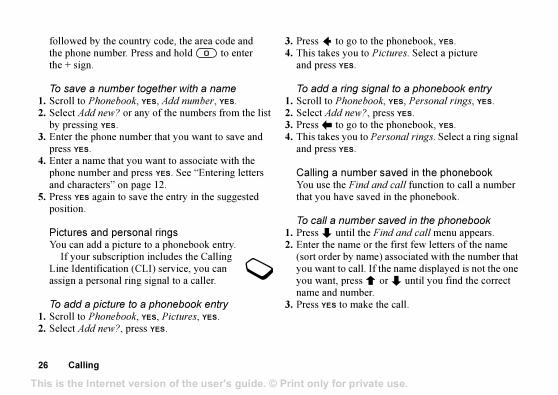
followed by the country code, the area code and the phone number. Press and hold to enter the + sign.
To save a number together with a name1. Scroll to Phonebook, YES, Add number, YES.2. Select Add new? or any of the numbers from the list
by pressing YES.3. Enter the phone number that you want to save and
press YES.4. Enter a name that you want to associate with the
phone number and press YES. See “Entering letters and characters” on page 12.
5. Press YES again to save the entry in the suggested position.
Pictures and personal ringsYou can add a picture to a phonebook entry.
If your subscription includes the Calling Line Identification (CLI) service, you can assign a personal ring signal to a caller.
To add a picture to a phonebook entry1. Scroll to Phonebook, YES, Pictures, YES.2. Select Add new?, press YES.
3. Press to go 4. This takes you
and press YES.
To add a ring1. Scroll to Phone
2. Select Add new
3. Press to go 4. This takes you
and press YES.
Calling a numYou use the Fi
that you have s
To call a num1. Press until t2. Enter the name
(sort order by nyou want to calyou want, presname and num
3. Press YES to m

ivate use.
Calling 27
scription must support the Calling
tion Service, if you want to save
ers.
k to save function on or offbook, YES, Options, YES, S.ff and press YES.
honebook up to datee and delete names and numbers book.
rybook, YES, Find and edit, YES. (or the first few letters) for the wish to edit and press YES.lect the entry. press YES.e finished editing, press YES to save
ntry from the phonebookbook, YES, Find and edit, YES. (or the first few letters) for the entry o delete and press YES.
This is the Internet version of the user's guide. © Print only for pr
Speed diallingYou can call the phone numbers that you have saved in positions 1–9 by entering the position number in standby, and then pressing YES.
Example:Press and then YES.
Shortcuts to phonebook entriesWhen in standby, you can find an entry of the keys
– to find an entry beginning with the first letter on that key, or the closest following.
Example:Press and hold to get to the first entry beginning with the letter “G” (or the closest following). Then scroll up or down, using or . When you find the entry you want, press YES to make the call.
Ask to saveIf Ask to save is on, you are asked if you want to save any called or answered number that is not already saved in your phonebook.
Note: Your sub
Line Identifica
answered numb
To turn the As1. Scroll to Phone
Ask to save, YE2. Select On or O
Keeping the pYou can changfrom the phone
To edit an ent1. Scroll to Phone
2. Enter the nameentry that you
3. Press YES to se4. Select Edit and5. When you hav
your changes.
To delete an e1. Scroll to Phone
2. Enter the namethat you wish t

ivate use.
are occupied. If you save your entries emory, you still have access to them if r SIM card with your phone.
ere to save an entry an entry and are asked to enter the r, you can do the following:
number in the first empty position ress YES.number in another position, press te the position number, enter a new ber and press YES.
number in the phone memory, you know how many positions you have SIM card. You can check this in the tus menu, see page 29. If, for u have 200 positions on your SIM n enter position number 201 to save a e first position of the phone memory.
triesve a phone number in a position contains a phone number, the message ars together with the name saved in ou now have two options:
This is the Internet version of the user's guide. © Print only for pr
28 Calling
When the entry you want to delete is highlighted, press YES.
3. Press YES to confirm.
Sort orderYou may change the sort order of your phonebook entries, so that they are sorted according to their position number instead of the name. This means that you search for the position number when you use the Find and call or the Find and edit functions.
To choose a sort order1. Scroll to Phonebook, YES, Options, YES,
Sort order, YES.2. Select a sort order and press YES.
Phonebook memoriesYour phonebook entries are saved in the memory on your SIM card. The number of entries you can save depends on your SIM card. By saving your entries on the SIM card, you still have access to them if you use the card with another phone.
You can also save your entries in the phone memory. The phone memory holds a number of positions in which your entries are saved when all
SIM positions in the phone myou use anothe
Choosing whWhen you saveposition numbe• To save the
suggested, p• To save the
to deleposition num
• To save the first need togot on your Memory sta
example, yocard, you canumber in th
Replacing enIf you try to sawhich already Replace? appethat position. Y
ivate use.
Calling 29
s to the SIM cardbook, YES, Options, YES, .
s to the phonebook, YES, Options, YES, .
a group of phonebook entries. You text message to all members of that
me time. See “Text messages (SMS)”
ew groupbook, YES, Groups, YES,
.or the group and press YES.ew? and press YES. in your phonebook and press YES.t member, repeat steps 3 and 4.ve the menu.
ber to an existing groupp you want and then select Edit, YES, .
This is the Internet version of the user's guide. © Print only for pr
• Press YES to replace the number with the new one.• Press NO if you do not want to replace the old
number. Enter a new position and press YES.
Checking the status of the memoryYou can check how many memory positions you have in your memories and how many of them you have used.
To check the status of the memoriesScroll to Phonebook, YES, Memory status, YES.If you have saved entries in the phone memory, you can delete them.
To delete all entries from the phone memory1. Scroll to Phonebook, YES, Options, YES, Delete all, YES.2. Press YES again. If you delete all entries from the phone
memory, the entries on your SIM card are not deleted.
Copy phonebook entriesYou can copy the phonebook entries between your phone’s memory and the SIM card. The number of entries that can be saved depends on the type of SIM card.
To copy entrieScroll to Phone
Copy all to SIM
To copy entrieScroll to Phone
Copy from SIM
GroupsYou can createcan then send agroup at the saon page 43.
To create a n1. Scroll to Phone
Add new?, YES2. Enter a name f3. Scroll to Add n
4. Select an entry5. To add the nex6. Press NO to lea
To add a memSelect the grouAdd new?, YES

ivate use.
call time and reset timerlls, YES, Time and cost, YES, and select an option, YES. timers to reset the call time meter.
ation you need to check ork operator or service can subscribe to such a call cost (or the number displayed.
ionubscription with a cost information n check the cost of your last call st of your calls.
bscribe to cost information, you must
2 to clear the cost or time counter.
call cost and reset cost meterlls, YES, Time and cost, YES, Call costs option, YES. total cost to reset the call cost meter.
This is the Internet version of the user's guide. © Print only for pr
30 Calling
Voice mailIf your subscription includes an answering service, callers can leave a voice mail message when you cannot answer a call.
Receiving a voice mail messageDepending on your network operator, you are informed that someone has left a message by a text message or by a voice mail indication.
Calling your voice mail serviceYou can easily call your voice mail service by pressing and holding , if you have saved your voice mail number in the phone. You get the number from your service provider.
To enter a voice mail numberScroll to Messaging, YES, Options, YES, Voice mail no., YES.
Call timeDuring a call, the duration of the call is shown in the display.
You can check the duration of your last call, outgoing calls and the total time.
To check the • Scroll to Ca
Call timers • Select Reset
Call costFor cost informwith your netwprovider if youservice, where of call units) is
Cost informatIf you have a sservice, you caand the total co
Note: If you su
enter your PIN
To check the • Scroll to Ca
and select an• Select Clear

ivate use.
Calling 31
, YES.nt, YES. on page 54 for more information
lsnswer incoming voice or can divert them to another ample your answering
e Restrict calls function is on, some
tions cannot be activated.
, you can choose between the rt alternatives:ys – divert all voice calls. divert calls if you are already
e.le – divert calls if your phone or if you are unreachable.ivert calls that you do not in a specified time limit pendent).
This is the Internet version of the user's guide. © Print only for pr
Setting the call costYou can use the Tariff function to specify the price per call unit. If you do not specify a price per call unit, the number of call units is displayed.
To enter the price per call unit1. Scroll to Calls, YES, Time and cost, YES, Call costs,
YES, Set tariff, YES.2. Enter your PIN2, YES.3. Select Change tariff, YES.4. Enter the code for the currency you want,
(for example GBP for Pounds Sterling), YES.5. Enter the price per call unit, YES.
To enter a decimal point, press .
Credit limit for callsYou can enter a total amount of money that can be used for making calls. When the amount reaches zero, no more calls can be made. Please note that the credit limit is only an estimated value.
To set a credit limit1. Scroll to Calls, YES, Time and cost, YES, Call costs,
YES, Set credit, YES.2. Enter your PIN2, YES.
3. Select Change
4. Enter an amouSee “Security”about PIN2.
Diverting calIf you cannot adata calls, you number, for exservice.
Note: When th
Divert calls op
For voice callsfollowing dive• Divert alwa
• When busy –on the phon
• Not reachab
is turned off• No reply – d
answer with(operator-de

ivate use.
e call more than one call . For example, you can call on hold, while you r a second call, and then the two calls. You cannot answer
hout ending one of the first two calls.
call the Ongoing call menu replaces
.
erviceing service is activated, you hear a piece if you receive a second call ing call.
deactivate the call waiting service YES, Manage calls, YES, ES.
cond callt the ongoing call on hold. You can ll on hold.
This is the Internet version of the user's guide. © Print only for pr
32 Calling
To turn on a call divert1. Scroll to Calls, YES, Manage calls, YES,
Divert calls, YES.2. Select a call category and then a divert
alternative, YES.3. Select Activate, YES.4. Enter the phone number to which you want your
calls to be diverted and press YES, or retrieve it from the phonebook.
To turn off a call divertSelect a divert alternative and select Cancel.
To check status1. Scroll to Calls, YES, Manage calls, YES,
Divert calls, YES.2. Select a call type, YES.3. Scroll to the divert you want to check, YES.
Select Get status, YES.
To check the status of all call divertsSelect Check all in the Divert calls menu.
More than onYou can handlesimultaneouslyput an ongoingmake or answeswitch betweena third call wit
Note: During a
the Calls menu
Call waiting sIf the call waitbeep in the earduring an ongo
To activate orScroll to Calls,Call waiting, Y
To make a se1. Press YES to pu
only put one ca

ivate use.
Calling 33
alls joint conversation ll) with up to five people. ut a conference on hold and all.
ay be additional charges for calls
ple parties. Contact your service
ore information.
nference callference call, you must first have one d one call on hold.
o calls into a conference calling call, YES, Join calls, YES.
participantt the conference call on hold.erson you wish to include in the l.lect Join calls, YES.to 3 to include more participants.
This is the Internet version of the user's guide. © Print only for pr
2. Enter the number you want to call and press YES, or retrieve a number from the phonebook. You can also reach different options by pressing .
To receive a second call• To answer the second call and put the ongoing call
on hold, press YES.• To reject the second call and continue the ongoing
call, press , select Busy.• To answer the second call and to end the ongoing
call, press , select Release&answer.
Handling two callsWhen you have one ongoing call and one call on hold, you can do the following:• Press YES to switch between the two calls.• Press and select Join calls to join the two
calls into a conference call.• Press and select Transfer call to connect the
two calls. You are disconnected from both calls.• Press NO to end the ongoing call, then press YES to
retrieve the held call.• Press NO twice to end both calls.
Conference cYou can have a(conference caYou can also pmake another c
Note: There m
involving multi
provider for m
Creating a coTo create a conongoing call an
To join the twScroll to Ongo
To add a new1. Press YES to pu2. Call the next p
conference cal3. Press , se
Repeat steps 1

ivate use.
calls can be restricted: – All outgoing calls.tl – All outgoing international calls.am – All outgoing international calls ur home country. – All incoming calls.am – All incoming calls when you when roaming).
restriction on or off YES, Manage calls, YES, ES.
n, YES. or Cancel, YES., YES.
ging function allows calls to o certain numbers saved on
international emergency numbers
de, even when the fixed dialling
This is the Internet version of the user's guide. © Print only for pr
34 Calling
To release a participant1. Press , select Release part, YES.2. Select the participant, YES.
To end the conference callPress NO.
Having a private conversationYou can have a private conversation with one of the participants and put the other participants on hold.
To start a private conversation1. Press , then select Extract part to select
the participant that you want to talk with.2. Select Join calls to resume the conference
call, again.
Restricted diallingYou can use the restrict calls service to restrict outgoing and incoming calls. This may be useful, for example, when you are abroad. To use this service, you need a password which you get from your service provider.
Note: If you divert incoming calls, you cannot
activate some Restrict calls options.
The following • All outgoing
• Outgoing in
• Outg. intl ro
except to yo• All incoming
• Inc. when ro
are abroad (
To turn a call 1. Scroll to Calls,
Restrict calls, Y2. Select an optio3. Select Activate
4. Enter your PIN
Fixed diallinThe fixed diallbe made only tthe SIM card.
Note: Calls to
can still be ma
function is on.

ivate use.
Calling 35
groupsr Group function is a way of lowering ome networks it is cheaper to make all group. You can save ten groups.
p YES, Manage calls, YES, YES, Edit list, YES.ew?, YES. of the user group, YES. number, YES. You get the index our operator.
group YES, Manage calls, YES, YES, Edit list, YES. YES., YES. Calls can only be made within up.
e a Closed User Grouplls and then select On.
This is the Internet version of the user's guide. © Print only for pr
Fixed dialling requires a SIM card that allows fixed numbers to be saved. The fixed numbers are protected by your PIN2.
You can save partial numbers or numbers with question marks.• Partial numbers: Saving 0123456 allows calls to
be made to all numbers starting with 0123456.• Numbers with question marks: Saving 01234567?0,
allows calls to be made to numbers from 0123456700 to 0123456790. To enter a question mark, press and hold .
To turn fixed dialling on or off1. Scroll to Phonebook, YES, Options, YES,
Fixed dialling, YES.2. Enter your PIN2, YES.3. Select On or Off, YES.
To save a fixed number1. Scroll to Phonebook, YES, Special numbers, YES,
Fixed numbers, YES.2. Select Add new? and enter the number.
Closed user The Closed Usecall costs. On scalls within a c
To add a grou1. Scroll to Calls,
Closed groups,2. Scroll to Add n
3. Enter the name4. Enter the index
number from y
To activate a 1. Scroll to Calls,
Closed groups,2. Select a group,3. Select Activate
the selected gro
To call outsidSelect Open ca

ivate use.
lling functions
lephone banking services or ering machine by sending
so known as DTMF tones during a call.
lear tonesmber keys 0-9, and .display after a call, press NO.
e phone to make a note of a phone a call. When you press the number n you are talking to hears tone these tone signals off during the call, ect Turn off tones, YES. When you end mber remains in the display. You can mber by pressing YES.
iding your numberption supports the Calling tion Restriction (CLIR) n hide your phone number call.
This is the Internet version of the user's guide. © Print only for pr
36 Calling
Accept callsWith the accept calls service, you can choose to receive calls only from certain numbers. Other calls are automatically rejected by a busy tone. The phone numbers of calls you have rejected are saved in the Call List.
To add numbers to the accepted callers list1. Scroll to Calls, YES, Manage calls, YES, Accept calls,
YES, Accepted list, YES.2. Scroll to Add to list?, YES.3. Select an option, YES.4. Select an entry, YES.
To select an accept optionScroll to Calls, YES, Manage calls, YES, Accept calls, YES, Accept options, YES.
NetworksWhen you turn on the phone, it automatically selects your home network if this is within range. If it is not within range, you may use another network. This is called roaming.
Additional ca
Tone signalsYou can use tecontrol an answtone signals (alor touch tones)
To send and c• Press the nu• To clear the
NotepadYou can use thnumber duringkeys, the persosignals. To turnpress , selthe call, the nuthen call the nu
Showing or hIf your subscriLine Identificaservice, you cawhen making a

ivate use.
Setting up WAP 37
p WAP
s the Internet or browse via the following are required:scription that supports data .red in your phone. Settings may
ntered when you buy your phone or ive settings in a text message from k operator or service provider. You settings at www.SonyEricsson.com.o have to register as a WAP user with provider or network operator.
ttings in a text messagework operator or Internet service e able to send the required data AP settings direct to your phone ge (SMS).
ngs from Sony Ericsson to www.SonyEricsson.com. Select d then use the Configurators to
This is the Internet version of the user's guide. © Print only for pr
To show or hide your phone number1. Enter the phone number you want to call.2. Press or scroll to Calls, YES, Next call, YES.3. Select Hide my number or Show my numb. and press
YES to make the call.
Setting u
WAP browser
RequirementIn order to useWAP services,• A phone sub
transmission• Settings ente
already be eyou can receyour networcan also find
• You may alsyour service
Receiving seYour GSM netprovider may baccount and Win a text messa
Request settiUse a PC to goyour region an

ivate use.
tting informationd settings that are described in the are not necessarily mandatory, your network operator or service ore information.
t includes connection settings server at your service provider, a WAP or via e-mail.file includes user settings that wsing.AP browser, via a WAP service eed settings for a specific data
AP, and a WAP profile.xt message (SMS) to an e-mail r network operator, you need to
ateway phone number.
settingseveral data accounts saved with different settings for ses. The main setting for a the Account type thod).
This is the Internet version of the user's guide. © Print only for pr
38 Setting up WAP
request that a text message be sent to your phone with the settings you need.
To install settingsWhen the message arrives, New settings received
Install? appears:• Press YES to install the new settings. If settings
already exist in your phone you can either keep or replace them. See “Advanced setting information” on page 38.
• Press NO to cancel installation.After installation, see “Using WAP” on page 48.
Set up with the wizardIf your phone is not set up for WAP, you can ask your network operator or service provider to provide you with WAP settings information. Then you can simply use the wizard in your phone to help guide you through the relevant settings.
To use the wizard for setting up WAP1. Scroll to WAP services, YES, homepage (for example
Sony Ericsson), YES. The wizard now starts if no WAP settings exist.
2. Enter and save settings when asked, press YES to confirm.
Advanced seSome advancefollowing textsplease consult provider for m
A data accoun
for access to a for example vi
A WAP pro
allow WAP broTo use the W
provider, you naccount for W
To send a teaddress via youset an e-mail g
Data accountYou can have sin your phone,different purpodata account is(connection me

ivate use.
Setting up WAP 39
your password to log on to the network.est (Password request) – if this
, you are asked for a password each on to the external data network.
(Preferred service) – if you want accept incoming calls during ion, select Automatic. If not, only. the IP address that the phone uses unicating with the network. If you do address, the network provides you orary IP address.s – if the network does not provide ss to the DNS server automatically, er it here.ngs (Advanced settings) – these are nsult your network operator.
nclude some settings that are S settings and some that are s follows:er – the phone number of t service provider.
This is the Internet version of the user's guide. © Print only for pr
Tip: If there are no data account or WAP profile
settings in your phone, you can enter data account
settings when you enter WAP profile settings.
You can choose from GPRS data or GSM data account types. If you want to change access type, you have to create a new data account and select the access type you want to use.
Note: Please contact your network operator
for charging details.
GPRSGPRS (General Packet Radio Service) allows fast and efficient access where you can always be online.
Note: You need a subscription that supports GPRS.
GPRS settings that are available:• APN (Access point name address) – the address of
the external data network you want to connect to, either an IP address or a text string.
• User id – your user id to log on to the external data network.
• Password – external data
• Passwd requ
setting is ontime you log
• Allow calls to be able toa GPRS sessselect GPRS
• IP address –when commnot enter anwith a temp
• DNS addres
the IP addreyou may ent
• Advan. setti
optional. Co
GSMGSM settings isimilar to GPRGSM specific a• Phone numb
your Interne

ivate use.
e status of GPRS coverage and
standby, look at the triangle above the
indicator. If the triangle is filled
ble, otherwise it is not.
erred modeectivity, YES, Data comm., YES, ES, and select GPRS and GSM
ettingsngs are stored in a WAP profile. ou only need to use one profile ternet.nd use additional WAP profiles, for accessing secure Internet sites, such te or a corporate intranet. You then between profiles when you need to
ork connection.
profile settings manually have a data account set up between the Internet server, as described in
settings” on page 38.
This is the Internet version of the user's guide. © Print only for pr
40 Setting up WAP
• Data rate – select the speed you want for the connection.
• Dial type – select analogue or ISDN connection.
To create a data account manually1. Scroll to Connectivity, YES, Data comm., YES,
Data accounts, YES, Add account?, YES.2. Select an account type for access.3. Enter a name for the data account.4. Enter the settings that you have received from your
network operator or service provider.Confirm each setting by pressing YES.
5. Scroll to Save?, YES.
To edit a data account1. Scroll to Connectivity, YES, Data comm., YES,
Data accounts, YES.2. Select a data account, YES.3. Select Edit.4. Select the setting you want to edit, YES. Edit the
setting, YES.5. Repeat step 4 for other settings you want to edit.
Preferred serviceYou can set GPRS or GSM as the preferred service.
Note: To see th
connection, in
signal strength
GPRS is availa
To select prefScroll to Conn
Pref. service, Yor GSM only.
WAP profile sThe WAP settiIn most cases yto access the In
You set up aexample, whenas a banking sisimply switch change the netw
To enter WAP1. Make sure you
your phone and“Data account

ivate use.
Setting up WAP 41
unt – Select an alternative data he first in Connect using fails.ter your user id for the WAP gateway.Enter your password for the WAP
ee WAP security settings.es – View pictures while browsing.
y settingss support for WAP secure rity for a connection
P gateway and a WAP r is the responsibility of e provider.
curity on security, the connection between the WAP gateway is secure.
ecure connectionservices, YES, Options, YES, ES.
ile to be used, YES.d, YES, Security, YES.
.
This is the Internet version of the user's guide. © Print only for pr
2. Scroll to WAP services, YES, Options, YES, WAP profiles, YES.
3. Select Add profile? to add a new profile or select an existing profile that you want to edit, YES.
To enter information in a new profileWhen selecting Add profile? enter a name for the profile, YES, Connect using:, YES, select the data account to be used, YES and enter the IP address:, YES. A list appears. Scroll to Save?, YES.
To edit an existing profileWhen selecting an existing profile, you can do the following:• Rename – Change the name of the profile.• Connect using – Select data account.• IP address – WAP gateway server address.• Advanced – More profile settings, see below.• Delete – Remove the profile.
To use advanced profile settingsIf you select Advanced you can do the following:• Chg homepage – Enter the address of the WAP
site you want as the homepage.
• Second acco
account, if t• User id – En• Password –
gateway.• Security – S• Show pictur
WAP securitYour phone habrowsing. Secubetween a WAservice providethe WAP servic
Turning on seWhen you turnyour phone and
To turn on a s1. Scroll to WAP
WAP profiles, Y2. Select the prof3. Select Advance
4. Select On, YES

ivate use.
ng
bers your service centre is ur operator. If the number centre is not saved on your must specify the number wise you cannot reply to ges or send your own messages.also features enhanced messaging ) that allow you to add pictures, nds and melodies to text messages.
number to your service centreging, YES, Options, YES, Service
no number is found, select Add new?
er, including the international + sign de, and press YES.
This is the Internet version of the user's guide. © Print only for pr
42 Messaging
Trusted certificatesTo establish a secure connection when using certain WAP services, for example banking or WAP shopping, you need certificates in your phone.
The different types of certificates are as follows:• Server certificates are used to identify a WAP
gateway to the phone and to show that it is certified by a trusted authority. The server certificate is checked against trusted certificates that are stored in the phone. If the phone cannot verify the identity of a server, you are given the options to terminate or continue the connection.
• Trusted certificates are used to verify the WAP gateway that you are trying to connect to. Your phone may already contain trusted certificates when you buy it.You can also download trusted certificates from Sony Ericsson or other WAP pages.
To check the certificates in your phone1. Scroll to WAP services, YES, Options, YES, Common,
YES, Security, YES, Trusted certif., YES.
Messagi
Text messaging
Service numThe number toprovided by yoto your serviceSIM card, you yourself. Otherreceived messa
Your phone services (EMSanimations, sou
To check the 1. Scroll to Messa
centres, YES. Ifand press YES.
2. Enter the numband country co
ivate use.
Messaging 43
t message to a groupext messages to groups that you and saved in your phonebook, see age 29. You will be charged for each .
t message to a groupging, YES, Write new, YES.sage and press YES.t Groups and press YES.and press YES.
nge the style, size and alignment text message.
text in a text messageging, YES, Write new, YES.essage.
at, YES. Then select Text size, ignment, YES. Select a format
This is the Internet version of the user's guide. © Print only for pr
Text messages (SMS)You can use the Short Message Service (SMS) to send and receive text messages consisting of up to 160 characters.
Note: Some language-specific characters use
more space. Turn off National char. to save space.
See “The list of options” on page 14.
To send a text message1. Scroll to Messaging, YES, Write new, YES.2. Enter your message and press YES. See “Entering
letters and characters” on page 12.3. Enter the recipient’s phone number or retrieve
it from the phonebook by pressing .4. Press YES to send the message.
To insert an item in a text message1. Scroll to Messaging, YES, Write new, YES.2. While writing your message press to enter
the option menu.3. Select Add symbol or Insert item, YES.4. Select Picture, Sound effect, Melody or
Animation, YES.5. Select an object or symbol, YES. Then press YES
again to confirm.
Sending a texYou can send thave specified “Groups” on pgroup member
To send a tex1. Scroll to Messa
2. Enter your mes3. Press , selec4. Select a group
Text formattiYou can changof the text in a
To format the1. Scroll to Messa
2. Write the text m3. Press .4. Select Text form
Text style or Al
and press YES.

ivate use.
y – Include a reply request if you ipient of your message to reply.st – Check if a message has been
lt message optionging, YES, Options, YES.e, Validity period, Request reply, st, YES.n from the list, YES.
send on or offand 2 above, then select S.
e or more messages that you send save these as templates. You can save nsisting of up to 60 characters each.
may come with a set of templates that r service provider has prepared for plates appear in the list of templates, icon.
This is the Internet version of the user's guide. © Print only for pr
44 Messaging
Long messagesA text message can contain up to 160 characters. You can send a longer message by linking two or more messages. Please note that you are charged for the number of linked messages.
To turn long messages onScroll to Messaging, YES, Options, YES, Long messages, YES, On, YES.
Message optionsYou can set a default value for the message options below, or you can turn on the Set on send option which means that you choose the settings each time you send a message.• SMS type – The phone supports different types of
messages. Your service provider may offer the facility of converting a text message into a format (e-mail, for example) that suits the equipment that is going to receive the message.
• Validity period – If your message cannot be delivered, for example, if the recipient has turned off the phone, your service centre can save the message to send it later.
• Request repl
want the rec• Status reque
delivered.
To set a defau1. Scroll to Messa2. Select SMS typ
or Status reque
3. Select an optio
To turn set onRepeat steps 1 Set on send, YE
TemplatesIf you have onoften, you can 20 templates co
Your phone your operator oyou. These temindicated by an

ivate use.
Messaging 45
messageive a message, the phone beeps and w messages appears in the display. of the message wants you to reply, ply requested Reply? appears in the ES again to reply. If you do not want NO.
essage now
key to scroll through the message.e read the message, press YES. A new erent options appears. These options n the following pages.
essage latere the message in your Inbox in the nu.
essagee read the message, press YES. the option list and press YES.
This is the Internet version of the user's guide. © Print only for pr
To create a template1. Scroll to Messaging, YES, Templates, YES,
Add new?, YES.2. Enter the message and press YES to save the
template.
To use a templateSelect a template from the Templates list in the Messaging menu, and proceed as described in “To send a text message” on page 43.
Message counterYou can check the number of text messages that you have sent.
To check the number of sent messagesScroll to Calls, YES, Time and cost, YES, SMS counter, YES, Show counter.
To reset the message counterScroll to Calls, YES, Time and cost, YES, SMS counter, YES, Reset counter.
Receiving a When you recethe message Ne
If the senderthe message Re
display. Press Yto reply, press
To read the m1. Press YES.2. Use the rocker
When you havmenu with diffare described o
To read the mPress NO to savMessaging me
To reply to a m1. When you hav2. Select Reply in

ivate use.
ing messagesages are saved in the phone memory. phone memory and the SIM memory g envelope in the display indicates
o empty the inbox to be able to essages. memory becomes full of unread messages are automatically saved on
essages that are saved on the SIM re until you delete them.
ssage on the SIM carde read the message, press YES. SIM and press YES.
tionhort Message Service is a e that carries your private Information is another type that is sent to all certain network area.
ation could, for example, be a local r the phone number of a local taxi
This is the Internet version of the user's guide. © Print only for pr
46 Messaging
3. Select the message you want to send as a reply and press YES. You can choose between: Write new, Include this msg or Templates.
4. Write your message and press YES.
To forward a message1. When you have read the message, press YES.2. Select Forward and press YES.
Continue in the same way as when sending a new text message.
To call a phone number found in a messageWhen the number is highlighted, press YES.
To call the sender of the message1. When you have read the message, press YES.2. Select Call and press YES.
To read the next message1. When you have read the message, press YES.2. Select Read next and press YES.
To delete a message1. When you have read the message, press YES.2. Select Delete and press YES.
Saving incomIncoming messWhen both theis full, a flashinthat you have treceive new m
If the phonemessages, newthe SIM card. Mcard remain the
To save a me1. When you hav2. Select Save on
Area informaThe ordinary Spersonal servicmessages. Areaof text messagesubscribers in a
This informtraffic report ocompany.

ivate use.
Messaging 47
onmation channel” is used rk operators for sending eir subscribers within a area. You read messages rmation channel in the same ading area messages.
ll information channel onging, YES, Area info, YES, n, YES and then select On.
This is the Internet version of the user's guide. © Print only for pr
Area information usagePlease refer to the information provided by your operator for more information about the area information codes.
To turn area information on or off1. Scroll to Messaging, YES, Area info, YES, Reception.2. Select On or Off and press YES.
To enter an area information code1. Scroll to Messaging, YES, Area info, YES,
Message list, YES, Add new?, YES.2. Enter the new code and press YES.
Receiving an area messageWhen you receive an Area Information message, the message automatically appears in the display. You read the message in the same way as you read an ordinary text message. You cannot save area messages. When you have read the message and press YES or NO, it is deleted.
Cell informatiThe “Cell inforby some netwomessages to thcertain networkon the Cell infoway as when re
To turn the CeScroll to MessaCell informatio

ivate use.
ing WAP profile you want to use. services, YES, Select profile, YES.e of the following:omepage, for example, on. your bookmarks. Select YES.dress of a WAP site. Select ss, YES, New address? to enter address or select one of the 10 d addresses. When you enter a s, the normal http:// prefix is not
nd disconnectld NO or
select Exit WAP.
browsinge started browsing, you can reach ing options by pressing .
menu is dynamic. Its content may on which WAP site you are visiting.
enu contains the following:
This is the Internet version of the user's guide. © Print only for pr
48 Using WAP
Using WAP
WAP browser, bookmarks
Your phone has a WAP (Wireless Application Protocol) browser which is designed to bring a modified Internet to your mobile phone. A wide range of services are available, for example, news, entertainment, timetables, reservations, banking, e-commerce, positioning and e-mail.
Before you startFirst make sure that you have:• A phone subscription that supports data
transmission.• Correct settings in your phone for WAP.
See “Setting up WAP” on page 37.• Registered as a WAP user with your network
operator or service provider.
Using the WAP browserSettings may already be entered when you buy the phone. Otherwise you can receive the settings from your network operator or your service provider in a text message.
To start browsFirst select theScroll to WAP Then select on• Open your h
Sony Ericss• Go to one of
Bookmarks,• Enter the ad
Enter addre
a new WAPlatest entereWAP addresneeded.
To exit WAP a• Press and ho• Press ,
Options whenWhen you havdifferent brows
The optionsvary dependingThe options m
ivate use.
Using WAP 49
arksarks in your mobile phone just as you
nternet browser. You can have up to a 5 bookmarks.
bookmarksservices, YES, Bookmarks, YES.mark you want to work with, .dit, Delete, Send via SMS, Send, or and press YES.
oad, for example, pictures and ring AP sites directly to your phone.
re the file sizes do not exceed the
your phone, see “Memory status”
more information.
more content Games, YES, Download, YES.
u want to download and follow the t appear, YES.
This is the Internet version of the user's guide. © Print only for pr
• Go to the homepage set for the current WAP profile. If you select an e-mail address when browsing a WAP site, you can reply with a text message.
• Bookmarks – Add the site you are currently browsing to your list of bookmarks, or see the list of bookmarks for the current profile.
• Enter address – Enter the WAP address of a site you want to visit.
• Save picture – Save a picture from the site.• Send via SMS – Send a text message with a link
to the current WAP page to another phone.• Send link – Send a link to the current site to
another phone via infrared.• Reload – Refresh the contents of the WAP page.• Exit WAP – Disconnect and go to standby.• Status – Display current status information, for
example, profile, access type, connection time, data rate, security, address.
• Set as homepg – Set the current site as the homepage of the WAP profile you are using.
• Edit – Edit the name and/or the WAP address of the bookmark.
• Delete – Delete the bookmark.• Send – Send a link to the current WAP address via
infrared.
Using bookmYou use bookmdo with a PC Imaximum of 2
To work with 1. Scroll to WAP 2. Select the book
Select Go to, ESet as homepg
DownloadingYou can downlsignals, from W
Note: Make su
free memory in
on page 55 for
To download 1. Scroll to Fun &
2. Select what yoinstructions tha

ivate use.
essage acceptanceservices, YES, Options, YES, Common, ss, YES and select one of the following
low push messages to be y loaded.u allow push messages, but only nfirm. not allow push messages.
a push messageservices, YES, Push inbox, YES, sh message, YES and select one
g:browser starts and loads the WAP ou can see the push content.letes the push message.Save the message, to be loaded later.
ationnformation can be saved in your phone:roves memory efficiency. improves server access efficiency.proves site access efficiency.
This is the Internet version of the user's guide. © Print only for pr
50 Using WAP
To download from wap.SonyEricsson.com1. Scroll to WAP services, YES, Bookmarks, YES,
Sony Ericsson, YES.2. Select what you want to download and follow
the instructions that appear, YES.
WAP push messagesYou can receive push messages via WAP Services. This means that a service provider sends WAP content (information) to your phone without you having to do anything. You can, for example, get updated news or new WAP settings from your service provider.
There are two kinds of push messages:• Text messages that inform you about WAP services,
by sending a link. To go to the WAP service, click the link and select Load.
• Updated information from a WAP service is sent to appear in the WAP browser.
Receiving a push messageYou can set your phone to either accept or reject push messages. This is valid for all your WAP profiles.
To set push mScroll to WAP YES, Push acce
settings:• On – You al
automaticall• Prompt – Yo
when you co• Off – You do
To respond toScroll to WAP
scroll to any puof the followin• Load – The
site so that y• Delete – De• Postpone –
Stored informThe following i• Cache – imp• Passwords –• Cookies – im

ivate use.
More features 51
tures
opwatch, calculator, calendar, games
be set to ring at a specific time within currently at a specific time on several ave both these alarms set at the same
ou have set your phone to silent, the ing. The alarm clock also rings if the off.
mizer, YES, Alarms, YES, Alarm or
m, YES. YES and day, if recurrent, by scrolling
, YES.
alarm timeizer, YES, Alarms, YES, Alarm, YES,
o turn the alarm signal off when it not want the alarm to be repeated,
This is the Internet version of the user's guide. © Print only for pr
It is advisable to clear any sensitive information about previously visited WAP services. This is to avoid a security risk if your phone is misplaced, lost or stolen.
Note: See “WAP security settings” on page 41 for
more information regarding security and
certificates.
To allow WAP information in your phone1. Scroll to WAP services, YES, Options, YES,
Common, YES.2. Select the information to allow, YES.
To clear cache, password list, cookies or push inbox
1. Scroll to WAP services, YES, Advanced, YES.2. Select the information to be cleared.3. Press YES to confirm.
More fea
Alarm clock, st
Alarm clockThe alarm can 24 hours, or redays. You can htime. Even if yalarm signals rphone is turned
To set an alar1. Scroll to Organ
Recurrent alar
2. Enter the time,and pressing
To change the1. Scroll to Organ
New time, YES.2. Press any key t
rings. If you dopress YES.

ivate use.
racy of the calculator function
lculatorizer, YES, Calculator, YES.
th the keypad, then press:-, x, /. the figure. decimal point or %.
e a result, equals to (=).emory.rom memory.
a 24-hour timer.
erizer, YES, Timer, YES. When the
ess any key to turn it off.
you can add tasks for things that ember. The tasks can be edited
This is the Internet version of the user's guide. © Print only for pr
52 More features
To cancel the alarmScroll to Organizer, YES, Alarms, YES, Alarm or Recurrent alarm, YES, Cancel, YES.
To select an alarm signalScroll to Settings, YES, Sounds & alerts, YES, Alarm signal, YES.
StopwatchThe stopwatch is turned off when you answer an incoming call or when you exit the stopwatch menu.
To use the stopwatchScroll to Organizer, YES, Stopwatch, YES, then press:
to reset (when stopped). to save up to nine lap times.
YES to start, stop or re-start.NO to stop.
or to check saved lap times.
CalculatorThe phone has a built-in calculator, which can add, subtract, divide and multiply.
Note: The accu
is limited.
To use the ca1. Scroll to Organ
2. Enter digits wi to get +, to delete to enter a
YES to calculat to save to m to retrieve f
TimerThe phone has
To set the timScroll to Organ
signal rings, pr
CalendarIn the calendaryou have to remor deleted.

ivate use.
More features 53
is displayed, press YES.S.ES, edit the date, YES, edit the
s several entertaining games. are specified with help for
e Games, YES, Games, YES.
YES.e or Resume game, YES.
This is the Internet version of the user's guide. © Print only for pr
To add a task1. Scroll to Organizer, YES, Calendar, YES.2. Select Add task?, YES.3. Enter a description, YES.4. Enter the start/end dates and times, YES.5. Scroll to Continue?, YES.6. Set a reminder, if required, or select None
and press YES to save.
To set the reminderSelect any of the predefined values or select Other reminder, and enter the alarm date, YES and the alarm time. Press YES to save the task.
To view a task1. Scroll to Organizer, YES, Calendar, YES.2. Select View today, View all tasks, View week,
or View month. Press YES.
To delete a taskScroll to the task that you want to delete, press .
To delete all tasksScroll to Organizer, YES, Calendar, YES, Delete all, YES.
To edit a task1. When the task 2. Select Edit, YE3. Edit the task, Y
reminder, YES.
GamesYour phone haGame controlseach game.
To start a gam1. Scroll to Fun &
2. Select a game,3. Select New gam
4. Start the game.

ivate use.
ur SIM cardpears. and press YES.
ur- to eight-digit PIN and press YES.w PIN to confirm and press YES.
INgs, YES, Locks, YES, SIM lock, YES, ES. If the message Codes do not
you entered the new PIN incorrectly. Wrong PIN appears, followed by entered your old PIN incorrectly.
s are protected by a second PIN.
IN2gs, YES, Locks, YES, SIM lock, YES, YES.
M card lock on or offgs, YES, Locks, YES, Protection, YES.ff, and press YES. and press YES.
This is the Internet version of the user's guide. © Print only for pr
54 Security
Security
SIM card lock, phone lock
SIM card lockThe SIM card lock protects your subscription, but not your phone itself, from unauthorized use. If you change SIM cards, the phone still works with the new SIM card.
PIN and PUK codeMost SIM cards are locked at the time of purchase. If the SIM card lock is on, you have to enter a “PIN” (Personal Identity Number) every time you turn on your phone.
As you enter your PIN, the digits are hidden with an *. However digits are shown if your PIN starts with the same digits as an emergency number, for example 112. This is so that you can see and call an emergency number without entering a PIN. See “Emergency calls” on page 23 for more information.
If you enter your PIN incorrectly three times in a row, the SIM card is blocked. This is indicated by the message PIN blocked. To unblock it you need to enter your “PUK” (Personal Unblocking Key). Your PIN and PUK are supplied by your operator.
To unblock yo1. PIN blocked ap2. Enter your PUK3. Enter a new fo4. Re-enter the ne
To edit your PScroll to Settin
Change PIN, Ymatch appears,If the message Old PIN:, you
PIN2Certain service
To edit your PScroll to SettinChange PIN2,
To turn the SI1. Scroll to Settin
SIM lock, YES, 2. Select On or O3. Enter your PIN

ivate use.
Security 55
ne lockgs, YES, Locks, YES, Phone lock, YES, .ative and press YES.
e lock code and press YES.
one lock codethat you remember your new code. orget it, you have to hand in your local Sony Ericsson retailer.
hone lock codegs, YES, Locks, YES, Phone lock, YES, ES.
sple, how many positions are left
ook or how much memory is used.
memory of the phonebookbook, YES, Memory status, YES.
This is the Internet version of the user's guide. © Print only for pr
Phone lockThe phone lock protects the phone against unauthorized use if it is stolen and the SIM card is exchanged. It is not on when you buy the phone. You can change the phone lock code (0000) to any four- to eight-digit personal code. The phone lock can be set to on, automatic or off.
Note: The phone lock code must be entered to use
Master reset. See “Master reset” on page 21 for
more information.
Phone lock onIf the phone lock is on, the message Phone locked appears each time you turn on the phone. You have to enter your code followed by YES to use your phone.
AutomaticIf the phone lock is set to automatic, you do not need to enter your phone lock code until a different SIM card is inserted in the phone.
To set the pho1. Scroll to Settin
Protection, YES2. Select an altern3. Enter the phon
Editing the phIt is important If you should fphone to your
To edit your pScroll to Settin
Change code, Y
Memory statuCheck for examin your phoneb
To check the Scroll to Phone

ivate use.
hooting
e phone work the way I want?
ts some problems that you might e using your phone. Some problems u call your service provider, but most s you can easily correct yourself.
annot be switched on
oneplace the battery. See “SIM card and tion” on page 4.
of chargingt charging a battery that is empty or a not been used for a long time, it may inutes before the battery icon appears
gehows a language that you do not u can always set the following from
This is the Internet version of the user's guide. © Print only for pr
56 Troubleshooting
To check the memory for themes, pictures, sounds, gamesScroll to Fun & Games, YES, select one of the menus, YES, , select Memory status, YES.
To check memory for text messagesScroll to Messaging, YES, Memory status, YES.
Memory fullFree memory by deleting unused files or information.
To delete saved files or informationSome factory default files and information cannot be deleted.• Select a file or information, press , YES.• Select a submenu option or advanced option
to delete.
Troubles
Why doesn’t th
This chapter lisencounter whilrequire that yoof the problem
The phone c
Hand-held phRecharge or rebattery informa
No indicationWhen you starbattery that hastake up to 30 min the display.
Menu languaIf the display sunderstand, yostandby:

ivate use.
Troubleshooting 57
ly range of a network, but you are use it. However, in an emergency, allow you to call, for example,
al emergency number 112. y calls” on page 23.
work within range or the received eak. You have to move to get a signal nough.
rong PIN2ed your PIN or PIN2 incorrectly. ct PIN or PIN2, and press YES. lock” on page 54.
matcht to change a security code our PIN) you have to confirm the tering it again. The two codes that
ed do not match. See “SIM card lock”
This is the Internet version of the user's guide. © Print only for pr
• Press 0000 for English menus.• Press 8888 for automatic, local menus.
Grey menu optionsGrey text indicates a function that is temporarily unavailable, for example, due to your subscription or due to a certain setting which has not been turned on.
Since you cannot send pictures and sounds that are copyright-protected, the Send menu is sometimes unavailable.
Error messages
Insert SIMThere is no SIM card in the phone, it may need cleaning or you may have inserted it incorrectly. See “SIM card and battery information” on page 4.
Insert correct SIM cardThe phone is set to work only with certain SIM cards. Insert the correct SIM card.
Inactive SIMThe SIM card is not activated. Contact your network operator for more information.
SOS calls onYou are withinnot allowed to some operatorsthe internationSee “Emergenc
No networkThere is no netsignal is too wthat is strong e
Wrong PIN/WYou have enterEnter the correSee “SIM card
Codes do notWhen you wan(for example ynew code by enyou have enteron page 54.

ivate use.
al informationnt use, warranty, declaration
le front coverse the front cover.
This is the Internet version of the user's guide. © Print only for pr
58 Additional information
PIN blocked/PIN2 blockedYou have entered your PIN or PIN2 incorrectly three times in a row. To unblock, see “SIM card lock” on page 54.
PUK blocked- contact operatorYou entered your personal unblocking key code (PUK) incorrectly 10 times in a row. Contact your network operator or service provider.
Phone lockedThe phone is locked. To unlock the phone, see “Phone lock” on page 55.
Phone lock code:Your phone comes with the phone lock code, 0000. You can change it to any four- to eight-digit code. See “Phone lock” on page 55.
Number not permittedThe Fixed Dialling function is on and the number you have dialled is not on your fixed numbers list. See “Fixed dialling” on page 34.
AdditionSafe and efficie
of conformity
ExchangeabYou can replac

ivate use.
Additional information 59
r Safe and Efficient Use
s information before using ne.
DATIONS your product with care a clean and dust-free
e your product to liquid or moisture
e your product to extreme mperatures.
e your product to open obacco products. throw or try to bend your
your phone with an object inserted pad and display; this may cause e phone.your product.our product near medical equipment esting permission.our product when in, or around aircraft, ted “turn off two-way radio”.
This is the Internet version of the user's guide. © Print only for pr
To change the front cover1. Gently pull the front cover away, starting from
the top of the phone.2. Slide the front cover and lift it off the phone.3. Insert the notches of the new front cover into the
corresponding slots on the phone. Slide and push the front cover up until it locks into place.
Sony Ericsson Consumer web siteOn www.SonyEricsson.com there is a support section where help and tips are only a few clicks away. Here you find the latest software updates, tips on how to use your product more efficiently, function guides for some of the products and additional help when you require it.
Guidelines fo
Please read thiyour mobile pho
RECOMMEN• Always treat
and keep it inplace.
• Do not exposor humidity.
• Do not exposhigh or low te
• Do not exposflames or lit t
• Do not drop,product.
• Do not closebetween keydamage to th
• Do not paint • Do not use y
without requ• Do not use y
or areas pos

ivate use.
cy energy (also known as radio waves cy fields).
s around the world have adopted international safety guidelines, cientific organizations, e.g. ICNIRP ommission on Non-Ionizing Radiation IEEE (The Institute of Electrical and ineers Inc.), through periodic and
ation of scientific studies. These blish permitted levels of radio wave general population. The levels include
designed to assure the safety of all less of age and health, and to account s in measurements.
orption Rate (SAR) is the unit of or the amount of radio frequency d by the body when using a mobile
R value is determined at the highest level in laboratory conditions, but the l of the mobile phone while operating w this value. This is because the mobile ed to use the minimum power required
twork. AR below the radio frequency exposure
t mean that there are variations in safety. y be differences in SAR levels among all Sony Ericsson mobile phone models meet radio frequency exposure
This is the Internet version of the user's guide. © Print only for pr
60 Additional information
• Do not use your product in an area where a potentially explosive atmosphere exists.
• Do not place your product or install wireless equipment in the area above your car’s air bag.
• Do not attempt to disassemble your product. Only Sony Ericsson authorised personnel should perform service.
ANTENNAOnly use an antenna that has been specifically designed by Sony Ericsson for your mobile phone. Use of unauthorised or modified antennas could damage your mobile phone and may violate regulations. causing loss of performance and SAR levels above the recommended limits (see below).
EFFICIENT USEHold your mobile phone as you would any other phone. Do not cover the top of the phone when in use, as this affects call quality and may cause the phone to operate at a higher power level than needed, thus shortening talk and standby times.
RADIO FREQUENCY (RF) EXPOSURE AND SARYour mobile phone is a low-power radio transmitter
and receiver. When it is turned on, it emits low levels
of radio frequenor radio frequen
Governmentcomprehensivedeveloped by s(International CProtection) andElectronics Engthorough evaluguidelines estaexposure for thea safety marginpersons, regardfor any variation
Specific Absmeasurement fenergy absorbephone. The SAcertified power actual SAR levecan be well belophone is designto reach the ne
Variations in Sguidelines do noWhile there mamobile phones, are designed toguidelines.

ivate use.
Additional information 61
s in their vehicles unless a handsfree nal antenna supports the installation. full attention to driving and pull off the efore making or answering a call if
ns so require.
EDICAL DEVICESes may affect the operation of cardiac d other implanted equipment. Please e mobile phone over the pacemaker, ast pocket. When using the mobile at the ear opposite the pacemaker. If a ce of 15 cm (6 inches) is kept between e and the pacemaker, the risk of
imited. If you have any reason to erference is taking place, immediately bile phone. Contact your cardiologist ation. dical devices, please consult the f the device.
W CHILDREN TO PLAY OBILE PHONE OR ITS . THEY COULD HURT
OR OTHERS, OR ENTALLY DAMAGE THE E OR ACCESSORY. YOUR MOBILE ACCESSORY MAY CONTAIN
THAT COULD BE DETACHED AND OKING HAZARD.
This is the Internet version of the user's guide. © Print only for pr
Before a phone model is available for sale to the public, it must be tested and certified to the FCC that it does not exceed the limit established by the government-adopted requirement for safe exposure. The tests are performed in positions and locations (that is, at the ear and worn on the body) as required by the FCC for each model. For body worn operation, this phone has been tested and meets FCC RF exposure guidelines when the handset is positioned a minimum of 15 mm from the body without any metal parts in the vicinity of the phone or when used with the original Sony Ericsson body worn accessory intended for this phone. Use of other accessories may not ensure compliance with FCC RF exposure guidelines.
A separate leaflet with SAR information for this mobile phone model is included with the material that comes with this mobile phone. This information can also be found, together with more information on radio frequency exposure and SAR, on: www.SonyEricsson.com.
DRIVINGPlease check if local laws and regulations restrict
the use of mobile phones while driving or require drivers to use handsfree solutions. We recommend that you use only Ericsson or Sony Ericsson handsfree solutions intended for use with your product. Please note that because of possible interference to electronic equipment, some vehicle manufacturers forbid the use
of mobile phonekit with an exter
Always give road and park bdriving conditio
PERSONAL MMobile phon
pacemakers anavoid placing the.g. in your brephone, place it minimum distanthe mobile phoninterference is lsuspect that intturn off your mofor more inform
For other memanufacturer o
CHILDRENDO NOT ALLOWITH YOUR MACCESSORIESTHEMSELVESCOULD ACCIDMOBILE PHONPHONE OR ITSSMALL PARTSCREATE A CH

ivate use.
E AND CAREnd that you fully charge the battery
your mobile phone for the first time. only be charged in temperatures +41°F) and +45°C (+113°F).y or one that has not been used for ld have reduced capacity the first few
standby times depend on the actual nditions when using the mobile phone. one is used near a base station, less d and talk and standby times are
ay explode if disposed of in fire.sson or Sony Ericsson branded original chargers intended for use with your
e. Other chargers may not charge r may produce excessive heat. Using s and chargers could be dangerous.e the battery to liquid. metal contacts on the battery touch l object. This could short-circuit and
battery.semble or modify the battery.e the battery to extreme
s, never above +60°C r maximum battery the battery in room
.
This is the Internet version of the user's guide. © Print only for pr
62 Additional information
DISPOSING OF THE PRODUCTYour mobile phone should not be
placed in municipal waste. Please check local regulations for disposal of electronic products.
POWER SUPPLYConnect the AC power adapter only to designated power sources as marked on the product. Make sure the cord is positioned so that it will not be subjected to damage or stress. To reduce risk of electric shock, unplug the unit from any power source before attempting to clean it. The AC power adapter must not be used outdoors or in damp areas. Never alter the cord or plug. If the plug will not fit into the outlet, have a proper outlet installed by a qualified electrician
EMERGENCY CALLSMobile phones operate using radio signals, which
cannot guarantee connection under all conditions. Therefore you should never rely solely upon any mobile phone for essential communications (e.g. medical emergencies).
Emergency calls may not be possible on all cellular networks or when certain network services and/or mobile phone features are in use. Check with your local service provider.
BATTERY USWe recomme
before you useThe battery canbetween +5°C (
A new battera long time coutimes it is used.
The talk andtransmission coIf the mobile phpower is requireprolonged. • Warning! M• Use only Eric
batteries andmobile phonsufficiently oother batterie
• Do not expos• Do not let the
another metadamage the
• Do not disas• Do not expos
temperature(+140°F). Focapacity, usetemperature

ivate use.
Additional information 63
l rates may apply) or visit son.com to get further information.
onditions of this Limited Warranty, warrants this Product to be free from n, material and workmanship at the al purchase by a consumer, and for eriod of one (1) year.
dorranty period, this Product fails to ormal use and service, due to defects
rials or workmanship, Sony Ericsson ibutors or service partners, in the where you purchased the Product, will, either repair or replace the Product in h the terms and conditions stipulated
n and its service partners reserve the a handling fee if a returned Product is under warranty according to the w.that your personal settings/downloads hen the Product is repaired or replaced.
valid only if the original proof of d to the original purchaser by an,
This is the Internet version of the user's guide. © Print only for pr
• Turn off your mobile phone before removing the battery.
• Keep out of children’s reach.• Use the battery for the intended
purpose only.• Do not allow the battery to be put into
the mouth. Battery electrolytes may be toxic if swallowed.
• Do not close your phone with an object inserted between keypad and display; this may cause damage to the phone.
DISPOSING OF THE BATTERYPlease check local regulations for disposal of batteries or call your local Sony Ericsson Customer Care Center for information.
The battery should never be placed in municipal waste. Use a battery disposal facility if available.
Limited WarrantySony Ericsson Mobile Communications AB, S-221 88 Lund, Sweden, (Sony Ericsson), provides this Limited Warranty for your mobile phone and original accessory delivered with your mobile phone (hereinafter referred to as “Product”).
Should your Product need warranty service, please return it to the dealer from whom it was purchased, or contact your local Sony Ericsson Customer Care
Centre (nationawww.SonyErics
Our warrantySubject to the cSony Ericsson defects in desigtime of its origina subsequent p
What we will If, during the waoperate under nin design, mateauthorised distrcountry/region*at their option, accordance witherein.
Sony Ericssoright to charge found not to beconditions belo
Please note might be lost w
Conditions1. The warranty is
purchase issue

ivate use.
oes not cover Product failures caused modifications, or repair or opening of formed by a non-Sony Ericsson on.oes not cover Product failures which ed by use of accessories or other es which are not Ericsson or Sony d original accessories intended for use t. any of the seals on the Product will ty. EXPRESS WARRANTIES, WHETHER RAL, OTHER THAN THIS PRINTED ANTY. ALL IMPLIED WARRANTIES,
ITHOUT LIMITATION THE IMPLIED OF MERCHANTABILITY OR FITNESS ULAR PURPOSE, ARE LIMITED TO N OF THIS LIMITED WARRANTY. IN LL SONY ERICSSON OR ITS
E LIABLE FOR INCIDENTAL OR IAL DAMAGES OF ANY NATURE , INCLUDING BUT NOT LIMITED TO OR COMMERCIAL LOSS, TO THE
THOSE DAMAGES CAN BE Y LAW.
/states do not allow the exclusion or dental or consequential damages, or duration of implied warranties, so the tions or exclusions may not apply to
This is the Internet version of the user's guide. © Print only for pr
64 Additional information
for this Product, Sony Ericsson authorised dealer, specifying the date of purchase and serial number**, is presented with the Product to be repaired or replaced. Sony Ericsson reserves the right to refuse warranty service if this information has been removed or changed after the original purchase of the Product from the dealer.
2. If Sony Ericsson repairs or replaces the Product, the repaired or replaced Product shall be warranted for the remaining time of the original warranty period or for ninety (90) days from the date of repair, whichever is longer. Repair or replacement may involve the use of functionally equivalent reconditioned units. Replaced parts or components will become the property of Sony Ericsson.
3. This warranty does not cover any failure of the Product due to normal wear and tear, or due to misuse, including but not limited to use in other than the normal and customary manner, in accordance with the Sony Ericsson instructions for use and maintenance of the Product. Nor does this warranty cover any failure of the Product due to accident, software or hardware modification or adjustment, acts of God or damage resulting from liquid.
4. Since the cellular system on which the Product is to operate is provided by a carrier independent from Sony Ericsson, Sony Ericsson will not be responsible for the operation, availability, coverage, services or range of that system.
5. This warranty dby installations,the Product perauthorised pers
6. The warranty dhave been causperipheral devicEricsson brandewith the Produc
7. Tampering withvoid the warran
8. THERE ARE NOWRITTEN OR OLIMITED WARRINCLUDING WWARRANTIES FOR A PARTICTHE DURATIONO EVENT SHALICENSORS BCONSEQUENTWHATSOEVERLOST PROFITSFULL EXTENTDISCLAIMED B
Some countrieslimitation of incilimitation of thepreceding limitayou.

ivate use.
Additional information 65
ntplies with Part 15 of the
ration is subject to the nditions: (1) This device harmful interference, vice must accept any interference ing interference that may cause ation.
This is the Internet version of the user's guide. © Print only for pr
The warranty provided does not affect the consumer's statutory rights under applicable legislation in force, nor the consumer's rights against the dealer arising from their sales/ purchase contract.
* European union (EU)If you have purchased your Product in an EU country you can have your Product serviced, under the conditions set out above, within the warranty period in any EU country where an identical Product is sold by an authorised Sony Ericsson distributor. To find out if your Product is sold in the EU country you are in, please call the local Sony Ericsson Customer Care Centre. Please observe that certain services may not be possible elsewhere than in the country of original purchase, for example due to the fact that your Product may have an interior or exterior which is different from equivalent models sold in other EU countries. It may not be possible to repair SIM-locked Products.
** In some countries/regions additional information is requested. If so, this is clearly shown on the valid proof of purchase.
FCC StatemeThis device comFCC rules. Opefollowing two comay not cause and (2) This dereceived, includundesired oper

ivate use.
cons mean? shows icons which may appear the menus.
ption
ersonal phonebook.
ng of text (SMS) and voice messages.
ng of outgoing/incoming calls, call time st information.
ng of pictures, sounds and themes. ames.
al settings including profiles, display, ge, time and locks.
you access to WAP services on the t.
, alarm clock and other extras.
This is the Internet version of the user's guide. © Print only for pr
66 Icons
Declaration of Conformity
We, Sony Ericsson Mobile Communications AB ofNya VattentornetS-221 88 Lund, Sweden.
declare under our sole responsibility that our product
Sony Ericsson type AAB-1021021-BV
and in combination with our accessories, to which this declaration relates is in conformity with the appropriate standards 3GPP TS 51.010-1, EN 301489-7, EN 60950, following the provisions of, Radio Equipment and Telecommunication Terminal Equipment directive 99/5/EC with requirements covering EMC directive 89/336/EEC, and Low Voltage directive 73/23/EEC.
Lund, June 2003
Hiroshi Yoshioka, Head of Product Business Unit GSM/UMTS
We fulfil the requirements of the R&TTE Directive (99/5/EC).
Icons
What do the iThe table belowin standby or in
0682
Icon Descri
Main menus
Your p
Handli
Handliand co
HandliPlay g
Personlangua
Gives Interne
Events

ivate use.
Icons 67
nals are off.
arm clock has been set and is on.
er has been set and is on.
ile other than Normal has been chosen.
rd lock is on or a secure WAP tion is established.
ve received a text message.
ve received a voice message.
ve received a WAP push message.
frared port is on.
d communication is in progress.
S session is in progress.
ption
This is the Internet version of the user's guide. © Print only for pr
Receive items via infrared, networks, data communications settings and accessories.
Create your own menu for the functions you use most often.
Standby
Tells you the strength of the GSM network signal.
GPRS is within range, but can not be used.
GPRS is within range and can be used.
Tells you the status of the battery.
You cannot receive any incoming calls.
You have missed an incoming call.
All incoming calls are diverted to a defined number.
No calls or only certain calls from numbers in a list are received.
Icon Description
All sig
The al
The tim
A prof
The caconnec
You ha
You ha
You ha
The in
Infrare
A GPR
Icon Descri

ivate use.
sage has not been read.
sage has been read.
aged message.
essage has not been sent.
essage has been sent.
sage has been delivered or read by the nt.
message has expired or been rejected recipient.
fined message template (not editable).
efined message template.
ed call in the call list.
ption
This is the Internet version of the user's guide. © Print only for pr
68 Icons
Ciphering is currently not being provided by the network.
The network is preferred and can be used.
The network is forbidden and cannot be used.
Your home network is within range and can be used.
An ongoing call.
Phonebook
You can enter the phonebook by pressing .
A picture is connected to a phonebook entry.
Messaging
A text message is saved on the SIM card.
A voice message has not been checked.
Icon Description
A mes
A mes
A dam
The m
The m
A mesrecipie
A sentby the
Pre-de
User-d
Calls
A miss
Icon Descri

ivate use.
Icons 69
This is the Internet version of the user's guide. © Print only for pr
An answered call in the call list.
A dialled number in the call list.
Fun & Games
A standard melody saved in My sounds.
A polyphonic melody saved in My sounds.
Icon Description

ivate use.
FFixed dialling 34Flip functions 20
GGames 53
memory status 55GPRS 39Groups
closed user groups 35conference calls 33
Groups. See Phonebook 29GSM 39GSM frequencies 2
HHandsfree 20
IIcons (display) 66Infrared port 21International
calls 23emergency number 23
This is the Internet version of the user's guide. © Print only for pr
70 Index
Index
AAlarm clock 51Animations 15Answering mode 20Area information 46Ask to save 27
BBattery 4
CCalculator 52Calendar 52Call costs 30
credit limit 31minute minder 18
Call time 30Calls
accept 36answer 5, 24automatic re-dialling 23call list 25divert 31emergency 23
fixed dialling 34international 23make 5, 22missed 24put on hold 32receive 5, 24reject 24restrict 34
Cell information 47Charging (battery) 4Conference calls 33Contrast (display) 19
DDeclaration of conformity 66Display
contrast 19icons 66light 18
Diverting calls 31Downloading 49
EEmergency calls 23Error messages 57

ivate use.
Index 71
Pictures 15animations 15exchange 16memory status 55send 16wallpaper 15
PINchange 54enter 5PIN2 54
Profiles 20PUK 54
QQuick keys 8
RReading a message 45Redialling 23Reset 21Ring signals 16
SSave a number 25Security
phone lock 55SIM card 54
This is the Internet version of the user's guide. © Print only for pr
KKey functions
flip closed 6flip open 7
Key sound 18
LLanguage (display) 18Locks
phone 55SIM card 54
MMaster reset 21Melodies, see Ring signals 16Memory
full 56status 55
Menu language 18Menu navigate 5Menu overview 11Messages. See Text messagesMinute minder 18Missed calls 24Multitap text input 12My numbers 20My shortcuts 20
NNetworks 5, 36
OOnline services 10Own number 20
PPersonal ring signal 26Phone lock 55Phonebook 25
ask to save 27call from 26card memory 28check the memory 29delete a phone number 27edit a name 27edit a phone number 27groups 29memory 28memory status 55phone memory 28replacing entries 28save a number 25shortcuts 27sort order 28

ivate use.
This is the Internet version of the user's guide. © Print only for pr72 Index
WAP 41Send a message 43Service centre 42Shortcuts 8, 10, 20Silent ring signal 17SIM card 4, 10
copy phonebook entries 29lock 54unblock 54
SMS. See Text messagesSony Ericsson
web site 59Sounds
memory status 55Speed dial 27Stopwatch 52
TT9 Text input 13Text messages
call phone number 46delete 46forward 46insert item 43memory status 55options 44
read 45reply 45save 46send 43
Themes 15memory status 55
Time settings 19Turning the phone on/off 5
VVibrating alert 18Voice mail 30Volume
change speaker volume 22
WWAP
bookmarks 48downloading 49options 48security 41setting up 37using WAP 48
Warranty 63