etarmishfx.co.uk/wp-content/uploads/2015/06/hfx_etarmis-–-lite-user... · creating a public...
TRANSCRIPT
EtarmisLITE User Guide

Etarmis
Contents
2
Etarmis
Creating A New Personal Record 3
Changing A Password 6
Creating a Site Administrator 7
Deleting An Employee 8
Making A Correction 10
Deleting A Correction 12
Modifying A Booking 14
Making a Collective Correction 16
Printing A Report 18
Creating A Public Holiday 20
Creating / Amending A Department 21
Producing a Working Schedule 22
3
EtarmisEtarmis
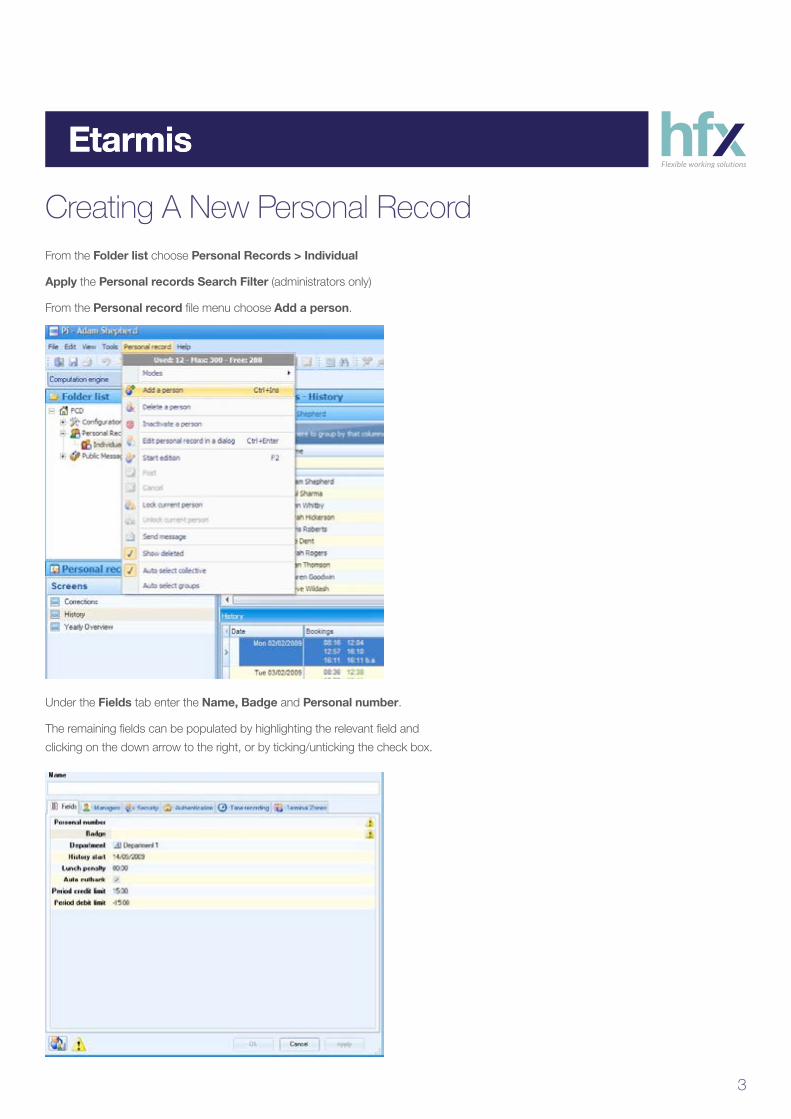
Under the Fields tab enter the Name, Badge and Personal number.
The remaining fields can be populated by highlighting the relevant field and
clicking on the down arrow to the right, or by ticking/unticking the check box.
Creating A New Personal RecordFrom the Folder list choose Personal Records > Individual
Apply the Personal records Search Filter (administrators only)
From the Personal record file menu choose Add a person.
4
Etarmis
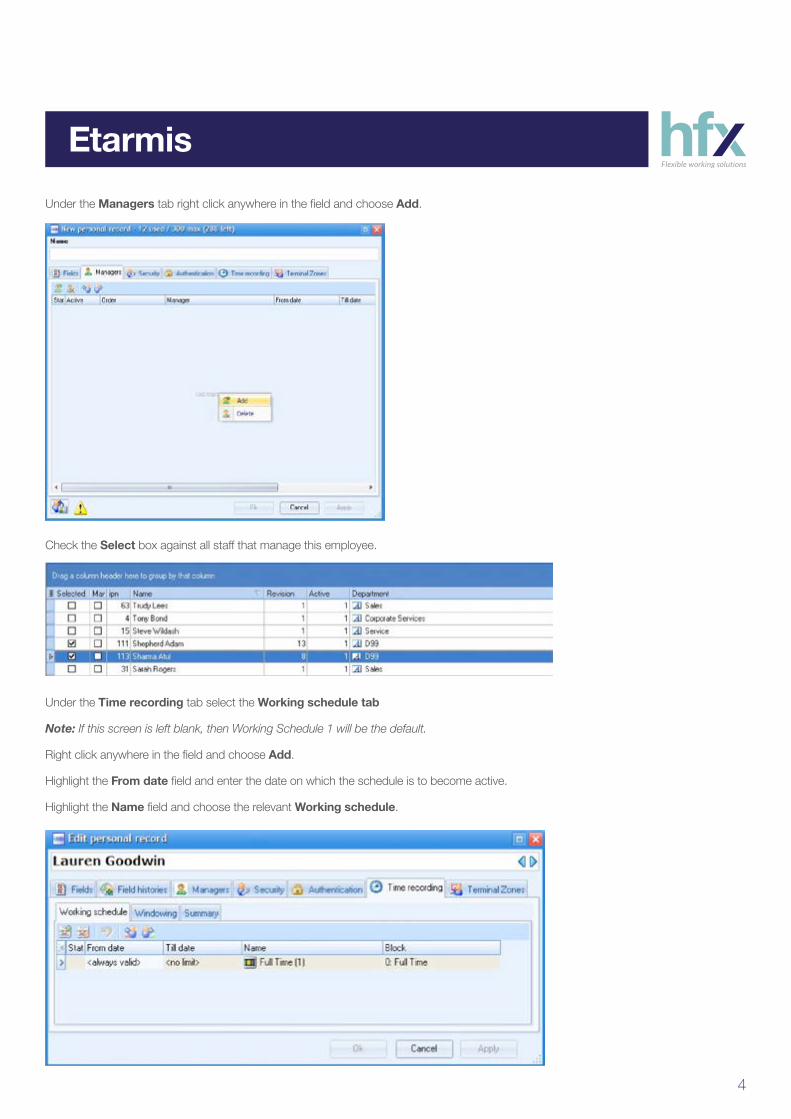
Under the Managers tab right click anywhere in the field and choose Add.
Check the Select box against all staff that manage this employee.
Under the Time recording tab select the Working schedule tab
Note: If this screen is left blank, then Working Schedule 1 will be the default.
Right click anywhere in the field and choose Add.
Highlight the From date field and enter the date on which the schedule is to become active.
Highlight the Name field and choose the relevant Working schedule.
5
Etarmis
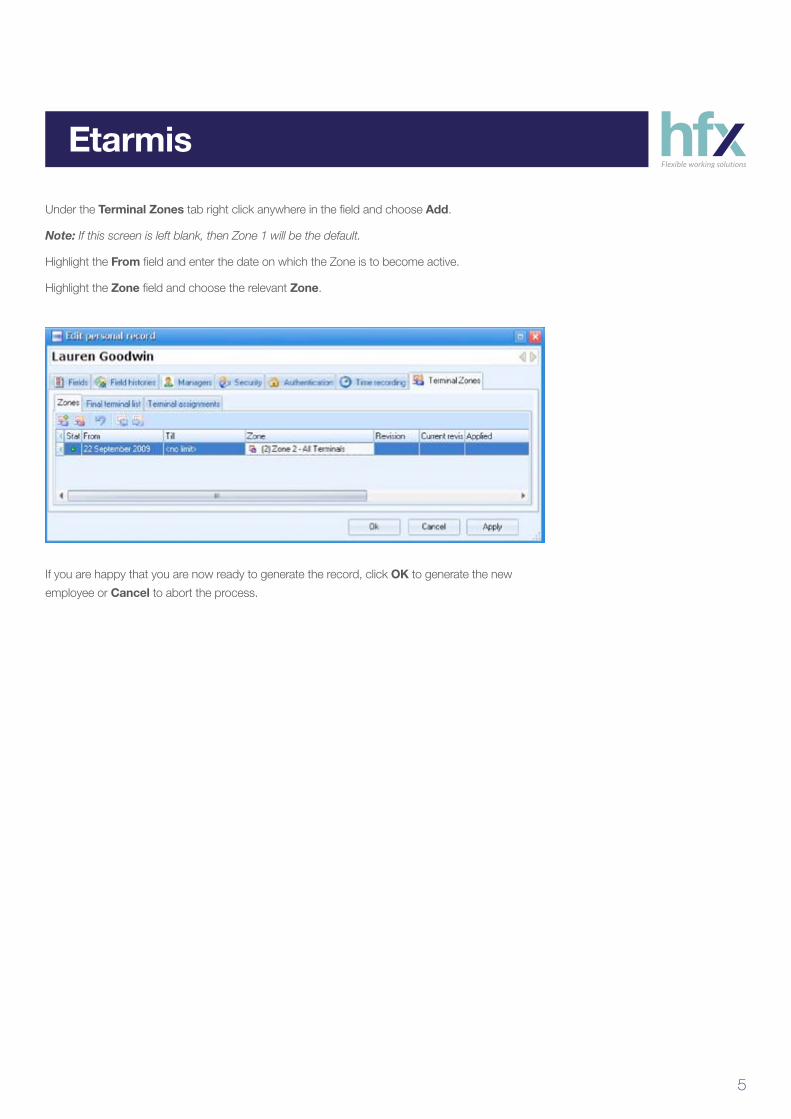
Under the Terminal Zones tab right click anywhere in the field and choose Add.
Note: If this screen is left blank, then Zone 1 will be the default.
Highlight the From field and enter the date on which the Zone is to become active.
Highlight the Zone field and choose the relevant Zone.
If you are happy that you are now ready to generate the record, click OK to generate the new
employee or Cancel to abort the process.

6
Etarmis
Changing A PasswordFrom the Folder List highlight Personal Records > Individual
From the Personal records window right click on the employee and choose Edit personal record in a dialog
From the Edit personal record dialogue box choose Authentication
Delete the current Password, enter the new Password, and then re-enter in the Confirm Password box.
Note: If the confirm password box is greyed out, left click with your mouse away from it and you should then
be able to enter the password again.

7
Etarmis
Creating a Site AdministratorFrom the Folder List highlight Personal Records > Individual
From the Personal records window right click on the employee and choose
Edit personal record in a dialog
From the Edit personal record dialogue box choose Security and then check the box entitled
Site Administrators. Choose OK to save.

8
Etarmis
Deleting an Employee
From the Personal record file menu choose either Delete a person or Inactivate a person
From the Folder List highlight Personal Records > Individual
From the Personal records window highlight the employee

9
Etarmis
Please Note: Deleting a person will stop the system from calculating their record any further and will
be indicated by a black line through the employee details.
In this state the option to Undelete current person can be chosen from the Personal record file
menu. This employee still occupies 1 user licence.
Please Note: Choosing the option Inactivate a person from the Personal record file menu will
completely remove this employee and their historical data from the system. This action will allow 1
user licence to become available for the creation of a new user.
10
Etarmis
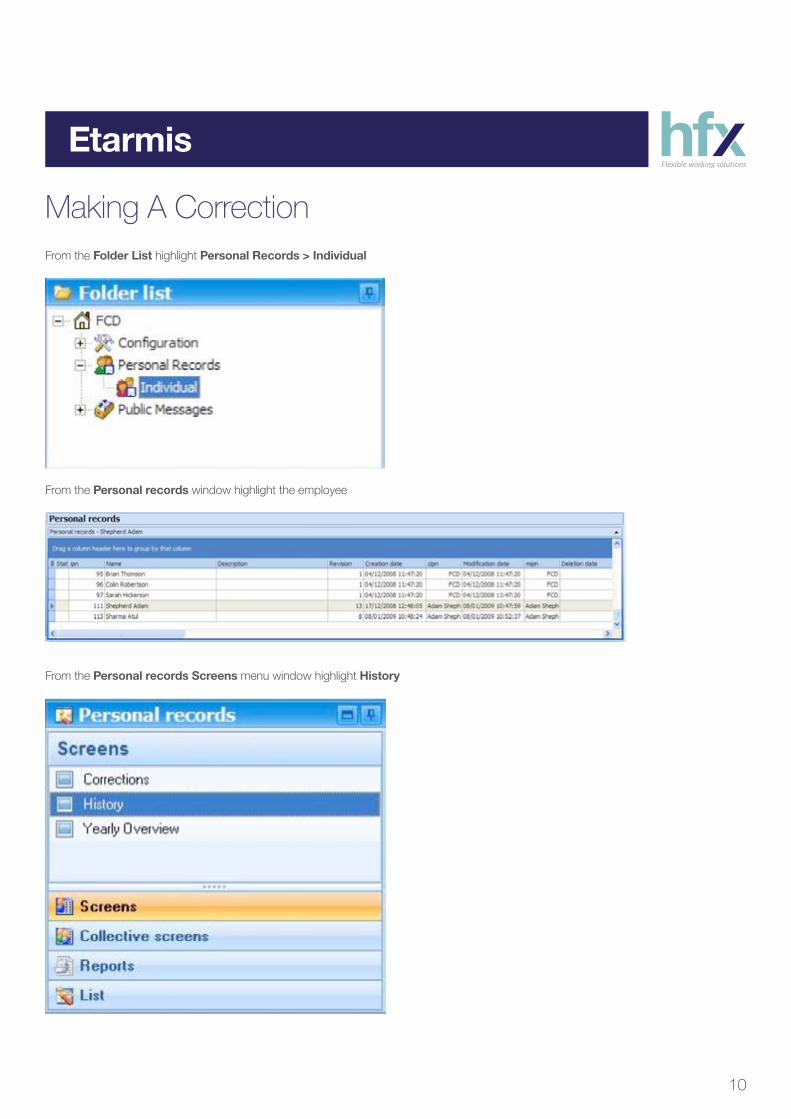
Making A CorrectionFrom the Folder List highlight Personal Records > Individual
From the Personal records window highlight the employee
From the Personal records Screens menu window highlight History
11
Etarmis
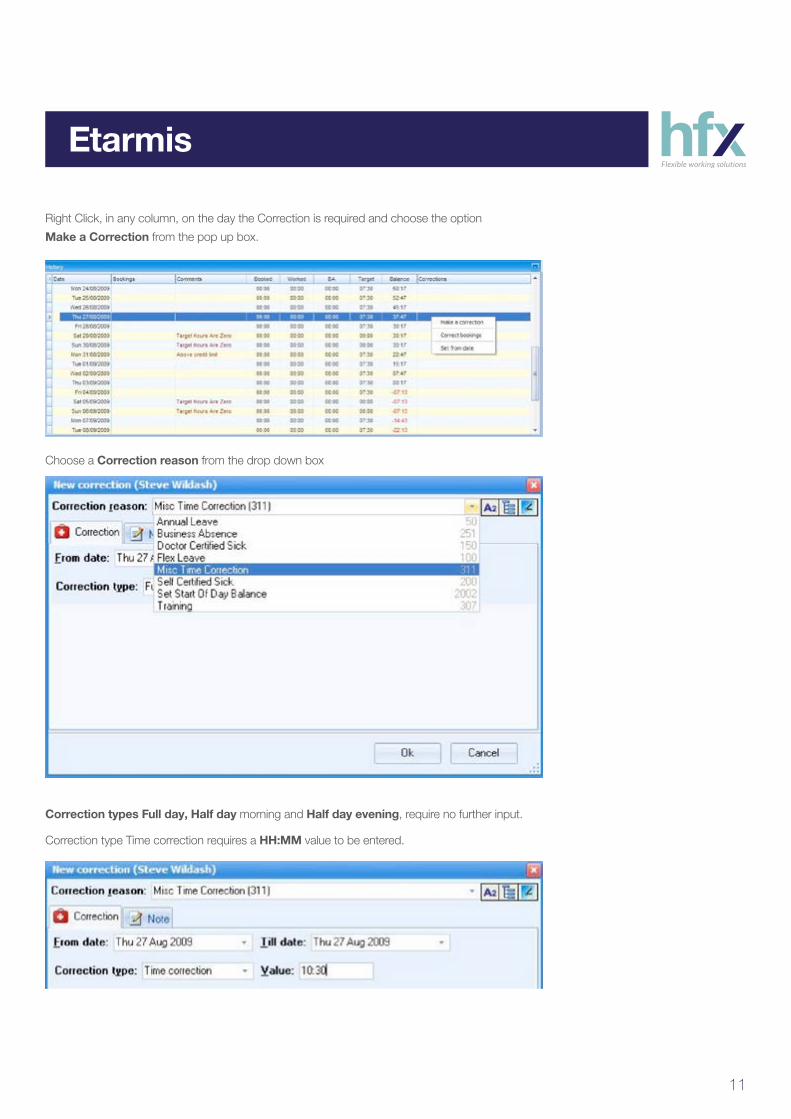
Right Click, in any column, on the day the Correction is required and choose the option
Make a Correction from the pop up box.
Choose a Correction reason from the drop down box
Correction types Full day, Half day morning and Half day evening, require no further input.
Correction type Time correction requires a HH:MM value to be entered.
12
Etarmis
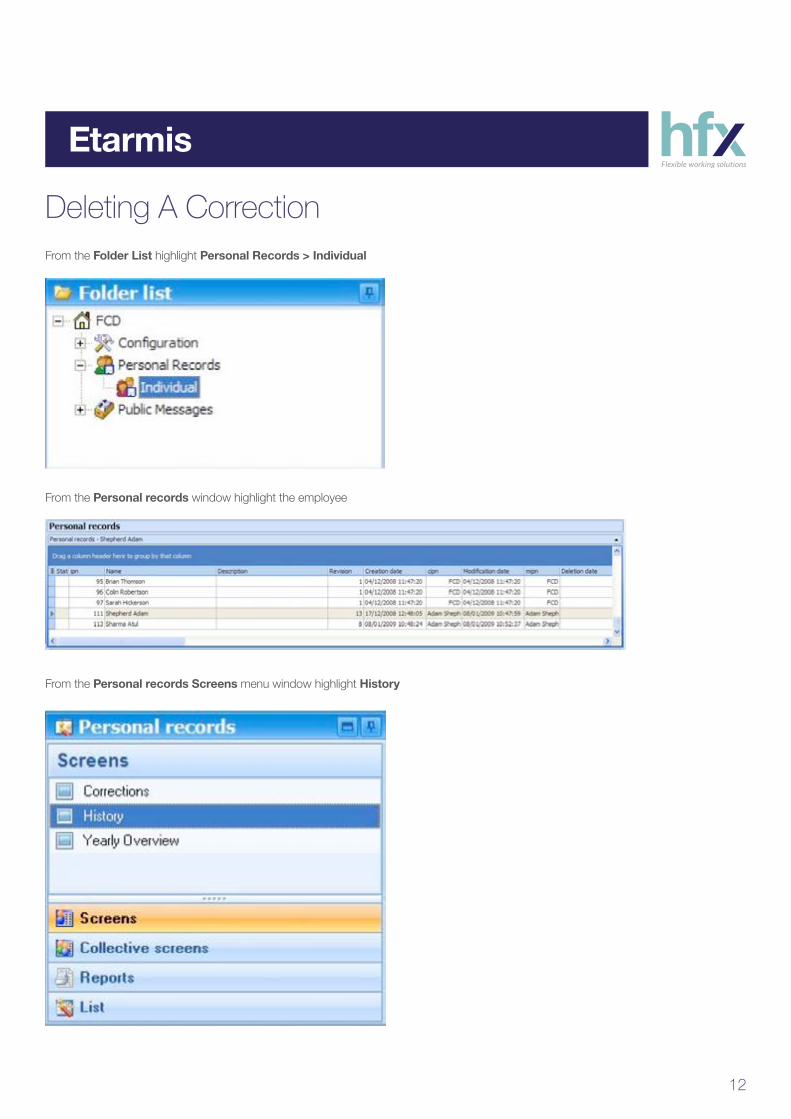
Deleting A Correction From the Folder List highlight Personal Records > Individual
From the Personal records window highlight the employee
From the Personal records Screens menu window highlight History
13
Etarmis
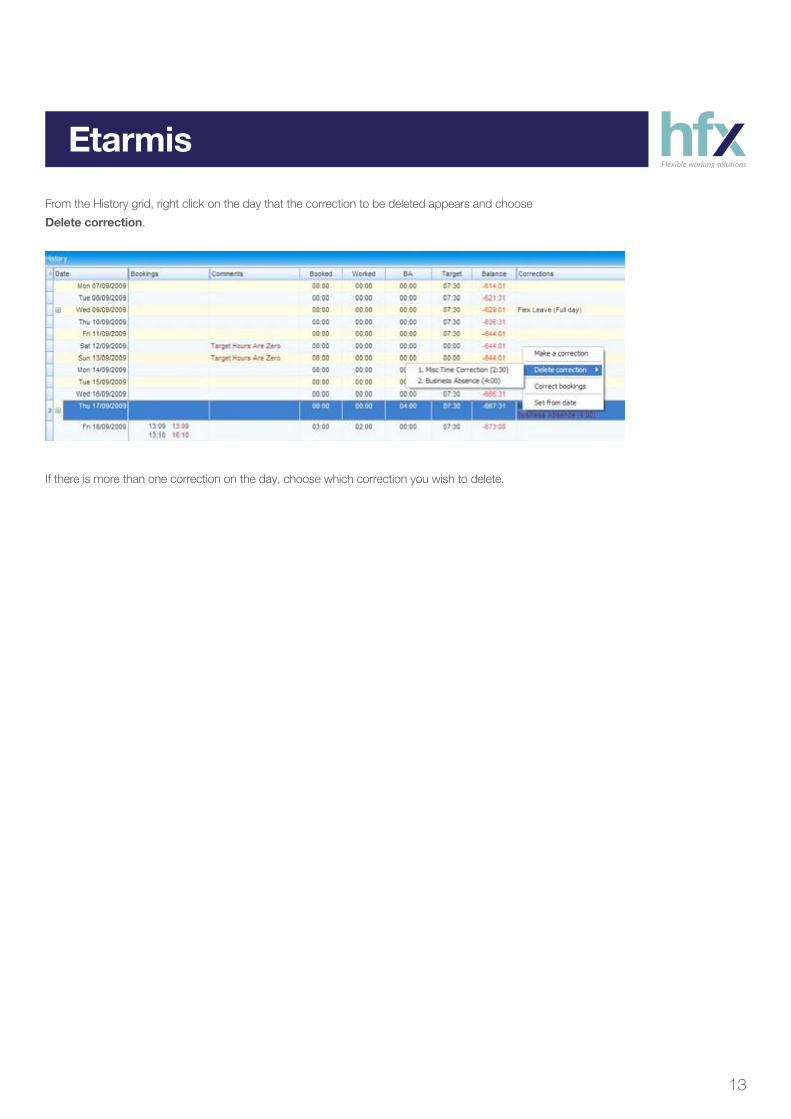
From the History grid, right click on the day that the correction to be deleted appears and choose
Delete correction.
If there is more than one correction on the day, choose which correction you wish to delete.

14
Etarmis
Modifying A BookingFrom the Folder List highlight Personal Records > Individual
From the Personal records window highlight the employee
From the Personal records Screens menu window highlight History
15
Etarmis
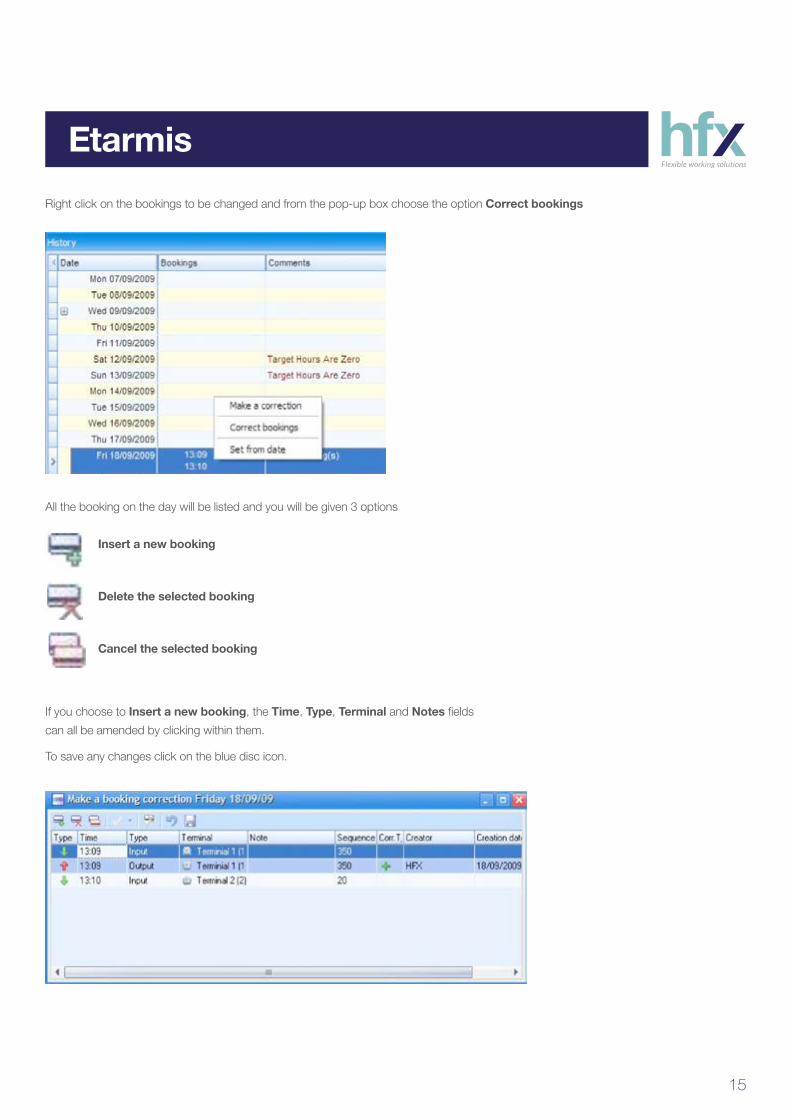
Right click on the bookings to be changed and from the pop-up box choose the option Correct bookings
All the booking on the day will be listed and you will be given 3 options
If you choose to Insert a new booking, the Time, Type, Terminal and Notes fields
can all be amended by clicking within them.
To save any changes click on the blue disc icon.
Insert a new booking
Delete the selected booking
Cancel the selected booking
16
Etarmis
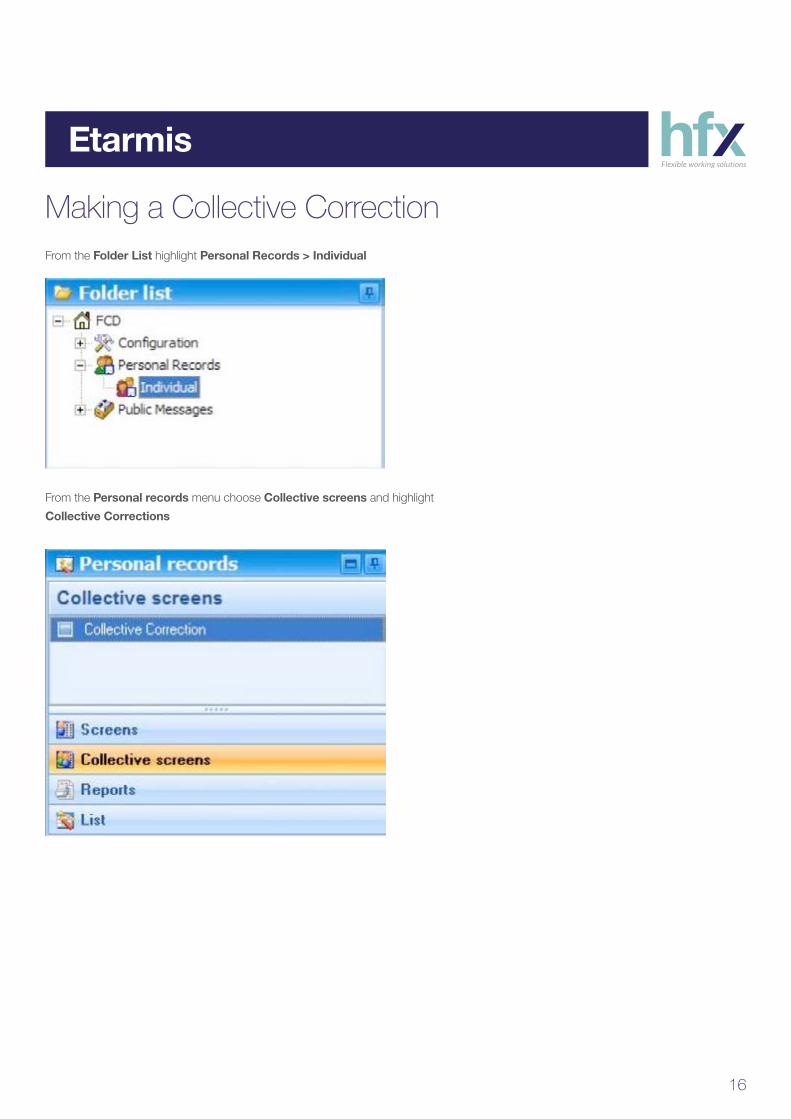
Making a Collective CorrectionFrom the Folder List highlight Personal Records > Individual
From the Personal records menu choose Collective screens and highlight
Collective Corrections

17
Etarmis
From the Personal records grid highlight the staff that the Collective Correction
should apply to. (Hold SHIFT, while selecting)
From the Collective Correction grid choose the Correction reason from the dropdown box.
Apply the correct From & Till date and Correction type.
Click on the Next button
The Summary screen describes the correction to be applied. Checking the Batch the
correction in the engine box allows the computation to run in the background. Leaving this
unchecked allows you to view the progress of the correction.
Click on the Next button

18
Etarmis
Printing A ReportFrom the Folder List highlight Personal Records > Individual
From the Personal records menu choose Reports
Highlight the Report required

19
Etarmis
All pages can be reviewed by using either the Thumbnails tab or scroll buttons in the right hand screen.
A default dates will be set by Etarmis. To change these dates:-
n Press the Cancel button (if the report is still building)
n Choose the Printout Options icon
n From the Dates tab select the required date range
n Choose the Printer icon from the toolbar to produce a hard copy,
or use the scroll arrows to view all pages on screen

20
Etarmis
Creating a Public HolidayFrom the Folder List highlight Configuration > Calendars > Public Holiday Calendar
Right click on the required day and from the Add event menu choose Public Holiday
To Delete a Public Holiday right click on the required day and from the
Add event menu choose Public Holiday
To Save the amendments choose the Save icon from the tool bar
21
Etarmis
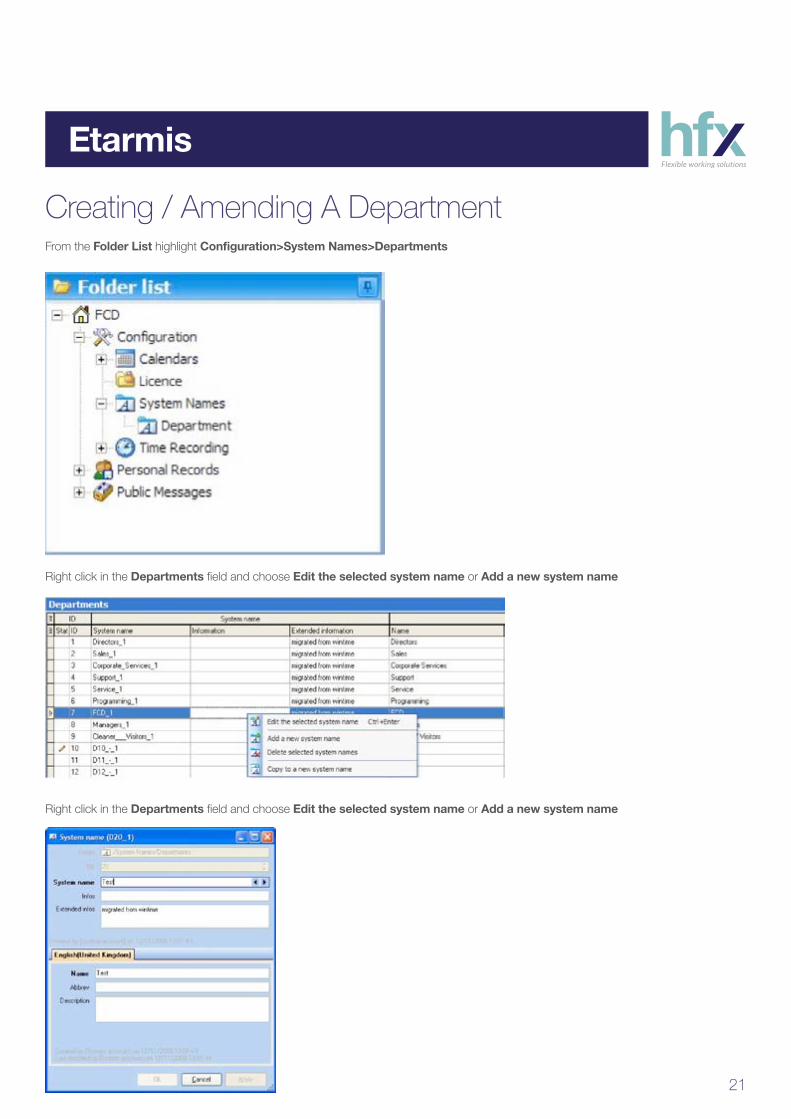
Creating / Amending A DepartmentFrom the Folder List highlight Configuration>System Names>Departments
Right click in the Departments field and choose Edit the selected system name or Add a new system name
Right click in the Departments field and choose Edit the selected system name or Add a new system name
22
Etarmis
Producing a Working ScheduleThere are 3 stages to producing a Working Schedule :-
1. Producing one or more Daily Programs
2. Using the Daily Programs to produce a Scheduled Pattern
3. Using the Scheduled Patterns to produce a Working Schedule
1. Producing A Daily Program
From the Folder List highlight Configuration>Time Recording>Daily Programs
Choose an existing Daily Program, click on the Daily Program Copy icon.
Enter a description in the System name field, click on OK.
With the Normal Day & Bandwidth tabs chosen, amend the Param. 1/2/3 fields to reflect the
relevant times.
Right click at any time to Add / Delete a Bandwidth line.
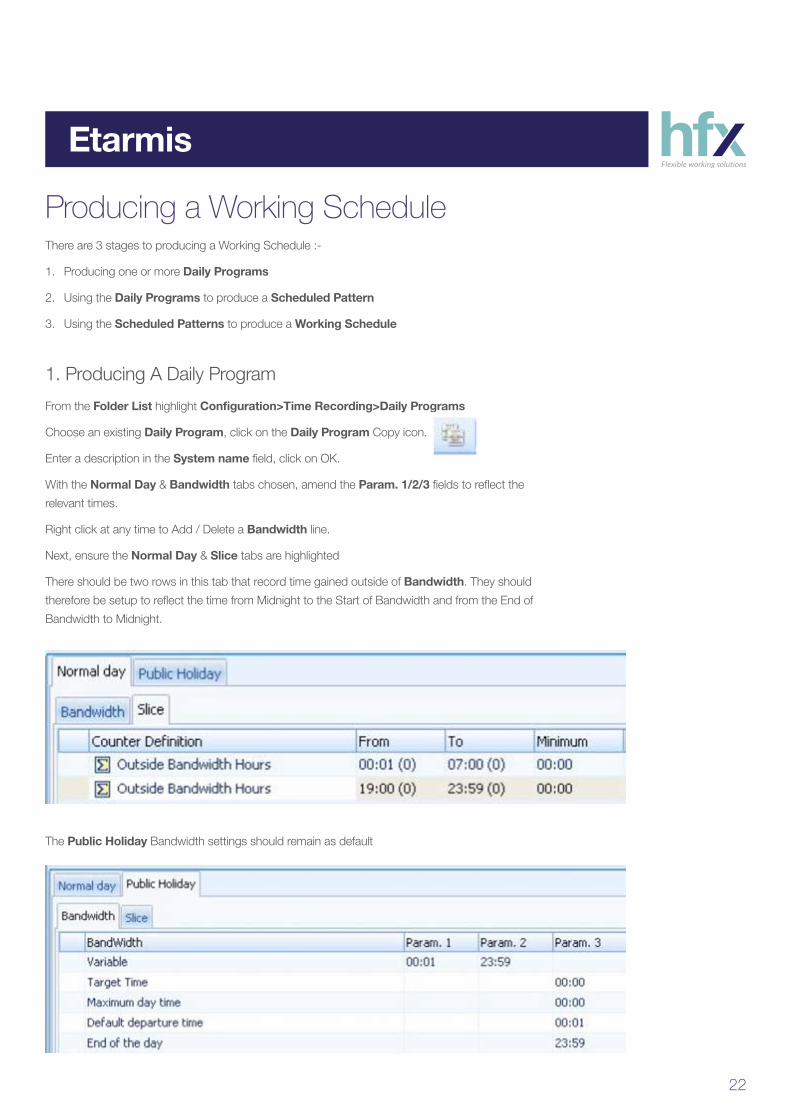
Next, ensure the Normal Day & Slice tabs are highlighted
There should be two rows in this tab that record time gained outside of Bandwidth. They should
therefore be setup to reflect the time from Midnight to the Start of Bandwidth and from the End of
Bandwidth to Midnight.
The Public Holiday Bandwidth settings should remain as default

23
EtarmisThe Public Holiday Slice settings should remain as default
This process can be continued in order to cater for patterns that vary or rotate on a weekly basis
Right click to either Add or Delete a line.
You can at this point change the ID number if desired.
When you are happy that all the desired field have been input, click on the Blue save disc in the Tool Bar.
You can at this point change the ID number if desired.
When you are happy that all the desired field have been input, click on the Blue save disc in the Tool Bar.
2. Producing A Scheduled Pattern
From the Folder List highlight Configuration>Time Recording>Working
Schedules>Scheduled Patterns
Choose an existing Scheduled Pattern, click on the Scheduled Pattern Copy icon.
Enter a description in the System name field, click on OK.
Making the assumption that all patterns begin on a Monday, enter the relevant Daily Programs
and the number of days that each program applies for.
In the example below the Daily Program ‘Full Time 07:30 Target’ applies for 4 days from Monday
(Monday, Tuesday, Wednesday & Thursday), ‘Full Time 07:00 Target’ applies for 1 day from Friday
(just Friday) and ‘Non working day, no target’ applies for 2 days (Saturday & Sunday)

24
Etarmis
Most Working Schedules will be made up of 1 Working Pattern, but you can enter as many as you
need, for example to cater for staff who work a weekly rotating shift.
Right click to either Add or Delete a line.
Ensure the Calendar field contains the correct Public Holiday Calendar (by default this is set to
Standard Public Holiday).
Ensure the Parameters tab contains an Accounting Period, either Every 4 Weeks or Every Month.
You can at this point change the ID number if desired.
When you are happy that all the desired field have been input, click on the Blue save disc in the Tool Bar.
3. Producing A Working Schedule
From the Folder List highlight Configuration>Time Recording>Working Schedules> Working
Schedules
Choose an existing Working Schedule, click on the Working Schedule Copy icon.
Enter a description in the System name field, click on OK.
Flexible working solutions
hfx Ltd.The Midden, Node CourtDrivers End Lane, CodicoteHertfordshire, SG4 8TR
To find out more about hfx and our solutions please call 01438 822170, visit www.hfx.co.uk or email [email protected]
Etarmis