omarshauntedtrail.comomarshauntedtrail.com/props/prop idea files/corpse...omarshauntedtrail.com
TRANSCRIPT

O
btai
ned
from
Om
arsh
aunt
edtra
il.com
http://www.skullandbone.com/tutorial_02.htm
Welcome to the Skull and Bone tutorial for Bucky corpsing.
**Updated 6/25/08
***READ THIS SECTION FIRST**:
Here is A quick opening comment and disclaimer. There are many thoughts and ways to go about corpsing. This just happened to be one way that we though resulted in a very nice effect with a low budget and not too much time. This process is a culmination of techniques published on the web and personal experimentation.
DRYING TIME:
I have found that enamel spray paint and wood stain used together stay very tacky for extended periods of time. Thick application of carpet latex takes a long time to dry. Do not try this project without allowing a couple of weeks to dry.
COLOR:
This tutorial will result in a pretty dark corpse. Depending on how dark your wood stain is, you can expect your corpses skin to be a very dark jerky brown. If lighter results are desired, I would do a test patch with lighter stain.
CAN YOU RUIN YOUR BUCKY?:
Many people write in and tell me they have tired various materials to great results.
It is very hard to 'ruin' a Bucky. Since corpses need to look disheveled and rotten pretty much all unanticipated results will end up helping achieve this goal. HOWEVER, do yourself a favor and do small test using your adhesives, stains and shellacs on a stick or PVC before covering a whole corpse. Many people write in and tell me they have

O
btai
ned
from
Om
arsh
aunt
edtra
il.com
tired various materials to great results. A quick stick test will make sure your particular combination of materials will not result in adverse results.
Project checklist:
1. One Bucky: A Bucky is the 4th quality skeleton available through the Anatomical Chart Company. . **Do yourself a favor and watch haunt message boards for deals on Buckys. There are very good deals to be found for haunters off season.
2. Latex Carpet adhesive: If price is not a problem go with latex instead of Latex Carpet adhesive. Latex Carpet Adhesive has a very, very long dry time. A corpse done three months ago is still tacky to the touch in spots.
**I got a couple mails about which adhesive I used. Here is the info. ROBERTS 6700 Premium Indoor/Outdoor Carpet Adhesive, Solvent Free, Superior Water Resistance, Gallon, 4/Case I got mine at Home Depot Model 6700-1 $12.97/EA Each
3. Several pairs of xl pantyhose: These can be in various darker skin tones ( not black).
4. Jute: In our town we call 'erosion control fabric' Jute. Some call it dorp. Some call it haunting fabric.
5. Flat Black spray paint
6. Shellac ** I can't remember the exact brand of shellac. Basically I had some laying around, and I used it as an extra layer.
7. Dark Wood stain **I used Minwax Dark Walnut 2716, this will make a very dark corpse.
8. An old wig
9. A pair of gloves worthy of being ruined
10. Scissors
11. A sturdy place (with a lot of ventilation) to hang a Bucky with a paint tarp under it.
12. Some kind of cleanser to clean up with.
13. A few 3-2 inch wide Disposable brushes.

O
btai
ned
from
Om
arsh
aunt
edtra
il.com
(This project can be done in 3-8 hours of labor and on a budget of 40$ (minus the skeleton) for 3 corpses.)
Step 0. Read up!
Read this information before trying to experiment on your own Bucky. There are a couple of key moments that will effect the look of your corpse. There are also considerable dry times. Do not attempt this project one or two weeks before Halloween. Do not attempt to do this project without proper ventilation. Don't even think about exposing any of this project to heat, flame or torches.
Step 1. Assemble your Bucky!
Fig, A
Buckys come packed in nice bubble wrap. Often legs and arms need to be bolted on. I have had one Bucky require drilling for the leg bolts.
Buckys can be found all over the web. It is pretty well known that buckys originate from the Anatomical Chart Company. Bucky prices range from less than $90.00 to $150.00. It is worth the research to find a reliable and economical source for the purchase of your Bucky.
If you don't have money, an option to the pricey Bucky is the blucky. The name of the blucky often causes some confusion when people don't realize there is and 'L' in the word blucky. Bluckys are blow molded cheap skeletons available at discount stores. I have found them at BigLots for $7.99 each.
Step 2. Hang your Bucky!
Fig.B
Find a nice sturdy place to hang your Bucky for a couple of weeks. Good ventilation is a must. The Bucky will smell and will be tacky for several weeks after corpsing. This is not a project to do day or a week before Halloween. Dry times can be extreme when using large amounts of carpet latex.
O
btai
ned
from
Om
arsh
aunt
edtra
il.com
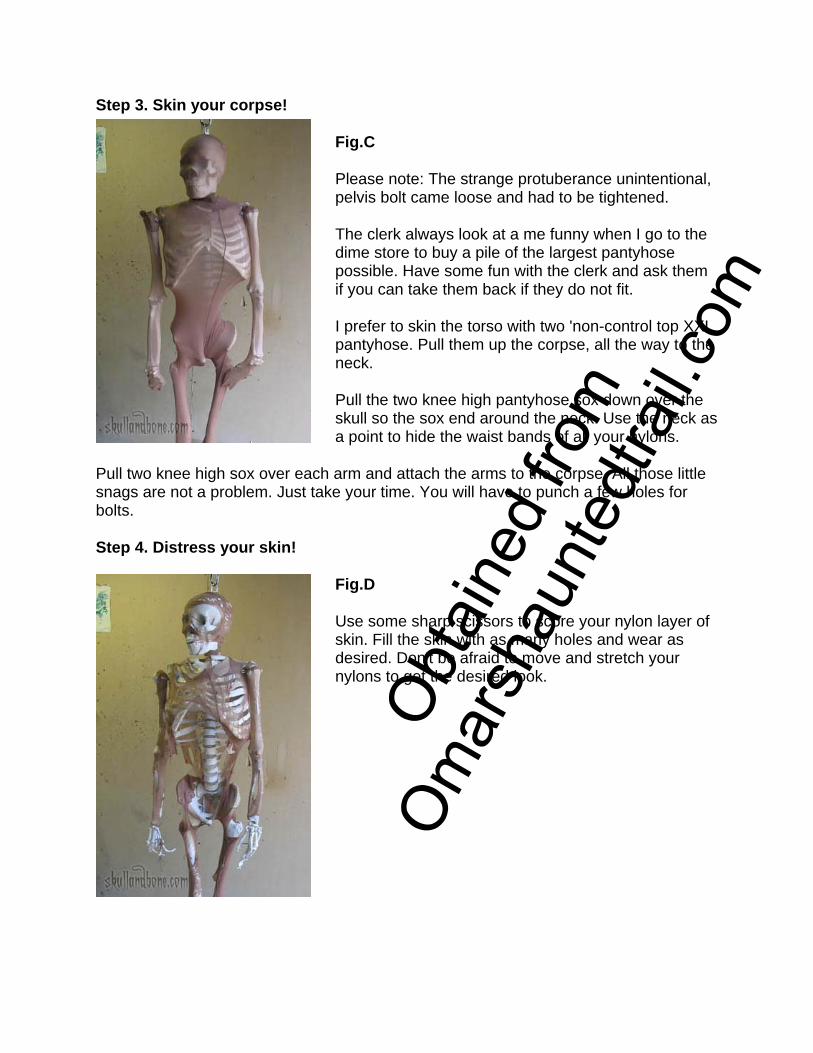
Step 3. Skin your corpse!
Fig.C
Please note: The strange protuberance unintentional, pelvis bolt came loose and had to be tightened.
The clerk always look at a me funny when I go to the dime store to buy a pile of the largest pantyhose possible. Have some fun with the clerk and ask them if you can take them back if they do not fit.
I prefer to skin the torso with two 'non-control top XXL pantyhose. Pull them up the corpse, all the way to the neck.
Pull the two knee high pantyhose sox down over the skull so the sox end around the neck. Use the neck as a point to hide the waist bands of all your nylons.
Pull two knee high sox over each arm and attach the arms to the corpse. All those little snags are not a problem. Just take your time. You will have to punch a few holes for bolts.
Step 4. Distress your skin!
Fig.D
Use some sharp scissors to score your nylon layer of skin. Fill the skin with as many holes and wear as desired. Don't be afraid to move and stretch your nylons to get the desired look.

O
btai
ned
from
Om
arsh
aunt
edtra
il.com
Fig.E
Take care when cutting the eye nose and mouth holes. These are the largest source of character for your corpse. Chose your cuts wisely to get a desirable facial expression. Don't be afraid to put new nylons over the head if your eye holes look awkward.
Fig.F
Decide how much skin you want to be on your corpse before cutting. We personally like to see the bones of the corpse. It helps to make the corpse more visible in low light.
If you want that 'peeled back skin exposing white bone' look, save areas without holes to peel back later.
If you want that 'rotted skin absorbing into bone, go to town with the holes.
Fig.G
I found cutting open the chest cavity gave me a pretty cool look. My intentions will be to light this cavity so light can be seen between the ribs.
Cut away the skin from the fingers and toes.
Where large holes are desired, pull on the skin and cut away bits with the scissors.

O
btai
ned
from
Om
arsh
aunt
edtra
il.com
Where you desire worm holes in the skin, take the sharp edge of some scissors and drag along the surface of the skin back and forth. Eventually this will create small pin holes that graduate to larger holes. A utility knife did not work as good as scissors to create wear and tear.
Your corpse's skin should be shaping up by now.
Step 5. Glue your skin down!
Fig.H
Glove up and go to town with the latex.
Carpet latex is extremely sticky, so make sure to have a tarp down and check your shoes before messing up your wife's/mom's carpeting. Apply latex over the nylon skin of your corpse liberally with a brush. Even scooping latex with a gloved hands and patting the latex into the skin of the corpse works well.
Take time to notice the effects of the latex on the skin of your corpse. If a certain type of rotting catches your eye, try to apply that to the rest of the corpse.
Fig.I
Don't be afraid to yank and stretch the skin of your corpse. This is the time to experiment with how much skin you want your corpse to have. For a peel away skin look, leave larger areas of extra skin to peel back later.
As pointed out before we desire an extreme rotted look. At this stage I take my time stretching and tugging on areas to find the best balance between hanging strands and skin patches.
Keep in mind the thicker your blobs of latex the longer the dry time.

O
btai
ned
from
Om
arsh
aunt
edtra
il.com
Step 6. Add your strands and bits!
Fig.J
When the corpse skin is satisfactory it is time to think about adding those touches that give the corpse visual depth and character.
Notice how we try to have layer upon layer with the surface of our corpse. Grab yourself some long strands of jute and begin rubbing them into the still wet skin of your corpse. Take a few blobs of adhesive and brush the jute into the skin. I try to emulate tree roots or dried up innards.
Fig.K
Take your time experimenting with how you drape your strands. Loops, long strands, short strands, frayed edges are all cool details on your corpse.
Anything that is not bolted down, can be candidate for becoming a strand or a bit. Plastic spiders, extra bones can all be mashed into the corpse to enhance surface detail.

O
btai
ned
from
Om
arsh
aunt
edtra
il.com
Step 7. Painting!
Fig.L
Note: I believe this process can be done with just stain. I happened to like the color of the shellac so I used it.
Make sure your have dark shellac and dark wood stain. The shellac with get very dark if you paint several layers of it. Dark skin is key for the peeled away skin look. Paint your corpse liberally with the stain. Try to get all the nooks and crannies. I resorted to pouring stain right down the arms and head of the corpse. I ruined my shoes with stain splashing, but the effect on the corpse was marvelous.
FIg.M
After staining the corpse, take black spray paint and spray the inside of the chest cavity, the eye sockets, and mist around the joint of the corpse.
The point of the black spray paint is to break up the monotony of the color of the stain. It also helps the corpse read better when you look at it in low light situations. Darkening the chest interior is key to make the ribs pop visually. Take your time with the spray paint. Stand back a few feet and loft it into the areas where you desire darker values. Don't over do the black paint. You should not see the paint as much as 'feel it'.
**Once you have your black painted, go back and brush in some more Shellac or Wood stain to blend the black back into the corpse.
This is the difference between Fig.M and Fig.N. The face looks a bit chalky because the brushing pulled some of the laxex adhesive through the stain.

O
btai
ned
from
Om
arsh
aunt
edtra
il.com
Fig. N
Fig.O
As stated above, go back with the brush and the shellac and paint the corpse again.
This step should do several things, it should help blend in the black spray paint. You should fill in any white holes or dry patches. I have been contemplating going back into the corpse with a small brush and some lighter brown/yellow to pop out the teeth a bit.

O
btai
ned
from
Om
arsh
aunt
edtra
il.com
Fig.O.2
How many layers of Stain, or Shellac?? Above are two corpses with slightly different colors. The left corpse was painted with two light coats of shellac while the carpet adhesive was still wet. The shellac blended into the laxex a bit, and made the corpse a bit chalky looking. The right corpse was allowed 24 hours of dry time before any shellac was applied. The corpse on the right has several coats of Shellac applied to it. When I ran out of Shellac, I coated it a couple more times with wood stain. This is why it appears much darker.
Fig.P
-Here is the famous Skull and Bone peeled back skin technique-
So you decided that you wanted that peeled back skin look! Go ahead and peel skin away. I peeled some off the skull and some off the ribs. . The white bones are a stark contrast to the painted and aged skin. Take stain and go over the areas of bone that are freshly exposed. This will help tie the bones into the color scheme. Don't put too much shellac or stain on the fresh bones, they will darken quickly. The desired effect is to have a nice contrast between bone and rotted/dry skin.
Step 8. Hair!
Fig.Q
Hair is one of the easiest but often most overlooked stages of corpsing.
Get a cheap wig, and cut clumps of hair out of it. Grab the ends of the hair and dunk them into the latex. Press the hair onto the skull. I like a patchy long hair look. I plan on experimenting with more hair and hair style on my next corpses. After placing all the hair, brush some stain or shellac over the lighter colored latex that holds the hair in place.

O
btai
ned
from
Om
arsh
aunt
edtra
il.com
Step 9. In hindsight.
-My first corpse had some really cool peeled away skin. I wanted to have that look on my second corpse.
-I should have left more 'skin' to peel back. I cut too many holes in the skin on my second corpse. I also painted a bit too much latex on the bones directly. When I unified the surfaces of the skin and the bone with the latex adhesive, I also unified the way the stain looked across the whole surface. It was hard to see the difference between bone and skin after staining. I am not unhappy with the look. It is a different, more 'dry' look. .
-It took me 3 hours to do the second corpse and 7 hours to do the first. Take your time, enjoy finding out what you like for your own corpse.
-These materials did not seem to have adverse reactions when mixed. Your results may vary.
-I need to find a source for ears. I think the corpses need ears, and fingernails to be really creepy.
-I am going to knock a few teeth out of these guys too. The perfect smile does not cut it for me.
-I bet latex paint would work great with this method. I plan on trying some latex paint mixed with a tiny bit of carpet adhesive to see what happens.
- I want to add eyes, but not glossy clear eyes. I want to add some milky marbles that resemble something you might see in a cooked fish.
Step 10. Cleanup
Welp, I'll admit I have not cleaned up yet. I did some experiments with cleaners and found that the best way to avoid a mess is to not make a mess. Consult the cans of the items in use for how to clean up properly. I'll admit, as I write this tutorial I see that my fingers stick slightly to the keyboard. I might not be the one to ask =P....
Step 11. Posing your corpse

O
btai
ned
from
Om
arsh
aunt
edtra
il.com
Above is a sketch of the rig I use for posing a corpse. Most poses can be achieved with a few hose clamps, a metal fence stake, and some heavy, bendable round bar.All these items were found at Home Depot.
Gallery of Corpses
**A quick note, I know I missed a few corpses that were sent to me.. I'm trying to find them, as soon as I do I will update yours too. If you can't wait to see yours here, feel free to send it again. -R

O
btai
ned
from
Om
arsh
aunt
edtra
il.com
Joe Allocco from The Franklin Square Horror sent a few pictures of his corpse in. The dry withered jaw bone is a great touch.
If you get a chance, check out their episode on Fearnet.
Ducky's Head
Ducky writes:
"I made this corpse head(I couldn't afford a full bucky) using nylons and carpet latex, but instead of covering it with stain I used regular paint. I found that doing so eliminated the tackiness of the latex immediately and achieved a more dried-out mummified look. "
-----------------------------------
Using paint instead of stain is a great idea. I like that it decreased dry times.
Rob
Mikes Corpse

O
btai
ned
from
Om
arsh
aunt
edtra
il.com
Mike writes:
"I had trouble finding Latex carpet adhesive....I could find the carpet adhesive, but none with "latex". I used clear latex flex caulk, and it seemed to work fine.
Hope my stuff is up to par. I had a blast and will try it again.
Thanks for the instructions.
Mike"
Heck yeah it's up to par, great corpse Mike!! The latex caulk idea is a great one.
Rob
Krough's Corpse
Check out Krough's great corpsing. He used a little bit of latex paint to add color to his adhesive. This is going to be the body for a very wicked scarecrow.

O
btai
ned
from
Om
arsh
aunt
edtra
il.com
Here is Krough's completed scarecrow. I love the different textures. Especially the material on the face.
Blackwidow's Corspse
Blackwidow from www.thewidowsden.com sent me pictures of her awesome corpsing job. Amazing attention to detail. The yellow teeth really creep me out....

O
btai
ned
from
Om
arsh
aunt
edtra
il.com
The layers of texture really make this a convincing corpse. As they say, the devil is in the details. This corpse is very well done!
FAQ's
Q- Where can I find these materials?
A- I got all the materials at Home Depot, except the pantyhose and the buckies.
Q- One Question I do have. They sell some cheap skeletons at Big Lots, can I almost get the same effect as yours since you mentioned them on your site?
A- I have never used a blucky (the blow molded skeletons) with this method. I think this corpsing would work pretty good on a blucky. However, I don't think it would work well on foam. Foam has a way of getting eaten up by my experiments.
All the best, Rob from Skull and Bone.