corvuerpcustomer.epicor.com/docu/acclaim/v11/manuals/corvu.pdf · corvu documentation updates date...
TRANSCRIPT
CORVU
DOCUMENTATION UPDATESDate Description Where Changed
02/02/00 Revised the steps in the section on downloading the knowledgelibrary from the Internet to reflect our current web page.
“Downloading the Knowledge Libraryfrom the Internet” (page 22)
12/09/99 Added a sentence to the note on completing the Licensee field,indicating that you must enter the name in this field exactly how itappears on the CorVu License Certificate in order for CorVu to workproperly.
“Installing the Client Software” section(page 11)
12/09/99 Added an Important! note, indicating that you should verify thatyou have an updated version of the knowledge library before youcontact the Software Support Department for further assistance.
“Updating the Knowledge Library”section (page 22)
12/09/99 Added another note indicating that the section on running a hiddenoption for the procedure on building the link to the Item Status Tableis only relevant if you installed CorVu the first time on an Acclaim9.1 system.
Chapter 5, “Common Procedures” inthe “Building the Link to Item StatusTable” section (page 32)
11/16/99 Added a note indicating that you only need to complete the sectionon building a link to the Item Status Table if you’re using Acclaim9.1. Due to improvements in data structures on Acclaim 10, you nolonger have to perform this procedure.
“Building the Link to Item StatusTable” section (page 25)
3/25/99 Added a section to explain how to download the Knowledge Libraryfrom the Internet.
Installation Chapter in the“Downloading the CorVu/P21Knowledge Library and SampleQueries” section (page 22)

ii
Installation InstructionsUpdating CorVu
Common ProceduresKnowledge Library Information
Troubleshooting
CORVU

iii
The documentation in this publication is provided pursuant to a Sales and Licensing Contract for theProphet 21® System entered into by and between Prophet 21 and the Purchaser to whom this documentation isprovided (“License Agreement”). In addition, the licensed software to which this documentation refers may besupported in accordance with a customer support agreement by and between the same parties (“SupportAgreement”). All warranties, conditions of use, transfer restrictions, and other provisions in the LicenseAgreement or Support Agreement which are applicable to Licensed Software, are applicable to this publication.In addition, this publication may include inadvertent technical inaccuracies or typographical errors for whichProphet 21 is not responsible. Changes may be periodically made to this publication; these changes will beincorporated in new editions of the publication. Any questions about the material contained in the publicationshould be addressed to the Prophet 21 Customer Support Department at 1-800-ITS-PR21.
Nothing in this statement amends or extends the terms of your agreement with Prophet 21, including anywarranties that might be included in our products. Warranties for such agreements are set forth in youragreement with Prophet 21.
Improvements and/or changes to the Licensed Software described in this publication may be made byProphet 21 at any time without notice.
DOCUMENTATION CONVENTIONS♦ The eyeglass symbol (�) indicates a field on which you can browse.♦ The star (�) indicates the default for a field.♦ To allow for the widest possible parameters when printing a report or performing a
function, accept the defaults for all of the parameter fields. To accept the defaults,either escape through all the fields, or press [Enter] without specifying any values.Generally, samples in the documentation are shown using the default values.
♦ Start and End parameters define the limits to a range of information you will print ona report. If information does not appear on a report, it may be because theinformation was excluded from the Start, End range.
♦ For a detailed explanation on how maintenance screens function, refer to the TourGuide manual.
♦ Use the search tool in Adobe Acrobat Reader to find which manual describes aspecific module, job, or function.
4/7/00Prophet 21 Acclaim® Version 10
The Prophet 21 System and Prophet 21 Acclaim are registered trademarks, and Prophet 21 and ScratchPad are trademarks of Prophet 21.All other trademarks and registered trademarks are the property of their respective companies.
iv
Table of Contents
1 INTRODUCTION____________________________________________________6
2 INSTALLATION ____________________________________________________7
Installation Summary__________________________________________________7
Minimum PC Requirements_____________________________________________8
Installing the Client Software ____________________________________________8
Installing the CorVu Server ____________________________________________12
Configuring the CorVu Client to Access the Server__________________________12Obtain Your RS/6000’s Hostname _____________________________________12Obtain Your RS/6000’s IP Address ____________________________________13Obtain Your CorVu Server Port Number ________________________________13Configure the CorVu Software to Access the RS/6000 _____________________14
Configuring CorVu to Access Prophet 21 _________________________________17
Setting up the Secure Server User ID ____________________________________17
Installing the CorVu / P21 Knowledge Library and Sample Queries _____________20Installing the Knowledge Library From a Diskette _________________________20Downloading the Knowledge Library from the Internet______________________22
Building the Link to Item Status Table____________________________________25Verifying Space Requirements ________________________________________25Running the Hidden Option __________________________________________26
Logging Into CorVu __________________________________________________27
3 UPDATING CORVU ________________________________________________28
4 SUPPORT ________________________________________________________31
5 COMMON PROCEDURES ___________________________________________32
Building the Link to Item Status Table____________________________________32

v
Terminating a Query Locked during Processing ____________________________32
Saving CorVu Queries to Disk__________________________________________33
Performing Updates using Patch Disks ___________________________________33Checking Version Level _____________________________________________34
6 KNOWLEDGE LIBRARY ____________________________________________35
Why Columns May Not Produce Output __________________________________35
Viewing Column Information ___________________________________________36
The FRECNO Column________________________________________________36
Column Descriptions using Description and Disp ___________________________37
Tables By Code vs. Tables By Key ______________________________________38Why Fields Do or Do Not Link ________________________________________39
Custom Tables _____________________________________________________39
Using the Link to Item Status Table______________________________________40Hiding Specific Columns_____________________________________________42
7 TROUBLESHOOTING ______________________________________________44
8 MISCELLANEOUS _________________________________________________48
Files and Maintenance (PC Side) _______________________________________48
Distributing CorVu Data Files __________________________________________49
Server Configuration File______________________________________________50Bases ___________________________________________________________50Limits ___________________________________________________________50
Messages _________________________________________________________51
User Preferences____________________________________________________52
CorVu User Manuals _________________________________________________54
SUPPORT FORM_____________________________________________________55

6
The CorVu report writer is used to view information from all Prophet 21® databases with a simple, graphicalinterface. CorVu automates report structure and layout, and it allows you to include calculated fields and graphics.
Designed to augment the user manual provided by CorVu, this manual contains information and tips on usingProphet 21 and CorVu, not covered in the CorVu User Manual. To best use this manual, you should first have agood understanding of the information supplied in the CorVu User Manual.
Information specific to the Prophet 21 Acclaimsystem databases is found in this supplemental manual. Thefollowing sections describe installation and update instructions, support procedures, and different topics that willhelp you use and understand the knowledge library.
Prophet 21 has also written several CorVu queries. To access these predefined queries and to get more informationon executing them, visit our web site at www.p21.com. For more information on this procedure, refer to page 20.
1 INTRODUCTION

7
INSTALLATION SUMMARY
Several components need to be installed to run CorVu. The following is a summary of the tasks that must beperformed to fully install CorVu.
1. You must have Acclaim version 9.1.574.C or higher installed on your system. The CorVu server isautomatically installed with these Acclaim installations.
2. The PC that will run CorVu must have a working network connection to the RS/6000.
3. Install the PC/client software by following the instructions starting on page 8. This will guide you throughinstalling and configuring the CorVu software on a PC and installing the CorVu patch disks, if youreceived them. For more information on patch disks, refer to page 33.
4. Configure the CorVu PC/client software to access the RS/6000. For CorVu to access the Prophet 21database, it must be able to connect to the RS/6000 via a network connection. The section on page 12 willshow you how to configure the PC/client software to connect to the RS/6000 via network.
5. Configure the PC/client CorVu software to access the Prophet 21 database by following the instructions onpage 17.
6. Download the Prophet 21 knowledge library and sample queries. For more information on this procedure,refer to page 20.
Before installing CorVu, verify that you received the following materials from Prophet 21 and CorVu:
Materials from Prophet 21 Materials from CorVu North America
♦ This CorVu manual ♦ A CD-ROM that contains the CorVu software usermanuals and other programs. Refer to the section“CorVu User Manuals” in the chapter“Miscellaneous” for instructions on viewing andprinting the manuals.
Note: You may have also received one of more patch disks from CorVu. As corrections and enhancementsare made to CorVu, patch disks are sent. Patch disks may come on diskette or CD-ROM. Insert themand run Setup for installation. For further information on patch disks, refer to page 33 or contactCorVu Support at 800-610-0769.
2 INSTALLATION

2 INSTALLATION
8
CORVU
In addition, if you need to upgrade to Acclaim 9.1.574.C or higher, you will have also received anAcclaim update tape.
MINIMUM PC REQUIREMENTS♦ Pentium 133MHz
♦ 16 MB RAM
♦ 30 MB of free hard disk space
♦ CD-ROM drive
♦ Network (Ethernet) connection to RS/6000. You must have a network (TCPIP) connection installed andtested between the PC that will be running CorVu and the RS/6000. CorVu will not work without thisconnection.
♦ Microsoft Windows 95 or Microsoft Windows NT 3.51 or later
INSTALLING THE CLIENT SOFTWARE
1. Close all applications except Windows itself. Make sure no applications are minimized to the task bar.
2. Insert the CorVu CD-ROM into the CD-ROM drive. The setup program should start automatically onWindows 95 or Windows NT.
3. Click the Setup CorVu button.
Click theSetup CorVubutton.
2 INSTALLATION
9
CORVU
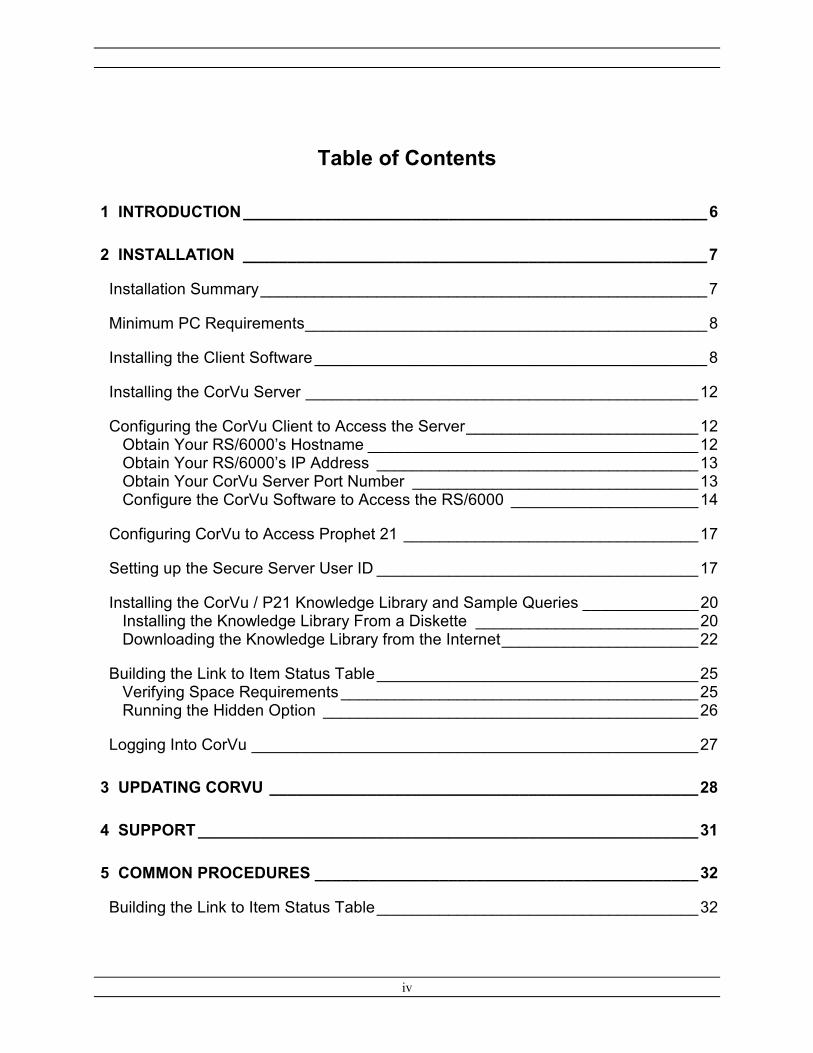
4. The setup program will prompt you for the components of CorVu you want to install.
If you are installing CorVu on a network disk, you should include the Network Installation Files. This will allowyou to set up additional workstations without needing the CorVu CD-ROM.
To save disk space, select and/or clear the relevant checkboxes.

2 INSTALLATION
10
CORVU
Approximate Disk Space Requirements are:
Windows 95/NT Version 8.25 MB
Windows 3.1 Version 7.20 MB
Network Installation Files 1.20 MB
Database Connectivity 6.00 MB
Help Files 2.20 MB
Mandatory Files 1.20 MB
Menu Buttons 0.50 MB
Full Installation 27.00 MB
5. Click Continue. The system will begin the installation process.
6. When the installation process is complete, the system displays the Choose Program Manager Group screen.Click OK to accept the default program manager group name, CorVu.
Tip!

2 INSTALLATION
11
CORVU
7. When the application has been installed, the setup program displays the CorVu Administrator screen:
8. Select the Enterprise Licenses tab. Enter the licensee and the licensing information for thecomponents that you purchased. The fields of the components you have not purchased should be leftblank.
For example, if you only purchased Graphical Analysis and Report Writer, enter the licensinginformation in these fields, and leave the rest of the component fields on the CorVu Administratorscreen blank.
Important! In the Licensee field, enter the name on the CorVu License Certificate to which your version of CorVuis issued. In order for CorVu to work properly, you must enter the name in this field exactly how itappears on the certificate.
2 INSTALLATION
12
CORVU
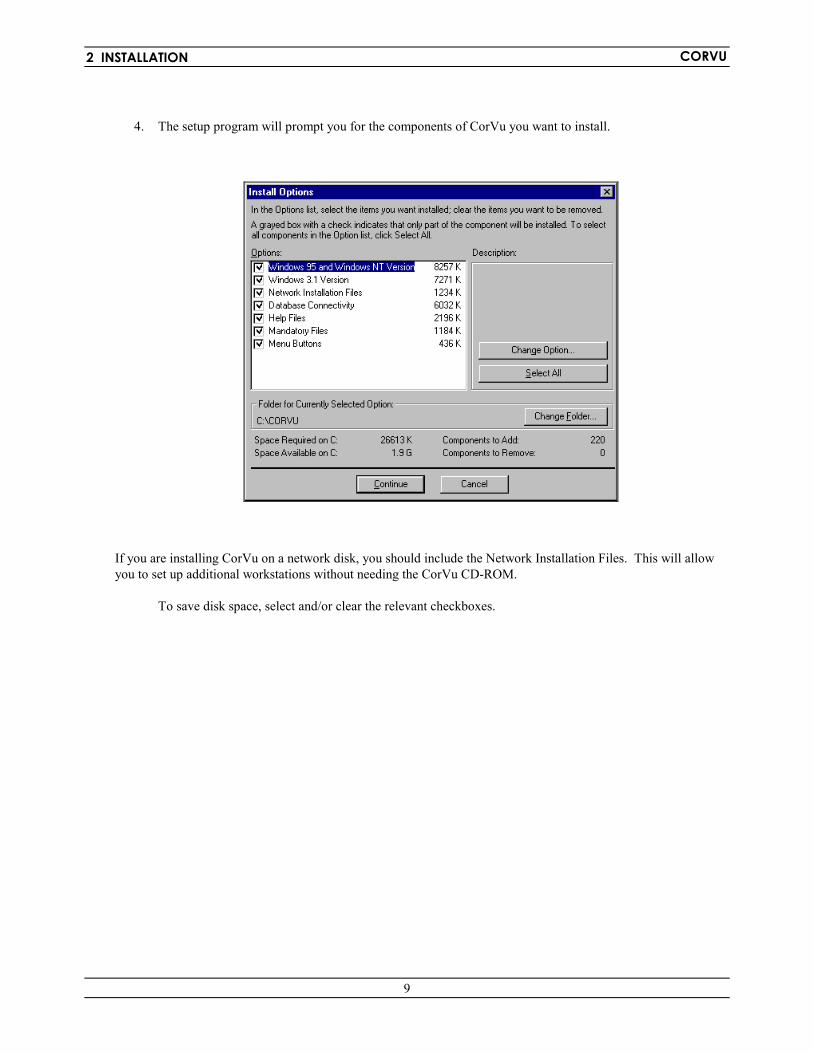
9. Click OK. If the installation process was successful, the Installation Status screen appears. Click Yesto exit this screen.
Note: If the Installation Status screen does not appear after you install CorVu, contact CorVu technicalsupport at 800-610-0769.
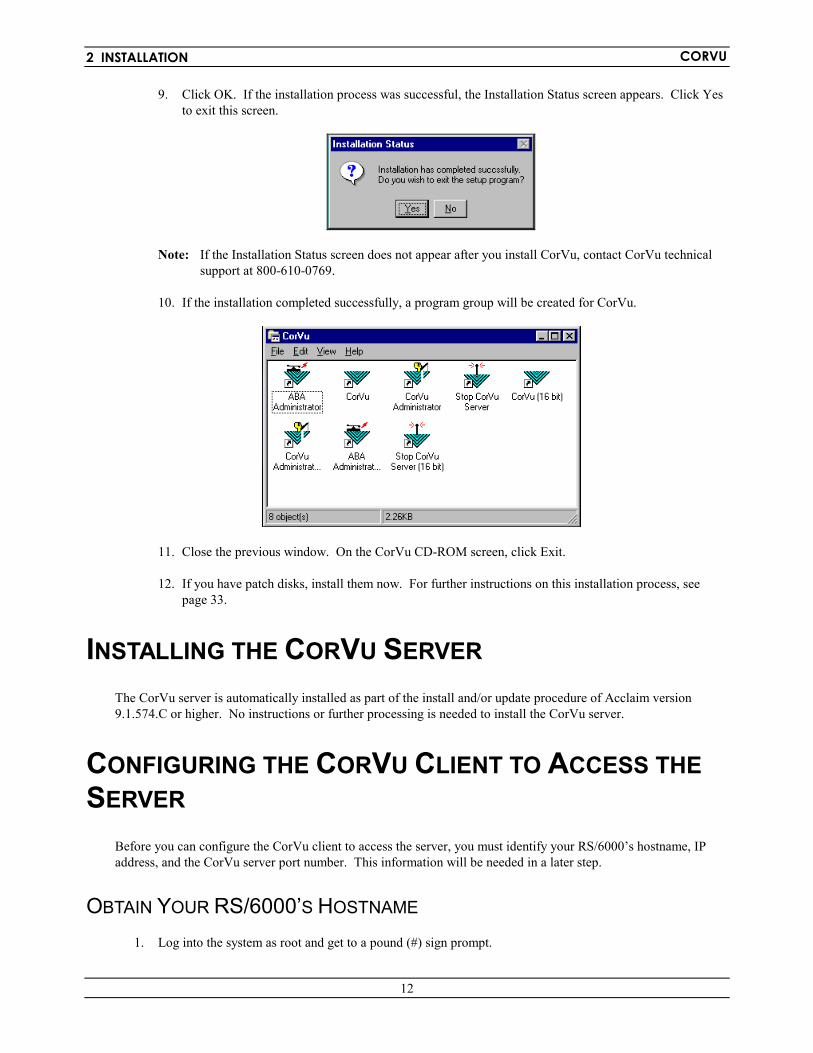
10. If the installation completed successfully, a program group will be created for CorVu.
11. Close the previous window. On the CorVu CD-ROM screen, click Exit.
12. If you have patch disks, install them now. For further instructions on this installation process, seepage 33.
INSTALLING THE CORVU SERVER
The CorVu server is automatically installed as part of the install and/or update procedure of Acclaim version9.1.574.C or higher. No instructions or further processing is needed to install the CorVu server.
CONFIGURING THE CORVU CLIENT TO ACCESS THESERVER
Before you can configure the CorVu client to access the server, you must identify your RS/6000’s hostname, IPaddress, and the CorVu server port number. This information will be needed in a later step.
OBTAIN YOUR RS/6000’S HOSTNAME
1. Log into the system as root and get to a pound (#) sign prompt.

2 INSTALLATION
13
CORVU
2. To see what the hostname is, type: hostname [Enter]. The system will report your hostname. If yoursystem does not report a hostname, contact the Prophet 21 Technical Support Department.
In the following section, be sure that the hostname is entered exactly as it is displayed on your screen.
OBTAIN YOUR RS/6000’S IP ADDRESS
1. Log into the system as root and get to a pound (#) sign.
2. Type: ping <hostname> [Enter]. Replace <hostname> with the hostname of your RS/6000.
For example, if the hostname of the RS/6000 is abcelec, type: ping abcelec [Enter]. The output from thiscommand would look like:
PING abcelec: (221.21.24.119): 56 data bytes64 bytes from 221.21.24.119: icmp_seq=0 ttl=255 time=16 ms64 bytes from 221.21.24.119: icmp_seq=1 ttl=255 time=1 ms64 bytes from 221.21.24.119: icmp_seq=2 ttl=255 time=1 ms64 bytes from 221.21.24.119: icmp_seq=3 ttl=255 time=1 ms
Your IP address will be listed in the output of this command. In the previous example, the IP address of theRS/6000 is 221.21.24.119.
To exit this screen, press [Ctrl][C].
OBTAIN YOUR CORVU SERVER PORT NUMBER
1. Log into the system as root to access the pound (#) sign.
2. At the root prompt, type the following: tail [Space Bar] / etc / services [Enter].
3. The port number for each unit appears on the line with the CorVu server number and server ID, which isrepresented by cv-yy. The number following yy is the number of your unit. The port number appearsbefore /tcp on this line.

2 INSTALLATION
14
CORVU
For example, on the previous screen, the port number for unit 0 is 7000, and the port number for unit 1is 7001.
Note: In the previous example, the user had two units – unit 0 and unit 1. If you have multiple units, theywill be listed accordingly. If you have only one unit, only one line with cv-yy with the unit numberwill display.
CONFIGURE THE CORVU SOFTWARE TO ACCESS THE RS/6000To connect to the Prophet 21 database, you need to have a working network (TCPIP) connection established andtested. If you do not, CorVu will not run. For assistance in setting up a network connection between the PC usingCorVu and the RS/6000, contact your network provider.
The following steps will configure the CorVu software to access the RS/6000.
1. Start the CorVu Administrator by selecting Start/Programs/CorVu. Then choose CorVu Administrator orselect the icon from the CorVu program group.
The portnumbersappear nextto the servernumber andID.
The servernumberand IDappear.
You can chooseCorVuAdministrator byselectingStart/Programs/CorVu/CorVuAdministrator.

2 INSTALLATION
15
CORVU
2. On the CorVu Administrator screen, verify that the CorVu Setup Server tab is selected. Click New todefine a connection to a database.
3. On the New Server screen, select TCP Connected Server in the Available Server Type box. Click OK.
You can alsoselect the iconfrom the CorVuprogram group.

2 INSTALLATION
16
CORVU
4. From the drop-down list of the Network Type field on the TCP Host Parameters screen, selectWindows Sockets 1.1 (32Bit).
Note: If you are using any Windows Sockets compliant network, you should select Windows Sockets.For assistance with your network software or connection, contact your network provider.
5. On the TCP Host Parameters screen, complete the parameters. For more information on the fields onthis screen, refer to the page numbers indicated below.
Field Page Number
Server Name Enter your RS/6000’s host name – page 12
Network Type Page 16
Host IP Address Page 13
Port Number Page 13
6. After you specify the correct values for your RS/6000, click OK to continue.

2 INSTALLATION
17
CORVU
7. The system will prompt you to create the knowledge library directory: C:\CORVU\DICT. Select Yesto accept this prompt.
8. On the CorVu Administrator screen, the server name appears. Click OK.
CONFIGURING CORVU TO ACCESS PROPHET 21CorVu supports two methods of accessing a database: secure servers and open servers. The version of the CorVuServer customized for Prophet 21 supports only secure servers.
This means that you must have a user called “*” with a password of “*” in the CorVu user base. This will allowyour users to log into CorVu and into the Prophet 21 database using their own AIX user ID and password. Toaccess the database, you must use a valid AIX user ID and password.
SETTING UP THE SECURE SERVER USER IDTo set up the secure server user ID and password in the CorVu client, use the following instructions.
1. Start the CorVu client application by choosing Start \ Programs \ CorVu \ CorVu. Or, select the CorVuicon from within the CorVu program group.

2 INSTALLATION
18
CORVU
2. Enter the user name admin and password -corvu-.
Note: The dashes are part of the password and must be entered.
3. Verify that the Connect to Server box is cleared, or not checked. Click OK.
4. The main CorVu menu appears. From the Users menu, select Modify User Base.
Select ModifyUser Base.

2 INSTALLATION
19
CORVU
5. On the following screen, select New User.
6. In the Name for New User box, type * (an asterisk).
7. Click OK.
8. In Access List, click 1.
Select NewUser.

2 INSTALLATION
20
CORVU
9. Click Change Password.
10. On the Changing Password screen, enter * (an asterisk) as the password. You must enter the * in Password1 and Password 2.
11. Click OK.
12. At the Modify Users screen, click All Done. From the CorVu main menu, click File then Exit.
INSTALLING THE CORVU / P21 KNOWLEDGELIBRARY AND SAMPLE QUERIES
You can either install the knowledge library from a diskette or by downloading the most current knowledge libraryrelease from Prophet 21’s web site.
To install the knowledge library from a diskette, refer to the following instructions, “Installing the Knowledge LibraryFrom a Diskette”.
To download the most current knowledge library release from the Internet, refer to the section, “Downloading theKnowledge Library from the Internet” on page 22.
INSTALLING THE KNOWLEDGE LIBRARY FROM A DISKETTE
SUMMARY OF STEPS
The following steps summarize how to install the knowledge library on your system. For detailed instructions oninstalling your knowledge library, refer to the section, “Specific Steps for Installing The Knowledge Library” onpage 21.
1. Determine the directory in which the CorVu knowledge library needs to be installed.
2. Insert the CorVu Knowledge Library install disk into your disk drive.
3. Run the executable file, which will unzip it and install the knowledge library files.
4. Execute CorVu and immediately test the knowledge library.

2 INSTALLATION
21
CORVU
SPECIFIC STEPS FOR INSTALLING THE KNOWLEDGE LIBRARY
These instructions are for Windows 95. If you are using a different operating system, contact the Software SupportDepartment for assistance on this installation procedure.
1. Insert the knowledge library disk in the disk drive.
2. Using My Computer or Windows Explorer, access the a: drive.
3. Double-click on the file corvudic.exe. The WinZip Self-Extractor screen appears, as shown similar to thefollowing sample:
Note: The directory that appears in the Unzip To Folder text box defaults to your temp directory. This willvary from PC to PC.
4. Change the directory in the Unzip To Folder text box to C:\CorVu\Dict. Your screen should look similarto the following:
5. Click Unzip.
Enter thedirectory whereyour knowledgelibrary resides.

2 INSTALLATION
22
CORVU
6. A message indicating that the files were unzipped successfully appears. Click OK.
If this message doesn’t appear, contact Prophet 21’s System Administration Team in Software Support for furtherassistance.
7. The WinZip Self-Extractor screen appears. Click Close.
8. Exit My Computer or Windows Explorer, and remove the diskette from the disk drive.
UPDATING THE KNOWLEDGE LIBRARY
Several times a year, an updated knowledge library version will be available. You can download it from theProphet 21 website at www.p21.com, or you can fax a request to 215-321-8003 for the knowledge library ondiskette from the Software Distribution Group in the Programming Department.
Caution! If you have customized your knowledge library or any of its parameters, the updates will overwrite thosechanges. When you perform the update, you will need to re-enter the work you’ve already done tocustomize the knowledge library..
For further information on the CorVu/P21 knowledge library, call the Software Support Department at Prophet 21for assistance.
Important! Before you contact the Software Support Department, make sure you have an updated version of theknowledge library. All current and updated versions are available at www.p21.com.
DOWNLOADING THE KNOWLEDGE LIBRARY FROM THE INTERNET
Periodically, you can download CorVu/P21 knowledge library updates or sample queries. The knowledge libraryupdates keep your CorVu application current with the most up-to-date features. You can run the predefined queries toaccess information on your system, or you can use them as samples to create other CorVu queries.
Caution! We recommend that you backup your current knowledge library before you perform the update. If youhave customized your knowledge library or any of its parameters, this update will overwrite those changes.If you perform the update, you will need to reenter your work to customize your knowledge library.
If you have any questions on the CorVu/P21 knowledge library or sample queries, call Prophet 21 Software Support forassistance.
To download the knowledge library or sample queries, use the following steps:
1. Using any Internet browser, access Prophet 21's web site at www.p21.com
2. On the left side of the screen, select the Web Support Customer Entrance link.
3. From the Web Support Customer Entrance page, select the Click Here to Enter the Web SupportCustomer Entrance link.
4. If the Enter Network Password screen appears, enter your user name and password.
Note: If the previous screen does not appear, the Customer Support screen should appear. If the CustomerSupport screen does not appear, notify Prophet 21 by sending an e-mail to the following address:[email protected], or call Internet Services at 1-800-776-7438.

2 INSTALLATION
23
CORVU
5. On the Customer Entrance screen, select the Acclaim link.
6. On left side of the Acclaim/XL Support Site screen, select the File Downloads link.
7. In the File Downloads section, select the CorVu Downloads link.
8. The CorVu Download Page screen appears, similar to the following:
If you want to download the CorVu /P21 Knowledge Library, select the Corvudic.exe file for the level ofAcclaim you are currently using:
A. If you are using Acclaim 9.1, select the Corvu9_1.exe link.
B. If you are using Acclaim 10, select the Corvu10.exe link.
C. If you are using Acclaim 10 versions A10.0248 and higher, select the Corvu10a.exe link.
If you want to download the sample queries, select the Corvusam.exe file.
9. You have the option to either open the file immediately or save it to a disk.
When you choose to open the file, security screens appear. Click the option to continue and to install the files onyour system.
If you choose to save the file to a disk, select the directory in which you want to save it. Using My Computer orWindows Explorer, access the directory where you saved the file, and double-click it.

2 INSTALLATION
24
CORVU
10. The WinZip Self-Extractor screen appears, similar to the following sample:
Note: The directory that appears in the Unzip to Folder box defaults to your temp directory. This variesfrom PC to PC.
11. Change the directory in the Unzip to Folder box to wherever your knowledge library or queries are stored.In most cases, the knowledge library is stored in C:\Corvu\Dict, and the CorVu queries are stored inC:\Corvu\Data.
Your screen should look similar to the following:
Tip! When you access the WinZip Self Extractor screen, the Overwrite Files Without Prompting box isselected. When this option is enabled, the system automatically overwrites all files, without prompting youbeforehand. When this option is disabled, the system prompts you to overwrite each file individually. Todisable this option, clear the check box.
12. On the WinZip Self-Extractor screen, click Unzip.
13. A message indicating that the files are “unzipped successfully” appears, similar to the following:
14. Click OK.
Note: If this message does not appear, notify Prophet 21 by sending an e-mail to the following address:[email protected], or call Internet Services at 1-800-776-7438.
15. On the WinZip Self-Extractor screen, click Close.
Change this fieldto the directory
where yourknowledge libraryor CorVu queries
exist.

2 INSTALLATION
25
CORVU
16. If you chose to save the file, exit My Computer or Windows Explorer. If you chose to open the file,proceed to the next step.
17. Execute CorVu and immediately test the knowledge library or the sample queries. A common way to testthe knowledge library is to run a query using the new tables or fields.
UPDATING THE KNOWLEDGE LIBRARY
Several times a year, an updated knowledge library version will be available. You can download it from theProphet 21 web site at www.p21.com, or you can fax a request to 215-321-8003 for the knowledge library ondiskette from the Software Distribution Group in the Programming Department.
Caution! If you have customized your knowledge library or any of its parameters, the updates will overwrite thosechanges. When you perform the update, you will need to re-enter the work you have already done tocustomize the knowledge library.
For further information on the CorVu/P21 knowledge library, call Software Support at Prophet 21 for assistance.
Important! Before you contact the Software Support Department, make sure you have an updated version of theknowledge library. All current and updated versions are available at www.p21.com.
If you’re currently using Acclaim 9.1, proceed to the next section, “Building the Link to Item Status Table”. Ifyou’re currently using Acclaim 10, proceed to the section, “Logging Into CorVu” on page 27.
BUILDING THE LINK TO ITEM STATUS TABLE
Important! You only need to complete the instructions in this section if you’re using Acclaim 9.1. Due toimprovements in the data structures of the Item Status Table on Acclaim 10, you do not need to buildthis link on an Acclaim 10 system. Therefore, if you’re using Acclaim 10, do not complete theinstructions in this section. Proceed to the section, “Logging Into CorVu” on page 27.
When you install CorVu for the first time, you need to run a hidden option that builds the Link to Item Status tablein the Accounting database. This table links your items to their item status information at each location, whichincludes data on free stock quantity and sold quantities for the month and year.
You also need to run this hidden option periodically, since the Link to Item Status table itself will not track anychanges to your item database. Over time, as your item database changes, the table will become outdated.Running this hidden option on a regular basis ensures that CorVu will display valid item status information.
The addition or deletion of a location will not automatically be reflected in the Link to Item Status table. Thehidden option must be run in this situation, so that the table is rebuilt to include the current location information.
VERIFYING SPACE REQUIREMENTS
The Link to Item Status table can take up a significant amount of space on your hard drive, since it contains anentry for every item at every stocking location. Before running the hidden option, you need to verify that you haveenough space in your system to hold the table. If the creation or rebuilding of the Link to Item Status table fills thedb filesystem on your hard disk, you will not only have problems with the CorVu link to item status information,but also be unable to perform transactions in the accounting modules. In this instance, you must expand the db filesystem.

2 INSTALLATION
26
CORVU
Use the following steps to verify space requirements:
1. At the AIX prompt, type:
Note: If your system consists of multiple units, you need to specify which p21pro directory to access, suchas p21pro or p21pro1. For example, running the above command for a Unit #1 system would be entered as:
2. The following screen appears:
View the %Used column. If this value is under 80%, you will be able to run the hidden option to create orrebuild the table. If the value is 80% or higher, your file system may need to be expanded. If you have anyquestions on expanding the file system, call Prophet 21 Technical Support for assistance. The file systemcan be expanded while your system is up and running.
RUNNING THE HIDDEN OPTION
Before you run the hidden option, make sure all users are logged off and the system is stopped. It may be moreconvenient to run this hidden option at day-end. The hidden option is (( [two forward parentheses] and can be runfrom the Hidden Option menu located under Utilities on the System Administration menu. If you are not familiarwith running hidden options, refer to the System Administration manual. When the hidden option is performed, thefollowing screen appears:
Enter Yes to build the Link to Item Status table. An asterisk moves across the following screen, indicating that thetable is being built:
When the build is complete, the following screen appears:
For more information on using the Link to Item Status table, refer to the section, “Using the Link to Item StatusTable” on page 40.

2 INSTALLATION
27
CORVU
LOGGING INTO CORVU
To successfully log into the Prophet 21 database through CorVu, you must have a working network connection tothe RS/6000, and have a valid AIX user ID and password.
1. Start the CorVu client on the PC by selecting Start/Programs/CorVu. Then click CorVu. You should seethe CorVu Login screen:
2. In the User Name field, enter a valid AIX user ID. This must be entered exactly as it would be typed to loginto AIX.
3. In the Password field, specify the AIX password for this AIX user ID. This also must be entered exactly asit would be to log into AIX.
4. Highlight the RS/6000’s hostname in the Server box. Make sure Connect to Server is checked.
5. Click OK.
6. After a brief pause, you should be placed into the main screen of CorVu. If you receive any errors,recheck all your settings. If you still have problems, contact CorVu directly at 800-610-0769.

28
Caution! Before updating your current version of CorVu to version 4.0, make sure you have a backup copy of all ofyour current files (e.g., queries and the knowledge library).
After you have created a backup copy of all of your files, complete the following steps to update to CorVu 4.0:
1. Close all applications except Windows itself. Make sure no applications are minimized to the task bar.
2. Insert CorVu CD-ROM into the CD-ROM drive. The setup program will start automatically.
3. Click the Setup CorVu button.
4. The setup program will prompt you for the components of CorVu 4.0 you want to install.
3 UPDATING CORVU
Click theSetup CorVubutton.

3 UPDATING CORVU
29
CORVU
If you are updating CorVu on a network disk, you should include the Network Installation Files. This will allowyou to set up additional workstations without needing the CorVu CD-ROM.
To save disk space, select and/or clear the relevant checkboxes.
Approximate Disk Space Requirements are:
Windows 95/NT Version 8.25 MB
Windows 3.1 Version 7.20 MB
Network Installation Files 1.20 MB
Database Connectivity 6.00 MB
Help Files 2.20 MB
Mandatory Files 1.20 MB
Menu Buttons 0.50 MB
Full Installation 27.00 MB
5. Click Continue. The system will begin the update process.
Tip!

3 UPDATING CORVU
30
CORVU
6. When the update process is complete, the system displays the Choose Program Manager Group screen.Click OK to accept the default program manager group name.
Note: If you named the program manager group a name other than CorVu, select that name on the previousscreen and click OK.
7. The CorVu Administrator screen appears. Verify that your server list is accurate, and click OK.
8. If the update process was successful, the Installation Status screen appears. Click Yes to exit this screen.
Note: If the Installation Status screen does not appear after you install CorVu, contact CorVu TechnicalSupport at 800-610-0769.
9. If the CorVu update completed successfully, a program group will be created for CorVu.
10. Close the previous window and the CorVu CD-ROM installation screens.
A program groupis created forCorVu.

31
Support for CorVu is provided by CorVu directly. If you have any problems or questions when installing,configuring, or using CorVu, please call CorVu at 800-610-0769. Their hours are 8:00am - 5:00pm, Central time,Monday through Friday.
The knowledge library, which holds Prophet 21 database information, is supported by Prophet 21’s SoftwareSupport Department. If you have any problems or questions on the output of a query, such as wrong data or nodata appearing, call Prophet 21 for assistance.
Before you call for support, keep the following in mind:
♦ Make sure you have an updated version of the knowledge library. All current and updatedversions are available at www.p21.com.
♦ Ensure that you have read the relevant sections of the installation chapter, on page 7, in theirentirety. Many questions can be answered by reading forward to the next step in the installationmanual, or by carefully re-reading the current or previous steps.
♦ Many common problems are listed in Chapter 7, “Troubleshooting.” Some problems listed therehave similar symptoms.
♦ Always have this manual and the CorVu User Manual with you. CorVu’s support staff will directyou to the relevant parts of the manuals, as needed.
4 SUPPORT

32
The following general procedures are described in this chapter:
♦ Building the Link to Item Status Table
♦ Terminating a Query Locked During Processing
♦ Saving CorVu Queries to Disk
♦ Performing Updated Using Patch Disks
BUILDING THE LINK TO ITEM STATUS TABLE
Important! You only built the link to the Item Status Table if you were using Acclaim 9.1 when you installedCorVu the first time. Due to improvements in the data structures of the Item Status Table on Acclaim10, you do not need to build this link on an Acclaim 10 system. Therefore, if you installed CorVuusing an Acclaim 10 system, the information in this section is not relevant.
When you installed CorVu for the first time, you ran a hidden option that built the Link to Item Status table in theAccounting database. This table links your items to their item status information at each location, which includesdata on free stock quantity and sold quantities for the month and year.
Because the Link to Item Status table itself will not track any changes to your item database, you also need to runthis hidden option periodically. As your item database changes, the table will become outdated. Running thishidden option on a regular basis ensures that CorVu will be displaying valid item status information.
The addition or deletion of a location will not automatically be reflected in the Link to Item Status Table.Therefore, the hidden option must be run so that the table is rebuilt to include the current location information.
For more information on running this hidden option, refer to page 25.
TERMINATING A QUERY LOCKED DURINGPROCESSING
There may be times when a query becomes locked during processing. This can happen when a selected fieldcannot produce output.
5 COMMON PROCEDURES
5 COMMON PROCEDURES
33
CORVU
Closing the window that is running the query is not recommended, since the process is left running. As the numberof abandoned processes grows, the CorVu server responds more and more slowly. The proper way to terminate alocked query is by stopping the CorVu server. To do this, perform the following steps:
1. Click Start.
2. Select Programs and select CorVu.
3. There are three choices under the CorVu option. Select the option for Stop CorVu Server (32 Bit).
These actions stop the CorVu server and erase all abandoned processes running on your IBM RS/6000 system. Ifthere were many abandoned processes on your system, they are now removed and the speed of the server returns tonormal. To reenter CorVu, start the program in the normal way.
SAVING CORVU QUERIES TO DISKHaving the ability to save CorVu queries to disk provides many benefits, including:
• Giving the query to a CorVu user who is not on your network. The query could then be imported intothe stand-alone version of CorVu, and the same report could be generated.
• Having a good backup of your CorVu queries, which alleviates the stress of recreating them if futureproblems arise.
• Freeing up hard drive space.
To save the queries to a disk, perform the following steps.
1. Insert a disk into your drive.
2. With all active windows minimized, double-click the My Computer icon located on the PC’s desktop.
3. Select the icon that represents your hard drive, usually identified as the C: drive.
4. Find the CorVu folder (directory) and double-click.
5. Find the Data folder and double-click. This folder will include a list of the CorVu queries that you saved.
6. To save multiple files to the disk, highlight the first query to be saved by clicking its name. Hold the [Ctrl]key down while using the down arrow key to highlight all the files you wish to save to disk.
7. While the files are selected and the cursor is positioned on one of these files, press the right mouse button todisplay the context menu. Select the Send to choice. Several options are displayed; choose the correctoption, depending on your system setup.
Note: Informational reports generated by the queries, known as result sets, are held in the Tables folder.
PERFORMING UPDATES USING PATCH DISKS
Patch disks are sent to update CorVu for revisions and to provide additional programming features. In most cases,a set of two disks needs to be installed. You may receive this information on a CD-ROM.

5 COMMON PROCEDURES
34
CORVU
The update instructions are similar to the installation instructions and screens found in the section entitled,“Installing the Client Software” on page 8. Perform the following steps to upgrade your system:
1. Close all applications except for Windows itself. There should be no applications that are open andminimized.
2. Insert CorVu Patch Disk 1 into the disk drive of the PC.
3. Select Start on the task bar of Windows 95 or Windows NT. Select Run from the menu, then typeA:\SETUP in the Open field. (If your 3 ½” floppy drive is the B: drive, type B:\SETUP.)
4. Click OK to continue.
5. The Select Installation Options window appears. The setup program determines the version of Windowsthat you are using, and automatically selects the correct options. Click OK to continue.
6. The Select Locations for CorVu Files window appears. The default values shown in the fields are correct;no modification is necessary. Click Install to start processing the information on the disk.
7. The setup program prompts you for the second patch disk after the first one’s information is updated to thesystem.
CHECKING VERSION LEVEL
You can check that the update was successful by checking CorVu’s version level. To do this, follow these steps:
1. Go to the CorVu main menu and select Help on the task bar.
2. Select About CorVu. The version level appears in the second line of information.

35
The following sections describe information about the Prophet 21 knowledge library. Definitions of tables andflags, as well as information on custom software and optional package fields are included. Details on why certainfields do or do not link, and the linking to item status from the accounting database are discussed.
WHY COLUMNS MAY NOT PRODUCE OUTPUTThe knowledge library is not tailored for any one user. It is shared by all Prophet 21 users. Field names createdfor a specific customer by custom software are displayed in the column information for every user.
For these reasons, you may notice column (field) names in the knowledge library that may seem unusual or unique.If you do not use the custom software or optional package, selecting these special fields for a CorVu query willdisplay a zero value in the result set, or final report.
If you notice that a column is displaying zero values, review the column description to see if it may be linked tocustom or optional software packages. The following list includes some column descriptions that will create zerooutput if you do not have their applicable software enabled:
Data Entry database under Item by Code and Item by Key tables:UPC Check DigitItem Disposal NumberDuty FactorD-length for Hose FittingsLabor Hours for Service PartsMSDS Sheet Number
Inventory database under PO Header 1 Information table:EDI Customer Code*EDI PO FlagEDI Alternate Ship-ToExchange Factor for CurrencyExchange RateForeign Currency ID
*The EDI database is accessible when the Electronic Data Interchange optional package is installed.
Note: The previous column descriptions are just some of the examples of the optional package or customsoftware fields that exist in the knowledge library.
6 KNOWLEDGE LIBRARY

6 KNOWLEDGE LIBRARY
36
CORVU
VIEWING COLUMN INFORMATION
To make using CorVu more user-friendly, the column descriptions have been revised to better define exactly whatthe column will display.
Column descriptions represent the internal field names within your database records. They are displayed inalphabetical order of the field names found in the CorVu/P21 knowledge library.
You may notice, when creating or editing a query, that the column descriptions will not appear in alphabeticalorder on the Generate Query screen. This is because the internal field name starts with a letter different from thecolumn description.
In the following example, the Order Line-Item Information Table displays a section of its column descriptions.The Line-Item Entry Date description is placed among descriptions starting with E and F, and appears out ofalphabetical order. This is because the description’s internal field name is Entry Date; the column description wasedited to Line-Item Entry Date so it would be more descriptive.
Note: Only the system administrator is typically allowed to access the library. So, you may not be able tosee the internal field name of the column.
THE FRECNO COLUMN
Many tables will have a column entitled “Frecno.” It is an internal field that is used to identify the record numberof the record being accessed. The Frecno column is used with many of the Prophet 21 databases to display theinternal record number of each record shown in the result set.
Although present in most tables throughout the knowledge library, it is not a column typically used in a query.There are no business applications within the Prophet 21 system that require you to know this value. Therefore,you can ignore any Frecno entries.
The Line-Item EntryDatecolumnlooks out oforder dueto itsinternalfield name,EntryDate.

6 KNOWLEDGE LIBRARY
37
CORVU
COLUMN DESCRIPTIONS USING DESCRIPTION ANDDISP
Some tables show one field name represented by three column names. For example, in the Order Line-ItemInformation table, the column Disposition is represented as Disposition, Disposition Description, andDisposition Disp. Different values are generated from each field.
Column Description Displayed Output
Disposition The disposition code of the line-item generates a numericalvalue such as 0, 1, 2, etc.
Disposition Description The descriptive text is used to describe the line-item’sdisposition, such as complete, backordered, allocated,cancelled, etc.
Disposition Disp The disposition code of the line-item generates letter values,such as A, L, C, etc.
You canignore the
Frecnocolumn.
There areno P21
businessapplications
that usethis
column.

6 KNOWLEDGE LIBRARY
38
CORVU
For our example, the Disposition field can have one of several values. The following defined values are shown inorder of the Disposition field, the Disposition Description field, and the Disposition Disp field.
Disposition Disposition Description Disposition Disp
0 Completed COMP
1 Allocated or Picked AP
2 Back Ordered B
3 Cancelled C
4 On Hold H
5 Direct Ship D
6 Local Pick-Up L
7 Pick-Up/Deliver P
Many tables will contain three column descriptions representing one field name. The previous example will helpyou determine which column to use in your query. Generally, the column with “description” in its name will bemost helpful to you.
TABLES BY CODE VS. TABLES BY KEY
The Prophet 21 Acclaim System consists of XL and Progress files. Because each type has a unique file structure,different CorVu databases were created to address each one.
Several databases, such as item, vendor, and customer, have two tables. The tables by code, such as Customer byCode, address the XL files in the system. They use actual values, such as customer codes, item codes, vendorcodes, and vendor numbers, to link the XL files together.
The tables by key, such as Item by Key, address the Progress files in the system. They use the internal recordnumber of a Progress database record to link to another Progress database record.
The following list illustrates which tables should be used for XL files, and which ones should be used for Progressfiles:
Data Entry Database Tables
Tables for XL Files Tables for Progress Files
Branch by Number Branch by Key
Vendor by Code Company by Key
Vendor by Number Vendor by Key
Item by Code Item by Key
Customer by Code Customer by Key

6 KNOWLEDGE LIBRARY
39
CORVU
WHY FIELDS DO OR DO NOT LINK
Any two tables that have a logical link can normally be linked together to create a CorVu query based on multipledatabases. For example, creating a query with the following columns, although from different tables and databases,produces a listing of ordered and invoiced sales values. Any open amounts that can be invoiced are shown byorder number.
Column Table Database
Customer Code Order Header 1 Information Order Processing
Bill-To Name Customer by Code Data Entry
Order Number Order Header 1 Information Order Processing
Order Date Order Header 1 Information Order Processing
Ordered Sales Value Order Header 2 Information Order Processing
Invoiced Sales Value Order Header 2 Information Order Processing
If an error in linking message appears, the columns chosen for the query do not logically link together. This maybe caused by using columns that are found in both a database by code and a database by key. Or two columnsselected just are not logically related. For example, running a query that consists of the Customer Code column,from the Customer by Code table, and a Cost column from the Vendor Sales History table, produces the error:
If an error should happen, review the query to make sure the selected columns are logically related so that a validreport will result. Errors are displayed only when you choose to either save, run, or modify the query. Errors arenot displayed while the columns are being selected.
Note: You should be able to link as many tables together as necessary. For example, links can be madebetween customers, orders, and receivables.
CUSTOM TABLES
You may notice certain tables marked with an asterisk (*) in some of the databases. These are custom tables thathave been created by request. Only the customer who requested the table has access to it. If you are not thiscustomer, creating a query based on any column within this table will not generate a valid result set.

6 KNOWLEDGE LIBRARY
40
CORVU
USING THE LINK TO ITEM STATUS TABLE
Because different types of files exist in the system, a unique table had to be created to link item information to itemstatus information. For example, a specific type of file holds item information, such as description and pricing, anda different type of file holds item status information, such as free stock quantity and PTD times sold. The table thatwas created to handle this is the Link to Item Status (Data Entry) table found in the Data Entry database.
The following steps illustrate creating a sample query reporting on item code, item location ID, and the currentquantities in free stock, allocated stock, and backordered stock.
1. Choose an Item Code column from any table. For this example, the Data Entry database and Item by Codetable have been chosen. Choose any other fields from this table on which you wish to report.
2. To link to the type of file that holds stock quantities, select the Link to Item Status table found in the DataEntry database. Choose any of the columns found in this table. This column provides the link to item statusinformation.
Note: It does not matter which column is chosen in the Link to Item Status table. Any of them provide thenecessary link between the different types of files. The Item Key and Item Location Key columns showinternal record numbers that are not useful to any business application. The Location Slot column alsodisplays a number that has no bearing on the type of information displayed. The Location Number columndisplays exactly that, so that column may be the most comprehensive to use.

6 KNOWLEDGE LIBRARY
41
CORVU
3. To access stock status fields, choose the appropriate columns found in the Item Stock Status table found inthe Data Entry database.
4. When the query is run, the result set will look similar to this:

6 KNOWLEDGE LIBRARY
42
CORVU
HIDING SPECIFIC COLUMNS
Some of the Link to Item Status columns provide the link from item information to item status, but are not usefulfor any other application. You may want to mask this column, or any column, from view. To prevent a columnfrom displaying on the result set, use either the Don’t Fetch or Hide Column option.
To use the Don’t Fetch option:
1. Modify the query and enter the field name of a column you wish to mask. This value is entered in theColumn field.
2. Highlight the Don’t Fetch option and this column will not show up in the result set.
3. Run the query and the Location ID column is no longer displayed:
Note: Saving the query with the Don’t Fetch option activated prevents the selected column from beingdisplayed no matter how often the query is run.
To use the Hide Column option:
1. Viewing the result set, position the mouse over the column heading you wish to hide.
2. Click the right mouse button and choose the Hide Column option. The column will disappear from view.
The systemwill notdisplay anycolumnmarkedDon’tFetch.
Choose theColumnthat you donot wantdisplayed inthe resultset.

6 KNOWLEDGE LIBRARY
43
CORVU
Note: The Hide Column option is temporary and is effective only while you view the result set. Saving thequery with the Hide Column option activated has no effect on future runs of the query. The hiddencolumn is displayed the next time the query is run.

44
The following table describes causes and solutions to problems you may experience.
Problem Probable Causes Remedy1. When retrieving a query, orgoing into the knowledgelibrary, the message "Cannotopen .... COLLECT.TMP"appears.
1. The Temporary directoryspecified in CORVU.INI doesnot exist or the user cannot writeto it.2. You are set up on a networkand you have placed thetemporary directory on anetwork disk other than a user’sprivate directory and two usersare using CorVu at the sametime. In this situation, if oneuser starts up CorVu whileanother is using it, CorVu'stemporary files will be lost.3. You are set up on a networkwith the temporary directory onthe user's private drive and theuser has logged in and runCorVu twice.
Create the directory or changeit to a local disk or to the user'sprivate directory, if on anetwork. If the temporarydirectory is on the user's privatenetwork directory, that usershould not attempt to log in andrun CorVu twice.
2. The CorVu menus arefrequently corrupted.
The Data directory specified inCORVU.INI is on a networkdisk and not in the user's privatedirectory and more than oneperson has tried to modify themenu at once.
Make sure the data directory ison a local drive or is in theuser's private directory.
3. CorVu gives anUnrecoverable ApplicationError or hangs when it starts up.
The user's menu has becomecorrupted or there is no menu inthe user's data directory.
Copy the file DEFAULT.MNUfrom the backup(DEFAULT.BAK) or from theCorVu programs directory tothe user's data directory.
7 TROUBLESHOOTING

7 TROUBLESHOOTING
45
CORVU
Problem Probable Causes Remedy4. When I start CorVu and login, I sometimes get a message"Cannot execute <program>:Error n."
1. Your system is out ofmemory, or the program namedis corrupted (Error 8).2. The program named does notexist (Error 2). Check that theentry in the Servers section iscorrect and that the programexists.3. A copy of the CorVucommunications server is stillrunning.
1. Free up memory or delete theprogram and reinstall it.2. Correct the Servers sectionentry or reinstall CorVu.3. Double click on the “StopCorVu Server” icon.
5. When I start CorVu and login, I get “CORVU caused aGeneral Protection fault inmodule LOADMSG.”
CorVu has previously exitedunexpectedly and thecommunications component isstill running.
Double click the Stop CorVuServer icon in the programmanager.
6. When I start CorVu and login, I always get the message"Cannot execute <program>:Error n."
1. The [Servers] section ofCORVU.INI has not beencorrectly set up.2. The program may becorrupted.
Ensure that the servers sectionof CORVU.INI is correctly setup. If the program is corrupted,erase it and reinstall it from theCorVu installation disks.
7. When I add users to theCorVu user base, they do notget saved properly.
1. You are using a network anddo not have access to the CorVupassword file.2. The password file has becomecorrupted.
Ensure that you have access tothe CorVu password file. If thefile has become corrupted youwill need to restore it frombackups.
8. When I start up CorVu, itgives a message saying mylicense has expired and exits. Ifit doesn't exit, trying to executea query hangs.
Your CorVu server license hasnot been activated or expired.
If you are on a trial license,contact your distributor todiscuss purchasing CorVu. Ifyou have purchased CorVu,contact CorVu to arrange fornew license numbers.
9. When I start up CorVu, I geta message, "Cannot findxxxxx.DLL."
1. Windows has becomecorrupted.2. Your networking software isnot listed in your DOS PATH.3. You have chosen to usenetworking software that is notinstalled.
Reinstall Windows.See if the DLL is in yournetworking software. If it is,make sure the directory it is inis listed in your PATH.Install any required files fromthe Windows Sockets Driversdisk.
10. When I start CorVu, I getthe message "GeneralProtection Fault inxxxxxxx.DLL called fromXXXX.EXE," whereXXXX.EXE is a CorVucommunications driver.
1. You have not started yournetwork software.2. You have not installed theWindows virtual device driverfor your network.3. You have attempted to use ahost name in a TCP parameterfile with a network for whichusing host names is notsupported.
Start your network software.Check your network software'sinstallation instructions forinformation on setting upMicrosoft Windows for yournetwork.Use an Internet numericaddress instead of a host name.

7 TROUBLESHOOTING
46
CORVU
Problem Probable Causes Remedy11. When I start CorVu usingmy TCP networking software, Iget the message "Cannotconnect to <Internet number>"almost immediately on pressingthe "OK" button at the loginscreen.
There is no CorVu serverrunning on the host for the portspecified in the CorVuAdministrator.
Ensure that the host numberand port number specified inthe CorVu Administrator fileare correct.If you are using inetd, ensurethat it has been reinitialized bysending it signal 1 (on a UNIXhost, kill -1 process_number).If you are using mini_inetd,ensure that mini_inetd isrunning.Ensure that you have set up theCorVu server to run on the portyou expected by checkingmini_inetd.conf if you are usingmini_inetd, or by checkinginetd.conf and services if youare using inetd.Use the telnet test to confirmthat the port has beenconfigured correctly.
12. When I start CorVu usingmy TCP networking software, Iget the message "Cannotconnect to <Internet number>"after a long delay after pressingthe "OK" button at the loginscreen.
1. The host system is notrunning.2. The host system's networkinterface has been marked asdown.3. Part of the network is down.4. The host parameter in theCorVu Administrator isincorrect.
Ensure that the host system isrunning.Ensure that the host system'snetwork interface is marked asup.Ensure that the network isfunctioning normally.Correct the host parameter inthe CorVu Administrator.
13. When I start CorVu usingmy TCP networking software,all apparently goes well, butwhen I try to execute a query orgo into the knowledge library,CorVu hangs.
1. Inetd is having troublerunning the CorVu server.2. mini_inetd.conf has anincorrect path name for a CorVuserver program.
Check the system logs andsystem console on your hostsystem for hints as to whatproblems inetd is having.Correct the CorVu server pathname in mini_inetd.conf.If these are both correct,problem 17 may apply.
14. When I start CorVu using aserial line connection, I get an"Unable to connect to server"message.
Your serial line login script istiming out.
Add the line "Debug=C" to the[Config] section ofCORVU.INI. When you runCorVu with this line,SERCHK.EXE will create adiagnostic window that will listall data sent and received overthe serial line. You can use thislog to adjust your serial linelogin script. When you havecorrected the problem, be sureto remove the line. You mayneed to modify the TIMEOUTparameter in your parameterfile.

7 TROUBLESHOOTING
47
CORVU
Problem Probable Causes Remedy15. When I makemodifications to the knowledgelibrary, those changes are notsaved to the knowledge libraryfiles.
The knowledge library files areon a network and you do nothave access to write to them.
Ensure that you have access towrite to the knowledge libraryfiles.
16. When I log in to CorVu,the connection appears tosucceed but CorVu hangs if Itry to execute a query.Inetd/mini inetd is set upcorrectly.
Some environment variables forthe database have not been setup and CorVu cannot find thedatabase system.The database you are trying toaccess is unavailable.
You can use telnet on the hostto see where the CorVu serveris failing. Type "telnetlocalhost port" where port is theport number that the CorVuserver is running on. If you get"Connection refused,"inetd/mini_inetd is not set upcorrectly, has not been reset oris not running. If you get"Connected to localhost"followed by "Connectionclosed by foreign host,"mini_inetd/inetd is havingtrouble running the server.If you see the message "loggedin,” you have successfully madea connection to an open server.If you see the message "loggedconnection," you havesuccessfully made a connectionto a secure server. Try issuing"#L user password" to log in tothe server.If environment variables are notbeing set correctly, you canrename the CorVu server andsubstitute in its place a shellscript that sets up theenvironment variables and thenexecutes the CorVu server.Alternatively, if your version ofthe server understands the"setenv" configuration fileparameter, you can use that toset environment variableswithin the CorVu configurationfile.

48
This chapter describes some miscellaneous topics associated with CorVu.
FILES AND MAINTENANCE (PC SIDE)When CorVu is initially installed, two accounts exist in the password file (PASSWD.DAT) on the client side.These are called "admin" and "dict."
The admin account is the initial account present for initialization purposes, and its password is"-CorVu-." The dict account is a system account that determines access to the knowledge library. Users withaccess boxes checked that the dict user also has checked, get access to the knowledge library and (if there is nouser called “sql”) to edit SQL.
Changes to the knowledge library are recorded in files in the dictionary directory defined in CORVU.INI.
Menus are stored in DEFAULT.MNU, which is in the data directory defined in CORVU.INI.
In all these cases, changes should be made on one machine only and copied to other machines manually if there isno networked file system installed. If there is a networked file system, you should read the “Server ConfigurationFile” section, on page 50, to find out how to make CorVu take best advantage of it.
8 MISCELLANEOUS

8 MISCELLANEOUS
49
CORVU
DISTRIBUTING CORVU DATA FILES
In many environments, it may be useful to place CorVu data files in different locations in the file system than thedirectory that holds CorVu. Networked file systems in particular require that the location of the table temporarydirectory, at a minimum, be specified in CORVU.INI. Failure to do so could result in conflicts between concurrentusers.
The locations of various types of files can be specified in the [Config] section of CORVU.INI. The followingexample lists the settings available in this section and shows their default values, assuming that the CorVudirectory is C:\CORVU. Note that the default values in the installation program are different to the default valuesin the CorVu client. However, when you run the CorVu installation program, it will set these values to the valuesyou establish there.
♦ [Config]
♦ TmpDir=C:\CORVU\TABLES
♦ DictDir=C:\CORVU
♦ DataDir=C:\CORVU
♦ PasswdFile=C:\CORVU\PASSWD.DAT
♦ CorVuDir=C:\CORVU
TmpDir is the location used for temporary data. This is where CorVu's largest disk space requirement is, so itshould, ideally, be on fast, high capacity, non-networked drive. It must also be formulated in such a way thatconcurrent users never conflict.
DictDir specifies the location of the knowledge library (*.DCT). In general, this should be the same for all users inan organization. Only one user should have write access to the knowledge library directory at any one time.
DataDir specifies the default location where saved data, such as saved SQL queries and reports, should go. Thismust be unique for each user.
PasswdFile specifies the location of the password file. This should be common to all users.
CorVuDir is the location of the CorVu executable file, other support files, parameter files and scripts. This shouldbe common to all users.

8 MISCELLANEOUS
50
CORVU
SERVER CONFIGURATION FILE
The server configuration file is called "config" on UNIX and AS/400 systems, "CORVU_CONFIG" on VMSsystems, and 'CORVU.LIB(CV$CONF)' on MSP systems. It is located in the CorVu server directory. It supportsa number of parameters as detailed below.
BASES
The bases command is used for RDBMS systems where multiple databases can be attached to the CorVu server tospecify the databases that should be attached. See the sections describing the particular database you use for moreinformation on this configuration parameter.
LIMITS
The "limits" parameter specifies limits on data being retrieved by CorVu clients, and the frequency with which theabort button is checked when processing a query. There are four limits.
1. Number of data rows sent between tests of the abort button.2. Number of data rows sent before a query is terminated automatically.3. Number of bytes sent between tests of the abort button.4. Number of bytes sent before a query is terminated automatically.
Example: limits 100 0 0 0
This specifies that the abort button should be checked once for every 100 rows of data returned. The default is totest it once for every 50 rows of data returned.
Example: limits 100 10000 0 0
This specifies that if a query returns 10000 rows, it should be terminated automatically.
A value of 0 results in no limit being applied.

8 MISCELLANEOUS
51
CORVU
MESSAGES
A Message Of The Day can be stored on the server by placing the text of the message in the file "motd" in theCorVu directory. If this file exists, it is displayed after you log into CorVu.

8 MISCELLANEOUS
52
CORVU
USER PREFERENCES
The following options are available in the Config section of CORVU.INI and cannot be set from within CorVu.All these options can be set to 0 (meaning the option is turned off) or 1 (meaning the option is turned on).
Option Default Effect
AllowPartialJoins 0 (Off) When turned on, allows tables withmultiple key fields to join to othertables using only some of the keyfields. This is not recommended.
FetchDataWithFormat 0 (Off) When turned on, causes the data for aquery to be returned in the reportwriter as soon as a query is supplied.When turned off, the data is notretrieved until you print the report.
WarnWhenRunningQuery 1 (On) When turned off, stops the question"Do you want to run the query now?"in most parts of CorVu.
AskBeforeClose 1 (On) When turned off, prevents somemodules from asking for confirmationwhen you attempt to close thewindow for that module.
ShowFaces 1 (On) When turned off, the “Please Wait”boxes will show a grandfather clockinstead of the mouse in top hat andcoat.
If this value is set to 2, a spinningCorVu logo with the name CorVuabove it and “Your Window Into theFuture” below it will be shown.
UseHostDescriptionsAlways 0 (Off) When turned on, if you enter theknowledge library while connected toan AS/400 database, the DDSdescriptions from the database willoverride any descriptions alreadyplaced in the CorVu/P21 knowledgelibrary.
HostCollationNonAscii 0 (Off) This should be set when your hostsorts character fields in a non-ASCIIorder. It causes CorVu to re-sort datalocally for cross-tabulated queries.This defaults to ON if you are usingPC Support for the AS/400.

8 MISCELLANEOUS
53
CORVU
Option Default Effect
DictDir This option specifies a directorywhich contains the knowledge libraryfiles. If you will be keeping theknowledge library on a network disk,the person who maintains theknowledge library should set DictDirin their CORVU.INI in the Windowsdirectory to point to a directory ontheir local hard disk. They can thenmaintain the knowledge librarywithout risk of conflicting with useraccess, and copy the knowledgelibrary files to the shared dictionarydirectory when they wish to updatethe network.

8 MISCELLANEOUS
54
CORVU
CORVU USER MANUALS
The user manuals, provided by CorVu, are stored in Word For Windows, version 6 files on the CD-ROM. Youcan view and print them using Word For Windows, or you can use the Word Viewers. The CD-ROM contains theWord Viewer for Windows 95 in the WORDVIEW directory, and the word viewer for Windows 3.1 in theWDVIEW16 directory.
There are US English versions of the manuals in the MANUALS\USA, and UK English versions inMANUALS\ENGLISH. Each of these directories contains subdirectories, and each subdirectory contains a sectionof the manual in multiple Word For Windows files.

55
Use the following form for all enhancement requests and issue reports. We recommend that this blank form becopied, so it can be used many times.
Your ReferenceNumber
Tracking Number(Assigned by CorVu)
Company Name
Contact Name Report Date
Contact Phone Contact Fax
Indicate report type Enhancement CorVu Version 4.0 32Bit/16Bit
IssuePatches (Cross one out)
Environment(Circle One)
Windows 3.1
Windows NT
Windows 95
WinOS/2
SunOS 4.x
Solaris 2.x
Priority (1-5)
1 = Business cannot function without this changed.2 = Needs to be changed urgently, but not critical to business.3 = Change is required as a patch to the current version.4 = Change is required for the next version.5 = Change is required for some future version.
Description
SUPPORT FORM