automatisation with object rexx - martin burger
TRANSCRIPT

OpenOffice.org Automatisation Page 1
OpenOffice.org Automatisation with Object RexxMartin Burger
Vienna University of Economics and Business Administration
Reg. No. 0251293
E-Mail [email protected]
October 28, 2005
Bachelor Course Paper
Departement of Business Informatics
Prof. Dr. Rony G.Flatscher
OpenOffice.org Automatisation Page 2
Contents
1 Introduction.....................................................................................................................6
1.1 Abstract....................................................................................................................6
1.2 Problem Discussion................................................................................................. 6
1.3 Approach..................................................................................................................6
1.4 Keywords................................................................................................................. 6
2 Discribing the main elements......................................................................................... 7
2.1 Open Source Definition........................................................................................... 7
2.2 Open Object Rexx................................................................................................... 8
2.2.1 History...........................................................................................................8
2.2.2 Open Object Rexx.........................................................................................9
2.2.3 Syntax Examples.........................................................................................10
2.3 OpenOffice.org...................................................................................................... 11
2.3.1 History.........................................................................................................11
2.3.2 The OpenOffice Product............................................................................. 12
2.4 The Bean Scripting Framework.............................................................................13
2.4.1 History.........................................................................................................13
2.4.2 Technical Concept...................................................................................... 13
2.5 BSF4Rexx..............................................................................................................14
2.6 The Architecture of OpenOffice.org......................................................................15
2.6.1 Universal Network Object concept ............................................................16
2.6.2 UNO Service Components..........................................................................17
2.6.2.1 Service Manager...........................................................................172.6.2.2 Services,Interfaces and Properties................................................192.6.2.3 UNO Java Access.........................................................................20
3 Interaction of Elements.................................................................................................21
3.1 UNO.CLS.............................................................................................................. 21
3.1.1 Java:ObjectRexx......................................................................................... 22
3.1.2 UNO.CLS................................................................................................... 23
4 Installation Guide .........................................................................................................24
5 Examples ..................................................................................................................... 26
5.1 Wordprocessor („swriter“) Examples....................................................................27
5.1.1 Example 01 – Hello World......................................................................... 29
5.1.2 Example 02 – Insert Texttable ................................................................... 31
5.1.3 Example 03 – Cursor Show........................................................................ 34
5.1.4 Example 04 – Page Counter........................................................................36

OpenOffice.org Automatisation Page 3
5.1.5 Example 05 – Insert Different Shapes........................................................ 38
5.1.6 Example 06 - Sending e-Mail with Attachement .......................................40
5.1.7 Example 07 – Using the Internet Explorer for Tracking Web-Sites (Windows-only)....................................................................................... 44
5.1.8 Example 08 – Using a Search Descriptor................................................... 47
5.2 „scalc“ Examples...................................................................................................50
5.2.1 Example 09 - „Hello World“...................................................................... 51
5.2.2 Example 10 - Insert Values and Formulas..................................................52
5.2.3 Example 11 - Copy Cell Ranges.................................................................54
5.2.4 Example 12 - Merging Cells.......................................................................56
5.2.5 Example 13 - Identify Row Differences..................................................... 57
5.2.6 Example 14 - Chart Show...........................................................................59
5.2.7 Example 15 - Using a Replace Describtor .................................................61
5.2.8 Example 16 - Inserting a Shape ................................................................. 62
5.2.9 Example 17 – Changing the Cell Format ...................................................63
5.3 „simpress“ and „sdraw“ Examples........................................................................ 65
5.3.1 Example 18 - Using Different Shapes ....................................................... 66
5.3.2 Example 19 - Organigram...........................................................................68
5.3.3 Example 20 - Using Layer for Shapes........................................................ 70
5.3.4 Example 21 - Creating a Master Page.........................................................72
5.3.5 Example 22 - Insert chart ...........................................................................75
5.3.6 Example 23 - Animations and click actions............................................... 78
5.4 General Examples .................................................................................................81
5.4.1 Example 24 - Access Internal Database......................................................81
5.4.2 Example 25 - Printing Different Documents ............................................. 83
6 Conclusion ................................................................................................................... 86
7 References.....................................................................................................................87
OpenOffice.org Automatisation Page 4
Figures
figure 1: Architectural Overview, [Hane05]....................................................................13
Figure 2: BSF interaction with ObjectRexx and Java, [Flat06].......................................14
Figure 3: Components of OOo [Flat05]...........................................................................15
Figure 4: Communication between UNO components [Flat05]......................................16
Figure 5: The Service Manager [Augu05].......................................................................17
Figure 6: Services [Open05, p.42]...................................................................................19
Figure 7: Java Adapter [Flat05].......................................................................................20
Figure 8: The overall concept [Augu05]..........................................................................21
Figure 9: ooRexxMakros................................................................................................. 24
figure 10: Text Document Model, [Open05, p.503]........................................................27
figure 11: Hello World.....................................................................................................29
figure 12: Insert Text Table............................................................................................. 32
figure 13: Cursor Show....................................................................................................35
figure 14: Page Counter................................................................................................... 37
Figure 15: Insert Different Shapes...................................................................................39
Figure 16: Confirm request .............................................................................................41
Figure 17: Received mail.................................................................................................42
Figure 18: E-mail button..................................................................................................43
Figure 19: Loading Web Sites......................................................................................... 45
Figure 20: Using Search Descriptor.................................................................................48
Figure 21: Spreadsheet Document Model [Open05, p.584]............................................ 50
Figure 22: Hello World calc............................................................................................ 51
Figure 23: Values and Formulas......................................................................................53
Figure 24: Copy Cell Ranges...........................................................................................55
Figure 25: Merging Cells.................................................................................................57
Figure 26: Identify Row Differences............................................................................... 58
Figure 27: Chart Show.....................................................................................................60
Figure 28: Using a Replace Descriptor............................................................................61
Figure 29: Inserting a shape.............................................................................................63
Figure 30: Changing the Cell Format.............................................................................. 64
Figure 31: Drawing and Impress model [Open05].......................................................... 65
figure 32: Using Different Shapes................................................................................... 67
figure 33: Organigram..................................................................................................... 70
figure 34: Using Layer for Shapes................................................................................... 72

OpenOffice.org Automatisation Page 5
figure 35: Creating a Master Page................................................................................... 74
figure 36: Insert Chart......................................................................................................76
figure 37: Animation and Click Actions..........................................................................79
Figure 38: Select type of external adress book................................................................ 82
Figure 39: Confirm Box...................................................................................................83

OpenOffice.org Automatisation Page 6
1 Introduction
The Introduction chapter will give you an short overwiew about the structure, the main problem and the approach of this work.
1.1 Abstract
This paper discusses how different technical components of Open Office can work together to support business processes. These technical components are Open Source and freely available through downloading them form the Internet. The main focus will be the script language Open Object Rexx, OpenOffice.org and the Bean Scripting Framework for Open Object Rexx.
After explaining the main components of the system, some Examples should show how the elements are working together and which effect is possible to achieve using them. The next step is to create small nutshell examples which should be supported through the interacting technical components mentioned above. At the end the conclusion part should summarise the main aspects of this paper.
1.2 Problem Discussion
Software is generally expensive to buy, especially commercial applications for firms and other organisations. In addition, software is often not independent from the operating system. These arguments bring up the question, if there are other possibilities to use software which supports working processes.
The first step toward a more independent way of using software is to identify approaches which can answer this question.
1.3 Approach
The approach of this paper suggests to use Open Source Software to answer the problem discussion due to several reasons. Open Source Software programs offer the possibility to save expensive licences and maintain independence from big market share holders. In addition the required automation of working processes can be achieved as described later on.
1.4 Keywords
Open Source Software, Open Object Rexx, OpenOffice.org, Bean Scripting Framework for Object Rexx, Automatisation
OpenOffice.org Automatisation Page 7
2 Discribing the main elements
In this chapter all used elemets, including generall definitions and software elements, will be discribed. This is necessary to build up an appropriate context of knwoledge to understand this issue in a more comprehensive way.
2.1 Open Source Definition
Open Source can be discribed through following criterias reffering to different sources1.
1. Source Code
The Source Code must be available for each Open Source Software. In addition the code must be accessible in compiled form. This is necessary to assure the possibility to modify and develop efficient Software.
2. Derived Works
This point simply means that modifications and derived works must be allowed.
3. Integrity of The Author's Source Code
Therefore „patch files“ must be allowed which modify the program at build time. The reason for this possibility of using Open Source license is to make „unofficial“ changes available and protecting the original source code. In this way, the reputation of the original Authors can be saved.
4. No Discrimination Against Persons of Groups
Open Source Software Projects try to gain a maximum of benefits for all participants and user. This aspect could be endangered through forbidding persons to contribute work afford.
5. No Discrimination Against Fields of Endeavor
It is forbidden to restrict the Field of Endeavor, for example to forbid commercial usage.
6. Distribution of License
The rights for the software pass over to all persons who are receiving the program. It is forbidden that a person has to buy additional licenses to use the Software.
1 [Osat06][Osorg06]
OpenOffice.org Automatisation Page 8
7. License Must Not Be Specific to a Product (Note: this argument is not always true)
The rights must not apply for a special software package. Parts of the package have the same rights then the whole product.
8. License Must Not Restrict Other Software
The license must not influence the rights on other software which are distributed on the same media.
To know these criterias is important for using Open Source Software. Especially for this paper, due to the fact that only Open Source programs will be analyzed and applied.
2.2 Open Object Rexx
Open Object Rexx is the name of an freely available scripting language2. In the following a history section, generally aspects and syntax examples of this programming language will introduce you in the world of Open Object Rexx.
2.2.1 History3
Rexx was originally disegned and implented as a scripting language between 1979 and 1982 by Mike Cowlishaw of IBM. Over the years, IBM made Rexx available for all his operating systems, Windows, java and Linux. In 1984/5 the first non-IBM version was written by Charles Daney for PC-DOS. In addition, versions for Atari, Amiga, Unix, Solaris, DEC, Windows CE, Pocket PC, MS-DOS, Palm OS, QNX, OS/2, Linux, BeOS, EPOC32, AtheOS, OpenVMS, Open Edition, Macintosh, and Mac OS x were also developed.
In 1992 two very important open source approaches of Rexx appeared. Ian Collier's REXX/imc for Unix and Anders Christensen's Regina for Windows and Linux were released. This two versions of Rexx are very popular and widely used.
In 1996 ANSI4 published a standard named ANSI X3.274-1996 „Information Technology – Programming Language REXX“
The latest versions of Rexx are NetRexx and Object Rexx.
Object Rexx is object-oriented5 and upwards-compatible with Rexx. Further information on this version will be provided in the next chapter.
2 Scripting programming languages are computer programming languages which are rather interpreted than compiled.
3 [WikiREXX06]4 The American National Standard Institute is a non-profit organization for standardization work in the
United States.5 Object-Oriented programming is a programming paradigm using objects which are communicating
through messages.
OpenOffice.org Automatisation Page 9
2.2.2 Open Object Rexx6
Open Object Rexx is an Open Source Project managed by RexxLA7 and is distributed under the Common Public License (CPL) v1.08. This license includes the criterias mentioned above in chapter 2.1. Open Source Definition.
Object Rexx can be characterized as follows:
An English-like statement:
That means that Rexx uses names for instructions which have a similar semantics in the English language. For example SAY, IF....THEN..Else, Do..End, and EXIT. This makes the using of this programming language a lot easyer.
Fewer Rules:
In Rexx it is possible to write one instruction in several lines or several instruction in one line. The language is also not case sensitive, for this reason it doesn't matter if you are writing the code in lowercase or uppercase. Furthermore one can keep spaces between lines which will cause no troubles during running the program. Finally you can name your varibles like built in functions which have the same name. The interpreter of Rexx will use the right function based on the context.
Interpreted not compiled:
Object Rexx is a scripting language that interprets the statements.
Built in functions and methods:
Built in functions and methods are providing different functionalities which are already implemented in the language.
Typeless variables:
In Rexx one don't have to declare variables, for example numbers or strings, due to the fact that variables can hold any kind of Object.
6 [Oorex05]7 The Rexx Language Association tries to support the understanding and use of the Rexx Programming
language and consist of volunteers throughout the world. 8 [Osorg06]
OpenOffice.org Automatisation Page 10
String handling:
Rexx offers a powerful functionality for manipulating strings. This is an advantage if you like to create programs which have to separate characters, numbers, and mixed input.
Decimal Arithmetic:
Rexx bases it's arithmetic operations on decimal arithmetic and not on binary arithmetic, which is used in many other programming languages.
Clear error messages and powerful debugging:
This point means simply that error messages of Rexx provide a full and meaningful explanation. In addition the TRACE instruction offers a powerful debugging tool.
2.2.3 Syntax Examples
In Object Rexx every value is an Object and is created as string by default. Even numeric values are saved as String. In the following examples code snipes are shown which are needed for some of the nutshell examples.
The first example shows how variables are used in Object Rexx.. The || operator assembles two strings.
a = “ab “
b = 123
SAY a b /*->“abc 123“ */
SAY a || b /*->“abc 123“ */
The second example shows a loop:
DO i = 1 TO 3
i
END
The next code snippet shows the requires statement which is needed to make the UNO.CLS module available. Within the UNO.CLS different routines are implemented which makes the using of the Universal Network Object concept more easier. The UNO concept will be described in chapter 2.6.1 Universal Network Object concept, p.16.
::requires UNO.CLS
For using methods within ObjectRexx the „Twiddle“ is needed. An example is shown below. The Twiddle can be compared with the . in Java an is used in the same way. If you use two Twiddles (~~) the object itself will be returnded.
Object1~method1
OpenOffice.org Automatisation Page 11
The next code snippet shows how it is possible to create a procedure. For this, the routine statement is used. The arguments a, b and c can be used in the instruction part. The variable d will be returned.
::routine name
use arg a, b, c
[instructions]
return d
2.3 OpenOffice.org
In this chapter the first section describes the most important steps of the development of OpenOffice.org. After this OpenOffice.org is described as product to show for which tasks this software can be used.
2.3.1 History9
Macro Börries founded in 1984 at the age of 16 a company named Star Division in Germany. This firm created star office, a office suite10 which was sold 25 million times. In 1999 Sun Microsystems11 bought Star Division for 70 million dollars. Since that time a free version of Star Office was made available via downloading it from the Internet. In the year 2000 Sun announced the OpenOffice.org project. Several months later the OpenOffice.org website went online with the possibility to download the Source Code of Star Office 6.0. At this time the software had 400 MegaByte and 7.500.000 lines of C++12 Code.
The first running version was finished in October 2001 named Build 638c. The next version named OpenOffice.org 1.1 was published in September 2003. In September 2005 OpenOffice.org 1.1.5 was available followed by the latest version OpenOffice.org 2.0 in October 2005.
Star Office is today commercially available and based on OpenOffice.org. Since the Star Office Version 6.0 Sun uses the sources of the OpenOffice.org project, including the source code, API's, file formats and reference implementation. In return Sun continues to sponsor development on OpenOffice.org and contributes code for the project.
The difference between these two products are some additional features of Star Office added by Sun.
9 [WikiOOo06][OOo06]10 Office Suite is a package of programs which can support usual office task's like writer letters or create
presentations. 11 Sun Microssystems is the name of a company which is producing computers and software in Silicon
Valley and is creater of Java. 12 A programming language which is machine-oriented and efficient.

OpenOffice.org Automatisation Page 12
2.3.2 The OpenOffice Product13
As mentioned above, Open Office is an integrated package of programs which can support common office work. This package includes the following programs:
– Writer
This program is similar to the Office Word14 program of Microsoft. It allows for writing simple letters or a whole book. There are many styles and formatting options, AutoCorrect15 dictionary, different wizards and many other features.
– Calc
The Calc program offers the possiblity to create spreadsheets which can be used for many different tasks. This program is similar to the Excel program of Microsoft.
– Impress
This part of the package can be used to create presentations. It includes a wide range of tools for designing and formatting. There are many similaritys to the Microsoft program Power Point.
– Draw
Draw is a program for drawing different graphics like diagrams and complex plans.
– Base
In the Base program you can develop Databases like in the Microsoft Office program Access. You can create, modify tabels, forms, queries and reports. In addition you can use wizards, SQL and other functionalities.
– Math
Math is the OpenOffice.org component for designing mathematical equations.
Finally it is important to say that OpenOffice.org allows to import and export MS Office document's.
13 [OOo06]14 The Office Word programm is a part of a office suite from Microsoft.15 AutoCorrect means that the program is checking and correcting your spelling as you are typing.
OpenOffice.org Automatisation Page 13
2.4 The Bean Scripting Framework
„Bean Scripting Framework (BSF) is a set of Java classes which provides scripting language support within Java applications, and access to Java objects and methods from scripting languages........“ [Ajp05]
This statement means, that a Bean Scripting Framework allows scripting languages access to Java objects and methods. Further information on the concept of this technology will be given in chapter 2.4.2. Technical Concept, p.12.
2.4.1 History
In 1999 BSF started as an opensource research project in the Watson Research Center of IBM. Initially the task was to provide access to Java Beans from scripting language enviroments. Soon the interest for this technology grew internally and externally of IBM. This sircumstances led the project moved to IBM's developer Works site, where BSF could operate as an open source project. In 2002 BSF was integrated as a subproject of Jakarta16. Since this time many improvements were made and led to the current version 2.3.[Ajp05]
2.4.2 Technical Concept17
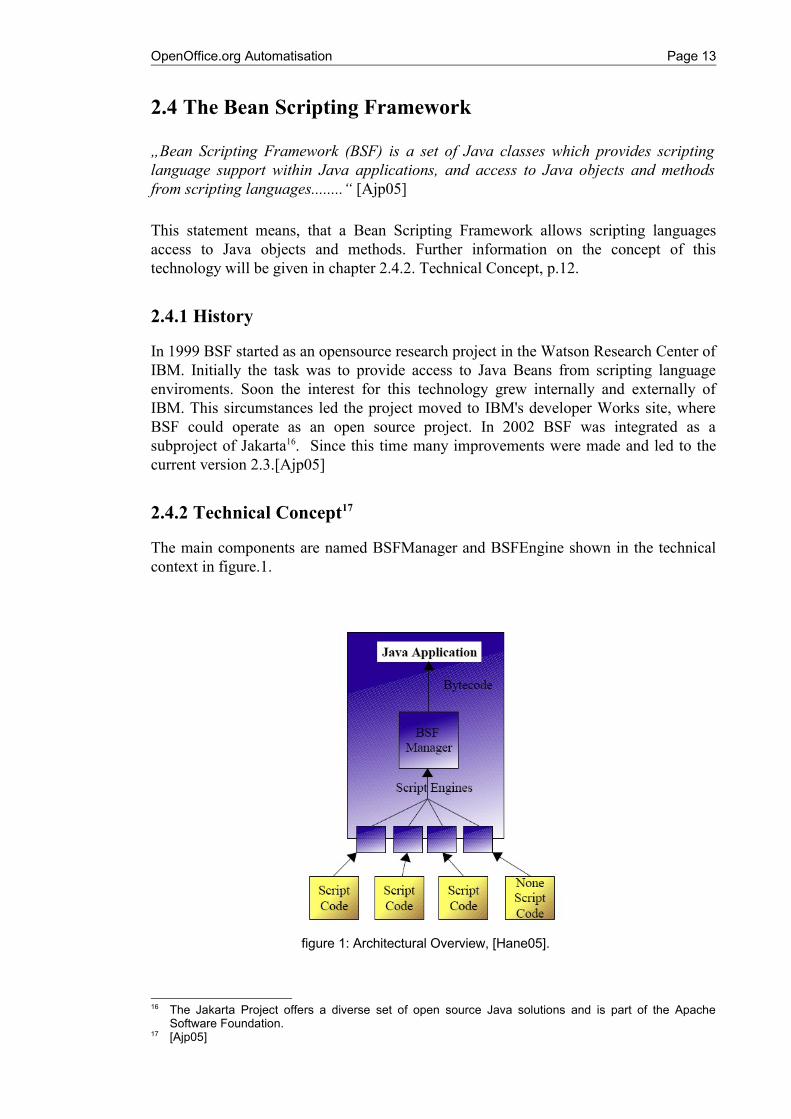
The main components are named BSFManager and BSFEngine shown in the technical context in figure.1.
16 The Jakarta Project offers a diverse set of open source Java solutions and is part of the Apache Software Foundation.
17 [Ajp05]
figure 1: Architectural Overview, [Hane05].
OpenOffice.org Automatisation Page 14
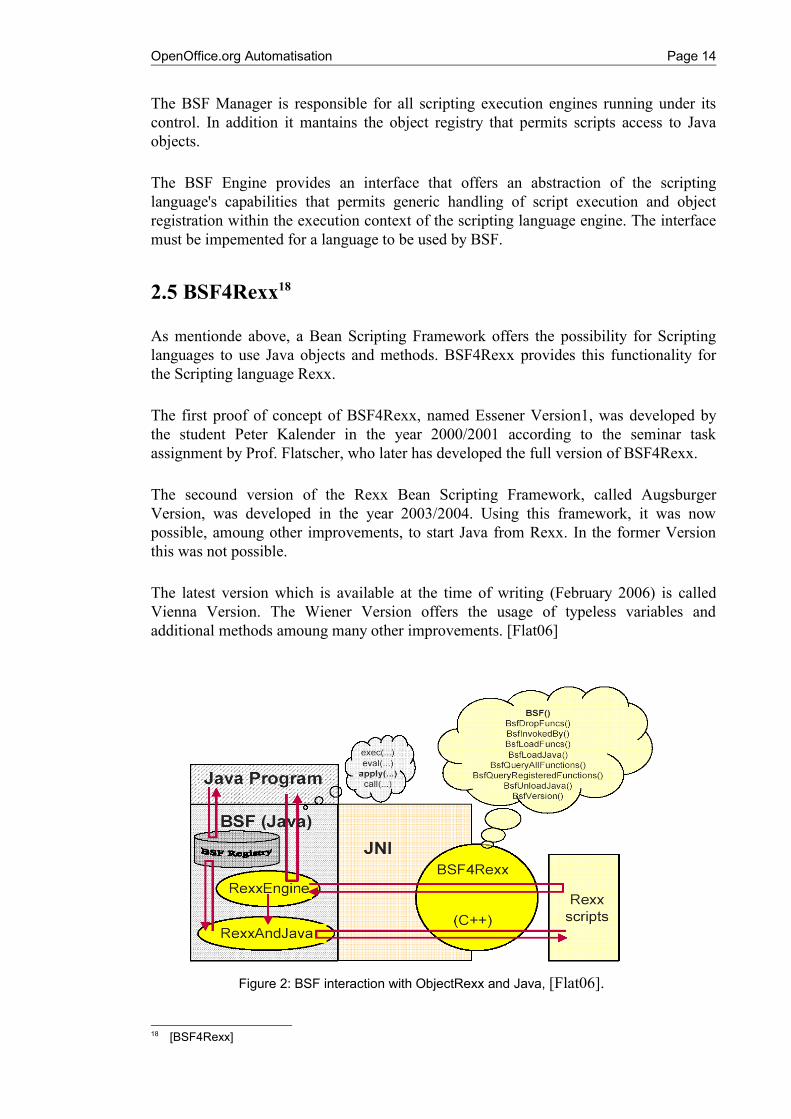
The BSF Manager is responsible for all scripting execution engines running under its control. In addition it mantains the object registry that permits scripts access to Java objects.
The BSF Engine provides an interface that offers an abstraction of the scripting language's capabilities that permits generic handling of script execution and object registration within the execution context of the scripting language engine. The interface must be impemented for a language to be used by BSF.
2.5 BSF4Rexx18
As mentionde above, a Bean Scripting Framework offers the possibility for Scripting languages to use Java objects and methods. BSF4Rexx provides this functionality for the Scripting language Rexx.
The first proof of concept of BSF4Rexx, named Essener Version1, was developed by the student Peter Kalender in the year 2000/2001 according to the seminar task assignment by Prof. Flatscher, who later has developed the full version of BSF4Rexx.
The secound version of the Rexx Bean Scripting Framework, called Augsburger Version, was developed in the year 2003/2004. Using this framework, it was now possible, amoung other improvements, to start Java from Rexx. In the former Version this was not possible.
The latest version which is available at the time of writing (February 2006) is called Vienna Version. The Wiener Version offers the usage of typeless variables and additional methods amoung many other improvements. [Flat06]
18 [BSF4Rexx]
Figure 2: BSF interaction with ObjectRexx and Java, [Flat06].
OpenOffice.org Automatisation Page 15
In figure.2 the architecture of BSF4Rexx is shown. In the following code example the usage of this technology is demonstrated:
.bsf~new('java.awt.Frame', 'Hallo, liebe Welt - von Object Rexx aus.') ~show
call SysSleep 10 -– sleep 10 seconds
::requires BSF.cls
[Flat06]
First the BSF module is loaded with the requires statement. After that BSF is used to create a new java.awt.Frame and adds the string „Hallo, liebe Welt – von Object Rexx aus“. In the same line the Java Frame is set visible using the method show. Finally the program stops for ten seconds.
2.6 The Architecture of OpenOffice.org19
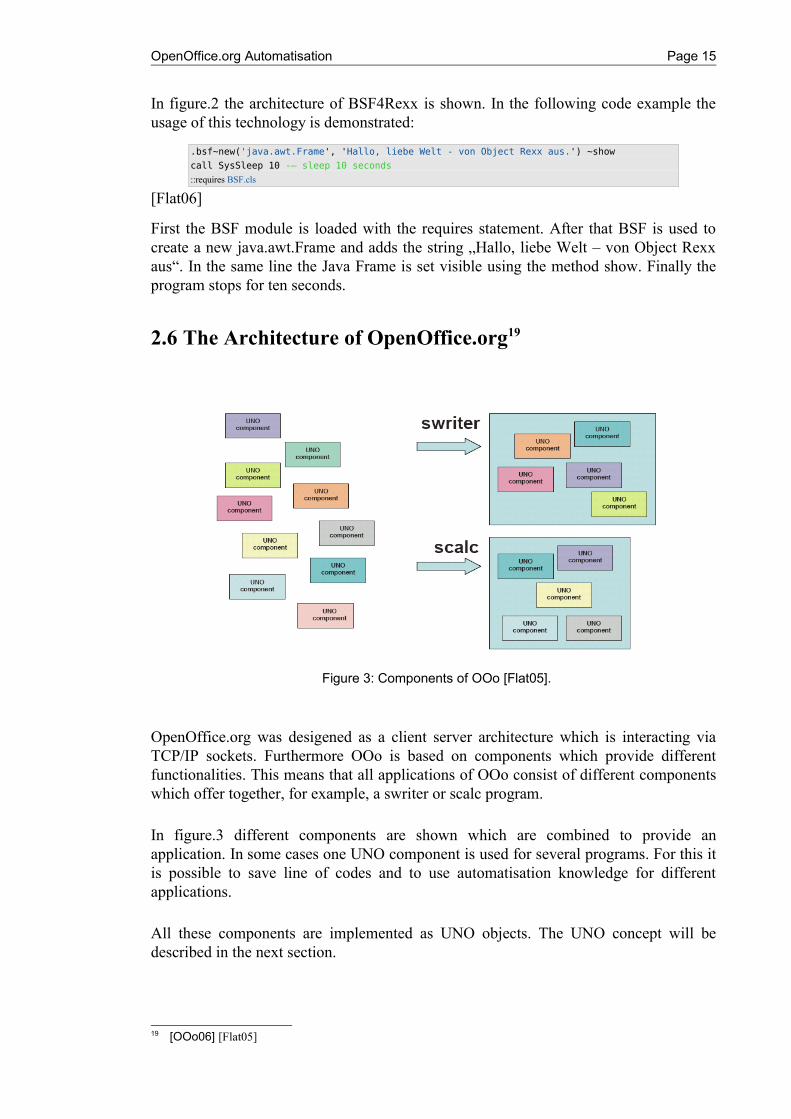
OpenOffice.org was desigened as a client server architecture which is interacting via TCP/IP sockets. Furthermore OOo is based on components which provide different functionalities. This means that all applications of OOo consist of different components which offer together, for example, a swriter or scalc program.
In figure.3 different components are shown which are combined to provide an application. In some cases one UNO component is used for several programs. For this it is possible to save line of codes and to use automatisation knowledge for different applications.
All these components are implemented as UNO objects. The UNO concept will be described in the next section.
19 [OOo06] [Flat05]
Figure 3: Components of OOo [Flat05].
OpenOffice.org Automatisation Page 16
2.6.1 Universal Network Object concept
Each component is described in the interface description lanugage (IDL) module20. The UNO Interfaces Description Language Modules can be described as following:
„...IDL modules may contain nested IDL modules, where the structure represents a hierarchy having a root module. Identifying a type in this hierarchy of modules is therefore easy, one starts out at the root module and names all nested modules one needs to traverse, leading in and separating the names with double colons (::, c-style) or separating them with a dot only (Java style). Hence the type named "XPrintable" has the fully qualified name "::com::sun::star::view::XPrintable" (C++) or "com.sun.star.view.XPrintable" (Java)....“ [Flat05]
In the statement above it can be seen that UNO components can be implemented in different programming languages.
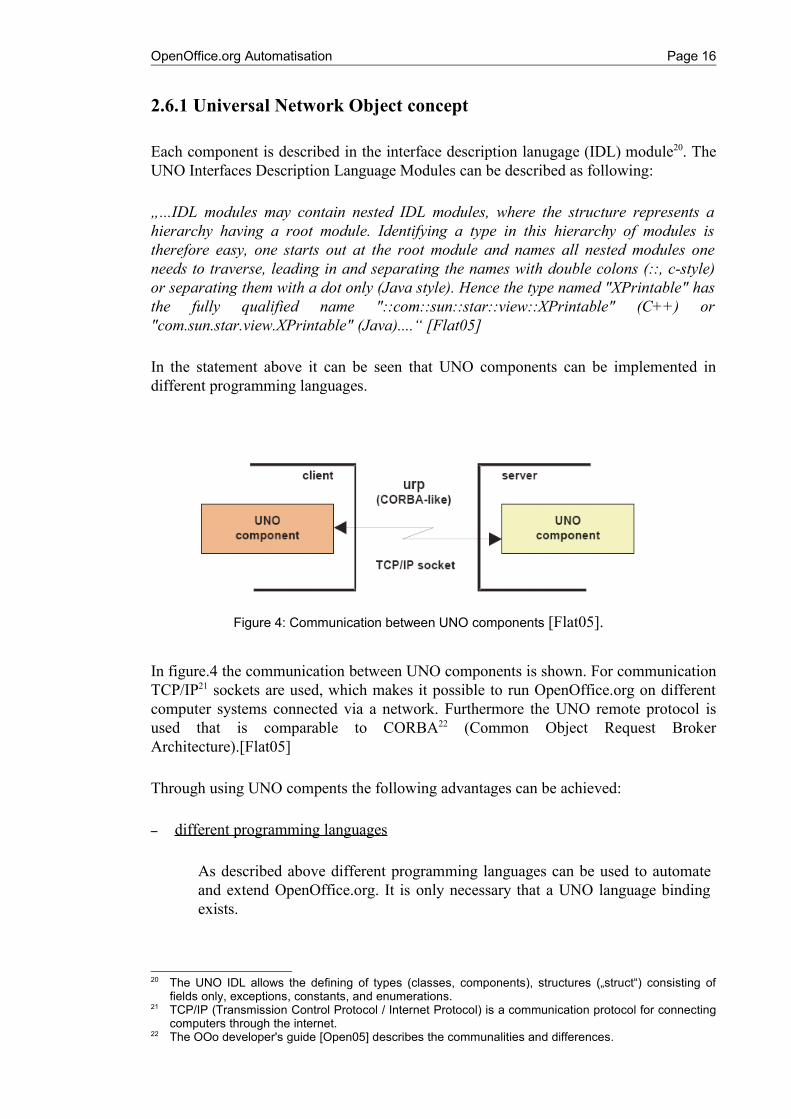
In figure.4 the communication between UNO components is shown. For communication TCP/IP21 sockets are used, which makes it possible to run OpenOffice.org on different computer systems connected via a network. Furthermore the UNO remote protocol is used that is comparable to CORBA22 (Common Object Request Broker Architecture).[Flat05]
Through using UNO compents the following advantages can be achieved:
– different programming languages
As described above different programming languages can be used to automate and extend OpenOffice.org. It is only necessary that a UNO language binding exists.
20 The UNO IDL allows the defining of types (classes, components), structures („struct“) consisting of fields only, exceptions, constants, and enumerations.
21 TCP/IP (Transmission Control Protocol / Internet Protocol) is a communication protocol for connecting computers through the internet.
22 The OOo developer's guide [Open05] describes the communalities and differences.
Figure 4: Communication between UNO components [Flat05].

OpenOffice.org Automatisation Page 17
– different operating systems
OpenOffice.org can be used on different operating systems like Windows, Linux or Solaris. In the the context of OOo automatisation you should consider that your used programming language is also platform independent.
– different networks
As mentioned above all components are communicating via TCP/IP. Normally the client and the server component are installed on the same computer. Using the UNO technology it is possible that the client component interacts with the server component over a network. That offers the possiblity to run OpenOffice.org clients on different computer systems. [Open05]
2.6.2 UNO Service Components
Each UNO component usually represents a service which consists of additional services, interfaces and properties. To create services the Service Manager is needed.
2.6.2.1 Service Manager
„UNO introduces the concept of service managers, which can be considered as factories that create services.“ [Open05, p.36]
The service manager in figure.5 is responsible to create services which represent UNO objects. Each service manager exists in a component context. A compenent context describes a set of components which are combined to run an application like the swriter. In figure 3 each box can be described as component context.
Figure 5: The Service Manager [Augu05]
OpenOffice.org Automatisation Page 18
For example, a service manager provides the following services23:
– com.sun.star.frame.Desktop:
maintains loaded documents: is used to load documents, to get the current document, and access all loaded documents
– com.sun.star.configuration.ConfigurationProvider:
yields access to the OpenOffice.org configuration, for instance the settings in the Tools - Options dialog
– com.sun.star.sdb.DatabaseContext:
holds databases registered with OpenOffice.org
– com.sun.star.system.SystemShellExecute:
executes system commands or documents registered for an application on the current platform
– com.sun.star.text.GlobalSettings:
manages global view and print settings for text documents
While creating the nutshell examples the desktop service will be the most important service. As described above this service enables to load and access documents. The desktop service will be described in more detail later on in this paper.
To create an instance of service components you have to use the method „createInstance()“ or „createInstanceWithArguments()“ passing the fully qualified name of the UNO component. The returned object is called „service object“ and can now be used for automation.[Flat05]
The next step will be to explain the terms Services, Interfaces and Properties in more detail.
23 [Open05, p.36]
OpenOffice.org Automatisation Page 19
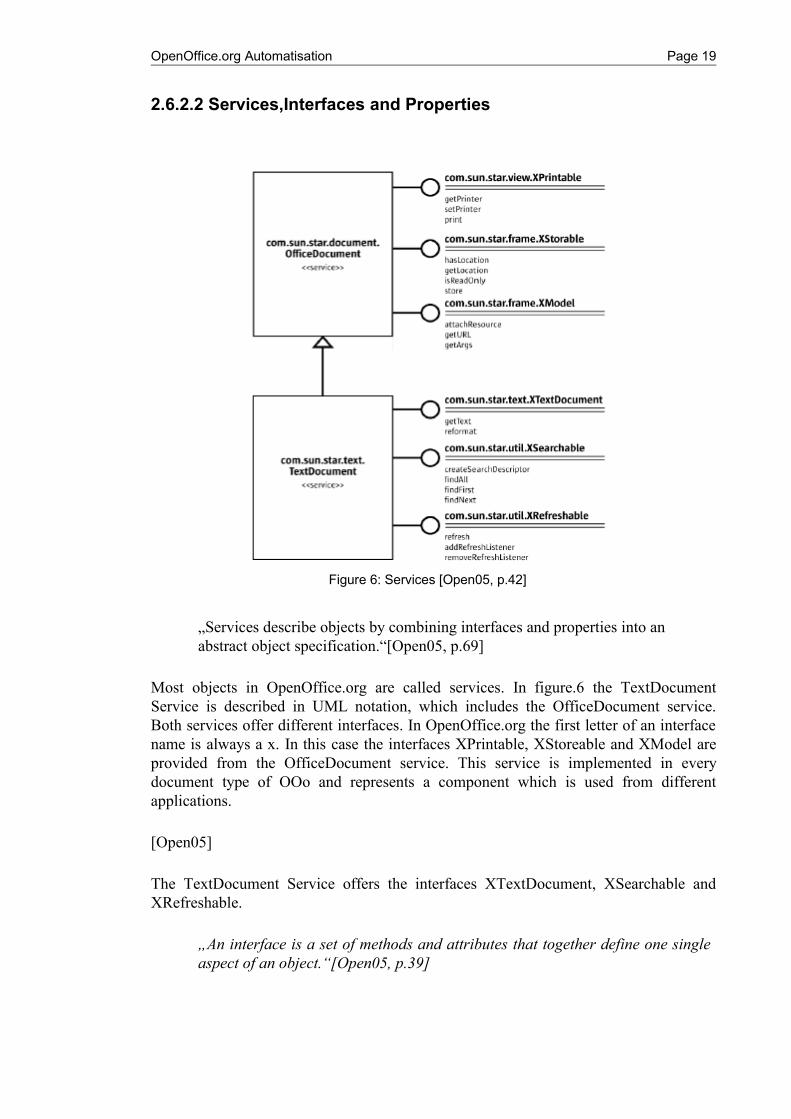
2.6.2.2 Services,Interfaces and Properties
„Services describe objects by combining interfaces and properties into an abstract object specification.“[Open05, p.69]
Most objects in OpenOffice.org are called services. In figure.6 the TextDocument Service is described in UML notation, which includes the OfficeDocument service. Both services offer different interfaces. In OpenOffice.org the first letter of an interface name is always a x. In this case the interfaces XPrintable, XStoreable and XModel are provided from the OfficeDocument service. This service is implemented in every document type of OOo and represents a component which is used from different applications.
[Open05]
The TextDocument Service offers the interfaces XTextDocument, XSearchable and XRefreshable.
„An interface is a set of methods and attributes that together define one single aspect of an object.“[Open05, p.39]
Figure 6: Services [Open05, p.42]
OpenOffice.org Automatisation Page 20
Each interface includes different methods and optionally arguments. For Example, the XTextDocument interface provides the methods getText and reformat. Interfaces and Services include often Properties which can be described as following:
„A property is a feature of a service which is not considered an integral or structural part of the service and therefore is handled through generic getPropertyValue() / setPropertyValue() methods instead of specialised get methods... .“ [Open05, p.41]
Generally, properties allow the storing and retrieving of information. If you want to identify properties it is necessary to study the OpenOffice.org API24
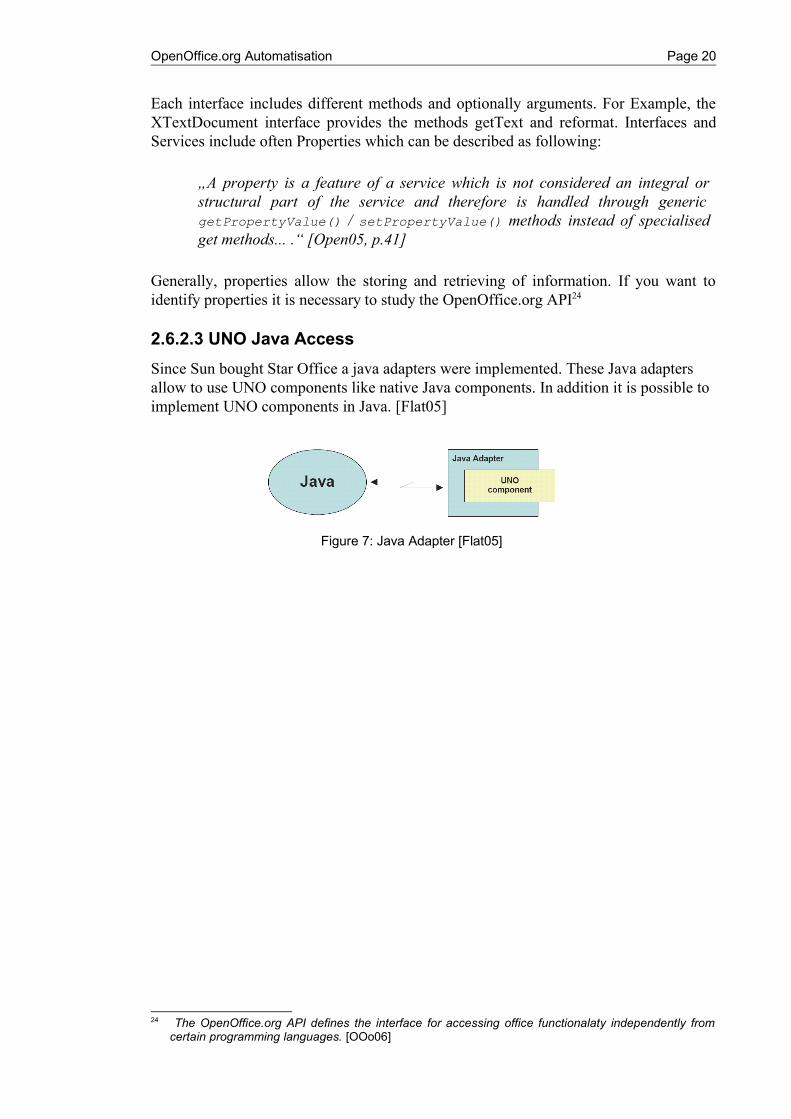
2.6.2.3 UNO Java AccessSince Sun bought Star Office a java adapters were implemented. These Java adapters allow to use UNO components like native Java components. In addition it is possible to implement UNO components in Java. [Flat05]
24 The OpenOffice.org API defines the interface for accessing office functionalaty independently from certain programming languages. [OOo06]
Figure 7: Java Adapter [Flat05]
OpenOffice.org Automatisation Page 21
3 Interaction of Elements
In chapter 2. Describing the main elements (p.7), all components of the OpenOffice.org automatisation were described. Now it is important to show how these different technologies are working together to build a bridge from OpenOffice.org to Object Rexx.
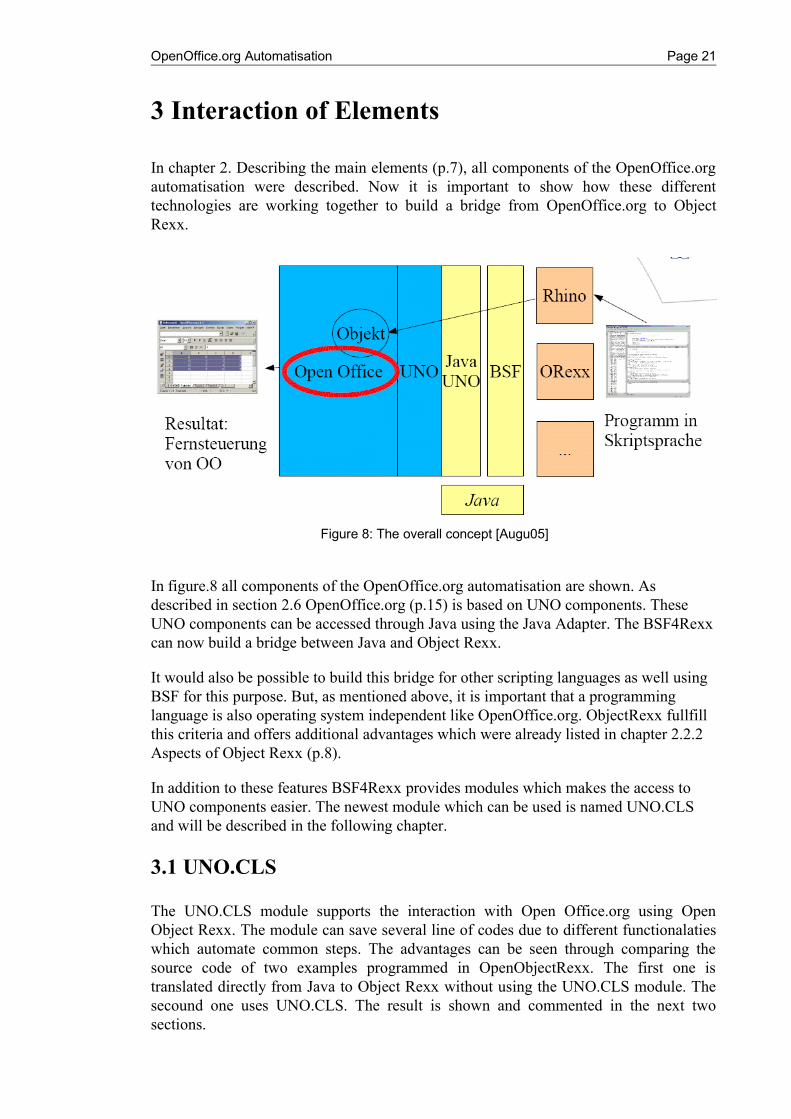
In figure.8 all components of the OpenOffice.org automatisation are shown. As described in section 2.6 OpenOffice.org (p.15) is based on UNO components. These UNO components can be accessed through Java using the Java Adapter. The BSF4Rexx can now build a bridge between Java and Object Rexx.
It would also be possible to build this bridge for other scripting languages as well using BSF for this purpose. But, as mentioned above, it is important that a programming language is also operating system independent like OpenOffice.org. ObjectRexx fullfill this criteria and offers additional advantages which were already listed in chapter 2.2.2 Aspects of Object Rexx (p.8).
In addition to these features BSF4Rexx provides modules which makes the access to UNO components easier. The newest module which can be used is named UNO.CLS and will be described in the following chapter.
3.1 UNO.CLS
The UNO.CLS module supports the interaction with Open Office.org using Open Object Rexx. The module can save several line of codes due to different functionalaties which automate common steps. The advantages can be seen through comparing the source code of two examples programmed in OpenObjectRexx. The first one is translated directly from Java to Object Rexx without using the UNO.CLS module. The secound one uses UNO.CLS. The result is shown and commented in the next two sections.
Figure 8: The overall concept [Augu05]

OpenOffice.org Automatisation Page 22
3.1.1 Java:ObjectRexx25
The source code below shows ObjectRexx code which initialises a xMultiServiceFactory in the blue marked part. The lines in red in the first paragraph create a Desktop Service Interface. During the next step the XComponentLoader Interface is created which makes it possible to open a new text document. This can be done with the method loadComponentFromURL() which needs an Property Array created in the black lines.
/*Beginning of the blue marked part*/
/* initialize connection to server, get its Desktop-service and XComponentLoader interface */
sComponentContext = .bsf~new("com.sun.star.comp.helper.Bootstrap") ~createInitialComponentContext(.nil)
unoRuntime = .bsf~new("com.sun.star.uno.UnoRuntime")
sUrlResolver = sComponentContext~getServiceManager() ~createInstanceWithContext("com.sun.star.bridge.UnoUrlResolver", sComponentContext)
XUnoUrlResolver = .bsf4rexx~Class.class~forName("com.sun.star.bridge.XUnoUrlResolver")
oUrlResolver = unoRuntime~queryInterface(XUnoUrlResolver, sUrlResolver)
unoUrl = "uno:socket,host=localhost,port=8100;urp;StarOffice.NamingService"
oInitialObject = oUrlResolver~resolve(unoUrl)
XNamingService = .bsf4rexx~Class.class~forName("com.sun.star.uno.XNamingService")
sNamingService = unoRuntime~queryInterface(XNamingService, oInitialObject)
oServiceManager = sNamingService~getRegisteredObject("StarOffice.ServiceManager")
XMSFactory = .bsf4rexx~Class.class~forName("com.sun.star.lang.XMultiServiceFactory")
sMSFactory = unoRuntime~queryInterface(XMSFactory, oServiceManager)
/*End of the blue marked part*/
/*Beginning of the marked red part*/
-- Retrieve the Desktop object, we need its XComponentLoader interface
-- to load a new document
sDesktop = sMSFactory~createInstance("com.sun.star.frame.Desktop")
XDesktop = .bsf4rexx~Class.class~forName("com.sun.star.frame.XDesktop")
oDesktop = unoRuntime~queryInterface(XDesktop, sDesktop)
XComponentLoaderName = .bsf4rexx~Class.class~forName("com.sun.star.frame.XComponentLoader")
sComponentLoader = unoRuntime~queryInterface(XComponentLoaderName, oDesktop)
/*End of the red marked part*/
/*Beginning of the black marked part, until end*/
/* Open a blank text document */
/* No properties needed */
propertyValueName = .bsf4rexx~Class.class~forName("com.sun.star.beans.PropertyValue")
loadProps = .bsf~createArray(propertyValueName, 0)
/* 0=no elements, i.e. empty Java array */
/*End of the black marked part*/
/* load an empty text document */
oWriterComponent = sComponentLoader~loadComponentFromURL("private:factory/swriter", "_blank", 0, loadProps)
::requires BSF.cls
25 [Flat06]
OpenOffice.org Automatisation Page 23
3.1.2 UNO.CLS26
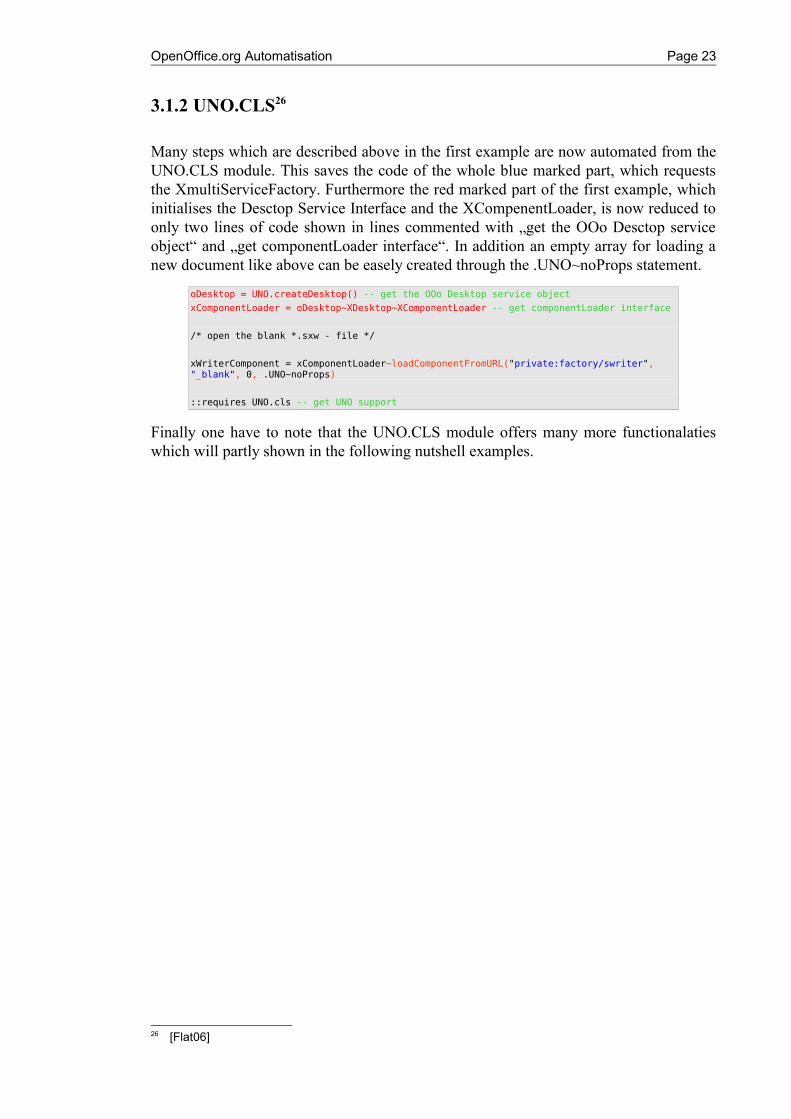
Many steps which are described above in the first example are now automated from the UNO.CLS module. This saves the code of the whole blue marked part, which requests the XmultiServiceFactory. Furthermore the red marked part of the first example, which initialises the Desctop Service Interface and the XCompenentLoader, is now reduced to only two lines of code shown in lines commented with „get the OOo Desctop service object“ and „get componentLoader interface“. In addition an empty array for loading a new document like above can be easely created through the .UNO~noProps statement.
oDesktop = UNO.createDesktop() -- get the OOo Desktop service object
xComponentLoader = oDesktop~XDesktop~XComponentLoader -- get componentLoader interface
/* open the blank *.sxw - file */
xWriterComponent = xComponentLoader~loadComponentFromURL("private:factory/swriter", "_blank", 0, .UNO~noProps)
::requires UNO.cls -- get UNO support
Finally one have to note that the UNO.CLS module offers many more functionalaties which will partly shown in the following nutshell examples.
26 [Flat06]
OpenOffice.org Automatisation Page 24
4 Installation Guide 1. Downloading OpenOffice.org
Download the newest version of OpenOffice.org. For the following nutshell examples OpenOffice.org 2.1 is used. The latest version of OOo can be downloaded at the OpenOffice.org homepage27.
2. Downloading Java
The next step is to download java from the from the Sun homepage28. Before doing this it should be checked if java is already installed.
3. Downloading Open Object Rexx
Open Object Rexx can be downloaded from the Open Object Rexx homepage29
4. Downloading Bsf4rexx
At the time of writing the lates version of BSF4Rexx can be retrieved from the Vienna University of Economics and Business Administration30
All steps for the installiation can be found in the readmeBSF4Rexx.txt file.
5. Differences between English and German OpenOffice.org versions
As mentioned above all steps for installing BSF4Rexx are described in the readme file. To make some steps more clear the following describtions can be used in addition.
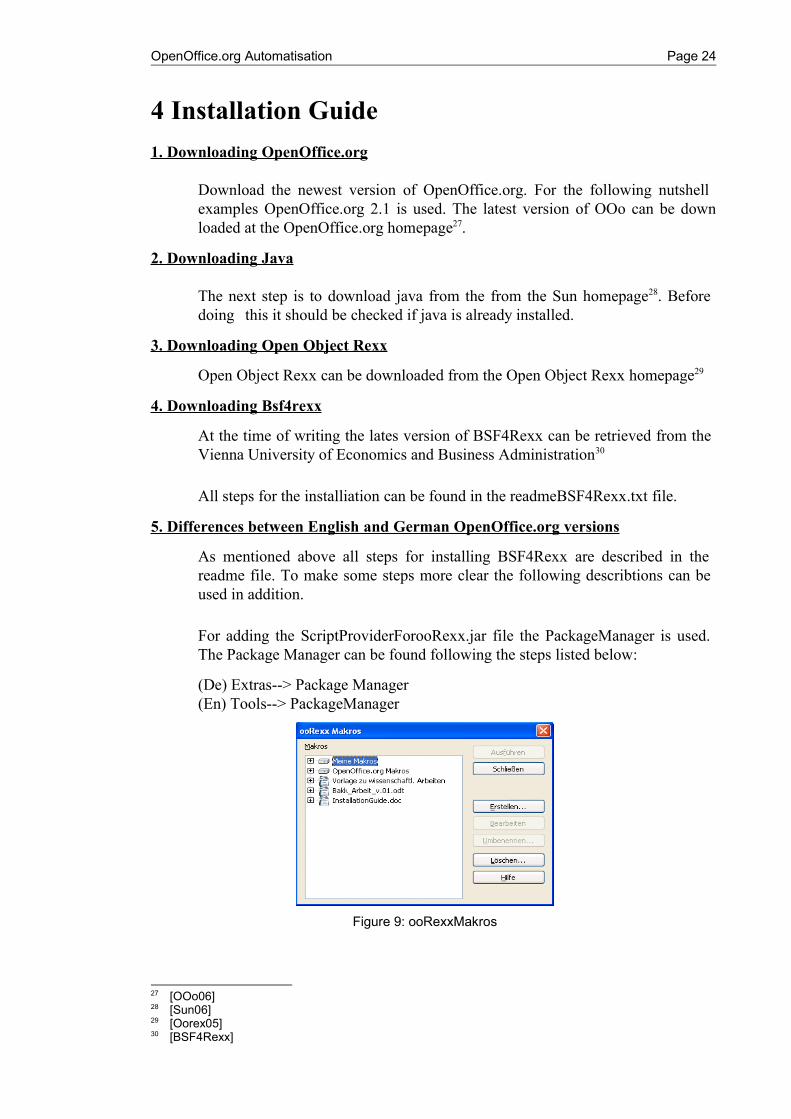
For adding the ScriptProviderForooRexx.jar file the PackageManager is used. The Package Manager can be found following the steps listed below:
(De) Extras--> Package Manager(En) Tools--> PackageManager
27 [OOo06]28 [Sun06]29 [Oorex05]30 [BSF4Rexx]
Figure 9: ooRexxMakros

OpenOffice.org Automatisation Page 25
After the file is added OpenOffice.org has to be closed including the Quickstarter. Then open OOo again. Now it is possible to create your own Macros using the Macros Organiser (figure.9) which can be found in the following menu:
(De) Extras--> Makros--> Makros verwalten--> ooRexx(En) Tools--> Macros--> Organise Macros --> ooRexx
OpenOffice.org Automatisation Page 26
5 Examples
In this chapter differnt nutshell examples are shown and described. The nutshell examples should show how different UNO components can be accessed using the technologies described above. Writing these examples following objectives were considered:
– Gain the understanding of the UNO component concept
The UNO component concept is very complex and not easy to understand. If you have read the first part of this paper carefully it should now be possible to get an quick overview during analysing the examples below. Without any examples it takes you a long time to translate theoretical knowledge into usefull source code.
– Create a database with code sinppets which could be used for further automatisation
The source code presented in this chapter can be easy by reused through copy and paste. Every code part will be described and documented to make it clear what functionality it provides.
– Make OpenOffice.org more attractive in view of competitive Office packages
This statement means that it is always necessary to force competition on markets which results in better products and lower prices.
– Support independent OpenSource technologies for daily business processes
It is always necessary to automate some steps of daily business processes to be more efficient. Due to the fact that OpenOffice.org is based on a Client/Server system creative IT-Infrastructure architectures are possible. These and other aspects allow to offer work place enviroments which support business processes in an effecient way.
Objectives
• gain the understanding of the UNO component concept,• create a set of code snippets which could be used for further automatisation,• make OpenOffice.org more attractive in view of competitive office packages,• support independent OpenSource technologies for daily business processes.
OpenOffice.org Automatisation Page 27
5.1 Wordprocessor („swriter“) Examples
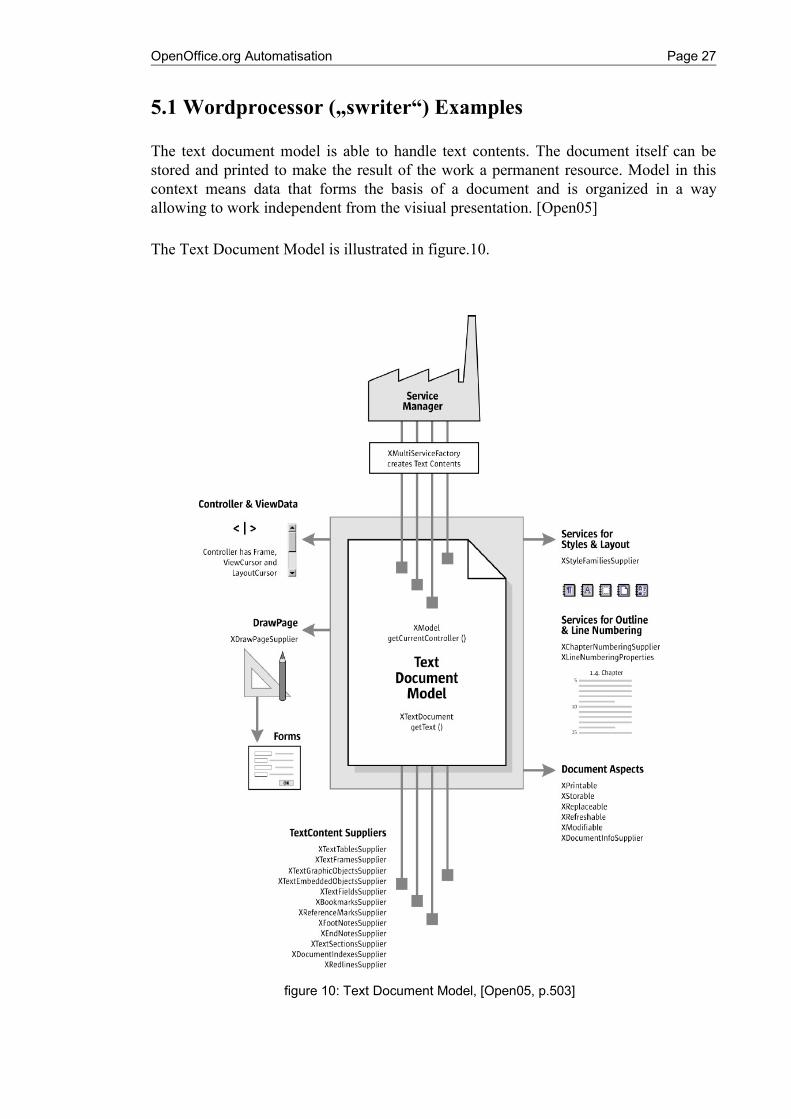
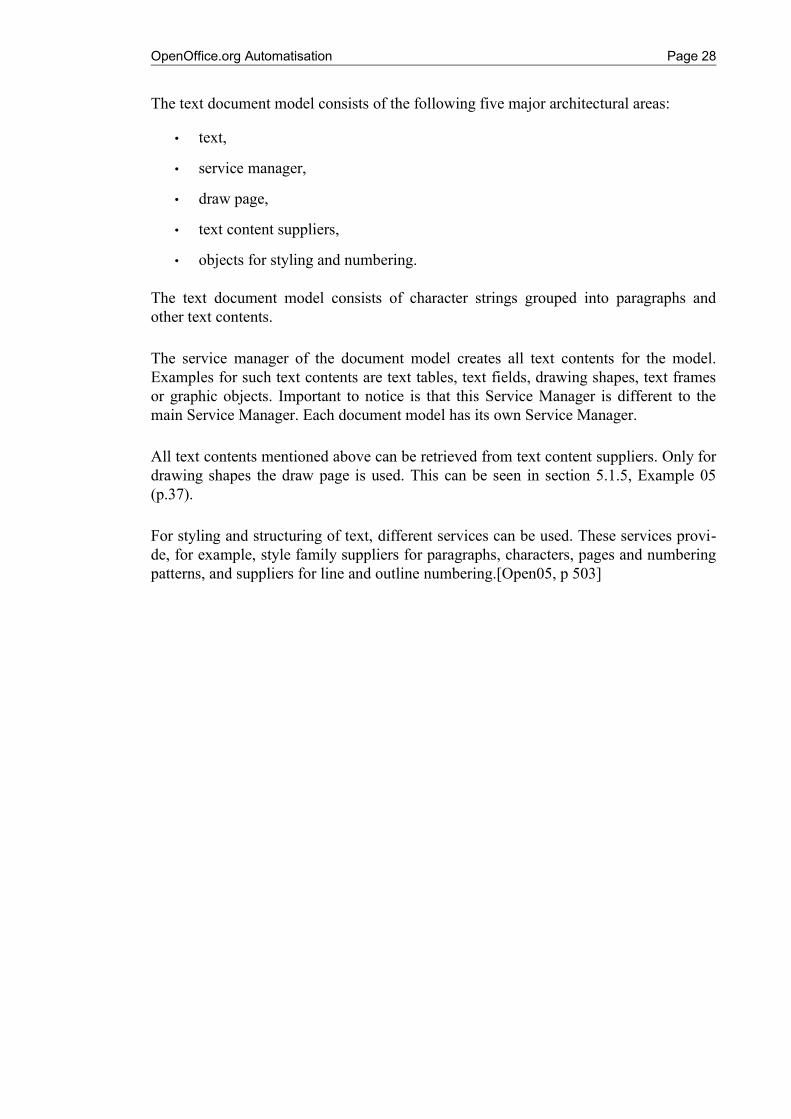
The text document model is able to handle text contents. The document itself can be stored and printed to make the result of the work a permanent resource. Model in this context means data that forms the basis of a document and is organized in a way allowing to work independent from the visiual presentation. [Open05]
The Text Document Model is illustrated in figure.10.
figure 10: Text Document Model, [Open05, p.503]
OpenOffice.org Automatisation Page 28
The text document model consists of the following five major architectural areas:
• text,
• service manager,
• draw page,
• text content suppliers,
• objects for styling and numbering.
The text document model consists of character strings grouped into paragraphs and other text contents.
The service manager of the document model creates all text contents for the model. Examples for such text contents are text tables, text fields, drawing shapes, text frames or graphic objects. Important to notice is that this Service Manager is different to the main Service Manager. Each document model has its own Service Manager.
All text contents mentioned above can be retrieved from text content suppliers. Only for drawing shapes the draw page is used. This can be seen in section 5.1.5, Example 05 (p.37).
For styling and structuring of text, different services can be used. These services provi-de, for example, style family suppliers for paragraphs, characters, pages and numbering patterns, and suppliers for line and outline numbering.[Open05, p 503]
OpenOffice.org Automatisation Page 29
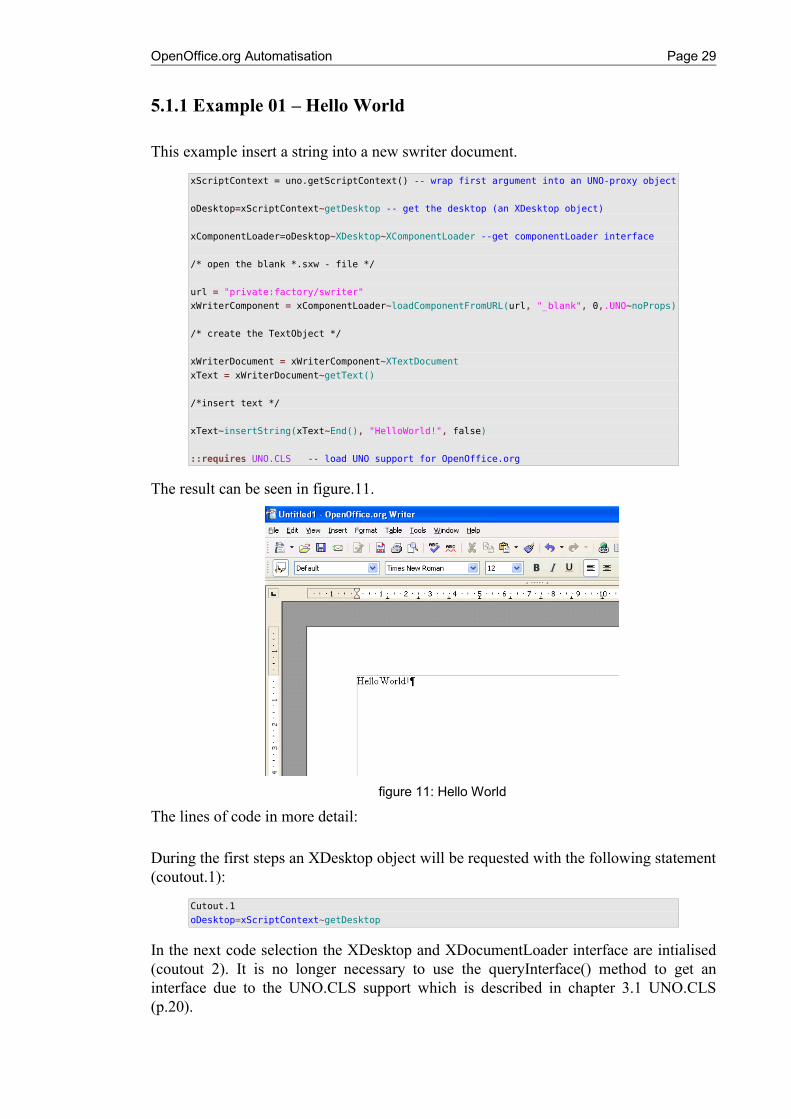
5.1.1 Example 01 – Hello World
This example insert a string into a new swriter document.
xScriptContext = uno.getScriptContext() -- wrap first argument into an UNO-proxy object
oDesktop=xScriptContext~getDesktop -- get the desktop (an XDesktop object)
xComponentLoader=oDesktop~XDesktop~XComponentLoader --get componentLoader interface
/* open the blank *.sxw - file */
url = "private:factory/swriter"
xWriterComponent = xComponentLoader~loadComponentFromURL(url, "_blank", 0,.UNO~noProps)
/* create the TextObject */
xWriterDocument = xWriterComponent~XTextDocument
xText = xWriterDocument~getText()
/*insert text */
xText~insertString(xText~End(), "HelloWorld!", false)
::requires UNO.CLS -- load UNO support for OpenOffice.org
The result can be seen in figure.11.
The lines of code in more detail:
During the first steps an XDesktop object will be requested with the following statement (coutout.1):
Cutout.1
oDesktop=xScriptContext~getDesktop
In the next code selection the XDesktop and XDocumentLoader interface are intialised (coutout 2). It is no longer necessary to use the queryInterface() method to get an interface due to the UNO.CLS support which is described in chapter 3.1 UNO.CLS (p.20).
figure 11: Hello World
OpenOffice.org Automatisation Page 30
Cutout 2
xComponentLoader = oDesktop~XDesktop~XComponentLoader -- get componentLoader interface
If one want to know more about the XDesktop Service a look into the OpenOffice.org Api31 may be helpfull.
In this context (cutout.3) the xComponentLoader is required which offers the method loadComponentFromURL(URL, TargetFrameName, SearchFlag, PropertyValue).
The URL is an important attribute for the following examples and should be explained in more detail. The URL contains a string which can contain the following values:
URL
url = „privat:factor/swriter“ --opens a new swriter documenturl = „privat:factor/scalc“ --opens a new scalc documenturl = „privat:factor/simpress“ --opens a new simpress documenturl = „privat:factor/sdraw“ --opens a new sdraw documenturl = „http://api.openoffice.org/“ --opens an html document from the passed URLurl = „file:///c:/originaldoc.odt“ --opens an existing document from the passed URL
Cutout 3
xWriterComponent = xComponentLoader~loadComponentFromURL(url, "_blank", 0,.UNO~noProps)
To get more information on this interface you can have again a look into the OpenOffice.org Api32.
In cutout 4 the XTextDocument interface and its getText() method are used. The XTextDocument was already explained in chapter 2.6.2.2 Services, Interfaces and Properties (p.18).
Cutout 4
xWriterDocument = xWriterComponent~XTextDocument
xText = xWriterDocument~getText()
/*insert text */
xText~insertString(xText~End(), "HelloWorld!", false)
In cutout.4 the insertstring() method is used which requires two attributes. The first passes a textrange with the end position of the text element. The last attribute defines if the inserted text should overwrite the current text or not. For more detailed information use the OpenOffice.org Api33.
31 [Api06a]32 [Api06a]33 [Api06b]
OpenOffice.org Automatisation Page 31
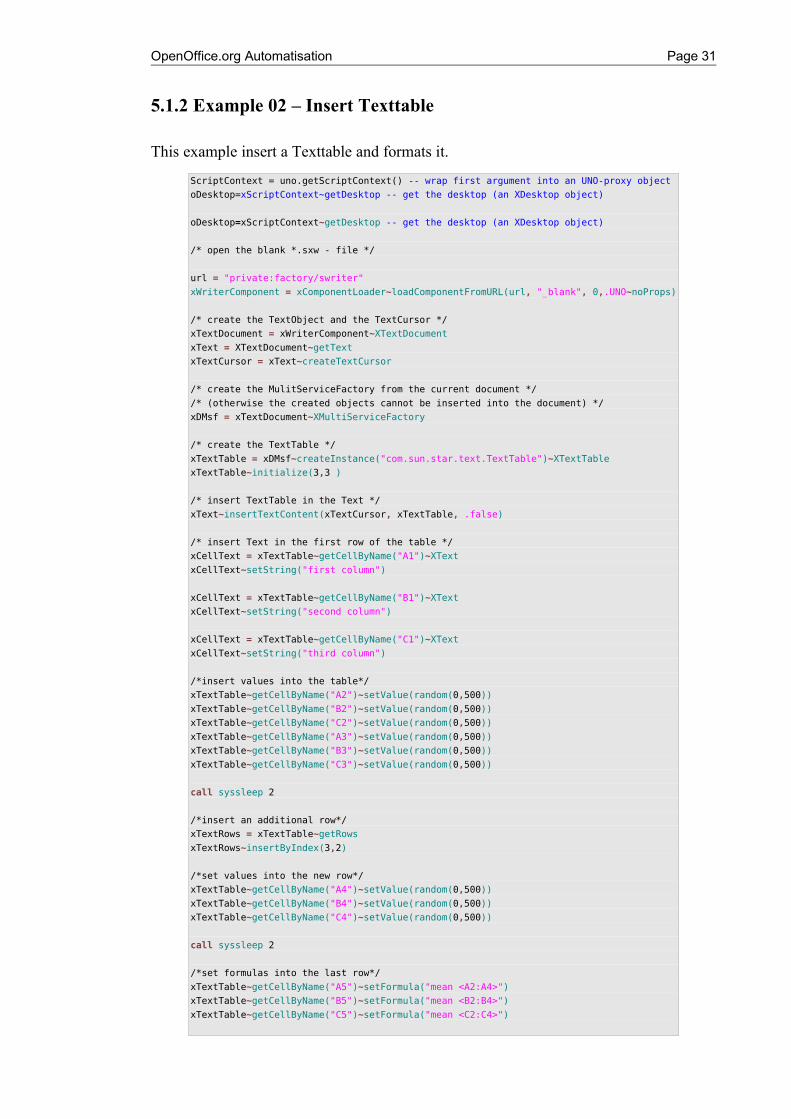
5.1.2 Example 02 – Insert Texttable
This example insert a Texttable and formats it.
ScriptContext = uno.getScriptContext() -- wrap first argument into an UNO-proxy object
oDesktop=xScriptContext~getDesktop -- get the desktop (an XDesktop object)
oDesktop=xScriptContext~getDesktop -- get the desktop (an XDesktop object)
/* open the blank *.sxw - file */
url = "private:factory/swriter"
xWriterComponent = xComponentLoader~loadComponentFromURL(url, "_blank", 0,.UNO~noProps)
/* create the TextObject and the TextCursor */
xTextDocument = xWriterComponent~XTextDocument
xText = XTextDocument~getText
xTextCursor = xText~createTextCursor
/* create the MulitServiceFactory from the current document */
/* (otherwise the created objects cannot be inserted into the document) */
xDMsf = xTextDocument~XMultiServiceFactory
/* create the TextTable */
xTextTable = xDMsf~createInstance("com.sun.star.text.TextTable")~XTextTable
xTextTable~initialize(3,3 )
/* insert TextTable in the Text */
xText~insertTextContent(xTextCursor, xTextTable, .false)
/* insert Text in the first row of the table */
xCellText = xTextTable~getCellByName("A1")~XText
xCellText~setString("first column")
xCellText = xTextTable~getCellByName("B1")~XText
xCellText~setString("second column")
xCellText = xTextTable~getCellByName("C1")~XText
xCellText~setString("third column")
/*insert values into the table*/
xTextTable~getCellByName("A2")~setValue(random(0,500))
xTextTable~getCellByName("B2")~setValue(random(0,500))
xTextTable~getCellByName("C2")~setValue(random(0,500))
xTextTable~getCellByName("A3")~setValue(random(0,500))
xTextTable~getCellByName("B3")~setValue(random(0,500))
xTextTable~getCellByName("C3")~setValue(random(0,500))
call syssleep 2
/*insert an additional row*/
xTextRows = xTextTable~getRows
xTextRows~insertByIndex(3,2)
/*set values into the new row*/
xTextTable~getCellByName("A4")~setValue(random(0,500))
xTextTable~getCellByName("B4")~setValue(random(0,500))
xTextTable~getCellByName("C4")~setValue(random(0,500))
call syssleep 2
/*set formulas into the last row*/
xTextTable~getCellByName("A5")~setFormula("mean <A2:A4>")
xTextTable~getCellByName("B5")~setFormula("mean <B2:B4>")
xTextTable~getCellByName("C5")~setFormula("mean <C2:C4>")
OpenOffice.org Automatisation Page 32
/*set style properties of the table*/
xTableRow = xTextRows~getbyIndex(0)
xProbRow = xTableRow~xPropertySet
xProbRow~setPropertyValue("BackColor", box("int", "e6e6fa"x ~c2d))
xTableRow = xTextRows~getbyIndex(4)
xProbRow = xTableRow~xPropertySet
xProbRow~setPropertyValue("BackColor", box("int", "66cdaa"x ~c2d))
::requires UNO.cls -- get UNO support
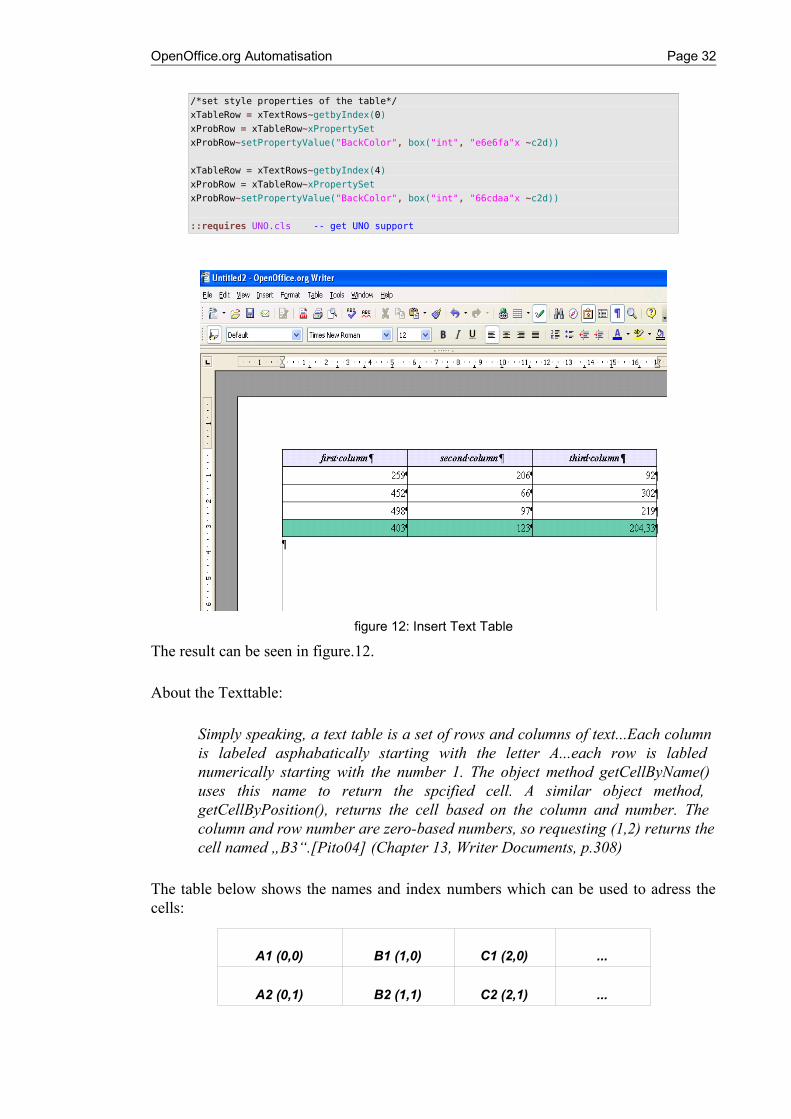
The result can be seen in figure.12.
About the Texttable:
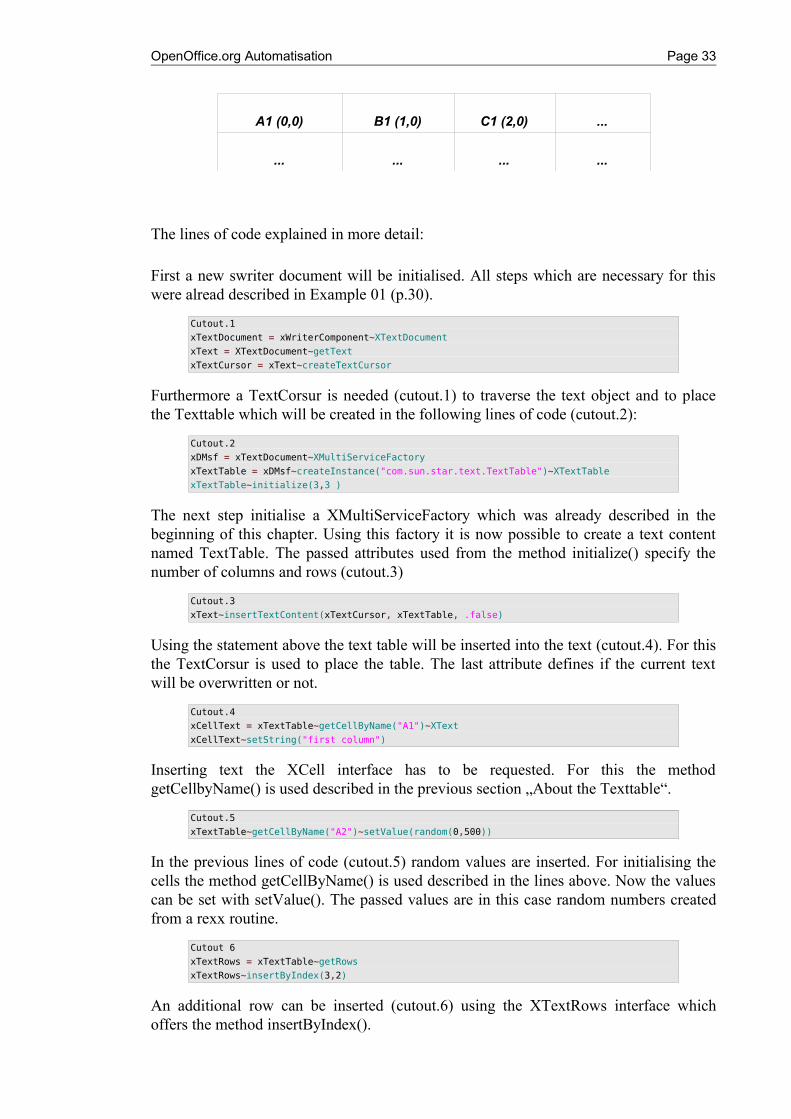
Simply speaking, a text table is a set of rows and columns of text...Each column is labeled asphabatically starting with the letter A...each row is labled numerically starting with the number 1. The object method getCellByName() uses this name to return the spcified cell. A similar object method, getCellByPosition(), returns the cell based on the column and number. The column and row number are zero-based numbers, so requesting (1,2) returns the cell named „B3“.[Pito04] (Chapter 13, Writer Documents, p.308)
The table below shows the names and index numbers which can be used to adress the cells:
A1 (0,0) B1 (1,0) C1 (2,0) ...
A2 (0,1) B2 (1,1) C2 (2,1) ...
figure 12: Insert Text Table
OpenOffice.org Automatisation Page 33
A1 (0,0) B1 (1,0) C1 (2,0) ...
... ... ... ...
The lines of code explained in more detail:
First a new swriter document will be initialised. All steps which are necessary for this were alread described in Example 01 (p.30).
Cutout.1
xTextDocument = xWriterComponent~XTextDocument
xText = XTextDocument~getText
xTextCursor = xText~createTextCursor
Furthermore a TextCorsur is needed (cutout.1) to traverse the text object and to place the Texttable which will be created in the following lines of code (cutout.2):
Cutout.2
xDMsf = xTextDocument~XMultiServiceFactory
xTextTable = xDMsf~createInstance("com.sun.star.text.TextTable")~XTextTable
xTextTable~initialize(3,3 )
The next step initialise a XMultiServiceFactory which was already described in the beginning of this chapter. Using this factory it is now possible to create a text content named TextTable. The passed attributes used from the method initialize() specify the number of columns and rows (cutout.3)
Cutout.3
xText~insertTextContent(xTextCursor, xTextTable, .false)
Using the statement above the text table will be inserted into the text (cutout.4). For this the TextCorsur is used to place the table. The last attribute defines if the current text will be overwritten or not.
Cutout.4
xCellText = xTextTable~getCellByName("A1")~XText
xCellText~setString("first column")
Inserting text the XCell interface has to be requested. For this the method getCellbyName() is used described in the previous section „About the Texttable“.
Cutout.5
xTextTable~getCellByName("A2")~setValue(random(0,500))
In the previous lines of code (cutout.5) random values are inserted. For initialising the cells the method getCellByName() is used described in the lines above. Now the values can be set with setValue(). The passed values are in this case random numbers created from a rexx routine.
Cutout 6
xTextRows = xTextTable~getRows
xTextRows~insertByIndex(3,2)
An additional row can be inserted (cutout.6) using the XTextRows interface which offers the method insertByIndex().

OpenOffice.org Automatisation Page 34
Cutout 7
xTextTable~getCellByName("A5")~setFormula("mean <A2:A4>")
For setting new formulas (cutout.7) into the text table the setFormula() method is used passing the name and range of the formula using a string.
Coutout.8
xTableRow = xTextRows~getbyIndex(4)
xProbRow = xTableRow~xPropertySet
xProbRow~setPropertyValue("BackColor", box("int", "66cdaa"x ~c2d))
In the last paragraph (coutout.8) of the source code the style properties of two rows are set. For this the XRow interface is initialised. Afterwards the XPropertySet interface will be requested which allows to pass property values. The method setPropertyValue() requires the name of the property and an integer value which spedifies the color. As described in section 2.2.3 Syntax Examples (p.10) Object Rexx uses only strings for variables. This makes it necessary to use the box routine which creates a Interger class containing the stated value. This class will be passed and makes it possible that OpenOffice.org can identify the value.
5.1.3 Example 03 – Cursor Show
In this example different corsurs are created and used to set text and to change the view on the current document.
xScriptContext = uno.getScriptContext() -- wrap first argument into an UNO-proxy object
oDesktop=xScriptContext~getDesktop -- get the desktop (an XDesktop object)
xComponentLoader = oDesktop~XDesktop~XComponentLoader -- get componentLoader interface
/* open the blank *.sxw - file */
url = "file:///c:/originaldoc.odt"
xWriterComponent = xComponentLoader~loadComponentFromURL(url, "_blank", 0,.UNO~noProps)
/* create the TextObject */
xTextDocument = xWriterComponent~XTextDocument
xText = XTextDocument~getText
/*create a text corsur*/
xTextCursor = xText~createTextCursor
/*create a word corsur*/
xSentenceCursor = xTextCursor~xSentenceCursor
/* create a Screen Cursor */
xScreenCursor=xTextDocument~XModel~getCurrentController ~XtextViewCursorSupplier~getViewCursor~XPropertySet~XScreenCursor
/* create a Page Cursor */
xPageCursor=xTextDocument~XModel~getCurrentController ~XTextViewCursorSupplier~getViewCursor~XPropertySet~XPageCursor
/*create the cursor property*/
xTextCursorProps = xTextCursor~xPropertySet
xTextCursorProps~setPropertyValue("CharBackColor", box("int", "e6e6fa"x ~c2d))
Call syssleep 2
xTextCursor~gotoStart(.false)
xText~insertString(xTextCursor, "Additional Text ", .false)
Call syssleep 2
OpenOffice.org Automatisation Page 35
xSentenceCursor~gotonextSentence(.false)
xText~insertString(xSentenceCursor,"This is page number ", .false)
xSentenceCursor~gotoEndOfSentence(.false)
xText~insertString(xTextCursor, xPageCursor~getPage, .false)
Call syssleep 2
/*move the screen down*/
xScreenCursor~screenDown
Call syssleep 2
/*move the screen up*/
xScreenCursor~screenUp
xSentenceCursor~gotonextSentence(.false)
xText~insertString(xSentenceCursor,"Back again", .false)
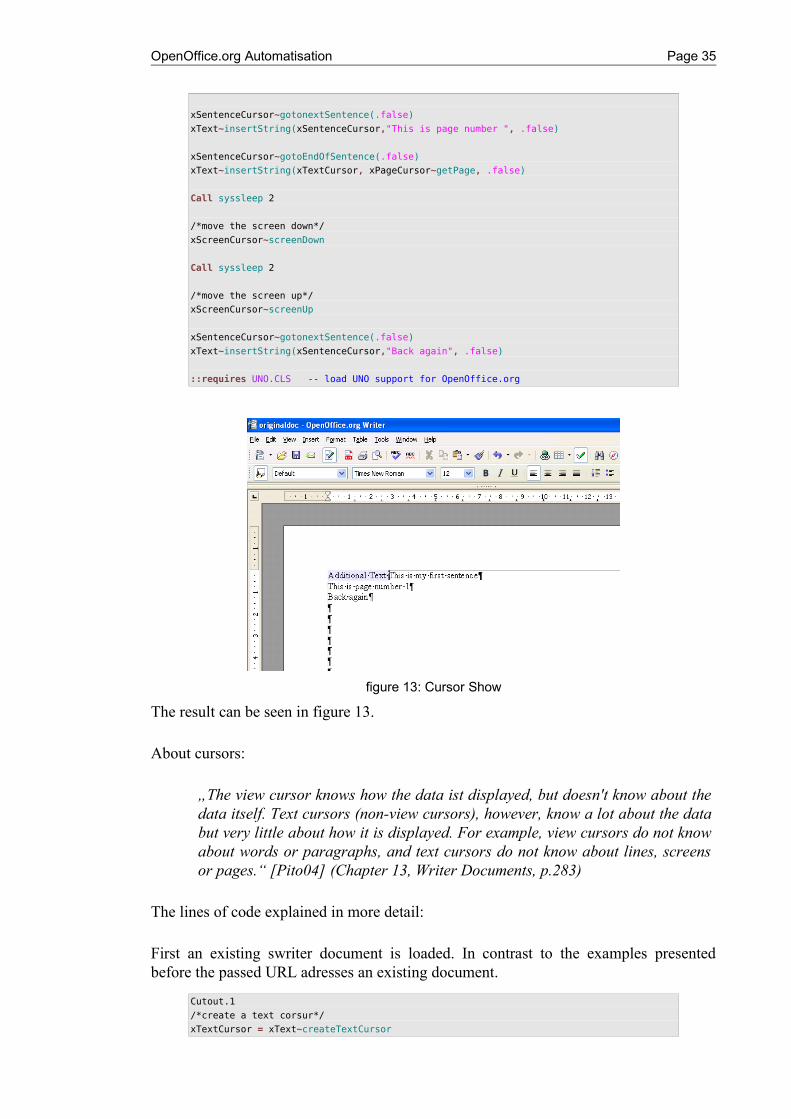
::requires UNO.CLS -- load UNO support for OpenOffice.org
The result can be seen in figure 13.
About cursors:
„The view cursor knows how the data ist displayed, but doesn't know about the data itself. Text cursors (non-view cursors), however, know a lot about the data but very little about how it is displayed. For example, view cursors do not know about words or paragraphs, and text cursors do not know about lines, screens or pages.“ [Pito04] (Chapter 13, Writer Documents, p.283)
The lines of code explained in more detail:
First an existing swriter document is loaded. In contrast to the examples presented before the passed URL adresses an existing document.
Cutout.1
/*create a text corsur*/
xTextCursor = xText~createTextCursor
figure 13: Cursor Show

OpenOffice.org Automatisation Page 36
/*create a word corsur*/
xSentenceCursor = xTextCursor~xSentenceCursor
/* create a Screen Cursor */
xScreenCursor=xTextDocument~XModel~getCurrentController ~XtextViewCursorSupplier~getViewCursor~XPropertySet~XScreenCursor
/* create a Page Cursor */
xPageCursor=xTextDocument~XModel~getCurrentController ~XTextViewCursorSupplier~getViewCursor~XPropertySet~XPageCursor
In the beginning part of the source code (cutout.1) cursors are created. The XTextCursor and the XSentenceCursor are called text (non-view) cursors and are used to traverse text. The XScreenCursor and the XPageCursor represents view cursors which are used to suport commands that are directly related to viewing. (See: „About corsurs" p.35)
Cutout.2
xTextCursorProps = xTextCursor~xPropertySet
xTextCursorProps~setPropertyValue("CharBackColor", box("int", "e6e6fa"x ~c2d))
Generally it is possible to set property values for TextCursors as shown in the code lines above (cutout.2). If one use now the cursor for inserting text, the set style will be adopted.
In the code lines which following after setting the cursor properties, the text cursors are used to traverse the text and inserting strings.
Cutout.3
xText~insertString(xTextCursor, xPageCursor~getPage, .false)
In cutout 3 a method of the XPageCursor is used to get the current Page number.
Cutout.4
xScreenCursor~screenDown
xScreenCursor~screenUp
At the end of the example (cutout.4) the XScreenCursor is used to move the screen up and down. As described above („About cursors“, p.35) view cursors can only be used for command related to viewing. They can not be used to work on the text object.
5.1.4 Example 04 – Page Counter
This example shows how the page cursor can be used to count the number of pages of any swriter document.
xScriptContext = uno.getScriptContext() -- wrap first argument into an UNO-proxy object
oDesktop=xScriptContext~getDesktop -- get the desktop (an XDesktop object)
xComponentLoader = oDesktop~XDesktop~XComponentLoader -- get componentLoader interface
/* open the blank *.sxw - file */
url = "file:///c:/mydocument.odt"
xWriterComponent = xComponentLoader~loadComponentFromURL(url, "_blank", 0, .UNO~noProps)
/*get the text of the document*/
xTextDocument = xWriterComponent~XTextDocument
xText = XTextDocument~getText
OpenOffice.org Automatisation Page 37
/*Creating a page cursor*/
xPageCursor=xTextDocument~XModel~getCurrentController ~XTextViewCursorSupplier~getViewCursor~XPropertySet~XPageCursor
/*Creating a text cursor*/
xTextCursor = xText~createTextCursor
/*counts the number of pages*/
page = 1
Do While xPageCursor~jumpToNextPage = 1
page = page + 1
End
xTextcursor~gotoEnd(.false)
xText~insertString(xTextcursor, " This document has " || page || " pages", .false)
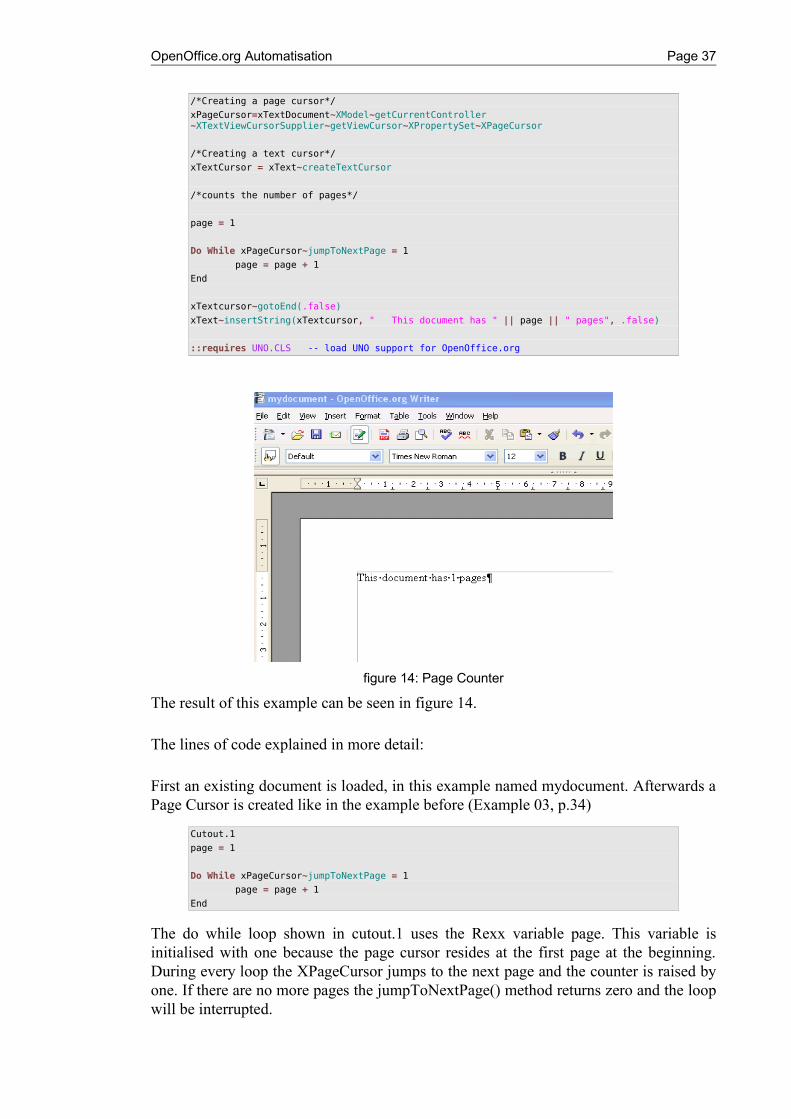
::requires UNO.CLS -- load UNO support for OpenOffice.org
The result of this example can be seen in figure 14.
The lines of code explained in more detail:
First an existing document is loaded, in this example named mydocument. Afterwards a Page Cursor is created like in the example before (Example 03, p.34)
Cutout.1
page = 1
Do While xPageCursor~jumpToNextPage = 1
page = page + 1
End
The do while loop shown in cutout.1 uses the Rexx variable page. This variable is initialised with one because the page cursor resides at the first page at the beginning. During every loop the XPageCursor jumps to the next page and the counter is raised by one. If there are no more pages the jumpToNextPage() method returns zero and the loop will be interrupted.
figure 14: Page Counter

OpenOffice.org Automatisation Page 38
Cutout.2
xTextcursor~gotoEnd(.false)
xText~insertString(xTextcursor, " This document has " page " pages", .false)
At the end of the example (cutout.2) the page counter is added to the end of the document.
5.1.5 Example 05 – Insert Different Shapes
This example shows how different shapes can be inserted into a text document.
xScriptContext = uno.getScriptContext() -- wrap first argument into an UNO-proxy object
oDesktop=xScriptContext~getDesktop -- get the desktop (an XDesktop object)
oDoc=xScriptContext~getDocument -- get the document service (an XModel object)
xComponentLoader = oDesktop~XDesktop~XComponentLoader -- get componentLoader interface
/* open the blank *.sxw - file */
url = "private:factory/swriter"
xWriterComponent = xComponentLoader~loadComponentFromURL(url, "_blank", 0,.UNO~noProps)
/* create the TextObject and the TextCursor */
xTextDocument = xWriterComponent~XTextDocument
xText = XTextDocument~getText
xTextCursor = xText~createTextCursor
/* create the MulitServiceFactory from the current document */
/* (otherwise the created objects cannot be inserted into the document) */
xDMsf = xTextDocument~XMultiServiceFactory
/* create a RectangleShape */
Shape = xDMsf~createInstance("com.sun.star.drawing.RectangleShape")
xShape = Shape~xShape
size = .bsf~new("com.sun.star.awt.Size")
size~Height = 2500
size~Width = 8000
xShape~setSize(size)
xPropertySet=xShape~xPropertySet
xPropertySet~setPropertyValue("FillColor", box("int", "C0 C0 C0"x ~c2d))
xTextContentShape = Shape~xTextContent
/*insert the shape*/
xText~insertTextContent(xText~getEnd, xTextContentShape, .false)
/*insert text into the shape*/
xShapeText = Shape~xText
xShapeText~setString("The components of OpenOffice.org:")
/*create a GraphicObjectShape with picture*/
oGraph = xDMsf~createInstance("com.sun.star.drawing.GraphicObjectShape")
xGraph = oGraph~xShape
size = .bsf~new("com.sun.star.awt.Size")
size~Height = 2500
size~Width = 8000
xGraph~setSize(size)
xPropertySet=xGraph~xPropertySet
xPropertySet~setPropertyValue("GraphicURL", "file:///C:/OpenOffice.bmp")
xTextContentShape2 = oGraph~xTextContent
/*Shape*/
xText~insertTextContent(xText~getEnd,xTextContentShape2 , .false)
::requires UNO.CLS -- load UNO support for OpenOffice.org

OpenOffice.org Automatisation Page 39
The result of this example can be seen in figure.14.
The lines of code explained in more detail:
First a new text document is opened in the same way like it could be seen in the examples above. Moreover the XMultiServiceFactory is needed to create instances of different shapes.
Cutout.1
Shape = xDMsf~createInstance("com.sun.star.drawing.RectangleShape")
xShape = Shape~xShape
In cutout.1 a rectangle shape is created. To set needed values like size and position the XShape interface will be requested.
Cutout.2
size = .bsf~new("com.sun.star.awt.Size")
size~Height = 2500
size~Width = 8000
xShape~setSize(size)
Next a com.sun.star.Size structure is needed which contains two integer values named Height and Weight. For this BSF is used like shown in chapter 2.5 BSF4Rexx, p.13. After adding these two variables the size structure is passed to the shape using the setSize() method (cutout.2).
Cutout.3
xPropertySet=xShape~xPropertySet
xPropertySet~setPropertyValue("FillColor", box("int", "C0 C0 C0"x ~c2d))
As shown in cutout.3 the XShape inteface includes a XPropertySet interface which allows to set properties like already done for a XTableRow interface in Example 02, cutout.8 (p.34) or Example 03, cutout.2 (p.36) for an XTextCorsur interface.
Figure 15: Insert Different Shapes

OpenOffice.org Automatisation Page 40
Cutout.4
xTextContentShape = Shape~xTextContent
To insert the shape into the text the XTextContent interface is needed (cutout.4). This interface enables objects to be inserted into a text and provide their location in text once they are inserted into it.
Cutout.5
xText~insertTextContent(xText~getEnd, xTextContentShape, .false)
A similar statement was already explained in Example 02, cutout.3 (p.33). Only the inserted object is different.
Cutout.5
xShapeText = Shape~xText
xShapeText~setString("The components of OpenOffice.org:")
The Shape object includes a XText interface which can be used like in Example 01, cutout.4 (p.30).
Cutout 6
oGraph = xDMsf~createInstance("com.sun.star.drawing.GraphicObjectShape")
xPropertySet~setPropertyValue("GraphicURL", "file:///C:/OpenOffice.bmp")
The second inserted object is a com.sun.star.drawing.GraphicObjectShape which can be filled with a graphic object. For this the GraphicURL property has to be set.
5.1.6 Example 06 - Sending e-Mail with Attachement
This program demonstrates how a text document can be attached to an e-mail which will be sent to a specific mail adress.
/*NOTE! This example is tested with Thunderbird and Windows XP */
xScriptContext = uno.getScriptContext() -- wrap first argument into an UNO-proxy object
oDesktop=xScriptContext~getDesktop -- get the desktop (an XDesktop object)
oContext=xScriptContext~getComponentContext
-- get the context(an XComponentContext object)
/*get xMultiComponentFactory*/
xMcf = oContext~getServiceManager
xComponentLoader=oDesktop~XDesktop~XComponentLoader -- get componentLoader interface
/* open the blank *.sxw - file */
url = "private:factory/swriter"
xWriterComponent=xComponentLoader~loadComponentFromURL(url, "_blank", 0, .UNO~noProps)
/* create the TextObject and the TextCursor */
xTextDocument = xWriterComponent~XTextDocument
xText = XTextDocument~getText
xTextCursor = xText~createTextCursor
/*design a document*/
/*create TextFields to insert date and time*/
xDmsf = xTextDocument~xMultiServiceFactory
xTextFieldTime1 = xDMsf~createInstance("com.sun.star.text.TextField.DateTime")~xTextField
xTextFieldTime2 = xDMsf~createInstance("com.sun.star.text.TextField.DateTime")~xTextField
xTextFieldTime1~XPropertySet~setPropertyValue("IsDate", box("boolean", .true))
xText~insertString(xTextCursor, "This is an attachement sent from Martin Burger, on the ", .false)
OpenOffice.org Automatisation Page 41
xText~insertTextContent(xTextCursor, xTextFieldTime1, .false)
xText~insertString(xTextCursor, " at ", .false)
xText~insertTextContent(xTextCursor, xTextFieldTime2, .false)
/*save the document*/
xWriterComponent~xStorable~storeAsURL("file:///c:/attachement.odt", .UNO~noProps)
/*create xSimpleMailClient(for sending) and SimpleMailMessage(for adding Subject, Recipient and Attachement)*/
SimpleMailSystem=xMcf~createInstancewithContext("com.sun.star.system.SimpleSystemMail",- oContext)
XSimpleMailClientSupplier = SimpleMailSystem~XSimpleMailClientSupplier
XSimpleMailClient = XSimpleMailClientSupplier~querySimpleMailClient
mail = XSimpleMailClient~createSimpleMailMessage
/*set Recipient and Subject*/
mail~setRecipient("[email protected]")
mail~setSubject("mail from OpenOffice.org 2.0")
/*setAttachement*/
attach = bsf.createArray(.bsf4rexx~string.class, 1)
attach[1] = "file:///c:/attachement.odt"
mail~setAttachement(attach)
XSimpleMailClient~sendSimpleMailMessage(mail, bsf.getConstant("com.sun.star.system.SimpleMailClientFlags", "NO_USER_INTERFACE"))
::requires UNO.CLS -- load UNO support for OpenOffice.org
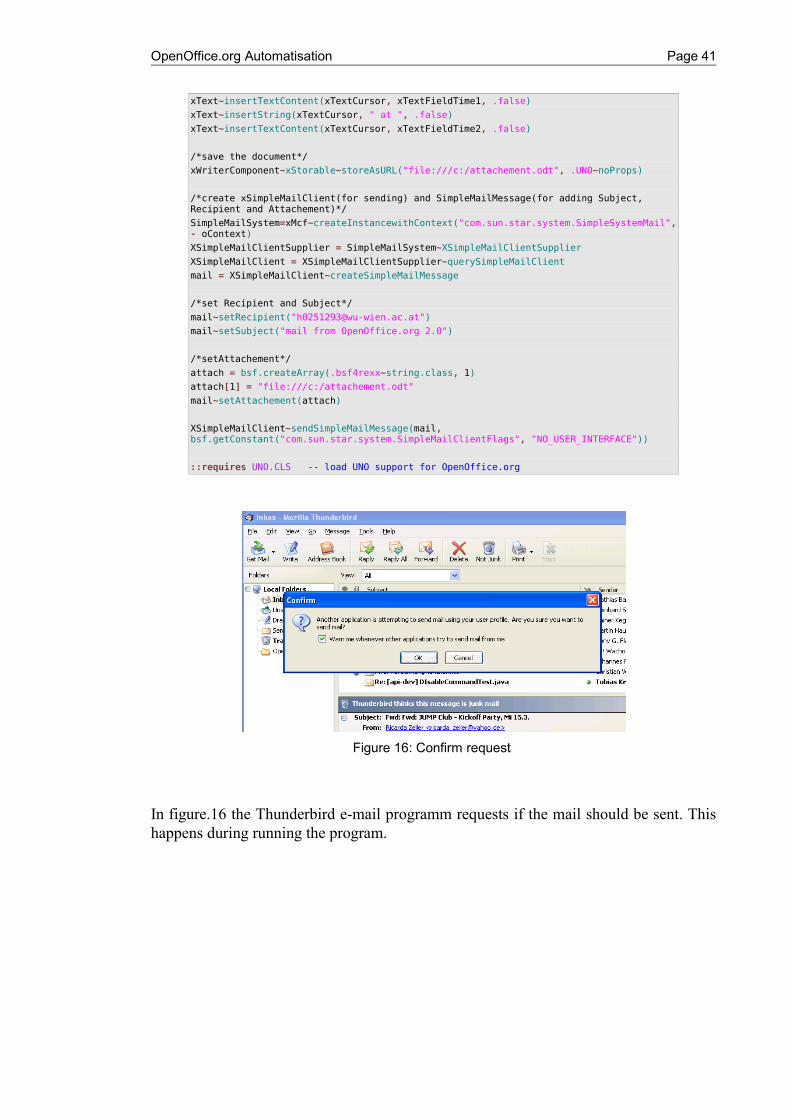
In figure.16 the Thunderbird e-mail programm requests if the mail should be sent. This happens during running the program.
Figure 16: Confirm request
OpenOffice.org Automatisation Page 42
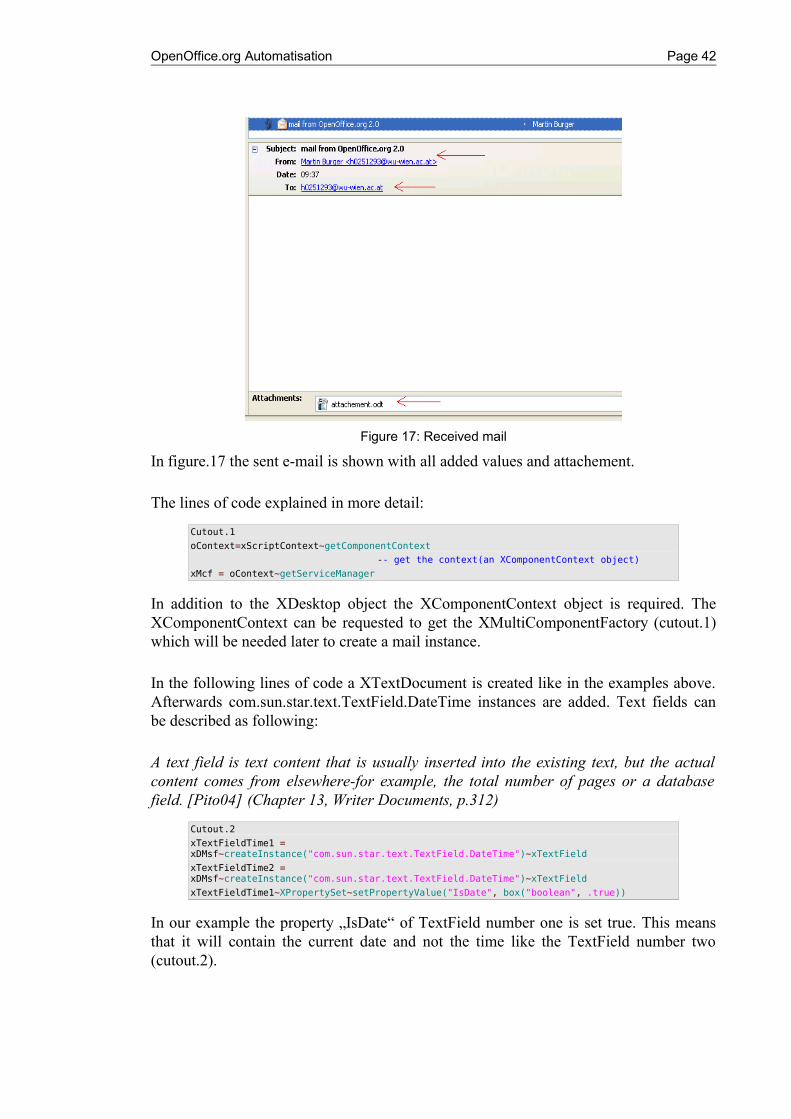
In figure.17 the sent e-mail is shown with all added values and attachement.
The lines of code explained in more detail:
Cutout.1
oContext=xScriptContext~getComponentContext
-- get the context(an XComponentContext object)
xMcf = oContext~getServiceManager
In addition to the XDesktop object the XComponentContext object is required. The XComponentContext can be requested to get the XMultiComponentFactory (cutout.1) which will be needed later to create a mail instance.
In the following lines of code a XTextDocument is created like in the examples above. Afterwards com.sun.star.text.TextField.DateTime instances are added. Text fields can be described as following:
A text field is text content that is usually inserted into the existing text, but the actual content comes from elsewhere-for example, the total number of pages or a database field. [Pito04] (Chapter 13, Writer Documents, p.312)
Cutout.2
xTextFieldTime1 = xDMsf~createInstance("com.sun.star.text.TextField.DateTime")~xTextField
xTextFieldTime2 = xDMsf~createInstance("com.sun.star.text.TextField.DateTime")~xTextField
xTextFieldTime1~XPropertySet~setPropertyValue("IsDate", box("boolean", .true))
In our example the property „IsDate“ of TextField number one is set true. This means that it will contain the current date and not the time like the TextField number two (cutout.2).
Figure 17: Received mail
OpenOffice.org Automatisation Page 43
Cutout.3
xWriterComponent~xStorable~storeAsURL("file:///c:/attachement.odt", .UNO~noProps)
Afterwards the document is saved using the XStoreable interface (cutout.3).
Cutout.4
SimpleMailSystem=xMcf~createInstancewithContext("com.sun.star.system.SimpleSystemMail",- oContext)
XSimpleMailClientSupplier = SimpleMailSystem~XSimpleMailClientSupplier
XSimpleMailClient = XSimpleMailClientSupplier~querySimpleMailClient
mail = XsimpleMailClient~createSimpleMailMessage
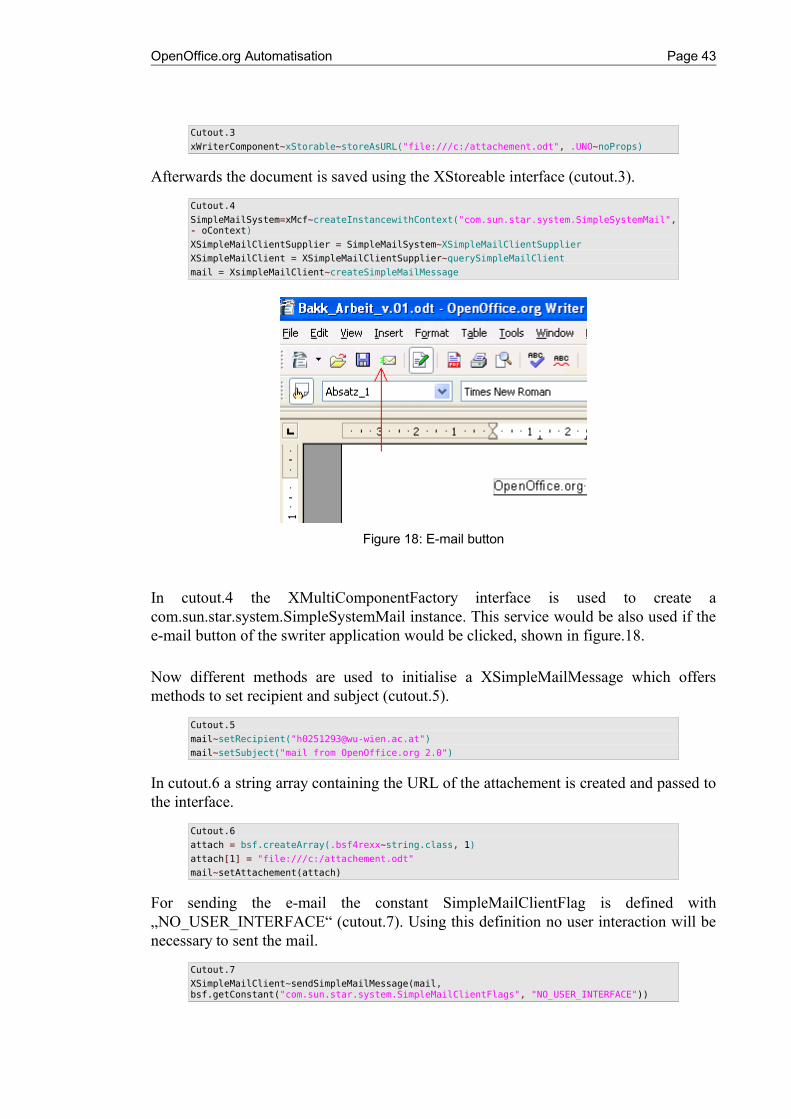
In cutout.4 the XMultiComponentFactory interface is used to create a com.sun.star.system.SimpleSystemMail instance. This service would be also used if the e-mail button of the swriter application would be clicked, shown in figure.18.
Now different methods are used to initialise a XSimpleMailMessage which offers methods to set recipient and subject (cutout.5).
Cutout.5
mail~setRecipient("[email protected]")
mail~setSubject("mail from OpenOffice.org 2.0")
In cutout.6 a string array containing the URL of the attachement is created and passed to the interface.
Cutout.6
attach = bsf.createArray(.bsf4rexx~string.class, 1)
attach[1] = "file:///c:/attachement.odt"
mail~setAttachement(attach)
For sending the e-mail the constant SimpleMailClientFlag is defined with „NO_USER_INTERFACE“ (cutout.7). Using this definition no user interaction will be necessary to sent the mail.
Cutout.7
XSimpleMailClient~sendSimpleMailMessage(mail, bsf.getConstant("com.sun.star.system.SimpleMailClientFlags", "NO_USER_INTERFACE"))
Figure 18: E-mail button
OpenOffice.org Automatisation Page 44
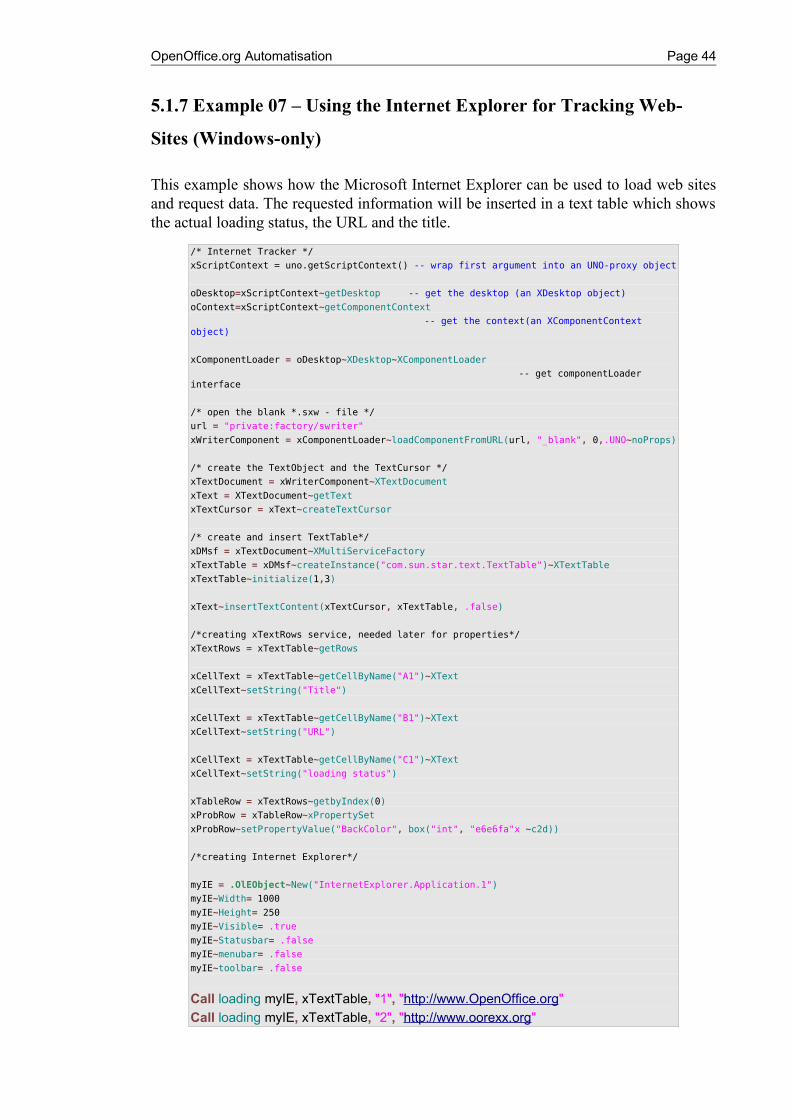
5.1.7 Example 07 – Using the Internet Explorer for Tracking Web-
Sites (Windows-only)
This example shows how the Microsoft Internet Explorer can be used to load web sites and request data. The requested information will be inserted in a text table which shows the actual loading status, the URL and the title.
/* Internet Tracker */
xScriptContext = uno.getScriptContext() -- wrap first argument into an UNO-proxy object
oDesktop=xScriptContext~getDesktop -- get the desktop (an XDesktop object)
oContext=xScriptContext~getComponentContext
-- get the context(an XComponentContext object)
xComponentLoader = oDesktop~XDesktop~XComponentLoader
-- get componentLoader interface
/* open the blank *.sxw - file */
url = "private:factory/swriter"
xWriterComponent = xComponentLoader~loadComponentFromURL(url, "_blank", 0,.UNO~noProps)
/* create the TextObject and the TextCursor */
xTextDocument = xWriterComponent~XTextDocument
xText = XTextDocument~getText
xTextCursor = xText~createTextCursor
/* create and insert TextTable*/
xDMsf = xTextDocument~XMultiServiceFactory
xTextTable = xDMsf~createInstance("com.sun.star.text.TextTable")~XTextTable
xTextTable~initialize(1,3)
xText~insertTextContent(xTextCursor, xTextTable, .false)
/*creating xTextRows service, needed later for properties*/
xTextRows = xTextTable~getRows
xCellText = xTextTable~getCellByName("A1")~XText
xCellText~setString("Title")
xCellText = xTextTable~getCellByName("B1")~XText
xCellText~setString("URL")
xCellText = xTextTable~getCellByName("C1")~XText
xCellText~setString("loading status")
xTableRow = xTextRows~getbyIndex(0)
xProbRow = xTableRow~xPropertySet
xProbRow~setPropertyValue("BackColor", box("int", "e6e6fa"x ~c2d))
/*creating Internet Explorer*/
myIE = .OlEObject~New("InternetExplorer.Application.1")
myIE~Width= 1000
myIE~Height= 250
myIE~Visible= .true
myIE~Statusbar= .false
myIE~menubar= .false
myIE~toolbar= .false
Call loading myIE, xTextTable, "1", "http://www.OpenOffice.org"Call loading myIE, xTextTable, "2", "http://www.oorexx.org"
OpenOffice.org Automatisation Page 45
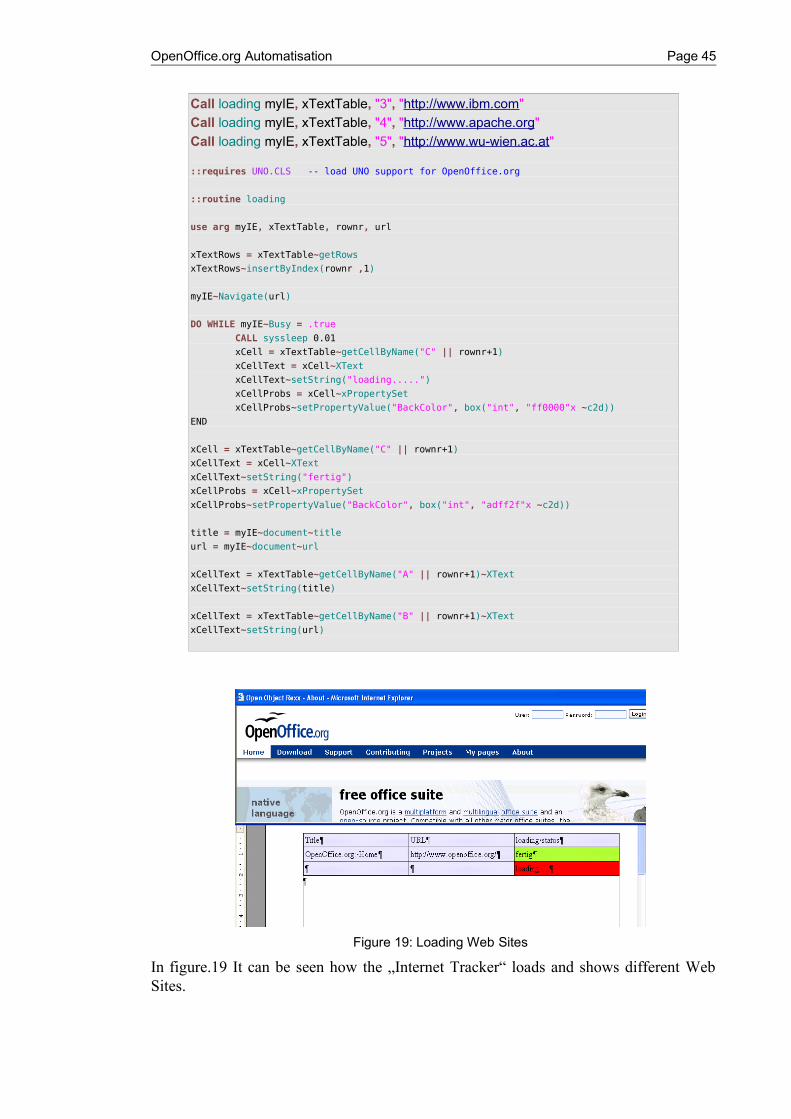
Call loading myIE, xTextTable, "3", "http://www.ibm.com"Call loading myIE, xTextTable, "4", "http://www.apache.org"Call loading myIE, xTextTable, "5", "http://www.wu-wien.ac.at"
::requires UNO.CLS -- load UNO support for OpenOffice.org
::routine loading
use arg myIE, xTextTable, rownr, url
xTextRows = xTextTable~getRows
xTextRows~insertByIndex(rownr ,1)
myIE~Navigate(url)
DO WHILE myIE~Busy = .true
CALL syssleep 0.01
xCell = xTextTable~getCellByName("C" || rownr+1)
xCellText = xCell~XText
xCellText~setString("loading.....")
xCellProbs = xCell~xPropertySet
xCellProbs~setPropertyValue("BackColor", box("int", "ff0000"x ~c2d))
END
xCell = xTextTable~getCellByName("C" || rownr+1)
xCellText = xCell~XText
xCellText~setString("fertig")
xCellProbs = xCell~xPropertySet
xCellProbs~setPropertyValue("BackColor", box("int", "adff2f"x ~c2d))
title = myIE~document~title
url = myIE~document~url
xCellText = xTextTable~getCellByName("A" || rownr+1)~XText
xCellText~setString(title)
xCellText = xTextTable~getCellByName("B" || rownr+1)~XText
xCellText~setString(url)
In figure.19 It can be seen how the „Internet Tracker“ loads and shows different Web Sites.
Figure 19: Loading Web Sites
OpenOffice.org Automatisation Page 46
In the first part of the example a new swriter document is created. Afterwards a text table is inserted which provide for each tracked web site a row divided into three co-lumns named loading status, url and title.
About OLE Object:
OLE Objects (Objects Linking and Embedding) are based on the Microsoft developed Component Object Model (COM).
Microsoft COM (Component Object Model) technology in the Microsoft Windows-family of Operating Systems enables software components to communicate. COM is used by developers to create re-usable software components, link components together to build applications, and take advantage of Windows services. The family of COM technologies includes COM+, Distributed COM (DCOM) and ActiveX® Controls.[IBM06]
A Microsoft ActiveX control is essentially a simple OLE object that supports the IUnknown interface.[IBM06]
Summarising the statements above OLE(ActiveX) can be described as COM based interfaces providing the possiblity to link different programs34.
The lines of code explained in more detail:
In our example ObjectRexx uses java which is able to access windows applications using the technology described in the paragraph „About OLE Object“.
Cutout.1
myIE = .OlEObject~New("InternetExplorer.Application.1")
myIE~Width= 1000
myIE~Height= 250
myIE~Visible= .true
myIE~Statusbar= .false
myIE~menubar= .false
myIE~toolbar= .false
In cutout.1 an new OLEObject instance named myIE is created. Afterwards attributes are set to define the window appearance.
After opening the Internet Explorer the loading routine is used which implements the following functionalities:
Cutout.2/loading routine.1
xTextRows = xTextTable~getRows
xTextRows~insertByIndex(rownr ,1)
Before initialising the loop a new row is created an added to the table (cutout.2/loading routine.1).
34 The usage of the COM technologiy with OpenObjectRexx is explained in more detail in the [Flat06] course slides.
OpenOffice.org Automatisation Page 47
Cutout.3/loading routine.2
DO WHILE myIE~Busy = .true
CALL syssleep 0.01
xCell = xTextTable~getCellByName("C" || rownr)
xCellText = xCell~XText
xCellText~setString("loading.....")
xCellProbs = xCell~xPropertySet
xCellProbs~setPropertyValue("BackColor", box("int", "ff0000"x ~c2d))
END
Afterwards the DO While loop checks if the Internet Explorer is still loading the web site until the busy method returns false (cutout.3/loading routine.2). During the last step values which are requested from the IE instance are inserted into the new row.
5.1.8 Example 08 – Using a Search Descriptor
The example of this section demonstrates how a search descriptor can be used to traverse text and mark all occurences of a spedifed word.
xScriptContext = uno.getScriptContext() -- wrap first argument into an UNO-proxy object
oDesktop=xScriptContext~getDesktop -- get the desktop (an XDesktop object)
xComponentLoader = oDesktop~XDesktop~XComponentLoader
-- get componentLoader interface
/* open the blank *.odt - file */
url = "file:///c:/articel.odt"
xWriterComponent = xComponentLoader~loadComponentFromURL(url, "_blank", 0,.UNO~noProps)
/* create the TextObject and the TextCursor */
xTextDocument = xWriterComponent~XTextDocument
xText = XTextDocument~getText
xTextCursor = xText~createTextCursor
/* create SearchDescriptor*/
xSearchabel = xTextDocument~xSearchable
xSearchDescriptor = xSearchabel~createSearchDescriptor
xSearchDescriptor~setSearchString("OpenOffice.org")
xFound = xSearchabel~findFirst(xSearchDescriptor)
if xFound = .nil
then
xText~insertstring(xText~End, "nothing found", .false)
else
xFoundProbs = xFound~xPropertySet
xFoundProbs~setPropertyValue("CharWeight", -
box("float", bsf.getConstant("com.sun.star.awt.FontWeight", "BOLD")))
found = "true"
counter = 1
DO WHILE found = "true"
xFound = xSearchabel~findNext(xFound, xSearchDescriptor)
if xFound = .nil
then do
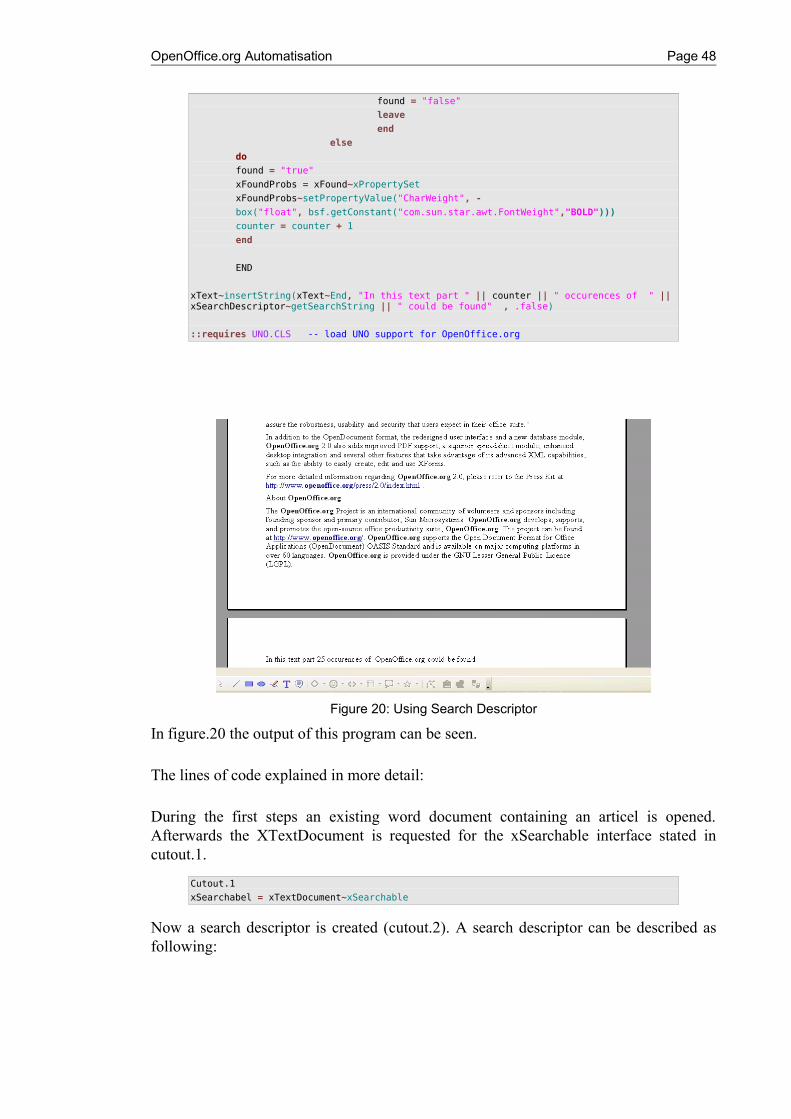
OpenOffice.org Automatisation Page 48
found = "false"
leave
end
else
do
found = "true"
xFoundProbs = xFound~xPropertySet
xFoundProbs~setPropertyValue("CharWeight", -
box("float", bsf.getConstant("com.sun.star.awt.FontWeight","BOLD")))
counter = counter + 1
end
END
xText~insertString(xText~End, "In this text part " || counter || " occurences of " || xSearchDescriptor~getSearchString || " could be found" , .false)
::requires UNO.CLS -- load UNO support for OpenOffice.org
In figure.20 the output of this program can be seen.
The lines of code explained in more detail:
During the first steps an existing word document containing an articel is opened. Afterwards the XTextDocument is requested for the xSearchable interface stated in cutout.1.
Cutout.1
xSearchabel = xTextDocument~xSearchable
Now a search descriptor is created (cutout.2). A search descriptor can be described as following:
Figure 20: Using Search Descriptor
OpenOffice.org Automatisation Page 49
„..A search descriptor supports the string property SearchString, which represents the string to search. The xSearchDescriptor interface defines the methods getSearchString() and setSearchString() to get and set the property....“ [Pito04] (Chapter 13, Writer Documents, p.296)
Cutout.2
xSearchDescriptor = xSearchabel~createSearchDescriptor
xSearchDescriptor~setSearchString("OpenOffice.org")
Then the the method findFirst() is used to check if any occurrences of the word „OpenOffice.org“ can be found. If not, the string „nothing found“ is added to the end of the text. Otherwise the found variable is set to true to initalise the Do While loop. In addition the founded expression is set bold.
The Do While loop uses the method findnext() to find the next occurence of the searched string. If no new occurrence is found the loop is interrupted using the leave statement. In the case of the XFound variable returns an object it is marked bold. Furthermore the counter is increased by one.
In the last lines of code a string is set at the end of the traversed text including the counter and SearchString.
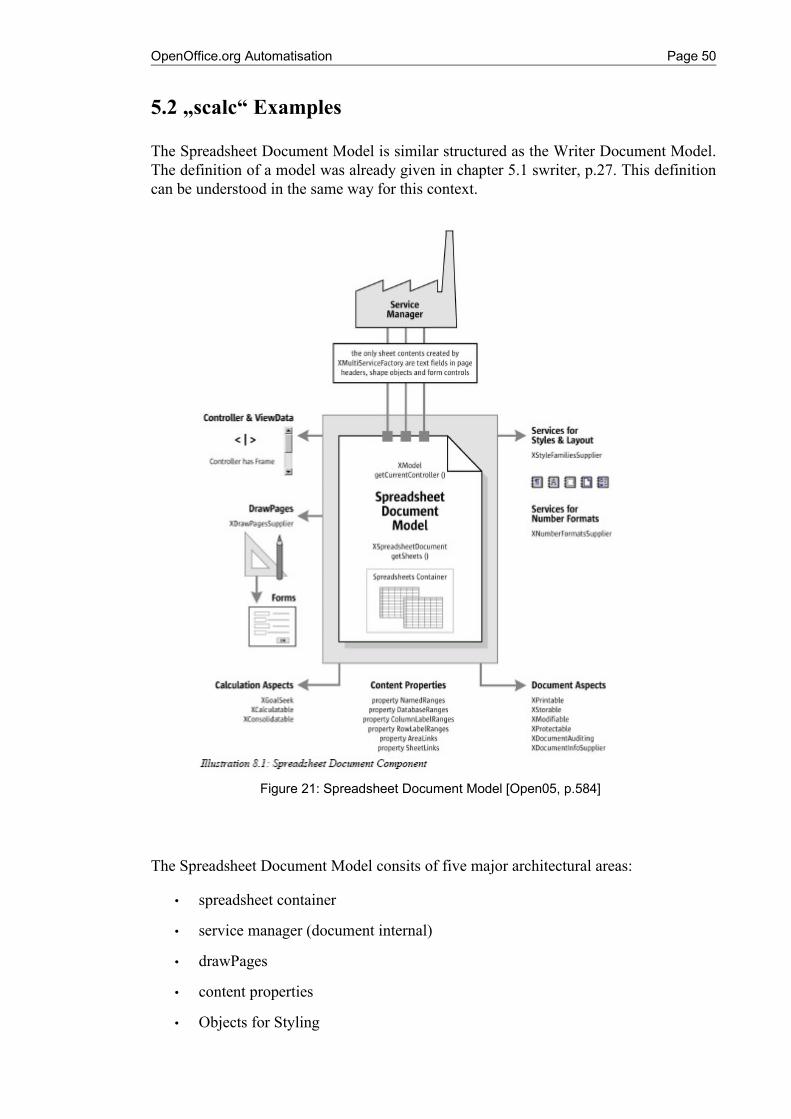
OpenOffice.org Automatisation Page 50
5.2 „scalc“ Examples
The Spreadsheet Document Model is similar structured as the Writer Document Model. The definition of a model was already given in chapter 5.1 swriter, p.27. This definition can be understood in the same way for this context.
The Spreadsheet Document Model consits of five major architectural areas:
• spreadsheet container
• service manager (document internal)
• drawPages
• content properties
• Objects for Styling
Figure 21: Spreadsheet Document Model [Open05, p.584]
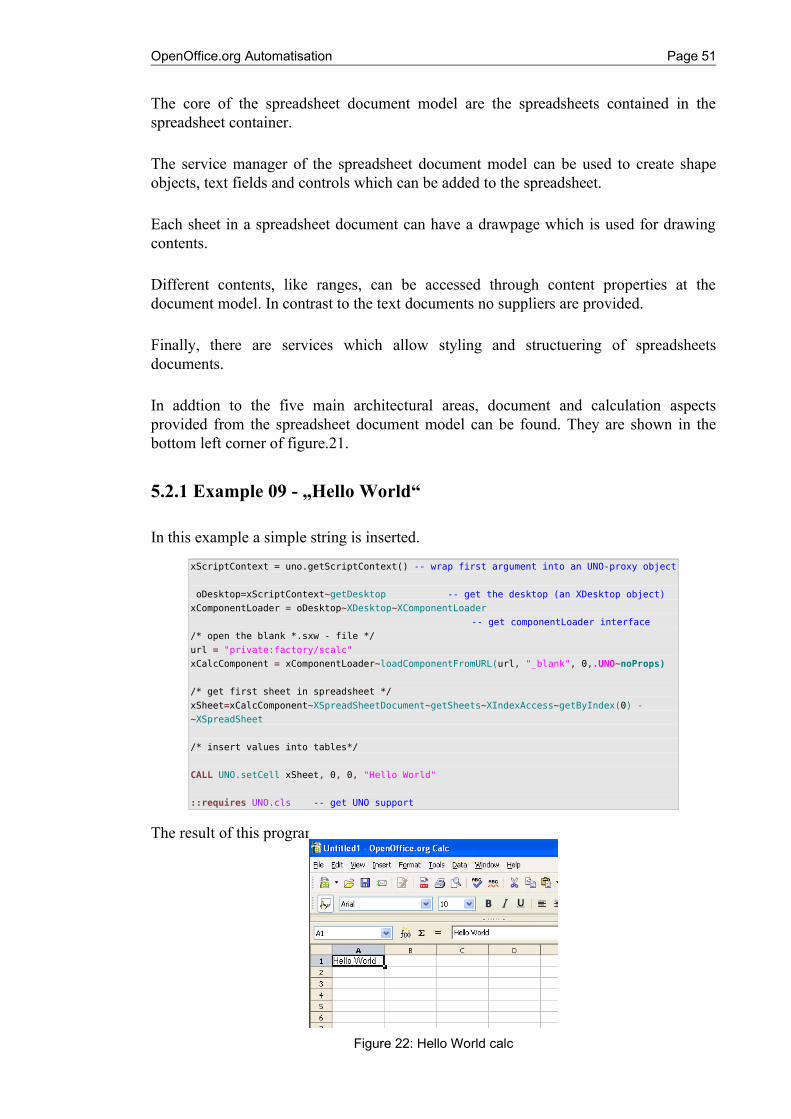
OpenOffice.org Automatisation Page 51
The core of the spreadsheet document model are the spreadsheets contained in the spreadsheet container.
The service manager of the spreadsheet document model can be used to create shape objects, text fields and controls which can be added to the spreadsheet.
Each sheet in a spreadsheet document can have a drawpage which is used for drawing contents.
Different contents, like ranges, can be accessed through content properties at the document model. In contrast to the text documents no suppliers are provided.
Finally, there are services which allow styling and structuering of spreadsheets documents.
In addtion to the five main architectural areas, document and calculation aspects provided from the spreadsheet document model can be found. They are shown in the bottom left corner of figure.21.
5.2.1 Example 09 - „Hello World“
In this example a simple string is inserted.
xScriptContext = uno.getScriptContext() -- wrap first argument into an UNO-proxy object
oDesktop=xScriptContext~getDesktop -- get the desktop (an XDesktop object)
xComponentLoader = oDesktop~XDesktop~XComponentLoader
-- get componentLoader interface
/* open the blank *.sxw - file */
url = "private:factory/scalc"
xCalcComponent = xComponentLoader~loadComponentFromURL(url, "_blank", 0,.UNO~noProps)
/* get first sheet in spreadsheet */
xSheet=xCalcComponent~XSpreadSheetDocument~getSheets~XIndexAccess~getByIndex(0) -
~XSpreadSheet
/* insert values into tables*/
CALL UNO.setCell xSheet, 0, 0, "Hello World"
::requires UNO.cls -- get UNO support
The result of this program can be seen in figure.22.
Figure 22: Hello World calc
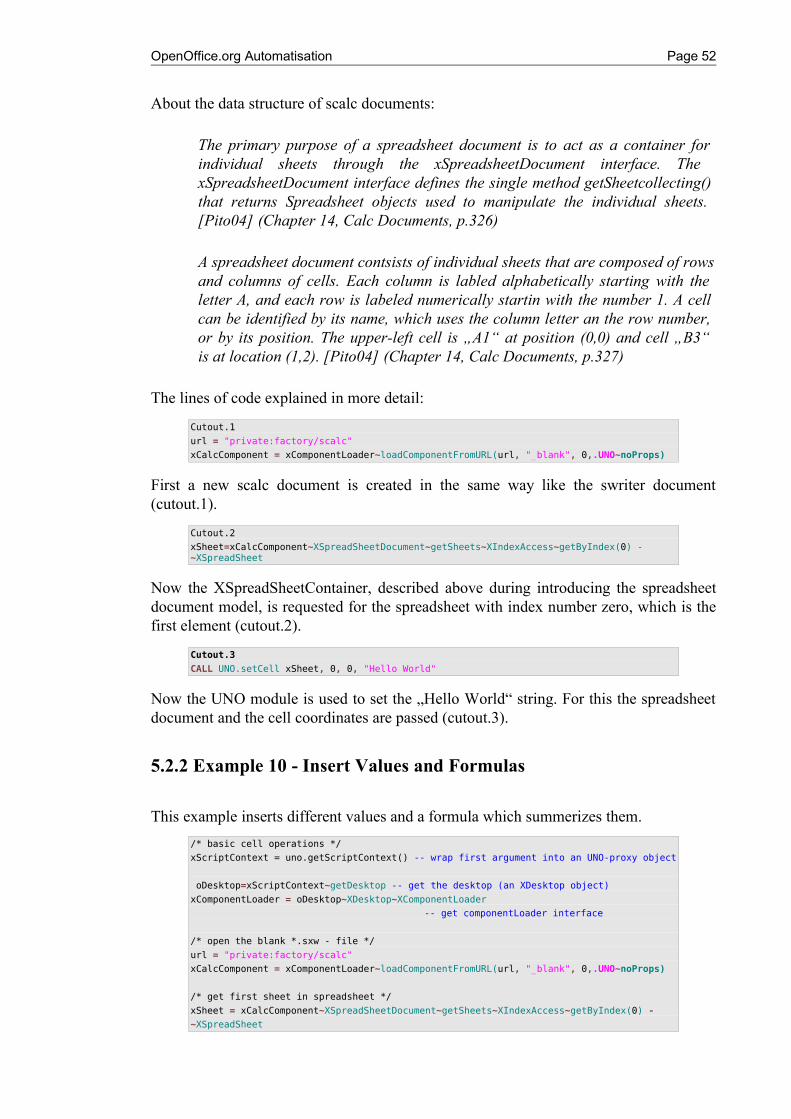
OpenOffice.org Automatisation Page 52
About the data structure of scalc documents:
The primary purpose of a spreadsheet document is to act as a container for individual sheets through the xSpreadsheetDocument interface. The xSpreadsheetDocument interface defines the single method getSheetcollecting() that returns Spreadsheet objects used to manipulate the individual sheets. [Pito04] (Chapter 14, Calc Documents, p.326)
A spreadsheet document contsists of individual sheets that are composed of rows and columns of cells. Each column is labled alphabetically starting with the letter A, and each row is labeled numerically startin with the number 1. A cell can be identified by its name, which uses the column letter an the row number, or by its position. The upper-left cell is „A1“ at position (0,0) and cell „B3“ is at location (1,2). [Pito04] (Chapter 14, Calc Documents, p.327)
The lines of code explained in more detail:
Cutout.1
url = "private:factory/scalc"
xCalcComponent = xComponentLoader~loadComponentFromURL(url, "_blank", 0,.UNO~noProps)
First a new scalc document is created in the same way like the swriter document (cutout.1).
Cutout.2
xSheet=xCalcComponent~XSpreadSheetDocument~getSheets~XIndexAccess~getByIndex(0) - ~XSpreadSheet
Now the XSpreadSheetContainer, described above during introducing the spreadsheet document model, is requested for the spreadsheet with index number zero, which is the first element (cutout.2).
Cutout.3
CALL UNO.setCell xSheet, 0, 0, "Hello World"
Now the UNO module is used to set the „Hello World“ string. For this the spreadsheet document and the cell coordinates are passed (cutout.3).
5.2.2 Example 10 - Insert Values and Formulas
This example inserts different values and a formula which summerizes them. /* basic cell operations */
xScriptContext = uno.getScriptContext() -- wrap first argument into an UNO-proxy object
oDesktop=xScriptContext~getDesktop -- get the desktop (an XDesktop object)
xComponentLoader = oDesktop~XDesktop~XComponentLoader
-- get componentLoader interface
/* open the blank *.sxw - file */
url = "private:factory/scalc"
xCalcComponent = xComponentLoader~loadComponentFromURL(url, "_blank", 0,.UNO~noProps)
/* get first sheet in spreadsheet */
xSheet = xCalcComponent~XSpreadSheetDocument~getSheets~XIndexAccess~getByIndex(0) -
~XSpreadSheet
OpenOffice.org Automatisation Page 53
/* insert values into tables*/
CALL UNO.setCell xSheet, 0, 0, "4"
CALL UNO.setCell xSheet, 0, 1, "1"
CALL UNO.setCell xSheet, 0, 2, "5"
CALL UNO.setCell xSheet, 0, 3, "11"
CALL UNO.setCell xSheet, 0, 4, "55"
/*insert formula into table*/
xCell = xSheet~getCellByPosition(0, 5)
xCell~setFormula("=sum(A1:A5)")
/*set Property values*/
xCell~XPropertySet~setPropertyValue("CellBackColor", box("int", "ff 00 00"x ~c2d))
::requires UNO.cls -- get UNO support
In figure.23 The resulting spreadsheet of this program can be seen.
About cell data:
A cell can contain four types of data named „empty“, „value“, „text“ and „formula“. For example, using the text type it would be possible to insert a text field which contains the current date. In our example a new formula is inserted. The formula type can be described as following:
„...A cell can contain a formula. The methods getFormula() and setFormula() get and set a cell's formula....when setting a cell's formula, you must include the leading equals (=) and the formula must be in English....“ [Pito04] (Chapter 14, Calc Documents, p.328)
The lines of code explained in more detail:
First different values are inserted like in Example 09, cutout.3 (p.52).
Cutout.1
xCell~setFormula("=sum(A1:A5)")
xCell~XPropertySet~setPropertyValue("CellBackColor", box("int", "ff 00 00"x ~c2d))
Figure 23: Values and Formulas
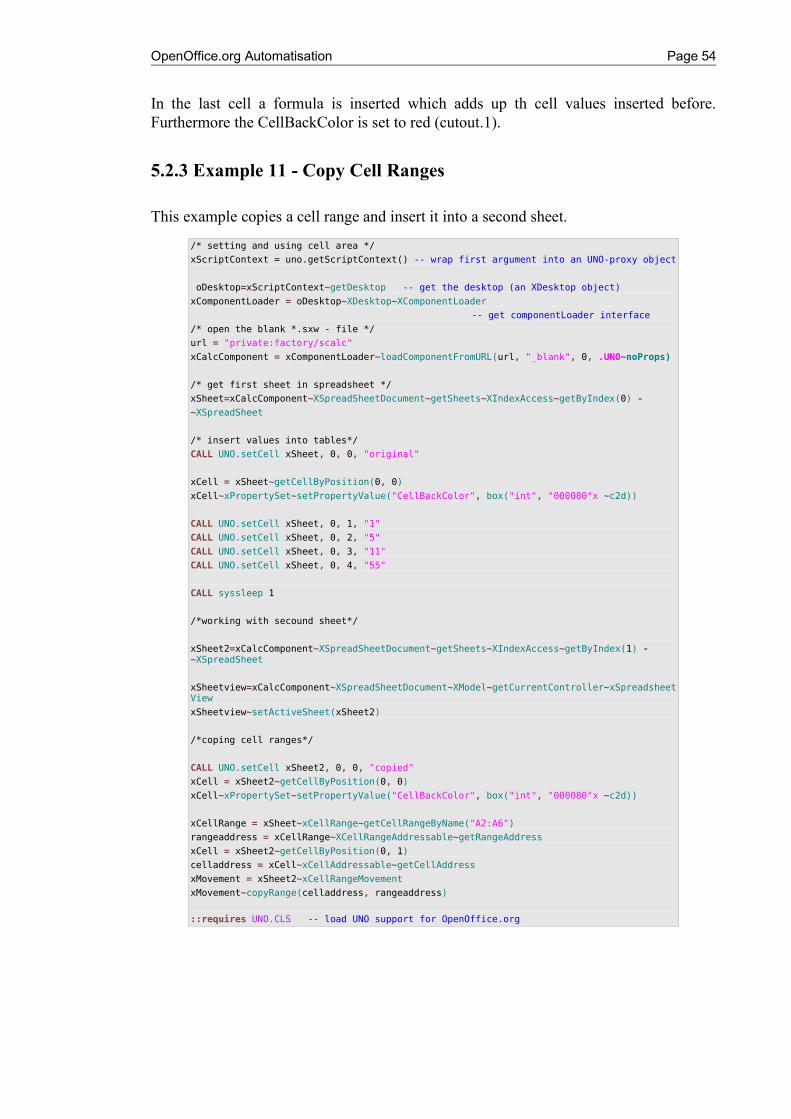
OpenOffice.org Automatisation Page 54
In the last cell a formula is inserted which adds up th cell values inserted before. Furthermore the CellBackColor is set to red (cutout.1).
5.2.3 Example 11 - Copy Cell Ranges
This example copies a cell range and insert it into a second sheet.
/* setting and using cell area */
xScriptContext = uno.getScriptContext() -- wrap first argument into an UNO-proxy object
oDesktop=xScriptContext~getDesktop -- get the desktop (an XDesktop object)
xComponentLoader = oDesktop~XDesktop~XComponentLoader
-- get componentLoader interface
/* open the blank *.sxw - file */
url = "private:factory/scalc"
xCalcComponent = xComponentLoader~loadComponentFromURL(url, "_blank", 0, .UNO~noProps)
/* get first sheet in spreadsheet */
xSheet=xCalcComponent~XSpreadSheetDocument~getSheets~XIndexAccess~getByIndex(0) -
~XSpreadSheet
/* insert values into tables*/
CALL UNO.setCell xSheet, 0, 0, "original"
xCell = xSheet~getCellByPosition(0, 0)
xCell~xPropertySet~setPropertyValue("CellBackColor", box("int", "000080"x ~c2d))
CALL UNO.setCell xSheet, 0, 1, "1"
CALL UNO.setCell xSheet, 0, 2, "5"
CALL UNO.setCell xSheet, 0, 3, "11"
CALL UNO.setCell xSheet, 0, 4, "55"
CALL syssleep 1
/*working with secound sheet*/
xSheet2=xCalcComponent~XSpreadSheetDocument~getSheets~XIndexAccess~getByIndex(1) - ~XSpreadSheet
xSheetview=xCalcComponent~XSpreadSheetDocument~XModel~getCurrentController~xSpreadsheetView
xSheetview~setActiveSheet(xSheet2)
/*coping cell ranges*/
CALL UNO.setCell xSheet2, 0, 0, "copied"
xCell = xSheet2~getCellByPosition(0, 0)
xCell~xPropertySet~setPropertyValue("CellBackColor", box("int", "000080"x ~c2d))
xCellRange = xSheet~xCellRange~getCellRangeByName("A2:A6")
rangeaddress = xCellRange~XCellRangeAddressable~getRangeAddress
xCell = xSheet2~getCellByPosition(0, 1)
celladdress = xCell~xCellAddressable~getCellAddress
xMovement = xSheet2~xCellRangeMovement
xMovement~copyRange(celladdress, rangeaddress)
::requires UNO.CLS -- load UNO support for OpenOffice.org
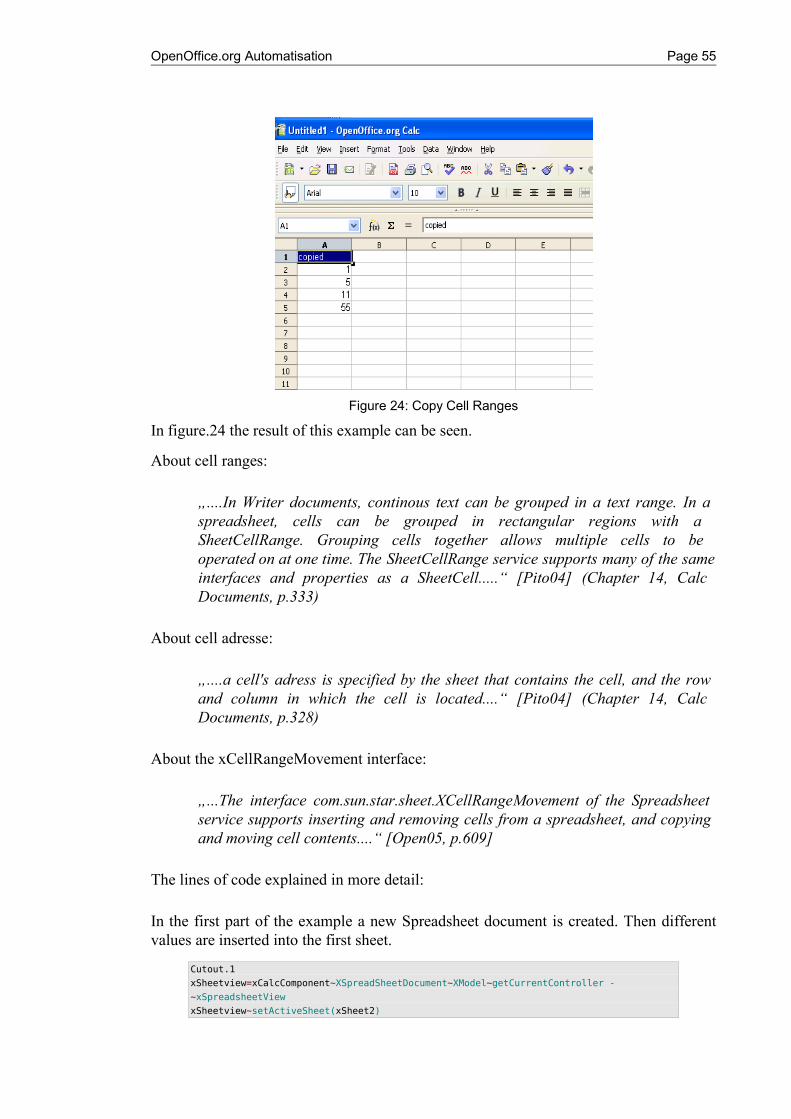
OpenOffice.org Automatisation Page 55
In figure.24 the result of this example can be seen.
About cell ranges:
„....In Writer documents, continous text can be grouped in a text range. In a spreadsheet, cells can be grouped in rectangular regions with a SheetCellRange. Grouping cells together allows multiple cells to be operated on at one time. The SheetCellRange service supports many of the same interfaces and properties as a SheetCell.....“ [Pito04] (Chapter 14, Calc Documents, p.333)
About cell adresse:
„....a cell's adress is specified by the sheet that contains the cell, and the row and column in which the cell is located....“ [Pito04] (Chapter 14, Calc Documents, p.328)
About the xCellRangeMovement interface:
„...The interface com.sun.star.sheet.XCellRangeMovement of the Spreadsheet service supports inserting and removing cells from a spreadsheet, and copying and moving cell contents....“ [Open05, p.609]
The lines of code explained in more detail:
In the first part of the example a new Spreadsheet document is created. Then different values are inserted into the first sheet.
Cutout.1
xSheetview=xCalcComponent~XSpreadSheetDocument~XModel~getCurrentController -
~xSpreadsheetView
xSheetview~setActiveSheet(xSheet2)
Figure 24: Copy Cell Ranges
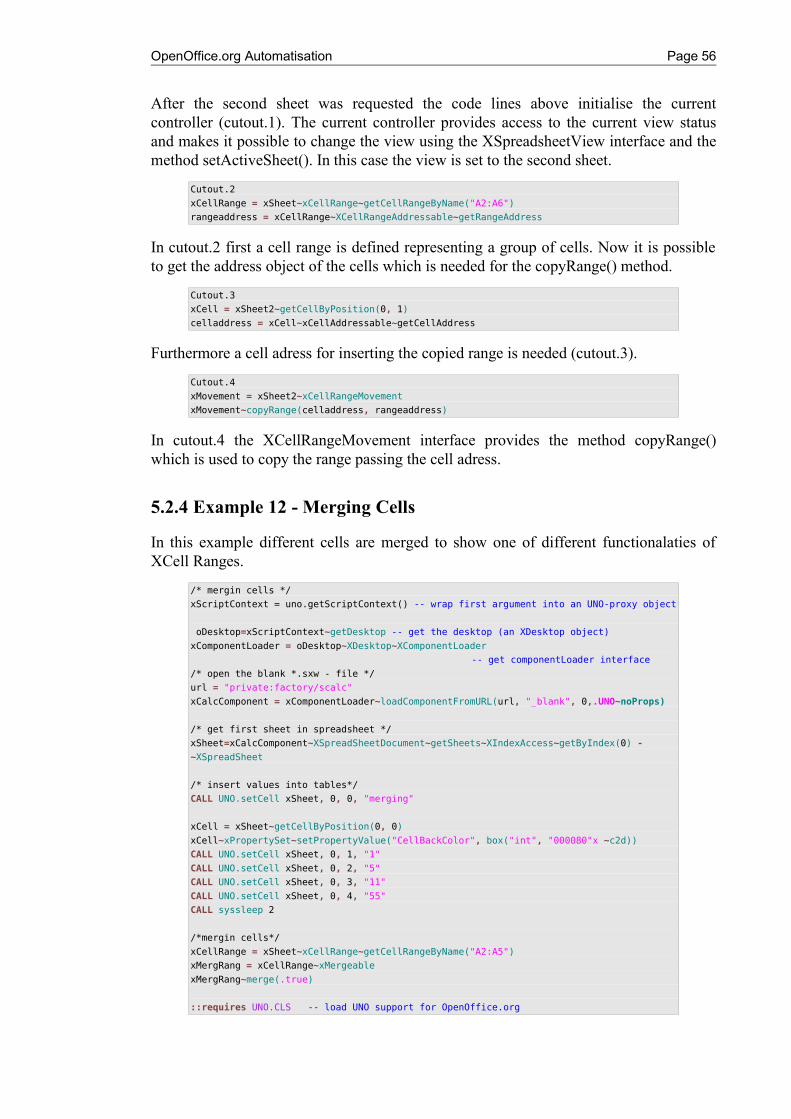
OpenOffice.org Automatisation Page 56
After the second sheet was requested the code lines above initialise the current controller (cutout.1). The current controller provides access to the current view status and makes it possible to change the view using the XSpreadsheetView interface and the method setActiveSheet(). In this case the view is set to the second sheet.
Cutout.2
xCellRange = xSheet~xCellRange~getCellRangeByName("A2:A6")
rangeaddress = xCellRange~XCellRangeAddressable~getRangeAddress
In cutout.2 first a cell range is defined representing a group of cells. Now it is possible to get the address object of the cells which is needed for the copyRange() method.
Cutout.3
xCell = xSheet2~getCellByPosition(0, 1)
celladdress = xCell~xCellAddressable~getCellAddress
Furthermore a cell adress for inserting the copied range is needed (cutout.3).
Cutout.4
xMovement = xSheet2~xCellRangeMovement
xMovement~copyRange(celladdress, rangeaddress)
In cutout.4 the XCellRangeMovement interface provides the method copyRange() which is used to copy the range passing the cell adress.
5.2.4 Example 12 - Merging Cells
In this example different cells are merged to show one of different functionalaties of XCell Ranges.
/* mergin cells */
xScriptContext = uno.getScriptContext() -- wrap first argument into an UNO-proxy object
oDesktop=xScriptContext~getDesktop -- get the desktop (an XDesktop object)
xComponentLoader = oDesktop~XDesktop~XComponentLoader
-- get componentLoader interface
/* open the blank *.sxw - file */
url = "private:factory/scalc"
xCalcComponent = xComponentLoader~loadComponentFromURL(url, "_blank", 0,.UNO~noProps)
/* get first sheet in spreadsheet */
xSheet=xCalcComponent~XSpreadSheetDocument~getSheets~XIndexAccess~getByIndex(0) -
~XSpreadSheet
/* insert values into tables*/
CALL UNO.setCell xSheet, 0, 0, "merging"
xCell = xSheet~getCellByPosition(0, 0)
xCell~xPropertySet~setPropertyValue("CellBackColor", box("int", "000080"x ~c2d))
CALL UNO.setCell xSheet, 0, 1, "1"
CALL UNO.setCell xSheet, 0, 2, "5"
CALL UNO.setCell xSheet, 0, 3, "11"
CALL UNO.setCell xSheet, 0, 4, "55"
CALL syssleep 2
/*mergin cells*/
xCellRange = xSheet~xCellRange~getCellRangeByName("A2:A5")
xMergRang = xCellRange~xMergeable
xMergRang~merge(.true)
::requires UNO.CLS -- load UNO support for OpenOffice.org
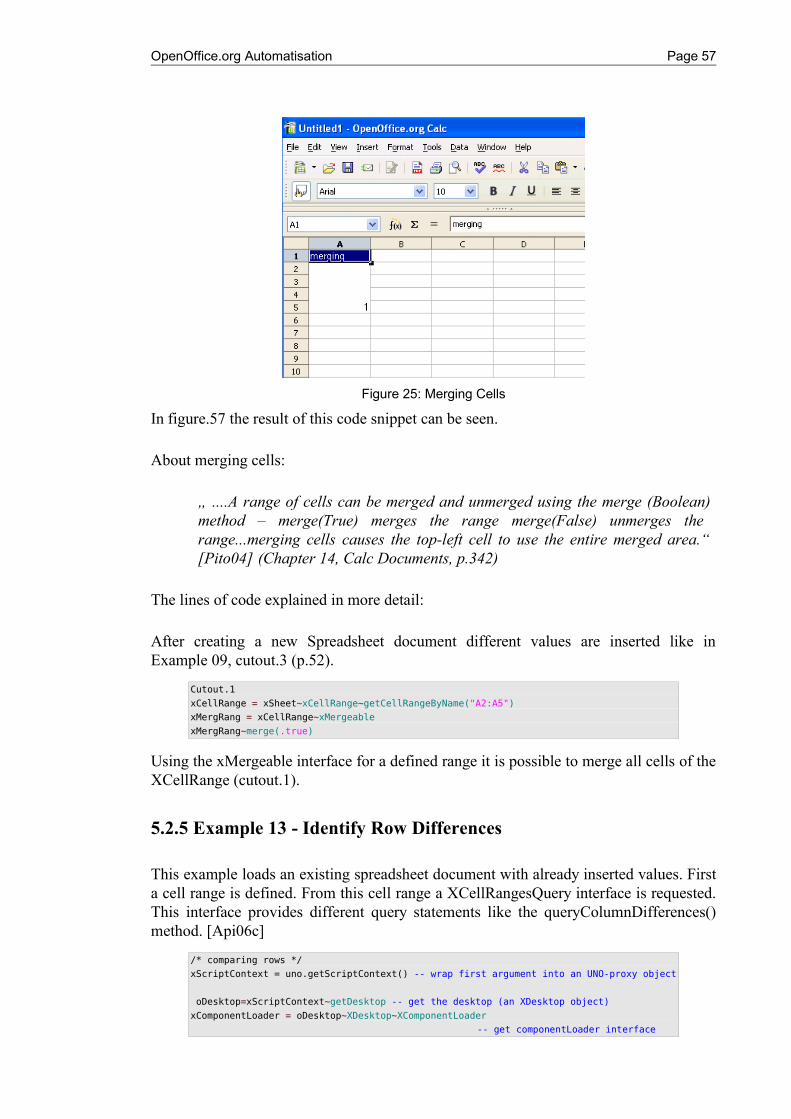
OpenOffice.org Automatisation Page 57
In figure.57 the result of this code snippet can be seen.
About merging cells:
„ ....A range of cells can be merged and unmerged using the merge (Boolean) method – merge(True) merges the range merge(False) unmerges the range...merging cells causes the top-left cell to use the entire merged area.“ [Pito04] (Chapter 14, Calc Documents, p.342)
The lines of code explained in more detail:
After creating a new Spreadsheet document different values are inserted like in Example 09, cutout.3 (p.52).
Cutout.1
xCellRange = xSheet~xCellRange~getCellRangeByName("A2:A5")
xMergRang = xCellRange~xMergeable
xMergRang~merge(.true)
Using the xMergeable interface for a defined range it is possible to merge all cells of the XCellRange (cutout.1).
5.2.5 Example 13 - Identify Row Differences
This example loads an existing spreadsheet document with already inserted values. First a cell range is defined. From this cell range a XCellRangesQuery interface is requested. This interface provides different query statements like the queryColumnDifferences() method. [Api06c]
/* comparing rows */
xScriptContext = uno.getScriptContext() -- wrap first argument into an UNO-proxy object
oDesktop=xScriptContext~getDesktop -- get the desktop (an XDesktop object)
xComponentLoader = oDesktop~XDesktop~XComponentLoader
-- get componentLoader interface
Figure 25: Merging Cells
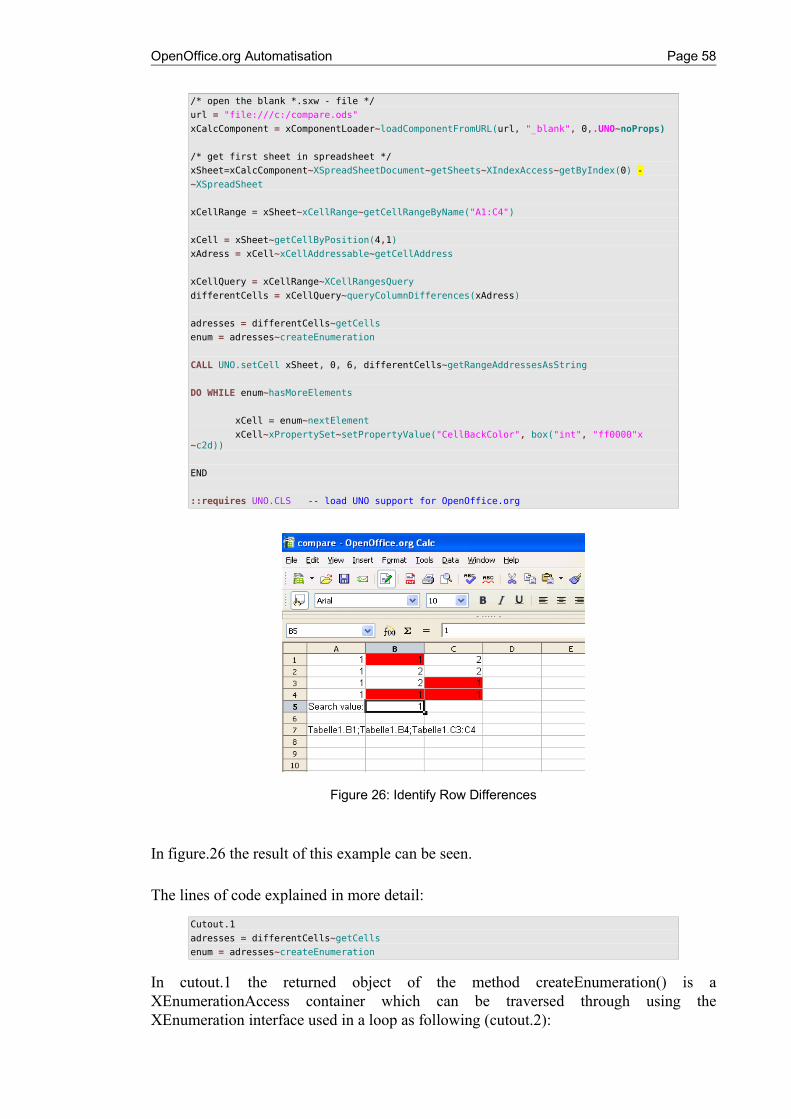
OpenOffice.org Automatisation Page 58
/* open the blank *.sxw - file */
url = "file:///c:/compare.ods"
xCalcComponent = xComponentLoader~loadComponentFromURL(url, "_blank", 0,.UNO~noProps)
/* get first sheet in spreadsheet */
xSheet=xCalcComponent~XSpreadSheetDocument~getSheets~XIndexAccess~getByIndex(0) -
~XSpreadSheet
xCellRange = xSheet~xCellRange~getCellRangeByName("A1:C4")
xCell = xSheet~getCellByPosition(4,1)
xAdress = xCell~xCellAddressable~getCellAddress
xCellQuery = xCellRange~XCellRangesQuery
differentCells = xCellQuery~queryColumnDifferences(xAdress)
adresses = differentCells~getCells
enum = adresses~createEnumeration
CALL UNO.setCell xSheet, 0, 6, differentCells~getRangeAddressesAsString
DO WHILE enum~hasMoreElements
xCell = enum~nextElement
xCell~xPropertySet~setPropertyValue("CellBackColor", box("int", "ff0000"x ~c2d))
END
::requires UNO.CLS -- load UNO support for OpenOffice.org
In figure.26 the result of this example can be seen.
The lines of code explained in more detail:
Cutout.1
adresses = differentCells~getCells
enum = adresses~createEnumeration
In cutout.1 the returned object of the method createEnumeration() is a XEnumerationAccess container which can be traversed through using the XEnumeration interface used in a loop as following (cutout.2):
Figure 26: Identify Row Differences
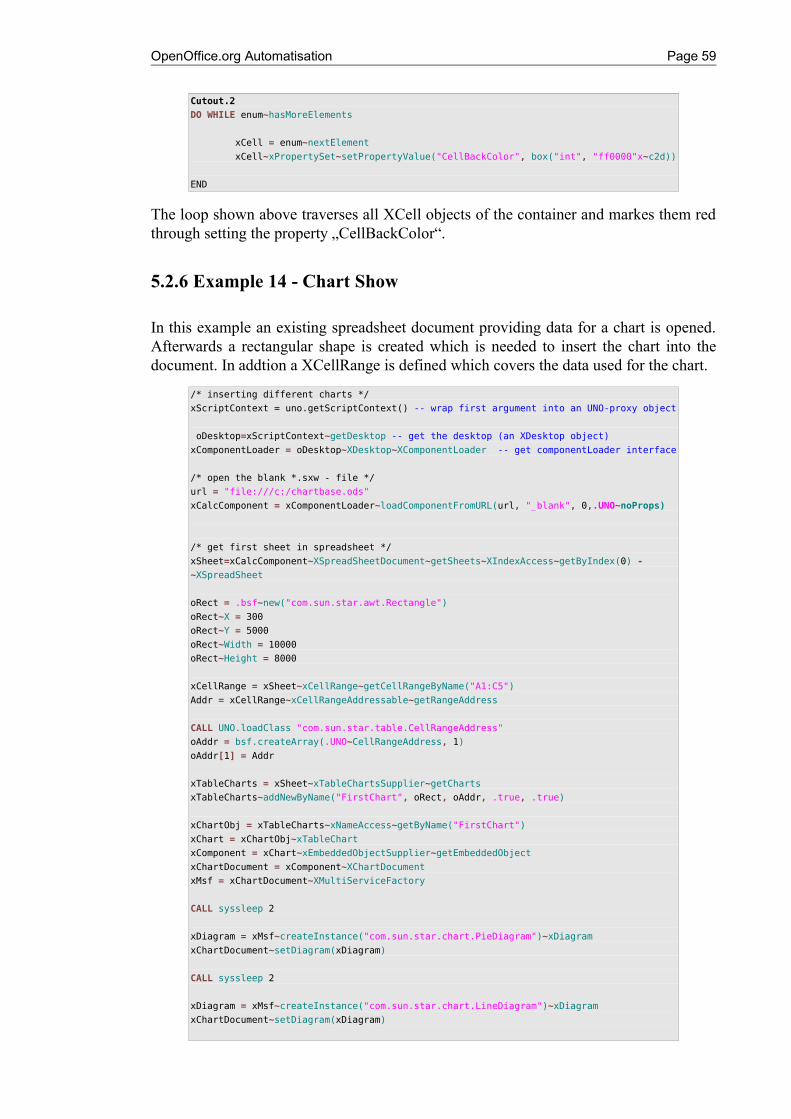
OpenOffice.org Automatisation Page 59
Cutout.2
DO WHILE enum~hasMoreElements
xCell = enum~nextElement
xCell~xPropertySet~setPropertyValue("CellBackColor", box("int", "ff0000"x~c2d))
END
The loop shown above traverses all XCell objects of the container and markes them red through setting the property „CellBackColor“.
5.2.6 Example 14 - Chart Show
In this example an existing spreadsheet document providing data for a chart is opened. Afterwards a rectangular shape is created which is needed to insert the chart into the document. In addtion a XCellRange is defined which covers the data used for the chart.
/* inserting different charts */
xScriptContext = uno.getScriptContext() -- wrap first argument into an UNO-proxy object
oDesktop=xScriptContext~getDesktop -- get the desktop (an XDesktop object)
xComponentLoader = oDesktop~XDesktop~XComponentLoader -- get componentLoader interface
/* open the blank *.sxw - file */
url = "file:///c:/chartbase.ods"
xCalcComponent = xComponentLoader~loadComponentFromURL(url, "_blank", 0,.UNO~noProps)
/* get first sheet in spreadsheet */
xSheet=xCalcComponent~XSpreadSheetDocument~getSheets~XIndexAccess~getByIndex(0) -
~XSpreadSheet
oRect = .bsf~new("com.sun.star.awt.Rectangle")
oRect~X = 300
oRect~Y = 5000
oRect~Width = 10000
oRect~Height = 8000
xCellRange = xSheet~xCellRange~getCellRangeByName("A1:C5")
Addr = xCellRange~xCellRangeAddressable~getRangeAddress
CALL UNO.loadClass "com.sun.star.table.CellRangeAddress"
oAddr = bsf.createArray(.UNO~CellRangeAddress, 1)
oAddr[1] = Addr
xTableCharts = xSheet~xTableChartsSupplier~getCharts
xTableCharts~addNewByName("FirstChart", oRect, oAddr, .true, .true)
xChartObj = xTableCharts~xNameAccess~getByName("FirstChart")
xChart = xChartObj~xTableChart
xComponent = xChart~xEmbeddedObjectSupplier~getEmbeddedObject
xChartDocument = xComponent~XChartDocument
xMsf = xChartDocument~XMultiServiceFactory
CALL syssleep 2
xDiagram = xMsf~createInstance("com.sun.star.chart.PieDiagram")~xDiagram
xChartDocument~setDiagram(xDiagram)
CALL syssleep 2
xDiagram = xMsf~createInstance("com.sun.star.chart.LineDiagram")~xDiagram
xChartDocument~setDiagram(xDiagram)
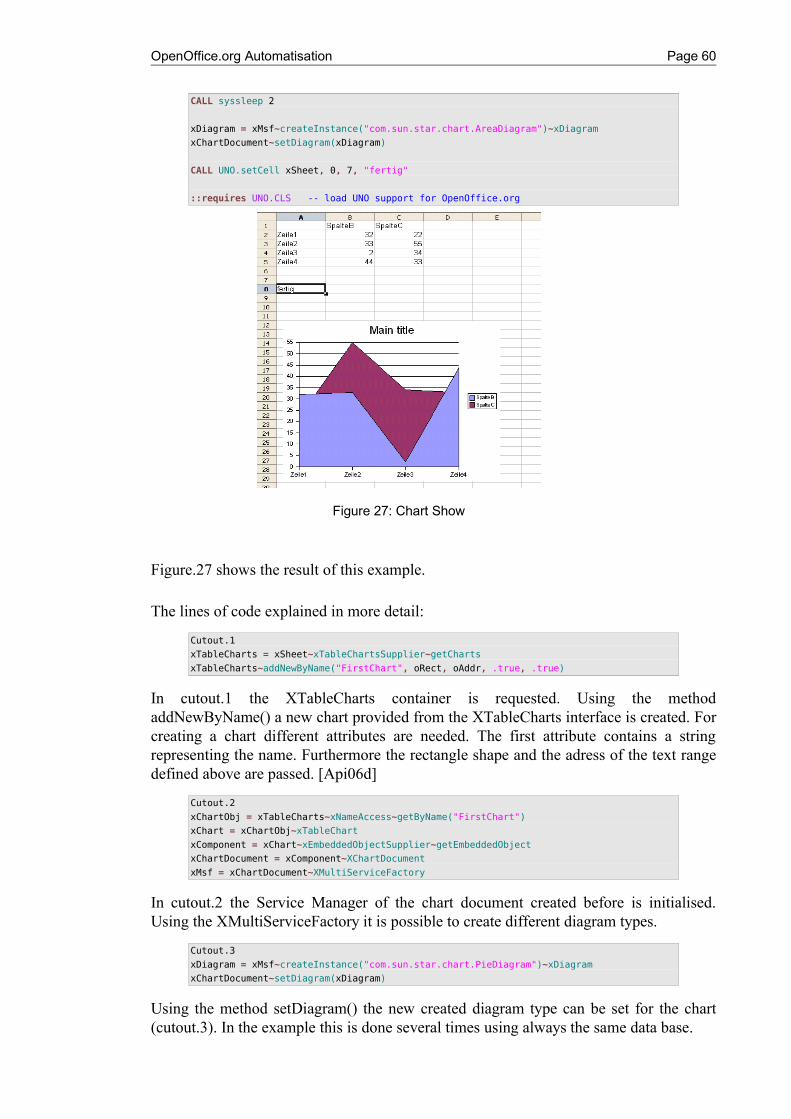
OpenOffice.org Automatisation Page 60
CALL syssleep 2
xDiagram = xMsf~createInstance("com.sun.star.chart.AreaDiagram")~xDiagram
xChartDocument~setDiagram(xDiagram)
CALL UNO.setCell xSheet, 0, 7, "fertig"
::requires UNO.CLS -- load UNO support for OpenOffice.org
Figure.27 shows the result of this example.
The lines of code explained in more detail:
Cutout.1
xTableCharts = xSheet~xTableChartsSupplier~getCharts
xTableCharts~addNewByName("FirstChart", oRect, oAddr, .true, .true)
In cutout.1 the XTableCharts container is requested. Using the method addNewByName() a new chart provided from the XTableCharts interface is created. For creating a chart different attributes are needed. The first attribute contains a string representing the name. Furthermore the rectangle shape and the adress of the text range defined above are passed. [Api06d]
Cutout.2
xChartObj = xTableCharts~xNameAccess~getByName("FirstChart")
xChart = xChartObj~xTableChart
xComponent = xChart~xEmbeddedObjectSupplier~getEmbeddedObject
xChartDocument = xComponent~XChartDocument
xMsf = xChartDocument~XMultiServiceFactory
In cutout.2 the Service Manager of the chart document created before is initialised. Using the XMultiServiceFactory it is possible to create different diagram types.
Cutout.3
xDiagram = xMsf~createInstance("com.sun.star.chart.PieDiagram")~xDiagram
xChartDocument~setDiagram(xDiagram)
Using the method setDiagram() the new created diagram type can be set for the chart (cutout.3). In the example this is done several times using always the same data base.
Figure 27: Chart Show

OpenOffice.org Automatisation Page 61
5.2.7 Example 15 - Using a Replace Describtor
This example creates and Replace Describtor to search and replace values in cells.
/* setting and using cell area */
xScriptContext = uno.getScriptContext() -- wrap first argument into an UNO-proxy object
oDesktop=xScriptContext~getDesktop -- get the desktop (an XDesktop object)
xComponentLoader = oDesktop~XDesktop~XComponentLoader -- get componentLoader interface
/* open the blank *.sxw - file */
url = "private:factory/scalc"
xCalcComponent = xComponentLoader~loadComponentFromURL(url, "_blank", 0, .UNO~noProps)
/* get first sheet in spreadsheet */
xSheet=xCalcComponent~XSpreadSheetDocument~getSheets~XIndexAccess~getByIndex(0) -
~XSpreadSheet
CALL UNO.setCell xSheet, 0, 0, "33"
CALL UNO.setCell xSheet, 0, 1, "44"
CALL UNO.setCell xSheet, 0, 2, "66"
CALL UNO.setCell xSheet, 0, 3, "23"
CALL UNO.setCell xSheet, 0, 4, "0"
CALL UNO.setCell xSheet, 0, 5, "67"
xCellRange = xSheet~xCellRange~getCellRangeByName("A1:A6")
Replace = xCellRange~XReplaceable
xReplaceDescriptor = Replace~createReplaceDescriptor
xReplaceDescriptor~setSearchString("0")
xReplaceDescriptor~setReplaceString("zero")
Replace~replaceAll(xReplaceDescriptor)
CALL UNO.setCell xSheet, 0, 6, "fertig"
::requires UNO.CLS -- load UNO support for OpenOffice.org
About searching and replacing in a spreadsheet document:
„The thing that I find most interesting about searching in a spreadsheet document is that searching is not supported by the document object. Cell object and cell range objects support searching, however....“ [Pito04] (Chapter 14, Calc Documents, p.341)
The lines of code explained in more detail:
Figure 28: Using a Replace Descriptor

OpenOffice.org Automatisation Page 62
In this example a simple new spreadsheet document is created and different values are inserted. These values are traversed using a replace descriptor which replace a specific value with a defined string.
For this a XCellRange has to be defined to cover the data and make searching and replacing possible. This range is used to create a Replace Descriptor (cutout.1).
Cutout.1
xReplaceDescriptor~setSearchString("0")
xReplaceDescriptor~setReplaceString("zero")
Replace~replaceAll(xReplaceDescript)
Now the search and replace string are set and the replace query is executed (cutout.1).
5.2.8 Example 16 - Inserting a Shape
In this example a rectangular shape is inserted into a spreadsheet document.
/* setting and using cell area */
xScriptContext = uno.getScriptContext() -- wrap first argument into an UNO-proxy object
oDesktop=xScriptContext~getDesktop -- get the desktop (an XDesktop object)
xComponentLoader = oDesktop~XDesktop~XComponentLoader -- get componentLoader interface
/* open the blank *.sxw - file */
url = "private:factory/scalc"
xCalcComponent = xComponentLoader~loadComponentFromURL(url, "_blank", 0,.UNO~noProps)
/* get first sheet in spreadsheet */
xSheet=xCalcComponent~XSpreadSheetDocument~getSheets~XIndexAccess~getByIndex(0) -
~XspreadSheet
/*creating Multi Service Factory*/
xCalcFactory = xCalcComponent~xMultiServiceFactory
/*creating draw page*/
xDrawPages = xSheet~xDrawPageSupplier
xDrawPage = xDrawPages~getDrawPage~xDrawPage
/*creating scalc shape*/
calcShape = xCalcFactory~createInstance("com.sun.star.drawing.RectangleShape")
xcalcShape = calcShape~xShape
size = .bsf~new("com.sun.star.awt.Size")
point = .bsf~new("com.sun.star.awt.Point")
size~Height = 2500
size~Width = 8000
point~x = 1000
point~y= 1000
xcalcShape~setSize(size)
xcalcShape~setPosition(point)
xPropertySet=xcalcShape~xPropertySet
xPropertySet~setPropertyValue("FillColor", box("int", "C0 C0 C0"x ~c2d))
xDrawPage~add(xCalcShape)
textShape = calcShape~xText
textShape~setString("This is a Rectangle Shape")
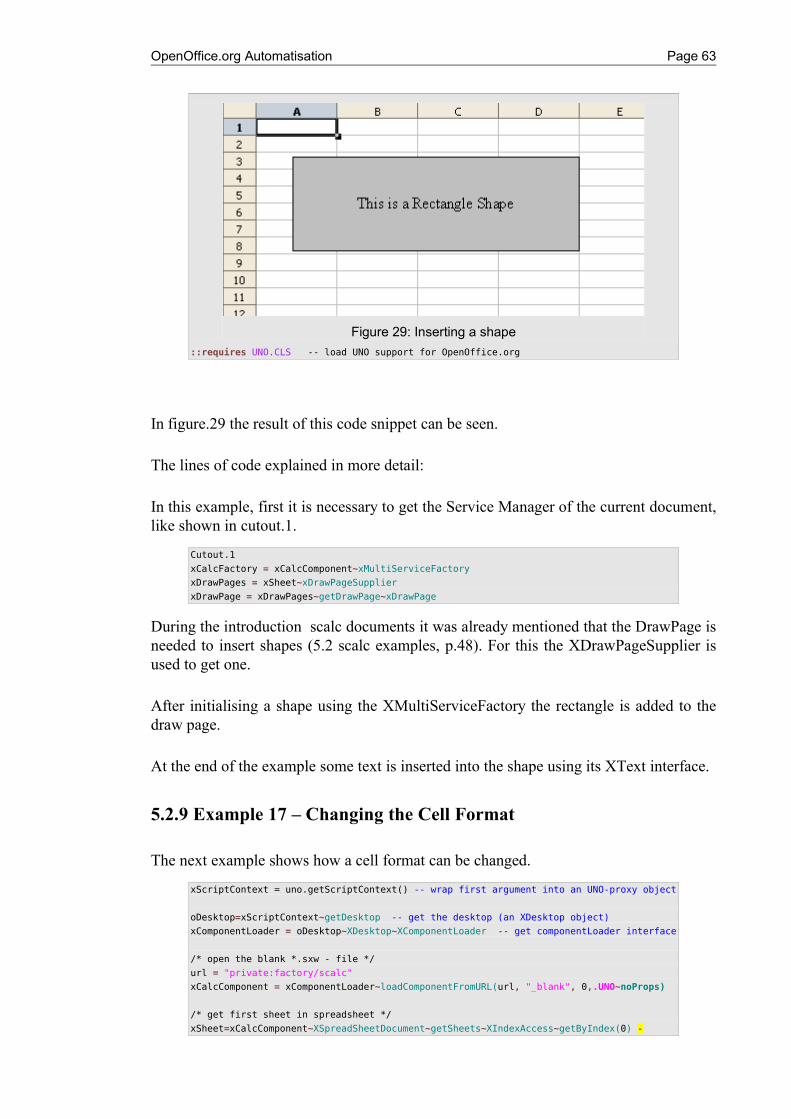
OpenOffice.org Automatisation Page 63
::requires UNO.CLS -- load UNO support for OpenOffice.org
In figure.29 the result of this code snippet can be seen.
The lines of code explained in more detail:
In this example, first it is necessary to get the Service Manager of the current document, like shown in cutout.1.
Cutout.1
xCalcFactory = xCalcComponent~xMultiServiceFactory
xDrawPages = xSheet~xDrawPageSupplier
xDrawPage = xDrawPages~getDrawPage~xDrawPage
During the introduction scalc documents it was already mentioned that the DrawPage is needed to insert shapes (5.2 scalc examples, p.48). For this the XDrawPageSupplier is used to get one.
After initialising a shape using the XMultiServiceFactory the rectangle is added to the draw page.
At the end of the example some text is inserted into the shape using its XText interface.
5.2.9 Example 17 – Changing the Cell Format
The next example shows how a cell format can be changed.
xScriptContext = uno.getScriptContext() -- wrap first argument into an UNO-proxy object
oDesktop=xScriptContext~getDesktop -- get the desktop (an XDesktop object)
xComponentLoader = oDesktop~XDesktop~XComponentLoader -- get componentLoader interface
/* open the blank *.sxw - file */
url = "private:factory/scalc"
xCalcComponent = xComponentLoader~loadComponentFromURL(url, "_blank", 0,.UNO~noProps)
/* get first sheet in spreadsheet */
xSheet=xCalcComponent~XSpreadSheetDocument~getSheets~XIndexAccess~getByIndex(0) -
Figure 29: Inserting a shape
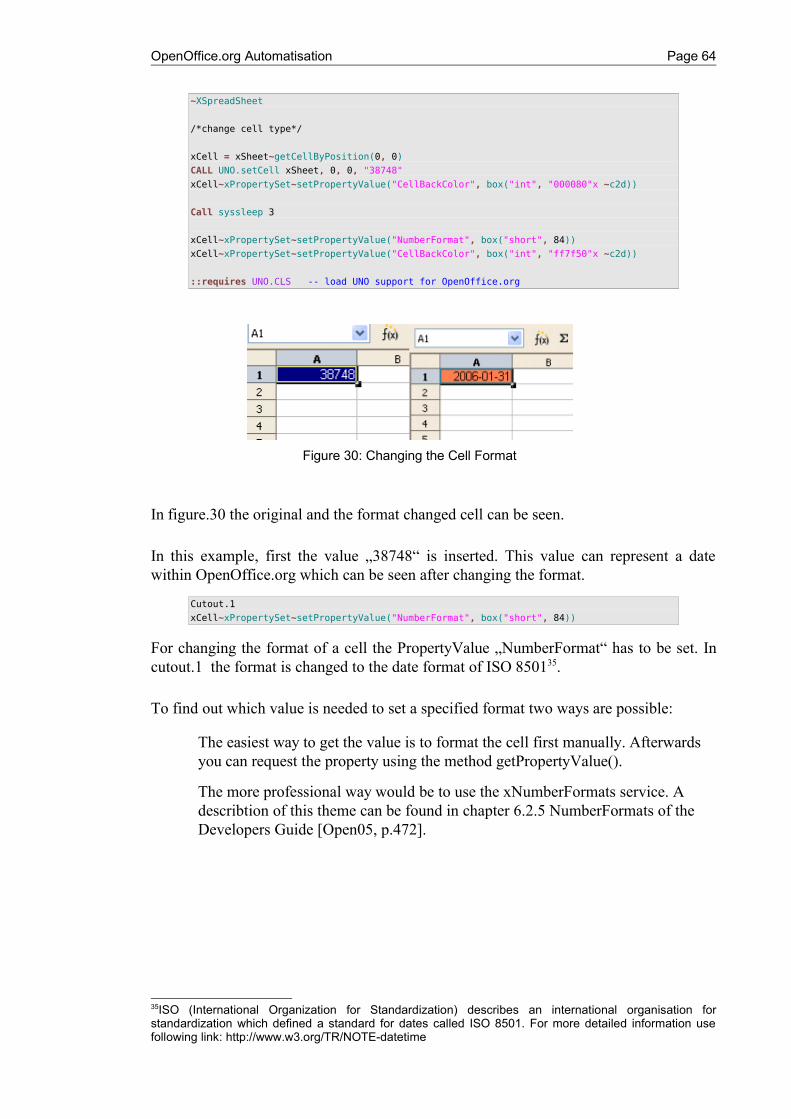
OpenOffice.org Automatisation Page 64
~XSpreadSheet
/*change cell type*/
xCell = xSheet~getCellByPosition(0, 0)
CALL UNO.setCell xSheet, 0, 0, "38748"
xCell~xPropertySet~setPropertyValue("CellBackColor", box("int", "000080"x ~c2d))
Call syssleep 3
xCell~xPropertySet~setPropertyValue("NumberFormat", box("short", 84))
xCell~xPropertySet~setPropertyValue("CellBackColor", box("int", "ff7f50"x ~c2d))
::requires UNO.CLS -- load UNO support for OpenOffice.org
In figure.30 the original and the format changed cell can be seen.
In this example, first the value „38748“ is inserted. This value can represent a date within OpenOffice.org which can be seen after changing the format.
Cutout.1
xCell~xPropertySet~setPropertyValue("NumberFormat", box("short", 84))
For changing the format of a cell the PropertyValue „NumberFormat“ has to be set. In cutout.1 the format is changed to the date format of ISO 850135.
To find out which value is needed to set a specified format two ways are possible:
The easiest way to get the value is to format the cell first manually. Afterwards you can request the property using the method getPropertyValue().
The more professional way would be to use the xNumberFormats service. A describtion of this theme can be found in chapter 6.2.5 NumberFormats of the Developers Guide [Open05, p.472].
35ISO (International Organization for Standardization) describes an international organisation for standardization which defined a standard for dates called ISO 8501. For more detailed information use following link: http://www.w3.org/TR/NOTE-datetime
Figure 30: Changing the Cell Format
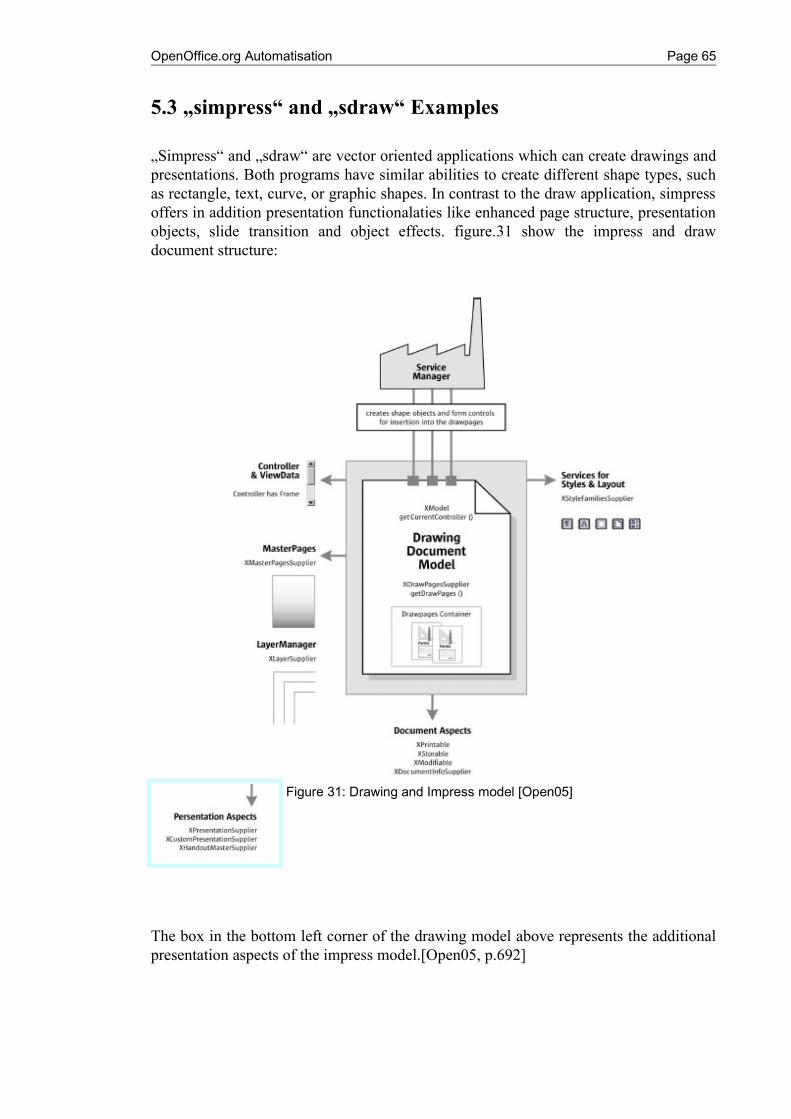
OpenOffice.org Automatisation Page 65
5.3 „simpress“ and „sdraw“ Examples
„Simpress“ and „sdraw“ are vector oriented applications which can create drawings and presentations. Both programs have similar abilities to create different shape types, such as rectangle, text, curve, or graphic shapes. In contrast to the draw application, simpress offers in addition presentation functionalaties like enhanced page structure, presentation objects, slide transition and object effects. figure.31 show the impress and draw document structure:
The box in the bottom left corner of the drawing model above represents the additional presentation aspects of the impress model.[Open05, p.692]
Figure 31: Drawing and Impress model [Open05]
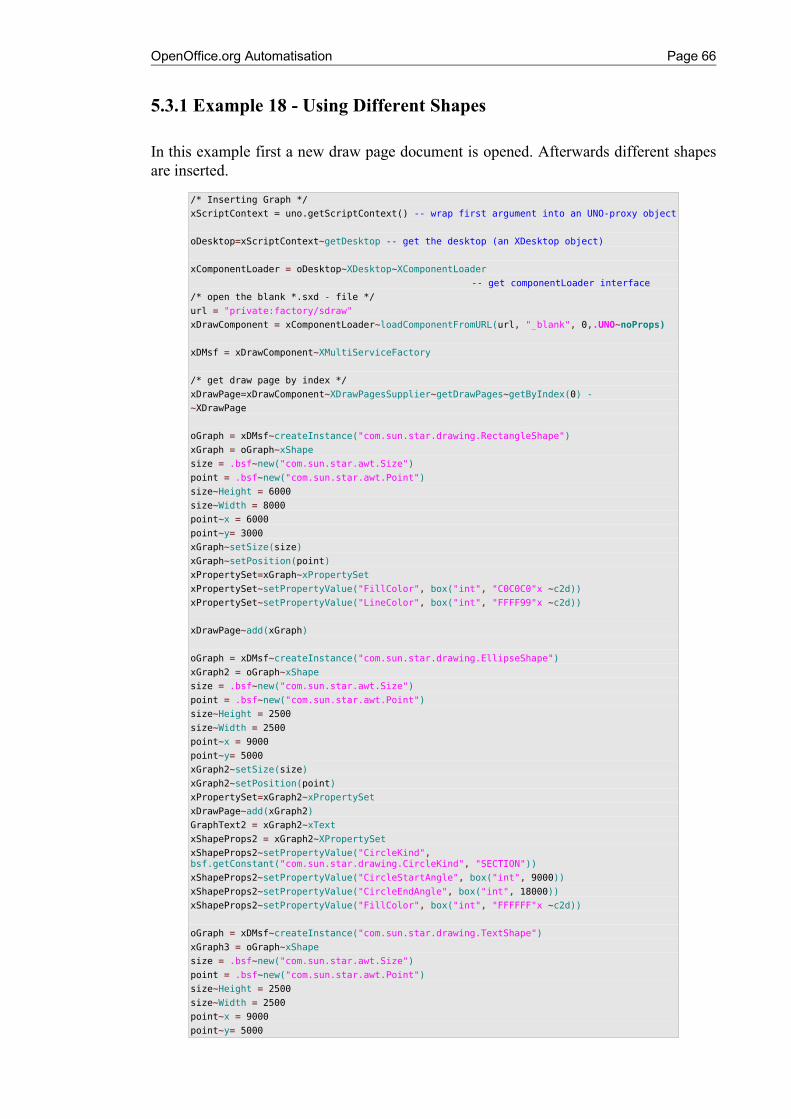
OpenOffice.org Automatisation Page 66
5.3.1 Example 18 - Using Different Shapes
In this example first a new draw page document is opened. Afterwards different shapes are inserted.
/* Inserting Graph */
xScriptContext = uno.getScriptContext() -- wrap first argument into an UNO-proxy object
oDesktop=xScriptContext~getDesktop -- get the desktop (an XDesktop object)
xComponentLoader = oDesktop~XDesktop~XComponentLoader
-- get componentLoader interface
/* open the blank *.sxd - file */
url = "private:factory/sdraw"
xDrawComponent = xComponentLoader~loadComponentFromURL(url, "_blank", 0,.UNO~noProps)
xDMsf = xDrawComponent~XMultiServiceFactory
/* get draw page by index */
xDrawPage=xDrawComponent~XDrawPagesSupplier~getDrawPages~getByIndex(0) -
~XDrawPage
oGraph = xDMsf~createInstance("com.sun.star.drawing.RectangleShape")
xGraph = oGraph~xShape
size = .bsf~new("com.sun.star.awt.Size")
point = .bsf~new("com.sun.star.awt.Point")
size~Height = 6000
size~Width = 8000
point~x = 6000
point~y= 3000
xGraph~setSize(size)
xGraph~setPosition(point)
xPropertySet=xGraph~xPropertySet
xPropertySet~setPropertyValue("FillColor", box("int", "C0C0C0"x ~c2d))
xPropertySet~setPropertyValue("LineColor", box("int", "FFFF99"x ~c2d))
xDrawPage~add(xGraph)
oGraph = xDMsf~createInstance("com.sun.star.drawing.EllipseShape")
xGraph2 = oGraph~xShape
size = .bsf~new("com.sun.star.awt.Size")
point = .bsf~new("com.sun.star.awt.Point")
size~Height = 2500
size~Width = 2500
point~x = 9000
point~y= 5000
xGraph2~setSize(size)
xGraph2~setPosition(point)
xPropertySet=xGraph2~xPropertySet
xDrawPage~add(xGraph2)
GraphText2 = xGraph2~xText
xShapeProps2 = xGraph2~XPropertySet
xShapeProps2~setPropertyValue("CircleKind", bsf.getConstant("com.sun.star.drawing.CircleKind", "SECTION"))
xShapeProps2~setPropertyValue("CircleStartAngle", box("int", 9000))
xShapeProps2~setPropertyValue("CircleEndAngle", box("int", 18000))
xShapeProps2~setPropertyValue("FillColor", box("int", "FFFFFF"x ~c2d))
oGraph = xDMsf~createInstance("com.sun.star.drawing.TextShape")
xGraph3 = oGraph~xShape
size = .bsf~new("com.sun.star.awt.Size")
point = .bsf~new("com.sun.star.awt.Point")
size~Height = 2500
size~Width = 2500
point~x = 9000
point~y= 5000
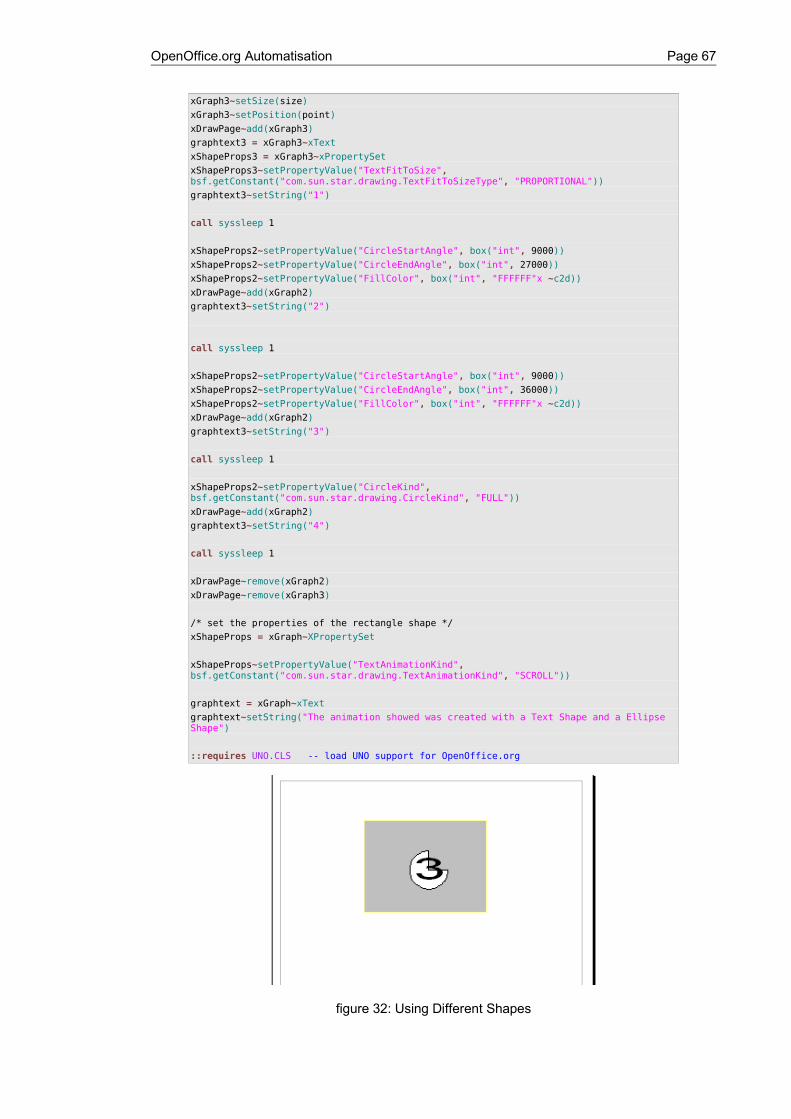
OpenOffice.org Automatisation Page 67
xGraph3~setSize(size)
xGraph3~setPosition(point)
xDrawPage~add(xGraph3)
graphtext3 = xGraph3~xText
xShapeProps3 = xGraph3~xPropertySet
xShapeProps3~setPropertyValue("TextFitToSize", bsf.getConstant("com.sun.star.drawing.TextFitToSizeType", "PROPORTIONAL"))
graphtext3~setString("1")
call syssleep 1
xShapeProps2~setPropertyValue("CircleStartAngle", box("int", 9000))
xShapeProps2~setPropertyValue("CircleEndAngle", box("int", 27000))
xShapeProps2~setPropertyValue("FillColor", box("int", "FFFFFF"x ~c2d))
xDrawPage~add(xGraph2)
graphtext3~setString("2")
call syssleep 1
xShapeProps2~setPropertyValue("CircleStartAngle", box("int", 9000))
xShapeProps2~setPropertyValue("CircleEndAngle", box("int", 36000))
xShapeProps2~setPropertyValue("FillColor", box("int", "FFFFFF"x ~c2d))
xDrawPage~add(xGraph2)
graphtext3~setString("3")
call syssleep 1
xShapeProps2~setPropertyValue("CircleKind", bsf.getConstant("com.sun.star.drawing.CircleKind", "FULL"))
xDrawPage~add(xGraph2)
graphtext3~setString("4")
call syssleep 1
xDrawPage~remove(xGraph2)
xDrawPage~remove(xGraph3)
/* set the properties of the rectangle shape */
xShapeProps = xGraph~XPropertySet
xShapeProps~setPropertyValue("TextAnimationKind", bsf.getConstant("com.sun.star.drawing.TextAnimationKind", "SCROLL"))
graphtext = xGraph~xText
graphtext~setString("The animation showed was created with a Text Shape and a Ellipse Shape")
::requires UNO.CLS -- load UNO support for OpenOffice.org
figure 32: Using Different Shapes
OpenOffice.org Automatisation Page 68
In figure.32 a screen shot of the running program can be seen.
The lines of code explained in more detail:
The interesting part of this program will be to set different properties for the shapes.
Cutout.1
xShapeProps3~setPropertyValue("TextFitToSize", bsf.getConstant("com.sun.star.drawing.TextFitToSizeType", "PROPORTIONAL"))
As shown in cutout.1 the property value „TextFitToSize“ is set „PROPORTIONAL“ using a bsf routine to get the correct constant type. The value „PROPORTIONAL“ defines that if the shape is scaled, the text character size is scaled proportionally.
Moreover the following properties are set during executing the code:
Cutout.2
xShapeProps2~setPropertyValue("CircleStartAngle", box("int", 9000))
xShapeProps2~setPropertyValue("CircleEndAngle", box("int", 27000))
In cutout.2 Integer values are passed defining the start and end point of the circle shape.
Cutout.3
bsf.getConstant("com.sun.star.drawing.CircleKind", "FULL"))
bsf.getConstant("com.sun.star.drawing.TextAnimationKind", "SCROLL"))
In cutout.3 the first line sets the com.sun.star.drawing.CircelKind property, the second adds a text animation named scroll to the rectangle shape.
5.3.2 Example 19 - Organigram
This example shows how Connector Shapes can be set to connect shapes.
/* Inserting Pictures */
xScriptContext = uno.getScriptContext() -- wrap first argument into an UNO-proxy object
oDesktop=xScriptContext~getDesktop -- get the desktop (an XDesktop object)
xComponentLoader = oDesktop~XDesktop~XComponentLoader
-- get componentLoader interface
/* open the blank *.sxd - file */
url = "private:factory/sdraw"
xDrawComponent = xComponentLoader~loadComponentFromURL(url, "_blank", 0,.UNO~noProps)
xDMsf = xDrawComponent~XMultiServiceFactory
/* get draw page by index */
xDrawPage=xDrawComponent~XDrawPagesSupplier~getDrawPages~getByIndex(0) -
~XDrawPage
oGraph = xDMsf~createInstance("com.sun.star.drawing.GraphicObjectShape")
xGraph = oGraph~xShape
size = .bsf~new("com.sun.star.awt.Size")
point = .bsf~new("com.sun.star.awt.Point")
size~Height = 6000
size~Width = 8000
point~x = 5000
point~y= 3000
xGraph~setSize(size)
xGraph~setPosition(point)
xPropertySet=xGraph~xPropertySet
OpenOffice.org Automatisation Page 69
xPropertySet~setPropertyValue("GraphicURL", "file:///C:/OpenOffice.org_01.gif")
xDrawPage~add(xGraph)
Call syssleep 2
/*set transparency*/
xPropertySet~setPropertyValue("Transparency", box("short", 50))
xGraphText = xGraph~xText
xGraphText~setString("OpenOffice.org - Automatisierung")
oGraph = xDMsf~createInstance("com.sun.star.drawing.GraphicObjectShape")
xGraph2 = oGraph~xShape
size = .bsf~new("com.sun.star.awt.Size")
point = .bsf~new("com.sun.star.awt.Point")
size~Height = 3000
size~Width = 4000
point~x = 3000
point~y= 12000
xGraph2~setSize(size)
xGraph2~setPosition(point)
xPropertySet=xGraph2~xPropertySet
xPropertySet~setPropertyValue("GraphicURL", "file:///C:/oorexx.gif")
xDrawPage~add(xGraph2)
oGraph = xDMsf~createInstance("com.sun.star.drawing.ConnectorShape")
xGraphconn = oGraph~xShape
oGraph2 = xDMsf~createInstance("com.sun.star.drawing.ConnectorShape")
xGraphconn2 = oGraph2~xShape
xDrawPage~add(xGraphconn)
xDrawPage~add(xGraphconn2)
oGraph = xDMsf~createInstance("com.sun.star.drawing.GraphicObjectShape")
xGraph3 = oGraph~xShape
size = .bsf~new("com.sun.star.awt.Size")
point = .bsf~new("com.sun.star.awt.Point")
size~Height = 3000
size~Width = 4000
point~x = 11000
point~y= 12000
xGraph3~setSize(size)
xGraph3~setPosition(point)
xPropertySet=xGraph3~xPropertySet
xPropertySet~setPropertyValue("GraphicURL", "file:///C:/bsf_logo.jpg")
xDrawPage~add(xGraph3)
xConnProps = xGraphconn~xPropertySet
xConnProps2 = xGraphconn2~xPropertySet
xConnProps~setPropertyValue("StartShape", xGraph)
xConnProps~setPropertyValue("StartGluePointIndex", box("int", 2))
xConnProps~setPropertyValue("EndShape", xGraph2)
xConnProps~setPropertyValue("EndGluePointIndex", box("int", 4))
xConnProps2~setPropertyValue("StartShape", xGraph)
xConnProps2~setPropertyValue("StartGluePointIndex", box("int", 2))
xConnProps2~setPropertyValue("EndShape", xGraph3)
xConnProps2~setPropertyValue("EndGluePointIndex", box("int", 4))
::requires UNO.CLS -- load UNO support for OpenOffice.org
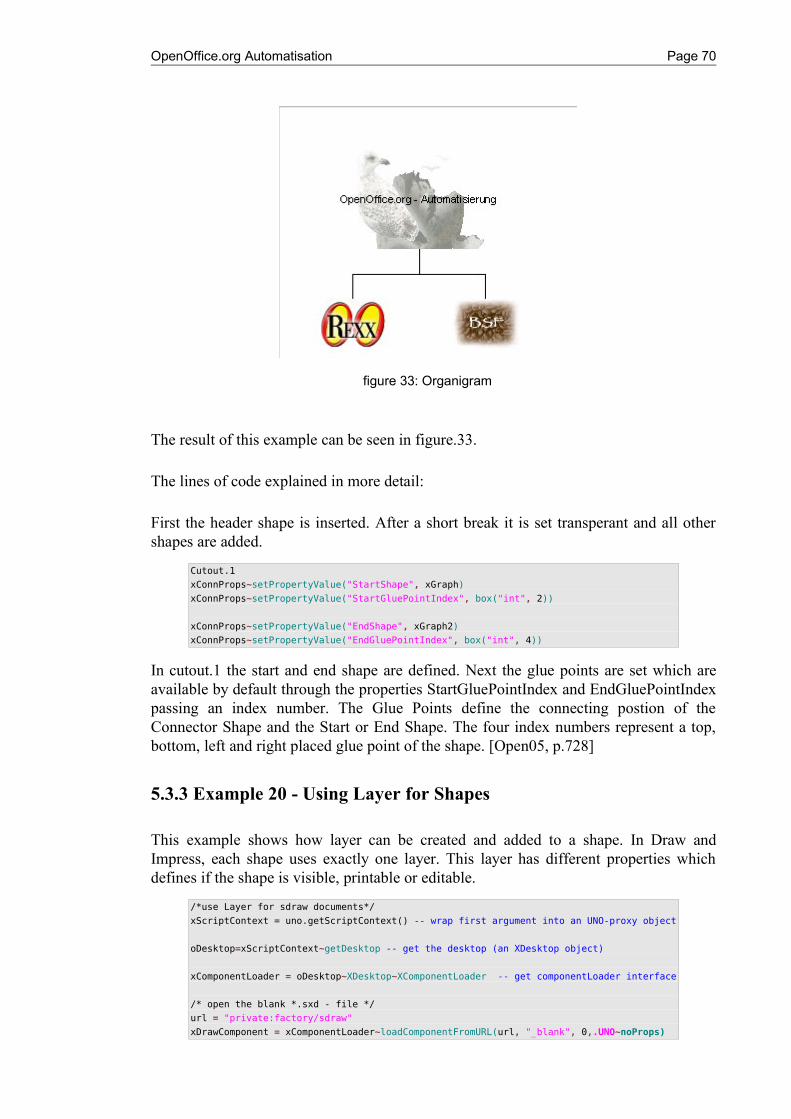
OpenOffice.org Automatisation Page 70
The result of this example can be seen in figure.33.
The lines of code explained in more detail:
First the header shape is inserted. After a short break it is set transperant and all other shapes are added.
Cutout.1
xConnProps~setPropertyValue("StartShape", xGraph)
xConnProps~setPropertyValue("StartGluePointIndex", box("int", 2))
xConnProps~setPropertyValue("EndShape", xGraph2)
xConnProps~setPropertyValue("EndGluePointIndex", box("int", 4))
In cutout.1 the start and end shape are defined. Next the glue points are set which are available by default through the properties StartGluePointIndex and EndGluePointIndex passing an index number. The Glue Points define the connecting postion of the Connector Shape and the Start or End Shape. The four index numbers represent a top, bottom, left and right placed glue point of the shape. [Open05, p.728]
5.3.3 Example 20 - Using Layer for Shapes
This example shows how layer can be created and added to a shape. In Draw and Impress, each shape uses exactly one layer. This layer has different properties which defines if the shape is visible, printable or editable.
/*use Layer for sdraw documents*/
xScriptContext = uno.getScriptContext() -- wrap first argument into an UNO-proxy object
oDesktop=xScriptContext~getDesktop -- get the desktop (an XDesktop object)
xComponentLoader = oDesktop~XDesktop~XComponentLoader -- get componentLoader interface
/* open the blank *.sxd - file */
url = "private:factory/sdraw"
xDrawComponent = xComponentLoader~loadComponentFromURL(url, "_blank", 0,.UNO~noProps)
figure 33: Organigram
OpenOffice.org Automatisation Page 71
xDMsf = xDrawComponent~XMultiServiceFactory
/* get draw page by index */
xDrawPage=xDrawComponent~XDrawPagesSupplier~getDrawPages~getByIndex(0) -
~XDrawPage
oGraph = xDMsf~createInstance("com.sun.star.drawing.GraphicObjectShape")
xGraph = oGraph~xShape
size = .bsf~new("com.sun.star.awt.Size")
point = .bsf~new("com.sun.star.awt.Point")
size~Height = 6000
size~Width = 8000
point~x = 5000
point~y= 3000
xGraph~setSize(size)
xGraph~setPosition(point)
xPropertySet=xGraph~xPropertySet
xPropertySet~setPropertyValue("GraphicURL", "file:///C:/OpenOffice.org_01.gif")
oGraph = xDMsf~createInstance("com.sun.star.drawing.RectangleShape")
xGraphtext = oGraph~xShape
size = .bsf~new("com.sun.star.awt.Size")
point = .bsf~new("com.sun.star.awt.Point")
size~Height = 1000
size~Width = 8000
point~x = 6000
point~y= 10000
xGraphtext~setSize(size)
xGraphtext~setPosition(point)
xDrawPage~add(xGraph)
xDrawPage~add(xGraphtext)
layersupplier = xDrawComponent~xLayerSupplier
xNameAccess = layersupplier~getLayerManager
xLayerManager = xNameAccess~XLayerManager
/*Layer 1*/
xNotVisibleAndEditable = xLayerManager~insertNewByIndex(xLayerManager~getCount)
xPropsLay = xNotVisibleAndEditable~XPropertySet
xPropsLay~setPropertyValue("Name", "NotVisibleAndEditable")
xPropsLay~setPropertyValue("IsVisible", box(boolean, false))
xPropsLay~setPropertyValue("IsLocked", box(boolean, true))
/*Layer 2*/
xNotEditable = xLayerManager~insertNewByIndex(xLayerManager~getCount)
xPropsLay = xNotEditable~XPropertySet
xPropsLay~setPropertyValue("Name", "NotEditable")
xPropsLay~setPropertyValue("IsVisible", box(boolean, true))
xPropsLay~setPropertyValue("IsLocked", box(boolean, true))
xLayerManager~attachShapeToLayer(xGraph, xNotVisibleAndEditable)
xGraphText = xGraphtext~xText
xGraphText~setString("NotVisibleAndEditable")
Call syssleep 2
xLayerManager~attachShapeToLayer(xGraph, xNotEditable);
xPropertySet~setPropertyValue("Transparency", box("short", 50))
xGraphText~setString("NotEditable")
::requires UNO.CLS -- load UNO support for OpenOffice.org
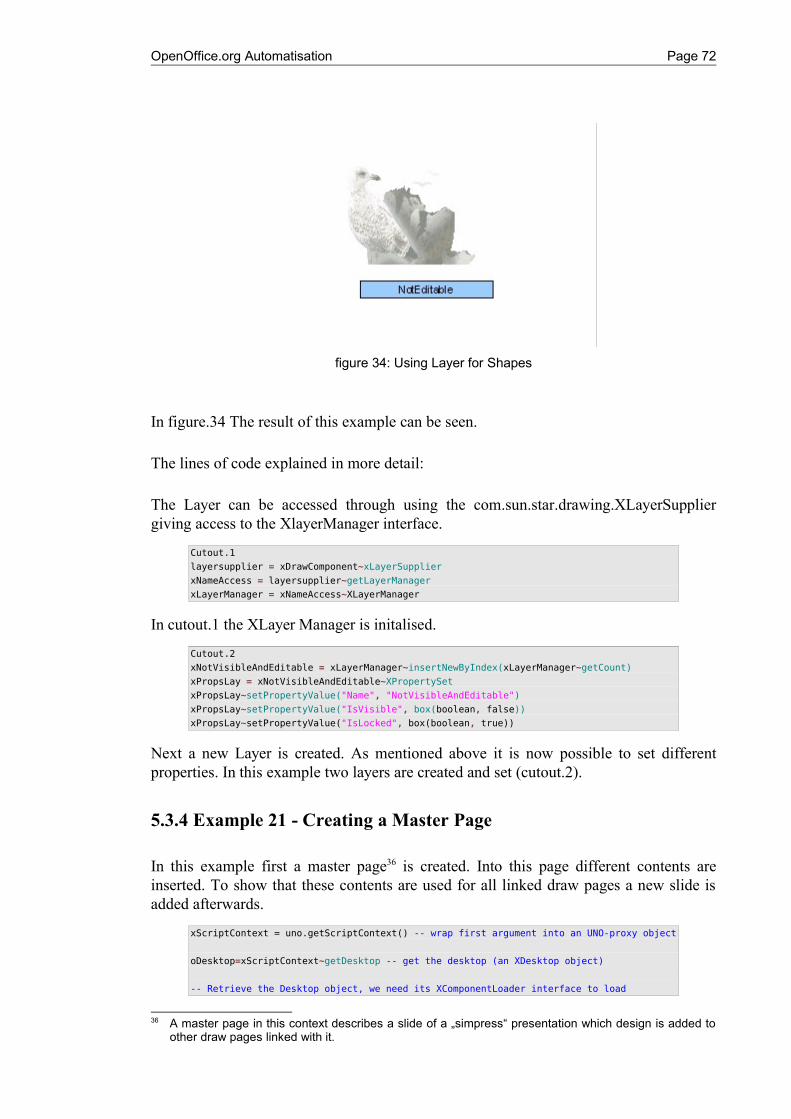
OpenOffice.org Automatisation Page 72
In figure.34 The result of this example can be seen.
The lines of code explained in more detail:
The Layer can be accessed through using the com.sun.star.drawing.XLayerSupplier giving access to the XlayerManager interface.
Cutout.1
layersupplier = xDrawComponent~xLayerSupplier
xNameAccess = layersupplier~getLayerManager
xLayerManager = xNameAccess~XLayerManager
In cutout.1 the XLayer Manager is initalised.
Cutout.2
xNotVisibleAndEditable = xLayerManager~insertNewByIndex(xLayerManager~getCount)
xPropsLay = xNotVisibleAndEditable~XPropertySet
xPropsLay~setPropertyValue("Name", "NotVisibleAndEditable")
xPropsLay~setPropertyValue("IsVisible", box(boolean, false))
xPropsLay~setPropertyValue("IsLocked", box(boolean, true))
Next a new Layer is created. As mentioned above it is now possible to set different properties. In this example two layers are created and set (cutout.2).
5.3.4 Example 21 - Creating a Master Page
In this example first a master page36 is created. Into this page different contents are inserted. To show that these contents are used for all linked draw pages a new slide is added afterwards.
xScriptContext = uno.getScriptContext() -- wrap first argument into an UNO-proxy object
oDesktop=xScriptContext~getDesktop -- get the desktop (an XDesktop object)
-- Retrieve the Desktop object, we need its XComponentLoader interface to load
36 A master page in this context describes a slide of a „simpress“ presentation which design is added to other draw pages linked with it.
figure 34: Using Layer for Shapes
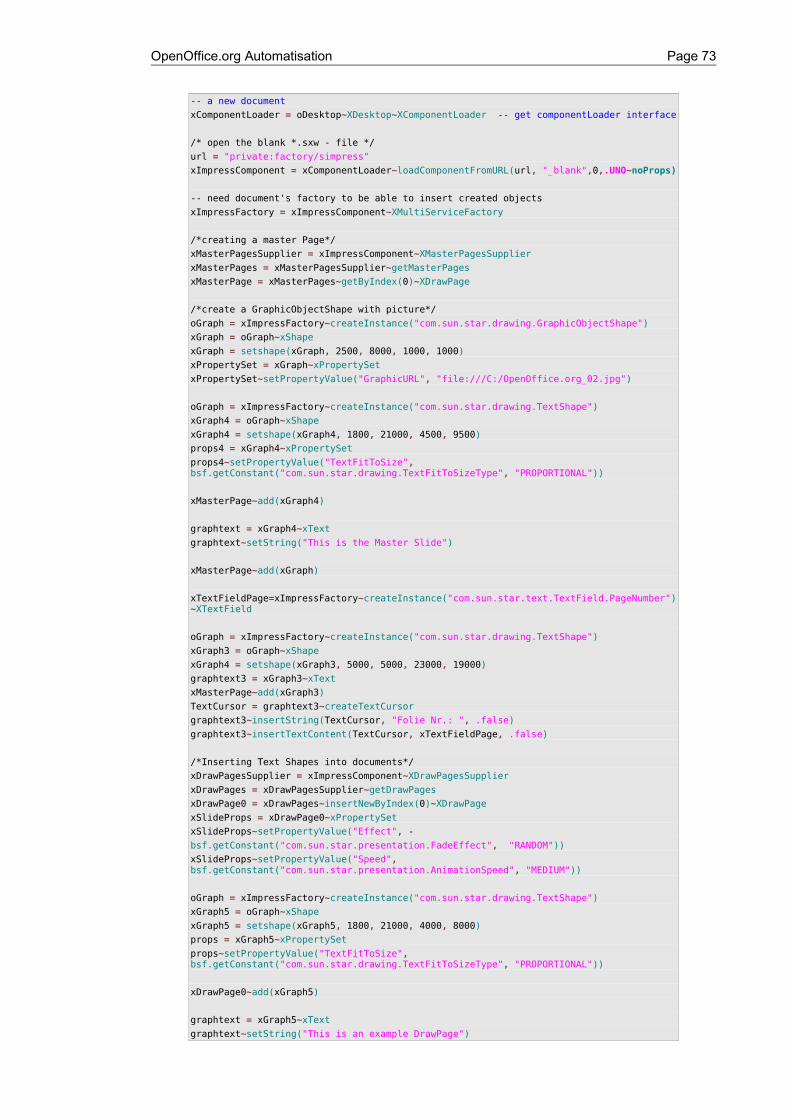
OpenOffice.org Automatisation Page 73
-- a new document
xComponentLoader = oDesktop~XDesktop~XComponentLoader -- get componentLoader interface
/* open the blank *.sxw - file */
url = "private:factory/simpress"
xImpressComponent = xComponentLoader~loadComponentFromURL(url, "_blank",0,.UNO~noProps)
-- need document's factory to be able to insert created objects
xImpressFactory = xImpressComponent~XMultiServiceFactory
/*creating a master Page*/
xMasterPagesSupplier = xImpressComponent~XMasterPagesSupplier
xMasterPages = xMasterPagesSupplier~getMasterPages
xMasterPage = xMasterPages~getByIndex(0)~XDrawPage
/*create a GraphicObjectShape with picture*/
oGraph = xImpressFactory~createInstance("com.sun.star.drawing.GraphicObjectShape")
xGraph = oGraph~xShape
xGraph = setshape(xGraph, 2500, 8000, 1000, 1000)
xPropertySet = xGraph~xPropertySet
xPropertySet~setPropertyValue("GraphicURL", "file:///C:/OpenOffice.org_02.jpg")
oGraph = xImpressFactory~createInstance("com.sun.star.drawing.TextShape")
xGraph4 = oGraph~xShape
xGraph4 = setshape(xGraph4, 1800, 21000, 4500, 9500)
props4 = xGraph4~xPropertySet
props4~setPropertyValue("TextFitToSize", bsf.getConstant("com.sun.star.drawing.TextFitToSizeType", "PROPORTIONAL"))
xMasterPage~add(xGraph4)
graphtext = xGraph4~xText
graphtext~setString("This is the Master Slide")
xMasterPage~add(xGraph)
xTextFieldPage=xImpressFactory~createInstance("com.sun.star.text.TextField.PageNumber")~XTextField
oGraph = xImpressFactory~createInstance("com.sun.star.drawing.TextShape")
xGraph3 = oGraph~xShape
xGraph4 = setshape(xGraph3, 5000, 5000, 23000, 19000)
graphtext3 = xGraph3~xText
xMasterPage~add(xGraph3)
TextCursor = graphtext3~createTextCursor
graphtext3~insertString(TextCursor, "Folie Nr.: ", .false)
graphtext3~insertTextContent(TextCursor, xTextFieldPage, .false)
/*Inserting Text Shapes into documents*/
xDrawPagesSupplier = xImpressComponent~XDrawPagesSupplier
xDrawPages = xDrawPagesSupplier~getDrawPages
xDrawPage0 = xDrawPages~insertNewByIndex(0)~XDrawPage
xSlideProps = xDrawPage0~xPropertySet
xSlideProps~setPropertyValue("Effect", -
bsf.getConstant("com.sun.star.presentation.FadeEffect", "RANDOM"))
xSlideProps~setPropertyValue("Speed", bsf.getConstant("com.sun.star.presentation.AnimationSpeed", "MEDIUM"))
oGraph = xImpressFactory~createInstance("com.sun.star.drawing.TextShape")
xGraph5 = oGraph~xShape
xGraph5 = setshape(xGraph5, 1800, 21000, 4000, 8000)
props = xGraph5~xPropertySet
props~setPropertyValue("TextFitToSize", bsf.getConstant("com.sun.star.drawing.TextFitToSizeType", "PROPORTIONAL"))
xDrawPage0~add(xGraph5)
graphtext = xGraph5~xText
graphtext~setString("This is an example DrawPage")
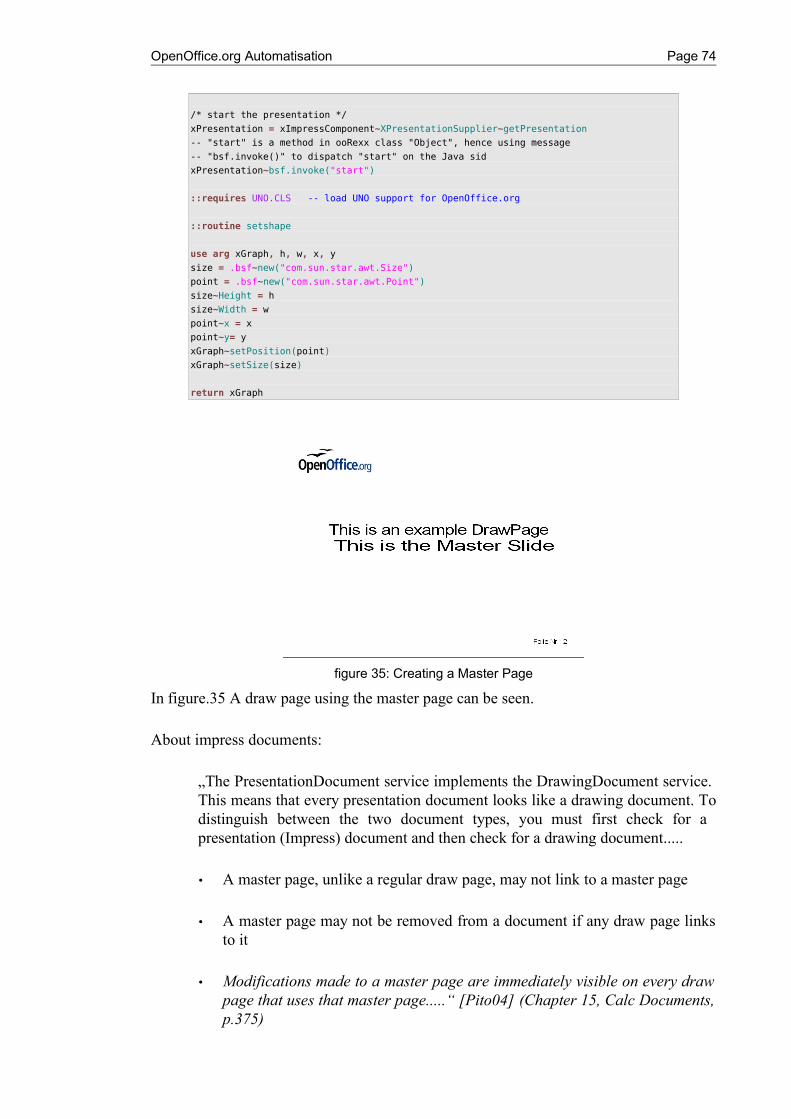
OpenOffice.org Automatisation Page 74
/* start the presentation */
xPresentation = xImpressComponent~XPresentationSupplier~getPresentation
-- "start" is a method in ooRexx class "Object", hence using message
-- "bsf.invoke()" to dispatch "start" on the Java sid
xPresentation~bsf.invoke("start")
::requires UNO.CLS -- load UNO support for OpenOffice.org
::routine setshape
use arg xGraph, h, w, x, y
size = .bsf~new("com.sun.star.awt.Size")
point = .bsf~new("com.sun.star.awt.Point")
size~Height = h
size~Width = w
point~x = x
point~y= y
xGraph~setPosition(point)
xGraph~setSize(size)
return xGraph
In figure.35 A draw page using the master page can be seen.
About impress documents:
„The PresentationDocument service implements the DrawingDocument service. This means that every presentation document looks like a drawing document. To distinguish between the two document types, you must first check for a presentation (Impress) document and then check for a drawing document.....
• A master page, unlike a regular draw page, may not link to a master page
• A master page may not be removed from a document if any draw page links to it
• Modifications made to a master page are immediately visible on every draw page that uses that master page.....“ [Pito04] (Chapter 15, Calc Documents, p.375)
figure 35: Creating a Master Page

OpenOffice.org Automatisation Page 75
The lines of code explained in more detail:
Cutout.1
xMasterPagesSupplier = xImpressComponent~XMasterPagesSupplier
xMasterPages = xMasterPagesSupplier~getMasterPages
xMasterPage = xMasterPages~getByIndex(0)~XDrawPage
In the cutout.1 the XMasterPageSupplier is requested and used to retrieve the master page. Now it is possible to use the method getMasterPages() which returns a indexed container accessable with the service MasterPages. This service can be used like the XDrawPages interface. Furthermore the XDrawPage interface can be requested and used to design the MasterPage.
In this program different shapes and text fields are added, which was already shown in Example.19 and 20.
Cutout.2
xDrawPagesSupplier = xImpressComponent~XDrawPagesSupplier
xDrawPages = xDrawPagesSupplier~getDrawPages
xDrawPage0 = xDrawPages~insertNewByIndex(0)~XDrawPage
The XDrawPages of the Impress document are used like the DrawPages of the Draw document, which can be seen in cutout.2.
At the end of the example some additional text is inserted to show that the last side is a normal Draw Page.
5.3.5 Example 22 - Insert chart
In this example an existing chart from a scalc document is inserted into an impress document. For this an ole2shape object is used. This means that this example runs only using a Windows operating system.
xScriptContext = uno.getScriptContext() -- wrap first argument into an UNO-proxy object
oDesktop=xScriptContext~getDesktop -- get the desktop (an XDesktop object)
-- Retrieve the Desktop object, we need its XComponentLoader interface to load
-- a new document
xComponentLoader = oDesktop~XDesktop~XComponentLoader -- get componentLoader interface
/* open the blank *.sxw - file */
url = "private:factory/simpress"
xImpressComponent = xComponentLoader~loadComponentFromURL(url, "_blank",0,.UNO~noProps)
/* open the blank *.sxw - file */
url = "file:///c:/chartbase_impress.ods"
props = bsf.createArray(.UNO~propertyValue, 1)
props[1] = .UNO~PropertyValue~new
props[1]~Name = "Hidden"
props[1]~Value = box("boolean", .true)
xCalcComponent = xComponentLoader~loadComponentFromURL(url, "_blank", 0, props)
/* get first sheet in spreadsheet */
xSheet=xCalcComponent~XSpreadSheetDocument~getSheets~XIndexAccess~getByIndex(0) -
~XSpreadSheet
xTableCharts = xSheet~xTableChartsSupplier~getCharts
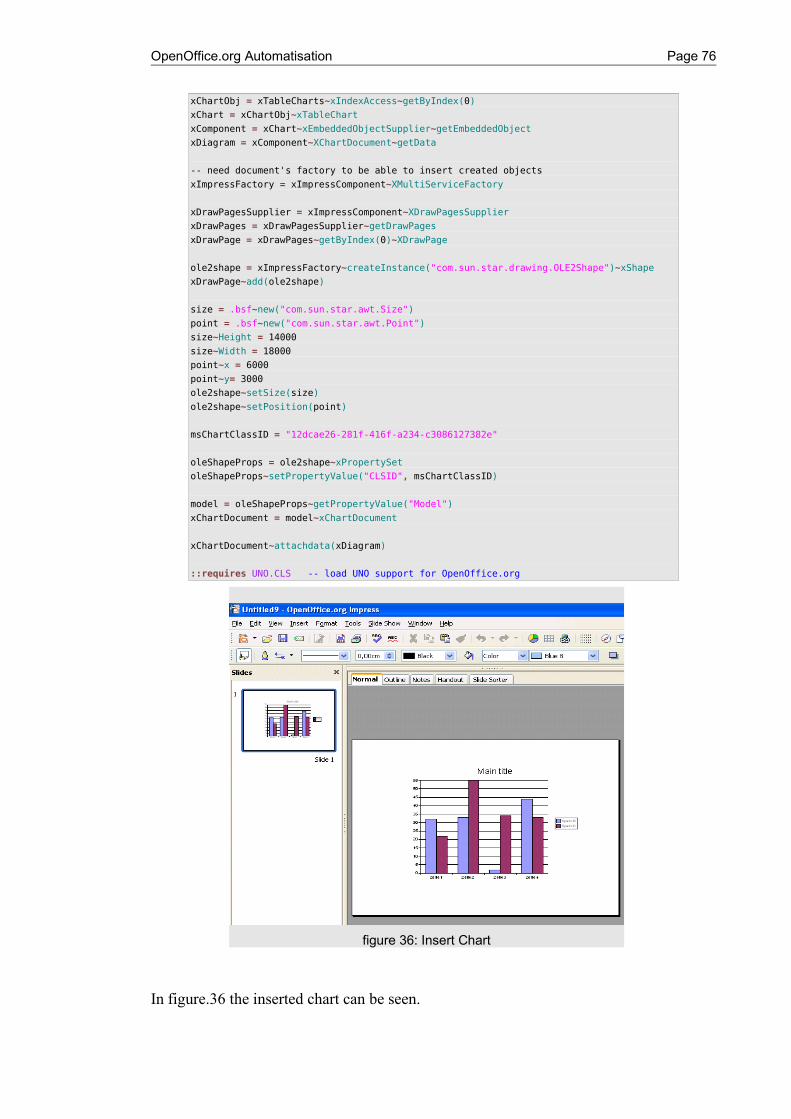
OpenOffice.org Automatisation Page 76
xChartObj = xTableCharts~xIndexAccess~getByIndex(0)
xChart = xChartObj~xTableChart
xComponent = xChart~xEmbeddedObjectSupplier~getEmbeddedObject
xDiagram = xComponent~XChartDocument~getData
-- need document's factory to be able to insert created objects
xImpressFactory = xImpressComponent~XMultiServiceFactory
xDrawPagesSupplier = xImpressComponent~XDrawPagesSupplier
xDrawPages = xDrawPagesSupplier~getDrawPages
xDrawPage = xDrawPages~getByIndex(0)~XDrawPage
ole2shape = xImpressFactory~createInstance("com.sun.star.drawing.OLE2Shape")~xShape
xDrawPage~add(ole2shape)
size = .bsf~new("com.sun.star.awt.Size")
point = .bsf~new("com.sun.star.awt.Point")
size~Height = 14000
size~Width = 18000
point~x = 6000
point~y= 3000
ole2shape~setSize(size)
ole2shape~setPosition(point)
msChartClassID = "12dcae26-281f-416f-a234-c3086127382e"
oleShapeProps = ole2shape~xPropertySet
oleShapeProps~setPropertyValue("CLSID", msChartClassID)
model = oleShapeProps~getPropertyValue("Model")
xChartDocument = model~xChartDocument
xChartDocument~attachdata(xDiagram)
::requires UNO.CLS -- load UNO support for OpenOffice.org
In figure.36 the inserted chart can be seen.
figure 36: Insert Chart
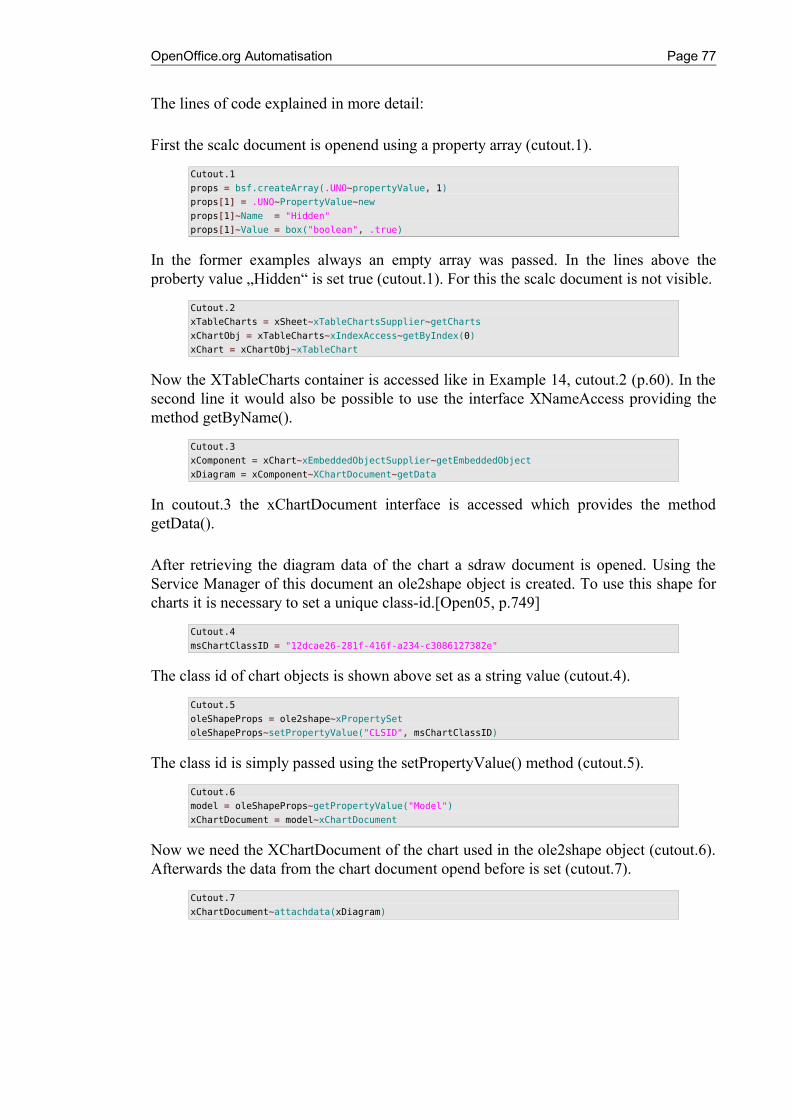
OpenOffice.org Automatisation Page 77
The lines of code explained in more detail:
First the scalc document is openend using a property array (cutout.1).
Cutout.1
props = bsf.createArray(.UNO~propertyValue, 1)
props[1] = .UNO~PropertyValue~new
props[1]~Name = "Hidden"
props[1]~Value = box("boolean", .true)
In the former examples always an empty array was passed. In the lines above the proberty value „Hidden“ is set true (cutout.1). For this the scalc document is not visible.
Cutout.2
xTableCharts = xSheet~xTableChartsSupplier~getCharts
xChartObj = xTableCharts~xIndexAccess~getByIndex(0)
xChart = xChartObj~xTableChart
Now the XTableCharts container is accessed like in Example 14, cutout.2 (p.60). In the second line it would also be possible to use the interface XNameAccess providing the method getByName().
Cutout.3
xComponent = xChart~xEmbeddedObjectSupplier~getEmbeddedObject
xDiagram = xComponent~XChartDocument~getData
In coutout.3 the xChartDocument interface is accessed which provides the method getData().
After retrieving the diagram data of the chart a sdraw document is opened. Using the Service Manager of this document an ole2shape object is created. To use this shape for charts it is necessary to set a unique class-id.[Open05, p.749]
Cutout.4
msChartClassID = "12dcae26-281f-416f-a234-c3086127382e"
The class id of chart objects is shown above set as a string value (cutout.4).
Cutout.5
oleShapeProps = ole2shape~xPropertySet
oleShapeProps~setPropertyValue("CLSID", msChartClassID)
The class id is simply passed using the setPropertyValue() method (cutout.5).
Cutout.6
model = oleShapeProps~getPropertyValue("Model")
xChartDocument = model~xChartDocument
Now we need the XChartDocument of the chart used in the ole2shape object (cutout.6). Afterwards the data from the chart document opend before is set (cutout.7).
Cutout.7
xChartDocument~attachdata(xDiagram)

OpenOffice.org Automatisation Page 78
5.3.6 Example 23 - Animations and click actions
In this example different shapes are created with animation effects and onClick actions.
/* Presentation Events */
xScriptContext = uno.getScriptContext() -- wrap first argument into an UNO-proxy object
oDesktop=xScriptContext~getDesktop -- get the desktop (an XDesktop object)
-- Retrieve the Desktop object, we need its XComponentLoader interface to load
-- a new document
xComponentLoader = oDesktop~XDesktop~XComponentLoader -- get componentLoader interface
/* open the blank *.sxw - file */
url = "private:factory/simpress"
xImpressComponent = xComponentLoader~loadComponentFromURL(url, "_blank",0,.UNO~noProps)
-- need document's factory to be able to insert created objects
xImpressFactory = xImpressComponent~XMultiServiceFactory
xDrawPagesSupplier = xImpressComponent~XDrawPagesSupplier
xDrawPages = xDrawPagesSupplier~getDrawPages
DO WHILE xDrawPages~getCount < 3
xDrawPages~insertNewByIndex(0)
END
xDrawPage0 = xDrawPages~getByIndex(0)~xDrawPage
oGraph = xImpressFactory~createInstance("com.sun.star.drawing.RectangleShape")
xGraph = oGraph~xShape
xGraph = setshape(xGraph, 5000, 5000, 1000, 1000)
xDrawPage0~add(xGraph)
xSlideProps = xGraph~xPropertySet
xSlideProps~setPropertyValue("Effect", bsf.getConstant("com.sun.star.presentation.AnimationEffect", "WAVYLINE_FROM_BOTTOM"))
xSlideProps~setPropertyValue("DimHide", box(boolean, false))
xSlideProps~setPropertyValue("DimPrevious", box(boolean, true))
xSlideProps~setPropertyValue("DimColor", box("int", "C0 C0 C0"x ~c2d))
xDrawPage0 = xDrawPages~getByIndex(1)~xDrawPage
oGraph = xImpressFactory~createInstance("com.sun.star.drawing.EllipseShape")
xGraph = oGraph~xShape
xGraph = setshape(xGraph, 5000, 5000, 21000, 15000)
xDrawPage0~add(xGraph)
xSlideProps = xGraph~xPropertySet
xSlideProps~setPropertyValue("Effect", bsf.getConstant("com.sun.star.presentation.AnimationEffect", "HIDE"))
xDrawPage0 = xDrawPages~getByIndex(2)~xDrawPage
oGraph = xImpressFactory~createInstance("com.sun.star.drawing.EllipseShape")
xGraph = oGraph~xShape
xGraph = setshape(xGraph, 5000, 5000, 1000, 8000)
xDrawPage0~add(xGraph)
xSlideProps = xGraph~xPropertySet
xSlideProps~setPropertyValue("Effect", bsf.getConstant("com.sun.star.presentation.AnimationEffect", "FADE_FROM_BOTTOM"))
xSlideProps~setPropertyValue("OnClick", bsf.getConstant("com.sun.star.presentation.ClickAction", "FIRSTPAGE"))
xDrawPage0 = xDrawPages~getByIndex(2)~xDrawPage
oGraph = xImpressFactory~createInstance("com.sun.star.drawing.RectangleShape")
xGraph = oGraph~xShape
xGraph = setshape(xGraph, 5000, 5000, 22000, 8000)
xDrawPage0~add(xGraph)
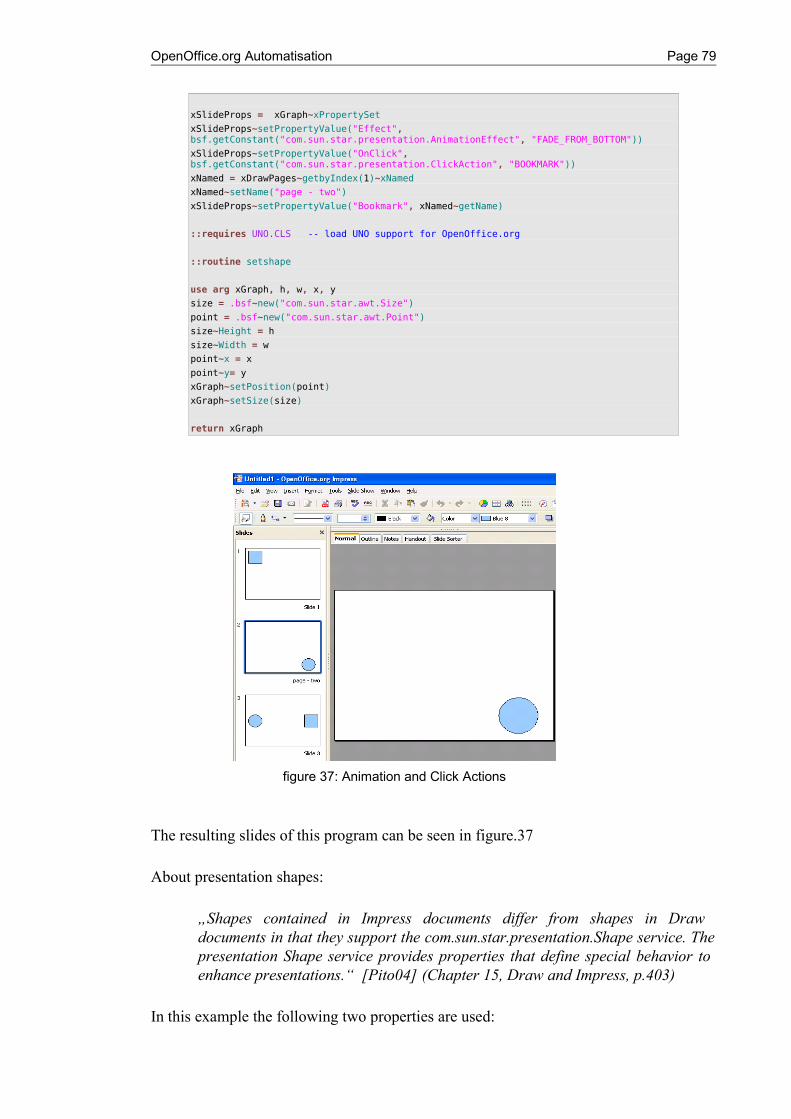
OpenOffice.org Automatisation Page 79
xSlideProps = xGraph~xPropertySet
xSlideProps~setPropertyValue("Effect", bsf.getConstant("com.sun.star.presentation.AnimationEffect", "FADE_FROM_BOTTOM"))
xSlideProps~setPropertyValue("OnClick", bsf.getConstant("com.sun.star.presentation.ClickAction", "BOOKMARK"))
xNamed = xDrawPages~getbyIndex(1)~xNamed
xNamed~setName("page - two")
xSlideProps~setPropertyValue("Bookmark", xNamed~getName)
::requires UNO.CLS -- load UNO support for OpenOffice.org
::routine setshape
use arg xGraph, h, w, x, y
size = .bsf~new("com.sun.star.awt.Size")
point = .bsf~new("com.sun.star.awt.Point")
size~Height = h
size~Width = w
point~x = x
point~y= y
xGraph~setPosition(point)
xGraph~setSize(size)
return xGraph
The resulting slides of this program can be seen in figure.37
About presentation shapes:
„Shapes contained in Impress documents differ from shapes in Draw documents in that they support the com.sun.star.presentation.Shape service. The presentation Shape service provides properties that define special behavior to enhance presentations.“ [Pito04] (Chapter 15, Draw and Impress, p.403)
In this example the following two properties are used:
figure 37: Animation and Click Actions

OpenOffice.org Automatisation Page 80
– OnClick, Specify an action if the user clicks on the shape
– Effect, Animation effect for this shape
The lines of code explained in more detail:
In the example first three draw pages are created. Afterwards in the first slide a shape is inserted to add some animation effects.
Cutout.1
xSlideProps = xGraph~xPropertySet
xSlideProps~setPropertyValue("Effect", bsf.getConstant("com.sun.star.presentation.AnimationEffect", "WAVYLINE_FROM_BOTTOM"))
xSlideProps~setPropertyValue("DimHide", box(boolean, false))
xSlideProps~setPropertyValue("DimPrevious", box(boolean, true))
xSlideProps~setPropertyValue("DimColor", box("int", "C0 C0 C0"x ~c2d))
In cutout.1 an animation effect is added through setting properties. Afterwards an ellipse shape, again with animation effect, is inserted into the second draw page. To the third draw page two shapes are set with following properties (cutout.2):
Cutout.2
xSlideProps~setPropertyValue("Effect", bsf.getConstant("com.sun.star.presentation.AnimationEffect", "FADE_FROM_BOTTOM"))
xSlideProps~setPropertyValue("OnClick", bsf.getConstant("com.sun.star.presentation.ClickAction", "FIRSTPAGE"))
xSlideProps~setPropertyValue("Effect", bsf.getConstant("com.sun.star.presentation.AnimationEffect", "FADE_FROM_BOTTOM"))
xSlideProps~setPropertyValue("OnClick", bsf.getConstant("com.sun.star.presentation.ClickAction", "BOOKMARK"))
xNamed = xDrawPages~getbyIndex(1)~xNamed
xNamed~setName("page - two")
xSlideProps~setPropertyValue("Bookmark", xNamed~getName)
The code shows the adding of animations effects and click actions. The first shape points to the first page if the click action is triggered. To the second shape a bookmark is set as click action refering to the second page.
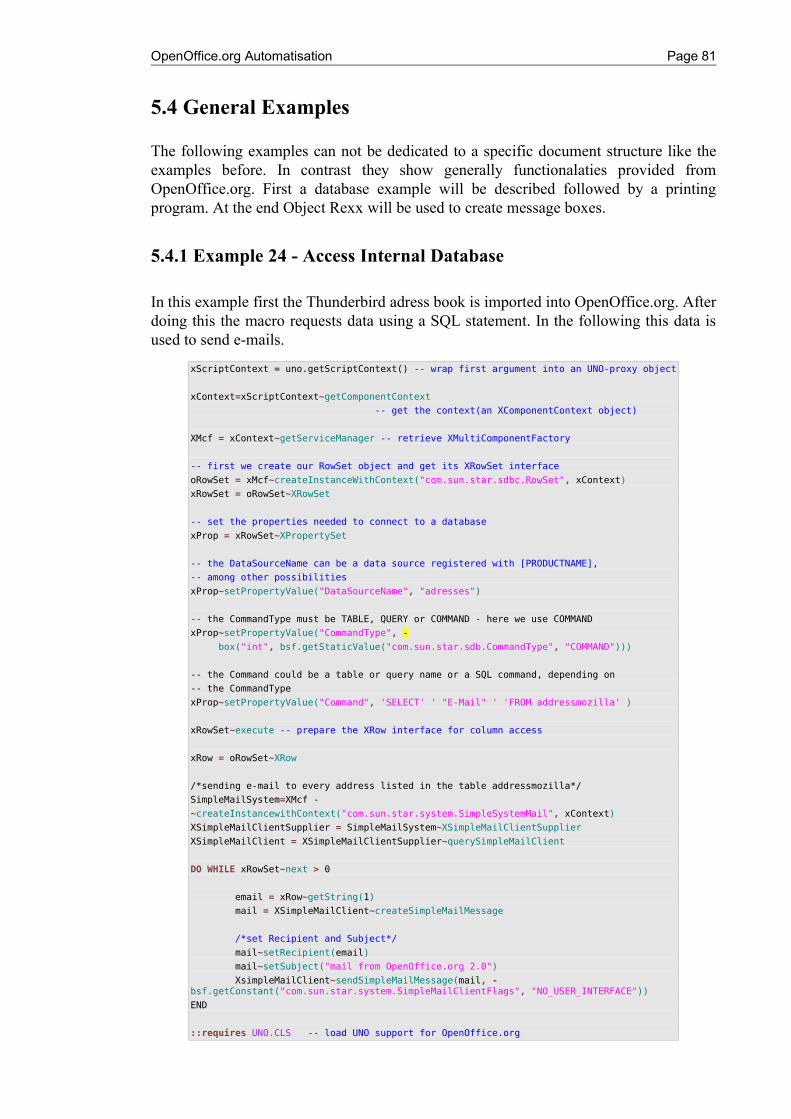
OpenOffice.org Automatisation Page 81
5.4 General Examples
The following examples can not be dedicated to a specific document structure like the examples before. In contrast they show generally functionalaties provided from OpenOffice.org. First a database example will be described followed by a printing program. At the end Object Rexx will be used to create message boxes.
5.4.1 Example 24 - Access Internal Database
In this example first the Thunderbird adress book is imported into OpenOffice.org. After doing this the macro requests data using a SQL statement. In the following this data is used to send e-mails.
xScriptContext = uno.getScriptContext() -- wrap first argument into an UNO-proxy object
xContext=xScriptContext~getComponentContext
-- get the context(an XComponentContext object)
XMcf = xContext~getServiceManager -- retrieve XMultiComponentFactory
-- first we create our RowSet object and get its XRowSet interface
oRowSet = xMcf~createInstanceWithContext("com.sun.star.sdbc.RowSet", xContext)
xRowSet = oRowSet~XRowSet
-- set the properties needed to connect to a database
xProp = xRowSet~XPropertySet
-- the DataSourceName can be a data source registered with [PRODUCTNAME],
-- among other possibilities
xProp~setPropertyValue("DataSourceName", "adresses")
-- the CommandType must be TABLE, QUERY or COMMAND - here we use COMMAND
xProp~setPropertyValue("CommandType", -
box("int", bsf.getStaticValue("com.sun.star.sdb.CommandType", "COMMAND")))
-- the Command could be a table or query name or a SQL command, depending on
-- the CommandType
xProp~setPropertyValue("Command", 'SELECT' ' "E-Mail" ' 'FROM addressmozilla' )
xRowSet~execute -- prepare the XRow interface for column access
xRow = oRowSet~XRow
/*sending e-mail to every address listed in the table addressmozilla*/
SimpleMailSystem=XMcf -
~createInstancewithContext("com.sun.star.system.SimpleSystemMail", xContext)
XSimpleMailClientSupplier = SimpleMailSystem~XSimpleMailClientSupplier
XSimpleMailClient = XSimpleMailClientSupplier~querySimpleMailClient
DO WHILE xRowSet~next > 0
email = xRow~getString(1)
mail = XSimpleMailClient~createSimpleMailMessage
/*set Recipient and Subject*/
mail~setRecipient(email)
mail~setSubject("mail from OpenOffice.org 2.0")
XsimpleMailClient~sendSimpleMailMessage(mail, - bsf.getConstant("com.sun.star.system.SimpleMailClientFlags", "NO_USER_INTERFACE"))
END
::requires UNO.CLS -- load UNO support for OpenOffice.org
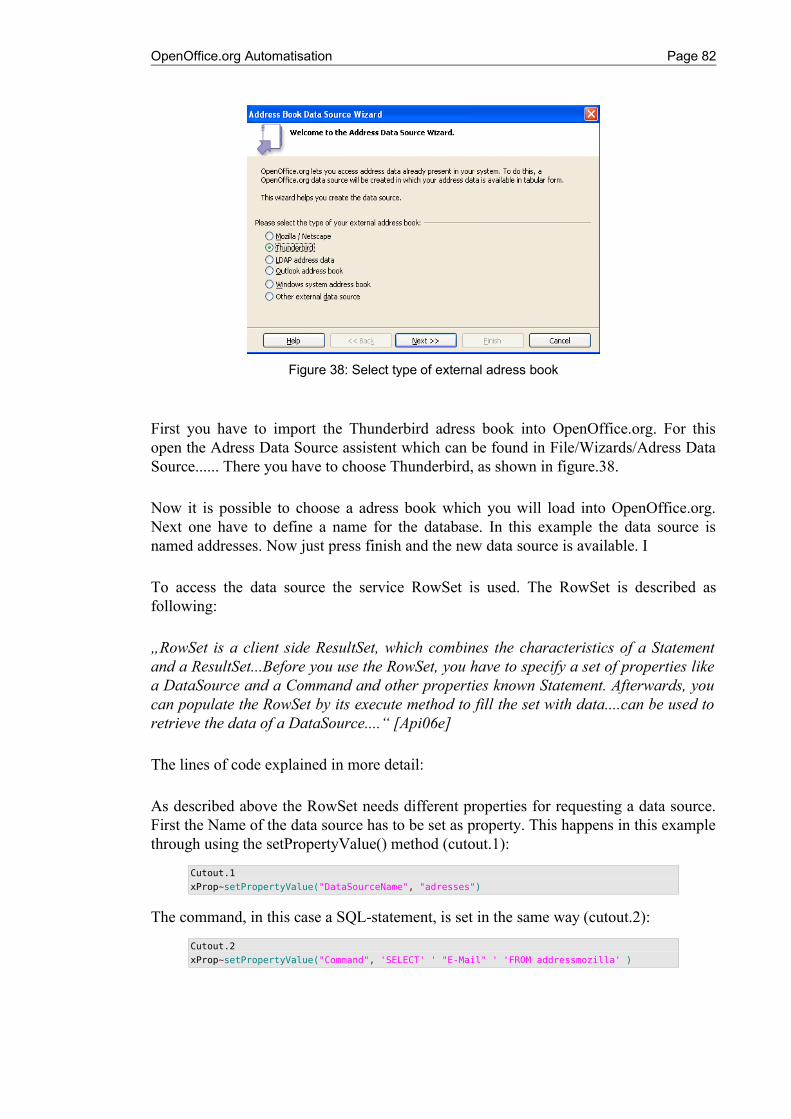
OpenOffice.org Automatisation Page 82
First you have to import the Thunderbird adress book into OpenOffice.org. For this open the Adress Data Source assistent which can be found in File/Wizards/Adress Data Source...... There you have to choose Thunderbird, as shown in figure.38.
Now it is possible to choose a adress book which you will load into OpenOffice.org. Next one have to define a name for the database. In this example the data source is named addresses. Now just press finish and the new data source is available. I
To access the data source the service RowSet is used. The RowSet is described as following:
„RowSet is a client side ResultSet, which combines the characteristics of a Statement and a ResultSet...Before you use the RowSet, you have to specify a set of properties like a DataSource and a Command and other properties known Statement. Afterwards, you can populate the RowSet by its execute method to fill the set with data....can be used to retrieve the data of a DataSource....“ [Api06e]
The lines of code explained in more detail:
As described above the RowSet needs different properties for requesting a data source. First the Name of the data source has to be set as property. This happens in this example through using the setPropertyValue() method (cutout.1):
Cutout.1
xProp~setPropertyValue("DataSourceName", "adresses")
The command, in this case a SQL-statement, is set in the same way (cutout.2):
Cutout.2
xProp~setPropertyValue("Command", 'SELECT' ' "E-Mail" ' 'FROM addressmozilla' )
Figure 38: Select type of external adress book
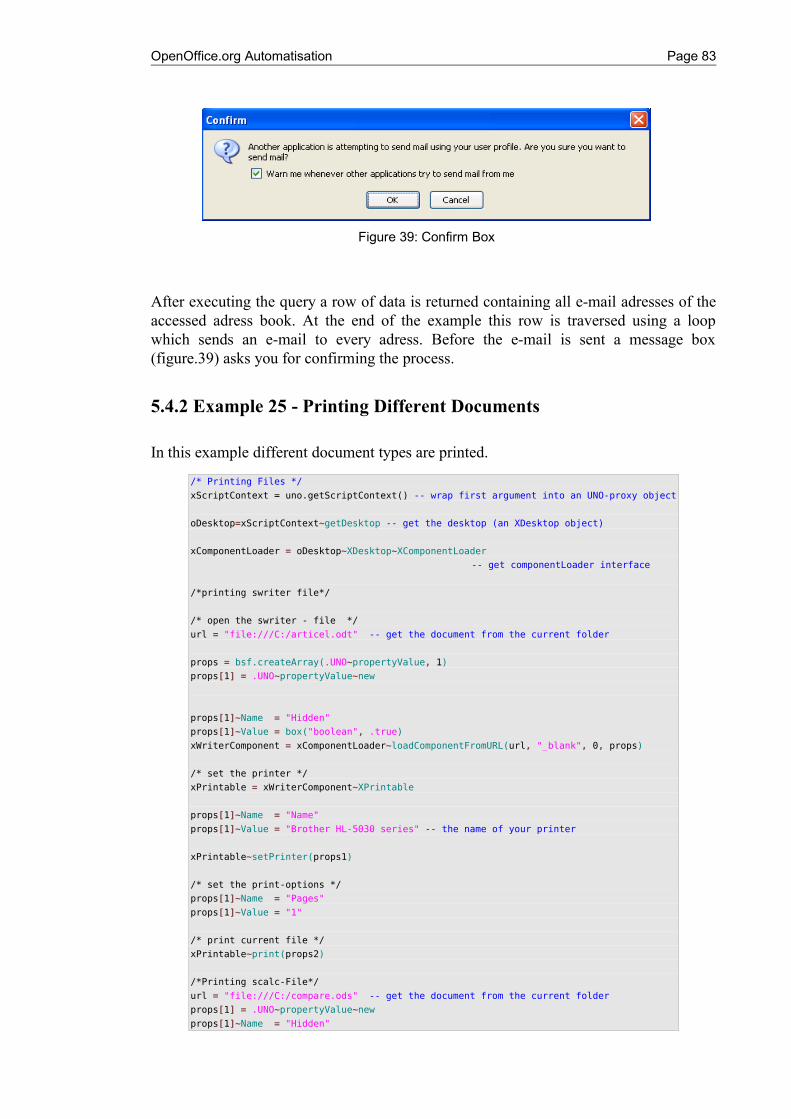
OpenOffice.org Automatisation Page 83
After executing the query a row of data is returned containing all e-mail adresses of the accessed adress book. At the end of the example this row is traversed using a loop which sends an e-mail to every adress. Before the e-mail is sent a message box (figure.39) asks you for confirming the process.
5.4.2 Example 25 - Printing Different Documents
In this example different document types are printed.
/* Printing Files */
xScriptContext = uno.getScriptContext() -- wrap first argument into an UNO-proxy object
oDesktop=xScriptContext~getDesktop -- get the desktop (an XDesktop object)
xComponentLoader = oDesktop~XDesktop~XComponentLoader
-- get componentLoader interface
/*printing swriter file*/
/* open the swriter - file */
url = "file:///C:/articel.odt" -- get the document from the current folder
props = bsf.createArray(.UNO~propertyValue, 1)
props[1] = .UNO~propertyValue~new
props[1]~Name = "Hidden"
props[1]~Value = box("boolean", .true)
xWriterComponent = xComponentLoader~loadComponentFromURL(url, "_blank", 0, props)
/* set the printer */
xPrintable = xWriterComponent~XPrintable
props[1]~Name = "Name"
props[1]~Value = "Brother HL-5030 series" -- the name of your printer
xPrintable~setPrinter(props1)
/* set the print-options */
props[1]~Name = "Pages"
props[1]~Value = "1"
/* print current file */
xPrintable~print(props2)
/*Printing scalc-File*/
url = "file:///C:/compare.ods" -- get the document from the current folder
props[1] = .UNO~propertyValue~new
props[1]~Name = "Hidden"
Figure 39: Confirm Box
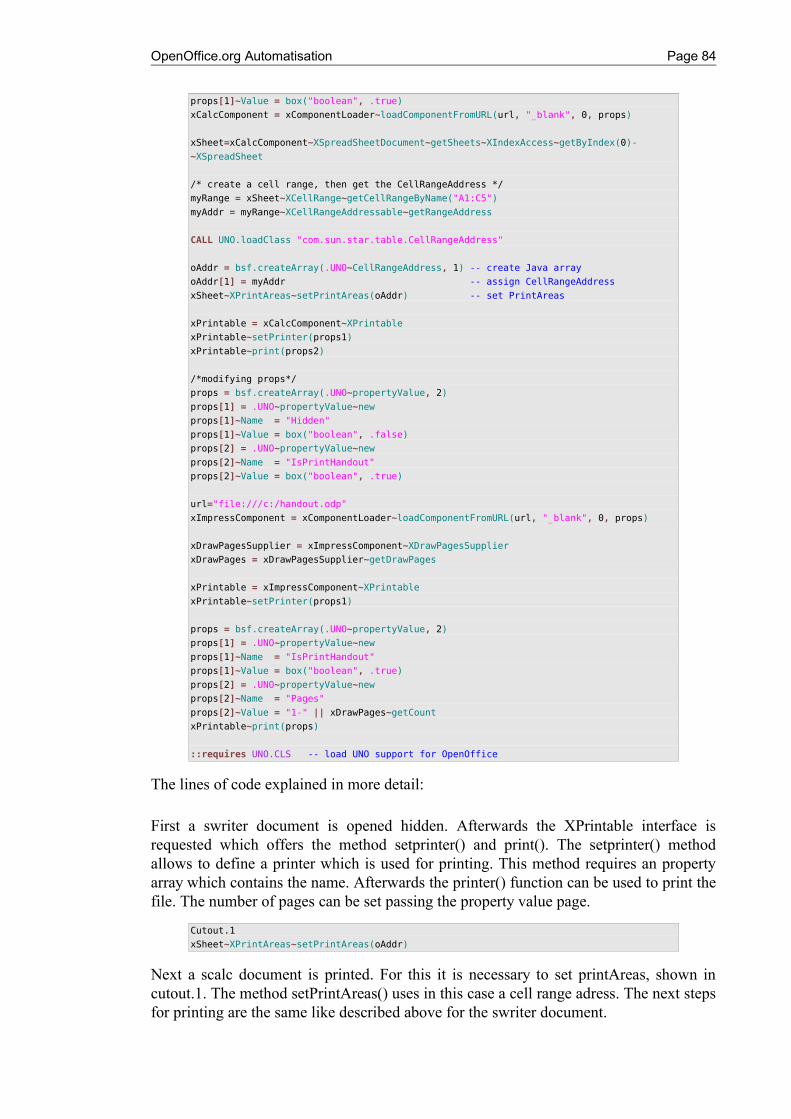
OpenOffice.org Automatisation Page 84
props[1]~Value = box("boolean", .true)
xCalcComponent = xComponentLoader~loadComponentFromURL(url, "_blank", 0, props)
xSheet=xCalcComponent~XSpreadSheetDocument~getSheets~XIndexAccess~getByIndex(0)-
~XSpreadSheet
/* create a cell range, then get the CellRangeAddress */
myRange = xSheet~XCellRange~getCellRangeByName("A1:C5")
myAddr = myRange~XCellRangeAddressable~getRangeAddress
CALL UNO.loadClass "com.sun.star.table.CellRangeAddress"
oAddr = bsf.createArray(.UNO~CellRangeAddress, 1) -- create Java array
oAddr[1] = myAddr -- assign CellRangeAddress
xSheet~XPrintAreas~setPrintAreas(oAddr) -- set PrintAreas
xPrintable = xCalcComponent~XPrintable
xPrintable~setPrinter(props1)
xPrintable~print(props2)
/*modifying props*/
props = bsf.createArray(.UNO~propertyValue, 2)
props[1] = .UNO~propertyValue~new
props[1]~Name = "Hidden"
props[1]~Value = box("boolean", .false)
props[2] = .UNO~propertyValue~new
props[2]~Name = "IsPrintHandout"
props[2]~Value = box("boolean", .true)
url="file:///c:/handout.odp"
xImpressComponent = xComponentLoader~loadComponentFromURL(url, "_blank", 0, props)
xDrawPagesSupplier = xImpressComponent~XDrawPagesSupplier
xDrawPages = xDrawPagesSupplier~getDrawPages
xPrintable = xImpressComponent~XPrintable
xPrintable~setPrinter(props1)
props = bsf.createArray(.UNO~propertyValue, 2)
props[1] = .UNO~propertyValue~new
props[1]~Name = "IsPrintHandout"
props[1]~Value = box("boolean", .true)
props[2] = .UNO~propertyValue~new
props[2]~Name = "Pages"
props[2]~Value = "1-" || xDrawPages~getCount
xPrintable~print(props)
::requires UNO.CLS -- load UNO support for OpenOffice
The lines of code explained in more detail:
First a swriter document is opened hidden. Afterwards the XPrintable interface is requested which offers the method setprinter() and print(). The setprinter() method allows to define a printer which is used for printing. This method requires an property array which contains the name. Afterwards the printer() function can be used to print the file. The number of pages can be set passing the property value page.
Cutout.1
xSheet~XPrintAreas~setPrintAreas(oAddr)
Next a scalc document is printed. For this it is necessary to set printAreas, shown in cutout.1. The method setPrintAreas() uses in this case a cell range adress. The next steps for printing are the same like described above for the swriter document.

OpenOffice.org Automatisation Page 85
At the end of the example an impress presentation is printed. For this it is necessary to find out how many documents are used within the presentation to cover all slides. For this two ways are possible. First, one can open the file and look how many slides are within the presentation. Maybe this way is not really effecient in the face of automatisation. The secound way is used in this example and can be seen in the line below, where the getCount() method returns the number of documents contained in the XDrawPages container (cutout.2). This value is inserted into the PropertyArray which is passed for the printing.
Cutout.2
xDrawPages~getCount
OpenOffice.org Automatisation Page 86
6 Conclusion
At the beginning of this paper the following question was defined:
„Software is generally expensive to buy, especially commercial applications for firms and other organisations. In addition, software is often not independent from the operating system. These arguments bring up the question, if there are other possibilities to use software which supports working processes.
The first step toward a more independent way of using software is to identify approaches which can answer this question.“(1.2 Problem Discussion, p.6).
This question should be know answered through the explanation of the software elements and examples which were used in this work. These parts form together the approach which is supposed as answer for the problem discussion.
It could be seen that all components of the introduced architecture are freely available and thus correspond to the statement that commercial software is expensive and alternatives should be found. Furthermore the different examples underline the ability of this architecture to support working processes efficient.
The last two paragraphs should give an short overview of some experiences made by the author:
During the work it was sometimes not easy to find the information which was needed to create some examples. The main information resources (Api Project homepage[Ajp05], Developer's Guide [Open05], Macros Explained [Pito04]) were very helpfull, but would can provide better support if some aspects would be more considered. Especially the Api Projekt homepage describes often interfaces or other objects only in a short way. In addition it was often very difficult to find out the sequence of interfaces which you have to retrieve to get the interface you need.
Finally there seems to be a great potential for further developments on this issue, and thus students and other people who will deal with this context. The author hopes to provide some helpfull findings for them.
OpenOffice.org Automatisation Page 87
7 References[Ajp05] Apache Jakarta Project homepage, URL (2006-01-18): http://www.openoffice.org/
[ApiOOo06] Api Project homepage, URL (2005-01-16): http://api.openoffice.org/
[Api06a] Api Project homepage, URL (2005-01-16):http://api.openoffice.org/docs/common/ref/com/sun/star/frame/-XComponentLoader
[Api06b] Api Project homepage, URL (2005-01-16):http://api.openoffice.org/docs/common/ref/com/sun/star/text/XText.html
[Api06c] Api Project homepage, URL (2005-01-16):http://api.openoffice.org/docs/common/ref/com/sun/star/sheet/-XCellRangesQuery.html
[Api06d] Api Project homepage, URL (2005-01-16):http://api.openoffice.org/docs/common/ref/com/sun/star/table/XTableCharts.html
[Api06e] Api Project homepage, URL (2005-01-16):http://api.openoffice.org/docs/common/ref/com/sun/star/sdb/RowSet.html
[Augu05] Augustin, Walter: Examples for Open Office Automation with Scripting Languages (2005), http://wi.wu-wien.ac.at/Studium/LVA-Unterlagen/rgf/autojava/-bsf.ooffice/ retrieved on 2005-11-10
[BSF4Rexx] BSF4Rexx home, URL (2006-03-13):http://wi.wu-wien.ac.at/rgf/rexx/bsf4rexx/current/
[Flat06] Flatscher, Rony G.: Java Automation - Course slides (in German), http://wwwi.wu-wien.ac.at/Studium/LVA-Unterlagen/rgf/autojava/folien/2004; retrieved on2005-11-10
[Flat05] Flatscher, Rony G.: “Automating OpenOffice.org with OORexx: OORexx nutshell exmaples for write and calc”,http://wi.wu-wien.ac.at/rgf/rexx/orx16/2005_orx16_NutShell_OOo.pdf; retrieved on 2005-11-10
[Hane05] Hahnekamp, Rainer: Extending the scripting abilities of OpenOffice.org with BSF and JSR-223; course paper, Vienna University of Economics and Business Administration, Information Systems and Operations (Flatscher, Rony G.); January, 2005
OpenOffice.org Automatisation Page 88
[IBM06] Microsoft homepage, URL (2006-01-22):http://www.microsoft.com/ com/default.mspx
[OOo06] OpenOffice.org homepage, URL (2006-01-18): http://www.microsoft.com/com/default.mspx
[Open05] OpenOffice.org: OpenOffice.org 1.1 - Developer's Guide, http://api.openoffice.org/DevelopersGuide/DevelopersGuide.htmlretrieved on 2005-11-10
[Oorex05] OpenObjectRexx homepage, URL (2006-01-18): http://www.oorexx.org/
[Osat06] OpenSource.co.at homepage, URL (2006-01-18): http://www.opensource.co.at/content.php?cid=5
[Osorg06] OpenSource.org homepage, URL (2006-01-18): http://opensource.org/
[Pito04] Pitonyak, Andrew: OpenOffice.org Macros Explained (2004)
[Sun06] Sun homepage, URL (2006-01-18)http://java.sun.com/
[Wiki06] Wikipedia homepage, URL (2006-01-18): http://de.wikipedia.org/wiki/Rexx
[WikiOOo06] Wikipedia homape, URL (2006-01-18): http://de.wikipedia.org/wiki/OpenOffice.org